

Page 1
NAMIOT IGLU Z TROPIKIEM
NAMIOT IGLU Z TROPIKIEM
Instrukcja obsługi
IGLU-DOPPELDACHZELT
Bedienungsanleitung
IAN 86026
DOUBLE-ROOF TENT
Instruction manual
Page 2
A
1
2
6
3
4
5
7
9
B C D
E F G
8
2
Page 3
H I J
3
Page 4

4
Page 5

Spis treści/Contents/Inhaltsverzeichnis
Zawartość ............................................................ 6
Dane techniczne .................................................. 6
Zastosowanie zgodne z przeznaczeniem ........ 6
Wskazówki bezpieczeństwa ......................... 6 - 7
Montaż ................................................................. 7
Demontaż ............................................................. 8
Konserwacja ........................................................ 8
Pielęgnacja ........................................................... 8
Przechowywanie ................................................. 8
Wskazówki dotyczące utylizacji ....................... 8
3 lata gwarancji ............................................. 8 - 9
Lieferumfang ....................................................... 13
Technische Daten ............................................... 13
Bestimmungsgemäße Verwendung .................. 13
Sicherheitshinweise .................................... 13 - 14
Aufbau ................................................................ 14
Abbau ................................................................. 15
Wartung ............................................................. 15
Pflege .................................................................. 15
Aufbewahrung ................................................... 15
Hinweise zur Entsorgung .................................. 15
3 Jahre Garantie ............................................... 15
Scope of Delivery .............................................. 10
Technical data .................................................... 10
Intended use ....................................................... 10
Safety instructions ....................................... 10 - 11
Assembly ............................................................ 11
Disassembly ................................................ 11 - 12
Maintenance ...................................................... 12
Care .................................................................... 12
Storage ............................................................... 12
Notes for disposal ............................................. 12
3 years warranty ............................................... 12
5
Page 6

Gratulujemy!
Kupując nasz artykuł zdecydowali się Państwo
na produkt o wysokiej jakości. Przed montażem
i pierwszym zastosowaniem należy zapoznać
się z artykułem. W tym celu prosimy o dokładne
przeczytanie poniższej instrukcji dot. montażu
i wskazówek bezpieczeństwa. Produkt należy
stosować, jak opisano w instrukcji i tylko w
podanym zakresie użycia. Instrukcję obsługi
należy dokładnie przechowywać. W przypadku
przekazania artykułu osobom trzecim, należy
również przekazać im wszystkie dokumenty.
Zawartość
1 – Namiot wewnętrzny 1 x
2 – Namiot zewnętrzny 1 x
3 – Pałąk do namiotu, czarny 2 x
4 – Pałąk do namiotu, szary 1 x
5 – Worek na stelaż 1 x
6 – Szpilki 20 x
7 – Worek na szpilki 1 x
8 – Torba do przechowywania 1 x
9 – Półka z siatki 1 x
Instrukcja obsługi 1 x
Dane techniczne
Materiał: Stelaż z tworzywa wzmocnionego
włóknem szklanym, oddychający
poliester/siatka/PE
Słup wody: 2000 mm
Wymiary: 110 + 240 x 210 x 150 cm
(przedsionek + dł. x szer. x wys.)
ok.
150 cm
Kategoria: Kat A
Poziom wydajności: Poziom 2 - Namiot, który
przeznaczony jest do użycia przy zasadniczo
łagodnych warunkach pogodowych.
ok. 240 cm
ok. 210 cm
Nie przewidziany na ekstremalne i górskie
warunki.
Zastosowanie zgodne z
przeznaczeniem
Niniejszy artykuł służy jako pomieszczenie do
noclegu i pobytu na dworze. Przeznaczony jest
na pobyt trzech osób. Artykuł nie jest skonstruowany do użycia podczas opadu śniegu lub
burzy.
Wskazówki
bezpieczeństwa
Niebezpieczeństwo urazu!
OSTRZEŻENIE!
Niebezpieczeństwo uduszenia dla dzieci!
Dzieci podczas zabawy nie pozostawiać bez
nadzoru w pobliżu nieustawionego namiotu lub
w jego wnętrzu. Istnieje zagrożenie, że dzieci
podczas zabawy materiałem namiotu uduszą
się.
OSTRZEŻENIE!
W namiocie nie używać otwartego ognia i z
powodu niebezpiecznych spalin nigdy lamp
benzynowych lub gazowych. Gotować należy
poza namiotem.
Środki ostrożności dotyczące
pożaru i wentylacji
Ostrożnie:
• Przy zastosowaniu gazu lub innych urządzeń
spalających wymagana jest dodatkowa
wentylacja;
• W pobliżu ścian, dachu lub zasłon nie
ustawiać gorących urządzeń;
• Zawsze przestrzegać wskazówek
bezpieczeństwa tych urządzeń;
• Nigdy nie pozwalać dzieciom na zabawę w
pobliżu gorących urządzeń;
• Nie zastawiać wyjść;
• Należy się zapoznać ze środkami do
zapobiegania pożarowi obowiązującym na
obszarze kempingu;
• Należy zadbać o to, aby otwory
wentylacyjne były zawsze otwarte w celu
uniknięcia uduszenia.
6
PL
Page 7

OSTRZEŻENIE!
Śmiertelne niebezpieczeństwo przez uderzenie
pioruna! Namiotu nie rozkładać bezpośrednio
pod drzewami. Podczas burzy istnieje
zagrożenie uderzeniami piorunów, które mogą
spowodować pożar namiotu lub drzewa albo
mogą wywrócić drzewo.
• Nie biwakować pod namiotem podczas
opadu śniegu i burzy oraz zwracać uwagę
na różne i zmieniające się warunki pogodowe
i wiatru.
Unikanie szkód materialnych!
• Namiotu nie ustawiać tak, aby wejście
wskazywało w kierunku wiatru. Wiatr mógłby
uszkodzić namiot.
• Wszystkie tkaniny materiału cierpią przy
dłuższej trwającym, mocnym promieniowaniu
słonecznym na zmęczenie materiału i
płowieją. Dlatego namiot należy rozkładać
przy dłuższym korzystaniu z niego możliwie
w zacienionym obszarze. Namiotu nie
pozostawiać bez potrzeby rozłożonego.
Montaż
WSKAZÓWKA!
Przed podróżą należy wykonać próbny montaż.
Należy się przy tym upewnić, że wszystkie
dodatki są kompletne.
Wybór miejsca ustawienia
Należy wybrać w razie możliwości równe,
czyste miejsce montażu. Unikać obniżeń terenu.
Należy usunąć kamienie, gałęzie i inne ostre
przedmioty, aby zapobiec uszkodzeniom spodu
namiotu. Wykorzystywać naturalne strony
zawietrzne jak zarośla, skały itd. Przy piaszczystym podłożu należy używać odpowiednich
szpil, aby zapobiec nieoczekiwanemu poluzowaniu się naciągu.
WSKAZÓWKA!
Szpile wetknąć w ziemię odrobinę po skosie, aby została przez to osiągnięta wysoka
stabilność, jednak aby ścianki namiotu nie były
naciągnięte. Materiał namiotu i punkty umocnienia powinny być lekko napięte, aby obciążenia
wywołane wiatrem mogły zostać wyrównane.
Uważać na to, aby na namiocie nie było za
dużo napięcia. Należy sprawdzać napięcie
namiotu zależnie od pogody.
WSKAZÓWKA!
Kondensacja wody występuje zasadniczo we
wszystkich namiotach, jednak w szczególności
przy mocnych wahaniach temperatury.
Po jednej nocy w namiocie na wewnętrznej
ściance znajdują się krople wody.
Dlatego kondensacja nie wskazuje na
nieszczelność. Dobra wentylacja zmniejsza
kondensację wewnątrz namiotu.
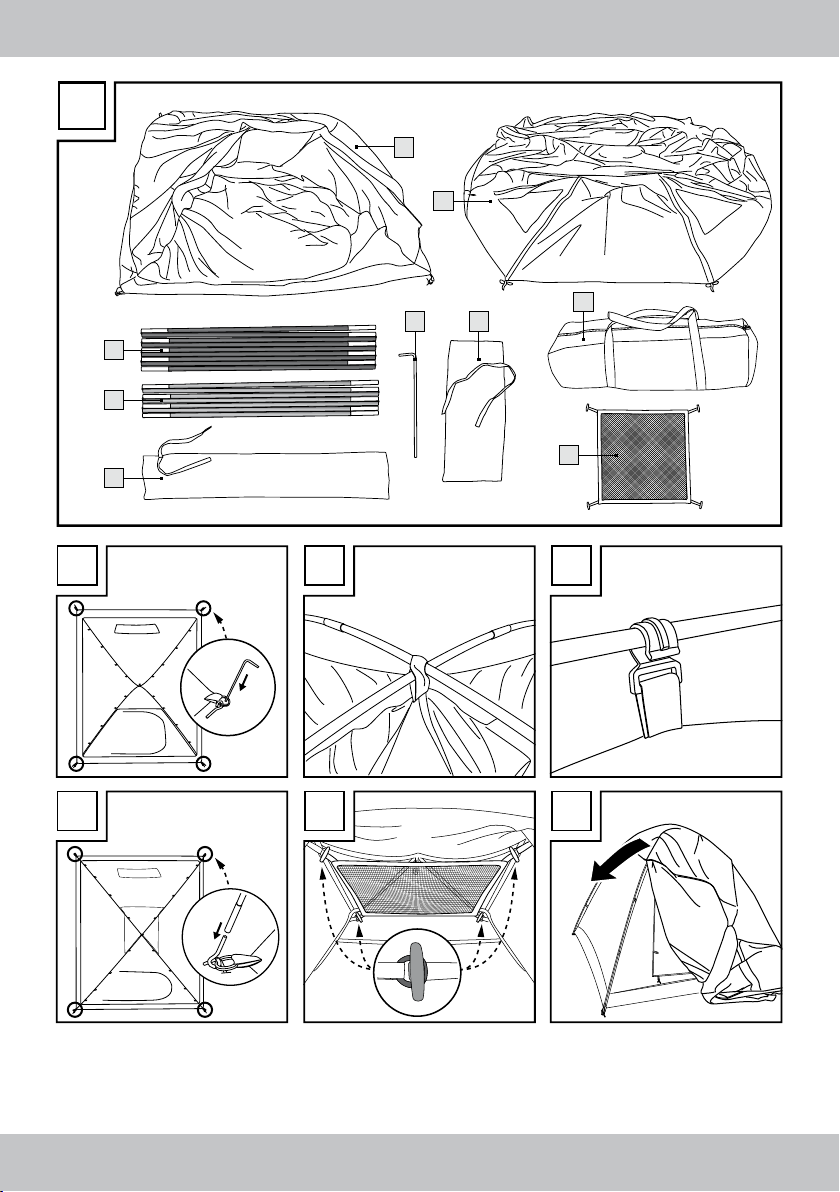
a) Spód namiotu rozłożyć płasko na podłożu,
zamknąć zamki błyskawiczne wejść i
przymocować szlufki na wszystkich czterech
rogach przy pomocy szpil (rys. B).
b) Spiąć razem segmenty pałąków namiotu
(3) i (4). Przesunąć oba czarne pałąki (3)
po przekątnej przez szlufkę po środku
namiotu wewnętrznego (rys. C).
Namiot wewnętrzny przymocować klipsami
do pałąków (rys. D).
c) Ustawić pałąki namiotu i wetknąć metalowe
sztyfty na rogach namiotu wewnętrznego w
końce pałąków, tak aby się napięły (rys. E).
d) Półka z siatki (9) może teraz zostać
zahaczona w kalenicy wewnątrz namiotu
wewnętrznego (rys. F).
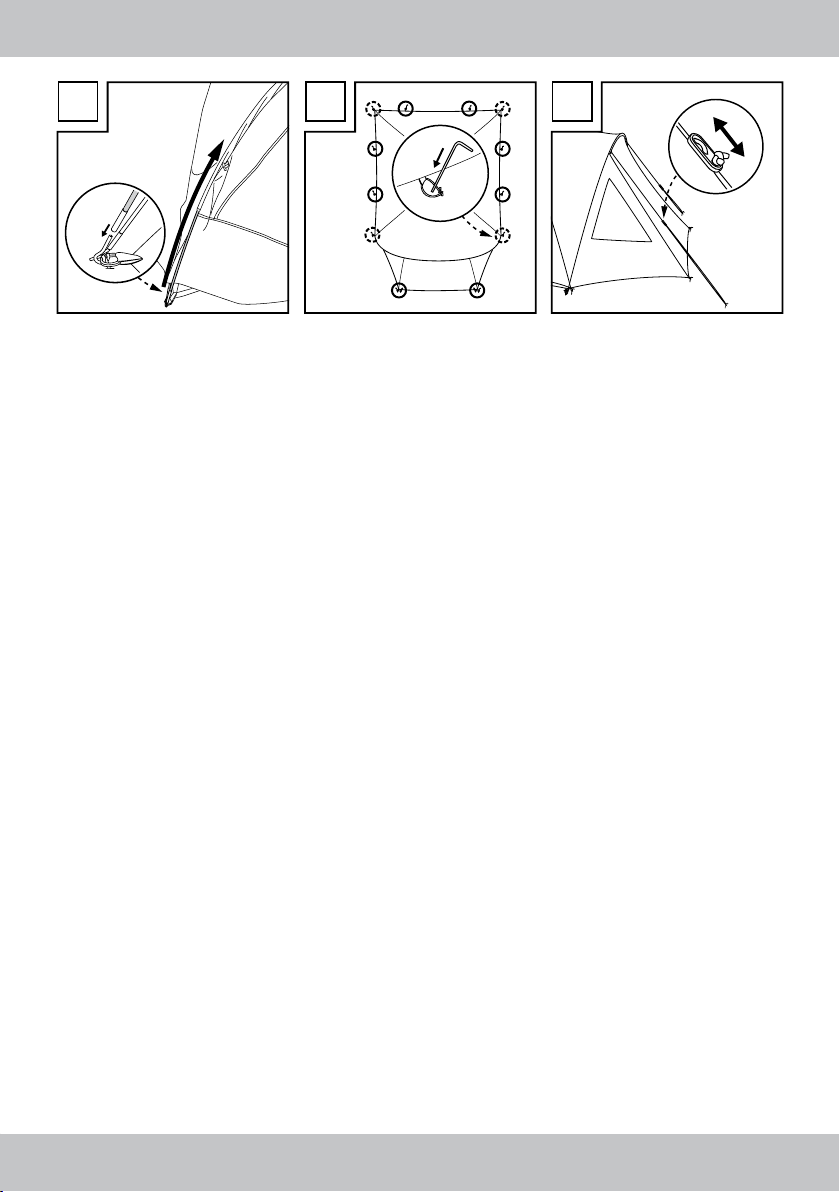
e) Namiot zewnętrzny umieścić nad namiotem
wewnętrznym (rys. G). Namiot zewnętrzny
przymocować taśmami na pałąkach i na
punkcie krzyżującym stelaża. Szary pałąk
(4) przeprowadzić przez tunel stelaża na
namiocie zewnętrznym (rys. H).
Ustawić stelaż i wetknąć metalowe sztyfty na
rogach namiotu wewnętrznego w końce
stelaża. Namiot zewnętrzny przymocować
10 szpilami przy czym szlufki czterech rogów
mocowane są razem ze szpilami namiotu
wewnętrznego (rys. I).
f) 6 linek napinających zabezpieczyć
każdorazowo po jednej szpili. Długość linek
napinających może być dopasowana przy
pomocy napinacza (rys. J).
PL
7
Page 8

Demontaż
WSKAZÓWKA!
Namiot należy demontować w możliwie czystym i suchym stanie, aby unikać tworzenia się
pleśni. Niezwłocznie po demontażu w deszczu
należy wysuszyć namiot. Przed zapakowaniem
oczyścić dokładnie wszystkie elementy.
• Usunąć szpile i linki napinające.
• Usunąć pałąki, złożyć je zdemontować
namiot zewnętrzny jak również wewnętrzny.
Schemat składania
• Namiot zewnętrzny i wewnętrzny złożyć w
prostokąt a wymiar złożenia dostosować do
maksymalnej szerokości torby do
przechowywania.
• Pałąki i szpile umieścić w odpowiednie
opakowanie.
• Namiot wewnętrzny ułożyć na namiocie
zewnętrznym. Worek na szpile i stelaż
umieścić po środku namiotu wewnętrznego,
następnie zwinąć namiot wewnętrzny i
zewnętrzny.
• Namiot, worek na stelaż i szpile umieścić w
torbie do przechowywania i zamknąć zamek
błyskawiczny.
Konserwacja
W przypadku małych pęknięć i dziur należy
zastosować zestaw naprawczy dostępny w
specjalistycznym sklepie. Natychmiast wymienić
pęknięte pałąki namiotu. Odrobinę naoliwić
zamki błyskawiczne gdy ciężko chodzą.
Pielęgnacja
Zabrudzenia na ściankach namiotu w suchym
stanie usunąć szczotką; ewentualnie przemyć
jeszcze raz czystą wodą. Nie stosować żadnych
chemicznych środków czyszczących. Od czasu
do czasu należy uszczelnić szwy namiotu.
Stosować do tego dostępne na rynku uszczelniacze szwów.
Przechowywanie
Aby unikać plam pleśni i zwietrzenia, artykuł
należy przechowywać w suchym miejscu.
Przy dłuższym niekorzystaniu artykuł należy
wyjąć z torby i przechowywać go w suchym,
osłoniętym przed bezpośrednim promieniowaniem słonecznym miejscu.
Wskazówki dotyczące
utylizacji
Opakowanie i artykuł prosimy usunąć
proekologicznie i odpowiednio do rodzaju!
Artykuł usunąć przez dopuszczony zakład gospodarki odpadami lub przez komunalny zarząd
gminy. Przestrzegać aktualnie obowiązujących
przepisów.
3 lata gwarancji
Produkt został wyprodukowany bardzo starannie i podczas stałej kontroli. Państwo otrzymują
na ten produkt trzy lata gwarancji od daty
zakupu. Prosimy o zachowanie paragonu.
Gwarancja obejmuje tylko błędy materiałowe
lub fabryczne i traci ważność podczas
używania produktu nie właściwie i nie zgodnie z jego przeznaczeniem. Państwa prawa,
w szczególności zasady odpowiedzialności
z tytułu rękojmi, nie zostaną ograniczone tą
gwarancję.
W razie ewentualnych reklamacji należy
skontaktować się pod niżej podanym numerem
infolinii lub poprzez pocztę elektroniczną.
Nasi współpracownicy omówią z Państwem jak
najszybciej dalszy przebieg sprawy.
Z naszej strony gwarantujemy doradztwo.
Czas gwarancji nie zostanie przedłużony przez
ewentualnie podjęte naprawy na podstawie
gwarancji, prawnej odpowiedzialności z tytułu
rękojmi czy dokonania bezpłatnej naprawy.
Dotyczy to również wymienionych i naprawionych części. Po upłynięciu czasu gwarancji
powstałe naprawy są płatne.
PL
8
Page 9

IAN: 86026
Serwis Polska
Tel.: 22 397 4996
E-Mail: deltasport@lidl.pl
Części zamienne do Waszego produktu znajdziecie także
pod adresem:
www.delta-sport.com, Rubryka serwisu - Serwis części zamiennych Lidl
PL
9
Page 10

Congratulations!
With your purchase you have decided on a
high-quality product. Get to know the product
before you start to use it. Carefully read the
following Instructions for use. Use the product
only as described and only for the given areas
of application. Keep these instructions safe.
When passing the product on to a third party,
always make sure that the documentation is
included.
Scope of Delivery
1 – Inner tent x 1
2 – Outer tent sheet x 1
3 – Tent poles, black x 2
4 – Tent poles, grey x 1
5 – Tent pole bag x 1
6 – Tent pegs x 20
7 – Tent peg bag x 1
8 – Packsack x 1
9 – Storage net x 1
1 x Instruction manual
Technical data
Material: Fibreglass poles,
breathable polyester / net / PE
Water column: 2000mm
Size: 110 + 240 x 210 x 150cm
(vestibule + L x W x H)
150cm
approx.
Category: Cat. A
Performance grade: Grade 2 – Tent for use in
generally mild weather conditions. Not designed
for extreme and mountain use.
approx. 240cm
approx.
210cm
Intended use
This product serves as an outdoor sleeping and
living space. It is suitable for three persons.
The product is not designed for use in snow or
storms.
Safety instructions
Risk of injury!
WARNING!
Risk of suffocation for children!
Do not leave your children unattended near a
tent that is not erected, or let them play with the
tent. There is the risk that children may suffocate
when playing with the tent material.
WARNING!
Do not use an open flame in the tent and never
use benzine or gas lamps due to the dangerous
fumes. Cook outside the tent.
Safety precautions for fire and
ventilation
Caution:
• When using gas or other flammable
appliances, additional ventilation is
necessary;
• Do not place any hot appliances near to the
walls, ceiling or curtains;
• Always observe the safety instructions for
these devices;
• Never allow children to play near to hot
appliances;
• Keep the exit clear;
• Ensure that you know the provisions for fire
on the premises;
• Ensure that the ventilation openings are
always open, in order to avoid suffocation.
WARNING!
Risk to life from lightening!
Do not erect the tent directly under trees.
During thunderstorms there is the risk of lightning
strikes, which can set the tent or tree on fire or
cause the tree to fall.
• Do not camp in snow and storms, and
consider different and changing weather
and wind conditions.
10 GB
Page 11

Avoid damage to property!
• Do not erect the tent so that the tent entrance
is in the direction of the wind. Wind could
damage the tent.
• All the tent materials suffer material fatigue
and bleaching if they are exposed to
prolonged, strong sunlight. For this reason,
when the tent is to be used over longer
periods, erect it in a shady position.
Do not leave the tent assembled
unnecessarily.
Assembly
NOTE!
Perform a test assembly before the camping trip.
In doing so, ensure that all the accessories are
present.
Selecting a location for
placing the tent
Choose a place that is as flat and clean as
possible. Avoid dips in the ground.
Remove stones, branches and other sharp objects in order to prevent damage to the tent floor.
Use natural shade, such as hedges, rocks, etc.
Use the appropriate pegs for sandy ground in
order to prevent accidental loosening of the
tension.
NOTE!
Insert the pegs into the ground at a slight angle
to achieve good strength but without causing
tension in the tent surface. The tent material and
tension points should only be slightly taut, so that
it can compensate for pressure from the wind.
Ensure that there is not too much pressure on the
tent. Check the tent tension according to weather
condition.
NOTE!
Water condensation occurs basically in every
tent, however particularly during strong fluctuations in temperature. After a night in the tent,
there will be drops of condensation on the inner
wall. Condensation is not evidence of leakiness.
Good ventilation reduces condensation in the
tent.
a) Spread the base of the inner tent flat on the
ground, close the zips for the entrance and fix
the loops at all four corners with the pegs
(Fig. B).
b) Build together the segments of the tent poles
(3) and (4). Slide the two black tent poles (3)
diagonally through the loops in the middle of
the inner tent (Fig. C). Secure the inner tent on
the tent poles using the clips (Fig. D).
c) Turn the tent around and insert the metal pins
at the corners of the inner tent into the end
of the tent poles so that these are under
tension (Fig. E).
d) The storage net (9) can now be hooked onto
the roof ridge in the interior of the inner tent
(Fig. F).
e) Place the outer tent over the inner tent
(Fig. G). Secure the outer tent using the bands
to the tent poles and at the crossing point in
the frame. Push the grey tent poles (4) through
the frame tunnel in the outer tent (Fig. H).
Right the frame up and insert the metal pins
from the corners of the inner tent into the end
of the tent poles. Secure the outer tent with
10 pegs and ensure that the loops at the four
corners are fixed with the pegs of the inner
tent (Fig. I).
f) Secure each of the 6 guy ropes with a peg.
The length of the guy ropes can be adjusted
with the tensioner (Fig. J).
Disassembly
NOTE!
Disassemble the tent, if possible, when clean
and dry to prevent the formation of mould and
mildew. After disassembling in rain, immediately dry the tent. Clean all the parts thoroughly
before packing them away.
• Remove the pegs and guy ropes.
• Remove the tent poles, fold them together
and disassemble the inner and outer tents.
GB
11
Page 12

Folding scheme
• Fold the outer and inner tent into squares and
adjust the sizes to match the maximum width
of the packsack.
• Place the tent poles and pegs into the
respective packaging.
• Place the inner tent onto the outer tent.
Place the tent peg bag and tent pole bag in
the middle of the inner tent and finally roll up
the inner and outer tents.
• Place the tent, tent pole bag and tent peg bag
in the packsack and close the zip.
Maintenance
In the case of small tears and holes, use a repair
kit from a specialist shop. Immediately replace
broken tent poles. Oil the zips a little if they
become stiff.
Care
Brush dirt off the dry tent surface; if necessary
treat with clean water. Do not use a chemical
cleaning product. Seal the tent seams from time
to time. For this, use a commercial seam sealer.
Storage
Store the product in a dry place to prevent the
mould and weather marks. If it is not used for
a longer period, take the product out of the
packsack and store it in a dry place out from
direct sunlight.
3 years warranty
The product was produced with great care and
under constant supervision. You receive a threeyear warranty for this product from the date of
purchase. Please retain your receipt.
The warranty applies only to material and
workmanship and does not apply to misuse or
improper handling. Your statutory rights, especially the warranty rights, are not affected by this
warranty.
With regard to complaints, please contact the
following service hotline or contact us by e-mail.
Our service employees will advise as to the
subsequent procedure as quickly as possible.
We will be personally available to discuss the
situation with you.
Any repairs under the warranty, statutory
guarantees or through goodwill do not extend
the warranty period. This also applies to
replaced and repaired parts. Repairs after the
warranty are subject to a charge.
IAN: 86026
Service Great Britain
Tel.: 0871 5000 720 (£ 0.10/Min.)
E-Mail: deltasport@lidl.co.uk
You can also find spare parts for your product at:
www.delta-sport.com, category Service - Lidl Spare Parts
Service
Notes for disposal
Please dispose of the packaging and product
separated according to materials and in an
environmentally-friendly manner! Dispose of the
product through an approved waste disposal
firm or by using your local municipal administration. Observe the current applicable legislation.
12
GB
Page 13

Herzlichen Glückwunsch!
Mit Ihrem Kauf haben Sie sich für ein hochwertiges Produkt entschieden. Machen Sie sich vor
der Montage und der ersten Inbetriebnahme mit
dem Produkt vertraut. Lesen Sie hierzu aufmerksam die nachfolgende Bedienungsanleitung
und die Sicherheitshinweise. Benutzen Sie das
Produkt nur wie beschrieben und für die angegebenen Einsatzbereiche. Bewahren Sie diese
Anleitung gut auf. Händigen Sie alle Unterlagen
bei Weitergabe des Produkts an Dritte ebenfalls
mit aus.
Kategorie: Kat A
Leistungsstufe: Stufe 2 – Zelt, das zum Gebrauch
bei hauptsächlich milden Wetterbedingungen
ausgelegt ist. Nicht gedacht für Extrem- oder
Bergbedingungen.
Bestimmungsgemäße
Verwendung
Dieser Artikel dient als Schlaf- und Aufenthaltsraum im Freien. Er ist für den Aufenthalt von drei
Personen geeignet. Der Artikel ist nicht für den
Gebrauch bei Schneefall oder Sturm konstruiert.
Lieferumfang
1 – Innenzelt 1 x
2 – Außenzelt 1 x
3 – Zeltstange, schwarz 2 x
4 – Zeltstange, grau 1 x
5 – Gestängesack 1 x
6 – Erdnagel 20 x
7 – Erdnagelsack 1 x
8 – Packsack 1 x
9 – Ablagenetz 1 x
Bedienungsanleitung 1 x
Technische Daten
Material: Fiberglasgestänge,
atmungsaktives Polyester/Netz/PE
Wassersäule: 2000 mm
Maße: 110 + 240 x 210 x 150 cm
(Vorzelt + L x B x H)
ca.
150 cm
ca. 240 cm
ca. 210 cm
Sicherheitshinweise
Verletzungsgefahr!
WARNUNG!
Erstickungsgefahr für Kinder!
Lassen Sie Kinder nicht unbeaufsichtigt in der
Nähe des nicht aufgestellten Zeltes oder im Zelt
spielen. Es besteht die Gefahr, dass Kinder beim
Spielen mit dem Zeltmaterial ersticken.
WARNUNG!
Benutzen Sie im Zelt keine offene Flamme und
wegen gefährlicher Abgase niemals Benzinoder Gaslampen. Kochen Sie außerhalb des
Zeltes.
Vorsichtsmaßregeln zu Feuer und
Lüftung
Vorsicht:
• Bei Verwendung von Gas oder anderen
Verbrennungsgeräten ist zusätzliche Lüftung
notwendig;
• Keine heißen Geräte in der Nähe der Wände,
des Daches oder der Vorhänge aufstellen;
• Immer die Sicherheitshinweise für diese
Geräte beachten;
• Niemals Kindern erlauben, in der Nähe von
heißen Geräten zu spielen;
• Ausgänge frei halten;
• Stellen Sie sicher, dass Sie die Vorkehrungen
gegen Feuer auf dem Gelände kennen;
• Stellen Sie sicher, dass die Lüftungsöffnungen
zu jeder Zeit geöffnet sind, um Ersticken zu
verhindern.
13DE/AT/CH
Page 14

WARNUNG!
Lebensgefahr durch Blitzschlag!
Bauen Sie das Zelt nicht direkt unter Bäumen
auf. Bei Gewitter besteht die Gefahr von Blitzschlägen, die das Zelt oder den Baum in Brand
setzen oder den Baum umstürzen könnten.
• Zelten Sie nicht bei Schneefall und Sturm
und beachten Sie unterschiedliche und sich
ändernde Wetter- und Windbedingungen.
Vermeidung von Sachschäden!
• Stellen Sie das Zelt nicht so auf, dass der
Zelteingang in Windrichtung zeigt.
Wind könnte das Zelt beschädigen.
• Alle Zeltstoffe erleiden bei länger
andauernder, starker Sonnenbestrahlung
eine Materialermüdung und bleichen aus.
Bauen Sie deshalb das Zelt bei längerer
Benutzung möglichst in einem schattigen
Gebiet auf. Lassen Sie das Zelt nicht unnötig
aufgebaut stehen.
Aufbau
HINWEIS!
Führen Sie vor Reiseantritt einen Probeaufbau
durch. Vergewissern Sie sich dabei, dass
sämtliches Zubehör komplett ist.
Wahl des Aufstellorts
Wählen Sie eine möglichst ebene, saubere
Aufbaustelle. Meiden Sie Bodensenken.
Entfernen Sie Steine, Äste und andere spitze
Gegenstände, um Beschädigungen des Zeltbodens zu verhindern. Nutzen Sie natürlichen
Windschatten wie Hecken, Felsen usw..
Benutzen Sie für Sandboden entsprechende
Erdnägel, um ein unbeabsichtigtes Lösen der
Verspannung zu verhindern.
HINWEIS!
Stecken Sie die Erdnägel etwas schräg in die
Erde, damit eine hohe Festigkeit erreicht wird, jedoch keine Verspannung in der Zelthaut auftritt.
Zeltstoff und Abspannpunkte sollten nur leicht
unter Spannung stehen, damit Belastungen durch
Wind ausgeglichen werden können.
Achten Sie darauf, dass nicht zuviel Spannung
auf dem Zelt ist. Prüfen Sie die Zeltspannung je
nach Witterung.
HINWEIS!
Wasserkondensation kommt grundsätzlich in
allen Zelten vor, jedoch insbesondere bei starken
Temperaturschwankungen. Nach einer Nacht im
Zelt befinden sich Kondenswassertropfen an der
Innenwand. Kondensation ist daher kein Hinweis
auf Undichtigkeit. Gute Belüftung vermindert
Kondensation im Inneren des Zeltes.
a) Breiten Sie den Boden des Innenzeltes flach
auf dem Untergrund aus, schließen Sie die
Reißverschlüsse der Eingänge und fixieren
Sie die Ringe an allen vier Ecken mit den
Erdnägeln (Abb. B).
b) Stecken Sie die Segmente der Zeltstangen
(3) und (4) zusammen. Schieben Sie die
beiden schwarzen Zeltstangen (3) diagonal
durch die Schlaufe in der Mitte des
Innenzeltes (Abb. C). Befestigen Sie das
Innenzelt per Clips an den Zeltstangen
(Abb. D).
c) Richten Sie die Zeltstangen auf und stecken
Sie die Metallstifte an den Ecken des
Innenzeltes in das Ende der Zeltstangen,
so dass diese auf Spannung stehen (Abb. E).
d) Das Ablagenetz (9) kann nun in den
Dachfirst im Inneren des Innenzeltes eingehakt
werden (Abb. F).
e) Platzieren Sie das Außenzelt über dem
Innenzelt (Abb. G). Befestigen Sie das
Außenzelt mit den Bändern an den
Zeltstangen und am Gestänge-Kreuzpunkt.
Führen Sie die graue Zeltstange (4) durch
den Gestängetunnel am Außenzelt (Abb. H).
Richten Sie das Gestänge auf und stecken Sie
die Metallstifte von den Ecken des Innenzeltes
in die Enden des Gestänges. Befestigen Sie
das Außenzelt mit 10 Erdnägeln, wobei die
Schlaufen an den vier Eckpunkten zusammen
mit den Erdnägeln des Innenzeltes fixiert
werden (Abb. I).
f) Sichern Sie die 6 Spannleinen mit jeweils
einem Erdnagel. Die Länge der Spannleinen
kann mit dem Straffer angepasst werden
(Abb. J).
14
DE/AT/CH
Page 15

Abbau
HINWEIS!
Bauen Sie das Zelt möglichst in sauberem und
trockenem Zustand ab, um Schimmelbildung
bzw. Stockflecken zu vermeiden. Nach einem
Abbau im Regen trocknen Sie das Zelt umgehend. Reinigen Sie vor dem Verpacken alle Teile
gründlich.
• Entfernen Sie Erdnägel und Spannleinen.
• Entfernen Sie die Zeltstangen, falten Sie sie
zusammen und bauen Sie Außen- sowie
Innenzelt ab.
Faltschema
• Außen- und Innenzelt in Rechteckform falten
und das Faltmaß auf maximale Breite des
Packsackes bringen.
• Zeltstangen und die Erdnägel in die jeweilige
Verpackung legen.
• Innenzelt auf das Außenzelt legen. Erdnagel sack und Packsack in der Mitte des Innen zeltes platzieren, anschließend Innen- und
Außenzelt aufrollen.
• Zelt, Gestänge- und Erdnagelsack in den
Packsack legen und Reißverschluss schließen.
Wartung
Verwenden Sie im Falle von kleinen Rissen und
Löchern ein Reparaturset aus dem Fachhandel.
Tauschen Sie zerbrochene Zeltstangen sofort
aus. Ölen Sie Reißverschlüsse bei Schwergängigkeit etwas nach.
Pflege
Verschmutzungen an der Zelthaut im trockenen
Zustand abbürsten; evtl. mit klarem Wasser nachbehandeln. Verwenden Sie keine chemischen
Reinigungsmittel. Von Zeit zu Zeit sollten Sie
die Zeltnähte abdichten. Verwenden Sie dazu
handelsübliche Nahtdichtmittel.
Aufbewahrung
Zur Vermeidung von Schimmel und Witterungsflecken lagern Sie den Artikel an einem
trockenen Ort. Bei längerem Nichtgebrauch
nehmen Sie den Artikel aus dem Packsack und
bewahren Sie ihn an einem trockenen, vor
direkter Sonneneinstrahlung geschützten Ort auf.
Hinweise zur Entsorgung
Verpackung und Artikel bitte umweltgerecht und
sortenrein entsorgen! Entsorgen Sie den Artikel
über einen zugelassenen Entsorgungsbetrieb
oder über Ihre kommunale Gemeindeverwaltung. Beachten Sie die aktuell geltenden
Vorschriften.
3 Jahre Garantie
Das Produkt wurde mit großer Sorgfalt und unter
ständiger Kontrolle produziert. Sie erhalten auf
dieses Produkt drei Jahre Garantie ab Kaufdatum. Bitte bewahren Sie den Kassenbon auf.
Die Garantie gilt nur für Material- und Fabrikationsfehler und entfällt bei missbräuchlicher oder
unsachgemäßer Behandlung. Ihre gesetzlichen
Rechte, insbesondere die Gewährleistungsrechte, werden durch diese Garantie nicht eingeschränkt.
Bei etwaigen Beanstandungen wenden Sie sich
bitte an die unten stehende Service-Hotline oder
setzen Sie sich per E-Mail mit uns in Verbindung.
Unsere Servicemitarbeiter werden das weitere
Vorgehen schnellstmöglich mit Ihnen abstimmen.
Wir werden Sie in jedem Fall persönlich beraten.
Die Garantiezeit wird durch etwaige Reparaturen aufgrund der Garantie, gesetzlicher
Gewährleistung oder Kulanz nicht verlängert.
Dies gilt auch für ersetzte und reparierte Teile.
Nach Ablauf der Garantie anfallende Reparaturen sind kostenpflichtig.
IAN: 86026
Service Deutschland
Tel.: 01805772033 (0,14 EUR/Min.
aus dem dt. Festnetz, Mobilfunk
max. 0,42 EUR/Min.)
E-Mail: deltasport@lidl.de
Service Österreich
Tel.: 0820 201 222 (0,15 EUR/Min.)
E-Mail: deltasport@lidl.at
Service Schweiz
Tel.: 0842 665566 (0,08 CHF/Min.,
Mobilfunk max. 0,40 CHF/Min.)
E-Mail: deltasport@lidl.ch
Ersatzteile zu Ihrem Produkt finden Sie auch unter:
www.delta-sport.com, Rubrik Service - Ersatzteilservice Lidl
DE/AT/CH
15
Page 16

DELTA-SPORT HANDELSKONTOR GMBH
Wragekamp 6 • D-22397 Hamburg
Version: 04/2013
Delta-Sport-Nr.: ID-1616
IAN 86026
 Loading...