

Page 1
Carbon Trekking Stick CT-1406
INSTRUCTIONS FOR USE
Read through the instruction manual carefully before use.
Make sure you keep the instructions for future reference!
Use
This trekking pole is equipped with a hardened metal tip and is intended
for trekking in the countryside, on ice or on other smooth surfaces.
It is also equipped with an asphalt pad which can be attached and
removed easily when trekking on asphalt or other hard surfaces.
This trekking pole is intended solely for hiking.
Disc change system with asphalt pad holder: when the asphalt pads
or trekking pole discs are not used on the current trail, they can
be attached to or inserted in the disc change system.
Safety notice
• Do not attempt any repairs that might put your safety at risk.
• We recommend using a heart rate monitor.
• Consult your doctor before engaging in sports activities if you have a
known cardiovascular problem.
• Use sports shoes with treaded soles and supportive sides.
• Avoid sporting activities in the dark or use reflectors worn on the body
at dusk.
• Check the screws on the trekking pole before use.
• Check the trekking pole for damage before use.
• As soon as you ascertain any damage in the stick segments, or
anything faulty that will affect the function of the trekking of floor,
cease use of the stick immediately.
• If possible, avoid public roads in order to minimise risk of accidents.
• Trekking poles are not suitable for downhill skiing.
• Please do not use oil as all types of oil can negatively influence the
retention force of the adjustment mechanism.
• Remember that the tip of the trekking pole may damage floors.
• Do not sit on the pole as it could break.
• Pointed poles are dangerous for children.
• This equipment is solely intended for private use.
This equipment is not guaranteed for commercial use.
• During use, please check the locking system regularly.
Adjusting the pole length
Your trekking poles are height-adjustable from 67cm to 135cm and
should be adjusted according to your height and the type of use.
Fig. 1A
Fig. 1D
Fig. 1B
Fig. 1E
Fig. 1C
Page 2
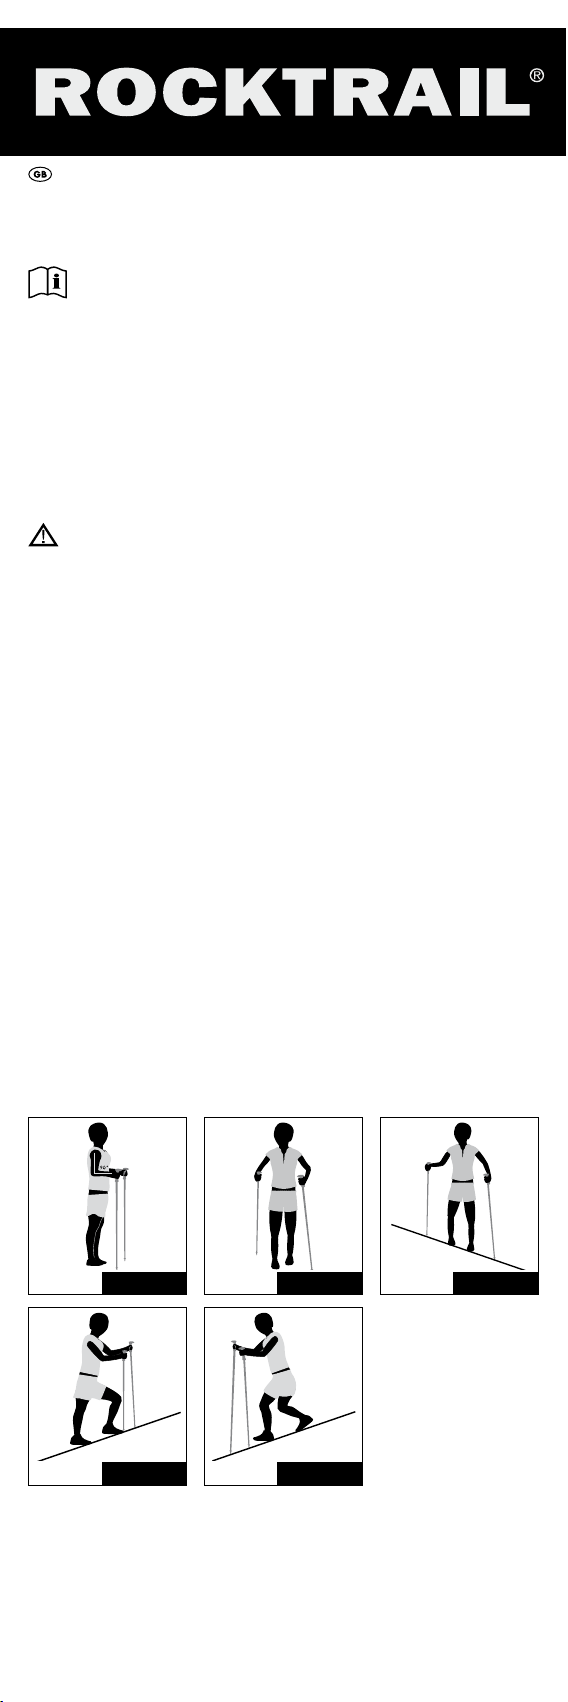
Walking on smooth surfaces (Fig. A/B)
Set the pole length so that the upper and lower arms form a 90°
angle. Ensure that both poles are adjusted to the same length.
Information regarding the length of the stick can be found on the central
and lower stick segments. What happens if you want to set the stick
length to 120cm? Fix both the central and lower stick segments so that
the 120cm marking is just visible above the upper stick segment.
Traversing (Fig. C)
The upper pole should be shortened and the lower pole lengthened
so that both offer support.
Ascent/Descent (Fig. D/E)
When walking uphill, the poles should be shortened in such a way
that they offer comfortable support. When walking downhill, the poles
should be extended so that they help to support a comfortable, upright
posture.
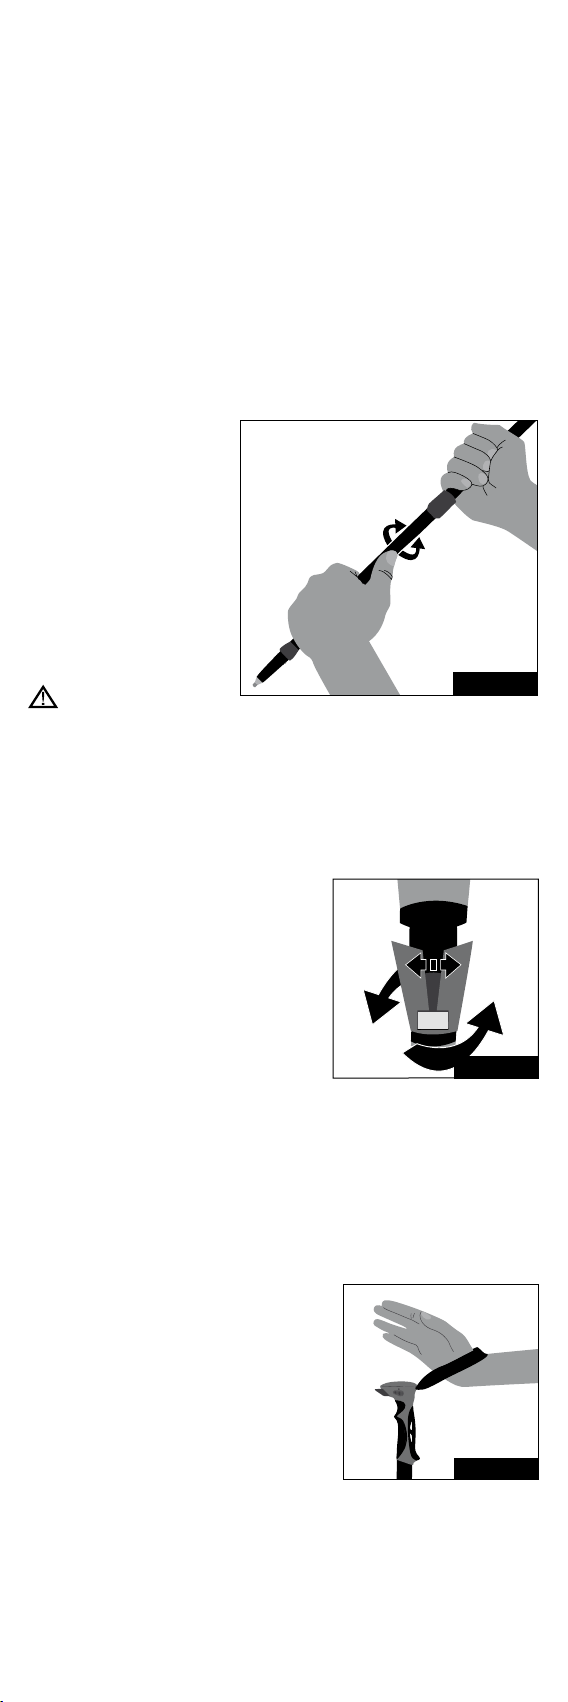
Close/open
The direction of force
required to open and close
is displayed on the upper
section of the trekking stick.
Hold the upper part of the
stick firmly and turn the lower
section to the right to tighten
and to the left to open.
Screw shut only as tightly
as required so that you are
able to loosen it again.
Open
Close
Note:
• After locking the strap ensure the closures are secure by lightly leaning
onto the pole.
• Do not tighten the poles past the “STOP“ mark.
• At very high tightening forces, the closure system of the trekking poles
reaches a clamping force of about 140kg.
• Loads over 100kg can cause damage to the damping system, should
the damping system be deactivated at the time.
• The stick refuses to close correctly?
Pull each individual segment out of the
stick itself. Turn the locking system
manually 2-3 turns to the right, until the
orange clamping device starts to widen
slightly (see fig.).
Then place the individual stick segments
into the stick once again and fix to the
desired length.
Fig. 2
Fig. 3
Switching cushioning system on/off
To deactivate the cushioning system, tighten the poles, as detailed in the
“Adjusting pole length“ section. Turn the central section of the trekking
pole slightly against the screw direction. You will hear a loud click.
The cushioning system is now deactivated. Turn the central part of the
trekking pole gently in the screw direction to reactivate the cushioning
system.
Using the strap
When using the strap ensure the back of
the hand is enclosed by the top portion of
the strap loop, with the Rocktrail logo
pointing outward before holding the grip.
Observe the “left“ (L) and “right“(R)
markings on the respective straps.
Fig. 4
Page 3

Adjusting the strap
1
The strap size can be adjusted
using the sliding buttons (A)
and the press button (B).
To open the locking mechanism
slide the sliding buttons (A) on
both sides of the pole forward
using the thumb and index finger.
Fig. 5 Fig. 6
3
Secure the strap by pressing
the press button (B).
3
2
The strap is now unlocked,
allowing you to adjust the size.
Pull the open bottom strap end to
tighten the strap.
Pull in the opposite direction to
loosen the strap.
21
4
Adjust the size of the strap so
it does not cut in when holding the
grip.
4
Fig. 8Fig. 7
Handy hints for use
• Wear gloves in cold weather.
• Ensure that you consume enough liquid when undertaking long walks.
It may be worth investing in either a drink rucksack or a drink belt.
• Wear clothing appropriate for the weather.
Composite support for asphalt pad & plate
You can store the asphalt pad and the trekking-pole plate in the composite support. The asphalt pad should be used on stony, hard ground,
and the trekking-pole plate should be used on soft ground to prevent the
trekking-pole from sinking in too deep.
You may also remove the composite support. Pull the red elastic ring from
its flap out of the fixture guide. The fixture can then be pulled off of the
pole.
In order to replace the combination fixture, place onto the pole once
again and bind the rubber ring around the pole, then placing it in the
fixture guide in the composite fixture.
Stretching and warming up
Always warm up and stretch extensively before hiking (see illustration).
Fig. 9A
Fig. 9D
Fig. 9B
Fig. 9C
Page 4

• Fig. 9A: Front Thigh Muscles
Pull your foot up in the direction of your posterior.
• Fig. 9B: Rear Lower Leg Muscles
Press your rear heel to the ground and angle your body forwards.
• Fig. 9C: Inner Hip Muscles
Push your pelvis in an obliquely downward direction.
• Fig. 9D: Calf Muscles
Lift your heels several times and place them on the ground again.
Care and cleaning
Clean the trekking poles with a cloth soaked in lukewarm or soapy water.
Do not attempt to clean the poles using detergent or abrasive cleaning
agents. These may permanently damage the plastic parts and printed
marks.
Storage and transport
Do not leave the trekking poles exposed to direct sunlight or excessive
temperatures as this could cause cracks to appear, causing them to
disintegrate, reducing their lifespan and drastically reducing their use.
Store the trekking poles in a dry place. Dry wet poles with a cloth before
collapsing to prevent rust. Always attach the rubber bumpers to the tips
when transporting the poles.
Disposal
Dispose of packaging in an environmentally friendly way. To discard
of trekking poles consult your local waste management authority.
3 Years Warranty
The product was manufactured with the greatest care and regular
testing. This product comes with a 3-year warranty as of the date of
purchase. Please keep the receipt.
The warranty only covers material and production errors and will
not cover improper or inappropriate handling. Your legal rights, in
particular statutory rights are not restricted with this warranty.
In the event of a warranty matter, please contact us free of charge via
our Service-Hotline or send us an email. In any case, we will be more
than happy to provide you with personal advice. In the event of a
warranty matter, defect parts can be shipped cash on delivery to the
indicated service-address in coordination with our service-colleagues.
Subsequently you will promptly receive a new or repaired part free of
charge.
The warranty period will not be extended due to any repairs based
on warranty, statutory guarantee or fair dealing. This also applies to
replaced and repaired parts. Any repairs required after the warranty
has expired are chargeable.
IAN: 64443
Service address
Product hotline 00800-88080808
(Mon.-Fri. 10am – 4pm, free phone)
PSB LOGISTICS MANAGEMENT LTD
UNIT B3 SITE B THE BOWMAN CENTRE
ARNCOTT, OX25 1NZ OXON
gb@nws-service.com
www.nws-service.com
Delta-Sport HanDelSkontor GmbH
Wragekamp 6 • D-22397 Hamburg
Version: 08/2011
 Loading...