


2000W DIGITAL INVERTER GENERATOR
WARNING : To reduce the risk of injury, user must read this manual before assembling, opera ng and maintaining this unit, You are responsible for opera ng the product properly & safely.
Version: V1.20170921

WARNING!
Read the following instructions before using the product!
These instructions below are for your safety. Please read through them thoroughly before use and retain them for future reference. Familiarize yourself with them to reduce hazards like personal injuries and damage to property.
TABLE OF CONTENTS
Safety Rules.………………….…………………………………………………………………………2 Product Specifications.……….…………………………………………………………………….7 Know Your Inverter Generator…………………………………………………………….……8 Generator Preparation……….…..……………………………………………………….………12 Starting The Generator…………………………………………………………………………….14 Stopping The Generator…………………………………………………………………………..16
Subsequent Starting Of The Generator………………………………………………………..17 Using The Generator………………………………………………………………………………….…….19
Maintenance……………….…………………………………………………………………………..23 Storage……………….……………………………………………………………………………………31 Troubleshooting …………………….……………………………………………………………….33
Wiring Diagram……………….…….……………………………………………………………….35
A112001 Exploded View & Part List……………………………………………….………..36
A112002 Exploded View & Part List……………………………………………….………..41
SAFETY RULES
Read and observe all warnings, cautions, and instructions on the generator and in this owner’s manual before operating your generator.
NOTE: The following safety information is not meant to cover all possible conditions and situations that may occur. Read the entire Owner’s Manual for safety and operating instructions. Failure to follow instructions and safety information could result in serious injury or death.
This safety alert symbol is used to
identify safety information about hazards that can result in personal injury.
 A signal word (DANGER, WARNING, or CAUTION) is used with the alert symbol to indicate the likelihood and the potential severity of injury. In addition, a hazard symbol may be used to represent the type of hazard.
DANGER indicates a hazard, which, if not avoided, will result in death or serious injury.
2
WARNING indicates a hazard, which, if not avoided, could result in death or serious injury.
CAUTION indicates a hazard, which, if not avoided, might result in minor or moderate injury.
CAUTION when used without the alert symbol, indicates a situation that could result in damage to the engine or generator.
 DANGER: CARBON MONOXIDE
Using a generator indoors CAN KILL YOU
IN MINUTES.
Generator exhaust contains high levels of carbon monoxide (CO), a poisonous gas you cannot see or smell. If you can smell the generator exhaust you are breathing CO. But even if you cannot smell the exhaust, you could be breathing CO.
NEVER use a generator inside houses, garages, crawlspaces, or other partly enclosed areas. Deadly levels of carbon monoxide can build up in these areas. Using a fan or opening windows and doors does NOT supply enough fresh air. ONLY use a generator outdoors and far away from open windows, doors, and vents. These openings can pull in generator exhaust.
Even if you use a generator correctly, CO may leak into the house. ALWAYS use a battery-powered or battery-backup CO alarm in your house.
If you start to feel sick, dizzy, or weak after the generator has been running,
move to fresh air RIGHT AWAY. See a doctor. You could have carbon monoxide poisoning."
 WARNING: This generator may emit highly flammable and explosive gasoline vapors, which can cause severe burns or even death if ignited. A nearby open flame can lead to explosion even if it isn’t directly in contact with gasoline.
Do not operate near open flame.
Do not smoke near generator.
Always operate on a firm, level surface.
Always turn generator off before refueling. Allow generator to cool for at least 2 minutes before removing fuel cap. Loosen cap slowly to relieve pressure in tank.
Do not overfill fuel tank. Gasoline may expand during operation. Do not fill to the top of the tank. Allow for expansion.
Always check for spilled fuel before operating.
Empty fuel tank before storing or transporting the generator.
 WARNING: This generator produces powerful voltage, which can result in electrocution.
ALWAYS ground the generator before using it (see the “Ground the Generator” portion of the “GENERATOR PREPARATION” section).
Generator should only be plugged into electrical devices, either directly or
with an extension cord. NEVER connect to a building electrical system
3
without a qualified electrician. Such connections must comply with local electrical laws and codes. Failure to comply can create a back-feed, which may result in serious injury or death to utility workers.
Use a ground fault circuit interrupter (GFCI) in highly conductive areas such as metal decking or steel work. GFCIs are available in-line with some extension cords.
Do not use in rainy conditions.
Do not touch bare wires or receptacles (outlets).
Do not allow children or
non-qualified persons to operate.
 WARNING: This generator produces heat when running. Temperatures near exhaust can exceed 150°F (65° C).
Do not touch hot surfaces. Pay attention to warning labels on the generator identifying hot parts of the machine.
Allow generator to cool down after use before touching engine or areas of the
generator that become hot during use. CAUTION: Misuse of this generator
can damage it or shorten its life.
Only use generator for its intended purposes.
Operate only on dry, level surfaces.
Allow generator to run for several minutes before connecting electrical devices.
Shut off and disconnect any malfunctioning devices from generator.
Do not exceed the wattage capacity of
the generator by plugging in more electrical devices than the unit can handle.
Do not turn on electrical devices until after they are connected to the generator.
Turn off all connected electrical devices before stopping the generator.
Turn the engine switch to “OFF” position when the engine is not running.
IMPORTANT SAFETY INSTRUCTIONS
SAVE THESE INSTRUCTIONS - This manual contains important instructions for the AAVIX 2000W inverter generator that should be followed during installation and maintenance of the generator.
Generators vibrate in normal use. During and after the use of the generator, inspect both the generator as well as extension and power supply cords for damage resulting from vibration. Have damaged items repaired or replaced as necessary. Do not use plugs or cords that show signs of damage such as broken or cracked insulation or damaged blades.
For power outages, permanently installed stationary generators are better suited for providing backup power to the home. Even a properly connected portable generator can become overloaded. This may result in overheating or stressing of the components, possibly leading to a generator failure.
DO NOT EXPOSE TO RAIN.
4

CHARGE ONLY 12V LEAD-ACID
BATTERIES. OTHER TYPES OF BATTERIES
MAY BURST CAUSING PERSONAL
INJURY AND DAMAGE.
RISK OF EXPLOSIVE GAS MIXTURE.
READ INSTRUCTIONS IN OWNER’S
GUIDE BEFORE USING CHARGER.
Keep it at least 1m away from inflammable. Fig.4
Never use it indoor. Fig.1
Never smoke when fueling. Fig.5
Never use it in a wet condition. Fig.2
Don’t spill when fueling. |
Fig.6 |
Never directly connect it to a |
|
house power system. |
Fig.3 |
Stop engine when fueling. Fig.7
5

CONNECTION TO A HOUSE POWER SUPPLY
 WARNING: If this generator is used as a supply for a building’s wiring system as a standby, the generator must be installed by a qualified electrician and connected to a transfer switch as a separately derived system in accordance with the National Electrical Code, NFPA 70. The generator shall be connected to a transfer switch that switches all conductors excluding the equipment grounding conductor. The frame of the generator shall be connected to an approved grounding electrode. Any improper connection may cause damage to the generator, or cause a fire.
Fig.10
GENERATOR GROUND CIRCUIT
In order to prevent electric shock due to shoddy electrical appliances or wrong use of electricity, the generator must be grounded with a good-quality insulated
Conductor.
Fig.11
Fig.8 |
CAUTION: |
|
Make sure the control panel, louver and |
|
the inverter bottom side cooling well and |
|
without chips, mud and water come in. it |
|
may damage the engine, inverter or |
|
alternator if the cooling vent blocked. |
|
Do not mix the generator with other stuff |
|
If moving, storing or running the unit. |
|
It may cause the generator damage or |
|
property safety issue when the generator |
Fig.9 |
in leakage. |
6
PRODUCT SPECIFICATIONS
Model |
R2000i |
|
|
|
|
|
|
|
Type |
Inverter |
|
|
|
|
|
|
Rated Frequency (Hz) |
60 |
|
|
|
|
|
|
Rated Voltage (V) |
120 |
|
|
|
|
|
|
Rated Output Power (KW) |
1.6 |
|
|
|
|
|
|
Max Output Power (KW) |
2.0 |
|
|
|
|
|
Generator |
Power Factor |
1.0 |
|
|
|
||
Charging Voltage (DC)(V) |
12 |
||
|
|||
|
|
|
|
|
Charging Current (DC)(A) |
8 |
|
|
|
|
|
|
Overload Protect (DC) |
Non-fuse Protector |
|
|
|
|
|
|
USB Port |
5V, 1 A&2.1A |
|
|
|
|
|
|
Phase |
Single |
|
|
|
|
|
|
Engine Type |
Single cylinder, 4-stroke, forced air |
|
Engine |
cooling, OHV |
||
|
|||
|
Displacement (cc) |
79.7 |
|
|
|
|
|
|
Fuel Type |
Unleaded Gasoline |
|
|
|
|
|
|
Fuel Tank Capacity |
1 US gallon (4 liters) |
|
|
|
|
|
|
Fuel Consump on (g/KW·) |
≤450 |
|
|
|
|
|
|
Con nue Running Time |
4 hours |
|
|
(at rated power) |
||
|
|
||
|
Oil Capacity |
0.37 quarts (0.35 liters) |
|
|
|
|
|
|
Spark Plug Model No. |
E6TC/E6RTC |
|
|
|
|
|
|
Star ng Mode |
Recoil Starter |
|
|
|
|
|
Generator |
Length×Width×Height |
480×285×390 (mm) |
|
Set |
|
|
|
Net weight |
47.4 lbs |
||
|
|||
|
|
|
7

KNOW YOUR INVERTER GENERATOR
Fig.12 |
|
Carrying handle |
Recoil starter |
Fuel tank cap |
Oil filler cap |
Fuel tank cap air vent knob |
Louver |
Control panel |
Muffler |
ACCESSORIES
12V DC Battery charging cable |
1 |
|
|
Spark plug socket |
1 |
|
|
Oil funnel |
1 |
|
|
Screw driver |
1 |
|
|
Fig.13
8
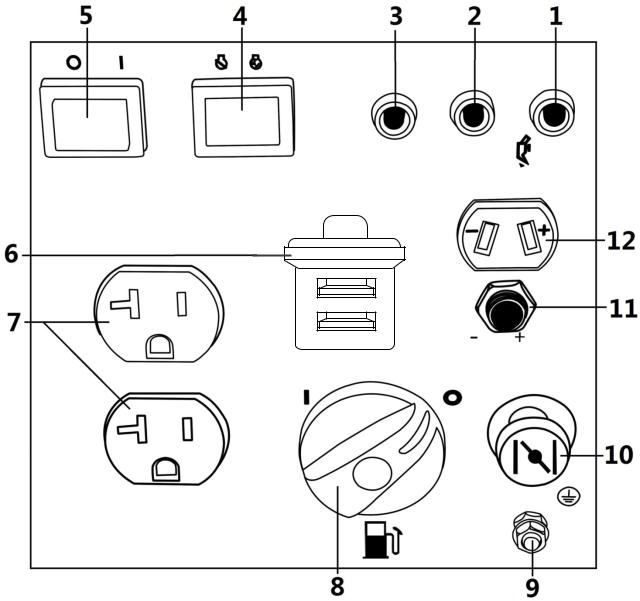
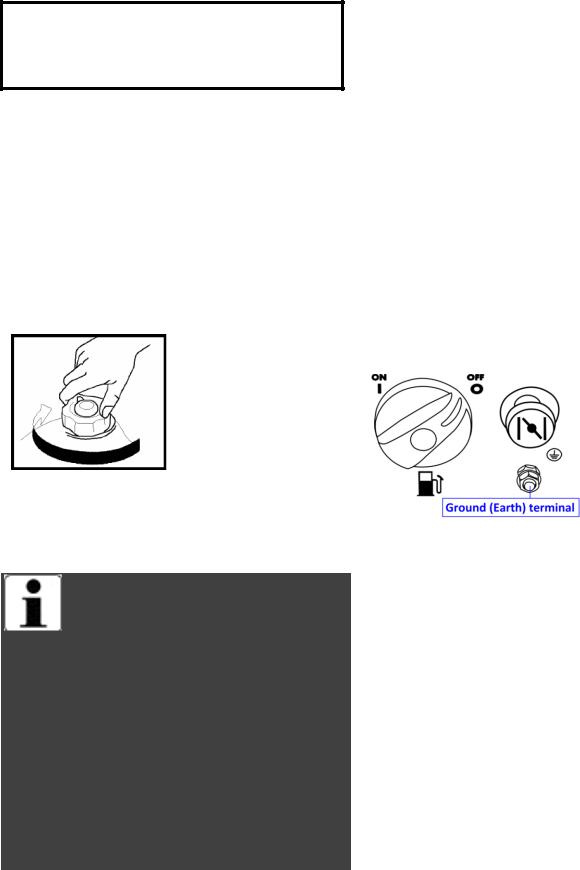
Control Panel
Fig.14
1 |
Oil warning light |
7 |
AC receptacle |
2 |
AC pilot light |
8 |
Fuel cock knob |
3 |
Overload indicator light |
9 |
Ground (earth) |
|
|
|
terminal |
4 |
Engine switch (Red) |
10 |
Choke knob |
5 |
Economy control switch |
11 |
DC protector |
|
(Black) |
|
|
6 |
USB Port (1A/2.1A) |
12 |
DC receptacle |
9

CONTROL FUNCTION
Engine switch (Red)
Fig.15
1. Engine switch (Red)  “STOP”; Ignition circuit is switched off. The
engine will not run.
2. Engine switch (Red)  “ON”;
“ON”;
Ignition circuit is switched on. The engine can be running.
Oil warning light (yellow)
Fig.16
When the oil level falls below the lower level, the oil warning light (yellow) comes on and then the engine stops automatically. Unless you refill with oil, the engine will not start again.
NOTE: If the engine stalls or does not start, turn the engine switch to “ON” and then pull the recoil starter.
If the oil warning light (yellow) flickers for a few seconds, the engine oil is insufficient . Add oil and restart.
Overload indicator light (Red)
Fig.17
The overload indicator light (Red) comes
on when an overload of a connected electrical device is detected, the inverter control unit overheats, or the AC output voltage rises. Then, the AC protector will trip, stopping power generation in order to protect the generator and any connected electric devices. The AC pilot light (Green) will go off and the overload indicator light (Red) will stay on, but the engine will not stop running.
When the overload indicator light (Red) comes on and power generation stops, proceed as follows:
1.Turn off any connected electric devices and stop the engine.
2.Reduce the total wattage of connected electric devices within the rated output.
3.Check for blockages in the cooling air inlet and around the control unit.
If any blockages are found, remove.
4.After checking, restart the engine.
NOTE: The overload indicator light (Red) may come on for a few seconds at first when using electric devices that require a large starting current, such as a compressor or a submergible pump. However, this is not a malfunction.
AC pilot light (Green)
Fig.18
The AC pilot light (Green) comes on when the engine starts and produces power.
DC protector
The DC protector (11) turns to “OFF” automatically when electric device being
10
connected to the generator is operating and current above the rated flows. To use this equipment again, turn on DC protector by pressing its button to “ON”.
1.“ON”: Direct current is output.
2.“OFF”:Direct current is not output.
Fig.20
Fuel tank cap
Remove the fuel tank cap by turning it counterclockwise.
Fig.19
 CAUTION:
Reduce the load of the connected electric device below the specified rated output of the generator if the DC protector turns off. If the DC protector turns off again, stop using the device immediately and consult customer service center.
Economy control switch (ECS)
1. “ON”
When the ESC (5) switch(Black) is turned to “ON”, the economy control unit controls the engine speed according to the connected load. The results are better fuel consumption and less noise.
2. “OFF”
When the ECS switch (Black) is turned to“OFF”, the engine runs at the rated speed 5000r/min regardless of whether is
a load connected or not.
NOTE:
The ECS switch (Black) must be turned to“OFF” when using electric devices that require a large starting current, such as a compressor of a submergible pump.
Fig.21
Fuel tank cap air vent knob
Fig.22
The fuel tank cap is provided with an air vent knob to stop fuel flow. The air vent knob must be turned to “ON”. This will allow fuel to flow to the carburetor and the engine to run. When the engine is not in use, turn the air vent knob to “OFF” to stop fuel flow.
Ground (Earth) terminal
Fig.23
Ground (Earth) terminal connects the earth line for prevention of electric shock. When the electric device is earthed, always the generator must be earthed.
11

GENERATOR
PREPARATION
USING THE GENERATOR FOR THE FIRST TIME
 The following section describes steps necessary to prepare the generator for use. If after reading this section, you are unsure about how to perform any of the steps please call for customer service. Failure to perform these steps properly can damage the generator or shorten its life.
Step 1- ADD OIL
The generator is shipped without oil. User must add the proper amount of oil before operating the generator for the first time. The oil capacity of the engine crankcase is 0.37 quarts (0.35 liters). For general use (above 40° F), we recommend 30W, 4-stroke engine oil.
Do not start the engine till fill with the sufficient engine oil.
Engine Oil Recommendations
Select good quality detergent oil bearing the American Petroleum Institute (API) service classifications SJ, SL, or SM. (Synthetic oils may be used.) Use the ASE viscosity grade of oil from the following chart (Fig.24) that matches the starting temperature anticipated before the next oil changes.
Fig.24
Engine Oil Replacemendations
To add oil, follow these steps:
1.Make sure the generator is on a level surface. Tilting the generator to assist in filling will cause oil to flow into engine areas and will cause damage. Keep generator level!
2.Remove the screws , and then remove the access panel .
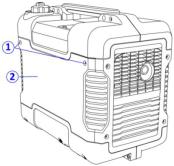 Fig.25
12
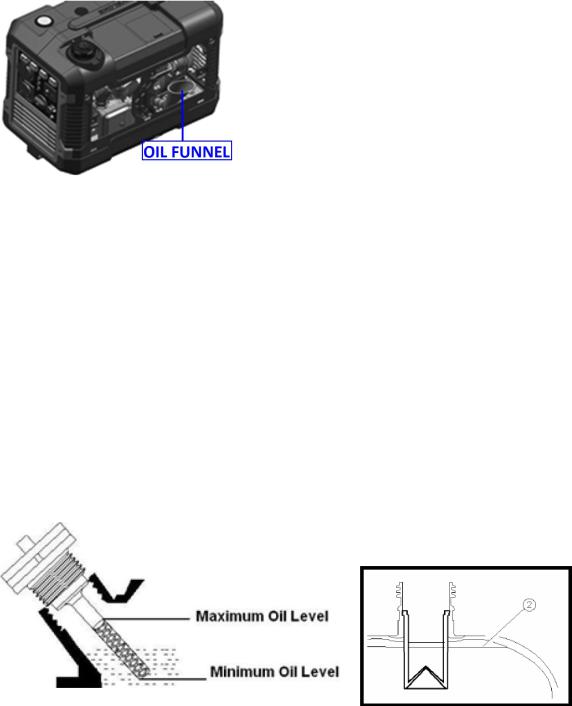
3. Remove the dipstick from the engine. Insert the oil funnel. (Fig.26)
Fig.26
4. Add oil slowly to bring level to full. (Fig. 27).
5.To check the oil level: wipe the dipstick with a clean rag. Insert the dipstick into the oil fill opening without screwing in. Remove the dipstick to check the oil mark.
6.Slowly add more oil and repeat step 4 until the oil mark reaches to the top of the dipstick (Fig.27). Do not over fill the crankcase. The generator is equipped with a low oil sensor and will not start if the amount of oil is in sufficient.
7.Check for oil leaks. Tighten dipstick firmly before closing the access panel.
Fig.27 Oil Fill Opening, Dipstick and Oil Level
Step 2-ADD GASOLINE
 DANGER:
This generator may emit highly flammable and explosive gasoline vapors, which can cause severe burns or even death if ignited. A nearby open flame can lead to explosion even if not directly in contact with gasoline.
Use fresh (within 30 days from purchase), lead-free gasoline with a minimum of 87
octane rating. Do not mix oil with gasoline.
To add gasoline, follow these steps:
1.Make sure the generator is on a level surface.
2.Unscrew fuel cap and set aside. NOTE: The fuel cap may be tight and
hard to unscrew.
3. Slowly add unleaded gasoline to the fuel tank up to the red level. Red lineFuel level.
Be careful not to overfill. The capacity of the fuel tank is 1 US gallon. NOTE: Do
not fill the fuel tank to the very top. Gasoline will expand and spill over during use when the fuel warms up even with the fuel cap in place.
 Fig.28
Fig.29
4. Reinstall fuel cap and wipe clean any spilled gasoline with a dry cloth.
 IMPORTANT:
• Use only unleaded gasoline. The use of leaded gasoline will cause severe damage to internal engine parts.
13
Recommended fuel: Unleaded gasoline Fuel tank capacity: Total: 4.0L(1.06 US gal, 0.88 lmp gal)
•Never use an oil/gasoline mixture.
•Never use old gasoline.
•Avoid getting dirt or water into the fuel tank.
•Gasoline can age in the tank and make
starting difficult. Never store generator
for extended periods of time with fuel in the tank.
• After fill the fuel, make sure the fuel tank cap is tightened securely.
Fig.30
• Immediately wipe off spilled fuel with a clean, dry, soft cloth, since fuel may deteriorate painted surfaces or plastic parts.
NOTE: Fuel deteriorates over time. It may be DIFFICULT to start the engine if you use fuel which has been kept for more
than 30 days. Towards the end of the season, it is advisable to put only as much fuel in the tank as you need for each use, since it should be completely used up before storing the product. Empty remaining fuel from the tank and the CARBURETTOR when storing the product for over 30 days.
Step 3-GROUND THE
GENERATOR
 WARNING: Failure to properly ground the generator can result in
electrocution.
Ground the generator by tightening the grounding nut on the front control panel against a grounding wire. A generally acceptable grounding wire is a No. 12 AWG (American Wire Gauge) stranded copper wire. This grounding wire should be connected at the other end to a copper, brass, or steel-grounding rod that is driven into the earth. Wire and grounding rods are not included in generator contents.
Grounding codes can vary by location. Contact a local electrician to check the area codes.
Fig.31
NOTE: After completing the above preparation, the generator is ready to be started.
STARTING THE GENERATOR
Before starting the generator, make sure you have read and performed the steps in the “Generator Preperation” section of this manual. If you are unsure about how to perform any of the steps in this manual please call customer service center.
 DANGER: CARBON MONOXIDE.
Using a generator indoors CAN KILL YOU IN MINUTES.
14
 Loading...