

Page 1
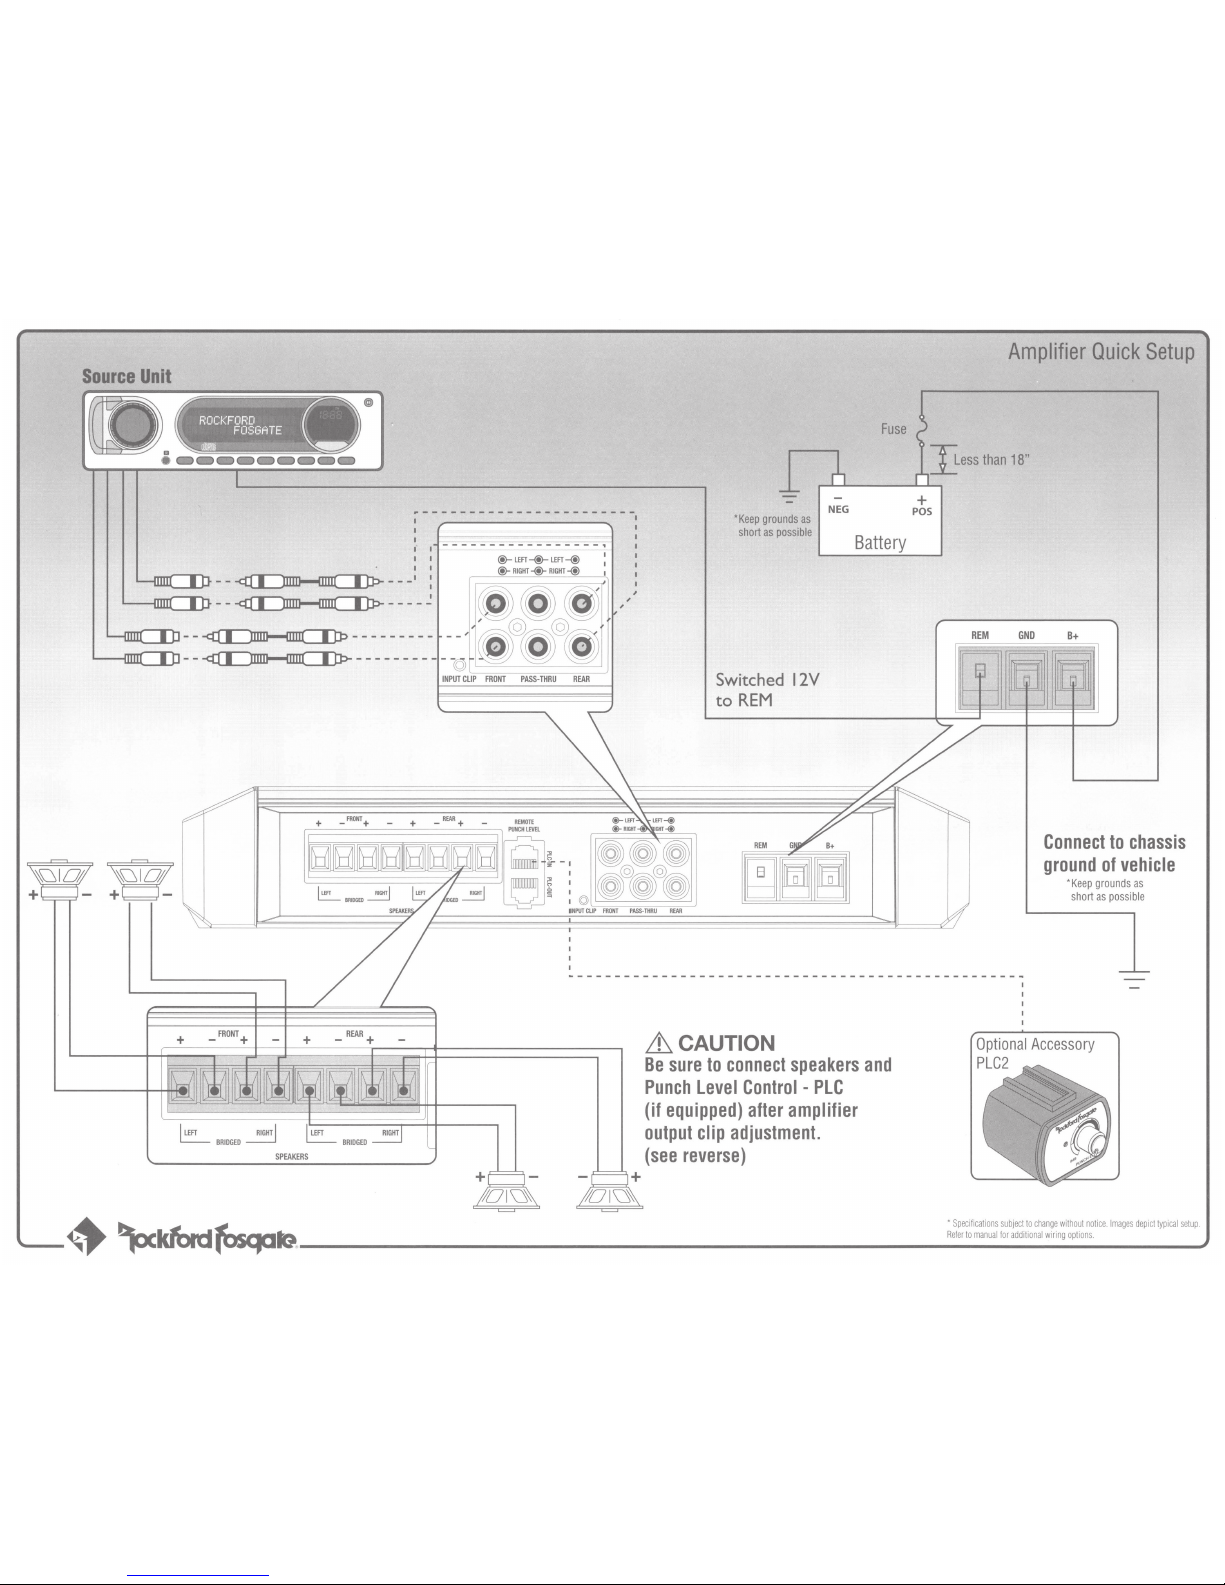
Source
Unit
~----------------------~
I
I
I I
__
;;.--;----------=----•
I I
~---------
~-----------
©
+
_FRONT+
@-
LEFT-@-
LEFT--@
@-
RIGHT-@- RIGHT-@
I
,
,
,
+
O l
u'
*
Keep
grounds
as
short
as
possible
Switched
12V
to
REM
REM
ihCAUTION
NEG
Battery
Be
sure
to
connect
speakers
and
Punch
level
Control -PLC
(if
equipped)
after
amplifier
output
clip
adjustment.
(see
reverse)
Amplifier
Quick
Setup
)!.ess
than
18"
+
POS
REM
Connect
to
chassis
ground
of
vehicle
*
Keep
grounds
as
short
as
possible
----~
~~~~~-------------------------------------------------------------------~
·~sp~ec~ific
:
atio
~
ns!su!bje
~
ctt
:
oc~ha:nge
~w~
itho
~
ut:no:tice
~.f:
ma:ges
:
de:pic
~
tty
:
pic
:
al:set
:
upj.
~
~
Refer
to
manual
for
add1t1onal
wiring
options.
Page 2
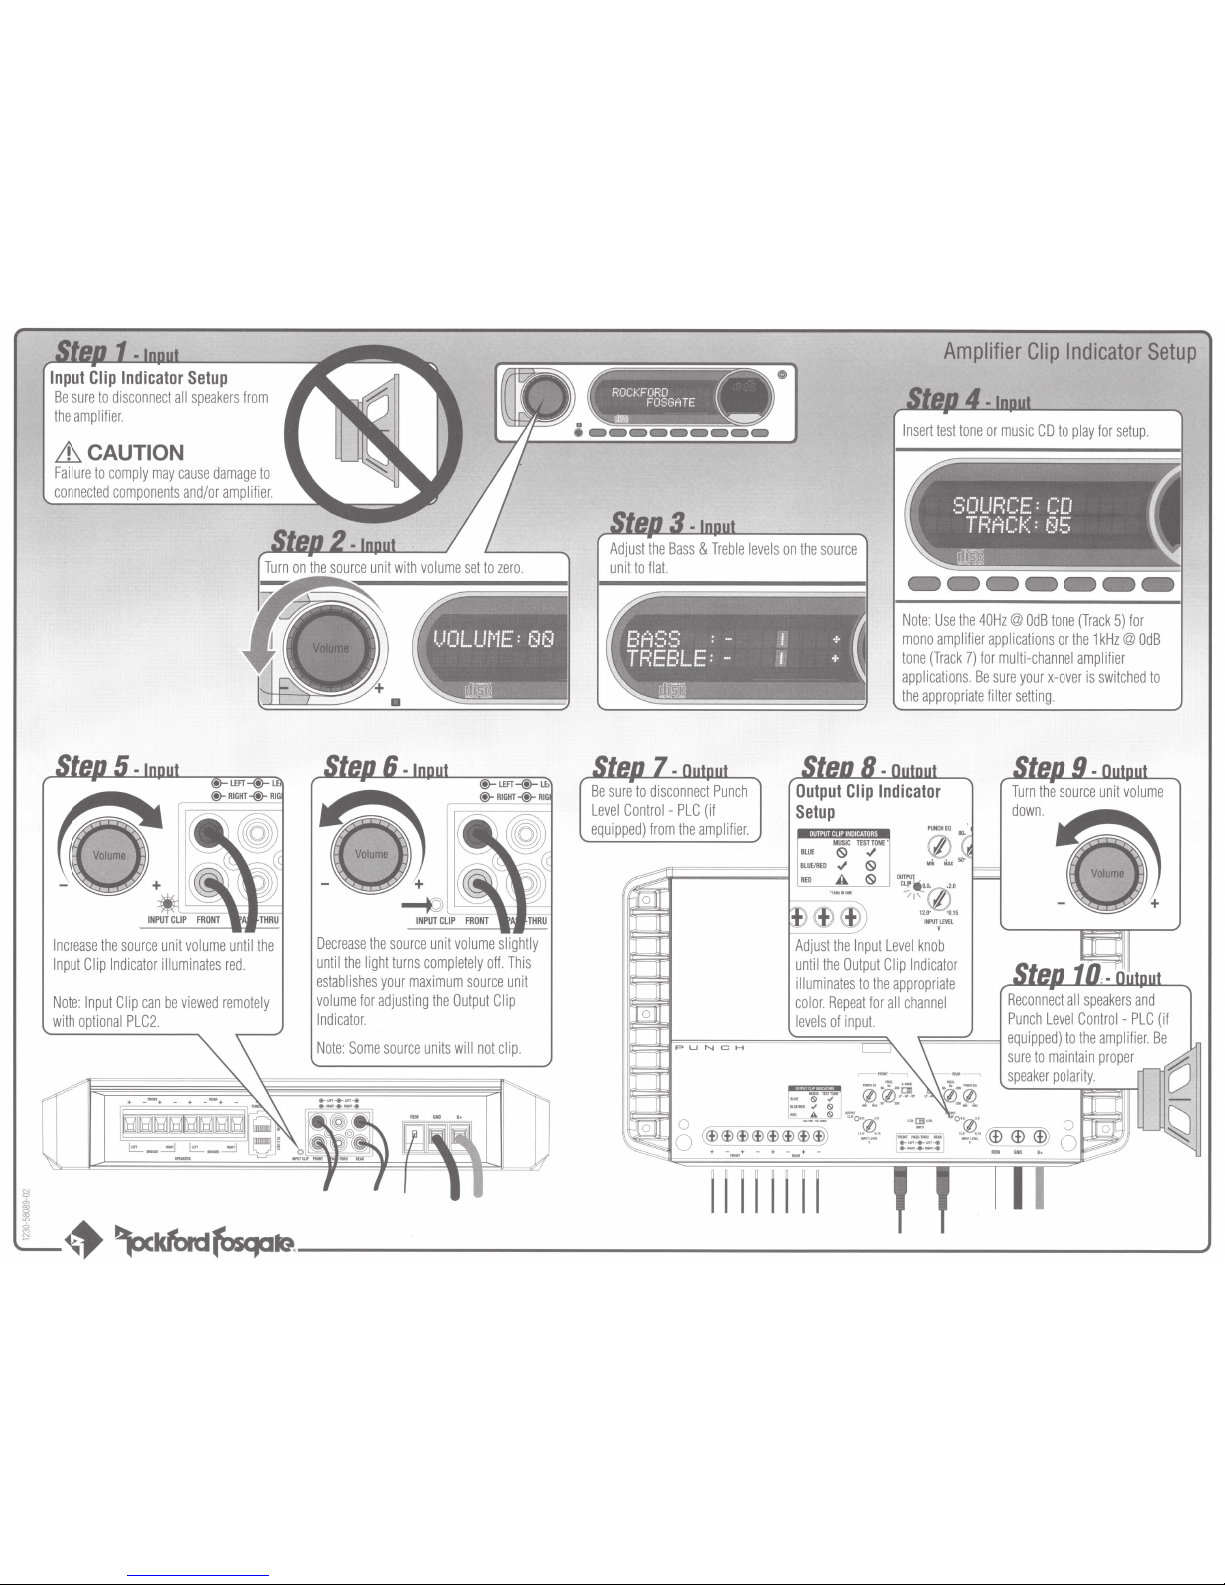
Input
Clip
Indicator
Setup
Be
sure
to
disconnect
all
speakers
from
the
amplifier.
~CAUTION
Failure
to
comply
may
cause
damage
to
connected
components
and/or
amplifier.
Increase
the
source
unit
volume
until
the
Input
Clip
Indicator
illuminates
red.
Note:
Input
Clip
can
be
viewed
remotely
with
optional
PLC2.
Decrease
the
source
unit
volume
slightly
until
the
light
turns
completely
off.
This
establishes
your
maximum
source
unit
volume
for
adjusting
the
Output
Clip
Indicator.
Note:
Some
source
units
will
not
clip.
Amplifier
Clip
Indicator
Setup
•
Insert
test
tone
or
music
CD
to
play
for
setup.
Adjust
the
Bass
&
Treble
levels
on
the
source
unit
to
flat.
Be
sure
to
disconnect
Punch
Level
Control
-
PLC
(if
equipped)
from
the
amplifier.
~~~~~~~
Note:
Use
the
40Hz@
OdB
tone
(Track
5)
for
mono
amplifier
applications
or
the
1kHz@
OdB
tone
(Track
7)
for
multi-channel
amplifier
applications.
Be
sure
your
x-over
is
switched
to
the
appropriate
filter
setting.
Output
Clip
Indicator
Setup
Turn
the
source
unit
volume
down
.
MUSIC
TEST
TONE
'
BLUE
(S}
~
~~~~~~=
BLUE/RED
~
(S}
RED
A
(S)
~.0.
.2.0
~~~
11
~~~
.15
ww
INPUTL.EVEL
y
Adjust
the
Input
Level
knob
until
the
Output
Clip
Indicator
illuminates
to
the
appropriate
color
.
Repeat
for
all
channel
levels
of
input.
Reconnect
all
speakers
and
Punch
Level
Control
-
PLC
(if
~~~=1
equipped)
to
the
amplifier.
Be
.....
--,
11111111
sure
to
maintain
proper
speaker
polarity
.
--·~~~b------------------------------~
Page 3
Page 4

Page 5

Page 6

Page 7

Page 8

Page 9

rf====:===::::
CERTIFICATE
OF
PERFORMANCE
VERIFICATION
===:===:===:~
~
are designed, developed,
ers
ed
n.
on. A
ti
States
fi
Impedance,
Rights Reversed.
ll
/or other
nd
a
1kHz
(ab
untries.
co
) or
ad
/
ROCKFO
ALL Rockford Fosgate ampli
nducted at 14.4Vdc, Mi
co
Ro
©2012
Corporation
without no
c
ti
kf
ce
ord
in
Corpora
the Unit
manufactured and tested in
(bd)
100Hz
FOSGA
RD
other tradem
All
otherwise stated.
unless
and associated l
,
TE
arks are the property of their respec
Total
Total
rdance with the
acco
ogos
Power
RMS Power@ 1% THD
watts
istered trademarks of Rockford
eg
r
re
where
pp
a
857
CEA-2006 amplifier
a
ble
ca
li
ers. Specifi
wn
ve o
ti
rating requirem
tions subject to change
ca
ents.
tests
ll
A
Page 10

Are
You
Engineered to Rock?
Get a One-Year Extended Warranty when you use a matching Rockford Fosgate
Amplifier Installation
kit with your
Amplifier!
We want you to get the performance and
quality
under-spec wiring is a guaranteed
reliability
way
to get less
that made Rockford Fosgate
We are so certain that getting your system wired to rock
will
give you an
dealer
To
to determine the matching kit for your amplifier.
extend your warranty under this program attach the
amplifier installation
One
warranty extension per
additional 1 year warranty on your amp when you use the matching
kit package
in
the box
below.
amplifier regardless
Keep this form
of
the number
must be purchased at the same time.
Amplifiers
than you paid for from your system.
with the right wire and cables will
amplifier installation
serial number sticker
along with your
of
amplifier
or
UPC
code removed from the original
original purchase receipt.
kits purchased.
famous. Using poor-
make a difference, that we
kit.
See
your
Amplifier
and wiring kit
Limit on
Any
express warranty set forth above.
may not
product.
How to Obtain
The
receipt and the ORIGINAL Performance
kit. Contact your Authorized Rockford Fosgate Dealer
EU
This product meets the current EU warranty requirements, see your Authorized
"This Additional One-
Implied
implied
apply.
amplifier
Warranty
Warranties
warranties
No person is authorized to assume for Rockford Fosgate any other
must be returned by the customer (you)
including
Service
Under the Extended Warranty Program
Year Warranty " is
warranties
Some
of
fitness for use and merchantability are limited
states do not
Verification Certificate with the
only available
allow limitations
or
an
authorized Rockford Fosgate
or
our Customer
where allowed
Attach Amplifier Installation
Serial
Number or
original
packagi
UPC Code
in
duration to the period of the
on the
length
of an
implied
liability
serial
number or
Support Specialists (1-800-669-9899) for assistance.
dealer for
under
local laws.
in connection with the
retailer
UPC
details.
warranty, so this limitation
sale
with a copy
code from the
of
the original
amp installation
Kit
from
ng
here .
of
the
 Loading...