

Page 1
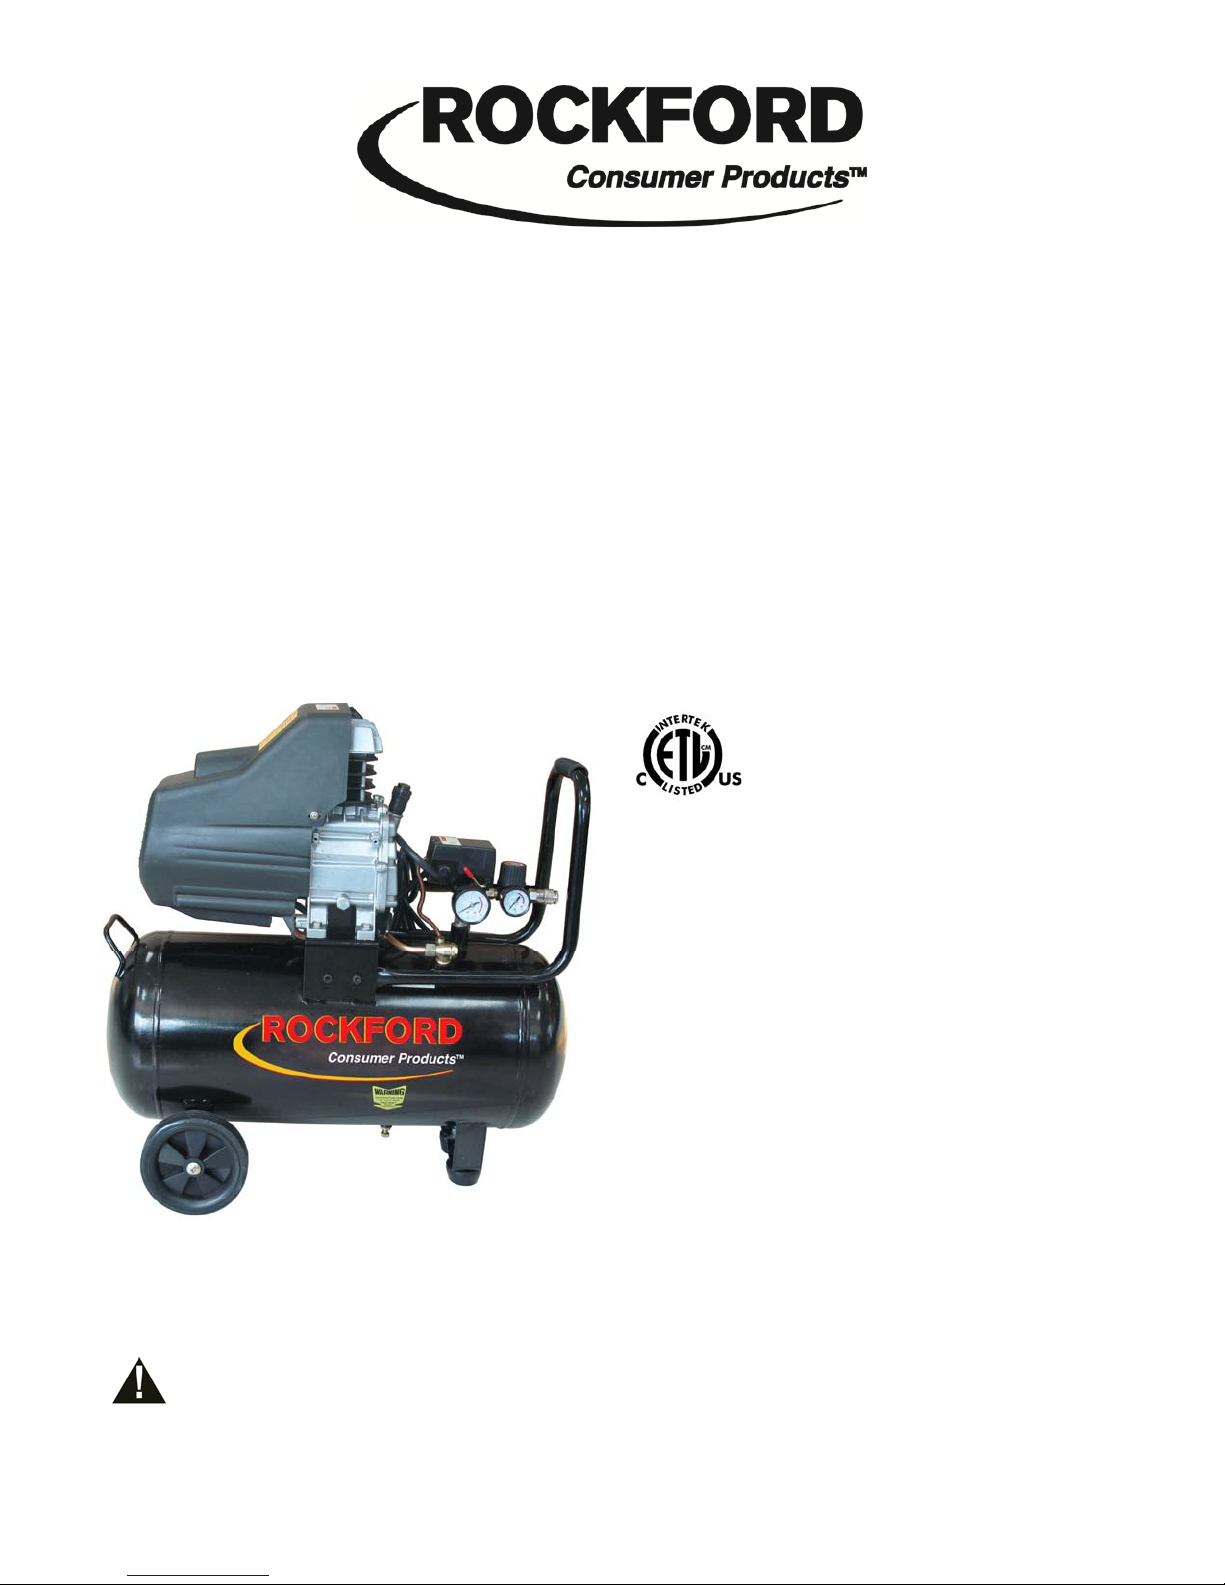
OPERATION & PARTS MANUAL
MODEL NO.: CAT1040
10 GALLON AIR COMPRESSOR
BEFORE USING THIS PRODUCT.
WARNING: READ THIS MANUAL FOR ALL SAFETY INSTRUCTIONS
SPECIFICATIONS:
Compressor ……………………… Oil lubricated
Horsepower…………………………3.0HP
Input …………………………………120V/60Hz, 15Amps
Tank Capacity ………………………10 Gallons
Air Pressure …………………………125psi max.
Speed ………………………………. 3400 RPM
Air Delivery ………………………… 5.1 SCFM @40PSI
………………………… 4.1 SCFM @90PSI
Net Weight …………………………. 63.5 lbs
1
Page 2
IMPORTANT SAFETY PRECAUTIONS
SAVE ALL INSTRUCTIONS Improper operation or maintenance of this product could
result in serious injury and/or property damage. Read and understand all of the warnings and safety
instructions provided before using this equipment.
Do not use this compressor to supply breathing air.
■
Risk of Moving Parts. If the air compressor is in operation, all guards and covers should be attached or installed
correctly. If any guard or cover has been damaged, do not operate the equipment until the proper personnel have
correctly repaired the equipment. The power cord should be free of any moving parts, twisting and/or crimping while in
use and while in storage.
■
Risk of Burns. There are surfaces on your air compressor that while in operation and thereafter can cause serious
burns if touched. The equipment should be allowed time to cool before any maintenance is attempted. Items such
as the compressor pump and the outlet tube are normally hot during and after operation.
■ Always Wear Approved Eye protection.
■ Risk of Falling. Operation of the air compressor should always be in a position that is stable. Never use the air
compressor on a rooftop or elevated position that could allow the unit to fall or be tipped over. Use additional air hose
for elevated jobs.
■
Risk from Flying Objects. Always wear approved safety glasses with side shields when the air compressor is in use.
Turn off the air compressor and drain the air tank before performing any type of maintenance or disassembly of the
hoses or fittings. Never point any nozzle or sprayer toward any part of the body or at other people or animals.
■
Risk to Breathing. Avoid using the air compressor in confined areas. Always have adequate space (30 cm) on all
sides of the air compressor. Also keep children, pets, and others out of the area of operation. This air compressor does
not provide breathable air for anyone or any auxiliary breathing device. Spraying material will always need to be in
another area away from the air compressor to not allow intake air to damage the air compressor filter.
■
Risk of Electrical Shock. Never utilize the air compressor in the rain or wet conditions. Any electrical issues or
repairs should be performed by authorized personnel such as an electrician and should comply with all national and
local electrical codes. The air compressor should also have the proper three prong grounding plug, correct voltage, and
adequate fuse protection.
■
Risk of Explosion or Fire. Never operate the compressor near combustible materials, gasoline or solvent vapors. If
spraying flammable materials, locate the air compressor at least 50m away from the spray area. Never operate the air
compressor indoors or in a confined area.
■
Risk of Bursting. Always drain the air compressor tank daily or after each use. If the tank develops a leak, then
replace the air compressor. Never use the air compressor after a leak has been found or tried to make any
modifications to the tank. Never modify the air compressor's factory settings which control the tank pressure or any
other function.
Only persons well acquainted with these rules of safe operation should be allowed to use the
compressor.
Keep visitors away and never allow children in the work area.
CALIFORNIA PROPOSITION 65 This product or its power cord may contain chemicals,
including lead, known to the State of California to cause cancer and birth defects or other reproductive harm. Wash
hands after handling.
SOME DUST CREATED BY POWER SANDING, SAWING, GRINDING, DRILLING, AND
OTHER CONSTUCTION ACTIVITIES CONTAINS CHEMICALS KNOWN TO CAUSE CANCER, BIRTH DEFECTS OR
REPRODUCTIVE HARM.
2
Page 3
PARTS & FEATURES
Drain Valve: Used to drain condensation from the air tank. Located at bottom of tank.
Tank Safety Valve: Used to allow excess tank pressure to escape into the atmosphere. This valve should only open
when the tank pressure is above the maximum rated pressure.
Tank Pressure Gauge: Indicates the reserve air pressure in the tank.
Outlet Pressure Gauge: Indicates the outgoing air pressure to the tool and is controlled by the regulator.
Regulator: The regulator controls the air pressure coming from the air tank. To increase the pressure, turn the knob
clockwise and to decrease the pressure turn the knob counterclockwise.
Quick Coupler: Offers a quick release feature for attaching and removing the air hose.
Motor Thermal Overload: The motor has an automatic thermal overload protector. If the motor overheats, this
protector will shut off the motor. The motor must be allowed 30 minutes to cool before restarting.
Auto/Off Switch: In the AUTO position, the compressor shuts off automatically when tank pressure reaches the
maximum preset pressure. In the OFF position, the compressor will not operate. This switch should be in the OFF
position when connecting or disconnecting the power cord from the electrical outlet or when changing air tools.
INSTALLATION & ASSEMBLY
Handle. Align holes in Handle(#78) to holes in mounting plate with Cap Screws(#68), and secure with washers and
nuts.
Wheels. Attach Wheels(#72) to the tank with Axle Bolt(#73), with offset hub facing axle iron, and secure with
washers(#71) and nuts(#70).
Filter. Thread the Air Filter(#32) onto the Cylinder Head(#27).
Location of the Air Compressor. The air compressor should always be located in a clean, dry, and well-ventilated
environment. The unit should have at minimum, 30cm of space on each side. The air filter intake should be free of
any debris or obstructions. Check the air filter on a daily basis to be sure it is clean and in working order.
Extension Cords. Use only a 3-wire extension cord that has a 3-blade grounding plug, and a 3-slot receptacle that will
accept the plug on the product. Make sure your extension cord is in good condition. When using an extension cord, be
sure to use one heavy enough to carry the current your product will draw. Cords must not exceed 25 feet and No. 12
AWG size must be used. An undersized cord will cause a drop in line voltage resulting in loss of power and
overheating.
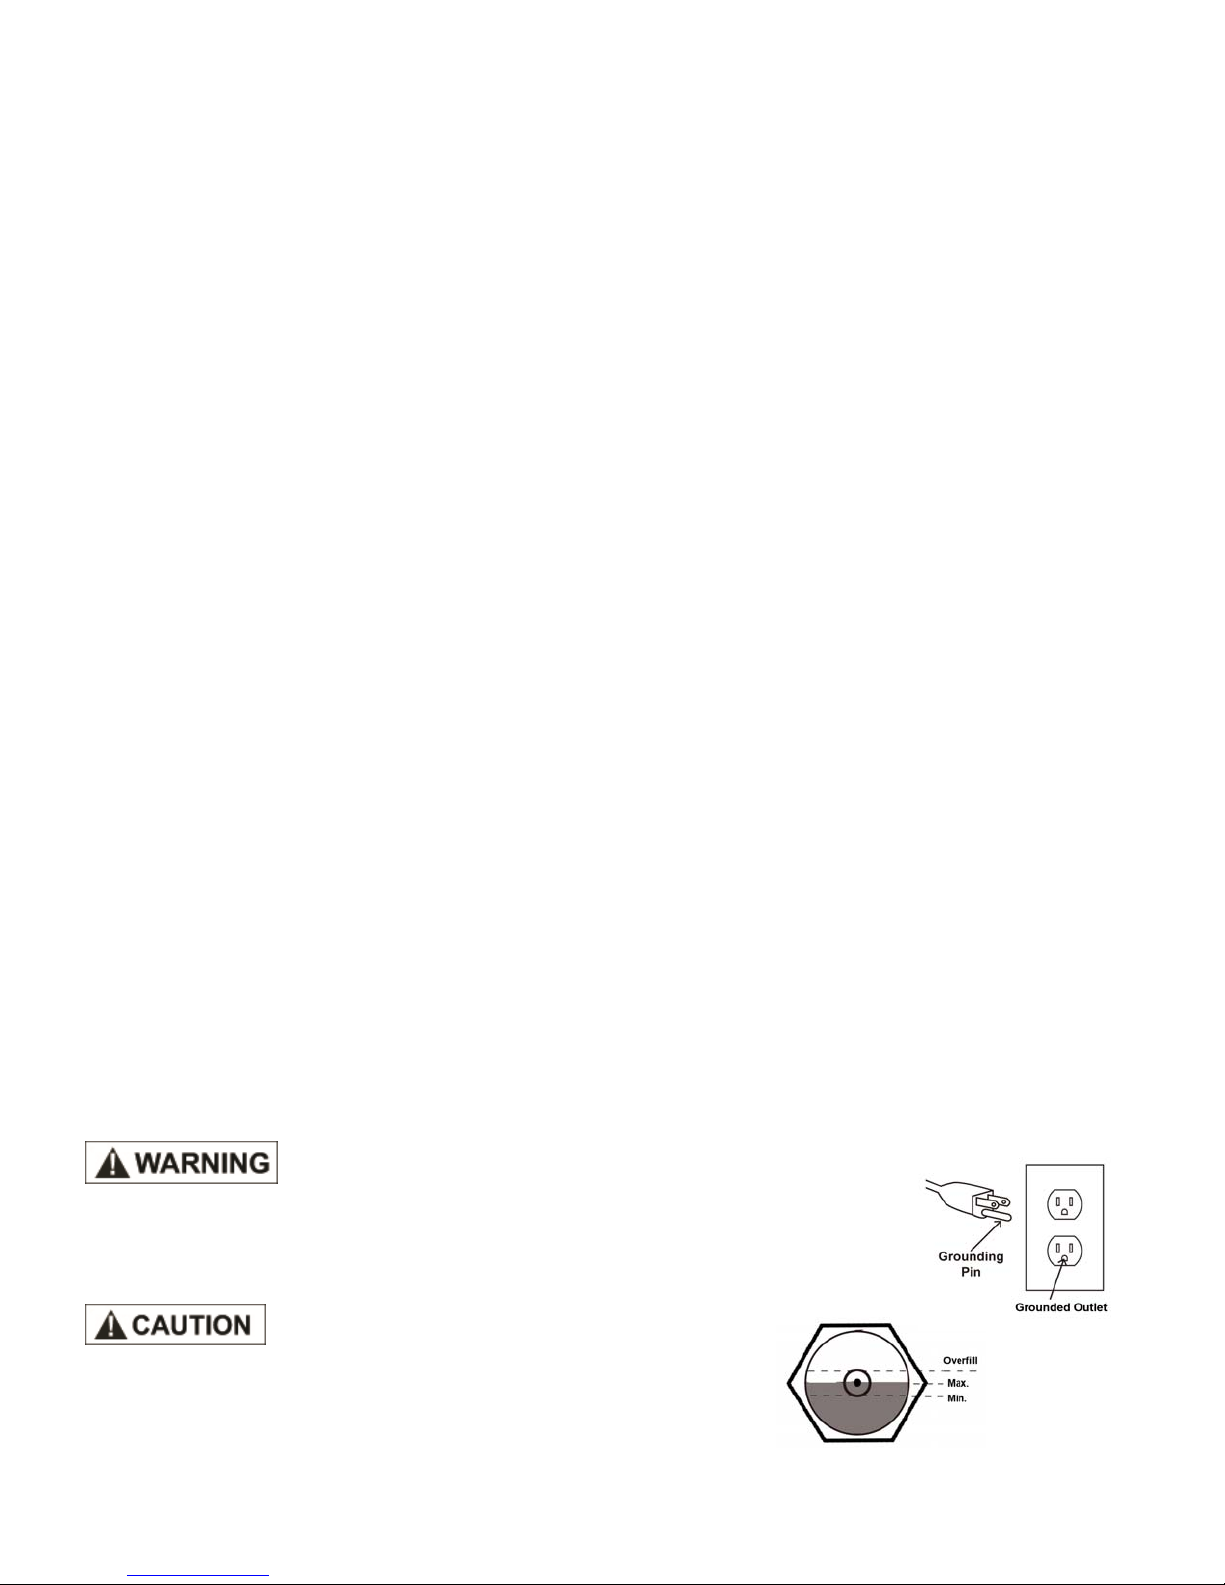
This product should be grounded. In the event of an electrical short
circuit, grounding reduces the risk of electric shock by providing an escape wire for the
electric current. This product is equipped with a cord having a grounding wire with an
appropriate grounding plug. The plug must be plugged into an outlet that is properly
installed and grounded in accordance with all local codes and ordinances.
This compressor is shipped without oil! FILL PROPER
OIL BEFORE OPERATING COMPRESSOR. Proper oil level is illustrated.
3
Page 4
OPERATION PROCEDURES
Before First Start-up Procedures
1. Fill proper oil before operating compressor.
2. Turn regulator knob fully clockwise (to the right) to open air flow.
3. Turn on/off switch to OFF position.
4. Plug in power cord.
5. Turn on/off switch to AUTO position and run compressor for 30 minutes.
6. Turn on/off switch to OFF position.
7. Unplug power cord.
8. The compressor is now ready for use.
Daily Start-Up Procedures
1. Fill proper oil before operating compressor
2. Turn on/off switch to OFF position.
3. Check the air compressor visually for any damage or obstruction.
4. Close the drain valve.
5. Turn regulator knob fully counter clockwise (to the left) to close air flow.
6. Connect air hose to outlet of regulator.
7. Plug in power cord.
8. Turn on/off switch to AUTO position and let compressor run until it reaches automatic shutoff pressure.
9. Attach tire chuck or tool to end of hose.
10. Turn regulator knob clockwise (to the right) to desired pressure of tool being used.
11. The air compressor is now ready for use.
Improper installation of the grounding plug can result in a risk of electric shock. If repair or
replacement of the cord or plug is necessary, do not connect the grounding wire to either flat blade terminal. The wire
with insulation having an outer surface that is green with or without yellow stripes is the grounding wire. Check with a
qualified electrician or serviceman if the grounding instructions are not completely understood, or if in doubt as to
whether the product is properly grounded. Do not modify the plug provided; if it will not fit the outlet, have the proper
outlet installed by a qualified electrician.
Compressor parts may be hot even if the unit is stopped. Keep fingers away from a running
compressor; fast moving and hot parts will cause injury and/or burns.
Never remove or attempt to adjust safety valve. Keep safety valve free from paint and other
accumulations.
Safety valve must be replaced if it cannot be actuated or it leaks air after ring is released.
Daily Shut-Down Procedures
1. Set the Auto-On/Off lever to the Off position.
2. Unplug the power cord from the receptacle.
3. Set the outlet pressure to zero on the regulator.
4. Remove any air tools or accessories.
5. Open the drain valve allowing air to bleed from the tank. After all of the air has bled from the tank, close the drain
valve to prevent debris buildup in the valve.
Water that remains in the tank during storage will corrode and weaken the air tank, which could cause the tank to
rupture. To avoid serious injury, be sure to drain the tank after each use or daily.
4
Page 5

r
A
A
Drain liquid from tank daily.
When draining the tank, always use ear and eye protection. Drain the tank in a suitable location;
condensation will be present in most cases of draining.
MAINTENANCE
NOTE: Qualified service personnel should perform any service procedure not covered in the maintenance schedule below.
ITEMS TO CHECK/CHANGE
Check Tank Safety Valve X
Overall Unit Visual Check
Check Air Filter (more frequently in dusty or humid environments)
To ensure efficient operation and longer life of the air compressor unit, a routine maintenance
schedule should be followed. The following schedule is geared toward a consumer whose compressor is used in a
normal working environment on a daily basis. If necessary, the schedule should be modified to suit the condition
under which your compressor is used. The modifications will depend upon the hours of operation and the working
environment. Air compressors used in an extremely dirty and/or hostile environment will require a greater frequency
of all maintenance checks.
Before Each
Use or Daily
X
X
After First Ten
Hours
Every 100
Hours
STORAGE
For storing the air compressor, be sure to do the following:
1. Turn the unit off and unplug the power cord from the receptacle.
2. Remove all air hoses, accessories, and air tools from the air compressor.
3. Perform the daily maintenance schedule.
4. Open the drain valve to bleed all air from the tank.
5. Close the drain valve.
6. Store the air compressor in a clean and dry location.
The air compressor should be turned off and unplugged from the power source before any
maintenance is performed as well as the air bled from the tank and the unit allowed time to cool. Personal injuries
could occur from moving parts, electrical sources, compressed air or hot surfaces.
TROUBLESHOOTING GUIDE
The air compressor should be turned off and unplugged from the power source before any maintenance is performed as well as
the air bled from the tank and the unit allowed time to cool. Personal injuries could occur from moving parts, electrical sources,
compressed air, or hot surfaces.
Problem Possible Cause & Corrective Action
Air leaks at the check valve o
at the pressure relief valve.
ir leaks between head and
cylinder.
when there is pressure in the tank and the compressor is shut off. Drain the tank,
then remove and clean or replace the check valve.
Be sure of proper torque on head bolts. If leak remains, contact a service
technician.
defective check valve results in a constant air leak at the pressure release valve
5
Page 6

Air leak from safety valve. Operate the safety valve manually by pulling on the ring. If the valve continues to
A
r
leak when in the closed position, it should be replaced.
Pressure reading on the
regulated pressure gauge
drops when an accessory is
used.
If there is an excessive amount of pressure drop when the accessory is used,
replace the regulator.
NOTE:
Adjust the regulated pressure under flow conditions (while accessory is being used).
It is normal for the gauge to show minimal pressure loss during initial use of the tool.
Excessive tank pressure. Move the Auto-On/Off lever to the Off position. If the unit doesn't shut off, unplug it
from the power source and contact a service technician.
Motor will not start. Make sure power cord is plugged in and the switch is on. Inspect for the proper size
fuse in your circuit box. If the fuse was tripped reset it and restart the unit. If repeated
tripping occurs, replace the check valve or contact your service technician.
Excessive moisture in the
discharge air.
Remove the water in the tank by draining after each use. High humidity
environments will cause excessive condensation. Utilize water filters on your air line.
NOTE:
Water condensation is not caused by compressor malfunction. Be sure the
compressor's air output is greater than your tool's air consumption rate.
ir leaks from the tank body
or tank welds.
Never drill into weld or otherwise modify the air tank or it will weaken. The tank can
rupture or explode. Compressor cannot be repaired. Discontinue use of the ai
compressor.
6
Page 7
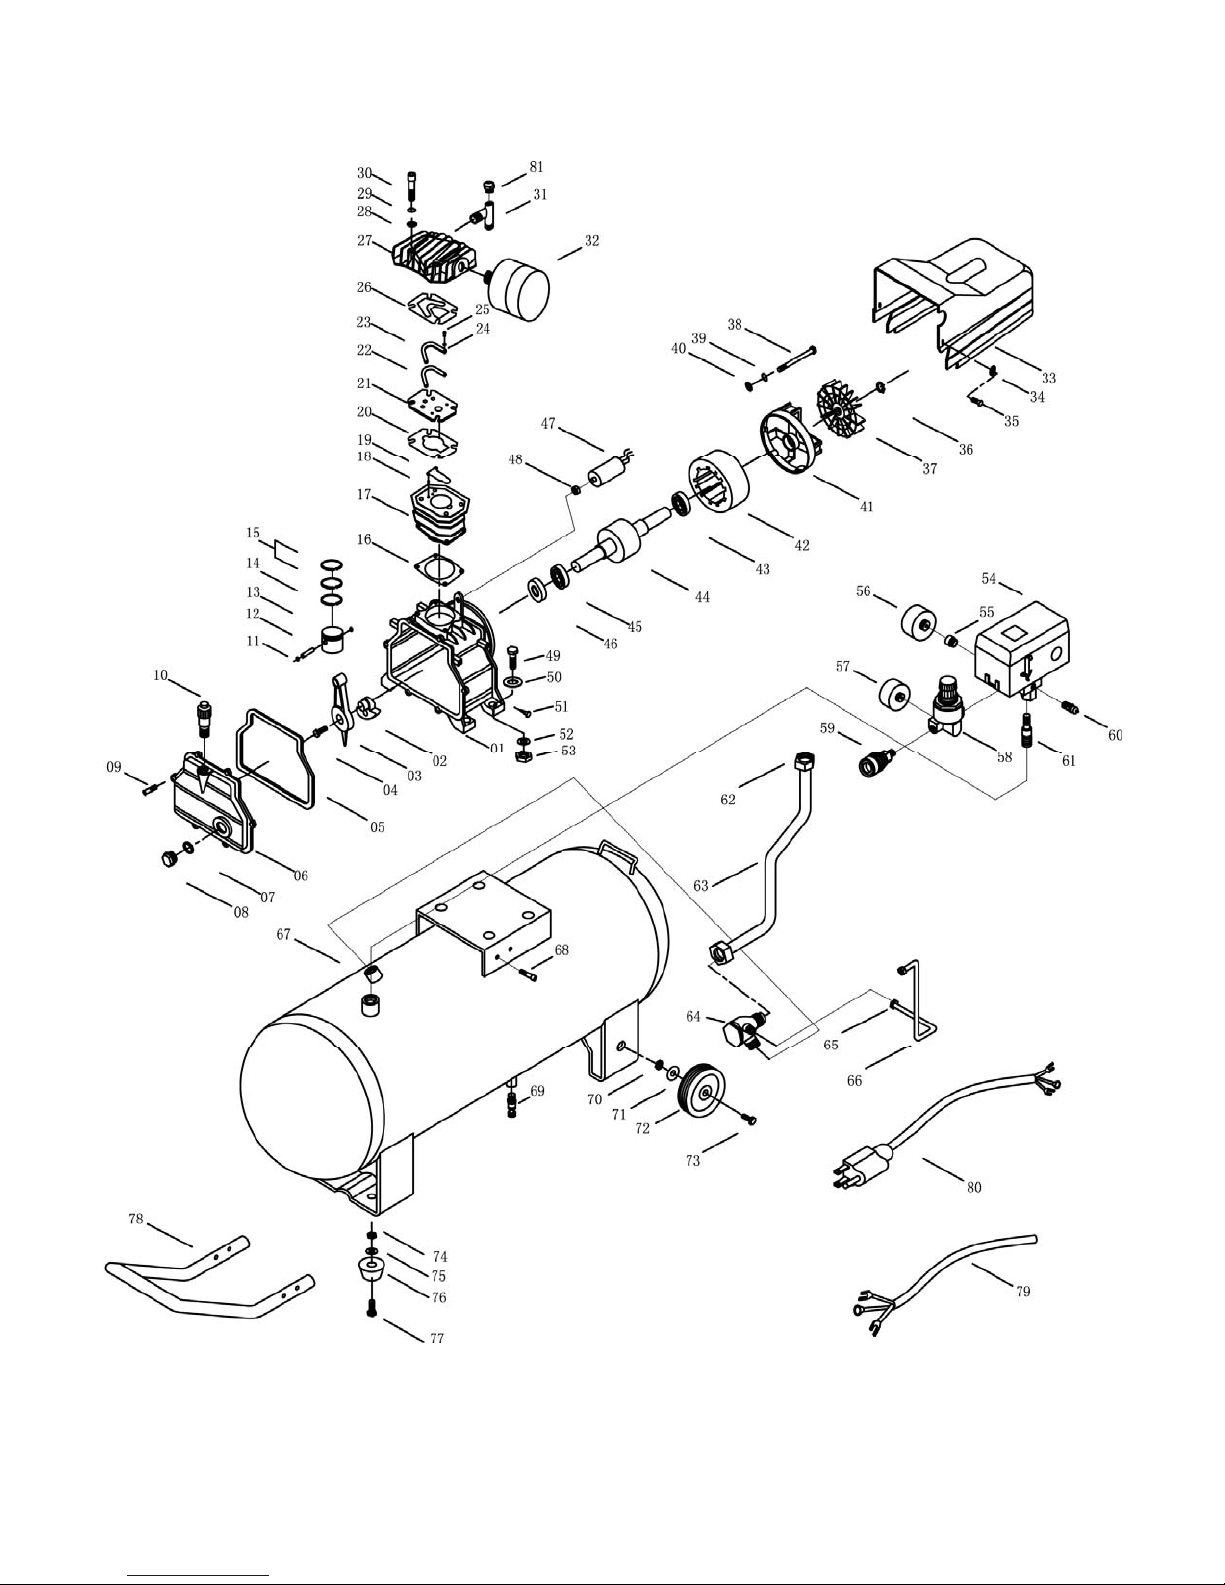
Exploded View and Parts List
7
Page 8

Ref # Part Name
1 CRANK CASE
2 CRANK SHAFT
3 CONNECT ROD
4 BOLT
5* GASKET
6 CRANKCASE COVER
7* GASKET
8 OIL SIGHT GLASS
9 BOLT
10* BREATHER
11 CIRCLIP
12* PISTON PIN
13 PISON
14 PISTON RING
15 PISTON RING
16 GASKET
17 CYLINDER
18 ROUND PIN
19 VALVE SLICE
20* VALVE GASKET
21* VALVE
22* VALVE SLICE
23* VPRESSING GASKET
24* SPRING
25 BOLT
26* HEAD GASKET
27 CYLINDER HEAD
28 WASHER
29 SPRING
30 BOLT
31 ELBOW EXHAUST
32* AIR FILTER
33 COVER
34 WASHER
35 BOLT
36 CIRCLIP
37 FAN
38* BOLT
39* SPRING
40* WASHER
41 REAR BEARING CRANK
Mark (*) is easy-worn-out spare parts
Q’ty
1
1
1
1
1
1
1
1
6
1
2
1
1
1
2
1
1
2
1
1
1
1
1
2
2
1
1
4
4
4
1
1
1
2
2
1
1
4
4
4
1
Ref # Part Name
42 STATOR
43 BEARING
44 ROTATOR
45 BEARING
46 OIL SEALING
47 CAPACITOR
48* NUT
49* BOLT
50* WASHER
51* BOLT
52* SPRING
53* NUT
54 PRESSURE SWITCH
55 CONNECTOR
56 TANK PRESSURE GAUGE
57 OUTPUT PRESSURE GAUGE
58 REGULATOR
59 QUICK COUPLER
60 SAFETY VALVE
61 CONNECTOR
62 UNLOADING NUT
63 UNLOADING TUBE
64 CHECK VALVE
65 EXHAUST NUT
66 EXHAUST TUBE
67 TANK
68 CAP SCREW
69 DRAIN VALVE
70 NUT
71 WASHER
72 WHEEL
73 AXLE BOLT
74 NUT
75 WASHER
76 CUSHION FOOT
77 BOLT
78 HANDLE
79 ELECTRICAL WIRE
80 PLUG
81 STARTER
Q’ty
1
1
1
1
1
1
1
4
4
2
4
4
1
1
1
1
1
1
1
1
1
1
1
1
1
1
4
1
2
2
2
2
2
2
2
2
1
1
1
1
8
Page 9

1 YEAR LIMITED WARRANTY
1. DURATION: From the date of purchase by the original purchaser.
2. WHO RECEIVES THIS WARRANTY(PURCHASER): The original purchaser(other than for purposes of resale)of
the Rockford air compressor.
3. WHAT PRODUCTS ARE COVERED UNDER THIS WARRANTY: Any Rockford air compressor supplied or
manufactured by the warrantor.
4.WHAT lS COVERED UNDER THIS WARRANTY: Substantial defects on material and workmanship which occur
within the duration of the warranty period with the exceptions noted below.
5. WHAT lS NOT COVERED UNDER THlS WARRANTY:
A. Implied warranties, including those of merchantability and FITNESS FOR A PARTICULAR PURPOSE ARE
LIMITED FROM THE DATE OF ORIGINAL PURCHASE AS STATED IN THE DURATION. If this air compressor is
used for commercial, industrial or rental purposes.The warranty will apply for ninety(90) days from the date of
purchase. Some States do not allow limitation on how Iong an implied warranty Iasts. so the above limitations may
not apply to you.
B. ANY INCIDENTAL lNDIRECT OR CONSEQUENTIAL LOSS,DAMAGE,OR EXPENSE THAT MAY RESULT
FROM ANY DEFECT, FAlLURE, OR MALFUNCTION OF THE ROCKFORD AIR COMPRESSOR. Some States do
not allow the exclusion or limitation of incidental or consequential damages. so the above limitation or exclusion may
not apply to you.
C. Any failure that results from shipping damage, accident, purchaser’s abuse, neglect or failure to install and
operate air compressor in accordance with instructions provided in the owner's manual supplied with product.
D. Pre-delivery service, i.e. assembly, oil or lubricants and adjustment.
E. Items or service normally required to maintain the air compressor
F. Additional items not covered under the warranty:
1). Normal wear items such as quick coupler, plug, air chuck, Sealant tape, inflation needle, PVC hose,recoil
hose.
2). Cosmetic defects that do not interfere with functionality.
3). Rusted components.
4). Pump wear or valve damage caused by using improper oil, oil contamination or by failure to follow proper oil
maintenance guidelines.
6. RESPONSIBlLITlES OF WARRANTOR UNDER THlS WARRANTY: Repair or replace, at Warrantor’s option, air
compressor or component which is defective has malfunctioned and/or failed to conform within duration of the
warranty period.
7. RESPONSIBILITIES OF PURCHASER UNDER THlS WARRANTY:
A.Provide dated proof of purchase and maintenance records.
B.Deliver or ship the Rockford air compressor or components to Rockford Commercial warehouse. Inc. Freight
costs, if any must be borne by the purchaser.
C.Use reasonable care in the operation and maintenance of the air compressor as described in the owner’s
manual.
8. WHEN WARRANTOR WlLL PERFORM REPAIR OR REPLACEMENT UNDER THIS WARRANTY: Repair or
replacement will be scheduled and serviced according to the normal work flow at the servicing Location, and
depending on the availability of replacement parts.
For customer service, call: 1-877-782-4111
Rockford Commercial Warehouse, Inc.
8105 Burden Road Machesney Park, IL 61115
9
Page 10

Manual de Instrucciones de
Operacióny Lista de Partes
MODELO NO.: CAT1040
COMPRESOR DE AIRE DE 10 GALÓN
Especificaciones:
Compresor ………………… Lubricado con Aceite
Potencia…………………… 2,2 kw
Voltaje/Frecuencia/
Tamaño del Tanque..………37,9 litros (10 galón)
Presión Máx.…………..……8,62 bar (125 psi)
RPM del Motor…………….. 3400 RPM
Entrega de aire ……....…… 144,5 l/min a 2,76 bar
INSTRUCCIONES DE SEGURIDAD ANTES DE USAR ESTE PRODUCTO.
ADVERTENCIA: LEA ESTE MANUAL PARA TODAS LAS
Peso Neto …………………. 28,8 kgs
Corriente. .
…………120V/60Hz, 15Amps
……………116,2 l/min a 6,21 bar
10
Page 11

PRECAUCIONES IMPORTANTES DE SEGURIDAD
No utilice este compresor para suministrar aire respirable.
Guarda todas las instrucciones La operación o mantenimiento
inadecuados de este producto podrían ocasionar lesiones graves y daños serios a la propiedad.
Lee y entiende todas las advertencias e instrucciones de seguridad adjuntas antes de utilizar este
equipo.
■ Móviles. Si el compresor de aire está funcionando, todos los protectores y cubiertas deben estar fijados e
instalados correctamente. Si cualquier protector o cubierta estuvieran dañados, no uses el equipo hasta
que el personal competente repare el equipo correctamente. Al usar o guardar el cable eléctrico, éste no
puede quedar retorcido o doblado y debe estar lejos de piezas móviles.
■Riesgo de Quemaduras. El compresor de aire tiene superficies que tanto durante su funcionamiento como minutos
después pueden causar quemaduras graves si se tocan. El equipo debe enfriarse antes de intentar darle
mantenimiento. Es normal que piezas como la bomba del compresor y el tubo de salida se calienten cuando el equipo
está funcionando y momentos después de apagarlo..
■
Siempre use protección para los ojos aprobada.
■ Riesgo de Caídas. El compresor de aire debe estar siempre en una posición estable cuando esté
funcionando. Nunca uses el compresor de aire encima de un techo o en un punto elevado para evitar que
se caiga o vuelque. Usa secciones adicionales de manguera de aire para llegar a lugares elevados
.
■ Riesgo de Objetos Volantes.Cuando uses el compresor siempre usa gafas de seguridad aprobadas con
protectores laterales. Apaga el compresor y purga la presión del tanque, antes de intentar darle mantenimiento o
desconectar mangueras o accesorios. Jamás apuntes ninguna boquilla o rociador hacia partes del cuerpo, otras
personas o animales.
■
Riesgo de Inhalación. Evita usar el compresor de aire en áreas cerradas. Siempre deja un espacio adecuado (30
cm) a ambos lados del compresor de aire. Mantén a los niños, mascotas y otras personas lejos del área de operación.
El compresor de aire no debe ser utilizado como fuente de aire respirable por nadie ni debe emplearse con un aparato
de respiración auxiliar. El material de rociado siempre deberá estar en otra zona, alejado del compresor de aire para
evitar que el aire aspirado dañe el filtro del compresor.
■
Riesgo de Descarga Eléctrica. Nunca utilices el compresor de aire bajo la Iluvia o en lugares mojados. Cualquier
reparación o problemas eléctricos deben dejarse en manos de personal autorizado como un electricista; además, se
deben cumplir todas las normas eléctricas nacionales y locales. El compresor también debe tener un enchufe
apropiado de tres clavijas con conexión a tierra, una fuente de energía con el voltaje correcto y un fusible de
protección adecuado.
■
Riesgo de Explosión e Incendio.Nunca operes el compresor cerca de materiales combustibles ni vapores de
solventes o gasolina. Si usas materiales inflamables para rociar, coloca el compresor a una distancia mínima de 50
metros del área de rociado. Nunca uses el compresor de aire en interiores o en lugares cerrados.
■
Riesgo de Explosión.Purga el compresor diariamente o después de cada uso. Si el tanque tiene una fuga, cambia
el compresor. No utilices el compresor si se ha detectado una fuga, ni trates de modificar el tanque. Nunca modifiques
las configuraciones de fábrica del compresor de aire que controlan la presión del tanque o cualquier otra función.
Este compresor sólo debe ser usado por personas que estén bien familiarizadas con las
reglas de seguridad y de manejo.
Mantenga a los visitantes alejados y NUNCA permita la presencia de niños en el área de
trabajo.
PROSOSICIÓN 65 DE CALIFORNIA Este producto o sucable de corriente pueden contener
químicos, incluido plomo, que es conocido por el Estado de California como causante de cáncer y defectos de
nacimiento u otros daños reproductivos. Lávese las manos después de manipularlo.
11
Page 12

En aligunos casos, el polvo ocasopmadp por lijado mecánico, aserrado, rectificación,
preforación y otras activdades de construcción contiene quimicos que se sabe son causantes de cáncer, defectos
congénitos u otros daňos en el sistema reproductivo.
PIEZAS Y FUNCIONES
Válvula de Drenaje: Usada para drenar el agua condensada dentro del tanque de aire. Localizada en el fondo del
tanque.
Válvula de Seguridad del Tanque: Permite purgar el exceso de presión en el tanque. Esta válvula sólo se abrirá
cuando la presión en el tanque se eleve por encima de la presión máxima nominal.
Manómetro de Presión del Tanque: Indica la presión del aire contenido en el tanque.
Manómetro de Presión de Salida: Indica la presión de salida del aire, controlada por el regulador, que se
suministra a la herramienta.
Regulador: El regulador controla la presión de aire que sale del tanque. Para aumentar la presión, gira la perilla en
dirección de las manecillas del reloj; para disminuir, gírala en dirección contraria.
Conector Rápido: Permite conectar y desconectar rápidamente la manguera de aire.
Control de Sobrecalentamiento del Motor: El motor tiene un mecanismo automático para proteger el motor contra
el sobrecalentamiento. Si el motor se calienta demasiado, el protector apaga el motor. Antes de volver a encender el
equipo, se debe esperar 30 minutos para que se enfríe.
Automático: En la posición AUTO el compresor se apaga automáticamente cuando la presión del tanque alcanza el
nivel máximo fijado en la fábrica. En la posición OFF, el compresor no funcionará. El presostato debe colocarse en
OFF para conectar o desconectar el cordón eléctrico del tomacorrientes o para cambiar la herramienta neumática.
INSTALACIÓN Y ENSAMBLAJE
Mango.
asegure con contratuercas uso arandela y tuerca.
Rueda.
asegure con contratuercas uso arandela(#71) y tuerca(#70).
Filtro.
Ubicación del Compresor de Aire. El compresor de aire siempre debe estar en un ambiente limpio,seco y bien
ventilado. La unidad debe tener al menos 30 cm de espacio libre a cada lado. La toma del filtro de aire debe estar
libre de desechos y obstrucciones. Revisa diariamente el filtro de aire para comprobar que esté limpio y en
perfecto estado de funcionamiento.
Cables de Extensión.
un receptáculo de 3 ranuras donde pueda conectarse el enchufe del producto.
Comprueba que el cable de extensión esté en buenas condiciones. Al usar un cable de
extensión, asegúrate que tenga la capacidad adecuada para conducir la corriente que
tu equipo necesita. Los cables no deben exceder los 25 pies y el calibre debe ser de 12
AWG. Un cable de calibre insuficiente puede provocar una caída del voltaje y, por
consiguiente, una pérdida de potencia y sobrecalientamiento.
Alinee los orificios del Mango(#78) con los orificios de la placa de montaje uso Tornillos de Cabeza(#68), y
Colocar la Rueda(#72) en el tanque de Perno del eje(#73), con el cubo descentrado hacia el hierro del eje, y
Enrosque el filtro de aire(#32) en Culata del Cilindro(#27).
Usa sólo cables de extensión de 3 hilos con un enchufe de 3 clavijas con conexión a tierra y
Este producto se debe conectar a tierra. En caso de
cortocircuito, la conexión a tierra reduce el riesgo de descargas eléctricas al ofrecer un
12
Page 13

conductor de escape para la corriente eléctrica. Este producto tiene un cable con un conductor a tierra y un enchufe
con un terminal a tierra apropiado. Este enchufe debe ser conectado en un tomacorriente instalado y conectado a
tierra de acuerdo con las leyes y regulaciones locales.
Ésta unidad viene de frbrica sin aceite! RELLEN ADECUADO
DE ACEITE ANTES DE OPERAR EL COMPRESOR. El nivel adecuado de aceite
está ilustrado.
PROCEDIMIENTOS DE USO
Procedimiento Antes de Arrancarlo Por Primera Vez
1. Rellene adecuado de aceite antes de operar el compresor.
2. Gire la perilla del regulador totalmente hacia la derecha para abrir el flujo de aire.
3. Coloque el interruptor de encendido/apagado en la posición OFF (apagado).
4. Enchufe el cable de corriente.
5. Gire el interruptor de encendido/apagado a la posición AUTO (encendido) y haga funcionar el compresor durante
30 minutos.
6. Coloque el interruptor de encendido/apagado en la posición OFF (apagado).
7. Desenchufe el cordón de corriente.
8. El compresor de aire ya está listo.
Procedimiento Diario de Arranque
1. Rellene adecuado de aceite antes de operar el compresor.
2. Coloque el interruptor de encendido/apagado en la posición OFF (apagado).
3. Revisa el compresor de aire visualmente para detectar cualquier daño u obstrucción.
4. Cierra la válvula de drenaje.
5. Gire la perilla del regulador totalmente hacia la izquierda.
6. Conecte la manguera de aire a la salida del regulador.
7. Enchufe el cable de corriente.
8. Gire el interruptor de encendido/apagado a la posición AUTO (encendido) y deje que el compresor funcione hasta
que alcance la presión de apagado automático.
9. Conecte la boquilla para inflar neumáticos u otra herramienta al extremo de la manguera.
10. Gire la perilla del regulador hacia la derecha hasta la presión deseada para la herramienta que esté usando.
11. El compresor de aire ya está listo.
Una instalación inadecuada del enchufe con conexión a tierra puede provocar una
descarga eléctrica. Si necesitas reparar o cambiar el cable o el enchufe, no conectes el conductor a tierra a
ninguna de las clavijas planas. El conductor a tierra tiene un aislante de color verde, con franjas amarillas o sin
ellas. Contacta con un electricista o personal de mantenimiento calificados si no entiendes completamente estas
instrucciones de conexión a tierra o en caso de tener dudas sobre la correcta conexión a tierra de la herramienta.
No modifiques el enchufe del equipo; si no puedes conectarlo en el tomacorriente, Ilama a un electricista
calificado para que instale el tomacorriente adecuado.
Las piezas del compresor podrían estar calientes, inclusive cuando la unidad esté
apagada. Mantenga los dedos alejados del scompresor cuando esté funcionando; las piezas en movimiento o
calientes, le ocasionarían heridas y/o quemaduras.
Nunca debe desconectar o tratar de ajustar las válvulas de seguridad. Igualmente, debe
evitar que se le acumule pintura u otros materiales.
Se debe reemplazar la válvula de seguridad si no se puede accionar o si tiene una fuga
de aire después de liberar el anillo.
13
Page 14

Procedimiento Diario de Apagado
s
1. Pon el interruptor On/Off (encendido/apagado) en la posición de Off (apagado).
2. Desconecta el cable del tomacorriente.
3. Pon en cero el regulador de presión de salida.
4. Desconecta cualquier herramienta o accesorio neumático.
5. Abre la válvula de drenaje para purgar el aire del tanque. Cuando no quede aire del tanque, cierra la válvula de
drenaje para evitar la acumulación de desechos en la válvula.
Si le queda agua en su interior, el tanque puede corroerse y debilitarse, y en última instancia, rajarse. Siempre purga
el tanque diariamente o después de cada uso para evitar lesiones graves.
Drene el tanque diariamente.
AI drenar el tanque, protégete los ojos y los oídos. Purga el tanque en un lugar apropiado;
normalmente al hacerlo también sale agua condensada.
MANTENIMIENTO
NOTA: Cualquier procedimiento de servicio no incluido en el siguiente programa de mantenimiento
deber ser ejecutado por personal de servicio calificado.
ARTÍCULOS PARA REVISAR/CAMBIAR
Uso o
Diariamente
Válvula de Seguridad del Tanque X
Antes de Cada
Revisión Visual General de la Unidad
Revisar el Filtro de Aire (aumentar la frecuencia en ambientes polvoriento
o húmedos)
X
X
Antes de las
Primeras Diez
Horas
Cada 100
Horas
A fin de asegurar una operación eficiente y una larga vida del compresor, debe seguirse
un programa de mantenimiento de rutina. El siguiente programa de mantenimiento está enfocado al consumidor
cuyo compresor se usa en un medio ambiente normal y con una periodicidad diaria. De ser necesario, el
programa se debe modificar para adecuarlo a las condiciones de uso del compresor. Las modificaciones
dependerán de las horas y el ambiente de uso. Los compresores de aire usados en medios ambientes muy
sucios o agresivos requieren una mayor frecuencia de mantenimiento.
ALMACENAMIENTO
Para guardar el compresor, asegúrate de hacer Io siguiente:
1. Apaga la unidad y desconecta del tomacorriente.
2. Quita del compresor las mangueras, accesorios y herramientas neumáticas.
3. Lleva a cabo el programa diario de mantenimiento.
4. Abre la válvula de drenaje para purgar el aire del tanque.
5. Cierra la válvula de drenaje.
6. Guarda el compresor de aire en un sitio seco y limpio.
GAntes de dar mantenimiento al equipo, se debe apagar y desconectar del
tomacorriente, así como purgar el aire del tanque y permitir que la unidad se enfríe. Las piezas móviles, las
fuentes de energía, el aire comprimido y las superficies calientes pueden provocar lesiones.
14
Page 15

A
A
GUÍA DE SOLUCIÓN DE PROBLEMAS
The air compressor should be turned off and unplugged from the power source before any maintenance is performed as
well as the air bled from the tank and the unit allowed time to cool. Personal injuries could occur from moving parts,
electrical sources, compressed air, or hot surfaces.
Problema Posible Causa & Acción a Tomar
Fuga de aire en la válvula
de retención o en la
válvula de alivio de
presión.
Una válvula de retención defectuosa provoca una fuga de aire constante en la válvula de
alivio de presión cuando el compresor está apagado y el tanque tiene presión de aire.
Purga el tanque, y quita y limpia o cambia la válvula de retención.
Fugas de aire entre la
culata y el cilindro.
Fuga de aire en la válvula
de seguridad.
l usar un accesorio se
puede notar una caída
excesiva de la presión en
la lectura de la presión
regulada.
Exceso de presión en el
tanque.
El motor no arranca. Comprueba que el cable de corriente está enchufado y que el interruptor está
Humedad excesiva en el
aire de salida.
Comprueba la torsión correcta en los pernos de la culata. Contacta a un técnico de
mantenimiento si la fuga continúa
Tira del anillo para operar manualmente la válvula de seguridad. Si el tanque aún tiene
una fuga con la válvula cerrada, ésta debe ser cambiada.
Si al usar un accesorio hay una caída excesiva de presión, cambia el regulador.
NOTA:
justa la presión regulada bajo condiciones de flujo (mientras usas el accesorio). Es
normal que el manómetro indique una caída mínima de presión al comenzar a utilizar la
herramienta.
Pon el interruptor On/Off automático en la posición de Off (apagado). Si la unidad no se
apaga, desconéctala del tomacorriente y comunícate con un técnico de mantenimiento.
encendido. Verifica que el fusible de la caja eléctrica tenga la capacidad correcta. Si se
disparó, reinícialo y enciende de nuevo la unidad. Si el fusible se dispara con frecuencia,
revisa la válvula de retención o Ilama a un técnico.
Cada vez que termines de usar el equipo, drena el agua del tanque. En ambientes con
un alto nivel de humedad habrá un exceso de condensación. Instala filtros de agua en tu
Iínea de aire.
NOTA:
La condensación de agua no es causada por fallas en el compresor. Verifica que la salida
de aire del compresor sea mayor al consumo de aire de tu herramienta.
Fugas de aire en el
cuerpo o la soldadura del
tanque.
Nunca taladres, sueldes o modifiques de manera alguna el tanque, pues puedes debilitar
su estructura. El tanque puede rajarse o explotar. El tanque no puede repararse. Deja de
usar el compresor de aire.
15
Page 16

Lista de partes y componentes
16
Page 17

Ref. N.° Descriptión Cant. Ref. N.° Descriptión Cant.
1 CÁRTER
2 CIGÜEÑAL
3 BIELA
4 PERNO
5* JUNTA
6 CUBIERTA DEL CÁRTER
7* JUNTA
8
9 PERNO
10* DISPOSITIVO DE VENTILACIÓN
11 ANILLO DE FIJACIÓN
12* PASADOR DE PISTÓN
13 PISTÓN
14 ANILLO DE PISTÓN
15 ANILLO DE PISTÓN
16 JUNTA
17 CILINDRO
18 PASADOR REDONDO
19 LÁMINA DE VÁLVULA
20* JUNTA DE VÁLVULA
21* VÁLVULA
22* LÁMINA DE VÁLVULA
23* JUNTA DE PRESIÓN
24* ARANDELA ELÁSTICA
25 PERNO
26* JUNTA DE CULATA
27 CULATA DEL CILINDRO
28 ARANDELA
29 ARANDELA ELÁSTICA
30 PERNO
31 ESCAPE ACODADO
32* FILTRO DE AIRE
33 CUBIERTA
34 ARANDELA
35 PERNO
36 ANILLO DE FIJACIÓN
37 VENTILADOR
38* PERNO
39* ARANDELA ELÁSTICA
40* ARANDELA
41
INDICADOR DE NIVEL DE
ACEITE
SOPORTE DEL COJINETE
POSTERIOR
1
1
1
1
1
1
1
1
6
1
2
1
1
1
2
1
1
2
1
1
1
1
1
2
2
1
1
4
4
4
1
1
1
2
2
1
1
4
4
4
1
Marca (*) es fácil de piezas de repuesto gastados
42 ESTÁTOR
43 COJINETE
44 ROTOR
45 COJINETE
46 RETÉN DE ACEITE
47 CONDENSADOR
48* TUERCA
49* PERNO
50* ARANDELA
51* PERNO
52* ARANDELA ELÁSTICA
53* TUERCA
54 PRESOSTATO
55 UNIÓN
56 MANÓMETRO
57 MANÓMETRO
58 REGULADOR
59 ACOPLAMIENTO RÁPIDO
60 VÁLVULA DE SEGURIDAD
61 UNIÓN
62 TUERCA DE DESCARGA
63 TUBO DE DESCARGA
64 VÁLVULA DE RETENCIÓN
65 TUERCA DE ESCAPE
66 TUBO DE ESCAPE
67 DEPÓSITO
68 TORNILLOS DE CABEZA
69 LLAVE DE DRENAJE
70 TUERCA
71 ARANDELA
72 RUEDA
73 PERNO DEL EJE
74 TUERCA
75 ARANDELA
76 PATA DE CAUCHO
77 PERNO
78 MANGO
79 CABLE ELÉCTRICO
80 ENCHUFE
81 DISPOSITIVO DE ARRANQUE
1
1
1
1
1
1
1
4
4
2
4
4
1
1
1
1
1
1
1
1
1
1
1
1
1
1
4
1
2
2
2
2
2
2
2
2
1
1
1
1
17
Page 18

Un año Garantía Limitada
1. DURACIÓN: A partir de la fecha de compra original: Un año
2. QUIÉN RECIBE ESTA GARANTÍA (COMPRADOR): El comprador original (siempre que no sea con el propósito de
revender) compresor de aire Rockford.
3. QUÉ PRODUCTOS ESTÁN CUBIERTOS BAJO ESTA GARANTÍA: Cualquier máquina para lavar a presión
Rockford, provistos o fabricados por el Garante.
4. QUÉ CUBRE ESTA GARANTÍA: Defectos sustanciales de materiales y fabricación que ocurran dentro del periodo
de la garantía, con las excepciones indicadas a continuación.
5. QUÉ NO CUBRE ESTA GARANTÍA:
A. Garantías implícitas, lo que incluye también las garantías de comerciabilidad e IDONEIDAD PARA UN FIN
ESPECÍFICO ESTARÁN LIMITADAS A PARTIR DE LA FECHA ORIGINAL DE COMPRA COMO SE EXPRESA EN
LA DURACIÓN. Si esta máquina compresor de aire es usada con fines comerciales o de alquiler en algún momento,
esta garantía sería solamente válida en los noventa (90) días siguientes a la fecha de compra.
B. CUALQUIER PÉRDIDA, DAÑO O GASTO INCIDENTAL, INDIRECTO O COMO CONSECUENCIA DE SU USO,
QUE PUEDAN RESULTAR DE CUALQUIER DEFECTO, FALLA O PROBLEMA DE FUNCIONAMIENTO DE LA
MÁQUINA PARA LAVAR A PRESIÓN ROCKFORD. Algunos estados no permiten la exclusión o limitación de daños
incidentales o secundarios, por lo que las limitaciones o exclusiones anteriores podrían no aplicarse en su caso.
C. Cualquier falla resultante de daños en envío, accidente, abuso, negligencia o incumplimiento por parte del
comprador de las instrucciones de instalación y operación provistas en el(los) manual(es) del usuario
proporcionado(s) con el producto.
D. Servicio previo a la entregas, como ensamblaje, aceite o lubricantes, y ajustes.
E. Artículos o servicios normalmente requeridos para mantener compresor de aire.
F. Artículos adicionales no cubiertos bajo esta garantía:
1). Artículos de desgaste normal como las mangueras de alta presión, sellos de aceite y de agua, aros tóricos,
válvulas, lanzas y puntas de rociador.
2).Defectos cosméticos que no interfieren con el funcionamiento.
3).Componentes oxidados.
4).Desgaste de la bomba o daños a las válvulas causados por uso de aceite inapropiado, contaminación del aceite
o el incumplimiento de las pautas de mantenimiento de aceite.
6. RESPONSABILIDADES DEL GARANTE BAJO ESTA GARANTÍA: Reparación o reemplazo, a juicio del Garante,
compresor de aire o componente defectuoso, que funcione mal y/o no cumple con la duración del periodo de la
garantía.
7. RESPONSABILIDADES DEL COMPRADOR BAJO ESTA GARANTÍA:
A. Proporcionar prueba de compra con fecha y registro de mantenimiento.
B. Entregar o enviar la máquina compresor de aire o su componente a Rockford Commercial warehouse.lnc. Los
costos de envío, de haberlos, deben ser cubiertos por el comprador.
C. Tener cuidado razonable al usar y dar mantenimiento a la máquina compresor de aire como se describe en el
manual del usuario.
8. CUÁNDO REALIZARÁ EL GARANTE UNA REPARACIÓN O REEMPLAZO BAJO ESTA GARANTÍA: La reparación
o reemplazo serán programados y proporcionados de acuerdo al flujo normal de trabajo del local de mantenimiento y
dependiendo de la disponibilidad de las piezas de repuesto.
Para servicio al cliente, llamar : 1-877-782-4111
Rockford Commercial Warehouse, Inc.
8105 Burden Road Machesney Park, IL 61115
18
Page 19

GUIDE D’UTILISATION ET LISTE DES PIÉCES
MODÈLE NO.: CAT1040
COMPRESSEUR D’AIR DE 37,9 LITRES
AVERTISSEMENT: CONSULTEZ LE MANUEL DU PRODUIT POUR
TOUTES LES CONSIGNES DE SÉCURITÉ
Caractéristiques:
Compresseur ……………. … Graissé à I‘Huile
Cheval-vapeur………………… 2,2 kw
Input ……………………………120V/60Hz, 15Amps
Taille du réservoir…………….. 37,9 litres
Pression max. ………………… 860 kpa
TR/MIN du moteur……………. 3400 TR/MIN
Le débit d'air…………………… 144,5 l/min @ 276 kpa
Poids net………………..……... 28.8 kgs
19
……….………. 116,2 l/min @ 621 kpa
Page 20

CONSIGNES DE SECURITE
Ne pas utiliser ce compresseur pour alimentation en air respirable.
Conservez toutes les directive Une utilisation ou un entretien incorrects de ce
produit peuvent entraîner des blessures graves et/ou des dommages matériels. Lisez et comprenez toutes
les mises en garde et consignes de sécurité fournies avant d'utiliser cet équipement.
■
Mobiles. Si le compresseur d'air est en marche, tous les protecteurs et couvercles doivent être attachés ou installés
correctement. Si tout protecteur ou couvercle a été endommagé, n'utilisez pas l'équipement avant que le personnel
qualifié l'ait réparé correctement. Le cordon d'alimentation doit être dégagé de toute pièce mobile et exempt de toute
torsion et/ou compression pendant l'utilisation ou l'entreposage.
■
Risque de brûlures. Votre compresseur d'air possède des surfaces qui peuvent entraîner des brûlures graves si elles
sont touchées pendant ou juste après l'utilisation. L'équipement doit avoir le temps de refroidir avant d'être entretenu.
Les éléments tels que la pompe du compresseur et le tuyau de sortie sont normalement chauds pendant et suivant
l'utilisation.
■ Portez toujours des protections pour les yeux homologuées.
■Risque de chute. L'utilisation du compresseur d'air doit toujours avoir lieu en position stable. N'utilisez jamais le
compresseur d'air sur un toit ou une position élevée qui pourrait entraîner la chute ou le basculement de l'appareil.
Utilisez un tuyau d'air supplémentaire pour les tâches en hauteur.
■Risque de projection d'objets. Portez toujours des lunettes de sécurité homologuées avec écrans latéraux lorsque
vous utilisez le compresseur d'air. Éteignez le compresseur d'air et videz le réservoir d'air avant d'effectuer un entretien
ou un démontage quelconque des tuyaux ou des raccords. Ne pointez jamais une buse ou un pulvérisateur vers une
partie quelconque du corps ou vers d'autres personnes ou animaux.
■
Risque à la respiration. Évitez d'utiliser le compresseur d'air dans les espaces clos. Conservez toujours un espace
suffisant (30 cm) tout autour du compresseur d'air. Gardez également les enfants, animaux domestiques et autres hors
de l'espace d'utilisation. Ce compresseur d'air ne fournit aucun air respirable pour qui que ce soit ni dispositif de
respiration supplémentaire. Le produit pulvérisé devra toujours se trouver dans un emplacement autre que le
compresseur d'air pour éviter l'aspiration d'air qui peut endommager le filtre du compresseur d'air.
■
Risque de choc électrique. N'utilisez jamais le compresseur d'air sous la pluie ou dans des conditions mouillées.
Tous les problèmes ou réparations d'ordre électrique doivent être traités par un personnel autorisé tel qu'un électricien
et doivent être conformes à tous les codes électriques nationaux et locaux. Le compresseur d'air doit également être
équipé de la fiche à trois broches correcte, de la tension correcte et de la protection par fusible appropriée.
■Risque d'explosion ou d'incendie.
d'essence ou de vapeurs de solvant. Si vous pulvérisez des matières inflammables, situez le compresseur d'air à au
moins 50 m de l'espace de pulvérisation. N'utilisez jamais le compresseur d'air en intérieur ou dans un espace clos.
■Risque d'éclatement.
Si le réservoir se met à fuir, remplacez le compresseur d'air. N'utilisez jamais le compresseur d'air une fois qu'une fuite
a été détectée, ni tentez d'apporter des modifications au réservoir. Ne modifiez jamais les paramètres d'usine du
compresseur d'air qui contrôlent la pression du réservoir ou toute autre fonction.
à se servir du compresseur.
produits chimiques, y compris du plomb, relevés par l'État de Californie comme cause de cancer, d'anomalies
congénitales ou d'autres problèmes reproductifs. Lavez-vous les mains après toute manipulation.
Videz toujours le réservoir du compresseur d'air quotidiennement ou après chaque utilisation.
Seules les personnes bien familiarisées avec ces règles d’utilisation doivent être autorisées
Garder les visiteurs à l’écart de/et NEJAMAIS permettre les enfants dans l’endroit de travail.
PROPOSITION 65 DE CALIFORNIE Ce produit ou son cordon peuvent contenir des
N'utilisez jamais le compresseur à proximité de matières combustibles,
LA POUSSIERE PRODUITE PAR LE PONCAGE, LE SCIAGE, LE MEULAGE, LE
PERCAGE ET LES AUTRES ACTIVITES DE CONSTRUCTION, CONTIENT DES PRODUITS CHIMIQUES CONNUS
POUR CAUSER LE CANCER, DES MALFORMATIONS DE NAISSANCE ET AUTRES MAUX CONGENITAUX.
20
Page 21

PIÈCES ET CARACTÉRISTIQUES
Robinet de vidange : Sert à drainer la condensation du réservoir d'air. Situé en bas du réservoir.
Soupape de sécurité du réservoir : Utilisée pour permettre à l'excès de pression du réservoir de s'échapper dans
l'atmosphère. Cette soupape ne doit être ouverte que lorsque la pression du réservoir dépasse la pression nominale
maximale.
Manomètre du réservoir : Indique la pression de l'air emmagasiné dans le réservoir.
Manomètre de sortie : Indique la pression de l'air de sortie arrivant à l'outil et est contrôlé par le régulateur.
Régulateur : Le régulateur contrôle la pression de l'air qui provient du réservoir d'air. Pour augmenter la pression,
tournez le bouton dans le sens des aiguilles d'une montre et pour la diminuer, tournez le bouton dans le sens inverse
des aiguilles d'une montre.
Raccord à branchement rapide : Offre un dispositif d'emboîtement rapide pour attacher et retirer le tuyau d'air.
Surcharge thermique du moteur : Le moteur est équipé d'une protection contre les surcharges thermiques. Si le
moteur surchauffe, cette protection arrête le moteur. Il faut permettre au moteur de refroidir pendant 30 minutes avant
de le remettre en marche.
Interrupteur Auto/Off: Dans la position AUTO, le compresseur se coupe automatiquement quand la pression du
réservoir arrive à la pression maximale réglée d’avance. Dans la position OFF, le compresseur ne fonctionnera pas.
Cet interrupteur devrait être dans la position OFF pendant le branchement ou le débranchement du cordon
d’alimentation de la prise de courant ou pendant le changement d’outils pneumatiques.
INSTALLATION ET
POIGNÉE. Aligner les trous de la poignée(#78) avec les trous de la plaque de montage(#68), Fixer avec des contre-
écrous.
ROUE. Attacher les roues (#72) dans le réservoir avec essieu Bolt (#73), Avec le moyeu décentré face au fer
d’essieu, fixer avec les rondelles (#71) et les écrous(#70).
FILTRE. Enfiler le Filtre à Air (# 32) sur la Culasse(# 27).
Emplacement du compresseur d'air.Le compresseur d'air doit toujours être placé dans un environnement
propre, sec et bien ventilé. L'appareil doit disposer d'au moins 30 cm libres de chaque côté. L'arrivée du filtre à air
doit être exempte de tout débris ou obturation. Vérifiez le filtre à air quotidiennement afin de vous assurer qu'il est
propre et en bon état de marche.
Rallonges. N'utilisez qu'une rallonge à 3 fils qui est équipée d'une fiche de mise à la terre à 3 broches et une prise
de courant à 3 trous qui acceptera la fiche du produit. Assurez-vous que votre rallonge est en bon état. Lorsque vous
utilisez une rallonge, assurez-vous qu'elle a un calibre assez élevé pour transmettre le courant nécessaire au
fonctionnement de votre appareil. Les rallonges ne doivent pas dépasser 7,62 m et un calibre 12 AWG doit être utilisé.
L'utilisation d'une rallonge de calibre trop faible entraînera une chute de tension sectorielle se traduisant par une
perte de puissance et une surchauffe de l'appareil.
Une installation incorrecte de la fiche de mise à la terre peut
entraîner un risque de choc électrique. Si vous devez faire réparer ou remplacer le cordon ou
la fiche, ne raccordez pas le fil de mise à la terre à l'une ou l'autre borne plate. Le fil isolé
dont la surface extérieure est verte avec ou sans rayures jaunes est le fil de mise à la terre.
21
Page 22

CE MODÈLE EST LIVRÉ SANS HUILE! REMPLIR D’HUILE
CORRECT AVANT DE FAIRE FONCTIONNER LE COMPRESSEUR. Le niveau d'huile
approprié est illustré.
PROCÉDURES D'UTILISATION
PROCÉDURE DE AVANT LE PREMIER DÉMARRAGE
1. Remplir d'huile correct avant de faire fonctionner le compresseur.
2. Tourner le bouton du régulateur complètement vers la droite, dans le sens des aiguilles d'une montre pour ouvrir la
circulation d'air.
3. Mettre l'interrupteur marche/arrêt à la position “OFF” (ARRÊT).
4. Brancher le cordon d'alimentation.
5. Mettre l'interrupteur marche/arrêt à la position “AUTO” (marche) et faire fonctionner le compresseur pendant 30
minutes.
6. Mettre l'interrupteur marche/arrêt à la position “OFF” (ARRÊT).
7. Débrancher le cordon d'alimentation.
8. Le compresseur d'air est prêt à être utilisé.
Procédures de démarrage quotidiennes
1. Remplir d'huile correct avant de faire fonctionner le compresseur.
2. Mettre l'interrupteur marche/arrêt à la position “OFF” (ARRÊT).
3. Vérifiez visuellement le compresseur d'air à la recherche de tout dommage ou obturation.
4. Fermez le robinet de vidange.
5. Tourner le bouton du régulateur complètement vers la gauche, dans le sens contraire des aiguilles d'une
montre.
6. Connecter le tuyau d'air à la sortie du régulateur.
7. Brancher le cordon d'alimentation.
8. Mettre l'interrupteur marche/arrêt à la position “AUTO” (marche) et faire fonctionner le compresseur jusqu'à ce qu'il
atteigne la pression d'arrêt automatique.
9. Fixer le mandrin de pneu ou l'outil à l'extrémité du tuyau.
10. Tourner le bouton du régulateur complètement vers la droite, dans le sens des aiguilles d'une montre jusqu'à la
pression voulue pour l'outil utilisé.
11. Le compresseur d'air est prêt à être utilisé.
Une installation incorrecte de la fiche de mise à la terre peut entraîner un risque de choc
électrique. Si vous devez faire réparer ou remplacer le cordon ou la fiche, ne raccordez pas le fil de mise à la terre à
l'une ou l'autre borne plate. Le fil isolé dont la surface extérieure est verte avec ou sans rayures jaunes est le fil de
mise à la terre. Consultez un électricien ou technicien qualifié si vous ne comprenez pas complètement ces
instructions ou si vous avez des doutes concernant la mise à la terre correcte de l'outil. Ne modifiez pas la fiche
d'alimentation fournie; si elle ne convient pas à la prise, veuillez faire installer la prise correcte par un électricien
accrédité.
Les pièces du compresseur peuvent être chaudes, même si le modèle est hors circuit. Garder les
doigts à l’écart du compresseur; les pièces mobiles et chaudes peuvent causer des blessures et/ou des brûlures.
Ne jamais enlever ou essayer d’ajuster la soupape de sûreté. Tenir la soupape de sûreté
libre de peinture et d’autres accumulations.
S’il y a une fuite après que la soupape soit lâchée ou si la soupape ne fonctionne pas, elle
devrait être remplacée.
Procédures quotidiennes de fermeture
1. Mettez le levier Marche/Arrêt automatique en position Arrêt.
22
Page 23

2. Débranchez le cordon d'alimentation de la prise.
A
A
s
3. Réglez la pression de sortie à zéro sur le régulateur.
4. Retirez tous les outils ou accessoires pneumatiques.
5. Ouvrez le robinet de vidange pour permettre à l'air de s'échapper du réservoir. Une fois que tout l'air s'est
échappé du réservoir, fermez le robinet de vidange pour empêcher l'accumulation de débris dans le robinet.
Purger le réservoir quotidiennement.
Lorsque vous videz le réservoir, utilisez toujours une protection pour les oreilles et les yeux.
Videz le réservoir dans un endroit approprié; une condensation sera présente dans la plupart des cas de vidange.
ENTRETIEN
NOTE: Qualified service personnel should perform any service procedure not covered in the main-
tenance schedule below.
ÉLÉMENTS À VÉRIFIER/CHANGER
Utilisation ou
quotidiennement
Vérifiez la soupape de sécurité du réservoir X
vant chaque
Vérification visuelle générale de l'appareil
Vérifiez le filtre à air (plus fréquemment dans les environnement
poussiéreux ou humides)
X
X
près les dix
premières
heures
Toutes les 100
heures
Pour assurer un fonctionnement efficace et une plus longue durée de vie du compresseur d'air,
un programme d'entretien régulier doit être suivi. Le programme suivant est conçu pour un client dont le compresseur
est utilisé quotidiennement dans un environnement de travail normal. Si nécessaire, le programme doit être modifié
pour convenir aux conditions dans lesquelles votre compresseur est utilisé. Les modifications dépendront des heures
de fonctionnement et de l'environnement de travail. Les compresseurs d'air utilisés dans un environnement
extrêmement sale et/ou hostile nécessiteront une fréquence d'entretien plus élevée.
ENTREPOSAGE
Pour entreposer le compresseur d'air, assurez-vous de :
1. Éteindre l'appareil et débrancher le cordon d'alimentation de la prise.
2. Retirer tous les tuyaux d'air, accessoires et outils pneumatiques du compresseur d'air.
3. Effectuer les tâches d'entretien quotidien.
4. Ouvrez le robinet de vidange pour permettre à tout l'air de s'échapper du réservoir.
5. Fermez le robinet de vidange.
6. Entreposez le compresseur d'air dans un emplacement propre et sec.
Le compresseur d'air doit être éteint et débranché de la source d'alimentation avant
d'effectuer tout entretien et l'air vidé du réservoir et l'appareil refroidi. Des blessures corporelles peuvent être
occasionnées par les pièces mobiles, les sources d'électricité, l'air comprimé ou les surfaces chaudes.
23
Page 24

GUIDE DE DÉPANNAGE
r
r
r
Le compresseur d'air doit être éteint et débranché de la source d'alimentation avant d'effectuer tout entretien et l'air vidédu
réservoir et l'appareil refroidi. Des blessures corporelles peuvent être occasionnées par les pièces mobiles, les sources d'électricité,
l'air comprimé ou les surfaces chaudes.
Problème Cause Posible & Mesure Corrective
L'air fuit au niveau du clapet de
non-retour ou de la soupape de
surpression.
Un clapet de non-retour défectueux entraîne une fuite d'air constante au niveau de
la soupape de surpression lorsqu'il y a une pression dans le réservoir et que le
compresseur est éteint. Videz le réservoir et retirez et nettoyez ou remplacez le
clapet de non-retour.
Fuites d'air entre la tête et le
cylindre.
Fuite d'air de la soupape de
sécurité.
La lecture de pression su
lemanomètre de pression
stabilisée chute lorsqu'un
accessoire est utilisé.
Pression excessive du
réservoir.
Le moteur ne se met pas en
marche.
Un excès d'humidité dans l'ai
déchargé.
Assurez-vous d'utiliser le couple correct sur les boulons à tête. Si la fuite persiste,
contactez untechnicien.
Opérez la soupape de sécurité manuellement en tirant sur l'anneau. Si la soupape
continue à fuir lorsqu'elle est en position fermée, elle doit être remplacée.
Si la pression chute de manière excessive lorsque l'accessoire est utilisé,
remplacez le régulateur.
REMARQUE :
Réglez la pression stabilisée dans des conditions de débit (lorsque l'accessoire est
utilisé). Il est normal que le manomètre indique une perte minimale de pression
pendant l'utilisation initiale de l'outil.
Mettez le levier Marche/Arrêt automatique en position Arrêt. Si l'appareil ne s'éteint
pas, débranchez-le de la source d'alimentation et contactez un technicien.
Assurez-vous que le cordon d'alimentation est branché et que l'interrupteur est
allumé. Vérifiez que les fusibles sont de la bonne taille dans votre panneau
électrique. Si un fusible a sauté, rétablissez-le et remettez l'appareil en marche. Si
les fusibles continuent à sauter, remplacez le clapet de non-retour ou contactez
votre technicien.
Retirez l'eau du réservoir en le vidant après chaque usage. Un environnement à
humidité élevée entraînera une condensation excessive. Utilisez des filtres à eau
sur votre conduit d'alimentation en air.
REMARQUE :
La condensation d'eau n'est pas le résultat d'une défaillance du compresseur.
Assurez-vous que la sortie d'air du compresseur est supérieure au taux de
consommation d'air de votre outil.
L'air fuit du corps du réservoi
ou des soudures du réservoir.
Ne percez jamais de trous dans les soudures ou modifiez le réservoir d'air d'une
façon quelconque sinon ils'affaiblira. Le réservoir peut se fracturer ou exploser. Le
compresseur ne peut pas être réparé. Arrêter d'utiliser le compresseur d'air.
24
Page 25

Vue éclatée et liste des pièces
25
Page 26

PIÈCE
o
N
1 CARTER MOTEUR
2 ARBRE À VILEBREQUIN
3 BIELLE
4 BOULON
5* JOINT
6
COUVERCLE DU CARTER
MOTEUR
7* JOINT
8 OLÉOMÈTRE
9 BOULON
10* SPIROCOMMANDE
11 CIRCLIP
12* AXE DE PISTON
13 PISTON
14 SEGMENT DE PISTON
15 SEGMENT DE PISTON
16 JOINT
17 CYLINDRE
18 GOUPILLE RONDE
19 GUIDE DE SOUPAPE
20* JOINT DE SOUPAPE
21* SOUPAPE
22* GUIDE DE SOUPAPE
23* JOINT À PRESSION
24* RESSORT
25 BOULON
26* JOINT DE CULASSE
27 CULASSE
28 RONDELLE
29 RESSORT
30 BOULON
31 COUDE D'ÉCHAPPEMENT
32* FILTRE À AIR
33 COVER
34 RONDELLE
35 BOULON
36 CIRCLIP
37 VENTILATEUR
38* BOULON
39* RESSORT
40* RONDELLE
41
MANIELLE DE ROULEMENT
ARRIÈRE
Mark (*) est facile usé les pièces de rechange
NOM DE LA PIÈCE Qté
PIÈCE
o
N
1
1
1
1
1
1
1
1
6
1
2
1
1
1
2
1
1
2
1
1
1
1
1
2
2
1
1
4
4
4
1
1
1
2
2
1
1
4
4
4
1
42 STATOR
43 ROULEMENT
44 ROTATEUR
45 ROULEMENT
46 BAGUE ANTIFUITE D'HUILE
47 CONDENSATEUR
48* ÉCROU
49* BOULON
50* RONDELLE
51* BOULON
52* RESSORT
53* ÉCROU
54 MANOCONTACTEUR
55 CONNECTEUR
56 MANOMÈTRE
57 MANOMÈTRE
58 RÉGULATEUR
59 COUPLEUR RAPIDE
60 SOUPAPE DE SÉCURITÉ
61 CONNECTEUR
62 ÉCROU DE DÉCHARGEMENT
63 TUYAU DE DÉCHARGEMENT
64 CLAPET DE NON-RETOUR
65 ÉCROU D'ÉCHAPPEMENT
66 TUYAU D'ÉCHAPPEMENT
67 RÉSERVOIR
68 VIS À TÈTE
69 ROBINET DE VIDANGE
70 ÉCROU
71 RONDELLE
72 ROUE
73 ESSIEU BOLT
74 ÉCROU
75 RONDELLE
76 PIED EN CAOUTCHOUC
77 BOULON
78 POIGNÉE
79 FIL ÉLECTRIQUE
80 BOUCHON
81 DÉMARREUR
NOM DE LA PIÈCE Qté
1
1
1
1
1
1
1
4
4
2
4
4
1
1
1
1
1
1
1
1
1
1
1
1
1
1
4
1
2
2
2
2
2
2
2
2
1
1
1
1
26
Page 27

Un an Garantie limitée
1. DURÉE : À partir de la date d'achat par l'acheteur original - Un an
2. QUI REÇOIT CETTE GARANTIE (ACHETEUR) : L'acheteur original (autre que dans le but de revendre) de la
Compresseur d'air Rockford.
3. QUELS PRODUITS SONT COUVERTS PAR CETTE GARANTIE : Toutes les Compresseur d'air Rockford fournies
ou fabriquées par le garantisseur.
4. CE QUE COUVRE CETTE GARANTIE : Les défauts de matériaux et de fabrication importants qui se révèlent
pendant la durée de la garantie, à l'exception des éléments notés ci-après.
5. CE QUE NE COUVRE PAS CETTE GARANTIE :
A. Les garanties tacites, y compris celles relatives à la qualité marchande et d'ADAPTATION À UN USAGE
PARTICULIER SONT LIMITÉES À PARTIR DE LA DATE D'ACHAT INITIAL COMME INDIQUÉ DANS LA DURÉE. Si
cette compresseur d'air est utilisée dans un but commercial, industriel ou de location, cette garantie sera en vigueur
pendant quatre-vingt-dix (90) jours à compter de la date d'achat.
B. TOUTE PERTE, DOMMAGE OU DÉPENSE ACCESSOIRE, INDIRECT OU CONSÉCUTIF POUVANT
RÉSULTER D'UN DÉFAUT, DÉFAILLANCE OU MALFONCTIONNEMENT DE
Certains États ne permettent pas l'exclusion ou la restriction des dommages accidentels ou consécutifs, et les
restrictions et exclusions citées ci-dessus peuvent ne pas s'appliquer à votre cas.
C. Toute défaillance qui résulte de dommages durant le transport, d'un accident, de l'usage abusif par l'acheteur, de
la négligence ou du manquement de la part de l'acheteur à installer et à utiliser compresseur d'air conformément aux
instructions fournies dans le(s) guide(s) d'utilisation fourni(s) avec ce produit.
D. Le service avant livraison, c-à-d. l'assemblage, l'huile ou lubrifiants et le réglage.
E. Les articles ou service normalement requis pour entretenir compresseur d'air.
F. Autres éléments non couverts par la garantie :
1). Les articles à usure normale tels que les tuyaux à haute pression, les siphons isolateurs et les joints d'huile, les
joints toriques, les obturateurs, les lances et les embouts de pulvérisation.
2). Les défauts d'ordre cosmétique qui ne gênent pas la fonctionnalité.
3). Les composants rouillés.
5. L'usure de la pompe ou le dommage à l'obturateur causés par l'utilisation d'une mauvaise huile, la contamination de
l'huile ou le manquement à suivre les directives correctes d'entretien de l'huile.
6. RESPONSABILITÉ DU GARANTISSEUR DANS LE CADRE DE CETTE GARANTIE : Réparer ou remplacer au
choix du garantisseur, compresseur d'air ou ses composants qui sont défectueux, ont mal fonctionné et/ou ont manqué
à se conformer à la durée de la période de garantie.
7. RESPONSABILITÉS DE L'ACHETEUR DANS LE CADRE DE CETTE GARANTIE :
A. Fournir une preuve d'achat datée ainsi qu'une documentation de l'entretien.
B. Livrer ou envoyer compresseur d'air ou composants Rockford à Rockford Commercial warehouse Inc. et les frais
de transport, s'il y en a, sont à la charge de l'acheteur.
C. Faire preuve d'un soin raisonnable lors de l'utilisation et de l'entretien de compresseur d'air comme indiqué dans
le(s) guide(s) d'utilisation.
8. QUAND LE GARANTISSEUR EFFECTUERA DES RÉPARATIONS OU REMPLACEMENTS DANS LE CADRE DE
CETTE GARANTIE : La réparation ou le remplacement sera prévu et effectué selon la quantité de travail normale du
centre de dépannage et selon la disponibilité des pièces de rechange.
Pour le centre de service à la clientèle, appelez: 1-877-782-4111
Rockford Commercial Warehouse, Inc.
8105 Burden Road Machesney Park, IL 61115
compresseur d'air ROCKFORD.
27
 Loading...