

User Guide
Powered by RPCX

2
Copyright:
Rob Papen ConcreteFX, 2007 All rights reserved.
Concept by
Rob Papen and Jon Ayres
Instrument by
Jon Ayres
Mac programming by
Jacek Kusmierczyk
Graphics by
Shaun Ellwood
Sounds by
Rob Papen
Manual by
Rob Papen, Jon Ayres, 'TONAL AXiS', Armand ten Dam.
Tobias Birkenbeil, Patrick Anglard and Frans Rutten
Thanks to (in alphabetical order):
TONAL Axis, Patrick
Anglard
, Pedro Camacho (www.musicbypedro.com), Armand ten Dam,
DJ
Eightysix (www.djeightysix.com), Joel Heatly, DJ Starfighter (www.studiobelverdere.com),
Sinus, Sola of Giana Brothers (www.giana-brotherz.com) Mandy Rayment, team of Time+Space
and all beta testers!
All technical specifications of the products specified
in this manual may be subject to change without notice.
The documents may not be changed, especially copyright notices may not be removed or changed. Rob
Papen is a trademark of Rob Papen Sound Design & Music. Predator is a trademark of Rob Papen
ConcreteF
X (RPCX).
VST is a registered trademark of Steinberg Media Technologies GmbH. All other trademarks are the property
of their respective owners. LCD font type by Samuel Reynolds www.dafont.com
Registering of box version and 2nd activation request:
Extra
install on a second computer
For the second 'activation code', say for use on a second computer, please create an account on
the
www.robpapen.com
website and there you can obtain a 2nd activation code.
To request the second activation you will need to ad y
our Predator product inside the section
'Software registration'.
Use the Predator 'activation code' which you can find at the cardboard sleeve in your packaging
(box version) or inside the ShareIt registration e-mail to add Predator inside your product lis
t.
3
Welcome
Thank you for purchasing the Rob Papen Predator.
Predator is a killer synthesizer that combines inspiring presets and first-class features to make this
your 'go-to'
synth
for contemporary music production.
The user interface has been d
esigned so that almost all controls are visible on screen, making it fun
and incredibly easy-to-use. And if you're unsure about a particular synth function, simply right click
your mouse to access the help screen.
Predator is packed with powerful feature
s such as Preset Morphing, Intelligent Preset Variation,
MIDI and
Synth
Controllable FX, Unison Detune, Chord Memory and an extremely versatile
Arpeggiator
.
Included preset banks: HipHop (NY, Club, DirtySouth and Gfunk) banks.
Jump, hardcore, breakbeat,
dubsteb, various trance styles, DnB banks and much more...
Last but not least Predator also includes PredatorFX, allowing you to use the incredible filters,
modulations, effects and vocoder as an FX plug-in within your music host.
Predator really is a s
wiss-army knife for making cutting-edge contemporary music tracks.
Rob Papen and the RPCX team, January 2007

4
Table of contents
WELCOME
..................................................
3
INSTALLATION ON PC (
VST)
....................
5
INSTALLATION ON PC (RTAS)
..................
6
INST.ALLATION ON MAC
(VST, AU AND
RTAS)
..........................................................
7
PREDATOR FEATURES
.............................
9
INTRODUCTION INTO PR
EDATOR
.........11
A
UDIO SIGNAL FLOW
...............................11
GUI DESIGN
/
USER INTERFACE
................11
U
SER GUIDE SETTINGS
............................11
PREDATOR CONTROLS
..........................12
[ PRESET ]
................................................14
[PRESET / BANK MANAG
ER ]
................17
[ PREDATOR OSCILLATO
R ]
..................19
[ PITCH MODULATION ]
...........................22
P
ITCH MODULATION
LFO
........................22
P
ITCH BEND
............................................22
[
FILTER
]..................................................23
M
AIN FILTER
...........................................23
M
ODULATION AMOUNTS OF CUTOFF
FREQUE
NCY
............................................25
F
ILTER ENVELOPE
...................................26
F
ILTER
LFO
............................................27
[
AMP
] .......................................................29
V
OLUME ENVELOPE
................................29
[
FREE
MODULATION ]
..........................31
E
NVELOPE 1 AND
2
.................................31
LFO
1
AND
2
..........................................33
[
ARPEGGIATOR
]...................................36
PATTERN/
SEQUENCER SECTION
...............38
[ PLAY MODE
].........................................39
[
ADVANCED
PANEL ]
............................41
A
UDIO INPUT (P
REDATORFX ONLY
)
.........42
I
NFO
FIELDS
............................................42
[
BACK
PANEL ]
......................................43
[
FX ]
........................................................44
M
ONO DELAY
.........................................45
S
TEREO DELAY
......................................45
COMB
....................................................45
R
EVERB
.................................................45
C
HORUS
.................................................46
C
HORUS/D
ELAY
.....................................46
F
LANGER
...............................................46
P
HASER
.................................................46
W
AH/D
ELAY
...........................................47
D
ISTORT (DISTORTION
)
...........................47
LOW-FI
..................................................47
A
MP SIM
................................................47
W
AVESHAPER
........................................47
S
TEREO WIDENER
..................................48
A
UTOPAN
...............................................48
G
ATOR
...................................................48
VOCODER..............................................48
FX
F
ILTER
..............................................50
E
QUALIZER
.............................................50
C
OMPRESSOR
........................................50
E
NSEMBLE
.............................................51
C
ABINET
.................................................51
M
ULTIDISTORT
.......................................51
A
UTOWAH
..............................................51
F
X MODULATION MATRIX
..........................52
MIDI IMPLEMENTATION
CHART
............53
APPENDIX A: WAVE TYPES...................54
APPENDIX B: LFOSYNC
SETTINGS
.......54
APPENDIX C: DELAY SY
NC SETTINGS.54
APPENDIX D: MODULATI
ON SOURCES
AND DESTINATIONS
...............................55
5
Installation on PC (VST)
Software box version
:
Predator comes with an installer "
Predator_1_5_Installer.exe
", which can
be found on the installation CD
ROM. Double-click on this program starts the installation process. The Installer will guide you through the
installation process.
Please note: In order to authorize Predator you will need to be connected to the internet.
T
he installer will then request you to enter your personal 'activation code' which can be found on the
cardboard sleeve which contains the CD-ROM. Read now 'Next steps' below.
Software online version
:
If you have purchased the online version of Predator, t
he installer program can be found on the
www.robpapen.com
download page.
To get access to the download page, first create an account at the
www.robpapen.com
To create an account look for the login box which can be found at the left side of the homepage.
N
ext step is adding your Predator product inside the section 'Software registration'.
Use the Predator 'activation code' which you can find in the ShareIt registration e-mail to add Predator into
your product list. Once added, the product will show up in yo
ur product list and also the link to the download
page will show up. Click at the download page link and it will open. The installer "
Predator_Setup.exe"
, can
be found inside and please download it.
Next steps
;
When the installer runs, first select the l
anguage for the 'Quick manual' and then choose the directory to
install. Make sure you choose the right directory, so your host software is able to find the Predator VSTi.
Refer to your host software's manual if you are unsure about where the host software
plug-in directory is
located.
The instrument files 'Predator.DLL' and 'PredatorFX.dll' together with their preset banks can be found in the
'Rob Papen' directory. The next time you start your host software Predator will be listed in the VST
Instrument li
st and PredatorFX in your FX list.
During the installation process,
Syncrosoft License Control
Center
will be installed and then run. When the
Syncrosoft License Control
Center
runs, it will open the License Download Wizard page.
In the Enter Activation Code box please enter your Predator 'activation code' into the 'Enter Activation Code'
printed on the cardboard sleeve containing the CD-ROM or the 'activation code' inside your ShareIt
registration e-mail. After activation it should show 'Rob Papen Pred
ator' in the License download screen.
Whilst on the 'License Download' Page, click on Start and the license for Predator will be downloaded. You
will need to be connected to the internet to download a license. After this Predator should be licensed and
us
able in your host.
Options
:
1.
Syncrosoft dongle
If you own a Syncrosoft dongle you can transfer the Predator license onto it by using the 'License Transfer'
wizard in
Syncrosoft License Control
Center
software.
Syncrosoft dongles can be also purchased
at www.robpapen.com
2. Registration, updates and additional installation on a second computer
For registration, updates or a second activation code to install for example on a second computer, please
create an account on the
www.robpapen.com
website and
there you can obtain a 2nd activation code.
To request the second activation you will need to add your Predator product inside the section 'Software
registration'. Use the Predator 'activation code' which you can find on the cardboard sleeve containing
t
he CD-ROM or the 'activation code' inside your ShareIt registration e-mail.
If you have any questions regarding the installation of Predator please look at FAQ or contact our support
team at
www.robpapen.com

6
Installation on PC (RTAS)
Software box vers
ion
:
Predator comes with an installer "Predator_RTAS_1_5_Installer.exe
", which can be found on the
installation CD-ROM. Double-click on this program starts the installation process. The Installer will guide you
through the installation process.
Please note
: In order to authorize Predator you will need to be connected to the internet.
The installer will then request you to enter your personal 'activation code' which can be found on the
cardboard sleeve which contains the CD-ROM. Read now 'Next steps' below
.
Software online version
:
If you have purchased the online version of Predator, the installer program can be found on the
www.robpapen.com
download page.
To get access to the download page, first create an account at the
www.robpapen.com
To create an acc
ount look for the login box which can be found at the left side of the homepage.
Next step is adding your Predator product inside the section 'Software registration'.
Use the Predator 'activation code' which you can find in the ShareIt registration e-mail
to add Predator into
your product list. Once added, the product will show up in your product list and also the link to the download
page will show up. Click at the download page link and it will open. The installer
"
Predator_RTAS_1_5_Setup.exe"
, can be fo
und inside and please download it.
Next steps :
When the installer runs, first select the language for the 'Quick manual'.
Next choose the directory C:\Program Files\Common Files\Digidesign\DAE\Plug-Ins
, so your host software is
able to find the Predato
r instrument.
The instrument files 'Predator.dpm' and 'PredatorFX.dpm' together with their preset banks can be found in
the 'Rob Papen' directory. The next time you start your host software Predator will be listed in the RTAS
Instrument list and Predato
rFX in your RTAS FX list.
During the installation process,
Syncrosoft License Control
Center
will be installed and then run. When the
Syncrosoft License Control
Center
runs, it will open the License Download Wizard page.
In the Enter Activation Code bo
x please enter your Predator 'activation code' into the 'Enter Activation Code'
printed on the cardboard sleeve containing the CD-ROM or the 'activation code' inside your ShareIt
registration e-mail. After activation it should show 'Rob Papen Predator' in
the License download screen.
Whilst on the 'License Download' Page, click on Start and the license for Predator will be downloaded. You
will need to be connected to the internet to download a license. After this Predator should be licensed and
usable in
your host.
Options
:
1.
Syncrosoft dongle
If you own a Syncrosoft dongle you can transfer the Predator license onto it by using the License Transfer
wizard in
Syncrosoft's License Control
Center
software.
Syncrosoft dongles can be also purchased at w
ww.robpapen.com
2. Registration, updates and additional installation on a second computer
For registration, updates or a second activation code to install for example on a second computer, please
create an account on the
www.robpapen.com
website where yo
u can obtain a 2nd activation code.
To request the second activation you will need to add your Predator product inside the section 'Software
registration'. Use the Predator 'activation code' which you can find on the cardboard sleeve containing
the CD-RO
M or the 'activation code' inside your ShareIt registration e-mail
If you have any questions regarding the installation of Predator please look at the FAQs or contact our
support team at
www.robpapen.com

7
Installat
ion on Mac (VST, AU and RTAS)
Software box version
:
Predator comes as a disc image "Predator_1_5_Installer.dmg
", which can be found on the installation CD
-
ROM. Double-click this file to decompress and mount this image. Double click the installer program t
o begin
the installation process. You will then be guided though the installation process.
Please note: In order to authorize Predator you will need to be connected to the internet.
The installer will ask you for you to enter your personal 'activation c
ode' which can be found on the
cardboard sleeve containing the CD-ROM.
Read now 'Next steps' below.
Software online version
:
If you have purchased the online version of Predator, the installer program can be found on the
www.robpapen.com
download page.
To
get access to the download page, first create an account at the
www.robpapen.com
To create an account look for the login box which can be found at the left side of the homepage.
Next step is adding your Predator product inside the section 'Software regi
stration'.
Use the Predator 'activation code' which you can find in the ShareIt registration e-mail to add Predator into
your product list.
Once added, the product will show up in your product list, and also the link to the download page will show
up. Cli
ck at the download page link and it will open. The installer '
Predator_1_5_Installer.dmg'
, can be
found and please download it.
Next steps
:
During the software installation process,
Syncrosoft License Control
Center
will be installed and will appear
on y
our screen or it will be shown in the dock.
When the
Syncrosoft License Control
Center
runs, click on the Wizards menu and select the 'Wizards
License Download' menu item. In the 'Enter Activation Code' please enter Predator's 'activation code' printed
o
n the cardboard sleeve containing the CD-ROM or the 'activation code' inside your ShareIt registration e
-
mail. After activation it should show 'Rob Papen Predator' in the download License screen.
Whilst in the 'License Download' page, click on Start and
the license for Predator will be downloaded. You
will need to be connected to the internet to download a license.
Then 'Quit' the
Syncrosoft License Control
Center
after you have finished downloading the license and t
he
installer will then finish the ins
tallation process
. After this Predator should be licensed and usable in your
host. So next time you start your host software, Predator and PredatorFX will be listed in the VST / AU /
RTAS instrument list.
Notes
:
1. If you run the installer and do have t
he 'Rob Papen Predator' already on a 'Syncrosoft dongle'.
Run the installer and the
Syncrosoft License Control
Center
will be installed. Select the
Syncrosoft License
Control
Center
from the dock if it does not appear on the screen Then click on 'refresh'
and the license will
appear. Then 'quit' the
Syncrosoft License Control
Center. The installer will then finish the installation
process
. After this Predator should be licensed and usable in your host as long as the 'Syncrosoft dongle' is
connected. So nex
t time you start your host software, Predator and PredatorFX will be listed in the VST / AU
/ RTAS instrument list
2. Running an installer to update Predator.
If you have already installed Predator, run the installer and the Syncrosoft License Control
Cen
ter
will be
installed. Select the
Syncrosoft License Control
Center
from the dock if it does not appear on the screen and
select Quit from the menu.
The installer will then finish the installation process.
The next time you start your host software, the
updated Predator and PredatorFX will be listed in the VST /
AU / RTAS instrument list..

8
Options:
1.
Syncrosoft dongle
If you own a Syncrosoft dongle you can transfer the Predator license onto it by using the License Transfer
wizard in
Syncrosoft's License Control
Center
software.
Syncrosoft dongles can be also purchased at www.robpapen.com
2. Registration, updates and additional installation on a second computer
For registration, updates or a second activation code to install for example on a secon
d computer, please
create an account on the
www.robpapen.com
website where you can obtain a 2nd activation code.
To request the second activation you will need to add your Predator product inside the section 'Software
registration'. Use the Predator 'acti
vation code' which you can find on the cardboard sleeve containing
the CD-ROM or the 'activation code' inside your ShareIt registration e-mail.
If you have any questions regarding the installation of Predator please look at the FAQs or contact our
supp
ort team at
www.robpapen.com
9
Predator Features
VST2.4, AU and RTAS plug-in synthesizer for PC and Mac
Oscillators section:
3 Oscillators with 128 waves included Analogue, Additive and Spectral type of waveforms
plus pink & white noise
generators.
Oscillator waveform Symmetry control for each oscillator.
Free running option for each oscillator and Oscillator Syncing of oscillator 2 or 3 to oscillator 1.
Extended semitone range going from -48 semitones up to +48
semitones.
Separate octave control and fine-tuning.
Keyboard tracking on/off for each oscillator.
Each Oscillator offers Pulse Width Modulation (PWM) using an independent LFO for each oscillator with individual
speed and amount controls.
FM and Ring modul
ation modes for Oscillator 2 and 3.
Each oscillator has a PWM square wave Sub-oscillator.
Spread function for detuned multiple oscillator sound within one Oscillator.
Volume control for each oscillator and output on/off for Oscillator 1 and 2.
Overall Pi
tch modulation section:
Tempo sync-able global Pitch LFO. You can set the amount and also which wave is used for this LFO.
Pitch bend with separate settings for up and down pitch-bends.
Filter section:
Main filter is an analogue modelled stereo Multimo
de Filter, offering 6dB LowPass and HighPass, 12dB, 18dB and
24dB LowPass and HighPass, 12dB and 24dB BandPass, 12dB and 24dB Notch, Comb and Vocal Filter
Pre-filtering distortion with smooth or edgy mode option.
Easy Filter control by pre-defined Cutoff
Frequency modulation controllers: Envelope, Velocity, Key-tracking, LFO
and Modulation Wheel.
Built-in Filter Envelope with Attack, Decay, Sustain, Fade and Release.
Build in Filter LFO with various waveforms, modulation amount control and tempo sync opti
on with speed settings
between 16/1 and 1/32t.
LFO Poly, free or mono mode options.
Filter2 section
Additional Filter with cutoff control offering 6dB, 12dB and 24dB LowPass, HighPass, Split-1 and Split-2 setting.
Amp section:
Built-in Amp/Volume Enve
lope with Attack, Decay, Sustain, Fade and Release.
Volume control. Velocity> Volume amount.
Panning control.
Free modulation section:
Free Envelopes
2 Envelopes with Attack, Decay Sustain, Fade and Release.
Option to control the Envelopes times using "v
elocity" or "key played".
Modulation Amount Envelope 1&2 and amount control for Envelope 1.
65 modulation destinations.
Free LFO's
2 LFO's with various waveforms.
Tempo sync option with speed settings between 16/1 and 1/32t.
Poly, free or mono mode optio
ns.
Modulation Amount LFO 1&2 and amount control for LFO 1.
65 modulation destinations.
Free Modulation Matrix
8 free modulation routings.
40 modulation sources.
65 modulation destinations.
Secondary modulation source & control.
10
Play modes section:
Pol
y/Mono/Mono2/Legato/Arp/Unison2/Unison4/Unsion6 synthesizer play modes.
Portamento featuring constant rate/constant time or held(legato) constant rate/constant time.
Unison detune amount, if Predator is in Unison2, Unison4 or Unsion6 mode.
8 note Chord mem
ory, saved within the preset, including syncalbe strum timing.
Demo C3 button to preview sounds.
Arpgeggiator section:
16 step
arpeggiator
, which can be used as a step sequencer or as modulation source.
Arpeggiator patterns can be 1-16 steps long.
Speed s
etting of 1/4, 1/3, 1/2, 2/3, 1, 3/2, 2, 3 and 4x BPM.
Up, down, up/down, down/up, random, ordered, reverse ordered, ordered up/down, ordered down/up, chord and
modulation mode.
1-
4 octaves settings.
Overall step length. Swing amount. Slide amount for slid
ing steps.
Velocity control knob which mixes between keyboard (midi) velocity input and the steps velocity settings.
Each step has on/off, Tie, Slide, Tune, Velocity and Free row.
Tie modes normal and special which allows Slide, Tune, Velocity and Free settings inside a step if that step is set
to Tie. Toggle modes 1 and 2 which toggle between normal and special.
Arpeggiator Latch which can be controlled by the midi sustain pedal.
You can load, save, copy, paste and reset
arpeggiator
patterns, so you can
reuse them in different presets.
Right mouse menu
in the arp screen brings up an arp menu which allows you to copy, paste, clear, move, reverse,
randomize and turn off / on controls, for both selected steps or all steps
.
Advanced section:
Adjustable Ana
logness setting to simulate the instability of vintage analogue synthesizers.
Global Tuning.
Attack Shape. This changes the curvature of Predator's envelopes attack stage. From exponential to linear to
logarithmic.
Decay/Release Shape. This Changes the cur
vature of Predator's envelopes decay and release stages. From
exponential to linear to logarithmic.
Velocity Shape. Changes Predator's velocity curvature. From exponential to linear to logarithmic.
Over-sampling mode: Sets the over-sampling from 1x / 2x /
4x / 8x / 16x / 32x
Over-sampling filter on/off: optional post-over-sampling lowpass filter.
Strum timing for use with chord mode, with timing in ms or tempo synced
Filter stereo spread function in case the Filter 1 is in Split-1 or Split-2 mode.
Audio i
nput selector >FX or >Filter (PredatorFX only).
Audio input gain control (PredatorFX only).
Synth Amp Hold on/off. Turn off the PredatorFX's Amp envelope and so the sound plays without changing volume.
(PredatorFX only).
All advance settings are saved with
in each individual preset.
External controller hardware (fader-box or synth) settings can be saved and restored.
Overall:
16-voice polyphony.
Parameter read-out field at lower right corner. Help function for most controls.
FX section:
HQ effects blocks i
n serial mode.
Available effects: Mono Delay, Stereo Delay, Comb, Reverb, Chorus, Chorus/Delay, Flanger, Phaser, Wah/Delay,
Distortion, Low Fi, Amp Simulator with 5 models, Waveshaper, Stereo Widener, Autopan, Gator, Vocoder, FX
multi-filter, 5 Band Equ
alizer, Compressor, Ensemble, Cabinet Simulator, Multi-distortion and AutoWah
Midi tempo based settings in most effects. Option to use ms settings instead of tempo based settings.
2 FX modulation sources for connecting midi or synth controls to FX paramete
rs.
Preset section:
Uses sound banks composed of 128 presets.
Quick browser with browse history and favourites
Preset handling with copy, paste, clear and compare function.
All settings included the Advance panel settings are stored inside each preset.
Presets are stored in clear categories.
Four 'Preset variation' buttons with amount control of the variation.
Preset morphing with amount control to morph between two presets within the selected bank.
Preset / Bank Manager screen, with powerful find preset
capabilities.
11
Introduction into Predator
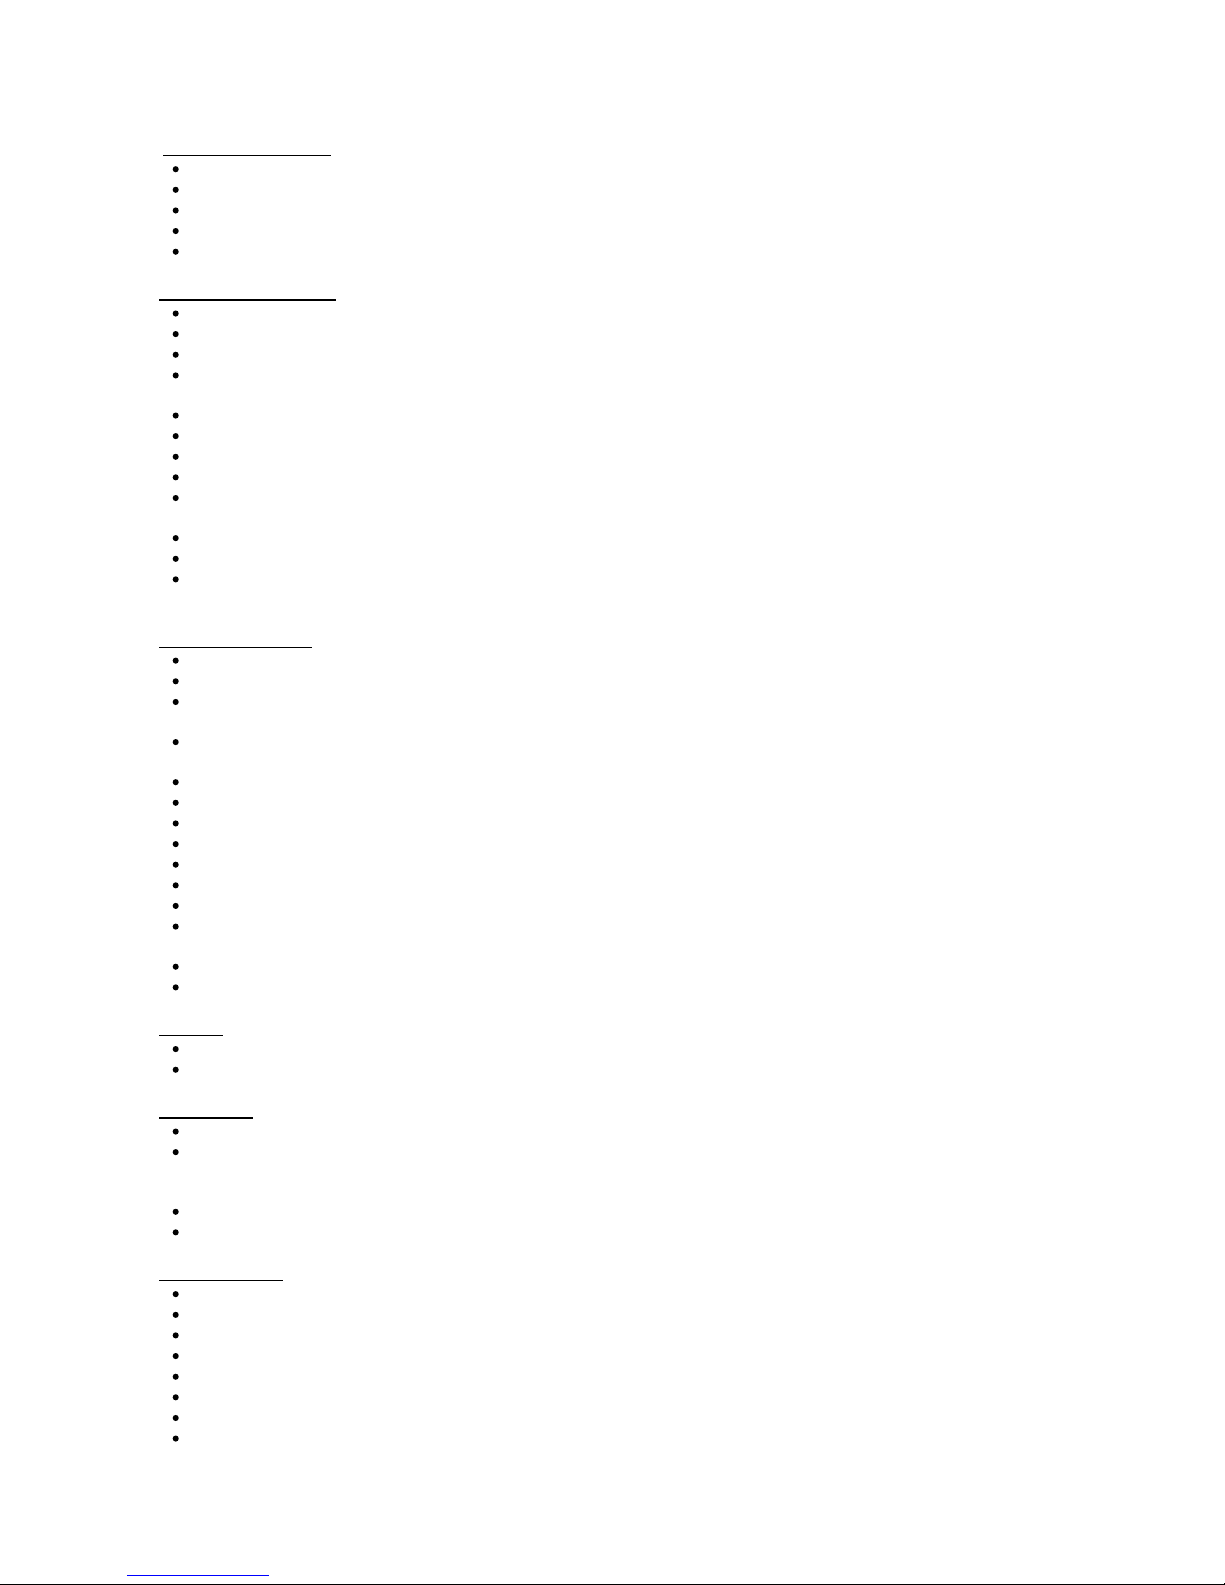
Audio Signal flow
Predator is a subtractive virtual synthesis synthesizer with 16 note polyphony including some extraordinary
new ideas and features. The synthesizer is designed so that it makes use of subtract
ive synthesis but also a
bit of FM synthesis is possible.
The block diagram below shows the audio signal flow within Predator and Predator FX.
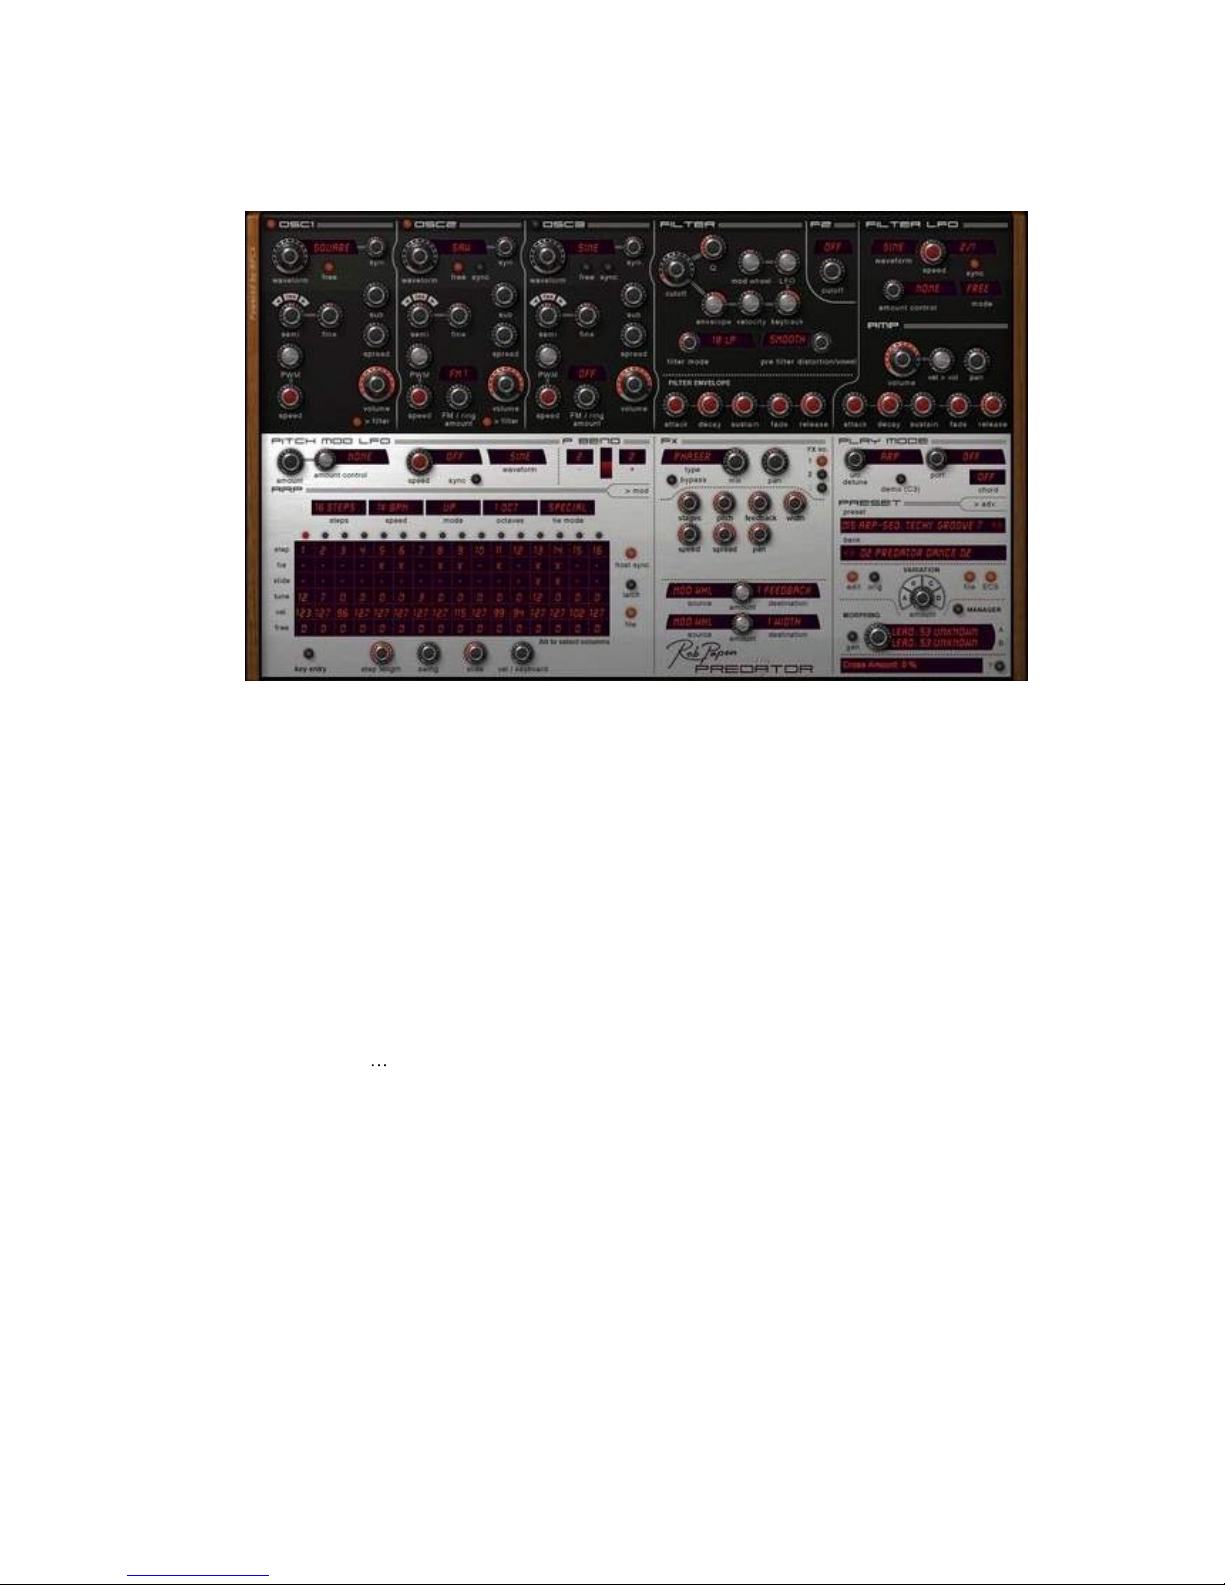
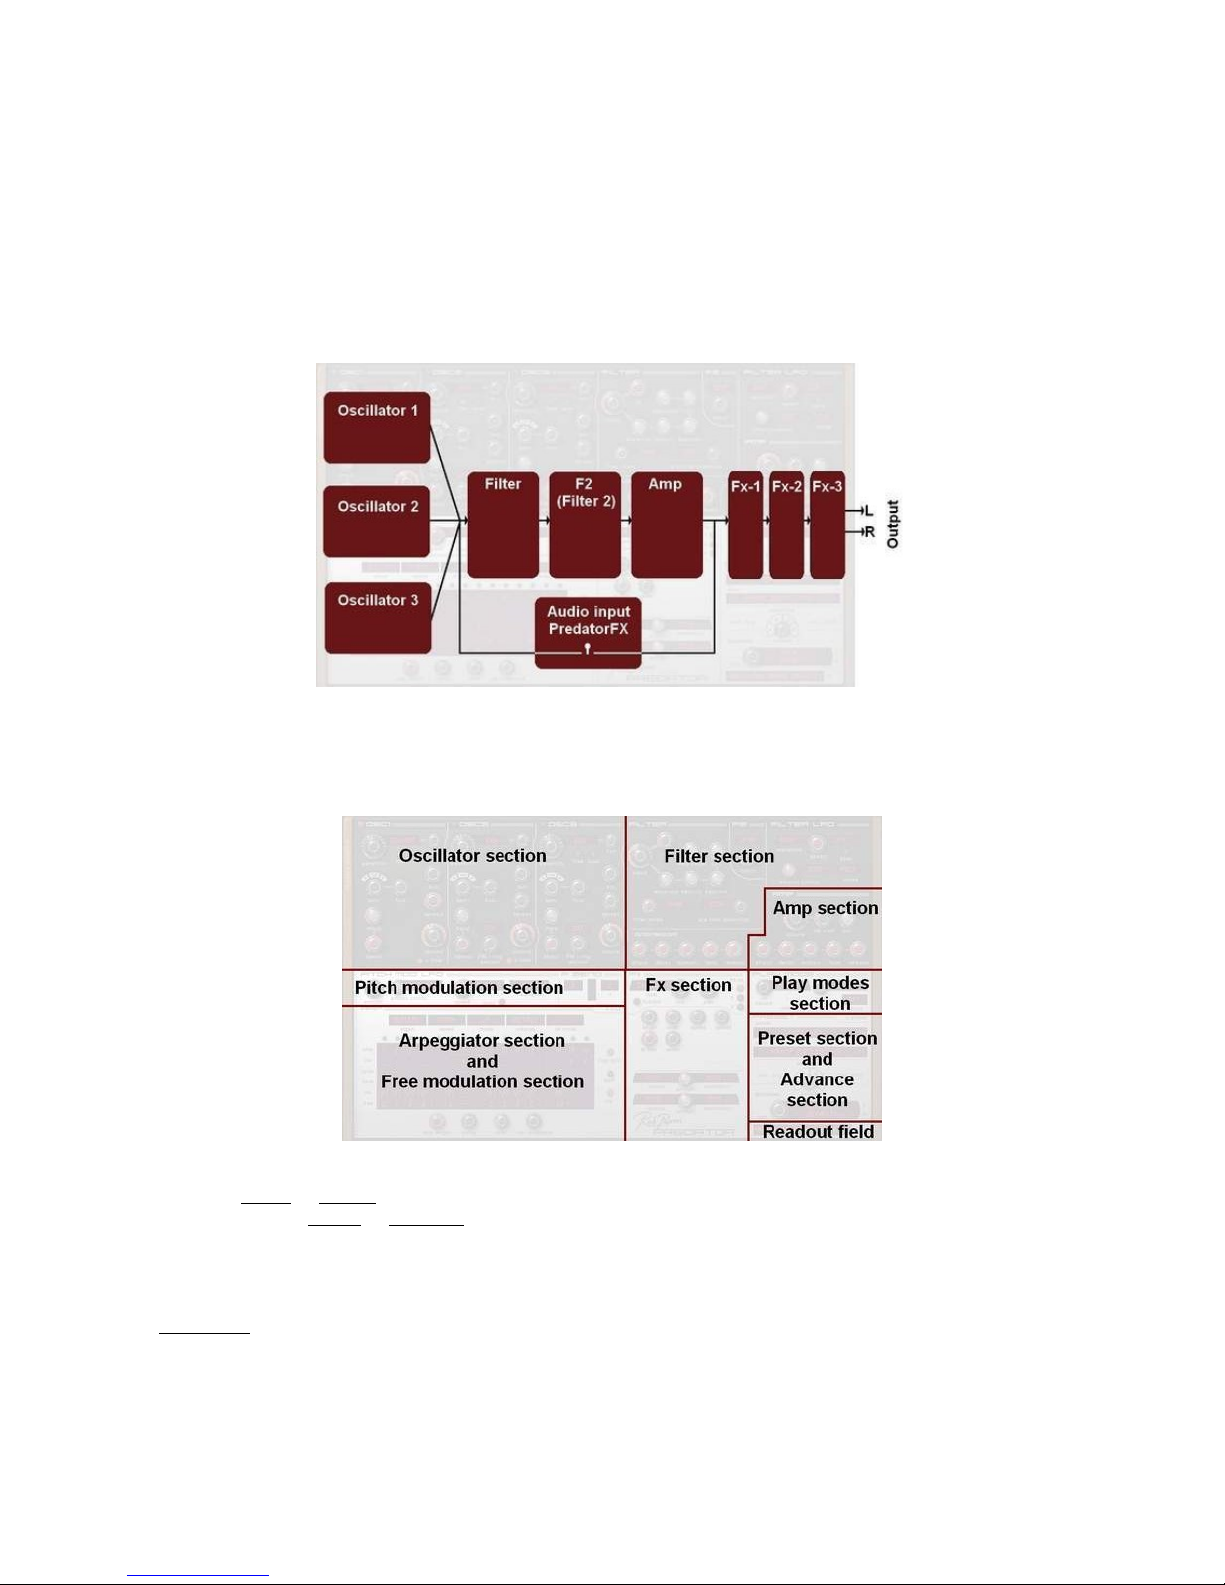
GUI design / user interface
The GUI design of Predator can be divided into 9 main sections: Oscillator secti
on, Pitch modulation section,
Filter section, Amp section, Free modulation section, Arpeggiator section, Play modes section, Preset
section and Advance section. Below at the right corner is the parameter readout field.
The Arpeggiator section and Free
modulation occupy the same space, to toggle between these two screens
press the
to Arp
or
to Mod
buttons. Similar you can select between the Preset section and Advance section,
by clicking on the
to Adv
or
to Preset
buttons.
User guide settings
[ Big Bol
d ]
= Header of 'synth-section' inside Pred
ator.
Bold regular
= Header sub-part inside a 'synth-section' of Predator.
Underlined
= parameter inside Predator.
setting =
setting of a parameter.
'section' = refers to a section of Predator. For instance the
Filter section.

12
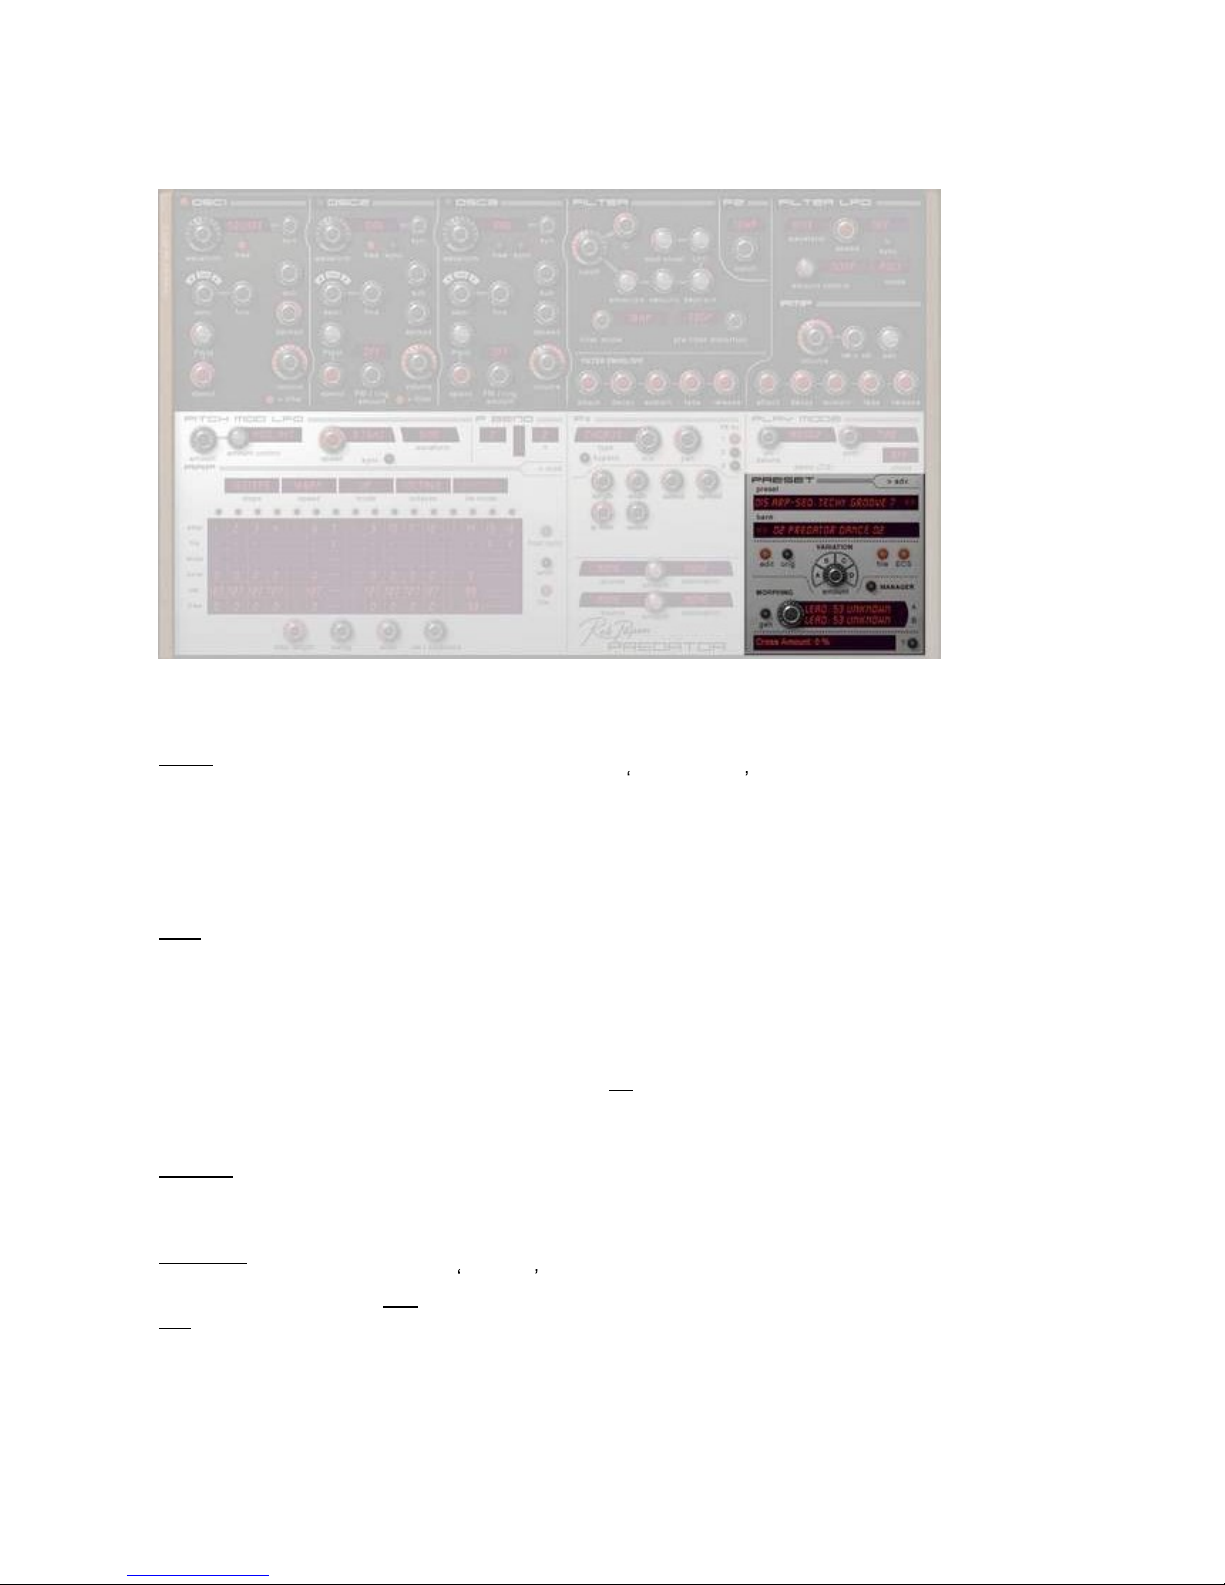
Predator Controls
Predator uses controller knobs and buttons to adjust its parameters. If you move your mouse over a control
the controller name and its value is shown in Predators read-
out screen, which is located at the bottom right
hand side.
Knobs
Knobs are controlled by left clicking on them and moving the mouse up and down, you can see the value in
the read-out screen. Pressing shift and moving up / down allows you to fine tune the control and pressing ctrl
+ mouse button sets
the control to its default value.
Buttons come in two kinds:
On / Off buttons
On / Off buttons: when you left click these they toggle between being on and off. An example of this is the
Oscillator tracking button.
Menu buttons
When you left click on th
ese a pop-up menu appears, this allows you to select the value for this control.
Right clicking
Right clicking (or control-click on Mac) on a control will bring up the midi / help menu.
Here is shown the control name, the current value and which midi con
trol this control is latched to.
Also you can do the following.
-
Help
(right clicking or control-click on Mac)
Bring up a help screen for that control.
-
Set to default
(right clicking or control-click on Mac)
Set the control to its default value.
- Set to Minimum
(right clicking or control-click on Mac)
Set the control to its minimum value.
-
Set to Maximum
(right clicking or control-click on Mac)
Set the control to its maximum value.
-
Set to Mid
(right clicking or control-click on Mac)
Set the con
trol to its medium value.
-
Set to Random
(right clicking or control-click on Mac)
Set the control to a random value.
-
Increase
(right clicking or control-click on Mac)
Increases the control value by 1%
-
Decrease
(right clicking or control-click on M
ac)
Decreases the control value by 1%
-
Set Value
(right clicking or control-click on Mac)
Brings up an entry box so you can directly set the value of a control.
-
Latch to midi
(right clicking or control-click on Mac)
Latches that control to the next m
idi control received.
For instance to latch
Osc 1 volume
to midi expression, right click on
Osc 1 volume knob
, click on
Latch to
Mid
and then move the midi expression control, this should move the Osc 1 volume knob as well.
These addressed midi controlle
r settings are overall and will work for all presets and active Predators in your
host.

13
-
Unlatch midi
(right clicking or control-click on Mac)
Unlatches that Predator control from any midi controls.
-
Set Midi CC (right clicking or control-click on Mac
)
Allows you to set directly which midi cc will be latched to the control.
-
Clear midi
(right clicking or control-click on Mac)
Clears all of the midi latching.
Note: in the preset section you can save or load your whole midi (latch) controller setup t
o Hard Disk. This
file button is called ECS.
Computer Keyboard Controls
You can alter the current preset and banks using the computers keyboard.
The functions can be turned
off
at the back panel of Predator.
To access the back panel, click at the Predator
logo. This setting is global.
-
Up arrow button
Previous preset
-
Down arrow button
Next preset
-
Left Arrow button
Increase preset number by 32. This is useful in the manager screen.
-
Right Arrow button
Decrease preset number by 32. This is usef
ul in the manager screen.
-
Page Down
Next Predator bank
-
Page Up
Previous Predator bank
-
Mouse Scroll Wheel Controls
Scrolling the mouse wheel up and down scrolls through the presets
14
[ Preset ]
In this section you control th
e presets, banks, the preset variations and the preset morphing options of
Predator.
Preset
Here you can select the preset, either by clicking on the preset screen itself which pops up a menu where
you can select the preset. You can also use the < and >
to scroll through the presets of the selected bank as
well. Next to that the preset screen has load / save / rename / copy / paste & clear presets. You can also
generate morph & variant presets here
Note: if you change a preset inside a bank, you need to
save that preset within the whole bank to keep the
changed preset. To keep the original preset banks, always save the bank with a new name.
Bank
This is where you can select the bank, either by clicking on the bank screen and selecting from the menu or
b
y using the < and > to scroll through the different types of banks. All Predator banks are saved inside
Predator/Banks folder on your computer. PredatorFX saves its banks inside the Predator/FXBanks folder.
It is recommended that you save your own Predator
or PredatorFX banks inside their own folder/file.
In the factory banks of Predator the last preset 110 up to 128 are left empty as morphing preset spots (read
preset morphing section below).
To save a bank or to load a bank you need to use the
file
functi
on inside this section.
Note
: if you change a preset inside a bank, you need to save that preset within the whole bank to keep the
changed preset. To keep the original preset banks, always save the bank with a new name.
Manager
Brings up the preset / bank
manager, see Preset / Bank Manager section for more details
Edit / Orig
Once you have edited a preset, the Edit/Orig button will light up.
If you then the click on the
Orig
button it will return the preset to its original settings, if you then click
on the
Edit
button, it will return it to its edited version.
This allows you to toggle between the original preset and the edited one, to hear the differences to any
changes that you have made.
Note
: if you change a preset inside a bank, you need to save
that preset within the whole bank to keep the
changed preset.
To keep the original preset banks, always save the bank with a new name.

15
Variation A-D, Amount
This is a unique feature that only Predator offers. It is an intelligent tool to produce usefu
l preset variations.
Unlike many other "random" systems this produces 99% useful preset variations.
You have 4 options, the button A, B, C & D.
Each option only changes certain preset controls.
A-
C changes the synthesizer parameters.
D changes only t
he FX section properties.
Amount
The amount of variation is set by the variation amount
control knob, a small value produces small changes,
and big values produce big changes.
If you use this function you can always go back to the original preset by pre
ssing
orig
or return back again by
pressing
edit.
File
load bank
loads a bank from the computer HD. Default directory is the Predator/Banks (synth) and
Predator/FXbanks (PredatorFX).
save bank
saves a bank to the computer HD. Default directory is the Pred
ator/Banks (synth) and
Predator/FXbanks (PredatorFX).
load preset
loads a preset inside the selected bank.
save preset saves a preset to the computer HD.
copy preset copies a preset, which allows you to move it to another spot in the bank or to another bank.
Note: bank needs to be saved again.
paste preset paste a copied preset to another spot in the bank or to another bank.
rename preset sets the name of the selected preset.
Note: bank or preset needs to be saved again.
default preset sets the preset t
o a default preset.
preset manager brings up the preset / bank manager screen
ECS
This allows you to load / save an external midi controller setup. Once set it is shared by all of the presets.
You can latch one of Predators controls to a midi controller
by using the right button (or control-click on Mac)
menu and selecting latch midi. You can also unlatch midi controls the same way or clear all of the midi
controls. For example try latching the filter cutoff control or one of the envelope knobs.
load esc
this opens the folder that holds ECS setups. Installer of Predator installed a folder called
ECS and it loads .ECS files.
save esc
this gives the user the option to save the midi setup you made and use them in other songs,
it is saved as an .ECS file.
re
set all midi this clears all the midi settings for the Predator synth. Handy if you want to start from
scratch.
Preset morphing
This feature allows you to morph two presets from the selected bank/banks into a new preset.
Browse through the bank to find t
wo presets that you would like to morph into each other.
If you find a preset you'd like to morph, select "Store as Morph A" or "Store as Morph B" using the preset
menu and this will store the current chosen preset as one of the morphing sources.
Then pi
ck an empty spot in the preset bank, for instance the factory preset banks all have empty spots from
preset 110 - 128.
Then, click on the A or B field
and select "Stored Morph A or B" in the preset selection box (in the Morphing
section). This then sets mo
rph source A or B to the previously stored preset.
Open the
amount
knob to set the morphing, between the A and B preset and then hit
GEN
to generate a
morphing preset. You can do this as often as you like until you find a nice morphing setting. You must s
ave
the newly generated preset either with the bank or as a separate preset, if you wish to use it again.
Note
: in preset box A and B you can also select a preset from the regular preset list.
Quick Browser
Use the right mouse button (or control-click o
n Mac) inside the Preset display menu to open the
"QuickBrowser".

16
This "Quick Browser" shows all the available banks and its presets. If you then click on a preset, that bank
and preset will be loaded in.
Recently Browsed
This shows a list of all the rec
ently used presets. Clicking on an entry loads in that
preset again. Clicking on "Clear Recent" removes all entries
.
Favorites
This shows a list of presets selected as being
Favorites
presets.
Clicking on an entry loads in that preset. You can select a p
reset to be a
Favorite
by
clicking on "Add Current to Favourites".
"Remove Current from
Favorites
" removes the current preset from the
Favorite
list,
and "Clear
Favorites
" removes all entries.
The
Favorite
list is stored on the computer's hard-disc, so t
he list will be
remembered the next time you use the plug-in.
17
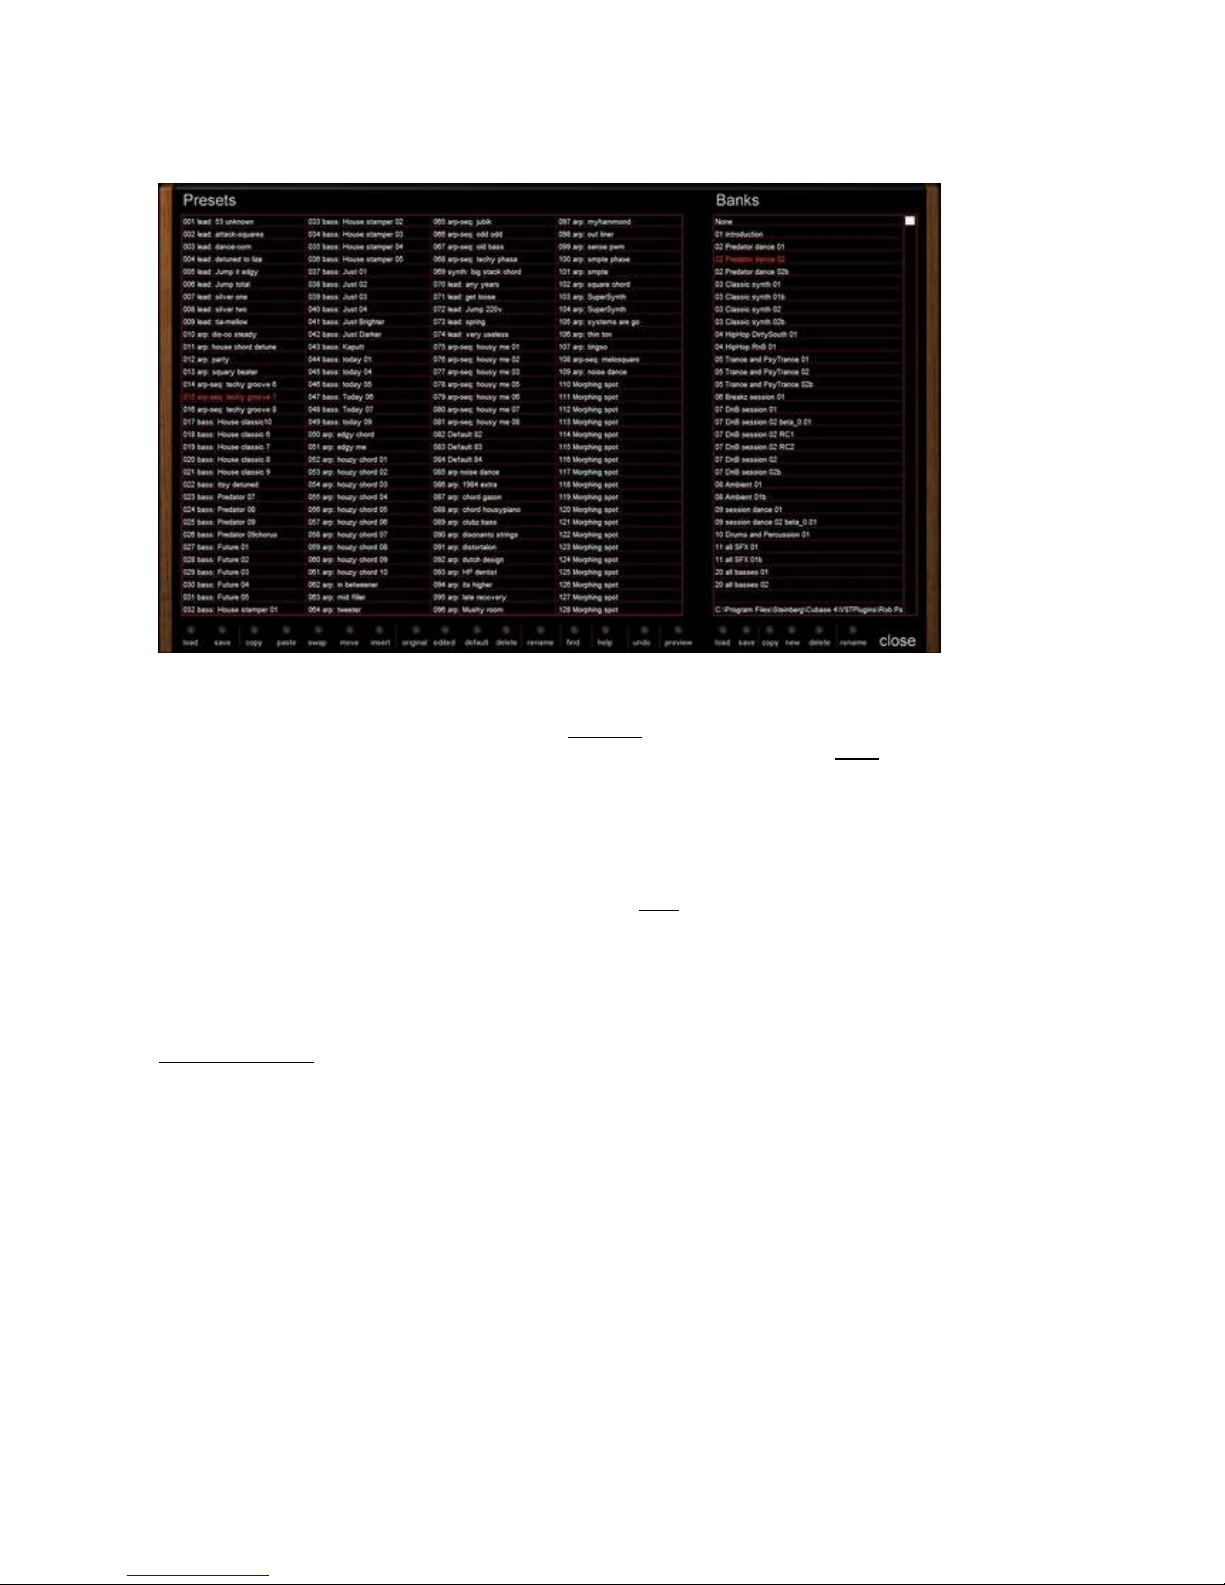
[Preset / Bank Manager ]
The manager screen allows you to see all the presets & banks at one time. Also it allows you to alter presets
and banks, and search for presets within all the ba
nks.
You enter the Manager screen by clicking on the
Manager
button in the Preset section or clicking on the
Preset Manager entry in the file menu. To return to the main screen, click on the
close
button.
In the Manager screen, the left hand screen shows
the presets in the current bank, and the right hand screen
the installed banks. At the bottom are the preset / bank controls.
In the Preset screen, the current preset is shown in red, and clicking on a preset loads it in.
Clicking and moving a preset al
lows you to move the preset from it's current position to a new position.
Shift + clicking allows you to select a range of presets and Ctrl + clicking allows you to select unconnected
presets. These multi-presets can be saved to disk via the
save
button
/ menu entry.
Alt + clicking & moving allows you to swap presets. Right clicking brings up the preset command menu.
In the Bank Screen, the current bank is shown in red, clicking on a bank loads it in and right clicking bring up
the bank command menu. M
oving the scroll bar at the right moves the displayed banks.
Preset Commands
Load
Loads in a saved preset / presets
Save
Saves the current preset/presets as a fxp file.
Copy
Copies current preset
Paste
Pastes last copied preset
Swap
Swaps the cu
rrent preset with another one
Move
Moves the current preset to another position
Insert
Inserts a blank preset at the current position, moving the rest of the presets forward one.
Original
Returns the current preset to it's original settings
Edited
Returns the current preset to it's last edited settings
Default
Sets the current preset to the default settings
Delete
Deletes the current preset, move the rest of presets back one
Rename
Renames the current preset
Find
Read find section below
Hel
p
Brings up the Manager help screen
Undo
Undo last preset command
Preview
Previews the current preset

18
Bank Commands
Load
Loads in a bank, if the current bank has been changed from its original state, then a back up
of it as a ~fx file is created.
Save
Save current bank
Copy
Makes a copy of current bank
New
Creates a new bank
Delete
Deletes the current bank (actually renames it as a ~fxb file so it's not shown)
Rename
Renames current bank
About Find
Clicking on the find button brings up
the file dialog. This searches all the banks for presets which includes the
searched for string. In the Preset screen, all found presets are shown in white (the others are shown in gray).
In the Bank screen, all the found preset in all the banks are shown
, these are shown as firstly bank name
then list of presets within that bank. Clicking on a bank loads in that bank, clicking on a preset within a bank
loads in that preset.

19
[ Predator Oscillator ]
Predator s sound begi
ns with the oscillator section.
Predator can use up to 3 oscillators to generate its basic sound.
Of course you don't need to use them all...it all depends on the type of sound you want to produce.
We have added FM & ring modulation options to Oscillator 2 and 3, to further shape the sound.
This adds an extra dimension to Predators
soundscape
.
Oscillator on/off
Next to the Oscillator label you can find a button to switch the oscillator on or
off
.
Waveform
Here you can select the basic shape or harmon
ic content of the oscillator, this is known as its waveform.
Predator has a total of 128 waveforms, ranging from classic
analog
style waveforms including saw & square
to additive and spectral waveforms.

20
Symmetry (Sym.)
This controls the
symmetry of the selected waveform. The effect it has differs from waveform to waveform,
but basically it moves the midpoint of the waveform.
It is most commonly used with the Square waveform. Here the symmetry control alters the pulse width of
the wa
veform, from very narrow pulse waveforms to normal square waves.
Free on/off
When this is turned on, it returns an oscillator to the initial position when you press a new key, when its off,
the oscillator continues from its last position, it is "free-run
ning".
This is useful in
spread
sounds because it removes the initial attack part of the sound.
Sync on/off (Osc.2 and Osc.3)
Only available for Oscillator 2 and Oscillator 3. If you switch it on, the oscillator synchronizes to Oscillator 1.
This means
that when oscillator 1 finishes the wave cycle, it resets the synced oscillator to the initial position.
This means that the oscillator does not have a life for its own anymore and is bound to Oscillator 1. You can
hear it very well if you detune, for in
stance, Oscillator2 and then turn Sync on.
The detuning disappears, and it now has the same pitch as Oscillator 1. However, Oscillator 2 will sound
different because it is being reset by Oscillator 1, this will cause the sound to have different harmonic
co
ntent. Listen to preset "Predator SyncLead" of the first bank for an example.
Semi
This controls the root pitch setting of the oscillator, with semitones you can alter the tuning from -48
semitones down (-4 octaves) to 48 semitones up (+4 octaves) from
the base note.
Fine
Next to the
semi
knob fine sets the fine-tuning of the oscillator with a range of -100cent up to +100cent.
Track
The track button is located at the very top of the
semi
button.
With track set to
on
the oscillator follows the
keyboard
in pitch. When it is
off
the pitch of the oscillator stays the same independent of what key is played.
In the case of FM or Ring modulation, or for FX sounds it can be handy if you can turn this setting
off.
Octave up/down
Next to the
track
control you c
an find an up and down arrow. Pressing up increases the oscillator tuning by
an octave, pressing down decreases the oscillator tuning down by an octave.

21
Sub
This knob controls the volume of the oscillators sub-
oscillator. The sub-oscillator is a square w
ave which is
one octave lower than the normal oscillator pitch.
The sub-oscillator pitch is always connected to the oscillator pitch, so if you detune the oscillator, the sub
-
oscillator detunes along with it.
Spread
This is a special Predator function. If
you open this control knob, a multiple oscillator sound is generated
using one oscillator.
The spread knob controls the level of detuning for these multiplied oscillators.
If you keep spread to 0 level, a normal oscillator is generated.
PWM
PWM stands f
or Pulse Width Modulation. This controls the maximum PWM modulation amount of the LFO
(see
speed
parameter).
PWM alters the symmetry setting (the middle point) of the oscillator over time.
You can use PWM on any waveform, but it is most commonly used with
the square wave where it alters the
pulse width of the waveform.
Speed:
The amount of
PWM
(Pulse Width Modulation) is altered over time by a sine-wave LFO.
With speed you control the speed of this LFO.
Of course you need to open the PWM amount to hear
the result of any speed changes.
Volume
With volume you control the volume of the oscillator before it goes into the 'Filter section'.
NB if you set the filter
pre-filter distortion
to
edgy
, the volume of the oscillator influences the distortion of the
f
ilter, and so you can add distortion with lower oscillator volume settings.
Output
This controls whether an oscillator is output to the 'filter section'.
With FM and Ring modulation you do not want the modulating oscillator output to be fed into the filte
r.
So with Osc.1 and Osc.2 you have the option to shut off the output to the filter, when you are using them as
a modulation oscillator.
FM Mode
This controls the FM or ring modulation options for Osc 2 and Osc 3. When you use either in FM or ring
modu
lation, youll need to keep the modulation oscillator on but not heard, so you can turn
off
the output of
the oscillator to the filter using the output button.
With FM modulation the oscillator modulates the pitch of the target oscillator, so you get over
tones to the
original sound. With Ring modulation, both oscillators are multiplied together and you get sound that uses a
combination of both sources.
FM Amount
This controls how much the oscillator is frequency or ring modulated.

22
[ Pitch Modulation ]
This section shows how you can alter the overall pitch of the sound, either using an LFO to change the pitch
over time (vibrato) or how much the pitch bend controller alters the pitch.
Pitch Modulation LFO
Amount
The amount of LFO modulation appli
ed. At the full amount, the pitch goes up / down by one semitone (
sine,
triangle
and
S&H
waves) & up only by one semitone for the square and saw waves.
Amount control
Here you can select the controller (for instance Modulation Wheel) that controls the amount
of Pitch LFO
modulation. Listen to "Predator SyncLead" in the first bank.
The control amount can be set to positive as well as negative.
Speed
This controls how fast or slow the L.F.O is running.
Sync
If you turn sync on, the
speed
of the LFO will
be tempo based.
To find the correct setting you need to adjust the
speed
parameter.
Waveform
Sine, Triangle, Saw Up, Saw Down, Square
and
S&H. Sinus
and
Triangle
are most often used for pitch
because they produce a modulation that goes up and down smoothly. The other waveforms are more
suitable for FX sounds or special sounds.
Pitch bend
Down
This sets the pitch change when you move the pitch-bend wheel Down. It ranges from
Off
, down to - 48
semitones (-4 octaves).
Up
This sets the pitch change when
you move the pitch-bend wheel Up. It ranges from
Off
, up to + 48 semitones
(+ 4 octaves).

23
[ Filter ]
The sound generated in the oscillators is passed into the filter. Here, the harmonic structure is altered by the
selected filter type.
Predator als
o has an extra secondary filter called F2 in case extra changes are needed.
Main Filter
Cutoff
This sets the filters frequency where the filter starts altering the sound.
For instance, if you set the Cutoff to 2000Hz and use a 12dB Lowpass filter it re
duces any frequencies above
2000Hz, so for instance a sound at 4000Hz will be reduced by 12dB.
The Cutoff frequency can be static at a fixed frequency, but you can also modulate the Cutoff frequency with
the
Filter Envelope, Keyboard tracking, Modulation W
heel
and
LFO
.
Therefore there is a line on Predator front-end which shows that these controls alter the Cutoff frequency.
The modulation doesnt move the Cutoff control knob from its initial position, but if you add any kind of
modulation (change the sil
ver colour control knobs) the Cutoff frequency is internally modulated.
Resonance (Q)
The resonance controls how much the sound at the
Cutoff frequency
is increased, so the resonance
"emphasises" this frequency.
As you increase resonance it gets more an
d more pronounced till the filter self-
oscillates".
So basically the resonance is feedback onto the Cutoff frequency.
NB: the 6dB filter types are unable to self-oscillate, and in Comb filter the resonance controls the comb filters
feedback.
To hear what
resonance does, the best thing to do is to try changing it. If you open the LFO modulation you
will hear that the Cutoff frequency starts to move. Opening the Resonance emphasises this movement.
There is a special mode to create resonance sounds without
using the oscillators. This is originally only
possible with
analog
synthesizers. To use this special resonance sounds, you need to turn off all the
oscillators.
One word of caution, this resonance sound can be very loud, so be careful with the volume.
Al
so it produces a bit of noise artifacts.

24
Filter mode
-
Bypass
The filter is bypassed and the sound passes through unaffected.
-
6dB LowPass
Low frequencies pass through this filter and frequencies above the
Cutoff frequency
are reduced by 6dB per
oct
ave.
For example: a frequency 2000Hz is 6dB softer in volume if the
Cutoff frequency
is set to 1000Hz.
-
6dB HighPass
High frequencies pass through this filter and those below the
Cutoff frequency
are reduced by 6dB per
octave.
The filter is open if the Cutoff frequency knob is fully turned left.
-
12dB LowPass
Low frequencies pass through this filter and those above the Cutoff frequency
are reduced by 12dB per
octave.
-
12dB HighPass
High frequencies pass through this filter and those below the
Cutoff f
requency
are reduced by 12dB per
octave.
The filter is fully open if the
Cutoff frequency
control knob is fully turned left.
-
18dB LowPass
Low frequencies pass through this filter and those above the Cutoff frequency
are reduced by 18dB per
octave.
-
18
dB HighPass
High frequencies pass through this filter and those below the
Cutoff frequency
are reduced by 18dB per
octave.
The filter is fully open if the
Cutoff frequency
knob is fully turned left.
-
24dB LowPass
Low frequencies pass through this filter
and those above the
Cutoff frequency
are reduced by 24dB per
octave.
-
24dB HighPass
High frequencies pass through this filter and those below the
Cutoff frequency
are reduced by 24dB per
octave.
The filter is fully open if the
Cutoff frequency
knob is f
ully turned left.
-
12dB BandPass
This filter mode is a combination of 12dB LowPass and 12dB HighPass filters.
Only those frequencies near to the filter
Cutoff frequency
pass through (a band of frequencies), the
resonance (Q)
, controls the width of this
band so that low & high frequencies are removed.
-
24dB BandPass
This filter mode is a combination of a 24dB LowPass and 24dB HighPass filter.
Only those frequencies near to filter
Cutoff frequency
pass through (a band of frequencies), the
resonance
(Q)
controls the width of this band, so low & high frequencies are removed.
-
12dB Notch
Those frequencies near to the filter Cutoff frequency
are reduced in volume (12dB), the resonance controls
the width of this removal region.
-
24db Notch
Those frequ
encies near to the filter
Cutoff frequency
are reduced in volume (24dB), the resonance controls
the width of this removal region.

25
-
Comb filter
This is a very short delay, which emphasises the comb filter frequency. The
Cutoff frequency
controls the
leng
th of this delay and
resonance (Q)
the feedback of the filter.
-
Vox filter
Vocal Filter, which adds a voice-like filtering to the sound. In Vox filter mode, the distortion knobs controls the
vowel of the filter.
Pre-Filter Distortion
It is possible to o
verdrive the oscillator sound ahead of going into the Filter. This can be done in a
smooth
way or in an
edgy
way. For the
edgy
setting, the following apply:
Overdrive of the filter already starts at about -3dB with a sinus waveform using only 1 oscillator.
Overdrive of the filter starts at -9dB with a sinus waveform using 2 oscillators.
Overdrive of the filter starts at -12dB with a sinus waveform using 3 oscillators.
So be careful with the volume of the oscillators if you are in
edgy
filter overdrive mode
.
The
smooth
overdrive is more "subtle" and less aggressive than the
edgy
setting. Also distortion in
smooth
setting starts only if you open up the drive
amount.
Try it out yourself and open the
resonance (Q)
to hear the difference in sound with both disto
rtion modes.
Modulation amounts of Cutoff frequency
Envelope
Adds a positive or negative
Cutoff frequency
Envelope amount. The 'Envelope' is inside the Filter section
itself.
Keep in mind that if you use negative modulation, that the envelope is reversed.
Velocity
Adds a positive or negative
Cutoff frequency
modulation by the amount of velocity used.
If Predator is in
arpeggiator
mode (
Play mode
) the
arpeggiator
velocity settings are active.
Keytrack
Adds a positive or negative
Cutoff frequency
modulat
ion by the keyboard note position.
With positive amount, the
Cutoff frequency
goes up the higher you play the keyboard.
With negative amount, the
Cutoff frequency
goes down the higher you play the keyboard.
LFO
Adds negative or positive
Cutoff frequency
modulation by the 'Filter LFO'.
Mod.Wheel
Adds negative or positive
Cutoff frequency
modulation by the 'Filter LFO'.
Filter 2 (F2)
Filter 2(F2) is an extra filter after the main filter that you can turn on or off.
Great if you want to take away bass fr
om a sequence sound or as extra filter to shape the sound.
In the 'Free modulation section' you can select the Filter2 Cutoff frequency as a destination.
So you can still use a 'Free Envelope', 'Free LFO' or any other midi controller to dynamically control
filter 2 s
Cutoff frequency.
Cutoff
This sets the filters frequency where the filter starts altering the sound.
For instance, if you set the Cutoff to 2000Hz and use a 12dB Lowpass filter it reduces any frequencies above
2000Hz, so for instance a sound
at 4000Hz will be reduced by 12dB.
The Cutoff frequency can be static on a fixed frequency, but you can also modulate the Cutoff frequency with
parts of the 'Free modulation section'.

26
Type
-
Bypass
The filter is bypassed and the sound passes through un
affected.
-
6dB LowPass
Low frequencies pass through this filter and frequencies above the
Cutoff frequency
are reduced by 6dB per
octave.
For example: a frequency 2000Hz is 6dB softer in volume if the
Cutoff frequency
is set to 1000Hz.
-
6dB HighPass
Hi
gh frequencies pass through this filter and those below the
Cutoff frequency
are reduced by 6dB per
octave.
The filter is open if the
Cutoff frequency
knob is fully turned left.
-
12dB LowPass
Low frequencies pass through this filter and those above the Cu
toff frequency are reduced by 12dB per
octave.
-
12dB HighPass
High frequencies pass through this filter and those below the
Cutoff frequency
are reduced by 12dB per
octave.
The filter is fully open if the
Cutoff frequency
knob is fully turned left.
-
24
dB LowPass
Low frequencies pass through this filter and those above the Cutoff frequency
are reduced by 24dB per
octave.
-
24dB HighPass
High frequencies pass through this filter and those below the
Cutoff frequency
are reduced by 24dB per
octave.
The fil
ter is fully open if the
Cutoff frequency
knob is fully turned left.
Split 1
In this mode, Filter 1 and Filter 2 are in parallel, so that Filter 2 has the same properties, such as envelope,
filter tracking etc, as Filter 1.
The only difference is that F
ilter 2's frequency can be altered independently from Filter 1's.
Using Filter Pan in the advance screen, you can pan Filter 1 and Filter 2, from both being centered, to Filter 1
being panned left and Filter 2 being panned right.
Split 2
In this mode,
Oscillator 1 goes into Filter 1, Oscillator 2 goes into Filter 2 and Oscillator 3 goes into both Filter
1 and 2. Filter 1 and Filter 2 are also in parallel and joined, so that Filter 2 has the same properties, such as
envelope, filter tracking etc, as Filt
er 1. The only difference is that Filter 2's frequency can be altered
independently from Filter 1's.
Using Filter Pan in the Advance screen, you can pan Filter 1 and Filter 2, from both being centered, to Filter
1 being panned left and Filter 2 being pann
ed right.
Filter Envelope
The Filter Envelope is addressed to the main filter
Cutoff Frequency
of Predator and the amount is controlled
by the
Env
amount in the Filter section.
An envelope is a time based modulation inside a synthesizer. If you pres
s a key it moves from 0% up to
100% and back to 0% when you release the key.
Between this you can adjust the time how it does do this.
The first part is know as the attack, this is the time it takes to reach 100%.

27
The second part is know as the decay, th
is is the time it takes to reach the sustain (the final) level. If this
level of sustain is for instance 50, the decay goes down to 50% and stays there.
Finally when you release the key, the envelope goes to 0%, during the period that you just set.
An extr
a feature inside Predator is Fade. Fade adds a second part to the sustain level, when it is positive the
sustain level goes up to 100% over a set period, if it is negative then the sustain level goes down to 0% over
a set period. This is a handy feature i
f you want the Cutoff frequency of the filter to rise whilst holding the
keys. Listen to preset "Syntho Brass" in the first bank.
To hear the full effect of the Filter Envelope you have to open the Env amount, which you can find in the filter
section nex
t to the Cutoff Frequency.
The amount can be positive or negative.
Attack
An envelope always rises from 0 to 100% and back to 0% when the key is released.
Attack controls how fast it rises to 100%. So if you open the Attack control knob, it takes longer
to go from 0
to 100%.
With Attack closed, the envelope starts at 100%.
Decay
After the attack stage, with the envelope at 100%, the decay stage is reached.
Decay reduces the envelope level to the sustain level over a set time. So if you use a long deca
y, it takes
longer to reach the sustain level.
If the sustain level is 100% the Decay has nothing to fall to and so the sustain stage is reached immediately
after the attack.
Sustain
This is level of the sustain stage. After the attack & decay stage, the
envelope goes into the sustain stage
and remains here for as long as you have a key pressed down. The sustain level is the level of this sustain
stage. Sustain level in the Filter envelope means the level of where the
Cutoff frequency
parameter stays as
l
ong as you hold the key(s).
Sustain fade
If the fade is set to off, the sustain remains at the sustain level i.e. it is a classic sustain.
If you open the fade amount in a positive direction the sustain changes into a second attack.
So after the Decay rea
ches the Sustain level it starts rising to 100% again and the time it takes to reach
100% is set by the Fade time.
If you open the fade amount in a negative direction the sustain changes into a second decay.
So after the Decay reaches the Sustain level it starts falling to 0% again and the time it takes to reach 0% is
set by the Fade time.
Release
After you have released a key (note), the release stage starts. The envelope then decays from the sustain
level to 0%, the time it takes is set with the release
knob.
Filter LFO
An LFO (Low Frequency Oscillator) is an oscillator at a very low pitch/frequency.
In Predator the LFO can have a frequency between 0.03Hz and 27.50Hz.

28
The Predator Filter LFO produces changes to the Filter
Cutoffs frequency
. You nee
d to open the
LFO
amount in the 'Filter section' to hear the results.
Often used is the sine waveform, here the Filter
Cutoff frequncy
rises up and down. But also using other
waveforms
with the LFO can be used to produce interesting results.
Predator has t
he option to "tempo base" the LFO, which makes it a great feature for changing sounds in a
musical tempo based way.
Waveform
Sine, Triangle, Saw Up, Saw Down, Square
and
S&H
.
Here you can set the type of wave, this modulates the Filter
Cutoff Frequency
.
Sinus
and
Triangle
are often used because they produce a modulation that goes up and down smoothly.
The other waveforms are more suitable for FX or special sounds.
Try selecting another waveform with the preset "Moving Filter", which you can find in the
first bank of
Predator, and see what it sounds like.
Speed
This controls how fast or slow the LFO is running. If the control
Sync
is set on then the speed is tempo
based.
Sync
If you turn Sync on, the Speed of the LFO will be tempo based. So it will sync
hronise with the song tempo.
To find the right setting you need to adjust the
Speed
parameter.
Mode
Poly, Free
and
Mono This controls how the LFO responds when you hit one or more keys.
Poly mode:
Each note you play has its own Filter LFO and each LFO s
tarts from the zero position.
Poly mode is useful for complex sounding Filter LFO modulation.
Free mode:
The LFO is free running and all the notes share the same LFO.The LFO is always
running and does not reset when you press a key.
Mono mode:
Similar
to free mode All the filter LFOs have the same value, however when you press
a key in Mono mode, all LFOs are reset to their initial start position.
Amount control
Here you can select the controller to adjust the
LFO
modulation inside the 'Filter secti
on'. This can be a
positive or a negative amount. So you can increase the modulation or decrease the modulation.
Look at preset "Moving Filter" in the first bank as an example. You can see that in this preset the Mod.Wheel
is addressed with -38% amount.
So
if you open the Mod.Wheel the
LFO
modulation inside the 'Filter section' will be less.
In fact with a fully open Mod.Wheel the
LFO
does not modulate the filter anymore.
This happens because the
LFO
amount in the filter is 38% and the modulation control
is set to -38%.

29
[ Amp ]
The audio that comes from the 'Filter section' moves on to the 'Amp section', this amplifies the signal and
controls the volume and panning.
An important controller of the Volume is the Volume Envelope. This
controls the volume contour over time.
Also in the Amp section is velocity control, this controls the response of Predator to the velocity of the
keyboard or
arpeggiator
.
Volume
This sets the overall volume of the preset.
Pan
This sets the overall pannin
g of the presets, from totally left, to
centered
, to totally right.
Vel>vol
This sets the amount volume depends on the velocity of the keys pressed (how hard you strike the key),
either normally or in the
arpeggiator
if selected.
Volume Envelope
This e
nvelope controls the volume contour over time.
An envelope is a time based modulation inside a synthesizer.
If you press a key it moves from 0% up to 100% and back to 0% when you release the key.
By using the Volume Envelope you can adjust the amount of
time it takes to do this.
The first part is known as the attack stage, this is the time it takes to reach 100%
The second part is know as the decay, this is the time it takes to reach the sustain (the final stage) level. If
this level of sustain is for i
nstance 50, the decay goes down to 50% and stays there.
Finally when you release the key, the envelope goes to 0%, during the period that you have set.
An extra feature inside Predator is Fade. Fade adds a second part to the sustain, when it is positi
ve the
sustain level goes up to 100% over a set period, if it is negative the sustain level falls to 0% over a set
period.
The amp envelope controls how the main volume of each note sounds.

30
Attack
An envelope always rises from 0 to 100% and back down to
0% when the key is released.
Attack controls how fast it rises to 100%. So if you open the Attack knob, it takes longer to go from 0 to
100%.
With Attack closed, the envelope starts at 100%.
Decay
After the attack stage, with the envelope at 100%, the de
cay stage is reached.
Decay reduces the envelope level to the sustain level over a set time. So if you use a long decay, it takes
longer to reach the sustain level.
If the sustain level is 100% the Decay has nothing to fall to and so the sustain stage is
reached immediately
after the attack.
Sustain
This is the level of the sustain stage. After the attack & decay stage, the envelope reaches the sustain stage
and remains here for as long as you have a key pressed down. The sustain level is the level of thi
s sustain
stage.
Sustain level in the volume envelope means that the level of the volume parameter will stay as long as you
hold the key(s).
Sustain fade
If the fade is set to off, the sustain remains at the sustain level i.e. it is a classic sustain
If
you open the fade amount in a positive direction the sustain changes into a second attack.
So after the Decay reaches the Sustain level it starts rising to 100% again and the time it takes to reach
100% is set by the Fade time.
If you open the fade amount
in a negative direction the sustain changes into a second decay.
So after the Decay reaches the Sustain level it stars falling to 0% again and the time it takes to reach 0% is
set by the Fade time.
Release
After you have released a key (note) the release
stage starts. The envelope then decays from the sustain
level to 0% the time it takes is set the release knob.

31
[ Free modulation ]
The free modulation section is at the bottom left hand corner, it the
arpeggiator
page is open click
on the
mod
button at the upper right corner of the
arpeggiator
screen to open the Free modulation section.
This section holds 2 Envelopes, 2 LFO's and a Modulation matrix with 8 slots.
The free modulation section is added to give you extra tools for addi
tional sound shaping options.
For instance, if you wish to make an FM synthesis sound you can address the Envelope to the FM amount
inside oscillators 2 and 3.
Or maybe you would like a stereo panning effect by an LFO.
Another option is to connect the
arp
eggiator
free or velocity row to other parameters inside Predator.
Envelope 1 and 2
Each envelope has its own destination. With Envelope 1 you also have the option to control the amount of
modulation either by midi or synth part.
The
destination
paramete
r is the one that will be changed over time by the Envelope. For example the pitch
of an oscillator. Listen to preset "Pred Brass" in the first bank.
An envelope is a time based modulation inside a synthesizer.
If you press a key it rises from 0% up to 100% and back down to 0% when you release the key. Between this
you can adjust the time how it does do this.
The first part is known as the attack, this is amount of time it takes to reach 100%
The second part is know as the decay, this is the time it tak
es to reach the sustain (the final) level. If the level
of sustain is for instance 50, then the decay falls to 50% and stays there.
Finally when you release the key, the envelope lowers to 0%, during the period that you have set.
An extra feature inside
Predator is Fade. Fade adds a second part to the sustain, when it is positive the
sustain level rises to 100% over a set period, if it is negative then the sustain level falls to 0% over a set
period.

32
Attack
An envelope always rises from 0 to 100% and
back to 0% when the key is released.
Attack controls how fast it rises to 100%. So if you open the Attack control knob, it takes longer to go from 0
to 100%.
With Attack closed, the envelope starts at 100%.
Decay
After the attack stage, with the envelope
at 100%, the decay stage is reached.
Decay reduces the envelope level to the
sustain
level over a set time. So if you use a long decay, it takes
longer to reach the sustain level.
If the sustain level is 100% the Decay has nothing to fall to and so the s
ustain stage is reached immediately
after the attack.
Sustain
Next we have the sustain stage. After the attack & decay stage, the envelope reaches the sustain stage and
remains here for as long as you have a key pressed down. The sustain level is the leve
l of this sustain stage.
Sustain level in the Free Envelope means that the "level"(amount) selected in the destination parameter
stays for as long as you hold down the key(s).
Sustain fade
If the fade is set to off, the sustain remains at the sustain leve
l i.e. it is a classic sustain
If you open the fade amount in a positive direction the sustain changes into a second attack.
So after the Decay reaches the Sustain level it starts rising to 100% again and the time it takes to reach
100% is set by the Fade
time.
If you open the fade amount in a negative direction the sustain changes into a second decay.
So after the Decay reaches the Sustain level it starts falling to 0% again and the time it takes to reach 0% is
set by the Fade time.
Release
After you have
released a key (note) the release stage starts. The envelope then decays from the sustain
level to 0%, the amount of time this takes is set by the release knob.
VEL > time
This controls how the envelope responds to the velocity of notes pressed.
If you
use a positive amount, the envelope times get shorter for higher velocities.
If you use a negative amount, the envelope times get longer for higher velocities.
KT > time
This controls how the envelope responds to the notes pressed.
If you use a positive a
mount, the envelope times get shorter for higher notes.
If you use a negative amount, the envelope times get longer for higher notes
Destination Envelope 1
This is where you can select the destination the Envelope 1 modulation.
Listen to preset "Pred Bras
s" in the first bank. In this preset the
fine pitch
of Oscillator1 is modulated by
Envelope 1.

33
Amount Envelope 1
This is where you can select the amount of Envelope 1 modulation.
This can be positive or negative modulation depending on the selected para
meter.
Listen to preset "Pred Brass" in the first bank. Again, in this preset the
fine pitch
of Oscillator1 is modulated.
Increase or decrease the amount to hear how this changes the sound.
Amount control Envelope 1
This is where you select the controller
for controlling the
amount Envelope 1
parameter. With amount you
can set the how deep it controls the
amount Envelope1
parameter.
This can be a positive or negative amount. So that you can either increase the modulation or decrease the
modulation.
Listen
to the preset "Psy FX 01" in the first bank. In this preset the Mod.Wheel controls the amount of
Envelope 1 modulation.
If you open the Mod.Wheel you will hear that the pitch fall stops in this preset.
Destination Envelope 2
This is where you can select t
he destination and amount of Envelope 2 modulation.
Listen to preset "Pluck FM" in the first bank. In this preset the
FM 3 amount
of Oscillator3 is being modulated
by Envelope 2.
Amount Envelope 2
This is where you select the amount of Envelope 2 modulati
on. This can be a positive or negative amount of
modulation depending on the selected parameter.
Listen to preset "Pluck FM" in the first bank. In this preset the
FM 3 amount
of Oscillator3 is being
modulated by Envelope 2.
Decrease the amount to hear th
e results.
LFO 1 and 2
Each LFO has its own destination. The Predator LFO continuously changes this destination control over
time.
With LFO 1 you also have the option to control the amount of modulation by midi or synth part.
An LFO (Low Frequency Osc
illator), is an oscillator at a very low pitch/frequency.
In Predator the LFO can have a frequency between 0.03Hz and 27.50Hz.
Used often is the sine waveform. But the other waveforms of the LFO can also be used and produce
interesting results.
Predator
has the option to "tempo base" the LFO, which makes it a great feature for changing sounds in a
musical tempo based way.
Waveform
Sine, Triangle, Saw Up, Saw Down, Square
and S&H
.
This is where you can set the type of wave that modulates the LFO destinati
on.
Sinus and Triangle are often used because they produce a modulation that goes up and down smoothly.
The other waveforms are more suitable for FX sounds or special sounds.
Speed
This controls how fast or slow the LFO is running. If the control
Sync is
set on then the speed is tempo
based.
Sync
If you turn Sync on, the Speed of the LFO will be tempo based. So it will synchronise with the song tempo.
To find the right setting you need to adjust the
Speed
parameter.

34
Mode
Poly, Free
and
Mono.
Thi
s controls how the LFO responds when you hit one or more keys.
Poly mode:
Each note you play has its own Filter LFO and each LFO starts from the zero position.
Poly mode is useful for complex sounding Filter LFO modulation.
Free mode:
The LFO is free r
unning and all the notes share the same LFO. The LFO is always
running and does not reset when you press a key.
Mono mode: Similar to free mode All the filter LFOs have the same value, however when you press
a key in Mono mode, all LFOs are reset to th
eir initial start position.
Destination LFO 1
This is where you can select the destination of the LFO 1 modulation.
Listen to preset "Hipass arp" in the first bank. In this preset the
Filter2 Cutoff frequency
is modulated by
LFO1.
Destination amount LFO
1
This is where you can select the amount of LFO1 changes the LFO 1 destination control.
This can be a positive or negative modulation depending on the selected parameter.
Listen to preset "Hipass arp" in the first bank. In this preset the
Filter2 Cutoff
frequency
is modulated.
Increase or decrease the amount to listen to what it does.
Amount control LFO1 destination
This is where you can adjust how much LFO 1 s amount is changed by the modulation source and also
which modulation source is used.
This
can be a positive or a negative amount. So you can increase the modulation or decrease the
modulation.
Look at preset "Hipasser arp" in the first bank as an example. You can see that in this preset the Mod.Wheel
is addressed with -81% amount.
So if you op
en the Mod.Wheel the LFO 1 modulation inside the destination will be less.
In fact with a fully open Mod.Wheel the LFO 1 does not modulate the destination anymore.
This happens because the LFO 1 destination amount is 81% and the modulation control is se
t to -81%.
Destination LFO 2
This is where you can select the destination of the LFO 2 modulation.
Listen to the preset "Hipass arp" in the first bank. In this preset the Amp panning is modulated by LFO2.
Destination amount LFO 2
This is where you can s
elect the amount of LFO2 changes the LFO 2 destination control.
This can be a positive or a negative modulation depending on the selected parameter.
Listen to the preset "Hipass arp" in the first bank. In this preset the Amp panning is modulated. Increase
or
decrease the amount to listen to what it does.

35
Free Mod 1 - 8
Predator has 8 slots to set your own modulation connection. Clicking on a modulation number label
bypasses that modulation.
There are 40 modulation sources that include midi s
ources and synth sources. These sources connect to 65
modulation destinations inside the Predators synth.
There is also an amount control for each connection. So you could for instance control a modulation by a
Free Envelope.
Source 1
-8
This is where you
can select one of the 40 modulation sources.
Listen to the preset "Control arp" in the first bank. In this preset at source 1, the Arpeggiator velocity is
selected as modulation source.
In source 2, the Arpeggiator free row is selected as modulation source
.
Destination 1
-8
Here you select one of the 65 modulation destinations.
Listen to preset "Control arp" in the first bank. In this preset destination 1 modulation is
sym
(symmetry) of
Osc.1.
In source 2, the Filter Resonance is selected as modulation dest
ination.
Destination amount 1
-8
This is where you select the amount of the modulation. This can be a positive or a negative modulation
depending on the selected parameter.
Listen to the preset "Control arp" in the first bank and do change the amount of de
stination 2 to hear what it
does.
Amount control 1-8 destination
This is where you select the controller for controlling the
destination amount
parameter. With amount you can
set how much this control alters this
destination amount
value.
This can be ei
ther a positive or a negative amount. So you can increase the modulation or decrease the
modulation.
Look at the preset "Control arp" in the first bank as an example. You can see that in this preset the Osc.1
sym (
symmetry) is addressed with 0% amount.
So
if you now open the Mod.Wheel the modulation inside the destination will be increased.

36
[ Arpeggiator ]
Predator offers a unique and very powerful
arpeggiator
, because it not only offers many features, but it can
be used al
so as a kind of sequencer. This because you have the option to tune a step and to tie a step in two
different ways.
A classic
arpeggiator
(arp) is when, instead of playing all the pressed keys at the same time, it plays them
one after another endlessly.
Next to classic arp modes Predator also offers a chord mode which triggers the played notes as a chord. The
arpeggiator
has a built in sequencer for making rhythmic patterns. Each step of the pattern sequencer offers
on/off, Tie, Slide, Tune, Velocity
sett
ings and also,
Free
modulation settings. To turn on the
arpeggiator
select the 'Play Mode section' of Predator.
To see the
arpeggiator
controls click on the
> Arp
button if the 'Free modulation section' is open.
Steps
Number of steps in the
arpeggiator sequencer. This can be from 1 to 16 steps.
Speed
Speed of the
arpeggiator
in respect to the host tempo, from ¼ of the tempo up to 4 times the tempo.
Mode
This controls how any pressed keys are arpeggio played.
Up
the notes are played in the order they
are pressed.
Down
the notes are played in the reverse order to which they are pressed.
Up/Down
the notes are played in the order they are pressed then in reverse order.
Down/Up
the notes are played in reverse order then normal order.
Random
from the
pressed keys a random one is played.
Ordered
the notes are ordered from lowest to highest and are played in that order.
Rev. Ordered
the notes are ordered from highest to lowest and are played in that order.
Ordered Up/Down
the notes are ordered and then p
layed from the lowest to highest and then back to
lowest.
Ordered Down/Up
the notes are ordered and then played from the highest to
lowest and then back to highest.
Chord
chord is a special mode where all the pressed keys are played at the same time so
producing a chord.
Mod
the
arpeggiator
can be used as modulator in "free mod" section.

37
Octaves
Determines how many octaves the
arpeggiator
plays. For instance if you set octave to 2, then it will play the
pressed notes firstly in the original octave and
then the pressed notes an octave higher. So pressing A4, C4
and E4 in the up mode with octave set to two plays A4, C4, E4 then A5, C5 and E5.
Tie mode
normal
: steps with tie do not have an individual
slide, tune, velocity
and
free
setting.
special:
step
s with tie do have still individual
slide, tune, velocity
and
free
settings.
Toggle 1 :
plays in special mode and then normal mode and so forth.
Toggle 2 :
plays in normal mode and then special mode and so forth.
Listen to the presets "SeqArp tie normal"
and "SeqArp tie seq" to see what great things you can do using this
feature.
Host sync
This turns on / off the
arpeggiator
syncing to your host sequencer. Depending on your host and also what
you are doing you may want this to be either on or
off
.
Default
is on.
Latch
When latching is turned on you dont need to keep a key pressed down for that note to be included in the
arpeggiator
. For instance if you have pressed C4 then released it and then pressed A4 and then released it,
when the latching is on the arpeggiator
will play C4 and then A4. Turning on / off the latching clears the
arpeggiator
of any notes.
Tip
: you can use also the sustain pedal to Latch and Unlatch the arpeggiator
.
File
If you press this button, you have the option to load or save the
arpeggiator
settings that you have made to
your hard disk. There is already a folder containing some arp patterns.
All settings of the
arpeggiator
are saved and loaded using this function.
The copy and paste function are there to copy a
arpeggiator
setting
into another preset inside the bank. Note
that you always need to save the new preset or the whole bank. The
Clear
function will reset all arpeggiator
parameters to their default setting.
Arp Key Entry on/off
When you press a note it will be entered into
the arp pitch's row at the current step.
C3 (midi 60 ) is set to 0 and the root key. So you should play notes in the key C.
Step length
This controls how long each arp note/step is.
Note that a 100% setting is needed if you use a
tied
step!
Swing
This
controls the swing of the
arpeggiator
, this is the difference in timing between consecutive notes and it
gives a more human/swing feel to the
arpeggiator
.
Slide
Controls the time taken for notes to slide from the previous notes pitch to the current one.
This only applies
to notes which have sliding on in their steps.
Note, always open the slide amount if you use slide in steps.
Vel / keyboard
This controls whether Predators velocity parameter settings are controlled by the
arpeggiator
sequencer
step set
tings (at 0%) or the pressed keys velocity (at 100%) or a combination of the two values.
Try preset "Arpoharp velocity keyb." and look at the setting. Here the input of the keyboard is in control. The
velocity settings in the steps make no difference.
Als
o try preset "Arpoharp velocity arp" and look at the settings. Here the input of the keyboard has no
influence. The velocity settings of the steps determine the way that Predator responds to velocity. Of course
you can also mix between these two settings.

38
Pattern/sequencer section
The main section of the arp screen is taken up with the Arpeggiator pattern/sequencer screen. This
sequencer allows you to have much more complex
arpeggiator
patterns than in most other synthesizers. The
arp sequencer can have
up to 16 steps. The number of steps is set using the
Steps selector. Each step in
the arp sequencer can have different properties that alter how that arp note is played.
The current selected arp step is shown in orange, and you can select several arp st
eps by alt + left clicking
on the start and end step. Right Clicking in the arp screen brings up an arp menu which allows you to copy,
paste, clear, move, reverse, randomize and turn off / on controls, for both selected steps or all steps.
Step 1-16 on/o
ff
This shows the arp sequencer step number. Clicking on it turns this step On or Off.
If it is set to off when an
arpeggiator
is played a rest occurs rather than a new note at this step.
Tie
Tie controls whether the note is tied at the selected step
. You can toggle tie by clicking in the step box.
When a step is in tie, the current arp note continues to play the step ahead. So it allows you to play notes
which are twice(or more) as long as the normal arp notes. In other words, you can tie notes toge
ther using
this function.
Keep two options in mind when using notes with tie:
1. You need to have the arp
step length
control set to 100% to make the steps tied.
2. You have two ways of using tie notes:
normal:
steps with tie do not have an individual slide, tune, velocity
and
free
setting.
special:
steps with tie do still have their individual
slide, tune, velocity
and
free
settings.
Listen to the presets "SeqArp tie normal" and "SeqArp tie seq" to see the excellent results
you can achieve using this f
eature.
Slide
Slide controls whether the note slides from the previous notes pitch to the current notes pitch or not. The
speed of sliding is controlled by the
Slide
amount knob. Clicking on the slide box inside turns on / off sliding.
Note
: Sliding do
es not work in Chord mode.
Tune
Tuning offset of the arp note, from -36 semitones to +36 semitones. If you use tie in a step, the tune does not
work at that step if the
arpeggiator
is in
tie mode
normal
.
Vel
Velocity of the arp sequencer step/note. T
his is used in combination with the
vel /Keyboard
control to control
how the velocity of each arp sequencer step is controlled by the arp sequencer and how much by the velocity
of the played note.
If you use tie in a step, the velocity does not work at th
at step if the
arpeggiator
is in
tie mode
normal
.
Free
Free control allows you to control other properties of Predator (i.e. panning etc) using the
arpeggiator
. This is
because you can use the Free control in the Free modulation section to modulate othe
r controls by selecting
the source to be
Arp Free
.
If you use tie in a step, the free setting does not work at that step if the
arpeggiator
is in
tie mode
normal
.

39
[ Play mode ]
In Play Mode you can control how Predator responds to notes played, eithe
r polyphonic or monophonic or by
passing them into the
arpeggiator
.
The portamento is set here as well as the chord memory.
Play modes
Poly
Synthesizer is in polyphonic mode and has 16 voices.
Mono1
Synthesizer is in monophonic mode 1 and uses 1 voice.
Only a single note can be played at once, pressing another key releases the
previous note.
Mono2
Synthesizer is in monophonic mode 2 and uses 1 voice only.
If you have a key pressed down and then press another key the new note plays, and if you
then
release this note the original held note is retriggered.
Legato
Synthesizer is in monophonic mode and uses 1 voice.
Similar to
mono2
but if you have a key pressed down and then press another key the note is
not retriggered (i.e. envelopes dont restart),
and if you release this second key the pitch
returns to the original note.
Arp
Arpeggiator is played. See
arpeggiator
section for the settings.
Unison2
This combines 2 voices on one note. If you use the
unison detune
these 2 voices are
detuned resulting i
n a phat sound.
Note in Unison2 you only have 8 notes polyphonic limit.
Unison4
This combines 4 voices on one note. If you use the
unison detune
these 4 voices are
detuned resulting in a phat sound.
Note in Unison4 you only have 4 notes polyphonic lim
it.
Unison6
This combines 6 voices on one note. If you use the
unison detune
these 6 voices are
detuned resulting in a phat sound.
Note in Unison6 you only have 2 notes polyphonic limit.
Uni detune
Unison detune controls the detuning between the stacke
d voice in
Unison2/4/6
play modes.
So Predator has to be in
unison2/4/6
mode for this feature to work.

40
Port
Portamento speed sets the time or rate of how notes change in pitch from the previous note played to the
current note played.
Port modes
Off
No portamento, the note goes immediately to the played one.
Constant Rate
The portamento changes at a constant rate, greater keyboard note ranges take a longer
time.
Constant Time
Always takes the same time to portamento between any notes.
Held Rate
Same as Constant Rate but portamento only appears if you are holding a note and then
playing another.
Held Time
Same as Constant Time but portamento only appears if you are holding a note and then
playing another.
Chord
The Chord memory control enable
s you to record chords. Up to 8 notes can be memorised and it is also
saved within the preset.
Clicking the chord gives you the options.
Off
Chord memory is
Off
and has no effect.
Learn
Chord memory will store any 8 notes you play. First, play the root
note and then the other
notes of the chord.
Play
The chord memories will be played, so if you pressed C, E & G while in chord
learn
mode,
then press D in chord
play
mode, it will play the chord D, F# & A.
Please look in the 'Advance panel'. There you have
the option to set the strum timing for the chord. This
strumming can be set to be tempo based. Listen to the "cluster" sounds inside of the "Ambient bank" of
Predator what cool things you can do with it.
The advance panel can be reached by clicking at it
in the preset section.
Demo
If you press this button a demo C3 note is generated. Great to test audio from Predator and also a good way
of previewing sounds.

41
[ Advanced Panel ]
In this section you can set the special advanced parameters and settings for each preset.
If you are in the preset section, click on the > adv
button to go to this section.
Clicking on
> Preset
returns to the preset screen.
Analog
This sets the amount of
analog
drifting, as in an old
analog
synthesiz
er.
The higher this amount, the more that Predator's oscillators will drift in pitch over time.
The setting is stored inside each preset.
Global tuning
This sets the global tuning of a preset. Default is 440Hz.
Note: this setting is stored inside each pre
set.
Over sampling mode
This sets the Predators oscillators over-
sampling mode.. You can select from 1x, 2x, 4x, 8x, 16x and up to
32x oversampling
. The higher
oversampling
levels use more CPU but the sound produced is better and there
is less aliasing n
oise.
The settings you use depend on the type of sound you wish to make for Predator.
For lead sounds and sounds played in the higher keyboard region 8x and 16x is best.
If the sound is mostly played in the lower keyboard ranges (such as bass lines), the
setting 2x or 4x is
usually good enough.
Have a listen to preset "Predator SyncLead" in the first bank and switch to a lower setting, you can hear the
changes the oversampling level has on the sound.
Tip: this is also a nice tool in case you are running
out of CPU power. Set Predator to 1x as long as you work
on your song. The moment you are ready with the Predator track, freeze or record it by using 16x
oversampling.
Note: this function is not effective inside PredatorFX.
Over filtering
This is where y
ou can set
on
or
off
an additional oversampling filter.
It reduces the very high frequencies of the oscillators, thus reducing aliasing noise. You may want to turn this
on or off depending on the sound that you are using.
Default setting is
off.
Note: t
his function is not effective inside PredatorFX.

42
Attack shape
This changes the curvature of all Predator's envelope Attack stage. From Exponential (negative values) to
linear (0) to Logarithmic (positive values). Default is linear (0).
Note: this setting
is saved inside each preset, so always check this if you build a new preset.
Decay / Release shape
This changes the curvature of all Predator's envelope Decay/Release stages. From exponential (negative
values) to linear (0) to logarithmic (positive values
). Default is exponential (-20%), which is good for most
synth sounds.
Tip: for Pad sounds 0% is an excellent setting.
Note: this setting is saved inside each preset, so always check this if you build a new preset.
Velocity shape
Changes Predator's veloci
ty curvature response to the keyboard input or host input. From exponential
(negative values) to linear (0) to logarithmic (positive values). Default is linear (0)
Note: many keyboards already have a built-in velocity curvature response setting. So the de
fault of 0 is
probably the best to use. This setting is also saved inside each preset.
Strum
In chord mode, you can set timing offset between the play chord notes, so creating strum effects. The sync
button allows you to set this timing in ms or in quart
er beats, synced to the host's tempo.
Filter Pan
This allows you to pan Filter 1 and Filter 2, when your using the 2nd Filter's Split modes. At 0% both filters
are
centered
, and at 100% Filter 1 is panned left and Filter 2 is panned right.
Default setti
ng is 50%, so if you switch a current preset to "split 1" or "split 2" the setting is 50%.
Audio input (PredatorFX only)
Audio input volume
If you use the PredatorFX in your host, you can adjust the input volume here. There are dedicated preset
banks f
or the PredatorFX with examples of how you can use PredatorFX.
FX path
If you are using PredatorFX in your host mixer you can amend the routing here.
You have two options:
> Filter
The sound thats fed to PredatorFX goes into the Predators filter and then into the fxs. Here you
can use midi input into the FX to control the volume, filter & free envelopes of PredatorFX.
To use the volume envelope you need to have
Amp Env Hold
set to off.
> FX
Here the sound goes directly into PredatorFXs effec
ts, however the synth part is still running and
can be used as a source for the vocoder or for controlling the FX parameters.
There are dedicated preset banks for the PredatorFX.
Amp env. Hold
If this function is set on the volume envelo
pe is turned off, so the volume of the amp is not changed by the
volume envelope.
If you still want to use the volume envelope, youll need to have Amp Env Hold set to
off
,
and have some midi connection into PredatorFX. Now when you press a key the volume
envelope is reset
and so the volume of the input is changed.
Info fields
Parameter read-out field
The parameter read-out field is located at the lower right corner of Predator.
If you change a parameter it displays the exact changing value and the parame
ter that has been changed. If
you also move the mouse over a control, you can see its current "value".
?
If you click this button it opens the HTML based Quick manual.

43
[ Back panel ]
If you click on the Predator Logo, the back panel is shown.
T
his is where you can read the credits and info on controls.
Next to that some global settings for Predator can be found.
Computer Keyboard on/off
You can alter the current preset and banks using the computers keyboard.
This setting is global and will work
for all Predator's active in your host.
Below the functions that are available.
-
Up arrow button
Previous preset.
-
Down arrow button
Next preset.
-
Right Arrow button
Increase preset number by 32, useful in the manager screen.
-
Left Arrow button
Decrease preset number by 32, useful in the manager screen.
-
Page Down
Next Predator bank
-
Page Up
Previous Predator bank
-
Mouse Scroll Wheel Ctrls Scrolling the mouse wheel up and down scrolls through the presets.
White text
If the red text appe
aring inside Predator is hard to read, please do switch to "white text".
This setting is global and will work for all Predator's active in your host.
Normal text
If the font type is difficult to read, you can switch to "normal text".
This setting is globa
l and will work for all Predator's active in your host.

44
[ Fx ]
In this section you can use up to 3 effects for Predator. These are connected into series.
So that if you use Fx1 it goes into Fx2 and then into Fx3.
A special feature of Predator is t
hat you can control all Fx parameters by midi or use as a Predator
modulation source. The quality of the Fx section is so good that we have created PredatorFX as a fx version
of Predator.
PredatorFX shows up in the FX list of your host and has its own pre
set banks which are stored in the
Predator/FXBanks folder.
Type
Here you can select one of the 24 effects for each of the 3 FX units of Predator.
Mix
This is where you control how much the fx output is mixed with the original signal.
Fully left only the
original signal is output and the more you move the knob to the right, the more the Fx will
be added.
If you use PredatorFX in your host mixer inside an effect send group, it is recommended to set all of the Mix
values to fully right (wet).
Pan
Controls
the Panning of the selected Fx.
Fx No
This is where you can select which one of the 3 Fx units that you want to select or edit.
Right clicking on the FX LEDs
This brings up the FX Control Menu. This shows the Fxs used and whether its bypassed or n
ot, also it
allows you to load / save / copy / paste & clear Fxs, swap the FXs around, and bypass individual FXs .
FX Sync Length allows you to set the delay length in tempo based settings or milliseconds!
The Fx number itself shows if the Fx unit is
used and whether it is bypassed or not. If the Fx unit is not used
the Fx number is shown in gray.

45
If it is used then it s shown in black if on, gray if bypassed. You can toggle between a Fx being bypassed or
not by clicking on the Fx number.
Bypass
Thi
s bypasses all the 3 Fx units at once. So only the dry signal is heard.
Mono Delay
A mono tempo based delay, great for making rhythmic grooves. For instance the 1/8* (1/8 dotted) is nice for
all kinds of arpeggiator or lead sounds.
To make the sound a
bit spacey, modulation of the length is possible which makes the delay swirl.
Length
Length of the delay set in tempo based settings.
Feedback
Feedback of the delay.
LP Filter
Low pass filter frequency.
HP Filter
High pass filter frequency.
Widen
St
ereo widening amount.
Mod Amount Delay modulation amount.
Mod Speed Delay modulation speed.
Stereo Delay
Two tempo based delays. One delay for each of the audio channels (left and Right).
This is useful for making deep pad sounds if you use 1/8* (Left
) and 1/4 (right) settings.
The
Feed Equal
option makes it possible to have equal feedback fade time, even if the left and right delay
have other length settings.
Left Delay
Left length of the delay set in tempo based settings.
Right Delay Right length
of the delay set in tempo based settings.
Feedback
Feedback of the delay.
CrossFeed
Feedback between the left / right delay.
LP Filter
Low pass filter frequency.
HP Filter
High pass filter frequency.
Mod Amount Delay modulation amount.
Feed Equal
Equal
on
makes that both L and R feedback do fade way equal, regardless
which length you use.
Comb
The Comb Filter effect uses two joined comb filters where the output of one is fed back into the other one.
Comb filters that are very short in delay a
nd has a frequency, which in turn determines the length of this
delay.
Comb 1 Freq Comb Filter 1 Frequency.
Comb 1 Feed Comb Filter 1 Feedback amount.
Comb 1 Mod Comb Filter 1 Feedback modulation amount.
Comb 2 Freq Comb Filter 2 Frequency.
Comb 2 Feed
Comb Filter 2 Feedback amount.
Comb 2 Mod Comb Filter 2 Feedback modulation amount.
Mod 1&2 Speed Feedback tempo based modulation speed.
Reverb
This effect reproduces the sound of acoustics in rooms using different sizes and reflections.
Pre-Delay
Pre-delay amount of the
reverbed
signal.
Size
Reverb room size.
Damp
Reverb damping amount.
LP Filter
Low pass filter frequency.
HP Filter
High pass filter frequency.
Spread
Stereo spreading amount.

46
Chorus
The chorus is a modulated delay signal
which is useful for thickening up the sound and making it sound
fatter .
Length
Length of the chorus.
Width
Maximum change or modulation to chorus length.
Speed
Speed that the chorus length changes.
Spread
Difference in speed between the left and ri
ght hand channels.
LP Filter
Low pass filter frequency.
Widen
Stereo widening amount.
Chorus/Delay
This is a combined chorus / delay. Specially developed in case you want to use another effect in combination
with Chorus without losing a delay function.
Length
Maximum length of the chorus in milliseconds.
Width
The amount how much the chorus length will change.
Speed
The rate the chorus length changes.
Spread
The amount the chorus length differs between left and right channels.
Delay
Length of the
chorus delay. Delay is after the chorus.
Feedback
Amount the chorus delay feeds back into the sound.
Delay Vol
Volume of the delay.
Flanger
The flanger effect is a very short delay which changes overtime, to make a whooshing type sound.
Length
Length
of the flanger.
Width
Maximum change to flanger length.
Speed
Speed the flanger length changes, this is midi tempo based.
Feedback
Feedback of the flanger.
Pan Mod
Flanger panning amount.
LP Filter
Low pass filter frequency.
HP Filter
High pass fi
lter frequency.
Phaser
A phaser is a combination of filters that can create a phasing effect.
Stages
Number of stages in the phaser.
Pitch
Pitch of the phaser.
Feedback
Feedback of the phaser.
Width
Maximum change to phaser pitch.
Speed
Speed th
e phaser length changes, this is midi tempo based.
Spread
Amount the phaser stages are spread from the central pitch.
Pan Mode
Speed the phaser pans from the left / right hand channels.

47
Wah/Delay
This effect produces a wahwah type effect by running the sound through a lowpass
-filter thats frequency is
changed over time. There is a built in delay which adds delays to the sound.
Low Range Lowest Frequency of the filter. Here you can adjust how deep the LP filter ranges. The more
you move the dial to the left, the lower the filter goes.
High Range Highest Frequency of the filter. Here you can adjust how high the LP filter goes.
The more you move the dial to the right, the higher the filter goes.
Speed
The rate the filter frequency changes
over time. Tempo based.
Resonance Controls the resonance of the used low-pass filter.
Delay
Length of the wahwah delay. This delay is after the WahWah FX.
Feedback
Amount the wahwah delay feeds back into the sound.
Delay Vol
Volume of the delay.
Distort (distortion)
This distorts the audio by saturating, limiting, rectifying and bandpass filtering the input.
Limit
Hard limiter threshold.
Rect
Amount of rectification, from -100% (no change), 0% half to 100% - full.
Distort
Amount of Distortio
n.
Tone
Frequency of the band pass filter.
Emphasis
Bandwidth of the band pass filter.
Post-Boost
Amount the filter signal is boosted.
M-
Wheel>Tone Amount the band pass filter frequency is changed by the modulation wheel.
Low-Fi
This effect reduce
s the digital audio quality of the sound, which results in old style computer sound effects.
Bits
Bit level of the signal.
Sample Rate
Sample rate of the signal.
LP Filter
Frequency of the low pass filter.
M-
Wheel>Filter Amount the low pass filter fre
quency is changed by the modulation wheel.
Amp Sim
Several types of amp types are simulated. Great for creating edgy sounds.
Type
Type of amp simulation. Settings are:- None, 4x10" guitar speakers, 4x12" guitar speakers
,
Bass speaker, Combo speaker
and
Radio speaker
.
The
none
speaker setting is useful if you want to only use the distortion in the FX effect.
Distort
Amount of distortion added to the sound. Also works if the
none
speaker setting is selected.
Bass
Bass EQ Volume. Adds or removes low end fr
om the speaker simulator.
Treble
Treble EQ Volume. Adds or removes high frequencies from the speaker simulator.
Volume
Volume boost. Adjusts the volume of the processed sound.
Note
: with the Amp simulator FX it is recommended to fully open the
Mix
control
knob (wet).
WaveShaper
The waveshaper effect shapes the in-going sound to a kind of distorted version of it.
It is then passed through a low pass filter which its frequency is changed over time by a tempo based LFO.
Top Amt
The amount positive input is
waveshaped.
Bottom Amt The amount negative input is waveshaped.
Rect
The amount the sound is rectified, at -100% the sound goes through as normal, at 0% no
negative output is heard and at 100% any negative output is made positive.
Filter
Low pass filter f
requency. This filter does not filter the high frequencies.
LFO Amount The amount the low pass filter frequency can change.
LFO Speed The rate the low pass filter frequency can change.

48
Stereo Widener
This effect widens the stereo sound.
Widen
Stereo wid
ening amount.
Width
Maximum change to the stereo widening amount.
Speed
Speed at which the stereo widening amount changes.
LP Filter
Low pass filter frequency.
HP Filter
High pass filter frequency.
AutoPan
Autopan pans the sound between the left and righ
t speakers.
Amount
Amount the autopan moves the sound in the stereo field.
Speed
The rate at which the autopan moves the sound. This is Tempo based so for example 1/1
does mean that the pan moves from left to right within 1bar.
Note: for maximal effec
t you also need to open the Fx Mix
control knob fully right (wet).
Gator
The gator uses a 16 step sequencer to alter the volume of the sound to give a trancegate type effect.
Basically it is a sequencer controlled audio gate.
Speed
The speed of the ga
tor. Speed is time based from 16/1 up to 1/32T speed. If for example the
speed is set to 1/1 each step is 1/16 note. If for example the speed is set to 2/1 then each step
is 1/8 of a note.
Smooth
How much the volume changes are smoothed out. This helps to
avoid clicks.
Mode
Whether the gator affects the left & right channels, the left channel only or the right channel
only or both.
Sync
Turns on / off the host syncing. For example if you do not hear the gator FX in standalone
host, then switch to
off
. In
side a host sequencer program the best setting is
auto
or
sync
. The
default setting in most presets is
auto.
So if you have problems with these settings, try
off
.
Left
Left channel sequencer. Clicking here turns on / off that step in the gator. When a st
ep is on
(light colour) the gate is open and you can hear the audio. When a step is off (dark colour) the
audio is muted.
Right
Right channel sequencer. Clicking here turns on / off that step in the gator. When a step is on
(light colour) the gate is open
and you can hear the audio. When a step is off (dark colour) the
audio is muted.
Swing
Adds swing to the timing of Gator
Note: FX
Mix
sets how much of the Gator FX is added. With the Gator FX it is wise to fully open the
Mix
control knob (wet).
Vocoder
Predator features a 32 band vocoder. The vocoder can use either samples or sound (input) that is fed into
Predator. The vocoder fx means that the sound of the sample or input, will be altered by the sound of
Predator and the vocoder fx. So for example if you use a speech (sample or input) it can create a classic
robot "vocoder " effect.
The base sound of a vocoder is the "carrier". This can be Predators synth sound, but also the input itself. If
you use the Predator synth as "carrier" you can produce a p
olyphonic vocoder sound. For instance you can
take a drumloop and play this vocoder
-wise in a polyphonic way, and the drum loops will alter Predators
output.
Listen to preset "voco-drummer" in the first preset bank. There are more vocoder example presets included
that show how to use the vocoder.
Keep in mind that if you change the sound of the "carrier" (which can be Predators own synth sound), that
the vocoder sound overall will change too.
The modulator is the sample or input. So this audio signal is
used by the vocoder to alter Predators output.

49
How to use it:
-
Inside Predator:
You can use the Vocoder inside Predator with a sample as a source or an audio input if the audio host
allows you.
The most common use has Predators output as the "carrier
" for example the preset
"voco-
drummer" allows you to play polyphonic vocoder sounds.
-
Inside PredatorFX:
You can use the Vocoder inside PredatorFX as well.
Firstly you select PredatorFX as an "insert" effect in your host mixer. This allows the vocoder
to receive an
input from the host.
PredatoFX needs to be in >FX mode, this means that the synth part of PredatorFX works as normal and can
be used as the carrier.
You can use the vocoder in two ways in PredatorFX, either you can set it so the left chann
el
vocodes
the
right channel, or the synth part of PredatorFX is
vocoded
by the audio input.
In order to get the synth part of PredatorFX to work you need to be able to trigger PredatorFX's oscillators
using midi. So for instance in Cubase SX you need to set up a midi track that is output as PredatorFX.
Note: you can only use the Vocoder in one FX slot, if you try to use two Vocoder slots, it will cause the sound
to be distorted.
The vocoder has several controls, these being the upper dials and the lowe
r buttons.
Samples
Clicking the long sample button allows you to load in a sample to use as the modulator in the Vocoder. You
can use either wav or aiff samples at 8/16/24 bits, mono or stereo wav and at any of the most common
sample rates. The sample c
an be up to 3,000,000 sample points long (more than a minute at 44.1Khz
sample rate).
You can either load in samples that are stored in the Predator Sample directory (or sub-directories under it)
or stored anywhere else on your hard disk.
After you have loaded a sample, its name is shown here (with a * at the end if the sample is not in the
sample directory).
If you use samples in the Predator Sample directory, and you move onto another computer make sure the
same sample is stored in the Predator Sample d
irectory on the new machine, then the vocoder will work.
This is because for samples stored in Predator sample directory, the relative path is stored, so presets
should work on any machine with the right samples. You can use samples stored in other places
, but on
different machines these presets may not work unless the same sample is stored in exactly the sample
place.
Near the sample load box are several buttons to alter the properties of the Vocoder:
Sample / Input
This selects if the vocoder uses a s
ample or the sound (input) going into the vocoder.
In PredatorFX, this button is changed to LR / Synth, this means you can either have it so that PredatorFX
uses the L channel signal as modulator and R channel signal as carrier, or it can use the input sig
nal (in
mono) as the modulator and PredatorFX synth output as the carrier.
Car Mod / Mod Car
This selects whether the sound in (sample or input) is the modulator or the carrier in the Vocoder. For most
purposes you want it set so that the sound in is the
modulator i.e. Car Mod, but you can experiment with the
other settings, here the sound of Predator modulates the input (the sample or input).
One Hit / Looping
This controls whether the sample plays only once when you press a key (
One Hit
) or loops cont
inuously
(
Looping
).

50
Reset Off / On
This controls whether the sample resets, if you have a key pressed and you then press another one. The
sample always starts from its start position, if you have no key pressed and then press one.
Next are the dials
controlling the Vocoder filter properties.
Mix
This controls how much the dry sample or input is mixed with the Vocoder output.
BandWidth
Controls the width of the
vocoder s filters, smaller settings give a sort of ringing comb filters sound, larger
on
es a more traditional vocoder sound.
Shift
This controls how much the vocoder output is pitch shifted, from -36 semitones to +36 semitones.
LP Filter
Built in lowpass filter.
HP Filter
Built in highpass filter.
Boost
Overall volume of the vocoder, from -40db to 0db.
In Volume
The volume of the input into the vocoder (either from a sample or via direct input into Predator).
Smpl Tune
Tuning of the sample used by the vocoder, it ranges .from -12 semitones to +12 semitones.
Very useful if you have a dru
m loop and you want to adjust its tempo
.
FX Filter
This is a analogue modelled stereo Multimode Filter, which has all the properties of Predator s main filter.
Type
Sets the type of filter, offering 6dB LowPass and HighPass, 12dB, 18dB and 24dB LowPass,
HighPass, 12dB and 24dB BandPass, 12dB and 24dB Notch and Comb Filter modes.
Frequency Sets the Cutoff frequency of the filter.
Q
Sets the Resonance level of the filter.
Distort
Sets the pre-filter distortion of the filter.
Smooth
Sets the pre-filter dist
ortion as
smooth
or
edgy
in sound.
Equalizer
The equalizer uses 5 bands at 60Hz, 200Hz, 600Hz, 2000Hz and 8000Hz frequencies. The control knob for
each band controls that bands volume, from -20db to +20db
When using the equalizer, it is recommended that y
ou a fully wet signal.
Compressor
The compressor is an audio effect that changes the dynamic range and response of a signal.
Threshold This sets the threshold on which the compressor starts to work.
Ratio
This sets the amount of dB reduction.
So with a
ratio setting of 1:2, and the signal exceeds the
threshold by 4dB then it is reduced by 4db/2 = 2db .
Attack
This sets how fast the compressor kicks in.
Release
This sets how long the compressor takes to react to a reduction in volume.
Volume
This allows y
ou to correct the volume after the signal has been compressed.

51
Note: FX
Mix
sets how much of the Compressor FX is added. With the Compressor FX it is wise to fully open
the
Mix
control knob (wet).
Ensemble
This effect uses 6 choruses, each having its own
setting, to give the effect of several copies of the sound
playing at once.
Length
Length of the ensemble effect.
Width
Maximum change to
ensemble
length.
Speed
Speed the ensemble length changes.
Feedback Feedback of the choruses.
Ensemble
Amoun
t the choruses differ from each other.
Spread
Amount the choruses are panned to the left or right.
Cabinet
Several types of cabinet types are simulated. Great for creating edgy sounds.
Type
Type of cabinet simulation. Settings are:- None, Fende
r, Marshall &
Off Axis. The none
speaker setting is useful if you want to only use the distortion in the FX effect.
Distort
Amount of distortion added to the sound. Also works if the none cabinet setting is selected.
Bass
Bass EQ Volume. Adds or removes low end from the cabinet simulator.
Treble
Treble EQ Volume. Adds or removes high frequencies from the cabinet simulator.
Volume
Volume boost. Adjusts the volume of the processed sound.
Note: with the Amp simulator FX it is recommended to fully open the Mix control knob (wet).
MultiDistort
Allows you to use several different types of distortion effects
Type
Different type of distortion allowed, they are
None, Atan, Cos, Cross, Foldover, Fuzz, Limiter, Overdrive, Power, Rectifier, Saturator,
Square,
None means no distortion is used
Pre-boost How much the signal is boosted before going into the distortion
Amount 1 Control how much the signal is distorted
Amount 2 Additional distortion parameter for Fuzz
Normalize How much the output volume is normaliz
ed to the input volume, at 100% the output volume
should be the same as the input volume.
Low Filter Post distortion low-pass filter
High Filter Post distortion high-pass filter
Post-Boost How much the output of the distortion is boosted.
AutoWah
Autowa
h uses a low/bandpass filter to filter the signal using the volume of signal to alter the frequency of the
filter.
Type
Type of auto-wah filter, lowpass or bandpass
Low Frequency Lowest frequency of auto-wah filter
High Frequency Highest frequency of auto-wah filter
Amoun
t
How much the volume of the signal alters the filter's frequency
Q
Resonance / Bandwidth of autowah filter
Smooth
How much signal volume is smoothed.

52
Fx modulation matrix
Below the FX section you can find two modulation matrix slots.
Using these slots you can connect different midi or Predator synth parts to the FX parameters. There are 40
modulation sources and you can use any FX parameter as a destination. For instance you can increase the
Reverb length by using the Mod.Wheel.
Lis
ten to preset "Jump Flip One" in the first bank.
Source
Here you can select the source that will modulate the Fx parameter.
Amount
Here you can set how much the modulation source will alter the Fx parameter.
Destination Here you can select the destinati
on FX control, all the FX parameters are shown here,
though some work better using modulation than others, its best to experiment and see the
results.

53
MIDI Implementation Chart
Product: Rob Papen PREDATOR
Version 1.5.5 Date: 1 Feb 2009
Manufacturer
R
ob Papen / RPCX
Function
Transmitted Recognized Remarks
Basic Channel
Default
no
no
Changed
no
no
Mode
Default
no
Omni
Changed
no
no
Note Number
no
yes
True Voice
no
no
Velocity
Note On
no
yes
No
te Off
no
no
Aftertouch
Poly (Key)
no
yes
Mono (Channel)
no
yes
Pitch Bend
no
yes
Control Change
no
yes
Program Change
no
yes
Bank Change
no
yes
System Exclusive
no
no
System Common
Song Position
no
no
Song Select
no
no
Tune Request
no
no
System
Real-time
Clock
no
yes
Commands
no
yes
Aux Messages
Local On/Off
no
no
All Notes Off
no
yes
Active Sensing
no
no
System Reset
no
yes

54
Ap
pendix A: wave types
Wave types1-128.
Analogue types:
Sine, Saw, Square, Triangle, Rez 1, Rez 2, Rez 3, HalfSine, SineSaw, SineSqr, SineRez, SawSqr, SawRez,
SqrRez, White Noise, Pink Noise.
Additive wave types:
Harmonic 1, Harmonic 2, Harmonic 3, Harmon
ic 4, Saw 2, Saw 3, Saw 4, Saw 5,
Sqr 2, Sqr 3, Sqr 4, Sqr 5, Triangle 2, Triangle 3, Glass, Hollow.
Octave, Overtone, Rez 4, Rez 5, Digix, Organ 1, Organ 2, Organ 3, Church Organ, Whistle, Vocal A, Vocal
E, Vocal O, Vocal U, Vox 01, Vox 02, Vox 03, Vox 04
, Vox 05, Vox 06, Vox 07, Vox 08, Vox 09.
Spectral wave types:
Spectral 01 - Spectral 73.
Appendix B: LFOSync Settings
Off, 16/1*, 16/1, 16/1T, 8/1*, 8/1, 8/1T, 4/1*, 4/1, 4/1T, 2/1*, 2/1, 2/1T, 1/1*, 1/1, 1/1T, 1/2*, 1/2, 1/2T, 1/4*,
1/4, 1/4T, 1/
8*, 1/8, 1/8T, 1/16*,1/16, 1/16T, 1/32*, 1/32, 1/32T.
Note: "T" stands for Triplet and "*" stands for a dotted note. In the case of a dotted note, the note duration is
equal to 1.5 times its original undotted value.
Appendix C: Delay Sync Settings
Of
f, 1/2, 1/2T, 1/4*, 1/4, 1/4T, 1/8*, 1/8, 1/8T, 1/16*,1/16, 1/16T, 1/32*, 1/32, 1/32T.
Note: "T" stands for Triplet and "*" stands for a dotted note. In the case of a dotted note, the note duration is
equal to 1.5 times its original undotted value.

55
Appe
ndix D: Modulation Sources and Destinations
Modulation Sources Synth:
Free Envelope 1&2, Filter Envelope
Bipolar.
Free LFO 1&2, Filter LFO
Bipolar.
Arpeggiator Velocity
The Velocity row settings of the Sequencer. Bipolar.
Arpeggiator Free
The Fre
e row settings of the Arpeggiator. Bipolar.
Offset
C
onstant value to extend the range of controls. Bipolar.
White Noise
White noise
Pink Noise
Pink noise
Input
Audio input into Predator
Osc 1
Output of oscillator 1
Osc 2
Output o
f oscillator 2
Osc 3
Output of oscillator 3
Osc Mix Out
Output of all oscillators
Filter Out
Output of Filter
Modulation Sources Midi:
Modulation Wheel
The MIDI modulation wheel (MIDI CC 1) (unipolar ).
Mod.Whl.+Aftertouch
The MIDI modula
tion wheel combined with Aftertouch.
Channel Aftertouch (mono)
One aftertouch value is used for the whole keyboard. All notes being played
on a specific channel share the same monophonic aftertouch value. This is
how most keyboards work (unipolar).
Poly
Aftertouch
The Aftertouch value of each separate note is used as a modulation source.
Your MIDI keyboard must support this. If this doesn't work it is likely that
your keyboard has no polyphonic aftertouch (unipolar).
Velocity
The MIDI note-on velocity in
formation. The harder the key is hit, the higher
the modulation value (unipolar).
Pitch Bend
The value of the pitch-Wheel which is taken as modulation source. It is
usually
centered
which produces no change in pitch, with top value
producing maximum posit
ive values and bottom value producing maximum
negative values.
Note
The note being played with a linear response. The modulation value follows
the note number (bipolar).

56
Breath Controller
MIDI CC 2 (unipolar).
Foot Controller
MIDI CC 4 (unipolar).
Expression Contr.
MIDI CC 11 (unipolar).
CC16 Controller
MIDI CC 16 (bipolar).
CC17 Controller
MIDI CC 17 (bipolar).
CC18 Controller
MIDI CC 18 (bipolar).
CC19 Controller
MIDI CC 19 (bipolar).
CC20 Controller
MIDI CC 20 (bipolar).
CC21 Contro
ller
MIDI CC 21 (bipolar).
CC84 Controller
MIDI CC 84 (bipolar).
CC85 Controller
MIDI CC 85 (bipolar).
CC86 Controller
MIDI CC 86 (bipolar).
CC87 Controller
MIDI CC 87 (bipolar).
CC88 Controller
MIDI CC 88 (bipolar).
CC89 Controller
MIDI CC 8
9 (bipolar).
CC90 Controller
MIDI CC 90 (bipolar).
Modulation Destinations:
Global:
Global Pitch
Main pitch control in semitone ranges.
(-
48 to +48 semitone).
Port Time/Rate
Portamento time/rate control.
Pitch modulation LFO Speed
Main pitch
LFO modulation speed control.
Pitch modulation LFO Amount
Main pitch LFO modulation amount control.
Osc 1:
Volume
Volume control of oscillator 1.
Semi tuning
Pitch control of oscillator 1 in semitones
(-
48 to +48 semitones).
Fine tuning
Pitch
control of oscillator in cents
(-
100 to +100 cent).
Symmetry waveform
Symmetry control of the waveform.
Sub-oscillator Volume
Volume of the sub-oscillator square wave.
PWM Amount
Amount of PWM modulation control.
PWM Speed
PWM LFO speed control.
Osc 2 and 3:
FM amount
Amount of FM or Ring modulation.
Volume
Volume control of oscillator.
Semi tuning
Pitch control of oscillator in semitones
(-
48 to +48 semitones).
Fine tuning
Pitch control of oscillator in cents
(-
100 to +100 cent).
Symmetry waveform
Symmetry control of the waveform.
Sub-oscillator Volume
Volume of the sub-oscillator square wave.
PWM Amount
Amount of PWM modulation control.
PWM Speed
PWM LFO speed control.
Filter:
Filt Cutoff Frequency
Cutoff Frequenc
y control.
Filter Resonance (Q)
Resonance control or the amount of feedback of the comb filter.
Filt Distortion
Controls the pre-filtering saturation distortion.
Filter Envelope Amount
Filter Envelope amount control.
Filter Env Speed
Filter Envelo
pe speed control.
Filter LFO Speed
Filter LFO speed control.
Filter2 Cutoff Frequency.
Filter2 Cutoff Frequency control.

57
Filter Attack
Filter Envelope attack amount
Filter Decay
Filter Envelope decay amount.
Filter Sustain
Filter Envelope sust
ain amount.
Filter Fade
Filter Envelope fade amount.
Filter Release.
Filter Envelope releaseamount
Amp:
Volume
Volume control.
Panning
Panning control.
Amp Env Speed
Volume Envelope speed control.
Amp Attack
Amp Envelope attack time
Amp
Decay
Amp Envelope decay time.
Amp Sustain
Amp Envelope sustain amount.
Amp Fade
Amp Envelope fade time.
Amp Release.
Amp Envelope release time
Free Envelope/LFO:
Envelope1 Speed
Envelope 1 speed control.
Envelope1 Amount
Envelope 1 amount
control.
Envelope2 Speed
Envelope 2 speed control.
Envelope2 Amount
Envelope 2 amount control.
Envelope1 Attack
Envelope 1 attack time
Envelope1 Decay
Envelope 1 decay time.
Envelope1 Sustain
Envelope 1 sustain amount.
Envelope1 Fade
Envelope
1 fade time.
Envelope1 Release.
Envelope 1 release time
Envelope2 Attack
Envelope 2 attack time
Envelope2 Decay
Envelope 2 decay time.
Envelope2 Sustain
Envelope 2 sustain amount.
Envelope2 Fade
Envelope 2 fade time.
Envelope2 Release.
Envelo
pe 2 release time
LFO1 Amount
LFO1 amount control.
LFO1 Speed
LFO1 speed control.
LFO2 Amount
LFO2 amount control.
LFO2 Speed
LFO2 speed control.
Predator User Guide version 1.5.5a
 Loading...