


Copyright:
LinPlug Virtual Instruments GmbH, 2006 All rights reserved. Rob Papen Sound Design & Music, 2006 All rights reserved.
Concept: |
Rob Papen and Peter Linsener |
Instrument: |
Peter Linsener and Pavol Markovič |
Graphics: |
Shaun Ellwood (www.decoderdesign.com) |
Sounds: |
Rob Papen (except for Noisia and Reyn Banks) |
Manual: |
Chris Share, Jacky Ligon |
Thanks to (in alphabetical order) Dutch Synth Forum, Ivan Willems, Nico Herz, Patrick Anglard, Patrick Robert, Summa and all beta testers
All technical specifications of the products specified in this manual may be subject to change without notice. The documents may not be changed, especially copyright notices may not be removed or changed. Rob Papen is a trademark of Rob Papen Sound Design & Music. Albino is a trademark of Rob Papen Sound Design & Music and LinPlug Virtual Instruments GmbH. LinPlug is a trademarks of LinPlug Virtual Instruments GmbH. VST is a registered trademarks of Steinberg Media Technologies GmbH. All other trademarks are the property of their respective owners.
Rob Papen Albino 3.0 |
2 |
Welcome
Thank you for purchasing the Rob Papen Albino 3.
The Albino 3 is a fully-professional, highly-flexible, easy-to-use, fourthgeneration virtual instrument designed for creating music on your personal computer.
The Albino 3 is the unique result of a collaboration between Virtual Instrument designer Peter Linsener and Dutch sound designer Rob Papen.
The Albino 3's key features include high quality presets in a wide range of styles, an easy-to-use interface, highly flexible oscillators, four types of stereo filters, an enormous range of processing and modulation options, a powerful, flexible arpeggiator and a layer system that allows you to combine up to four layers in one preset.
This manual describes all aspects of the Albino 3 synthesizer and is designed so that your use of this software is as efficient and as pleasurable as possible.
We feel that the Albino 3 is exceptional because of its audio quality, its features and especially because of the presets programmed by Rob Papen. We hope you get a lot of pleasure using the Albino 3 Synthesizer and that it becomes an inspirational part of your music-making.
Rob Papen and the LinPlug team, April 2006
Rob Papen Albino 3.0 |
3 |
Table of Contents |
|
INSTALLATION................................................................................ |
6 |
WHAT'S NEW IN ALBINO 3............................................................. |
7 |
FEATURES....................................................................................... |
8 |
OVERVIEW.................................................................................... |
10 |
CONTROLS.................................................................................... |
12 |
LAYERS.......................................................................................... |
13 |
OSCILLATORS.............................................................................. |
16 |
DIGITAL OSCILLATOR............................................................. |
17 |
ANALOG OSCILLATOR............................................................. |
19 |
NOISE OSCILLATOR............................................................... |
21 |
AUDIO INPUT........................................................................ |
22 |
FILTERS......................................................................................... |
23 |
SILK FILTER......................................................................... |
24 |
CREAM FILTER..................................................................... |
25 |
SCREAM FILTER.................................................................... |
26 |
COMB FILTER....................................................................... |
27 |
AMP................................................................................................ |
29 |
ENVELOPES.................................................................................. |
31 |
ADSFR ENVELOPE.............................................................. |
31 |
5 STAGE ENVELOPE.............................................................. |
33 |
MODULATION................................................................................ |
35 |
QUAD LFO......................................................................... |
35 |
MODULATION MATRIX............................................................. |
37 |
THE ARPEGGIATOR................................................................ |
39 |
Mode............................................................... |
39 |
Clk (Clock) ..................................................... |
40 |
Retrigger ........................................................ |
40 |
Step Display.................................................... |
40 |
Length (Len) .................................................. |
41 |
Swing (Swi)..................................................... |
41 |
Step (Stp)........................................................ |
41 |
Velocity (Vel) .................................................. |
42 |
Octave (Oct) .................................................. |
42 |
EFFECTS....................................................................................... |
43 |
Rob Papen Albino 3.0 |
4 |
DELAY................................................................................ |
44 |
CHORUS AND CHORUS 2........................................................ |
45 |
PHASER.............................................................................. |
46 |
FLANGER............................................................................. |
47 |
FILTER................................................................................ |
48 |
REVERB.............................................................................. |
50 |
STEREO DELAY.................................................................... |
51 |
GATOR............................................................................... |
52 |
WAHWAH........................................................................... |
54 |
COMPRESSOR....................................................................... |
55 |
LOFI................................................................................... |
56 |
MASTER......................................................................................... |
58 |
PRECISION........................................................................... |
58 |
ECS................................................................................. |
59 |
CHORD (MEMORY)................................................................ |
59 |
GEN................................................................................... |
60 |
PRESET BROWSER / FILE CONTROLS........................................ |
60 |
GLIDE................................................................................. |
61 |
SINGLE TRIGGER/VOICES........................................................ |
61 |
VOLUME CONTROL................................................................ |
62 |
REAR PANEL................................................................................. |
63 |
OPTIMIZING CPU USAGE............................................................ |
65 |
GLOSSARY.................................................................................... |
66 |
MIDI IMPLEMENTATION CHART................................................. |
69 |
APPENDIX A: DIGITAL OSCILLATOR WAVEFORMS AND |
|
RANGES......................................................................................... |
71 |
APPENDIX B: LFO/ARPEGGIATOR SYNC SETTINGS ............. |
71 |
APPENDIX C: DELAY SYNC SETTINGS...................................... |
71 |
APPENDIX D: MODULATION SOURCES AND DESTINATIONS.... |
|
72 |
|
MODULATION SOURCES.......................................................... |
72 |
MODULATION DESTINATIONS.................................................... |
74 |
APPENDIX E: USING TUN FILES................................................. |
77 |
CREATING TUN MICROTUNING FILES WITH SCALA..................... |
77 |
SPECIFYING THE REFERENCE FREQUENCY OF A MICROTUNING........ |
78 |
Rob Papen Albino 3.0 |
5 |
Installation
Installation on PC
The Albino 3 comes with its own Installer. After downloading the Albino 3 you will find a file named "AlbinoInstaller3xx.exe" located in your download folder. Start this program to begin the installation process. The Installer will guide you through the installation process.
Make sure you choose the right directory, so your host software finds the Albino3. Refer to your host software's manual if you are unsure about where the host software plug-in directory is located.
The instrument file "Albino3.DLL" and the Albino 3 manual and presets will be placed in the chosen directory. The next time you start your host software the Albino 3 will be listed in the RTAS or VST Instrument list.
Installation on Mac
The Albino 3 comes with its own Installer. After downloading the Albino 3 you will find a file named "AlbinoInstaller3xx.dmg" located in your download folder. Double-click this file to decompress and open the image, then double-click the installer program to begin the installation process.
You will be guided through the installation process. The instrument file "Albino3" and the Albino 3 presets will now be placed in the right directory for virtual instruments on your Mac. The next time you start your host software the Albino 3 will be listed in the AU / RTAS / VST Instrument list.
Common to Mac and PC
After you've installed and opened the full version of the Albino 3, go to the instrument's rear panel. The S/N edit box should read "Enter here". Enter the serial number you have received into the S/N edit box. If the serial number has not been entered or it has been entered incorrectly, the full version of the Albino 3 will not play any notes. To switch back to the main edit screen click the Albino 3 logo on the rear panel.
Now send the Albino 3 a few note-on messages. After the Albino 3 receives the first few note-on messages it automatically becomes registered.
If you have any questions regarding the installation of Albino 3 please contact our support team at www.linplug.com/support/support.htm.
Rob Papen Albino 3.0 |
6 |
What's New in Albino 3
In comparison with its predecessor the Albino 2, the Albino 3 contains a host of new features intended to make your music-making more efficient and enjoyable. These new features are listed below:
Each preset can now be made up of 4 individual layers.
Each layer features controls for Visibility, On/Off, Activity, Location, Name, Browse Previous, Browse Next, Load, Save, Volume, Pan, Note Offset (Transpose), Filter Control Source (Pitchwheel, Modwheel and Aftertouch), Key Range and Velocity Range.
Wah wah effect.
Compressor effect.
LoFi effect.
Enhanced reverb effect including controls for diffusion, modulation, modulation speed and a sync menu for predelay.
The cutoff-modulation-speed of the filter in the Effects section can be synced to song tempo.
Oscillator 1 can be used as an audio input so that external audio can be processed.
Each Oscillator now has its own Spread control.
Each Oscillator now has a Free-run mode.
Each ADSFR Envelope now has 4 additional slope/curve settings.
Both envelope types now have a Sync control which switches between Time and Sync modes.
Filter Saturation now has 4 different modes.
2 new types of filter: Scream and Comb.
Oscillator 2 can be used to modulate Filter1FM
Oscillator 4 can be used to modulate Filter2FM
The Bend Range control now has separate controls for Up/Down.
The Analog Oscillator now has a control for the sub-oscillator intensity.
The Modulation Matrix now has 16 slots.
Rob Papen Albino 3.0 |
7 |
Features
The Albino 3 contains a range of features designed to make your musicmaking more efficient and enjoyable. These features are described below:
Sound Presets consist of 4 separate Layers for rich, complex sound synthesis.
4 oscillators per Layer, 4 types. Oscillator modules include Analogtype, Digital-type, Noise-type and Audio Input-type. FM modulation and AM modulation. Oscillator Sync in Analog Oscillator 2 and 4. Various filter routing options.
Stereo Filters, 4 types. Filter modules include Silk-type, Cream-type, Scream-type and Comb-type. 3 multimode filters (Silk, Cream and Scream), each with a different basic design thus producing different sounding filters. Filters are stereo with panning and panning modulation options.
Saturation knob precedes each filter to add overdrive to the sound before it enters the filter. Four types of Saturation are available.
8 envelopes, 2 types. ADSFR type and 5-stage envelope type with loop function. Each envelope stage has separate slope/curve settings. Each oscillator has its own volume envelope.
4 LFOs with various waveforms and midi-syncable. LFO Waves have adjustable start-phase and waveform-symmetry. LFOs can also be set to mono mode.
Modulation Matrix which includes 16 routings with 26 sources and 47 destinations. Separate control section for Velocity to: AMP, Filter 1 and Filter 2.
Arpeggiator with 32 step rhythm sequencer, step length, clock settings, various modes including modulation and chord, switchable keyboard retrigger, swing, velocity mix, save/load functionality
Spread function for each Oscillator for ultra fat detuned sounds
Chord memory mode (saved with the preset)
Rob Papen Albino 3.0 |
8 |
4 effects units per layer each containing 12 stereo effects including two Choruses, two Delays, Filter, Phaser, Reverb, Flanger, Gator, Wah Wah, Compressor and LoFi.
Mono/Polyphonic Portamento/Glide featuring Fingered mode, switchable constant Time/constant Rate and Auto-Bend Modes.
Sound programs are stored directly on hard disk so providing a virtually unlimited number of storage locations. Sounds are sorted into stylemaps for easy search. Integrated Sound Browser, MIDI program change supported.
Adjustable Precision setting for recreating the warmth of true analog synthesizers.
Gen (randomize) function for experimentation and fun!
Microtonal support (Scala file import) for different scales (Indian, Arabic, etc.)
Adjustable keyboard velocity response curve.
32-voice polyphony.
Adjustable voice limit (mono, 1...12, oo).
MIDI activity display (also triggers a C3 when clicked)
Several parameters are located on the "rear panel" so they are not changed accidentally during use.
Controller hardware (faderbox or synth) settings can be saved and restored.
Dial operation is switchable between circular and linear modes.
Rob Papen Albino 3.0 |
9 |
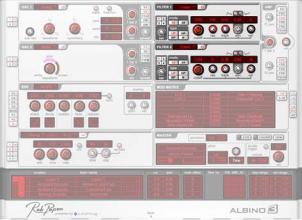
Overview
The Albino 3 is a 32 note-polyphonic virtual subtractive-style synthesizer with some extraordinary features. The synthesizer has a layered modular design that includes various oscillator modules, filter modules, envelope modules and effects modules.
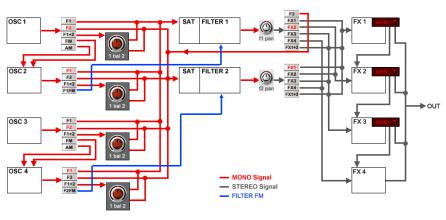
The block diagram below shows the signal flow within the Albino 3 synthesizer:
An Albino 3 Preset is made up of one to four individual Layers. Each Layer is divided into 7 sections: Oscillator, Filter, Effects, Envelope, Modulation Matrix/LFO, Arpeggiator and Master.
Audio signals are generated by an oscillator that gets pitch information from the synthesizer's MIDI input. The MIDI input is automatically connected to MIDI output of the host software. Albino receives MIDI on all Channels simultaneously.
The Albino 3 has four oscillators per Layer. Each oscillator has its own amplitude envelope. Each oscillator's pitch can be controlled using the Modulation Matrix, with all four oscillators being controlled by a single modulation envelope.
Rob Papen Albino 3.0 |
10 |
The output of any or all of the oscillators can be routed to either Filter 1, Filter 2 or both in series or parallel as shown above. The filter modifies the frequency spectrum of the oscillator's output. Both filters are stereo and completely independent, and each has an envelope for controlling its cutoff parameter.
Oscillators one and three have a further routing option. Their output can be used to modulate the frequency and amplitude of oscillators two and four respectively. This option increases the richness of the spectrum of the modulated oscillators, producing very interesting, harmonically-rich results. Oscillators two and four can also be used to modulate the cutoff frequency of Filter 1 and Filter 2 respectively.
The output of the Filter section is then sent to the Effects section which contains four independent stereo effects modules, each of which contains two Choruses, two Delays, a Filter, a Phaser, a Reverb, a Flanger, a Gator, a Wah Wah, a Compressor and LoFi effect. Each effects processor is described in detail later in this manual. The output of the four separate effects modules can be sent to either the next module or the main output. The output of each filter can be sent to each effects module or to the first and third effects module.
The audio outputs of the Albino 3 are automatically connected to the input of your host software's mixer. Here you can set the pan position of the Albino's output.
At various points throughout the signal path you can modulate the signal using either envelopes, LFOs, the Arpeggiator or MIDI Controllers. The Albino 3 contains 8 independent envelopes. The first 4 control each oscillator's amplitude. Envelopes 6 and 7 can be used to control Filter 1 and Filter 2, while Envelope 8 controls the overall audio amplitude. Envelope 5 is a general purpose envelope designed for use with the Modulation Matrix and so can control any available modulation destination.
The Albino 3 also contains 4 independent LFOs. Each LFO has its own envelope controls as well as syncing and waveshaping options. LFOs can be routed to any available modulation destination.
Hopefully, this chapter has given you a brief overview of how the Albino 3 works. More detailed information can be found in the following chapters.
Rob Papen Albino 3.0 |
11 |
Controls
Users have the option of controlling all Albino 3 dials in either a circular or a linear manner depending on the Dial Mode setting on the Albino 3's rear panel (see the "Main" section of this manual for more information about the Albino's rear panel).
Holding down the ALT key while clicking on a control changes the selected control's value a minimum step upwards (when clicking in the upper half of the control) or a minimum step downwards (when clicking in the lower half of the control).
Holding down the CTRL key while clicking on a control sets the control to its default value (e.g. for Volume controls it sets the control's value to -6 dB).
Holding down the SHIFT key while changing a control's value enables finer control values to be set.
Double clicking once in a Modulation Matrix slot sets the value of the slot to 0.00. Double clicking in the same slot a second time resets the slot to its previous value.
All Controls can be controlled using external MIDI messages. To do this you need to use the Albino 3's ECS which is described in detail later in this manual.
Rob Papen Albino 3.0 |
12 |
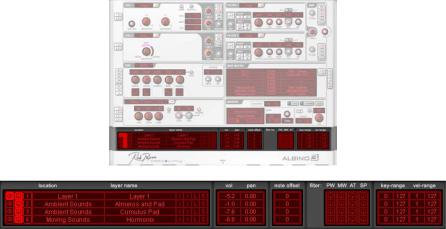
Layers
Each Albino 3 Preset is made up of four separate Layers which are combined to produce the instrument's final output. By default, the Layer section is hidden from view. To show the Layer section, click on the Layer icon at the bottom of the Front Panel. The Layer section will then appear.
It is possible to load Albino 1 and 2 Presets into an Albino 3 Layer. In this case, the Presets are loaded as single Layers and the name of the Layer is taken from the name of the Preset. The Location control displays the directory in which the Preset is located.
In the case of Albino 3 Presets, individual Layers are named “Layer 1,” “Layer 2,” “Layer 3” and “Layer 4”. Albino 1, 2 and 3 Presets can be combined. For example, a 2-Layer Albino 3 Preset can be combined with an Albino 2 Preset simply by loading the Albino 2 Preset into one of the Albino 3 Preset's unused Layers. Note that an Albino 3 Preset can only be loaded using the Master module's File controls and that when such a Preset is loaded all unused Layers are initialised to their default settings. This means that if you want to combine Albino 1 or Albino 2 Presets with Albino 3 Presets it's better to load the Albino 3 Preset first and then load the others into empty Layers using the controls in the Layer section.
Each layer contains controls for Layer Visibility, Layer On/Off, Layer Activity, Location, Layer Name, Browse Previous, Browse Next, Load,
Rob Papen Albino 3.0 |
13 |
Save, Volume, Pan, Note Offset (Transpose), Filter Control Source (Pitchwheel, Modwheel, Aftertouch and Sustain Pedal), Key Range and Velocity Range. These controls are described below.
The Albino 3's Front Panel displays one Layer at a time. The Layer Visibility control is used to set the Layer that is displayed. The Layer Visibility control is located at the far left of the Layer section and resembles an “eye.” To change Layers, click on the Layer Visibility control of the Layer that you wish to see.
Each Layer can be switched on or off using the Layer On/Off control which is located to the right of the Layer Visibility control. When the control is illuminated the respective Layer is switched on. To turn a Layer on or off, click on the Layer On/Off control.
The Layer Activity control is located to the right of the Layer On/Off control. This control has two functions. Firstly, it shows when a Layer receives MIDI data. Secondly, clicking on the the Layer Activity control triggers the respective Layer.
The Location control displays the name of the current Layer's directory. Whenever a Layer is loaded using the Layer Load and Browse controls (see below), the Location is updated. Clicking on the Location control opens a popup menu that displays all Locations that are accessible from the current Location.
The Layer Name displays the name of the current Layer. Whenever a Layer is loaded using the Layer Load and Browse controls (see below), the Layer name is updated with the name of the current Layer. Clicking on the Layer Name opens a popup menu that displays all Layers in the current Location.
As mentioned above, Albino 1 and Albino 2 Presets as well as Albino 3 Layers can be loaded into the Albino 3 using the File controls found in the Layer section. Four controls are available: Browse Previous, Browse Next, Load and Save. The Load button opens a dialog that lets you select a Preset/Layer for loading. The Previous and Next buttons allow you to traverse a list of Albino 1 Presets, Albino 2 Presets and Albino 3 Layers. The Save button allows you to save the current Layer which can then be loaded as a Layer into other Presets.
The settings of all controls in the Layer, as well as the Precision, ECS, Chord and Voices settings, are saved with the Layer. The Albino loads and saves all of its presets directly to hard disk so your computer's RAM does not limit the number of available presets.
Rob Papen Albino 3.0 |
14 |
Note that Layers can also be loaded using the File controls in the Master section. In this case, Layers are loaded as Albino 3 Presets so that all Layers will be initialised to their default settings. If you are designing sounds with multiple Layers it is recommended that the Layers are loaded using the File controls in the Layer section as this will prevent initialisation of Layers.
The Browse Previous, Browse Next, Load and Save controls are used to load individual Layers into the Albino 3. The Browse Previous and Browse Next controls select the previous or next Layer/Preset in the current location. Whenever a Layer/Preset is loaded using the Browse Previous or Browse Next controls, the Layer name is updated with the name of the loaded Layer/Preset. Note that this only applies to Albino 2 Presets and Layers that have been saved individually. The Load button opens a dialog that lets you select a Layer/Preset for loading. The Save button allows you to save the current Layer/Preset settings.
The "Volume" control sets the volume of each Layer within the Preset. Volume can be set in a range from -oodB to +6dB.
The "Pan" control sets the position within the stereo field of each Layer within the Preset. Pan can be set in a range from -1.00 To 1.00.
The Note Offset or “Transpose” control enables a Layer to be transposed by within a -24 to +24 semitone range.
The Filter Control Source consists of four controls, each of which determines the MIDI control source for the Layer. The four available options are Pitchwheel, Modwheel, Aftertouch and Sustain Pedal. To select a Filter Control Source click on the respective control. These controls are useful, if for example, you have a multi-Layer Preset that is split across the keyboard and you want a MIDI controller to control only one Layer within the Preset. For example, if you have a lead/bass Preset and want only the lead Layer to respond to the Pitchwheel, then you can achieve this by setting the lead Layer's Pitchwheel control to On. In this case, the bass Layer will not be affected by the Pitchwheel.
Each Layer can have its own Key Range and Velocity Range. The Key Range setting determines the range of notes that trigger the Layer. This can be set anywhere in the range 0 to 127. The Velocity Range setting determines the range of MIDI note-on velocity values that trigger the Layer. The Velocity Range can be set anywhere in the range 1 to 127.
Rob Papen Albino 3.0 |
15 |

Oscillators
The Albino 3 contains 4 oscillators grouped into 2 pairs ("Osc 1/Osc 2", "Osc 3/Osc 4"). Each oscillator pair is identical to the other except that Oscillator 1 contains an additional Oscillator type—Audio Input. To change oscillator pairs click on the buttons to the left of the Oscillator section.
Each Oscillator can be switched on or off using the Power button beside its name or using the additional Power button next to the Oscillator Selector. The status of each Oscillator is shown by the state of the button.
The Albino 3 contains four types of Oscillator module: "Analog", "Digital", "Noise" and “Audio Input”. Don't be confused by the use of the terms "digital" and "analog" here; all of the Albino 3's oscillators are digital (obviously!). In this case, we've used the term "digital" to describe oscillators that use additive waveforms, while "analog" oscillators use waveforms that are created in real-time much as in true analog synthesizers.
As mentioned above, the Albino 3 contains several types of oscillator module. To change the oscillator type click on the menu to the right of the “Osc” label. When you change oscillator type, the Albino's display changes accordingly.
Each oscillator's controls differ. These controls are described in detail below.
Rob Papen Albino 3.0 |
16 |
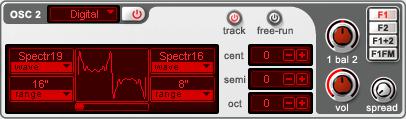
Digital Oscillator
The Albino 3's "Digital" oscillator outputs a waveform that is a combination of two basic waveforms. These waveforms are constructed from harmonic sine waves using a unique additive process which ensures a smooth, high quality output signal.
The type of waveform is set by clicking on the Wave item on either side of the Waveform Display. This opens a menu that allows you to select from the available waveforms. See Appendix A for a complete list of all Digital oscillator waveforms. The combined output waveform is shown in the Waveform Display. The waveform's pitch range is set in a similar manner using the Range item.
Below the Waveform Display is a slider that allows you to interpolate between the two waveforms. When the slider is at its leftmost setting, the waveform consists of purely the leftmost waveform. Similarly, if the slider is moved all the way to the right the waveform consists of purely the rightmost waveform. When in an intermediate position, the waveform consists of a mixture of the two waveforms. It's probably easier to see this rather than explain it, so try it for yourself. Set one wave to Sine and the other to a different wave such as Sawtooth. As you move the slider from one end to the other you can see the wave "morph" from one waveshape to the other. The Waveform display shows a number of cycles corresponding to the lowest waveform range setting.
The Digital oscillator has a range of controls for oscillator's pitch. These are: Track, Free-Run, Cent, Semi and Oct. The Track button determines whether the oscillator tracks the pitch of incoming MIDI messages. The Free-run button determines the manner in which the oscillator is retriggered. When the Free-run button is Off, the phase of each note is reset at each onset. When the Free-run button is On, the phase of each note continues on from the phase of the previous note. The Cent control sets the oscillator pitch in cents (a semitone is equal to 100 cents). A range of
Rob Papen Albino 3.0 |
17 |
-100 to +100 cents is available. The Semi control sets the oscillator pitch in semitones. A range of -11 to +11 semitones is available. The Oct control sets the oscillator pitch in octaves. A range of -2 to +7 octaves is available.
The Oscillator also has a range of output destinations. The output of Oscillators 1/3 can be sent to F1, F2, F1+2, FM,and AM. The output of Oscillators 2/4 can be sent to F1, F2, F1+2 and F1FM/F2FM. F1 selects Filter 1, F2 selects Filter 2, while F1+2 selects both filters. In the latter case you can use the Bal dial to control how much of the signal each filter receives (see below).
In the case of Oscillator 1 and 3, two further routing options are available, both of which can be used to create complex, harmonically-rich waveforms. FM allows you to modulate the frequency of oscillators 2 and 4 using oscillators 1 and 3. This type of modulation, known as Frequency Modulation, is great for producing metallic, bell-like tones. AM allows you to modulate the amplitude of oscillators 2 and 4 using oscillators 1 and 3. This type of modulation, known as Amplitude Modulation can also be used to produce rich and complex waveforms.
In the case of Oscillator 2 and 4, a routing option is also available for F1FM/F2FM. When this option is selected the oscillator output is used to modulate the cutoff frequency of Filter 1 and Filter 2 respectively. Note that this option is only available for the Cream filter.
The Digital oscillator also has controls for Vol, Bal and Spread. The Vol dial is used to set the output volume of the oscillator while the Bal dial determines the proportion of the signal that is sent to Filter 1 and Filter 2. Turning the Bal dial all the way to the right sends all of the oscillator's output to Filter 2, while turning it all the way to the left sends all of the output to Filter 1.
It's quite common for synths to offer a Unison mode in which several or all of the oscillators are simultaneously detuned to create extremely fat, rich sounds. However, on most synths this mode has a major drawback: the synth becomes monophonic. A special feature of the Albino 3 is that it allows polyphonic unison. That is, the detuning of Oscillators without the loss of polyphony. The Spread dial is used to set the Albino 3's level of polyphonic unison. When moved from the leftmost position the dial gradually detunes voices to produce a thick and fat sound. This does not affect polyphony (however it does use significantly more CPU resources of course).
Rob Papen Albino 3.0 |
18 |

Analog Oscillator
The Analog oscillator module creates its waveforms in real-time and emulates the sound of an analog synthesizer's oscillator. It contains three controls: Waveform, Symmetry and Sub Osc.
The Waveform dial sets the oscillator's waveform shape. When turned all the way to the right it outputs a pulse wave. When turned all the way to the left it outputs a sawtooth wave. In intermediate positions it outputs a waveform that is a combination of the two.
The Symmetry dial effects the waveform's shape, expanding and contracting it, as in the case of pulse width modulation. In this case however, the waveform reshaping can be applied to any available waveform.
The Sub Osc control sets the level of a sub-oscillator one octave lower than the oscillator's fundamental pitch. This can be used to add extreme low-end to Presets. The waveform of the sub-oscillator is always a Square wave.
The Analog oscillator has a range of controls for oscillator's pitch. These are: Track, Free-Run, Cent, Semi and Oct. The Track button determines whether the oscillator tracks the pitch of incoming MIDI messages. The Free-run button determines the manner in which the oscillator is retriggered. When the Free-run button is Off, the phase of each note is reset at each onset. When the Free-run button is On, the phase of each note continues on from the phase of the previous note. The Cent control sets the oscillator pitch in cents (a semitone is equal to 100 cents). A range of -100 to +100 cents is available. The Semi control sets the oscillator pitch in semitones. A range of -11 to +11 semitones is available. The Oct control sets the oscillator pitch in octaves. A range of -2 to +7 octaves is available.
Rob Papen Albino 3.0 |
19 |
The Oscillator also has a range of output destinations. The output of Oscillators 1/3 can be sent to F1, F2, F1+2, FM,and AM. The output of Oscillators 2/4 can be sent to F1, F2, F1+2 and F1FM/F2FM. F1 selects Filter 1, F2 selects Filter 2, while F1+2 selects both filters. In the latter case you can use the Bal dial to control how much of the signal each filter receives (see below).
In the case of Oscillator 1 and 3, two further routing options are available, both of which can be used to create complex, harmonically-rich waveforms. FM allows you to modulate the frequency of oscillators 2 and 4 using oscillators 1 and 3. This type of modulation, known as Frequency Modulation, is great for producing metallic, bell-like tones. AM allows you to modulate the amplitude of oscillators 2 and 4 using oscillators 1 and 3. This type of modulation, known as Amplitude Modulation can also be used to produce rich and complex waveforms.
In the case of Oscillator 2 and 4, a routing option is also available for F1FM/F2FM. When this option is selected the oscillator output is used to modulate the cutoff frequency of Filter 1 and Filter 2 respectively. Note that this option is only available for the Cream filter.
The Analog oscillator also has controls for Vol, Bal and Spread. The Vol dial is used to set the output volume of the oscillator while the Bal dial determines the proportion of the signal that is sent to Filter 1 and Filter 2. Turning the Bal dial all the way to the right sends all of the oscillator's output to Filter 2, while turning it all the way to the left sends all of the output to Filter 1.
It's quite common for synths to offer a Unison mode in which several or all of the oscillators are simultaneously detuned to create extremely fat, rich sounds. However, on most synths this mode has a major drawback: the synth becomes monophonic. A special feature of the Albino 3 is that it allows polyphonic unison. That is, the detuning of Oscillators without the loss of polyphony. The Spread dial is used to set the Albino 3's level of polyphonic unison. When moved from the leftmost position the dial gradually detunes voices to produce a thick and fat sound. This does not affect polyphony (however it does use significantly more CPU resources of course).
Rob Papen Albino 3.0 |
20 |
Noise Oscillator
The Albino 3's "Noise" oscillator module offers three types of noise waveform: White, Pink and Brown. The type of waveform is set by rotating the waveform dial. For more information about these waveforms please see the Glossary section of this manual.
The Noise Oscillator has a range of output destinations. The output of Oscillators 1/3 can be sent to F1, F2, F1+2, FM,and AM. The output of Oscillators 2/4 can be sent to F1, F2, F1+2 and F1FM/F2FM. F1 selects Filter 1, F2 selects Filter 2, while F1+2 selects both filters. In the latter case you can use the Bal dial to control how much of the signal each filter receives (see below).
In the case of Oscillator 1 and 3, two further routing options are available, both of which can be used to create complex, harmonically-rich waveforms. FM allows you to modulate the frequency of oscillators 2 and 4 using oscillators 1 and 3. This type of modulation, known as Frequency Modulation, is great for producing metallic, bell-like tones. AM allows you to modulate the amplitude of oscillators 2 and 4 using oscillators 1 and 3. This type of modulation, known as Amplitude Modulation can also be used to produce rich and complex waveforms.
In the case of Oscillator 2 and 4, a routing option is also available for F1FM/F2FM. When this option is selected the oscillator output is used to modulate the cutoff frequency of Filter 1 and Filter 2 respectively. Note that this option is only available for the Cream filter.
The Noise oscillator also has controls for Vol and Bal. The Vol dial is used to set the output volume of the oscillator while the Bal dial determines the proportion of the signal that is sent to Filter 1 and Filter 2. Turning the Bal dial all the way to the right sends all of the oscillator's output to Filter 2, while turning it all the way to the left sends all of the output to Filter 1.
Rob Papen Albino 3.0 |
21 |
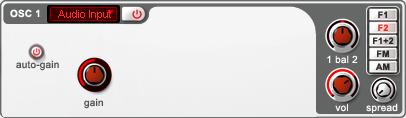
Audio Input
The Albino 3's “Audio Input” module allows external audio from the host software to be routed through the Albino 3. This means that it is possible to use the Albino 3 as a signal processing unit. All of the Albino 3's modules are available so external audio can be modulated, filtered and processed in the Effects section. The Audio Input module is only available in Oscillator 1.
The Audio Input has two controls: Gain and Auto-Gain. The Gain control sets the level of the Audio Input's signal. The Auto-Gain control automatically adjusts the input gain within a 40 dB range. This is useful if you have an audio input signal with a widely changing amplitude and want it to be “smoothed” to an approximately constant level. If however, you want to preserve the amplitude changes of the audio input signal then this control should be set to off. The Gain control precedes the Auto-Gain control.
The Audio Input has a range of output destinations. Its output can be sent to F1, F2, F1+2, FM,and AM. F1 selects Filter 1, F2 selects Filter 2, while F1+2 selects both filters. In the latter case you can use the Bal dial to control how much of the signal each filter receives (see below). Two further routing options are available, both of which can be used to create complex, harmonically-rich waveforms. FM allows you to modulate the frequency of oscillator 2 using the audio input signal. AM allows you to modulate the amplitude of oscillator 2 using the audio input signal. This type of modulation, known as Amplitude Modulation can also be used to produce rich and complex waveforms.
The Audio Input also has controls for Vol and Bal. The Vol dial is used to set the output volume of the oscillator while the Bal dial determines the proportion of the signal that is sent to Filter 1 and Filter 2. Turning the Bal dial all the way to the right sends all of the oscillator's output to Filter 2, while turning it all the way to the left sends all of the output to Filter 1.
Rob Papen Albino 3.0 |
22 |
Filters
The Albino 3 contains four types of filter: "Silk," "Cream," “Scream,” and “Comb.” The first three of these are multi-mode filters, each having a different design. A lot of care and attention has been paid to the Albino 3's filter design in order to make them especially "musical" and to ensure that they use very little CPU resources.
The Albino 3 has 2 filter modules, each of which can be set to one of the four filter types mentioned above. To turn a filter on or off, select the "On/Off" button to the right of the filter type menu. An important point to note is that when a filter is turned off no audio can pass through it. To change the filter type click on the menu to the right of the Filter label.
Each filter has its own "Sat" (Saturation) control located on the left of the filter section. The Sat control is used to overdrive the Albino's filters. In terms of signal flow, the Sat control precedes the filter so that the overdriven signal passes through the filter. Four types of saturation are available.
Each filter's controls differ slightly. These controls are described in detail below.
Rob Papen Albino 3.0 |
23 |

Silk Filter
The Silk filter contains 4 filter types: LP 12 dB (Low Pass 12 dB/Oct), LP 24 dB (Low Pass 24 dB/Oct), HP (High Pass 12 dB/Oct) and BP (Band Pass 24 dB/Oct).
The Silk filter contains several parameter controls. These are: Cutoff, Res (Resonance), Track (Tracking), Env (Envelope Depth), Envelope Direction and Vel (Velocity).
Cutoff is used to set the frequency (in Hz) above which frequencies are filtered out of the signal. When using the Low Pass filters higher settings produce brighter sounds while lower settings result in darker sounds. When using the High Pass filters higher settings produce thinner, brighter sounds, while lower settings produce fatter, darker sounds.
Resonance is used to set the amount of emphasis around the cutoff frequency. Higher settings create a more pronounced peak in the signal while lower settings produce a flatter response.
Tracking is used to control the degree to which the filter tracks the signal's frequency.
Env is used to set the degree to which the filter's envelope effects the signal. Setting Env to 0.00 means that the envelope has no effect on the filter. Setting Env to 1.00 means that the filter is modulated by the envelope's full range.
The Envelope Direction button is used to set either a positive or negative envelope shape. This can be used for a range of effects including opening the filter when a note is released (this is impossible with a non-inverted envelope).
Rob Papen Albino 3.0 |
24 |
 Loading...