

Page 1
DAB / FM / CD / USB / SD stereo radio cassette recorder
Please read this manual before use
ROBERTS
Page 2

Concerto 2 CD radio cassette recorder features .................2
Controls ........................................................................... 3-4
Battery operation .................................................................5
Mains operation ...................................................................5
Operating your CD radio cassette recorder - DAB ..............6
Selecting a station - DAB.....................................................7
Secondary services - DAB...................................................7
Finding new stations - DAB .................................................8
Signal strength display - DAB ..............................................8
Operating your radio - Search tuning FM ............................9
Manual tuning - FM............................................................10
Presetting stations ........................................................11-12
Compact discs / MP3/WMA-CDs ................................. 13-14
Playing a CD......................................................................15
CD Bookmark ....................................................................16
Selecting a track ................................................................17
Search function..................................................................18
CD repeat mode ................................................................18
CD Intro mode ...................................................................18
SD/USB mode ............................................................. 19-20
Listening to cassette tapes ................................................21
Contents
Recording from radio .........................................................22
Recording from CD ............................................................23
Recording from SD/USB....................................................24
Recording from internal microphone .................................25
Recording from external microphone ................................26
Preventing accidental erasure ...........................................27
Cleaning tape heads..........................................................27
Zoom function ....................................................................28
FM stereo/mono ................................................................28
System Reset ....................................................................29
Headphone socket.............................................................30
General ..............................................................................31
Specifi cations ....................................................................32
Circuit features ..................................................................32
Mains supply......................................................................33
Guarantee..........................................................................34
1
Page 3

2
Concerto 2 - features
The Roberts Concerto provides the following features in an attractive
compact unit.
Radio
The Concerto can receive DAB and FM (with RDS) wavebands.
CD
The Concerto plays audio CDs (can also play CDR, CD-RW discs).
CD-MP3/WMA
The Concerto plays MP3 and WMA fi les which have been recorded to
CDR or CD-RW discs.
CD Bookmark
The Concerto has a CD Bookmark feature which allows CD playback
to resume from the track and time position reached when the unit was
previously put into standby mode.
Headphone output
A standard 3.5mm headphone socket is provided for private listening.
SD/USB - MP3/WMA
The Concerto plays MP3 and WMA fi les from an SD card or USB memory
devices.
SD/USB Bookmark
The Concerto has a SD/USB Bookmark feature which allows SD/USB
playback to resume from the track and time position reached when the
unit was previously put into standby mode.
Tape mode
The Concerto has a tape facility which can be used to play cassette tapes,
and record from the radio, CD, SD, USB or record using the internal
microphone and external microphone. (not included)
Page 4
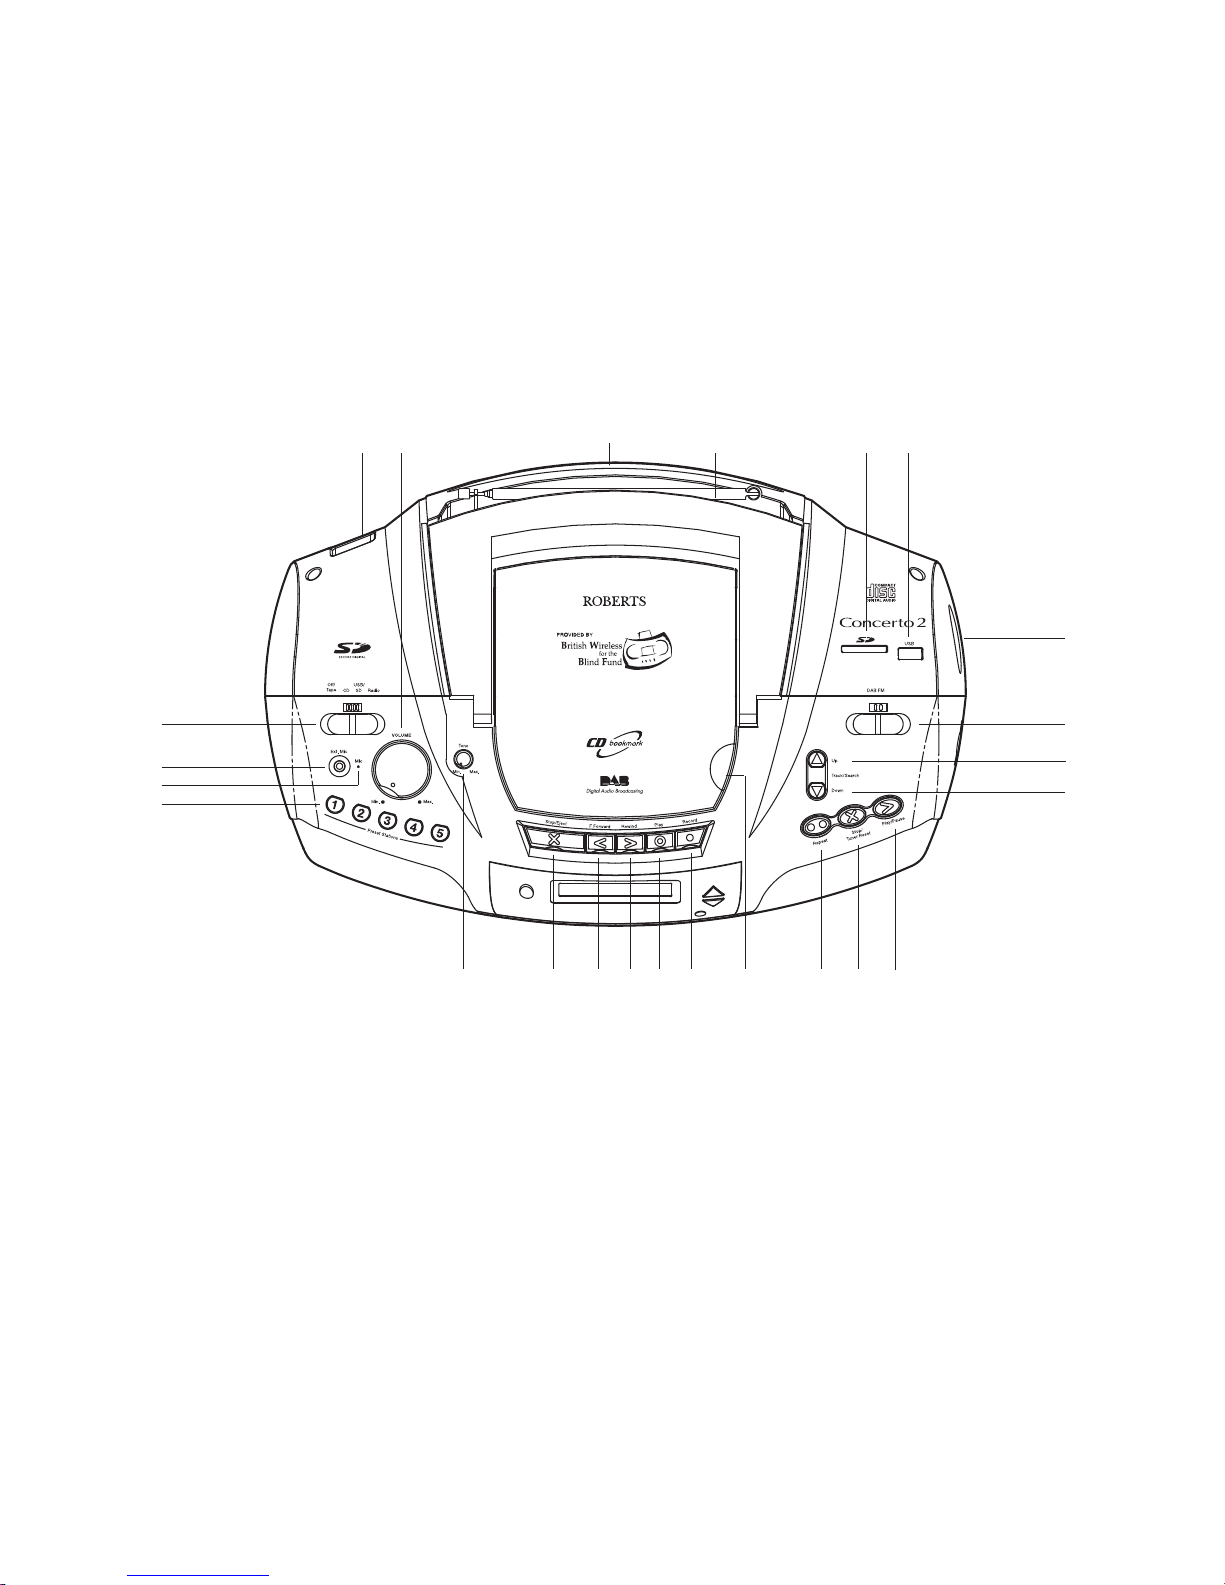
Controls
1. Tone control
2. Preset buttons 1-5
3. Internal microphone
4. External mic socket
5. Function switch
6. Mains socket
(Top)
13. DAB/FM switch
14. Track / Search Up button
15. Track / Search Down button
16. Play / Pause button
17. Stop / Tuner Reset button
18. Repeat button
7. Volume control
8. Battery compartment
9. Telescopic aerial
10. SD card slot
11. USB socket
12. Tuning tone volume control
3
19. Raised lip for CD access
20. Record key
21. Play key
22. Rewind key
23. Fastforward key
24. Stop / Eject key
1
2
3
4
5
67
8
910
12
14
15
17
18192021222324
16
11
13
Page 5
4
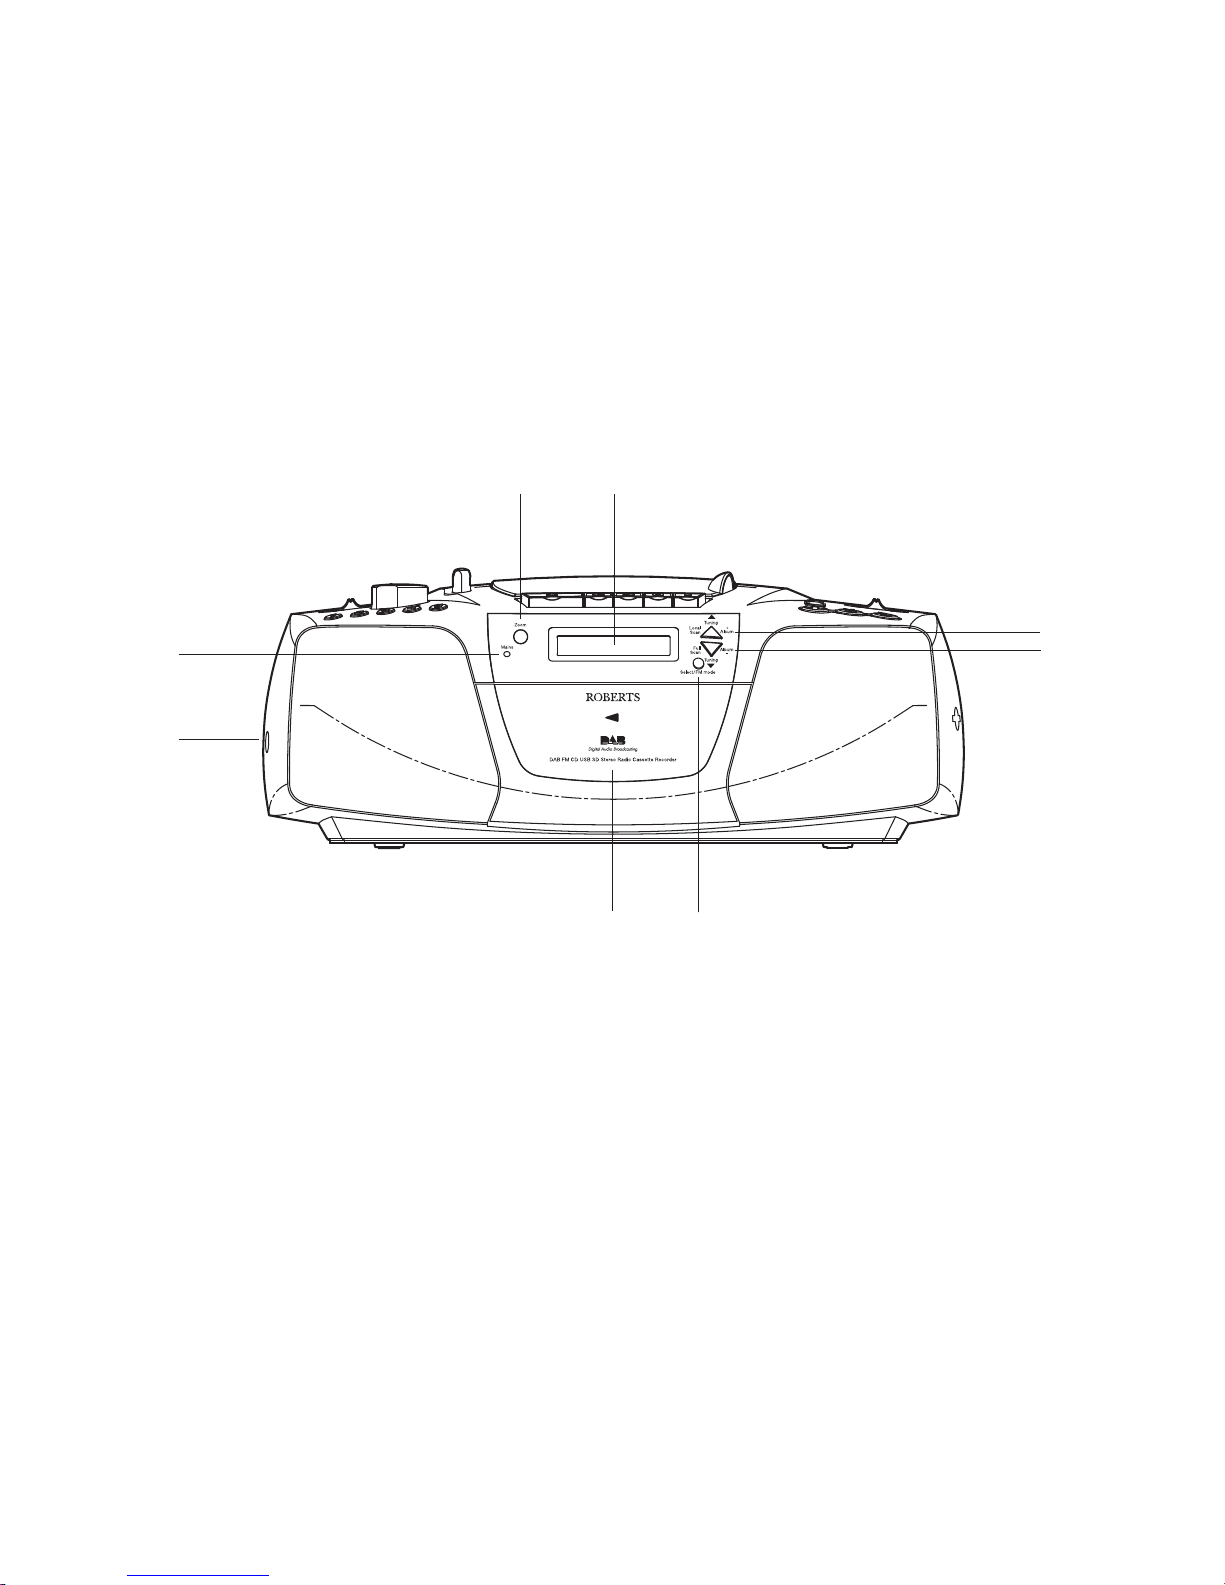
Controls
(Front view)
25. Zoom button
26. LCD display
27. Tuning / Album up / local scan button
28. Tuning / Album down / full scan button
25
29
31
26
27
28
30
32
29. Select / FM mode button
30. Cassette door
31. Headphone socket
32. Mains indicator light
Page 6

5
Battery operation
1. Remove the Battery cover on the rear of your CD radio cassette by
pushing the catches in the direction shown.
2. Insert eight LR14 (C size) batteries into the compartment. Take care
to ensure all batteries are inserted with the correct polarity as shown
inside the battery compartment. Replace the battery cover.
3. Reduced power, distortion, and a ‘stuttering’ sound are all signs that
the batteries may need replacing.
IMPORTANT: The batteries should not be exposed to excessive
heat such as sunshine, fi re or the like. After use, disposable
batteries should if possible be taken to a suitable recycling centre.
On no account should batteries be disposed of by incineration.
We would recommend for economy that your Concerto is used on
the mains whenever possible with battery operation for occasional
or stand-by use only.
Mains operation
1. Place your CD radio cassette on a fl at surface.
2. Plug the mains lead into the Socket located on the rear of your CD
radio cassette. Ensure that the plug is pushed fully into the socket.
3. Plug the other end into a wall socket and switch on.
IMPORTANT: The mains plug is used as the means of connecting the
radio to the mains supply. The mains socket used for the radio must
remain accessible during normal use. In order to disconnect the radio
from the mains completely, the mains plug should be removed from
the mains socket outlet completely.
4. When the mains LED is on, it indicates that the radio is connected to
and powered from the mains supply.
ON
1
1
Page 7
6
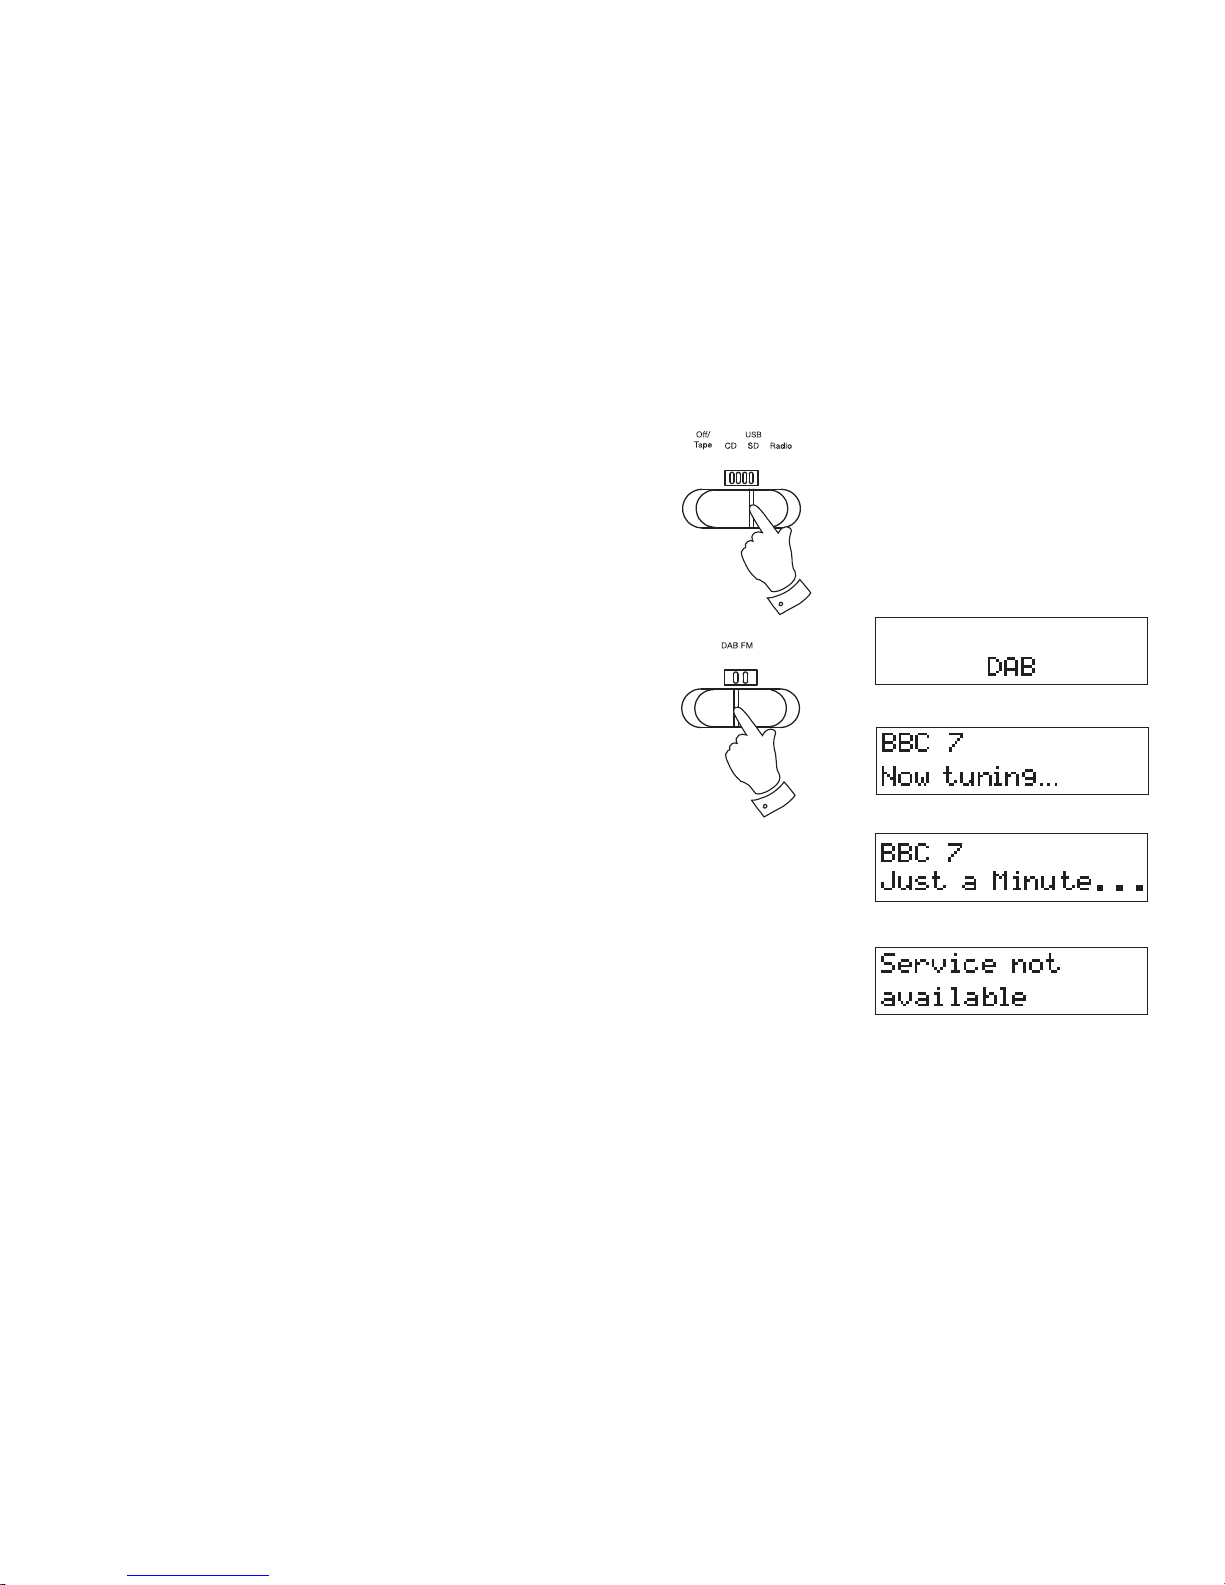
Operating your CD radio cassette recorder - DAB
1. Fully extend the Telescopic aerial and then angle and rotate for best
reception.
2. Slide the Function switch to the Radio position to switch on your CD
radio cassette recorder.
3. Slide the Waveband switch to the DAB position The display will show
"DAB" and then " Now tuning" for a few seconds.
4. If this is the fi rst time the CD cassette recorder is used a quick scan of
UK Band III DAB channels may be carried out. If the CD radio cassette
recorder has been used before, the last used station will be selected.
If new radio stations are found, they will be added to the stored list of
stations.
5. When fi rst switched on, the fi rst station in the list of stations found will
be played. The display will show the station name in the fi rst line of
the display and other information in the second line.
6. If the station list is still empty after the scan operation your cd radio
cassette recorder will display "Service not available".
7. If no signals are found it may be necessary to relocate your CD radio
cassette recorder to a position giving better reception, and then repeat
the scan using the AutoScan facility (page 8).
2
3
Page 8
7
Selecting a station - DAB
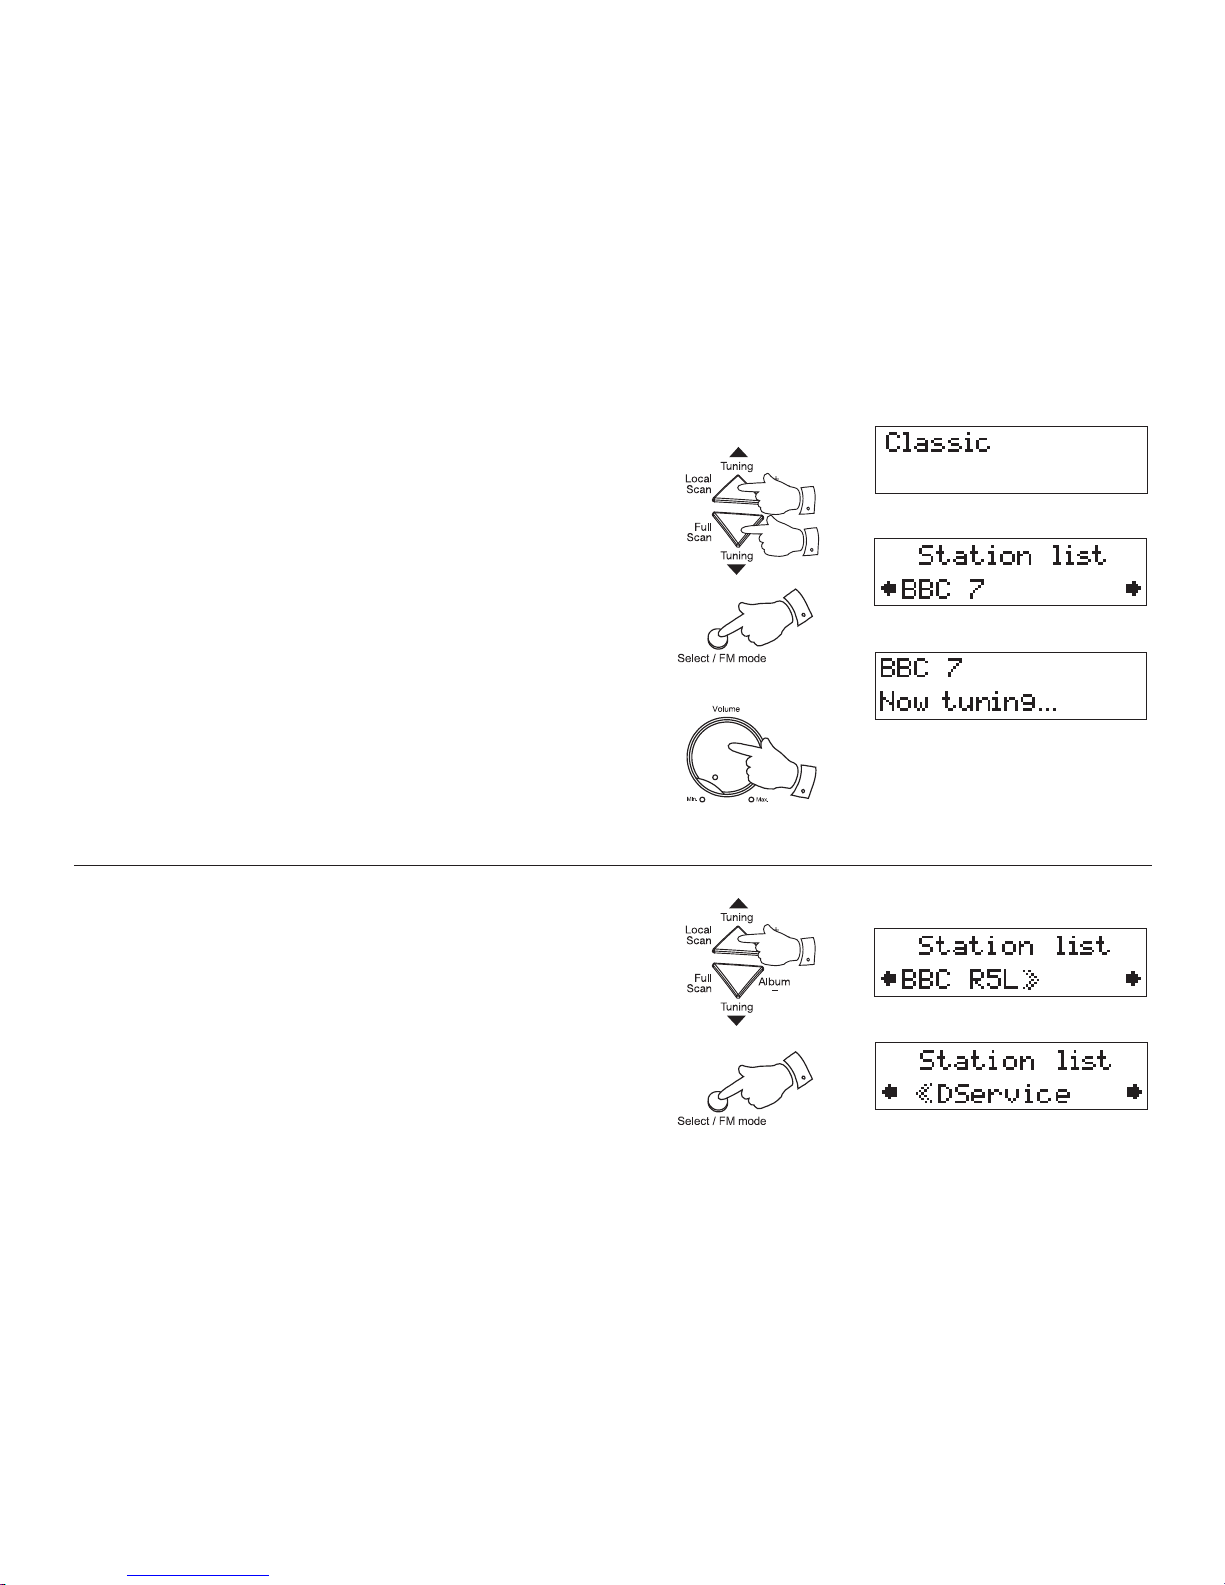
1. The top line of the display shows the name of the station currently
selected.
2. Press the Tuning Up or Down buttons to scroll through the list of
available stations on the lower line of the display. Stop pressing the
Tuning buttons when you fi nd the station that you wish to hear.
3. Press and release the Select button to select the station. The display
may show "Now tuning" while your cd cassette recorder fi nds the new
station.
4. Adjust the Volume to the required settings.
Note: If after selecting a station the display continues to show "Service
not available" it may be necessary to relocate your cd radio cassette
recorder to a position giving better reception.
2
2
Secondary services - DAB
1. Certain radio stations have one or more secondary services associated
with them. If a station has a secondary service associated with it the
display will show ">>" next to the station name on the station list. The
secondary service will then appear immediately after the primary
service as you press the Tuning Up button.
2. Press and release the Select button to select the station.
3
4
1
2
Page 9
8
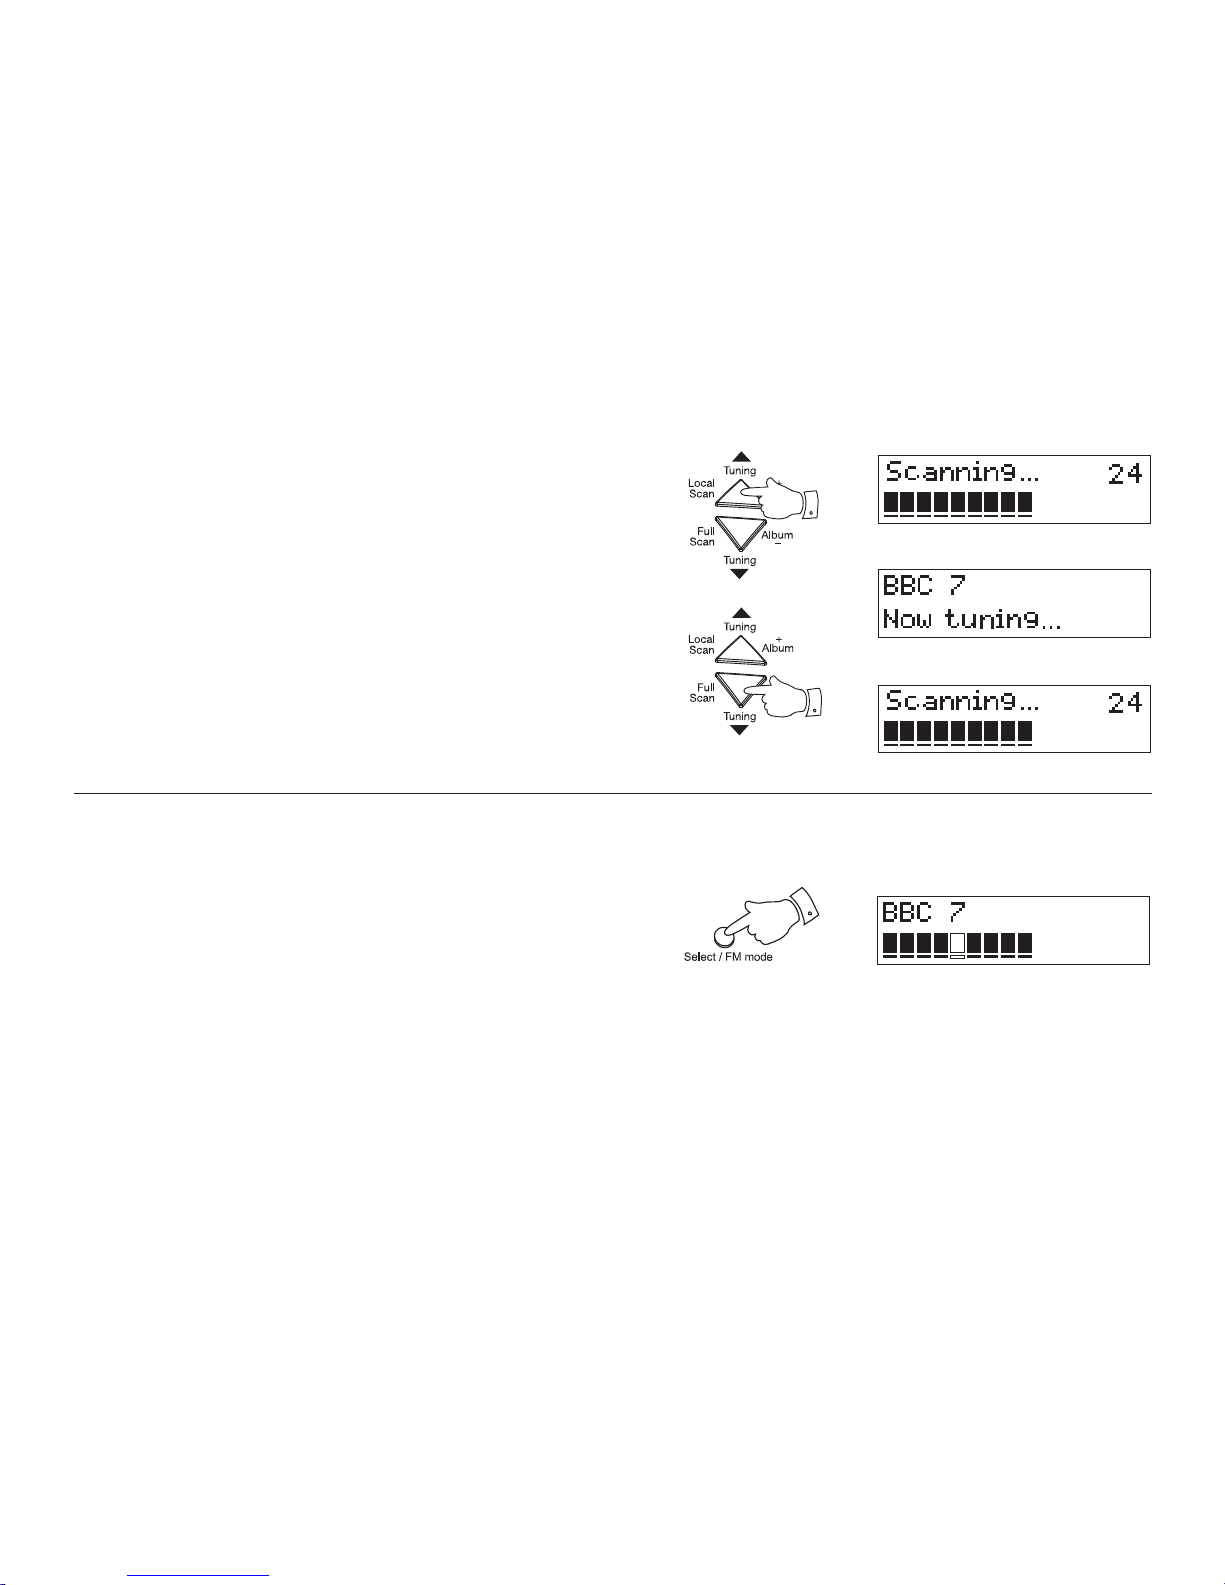
Finding new stations - DAB
As time passes new stations may become available. To fi nd new stations
proceed as follows:-
1. Press and hold the Local scan button. The display will show "Scanning" and will perform a scan of the UK DAB frequencies. As new
stations are found the station counter on the right-hand side of the
display will increase and stations will be added to the list.
2. To carry out a full scan of the entire DAB Band III frequencies press
and hold the Full Scan button. The display will show "Scanning". As
new stations are found the station counter on the right-hand side of
the display will increase and stations will be added to the list.
Signal strength display - DAB
1. Press and release the Select button. The lower line of the display
shows signal strength. Position your cd cassette recorder and angle
the telescopic aerial for best reception using the signal strength display
as a guide. The strongest signal is indicated with the largest number
of black rectangles on the signal strength display.
2. The clear unfi lled rectangle indicates minimum signal level required for
satisfactory reception. Press and release the Select button to return
to the previous display mode.
1,2
1
2
Page 10
9
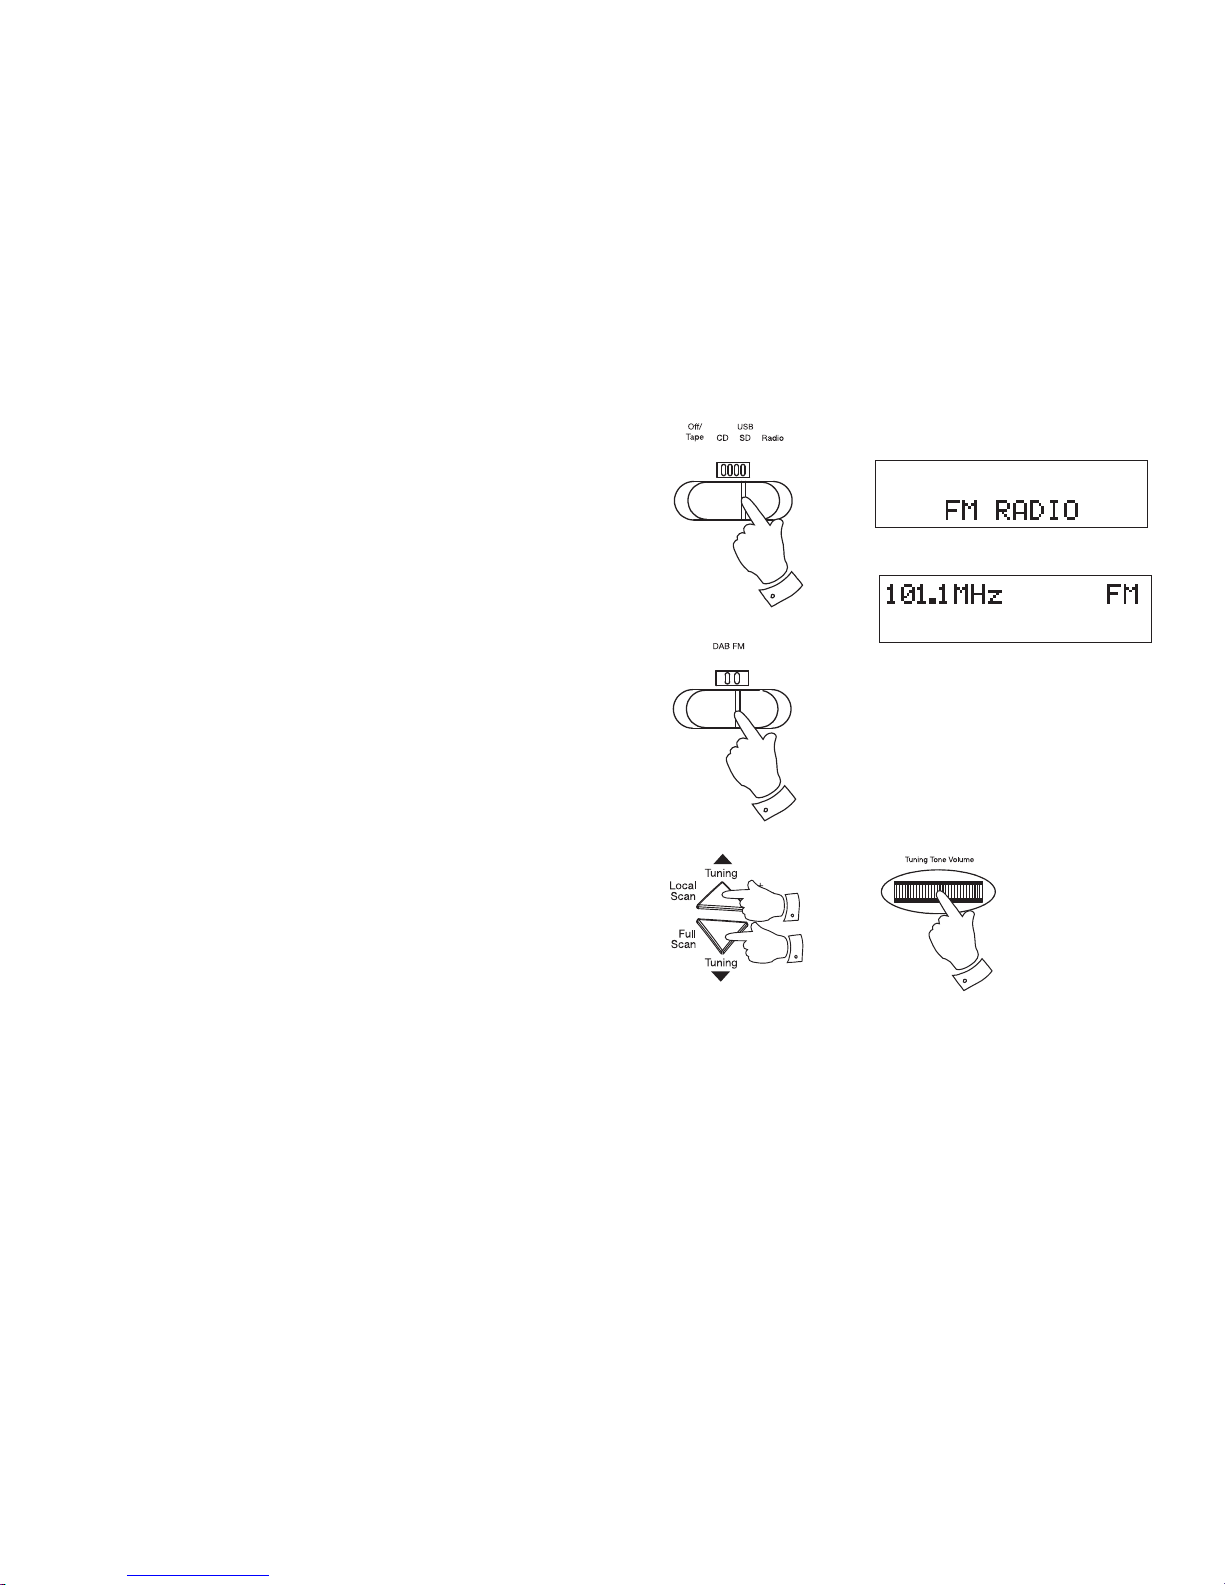
Operating your radio - Search tuning FM
1. Fully extend the Telescopic aerial and then angle and rotate for best
reception.
2. Slide the Function switch to the Radio position to switch on your CD
cassette recorder.
3. Slide the Waveband switch to the FM position The display will show
"FM RADIO" for a few seconds and the frequency will be displayed.
4. Press and hold down either the Tuning Up or Tuning down buttons for
more than 0.5 secs to commence scan tuning. An audible tone will be heard
indicating that the radio is tuning. The tone will increase in pitch for tuning up
and decrease for tuning down. The audible tone volume can be adjusted
using the Tuning tone volume control on the right hand side of the unit.
5. Your radio will scan the selected waveband, sound a beep tone and stop
automatically when it fi nds a station of suffi cient strength.
6. The display will show the frequency of the signal which has been
found. The display will also show "St" and "RDS" on the upper line if
the station is received with stereo information.
7. To recommence scan tuning, press and hold down either the Tuning Up or
Down button for more than 0.5 sec. When the end of the waveband is
reached your radio will recommence tuning from the opposite end of
the waveband.
2
3
4
4,7
4,7
Page 11
10
8
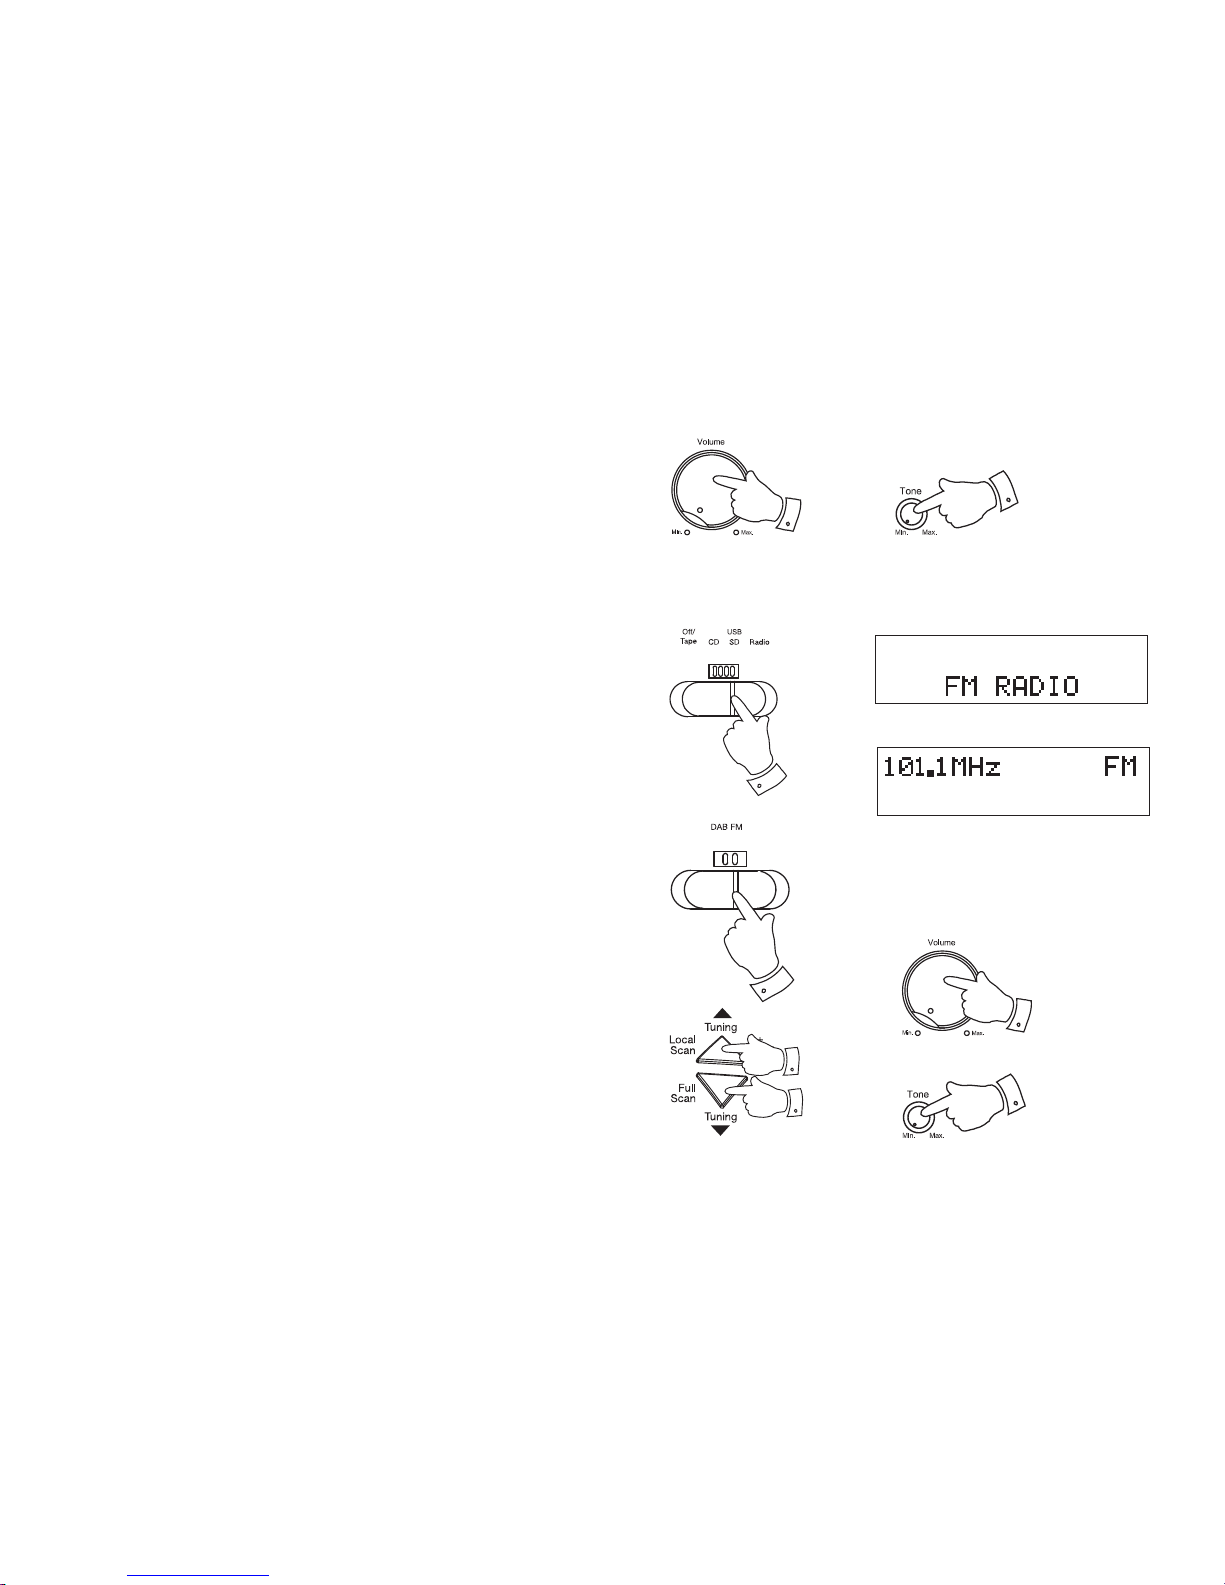
8. Adjust the Volume and Tone controls to the required settings.
9. To switch off your CD radio cassette recorder slide the Function
switch to the Off position.
Note: On FM if a station being received is weak some hiss may be audible.
To reduce the hiss press and and hold the Select/FM mode button. The
stereo indicator will be removed from the display.
Manual tuning FM
1. Fully extend the Telescopic aerial and then angle and rotate for best
reception.
2. Slide the Function switch to the Radio position to switch on your CD
cassette recorder.
3. Slide the Waveband switch to the FM position.
4. Press the Tuning Up or Down buttons to tune to a station. The
frequency will change in steps of 50kHz.
5. When the end of the waveband is reached your radio will recommence
tuning from the opposite end of the waveband.
6. Adjust the Volume control and Tone controls to the required
settings.
7. To switch off your CD radio cassette recorder slide the Function
switch to the Off position.
2
3
6
8
6
4
4
Page 12

11
Presetting stations
There are 10 memory presets available. There are 5 on each of the DAB
and FM wavebands.
1. Slide the Function switch to the Radio position to switch on your CD
cassette recorder.
2. Slide the Waveband switch to the desired waveband position.
3. Tune to the required station as previously described.
4. Press and hold down the required Preset button 1-5 until a beep is
heard. The display will show, for example, "Preset 1 stored". The station
will be stored under the chosen preset button. Repeat this procedure
for the remaining presets.
5. Stations stored in preset memories may be overwritten by following
the above procedure.
1
2
4
Page 13

12
Recalling a preset station
1. Slide the Function switch to the Radio position to switch on your CD
cassette recorder.
2. Slide the Waveband switch to the desired waveband position
3. Momentarily press the required Preset button 1-5. Your radio will
tune to the station stored in preset memory.
3
1
2
Page 14

13
Compact discs
Use only Digital Audio CDs which have the symbol.
Never write on a CD or attach any sticker to the CD. Always hold the CD
at the edge and store it in its box after use with the label facing up.
To remove dust and dirt, breathe on the CD and wipe it with a soft, lint free
cloth in a straight line from the centre towards the edge.
Cleaning agents may damage the CD.
Do not expose the CD to rain, moisture, sand or to excessive heat. (e.g
from heating equipment or in motor cars parked in the sun).
CD-R/CD-RW discs
Your Concerto can playback CDDA format audio CD-R/CD-RW discs that
have been fi nalised* upon completion of recording.
Your Concerto may fail to playback some CD-R/CD-RW discs due to poor
recording and wide variation in quality of the CD-R/CD-RW disc.
*Finalising enables a CD-R/CD-RW disc to playback on audio players
such as your Concerto.
Page 15

14
MP3 / WMA CD Mode
The Concerto is able to play CD-R and CD-RW discs containing MP3 or
WMA fi les.
In MP3 / WMA mode the terms "album" and "fi le" are very important.
"Album" corresponds to a folder on a PC, "File " to an audio track in MP3
or WMA format. The cd cassette recorder reads MP3 or WMA fi les with
a maximum of 255 fi les per folder. An MP3 or WMA CD may not contain
more than 512 fi les or albums in total. MP3 or WMA fi les must be created
with an audio sample rate of 44.1kHz (this is normal for fi les created from
CD audio content). Both MP3 and WMA fi les may be recorded on to the
same media.
When burning CD-R and CD-RWs with audio fi les, various problems may
arise which could lead to interference in playback. This can be caused
by faulty software or hardware settings in your PC or by the CD being
used. Should such problems arise, contact the customer services of your
CD burner or software manufacturer or look for relevant information, for
example on the internet. When you are making audio CDs, observe all legal
guidelines and ensure that the copyright of third parties is not infringed.
WARNING
CLASS 1 LASER PRODUCT means that the laser's construction makes
it inherently safe so that the legally prescribed maximum permissible
radiation values can never be exceeded.
Caution: Using any equipment or devices other than those described and
specifi ed in these operating instructions, or tampering with the unit in any
way, can result in dangerous exposure to radiation.
Page 16

15
Inserting a CD
1. To open the CD compartment, position a fi nger underneath the raised
lip and lift up the CD door.
2. Put the CD on the spindle, print side facing upwards until it clicks into
place and then gently close the CD compartment by pushing the cd
door back into position.
Playing a CD
1. Slide the Function switch to the CD position.
The CD player will scan the contents of the CD and "READING" will
appear on the display.
Audio CD: the total number of tracks and total playing time will then
be displayed.
MP3/WMA CD: The total number of fi les and folders will then be
displayed.
2. Press the Play/Pause button to start playback. The display will show
the fi rst track number and the play symbol
. The radio will also
show:
Audio CD: The current track number and elapsed playing time.
MP3/WMA CD: The current fi le number for 3 seconds, before changing
to show the fi le name, ID3 tag and the elapsed playing time.
3. Adjust the Volume control to the required setting.
1
1
3
2
Page 17

16
4. To pause playback press the Play/Pause button. The pause symbol
will show on the display.
Audio CD: The current track number and the elapsed playing time will
be shown on the display.
MP3/WMA CD: The fi le name with ID3 tag scrolls, the elapsed playing
time will be shown on the display.
5. To continue playback press the Play/Pause button again.
6. To stop playback, press the Stop button once.
CD Bookmark
The CD Bookmark feature allows you to stop the playback of a CD and
then to continue playback from the same point at a later time. Even if you
change the radio function, the next CD play operation will start from the
point where playback was previously stopped. Note that if mains power
is removed and restored the Bookmark setting will be cancelled and the
CD will then play from the beginning.
1. When the CD is playing, press the Stop button once. The display will
then show:
Audio CD: The current track number and "Resume".
MP3/WMA CD: The fi le number and "Resume".
You can then select an alternative function.
2. If you wish to cancel the Bookmark function, either press the Stop
button a second time when the radio is in CD mode, or simply take
out the CD.
3. To take out the CD, position a fi nger underneath the raised lip and lift
up the CD door.
Note: The CD door should only be opened when the CD player is in
stop mode.
4,5
6
1,2
Page 18

17
Selecting a track
1. Audio CD: While the CD is playing, press either the Track Up or Down
buttons to change the desired track. You can also skip to a wanted
track when the player is in stop mode. Press the Play/Pause button
to play the selected track.
2. MP3/WMA CD: While the CD is playing, press either the Album +
or - buttons to change to the desired album / folder, then press either
the Track Up or Down buttons to change to the desired track. You
can also skip albums or tracks when the player is in stop mode. Press
the Play/Pause button to play the selected track.
1
1
1
2
2
2
2
2
Page 19

18
Search function
1. While the CD is playing, press and hold down either the Track/Search
Up or Down buttons. Release the button when the desired part of
the track is reached.
CD repeat mode
1. Whilst the CD is playing press the Repeat button. The radio will step
through the following options:
Audio CD: Repeat 1
, Repeat ALL , Normal Play
MP3/WMA CD: Repeat 1
, Repeat Album , Repeat ALL
, Normal Play
2. The display will show the currently selected repeat mode.
CD Intro mode
1. When in the stop mode, press and hold the Repeat button to play
the fi rst 10 seconds of each of the tracks on the disc. "Intro" appears
on the display.
2. To cancel the Intro mode, press the Repeat button.
1
1
1
1,2
Page 20

19
SD / USB mode
This section describes how to use your radio to access and playback your
audio fi les via Secure Digital (SD, SDHC) cards and USB memory devices.
The Concerto has been tested with a range of SD cards up to 2GB and
SDHC cards and USB memory devices up to 16GB. However there are
many different card variants available and not all cards can be guaranteed
to work in the Concerto. Memory must use the FAT or FAT 32 fi ling system
in order to operate in the Concerto.
Important: Your radio is designed to work with USB fl ash memory devices.
It is not intended to be connected to hard disk drives or any other type
of USB device.
Audio formats supported for playback are MP3 and WMA. Playback does
not support fi les encoded using WMA lossless, WMA voice, WMA 10
professional, nor fi les of any format which have DRM protection.
The SD slot and USB socket are located on the top of the unit on the right
hand side of the radio.
Cautions
In order to minimise the risk of damage to your radio, SD card or USB
memory device, please place the unit so that the device cannot be easily
knocked while it is inserted in the socket.
Remove the SD card or USB memory device before carrying the unit or
if not using the SD/USB feature for a prolonged period.
Switch the unit off before removing your SD card or USB memory device.
Recommendations
Unless you have only a few fi les on the memory device, do not place all
fi les in the root folder.
The number of items (fi les/sub directories) in any directory should be
less than 2000.
Searching and playback will be more responsive if the number of fi les in
any one folder is limited. (we suggest not more than 250).
It is recommended that the memory device is reformatted in your computer
before adding your music fi les.
The maximum depth of folder nesting permitted is 8 directory levels (but
playback is only from the currently selected folder).
Inserting and removing a card
To insert an SD card into your CD cassette recorder, push the card label
side facing towards you and gold contacts fi rst into the SD card slot on
the top of your CD radio cassette recorder until it clicks.
To remove the card, push the card in slightly and it will pop out allowing
removal.
Page 21

20
1
SD / USB mode cont.
Inserting and removing a USB memory device
Carefully insert a USB memory device into the USB socket.
To remove the USB memory device simply pull the device out.
Selecting SD/USB mode
1. To select the SD/USB mode slide the Function switch to SD/USB
position.
Playback control in SD/USB mode is similar to CD-MP3/WMA mode (see
pages 15-18). MP3 and WMA fi les are played back in the order that they
are written to the SD/USB memory device by your computer.
Note: In the event that the SD card and USB memory are inserted in
their sockets, then the radio will generally use whichever was the most
recently added. Removing one will then cause the radio to start reading
from the other.
Note: The SD card / USB memory device should not be removed during
playback or recording as damage or corruption of fi les may occur.
Page 22

21
Listening to cassette tapes
Note: This unit is not suitable for recording onto CHROME (IEC II) or METAL
(IEC IV) cassettes. For playback any cassette type may be used
1. Slide the Function switch to the Tape position.
2. Press the Stop Eject key to open the Cassette compartment.
3. Insert a pre-recorded cassette with the tape surface upwards and the
side with the desired recording facing towards you.
4. Close the Cassette compartment.
5. Depress the Play key and adjust the Volume and Tone controls to
suit your personal taste.
6. Use the Fast forward or Rewind keys to locate a specifi c part of the
tape.
7. To stop the tape press the Stop/Eject key.
1
2,7
66
5
5
5
Page 23

22
Recording from the Radio
1. Slide the Function switch to the Radio position.
2. Tune in to the desired station.
3. Adjust the Volume control to suit your requirements.
4. Insert a blank cassette with the tape surface uppermost and the side
you wish to record on facing towards you.
5. Depress the Record key to commence recording.
6. The recording level is set automatically and is not affected by the
setting of the Volume control.
7. To stop the recording, press the Stop/Eject key.
8. To switch off your CD radio cassette slide the Function switch to the
Tape/Off position.
7
5
1
Page 24

23
Recording from CD
1. Slide the Function switch to the CD position.
2. Insert a CD into the compartment. Insert a blank cassette with the tape
surface upwards and the side you wish to record on facing towards
you.
3. Depress the Record key to commence recording. The CD will start
automatically (CD syncro start)
4. The recording level is set automatically and is not affected by the
setting of the Volume control.
5. To stop the recording press the Stop/Eject key.
5
3
1
Page 25

24
Recording from SD/USB
1. Slide the Function switch to the SD/USB position.
2. Insert an SD card into the SD slot or a USB memory device into the
USB socket on the top of the unit on the right hand side.
3. Insert a blank cassette with the tape surface upwards and the side
you wish to record on facing towards you.
4. Depress the Record key to commence recording. The SD or USB
will start automatically (SD/USB syncro start)
5. The recording level is set automatically and is not affected by the
setting of the Volume control.
6. To stop the recording press the Stop/Eject key.
6
4
1
Page 26

25
Recording from the internal microphone
1. Slide the Function switch to the 'Tape' position.
2. Insert a blank cassette with the tape surface upwards and the side
you wish to record on facing towards you.
3. Depress the Record key to commence recording.
4. The recording level is set automatically and is not affected by the
setting of the Volume control.
5. To stop the recording press the Stop/Eject key.
5
3
1
Page 27

26
Recording from an external microphone
(not included)
When recording from an external microphone the loudspeakers remain
connected for monitoring purposes. If you do not wish to hear the recording
being made simply rotate the volume control to minimum.
The recording level is set automatically and is not affected by the setting
of the Volume control.
1. Slide the Function switch to the 'Tape' position.
2. Insert a blank cassette with the tape surface upwards and the side
you wish to record on facing towards you.
3. Plug the external microphone into the Microphone socket located on
the left side of the top panel. The internal microphone will be automatically disconnected
4. Depress the Record key to commence recording.
5. The recording level is set automatically and is not affected by the
setting of the Volume control.
6. To stop the recording press the Stop/Eject key.
6
4
1
Page 28

27
Preventing accidental erasure
1. To safeguard your recordings against accidental erasure, break off
the appropriate tab on the cassette as shown.
2. There is one tab for each side of the cassette. This will prevent the
Record button from being pressed.
3. To restore the cassette to normal, seal the tab openings with a small
piece of self-adhesive tape.
A
C60
Cleaning tape heads
The oxide from magnetic tapes can accumulate on the pinch roller (A)
the capstan shaft (B) and also the heads (C and D). This will impair the
sound quality.
To clean these parts proceed as follows:-
1. Switch off the power to the unit.
2. Press the Stop/Eject key.
3. Press the Play key and the heads will be clearly seen.
4. Clean the surfaces (A, B, C, D) with a lint free rag or cotton swab
soaked in alcohol. Press the stop/eject button as soon as cleaning is
over.
Page 29

28
Zoom function
Your CD radio cassette recorder has a zoom button which can be used
to enlarge the size of fonts on the display.
1. Press the Zoom button to enlarge the upper line of the display.
2. Press the Zoom button again to enlarge the lower line of the display.
3. Press the Zoom button once more to return to the normal display.
FM Stereo/Mono
1. If the FM radio station being received is weak some hiss may be
audible. To reduce the hiss press and hold the Select/FM mode
button to switch your radio to mono mode. "Forced mono" will show
on the display.
2. To return to stereo mode press and hold the Select/FM mode button
again. "Auto" will show on the display.
1,2
Page 30

29
System Reset
If your radio fails to operate correctly, or some digits on the display are
missing or incomplete, carry out the following procedure.
1. Slide the Function switch to the "Radio" position.
2. Slide the Waveband switch to the DAB position.
3. Press and hold the Stop/Tuner Reset button to select system reset.
A full reset will be performed and the station list together with any preset
stations will be erased. The display will show "Scanning" and will show
progress of the station search. The number on the right of the display is
the number of stations that have been found.
In case of malfunction due to electrostatic discharge, reset the product
(temporary disconnection of the mains power and removal of batteries
may be required) to resume normal operation.
1
3
2
Page 31

30
Headphone socket
1. A 3.5mm Headphone Socket is located on the left hand side of your
CD radio cassette recorder is provided for use with either headphones
or an earpiece. Inserting a plug automatically mutes the internal
loudspeakers.
2. Adjust the volume on the CD radio cassette recorder as needed.
Please be aware that the sensitivity of headphones can vary widely. We
therefore recommend setting volume to a low level before connecting
headphones to the CD radio cassette recorder.
IMPORTANT: Excessive sound pressure from earphones and headphones
can cause hearing loss.
To prevent possible hearing damage, do not listen at high
volume levels for long periods.
Page 32

31
General
Do not allow this CD radio cassette recorder to be exposed to water,
steam or sand. Do not leave your radio where excessive heat could cause
damage. It is recommended that the DAB band be used wherever possible
as better results in terms of quality and freedom from interference will
usually be obtained than on the FM band.
• The name plate is located on the underside of your radio.
IMPORTANT:
• IMPORTANT: The mains plug is used as the means of connecting the
radio to the mains supply. The mains socket used for the radio must
remain accessible during normal use. In order to disconnect the radio
from the mains completely, the mains plug should be removed from
the mains socket outlet completely.
• The CD radio cassette recorder shall not be exposed to dripping or
splashing and that no objects fi lled with liquids, such as vases, shall
be placed on the radio.
• It is recommended to operate the product such that there is a minimum
distance (10cm recommended) to adjacent objects in order to ensure
good ventilation.
• The ventilation of the product should not be restricted by covering it or
its ventilation openings with items such as newspapers, table-cloths,
curtains etc.
• No naked fl ame sources such as lighted candles should be placed on
the product.
• It is recommended to avoid using or storing the product at extremes
of temperature. Avoid leaving the unit in cars, on window sills in direct
sunlight etc.
• The radio cassette recorder must be used in a moderate climate.
Page 33

32
Specifi cations
Power Requirements
Mains AC 230 volts, 50Hz
only
Batteries 8 x LR14 (C size)
Frequency Coverage
FM 87.5-108MHz
DAB 174.928 - 239.200MHz
Circuit features
Loudspeakers 2 x 100mm
Output power 2 x 2.5 W
Headphone socket 3.5mm dia
Microphone socket 3.5mm dia
Aerial System FM Telescopic aerial
DAB Telescopic aerial
The Company reserves the right to amend the specifi cation without notice.
Page 34

33
Mains supply
Your Concerto 2 will operate from a supply of AC 230 volts, 50Hz only.
DO NOT cut off the mains plug from this equipment. If the plug fi tted
is not suitable for the power points in your home or the cable is too short
to reach a power point, then obtain an appropriate safety approved extension lead or adaptor. If in doubt consult your dealer.
If nonetheless the mains plug is cut off, remove the fuse and dispose of
the plug immediately to avoid a possible shock hazard by inadvertent
connection to the mains supply.
If this product is not supplied with a mains plug, or one has to be fi tted,
then follow the instructions given below:
IMPORTANT. DO NOT make any connection to the larger terminal which
is marked with the letter E or by the safety earth symbol
or coloured
Green or Green-and-yellow.
The wires in the mains lead are coloured in accordance with the following
codes :-
BLUE - NEUTRAL BROWN - LIVE
As these colours may not correspond with the coloured markings identifying
the terminals in your plug, proceed as follows:-
The wire coloured BLUE must be
connected to the terminal marked N
or coloured BLACK.
The wire coloured BROWN must be
connected to the terminal marked L
or coloured RED.
Fuse
When replacing the fuse only a 3A ASTA approved to BS1362 type should
be used and be sure to re-fi t the fuse cover.
IF IN DOUBT - CONSULT A QUALIFIED ELECTRICIAN.
Page 35

34
Guarantee
This product is guaranteed for twelve months from the date of purchase by the original owner against failure due to faulty workmanship or component
breakdown, subject to the procedure stated below. Should any component or part fail during this guarantee period it will be repaired or replaced free
of charge.
The guarantee does not cover:
1. Damage resulting from incorrect use.
2. Consequential damage.
3. Product with removed or defaced serial numbers.
N.B. Damaged or broken telescopic aerials will not be replaced under guarantee.
Procedure:
Any claim under this guarantee should be made through the dealer from whom the product was purchased. It is likely that your Roberts' dealer will be
able to attend to any defect quickly and effi ciently, but should it be necessary the dealer will return the product to the company’s service department
for attention. In the event that it is not possible to return the product to the Roberts dealer from whom it was purchased, please contact Roberts Radio
using the contact details on the www.robertsradio.com website.
For product repairs falling outside the guarantee period, please refer to the “Customer care” tab on the www.robertsradio.com website.
These statements do not affect the statutory rights of a consumer.
Page 36

Issue 2
ROBERTS RADIO LIMITED
PO Box 130
Mexborough
South Yorkshire
S64 8YT
Website: http://www.robertsradio.com
© 2011, 2014 Roberts Radio Limited
 Loading...