

Operation Manual
306
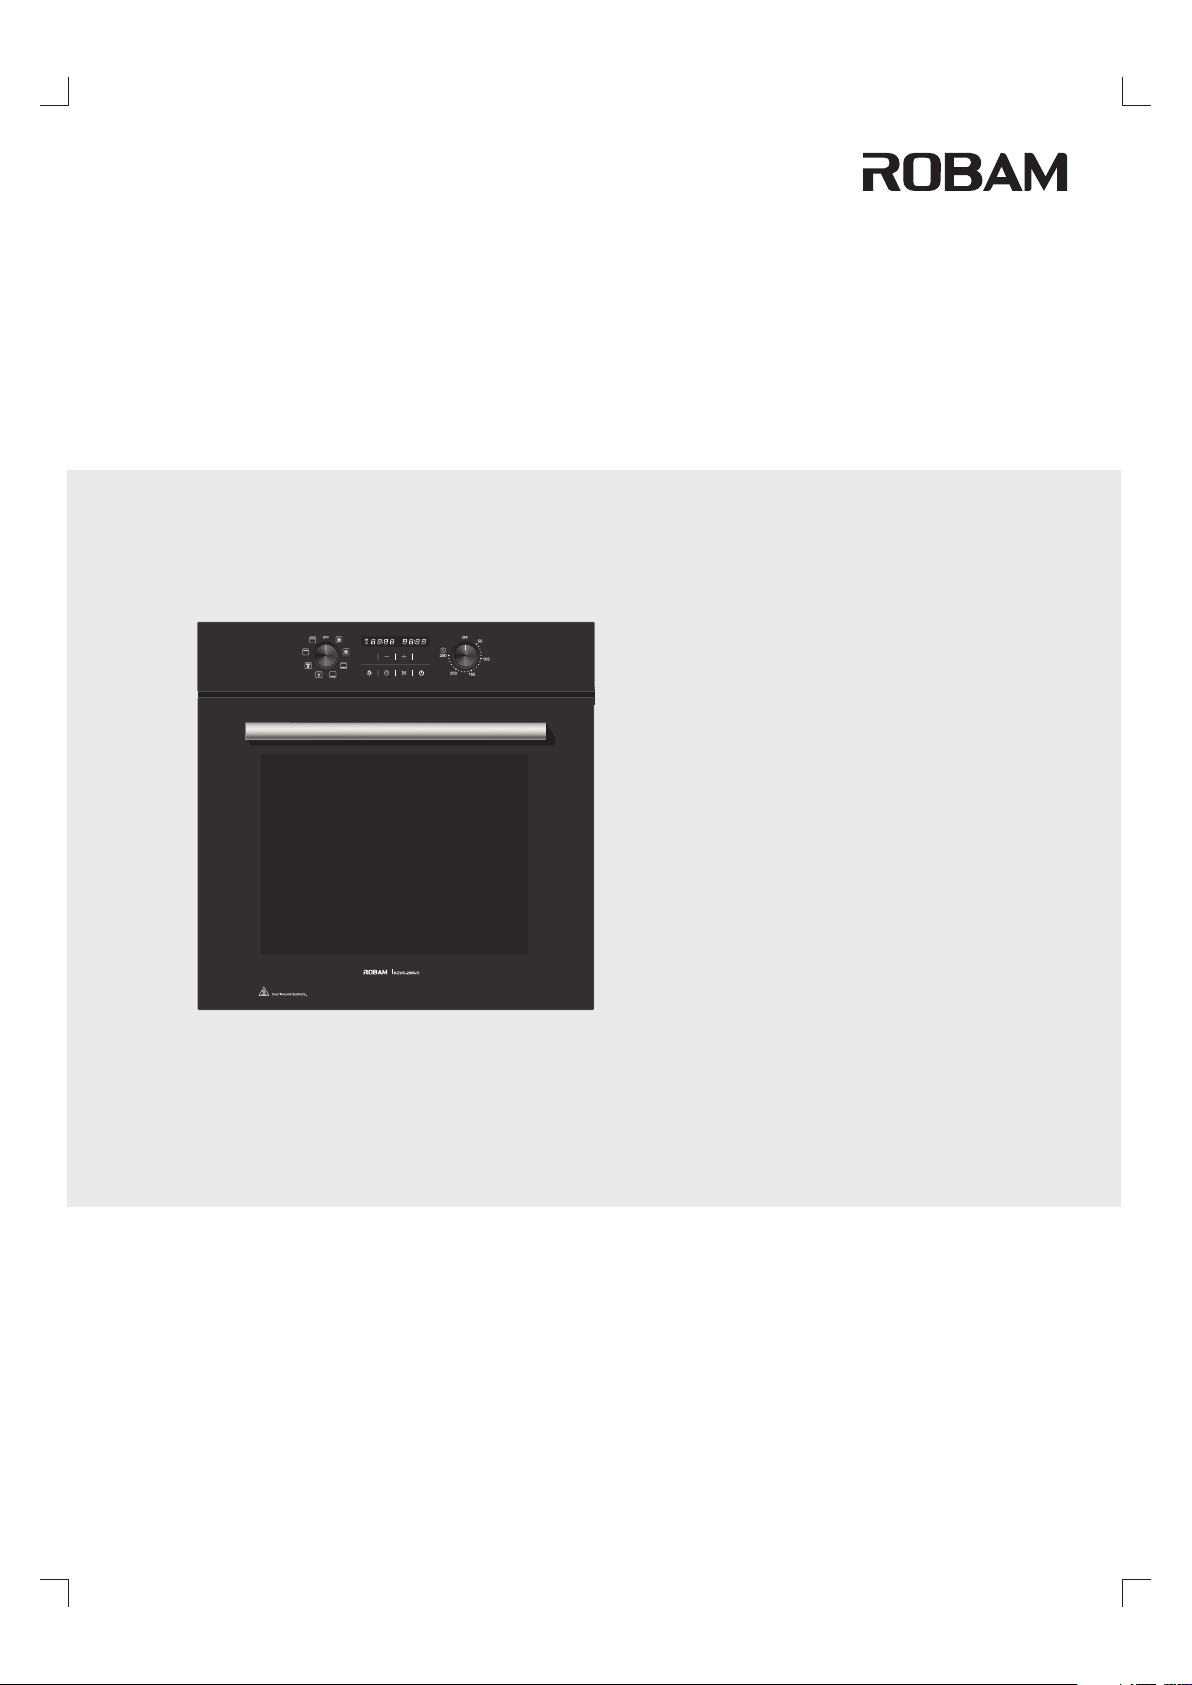
KQWS-2800-R306
Electric Oven

Contents
Safety Precautions
Product Introduction
Installation Instructions
Operation Instructions
Common Faults and Fault Dropping
Maintenance and care
Electrical Schematic Diagram
........................................................................................
......................................................................................
.................................................................................
...................................................................................
..................................................................................
......................................................................
...........................................................
1
3
5
6
11
11
13
Electric Oven
Safety Precautions
In order to avoid any harm or property damage to the users and other persons, following distinctions and signs
are specially given.
All these are the important notices concerned with safety, so please abide by these notices strictly. And,
please use this product correctly on the premise that all the contents herein are understood fully.
Distinctions on contents made in accordance with extent of harm and damage
Danger
War nin g
Notice
Signs of the behaviors that shall be paid attention to or that shall be prohibited
Prohibited No touch No remove Abide by
War nin g
Abide by
strictl y
No open
flames
Before disconnecting plug from the
socket, you should grip the end of the
plug. Be sure not to disconnect the plug
with power wire in your hand, otherwise
such dangers as electric shock, short
out and fire may be caused .
Personal risk, serious injury or a fire may be very likely caused if this sign is
neglected and the product is operated improperly.
Personal risk, serious injury or a fire may be caused if this sign is neglected and the
product is operated improperly.
Personal injury or damage to objects may be caused if this sign is neglected and
the product is operated improperly.
To be
strictl y
Please use this product strictly in accordance with contents of this Operation Manual.
Our company is not reliable for any property loss or personal injury caused by improper
using of this product.
Danger
Prohibited
grounded
Be sure not to use a power socket which
is loose or contacted poorly, otherwise
such dangers as electric shock, short
out and fire may be caused.
Electric
shock danger
Hot surface
Abide by
strictl y
Hot surface
In order to avoid the electric shock that
may occur, please ensure that the
appliance has been disconnected from
power before replacement of a bulb.
During use the appliance becomes hot. Care should be taken to avoid touching heating
elements inside the oven. when taking out foods after using, make sure to wear the high-
temperature resistant protective gloves properly in order to avoid burns.
Abide by
strictl y
The complete appliance shall be kept
fa r away fr om heat so urces and
inflammables (e.g. gas and alcohol).
1
Electric Oven
Notice
Abide by
strictl y
Abide by
strictl y
Abide by
strictl y
Abide by
strictl y
Abide by
strictl y
If the supply cord is damaged, it must be
replaced by the manufacturer, its service
agent or similarly qualified persons in
order to avoid a hazard.
If the appliance functions improperly,
make sure to disconnect it from the
power and stop using immediately. And,
be sure not to touch the appliance and
that it is repaired by a professional.
You should cut off the power before
cleaning of the appliance and use a
neutral detergent to clean it. Moreover,
make sure to clean it with a soft piece of
cloth, in order to prevent its surface from
being scratched.
Turn off the appliance immediately after
using, otherwise the residual fat may
cause a fire; in case the appliance is not
to be used for an extended period of time,
please cut off the power.
WARNING: Accessible parts may become
hot during use.
Young children should be kept away.
Do not use harsh abrasive cleaners or
sharp metal scrapers to clean the oven
door glass, since they can scratch the
surface, which may result in shattering of
the glass.
To be
grounded
Abide by
strictl y
Abide by
strictl y
Abide by
strictl y
Abide by
strictl y
ProhibitedProhibited
Use a separate 16A or higher socket, and
be sure not to connect several appliances
to the same power socket at the same
time, and make sure that the socket is
grounded safely and effectively.
Ma ke su re the p owe r cor d is not
damaged. When using the power cord,
make sure that the cord is not bent,
stretched, twisted or knotted. And, Be
sure not to press or attack the power cord
with weight.
Make sure to disconnect the electric oven
from power before removing the fan
gu a rd.
guard
Af t e r c lea n i ng , r e s et th e
properly to the original position
in accordance with the Operation Manual.
Hot air may come out when door of the
appliance is opened after using, so
please be sure not to stand too close to
the appliance to avoid burns caused by
the hot air.
WAR NIN G: Ensure th at the appli ance is
switche d off bef ore replac ing the lamp t o
avoid the p ossibili ty of e lectric sh ock.
Never place any flammable substance
(e.g. smoke agent) in or under the
appliance; when using the appliance, be
sure not to spray any smoke agent
around it and that the appliance is always
supervised.
In order to prevent a fire, the appliance
Abide by
strictl y
Prohibited
should be kept clean and the air duct
should be kept smooth.
This appliance is not intended for use by persons (including children) with reduced physical, sensory or
mental capabilities, or lack of experience and knowledge, unless they have been given supervision or
instruction concerning use of the appliance by a person responsible for their safety.
Children should be supervised to ensure that they do not play with the appliance.
Abide by st rictly
Prohibited
Abide by st rictly
Be sure not to operate the appliance
when any of your hand or foot is wet or
Abide by
your feet are bare.
strictl y
Notice
If the appliance functions abnormally,
please disconnect the power plug and
power it on again.
Be sure not to use a steam cleaner.
Abide by st rictly
The internal grills and ovenware,
etc. should be placed properly
during using.
The appliance cannot be used
as an indoor heater.
Prohibited
Use a temperature sensor recommended for this electric oven.
2
Electric Oven
Product introduction
Dear users:
We take this opportunity to express our heartfelt thanks to you for your choosing of ROBAM brand
electric oven series products. We especially recommend that you shall read this Manual carefully before
installing and using this product and keep it properly for later reference.
Our company is a professional corporation specializing in production of household appliances and
kitchen wares such as extractor hoods, electric ovens, gas cookers and disinfector cabinets in China. The
electric oven of ROBAM brand adopts advanced design concept and optimized molding and focuses on
matching with cabinet in the aspect of overall design.
Important Information
Packaging of electric oven
Please dispose these packaging materials in an environment-friendly way, in order to keep a good
environment.
Be sure not to allow children to play with the packaging materials (e.g. plastic film and carton box, etc.),
otherwise it would lead to suffocation accident. So, please keep children away from the packaging materials.
Product Characteristics
Adoption of knob adjustment mode makes operation convenient;
The high-temperature enamel liner is durable in use and the roll-over heating tube is convenient for removal
and easy to be cleaned;
Combination of special hinge and multiple layers of tempered glass door makes opening/closing of door
portable and flexible;
The multi-function baking options meet a variety of baking demands and are easy to use;
The high-quality heating tubes for baking are characterized by rapid heating-up, high heat efficiency and
long operating life;
Adoption of energy-saving and environment-friendly high temperature-resistant super cotton brings better
heat insulation performance and saves power energy during baking;
Technical Pa ram eters of the P roduct
Item No.
Rated Voltage
Rated Frequecy
Rated Pow er
Capacity
KQWS-2800-R306
220-240V~
50Hz
2800W
56L
Net Weight
Dimensi ons
W H D(mm)× ×
41kg
595×595×520
3

Product Structure
(The picture is for reference only,specifications are subject to the physical product)
Control panel
Shelf
Grill lay ers
Electric Oven
Fan cover plate
Hinge
Wire rack
List of Accessories
S/N
1
2
3
4
5
Cavity
The side wi th holes
Ovenware
Note: when placing the ovenware, the side with holes shall be placed inward.
The should be p laced in the .Wire rack Shelf
Name
Operation Manual
Wire rack
Ovenware
Shelf
Mounting screw
Quantity
1copy
1copy
1copy
2copy
2copy
4

Electric Oven
Installation Instructions
Drill a square hole on the setting position of the cabinet according to the installation drawing as shown below,
insert the electric oven into this square hole stably and keep the electric oven horizontal. The specific
dimensions of the hole are as shown in following table:
S/N
1
2
(The pictures are for reference only and the specifications are subject to the physical product)
Dimensions of the hole for full insertion
Dimensions of the hole for semi-insertion
595
5
9
5
Complete dimensions diagram
Mounting screw fixed plate
Name
0
50
0
2
Air vent(200× )200
A
600
560
583
B
A
B
600
590
Air vent(200× )200
C
C
565
550
B
Full insertion hole diagram
Install ation Requ irements :
The oven mu st not be inst all ed behind a de corative d oor in order t o avo id overhea ting.
The surface where the electric oven is to be placed on should be flat and the air around the electric oven
mounted in the cabinet shall be ventilated well as much as possible. It is recommended that the clamping
plates and fixed plates shall adopt incombustible thermal insulation material.
For easy connec tion and disco nne ction of power cord ,be sure to discon nect the power supply at any
time aft er the ins tallatio n of the oven. a separ ate 16A or hig her socket s hal l be used, be sure not to
connect s eve ral a ppl iances to the s ame p ower socket at the s ame t ime , and t hat t he socke t is groun ded
safely and effectivel y. I n c ase th ere is any other electri cal ap pliances aroun d, ple ase ke ep a 100mm or
larger mo unting dis tan ce.
C
2
-20
A
0
2
Semi-insertion hole diagram
5
Electric Oven
Operation Instructions
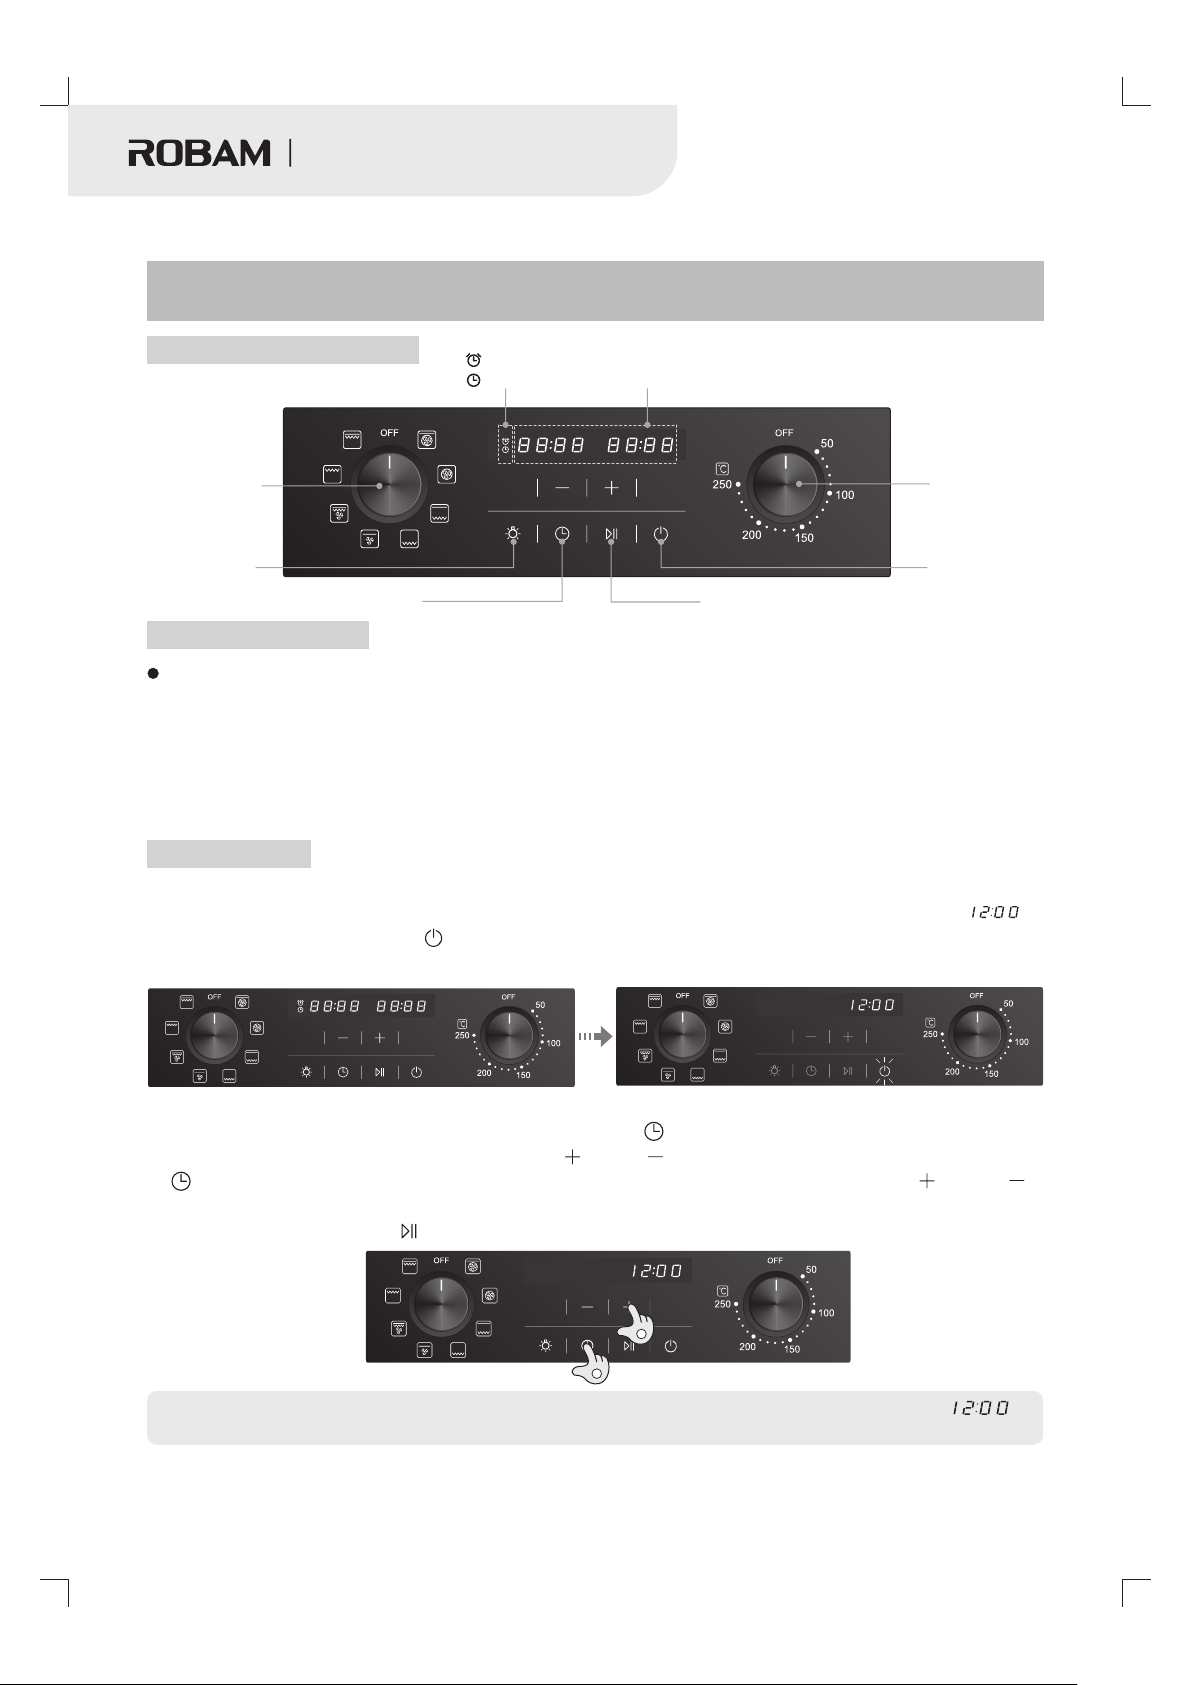
Introduction to Control Panel
Function
selector knob
Lighting key
Preset key
timing
preset
Time display area
Temperature
selector knob
Power button
OK/pause button
Operation Instructions
Since heating elements of the electric oven are protected with coating during storage, there will be a
peculiar smell with evaporation of the heated coating when the electric oven is used for the first time. First
of all, it is necessary to keep the room well ventilated, select the “Fan baking” function and set to the
highest temperature and the longest operating duration to heat and evaporate the peculiar smell of
coating without foods. Thereafter, open door of the electric oven to cool it down, in order to ensure
delicacy of follow-up baking.
Warm tips: You are recommended to open the exhaust hood when the electric oven is operating.
Using Methods
1. Power on
A beep sounds and all indicator lights turn on when the power is turned on. A few seconds later, “ ”
will appear on the display, the “ ” button flashes and other indicator lights turn off. And, the machine is
in standby state (as shown below).
2. Time adjustment
In the standby state, the “H our” wi ll f las h wh en t he “ ” butto n is pre sse d an d he ld. By this tim e,
the “Hour” can be adjus ted b y pressing t he “ ” or “ ” butto n; th e “Minute” will fla sh wh en the
“ ” bu tton is pressed again, and t he “Mi nute” can be adjus ted by pressing the “ ” or “ ”
button. The result will be confi rmed aut omatical ly a few s eco nds a fter the adj ust ment or can be
confirm ed by pressi ng th e “ ” button (as s hown below ).
定时
预约
2
1
Note: the d efault tim e is 12 :00. In case o f a power outa ge, the time w ill r eset to the de fault
automat ically aft er a fe w seconds. An d, the time sh all be readj ust ed after pow er on.
6

Electric Oven
3. Start up
Press and hold the “ ” button to start up (as shown below);
定时
预约
4. How to sel ect functi ons
For example, turn the function selector knob to “ ” icon to select the “Wind baking” function
(as shown below).
Adjust time: press “ ” or “ ” button to adjust baking duration (within a range of 5-90min) when the
time display area flashes.
定时
预约
定时
预约
Adjust temperature: turn the temperature selector knob to adjust baking temperature (as shown below).
定时
预约
Note:
When setting the baking temperature and duration, users can adjust the temperature and duration in
accordance with the baking reference table or their personal taste and cooking experiences.
In the process of duration adjustment, the time duration will decrease or increase continuously when
the “ ” or “ ” button is pressed and held.
5. Confir m to start
After the function is set properly, press the “ ” button to start (as shown below); after baking is finished,
a beep will sound.
定时
预约
7

Electric Oven
Settings adjustment
If you want to change baking duration that has been set when the electric oven is working, please first press
the“ ” button to stop and enable the electric oven to be adjustable. By this time, you can reset the duration
and press “ ” button again after adjustment to start baking. If you want to change the baking mode or
temperature that has been set, just operate the corresponding knob.
Note: The “Preset” function will be disabled after such stop.
Preset function
For example: If the time now is 9:00 a.m., the specific operation will be as follows when the client wants to
preset to bake at 10:30 a.m.:
1. Select the baking mode and adjust temperature and time duration after the machine is powered on;
2. Press “ ” button to enter into “Preset” function. By this time, the “Hour” will flash, press “ ” or
“ ” button to adjust the “Hour” to 10; then, the “Minute” will flash when you press the “ ” button
again, just press “ ” or “ ” button to adjust the “Minute” to 30;
3. Press “ ” button to start the preset function;
4. The machine will enter into baking mode when the time on the display is “10:30”.
Note:
Lighting function
The lighting function will be enabled when the “ ” button is pressed and then the function will be disabled
when such button is pressed again. And, the function will be disabled also when such button is not pressed
again within one minute.
Power off
1. When the electric oven stops working, a beep will sound to hint that heating is stopped.
2. The electric oven in standby or power-on state will power off automatically several minutes after
(no operation is carried out).
3. When the electric oven is working, it will stop heating and power off if you press and hold the “ ” button.
If you want to cancel the preset function, just press the “ ” button.
The preset time refers to the time that baking starts.
Please make sure that the time of the product is correct before using the preset function.
8

Baking Reference Table
Electric Oven
Function Food
Corn
Fan
grill
grill
Vegetables
Egg tart
French chips
Sweet potato
Cup cake
Cake
Bun
Biscuit
Pizza
Pork chop
Streaky pork
Bacon
Wing middle joint
Drumstick
Roast duck
Roast chicken
Shrimp
Steak
Pork chop
Kebab
Sausage
Wing root
Steak
Sausage
Bacon
Roast chicken
Wing middle joint
Wing root
Drumstick
Roast fish
Crispy bun slices
Rapid
heating
Wind
baking
Baking
baking
Strong
Position
of Grill
3 220-230 35-45
3
3
3
3
3
3
3
3
3
3
3
3
3
3
3
3
3
3
3
3
3
3
3
3
3
3
3
3
3
3
3
Apparatus
Adopted
Wire rack
Wire rack
Ovenware
Ovenware
Wire rack
Ovenware
Stainless steel
cookware
Ovenware
Ovenware
Ovenware
Ovenware
Ovenware
Ovenware
Wire rack
Wire rack
Wire rack
Wire rack
Wire rack
Wire rack
Ovenware
Wire rack
Wire rack
Wire rack
Ovenware
Wire rack
Ovenware
Wire rack
Wire rack
Wire rack
Wire rack
Ovenware
Ovenware
Temperature
( )
℃
18 0-1 90 15 -20
20 0-2 20
22 0-2 30 45 -60
170-180 20-25
155-165
190-210 15-20
195-205
180-200
195-215
200-220
180-200 8- 12
180-200 10-15
200-215
190-210
180-200
200-220
195-210
Baking Time
(min)
16-23
15-25175-185
45-55
15-20165-175
15-22160-170
18-23190-205
25-35210-230
7-12
15-20
20-30
45-60200-220
35-50
20-30
10-15190-200
15-20190-210
30-40
10-15180-200
15-20185-195
8-13
50-65195-215
15-25180-200
20-30190-210
25-35
25-30
10-15160-170
Remarks
About 200-300g/each
Applicable for 8 in. cake
About 30g/each
About 3-4mm thick/piece
Applicable for 8in. and 9in. pizza
About 9-12 thick/piece
The whole piece of streaky pork is
300g weight (the recommended
dimensions are approximately
150x50x50mm (L x W x T)
About 2mm thick/piece
About 25-35g/each
About 60g/each
About 1,600-1,800g/piece
About 900-1,400g/piece
About 12-14mm thick/piece
About 9-12mm/piece
About 50g/each
About 12-14mm/piece
About 2mm thick/piece
About 900-1,400g/each
About 25-35g/each
About 50g/each
About 50g/each
About 500g/piece
About 10mm thick/piece
Bottom
heating
Unfreez ing
Notes:
The baking temperature and time of foods mentioned in above table are for reference only. During baking of
foods, users can adjust the baking temperature, time, baking function and baking layer according to their own
tastes and baking experience;
When baking meats of larger size (e.g. chicken and duck, etc.), the taste will be better if you have it baked at low
temperature first and then bake it at high temperature thereafter;
Bacon
You are rec ommended t o unfreeze t he fo ods by selec ting this fu nction.
3
Ovenware
195-205 10-15
About 2mm thick/piece
9

Electric Oven
Before baking of foods requiring to be soused, users can have the foods soused with the prepared ingredients for
approximately 30-40 minutes. Then, the foods will be tastier;
Users also can bake the same food with different functions according to their own baking experience;
In order to ensure that the heating is even during baking, it is recommended to turn foods over during baking.
Especially, the chicken or duck should be turned over during baking.
Baking & Heating Modes
Functio n
Rapid heating
Wind baking
Baking
Fan baking
Bottom heating
grill
Strong grill
Unfreez ing
Note: users can know the heating ways and select an appropriate baking function according to the heating
modes mentioned in this table.
Common Baking Symptoms and Remedies
Symptoms
Baking is u neven
Upper surface
color or bottom
color of the baked
foods is dark
Default
Time
(min)
50
50
50
50
50
50
50
50
Position of the baking layer is incorrect.
*
Foods are not placed at center part of
*
the ovenware.
*
Selected function is improper.
Selected function is improper.
*
Size of foods is non-uniform or foods are
*
not arranged evenly.
*
Baking temperature is too high.
*
Roast layer location is too high or too low.
*
Door of the electric oven is opened
frequently during baking.
Upper Outer
Heating
Tubes
Require d
Possible Causes
Upper Inner
Heating
Tubes
Optiona l
Bottom
Heating
Tubes
*
Select an appropriate baking layer position.
*
Place foods at center part of the ovenware.
Select a proper function.
*
Select a proper function.
*
*
Cut foods into uniform pieces and arrange
them evenly on the ovenware.
Lower the temperature.
*
*
Place the foods to a lower or higher position.
Only open door of the electric oven when
*
half of the baking time elapses.
Rear
Heating
Tubes
Rear
Fan
Remedies
Lighting
Cooling
Fan
The baked cake
has cracks or
thick crust
The baked foods
are light-colored
or under-baked
*
The baking time is too long.
Baking temperature is too high.
*
Bake recipe or preparation method
*
is incorrect.
Selected container is improper.
*
*
Baking temperature is too low.
Baking time is too short.
*
10
Adjust the baking time.
*
Lower the temperature.
*
Adjust recipe and adopt correct preparation
*
methods.
Replace with a proper container.
*
Adjust the baking temperature.
*
Extend the baking time.
*

Common Faults and Fault Dropping
Electric Oven
Faults
The electric oven
does not work
Lighting lamp of the
electric oven does
not turn on
Heating of the electric
oven is not enough
Smoke is seen from
the electric oven for
the first time of using
The solid electric
heating tubes
fade in color
Note:
please contact with authorized service center or dealers of our company when any of the fault still lasts after
fault dropping, and never allow any non-specialized person to remove or install the appliance without
authorization.
※The power is not connected.
※Function button is operated improperly.
※
※The bulb wire is open or disconnected.
※Any of the heating tube is open.
※Any sensor fails.
※The protective oil is volatilizing.
※Fading of heating elements and
ornaments when being heated is
normal.
Possible Causes
The bulb is burnt out.
Fault Dropping
Connect the power.
※
※Operate properly.
※
Replace the bulb.
※Please contact the professional
maintenance personnel.
※Please contact the professional
maintenance personnel.
※Clean it out with a piece of cloth.
※This is normal and shall not be
repaired.
Maintenance and care
Important Notification: before cleaning the electric oven, make sure to cut off power of the electric oven first
and never clean with steam.
Always keep the electric oven clean and make sure that no grease and oil is accumulated around the
heating elements and fan; the ovenware and w , etc. should be cleaned up, in order to prevent a fire from
being caused by accumulated grease; before baking of meats, warp the meats with a piece of aluminum foil in
order to make it convenient for later cleaning; all the greases and oils will form a layer of lacquer deposit which is
difficult to be cleaned in the electric oven. Therefore, the electric oven shall be cleaned thoroughly after every
use.
1. Cavity of electric oven: clean it with warm water without using any corrosive or abrasive detergent; the
stains which are difficult to be removed can be cleaned with a nylon brush or mild detergent rather than a steel
wire ball, in order to avoid the surface from being left with un-repairable damages. The detergent to be used in
the cavity should be cleaned up and no residue shall be left. After cleaning, wipe cavity out with a piece of wet
cloth and keep it dry.
ire rack
11

Electric Oven
Glass panel: the glass panel of door and control panel shall be cleaned up immediately after it becomes
2.
dirty. The dirt that is difficult to be removed shall be cleaned with mild detergent rather than a steel wire ball, in
order to avoid the surface from being scratched. After cleaning, dry it with a piece of cloth.
3. Removal and installation of fan cover plate: the fan cover plate is fixed to the internal cavity with 4 bolts
and can be removed by screwing these bolts anticlockwise. Note: the fan cover plate should be reinstalled after
being cleaned.
4. Removal and installation of lighting lamp in electric oven: remove the lighting lamp of the electric oven
by rotating the glass lamp cover anticlockwise and then pull out the bulb; inset the bulb upward and rotate the
glass lamp cover clockwise so that the lighting lamp of the electric oven is reinstalled.
5. In order to make it convenient for cleaning the top of the cavity, you can flip the upper heating tube down.
First, rotate the fixation column of heating tube for 90 degrees (as shown in Fig.1), at this moment, the fixed plate
at front end of heating tube will separate from the fixation column and then the heating tube can be flipped down
about 20 degrees (as shown in Fig.2). Then retighten the upper heating tube in opposite direction, and reinstall
the fixed plate of upper heating tube to the fixation column, then rotate it for 90 degrees.
Fixed plate
Upper heating tube fixation
Upper heating tube
Top of cavity Upper heating tube
Rotate 90 degree
Diag. 1 Diag. 2
6. Removal and inst allation of shelv es (the p rocedure s f or lef t s helve are the same with that of the
right one) : press t he positi on of s helf 1 (as show n in Diag.3 ) until the she lf is disconnec ted from the
positio ning bolts, then tilt it to a ce rtain angle and take it o ut al ong t he di rection of arro w as shown in
Diag.4, then the shelf can be re moved. W hen r einstall ing t he sh elf , ali gn lo wer e nd of the shelf with hole
1 an d 2 a s sho wn in Diag.4 and i nsert the she lf in to th e hole, then secure the up per e nd of the shelf wi th
positio ning bolts .
1
Press
Hole 2
Hole 1
Diag. 3
Diag. 4
Note: ple ase adjust t he an gle slight ly during in stallati on or r emoval,
or the line r enamel wou ld be d amaged.
12
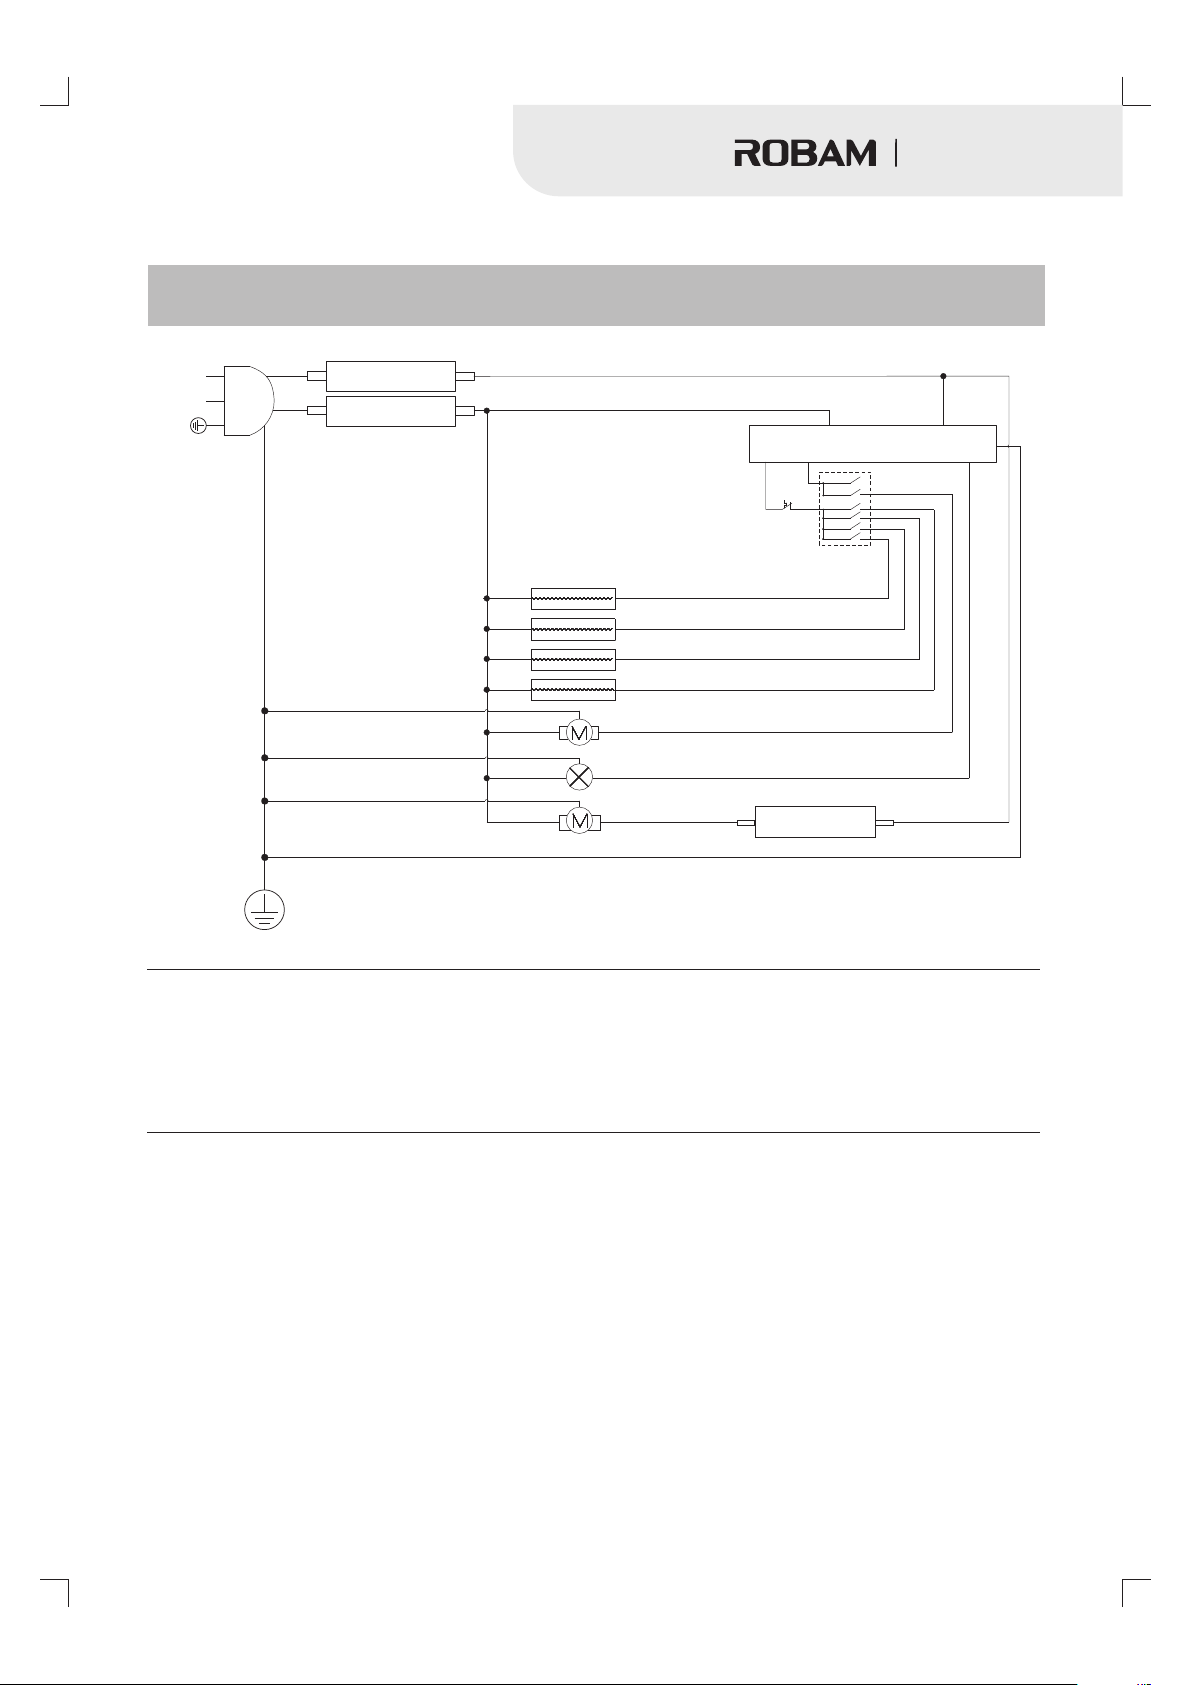
Electrical Schematic Diagram
Electric Oven
L
Plug
N
220-240V~ 50Hz
Over-temperature
protector
Over-temperature
protector
Thermostat
Position switch
Upper Outer Heating Tube
Upper Inner Heating Tube
Rear Heating Tube
Bottom Heating Tube
Heating fan
Lighting lamp
Cooling fan
Over-temperature
Computer controller
protector
Special statements
Technical improvements of the product (if any) will be incorporated in the Operation Manual of a new version
without notice. If any alteration occurs on appearance or color of the product, the actual specifications are subject
to the physical product.
13
Edition : A 0/
Publica tion Date: Ap ril ,01,2017
 Loading...