

Page 1

is a registered Trademark of Roadstar S.A. - Switzerland All rights reserved
www.roadstar.com
CLR-2950DAB+
Instruction manual
Bedienungsanleitung
Page 2
INDEX
Your new unit was manufactured and assembled under strict ROADSTAR quality
control. Thank-you for purchasing our product for your music enjoyment. Before
operating the unit, please read this instruction manual carefully. Keep it also handy for further future references.
Ihr neues Gerät wurde unter Beachtung der strengen ROADSTAR-
Qualitätsvorschriften gefertigt. Wir danken Ihnen für den Kauf unseres Produktes
und wünschen Ihnen optimalen Hörgenuss. Bitte lesen Sie diese Bedienungsanleitung durch, und heben Sie sie auf, um jederzeit darin nachschlagen zu können.
English Page 1
Deutsch Seite 11
This marking shown on the product or its literature, indicates that it should not be disposed with other
household wastes at the end of its working life. To prevent possible harm to the environment or
human health from uncontrolled waste disposal, please separate this from other types of wastes and
recycle it responsibly to promote the sustainable reuse of material resources. Househol d users
shoul d contact ei ther the retai l er where they purchased this product, or their local government
office, for details of where and how they can take this item for environmentally safe recycling. Business users should contact their supplier and check the terms and conditions of the purchase contract. This product should not be mixed with other commercial wastes for disposal.
Correct Disposal of This Product
(Waste Electrical & Electronic Equipment)
Die Kennzeichnung auf dem Produkt bzw. auf der dazugehörigen Literatur gibt an, dass es nach seiner Lebensdauer nicht zusammen mit dem normalen HaushaltsmüIl entsorgt werden darf. Entsorgen Sie dieses Gerat
bitte getrennt von anderen Abfallen, um der Umwelt bzw. der menschl i chen Gesundhei t ni cht durch unkontrol l i erte Mül l besei ti gung zu schaden. Recycel n Si e das Gerät, um di e nachhaltige Wiederverwertung von
stofflichen Ressourcen zu fördern. Private Nutzer sollten den Händler, bei dem das Produkt gekauft wurde,
oder die zuständigen Behörden kontaktieren, um in Erfahrung zu bringen, wie sie das Gerät auf umweltfreundliche Weise recyceln können. Gewerbliche Nutzer sollten sich an Ihren L ieferanten wenden und die Bedingungen des Verkaufsvertrags konsultieren. Dieses Produkt darf nicht zusammen mit anderem Gewerbemüll
entsorgt werden.
Korrekte Entsorgung dieses Produkts
(Elektromüll)
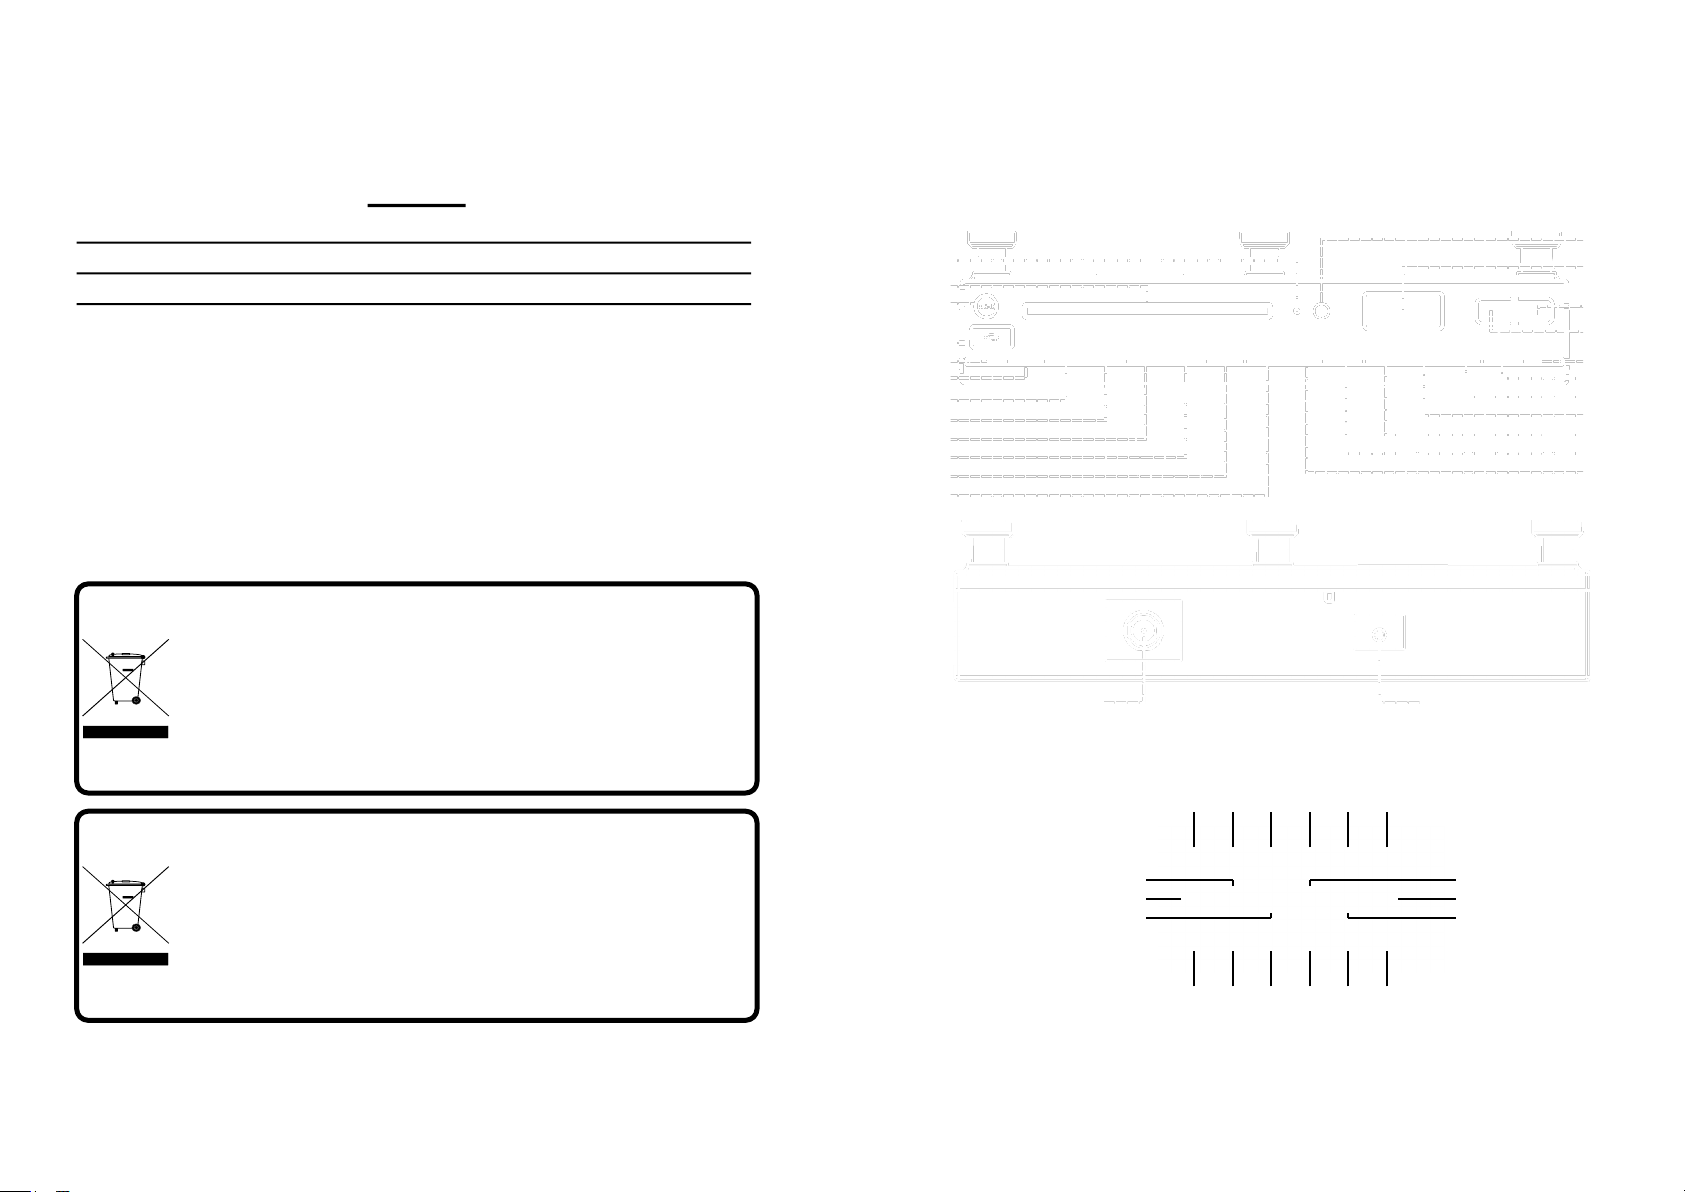
CLR-2950DAB+
CLR-2950DAB+ - REMOTE
8
1
2
3
4
5
6
7
15
14
13
12
11
10
9
16
17
23
22
21
20
18
19
24
25
10 13 2 3 8 11
15 16 4 1 6 12
5
18
14
7
9
17
Page 3
English English 1 2
CLR-2950DAB+
LOCATION OF CONTROLS
1. OPEN / CLOSE BUTTON
2. PLAY / PAUSE / SCAN BUTTON
3. STOP / ENTER BUTTON
4. SKIP BACK / TUNING - BUTTON
5. SKIP UP / TUNING + BUTTON
6. FOLDER / MEMORY - BUTTON
7. FOLDER / MMEMORY + BUTTON
8. MEMORY / CLOCK ADJUST / MENU BUTTON
9. PLAY MODE / INFO BUTTON
10. SLEEP BUTTON
11. TIMER BUTTON
12. DISPLAY / ID3 BUTTON
13. PRESET EQUALIZER BUTTON
14. FUNCTION BUTTON
15. STANDBY BUTTON
16. VOLUME - BUTTON
17. VOLUME + BUTTON
18. AUX IN JACK
19. USB PORT
20. FRONT LOADING CD DOOR
21. POWER LED
22. REMOTE RECEIVER
23. LCD DISPLAY
24. FM / DAB ANTENNA
25. AC SOCKET DC
REMOTE
1. 10 - BUTTON
2. PLAY / PAUSE / SCAN BUTTON
3. STOP / ENTER BUTTON
4. SKIP BACK / TUNING - BUTTON
5. SKIP UP / TUNING + BUTTON
6. FOLDER / M- BUTTON
7. FOLDER / M+ BUTTON
8. MEMORY / CLOCK ADJUST / MENU BUTTON
9. PLAY MODE / INFO BUTTON
10. SLEEP BUTTON
11. TIMER BUTTON
12. DISPLAY / ID3 BUTTON
13. PRESET EQUALIZER BUTTON
14. FUNCTION BUTTON
15. STANDBY BUTTON
16. VOLUME - BUTTON
17. VOLUME + BUTTON
18. 10 + BUTTON
Note: Please pull battery protector before using.
To operate the unit with the remote control, point the remote handset at the
remote sensor on the front panel and press the appropriate button on the
remote handset. The remote works best within a range of 6 ~ 7 meters from
the front panel and on an angle of 30 degrees. Bright sunlight or room light
conditions can interfere with the remote control. If the remote operation is
unsatisfactory or stops working entirely, first try replacing the remote batteries, then try reducing the room lighting conditions.
Baery Back-Up Memory
Page 4
English English 3 4
MOUNTING INSTRUCTIONS
1. Drill a 6mm diameter holes through the underside of the cabinet bottom shelf
using the three points marked on the template.
2. Select the spacer or combination of spacers that fit your preferences, from
the mounting kit.
3. Fix the unit using the screws from the mounting kit.
MAINS (AC) OPERATION
Before switching on make sure that the voltage of your electricity supply is the
same as that indicated on the rating plate.
For your own safety read the following instructions carefully before attempting to
connect this unit to the mains.
This unit is designed to operate on AC 230V 50Hz / DC 12V current only. Connecting it to other power sources may damage the unit.
To prevent electric shock disconnect from the mains before removing cover. No
user serviceable parts inside. Refer servicing to qualified service personnel.
SETTING THE TIME
Note: Please make sure that all connections have been ready.
1. In standby mode, press and hold MEM/CLK/MENU BUTTON (8), the Hour
digits will flash. Press SKIP BACK/UP / TUNING -/+ BUTTONS (4)/(5) on
unit or on remote repeatedly to set the clock to the correct Hour, press MEM/
CLK/MENU BUTTON (8) to confirm.
2. Then the minute digits will flash, press SKIP BACK/UP / TUNING -/+ BUT-
TONS (4)/(5) on unit or on remote repeatedly to set the clock to the correct
Minutes, press MEM/CLK/MENU BUTTON (8) again to confirm.
3. The display will show the RTC 12 hours or the RTC 24 hours version. Press
SKIP BACK/UP / TUNING -/+ BUTTONS (4)/(5) on unit or on remote to
choose for the 12 or 24 hour version. Press the MEM/CLK/MENU BUTTON
(8) to confirm.
WARNINGS
The exclamation point within the triangle is a warning sign alerting
the user of important instructions accompanying the product.
The lightening flash with arrowhead symbol within the triangle is a
warning sign alerting the user of “dangerous voltage” inside the unit.
To reduce the risk of electric shock, do not remove the cover. No
user serviceable parts inside the unit. Refer all servicing to qualified personnel.
This unit operates on 230V ~ 50Hz. If the unit is not used for a
long period of time, remove the plug from the AC mains.
Ensure all connections are properly made before operating the
unit.
This unit must not be exposed to moisture or rain.
This unit should be positioned so that it is properly ventilated.
Avoid placing it, for example, close to curtains, on the carpet or in
a built-in installation such as a bookcase.
Do not expose this unit to direct sunlight or heat radiating sources.
Page 5

English English 5 6
COOKING TIMER
1. In standby mode, press and hold TIMER BUTTON (11), the minute digits will
flash. Press VOLUME -/+ BUTTON (16)/(17) on unit or on remote repeatedly
to set the timer to the desired time (the display will run up from 1 minute to
120 minutes maximum), press TIMER BUTTON (11) to confirm.
2. Then the volume digits will flash, press VOLUME -/+ BUTTON (16)/(17) on
unit or on remote repeatedly to set the desired volume, press TIMER BUTTON (11) again to confirm.
3. The timer will start the countdown. Once countdown was arrived, bee tone
sound will coming. You can stop it by pressing one more time TIMER BUTTON (11) on unit or remote.
TURNING ON THE UNIT
Press STANDBY BUTTON (15) on unit or remote control, then press FUNCTION
BUTTON (14) on unit or on remote control to choose FM / CD / USB / AUX model.
VOLUME ADJUSTING
Press VOLUME -/+ BUTTON (16)/(17) on unit or on remote control to increase or
decrease volume.
TUNING RADIO STATIONS
1. Press FUNCTION BUTTON (14) on unit or remote control to select the desi-
red wave band FM.
2. Press 3 seconds SKIP BACK/UP / TUNING -/+ BUTTONS (4)/(5) to start the
Radio auto-tuning function (the unit will search automatically the strongest
stations).
3. To search manually a Radio station, when in radio mode press SKIP BACK/
UP / TUNING -/+ BUTTONS (4)/(5) sequentially until the desired frequency
is displayed.
4. To turn off the radio, press FUNCTION BUTTON (14) to switch to other func-
tions or press STANDBY BUTTON (15) to turn off the unit.
DAB AUTO SCAN
The auto scan will search for the entire DAB Band III channels. After the scan
has finished, the first alphanumerically found station will be automatically selected.
1. To activate auto scan press PLAY/PAUSE/SCAN BUTTON (2), the display
will show “Searching …” and a progressing slide bar.
2. All the stations that have been found will be stored automatically, to explore
and select listening to the found stations, repeatedly press SKIP BACK/UP /
TUNING -/+ BUTTONS (4)/(5).
DAB DISPLAY MODES
Every time you press P.MODE/INFO BUTTON (9), the display will cycle through
the following display modes:
Programme type
This describes the style of the programme that is being broadcast. If the information is not available, the display will show “<Program Type>”.
Ensemble/Multiplex (Group name)
The Ensemble/Multiplex is a collection of radio stations that are bundled and
transmitted together in a single frequency. There are national and local multiplexes, local ones contain stations that are specific to that area.
Frequency
The frequency of the present station will be displayed.
Audio bit rate
The display will show the digital audio bit rate being received.
Signal strength
The display will show a slide bar to indicate the signal strength, the stronger the
signal, the longer the bar will be from left to right.
DLS
Page 6

English English 7 8
DLS stands for Dynamic Label Segment which is a scrolling message that the
broadcaster may include in their transmissions. The message usually includes
information such as programme details …etc.
STORING AND RECALLING STORED STATIONS
In either DAB or FM mode, you can store up to 20 stations to the favourite presets; this will enable you to get direct access to your favourite stations.
1. To store a preset, first tune to your desired station, then press and hold
MEM/CLK/MENU BUTTON (8) until the display shows “#” and flash.
2. Repeatedly turn FOLDER/M -/+ BUTTON (6)/(7) to select your desired sta-
tion preset number then press MEM/CLK/MENU BUTTON (8) to confirm
your selection, the display will show “Preset # saved”.
3. To recall a preset station, first press MEM/CLK/MENU BUTTON (8) once,
then repeatedly press FOLDER/M -/+ BUTTON (6)/(7) to scroll up or down
the presets that you have stored. When the display shows your desired preset number, press MEM/CLK/MENU BUTTON (8). If the preset hasn’t been
allocated a station, the display will show “Empty preset #”.
DISCS FOR PLAYBACK
This system can playback all digital audio CD/MP3, finalized digital audio CDRecordable (CD-R) discs, finalized digital audio CD-Rewritable (CD-RW) discs
and CD-DA format digital audio CD/CD-R/CD-RW discs.
LOADING A DISC
1. Press FUNCTION BUTTON (14) on unit or remote control to select CD mo-
de.
2. Press OPEN/CLOSE BUTTON (1) to open the CD door, “OPEN” will be
shown on the display.
3. Place an audio CD/MP3 DISC into the tray with the front side facing up.
4. Close the CD door. The display will show a flashing “READING”, then the
total number of tracks would be shown and the playback will start from track.
5. To remove the CD, press OPEN/CLOSE BUTTON (1) to open CD door, the
display will show “OPEN”. Hold the CD by its edges, and take it out carefully.
Note:
Make sure the disc is stopped before opening the CD DOOR.
To ensure good system performance; wait until the unit completely reads the
disc before proceeding.
If no disc loaded into the tray, or the disc is unreadable, the display will show
NO DISC.
PLAYING A DISC
1. The playback starts from track 1 automatically when reading the disc.
2. To pause playback, press PLAY/PAUSE/SCAN BUTTON (2) on unit or on
remote.
3. To resume playback, press PLAY/PAUSE/SCAN BUTTON (2) on unit or on
remote again.
4. To stop playback, press STOP/ENTER BUTTON (3) on unit or on remote.
SELECTING A DESIRED TRACK/PASSAGE
To select a desired track
Press SKIP BACK/UP / TUNING -/+ BUTTONS (4)/(5) on unit or on remote respectively in stop mode or during playing until the desired track appears on the
display. Press press PLAY/PAUSE/SCAN BUTTON (2) on unit or on remote to
start play.
To search for a particular passage during playback
Press and hold SKIP BACK/UP / TUNING -/+ BUTTONS (4)/(5) on unit or on
remote to scan the current playing track at high speed until desired point
(passage) appears, then release for normal playback mode. Playback will start
again from this point.
REPEAT
You can play one track or all tracks on the disc repeatedly.
To Repeat a Single Track
1. Press P.MODE/INFO BUTTON (9) on unit or on remote during play, the di-
splay will show a flashing “Rep1“ and the current track will be played over an
Page 7

English English 9 10
over again till you press STOP/ENTER BUTTON (3) on unit or on remote.
2. To cancel repeat play, press P.MODE/INFO BUTTON (9) on unit or on remo-
te until “Rep1” disappears from the display.
To Repeat all the Tracks
1. Press P.MODE/INFO BUTTON (9) on unit or on remote until the “RepA”
shows steady on the display, all tracks on the disc will be played over and
over again till you press STOP/ENTER BUTTON (3) on unit or on remote.
2. To cancel repeat play, press P.MODE/INFO BUTTON (9) on unit or on remo-
te until “RepA” disappears from the display.
To Repeat Folder
1. Press P.MODE/INFO BUTTON (9) on unit or on remote until the “RepF”
shows steady on the display, all tracks of the folder will be played over and
over again till you press STOP/ENTER BUTTON (3) on unit or on remote.
2. To cancel repeat play, press P.MODE/INFO BUTTON (9) on unit or on remo-
te until “RepF” disappears from the display.
RANDOM PLAY
Press P.MODE/INFO BUTTON (9) on unit or on remote in play mode till the
“Rand” shows steady on the display, the random play will start from next track
automatically, until all tracks are played over and then it will stop. Press
P.MODE/INFO BUTTON (9) on unit or on remote again until the “Rand” disappears from the display.
SLEEP
During music playback, press SLEEP BUTTON (10). The clock display will show
90/80/70/60/50/40/30/20/10 minutes. The unit will turn off automatically after the
selected sleep timer.
USB OPERATION
1. Press FUNCTION BUTTON (14) on unit or on remote to select “USB” mode.
2. Connect the USB to the USB INPUT. The playback stars from track 1 auto-
matically after reading the USB.
3. Press STOP/ENTER BUTTON (3) on unit or on remote to stop playing. The
display will show total number of USB and STOP.
4. Proceed repeat play (repeat 1- repeat folder - repeat all)/program play/skip
up and back operation as the same described in above “CD/MP3 OPERATION”.
CAUTION: Do not use any USB extension cable for connecting the USB bar
which may cause harmful interference.
AUX OPERATION
1. Press FUNCTION BUTTON (14) to select “AUX” mode.
2. Insert the AUX line plug into the AUX IN jack (3.5mm) on the player, music
from the device would be amplified and exported from the speakers.
3. Adjust the volume of the main unit to your desired level.
4. Press PLAY of the external audio source (eg. MP3 player) to start playback.
PRESET EQUALIZER
Every time you press PRESET EQ. BUTTON (13), the display will cycle through
the following preset equalizer: classic, rock, pop, jazz, flat.
ID3 / DISPLAY FUNCTION
Since this system designed with clock/timer feature, thus, the LCD display will
change to clock automatically after operation. To check your playing mode state
(such as CD track number/radio frequency) press DISPLAY / ID3 BUTTON (12)
on unit or remote to change the information for displaying few second.
SPECIFICATIONS
FM Band: 87.5 to 108 MHz
DAB: Band III
Power Supply: DC 12V (adapter)
Design and specifications are subject to change without notice.
Page 8

Deutsch Deutsch 11 12
CLR-2950DAB+
ÜBERWACHUNG
1. TASTE ÖFFNEN / SCHLIESSEN (CD)
2. TASTE PLAY / PAUSE / SCAN
3. TASTE STOP / ENTER
4. TASTE SKIP BACK / TUNING -
5. TASTE SKIP UP / TUNING +
6. TASTE MAPPE / SPEICHER -
7. TASTE MAPPE / SPEICHER +
8. TASTE SPEICHER / UHR ADJUSTE / MENU
9. TASTE WIEDERGABEMODUS / INFO
10. TASTE SLEEP
11. TASTE TIMER
12. TASTE ANZEIGE / ID3
13. TASTE PRESET EQUALIZER
14. TASTE FUNKTION
15. TASTE STANDBY
16. TASTE VOLUME -
17. TASTE VOLUME +
18. AUX IN-ANSCHLUSS
19. USB ANSCHLUSS
20. EINLEGEFACH CD
21. POWER LED
22. FERNBEDIENUNGSEMPFÄNGER
23. LCD DISPLAY
24. ANTENNE DAB / FM
25. DC-ANSCHLUSS
FERNBEDIENUNG
1. TASTE 10 -
2. TASTE PLAY / PAUSE
3. TASTE STOP
4. TASTE SKIP BACK / TUNING -
5. TASTE SKIP UP / TUNING+
6. TASTE MAPPE / M -
7. TASTE MAPPE / M +
8. TASTE SPEICHER / UHR ADJUSTE / MENU
9. TASTE WIEDERGABEMODUS / INFO
10. TASTE SLEEP
11. TASTE TIMER
12. TASTE ANZEIGE / ID3
13. TASTE PRESET EQUALIZER
14. TASTE FUNKTION
15. TASTE STANDBY
16. TASTE VOLUME -
17. TASTE VOLUME +
18. TASTE 10 +
Anmerkung: Entfernen Sie vor Gebrauch den Batterieschutz.
Um das Gerät mit der Fernbedienung zu bedienen, richten Sie die Fernbedienung auf den Fernbedienungssensor an der Vorderseite und drücken Sie
die entsprechende Taste auf der Fernbedienung. Die optimale Funktion der
Fernbedienung ist in einem Abstand von ca. 6 bis 7 m von der Vorderseite
und in einem Winkel von 30 Grad gegeben. Direkte Sonneneinstrahlung
oder eine übermäßig beleuchtete Umgebung können die Funktionalität der
Fernbedienung beeinflussen. Wenn die Fernbedienung nicht richtig funktioniert oder nicht mehr funktioniert, wechseln Sie die Batterien der Fernbedienung aus oder versuchen Sie, die Helligkeit der Umgebung zu verringern.
Baerie-Backup-Speicher
Page 9

Deutsch Deutsch 13 14
MONTAGEANLEITUNG
1. Bohren 6mm Durchmesser Löcher in der Unterseite des Gehäuses unteren
Regal mit den drei Punkten auf der Schablone markiert.
2. Wählen Sie das Distanzstück oder eine Kombination von Abstandshaltern ,
die Ihre Vorlieben anpassen , von der Montage-Kit .
3. Befestigen Sie das Gerät mit den Schrauben aus dem Montagesatz.
UHRZEITEINSTELLUNG
Achtung: sich genau vergewissern, dass alle Verbindungen korrekt ange-
schlossen sind.
1. Im Standby-Modus die TASTE SPEIC/UHR/MENU (8) gedrückt halten, am
Display blinkt die RTC-12-Stundenversion oder die RTC 24-Stundenversion
an. TASTE SKIP BACK/UP / TUNING -/+ (4)/(5) auf der Einheit oder auf der
Fernbedienung drücken, um die 12- oder 24-Stundenversion zu wählen. TASTE SPEIC/UHR/MENU (8) zum Bestätigen drücken.
2. Auf dem Display blinken die Minuten, um die Minuten einzustellen, die TASTE SKIP BACK/UP / TUNING -/+ (4)/(5) Taste auf der Einheit, oder auf der
Fernbedienung drücken, TASTE SPEIC/UHR/MENU (8) zum Bestätigen
drücken.
3. Der Display blinkt die Uhrzeit, die TASTE SKIP BACK/UP / TUNING -/+ (4)/
(5) auf der Einheit oder auf der Fernbedienung drücken, um die Uhrzeit einzustellen. Die Taste TASTE SPEIC/UHR/MENU (8) zur Bestätigung drücken.
TIMER
1. Im Standby-Modus oder Wiedergabemodus, halten Sie TASTE TIMER (11),
wird die Minutenanzeige zu blinken. Drücken TASTE VOLUME -/+ (16)/(17)
(zeigt das Display bis 1 Minute bis 120 Minuten maximale laufen)am Gerät
oder auf der Fernbedienung mehrmals, um den Timer auf die gewünschte
Zeit eingestellt, um zu bestätigen, drücken Sie TASTE TIMER (11).
2. Dann werden die Volumenanzeige blinkt, drücken TASTE VOLUME -/+ (16)/
(17) am Gerät oder auf der Fernbedienung, um die gewünschte Lautstärke
einzustellen, drücken Sie TASTE TIMER (11) zur Bestätigung erneut.
3. Der Timer den Countdown zu starten. Sobald Countdown angekommen war ,
wird bee Ton Geräusch. Sie können es, indem Sie noch einmal auf TASTE
SICHERHEITSHINWEISE
Das Ausrufszeichen im Dreieck weist den Benutzer auf
wichtige Bedienungs- und Wartungsanweisungen (Service)
in diesem Handbuch hin, die unbedingt zu befolgen sind.
Um die Gefahr elektrischer Schläge auszuschliessen,
Gehäuse auf keinen Fall abnehmen.
Im Innem befinden sich keine vom Benutzer selbst instandsetz-baren Teile. Reparaturen dürfen nur von einer autorisierten Fachwerkstatt durchgeführt werden.
Dieses Gerät ist für 230V ~ 50Hz Netzspannung ausgelegt.
Bei längerer Nichtbenutzung des Geräts ziehen Sie den
Stecker aus der Steckdose.
Setzen Sie das Gerät weder Feuchtigkeit noch Regen aus.
Schalten Sie das System erst dann ein, wenn Sie alle Verbindungen genau geprüft haben.
Stellen Sie das Gerät so auf, dass immer eine ungestörte
Frischluftzufuhr sichergestellt ist. Es ist zum beispiel keinesfalls auf Teppiche und in der Nähe von Gardinen zu stellen oder in Bücherregale einzubauen.
Setzen Sie das Gerät weder direkter Sonneneinstrahlung
noch Wärmequellen aus.
Page 10

Deutsch Deutsch 15 16
TIMER (11) Gerät oder der Fernbedienung zu stoppen.
EINSCHALTEN DER EINHEIT
Die TASTE STANDBY (15) auf der Einheit oder auf der Fernbedienung drücken,
dann die TASTE FUNKTION (14) auf der Einheit oder auf der Fernbedienung
drücken, um die Modalität FM / CD / USB / AUX auszuwählen.
LAUTSTÄRKEEINSTELLUNG
TASTE VOLUME -/+ (16)/(17) auf der Einheit oder auf der Fernbedienung drücken, um die Lautstärke zu verringern oder zu erhöhen.
RADIOSENDER SYNCHRONISIEREN
1. Die TASTE FUNKTION (14) auf der Einheit oder auf der Fernbedienung drücken, um den gewünschten FM-Band zu wählen.
2. Die TASTE SKIP BACK/UP / TUNING -/+ (4)/(5) 3 für Sekunden drücken,
um die Funktion Auto-Synchronie des Radios zu starten (das Gerät synchro-
nisiert automatisch, in Sequenz, die stärksten Sender).
3. Um Radiosender manuell zu suchen, die TASTE SKIP BACK/UP / TUNING -/
+ (4)/(5) in Modalität RADIO drücken, bis die gewünschte Frequenz da ist.
4. Um auf die nächste Funktion überzugehen, die TASTE FUNKTION (14) drüc-
ken, um die Einheit auszuschalten, die TASTE STANDBY (15) drücken.
DAB AUTO SENDER EINSTELLEN
Die Auto-Scan wird für die gesamte DAB Band III-Sender zu suchen. Nachdem
die Prüfung abgeschlossen ist, wird die erste alphanumerisch gefunden Station
automatisch ausgewählt.
1. Um die Auto-Scan, drücken Sie die TASTE PLAY/PAUSE/SCAN (2), das
Display zeigt "Searching..." und einer fortschreitenden Schlitten bar.
2. Alle Stationen, die gefunden wurden werden automatisch gespeichert, zu
erkunden und zu hören, wählen Sie die gefundenen Sender, drücken Sie die
TASTE SKIP BACK/UP / TUNING -/+ (4)/(5).
DAB ANZEIGE-MODI
Jedes mal wenn Sie die TASTE W.MODUS/INFO (9) drücken werden im Display
folgende Informationen angezeigt:
Programmtyp
Dies beschreibt den Stil des Programms, das ausgestrahlt wird. Wenn die Information nicht verfügbar ist, zeigt das Display “ <Program Type> “.
Ensemble/Multiplex (Gruppenname)
Das Ensemble/Multiplex ist eine Sammlung von Radiostationen, die gebündelt
und in einer einzigen Frequenz zusammen übertragen wird. Es gibt nationale und
lokale Multiplexe, lokale Stationen.
Frequenz
Die Häufigkeit der vorliegenden Station wird angezeigt.
Audio-Bitrate
Das Display zeigt die empfangene digitale Audio-Bitrate.
Die Signalstärke
Das Display zeigt einen Balken, der die Signalstärke anzeigt.
DLS
DLS steht für Dynamic Label Segment , das ist eine Bildlauf -Nachricht, die der
Sender überträgt. Die Nachricht enthält in der Regel Informationen wie Programmdetails ... etc.
SPEICHERN UND ABRUFEN VON GESPEICHERTEN SENDER
Im DAB-oder UKW-Modus können Sie bis zu 20 Stationen speichern. Dieses
ermöglicht Ihnen den direkten Zugriff auf Ihre Lieblingssender.
1. Um einen gewünschten Sender zu speichern, drücken und halten Sie die
TASTE SPEIC/UHR/MENU (8) solange, bis auf dem Display Flash “#” erscheint. (#=steht für Programm-Platz-Nummer)
2. Durch drehen des TASTE MAPPE/M -/+ (6)/(7), ordnen Sie dem gewünsch-
ten Sender einen Programmplatz zu. Durch drücken der TASTE MAPPE/M -/
Page 11

Deutsch Deutsch 17 18
+ (6)/(7) wird der Programmplatz gespeichert. Das Display zeigt “Preset #
gespeichert”.
3. Um einen voreingestellten Sender aufzurufen, drücken Sie zunächst die TA-
STE SPEIC/UHR/MENU (8). Durch drehen des TASTE MAPPE/M -/+ (6)/(7)
wählen Sie zwischen Programmplatz 1 bis 20. Wenn dem Platz noch keine
Station zugeordnet ist, zeigt das Display “Empty Preset”.
BRENNBARE CDS
Dieses System kann alle digitale Audios CD/MP3 spielen, brennbare Audios auf
CD (CD-R), digitale wiederbrennbare Audios auf CD (CD-RW) und digitale Audios im Format CD-R/CD-RW.
CD LESEN
1. Um die Modalität “CD” zu wählen, die Taste TASTE FUNKTION (14) auf der
Einheit oder Fernbedienung drücken.
2. Um die Tür zu öffnen, die TASTE OPEN/CLOSE (1) drücken, auf dem Di-
splay erscheint “OPEN“.
3. Eine Audio-CD/MP3 mit der Vorderseite nach oben eingeben.
4. Die CD-Tür schließen. Auf dem Display erscheint “READING”, die Zahl der
Musikstücke wird angezeigt, das erste Lied startet.
5. Um die CD zu entfernen, die TASTE OPEN/CLOSE (1) drücken, um die CD-
Tür zu öffnen, auf dem Display erscheint “OPEN“; die CD an den Rändern
angreifen, und in den Behälter legen.
Anmerkung:
Bevor die CD-Tür geöffnet wird, sich genau vergewissern, dass die CD steht.
Um gute Leistungen zu gewährleisten, vor dem fortschreiten warten, bis die
Einheit die CD fertiggelesen hat.
Falls in der Tür keine CD vorhanden ist, oder falls die CD nicht lesbar ist, er-
scheint auf dem Display NO DISC.
CD SPIELEN
1. Die CD wird automatisch ab Lied 1 gespielt, wenn die CD schon gelesen wor-
den ist.
2. TASTE PLAY/PAUSE/SCAN (2) auf der Einheit oder auf der Fernbedienung
drücken, um auf Pause zu setzen.
3. Um die CD wieder zu starten, TASTE PLAY/PAUSE/SCAN (2) auf der Einheit
oder auf der Fernbedienung drücken.
4. Um die CD zu stoppen, TASTE STOP/ENTER (3) auf der Einheit oder (16)
auf der Fernbedienung drücken.
LIEDWAHL/PASSAGE
Ein Lied wählen
In Stopp-Modalität oder während dem spielen, TASTE SKIP BACK/UP / TUNING
-/+ (4)/(5) auf der Einheit oder auf der Fernbedienung drücken, bis das gewünsch-
te Lied auf dem Display erscheint. TASTE PLAY/PAUSE/SCAN (2) auf der Einheit oder (5) auf der Fernbedienung drücken, um das Lied zu starten.
Eine bestimmte Passage während dem Spielen suchen
Um das Lied in Hochgeschwindigkeit zu scannen, TASTE SKIP BACK/UP / TU-
NING -/+ (4)/(5) auf der Einheit oder auf der Fernbedienung drücken, und
gedrückt halten, bis das gewünschte Punkt (die Passage) erscheint, die Taste
loslassen, um die normale Modalität wieder aufzunehmen. Das Spielen geht ab
diesem Abschnitt los.
WIEDERHOLEN
Es ist möglich, ein Lied, oder alle von einer CD zu wiederholen.
Nur ein Lied wiederholen
1. Während dem Spielen, TASTE W.MODUS/INFO (9) auf der Einheit oder auf
der Fernbedienung drücken. Auf dem Display blinkt “Rep1“, und das aktuelle
Lied wird bis die TASTE STOP/ENTER (3) auf der Einheit oder auf der Fernbedienung gedrückt wird, wiedergespielt.
2. Um das Wiederholen zu löschen, TASTE W.MODUS/INFO (9) auf der Einheit
oder auf der Fernbedienung drücken, bis “Rep1“ vom Display verschwindet.
Alle Lieder wiederholen
1. TASTE W.MODUS/INFO (9) auf der Einheit oder auf der Fernbedienung
drücken, bis “RepA“ auf dem Display stabil ist. Alle Lieder der CD werden
Page 12

Deutsch Deutsch 19 20
mehrmals gespielt, bis TASTE STOP/ENTER (3) auf der Einheit oder auf der
Fernbedienung gedrückt wird.
2. Um das Wiederholen zu löschen, TASTE W.MODUS/INFO (9) auf der Einheit
oder auf der Fernbedienung drücken, bis “RepA“ auf dem Display erscheint.
Ordner wiederholen
1. TASTE W.MODUS/INFO (9) auf der Einheit oder auf der Fernbedienung
drücken, bis “RepF“ auf dem Display stabil ist. Alle Lieder des Ordners werden mehrmals gespielt, bis TASTE STOP/ENTER (3) auf der Einheit oder auf
der Fernbedienung gedrückt wird.
2. Um das Wiederholen zu löschen, TASTE W.MODUS/INFO (9) auf der Einheit
oder auf der Fernbedienung drücken, bis “RepF“ auf dem Display erscheint.
ZUFÄLLIGES SPIELEN
TASTE W.MODUS/INFO (9) auf der Einheit oder auf der Fernbedienung drücken,
bis “Rand“ stabil auf dem Display ist, das zufällige Spielen wird automatisch ab
dem nächsten Lied starten, bis alle Lieder gespielt werden, dann wird es ge-
stoppt. TASTE W.MODUS/INFO (9) auf der Einheit oder auf der Fernbedienung
drücken, bis “Rand“ vom Display verschwindet.
EINSCHLAF-FUNKTION
In Wiedergabe-Modalität, TASTE SLEEP (10) drücken. Die Uhranzeige zeigt
90/80/70/60/50/40/30/20/10 Minuten. Das Radio schaltet sich automatisch nach
der gewählten Sleep-Timer.
USB
1. Die Taste TASTE FUNKTION (14) auf der Einheit oder auf der Fernbe-
dienung drücken, um die Modalität “USB“ zu wählen.
2. Den USB-Kabel an die USB-Tür anschließen. Nach der USB-Lesung, startet
das Spielen ab Lied 1 automatisch.
3. TASTE STOP/ENTER (3) auf der Einheit oder auf der Fernbedienung drücken, um das Spielen zu stoppen. Auf dem Display erscheint die Gesamtzahl
der gespielten USB-Lieder und STOP.
4. Wiederholen (repeat 1-repeat folder-repeat all)/program play/skip up, sind
identisch wie die von CD.
Achtung: Keine USB-Verlängerung für die Verbindung der USB-Einheit benutzen, sie könnte schädliche Interferenzen verursachen.
AUX
1. Die entsprechende Taste drücken, um die “AUX”-Modalität zu wählen.
2. Den AUX-Stecker in AUX-IN des Lesers stecken (3,5 mm), die vom Gerät
gespielte Musik wird verstärkt, und durch die Lautsprecher ausgegeben.
3. Die Lautstärke der Haupteinheit wie gewünscht regulieren.
4. Um das Spielen zu starten, PLAY auf der externen Audioquelle drücken.
PRESET EQUALIZER
Jedes mal wenn Sie die TASTE PRESET EQ. (13) drücken werden im Equalizer
folgende Informationen angezeigt: classic, rock, pop, jazz, flat.
ID3 FUNKTION
Da dieses System mit Uhr / Timer -Funktion entwickelt , damit die LCD-Anzeige ,
um Uhr automatisch nach dem Betrieb zu ändern. Ihre SpielmodusZustand ( wie
CD- Titelnummer / Hochfrequenz) drücken TASTE ANZEIGE / ID3 (12) am Gerät
oder Fernbedienung zu überprüfen, um die Informationen für die Anzeige von
wenigen Sekunden zu ändern.
TECHNISCHE DATEN
UKW-Band: 87.5 - 108 MHz
DAB: Band III
Stromversorgung: DC 12V (Netradap.)
Änderung vorbehalten.
 Loading...