

Page 1
is a registered TrademarkofRoadstarS.A. - Switzerland All rights reserved
AlarmClockwithPLL FM Radio
Instructionmanual
Bedienungsanleitung
Manueld’instructions
Manualed’istruzioni
Manualde instrucciones
Manualde instruções
CLR-2855
Roadstarmanagement SA,via Passeggiata 7CH 6883Novazzano (Switzerland)
Page 2
INDEX
English Page 1
Deutsch Seite 7
Français Page 13
Italiano Pagina 19
Español Página 25
Português Pagina 31
CLR-2855
• IhrneuesGerätwurdeunterBeachtungderstrengen
ROADSTAR-Qualitätsvorschriftengefertigt.
WirdankenIhnenfürdenKaufunseresProduktesund
wünschen Ihnen optimalen Hörgenuss.Bittelesen
SiedieseBedienungsanleitungdurch,undhebenSie
sieauf, umjederzeitdarinnachschlagenzukönnen.
• Il vostro nuovo apparecchio é stato prodotto ed
assemblato sotto lo stretto controllo di qualità
ROADSTAR.
Viringraziamodiaver acquistatoun nostroprodotto
perilvostro piacere d’ascolto.
Prima diprocedereall'utilizzodell'apparecchio,leggete
attentamenteilmanualed’istruzionietenetelosempre
aportatadi manoper futuririferimenti.
•
Seunovoaparelhofoiconstruidoe montado sob o
estritocontrolede qualidadedaROADSTAR.
Agradecemosportercompradonossoprodutoparaa
suadiversão.
Antes de usar esta unidade é necessário ler com
atençâoestemanualdeinstruçõespare quepossa
serusadaapropriadamente;mantenhao manualao
seualcancepara outrasinformações.
• Your new unit was manufactured and
assembled under strict ROADSTAR quality
control.
Thank-youfor purchasingourproductfor your
music enjoyment.
Before operating the unit, please read this
instructionmanualcarefully.Keepitalsohandy
for further futurereferences.
• Votrenouvelappareilaétéfabriquéetmontéen
étantsoumisauxnombreauxtestsROADSTAR.
Nousespéronsquecetappareilvousdonnera
entièresatisfaction.
Avantdevous adonnerà cesactivités,veuillez
lire attentivement ce manuel d’instructions.
Conservez-leàportéedemainàfinde référence
ultérieure.
• Vuestro nuevo sistema ha sido construido
según las normas estrictas de control de
calidadROADSTAR.
Le felicitamos y le damos las gracias por su
elección de este aparado. Por favor leer el
manualantes de poner en funcionamiento el
equipoyguardarestadocumentaciónen case
de quesenecesitenuevamente.
1
2
9
11
10
6
43
5
7
8
Page 3
English English
CLR-2855
DIGITALALARM CLOCK WITHFM PLL RADIO
TABLE OF CONTENTS
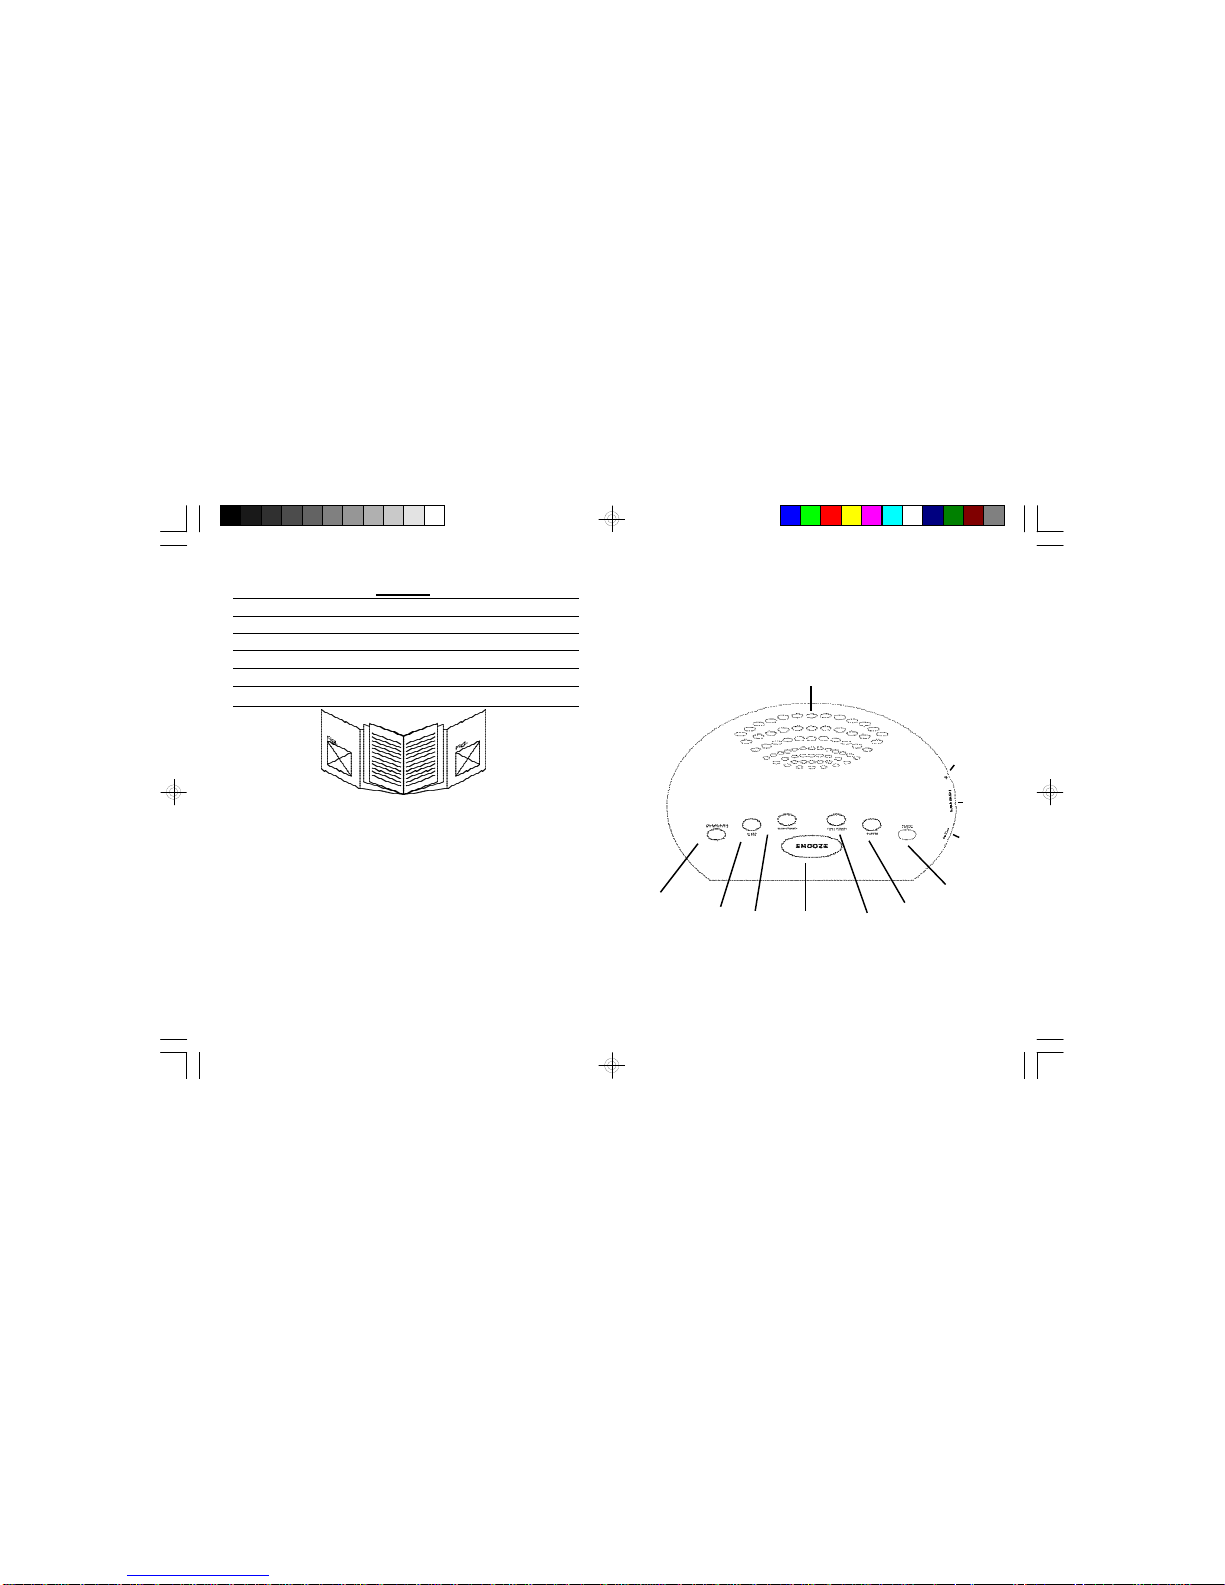
• LOCATIONOFCONTROLS
• POWERSUPPLY
• ACPOWER
• SPECIFICATIONS
LOCATION OF CONTROLS
1. SNOOZEBUTTON
2. ALARMON/OFFBUTTON
3. TIME- SETBUTTON/ TUNINGDOWN
4. TIME+ SETBUTTON/ TUNINGUP
5. SLEEPBUTTON
6. ALARMBUTTON
7. FUNCTIONSWITCH(ON/OFF/AUTO)
8. LOUDSPEAKER
9. EARPHONEOUTPUT
10. CLOCKBUTTON
11. VOLUMECONTROL
POWERSUPPLY
Thisunitoperatesfroma mainsupplyof230V~50Hz.ConnecttheACpower
cordto theAChouseholdmainoutlet.Ensurethatthevoltageis asindicated
on the rating plate on the rear of the unit.
1 2
WARNINGS
The exclamation point within the triangle is a warning sign alerting
the user of important instructions accompanying the product.
The lightening flash with arrowhead symbol within the triangle is a
warning sign alerting the user of “dangerous voltage” inside the
unit.
To reduce the risk of electric shock, do not remove the cover. No
user serviceable parts inside the unit. Refer all servicing to qualified
personnel.
This unit operates on 230V ~ 50Hz. If the unit is not used for a long
period of time, remove the plug from the AC mains.
This unit must not be exposed to moisture or rain.
The power switch in this unit is mounted on the secondary circuit
and does not disconnect the whole unit from the mains in OFF
position.
Ensure all connections are properly made before operating the unit.
This unit should be positioned so that it is properly ventilated. Avoid
placing it, for example, close to curtains, on the carpet or in a builtin installation such as a bookcase.
Do not expose this unit to direct sunlightor heat radiating sources.
Correct Disposal of This Product
(Waste Ele ctrical & Electr onic E quipment)
Thismarkingshownontheproductoritsliterature,indicatesthatitshouldnotbedisposedwith
otherhouseholdwastesattheendofitsworkinglife.Topreventpossibleharmtotheenvironment
orhumanhealthfromuncontrolledwastedisposal,pleaseseparatethisfromothertypesofwastes
andrecycleitresponsiblytopromotethesustainablereuseofmaterialresources.Householdusers
shouldcontacteitherthe retailerwheretheypurchasedthisproduct,ortheirlocalgovernment
office,fordetailsofwhereand howtheycan takethisitemfor environmentallysaferecycling.
Businessusersshouldcontacttheirsupplierandcheckthetermsandconditionsofthepurchase
contract.Thisproductshouldnotbemixedwithothercommercialwastesfordisposal.
Page 4

English English
Note: If power isinterruptedthetimeandalarmsettings will be lost. When
power is restored the clock will begin indicating 00:00 that the time
and alarm settings must be corrected.
SETTING THE CORRECTTIME
1. PressshortlytheCLOCKButton(10).
2. PresstheTUN/TIME+(3)or- (4) button to advance hour
3. Pressshortly the CLOCK Button (10) again.
4. PresstheTUN/TIME+(3)or- (4) button to advance MINUTE untilthe
correct time is displayed.
5. PressshortlytheCLOCKButton(7) to complete the setting operation.
SETTING THE WAKE UPTIME
1. Set the alarm time by following this procedure:
2. PressshortlytheALARMButton(6)two times.
3. PresstheTUN/TIME+(3)or- (4) button to advance hour
4. PressshortlytheALARM Button (6) again.
5. PresstheTUN/TIME+(3)or- (4) button to advance MINUTE untilthe
correct time is displayed.
6. PressshortlytheALARM Button (6) again.
7. Press the TUN/TIME+ (3) or - (4) button to select the alarm mode 1
(BUZZER)or2(RADIO)
8. PressshortlytheALARMButton(6) to finish.
9. SettheALARM ON/OFFSelector(2) totheactivateordeactivatethe
alarm (when ON, the “ ”indicator will light up on theright side of the
display).
10. Toswitch offthealarmsetthe ALARM ON/OFFSelector (2) totheOFF
position.
9. AdjusttheVOLUME(11) knobforthebestBuzzerorRadiolevel.
LISTENING TOTHERADIO
1. PressshortlytheON/OFF/AUTO(7) button to switch the RadioON.
2. PressshortlytheON/OFF/AUTObuttonagaintostarttheRadioautotuningfunction(the unit will storeautomaticallythe strongest stations).
3. AdjusttheVOLUMEControl(15)toacomfortablelisteninglevel.
4. Toturn off the radio, keep pressed the CLOCK (10) button for three
seconds.
5.Tolistenthe desiredRadiostations,shortpressSNOOZEbuttonto select
the stored station.
6. Tosearchmanually a Radio station, when in RADIO mode press the
TUN-(3)or TUNEUP(4)buttonsequentiallyuntilthedesiredfrequency
isdisplayed,thenpressthe SNOOZEbutton(1) tostoreinthememory.
Note: For FM reception there is a built-in FM antenna wireatthe rear of
theunit. Move the wire aroundto obtain the best reception.
3 4
Page 5

English English
Do not use abrasives, benzine, thinners, or other solvents to clean the
surfaces of the clock radio. To clean it, wipe with a mild non-abrasive
defergent solution on a clean soft cloth.
Neverattempttoinsertwires,pins, orotherobjects intothevenlilation holes
or openings on the clock radio.
Note: WhensettingtheClockorAlarmtimesrememberthatthisclockradio
has a 24 Hour clock mode.
ACPOWER
Foryourownsafetyreadfollowinginstructionscarefullybefore attempting
to connect this clock radio to the mains.
Thisunit is designed to operate on a 230V~50Hz supplyonly. Connecting
it to other power sources may damage it.
Ensurethatsupply correspondstotheinformation ontheratinglabel on the
bottomoftheunit.
SPECIFICATIONS
FMBand: 87.5to108MHz
PowerSupply: 230VAC,50 Hz
Power Consumption: 3W
Design and specifications are subject to change withoutnotice.
SNOOZEFUNCTION
When the alarm sounds, pressing the SNOOZE Button (1) willtemporary
stop about 8 minutes then the alarm sounds again.
SLEEPFUNCTION
1. This function enables you to go to sleep listening to the Radio.
2. PresstheON/OFF/AUTObutton to switchONtheRadio.
3. Press the SLEEP Button (5) sequentially.Theclock display will show
10/20/30/45/60/90/120 minutes. The Radio turns on and will turn off
automatically after the selected sleep timer.
4. Toturn off the Radio at any time during the Sleep period, press the
Clock Button (1) three seconds.
IMPORTANT:When the unit finish the Sleep time, the displayswitchOFF.
DISPLAY ON / OFF
KeeppressedtheON/OFF/AUTO(7) buttonuntilthe displaywillswitchOFF.
PressagaintheON/OFF/AUTO(7)buttontolightUPagainthedisplay.
CAREAND MAINTENANCE
Topreventfireorshockhazard, do not allow this clock radiotobeexposed
to rain or moisture.
This clock radio should not be exposed todirect sunlight, very high or low
temperature,moisture,vibration, or placed in a dusty environment.
5 6
Page 6
Deutsch Deutsch
CLR-2855
DIGITAL-WECKER MIT UKW-PLL RADIO
INHALTSVERZEICHNIS
• LAGE DER BEDIENUNGSELEMENTE
• SPEISUNG
• WECHSELSTROM (AC)
• TECHNISCHE DATEN
LAGE DER BEDIENUNGSELEMENTE
1. SNOOZE-TASTE
2. ALARM ON / OFF-TASTE
3. ZEIT - SET-TASTE / ABSTIMMUNG -
4. ZEIT + SET-TASTE / ABSTIMMUNG +
5. SLEEP-TASTE
6. ALARM-TASTE
7. FUNKTIONSSCHALTER (ON / OFF / AUTO)
8. LAUTSPRECHER
9. KOPFHÖRERAUSGANG
10. UHR-TASTE
11. LAUTSTÄRKEREGLER
SPANNUNGSVERSORGUNG
Dieses Gerät funktioniert mit Netzstrom von 230V ~ 50Hz. Schließen
Sie das AC-Netzkabel an eine AC-Netzsteckdose an. Vergewissern Sie
78
SICHERHEITSHINWEISE
CAUTION
RISKOF ELECTRIC
SHOCK
DONOT OPEN
230v~
Das Ausrufszeichen im Dreieck weist den Benutzer auf wichtige
Bedienungs- und Wartungsanweisungen (Service) in diesem Handbuch
hin, die unbedingt zu befolgen sind.
Das Blitzsymbol im Dreieck weist den Benutzer auf “gefährliche
Spannungen” an einigen freiliegenden Bauteilen im Innem des
Gerätes hin.
Um die Gefahr elektrischer Schläge auszuschliessen, Gehäuse auf
keinen Fall abnehmen. Im Innem befinden sich keine vom Benutzer
selbst instandsetz-baren Teile. Reparaturen dürfen nur von einer
autorisierten Fachwerkstatt durchgeführt werden.
Dieses Gerät ist für 230V ~ 50Hz Netzspannung ausgelegt. Bei längerer
Nichtbenutzung des Geräts ziehen Sie den Stecker aus der Steckdose.
Setzen Sie das Gerät weder Feuchtigkeit noch Regen aus.
Der EIN-Schalter dieses Geräts ist an den Sekundärschaltkreis ange-
schlossen. Seine Abschaltung unterbricht die Hauptstromzufuhr des
Geräts nichts.
Schalten Sie das System erst dann ein, wenn Sie alle Verbindungen
genau geprüft haben.
Stellen Sie das Gerät so auf, dass immer eine ungestörte
Frischluftzufuhr sichergestellt ist. Es ist zum beispiel keinesfalls auf
Teppiche und in der Nähe von Gardinen zu stellen oder in Bücherregale
einzubauen.
Setzen Sie das Gerät weder direkter Sonneneinstrahlung noch
Wärmequellen aus.
Korrekte Entsorgung dieses Produkts (Elektromüll)
Die Kennzeichnung auf dem Produkt bzw. auf der dazugehörigen
Literatur gibt an, dass es nach seiner Lebensdauer nicht zusammen
mit dem normalen HaushaltsmüIl entsorgt werden darf. Entsorgen Sie
dieses Gerat bitte getrennt von anderen Abfallen, um der Umwelt bzw.
der menschlichen Gesundheit nicht durch unkontrollierte
Müllbeseitigung zu schaden. Recyceln Sie das Gerät, um die
nachhaltige Wiederverwertung von stofflichen Ressourcen zu fördern.
Private Nutzer sollten den Händler, bei dem das Produkt gekauft wurde,
oder die zuständigen Behörden kontaktieren, um in Erfahrung zu
bringen, wie sie das Gerät auf umweltfreundliche Weise recyceln
können.
Gewerbliche Nutzer sollten sich an Ihren Lieferanten wenden und die
Bedingungen des Verkaufsvertrags konsultieren. Dieses Produkt darf nicht
zusammen mit anderem
Page 7

Deutsch Deutsch
sich, daß die Spannung mit der auf dem Typenschild angegebenen
übereinstimmt. Das Typenschild befindet sich auf der Rückseite des
Gerätes.
Hinweis: Bei Stromausfall, gehen die Einstellungen der Uhrzeit und des
Weckers verloren. Bei erneuter Stromversorgung was anzeigt,
daß die Uhr- und die Weckzeit eingestellt werden müssen.
EINSTELLEN DER GENAUEN UHRZEIT
1. Drücken Sie kurz die CLOCK T aste (10).
2. Drücken Sie die TUN / TIME + (3) oder - (4) um eine Stunde vorgestellt
3. Drücken Sie kurz die TIME-Taste (7) erneut.
3. Drücken Sie die TUN / TIME + (3) oder - Taste (4), um die Minuten zu
fördern, bis die richtige Zeit angezeigt wird.
4. Drücken Sie kurz die CLOCK Taste (7), um die Einstellung
abzuschließen.
EINSTELLEN DER WECKZEIT
1. Stellen Sie die Weckzeit mithilfe des folgenden V erfahrens:
2. Drücken Sie kurz die Taste ALARM (6) zwei mal.
3. Drücken Sie die TUN / TIME + (3) oder - (4) um eine Stunde vorgestellt
4. Drücken Sie kurz die TIME-Taste (7) erneut.
5. Drücken Sie die TUN / TIME + (3) oder - Taste (4), um die Minuten zu
fördern, bis die richtige Zeit angezeigt wird.
6. Drücken Sie kurz die TIME-Taste (7) erneut.
7. Drücken Sie die TUN / TIME + (3) oder - T aste (4), um den Alarm-Modus
1 (BUZZER) oder 2 (RADIO) zu wählen
6. Drücken Sie kurz die T aste ALARM (6) zu beenden.
7. Stellen Sie die ALARM ON / OFF Selector (2) aktivieren oder deaktivieren,
um die Alarm (bei ON, das " "Anzeige leuchtet auf der rechten Seite
des Displays).
8. Zum Ausschalten des Alarms die ALARM ON / OFF Selector (2) in die
Position OFF.
9. Stellen Sie den VOLUME (11) Drehknopf für die beste Summer oder
Radio Ebene.
RUNDFUNKEMPFANG
Ein. Drücken Sie kurz die ON / OFF / AUTO (7)-Taste, um das Radio
einzuschalten.
2. Drücken Sie kurz die ON / OFF / AUTO Taste erneut, um das Radio Auto-
Tuning-Funktion (das Gerät speichert automatisch die stärksten Sender)
zu starten.
3. Stellen Sie die Lautstärke (15) auf eine angenehme Lautstärke.
4. Um das Radio auszuschalten, gedrückt halten Sie die CLOCK Taste
(10) für drei Sekunden.
5. Hören Sie den gewünschten Radiosender, kurze press SNOOZE-T aste
wählen Sie den gespeicherten Sender.
6. Um manuell nach Radiosendern, wenn im RADIO-Modus drücken Sie
die TUN-(3) oder TUNE + Taste (4) nacheinander bis die gewünschte
Frequenz angezeigt wird, und drücken Sie dann die T aste SNOOZE (1) im
Speicher zu speichern.
Hinweis: Für den UKW-Empfang gibt es einen eingebauten FMAntennendraht an der Rückseite des das Gerät. Bewegen Sie den Draht
um den besten Empfang zu erzielen.
910
Page 8

Deutsch Deutsch
ausgesetzt werden. Stellen Sie es nicht in einer staubigen Umgebung auf.
Verwenden Sie keine scharfen Reinigungsmittel, Benzin, Verdünner
oder andere Lösungsmittel, um das Gehäuse des Weckradios zu
reinigen. Um es zu reinigen, wischen Sie es mit einem sauberen und
weichen Tuch ab, das mit einer milden Reinigungslösung angefeuchtet ist.
Stecken Sie niemals Drähte, Nadeln oder andere Gegenstände in die
Belüftungslöcher oder Öffnungen des Weckradios.
Hinweis: Wenn Sie die Uhr- oder Weckzeit einstellen, denken Sie daran,
daß dieses Weckradio eine 24-Stunden-Uhr hat.
WECHSELSTROM (AC)
Zu Ihrer eigenen Sicherheit lesen Sie aufmerksam die folgende
Bedienungsanleitung, bevor Sie dieses Weckradio ans Netz anschließen.
Dieses Gerät funktioniert nur mit 230V ~ 50Hz - Wechselstrom (AC).
Wenn Sie es an andere Stromquellen anschließen, könnte es
beschädigt werden. Vergewissern Sie sich, daß die Stromversorgung
mit der auf dem Typenschild angegebenen übereinstimmt. Das
Typenschild befindet sich auf dem Boden des Gerätes.
TECHNISCHE DATEN
UKW-Band: 87.5 - 108 MHz
Stromversorgung: 230V 50Hz, 3W
Änderung vorbehalten.
SCHLUMMER-FUNKTION
Wenn der Wecker ertönt und Sie die SCHLUMMER-T aste (1) drücken, stoppt
der Wecker zeitweilig für ca. 8 Minuten, danach ertönt er wieder.
EINSCHLAF-FUNKTION
1. Diese Funktion ermöglicht Ihnen, schlafen zu gehen Radio hören.
2. Drücken Sie die ON / OFF / AUTO-T aste, um das Radio einzuschalten.
3. Drücken Sie die Sleep-Taste (5) nacheinander . Die Uhranzeige zeigt 10/
20/30/45/60/90/120 Minuten. Das Radio schaltet sich ein und schaltet
sich automatisch nach der gewählten Sleep-Timer.
4. Um das Radio auszuschalten, jederzeit während der Schlafphase,
drücken Sie die T aste CLOCK (1) drei Sekunden.
WICHTIG: Wenn das Gerät den Schlaf rechtzeitig fertig ist, schaltet sich
das Display aus.
DISPLAY BELEUCHTUNG-FUNKTION
Gedrückt halten Sie die ON / OFF / AUTO (7) drücken, bis das Display
Abschaltung. Drücken Sie erneut die ON / OFF / AUTO (7) UP-T aste erneut,
um die Anzeige leuchtet auf.
WARTUNG UND PFLEGE
Um Bränden oder elektrischen Schlägen vorzubeugen, setzen Sie dieses
Weckradio nicht Regen oder Feuchtigkeit aus.
Dieses Weckradio sollte nicht dem direkten Sonnenlicht, sehr hohen
oder sehr niedrigen Temperaturen, Feuchtigkeit oder Schwingungen
11 12
Page 9

Français Français
CLR-2855
HORLOGE-REVEILDIGITALAVECAFFICHEURLCD ET RADIO
FM-PLL
TABLEDESMATIERES
• POSITIONNEMENT DES COMMANDES
• SOURCES D'ALIMENTATION
• ALIMENTATION SUR SECTEUR CA
• CARACTERISTIQUES TECHNIQUES
POSITIONNEMENTDESCOMMANDES
1.BOUTONSNOOZE
2.INTERRUPTEURD'ALARMEON / OFF
3.BOUTONRÉGLAGEDEL'HEURE/TUNE-
4.BOUTONRÉGLAGEDEL'HEURE/TUNE+
5.TOUCHESLEEP(ARRÊTAUTOMATIQUERADIO)
6.BOUTOND'ALARME
7.TOUCHE FONCTIONON /OFF/AUTO)
8.HAUT-PARLEUR
9.PRISECASQUE
10.BOUTONHORLOGE(TIME)
11.RÉGLAGEDU VOLUME
SOURCES D'ALIMENTATION
Cet appareil fonctionne sur secteurs de 230V - 50Hz. Brancher le
cordon de raccordement CA à votre prise de secteur CA. Vérifier que la
13 14
ATTENTION
Le symbole “point d’exclamation” à l’intérieur d’un triangle avertit
l’utilisateur que d’importantes instructions d’utilisation et de maintenance sont contenues dans le mode d’emploi.
Le symbole “éclair” à l’intérieur d’un triangle sert à avertir l’utilisateur de la
présence du courant à l’intérieur du l’appareil qui pourrait constituer un
risque.
Afin de minimiser les risques, ne pas ouvrir le boîtier ni ôter le dos de
l’appareil. En case de panne, faites appel aux techniciens qualifiés pour
les réparations. L’appareil ne renferme aucune pièce reparable par
l’utilisateur.
Cet appareil a été conçu pour une tension d’alimentation de 230V ~
50Hz. Débranchez la prise de courant quand on prévoit de ne pas
utiliser l’appareil pendant un certain temps.
L’unité ne doit pas être exposée à l’humidité ou à la pluie.
L’interrupteur d’allumage de cet appareil est monté sur des circuits
secondaires et il ne débranche pas l’appareil tout entier lorsqu’on
l’éteint.
Mettez l’appareil sous tension seulement après avoir vérifié que tous
les raccordements soient corrects.
L’appareil doit être gardé dans un endroit suffisamment ventilé. Ne le
gardez jamais par exemple près des rideaux, sur un tapis ou dans des
meubles, tels qu’une bibliothèque.
L’appareil ne doit pas être exposé à la lumière directe du soleil ou à
des sources de chaleur.
Comment é liminer ce prod uit -
(déchets d'équipem ents éle ctriques et éle ctroniques)
Ce symbole sur le produit ou sa documentation indique qu'il ne doit
pas être éliminé en fin de vie avec les autres déchets ménagers.
L'élimination incontrôlée des déchets pouvant porter préjudice a
l'environnement ou a la santé humaine, veuillez le séparer des autres
types de déchets et le recycler de façon responsable. Vous favoriserez
ainsi la réutilisation durable des ressources matérielles.
Les particuliers sont invites a contacter le distributeur leur ayant vendu
le produit ou a se renseigner auprès de leur mairie pour savoir ou et
comment ils peuvent se débarrasser de ce produit afin qu'il soit recyclé
en respectant l'environnement.
Les entreprises sont invitées a contacter leurs fournisseurs et a consulter
les conditions de leur contrat de vente. Ce produit ne doit pas être
éliminé avec les autres déchets commerciaux.
Page 10

Français Français
tension électrique corresponde à celle indiquée sur la plaque des
caractéristiques techniques placée au dos de l'appareil.
Remarque: Sil'alimentationélectriqueestcoupé,lesprogrammations
del'horaireetduréveilserontperdues.Quandl'alimentationélectriqueest
rétablie,l'horlogecommenceà indiquant00:00 quelesprogrammations
del'horaireetduréveildoiventêtrecorrigées.
PROGRAMMATIONDEL'HORAIRE JUSTE
1.Appuyez brièvementsurCLOCK(10).
2.AppuyezsurlatoucheTUN / ou TUN + TUN / TIME - pour régler l'heure.
3.Appuyezbrièvement sur la touche CLOCK(10)
4.Appuyezsurla toucheTUN/ TIME+TUN/ TIME-pourréglerlesminutes.
5.Appuyez brièvementsur la toucheCLOCK(10)pour terminerl'opération.
PROGRAMMATIONDE L'HORAIREDU RADIO-REVEIL
1.Réglez l'heure de réveil utilisantlaprocéduresuivante:
2.Appuyez brièvementsurlatoucheALARM(6)deuxfois
3.Appuyezsur la toucheTUN/TIME+ou TUN/TIME-pourréglerl'heure.
4.Appuyez brièvementsur la toucheALARM(6)
5.Appuyezsurla toucheTUN/ TIME+TUN/ TIME-pourréglerlesminutes.
6.Appuyez brièvementsur la toucheALARM(6)
7.Appuyezsur la touche TUN / TIIME +TUN / TIME - pour régler le mode
d'alarme (1) ou le mode radio (2).
8.Appuyezbrièvement sur le boutonALARM(6)pour terminer l'opération.
9.Réglezle commutateurALARMON/OFF(2)pour activeroudésactiverl'
alarme (lorsque le point "" apparaît à l'écran signifie que le' alarme
est en mode ON (amarré).
10.Ajusterle réglage de volume (11)auniveau souhaité.
ECOUTEDE LARADIO
1.Appuyezbrièvementsurla touche ON / OFF / AUTO (7) pour allumer la
radio.
2.Appuyez brièvement sur la touche ON / OFF / AUTO pour démarrer le
réglage automatique de la radio (l'appareil mémorise
automatiquement les stations les plus puissantes dans l'ordre).
3.Réglez le volume (15) à un niveau d'écoute confortable.
4.Pouréteindrelaradio,appuyez et maintenez enfoncéleboutonCLOCK
(10) pendant trois secondes.
5. Pour écouter votre radio, appuyez sur la touche SNOOZE pour
sélectionner la station préréglée.
6. Pour rechercher manuellement une station de radio, appuyez sur le
mode RADIO TUN-(3) ou TUNE + (4) jusqu'à obtenir la fréquence
désirée, puis appuyez sur le bouton SNOOZE (1) à stocker dans la
fréquence de la mémoire.
Remarque:Pour la réceptionFM,est incorporéeàl'arrièredufild'antenne.
Déplacez le fil pour atteindre la meilleure réception.
FONCTIONSNOOZE
Quand le réveil sonne, en appuyant sur la Touche de SNOOZE (1) on
l'arrête momentanément pendant environ 8 minutes, après quoi le réveil
recommence à sonner.
15 16
Page 11

Français Français
Ne jamais tenter d'insérer ni câbles, ni fiches, ni tout autre object dans
les trous de ventilation ou bien dans les fentes de ce radio-réveil.
Remarque: Lors du réglagede l'horaire de l'Horloge et celuidu Réveil, se
rappeler que l'horloge de cet appareilfonctionnesur24heures.
ALIMENTATIONSUR SECTEURCA
Pour votre sécurité uniquement, veuillez lire attentivement le mode
d'emploi présent, avant de brancher cet appareil radio au réseau.
Alimentation du réseau de 230V - 50Hz - CA seulement.
L'appareila étéconçupourlefonctionnementsurunvoltagede230Vseulement.
Son branchement à d'autres sources d'alimentation pourrait l'endommager.
S'assurerquelatensionélectriquecorrepondeauxinformationssurlaplaquedes
caractéristiquestechniquesen dessousdel'appareil.
CARACTERISTIQUESTECHNIQUES
BandeFM: de 87.5 à 108 MHz
Sources d'alimentation: 230VAC- 50Hz
Consumption: 3W
Caractéristiques sujettes à modifications sans avis préalable.
17 18
FONCTIOND'ARRET AUTOMATIQUE (SLEEP)
1. Cette fonction vous permet de dormir en écoutant laradio.
2.Appuyezsur la touche ON / OFF / AUTO (7) pourallumerlaradio.
3.Appuyezsurlebouton SLEEP (2). L'affichage de l'horloge affichera 10/
20/30/45/60/90/120 minutes. La radio se met en marche et s'éteint
automatiquement après le réglage choisi.
4. Pour éteindre la radio à tout moment pendant le mode veille, appuyez
sur le bouton pendant trois secondes CLOCK (1).
IMPORTANT:LorsquelafonctionSLEEP sera inséré à la fin de la radio
s'éteint en même temps à l'écran.
SELECTEURILLUMINATIONAFFICHEUR
enuspresseleboutonON/OFF/AUTO (7) jusqu'à ce que l'écran s'éteint.
AppuyezsurlatoucheON / OFF / AUTO(7)pourrallumerl'écran.
ENTRETIEN
Pourévitertoutrisquededéchargeélectrique,n'exposerceradio-réveilni
à la pluie, ni à l'humidité.
L'appareilnedevraitêtreexposéni dans un endroit en plein soleil, ni à des
températures très élévées ou très basses, ni à l'humidité, ni être
sujet à des vibrations, ni être placé dans un endroit poussiérex.
Pournettoyerlasurfacede ce radio-réveil, n'utiliserniabrasifs,nibenzine,
nidiluants, ni tout autre solvant. Si nécessaire,la nettoyer avec un chiffon
propre et doux, humidifié avec une solution détergente
délecateetnon-abrasive.
Page 12

Italiano Italiano
CLR-2855
OROLOGIO-SVEGLIADIGITALE CON DISPLAYE RADIO FM
INDICE
• LOCALIZZAZIONE E CONTROLLI
• FONTI ALIMENTAZIONE
• ALIMENTAZIONE AC
• SPECIFICHE TECNICHE
LOCALIZZAZIONEDEICONTROLLI
1. TastoSNOOZE
2. SelettoreAllarme Inserito / Disinserito
3. Tastosettaggiosu / Sintonia su
4. Tastosettaggio giu / sintonia giu
5. TastoSLEEP
6. TastoimpostazioneAllarme
7. Tastofunzione(ON/ OFFAUTO)
8. Altoparlante
9. UscitaCuffie
10. TastoDisplay
11. Controllo Volume
FONTIALIMENTAZIONE
Questo apparecchio funziona con una fonte di alimentazione di 230V ~
50Hz. Collegare il cavo alimentazione AC alla presa di corrente AC
domestica. Assicurarsi che il voltaggio sia uguale a quello riportato sulla
19 20
ATTENZIONE
Ilpuntodiesclamazioneall’internodiuntriangoloavvertel’utentecheillibretto
d’istruzionicontienedelleimportantiistruzioniper l’usoe la manutenzione.
Ilsimbolodelfulmineall’internodi untriangoloavvertel’utentedellapresenza
diunapericolosatensioneall’internodell’apparecchio.
Perridurrei rischidiscosseelettriche,nonaprirel’apparecchio.L’apparecchio
noncontieneparti riparabilidall’utente.In casodi guastofareappelloa tecnici
qualificatiper le riparazioni.
Questoapparecchioèstatoprogettatoperfunzionarea 230V~ 50Hz.Se non
siintendeutilizzarel’apparecchioperunlungoperiododi tempo,rimuoverela
spinadalla presadi corrente.
Nonesporrel’apparecchioalla pioggiaoall’umidità.
L’interruttoredi alimentazione diquestoapparecchio è montatosul circuito
secondarioenondisconnettecompletamentel’apparecchioquandovienespento.
Utilizzarel’apparecchiosolodopoaververificatochetutteleconnessionisiano
stateeseguitecorrettamente.
Posizionarel’apparecchio in unluogosufficientemente ventilato.Evitaredi
sistemarlovicinoatende,sultappetoo all’internodiun mobilequale,adesempio,
unalibreria.
Nonesporrel’apparecchioalla lucediretta delsoleo afontidi calore.
Noi. RoadstarItaliaSpa
Viale Matteotti39
I-22012Cernobbio(Como)
Dichiariamo:
Che il modello RADIOSVEGLIA DIGITALE CLR-2855 della Roadstar è prodotto
in conformità al D.M. no. 548 datato 28/08/95 (G.U. no. 301 datata 28/12/95) e,
in particolare, è in conformità alle prescrizioni dell’articolo 2 comma 1.
Page 13

Italiano Italiano
targa dei dati caratteristici posizionata sul retro dell'apparecchio.
Nota: Se l'alimentazione viene interrotta l'orario e le impostazioni della
svegliasaranno perse.Quandoverrà ripristinatala correnteelettrica
l'orologio indichera 00:00 quindi l'orario e le impostazioni della
sveglia dovranno essere re-impostati.
IMPOSTAZIONE DELL'ORARIO
1. Premerebrevementeil tasto CLOCK (10).
2. Premereil tasto TUN/TIME+ o TUN/TIME - per impostarel’ ora.
3. Premerebrevemente il tasto CLOCK (10)
4. PremereiltastoTUN/TIME+oTUN/TIME-perimpostareiminuti.
5. PremerebrevementeiltastoCLOCK(10)per completarel’ operazione.
IMPOSTAZIONEDELL'ORARIODELLA SVEGLIA(ALLARME)
1. Regolare l’ ora di allarme seguendo la procedura seguente:
2. Premerebrevementeil tastoALARM(6)duevolte
3. Premereil tasto TUN/TIME+ o TUN/TIME - per impostarel’ ora.
4. Premerebrevementeil tastoALARM(6)
5. PremereiltastoTUN/TIME+oTUN/TIME-perimpostareiminuti.
6. Premerebrevementeil tastoALARM(6)
7. Premereil tasto TUN/TIME + o TUN/TIME - per impostarela modalita
allarme (1) oppure la modalita radio (2).
8. PremerebrevementeiltastoALARM (6) percompletarel’operazione.
9. PosizionareilselettoreALARM ON/OFF(2)perattivareodisattivarel’
allarme (quando il puntino “” appare nel display significa che l’
allarme é in modalita ON (inserito).
10. Regolare il controllo Volume(11)al livello desiderato.
ASCOLTO DELLA RADIO
1.Premerebrevementeil tastoON/OFF/ AUTO(7)per accenderelaradio.
2. Premere brevemente il tasto ON / OFF / AUTO nuovo per avviare la
funzione auto-sintonia della Radio (l'apparecchio memorizza
automaticamente in sequenza le stazioni più forti).
3.Regolareil controllo VOLUME (15) ad un livello di ascolto confortevole.
4.Perspegnerelaradio,tenerepremutoiltastoCLOCK(10)pertre secondi.
5.Perascoltarelestazioniradiodesiderate,premere il tasto SNOOZE per
selezionarelastazionememorizzata.
6.Percercaremanualmenteunastazioneradio,inmodalitàRADIOpremere
il tasto TUN-(3) o TUNE UP (4) fino a quando si ottiene la frequenza
desiderata,quindi premere il pulsante SNOOZE (1) per memorizzare
nella memoria la frequenza.
Nota: Perlaricezionein FM, si trovaincorporatasul retrodell’apparecchio
un’antenna a filo. Muovere il filo fino a raggiungere la migliore
ricezione.
FUNZIONE SNOOZE
Quando la sveglia suonerà, premendo il Tasto SNOOZE (1) questa si
fermerà temporaneamente per circa 8 minuti e poi la sveglia suonerà
nuovamente.
FUNZIONE SLEEP
1. Questa funzione vi permette di andare a dormire ascoltando la radio.
2. PremereiltastoON/OFF/AUTO(7) per accendere la radio.
3. PremereilTastoSLEEP(2). Il display dell'orologio mostrerà10/20/30/
21 22
Page 14

Italiano Italiano
ALIMENTAZIONEAC
Perlavostrapropriasicurezza,leggereaccuratamentele seguentiistruzioni
prima di tentare di collegare questa radiosveglia alla fonte di
alimentazione principale.
Alimentazione Principale: solo AC da 230V - 50Hz.
Questo apparecchio è stato disegnato per funzionare solo con
un'alimentazione da 230V - 50Hz. Collegarlaad altri tipi di alimentazione
potrebbe danneggiarla. Controllare che la fonte di alimentazione
corrisponda a quella indicata sulla targa dei dati caratteristici posizionata
sul fondo dell'apparecchio.
SPECIFICHETECNICHE
Banda FM: da 87.5 a 108 MHz
Alimentazione: 230V - 50 Hz
Consumo: 3Watt
Lecaratteristichesonosoggettea variazioni senza preavviso.
45/60/90/120 minuti. La Radio si accenderà e si spegnerà
automaticamente dopo l’ impostazione prescelta.
4. Per spegnere la radio in qualsiasi momento durante il periodo sleep,
premere per tre secondi il TastoCLOCK (1).
IMPORTANTE:QuandolafunzioneSLEEPsarainserita,allafinelaradio
si spegnera assieme al display.
FUNZIONEILLUMINAZIONE DISPLAY
Tenerepremuto iltastoON/OFF /AUTO(7)finché il display si spegnera.
Premeredinuovoil tasto ON / OFF /AUTO(7)perriaccendereil display.
CURA E MANUTENZIONE
Per prevenire il rischio d'incendio o di scossa elettrica, non lasciare che
questa radiosveglia venga esposta alla pioggia o all'umidità.
Questa radiosveglia non dovrà essere esposta alla luce diretta del
sole, temperature molto alte o molto basse, umidità, vibrazioni, o
posizionata in ambienti polverosi.
Non utilizzare abrasivi, benzina, diluenti, o altri tipi di solventi per pulire la
superficie della radiosveglia. Per pulirla, usare un panno morbido pulito e
inumidito con un sapone delicato non abrasivo.
Non tentare mai di inserire fili,spineoaltri oggetti nei fori di ventilazione o
le aperture della radiosveglia.
Nota: Quando si imposta l'Orologio o la Sveglia ricordare che questa
radiosveglia possiede un orologio a 24 ore.
23 24
Corret to sma ltimento d el pr odotto - (rif iuti elett rici ed
elettronici)
II marchio riportato sul prodotto e sulla sua documentazione
indica che il prodotto non deve essere smaltito con altri
rifiuti domestici al termine del ciclo di vita. Per evitare
eventuali danni all'am biente o alla salute causa ti
dall'inopportuno smaltimento dei rifiuti, si invita l'utente a
separare questo prodotto da altri tipi di rifiuti e di riciclarlo
in maniera responsabile per favorire il riutilizzo sostenibile
delle risorse materiali.
Gli utenti domestici sono invitati a contattare il rivenditore
presso il quale e stato acquistato il prodotto a l'ufficio locale
preposto per tutte le informazioni relative alla raccolta
differenziata e al riciclaggio per questo tipo di prodotto.
Gli utenti aziendali sono invitati a contattare il proprio
fornitore e verificare i termini e le condizioni del contratto
di acquisto. Questo prodotto non deve essere smaltito
unitamente ad altri rifiuti commerciali.
Page 15

Español Español
CLR-2855
RELOJ-DESPERTADORDIGITALYRADIOFM-PLL
ÍNDICE
• LOCALIZACIÓN DE LOS CONTROLES
• FUENTES ALIMENTACIÓN
• ALIMENTACIÓN CA
• ESPECIFICACIONES TÉCNICAS
LOCALIZACIÓNDE LOSCONTROLES
1. Botón DESPERTADOR (ALARM)
2. Botón AJUSTE SLEEP
3. Botón SNOOZE
4. Botón DESACTIVACIÓN DESPERTADOR (OFF)
5. Botón AJUSTE HORA
6. Botón AJUSTE MINUTO
7. Selector LIGHT (Iluminación)
8. Control VOLUMEN/BUZZER
9. Selector FUNCIÓN (RADIO ON/OFF/AUTO)
10. Pantalla LED
11. Selector BANDA FM/AM
12. Control SINTONIZACIÓN
13. Selector DIMMER (Atenuator display)
14. Botón AJUSTE HORARIO
FUENTES ALIMENTACIÓN
Este aparato funciona con una fuente de alimentación de 230V-50Hz.
25 26
ATTENTIÓN
Elsímbolode exclamación dentrountriángulo tiene elobjetode advertir al
usuariodelapresencia de instrucciones importantes defuncionamientoy
mantenimientoenladocumentaciónadjuntaconelequipo.
Elsímbolodelrayoconpuntadeflechadentrodeun triánguloadvertealusuario
delapresenciade tensionespeligrosasenel equipo.
Para reducir los riesgos de descargas eléctricas, no retire la cubierta. La
unidadno hay ensu enteriorcomponentesquepueda manipularel usuario.
Encarguesu reparaciónapersonalcualificado.
Estaunidadfuncionacon230V~ 50Hz.Cuandoelequipovayaaestaruntiempo
prolongadosinutilizarse,desenchufarelcablede alimentación.
Launidadno deberíaser expuestaa lluviaohumedad.
Elinterruptordeencendidodelaparatoestámontadoen elcircuitosecundario
yalapagarlono desconectade laalimentacióntodoelaparato.
Noconectelaunidadhastaquenosehayanefectuadotodaslasotrasconexiones.
Launidadsedebeinstalardeformaquesuposiciónnole impidatenerventilación
adecuada.Porejemplo,elequipono sedebecolocarcercadecortinasosobre
eltapete,nien unainstalacióncomopuedeserun armario.
Launidadno deberíaser expuestaa laluzsolardirectaniafuentesemisorade
calor.
Elimina ción co rrecta de es te prod ucto -
(mater ial el ectrico y electró nico de de scarte)
La presencia de esta marca en el producto o en el materiál
informativo que lo acompaña, indica que al finalizar su vida útil
no deberá eliminarse junto con otros residuos domésticos. Para
evitar los posibles daños al medio ambiente o a la salud humane
que representa la eliminación incontrolada de residuos, separe
este producto de otros tipos de residuos y reciclelo correctamente
para promover la reutilización sostenible de recursos materiales.
Los usuarios particulares pueden contactar con el establecimiento
donde adquirieron el producto, o con las autoridades locales
pertinentes, para informarse sobre cómo y dónde pueden lIevario
para que sea sometido a un reciclaje ecológico y seguro.
Los usuarios comerciales pueden contactar con su proveedor y
consultar las condiciones del contrato de compra. Este produco
no debe eliminarse mezclado con otros residuos comerciales.
Page 16

Español Español
Conectar el cable alimentación CA a la toma de corriente CA doméstica.
Asegurarse de que el voltaje sea igual a aquel indicado en la placa de los
datos característicos colocada en la parte posterior del aparato.
Nota: Si la alimentación se interrumpe el horario y los ajustes del
despertador se perderán. Cuando se restablecerá la corriente
eléctricaelrelojiniciará00:00 indicando que el horarioylosajustes
del despertador tendrán que ser corregidos.
AJUSTEDELHORARIOCORRECTO
1.Pulse brevemente el botón CLOCK (10).
2.Pulse el botón TUN / oTUN + TUN / TIME - paraajustar la hora.
3.Pulse brevemente el CLOCK (10)
4. Pulse el botón TUN/ o TUN + TUN / TIME - paraajustar los minutos.
5. Pulse brevemente el botón CLOCK (10) para completar la operación.
AJUSTEDEL HORARIODELDESPERTADOR
1.Ajuste la hora de la alarma mediante el siguiente procedimiento:
2.Pulse brevemente el botón de ALAR (6) dos veces
3.Pulseel botón TUN / TIME + TUN / TIME - para ajustar la hora.
4.PulsebrevementeelbotóndeALARM (6)
5.Pulse el botón TUN / TIME +TUN / TIME - para ajustar los minutos.
6.PulsebrevementeelbotóndeALARM (6)
7. Pulse el botón TUN / TIME + TUN / TIME - para configurar el modo de
alarma (1) o el modo de radio (2).
8.Pulse brevemente el botónALARM(6) paracompletarla operación.
9. Ponga el interruptor ALARM ON / OFF (2) para activar o desactivar la
alerta (cuando el punto "" aparece en la pantalla significa que la
alarma está en modo ON (acoplado).
10.Ajuste el control de volumen (11)hasta el nivel deseado.
ESCUCHARLA RADIO
1.Pulsebrevementeel botón ON / OFF / AUTO(7)paraencenderla radio.
2. Pulse brevemente el botón ON / OFF / AUTO de nuevo para iniciar el
autoajuste de la radio (la unidad almacenará automáticamente las
emisoras más fuertes en secuencia).
3.Ajusteel control de volumen (15) a un nivel de escucha cómodo.
4. Para apagar la radio, pulse y mantenga pulsado el botón CLOCK (10)
para tres segundos.
5. Para escuchar la radio, pulse el botón SNOOZE para seleccionar la
emisora presintonizada.
6.Parabuscarmanualmenteunaemisoraradio,pulseelmododeRADIO
TUN-(3) o TUNE + (4) hasta obtener la frecuencia deseada, y luego
pulse el botón SNOOZE (1) para almacenar en la frecuencia de la
memoria.
Nota:Para la recepciónFM,se encuentraincorporadaenlaparteposterior
del aparato el hilo de la antena FM. Mover el hilo hasta cuando se
alcance la mejor recepción.
FUNCIÓN SNOOZE
Cuando el despertador sonará, pulsando el botón SNOOZE (3) este se
27 28
Page 17

Español Español
No utilizar abrasivos, bencina, diluentes, u otros tipos de solventes para
limpiar la superficie del radio despertador. Para limpiarla, usar un paño
suave limpio y humedecido con un jabón delicado no abrasivo.
No introducir nunca hilos, clavijas u otros objetos en los orificios de
ventilación o las aberturas del radio despertador.
Nota: Cuando se ajusta el Reloj y el Despertador recordar que este
radio despertador posee un reloj de 24 horas.
ALIMENTACIÓNCA
Para su propia seguridad, leer atentamente las siguientes instrucciones
antes de conectar este radio despertador a la fuente de alimentación
principal.
Alimentación Principal: Sólo CA de 230V - 50Hz.
Este aparato ha sido diseñado para funcionar con una alimentación
de 230V-50Hz. Conectarlo a otros tipos de alimentación podría dañarlo.
Controlar que la fuente de alimentación corresponda a aquella
indicadaenla placa de los datos característicos colocada en la parte baja
delaparato.
ESPECIFICACIONESTÉCNICAS
BandaFM: de87.5a108 MHz
Alimentación: 230V-50Hz,3W
Especificaciones y diseño sujetos a posibles modificaciones sin
previoaviso.
detendrá momentáneamente por aproximadamente 8 minutos luego el
despertador sonará nuevamente.
FUNCIÓNSLEEP
1. Este función le permite adormecerse escuchando la radio.
2. Colocar el Selector FUNCIÓN (9) en la posición AUTO.
3. Pulsaren secuencia el botón SLEEP (2). Lapantallamostrará10/20/
30/45/60/90/120 minutos. La Radio se activará y se desactivará
automáticamente después de el tiempo establecido.
4. Paraapagarlaradioencualquiermomentoduranteelmodode SLEEP,
pulse el botón CLOCK para tres segundos (1).
IMPORTANTE:cuando la función de apagado automático se inserta en el
extremo de la radio se apagará junto a la pantalla.
FUNCIÓNILUMINACIÓN PANTALLA
Mantengapulsado el botón ON / OFF /AUTO(7)hastaque la pantalla se
apagará.PulseelbotónON/OFF/AUTO(7)paravolveraencenderla
pantalla.
CUIDADO Y MANUTENCIÓN
Para prevenir el riesgo de incendioo de descarga eléctrica, no dejar que
este radio despertador se exponga a la lluvia o a la humedad.
Este radio despertador no tendrá que estar expuesto a la luz directa del
sol,temperaturasmuy altasomuybajas,humedad,vibracionesocolocado
en ambientes polvorientos.
29 30
Page 18

Português Português
CLR-2855
RELÓGIO-DESPERTADOR COMDISPLAY DIGITAL E RÁDIO
FM
ÍNDICE
• LOCALIZAÇÃODOSCONTROLES
• LIGAÇÃODOSACESSÓRIOS
• LIGAÇÃOAC
• ESPECIFICAÇES
LOCALIZAÇÃODOS CONTROLES
1. BOTÃOSNOOZE
2. INTERRUPTORDEALARMEON /OFF
3. BOTÃODEAJUSTEDOTEMPO/ TUNE-
4. BOTÃODEAJUSTEDOTEMPO/ TUNE+
5. BOTÃOSLEEP(OFFRÁDIOAUTOMÁTICO)
6. BOTÃODEALARME
7. CONTROLEFUNÇÃO(ON / OFF/AUTO)
8. ALTO-FALANTE
9. AUSCULTADOR
10. BOTÃORELÓGIO
11. CONTROLEDE VOLUME
LIGAÇÃODOS ACESSÓRIOS
Este aparelho opera com acessórios de 230V - 50Hz. Ligar o fio AC à
31 32
ATENÇÕES
O ponto de exclamação dentro de um triãngulo adverte que o manual
de i nstruções c ontém importantes informações de uso e de
manutenção.
O simbolo do raio dentro de um triãngulo serve para advertir a presença
de uma tensão que pode constituir um risco se o aparelho não for
utilizado de uma maneira correta.
Para reduzir o risco de choque elétrico, não abrir o aparelho. O
aparelho não contém partes reparáveis pelo utilitário. Em caso de
problema, apelar a técnicos qualificados para o conserto.
Este aparelho foi projetado para funcionar a 230V ~ 50Hz. Se não for
utilizá-lo por um longo período de tempo, se deve desligá-lo da
corrente elétrica.
Não expor o aparelho a chuva ou a umidade.
O interruptor de alimentação deste aparelho foi montado sobre o
circuito secundário e não desconecta completamente o aparelho
quando este for desligado.
Utilizar o aparelho somente depois de verificar se as conexões foram
seguidas corretamente.
Colocar o aparelho em um local suficientemente ventilado. Evitar de
colocá-lo vizinho a cortinas, sobre tapetes ou dentro de um móvel
qualquer, por exemplo uma estante.
Não expor o aparelho diretamente a luz do sol ou a fontes de calor.
Page 19

Português Português33 34
tomadade paredeAC.Verificaravoltagemcomoindicadaatrásdaunidade.
Notas: se a ligação é interrompida, a hora e o alarme serão perdidos.
Quandoissoacontece,aparecerá no display 00:00umaindicação
para serem corrigidas a data e a hora.
ACERTARASHORAS
1. Pressione brevemente o botão CLOCK (10).
2.Pressioneo botão TUN / TIME + ou TUN / TIME - paradefinirahora '.
3. Pressione brevemente o botão CLOCK (10)
4.PressioneobotãoTUNTIME+ ou TUN / TIME - paradefinirosminutos.
5.ResumidamentepressioneobotãoCLOCK(10)paraconcluiraoperação
ACERTARAHORADODESPERTADOR
1. Ajustar a hora de alarme através o seguinte procedimento:
2.PressionebrevementeobotãoALARME(6)duasvezes
3.Pressioneo botão TUN / TIME + ou TUN / TIME - paradefinirahora '.
4.PressionebrevementeobotãoALARME (6)
5.Pressioneobotão TUN /TIME+ouTUN/ TIME -paradefinirosminutos.
6.PressionebrevementeobotãoALARME (6)
7.PressioneobotãoTUN/TIME+ ou TUN / TIME - para definiromodode
alarme (1) ou o modo de rádio (2).
8.Pressionebrevementeo botão ALARM (6) para concluir a operação.
9.DefinaointerruptordealarmeON/OFF(2) paraativaroudesativaroalerta
(quandoo ponto" "aparecenovisorsignificaqueo alarme está em
modo ON (acoplado).
10. Ajuste o controlo de volume (11) para o níveldesejado.
FUNÇÃORÁDIO
1. Resumidamente pressione o botão ON / OFF / AUTO (7) para ligar o
rádio.
2. Resumidamente pressione o botão ON / OFF / AUTO novamente para
começara auto-ajustarorádio(o aparelhoarmazenaautomaticamente
as estações mais fortes em seqüência).
3.Ajusteocontroledevolume(15)paraumnívelconfortável.
4. Para desligar o rádio, pressione e segure o botão CLOCK (10) por três
segundos.
5.Paraouvirarádio,pressioneobotãoSNOOZEpara selecionara estação
predefinida.
6. Para pesquisar manualmente uma estação de rádio, modo de rádio
pressione o TUN (3) ou TuneUp (4) até obter a freqüênciadesejada,
eentãopressioneo botão SNOOZE (1) para armazenar a freqüência
de memória.
Nota: Para a recepção em FM, é incorporado na parte de trás do fio de
antena.Mova o fio para alcançar a melhor recepção.
FUNÇÃOSNOOZ
Quando o despertador tocar, poderá desliga-lo durante cerca de 8
minutos pressionando o botão SNOOZ (3). O despertador tornará a to-
Page 20

Português Português35 36
car após os 8 minutos se não desactivar esta função.
FUNÇÃOSLEEP
1. Este recurso permite que você vá dormir ouvindo o rádio.
2.Pressione o botão ON / OFF / AUTO (7) para ligar o rádio.
3. Pressione o botão SLEEP (2). A exibição do relógio mostrar 10/20/30/
45/60/90/120 minutos. O rádio irá ligar e desligar automaticamente
após a definição de 'escolhido.
4. Para desligar o rádio, a qualquer momento durante o modo de espera,
pressione o botão para três CLOCK segundo (1).
Importante: Quando a função SLEEP será inserido na extremidade do
rádio vai sair juntos para a exibição.
FUNÇÃOILUMINAÇÃODISPLAY
Pressione e segure o botão ON / OFF / AUTO (7) até o visor será
desligado.
PressioneobotãoON/OFF/AUTO(7)paravoltarnodisplay.
CUIDADOSEMANUTENÇÃO
Para prevenir choques ou fogo, não posicionar o aparelho em lugares
úmidos com chuva, com a luz do sól, altas temperaturas e poeira.
Não usar produtos químicos, para a limpeza. Somente um pano macio e
um produto não abrasivo.
Não inserir pinos, fios ou objetos dentro do rolo de ventilação.
LIGAÇÃO AC
Para a sua segurança, ler as instruções antes do primeiro uso.
AcessóriosPrincipais230V-50Hz-ACsomente.
Esta unidade foi produzida para operar com acessórios de 230V-50Hz ACsomente.
Ligá-lo em outra fonte, pode criar problemas. Verificar se as potências
correspondem ao indicado na etiqueta.
ESPECIFICAÇ£ES
OndaFM: 87.5 à 108 MHz
Potência dos Acessórios 230V,50Hz 3W
Estas especificações estão sujeitas a alterações sem prévio aviso.
Eliminaça o Corre cta Des te Prod uto (Resíduo de Equ ipamentas El éctricos e El ectrónicos)
Esta marca, apresentada no produto ou na sua literatura indica que
ele não deverá ser eliminado juntamente com os residuos domésticos
indiferenciados no final do seu periodo de vida útil. Para impedir
danos ao ambiente e á saúde humana causados pela eliminação
incontrolada de resíduos deverá separar este equipamento de outros
tipos de residuos e reciclá-lo de forma responsável, para promover
uma reutilização sustentável dos recursos materiais.
Os utilizadores domesticos deverão contactar ou o estabelecimento
onde adquiriram este produto ou as entidades oficiais locais para
obterem informaçães sobre onde e de que forma podem levar este
produto para permitir efectuar uma reciclagem segura em termos
ambientais.Os utilizadores profissionais deverão contactar o seu
fornecedor e consultar os termos e condições do contrato de compra.
Este produto não devera ser misturado com outros residuos comerciais
para eliminação.
 Loading...