

Page 1
R
AUDIO VIDEO
AM/FM LED ALARM CLOCK RADIO WITH
1.2” BLUE DISPLAY, CALENDAR AND
TEMPERATURE.
Instruction manual
Bedienungsanleitung
Manuel d’instructions
Manuale d’istruzioni
Manual de instrucciones
Manual de instruções
CLR-2619
R
AUDIOVIDEO
is a registered Trademark of Roadstar S.A. - Switzerland All rights reserved
Page 2

English Page 1
Deutsch Seite 1 1
Français Page 21
Italiano Pagina 31
Español Página 4 1
Portuguès Pagina 5 1
Fig.
Fig.
CLR-2619
INDEX
• Your new unit was manufactured and assembled
under strict ROADSTAR quality control.
Thank-you for purchasing our product for your music
enjoyment.
Before operating the unit, please read this instruction manual carefully. Keep it also handy for further
future references.
• Votre nouvel appareil a été fabriqué et monté en
étant soumis aux nombreaux tests ROADSTAR. Nous
espérons que cet appareil vous donnera entière satisfaction.
Avant de vous adonner à ces activités, veuillez lire
attentivement ce manuel d’instructions. Conservezle
à portée de main à fin de référence ultérieure.
• Vuestro nuevo sistema ha sido construido según las
normas estrictas de control de calidad ROADSTAR.
Le felicitamos y le damos las gracias por su elección
de este aparado. Por favor leer el manual antes de
poner en funcionamiento el equipo y guardar esta
documentación en case de que se necesite
nuevamente.
• Ihr neues Gerät wurde unter Beachtung der strengen
ROADSTAR-Qualitätsvorschriften gefertigt.
Wir danken Ihnen für den Kauf unseres Produktes
und wünschen Ihnen optimalen Hörgenuss. Bitte
lesen Sie diese Bedienungsanleitung durch, und
heben Sie sie auf, um jederzeit darin nachschlagen
zu können.
• Il vostro nuovo apparecchio é stato prodotto ed
assemblato sotto lo stretto controllo di qualità
ROADSTAR.
Vi ringraziamo di aver acquistato un nostro prodotto
per il vostro piacere d’ascolto.
Prima di procedere all'utilizzo dell'apparecchio,
leggete attentamente il manuale d’istruzioni e
tenetelo sempre a portata di mano per futuri
riferimenti.
• Seu novo aparelho foi construido e montado sob o
estrito controle de qualidade da ROADSTAR.
Agradecemos por ter comprado nosso produto para
a sua diversão.
Antes de usar esta unidade é necessário ler com
atençâo este manual de instruções pare que possa
ser usada apropriadamente; mantenha o manual
ao seu alcance para outras informações.
201819
1217
6
13
24
5/7
3
41
11
9
22
2
10
815
14
16
23
21
Page 3
EnglishEnglish
12
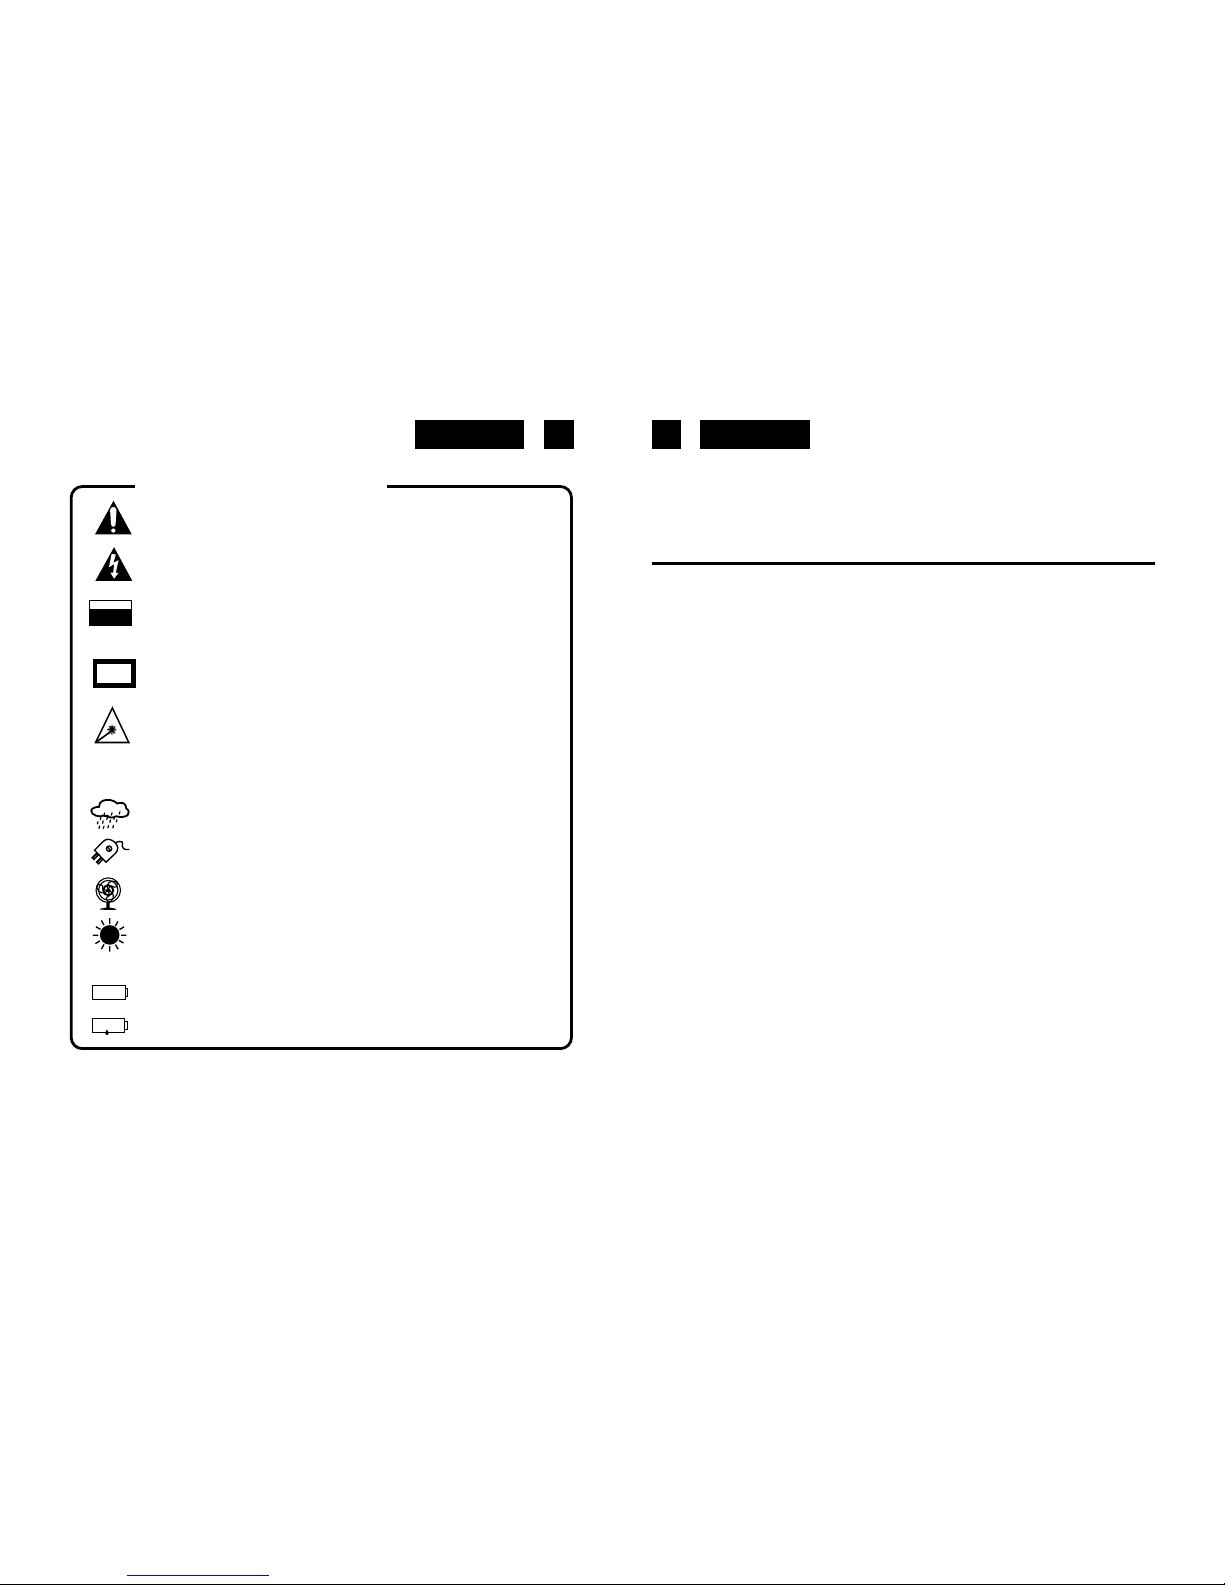
WARNINGS
The exclamation point within the triangle is a warning sign alerting the
user of important instructions accompanying the product.
The lightening flash with arrowhead symbol within the triangle is a warning
sign alerting the user of “dangerous voltage” inside the unit.
To reduce the risk of electric shock, do not remove the cover. No user
serviceable parts inside the unit. Refer all servicing to
qualified personnel.
This unit operates on 230V ~ 50Hz. If the unit is not used for a long period
of time, remove the plug from the AC mains.
This unit must not be exposed to moisture or rain.
Ensure all connections are properly made before operating the unit.
This unit should be positioned so that it is properly ventilated. Avoid placing
it, for example, close to curtains, on the carpet or in a built-in installation
such as a bookcase.
Do not expose this unit to direct sunlight or heat radiating sources.
Make sure all batteries are inserted according to the proper polarity. Do
not mix old batteries with new ones.
If the unit is not used for a long period of time (more than 1 month), remove
all batteries from their compartment to avoid possible leaking.
CAUTION
RISKOF ELECTRIC
SHOCK
DONOT OPEN
230v~
- +
- +
CLR-2619
AM/FM LED ALARM CLOCK RADIO WITH 1.2” BLUE LED DISPLAY,
CALENDAR AND TEMPERATURE FUNCTION.
LOCATION OF CONTROLS
1. MODE SET BUTTON
2. ALARM SET BUTTON
3. ALARM 1 BUZZER / RADIO SELECT BUTTON
4. ALARM 2 BUZZER / RADIO SELECT BUTTON
5. C° / F° BUTTON
6. INFRARED SENSOR
7. << SET BUTTON
8. >> SET BUTTON
9. POWER ON/OFF RADIO (ALARM OFF) BUTTON
10. SNOOZE / SLEEP BUTTON
11. LED DISPLAY
12. DIMMER FUNCTION
13. AUDIO IN JACK
14. VOLUME CONTROL
15. WAVE BAND
16. TUNING CONTROL
17. RESET BUTTON
18. TEMPERATURE SENSOR (IN DOOR)
19. AC POWER CORD
20. FM ANTENNA WIRE
21. BLUE NIGHT ILLUMINA TION
22. BATTERY COMP ARTMENT
23. SPEAKER
24. ON / OFF NIGHT ILLUMINA TION
Page 4
EnglishEnglish
34
POWER SUPPL Y
This unit operates from a main supply of 230V ~ 50Hz. Connect the AC power cord to the AC
household main outlet. Ensure that the voltage is as indicated on the rating plate on the rear
of the unit.
Battery Back-up Power Failure Protection
This radio has a battery back up circuit that will keep the correct time and alarm settings in
the event of a temporary power interruption.
Install 1 x 3-volt CR2032 Flat Lithium battery, not included, into the battery compartment
located on the bottom of the unit, making certain that the positive and negative (+ and -) battery
terminals are attached to the corresponding terminals on the plate in the battery compartment.
If power is temporarily interrupted the display will blink and the radio will not play. However,
the battery back-up circuit will continue to maintain the clock and alarm settings. When power
is restored the clock will display the correct time and alarm settings, and no adjustment is
necessary.
GETTING STARTED
Press the Reset button (17) located on the back of the unit after pluging in the AC cord.
- The unit will display full segment for 2 seconds, then it will enter the normal mode.
- The Display will light up.
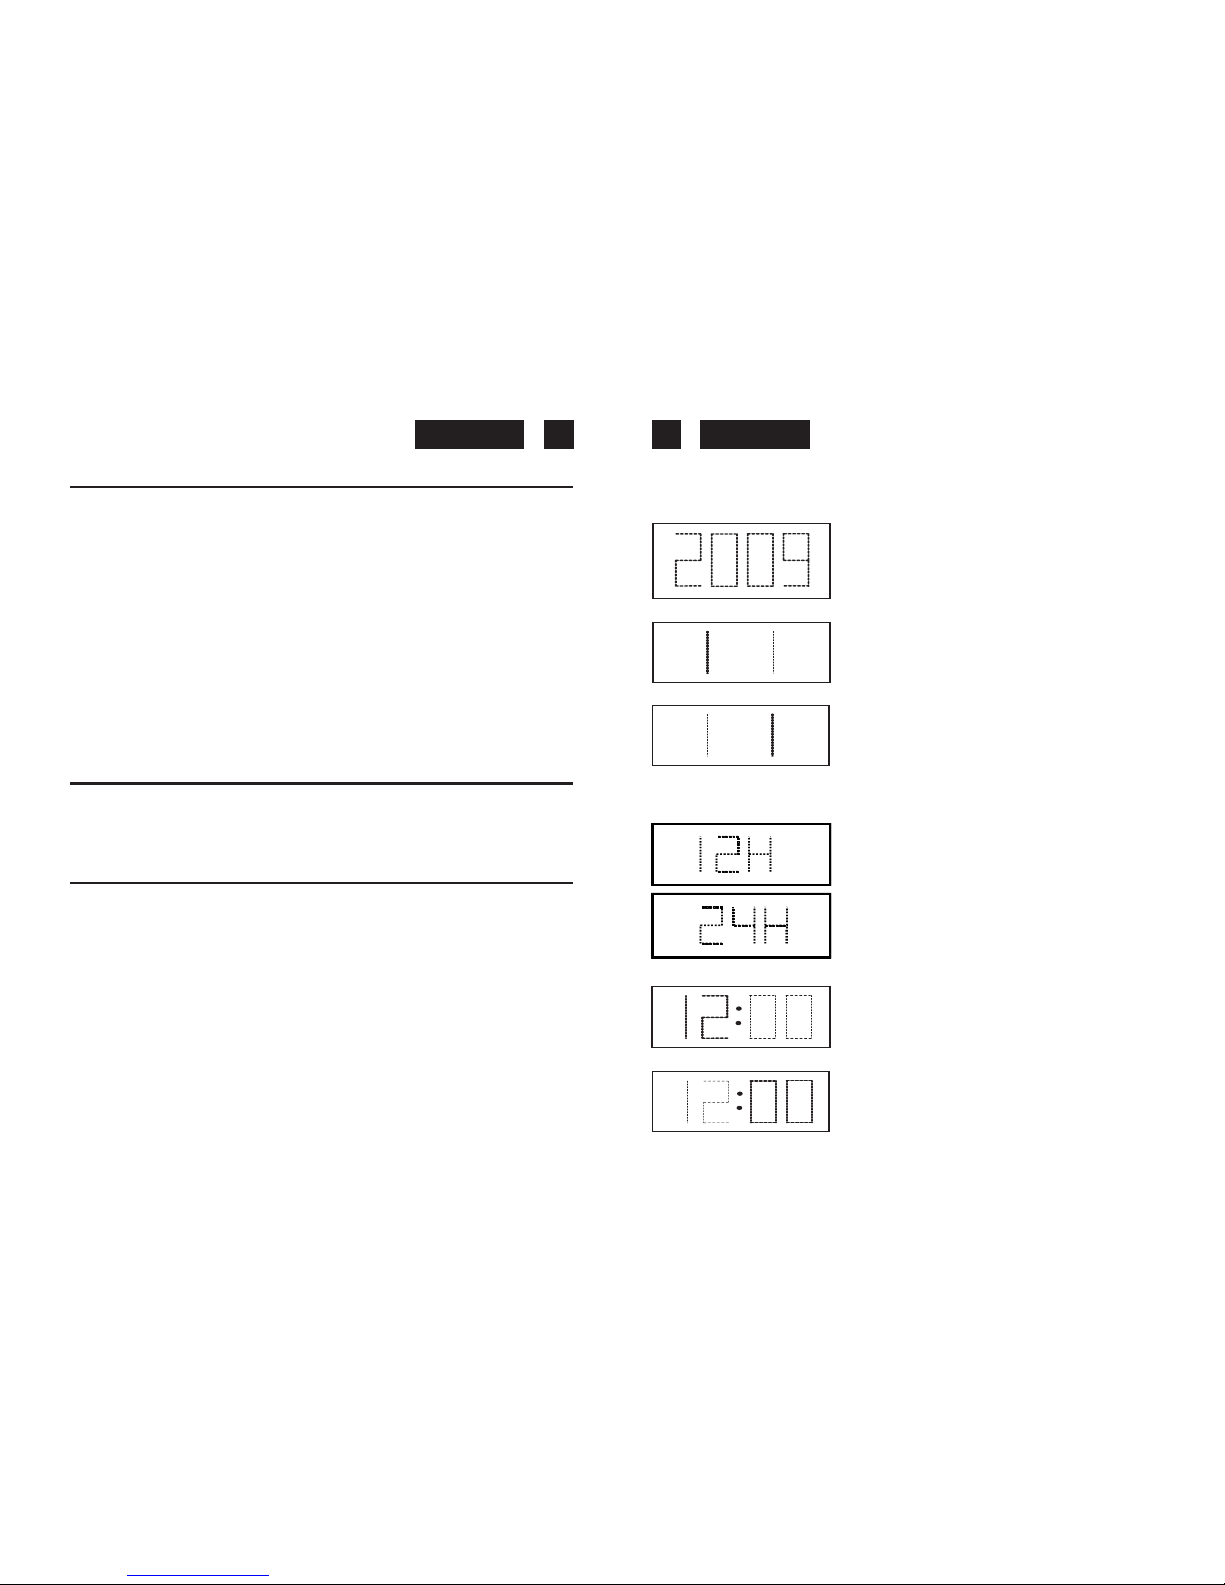
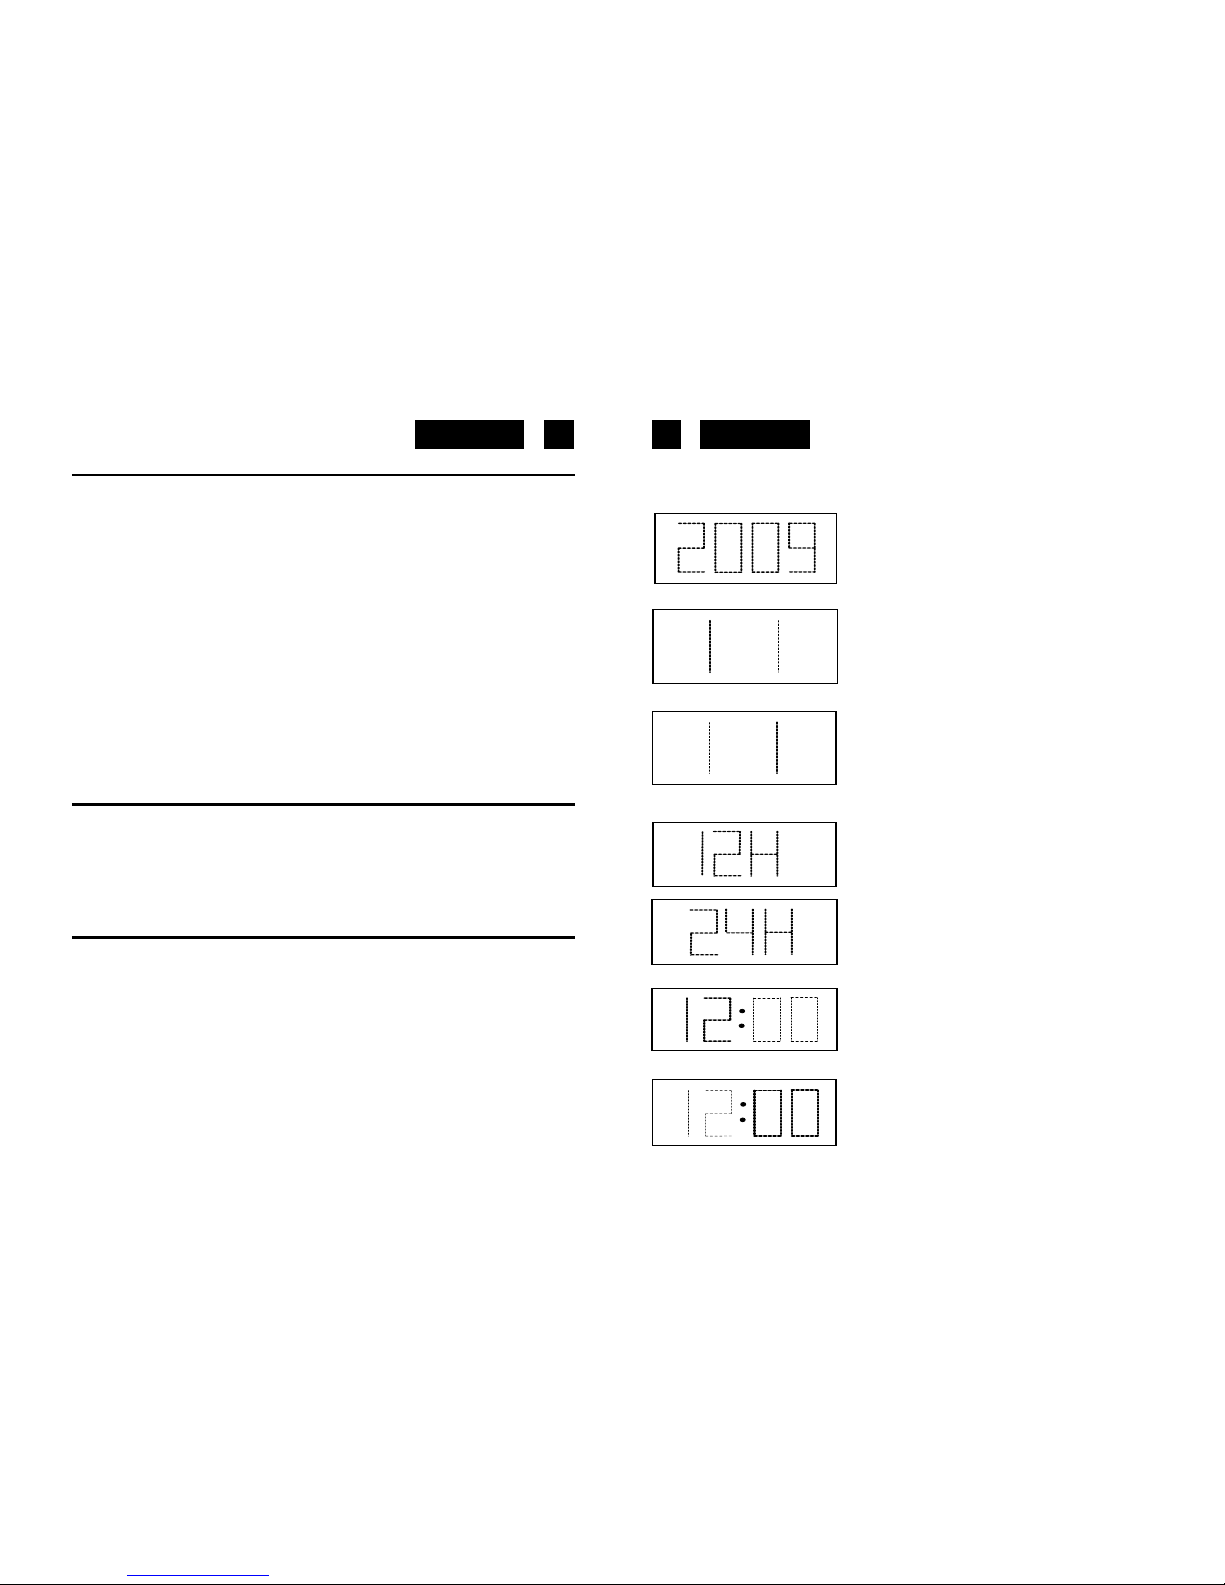
1. TIME AND CALENDAR SETTING
A. Setting Time and Calendar - Press Mode Set button (1) in normal mode and keep pressed
over 2 seconds to enter Time Set mode. After entering the setting mode, press Mode Set
button (1) to change the mode cycle as follows :
Normal > Year > Month > Day > 12/24H > RTC Hour > RTC Min > Normal
Action (during data adjustment) :
- Press >> button (7) to adjust data forward
- Press << button (8) to adjust data backward
- Keep pressed << or >> button for 2 seconds to enable auto forward or backward
a. Year Set Mode
Initial Value : 2009
Year Range : 2000 to 2099
Display showing Year Set Mode
b. Month Set Mode
Display showing Month Set Mode
c. Day Set Mode
Display showing Day Set Mode
Remark : Weekday will recalculate when year, month or day is adjusted
d. 12/24H Set Mode
Display showing 12/24H Set Mode (Select 12H)
Display showing 12/24H Set Mode (Select 24H)
e. RTC Hour Set Mode
Display showing Hour Set Mode
f. RTC Min Set Mode
Display showing Min Set Mode
Remark : Second will reset for every minute adjustment
M
D
M
D
Page 5

EnglishEnglish
B. Setting Alarm 1 and Alarm 2 - Press Alarm set button (2) during normal mode and keep
pressed over 2 seconds to enter alarm set mode, after enter the setting mode, press Alarm
set button (2) to change the mode cycle as follows :
Normal > AL1 Hour > AL1 Min > AL1 Weekend Alarm > AL2 Hour > AL2 Min >
AL2 Weekend Alarm > Normal
Action (during data adjustment) :
- Press >> button (8) to adjust data forward
- Press << button (7) to adjust data backward
- Keep pressed << or >> button for 2 seconds to enable auto forward
2. SETTING ALARM OUTPUT AND ALARM ON/OFF
A. Change the alarm Output
Press AL1 (3) / AL2 (4) button to Music position to select wake up by Radio, set to Buzzer
position to select wake up by Buzzer, set to Alarm Off position to disable all alarm.
B. Buzzer Pattern
1st 8 seconds output 1 beep, 2nd second output 2 beep, 3rd 8 second output 4 beep, after
that continue output beep tone, the same pattern repeat at next minute again.
56
Display showing Setting Alarm 1 Hour
Display showing Setting Alarm 1 Min
Display showing Setting Alarm 1
Weekend Alarm - Mon to Fri
Display showing Setting Alarm 1
Weekend Alarm - Mon to Sat
Display showing Setting Alarm 2 Hour
Display showing Setting Alarm 2 Min
Display showing Setting Alarm 2
Weekend Alarm - Mon to Fri
Display showing Setting Alarm 2
Weekend Alarm - Mon to Sat
Display showing Setting Alarm 2
Weekend Alarm - Mon to Sun
Display showing Alarm 1
wake up by Buzzer
Display showing Alarm 1
wake up by Radio
Display showing Alarm 2
wake up by Buzzer
Display showing Alarm 2
wake up by Radio
1
1
1
1
1
1
1
1
2
2
2
2
2
2
2
2
2
2
1
1
2
2
Page 6
EnglishEnglish
3. ALARM DURATION AND SNOOZE FUNCTION
Alarm Duration - Buzzer Alarm or Radio Alarm will continue output for 30 minutes if no key
is pressed, then it will stop automatically and wait for same alarm time on the next day.
Action for Snooze :
- During alarming, press SNOOZE button (10) to enable snooze function, Buzzer Alarm
or Radio Alarm will stop.
- Snooze Interval is 9 minutse (not included second offset)
- Snooze will continue unless Power On/Off (Alarm Off) button(9) is pressed to Alarm Off
or Buzzer Alarm or Radio Alarm stop automatically after 30 minutes
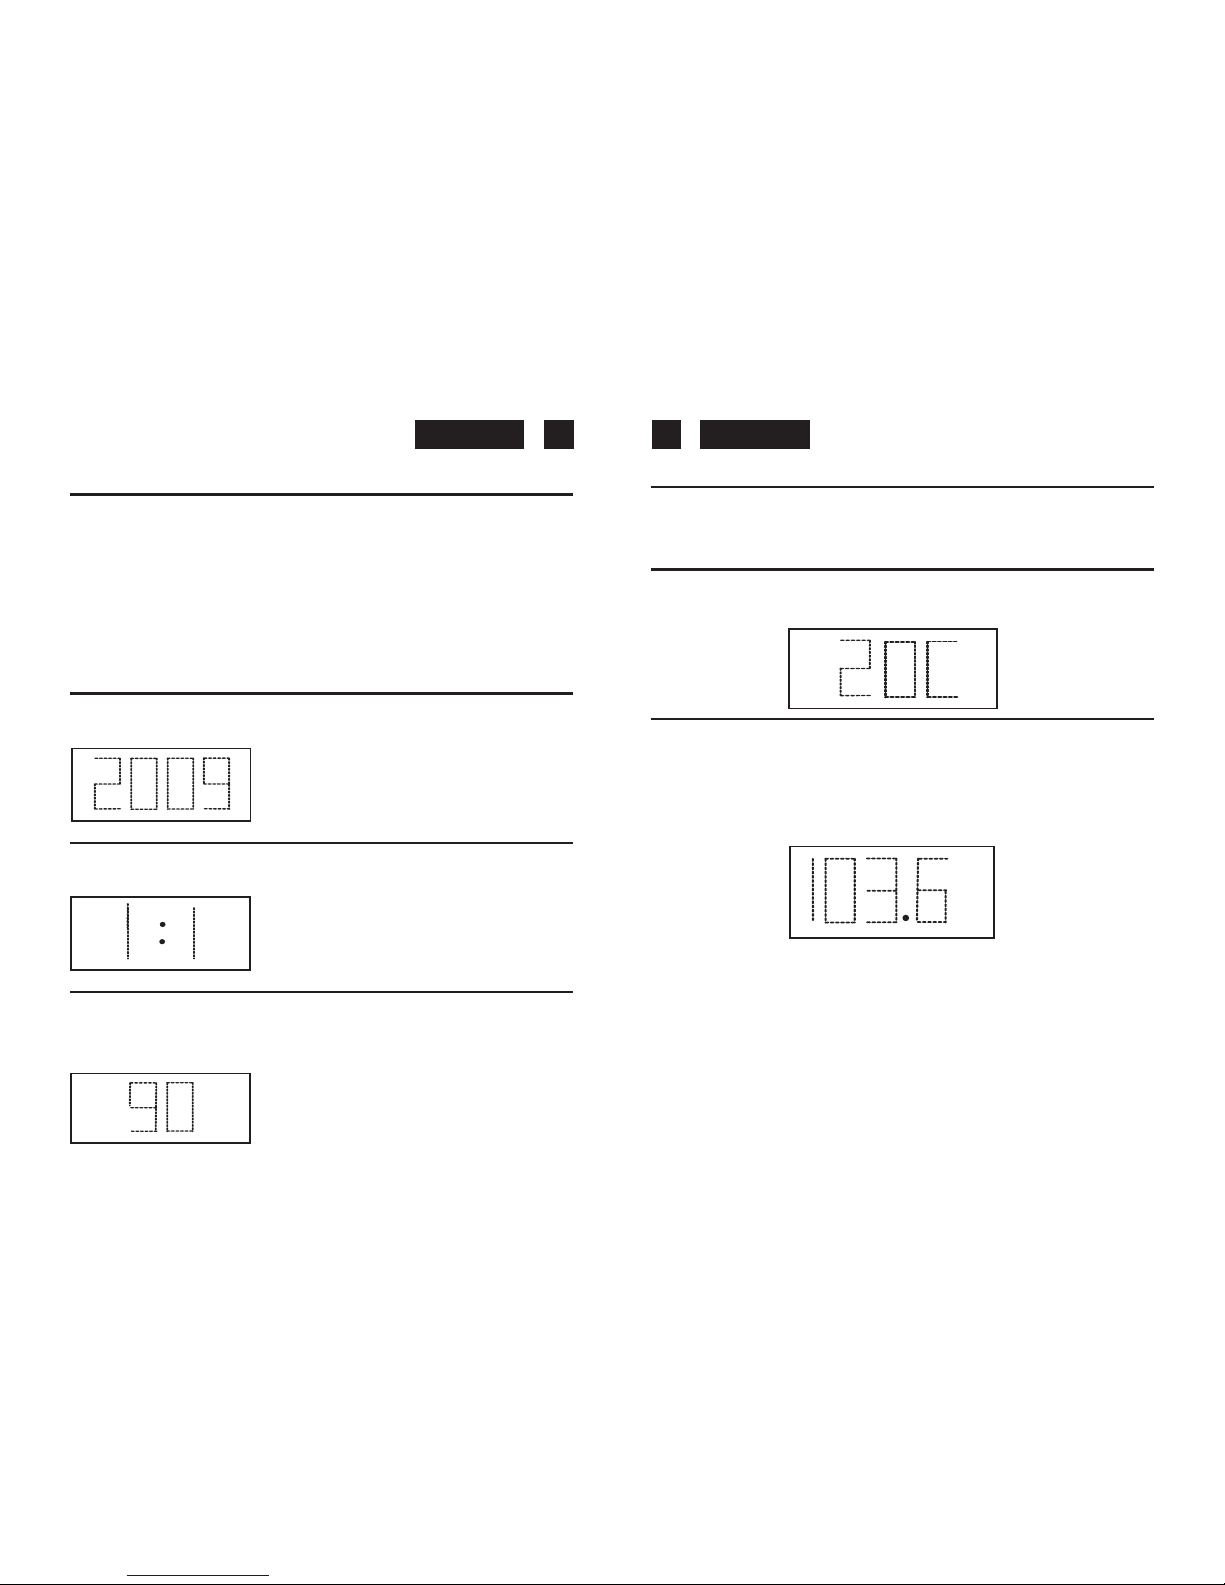
4. CHANGE DISPLAY CONTENT
Press >> button (8) during normal function to switch to display Ye ar, after 5 seconds timeout
and return back to display date and month.
Display showing Year
5. CHANGE DISPLAY CONTENT
Press << button (7) two times during normal function to switch to display Month and day,
after 5 seconds timeout and return back to display time.
Display showing Month and Day
6. SLEEP FUNCTION
During Radio On mode, press Snooze/Sleep button (10) to turn on Sleep mode, the Sleep
time will keep flashing by 5 seconds, within 5 second and press Sleep button to change the
duration from 90 min - 10 min. Press Power button (9) to cancel sleep function.
Display showing Setting Sleep Duration
NIGHT ILLUMINATION
Press the ON / OFF Light button (24) to switch the night illumination ON or OFF.
7. THERMOMETER FUNCTION
Press Temp Button (
Remark : Temperature Range for Indoor : 0 to + 50°C or 32 to 122°F.
RADIO
RADIO OPERATION
- Press the Power On/Off button (9) to turn the radio on.
- Select AM or FM band using the wave band switch (15).
- Select the Station using the tuning control (16).
- Turn the volume control (14) to adjust volume as required.
- Press the power On/Off button (9) to turn the radio off.
Note :
- The AM band uses an internal directional aerial. Rotate the radio for best reception.
- Ensure that the FM cord antenna (20) is completely unrolled and extended for best FM
reception.
RESET
- The Reset button (17) is located on the back of unit. Use a ballpoint pen to press it
whenever you change the batteries, or if the unit is not performing as expected.
This will return all settings to default value, and you will lose any stored data (alarm and
clock settings).
CAUTION
- No naked flame sources, such as lighted candles, should be placed on the apparatus.
- The unit should not be exposed to direct sunlight, very high or low temperature, moisture,
vibrations or placed in a dusty environment.
78
M
D
sleep
fm MHz
Page 7

EnglishEnglish
- Do not use abrasive, benzene, thinner or other solvents to clean the surfaces of the unit.
To clean, wipe it will mild non-abrasive detergent solution and clean soft cloth.
- Never attempt to insert wires, pins or other such objects into the vents or opening of the
unit.
- Do not place the unit near the light on table lamp. The light will affect the reception of the
infrared sensor function.
WARNINGS
NOTE : Do not connect FM antenna to external antenna.
Dripping warning : The product shall not be exposed to dripping or splashing and that no
objects filled with liquids, such as vases, shall be placed on the product.
Ventilation warning : The normal ventilation of the product shall not be impeded for intended
use.
Disconnect device warning : Main plug is used as the connection, so is should always 3.
The alarm on mode, use the infrared sensor to turn Snooze function onremain ready operate.
INFRARED SENSOR FUNCTION
1. When the radio is in Off mode, the infrared display time or temperature.
2. When the radio is in On mode, use the infrared sensor to turn Sleep function on
- Hand on top of sensor (6) within 2 seconds to turn the sleep on, the word “Slp” showing
on the LED display
. Sleep time from 10-90 minutes. (Refer to “Sleep function” for sleep
time adjustment). Press (9) to cancel Sleep function.
9
10
- Hand on top of sensor (6) within 1 second for Snooze off for 9 mintues.
AUDIO IN FUNCTION
Sound will come out automatically if an external audio device is plugged in the AUDIO IN
jack.
SPECIFICATIONS
Frequency Range : AM 540 - 1611 kHz
FM 87.5 - 108 MHz
Output Power : 350 mW
Speaker Impedance : 8 ohm
Battery Backup : 3V (1 x 3V CR3032 Flat Lithium battery) (for clock)
Power Source : AC230V ~ 50 Hz, 5 Watts
Specifications subject to change without notice.
Correct Disposal of This Product
(Waste Electrical & Electronic Equipment)
This marking shown on the product or its literature, indicates that it
should not be disposed with other household wastes at the end of its
working life. To prevent possible harm to the environment or human
health from uncontrolled waste disposal, please separate this from
other types of wastes and recycle it responsibly to promote the
sustainable reuse of material resources.
Household users should contact either the retailer where they
purchased this product, or their local government office, for details of
where and how they can take this item for environmentally safe recycling.
Business users should contact their supplier and check the terms and
conditions of the purchase contract. This product should not be mixed
with other commercial wastes for disposal.
Page 8
DeutschDeutsch
11 12
CLR-2619
AM/FM-LED-RADIOWECKER MIT BLUE LED-DISPLAY, KALENDER
UND TEMPERATURANZEIGE
GERÄTEÜBERSICHT
1. TASTE MODE SET
2. TASTE ALARM SET
3. TASTE ALARM 1 SIGNALT ON / RADIO
4. TASTE ALARM 2 SIGNALT ON / RADIO
5. TEMPERATURANZEIGET ASTE (C° / F°)
6. INFRAROTSENSOR
7. TASTE <<
8. TASTE >>
9. TASTE POWER ON/OFF (ALARM OFF)
10. TASTE SNOOZE / SLEEP
11. LED-DISPLAY
12. DIMMER
13. AUDIO-EINGANGSBUCHSE
14. LAUTSTÄRKEREGLER
15. BANDWAHLSCHALTER
16. TUNING-REGLER
17. TASTE RESET
18. TEMPERATURSENSOR (FÜR RAUMTEMPERA TUR)
19. NETZKABEL
20. FM-ANTENNE
21. NACHT BELEUCHTUNG
22. BATTERIEFACH
23. LAUTSPRECHER
24. TASTE EIN / AUS NIGHT LIGHT
SICHERHEITSHINWEISE
CAUTION
RISKOF ELECTRIC
SHOCK
DONOT OPEN
LASER PRODUCT
CLASS 1
230v~
- +
- +
Das Ausrufszeichen im Dreieck weist den Benutzer auf wichtige Bedienungs- und
Wartungsanweisungen (Service) in diesem Handbuch hin, die unbedingt zu befolgen
sind.
Das Blitzsymbol im Dreieck weist den Benutzer auf “gefährliche Spannungen” an
einigen freiliegenden Bauteilen im Innem des Gerätes hin.
Um die Gefahr elektrischer Schläge auszuschliessen, Gehäuse auf keinen Fall
abnehmen. Im Innem befinden sich keine vom Benutzer selbst instandsetz-baren
T eile. Reparaturen dürfen nur von einer autorisierten Fachwerkstatt durchgeführt
werden.
Diese Apparat benützt einen Laserstrahl. da Gefahr Augenschädern besteht, darf
nur qualifiziertes Personal den Deckel des Gerätes aufheben, entfernen oder
reparieren.
Dunkelstrahlung bei geöffneten Geräten und defektem Verschluss. Bedienung oder
Regulierung der technischen Eigenshaften oder sonstige nicht spezifierte Prozeduren
auf dieser manuellen Betriebsart können zur Ausetzung gefährlicher Laserstrahlen
führen.
Dieses Gerät ist für 230V ~ 50Hz Netzspannung ausgelegt. Bei längerer
Nichtbenutzung des Geräts ziehen Sie den Stecker aus der Steckdose.
Setzen Sie das Gerät weder Feuchtigkeit noch Regen aus.
Schalten Sie das System erst dann ein, wenn Sie alle Verbindungen genau geprüft
haben.
Stellen Sie das Gerät so auf, dass immer eine ungestörte Frischluftzufuhr
sichergestellt ist. Es ist zum beispiel keinesfalls auf T eppiche und in der Nähe von
Gardinen zu stellen oder in Bücherregale einzubauen.
Setzen Sie das Gerät weder direkter Sonneneinstrahlung noch Wärmequellen aus.
Beim Einlegen der Batterien achten Sie auf die richtige Polarität. Vermischen Sie
keine neue Batterien mit alten oder entladenen Batterien.
Bei längerer Nichtbenutzung des Geräts (mehr als einen Monat) ziehen Sie die
Batterien heraus, um Auslaufen zu vermeiden, die schädlich für das Gerät sein
konnen.
Page 9
DeutschDeutsch
13 14
SPEISUNG
Dieses Gerät funktioniert mit Netzstrom von 230V ~ 50Hz. Schließen Sie das AC-Netzkabel
an eine AC-Netzsteckdose an. Vergewissern Sie sich, daß die Spannung mit der auf dem
Typenschild angegebenen übereinstimmt. Das Typenschild befindet sich auf der Rückseite
des Gerätes.
Stützbatterie zum Schutz gegen Stromausfall
Dieses Radio hat einen eingebauten Stützbatterie-Schaltkreis, der bei einem zeitweiligen
Stromausfall die Einstellungen der genauen Uhrzeit und der Weckzeit aufrechterhält.
Legen Sie 1 X Lithiumknopfzellen Typ CR2032 mit 3 V (nicht im Lieferumfang enthalten) in
das Batteriefach auf der Geräteunterseite ein. Achten Sie dabei darauf, dass die positiven
und negativen Batteriekontakte (Polarität gekennzeichnet durch + und -) ordnungsgemäß an
die entsprechenden Kontakte im Batteriefach angeschlossen werden.
Wenn die Stromversorgung kurzzeitig unterbrochen wird, blinkt das Display und das Radio
spielt nicht. Dank der Pufferbatterie werden jedoch die Einstellungen von Uhrzeit und Alarm
beibehalten. Bei Wiederherstellung der Stromversorgung zeigt die Uhr die richtige Uhrzeit und
die korrekten Alarmeinstellungen an, ohne dass eine weitere Einstellung erforderlich ist.
ERSTE SCHRITTE
Nach dem Anschluss des Netzkabels an eine Steckdose drücken Sie auf die Taste
Reset (17), die sich auf der Geräterückseite befindet.
- Das Gerät zeigt zwei Sekunden lang die volle Segmentanzeige an und wechselt
dann in den normalen Betriebsmodus.
- Die Displaybeleuchtung schaltet sich ein.
1. EINSTELLUNG VON UHRZEIT UND KALENDER
A. Einstellung von Uhrzeit und Kalender - Drücken Sie im normalen Betriebsmodus über
zwei Sekunden lang auf die Taste Mode Set (1), um den Modus für die Zeiteinstellung
aufzurufen. Wählen Sie anschließend die gewünschte Einstelloption durch mehrmaliges
Drücken der Taste Mode Set (1) entsprechend der folgenden Reihenfolge aus:
Normal > Jahr > Monat > Tag > 12/24-Stunden > Echtzeituhr (RTC) Stunden > Echtzeituhr
(RTC) Minuten > Normal
Vorgehensweise bei der Zeiteinstellung:
- Verwenden Sie die Tasten << (7) und >> (8), um den jeweils einstellbaren Wert zu senken
bzw. zu erhöhen.
- Halten Sie die Taste << oder >> zwei Sekunden lang gedrückt, um den automatischen
Vor- bzw. Rücklauf zu nutzen.
a. Einstellung des Jahres
Ausgangswert: 2009
Möglicher Einstellbereich: 2000 bis 2099
Display zeigt Modus zur Einstellung des Jahres
b. Einstellung des Monats
Display zeigt Modus zur Einstellung des Monats
c. Einstellung des Tages
Display zeigt Einstellung des Tages
Anmerkung: Der Wochentag wird nach der Einstellung des Jahres, Monats oder Tages angepasst.
d. Einstellung des 12/24-Stunden-Zeitanzeigeformats
Display zeigt Modus zur 12/24Std.-Modus (12H wählen)
Display zeigt Modus zur 12/24Std.-Modus (24H wählen)
e. Einstellung der Stunden für Echtzeituhr
Display zeigt Modus zur Einstellung der Stunden
f. Einstellung der Minuten für Echtzeituhr
Display zeigt Modus zur Einstellung der Minuten
Anmerkung: Die Sekunden werden bei jeder Minuteneinstellung zurückgesetzt.
M
D
M
D
Page 10

DeutschDeutsch
15 16
B. Einstellung von Alarm 1 und Alarm 2 - Drücken Sie während des normalen Betriebsmodus
über zwei Sekunden lang auf die Taste Alarm Set (2), um den Modus zur Einstellung des
Weckalarms aufzurufen. Wählen Sie dann die gewünschte Option entsprechend der
nachfolgenden Reihenfolge durch mehrmaliges Drücken der Taste Alarm Set (2) aus:
Normal > AL1 Stunde > AL1 Minute > AL1 Wochenendalarm > AL2 Stunde > AL2 Minute > AL2
Wochenendalarm > Normal
Vorgehensweise bei der Dateieneinstellung:
- Verwenden Sie die Tasten << (7) und >> (8), um den jeweils einstellbaren Wert zu senken
bzw. zu erhöhen.
- Halten Sie die Taste << oder >> zwei Sekunden lang gedrückt, um den automatischen
Vor- bzw. Rücklauf zu nutzen.
2. ALARMAUSGABE SOWIE EIN-/AUSSCHALTEN DES ALARMS
A. Umschalten zwischen Signalton und Radioalarm
Stellen Sie die Taste AL1 (3) beziehungsweise AL2 (4) auf die Position "Music" ein, wenn
Sie durch das Radio geweckt werden möchten. Zur Einstellung des Signaltons wählen Sie
hingegen die Position "Buzzer" und zur Abschaltung der Alarmfunktion die Position "Alarm Off".
B. Signaltonausgabe (Buzzer)
Während der ersten acht Sekunden ertönt ein Signalton, während der nächsten acht
Sekunden werden zwei Signaltöne ausgegeben und während der darauf folgenden acht
Sekunden 4 Signaltöne. Im Anschluss daran wird das Signalmuster während der nächsten
Minute wiederholt.
Display zeigt Einstellung für Alarm 1
Stunden
Display zeigt Einstellung für Alarm 1
Minuten
Display zeigt Einstellung für Alarm 1
Wochenendalarm - Mon bis Fre
Display zeigt Einstellung für Alarm 1
Wochenendalarm - Mon bis Son
Display zeigt Einstellung für Alarm 2
Stunden
Display zeigt Einstellung für Alarm 2
Minuten
Display zeigt Einstellung für Alarm 2
Wochenendalarm - Mon bis Fre
Display zeigt Einstellung für Alarm 2
Wochenendalarm - Mon bis Sam
Display zeigt Einstellung für Alarm 2
Wochenendalarm - Mon bis Son
Display zeigt Alarm 1
Wecken durch Buzzer
Display zeigt Alarm 1
Wecken durch Radio
Display zeigt Alarm 2
Wecken durch Buzzer
Display zeigt Alarm 2
Wecken durch Radio
1
1
1
1
1
1
1
1
2
2
2
2
2
2
2
2
2
2
1
1
2
2
Page 11

DeutschDeutsch
3. ALARMDAUER UND SCHLUMMERFUNKTION
Alarmdauer: Der Signalton beziehungsweise das Radio ertönt 30 Minuten lang, wenn
keine Taste betätigt wird. Anschließend wird der Alarm automatisch deaktiviert und erst am
nächsten Tag zur gleichen Zeit wieder eingeschaltet.
Schlummerfunktion (Snooze):
- Drücken Sie beim Auslösen des Weckalarms auf die Taste Snooze (10), um die
Schlummerfunktion zu aktivieren; der Signalton beziehungsweise das Radio verstummt
daraufhin vorübergehend.
- Nach neun Minuten (minimaler Zeitversatz nicht eingerechnet) ertönt der Alarm
automatisch erneut.
- Zum Abschalten der Schlummerfunktion drücken Sie auf die Taste Power On/Off (Alarm
Off) (9). Andernfalls schaltet sich der Signalton beziehungsweise das Radio automatisch
nach 30 Minuten aus.
4. DISPLAYANZEIGE DER JAHRESANGABE
Drücken Sie zur Anzeige der Jahreszahl während des normalen Betriebsmodus auf die
Taste << (7). Nach fünfsekündiger Einblendung werden erneut Datum und Monat angezeigt.
Anzeige der Jahreszahl
5. DISPLAYANZEIGE VON MONAT / TAG
Drücken Sie zur Anzeige von Monat und Tag während des normalen Betriebsmodus auf die
Taste >> (8). Nach fünfsekündiger Einblendung erscheint erneut die Zeitanzeige.
Anzeige von Monat und Tag
6. EINSCHLAFTIMER (SLEEP)
Drücken Sie bei eingeschaltetem Radio auf die Taste Snooze/Sleep (10), um in den
Einschlaftimermodus zu wechseln. Die Zeitanzeige für die Einschlafzeit blinkt nun fünf
Sekunden lang. Verwenden Sie die Taste Sleep, um die Einstellung für die Einschlafzeit
während dieser fünf Sekunden zu verändern (mögliche Zeitdauer zwischen 90 und 10 Minuten).
Zum Abbrechen dieser Funktion drücken Sie einfach auf die Taste Power On/Off (9).
Anzeige der Einschlafzeit
NACHT BELEUCHTUNG
Den Knopf ON/OFF (24) drücken um die Nachtbeleuchtung anzuschalten.
7. THERMOMETERFUNKTION
Anmerkung:
Messbarer Temperaturbereich im Haus: 0 bis + 50°C oder 32 bis 122°F.
RADIO
RADIOBETRIEB
- Drücken Sie zum Einschalten des Radios auf die Taste Power On/Off (9).
- Wählen Sie das gewünschte AM- oder FM-Frequenzband mithilfe des Bandwahlschalters (15) aus.
- Stellen Sie den gewünschten Sender mit dem Tuning-Regler (16) ein.
- Regulieren Sie die Lautstärke mittels des Lautstärkereglers (14) nach Bedarf.
- Zum Ausschalten des Radios betätigen Sie die Taste Power On/Off (9).
Hinweis:
- Für das AM-Frequenzband ist eine interne Richtungsantenne im Gerät vorgesehen. Zur
Erzielung eines optimalen Empfangs drehen Sie das Gerät.
- Stellen Sie sicher, dass die FM-Antenne (20) vollständig ausgerollt und für einen
bestmöglichen FM-Empfang ausgerichtet ist.
RÜCKSETZEN AUF DIE STANDARDEINSTELLUNGEN
- Die Reset-Taste (17) befindet sich auf der Rückseite des Gerätes. Drücken Sie diese mit
einem Stift mit Kugelspitze bei jedem Batteriewechsel oder im Falle von
Funktionsstörungen des Gerätes.
Hierdurch werden alle Einstellungen auf die Standardwerte zurückgesetzt, wobei alle
gespeicherten Daten (Alarm- und Uhrzeiteinstellungen) verloren gehen.
17 18
M
D
sleep
fm MHz
Page 12

DeutschDeutsch
SICHERHEITSHINWEISE
- Achten Sie darauf, dass sich niemals offene Flammen wie beispielsweise brennende
Kerzen auf dem Gerät befinden.
- Das Gerät darf nicht direktem Sonnenlicht, sehr hohen oder niedrigen Temperaturen,
Feuchtigkeit oder Vibrationen ausgesetzt und nicht in einer staubigen Umgebung
aufgestellt werden.
- Zur Säuberung der Geräteoberfläche verwenden Sie keine Scheuermittel, Benzole,
Verdünner oder anderen Lösungsmittel. Wischen Sie das Gerät zur Reinigung mit einer
milden, nicht scheuernden Reinigungslösung und einem sauberen, weichen Tuch ab.
- Versuchen Sie niemals, Drähte, Stifte oder andere Gegenstände in die Luftdurchlässe
oder Öffnungen des Gerätes zu stecken.
- Stellen Sie das Gerät nicht unter das Licht einer Tischlampe, da das Licht den Empfang
des Infrarotsensors stören könnte.
SPEZIELLE WARNHINWEISE
Antenne: Schließen Sie die FM-Antenne nicht an eine externe Antenne an.
Flüssigkeiten: Achten Sie darauf, dass keine Flüssigkeiten auf das Gerät tropfen oder
spritzen und dass keine mit Flüssigkeiten gefüllten Behältnisse wie beispielsweise Vasen
darauf gestellt werden.
Belüftung: Die normale Belüftung des Gerätes darf für den vorgesehenen Gebrauch nicht
behindert werden.
Trennvorrichtung: Der Netzstecker dient als Trennvorrichtung, weshalb er stets leicht
zugänglich sein sollte.
FUNKTION DES INFRAROTSENSORS
1. Bei abgeschaltetem Radio dient der Infrarotsensor zur Anzeige der Zeiteinstellung
für den Alarm 1 und den Alarm 2.
2. Verwenden Sie den Infrarotsensor bei eingeschaltetem Radio zur Aktivierung des
Einschlaftimers.
einzuschalten. Dabei wird die Anzeige "Slp" auf dem Display angezeigt und die
Einschlafzeit kann nach Wunsch zwischen 10 und 90 Minuten eingestellt werden
(bezüglich der Zeiteinstellung siehe Abschnitt "Einschlaftimer"). Betätigen Sie die Taste
(9), wenn Sie die Funktion abbrechen möchten.
3. Bei Alarmauslösung können Sie mittels des Infrarotsensors die Schlummerfunktion
aktivieren.
-Mittels Handbewegung (1 Sek.) auf den Sensor (6) wird der Alarm für neun Minuten
abgeschaltet.
19 20
AUDIO IN FUNKTION
Die T onausgabe erfolgt automatisch, wenn ein externes Audiogerät an die AUDIO-IN Buchse
angeschlossen wird.
TECHNISCHE DATEN
Frequenzgang : AM 540 - 1611 kHz
FM 87.5 - 108 MHz
Leistungsausgabe : 350 mW
Impedanz : 8 Ohm
Battery Backup : 3V (1 x CR3032 (Lithium-Knopfzelle) (für Uhr)
ungsorStromv : AC230V ~ 50 Hz, 5 Watt
Änderungen vorbehalten.
Korrekte Entsorgung dieses Produkts (Elektromüll)
Die Kennzeichnung auf dem Produkt bzw. auf der dazugehörigen
Literatur gibt an, dass es nach seiner Lebensdauer nicht zusammen
mit dem normalen HaushaltsmüIl entsorgt werden darf. Entsorgen Sie
dieses Gerat bitte getrennt von anderen Abfallen, um der Umwelt bzw.
der menschlichen Gesundheit nicht durch unkontrollierte
Müllbeseitigung zu schaden. Recyceln Sie das Gerät, um die
nachhaltige Wiederverwertung von stofflichen Ressourcen zu fördern.
Private Nutzer sollten den Händler, bei dem das Produkt gekauft wurde,
oder die zuständigen Behörden kontaktieren, um in Erfahrung zu
bringen, wie sie das Gerät auf umweltfreundliche Weise recyceln
können.
Gewerbliche Nutzer sollten sich an Ihren Lieferanten wenden und die
Bedingungen des Verkaufsvertrags konsultieren. Dieses Produkt darf
nicht zusammen mit anderem Gewerbemüll entsorgt werden.
- Bewegen Sie die Hand zwei Sekunden auf den Sensor (6), um den Einschlaftimer
Page 13

FrançaisFrançais
21 22
CLR-2619
RADIORÉVEIL LED AM/FM AVEC BLUE LED, AFFICHAGE DU
CALENDRIER ET DE LA TEMPÉRATURE.
EMPLACEMENT DES COMMANDES
1. TOUCHE MODE SET (RÉGLAGE DE LA MODALITÉ)
2. TOUCHE ALARM SET (RÉGLAGE DE L'ALARME)
3. TOUCHE ALARM 1 SELECTION BUZZER / RADIO
4. TOUCHE ALARM 2 SELECTION BUZZER / RADIO
5. TOUCHE C° / F°
6. CAPTEUR INFRAROUGE
7. TOUCHE << SET
8. TOUCHE >> SET
9. TOUCHE POWER ON/OFF (ALARME OFF)
10. TOUCHE SNOOZE / SLEEP
11. AFFICHAGE À DEL
12. RÉGULATEUR DE LUMINOSITÉ
13. PRISE ENTRÉE AUDIO
14. BOUTON VOLUME
15. GAMME D'ONDES
16. BOUTON DE SYNTONISA TION
17. TOUCHE RESET
18. CAPTEUR DE TEMPERATURE (INTERNE)
19. CORDON D'ALIMENTA TION AC
20. ANTENNE FM
21. ÉCLAIRAGE NOCTURNE
22. COMPARTIMENT À PILES
23. HAUT-PARLEUR
24. TOUCHE ÉCLAIRAGE NOCTURNE
ATTENTION
CAUTION
RISKOF ELECTRIC
SHOCK
DONOT OPEN
Le symbole “point d’exclamation” à l’intérieur d’un triangle avertit l’utilisateur que
d’importantes instructions d’utilisation et de maintenance sont contenues dans le
mode d’emploi.
Le symbole “éclair” à l’intérieur d’un triangle sert à avertir l’utilisateur de la
présence du courant à l’intérieur du l’appareil qui pourrait constituer un risque.
Afin de minimiser les risques, ne pas ouvrir le boîtier ni ôter le dos de l’appareil. En
case de panne, faites appel aux techniciens qualifiés pour les réparations.
L’appareil ne renferme aucune pièce reparable par l’utilisateur.
Cet appareil utilise un rayon laser. Etant donné le danger que ceci représente
pour les yeux, seulement un technicien qualifié devrait retirer le couvercle et
réparer cet appareil.
Un rayonnement laser invisible est présent lorsque l’appareil est ouvert ou le
verrouillage de sécurité est inopérant. Eviter toute exposition directe au rayon
laser. L’utilisation des commandes, réglages ou procédés autres que ceux stipulés
dans le présent mode d’emploi sont dangereux.
Cet appareil a été conçu pour une tension d’alimentation de 230V ~ 50Hz.
Débranchez la prise de courant quand on prévoit de ne pas utiliser l’appareil
pendant un certain temps.
L’unité ne doit pas être exposée à l’humidité ou à la pluie.
Mettez l’appareil sous tension seulement après avoir vérifié que tous les
raccordements soient corrects.
L’appareil doit être gardé dans un endroit suffisamment ventilé. Ne le gardez
jamais par exemple près des rideaux, sur un tapis ou dans des meubles, tels
qu’une bibliothèque.
L’unité ne doit pas être exposée à la lumière directe du soleil ou à des sources de
chaleur.
Installez vos piles en veillant à respecter la correcte polarité. N’utilisez pas en
même temps des piles neuves et des piles usées.
Quand vous prévoyez de ne pas utiliser l’appareil pendant un mois ou plus,
retirez les piles du logement pour empêcher toute fuite d’acide.
230v~
LASER PRODUCT
CLASS 1
- +
- +
Page 14

FrançaisFrançais
23 24
ALIMENTATION
Cet appareil fonctionne sur secteurs de 230V - 50Hz. Brancher le cordon de raccordement
CA à votre prise de secteur CA. Vérifier que la tension électrique corresponde à celle indiquée
sur la plaque des caractéristiques techniques placée au dos de l'appareil.
Pile de réserve comme protection contre les manques d'alimentation électrique
Cet appareil est équipé d'un circuit de réserve sur pile pour préserver les programmations
de l'horaire correct et du réveil en cas d'interruption temporaire de l'alimentation électrique.
Installez 1 piles lithium plate, non fournies, de 3-volts type CR3032 dans le compartiment
à piles situé sur la partie inférieure de l'unité, en vous assurant de bien faire correspondre
la borne positive et négative (+ et -) de la pile avec les bornes situées sur la plaque du
compartiment à piles.
Si le courant électrique est momentanément coupé, l'écran se met à clignoter et la radio ne
fonctionne plus. Cependant, la batterie de secours conservera les réglages de l'heure et de
l'alarme. Lorsque le courrant sera rétabli, l'écran affichera les réglages corrects de l'heure
et du réveil, il ne sera pas nécessaire d'effectuer des réglages.
OPÉRATIONS INITIALES
Appuyez sur la touche Reset (17) située à l'arrière de l'unité, après avoir branché le
cordon AC.
- L'unité affiche un segment entier pendant 2 secondes, puis entre en mode normal.
- L'écran clignote.
1. RÉGLAGE DE L'HEURE ET DE LA DATE
A. Réglage de l'heure et de la date - en mode de fonctionnement normal, appuyez sur la
touche Mode Set (1) pendant plus de 2 secondes pour entrer en mode Time Set (réglage
de l'heure). Après être entrés en mode réglage, appuyez sur la touche Mode Set (1) pour
modifier la séquence du mode comme indiqué ci-dessous:
Normal > Année > Mois > Jour > 12/24H > Heure RTC > Minutes RTC > Normal
Etapes à suivre pour le réglage des données :
- Appuyez sur la touche >> (8) pour régler la donnée suivante
- Appuyez sur la touche << (7) pour régler la donnée précédente
- Appuyez sur la touche << ou >> pendant 2 secondes pour activer la recherche automatique
avant ou arrière
a. Mode Réglage de l'année
Valeur initiale : 2006
Réglage de l'année : de 2000 à 2099
Affichage Mode de réglage de l'année
b. Mode Réglage du mois
Affichage Mode Réglage du mois
c. Mode Réglage du jour
Affichage Mode Réglage du jour
Remarque : le jour de la semaine est recalculé lorsque l'année, le mois ou le jour est réglé
d. Mode Réglage 12/24H
Affichage Mode Réglage 12/24H (Sélectionner 12H)
Affichage Mode Réglage 12/24H (Sélectionner 24H)
e. Mode Réglage heure RTC
Affichage Mode Réglage heure RTC
f. Mode Réglage minutes RTC
Affichage Mode Réglage minutes RTC
Remarque : les secondes sont remises à zéro chaque fois que les minutes sont modifiées
M
D
M
D
Page 15

FrançaisFrançais
25
26
B. Réglage Alarme 1 et Alarme 2 - En mode normal, appuyez sur la touche Alarm set (2)
pendant plus de 2 secondes pour entrer en mode de réglage de l'alarme. Après être
entrés en mode réglage de l'alarme, appuyez sur la touche Alarm set (2) pour modifier
le mode selon la séquence qui suit:
Normal > Heure AL1 > Minutes AL1 > Alarme week-end AL1 > Heure AL2 > Minutes AL2 >
Alarme week-end AL2 > Normal
Etapes à suivre pour le réglage des donnéés:
- Appuyez sur la touche << (7) pour régler la donnée suivante
- Appuyez sur la touche >> (8) pour régler la donnée précédente
- Appuyez sur la touche << ou >> pendant 2 secondes pour activer la recherche avant ou arrière
2. RÉGLAGE DU TYPE D'ALARME
A. Modifier le type d'alarme
Appuyez sur le bouton AL1 (3) / AL2 (4) et choisissez Music (musique) pour être réveillés par la
radio, Buzzer (sonnerie) pour être réveillés par la sonnerie ou Alarm Off pour désactiver l'alarme.
B. Buzzer (sonnerie)
Au cours des 8 premières secondes, un bip sera émis, au cours des 8 secondes suivantes,
2 bips seront émis, puis 4 bips au cours des 8 secondes suivantes, après cela, un bip
continu sera émis. Le même schéma se répétera la minute suivante.
Affichage du réglage de l'alarme 1
Heure
Affichage du réglage de l'alarme 1
Minutes
Affichage du réglage de l'alarme 1
Alarme week-end - de lundi à vendredi
Affichage du réglage de l'alarme 1
Alarme week-end - de lundi à samedi
Affichage du réglage de l'alarme 2
Heure
Affichage du réglage de l'alarme 2
Minutes
Affichage du réglage de l'alarme 2
Alarme week-end - de lundi à vendredi
Affichage du réglage de l'alarme 2
Alarme week-end - de lundi à samedi
Affichage du réglage de l'alarme 2
Alarme week-end - de lundi à dimanche
Affichage du réglage de l'alarme 1
Réveil par Buzzer
Affichage du réglage de l'alarme 1
Réveil par Radio
Affichage du réglage de l'alarme 2
Réveil par Buzzer
Affichage du réglage de l'alarme 2
Réveil par Radio
1
1
1
1
1
1
1
1
2
2
2
2
2
2
2
2
2
2
1
1
2
2
Page 16

FrançaisFrançais
3. DURÉE DE L'ALARME ET FONCTION SNOOZE (répétition de l'alarme)
Durée de l'alarme - L'alarme avec la sonnerie ou la radio est active pendant 30 minutes si
vous n'appuyez sur aucune touche. Une fois ce temps écoulé, l'alarme s'arrête
automatiquement et recommencera le lendemain à la même heure.
Pour activer la fonction Snooze :
- Lorsque l'alarme retentie, appuyez sur la touche SNOOZE (10) pour activer la fonction
répétition de l'alarme, la sonnerie ou la radio s'interrompt.
- L'intervalle Snooze est de 9 minutes (cette valeur ne peut être modifiée)
- La fonction Snooze sera active jusqu'à ce que vous appuyiez sur la touche Power On/Off
(Alarme Off) (9) pour désactiver l'alarme. La sonnerie ou la radio s'arrête automatiquement
au bout de 30 minutes.
4. MODIFIER L'AFFICHAGE DE L'ÉCRAN
En mode de fonctionnement normal, appuyez sur la touche << (7) pour passer à l'affichage
de l'année, au bout de 5 secondes, l'écran affichera de nouveau le jour et le mois.
Affichage de l’année
5. MODIFIER L'AFFICHAGE DE L'ÉCRAN
En mode de fonctionnement normal, appuyez sur la touche >> (8) pour passer à l'affichage
du mois et du jour, au bout de 5 secondes, l'écran affichera de nouveau l'heure.
Affichage du mois et du jour,
6. FONCTION SLEEP (mise en veille)
En mode Radio On (allumée), appuyez sur la touche Snooze/Sleep (10) pour activer le
mode Sleep, l'heure de mise en veille clignotera pendant 5 secondes, puis appuyez sur la
touche Sleep pour modifier la durée allant de 90 min à 10 min. Appuyez sur la touche Power
(9) pour désactiver la fonction sleep.
Affichage de la durée de Sleep
ÉCLAIRAGE NOCTURNE
Appuyez sur la touche (24) pour activer la function eclairage nocturne.
7. FONCTION THERMOMÈTRE
Remarque :
Plage de température interne : de 0 à + 50°C
RADIO
FONCTIONNEMENT DE LA RADIO
- Appuyez sur la touche Power On/Off (9) pour allumer la radio.
- Sélectionnez la bande AM ou FM à l'aide du bouton wave band (gamme d'onde) (15).
- Sélectionnez la station à l'aide du bouton de syntonisation (16).
- Tournez le bouton volume (14) pour régler le volume
- Appuyez sur la touche power On/Off (9) pour éteindre la radio.
Remarque :
- La bande AM utilise une antenne directionnelle interne. Positionnez la radio de façon à
obtenir la meilleure réception possible.
- Assurez vous que l'antenne FM (20) est complètement dépliée pour obtenir la meilleure
réception FM possible.
RESET
- Le bouton Reset (17) est situé à l'arrière de l'unité. Utilisez un stylo-bille pour agir sur celuici lorsque vous devez changer les piles, ou si l'unité ne fonctionne pas correctement.
Cette fonction permet de retrouver les réglages prédéfinis, toutes les données
sauvegardées seront perdues (réglages de l'heure et de l'alarme).
PRÉCAUTION
- Aucune source de flammes nues, telle qu'une bougie, ne doit être placée sur l'appareil.
- L'unité ne doit pas être directement exposée à la lumière du soleil, à des températures
très faibles ou très élevées, à l'humidité, aux vibrations et elle ne doit pas se trouver dans
un endroit poussiéreux.
27
28
M
D
sleep
fm MHz
Page 17

FrançaisFrançais
- N'utilisez pas d'abrasifs, de benzènes, de diluants ou autres solvants pour nettoyer les
surfaces de l'appareil. Pour le nettoyer, utilisez une solution détergente légère, nonabrasive, et un chiffon doux et propre.
- Ne cherchez pas à insérer des fils métalliques, des épingles, etc., dans les ouvertures
de ventilation de l'unité.
- Ne placez jamais l'unité à proximité de la lumière d'une lampe. La lumière influence la
réception du capteur infrarouge.
AVERTISSEMENTS
REMARQUE : ne connectez pas l'antenne FM à une antenne externe.
Liquides : l'appareil ne doit pas être exposé à des égouttements d'eau ou à des éclaboussures.
Aucun objet rempli de liquide, tel que des vases, ne doit être placé sur l'appareil.
Ventilation : la ventilation normale de l'appareil ne doit pas être obstruée.
Pour brancher ou débrancher l'appareil il faut agir sur la prise principale; par conséquent,
celle-ci doit toujours être accessible.
FONCTION CAPTEUR INFRAROUGE
2. Lorsque la radio est en mode On (allumée), utilisez le capteur infrarouge pour activer
la fonction Sleep (mise en veille)
- Positionnez une main sur le capteur (6) en l'espace de deux secondes la fonction
sleep est activée, le mot "Slp" apparaît sur l'écran à DEL. Réglez la mise en veille
automatique comprise allant 10 à 90 minutes. (Voir "Fonction Sleep" pour le réglage de
l'heure de mise en veille). Appuyez sur la touche (9) pour désactiver la fonction Sleep.
3. En mode alarme On (activée), utilisez le capteur infrarouge pour activer la fonction
Snooze (alarme à répétition)
- Positionnez une main sur le capteur (6) en l'espace d'une seconde l'alarme s'éteindra
29
30
momentanément pendant 9 minutes
FONCTION AUDIO IN
Le son est audible automatiquement si un dispositif audio externe est relié à l’entrée
AUDIO IN, à l’arriere de l’appareil.
CARACTERISTIQUES TECHNIQUES
Frequences : AM 522 - 1611 kHz
FM 87.5 - 108 MHz
Sortie : 350 mW
Impédance H.P. : 8 ohm
Batterie support : 3V (1 x 3V CR3032 pile plate au lithium) (pour l'horloge)
Alimentation : AC230V ~ 50 Hz, 5 Watts
Les spécifications et le design peuvent changer sans avis préalable.
Comment éliminer ce produit -
(déchets d'équipements électriques et électroniques)
Ce symbole sur le produit ou sa documentation indique qu'il ne doit
pas être éliminé en fin de vie avec les
autres déchets ménagers. L'élimination incontrôlée des déchets
pouvant porter préjudice a l'environnement ou a la santé humaine,
veuillez le séparer des autres types de déchets et le recycler de
façon responsable. Vous favoriserez ainsi la réutilisation durable des
ressources matérielles.
Les particuliers sont invites a contacter le distributeur leur ayant vendu
le produit ou a se renseigner auprès de leur mairie pour savoir ou et
comment ils peuvent se débarrasser de ce produit afin qu'il soit recyclé
en respectant l'environnement.
Les entreprises sont invitées a contacter leurs fournisseurs et a
consulter les conditions de leur contrat de vente. Ce produit ne doit
pas être éliminé avec les autres déchets commerciaux.
Page 18

ItalianoItaliano
31 32
Noi, Roadstar Italia Spa
Viale Matteotti 39
I-22012 Cernobbio (Como)
Dichiariamo:
Che il modello Radiosveglia digitale CLR-2619 della Roadstar è prodotto in conformità
al D.M. no. 548 datato 28/08/95 (G.U. no. 301 datata 28/12/95) e, in particolare, è in
conformità alle prescrizioni dell’articolo 2 comma 1.
CLR-2619
RADIOSVEGLIA AM/FM CON DISPLAY LED BLU, VISUALIZZAZIONE
CALENDARIO E TEMPERATURA.
POSIZIONE DEI COMANDI
1. TASTO MODE SET (IMPOST AZIONE MODALITÀ)
2. TASTO ALARM SET (IMPOSTAZIONE ALLARME)
3. TASTO ALARM 1 SELEZIONE BUZZER / RADIO
4. TASTO ALARM 2 SELEZIONE BUZZER / RADIO
5. TASTO C° / F°
6. SENSORE AD INFRAROSSI
7. TASTO << SET
8. TASTO >> SET
9. TASTO POWER ON/OFF (ALLARME OFF)
10. TASTO SNOOZE / SLEEP
11. DISPLA Y A LED
12. FUNZIONE DIMMER
13. PRESA JACK INGRESSO AUDIO
14. CONTROLLO VOLUME
15. GAMMA LUNGHEZZA D'ONDA
16. TASTO DI SINT ONIZZAZIONE
17. TASTO RESET
18. SENSORE TEMPERATURA (INTERNA)
19. CAVO DI ALIMENTAZIONE AC
20. ANTENNA FM
21. ILLUMINAZIONE NOTTURNA
22. VANO BA TTERIE
23. ALTOP ARLANTE
24. TASTO ILLUMINAZIONE NOTTURNA
A TTENZIONE
Il punto esclamativo all’interno di un triangolo avverte l’utente che il libretto
d’istruzioni contiene delle importanti istruzioni per l’uso e la manutenzione.
Il simbolo del fulmine all’interno di un triangolo avverte l’utente della
presenza di una pericolosa tensione all’interno dell’apparecchio.
Per ridurre i rischi di scosse elettriche, non aprire l’apparecchio.
L’apparecchio non contiene parti riparabili dall’utente. In caso di guasto
fare appello a tecnici qualificati per le riparazioni.
Questo apparecchio utilizza un raggio laser. A causa del pericolo di danni alla
vista, solo personale qualificato può aprire l’apparecchio o tentare di ripararlo.
Radiazioni laser invisibili possono fuoriuscire ad apparecchio aperto on in
caso di guasto del dispositivo di sicurezza. Evitare l’esposizione diretta ai raggi
laser. L’uso di comandi, regolazioni o procedure non specificate in questo
manuale possono causare pericolose esposizioni alle radiazioni laser.
Questo apparecchio è stato progettato per funzionare a 230V ~ 50Hz. Se
non si intende utilizzare l’apparecchio per un lungo periodo di tempo,
rimuovere la spina dalla presa di corrente.
Non esporre l’apparecchio alla pioggia o all’umidità.
Utilizzare l’apparecchio solo dopo aver verificato che tutte le connessioni
siano state eseguite correttamente.
Posizionare l’apparecchio in un luogo sufficientemente ventilato. Evitare
di sistemarlo vicino a tende, sul tappeto o all’interno di un mobile quale,
ad esempio, una libreria.
Non esporre l’apparecchio alla luce diretta del sole o a fonti di calore.
Assicurarsi di aver inserito tutte le pile rispettando la corretta polarità. Non
inserire pile vecchie assieme a pile nuove.
Se non intendete utilizzare l’apparecchio per un lungo periodo di tempo (un
mese o più), rimuovere tutte le pile dal compartimento per evitare possibili
fuoriuscite di acido.
CAUTION
RISKOF ELECTRIC
SHOCK
DONOT OPEN
LASER PRODUCT
CLASS 1
230v~
- +
- +
Page 19

ItalianoItaliano
33 34
ALIMENTAZIONE
Questo apparecchio funziona con una fonte di alimentazione di 230V ~ 50Hz. Collegare il cavo
alimentazione AC alla presa di corrente AC domestica. Assicurarsi che il voltaggio sia uguale
a quello riportato sulla targa dei dati caratteristici posizionata sul retro dell'apparecchio.
Batterie di riserva di protezione in caso di mancanza di elettricità.
La radio possiede un circuito di batterie di riserva che mantiene l'orario
corretto e le impostazioni della sveglia se si verifica un'interruzione temporanea della
corrente elettrica.
Installare la batterieal litio 3-volt CR3032, non incluse, nel vano batteria posto nella parte
inferiore dell'unità, assicurandosi che il morsetto positivo e negativo della batteria (+ e -)
corrispondano ai morsetti posti nella piastra della batteria.
Se la corrente elettrica viene temporaneamente interrotta, il display inizia a lampeggiare e
la radio non riproduce nessun suono. Tuttavia, la batteria di riserva continua a mantenere
le impostazioni dell'orologio e dell'allarme. Quando la corrente viene ripristinata, l'orologio
visualizza le impostazioni corrette dell'ora e dell'allarme, non è necessario effettuare
nessuna regolazione.
OPERAZIONI INIZIALI
Premere il tasto Reset (17) posto sul retro dell'unità, dopo avere collegato il cavo AC.
- L'apparecchio visualizza il segmento completo per 2 secondi, quindi entra in modalità normale.
- Il display inizia a lampeggiare
1. IMPOSTAZIONE DELL'ORA E DELLA DATA
A. Impostazione dell'ora e della data - In modalità normale, premere il tasto Mode Set (1)
per più di 2 secondi per entrare nella modalità Time Set (impostazione dell'ora). Dopo
essere entrati nella modalità impostazione, premere il tasto Mode Set (1) per cambiare
la sequenza della modalità come indicato di seguito:
Normale > Anno> Mese> Giorno> 12/24H > Ora RTC > Minuti RTC > Normale
Operazioni per l'impostazione dei dati:
- Premere il tasto >> (8) per impostare il dato successivo
- Premere il tasto << (7) per impostare il dato precedente
- Premere il tasto << o >> per 2 secondi per attivare l'opzione ricerca automatica avanti o
indietro
a. Modalità Impostazione dell'ora
Valore iniziale: 2006
Impostazione dell'anno: da 2000 fino a 2099
Display con Modalità Impostazione dell'ora
b. Modalità Impostazione del mese
Display con Modalità Impostazione del mese
c. Modalità Impostazione del giorno
Display con Modalità Impostazione del giorno
Nota: il giorno della settimana viene ricalcolato quando vengono regolati l'anno, il mese o il giorno
d. Modalità Impostazione 12/24H
Display con Modalità Impostazione 12/24H (Selez. 12H)
Display con Modalità Impostazione 12/24H (Selez. 24H)
e. Modalità Impostazione ora RTC
Display con Modalità Impostazione ora RTC
f. Modalità Impostazione minuti RTC
Display con Modalità Impostazione minuti RTC
Nota: i secondi vengono azzerati ogni volta che i minuti vengono modificati
M
D
M
D
Page 20

ItalianoItaliano
35
36
B. Impostazione Allarme 1 e Allarme 2 - In modalità normale, premere il tasto Alarm set
(2) per più di 2 secondi per entrare in modalità impostazione dell'allarme. Dopo essere
entrati in modalità impostazione dell'allarme, premere il tasto Alarm set (2) per modificare
la modalità secondo la sequenza che segue:
Normale > Ora AL1 > Minuti AL1 > Allarme weekend AL1 > Ora AL2 > Minuti AL2 >
Allarme weekend AL2 > Normale
Operazioni per l'impostazione dei dati:
- Premere il tasto << (7) per impostare il dato successivo
- Premere il tasto >> (8) per impostare il dato precedento
- Premere il tasto << o >> per 2 secondi per attivare l'opzione ricerca automatica avanti o indietro
2. IMPOSTAZIONE MODALITÀ ALLARME SVEGLIA
A. Modificare la modalità allarme sveglia
Premere il tasto AL1 (3) / AL2 (4) e scegliere l'opzione Music (musica) per un risveglio con
la radio, scegliere Buzzer (suoneria) per un risveglio con la suoneria o scegliere Alarm Off
per disattivare l'allarme
B. Buzzer (suoneria)
I primi 8 secondi verrà emesso 1 bip, nei successivi 8 secondi verranno emessi 2 bip, dopo
altri 8 secondi verranno emessi 4 bip, dopo di che verrà emesso un bip continuo, lo stesso
schema si ripeterà di nuovo il minuto successivo.
Display di visualizzazione dell'impostazione Alarm 1
Ore
Display di visualizzazione dell'impostazione Alarm 1
Minuti
Display di visualizzazione dell'impostazione Alarm 1
Allarme Weekend - Lunedì a Venerdì
Display di visualizzazione dell'impostazione Alarm 1
Allarme Weekend - Lunedì a Sabato
Display di visualizzazione dell'impostazione Alarm 2
Ore
Display di visualizzazione dell'impostazione Alarm 2
Minuti
Display di visualizzazione dell'impostazione Alarm 2
Allarme Weekend - Lunedì a Venerdì
Display di visualizzazione dell'impostazione Alarm 2
Allarme Weekend - Lunedì a Sabato
Display di visualizzazione dell'impostazione Alarm 2
Allarme Weekend - Lunedì a Domenica
Display di visualizzazione Alarm 1
Sveglia con Buzzer
Display di visualizzazione Alarm 1
Sveglia con Radio
Display di visualizzazione Alarm 2
Sveglia con Buzzer
Display di visualizzazione Alarm 2
Sveglia con Radio
1
1
1
1
1
1
1
1
2
2
2
2
2
2
2
2
2
2
1
1
2
2
Page 21

ItalianoItaliano
3. DURATA DELL'ALLARME E FUNZIONE SNOOZE (ripetizione allarme)
Durata dell'allarme - l'allarme con la suoneria o la radio continua per 30 minuti se non si preme
nessun tasto, quindi si arresta automaticamente e si attiva alla stessa ora il giorno dopo.
Per attivare la funzione Snooze: :
- Durante l'allarme, premere il tasto SNOOZE (10) per attivare la funzione ripetizione
dell'allarme, la suoneria o la radio si interrompono.
- L'intervallo Snooze è di 9 minuti (un altro tipo di intervallo non è impostabile)
- La funzione Snooze continua fino a quando il tasto Power On/Off (Allarme Off) (9) non
viene premuto per disattivare l'allarme. La suoneria o la radio si spengono
automaticamente dopo 30 minuti.
4. MODIFICARE LA VISUALIZZAZIONE DEL DISPLAY
Premere il tasto << (7) durante il funzionamento normale per passare alla visualizzazione
dell'anno, dopo 5 secondi il display torna alla visualizzazione di giorno e mese.
Display di visualizzazione anno
5. MODIFICARE LA VISUALIZZAZIONE DEL DISPLAY
Premere il tasto >> (8) durante il funzionamento normale per passare alla visualizzazione
di mese e giorno, dopo 5 secondi, il display torna alla visualizzazione dell'ora.
Display di visualizzazione mese e giorno
6. FUNZIONE SLEEP (spegnimento automatico)
In modalità Radio accesa, premere il tasto Snooze/Sleep (10) per attivare la modalità
Sleep, dopo 5 secondi l'ora di spegnimento automatico inizia a lampeggiare per 5 secondi,
premere il tasto Sleep per modificare la durata da 90 min a 10 min. Premere il tasto Power
(9) per disattivare la funzione sleep.
Display di visualizzazione durata Sleep
ILLUMINAZIONE NOTTURNA
Premere il tasto (24) per accendere o spegnere l’ illuminazione notturna.
7. FUNZIONE TERMOMETRO
Nota:
Gamma di temperatura interna: da 0 a + 50°C.
RADIO
FUNZIONAMENTO DELLA RADIO
- Premere il tasto Power On/Off (9) per accendere la radio.
- Selezionare la banda AM o FM tramite la manopola wave band (gamma di lunghezza
d'onda) (15).
- Selezionare la stazione tramite la manopola di controllo della sintonia (16).
- Ruotare il controllo del volume (14) per regolare il volume.
- Premere il tasto On/Off (9) per spegnere la radio.
Nota:
- La banda AM utilizza un'antenna direzionale interna. Muovere la radio per ottenere la
migliore ricezione possibile.
- Assicurarsi che l'antenna FM (20) sia completamente estratta ed allungata per ottenere
la migliore ricezione FM possibile.
RESET
- Il tasto Reset (17) è posto sul retro dell'unità. Utilizzare una penna a sfera per premere
il tasto se si devono sostituire le batterie o se l'unità non funziona come dovrebbe.
Questa funzione permette di ripristinare le impostazioni predefinite, tutti dati memorizzati
andranno persi (impostazioni dell'orologio e dell'allarme).
ATTENZIONE
- Non posizionare sull'apparecchio fiamme libere, come ad esempio delle candele accese.
- L'unità non deve essere esposta alla luce diretta del sole, a temperature molto alte o molto
basse, all'umidità, alle vibrazioni, né deve essere posta in un ambiente polveroso.
37
38
M
D
sleep
fm MHz
Page 22

ItalianoItaliano
- Non utilizzare prodotti abrasivi, benzene, diluenti o altri solventi per pulire le superfici
dell'unità. Per pulire l'unità, utilizzare una soluzione detergente leggera, non abrasiva e
un panno morbido e pulito.
- Non cercare di inserire fili metallici, spilli o altri oggetti nelle aperture di ventilazione
dell'unità.
- Non porre l'unità vicino alla luce su una lampada da tavolo. La luce influenza la ricezione
del sensore ad infrarossi.
AVVERTENZE
NOTA : non collegare l'antenna FM ad un'antenna esterna.
Liquidi: l'apparecchio non deve entrare in contatto con liquidi o spruzzi. E' vietato appoggiarvi
sopra oggetti contenenti dei liquidi, come vasi.
Ventilazione: durante l'uso, la normale ventilazione dell'apparecchio non deve essere
ostacolata in alcun modo.
Per collegare o scollegare l'apparecchio si deve agire sulla spina principale; pertanto questa
deve risultare sempre ben accessibile.
dell'ora di spegnimento). Premere il tasto (9) per disattivare la funzione Sleep.
3. In modalità allarme attivata, utilizzare il sensore ad infrarossi per attivare la funzione
Snooze
- Posizionare la mano sul sensore (6) entro 1 secondo per spegnere
momentaneamente l'allarme per 9 minuti.
FUNZIONE AUDIO IN
Il suono è udibile automaticamente se un dispositivo audio esterno viene collegato
all’ingresso AUDIO IN.
SPECIFICHE TECNICHE
Bande di frequenza : AM 540 - 1611 kHz
FM 87.5 - 108 MHz
Uscita : 350 mW
Impedenza altoparlanti : 8 ohm
Batteria tampone : 3V (1 x CR3032 Batteria piatta al litio) (per orologio)
PAlimentazione: AC230V ~ 50 Hz, 5 Watt
Le caratteristiche ed il design sono soggetti a variazioni senza preavviso.
39
40
FUNZIONE SENSORE AD INFRAROSSI
2. Quando la radio è in modalità On (accesa), utilizzare il sensore ad infrarossi per
attivare la funzione Sleep.
- Posizionare una mano sul sensore (6) entro 2 secondi per attivare la funzione sleep,
la parola "Slp" viene visualizzata sul display LED. Impostare il tempo di spegnimento
automatico tra 10-90 minuti (riferirsi al paragrafo "funzione Sleep" per l'impostazione
dell'ora di spegnimento). Premere il tasto (9) per disattivare la funzione Sleep.
Posizionare una mano sul sensore (6) entro 2 secondi per attivare la funzione sleep, la
parola "Slp" viene visualizzata sul display LED. Impostare il tempo di spegnimento
automatico tra 10-90 minuti (riferirsi al paragrafo "funzione Sleep" per l'impostazione
Corretto smaltimento del prodotto - (rifiuti elettrici ed elettronici)
II marchio riportato sul prodotto e sulla sua documentazione indica che
il prodotto non deve essere smaltito can altri rifiuti domestici al termine
del ciclo di vita. Per evitare eventuali danni all'ambiente o alla salute
causati dall'inopportuno smaltimento dei rifiuti, si invita l'utente a
separare questo prodotto da altri tipi di rifiuti e di riciclarlo in maniera
responsabile per favorire il riutilizzo sostenibile delle risorse materiali.
Gli utenti domestici sono invitati a contattare il rivenditore presso il quale
e stato acquistato il prodotto a l'ufficio locale preposto per tutte le
informazioni relative alla raccolta differenziata e al riciclaggio per questo
tipo di prodotto.
Gli utenti aziendali sono invitati a contattare il proprio fornitore e verificare
i termini e le condizioni del contratto di acquisto. Questo prodotto non
deve essere smaltito unitamente ad altri rifiuti commerciali.
Page 23

EspañolEspañol
41 42
CLR-2619
RADIO DESPERTADOR AM/FM CON PANTALLA LED, CALENDARIO Y
VISUALIZACIÓN DE TEMPERATURA.
UBICACIÓN DE LOS CONTROLES
1. BOTÓN DE AJUSTE DE MODO
2. BOTÓN DE AJUSTE DE ALARMA
3. BOTÓN DE SELECCIÓN DE ALARMA 1 - ZUMBADOR/RADIO
4. BOTÓN DE SELECCIÓN DE ALARMA 2 - ZUMBADOR/RADIO
5. BOTÓN DE ºC/ºF
6. SENSOR INFRARROJO
7. BOTÓN DE AJUSTE <<
8. BOTÓN DE AJUSTE >>
9. BOTÓN DE ENCENDIDO/APAGADO (AP AGADO DE ALARMA)
10. BOTÓN DE REPETICIÓN DE ALARMA / APAGADO AUTOMÁTICO
11. VISOR DE LED
12. BOTÓN DE DE ATENUACIÓN
13. CLAVIJA DE ENTRADA DE AUDIO
14. CONTROL DEL VOLUMEN
15. BANDA DE ONDA
16. CONTROL DE LA SINTONIZACIÓN
17. BOTÓN DE REAJUSTE
18. SENSOR DE TEMPERATURA (INTERIORES)
19. CABLE DE ALIMENTACIÓN DE CA
20. CABLE DE ANTENA FM
21. BOTÓN DE ILUMINACION NOCTURNA
22. COMPARTIMIENTO DE LA PILA
23. ALTAVOZ
24. BOTÓN DE ILUMINACION NOCTURNA
ATENCIÓN
CAUTION
RISKOF ELECTRIC
SHOCK
DONOT OPEN
230v~
- +
- +
El símbolo de exclamación dentro un triángulo tiene el objeto de advertir
al usuario de la presencia de instrucciones importantes de
funcionamiento y mantenimiento en la documentación adjunta con el
equipo.
El símbolo del rayo con punta de flecha dentro de un triángulo adverte al
usuario de la presencia de tensiones peligrosas en el equipo.
Para reducir los riesgos de descargas eléctricas, no retire la cubierta. La
unidad no hay en su enterior componentes que pueda manipular el
usuario. Encargue su reparación a personal cualificado.
Esta unidad funciona con 230V ~ 50Hz. Cuando el equipo vaya a estar un
tiempo prolongado sin utilizarse, desenchufar el cable de alimentación.
La unidad no debería ser expuesta a lluvia o humedad.
No conecte la unidad hasta que no se hayan efectuado todas las otras
conexiones.
La unidad se debe instalar de forma que su posición no le impida tener
ventilación adecuada. Por ejemplo, el equipo no se debe colocar cerca
de cortinas o sobre el tapete, ni en una instalación como puede ser un
armario.
La unidad no debería ser expuesta a la luz solar directa ni a fuentes
emisora de calor.
Todas las pilas deben ser instaladas respectando la correcta polaridad.
No asociar pilas nuevas con pilas viejas o usadas.
Si no se usará el aparato por mucho tiempo (un mes o más), quitar las
ilasdel alojamiento para evitar daños provocados por eventuales pérdidas
de ácido.
Page 24

EspañolEspañol
43 44
ALIMENTACIÓN
Este aparato funciona con una fuente de alimentación de 230V-50Hz. Conectar el cable
alimentación CA a la toma de corriente CA doméstica. Asegurarse de que el voltaje sea igual
a aquel indicado en la placa de los datos característicos colocada en la parte posterior del
aparato.
Baterías de Reserva de Protección contra una Avería Eléctrica
La radio posee un circuito de baterías de reserva que mantiene el horario correcto y los
ajustes del despertador si se verifica una interrupción momentánea de la corriente eléctrica.
Instale 3 pilas planas de litio CR3032 de 3 voltios (no incluidas) en el compartimiento de la
pila situado en la parte inferior de la unidad, asegurándose de que los terminales positivo
y negativo (+ y -) de la pila coinciden con los correspondientes terminales en la placa del
compartimiento de la pila.
Nota: Si se interrumpe temporalmente la alimentación, la pantalla parpadeará y la radio
dejará de emitir. No obstante, la pila de respaldo mantendrá los ajustes del reloj y la alarma.
Cuando se restablezca la alimentación, el reloj mostrará la hora y los ajustes de alarma
correctos, por lo que no será necesario realizar ninguna corrección.
PRIMEROS PASOS
Pulse el botón de reajuste (17) situado en la parte trasera de la unidad tras enchufar el
cable de CA.
- La unidad presentará todos los segmentos durante 2 segundos, y a
continuación entrará en el modo normal.
- La pantalla se iluminará.
1. AJUSTE DE LA HORA Y DEL CALENDARIO
A. Ajuste de la hora y del calendario - Pulse el botón de ajuste de modo (1) en el modo
normal y manténgalo pulsado durante 2 segundos para entrar en el modo de ajuste
de la hora. Tras entrar en este modo de ajuste, pulse el botón de ajuste de modo (1)
para avanzar por el ciclo de modo en el siguiente orden:
Normal > Año > Mes > Día > 12/24H > Hora RC > Min RTC > Normal
Acción (durante el ajuste de datos):
- Pulse el botón >> (8) para ajustar los datos hacia delante
- Pulse el botón << (7) para ajustar los datos hacia atrás
- Mantenga pulsado el botón << o el >> durante 2 segundos para activar el avance o
retroceso automático
a. Modo de ajuste de año
Valor inicial: 2006
Intervalo de años : de 2000 a 2099
Pantalla en el Modo de ajuste de año
b. Modo de ajuste de mes
Pantalla en el Modo de ajuste de mes
c. Modo de ajuste de día
Pantalla en el Modo de ajuste de día
Observación: El día de la semana se recalculará cuando se ajuste el año, mes o día
d. Modo de ajuste de 12/24H
Pantalla en el Modo de ajuste de 12/24H (Selecc. 12H)
Pantalla en el Modo de ajuste de 12/24H (Selecc. 24H)
e. Modo de ajuste de hora RTC
Pantalla en el Modo de ajuste de hora RTC
f. Modo de ajuste de minutos RTC
Display showing Modo de ajuste de minutos RTC
Observación: Los segundos se reiniciarán cada vez que se ajusten los minutos
M
D
M
D
Page 25

EspañolEspañol
45
46
B. Ajuste de la Alarma 1 y la Alarma 2 - Pulse el botón de ajuste de la alarma (2) durante
el modo normal y manténgalo pulsado durante 2 segundos para entrar en el modo de
ajuste de la alarma. Tras entrar en este modo, pulse el botón de ajuste de la alarma (2)
para avanzar por el ciclo de modo de esta manera:
Normal > Hora AL1 > Min AL1 > Alarma fin de semana AL1 > Hora AL2 > Min AL2
Alarma fin de semana AL2 > Normal
Acción (durante el ajuste de datos):
- Pulse el botón << (7) para ajustar los datos hacia delante
- Pulse el botón >> (8) para ajustar los datos hacia atrás
- Mantenga pulsado el botón << o el >> durante 2 segundos para activar el avance o
retroceso automático
2. AJUSTE DE LA SALIDA Y DE LA ACTIVACIÓN/DESACTIVACIÓN DE LA ALARMA
A. Modificación de la salida de la alarma
Pulse el botón AL1 (3) / AL2 (4) y seleccione la posición 'Music' para despertarse con la radio,
'Buzzer' para despertarse con un zumbador o la posición 'Alarm Off' para desactivar la alarma.
B. Patrón del zumbador
Durante los primeros 8 segundos suena un pitido, en los siguientes 8 segundos suenan
2 pitidos, en los terceros 8 segundos suenan 4 pitidos, y en adelante el tono de pitido se
mantiene continuo. Este patrón se repite cada minuto.
Pantalla que muestra al Ajuste de la alarma 1 Hora
Pantalla que muestra al Ajuste de la alarma 1Minuto
Pantalla que muestra al Ajuste de la alarma 1 Alarma de fin de semana - Lun a Vie
Pantalla que muestra al Ajuste de la alarma 1 Alarma de fin de semana - Lun a Sáb
Pantalla que muestra al Ajuste de la alarma 2 Hora
Pantalla que muestra al Ajuste de la alarma 2Minuto
Pantalla que muestra al Ajuste de la alarma 2 Alarma de fin de semana - Lun a Vie
Pantalla que muestra al Ajuste de la alarma 2 Alarma de fin de semana - Lun a Sàb
Pantalla que muestra al Ajuste de la alarma 2 Alarma de fin de semana - Lun a Dom
Pantalla que muestra al Ajuste de la
alarma 1 - Despertar con Buzzer
Pantalla que muestra al Ajuste de la
alarma 1 - Despertar con Radio
Pantalla que muestra al Ajuste de la
alarma 2 - Despertar con Buzzer
Pantalla que muestra al Ajuste de la
alarma 2 - Despertar con Radio
1
1
1
1
1
1
1
1
2
2
2
2
1
1
2
2
2
2
1
1
2
2
Page 26

EspañolEspañol
47
48
3. DURACIÓN DE LA ALARMA Y FUNCIÓN DE REPETICIÓN DE ALARMA
Duración de la alarma - La alarma de zumbador o de radio seguirá sonando durante 30
minutos si no se pulsa ningún botón, y entonces se parará automáticamente y esperará al
siguiente día para sonar de nuevo.
Acción para la repetición de alarma:
- Durante la alarma, pulse el botón de REPETICIÓN DE ALARMA (10) para activar la
función de repetición de alarma. La alarma de zumbador o de radio se detendrá.
- El intervalo de la repetición de alarma es de 9 minutos (sin incluir el desfase de seg.)
- La repetición de alarma continuará a menos que se pulse el botón de encendido/
apagado (Apagado de alarma) (9) para apagar la alarma, o bien se detendrá
automáticamente la alarma de zumbador o de radio tras 30 minutos.
4. CAMBIO DEL CONTENIDO DE LA PANTALLA
Pulse el botón << (7) durante el funcionamiento normal para pasar a visualizar el año. Tras
5 segundos, la pantalla volverá a mostrar el día y el mes.
Pantalla que visualiza el año
5. CAMBIO DEL CONTENIDO DE LA PANTALLA
Pulse el botón >> (8) durante el funcionamiento normal para pasar a visualizar el mes y el
día. Tras 5 segundos, la pantalla volverá a mostrar la hora.
Pantalla que visualiza el mes y el día
6. FUNCIÓN DE APAGADO AUTOMÁTICO (SLEEP)
Durante el modo de radio, pulse el botón de repetición de alarma/apagado automático (10)
para activar el modo de apagado automático. El periodo de apagado automático parpadeará
durante 5 segundos; dentro de dicho intervalo pulse sucesivamente el botón de apagado
automático para cambiar la duración del mismo entre 90 y 10 minutos. Pulse el botón de
encendido (9) para cancelar la función de apagado automático.
Pantalla que visualiza la duración de
Sleep
ILUMINACION NOCTURNA
Pulse el botón de encendido/apagado (24) para encender la iluminacion nocturna.
7. FUNCIÓN DEL TERMÓMETRO
Observación:
Intervalo de temperatura para interiores: 0 a +50 °C o +32 a +122 °F.
RADIO
FUNCIONAMIENTO DE LA RADIO
- Pulse el botón de encendido/apagado (9) para encender la radio.
- Seleccione la banda AM o FM utilizando el interruptor de selección de banda de la onda (15).
- Seleccione la emisora utilizando el control de sintonización (16).
- Gire el control del volumen (14) para ajustar el volumen al nivel deseado.
- Pulse el botón de encendido/apagado (9) para apagar la radio.
Nota:
- La banda AM utiliza una antena direccional interna. Gire la radio para obtener la mejor
recepción posible.
- Asegúrese de que la antena FM de cable (20) está completamente desenrollada y
extendida para obtener la mejor recepción de FM posible.
REAJUSTE
- El botón de reajuste (17) está ubicado en la parte posterior de la unidad. Utilice un bolígrafo
para pulsarlo cuando cambie las pilas, o si la unidad no tiene el comportamiento esperado.
Esto devolverá todos los ajustes a sus valores predeterminados, y perderá todos los
datos almacenados (de la alarma y el reloj).
CUIDADO
- No deberá colocarse ninguna fuente de llama descubierta, como velas encendidas,
sobre el aparato.
- La unidad no deberá estar expuesta a la luz del sol directa, a temperaturas muy altas
o muy bajas, a la humedad, vibraciones o a un entorno con excesivo polvo.
- No utilice materiales abrasivos, benceno, diluyentes u otros disolventes para
limpiar las superficies de la unidad. Para ello, límpiela con una solución suave de un
detergente no abrasivo y un trapo suave y limpio.
M
D
sleep
sleep
Page 27

EspañolEspañol
49
50
- Nunca intente introducir cables o cualquier otro objeto punzante en las rendijas de
ventilación o aberturas de la unidad.
- No coloque la unidad cerca de la luz de una lámpara de mesa. La luz afectará a la
recepción del sensor infrarrojo.
ADVERTENCIAS
NOTA: No conecte la antena FM a una antena externa.
Aviso de salpicaduras: No exponga al aparato a salpicaduras o derrames, ni coloque
objetos llenos de agua (como jarrones) encima del mismo.
Aviso de ventilación: No debe impedirse la ventilación normal del producto durante el uso.
Aviso de desconexión del dispositivo : El enchufe principal constituye la conexión del
aparato, por lo que deberá permanecer siempre operativo.
FUNCIÓN DEL SENSOR INFRARROJO
2. Cuando la radio está en el modo activado, utilice el sensor infrarrojo para activar la
función de apagado automático.
- Coloque la mano sobre el sensor (6) durante 2 segundos para activar el apagado
automático; la indicación "Slp" aparecerá en el visor de LED. Puede modificar el periodo
de apagado automático de 10 a 90 minutos. (Consulte el ajuste del periodo de apagado
automático en la sección de la función "apagado automático"). Pulse el botón (9) para
cancelar la función de apagado automático.
3. En el modo de alarma, utilice el sensor infrarrojo para activar la función de repetición
de alarma
- Coloque la mano sobre el sensor (6) durante 1 segundo para repetir la alarma dentro
de 9 minutos.
FUNCIÓN AUDIO IN
El sonido se emitirá automaticamente si hay un dispositivo de audio exterior conectado
a la entrada AUDIO IN (13).
ESPECIFICACIONES TÉCNICAS
Gama de frecuencia : AM 540 - 1611 kHz
FM 87.5 - 108 MHz
Potencia de salida: 350 mW
Impedancia altavoz : 8 ohm
Pila mémoria : 9V (3 x 3V CR3032 Pila plana de litio (para el reloj)
Alimentación : AC230V ~ 50 Hz, 5 V atios
Especificaciones y diseño sujetos a posibles modificaciones sin previo aviso.
Eliminación correcta de este producto -
(material electrico y electrónico de descarte)
La presencia de esta marca en el producto o en el materiál informativo
que lo acompaña, indica que al finalizar su vida útil no deberá
eliminarse junto con otros residuos domésticos. Para evitar los
posibles daños al medio ambiente o a la salud humane que
representa la eliminación incontrolada de residuos, separe este
producto de otros tipos de residuos y reciclelo correctamente para
promover la reutilización sostenible de recursos materiales.
Los usuarios particulares pueden contactar con el establecimiento
donde adquirieron el producto, o con las autoridades locales
pertinentes, para informarse sobre cómo y dónde pueden lIevario para
que sea sometido a un reciclaje ecológico y seguro.
Los usuarios comerciales pueden contactar con su proveedor y
consultar las condiciones del contrato de compra. Este produco no
debe eliminarse mezclado con otros residuos comerciales.
Page 28

Português Português
51 52
CLR-2619
RÁDIO AM/FM COM RELÓGIO DESPERTADOR, VISOR LED,
CALENDÁRIO E INDICADOR DE TEMPERATURA.
LOCALIZAÇÃO DOS CONTROLOS
1. TECLA DE CONFIGURAÇÃO DE MODO
2. TECLA DE CONFIGURAÇÃO DO DESPERTADOR
3. TECLA DE SELECÇÃO DO DESPERTADOR 1 / RÁDIO
4. TECLA DE SELECÇÃO DO DESPERTADOR 2 / RÁDIO
5. TECLA C° / F°
6. SENSOR DE INFRAVERMELHOS
7. TECLA DE CONFIGURAÇÃO <<
8. TECLA DE CONFIGURAÇÃO >>
9. TECLA ON/OFF (ALARME OFF)
10. TECLA DORMIT AR / SONO
11. VISOR LED
12. REGULAÇÃO DE INTENSIDADE
13. TOMADA DE ENTRADA ÁUDIO
14. CONTROLO DE VOLUME
15. BANDA DE ONDA
16. CONTROLO DE SINTONIA
17. TECLA DE REPOSIÇÃO
18. SENSOR DE TEMPERATURA (INTERIOR)
19. CABO DE ALIMENT AÇÃO
20. ANTENA FM
21. ILUMINAÇÃO NOCTURNA
22. COMPARTIMENT O DAS PILHAS
23. ALTIFALANTE
24. TECLA ILUMINAÇÃO NOCTURNA
O ponto de exclamação dentro de um triângulo avisa o utilizador que no livrete de
instruções há importantes informações para a utilização e a manutenção.
O símbolo com o raio dentro de um triângulo avisa o utilizador que há tensão
perigosa no interior do aparelho.
Para reduzir o risco de choque eléctrico, não abra o aparelho. O aparelho não
contém peças que podem ser reparadas pelo utilizador. Em caso de defeitos, para
a reparação, contacte um técnico qualificado.
Este aparelho utiliza um ráio laser. Por causa de perigo de danos a vist a,somente
pessoas qualificadas podem abrí-lo para tentar consertá-lo.
Radiações laser invisíveis podem sair se a aparelhagem for aberta ou se estragarse o dispositivo de segurança. Evite a exposição directa aos raios laser. A utilização
de comandos, regulações ou procedimentos não especificados neste manual
pode causar perigosas exposições a radiações laser.
Este aparelho foi projectado para funcionar com 230 V . ~ 50 Hz. Se o aparelho não
for utilizado durante muito tempo, tire a ficha eléctrica da tomada de corrente.
Não exponha o aparelho à chuva nem à humidade.
Utilize o aparelho somente depois de ter verificado que todas as conexões foram
correctamente ligadas.
Coloque o aparelho num local suficientemente ventilado. Evite colocá-lo perto de
cortinas, em cima de alcatifas ou dentro de quaisquer móveis como por exemplo
uma estante.
Não exponha o aparelho directamente à luz do sol nem a fontes de calor.
Certifique-se que as pilhas foram colocadas respeitando as polaridades certas.
Não coloque pilhas velhas junto com pilhas novas.
Se o aparelho não for utilizado durante muito tempo (um mês ou mais), tire todas
as pilhas de dentro para evitar possíveis vazamentos de ácido.
CAUTION
RISKOF ELECTRIC
SHOCK
DONOT OPEN
ATENÇÃO
LASER PRODUCT
CLASS 1
230v~
- +
- +
Page 29

Português Português
53 54
LIGAÇÃO À FONTE DE ALIMENT AÇÃO
Este aparelho foi projectado para funcionar somente com uma fonte de alimentação de
Corrente Alternada de 230 V. 50 Hz. A ligação a qualquer outro tipo de alimentação poderá
danificar o aparelho.
BATERIA DE RESERV A PROTETORA
Este rádio possui uma bateria de reserva, com um circuito que mantem a hora e o alarme
em uma interrupção temporária.
Instale 1baterias de lítio de 3V CR3032, não incluídas, no compartimento das baterias situado
no fundo do aparelho, assegurando-se que os terminais positivo e negativo (+ e -) das baterias
são ligados aos terminais correspondentes na placa do compartimento das baterias.
Observação: Se a alimentação for temporariamente interrompida, o visor pisca e o rádio
deixa de tocar. No entanto, o circuito de recurso das baterias mantém as configurações do
relógio e despertador. Quando a alimentação é restaurada, o relógio apresenta a hora certa
e as configurações do despertador, não sendo necessária nenhuma regulação.
PARA COMEÇAR
Prima a tecla Reset (17) situada na parte traseira do aparelho depois de ligar o cabo
de alimentação.
- O aparelho apresentará o segmento completo por 2 segundos, depois entra no
modo normal.
- O Visor acende-se.
1. CONFIGURAÇÃO DA HORA E DATA
A. Acerto da Hora e Data – Prima a tecla Mode Set (1) no modo normal e mantenha premida
por mais de 2 segundos para entrar no modo Time Set (acerto da hora). Depois de entrar
no modo de configuração, prima a tecla Mode Set (1) para mudar no ciclo de modo como
segue:
Normal > Ano > Mês > Dia > 12/24H > RTC Hora > RTC Min. > Normal
Acção (durante o acerto) :
- Prima a tecla > (8) para fazer avançar
- Prima a tecla << (7) para fazer recuar
- Mantenha premida a tecla << ou >> por 2 segundos apara activar o avanço ou recuo
automático
a. Modo de acerto do ano
Valor inicial: 2006
Intervalo possível: 2000 a 2099
Visor a mostrar o Modo de acerto do ano
b. Modo de acerto do mês
Visor a mostrar o Modo de acerto do mês
c. Modo de acerto do dia
Visor a mostrar o Modo de acerto do dia
Observação: O dia da semana será recalculado depois de ter sido acertado o ano, o mês
e o dia.
d. Modo de configuração 12/24H
Visor Modo de configuração 12/24H (Selec. 12H)
Visor Modo de configuração 12/24H (Selec. 24H)
e. Modo de acerto da hora RTC
Visor a mostrar o Modo de acerto da hora RTC
f. Modo de acerto do minuto RTC
Visor a mostrar o Modo de acerto do minuto RTC
Observação: O segundo será reacertado para cada acerto de minuto.
M
D
M
D
Page 30

Português Português
56
B. Configuração do Despertador 1 e Despertador 2 - Prima a tecla de configuração Alarm
(2) durante o modo normal e mantenha premida por mais de 2 segundos para entrar no
modo de configuração do despertador; depois de entrar no modo de configuração, prima
a tecla Alarm (2) para mudar o modo segundo o ciclo seguinte:
Normal > AL1 Hora > AL1 Min > AL1 fim-de-semana > AL2 Hora > AL2 Min >
AL2 fim-de-semana > Normal
Acção (durante o acerto) :
- Prima a tecla << (7) para fazer avançar
- Prima a tecla > (8) para fazer recuar
- Mantenha premida a tecla << ou >> por 2 segundos apara activar o avanço ou recuo
automático
2. CONFIGURAÇÃO DA SAÍDA DE DESPERTADOR E DESPERTADOR ON/OFF
A. Alterar a saída de despertador
Desloque a tecla AL1 (3) / AL2 (4) para a posição Music a fim de seleccionar despertar por
Rádio, para a posição Buzzer para seleccionar despertar por campainha, e para a posição
Alarm Off para desactivar o despertador.
B. Padrão da campainha
1ºs 8 segundos emite 1 sonido, nos 2ºs emite 2 sonidos, nos 3ºs 8 segundos, emite 4
sonidos, depois disso mantém o tom, repetindo o mesmo padrão no próximo minuto.
Visor a mostrar a configuração do
Despertador 1 (Alarm 1) - Hora
Visor a mostrar a configuração do
Despertador 1 (Alarm 1) - Minuto
Visor a mostrar o Despertador 1
de fim-de-semana - Seg a Sex
Visor a mostrar o Despertador 1
de fim-de-semana - Seg a Sab
Visor a mostrar a configuração do
Despertador 2 (Alarm 2) - Hora
Visor a mostrar a configuração do
Despertador 2 (Alarm 2) - Minuto
Visor a mostrar o Despertador 2
de fim-de-semana - Seg a Sex
Visor a mostrar o Despertador 2
de fim-de-semana - Seg a Sab
Visor a mostrar o Despertador 2
de fim-de-semana - Seg a Dom
Visor a mostrar o Despertador 1
Despertar com Buzzer
Visor a mostrar o Despertador 1
Despertar com Radio
Visor a mostrar o Despertador 2
Despertar com Buzzer
Visor a mostrar o Despertador 2
Despertar com Radio
55
1
1
1
1
1
1
1
1
2
2
2
2
2
2
2
2
2
2
1
1
2
2
Page 31

Português Português
3. DURAÇÃO DO DESPERTAR E FUNÇÃO DORMITAR (SLEEP)
Duração do despertar - A campainha ou o Rádio continuam a emitir por 30 minutos se não
premida nenhuma tecla, depois pára automaticamente e aguarda pela mesma hora de
despertar no dia seguinte.
Activação da função Dormitar:
- Durante o despertar, prima a tecla SNOOZE (10) para activar a função dormitar,
interrompendo a campainha ou o Rádio.
- O período de dormitar é de 9 minutos (não incluindo o segundo deslocamento)
- O período de dormitar continua a menos que seja deslocada a tecla Power On/Off
(Alarm Off) (9) para Alarm Off ou a Campainha ou o rádio param automaticamente ao
fim de 30 minutos.
4. ALTERAÇÃO DO CONTEÚDO DO VISOR
Prima a tecla << (7) durante o funcionamento normal para apresentar o Ano, após um
retardo de 5 segundos e voltar a apresentar o dia e o mês.
Visor a mostrar o Ano
5. ALTERAÇÃO DO CONTEÚDO DO VISOR
Prima a tecla << (8) durante o funcionamento normal para apresentar o Mês, após um
retardo de 5 segundos e voltar a apresentar a hora.
Visor a mostrar o dia e o mês
6. FUNÇÃO DE SONO
Durante o modo Radio On, prima a tecla Snooze/Sleep (10) para activar o modo Sleep
(sono), a respectiva hora piscará durante 5 segundos, e nesse período pode premir a tecla
Sleep para alterar a duração de 90 min - 10 min. Prima a tecla Power (9) para cancelar a
função sono.
Visor a mostrar a duração de Sleep
FUNÇÃO ILUMINACAO NOCTURNA
Prima a tecla Power On/Off (24) para ligar o iluminacao nocturna.
7. FUNÇÃO DE TERMÓMETRO
Observação: O intervalo de temperaturas para interior é: 0 a + 50°C .
RÁDIO
FUNCIONAMENTO DO RÁDIO
- Prima a tecla Power On/Off (9) para ligar o rádio.
- Seleccione a banda AM ou FM utilizando o comutador de banda de frequência (15).
- Escolha a Estação usando o controlo de sintonia (16).
- Rode o controlo de volume (14) para regular o volume.
- Prima a tecla Power On/Off (9) para desligar o rádio.
Nota:
- A banda AM usa uma antena direccional interna. Rode o rádio para obter melhor
recepção.
- Verifique que a antena de FM (20) está completamente desenrolada e esticada para
melhor recepção FM.
RESET (reposição)
- O botão de Reset (reposição) (17) está situado na parte traseira do aparelho. Utilize uma
esferográfica para o premir sempre que substitua as baterias, ou se o aparelho não
funcionar convenientemente.
Esta acção reporá todas as configurações pré-definidas, e perderá quaisquer dados
gravados (configurações de despertador e relógio).
CUIDADO
- O aparelho não deve ser exposto a chamas nuas, como sejam velas.
- O aparelho não deve ser expostos à luz solar directa, a temperaturas muito altas ou muito
baixas, a humidade, vibrações, ou colocado num ambiente poeirento.
57 58
M
D
sleep
fm MHz
Page 32

Português Português
- Não utilize abrasivos, benzeno, diluente ou outros solventes para limpar as superfícies
do aparelho. Para limpar, use uma solução detergente suave e não abrasiva e um pano
limpo e macio.
- Nunca tente inserir fios, alfinetes ou outros objectos nas aberturas de ventilação do
aparelho.
- Não coloque o aparelho perto da lâmpada do candeeiro de secretária. A luz afectará a
recepção do sensor de infravermelhos.
ADVERTÊNCIAS
NOTA: Não ligue a antena de FM a uma antena externa.
Cuidado com os pingos: O aparelho não deve ser exposto a pingos ou salpicos e não deve
ser colocado sobre o aparelho qualquer objecto com líquido, como sejam vasos.
Ventilação: Não deve ser impedida a ventilação normal do aparelho.
Alimentação principal: A ficha de ligação à corrente é a alimentação principal, pelo que estar
sempre ligada.
SENSOR DE INFRAVERMELHOS
2. Quando o rádio está ligado, uso o sensor de infravermelhos pata activar a função
Sleep (sono).
Pressione o topo do sensor (6) por 2 segundos para activar a função Sleep,
aparecendo no LED a sigla "Slp". Tempo de Sono de 10-90 minutos. (Consulte o
parágrafo "Função Sleep" para regulação das horas). Prima (9) para cancelar a função
Sleep.
59
60
3. No modo de Despertador, use o sensor de infravermelhos pata activar a função
Snooze (dormitar)
- Pressione o topo do sensor (6) por 1 segundo para Dormitar por 9 minutos.
FUNÇÃO AUDIO IN
O som sairá automaticamente se um dispositivo auditivo externo é ligado no ingreso
AUDIO IN.
ESPECIFICAÇÕES
Gama de frequência : AM 540 - 1611 kHz
FM 87.5 - 108 MHz
Potência de saída : 350 mW
Speaker Impedance : 8 ohm
Battery Backup : 3V (1 x 3V CR3032 Bateria plana de lítio (para o relógio))
Power Source : AC230V ~ 50 Hz, 5 Watts
As especificacões e o desenho podem ser alterados sem pré-aviso.
Correct Disposal of This Product
(Waste Electrical & Electronic Equipment)
This marking shown on the product or its literature, indicates that it
should not be disposed with other household wastes at the end of its
working life. To prevent possible harm to the environment or human
health from uncontrolled waste disposal, please separate this from
other types of wastes and recycle it responsibly to promote the
sustainable reuse of material resources.
Household users should contact either the retailer where they
purchased this product, or their local government office, for details of
where and how they can take this item for environmentally safe recycling.
Business users should contact their supplier and check the terms and
conditions of the purchase contract. This product should not be mixed
with other commercial wastes for disposal.
 Loading...