

Page 1
VRFM9 MP3/WMA Player & FM
Transmitter with USB Port, SD
Card Slot, and Auxiliary Input
Dear Customer,
CONGRATULATIONS. The VRFM9 MP3/WMA Player & FM Transmitter with USB Port,
SD Card Slot, and Auxiliary Input, when used as described, will give you years of dependable service in your car, truck, RV, or mini-van. We have taken numerous measures
in quality control to ensure that your product arrives in top condition, and will perform to
your satisfaction. In the rare event that your VRFM9 MP3/WMA Player & FM Transmitter
with USB Port, SD Card Slot, and Auxiliary Input contains a damaged or missing item,
does not perform as specified, requires warranty service, or you have an installation
problem, DO NOT RETURN THIS PRODUCT TO THE STORE. PLEASE CALL OUR
TOLL FREE NUMBER FROM THE U.S.A. AND CANADA 1-800-445-1797 and ask to
speak with a member of our technical service team, or submit your questions by e-mail
to customerservice@vr-3.com and a member of our technical service team will respond
by e-mail to your questions. Our in-house technical service team will expedite delivery
of your part, advise you on installation, or help troubleshoot a problem with you. If your
product needs warranty service, our technical service team representative will help you
obtain the fastest remedy possible under the warranty.
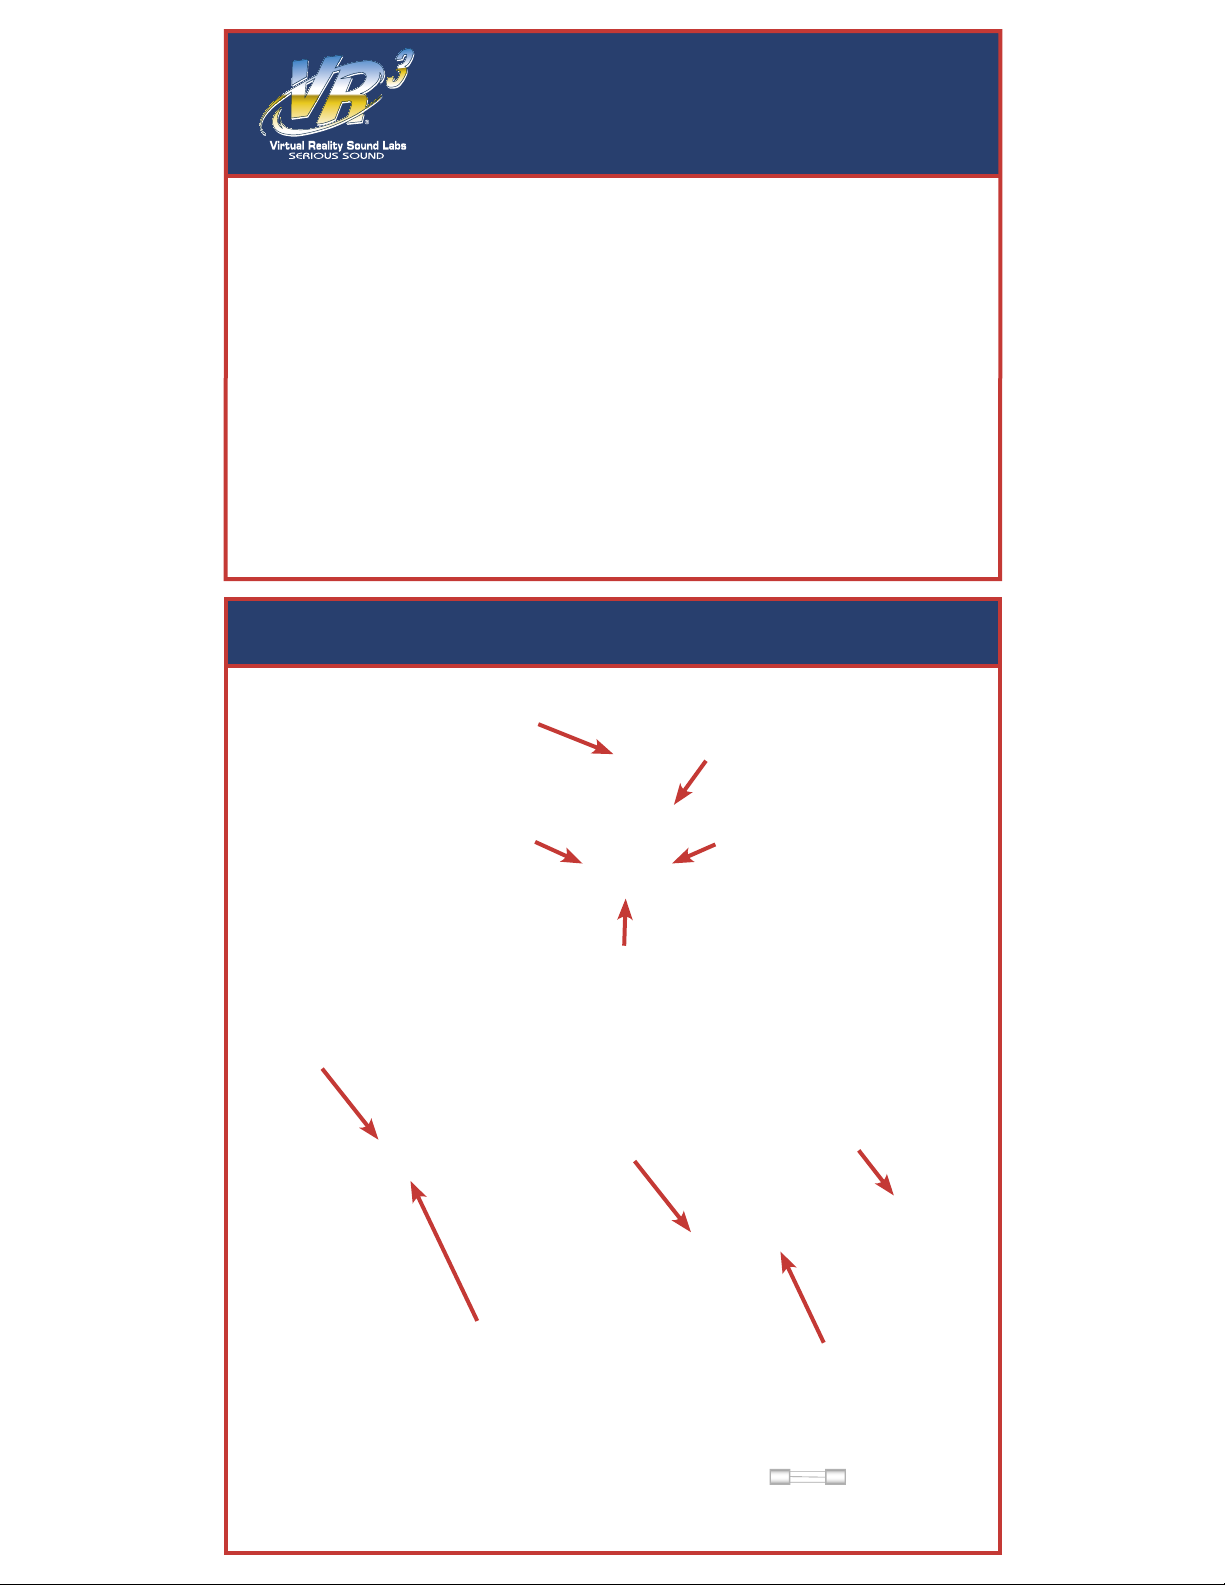
Features & Functions
Channel Button
Press the channel button to change
the broadcast frequency, The VRFM9
remembers the last broadcast fre
quency.
Previous Track & Volume Decrease
(USB Flash Memory & SD Card)
Press this button once to return to
the previous file. Press and hold to
decrease the volume.
SD Memory Card Slot
-
Play/Pause/Shuffle
(USB Flash Memory & SD Card)
Press this button once to start playing an MP3/WMA file.
Press it again to pause. Press and hold to enter shuffle
mode. In shuffle mode, files will be played at random. The
mode icon will have an “S” instead of an “A”.
Input Jack
This set complies as of date of manufacture with
FCC rules and regulations Part 15, Subpart C
Liquid Crystal Display
Next Track & Volume Increase
(USB Flash Memory & SD Card)
Press this button once to advance
to the next file. Press and hold to increase the volume.
12 Volt Adaptor End
USB Port
Supplied Cable
Six Position Flexible Joint
Extra .5 Amp
Fuse
Page 2

Before You Start
The VRFM9 plays only MP3 and WMA files that are not protected with Digital RIghts Management. Internet music vendors sell digital audio files in MP3, WMA, and AAC format,
that are protected by Digital Rights Management. Digital Rights Management is used to
prevent unauthorized copying of digital material. For specific information about your digital music files and Digital Rights Management please contact the vendor from whom you
purchased your digital audio files.
For converting your music CDs to MP3 and/or WMA you will need to use conversion
software of some type. Several websites contain software for users of PCs and MACs to
convert various audio files to MP3/WMA compatible files. The websites listed below are
provided for informational purposes only and the inclusion herein shall not be considered
as an endorsement or recommendation by Virtual Reality Sound Labs of these entities,
products or service to which they link. Similarly, omissions of other websites offering similar products or services are not intended to indicate non-endorsement or disapproval of
such sites.
www.nonags.com, www.tucows.com, www.cnet.com, www.superfiles.com,
www.jumbo.com, www.freewarehome.com, www.panic.com, www.freewareweb.com
Virtual Reality Sound Labs® is not responsible for the content and usefulness of the
information found on the above-listed websites and you hereby waive any claims against
Virtual Reality Sound Labs® regarding the quality, suitability for any particular purpose,
merchantability or the legality of any such websites, products or services.
Getting Started
Copying Files
SD Memory Card/USB Memory
Windows XP
1. Insert your SD card into an internal
or external memory card reader or insert
your USB memory into your computers
USB port.
2. Open “My Computer” and find the
icon for it, it will be listed as a removable drive.
3. Right click on the removable drive
icon and choose fromat from the drop
down menu.(Fig. 1)
4. Choose FAT32 or FAT file system and
press the start button. ALL FILES ON
THE SD CARD/USB MEMORY WILL BE
ERASED!
5. Copy your non-DRM MP3 or WMA
files to a SD Card/USB Memory from
your computer.
Macintosh
1. Open Disk Utility, located in Applications/Utilities, and select the disk you
want to format.
2. Click Erase and choose MS-DOS File
System from the Volume Format pop-up
menu.
3. Type a name for the disk.
4. Click Erase, then click Erase again.
5. Copy your non-DRM MP3 or WMA
files to a SD Card/USB Memory from
your computer.
Be sure to back-up all the information on the
SD Card/USB Memory before you format it.
Fig. 1
Fig. 2
Page 3

Operation
No Media
LINE IN
107.9
Set Up
1.
Insert the 12 Volt adaptor end of the VRFM9 into
your vehicle’s cigarette lighter receptacle or power
port. You will see the screen as shown in Fig. 3
2. Tune your FM radio to one of the following
pre-set FM frequencies used by the VRFM9.
87.7, 87.9, 88.1, 88.3, 88.5, 88.7, 88.9, 89.1,
106.7, 106.9, 107.1, 107.3, 107.5, 107.7, 107.9
Make sure the pre-set FM frequency you choose
is not being used by any local radio stations.
3. Use the Channel Button to set the VRFM9’s broadcast frequency to match the
frequency you have set on your radio.
Pre-set Broadcast Frequency
Fig. 3
SD Memory Card
1. Follow the instructions in the “Set
Up” section of this manual.
2. Insert the SD Memory card into
the SD card slot of the VRFM9.
3. The LCD will display the screen
shown in Fig. 4. Press the button
once to start playing an MP3/WMA
file. Press again to pause. Press and
hold to enter shuffle mode. In shuffle
mode, files will be played at random.
The mode icon will have an “S” instead of an “A”.
SD Card
Elapsed Time
SD Card icon
Broadcast Frequency
Mode Icon
4. Press the button once to advance to the next file. Press and
hold the button to increase the
volume.
5. Press the button once to go to
the previous file. Press and hold the
button to decrease the volume.
USB Flash Memory
1. Follow the instructions in the “Set
Up” section of this manual.
2. Insert the USB Memory into the USB
port of the VRFM9.
3. The LCD will display the screen shown
in Fig. 5. Press the button once to
start playing an MP3/WMA file. Press
again to pause. Press and hold to enter
shuffle mode. In shuffle mode, files will
be played at random. The mode icon
will have an “S” instead of an “A”.
4. Press the button once to advance
to the next file. Press and hold the
button to increase the volume.
USB icon
Elapsed Time
Mode Icon
Fig. 4
Broadcast Frequency
5. Press the button once to go to the
previous file. Press and hold the
button to decrease the volume.
Fig. 5
Page 4

Operation
Using The Input Jack
1. Follow the instructions in the “Set Up”
section of this manual, then insert the
2.5mm plug of the supplied cable into the
jack on the side of the VRFM9.
2. Insert the 3.5mm end of the supplied
cable into the headphone jack of the device you want to broadcast to your FM
radio.
3. Turn on the device you have connected
to the VRFM9, then set the volume to your
normal listening range.
4. Next adjust the volume of the radio to
the desired level.
Do Not Return This Product to the Store,
Give Us a Call, We’ll Help You Install!
For Customer Service go to
www.vr-3.com
or
1-800-445-1797
Limited Warranty
VIRTUAL REALITY SOUND LABS® products are designed and manufactured to provide a high level of trouble-free
performance. VIRTUAL REALITY SOUND LABS® warrants, to the original purchaser, that its products are free from
defects in material and workmanship for 30 days from the date of original purchase, as part of our commitment
to product excellence. VIRTUAL REALITY SOUND LABS® and/or its affiliates routinely improves the designs,
materials or production methods of its existing products. Because it is impractical to publicize all changes in every
product, we reserve the right to make such changes without notice.
CONDITIONS OF WARRANTY:
If during the 30 day warranty period your new product is found to be defective, VIRTUAL REALITY SOUND LABS®
will repair such defect, or replace the product, without charge for parts or labor subject to the following conditions:
1.
All repairs must be performed by VIRTUAL REALITY SOUND LABS® and/or its affiliates in Eatontown, New Jersey.
2.
The equipment must not have been altered or been damaged through negligence, accident, or improper operation.
3.
The replacement of parts are exempted from this warranty when replacement is necessary due to normal wear and tear.
4. All warranty claims must be accompanied by a copy of the sales receipt or bill of sale.
5. Repair or replacement parts supplied by VIRTUAL REALITY SOUND LABS® under this warranty are protected
only for the unexpired portion of the original warranty.
6. In the case of car stereos, this warranty does not extend to the elimination of car static or motor noise; correction
of antenna problems; costs incurred for the removal or reinstallation of the product; damage to tapes, speakers,
accessories or car electrical systems.
7. VIRTUAL REALITY SOUND LABS® will not be responsible for any charge incurred for installation.
OWNER’S RESPONSIBILITIES:
VIRTUAL REALITY SOUND LABS® will make every effort to provide warranty service within a reasonable period of time.
SHOULD YOU HAVE ANY QUESTIONS ABOUT SERVICE RECEIVED, OR IF YOU WOULD LIKE ASSISTANCE IN
OBTAINING SERVICE, PLEASE CALL TOLL FREE 1-800-445-1797, 8:30am - 4:30pm EST.
In order to provide you with the proper warranty service, we request that you adhere to the following procedure:
1. Include a copy of your sales receipt or bill of sale with your unit when it is returned for warranty service.
2. If it is necessary to return your product for service, please return it securely packed, preferably in the original shipping carton, and freight and insurance prepaid to the following address: VIRTUAL REALITY SOUND LABS, Service
Department, 41 James Way, Eatontown, New Jersey 07724.
3. Please include a detailed explanation of the problem you are having.
4. If your product is found by VIRTUAL REALITY SOUND LABS® to have a defect in material or workmanship, within
the warranty period, it will be repaired or replaced at no charge and returned to you prepaid. Where permitted by
Iaw VIRTUAL REALITY SOUND LABS® liability shall be limited to that set forth in this warranty. This warranty shall
be the exclusive remedy of the purchaser.
VIRTUAL REALITY SOUND LABS® makes no other warranty of any kind, expressed or implied; and all implied warranties, are hereby disclaimed by VIRTUAL REALITY SOUND LABS® and excluded from this warranty, VIRTUAL
REALITY SOUND LABS® and/or its affiliates, the manufacturer, distributor and seller shall not be liable for any
injury, loss or damage, incidental or consequential, arising out of the use or intended use of the product.
©2006 Virtual Reality Sound Labs® All designs, logos and images are the exclusive property of Virtual Reality Sound
Labs® and/or its affiliates. All rights reserved. 011306 Printed in China 00000
 Loading...