

RME Audio HDSP RPM Instruction Manual

™
®
User’s Guide
Hammerfall® DSP System
24 Bit / 96 kHz üü
SyncAlign
Mobile Turntable / CD / MIC / MIDI Interface
RPM
TotalMix
ZLM®
PCI Busmaster Digital I/O System
PCI and CardBus Interface
24 Bit / 96 kHz

Contents
1 Introduction............................................................ 4
2 Package Contents.................................................. 4
3 System Requirements ............................................ 4
4 Brief Description and Characteristics................... 5
5 Technical Specifications
5.1 Digital.................................................................... 5
5.2 Analog................................................................... 5
5.3 MIDI...................................................................... 6
5.4 Power Supply........................................................ 6
6 Hardware Installation
6.1 PCI Interface......................................................... 7
6.2 CardBus Card ....................................................... 7
7 Driver Installation
7.1 Windows 2000/XP................................................. 8
7.2 Driver Update ........................................................ 8
7.3 Flash Update ......................................................... 9
7.4 Deinstalling the Drivers ......................................... 9
7.5 Linux/Unix............................................................. 9
8 Operation and Usage
8.1 Connections .........................................................10
8.2 Playback ..............................................................11
8.3 Multi-Client Operation...........................................12
8.4 DVD-Playback under MME...................................12
8.5 Low Latency under MME......................................13
8.6 Recording.............................................................14
8.7 Analog Inputs .......................................................15
8.8 Analog Outputs.....................................................16
9 Configuring the RPM ............................................17
10 Disconnect Mode ..................................................18
11 Bypass Mode.........................................................18
11 Using more than one Hammerfall DSP ................19
13 Operation under ASIO 2.0.....................................19
14 Operation under GSIF ...........................................20
15 TotalMix: Routing and Monitoring.......................21
15.1 Elements of the Surface.....................................22
15.2 Tour de TotalMix ................................................23
15.3 Submix View ......................................................24
15.4 Mute and Solo....................................................24
15.5 Hotkeys..............................................................24
15.6 Quick Access Panel............................................25
15.7 Presets...............................................................26
15.8 Monitor...............................................................27
15.9 Menu Options.....................................................27
15.10 Level Meter ......................................................28
16 The Matrix
16.1 Elements of the Surface.....................................29
16.2 Usage.................................................................29
16.3 Advantages of the Matrix....................................30
User’s Guide HDSP System RPM © RME
2

17 TotalMix Super-Features
17.1 ASIO Direct Monitoring...................................... 30
17.2 Selection and Group-based Operation............... 31
17.3 Copy Routings to other Channels ...................... 31
17.4 Delete Routings ................................................. 31
18 Notes on Laptops and CardBus.......................... 32
19 Hotline - Troubleshooting
19.1 General............................................................. 33
19.2 Installation......................................................... 33
20 HDSP Software
20.1 DIGICheck ........................................................ 34
20.2 HDSP Meter Bridge........................................... 34
21 Accessories.......................................................... 35
22 TECH INFO ........................................................... 36
23 Warranty ............................................................... 37
24 Appendix............................................................... 37
25 Block Diagram RPM ............................................. 38
26 CE / FCC Compliance........................................... 39
User’s Guide HDSP System RPM © RME
3

1. Introduction
Thank you for choosing the RPM. This unique audio system is the perfect tool for DJs, home
recording and professional entertainers. It connects microphone, turntable, CD player and other
analog sources directly to a computer. Installation is simple, even for the inexperienced user,
thanks to the latest Plug and Play technology and full interrupt-sharing. The numerous unique
features and well thought-out configuration dialog puts the Hammerfall DSP at the very top of
the range of digital audio interface cards.
The package includes drivers for Windows 2000/XP and Mac OS X. An ALSA driver for Linux
will soon be available (see chapter 7.5).
Our high-performance philosophy guarantees maximum system performance by executing all
functions directly in hardware and not in the driver (i.e. the CPU).
2. Package Contents
Please check that your Hammerfall DSP System's package contains each of the following:
PCI Interface:
• PCI card HDSP
• Quick Info guide
• RME Driver CD
• Cable IEEE1394, 4.5 m (15 ft)
• Internal cable (3 pin)
CardBus Interface:
• CardBus card
• Quick Info guide
• RME Driver CD
• Cable CardBus to IEEE1394, 4.5 m (15 ft)
• 12 V car cable
• Battery cable
• Power supply 12 V / 1.25 A and power cord
RPM:
• I/O-box RPM
• Quick Info guide
• RME Driver CD
3. System Requirements
• Windows 2000/XP, Mac OS 10.2.8 or up
• PCI Interface: a free PCI rev. 2.1 Busmaster slot
• CardBus Interface: a free PCMCIA Slot type II, CardBus-compatible
Note: Examples and detailed descriptions of suitable audio desktop systems can be found in
the Tech Info RME Reference PCs: Hardware recommendations. Information on compatibility
and performance of notebooks/laptops is included in RMEs Tech Infos about notebooks, HDSP
System – Notebook Basics and Tests.
User’s Guide HDSP System RPM © RME
4

4. Brief Description and Characteristics
• 2 high quality phono inputs with RIAA compensation
• 1 microphone input with Class-A frontend
• Level adjustment in hardware ensures highest dynamic ratio
• All settings can be changed in real-time
• 8 available buffer sizes/latencies: 1.5 / 3 / 6 / 12 / 23 / 46 / 93 / 186 ms
• Zero Latency Monitoring: Hardware bypass per track, controlled by Punch in/out
• Enhanced ZLM for latency-free submixes and perfect ASIO Direct Monitoring
• SyncAlign guarantees sample aligned and never swapping channels
• 1 x MIDI I/O, 16 channels high-speed MIDI
• 1 x Analog Line/headphone output, separate output for independent submix
• DIGICheck DSP: Level meter in hardware, peak- and RMS calculation
• TotalMix: 102 channel mixer with 40 bit internal resolution
5. Technical Specifications
5.1 Digital
• Internal sample rates: 32 / 44.1 / 48 / 88.2 / 96 kHz
• Internal resolution: 24 Bit
5.2 Analog
AD Phono Input
• Resolution AD: 24 Bit
• Frequency response (RIAA), ± 1 dB: 40 Hz - 20 kHz
• Maximum input level (0 dBFS), 1 kHz: -23 dBu, 54 mV
• Signal to Noise Ratio (SNR): 87 dB RMS unweighted, 96 dBA
• THD: < -93 dB, < 0.002 %
• THD+N: < -83 dB, < 0.007 %
• Channel separation @ 1 kHz: > 100 dB
• Input impedance: 30 kOhm
• Input capacity: 220 pF
AD Line Input
• Resolution AD: 24 Bit
• Frequency response AD @ 44.1 kHz, -0.5 dB: 5 Hz - 20.7 kHz
• Frequency response AD @ 96 kHz, -0.5 dB: 5 Hz - 32 kHz
• Signal to Noise ratio: 10 dB RMS unweighted, 106 dBA
• THD: < -100 dB, < 0.001 %
• THD+N: < -93 dB, < 0.002 %
• Channel separation @ 1 kHz: > 100 dB
• Input: RCA, unbalanced
• Input impedance @ Line 0 dB: 30 kOhm
• Input impedance @ Line -6 dB: 2 kOhm
• Input level for 0 dBFS @ Line 0 dB: +2.5 dBu, 1 V RMS
• Input level for 0 dBFS @ Line –6 dB: +8.5 dBu, 2 V RMS
User’s Guide HDSP System RPM © RME
5

AD Mic Input
• Resolution AD: 24 Bit
• Frequency response AD @ 44.1 kHz, -0.5 dB: 5 Hz – 20.7 kHz
• Frequency response AD @ 96 kHz, -0.5 dB: 5 Hz - 32 kHz
• Signal to Noise ratio (SNR): 100 dB RMS unweighted, 106 dBA
• THD: < -100 dB, < 0.001 %
• THD+N: < -93 dB, < 0.002 %
• Input: 6.3 mm TRS (stereo) / XLR combo jack, servo-balanced
• Input impedance: 2 kOhm
DA
• Resolution DA: 24 Bit
• Signal to Noise ratio: 108 dB RMS unweighted, 111 dBA (unmuted)
• Frequency response DA @ 44.1 kHz, -0.5 dB: 5 Hz – 20.9 kHz
• Frequency response DA @ 96 kHz, -0.5 dB: 5 Hz - 35 kHz
• THD: < - 98 dB, < 0.0013 %
• THD+N: < -91 dB, < 0.002 %
• Channel separation: > 100 dB
• Maximum output level RCA unbalanced: +8 dBu, 2 V RMS
• Maximum output level TRS balanced: +14 dBu, 4 V RMS
• Output impedance: 220 Ohm
Phones
• Resolution DA: 24 Bit
• Frequency response DA, -0.1 dB: 20 Hz - 20.8 kHz (sf 44,1 kHz)
• Frequency response DA, -0.5 dB: 10 Hz - 44 kHz (sf 96 kHz)
• Signal to Noise Ratio (SNR): 108 dB (RMS unweighted, unmuted), 111 dBA
• THD: < - 98 dB, < 0.0013 %
• THD+N: < -91 dB, < 0.002 %
• Channel separation: > 100 dB
• Maximum output level: +8 dBu
• Ouput impedance: 30 Ohm
5.3 MIDI
• 1 x MIDI I/O via 5-pin DIN sockets
• PCI bus based hi-speed operation
• Separate 128 byte FIFO for input and output
• MIDI state machine in hardware for reduced interrupt request load
5.4 Power supply
• The CardBus card does not provide power to the RPM. Therefore a hi-tech switching power
supply is included
• The PCI card operates as power supply for the attached RPM via the FireWire cable
The RPM draws a high startup current of more than 2 A during initialisation. Current at 12 Volt
operating voltage: unloaded 250 mA (3 Watts), loaded 560 mA (7 Watts). Supply voltage range
DC 10 V – 15 V. The center pin of the AUX jack is Plus. The unit includes protection against
reversed polarity of the power supply.
User’s Guide HDSP System RPM © RME
6

6. Hardware Installation
6.1 PCI Interface
Before installing the PCI card, please make sure the computer is switched off and the
power cable is disconnected from the mains supply. Inserting or removing a PCI card while
the computer is in operation can cause irreparable damage to both motherboard and card!
1. Disconnect the power cord and all other cables from the computer.
2. Remove the computer's housing. Further information on how to do this can be obtained
from your computer´s instruction manual.
3. Important: Before removing the card from its protective bag, discharge any static in your
body by touching the metal chassis of the PC.
4. Insert the PCI card firmly into a free PCI slot, press and fasten the screw.
5. Replace the computer's housing.
6. Reconnect all cables including the power cord.
7. Connect PCI interface and RPM using the supplied cable (IEEE1394). This is a standard
FireWire cable (6-pin).
6.2 CardBus Card
Before inserting the CardBus card make sure the complete HDSP system is ready for
operation!
1. Connect the CardBus card with the RPM using the supplied cable.
2. Insert the CardBus card with the Hammer logo up into a PCMCIA slot.
3. Plug the power jack of the supplied switching power supply into the connector labeled AUX,
on the rear of the RPM.
4. Connect power cord to power supply, plug into AC outlet. The green LED of the power
supply and the red LED of the RPM will light up.
5. Switch on the notebook and boot the operating system.
The small 15-pin connector of the CardBus card is coded. Only the supplied special cable
can be plugged in, and only when the metal sleeve is up. Any kind of violence when
plugging in and out can cause damage to the CardBus card.
User’s Guide HDSP System RPM © RME
7

7. Driver Installation
7.1 Windows 2000/XP
After the interface has been installed correctly, connected to the RPM (see 6. Hardware
Installation), and the computer has been switched on, Windows will recognize the new
hardware component and start its ‘Hardware Wizard’. Insert the RME Driver CD into your CDROM drive, and follow further instructions which appear on your computer screen. The driver
files are located in the directory \HDSP_w2k on the RME Driver CD.
Windows will install the Hammerfall DSP System driver, and will register the card in the system
as a new audio device. After a reboot the RPM is ready for use.
RPM can be configured easily using the HDSP's settings dialog (see section 9.1).
In case the warning messages 'Digital signature not found', 'Do not install driver', 'not certified
driver' or similar come up: Don't listen to Microsoft, listen to us and continue with the
installation.
In case the Hardware Wizard does not show up automatically after installation of the card,
do not attempt to install the drivers manually! An installation of drivers for non-recognized
hardware will cause a blue screen when booting Windows!
7.2 Driver Update under W2k/XP
RME's driver updates often include a new hdsp32.inf file. Also the revision number of the
hardware might change (after a flash update). To prevent Windows 2000/XP from using an old
hdsp32.inf, or to copy some of the old driver files, be sure NOT to let Windows search for the
driver! Instead tell Windows what to do.
Under Control Panel /System /Device Manager /Sound, Video and Game Controllers /RME
Hammerfall DSP/Properties /Driver you'll find the 'Update Driver' button. Select 'Install from a
list or specific location (advanced)', click 'Next', select 'Don't search I will choose the
driver to install', click 'Next', then 'Have Disk'. Now point to the driver update's directory.
User’s Guide HDSP System RPM © RME
8

7.3 Flash Update
The Flash Update Tool updates HDSP PCI cards or CardBus cards to the latest version. It
requires an already installed driver.
Start the program hdsp_fut.exe. The Flash Update Tool displays the current revision of the
HDSP interface, and whether it needs an update or not. If so, then please manually select if a
PCI card (desktop computer) or a CardBus card (laptop) shall be flashed. Next simply press the
'Update' button. A progress bar will indicate when the flash process is finished. The bar moves
slowly first (program), then faster (verify).
If more than one interface card is installed, all cards can be flashed by changing to the next tab
and repeating the process.
After the update the PCI/CardBus cards need to be resettet. This is done by powering down
and shutting off the PC. A warm boot is not enough!
PCI card revision 1.8 or up (black PCB): When the update fails (status: failure), the card's
second BIOS will be used from the next cold boot on (Secure BIOS Technology). Therefore the
card stays fully functional. The flash process should then be tried again on a different
computer.
All other PCI cards and all CardBus cards: When the update fails (status: failure) the flash
process should be repeated several times, until no error message occurs anymore. If the failure
message is displayed nonetheless, the interface will most propably no longer work when the
computer is switched off and on again. The interface then has to be re-programmed at the
factory. We have invested a lot of work to prevent the system from getting in this state. If it
happens despite our efforts, the best advice we can give is to not switch off the computer! As
long as it is not switched off the old programming of the PCI/CardBus interface will stay active,
and you can continue to work with the system using the old drivers
Note: Because of the changed hardware revision, Windows 2000/XP will start the hardware
assistant and wants to install new drivers. Do NOT let Windows search for new drivers, but
follow the instructions given in chapter 7.2.
7.4 Deinstalling the Drivers
A deinstallation of the HDSP's driver files is not necessary – and not supported by Windows
anyway. Thanks to full Plug & Play support, the driver files will not be loaded after the hardware
has been removed. If desired these files can then be deleted manually.
Unfortunately Windows Plug & Play methods do not cover the additonal autorun entries of
TotalMix, the Settings dialog, and the registering of the ASIO driver. Those entries can be
removed from the registry through a software deinstallation request. This request can be found
(like all deinstallation entries) in Control Panel, Software. Click on the entry 'RME Hammerfall
DSP Tray Tools', or 'RME Hammerfall DSP'.
7.5 Linux/Unix
A Linux ALSA driver for the Hammerfall DSP system is available. EvenTotalMix has been
ported to Linux. Support for the RPM is expected soon. Further information on ALSA is
available at
http://www.alsa-project.org
User’s Guide HDSP System RPM © RME
9

8. Operation and Usage
8.1 Connections
The front of the I/O-box RPM has the microphone input, MIDI input and output, the headphone
output, and several status LEDs:
Microphone In allows to connect a microphone via XLR or 1/4" TRS jack.
Using the GAIN knob the sensitivity is adjusted to match the currently used microphone.
The CLIP LED visualizes overload, caused by too high input level or wrong Gain adjustment.
The LED lights up 4 dB before reaching the highest possible (undistorted) level.
MIDI IN and OUT represent the MIDI input and output, realized as 5-pin DIN jacks.
MIDI State indicates sent or received data for the MIDI port
The red HOST LED lights up constantly when the power supply or the computer is switched on,
thus signalling the presence of operating voltage. At the same time it operates as Error LED, in
case the I/O-box wasn’t initialised, or the connection to the interface has been interrupted
(Error, cable not connected etc.). The latter causes the LED to flash. After the firmware has
been loaded into the I/O-box the LED extinguishes, thus signalling an error-free operation.
Phones is a low impedance line output of highest quality, which can produce a sufficient and
undistorted volume even when used with low-impedance headphones.
The volume for the headphones is controlled with the VOL knob.
The back of the RPM has the 4 analog inputs and outputs and the power supply connector AUX
(only needed in CardBus operation).
The PHONO/LINE INPUTS 1/2 and 3/4 can be used with turntables (moving magnet) or Linebased devices (CD player etc.). Operation is controlled in the Settings dialog.
OUTPUTS 1/2 are provided as both RCA jacks (unbalanced) and as stereo TRS jacks
(balanced).
OUTPUTS 3/4 are only available as RCA jacks (unbalanced).
The hook serves as strain relief. Originally only intended to secure the power supply cable
(simply tie it around the hook, or tie a knot around it), the hook is big enough to hold several of
the cables connected to the RPM.
User’s Guide HDSP System RPM © RME
10
8.2 Playback
The HDSP system can play back audio data only in supported formats (sample rate, bit
resolution). Otherwise an error message appears (for example at 22 kHz and 8 bit).
In the audio application being used, HDSP must be selected as output device. This can often
be found in the Options, Preferences or Settings menus under Playback Device, Audio Devices,
Audio etc. We recommend using 24-bit resolution for playback, to make full use of the HDSP’s
potential.
We strongly recommend switching all system sounds off (via >Control Panel /Sounds<). Also
HDSP should not be the Preferred Device for playback, as this could cause loss of
synchronization and unwanted noises. If you feel you cannot do without system sounds, you
should consider buying a cheap Blaster clone and select this as Preferred Device in >Control
Panel /Multimedia /Audio<.
The RME Driver CD includes step by step instructions for configuring many popular audio
applications, found in the directory \rmeaudio.web\english\techinfo\conf.
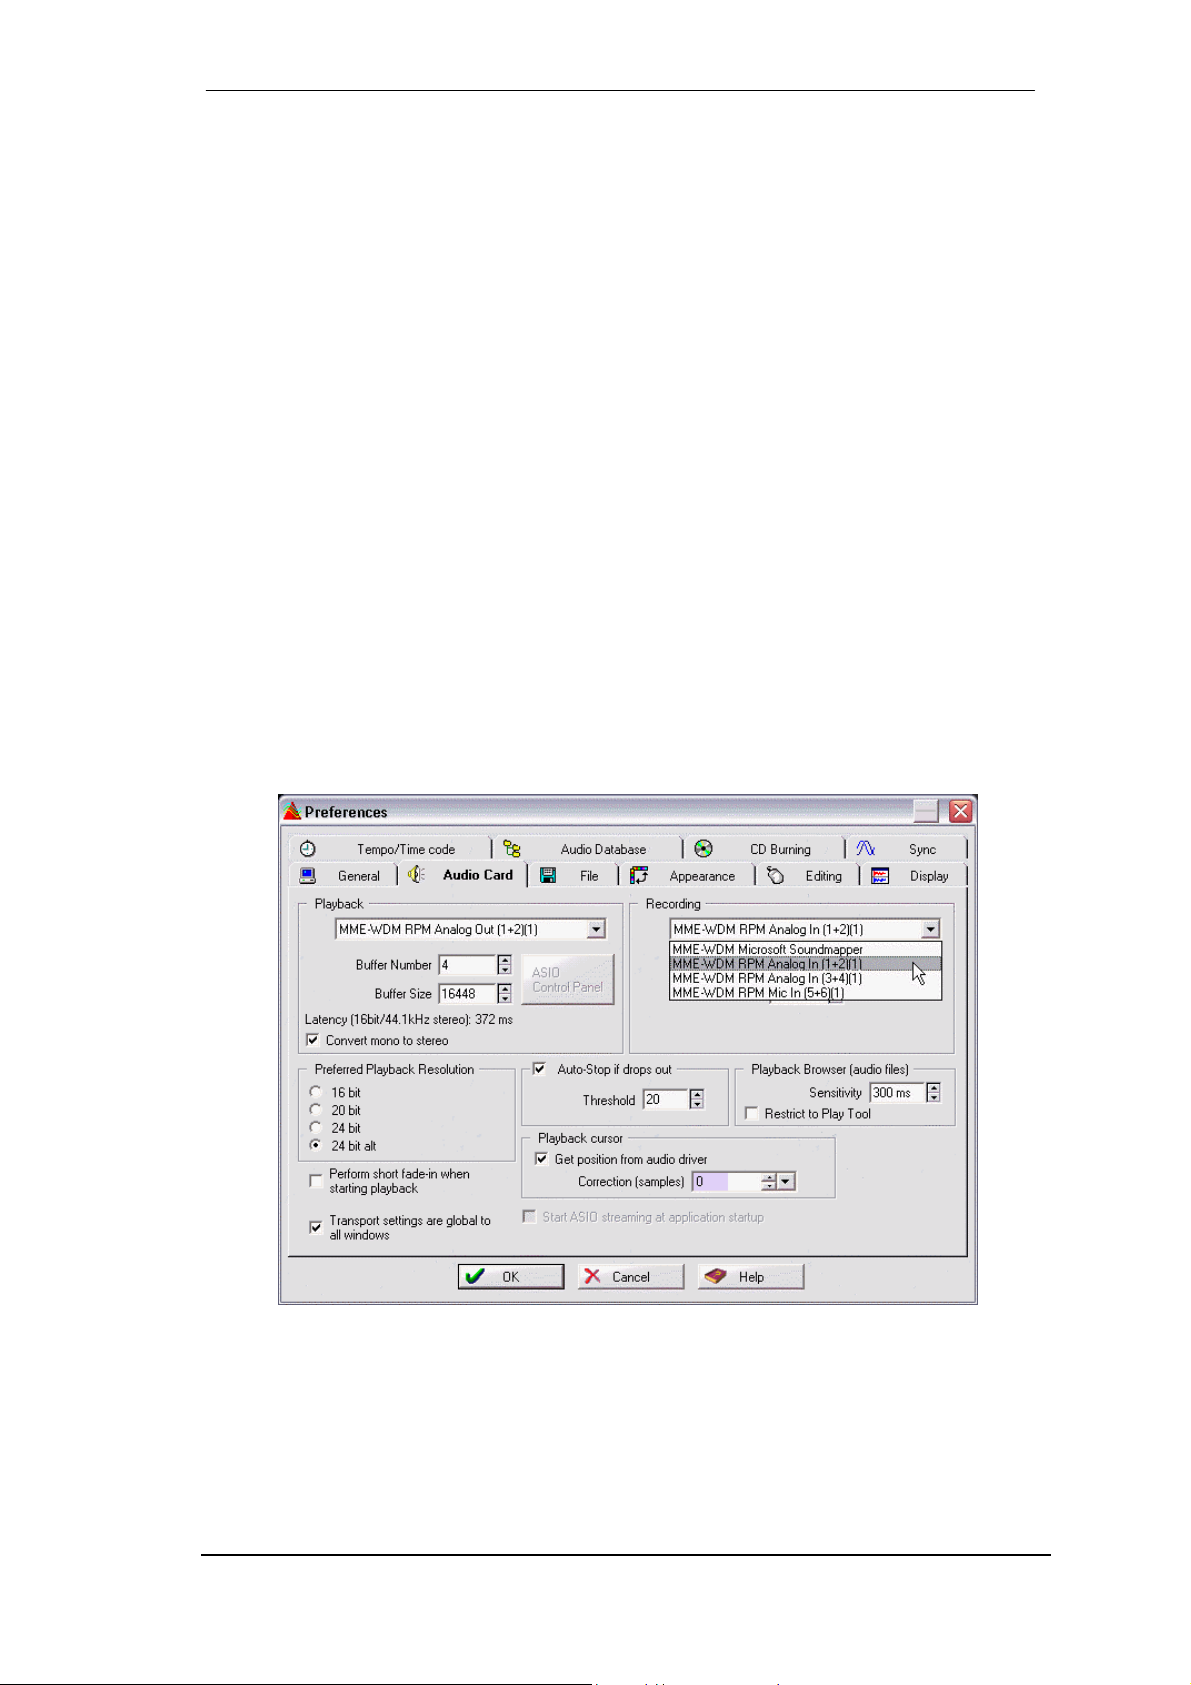
The screenshot below shows a typical configuration dialog as displayed by a (stereo) wave
editor. Audio data is sent to the chosen device, which can be one of 6 stereo outputs. 3 of these
outputs are virtual and will be mixed by TotalMix to any of the existing 3 hardware outputs.
Increasing the number and/or size of audio buffers may prevent the audio signal from breaking
up, but also increases latency i.e. output is delayed. For synchronized playback of audio and
MIDI (or similar), be sure to activate the checkbox ‘Get position from audio driver’.
User’s Guide HDSP System RPM © RME
11

8.3 Multi-Client Operation
RME audio cards support multi-client operation. This means several programs can be used at
the same time. Also all formats, like ASIO, MME and GSIF can be used simultaneously. The
use of multi-client operation requires to follow two simple rules:
• Multi-client operation requires identical sample rates!
It is not possible to use one software with 44.1 kHz and the other with 48 kHz.
• Different software can not use the same channels at the same time.
If for example Cubase uses channels 1/2 (default in Cubase, Master bus), this playback pair
can't be used in Gigasampler/Studio (GSIF) nor under MME (WaveLab etc) anymore (the
inputs can be used at the same time). This is no limitation at all, because TotalMix allows any
output routing, and with this a playback of multiple software on the same hardware outputs.
Interesting, but with limited real-world meaning: all inputs can be used simultaneously.
ASIO Multi-client
RME audio cards support ASIO multi-client operation. It is possible to use more than one ASIO
software at the same time. Again the sample rate has to be identical, and each software has to
use its own playback channels. Again the inputs can be used simultaneously.
An exception is our sophisticated tool DIGICheck. It operates like an ASIO host, using a special
technique to access playback channels already occupied. Therefore DIGICheck is able to
perform an analyzis and display of playback data from any software, no matter which format
the software uses.
Virtual Outputs
The RPM has 6 physical outputs, but the driver provides 12 playback channels, which can be
routed and mixed with no limitations to any of the 6 physical outputs. This technique allows for
a simultaneuos usage of multiple programs (multi-client operation). Each program uses its own
playback channels exclusively. As a result, up to 6 programs can be used at the same time for
playback purposes.
8.4 DVD-Playback under MME
DVD software player like WinDVD and PowerDVD can operate as software decoder, sending a
DVD's multichannel data stream directly to the analog outputs of the RPM. Supported are all
modes, from 2 to 8 channels, at 16 bit resolution and 48 kHz sample rate.
For this to work an output wave device of the HDSP has to be selected in 'Control
Panel/Sounds and Multimedia/Audio'. Also check 'use preferred device only'. PowerDVD's
audio properties now lists several multichannel modes. If one of these is selected, PowerDVD
sends the decoded analog multichannel data to the HDSP RPM.
The device selected as Preferred Playback Device defines the first playback channel. Choosing
RPM Analog Out 3/4 and 6-channel mode, playback will happen on channels 3 to 8.
User’s Guide HDSP System RPM © RME
12
 Loading...