

Page 1
HEARING AID
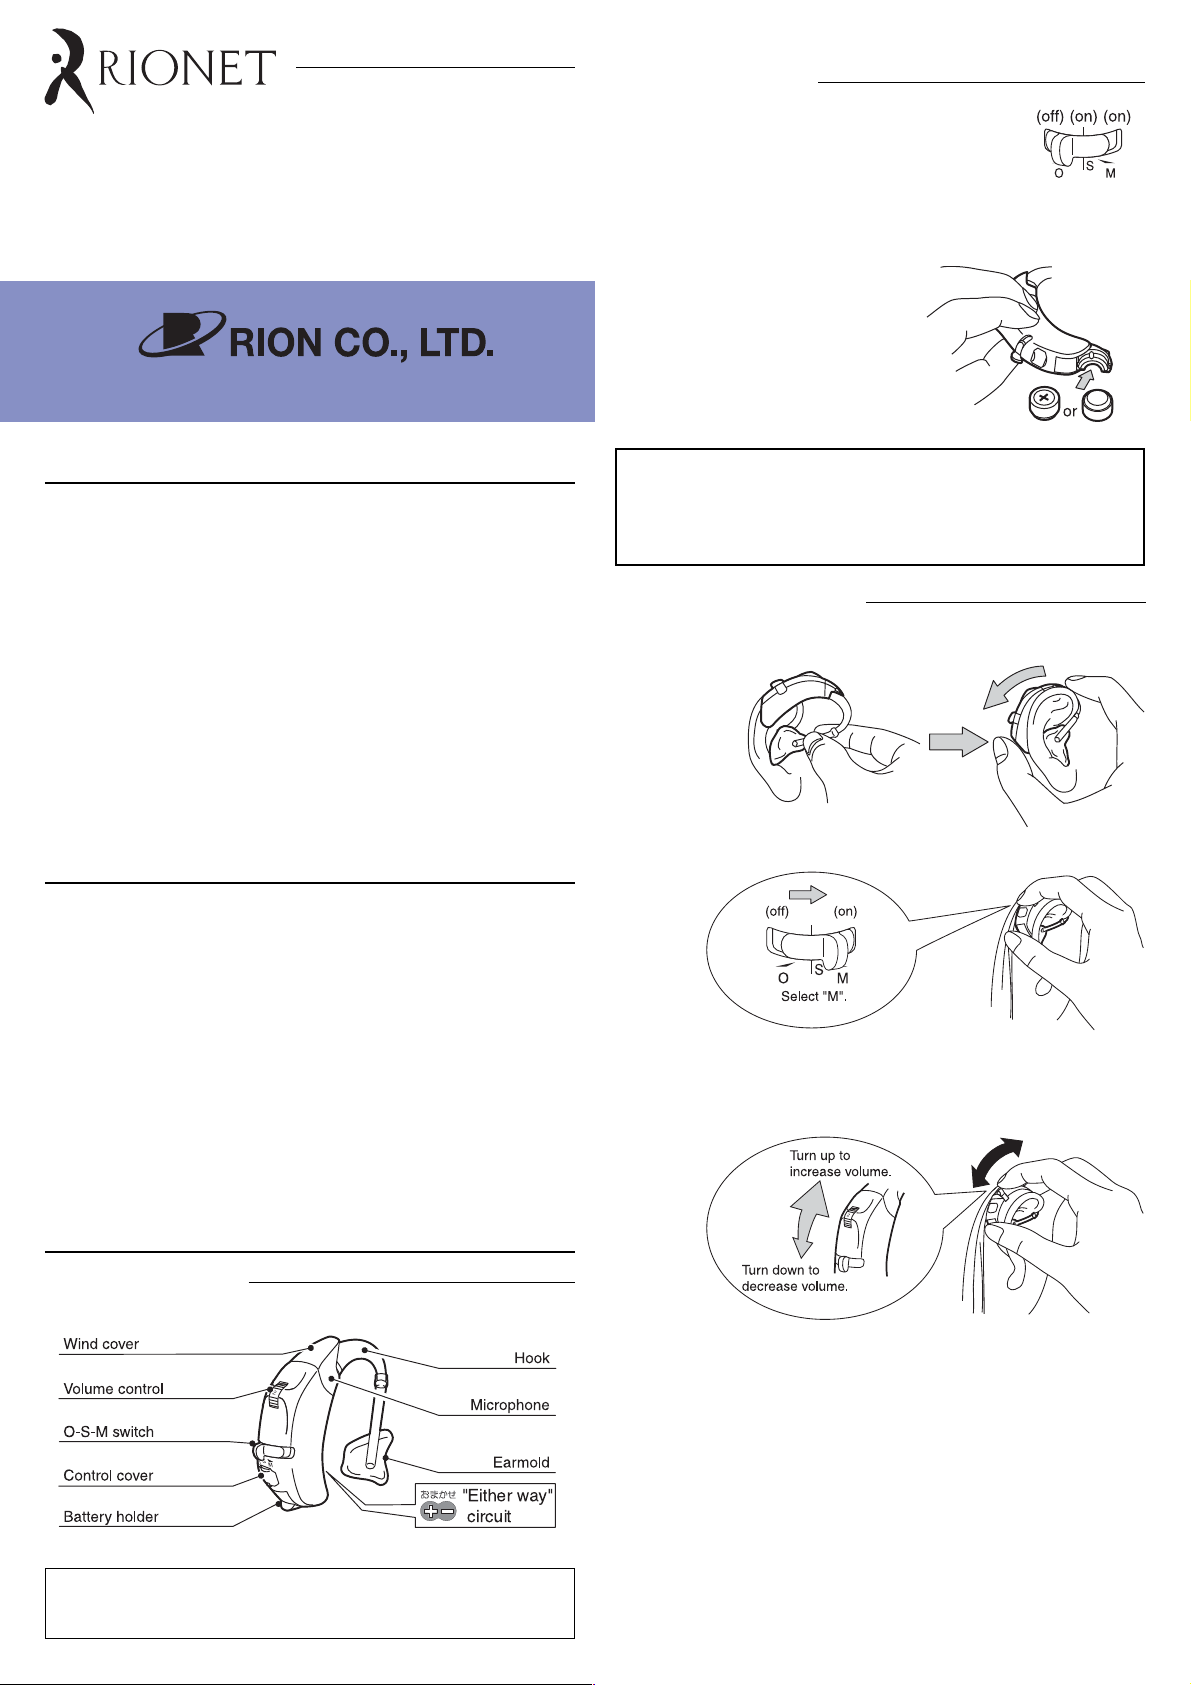
Battery Placement
1. Set the O-S-M switch of the hearing aid to
"O" (power off).
2. Peel off the sticker on the positive side of
battery (PR48 or 13 zinc-air battery).
HB-M1
3-20-41 Higashimotomachi, Kokubunji, Tokyo 185-8533, Japan
HOW TO USE YOUR FIRST HEARING AID
l Any hearing aid cannot return level of your hearing to normal or
halt further hearing deterioration, but proper use of your hearing
aid can help you hear what is going on around you and let you
get more enjoyment of life.
l
If this is your first hearing aid, you - like most new users - will
probably be surprised at the loudness of the sounds, and after using
it for a short while, you may even feel that it is too noisy. The following
three tips are important in overcoming your concerns.
1) Read this manual and become familiar with the hearing aid's
various mechanisms and how to use them correctly.
2) First, use your hearing aid in a quiet place and listen to quiet
sounds and give yourself sufficient time to get accustomed
to the sound of your hearing aid.
3) If any physical problems develop, consult your doctor.
FOR KEEPING YOUR HEARING AID LONGER
3. Open the battery holder with the
tip of your finger.
4. Insert a PR48 or 13 battery into
the battery holder. You do not
have to worry about the polarity.
5. Close the battery holder.
Battery life (PR48 or 13, for continuous use)
Approx. 230 hours
- Battery life will change depending on the operating
condition.
Putting on Hearing Aid
1. Place the hearing aid on the ear.
2. Turn the power on.
l Always keep the hearing aid clean. Clean the hearing aid with
dry cloth periodically and also remove earwax plugged in the
earpiece or earmold using eyebrush or toothbrush.
l Do not expose the hearing aid to the heat from stoves, etc. Also,
avoid leaving it in places with high humidity.
l Operate the controls with care. Do not press hard.
l If the hearing aid is dropped in water, wipe with dry cloth and ask
the dispenser for check.
l Do not pick the microphone with nail, pin, etc., because this may
damage the microphone.
l Do not disassemble or attempt any repairs by yourself. Ask the
dispenser for repair.
OPERATING INSTRUCTIONS
Parts and Controls
l Earmold shown above are not included as standard
accessories.
3. Adjust the volume control to a suitable level.
l Volume control
Higher numbers mean louder sound.
* Adjust the volume according to the situation (volume of
other voices, ambient noise, etc.).
l O-S-M switch
O: Hearing aid is turned off and no sound is heard.
S: Hearing aid is turned on and noise suppressor is
active. Use this position when wishing improve
speech clarity in a noisy environment, such as in
car, in shops, or on the street.
M: Hearing aid is turned on and noise suppressor is
not active. This is the normal operating position.
Page 2
Removing Hearing Aid
Adjusting the controls
1. Set the switch to "O" (power off) before removing the hearing
aid. If the switch is left in the "M" or "S" position, acoustic
feedback (howling) may occur.
2. Be sure to set the switch to "O" and take out the battery,
when not using the hearing aid.
Opening / closing the control cover
1. Insert a screwdriver
into the notch of the
control cover, as
shown in Fig. 1, and
push the cover down.
(Only the top section of
the cover will open.)
2. When the top of the cover opens, insert the screwdriver into
the clearance, as shown in Fig. 2, and push the cover out to
open it fully.
3. To close the cover, push the entire cover in with finger.
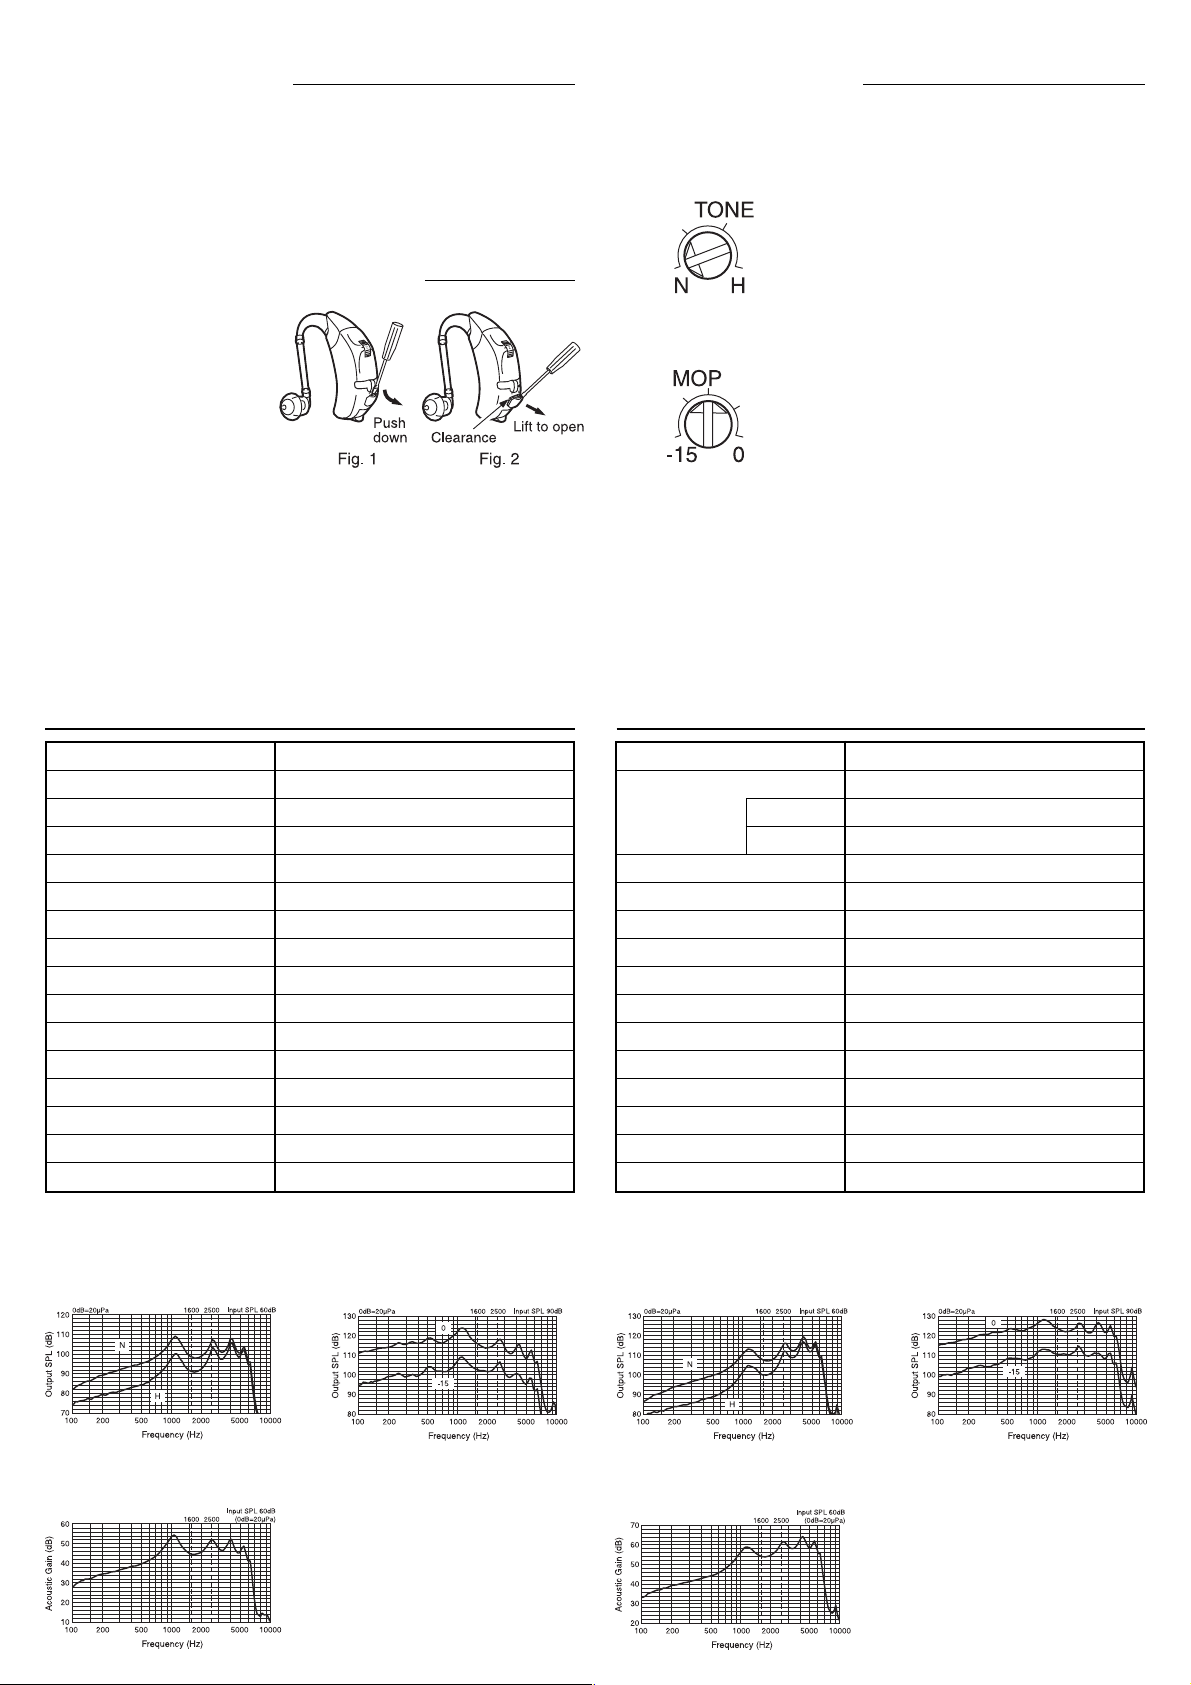
Tone control (Tone H) and Output limiting control (MOP) should
be set at the position of comfortable sound by the screw driver.
l Tone control (TONE H)
In the factory default condition, this control is
set to the "N" position. Turning the control
from the "N" to the "H" position, low frequencies are attenuated and high frequencies
emphasized.
l Output limiting control (MOP)
This control prevents the hearing aid from
outputting excessively loud sounds. Turning
the control towards the left reduces the maximum output level of the hearing aid.
TECHNICAL DATA (According to ANSI standard S3.22 1996)
Maximum-OSPL90 124 dB (1100 Hz)
HFA-OSPL90 116 dB
HFA-full-on Acoustic Gain 45 dB
Reference Test Gain 36 dB
Frequency Range 200 Hz to 6900 Hz
Equivalent Input Noise Level
Total Harmonic Distortion 800 Hz: 7% 1600 Hz: 3%
Operating Switch O-S-M
Output Limiting Control MOP (range: 15 dB)
Tone Control TONE H
Gain Control Main (range: 42 dB)
Battery Type / Supply Voltage
Battery Current 1.25 mA
Battery Life Approx. 230 hours
Dimensions 3.75 × 1.27 × 0.88 cm
Weight 4.0 g
Frequency response curve
and effect of Tone H
29 dB
13 / 1.3 V
(excluding battery)
(Typical value)
OSPL 90 curve and effect of
output limiting control
According to IEC standard Pub. 60118-0-1983
TECHNICAL DATA
Reference Test Frequency 1600 Hz
OSPL90 124 dB
500 Hz 123 dB
Peak 129 dB
Full-on Acoustic Gain 54 dB
Equivalent Input Noise Level
Total Harmonic Distortion 800 Hz: 9% 1600 Hz: 5%
Operating Switch O-S-M
Output Limiting Control MOP (range: 15 dB)
Tone Control TONE H
Gain Control Main (range: 42 dB)
Battery Type / Supply Voltage
Battery Current 1.25 mA
Battery Life Approx. 230 hours
Dimensions 3.75 × 1.27 × 0.88 cm
Weight 4.0 g
Basic frequency response
curve and effect of Tone H
()
Amendment 1-1994
27 dB
PR48 / 1.3 V
(excluding battery)
OSPL
90 curve and effect of
output limiting control
(Typical value)
Full-on gain curve
Note:
(1) Production number (serial
number) is indicated at the
upper rear side of the unit.
(2) Manufacturer's name is
imprinted at the lower rear
side of the unit.
Full-on acoustic gain
frequency response curve
No. 37780 03-06
 Loading...