

Rio Sport S30S, Sport S35S User Manual
Index
Welcome
1
Contents
Rio Sport S30S / S35S User’s Guide
Welcome
Thanks for your purchase of the Rio Sport S30S / S35S digital music player. The Rio Sport portable player
supports MP3 and WMA playback, and features a built-in FM radio. The Rio Sport player comes equipped
with an AAA-size alkaline battery to supply up to 10 hours of continuous music playtime. With 64MB memory (S30S), or 128MB memory (S35S) — expandable with optional external memory cards — the Rio Sport
player holds hours of your favorite music. Use the music management software included on the software
CDs to:
• Organize digital audio tracks on your computer
• Encode
your audio CDs into compressed digital audio format
• Download tracks to your Rio player
• Search for tracks on your computer or on the Internet
• Create custom CDs — if you have CD burning hardware and your computer supports it
Contents
Navigating the User’s Guide / Using Acrobat
Tour of the Rio Player
Getting Started
Playing Music
Using the Stopwatch
Setting and Releasing Hold
Setting Shuffle and Repeat Play
Setting the Equalizer
Listening to the FM Radio
Advanced Features

Index
Welcome
2
Contents
Rio Sport Digital Music Player
Using the Music Management Software
Glossary of Digital Audio Terms
Frequently Asked Questions (FAQ) and Troubleshooting
Warranty Information
Regulatory Information
Customer Care
Index
To l e ar n mo re:
• Refer to the Quick Start poster for the basics on how to set up and start using your Rio player.
• Refer to the complete music management software online Help for step-by-step instructions on how to
use the software to convert CD tracks into compressed digital audio formats, download tracks to your
Rio player, or get audio files from the Internet.
•Visit the SONICblue Web site.
Navigating the User’s Guide
The User’s Guide is in Adobe Acrobat (.PDF) file format.
Important: We recommend that you use Adobe Acrobat Reader version 4.0 or higher to view
and print the Rio User’s Guide. Acrobat reader 4.0 is available on the software CDs.
Click blue, underlined text links to jump to another location in the document or to a location on the Internet.
Click the Contents
link at the top of any page to go to the list of User’s Guide contents.
Click the Index link at the top of any page to go to the alphabetical Index of topics. Click page numbers in
the Index to jump to a topic.
Using Acrobat
Click the navigation buttons in the Acrobat toolbar to go to the first page, previous page,
next page, or last page of the User’s Guide.
Click the print button in the Acrobat toolbar to print the User’s Guide.
Index
Legal Notices
3
Contents
Click the show/hide navigation pane button in the Acrobat toolbar to show a list of bookmarks. Bookmarks are links to the contents of the User’s Guide. Click any bookmark in the list to jump to the page in
the User’s Guide that contains the topic.
Legal Notices
© 2002 SONICblue Incorporated. All Rights Reserved.
SONICblue Incorporated shall not be liable for any errors contained herein or for any damages arising out
of or related to this document or the information contained herein, even if SONICblue has been advised of
the possibility of such damages.
This document is intended for informational and instructional purposes only. SONICblue reserves the right
to make changes in the specifications and other information contained in this document without prior notification. SONICblue disclaims any obligation to update the information contained herein.
Rio is a registered trademark of SONICblue Incorporated. SONICblue is a trademark of SONICblue Incorporated.
This product is iTunes ready. iTunes is provided by Apple Computer, Inc. © 2002 Apple
Computer, Inc. All rights reserved. iTunes is a trademark of Apple Computer, Inc. Mac
and the Mac logo are trademarks of Apple Computer, Inc. registered in the United States
and other countries.
Microsoft, Windows Media and the Windows Logo are trademarks or registered
trademarks of Microsoft Corporation in the United States and/or other countries.
All other product names may be trademarks of the companies with which they are
associated.
First edition, June 2002
Sport P/N 75510394-001
Index
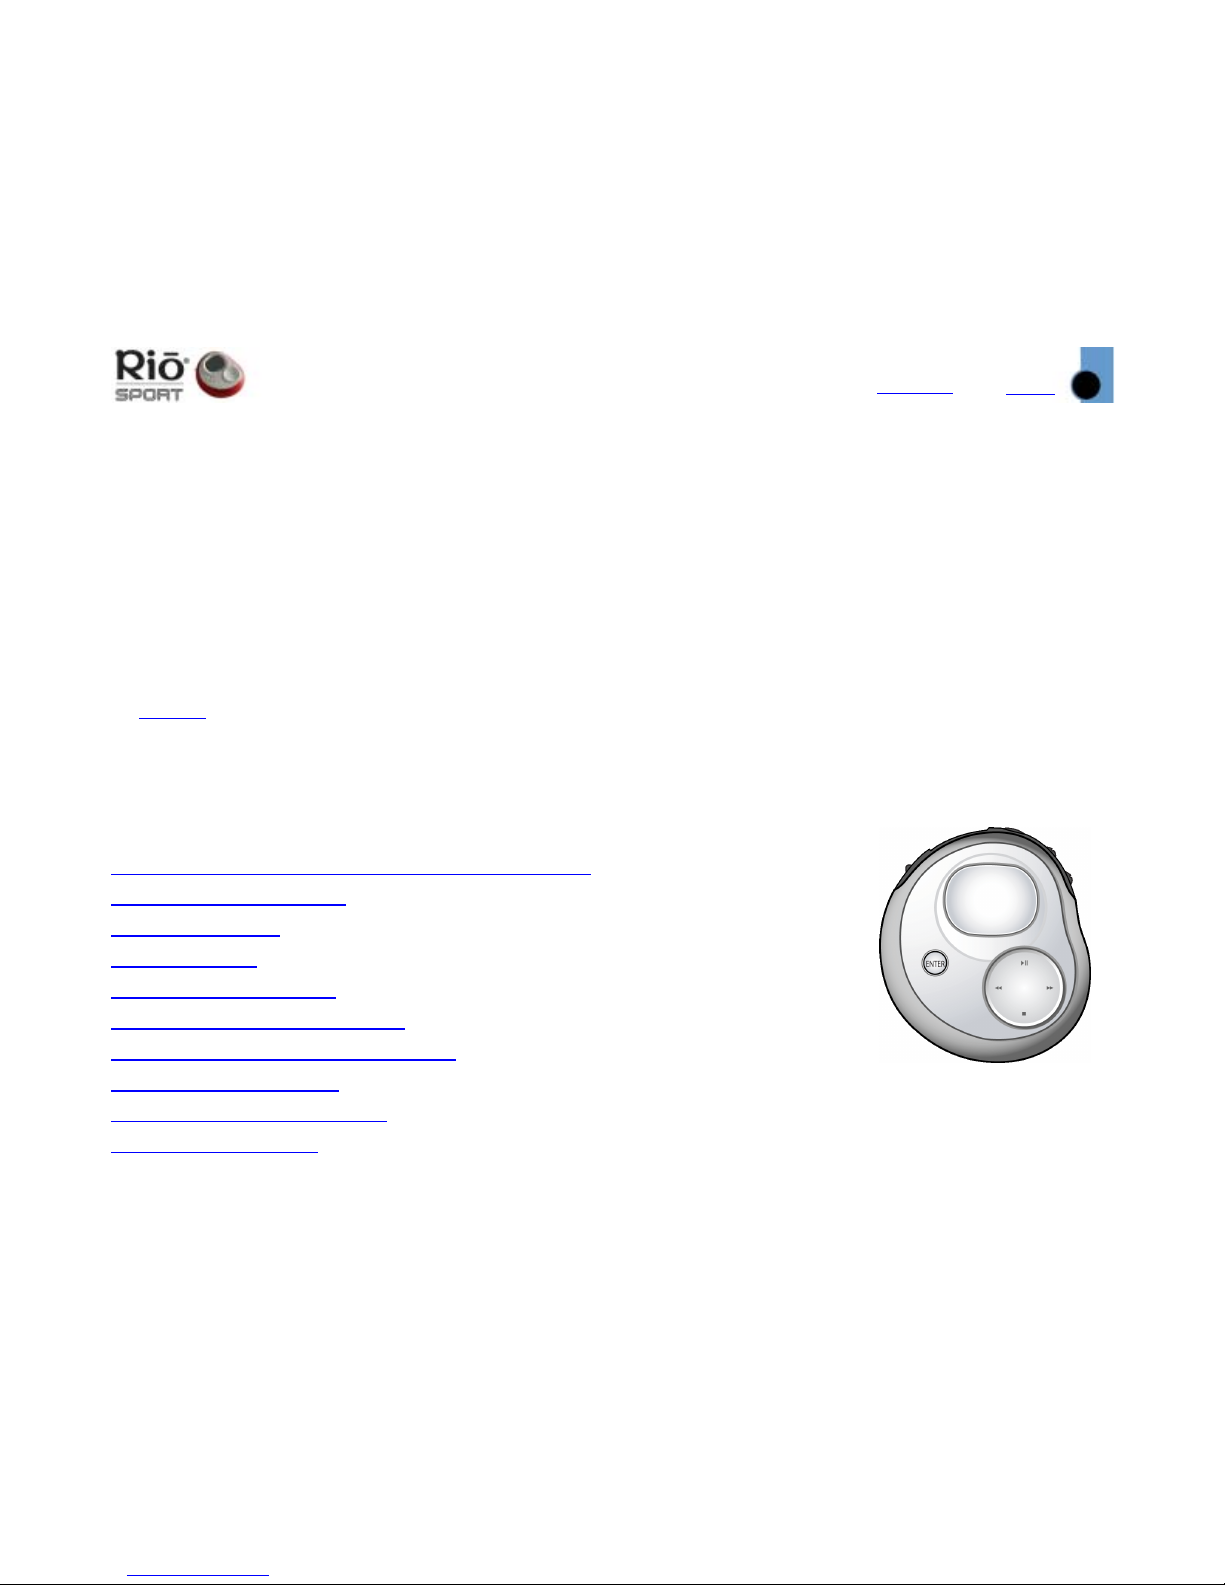
Tour of the Rio Player
4
Contents
Rio Sport Digital Music Player
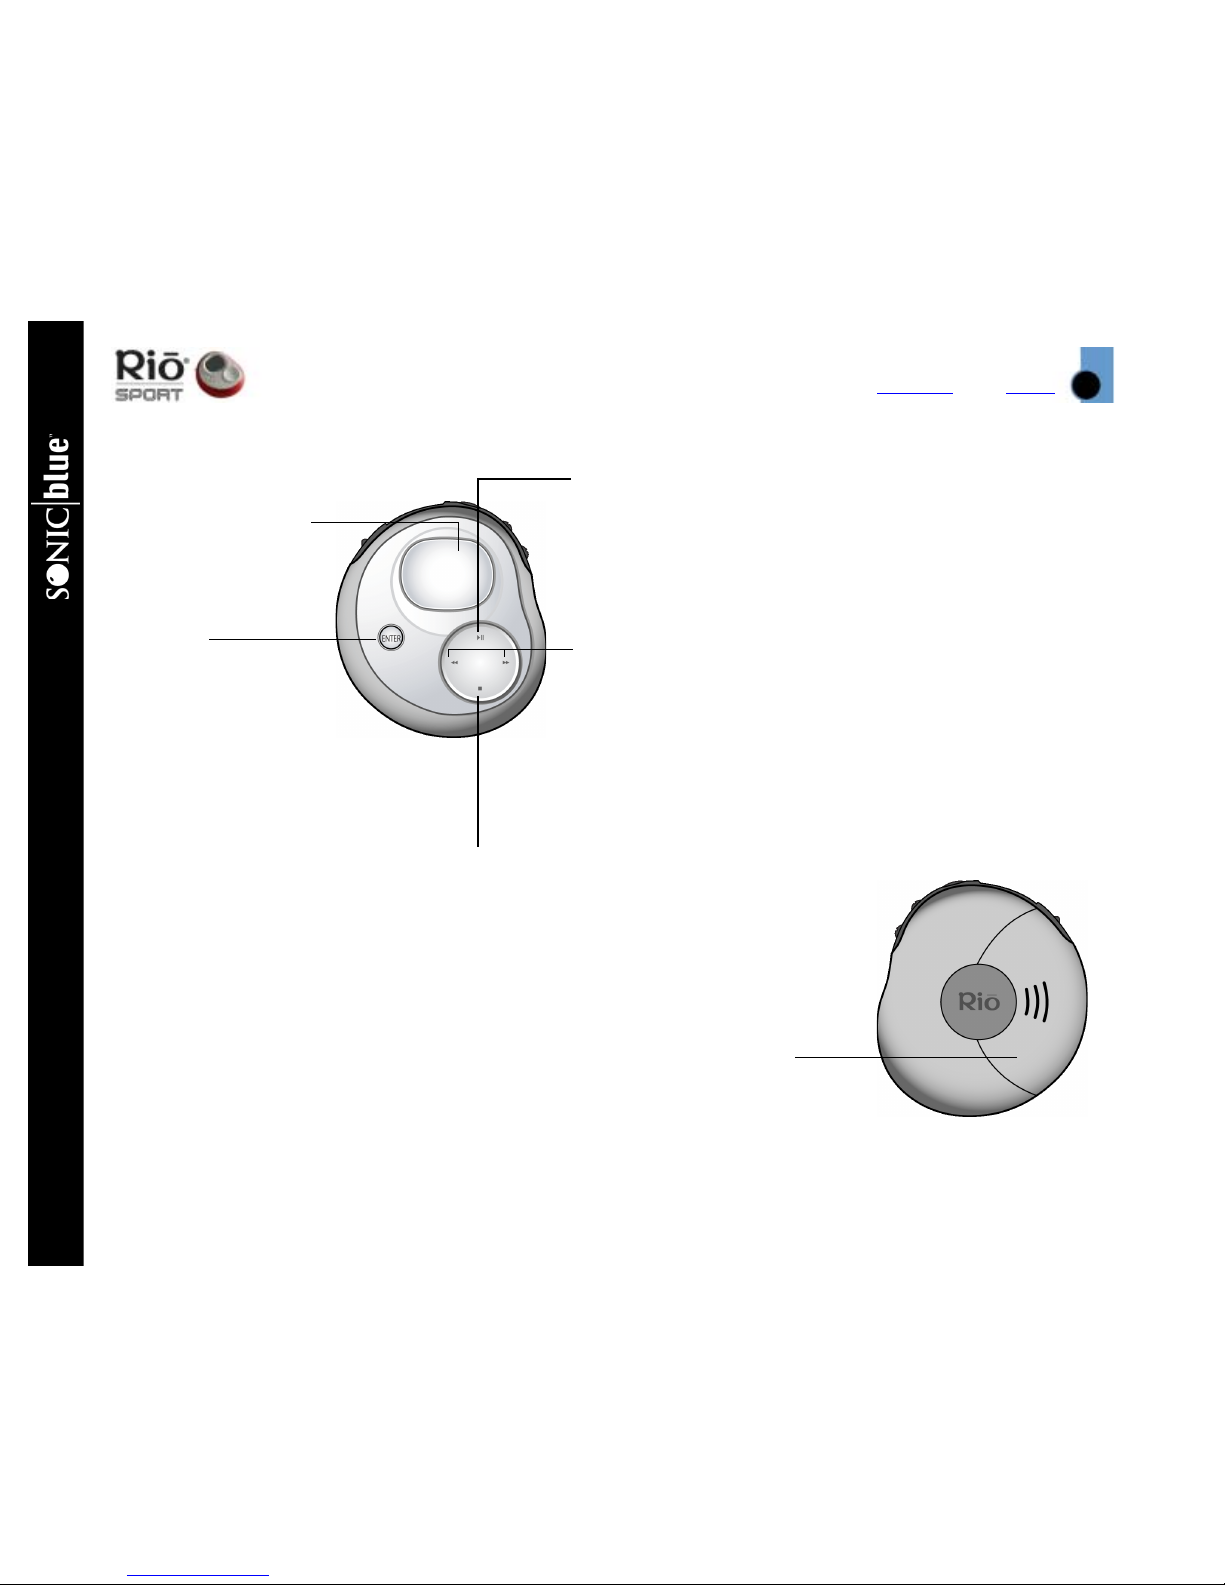
Tour of the Rio Player
Battery compartment cover
Remove cover and insert the supplied
battery and optional external memory
cards here. Insert external memory
cards before inserting the battery.
Display (LCD)
ENTER
Press to cycle through
the player’s various
screens;
Press while pressing and holding MENU to put the Rio player
into or out of Hold mode;
Press and hold to set a bookmark;
In Menu mode, press to select
Menu options;
In Stopwatch mode, press to
move lap times down on the
LCD; if the timer is running,
press to capture a new lap time
without stopping the timer; press
and hold to reset all lap times to
zero;
In Tuner mode, press to switch
between Manual and Preset
modes; press and hold to store a
preset station
PLAY/PAUSE
Press to play or pause playback;
In Menu mode, press to navigate to the previous Menu
option;
In Stopwatch mode, press to start and stop the timer;
In Tuner mode, press to mute/unmute radio output
REVERSE and FORWARD
Press to skip to the start of the current or next track —
if less than five seconds have elapsed, REVERSE skips
to the start of the previous track; Press and hold to
scan backward or forward within the current track;
In Menu mode, press FORWARD to select or execute a
Menu option;
In Tuner mode, press to manually tune to stations or
cycle through presets
STOP
Press to stop playback;
In Menu mode, press to navigate
to the next Menu option;
In Stopwatch mode, press to
reset the timer to zero

Index
Tour of the Rio Player
5
Contents
Tour of the Rio player (continued)
VOLUME + and - Press to adjust vol-
ume level up or down on a range from
0-30
When the player is turned OFF and back
ON, the volume level automatically
resumes at 70% of the previous level
OFF (0) / ON (1)
Slide to turn your Rio
player OFF or ON;
When the player is
turned OFF, the current
mode and user preferences are saved and
resume when the player
is turned back ON
MENU
Press to display the main Menu system; If a
Menu is already open, press to close;
Press to cancel before selecting or executing
Menu options;
Press and hold, then press ENTER to put the
Rio player into or out of Hold mode — locking
the Rio player buttons to prevent accidental
operation
MULTIFUNCTION port
Connect supplied earphones, USB
cable, or optional accessory
remote control here

Index
Tour of the Rio Player
6
Contents
Rio Sport Digital Music Player
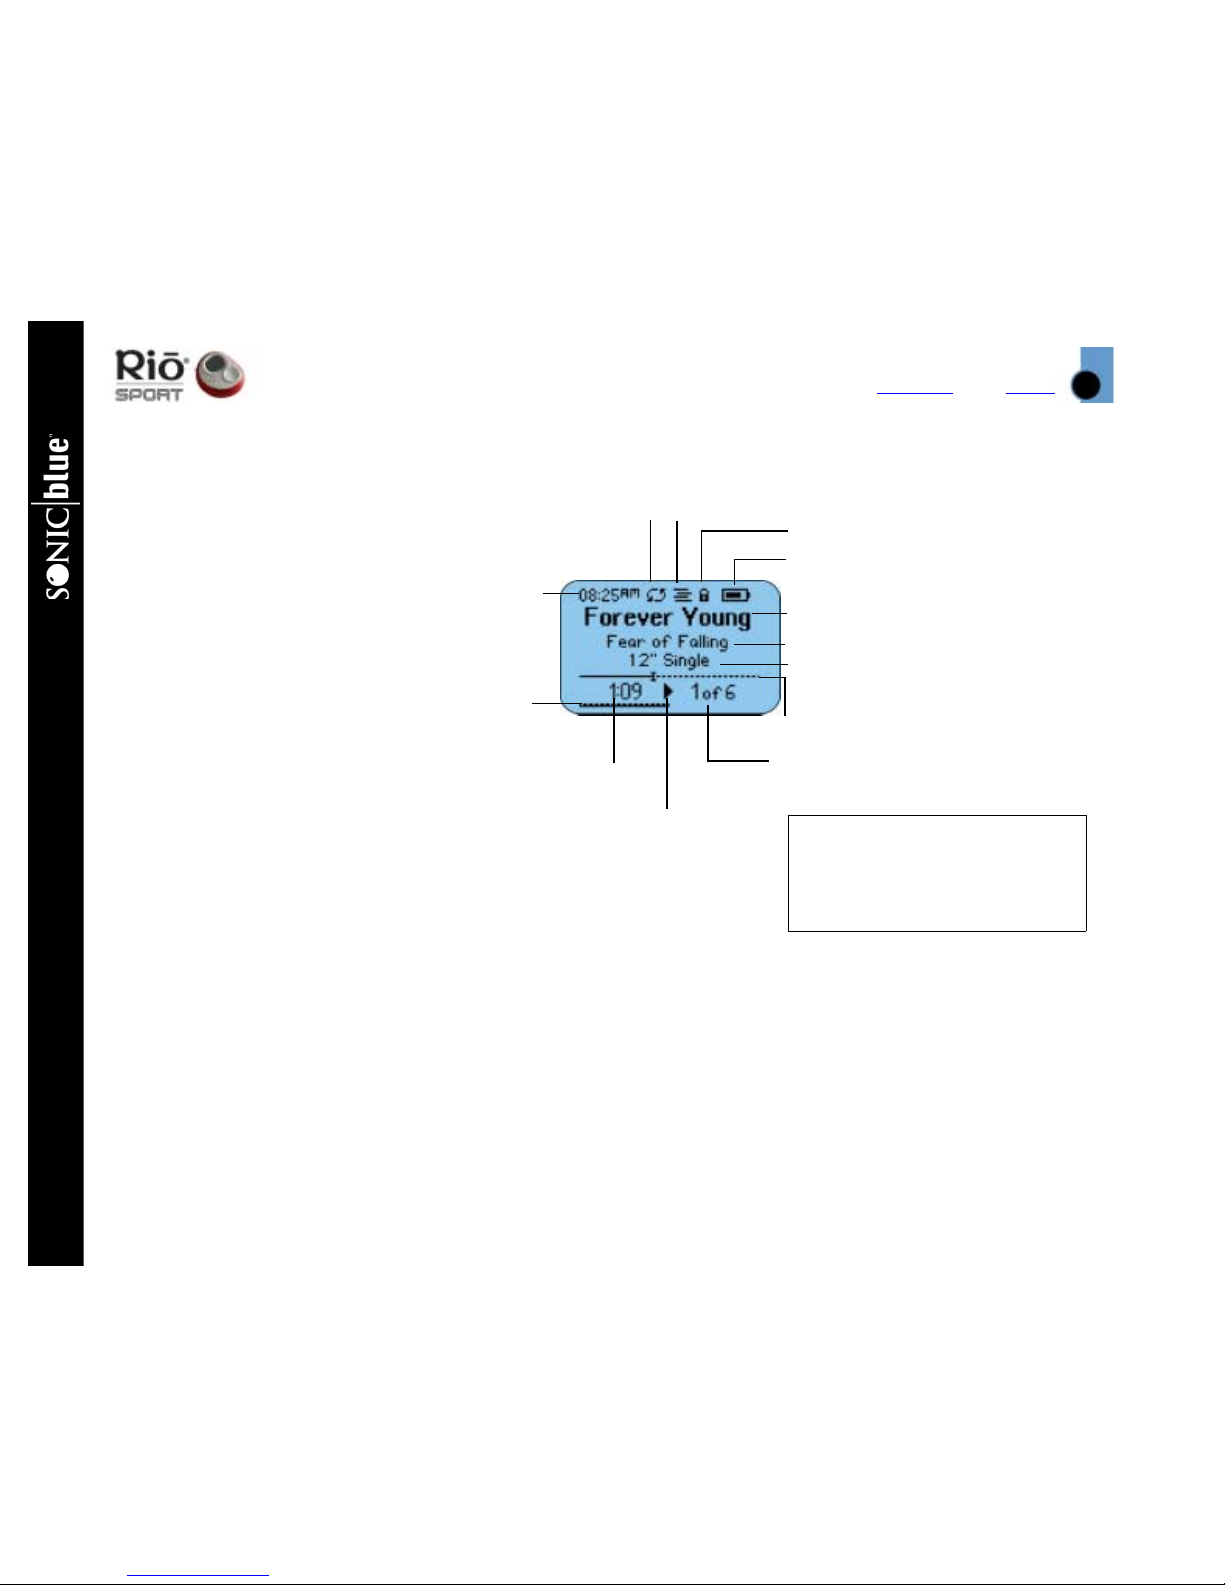
LCD Overview
Player Mode
Press ENTER to cycle
through the player’s
various screens
Clock
Repeat
Indicator
Shuffle
Indicator
Hold Indicator
Track Title (from ID3 tag info)
Artist (from ID3 tag)
Album (CD) (from ID3 tag)
Progress Indicator
Track Timer: Time
Elapsed or Time
Remaining
Track Number of Total
Playback
Mode
Indicator
Battery Indicator
Track Information: Codec,
Encoding Bitrate and Stereo/
Mono Mode Indicator (from
track ID3 tag information)
Date Information
The Battery Indicator
graphically shows
the power level:
Empty to
Full.
The Battery Indicator
flashes when the
power level is low.
Battery Indicator
Volume
Indicator
Index
Tour of the Rio Player
7
Contents
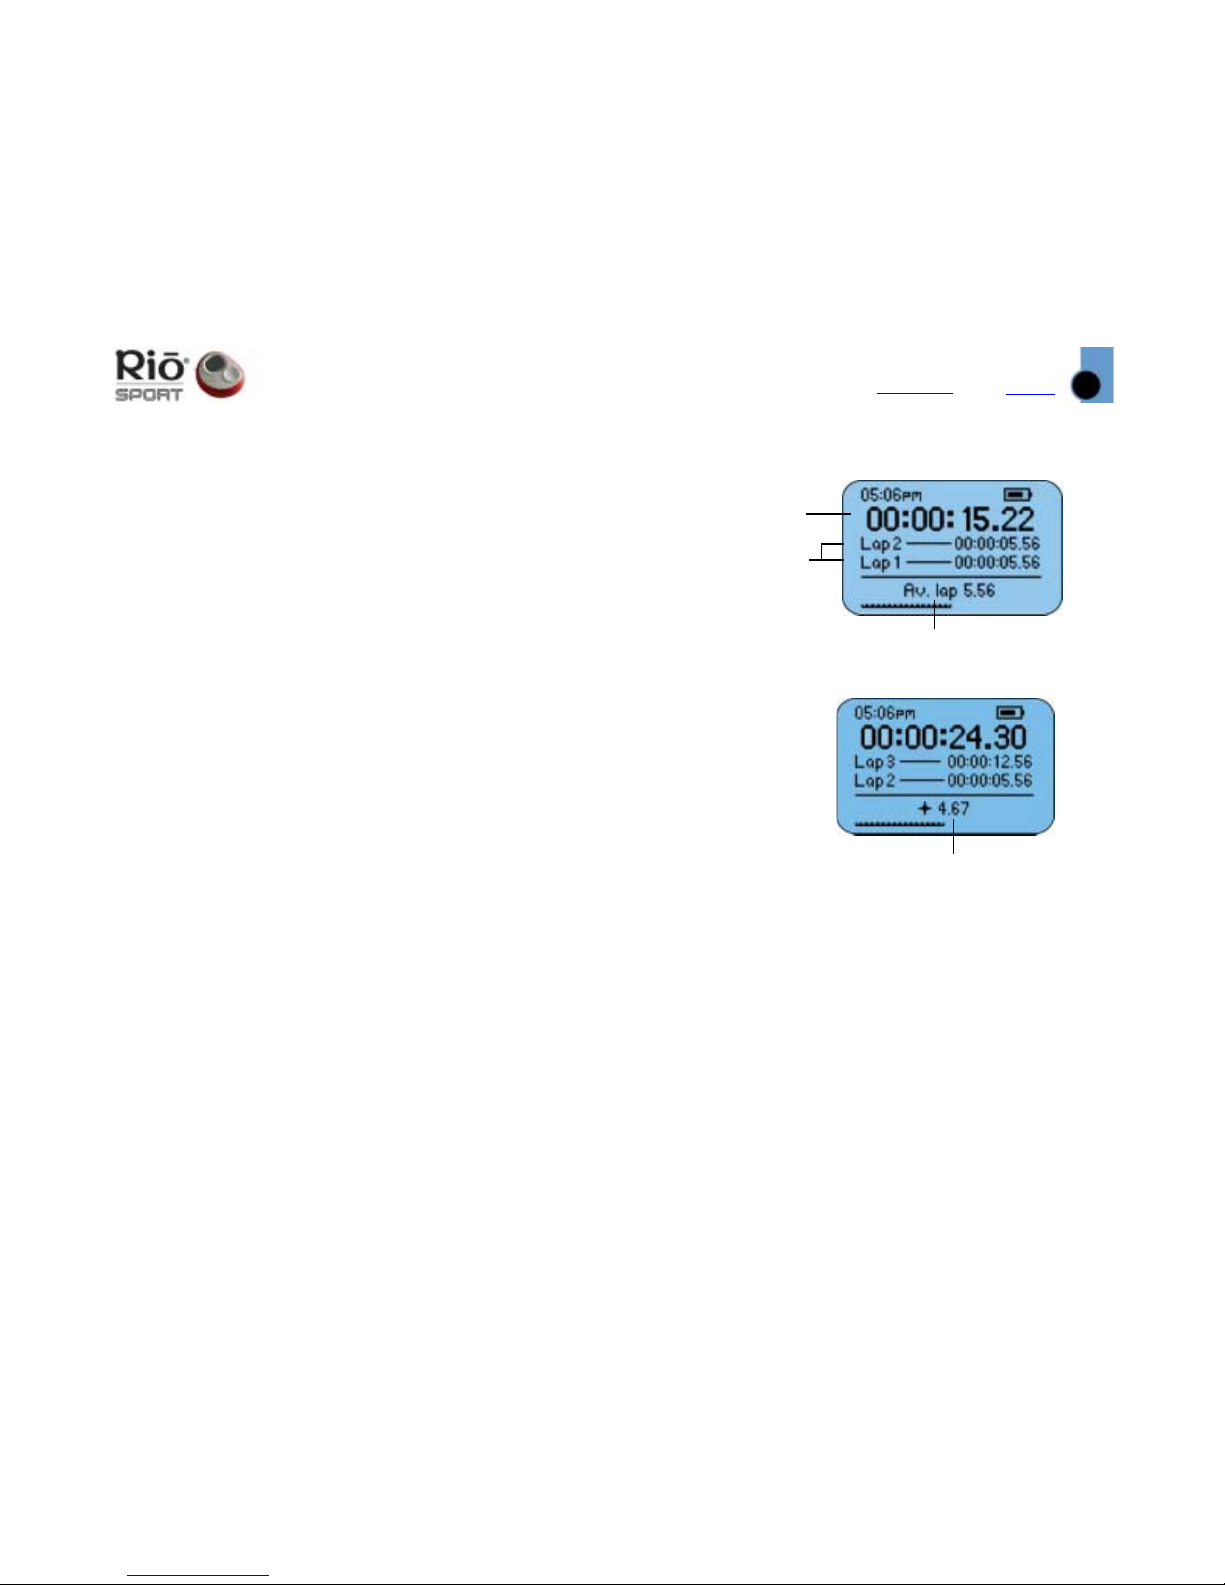
Stopwatch Mode
FM Tuner mode
Timer
Lap Times
Lap Statistics: Current to
Average Lap Time Difference
Lap Statistics: Average Lap Time
Frequency Scale
Currently Tuned
Frequency
Tuning Mode
Indicator
Strong
Station
Indicator
Stereo/
Mono
Indicator
Preset Station
Frequencies:
Currently
selected preset
highlighted
Preset Scroll
Indicator
Press ENTER to switch between
Manual and Preset FM Tuner modes
Mute
Indicator
Tuning Mode
Indicator

Index
Getting Started
8
Contents
Rio Sport Digital Music Player
Getting Started
Please refer to the Quick Start poster for complete
setup instructions, including information on connecting the Rio to your computer.
Step 1: Unpack
Make sure your package includes the following:
•Rio player
•Earphones
•One AAA-size alkaline battery
• Universal Serial Bus (USB) cable
• PC and Mac Software CDs
• Quick Start poster and other printed materials
• Carrying case
Step 2: Insert Battery
1 Slide open the battery compartment cover on the
back of the Rio player.
Tip: Insert optional external memory cards
into the memory card slot while the battery
cover is off — before you insert the battery.
2 Insert the supplied battery. Ensure the battery is
inserted properly by matching the + and - symbols on the battery with the symbols in the Rio
player battery compartment.
3 Replace the battery cover.
Step 3: Install Software
PC
Follow these instructions to load the software that
enables your PC to recognize the Rio player. The
installation also loads the selected music management software.
1 Place the software CD label side up into your
computer’s CD-ROM drive. After a few seconds,
the install screen is displayed.
2 Click “Install” link of the music management
software that you would like to install, then follow the on-screen instructions. The Rio Music
Manager application is required.
You can also choose to view the User’s Guide, get
support, or register your Rio player online.
3 Reboot your computer when the software instal-
lation is complete, or you are prompted to do so.
Note: If the install screen does not display
automatically, follow these steps to begin
the installation manually:
1 Click the START button in bottom-left corner of
your computer screen and choose RUN...
2 Type d:\install.exe in the field labeled OPEN. If
your computer’s CD-ROM drive uses a letter
other than “d”, substitute that letter for “d”.
3 Click the OK button, and follow the on-screen
instructions.

Index
Getting Started
9
Contents
MAC
Follow these instructions to load the software that
enables your Macintosh computer to recognize the
Rio player. The installation also loads the iTunes
music management software.
1 Place the software CD label side up into your
computer’s CD-ROM drive.
2 The CD contents should display automatically. To
manually display the CD contents, double-click
the Rio icon on your computer’s desktop.
3 Double-click the Install icon.
4 After a few seconds, the Rio splash screen will
display.
5 Click the “Install iTunes” link, then follow the on-
screen instructions to install the software, see
the User’s Guide, get support, or register your
Rio player online.
6 Reboot your computer when the installation is
complete.
OSX Users
The “Install” program on the software CD may not
run on some OSX systems, if you are having difficulty, follow these steps to install iTunes:
1 Double-click the CD icon to show the contents of
the software CD.
2 Open the “iTunes” folder.
3 Open the “OSX” folder.
4 Double-click the iTunes2.pkg file to begin the
installation.
Step 4: Connect USB
1 Insert the USB cable into the MULTIFUNCTION
port on top of the Rio player. The Rio USB connection only fits one way. Do not try to force the
connection.
2 Connect the other end of the USB cable to your
computer’s USB port.
3 Turn your Rio player ON.
Note: The player automatically turns OFF
after being connected to USB for 30
minutes, if no USB commands are received
or no buttons are pressed.
4 PC ONLY: Follow these instructions if the Win-
dows Device Driver wizard is displayed on the
computer screen: Make sure that the software
CD is in your computer’s CD-ROM drive. When
the wizard prompts you for the location of the
Rio player drivers, select the “CD-ROM Drives”
check box, then click the “Next” button, and follow the on-screen instructions.
Step 5: Rip/Load Music
Please see the Using the Music Management Soft-
ware section in this manual for more information
about using the software to encode your audio CDs
into compressed digital audio format, organize your
digital audio collection on your computer, or download music to your Rio player. Please refer to the
complete software online Help for detailed information on using each software application.
Index
Using the Player
10
Contents
Rio Sport Digital Music Player
Using the Player
Playing Music
1 Connect the supplied ear-
phones or optional head-
phones into the
MULTIFUNCTION port on top
of the Rio player.
2 Turn the player ON.
3 Press PLAY/PAUSE to begin
playback.
Switching Modes
Follow these steps to play
music without changing the
display from Stopwatch or
Tuner modes, or to switch to
Player mode.
1 Press MENU.
2 Press PLAY/PAUSE or STOP to
navigate between Play Music
and Player. Press FORWARD
to select an option.
• Play Music: Plays MP3/WMA tracks while remaining in the previous mode on the LCD. Press PLAY/
PAUSE or STOP to navigate between Play All or Play Track.
Play All: Press FORWARD to select and begin playback.
Play Track: Press FORWARD to select and display a list of tracks you can choose from. Press PLAY/
PAUSE or STOP to navigate through the track list; press FORWARD to select a track and begin
playback.
• Player: Switches to Player mode on the LCD. Press PLAY/PAUSE to begin playback.
In Player mode, press
ENTER to cycle through
the player’s various
screens
Clock
Repeat
Indicator
Shuffle
Indicator
Hold Indicator
Track Title (from ID3 tag info)
Artist (from ID3 tag)
Album (CD) (from ID3 tag)
Progress Indicator
Track Timer: Time
Elapsed or Time
Remaining
Track Number of Total
Playback
Mode
Indicator
Battery Indicator
Volume
Indicator
Index
Using the Player
11
Contents
Using the Stopwatch
You can use the Stopwatch feature while you are playing
music. Lap Statistics shown at the bottom of the LCD toggle
between Average Lap Time and Current to Average Lap Time
Difference.
Tip: The Current to Average Lap Time Difference
statistic indicates a “+” if the current lap is above
the average time (slower than average), or a “-” if
the current lap is below the average time (faster
than average).
1 Press MENU.
2 Press PLAY/PAUSE or STOP to navigate to Stopwatch.
3 Press FORWARD to select Stopwatch mode.
• Press PLAY/PAUSE to start and stop the Timer without
resetting the Timer value to zero.
• Press STOP to reset the Timer value to zero.
• Press ENTER to move lap times down on the LCD; if
the timer is running, press ENTER to capture a new
lap time without stopping the timer.
• Press and hold ENTER to reset all lap times to zero.
Stopwatch mode screens
Timer
Lap Times
Lap Statistics: Average Lap Time
Lap Statistics: Current to
Average Lap Time Difference
Index
Using the Player
12
Contents
Rio Sport Digital Music Player
Setting and Releasing Hold
Press and hold MENU, then press ENTER to put the Rio player into or out of Hold mode. Hold mode locks the
Rio player buttons — except the OFF/ON switch — preventing accidental operation. This is a useful feature,
for example, if you wish to prevent the player buttons from being bumped while you are exercising. When
the player is in Hold mode, a lock icon is displayed on the LCD, and the player displays a message indicating that Hold mode is active if the player buttons are pressed.
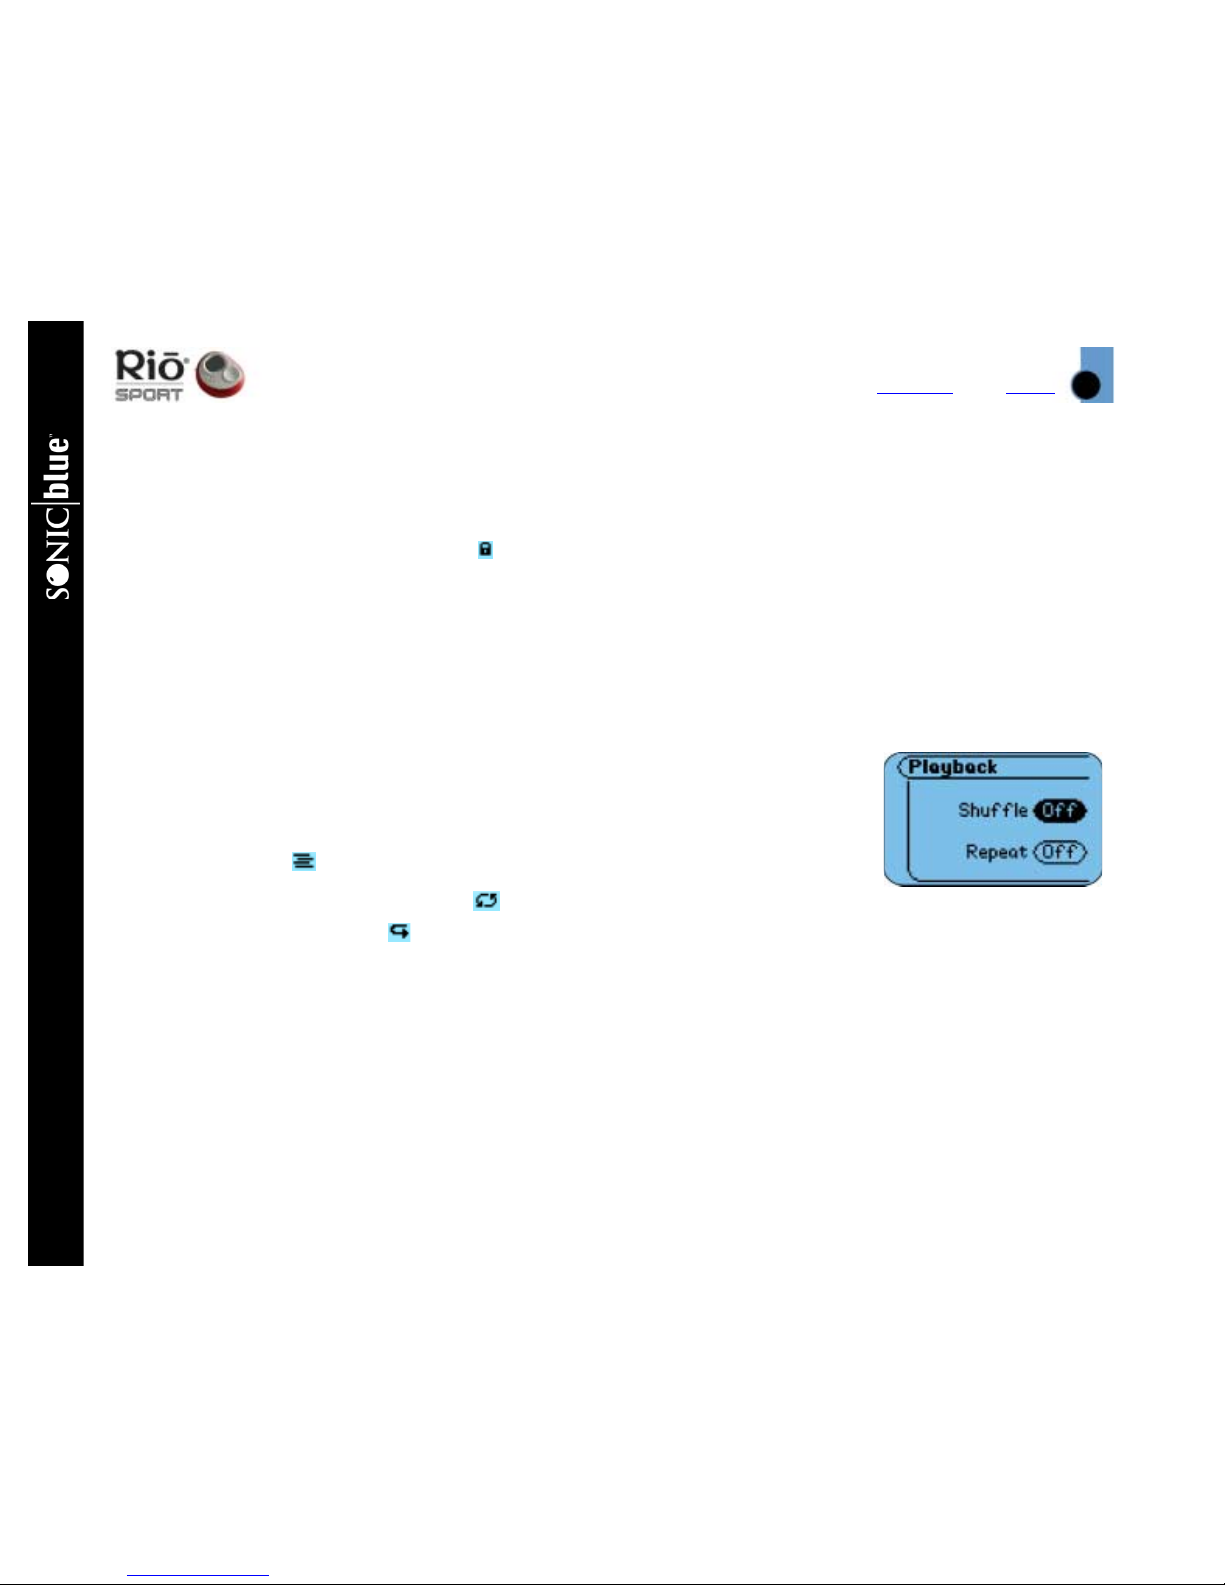
Setting Shuffle and Repeat Play
These features control the track playback order.
1 Press MENU.
2 Press STOP or PLAY/PAUSE to navigate to Settings.
3 Press FORWARD to select the Settings option.
4 Press FORWARD to select Playback. The Shuffle/Repeat screen is displayed.
5 Press PLAY/PAUSE or STOP to navigate between Shuffle and Repeat. Press
FORWARD or REVERSE to cycle through these Shuffle/Repeat settings:
• Shuffle (random play): ON or OFF (Default); When Shuffle is ON, the
Shuffle icon is displayed on the LCD.
• Repeat: ALL (repeats all tracks) icon is displayed on the LCD, ONE
(repeats current track) icon is displayed on the LCD, or OFF (Default).
6 Press ENTER to save the settings and exit.
Shuffle/Repeat
screen
 Loading...