

Page 1

(Optional)
1. Insert the Rio Connector into an available PCI slot in your PC.
2. Power on your computer. Windows should post a “New
Hardware Found” screen and notify you that it has found the Rio
Connector.
3. If prompted, place the Rio Receiver Installation CD in the CDROM drive and click Next. This will prompt Windows to select
the Rio Connector’s driver from the CD. Windows will then
finish installing the Rio Connector.
Note: You may be prompted to
load drivers from your Windows
CD as well, so have it on hand.
4. Plug the 6¹ phone cord into the
Rio Connector port marked
“Line” and into the nearest
phone jack to your computer.
1. Go to the room where your Rio
Receiver will be located (i.e.
livingroom, kitchen, bedroom...).
Plug the 15¹ phone cord into the
nearest wall phone jack and into
the back of the Rio Receiver in the
port marked “Wall”OR plug an
Ethernet cable into the “Ethernet” port at
the back of the Rio Receiver and into your
Ethernet hub.
1. Insert the Rio Receiver Installation CD in the CD-ROM drive.
2. When the Rio Receiver splash screen appears, click the
Software Installation button. (If it does not automatically run,
click Start and then Run. Type in D:\Setup.exe and click OK. If
your CD-ROM drive is a letter other than D, replace D with that
letter.)
3. Click the Rio Software button. The Installation Wizard
screen will apear.
4. Click Next. You will be prompted to read through the Audio
Receiver Manager License Agreement.
5. Click Yes. When you are prompted to select the destination
folder for the program, we recommend leaving it at the default
folder (c:\Program Files\Audio Receiver), but you can change the
destination folder by clicking the Browse button and pointing
the installation program to your preferred destination.
6. Click Next and then click Finish. Audio Receiver Manager will
place an icon in the PC’s system tray in the bottom right corner
of the desktop. Audio Receiver Manager will launch and then
prompt you to search your hard drive for music.
7. Click OK. The Select Music Locations screen will launch
with a list of hard drives located on your computer.
8. Click OK to let it search those drives or use the Add,
Remove, and Remove All buttons to select specific drives and
folders you want to search. When it has finished searching the
selected drives for music, Audio Receiver Manager will display a
message telling you how many tracks and playlists it found.
9. Click OK to exit the program.
2. Using the speaker wires, connect a wire to the red and black
spring clips on the Rio Receiver and to each speaker
OR if connecting the Rio Receiver to your home theater with the RCA
cable, connect the red RCA connector to the red jack and the white RCA
connector to the white jack on your stereo receiver and the Rio Receiver.
3. Plug the Rio Receiver’s power cord into a power supply.
4. Power on the Rio Receiver. The Rio Receiver’s LCD will display:
5. When it has finished querying your PC, the Rio Receiver will
display the first song in your digital music file database. It is now
ready to bring your music to you.
Power - Turn the Rio Receiver on and off.
Menu - Press once to access the control
menus.
Volume - Increase and decrease the volume.
Select - Scroll through the menus by pressing
the up and down arrows.
Enter - Press once to enter in your choices.
Cancel - Press once to cancel current mode.
Random - Press once to shuffle songs, twice
to turn off this feature.
Repeat - Press once to repeat current song,
twice to repeat all songs.
List - Press to create and recall playlists.
Search - Press to search for an album, artist,
genre, playlist or song title using the
Alphanumeric Numbers.
Alphanumeric Numbers - Use with Search
and List to find selections by title or number.
Play - Press once to play a song, twice to
pause.
Fast Forward - Press once to skip to next
track.
Rewind - Press once to return to previous
track.
Stop - Press once to stop the current song,
resets song to beginning of track.
System Requirements
Intel ® Pentium® 200 MHz MMX
or higher CPU
32 MB RAM
16 MB free hard drive space
CD-ROM drive
PNA networking or Ethernet
networking for PC
Windows 98, 98SE, 2000,
Millennium
Package Contents
Rio Receiver w/power cord
Rio Connector (optional)
Rio Remote
15¹ standard phone cord
6¹ standard phone cord
6¹ RCA cable
Rio Receiver Installation CD
- Online User’s Guide
- Audio Receiver Manager software
- And much more
For more in-depth instructions on how to install and use your new Rio
Digital Audio Receiver, check out the online User Guide located on the
Rio Receiver Installation CD. Put the CD in your CD-ROM drive and
when the splash screen comes on, click the Manuals button and then the
Rio Receiver Manual button to launch the online User Guide.
Copyright and trademark
© 2000 S3 Incorporated. All Rights Reserved.
Rio is a registered trademark of RioPort.com, Inc. licensed by Diamond Multimedia Systems, Inc., a Division of S3
Incorporated. Rio Receiver is a trademark or registered trademark of S3 Incorporated in the United States and/or
other countries. Microsoft Windows and the Windows Logo are trademarks or registered trademarks of
Microsoft Corporation in the United States and/or other countries. All other brand and product names are trademarks of their respective companies or organizations. Unauthorized duplication and distribution of any recordings
downloaded from the Internet or made from audio CDs are a violation of copyright law and international treaties.
Neither S3 Incorporated nor Diamond Multimedia Systems, Inc. assume any responsibility for errors or omissions
in this document. Neither S3 Incorporated nor Diamond Multimedia Systems, Inc. makes any commitment to
update the information contained herein.
Parts of the software provided with the Rio Receiver tm are covered by the GNU General at wwww.gnu.org.
Under the terms of the license we are required to provide the source code for these components. Source code is
provided on CD-ROM in addition to the standard locations.
First Edition, August, 2000. Part Number 41000550-002 rev B
Page 2
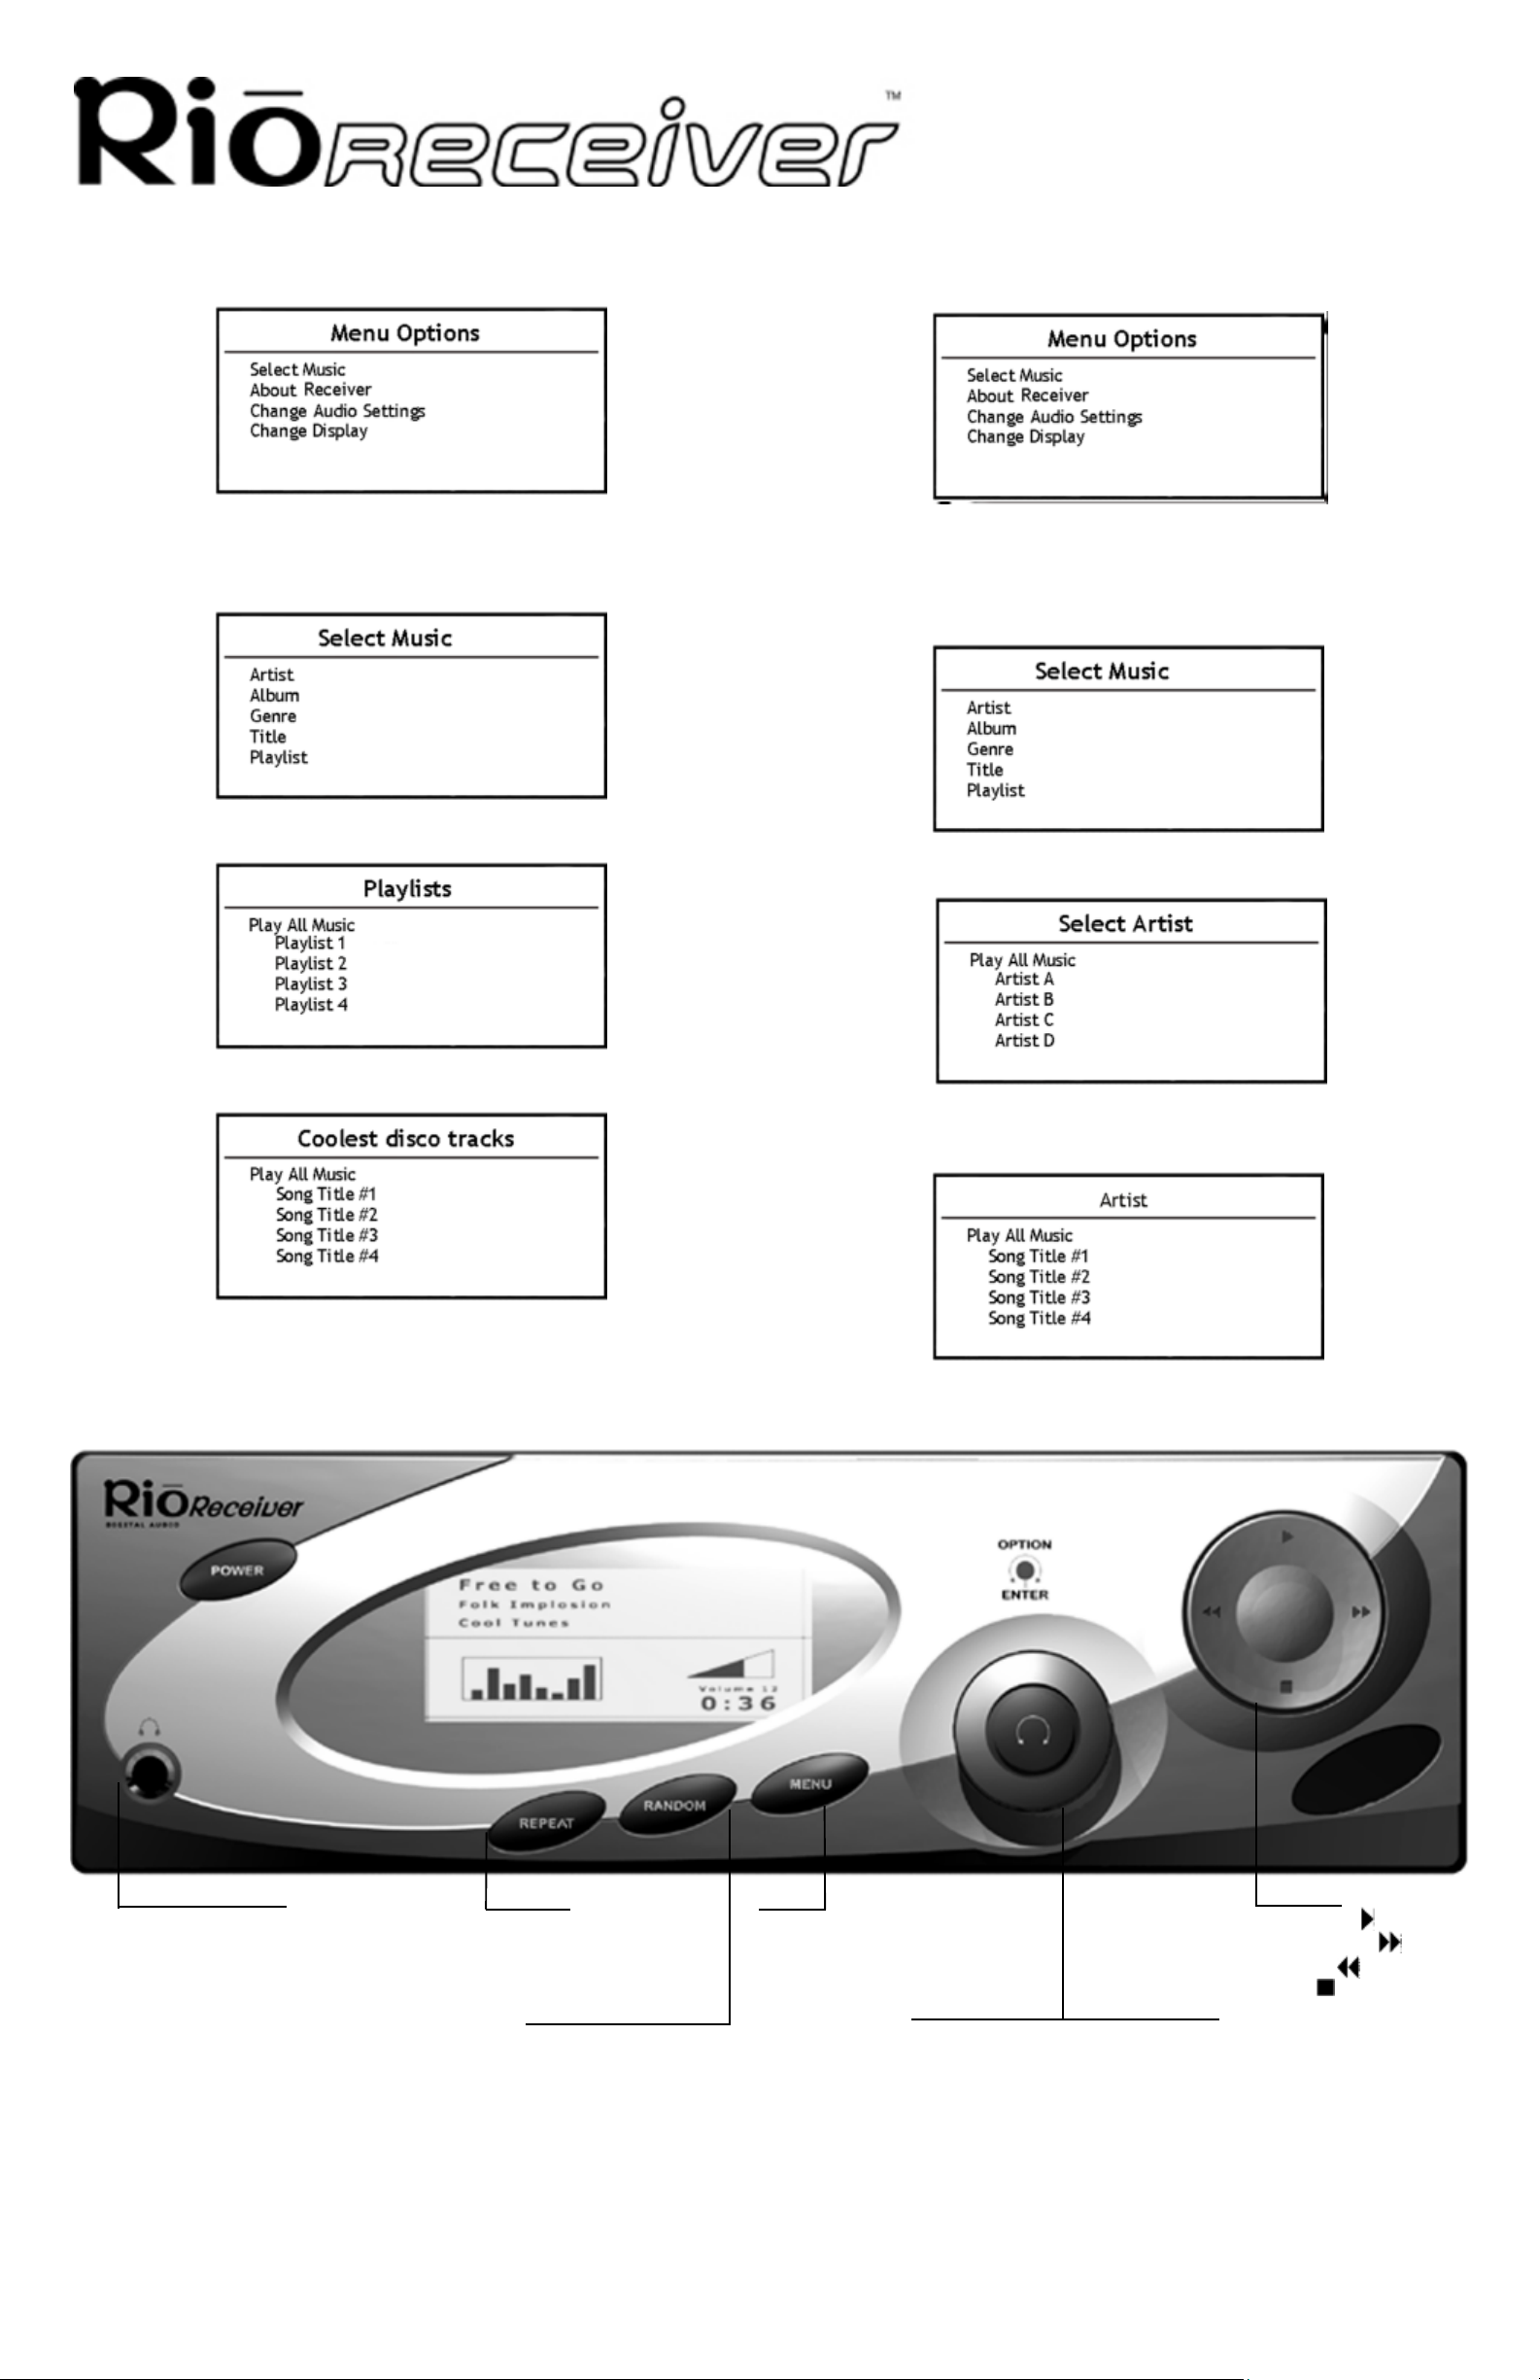
Use the Menu button and the
Volume Select on the Rio
Receiver to choose music
To Select Playlists:
1. Press the Menu button to access the Menu Options.
2. Turn the Volume Select left or right to scroll through the options.
3. Highlight Select Music and press the Volume Select.
4. On the Select Music screen highlight Playlist and press the
Volume Select.
5. Scroll through the playlists on the Playlists menu until you highlight
the desired playlist.
To Select Individual Songs:
1. Press the Menu button to access the Menu Options.
2. Turn the Volume Select left or right to scroll through the options.
3. Highlight Select Music and press the Volume Select.
4. On the Select Music screen scroll through the options. Highlight
Artist, Album, Genre, Title, or Playlist and press the Volume
Select. For example: Select Artist.
5. On the Select Artist screen select which artist you want to listen
to and press the Volume Select.
6. Highlight Play All and press the Volume Select to play all of the
songs in that playlist.
6. The screen title will be that of the Artist you chose. Scroll through
the list of songs and highlight the song you want to listen to. Press
the Volume Select to play that song .
Headphone Jack
Repeat
Press once - repeat 1 song.
Press twice - repeat all songs.
Menu
Press once to enter Menu Mode.
Random
Press once - shuffle songs in selected playlist.
Press twice - turn off Random feature.
Joypad
Play/Pause
FastForward
Rewind
Stop
Volume Knob Select Button
In Normal Mode:
Turn right/left to increase/decrease volume.
Press in twice and turn right/left to adjust Balance.
Press in three times and turn right/left to adjust Bass.
Press in four times and turn right/left to adjust Treble.
In Menu Mode:
Turn right/left to scroll through menu options.
Press in to select options.
 Loading...