

Page 1

RIO PMP300
San Jose, CA 95134-1922 USA
USER’S GUIDE
Diamond Multimedia Systems, Inc.
2880 Junction Avenue
Page 2

Copyright Notices
Xaudio MPEG Audio engine Copyright © 1998 by MpegTV.
Cdda is a product of Computall
Winamp is a product of NullSoft
Licensed to Diamond Multimedia Systems, Inc.
This manual is copyrighted. All rights reserved. This document
may not, in whole or part, be copied, reproduced, reduced or
translated by any means, either mechanical or electronic,
without prior consent in writing from Diamond Multimedia
Systems, Incorporated. The information in this manual has
been carefully checked and is believed to be accurate.
However, Diamond Multimedia Systems assumes no
responsibility for any inaccuracies that may be contained in
this manual. In no event will Diamond Multimedia Systems be
liable for direct, indirect, special, incidental, or consequential
damages resulting from any defect or omission in this manual,
even if advised of the possibility of such damages.
In the interest of continued product development, Diamond
Multimedia Systems reserves the right to make improvements
in this manual and the products it describes at any time,
without notice or obligation.
Copyright © 1998, Diamond Multimedia Systems, Inc. 2880 Junction
Avenue, San Jose, CA 95134
Page 3

Table of Contents
1 INTRODUCTION............................................................................1
What is MP3? ...........................................................................1
The Rio PMP300 Player..........................................................1
How Does Rio Work?............................................................2
MP3 Internet Sites ...................................................................2
2 INSTALLING RIO............................................................................3
General System Requirements...............................................3
Rio Kit Overview.....................................................................4
Rio Hardware Installation.......................................................4
Rio Software Installation.........................................................5
3 USING THE RIO PLAYER..............................................................7
Connecting Rio to Your PC ..................................................7
Using the RioPMP300 Player..................................................9
Making MP3 Files .....................................................................16
4 TROUBLESHOOTING ....................................................................17
A C
ONTACTING DIAMOND..........................................................19
USA Customer Service ...........................................................19
Technical Support ...................................................................19
B TECHNICAL SPECIFICATIONS .....................................................21
C T
RADEMARK, WARRANTY AND CERTIFICATION
INFORMATION ...............................................................................23
Table of Contents
Page 4

Page 5

INTRODUCTION
1
Welcome to the world of Rio! The Rio PMP300 plays your
favorite audio soundtracks formatted with the popular MP3
standard. This chapter introduces you to the MP3 audio
technology, and provides a general overview on how to use Rio.
♦ ♦ WHAT IS MP3?
♦ ♦ THE RIO PMP300 PLAYER
♦ ♦ HOW TO USE RIO
♦ ♦ MP3 INTERNET SITES
WHAT IS MP3?
MP3 stands for MPEG 1 layer 3. It is an efficient way to store
high-quality music or other audio content on your computer.
MP3 files can be 1/4 to 1/20 the size of a commercial CD audio
file—yet retain a high sound quality. MP3 files usually have the
extension .mp3, and can be downloaded from the Internet, or can
be legally made for personal use from your favorite CDs that you
purchased.
Warning!—It is illegal to encode MP3 files for trade or sale unless
you have the expressed and explicit permission of the copyright
holder(s).
HE RIO PMP300 PLAYER
T
The Rio PMP300 player stores your favorite MP3 files in its flash
memory so that they can be played anywhere you want to go.
Rio’s solid-state design makes it impervious to the skipping and
jitter experienced with portable CD players. Rio is lightweight,
and about the size of a pager. It is perfect for activities like
Introduction
1
Page 6

2
jogging or walking, hiking—just about any activity you like to
do.
OW DOES RIO WORK?
H
The Rio PMP300 player is easy to use. It takes only three steps to
start playing your favorite music titles using Rio:
1. Obtain legal MP3 files from many MP3 Internet sites, or
create them from CD disks you purchased using the
MusicMatch JukeBox software provided on the installation
CD.
2. Use the Rio Manger to download your MP3 files into Rio’s
flash memory.
3. Put your headphones on and press the Play button on the
Rio PMP300 player to listen to great digital sound!
The following chapters go into greater detail on how to work
with Rio. Soon you can start taking your favorite personal, and
legally-obtained MP3 files anywhere you go.
MP3 I
You can obtain legal MP3 files and the latest information on
MP3 technology from a growing number of Internet sites. Some
sites you might want to explore:
♦ www.mp3.com
♦ www.mpeg.org
♦ www.goodnoise.com
♦ www.musicmatch.com
♦ www.mp3bench.com
♦ www.nordicdms.com
♦ www.diamondmm.com
MP3 files are also available on the MP3 sampler and the
installation CD.
NTERNET SITES
Page 7

INSTALLING RIO
2
This chapter provides an overview of the Rio components and
instructions on the Rio hardware and software installation.
♦ ♦ GENERAL SYSTEM REQUIREMENTS
♦ ♦ RIO KIT OVERVIEW
♦ ♦ RIO HARDWARE INSTALLATION
♦ ♦ RIO SOFTWARE INSTALLATION
GENERAL SYSTEM REQUIREMENTS
The following system is recommended:
♦ Pentium 90MHz or faster
♦ Windows 98/95
♦ 20 MB free hard disk space
♦ 1 available parallel port
♦ CD-ROM drive (some drives may not accept encoding of MP3
files, see www.mp3.com for more information)
♦ 1 installed sound card
You may have acceptable performance with older or slower
systems. Be aware that certain operations, like creating MP3 files,
may take several minutes or longer.
Installing Rio 3
Page 8
4
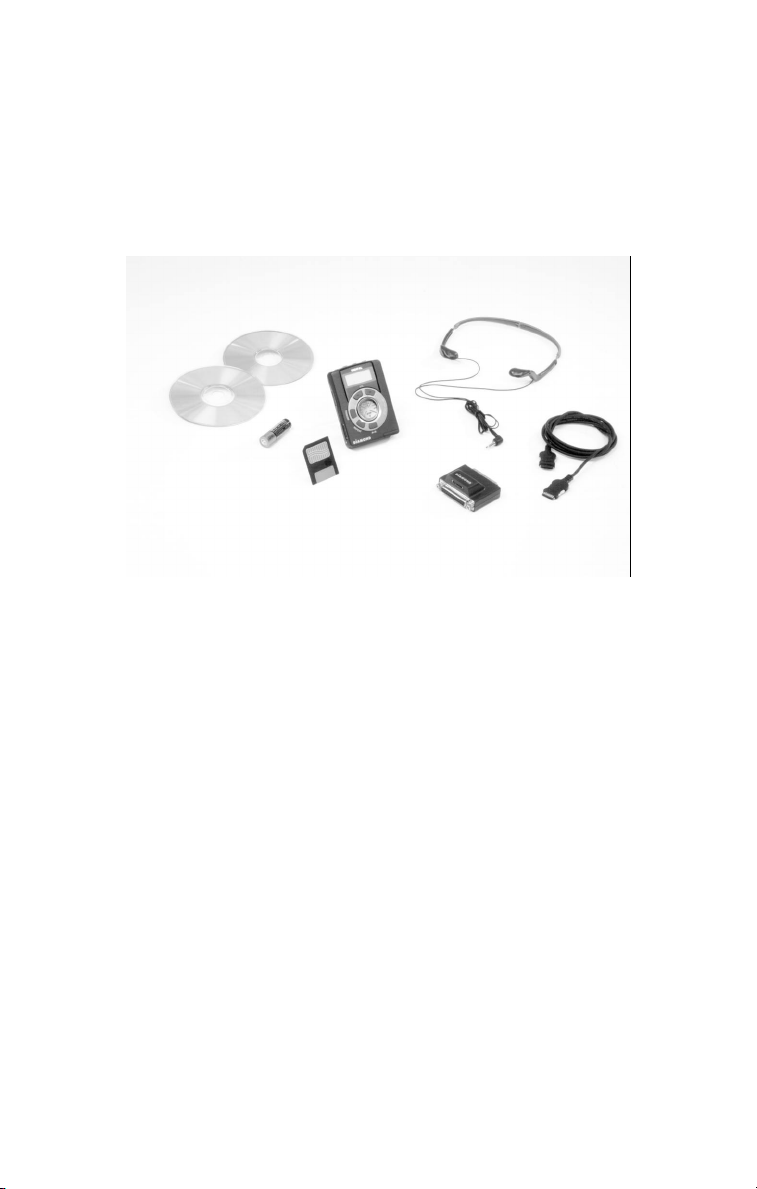
RIO KIT OVERVIEW
B – Headphones
F – AA battery
C – 15-pin data transfer cable
G* – Add-on flash memory
ABCDEFG
*
Take a moment to examine the components provided with your
Rio PMP300 kit in the following photo:
A – Rio PMP300 player E – Installation and MP3
sampler CDs
D – Parallel port adapter
Rio is designed to connect easily to your PC for downloading
MP3 files. Before you can enjoy high-quality audio with your Rio
Player, you must first connect the parallel port adapter (see
following section) and install the Rio software (see Chapter 2).
Chapter 3 instructs you on how to download MP3 files into Rio’s
flash memory using the Rio Manager.
IO HARDWARE INSTALLATION
R
Rio takes advantage of the parallel port on your computer for
MP3 data transfer. To set up Rio for MP3 file transfers, you need
*Not included. To order, contact Diamond
Customer Service at 1-800-4-M
ULTIMEDIA
Page 9
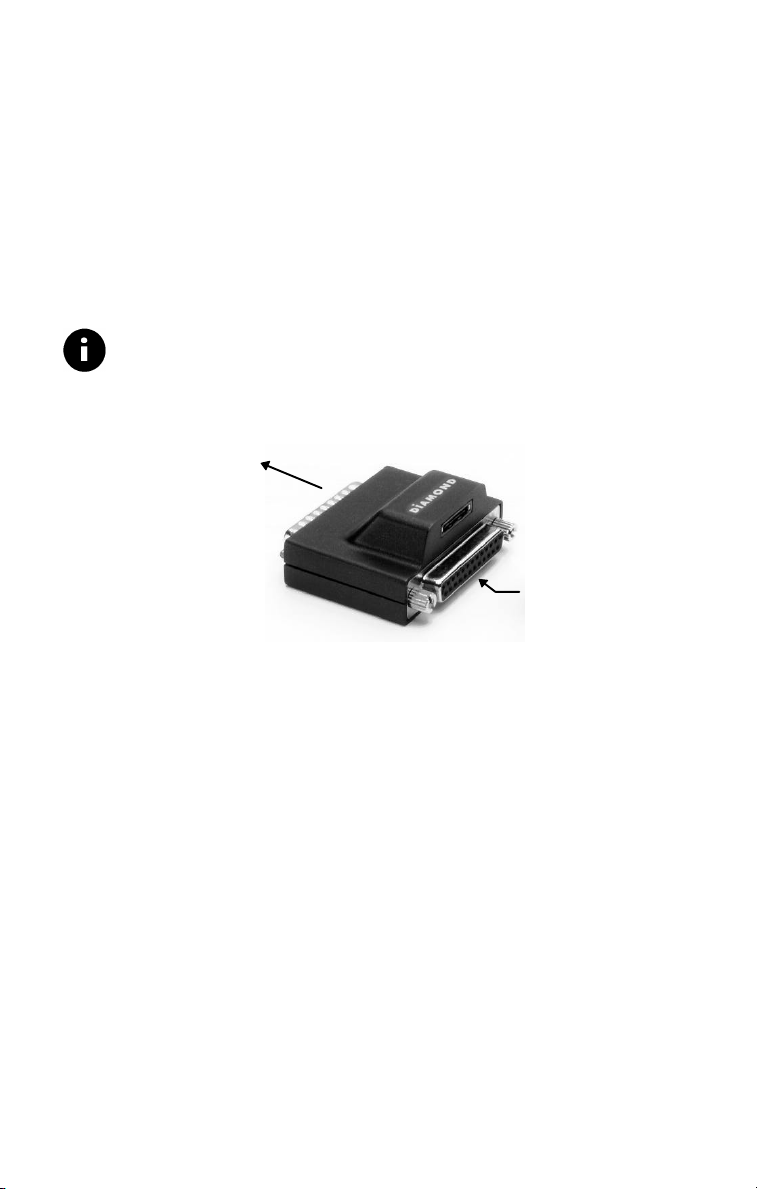
to attach the parallel port adapter to the parallel port. Leave the
parallel port
Figure - Rio parallel port adapter
through connector
adapter permanently connected to your PC—a pass-through
connector allows a printer, or other device, to remain coupled to
your computer.
1. With your computer turned off, remove the printer cable or
other device from your parallel port.
2. Take the parallel port adapter (item D from the table on page
4) and attach it to your parallel port. (see figure below)
Note—The parallel port adapter includes a pass-through
connector to allow shared operation of both Rio and your
printer (or other device). Reattach the printer or other device
cable to the parallel port using the pass-through connector.
Attach to computer
Printer/device pass-
When you want to load files into Rio, simply attach one end of
the 15-pin data transfer cable (item C, page 4) to the Rio PMP300
player, and the other end to the parallel port adapter. You then
run the Rio Manager. See Chapter 3 for information on using the
Rio software and hardware to download MP3 files.
IO SOFTWARE INSTALLATION
R
Installing the Rio software is a quick and simple procedure. To
install the Rio PMP300 software:
1. Turn on your computer. After it has booted, insert the Rio
Installation CD disk. The Rio installation program should
automatically launch if your computer is set to “auto-play”
the CD-ROM drive. After you see the Welcome screen, click
Next.
Installing Rio 5
Page 10

6
If the installation program does not start automatically, then
from My Computer, double-click the letter of your CD-ROM
drive (usually labeled D), then double-click Setup.exe.
2. You are requested to select a destination directory. We
recommend you use the default directory paths. Click Next.
3. In the Select Components screen, click the check boxes to
install the software you want. We recommend you install all
pre-checked options. Click Next. The Ready to Install screen
appears.
4. Click Next to proceed with the installation.
5. Click Finish when the Install Complete screen appears.
After the Rio software has been installed, the MusicMatch
Jukebox installation program should automatically begin—if you
selected MusicMatch in the installation options in step 3 above.
Follow the on-screen directions to complete the MusicMatch
installation.
You are now ready to enjoy the wonderful world of Rio!
Page 11

USING THE RIO
3
The Rio PMP300 player uses both software and hardware together
to bring portability to your favorite MP3 music titles. To use the
Rio player, you must first have MP3 files to play.
This chapter describes how to create MP3 files, and load them
into the Rio PMP300.
PLAYER
♦ ♦ CONNECTING RIO TO YOUR PC
♦ ♦ USING THE RIOPMP300 PLAYER
♦ ♦ MAKING MP3 FILES
CONNECTING RIO TO YOUR PC
Before you can load legal MP3 files into the Rio PMP300 player,
you must connect Rio to your PC through the parallel port
adapter you installed in the previous chapter. The following
sections describe how to connect Rio to your PC so you can load
your personal-use MP3 files.
Before Using Rio…
Before you can use the Rio player, you must first insert a 1.5v AA
battery (provided with your Rio kit).
1. Hold the Rio PMP300
player carefully in your
hand, and use your thumb
to slide open the battery
compartment lid.
Using the Rio Player 7
Page 12

8
2. Insert the 1.5v AA battery into the
Data transfer connector
transfer cable
battery compartment.
3. Close the battery compartment lid.
Attach Data Transfer
Cable
1. Align one end of the 15pin data transfer cable
(item C, page 4) with its
connector slot on the
parallel port adapter .
15-pin data
2. Insert the data transfer
cable into the connector
on the parallel port
adapter until it locks into
place as shown.
Note—DO NOT FORCE the
data transfer cable into the
parallel port adapter or the Rio player. It is a one-way fit only.
Flip the connector and reinsert if it does not fit easily.
Slide until
connector
locks
3. Connect the opposite end of the
You are now ready to use the Rio
player.
data transfer cable to the data
cable connector slot located on
the side of the Rio Player.
Page 13

U
Figure A - Front end of the Rio player
INTRO buttons plus headphone jack
SING THE RIOPMP300 PLAYER
The following sections describe the Rio player control buttons,
and how to download MP3 files into the Rio flash memory.
Rio Control Buttons
Your Rio player has buttons that control playback modes, and an
LED display to indicate the
current mode and status.
Before downloading your first
MP3 files into Rio, familiarize
yourself with how the various Rio
control buttons are organized,
and what functions these buttons
control.
The Rio MP3 playback control
buttons are located on the front
face and top of the Rio player
(see Figures A and B). The
playback buttons are arranged in
a circular dial, and are familiar to
cassette or VCR controls.
There is no On-Off switch. Rio is
turned on by pressing the Play
button once. Total memory, in
Megabytes (MB) is always
displayed when Rio is turned on.
If there are any MP3 files loaded,
the first track begins to play automatically.
Rio Playback Dial Control Buttons
Basic playback functions are controlled using the playback dial
buttons. The playback dial is the nerve center of the Rio player:
you control On-Off in addition to basic Play/Pause/Stop—and
other functions. Refer to the following figure.
Figure B - Top end view MENU-EQ-
Using the Rio Player 9
Page 14

10
Reference Command Function
Figure C - Rio playback dial control buttons
562
7
1
348
1
1 Volume
2 Rewind Rewind. Press and hold to move backward
3 Random Begin Random Play mode. Press again to
4 Repeat Begin Repeat Play mode. Press once to
5 Play/Pause Play/Pause/ Power On. Press once to turn
6 Fast Fwd. Fast Forward. Press and hold to move
7 Stop Stop playback/Power Off. Press once to
8 A—B Select Excerpt. Marks selection for repeated
+ or - to increase/decrease volume.
Press
within the current track; press and release
to skip to the start of the previous track.
cancel.
repeat current track; press again to repeat
all tracks in memory; press again to cancel.
on Rio and begin Play; press again to pause
current track.
forward within the current track; press and
release to skip to next track.
stop playback; press again to turn Rio off.
playback. Press once to start (letter A
appears); press again to complete selection
(letter B appears); press again to cancel.
Note—To preserve battery power, Rio will automatically shut
itself off after 15-20 seconds of no activity.
Page 15

MENU—EQ—INTRO Buttons
Flash memory lock
The top of the Rio player contains three additional buttons:
Menu, EQ, and INTRO (see Figure B, page 9). These buttons
provide additional features to view the Rio player status, change
the audio levels (EQ), and preview your tracks. Following is a
quick description of the buttons and their functions:
Button Name Function
MENU
EQ
INTRO
Monitor internal/external flash memory. Click the
Forward button on the Rio playback dial to scroll and
check the following:
♦ total internal memory (Ti)
♦ total external memory (Te)
♦ remaining internal memory (Ri)
♦ remaining external memory (Re)
♦ firmware version number
Rio must be in Stop mode to view this information.
Change equalization (EQ) settings. There are four
available EQ settings:
♦ Normal—no EQ applied
♦ Classic (displayed as “Clasic”)
♦ Jazz
♦ Rock
Plays first 5-10 seconds of each track; moves on to next
track immediately, if any.
External Memory Card Eject
If you have an external flash memory card inserted into the Rio
player, eject it by first
releasing the lock and
then pushing the eject
slide with your thumb.
Using the Rio Player 11
Page 16

12
Rio LED Display
On
Play/Pause
Repeat One/All
Random play mode
B select excerpt repeat
Rio’s LED display indicates its current mode—Play, Pause, Stop—
and status. Rio also displays additional information, such as on
volume level, track number, and battery charge status.
Following is a description of the LED display functions.
Note—The modes shown in the following illustration are not
always visible. The information shown by the LED depends upon
the current mode, or command you execute.
Track number/time
counter
♦ Play/Pause: Play arrow or vertical Pause displays depending
on mode
♦ Track number/time counter: displays track number and time
count of current track
♦ Repeat 1/All: repeats either current or loops through all
tracks
♦ A—B select excerpt: indicates select excerpt is On (see Figure
C on page 10 and accompanying table for details on how to
use this function)
♦ INTRO: when displayed, a preview of the first 10 seconds of
each track are played. See
♦ Battery charge: indicates current battery status. Illustration
shows ½ battery life remaining. All black indicates fullycharged battery. Always visible.
MP3 encoding
rate
Battery charge
indicator
INTRO
A—
MENU—EQ—INTRO, page 11.
Page 17

♦ Mp3 encoding rate: indicates at which rate the MP3 file was
window.
encoded. Higher number equals higher quality audio output
(measured in kilobits per second (Kbps) .
♦ HOLD: indicates that the
Hold switch has been turned
on. Prevents all buttons from
operating from accidental or
unintended contact.
♦ VOL: indicates volume level.
Note—The LED will display Play, Pause, Stop, and so forth, for
several seconds after you press a playback control button.
Downloading Files Into Rio
Your Rio PMP300 player comes with 32 megabytes (MB) of
internal flash memory to store your audio tracks—about 60
minutes of playing time at an MP3 bitrate of 64Kbps.
For an additional cost, you can purchase external flash memory
cards that can increase your total playing time. Contact Diamond
Customer Service to purchase external flash memory upgrades.
(see page 19)
Note—Actual playback time may vary according to the amount of
flash memory and the quality level used to create the MP3 files.
Quality level is controlled by the software used to make MP3
files. See
Making MP3 Files, page 16.
To download legal MP3 music files into Rio:
1. Start the Rio software by clicking Start > Programs >
RioPMP300 > Rio Manager. The Rio PMP manager appears:
Figure - Rio PMP Manager player
Using the Rio Player 13
Page 18

14
2. Click Memory (Mem). The Memory screen appears:
window.
Figure - Rio PMP Internal/External Memory
If there is any music already loaded into Rio, it will be
displayed in the Memory window play list. Click External to
view contents of the external flash memory card—if one is
installed. See the online Help for more information on flash
memory management.
3. Click Open.
4. Browse your system for the location of your MP3 files. Select
the files you want to load and click Open. The Rio software
starts downloading the selected file(s) into the Rio PMP300
player.
The Rio LED indicates that a file download is in process:
5. When the file download is complete, the LED display returns
to either Off or Stop mode. You can disconnect the data
transfer cable at this time, and take Rio with you.
Page 19

Downloading Files Using Drag-n-Drop
You can also use Rio’s Drag-n-Drop feature to load files from
your desktop to the Rio memory window.
To use the Drag-n-Drop feature:
1. Follow steps 1-2 in the previous section.
2. Open a folder on your computer that contains MP3 files.
3. Select the files you want using your mouse, and drag the files
over to the Rio memory window. The MP3 files are now
loaded into the Rio memory.
4. When the file download is complete, the LED display returns
to either Off or Stop mode. You can disconnect the data
transfer cable at this time, and take Rio with you.
Notes—(1) Files will not load into Rio if you exceed the available
memory (see Chapter 4,
into the currently displayed (Internal or External) Memory
window only. (3) Drag-n-Drop functions will not work with the
MusicMatch software.
If you need additional help using the Rio PMP Manager, click ?
located in the upper-right side of the Rio Manager. You can also
access general online Help for Rio. Click Start > Programs > Rio
PMP300 > Online Help.
Troubleshooting). (2) Files always load
Playing MP3 Files with Rio
To begin music playback, insert headphones (see Figure B, page 9)
into the headphone jack and turn Rio on by pressing the Play
button. The first track begins to play. Use the playback buttons to
move to other tracks, or perform other commands. Refer to the
table on page 10 for a quick reference of the playback commands.
After Rio plays the last track, it shuts off automatically—unless
you pressed the Repeat button.
Playing MP3 Files Using the Rio Manager
You can also drag MP3 files into, and play them directly from the
Rio Manager using your PC sound system. After you open the Rio
Using the Rio Player 15
Page 20

16
Manager, drag an MP3 file into the player window. (see figure of
the Rio Manager player window on page 13)
AKING MP3 FILES
M
Warning!—It is illegal to encode MP3 files for trade or sale unless
you have the expressed and explicit permission of the copyright
holder(s).
Not only can you download legal MP3 files from the Internet for
personal use, you can also make MP3 files from CD recordings
you have already purchased. The following section gives an
overview of MusicMatch—the software used to make MP3 files.
MusicMatch JukeBox Software
Brava Software, Inc., in partnership with Diamond Multimedia
Systems, Inc., provides the easy-to-use software to make and play
MP3 files on your PC.
MusicMatch is an optional component of the Rio installation
program. If you need to install—or reinstall—the MusicMatch
software, follow the software installation procedures on page 5.
Make sure you select the MusicMatch Jukebox component in the
Select Components dialog of the Rio installation program.
With the MusicMatch software, you can convert your favorite CD
music tracks to .mp3 files for personal use. Brava Software
provides detailed online Help to aid you in using and configuring
the software.
To learn more about using the MusicMatch JukeBox software, go
to Start > Programs > MusicMatch > MusicMatch JukeBox.
Once you have started the program, click Help for assistance.
Note—The time to make—and quality of—an MP3 from a CD will
vary depending upon your system speed, CD-ROM capabilities,
general system resources.
Page 21

TROUBLESHOOTING
4
This section provides some useful information regarding setup and
operation of your Rio PMP300.
The computer displays a message that “no communications port” was found, or
that it “cannot find the Rio player.”.
First, check the following:
♦ make sure the parallel port adapter and cables are properly connected
♦ check the battery charge using the charge indicator on the Rio LED
♦ verify that the parallel port is enabled and working using the Windows
98/95 Device Manager
♦ try removing other parallel port devices
♦ check and see if the parallel port is enabled in your system BIOS
Important—Before making any changes to your system BIOS, consult your
motherboard manufacturer’s user guide.
The AA battery inside Rio drains even if I haven’t used the Rio player some time.
What causes this?
The Rio player always uses some battery power. When Rio is turned “off,” it
actually is in a low-power mode. If you know you will not use Rio for a while,
remove the AA battery to preserve its charge.
Can I use any flash memory card to increase my Rio player’s memory?
No. The Rio PMP300 uses a 3.3 volt (v) flash ROM memory card only. Do not use
5v cards. You can purchase the correct memory upgrade for your Rio PMP300
player from Diamond Customer Service (1-800-4-M
Online Store at www.diamomdmm.com/rio for convenient online shopping. Flash
memory cards may also be purchased from retail electronic stores.
ULTIMEDIA), or the Diamond
Why can’t I play the tracks I have loaded on an external flash memory card before
tracks already loaded on Rio’s internal memory?
Rio always plays tracks that are loaded into its internal memory first; then it
plays any tracks loaded on an external flash memory card.
Why don’t the buttons on Rio respond when pressed?
Check the Hold switch (see description, page 13). Check battery charge.
When downloading an MP3 file to Rio, I get a message that says I cannot
download a first generation, copyrighted file. Why do I receive this message?
The file you attempted to download is a duplication of a copyrighted file.
Copyright laws prohibit serial copying of such files. Rio will not allow you to
Troubleshooting 17
Page 22

18
download files that have been duplicated in this manner. Obtain a legal copy of
the MP3 file you want to load into Rio to avoid this message in the future.
General Troubleshooting Tips
♦ Make sure your battery has adequate charge
♦ If you try to load more than 32MB of songs into the Rio memory, it will
automatically drop the entire last song. For example, if you attempt to load
a 34MB song into Rio’s internal memory, it will not load; if you load 4
10MB (40MB total) songs only the first 3 will load.
♦ There is no way to change the song play order from the Rio player itself;
but you can set to Random play—this mode will play until you shut Rio off.
To change the play order, use the Rio Manager software to place tracks in
the order you want.
♦ You cannot download first generation, copyrighted files.
Note—Troubleshooting information on the Rio software is found
inside the online Help, Troubleshooting section. To get help on the
Rio software, click Start > Programs > Rio PMP300 > Online
Help.
Page 23

CONTACTING
Customer Service FAX:
408-325-7408
Web Site:
www.diamondmm.com
FTP Site:
ftp.diamondmm.com
FAX on-demand:
800-380-0030
World Wide Web:
www.diamondmm.com
Product Support Email:
techsupt@diamondmm.com
Developer Relations:
developer@diamondmm.com
A
DIAMOND
USA CUSTOMER SERVICE
For updates and news on Diamond Multimedia products, please
fill out the product registration card and mail it in. For questions
or information in the United States regarding Diamond
Multimedia Systems products, please use any of the following:
U.S. mail:
Sales Info:
Customer Service Phone:
Diamond Multimedia Systems, Inc.
7101 Supra Drive SW
Albany OR 97321
1-800-4-M
sales4u@diamondmm.com
800-468-5846
ULTIMEDIA
TECHNICAL SUPPORT
If you need assistance, contact us by phone at 541-967-2450.
You can also FAX, e-mail or use the following information below
for additional information.
Visit the Diamond Multimedia web site for the latest software
updates and technical information.
Contacting Diamond 19
Page 24

20
Diamond Worldwide Support and Information Services
Service Country Phone / Address
Technical Support
Email support
RMA
UK
Germany
France
Japan
UK, Ger.,
France
All
+44-1189-4444-44
+49-8151-266-330
+33-1-55 38 16 16
+81-(0)3-5695-8405
techsupt.euro@diamondmm.com
+44-1189-4444-30
Electronic Bulletin
UK
Board Service (BBS)
Germany
World Wide Web UK
Germany
Japan
Fax on Demand UK
Germany
+44-1189-4444-15 (to 33.6 Kbps)
+44-1189-4413-12 (K56flex/V.90)
+49-8151-266-333 (to 28.8 Kbps)
+49-8151-266-356 (K56flex/V.90)
+49-8151-266-334 (ISDN)
www.diamondmm.co.uk
www.diamondmm.de
www.diamondmm.co.jp
+44-1189-4444-60
+49-8151-266-332
Page 25

TECHNICAL SPECIFICATIONS
B
Rio Specifications
Size: 3.5” x 2.5” x 5/8” Weight: 70grams (2.4 ounces)
Onboard memory: 32MB,
upgradable
Slots: 1 external flash memory Parallel port Transfer rate:
Total Harmonic Distortion:
0.01 - 0.1%
Connectors: Headphone; 15pin data transfer cable
connector
Battery: single 1.5V AA
(alkaline type recommended)
100Kbps (about 6 MB/minute)
Signal-to-noise ratio: >90dB
Accessories: Headphones; 15-
pin data transfer cable; parallel
port adapter
Technical Specifications 21
Page 26

22
Page 27

TRADEMARK, WARRANTY
INFORMATION
B
AND
CERTIFICATION
Trademarks
XingMP3 is a trademark of Xing Technology.
RealAudio is a trademark of RealNetworks
All other trade names referenced in this manual are the service mark, trademark, or registered
trademarks of their respective manufacturers. Diamond reserves the right to change specifications
without notice. Copyright © 1998 Diamond Multimedia Systems, Inc. Printed in USA.
Diamond Rio PMP300 Warranty
Your Rio PMP300 kit comes with a one-year hardware warranty. Diamond Multimedia Systems,
Inc., (Diamond) warrants Rio PMP300 against defects in material and workmanship for a period of
one year from the date of purchase from Diamond or an authorized Diamond agent. This warranty
applies only to the original purchaser of the Rio PMP300 kit and is not transferable. This warranty
does not cover any incompatibilities due to the user’s computer, hardware, software or any other
related system configuration in which Rio PMP300 interfaces. Proof of purchase will be required
before any warranty consideration by Diamond occurs.
This warranty does not cover any damage caused by negligence, non-authorized modifications, or
parts installed without prior written permission from Diamond.
This warranty does not apply if the product has been damaged by accident, abuse, misuse, or
misapplication, nor as a result of service to the product by anyone other than by Diamond.
DIAMOND IS NOT RESPONSIBLE FOR ANY LOST PROFITS, LOST SAVINGS OR
OTHER INCIDENTAL OR CONSEQUENTIAL DAMAGES ARISING OUT OF THE USE
OF, OR INABILITY TO USE, THIS PRODUCT. THIS INCLUDES DAMAGE TO
PROPERTY AND, TO THE EXTENT PERMITTED BY LAW, DAMAGES FOR
PERSONAL INJURY. THIS WARRANTY IS IN LIEU OF ALL OTHER WARRANTIES
INCLUDING IMPLIED WARRANTIES OF MERCHANTABILITY AND FITNESS FOR A
PARTICULAR PURPOSE.
Some states do not allow limitation of implied warranties, or exclusion or limitation of incidental or
consequential damages, so the above limitations may not apply to you. This warranty gives you
specific legal rights. You may have other rights which may vary from state to state.
This warranty applies only to this product, and is governed by the laws of the State of California.
Certification Information
This equipment has been tested and found to comply with the limits for a Class B digital
device, pursuant to Part 15 of the FCC Rules. These limits are designed to provide
TRADEMARK, WARRANTY AND CERTIFICATION INFORMATION 23
Page 28

24
reasonable protection against harmful interference in a residential installation. This
equipment generates, uses and radiates radio frequency energy and, if not installed and
used in accordance with the instructions, may cause harmful interference to radio
communications. However, there is no guarantee that interference will not occur in a
particular installation. If this equipment does cause harmful interference to radio or
television reception, which can be determined by turning the equipment off and on, the
user is encouraged to try to correct the interference by one or more of the following
measures:
1. Reorient or relocate the receiving antenna (television, radio, etc.).
2. Increase the separation between the equipment and receiver.
3. Connect the equipment to an outlet on a circuit different from that to which the
receiver is connected.
4. Consult the dealer or an experienced radio/TV technician for additional help.
Caution: Changes or modifications not expressly approved by the party responsible for
compliance could void the user’s authority to operate the equipment. Contact Diamond
Multimedia Systems, Inc., 7101 Supra Drive SW, Albany OR 97321. Technical Support tel:
541-967-2450. This device complies with Part 15 of the FCC Rules. Operation is subject to
the following two conditions: (1) this device may not cause harmful interference, and (2)
this device must accept any interference received, including interference that may cause
undesired operation. Warning: Using this product in any way other than as described in this
manual or altering the antenna in any way may violate FCC rules. FCC ID JJ4-GP9450-H
(Handset)FCC ID JJ4-GP9450-R (Receiver)
Canadian Radio Interference Regulations
This Class B digital apparatus meets all requirements of the Canadian Interference Causing
Equipment Regulations. Cet appareil numérique de la classe B respecte toutes les exigences
du Règelement sur le matériel brouilleur du Canada.
 Loading...