

Rinnai Evolve 950 RHFE950ETRN, Evolve 950 RHFE950ETRL, Evolve 950, RHFE950ETRN, RHFE950ETRL Installation Manual
Evolve 950
™
Installation guide
Models: RHFE950ETRN/RHFE950ETRL

Appliance must be installed with a Rinnai approved flue
system.
This appliance shall be installed in accordance with:
- Manufacturer’s installation instructions
- AS/NZS 5601 Gas Installations
- Local regulations and municipal building codes
Installation, servicing and repair shall be carried out only
by authorised personnel.
Warning
Improper installation, adjustment, alteration, service or
maintenance can cause property damage, personal injury
or loss of life.
For more information about buying, using, and servicing
of Rinnai appliances call: 0800 RINNAI (0800 746 624).
Rinnai New Zealand Limited
105 Pavilion Drive, Mangere, Auckland
PO Box 53177, Auckland Airport, Auckland 2150
Phone: (09) 257 3800
Email: info@rinnai.co.nz
Web: www.rinnai.co.nz
www.youtube.com/rinnainz
www.facebook.com/rinnainz
Important:

cnt:
Before you start ............................................... 4
Specification .................................................... 5
Gas supply ....................................................... 6
Electrical supply .............................................. 6
Wall penetration .............................................. 7
Framing dimensions ........................................ 8
Clearances ....................................................... 9
TV installation .................................................. 10
Flueing options ................................................ 11
Evolve 950 installation overview ..................... 12
Connect flue system ........................................ 13
Install heater into enclosure ............................ 14
Removing and replacing the glass panel ......... 15
Install burn media - log set .............................. 16
Install burn media - stones .............................. 18
Commissioning ............................................... 20
Install inner and outer frame ........................... 21
Test operation and lighting sequence ............. 22
Wiring diagram ................................................ 23
4 | Evolve 950 Installation Guide: 12471-A 01-14
Before you start
Unpack the appliance and components and check for damage. DO NOT install any damaged items.
Check all components have been supplied and that you have the correct gas type.
Read these instructions to get an overview of the steps required before starting the installation. Failure
to follow these instructions could cause a malfunction of the appliance. This could result in serious injury
and/or property damage.
Flue installation guide
These instructions are to be used in conjunction with the Rinnai Arriva and Evolve flue installation guide
supplied with the flue kits.
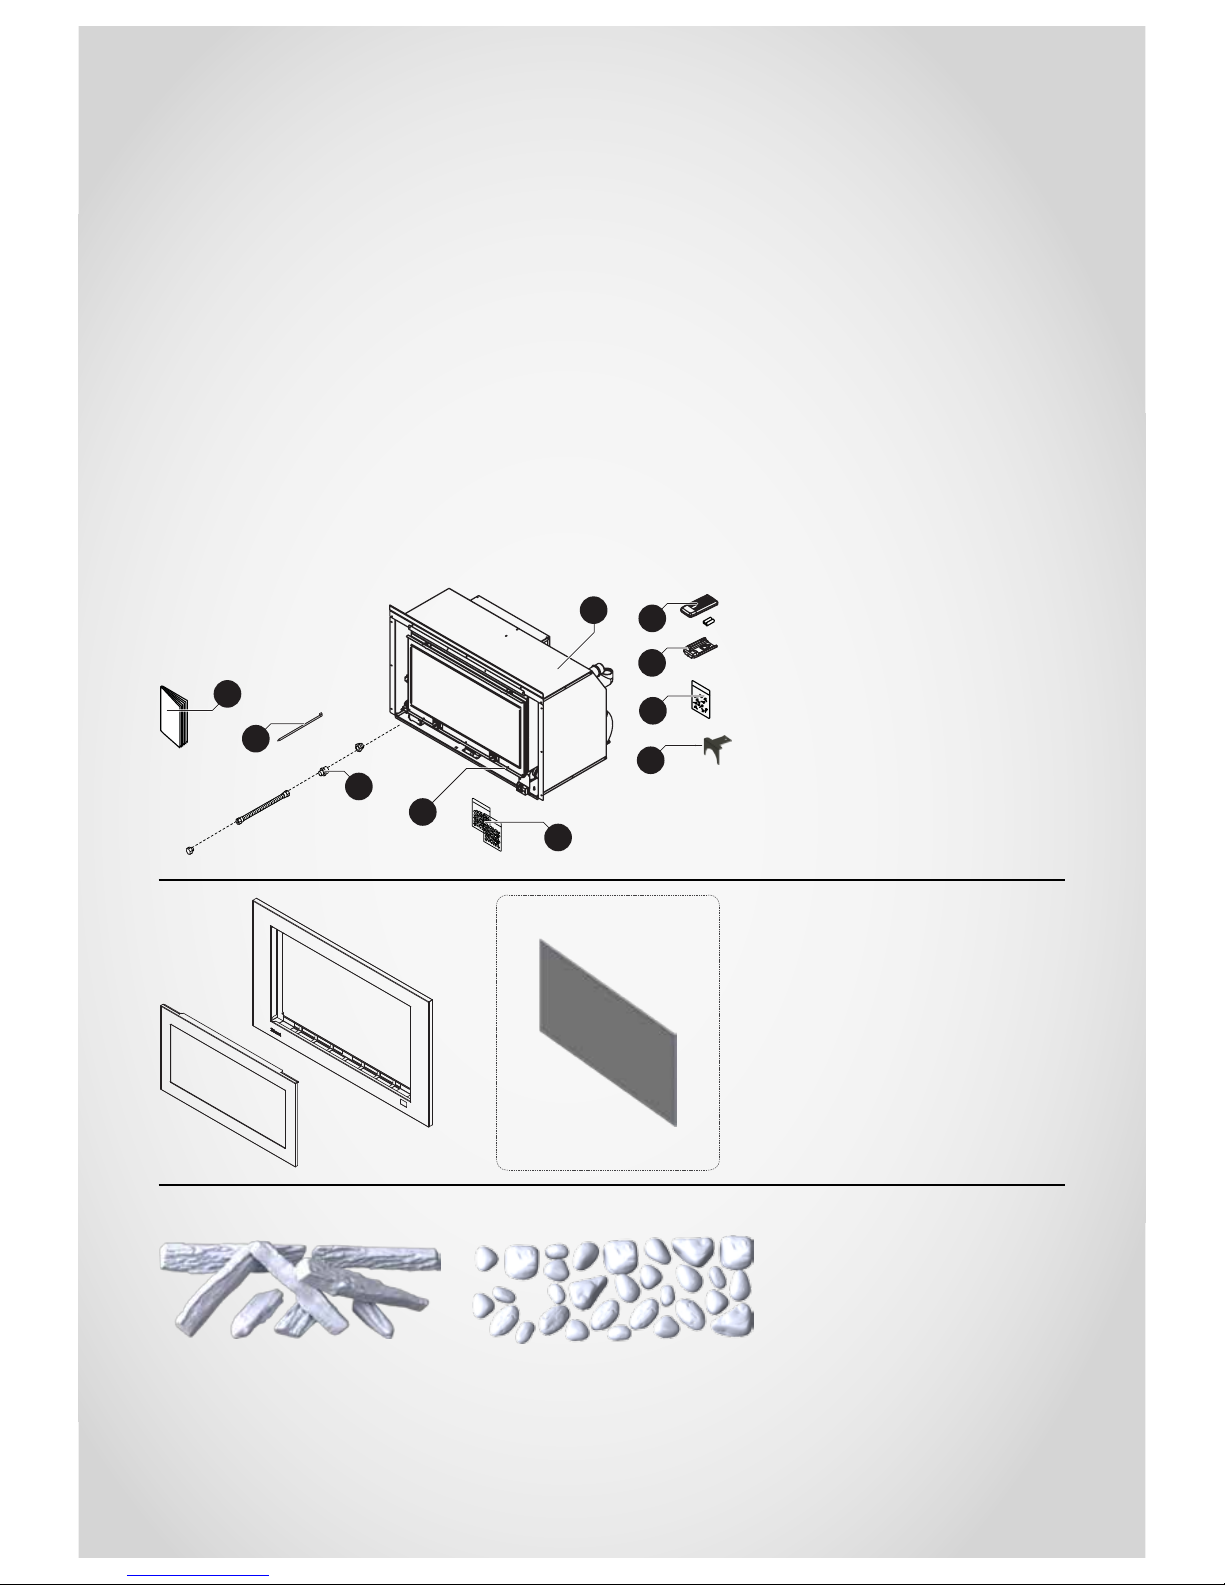
Carton contents
The components for the Evolve 950 are supplied in three separate cartons (four if a mesh guard is
purchased). Ensure all the components are supplied before starting the installation.
1
2
3
4
5
6
10
9
8
7
1. Evolve 950 engine
2. Remote control and batteries
3. Remote control mounting bracket
4. Screw pack
5. Flue clamp bracket
6. Cable tie
7. Fascia mounting screws
8. Operation and installation guides
9. Granule pack (x2)
10. Gas connections
• Inner frame
• Outer frame
Log set OR river stone set
• Mesh guard (optional accessory),
packaged in a separate carton
Evolve 950 Installation Guide: 12471-A 01-14 | 5
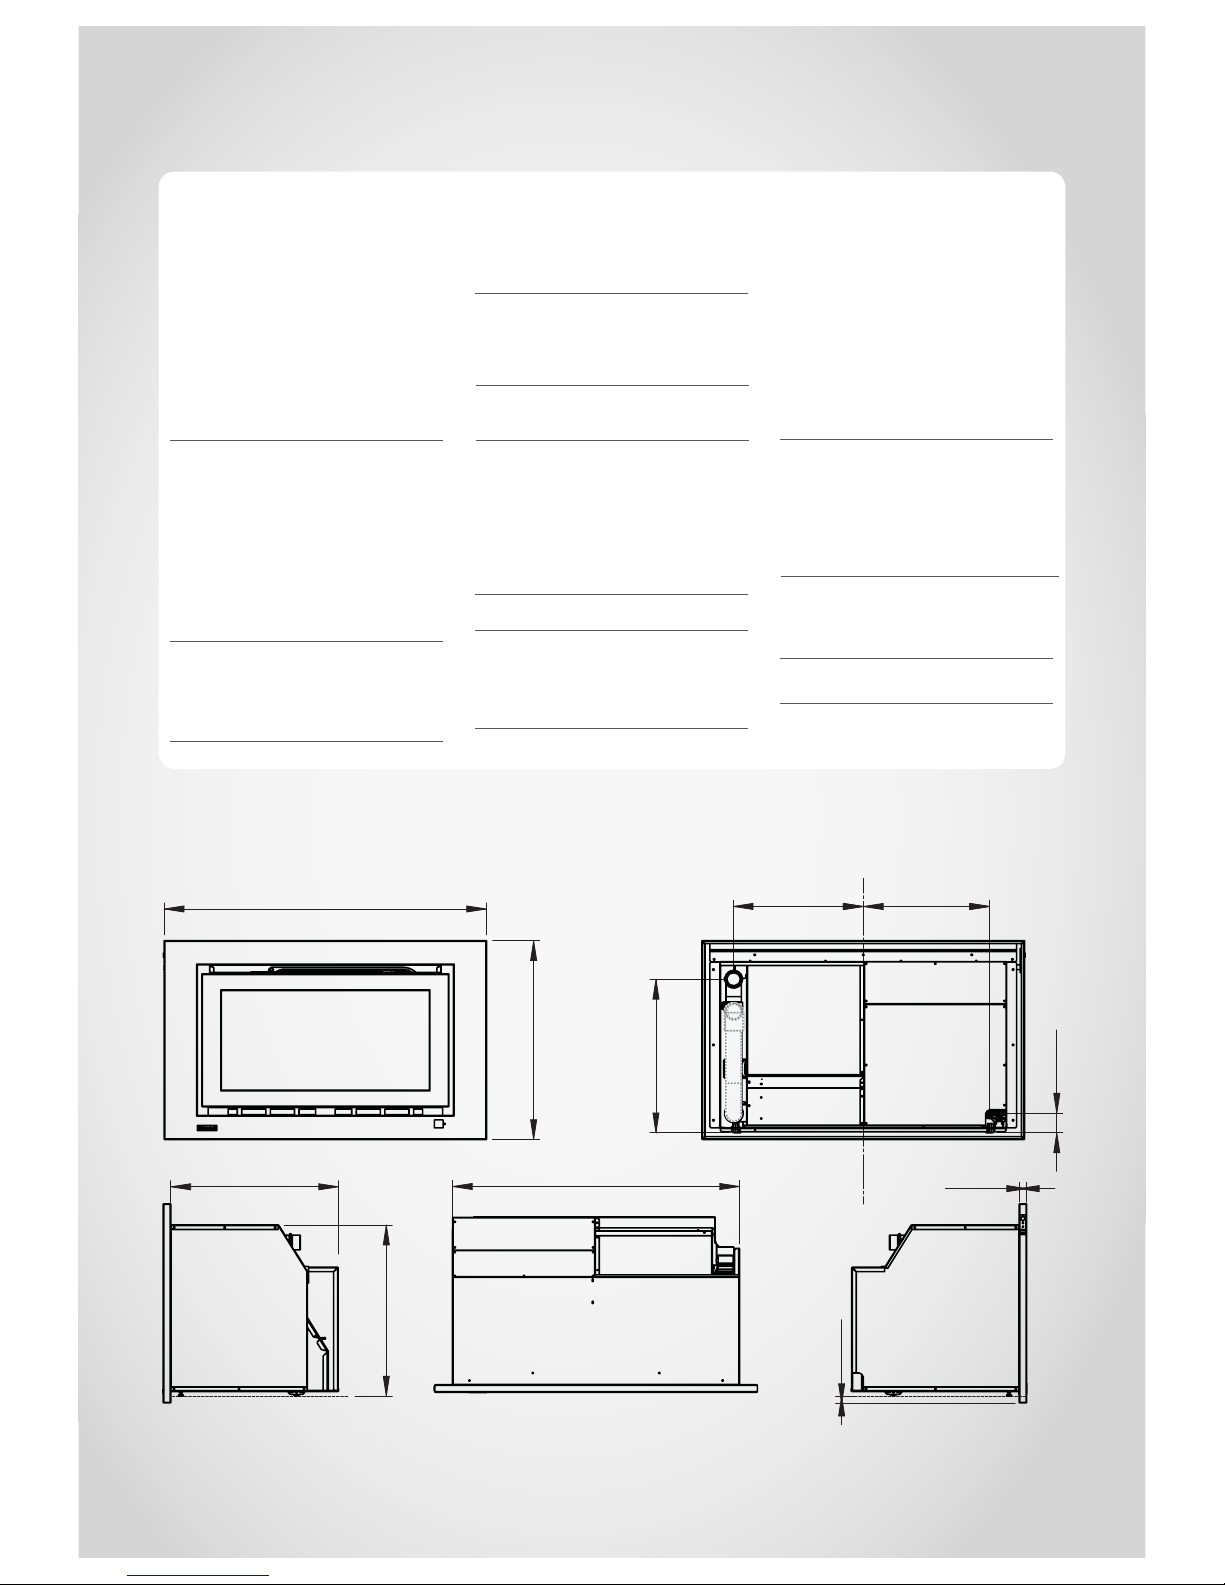
Specication
Evolve 950
™
Specification summary
Input = 10-34 MJ/h
Output = 2.4-8.13* kW
Efficiency = 86% (on high)
Heating area = 82-125 m2**
Gas type = NG or ULPG
Inbuilt exhaust balance flued
convection flame fire with electronic
temperature control, timer and
remote.
Suitability
Ideal for living rooms and open plan
areas. Versatile power flue system
makes for easy installation in almost
any living space, including bedrooms.
The Evolve is ideal for a new build
installation into a false (mock)
chimney.
Data plate
Located inside the appliance, upper
right hand side.
Convection fan
2-speed centrifugal, double diameter
160 x 180 mm.
Gas connection
½ “ BSP, the gas supply terminates
inside the heaterlower left hand
side of the appliance.
Ignition
Continuous spark electronic ignition.
Installation considerations
Room sizesmaller rooms will heat
up quickly, and due to the efficiency
of the appliance, the heater (if auto
off is selected) will turn to a low flame
setting once the set temperature has
been reached.
Noise level - 37-45 dB(A)
Power flue
Inner 50 mm, outer 70~80 mm.
Appliance must be installed with a
Rinnai flue system.
Power consumption and electrical
supply
High = 160 W
Standby = <8 W
This heater has a 1.5 m power cord
with a three pin plug supplied. The
power cord passes through a slot in
the back right hand corner of the
appliance.
Safety devices
Flame failure sensing system,
pressure relief, overheat safety
switch, air temperature sensor,
thermal fuse, overcurrent fuse, and
spark detector.
Temperature control
Thermostatic, temperature control
range 16-26 °C.
Weight - 75 kg
* Will vary according to gas type and flue configuration ** Will vary depending on geographical location in NZ
Dimensions are in mm.
1070
660
430
65
500 ±25
420
960
560
568
25
25
6 | Evolve 950 Installation Guide: 12471-A 01-14
Gas supply
Gas pipe sizing must consider the gas input to this appliance, as well as other gas
appliances in the premises. The gas supply termination is inside the heater, and enters
from the lower left hand side of the appliance.
To ensure correct positioning terminate the gas supply so it is 175 mm
in from the front face of the enclosure opening.
Purging the gas supply
Foreign materials and debris such as swarf, filings etc. must be purged
from the gas supply. Failure to do so may cause damage to the control
valve causing it to malfunction.
175 mm175 mm
Front of
enclosure
Consumer pipe
Adapter (supplied)
Rear of
enclosure
Gas supply pressure
to be 1.13 to 3 kPa
Flexible pipe (supplied)
175*
197**
* Where copper pipe ends
** With RNZ supplied adaptor
Electrical supply
This heater has a 1.5 m power cord with a three pin plug
supplied. The power cord passes through a slot in the
back right hand corner of the appliance.
Rinnai recommend the heater be plugged into a 230 V,
10 A earthed power point. The power point must not
be above the heater. Alternatively the appliance can
be direct wired if the power supply is to be concealed.
Consult a qualified electrician if direct wiring is required
as it must comply with AS/NZS 5601 and AS/NZS 3000
and other relevant local regulations.
Evolve 950 Installation Guide: 12471-A 01-14 | 7
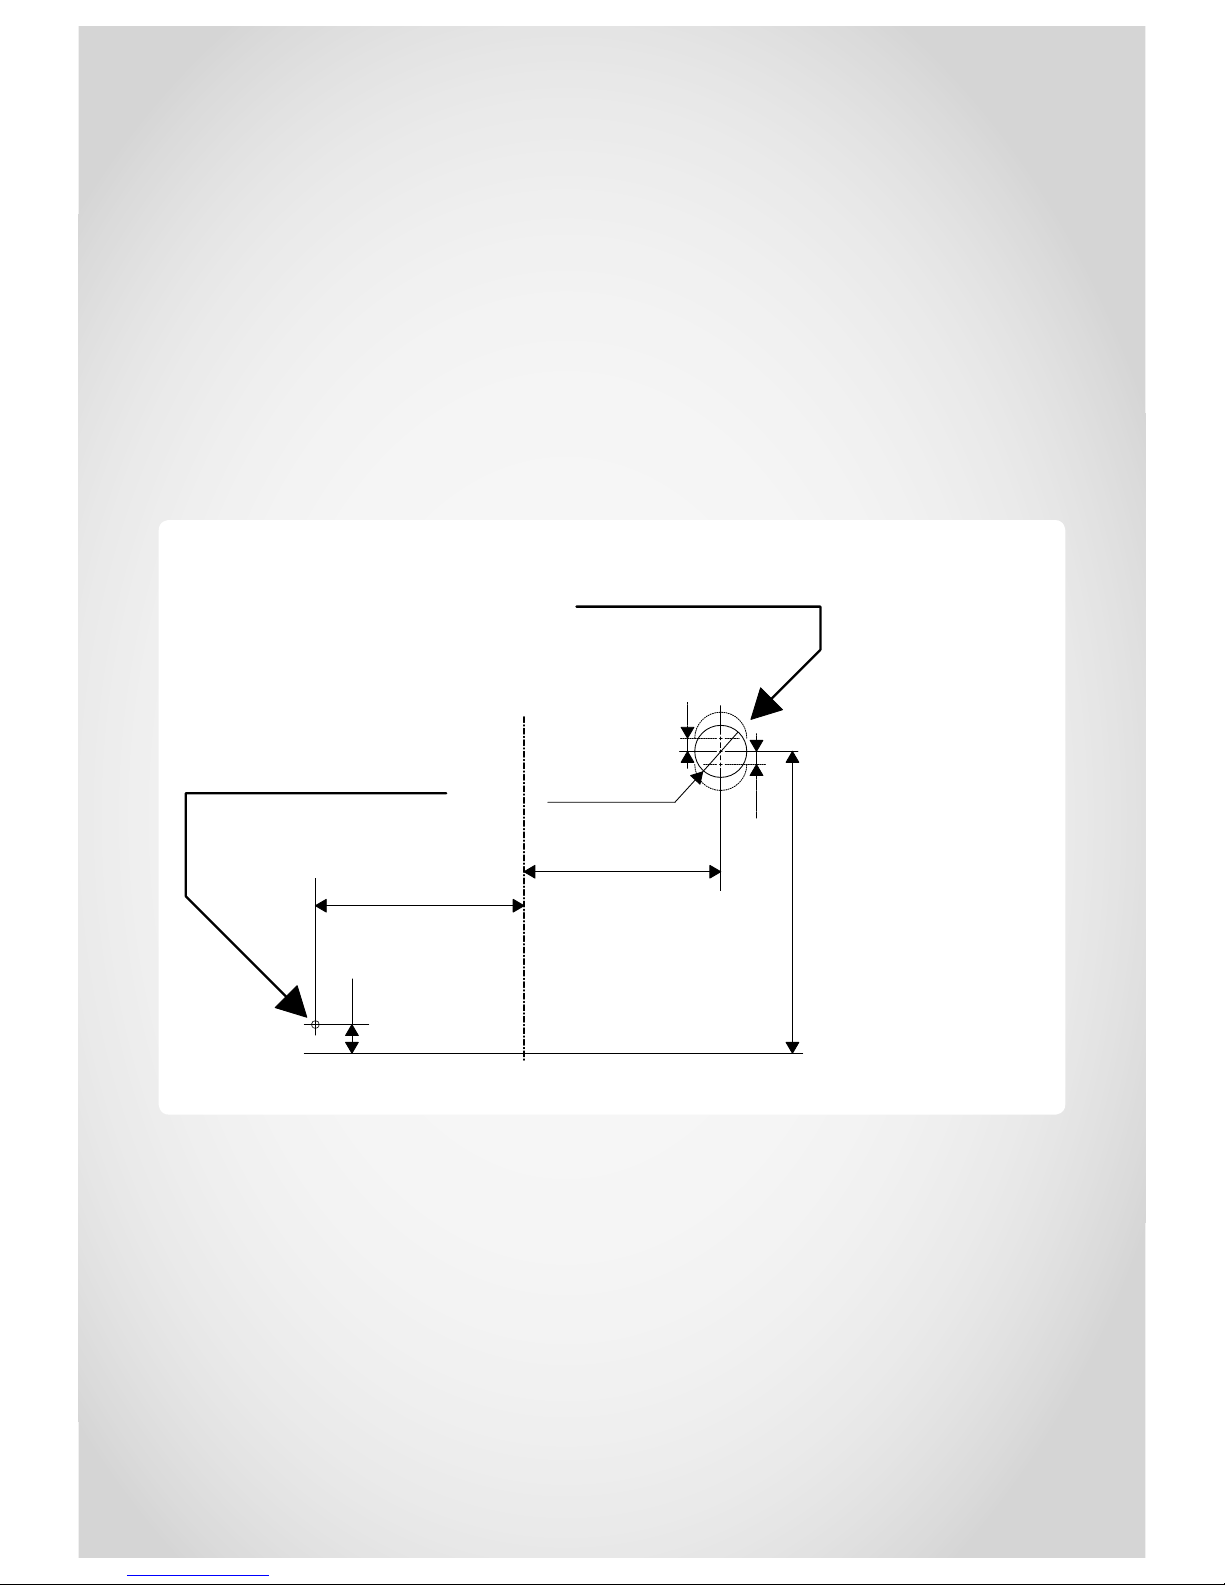
Wall penetration
Direct flue wall penetration requirements
Use the guide pictured to mark the penetration points for the gas supply and flue transition locations.
Consideration must be given to the position of any studs, noggins or other components of the wall
structure on both sides of the wall. Mark these measurements accurately as this is critical to a successful
installation.
The penetration for the flue transition only needs to be made for direct flue installations, where the
terminal is directly to the rear of the appliance. If no flue pipe penetration is required the markings are
still useful for indicating the correct position of the flue transition within the enclosure for other flue
applications.
For weatherboard walls, drill through the centre of the weatherboard from the outside, then drill from
the inside through the plaster board.
Ø 85~95
Gas supply penetration
Flue pipe penetration
500 ± 25
430 (right)
Centreline of enclosure
420 (left)
65
Base of enclosure
Dimensions are in mm.
8 | Evolve 950 Installation Guide: 12471-A 01-14
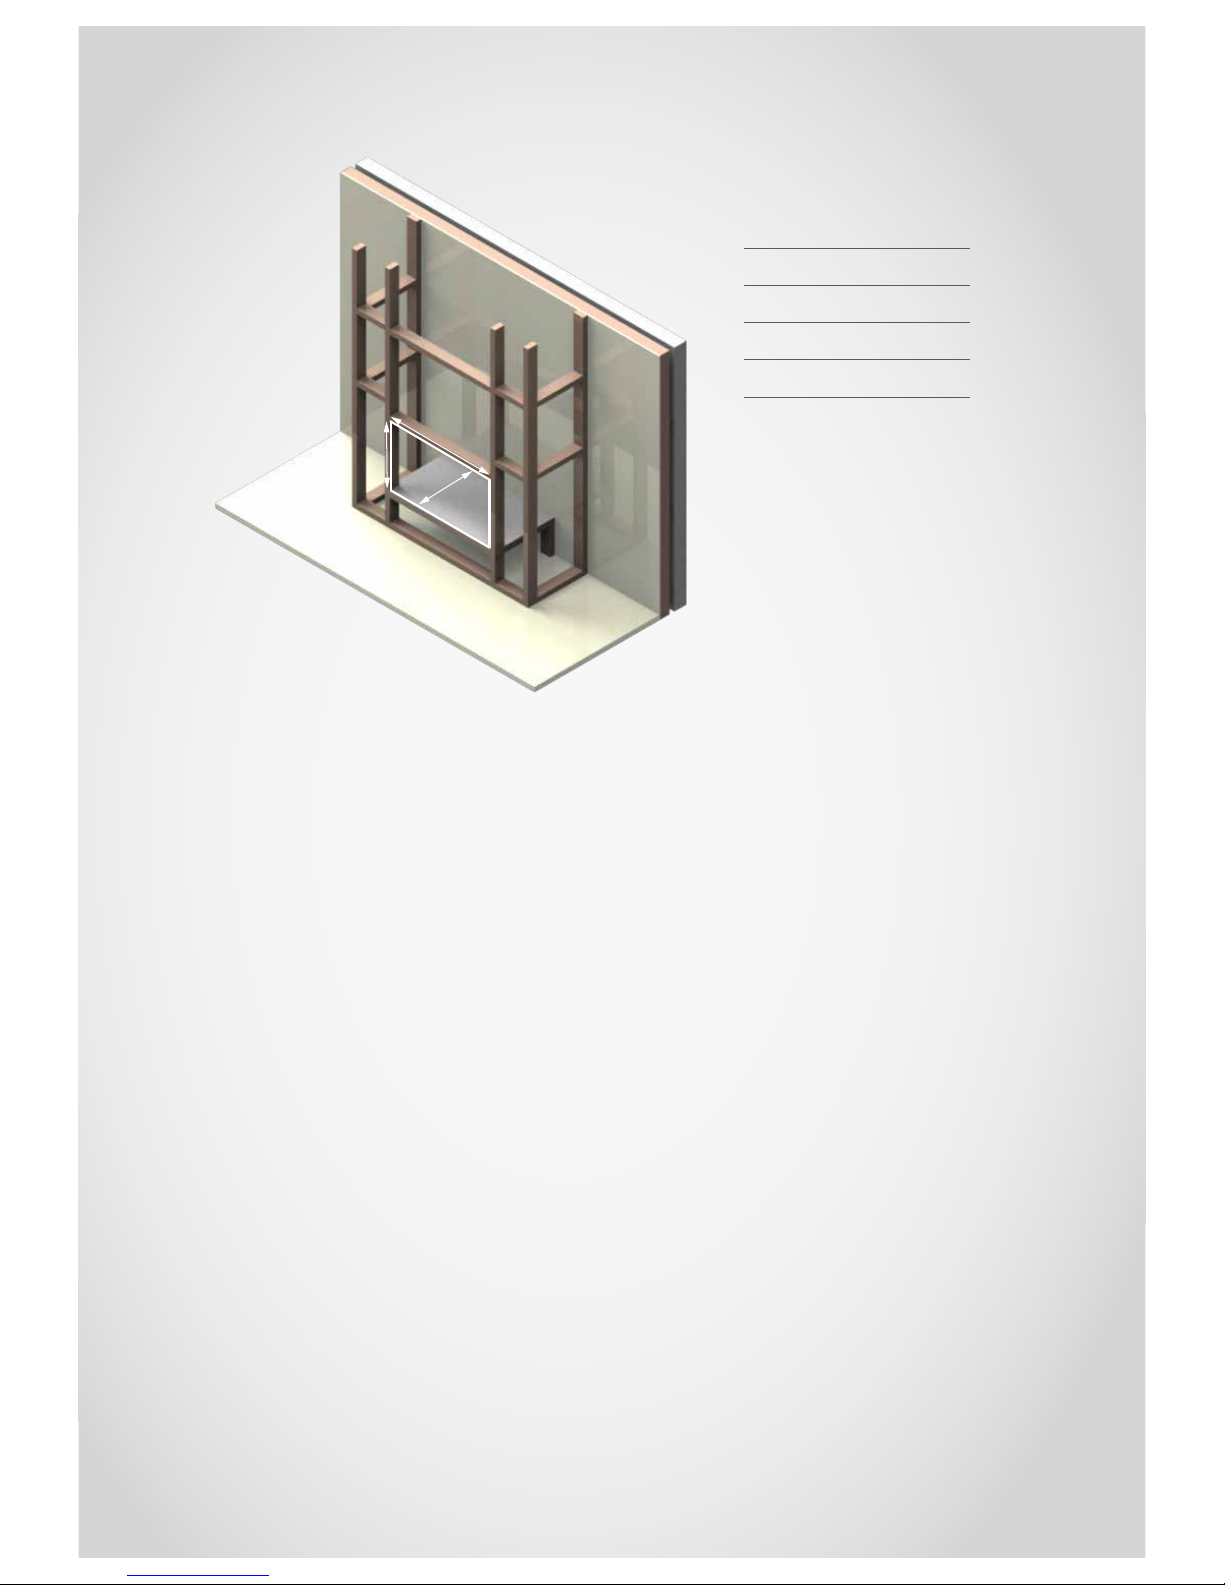
The main points governing location are flueing and warm air distribution. The Rinnai Evolve has an
integrated zero clearance box that isolates the appliance from combustible materials. This means it can
be installed directly into a decorative fireplace constructed from materials such as wood or plaster.
The heater must be positioned within the enclosure on a flat level surface that allows free movement of
the appliance. The joists used to support the appliance off the ground must be capable of supporting
a minimum of 1.5 times the weight of the appliance. A pair of wheels located at the rear of the heater
allows the unit to slide in and out of the enclosure for installation and maintenance.
D
W
H
Framing dimensions
Enclosure dimensions
W-width 965-980 mm
H-height 570-580 mm
D-depth 570 mm min.
 Loading...