

Rinnai Arriva 750 Installation Manual
Arriva 750
Installation guide
Models: RHFE750ETRN/RHFE750ETRL
Appliance must be installed with a Rinnai approved flue
system.
This appliance shall be installed in accordance with:
- Manufacturer’s installation instructions
- AS/NZS 5601.1
- Local regulations and municipal building codes
Installation, servicing and repair shall be carried out only
by authorised personnel.
Warning
Improper installation, adjustment, alteration, service or
maintenance can cause property damage, personal injury
or loss of life.
For more information about buying, using, and servicing
of Rinnai appliances call: 0800 RINNAI (0800 746 624).
Rinnai New Zealand Limited
105 Pavilion Drive, Mangere, Auckland
PO Box 53177, Auckland Airport, Auckland 2150
Phone: (09) 257 3800
Email: info@rinnai.co.nz
Important:
cnt:
Specification .................................................... 4
Clearances ....................................................... 5
Location .......................................................... 6
Gas connection ............................................... 7
Flueing options ................................................ 8
Flueing guidelines ........................................... 9
Arriva flue components ................................... 10
Flue transition .................................................. 12
Installation ....................................................... 13
Installing the log set ........................................ 14
Commissioning ............................................... 15
Setting the air guide vane................................ 15
Panel installation ............................................. 16
Flame pattern .................................................. 17
Installation checklist ........................................ 18
Wiring diagram ................................................ 19
4 | Arriva 750 Installation Guide: 10473-C 03-13
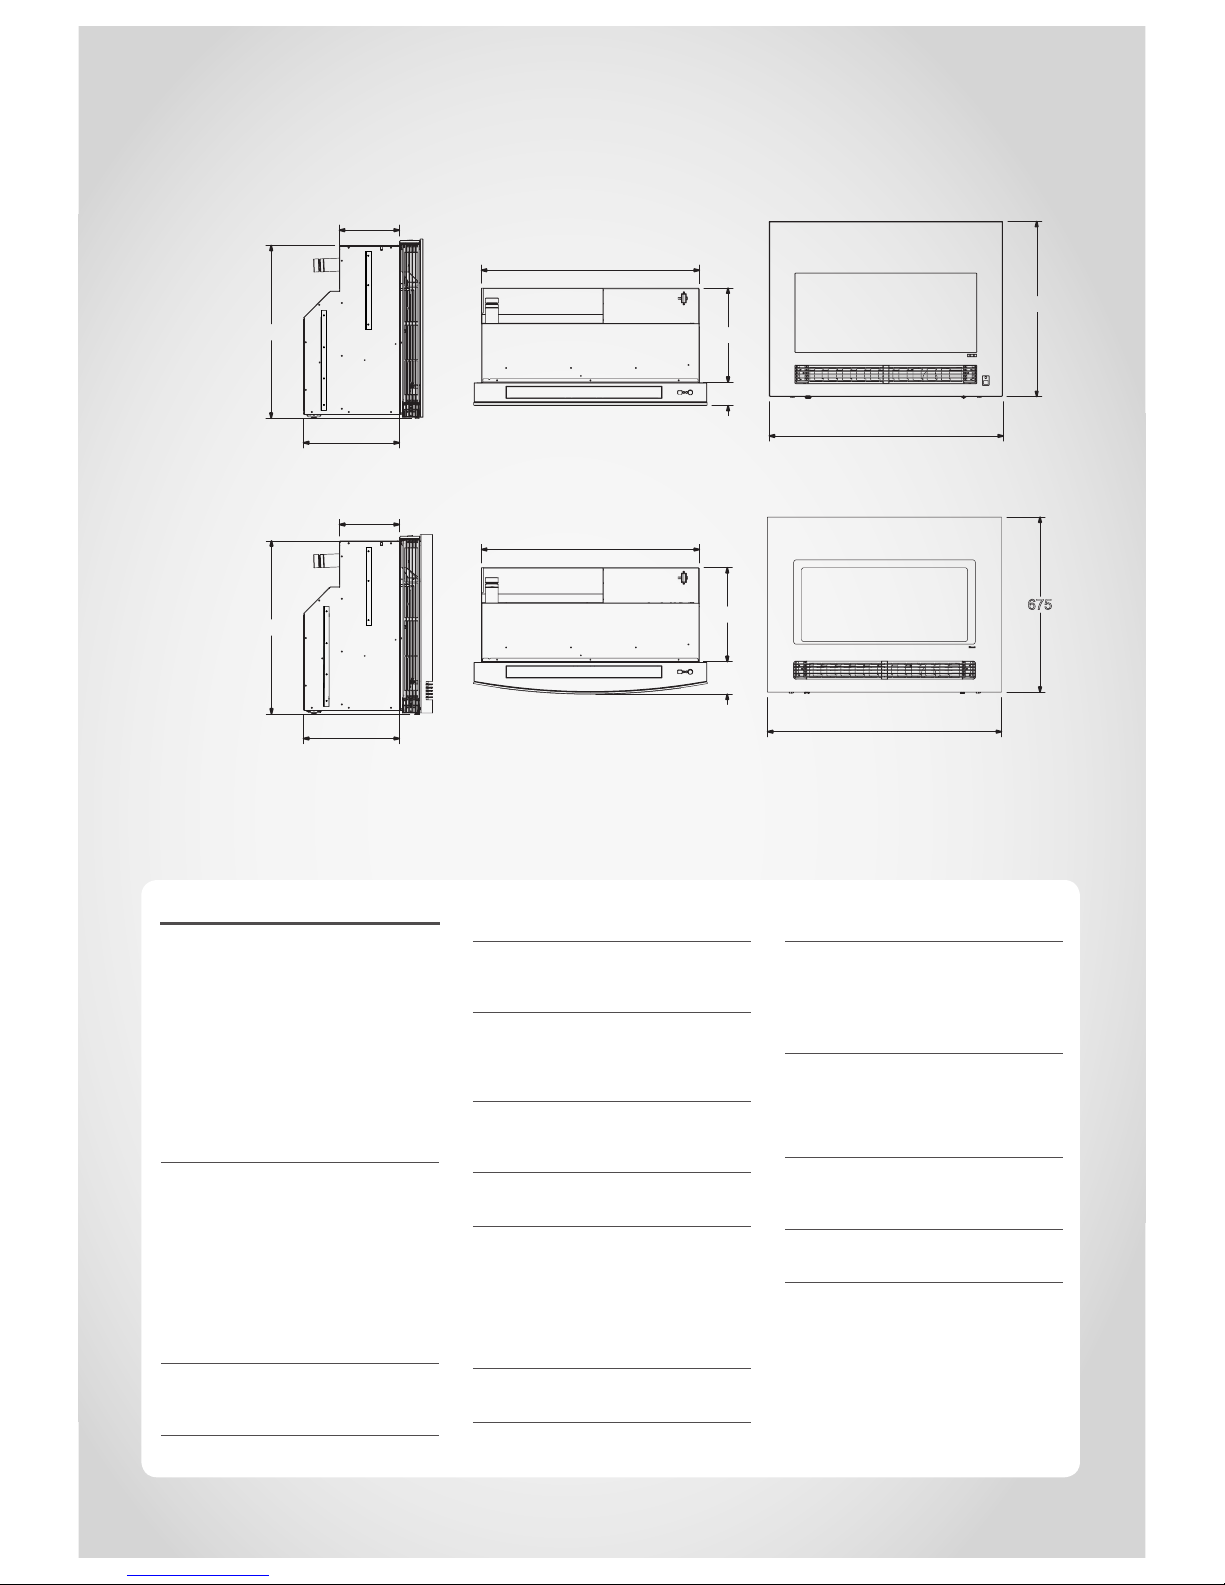
Specication
Specification summary
Input = 8-31.5 MJ/h
Output = 1.8-7.0* kW
Efficiency = 80% (on high)
Heating area = 70-95 m²**
Gas type = NG or LPG
Inbuilt convector ceramic log space heater
with forced convection and power flue
system.
Arriva 750
Suitability
Ideal for living rooms and open plan areas.
Versatile power flue system makes for
easy installation in almost any living space,
including bedrooms.
The Arriva is ideal for new build installation
into a false (mock) chimney, but can be
fitted into an existing masonry fireplace if
it is big enough.
Dataplate
Inside appliance, upper right hand side
(beside convection fan).
Fan type
3-speed (high, medium, and low) radial
blower fan.
Flue
Power flue, inner - 50 mm,
outer - 78~80 mm. Appliance must be
installed with a Rinnai flue system.
Gas connection
½ “ BSP male flare to barrel union
(lower right hand side of appliance).
Ignition
Continuous spark electronic ignition.
Installation considerations
Room sizesmaller rooms will heat
up quickly, and due to the efficiency of
the appliance, the heater (if auto off is
selected) will turn to a low flame setting
once the set temperature has been
reached.
Noise level
33-41 dB(A)
Power consumption
High 90 W, low 60 W, and standby 10 W.
Standard electrical connection is to the
right hand side of the appliance.
Safety devices
Flame failure sensing system, pressure
relief, overheat safety switch, air
temperature sensor, thermal fuse,
overcurrent fuse, and spark detector.
Temperature control
Thermostatic, temperature control range
16-26 °C.
Weight
70 kg
126
845
365
675
900
675
900
365
90
845
230
660
365
230
660
365
Flat Front
Glass Front
* Will vary according to gas type and flue configuration ** Will vary depending on geographical location in NZ
Dimensions are in mm.
Arriva 750 Installation Guide: 10473-C 03-13 | 5
Clearances
The clearances listed below are minimum clearances unless otherwise stated.
Clearances around the heater
The appliance must not be
installed where curtains or other
combustible materials (coffee
tables, couches etc.) could come
into contact with the heater. In
some cases curtains may need
restraining.
Floor protection
Heat emanating from this fire may
over time affect the appearance of
some materials used for flooring,
such as, carpet, vinyl, cork or
timber. This may be amplified if
the air contains cooking vapours
or cigarette smoke. To avoid this
occurring, it is recommended that
a mat be placed in front of the
appliance.
Mantels and surrounds
Mantels and surrounds are allowed
providing they conform to the
minimum clearances shown. These
clearances are important as they:
- allow heat to escape in the
event of a power failure during
operation
- allow optimum performance of
the heater (room air return)
- allow access to the side mesh
filters
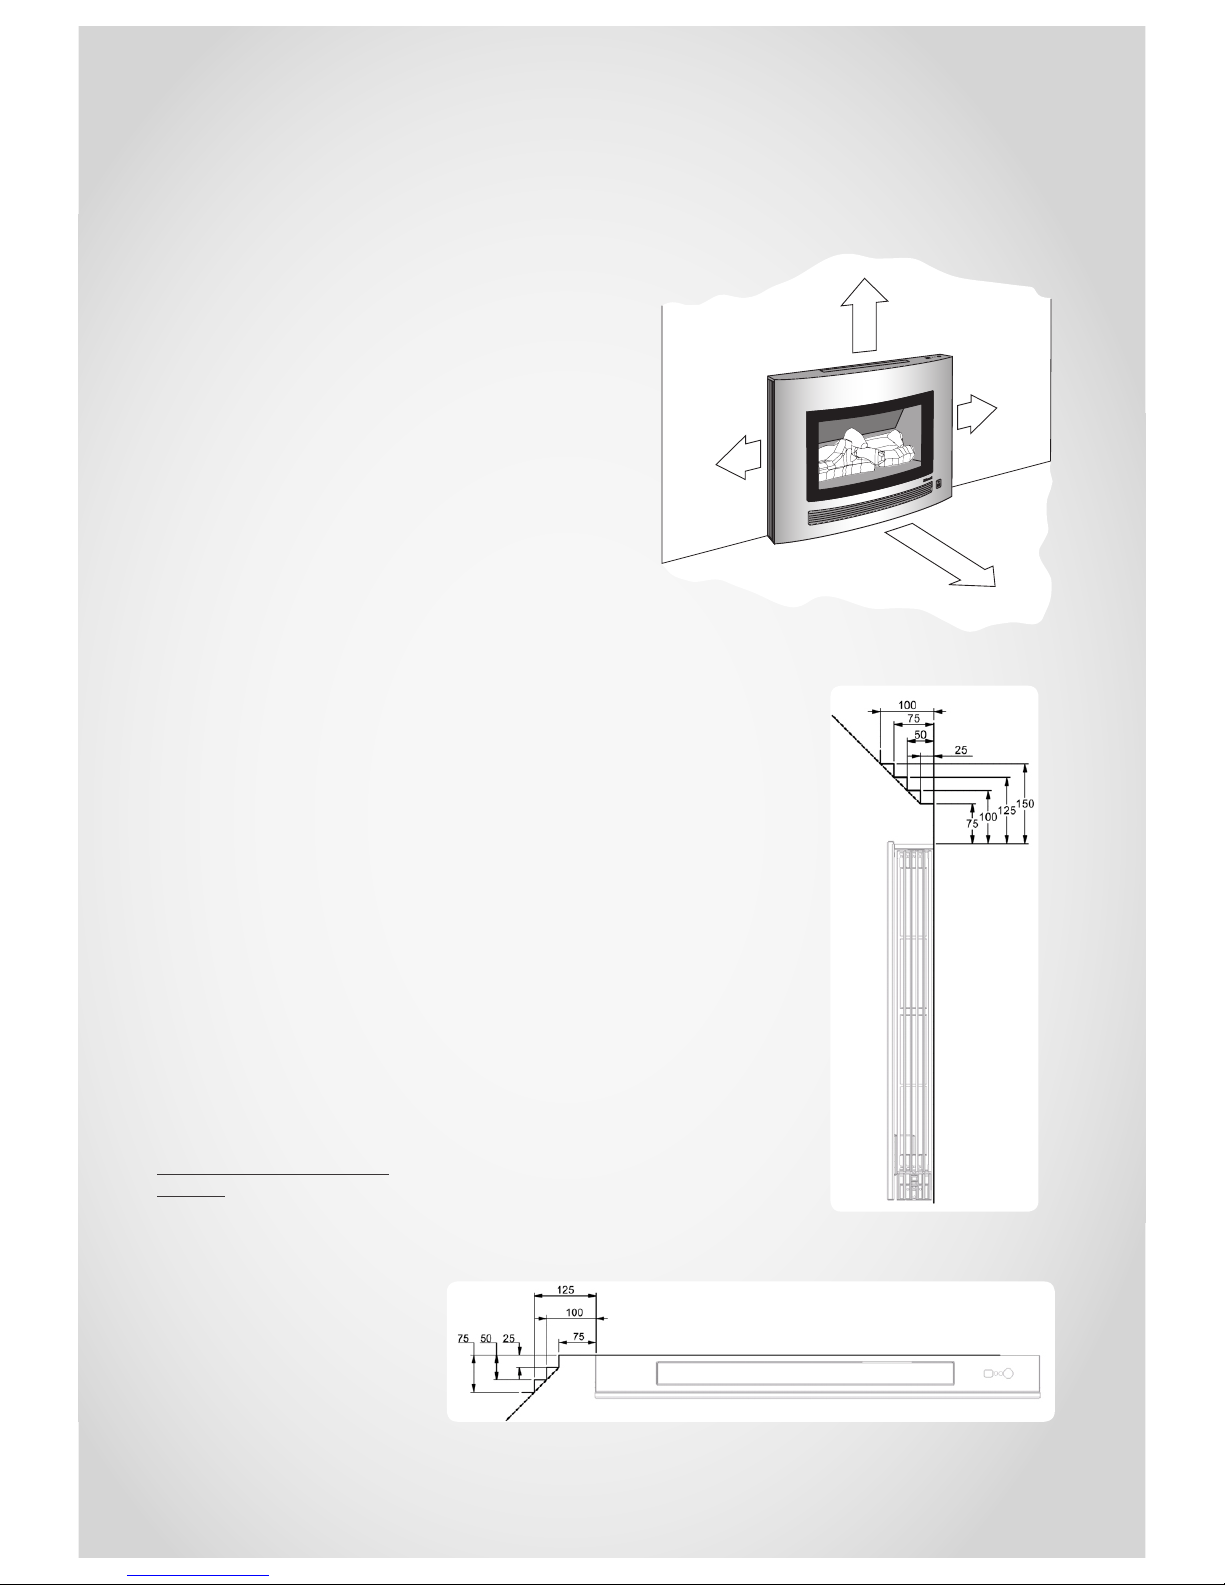
Mantel clearance calculation
example
At a 75 mm vertical clearance, the
maximum mantel depth is 25 mm.
For every 25 mm of added mantel
depth, there must be an additional
25 mm of vertical clearance. For
example a mantel depth of
100 mm requires a vertical
clearance of 150 mm.
100 mm
1000 mm
100 mm
250 mm
Arriva mantel clearances
Arriva surround clearances
Clearances required around the heater when operating
6 | Arriva 750 Installation Guide: 10473-C 03-13
Location
The main points governing location are flueing and warm air distribution. The Rinnai
Arriva has a cool outer casing, it can be installed into an existing masonry, or decorative
fireplace.
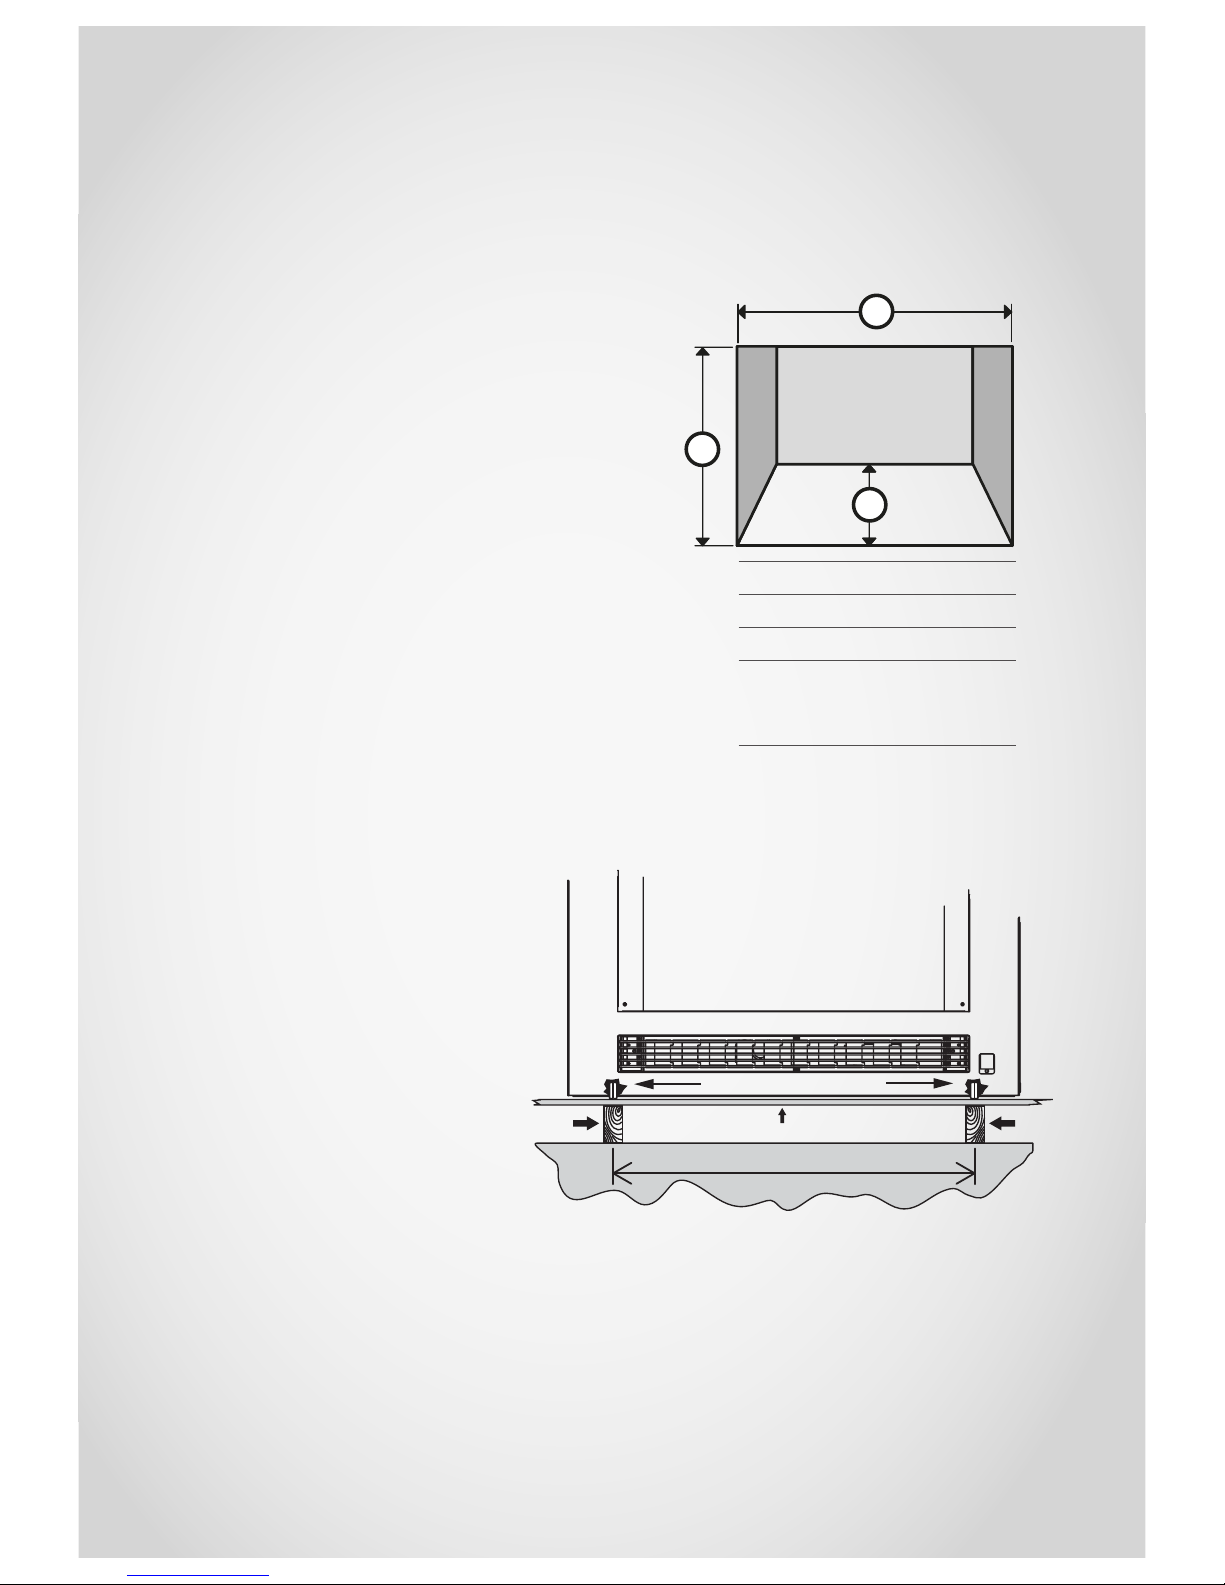
Enclosure dimensions
The heater must be positioned on
a flat level surface that allows free
movement of the appliance. A pair
of wheels located at the rear of
the heater allows the unit to slide
in and out of the enclosure for
commissioning and maintenance.
In a masonry fireplace use a slurry
of sand and cement to level the
base as required.
In a decorative fireplace, when
the appliance is elevated from the
ground, construct a base using
a board with supporting joists as
pictured.
Elevated installation in a decorative fireplace
Enclosure dimensions
W-width 850-860 mm
H-height 660-665 mm
D-depth 380 mm direct flue
475 mm extended flue
500 mm underfloor flue
All dimensions provided are critical to the
installation of this appliance and must be
strictly adhered to.
Joist Joist
MDF board, minimum 20 mm
720
Left and right wheels
w
d
h
 Loading...