

Rinnai Arriva Operation And Installation Manual
Arriva Operation and
Installation Manual
Appliance must be installed with an approved Rinnai ue system.
Appliance must be installed, commissioned and serviced by a licensed tradesperson
in accordance with these instructions and all applicable local rules and
regulations.
Owner, please retain this manual for future reference.
®
SUPPORTING
ASTHMA CARE
SENSITIVE
CHOICE
Approved by the Asthma and
Respiratory Foundation

LIMITED WARRANTY
Please keep these instructions in a safe place for future reference.
RECORD AND ATTACH YOUR PROOF OF PURCHASE BELOW:
Your Retailer:__________________________________________________
Name:________________________________________________________
Address:______________________________________________________
_____________________________________________________________
Telephone:( _______ ) __________________________________________
Date of Purchase: ______ / ______ / _________
TERMS AND CONDITIONS
1. During the 24 month period from date of
purchase and subject to clauses 2 and
3 below, Rinnai New Zealand Limited
(“Rinnai”) will, at its own discretion, either
replace or repair any defective product at
no charge to the customer.
2. This warranty covers manufacturing defects
only. This warranty will not apply if (for
example) the product has been improperly
installed or is otherwise installed contrary
to manufacturer’s recommendations, has
been damaged during or after installation,
has not been operated in accordance
with operating instructions, or has been
subjected to damage or abuse beyond that
expected from conditions of normal use.
3. Warranty claims may be invalid if not
accompanied by details of the installing or
supervising gas tter’s registration number
and the gas tting certication number.
4. This warranty commences from the date of
purchase. Proof of purchase is required at
the time of any warranty claim.
5. Servicing of the product is to be carried out
by a Rinnai authorised service centre.
All Rinnai appliances meet or exceed the
safety standards required by New Zealand
gas and electrical regulations. The company
is constantly improving its products and as
such specications are subject to change or
variation without notice.
Rinnai brings you peace of mind
with a 2 year minimum warranty.

Contents
WARNING
Improper installation, adjustment, alteration, service or maintenance
can cause property damage, personal injury or loss of life.
For assistance or additional information contact Rinnai on 0800
RINNAI (0800 746 624).
Customer Information
Limited Warranty 2
About Your Arriva 4
Safety 5
Clearances 6
Mantles and Surrounds 7
General Information 8
Basic Heater Operation 10
Operation Using Remote Control 12
Care and Maintenance 15
Servicing 17
Abnormal Flame Pattern 18
Troubleshooting 19
Arriva Accessories 22
Installer Information
General and Specication 24
Appliance Positioning 25
Gas Supply and Direct Flue Wall Penetrations 26
Flueing 27
Arriva Installation 32
Installing the Log Set 35
Commissioning 37
Setting Air Guide Vanes 38
Front Fascia and Top Panel 39
Wiring Diagrams 40
Commissioning Checklist 42
Installer Details 43
Customer Contacts 44
Rinnai New Zealand Limited Arriva Operation and Installation Manual: 10343-E
05-10
4
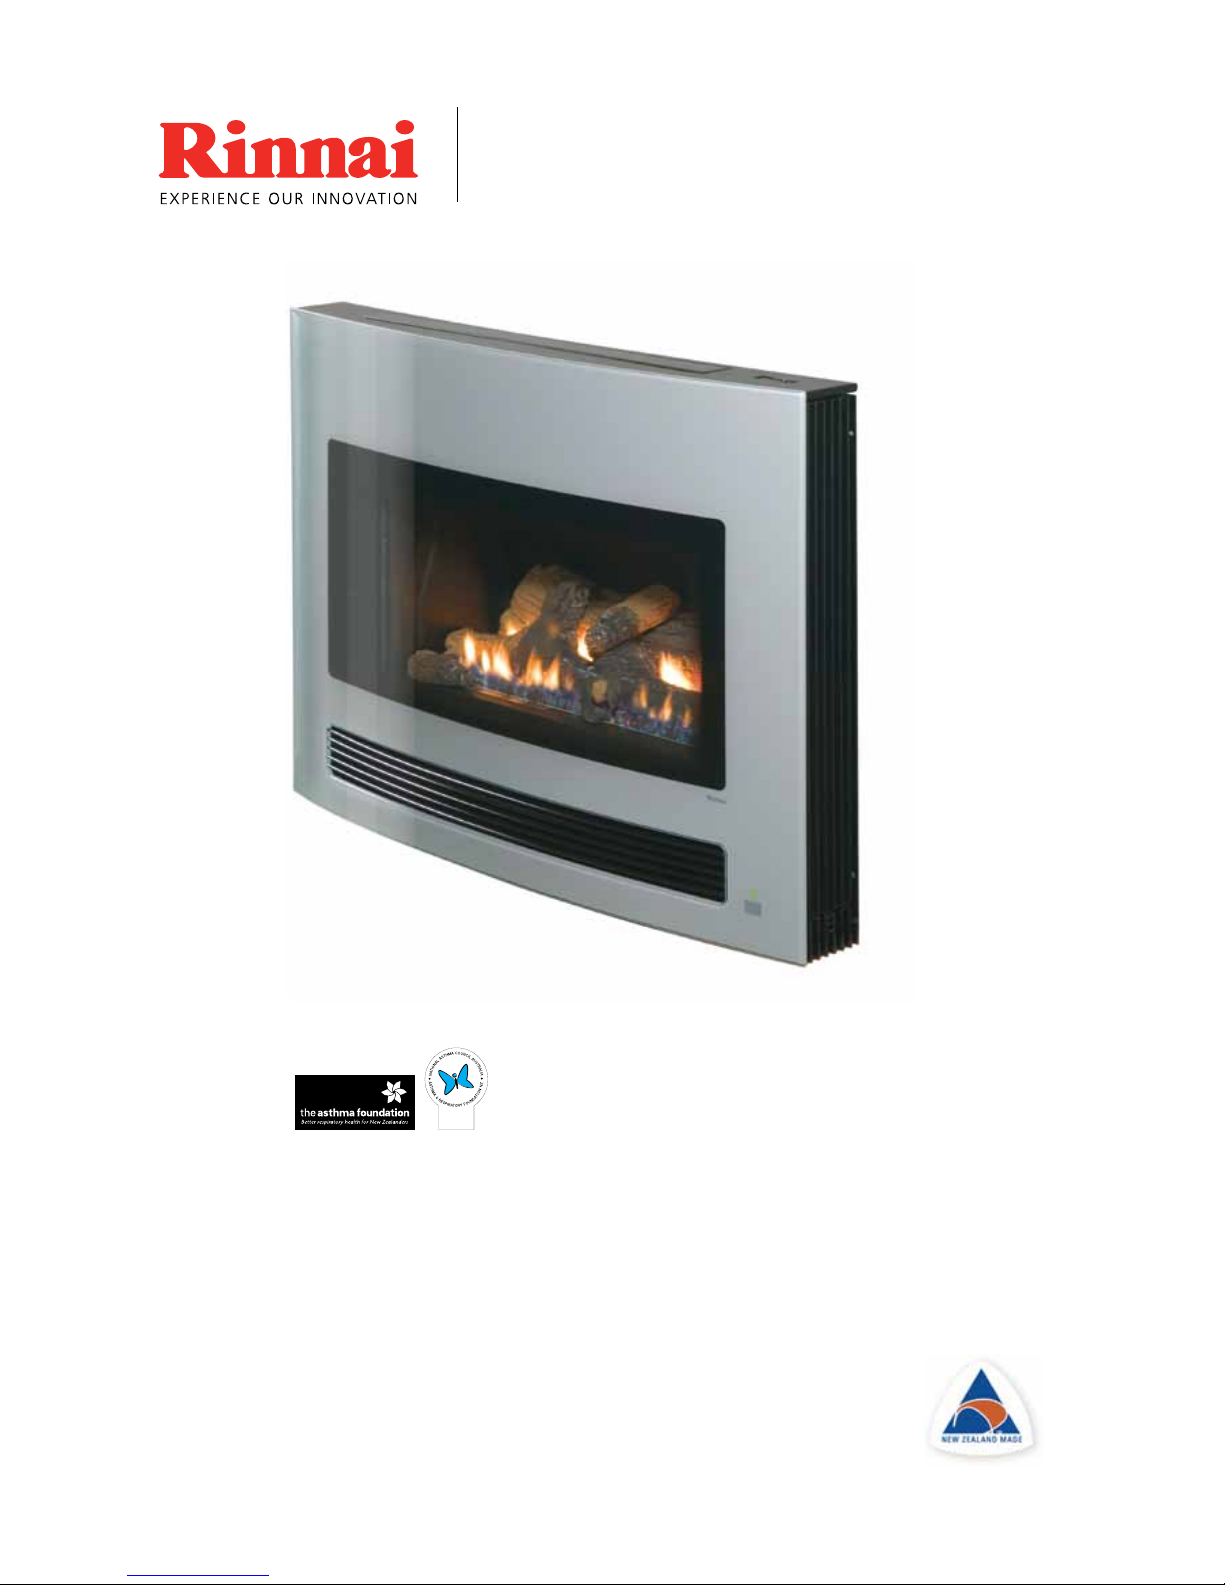
About Your Arriva
Gas Consumption: 31.5 MJ/h (high)
Output: 7.0 - 1.8 kW
Efciency: 80% (high)
Heats Area Up To: 70 - 95 m2 (depending on the region you live in)
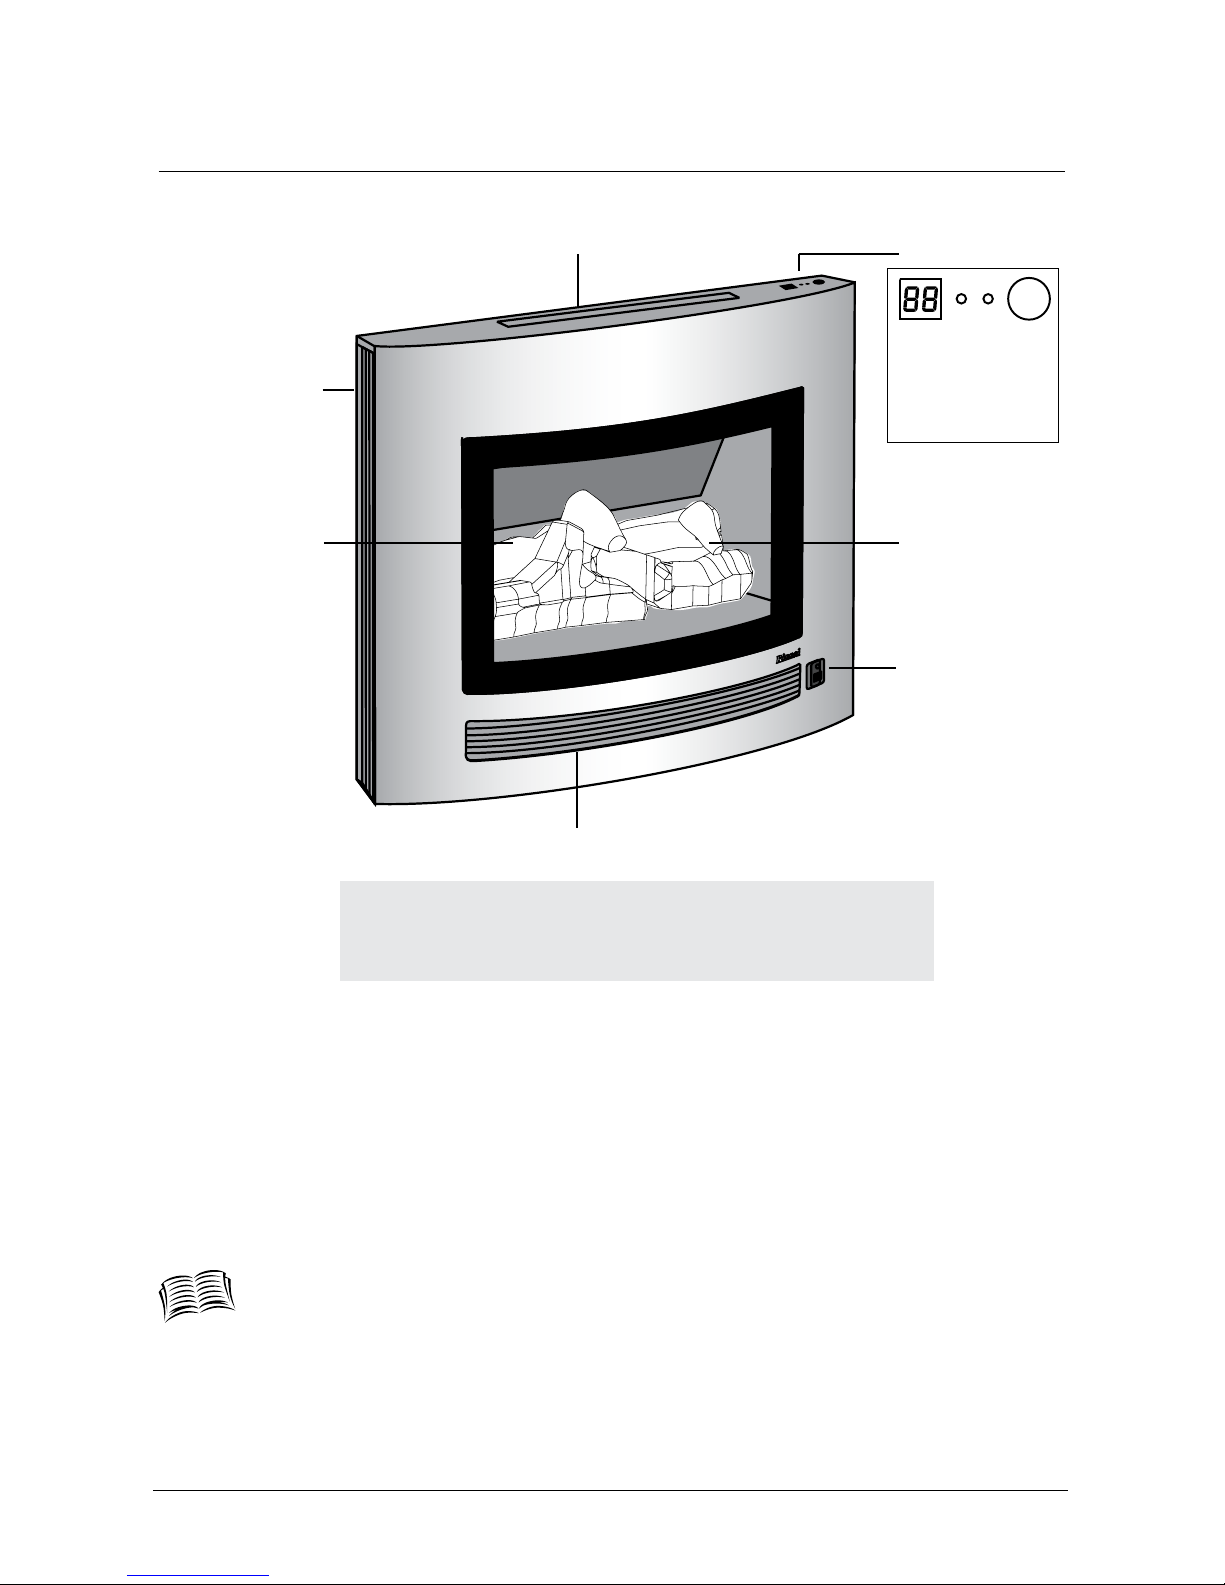
Auto overheat discharge vent
Double glazed
frame window
Room air return
Log set
Louvre, warm air discharge
Receiver window
for infra red remote
control receiver (5 m
range) and blockage
indicator for lter/
louvre blockages
Control panel
From left to right:
- error display
- timer indicator
- operation indicator
- on/off button
Power ued appliance that uses a fan to draw air from the outside for combustion. Combusted
gases are propelled back outside creating combustion efciency and better room air quality.
The operation section of this manual has been written to:
• Highlight the safe operation and positioning of this appliance
• Advise on maintenance, servicing and troubleshooting to ensure optimum
performance
Rinnai New Zealand Limited Arriva Operation and Installation Manual: 10343-E
05-10
5
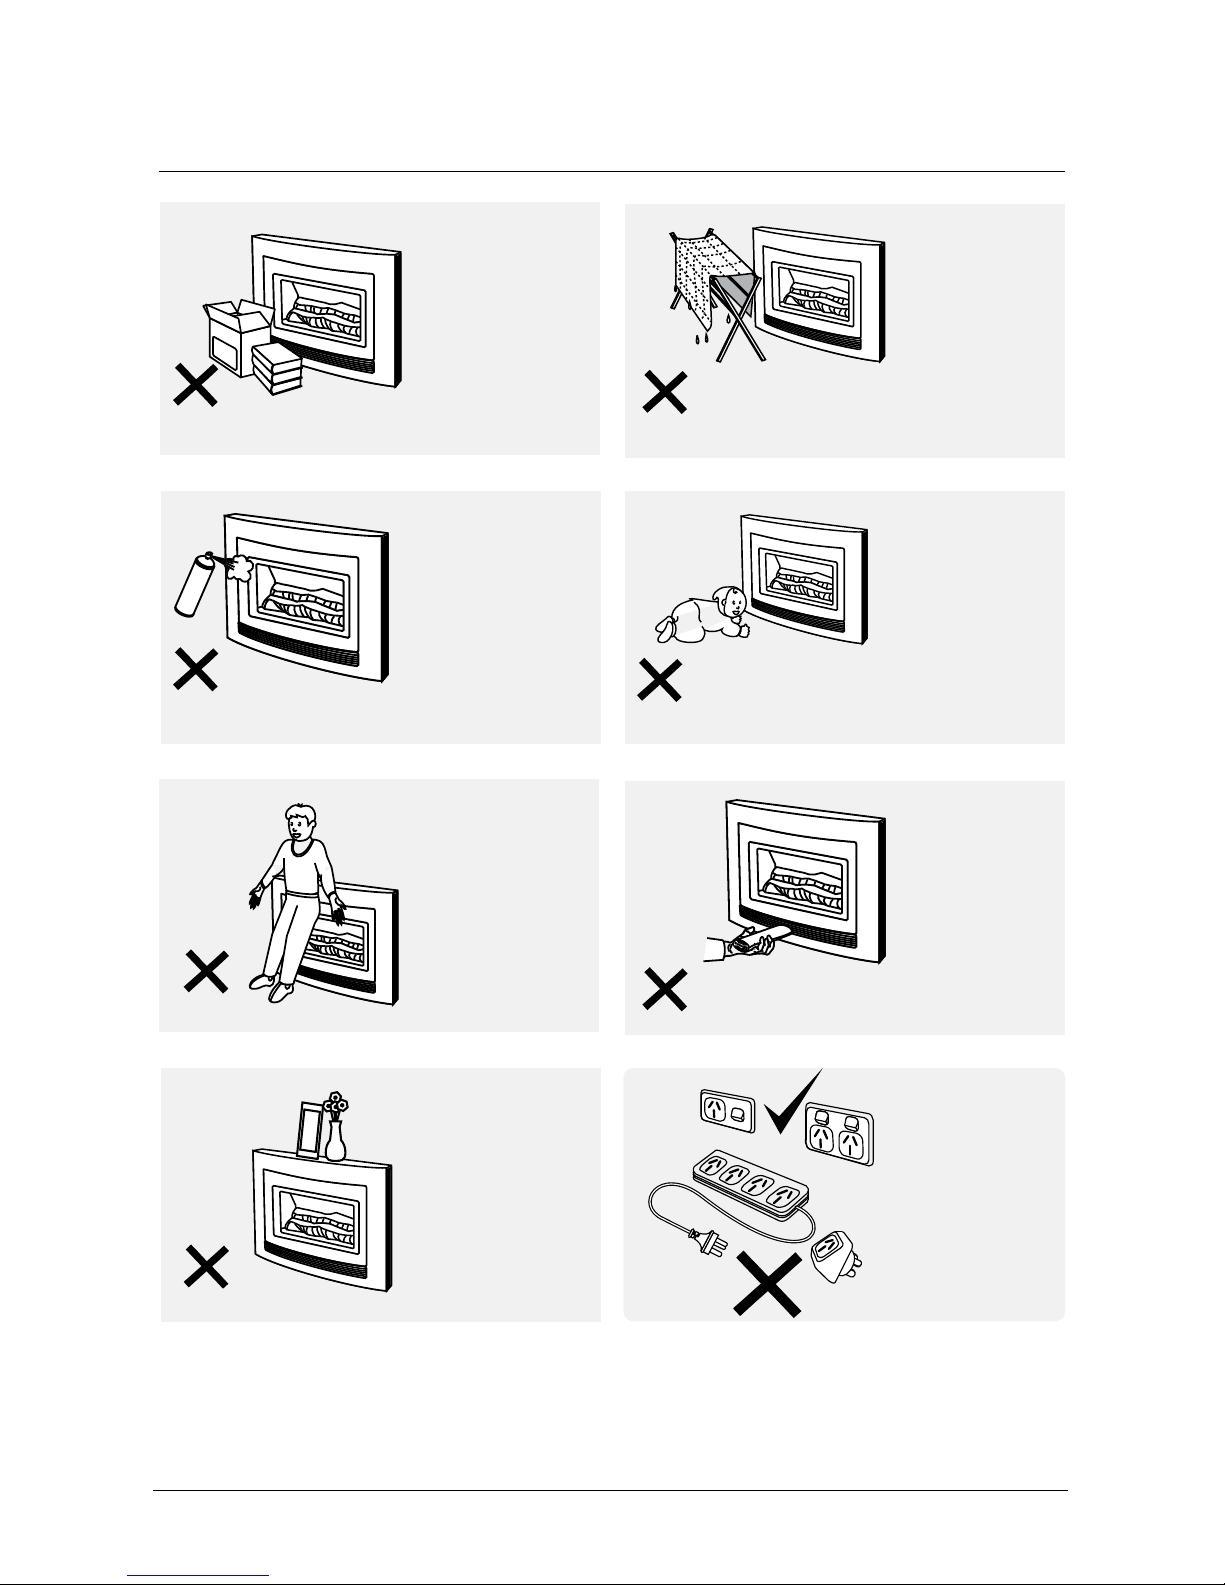
Safety
Do not restrict
warm air
discharge by
placing articles
in front of the
appliance.
This appliance
must not be
used for any
purpose other
than heating.
Young children
should be
supervised
at all times.
Hand or body
contact with
the appliance
must be
avoided.
Do not spray
aerosols while
the appliance is
operating. Most
contain butane
gas which can
be a re hazard
if used near the
appliance.
Do not allow
anyone to sit,
lean or sleep
directly in front
of the appliance.
Do not allow
anyone to
post articles
through into
the heater.
Do not place
articles on the
top panel or
obstruct the
auto overheat
discharge
vent.
Do not unplug
the appliance
while it is
operating.
Do not use
power boards
or double
adaptors to
operate this
appliance.
Rinnai New Zealand Limited Arriva Operation and Installation Manual: 10343-E
05-10
6
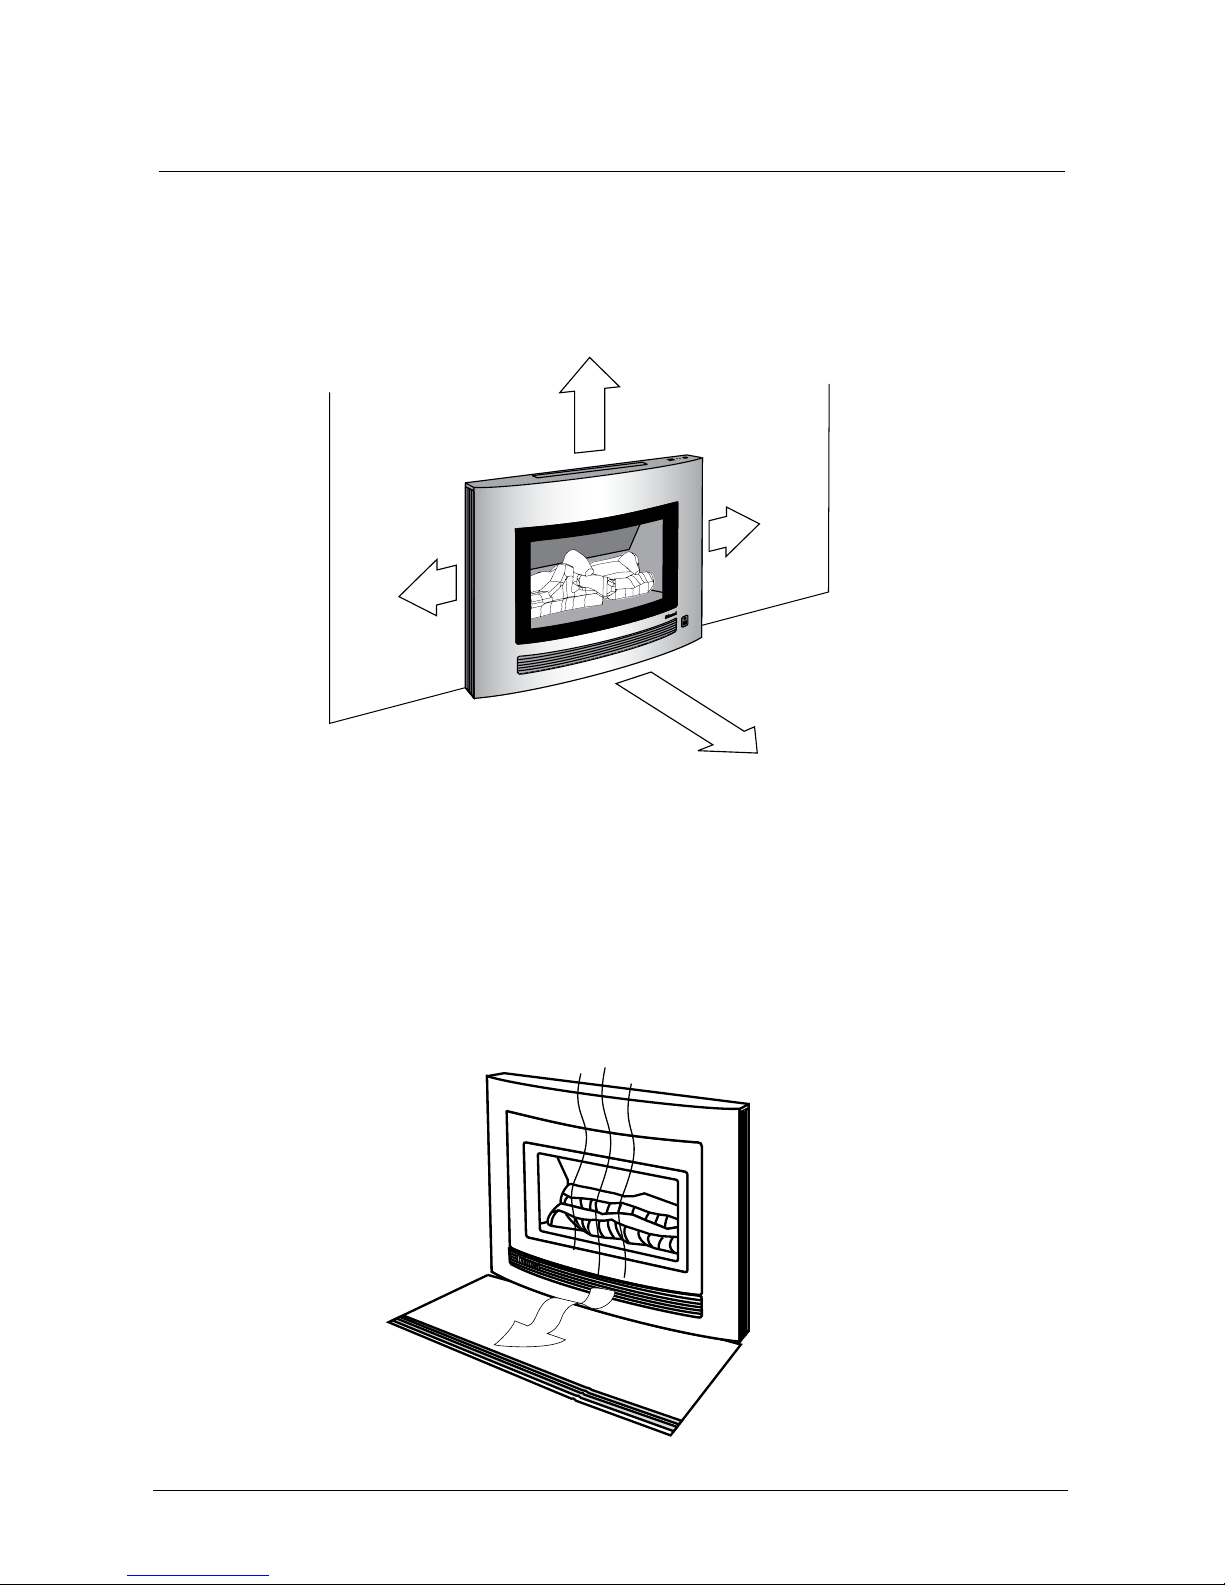
Clearances
The appliance must not be installed where curtains or other combustible materials could come
into contact with the heater. In some cases curtains may need restraining.
The diagram below shows clearances required when the heater is operating.
100 mm
1000 mm
100 mm
250 mm
This appliance discharges a large volume of warm air at a low level.
Heat emanating from this re may over time affect the appearance of some
materials used for ooring, such as, carpet, vinyl, cork or timber. This may be
amplied if the air contains cooking vapours or cigarette smoke. To avoid this
occurring, it is recommended that a mat be placed in front of the appliance.
Floor
protection
Rinnai New Zealand Limited Arriva Operation and Installation Manual: 10343-E
05-10
7
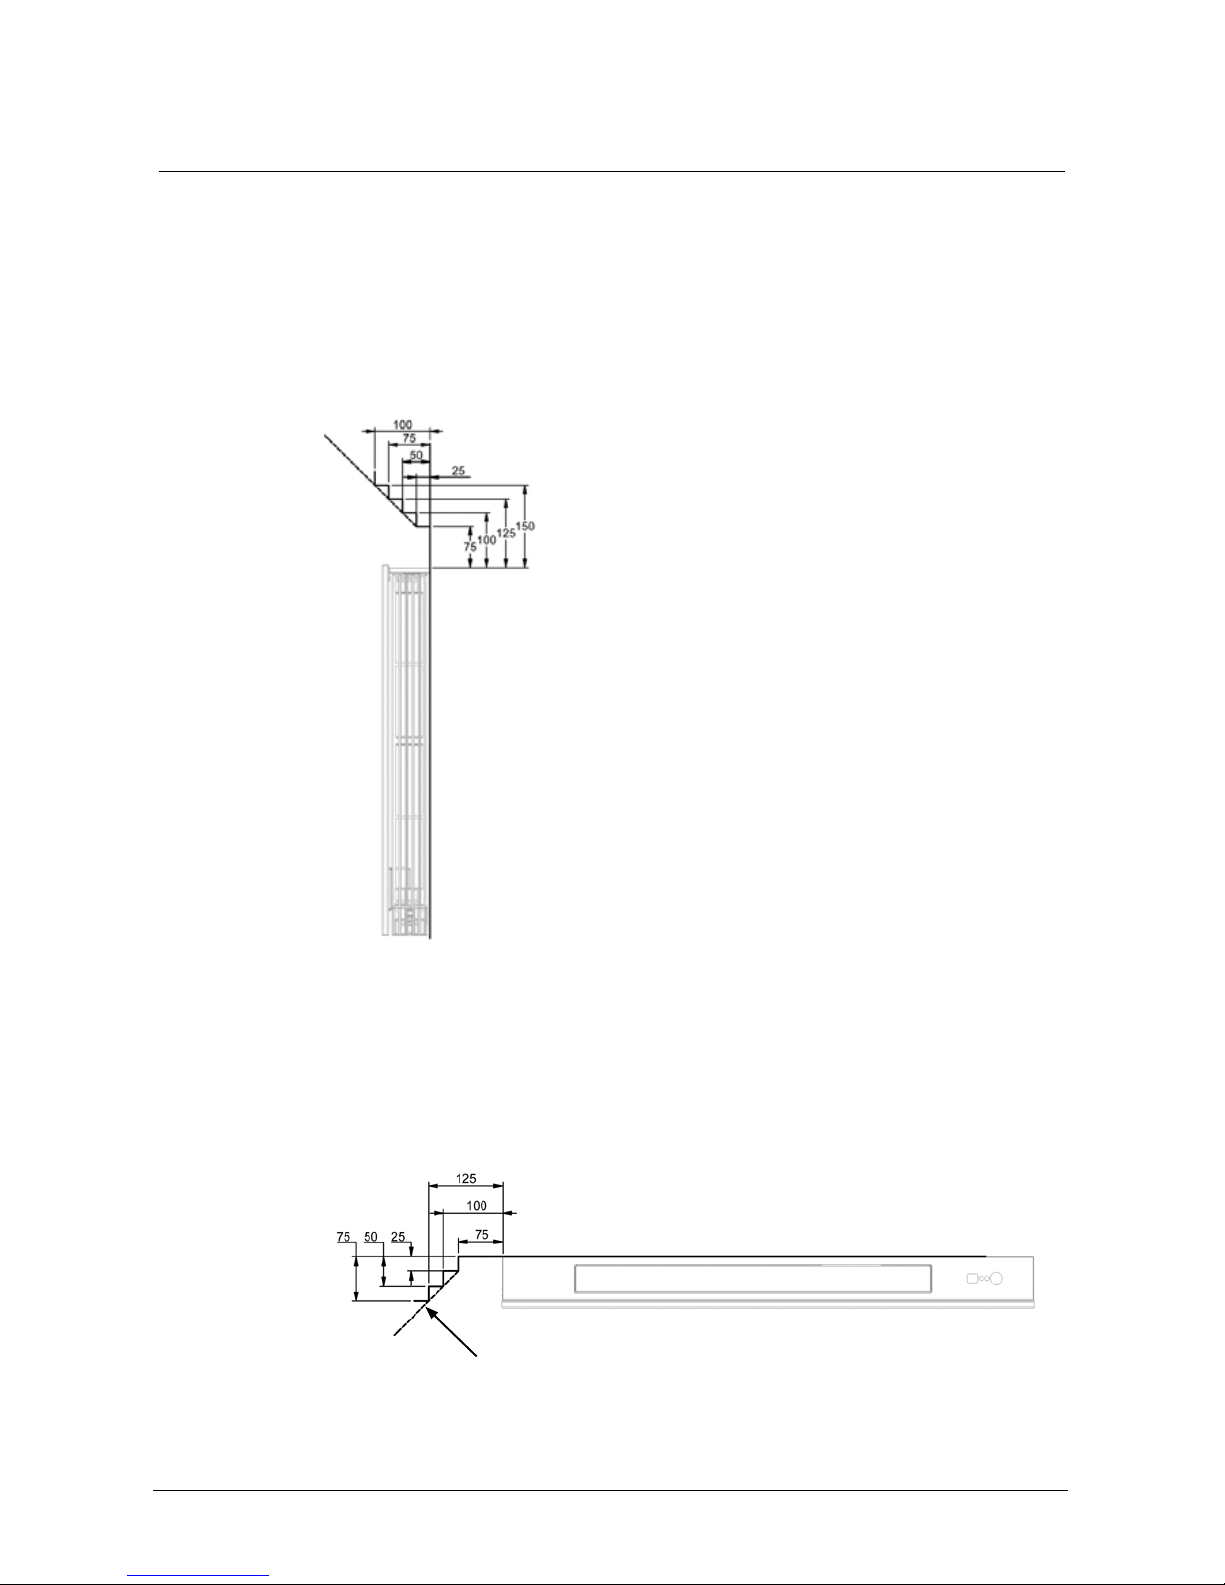
Mantles and Surrounds
Mantles and surrounds can be added to complement design providing they are within the
clearance requirements below.
Mantles
75 mm is the minimum clearance above (to allow the overheat safety device
to open), with a maximum depth of 25 mm.
For every 25 mm of added depth, there must be 25 mm of vertical clearance.
Refer mantle diagram below.
Surrounds 75 mm is also the minimum clearance from the sides for access to side
louvres, opening, cleaning and room air return. At 75 mm, the maximum
depth is 25 mm. For additional depth, 25 mm of horizontal clearance is
required for every 25 mm of added depth.
Refer surround diagram below.
Angled for free ow clearance for room air return

Rinnai New Zealand Limited Arriva Operation and Installation Manual: 10343-E
05-10
8
General Information
Before operation
Read these instructions to get an overview of how to operate, maintain and service your
Rinnai Arriva.
Hearths
A hearth is not necessary but can be used for decorative purposes or protection of sensitive
ooring if required. Some general guidelines when installing a hearth.
• It must not obscure the front of the re
• The bottom of the appliance must be level with the top of the hearth so there is a
continuous level
• Size should be at least the width and depth of the re
Remember to adjust the dimensions of the cavity to allow for the hearth.
Electrical connection
The standard electrical connection is to the right hand side of the heater
front assembly. If necessary this can be changed by your electrician to
terminate on the left.
A 3 pin plug is supplied which must be connected to a dedicated earthed
power point. The power point must be 300 mm to the side of the re
and a maximum of 1500 mm (cord supplied is 1500 mm). It must not
be above the unit as this is a potential re hazard.
Alternatively the appliance can be direct wired if the power supply is to be concealed. The
electric isolation switch must be accessible after the appliance has been installed.
If the supply cord is damaged and requires replacing, it must be replaced by a licensed
tradesperson. This must be a genuine replacement part available from Rinnai.
Installation by a licensed tradesperson
Ensure your installer talks to you about the use and care of this appliance and that you
understand these instructions. They also need to complete their installer details on page 43 of
the installation manual and leave the manual with you.
Improper installation, adjustment, service or maintenance can cause serious injury, property
damage or death. Please ensure your installation is completed by a licensed tradesperson.
Rinnai New Zealand Limited Arriva Operation and Installation Manual: 10343-E
05-10
9
General Information
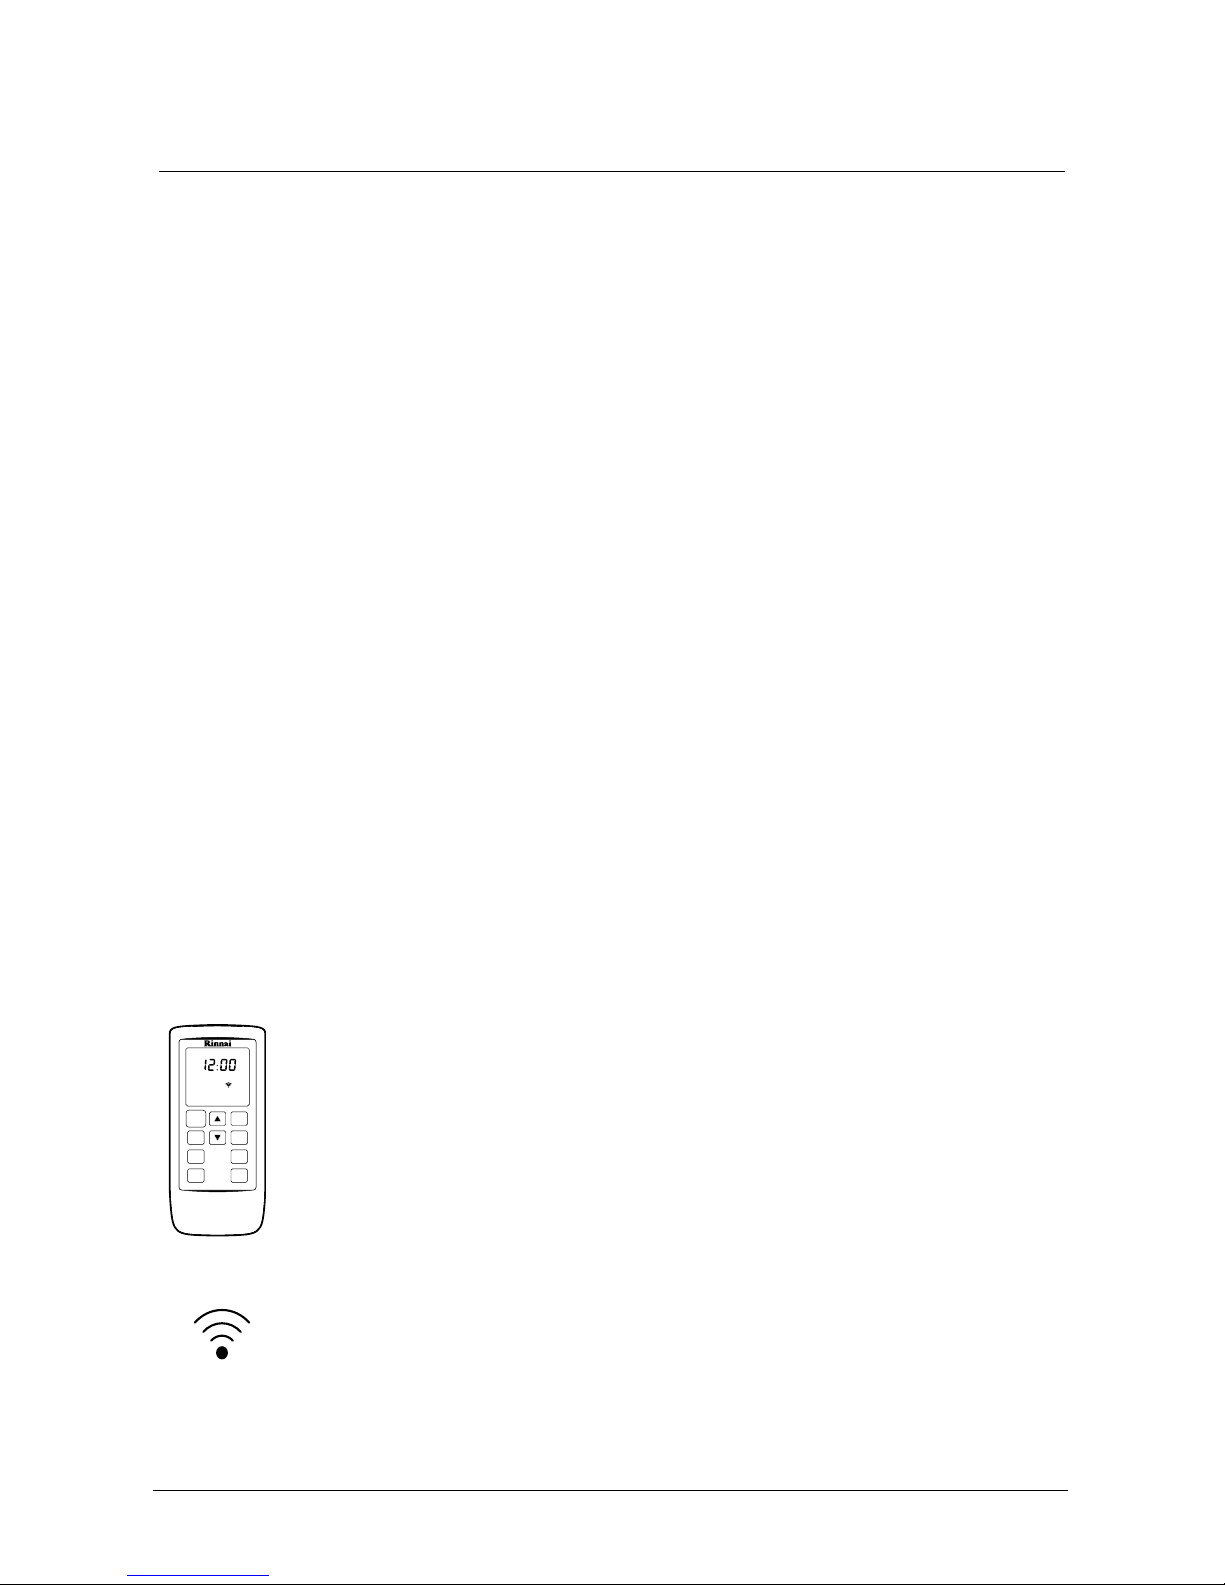
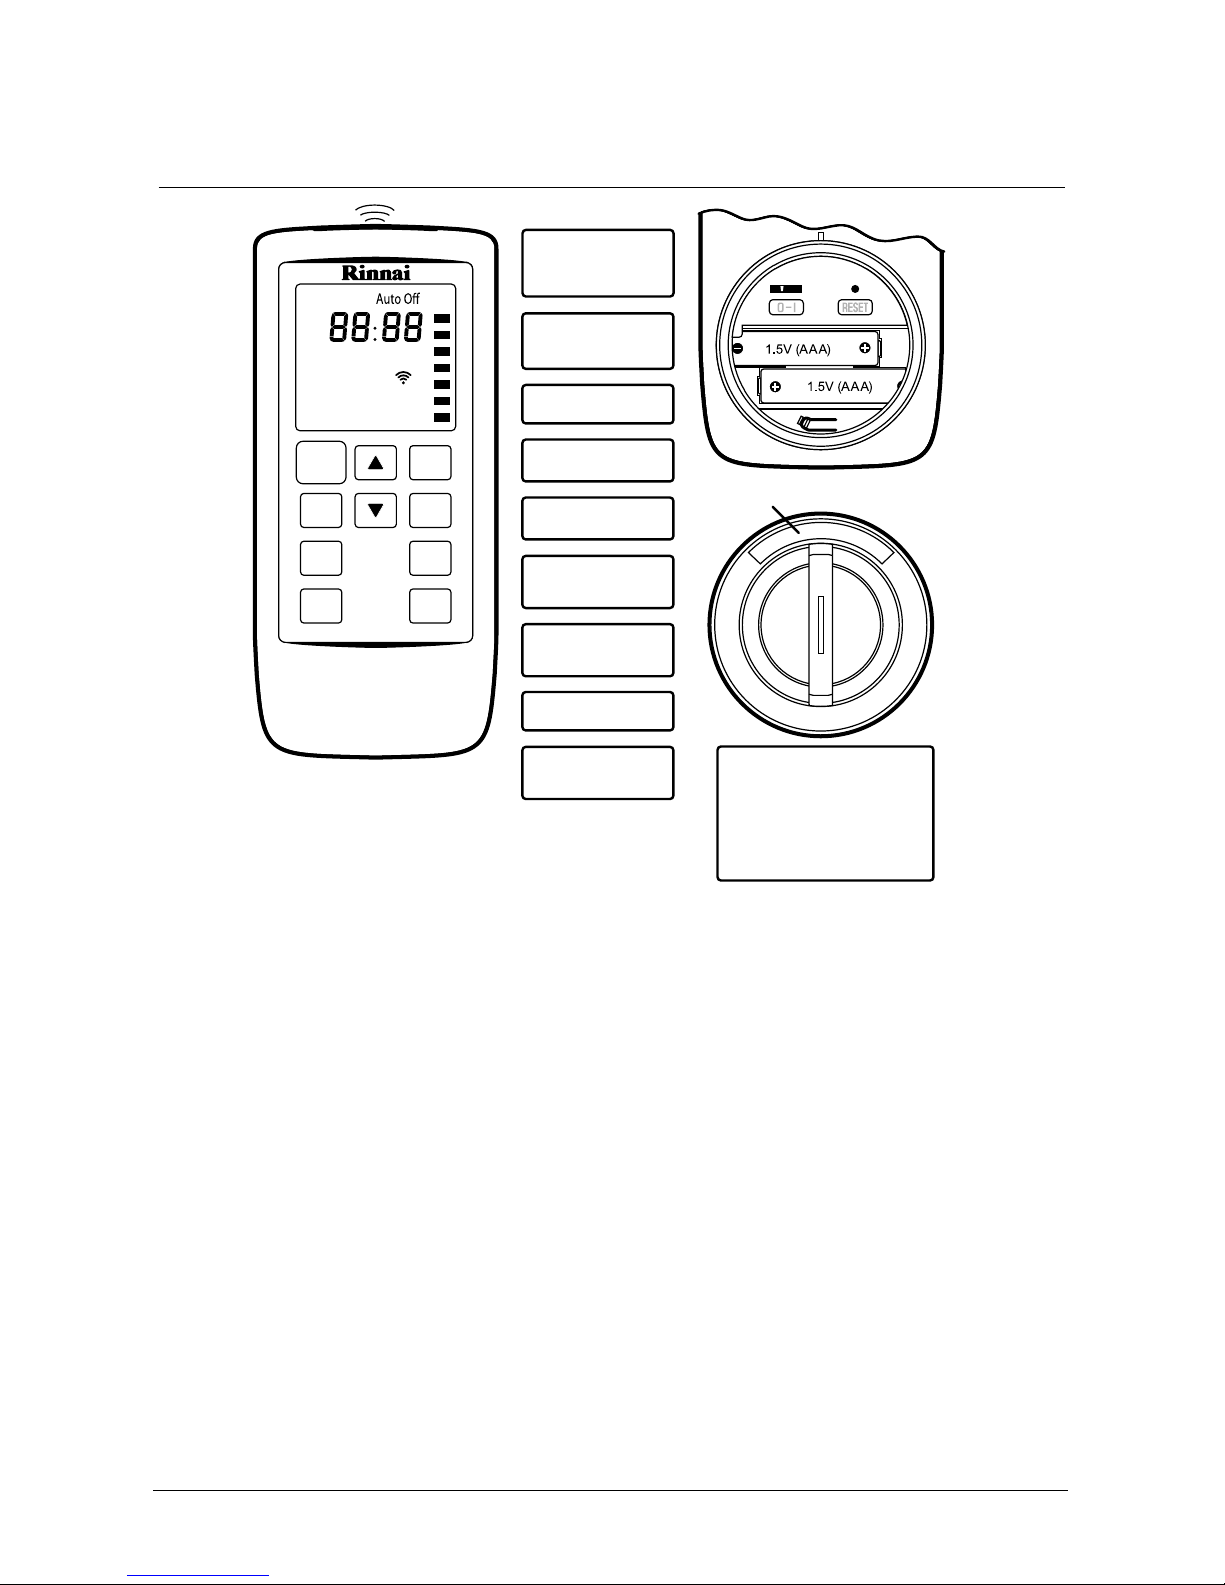
Remote control
• Avoid leaving the remote in direct sunlight and do not place it close to the warm air
discharge louvres of the heater
• Avoid dropping or getting wet
• Some uorescent lights may interfere with the transmission of the remote control signals,
changing position from which you are operating the remote may help
The remote uses 2 x 1.5V AAA batteries. Never mix old and new batteries.
Remove batteries if not going to be used for a long time. This will help avoid
damage from leaking batteries.
Positioning of the Arriva
To gain maximum heating advantage from the bottom air discharge,
position the Arriva close to the oor.
Can be fully recessed as long as a 75 mm clearance above and to the
sides is maintained for; operating devices to function, access to the unit,
cleaning and servicing.
Safety devices
Your Arriva is designed with the following safety devices.
• ame failure sensing system
• explosion relief
• overheat safety switch
• air temperature sensor
• thermal fuse
• overcurrent fuse
• spark detector
TV installation above replace
If installing a at screen television above the re, the main issue is heat. Heat from
the re itself and heating from the ueing components that may sit behind the
television, especially if recessed.
The Arriva has a fan that distributes warm air at a low level, this pushes the heat out and
around the room as opposed to straight up. The Arriva also has a power ue that has virtually
zero clearance to any cavity in which it is installed. The ueing components are also small and
generate very little heat.
The general rule for installations above a replace is the bottom of the television recess should
be at least 450 mm above the re. It is still however up to you to check with your television
supplier to verify clearances. Some TV manufacturers have warranty conditions that state a
television is not to be installed above a replace.
Rinnai New Zealand Limited Arriva Operation and Installation Manual: 10343-E
05-10
10
Basic Heater Operation
This appliance has a sealed combustion chamber that requires purging
before gas can ow and the unit can start. As a result the combustion fan
starts several seconds before there are any signs of the Arriva starting.
The normal ignition sequence is:
1. When the On/Off button is pressed the LED will glow red and the
combustion fan starts to purge the system.
2. Pilot sparker will operate and as soon as a spark is sensed gas will ow
to the pilot.
3. When the pilot ame is established gas will ow to the front and then
rear burners.
4. When all burners are on the heater will automatically modulate between
burner settings to achieve and maintain the default set temperature of
22 °C.
General notes
about ignition
The heater can be operated and stopped without the remote control by
using the On/Off button on the top panel of the heater. This operation is
called the automatic mode. In automatic mode the default set temperature
is 22 °C.
If the heater is turned off using the On/Off button on the heater control
panel, when it is turned back on it will lose all timer and clock settings until
the remote is used to re-transmit the information. The remote control
stores the clock, timer and temperature settings of the heater.
Operation
without the
remote control
(automatic
mode)
For the remote control functions to be available, the appliance On/Off
button must be in the On position.
The remote control emits an Infra Red signal and must be aimed at the
receiver unit located on the right side of the unit. The normal operating
range is 5 m. This range may vary depending on the position of the
installation and strength of the batteries.
The remote control transmits information to the heater whenever a button
is pressed except when the:
• remote display is deactivated
• lock function is activated
When the timers are being set, information is transmitted only when the
‘Time Set’ button is pressed.
Signal transmissions are conrmed by a brief illumination of the
transmission signal indicator on the remote. The unit will also ash and
beep to conrm the settings have been received.
When the remote is not used for a period of approximately 5 seconds,
the display will default to standby mode, displaying only the time. To reactivate press any button on the key pad.
Operation with
the remote
control
STANDBY
ON
Flame
Auto
Off
Lock
Timer 2
Timer 1
Override
Time
Set
Temperature
Lock
Clock
AM
PM
Timer 1
Set
Set ON OFF
ON OFFTimer 2Set
OverrideAuto Off
Time
Flame
Rinnai New Zealand Limited Arriva Operation and Installation Manual: 10343-E
05-10
11
Basic Heater Operation
If the power is disrupted while the heater is operating, once the power is
restored, the heater will go into power failure mode. This is indicated by a
ashing zeros in the error display and the LED ashing green.
To reset the heater, press the On/Off button once. Press the Standby/On
button a second time to switch the heater on.
Power
disruption
Do not unplug the main power supply to turn the unit off as this may cause
damage. There are safety devices that will continue to operate without
power, however the convection fan is required to operate for several
minutes after the unit is turned off to assist in cooling.
Do not unplug
power supply
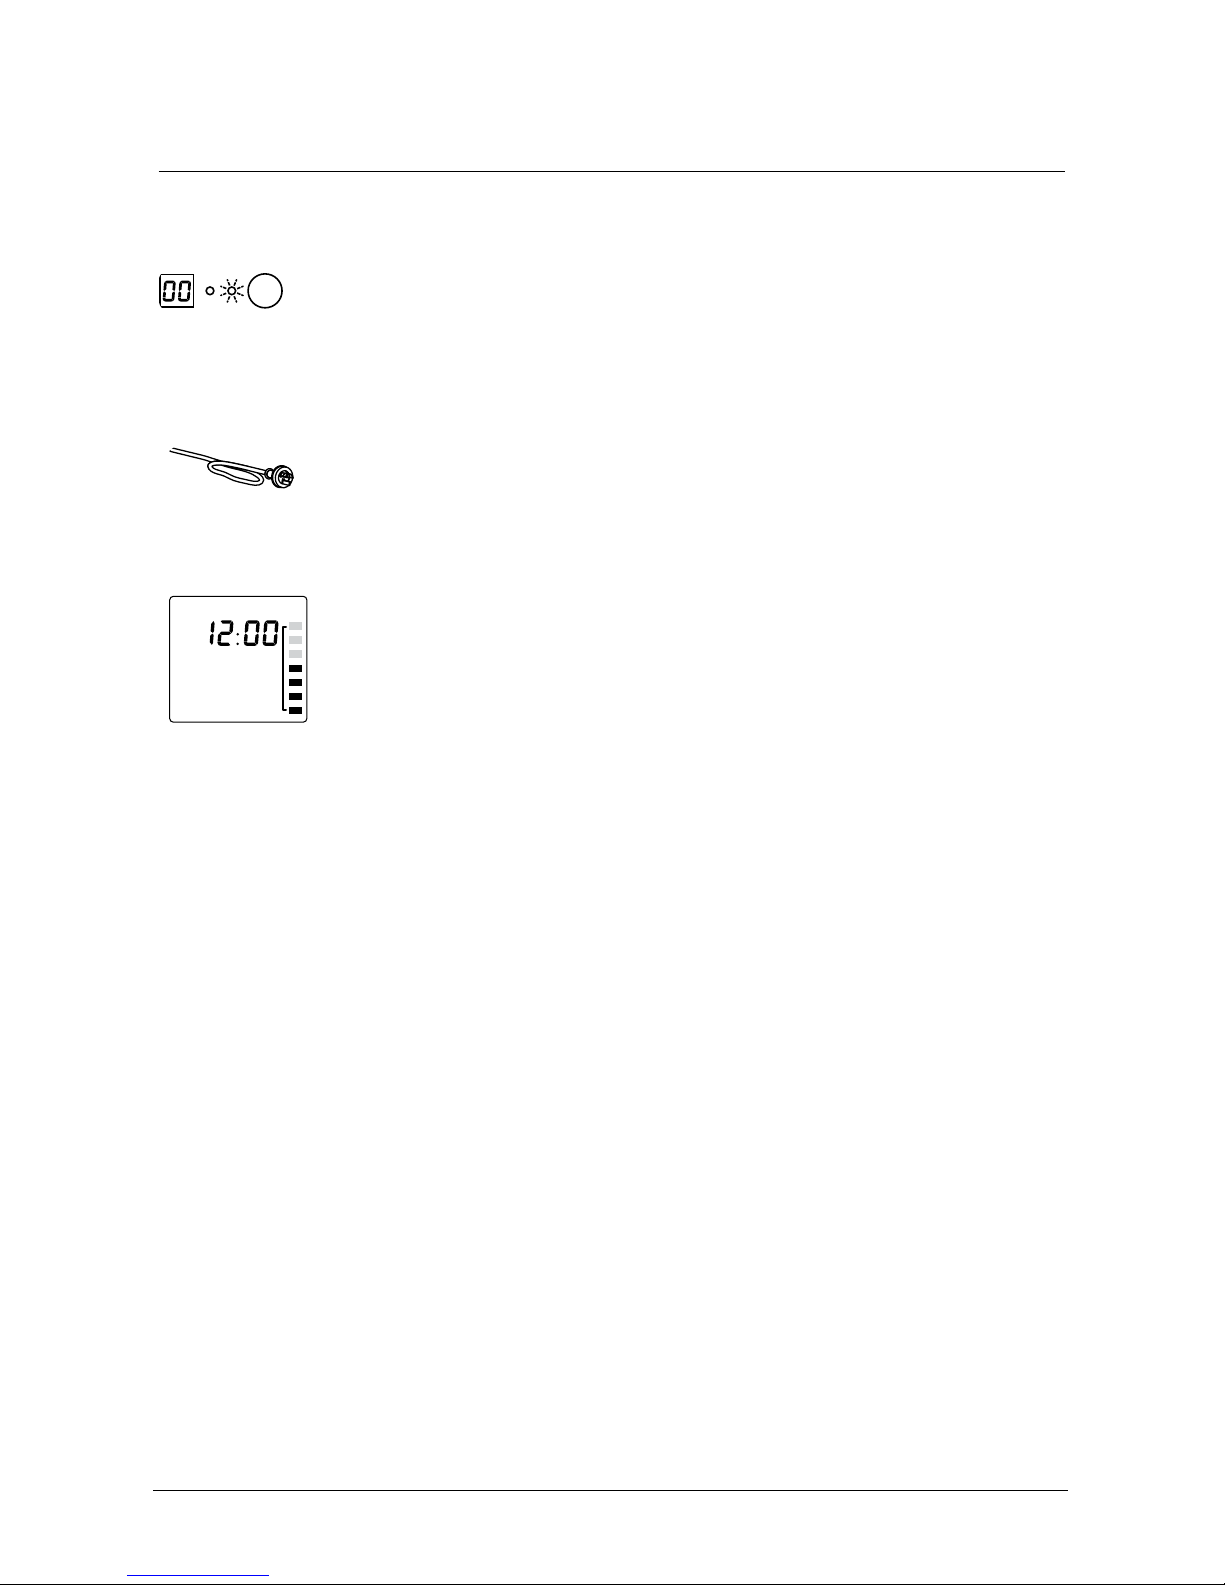
Used to select a desired ame picture and overrides the automatic mode.
There are 7 ame picture settings available.
While the heater is in operation press the Flame button. The heater will
automatically default to the last ame picture setting. The word ‘Flame’ and
a series of short bars will be displayed to show that the ame function is in
operation.
Use the up and down buttons to select the desired ame picture. The
number of bars illuminated correspond to your selection.
Should the room temperature exceed 40 °C while the ame function is
activated, the heater will switch off automatically. This is a safety feature.
Flame function
AM
PM
Set
Set
Timer 2
Time
Flame
Rinnai New Zealand Limited Arriva Operation and Installation Manual: 10343-E
05-10
12
Operation Using The Remote Control
BATTERY
COMPARTMENT
COVER
STANDBY
ON
Flame
Auto
O
Lock
Timer 2
Timer 1
Override
Time
Set
Temperature
Lock
Clock
AM
PM
Timer 1
Set
Set ON OFF
ON OFFTimer 2 Set
Override
Time
Flame
CONTROL BUTTONS
Used to select the temperature,
flame picture and adjust timers.
STANDBY / ON
BUTTON
Stops and Operates the heater
remotely.
FLAME BUTTON
Sets the flame picture.
TIME SET BUTTON
Sets clock and timers.
TIMER 1 BUTTON
Sets timer program 1.
TIMER 2 BUTTON
Sets timer program 2.
OVERRIDE BUTTON
Manually overrides
current timer operation.
LOCK BUTTON
Locks out control to
prevent tampering.
AUTO OFF
Energy saving room temperature
control.
BATTERIES AND
BATTERY COMPARTMENT
The remote control is powered by a pair of
1.5V AAA batteries.
To replace batteries simply unscrew the battery
compartment cover located on the back of the
remote control anti-clockwise, when installing
new batteries ensure that the correct polarity is
observed.
When the heater is in Standby mode pressing the Standby/On button will
start the ignition sequence and the LED will glow red to indicate that the
heater is operating.
Press the Standby/On button. This will turn off the unit and the LED will
glow green to indicate appliance is in standby.
Pressing the up and down buttons will change the preset temperature by
increments of 1 °C.
Temperature will be displayed to conrm that the function has been
initiated.
The temperature can be preset to:
• L (Low) continuous combustion on low
• 16 °C ~ 26 °C (in 1 °C steps) combustion rate varies to maintain
selected temperature
• H (High) continuous combustion on high
Turning the
heater on
Turning the
heater to
standby
Adjusting the
temperature
Rinnai New Zealand Limited Arriva Operation and Installation Manual: 10343-E
05-10
13
Operation Using The Remote Control
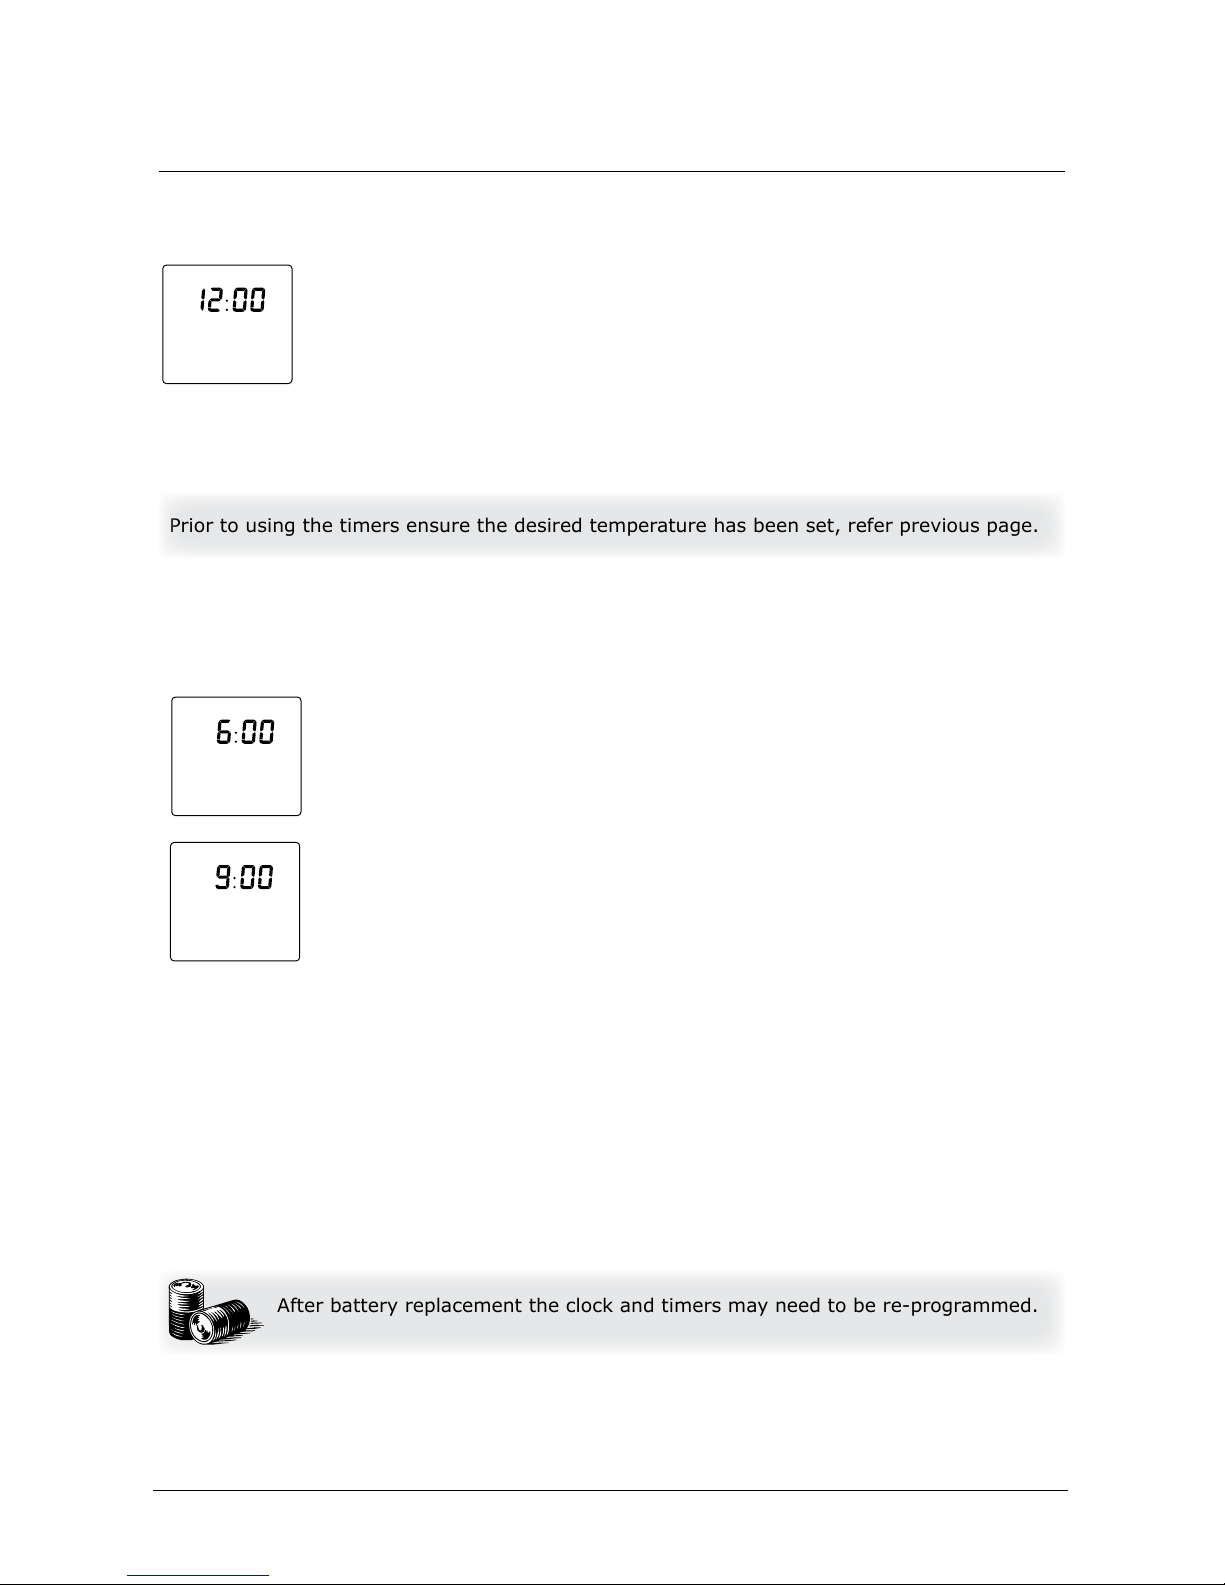
The clock must be set before the timers will operate.
1. Press the Time Set button once, ‘Clock Set’ will be displayed to conrm
function is initiated. The remote will show ‘AM 12:00’.
2. Use the up and down buttons to set AM or PM, then press the Time Set
button once to start programming the timers.
If you do not want to set the timers at this point, press Time Set four more
times until the display returns to the time. If no button is pressed within
approximately 90 seconds the screen will deactivate and any settings that
have not been transmitted will be lost.
Setting the
clock
Lock
Clock
AM
PM
Set
Set
ON OFF
Auto Off
Time
Flame
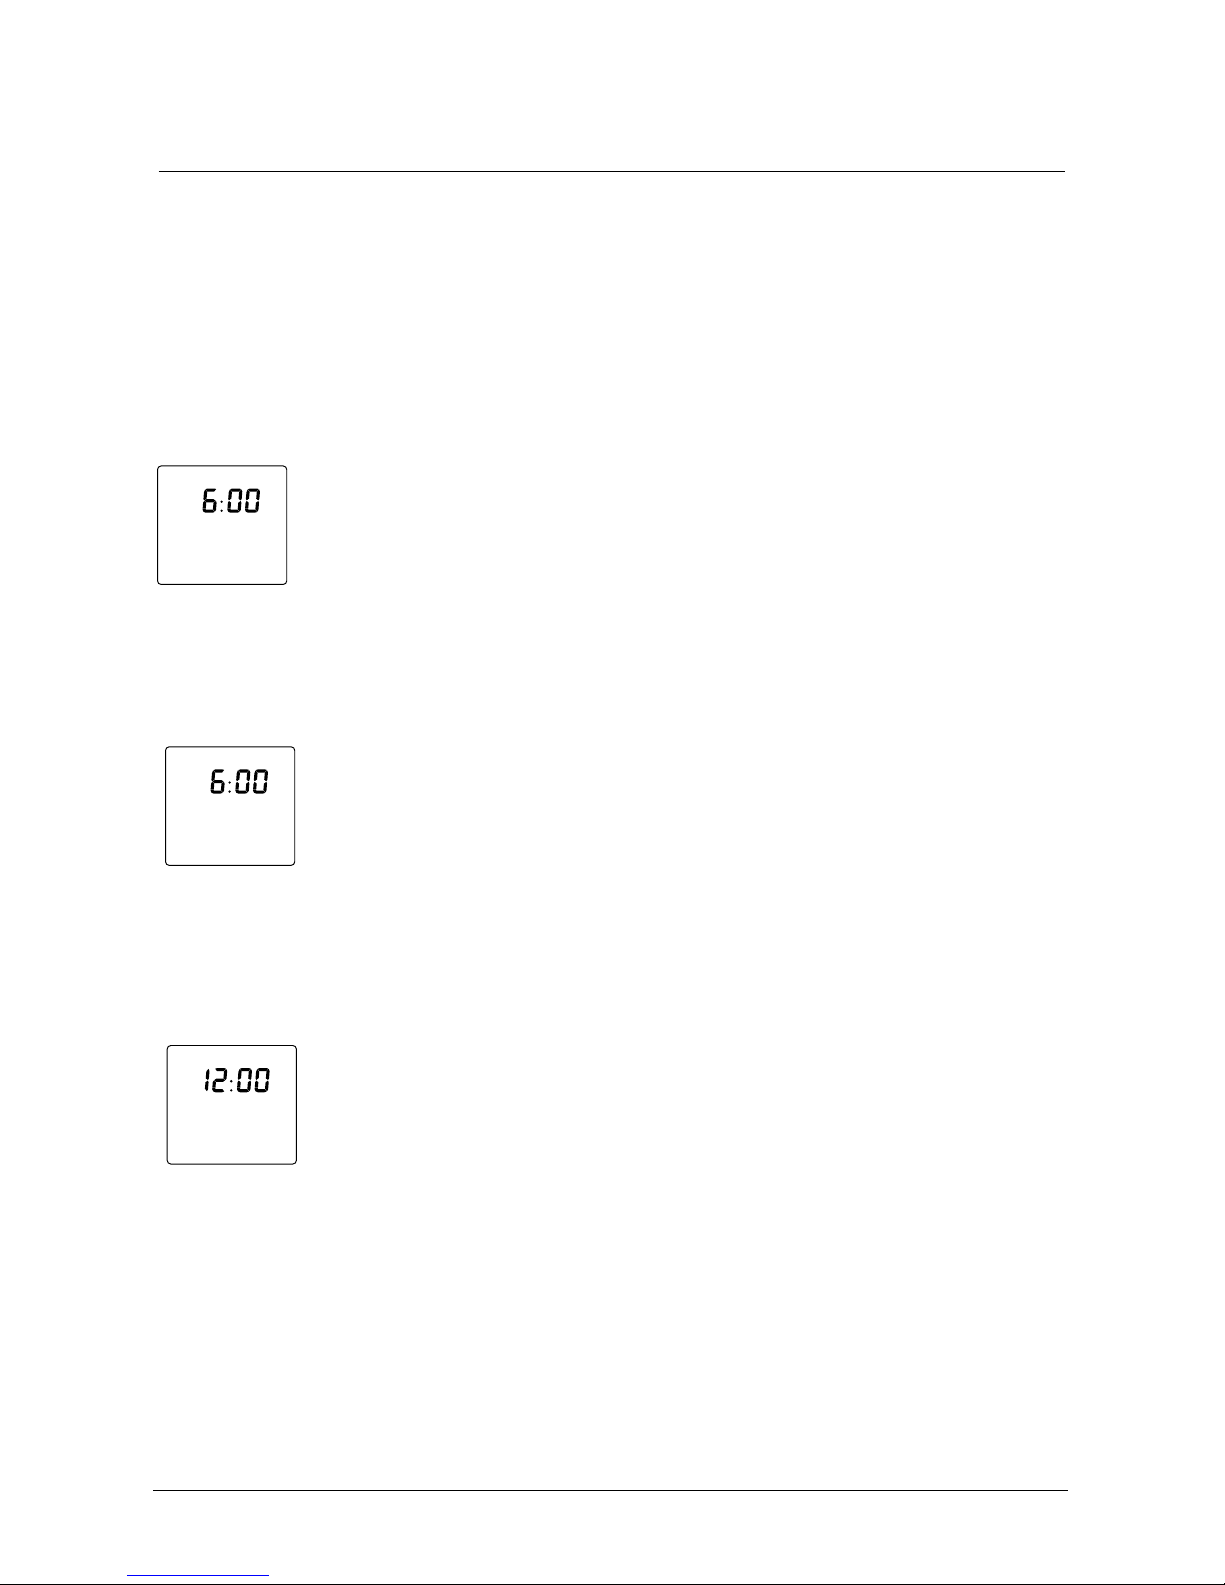
After the clock has been set and the Time Set button selected:
1. ‘Timer 1 Set ON’ and ‘AM 06:00’ will be displayed. Use the up and down
buttons to set the desired AM or PM on time. Press the Time Set button
once.
2. ‘Timer 1 Set OFF and ‘AM 09:00’ will be displayed. Use the up and down
buttons to set the desired AM or PM off time. Press the Time Set button
once.
3. To set up Timer 2, repeat above steps or press Time Set three times to
exit the timer programme.
4. The set On/Off timers will be displayed briey to conrm settings. When
the programs have been received the remote display will revert to the
time mode.
Setting the
timers
Temperature
Lock
Clock
AM
PM
Timer 1
Set
Set ON OFF
ON OFFTimer 2 Set
Override Auto Off
Time
Flame
Temperature
Lock
Clock
AM
PM
Timer 1
Set
Set ON OFF
ON OFFTimer 2 Set
Override Auto Off
Time
Flame
After battery replacement the clock and timers may need to be re-programmed.
Prior to using the timers ensure the desired temperature has been set, refer previous page.
You can view the timer settings by pressing the Timer 1 or Timer 2 buttons
while the heater is operating. The display will briey show the status of
each timer, i.e. Timer 1 On, Timer 1 Off. If the current time is outside of the
programmed times the heater will go into standby mode and the LED will
glow green.
To turn the timers off, press the relevant timer button again. The heater will
return to standby mode. If there are no timers set the Timer indicator will
go out.
Using the
timers
Rinnai New Zealand Limited Arriva Operation and Installation Manual: 10343-E
05-10
14
Automatically functions in conjunction with the timers. When a timer is
selected, the heater may operate anywhere within an hour prior to the
programmed On time.
The preheat function ensures the room reaches the desired temperature
by the programmed on time. This is achieved by sensing the room
temperature one hour prior to start.
Preheat
Operation Using The Remote Control
Used to manually override the timers so the heater can be operated outside
of the timer settings.
When override is selected ‘Override’ will be displayed. While in override
mode all remote control functions except for the ame function are
available until the next timer setting is reached.
To return to the timer setting, press the Override button a second time.
If standby/on is pressed during Override the heater will revert to standby
and the timer programs will be cancelled.
Override
function
Temperature
Lock
Clock
AM
PM
Timer 1
Set
Set ON OFF
ON OFFTimer 2 Set
Override Auto Off
Time
Flame
This is a energy saving feature designed to control the room temperature
economically. If the room temperature continues to rise when the heater
is thermostatically turned down to its lowest setting the front burner will
turn off leaving only the pilot ame operating. When the room temperature
requires further heating the heater will automatically re-ignite to warm the
room.
To switch the Auto Off function to ‘On’, press the Auto Off button once,
‘Auto Off’ will be displayed to conrm the function has been selected. To
switch this off, press the Auto Off button again. The ‘Auto Off’ will no longer
be displayed on the remote.
Using Auto Off
Temperature
Lock
Clock
AM
PM
Timer 1
Set
Set ON OFF
ON OFFTimer 2 Set
Override Auto Off
Time
Flame
This is designed as a child lock function which is a safety feature.
When Lock is pressed all remote control functions will be locked with the
exception of the Standby/On button for the purpose of turning the heater to
Standby only.
The remote control will show ‘Lock.
To cancel, hold the Lock button for 3 seconds.
Lock function
Temperature
Lock
Clock
AM
PM
Timer 1
Set
Set ON OFF
ON OFFTimer 2 Set
Override Auto Off
Time
Flame
 Loading...