

Page 1

RIGOL
Quick Guide
DP800A Series Programmable
Linear DC Power Supply
Aug. 2013
RIGOL Technologies, Inc.
Page 2

Page 3

RIGOL
Guaranty and Declaration
Copyright
© 2012 RIGOL Technologies, Inc. All R ights Reserv ed.
Trademark Information
RIGOL is a registered trademark of RIGOL Technologies, Inc.
Publication Number
QGH03104-1110
Notices
RIGOL products are protected by patent law in and outside of P.R.C.
RIGOL reserves the right to modify or change parts of or all the specifications
and pricing policies at company’s sole decision.
Information in this publication replaces all previously corresponding material.
RIGOL shall not be liable for losses caused by ei ther incidental or consequenti al
in connection with the fu r nis hing , use or perfo rman ce of this manual as well as
any information contained.
Any part of this document is forbidden to be copied or ph otocopied or
rearranged without prior written approval of RIGOL.
Product Certification
RIGOL guar antees this pr oduct confo rms to the national and industrial stan dar ds in
China as well as the ISO9001:2008 standard and the ISO14001:2004 standard.
Other international standard conformance certification is in progress.
Contact Us
If you have any problem or requirement when using our products o r this manual,
please contact RIGOL.
E-mail: service@rigol.com
Website: www.rigol.com
DP800A Quick Guide I
Page 4

RIGOL
Safety Requirement
General Safety Summary
Please review the following safety precautions carefully before putting the
instrument into operation so as to avoid any personal injuries or damages to the
instrument and any product connecte d to it. To prevent potential hazards, plea se use
the instrument only specified by this manual.
Use Proper Power Cord.
Only the power cord designed for the instrument and authorized by local country
could be used.
Ground The Instrument.
The instrument is grounded through the Protective Earth lead of the power cord. To
avoid electric shock, it is e ssential t o connect the ea rth terminal of power cord to the
Protective Earth terminal before any inputs or outputs.
Observe All Terminal Ratings.
To avoid fire or shock hazard, observe all ratings an d markers on the instrume nt and
check your manual for more information about ratings before connecting.
Use Proper Overvoltage Protection.
Make sure that no overvoltage (such as that caused by a thunderstorm) can reach
the product, or else th e op erator might expose to danger of electrica l shock.
Do Not Operate Without Covers.
Do not operate the instrument with covers or panels removed.
Use Proper Fuse.
Please use the specified fuses.
Avoid Circuit or Wire Exposure.
Do not touch exposed junctions and components when the unit is powered.
Do Not Operate With Suspected Failures.
If you suspect damage occurs to the instrument, have it inspected by qualified
service personnel before further oper at ions. Any maintenance, adjustment or
replacement especially to circuits or accessories must be performed by RIGOL
authorized personnel.
Keep Well Ventilation.
Inadequate ventilation may cause increasing of temperature or damages to the
device. So please keep well ventilated and inspect the intake and fan regularly.
II DP800A Quick Guide
Page 5

RIGOL
Do Not Operate in Wet Conditions.
In order to av oid short circuiting t o the interi or of the device or electric shock, please
do not operate in a humid environment.
Do Not Operate in an Explosive Atmosphere.
In order to avoid damages to the device or personal injuries, it is important to
operat e the device away from an explo sive atmosphere.
Keep Product Surfaces Clean and Dry.
To avoid the influence of dust and/or moisture in air, please keep the surface of
device clean and dry.
Electrostatic Prevention.
Operate in an elect r ostatic discharge protective area enviro nment to avoid damages
induced by static discharges. Always ground both the internal and external
conductors of the cable to release static before connecting.
Handling Safety.
Please handle with care during transportation to avoid damages to buttons, knob
interfaces and other parts on the panels.
DP800A Quick Guide III
Page 6

RIGOL
WARNING
injury or loss of life.
CAUTION
damage to this product or other property.
DANGER
indicates an injury or hazard may immediately happen.
WARNING
indicates an injury or hazard may be accessible potentially.
CAUTION
indicates a potential dama ge to the inst rument or ot her property mi ght
occur.
Hazardous
Safety
Protective
Chassis
Test
Safety Terms and Symbols
Terms in this Ma n ual. These terms may appear in this manual:
Warning state ments indicate the conditions or practices that could result in
Caution statements indicate the c onditions or practic es that coul d result i n
Terms on the Product. These terms may appear on the Product:
Symbols on the Product. These symbols may appear on the product:
Voltage
Warning
Earth
Terminal
Ground
IV DP800A Quick Guide
Ground
Page 7

RIGOL
CAUTION
have causticity.
WARNING
completely dry before reconnecting to a power source.
General Care and Cleaning
General Care:
Do not store or leave the instrument in where the instrument will be exposed to
direct sunlight for long periods of time.
Cleaning:
Clean the instrument regularly according to its operating conditions. To clean the
exterior surface, perform the following steps:
1. Disconnect the instrument from all power sources.
2. Clean the loose dust on the outside of the instrument with a lint - free cloth (with
a mild detergent or water). When cleaning the LCD, take care to a void sca rifying
it.
To avoid damages to the instrument, do not expose them to liquids which
To avoid injury resulting from short circuit, make sure the instrument is
Environmental Consideratio ns
The following symbol indicates that this product complies with the applicable
European Union requirements according to Directives 2002/96/EC on waste electrical
and electronic equipment (WEEE) and batteries.
Product End-of-Life Handling
The equipment may contain substances that could be ha rmful to the environment or
human health. In order to avoid release of such substances into the environment and
harm to human health, we encourage you to recycle this product in an appropriate
system that will ensure that most of the materials are reused or recycled
appropriately. Please contact your local authorities for disposal or recycling
information.
DP800A Quick Guide V
Page 8

RIGOL
Model
Channel
Channel Output Voltage/Current
DP831A
3
8V/5A, 30V/2A, -30V/2A
DP832A
3
30V/3A, 30V/3A, 5V/3A
DP821A
2
60V/1A, 8V/10A
DP811A
1
20V/10A (Range 1), 40V/5A (Range 2)
Document Overview
This manual is used to gui de use rs to qui ckly unders tand the f ront panel , rear panel,
user interface and basic operating methods of DP800A series programmable linear
DC power supply. You can download the newest version of this manual from
www.rigol.com.
Format Conventions in this Manual
1 Buttons
The function key at the front panel is denoted by the format of “Button Name
(Bold) + Text Box” in the manual, for example, Utility denotes the “System
Auxiliary Function Setting” key.
2 Menu
The menu item is denoted by the format of “Menu Word (Bol d) + Characte r
Shading” in the manual, for example, Sys Info denotes the “System
Information” item under Utility.
3 Operation Steps
The next step of the operation is denoted by an arrow “” in the manual. For
example, Utility System denotes pressing Utility at the front panel and
then pressing System.
Content Conventions in this Manual
DP800A series programmable linear DC power sup pl y i nclu des the following models.
In this manual, DP831A is taken as an example to illustrate the functions and
operating methods of DP800A series.
VI DP800A Quick Guide
Page 9

RIGOL
Contents
Guaranty and Declaration ......................................................................... I
Safety Requirement ................................................................................ II
General Safety Summary ........................................................................... II
Safety Terms and Symbols ....................................................................... IV
General Care and Cleaning ........................................................................ V
Environmental Considerations .................................................................... V
Document Overview ............................................................................... VI
Quick Start ............................................................................................... 1
General Inspection ................................................................................... 1
Appearance and Dimensions ...................................................................... 2
Front Panel .............................................................................................. 3
Rear Panel .............................................................................................. 13
To Connect to Power ................................................................................ 15
Power-on Inspection ................................................................................ 15
To Replace the Fuse ................................................................................ 16
User Interface ......................................................................................... 17
To Use the Built-in Help System ................................................................ 19
Troubleshooting ..................................................................................... 20
DP800A Quick Guide VII
Page 10

Page 11

RIGOL
Quick Start
General Inspection
1. Inspect the shipping container for damage
Keep the damaged shipping container or cushioning material until the contents
of the shipment have been checked for completeness and the instrument has
passed both ele ctrical and mechanical tests.
The consigner or carrier shall be liable for the damage to instrument resulting
from shipment. RIGOL woul d n ot be responsible for free maintenance/rework
or replacement of the unit.
2. Inspect the instrument
In case of any damage, or defect, or failure, notify your RIGOL sales
representative.
3. Check the accessories
Please check the accessories according to the packi ng l is t s. If t he accessories
are incomplete or damaged, please contact your RIGOL sales representative.
DP800A Quick Guide 1
Page 12

RIGOL
Appearance and Dimensions
For DP800A se ries, the dimensions of all models are same. But the design of the f ront
and rear panels are not exactly the same (about the differences, please r efer to
“Front Panel” and “Rear Panel”). In this section, DP831A is taken as an example
to introduce the appearance and dimensions of DP800A series (as shown in Figure
1and Figure 2).
Figure 1 Front View Unit: mm
Figure 2 Side View Unit: mm
2 DP800A Quick Guide
Page 13

RIGOL
1 2 3 4
11 10 9 8 7 6 5
Front Panel
The front panels of different models of DP800A series are shown in the figures below.
In this section, DP831A (as shown in Figure 3) is taken as an example to introduce
the front panels of DP800A series.
Figure 3 DP831A Front Panel
DP800A Quick Guide 3
Page 14

RIGOL
Figure 4 DP821A Front Panel
Figure 5 DP811A Front Panel
4 DP800A Quick Guide
Page 15

RIGOL
Press this key to select CH1 and set the parameters of this channel,
Press this key to select CH2 and set the parameters of this channel,
Press this key to select CH3 and set the parameters of this channel,
Press this key to enable or disable the output of the corresponding
Press this key and the prompt message asking whether to enable the
outputs of all the channels. Press this key again to disable the outputs
of all the channels.
1. LCD
3.5 inches TFT display. It is used to display system parameter settings, system
output state, menu options, prompt messages, etc.
2. Channel (Range) Selection and Output Switch
For the multi-channel model, the function of this part is channel selection and
output switch. For the single channel model (DP811A), the function of this part
is range selection and output switch.
Multi-channel Model (takes DP831A as the example):
such as voltage, current and overvoltage/overcurrent protection.
such as voltage, current and overvoltage/overcurrent protection.
such as voltage, current and overvoltage/overcurrent protection.
channel.
outputs of all the channels will be displayed. Press OK to enable the
DP800A Quick Guide 5
Page 16

RIGOL
Press this key to select the 20V/10A range. Users can set the
Press this key to select the 40V/5A range. Users can set the parameters
Single Channel Model (DP811A):
parameters of the channel, such as voltage, current and
overvoltage/overcurrent protection.
of the channel, such as voltage, current and overvoltage/overcurrent
protection.
Press this key to enable or disable the output of the channel.
6 DP800A Quick Guide
Page 17

RIGOL
3. Parameter In p ut Area
The parameter input a rea is as s hown in the figure below. This area includes the
direction keys (unit selection keys), numeric keyboard and knob.
(1) Direction keys and unit selection keys
Direction keys: move the cursor.
Unit selection keys: whe n usi ng the nume ric ke yboa rd t o i nput par ameters ,
the keys are used to select the voltage units (V and mV) and the current
units (A and mA).
(2) Numeric Keyboard
Ring-type numeric keyboard: includes numbers 0-9 and the decimal point.
Press the corresponding key to input the number.
(3) Knob
When setting parameters, rotate the knob to increase or decrease the value
of the digit at the cursor.
When browsing the setting objects (timing parameters, delay parameters,
filename input, etc.), rotate the knob to quickly move the cursor.
DP800A Quick Guide 7
Page 18

RIGOL
Restore all the settings of the instrume nt to default values or recall
Confirm the parameter setting.
ress and hold this k ey to lock the front panel keys; at t his point,
unlock the front panel keys.
4. Preset
the user-defined channel voltage/current configurations.
5. OK
P
the front panel keys (except the output on/off key of each
channel) are not available. Press and hold this key again to
unlock the front panel keys. When the keyboard lock pa s s w ord
is enabled,
users need to input the correct password (2012) to
6. Back
Delete the character currently before the cursor.
When the instrument is in remote mode, p ress this k ey to return
to local mode.
8 DP800A Quick Guide
Page 19

RIGOL
7. Output Terminals
For DP800A series, the output terminals of different models are not exactly the
same.
DP831A:
(1) (2)
DP821A:
(3)
DP811A:
(1) Use d to output the voltage and current of the channel.
(2) This terminal is connected to the instrument chassis and g round wire (power
cord ground terminal) and is in grounded state.
(3) Used to sense the actual voltage at the load to compensate the voltage drop
caused by the leads between the power supply and the load.
DP800A Quick Guide 9
Page 20
RIGOL
A
B
Connection methods of the output terminal:
Method 1:
Connect the test lead to A of the output terminal.
Method 2:
Rotate the outer nut of the output terminal counterclockwise and connect the
test lead to B of the output terminal; then, rotate the outer nut of the output
terminal clockwise. This connection method can eliminate the error caused by
the resistance of the output terminal.
Note: Connect the positive terminal of the test lead with the (+) terminal of the
channel output and connect the negative terminal of the test lead with the (-)
terminal of the channel output.
10 DP800A Quick Guide
Page 21

RIGOL
Press this key to enter the display parameter setting interface.
management system.
8. Function Menu Area
Users can set the brightness, contrast, RGB luminosity and display
mode.
Press this key to enter the file store and recall interface. Yo u can
save, read, delete, copy and paste files. The file types available for
storage include state file, record file, timer f ile, delayer file and
bitmap file. The instrument supports internal and external storage
and recall. Wherein, external storage supports FAT32 file
Press this key to enter the system auxiliary function set t ing
interface. Users can set the remote interface parameters, system
parameters and print parameters. Besides, users can also calibrate
the instrument, view system information and define the recall
configuration of Preset.
Press this key to enter the advanced function setting interface.
Users can set the recorder, analyzer, monitor and trigger
parameters.
Press this key to enter the timer and delayer setting interface.
Users can set the timer and delayer parameters as well as turn on
or off the timer and delayer.
Press this key to open the built-in help system and press the
desired key to get the corresponding help information. F or detailed
introductions, refer to “To Use the Built-in Help System”.
DP800A Quick Guide 11
Page 22

RIGOL
press this key to exit the current interface and return to t he main
interface.
The menu keys correspond to the menus above them. Pres s a n y
menu key to selec t the corresponding menu.
9. Display Mode Switch/Return to the Main Interface
Switch between the current display (normal or waveform) mode
and dial display mode. Besides, in various function interfaces,
10. Menu Keys
11. Power Switch Key
Turn on or off the instrument.
12 DP800A Quick Guide
Page 23

RIGOL
11
10 9 8 7
1 2 3 4 5 6
Rear Panel
The rear panels of the various models of DP800A series are as shown in the figures
below. I n this section, DP831A (as shown in Figure 6 and Table 1) is taken as an
example to introduce the rear panels of DP800A series.
Figure 6 DP831A Rear Pannel
Figure 7 DP811A Rear Panel
DP800A Quick Guide 13
Page 24

RIGOL
No.
Name
Explanation
1
LAN Interf ace
Connect to the local network via the RJ45 interface
Connect the instrument (as “slave” device) to
external USB device (such as, PC)
Connect the instrument (a s “host” device) to external
USB device (such as, USB storage device)
4
Digital I/O
Digital I/O interface
5
RS232 Interface
Serial communication interface
Select the specification of the input voltage (100V,
115V, 230V)
7
Power Socket
AC power input interface
For different models of instrument or when different
fuses are different
9
Fan
Input Power
Requirement
Corresponding relations of the input power
frequency, voltage and fuse
Only DP811A provides this interface which has the
the front panel
Table 1 DP800A Rear Panel Explanation
2 USB DEVICE
3 USB HOST
6 Voltage Selector
8 Fuse
input voltages are selected, the specifications of the
10
11 Output Interface
same function as that of the “Output Ter min als ” at
Note: The “Output Terminals” at the front panel and the “Output Interface” at the
rear panel cannot output at the same tim e. Only one of the two can be selected to
output at any one time (the “Output Terminals” at the front panel has higher
accuracy).
14 DP800A Quick Guide
Page 25

RIGOL
WARNING
grounded.
Tip
hen turn the instrument on again after turn it off, please make sure the time
To Connect to Power
1. Input power requirement
DP800A series power supply can accept three kinds of AC power supplies:
50Hz–60Hz frequency; 100V, 115V and 230V voltages.
2. Check the voltage selector at the rear panel
Before connecting to power, make sure that the setting voltage of the voltage
selector at the rear panel matches the input voltage.
3. Check the fuse
When the instrument leaves factory, proper fuse is installed. Please check
whether the fuse matches the input voltage according to the “Input Power
Requirement” at the rear panel.
4. Connect the instrument power cord
Connect the instrument to AC power supply using the power cord provided in
the accessories.
To avoid electric shock, make sure that the instrument is correctly
Power-on Inspection
Press the power switch at the front panel and the instrument executes self-test. If
the instrument passes the self-test, the welcome interface will be displayed;
otherwise, the corresponding self-test failure information (including TopBoard,
BottomBoard, Fan and Temperature) will be displayed.
W
between the two operations are larger than 5s.
DP800A Quick Guide 15
Page 26

RIGOL
WARNING
connecting to pow er.
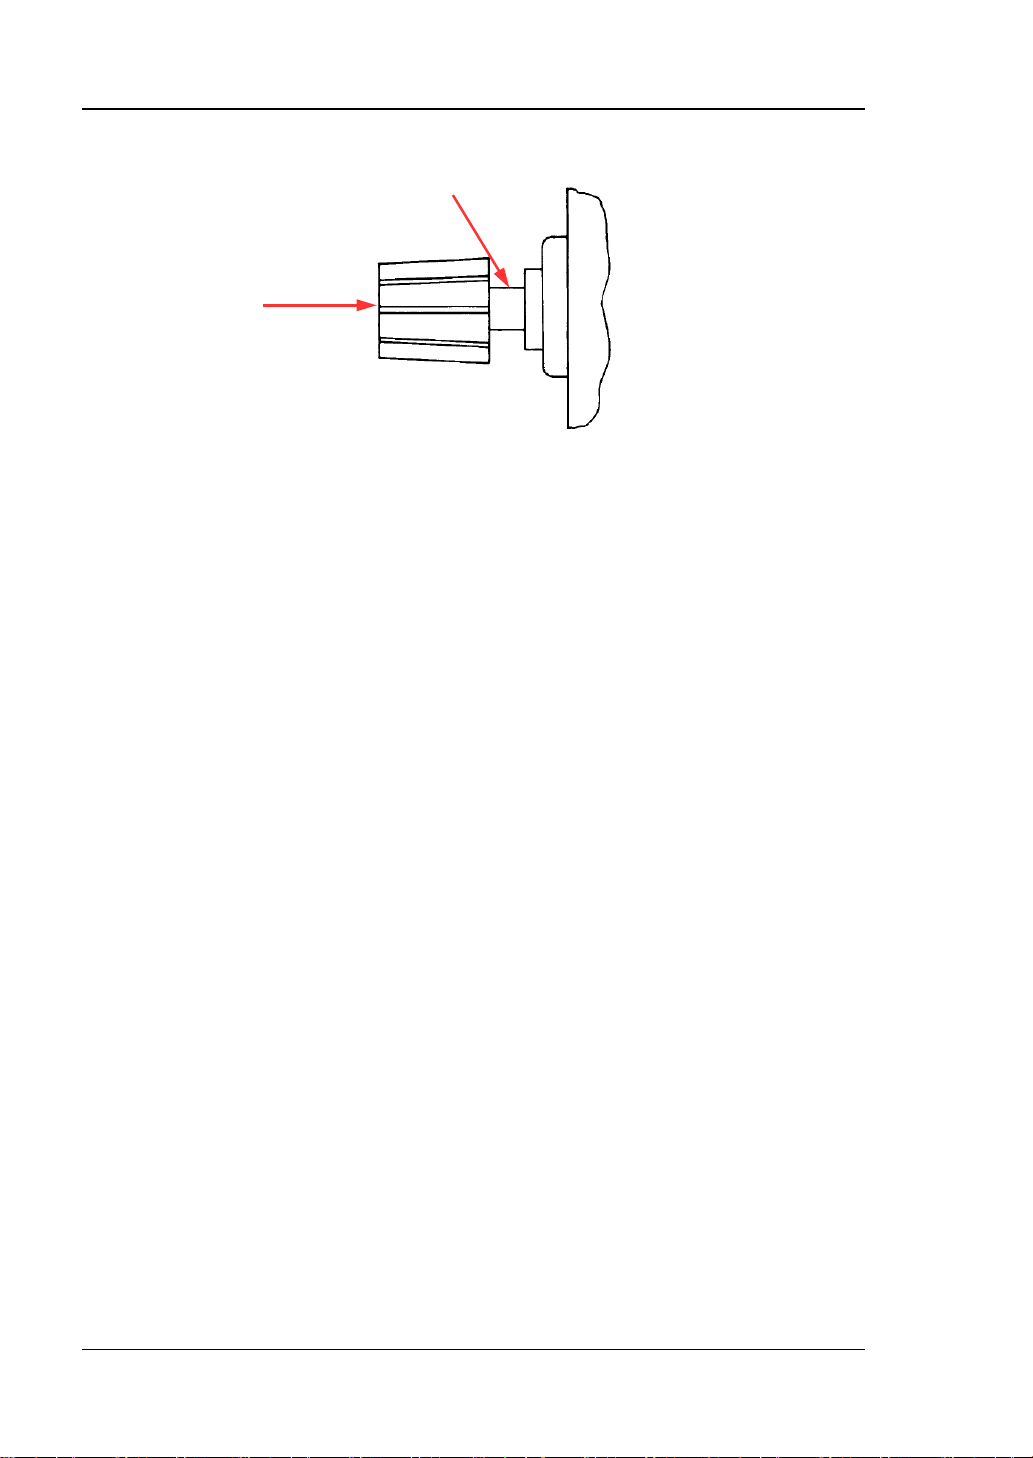
Fuse Seat
To Replace the Fuse
To replace the fuse, follow the steps below.
1. Turn off the instrument and remove the power cord.
2. Insert a small straight screw driver int o the sl ot at the power so cket an d prize out
the fuse seat gently.
3. Adjust the power voltage selector manually to select the correct voltage scale.
4. Take out the fuse and replace it with a specified fuse (for the corresponding
relations between the input voltage and fuse specification, refer to the “Input
Power R e quirement” at the rear panel).
Fuse
16 DP800A Quick Guide
To avoid personal injuries, cut off the power supply before replacing the
fuse; to avoid elect ric shock or fire, s elect th e p r oper po wer supply
specification and replace a fuse corresponding to this specification before
Page 27

RIGOL
1
8 9 10 11
User Interface
DP800A series power supply provides three kinds of display modes (normal,
waveform and dial). The default is normal and press Display Disp Mode to set
the display mod e to “Waveform” or “D ial”. In this section, DP831A is taken as an
example to introduce the inte rfa ce la yout under the normal display m ode (as shown
Figure 8 and Table 2).
in
2
3
4
5
6
7
Figure 8 DP831A User In terface (Normal)
Figure 9 DP821A User Interf a ce (Normal)
DP800A Quick Guide 17
Page 28

RIGOL
1
Voltage and current setting values
2
Overvoltage and overcurrent protection setting values
3
Actual output voltage
4
Actual output current
5
Actual output power
6
Channel output mode
7
Menu bar
8
Channel number
9
Channel output status
10
Channel currently selected
11
Status bar, display the system sta tus indic ato rs.
: remote control is connected
Figure 10 DP811A User Interface (Normal)
Table 2 DP800A User Interface Explanation
: over-temperature protection is enabled.
: the front panel is locked.
: LAN is connected successfully.
: USB device is recognized.
: system sound is enabled.
: system sound is disabled.
18 DP800A Quick Guide
Page 29

RIGOL
To Use the Built-in Help System
The built-in help s ystem provides help inf ormation for an y front panel key (except the
parameter input area) and menu keys for users to quickly obtain the function
prompts of the function keys or menus.
Obtain the help information of any key
Press Help to illuminate it and press the desired key to get the corresponding help
information; at the same time, the backlight of Help goes off. Press to
exit the help system.
Built-in help interface
Press Help to illuminate it and press Help again to open the built-in help interface
as shown in the figure below. Press the up/down direction keys to select the desired
help topic and press View to view the corresponding help information.
Figure 11 Built-in Help Interface
DP800A Quick Guide 19
Page 30

RIGOL
Troubleshooting
The commonly encountered failures and their solutions are listed below. When you
encounter those problems, please solve them following the corresponding steps. If
the problem remains still, please contact RIGOL and provide your device
information (Utility Sys Info).
1. The instrument can not start up.
(1) Check whether the power is correctly connected.
(2) Check whether the power switch at the front panel is really on.
(3) Remove the power cord and check whether the voltage selector is at the
proper scale, whether the specification of the fuse is correct and whether
the fuse is intact. If the fuse needs to be changed, ref er to “To Replace the
Fuse”.
(4) If the problem remains, please contact RIGOL.
2. The constant voltage output is abnormal.
(1) Check whether the maximum output power of the scale currently selected
fulfills the load requirement. If yes, go to the next step.
(2) Check whether the cable connecting the load and power supply is
short-circuited and in good contact.
(3) Check whether the load is normal.
(4) Check whether the current setting value of this scale is proper; if it is too
low, increase it properly.
(5) If the problem remains, please contact RIGOL.
3. The constant current output is abnormal.
(1) Check whether the maximum output power of the scale currently selected
fulfills the load requirement. If yes, go to the next step.
(2) Check whether the cable connecting the load and power supply is
short-circuited and in good contact.
(3) Check whether the load is normal.
(4) Check whether the voltage setting value of this scale is proper; if it is too
low, increase it properly.
(5) If the problem remains, please contact RIGOL.
4. The USB storage device can not be recognized.
(1) Check whether the USB storage device can work normally.
(2) Make sure that the USB storage dev ice being used is flash storage type.
This oscilloscope does not support hardware storage type.
(3) Restart the instrument and then insert the USB storage device to check it.
(4) If the USB storage device still can not be used normally, please contact
RIGOL.
20 DP800A Quick Guide
 Loading...