

RIDGID WD1660 Owner's Manual
:'
2:1(560$18$/
48(67,21625&200(176"
&$//5,'*,'
ZZZULGJLGZRRGZRUNLQJFRP
Part No. SP6226 Printed in U.S.A.
86*$//216
&'1* $//216
:(7'5<9$&:,7+
'(7$&+$%/(%/2:(5
$VVHPEO\
2SHUDWLRQ
5HSDLU3DUWV
)RU<RXU6DIHW\
5HDGDOOLQVWUXFWLRQVFDUHIXOO\

Table of Contents
Section Page
Table of Contents ..................................2
Important Safety Instructions .................2
Safety Signal Words ............................2
Save These Instructions ........................3
Introduction ............................................ 4
Unpacking and Checking
Carton Contents ........................... ......4
Carton Contents List ...........................4
Float/Cage Assembly .............................5
Filter Assembly ......................................6
Accessory Caddy Assembly ..................6
To Install the Wheels/Caster s ..............6
To Install Your Vac Drum
Onto the Caddy ...................................7
To Store Your Accessories ....................7
Vac Assembly ........................................8
Positioning Detachable Blower (Power
Head Assembly) ................................9
Section Page
Operation .............................................10
Vacuuming Dry Materials ..................10
Vacuuming Liquids ............................11
Emptying Dust Drum .........................11
Cord Wrap ....................... ..................12
Moving the Vac ..................................12
Blowing Feature ................................12
Assemble the Detachable
Blower for “Blowing”. .........................13
Maintenance ........................................13
Blower Intake .....................................13
Cleaning Vac Filter ............................14
Wet/Dry Vac ......................................14
Wet Nozzle ........................................15
Repair Parts ........................................16
Notes ................................................... 18
IMPORTANT SAFETY INSTRUCTIONS
Safety is a combination of common
sense, staying alert and knowing how
your vac works. Read this manual to
understand the vac.
Safety Signal Words
DANGER: mean s if the s afe ty inf ormation
is not followed someone will be seriously
injured or killed.
WARNING: means if the safety information is not followed someone coul d be
seriously injured or killed.
CAUTION: means if the safety information is not followed someone may be
injured.
When using your Wet/Dry Vac, follow
basic safety precautions including the following.
WARNING - To reduce
the risk of fire, electric shock, or
injury:
Read and un derstand this o wner’ s manual
and all labels on the Wet/Dry Vac before
operating. Use only as described in this
manual. To reduce the risk of personal
injury or damage to W et/Dry Vac, use only
RIDGID recommended accessories.
Sparks inside the motor can ignite flammable vapors or dust. To reduce the risk
of fire or explosion:
• Do not vac uum, or use th is We t/Dry V ac
near, flammable or combustible liquids,
gases, or explosive dusts like gasoline
or other fuels, lighte r flu id, cl eaners , oi lbased paints, natural gas, hydrogen,
coal dust, magnesium dust, grain dust,
or gun powder.
• Do not use Wet/Dry Va c as a sprayer.
Do not vacuum anything that is burning or
smoking, such as cigarettes, matches, or
hot ashes.
Do not vacuu m firepl ace so ot or ash . This
is a very fine dust which will not be captured by the filter and ma y c aus e d am age.
To reduce the risk of health hazards from
vapors or dusts, do not vacuum toxic
materials.
Do not use or store near hazardo us materials .
To reduce the risk of elect ric shock, do not
expose to rain. Store indoors.
2
Do not allow to be used as a toy. Close
attention is necessary when used by or
near children.
Do not use this W et/Dry Vac with a torn filter or without the filter installed except for
vacuuming liquids as described in the
operation section of this manual.
Do not leave Wet/Dry Vac when plugged
in. Unplug fr om outlet w hen not in us e and
before servicing. Turn off Wet/Dry Vac
before unplugging.
To reduce the risk of injury from accidental starting, unplug power cord before
changing or cleaning filter.
Do not unplug by pulling on cord. To
unplug, grasp the plug, not the cord.
Do not use with damaged cord, plug or
other parts. If your Wet/Dry Vac is not
working as it should, has missing parts,
has been dropped, damaged, left outdoors, or dropped into water, return it to a
Authorized Service Center.
Do not pull or carry by cord, use cord as
handle, close a door on cord, or pull cord
around sharp edges or corners. Do not
run Wet/Dry Vac over cord. Keep cord
away from heated surfaces.
Do not handle plug or the Wet/Dry Vac
with wet hands.
Do not put any object into ventilation openings. Do not vacuum with an y ventilation
openings blocked; keep free of dust, lint,
hair or anything that may reduce air flow.
Keep hair, loose clothing, fingers, and all
parts of body away from openings and
moving parts.
To reduce the risk of falls, use extra care
when cleaning on stairs.
This Wet/Dry Vac is double-insulated,
eliminating the need for a separate
grounding system. Use only identical
replacement parts. Read the instructions
for Servicing Double-Insulated Wet/Dry
Vacs before servicing.
Use this Wet/d ry Detachable Blower Vac
as described in this manual.
When using as detached blower :
• Turn unit off before setting on ground or
releasing grasp from handle.
• Do not use on wet surfaces, electric
shock could occur.
• Direct air discharge only at work area.
• Do not direct air at bystanders.
• Keep children away when blowing.
• Do not use blower for any job except
blowing dirt and debris.
Observe the following warnings that
appear on the motor housing of your Wet/
Dry Vac.
DOUBLE INSULA TED
GROUNDING NOT REQUIRED
WHEN SERVICING USE ONLY
IDENTICAL REPLACEMENT P AR TS
WARNING: To reduce the risk of
electric shock- do not expose to
rain-store indoors.
WARNING: For your own safety,
read and understand owner’s man-
ual. Do not pick up ho t ashes, coal s,
toxic, flammable or other hazard-
ous materials. Do not use around
explosive liquids or v apor s .
SAVE THESE INSTRUCTIONS
The operation of any utility vac or blower
can result in foreign objects being blown into
the eyes, which can result in severe ey e
damage. Always wear safety goggles, not
glasses, complying with ANSI Z87.1 (or in
Canada CSA Z94-3-M88) shown on package. Everyday ey eglasses have only impact
resistant lenses. They are not safety
glasses. Safety Goggles are available at
many local retail stores. Glasses or goggles
not in compliance with ANSI or CSA could
seriously hurt you when they break.
To reduce the risk of hearing damage,
wear ear protectors when using the vac
for extended hours or when, using it in a
noisy area.
3

For dusty operations, wear dust mask.
Only use extension cords that are rated
for outdoor use. Extension cords in poor
condition or that are too small in wi re si ze
can pose fire and shock hazards. When
using an extension cord, be sure it is in
good condition. Using any extension cord
will cause some loss of power. To keep
Introduction
the loss to a minimum, use the following
table to choose the minimum wire size
extension cord.
Extension
Cord Length
0-50 Ft.
50-100 Ft.
Gauge
(A.W.G.)
14
12
This Wet/Dry Vac is intended for household use only.
IMPORTANT NOTE
Please Read Carefully
Static Shocks Are Common - In dry
areas or when the relative humidity of the
air is low. To reduce static shocks in your
home the best remedy is to add moisture
to the air with a console humidifier.
Unpacking and Checking Carton Contents
Remove contents of carton. Check each
item against the Carton Contents List.
Contact 1-800-4-RIDGID (www.ridgidwoodworking.com) if any parts are damaged or missing.
Carton Contents List
Key Description........................... Qty.
A 16 Gallon Wet/Dry Vac................1
B Hose ...........................................1
C Filter............................................1
D Filter Nut.....................................1
E Utility Nozzle...............................1
F Car Nozzle..................................1
G Blower Nozzle.............................1
H Wet Nozzle..................................1
J Male-Male Adapter......................1
K Diffuser Blowing..........................1
L E x ten si on Wands........................2
M Filter Cage..................................1
N Float ........................................... 1
O Owners Manual...........................1
P Accessory Caddy........................1
Q Twin Wheel Caster......................2
R Wheel Assembly.........................2
A
E
F
B
C
D
L
M
P
Q
R
G
N
H
O
J
4
K
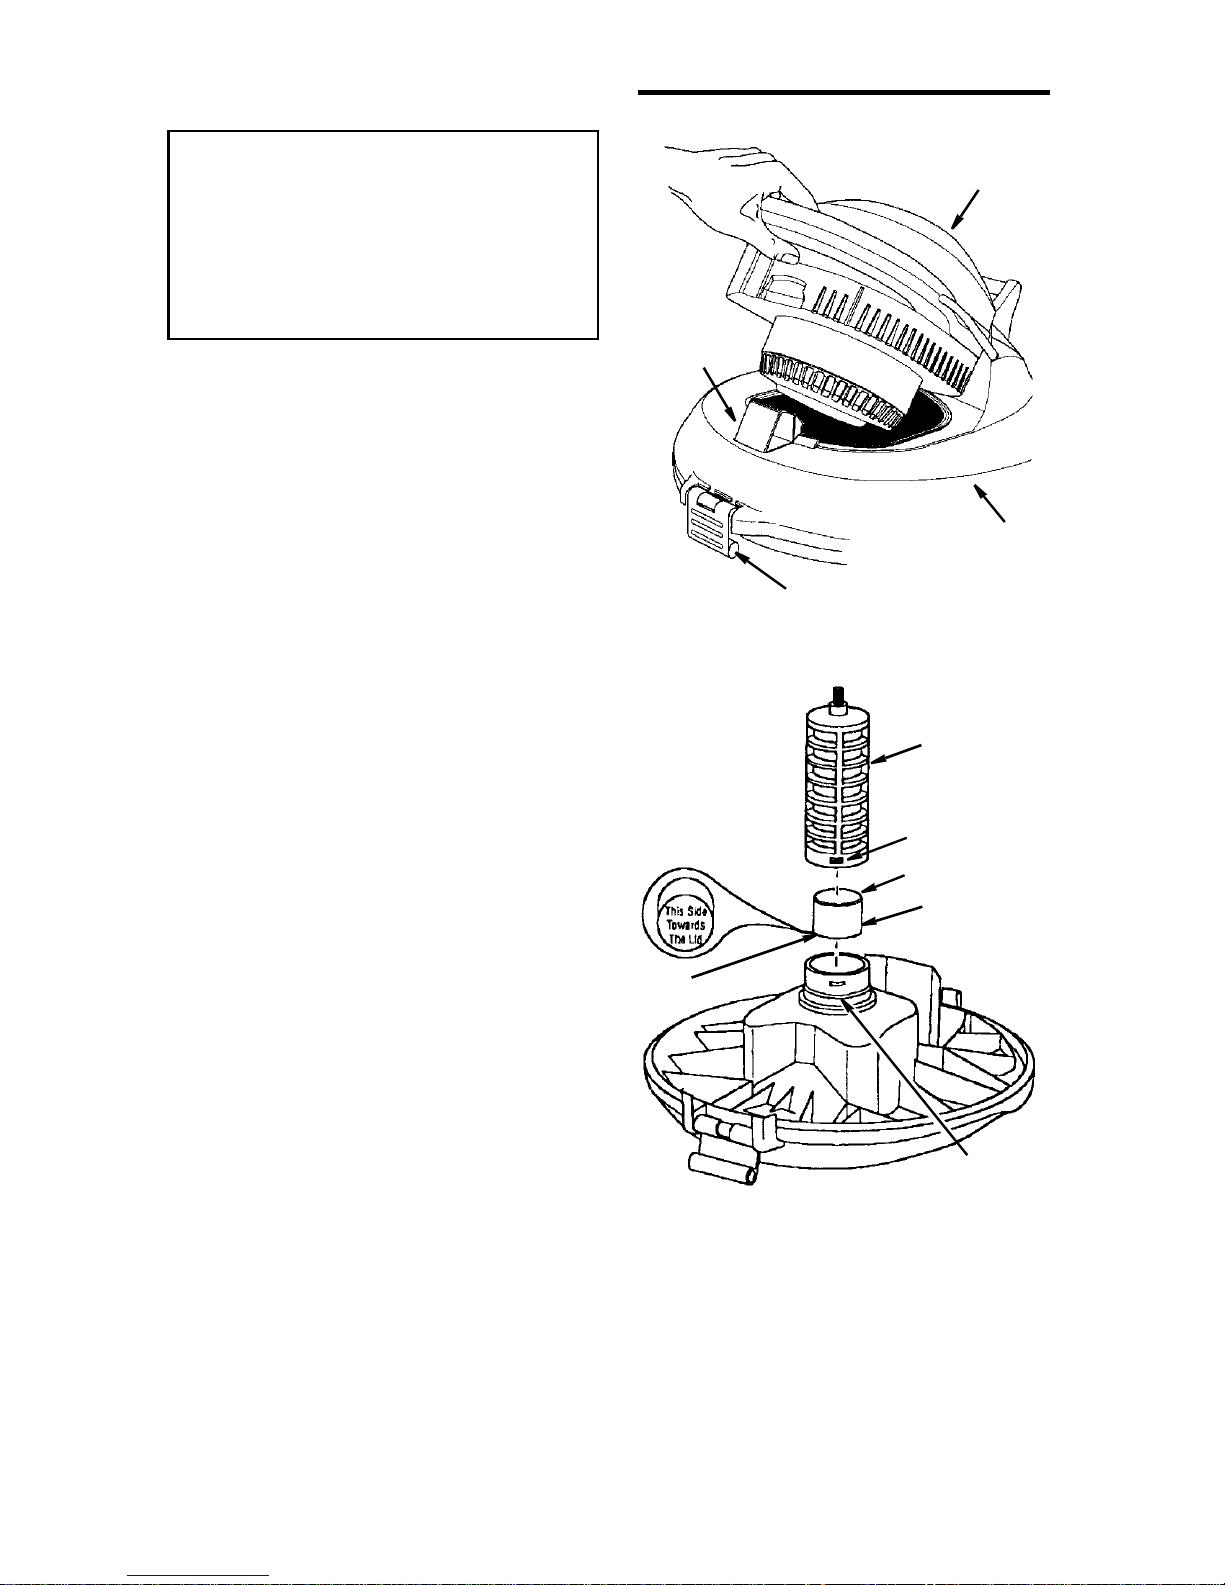
Float/Cage Assembly
WARNING: For your own safety,
never connect plug to power source
outlet until all assembly steps are
complete and you have read and
understood the sa fety and operation
instructions. Do not operate v ac with
any parts damaged or missing.
1.Remove the detachable blower from the
power head assembly by pressing
down on the power head latch under
the detachab le bl ower h andle and lif ting
the blower off the lid of the vac. Set the
detachable blower off to the side.
2.Unlatch the two drum latches lo cated in
the front and rear of the vac. Lift the lid
off the drum. Place the lid assembly of
the vac upside down into the drum or
place upside down on a clean smooth
surface.
3.Find the float in the loose parts bag.
Place the float over the center of the lid
with the words “This Side Towards Lid”
laying face down over the hole.
4.Line up filter cage tabs with the slots in
the center ring of the lid assem bly. Push
on the filter cage u ntil the tabs sna p into
the slots for a se cure fit.
NOTE: If f ilt er c age needs to be removed,
because the float is placed in the wrong
way, use a flat blade screwdriver and
insert the blade near one of the tabs
between th e filter cage and the cen ter ring
of the lid. Pry the tab out of the slot. Tilt
the cage and lift away from the lid. To
replace, follow float/cage assembly
instructions.
Detachable
Blower
Power Head
Latch
Lid Asm.
Drum Latch
Filter
Cage
Tabs (3)
Open End
Float
Solid
End
Slots (3)
5
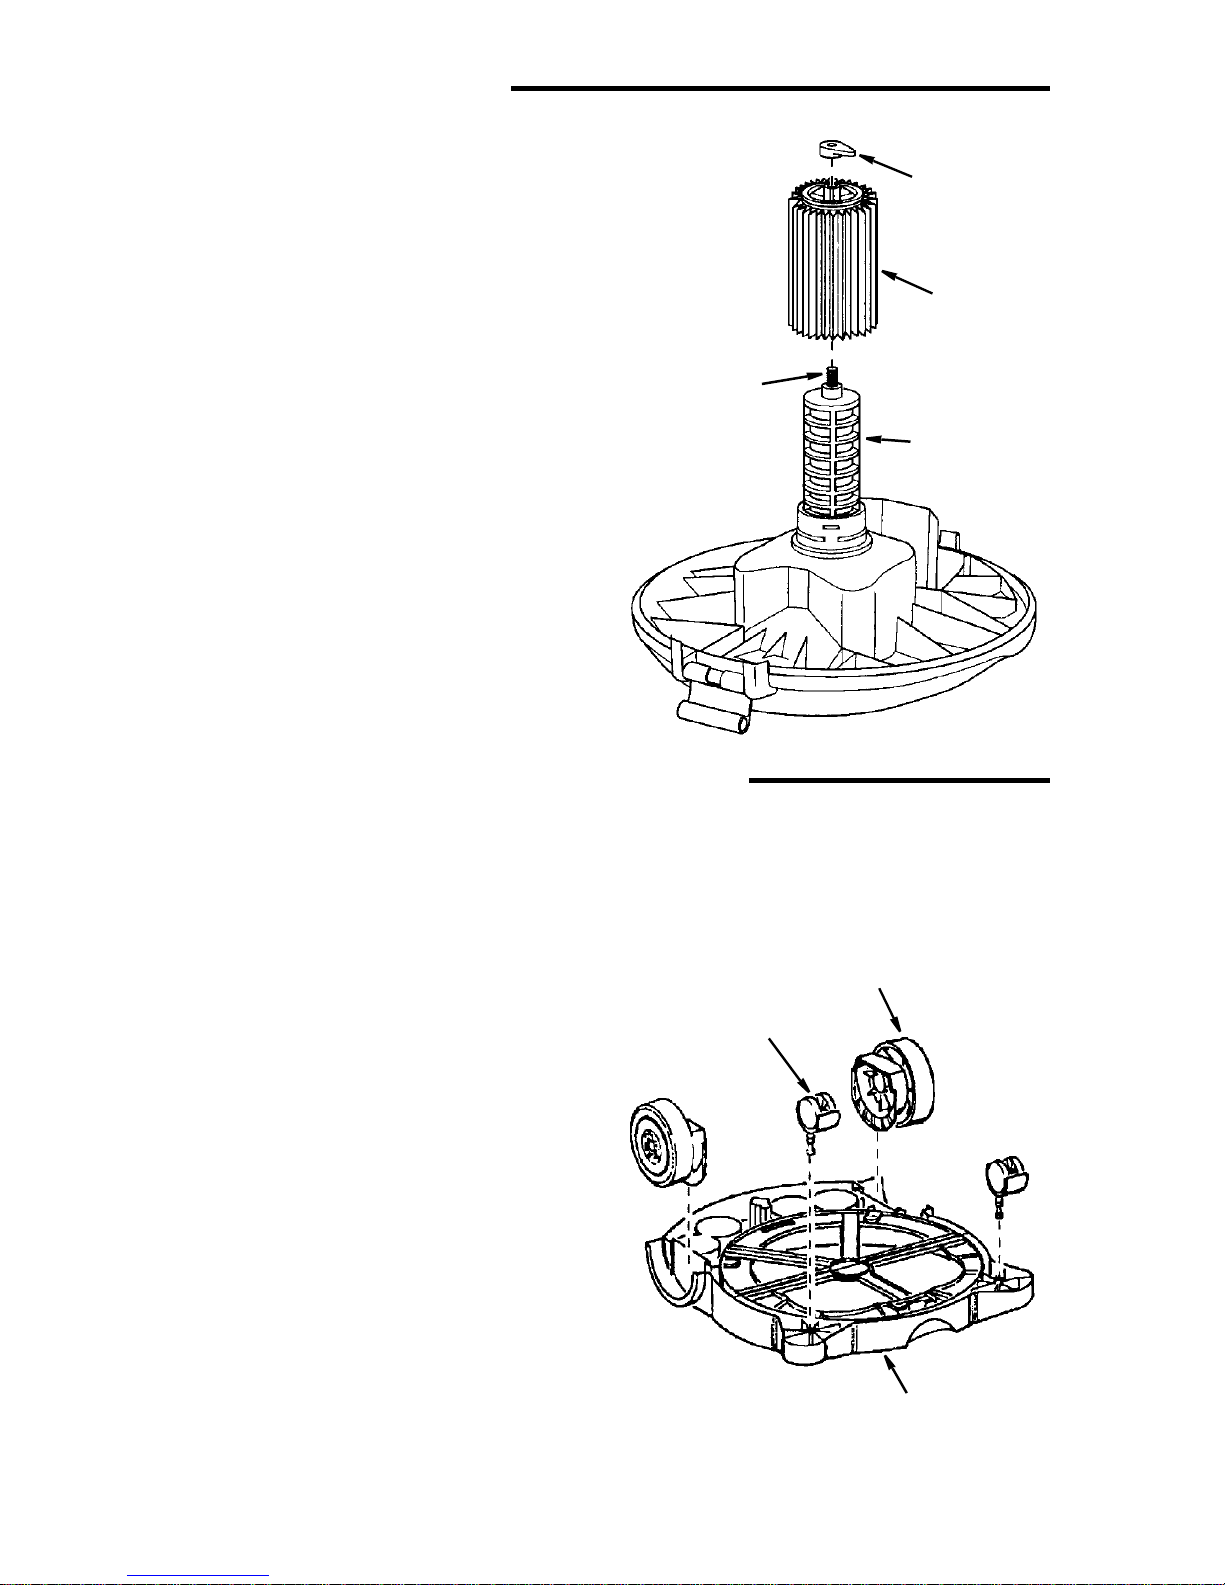
Filter Assembly
1.Carefully slide the filter over the filter
cage, lining up hole in filter with
threaded stud and sliding it over the
center ring co vering the 3 slots until th e
filter stops against the lid.
2.Place filter nut onto threade d screw and
tighten it down. Finger tighten only.
NOTE: Lever of filter nut should be away
from plate as shown.
IMPORTANT: Do not overtighten as this
may deform or crack the filter cage or the
filter.
Filter Nut
Filter
Threaded
Screw
Filter Cage
Accessory Caddy Assembly
Locate the two 5-1/4" wheel assembli es
and the two dual wheel casters in the carton. The casters are designed to fit in the
front of your new accessory caddy and
the larger wheels fit the rear of the caddy.
To Install the Wheels/Casters
1.Place the accessory caddy upside
down on a flat surface as illustrated.
2.Insert the dual wheel casters into the
bottom of the accessory caddy as
shown (2 places).
3.Push on the caster until the flange on
the caster stem is inserted all the way
into the socket. You will be able to hear
the flange snap into the socket. The
caster will swivel easily when positioning is correct.
4.Position the dove tail portion of one of
the wheel assemblies into the accessory caddy as il lustr at ed. Tap t he whee l
support into the access ory caddy with a
soft mallet. Repeat for the second
wheel assembly.
5.Turn the accessory caddy upright.
This completes the assembly of your 16
gallon wet/dry vac accessory caddy.
The caddy is now ready for the sixteen
gallon drum of your RIDGID wet/dry vac.
Dual Wheel
Caster
5-1/4" Wheel Assembly
Accessory Caddy
6
 Loading...