

RIDGID RC-40, RC-70, RC-55 Instructions Manual
Ratchet Cable Cutters Instructions
WARNING
Read these instructions and
the warnings for all equipment being used before op -
the risk of serious personal injury.
SAVE THESE INSTRUCTIONS!
er ating this tool to reduce
• Use personal protective equipment. Always wear eye pro-
tection to reduce the risk of eye injury.
• Keep your fingers and hands away from the blades.
Fingers can be cut.
• Do NOT use on or near energized conductors. These
tools are not insulated. Use of tools near energized conductors may lead to electrical shock, causing severe injury or
death.
• Do not use handle extensions to activate the tool. Handle
extensions can slip and cause serious injury. Extended handles can overload the tool and cause tool failure and/or serious personal injury.
Description and Specifications
The RIDGID®RC-40, RC-55 and RC-70 Ratchet Cable Cutters are
designed to cut copper and aluminum cables as listed in the
below table. Do not use on ACSR or steel cables.
MODEL RC-40 RC-55 RC-70
Max. Cable Diameter Cu: 600 MCM Cu: 750 MCM Cu: 1000 MCM
(w/Insulation) Al: 750 MCM Al: 1000 MCM Al: 1000 MCM
Cable Type Class 2 Stranded Conductor and Class 5
Conductor Material Copper and Aluminum
Length in (mm) 9.4" 12.2" 21.7"
Weight lb (kg) 1.5 lb (0,7 kg) 3.3 lb (1,5 kg) 6.4 lb (2,9 kg)
The RIDGID®RC-336 and RC-556 Ratchet Cable Cutters are
designed to cut ACSR cable. Do not use on steel cables.
MODEL RC-336 RC-556
Max. Cable Diameter 336 MCM 556 MCM
Cable Type ACSR ACSR
Length in (mm) 9.4" (239 mm) 12.5" (317 mm)
Weight lb (kg) 1.8 lb (0,8 kg) 3.7 lb (1,7 kg)
Pivoted
Blade
1.5" (40 mm) 2" (55 mm) 2.75" (70 mm)
Flexible Conductor to DIN VDE 57295
(240 mm) (310 mm) (550 mm)
Pawl Release
Warnings
(On Reverse)
Inspection/Maintenance
1. Daily before use, clean equipment, including handles to aid
inspection and improve control. Clean pivoted blade teeth.
2. Inspect the cutter for:
• Proper assembly and completeness.
• Binding, wear or damage. Inspect the blade profile for
damage.
• Presence and readability of markings and warnings.
If any problems are found, do not use until corrected.
3. Lubricate pivot point with a light lubricating oil. Wipe off any
excess oil.
Set Up and Operation
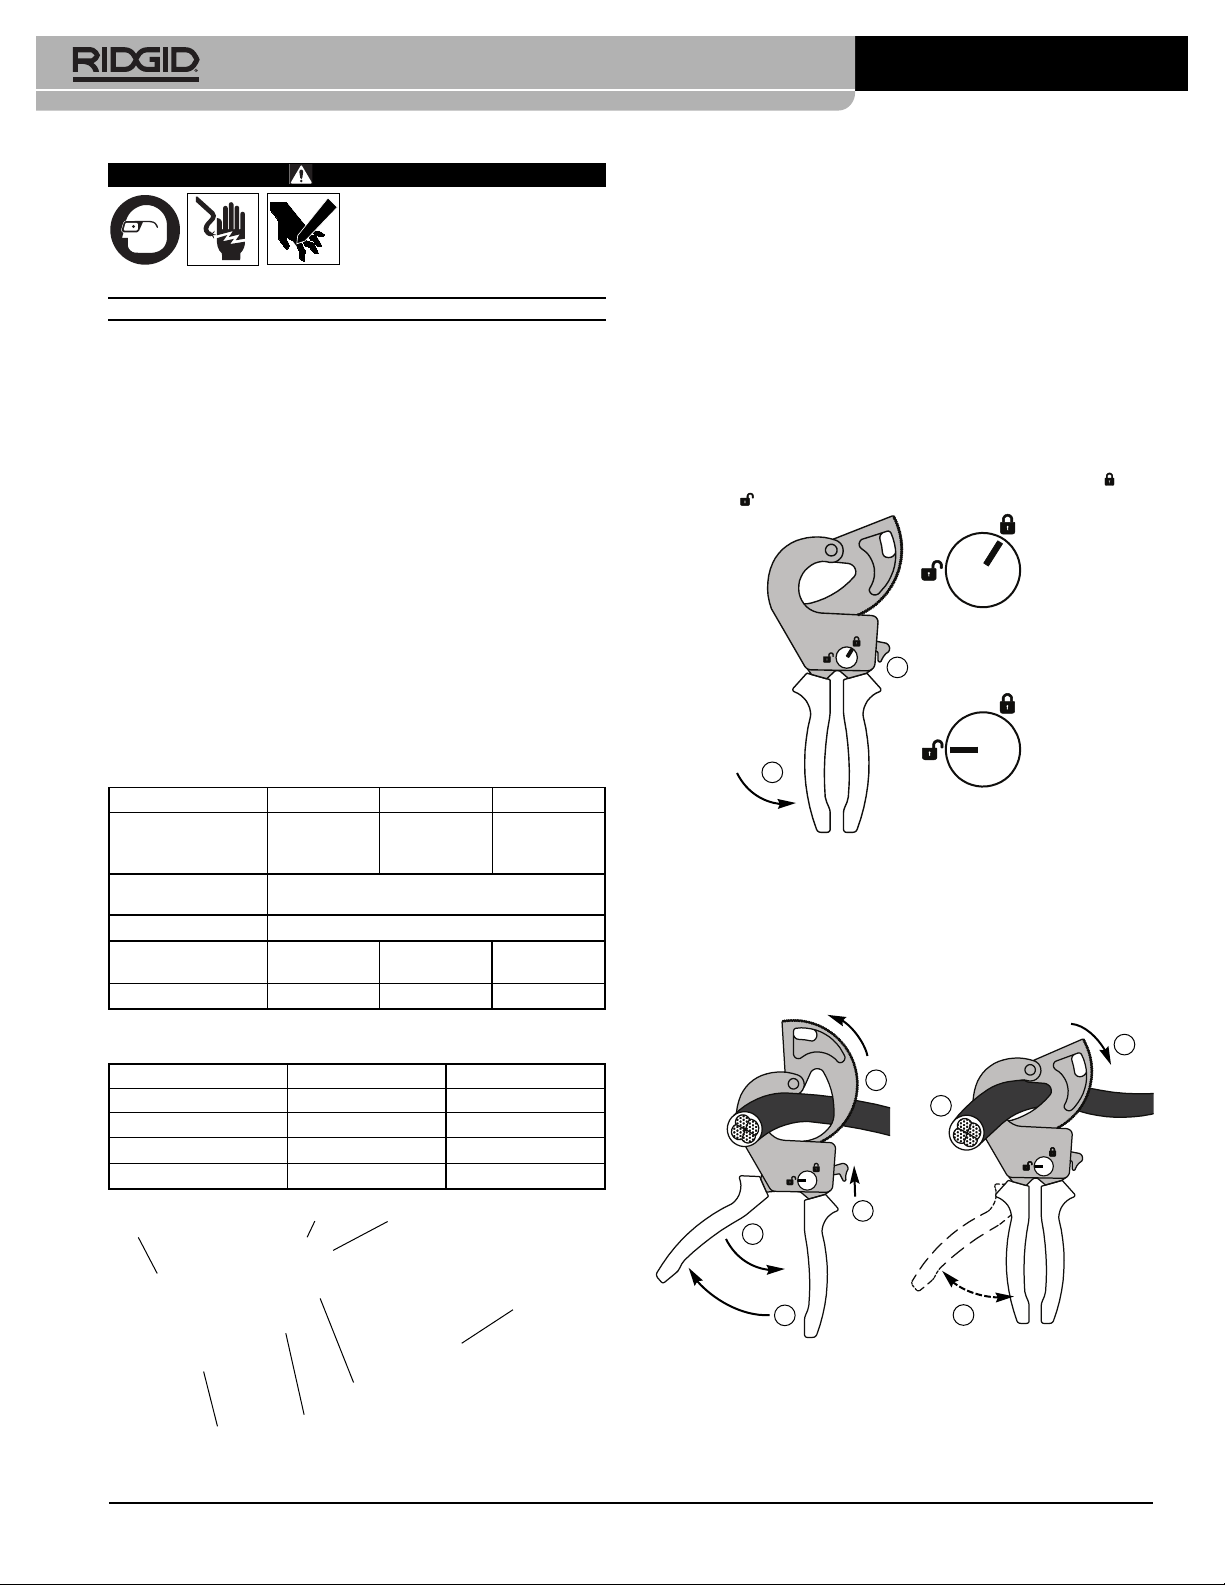
Locking Handles
For storage the handles can be locked closed. Hold the handles
together (1) and move the lock knob to the locked ( ) or
unlocked ( ) position as desired (2).
LOCK
2
1
UNLOCK
Figure 2 – Cutter Lock/Unlock
Opening Cutter
Cutter Empty – Either push the pivoted blade through or press the
pawl release to allow the blade to be retracted.
When Cutting - hold the handles together (1) and press the pawl re lease (2). Continue pressing the pawl release and open the handles
(3) so that the pawl disengag es from the pivoted blade teeth.
Retract the pivoted blade (4).
2
4
1
2
1
Locking Knob
Figure 1 – Ratchet Cutters (Model RC-40 Shown)
Fixed Blade
Markings
Handles
3
Figure 3 – Opening Cutter
when Cutting
Cutting
1. Insert appropriate cable between the blades.
2. Squarely line up the cutting edges with the cut location.
Push the pivoted blade through the cutter into contact with the
3
Figure 4 – Cutting the Cable
cable.
Printed 10/17
EC43120
Find Quality Products Online at: sales@GlobalTestSupply.com
The Emerson logo and RIDGID logo are registered trademarks of Emerson Electric Co. or RIDGID, Inc. in the U.S. and other countries.
www.GlobalTestSupply.com
All other trademarks belong to their respective holders.
©2015, 2017 RIDGID, Inc.
999-995-077.10
REV. C

Ratchet Cable Cutters Instructions
Keep the blades at right angle to the cable. Do not cut diagonally. Do not use cutter to twist, pry or bend. This can result
in breaking or chipping of cutter.
3. Repeatedly squeeze the handles to ratchet the pivoted blade
and cut the cable.
4. Inspect the cut. Be careful of any sharp edges.
2
Find Quality Products Online at: sales@GlobalTestSupply.com
www.GlobalTestSupply.com
 Loading...