

Page 1

Operator’s Manual
WARNING!
Read this Operator’s Manual carefully before using
this tool. Failure to understand and follow the contents of this manual may
result in electrical shock,
fire, and/or serious personal injury.
Companion Apps
Available
Find Quality Products Online at: [email protected]
www.GlobalTestSupply.com
Original Instructions – English – 1
Page 2

Table of Contents
Introduction
Regulatory Statements �����������������������������������������������������������������������������������������������������������������������������������������������������3
Safety Symbols �����������������������������������������������������������������������������������������������������������������������������������������������������������������3
General Safety Rules
Work Area Safety �������������������������������������������������������������������������������������������������������������������������������������������������������������� 4
Electrical Safety ���������������������������������������������������������������������������������������������������������������������������������������������������������������� 4
Personal Safety ����������������������������������������������������������������������������������������������������������������������������������������������������������������� 4
Equipment Use and Care �������������������������������������������������������������������������������������������������������������������������������������������������5
Battery Use and Care ������������������������������������������������������������������������������������������������������������������������������������������������������� 5
Pre-Operation Inspection �������������������������������������������������������������������������������������������������������������������������������������������������� 6
SeeSnake CS6xPak Overview
Description
Specifications �������������������������������������������������������������������������������������������������������������������������������������������������������������������� 8
Components
Operating Instructions
SeeSnake CS6xPak Safety �������������������������������������������������������������������������������������������������������������������������������������������� 10
Inspection Overview ������������������������������������������������������������������������������������������������������������������������������������������������������� 11
Connecting to a Camera Reel ���������������������������������������������������������������������������������������������������������������������������������������� 11
Powering the System ������������������������������������������������������������������������������������������������������������������������������������������������������ 11
Keypad ���������������������������������������������������������������������������������������������������������������������������������������������������������������������������� 12
User Interface �����������������������������������������������������������������������������������������������������������������������������������������������������������������14
Maintenance and Support
Product Support �������������������������������������������������������������������������������������������������������������������������������������������������������������� 16
Software Updates �����������������������������������������������������������������������������������������������������������������������������������������������������������16
Cleaning �������������������������������������������������������������������������������������������������������������������������������������������������������������������������� 16
Transport and Storage ���������������������������������������������������������������������������������������������������������������������������������������������������� 16
Service and Repair ��������������������������������������������������������������������������������������������������������������������������������������������������������� 17
Disposal �������������������������������������������������������������������������������������������������������������������������������������������������������������������������� 17
Troubleshooting ���������������������������������������������������������������������������������������������������������������������������������������������������������������18
������������������������������������������������������������������������������������������������������������������������������������������������������������������������ 7
���������������������������������������������������������������������������������������������������������������������������������������������������������������������9
2 – English – CS6xPak
Find Quality Products Online at: [email protected]
www.GlobalTestSupply.com
Page 3
Introduction
The warnings, cautions, and instructions discussed in this manual cannot cover all possible
conditions and situations which may occur. It
must be understood by the operator that common sense and caution are factors that cannot be
built into this product, but must be supplied by
the operator.
Safety Symbols
In this manual and on the product, safety symbols and
signal words are used to communicate important safety information� This section is provided to improve understanding of these signal words and symbols�
This is the safety alert symbol� It is used to alert
you to potential personal injury hazards� Obey all
safety messages that follow this symbol to avoid
possible injury or death�
Regulatory Statements
The EC Declaration of Conformity (890-011320�10) will accompany this manual as a separate
booklet when required�
Directive 2014/53/EU
Radio Operating Spectrum / Power
Bluetooth 4�0 2402 – 2480 MHz 14�20 dBm
Wi-Fi
802�11 b/g/n
Wi-Fi
802�11 a/n
This device complies with Part 15 of FCC rules�
Operation is subject to the following two conditions: (1) This device may not cause harmful interference, and (2) this device must accept any interference received, including interference that may
cause undesired operation�
2400 – 2483�5 MHz 19�90 dBm
5150 – 5250 MHz 20�46 dBm
5250 – 5350 MHz 18�32 dBm
5470 – 5725 MHz 19�43 dBm
DANGER
DANGER indicates a hazardous situation which, if not
avoided, will result in death or serious injury�
WARNING
WARNING indicates a hazardous situation which, if not
avoided, could result in death or serious injury�
CAUTION
CAUTION indicates a hazardous situation which, if not
avoided, could result in minor or moderate injury�
NOTICE
NOTICE indicates information that relates to
the protection of property�
This symbol means read the manual carefully before using the equipment� The manual contains
important information on the safe and proper operation of the equipment�
This symbol means always wear safety glasses
with side shields or goggles when handling or
using this equipment to reduce the risk of eye injury�
This symbol indicates the risk of electrical shock�
Contains Transmitter Module FCC ID: Z64-WL18SBMOD�
CS6xPak – English – 3
Find Quality Products Online at: [email protected]
www.GlobalTestSupply.com
Page 4

General Safety Rules
WARNING
Read all safety warnings and instructions. Failure to
follow the warnings and instructions may result in
electrical shock, fire, and/or serious injury.
SAVE THESE INSTRUCTIONS!
Work Area Safety
• Keep your work area clean and well lit. Cluttered or
dark areas invite accidents�
• Do not operate equipment in explosive atmo-
spheres, such as in the presence of flammable liquids, gases, or dust. Equipment can create sparks
which may ignite the dust or fumes�
• Keep children and bystanders away while operat-
ing equipment. Distractions can cause you to lose
control�
Personal Safety
• Stay alert, watch what you are doing, and use common sense when operating equipment. Do not use
equipment while you are tired or under the influence of
drugs, alcohol, or medication� A moment of inattention
while operating equipment may result in serious injury�
• Dress properly. Do not wear loose clothing or jewelry�
Loose clothes, jewelry, and long hair can be caught in
moving parts�
• Practice good hygiene. Use hot, soapy water to wash
hands and other body parts exposed to drain contents
after handling or using drain inspection equipment� To
prevent contamination from toxic or infectious material, do not eat or smoke while operating or handling
drain inspection equipment�
• Always use appropriate personal protective equip-
ment when handling and using equipment in
drains. Drains may contain chemicals, bacteria, and
other substances that may be toxic, infectious, and
cause burns or other issues� Appropriate personal protective equipment always includes safety glasses and
may include a dust mask, hard hat, hearing protection,
drain cleaning gloves or mitts, latex or rubber gloves,
face shields, goggles, protective clothing, respirators,
and steel toed, non-skid footwear�
• Avoid traffic. Pay attention to moving vehicles when
using on or near roadways� Wear high-visibility clothing or reflector vests�
Electrical Safety
• Avoid body contact with earthed or grounded surfaces such as pipes, radiators, ranges, and refrigerators. There is an increased risk of electrical shock
if your body is earthed or grounded�
• Do not expose equipment to rain or wet condi-
tions. Water entering equipment will increase the risk
of electrical shock�
• Keep all electrical connections dry and off the
ground. Touching equipment or plugs with wet hands
can increase the risk of electrical shock�
• Do not abuse the cord. Never use the cord for car-
rying, pulling, or unplugging the power tool� Keep cord
away from heat, extreme cold, oil, sharp edges, and
moving parts� Damaged or entangled cords increase
the risk of electrical shock�
• If operating equipment in a damp location is un-
avoidable, use a ground fault circuit interrupter
(GFCI) protected supply. Use of a GFCI reduces the
risk of electrical shock�
• If using drain cleaning equipment and drain in-
spection equipment at the same time, wear RIDGID
drain cleaning gloves. Never grasp the rotating drain
cleaning cable with anything else, including other
gloves or a rag which can become wrapped around
the cable and cause hand injuries� Only wear latex
or rubber gloves underneath RIDGID drain cleaner
gloves� Do not use damaged drain cleaning gloves�
4 – English – CS6xPak
Find Quality Products Online at: [email protected]
www.GlobalTestSupply.com
Page 5

Equipment Use and Care
• Do not force equipment. Use the correct equipment
for your application� The correct equipment does the
job better and more safely�
Battery Use and Care
• Use equipment only with specifically designed
battery packs. Use of any other battery packs may
create a risk of injury and/or fire�
• Do not use equipment if the power switch does not
turn it on and off. Any equipment that cannot be controlled with the power switch is dangerous and must
be repaired�
• Disconnect the plug from the power source and/or
the battery pack from the equipment before making adjustments, changing accessories, or storing.
Preventive safety measures reduce the risk of injury�
• Store idle equipment out of the reach of children
and do not allow persons unfamiliar with the equipment or these instructions to operate the equipment. Equipment can be dangerous in the hands of
untrained users�
• Maintain equipment. Check for misalignment or bind-
ing of moving parts, missing parts, breakage of parts,
and any other condition that may affect the equipment’s operation� If damaged, have the equipment
repaired before use� Many accidents are caused by
poorly maintained equipment�
• Do not overreach. Keep proper footing and balance
at all times� This enables better control of the equipment in unexpected situations�
• Use the equipment and accessories in accordance
with these instructions, taking into account the
working conditions and the work to be performed.
Use of the equipment for operations different from
those intended can result in a hazardous situation�
• Use only accessories that are recommended by
the manufacturer for your equipment. Accessories
that may be suitable for one piece of equipment may
become hazardous when used with other equipment�
• Recharge only with the charger specified by the
manufacturer. A charger suitable for one type of battery pack may create a risk of fire when used with another battery pack�
• Do not cover charger while in use. Proper ventila-
tion is required for correct operation� Covering charger
while in use could result in fire�
• Use and store batteries and chargers in dry, ap-
propriate temperature areas according to their
documentation. Extreme temperatures and moisture
can damage batteries and result in leakage, electrical
shock, fire, or burns�
• Do not probe the battery with conductive objects.
Shorting of battery terminals may cause sparks, burns,
or electrical shock� When the battery pack is not in use,
keep it away from other metal objects, like paper clips,
coins, keys, nails, screws or any other small metal object that can make a connection from one terminal to
the other� Shorting the battery terminals may cause
burns or a fire�
• Under abusive conditions, liquid may eject from
battery; avoid contact. If contact occurs, flush with
water� If liquid contacts eyes, seek medical help� Liquid
ejected from the battery may cause irritation or burns�
• Properly dispose of batteries. Exposure to high tem-
peratures can cause the batteries to explode; do not
dispose of in a fire� Some countries have regulations
concerning battery disposal� Follow all applicable regulations�
• Keep handles dry, clean, and free from oil and
grease. Clean handles give better control of the equipment�
• Protect the LCD from impacts during use. Impacts
to the front of the LCD can cause glass breakage and
complete failure of the display�
CS6xPak – English – 5
Find Quality Products Online at: [email protected]
www.GlobalTestSupply.com
Page 6

Pre-Operation Inspection
WARNING
To reduce the risk of serious injury from electrical
shock or other causes, and to prevent damage to
your equipment, inspect all equipment and correct
any problems before each use.
To inspect all equipment, follow these steps:
1� Power off your equipment�
2� Disconnect and inspect all cords, cables, and con-
nectors for damage or modification�
3� Clean any dirt, oil, or other contamination from your
equipment to ease inspection and to prevent it from
slipping from your grip during transportation or use�
4� Inspect your equipment for any broken, worn, miss-
ing, misaligned, or binding parts, or any other condition which might prevent safe, normal operation�
5� Refer to the instructions for all other equipment to in-
spect and make sure it is in good, usable condition�
6� Check your work area for the following:
• Adequate lighting�
• The presence of flammable liquids, vapors, or
dust that may ignite� If present, do not work in
area until sources have been identified and corrected� The equipment is not explosion proof�
Electrical connections can cause sparks�
• A clear, level, stable, and dry place for the operator� Do not use the equipment while standing in
water�
7� Examine the job to be done and determine the cor-
rect equipment for the task�
8� Observe the work area and erect barriers as neces-
sary to keep bystanders away�
See additional product specific safety information
and warnings starting on page 10.
6 – English – CS6xPak
Find Quality Products Online at: [email protected]
www.GlobalTestSupply.com
Page 7

SeeSnake CS6xPak Overview
Description
The RIDGID® SeeSnake® CS6xPak Wi-Fi-enabled reporting monitor is an all-in-one solution for capturing media
and delivering inspection results to your customers, all
right from the job site� Built for speed and efficiency, the
CS6xPak captures images and video directly to a USB
drive� Professional multimedia reports are automatically
created while you work, increasing your productivity and
helping you move on to the next job�
The CS6xPak is compatible with all SeeSnake camera
reels, and conveniently docks onto the SeeSnake Compact2 for easy transport and storage�
Download HQx Live, the free iOS™ or Android™ companion app to use your mobile device as a second screen�
Using the CS6xPak’s built-in Wi-Fi, pair a smartphone or
tablet to the CS6xPak to provide uninterrupted, high-quality video streaming directly on the device, letting you show
your customers the inspection in real-time� HQx Live also
lets you capture media from a paired device�
HQ software streamlines critical and routine updates
which help improve and prolong the life of your equipment�
HQ also gives you the ability to manage jobs and generate reports for customers� The included 8GB USB drive
comes with HQ preloaded�
CS6xPak – English – 7
Find Quality Products Online at: [email protected]
www.GlobalTestSupply.com
Page 8
Specifications
Specifications
Weight without Battery
2�6 kg [5�7 lb]
Dimensions
Depth 356 mm [14 in]
Width 193 mm [7�6 in]
Height 254 mm [10 in]
Power Source
18 V Li-Ion rechargeable
battery or AC adapter
Power Rating 15-25 VDC, 25 W
Display
Type Color LCD
Size
Resolution
Brightness 500 cd/m
145 mm [5�7 in]
VGA
640 × 480 pixels
2
Transfer Method
2�0 USB
USB Port 1 x 1�5 A
Connectivity
Bluetooth 4�0
Wi-Fi 802�11 a/b/g/n
Operating Environment
Temperature*
Storage temperature
-10°C to 50°C
[14°F to 122°F]
-20°C to 60°C
[-4°F to 140°F]
Relative humidity 5 to 95 percent
Altitude 4,000 m [13,120 ft]
*The AC adapter is rated for 0°C to 40°C [32°F to
104°F]� Using the AC adapter may limit operation in
extreme temperatures�
Media
Standard video MPEG4 (H�264)
MPEG4 (H�264)
Highly compressed
Autolog video
format using a space
saving frame rate
optimized for pipe
inspections
Photo JPG
MPEG4 (H�264)
PhotoTalk
™
Single image with audio
commentary
Audio
Integrated microphone
and speaker
Standard Equipment
• SeeSnake CS6xPak
• AC Adapter
• 8 GB USB Drive (with HQ preloaded)
• Operator’s Manual
8 – English – CS6xPak
Find Quality Products Online at: [email protected]
www.GlobalTestSupply.com
Page 9

Components
Front Cover
Keypad
Docking Handle
LCD
USB Port
USB Status LED
Microphone
Front Cover Handle
and Kick Stand
Battery Shoe
Docking Joint
SeeSnake System Connection
USB Port Cover
Auxiliary Power Port
for AC Adapter
Speaker
Docking Handle
The CS6xPak is designed to dock into the SeeSnake
Compact2’s docking system� Ensure the docking joints
on both sides of the CS6xPak are locked into the joint
sockets� Always carry the system by the Compact2 frame
handle�
Joint Sockets
Quick-Release Knob
Docking Fins
Serial Number Label
Transmitter Clip-On Terminal
Note: The maximum USB drive length for the USB port
cover to close is 50mm [2in].
CS6xPak – English – 9
Find Quality Products Online at: [email protected]
www.GlobalTestSupply.com
Page 10

Operating Instructions
WARNING
This section contains important safety information
that is specific to the RIDGID® SeeSnake® CS6xPak.
Read these precautions carefully before using the
CS6xPak to reduce the risk of electrical shock, fire,
and/or serious injury.
SAVE ALL WARNINGS AND INSTRUCTIONS
FOR FUTURE REFERENCE!
SeeSnake CS6xPak Safety
• Read and understand this manual, the camera reel
manual, and the instructions for any other equipment you are using before operating the equipment. Failure to follow all instructions may result in
property damage and/or serious injury� Keep this manual with the equipment for future use�
• The AC adapter is not waterproof and is intended
for indoor use only. To prevent electrical shock do
not power the system with an AC adapter outdoors or
in wet conditions�
• The monitor is not designed to provide high volt-
age protection and isolation. Do not use where a
danger of high voltage contact is present�
• Do not expose the unit to mechanical shocks. Ex-
posure to mechanical shocks can damage equipment
and increases the risk of serious injury�
• Carrying the system incorrectly can cause the
CS6xPak to disengage from the docking system
and may result in property damage and/or serious
injury. Never carry the Compact2 by the CS6xPak’s
handle when transporting the system� Always use the
frame handle on the Compact2�
• Do not operate the unit if you or the equipment
are standing in water. Operating the equipment while
in water increases the risk of electrical shock� Rubber-soled, non-slip shoes can help prevent slipping
and electrical shock on wet surfaces�
• The battery shoe and other electrical equipment
and connections are not waterproof. Do not expose
the equipment to wet locations�
• Only power the system with a compatible battery
or AC adapter. Use of any other battery may create a
risk of fire and/or injury� When powered by a battery,
protect the monitor from exposure to weather�
10 – English – CS6xPak
Find Quality Products Online at: [email protected]
www.GlobalTestSupply.com
Page 11
Inspection Overview
WARNING
Connecting to a Camera Reel
The CS6xPak can connect to any SeeSnake camera reel
with the SeeSnake system cable�
1� Pull back the outer locking sleeve on the system
cable connector�
2� Align the connector ridge and plastic guide pin with
the socket and push the connector straight in�
Wear appropriate protective equipment such as latex
or rubber gloves, goggles, face shields, and respirators when inspecting drains that might contain hazardous chemicals or bacteria. Always wear eye protection against dirt and other foreign objects.
The following is an overview of how to perform a pipe inspection with your SeeSnake system:
1� Connect the monitor to a camera reel with the sys-
tem cable�
2� Press the Power key �
3� Carefully put the camera into the pipe� Protect the
push cable from sharp edges at the pipe entrance�
4� Push the camera through the pipe and observe the
display�
5� Depending on the requirements for the job, you may
want to include one or more of the following:
• Capture media�
• Stream live video to your mobile device and share
media with customers�
• Locate an inspection point or path�
• Take a temporary segment distance measurement�
• Add custom overlay�
• Review the job, captured media, and preview the
report�
• Deliver a report to your customer on a USB drive�
3� Tighten the outer locking sleeve�
NOTICE
Outer Locking Sleeve
Only twist the outer locking sleeve. To
prevent damage to the pins, never bend
or twist the connector.
Connector Ridge
Guide Pin
Socket
Powering the System
NOTICE
The system is powered by a compatible 18 V Li-Ion rechargeable battery or AC adapter� Battery run time will
vary according to battery capacity and use�
Note: The AC adapter does not recharge the 18V battery.
Unexpected power loss may result in data
loss and corruption.
CS6xPak – English – 11
Find Quality Products Online at: [email protected]
www.GlobalTestSupply.com
Page 12
Keypad
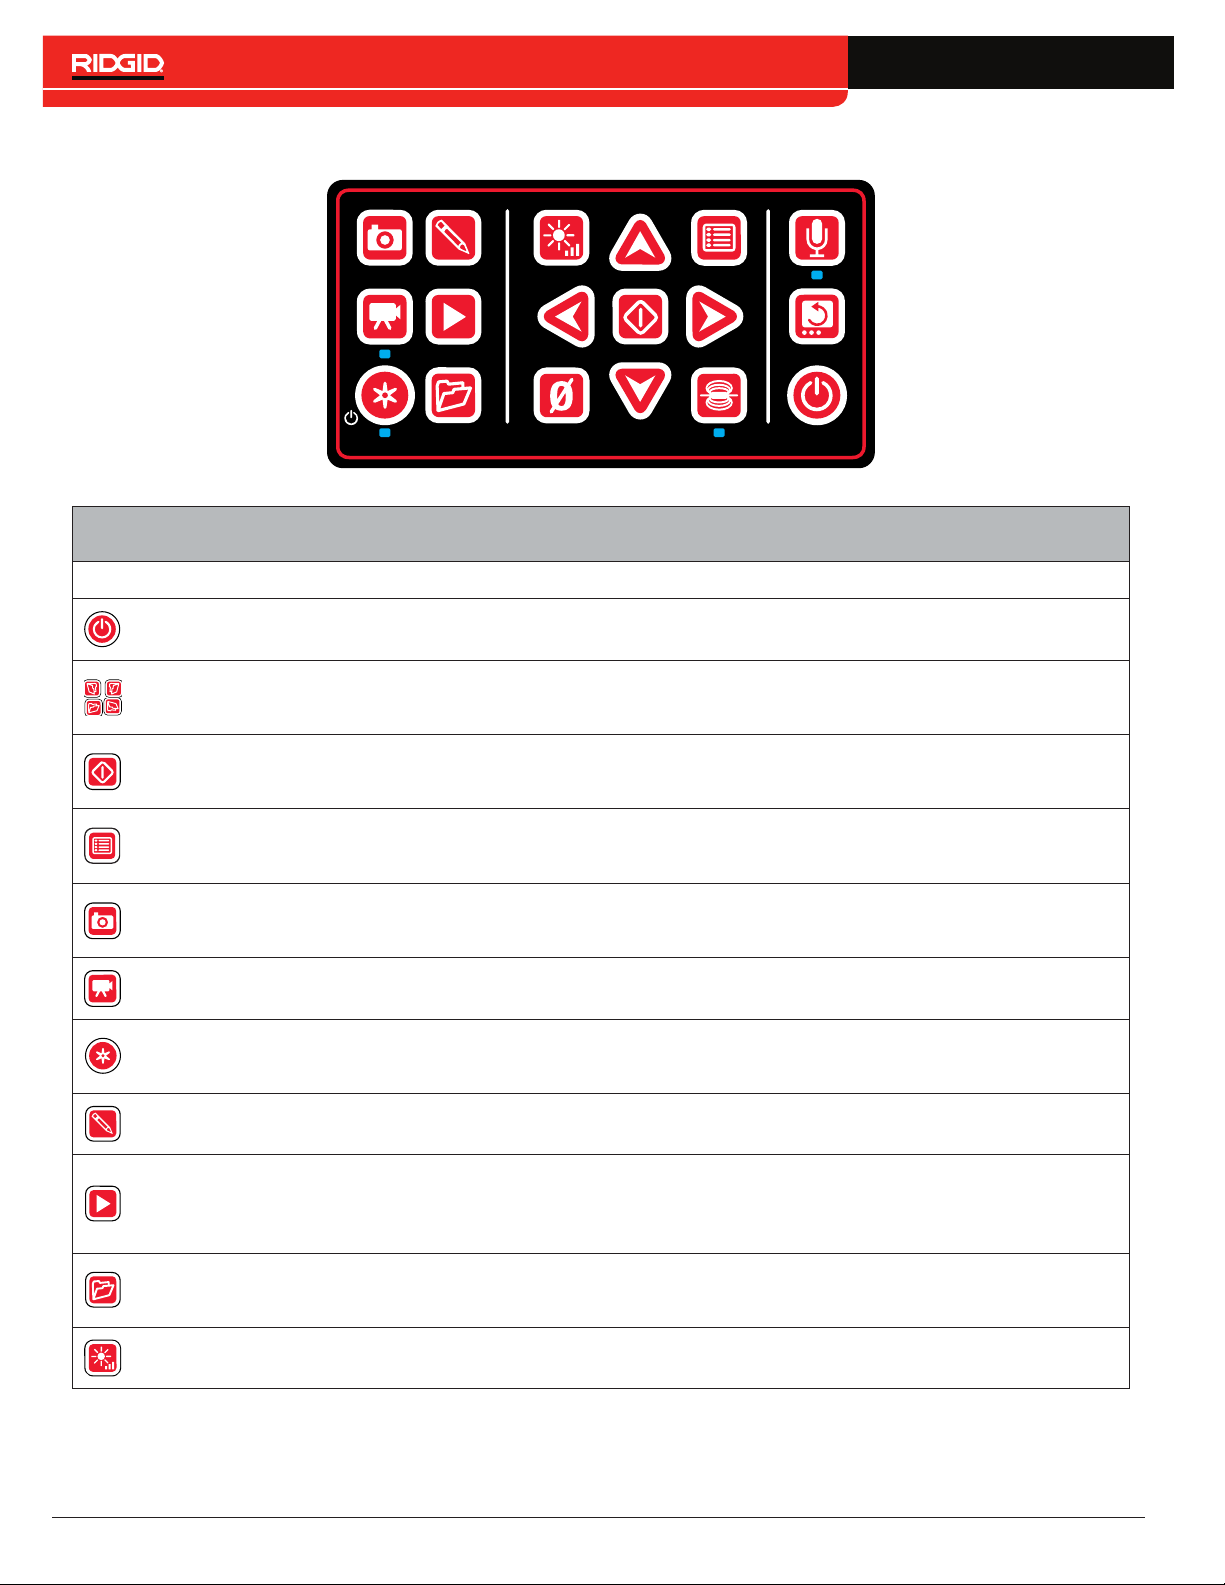
Keypad Key Name Function
Power Power on and off�
Keys and Functions
Arrows
Select / Pause
Menu
Photo / PhotoTalk
Video Start and stop standard video recording�
Autolog
Text Add and edit custom overlay text�
Review
™
Navigate through menus and screens and increase or decrease volume during
playback�
Select highlighted items and apply changes� When recording standard video or
Autolog video, press to pause and resume recording�
Open the menu to modify settings, including connectivity, reel, camera, region,
and more� Press to exit out of tabs and screens�
Press to capture a photo or press and hold to create a PhotoTalk� Default key
action can be swapped in the settings menu�
Start and stop Autolog video recording� Optionally press once to power on and
start Autolog video recording simultaneously�
Open the Job Review screen to review captured media, playback videos, add
notes, enter customer and job location information, and preview the report for
the open job�
Job Manager
LED Brightness
12 – English – CS6xPak
Find Quality Products Online at: [email protected]
Open the Job Manager to view the job list, create a new job, preview an
existing job, enter company information, or delete jobs from the USB drive�
Control the brightness of the LEDs in the camera�
www.GlobalTestSupply.com
Page 13
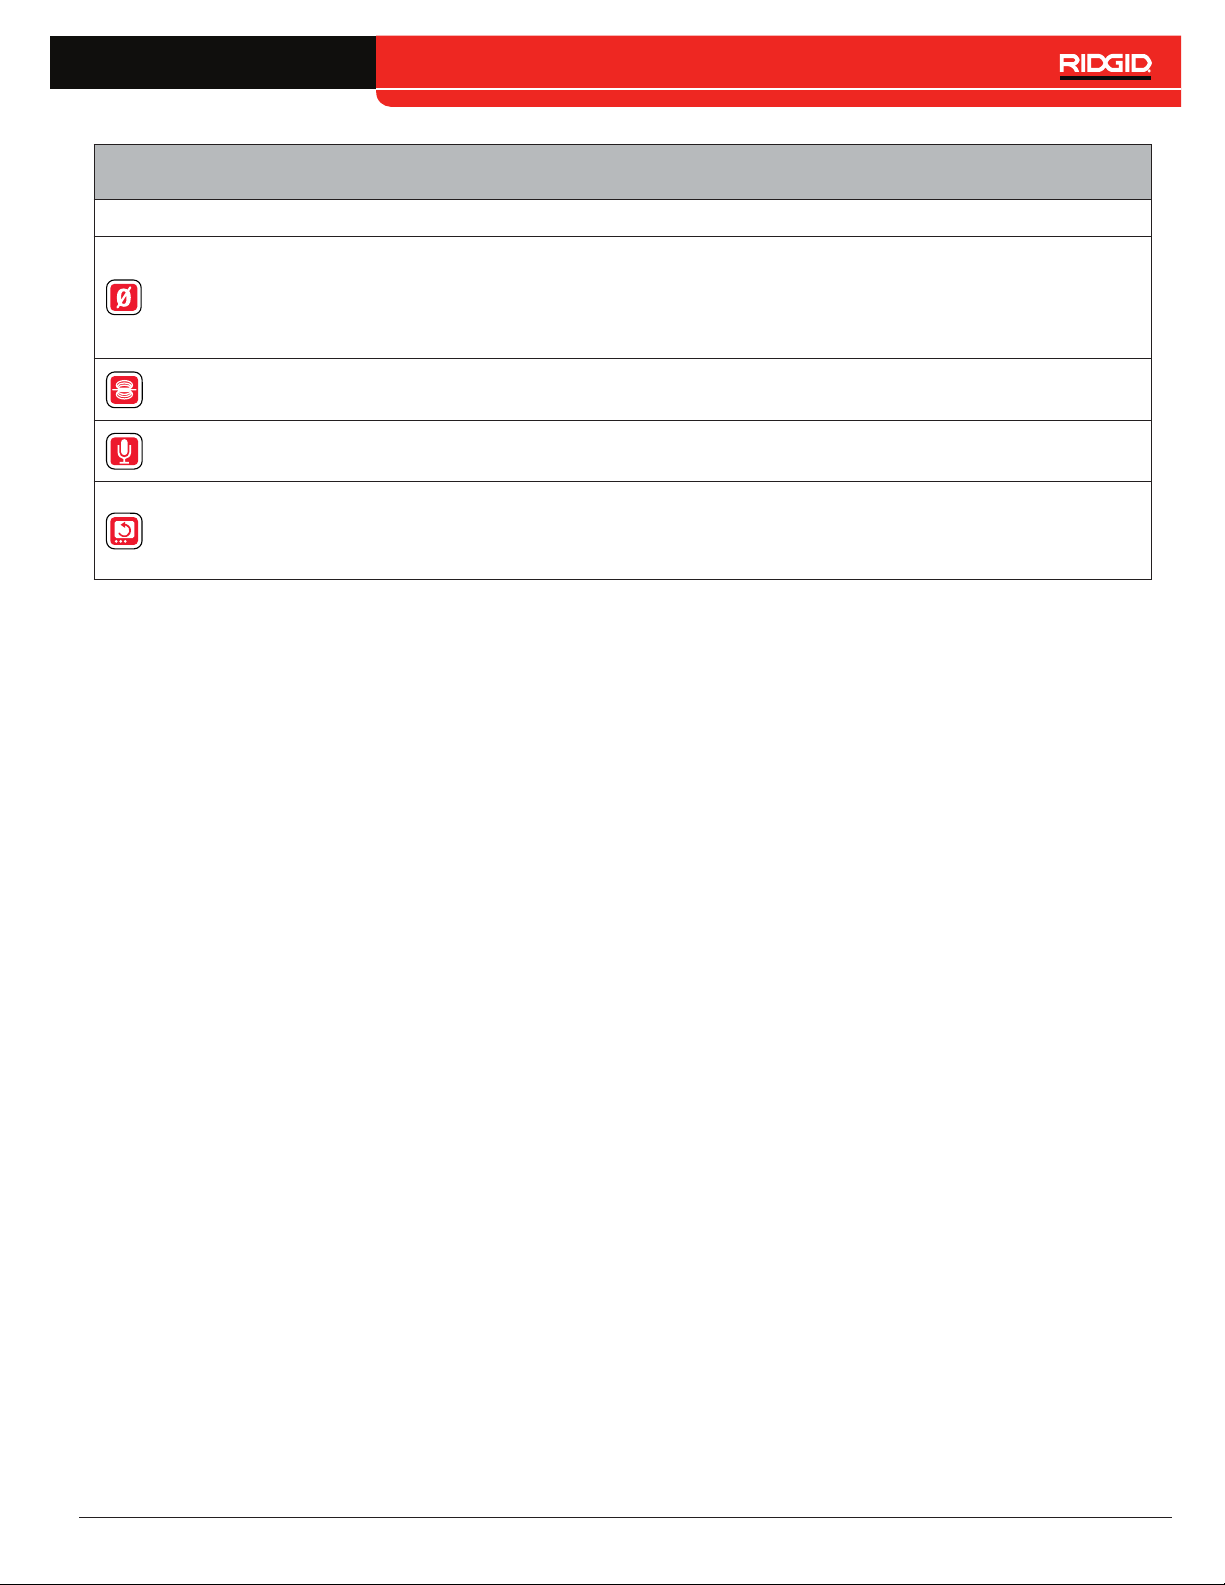
Keypad Key Name Function
Long press (>3 seconds) to set the system measurement to zero at the
Zero
Sonde Enable and disable the sonde�
Microphone Mute Enable and disable the microphone�
Image Flip
beginning of an inspection� Short press (<1 second) to start and stop
temporary segment measurements� The temporary segment measurement
appears in brackets�
Short press (<1 second) to rotate the view 180 degrees� The rotated image
appears in captured media� Long press (>3 seconds) to rotate the user
interface 180 degrees�
Keys and Functions
CS6xPak – English – 13
Find Quality Products Online at: [email protected]
www.GlobalTestSupply.com
Page 14
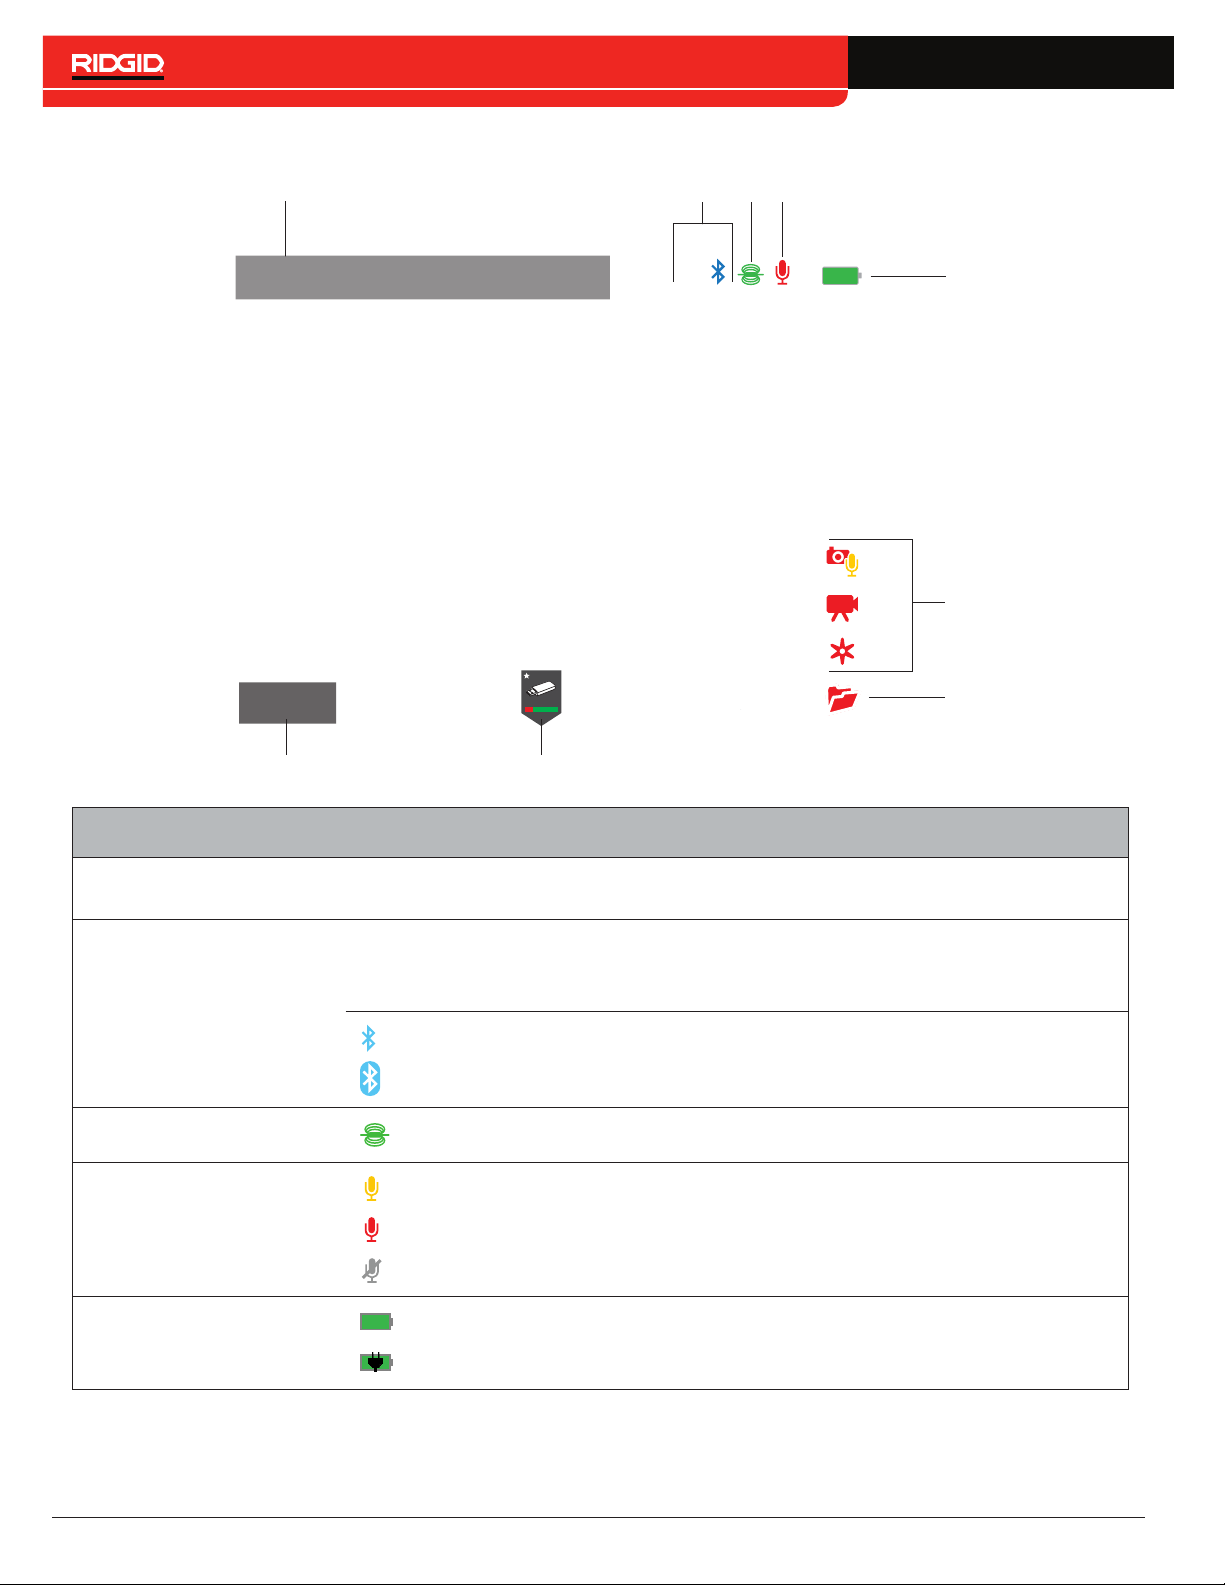
User Interface
1
12:05:54 PM / 11-30-2016
3.8m
2 3 4
5
6
7
9 8
User Interface
Time and Date
1
Overlay
Connectivity
2
Sonde Sonde enabled and transmitting�
3
Microphone
4
Power
5
--- Options: Show time only, date only, both, or neither�
Wi-Fi not connected�
Wi-Fi connected�
Bluetooth enabled but not connected�
Bluetooth connected�
Microphone enabled�
Audio recording in progress�
Microphone disabled�
Battery power level indicator�
AC Power�
14 – English – CS6xPak
Find Quality Products Online at: [email protected]
www.GlobalTestSupply.com
Page 15
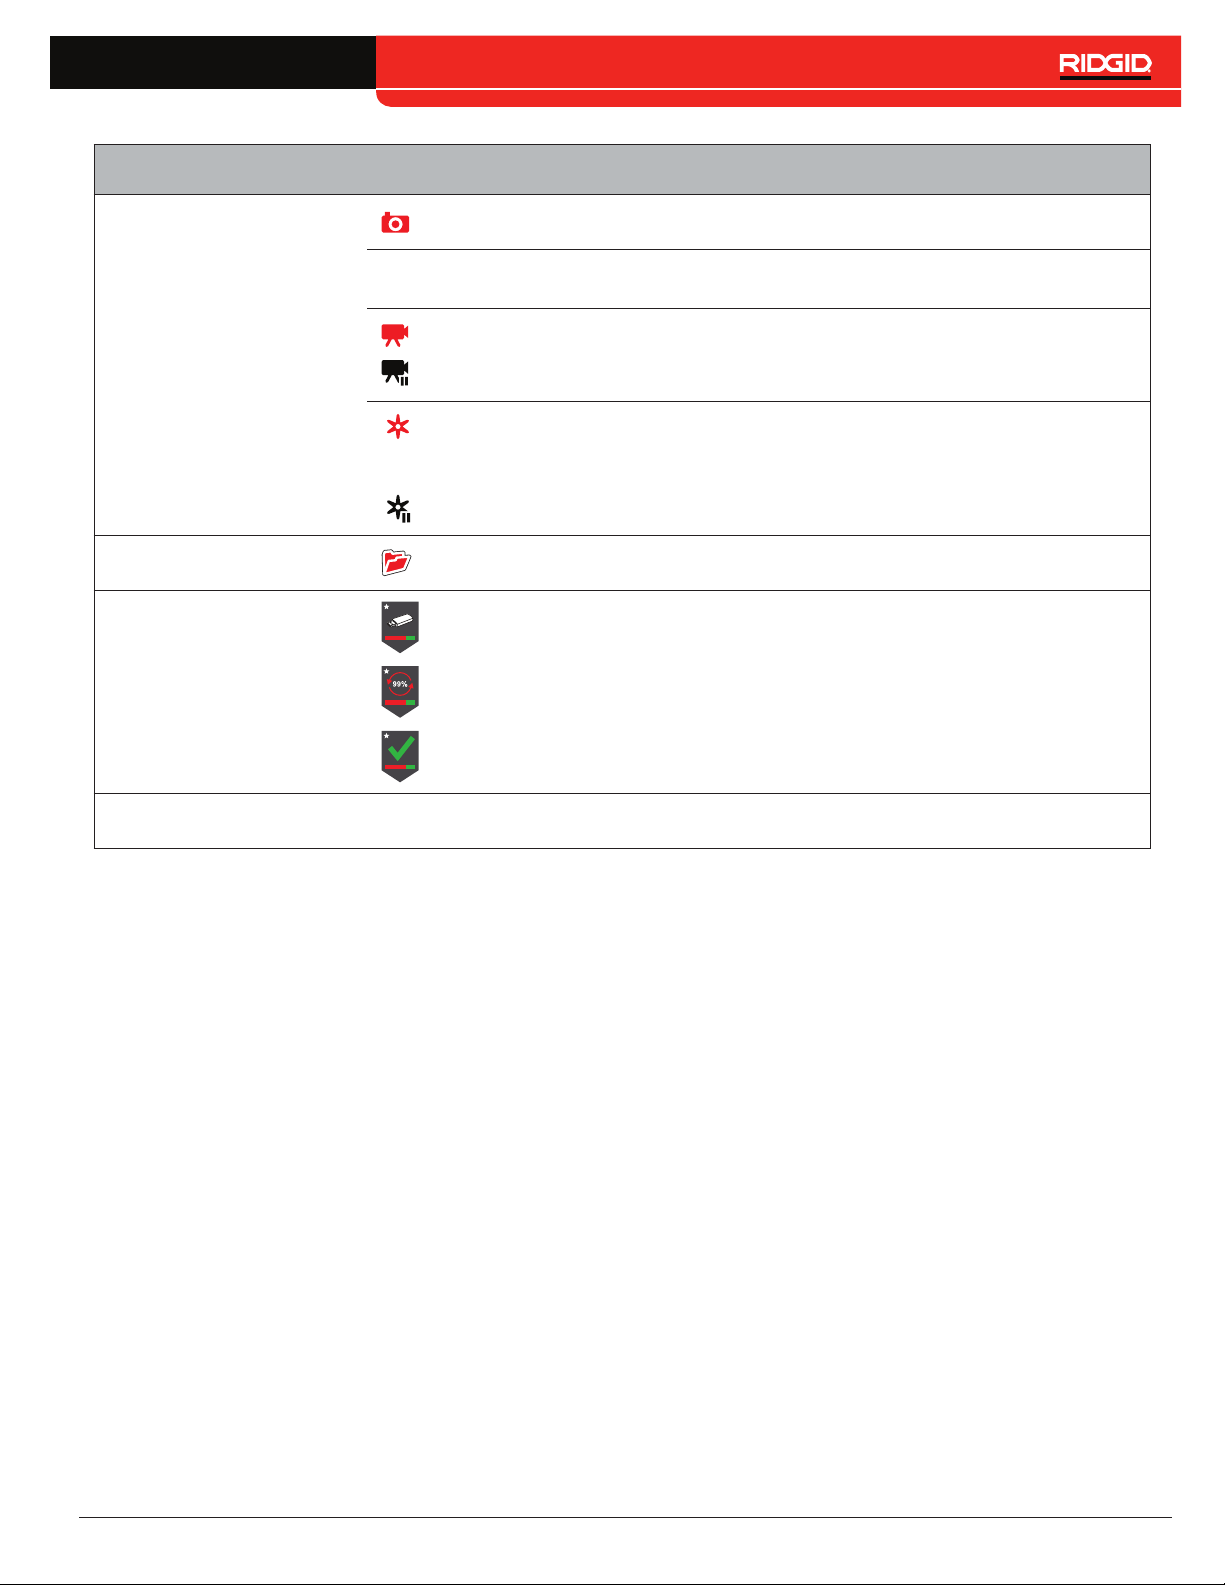
Media Capture Icons
6
User Interface
Photo captured�
PhotoTalk™ media created�
Video recording�
Video recording paused�
Open Job
7
USB Status
8
Count Overlay ---
9
Autolog video recording�
Autolog video recording, motion detected�
Autolog video recording paused�
A job is open�
USB drive inserted� Safe to remove the USB drive.
Do not remove the USB drive! Media is being written to the USB drive�
Premature removal of the USB drive may result in data loss and corruption�
Media transfer complete� Safe to remove the USB drive.
Options: Show or hide count overlay�
CS6xPak – English – 15
Find Quality Products Online at: [email protected]
www.GlobalTestSupply.com
Page 16

Maintenance and Support
Accessories
Only use accessories designed and recommended
for use with the CS6xPak. Accessories designed for
use with other tools may become hazardous when
used with the CS6xPak.
The following RIDGID products have been designed for
use with the CS6xPak:
Software Updates
Critical and routine software updates for your SeeSnake
monitor are released through HQ� Staying up to date with
HQ software prolongs and improves the life and usefulness of your equipment�
Cleaning
WARNING
To reduce the risk of electrical shock, disconnect all
cords and cables and remove the battery or other
power supply from the CS6xPak before cleaning.
The best way to clean the unit is with a damp cloth� Close
the USB port cover before cleaning� Do not hose down
or allow any liquid or moisture to enter the unit� Do not
use liquid or abrasive cleaners� Only clean the display with
cleaners approved for use on LCDs�
• SeeSnake Compact2
• Original SeeSnake Camera Reels
• SeeSnake Max Camera Reels
• Dual Battery Kit with Charger
• Single Battery Kit with Charger
• SeekTech or NaviTrack/Scout Receivers
• SeekTech or NaviTrack Transmitters
Transport and Storage
Store and transport your system with the following in mind:
• Store in a locked area out of the reach of children and
people unfamiliar with its purpose�
• Store in a dry place to reduce risk of electrical shock�
• Store away from heat sources such as radiators, heat
registers, stoves, and other products (including amplifiers) that produce heat�
• Storage temperature should be -20°C to 60°C [-4°F
to 140°F]�
• Do not expose to heavy shocks or impacts during
transport�
• Remove the battery before shipping and before storing for extended periods of time�
16 – English – CS6xPak
Find Quality Products Online at: [email protected]
www.GlobalTestSupply.com
Page 17

Service and Repair
Improper service or repair can cause the CS6xPak to
be unsafe to operate.
Service and repair of the CS6xPak must be performed
at a RIDGID Independent Authorized Service Center� To
maintain the safety of the monitor, make sure a qualified
repair person services your unit using only identical replacement parts� Discontinue using the CS6xPak, remove
the battery, and contact service personnel under any of
the following conditions:
• If liquid has been spilled or objects have fallen into the
equipment�
• If the equipment does not operate normally when operating instructions are followed�
Disposal
Parts of your system contain valuable materials that can
be recycled� There are companies that specialize in recycling that may be found locally� Dispose of the components
in compliance with all applicable regulations� Contact your
local waste management authority for more information�
EC Countries: Do not dispose of electrical
equipment with household waste!
According to the European Guideline 2002/96/
EC for Waste Electrical and Electronic Equip-
ment and its implementation into national legislation, electrical equipment that is no longer usable must
be collected separately and disposed of in an environmentally correct manner�
• If the equipment has been dropped or damaged�
• If the equipment exhibits a distinct change in performance�
For information on your nearest RIDGID Independent
Service Center or any service or repair questions:
• Contact your local RIDGID distributor�
•
Battery Disposal
RIDGID is licensed with the Call2Recycle®
program, operated by the Rechargeable
Battery Recycling Corporation (RBRC™)� As
a licensee, RIDGID pays the cost of recycling RIDGID rechargeable batteries�
In the U�S� and Canada, RIDGID and other battery suppli-
use the Call2Recycle® program network of over 30,000
ers
collection locations to collect and recycle rechargeable
batteries� Return used batteries to a collection location
for recycling�
EC Countries: Defective or used battery packs/
batteries must be recycled according to the guideline
2006/66/EC�
CS6xPak – English – 17
Find Quality Products Online at: [email protected]
www.GlobalTestSupply.com
Page 18
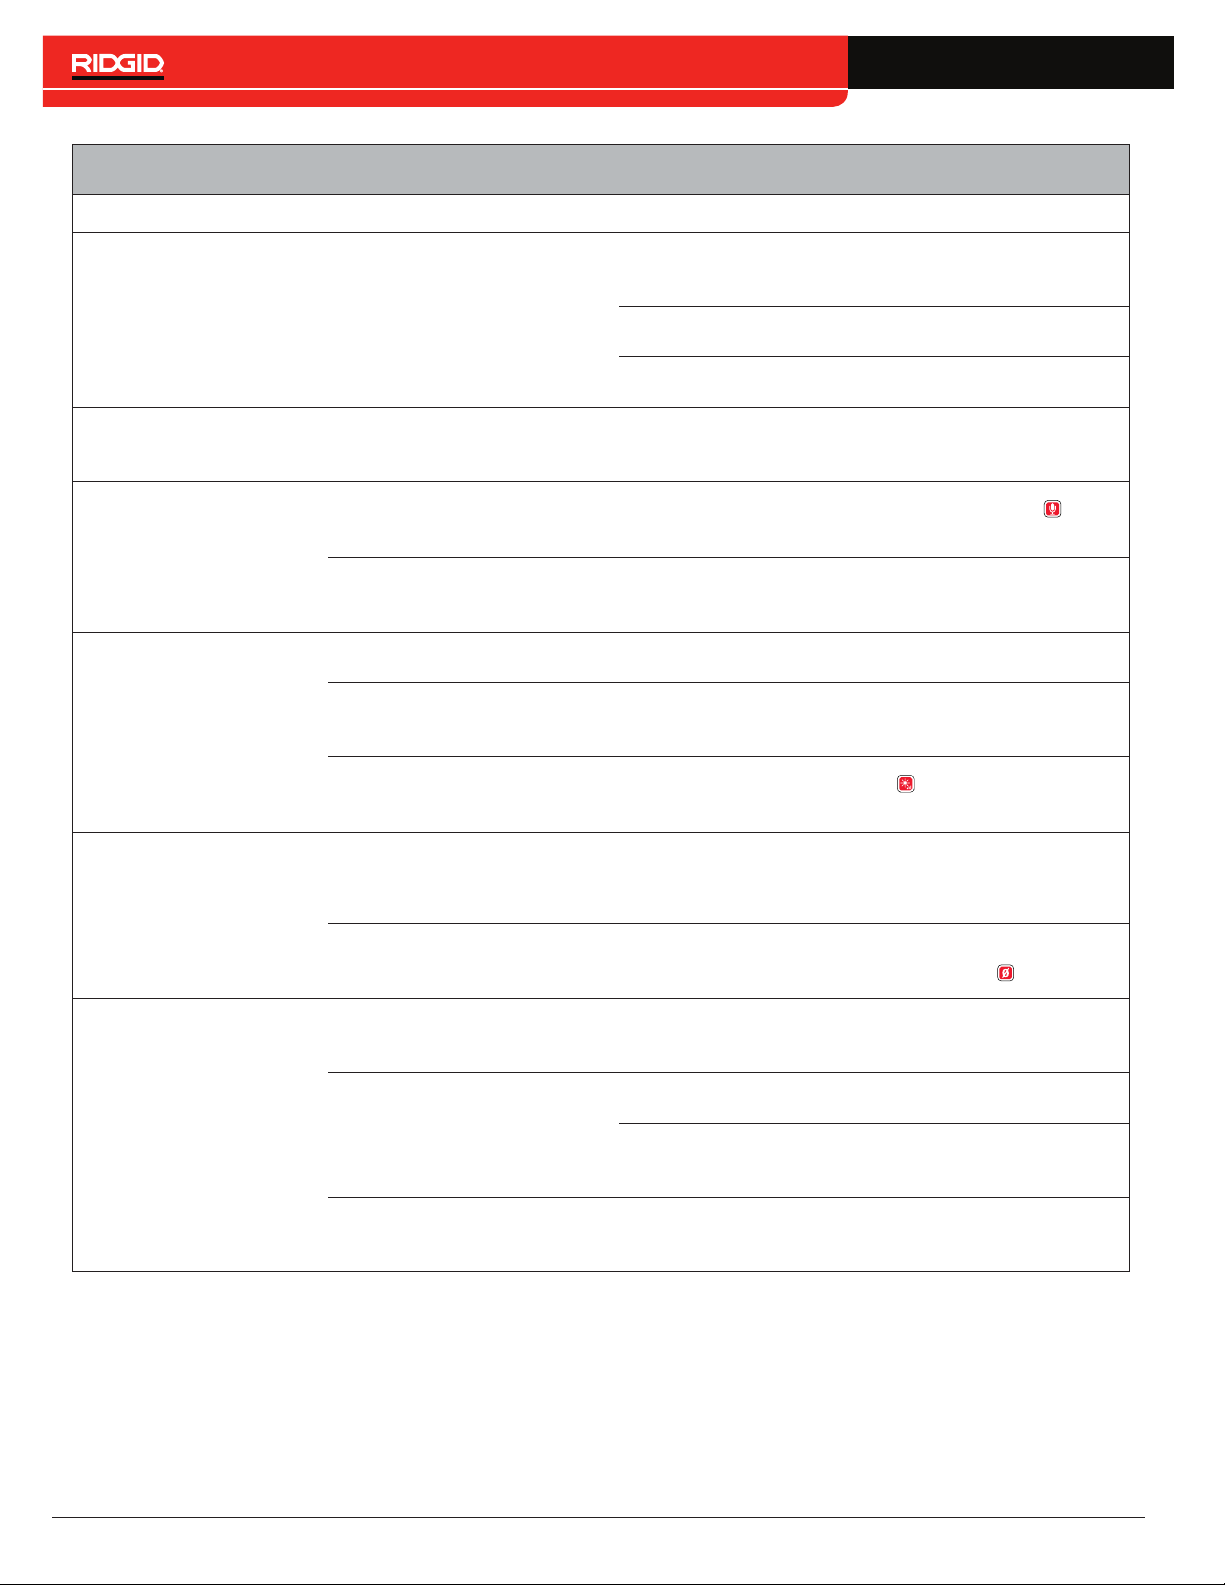
Troubleshooting
Problem Probable Fault Solution
Verify that the battery is a compatible model� Not all
batteries that fit into the battery shoe are compatible�
System does not
power on
Power source
Recharge the battery�
Switch to AC power�
Unable to capture media No USB drive inserted
Speakers are muted
No audio during
playback
Settings need adjustment
Glare on the display
Display is dark or hard
to see
Count measurement
accuracy is unreliable
LCD settings
Camera LED settings
The drum’s integrated
counter settings are incorrect
for the drum or push cable
Counting from the wrong
zero point
Insert a USB drive� Verify the USB drive you are
using is working and not corrupted or read-only�
Verify the LED below the Microphone Mute key
lit and the icon is yellow�
Go to the CS6xPak Settings tab to adjust the speaker
volume and/or microphone gain settings�
Position LCD facing away from direct sunlight�
Go to the LCD Settings tab to adjust the display
settings�
Press the LED Brightness key to adjust the
camera LED brightness�
Verify the settings are correct for the cable length,
cable diameter, and drum�
Confirm measurement starts from the intended zero
point� Reset zero point using the Zero key �
is
No power to the SeeSnake
monitor
No live view
18 – English – CS6xPak
Find Quality Products Online at: [email protected]
Slip-ring assembly is broken
or the connection is faulty
System cable connection
is faulty
www.GlobalTestSupply.com
Check to make sure the battery is charged or the AC
adapter is properly plugged in�
Check all alignment and connection pins�
Check placement and pin condition in the slip-ring
assembly�
Check system cable connection� Make sure the
connector is pushed all the way in�
Page 19

Printed in USA 2017/12/05 999-995-108.10
EC42767 742-049-509-EN-0A Rev C
© 2017 Ridge Tool Company
. All rights reserved.
Every effort has been made to ensure that the information in this manual is accurate. Ridge Tool Company and its affiliates
reserve the right to change the specifications of the hardware, software, or both as described in this manual without
notice. Due to product development, the photos and other presentations specified in this manual may differ from the actual
product.
RIDGID and the RIDGID logo are trademarks of Ridge Tool Company, registered in the USA and other countries. All other
registered and unregistered trademarks and logos mentioned herein are the property of their respective owners. Mention of
third-party products is for informational purposes only and constitutes neither an endorsement nor a recommendation.
iPad, iPhone, iPod touch, and App Store are trademarks of Apple Inc., registered in the USA and other countries. “Made for
iPod,” “Made for iPhone,” and “Made for iPad” mean that an electronic accessory has been designed to connect specifically
to iPod, iPhone, or iPad respectively, and has been certified by the developer to meet Apple performance standards. Apple is
not responsible for the operation of this device or its compliance with safety and regulatory standards. Please note that the
use of this accessory with iPod, iPhone, or iPad may affect wireless performance.
IOS is a trademark or registered trademark of Cisco in the USA and other countries and is used under license by Apple Inc.
The Bluetooth word mark and logos are owned by the Bluetooth SIG, Inc.
Android and Google Play are trademarks of Google Inc.
Ridge Tool Company
Ridge Tool Europe
Find Quality Products Online at: [email protected]
www.GlobalTestSupply.com
 Loading...