

Page 1

K-3800
Drain Cleaning
Machine
OPERATOR’S
MANUAL
• Français – 15
• Castellano – pág. 33
WARNING!
Read this Operator’s Manual
carefully before using this
tool. Failure to understand
and follow the contents of this
manual may result in electrical shock, fire and/or serious
personal injury.
Find Quality Products Online at: [email protected]
www.GlobalTestSupply.com
Page 2

K-3800 Drain Cleaning Machine
Table of Contents
Recording Form for Machine Serial Number..............................................................................................................1
General Safety Information
Work Area Safety........................................................................................................................................................2
Electrical Safety..........................................................................................................................................................2
Personal Safety ..........................................................................................................................................................2
Tool Use and Care......................................................................................................................................................3
Service........................................................................................................................................................................3
Specific Safety Information
Machine Safety...........................................................................................................................................................3
Description, Specifications and Standard Equipment
Description..................................................................................................................................................................4
Specifications..............................................................................................................................................................4
Standard Equipment...................................................................................................................................................4
Accessories ................................................................................................................................................................4
Machine Assembly
Installing Drum ...........................................................................................................................................................5
Instructions For Mounting Autofeed ...........................................................................................................................5
Machine Inspection ......................................................................................................................................................6
Machine Set Up .............................................................................................................................................................6
Operating Instructions
Using Manual Feed Machine......................................................................................................................................8
Using Autofeed Machine............................................................................................................................................8
Special Procedures
Reverse Operating Instructions................................................................................................................................10
Removing Drum .......................................................................................................................................................10
Machine Transport ...................................................................................................................................................10
Draining Water From Drum......................................................................................................................................10
Installing Replacement Cable
To Remove Damaged or Worn Cables....................................................................................................................10
To Install Replacement Cables ................................................................................................................................11
Accessories
Replacement Cables & Tools...................................................................................................................................12
Maintenance Instructions
Lubrication................................................................................................................................................................13
Autofeed Assembly ..................................................................................................................................................13
Cables......................................................................................................................................................................13
Machine Storage.........................................................................................................................................................13
Service and Repair .....................................................................................................................................................13
Troubleshooting .........................................................................................................................................................14
Wiring Diagram...........................................................................................................................................................15
Lifetime Warranty.........................................................................................................................................Back Cover
Ridge Tool Companyii
Find Quality Products Online at: [email protected]
www.GlobalTestSupply.com
Page 3

K-3800
Drain Cleaning Machine
K-3800 Drain Cleaner
Record Serial Number below and retain product serial number which is located on nameplate.
Serial
No.
Find Quality Products Online at: [email protected]
www.GlobalTestSupply.com
Page 4
K-3800 Drain Cleaning Machine
General Safety Information
WARNING! Read and understand all instructions. Failure
to follow all instructions listed below may
result in electric shock, fire, and/or serious
personal injury.
SAVE THESE INSTRUCTIONS!
Work Area Safety
• Keep your work area clean and well lit. Cluttered
benches and dark areas invite accidents.
• Do not operate tools in explosive atmospheres,
such as in the presence of flammable liquids,
gases, or dust. Tools create sparks which may ignite
the dust or fumes.
• Keep bystanders, children, and visitors away
while operating a tool. Distractions can cause you to
lose control.
Electrical Safety
• Grounded tools must be plugged into an outlet,
properly installed and grounded in accordance
with all codes and ordinances. Never remove the
grounding prong or modify the plug in any way. Do
not use any adapter plugs. Check with a qualified
electrician if you are in doubt as to whether the outlet is properly grounded. If the tool should electrically
malfunction or break down, grounding provides a low resistance path to carry electricity away from the user.
Cover of
grounded
outlet box
are rated for outdoor use and reduce the risk of electrical shock.
• Use only three-wire extension cords which have
three-prong grounding plugs and three-pole receptacles which accept the tool’s plug. Use of other
extension cords will not ground the tool and increase
the risk of electrical shock.
• Use proper extension cords. (See chart.) Insufficient
conductor size will cause excessive voltage drop, loss
of power.
Minimum Wire Gauge for Extension Cord
Nameplate
Amps
0 – 25 26 – 50 51 – 100
0 – 6 18 AWG 16 AWG 16 AWG
6 – 10 18 AWG 16 AWG 14 AWG
10 – 12 16 AWG 16 AWG 14 AWG
12 – 16 14 AWG 12 AWG
Total Length (in feet)
NOT RECOMMENDED
• Before using, test the Ground Fault Circuit Inter-
rupter (GFCI) provided with the power cord to insure it is operating correctly. GFCI reduces the risk
of electrical shock.
• Extension cords are not recommended unless
they are plugged into a Ground Fault Circuit Interrupter (GFCI) found in circuit boxes or outlet receptacles. The GFCI on the machine power cord will
not prevent electrical shock from the extension cords.
• Keep all electric connections dry and off the
ground. Do not touch plug with wet hands. Reduces
the risk of electrical shock.
Personal Safety
• Stay alert, watch what you are doing and use com-
Grounding prong
Grounding prong
• Avoid body contact with grounded surfaces such
as pipes, radiators, ranges and refrigerators. There
is an increased risk of electrical shock if your body is
grounded.
• Don’t expose electrical tools to rain or wet condi-
tions. Water entering a tool will increase the risk of
electrical shock.
• Do not abuse cord. Never use the cord to carry the
tools or pull the plug from an outlet. Keep cord
away from heat, oil, sharp edges or moving parts.
Replace damaged cords immediately. Damaged
cords increase the risk of electrical shock.
• When operating a tool outside, use an outdoor
extension cord marked “W-A” or “W”. These cords
Ridge Tool Company2
Find Quality Products Online at: [email protected]
www.GlobalTestSupply.com
mon sense when operating a power tool. Do not
use tool while tired or under the influence of drugs,
alcohol, or medications. A moment of inattention
while operating power tools may result in serious personal injury.
• Dress properly. Do not wear loose clothing or jew-
elry. Contain long hair. Keep your hair, clothing,
and gloves away from moving parts. Loose clothes,
jewelry, or long hair can be caught in moving parts.
• Avoid accidental starting. Be sure switch is OFF
before plugging in. Carrying tools with your finger on
the switch or plugging tools in that have the switch ON
invites accidents.
• Remove adjusting keys or switches before turning
the tool ON. A wrench or a key that is left attached to
a rotating part of the tool may result in personal injury.
Page 5

K-3800 Drain Cleaning Machine
• Do not overreach. Keep proper footing and balance at all times. Proper footing and balance enables
better control of the tool in unexpected situations.
• Use safety equipment. Always wear eye protection.
Dust mask, non-skid safety shoes, hard hat, or hearing
protection must be used for appropriate conditions.
Tool Use and Care
• Use clamp or other practical way to secure and
support the workpiece to a stable platform. Holding
the work by hand or against your body is unstable and
may lead to loss of control.
• Do not force tool. Use the correct tool for your ap-
plication. The correct tool will do the job better and
safer at the rate for which it is designed.
• Do not use tool if switch does not turn it ON or
OFF. Any tool that cannot be controlled with the switch
is dangerous and must be repaired.
• Disconnect the plug from the power source before
making any adjustments, changing accessories, or
storing the tool. Such preventive safety measures re-
duce the risk of starting the tool accidentally.
• Store idle tools out of the reach of children and
other untrained persons. Tools are dangerous in
the hands of untrained users.
• Maintain tools with care. Keep cutting tools sharp
and clean. Properly maintained tools with sharp cutting
edges are less likely to bind and are easier to control.
• Check for misalignment or binding of moving
parts, breakage of parts, and any other condition
that may affect the tools operation. If damaged,
have the tool serviced before using. Many accidents
are caused by poorly maintained tools.
• Use only accessories that are recommended by
the manufacturer for your model. Accessories that
may be suitable for one tool may become hazardous
when used on another tool.
• Keep handles dry and clean; free from oil and
grease. Allows for better control of the tool.
Specific Safety Information
WARNING
Read this operator’s manual carefully before using
the K-3800 Drain Cleaner. Failure to understand
and follow the contents of this manual may result in
electrical shock, fire and/or serious personal injury.
Call the Ridge Tool Company, Technical Service Department at (800) 519-3456 if you have any questions.
Drain Cleaner Safety
• Wear gloves provided with the machine. Never
grasp a rotating cable with a rag or loose fitting
cloth glove. Could become wrapped around the cable
and cause serious injury.
• Do not overstress cables. Keep two hands on the
cable for control when machine is running. Overstressing cables because of obstruction may cause
twisting, kinking or breaking of the cable and result in
serious injury.
• Position machine within two feet of inlet. Greater
distances can result in cable twisting or kinking.
• Machine is designed for one person operation.
Operator must control foot switch and cable.
• Use foot switch to operate machine while main-
taining good footing and balance. Do not operate
machine in (REV) reverse. Operating machine in
reverse can result in cable damage and is used only to
back tool out of an obstruction.
• Keep hands away from rotating drum and guide
tube. Do not reach into drum unless machine is
unplugged. Hand may be caught in the moving parts
resulting in serious injury.
• Be careful when cleaning drains where cleaning
compounds have been used. Avoid direct contact with skin and eyes. Serious burns can result
from some drain cleaning compounds.
• Do not operate machine if operator or machine is
standing in water. Will increase the risk of electrical
shock.
Service
• Tool service must be performed only by qualified
repair personnel. Service or maintenance performed
by unqualified repair personnel could result in injury.
• When servicing a tool, use only identical replace-
ment parts. Follow instructions in the Maintenance
Section of this manual. Use of unauthorized parts or
failure to follow maintenance instructions may create a
risk of electrical shock or injury.
Ridge Tool Company 3
Find Quality Products Online at: [email protected]
www.GlobalTestSupply.com
• Wear safety glasses and rubber soled, non-slip
shoes. Use of this safety equipment may prevent se-
rious injury.
• Only use the K-3800 to clean drain lines up to 4″ in
diameter. Follow instructions on the use of the
machine. Other uses or modifying the drain cleaner for
other applications may increase the risk of injury.
Page 6

K-3800 Drain Cleaning Machine
Description, Specifications
And Standard Equipment
Description
The RIDGID K-3800 Drain Cleaning Machine will clean
drain lines up to 4″ in diameter and 100 feet in length.
Drum provided with the machine holds up to 100 feet of
3
/8″ cable or 90 feet of 1/2″ cable. An optional sink drum
holds 50 feet of 5/16″ cable. Both drums include an innerdrum to guard against cable flip-over. Designed to clean
sink lines, floor drains and roof vents.
The drum is driven by a
has a grounded electrical system. An integral Ground
Fault Interrupter (GFCI) is built into the line cord and a
pneumatic foot actuator provides ON/OFF control of the
motor. When the cable hits a blockage, the motor gears
down automatically to provide more power and greater operator control.
The cable is manually fed in and out of the drain. An
optional autofeed is available that will advance or retract
the cable. Drum tilt-adjusts to provide proper cable feed
angle. The cable has a quick change coupling system for
connecting tools. The drum separates from the motor
frame for two-hand transport.
Specifications
Line Capacity...............Depends on choice of cable.
Recommended Line Size and Distance
Cable Size in. mm ft. M
1
/4″ Cable
5
/16″ Cable
3
/8″ Cable 11/2- 3 38 - 75 100 30.0
1
/2″ Cable 2 - 4 50 - 100 90 27.0
Drum Capacity
Standard Cable Drum....100′ of
Sink Drum......................50′ of
Motor
Type ..............................115V/50-60 Hz, Reversible,
Rating............................
1
/10HP universal series motor that
Refer to the following chart
for recommendations.
Line Size Distance
3
4
/4- 11/
3
/4- 11/
19 - 32 35 10.6
2
19 - 38 50 15.2
3
/8″ Cable
90′ of1/2″ Cable
5
/16″ Cable
Universal AC Motor. 220-240V
Available Upon Request
1
/10HP
Height............................17″ (43 cm)
Width.............................14″ (36 cm)
Standard Equipment
K-3800 w/C-31 Cable, Cat. No. 53112 includes:
• K-3800 Machine
• C-31, 3/8″ x 50′′ Inner Core Cable
• T-202 Bulb Auger
• T-205 “C” Cutter 13/
8
″
• T-211 Spade Cutter
• A-13 Pin Key
• Pair Gloves
K-3800 w/C-32, Cat. No. 53117 includes:
• K-3800 Machine
• C-32,
3
/8″ x 75′ Inner-Core Cable
• T-202 Bulb Auger
• T-205 “C” Cutter
• T-211 Spade Cutter
• A-13 Pin Key
• Pair Gloves
K-3800 w/C-45, Cat. No. 53122 includes:
• K-3800 Machine
• C-45,
1
/2″ x 75′ Inner-Core Cable
• T-102 Funnel Auger
• T-142 Blade Cutter
• T-107 Spade Cutter
• A-12 Pin Key
• Pair Gloves
K-3800 w/C-46, Cat. No. 53127 includes:
• K-3800 Machine
• C-46,
1
/2″ x 90′ Inner-Core Cable
• T-102 Funnel Auger
• T-142 Blade Cutter
• T-107 Spade Cutter
• A-12 Pin Key
• Pair Gloves
Accessories
Catalog Model
No. No. Description
55002 A-380 Std Drum for
55007 A-381 Sink Drum for
41937 — Pair of Gloves
59230 A-13 Pin Key for
59225 A-12 Pin Key for
55017 — Transport Cart
55012 A-381-A Sink D r u m w / 2 5 ′ x
Core Cable
60087 — K3800 Power Feed
3
/8″,1/2″ Cable
5
/16″,1/4″ Cable
3
/8″ Cable
1
/2″ Cable
5
/16″ Inner
Amps.............................2
Weight (machine only) ...35 lbs. (15.9 kgs)
Length ...........................19″ (48 cm)
Ridge Tool Company4
Find Quality Products Online at: [email protected]
www.GlobalTestSupply.com
Page 7

K-3800 Drain Cleaning Machine
Machine Assembly
WARNING
To prevent serious injury, proper assembly of the
Drain Cleaner is required. The following procedures
should be followed:
To Install Drum
1. Loosen adjusting knob and pivot yoke assembly to a
slight angle (15 degrees) above horizontal, then
retighten knob (Figure 1).
2. Pull locking pin to release nose bracket and swing
bracket open.
3. Grasp drum at hand-hold and steady it with your
free hand. Align drum drive shaft with mounting bore
on gearbox. Then slide shaft home. Bearing assembly (on front of drum) should rest flat on its mount on
yoke (Figure 2).
4. Slowly rotate drum until drive shaft engages with
drive lug on gearbox. Drum should drop back slightly
as drive engages.
5. Close bracket over bearing assembly, push down
on bracket until push pin clicks into locked position in
yoke (Figure 3).
NOTE! If bracket does not align with groove in bearing
assembly, drive bracket is not engaged. Rotate
drum for proper engagement.
Figure 3 – Locking Front Bracket
Instructions For Mounting Autofeed
(Optional Accessory)
1. Screw handle into the autofeed.
NOTE! The autofeed comes from the factory set-up to
run both
moval of spacers is necessary.
2. Turn feed knob up to allow cable to pass through the
autofeed.
1
/2″and3/8″ cable. No addition or re-
3. Attach the autofeed onto the front frame of the K-3800
using the two T-shaped mounting knobs (Figure 4).
Figure 1 – Pivoting Yoke Assembly
Figure 4 – Mounting the Autofeed Onto the Frame
Figure 2 – Aligning Drum and Gearbox Bore
Ridge Tool Company 5
Find Quality Products Online at: [email protected]
www.GlobalTestSupply.com
Page 8
K-3800 Drain Cleaning Machine
Machine Inspection
WARNING
To prevent serious injury, inspect your Drain Cleaning Machine. The following inspection procedures
should be performed before each use.
1. Make sure the Drain Cleaning Machine is unplugged
and the directional switch is set to the OFF position
(Figure 5).
2. Make sure the foot switch is present and attached to
the Drain Cleaning Machine (Figure 5). Do not operate the machine without a foot switch.
use with other equipment may be hazardous when
used with this drain cleaner.
7. Clean any oil, grease or dirt from all equipment handles and controls. This reduces the risk of injury due
to a tool or control slipping from your grip.
8. Inspect the cutting edges of your tools. If necessary,
have them sharpened or replaced prior to using the
Drain Cleaning Machine. Dull or damaged cutting
tools can lead to binding and cable breakage.
9. Inspect cables and couplings for wear and damage.
Cables should be replaced when they become
severely worn or corroded. A worn cable can be
identified when the outside coils become flat.
WARNING
ing serious injury.
Worn or damaged cables can break caus-
Machine Set-Up
WARNING
Figure 5 – K-3800 Drum Machine
3. Inspect the power cord, Ground Fault Circuit Interrupter (GFCI) and plug for damage. If the plug has
been modified, is missing the grounding prong or if the
cord is damaged, do not use the Drain Cleaning
Machine until the cord has been replaced.
4. Inspect the Drain Cleaning Machine for any broken,
missing, misaligned or binding parts as well as any
other conditions which may affect the safe and normal
operation of the machine. If any of these conditions
are present, do not use the Drain Cleaning Machine
until any problem has been repaired.
5. Lubricate the Drain Cleaning Machine, if necessary,
according to the Maintenance Instructions.
6. Use tools and accessories that are designed for your
drain cleaner and meet the needs of your application.
The correct tools and accessories allow you to do the
job successfully and safely. Accessories suitable for
To prevent serious injury, proper set-up of the machine and work area is required. The following
procedures should be followed to set-up the machine:
1. Check work area for:
• Adequate lighting
• Grounded electrical outlet
• Clear path to the electrical outlet that does not
contain any sources of heat or oil, sharp edges or
moving parts that may damage electrical cord.
• Dry place for machine and operator. Do not place
the machine in water.
• Flammable liquids, vapors or dust that may ignite.
2. Position the Drain Cleaning Machine within 2′ of
sewer inlet. Greater distance can result in cable twisting or kinking.
3. Position the air foot switch pedal for easy operator accessibility. Machine is designed for one person
operation.
4. Make sure FOR/OFF/REV switch is in the OFF po-
sition.
5. Adjust drum and pivot yoke assembly to a convenient
position above the sewer inlet.
Ridge Tool Company6
Find Quality Products Online at: [email protected]
www.GlobalTestSupply.com
Page 9
K-3800 Drain Cleaning Machine
6. Select and install the proper tool to the end of the
cable. The T-Slot Coupler allows the tool to be
snapped into the cable coupler (Figure 6). To remove tool, use the pin key to depress the plunger and
slide the coupling apart.
To Couple Cable
and Tools
Snap Together Insert Pin Slide Apart
Figure 6 – Coupling and Uncoupling Tools
NOTE! Proper Tool Selection
To Uncouple Cable and Tools
A good rule of thumb is to use a tool at least 1″
smaller than the line to be cleaned. The style of the
tool is determined by the nature of the job and is
left up to the operator.
7. Plug the Drain Cleaning Machine into the electrical
outlet, making sure to position the power cord along
the clear path selected earlier. If the power cord
does not reach the outlet, use an extension cord in
good condition.
WARNING
To avoid electric shock and electrical
fires, never use an extension cord that is damaged or
does not meet the following requirements:
• The cord has a three-prong plug similar to shown in
Electrical Safety section.
• The cord is rated as “W” or “W-A” if being used out-
doors.
• The cord has sufficient wire thickness (16 AWG - 100′).
If the wire thickness is too small, the cord may overheat,
melting the cord’s insulation or causing nearby objects
to ignite.
WARNING
To reduce risk of electrical shock, keep all
electrical connections dry and off the ground. Do not
touch plug with wet hands. Test the Ground Fault Circuit
Interrupter (GFCI) provided with the electric cord to insure
it is operating correctly. When test button is pushed in, the
indicator light should go off. Reactivate by pushing the
reset button in. If indicator light goes on, the machine is
ready to use. If the GFCI does not function correctly, do
not use the machine.
Operating Instructions
WARNING
Wear gloves provided with machine. Never grasp
a rotating cable with a rag or loose fitting cloth
glove that may become wrapped around the cable,
causing serious injury.
Always wear eye protection to protect your eyes
against dirt and other foreign objects. Wear rubber
soled, non-slip shoes.
Be very careful when cleaning drains where cleaning compounds have been used. Wear gloves when
handling cable and avoid direct contact to the
skin and especially the eyes and facial area as serious burns can result.
WARNING
ture in order to maintain proper balance (Figure 7). Should
an unexpected situation arise, this posture provides you
with the opportunity to safely keep control of the machine and cable.
• Be sure you can quickly remove your foot from the
foot switch.
• Hand must be on the cable to control its twisting action when it hits an obstruction.
• Keep hands away from rotating drum. Do not reach
into drum unless machine is unplugged.
Always assume the correct operating pos-
Figure 7 – Proper Operating Position
Ridge Tool Company 7
Find Quality Products Online at: [email protected]
www.GlobalTestSupply.com
Page 10

K-3800 Drain Cleaning Machine
Using Manual Feed Machines
1. Pull sufficient cable out of the drum to start tool and
cable into the sewer inlet. Push cable into inlet as far
as it will go.
2. Move FOR/OFF/REV switch into FOR (forward) position. Grasp cable with two gloved hands and pull
approximately 1 foot of additional cable out of machine, building a slight loop of cable between machine
and sewer inlet (Figure 7).
WARNING
gloved hands must be on the cable.
3. While depressing foot switch to start machine, use
both gloved hands to grasp and push cable into
sewer inlet. Rotating cable will slowly work its way into
line as operator applies downward pressure with
gloved hands on cable loop.
4. Continue to feed the cable into the line until resistance
or obstruction is encountered. This will become apparent to operator as the motor will “lug” down and/or
the cable will have a tendency to twist sideways in operator’s hands.
5. If cable loads down in the obstruction, relieve load by
pulling back on cable with short, quick jerks to free
cutter (the drum speed will increase). Slowly advance cable back into the obstruction. Repeat this
process until the obstruction is clear. Remember,
make sure the cutter is rotating at all times and never
force the cable.
Before starting machine, both operator’s
WARNING
Never retract tool from sewer inlet while
cable is rotating. Tool can whip causing serious injury.
8. Release foot actuator and allow machine to come to
a complete stop.
NOTE! It is recommended that a continuous flush of
water be used to clean the cable and tool as
they are retrieved.
9. Turn FOR/OFF/REV Switch to OFF position and remove cord from power source.
10. Pull remaining cable and tool from sewer and hand
feed cable back into machine.
Using Autofeed Machines
1. Manually pull sufficient cable out of the drum to start
tool and cable into the sewer inlet. Push cable into
inlet as far as it will go.
2. Turn feed knob down until front bearing makes contact with the cable.
3. Move FOR/OFF/REV switch into FOR (forward) position. Do not step on the air foot switch pedal at
this time.
4. Loosely grasp cable with gloved hand and place
right hand on the feed lever. Feed lever should be in
the neutral position (vertical or 12 o’clock). Exert
sufficient downward pressure on cable to maintain
control while depressing foot actuator to start drum
rotation. Do not force the cable. Allow it to feed itself
into the drain.
WARNING
Do not allow tension to build up in the cable. This will
happen if the cutting tool hits a snag and stops turning, but
the motor and its drum continue to rotate. Torque builds
until the cable suddenly twists, potentially wrapping around
your hand or arm. This can happen quickly and without
warning, so proceed slowly and carefully as you feed the
cable into the drain. If tool gets hung up in an obstruction,
refer to Reverse Operating Instructions in the “Special
Procedures” section.
6. Once obstruction is cleared, it is recommended to
flush debris from line with running water. Repeat
Step 5 several times if necessary for a thorough
cleaning job and then work cable through additional
stoppages as required.
7. To retrieve cable from sewer line, pull one to two
feet of cable from sewer while continuing to run machine in forward rotation. This excess cable should
then be manually pushed back into machine. This pull
and push procedure should be continued until it is apparent that tool is just inside sewer inlet.
5. Move the feeder lever in the opposite direction of the
rotating drum to advance the cable (Figure 8). The
rate at which the cable is fed (0-20 feet per minute)
into the sewer is controlled by the position of the feed
lever away from neutral (vertical) position. The farther
from vertical, the faster the feed rate. Always keep
one hand on the cable to feel tension.
WARNING
Before starting machine, operator’s gloved
hands must be on the cable.
WARNING
Always keep hand on the cable to feel ten-
sion.
Ridge Tool Company8
Find Quality Products Online at: [email protected]
www.GlobalTestSupply.com
Page 11

K-3800 Drain Cleaning Machine
Figure 8 – Autofeed
WARNING
Do not allow tension to build up in the cable. This will happen if the cutting tool hits a snag and stops turning, but
the motor and its drum continue to rotate. Torque builds
until the cable suddenly twists, potentially wrapping
around your hand or arm. This can happen quickly and
without warning so proceed slowly and carefully as you
feed the cable into the drain. If tool gets hung up in an obstruction, refer to Reverse Operating Instructions in the
“Special Procedures” section.
10. Several passes at a thoroughly blocked drain line are
recommended. After establishing flow, increase cutter size to thoroughly clean line. Flush with strong flow
of water.
11. To retrieve cable from sewer line, move the feed
lever in same direction of drum rotation (Figure 9).
The cable should now feed itself back into machine.
The retrieval process is greatly aided by manually
pulling the cable from the drain a foot at a time as the
autofeed is used.
6. Continue to feed the cable into the line until resistance
or obstruction is encountered. The condition will generally become apparent to the operator as the cable
will have a tendency to twist sideways in the operator’s hands.
NOTE! When encountering an obstruction or an elbow,
the motor/gearbox will audibly “gear down”, indicating the presence of resistance.
7. Operator should immediately respond to this condition
by moving feed lever into full reverse (same direction
of drum rotation). This should release the twist in
cable and reduce size of cable loop.
8. Once free of this obstruction and the load is relieved
from the cable, gradually feed cable forward. Remember, when using the feed mechanism the rate of
cable advance is controlled by the autofeed handle.
Allow cutter to advance slowly and work through the
obstruction. If cable shows signs of loading (generally
apparent by growing loop between machine and
drain), immediately back cutter from obstruction by reversing feed.
NOTE! At this point, progress depends upon the sharp-
ness of the tool and the nature of the obstruction.
Continued operation may require manual feed
mode until the obstruction has been cleared.
9. Manually pull back sharply on the cable to free the cutter and relieve the load on the cable. Slowly advance
cable back into the obstruction. Repeat this process
until the obstruction is clear. Remember, make sure
the cutter is rotating at all times and never force the
cable. Occasionally move power feed lever to neutral
to allow cutter to work through the obstruction.
Figure 9 – Autofeed in Reverse Position
NOTE! It is recommended that a continuous flush of
water be used to clean cable and tool as they are
retrieved.
12. When the tool is just inside the sewer inlet, release
the air foot switch pedal and allow the machine to
come to a complete stop.
Ridge Tool Company 9
Find Quality Products Online at: [email protected]
www.GlobalTestSupply.com
Page 12

K-3800 Drain Cleaning Machine
WARNING
cable is rotating. Tool can whip causing serious injury.
13. Turn FOR/OFF/REV switch to OFF position.
14. Loosen the feed knob and pull remaining cable and
tool from the sewer. Hand feed the cable into the machine.
15. Remove cord from power source.
Never retract tool from sewer inlet while
Special Procedures
Reverse Operation
Running machine in reverse will cause premature failure
of cable. Use reverse only to free a tool caught in an
obstruction. If this should occur, immediately remove foot
from air foot switch pedal and allow machine to come to a
full and complete stop. Place FOR/OFF/REV switch to
REV (reverse) position.
Tighten screw on nose of machine so that it firmly captures cable to avoid kinks occurring inside the drum. If
machine has automatic feed, move feed knob to neutral
position. Grasp cable with gloved hands and pull while jogging air foot switch pedal. When tool is dislodged and
drum has stopped rotating, place FOR/OFF/REV switch in
FOR (forward) position, loosen set screw on nose of machine and follow normal operating procedure.
WARNING
verse) for any other purpose. Operating in reverse can
damage a cable and cause serious injury.
To Remove Drum
WARNING
machine unplugged before removing or installing drum.
1. Pull locking pin to release bracket – swing bracket
open (Figure 10).
Never operate this machine in REV (re-
FOR/OFF/REV switch should be OFF and
Bracket
2. Grasp drum at hand hold and pull slightly forward to
disengage drive, then lift free of yoke.
Machine Transport
The K-3800 is easier to transport with the drum removed.
Separating the drum from the frame creates balanced,
easy to carry assemblies.
An optional two-wheel cart is also available (Figure 11)
Cat. No. 55017.
Figure 11 – Optional Transport Cart
Draining Water From Drum
Rotate drum so that drain hole is at lowest point – the six
o’clock position. Remove plug and drain drum, then replace plug.
Installing Replacement Cable
WARNING
machine unplugged before removing or installing cable.
To Remove Damaged or Worn Cable
1. Remove drum from machine as outlined.
FOR/OFF/REV switch should be OFF and
2. Pull out loose cable from drum. End of cable is fastened to back wall of drum.
3. To free cable end, loosen two bolts on drum back that
clamp the cable’s end against the back wall of the
drum (Figure 12).
4. Grasp the neck of the inner-drum and rotate it counter-clockwise to pull cable end from under bracket
(Figure 13).
5. Pull remaining length of cable from drum and discard.
Figure 10 – Open Front Bracket
Ridge Tool Company10
Find Quality Products Online at: [email protected]
www.GlobalTestSupply.com
Page 13

K-3800 Drain Cleaning Machine
Figure 14 – Removing E-Clips
Figure 12 – Loosen Cable Bracket
To Install Replacement Cable
1. Remove two E-Clips, front bearing assembly, and
inner-drum from guide tube shaft (Figure 14 and
Figure 15).
2. Insert approximately two feet of cable through the
guide tube into drum. Let cable follow natural sweep
of guide tube.
Figure 13 – Removing Cable End
Figure 15 – Removing Inner Drum
3. Reach inside drum and grasp cable near end. Position cable end under cable bracket. Allow 2″ of
cable to protrude past clamp bracket (Figure 16).
Ridge Tool Company 11
Find Quality Products Online at: [email protected]
www.GlobalTestSupply.com
Page 14

K-3800 Drain Cleaning Machine
Figure 16 – Position New Cable Under Bracket
NOTE! If cable will not fit under bracket, loosen the
two bolts at the drum back.
4. With cable end under bracket, retighten bolts to
clamp cable firmly against the back wall of the drum.
5. Lay drum on its back and push cable into drum.
Guide tube will evenly distribute the cable around the
drum.
6. Reassemble inner drum, front bearing and E-clips
(Figure 17).
7. Mount drum on machine as outlined previously.
Accessories
WARNING
been designed to function with the K-3800 Drain Cleaning
Machine. Other accessories suitable for use with other
tools may become hazardous when used on the K-3800.
To prevent serious injury, use only the accessories listed
below.
Accessories
Catalog Model
No. No. Description
55002 A-380 Std Drum for
55007 A-381 Sink Drum for
41937 — Pair of Gloves
59230 A-13 Pin Key for
59225 A-12 Pin Key for
55017 — Transport Cart
55012 A-381-A Sink D r u m w / 2 5 ′ x
60087 — K3800 Power Feed
Sink Drum Cables
Catalog Model
No. No. Description
56782 C-1IC
56787 C-2IC
56792 C-13IC
50652 S-2
50657 S-3
Only the following RIDGID products have
3
/8″,1/2″ Cable
5
/16″,1/4″ Cable
3
/8″ Cable
1
/2″ Cable
5
/16″ Inner
Core Cable
5
/16″ x 25′ (7.6m) Inner Core
w/Bulb Auger
5
/16″ x 25′ (7.6m) Inner Core
w/Drop Head Auger
5
/16″ x 35′ (10.7m) w/Funnel Auger
1
/4″ x 25′ (7.6m) w/Funnel Auger
1
/4″ x 35′ (10.7m) w/Funnel Auger
Figure 17 – Reassemble Inner Drum, Front Bracket and
E-Clips
3/8″ Cables (10mm)
Catalog Model
No. No. Description
37842 C-31 50′ (15m) I.C. Cable
37847 C-32 75′ (23m) I.C. Cable
37852 C-33 100′ (30m) I.C. Cable
1/2″ Cable (12mm)
Catalog Model
No. No. Description
37857 C-44 50′ (15m) I.C. Cable
37862 C-45 75′ (23m) I.C. Cable
55467 C-46 90′ (27m) I.C. Cable
Ridge Tool Company12
Find Quality Products Online at: [email protected]
www.GlobalTestSupply.com
Page 15
K-3800 Drain Cleaning Machine
Tools – Fit C-31, C-32 and C-33 Cables
Catalog Model
No. No. Description
62990 T-201 Straight Auger, 5″ Long
62995 T-202 Bulb Auger, 1
63000 T-203 Bulb Auger,
1
/8″ O.D.
7
/8″ O.D.
63065 T-217 Drop Head, 4″ Long
54837 T-204 “C” Cutter - 1″
63005 T-205 “C” Cutter - 1
63010 T-206 Funnel Auger, 3″ Long
63015 T-207 Spiral Cutter, 1
63020 T-208 Spiral Cutter, 1
3
8
/
″
1
4
/
″
1
2
/
″
63025 T-209 Spiral Cutter, 2″
63030 T-210 Spade Cutter, 1″
63035 T-211 Spade Cutter, 1
63040 T-212 Spade Cutter, 1
63045 T-213 4-Blade Cutter, 1″
63050 T-214 4-Blade Cutter, 1
63055 T-215 4-Blade Cutter, 1
3
8
/
″
3
4
/
″
3
8
/
″
3
4
/
″
63060 T-216 Chain Knocker, 2″
49002 T-260 Tool Set:
- T-202 Bulb Auger
- T-205 “C” Cutter
- T-211 Spade Cutter
- A-13 Pin Key
Tools – Fits C-44, C-45, and C-46 Cables
Catalog Model
No. No. Description
62850 T-101 Straight Auger
62855 T-102 Funnel Auger
27642 T-125 Retrieving Auger
62865 T-104 “H” Cutter, 2
62870 T-105 Grease Cutter, 2
62875 T-106 Grease Cutter, 3
62880 T-107 Spade Cutter, 1
62930 T-112 4-Blade Cutter, 1
62935 T-113 4-Blade Cutter, 3″
62940 T-114 Chain Knocker
54842 T-141 Knife Blade Cutter, 1
54852 T-142 Knife Blade Cutter, 2
54992 T-270 Tool Set:
- T-102 Funnel Auger
- T-142 Knife Blade Cutter
- T-107 Grease Cutter
- A-12 Pin Key
1
2
/
″
1
2
/
″
1
2
/
″
3
4
/
″
3
4
/
″
1
2
/
″
1
2
/
″
Autofeed Assembly
Proper cleaning and lubrication of the autofeed assembly
is advised for long, trouble-free operation. After each
use, hose out autofeed assembly with water and lubricate
with lightweight machine oil.
Cables
Cables should be thoroughly flushed with water to prevent
damaging effects of sediment and drain cleaning compounds. Periodically lubricate cables and couplings with
RIDGID Cable Rust Inhibitor.
When not in use, store cables indoors to prevent deterioration by the elements.
Cables should be replaced when they become severely
corroded or worn. A worn cable can be identified when
outside coils of cable become flat.
Machine Storage
WARNING
doors or well covered in rainy weather. Store the machine
in a locked area that is out of reach of children and people unfamiliar with drain cleaners. This machine can
cause serious injury in the hands of untrained users.
Motor-driven equipment must be kept in-
Service and Repair
WARNING
The “Maintenance Instructions” will take care of most of
the service needs of this machine. Any problems not
addressed by this section should only be handled by an
authorized RIDGID service technician.
Refer to Ridge Tool catalog for complete listing of tools
and accessories.
Tool should be taken to a RIDGID Independent Authorized Service Center or returned to the factory. All repairs made by Ridge service facilities are warranted
against defects in material and workmanship.
Maintenance Instructions
WARNING
Make sure machine is unplugged from electrical
system before making any adjustment.
WARNING
When servicing this machine, only identical replacement parts should be used. Failure to follow
these instructions may create a risk of electrical shock or
other serious injury.
Lubrication
Grease all exposed moving and rotating parts such as
guide tube assembly as required.
Ridge Tool Company 13
Find Quality Products Online at: [email protected]
www.GlobalTestSupply.com
Page 16
K-3800 Drain Cleaning Machine
If you have any questions regarding the service or repair
of this machine, call or write to:
Chart 1. Troubleshooting
PROBLEM CAUSE CORRECTION
Cable kinking
or breaking.
Drum stops while pedal
is depressed. Restarts
when pedal is re-pressed.
Drum turns in one direction but not the other.
Ground fault Interrupter
trips when machine is
plugged in or when foot
pedal is depressed.
Cable is being forced.
Cable used is incorrect pipe diameter.
Motor switched to reverse.
Cable exposed to acid.
Cable worn out.
Hole in pedal or hose.
Hole in diaphragm switch.
Faulty reverse switch.
Damaged power cord.
Short circuit in motor.
Faulty Ground Fault Circuit Interrupter.
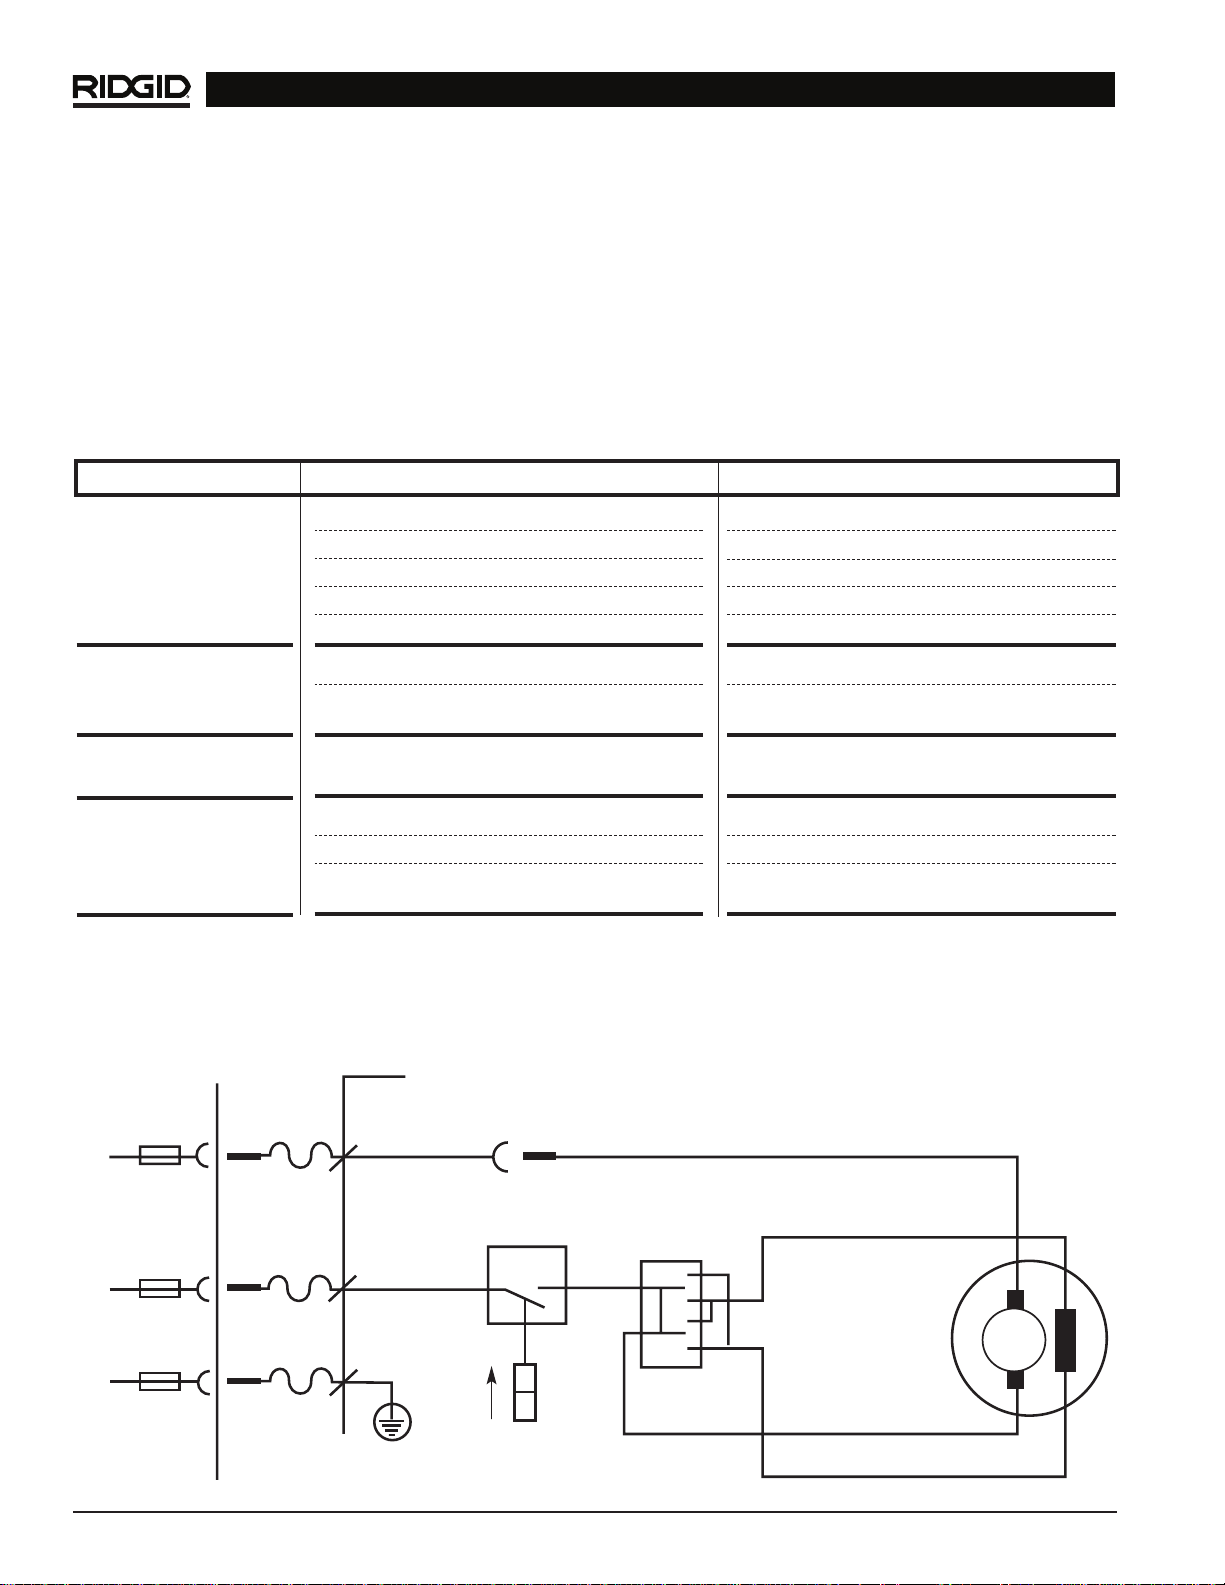
Wiring Diagram – K-3800 Drain Cleaner
115V 60Hz
1.5MM
2
Do Not Force Cable! Let the cutter do the work.
Use 1/2″ cables in 3″ to 4″ lines.
Use REVERSE only if cable gets caught in pipe.
Clean and oil cables routinely.
If cable is worn, replace it.
Replace damaged component.
If no problem found with pedal or hose, replace
diaphragm switch.
Replace switch.
Replace cord set.
Take motor to authorized service center.
Replace cord set that includes a Ground Fault
Circuit Interrupter.
Connector
Air Pressure
Switch
BK
YE
M
Switch
RD
OR
L
PE
N
WH
BK
GN
Ridge Tool Company14
Find Quality Products Online at: [email protected]
www.GlobalTestSupply.com
 Loading...