

Page 1
Scanner Option
Type 480
Operating Instructions
Scanner Reference
Getting Started
Sending Scan Files by E-mail
Sending Scan Files by Scan to Folder
Storing Files
Delivering Scan Files
Using the Network TWAIN Scanner Function
Configuring/Registering Scan Settings
Troubleshooting
Initial Scanner Setup
Appendix
Read this manual carefully before you use this machine and keep it handy for future reference. For safe and correct use, be sure to read the Safety
Information in the "General Settings Guide" before using the machine.
Page 2

Introduction
This manual contains detailed instructions and notes on the operation and use of this machine. For your
safety and benefit, read this manual carefully before using the machine. Keep this manual in a handy
place for quick reference.
Two kinds of size notation are employed in this manual. With this machine refer to the inch version.
Important
Contents of this manual are subject to change without prior notice. In no event will the company be liable for direct, indirect, special, incidental, or consequential damages as a result of handling or operating the machine.
Do not copy or print any item for which reproduction is prohibited by law.
Copying or printing the following items is generally prohibited by local law:
bank notes, revenue stamps, bonds, stock certificates, bank drafts, checks, passports, driver's licenses.
The preceding list is meant as a guide only and is not inclusive. We assume no responsibility for its
completeness or accuracy. If you have any questions concerning the legality of copying or printing certain items, consult with your legal advisor.
Trademarks
®
• Adobe
, PostScript®, and Acrobat® are trademarks of Adobe Systems Incorporated.
• Pentium® is a registered trademark of Intel Corporation.
®
•Microsoft
, Windows®, and Windows NT® are registered trademarks of Microsoft Corporation.
• Other product names used herein are for identification purposes only and might be trademarks of
their respective companies. We disclaim any and all rights to those marks.
®
• The product name of Windows
95 is Microsoft® Windows® 95.
• The product name of Windows® 98 is Microsoft® Windows® 98.
• The product name of Windows® Me is Microsoft® Windows® Millennium Edition (Windows Me).
®
• The product names of Windows
Microsoft
Microsoft
Microsoft
• The product names of Windows® XP are as follows:
Microsoft
Microsoft
• The product names of Windows ServerTM 2003 are as follows:
Microsoft
Microsoft
Microsoft
• The product names of Windows NT® 4.0 are as follows:
Microsoft
Microsoft
®
Windows® 2000 Professional
®
Windows® 2000 Server
®
Windows® 2000 Advanced Server
®
Windows® XP Home Edition
®
Windows® XP Professional
®
Windows ServerTM 2003 Standard Edition
®
Windows ServerTM 2003 Enterprise Edition
®
Windows ServerTM 2003 Web Edition
®
Windows NT® Workstation 4.0
®
Windows NT® Server 4.0
2000 are as follows:
Page 3

Manuals for This Machine
The following manuals describe the operational procedures of this machine. For
particular functions, see the relevant parts of the manual.
Note
❒ The manuals provided are specific to machine type.
❒ Adobe Acrobat Reader/Adobe Reader is necessary to view the manuals as a
PDF file.
❒ Two CD-ROMs are provided:
• CD-ROM 1 "Operating Instructions"
• CD-ROM 2 "Scanner Driver and Utilities"
❖❖❖❖ General Settings Guide
Provides an overview of the machine and describes System Settings (such as
Tray Paper Settings), Document Server functions and troubleshooting.
Refer to this manual for Address Book procedures such as registering e-mail
addresses and user codes.
❖❖❖❖ Security Reference
This manual is for administrators of this machine. It describes security functions that the administrators can use to protect data from being tampered, or
prevent the machine from unauthorized use. Also refer to this manual for the
procedures for registering administrators, as well as setting user and administrator authentication.
❖❖❖❖ Network Guide (PDF file - CD-ROM1)
Provides information about configuring and operating the scanner (Type 480)
in a network environment.
For details about network settings of the scanner (RW480) and printer
(RW480) , see the manual that comes with the related option.
❖❖❖❖ Copy Reference
Describes operations, functions, and troubleshooting for the machine's copier
function.
❖❖❖❖ Scanner Reference (Scanner Option Type 480) (this manual) (PDF file - CD-ROM1)
Describes operations, functions, and troubleshooting for the machine's scanner function.
i
Page 4

❖❖❖❖ Manuals for DeskTopBinder Lite
DeskTopBinder Lite is a utility included on the CD-ROM labeled "Scanner
Driver and Utilities".
• DeskTopBinder Lite Setup Guide (PDF file - CD-ROM2)
Describes the installation of DeskTopBinder Lite, and the operating environment for DeskTopBinder Lite in detail. This guide can be displayed
from the [Setup] dialog box when DeskTopBinder Lite is installed.
• DeskTopBinder Lite Introduction Guide (PDF file - CD-ROM2)
Describes operations with DeskTopBinder Lite and provides an overview
of its functions. This guide is added to the [Start] menu when DeskTopBinder Lite is installed.
• Auto Document Link Guide (PDF file - CD-ROM2)
Describes operations and functions of Auto Document Link installed with
DeskTopBinder Lite. This guide is added to the [Start] menu when DeskTopBinder Lite is installed.
❖❖❖❖ Other manuals
• Manuals for Printer (RW480) function
• Manuals for Scanner (RW480) function
ii
Page 5

TABLE OF CONTENTS
Manuals for This Machine......................................................................................i
How to Read This Manual .....................................................................................1
Symbols ..................................................................................................................... 1
Names of Major Options ............................................................................................ 1
1. Getting Started
Control Panel..........................................................................................................3
Network Scanner....................................................................................................5
E-mail ......................................................................................................................... 5
Scan to Folder ............................................................................................................ 6
Store...........................................................................................................................7
Network Delivery Scanner..........................................................................................8
Network TWAIN Scanner ........................................................................................... 9
Installing Software ...............................................................................................10
Quick Install.............................................................................................................. 10
TWAIN Driver ........................................................................................................... 10
DeskTopBinder ........................................................................................................ 11
User Authentication ............................................................................................. 12
User Code Authentication (Using the Control Panel)...............................................12
Login (Using the Control Panel) ............................................................................... 12
Log Off (Using the Control Panel) ............................................................................ 13
Programming E-mail Addresses and Folders ...................................................14
Specifying How to Start Scanning .....................................................................15
2. Sending Scan Files by E-mail
Preparation for Sending by E-mail .....................................................................17
E-mail Screen........................................................................................................... 18
Sending Scan Files by E-mail.............................................................................19
Procedure for Sending E-mail .................................................................................. 19
Simultaneous Storage and Sending by E-mail......................................................... 28
Checking the E-mail Results...............................................................................30
3. Sending Scan Files by Scan to Folder
Preparation for Sending by Scan to Folder.......................................................31
Scan to Folder Screen ............................................................................................. 32
Sending Scan Files by Scan to Folder...............................................................34
Procedure for Sending by Scan to Folder ................................................................ 34
Simultaneous Storage and Sending by Scan to Folder ...........................................41
Checking the Scan to Folder Results ................................................................42
iii
Page 6

4. Storing Files
Storing Files ......................................................................................................... 43
Storage Procedure ................................................................................................... 44
Displaying the List of Stored Files ..................................................................... 47
Viewing the List ........................................................................................................48
Searching for Files ................................................................................................... 49
Sending Stored Files by E-mail or Scan to Folder, or Delivering .............................50
Checking Stored Files from a Client Computer ........................................................ 51
Managing Stored Files.........................................................................................53
Deleting Files ........................................................................................................... 53
Changing File Information ........................................................................................ 53
5. Delivering Scan Files
Preparation for Delivering...................................................................................58
Network Delivery Scanner Screen ...........................................................................59
Delivering Scan Files...........................................................................................60
Delivery Procedure................................................................................................... 60
Simultaneous Storage and Delivery .........................................................................65
Checking the Status of Delivery.........................................................................67
6. Using the Network TWAIN Scanner Function
Preparation for Using the Network TWAIN Scanner.........................................69
Scanning Originals ..............................................................................................70
7. Configuring/Registering Scan Settings
Specifying Scan Settings....................................................................................73
Specifying the Orientation and Output Tray of the Original ............................75
For E-mail, Scan to Folder, and a Network Delivery Scanner..................................75
For a Network TWAIN Scanner................................................................................76
Scanning Multiple Pages into a Single File.......................................................77
When a Time Limit Is Specified for Additional Originals .......................................... 77
When a Time Limit Is Not Specified for Additional Originals.................................... 78
Programs ..............................................................................................................80
Registering a Program ............................................................................................. 80
Recalling a Program.................................................................................................81
Changing a Registered Program..............................................................................81
Deleting a Program .................................................................................................. 81
Changing the Program Name ..................................................................................82
iv
Page 7

8. Troubleshooting
If Your Machine Does Not Operate As You Want..............................................83
When Scanning Is Not Performed as Expected .......................................................83
When the Delivery Function Does Not Work............................................................ 83
When Stored Files Cannot Be Accessed ................................................................. 84
Network Cannot Be Browsed When Sending a Scan File .......................................84
The TWAIN Driver Cannot Be Started .....................................................................84
Stored Files Cannot Be Edited................................................................................. 84
The Network Delivery Function Cannot Be Used..................................................... 84
Operations are not possible when messages appear .............................................. 85
When a Message Is Displayed............................................................................86
When an Error Message Appears on the Control Panel ..........................................86
When an Error Message Appears on the Client Computer ......................................92
9. Initial Scanner Setup
Scanner Features.................................................................................................95
Adjusting Scanner Features ...............................................................................97
Settings.................................................................................................................98
Scan Settings ...........................................................................................................98
Destination List Settings......................................................................................... 101
Send Settings .........................................................................................................101
Administrator Tools ................................................................................................ 103
10.Appendix
Relationship between Resolution and original size .......................................105
When Using for E-mail, Scan to Folder, or Store, or as a Network Delivery Scanner
When Using as a Network TWAIN Scanner........................................................... 108
Placing Originals................................................................................................ 109
Software Supplied on CD-ROM ........................................................................110
Table of files ...........................................................................................................110
TWAIN Driver ......................................................................................................... 110
DeskTopBinder ...................................................................................................... 111
Specifications for Transmission/Store/Delivery Functions...........................112
Transmission ..........................................................................................................112
Store....................................................................................................................... 114
The network delivery scanner function...................................................................114
Specifications.....................................................................................................115
INDEX....................................................................................................... 116
...106
v
Page 8

vi
Page 9

How to Read This Manual
Symbols
In this manual, the following symbols are used:
Important
If this instruction is not followed, paper might be misfed, originals might be
damaged, or files might be lost. Be sure to read this.
Preparation
This symbol indicates the prior knowledge or preparations required before operating.
Note
This symbol indicates precautions for operation or actions to take after misoperation.
Limitation
This symbol indicates numerical limits, functions that cannot be used together,
or conditions in which a particular function cannot be used.
Reference
This symbol indicates a reference.
[]
Keys that appear on the machine's display panel.
[]
Keys and buttons that appear on the computer's display.
{}
Keys built into the machine's control panel.
{}
Keys on the computer's keyboard.
Names of Major Options
Major options of this machine are referred to as follows in this manual:
• Scanner Option Type 480 → scanner option
The following software products are referred to using a general name:
• DeskTopBinder Lite and DeskTopBinder Professional
• ScanRouter EX Professional
er delivery software
*
Optional
*
and ScanRouter EX Enterprise* → the ScanRout-
*
→ DeskTopBinder
1
Page 10

2
Page 11
1. Getting Started
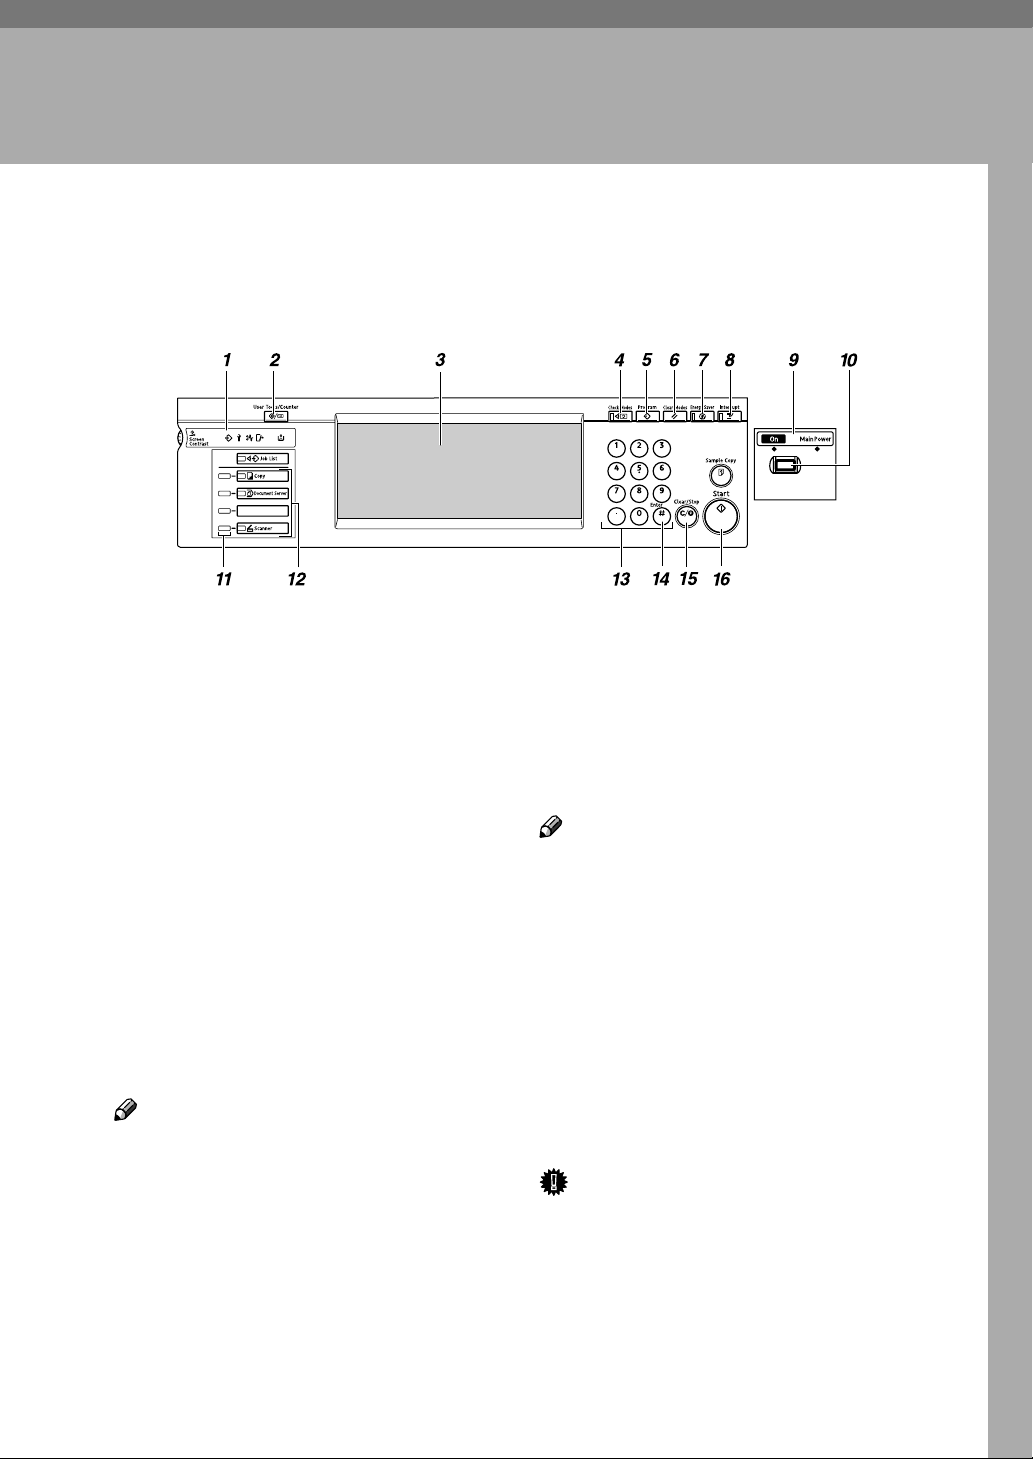
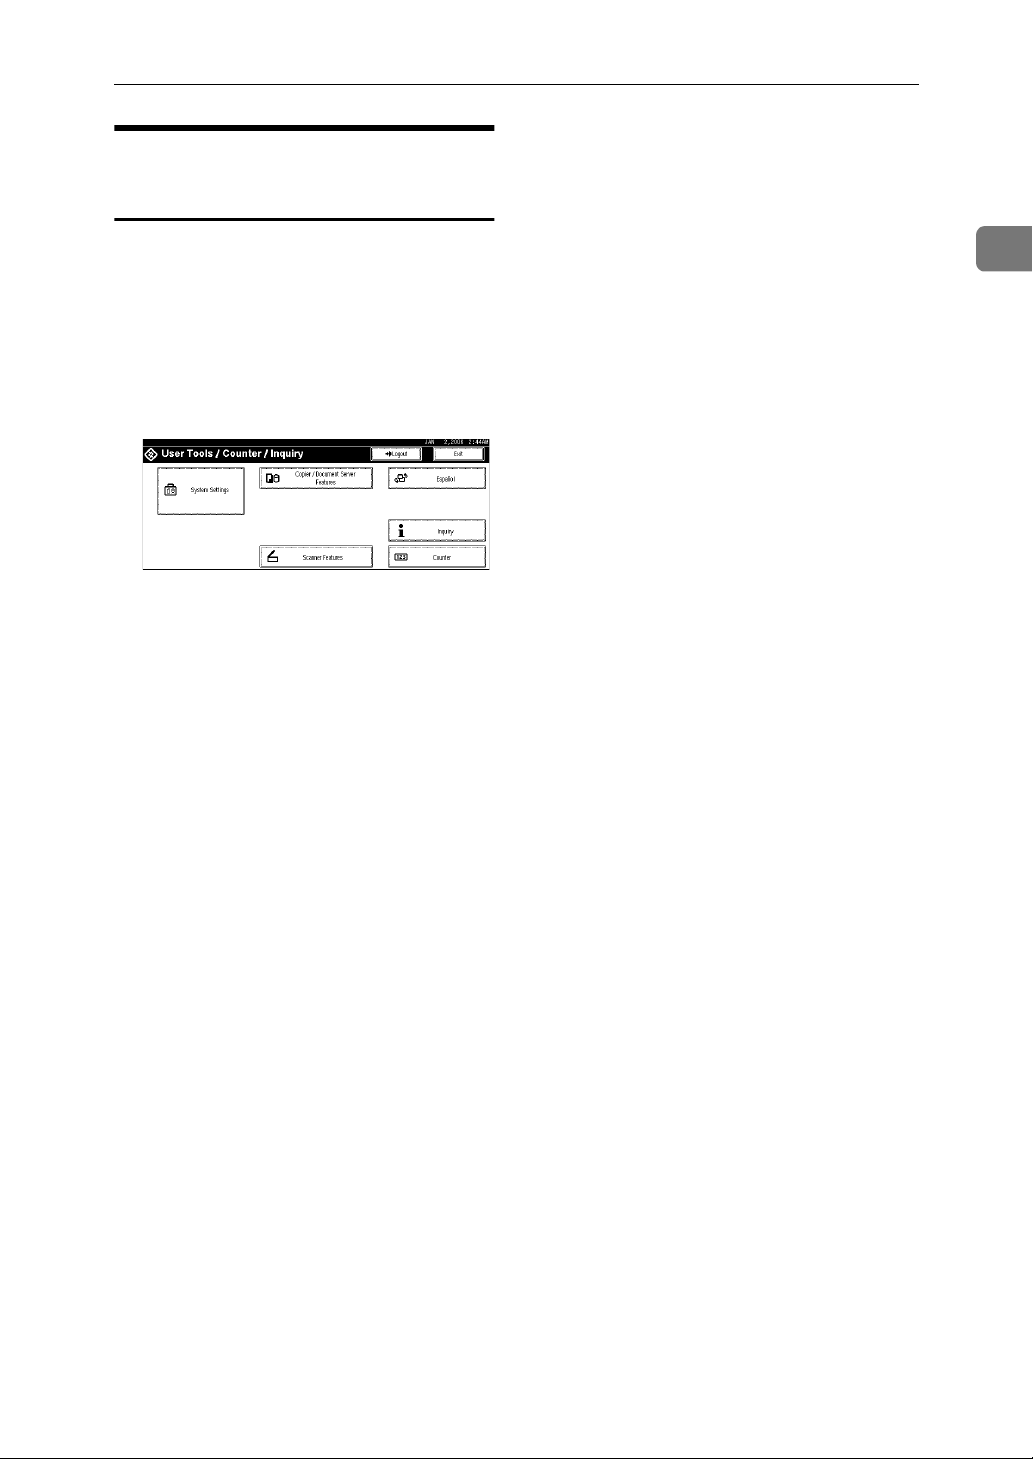
Control Panel
This illustration shows the control panel when options are installed.
AGH002S
1. Indicators
Display errors and the machine status.
See "Control Panel", General Settings
Guide.
m: Data In Indicator (indicates data is being received.).
D: Add Toner indicator
L: Service Call indicator
M: Open Cover indicator
x: Misfeed indicator
{{{{User Tools/Counter}}}} key
2.
Use to change default or operation parameters according to the operating conditions.
3. Display panel
Displays the operation status and messages.
Note
❒ Screenshots in this manual are exam-
ples and may differ from actual
screens.
4. {
{Check Modes}}}} key
{{
Press to check the destinations which are
currently selected.
5. {
{Program}}}} key
{{
Use to register settings used frequently as
a program or to recall the registered program.
6. {
{Clear Modes}}}} key
{{
Press to clear the current settings.
7. {
{Energy Saver}}}} key
{{
Press this key to begin warm-up.
Pressing this key again while in warm-up
mode cancels warm-up.
Note
❒ This key is inactive while scanning or
setting scanner defaults.
8. {
{Interrupt}}}} key
{{
Press this key to interrupt the scanner
mode and to activate the copy mode.
9. Main power indicator and power
indicator
The main power indicator lights up when
the main power switch is set to on. The
power indicator lights up when the machine is on.
Important
❒ Do not turn off the main power
while the power indicator is lit or
blinking. Doing so may cause a
failure of the hard disk.
3
Page 12

1
Getting Started
10. Operation switch
Press this switch to turn the machine on.
The power indicator lights up. To turn
the machine off, press this switch again.
See "Turning On the Power", General Set-
tings Guide.
Note
❒ This key is inactive while scanning or
setting scanner defaults.
11. Function status indicators
• When lit green, the corresponding
function is active.
• When lit red, the corresponding function is interrupted. Press the respective key, and then follow the
instructions that appear on the screen.
12. Function keys
Press the {{{{Copy}}}}, {{{{Document Server}}}}, or
{{{{Scanner}}}} key to activate the respective
function. The display content changes accordingly.
The indicator for the selected function
lights up.
13. Number keys
Use to enter numeric values.
14. {
{#}}}} key (Enter key)
{{
Use to confirm the entered numeric value.
15. {
{Clear/Stop}}}} key
{{
• Clear: Clears an entered numeric value
• Stop: Stops scanning
16. {
{Start}}}} key
{{
Use to begin scanning, file storing, or delivery.
Note
❒ Using the default setting, you can start
scanning, storing, and delivering files,
simply by loading them (without
pressing the {{{{Start}}}} key). For details
about how to start scanning, see “Sys-
tem Settings”, General Settings Guide.
4
Page 13
Network Scanner
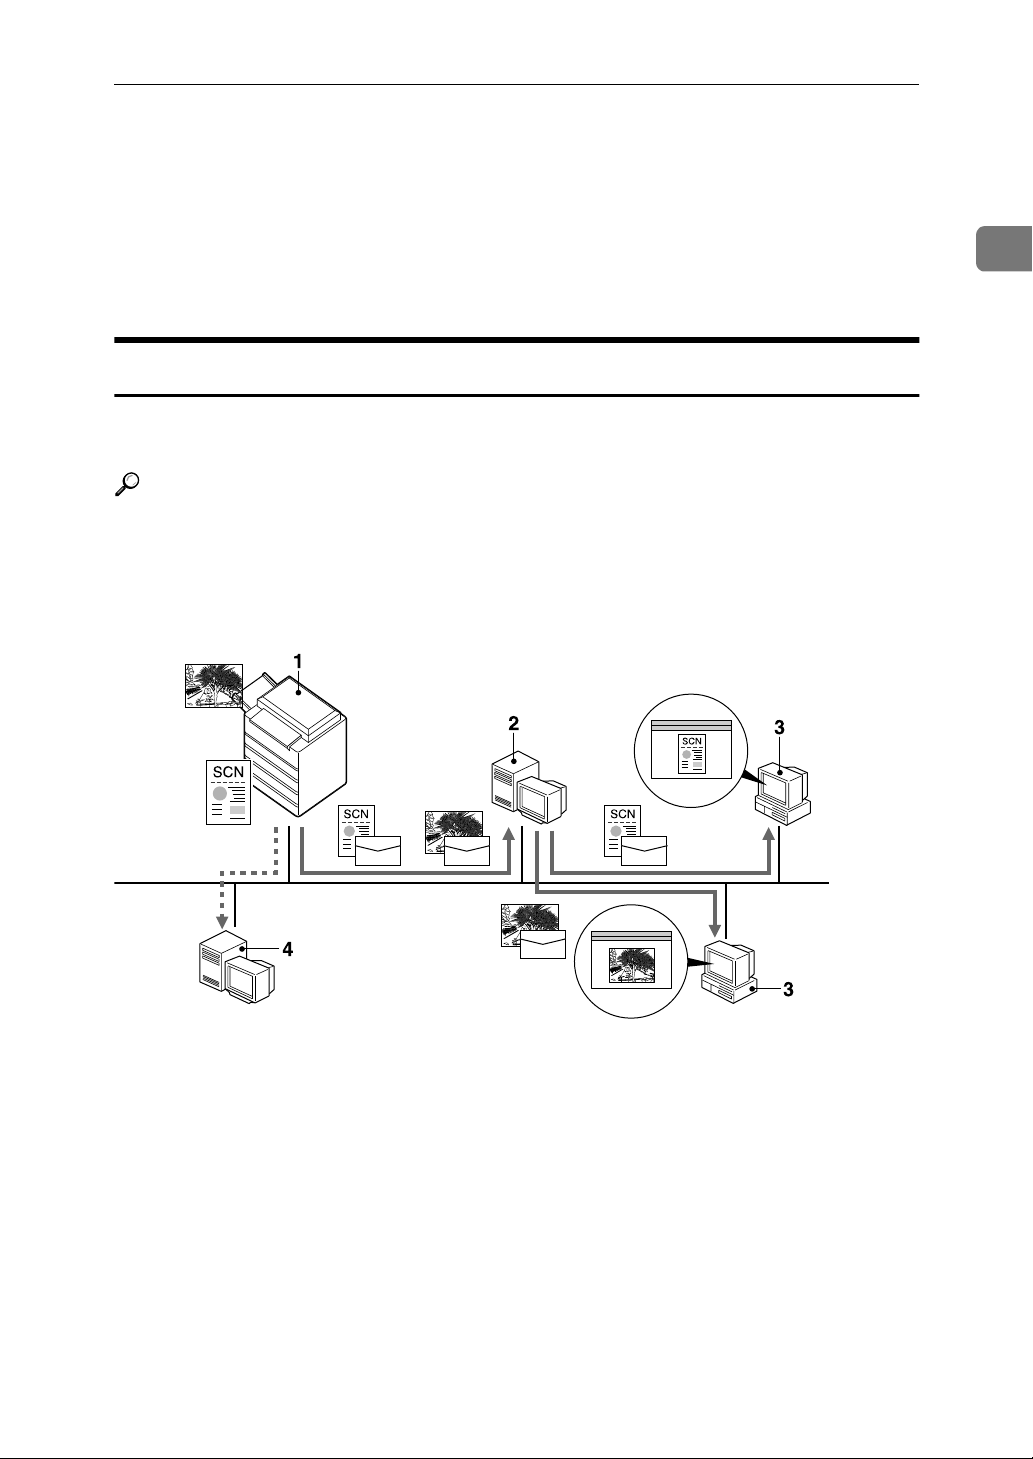
Network Scanner
By installing the scanner option, the machine can be used as a network scanner.
As a network scanner, the machine can send e-mail, send files to the FTP server
or the shared folders of client computers, store scan files, operate as a network
delivery scanner, and operate as a network TWAIN scanner.
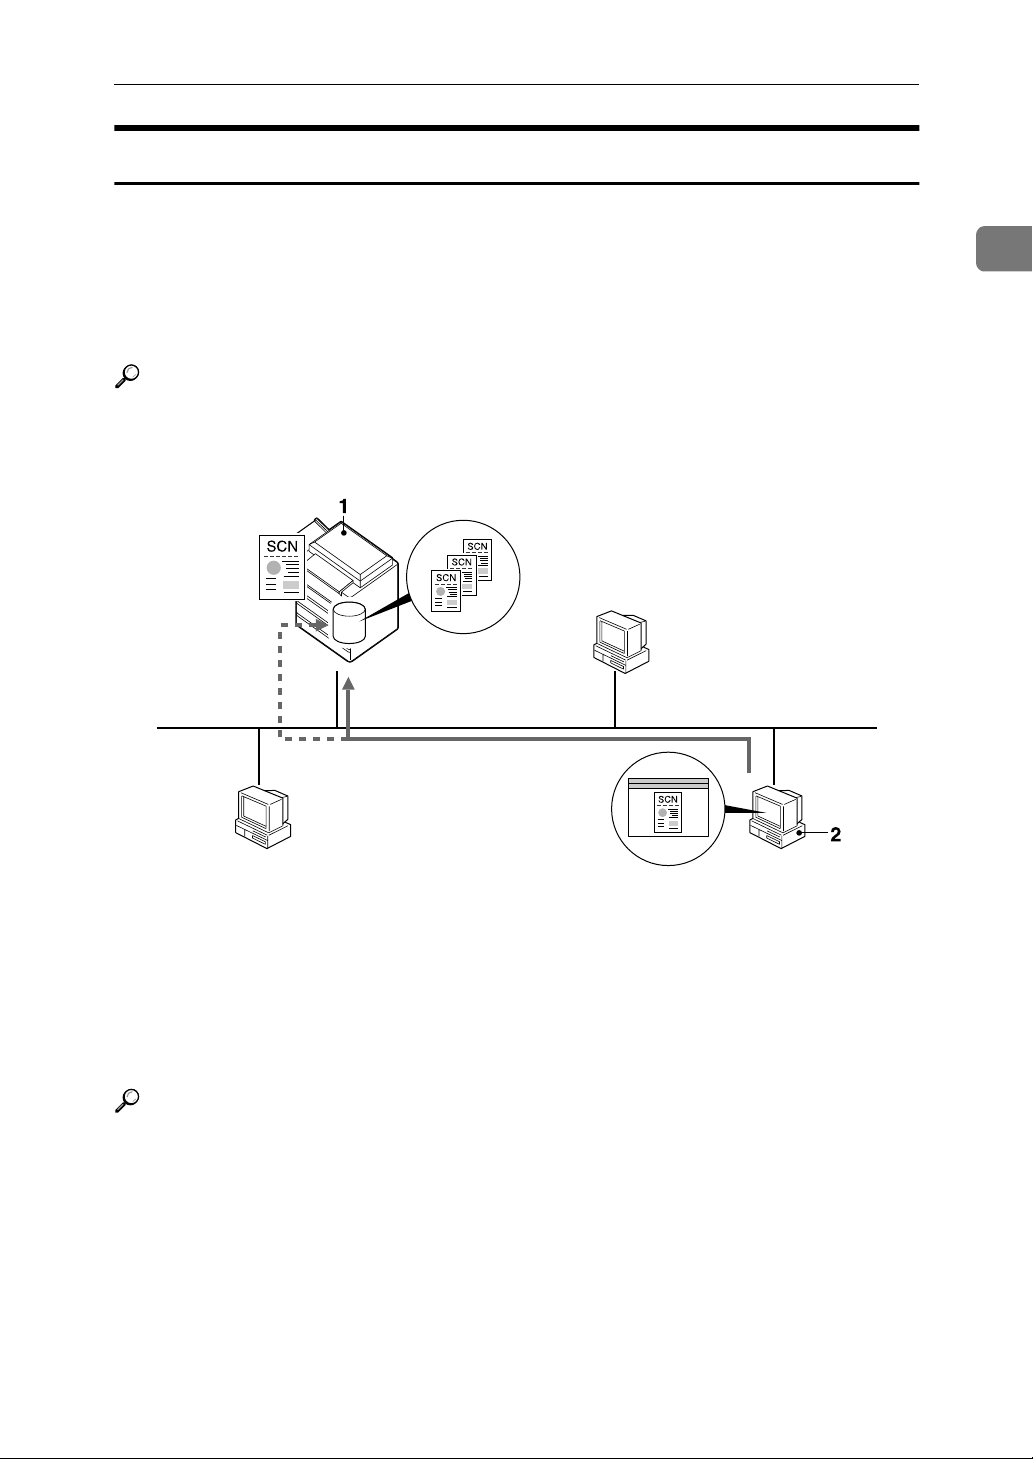
A scan file that is attached to an e-mail can be sent using the e-mail system
through a LAN or the Internet.
Reference
p.17 “Sending Scan Files by E-mail”
1
1. This machine
A scan file can be attached to an e-mail
and sent to a mail server. In combination
with the file storage function, scan files
from multiple originals that have been
temporarily stored can be sent all at once.
2. Mail server
A mail server is an SMTP server used for
an e-mail system. It transfers a received email to a specified destination through a
LAN or the Internet.
ZZZ601S
3. Client computer
An e-mail with a scan file attached is received from the mail server.
Check the content of the file using an appropriate application.
4. LDAP server
The LDAP server provides a directory service for search operations or inquiries from a
client computer on the same network.
You can use the LDAP server to search
for e-mail information when the server is
used as data base to manage user authentication and e-mail accounts.
5
Page 14
1
Getting Started
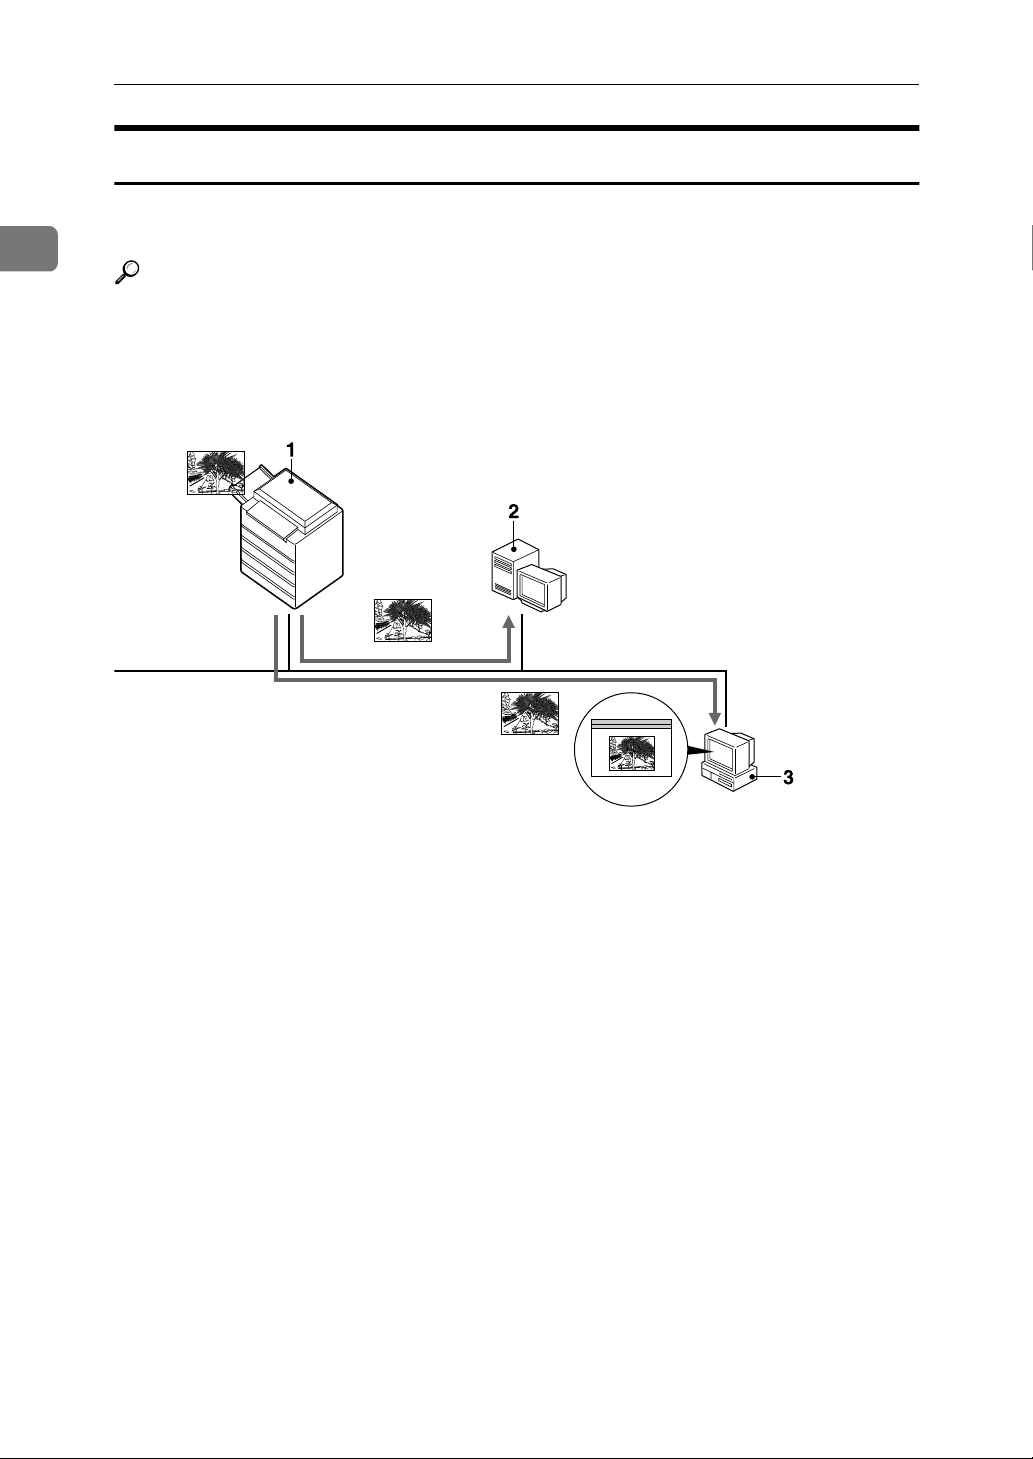
Scan to Folder
A scan file can be sent to the FTP server folders or the shared Windows folders
on the same network.
Reference
p.31 “Sending Scan Files by Scan to Folder”
1. This machine
A scan file can be sent to the FTP server
folders using FTP or to the shared Windows folders using SMB. In combination
with the file storage function, scan files
from multiple originals that have been
temporarily stored can be sent all at once.
2. FTP server
The FTP server is a server that provides
file transfer services among computers
on the same network. A scan file that is
sent to the FTP server is stored, and the
stored files can be downloaded by a client computer that logs on to the FTP server.
ZZZ602S
3. Client computer
A scan file that is sent from the machine
is received in shared Windows folders.
Check the content of the file using an appropriate application.
6
Page 15
Network Scanner
Store
You can store scanned documents as files on the machine’s hard disk. The stored
scan files can be viewed, copied, deleted, or retrieved over the network using
DeskTopBinder from a client computer. You can also view, delete or download
scan files over the network using Web Image Monitor from the client. A file can
be searched for using the user name or the file name. Also, others can be kept
from viewing a file by setting a password for the file.
Reference
p.43 “Storing Files”
1
1. This machine
A scan file from the originals scanned by
the machine is stored.
Reference
For details about DeskTopBinder, see the DeskTopBinder manuals. See p.i
“Manuals for This Machine”.
For details about Web Image Monitor, see the Web Image Monitor Help.
2. Client computer
A stored file can be viewed, copied, or
deleted by connecting to the machine using DeskTopBinder.
Also, a file stored in the machine can be
viewed, downloaded, or deleted using
Web Image Monitor.
ZZZ603S
7
Page 16
1
Getting Started
Network Delivery Scanner
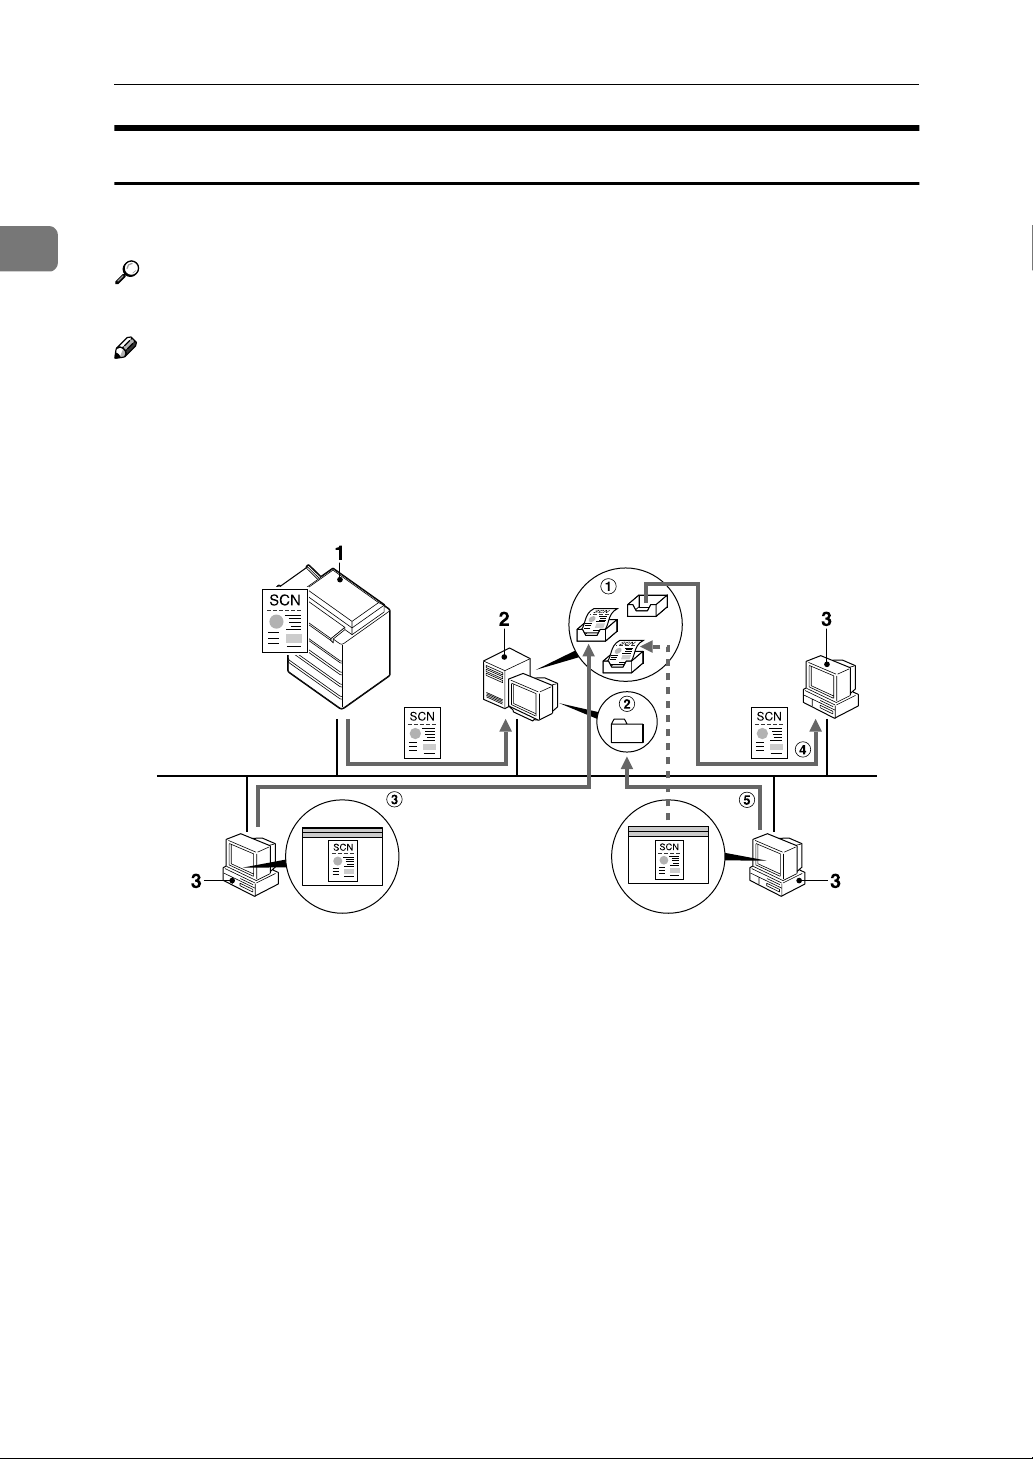
A scan file from the originals scanned by the machine is stored in the delivery
server and delivered to the folders of client computers on the same network.
Reference
p.57 “Delivering Scan Files”
Note
❒ To use the delivery scanner function, a delivery server installed with the
ScanRouter delivery software is required.
❒ When the ScanRouter delivery software is used, the machine can also deliver
scan files using e-mail, store scan files in the document management server.
1. This machine
A scan file from the originals scanned by
the machine is sent to the delivery server.
In combination with the file storage function, scan files from multiple originals
that have been temporarily stored can be
delivered all at once. See p.65 “Simulta-
neous Storage and Delivery”.
2. Delivery server
The ScanRouter delivery software is installed in this computer which is used as
a delivery server.
A received file is delivered to the in-tray
of the specified destination (A in the figure). According to the settings of the intray, the file is stored in the in-tray or in a
Windows folder (B in the figure).
8
ZZZ604S
3. Client computer
The contents of a stored file can be
checked in the following ways:
• View the file in the in-tray using Desk-
TopBinder to check the contents. (C
in the figure)
• Use Auto Document Link to receive
the file stored in the in-tray, and check
the contents with an appropriate application. (D in the figure)
• Access the Windows folder where the
file is stored via the network, and
check the contents with an appropriate application. (E in the figure)
Page 17
Network Scanner
Reference
For details about DeskTopBinder, or Auto Document Link, see the respective
manuals. See p.i “Manuals for This Machine”.
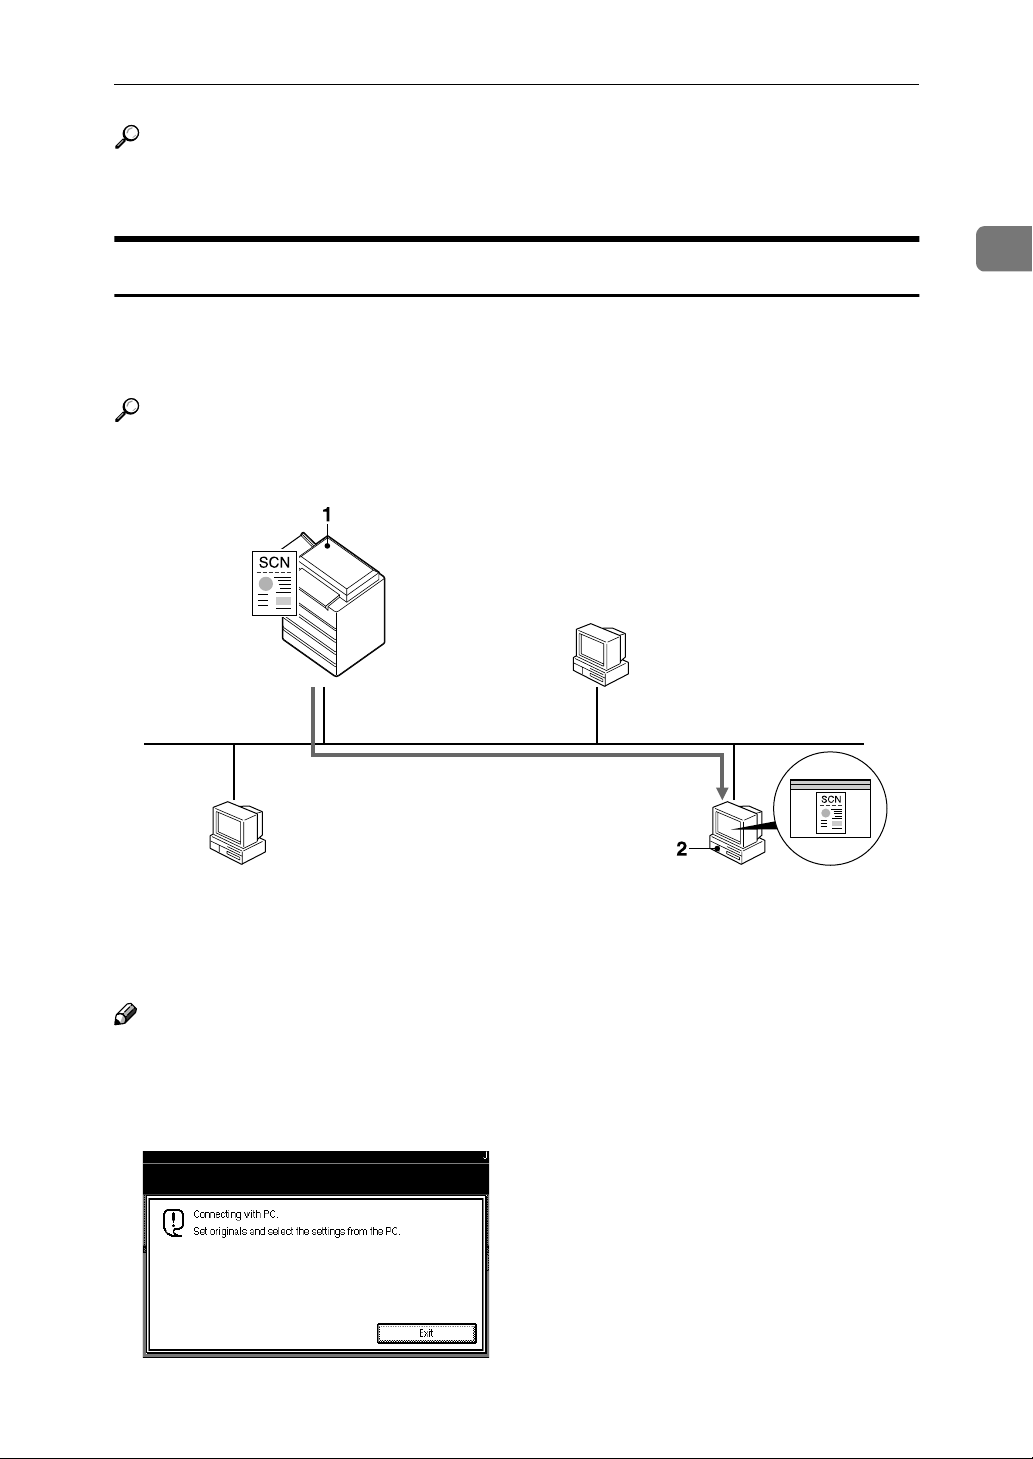
Network TWAIN Scanner
The scanner function of this machine can be used from a client computer via a
network using Ethernet, optional IEEE 1394 (IP over 1394), or optional IEEE
802.11b (wireless LAN).
Reference
p.69 “Using the Network TWAIN Scanner Function”
1
ZZZ605S
1. This machine
The scanner function of the machine can be
used from a client computer via a network.
Note
❒ When using the machine as a network TWAIN scanner, it is not necessary to
press the {{{{Scanner}}}} key on the control panel. When the TWAIN Driver becomes active on a client computer, the display automatically switches to the
following screen.
❒ Press [Exit] to use functions other than the network TWAIN scanner function.
2. Client computer
Originals are scanned using the TWAIN
Driver from an application.
9
Page 18

Getting Started
Installing Software
1
This section describes how to install
the software supplied on the “Scan-
ner Driver and Utilities".
Reference
For details about the software on
the CD-ROM and the system requirements of the software, see
p.110 “Software Supplied on CDROM”.
Quick Install
When the CD-ROM is inserted into a
client computer running Windows
95/98/Me/2000/XP, Windows Server 2003, or Windows NT 4.0, the installer starts automatically (Auto
Run) to install various software.
Note
❒ If Plug and Play starts, click [Can-
cel] in the [New Hardware Found],
[Device Driver Wizard], or [Found New
Hardware Wizard] dialog box, and
then insert the CD-ROM. The [New
Hardware Found], [Device Driver Wizard], or [Found New Hardware Wizard]
dialog box appears depending on
the operating system used.
❒ Auto Run may not automatically
work with certain operating system settings. If this happens,
launch “SETUP.exe” on the CDROM root directory.
❒ To disable Auto Run, press the
{{{{SHIFT}}}} key when inserting the
CD-ROM into the drive and keep it
pressed until the computer finishes reading from the CD-ROM.
❒ If [Cancel] is selected during instal-
lation, the installation will be
stopped and all the remaining software will not be installed. If [Can-
cel] has been selected, reinstall the
remaining software after restarting
the client computer.
❒ For information about the software
that can be installed by Auto Run,
see p.110 “Software Supplied on
CD-ROM”.
Limitation
❒ For installation under Windows
2000/XP, Windows Server 2003, or
Windows NT 4.0, log on as an Administrators group member.
TWAIN Driver
To use the machine as a network
TWAIN scanner, it is essential to install the TWAIN Driver on a client
computer.
If an application that supports
TWAIN is not installed on the client
computer, it is also necessary to install DeskTopBinder. For information
about the installation of DeskTopBinder, see p.11 “DeskTopBinder”.
Preparation
Before installation, check the system requirements for the TWAIN
Driver. For details about the system requirements, see p.110 “Soft-
ware Supplied on CD-ROM”.
Note
❒ Use Auto Run for installation.
10
Page 19

Start Windows, and then insert
AAAA
the CD-ROM labeled "Scanner
Driver and Utilities" into the CDROM drive of the client computer.
Reference
If the installer does not start automatically, see p.10 “Quick Install”.
Click [TWAIN Driver].
BBBB
The Software Setup screen appears.
The installer of the TWAIN Driv-
CCCC
er starts. Follow the instructions.
Note
❒ When the installation is com-
plete, a message about restarting the client computer may
appear. In this case, restart the
client computer.
❒ After the installation is com-
plete, a folder with the name of
the machine in use is in [Pro-
gram] on the [Start] menu. Help
can be displayed from here.
Installing Software
DeskTopBinder
To check an in-tray or to retrieve files
using the network delivery scanner
function, you must install DeskTopBinder on the client computer.
Preparation
Before installation, check the system requirements for DeskTopBinder. See p.110 “Software
Supplied on CD-ROM”.
Note
❒ Use Auto Run for installation.
❒ To use the network delivery scan-
ner function, you need to install
the ScanRouter delivery software
(optional) on the computer used as
the delivery server.
Start Windows, and then insert
AAAA
the CD-ROM labeled “Scanner
Driver and Document Management Utility” into the CD-ROM
drive of the client computer.
The CD-ROM Launcher screen appears.
1
❒ Notes on using the network
TWAIN scanner are provided in
“Readme.txt”. Be sure to read
them before use.
Click [DeskTopBinder Lite].
BBBB
The DeskTopBinder Lite Setup
screen appears.
Click [DeskTopBinder Lite]. The in-
CCCC
staller of the DeskTopBinder
starts. Follow the instructions on
the screen.
Reference
For information about the subsequent installation procedure,
see Setup Guide that can be dis-
played from the Setup screen of
DeskTopBinder.
11
Page 20
1
Getting Started
User Authentication
When user authentication (User Code
Authentication, Basic Authentication,
Windows Authentication, or LDAP
Authentication) is set, the authentication screen is displayed. Unless a valid user name and password are
entered, operations are not possible
with the machine. Log on to operate
the machine, and log off when you
are finished operations. Be sure to log
off to prevent unauthorized users
from using the machine.
Note
❒ Consult the User Administrator
about your login user name, password, and user code. For details
about the various types of user authentication, consult the appropriate administrators.
❒ For user code authentication, enter
a number registered in the address
book as [User Code].
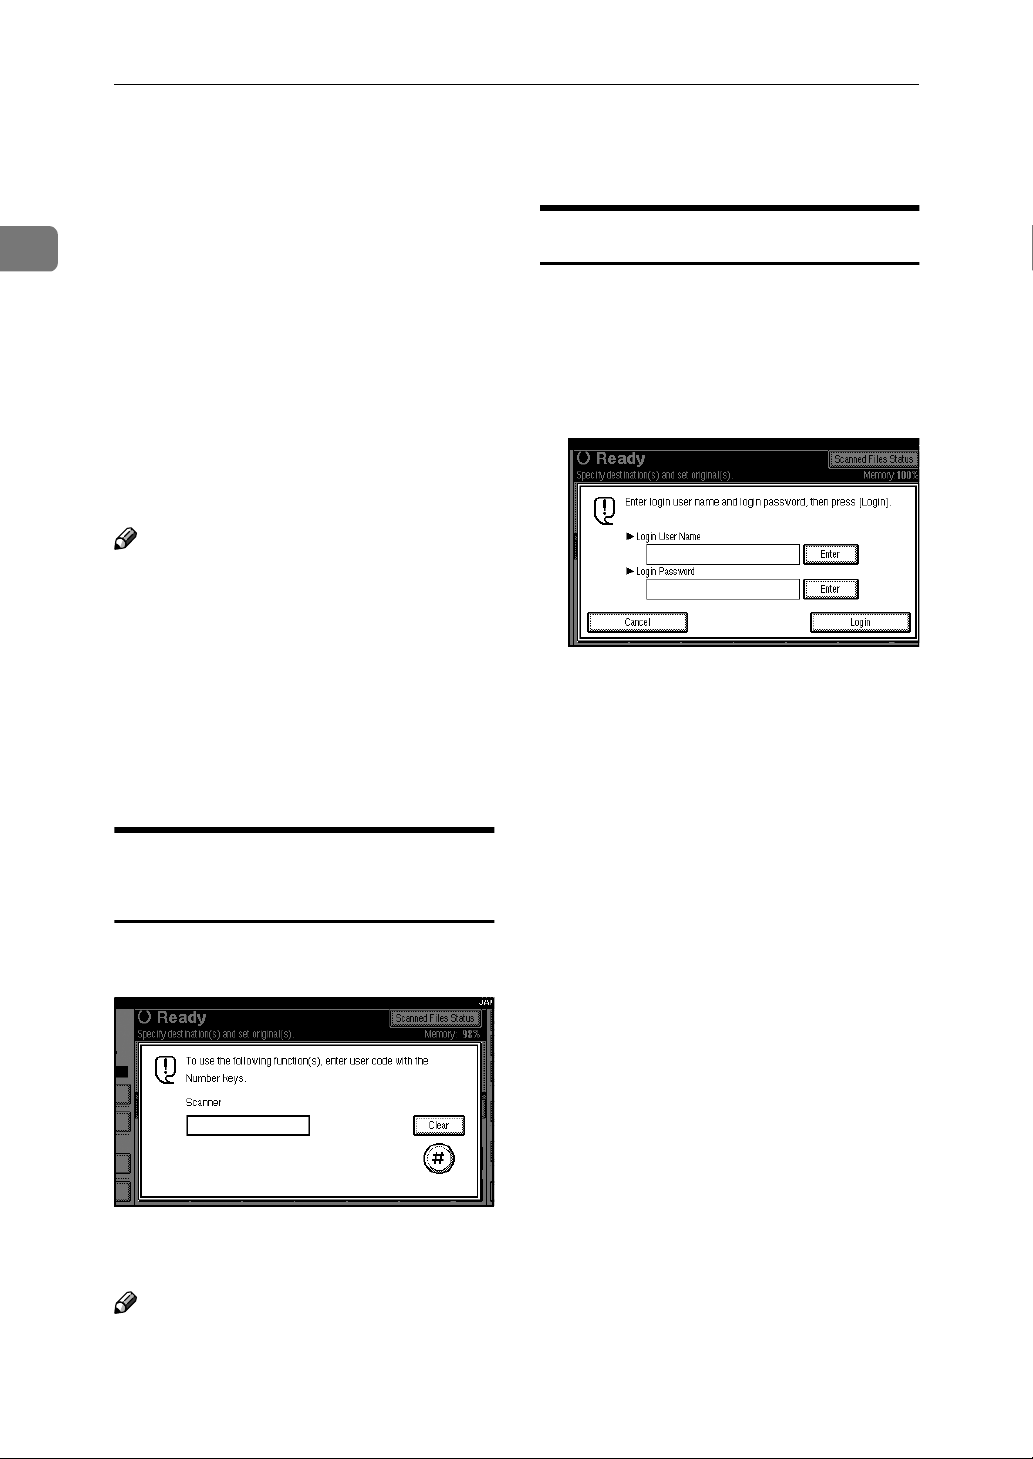
User Code Authentication (Using the Control Panel)
When user code authentication is set,
the following screen appears.
Login (Using the Control Panel)
Follow the procedure below to log in
when Basic Authentication, Windows
Authentication, or LDAP Authentication is set.
Press [Enter] for [Login User Name].
AAAA
Enter a login user name, and then
BBBB
press [OK].
Press [Enter] for [Login Password].
CCCC
Enter a login password, and then
DDDD
press [OK].
Press [Login].
EEEE
When the user is authenticated, the
screen for the function you are using appears.
Enter a User Code (eight digit), and
then press [####].
Note
❒ You do not need to log off after
user code authentication.
12
Page 21
Log Off (Using the Control Panel)
User Authentication
Follow the procedure below to log off
when Basic Authentication, Windows
Authentication, or LDAP Authentication is set.
Press {{{{User Tools / Counter}}}}.
AAAA
Press [Logout].
BBBB
Press [Yes].
CCCC
Press{{{{User Tools / Counter}}}}.
DDDD
1
13
Page 22

Getting Started
Programming E-mail Addresses and Folders
1
You can program e-mail addresses and folders using Address Book Management in the Administrator Tools menu under System Settings.
You can also register the programmed e-mail addresses and folders in a Group.
Note
❒ You can register entries in the address book using Web Image Monitor or
SmartDeviceMonitor for Admin. For details about installing SmartDeviceMonitor for Admin, see "Monitoring and Configuring the Printer", Network
Guide. For details about registering addresses, see each application’s Help.
❒ Depending on the machine type, you may not be able to use the machine
when it is updating the address book using CSV files (retrieved using SmartDeviceMonitor for Admin) that contain user codes.
Reference
“E-mail Destination”, General Settings Guide
“Folder Destination”, General Settings Guide
“Registering Destinations to a Group”, General Settings Guide
14
Page 23

Specifying How to Start Scanning
Specifying How to Start Scanning
There are two ways to start scanning:
• Placing originals
• Pressing the {{{{Start}}}} key.
Using the default setting, you can start scanning, storing, and delivering files
simply by loading them (without pressing the {{{{Start}}}} key). When you do this,
the {{{{Start}}}} key does not light. However, in the following situations, press the
{{{{Start}}}} key.
• When you print the scanner journal
• Right after you remove misfed paper
• Right after you specify an entry (such as the destination) required for scan-
ning
Note
❒ You can specify that the {{{{Start}}}} key must be pressed to start scanning. For de-
tails about specifying how to start scanning, see “System Settings”, General
Settings Guide.
1
15
Page 24

1
Getting Started
16
Page 25
2.
Sending Scan Files by E-mail
Scan files can be sent from this machine to specified destinations using the email system. This chapter explains the preparation for sending files by the e-mail
system, various display screens, procedures for sending, and how to check the
sending results when this function is used.
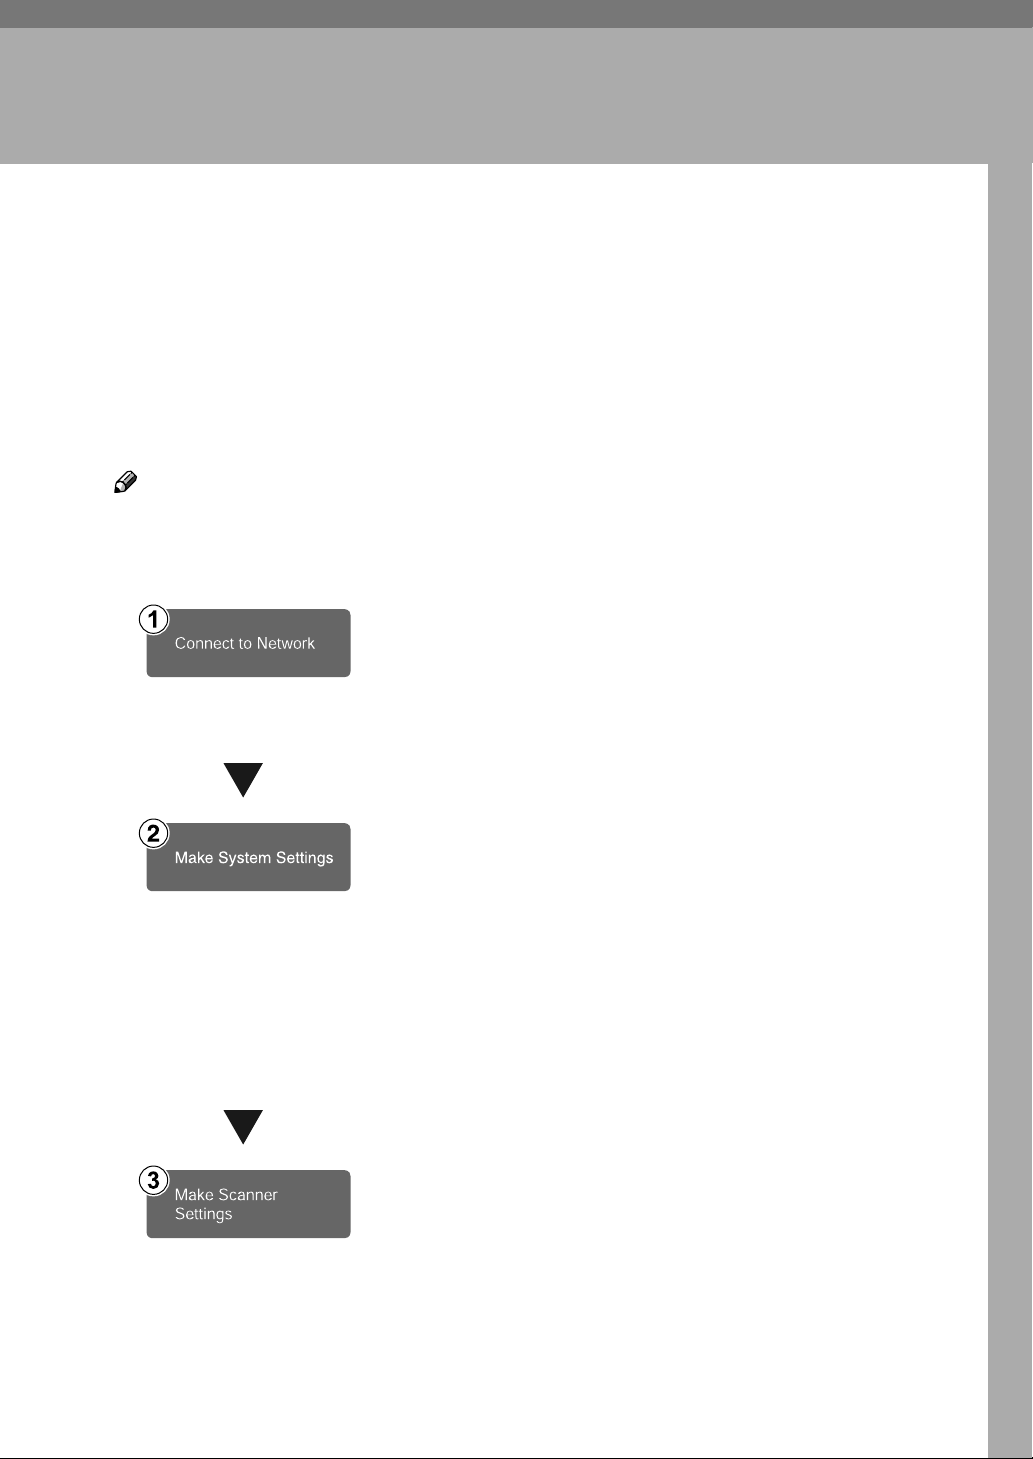
Preparation for Sending by E-mail
To send scan files by the e-mail system, the preparation described below is required.
Note
❒ If you establish an e-mail server on the network, set up the e-mail server on
the network in advance. For information about setting up an e-mail server,
see the manuals of the mail server to be used and the software to be installed.
Connect the machine to the network with an Ethernet cable or
IEEE 1394 cable, or use wireless LAN.
To connect using an IEEE 1394 cable, the IEEE 1394 interface
board is required. To connect using wireless LAN, the IEEE
802.11b interface unit is required.
See Network Guide.
To send scan files by e-mail, the following [System Settings] settings must be specified correctly. (Certain other settings must
also be specified.)
• IP address
• subnet mask
• DNS server
• SMTP server name
For details about making settings and other settings, see
work Guide
formation in the address book. For details, see General Settings
Guide.
Make settings for sending e-mail such as file type priority and
sender's default.
See p.101 “Send Settings”.
. You also need to register destinations and other in-
Net-
17
Page 26
2
Sending Scan Files by E-mail
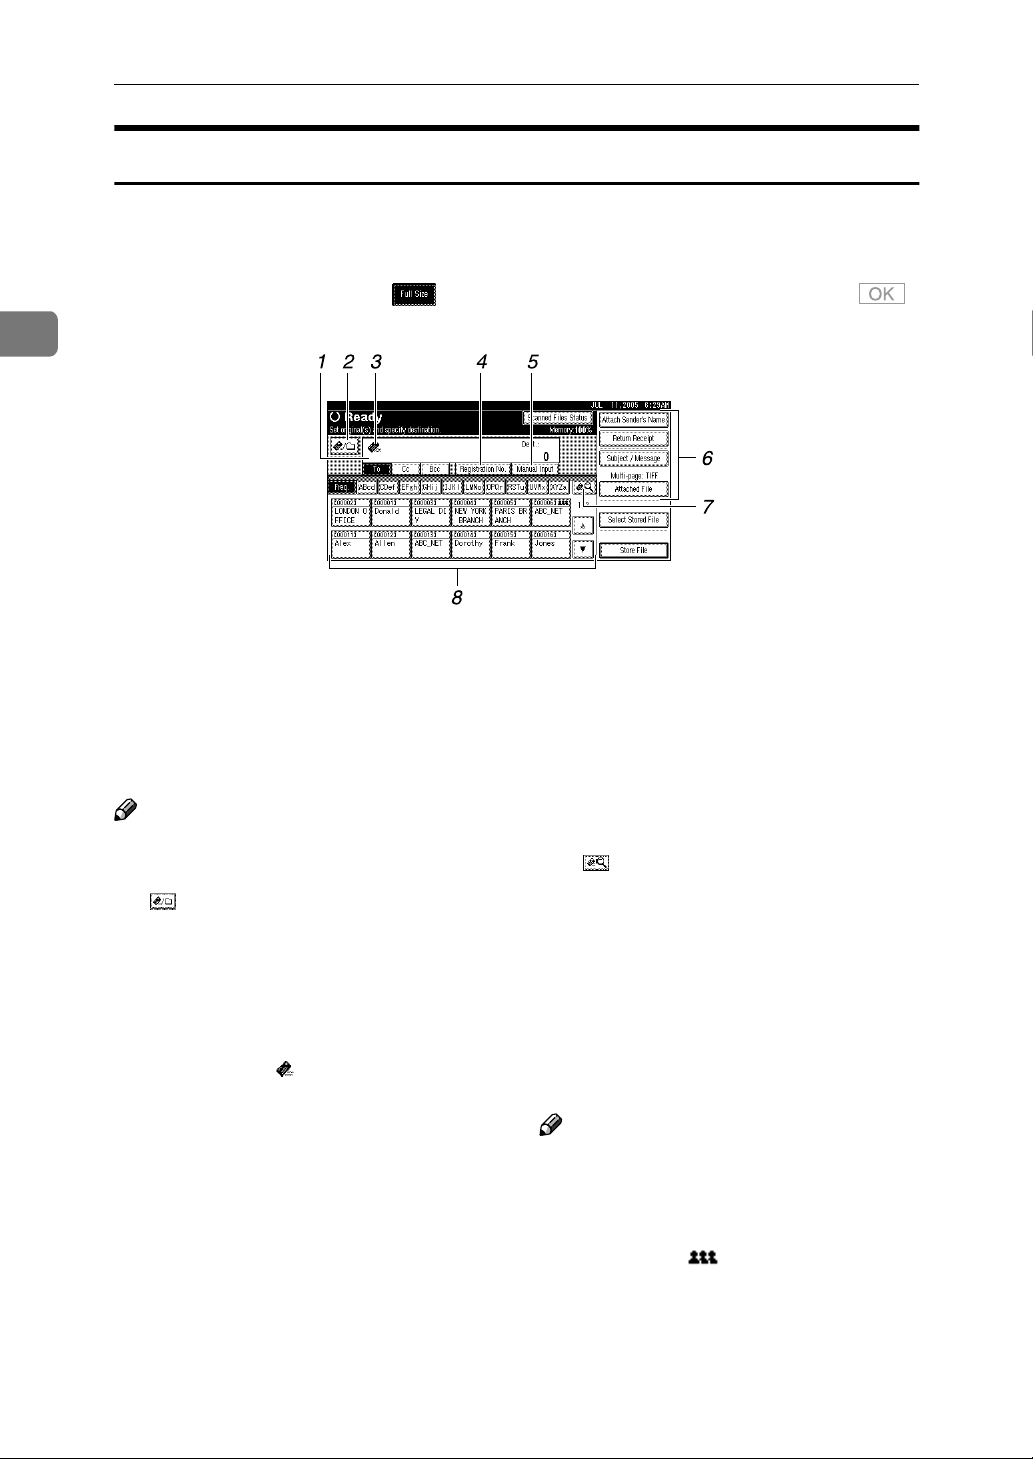
E-mail Screen
The e-mail is as shown.
The function items displayed serve as selector keys. You can select or specify an
item by lightly pressing it. When you select or specify an item on the display
panel, it is highlighted like . Keys that cannot be selected appear like .
1. Destination field
Displays the selected destination. If multiple destinations are selected, the destinations are displayed in the order they
were selected by pressing [UUUUPrev.] or
[TTTTNext].
Note
❒ To check the selected destinations,
press the {{{{Check Modes}}}} key.
2.
[] E-mail/Scan to Folder
Press to switch between the e-mail function and the Scan to Folder function. You
can send a file to e-mail destinations and
Scan to Folder destinations at the same
time.
3. E-mail icon ( )
Indicates that the e-mail screen is displayed.
4.
[Registration No.]
Press to specify a destination using a five
digit registration number.
5.
[Manual Input]
When specifying a destination that is not
listed, press [
the destination using the soft keyboard.
Manual Input
], and then enter
6.
[Attach Sender's Name] [Return Re-
ceipt] [Subject / Message] [Attached File]
Set the sender, a reception confirmation
e-mail, subject, and message of the e-mail
to be sent.
If necessary, specify the file type and file
name of the scan file attached to the email.
7.
[] Switch Destination
List/Search/Switch Title
Press to switch a destination from the delivery server list to the destination list of
this machine, to search for an e-mail destination.
8. Destination list
Displays the destinations registered in
the delivery server or this machine.
Note
❒ When the entire list does not fit on one
screen, [UUUU] or [TTTT] can be used to scroll
through the list.
❒ Group destinations are denoted by
this symbol ( ).
18
Page 27
Sending Scan Files by E-mail
Sending Scan Files by E-mail
Procedure for Sending E-mail
A scan file is sent after scan settings
and destinations are specified.
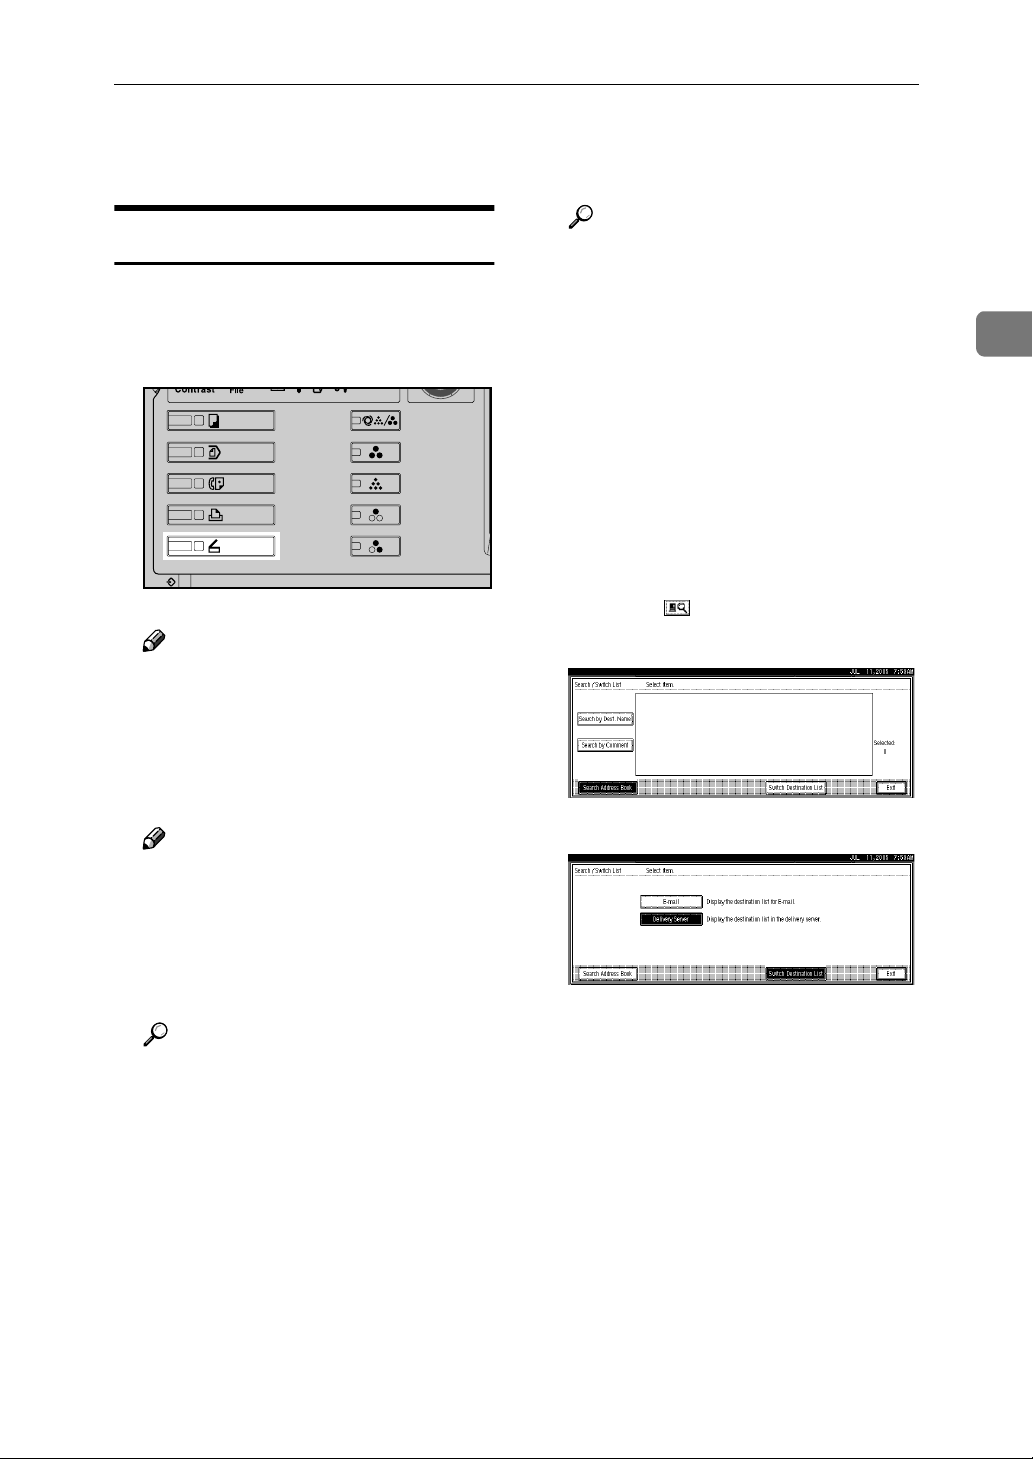
Press the {{{{Scanner}}}} key.
AAAA
ZZZ606S
Note
❒ The illustration is an example.
The actual appearance may be
different.
Make sure that no previous set-
BBBB
tings remain.
Note
❒ If a previous setting remains,
press the {{{{Clear Modes}}}} key.
Reference
There are two ways to specify
scan settings, as described below:
• Configure each setting for
scanning. For details, see
p.73 “Specifying Scan Settings”.
• Recall registered settings. For
details, see p.80 “Programs”.
If the network delivery scanner
EEEE
screen appears, switch to the email screen.
A Press [].
B Press [Switch Destination List].
C Press [E-mail].
2
Make settings for the original,
CCCC
such as orientation and output
tray.
Reference
p.75 “Specifying the Orientation and Output Tray of the
Original”
Make the scan settings.
DDDD
D Press [Exit].
The e-mail screen appears.
Specify the destination.
FFFF
You can specify the destination in
the following ways:
•
Select it from the destination list.
• Specify its registration number.
•
Enter the e-mail address directly.
• Search for it in the destination
list.
• Search for it in the LDAP server.
19
Page 28

Sending Scan Files by E-mail
2
Note
❒ Destinations in the destination
list and registration numbers
must be registered in advance
in [System Settings]. For details,
see “System Settings”, General
Settings Guide.
❒ For details about the maximum
number of destinations that can
be selected for each transmission, see p.112 “E-mail”.
❒ Before selecting the destination,
be sure to select [To]. If necessary, select [Cc] or [Bcc] and the
respective destinations.
❒ Depending on the security set-
tings, certain destinations may
not be displayed.
Selecting a destination from the
list
A Select the destination.
B To select more destinations, re-
peat steps AAAA.
Note
❒
To deselect a destination, press
the destination once more, or
press [UUUUPrev.] or [TTTTNext] to
display the destination in the
destination field, and then
press the {{{{Clear/Stop}}}} key.
Using a registration number to
select a destination
A Press [Registration No.].
B Enter the five digit registration
number that has been assigned
to a destination folder using
the number keys.
If the entered number is less
than five digits, press the {{{{#}}}}
key after the last number.
Example: To enter 00003
Press the {{{{3}}}} key, and then
press the {{{{#}}}} key.
20
The selected destination is highlighted and also displayed in
the destination field at the top of
the screen.
Note
❒ If the target destination does
not appear, take one of the
following steps:
• Display the destination by
selecting its initial letter
from the title.
• Display the destination by
pressing [UUUU] or [TTTT].
C To select more destinations, re-
peat steps AAAA to BBBB.
Note
❒
To deselect a destination, press
[UUUUPrev.] or [TTTTNext] to display
the destination in the destination field, and then press
the {{{{Clear/Stop}}}} key.
Page 29
Sending Scan Files by E-mail
Manual entry of an e-mail
address
A Press [Manual Input].
The soft keyboard appears.
Note
❒ Depending on the security
settings, [Manual Input] may
not be displayed.
B Enter the e-mail address.
Note
❒ For details about the maxi-
mum number of characters
that can be entered, see p.112
“E-mail”.
❒ It is possible to enter alpha-
numeric characters and periods. The symbols ( ) \ , ; : ”
and spaces cannot be entered. For details, see p.112
“E-mail”.
Note
❒
To deselect a destination, press
[UUUUPrev.] or [TTTTNext] to display
the destination in the destination field, and then press
the {{{{Clear/Stop}}}} key.
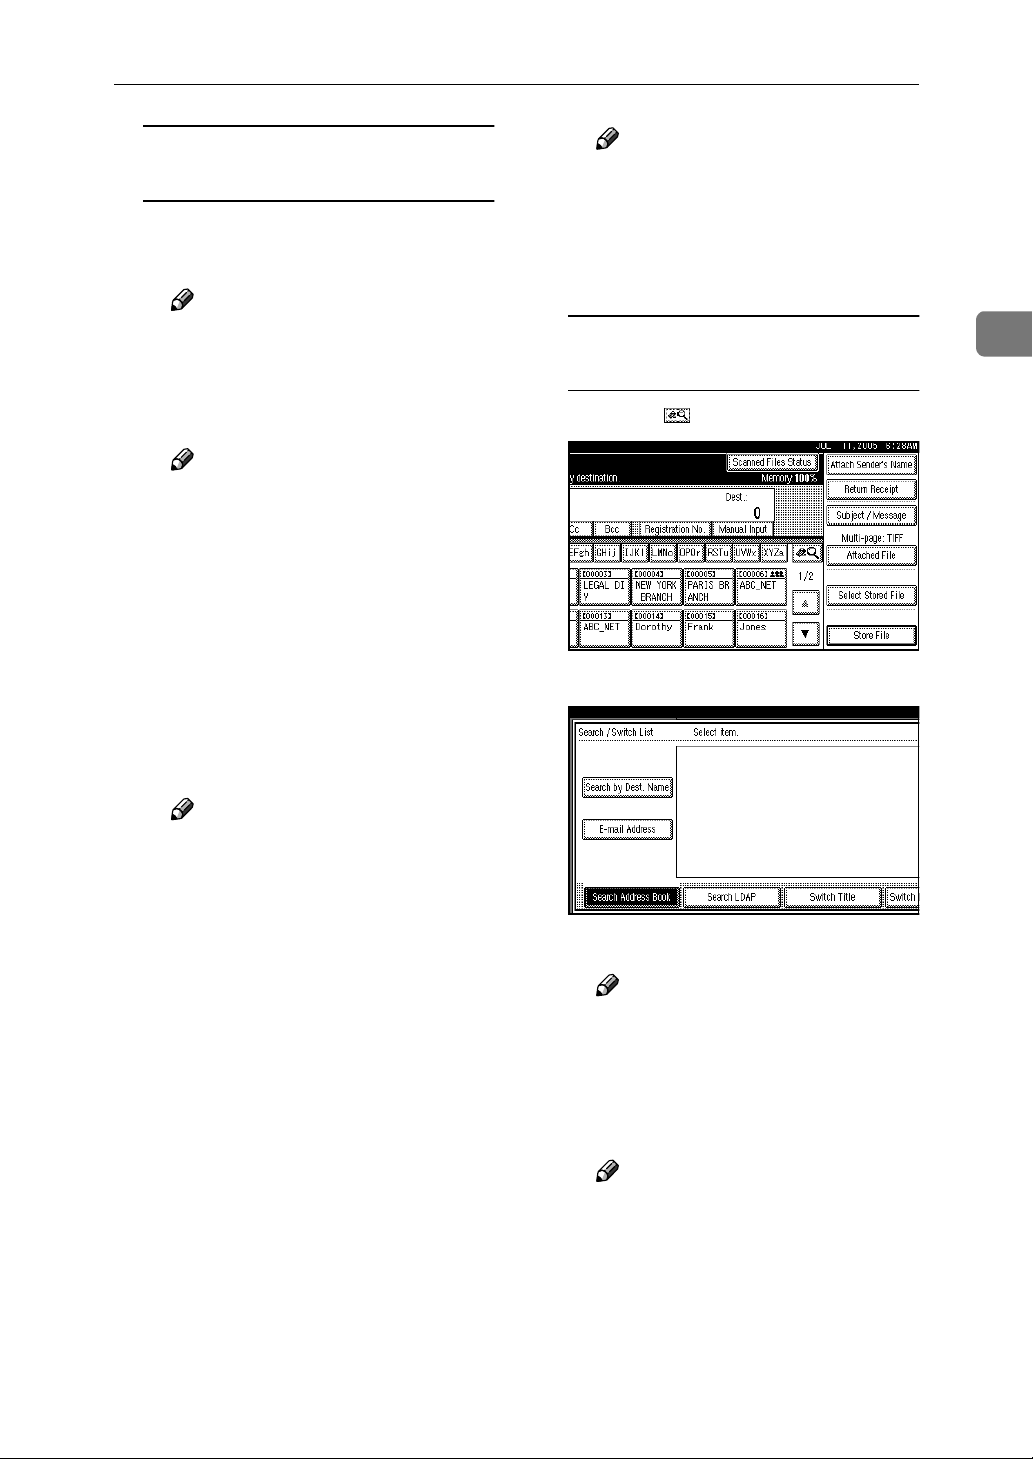
Searching for a destination in the
destination list
A Press [].
B Press [Search by Dest. Name].
2
C Press [OK].
Note
❒ An e-mail address entered
manually can be registered in
the list. Press [ProgDest], and
a screen for registering the email address appears. For information, see General Set-
tings Guide.
❒ To change an e-mail address
entered, press [Change] located on the left side of the destination field. The soft
keyboard appears. Make any
changes, and then press [OK].
❒ To check the selected desti-
nations, press the {{{{Check
Modes}}}} key.
❒ Depending on the security
settings, [ProgDest] may not
be displayed.
D To enter more destinations, re-
peat steps AAAA to CCCC.
The soft keyboard appears.
Note
❒ To search using an e-mail ad-
dresses, press [E-mail Ad-
dress].
C Enter part of the destination
name.
Note
❒ Enter the first character or
characters of the destination
name.
❒ It is also possible to perform
a combined search using
[Search by Dest. Name] and [E-
mail Address].
21
Page 30
Sending Scan Files by E-mail
2
❒ It is necessary to differentiate
between uppercase and lowercase letters.
D Press [OK].
E Select a destination.
F Press [Exit].
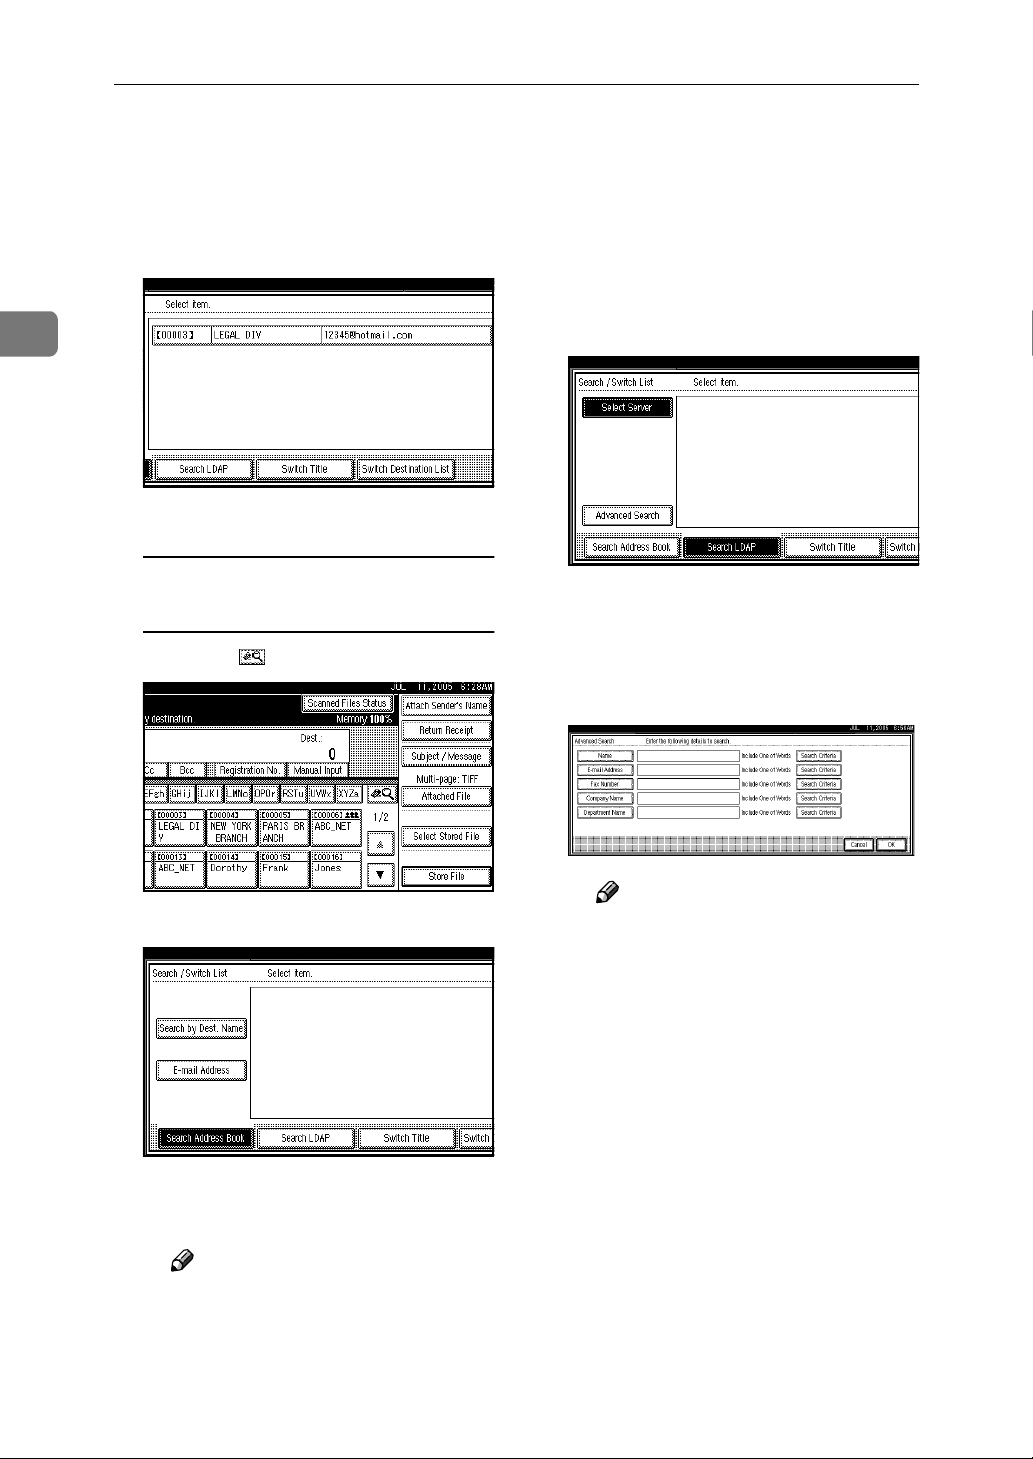
Searching for a destination in the
LDAP server
A Press [].
❒ Make sure that the LDAP
server you want to search is
selected and highlighted. If a
server is not selected, the
search is not performed and
an error message appears.
E Press [OK].
F Press [Advanced Search].
G
Enter a character string related
to the destination for a search
condition such as
,
Address]
Name]
[Fax Number], [Company
, or
[Department Name]
[Name], [E-mail
.
22
B Press [Search LDAP].
C Press [Select Server].
D Select the LDAP server.
Note
❒ The LDAP server can be reg-
istered in advance in [System
Settings]. For details, see Net-
work Guide.
Note
❒
Each search condition (Name,
E-mail Address, Fax Number,
Company Name, and Department Name) corresponds to a
item that is registered in the
LDAP server.
❒ If you press a search condi-
tion item, the soft keyboard
appears. Enter the first character or characters for the
name, address, or number.
❒
If you select [SSSS
in [Program / Change / Delete
LDAP Server] in [Administrator
Tools] in [System Settings],
you can add a field for LDAP
search. For details, see Net-
work Guide.
Search Options
]
Page 31

Sending Scan Files by E-mail
❒ When the search condition
[Name] is used for searching,
whether the first name or sirname is searched for depends on the setting made by
the administrator. For example, if you want to search for
"John Doe", enter "John" or
"Doe" according to the setting
made by the administrator.
Consult your administrator
for which name to use.
H
Press [Search Criteria] correspond-
to each item, and then se-
ing
lect criteria from the list
displayed.
Note
❒ You can select criteria from
the following list:
•
[
Search Beginning Word
names which start with
the entered character or
characters are targeted.
For example, to search for
“ABC”, enter “A”.
•
[Search End Word]
which end with the entered character or characters are targeted.
For example, to search for
“ABC”, enter “C”.
• [Exact Match]: The names
which correspond to an
entered character or characters are targeted.
For example, to search for
“ABC”, enter “ABC”.
: The names
]: The
• [Include One of Words]: The
names which contain an
entered character or characters are targeted.
For example, to search for
“ABC”, enter “A”, “B”, or
“C”.
• [Exclude Words]
which do not contain an
entered character or characters are targeted.
For example, to search for
“ABC”, enter “D”.
•
[Fuzzy Search]
(The function of this
vague search depends on
the system supported by
the LDAP server.)
I Press [OK].
Note
❒ The e-mail address searched
for in the LDAP server cannot be specified correctly if it
contains too many characters. For details about the
maximum number of characters that can be entered, see
p.112 “E-mail”.
❒ If a user name and password
for the LDAP server authentication are not set, a log-on
screen appears. Enter a user
name and password.
❒
Multiple e-mail addresses can
be registered for one person,
but a search will only find
one e-mail address per person. Depending on the LDAP
server, the address which
was registered first is generally found.
❒ To display details about the
destination, press [Details].
J Select a destination.
K Press [Exit].
: The names
: a vague search
2
23
Page 32

Sending Scan Files by E-mail
2
Note
❒ An e-mail address found in a
search can be registered in
the list. Press [ProgDest], and
a screen for entering the email address appears. For
more information, see Gener-
al Settings Guide.
Checking selected destinations
A Use the destination field at the
top of the screen to check
which destinations are selected.
Note
❒ Press [UUUUPrev.] or [TTTTNext] to
scroll through the list. Destinations are displayed in the
order they were selected.
❒ To check the selected desti-
nations, press the {{{{Check
Modes}}}} key.
Select the file type if necessary.
GGGG
A Press [Attached File].
B Press [File Type]
C Select the file type of the file.
Specify the e-mail sender.
IIII
You can specify the sender in the
following ways:
• Select the sender from the list.
• Enter the registration number of
the sender using the number
keys.
• Search for the sender.
Note
❒ If you specify the sender, infor-
mation about the sender is included in the file being sent. The
name of the specified sender is
automatically placed in the
from field of the e-mail so that
the sender can be identified
when the e-mail is received.
❒ Depending on system settings,
the administrator's e-mail address may appear automatically
in the e-mail header's FROM
field. To change the address,
specify the sender in Step
❒ To prevent misuse of a sender
name, we recommend you set
protection code for that sender
name.See General Settings Guide.
❒ Depending on the security set-
tings, [Attach Sender's Name] may
be selected as the user name
when logging in.
.
I
24
D Press [OK] twice.
Specify the file name if necessary.
HHHH
A Press [Attached File].
B Press [File Name].
The soft keyboard appears.
C Enter a file name.
D Press [OK] twice.
Selecting a sender from the list
A Press [Attach Sender's Name].
Page 33

Sending Scan Files by E-mail
B Select the sender.
Note
❒ When a protection code has
been set, a screen for entering
the protection code appears
after selecting the sender. Enter the protection code, and
then press [OK]. If the protection code you entered is correct, the sender name is
displayed.
C Press [OK].
Using a registration number to
specify a sender name
A Press [Attach Sender's Name].
Example: To enter 00006
Press the {{{{6}}}} key, and then
press the {{{{#}}}} key.
2
Note
❒ When a protection code has
been set, a screen for entering
the protection code appears
after selecting the sender. Enter the protection code, and
then press [OK]. If the protection code you entered is correct, the sender name and
[Return Receipt] are displayed.
C Press [OK].
Searching for a sender
A Press [Attach Sender's Name].
B Enter the five digit registration
number that has been assigned
to a destination folder using
the number keys.
If the entered number is less
than five digits, press the {{{{#}}}}
key after the last number.
B Press [].
25
Page 34

Sending Scan Files by E-mail
2
C Press [User (Dest.) Name].
The soft keyboard appears.
Note
❒ To search for an e-mail ad-
dress, press [E-mail Address].
D Enter part of the sender name.
Note
❒ Enter the first character or
characters of the sender name.
❒ It is also possible to perform
a combined search using [Us-
er (Dest.) Name] and [E-mail Address].
❒ It is necessary to differentiate
between uppercase and lowercase letters.
E Press [OK].
F Select the sender.
G Press [Exit].
H Press [OK].
For a reception confirmation e-mail,
JJJJ
press [Return Receipt].
Note
❒ To use [Return Receipt] you must:
• Log on as a user
• Specify the sender in Step
❒ When [Return Receipt] is select-
ed, an e-mail notifying that the
e-mail has been read by the destination party is sent to the
sender selected here. However,
if the mailing software used by
the destination party does not
support MDN (Message Disposition Notification), the e-mail
may not be sent.
Specify a subject if necessary.
KKKK
Note
❒ To specify a subject, you can se-
lect it from the list, enter it directly, or combine selecting and
entering it.
❒ For details about the maximum
number of characters that can
be entered, see p.112 “E-mail”.
I
26
Note
❒
When a protection code has
been set, a screen for entering
the protection code appears after selecting the sender. Enter
the protection code, and then
press [
code you entered is correct, the
sender name is highlighted.
OK
]. If the protection
❒ When a subject has been speci-
fied, this information is added
to the scan file. The subject is automatically placed in the subject
field of the e-mail.
❒ The subjects that can be selected
from the list must be registered
in [System Settings] in advance.
See Network Guide.
The procedure to specify the subject “[Urgent] New product appearance” is explained as an example
here.
A Press [Subject / Message].
Page 35

Sending Scan Files by E-mail
B Press [Attach Subject].
C Select the subject [Urgent].
D Press [Manual Input].
The soft keyboard appears.
❒ The messages that can be select-
ed from the list must be registered in [System Settings] in
advance. See Network Guide.
❒ A message can be selected from
the list or entered directly.
Selecting a message from the list
A Press [Subject / Message].
B Press [E-mail Message].
C Select a message.
2
E Enter the subject “New prod-
uct appearance”.
F Press [OK].
G Press [OK] twice.
Enter a message if necessary.
LLLL
Note
❒ For details about the maximum
number of characters that can
be entered, see p.112 “E-mail”.
❒ When a message has been en-
tered, this information is added
to the scan file.
D Press [OK] twice.
Manual entry of a message
A Press [Subject / Message].
B Press [E-mail Message].
C Press [Manual Input].
The soft keyboard appears.
27
Page 36

2
Sending Scan Files by E-mail
D Enter the message “Thank you
for what you did yesterday”.
E Press [OK] three times.
Place originals.
MMMM
Reference
The procedure for placing originals is the same as that for placing originals for copying. For
details about placing originals,
see “Placing Originals”, Copy
Reference.
Note
❒ For details about the maximum
size of the scan file and maximum number of pages that can
be sent, see p.112 “E-mail”.
❒ To interrupt scanning, press the
{{{{Clear/Stop}}}} key or press [Stop]
on the display panel.
❒ When scanning multiple pages
into a single file, place the next
original. For details, see p.77
“Scanning Multiple Pages into a
Single File”.
Simultaneous Storage and Sending by E-mail
You can use the e-mail function and
the storage function together.
The scan file is sent by e-mail and at
the same time is stored.
Note
❒ This section explains mainly the
procedure for simultaneous storage and sending of e-mail. For details, see p.19 “Procedure for
Sending E-mail”.
❒ The file stored when simultane-
ously storing a file and sending it
by e-mail cannot be resent in the email screen. To resend the file, select the file in the [Select Stored File]
screen and send it. See p.50 “Send-
ing Stored Files by E-mail or Scan
to Folder, or Delivering”.
Make settings for the original, such
AAAA
as orientation and output tray.
Reference
p.75 “Specifying the Orientation and Output Tray of the
Original”
Make the scan settings.
BBBB
Note
❒ There are two ways to specify
scan settings, as described below:
28
• Configure each setting for
scanning. For details, see
p.73 “Specifying Scan Settings”.
• Recall registered settings. For
details, see p.80 “Programs”.
Specify the destination.
CCCC
Specify the sender and a subject.
DDDD
Page 37

Press [Store File].
EEEE
Make sure [Send & Store] is select-
FFFF
ed.
Sending Scan Files by E-mail
2
Specify file information if neces-
GGGG
sary.
Reference
For details about specifying file
information, see p.45 “Specify-
ing file information”.
Press [OK].
HHHH
Place originals.
IIII
Note
❒ The procedure for placing origi-
nals is the same as that for placing originals for copying. For
details about placing originals,
see “Placing Originals”, Copy
Reference.
29
Page 38

Sending Scan Files by E-mail
Checking the E-mail Results
2
The sending results can be checked.
Note
❒ For details about the maximum
number of sending operations that
can be checked, see p.102 “Print &
Delete Scanner Journal”.
❖❖❖❖ Items that can be checked
• Date / Time
The date and time the e-mail
was sent or the date and time
“Error” or “Cancelled” was
confirmed is displayed.
• Destination
The sending function (e-mail,
Scan to Folder, or delivery function) used is displayed with an
icon.
When multiple destinations
were selected, the first selected
destination is displayed.
• Sender
• File Name
The file name is displayed only
when a file is stored at the same
time and when a stored file is
sent.
Check the displayed records.
BBBB
Note
❒ Depending on the security set-
tings, certain records may not
be displayed.
❒ One screen shows the records
for five sending operations. Use
[UUUUPrev.] or [ TTTTNext] to scroll
through the list.
❒ When the status of a file is
“Waiting...”, the sending can be
canceled by selecting that file,
and then pressing [Cancel].
❒ Press [Print] to print the whole
journal.
Press [Exit].
CCCC
The e-mail screen appears.
30
• Status
One of the following status is
displayed: “Done”, “ Sending...”, “Waiting...”, “Error”, or
“Cancelled”.
Press [Scanned Files Status] on the
AAAA
e-mail screen.
Page 39

3. Sending Scan Files by Scan to Folder
Scan files can be sent to the folders of the FTP server or the shared folders of Windows. This chapter explains the preparation for sending files by Scan to Folder,
various display screens, procedures for sending, and how to check the sending
results when this function is used.
Preparation for Sending by Scan to Folder
To send scan files by Scan to Folder, the preparation described below is required.
Connect the machine to the network with an Ethernet cable or
IEEE 1394 cable, or use wireless LAN.
To connect using an IEEE 1394 cable, the IEEE 1394 interface
board is required. To connect using wireless LAN, the IEEE
802.11b interface unit is required.
See Network Guide.
To send scan files by Scan to Folder, the following [System Set-
tings] settings must be specified correctly. (Certain other settings
must also be specified.)
• IP address
• subnet mask
For details about making settings and other settings, see
work Guide. You also need to register destinations and other information in the address book. For details, see
Guide.
Make settings for sending such as compression and file type priority.
See p.101 “Send Settings”.
Note
❒ Under Windows Server 2003, you may not be able to send files by Scan to
Folder.
❒ Sending files using SMB is available only under a NetBIOS over TCP/IP en-
vironment. Sending files using SMB is not available under a NetBEUI environment.
❒ Even when settings made with the control panel, Web Image Monitor, Telnet,
or other methods do not permit the use of SMB and FTP, sending files is still
possible.
General Settings
Net-
31
Page 40

3
Sending Scan Files by Scan to Folder
Scan to Folder Screen
The Scan to Folder screen is as shown.
The function items displayed serve as selector keys. You can select or specify an
item by lightly pressing it. When you select or specify an item on the display
panel, it is highlighted like . Keys that cannot be selected appear like .
1. Destination field
Displays the selected destination. If multiple destinations are selected, the destinations are displayed in the order they
were selected by pressing [UUUUPrev.] or
[TTTTNext].
Note
❒ To check the selected destinations,
press the {{{{Check Modes}}}} key.
2.
[] E-mail/Scan to Folder
Press to switch between the Scan to Folder function and the e-mail function. You
can send a file to Scan to Folder destinations and e-mail destinations at the same
time.
3. Scan to Folder icon ( )
Shows that the Scan to Folder screen is
displayed.
4.
[Registration No.]
Press to specify a destination using a five
digit registration number.
5.
[Enter Destination]
When specifying a destination that is not
listed, press [
enter the destination using the soft keyboard.
Enter Destination
], and then
6.
[Attach Sender's Name] [Return Re-
ceipt] [Subject / Message] [Attached File]
Set the sender, a reception confirmation
e-mail, file name, subject, and message of
the scan file to be sent.
If necessary, make settings for the file
type and file name of the file.
Important
❒ When the scan file is sent to desti-
nations for e-mail and Scan to
Folder at the same time, the sender, subject, and message are sent to
the e-mail destinations only. [Re-
turn Receipt] is also used for e-mail
transmission. For details, see p.17
“Sending Scan Files by E-mail”.
7.
[] Switch Destination
List/Search/Switch Title
Press to switch between the destination
list of the delivery server and the destination list of this machine, or to search for
an e-mail destination.
8. Destination list
Displays the destinations registered in
the delivery server or this machine.
32
Page 41

Note
❒ When the entire list does not fit on one
screen, press [UUUU] or [TTTT] to scroll
through the list.
❒ Group destinations are denoted by
this symbol ( ).
Preparation for Sending by Scan to Folder
3
33
Page 42

Sending Scan Files by Scan to Folder
Sending Scan Files by Scan to Folder
3
Procedure for Sending by Scan to Folder
A scan file is sent after scan settings
and destinations are specified.
Press the {{{{Scanner}}}} key.
AAAA
ZZZ606S
Note
❒ The illustration is an example.
The actual appearance may be
different.
Reference
There are two ways to specify
scan settings, as described below:
• Configure each setting for
scanning. For details, see
p.73 “Specifying Scan Settings”.
• Recall registered settings. For
details, see p.80 “Programs”.
If the network delivery scanner
EEEE
screen appears, switch to the Scan
to Folder screen.
A Press [].
B Press [Switch Destination List].
Make sure that no previous set-
BBBB
tings remain.
Note
❒ If a previous setting remains,
press the {{{{Clear Modes}}}} key.
Make settings for the original, such
CCCC
as orientation and output tray.
Reference
p.75 “Specifying the Orientation and Output Tray of the
Original”
Make the scan settings.
DDDD
C Press [E-mail].
D Press [Exit].
The e-mail screen appears.
E Press [].
The Scan to Folder screen appears.
Specify the destination folder.
FFFF
You can specify the destination
folder in the following ways:
•
Select it from the destination list.
• Specify its registration number.
34
Page 43

Sending Scan Files by Scan to Folder
• Enter the path for the folder of a
client computer on the same
network directly.
• Specify the folder in the FTP
server.
• Select it from the client computers on the same network.
Note
❒ Destinations in the destination
list and registration numbers
must be registered in advance
in [System Settings]. For details,
see “System Settings”, General
Settings Guide.
❒ Depending on the security set-
tings, certain destinations may
not be displayed.
Selecting a destination folder
from the list
A Select the destination folder.
❒ If a protection code has been
set for the shared folder, a
screen for entering the protection code appears.
B
To select more destination folders,
repeat step AAAA.
Note
❒
To deselect a destination, press
the destination once more, or
press [UUUUPrev.] or [TTTTNext] to
display the destination in the
destination field, and then
press the {{{{Clear/Stop}}}} key.
Using a registration number to
select a destination folder
A Press [Registration No.].
B Enter the five digit registration
number that has been assigned
to a destination folder using
the number keys.
If the entered number is less
than five digits, press the {{{{#}}}}
key after the last number.
3
The selected folder is highlighted and also is displayed in the
destination field at the top of the
screen.
Note
❒ If the target destination does
not appear, take one of the
following steps:
• Display the destination by
selecting its initial letter
from the title.
• Display the destination by
pressing [UUUU] or [TTTT].
Example: To enter 00004
Press the {{{{4}}}} key, and then
press the {{{{#}}}} key.
Note
❒ If a protection code has been
set for the shared folder, a
screen for entering the protection code appears.
C
To select more destination fold-
repeat step BBBB.
ers,
35
Page 44

Sending Scan Files by Scan to Folder
3
Note
❒
To deselect a destination, press
[UUUUPrev.] or [TTTTNext] to display
the destination in the destination field, and then press
the {{{{Clear/Stop}}}} key.
Manual entry of a path for the
destination folder of the client
computer on the same network
A Press [Enter Destination].
B Press [SMB].
E Press [OK].
F If entering a user name to log
on is required, press [Manual In-
put] on the right side of the user
name field.
The soft keyboard appears.
G Enter the user name.
Reference
For details about the maximum number of characters
that can be entered, see p.113
“Scan to Folder”.
H Press [OK].
I If entering a password to log
on is required, press [Manual In-
put] for [Password].
The soft keyboard appears.
J Enter the password.
K Press [OK].
36
C Press [Manual Input] on the right
side of the path field.
The soft keyboard appears.
D Enter the path for the folder.
Note
❒ For details about the maxi-
mum number of characters
that can be entered, see p.113
“Scan to Folder”.
❒ The following is an example
of a path where the folder
name is “user” and the computer name is “ desk01”:
\\desk01\user
❒ An IP address can also be en-
tered if you use one of the following operating systems :
Windows 98/Me/XP/2000
or Windows NT 4.0.
❒ Computer and shared folder
names consisting of more
than 12 characters cannot be
displayed.
L Press [Connection Test].
A connection test is performed
to check whether the specified
shared folder exists.
Note
❒ The connection test may take
time.
❒ You may not be able to press
[Connection Test] right after
pressing [Cancel] during a
connection test.
Page 45

Sending Scan Files by Scan to Folder
❒ Though the connection test
was successful, the machine
may fail to transfer the file if
writing authority is lacking
or if there is not enough free
space on the hard disk.
M Check the connection test re-
sult, and then press [Exit].
N Press [OK].
O To enter more destinations, re-
peat steps AAAA to NNNN.
Note
❒
To deselect a destination, press
[UUUUPrev.] or [TTTTNext] to display
the destination in the destination field, and then press
the {{{{Clear/Stop}}}} key.
❒ To change the path for the
folder that has been entered,
press [Change] on the left side
of the destination field. Enter
the correct path for the folder, and then press [OK].
❒ To check the selected desti-
nations, press the {{{{Check
Modes}}}} key.
Specifying a folder in the FTP
server
A Press [Enter Destination].
B Press [FTP].
C Press [Manual Input] on the right
side of the server name field.
The soft keyboard appears.
D Enter a server name.
Note
❒ For details about the maxi-
mum number of characters
that can be entered, see p.113
“Scan to Folder”.
❒ An IP address also can be en-
tered.
E Press [OK].
F Press [Manual Input] on the right
side of the path field.
The soft keyboard appears.
G Enter the path for the folder.
Note
❒ For details about the maxi-
mum number of characters
that can be entered, see p.113
“Scan to Folder”.
❒ The following is an example
of a path where the folder
name is “user” and the sub-
folder name is “lib”: user\lib
H Press [OK].
3
A confirmation message for
changing the protocol appears.
I If entering a user name to log
on is required, press [Manual In-
put] on the right side of the user
name field.
The soft keyboard appears.
J Enter the user name.
37
Page 46

Sending Scan Files by Scan to Folder
3
Reference
For details about the maximum number of characters
that can be entered, see p.113
“Scan to Folder”.
K Press [OK].
L If entering a password to log
on is required, press [Manual In-
put] for [Password].
The soft keyboard appears.
M Enter the password.
N Press [OK].
O To change the port number
which is set in [System Settings],
press [Change] on the right side
of the port number field. Enter
a port number using the
number keys, and then press
the {{{{#}}}}key.
P Press [Connection Test].
Note
❒
To deselect a destination, press
[UUUUPrev.] or [TTTTNext] to display
the destination in the destination field, and then press
the {{{{Clear/Stop}}}} key.
❒ To change the path for the
folder that has been entered,
press [Change] on the left side
of the destination field. Enter
the correct path for the folder, and then press [OK].
❒ To check the selected desti-
nations, press the {{{{Check
Modes}}}} key.
Searching for a destination folder
in client computers on the
network
A Press [Enter Destination].
38
A connection test is performed
to check whether the specified
shared folder exists.
Note
❒ The connection test may take
time.
❒ You may not be able to press
[Connection Test] right after
pressing [Cancel] during a
connection test.
Q Check the connection test re-
sult, and then press [Exit].
R Press [OK].
S To enter more destinations, re-
peat steps AAAA to RRRR.
B Press [SMB].
C Press [Browse Network] on the
right side of the path field.
The list of client computers on
the same network appears.
Page 47

Sending Scan Files by Scan to Folder
Note
❒ Computer and shared folder
names consisting of more
than 12 characters cannot be
displayed.
❒ If the client computer you
want to select is not displayed, press [Up One Level]
to select another workgroup,
and then search for the client
computer.
❒ The maximum number of cli-
ent computers and shared
folders that can be displayed
is 100.
D Select the client computer that
has the destination folder.
❒ If authentication is required
for the selected folder, a logon screen appears. Enter the
user name and password.
F Press [OK].
G Press [OK].
Searching for a destination folder
in the destination list
A Press [].
B Press [Search by Dest. Name].
3
Note
❒ If authentication is required
for the selected computer, a
log-on screen appears. Enter
the user name and password.
The list of folders on the selected computer appears.
E Select the destination folder.
Note
❒ When the selected folder has
sub-folders, the sub-folders
list appears.
The soft keyboard appears.
Note
❒ To search by path, press
[Search by Folder Name].
C Enter part of the destination
folder name.
Note
❒ Enter the first character or
characters of the destination
name.
❒ It is necessary to differentiate
between uppercase and lowercase letters.
39
Page 48

Sending Scan Files by Scan to Folder
3
❒ It is also possible to perform
a combined search using
[Search by Dest. Name] and
[Search by Folder Name].
D Press [OK].
E Select a destination folder.
F Press [Exit].
Checking selected destinations
A Use the destination field at the
top of the screen to check
which destinations are selected.
Note
❒ Press [UUUUPrev.] or [TTTTNext] to
scroll through the list. Destinations are displayed in the
order they were selected.
Specify the file name if necessary.
HHHH
A Press [Attached File].
B Press [File Name].
The soft keyboard appears.
C Enter a file name.
Note
❒
A scan file is given a 21-digit
(excluding the extension) file
name which combines the
time and date the original was
scanned with a 4-digit page
number. (Example : When one
page is scanned in TIFF at
15.10 seconds, 3.30 p.m., 31
December, 2020, the file name
is 202012311530150100001.tif)
D Press [OK].
40
❒ To check the selected desti-
nations, press the {{{{Check
Modes}}}} key.
Select the file type if necessary.
GGGG
A Press [Attached File].
B Press [File Type].
C Select the file type.
D Press [OK] twice.
E Press [OK].
Place originals.
IIII
Reference
The procedure for placing originals is the same as that for placing originals for copying. For
details about placing originals,
see “Placing Originals”, Copy
Reference.
Note
❒ For details about the maximum
size of the scan file that can be
sent, see p.113 “Scan to Folder”.
❒ To interrupt scanning, press the
{{{{Clear/Stop}}}} key or press [Stop]
on the display panel.
Page 49

Sending Scan Files by Scan to Folder
❒ When scanning multiple pages
into a single file, place the next
original. For details, see p.77
“Scanning Multiple Pages into a
Single File”.
Simultaneous Storage and Sending by Scan to Folder
You can use the Scan to Folder function and the storage function together.
The scan file is sent by Scan to Folder
and at the same time is stored.
Note
❒ This section explains mainly the
procedure for simultaneous storage and sending by Scan to Folder.
For details, see p.34 “Procedure for
Sending by Scan to Folder”.
❒ The file stored when simultane-
ously storing a file and sending it
by Scan to Folder cannot be resent
from the Scan to Folder screen. To
resend the file, select the file in the
[Select Stored File] screen and send
it. See p.50 “Sending Stored Files
by E-mail or Scan to Folder, or Delivering”.
Make settings for the original, such
AAAA
as orientation and output tray.
Reference
p.75 “Specifying the Orientation and Output Tray of the
Original”
Make the scan settings.
BBBB
Note
❒ There are two ways to specify
scan settings, as described below:
• Configure each setting for
scanning. For details, see
p.73 “Specifying Scan Settings”.
• Recall registered settings. For
details, see p.80 “Programs”.
Select the destination.
CCCC
Specify the sender, subject, and
DDDD
message when sending e-mail is
performed at the same time.
Press [Store File].
EEEE
Make sure that [Send & Store] is se-
FFFF
lected.
Specify file information if neces-
GGGG
sary.
Reference
For details about specifying file
information, see p.45 “Specify-
ing file information”.
Press [OK].
HHHH
Place originals.
IIII
Note
❒ The procedure for placing origi-
nals is the same as that for placing originals for copying. For
details about placing originals,
see “Placing Originals”, Copy
Reference.
3
41
Page 50

Sending Scan Files by Scan to Folder
Checking the Scan to Folder Results
3
The sending results can be checked.
Note
❒ For details about the maximum
number of sending operations that
can be checked, see p.102 “Print &
Delete Scanner Journal”.
❖❖❖❖ Items that can be checked
• Date / Time
The date and time sending was
requested or the date and time
“Error” or “Cancelled” is confirmed is displayed.
• Destination
The sending function (e-mail,
Scan to Folder, or delivery function) used is displayed with an
icon.
When multiple destinations
were selected, the destinations
are displayed individually.
• Sender
• File Name
The file name is displayed only
when a file is stored at the same
time and when a stored file is
sent.
Check the displayed records.
BBBB
Note
❒ Depending on the security set-
tings, certain records may not
be displayed.
❒ One screen shows the records
for five sending operations.
Press [UUUUPrev.] or [ TTTTNext] to
scroll through the screen.
❒ When the status of a file is
“Waiting...”, the sending can be
canceled by selecting that file,
and then pressing [Cancel].
❒ Press [Print] to print the whole
journal.
Press [Exit].
CCCC
The Scan to Folder screen appears.
42
• Status
One of the following status is
displayed: “Done”, “ Sending...”, “Waiting...”, “Error”, or
“Cancelled”.
Press [Scanned Files Status] on the
AAAA
Scan to Folder screen.
Page 51

4. Storing Files
Scan files can be stored in the hard disk of the machine using the Document
Server function, and the stored file can be used later. Using DeskTopBinder,
stored files can be viewed or retrieved with a client computer.
Important
❒ A password can be set for every stored file.There is a risk that stored files
without a password can be accessed by someone using DeskTopBinder on the
same LAN. We recommend you consider security measures such as setting
passwords to protect against unauthorized access.
❒ Scan file stored in the machine may be lost if some kind of failure occurs. We
advise against using the hard disk to store important files. The supplier shall
not be responsible for any damage that may result from the loss of files. For
long-term storage of files, we recommend the use of DeskTopBinder. For details, contact your local dealer.
Note
❒ When a delivery server is added to the network, stored files can be delivered.
You can store scan files and simultaneously deliver them with the network
delivery scanner function, send it by e-mail, or send it by Scan to Folder. See
p.50 “Sending Stored Files by E-mail or Scan to Folder, or Delivering”.
Storing Files
This section explains how to store files and how to specify file information for
stored files.
Note
❒ For details about the maximum number of files that can be stored, see p.114
“Store”.
❒ The stored files are deleted automatically after a certain number of days have
passed. For information about making settings and changing settings, see
General Settings Guide.
❒ Files cannot be printed from the control panel after being stored using the
scanner function. Print scan files after a client computer receives them. See
p.51 “Viewing a list of stored files using DeskTopBinder” or p.52 “Viewing a
list of stored files using Web Image Monitor”.
43
Page 52

Storing Files
Storage Procedure
Make the settings for storing scan
EEEE
files.
4
You can scan and store files.
Press the {{{{Scanner}}}} key.
AAAA
Note
❒ The illustration is an example.
The actual appearance may be
different.
Make sure that no previous set-
BBBB
tings remain.
Note
❒ If a previous setting remains,
press the {{{{Clear Modes}}}} key.
Make settings for the original, such
CCCC
as orientation and output tray.
Reference
p.75 “Specifying the Orientation and Output Tray of the
Original”
Make the scan settings.
DDDD
A Press [Store File].
B Press [Store Only].
ZZZ606S
Note
❒ To store and deliver scan
files, press [Send & Store]. See
p.28 “Simultaneous Storage
and Sending by E-mail”, p.41
“Simultaneous Storage and
Sending by Scan to Folder”,
or p.65 “Simultaneous Storage and Delivery”.
❒ [Store Only] cannot be pressed
if a destination or sender is
selected.
44
Reference
There are two ways to specify
scan settings, as described below:
• Configure each setting for
scanning. For details, see
p.73 “Specifying Scan Settings”.
• Recall registered settings. For
details, see p.80 “Programs”.
C Press [OK].
Specify file information.
FFFF
Specify a user name, file name, and
password for the file.
Reference
For details about specifying file
information, see p.45 “Specify-
ing file information”.
Place originals.
GGGG
Page 53

Storing Files
Reference
The procedure for placing originals is the same as that for placing originals for copying. For
details about placing originals,
see “Placing Originals”, Copy
Reference.
Note
❒ To interrupt scanning, press the
{{{{Clear/Stop}}}} key or press [Stop]
on the display panel.
❒ When placing multiple origi-
nals one-by-one, place the next
original. For details, see p.77
“Scanning Multiple Pages into a
Single File”.
Specifying file information
You can specify a user name, file
name, and password for a stored scan
file.
The File Information screen appears.
Specify file information.
BBBB
Specifying a user name
A Press [User Name].
B Select the user name.
4
According to the settings made, you
can search for files by user name or
file name and you can prevent unauthorized persons from accessing the
files.
Reference
For details about the maximum
number of characters that can be
entered, see p.114 “Store”.
Press [Store File].
AAAA
Note
❒ The user names shown here
are names that were registered on the [Administrator
Tools] tab in [System Settings].
To specify a name not shown
here, press [Non-programmed
Name], and then enter the
user name.
C Press [OK].
45
Page 54

Storing Files
4
Specifying a file name
Scan files are automatically named
SCAN0001, SCAN0002, etc. If necessary, you can change the file
name.
A Press [File Name].
The soft keyboard appears.
B Enter the file name.
Reference
For information about how
to enter characters, see Gener-
al Settings Guide.
C Press [OK].
Specifying a password
When a password is specified,
only a person who knows the password can view the file.
Important
❒ Do not forget the password.
If you forget it, consult the
system administrator of the
machine.
Press [OK] to return to the previ-
CCCC
ous screen.
A Press [Password].
B
Enter a four to eight digit number
using the number keys.
C Press the {{{{#}}}} key.
Note
❒
To change the password, press
[Change], and then enter a
new one.
D Enter the same number as you
entered in step BBBB for confirmation.
E Press the {{{{#}}}} key.
46
F Press [OK].
Page 55

Displaying the List of Stored Files
Displaying the List of Stored Files
From the list of stored files, you can
delete stored files or change file information. To show the list of stored
files, perform the following steps:
Note
❒ You can also display the list of
stored files from a client computer
using DeskTopBinder and Web
Image Monitor. For details, see
p.51 “Checking Stored Files from a
Client Computer”.
Press the {{{{Scanner}}}} key.
AAAA
4
Note
❒ The illustration is an example.
The actual appearance may be
different.
Display the list of stored files.
BBBB
A Press [Select Stored File].
B Press [Manage / Delete File].
ZZZ606S
47
Page 56

4
Storing Files
Viewing the List
The list of stored files has the following elements.
The function items displayed serve as selector keys. You can select or specify an
item by lightly pressing it. When you select or specify an item on the display
panel, it is highlighted like . Keys that cannot be selected appear like .
Note
❒ Depending on the security settings, certain files may not be displayed.
❖❖❖❖ When using the network delivery scanner, e-mail, or Scan to Folder function
❖❖❖❖ When displaying information of a selected stored file
1. Keys for searching for files
Press to switch to the screens for
searching for a file by user name or file
name, or to the screen for displaying
all files.
2. Keys to switch to the information
display
Press to switch between the stored file
list and the detailed information of the
selected file.
3. Keys for sorting files
Press to sort the files using the selected item. Select the same item once
more for a reverse sort. However, the
files cannot be sorted in reverse delivery order.
4.
Keys for changing file information
Use for deleting the selected file or
changing the user name, file name, or
password.
48
Page 57

5. List of stored files
Displays the list of stored files.
Displaying the List of Stored Files
Searching for Files
Note
❒ The files that are stored by func-
tions other than the scanner can be
displayed by pressing the [
ment Server] key.
❒ If the file is not displayed, press
[UUUUPrev.] or [TTTTNext] to scroll through
the list.
❒ For files which are password pro-
tected, a key symbol( ) is shown to
the left of the user name.
6.
[Manage / Delete File]
Press to perform operations such as
deleting stored files or changing file
information.
7.
[Send]
Press to send or deliver stored files.
For details, see p.50 “Sending Stored
Files by E-mail or Scan to Folder, or
Delivering”.
8.
Information for a selected stored file
Press [Detail] to display the information for a file after selecting the file
from the file list.
Docu-
You can search for files from the
stored files using the user name or file
name.
Searching by user name
On the screen with the list of stored
AAAA
files, press [Search by User Name].
Select the user name to be used
BBBB
for the search.
Note
❒ The user names shown here are
names that were registered on
the [Administrator Tools] tab in
[System Settings]. To change a
user name not shown here,
press [Non-programmed Name],
and then enter the user name.
4
Press [OK].
CCCC
The search starts, and files whose
user name starts with the entered
string appear.
49
Page 58

Storing Files
4
Searching by file name
On the screen with the list of stored
AAAA
files, press [Search by File Name].
The soft keyboard appears.
Enter the file name.
BBBB
Note
❒ It is necessary to differentiate
between uppercase and lowercase letters.
Reference
For information about how to
enter characters, see General Set-
tings Guide.
Press [OK].
CCCC
The search starts, and files whose
name starts with the entered string
appear.
Sending Stored Files by E-mail or Scan to Folder, or Delivering
Files stored can be sent by e-mail or
Scan to Folder, or delivered to the delivery server.
Note
❒ This section explains how to select
files you want to send or deliver.
For details about sending by email, see p.19 “Procedure for Sending E-mail”. For details about
sending by Scan to Folder, see p.34
“Procedure for Sending by Scan to
Folder”. For details about delivering stored files, see p.60 “Deliver-
ing Scan Files”.
❒ When stored files are sent or deliv-
ered, scan settings cannot be
changed. The files are sent or delivered with the scan settings specified when they were stored.
Press [Select Stored File] to display
AAAA
the list of stored files.
Reference
p.47 “Displaying the List of
Stored Files”
Select a file.
BBBB
Note
❒ When you select a password
protected file, the Password entry screen appears. After you
have entered the correct password and pressed [OK], the file
will be selected.
50
Page 59

Displaying the List of Stored Files
To select multiple files, repeat
CCCC
step
❒ For details about the maximum
❒ If you select multiple files, the
❒ If you press [Display Selection],
Press [OK].
DDDD
The e-mail, Scan to Folder, or network delivery scanner screen appears.
.
BBBB
Note
number of files that can be selected at once, see p.114 “Store”.
files will be sent or delivered in
the order they were selected.
the selected files will be shown
in the order of delivery.
❒ The illustration used in the follow-
ing explanation is an example. The
items that actually appear on the
screen may differ, depending on
the model in use and the environment.
Viewing a list of stored files using DeskTopBinder
Stored files are shown below using
DeskTopBinder.
4
Switch the destination list if nec-
EEEE
essary.
Specify a destination.
FFFF
Specify the sender, subject, and
GGGG
message if necessary.
Press the {{{{Start}}}} key.
HHHH
Checking Stored Files from a Client Computer
You can view the list of stored files
from a client computer using DeskTopBinder and Web Image Monitor.
Note
❒ You can also view the files stored
under the copy, Document Server,
and printer functions.
Note
❒ The illustration is an example. The
items that actually appear may be
different.
❒ You can also transfer the stored
files to the client computer.
Reference
For details about installing
DeskTopBinder, see p.11
“DeskTopBinder”. For details
about the functions of DeskTopBinder, such as transferring files
to a client computer, see the
manuals related to DeskTopBinder manuals. See p.i “Manu-
als for This Machine”.
51
Page 60

4
Storing Files
Viewing a list of stored files using Web Image Monitor
The stored files are displayed and can
be checked also in Web Image Monitor.
Note
❒ When you enter http:// (machine
IP address)/ in the address bar of
the Web browser on a client computer, Top Page of Web Image
Monitor is displayed.
❒ You can also download the stored
files.
Reference
For details about displaying or
downloading stored files using
Web Image Monitor, see General
Settings Guide.
For details about making settings
for using Web Image Monitor, see
Network Guide.
For details about functions for
managing stored files using Web
Image Monitor, click [Help] on the
upper-right corner of the displayed screen.
52
Page 61

Managing Stored Files
Deleting Files
You can delete files that are no longer
needed.
Limitation
❒ Files waiting for delivery cannot
be deleted.
Reference
Using Web Image Monitor from a
client computer, you can also delete the stored files. See General Set-
tings Guide.
Display the list of stored files.
AAAA
Managing Stored Files
❒ When you select a password
protected file, the Password entry screen appears. Enter the
correct password, and then
press [OK]. When multiple files
are selected, the password entry
screen appears each time a password protected file is selected.
Press [Delete File].
DDDD
4
Reference
p.47 “Displaying the List of
Stored Files”
Press [Manage / Delete File].
BBBB
The [Manage / Delete File] screen appears.
Select the file you want to delete.
CCCC
Note
❒ For details about the maximum
number of files that can be selected at once, see p.114 “Store”.
A confirmation message about deleting the file appears.
Press [Delete].
EEEE
Press [Exit].
FFFF
Changing File Information
The information for stored files (user
name, file name, and password) can
be changed.
Limitation
❒ Information for files waiting for
delivery cannot be changed.
Reference
Using Web Image Monitor from a
client computer, you can change
the information of files stored. See
General Settings Guide.
Display the list of stored files.
AAAA
Reference
p.47 “Displaying the List of
Stored Files”
53
Page 62

Storing Files
4
Press [Manage / Delete File].
BBBB
Select the file for which you want
CCCC
to change the file information.
Note
❒ When you select a password
protected file, the password entry screen appears. Enter the
correct password, and then
press [OK].
Change the file information.
DDDD
Note
❒ The user names shown here
are names that were registered on the [Administrator
Tools] tab in [System Settings].
To change a user name not
shown here, press [Non-pro-
grammed Name], and then en-
ter the user name.
C Press [OK].
Changing the file name
Changing the user name
A Press [Change User Name].
B Select the new user name.
A Press [Change File Name].
B Enter the new file name.
Reference
For information about how
to enter characters, see Gener-
al Settings Guide.
54
C Press [OK].
Page 63

Changing the password
A Press [Change Password].
B Enter a new four to eight digit
number as the password using
the number keys.
Managing Stored Files
Make sure that the file informa-
EEEE
tion was changed as necessary,
and press [Exit].
4
C Press the {{{{#}}}} key.
Note
❒
To change the password, press
[Change], and then enter a
new one.
D Enter the same number as you
entered in step BBBB for confirmation.
E Press the {{{{#}}}} key.
F Press [OK].
Important
❒ Do not forget the password.
If you forget it, consult the
system administrator of the
machine.
55
Page 64

4
Storing Files
56
Page 65

5. Delivering Scan Files
Scan files can be sent to a specified destination using the network delivery scanner function. This chapter explains the preparation for delivering files, various
display screens, delivery procedures, and how to check the delivery results
when this function is used.
Important
❒ A delivery server in which the ScanRouter delivery software is installed is
necessary to use the network delivery scanner function. Information about
delivery destinations and senders must be registered first in the delivery server. Also, connected devices should be configured in [Set I/O Device] of the ScanRouter delivery software. For details, see the ScanRouter delivery software
Help.
57
Page 66

5
Delivering Scan Files
Preparation for Delivering
To use the machine as a network delivery scanner, the preparation described below is required.
Connect the machine to the network with an Ethernet cable or
IEEE 1394 cable, or use wireless LAN.
To connect using an IEEE 1394 cable, the IEEE 1394 interface
board is required. To connect using wireless LAN, the IEEE
802.11b interface unit is required.
See
Network Guide
To deliver scan files, the following [System Settings] settings
must be specified correctly. (Certain other settings must also be
specified.)
• IP address
• subnet mask
Also, [On] must be selected for [Delivery Option] under [File Trans-
fer]. For details about making settings and other settings, see
Network Guide
.
.
Make settings for the network delivery scanner function, such as
Destination List Settings.
See p.95 “Initial Scanner Setup”.
Install the ScanRouter delivery software required for using the
network delivery scanner functions on the delivery server.
See p.11 “DeskTopBinder”.
After installing the software, make the required settings for
server maintenance and delivery service.
For details, see the ScanRouter delivery software manuals.
Set the destination, sender information, and connected devices
in the ScanRouter delivery software.
On the client computers, install the software required for viewing or retrieving files by connecting to the delivery server, such
as DeskTopBinder.
See p.11 “DeskTopBinder”.
58
Page 67

Preparation for Delivering
Network Delivery Scanner Screen
The network delivery scanner screen is as shown.
The function items displayed serve as selector keys. You can select or specify an
item by lightly pressing it. When you select or specify an item on the display
panel, it is highlighted like . Keys that cannot be selected appear like .
1.
Network delivery scanner icon
Indicates that the network delivery scanner screen is displayed.
2. Destination field
The selected destination is shown here. If
multiple destinations are selected, the
destinations are displayed in the order
they were selected by pressing [UUUUPrev.
].
[TTTTNext
Note
❒ To check the selected destinations,
press the {{{{Check Modes}}}} key.
3.
[Registration No.]
Press to specify a destination using a five
digit registration number.
4.
[Manual Input]
When sending e-mail via the delivery
server, press [Manual Input], and then enter
the destination using the soft keyboard
that is displayed. For information about
sending e-mail via the delivery server,
see the ScanRouter delivery software
manuals.
()
] or
5.
[Attach Sender's Name] [Return Re-
ceipt] [Attach Subject]
Specify the sender, subject, and message
of the document to be delivered. In addition, specify whether or not to check
whether the file has been opened at the
destination.
6.
Press to switch between the destination
list of the delivery server and the destination list of this machine, or to perform a
search such as a user name search.
Switch Destination List/Search
[]
7. Destination list
Displays the destinations registered in
the delivery server or this machine.
Note
❒ When the entire list does not fit on one
screen, press [UUUU] or [TTTT] to scroll
through the list.
❒ Group destinations are denoted by
this symbol ( ).
5
59
Page 68

Delivering Scan Files
Delivering Scan Files
5
Delivery Procedure
A scan file is delivered after scan settings and destinations are specified. If
necessary, you can select a sender and
a subject.
Press the {{{{Scanner}}}} key.
AAAA
ZZZ606S
Note
❒ The illustration is an example.
The actual appearance may be
different.
Make sure that no previous set-
BBBB
tings remain.
Reference
There are two ways to specify
scan settings, as described below:
• Configure each setting for
scanning. For details, see
p.73 “Specifying Scan Settings”.
• Recall registered settings. For
details, see p.80 “Programs”.
If the e-mail screen appears, switch
EEEE
to the network delivery scanner
screen.
A Press [].
B Press [Switch Destination List].
C Press [Delivery Server].
60
Note
❒ If a previous setting remains,
press the {{{{Clear Modes}}}} key.
Make settings for the original, such
CCCC
as orientation and output tray.
Reference
p.75 “Specifying the Orientation and Output Tray of the
Original”
Make the scan settings.
DDDD
D Press [Exit].
The network delivery scanner
screen appears.
Specify the destination.
FFFF
You can specify the destination in
the following ways:
•
Select it from the destination list.
• Specify its registration number.
• Search for it.
•
Enter the e-mail address directly.
Page 69

Delivering Scan Files
Note
❒ The destination list is updated
automatically.
❒ Depending on the security set-
tings, certain destinations may
not be displayed.
Selecting a destination from the
list
A Select the destination.
The selected destination is highlighted and also is displayed in
the destination field at the top of
the screen.
Note
❒ If the target destination does
not appear, take one of the
following steps:
• Display the destination by
selecting its initial letter
from the title.
• Display the destination by
pressing [UUUU] or [TTTT].
❒ The destination titles are pro-
gramed in the delivery server.
Using a registration number to
select a destination
A Press [Registration No.].
B Enter the five digit registration
number that has been assigned
to a destination folder using
the number keys.
If the entered number is less
than five digits, press the {{{{#}}}}
key after the last number.
Example: To enter 00009
Press the {{{{9}}}} key, and then
press the {{{{#}}}} key.
Note
❒
To deselect a destination, press
[UUUUPrev.] or [TTTTNext] to display
the destination in the destination field, and then press
the {{{{Clear/Stop}}}} key.
C To select more destinations, re-
peat step BBBB.
Searching for a destination
A Press [].
5
❒ To deselect a destination,
press the destination once
more, or press [UUUUPrev.] or
[TTTTNext] to display the desti-
nation in the destination
field, and then press the
{{{{Clear/Stop}}}} key.
B To select more destinations, re-
peat step AAAA.
61
Page 70

Delivering Scan Files
5
B Press [Search Address Book].
C Press [Search by Dest. Name].
Note
❒ To search by comment, press
[Search by Comment].
The soft keyboard appears.
D Enter part of the destination
name.
Note
❒ Enter the first character or
characters of the destination
name.
❒ It is necessary to differentiate
between uppercase and lowercase letters.
E Press [OK].
F Select a destination.
Manual entry of a destination
A Press [Manual Input].
The soft keyboard appears.
B Enter the destination.
Note
❒ Enter the e-mail address of
the destination when sending via the delivery server.
❒ For details about the maxi-
mum number of characters
that can be entered, see p.114
“The network delivery scanner function”.
❒
Alphanumeric characters and
periods can be entered. The
symbols ( ) \ , ; : ” and spaces
cannot be entered. For details, see p.114 “The network
delivery scanner function”.
62
G Press [Exit].
C Press [OK].
Note
❒
To deselect a destination, press
[UUUUPrev.] or [TTTTNext] to display
the destination in the destination field, and then press
the {{{{Clear/Stop}}}} key.
❒ To check the selected desti-
nations, press the {{{{Check
Modes}}}} key.
D To enter more destinations, re-
peat steps AAAA to CCCC.
Page 71

Delivering Scan Files
Checking selected destinations
A Use the destination field at the
top of the screen to check
which destinations are selected.
Note
❒ Press [UUUUPrev.] or [TTTTNext] to
scroll through the list. Destinations are displayed in the
order they were selected.
❒ To check the selected desti-
nations, press the {{{{Check
Modes}}}} key.
Specify the sender (sender of the
GGGG
file) if necessary.
You can specify the sender in the
following ways:
• Select it from the list.
B Select the sender.
The selected sender and its registration number appear.
C Press [OK].
Using a registration number to
specify a sender name
A Press [Attach Sender's Name].
5
• Specify its registration number.
• Search for it.
Note
❒ When a sender has been speci-
fied, this information is added
to the scan file. Select a sender
from the senders registered in
the delivery server.
❒ Depending on the security set-
tings, [Attach Sender's Name] may
be selected as the user name
when logging in.
Selecting a sender from the list
A Press [Attach Sender's Name].
B Enter the five digit registration
number that has been assigned
to a destination folder using
the number keys.
If the entered number is less
than five digits, press the {{{{#}}}}
key after the last number.
Example: To enter 00006
Press the {{{{6}}}} key, and then
press the {{{{#}}}} key.
C Press [OK].
63
Page 72

Delivering Scan Files
5
Searching for a sender
A Press [Attach Sender's Name].
B Press [].
C Press [User (Dest.) Name].
F Select a sender.
G Press [Exit].
H Press [OK].
Specify [Return Receipt] if neces-
HHHH
sary.
Note
❒ If you did not specify the sender
in Step
be used even if you select it.
❒ E-mail notification that the file
has been opened at the destination is sent to the sender specified in [Attach Sender's Name]. To
use [Return Receipt], it is necessary to make sett ings such as the
e-mail address in advance in the
ScanRouter delivery software.
, [Return Receipt] cannot
G
The soft keyboard appears.
D Enter part of the sender name.
Note
❒ Enter the first character or
characters of the sender
name.
❒ It is necessary to differentiate
between uppercase and lowercase letters.
E Press [OK].
Specify a subject if necessary.
IIII
Note
❒ To specify a subject, you can se-
lect it from the list, enter it directly, or combine selecting and
entering it.
❒ For details about the maximum
number of characters that can
be entered, see p.114 “The network delivery scanner function”.
❒ When a subject has been speci-
fied, this information is added
to the scan file.
❒ The subjects that can be selected
from the list must be registered
in [System Settings] in advance.
See Network Guide.
64
Page 73

Delivering Scan Files
The procedure to specify the subject name “[Urgent] New product
appearance” is explained as an example here.
A Press [Attach Subject].
B Press the subject [Urgent].
C Press [Manual Input].
The soft keyboard appears.
D Enter the subject “New prod-
uct appearance”.
E Press [OK] twice.
Place originals.
JJJJ
Reference
The procedure for placing originals is the same as that for placing originals for copying. For
details about placing originals,
see “Placing Originals”, Copy
Reference.
Note
❒ To interrupt scanning, press the
{{{{Clear/Stop}}}} key or press [Stop]
on the display panel.
❒ When scanning multiple pages
into a single file, place the next
original. For details, see p.77
“Scanning Multiple Pages into a
Single File”.
Simultaneous Storage and Delivery
You can use the network delivery
scanner function and the storage
function together.
The scan file is delivered and at the
same time is stored.
Note
❒ This section explains mainly the
procedure for simultaneous delivery and storage. For details, see
p.60 “Delivering Scan Files”.
Make settings for the original,
AAAA
such as orientation and output
tray.
Reference
p.75 “Specifying the Orientation and Output Tray of the
Original”
Make the scan settings.
BBBB
Note
❒ There are two ways to specify
scan settings, as described below:
• Configure each setting for
scanning. For details, see
p.73 “Specifying Scan Settings”.
• Recall registered settings. For
details, see p.80 “Programs”.
Select the destination.
CCCC
5
Specify the sender and a subject if
DDDD
necessary.
65
Page 74

5
Delivering Scan Files
Press [Store File].
EEEE
Make sure that [Send & Store] is se-
FFFF
lected.
Make settings for file informa-
GGGG
tion if necessary.
Reference
For details about specifying file
information, see p.45 “Specify-
ing file information”.
Press [OK].
HHHH
Place originals.
IIII
Note
❒ The procedure for placing origi-
nals is the same as that for placing originals for copying. For
details about placing originals,
see “Placing Originals”, Copy
Reference.
66
Page 75

Checking the Status of Delivery
Checking the Status of Delivery
The sending results can be checked.
Note
❒ For details about the maximum
number of sending operations that
can be checked, see p.102 “Print &
Delete Scanner Journal”.
❖❖❖❖ Items that can be checked
• Date / Time
The date and time the delivery
was requested or the date and
time “Error” or “Cancelled”
was confirmed is displayed.
• Destination
The sending function (e-mail,
Scan to Folder, or delivery function) used is displayed with an
icon.
When multiple destinations
were selected, the first selected
destination is displayed.
• Sender
• File Name
The file name is displayed only
when a file is stored at the same
time and when a stored file is
sent.
Check the displayed records.
BBBB
Note
❒ Depending on the security set-
tings, certain records may not
be displayed.
❒ One screen shows the records
for five delivery operations.
Press [UUUUPrev.] or [ TTTTNext] to
scroll through the screen.
❒ When the status of a file is
“Waiting...”, the delivery can be
canceled by selecting that file,
and then pressing [Cancel].
❒ Press [Print] to print the whole
journal.
Press [Exit].
CCCC
The network delivery scanner
screen appears.
5
• Status
One of the following status is
displayed: “Done”, “ Sending...”, “Waiting...”, “Error”, or
“Cancelled”.
Press [Scanned Files Status] on the
AAAA
network delivery scanner screen.
67
Page 76

5
Delivering Scan Files
68
Page 77

6. Using the Network TWAIN Scanner Function
This chapter explains the procedure for scanning originals with the network
TWAIN scanner using DeskTopBinder. In addition, the preparation for using
the network TWAIN scanner is explained.
Preparation for Using the Network TWAIN Scanner
To use the machine as a network TWAIN scanner, the preparation described below is required.
Connect the machine to the network with an Ethernet cable or
IEEE 1394 cable, or use wireless LAN.
To connect using an IEEE 1394 cable, the IEEE 1394 interface
board is required. To connect using wireless LAN, the IEEE
802.11b interface unit is required.
See
Network Guide
.
Check the network settings in [System Settings], and change if required.
See Network Guide.
On the client computers, install the software required for using
the network TWAIN scanner functions, such as a TWAIN Driver and DeskTopBinder.
See p.10 “TWAIN Driver”.
69
Page 78

Using the Network TWAIN Scanner Function
Scanning Originals
6
This section explains how to scan
originals using the network TWAIN
scanner function.
Note
❒ When using the TWAIN scanner,
you can scan the original without
entering a user code even if [Weekly
Timer Code] has been selected in
[System Settings]. See "System Set-
tings", General Settings Guide.
Start DeskTopBinder, and then
AAAA
select the scanner driver.
A On the [Start] menu, point to
[Program], point to [DeskTop-
Binder V2], and then click [Desk-
TopBinder V2].
B On the [Tools] menu, click
[Scanner Settings...].
If the scanner is already selected, no scanner settings are necessary. Check the settings in
[File format for scanned image(s)] ,
and then proceed to step E.
C Click [Select Scanner Driver...].
D Select the name of the machine
you want to use in the list, and
then click [Select].
E Click [OK].
Make the scan settings.
BBBB
A On the [File] menu, point to
[Add Document], and then click
[Scan...].
After a short while, the dialog
box of the TWAIN Driver that
operates the scanner appears.
This dialog box is called the
scanner properties dialog box.
Note
❒ The name of the scanner cur-
rently being used is shown
on the title bar of the dialog
box. When multiple machines are connected, make
sure that the indicated machine is the machine you
want to use. If it is different,
click [Select Scanner] to select
the scanner again.
❒ If the machine you want to
use is not displayed in the
list, make sure that the IP address is configured and that
the machine is correctly connected to the network. If the
machine is still not displayed
in the list after confirming
the above, consult your network administrator.
B
Make settings according to such
factors as the type of original,
type of scanning, and orientation of the original.
Note
❒ For details about the settings,
see the TWAIN Driver Help.
Click [Scan] in the scanner proper-
CCCC
ties dialog box.
Note
❒ Depending on the security set-
tings, a dialog box requesting
your user name and password
may appear when you press
[Scan].
A message appears on machine's
DDDD
control panel. Specify the output
tray of the original.
70
Page 79

Place originals.
EEEE
Reference
The procedure for placing originals is the same as that for placing originals for copying. For
details about placing originals,
see “Placing Originals”, Copy
Reference.
If you have further originals, re-
FFFF
peat Step
After completing scanning, click
GGGG
[Cancel] on the computer display.
A message appears on the compu-
HHHH
ter display. Click [OK].
A message appears on the compu-
IIII
ter display. Click [Complete].
.
EEEE
Scanning Originals
Save the scan file in DeskTop-
JJJJ
Binder.
A On the [File] menu, click [Exit].
B Enter the file name, and then
click [OK].
The image is stored in DeskTopBinder, and DeskTopBinder
Viewer closes.
----Editing and printing scan files
With DeskTopBinder, it is possible to
edit and print scan files. For details
about how to edit and print, see DeskTopBinder Help.
6
71
Page 80

Using the Network TWAIN Scanner Function
6
72
Page 81

7. Configuring/Registering Scan Settings
This section describes how to specify scan settings, the orientation of the original, and the output tray of the original. In addition, this section describes the
programming function by which you can register frequently used settings.
Specifying Scan Settings
Press [Scan Settings].
AAAA
Select items such as resolution
BBBB
and original size, and then
change their settings.
• Text (OCR)
For standard originals containing mainly text.
Text (OCR) is suitable for
higher OCR accuracy.
• Drawing
For originals containing
mainly lines, such as technical drawings.
This setting prevents smudges on the original appearing
on the scanned image.
• Text / Photo
For originals containing a
mixture of text and photographs
• Photo
For originals containing photographs and other pictures
(two-value).
Creates scanned images suitable for printing.
Specify the basic scan settings
(scan type, resolution, image density, scan size, and edit) as follows:
❖❖❖❖ Scan Type
Originals are scanned according
to the selected scan type.
Select the scan type from the following:
• Text (Print)
For standard originals containing mainly text.
Printer printing is best
scanned with Text (Print).
❖❖❖❖ Resolution
Select the resolution from 150,
200, 300, 400, or 600 dpi.
❖❖❖❖ Image Density
Select the image density in seven steps from iLighter (1) to
Darkerj (7), or use Auto Image
Density.
73
Page 82

Configuring/Registering Scan Settings
7
❖❖❖❖ Scan Size
Select the size of the original to
be scanned.
When [Auto Detect] is selected,
the auto detect function of the
machine is used to set the original size.
If you select [Custom Size], you
can specify the vertical and horizontal dimensions of the
scanned area in millimeters. Alternatively, specify the horizontal dimension only, and then set
the vertical dimension using
[Auto Detect].
Reference
For details about operations
under [Custom Size], see p.99
“Selecting a custom size”.
When the size is specified, scanning is performed for that size,
regardless of the actual size of
the original. The following sizes
can be selected:
A0R, A1RS, A2RS,
A3RS, A4RS,B1R,
B2RS,B3RS,B4RS,
36 × 48 inchR,
34 × 44 inchR,
30 × 42 inchR,
24 × 36 inchRS,
22 × 34 inchRS,
18 × 24 inchRS,
17 × 22 inchRS,
12 × 18 inchRS,
11 × 17 inchRS,
1
8
/2 × 14 inchRS,
9 × 12 inchRS,
1
8
/2 × 11 inchRS
❖❖❖❖ Edit
Make editing settings.
• Erase Border
Delete the borders of the
scanned original according
to the width specified.
If you select [Same Width], you
can specify, millimeters
(inches), a uniform width for
deleting all sides (top, bottom, left, and right). If you
select [Diff. Width], you can
specify, millimeters (inches),
a different width for deleting
each side. You can specify a
value between 2 and 99 millimeters (0.1 and 3.9 inches).
Limitation
❒ If you set [Scan Size] to [Au-
to Detect], or select [Auto
Detect] for the vertical
length in [Custom Size],
[Erase Border] becomes un-
available (If [Erase Border]
was selected beforehand,
[Erase Border] is disabled).
• Positive / Negative
If you select [Positive / Nega-
tive], a black and white origi-
nal will produce a negative
scanned image.
Note
❒ If you select [Erase Border],
the deleted margin is
made black.
• Mirror Image
If you select [Mirror Image], the
scanned image will be a mirror image of the original.
74
Press [OK].
CCCC
Page 83

Specifying the Orientation and Output Tray of the Original
Specifying the Orientation and Output
Tray of the Original
To correctly orient a scanned image
on the computer display, you must
specify the orientation of the original.
Also, specify the original's output
tray.
For E-mail, Scan to Folder, and a Network Delivery Scanner
Select [Original Orientation] or [Origi-
AAAA
nal Exit].
Orientation selection
A Press the key for the same ori-
entation as the actual orientation of the original.
❒
Depending on the image size,
originals with orientations
other than may not be
scanned. If this happens, an
error message appears after
scanning is started. ⇒ p.105
“Relationship between Resolution and original size”
Reference
For details about the orientation of the original and [Origi-
nal Orientation] setting, see
p.109 “Placing Originals”.
The default orientation setting can be changed in [Origi-
nal Orientation Priority] in
[Scanner Features]. For details,
see p.98 “Scan Settings”.
Specifying the Output Tray for the
Original
A Specify the output tray for the
original.
[] is suitable as the output
tray for roll paper.
7
Limitation
❒ If you set [Scan Size] to [Auto
Detect], or set only the verti-
cal size to [Auto Detect] in
[Custom Size], orientations
other than cannot be selected.
Note
❒ The default setting for the
output tray for the original
can be registered in [System
Settings]. For details, see
“System Settings”, General
Settings Guide.
75
Page 84

Configuring/Registering Scan Settings
Press [OK].
BBBB
The current settings are displayed.
For a Network TWAIN Scanner
When using the network TWAIN
scanner, make the setting using the
TWAIN Driver.
Open the Scanner Properties dia-
AAAA
log box.
Reference
p.70 “Scanning Originals”
Change the settings in the [Original
DDDD
Size], [Specify output size], and [Qual-
ity] groups.
Reference
For details about each setting,
see the Help.
If you have specified the User
EEEE
Code Authentication, click [Au-
thentication...], enter the User Code
and encryption key in the dialog
box that appears, and then click
[OK].
Note
❒ Ask the administrator for the
User Code and encryption key.
7
Specify [Scan Mode:] according to
BBBB
the type of original and scanning.
• [Standard] is suitable for scan-
ning text-based standard originals.
• [Diazo type] is suitable for scan-
ning diazo copies.
From the [Rotate Image:] menu in
CCCC
the [Quality] group, select the angle of rotation.
To correctly orient the scanned image on the computer display, specify the angle of rotation according
to the orientation of the original.
Reference
p.109 “Placing Originals”
76
Page 85

Scanning Multiple Pages into a Single File
Scanning Multiple Pages into a Single File
You can scan multiple pages into a
single file.
Select the standby mode for additional originals from the following:
• Wait a specified length of time for
the next original (Time limit set)
• Wait indefinitely for the next original (No time limit set)
Note
❒ The machine will not switch to en-
ergy saver mode while waiting for
additional originals.
❒ While the machine is waiting for
additional originals, you can
change scan settings and the output tray for the original.
When a Time Limit Is Specified for Additional Originals
Reference
p.73 “Specifying Scan Settings”
p.75 “Specifying the Orientation and Output Tray of the
Original”
Make sure [Next Original Wait] is not
BBBB
selected.
Make settings for sending by e-mail,
CCCC
Scan to Folder, storing, or delivering.
Reference
p.19 “Procedure for Sending Email”
p.34 “Procedure for Sending by
Scan to Folder”
p.44 “Storage Procedure”
p.60 “Delivery Procedure”
Place the originals.
DDDD
7
In advance, specify the waiting time
in seconds for placing the additional
originals.
In [Scanner Features], [Next Original Wait
at Off], specify [Set Wait Time].
Reference
⇒ p.98 “Next Original Wait at Off”
Specify scan settings, the orienta-
AAAA
tion of the original, and the output tray for the original.
Reference
The procedure for placing the
originals is the same as that for
placing the originals for copying. For details about placing
the originals, see “Placing Originals”, Copy Reference.
Note
❒ Originals are scanned in order.
Place them from the first page.
Scanning is started. When scanning is
completed, the time remaining for receiving additional originals appears.
77
Page 86

Configuring/Registering Scan Settings
Note
❒
The selected destination appears
while scanning the originals.
To scan additional originals, load
EEEE
them within the specified time.
Repeat this step until all originals
are scanned.
Note
❒ If you change settings while the
machine is waiting for additional originals, the countdown
stops. If you load an original, it
is scanned, and the countdown
for loading additional originals
starts
When scanning of all originals
FFFF
and the countdown are completed, the machine automatically
starts storing/sending the
scanned data.
Select [Next Original Wait].
BBBB
Note
❒ In [Scanner Features], if you set
[Next Original Wait at Off] to [Con-
tinuous Wait], [Next Original Wait]
does not appear. Proceed to
Step
operates as if [Next Original Wait]
has been selected.
Make settings for sending by e-
CCCC
mail, or Scan to Folder, storing, or
delivering.
. In this case, the machine
C
7
Note
❒ Alternately, you can press the
{{{{#}}}} key to start storing/sending
the scanned data.
When a Time Limit Is Not Specified for Additional Originals
Specify scan settings, orientation
AAAA
and output tray for the original.
Reference
p.73 “Specifying Scan Settings”
p.75 “Specifying the Orientation and Output Tray of the
Original”
Reference
p.19 “Procedure for Sending Email”
p.34 “Procedure for Sending by
Scan to Folder”
p.44 “Storage Procedure”
p.60 “Delivery Procedure”
Place the originals.
DDDD
Scanning starts.
Reference
The procedure for placing the
originals is the same as that for
placing the originals for copying. For details about placing
the originals, see “Placing Originals”, Copy Reference.
78
Page 87

Note
❒ Originals are scanned in or-
der.Place them from the first
page.
Note
❒
The selected destination appears
while scanning the originals.
To scan additional originals, load
EEEE
them.
Scanning Multiple Pages into a Single File
Repeat this step until all originals
are scanned.
After all originals are scanned,
FFFF
press the {{{{#}}}} key.
Storing or sending starts.
7
79
Page 88

Configuring/Registering Scan Settings
Programs
7
You can register frequently used settings in the machine memory and recall them for future use.
Note
❒ You can register up to 10 programs
for the scanner mode.
❒ You can use the settings registered
in program No.10 as the initial
mode by selecting [Program No.10]
in [Change Initial Mode] of [Scanner
Features].
❒
Programs are not deleted by turning
the power off or by pressing the
{{{{Clear Modes}}}}
ed only when you delete them or
overwrite them with another program.
❒ Settings that can be registered as a
program are scan settings, standby
mode for additional originals,
loading orientation of the original,
output tray of the original, and file
format.
key. They are delet-
Press [mmmm Register].
CCCC
Press the program number you
DDDD
want to register.
Note
❒ Program numbers with m al-
ready have settings in them.
Enter the program name with the
EEEE
soft keyboard that appears on the
display panel.
Registering a Program
Make the settings you want to
AAAA
register in the initial display of
the scanner mode.
Press the {{{{Program}}}} key.
BBBB
80
AGH003S
Note
❒ You can enter up to 40 charac-
ters.
❒ If it is not necessary to enter the
program name, proceed to step
.
F
Press [OK].
FFFF
When the settings are successfully
registered, m appears on the left
side of the registered program
number and the program name appears on the right side. The display
returns to the initial display after a
moment.
Page 89

Recalling a Program
Make sure the {{{{Scanner}}}} key is se-
AAAA
lected, and then press the {{{{Program}}}} key.
Press [BBBB Recall].
BBBB
Press the number of the program
GGGG
for which you changed settings or
the number of a different program in which you want to register the changed settings.
Press [Register].
HHHH
Note
❒ When you want to overwrite a
program that is already registered, a confirmation message
appears.
Enter a program name.
IIII
Press [OK].
JJJJ
Programs
Press the number of the program
CCCC
you want to recall.
The registered settings are displayed.
Note
❒ Programs are not registered in
numbers that appear without
m.
Place the originals.
DDDD
Scanning of the original is started.
Changing a Registered Program
Make sure the {{{{Scanner}}}} key is se-
AAAA
lected, and then press the {{{{Program}}}} key.
Press [BBBB Recall].
BBBB
Note
❒ If you register a program in a
number that is already registered, the old program is overwritten.
Deleting a Program
Make sure the {{{{Scanner}}}} key is se-
AAAA
lected, and then press the {{{{Program}}}} key.
Press [Delete].
BBBB
7
Press the number of the program
CCCC
you want to change.
Change settings of the program.
DDDD
Press the {{{{Program}}}} key.
EEEE
Press [mmmm Register].
FFFF
Press the number of the program
CCCC
you want to delete.
Press [Yes].
DDDD
The program is deleted, and the
display returns to the initial display after a moment.
81
Page 90

Configuring/Registering Scan Settings
Changing the Program Name
Make sure the {{{{Scanner}}}} key is se-
AAAA
lected, and then press the {{{{Program}}}} key.
Press [Change Name].
BBBB
Press the number of the program
CCCC
for which you want to change the
name.
7
Enter a new program name.
DDDD
Note
❒ A program name can be entered
using up to 40 characters.
Press [OK].
EEEE
The new program name appears
briefly, and then the display returns to the initial display.
82
Page 91

8. Troubleshooting
This section contains advice on what to do if you have problems scanning an
original, or if the network delivery scanner or e-mail function does not work.
Various messages that may appear on the control panel or client computer are
listed, along with causes and solutions.
If Your Machine Does Not Operate As You Want
When Scanning Is Not Performed as Expected
Problems Causes and solutions
The scanned image is
dirty.
The image is distorted or
out of position.
The scanned image is upside down.
No image results from
scanning.
The scanned image contains white spaces.
The exposure glass or reflector is dirty. Clean these parts. See
“Maintaining Your Machine”, General Settings Guide.
• The original was moved during scanning. Do not move the
original during scanning.
• The original has not been loaded square. Align the original
with the side guides. See “Placing Originals”,
The original was placed upside down. Place the original in the correct orientation.
See "Placing Originals", Copy Reference.
The original was loaded back-to-front. Load the original with the
side you want to scan facing up. See "Placing Originals", Copy Ref-
erence.
If you scan originals using functions other than the network
TWAIN scanner function, certain paper size and resolution settings may produce scanned images that are larger than the specified size because of margins being added to the sides. Scanning at
a higher resolution may reduce the margins.
When the Delivery Function Does Not Work
Problems Causes and solutions
Copy Reference
.
The delivery scanner function screen is not displayed.
• If the network TWAIN scanner screen appears when the machine is switched to scanner mode, press [
network delivery scanner screen.
• If the display does not switch from network TWAIN scanner
to network delivery scanner, the delivery scanner settings are
not correct. See p.95 “Initial Scanner Setup”, and then make the
appropriate settings.
] to switch to the
Exit
83
Page 92

Troubleshooting
When Stored Files Cannot Be Accessed
Problems Causes and solutions
The stored file is locked
and is not accessible.
The file, which is password protected, is locked because the password was incorrectly entered ten times. Consult the network administrator.
Network Cannot Be Browsed When Sending a Scan File
Problems Causes and solutions
The network cannot be
browsed when specifying
the destination folder.
The following machine settings may not be correct:
• IP address
• subnet mask
Check the settings.
See "Connection and Setup", Network Guide.
The TWAIN Driver Cannot Be Started
Problems Causes and solutions
The Scanner Properties dialog box cannot be displayed.
Advanced encryption has been specified in the extended security
setting. For details about the extended security setting, consult an
administrator.
8
Stored Files Cannot Be Edited
Problems Causes and solutions
Stored files cannot be deleted. File names and passwords cannot be changed.
Files cannot be redelivered.
Limits have been imposed using the available extended security
function. Consult the user administrator.
The Network Delivery Function Cannot Be Used
Problems Causes and solutions
The network delivery
function cannot be used.
84
The delivery software may be an old version or a security setting
may be specified. Consult the machine administrator.
Page 93

If Your Machine Does Not Operate As You Want
Operations are not possible when messages appear
Problems Causes and solutions
Updating the des-
"
tination
list...Please
wait. Specified
destination(s) or
sender's name has
been cleared.
pears, and operations are
not possible.
” ap-
The destination list is being updated from the network using
SmartDeviceMonitor for Admin. Depending on the number of
destinations to be updated, there may be some delay before you
can resume operation. Operations are not possible while this message is displayed.
Wait until the message disappears. Do not switch off the power
while this message is displayed.
85
8
Page 94

Troubleshooting
When a Message Is Displayed
When an Error Message Appears on the Control Panel
Note
❒ If an error message that is not included in this section appears, turn off the
main power switch of the machine, and then turn it on again. If the message
still appears, note the content of the message and the error number (if displayed), and contact your service representative. For information about how
to turn off the main power switch, see General Settings Guide.
Message Causes and solutions
8
Authentication has failed.
Authentication with the destination
has failed. Check settings. To check
the current status, press [Scanned
Files Status].
Cannot cancel sending certain file(s).
To confirm the result, check [Scanned
Files Status].
Cannot find the specified path. Please
check the settings.
Cannot log in with the entered user
name or password.
The entered login user name or login
password is incorrect. Check the
login user name and login password.
The machine is unable to authenticate. Consult an administrator.
• Check that the user name and
password are correct.
Note
❒ A password of 64 or more
characters may not be recognized.
• Check that the ID and password
for the destination folder are correct.
Only files in waiting can be canceled.
Files with a delivery status of successful or other result cannot be canceled.
Check whether the computer name
and the folder name for the destination are correct.
Make settings correctly for the user
name and password for authentication.
86
Cannot send scanned data. Exceeded
max. number of files. Unable to capture files.
Captured file exceeded max. number of
pages per file. Cannot send the
scanned data.
For details about the maximum
number of files that can be stored,
see p.114 “Store”. Reduce the
number of stored files for transmission or delete unnecessary stored
files.
For details about the maximum
number of pages per file that can be
stored, see p.114 “Store”. Reduce the
number of pages in the file, and then
resend it.
Page 95

When a Message Is Displayed
Message Causes and solutions
Connection with LDAP server has
failed. Check the server status.
Connection with the destination has
failed. Check the status and connection. To check the current status,
press [Scanned Files Status].
Entered protection code for destination is incorrect. Please re-enter.
Exceeded max. data capacity. Original
Orientation to , then press the
Start key again.
Exceeded max. E-mail size. Sending Email has been cancelled. Check [Max.
E-mail Size] in Scanner Features.
A network error has occurred and
connection has failed. Try the operation once more. If the message is still
shown, the network may be crowded. Check the information of System
Settings. See "User Tools (System
Settings)", General Settings Guide.
• Check the network settings of the
client computer.
• Check that components such as
the LAN cable are connected
properly.
• Check that the server settings are
correct and the server is working
properly.
Make sure the protection code is correct, and then enter it again. See
"Registering a Protection Code",
General Settings Guide.
• Reload the original in the orientation of .
• If you select an original loading
orientation other than , the
machine may not be able to scan
the original with high resolution.
seep.105 “Relationship between
Resolution and original size”.
•
Increase the size of [
• Set [Divide & Send E-mail] to [Yes
(per page)] or [Yes (per max. size)].
See p.101 “Send Settings”.
Max. E-mail Size
].
8
Exceeded max. file capacity. Delete
the unnecessary stored files.
Exceeded max. No. of search results
which can be displayed.
Max.: nnn
Note
❒ “nnn” in the message represents a changeable
number.
For details about the maximum
number of files that can be stored,
see p.114 “Store”. Reduce the
number of stored files for transmission or delete unnecessary stored
files.
Search again after changing the
search conditions.
87
Page 96

Troubleshooting
Message Causes and solutions
Exceeded max. number of alphanumeric
characters.
Exceeded max. number of alphanumeric
characters for the path.
Exceeded max. number of files which
can be sent at the same time. Reduce
the number of the selected files.
Exceeded max. number of files which
can be used in Document Server at the
same time.
Exceeded max. number of pages per
file. Do you want to store the scanned
pages as 1 file?
Exceeded max. number of standby files.
Try again after the current file is
sent.
Make sure the maximum number of
characters which can be entered, and
then enter it again. See p.112 “Speci-
fications for Transmission/Store/Delivery Functions”.
The maximum number of characters
which can be entered for the path is
128. Check the number of character
you entered, and then enter the path
again. See p.113 “Scan to Folder”.
The number of files exceeded the
maximum number possible. Reduce
the number of files and send them
again.
Check the files stored by the other
functions, and then delete unneeded
files. See "Document Server", General
Settings Guide.
Specify whether to use the data or
not. Scan the pages that were not
scanned and store them as a new file.
See p.43 “Storing Files”.
There are 100 files waiting in the
sending queue for e-mail, Scan to
Folder, or delivery functions. Wait
until files have been sent.
8
88
Exceeded max. page capacity per file.
Press [Send] to send the scanned data,
or press [Cancel] to delete.
Exceeded time limit for LDAP server
search. Check the server status.
LDAP server authentication has failed.
Check the settings.
Load paper of the following sizes. Required: A3S B4S A4S A4R
Because the number of pages has
reached the maximum number that
can be sent, the data up to this point
is sent. Scan the remaining pages after transmission.
A network error has occurred and
connection has failed. Try the operation once more. If the message is still
shown, the network may be crowded. Check the information of System
Settings. See "User Tools (System
Settings)", General Settings Guide.
Make settings correctly for the user
name and the password for LDAP
server authentication.
Load paper of the sizes listed in the
message.
Page 97

When a Message Is Displayed
Message Causes and solutions
Memory is full. Cannot scan. The
scanned data will be deleted.
Memory is full. Do you want to store
scanned file?
Memory is full. Press [Send] to send
the current scanned data, or press
[Cancel] to delete.
Because of insufficient hard disk
space, the first page could not be
scanned. Try one of the following
measures:
• Wait for a while, and then retry
the scan operation.
• Reduce the scan area or scanning
resolution. See p.95 “Scan Settings”.
• Delete unneeded stored files. See
p.53 “Deleting Files”.
Because there is not enough free
hard disk space in the machine for
storing in the Document Server, only
some of the pages could be scanned.
Specify whether to use the data or
not.
Because there is not enough free
hard disk space in the machine for
delivering or sending by e-mail
while storing in the Document Server, only some of the pages could be
scanned. Specify whether to use the
data or not.
Original is being scanned by another
function.
Output buffer is full. Sending the
data has been cancelled. Please try
again later.
Selected file is currently in use.
Cannot change file name.
Selected file is currently in use.
Cannot change password.
Selected file is currently in use.
Cannot change user name.
The machine is using another function such as copying. Retry scanning
after the operation with the other
function is completed.
Too many files are waiting to be delivered. Please try again after they
have been delivered.
You cannot change the name of a file
whose status is “Waiting...” or that is
being edited with DeskTopBinder.
Change the file name after canceling
delivery or completing editing.
You cannot delete the password of a
file whose status is “Waiting...” or
that is being edited with DeskTopBinder. Delete the password after
canceling delivery or completing editing.
You cannot change the user name for
a file whose status is “Waiting...” or
that is being edited with DeskTopBinder. Change the user name after
canceling delivery or completing editing.
8
89
Page 98

Troubleshooting
Message Causes and solutions
8
Selected file is currently in use.
Cannot delete it.
Selected files contain file(s) that
the user does not have access privileges to. Please note that only the
files with access privileges will be
deleted.
Sender's name is not selected. Please
specify sender's name.
Sending the data has failed. The data
will be resent later.
Sending the data has failed. To confirm the result, check [Scanned Files
Status].
You cannot delete a file whose status
is “Waiting...” or that is being edited
with DeskTopBinder. Delete the file
after canceling delivery or completing editing.
You have tried to delete files without
the authority to do so. The files can
be deleted by the file administrator.
To delete a file which you are not authorized to delete, contact the file administrator.
A sender's name should be specified
before sending e-mail. Send e-mail
after specifying the sender's name.
A network error has occurred and a
file was not sent correctly. Wait until
sending is retried automatically after
the preset interval. If sending fails
again, consult the network administrator.
While a file was being sent, a network error occurred and the file
could not be sent correctly. Try the
operation once more.
If the message is still shown, the network may be crowded. Consult the
network administrator.
If multiple files were sent, use the
Scanned Files Status screen to check
for which file the problem occurred.
See p.30 “Checking the E-mail Results”, p.42 “Checking the Scan to
Folder Results”, or p.67 “Checking
the Status of Delivery”.
90
The destination list has been updated.
Specified destination(s) or sender's
name has been cleared.
The E-mail address entered is not correct. Please re-enter.
The entered path is not correct.
Please re-enter.
A specified destination or sender's
name was cleared when the destination list in the delivery server was
updated. Specify the destination or
sender's name again.
Make sure the e-mail address is correct, and then enter it again.
Confirm the destination computer
and the path, and then enter it again.
Page 99

When a Message Is Displayed
Message Causes and solutions
The specified group contains some
invalid destination(s). Do you want to
select only valid destination(s)?
Transmission has failed. Insufficient
memory in the destination hard disk.
To check the current status, press
[Scanned Files Status].
Updating the destination list...
Please wait. Specified destination(s)
or sender's name has been cleared.
Updating the destination list has
failed. Try again?
You do not have the privileges to use
this function.
The specified group contains some
destinations for sending by e-mail
and some destinations for sending
by Scan to Folder. To select destinations for sending by email, press [Se-
lect] for the message displayed on
the e-mail screen. To select destination for sending by Scan to Folder,
press [Select] for the message displayed on the Scan to Folder screen.
Transmission has failed. There was
not enough free space on the hard
disk of the SMTP server, FTP server,
or client computer at the destination.
Allocate sufficient space.
If a destination or sender's name was
already selected, re-select it after this
message disappears.
Check whether the server is connected.
The machine has not been set to allow you to use the function. Consult
an administrator.
No HDD is available for this function,
or File Format Converter is not connected. Cannot use Scanner Function.
The required device for the scanner
function cannot be identified correctly. Contact your service representative.
8
91
Page 100

Troubleshooting
When an Error Message Appears on the Client Computer
This section describes the main possible causes and solutions for error messages
displayed on the client computer when the TWAIN Driver is used.
Note
❒ If an error message that is not included in this section appears, turn off the
main power switch of the machine, and then turn it on again. If the message
still appears, note the content of the message and the error number (if displayed), and contact your service representative. For information about how
to turn off the main power switch, see General Settings Guide.
Message Causes and solutions
8
[
Another user is already logged in.
[
Authentication at the device side may take some time.
Please wait.
[
Authentication succeeded. However, the access privileg-
es for scanner function has been denied.
[
Cannot find the scanner. Check the scanner main power
switch..
[
Entered value is out of range.
[
Reenter the size within the range of xxxx to xxxx.
[
Enter New Name.
[
Error has occurred on the scanner. Scanning will be cancelled.
]
]
] In the [
] Another user has logged on to the ma-
]
]
]
chine. Wait for that user to log off.
Contact the machine administrator or
network administrator.
Ask the machine administrator about the
access privilege to use the scanner function.
• Check whether the main power
switch of the machine is turned off.
• Check whether the machine is connected to the network correctly.
Check and correct the setting in the scan
setting dialog box.
Save/Delete
new name.
• If the message appears while operat-
]
ing the TWAIN driver:
• Make sure the scanner is not switched
off.
• Make sure the cables are connected
properly.
• Delete or change the access mask in
the network setting.
• Update the version of Winsock.
•
If the message appears while scanning:
• Expand the RAM or virtual memory
in the client computer.
• If you try to scan a long original at
high resolution, an error may occur
due to the prolonged processing time.
If this happens, select [
pression (Black & White)
“Send Settings”.
] dialog box, enter the
] in [
Off
Com-
]. See p.101
92
 Loading...