

Page 1
SP 1200S
User’s Guide
Read this manual carefully before you use this machine and keep it handy for future reference. For safe and correct
use, be sure to read the Important Information in this manual before using the machine.
Page 2

Page 3

Table of Contents
Section I General
1 General information 2
Using the documentation.......................................................................................2
Symbols and conventions used in the documentation ....................................2
Accessing the Software User’s Guide ...................................................................2
Viewing documentation ...................................................................................2
Control panel overview (For EU) ...........................................................................4
Control panel overview (For Asia/Oceania)...........................................................5
2 Loading paper and documents 6
Loading paper and print media ..............................................................................6
Loading paper in the paper tray....................................................................... 6
Loading paper in the manual feed slot ............................................................7
Unprintable area............................................................................................10
Acceptable paper and other print media.............................................................. 11
Recommended paper and print media ..........................................................11
Type and size of paper..................................................................................11
Handling and using special paper .................................................................12
Loading documents .............................................................................................15
Using the automatic document feeder (ADF) ................................................15
Using the scanner glass ................................................................................16
3 General setup 17
Paper settings......................................................................................................17
Paper type .....................................................................................................17
Paper size......................................................................................................17
Volume settings ...................................................................................................17
Beeper volume ..............................................................................................17
Ecology features..................................................................................................18
Toner Save ....................................................................................................18
Sleep time......................................................................................................18
LCD contrast........................................................................................................19
User Settings List.................................................................................................19
i
Page 4

Section II Copy
4 Making copies 22
How to copy .........................................................................................................22
Entering copy mode.......................................................................................22
Making a single copy.....................................................................................22
Making multiple copies ..................................................................................22
Stop copying..................................................................................................22
2 in 1 ID Copy................................................................................................22
Copy options (temporary settings).......................................................................23
Enlarging or reducing the image copied ........................................................23
Adjusting contrast..........................................................................................24
Using the Options key ...................................................................................25
Improving copy quality...................................................................................25
Sorting copies using the ADF ........................................................................26
Making N in 1 copies (page layout) ...............................................................26
Out of memory message .....................................................................................27
Section III Software
5 Software features 30
How to read PDF User’s Guide ...........................................................................30
Section IV Appendixes
A Safety and legal 32
Choosing a location .............................................................................................32
Important information...........................................................................................33
Safety precautions.........................................................................................33
Symbols for the main power switch ...............................................................36
IEC 60825-1:2007 Specification ....................................................................36
Disconnect device .........................................................................................37
Wiring information (U.K. only)........................................................................37
Radio interference .........................................................................................37
EU Directive 2002/96/EC and EN50419........................................................38
International ENERGY STAR
Important safety instructions for EU.....................................................................40
Important Information for Australia ......................................................................42
IMPORTANT-For Your Safety .......................................................................42
Important safety instructions..........................................................................42
Important Information for Some Countries...........................................................44
Important Safety Instructions.........................................................................44
Trademarks..........................................................................................................46
®
Qualification Statement................................39
ii
Page 5

B Troubleshooting and routine maintenance 47
Troubleshooting ...................................................................................................47
If you are having difficulty with your machine................................................47
Improving the print quality .............................................................................50
Error and maintenance messages.......................................................................56
Document jams..............................................................................................58
Paper jams ....................................................................................................59
Routine maintenance...........................................................................................63
Cleaning the outside of the machine .............................................................63
Cleaning the scanner glass ...........................................................................64
Cleaning the laser scanner window...............................................................65
Cleaning the corona wire...............................................................................67
Cleaning the drum unit ..................................................................................68
Replacing the consumable items.........................................................................71
Replacing a toner cartridge ...........................................................................71
Replacing the drum unit.................................................................................75
Changing LCD language ..................................................................................... 78
Machine information ............................................................................................78
Checking the serial number...........................................................................78
Checking the page counters..........................................................................78
Checking the Drum life ..................................................................................78
Packing and shipping the machine ...................................................................... 79
C Menu and features 80
On-screen programming......................................................................................80
Menu table.....................................................................................................80
Memory storage.............................................................................................80
Menu keys ...........................................................................................................80
How to access the menu mode .....................................................................81
Menu table...........................................................................................................82
D Specifications 85
General................................................................................................................85
Print media...........................................................................................................87
Copy ....................................................................................................................88
Scan ....................................................................................................................89
Print .....................................................................................................................90
Interfaces.............................................................................................................90
Computer requirements.......................................................................................91
Consumable items...............................................................................................92
E Glossary 93
FIndex 94
iii
Page 6

iv
Page 7

Section I
General I
General information 2
Loading paper and documents 6
General setup 17
Page 8

1
General information 1
Using the documentation
Thank you for buying this machine! Reading
the documentation will help you make the
most of your machine.
Symbols and conventions used in the documentation 1
The following symbols and conventions are
used throughout the documentation.
Bold Bold style identifies keys on the
machine control panel or
computer screen.
Italics Italicized style emphasizes an
important point or refers you to
a related topic.
Courier
New
Courier New font identifies the
messages shown on the LCD
of the machine.
Warnings tell you what to do to
prevent possible personal injury.
Cautions specify procedures you
must follow or avoid to prevent
possible damage to the machine or
other objects.
Electrical Hazard icons alert you to a
possible electrical shock.
Hot Surface icons warn you not to
touch machine parts that are hot.
Incorrect setup icons alert you to
devices and operations that are not
compatible with the machine.
Note icons give useful tips.
Accessing the
1
Software User’s Guide
This User’s Guide does not contain all the
information about the machine such as how
to use the advanced features of Printer,
Scanner. When you are ready to learn
detailed information about these operations,
read the Software User’s Guide.
Viewing documentation 1
Viewing documentation 1
To view the documentation, from the Start
menu, point to SP 1200 series, TYPE 1200S
Documentation, from the program group,
and then click User's Guides.
If you have not installed the software, you can
find the documentation by following the
instructions below:
a Turn on your PC.
Insert the CD-ROM labelled Manuals
into your CD-ROM drive.
b If the language selection screen
appears, click your language.
1
2
Page 9

General information
c The CD-ROM main menu will appear.
If this window does not appear, use
Windows
Start.exe program from the root
directory of the CD-ROM.
®
Explorer to find and run the
d Click Documentation.
e Click the documentation you want to
read:
PDF documents (3 manuals):
User’s Guide for stand-alone
operations, Software User’s Guide
and Quick Setup Guide.
This format is recommended for printing
the manuals.
How to find scanning instructions 1
There are several ways you can scan
documents. You can find the instructions as
follows:
Software User's Guide: 1
Scanning a document using the TWAIN
driver in Chapter 2
Scanning a document using the WIA
driver in Chapter 2
Using ControlCenter3 in Chapter 3
ScanSoft™ PaperPort™ 11SE with OCR How-to-Guides 1
The complete ScanSoft™ PaperPort™
11SE with OCR How-to-Guides can be
viewed from the Help selection in the
ScanSoft™ PaperPort™ 11SE
application.
How to find scanning instructions 1
There are several ways you can scan
documents. You can find the instructions as
follows:
1
Software User's Guide: 1
Scanning in Chapter 9
Using ControlCenter2 in Chapter 10
3
Page 10
Chapter 1
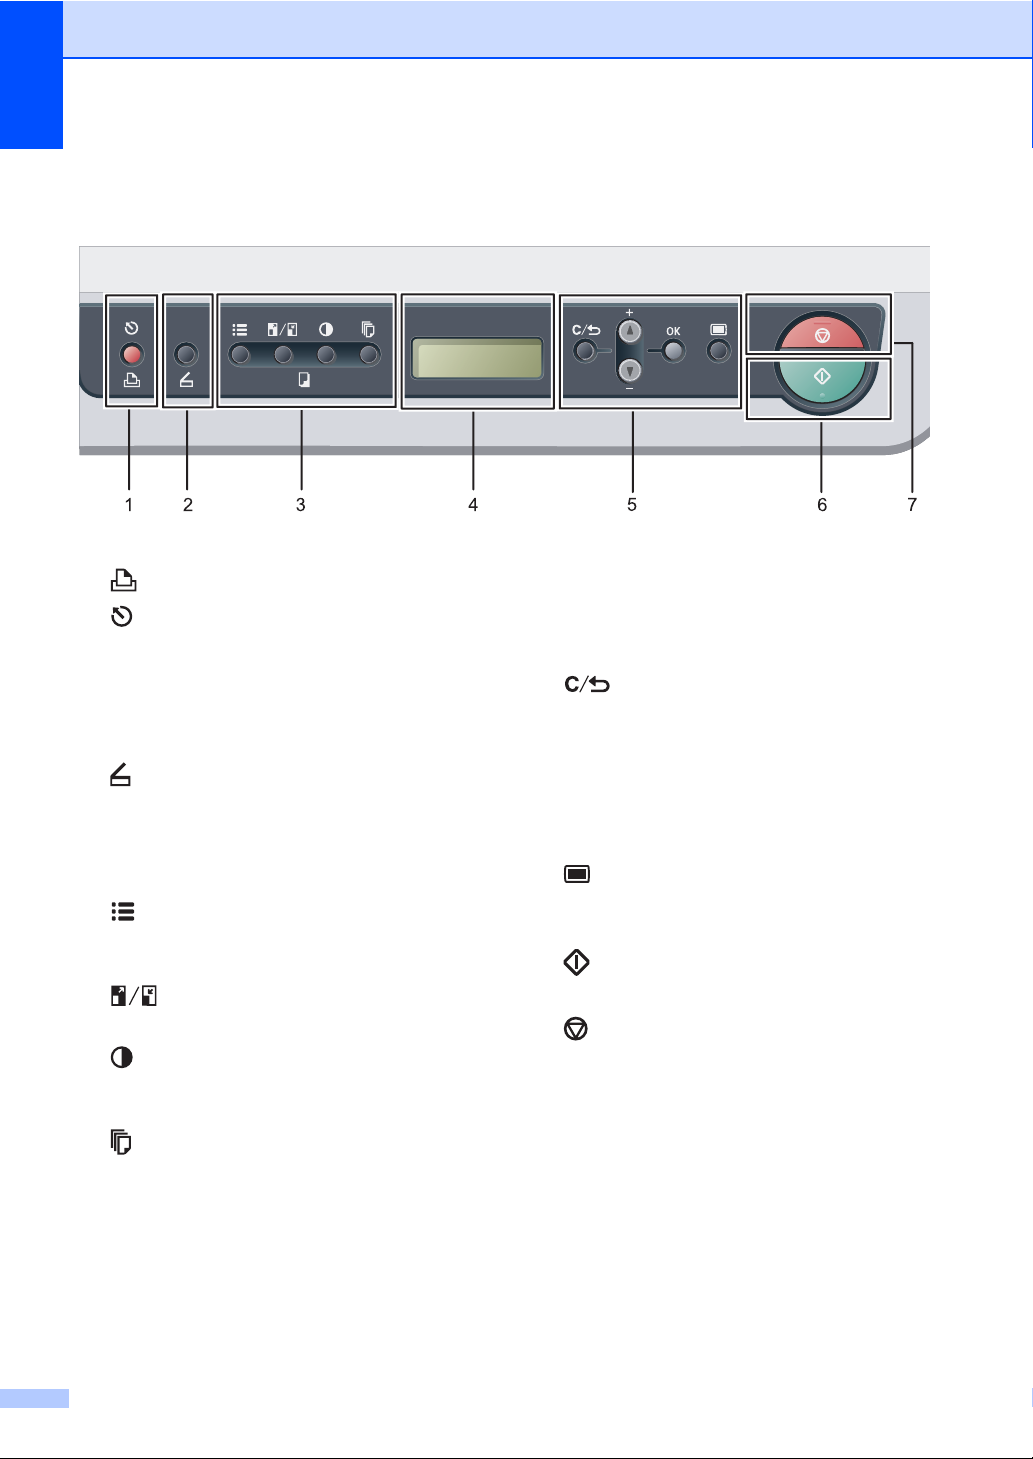
Control panel overview (For EU) 1
1 Print key
Job Cancel
Cancels a programmed print job and clears it
from the machine’s memory.
To cancel multiple print jobs, hold down this
key until the LCD shows
Job Cancel (All).
2 Scan key
Puts the machine in Scan mode. (For details
about scanning, see the Software User’s Guide
on the CD-ROM.)
3 Copy keys:
Options
You can quickly and easily choose temporary
settings for copying.
Enlarge/Reduce
Reduces or enlarges copies.
Contrast
You can increase or decrease the contrast of
your copies.
Number of Copies
Use this key to make multiple copies.
4LCD
Displays messages to help you set up and use
your machine.
5 Menu keys:
Clear/Back
Deletes entered data or lets you cancel the
current setting.
a
+ or b -
Press to scroll through the menus and options.
OK
Lets you store your settings in the machine.
Menu
Lets you access the Menu to program your
settings in this machine.
6 Start
Lets you start making copies or scanning.
7 Stop/Exit
Stops an operation or exits from a menu.
4
Page 11

General information
Control panel overview (For Asia/Oceania) 1
1 Print key
Job Cancel
Cancels a programmed print job and clears it
from the machine’s memory.
To cancel multiple print jobs, hold down this
key until the LCD shows
Job Cancel (All).
2 Scan key
Puts the machine in Scan mode. (For details
about scanning, see the Software User’s Guide
on the CD-ROM.)
3 Copy keys:
Options
You can quickly and easily choose temporary
settings for copying.
Enlarge/Reduce
Reduces or enlarges copies.
Contrast
You can increase or decrease the contrast of
your copies.
Number of Copies
Use this key to make multiple copies.
4LCD
Displays messages to help you set up and use
your machine.
5 Menu keys:
Clear/Back
Deletes entered data or lets you cancel the
current setting.
+ or b -
a
Press to scroll through the menus and options.
OK
Lets you store your settings in the machine.
Menu
Lets you access the Menu to program your
settings in this machine.
6Start
Lets you start making copies or scanning.
7 Stop/Exit
Stops an operation or exits from a menu.
1
5
Page 12
2
Loading paper and documents 2
Loading paper and print media
The machine can feed paper from the
standard paper tray or manual feed slot.
When you put paper into the paper tray, note
the following:
If your application software supports
paper size selection on the print menu,
you can choose it through the software. If
your application software does not
support it, you can set the paper size in
the printer driver or by using the control
panel buttons.
Before using paper that has holes in it,
such as organizer sheets, you must ‘fan’
the stack to avoid paper jams and
misfeeds.
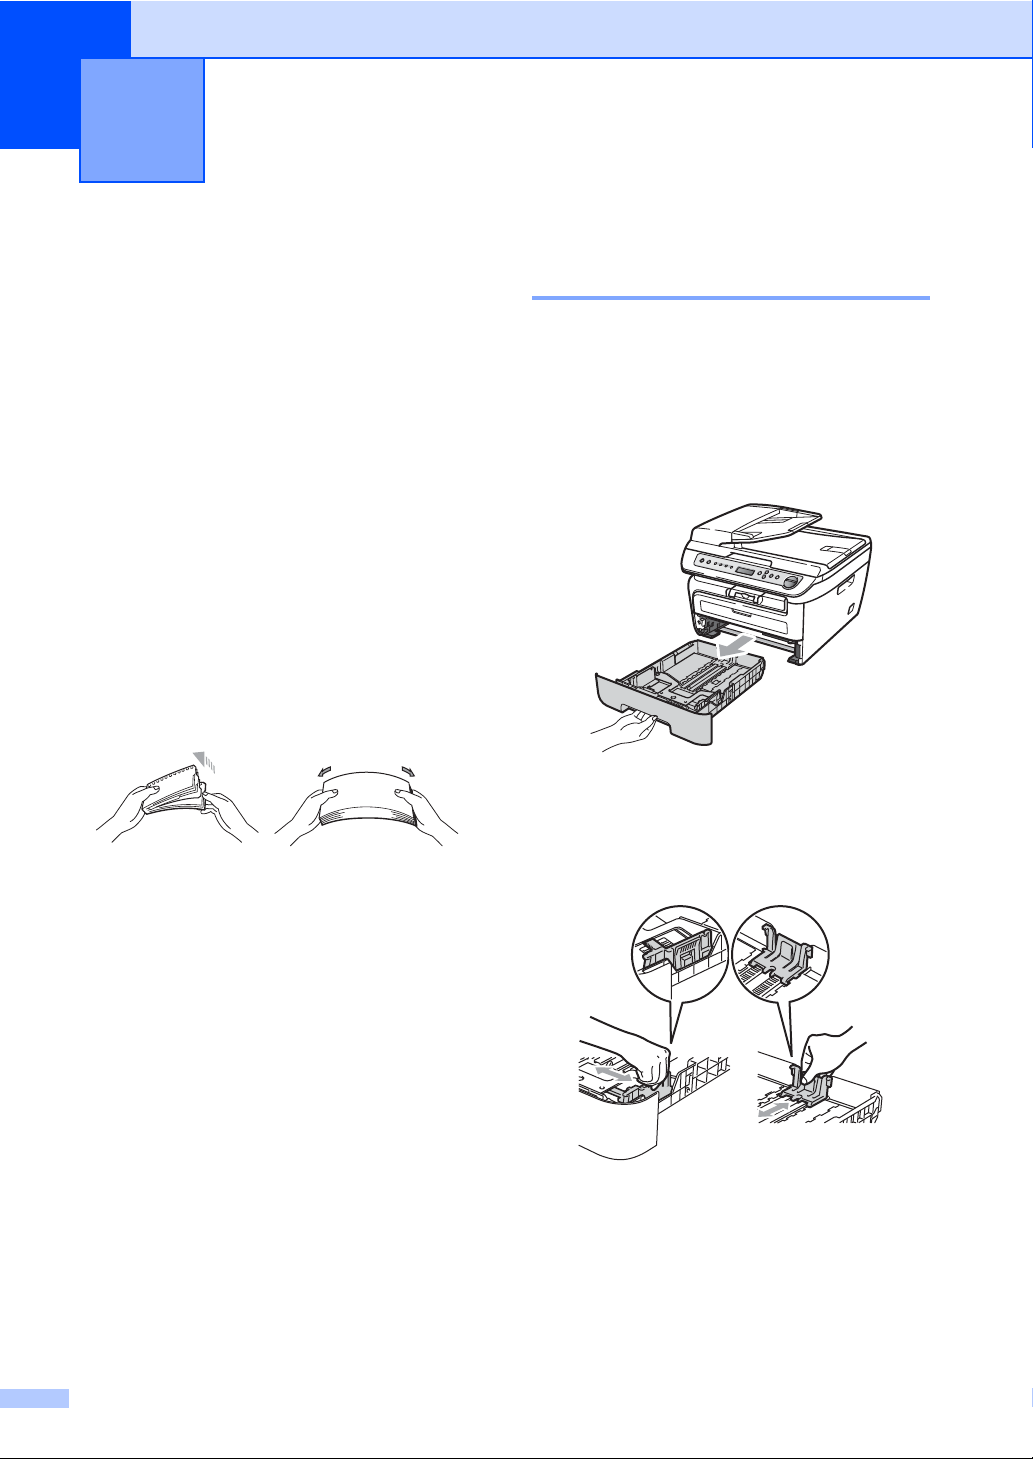
Loading paper in the paper tray 2
2
Printing on plain paper, recycled paper or transparencies from the paper tray
a Pull the paper tray completely out of the
machine.
b While pressing the green paper guide
release lever, slide the paper guides to
fit the paper size. Make sure that the
guides are firmly in the slots.
2
6
Page 13
Loading paper and documents
CAUTION
Note
1
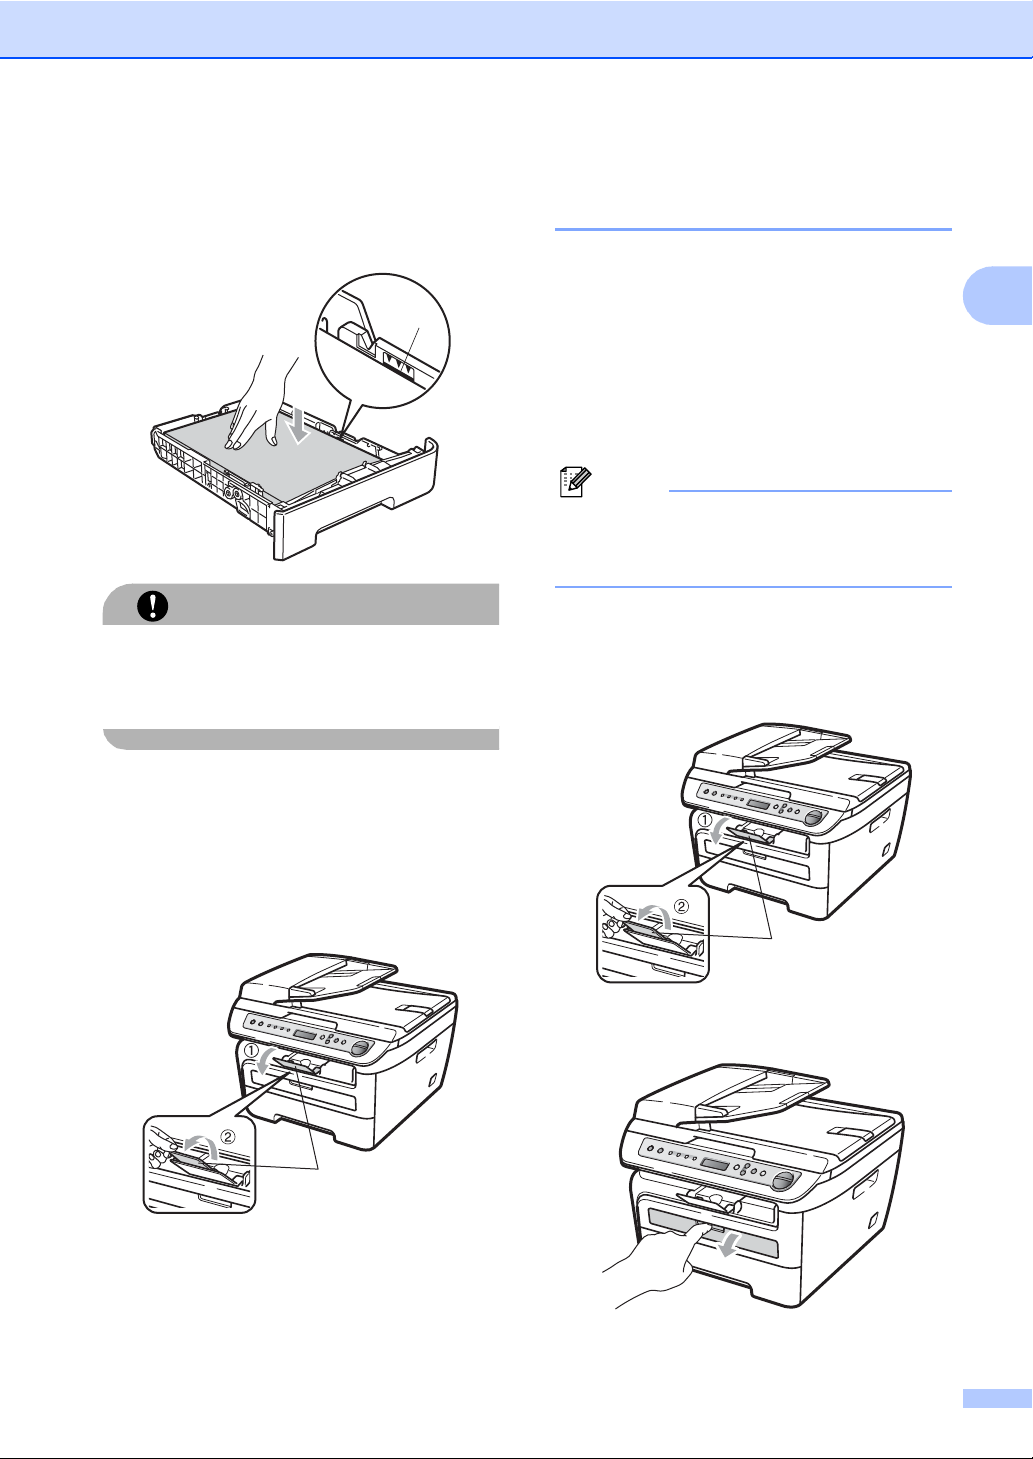
c Put paper in the tray, and make sure that
the paper is below the maximum paper
mark (1). The side to be printed on must
be face down.
1
To prevent damage to your machine
caused by paper misfeeding, make sure the
paper guides touch the sides of the paper.
d Put the paper tray firmly back in the
machine. Make sure that it is completely
inserted into the machine.
Loading paper in the manual feed slot 2
You can load envelopes and special print
media one at a time into this slot. Use the
manual feed slot to print or copy on labels,
envelopes or thicker paper.
Printing on plain paper, recycled paper or transparencies from the manual feed slot
The machine automatically turns on the
Manual Feed mode when you put paper in
the manual feed slot.
a Fold out the support flap (1) to prevent
paper from sliding off the face-down
output tray, or remove each page as
soon as it comes out of the machine.
2
2
e Fold out the support flap (1) to prevent
paper from sliding off the face-down
output tray.
1
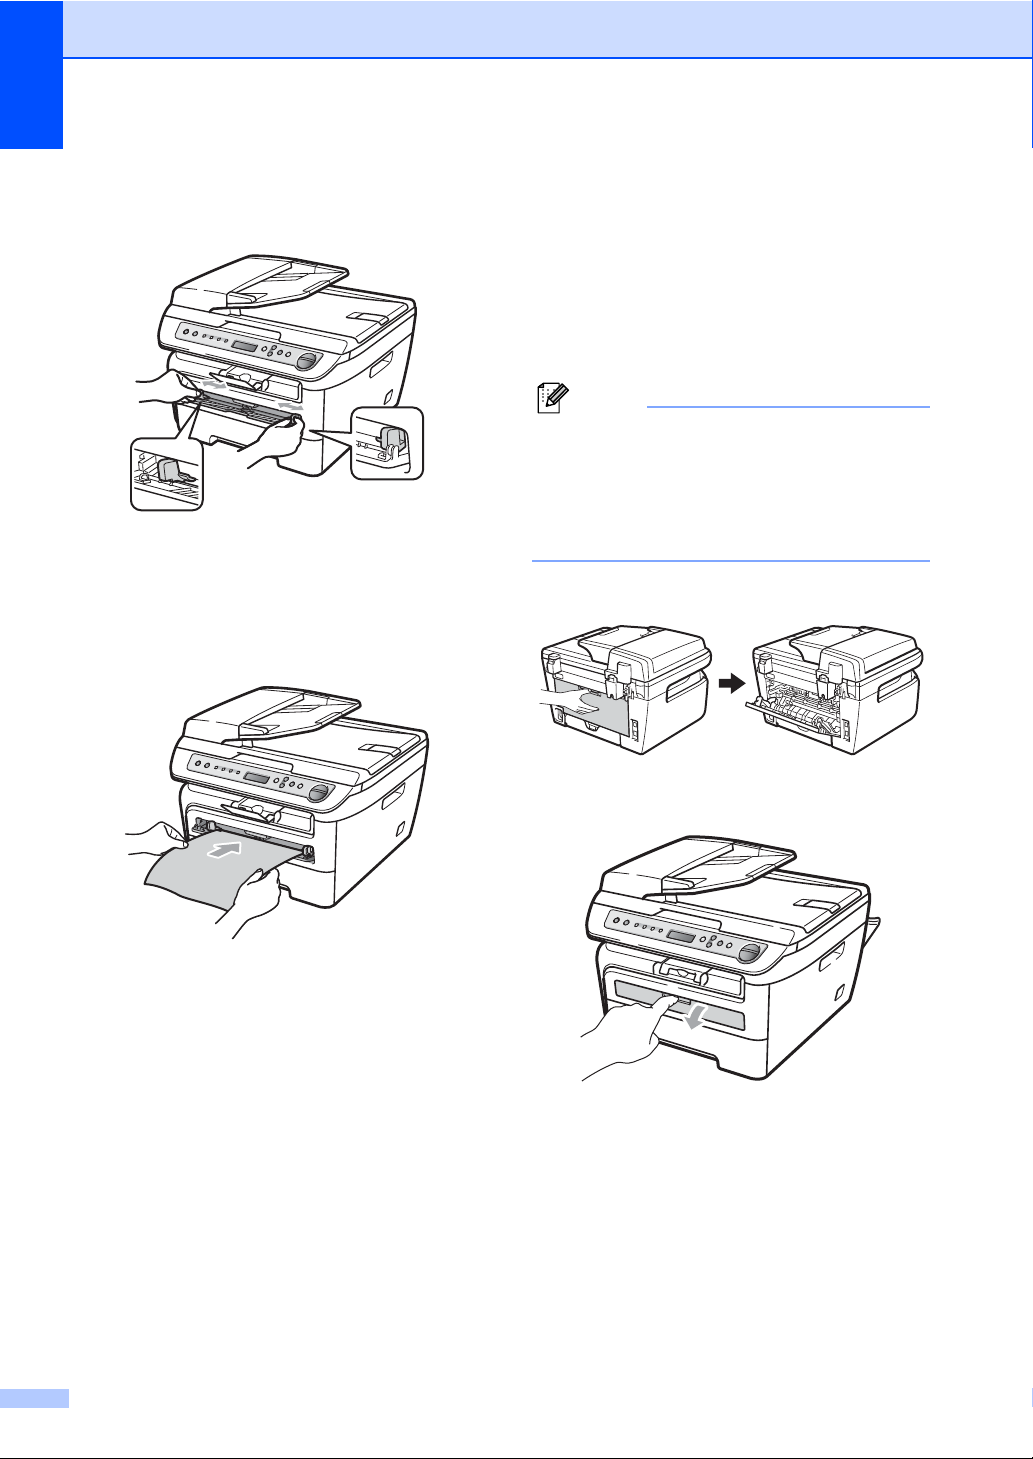
b Open the manual feed slot cover.
7
Page 14
Chapter 2
Note
c Using both hands, slide the manual feed
slot paper guides to the width of the
paper that you are going to use.
d Using both hands, put one sheet of
paper or one transparency in the
manual feed slot until the front edge
touches the paper feed roller. When you
feel the machine pull in the paper, let go.
Printing on thick paper, bond paper, labels and envelopes 2
When the back output tray is pulled down, the
machine has a straight paper path from the
manual feed slot through to the back of the
machine. Use this paper feed and output
method when you want to print on thick
paper, labels or envelopes.
• Remove each printed sheet or envelope
immediately to prevent a paper jam.
• The machine automatically turns on the
Manual Feed mode when you put paper in
the manual feed slot.
a Open the back cover (back output tray).
b Open the manual feed slot cover.
8
Page 15
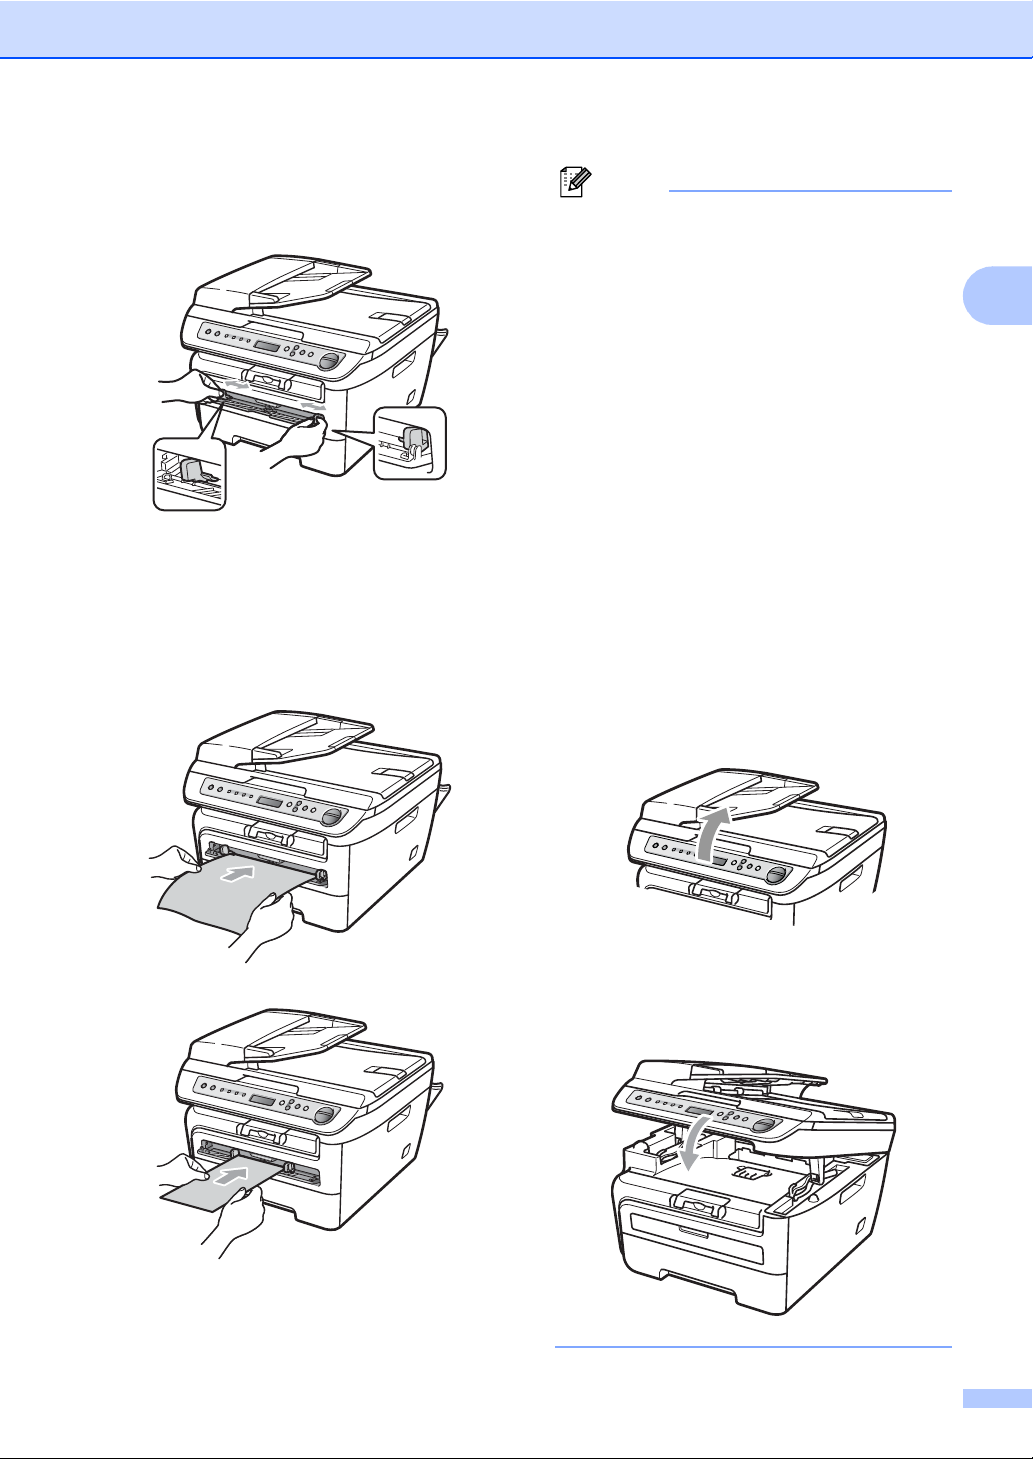
c Using both hands, slide the manual feed
Note
slot paper guides to the width of the
paper that you are going to use.
d Using both hands, put one sheet of
paper or one envelope in the manual
feed slot until the front edge of the paper
or envelope touches the paper feed
roller. When you feel the machine pull in
the paper, let go.
Loading paper and documents
• Put the paper into the manual feed slot
with the side to be printed face up.
• Make sure that the print media (See
Acceptable paper and other print media
on page 11) is straight and in the proper
position on the manual feed slot. If it is not,
the paper or the transparency may not be
fed correctly, resulting in a skewed
printout or a paper jam.
• Do not put more than one sheet of paper
in the manual feed slot at any one time, as
it may cause a jam.
• If you put any print media in the manual
feed slot before the machine is in the
Ready state, the print media may be
ejected without being printed on.
• To easily remove a small printout from the
output tray, lift up the scanner cover by
using both hands as shown in the
illustration.
2
• You can still use the machine while the
scanner cover is up. To close the scanner
cover, push it down with both hands.
9
Page 16
Chapter 2
Note
Note
2
2
1
1
2
2
1
1
2
2
1
1
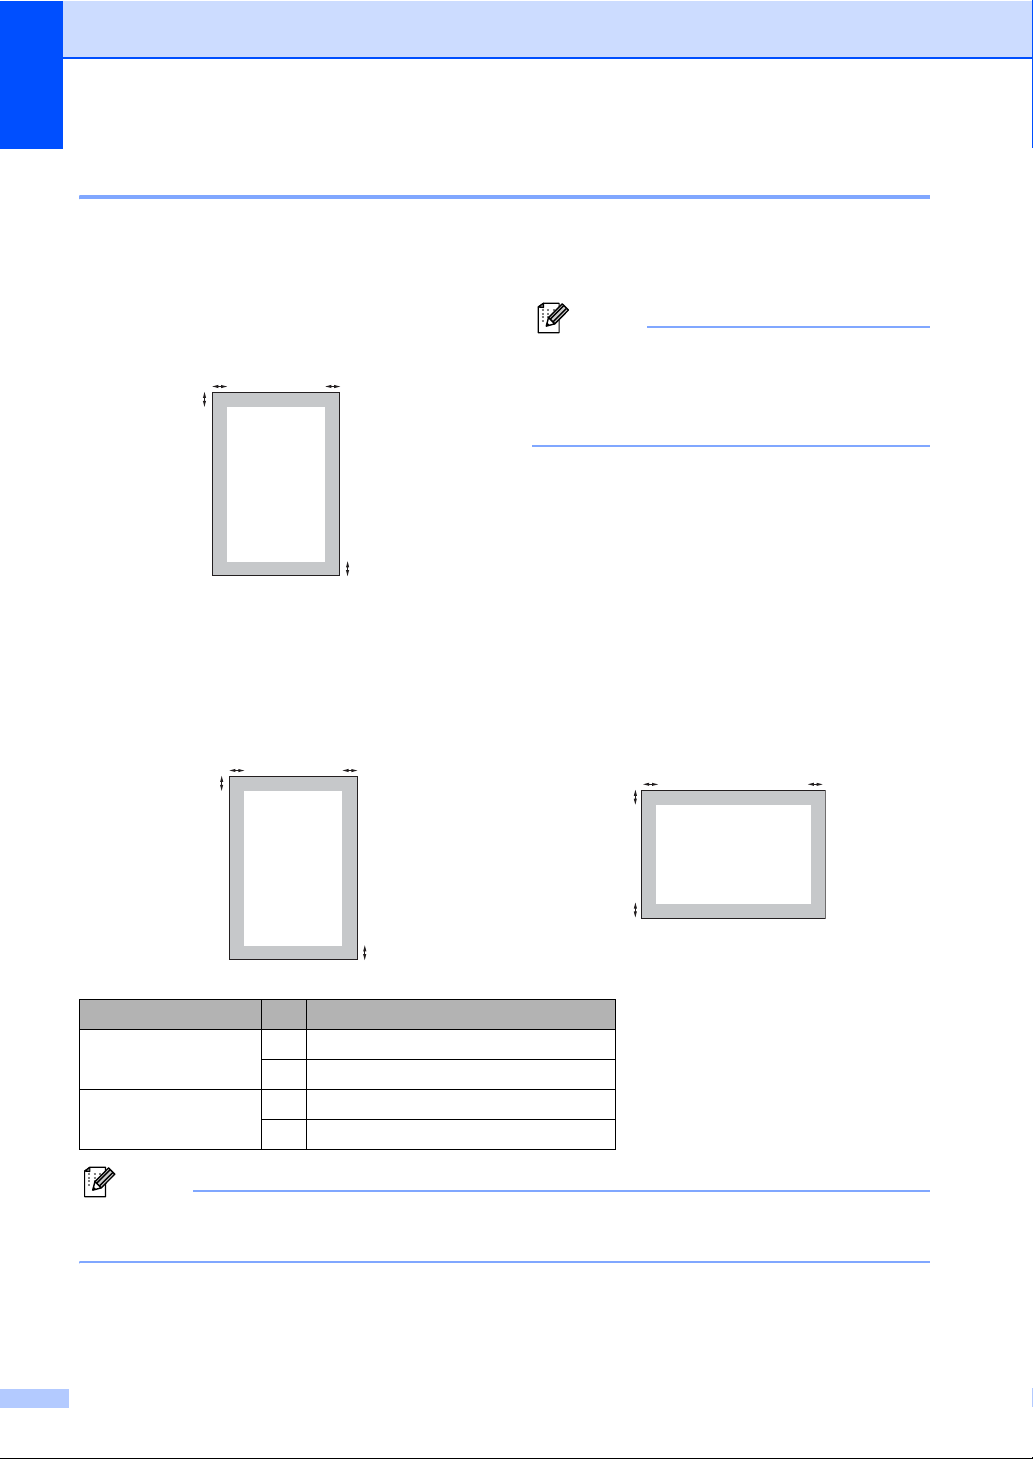
Unprintable area 2
Unprintable area for copies 2
The printable area of your machine begins at
13 mm
22 mm
approximately 3 mm from the top and bottom
and 2 mm from both sides of the paper.
This unprintable area shown above is for a
single copy or a 1 in 1 copy using A4 size
paper. The unprintable area changes with
the paper size.
Unprintable area when printing from a computer 2
When using the printer driver the printable area is smaller than the paper size, as shown below.
Portrait Landscape
Printer driver
Portrait 1 4.23 mm
26.01 mm
Landscape 1 4.23 mm
25 mm
The unprintable area shown above is for A4 size paper. The unprintable area changes with the
paper size.
10
Page 17

Loading paper and documents
Acceptable paper and other print media 2
Print quality may vary according to the type of
paper you are using.
You can use the following types of print
media: plain paper, bond paper, recycled
paper, transparencies, labels or envelopes.
For best results, follow the instructions below:
Use paper made for plain paper copying.
Use paper that is 75 to 90 g/m
Use labels and transparencies which are
designed for use in laser machines.
Do not put different types of paper in the
paper tray at the same time because it
may cause paper jams or misfeeds.
For correct printing, you must choose the
same paper size from your software
application as the paper in the tray.
Avoid touching the printed surface of the
paper immediately after printing.
When you use transparencies remove
each sheet immediately to prevent
smudging or paper jams.
Use long grain paper with a neutral Ph
value, and a moisture content of approx.
5%.
2
.
Recommended paper and print media 2
To get the best print quality, we suggest using
the following paper.
Paper Type Item
Plain Paper
Recycled Paper Xerox Recycled Supreme
Transparency 3M CG3300
Labels Avery laser label L7163
Envelope Antalis River series (DL)
Xerox Premier TCF 80 g/m
Xerox Business 80 g/m
2
80g/m
2
2
Type and size of paper 2
The machine loads paper from the installed
standard paper tray or manual feed slot.
Standard paper tray 2
Since the standard paper tray is a universal
type, you can use any of the paper sizes (one
paper type and size at a time) listed in the
table in Paper capacity of the paper trays
on page 12. The standard paper tray can
hold up to 250 sheets of Letter/A4 size paper
(80 g/m
maximum paper mark on the sliding paper
width guide.
2
). Paper can be loaded up to the
2
Manual Feed Slot 2
The manual feed slot can hold a sheet with a
size of 76.2 to 220 mm wide and 116 to
406.4 mm long. You can use the manual feed
slot if you are using special paper, envelopes
or labels.
11
Page 18

Chapter 2
Paper capacity of the paper trays 2
Paper size Paper types No. of sheets
Paper Tray (For EU)
A4, Letter, Executive, A5,
A6, B5, B6.
(For Asia)
A4, Letter, Executive, A5,
A6, B5, B6 and Folio
Manual Feed Slot Width: 76.2 to 220 mm
Length: 116 to 406.4 mm
1
Folio size is 215.9mm x 330.2 mm
1
Plain paper and recycled
paper
.
Transparency up to 10
Plain paper, recycled
paper, bond paper,
envelopes, labels and
transparencies
up to 250
[80 g/m2]
1
Recommended paper specifications 2
The following paper specifications are suitable for this machine.
Basis weight
Thickness 80-110 µm
Roughness Higher than 20 sec.
Stiffness
Grain direction Long grain
Volume resistivity
Surface resistivity
Filler CaCO
Ash content Below 23 wt%
Brightness Higher than 80 %
Opacity Higher than 85 %
75-90 (g/m
90-150 cm
10e
10e
2
)
3
/100
9
-10e11 ohm
9
12
-10e
ohm-cm
(Neutral)
3
Handling and using special paper 2
The machine is designed to work well with
most types of xerographic and bond paper.
However, some paper variables may have an
effect on print quality or handling reliability.
Always test samples of paper before
purchasing to ensure desirable performance.
Store paper in its original packaging and keep
it sealed. Keep the paper flat and away from
moisture, direct sunlight and heat.
Some important guidelines when selecting
paper are:
Do not use inkjet paper because it may
cause a paper jam or damage your
machine.
Preprinted paper must use ink that can
withstand the temperature of the
machine’s fusing process (200 degrees
centigrade).
12
Page 19
Loading paper and documents
CAUTION
1
1
If you use bond paper, paper having a
rough surface or paper that is wrinkled or
creased, the paper may exhibit degraded
performance.
Types of paper to avoid 2
Some types of paper may not perform well
or may cause damage to your machine.
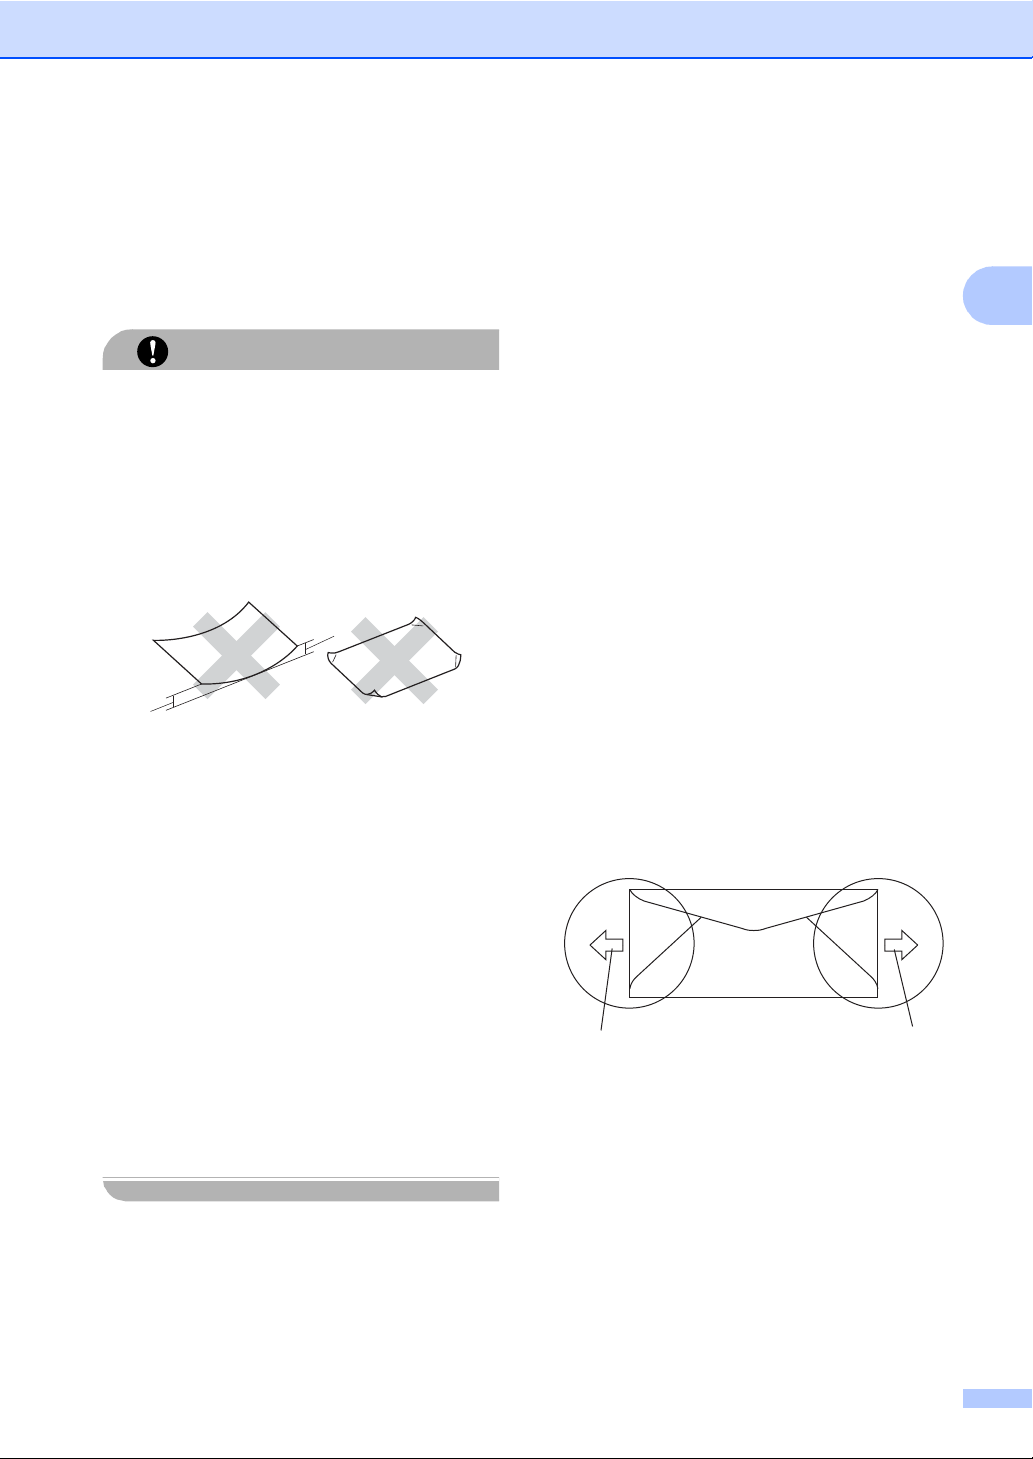
DO NOT use paper:
• that is highly textured
• that is extremely smooth or shiny
• that is curled or warped
12 mm
• that is coated or has a chemical finish
• that is damaged, creased or folded
• that exceeds the recommended weight
specification in this guide
• with tabs and staples
Envelopes 2
Most envelopes will be suitable for your
machine. However, some envelopes may
have feed and print-quality problems
because of the way they have been made. A
suitable envelope should have edges with
straight, well-creased folds and the leading
edge should not be thicker than two sheets of
paper. The envelope should lie flat and not be
of baggy or flimsy construction. You should
buy quality envelopes from a supplier who
understands that you will be using the
envelopes in a laser machine.
Envelopes can be fed from manual feed slot
one at a time. We recommend that you print
a test envelope to make sure the print results
are what you want before you print or
purchase a large quantity of envelopes.
Check the following:
Envelopes should have a lengthwise
sealing flap.
The sealing flaps should be folded crisply
and correctly (irregularly cut or folded
envelopes may cause paper jams).
Envelopes should consist of two layers of
paper in the area circled in figure below.
2
• with letterheads using low temperature
dyes or thermography
• that is multipart or carbonless
• that is designed for inkjet printing
If you use any of the types of paper listed
above, they may damage your machine.
This damage is not covered under any our
warranty or service agreement.
1
1 Feeding direction
We recommend that you do not print
within 15 mm of the edges of envelopes.
1
Envelope joints that are sealed by the
manufacturer should be secure.
13
Page 20

Chapter 2
CAUTION
Types of envelopes to avoid 2
DO NOT use envelopes:
• that are damaged, curled, wrinkled or an
unusual shape
• that are extremely shiny or textured
• with clasps, staples, snaps or tie strings
• with self-adhesive closures
• that are of a baggy construction
• that are not sharply creased
• that are embossed (have raised writing
on them)
• that were previously printed by a laser
machine
• that are pre-printed on the inside
• that cannot be arranged neatly when
stacked
• that are made of paper that weighs more
than the paper weight specifications for
the machine
• with double flaps as shown in figure
below
• with sealing flaps that have not been
folded at purchase
• with sealing flaps as shown in figure
below
• with each side folded as shown in figure
below
• with edges that are not straight or
consistently square
• with windows, holes, cut-outs or
perforations
• with glue on surface as shown in figure
below
14
If you use any of the types of envelopes
listed above, they may damage your
machine. This damage is not covered
under any our warranty or service
agreement.
Occasionally you may experience paper
feed problems caused by the thickness,
size and flap shape of the envelopes you
are using.
Page 21

Loading paper and documents
CAUTION
CAUTION
Labels 2
The machine will print on most types of labels
designed for use with a laser machine. Labels
should have an adhesive that is acrylic-based
since this material is more stable at the high
temperatures in the fuser unit. Adhesives
should not come in contact with any part of
the machine, because the label stock may
stick to the drum unit or rollers and cause
jams and print quality problems. No adhesive
should be exposed between the labels.
Labels should be arranged so that they cover
the entire length and width of the sheet. Using
labels with spaces may result in labels
peeling off and causing serious jams or print
problems.
All labels used in this machine must be able
to withstand a temperature of 392 degrees
Fahrenheit (200 degrees centigrade) for a
period of 0.1 seconds.
Label sheets should not exceed the paper
weight specifications described in this User’s
Guide. Labels exceeding this specification
may not feed or print correctly and may cause
damage to your machine.
Labels can be fed from the manual feed slot
only.
Types of labels to avoid 2
Do not use labels that are damaged, curled,
wrinkled or an unusual shape.
DO NOT feed part used label sheets. The
exposed carrier sheet will damage your
machine.
Loading documents 2
Using the automatic document feeder (ADF) 2
The ADF can hold up to 35 pages and feeds
each sheet individually. Use standard
80 g/m
before putting them in the ADF.
Recommended environment 2
2
paper and always fan the pages
Temperature: 20 to 30 C
Humidity: 50% - 70%
Paper: Xerox Premier TCF 80 g/m
Business 80 g/m
2
2
or Xerox
DO NOT leave thick documents on the
scanner glass. If you do this, the ADF may
jam.
DO NOT use paper that is curled, wrinkled,
folded, ripped, stapled, paper-clipped,
pasted or taped.
DO NOT use cardboard, newspaper or
fabric.
To avoid damaging your machine while
using the ADF, DO NOT pull on the
document while it is feeding.
To scan non-standard documents see
Using the scanner glass on page 16.
Make sure documents written with ink are
completely dry.
Documents must be from 148 to
215.9 mm wide and from 148 to 355.6 mm
long, and of a standard weight 80 g/m
2
.
2
15
Page 22
Chapter 2
Note
Note
CAUTION
2
1
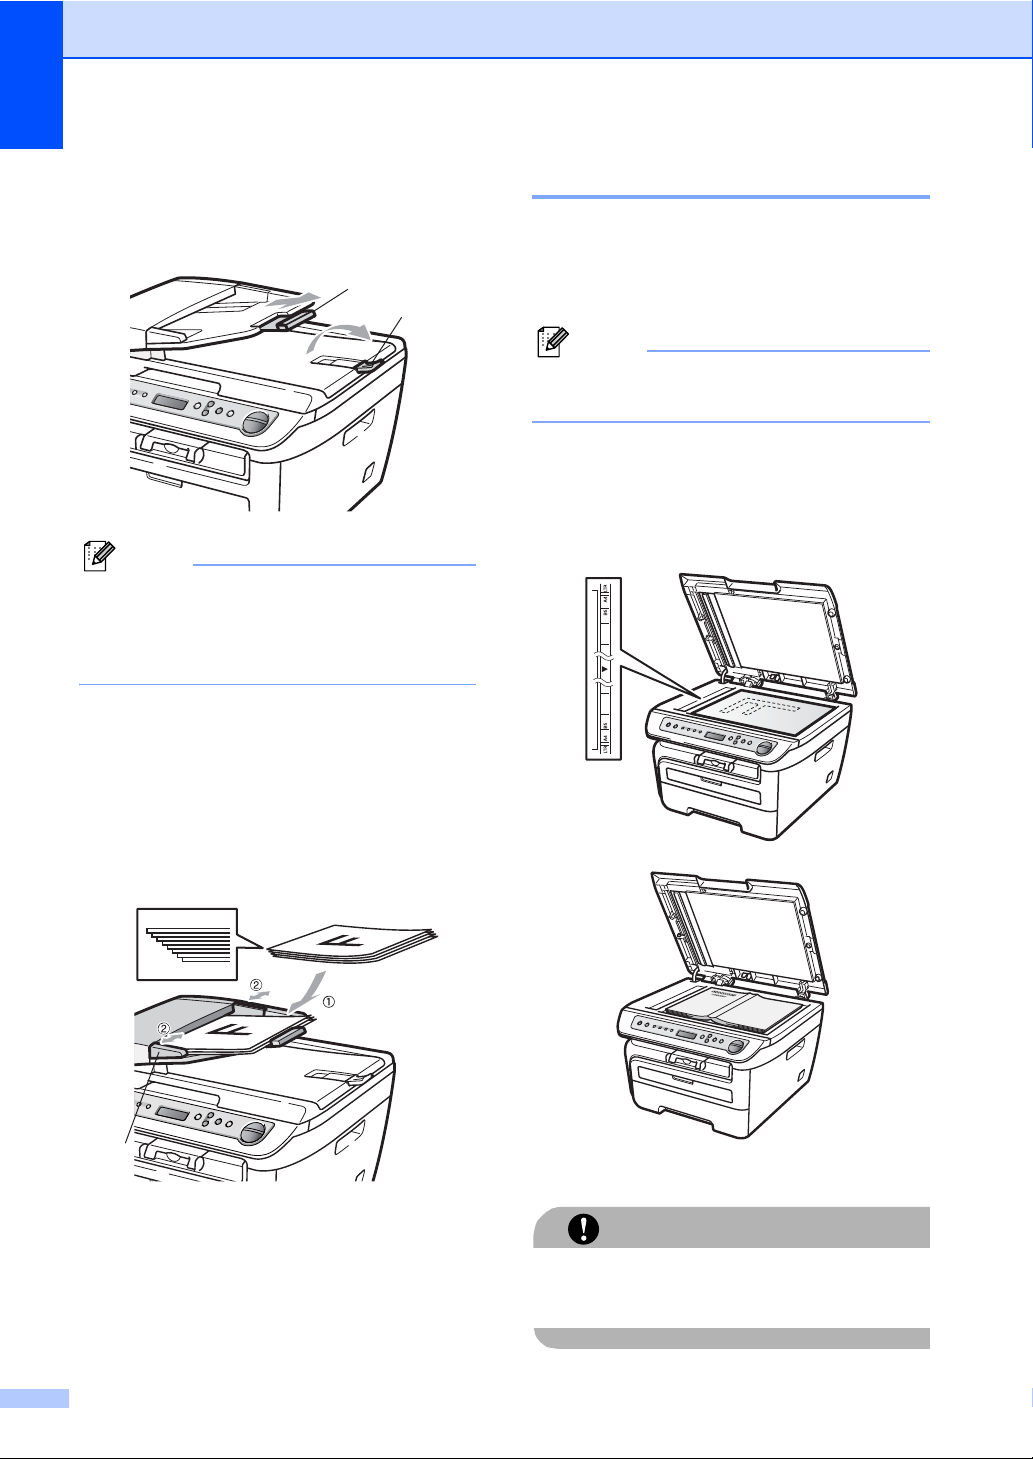
a Fold out the ADF document output
support flap (1) and the ADF support
flap (2).
For legal paper, close the ADF document
output support flap (1), and then take each
individual sheet off the ADF output tray
after scanning.
b Fan the pages well.
Using the scanner glass 2
You can use the scanner glass to copy or
scan pages of a book or one page at a time.
Documents can be up to 215.9 mm wide and
297 mm long.
To use the scanner glass, the ADF must
be empty.
a Lift the document cover.
b Using the document guidelines on the
left, centre the document face down on
the scanner glass.
c Place your document, face up top edge
first, in the ADF until you feel it touch the
feed roller.
d Adjust the paper guides (1) to fit the
width of your document.
1
c Close the document cover.
If the document is a book or is thick do not
slam the cover or press on it.
16
Page 23

3
Note
General setup 3
Paper settings 3
Paper type 3
Set up the machine for the type of paper you
are using. This will give you the best print
quality.
a Press Menu.
b Press a or b to choose 1.General
Setup.
Press OK.
c Press a or b to choose 1.Paper Type.
Press OK.
d Press a or b to choose Thin, Plain,
Thick, Thicker, Transparency or
Recycled Paper.
Press OK.
e Press Stop/Exit.
Paper size 3
e Press Stop/Exit.
If you chose Transparency as the paper
type you will only be able to choose
Letter or A4 size paper in Step d.
Volume settings 3
Beeper volume 3
When the beeper is on, the machine will beep
when you press a key or make a mistake. You
can choose a range of volume levels, from
High to Off.
a Press Menu.
b Press a or b to choose 1.General
Setup.
Press OK.
c Press a or b to choose 3.Beeper.
Press OK.
3
You can use seven sizes of paper for printing
copies: A4, Letter, Executive, A5, A6, B5 and
B6.
When you change the size of paper in the
tray, you will also need to change the setting
for paper size at the same time so your
machine can fit the document on the page.
a Press Menu.
b Press a or b to choose 1.General
Setup.
Press OK.
c Press a or b to choose 2.Paper Size.
Press OK.
d Press a or b to choose A4, Letter,
Executive, A5, A6, B5 or B6.
Press OK.
d Press a or b to choose Off, Low, Med or
High.
Press OK.
e Press Stop/Exit.
17
Page 24

Chapter 3
Note
Note
Ecology features 3
Toner Save 3
You can save toner using this feature. When
you set Toner Save to On, print appears
lighter. The default setting is Off.
a Press Menu.
b Press a or b to choose 1.General
Setup.
Press OK.
c Press a or b to choose 4.Ecology.
Press OK.
d Press a or b to choose 1.Toner Save.
Press OK.
e Press a or b to choose On or Off.
Press OK.
f Press Stop/Exit.
We do not recommend Toner Save for
printing Photo or Greyscale images.
Sleep time 3
Setting the sleep time reduces power
consumption by turning off the fuser while the
machine is idle.
You can choose how long the machine must
be idle (from 00 to 99 minutes) before it goes
into sleep mode. When the machine receives
computer data, or makes a copy, the timer will
be reset. The default setting is 05 minutes.
While the machine is in sleep mode the LCD
will display Sleep. When printing or copying
in sleep mode, there will be a short delay
while the fuser warms up.
a Press Menu.
b Press a or b to choose 1.General
Setup.
Press OK.
c Press a or b to choose 4.Ecology.
Press OK.
d Press a or b to choose 2.Sleep Time.
Press OK.
e Enter the length of time the machine is
idle before entering sleep mode (00 to
99). Press OK.
f Press Stop/Exit.
To turn off sleep mode, press Start
and Options at the same time in e.
Press a or b to choose Off. Press OK.
18
Page 25

LCD contrast 3
You can change the contrast to make the
LCD look lighter or darker.
a Press Menu.
b Press a or b to choose 1.General
Setup.
Press OK.
c Press a or b to choose 5.LCD
Contrast.
Press OK.
d Press a to make the LCD darker. Or,
press b to make the LCD lighter.
Press OK.
e Press Stop/Exit.
General setup
3
User Settings List 3
You can print a list of the settings you
programmed.
a Press Menu.
b Press a or b to choose 1.General
Setup.
Press OK.
c Press a or b to choose 6.User
Settings.
Press OK.
d Press Start.
e Press Stop/Exit.
19
Page 26

Chapter 3
20
Page 27

Section II
Copy II
Making copies 22
Page 28
4
Note
Making copies 4
How to copy 4
Entering copy mode 4
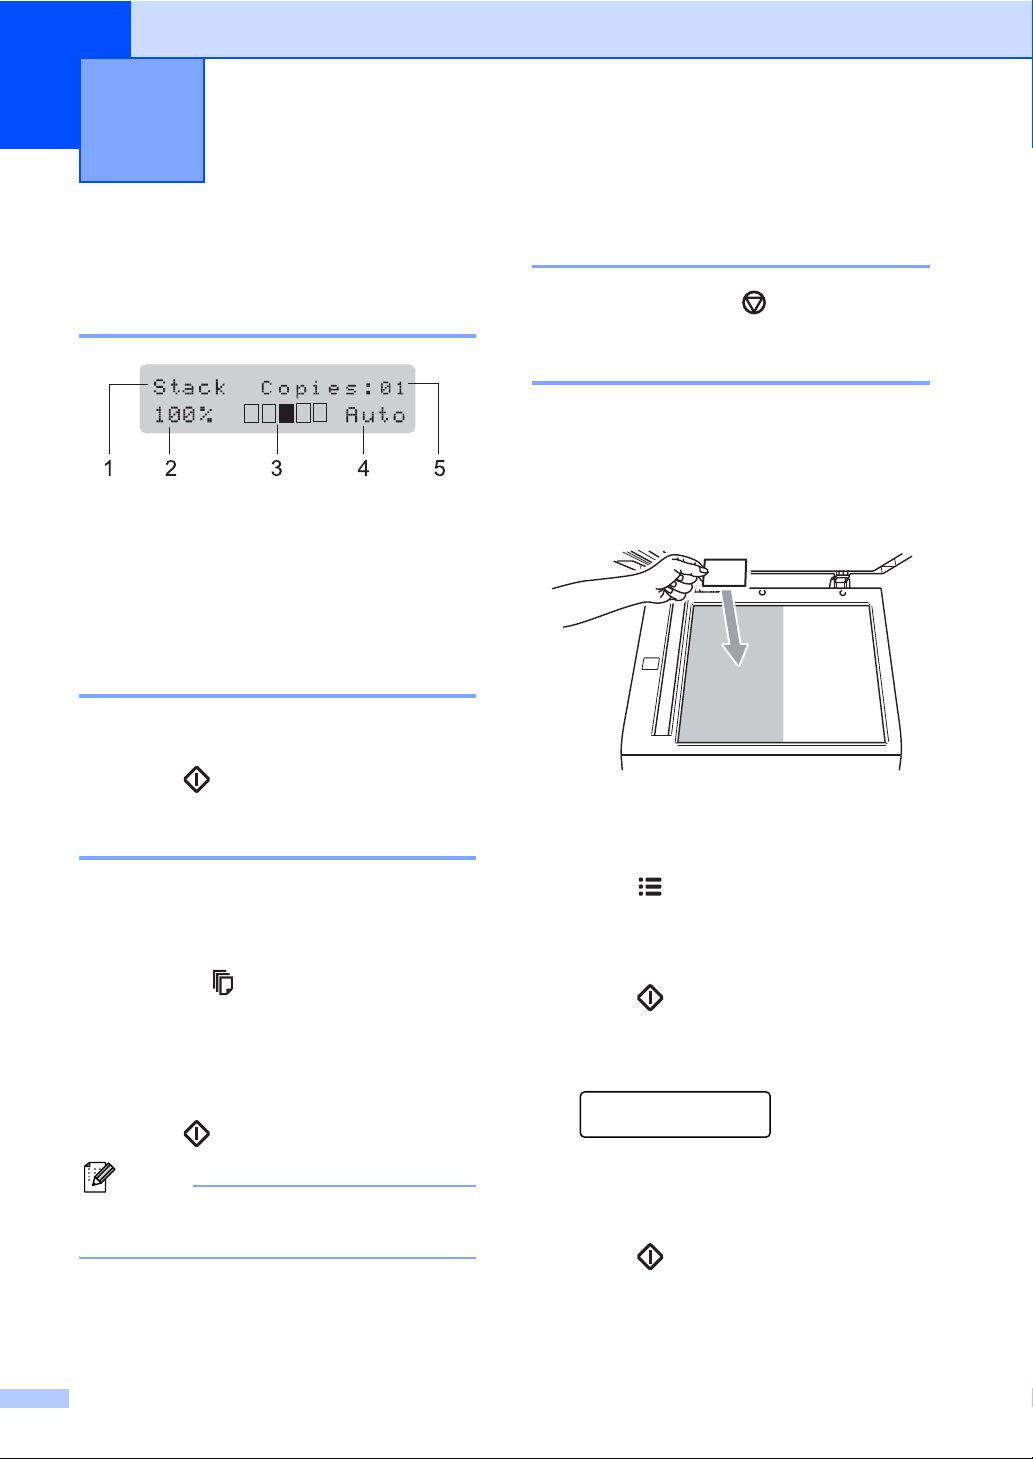
1 Stack/Sort
2 Copy ratio and copy layout
3 Contrast
4Quality
5 Number of copies
Making a single copy 4
a Load your document.
b Press Start.
Making multiple copies 4
Stop copying 4
To stop copying, press Stop/Exit.
2 in 1 ID Copy 4
You can copy both sides of your identification
card onto one page, keeping the original card
size.
a Place your identification card face down
on the left side of the scanner glass.
Even if a document is placed on the
ADF, the machine scans the data
from the scanner glass.
a Load your document.
b Do one of the following:
Press Number of Copies to
enter the number of copies (up to
99).
Press or hold a or b to increase or
decrease the number of copies.
c Press Start.
To sort your copies, see Sorting copies
using the ADF on page 26.
22
b Press Options. LCD display
2 in 1 ID Copy.
c Press OK.
d Press Start.
After the machine scans the first side of
the card, the LCD will display the
following instruction.
Turn over the ID
Then Press Start
e Turn over your identification card and
place it at the left side of the scanner
glass.
f Press Start.
The machine scans the other side of the card
and prints the page.
Page 29
Note
When 2 in 1 ID Copy is chosen, the
machine sets the quality to Photo and the
contrast to +1 (-nnnon+).
Making copies
Copy options (temporary settings) 4
When you want to quickly change the copy
settings temporarily for the next copy, use the
temporary Copy keys. You can use different
combinations.
4
The machine returns to its default settings
one minute after copying.
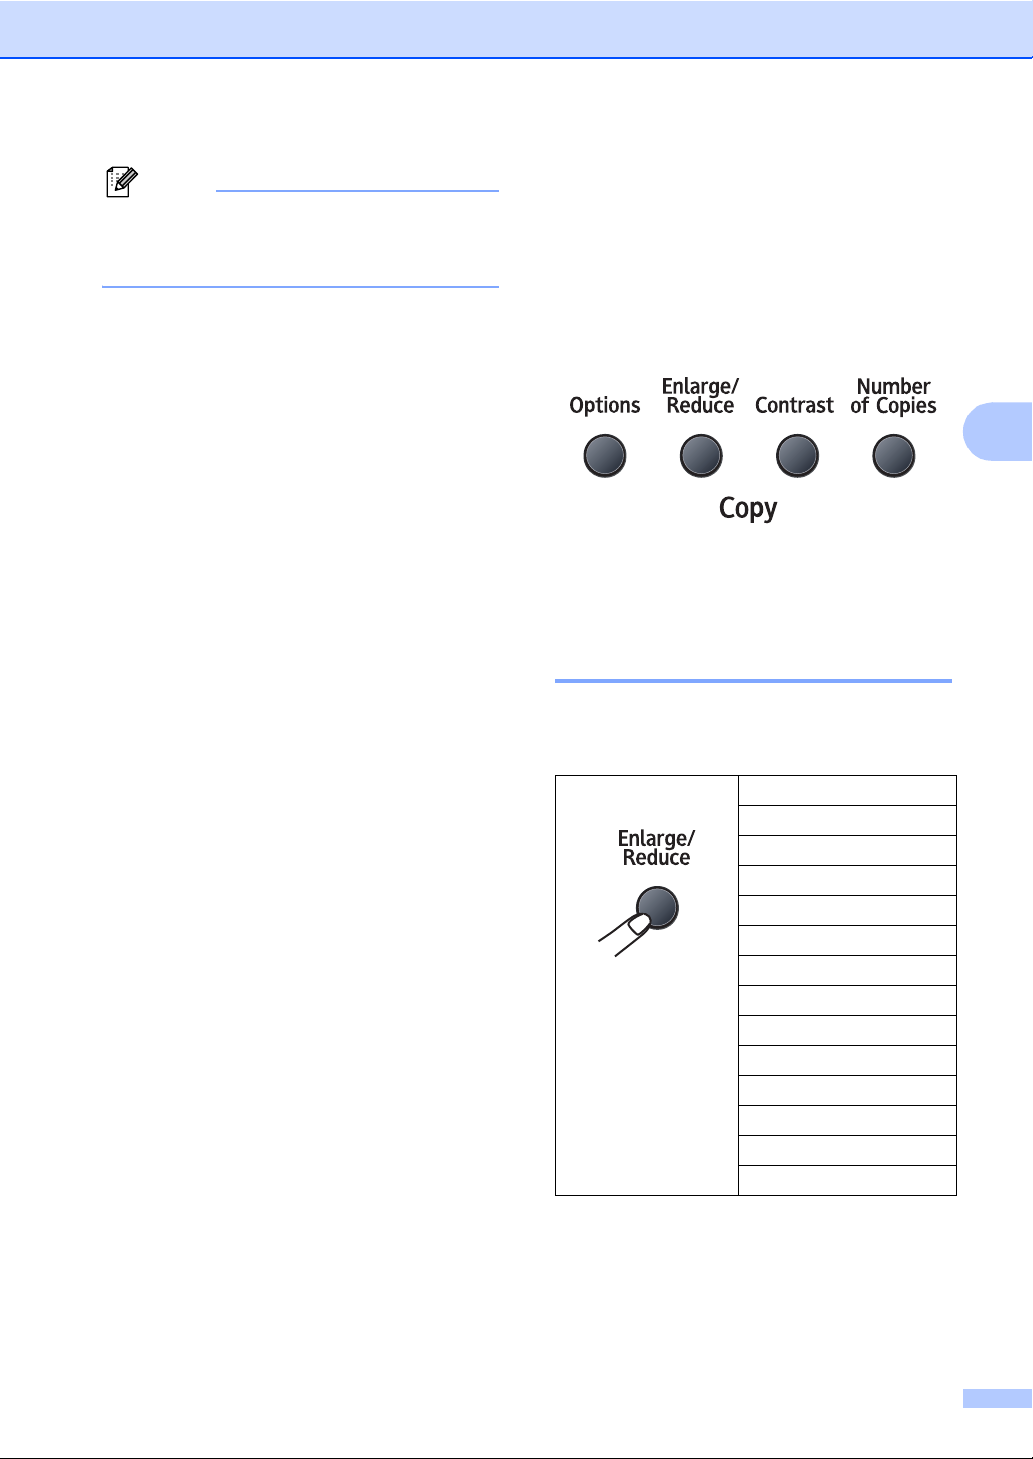
Enlarging or reducing the image copied 4
You can choose the following enlargement or
reduction ratios:
Press
100%*
97% LTRiA4
94% A4iLTR
91% Full Page
85% LTRiEXE
83%
78%
70% A4iA5
50%
Custom(25-400%)
Auto
200%
141% A5iA4
104% EXEiLTR
* The factory setting is shown in Bold with an
asterisk.
23
Page 30

Chapter 4
Note
When set to Auto, the machine calculates
the reduction ratio that best fits the paper size
the paper tray set to. (See Paper size
on page 17.) Auto is only available when
using the ADF.
Custom(25-400%) allows you to enter a
ratio from 25% to 400%.
To enlarge or reduce the next copy follow the
instructions below:
a Load your document.
b Enter the number of copies you want.
c Press Enlarge/Reduce.
d Do one of the following:
Press a or b to choose the
enlargement or reduction ratio you
want.
Press OK.
Press a or b to choose
Custom(25-400%).
Adjusting contrast 4
Contrast 4
Adjust the contrast to help an image look
sharper and more vivid.
To temporarily change the contrast setting,
follow the steps below:
a Load your document.
b Enter the number of copies you want.
c Press Contrast.
d Press a or b to increase or decrease the
contrast.
Press OK.
e Press Start.
To change the default setting follow the steps
below:
a Press Menu.
Press OK.
Press a or b to enter an enlargement
or reduction ratio from 25% to 400%.
Press OK.
e Press Start.
Page Layout Options 2 in 1(P), 2 in 1(L), 4
in 1(P) or 4 in 1(L) are not available with
Enlarge/Reduce.
b Press a or b to choose 2.Copy.
Press OK.
c Press a or b to choose 2.Contrast.
Press OK.
d Press a or b to increase or decrease the
contrast.
Press OK.
e Press Stop/Exit.
24
Page 31
Making copies
Using the Options key 4
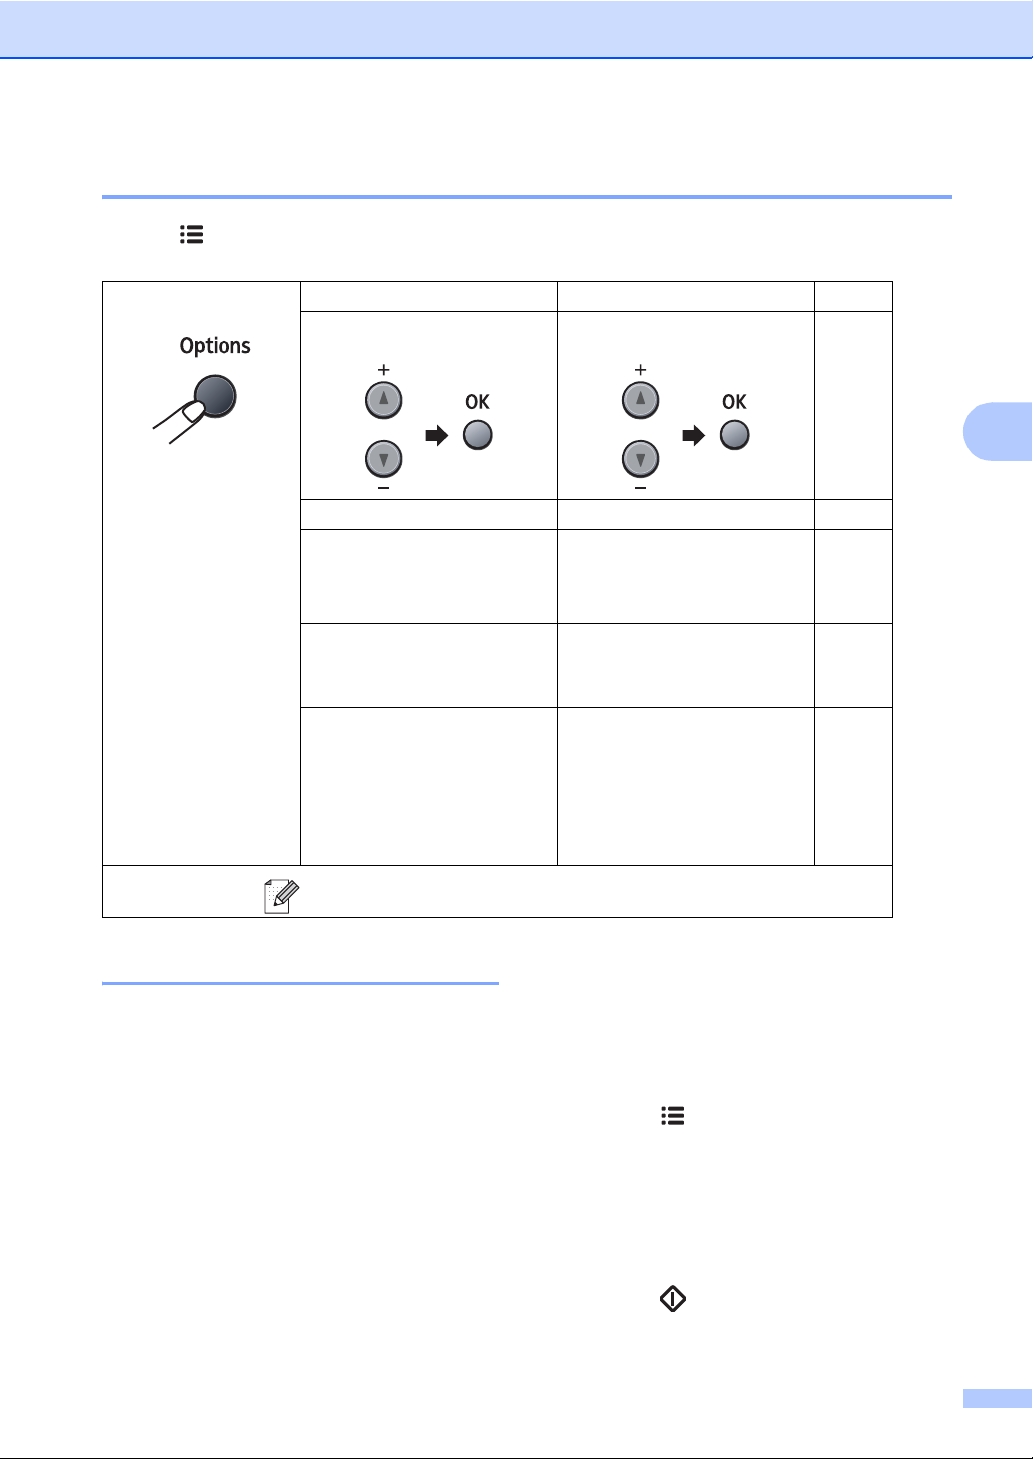
Use the Options key to quickly set the following copy settings temporarily for the next copy.
Press
Menu selections Options Page
Press a or b, then press OK
Press a or b, then press OK
4
2 in 1 ID Copy -22
Quality Auto*
Photo
Text
Stack/Sort
(appears when the document
is in the ADF)
Page Layout Off(1 in 1)*
The factory settings are shown in Bold with an asterisk.
Stack*
Sort
2 in 1 (P)
2 in 1 (L)
4 in 1 (P)
4 in 1 (L)
25
26
26
Improving copy quality 4
You can choose from a range of quality
settings. The default setting is Auto.
Auto
Auto is the recommended mode for
ordinary printouts. Suitable for documents
that contain both text and photographs.
Text
Suitable for documents containing only
text.
Photo
Suitable for copying photographs.
To temporarily change the quality setting,
follow the steps below:
a Load your document.
b Enter the number of copies you want.
c Press Options.
Press a or b to choose Quality.
Press OK.
d Press a or b to choose Auto, Photo or
Text.
Press OK.
e Press Start.
25
Page 32

Chapter 4
To change the default setting, follow the
steps below:
a Press Menu.
b Press a or b to choose 2.Copy.
Press OK.
c Press a or b to choose 1.Quality.
Press OK.
d Press a or b to choose the copy quality.
Press OK.
e Press Stop/Exit.
Sorting copies using the ADF4
You can sort multiple copies. Pages will be
stacked in the order 1 2 3, 1 2 3, 1 2 3, and so
on.
a Load your document in the ADF.
b Enter the number of copies you want.
c Press Options and a or b to choose
Stack/Sort.
Press OK.
d Press a or b to choose Sort.
Press OK.
Making N in 1 copies (page layout) 4
You can reduce the amount of paper used
when copying by using the N in 1 copy
feature. This allows you to copy two or four
pages onto one page, which lets you save
paper.
Important 4
Please make sure the paper size is set to
Letter or A4.
(P) means Portrait and (L) means
Landscape.
You cannot use the Enlarge/Reduce
setting with the N in 1 feature.
a Load your document.
b Enter the number of copies you want.
c Press Options.
d Press a or b to choose Page Layout.
Press OK.
e Press a or b to choose 2 in 1 (P),
2 in 1 (L), 4 in 1 (P),
4 in 1 (L) or Off(1 in 1).
Press OK.
e Press Start.
26
f Press Start to scan the page.
If you placed the document in the ADF,
the machine scans the pages and starts
printing.
If you are using the scanner glass, go
to g.
g After the machine scans the page,
press a to scan the next page.
Next Page?
a Yes b No
h Put the next page on the scanner glass.
Press OK.
Repeat g and h for each page of the
layout.
Page 33
Making copies
i After all the pages have been scanned,
press b in h to finish.
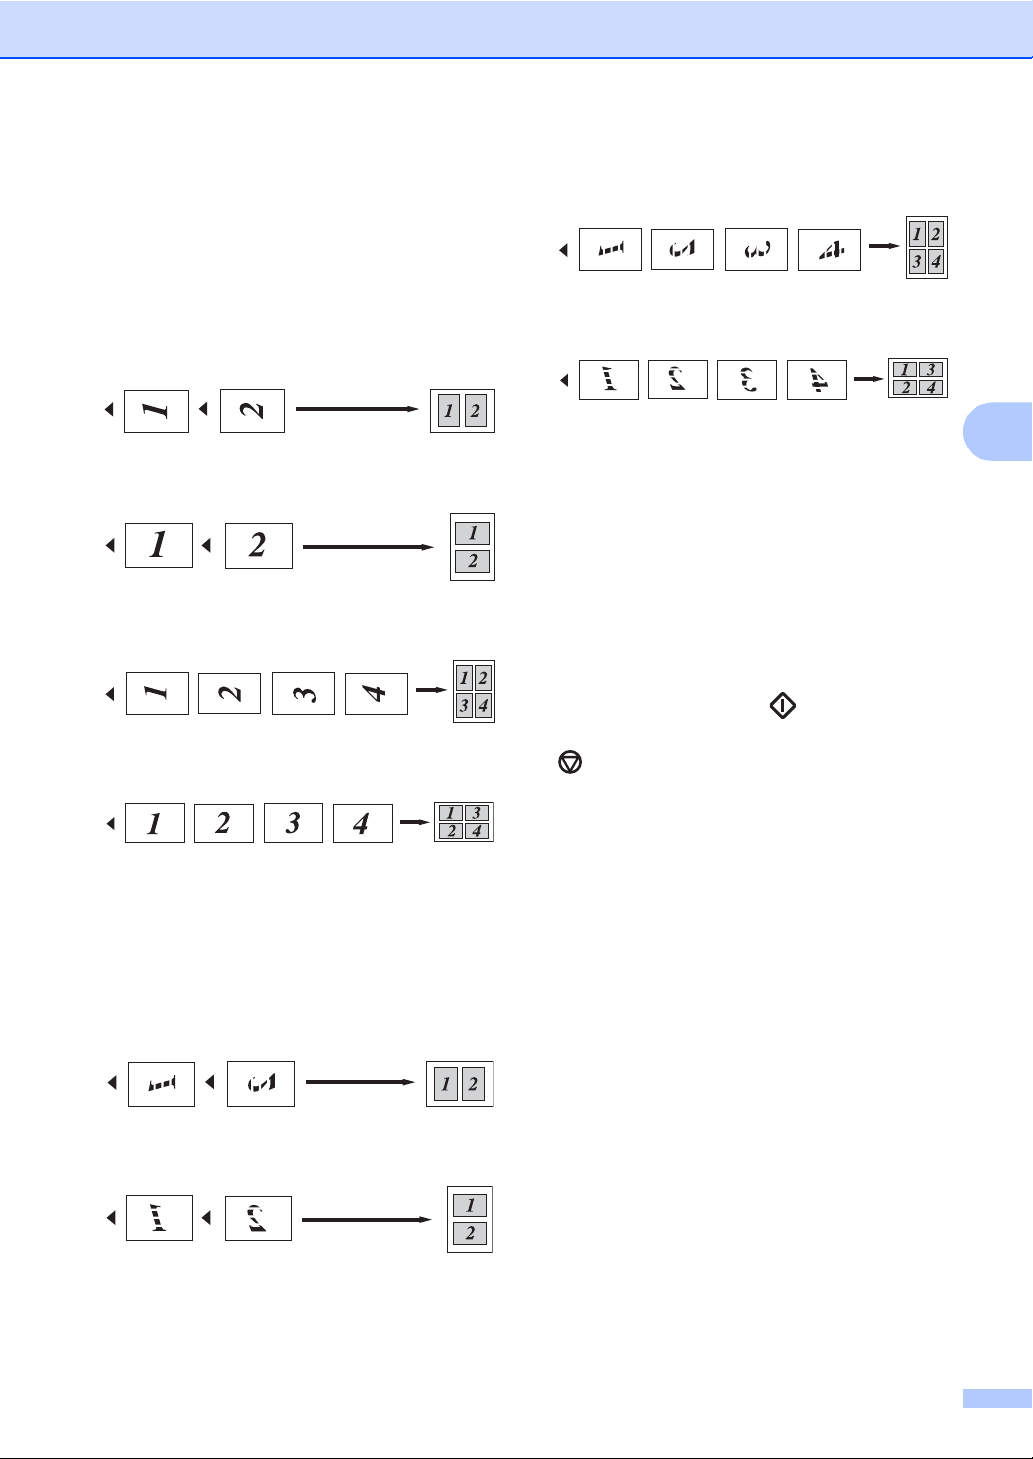
If you are copying from the ADF: 4
Insert your document face up in the direction
shown below:
2 in 1 (P)
2 in 1 (L)
4 in 1 (P)
4 in 1 (L)
4 in 1 (P)
4 in 1 (L)
Out of memory message
If the memory becomes full while you are
making copies, the LCD message will guide
you through the next step.
If you get an Out of Memory message
while scanning a subsequent page, you will
have the option to press Start to copy the
pages scanned so far, or to press
Stop/Exit to cancel the operation.
4
4
If you are copying from the scanner glass:
Insert your document face down in the
direction shown below:
2 in 1 (P)
2 in 1 (L)
4
27
Page 34

Chapter 4
28
Page 35

Section III
Software III
Software features 30
Page 36

Note
Software features 5
5
The User’s Guide on the CD-ROM includes
Quick Setup Guide, User’s Guide and
Software User’s Guide for features
available when connected to a computer (for
example, printing and scanning). These
guides have easy to use links that, when
clicked, will take you directly to a particular
section.
You can find information on these features:
Printing
Scanning
ControlCenter3
How to read PDF User’s Guide
This is a quick reference for using the PDF
User’s Guide.
If you have not installed the software, see
Chapter 1.
a From the Start menu, point to SP 1200
series, TYPE 1200S Documentation,
from the program group, and then click
User's Guides.
b Click on the manual you want
(QUICK SETUP GUIDE,
USER'S GUIDE,
SOFTWARE USER'S GUIDE) from the
top menu.
5
30
Page 37

Section IV
Appendixes IV
Safety and legal 32
Troubleshooting and routine maintenance 47
Menu and features 80
Specifications 85
Glossary 93
Page 38
Safety and legal A
A
Choosing a location A
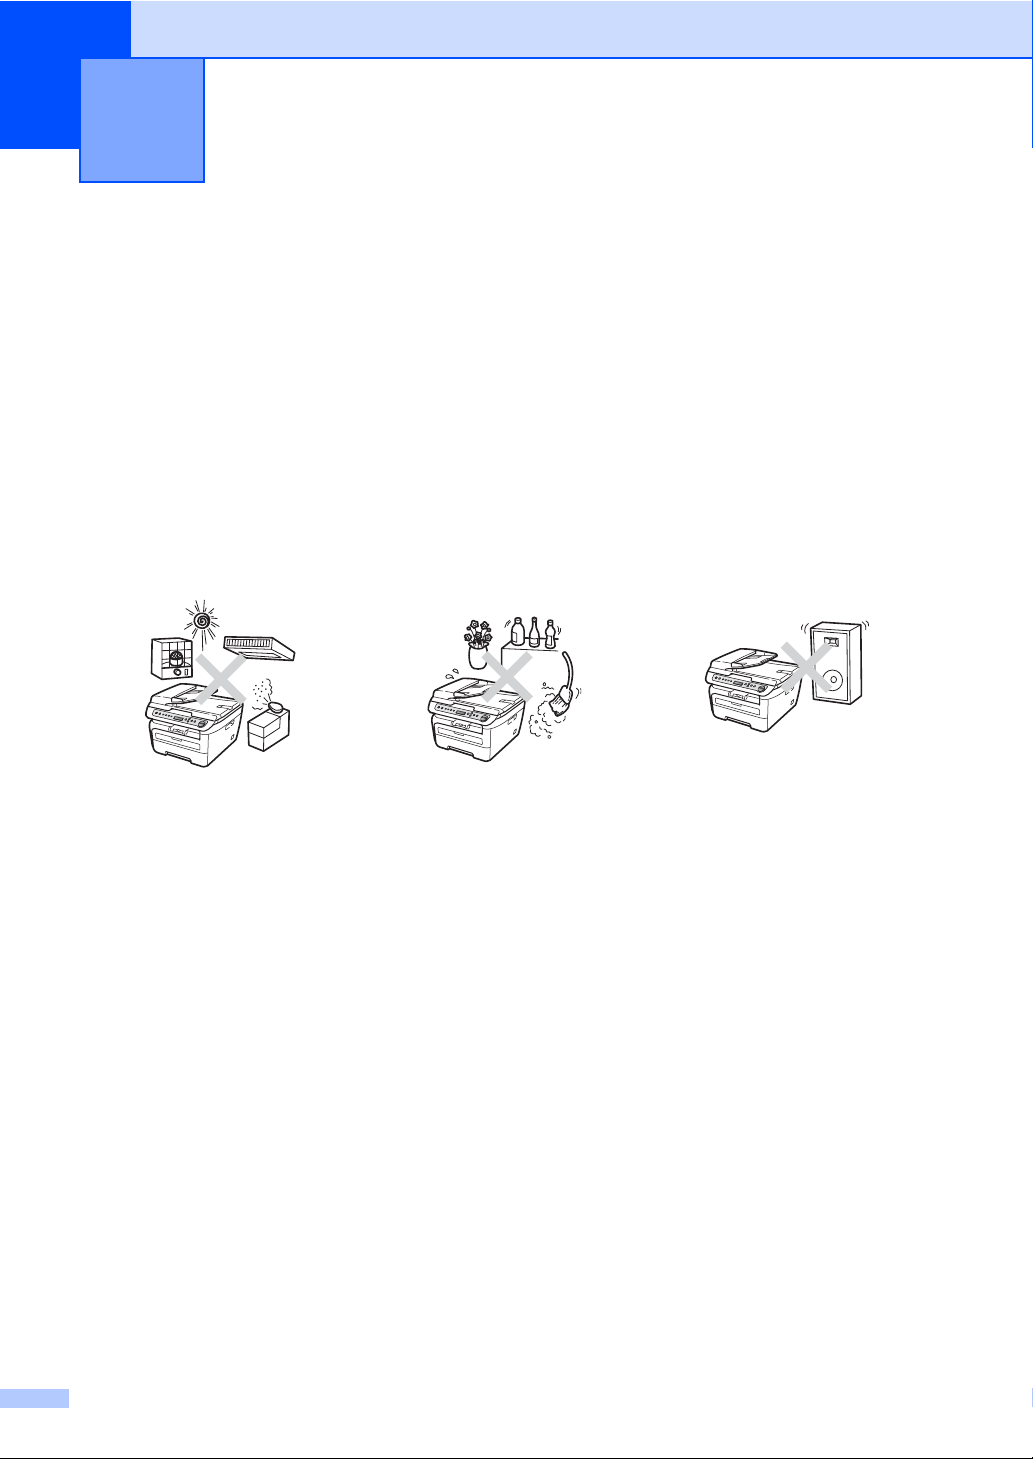
Place your machine on a flat, stable surface that is free of vibration. Put the machine near a
standard, grounded electrical socket. Choose a location where the temperature remains between
10 C and 32.5 C and the humidity is between 20% to 80% (without condensation).
Make sure cables leading to the machine do not constitute a trip hazard.
Avoid placing your machine on the carpet.
Do not place near heaters, air conditioners, water, chemicals or refrigerators.
Do not expose the machine to direct sunlight, excessive heat, moisture or dust.
Do not connect your machine to electrical sockets controlled by wall switches or automatic
timers, or to the same circuit as large appliances that might disrupt the power supply.
32
Page 39

Safety and legal
Important information A
Safety precautions A
Please read these instructions before attempting any maintenance, and keep them for later
reference. When using your equipment, follow basic safety precautions to reduce the risk of fire,
electric shock or personal injury.
DO NOT use this product near water, or in a damp environment.
Avoid using this product during an electrical storm. There may be a remote risk of electric
shock from lightning.
We DO NOT advise using an extension lead.
If any cables become damaged, disconnect your machine, and contact your dealer.
DO NOT place any objects on the machine, or obstruct the air vents.
This product should be connected to an adjacent grounded AC power source within the range
indicated on the rating label. DO NOT connect it to a DC power source or inverter. If you are
not sure, contact a qualified electrician.
A
33
Page 40
WARNING
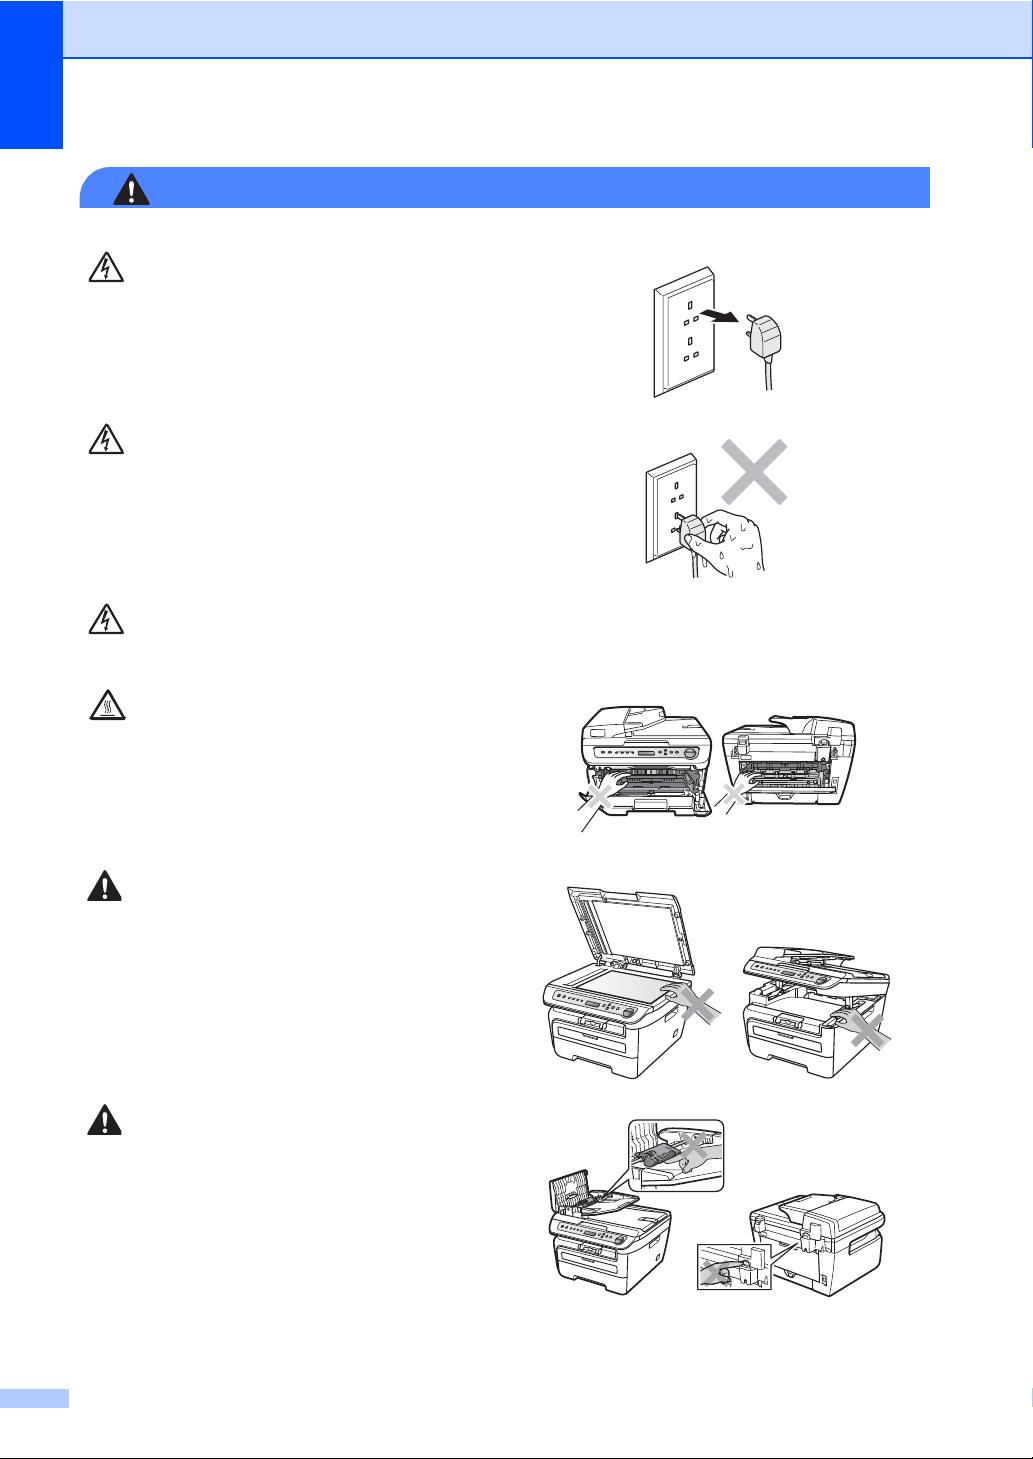
Before cleaning the inside of the machine, unplug
the power cord from the electrical socket.
DO NOT handle the plug with wet hands. Doing
this might cause an electrical shock.
Always make sure the plug is fully inserted.
After you have just used the machine, some
internal parts of the machine will be extremely hot.
When you open the front or back cover of the
machine, DO NOT touch the shaded parts shown
in the illustrations.
To prevent injuries, be careful not to put your
hands on the edge of the machine under the
document cover or scanner cover as shown in the
illustrations.
To prevent injuries, DO NOT put your fingers in the
areas shown in the illustrations.
34
Page 41
Safety and legal
Note
CAUTION
DO NOT use a vacuum cleaner to clean up scattered toner. Doing this might cause the toner
dust to ignite inside the vacuum cleaner, potentially starting a fire. Please carefully clean the
toner dust with a dry, lint-free cloth and dispose of it according to local regulations.
If moving your machine, use the handholds provided. First making sure to disconnect any
cables.
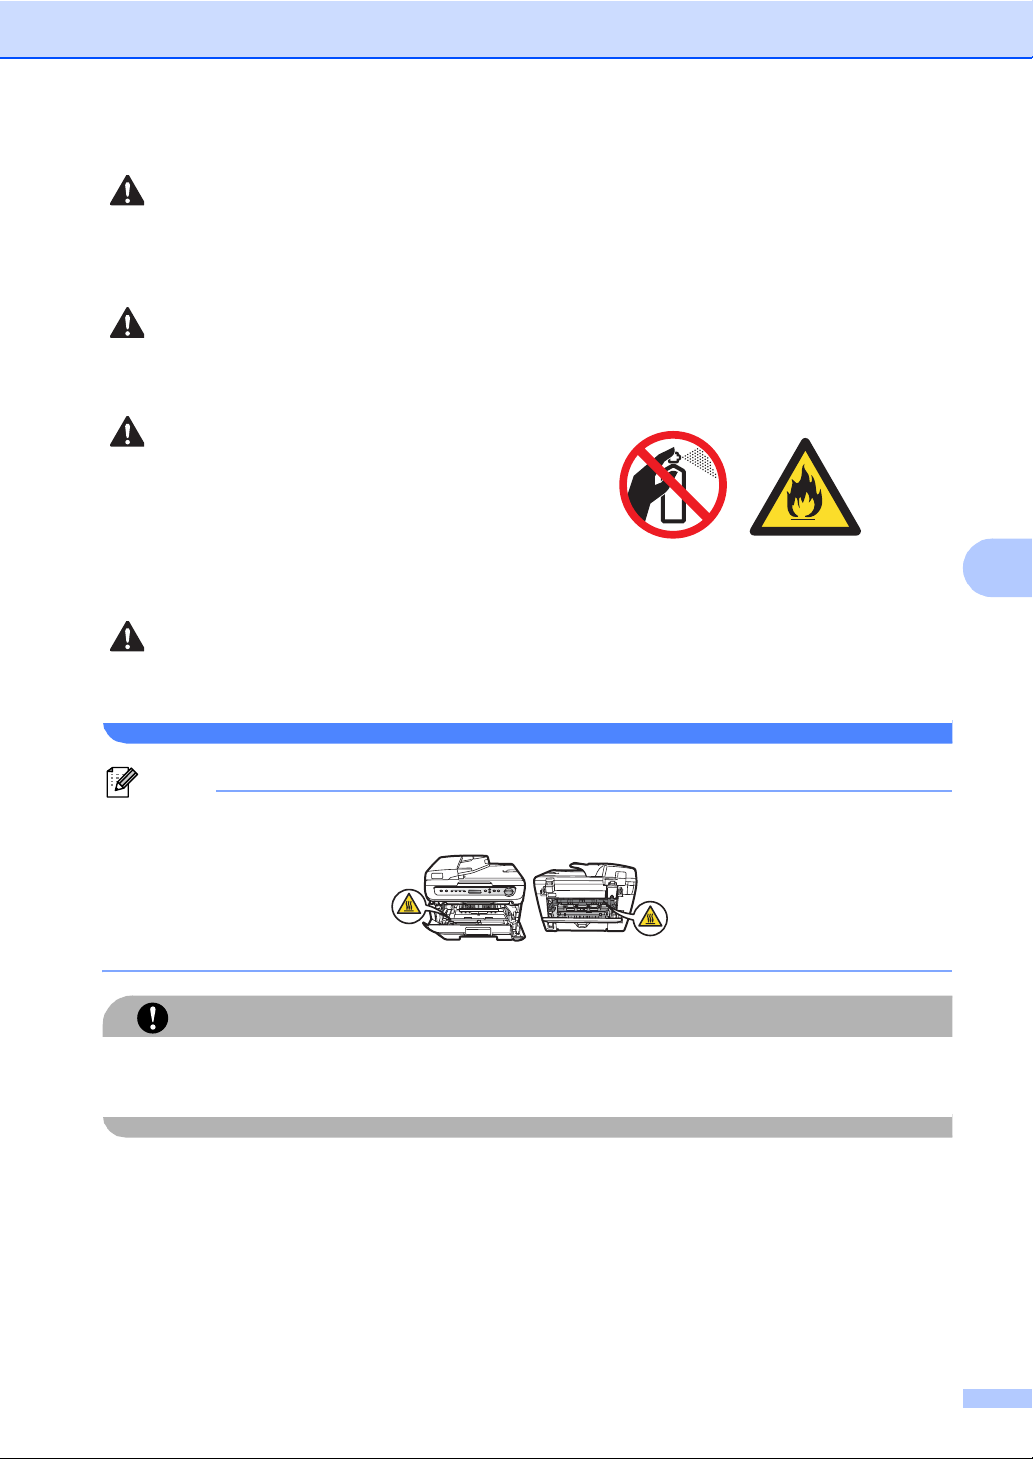
DO NOT use any flammable substances, spray or
organic solvent/liquids containing
alcohol/ammonia to clean the inside or outside of
the machine. Doing this may cause a fire or
electrical shock. Refer to Routine maintenance
on page 63 for how to clean the machine.
A
Plastic bags are used in the packaging of your machine. To avoid the danger of suffocation,
keep these bags away from babies and children.
The fuser unit is marked with a Caution label. DO NOT remove or damage the label.
Be sure to disconnect the plug from the wall outlet and clean the prongs and the area around
the prongs at least once a year. Allowing dust to build up on the plug constitutes a fire hazard.
35
Page 42
Symbols for the main power switch A
Note
WARNING
In accordance with IEC 60417, this machine uses the following symbols for the
main power switch:
means POWER ON.
-
means POWER OFF.
-
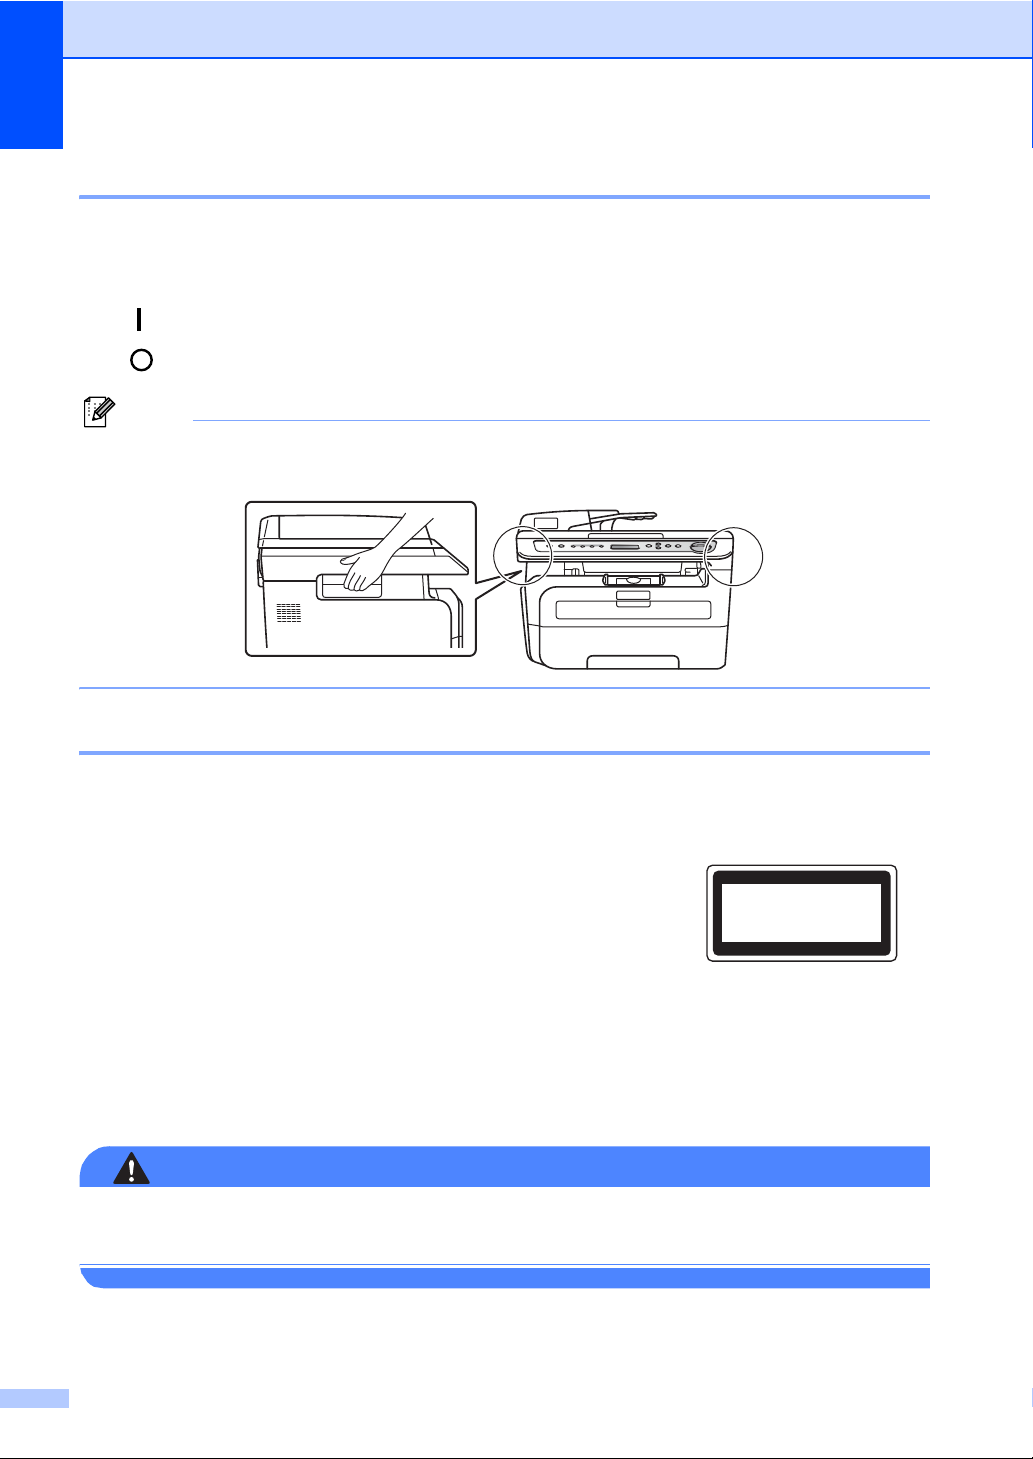
When you move the machine, grasp the side handholds that are under the scanner. Do NOT
carry the machine by holding it at the bottom.
IEC 60825-1:2007 Specification A
This machine is a Class 1 laser product as defined in IEC 60825-1:2007 specifications. The label
shown below is attached in countries where required.
This machine has a Class 3B Laser Diode which emits invisible
laser radiation in the Scanner Unit. The Scanner Unit should not
be opened under any circumstances.
CLASS 1 LASER PRODUCT
LASER KLASSE 1 PRODUKT
Laser Diode A
Wave length: 780 - 800 nm
Output: 10 mW max.
Laser Class: Class 3B
Use of controls, adjustments or performance of procedures other than those specified in this
manual may result in hazardous radiation exposure.
36
Page 43

Safety and legal
Disconnect device A
This product must be installed near an electrical socket that is easily accessible. In case of
emergencies, you must disconnect the power cord from the electrical socket to shut off power
completely.
Wiring information (U.K. only) A
If you need to replace the plug fuse, fit a fuse that is approved by ASTA to BS1362 with the same
rating as the original fuse.
Always replace the fuse cover. Never use a plug that does not have a cover. If in any doubt, call
a qualified electrician.
Warning - This printer must be earthed.
The wires in the mains lead are coloured in line with the following code:
Green and Yellow: Earth
Blue: Neutral
Brown: Live
Radio interference A
This product complies with EN55022 (CISPR Publication 22)/Class B. When connecting the
machine to a computer, ensure that you use the following interface cables.
A USB cable which must not exceed 2.0 metres in length.
A
37
Page 44

EU Directive 2002/96/EC and EN50419 A
Users in the EU, Switzerland and Norway A
Our Products contain high quality components and are designed to facilitate recycling.
Our products or product packaging are marked with the symbol below.
The symbol indicates that the product must not be treated as municipal waste. It must be disposed
of separately via the appropriate return and collection systems available. By following these
instructions you ensure that this product is treated correctly and help to reduce potential impacts
on the environment and human health, which could otherwise result from inappropriate handling.
Recycling of products helps to conserve natural resources and protect the environment.
For more detailed information on collection and recycling systems for this product, please contact
the shop where you purchased it, your local dealer or sales/service representatives.
All Other Users A
If you wish to discard this product, please contact your local authorities, the shop where you
bought this product, your local dealer or sales/service representatives.
38
Page 45

Safety and legal
International ENERGY STAR® Qualification Statement A
The purpose of the International ENERGY STAR® Program is to promote the development and
popularization of energy-efficient office equipment.
As an ENERGY STAR
ENERGY STAR
®
Partner, Ricoh Campony, Ltd. has determined that this product meets the
®
guidelines for energy efficiency.
A
39
Page 46

Important safety instructions for EU A
1 Read all of these instructions.
2 Save them for later reference.
3 Follow all warnings and instructions marked on the product.
4 Unplug this product from the wall socket before cleaning inside of the machine. DO NOT use
liquid or aerosol cleaners. Use a damp cloth for cleaning.
5 DO NOT place this product on an unstable cart, stand, or table. The product may fall, causing
serious damage to the product.
6 Slots and openings in the casing at the back or bottom are provided for ventilation. To ensure
reliable operation of the product and to protect it from overheating, these openings must not
be blocked or covered. The openings should never be blocked by placing the product on a bed,
sofa, rug, or other similar surface. This product should never be placed near or over a radiator
or heater. This product should never be placed in a built-in installation unless adequate
ventilation is provided.
7 This product should be connected to an AC power source within the range indicated on the
rating label. DO NOT connect it to a DC power source or inverter. If you are not sure, contact
a qualified electrician.
8 This product is equipped with a 3-wire grounded plug. This plug will only fit into a grounded
power outlet. This is a safety feature. If you are unable to insert the plug into the outlet, call
your electrician to replace your obsolete outlet. DO NOT defeat the purpose of the grounded
plug.
9 Use only the power cord supplied with this machine.
10 DO NOT allow anything to rest on the power cord. DO NOT place this product where people
can walk on the cord.
11 Use the product in a well-ventilated area.
12 The power cord, including extensions should be no longer than 5 metres.
DO NOT share the same power circuit with other high powered appliances, such as an air
conditioner, copier, shredder or similar devices. If you cannot avoid using the printer with these
appliances, we recommend that you use a high-frequency noise filter.
Use a voltage regulator if the power source is not stable.
13 DO NOT place anything in front of the machine that will block printed pages. DO NOT place
anything in the path of printed pages.
14 Wait until pages have exited the machine before picking them up.
15 Unplug this product from the power socket and refer all servicing to your Authorized Service
Personnel under the following conditions:
When the power cord is damaged or frayed.
If liquid has been spilled into the product.
If the product has been exposed to rain or water.
40
Page 47

Safety and legal
If the product does not operate normally when the operating instructions are followed.
Adjust only those controls that are covered by the operating instructions. Incorrect
adjustment of other controls may result in damage and will often require extensive work by
a qualified technician to restore the product to normal operation.
If the product has been dropped or the casing has been damaged.
If the product exhibits a distinct change in performance, indicating a need for service.
16 To protect your product against power surges, we recommend the use of a power protection
device (Surge Protector).
17 To reduce the risk of fire, electric shock and injury to people, note the following:
DO NOT use this product near appliances that use water, a swimming pool or in a wet
basement.
DO NOT use the machine during an electrical storm (there is the remote possibility of an
electrical shock).
A
41
Page 48

Important Information for Australia A
IMPORTANT-For Your Safety A
To ensure safe operation the three-pin plug supplied must be inserted only into a standard threepin power point which is effectively grounded through the normal household wiring.
Extension cords used with the equipment must be three-conductor and be correctly wired to
provide connection to ground. Incorrectly wired extension cords are a major cause of fatalities.
The fact that the equipment operates satisfactorily does not imply that the power is grounded and
that the installation is completely safe. For your safety, if in any doubt about the effective
grounding of the power, consult a qualified electrician.
Important safety instructions A
1 Read all of these instructions.
2 Save them for later reference.
3 Follow all warnings and instructions marked on the product.
4 Unplug this product from the wall socket before cleaning the outside of the machine and the
scanner glass. DO NOT use liquid or aerosol cleaners. Use a damp cloth for cleaning.
5 DO NOT use this product near water.
6 DO NOT place this product on an unstable cart, stand, or table. The product may fall, causing
serious damage to the product.
7 Slots and openings in the casing at the back or bottom are provided for ventilation; to ensure
reliable operation of the product and to protect it from overheating, these openings must not
be blocked or covered. The openings should never be blocked by placing the product on a bed,
sofa, rug, or other similar surface. This product should never be placed near or over a radiator
or heater. This product should never be placed in a built-in installation unless adequate
ventilation is provided.
8 This product should be connected to an AC power source within the range indicated on the
rating label. DO NOT connect it to a DC power source or inverter. If you are not sure, contact
a qualified electrician.
9 This product is equipped with a 3-wire grounded plug, a plug having a third (grounded) pin.
This plug will only fit into a grounded power outlet. This is a safety feature. If you are unable to
insert the plug into the outlet, call your electrician to replace your obsolete outlet. DO NOT
defeat the purpose of the grounded plug.
10 DO NOT place anything on top of the power cord including this machine. DO NOT allow the
power cord to be stepped on.
11 DO NOT touch a document during printing.
12 Never push objects of any kind into this product through cabinet slots, since they may touch
dangerous voltage points or short out parts resulting in a risk of fire or electric shock. Never
spill liquid of any kind on the product.
42
Page 49

Safety and legal
13 DO NOT attempt to service this product yourself, because opening or removing covers may
expose you to dangerous voltage points and/or other risks. Refer all servicing to service
personnel.
14 Wait until pages have exited the machine before picking them up.
15 Unplug this product from the wall outlet and refer servicing to Authorised Service Personnel
under the following conditions:
When the power cord is damaged or frayed.
If liquid has been spilled into the product.
If the product has been exposed to rain or water.
If the product does not operate normally when the operating instructions are followed.
Adjust only those controls that are covered by the operating instructions. Incorrect
adjustment of other controls may result in damage and will often require extensive work by
a qualified technician to restore the product to normal operation.
If the product has been dropped or the casing has been damaged.
If the product exhibits a distinct change in performance, indicating a need for service.
A
43
Page 50

Important Information for Some Countries A
Important Safety Instructions A
1 Read all of these instructions.
2 Save them for later reference.
3 Follow all warnings and instructions marked on the product.
4 Unplug this product from the wall outlet before cleaning the outside of the machine and the
scanner glass. DO NOT use liquid or aerosol cleaners. Use a damp cloth for cleaning.
5 DO NOT place this product near water.
6 DO NOT place this product on an unstable cart, stand, or table. The product may drop, causing
serious damage to the product.
7 Slots and openings in the casing at the back or bottom are provided for ventilation; to ensure
reliable operation of the product and to protect it from overheating, these openings must not
be blocked or covered. The openings should never be blocked by placing the product on a bed,
sofa, rug, or other similar surface. This product should never be placed near or on a radiator
or heater. This product should never be placed in a built-in installation unless adequate
ventilation is provided.
8 This product should be connected to an AC power source within the range indicated on the
rating label. DO NOT connect it to a DC power source or inverter. If you are not sure, contact
a qualified electrician.
9 This product is equipped with a 2-wire grounding type plug or a 3-wire grounding type plug
(Only for Singapore, Malaysia, Hong Kong and India), a plug having two or three pins. This
plug will only fit into only a grounding-type power outlet. This is a safety feature. If you are
unable to insert the plug into the outlet, contact your electrician to replace your obsolete outlet.
DO NOT defeat the purpose of the grounding-type plug.
10 DO NOT place anything on top of the power cord including this machine. DO NOT allow the
power cord to be stepped on.
11 If an extension cord is used with this product, make sure that the total ampere ratings on the
products plugged into the extension cord DO NOT exceed the extension cord ampere rating.
12 DO NOT touch a document during printing.
13 Never push objects of any kind into this product through cabinet slots, since they may touch
dangerous voltage points or short out parts resulting in the risk of fire or electric shock. Never
spill liquid of any kind on the product.
14 DO NOT attempt to service this product yourself, as opening or removing covers may expose
you to dangerous voltage points and/or other risks, and may void your warranty. Please refer
all servicing to your Authorized Service Personnel.
15 Unplug this product from the wall outlet and refer servicing to Authorized Service Personnel
under the following conditions:
If the power cord is damaged or frayed.
If the product has been spilled by liquid.
44
Page 51

Safety and legal
WARNING
If the product has been exposed to rain or water.
If the product does not operate normally when the operating instructions are followed.
Adjust only those controls that are covered by the operating instructions. Incorrect
adjustment of other controls may result in damage and will often require extensive work by
a qualified technician to restore the product to normal operation.
If the product has been dropped or the casing has been damaged.
If the product exhibits a distinct change in performance, indicating a need for service.
16 To protect your product against power surges, we recommend the use of a power protection
device (Surge Protector).
For protection against the risk of electrical shock, always disconnect all cables from the wall
outlet before servicing, modifying or installing the equipment.
Ricoh cannot accept any financial or other responsibilities that may be the result of your use of
this information, including direct, special or consequential damages. There are no warranties
extended or granted by this document.
A
45
Page 52

Trademarks A
Windows Vista is either a registered trademark or a trademark of Microsoft Corporation in the
United States and/or other countries.
Microsoft, Windows, Windows Server and Internet Explorer are registered trademarks of Microsoft
Corporation in the United States and/or other countries.
Intel, Intel Core and Pentium are trademarks of Intel Corporation in the U.S. and other countries.
AMD is a trademark of Advanced Micro Devices, Inc.
Adobe, Flash, Illustrator, PageMaker, Photoshop, PostScript and PostScript 3 are either
registered trademarks or trademarks of Adobe Systems Incorporated in the United States and/or
other countries.
Nuance, the Nuance logo, PaperPort and ScanSoft are trademarks or registered trademarks of
Nuance Communications, Inc. or its affiliates in the United States and/or other countries.
Each company whose software title is mentioned in this manual has a Software Licence
Agreement specific to its proprietary programs.
All brand and product names mentioned in this manual are registered trademarks of their
respective companies.
46
Page 53

Troubleshooting and routine
B
maintenance
Troubleshooting B
If you think there is a problem with your machine, check the chart below and follow the
troubleshooting tips.
Most problems can be easily resolved by yourself.
If you are having difficulty with your machine B
Check the chart below and follow the troubleshooting tips.
Copy quality difficulties
Difficulties Suggestions
Vertical black line appears in
copies.
Printing difficulties
Difficulties Suggestions
No printout. Check that the machine is plugged in and the power switch is turned on.
The machine prints unexpectedly
or it prints garbage.
Black vertical lines on copies are typically caused by dirt or correction fluid on the
glass strip or the corona wire for printing is dirty. (See Cleaning the scanner glass
on page 64 and Cleaning the corona wire on page 67.)
Check that the toner cartridge and drum unit are installed correctly. (See
Replacing the drum unit on page 75.)
Check the interface cable connection on both the machine and your computer.
(See the Quick Setup Guide.)
Check that the correct printer driver has been installed and chosen.
Check to see if the LCD is showing an error message. (See Error and
maintenance messages on page 56.)
Check that machine is online:
(For Windows Vista
Click the Start button, Control Panel, Hardware and Sound, and then
Printers. Right-click TYPE SP 1200S Printer. Make sure that Use Printer
Offline is unchecked.
(For Windows
Click the Start button and choose Printers. Right-click TYPE SP 1200S
Printer. Make sure that Use Printer Offline is unchecked.
(For Windows
Click the Start button and choose Settings and then Printers. Right-click
TYPE SP 1200S Printer. Make sure that Use Printer Offline is unchecked.
Pull out the paper tray and wait until the machine stops printing. Then turn off
the machine’s power switch and disconnect from the power for several
minutes.
Check the settings in your application to make sure it is set up to work with
your machine.
®
XP)
®
2000)
®
)
B
B
47
Page 54

Printing difficulties (continued)
Difficulties Suggestions
The machine prints the first couple
of pages correctly, then some
pages have text missing.
The headers or footers appear
when the document displays on the
screen but they do not show up
when it is printed.
Check the settings in your application to make sure that it is set up to work with
your machine.
Your computer is not recognising the machine’s input buffer’s full signal. Make
sure that you connected the interface cable correctly. (See the Quick Setup
Guide.)
There is an unprintable area on the top and bottom of the page. Adjust the top and
bottom margins in your document to allow for this.
Scanning difficulties
Difficulties Suggestions
TWAIN errors appear while
scanning.
OCR does not work Try increasing the scanning resolution.
Make sure that the TWAIN driver is chosen as the primary source. In PaperPort™
11SE, click File, Scan or Get Photo and choose the TYPE TWAIN driver.
Software difficulties
Difficulties Suggestions
Cannot install software or print. Run the Repair Multi-Function Suite program on the CD-ROM. This program will
Cannot perform ‘2 in 1’ or ‘4 in 1’
printing.
The machine does not print from
®
Illustrator®.
Adobe
repair and reinstall the software.
Check that the paper size setting in the application and in the printer driver are the
same.
Try to reduce the print resolution. (See Advanced tab in the Software User’s Guide
on the CD-ROM.)
Paper handling difficulties
Difficulties Suggestions
The machine does not load paper.
The LCD shows No Paper or a
Paper Jam message.
How do I print on envelopes? You can load envelopes from the manual feed slot. Your application must be set
Which paper can I use? You can use plain paper, recycled paper, transparency and labels that are made
There is a paper jam. (See Paper jams on page 59.)
48
If there is no paper, load a new stack of paper into the paper tray.
If there is paper in the paper tray, make sure it is straight. If the paper is curled,
you should straighten it. Sometimes it is helpful to remove the paper, turn the
stack over and put it back into the paper tray.
Reduce the amount of paper in the paper tray, and then try again.
If the LCD shows Paper Jam message and you still have a problem, see
Paper jams on page 59.
up to print the envelope size you are using. This is usually done in the Page Setup
or Document Setup menu of your application. (See your application’s manual for
more information.)
for laser machines. (For details, see Acceptable paper and other print media
on page 11.)
Page 55

Troubleshooting and routine maintenance
Print quality difficulties
Difficulties Suggestions
Printed pages are curled. Low quality thin or thick paper or not printing on the recommended side of the
paper could cause this problem. Try turning over the stack of paper in the
paper tray.
Make sure that you choose the Paper Type that suits the print media type you
are using. (See Acceptable paper and other print media on page 11.)
Printed pages are smeared. The Paper Type setting may be incorrect for the type of print media you are using,
or the print media may be too thick or have a rough surface. (See Acceptable
paper and other print media on page 11 and Basic tab in the Software User’s
Guide on the CD-ROM.)
Printouts are too light. If this problem occurs when making copies or printing, set Toner Save mode
to off in the machine menu settings. (See Toner Save on page 18.)
Set Toner Save mode to off in the Advanced tab in the printer driver. (See
Advanced tab in the Software User’s Guide on the CD-ROM.)
B
49
Page 56
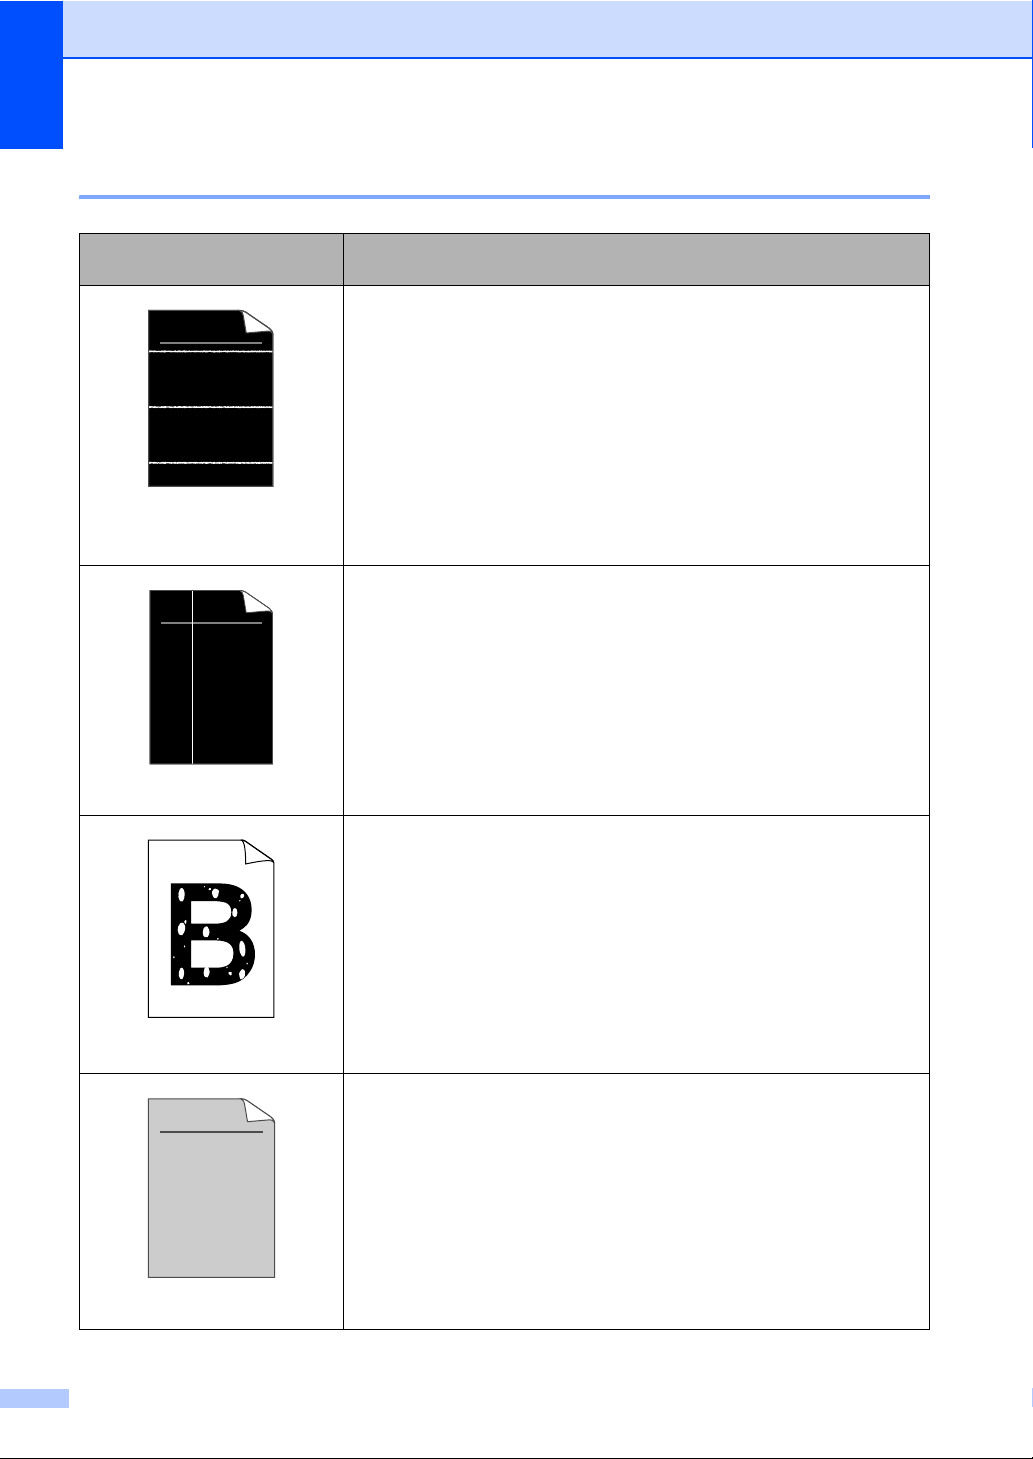
Improving the print quality B
ABCDEFGH
abcdefghijk
ABCD
abcde
01234
ABCDEFGH
abcdefghijk
ABCD
abcde
01234
ABCDEFGH
abcdefghijk
ABCD
abcde
01234
Examples of poor print
quality
White lines across the page
White lines down the page
50
Hollow print
Grey background
Recommendation
Make sure that you use paper that meets our specifications. A rough
surfaced paper or thick print media can cause the problem. (See
Acceptable paper and other print media on page 11.)
Make sure that you choose the appropriate media type in the printer
driver or in the machine’s Paper Type menu setting. (See Acceptable
paper and other print media on page 11 and Basic tab in the Software
User’s Guide on the CD-ROM.)
The problem may disappear by itself. Print multiple pages to clear this
problem, especially if the machine has not been used for a long time.
The drum unit may be damaged. Put in a new drum unit. (See
Replacing the drum unit on page 75.)
Wipe the laser scanner windows with a soft cloth. (See Cleaning the
laser scanner window on page 65.)
Make sure that a torn sheet of paper is not inside the machine
covering the scanner window.
The toner cartridge may be damaged. Put in a new toner cartridge.
(See Replacing a toner cartridge on page 71.)
The drum unit may be damaged. Put in a new drum unit. (See
Replacing the drum unit on page 75.)
Make sure that you use paper that meets our specifications. (See
Acceptable paper and other print media on page 11.)
Choose Thick paper mode in the printer driver, choose Thick in the
machine’s Paper Type menu setting or use thinner paper than you
are currently using. (See Paper type on page 17 and Basic tab in the
Software User’s Guide on the CD-ROM.)
Check the machine’s environment. Conditions such as high humidity
can cause hollow print. (See Choosing a location on page 32.)
The drum unit may be damaged. Put in a new drum unit. (See
Replacing the drum unit on page 75.)
Make sure that you use paper that meets our specifications. (See
Acceptable paper and other print media on page 11.)
Check the machine’s environment. Conditions such as high
temperatures and high humidity can increase the amount of
background shading. (See Choosing a location on page 32.)
The toner cartridge may be damaged. Put in a new toner cartridge.
(See Replacing a toner cartridge on page 71.)
The drum unit may be damaged. Put in a new drum unit. (See
Replacing the drum unit on page 75.)
Page 57
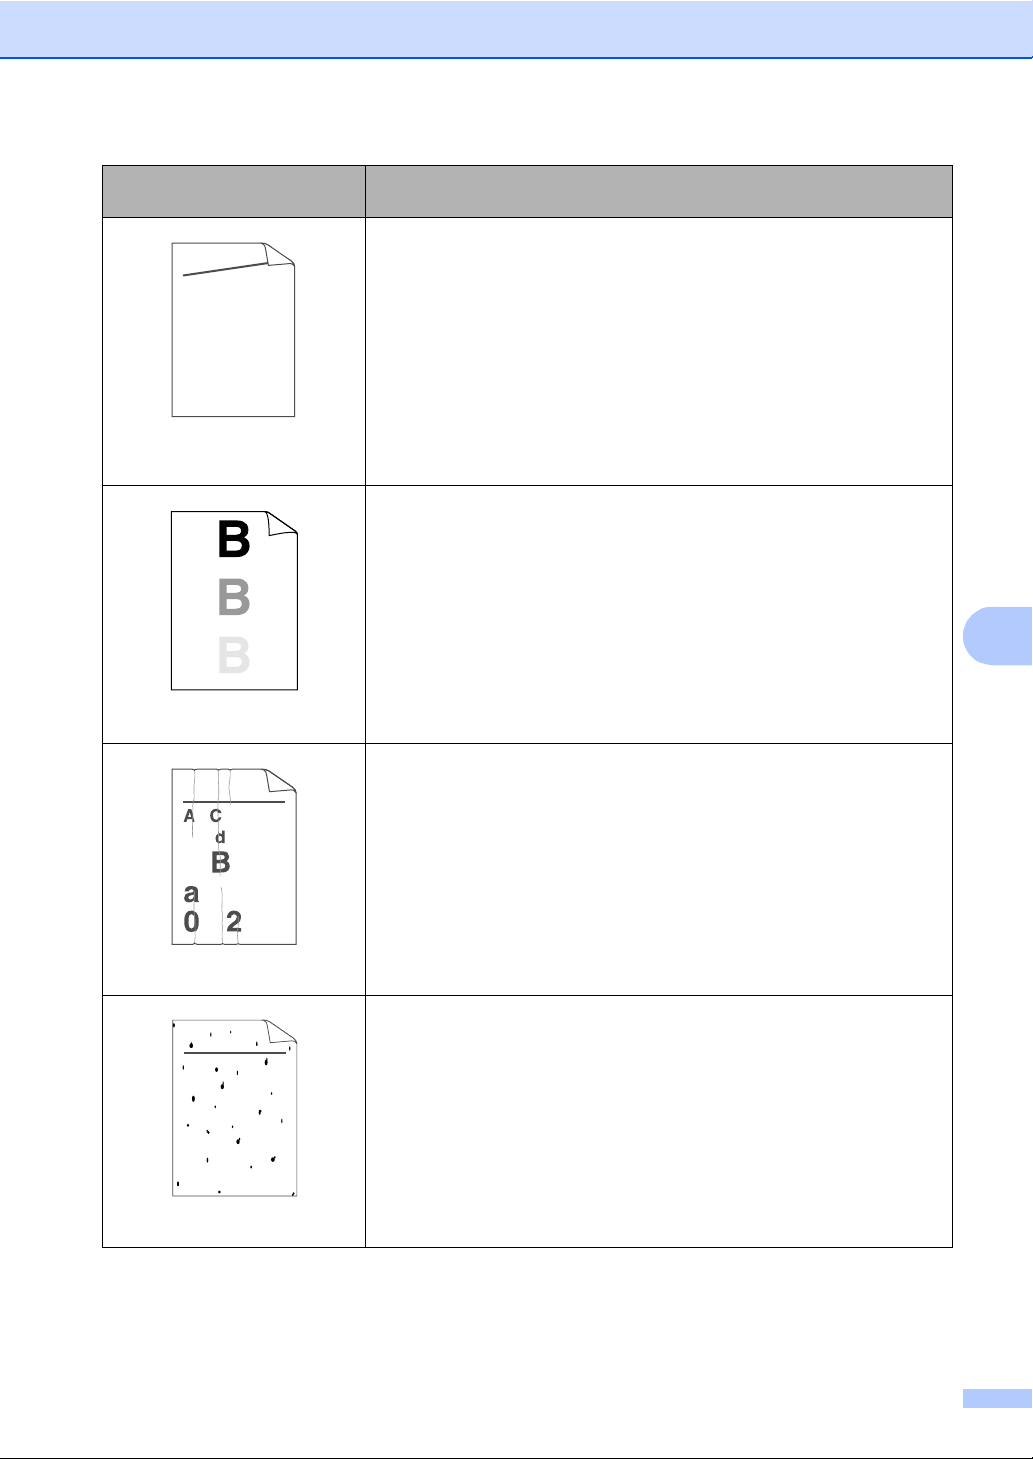
Troubleshooting and routine maintenance
ABCDEFGH
abcdefghijk
ABCD
abcde
01234
B DEFGH
abc efghijk
ACD
bcde
134
ABCDEFGH
abcdefghijk
ABCD
abcde
01234
Examples of poor print
quality
Page skewed
Ghost
Recommendation
Make sure that the paper or other print media is loaded correctly in
the paper tray and that the guides are not too tight or too loose
against the paper stack.
Set the paper guides correctly. (See Loading paper in the paper tray
on page 6.)
The paper tray may be too full.
If you are using the manual feed slot, see Loading paper in the
manual feed slot on page 7.
Check the paper type and quality. (See Acceptable paper and other
print media on page 11.)
Make sure that you use paper that meets our specifications. Rough-
surfaced paper or thick paper may cause the problem. (See
Acceptable paper and other print media on page 11.)
Make sure that you choose the correct media type in the printer driver
or in the machine’s Paper Type menu setting. (See Acceptable paper
and other print media on page 11 and Basic tab in the Software
User’s Guide on the CD-ROM.)
The drum unit may be damaged. Put in a new drum unit. (See
Replacing the drum unit on page 75.)
The fuser unit may be contaminated. Call your dealer for service.
Check the paper type and quality. (See Acceptable paper and other
print media on page 11.)
Make sure that paper is loaded correctly. (See Loading paper in the
paper tray on page 6.)
Turn over the stack of paper in the tray or rotate the paper 180° in the
input tray.
B
Wrinkles or creases
Poor fixing
Choose Improve Toner Fixing mode in the printer driver. (See
Device Options in the Software User’s Guide on the CD-ROM.)
If this selection does not provide enough improvement, choose
Thicker Paper in Media Type settings.
51
Page 58
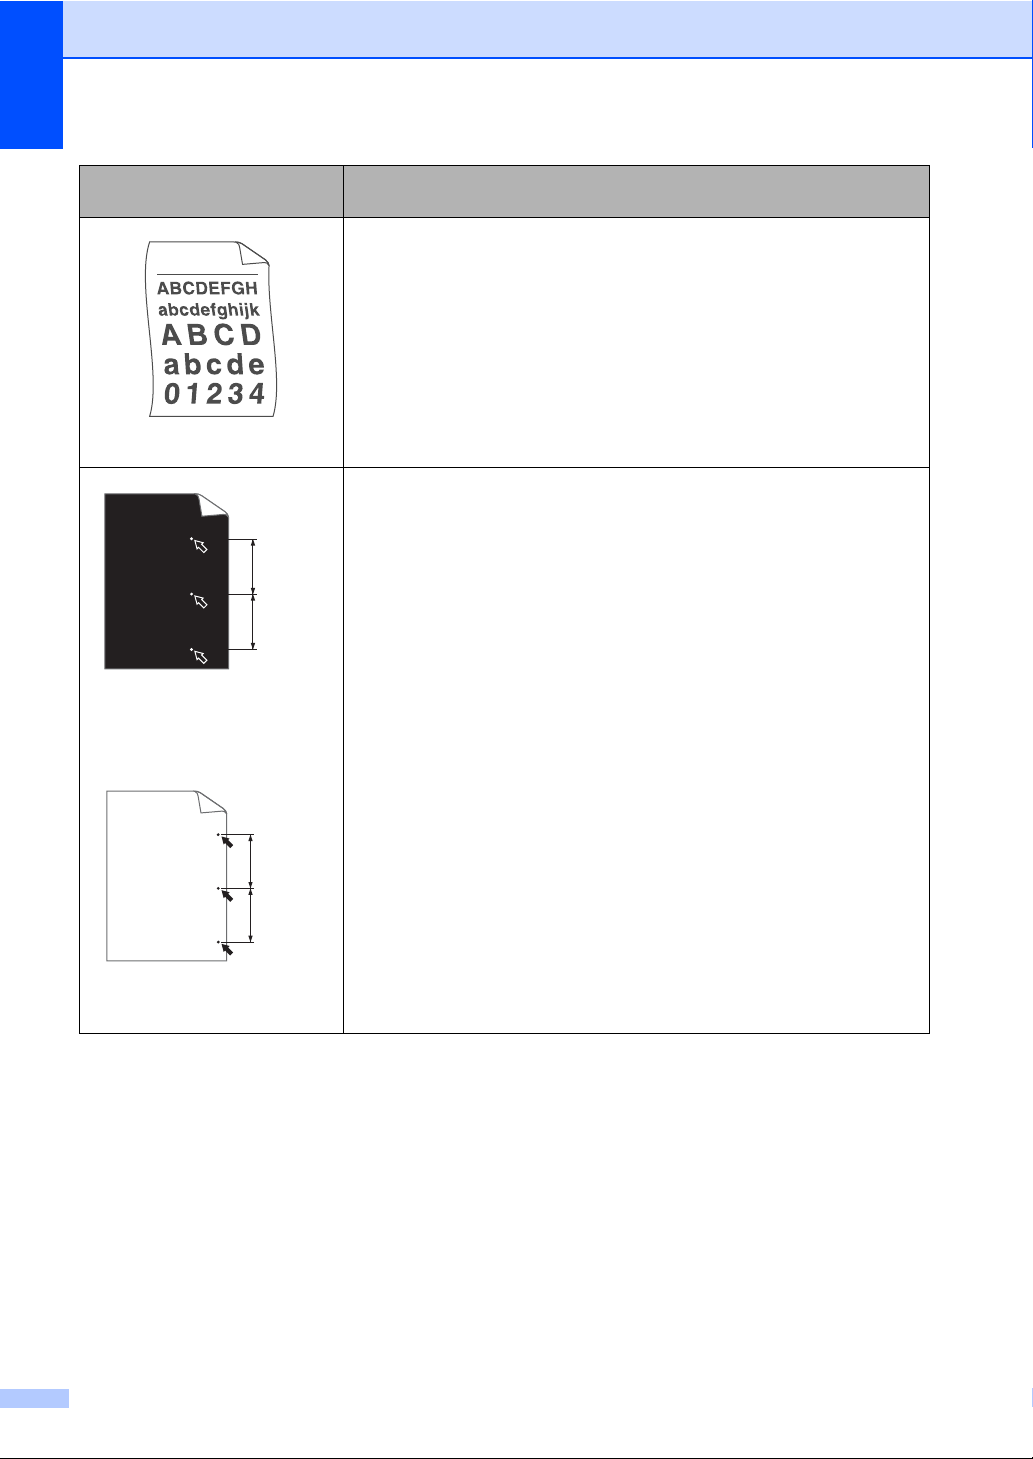
Examples of poor print
quality
Curled or wavy
75 mm
75 mm
White Spots on black text
and graphics at 75 mm
intervals
Recommendation
Check the paper type and quality. High temperatures and high
humidity will cause paper to curl.
If you do not use the machine often, the paper may have been in the
paper tray too long. Turn over the stack of paper in the paper tray.
Also, fan the paper stack and then rotate the paper 180° in the paper
tray.
Make ten copies of a blank, white sheet of paper. (See Making
multiple copies on page 22.) If the problem is not solved, the drum
unit may have glue from a label stuck on the OPC drum surface.
Clean the drum unit. (See Cleaning the drum unit on page 68.)
The drum unit may be damaged. Put in a new drum. (See Replacing
the drum unit on page 75.)
Black Spots at 75 mm
intervals
52
75 mm
75 mm
Page 59
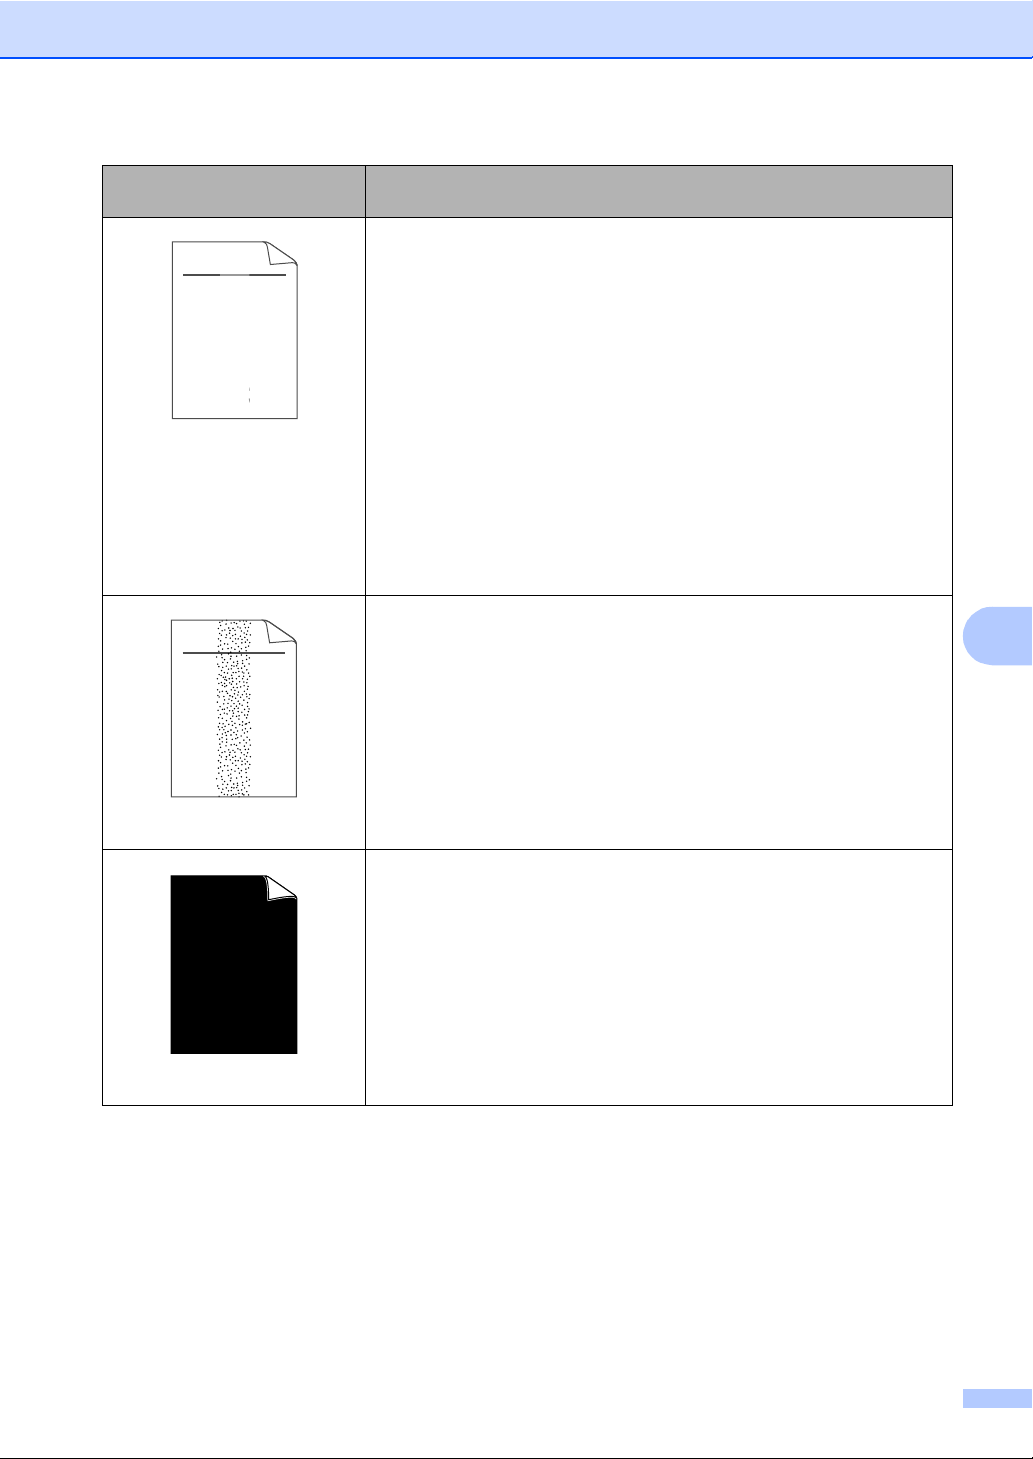
Troubleshooting and routine maintenance
ABCDEFGH
abcdefghijk
ABCD
abcde
01234
F
g
d
3
ABCDEFGH
abcdefghijk
ABCD
abcde
01234
Examples of poor print
quality
DE
ef
c
2
Faint
Recommendation
Check the machine’s environment. Conditions such as humidity, high
temperatures, and so on, may cause this print fault. (See Choosing a
location on page 32.)
If the whole page is too light, Toner Save mode may be on. Turn off
Toner Save mode in the machine menu settings or Toner Save
mode in the printer Properties of the driver. (See Toner Save
on page 18 or Advanced tab in the Software User’s Guide on the CD-
ROM.)
Clean the scanner window and the corona wire of the drum unit. (See
Cleaning the laser scanner window on page 65 and Cleaning the
corona wire on page 67.)
The toner cartridge may be damaged. Put in a new toner cartridge.
(See Replacing a toner cartridge on page 71.)
The drum unit may be damaged. Put in a new drum unit. (See
Replacing the drum unit on page 75.)
Make sure that you use paper that meets our specifications. Rough-
surfaced paper may cause the problem. (See Acceptable paper and
other print media on page 11.)
Clean the corona wire and the drum unit. (See Cleaning the corona
wire on page 67 and Cleaning the drum unit on page 68.)
The drum unit may be damaged. Put in a new drum unit. (See
Replacing the drum unit on page 75.)
The fuser unit may be contaminated. Call your dealer for service.
B
Toner specks
All black
Clean the corona wire inside the drum unit by sliding the blue tab. Be
sure to return the blue tab to the home position (a). (See Cleaning the
corona wire on page 67.)
The drum unit may be damaged. Put in a new drum unit. (See
Replacing the drum unit on page 75.)
The fuser unit may be contaminated. Call your dealer for service.
53
Page 60
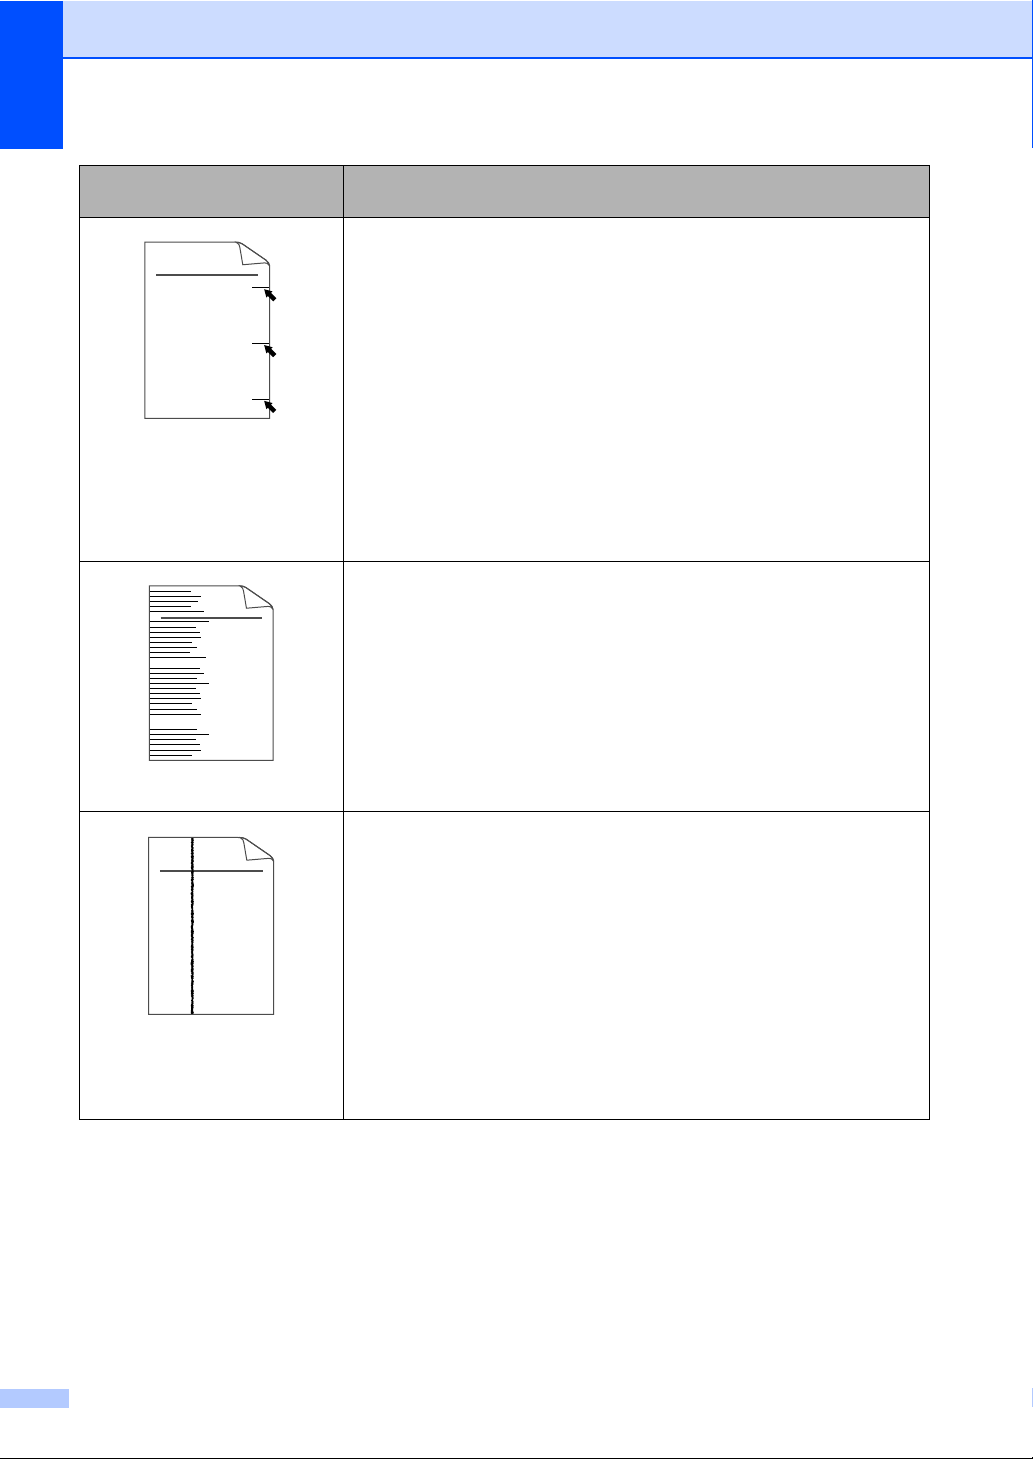
Examples of poor print
ABCDEFGH
abcdefghijk
ABCD
abcde
01234
ABCDEFGH
abcdefghijk
ABCD
abcde
01234
ABCDEFGH
abcdefghijk
ABCD
abcde
01234
quality
Black toner marks across the
page
Recommendation
Make sure that you use paper that meets our specifications. (See
Acceptable paper and other print media on page 11.)
If you use label sheets for laser machines, the glue from the sheets
may sometimes stick to the OPC drum surface. Clean the drum unit.
(See Cleaning the drum unit on page 68.)
Do not use paper that has clips or staples because they will scratch
the surface of the drum.
If the unpacked drum unit is in direct sunlight or room light, the unit
may be damaged.
The toner cartridge may be damaged. Put in a new toner cartridge.
(See Replacing a toner cartridge on page 71.)
The drum unit may be damaged. Put in a new drum unit. (See
Replacing the drum unit on page 75.)
Clean the laser scanner window and the corona wire inside the drum
unit. (See Cleaning the laser scanner window on page 65 and
Cleaning the corona wire on page 67.)
The drum unit may be damaged. Put in a new drum unit. (See
Replacing the drum unit on page 75.)
Black lines down the page
Printed pages have toner
54
Line across the page
stains down the page
Clean the corona wire inside the drum unit by sliding the blue tab. Be
sure to return the blue tab to the home position (a). (See Cleaning the
corona wire on page 67.)
The toner cartridge may be damaged. Put in a new toner cartridge.
(See Replacing a toner cartridge on page 71.)
The drum unit may be damaged. Put in a new drum unit. (See
Replacing the drum unit on page 75.)
The fuser unit may be smudged. Call your dealer for service.
Page 61
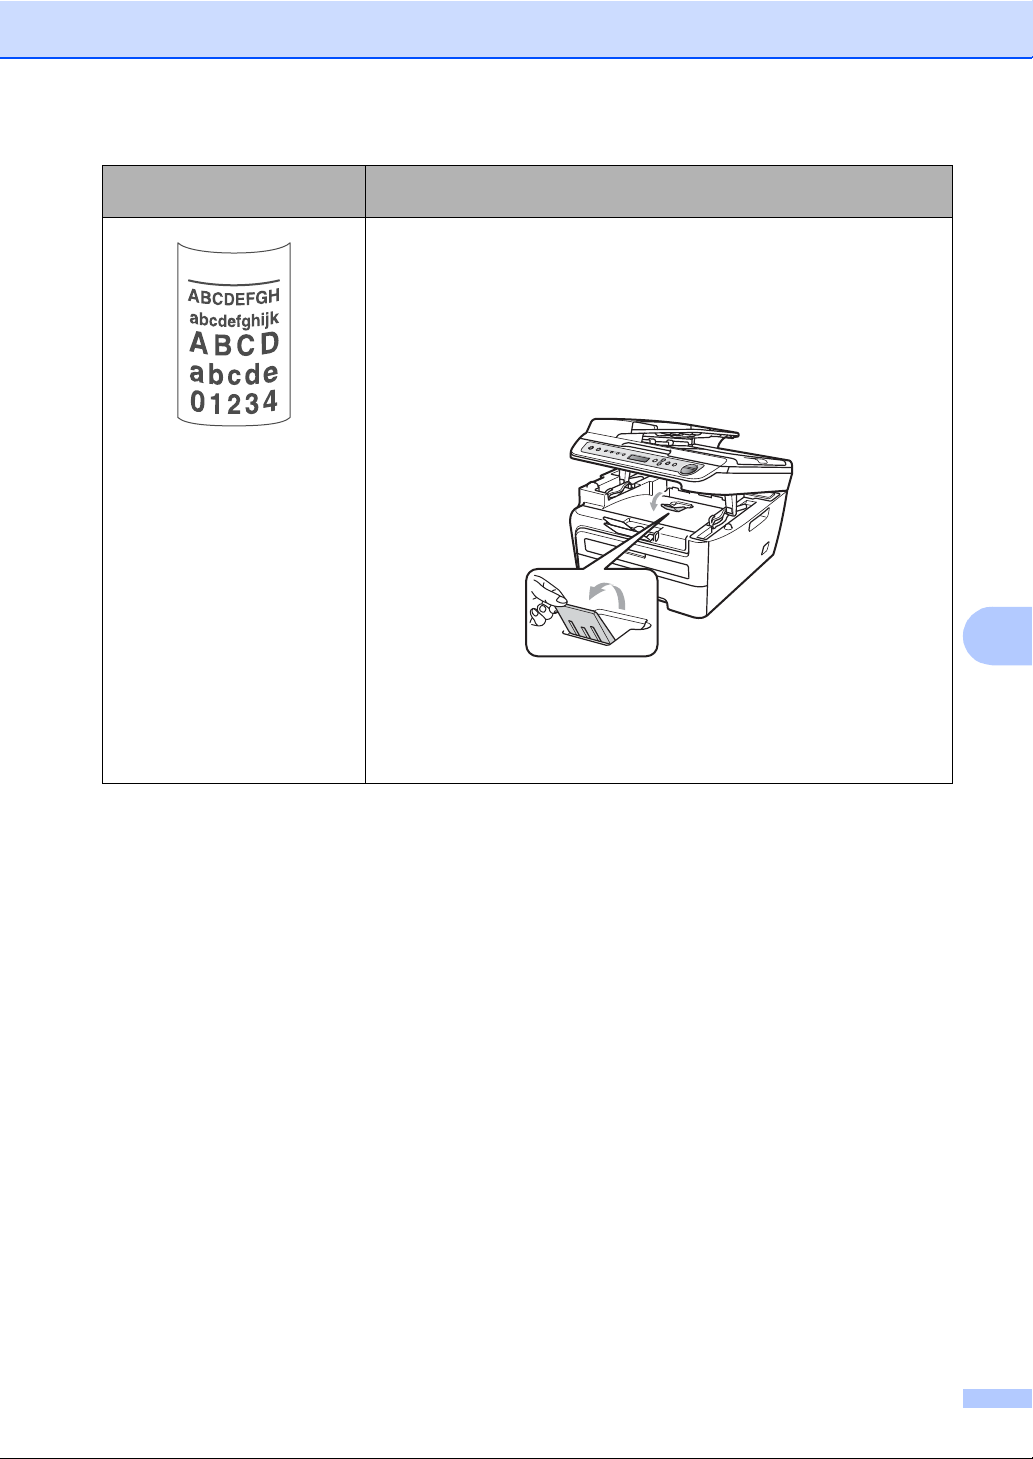
Troubleshooting and routine maintenance
Examples of poor print
quality
Curled
Recommendation
Choose Reduce Paper Curl mode in the printer driver when you do
not use our recommended paper. (See Device Options in the
Software User's Guide on the CD-ROM.)
Turn the paper over in the paper tray, and print again. (Excluding
Letterhead paper)
Lift up the output tray support flap.
B
Replace the paper in the paper tray with paper from a freshly opened
ream.
Make sure you are using paper that is recommended for your
machine. (See Acceptable paper and other print media on page 11.)
55
Page 62

Error and maintenance messages B
As with any sophisticated office product, errors may occur and consumable items may need to be
replaced. If this happens, your machine identifies the error or required routine maintenance and
shows the appropriate message. The most common error and maintenance messages are shown
below.
You can correct most errors and routine maintenance by yourself.
Error Message Cause Action
Cartridge Error The toner cartridge is not
installed correctly.
Drum End Soon The drum unit is near the end of
its life.
Cooling Down
Wait for a while
Cover is Open The front cover is not closed
Cover is Open The fuser cover is not closed
Cover is Open The fuser cover is not closed
Document Jam The document was not inserted
Drum Error The corona wire on the drum unit
Fuser Error The temperature of fuser unit
The temperature of the drum unit
or toner cartridge is too hot. The
machine will pause its current
print job and go into cooling down
mode. During the cooling down
mode, you will hear the cooling
fan running while the LCD shows
Cooling Down, and
Wait for a while.
completely.
completely.
completely or paper was jammed
in the back of the machine when
you turned on the power.
or fed correctly, or the document
scanned from the ADF was too
long.
needs to be cleaned.
The drum unit has reached the
end of its life.
does not rise at a specified
temperature within specified time.
The fuser unit is too hot.
Pull out the drum unit, take out the toner
cartridge that is indicated on the LCD, and
put it back into the drum unit again.
Use the drum unit until you have a print
quality problem; then replace the drum unit
with a new one.
(See Replacing the drum unit on page 75.)
Make sure that you can hear the fan in the
machine spinning and that the exhaust outlet
is not blocked by something.
If the fan is spinning, remove any obstacles
that surround the exhaust outlet, and then
leave the machine turned on but do not use
it for several minutes.
If the fan is not spinning do the following:
Disconnect the machine from the power for
several minutes and then reconnect it.
Close the front cover of the machine.
Close the fuser cover of the machine.
Make sure paper is not jammed inside the
back of the machine, and then close the
fuser cover and press Start.
See Document jams on page 58 or Using the
automatic document feeder (ADF)
on page 15.
Clean the corona wire on the drum unit. (See
Cleaning the corona wire on page 67.)
Replace the drum unit. (See Replacing the
drum unit on page 75.)
Turn the power switch off, wait a few
seconds, and then turn it on again. Leave the
machine for 15 minutes with the power on.
56
Page 63

Troubleshooting and routine maintenance
Error Message Cause Action
Init Unable XX The machine has a mechanical
problem.
Jam Rear The paper is jammed in the back
of the machine.
Jam Inside The paper is jammed inside the
machine.
Jam Tray The paper is jammed in the paper
tray of the machine.
No Paper The machine is out of paper or
paper is not correctly loaded in
the paper tray.
Out of Memory The machine’s memory is full. Copy operation in progress
Disconnect the machine from the power for
several minutes and then reconnect it.
(See Paper jams on page 59.)
(See Paper jams on page 59.)
(See Paper jams on page 59.)
Do one of the following:
Refill the paper in the paper tray, and
then press Start.
Remove the paper and load it again, and
then press Start.
Do one of the following:
Press Start to copy the scanned
pages.
B
Print Unable XX The machine has a mechanical
problem.
Scan Unable XX The machine has a mechanical
problem.
Toner Life End The drum unit and toner cartridge
assembly is not installed
correctly, or the toner cartridge is
used up and printing is not
possible.
Toner Low If the LCD shows Toner Low,
you can still print; however, the
machine is telling you that the
toner cartridge is near the end of
its life and the toner will soon
need replacing.
Press Stop/Exit and wait until the
other operations in progress finish, and
then try again.
Clear the data from the memory. (See
Out of memory message on page 27.)
Print operation in process
Reduce print resolution. (See Advanced tab
in the Software User’s Guide on the
CD-ROM.)
Disconnect the machine from the power for
several minutes and then reconnect it.
Disconnect the machine from the power for
several minutes and then reconnect it.
Do one of the following:
Re-install the toner cartridge and drum
unit assembly.
Replace the empty toner cartridge with a
new one. (See Replacing a toner
cartridge on page 71.)
Order a new toner cartridge now.
57
Page 64
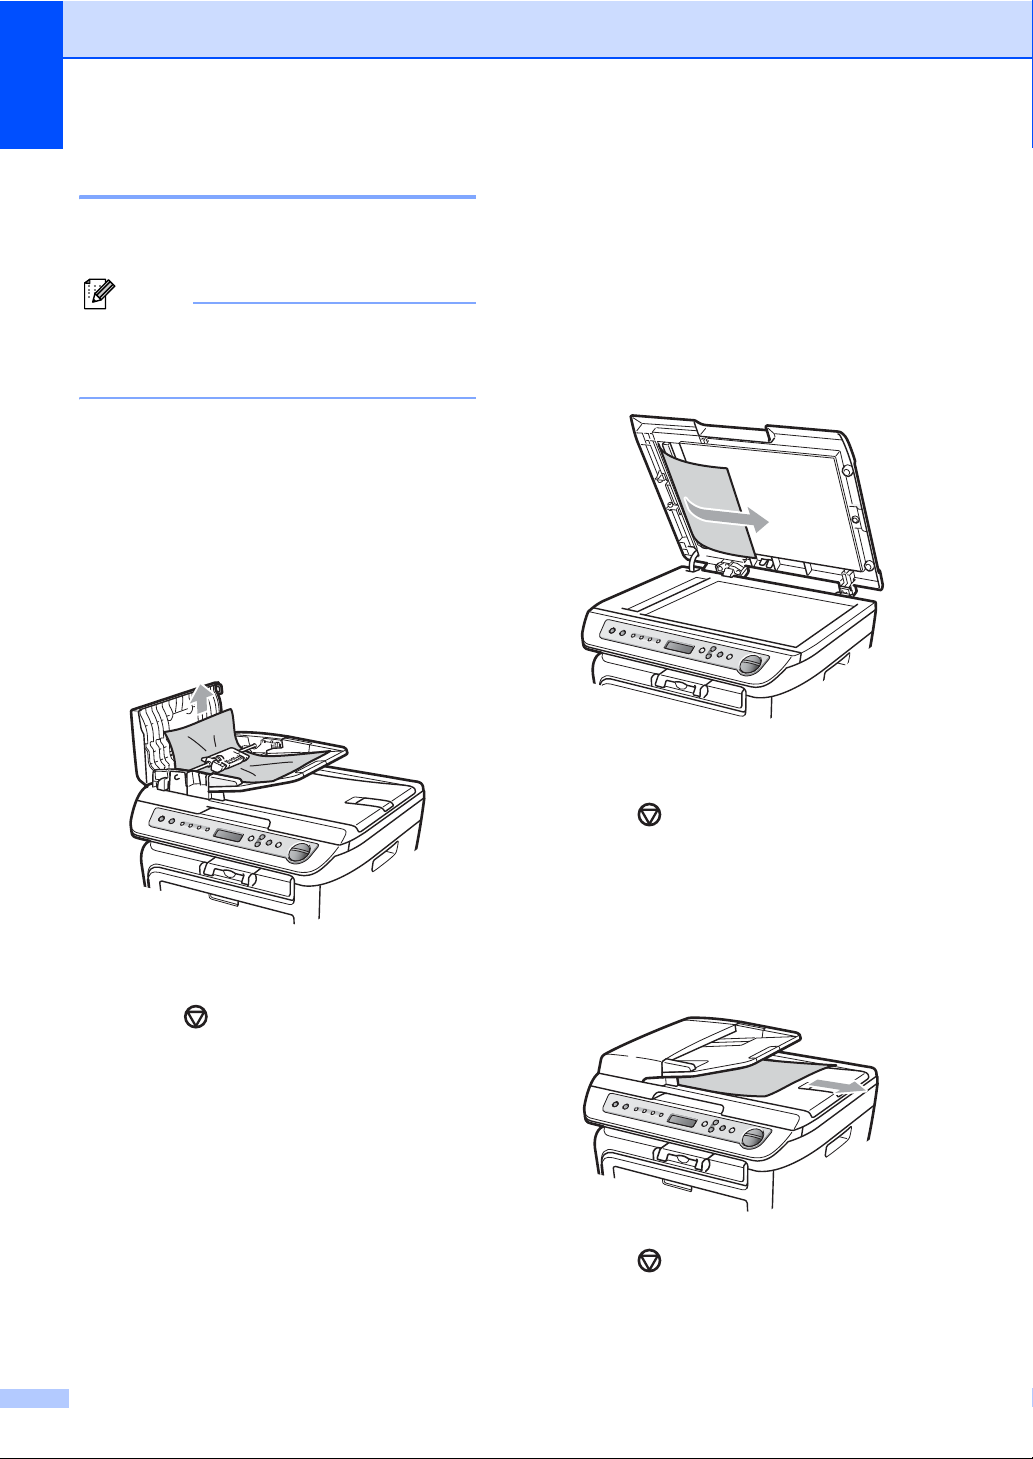
Document jams B
Note
If the document is jammed, follow the steps
below.
Document is jammed under the document cover B
a Take out any paper from the ADF that is
not jammed.
After removing a jammed document,
check that no paper scraps are left in the
machine that could cause another jam.
Document is jammed in the top of the ADF unit B
a Take out any paper from the ADF that is
not jammed.
b Open the ADF cover.
c Pull the jammed document out to the
left.
b Lift the document cover.
c Pull the jammed document out to the
right.
d Close the document cover.
e Press Stop/Exit.
Document is jammed at the output tray B
d Close the ADF cover.
e Press Stop/Exit.
58
a Pull the jammed document out to the
right.
b Press Stop/Exit.
Page 65
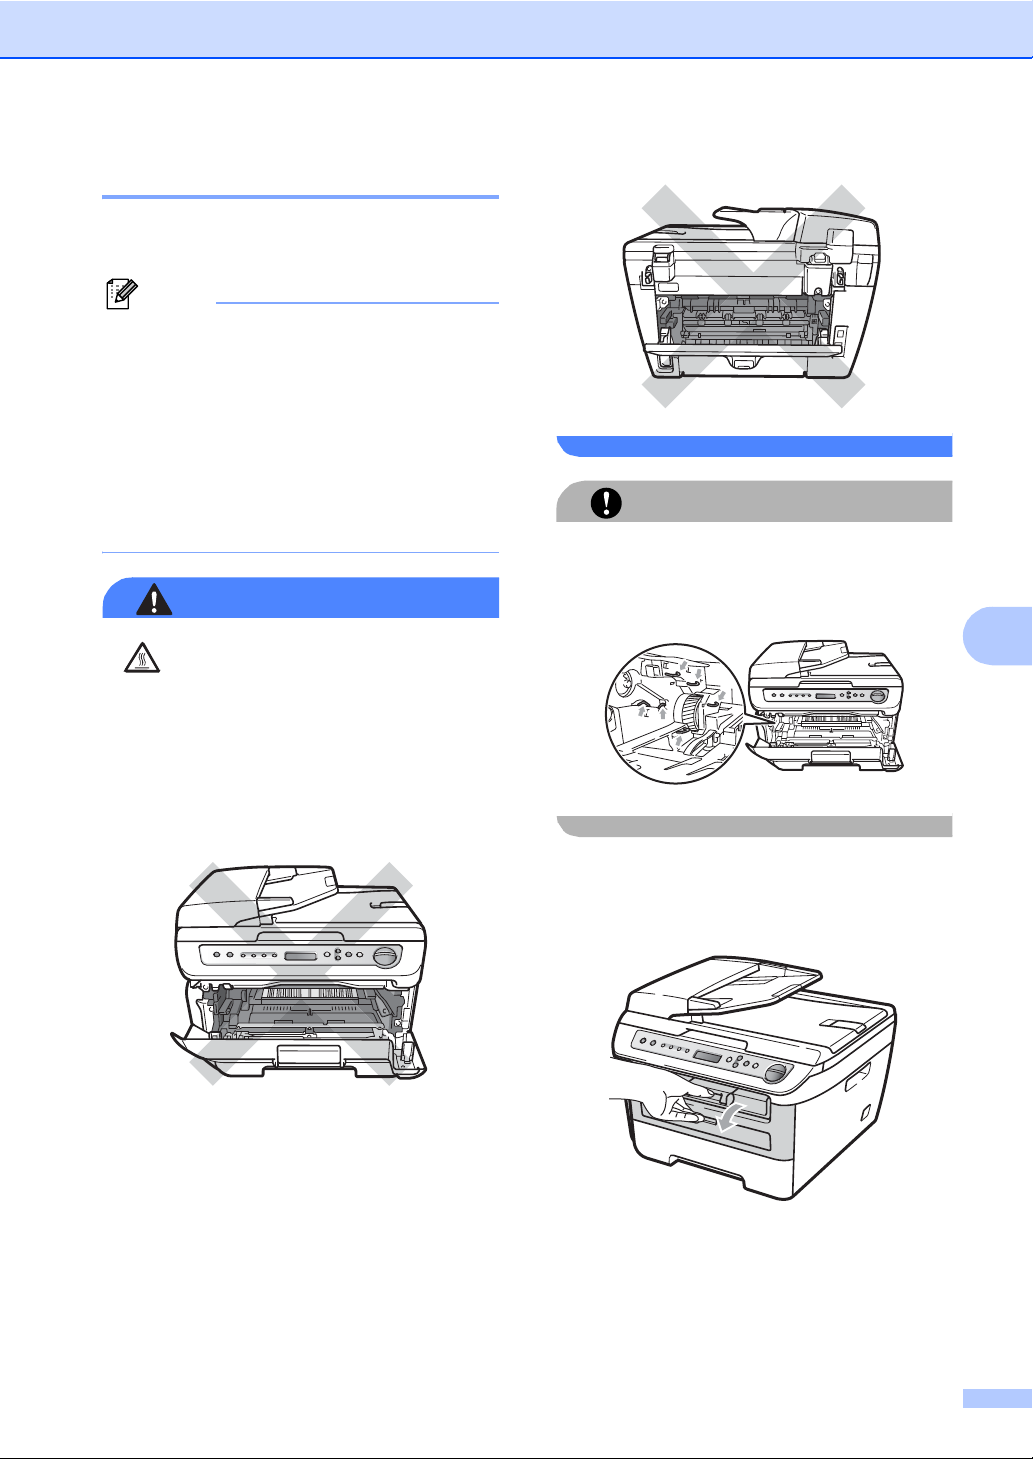
Troubleshooting and routine maintenance
Note
WARNING
CAUTION
Paper jams B
To clear paper jams, please follow the steps
in this section.
• Please confirm that you have installed
both a toner cartridge and a drum unit in
the machine. If you have not installed a
drum unit or have installed the drum unit
incorrectly, then this may cause a paper
jam in your machine.
• If the error message remains, open and
close the front cover and fuser cover firmly
to reset the machine.
HOT SURFACE
After you have just used the machine, some
internal parts of the machine will be
extremely hot. To prevent injury, when you
open the front or back cover (back output
tray) of the machine, DO NOT touch the
shaded parts shown in the illustration.
To prevent damage to the machine caused
by static electricity, DO NOT touch the
electrodes shown in the illustration.
B
Paper is jammed inside the machine B
a Open the front cover.
59
Page 66
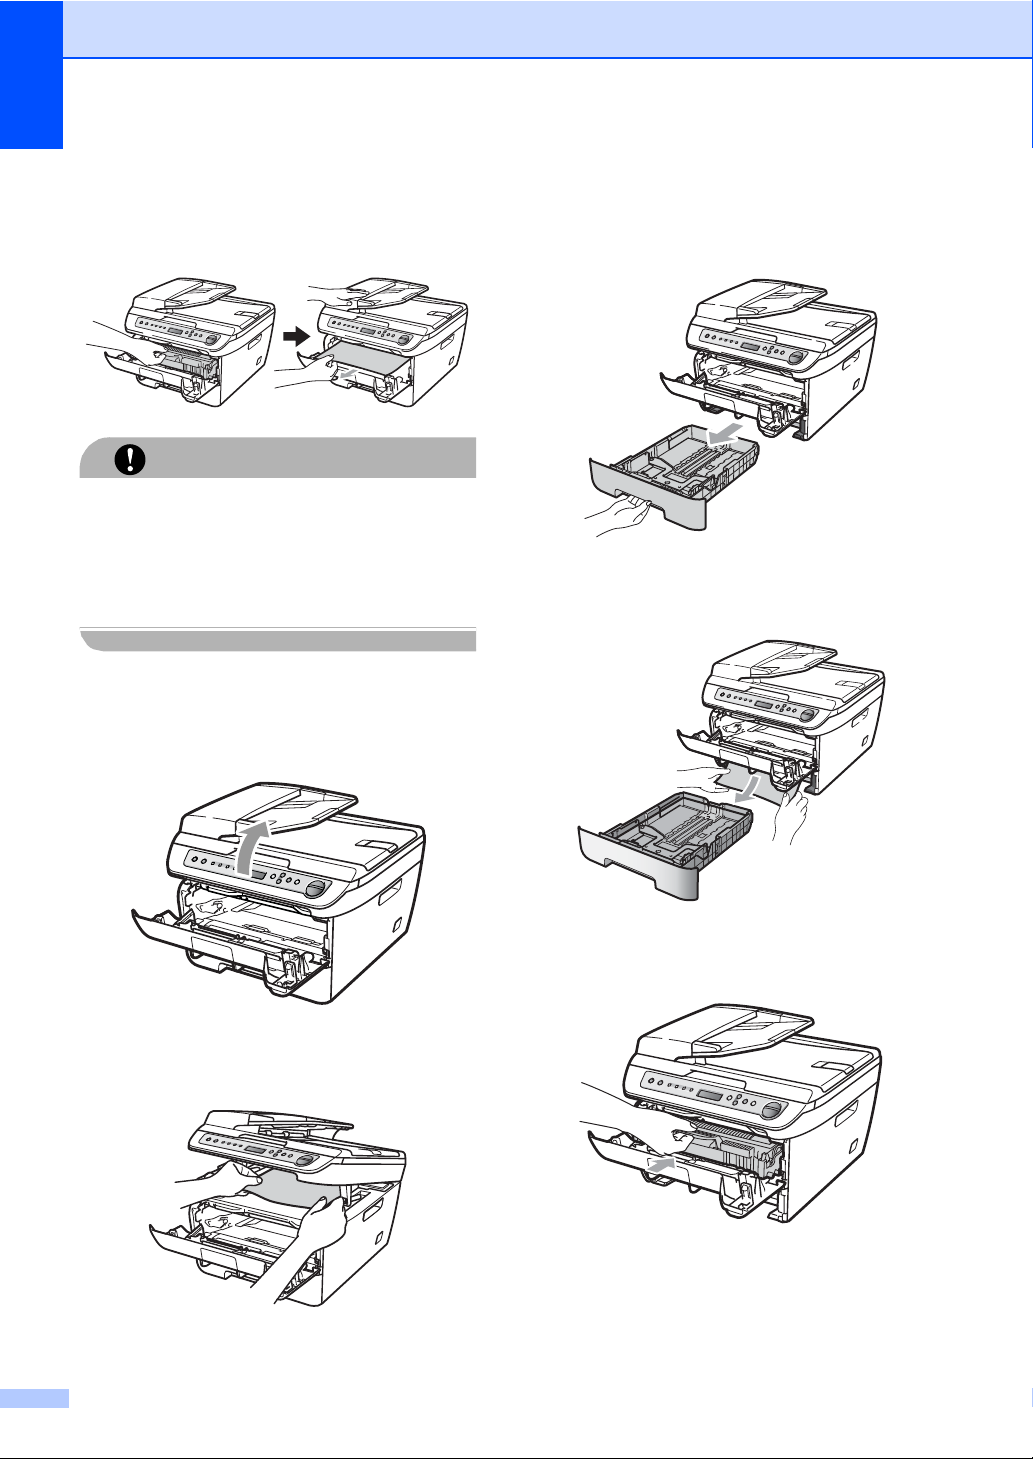
b Slowly take out the drum unit and toner
CAUTION
cartridge assembly. The jammed paper
will be pulled out with the toner cartridge
and drum unit assembly.
We recommend that you place the drum
unit and toner cartridge assembly on a
clean, flat surface with a piece of
disposable paper or cloth underneath it in
case you accidentally spill or scatter toner.
c If you cannot remove the drum unit and
toner cartridge assembly easily, do not
use extra force. Instead, lift the scanner
cover.
e If you cannot pull the jammed paper out
of the output tray opening, take the
paper tray completely out of the
machine.
f Pull the jammed paper out of the paper
tray opening.
Use both hands to carefully pull the
jammed paper up and out of the output
tray opening.
d Close the scanner cover.
60
g Put the drum unit and toner cartridge
assembly back in the machine.
h Put the paper tray back in the machine.
i Close the front cover.
Page 67
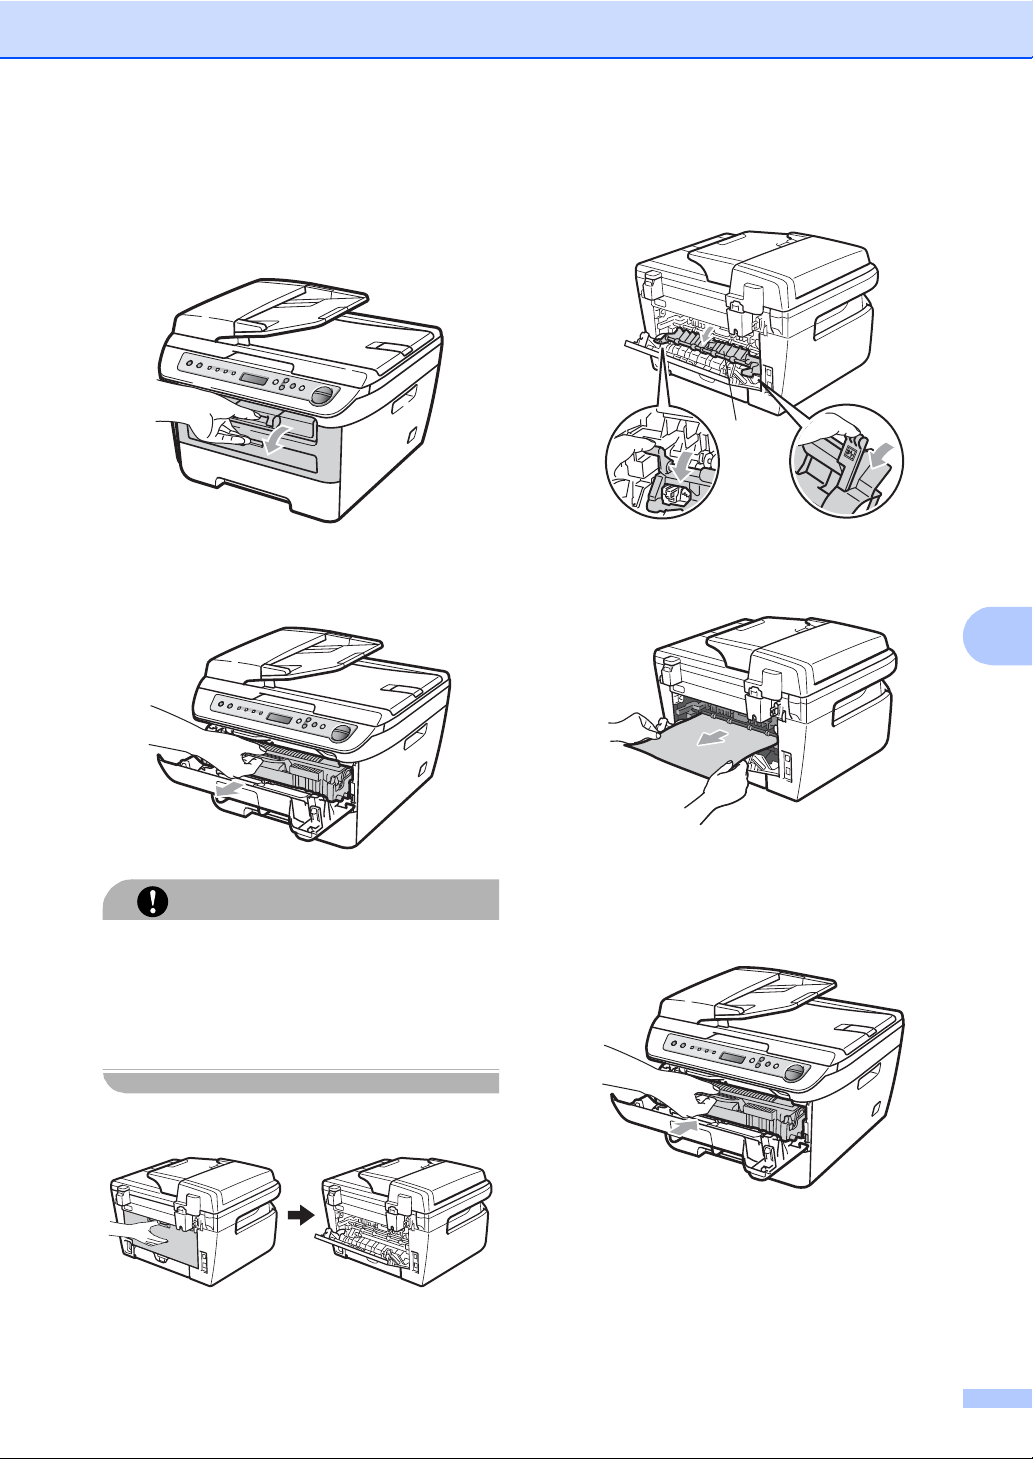
Troubleshooting and routine maintenance
CAUTION
Paper is jammed at the back of the machine B
a Open the front cover.
b Slowly take out the drum unit and toner
cartridge assembly.
d Pull the tabs toward you to open the
fuser cover (1).
1
e Pull the jammed paper out of the fuser
unit.
B
We recommend that you place the drum
unit and toner cartridge assembly on a
clean, flat surface with a piece of
disposable paper or cloth underneath it in
case you accidentally spill or scatter toner.
c Open the back cover (back output tray).
f Close the back cover (back output tray).
g Put the drum unit and toner cartridge
assembly back in the machine.
h Close the front cover.
61
Page 68
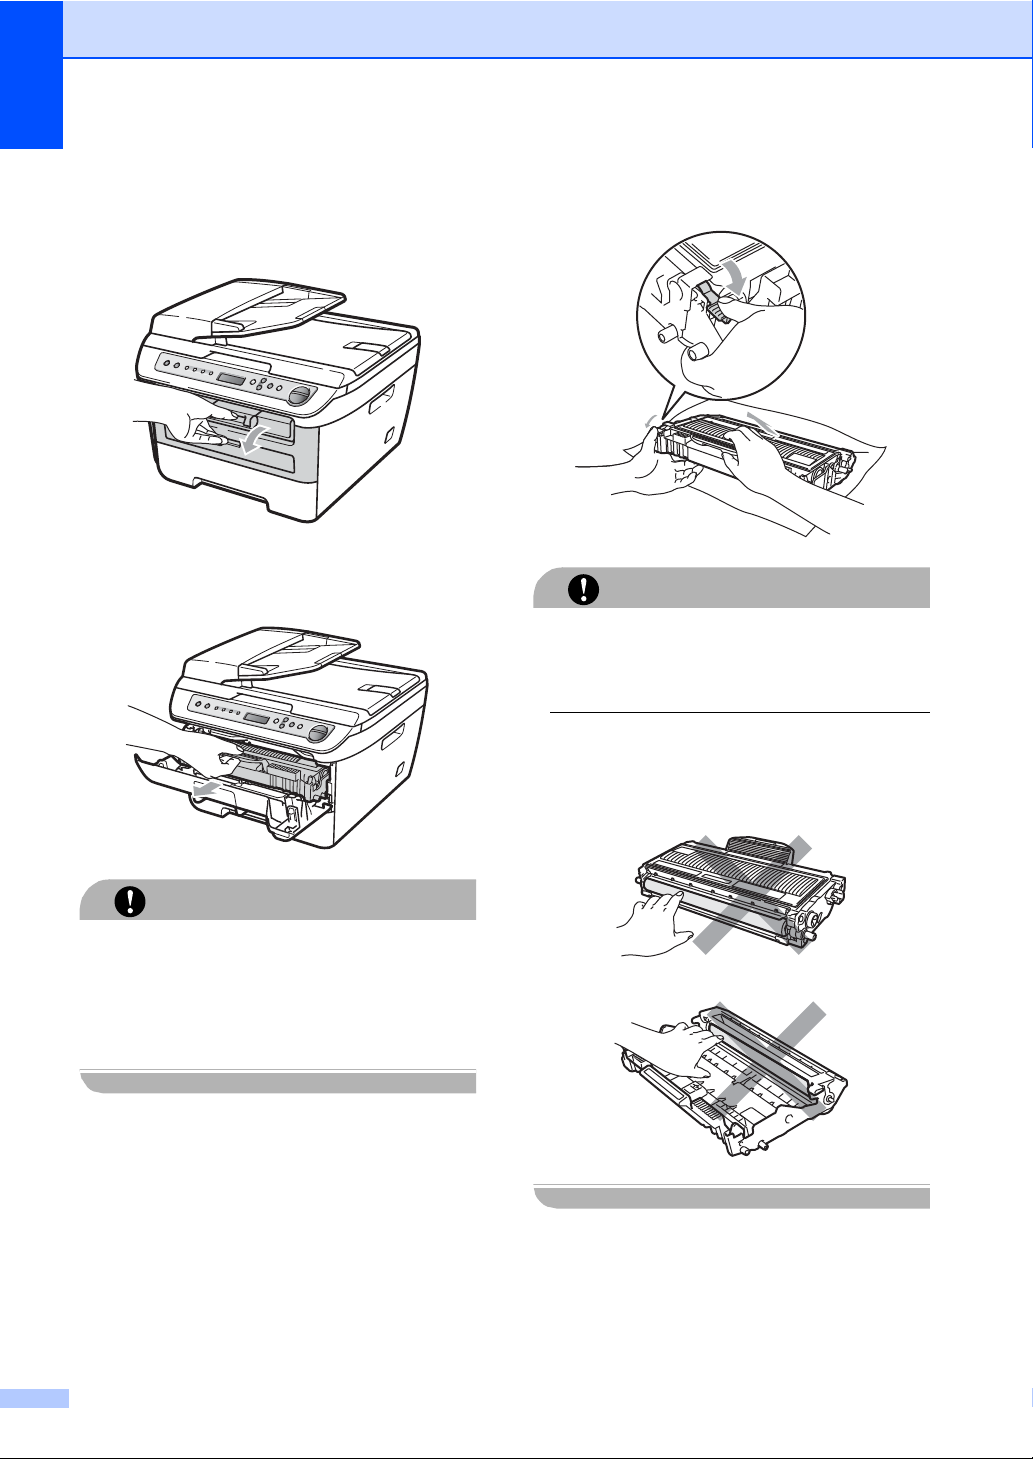
Paper is jammed inside the drum unit
CAUTION
CAUTION
and toner cartridge assembly B
a Open the front cover.
b Slowly take out the drum unit and toner
cartridge assembly.
c Push down the blue lock lever and take
the toner cartridge out of the drum unit.
Handle the toner cartridge carefully. If toner
scatters on your hands or clothes, wipe or
wash it off with cold water at once.
To avoid print quality problems, DO NOT
touch the shaded parts shown in the
illustrations below.
We recommend that you place the drum
unit and toner cartridge assembly on a
clean, flat surface with a piece of
disposable paper or cloth underneath it in
case you accidentally spill or scatter toner.
62
d Clear the jammed paper if there is any
inside the drum unit.
Page 69
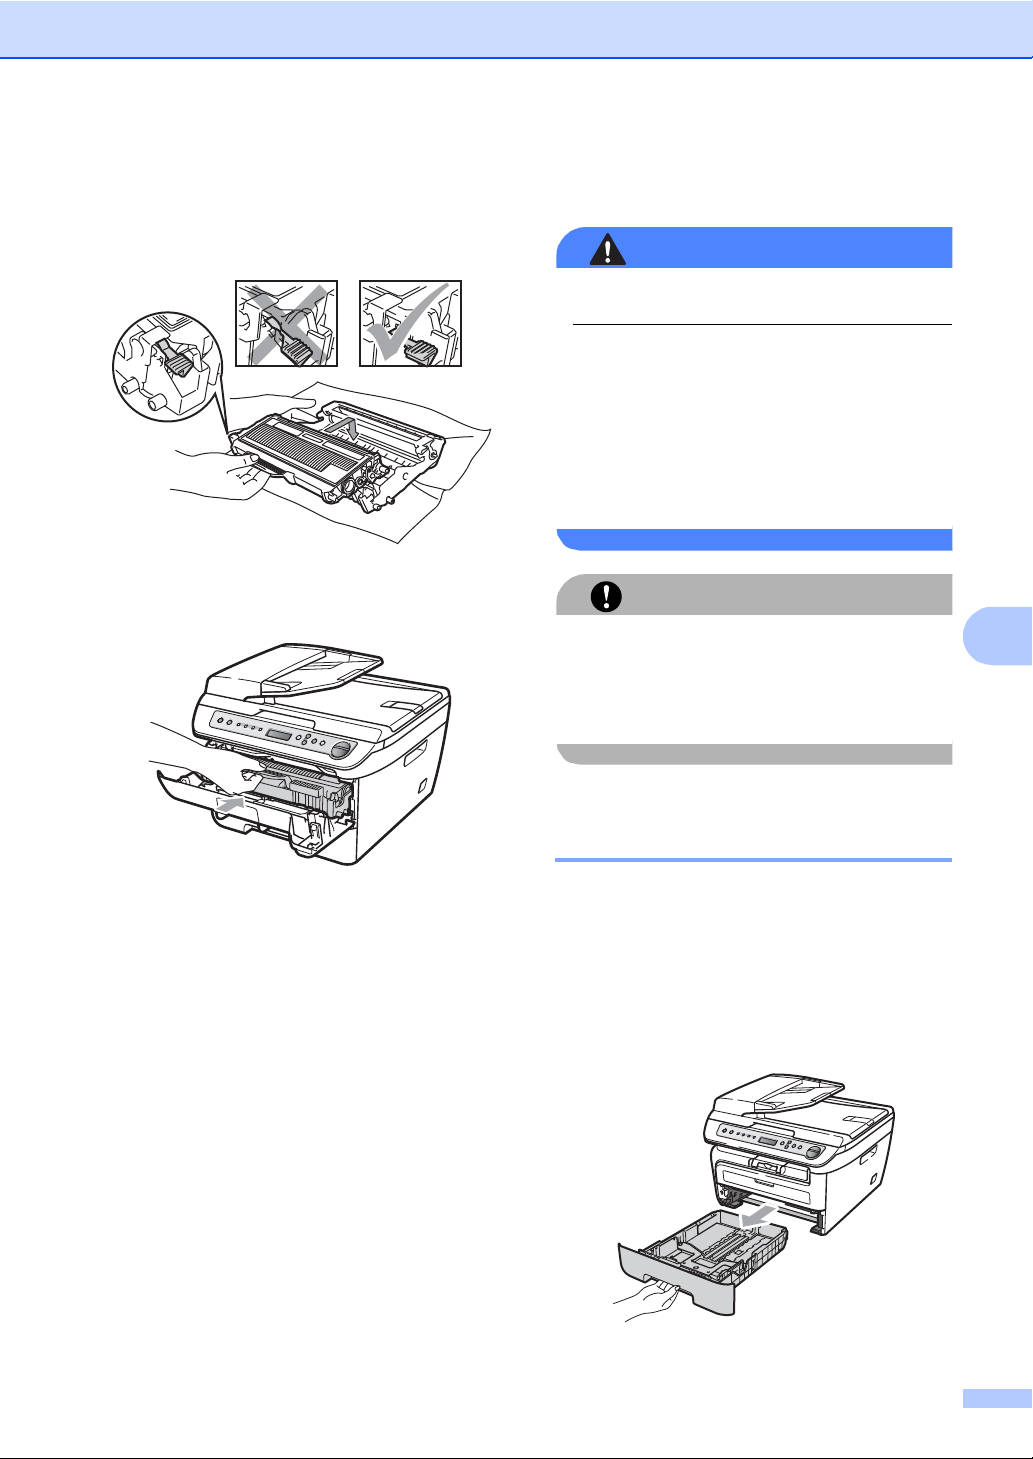
Troubleshooting and routine maintenance
WARNING
CAUTION
e Put the toner cartridge back into the
drum unit until you hear it lock into place.
If you put it in correctly, the blue lock
lever will lift automatically.
f Put the drum unit and toner cartridge
assembly back in the machine.
Routine maintenance B
Use neutral detergents.
DO NOT use any flammable substances,
spray or organic solvent/liquids containing
alcohol/ammonia to clean the inside or
outside of the machine. Doing this may
cause a fire or electrical shock. For more
information see Important information
on page 33.
The drum unit contains toner, so handle it
carefully. If toner scatters on your hands or
clothes, wipe or wash it off with cold water
at once.
B
g Close the front cover.
Cleaning the outside of the machine B
a Turn off the machine’s power switch.
Disconnect all cables, and then unplug
the power cord from the electrical
socket.
b Pull the paper tray completely out of the
machine.
63
Page 70
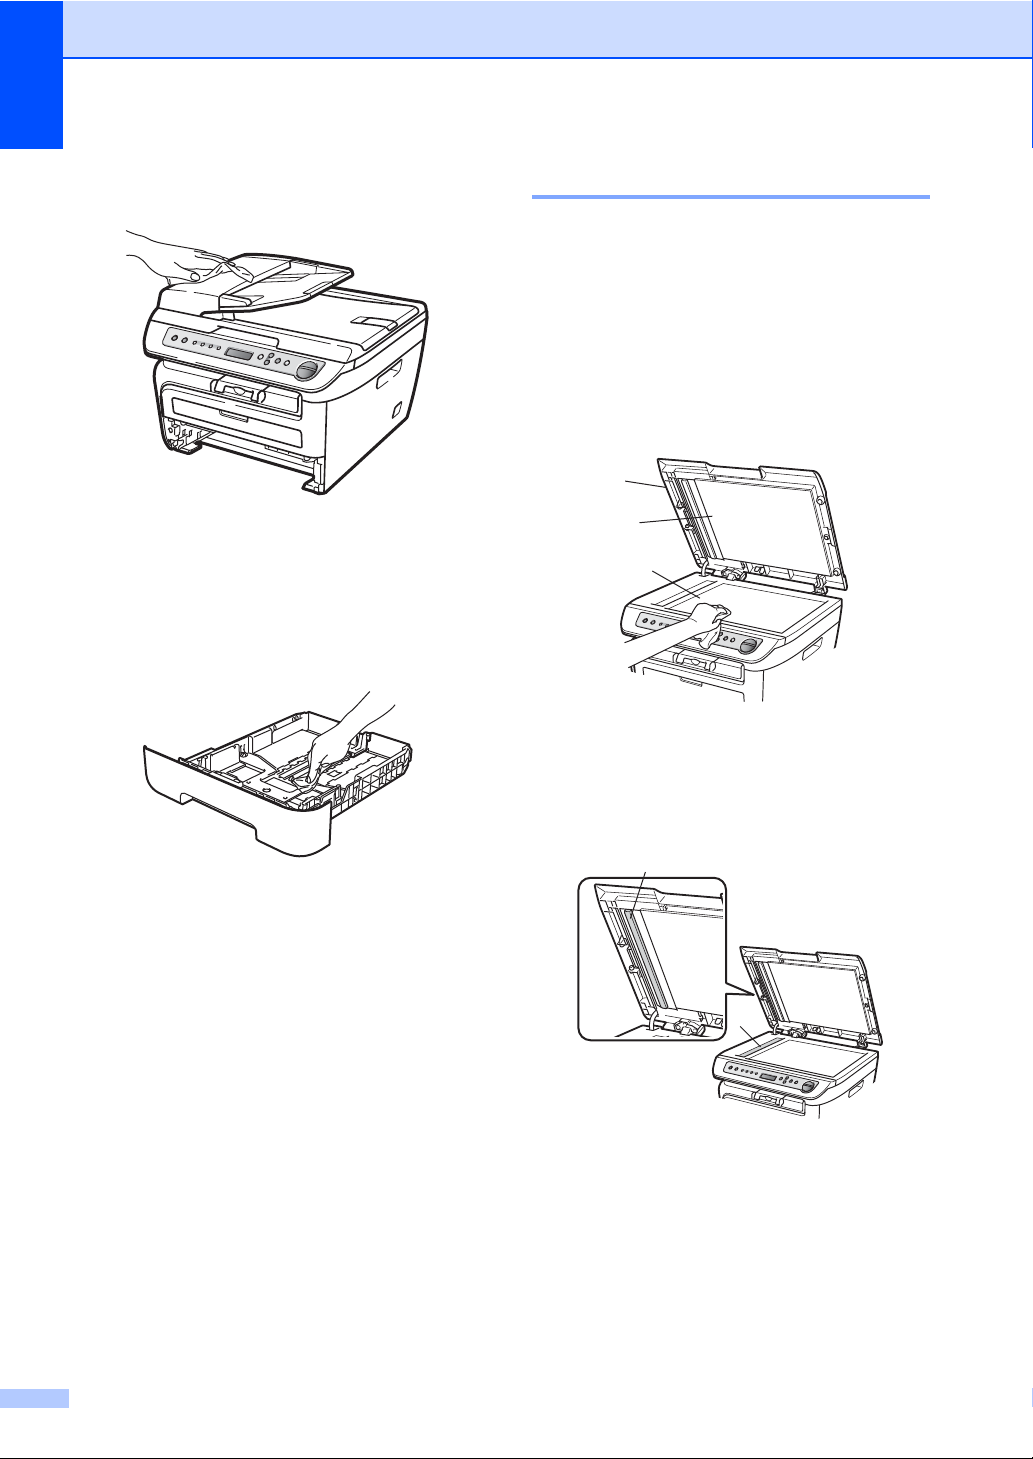
c Wipe the outside of the machine with a
soft cloth to remove dust.
Cleaning the scanner glass B
a Turn off the machine’s power switch.
Disconnect all cables and then unplug
the power cord from the electrical
socket.
b Lift the document cover (1).
Clean the white plastic surface (2) and
scanner glass (3) underneath it with a
soft lint-free cloth moistened with water.
1
d Remove any paper that is in the paper
tray.
e Wipe the inside and the outside of the
paper tray with a soft cloth to remove
dust.
f Re-load the paper and put the paper tray
firmly back in the machine.
g Plug the machine’s power cord back into
the electrical socket first, and then
reconnect all cables. Turn on the
machine’s power switch.
2
3
c In the ADF unit, clean the white bar (1)
and the scanner glass strip (2)
underneath it with a soft lint-free cloth
moistened with water.
1
2
64
Page 71
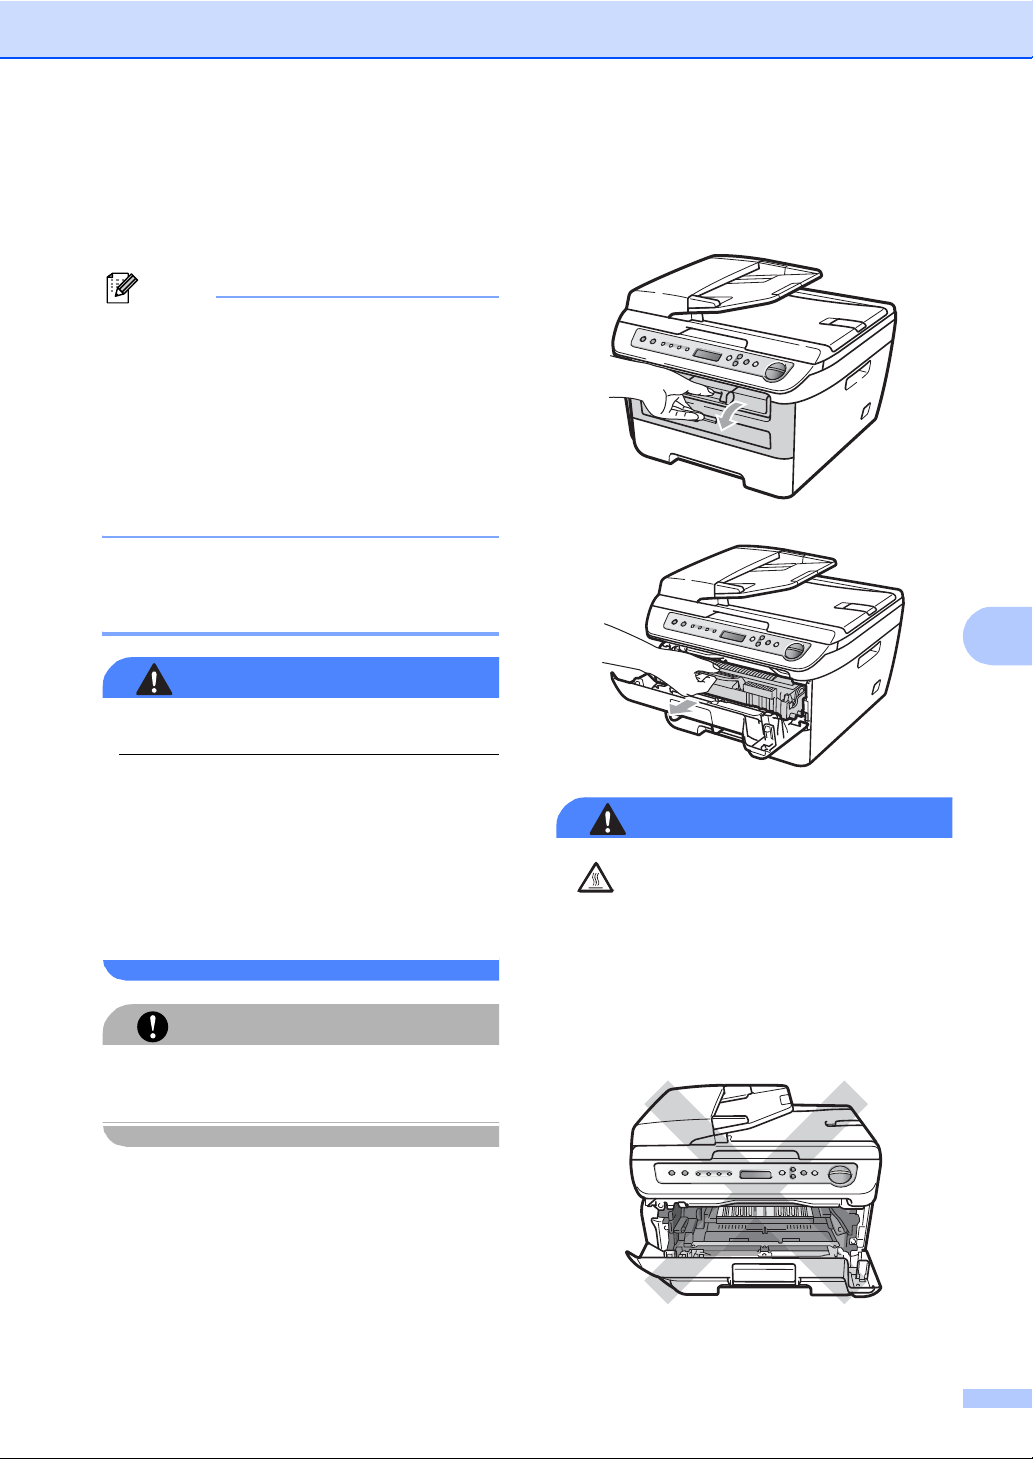
Troubleshooting and routine maintenance
Note
WARNING
CAUTION
WARNING
d Plug the machine’s power cord back into
the electrical socket first, and then
reconnect all cables. Turn on the
machine’s power switch.
In addition to cleaning the scanner glass
and glass strip with a soft lint-free cloth
moistened with water, run your finger tip
over the glass to see if you can feel
anything on it. If you feel dirt or debris,
clean the glass again concentrating on
that area. You may need to repeat the
cleaning process three or four times. To
test, make a copy after each cleaning.
Cleaning the laser scanner window B
Use neutral detergents.
DO NOT use any flammable substances,
spray or organic solvent/liquids containing
alcohol/ammonia to clean the inside or
outside of the machine. Doing this may
cause a fire or electrical shock. For more
information see Important information
on page 33.
DO NOT touch the laser scanner window
with your fingers.
b Open the front cover and slowly take out
the drum unit and toner cartridge
assembly.
HOT SURFACE
After you have just used the machine, some
internal parts of the machine will be
extremely hot. To prevent injury, when you
open the front or back cover (back output
tray) of the machine, DO NOT touch the
shaded parts shown in the illustration.
B
a Before you clean the inside of the
machine, turn off the machine’s power
switch.
Unplug the power cord from the
electrical socket.
65
Page 72
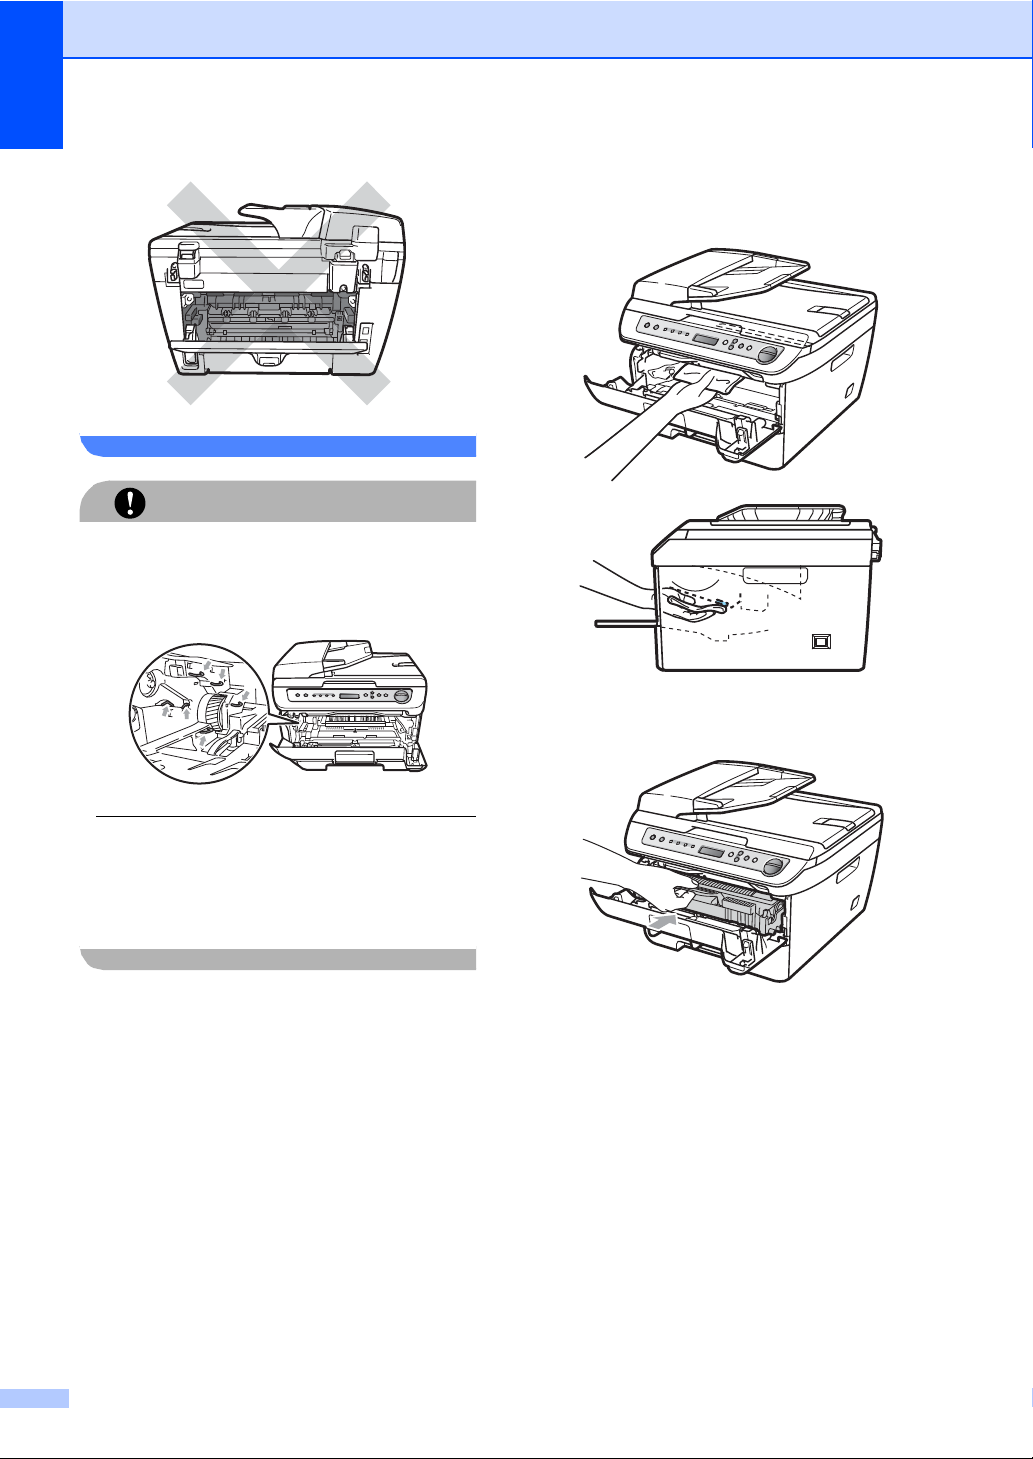
CAUTION
To prevent damage to the machine caused
by static electricity, DO NOT touch the
electrodes shown in the illustration.
c Wipe the laser scanner window by
wiping it with a clean soft, dry lint-free
cloth.
d Put the drum unit and toner cartridge
assembly back in the machine.
We recommend that you place the drum
unit on a clean, flat surface with a piece of
disposable paper or cloth underneath it in
case you accidentally spill or scatter toner.
e Close the front cover.
f Plug the machine’s power cord back into
the electrical socket.
Turn on the machine’s power switch.
66
Page 73
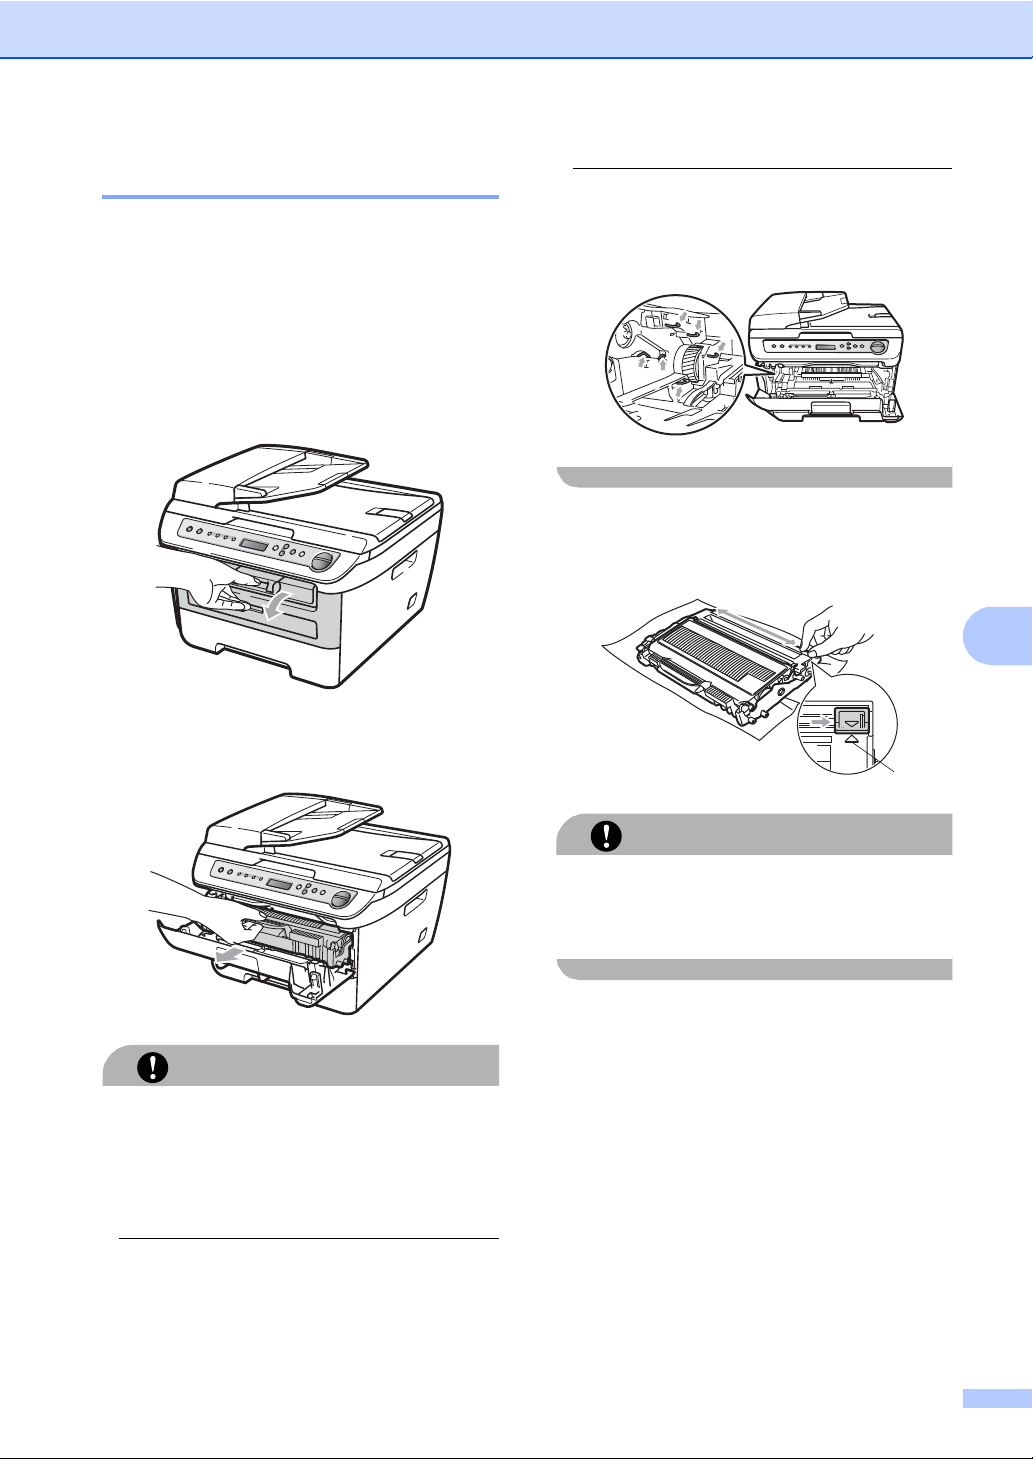
Troubleshooting and routine maintenance
CAUTION
CAUTION
Cleaning the corona wire B
If you have print quality problems, clean the
corona wire as follows:
a Turn off the machine’s power switch.
Disconnect all cables, and then unplug
the power cord from the electrical
socket.
b Open the front cover.
c Slowly take out the drum unit and toner
cartridge assembly.
To prevent damage to the machine caused
by static electricity, DO NOT touch the
electrodes shown in the illustration.
d Clean the corona wire inside the drum
unit by gently sliding the blue tab from
right to left and left to right several times.
1
B
We recommend that you place the drum
unit and toner cartridge assembly on a
clean, flat surface with a piece of
disposable paper or cloth underneath it in
case you accidentally spill or scatter toner.
Handle the toner cartridge carefully. If toner
scatters on your hands or clothes, wipe or
wash it off with cold water at once.
Be sure to return the blue tab to the home
position (a) (1). If you do not, printed pages
may have a vertical stripe.
e Put the drum unit and toner cartridge
assembly back in the machine.
f Close the front cover.
67
Page 74
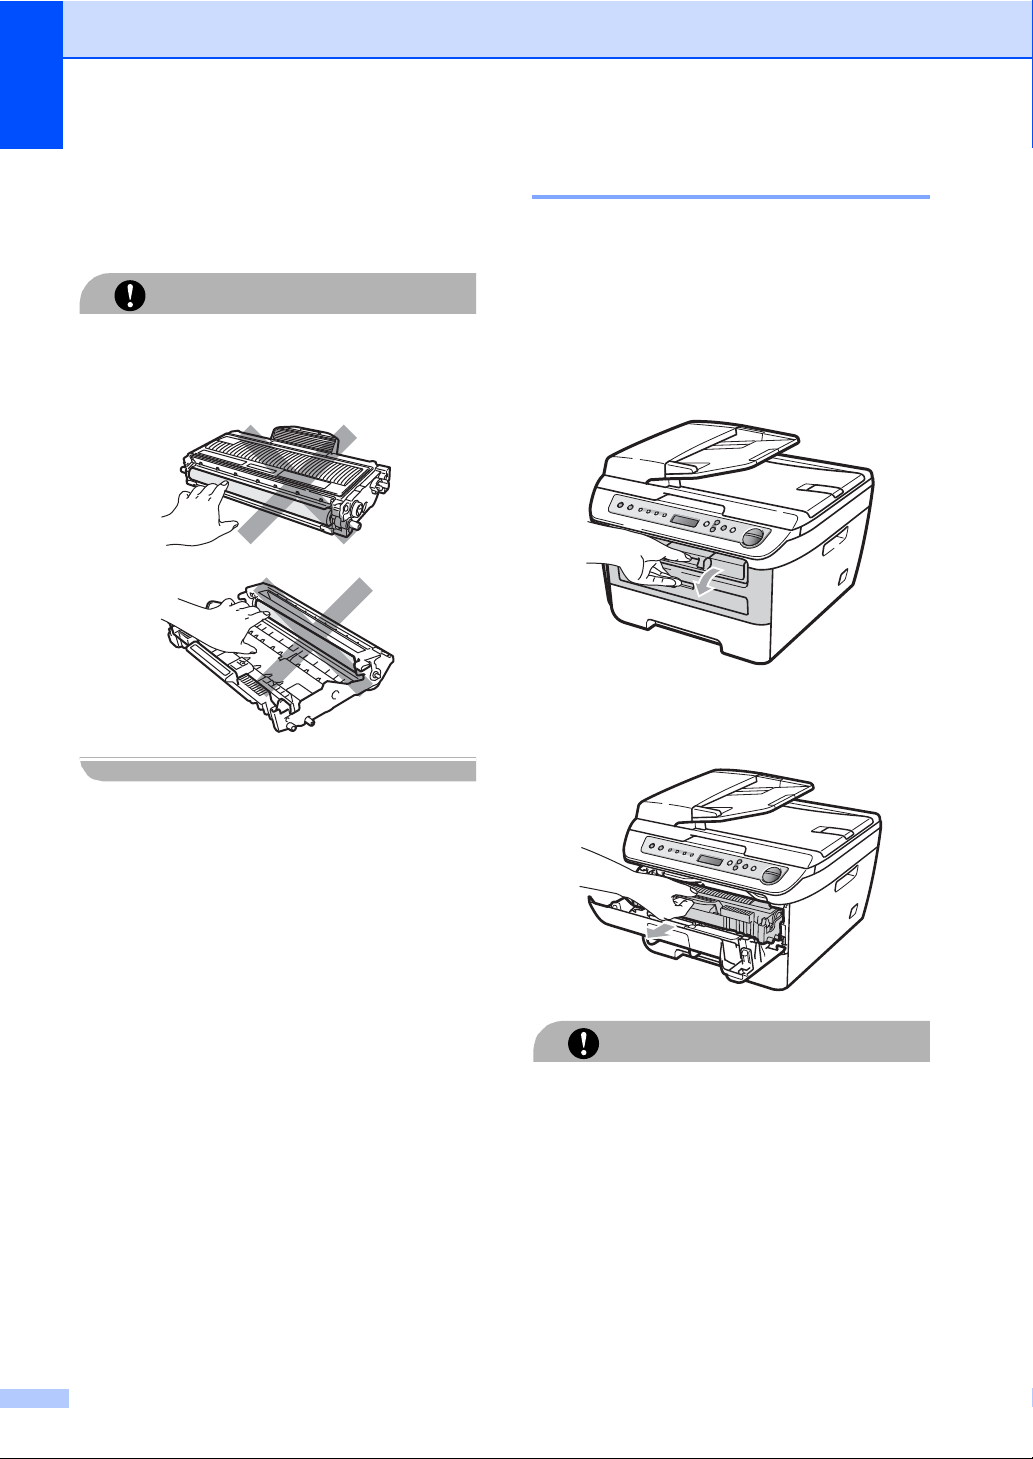
g Plug the machine’s power cord back into
CAUTION
CAUTION
the electrical socket first, and then
reconnect all cables. Turn on the
machine’s power switch.
Cleaning the drum unit B
If you have print quality problems, clean the
drum unit as follows.
To avoid print quality problems, DO NOT
touch the shaded parts shown in the
illustrations below.
a Turn off the machine’s power switch.
Unplug the power cord from the
electrical socket.
b Open the front cover.
c Slowly take out the drum unit and toner
cartridge assembly.
68
We recommend that you put the drum unit
and toner cartridge assembly on a clean,
flat surface with a piece of disposable paper
or cloth underneath it in case you
accidentally spill or scatter toner.
Page 75
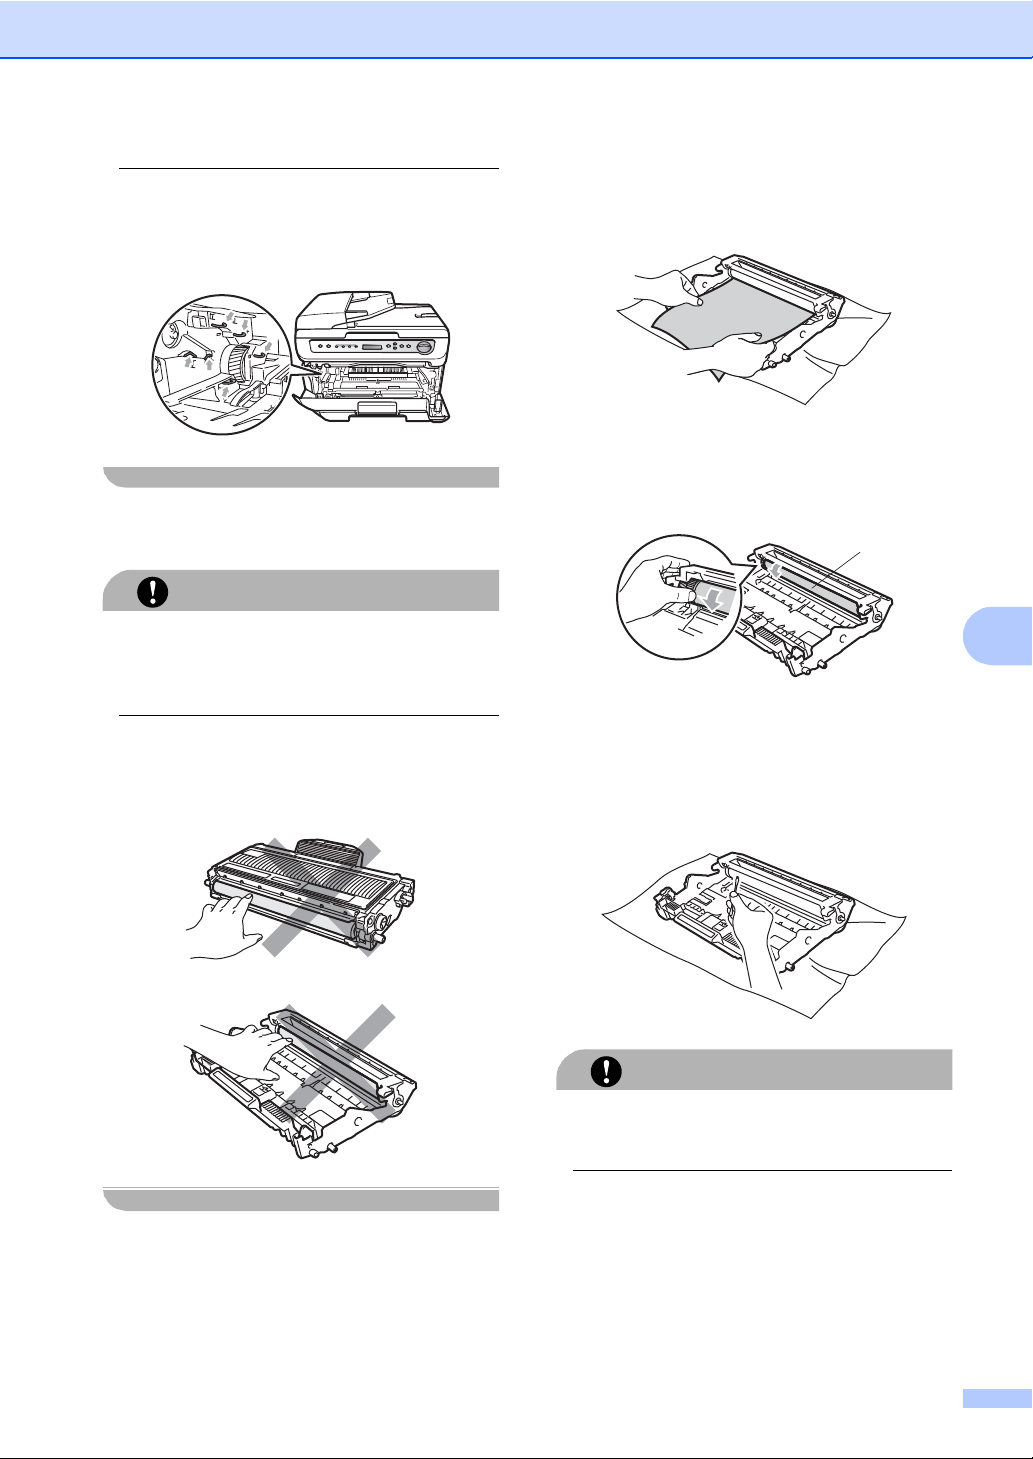
Troubleshooting and routine maintenance
CAUTION
CAUTION
To prevent damage to the machine caused
by static electricity, DO NOT touch the
electrodes shown in the illustration.
d Push down the blue lock lever and take
the toner cartridge out of the drum unit.
Handle the toner cartridge carefully. If toner
scatters on your hands or clothes, wipe or
wash it off with cold water at once.
To avoid print quality problems, DO NOT
touch the shaded parts shown in the
illustrations below.
e Put the print sample in front of the drum
unit, and find the exact position of the
poor print.
f Turn the drum unit gear by hand while
looking at the surface of the OPC
drum (1).
1
g When you have found the mark on the
drum that matches the print sample,
wipe the surface of the OPC drum with a
dry cotton swab until the dust or glue on
the surface comes off.
B
The drum is photosensitive so DO NOT
touch it with your fingers.
DO NOT clean the surface of the
photosensitive drum with a sharp object.
69
Page 76
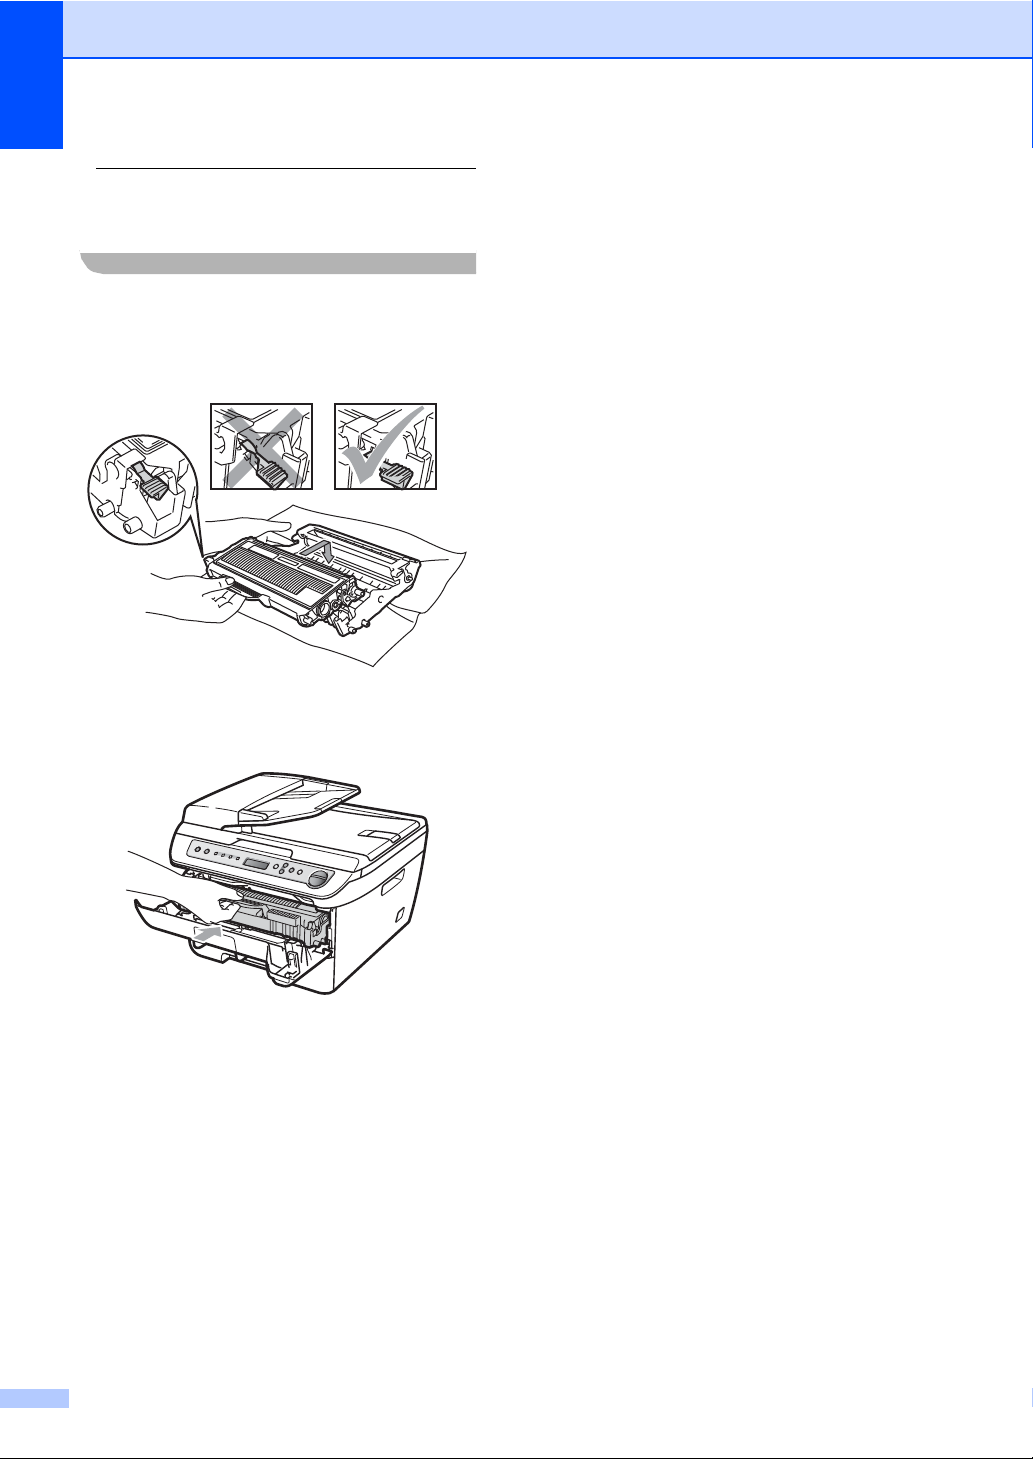
DO NOT use excessive force when
cleaning the drum unit.
h Put the toner cartridge back into the
drum unit until you hear it lock into place.
If you put the cartridge in correctly, the
blue lock lever will lift automatically.
i Put the drum unit and toner cartridge
assembly back in the machine.
j Close the front cover.
k Plug the machine’s power cord back into
the electrical socket first, and then
reconnect all cables. Turn on the
machine’s power switch.
70
Page 77
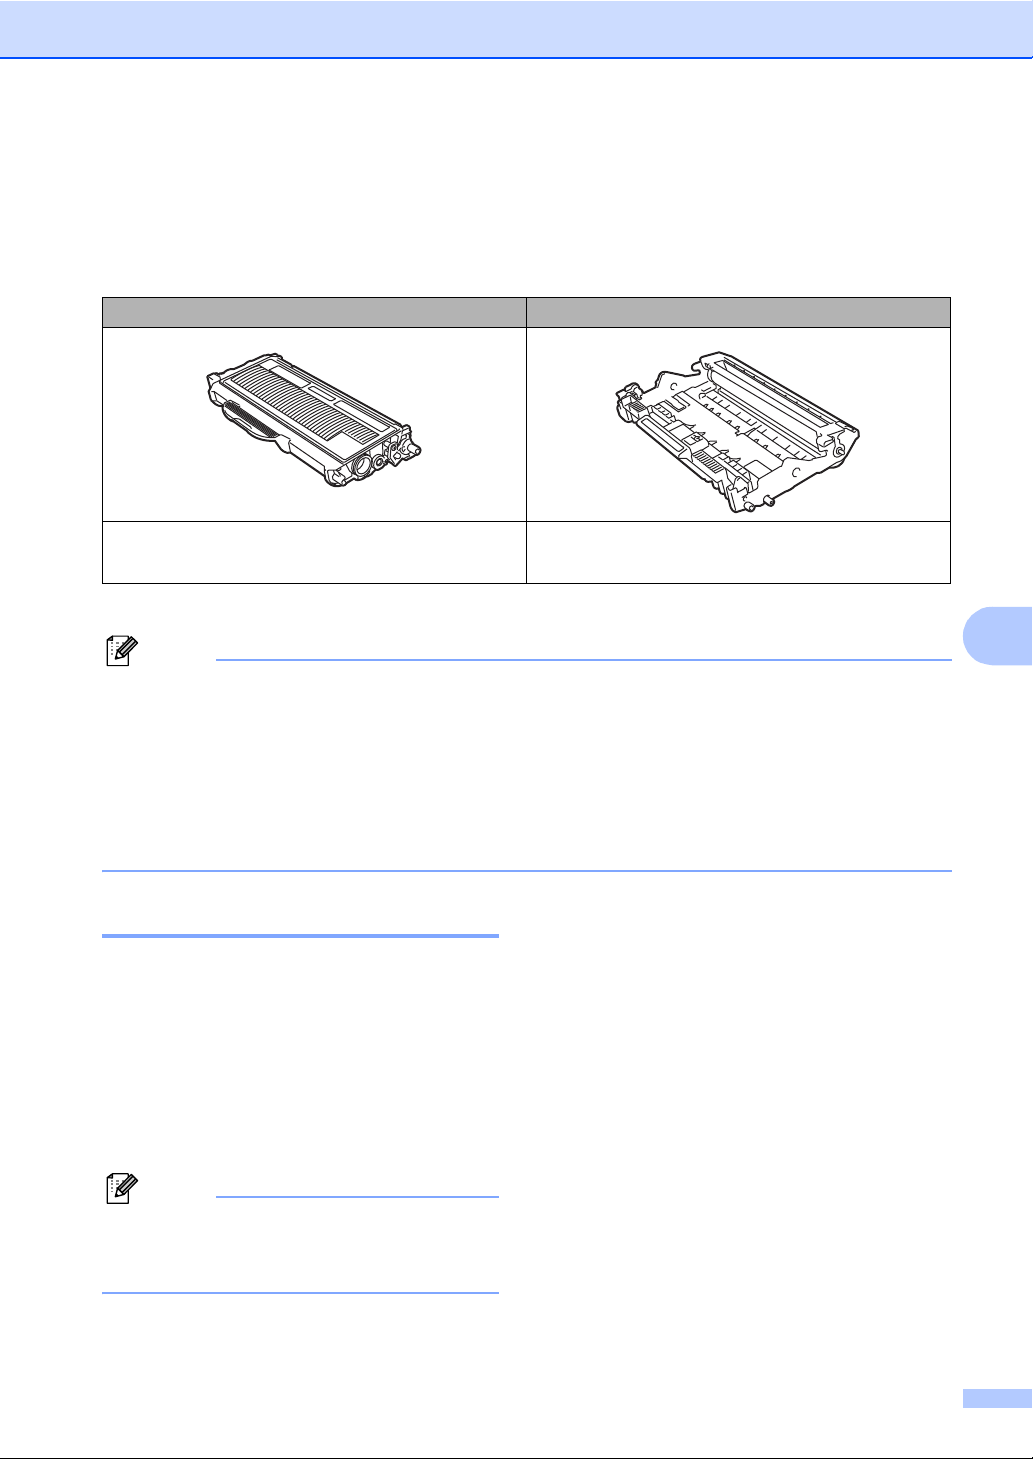
Troubleshooting and routine maintenance
Note
Note
Replacing the consumable items B
You will need to replace the consumable items when the machine indicates that the life of the
consumable is over.
Toner cartridge Drum unit
Print Cartridge SP 1200E (for Europe)
Print Cartridge SP 1200S (for Asia)
1
Approx. cartridge yield is declared in accordance with ISO/IEC 19752.
(Approx. 12,000 pages A4/Letter pages)
Drum Unit SP 1200
• Discard used consumable items according to local regulations. (See EU Directive 2002/96/EC
and EN50419 on page 38.) If you have questions, call your local waste disposal office. Be sure
to reseal the consumable items tightly so that the material inside does not spill.
• We recommend placing used consumable items on a piece of paper to prevent accidentally
spilling or scattering the material inside.
• If you use paper that is not a direct equivalent for the recommended paper, the life of
consumable items and machine parts may be reduced.
Replacing a toner cartridge B
The toner cartridges can print approximately
2,600 pages
depending on your average type of document
(i.e., standard letter, detailed graphics).
When a toner cartridge is running low, the
LCD shows Toner Low.
1
Approx. cartridge yield is declared in accordance
with ISO/IEC 19752.
1
. Actual page count will vary
B
It is a good idea to keep a new toner
cartridge ready for use when you see the
Toner Low warning.
71
Page 78
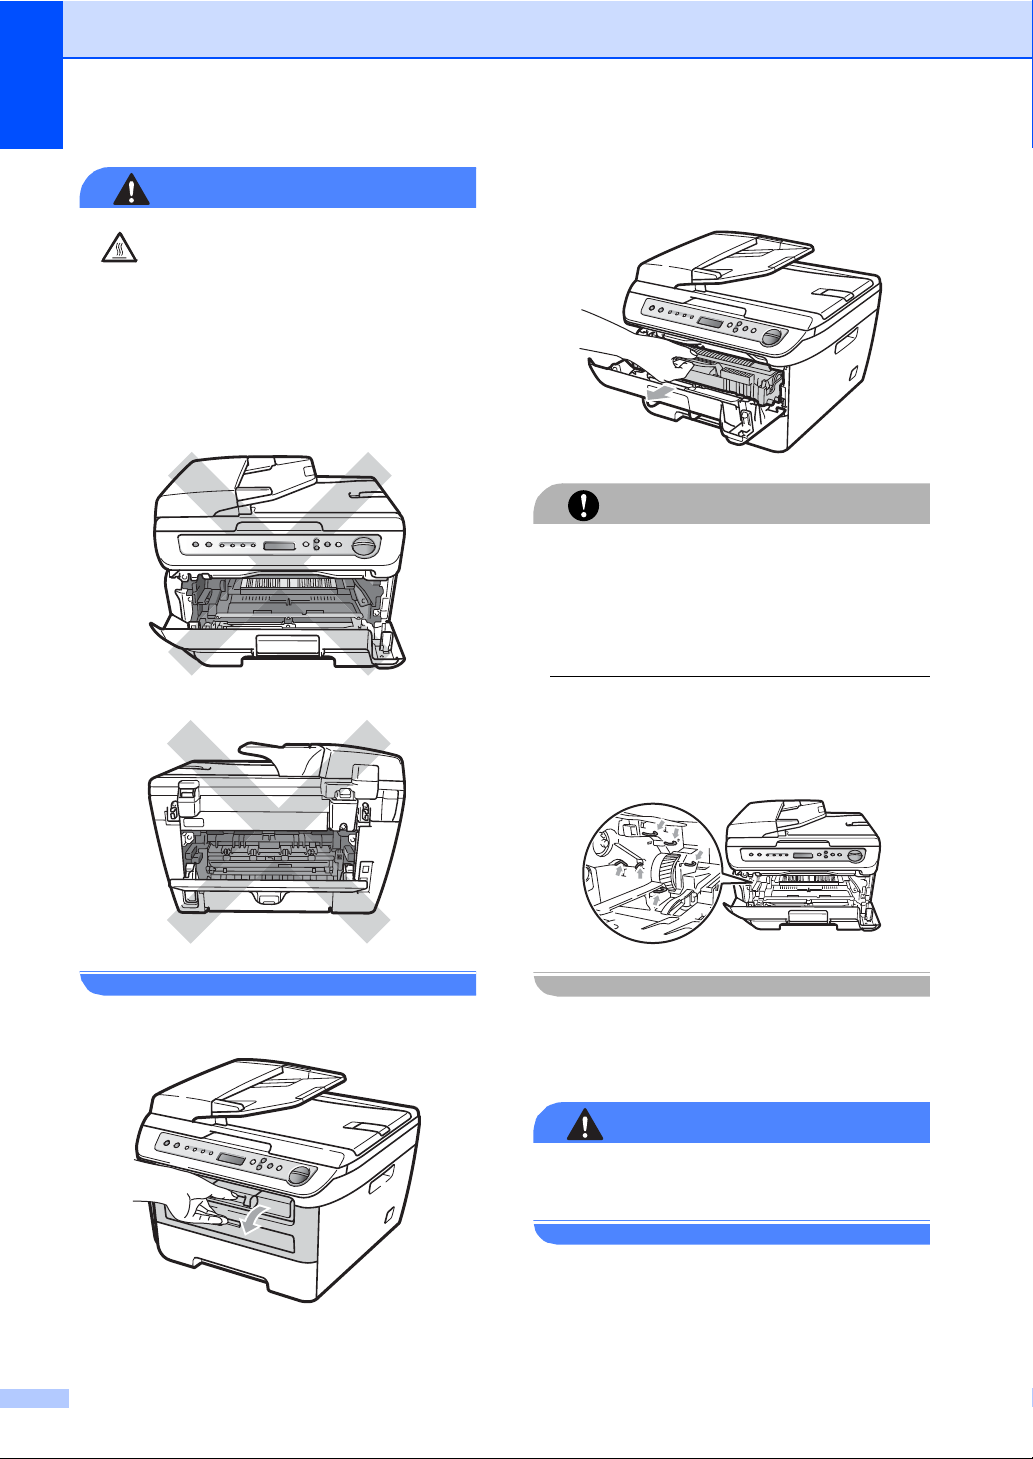
WARNING
HOT SURFACE
CAUTION
WARNING
After you have just used the machine, some
internal parts of the machine will be
extremely hot. To prevent injury, when you
open the front or back cover (back output
tray) of the machine, DO NOT touch the
shaded parts shown in the illustration.
b Slowly take out the drum unit and toner
cartridge assembly.
We recommend that you put the drum unit
and toner cartridge assembly on a clean,
flat surface with a piece of disposable paper
or cloth underneath it in case you
accidentally spill or scatter toner.
To prevent damage to the machine caused
by static electricity, DO NOT touch the
electrodes shown in the illustration.
a Open the front cover.
72
c Push down the blue lock lever and take
the used toner cartridge out of the drum
unit.
DO NOT put a toner cartridge into a fire. It
could explode, resulting in injuries.
Page 79
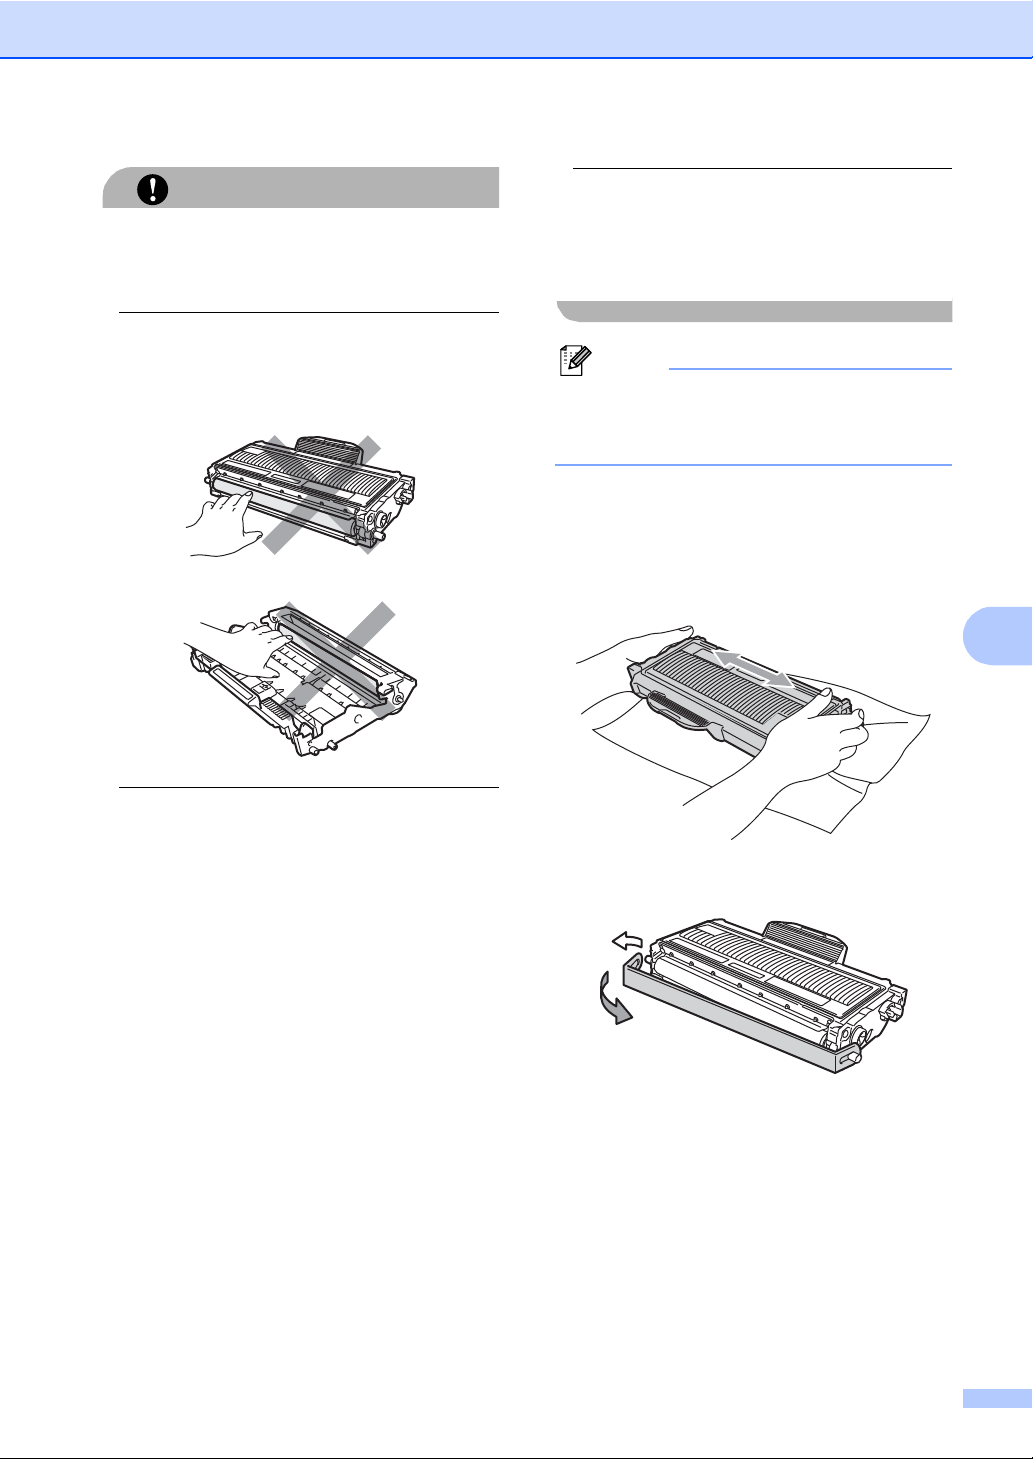
CAUTION
Note
Handle the toner cartridge carefully. If toner
scatters on your hands or clothes, wipe or
wash it off with cold water at once.
To avoid print quality problems, DO NOT
touch the shaded parts shown in the
illustrations.
Troubleshooting and routine maintenance
Unpack the toner cartridge just before you
put it in the machine. If a toner cartridge is
left unpacked for a long time, the toner life
will be shortened.
Be sure to seal up the used toner cartridge
tightly in a suitable bag so that toner
powder does not spill out of the cartridge.
d Unpack the new toner cartridge. Hold
the cartridge level with both hands and
gently rock it from side to side five or six
times to spread the toner evenly inside
the cartridge.
B
This machines are designed to work with
toner of a particular specification and will
work to a level of optimum performance
when used with genuine toner cartridges
(SP 1200E (for Europe), SP 1200S (for
Asia)). We cannot guarantee this optimum
performance if toner or toner cartridges of
other specifications are used. We does not
therefore recommend the use of cartridges
other than genuine cartridges with this
machine, or the refilling of empty cartridges
with toner from other sources. If damage is
caused to the drum unit or other part of this
machine as a result of the use of toner or
toner cartridges other than genuine
products due to the incompatibility or lack of
suitability of those products with this
machine, any repairs required as a result
may not be covered by the warranty.
e Pull off the protective cover.
73
Page 80
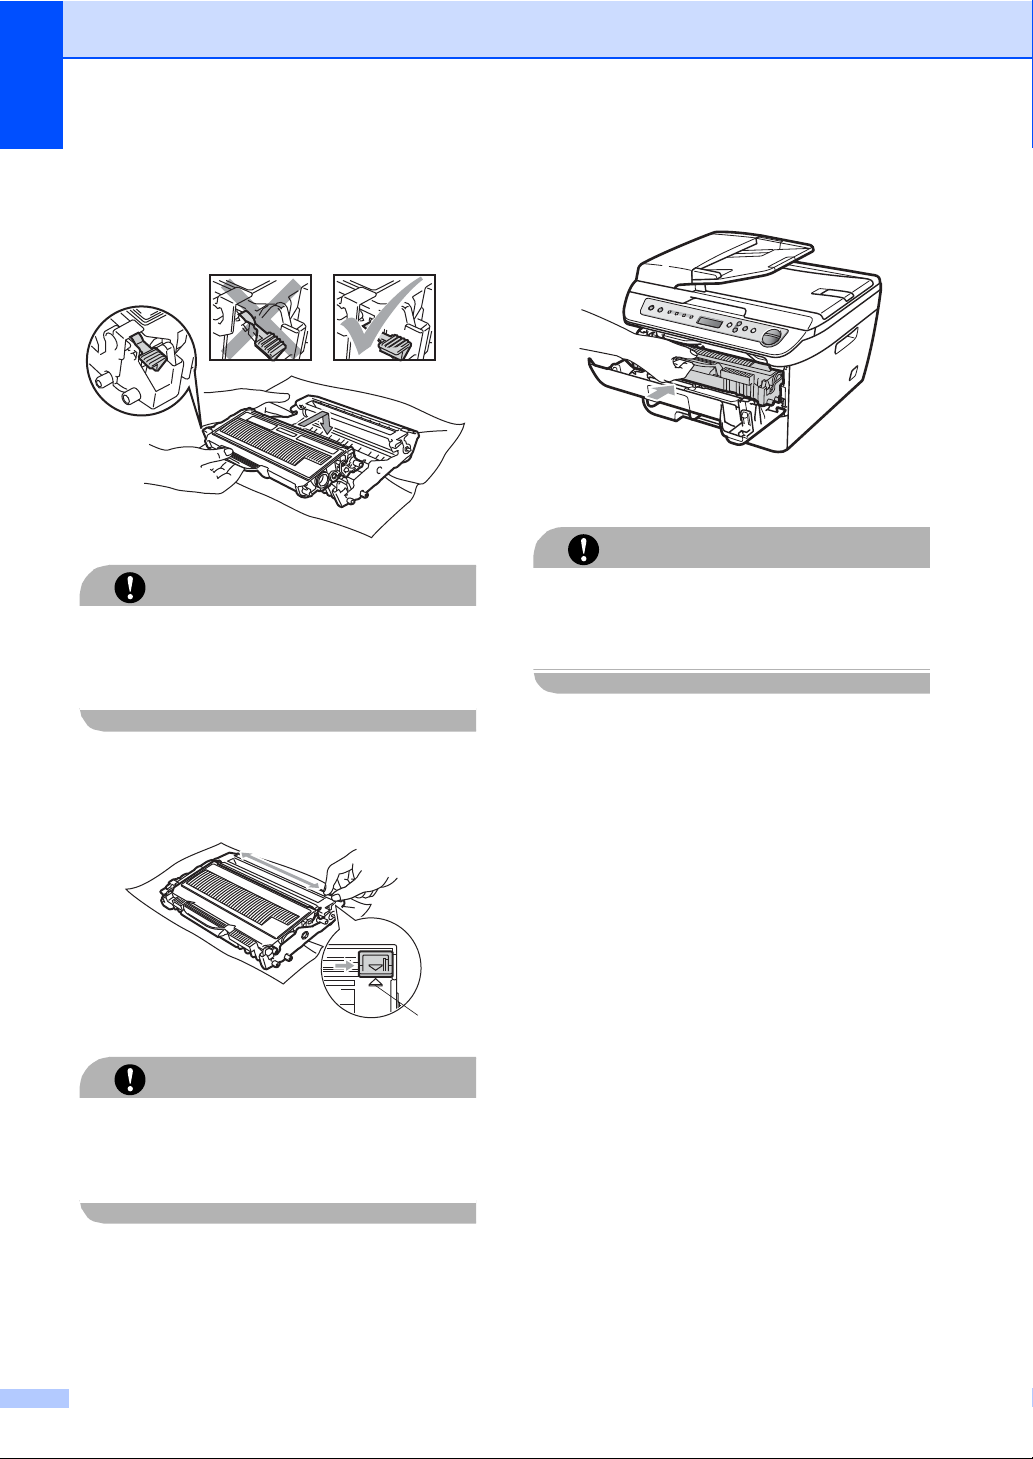
f Put the new toner cartridge firmly into
CAUTION
CAUTION
CAUTION
the drum unit until you hear it lock into
place. If you put it in correctly, the lock
lever will lift automatically.
Make sure that you put in the toner
cartridge correctly or it may separate from
the drum unit.
g Clean the corona wire of the drum unit
by gently sliding the blue tab from right
to left and left to right several times.
h Put the drum unit and toner cartridge
assembly back in the machine.
i Close the front cover.
DO NOT turn off the machine’s power
switch or open the front cover until the LCD
returns to the standby state.
1
Be sure to return the blue tab to the home
position (a) (1). If you do not, printed pages
may have a vertical stripe.
74
Page 81
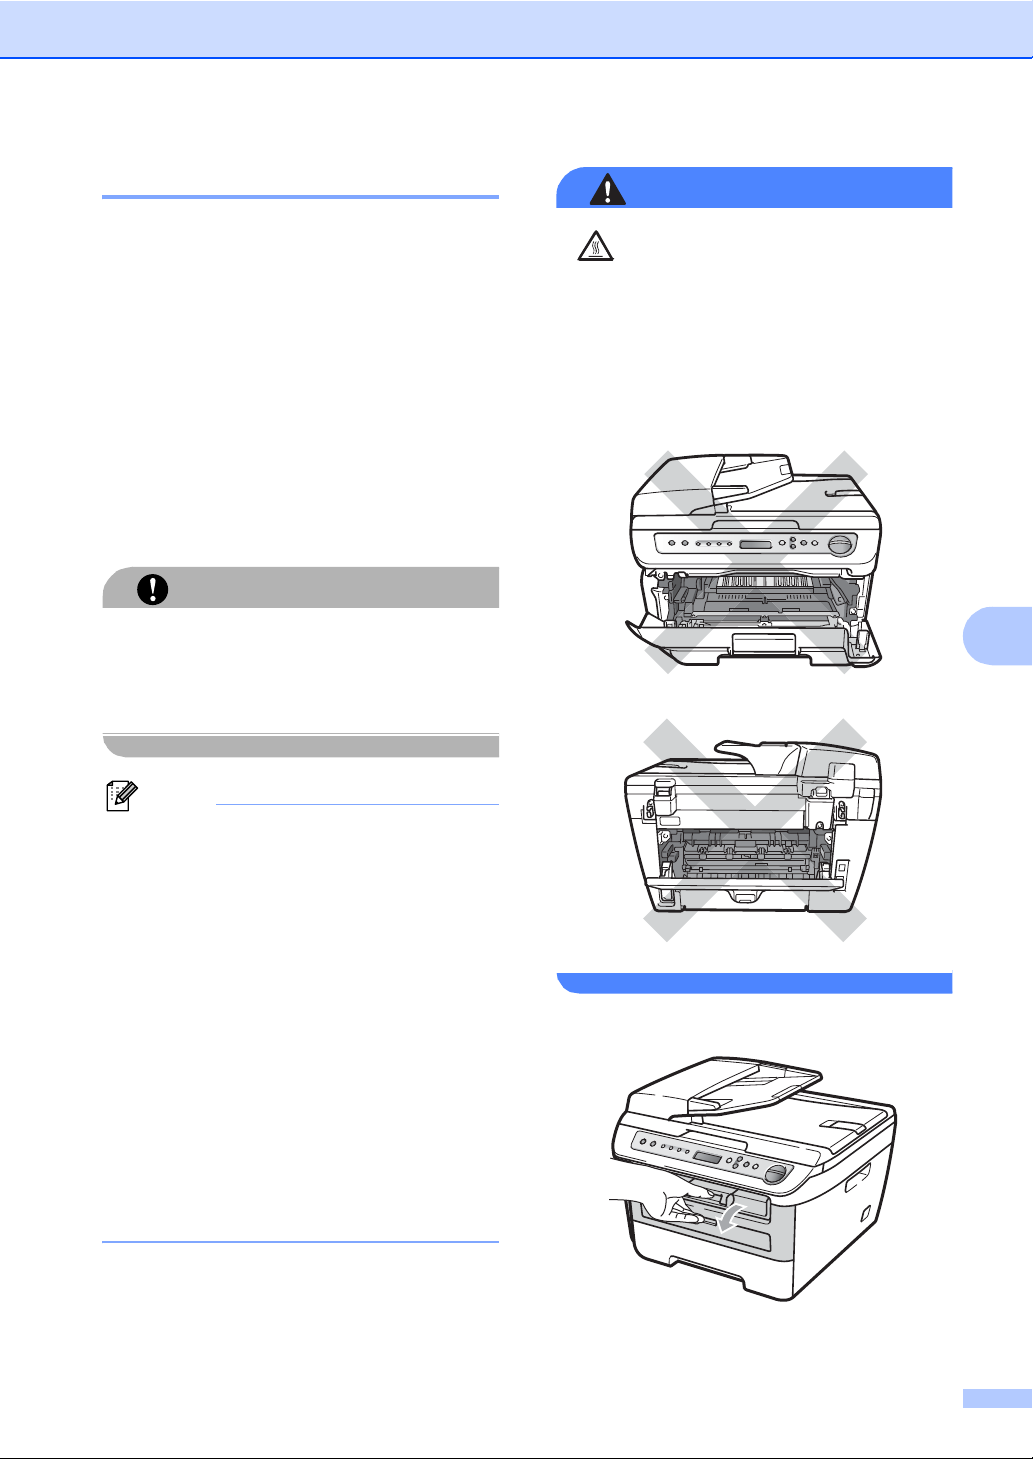
Replacing the drum unit B
CAUTION
Note
WARNING
Troubleshooting and routine maintenance
The machine uses a drum unit to create print
images on paper. If the LCD shows
Drum End Soon, the drum unit is near the
end of its life and it is time to buy a new one.
Even if the LCD shows Drum End Soon,
you may be able to continue printing without
having to replace the drum unit for a while.
However, if there is a noticeable deterioration
in the output print quality (even before
Drum End Soon appears), then the drum
unit should be replaced. You should clean the
machine when you replace the drum unit.
(See Cleaning the laser scanner window
on page 65.)
While removing the drum unit, handle it
carefully because it may contain toner. If
toner scatters on your hands or clothes,
wipe or wash it off with cold water at once.
HOT SURFACE
After you have just used the machine, some
internal parts of the machine will be
extremely hot. To prevent injury, When you
open the front or back cover (back output
tray) of the machine, DO NOT touch the
shaded parts shown in the illustration.
B
The drum unit is a consumable item, and
it is necessary to replace it periodically.
There are many factors that determine the
actual drum life, such as temperature,
humidity, type of paper and how much
toner you use for the number of pages per
print job. The estimated drum life is
approximately 12,000 pages
1
. The actual
number of pages your drum will print may
be significantly less than this estimate.
Because we have no control over the
many factors that determine the actual
drum life, we cannot guarantee a
minimum number of pages that will be
printed by your drum.
1
Drum yield is approximate, and may vary by type of
use.
a Open the front cover.
75
Page 82
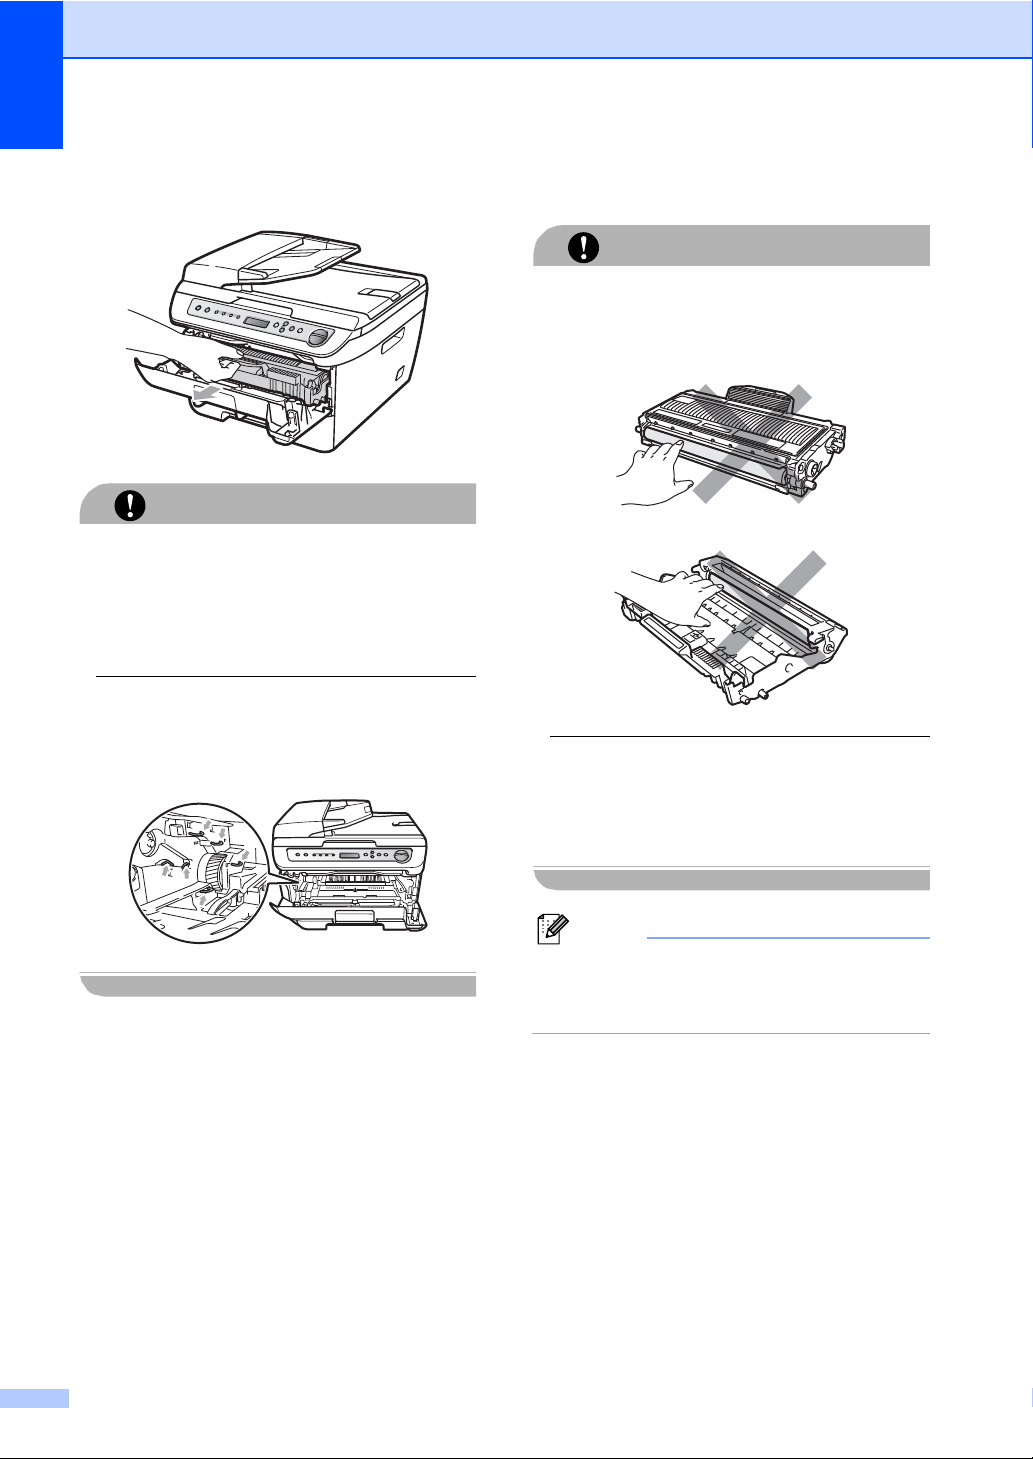
b Slowly take out the drum unit and toner
CAUTION
CAUTION
Note
cartridge assembly.
c Push down the blue lock lever and take
the toner cartridge out of the drum unit.
To avoid print quality problems, DO NOT
touch the shaded parts shown in the
illustrations.
We recommend that you put the drum unit
and toner cartridge assembly on a clean,
flat surface with a piece of disposable paper
or cloth underneath it in case you
accidentally spill or scatter toner.
To prevent damage to the machine caused
by static electricity, DO NOT touch the
electrodes shown in the illustration.
Wait to unpack a new drum unit until
immediately before you put it in the
machine. Exposure to direct sunlight or
room light may damage the drum unit.
Be sure to seal up the used drum unit
tightly in a bag so that toner powder does
not spill out of the unit.
d Unpack the new drum unit.
76
Page 83
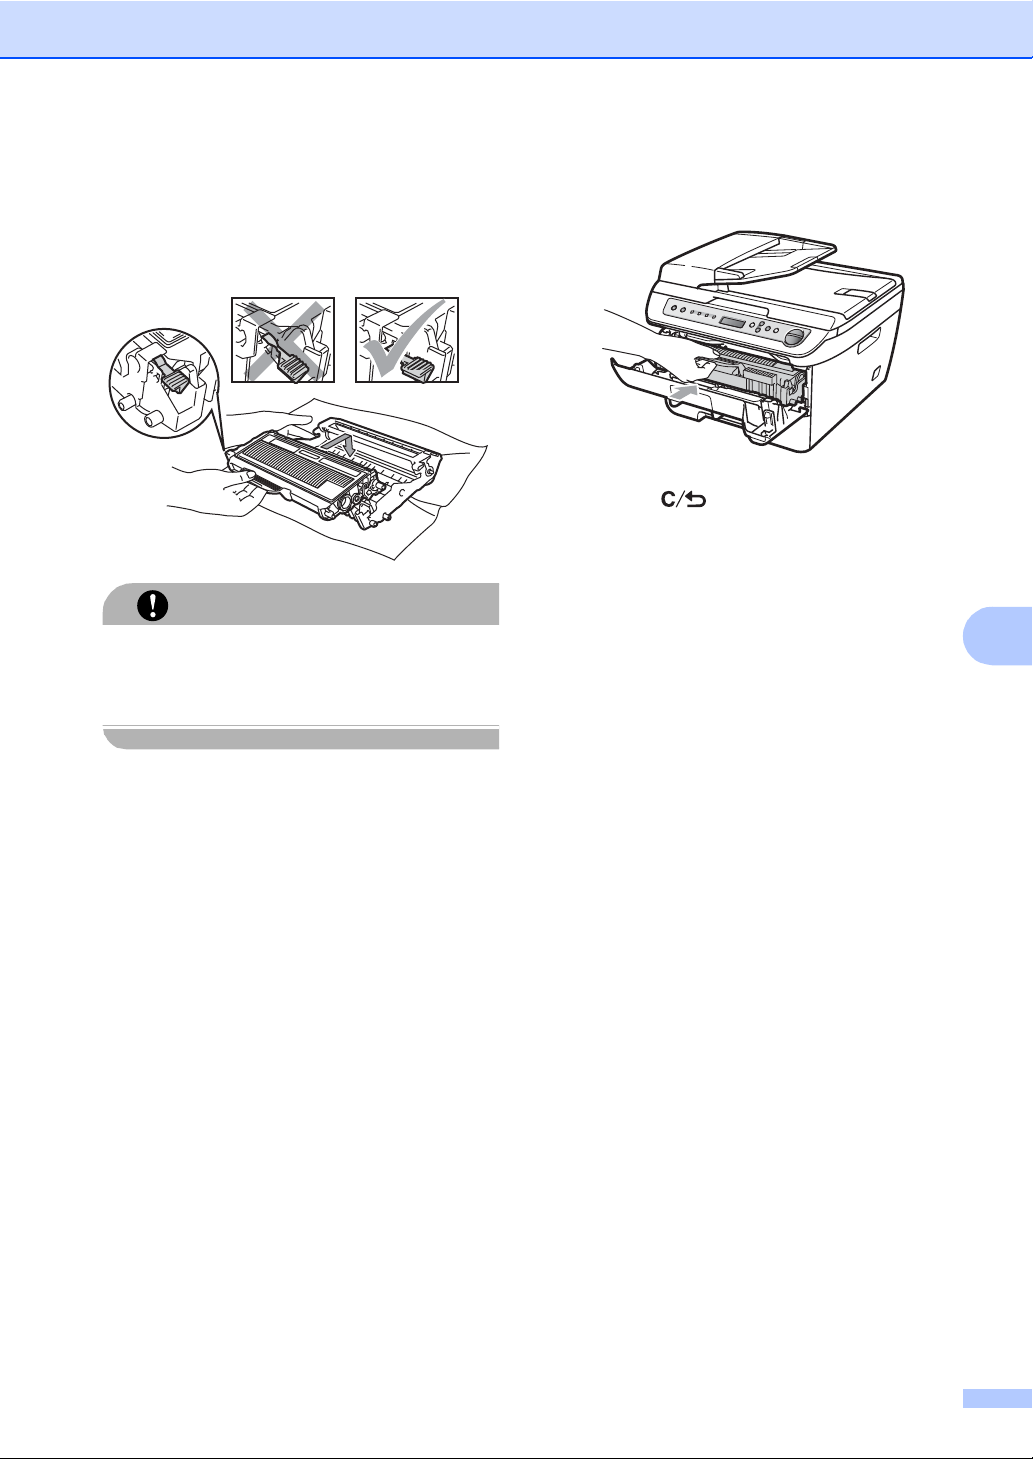
Troubleshooting and routine maintenance
CAUTION
e Put the toner cartridge firmly into the
new drum unit until you hear it lock into
place. If you put the cartridge in
correctly, the blue lock lever will lift
automatically.
Make sure that you put in the toner
cartridge correctly or it may separate from
the drum unit.
f Put the new drum unit and toner
cartridge assembly in the machine.
g Press Clear/Back.
To confirm you are installing a new
drum, press a.
h When the LCD shows Accepted, close
the front cover.
B
77
Page 84

Changing LCD
Checking the page counters B
language B
You can change the LCD language.
a Press Menu.
b Press a or b to choose 1.General
Setup.
Press OK.
c Press a or b to choose 0.Local
Language.
Press OK.
d Press a or b to choose your language.
Press OK.
e Press Stop/Exit.
Machine information B
Checking the serial number B
You can see the machine’s serial number on
the LCD.
a Press Menu.
b Press a or b to choose 3.Machine
Info.
Press OK.
c Press a or b to choose 1.Serial No.
Press OK.
d Press Stop/Exit.
You can see the machine’s page counters for
copies, printed pages, reports and lists or a
summary total.
a Press Menu.
b Press a or b to choose 3.Machine
Info.
Press OK.
c Press a or b to choose 2.Page
Counter.
Press OK.
d Press a or b to choose Total, List,
Copy or Print.
You can see the machine’s page count.
e Press Stop/Exit.
Checking the Drum life B
You can see the machine’s drum life on the
LCD.
a Press Menu.
b Press a or b to choose 3.Machine
Info.
Press OK.
c Press a or b to choose 3.Drum Life.
Press OK.
You can see the remaining percentage
of drum life.
d Press Stop/Exit.
78
Page 85
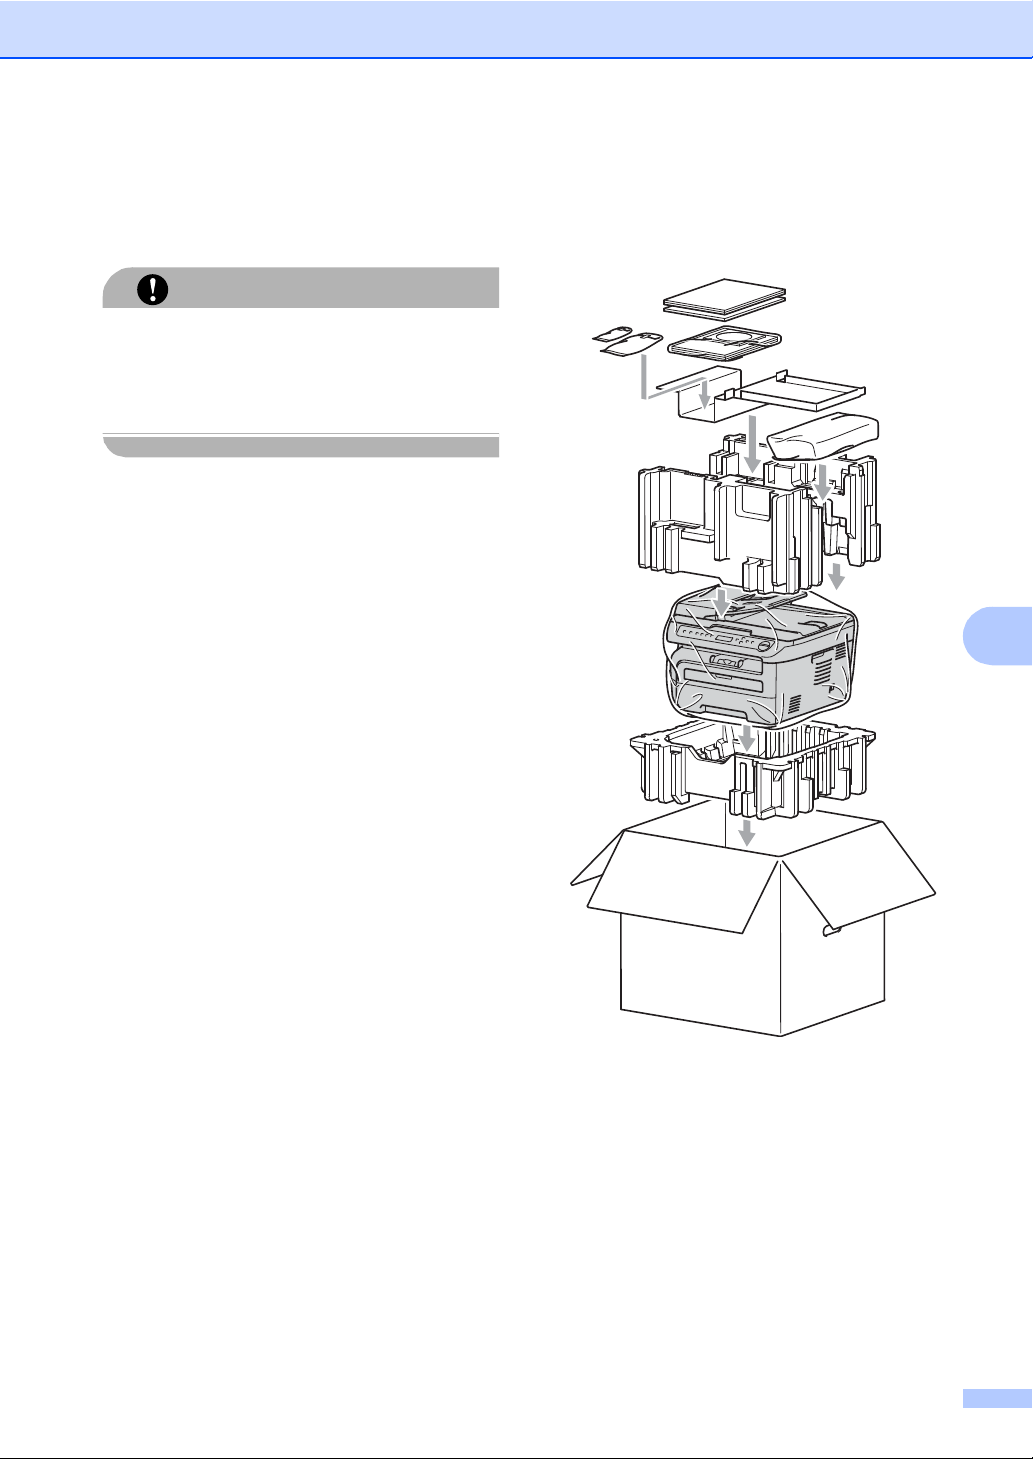
Troubleshooting and routine maintenance
CAUTION
Packing and shipping the machine B
Make sure that the machine has fully
cooled down by leaving it disconnected
from the power for at least 30 minutes
before packing.
When you transport the machine, use the
packing materials that came with your
machine. If you do not pack the machine
correctly, you could void your warranty.
a Turn off the machine’s power switch.
b Unplug all the cables and AC power
cord from the machine.
c Open the front cover.
h Pack the drum unit and toner cartridge
assembly, AC cord and printed
materials in the original carton as shown
below:
B
d Remove the drum unit and toner
cartridge assembly. Leave the toner
cartridge installed in the drum unit.
e Place the drum unit and toner cartridge
assembly into the plastic bag and seal
the bag.
f Close the front cover.
g Wrap the machine in the plastic bag and
place it in the original carton with the
original packing material.
i Close the carton and tape it shut.
79
Page 86
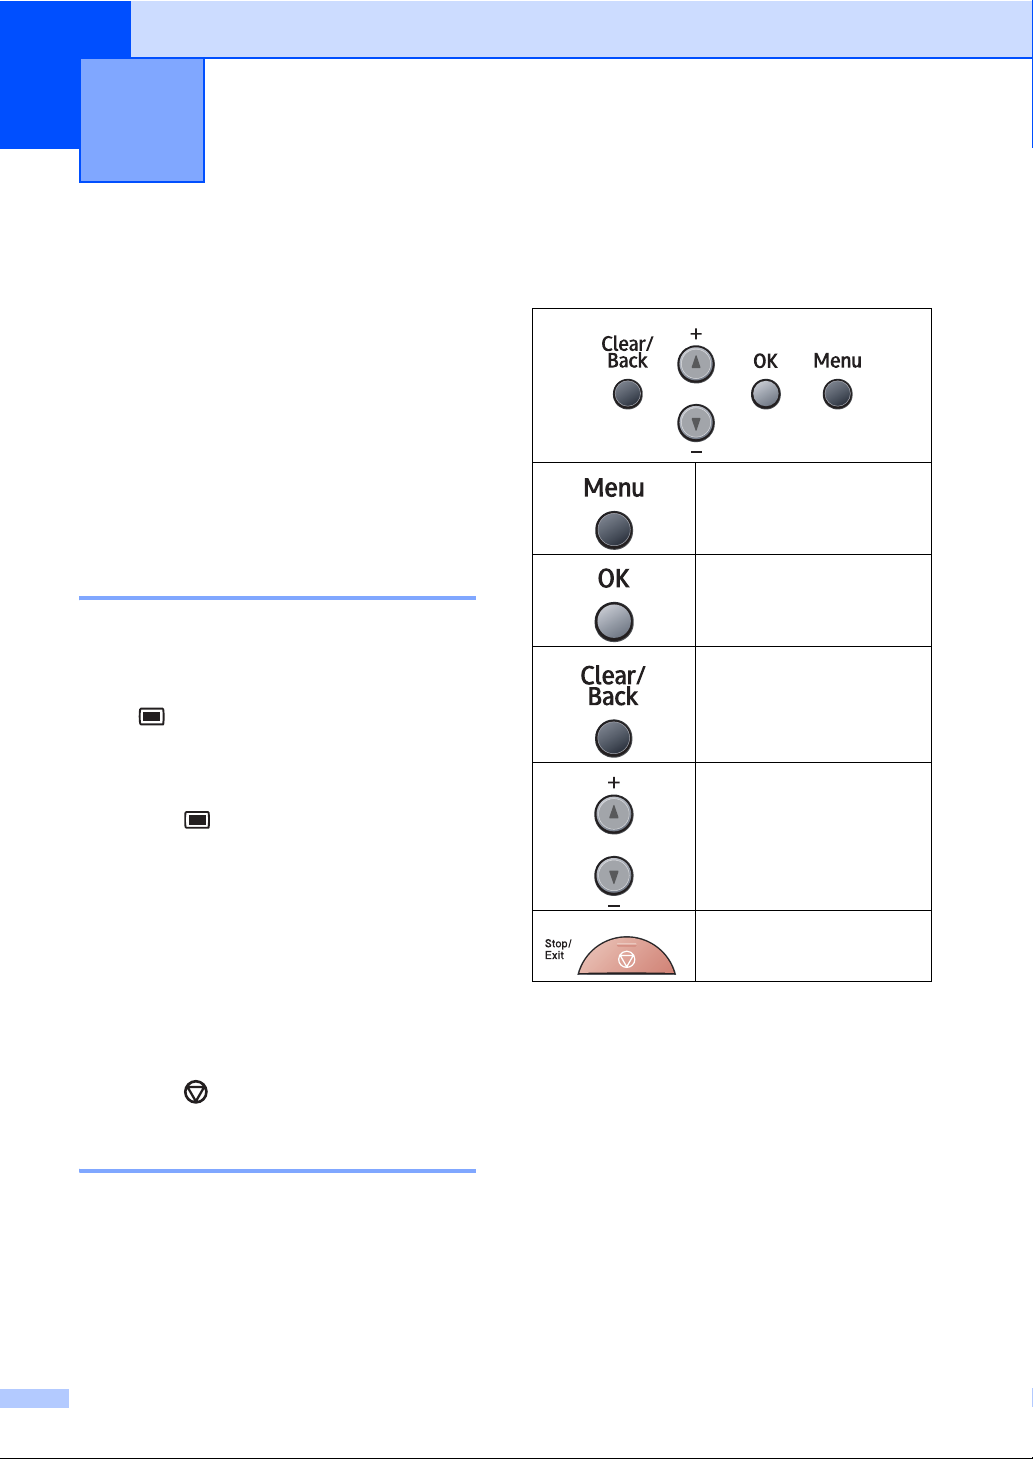
C
Menu and features C
On-screen programming
Your machine has been designed to be easy
to use. The LCD provides on-screen
programming using the menu keys.
We have created step by step on-screen
instructions to help you program your
machine. Simply follow the steps as they
guide you through the menu selections and
programming options.
Menu table C
You can program your machine by using the
Menu table on page 82. These pages list the
menu selections and options.
Press Menu followed by the menu
numbers to program your machine.
For example, to set Beeper volume to Low:
a Press Menu.
Menu keys C
C
Access the menu.
Go to the next menu level.
Accept an option.
Exit the menu by pressing
repeatedly.
Go back to the previous
menu level.
Scroll through the current
menu level.
b Press a or b to choose 1.General
Setup.
Press OK.
c Press a or b to choose 3.Beeper.
Press OK.
d Press a or b to choose Low.
Press OK.
e Press Stop/Exit.
Memory storage C
Your menu settings are stored permanently,
and in the event of a power failure will not be
lost. Temporary settings (for example,
Contrast) will be lost.
80
Exit the menu.
Page 87

How to access the menu mode C
a Press Menu.
b Scroll through each menu level by
pressing a or b for the direction you
want.
c Press OK when the option you want
appears on the LCD.
The LCD will then show the next menu
level.
d Press a or b to scroll to your next menu
selection.
e Press OK.
When you have finished setting an
option, the LCD will show Accepted.
Menu and features
f Press Stop/Exit to exit Menu mode.
C
81
Page 88
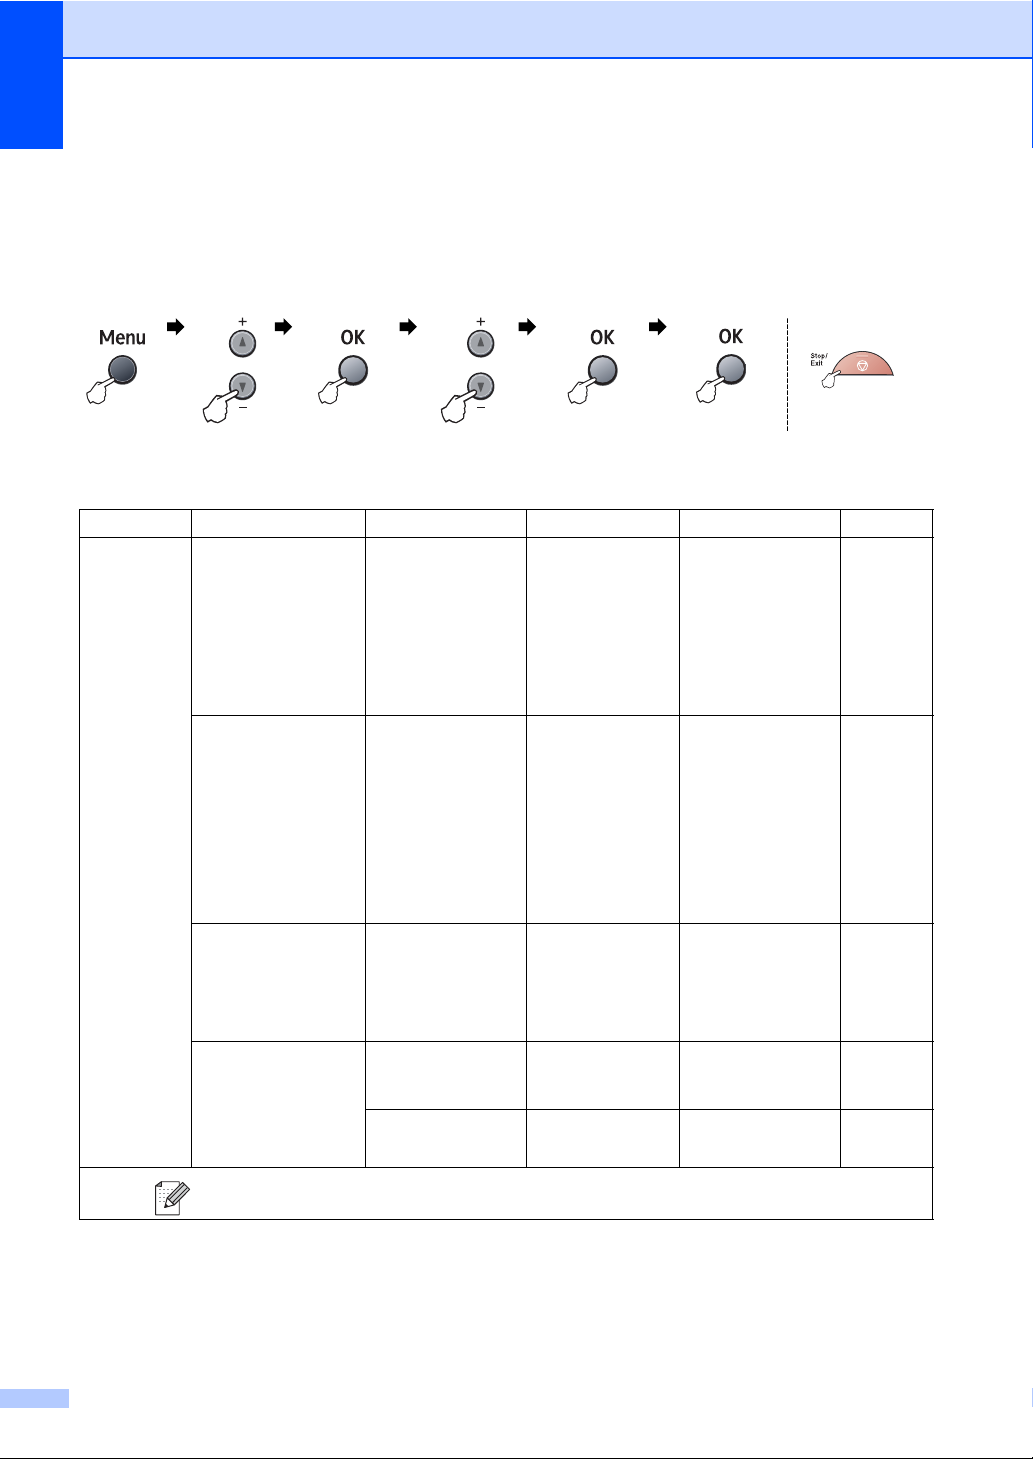
Menu table C
The factory settings are shown in Bold with an asterisk.
Choose & OK Choose & OK to accept to exit
Main Menu Submenu Menu Selections Options Descriptions Page
1.General
Setup
1.Paper Type — Thin
Plain*
Thick
Thicker
Transparency
Recycled Paper
2.Paper Size — A4*
Letter
Executive
A5
A6
B5
B6
3.Beeper — Off
Low
Med*
High
4.Ecology 1.Toner Save On
Off*
2.Sleep Time (00-99)
05Min*
The factory settings are shown in Bold with an asterisk.
Sets the type of
paper in the paper
tray.
Sets the size of the
paper in the paper
tray.
Adjusts the volume
level of the beeper.
Increases the page
yield of the toner
cartridge.
Conserves power. 18
17
17
17
18
82
Page 89

Menu and features
Main Menu Submenu Menu Selections Options Descriptions Page
1.General
Setup
(continued)
2.Copy 1.Quality — Auto*
5.LCD Contrast — b -nnnno+ a
6.User Settings — — Lists your current
0.Local Language — (Choose your
2.Contrast — b -nnnno + a
The factory settings are shown in Bold with an asterisk.
b -nnnon+ a
b -nnonn+ a*
b -nonnn+ a
b -onnnn+ a
language.)
Text
Photo
b -nnnon+ a
b -nnonn+ a*
b -nonnn+ a
b -onnnn+ a
Adjusts the contrast
of the LCD.
19
settings.
Allows you to
change the LCD
language for your
country.
You can choose the
Copy resolution for
your type of
document.
Adjusts the contrast
for copies.
19
78
25
24
C
83
Page 90

Main Menu Submenu Menu
Selections
3.Machine Info.
5.Machine Info.
1.Serial No. — — You can check the serial
2.Page Counter — Total
3.Drum Life — — You can check the
The factory settings are shown in Bold with an asterisk.
Options Descriptions Page
number of your machine.
You can check the
List
Copy
Print
number of total pages the
machine has printed
during its life.
percentage of a Drum life
that remains available.
78
78
78
84
Page 91
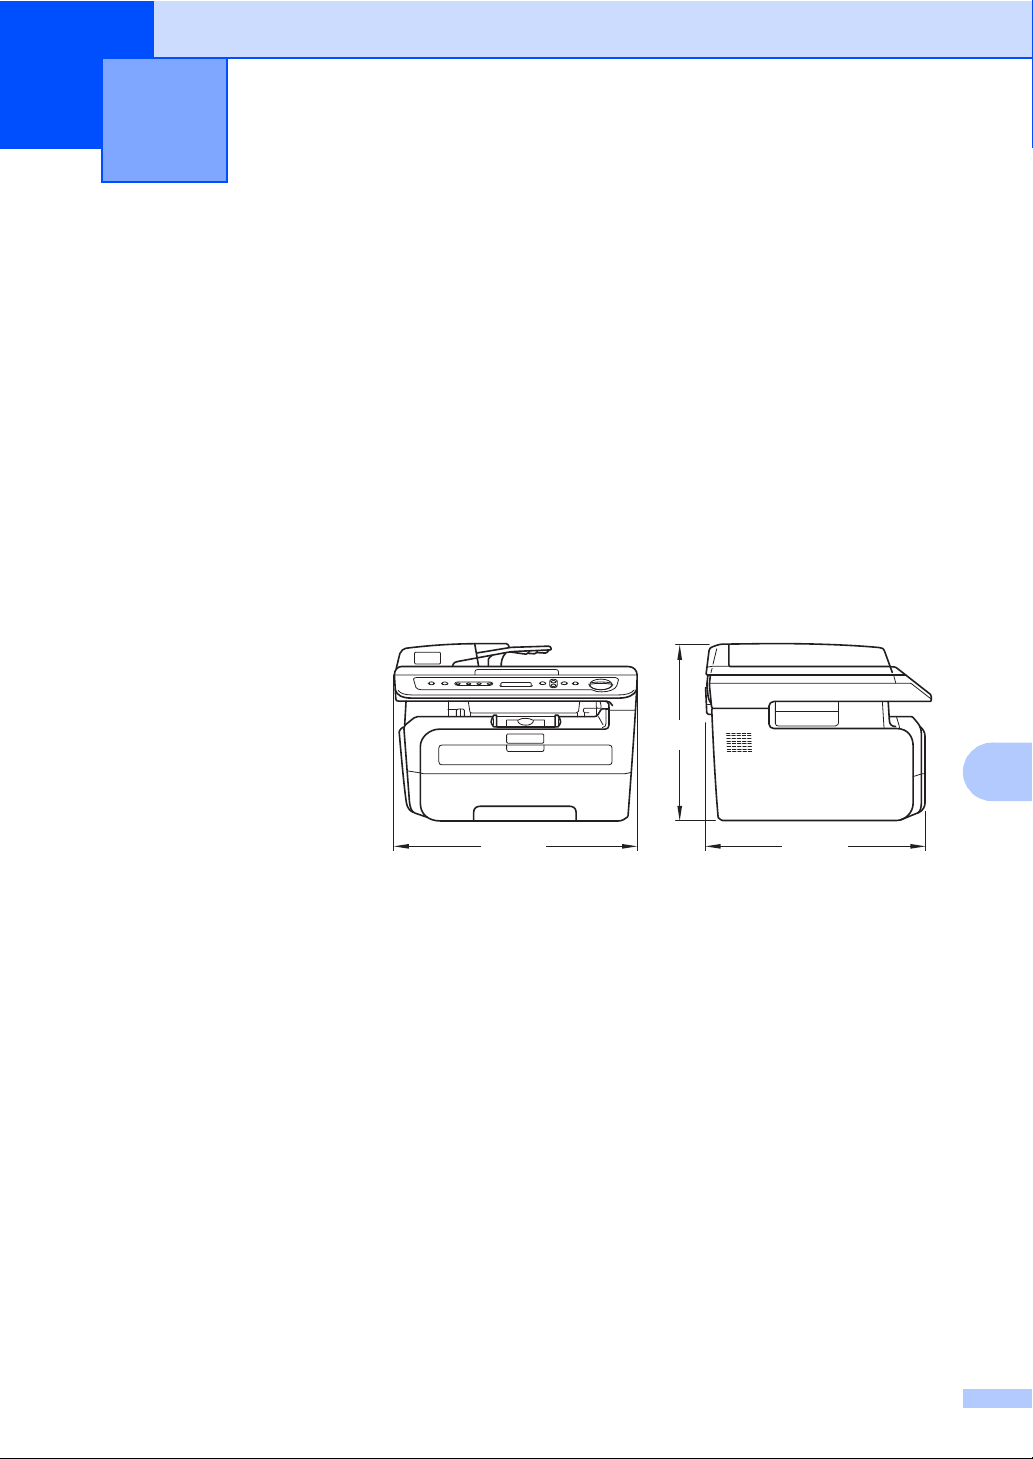
Specifications D
D
General D
Printer Type Laser
Print Method Electrophotography by semiconductor laser beam scanning
Memory Capacity 16 MB
LCD (liquid crystal display) 16 characters 2 lines
Power Source 220 - 240V 50/60Hz
Power Consumption Peak: 1056 W
1
1
When making a copy from one sheet
Dimensions
Copying:
Sleep: Average 9 W
Standby: Average 75 W
Average 320 W
428 mm
Weight Without
Drum/Toner
Unit:
Noise level Sound power
Operating
(Copying):
Standby: L
Sound pressure
Operating
(Copying):
Standby: L
11.1 kg
L
WAd = 6.2 Bell
WAd = 4.4 Bell
PAm = 53 dBA
L
PAm = 32 dBA
305 mm
D
397 mm
85
Page 92

Temperature Operating: 10 to 32.5C
Storage: 5 to 35C
Humidity Operating: 20 to 80% (without condensation)
Storage: 10 to 90% (without condensation)
ADF (automatic document
feeder)
Up to 35 pages (Staggered) [80 g/m
Recommended Environment for Best Results:
2
]
Temperature: 20 to 30C
Humidity: 50% - 70%
2
or
2
Paper Tray
Paper:
250 Sheets [80 g/m
Xerox Premier TCF 80 g/m
Xerox Business 80 g/m
2
]
86
Page 93

Specifications
Print media D
Paper Input Paper Tray
2
2
1
or Recycled
plain paper
1
Paper Type:
Plain paper, Transparencies
paper
Paper Size: Letter, A4, B5 (ISO), A5, B6, A6 and
Executive, Legal, Folio
Paper Weight:
Maximum paper tray capacity:
60 to 105 g/m
Up to 250 sheets of 80 g/m
2
Manual Feed Slot
Paper Type: Plain paper, Transparencies, Recycled
paper, Bond paper, Envelopes or Labels
Paper Size: Width: 76.2 to 220 mm
Length:116 to 406.4 mm
Paper Weight:
Maximum manual feed slot
60 to 163 g/m
One sheet at a time
2
capacity:
1
For transparencies and labels, we recommend removing printed pages from the output paper tray immediately after
they exit the machine to avoid the possibility of smudging.
2
Legal and Folio are avaliable in Asia model.
2
Paper Output Up to 100 sheets (with 80 g/m
(20 lb) paper, A4/LT size)
D
87
Page 94

Copy D
Colour/Monochrome Monochrome
Document Size ADF Width: 148.0 to 215.9 mm
ADF Length: 148.0 to 355.6 mm
Scanner Glass Width: Max. 215.9 mm
Scanner Glass Length: Max. 297 mm
Copy Width Max. 210 mm
Multiple Copies Stacks up to 99 pages
Sorts up to 99 pages
Reduce/Enlarge 25% to 400% (in increments of 1%)
Resolution Up to 600 600 dpi, 1200 dpi class
First Copy Out Time
1
The fir st copy out time may vary depending on scanner lamp warm up time.
Less than 15 seconds (from Ready state)
1
88
Page 95

Specifications
Scan D
Colour/Monochrome Yes/Yes
TWAIN Compliant
Yes (Windows
XP Professional x64 Edition/Windows Vista
WIA Compliant
Yes (Windows
Colour Depth 24 bit colour
Resolution
Up to 19200 19200 dpi (interpolated)
Up to 600 2400 dpi (optical) (From Scanner Glass)
Up to 600 600 dpi (optical) (From ADF)
Document Size ADF Width: 148.0 to 215.9 mm
ADF Length: 148.0 to 355.6 mm
Scanner Glass Width: Max. 215.9 mm
Scanner Glass Length: Max. 297 mm
Scanning Width Max. 210 mm
Greyscale 256 levels
®
2000 Professional/XP/
®
/Windows® 7)
®
XP/Windows Vista® /Windows® 7)
1
1
Maximum 1200 1200 dpi scanning with the WIA driver in Windows® XP/7/Windows Vista® (resolution up to
19200 19200 dpi can be chosen by using the scanner utility)
D
89
Page 96

Print D
Printer Driver
Host-Based Driver for Windows
XP/XP Professional x64 Edition/Windows Vista
®
2000 Professional/
®
Resolution HQ1200 (2400 600 dpi), 600, 300 dpi
Print Speed
Up to 22 pages/minute (A4 size)
1
First Print Out Time Less than 10 seconds (from Ready state and standard tray)
1
The print speed may change depending on the type of document you print.
Interfaces D
USB
1
Your machine has a Full-Speed USB 2.0 interface. The machine can also be connected to a computer that has a USB
1.1 interface.
Use a USB 2.0 interface cable that is no longer than 2.0 m.
1
90
Page 97

Specifications
Computer requirements D
Minimum System Requirements and Supported PC Software Functions
Computer Platform &
Operating System
Version
Windows®
Operating
System
1
Windows®
2000
3
Professional
Windows®
XP
2 3
Home
Windows®
XP
2 3
Professional
Windows®
XP
Professional
x64
2
Edition
Windows
® 2
Vista
Windows®
7
Supported
PC
Software
Functions
Printing,
Scanning
PC
Interface
USB
Processor
Minimum
Speed
®
Intel
Pentium® II
or AMD
equivalent
64-bit
®
(Intel
64
or AMD64)
supported
CPU
Intel®
Pentium® 4
or
equivalent
64-bit
®
(Intel
64
or AMD64)
supported
CPU
Minimum
RAM
64 MB 256
Recommende d
RAM
MB
Available Hard
Disk Space
For
Drivers
For
Applications
150 MB 310 MB
128 MB
256 MB
512 MB
512 MB 1 GB 500 MB 500 MB
1GB
(32-bit)
2GB
(64-bit)
1GB
(32-bit)
2GB
(64-bit)
650MB 530MB
D
1
Microsoft® Internet Explorer 5.5 or greater
2
For WIA, 1200x1200 resolution. Scanner Utility enables to enhance up to 19200 x 19200 dpi.
3
PaperPort™ 11SE supports Microsoft® SP4 or higher for Windows® 2000 and SP2 or higher for XP.
91
Page 98

Consumable items D
Toner Cartridge Life Print Cartridge SP 1200E
(for Europe)
Print Cartridge SP 1200S
(For Asia)
Drum Unit Drum Unit SP 1200
1
Approx. cartridge yield is declared in accordance with ISO/IEC 19752.
2
Drum yield is approximate, and may vary by type of use.
Approx. 2,600 pages (A4)
1
Approx. 12,000 pages A4/Letter pages
2
92
Page 99

Glossary E
E
This is a comprehensive list of features and terms that appear in manuals. Availability of these
features depends on the model you purchased.
ADF (automatic document feeder)
The document can be placed in the ADF
and scanned one page at a time
automatically.
Beeper Volume
Volume setting for the beep when you
press a key or make an error.
Cancel Job
Cancels a programmed print job and
clears the machine’s memory.
Contrast
Setting to compensate for dark or light
documents, by making copies of dark
documents lighter and light documents
darker.
Greyscale
The shades of grey available for copying
photographs.
LCD (liquid crystal display)
The display screen on the machine that
shows interactive messages during OnScreen Programming and shows the date
and time when the machine is idle.
Scanning
The process of sending an electronic
image of a paper document into your
computer.
Temporary settings
You can choose certain options for each
copy without changing the default
settings.
User Settings List
A printed report that shows the current
settings of the machine.
E
Menu mode
Programming mode for changing your
machine’s settings.
OCR (optical character recognition)
The bundled ScanSoft™
PaperPort™ 11SE with OCR or Presto!
PageManager software application
converts an image of text to text you can
edit.
Resolution
The number of vertical and horizontal lines
per inch.
93
Page 100

F
Index
A
ADF (automatic document feeder)
using
.....................................................15
C
Cancelling
print jobs
Cleaning
corona wire
drum unit
laser scanner window
scanner glass
Consumable items
Control panel overview
Copy
contrast
Enlarge/Reduce key
keys
multiple
N in 1 (page layout)
out of memory
quality
single
sort (ADF only)
temporary settings
using ADF
using scanner glass
............................................ 4, 5
...........................................67
...............................................68
...........................65
........................................64
...................................71
......................... 4, 5
.......................................... 22, 24
..............................23
..............................................4, 5, 23
..................................................22
...............................26
.......................................27
....................................................25
.....................................................22
......................................26
................................23
.............................................26
..............................26
Error messages on LCD
Init Unable XX
No Paper
Out of Memory
Print Unable XX
Scan Unable XX
...................................... 57
.............................................. 57
...................................... 57
.......................... 56
.................................... 57
................................... 57
G
Greyscale ................................................ 93
H
HELP
LCD messages
Menu Table
using menu keys
..................................... 80
....................................80, 82
.................................. 80
J
Jams
paper
.................................................... 59
Job Cancel key
......................................4, 5
L
Labels ..........................................11, 12, 15
LCD (liquid crystal display)
contrast
................................................. 19
..............4, 5, 80
D
Document
how to load
Drum unit
checking (remaining life)
cleaning
replacing
..................................... 15, 16
.......................78
.......................................... 67, 68
...............................................75
E
Enlarge/Reduce key .................................23
Envelopes
how to load
94
.............................. 6, 11, 12, 13
..............................................8
M
Machine information
checking remaining life of drum unit
page counts
Maintenance, routine
checking the remaining life
of drum unit
replacing
drum unit
toner cartridge
Memory
storage
Menu Table
using menu keys
.......................................... 78
............................... 63
.......................................... 78
........................................... 75
................................... 71
................................................. 80
.......................................80, 82
.................................. 80
..... 78
 Loading...