

Ricoh Pro L5130, Pro L5160 Rip Settings Manual
RIP Settings Guide
Installing RIPCenter/PosterShop
Functions for RICOH Pro L5130/L5160
Restrictions on Using RIPCenter/PosterShop
Appendix
For information not in this manual, refer to
the PDF files on the supplied CD.
For safe and correct use, be sure to read the Safety Information in
Read This First before using the machine.


TABLE OF CONTENTS
Getting Started....................................................................................................................................................3
Software Described in This Manual..............................................................................................................3
About this Manual..........................................................................................................................................3
Disclaimer........................................................................................................................................................3
Notes...............................................................................................................................................................3
1. Installing RIPCenter/PosterShop
Checking the Operating Environment...............................................................................................................5
Installation Setup.................................................................................................................................................7
Establishing a Network Connection between Printer and Computer.........................................................7
Computer Setup..............................................................................................................................................7
Preparing the Media for Installation............................................................................................................. 8
Installing the Software........................................................................................................................................ 9
2. Functions for L5130/L5160
Functions on the Main Menu...........................................................................................................................11
Printer Area...................................................................................................................................................12
Jobs Ready to Print Area/Buffered Jobs Area.......................................................................................... 12
Information Area..........................................................................................................................................12
Preview Area................................................................................................................................................14
Job Control Window................................................................................................................................... 14
Changing Printer Settings................................................................................................................................ 16
Opening the Printer Settings Dialog Box................................................................................................... 16
Printer Settings Dialog Box..........................................................................................................................20
Other Functions................................................................................................................................................ 23
Updating the Media Width Information Automatically............................................................................ 23
Specifying SNMP Community Name........................................................................................................ 23
Functions Usable with PosterShop.................................................................................................................. 26
Specifying Resolution.................................................................................................................................. 26
Specifying Multilayer Printing..................................................................................................................... 27
3. Restrictions on Using RIPCenter/PosterShop
Restrictions on RIP-Queue................................................................................................................................31
Restrictions on Job Editor................................................................................................................................. 34
Restrictions on the Virtual Printer..................................................................................................................... 36
Restrictions on Media Manager..................................................................................................................... 37
1

4. Appendix
Trademarks....................................................................................................................................................... 39
2

Getting Started
Software Described in This Manual
Software Abbreviated Name Note
ONYX RIPCenter RIPCenter This RIP software is supplied with the machine. You
can use RIP-Queue, Job Editor, and Cut-Server.
ONYX PosterShop PosterShop This is optional RIP software. In addition to RIP-
Queue, Job Editor, and Cut-Server, you can also use
Layout Tool and Media Manager.
About this Manual
This manual describes the following:
• How to install RIPCenter/PosterShop
• RIPCenter/PosterShop functions customized for RICOH Pro L5130/L5160
• Restrictions on using RIPCenter/PosterShop
Disclaimer
To the maximum extent permitted by applicable laws, in no event will the manufacturer be liable for any
damages whatsoever arising out of failures of this product, losses of documents or data, or the use or
non-use of this product and operation manuals provided with it.
Notes
Contents of this manual are subject to change without prior notice.
Some illustrations or explanations in this guide may differ from your product due to improvement or
change in the product.
3

4

1. Installing RIPCenter/PosterShop
This section explains how to install RIPCenter and, optionally, PosterShop on the computer. The
installation procedure is the same in both cases.
Checking the Operating Environment
To use RIPCenter/PosterShop, the following environment is required:
Configuration
Desktop computer
Operating system
• Windows 7 Professional (64-bit)
• Windows 8.1 Pro (64-bit)
• Windows 10 Pro (64-bit)
32-bit operating systems are not supported.
CPU
Intel Core i7/i9
AMD FX and later models
Memory
16 GB or greater
Available hard disk space
750 GB or greater
• The available hard disk space mentioned above is required for storing temporary data when
printing. The required space (reference value) for basic printing is as follows.
• For printing with a print width of 1615 mm, image length of 50 m, color composition of
4C, resolution of 1200 dpi × 1200 dpi, and a single color layer (color): approx. 179
GB
• For printing with a print width of 1615 mm, image length of 50 m, color composition of
4CW, resolution of 900 dpi × 600 dpi, and three color layers (color/white/color):
approx. 153 GB
• The greater the image length, the greater the temporary data size becomes.
• The temporary data is deleted after printing or when printing is cancelled or has failed.
Hard disk rotational speed
7200rpm
USB ports
2 or more
5

1. Installing RIPCenter/PosterShop
Screen resolution
1280 × 1024 or greater
6
Installation Setup
Hub
PC
1000BASE-T/
100BASE-TX
1000BASE-T/
100BASE-TX
EDP003
Internet
Printer
Establishing a Network Connection between Printer and Computer
1. Connect the printer and computer to the network.
The supported interface is 1000BASE-T/100BASE-TX.
For information about the connection procedure, see "Connecting the Cable" and "Ethernet
Configuration", Operating Instructions.
Installation Setup
2. Make a note of the printer's IP address or host name.
This is required for installing RIPCenter/PosterShop.
Computer Setup
Before installation, do the following:
1. Log into the account with administrator privileges.
2. Temporarily disable the anti-virus software.
3. Set the user account control (UAC) setting to "Never notify".
• Windows 7
[Start] menu [Control Panel] [User Accounts] [User Accounts] [Change User
Account Control settings] [Never notify] (bottommost item)
• Windows 10
[Start]menu [Windows system] [Control Panel] [User Accounts] [User Accounts]
[Change User Account Control settings] [Never notify] (bottommost item)
7
EDP004
DWT811
12
1. Installing RIPCenter/PosterShop
Preparing the Media for Installation
Prepare the media required for installation as follows:
1. USB flash drive
The programs to be installed are on this.
2. USB hardware key
To install and use RIPCenter/PosterShop, plug it into the computer.
8

Installing the Software
Installing the Software
1. Plug the USB hardware key ("hardware key") into one of the computer’s USB ports.
2. Plug the USB flash drive into another of the computer’s USB ports.
If the Auto Play dialog box appears, select the folder.
3. In Explorer, open the USB flash drive and double-click "Install_ONYX.exe" to run it.
4. Click [INSTALL].
5. Read the end-user license agreement (EULA), and then click [Yes].
6. To install the hardware key driver, click [OK].
This will take a while.
Depending on the computer's operating environment, Microsoft Visual C++ 2015 Redistributable
may be installed.
7. Select where to install the file. To install the file on another hard drive, change only the
name of the drive in the path and leave the folder name unchanged.
Example: C:Onyx18
8. In the Printers area at the bottom right of the window, check the printer to be used.
9. Click [Install] to start installation.
This will take a while.
After the web browser opens and the description on the UAC and administrator privileges appear,
close the browser.
10. Once installation is complete, click [Finish].
RIP-Queue automatically starts.
11. If the wizard to register myonyx appears, click [Next] to register or [Cancel] to skip
registration.
12. On the "Configure Printer Port" window, select "TCP/IP Printer" and then click
[Configure].
13. In "IP address", enter the printer's IP address or host name.
14. Make sure that "Port Number:" is <Port52026>.
15. Click [Test] to test the connection.
If correctly connected to the printer, a message reporting that a valid IP address has been found
appears. If the connection test fails, set the printer to a status with "Ready" displayed on its control
panel and retry the connection test.
D:Onyx18
16. Click [OK] twice.
Installation of RIPCenter/PosterShop is now complete.
9

1. Installing RIPCenter/PosterShop
10
2. Functions for L5130/L5160
1
2
3
4
5
6
DWU800
This section explains the RIPCenter/PosterShop functions customized for RICOH Pro L5130/L5160. For
information about other functions and operations, see the RIPCenter/PosterShop manuals.
• When using RIPCenter/PosterShop, keep the USB hardware key connected to the computer.
Functions on the Main Menu
The main menu comprises the following areas and window:
1. Printer Area
Displays usable printers.
2. Jobs Ready to Print Area
Displays print jobs before or during printing.
3. Buffered Jobs Area
Displays completed print jobs and archived jobs.
4. Information Area
Displays the list of information related to printers.
5. Preview Area
Displays the print job preview.
6. Job Control Window
This appears as a pop-up window during printing. You can monitor and control the print job while printing.
11
1
DWU808
1
DWU809
2. Functions for L5130/L5160
Printer Area
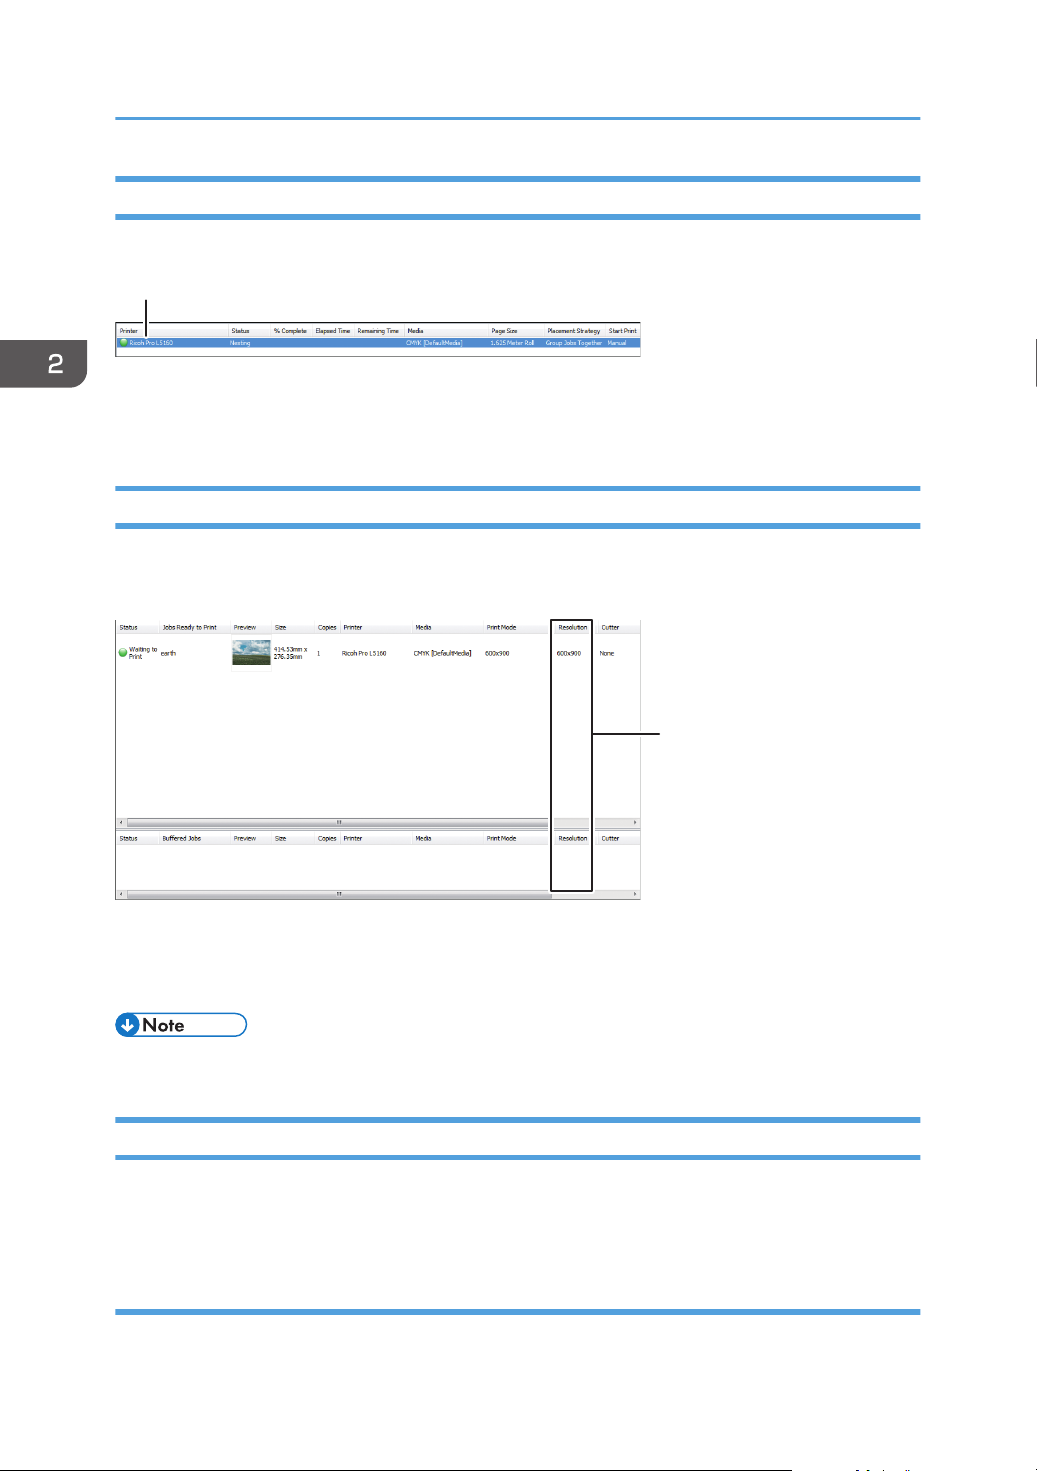
For details about the displayed location of the printer area, see page 11 "Functions on the Main Menu".
1. Printer
Displays the printer model name.
Jobs Ready to Print Area/Buffered Jobs Area
For details about the displayed location of the Jobs Ready to Print area and Buffered Jobs area, see
page 11 "Functions on the Main Menu".
1. Resolution
Displays the resolution specified in the profile setting.
• If the resolution does not appear, right-click the header, and then check "Resolution".
Information Area
For details about the displayed location of the Information area, see page 11 "Functions on the Main
Menu".
Device information menu
In the Information area, click the [Device Info] tab to display the Device Information menu.
12
 Loading...