

Ricoh PRO L4130 series, PRO L4160 series Care And Maintenance Manual
Pro L4130/L4160 Series
Requests for Daily Care and Maintenance
This machine is a precision machine equipped with extremely fine mechanisms. Especially, the nozzle surface of the
heads from which the ink is discharged is affected even by a slightest attachment of dust or paper powder and the
proper printing results could not be obtained. With a view to using this machine in a better condition, we would like to
recommend performing the following care and maintenance on daily basis.
Also, be careful not to spill the ink or maintenance liquid on your skin or clothes when cleaning the machine.
CAUTION
Make sure to wear the attached goggles and gloves.
The gloves supplied with the machine are disposable. When all the gloves are expended, purchase an
equivalent product on the market.
The ink, if mixed with water or alcohol, generates condensed substances. Pay attention not to deposit
water or alcohol to the nozzle surface, surrounding area of the heads, caps and wipers.
To secure the stability of the ink discharge, when the printer is not used (output) for an extended
period of time, it could become necessary to discharge periodically a small amount of ink (flushing),
depending on the kinds of the ink.
When not using for an extended period of time, execute the [CUSTODY WASH] function of this equipment, ("When the Machine Is Not Used for a Long Time (CUSTODY WASH)" Chapter 4 of Operation
Manual) and put off the power switch on the front, only. Leave the main power switch at the side of
the equipment on and keep the cable socket inserted into the plug.
Never disassemble this machine. It could cause electrical shock, fire and breakage.
Keep away the moisture from the inside of this machine. If the inside is moistened, it could cause electrical shock, fire and breakage.
Perform the maintenance and care after switching off the power and taking off the power cable. Otherwise, it could cause unexpected accidents.
Avoid using benzene, thinner, and chemicals containing abrasive compounds. The surface of the
cover could be degenerated or deformed.
Do not supply lubricant oil etc. to the inside this machine.
It could cause the breakdown of this machine.
1. Installation environment
Use this printer as much as possible in a dust-free environment. Fans and air-blowers could cause the dust-
spewing.
The using environment of this printer is from 20 to 30
humidity. Avoid the use of this printer at a temperature and humidity higher or lower than the indicated
ranges.
o
C in temperature and from 35 to 65 % in relative
1

2. Daily care and maintenance
CARR I AGE OUT
[ENT]
MAINT.
MOV E PO S I T I ON
:STATION MAINT.
MOV E PO S I T I ON
:HEAD MAINT.
Q Tools required for Maintenance
Item Name
Clean stick
Pro Maintenance kit
Wiper
Absorber kit
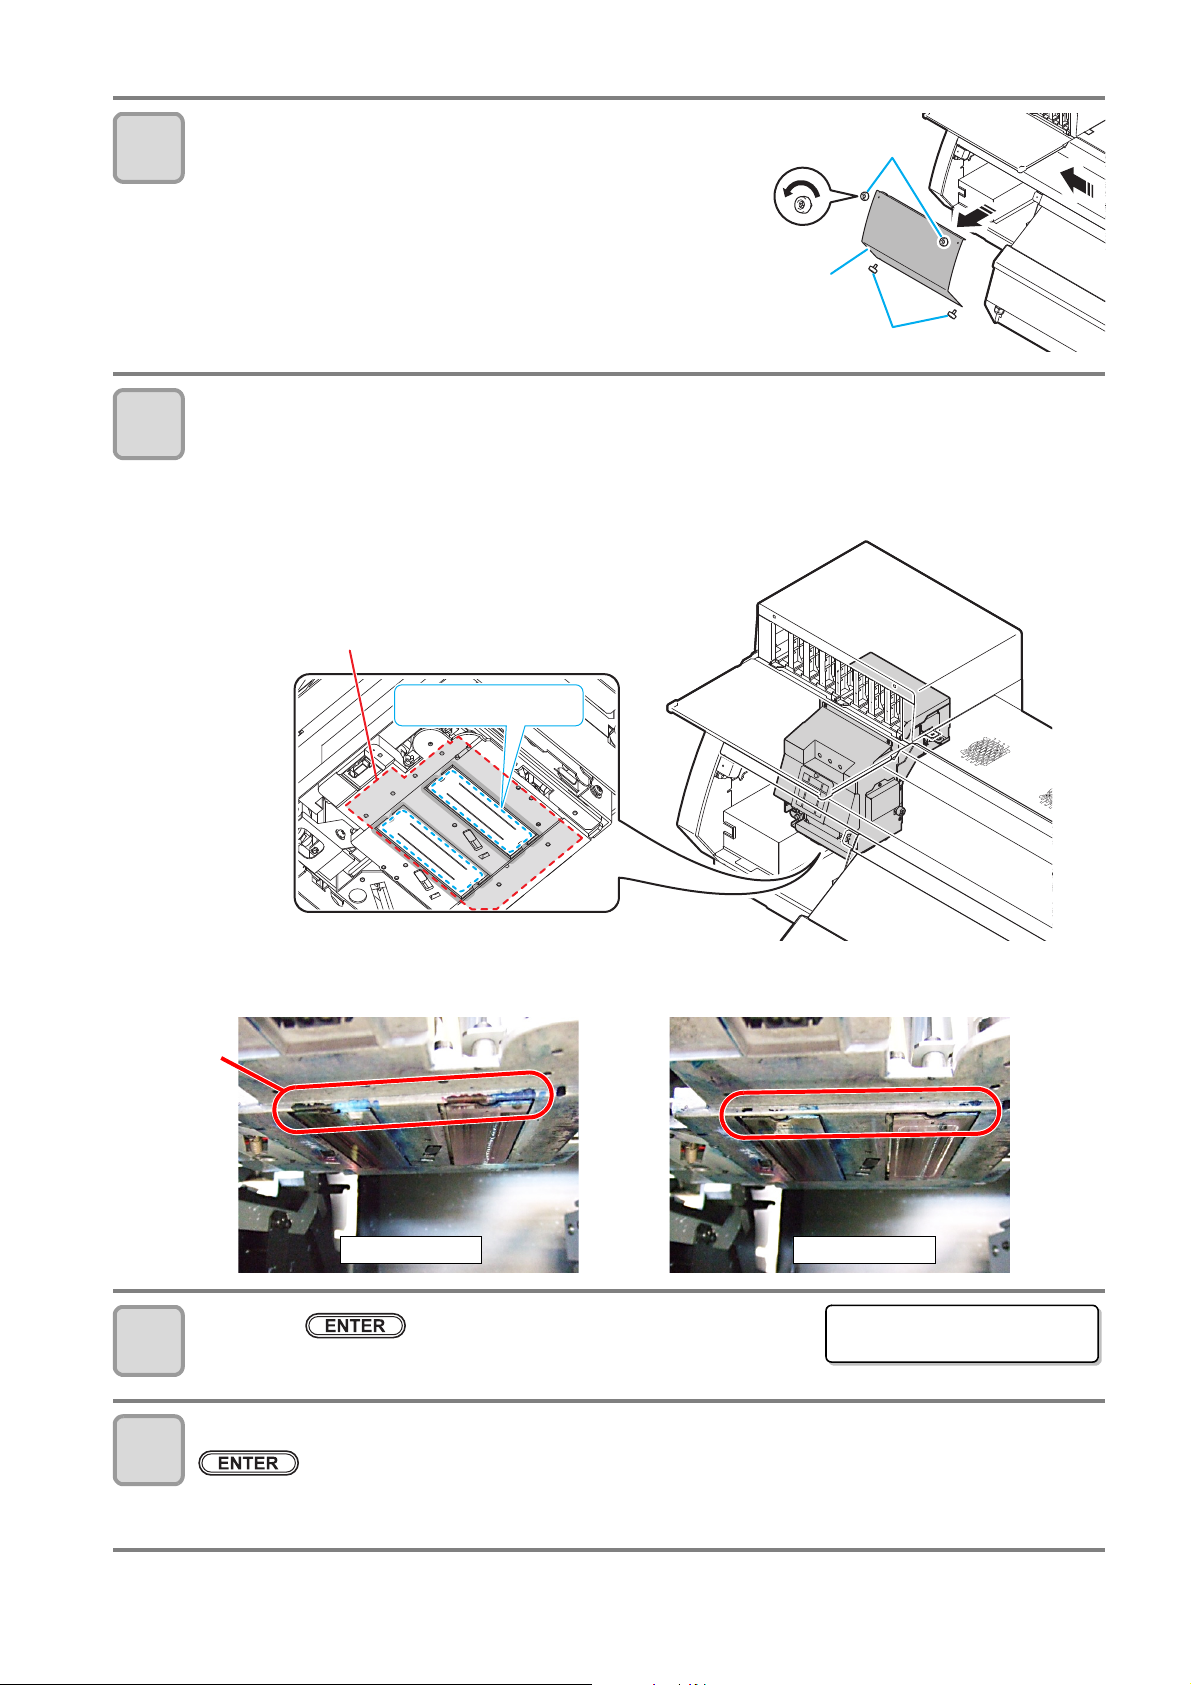
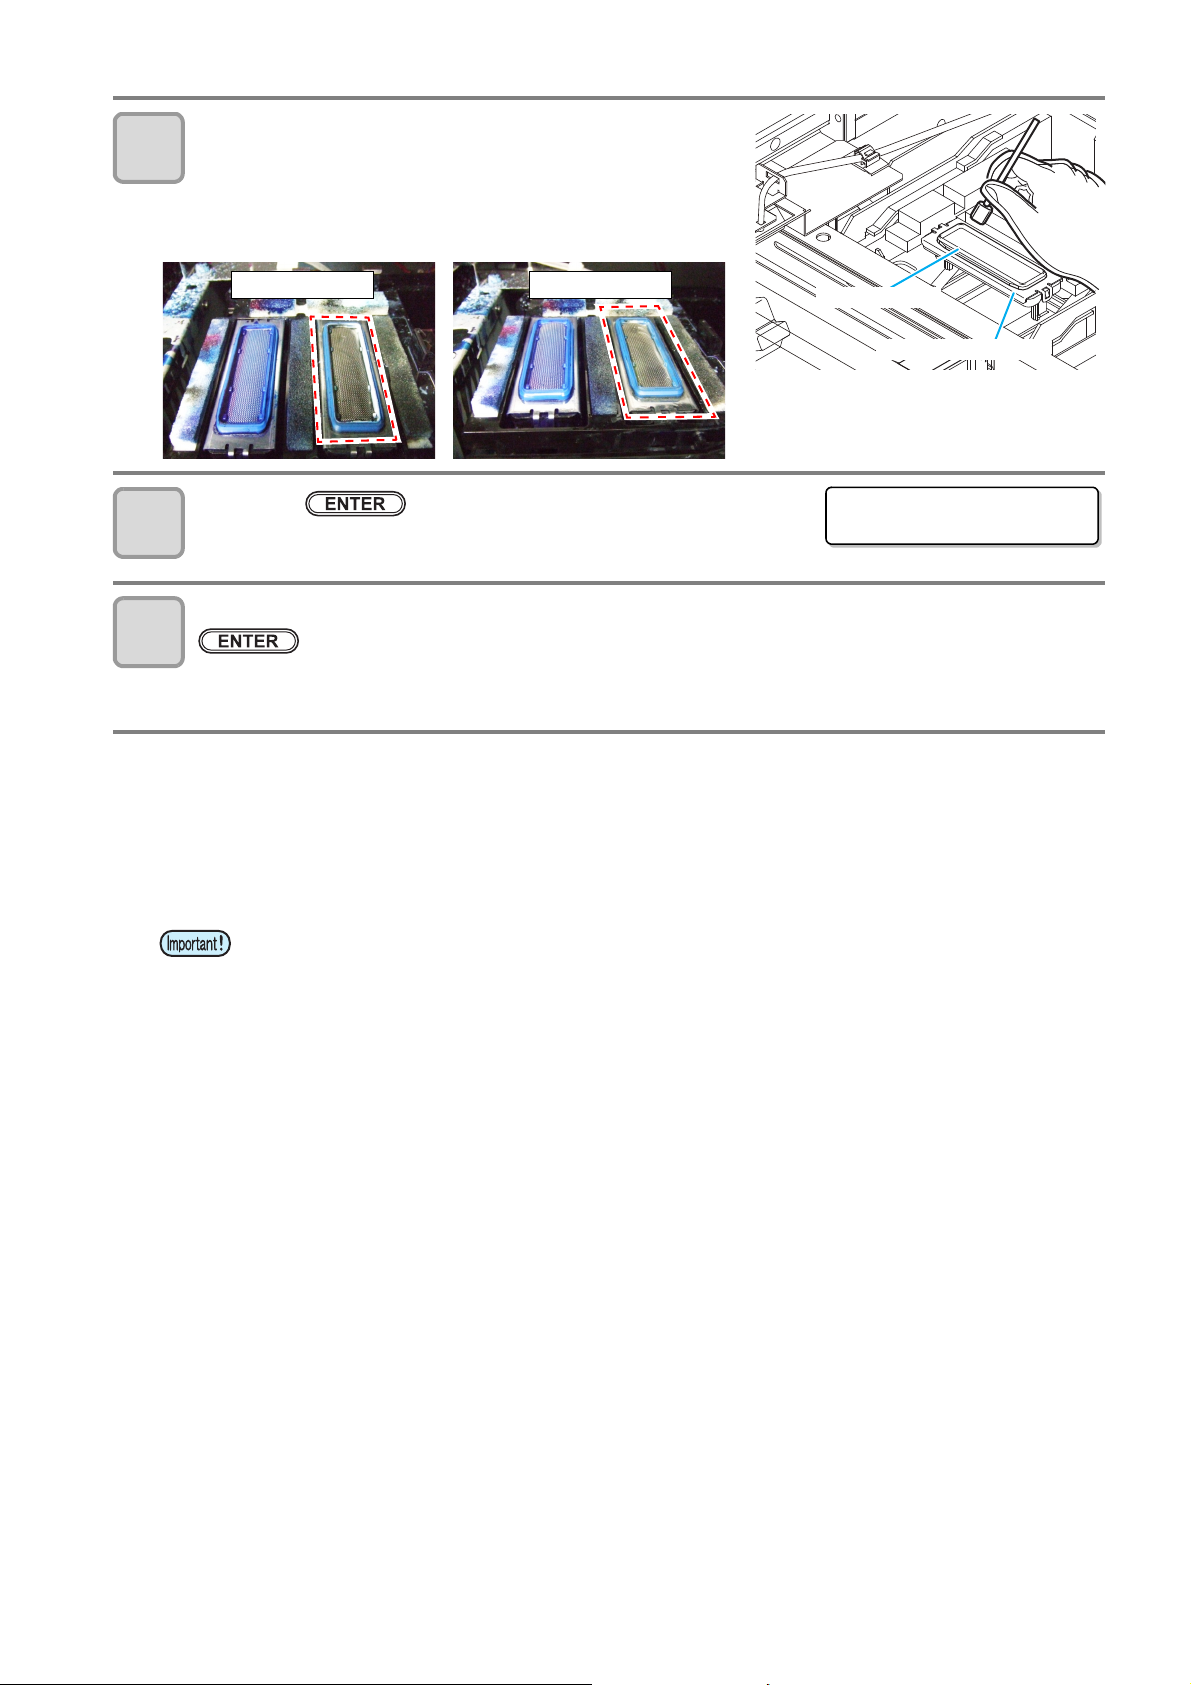
Q Surroundings of the heads ("Cleaning the Head and the Area around It" Chapter 4 of
the Operation Manual)
Because the head employs a very precise mechanism, due care needs to be taken when it is cleaned.
Using a clean stick, etc., rub off gelatinous ink or dust that may stick to the lower part of the slider and the area
around the head.In doing so, never rub the nozzles of the head.
Tools required for cleaning
• Be sure to wear the attached goggles and gloves when cleaning the area around the
head.Otherwise, you may get ink in your eyes.
• The ink contains organic solvent.If you get the ink on your skin or in your eyes, wash it away
with plenty of water immediately.
Press the key in LOCAL.
1
Press the key.
2
Press to select [HEAD MAINT.].
3
Press the key.
4
• Carriage will move to the left end of this device.
• If the carriage is not covered by the ink cap for a long period of
time, the nozzle face of the head may get dry and clogged,
resulting in white lines being left in the printed image.
• The buzzer sounds periodically while the carriage is out of the
capping station. The buzzer sounds at shorter interval when the
print heater temperature is high.
• Clean stick • Gloves • Goggles
2
5
Screw
Screw
Maintenance
cover
Rotate it left.
The nozzle part (Never
touch it.)
Clean with a clean stick.
After cleaningBefore cleaning
Wipe off the
gelatinous or
solid ink residue.
Close cover
COMP L E T ED [ ENT ]
6
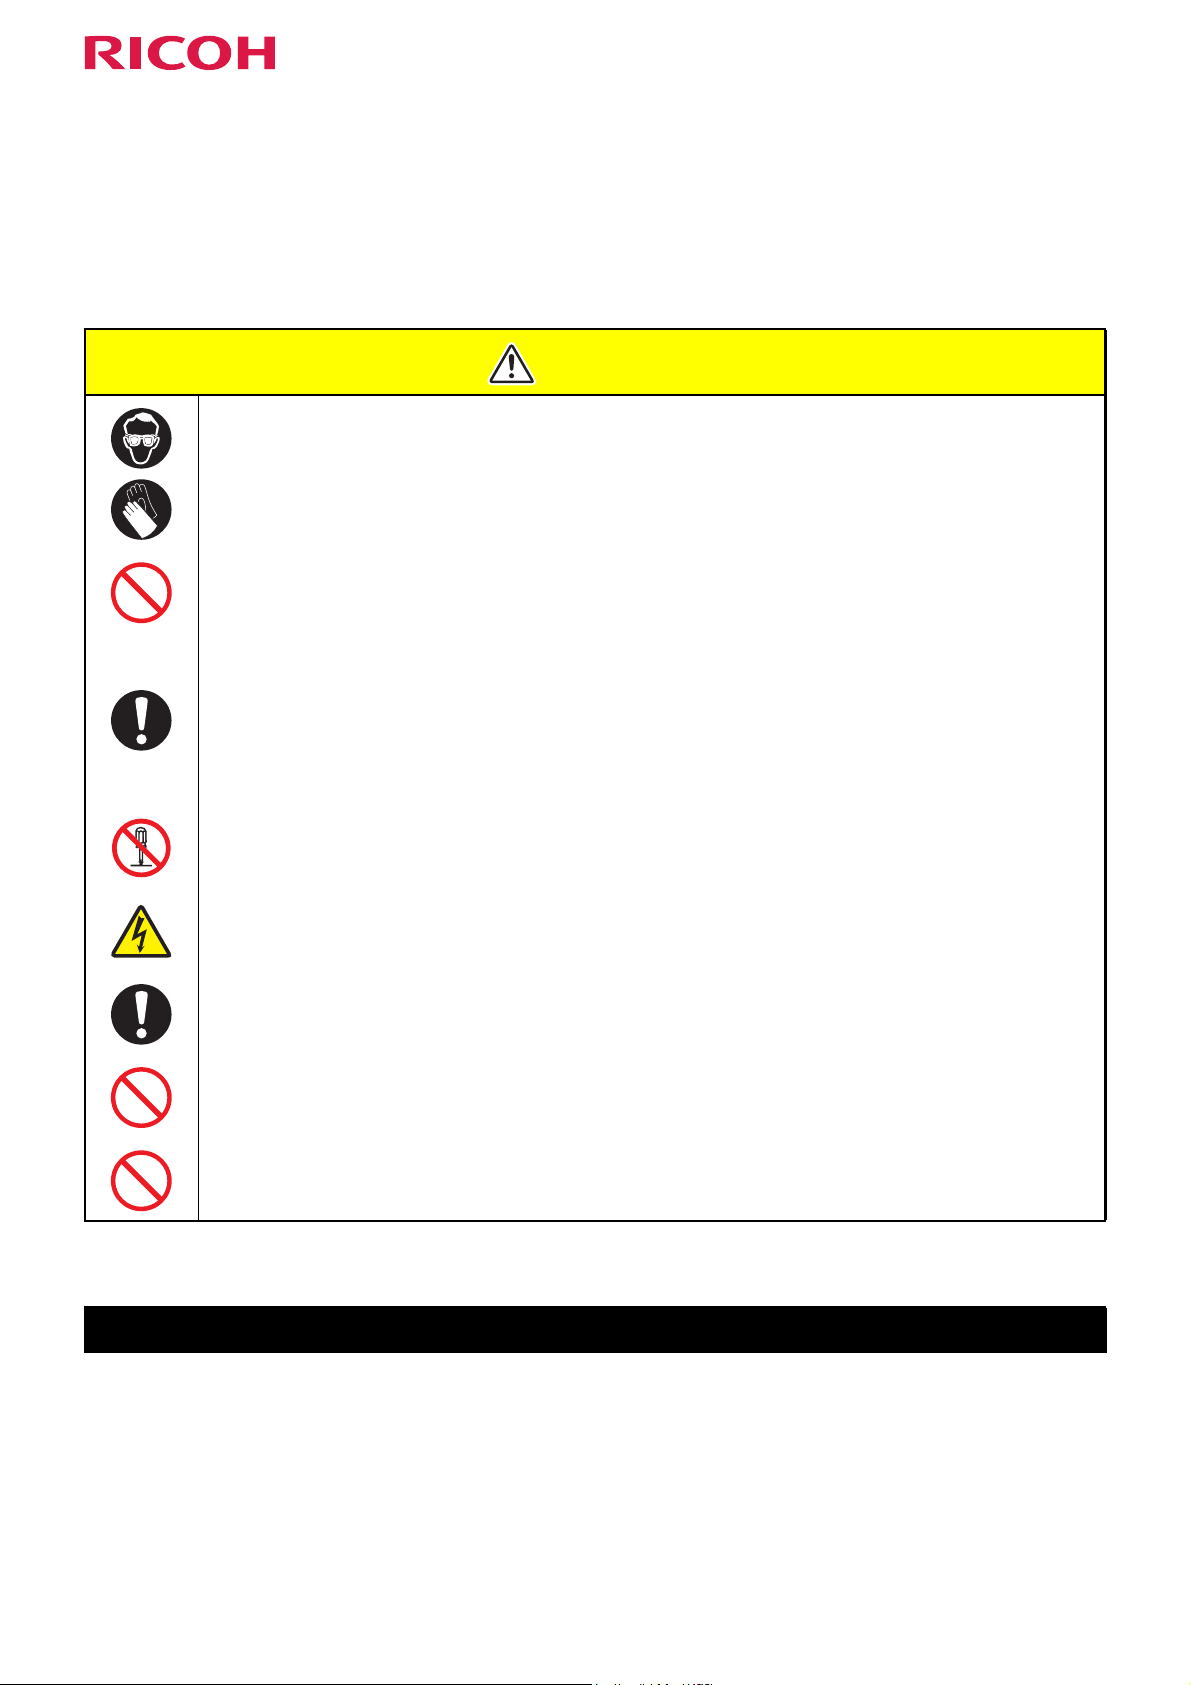
Open the left maintenance cover.
(1) Turn four screws that fix the maintenance cover to
the left, and remove them.
(2) Remove the maintenance cover.
• If the maintenance cover is hard to remove, use the
supplied screwdriver.
Wipe ink sticking to the side of the head off with a clean stick.
• To prevent gelled/ solid ink ground from pooling at the front of the carriage, scrape them off with clean stick
etc.
• Clean the side surface of the head (shown in deep gray) with a clean stick.
• Never rub the nozzles.
Press the key after the cleaning.
7
8
Close the left maintenance cover then press the
• After its initial operation, the machine returns to step1.
key.
3

Q Capping station (Cleaning the Wiper and Cap) ("Cleaning the Wiper and Cap" Chapter
MAINT.
Reference for cleaning
Top edge of the film
CARR I AGE OUT
[ENT]
MAINT.
MOV E PO S I T I ON
:STATION MAINT.
MOV E PO S I T I ON
:STATION MAINT.
4 of the Operation Manual)
Cleaning the Wiper and Cap
Ink, dust, or paper waste is pooled on the wiper. To keep stable printing quality, wash the wiper and cap at the
end of the day.
Tools required for Maintenance
• Be sure to wear the supplied goggles and gloves when maintaining the capping
station.Otherwise, you may get ink in your eyes.
• Do not move the carriage out of the capping station by hand.When it is desirable to move the
carriage, press the key to execute the carriage-out.
• Further, in the cases as explained below, replace the wiper with the new one.
Even if you clean the wiper enough, nozzle clogging etc. occurs frequently
When the wiper is deformed
When the stuck ink can not be wiped off
When the warning for wiper replacement is indicated
• When cleaning the wiper, be careful that lint from the clean stick or kimwipe® does not get left on the
wiper.Remaining lint may cause image quality to deteriorate.
• Clean the wiper completely until the stained ink on the top
edge of the wiper film is washed away after soaking the wiper
in the Cleaning Fluid for 1-24 hours. It is recommended to
prepare two or more wipers and use them alternately.
• If cleaning of the wiper is not enough, it may cause nozzle
clogging.
• Do not wash the wiper with other than the Kimwipe®.
Otherwise, lint may remain on the wiper.
• Maintenance kit • Gloves
• Clean stick • Goggles
Press the key in LOCAL.
1
Press the key.
2
Press to select [STATION MAINT.].
3
4
4
Carriage
Projection
At the start of immersion
At the end of immersion
5
6
Press the key.
• The carriage moves to the maintenance position.
• If the carriage is not covered by the ink cap for a long period of
time, the nozzle face of the head may get dry and clogged,
resulting in white lines being left in the printed image.
• The buzzer sounds periodically while the carriage is out of the
capping station. The buzzer sounds at shorter interval when the
print heater temperature is high.
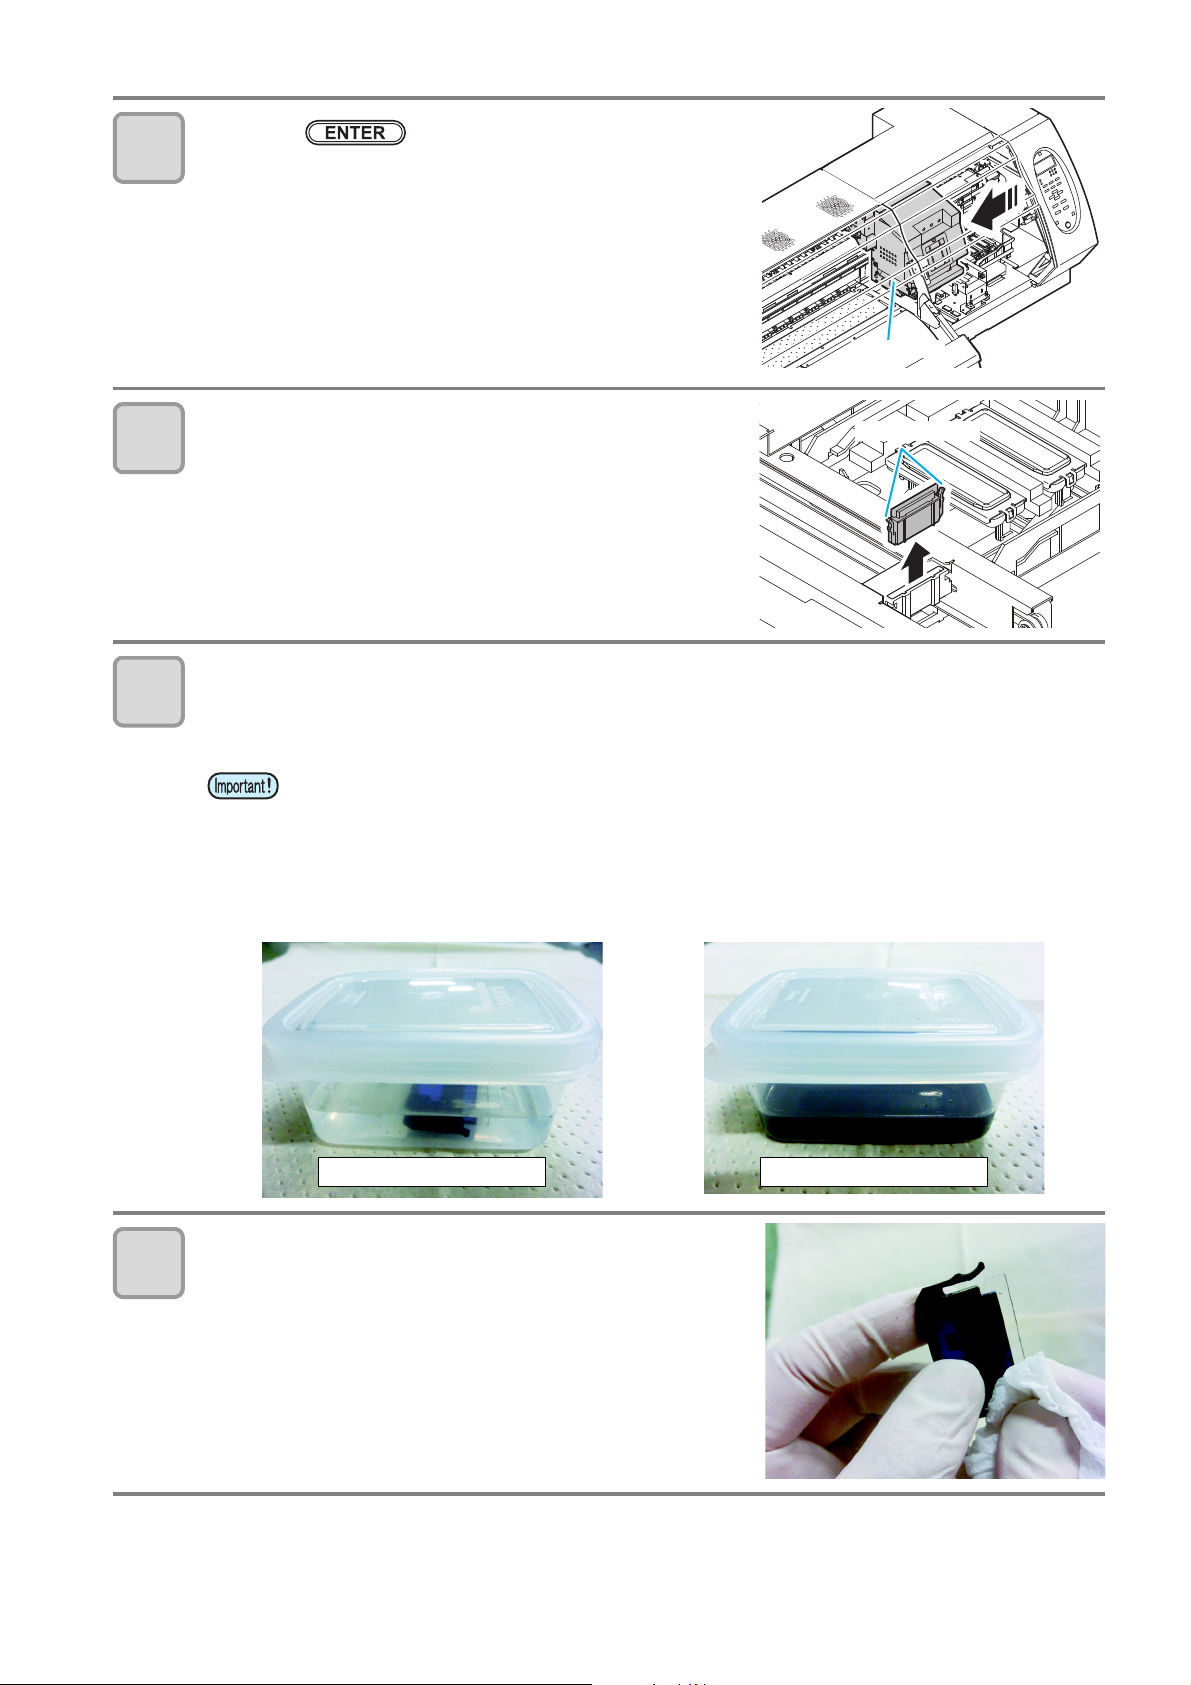
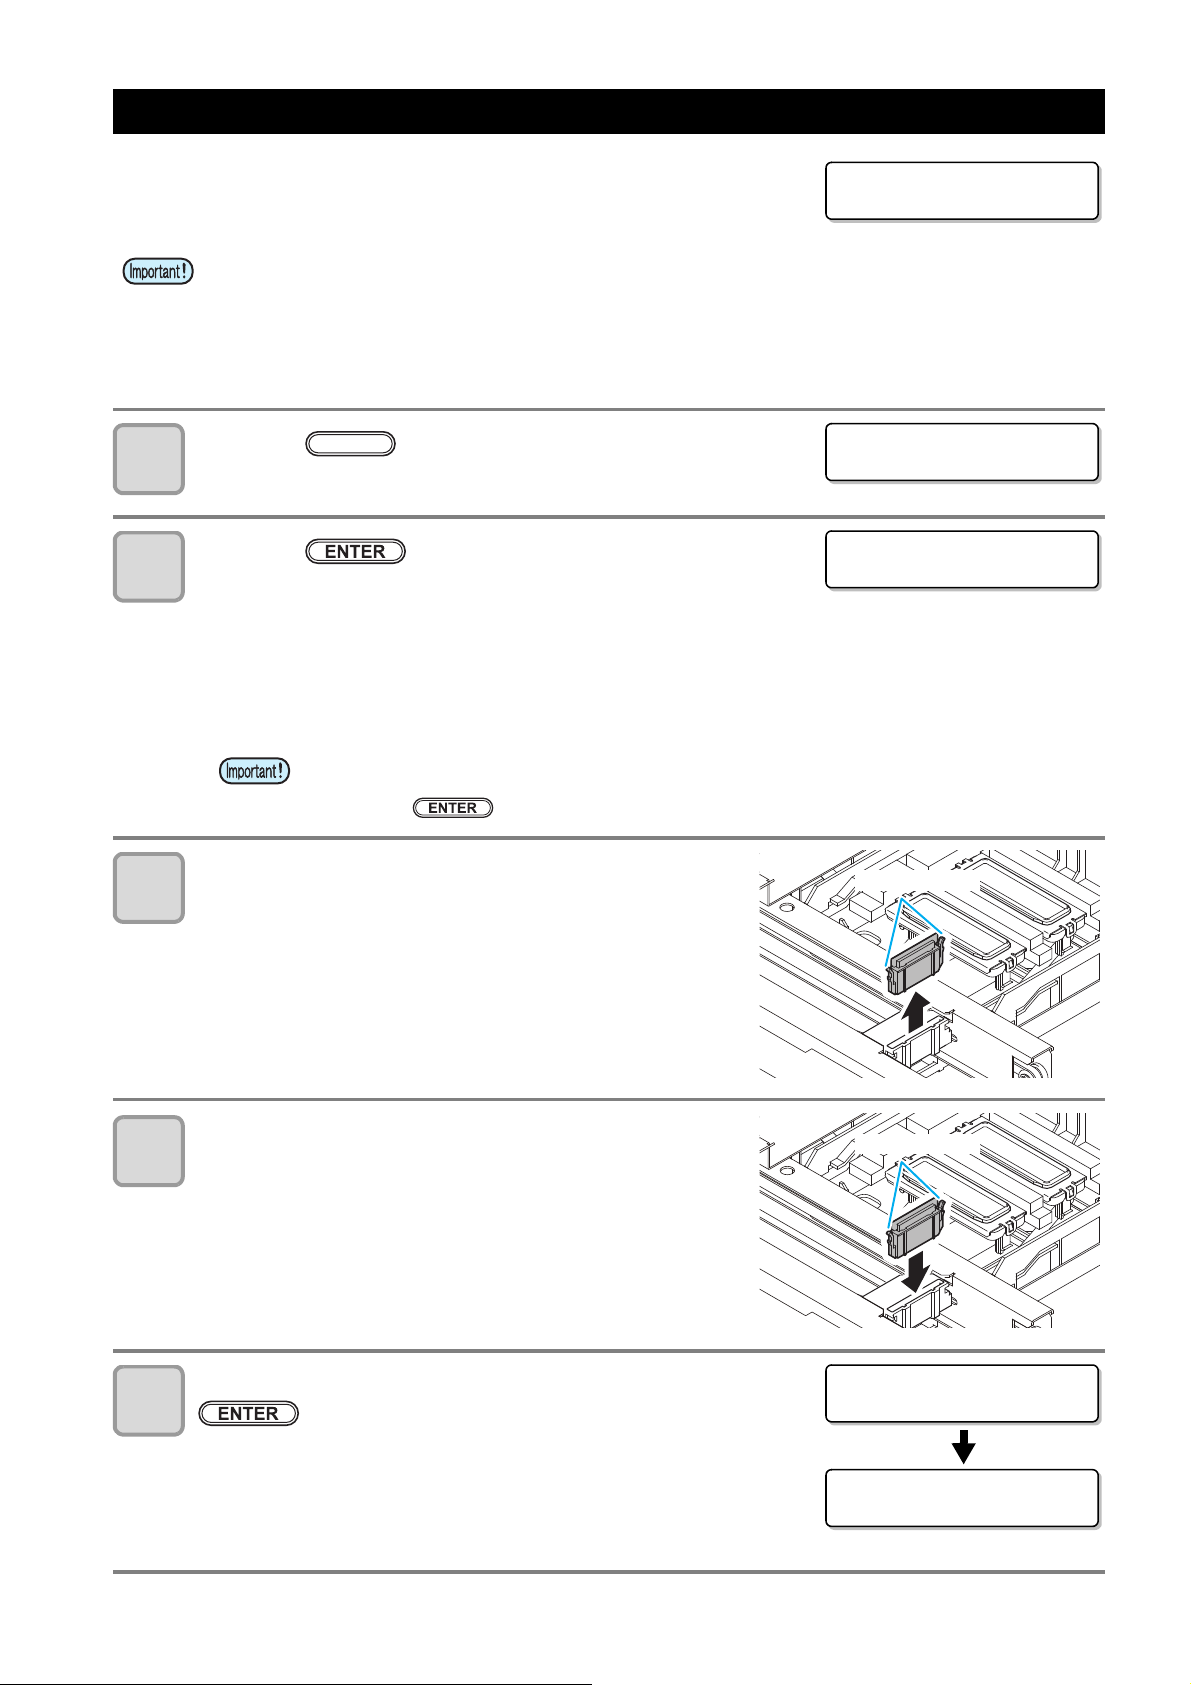
Open the right maintenance cover cover then
remove the wiper.
• Pull out the wiper by holding the protrusions at its both ends.
Put the wiper that you used for one day into a provided case or solvent-resistancecovered-container (glass, earthenware, etc.) and pour Cleaning Fluid.
• Time to immerse the wiper shall be for 1 to 24 hours.
7
• If you leave the wiper immersed in Cleaning Fluid too long, the wiper may be deformed.
• Dispose the Cleaning Fluid for soaking the wiper if it gets dirty. (As a guide, replace it in a
week). Regarding disposal of unused Cleaning Fluid, please ask Industrial waste disposer
and pursuant to the regulations of your district.
• For case for immersing the wiper, please use provided case or solvent-resistance-coveredcontainer. In case that you want to immerse the wiper by using your resin case, please
make sure to test whether there are no problems such as case deformation before you try.
Take out the wiper and remove ink blot etc. with a
Kimwipe®.
• Wipe off well so that any lint etc. do not remain on the top
edge of the wiper film.
5
8
Clean
Projection
Space below the wiper guide Space between the wiper
slider and ink guard W
Wiper guide
Wiper guide
Ink guard W
Enlarged view of the Wiper Slider
and Ink Guard W
Do not clean this part
Clean this part along the rail
9
10
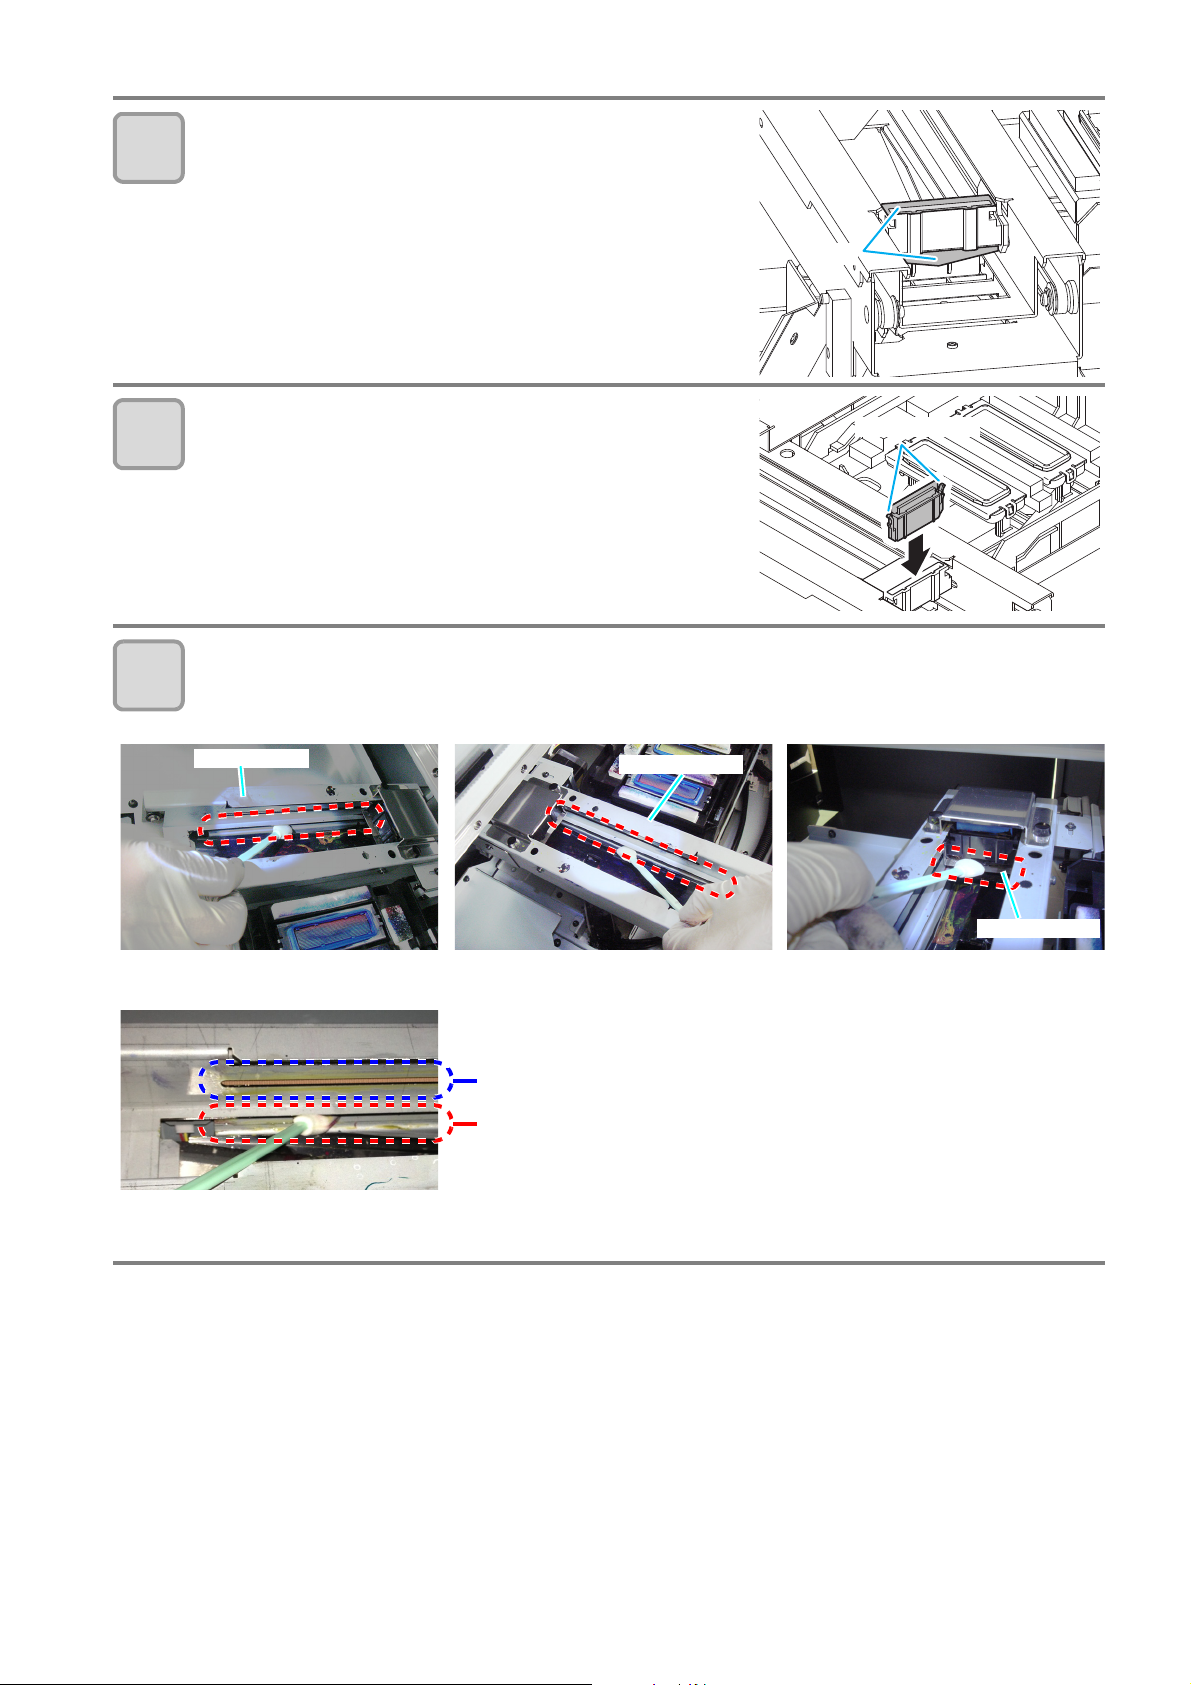
Clean the wiper slider.
• Wipe off the ink sticking of the figure with a clean stick dipped in
Cleaning Fluid for maintenance.
Wipe off so that Cleaning Fluid for maintenance will not remain.
Set the wiper at the original position.
• Insert the wiper by holding both ends of the wiper.
Clean the area around the wiper.
• Dip the clean stick in the cleaning liquid for maintenance, and wipe the space below the wiper guide, and
the space between the wiper slider and ink guard W.
6
11
Cap rubber
Cap rubber cover
After cleaningBefore cleaning
Close cover
COMP L E T ED [ ENT ]
12
13
Clean the cap rubber and cap rubber cover.
• Wipe off the ink sticking to the cap rubber and cap rubber cover
with a clean stick dipped in Cleaning Fluid for maintenance.
(Wipe off so that you can see blue color of the cap rubber.)
Wipe off so that Cleaning Fluid for maintenance will not remain.
Press the key after the cleaning.
Close the right maintenance cover then press the
key.
• After its initial operation, the machine returns to step1.
Further, in the cases as explained below, replace the wiper with the new one.
Even if you clean the wiper enough, nozzle clogging etc. occurs frequently
When the wiper is deformed
When the stuck ink can not be wiped off
When the warning for wiper replacement is indicated
When the warning message for replacing wiper is shown, confirm whether
there is no damage and fuzz at the top edge of the wiper film. If there is no
damage on the top edge of the wiper film, it is possible to use the wiper continuously without replacing it.
7
Replacing the wiper
<LOCAL>
REPLACE WI PER
[MNT]
REPLACE WI PER
EXECUTE [ ENT ]
MAINT.
REPLACE WI PER
COMP L E T ED [ ENT ]
Projection
Projection
Close a cover
PLEASE WA I T
The wiper is consumable.When the display indicates that it is necessary to
check and replace the wiper, immediately replace the wiper with a new one.
Also, wipe ink sticking to the lower surface of the slider off.
• When the warning message for replacing wiper is shown, confirm whether there is no damage and
fuzz at the top edge of the wiper film. If there is no damage on the top edge of the wiper film, it is
possible to use the wiper continuously without replacing it.
• A wiper is a consumable. Buy one through the dealer in your region or at our service office.
• When you replace it before the message is displayed, first perform carriage out and then replace it.
After replacing, reset the counter for the number of times the wiper was used.
Press the key in LOCAL.
1
Press the key.
2
• The carriage moves to the maintenance position.
• If the carriage is not covered by the ink cap for a long period of time,
the nozzle face of the head may get dry and clogged, resulting in
white lines being left in the printed image.
• The buzzer sounds periodically while the carriage is out of the
capping station. The buzzer sounds at shorter interval when the print
heater temperature is high.
3
4
• Until the replacement work is completed, [COMPLETED: ent] is displayed on the screen.
After the work up to the Step 4 is completed and you close the right maintenance cover,
press the key.
Open the rght maintenance cover then remove the
wiper.
• Pull out the wiper by holding the protrusions at its both ends.
Insert a new wiper.
• Insert a new wiper by holding its both ends.
Close the right maintenance cover then press the
5
• After its initial operation, the machine returns to LOCAL.
key.
8
Q Replacing method of absorber kit ("Replacing method of
Dirty absorber
Dirty absorber
CARR I AGE OUT
[ENT]
MAINT.
MOV E PO S I T I ON
:STATION MAINT.
MOV E PO S I T I ON
:STATION MAINT.
Carriage
absorber
absorber2
absorber kit" Chapter 4 of the Operation Manual)
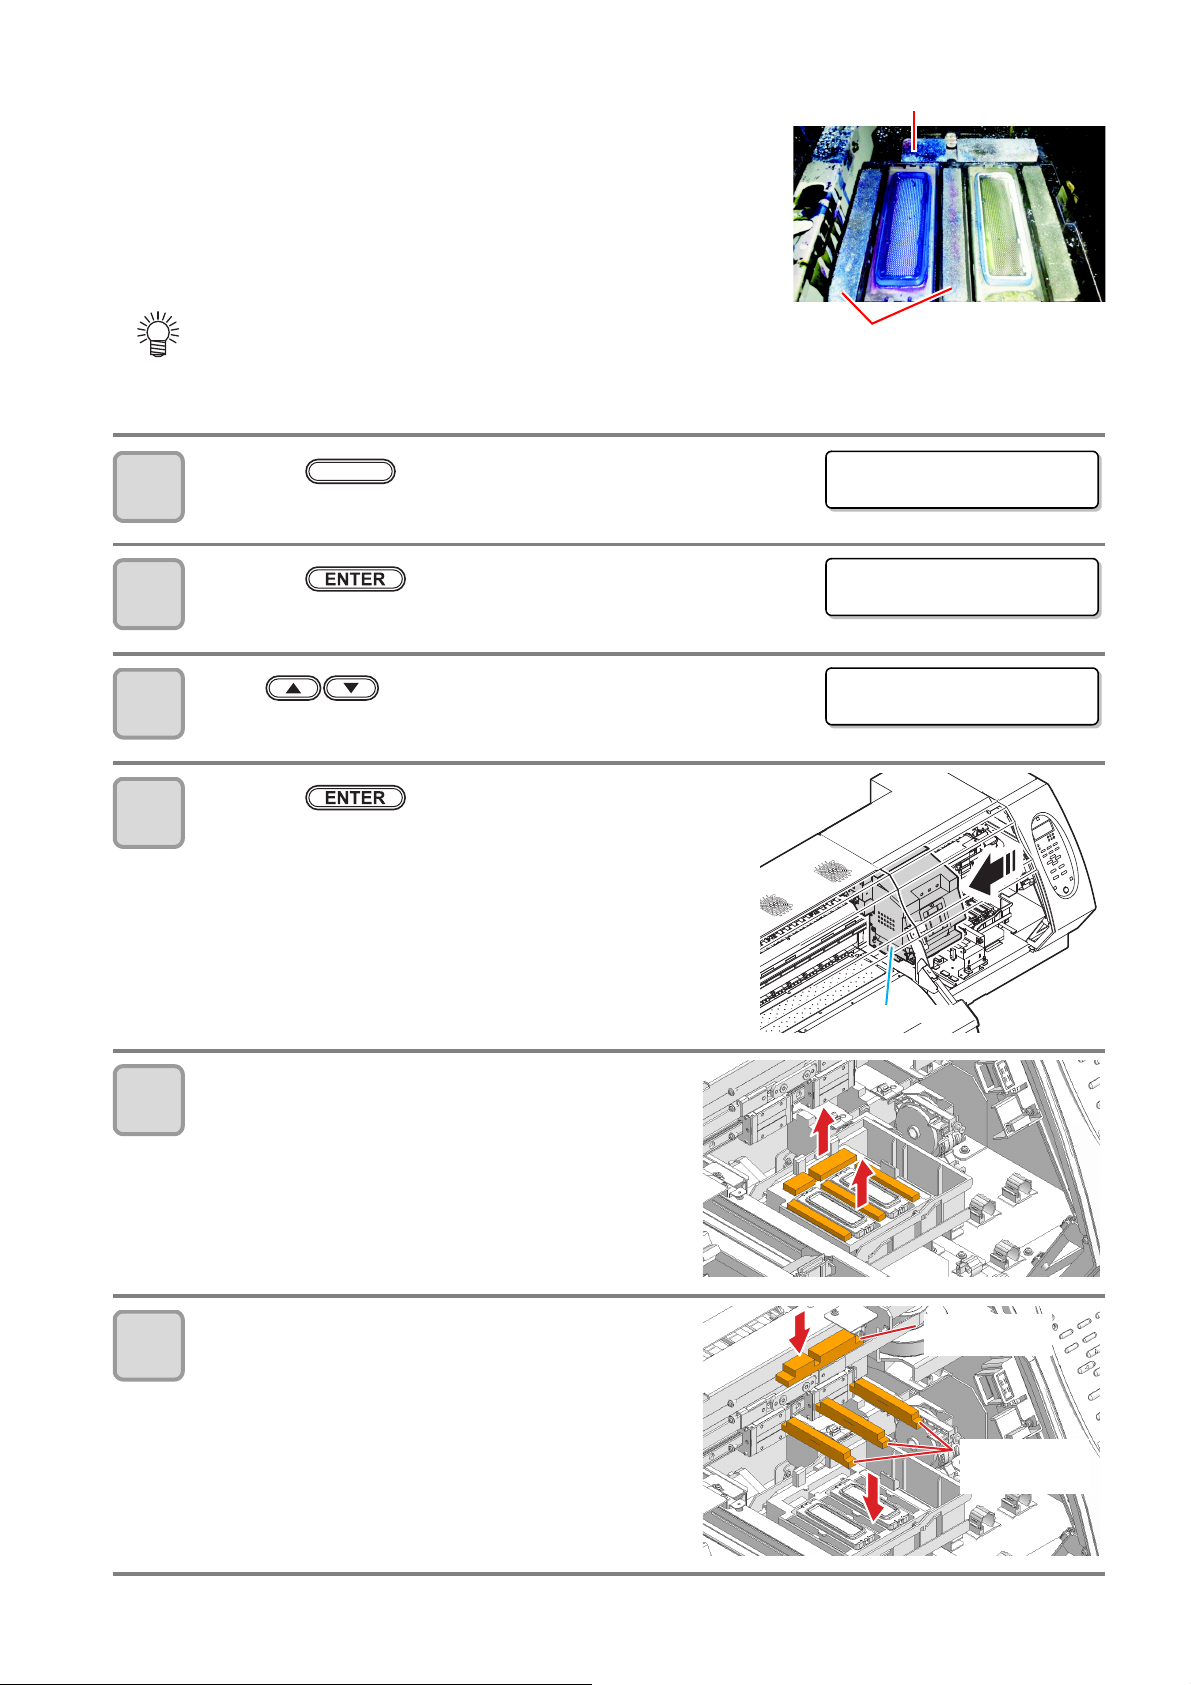
If ink adheres to the absorber, it is required to replace the absorber.
Rough guide for replacement:
Replace when the concavity and convexity of the surface of the absorber
are filled with ink as indicated in the right photo.
In addition, when you replace the absorber, clean ink adhering to the
capping station at the same time.
• To replace the absorber, the absorber kit separately sold is
required. Contact a distributor in your district or our office
for purchasing it.
Press the key in LOCAL.
1
Press the key.
2
3
4
5
Press to select [STATION MAINT.].
Press the key.
• The carriage moves to the maintenance position.
• If the carriage is not covered by the ink cap for a long period of
time, the nozzle face of the head may get dry and clogged,
resulting in white lines being left in the printed image.
• The buzzer sounds periodically while the carriage is out of the
capping station. The buzzer sounds at shorter interval when the
print heater temperature is high.
Open the rght maintenance cover then remove
the absorber.
• Pull out the absorbers (x 4).
6
Insert a new absorber.
• There are two types’ absorbers and four in total
(absorber x 1, absorber 2 x 3).
• Be careful not to mess up the positions to which they are
inserted.
9
 Loading...