

Page 1
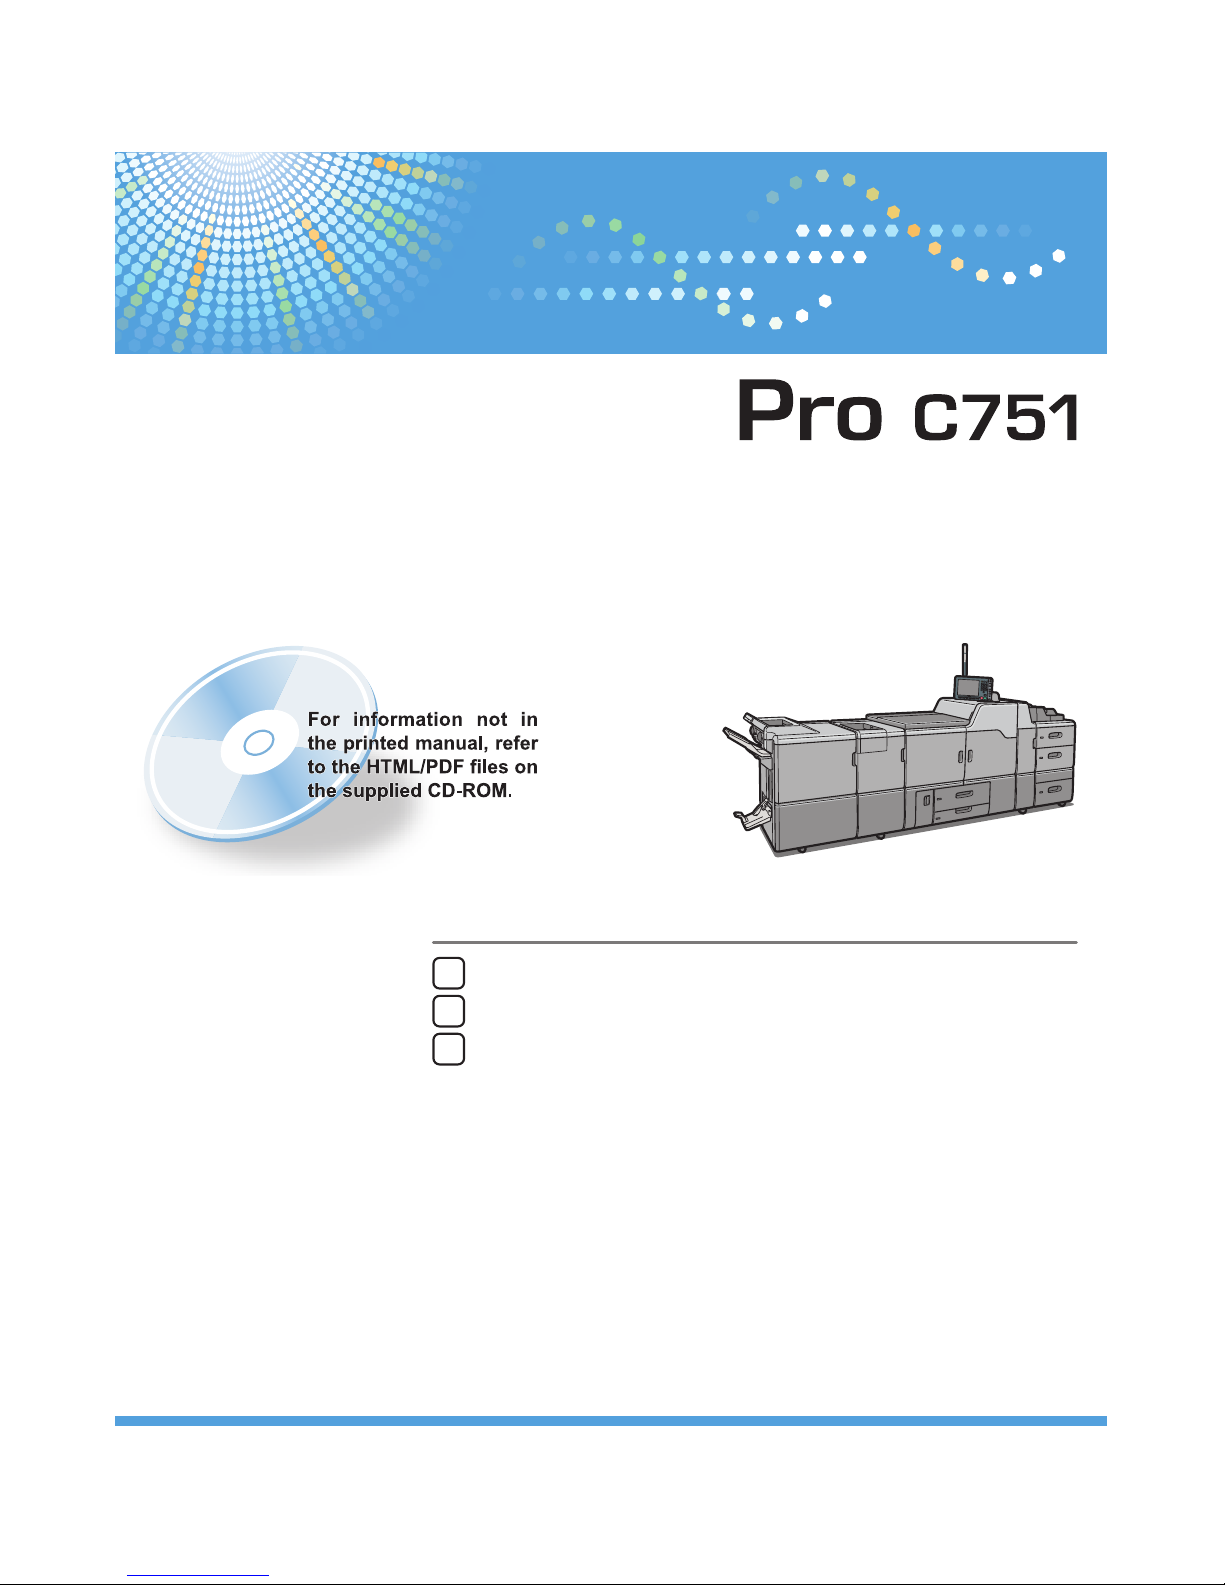
When the Machine Does Not Operate As Wanted
Clearing Misfeeds
Appendix
1
2
3
For safe and correct use, be sure to read the Safety Information in "About This Machine" before using the machine.
Troubleshooting
Operating Instructions
Page 2

Page 3

Documentation for This Machine
About This Machine
Troubleshooting (This manual)
Network and System Settings Reference
Connecting to a network
Changing the default settings of the system, and related information
Paper Settings Reference
Security Reference
Guide to Paper
.................................................................................................................................
................................................................................................................
.......................................................................................................
............................................................................................................................
....................................................
.........................................................................................................................
...........................................................................................................................................
................................................................................................................................................
1
Page 4

TABLE OF CONTENTS
Documentation for This Machine.......................................................................................................................1
Manuals for This Machine.................................................................................................................................4
Notice..................................................................................................................................................................6
Important.........................................................................................................................................................6
How to Read This Manual.................................................................................................................................7
Symbols...........................................................................................................................................................7
Names of Major Items...................................................................................................................................7
Notes...............................................................................................................................................................8
1. When the Machine Does Not Operate As Wanted
Indicators.............................................................................................................................................................9
Attention Light...................................................................................................................................................11
Beep Alert.........................................................................................................................................................13
Checking Machine Status and Settings..........................................................................................................14
When You Have Problems Operating the Machine.....................................................................................17
Adjusting the Color Registration......................................................................................................................24
Adjusting the Image Position...........................................................................................................................25
Pausing Print When Using Finisher SR5030 or Booklet Finisher SR5040...................................................26
When the Output Z-folded Paper Is Less than the Stack Capacity..............................................................27
Finisher SR5030 or Booklet Finisher SR5040...........................................................................................27
Multi-Folding Unit........................................................................................................................................28
When the Output Letter Fold-out Paper Is Less than the Stack Capacity.....................................................29
When Large Size Paper Is Not Properly Aligned..........................................................................................31
When Coated Paper Is Not Properly Aligned...............................................................................................33
Using Thin Coated Paper............................................................................................................................33
Using Thick Coated Paper...........................................................................................................................34
2. Clearing Misfeeds
Removing Jammed Paper................................................................................................................................37
Locating Jammed Paper..............................................................................................................................38
When A Is Displayed...................................................................................................................................40
When B1 Is Displayed.................................................................................................................................40
When B Is Displayed...................................................................................................................................41
When C Is Displayed...................................................................................................................................41
When D Is Displayed...................................................................................................................................42
2
Page 5

When E Is Displayed...................................................................................................................................44
When K Is Displayed...................................................................................................................................45
When L Is Displayed....................................................................................................................................46
When Mc1 - Mc4 Is Displayed..................................................................................................................47
When Mc5 or Mc6 Is Displayed...............................................................................................................47
When Mc7 or Mc8 Is Displayed...............................................................................................................48
When N1 - N5 Is Displayed......................................................................................................................49
When N6 - N22 Is Displayed....................................................................................................................50
When Q1 - Q4 Is Displayed......................................................................................................................52
When Rb1 - Rb5 Is Displayed in the Case of Finisher SR5030..............................................................53
When Rb6 - Rb9 Is Displayed in the Case of Finisher SR5030..............................................................54
When Rb12 - Rb13 Is Displayed in the Case of Finisher SR5030.........................................................54
When Rb1 - Rb5 Is Displayed in the Case of Booklet Finisher SR5040.................................................55
When Rb6 - Rb9 Is Displayed in the Case of Booklet Finisher SR5040.................................................55
When Rb10 - Rb17 Is Displayed in the Case of Booklet Finisher SR5040............................................56
When Rt1 or Rt2 Is Displayed....................................................................................................................56
When U Is Displayed...................................................................................................................................57
When V Is Displayed...................................................................................................................................58
When Z Is Displayed...................................................................................................................................58
Removing Jammed Staples..............................................................................................................................59
Finisher SR5030..........................................................................................................................................60
Booklet Finisher SR5040.............................................................................................................................61
Removing Jammed Ring Combs......................................................................................................................63
Removing Punch Waste...................................................................................................................................64
Finisher SR5030 or Booklet Finisher SR5040...........................................................................................64
Ring Binder...................................................................................................................................................64
Removing Staple Waste..................................................................................................................................65
Removing Waste Paper...................................................................................................................................66
3. Appendix
Trademarks.......................................................................................................................................................67
INDEX.............................................................................................................................................................69
3
Page 6

Manuals for This Machine
Read this manual carefully before you use this machine.
Refer to the manuals that are relevant to what you want to do with the machine.
• Media differ according to manual.
• The printed and electronic versions of a manual have the same contents.
• Adobe® Acrobat® Reader®/Adobe Reader must be installed in order to view the manuals as PDF
files.
• A Web browser must be installed in order to view the html manuals.
About This Machine
Before using the machine, be sure to read the section of this manual entitled Safety Information.
This manual introduces the machine's various functions. It also explains the control panel,
preparation procedures for using the machine, how to enter text, how to install the HTML manuals
from the CD-ROMs provided, and how to replace paper, toner, staples, and other consumables.
Troubleshooting
Provides a guide for resolving common usage-related problems.
Network and System Settings Reference
Explains how to connect the machine to a network and how to configure and operate the machine
in a network environment. It also explains how to change System Settings, how to specify
Adjustment Settings for Operators, and how to register information in the Address Book.
Paper Settings Reference
Explains how to make paper settings for each tray using the paper library, which contains optimum
printing conditions. It also explains how to manually specify a paper size and type for a paper tray.
Security Reference
This manual is for administrators of the machine. It explains security functions that you can use to
prevent unauthorized use of the machine, data tampering, or information leakage. For enhanced
security, we recommend that you first make the following settings:
• Install the Device Certificate.
• Enable SSL (Secure Sockets Layer) Encryption.
• Change the user name and password of the administrator using Web Image Monitor.
For details, see "Setting up the Machine", Security Reference.
Be sure to read this manual when setting the enhanced security functions, or user and administrator
authentication.
4
Page 7

Guide to Paper
Explains paper characteristics and methods for handling paper.
• Manuals provided are specific to machine types.
• In addition to the above, manuals are also provided for the Printer function.
5
Page 8

Notice
Important
In no event will the company be liable for direct, indirect, special, incidental, or consequential damages
as a result of handling or operating the machine.
For good output quality, the manufacturer recommends that you use genuine toner from the
manufacturer.
The manufacturer shall not be responsible for any damage or expense that might result from the use of
parts other than genuine parts from the manufacturer with your office products.
6
Page 9
How to Read This Manual
Symbols
This manual uses the following symbols:
Indicates points to pay attention to when using the machine, and explanations of likely causes of paper
misfeeds, damage to originals, or loss of data. Be sure to read these explanations.
Indicates supplementary explanations of the machine’s functions, and instructions on resolving user
errors.
[ ]
Indicates the names of keys on the machine's display or control panels.
Indicates instructions in book form.
Indicates instructions stored in a file on a provided CD-ROM.
Names of Major Items
Major items of this machine are referred to as follows in this manual:
• Multi Bypass Tray BY5010 (optional) Multi bypass tray (Tray 6)
• LCIT RT5060 (optional) Wide Large Capacity Tray (Wide LCT)
• Multi-Folding Unit FD5010 (optional) Multi-folding unit
• Buffer Pass Unit Type 5010 (optional) Buffer pass unit
• Ring Binder RB5010 (optional) Ring binder
• High Capacity Stacker SK5020 (optional) High capacity stacker
• Trimmer Unit TR5040 (optional) Trimmer unit
• Cover Interposer Tray CI5020 (optional) Interposer
7
Page 10

Notes
Contents of this manual are subject to change without prior notice.
Some illustrations in this manual might be slightly different from the machine.
Certain options might not be available in some countries. For details, please contact your local dealer.
Depending on which country you are in, certain units may be optional. For details, please contact your
local dealer.
8
Page 11
1. When the Machine Does Not
Operate As Wanted
This chapter describes basic troubleshooting procedures that are applicable to all functions of this
machine.
Indicators
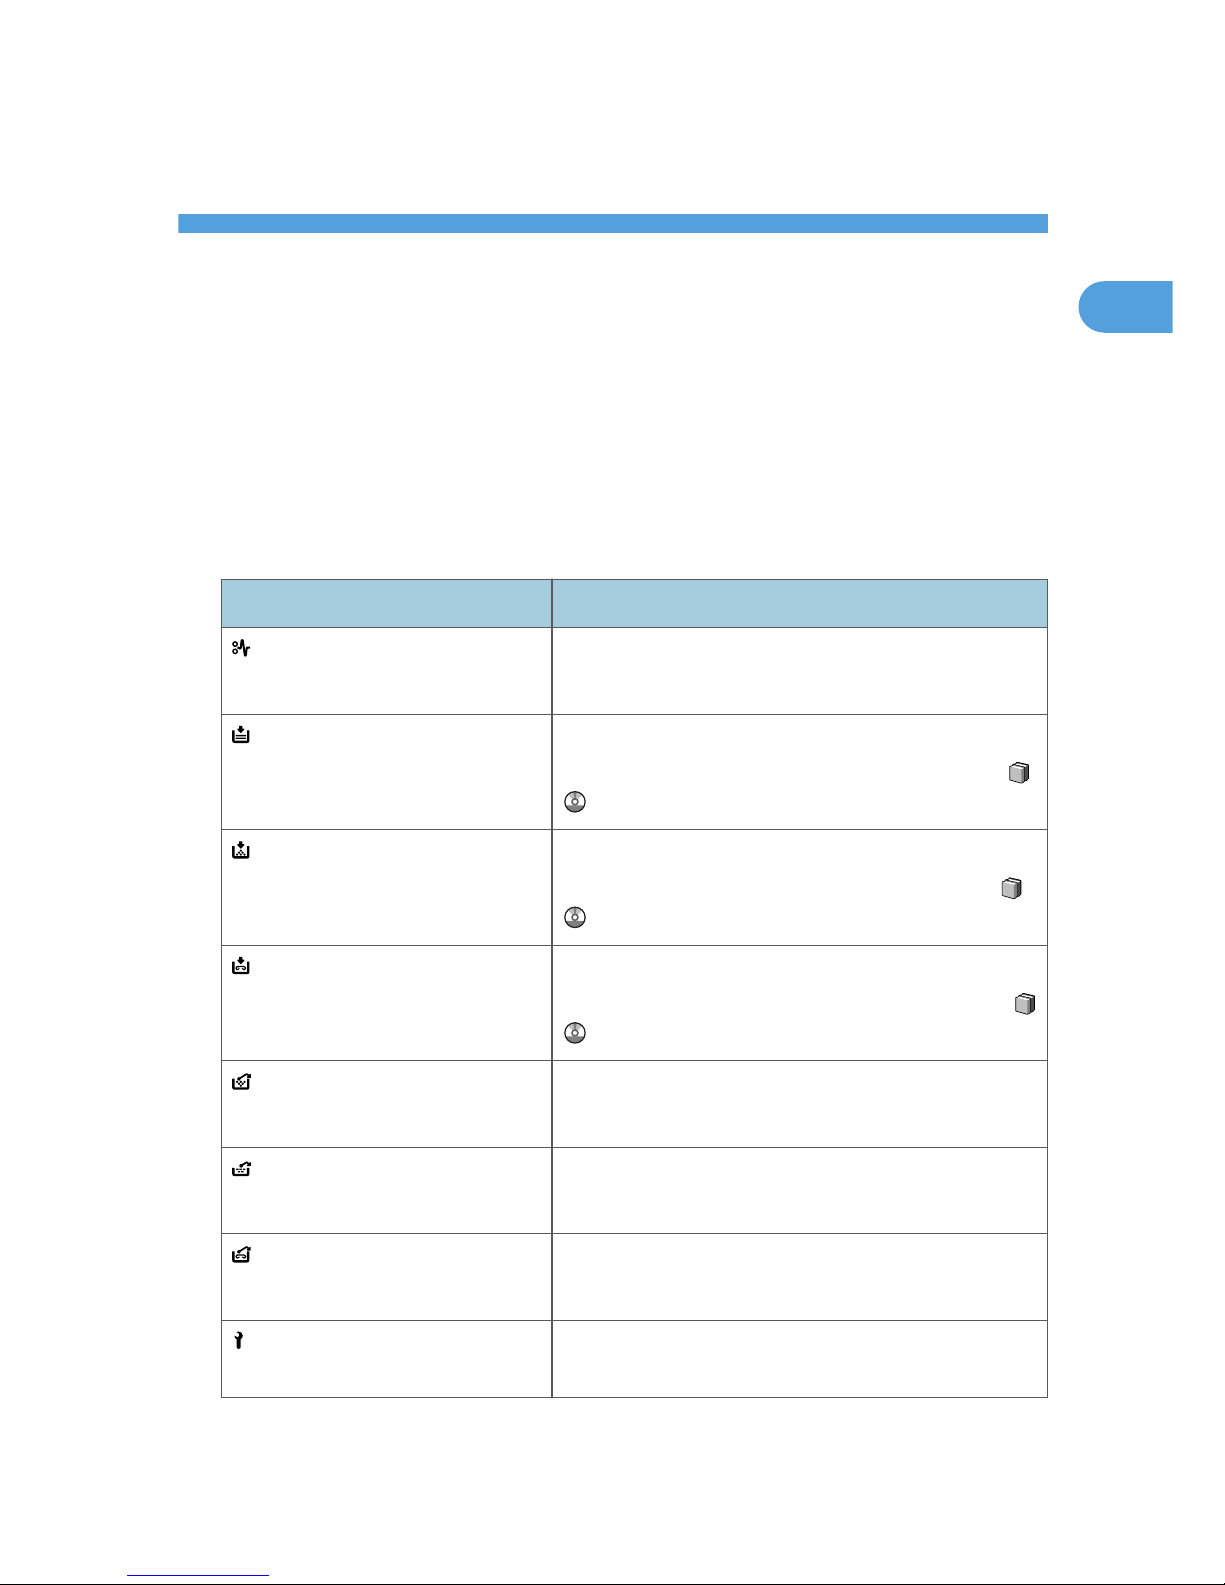
This section describes indicators that appear on the display panel when the machine requires the user to
clear misfeeds, add paper, or perform other troubleshooting procedures.
Display Panel Indicator
Indicator Status
: Misfeed indicator Appears when a misfeed occurs.
For details, see p.37 "Removing Jammed Paper".
: Load Paper indicator Appears when paper runs out.
For details, see "Loading Paper", About This Machine
.
: Add Toner indicator Appears when toner runs out.
For details, see "Adding Toner", About This Machine
.
: Add Staple indicator Appears when staples run out.
For details, see "Adding Staples", About This Machine
.
: Waste Toner Full indicator Appears when the waste toner bottle is full.
Contact your service representative.
: Empty Hole Punch Receptacle
indicator
Appears when the hole punch receptacle is full.
For details, see p.64 "Removing Punch Waste".
: Empty Waste Staple Receptacle
indicator
Appears when the waste staple receptacle is full.
For details, see p.65 "Removing Staple Waste".
: Service Call indicator Appears when the machine is malfunctioning or requires
maintenance.
9
1
Page 12

Indicator Status
: Open Cover indicator Appears when one or more covers of the machine are
open.
1. When the Machine Does Not Operate As Wanted
10
1
Page 13
Attention Light
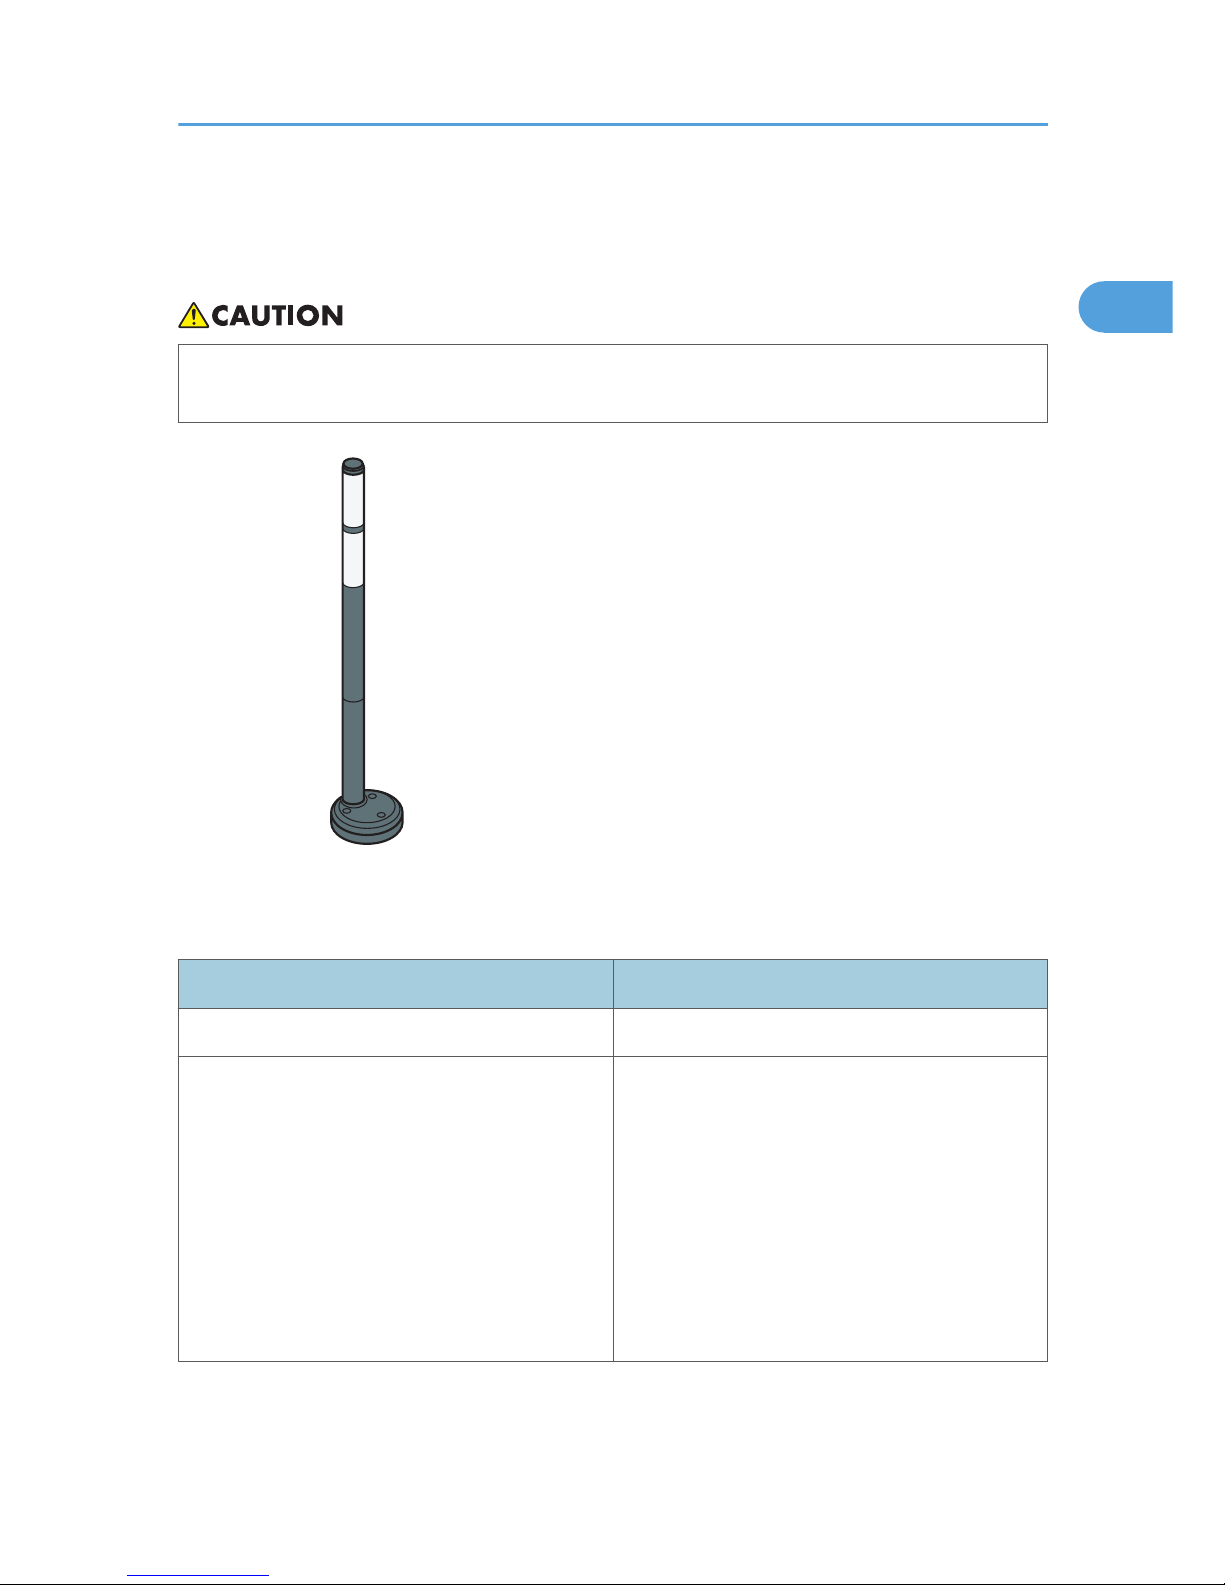
This section describes the names and functions of the attention light.
• Do not push or pull the attention light when installed to the machine. Doing so may result in
damage or malfunction of the attention light or the machine.
CAL154
The attention light notifies the user by light when there is a paper jam or no paper is left.
The colors of the lamp and their meanings are as follows:
Lamp
Status
The bottom lamp lights blue. Printing
The top lamp lights red. Error
(Example)
• Paper jam
• Out of paper
• Out of toner
• Memory overflow
Read the message on the display panel, and then
take appropriate action.
Attention Light
11
1
Page 14

Lamp Status
The top lamp flashes yellow. Warning
(Example)
• Toner has nearly run out.
• Waste toner bottle is nearly full.
Read the message on the display panel, and then
take appropriate action.
1. When the Machine Does Not Operate As Wanted
12
1
Page 15
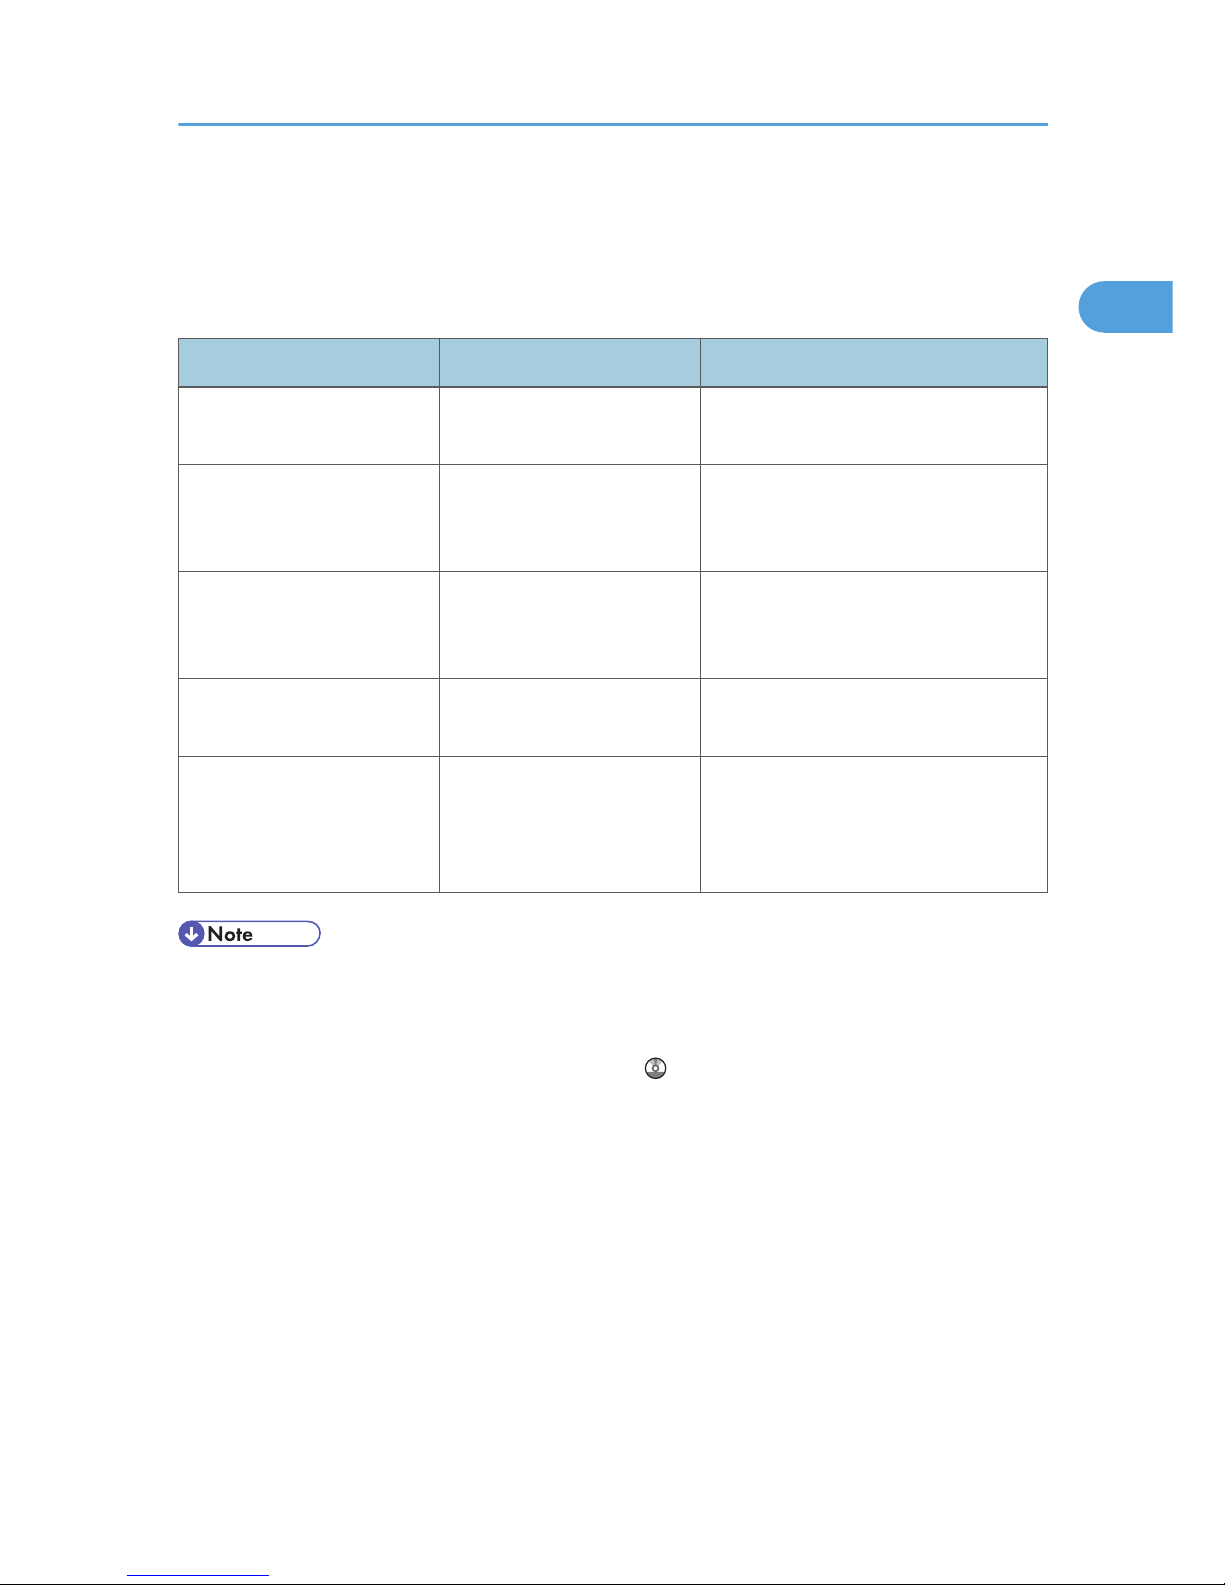
Beep Alert
This section describes the different beep patterns that the machine emits to notify users of various events
and conditions.
Beep pattern Meaning Cause
Single short beep Panel/screen input
accepted.
A key on the control or display panels
was pressed.
Short, then long beep Panel/screen input rejected. An invalid key was pressed on the
control or display panels, or the
entered password was incorrect.
Two long beeps Machine is ready for use. The machine has fully warmed up or
has revived from Energy Saver mode
and is ready for use.
Five long beeps repeated
four times.
Soft alert A paper tray is empty.
Five short beeps repeated
five times.
Strong alert The machine requires user attention
because paper has jammed, the toner
needs replenishing, or other problems
have occurred.
• You cannot stop the beeping. If covers are opened and closed repeatedly when clearing paper
jams or adding toner, beeping might continue even after the machine has returned to normal status.
• You can specify to enable or disable beep alerts. For details, see Panel Key Sound in "General
Features", Network and System Settings Reference .
Beep Alert
13
1
Page 16

Checking Machine Status and Settings
This section describes how to check the machine's system status.
Maintenance Info
You can check the following items under [Maintenance Info]:
• [Remaining Toner]
Displays the amount of remaining toner.
• [No Staples]
Displays whether there are staples remaining.
• [Waste Staple Recept. Full]
Displays whether the waste staple receptacle is full.
• [Punch Receptacle Full]
Displays whether the hole punch receptacle is full.
• [Paper Tray]
Displays the paper type and size loaded in the paper trays.
• [Binding Ring Comb Type]
Displays the binding ring comb type.
• [No Binding Ring Combs]
Displays whether there are binding ring combs remaining.
• [Output Tray Full]
Displays whether the output tray is overloaded.
• [Paper Misfeed]
Displays state of and solutions for paper misfeeds.
• [Cover Open]
Indicates the cover that is open.
• [Comb Punch Receptcl Full]
Displays whether the comb punch waste receptacle is full.
• [Waste Paper Receptcl Full]
Displays whether the waste paper receptacle is full.
Machine Address Info
You can check the following items under [Machine Address Info]:
• [Machine IPv4 Address]
Displays the machine's IPv4 address.
1. When the Machine Does Not Operate As Wanted
14
1
Page 17
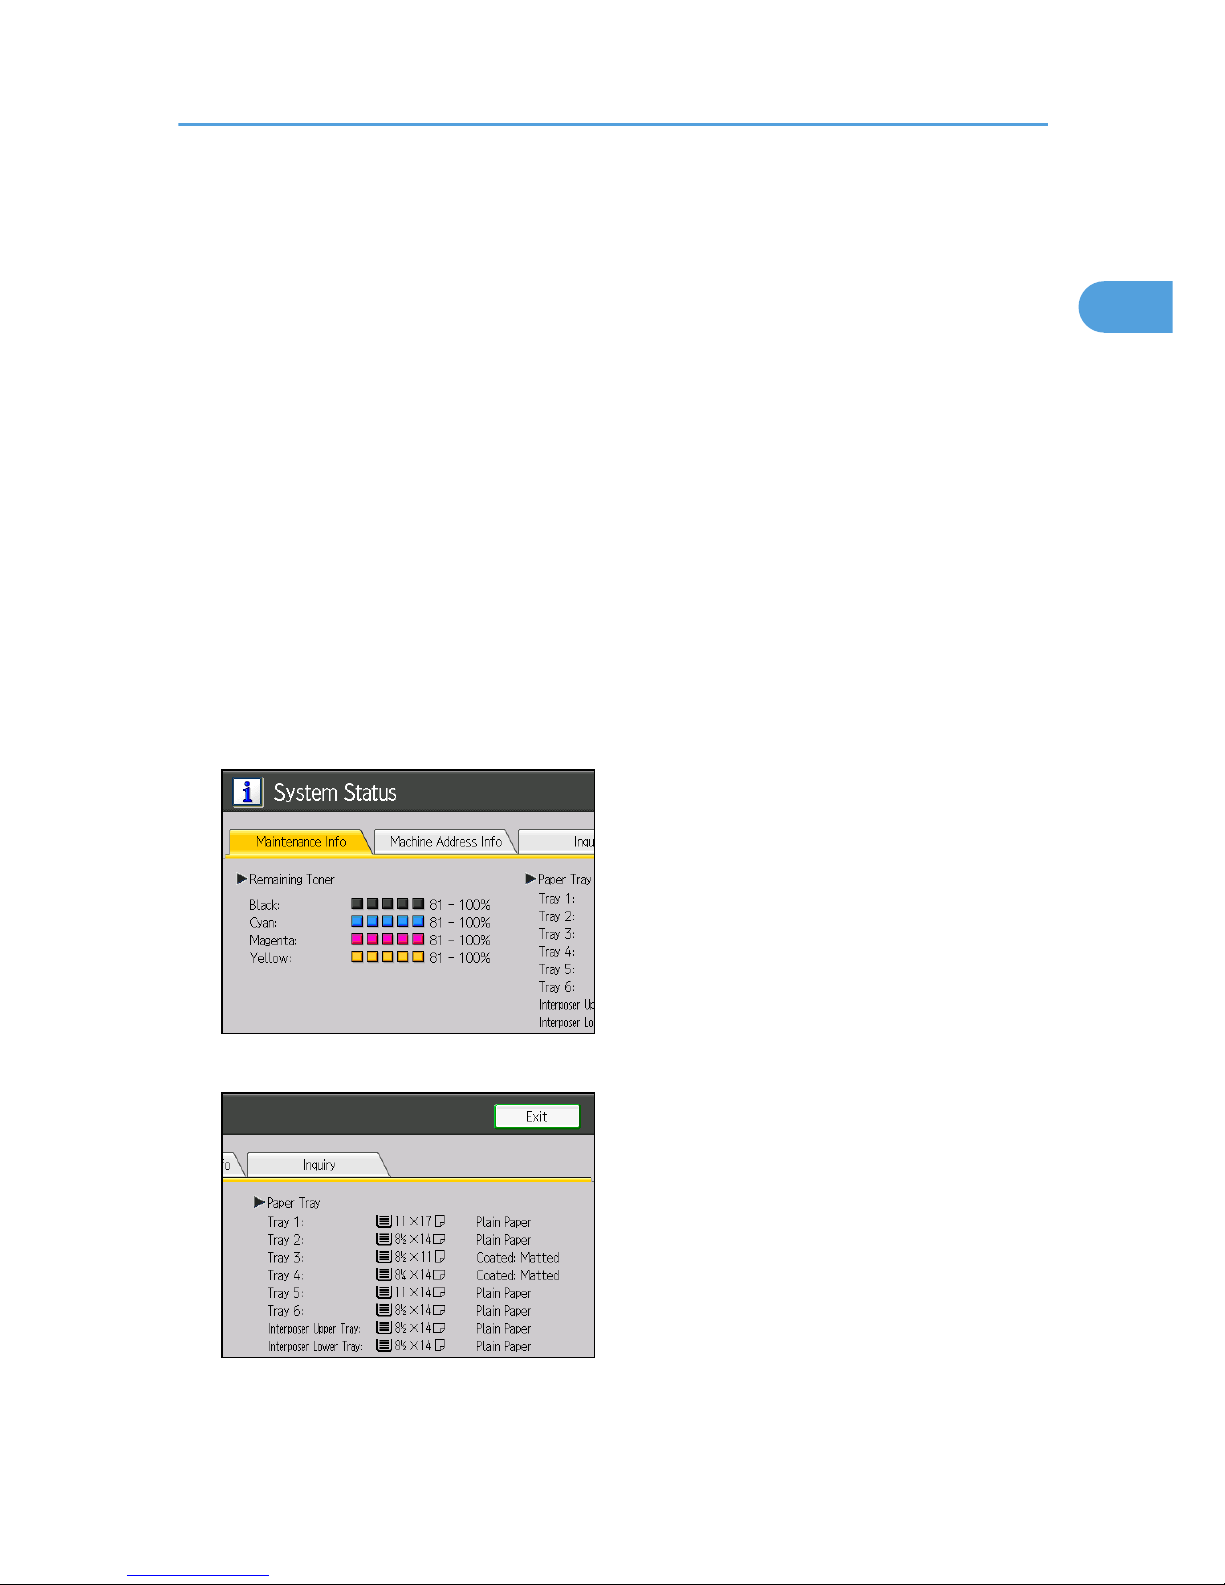
• [Machine IPv6 Address]
Displays the machine's IPv6 address.
[Manual Configuration Address] displays the IPv6 address configured manually.
Inquiry
You can check the following items under [Inquiry]:
• [Machine Repairs]
Displays the machine number and contact number that are required for service.
• [Sales Representative]
Displays the sales representative's telephone number.
• [Supply Order]
Displays the contact number for placing orders for supplies.
• [Supply Details]
Displays the types of toner, staples, and other supplies for this machine.
1. On the display panel, press [System Status].
2. Press each tab, and then check the contents.
3. After checking the information, press [Exit].
Checking Machine Status and Settings
15
1
Page 18

• [No Staples], [Waste Staple Recept. Full], [Punch Receptacle Full], [No Binding Ring Combs],
[Output Tray Full], [Paper Misfeed], [Cover Open], [Comb Punch Receptcl Full], and [Waste Paper
Receptcl Full] appear on the [Maintenance Info] tab only when these errors occur.
• Depending on the security settings, the [Machine Address Info] tab might not be displayed.
• For details about how to locate and remove misfeeds, see p.37 "Removing Jammed Paper".
1. When the Machine Does Not Operate As Wanted
16
1
Page 19

When You Have Problems Operating the
Machine
This section describes common problems and messages. If other messages appear, follow the
instructions displayed.
Problem Causes Solutions
The operation switch
indicator continues blinking
and does not turn off when
pressed.
This occurs in the following
cases:
• The machine is
communicating with
external equipment.
• The hard disk is active.
• The machine is cooling
down.
Check if the machine is communicating
with external equipment.
The display is off. The machine is in Energy
Saver mode.
Press the [Energy Saver] key to cancel
Energy Saver mode.
The display is off. The operation switch is
turned off.
Turn on the operation switch.
Nothing happens when the
operation switch is turned
on.
The main power switch is
turned off.
Turn on the main power switch.
"Please wait." appears. This message appears when
you turn on the operation
switch.
Wait for a while. If the machine does
not get ready in two minutes, contact
your service representative.
"Please wait." appears. This message appears when
the machine is warming up.
• Wait for a while. If the machine
does not get ready in 10 minutes,
contact your service
representative.
• Wait until the message
disappears. Do not turn off the
main power switch while the
message is showing.
When You Have Problems Operating the Machine
17
1
Page 20

Problem Causes Solutions
"Please wait." appears. This message appears when
you change the toner
cartridge.
Wait for a while. If the message does
not disappear in two minutes, contact
your service representative.
"Self checking..." appears. The machine is performing
image adjustment
operations.
The machine may perform periodic
maintenance during operations. The
frequency and duration of
maintenance depends on the humidity,
temperature, and printing factors such
as number of prints, paper size, and
paper type. Wait for the machine to
get ready.
The user code entry screen is
displayed.
Users are restricted by User
Code Authentication.
Enter the user code (up to eight digits),
and then press [OK].
The Authentication screen
appears.
Basic Authentication,
Windows Authentication,
LDAP Authentication or
Integration Server
Authentication is set.
Enter your login user name and login
password. For details, see "When the
Authentication Screen is Displayed",
About This Machine .
"Authentication has failed."
appears.
The entered login user name
or login password is not
correct.
Enquire the user administrator for the
correct login user name and login
password.
"Authentication has failed."
appears.
The machine cannot perform
authentication.
Contact the administrator.
"You do not have the
privileges to use this
function." continues to be
displayed even though you
have entered a valid user
name.
The logged in user name
does not have permission for
the selected function.
Contact the administrator about the
permission for the required function.
An error message remains,
even if misfed paper is
removed.
• When a misfeed
message appears, it
remains until you open
and close the cover as
required.
• Paper is still jammed in
the tray.
Remove misfed paper, and then open
and close the cover. For details, see p.
37 "Removing Jammed Paper".
1. When the Machine Does Not Operate As Wanted
18
1
Page 21

Problem Causes Solutions
Original images are printed
on the reverse side of the
paper.
You may have loaded the
paper incorrectly.
Load paper correctly. Load paper into
the paper tray with the print side down.
Load paper into the Wide LCT or multi
bypass tray with the print side up.
Misfeeds occur frequently. The side or end fences of the
paper trays may not be set
properly.
• Remove misfed paper. For details,
see p.37 "Removing Jammed
Paper".
• Check the side or end fences are
set properly. Also, check the side
fences are locked. For details, see
"Changing the Paper Size", About
This Machine .
Misfeeds occur frequently. Paper of undetectable size
has been loaded.
• Remove misfed paper. For details,
see p.37 "Removing Jammed
Paper".
• When paper is loaded which
cannot be detected automatically,
the user must set the paper size on
the display panel. For details, see
"Changing to a Size That Is Not
Automatically Detected", About
This Machine .
Misfeeds occur frequently. There is a foreign object on
the finisher tray.
• Remove misfed paper. For details,
see p.37 "Removing Jammed
Paper".
• Do not place anything on the
finisher tray. It may cause a paper
jam.
Misfeeds occur frequently. The staple cartridge is not
set correctly.
Set the staple cartridge properly. The
Booklet Finisher SR5040 requires the
saddle stitch staple cartridge. For
details about how to add staples, see
"Adding Staples", About This Machine
.
When You Have Problems Operating the Machine
19
1
Page 22

Problem Causes Solutions
Misfeeds occur when
printing to envelopes.
The envelopes are curled. • Make sure you fully flatten curled
envelopes before you load them.
Do not stack envelopes over the
limit mark on the paper tray.
• If misfeeds still occur after the
envelopes have been flattened,
load envelopes on the Wide LCT
one at a time and print them
individually.
• For details about how to load
envelopes, see "Envelopes",
About This Machine .
Misfeeds occur when
printing to envelopes.
You printed envelopes with
a non-rectangular flap when
[Skew Detection] was set to
[On].
• Make sure you set [Skew
Detection] to [Off] when printing
envelopes with a non-rectangular
flap.
• For details about setting of skew
detection, see "Adjustment
Settings for Operators", Network
and System Settings Reference
.
When printing to envelopes,
the envelopes may be fed in
together, or the envelopes
may not be fed.
The envelopes are curled. • Make sure you fully flatten curled
envelopes before you load them.
Do not stack envelopes over the
limit mark on the paper tray.
• If misfeeds still occur after the
envelopes have been flattened,
load envelopes on the Wide LCT
one at a time and print them
individually.
• For details about how to load
envelopes, see "Envelopes",
About This Machine .
1. When the Machine Does Not Operate As Wanted
20
1
Page 23

Problem Causes Solutions
Wrinkling occurs when gate
fold, letter fold-in, or letter
fold-out is applied.
Wrinkling can occur if gate
fold, letter fold-in, or letter
fold-out is applied to B4 JIS
, A3 , 8 1/2" 14", 11"
17" , 12" 18" , 8K
, or larger sizes of paper.
When applying gate fold, letter fold-in,
or letter fold-out to paper larger than
A4, we recommend you enable image
reduction and use paper no larger
than A4 .
When you print Z-folded
paper, the machine
indicates that the output tray
is full even though the output
paper on the tray is less than
the stack capacity.
The Z-fold support tray is not
set.
Set the Z-fold support tray for finisher
or multi-folding unit. For details about
how to add the Z-fold support tray, see
p.27 "When the Output Z-folded
Paper Is Less than the Stack Capacity".
Cannot print in duplex
mode.
"Apply Duplex" is set to [No]
for Tray 1-6.
In [Tray Paper Settings], under Tray
1-6, set "Apply Duplex" to [Yes].
Cannot print in duplex
mode.
You cannot select duplex
printing if the paper type is
set to [Label Paper],
[Translucent Paper], [OHP
(Transparency)], [Envelope],
or [Tab Stock].
In [Tray Paper Settings], under Tray
2-6, select a paper type other than
[Label Paper], [Translucent Paper],
[OHP (Transparency)], [Envelope],
and [Tab Stock].
The multi-folding unit outputs
sheets with creased edges
when gate fold is applied.
The paper is curled. Remove the paper, and then reload it
upside down. Alternatively, remove the
paper, and then reload it in the
opposite direction.
The position of the fold is
incorrect when letter fold-in
is applied to B5 sheet.
Multi-sheet fold has been
specified when only one
sheet is being printed.
Change the setting of letter fold-in so
that multi-sheet fold is not performed.
Depending on your machine, the
procedure of multi-sheet fold function
settings might be slightly different. For
details, refer to the procedure for your
machine.
Paper is bent. Paper may be bent when it is
ejected from the finisher
upper tray.
Change the output tray to the finisher
shift tray.
When You Have Problems Operating the Machine
21
1
Page 24

Problem Causes Solutions
The print image is not
properly positioned on the
paper.
The machine has not
detected the paper type
and/or width correctly.
Contact the machine administrator or
your service representative.
Paper delivered to the high
capacity stacker is curled,
causing it to not align
properly.
Paper is curled. • When the paper is curled
downward, select [Adjust
Curl: Weak] or [Adjust Curl:
Strong] under [Adjust Paper Curl]
in Adjustment Settings for
Operators.
• When the paper is curled
upward, select [Adjust Curl:
Weak] or [Adjust Curl: Strong]
under [Adjust Paper Curl] in
Adjustment Settings for
Operators.
For details about the Adjustment
Settings for Operators, see "Adjustment
Settings for Operators", Network and
System Settings Reference .
Output paper to the stacker
tray does not align properly.
When using coated paper,
the output paper to the
stacker tray might fail to
align properly.
Select [Adjust Curl: Weak] or
[Adjust Curl: Strong] under [Adjust
Paper Curl] in Adjustment Settings for
Operators.
For details about the Adjustment
Settings for Operators, see "Adjustment
Settings for Operators", Network and
System Settings Reference .
Output paper to the stacker
tray does not align properly.
When the paper weight is
280.0 g/m2 or more, and
the paper size is A3, SRA3
or larger, the output paper
to the stacker tray might fail
to align properly.
Select [Adjust Curl: Weak] or
[Adjust Curl: Strong] under [Adjust
Paper Curl] in Adjustment Settings for
Operators.
For details about the Adjustment
Settings for Operators, see "Adjustment
Settings for Operators", Network and
System Settings Reference .
1. When the Machine Does Not Operate As Wanted
22
1
Page 25

• If you cannot make prints as you want because of paper type, paper size, or paper capacity
problems, use recommended paper. See "Recommended Paper Sizes and Types", About This
Machine .
• Curled paper causes misfeeds, soiled paper edges, or slipped positions while performing staple or
stack printing. When using curled paper, first straighten the curl with your hands or by placing the
paper upside down. Also, lay paper on a flat surface to prevent paper from curling, and do not
lean it against the wall.
When You Have Problems Operating the Machine
23
1
Page 26
Adjusting the Color Registration
This section describes how to adjust the color registration by specifying a setting in [Maintenance].
When the machine is moved, the fusing unit is replaced, or after printing repeatedly for some time,
registration shifting might occur. By performing color registration adjustment, you can maintain optimum
print results.
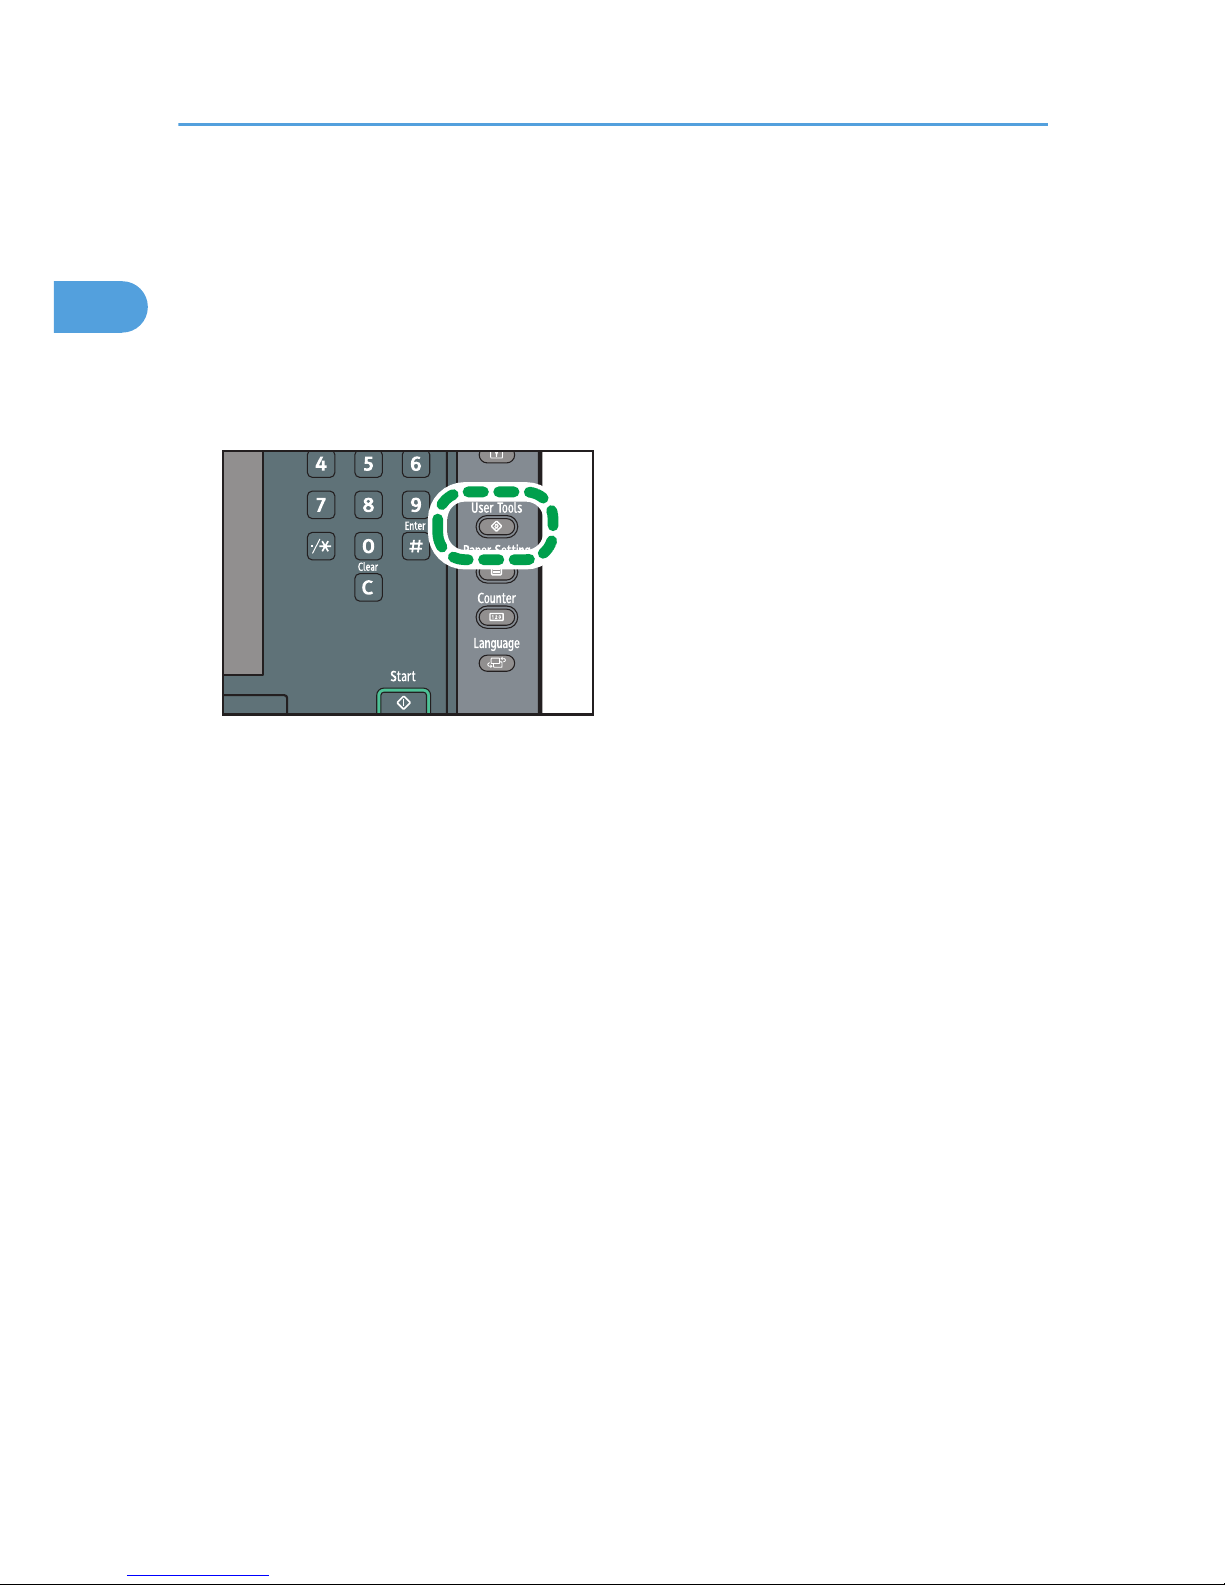
1. Press the [User Tools] key.
CAL163
2. Press [Maintenance].
3. Press [Color Registration].
4. Press [OK].
Auto color registration takes about 20 to 30 seconds. When it is completed, the display returns to
the color registration menu.
5. Press [Exit] twice to return to the initial display.
1. When the Machine Does Not Operate As Wanted
24
1
Page 27

Adjusting the Image Position
Depending on your machine, the procedure for adjusting the image position may be slightly different.
For details, contact the machine administrator.
Adjusting the Image Position
25
1
Page 28
Pausing Print When Using Finisher SR5030 or
Booklet Finisher SR5040
This section describes how to suspend a large print job when using the Finisher SR5030 or Booklet
Finisher SR5040.
Depending on the image you are printing, prints might not stack properly. If this happens, suspend the
job, remove the prints and then restart the job.
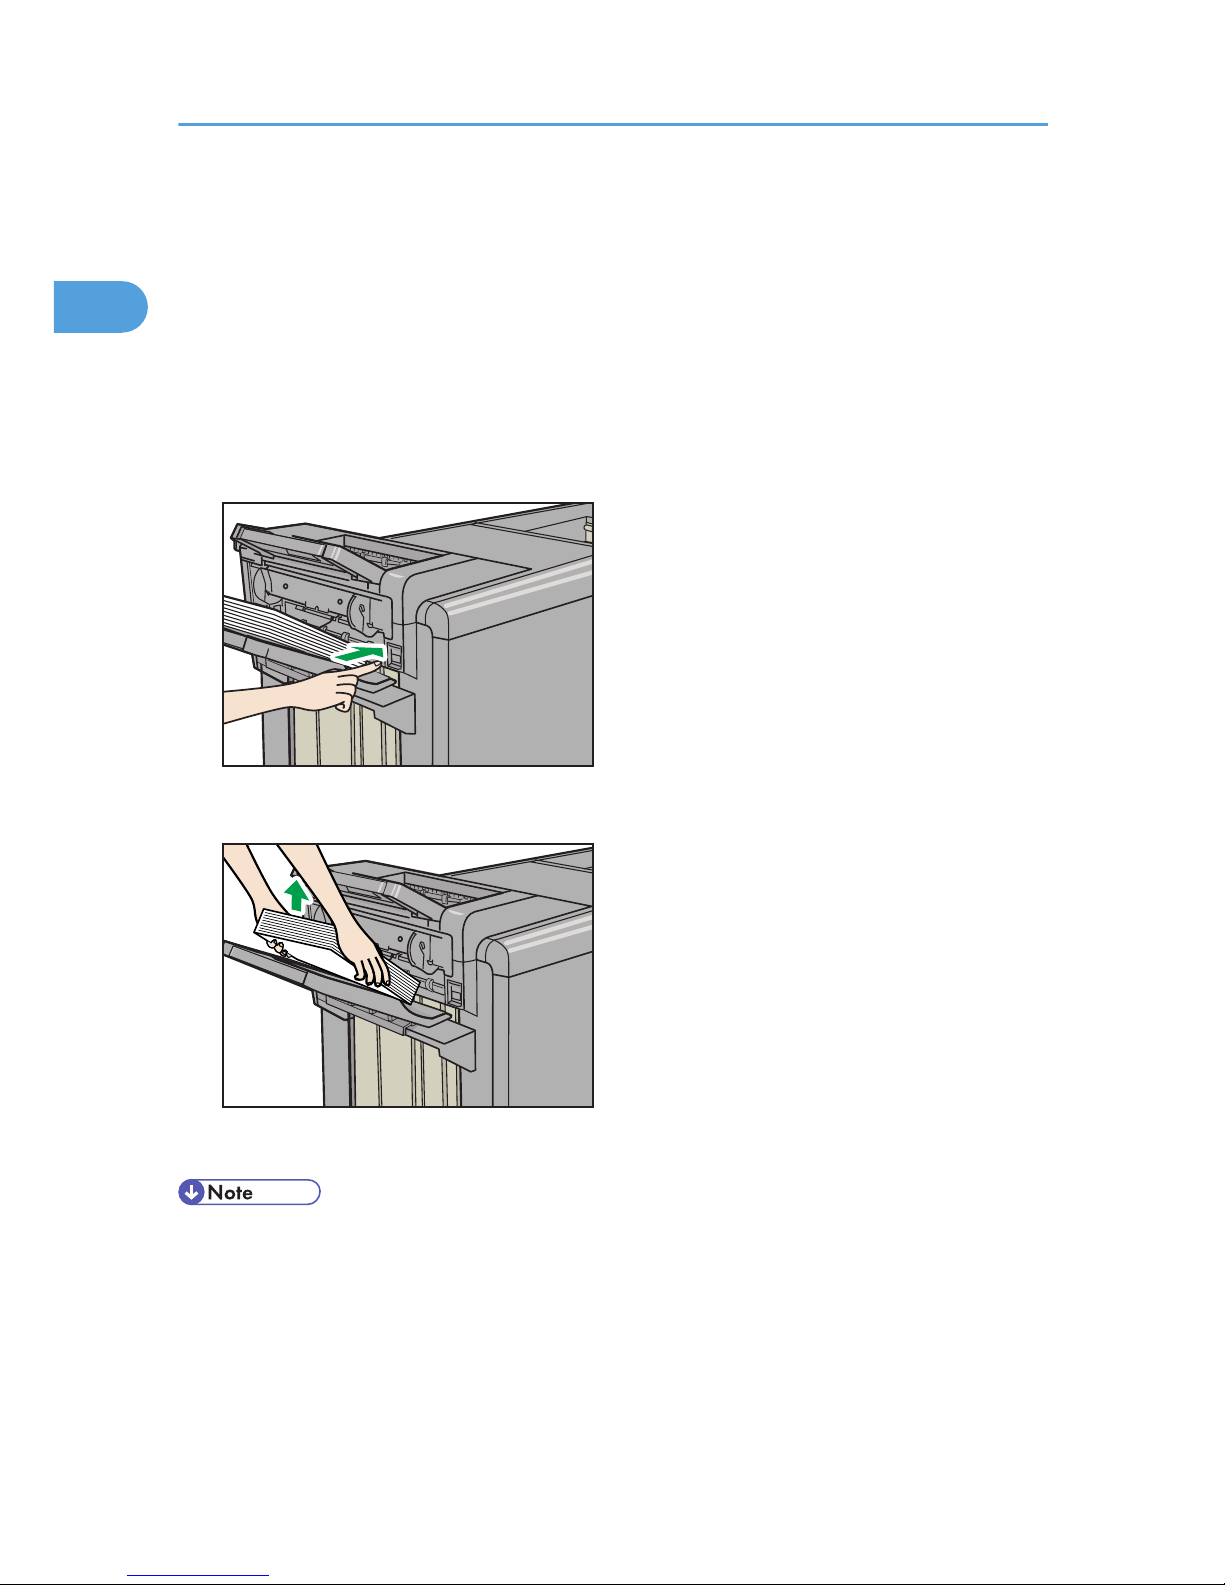
1. Press the [Suspend/Resume] key.
CDN007
2. Remove the stack of paper from the finisher shift tray.
CDN008
3. Press the [Suspend/Resume] key to restart the print.
• You can suspend printing only when the finisher's shift tray is selected as the output tray.
1. When the Machine Does Not Operate As Wanted
26
1
Page 29
When the Output Z-folded Paper Is Less than
the Stack Capacity
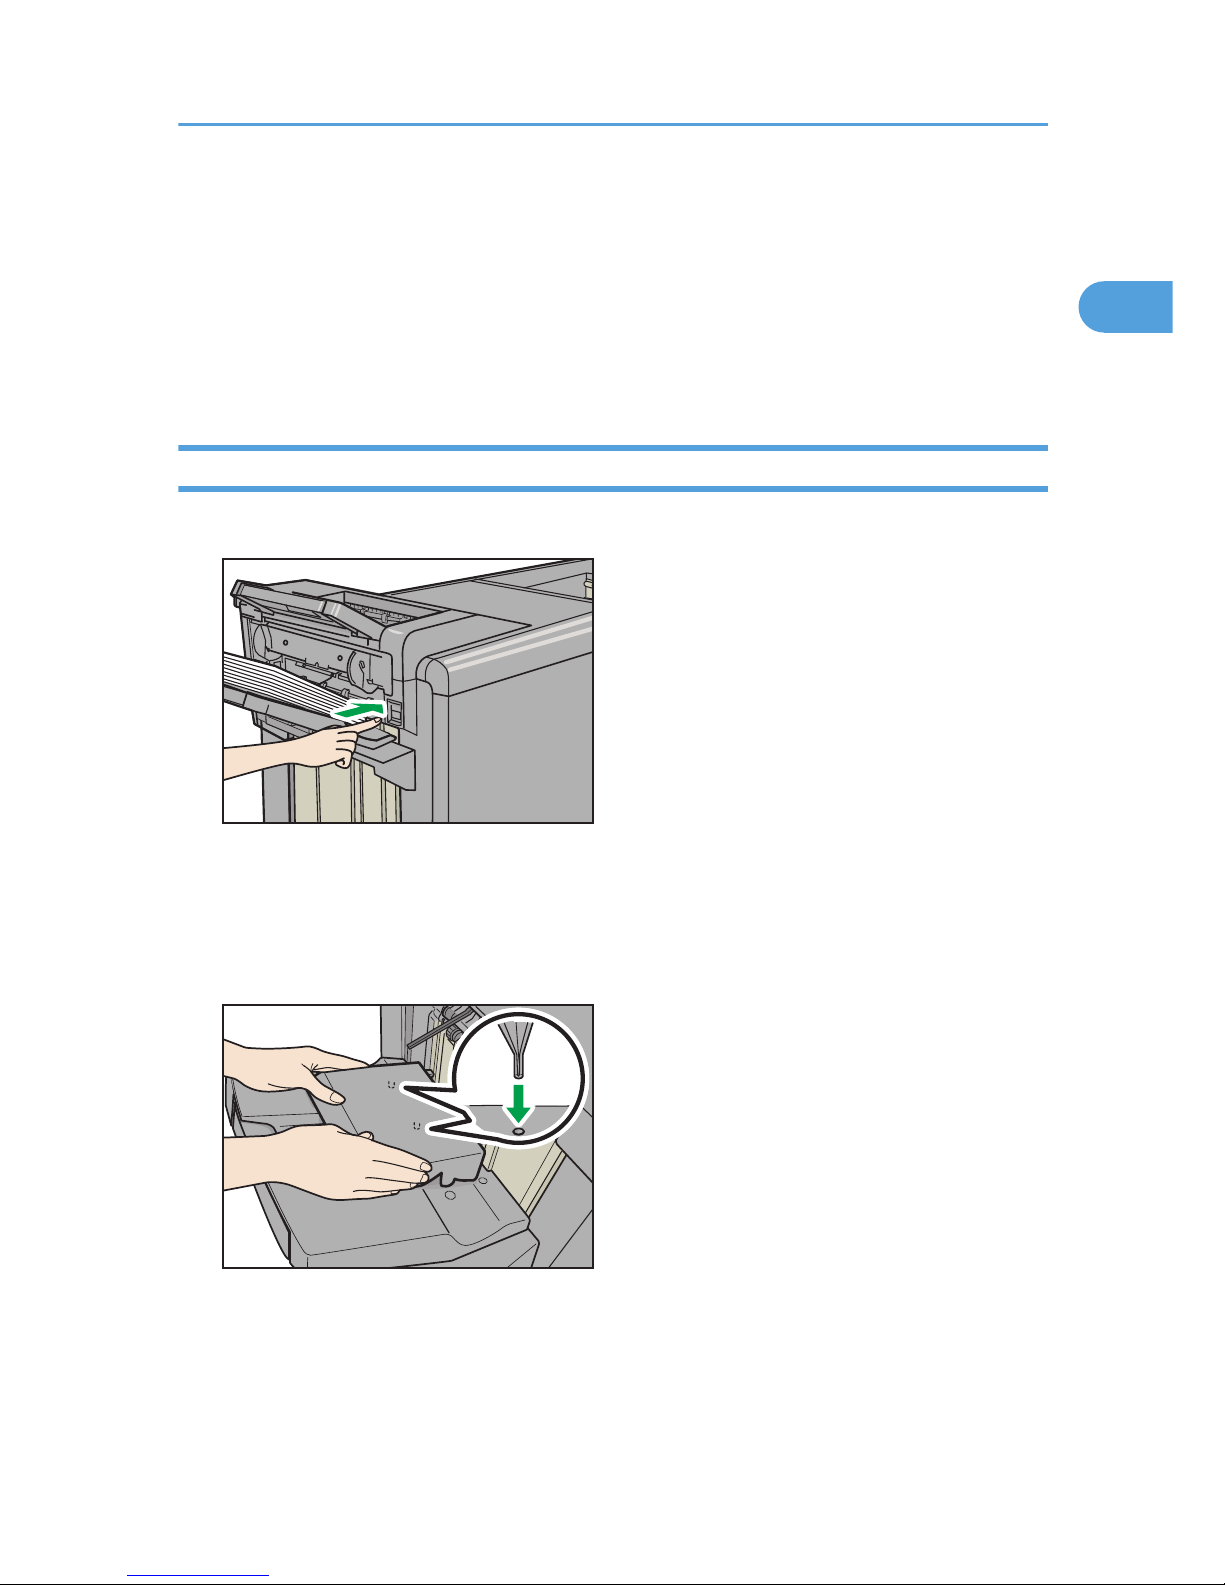
When you use the multi-folding unit, Finisher SR5030, or Booklet Finisher SR5040 to print Z-folded
paper, the machine might indicate that the output tray is full even though the output paper on the tray is
less than the stack capacity. If this occurs, use the Z-fold support tray.
Finisher SR5030 or Booklet Finisher SR5040
1. Press the [Suspend/Resume] key.
CDN007
2. Remove the prints.
3. Set the Z-fold support tray for the finisher shift tray.
Attach the Z-fold support tray by inserting the two protrusions on its underside into the holes on the
finisher shift tray.
CDN010
4. Press the [Suspend/Resume] key to restart the print.
When the Output Z-folded Paper Is Less than the Stack Capacity
27
1
Page 30
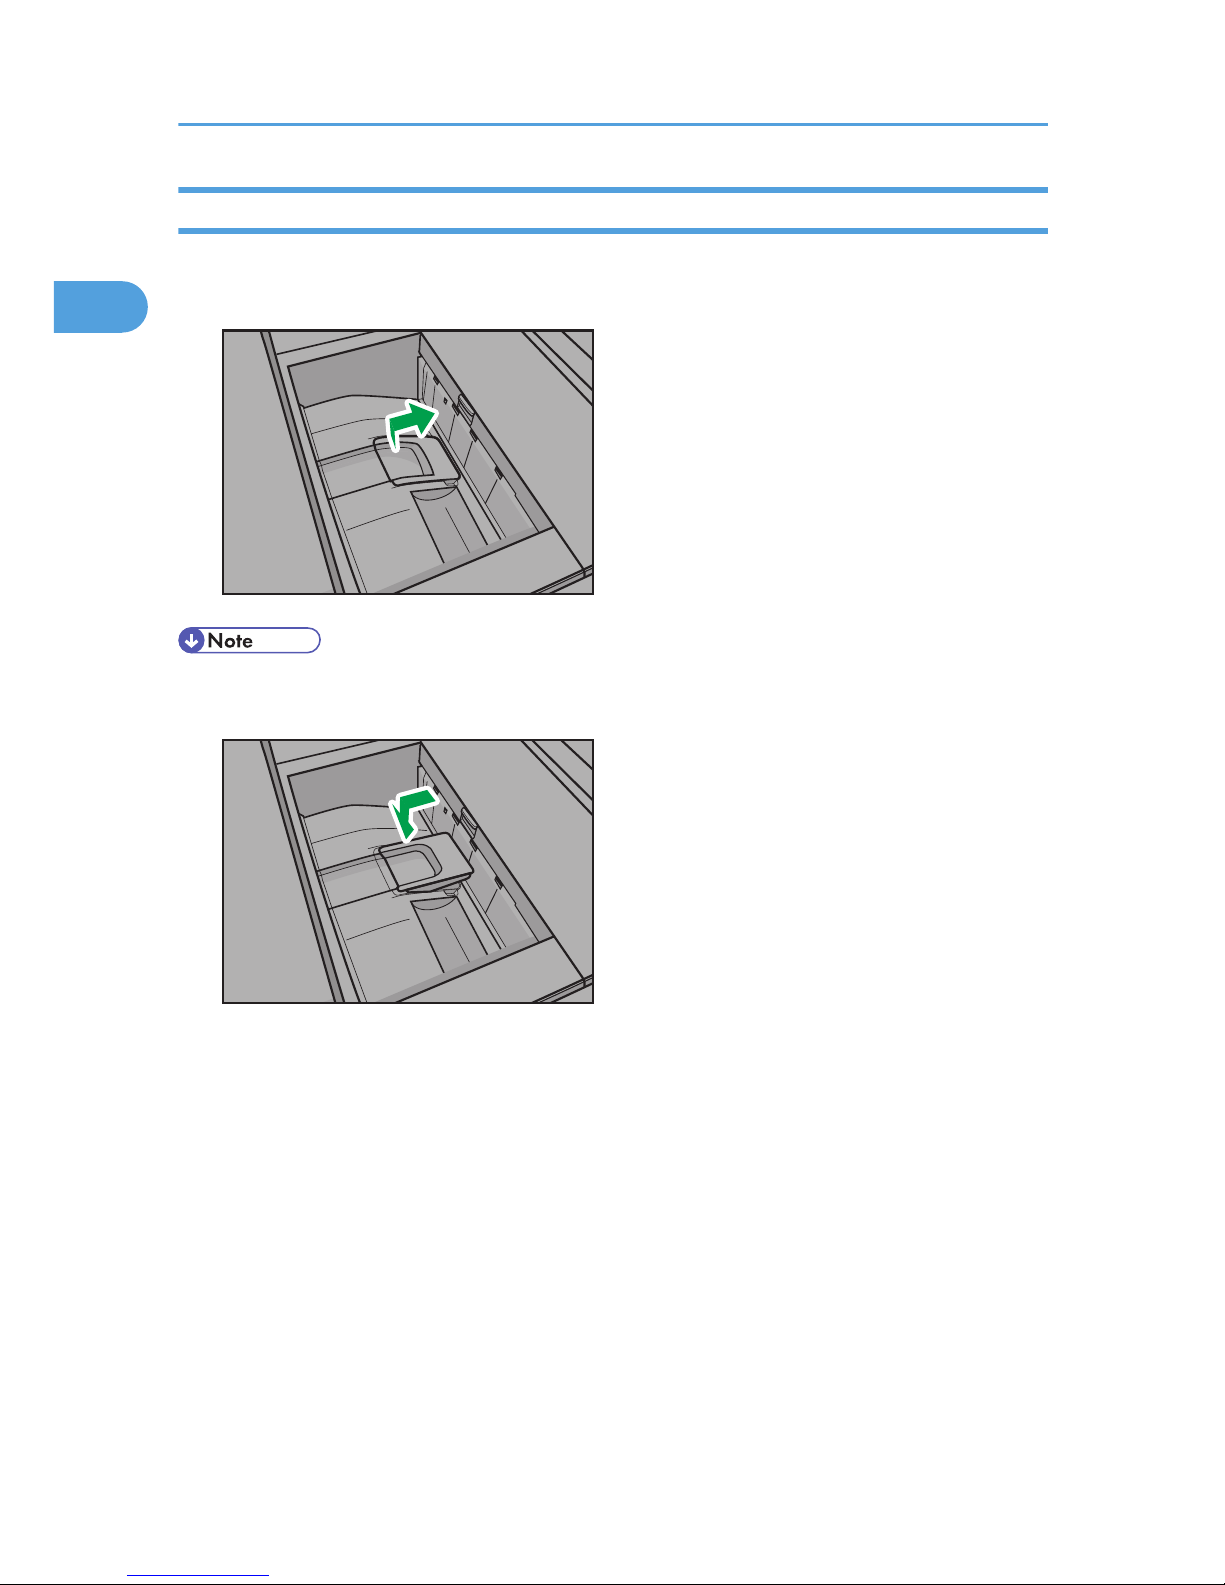
Multi-Folding Unit
1. Lift up and slide the Z-fold support tray for multi-folding unit to the right, and then set it in
place.
CDN003
• When you have finished using the Z-fold support tray for multi-folding unit, lift it up and slide the
tray to the left, and then lower it.
CDN001
1. When the Machine Does Not Operate As Wanted
28
1
Page 31
When the Output Letter Fold-out Paper Is Less
than the Stack Capacity
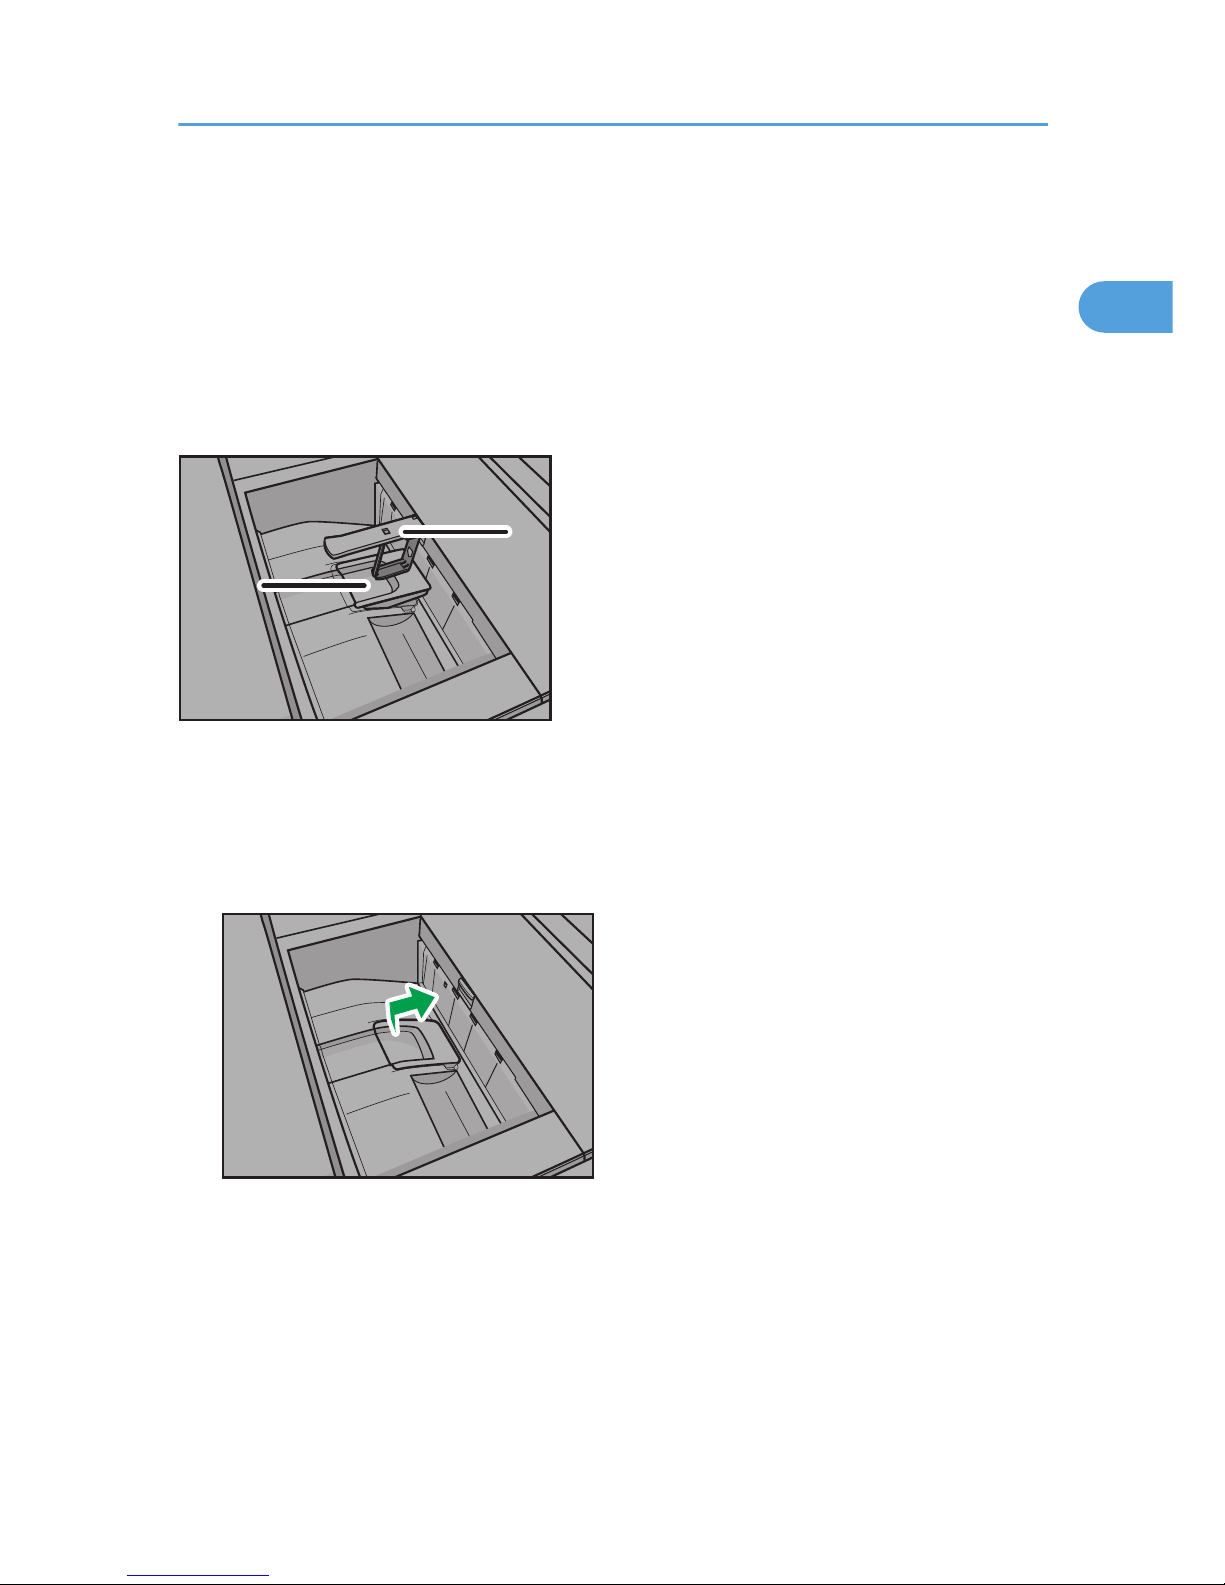
When you print letter fold-out paper with multi-sheet fold, the machine might indicate that the output tray
is full even though the output paper on the tray is less than the stack capacity.
If this occurs, use the Z-fold support tray for multi-folding unit and the output holding unit for letter foldout.
11
22
CDN022
1. Z-fold support tray for multi-folding unit
2. Output holding unit for letter fold-out
1. Lift up and slide the Z-fold support tray for multi-folding unit to the right, and then set it in
place.
CDN003
When the Output Letter Fold-out Paper Is Less than the Stack Capacity
29
1
Page 32
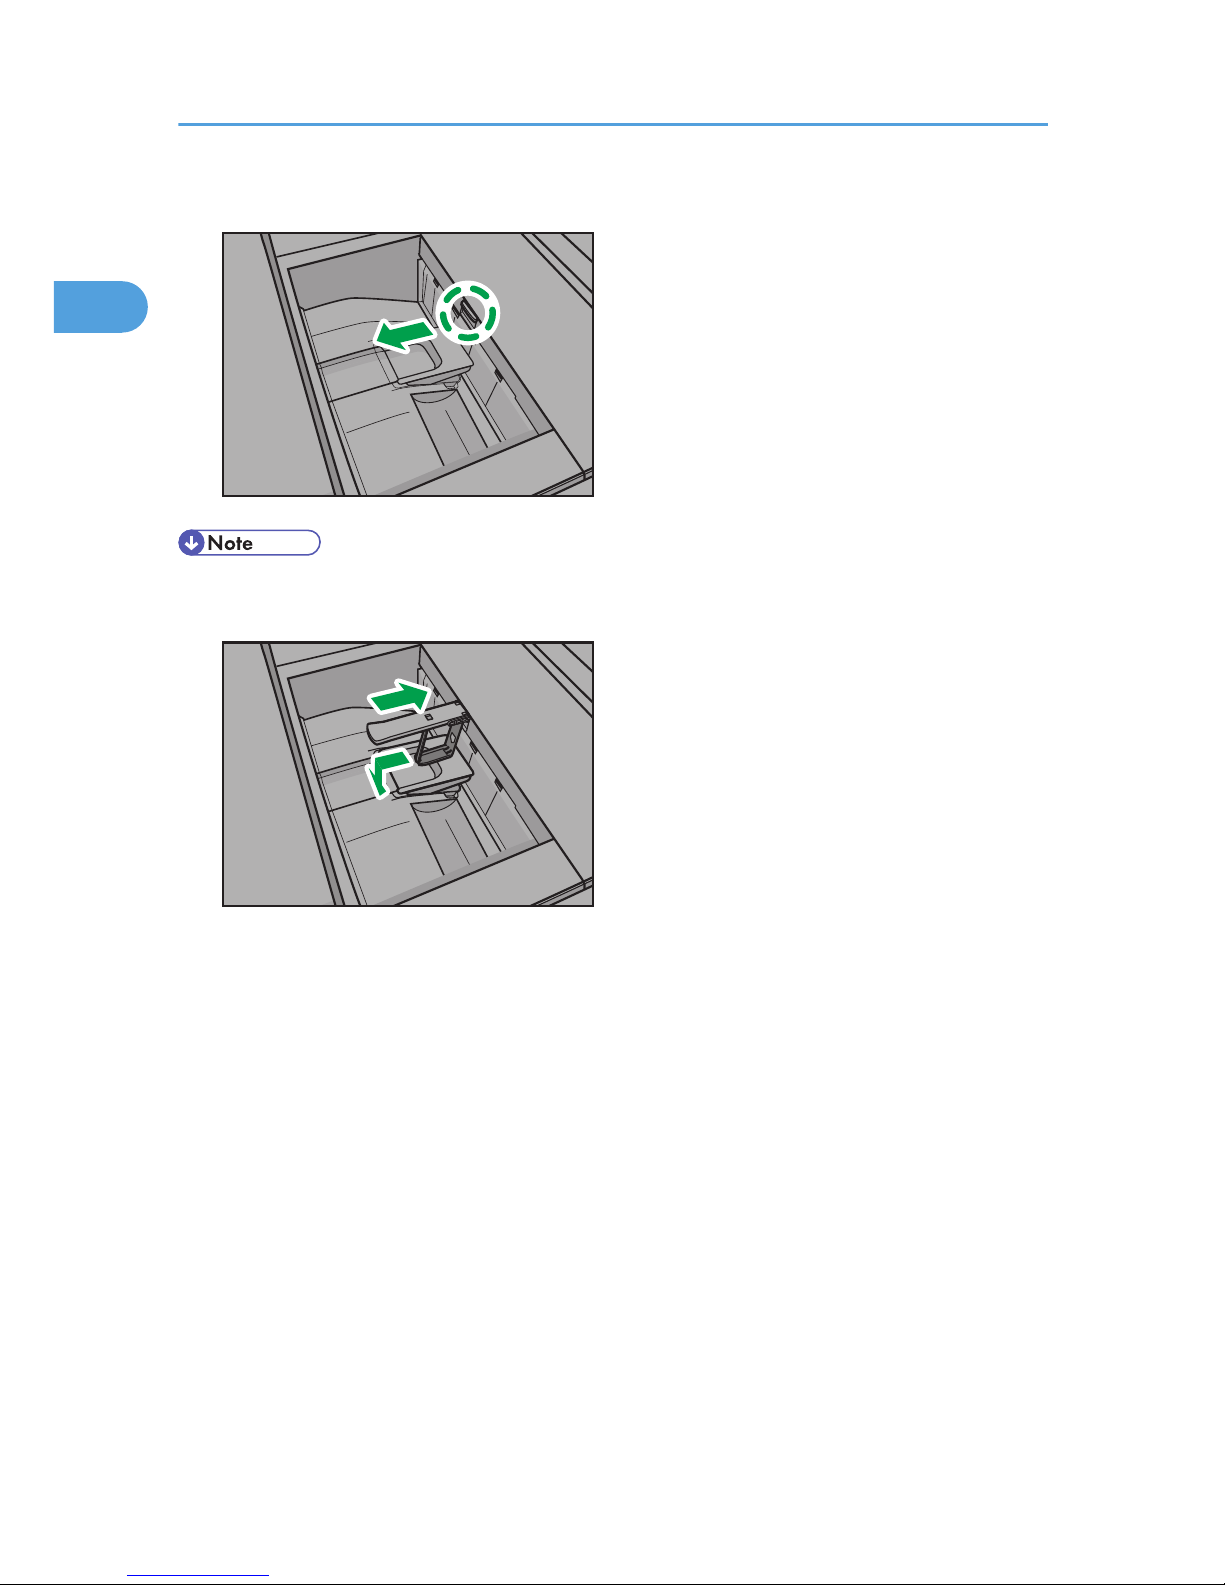
2. Pull out the output holding unit for letter fold-out.
CDN002
• When you have finished using the Z-fold support tray for multi-folding unit and the output holding
unit for letter fold-out, return each to their previous positions.
CDN004
1. When the Machine Does Not Operate As Wanted
30
1
Page 33
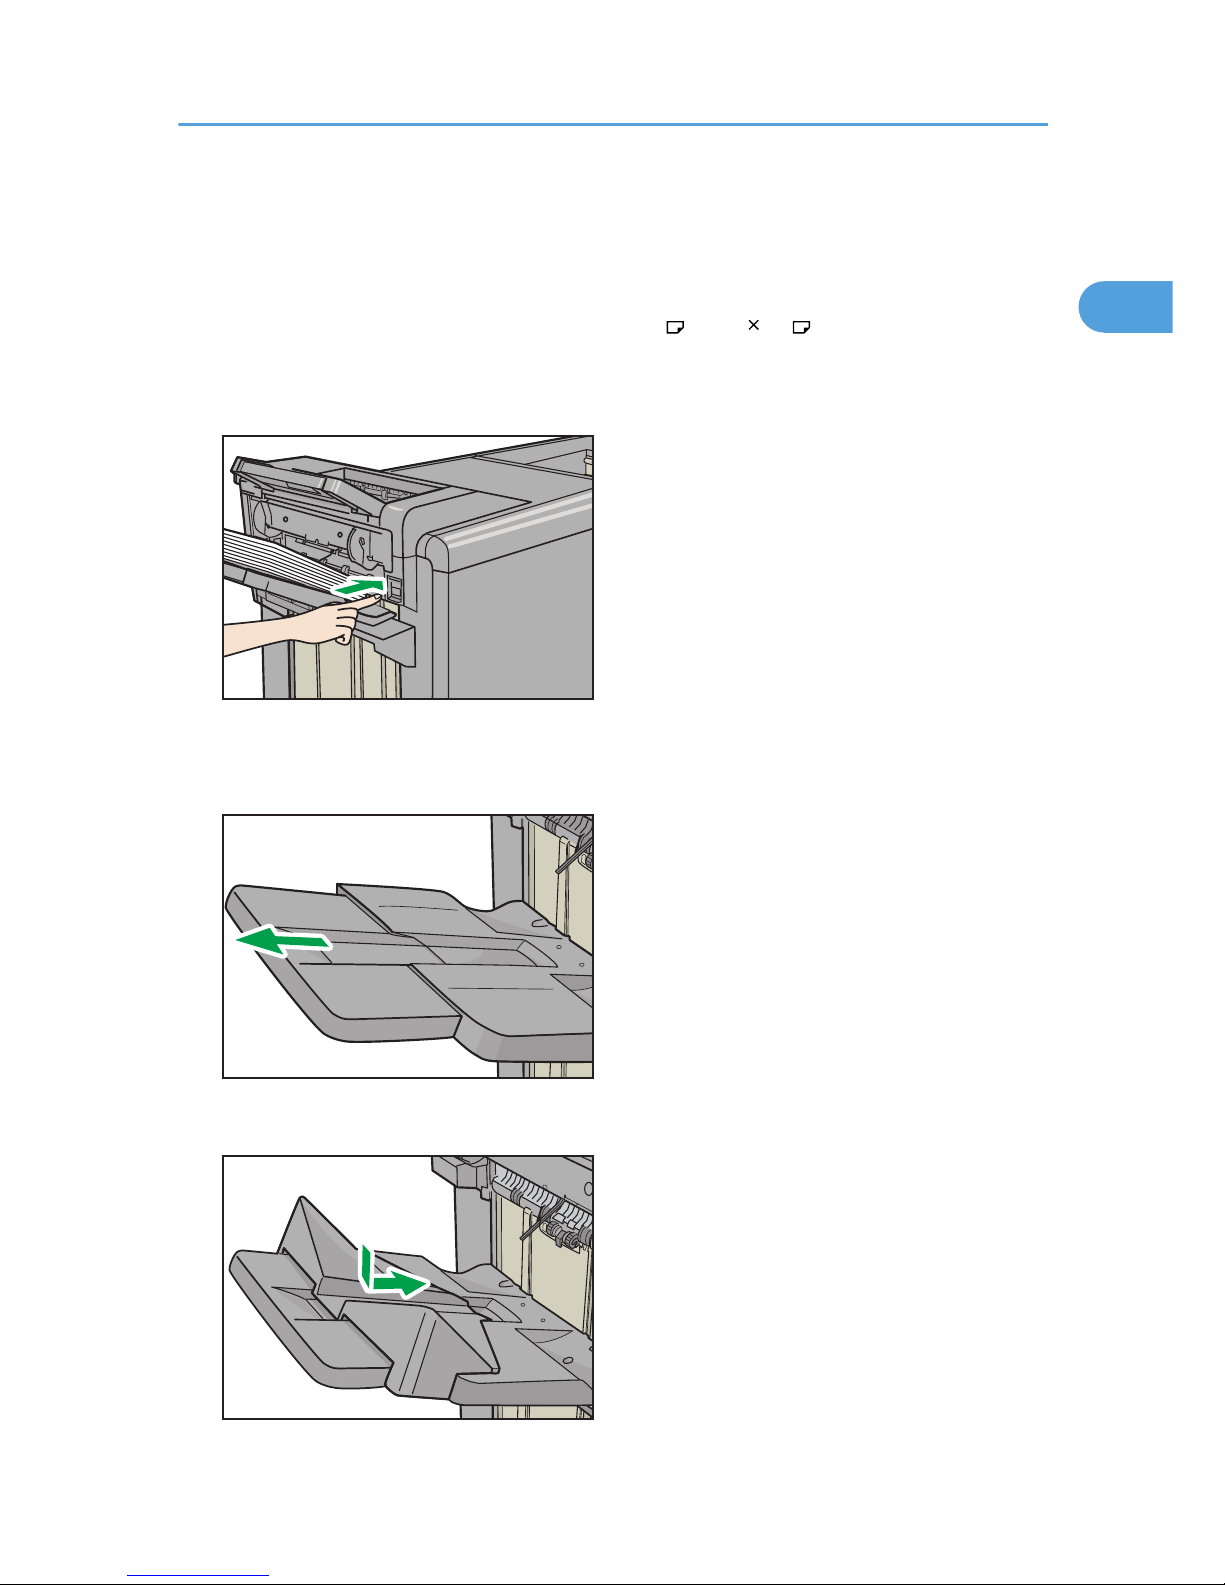
When Large Size Paper Is Not Properly
Aligned
This section describes what to do if paper with a size of B4 , 81/2" 14" or larger is not properly
aligned or falls from the finisher shift tray when using Finisher SR5030 or Booklet Finisher SR5040.
1. Press the [Suspend/Resume] key.
CDN007
2. Remove the prints.
3. Pull out the finisher shift tray's extension.
CDN011
4. Set the auxiliary paper tray.
CDN012
When Large Size Paper Is Not Properly Aligned
31
1
Page 34

5. Press the [Suspend/Resume] key to restart the print.
1. When the Machine Does Not Operate As Wanted
32
1
Page 35
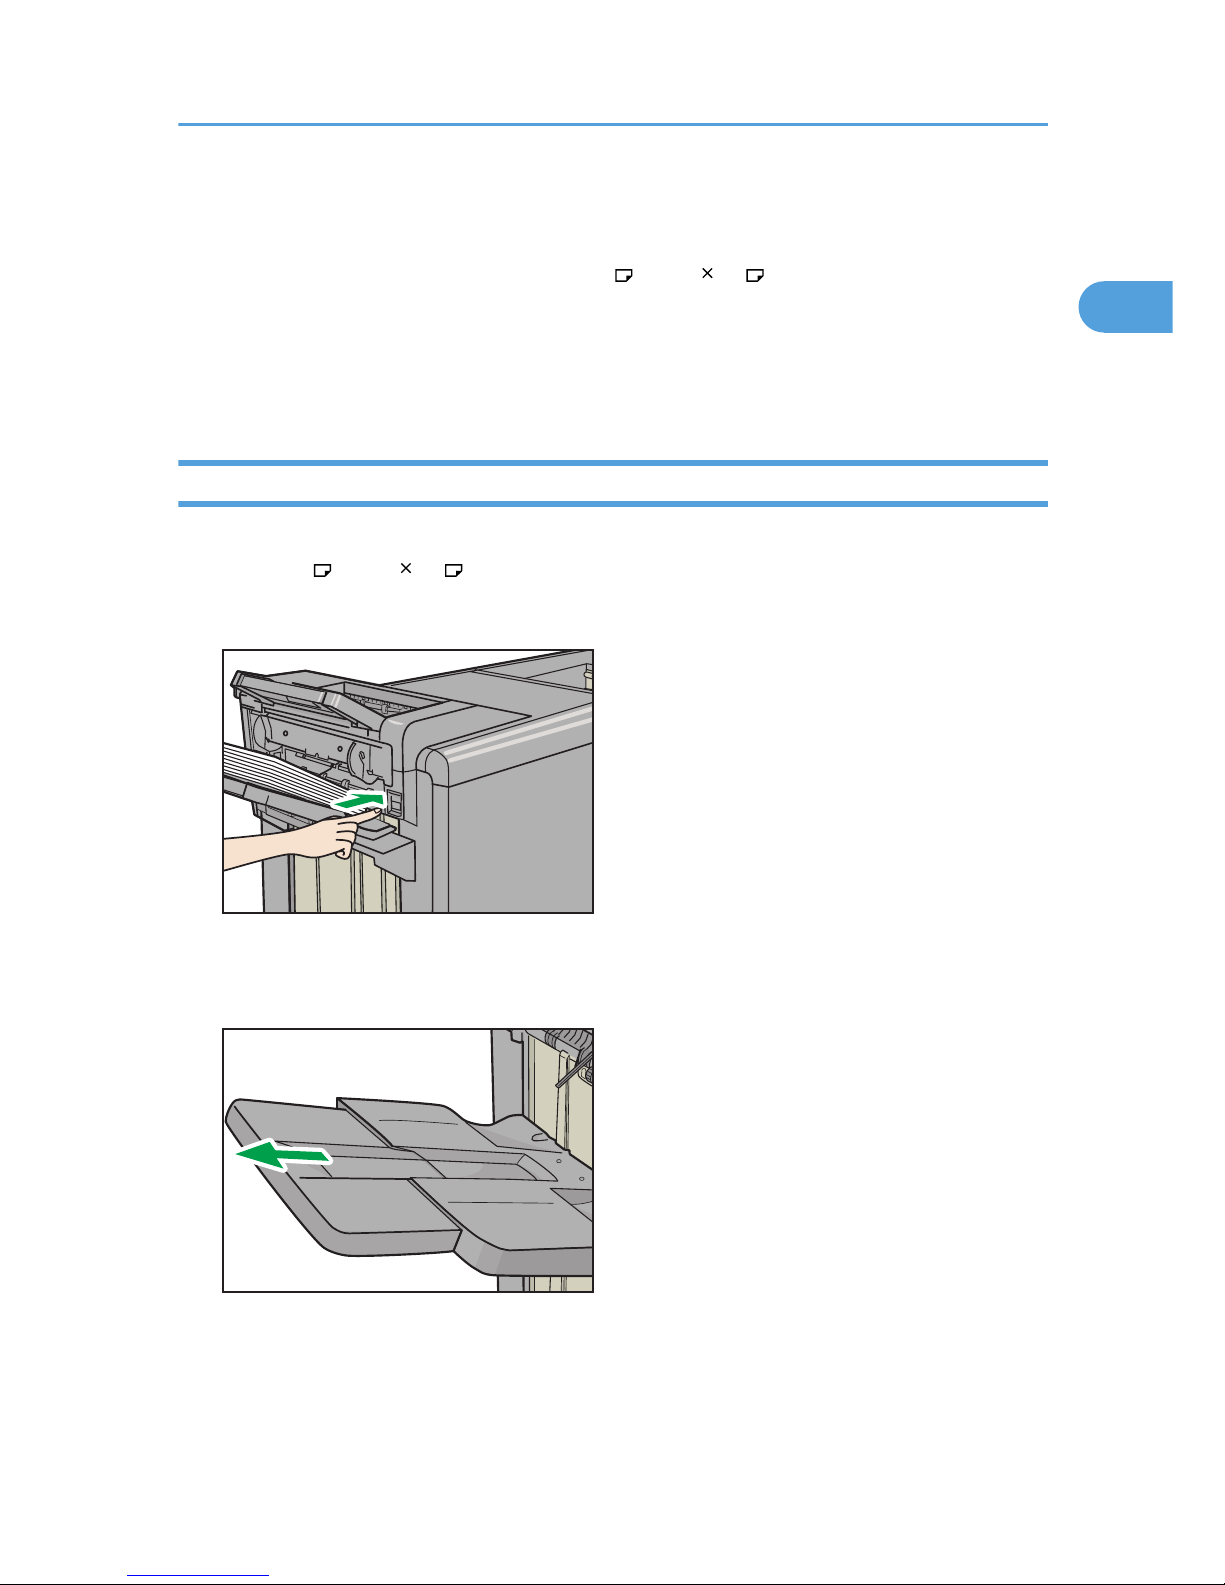
When Coated Paper Is Not Properly Aligned
If the size of the coated paper used for printing is B4 , 8 1/2" 14" , or larger, the output paper from
Finisher SR5030 or Booklet Finisher SR5040 might be curled, might stick to other sheets and push it off
the tray, or might not be aligned properly. If this happens, use an auxiliary tray.
There are two types of auxiliary trays. Use the auxiliary tray which corresponds to the weight of the
coated paper.
Using Thin Coated Paper
When the paper weight is 105.0 g/m2, 28 lb. Bond or less (paper thickness: Paper Weight 3), and the
paper size is B4 , 8 1/2" 14" or larger, use the auxiliary tray for thin coated paper.
1. Press the [Suspend/Resume] key.
CDN007
2. Remove the prints.
3. Pull out the finisher shift tray’s extension.
CDN011
When Coated Paper Is Not Properly Aligned
33
1
Page 36

4. Set the auxiliary tray for thin coated paper by aligning the tray with grooves on the end
fence.
CDN026
5. Press the [Suspend/Resume] key to restart the print.
• When the output paper curls downward, it might not align properly, even if the auxiliary tray for
thin coated paper is used. If the paper curls downward, fan the stack of paper and fix the curl
before printing, then turn the paper over and place it back on the Wide LCT. If your machine has a
paper curl correction function, correct the paper curl to make the paper flat or curl upward. For
details about the paper curl correction function, see "Adjustment Settings for Operators", Network
and System Settings Reference .
• If the output paper fails to align properly on the auxiliary tray for thin coated paper, use the
auxiliary paper tray. For details about setting the auxiliary paper tray, see p.34 "Using Thick
Coated Paper".
• When removing the output paper, make sure the auxiliary tray for thin coated paper remains in its
set position.
Using Thick Coated Paper
When the paper weight is 105.1 g/m2, 28.1 lb. Bond or more (paper thickness: Paper Weight 4 to
Paper Weight 7), and the paper size is B4 , 8 1/2" 14" or larger, use the auxiliary paper tray.
1. When the Machine Does Not Operate As Wanted
34
1
Page 37
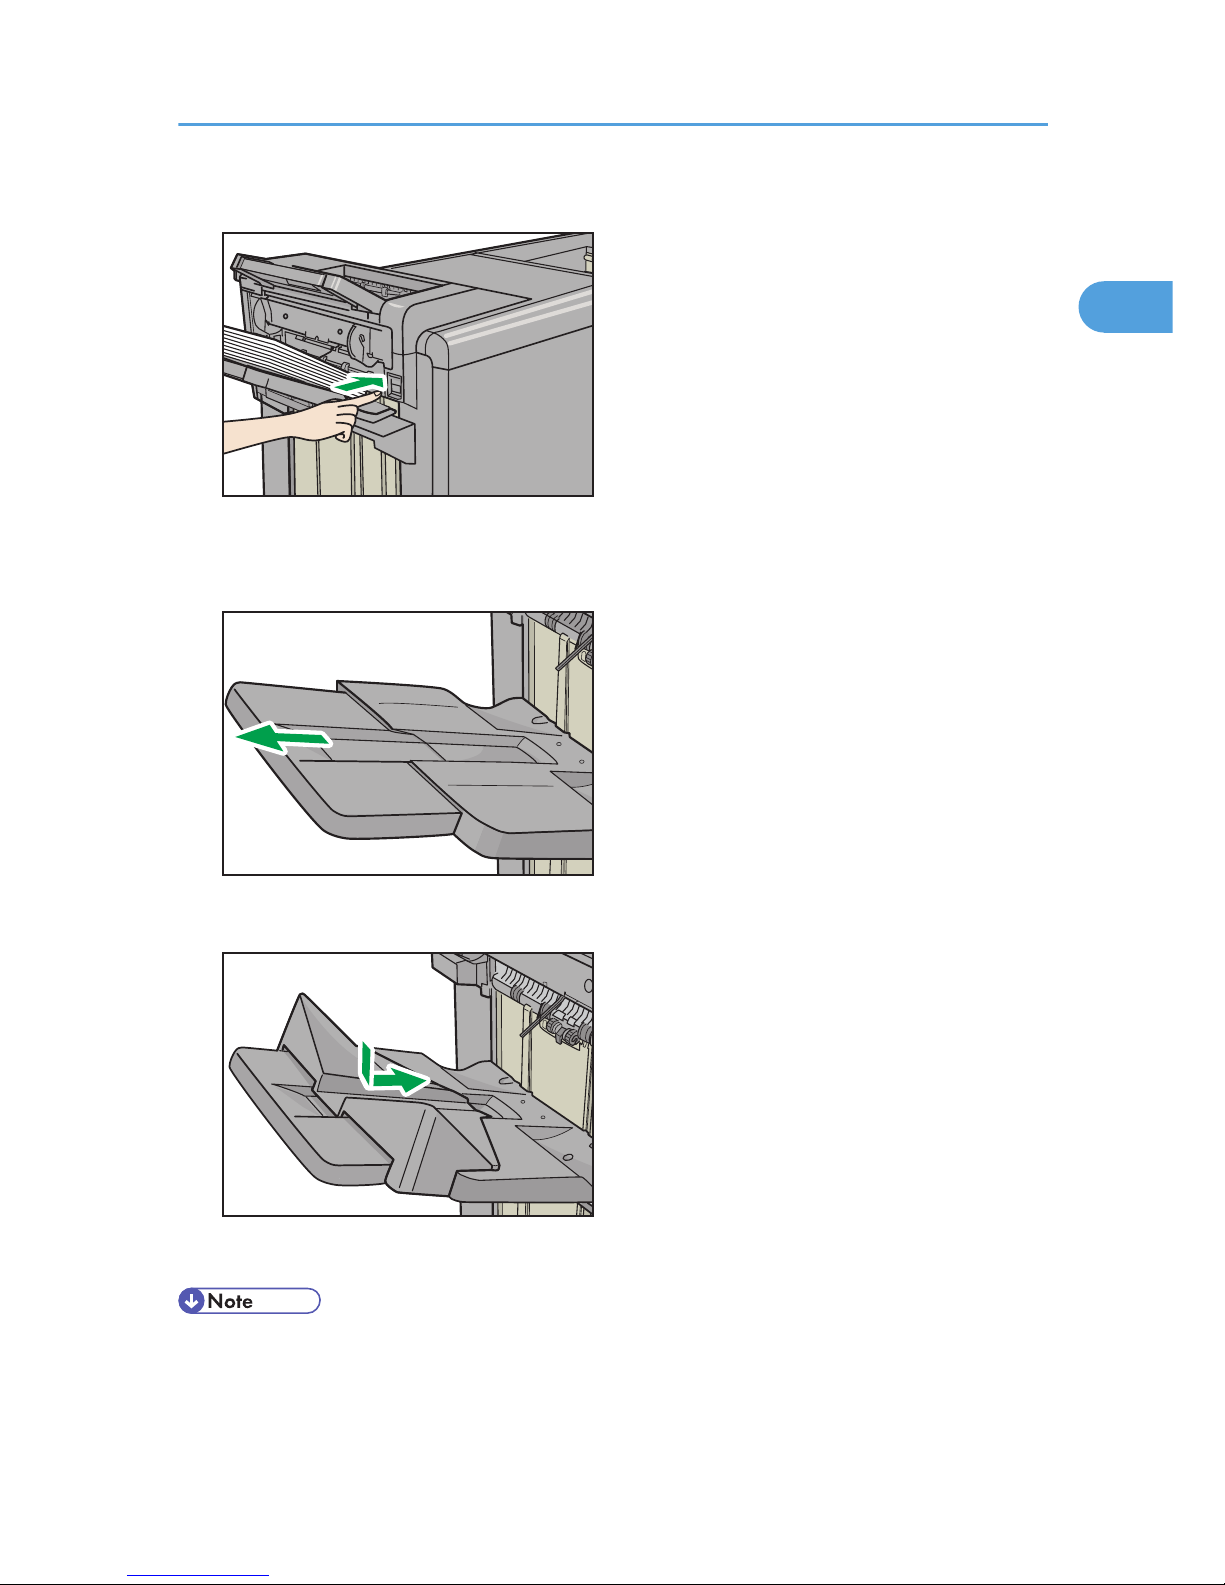
1. Press the [Suspend/Resume] key.
CDN007
2. Remove the prints.
3. Pull out the finisher shift tray's extension.
CDN011
4. Set the auxiliary paper tray.
CDN012
5. Press the [Suspend/Resume] key to restart the print.
• If the output paper fails to align properly on the auxiliary paper tray, use the auxiliary tray for thin
coated paper. For details about setting the auxiliary tray for thin coated paper, see p.33 "Using
Thin Coated Paper".
When Coated Paper Is Not Properly Aligned
35
1
Page 38

1. When the Machine Does Not Operate As Wanted
36
1
Page 39
2. Clearing Misfeeds
This chapter describes what to do if a paper jam (misfeed) occurs.
Removing Jammed Paper
This section describes how to locate and remove jammed paper.
• The inside of the machine could be very hot. Do not touch the parts with a label indicating the
"hot surface." Otherwise, an injury might occur.
• Some of this machine's internal components get very hot. For this reason, take care when
removing misfed paper. Not doing so could result in burns.
• Keep your hands clear of the booklet finisher tray when removing misfed paper, pulling out or
pushing in the finisher's staple unit. You can trap and injure your fingers if you do not.
• Keep your hands clear of the inside of the ring binder and the space under the ring binder tray.
You can trap your fingers if you do not.
• When clearing misfeeds, do not turn off the operation switch. If you do, your settings will be lost.
• When removing jammed sheets, take care to touch only those areas explicitly indicated in the
manual.
• Do not remove the fusing unit. Doing so will result in loss of print quality.
• To prevent misfeeds, do not leave any torn scraps of paper inside the machine.
• Contact your service representative if misfeeds occur frequently.
• If the error message remains displayed even after you remove misfed paper, open and close the
front cover.
• Inside the finisher, or inside the front cover, there is a sticker explaining how to remove misfed
paper.
• If a detailed removal instruction appears on the right of the screen, follow it.
• You can also use the procedure indicated in [System Status] to remove jammed paper.
37
2
Page 40
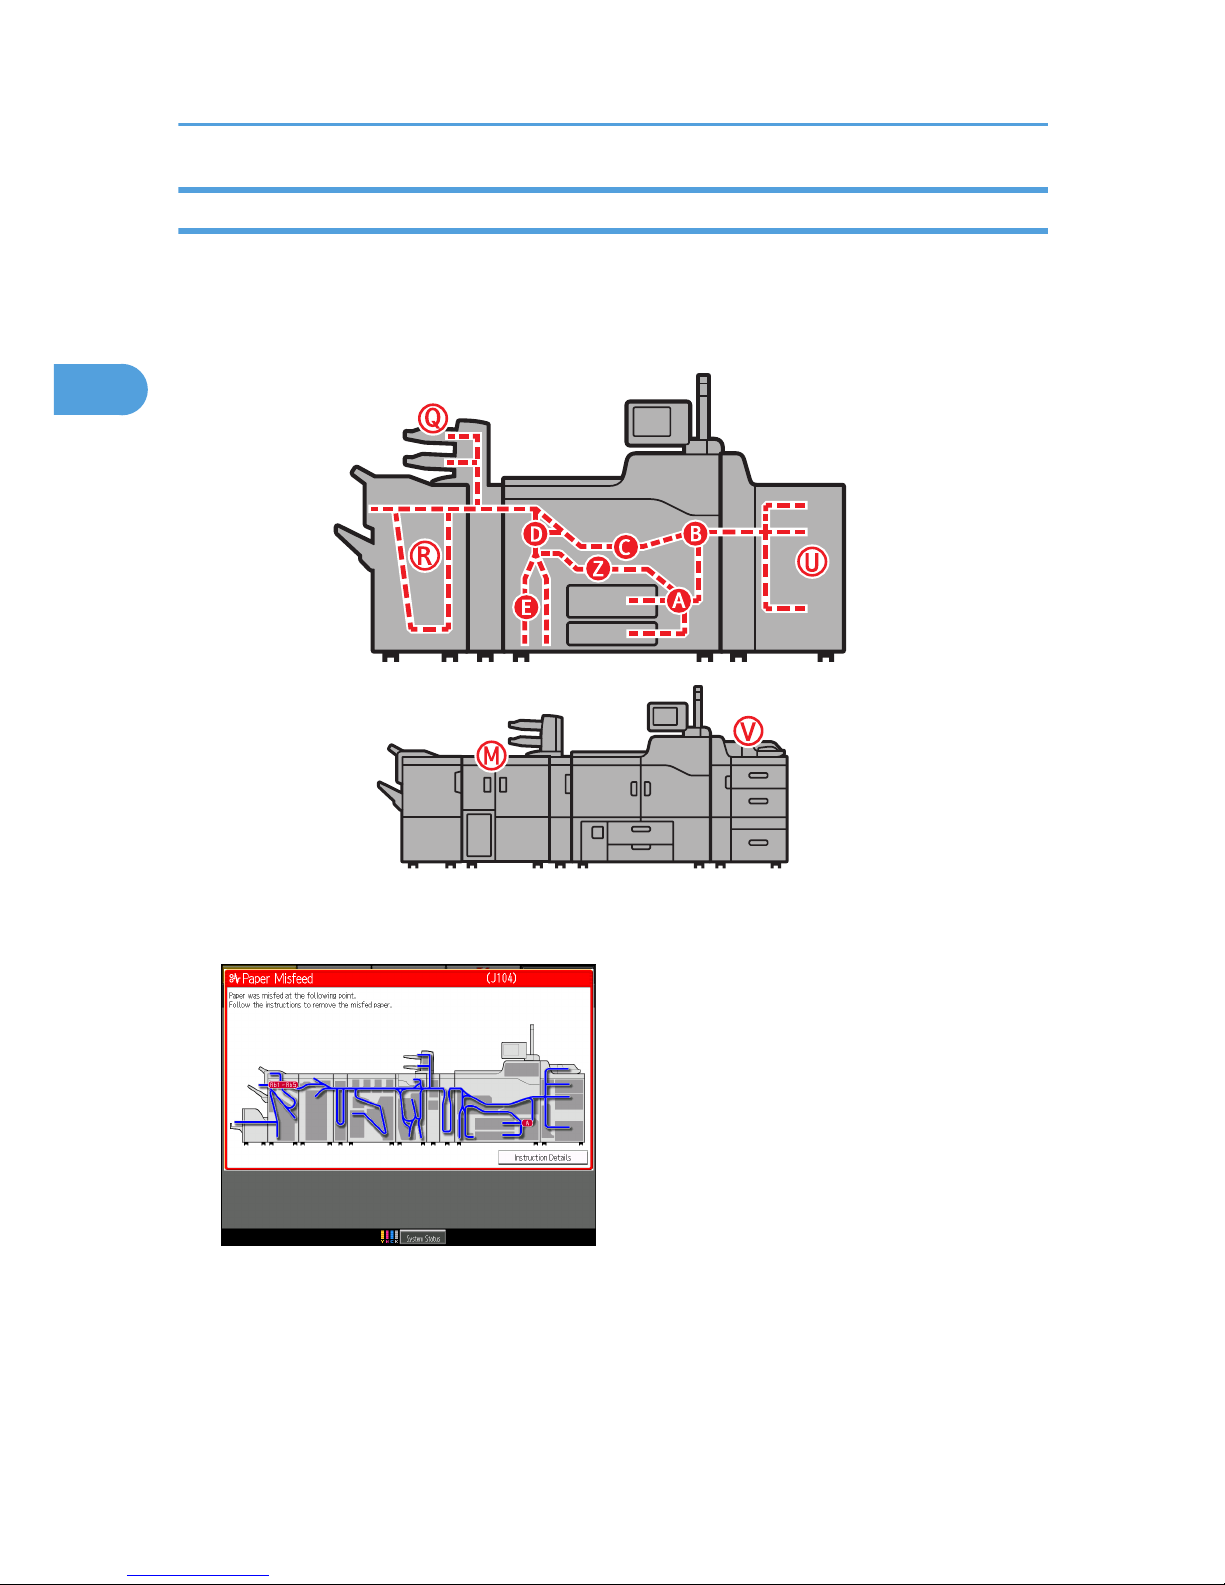
Locating Jammed Paper
If a misfeed happens, remove the misfed paper following the procedures stated on the sticker inside the
finisher or front cover.
The location of the paper jam (misfeed) is indicated by the letter shown on the display panel.
CEQ009
1. Press [Instruction Details].
2. Clearing Misfeeds
38
2
Page 41
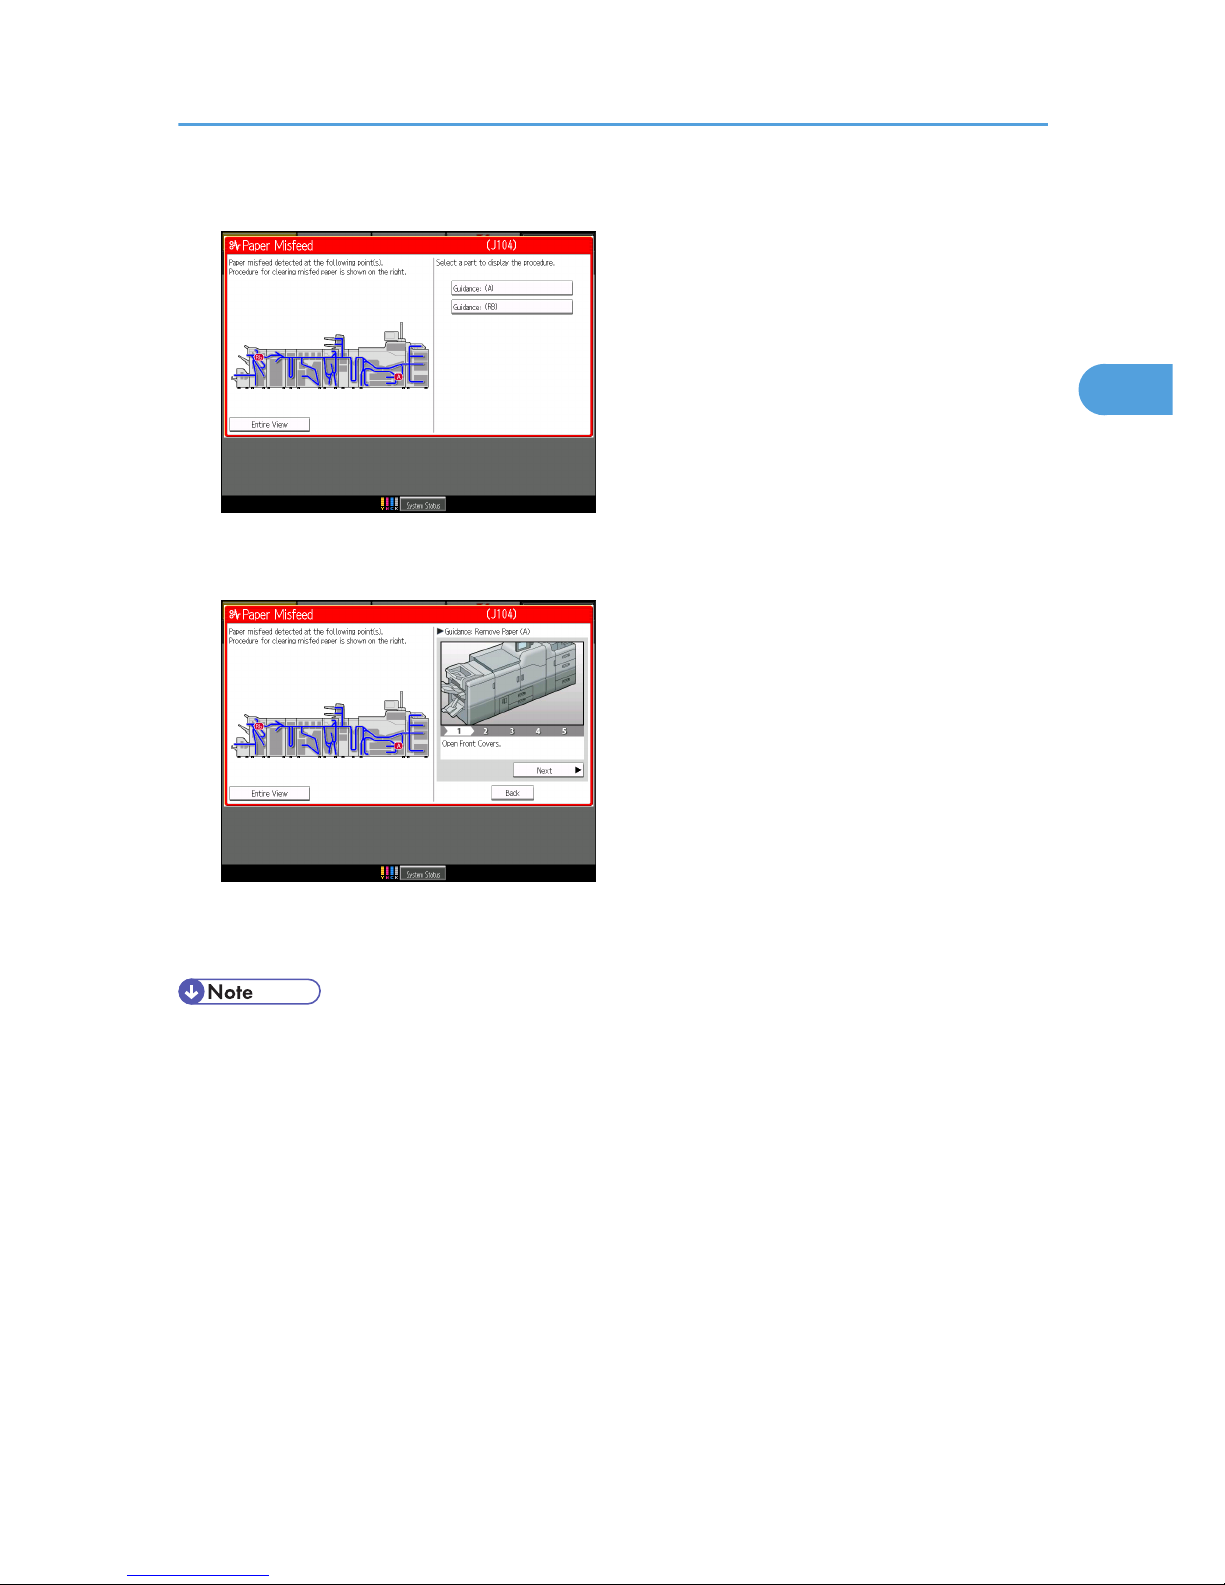
2. Press the key of the section from where you want to remove the jammed paper.
3. After each step is completed, press [Next]. To go back to the previous step, press
[Previous].
Press [Entire View], the entire machine is displayed.
4. When all jammed paper is removed, restore the machine to the original state.
• More than one misfeed may be indicated. When this happens, check all the areas indicated.
• If there is no misfed paper in the first area you check, see the other areas that are indicated.
Removing Jammed Paper
39
2
Page 42

When A Is Displayed
CDN028
Open the paper tray,
and then remove
misfed paper.
Return the paper tray
to its original position.
Turn knobs A2 and
A3 clockwise.
Lower lever A1.
Close both front
covers.
Open both front
covers.
Remove misfed
paper.
Return lever A1 to its
original position.
When B1 Is Displayed
CDN036
Lower lever A1.
Close both front
covers.
Open both front
covers.
Return the lever A1
to its original position.
Turn knob B2
clockwise, and then
remove misfed paper.
Return lever B1 to its
original position.
Turn lever B1 to
the left.
Remove misfed
paper.
2. Clearing Misfeeds
40
2
Page 43
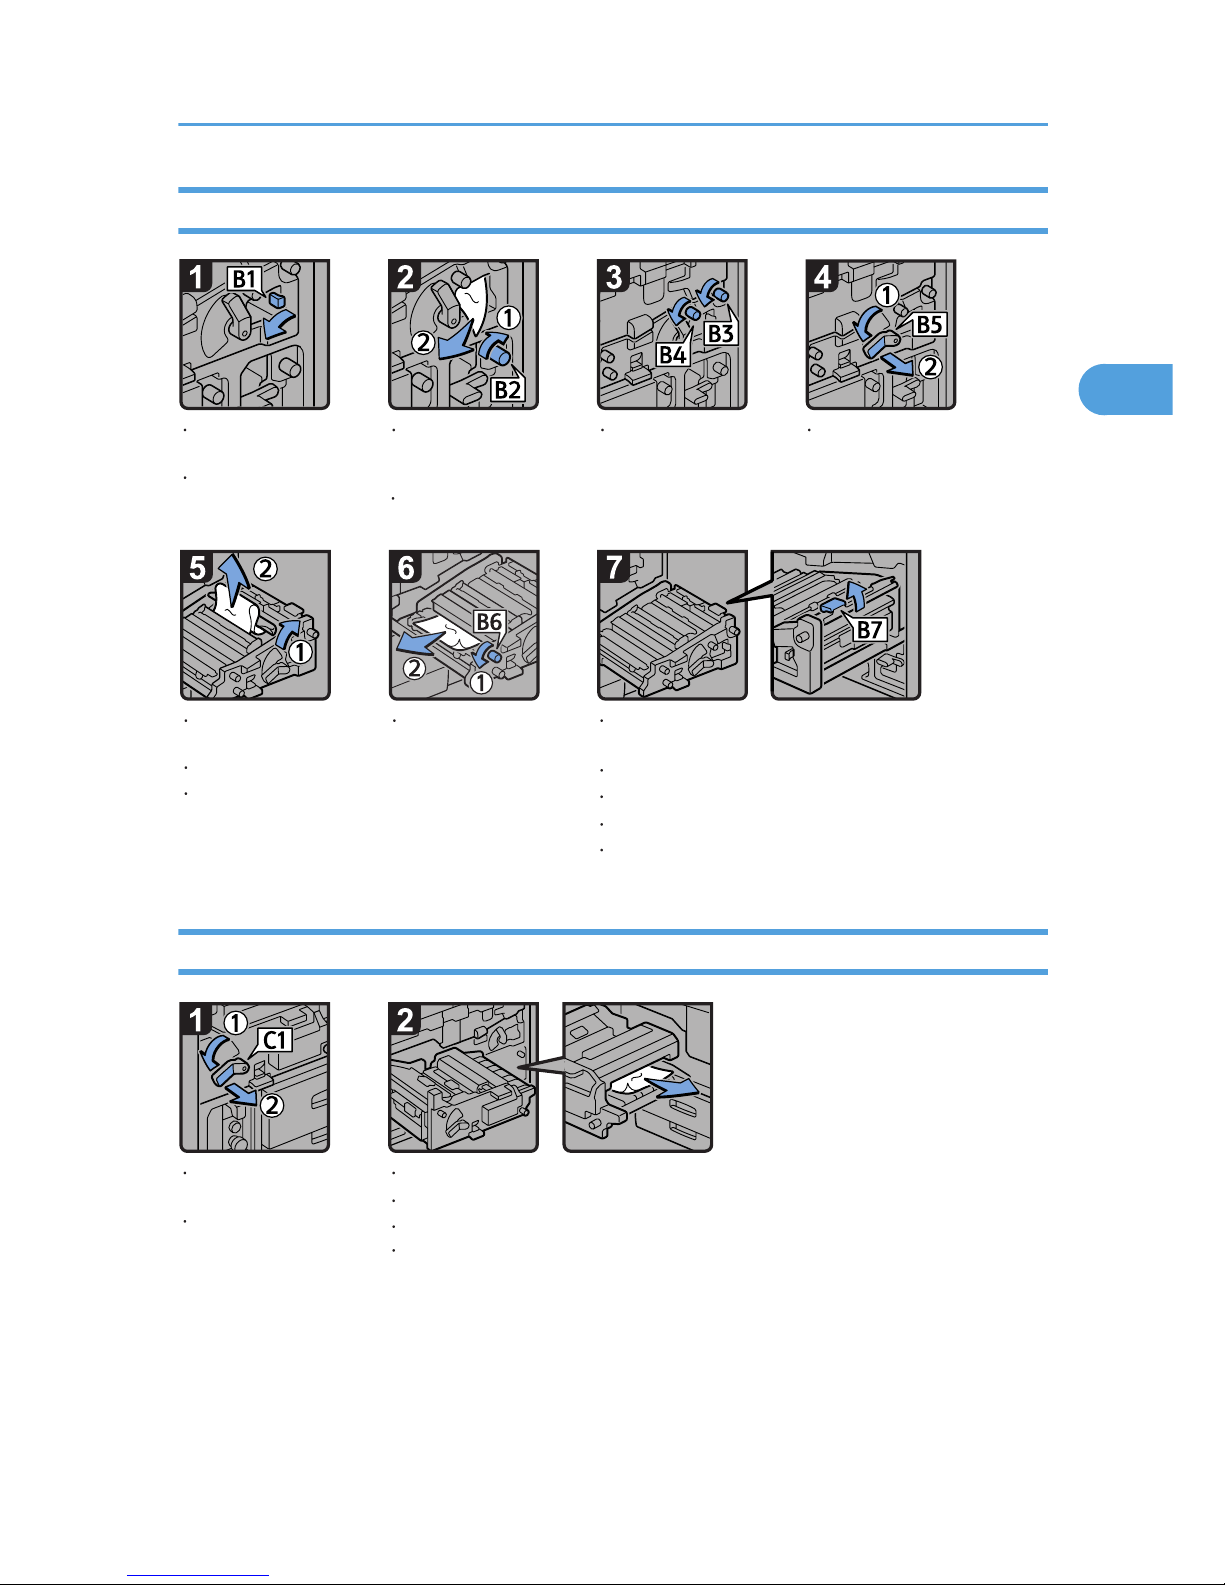
When B Is Displayed
CDN029
Turn knobs B3 and
B4 counterclockwise.
Open the clear
cover.
Return the unit to its original position.
Open both front
covers.
Turn lever B1 to
the left.
Turn knob B2
clockwise, and then
remove misfed paper.
Open B7 guide board. If there is any misfed
paper, remove it.
Close B7 guide board.
Turn knob B6
counterclockwise,
and then remove
misfed paper.
Remove misfed paper.
Turn lever B5 to the
left, and then pull
out the unit.
Close the clear cover.
Return lever B5 to its original position.
Close both front covers.
Return lever B1 to its
original position.
When C Is Displayed
CDN030
Turn lever C1 to the
left, and then pull
out the unit.
Open both front
covers.
Remove misfed paper.
Return the unit to its original position.
Return lever C1 to its original position.
Close both front covers.
Removing Jammed Paper
41
2
Page 44
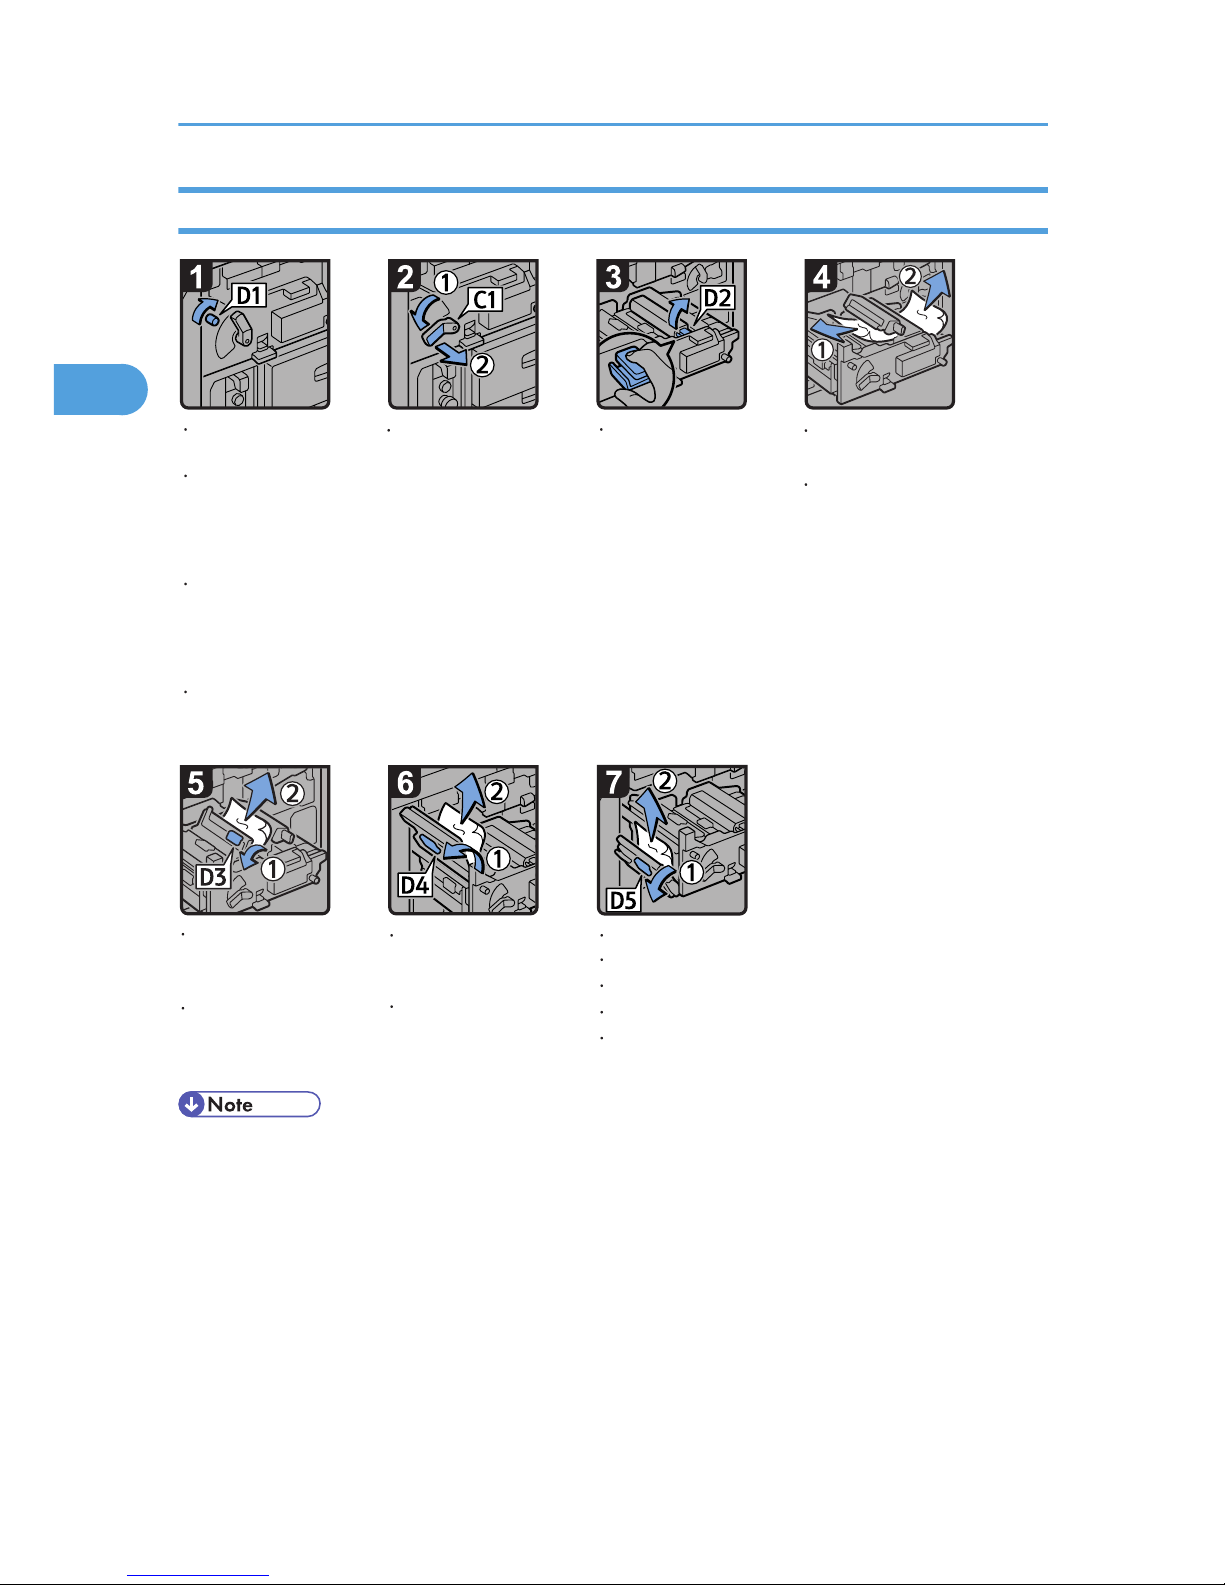
When D Is Displayed
CDN031
Turn lever C1 to the
left, and then pull
out the unit.
Lower lever D5, and then remove misfed paper.
Open both front
covers.
Open the cover of
the unit on the left
of the machine, and
then open the guide
board.
Turn knob D1
clockwise, and then
remove misfed paper
from the unit on the
left of the machine.
Close the guide board
of the unit on the left
of the machine.
Pull lever D2 up to
release the lock,
and then raise the
lever D2.
Remove misfed
paper.
If you cannot remove
the misfed paper,
remove it from the
right side of the unit.
Raise lever D3,
and then remove
misfed paper.
Raise lever D4, and
then remove misfed
paper.
Return lever D4 to
its original position.
Return levers D2
and D3 to their
original positions.
Return lever D5 to its original position.
Return the unit to its original position.
Return lever C1 to its original position.
Close both front covers.
• If you cannot remove the misfed paper from the right side of the unit, use the knob located on the
inside of the left front cover.
1. Pull out the knob located on the inside of the left front cover.
2. Clearing Misfeeds
42
2
Page 45
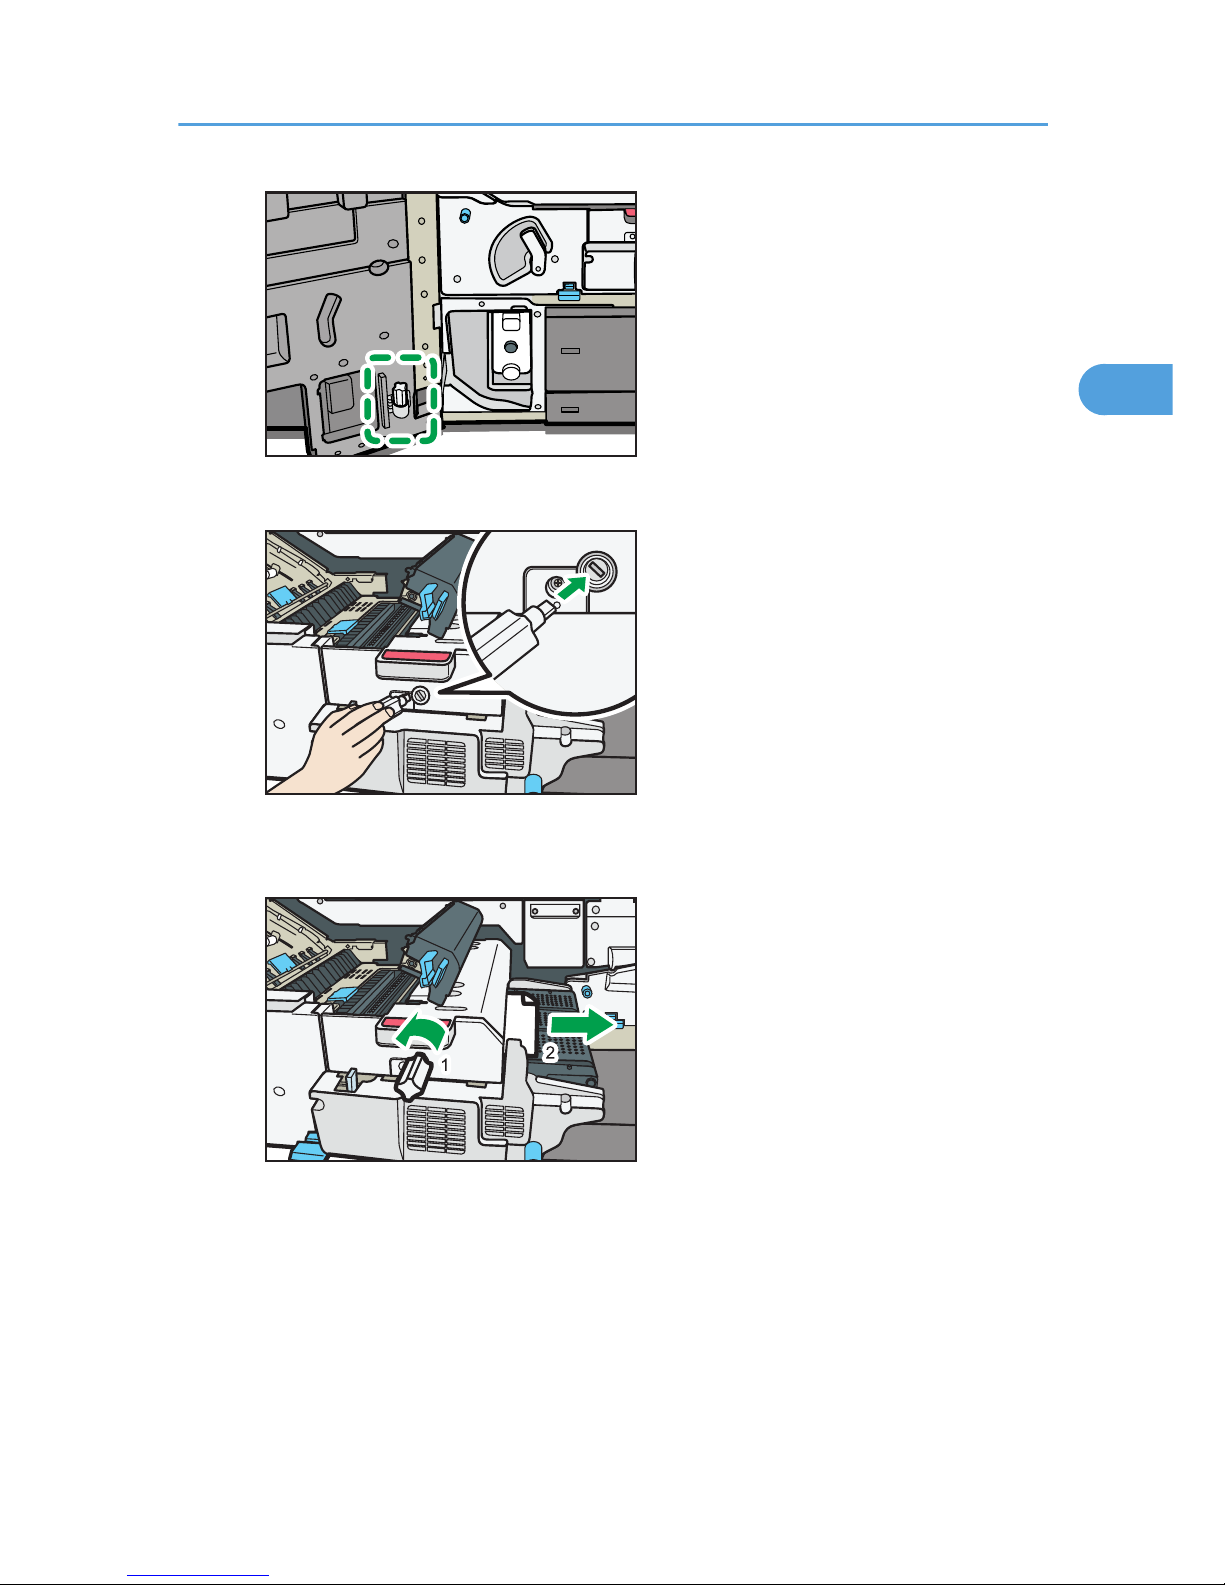
CDN042
2. Align the knob with the slot on the unit, and then insert it.
CDN041
3. Turn the knob counterclockwise until the misfed paper comes out from the right side of the unit,
and then remove it.
CDN040
4. Return the knob to its original position.
Removing Jammed Paper
43
2
Page 46

When E Is Displayed
CDN032
Close the front left cover.
Open the front left cover.
Remove misfed paper.
2. Clearing Misfeeds
44
2
Page 47
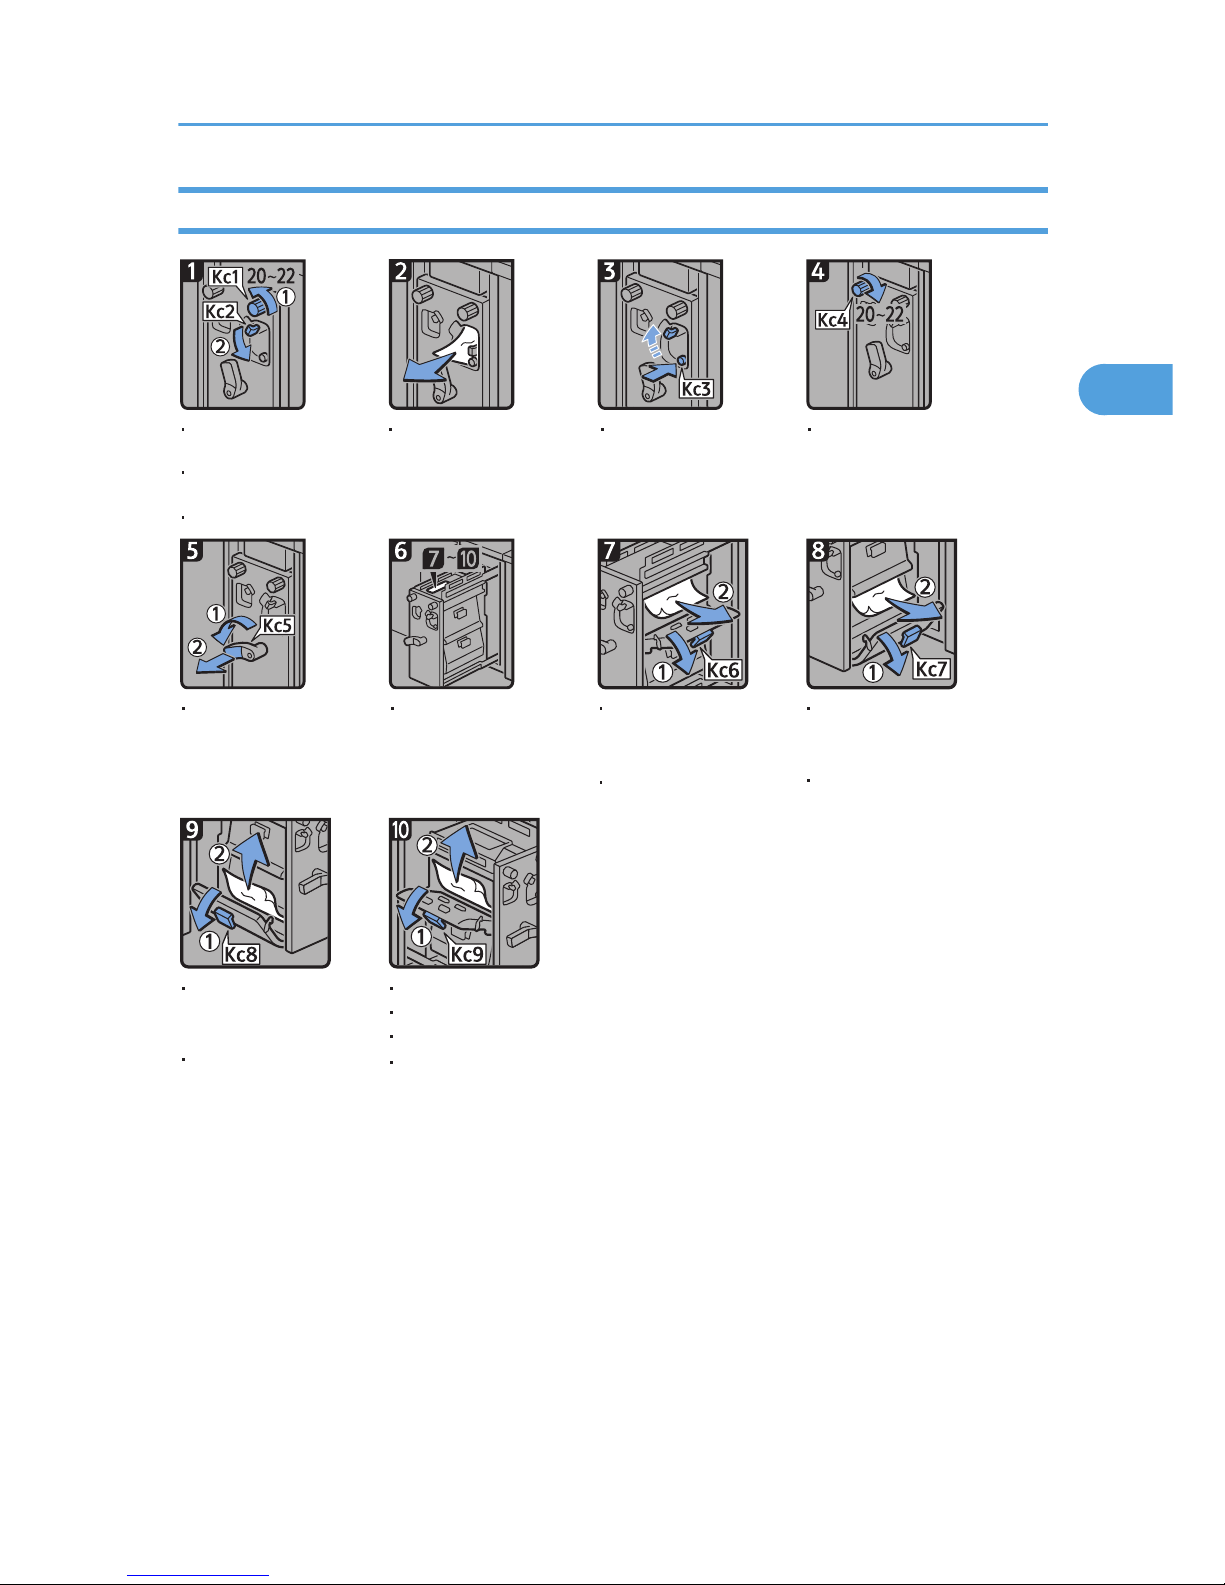
When K Is Displayed
Turn knob Kc1 20 to 22
times counterclockwise.
Open Kc2 cover.
Remove misfed paper. Push Kc3 button to
close Kc2 cover.
Turn knob Kc4 20 to
22 times clockwise.
Turn lever Kc5 to the
left, and then pull out
the unit.
See the illustrations
on the unit.
Open Kc6 cover, and
then remove misfed
paper.
Close Kc6 cover.
Open Kc7 cover, and
then remove misfed
paper.
Close Kc7 cover.
Open Kc8 cover, and
then remove misfed
paper.
Close Kc8 cover.
Open the buffer pass
unit front cover.
CEQ002
Open Kc9 cover, and then remove misfed paper.
Close Kc9 cover.
Return the unit and lever Kc5 to their original positions.
Close the buffer pass unit front cover.
Removing Jammed Paper
45
2
Page 48

When L Is Displayed
Raise lever L1,
and then remove
misfed paper.
Raise lever L2,
and then remove
misfed paper.
Turn knob L4
17 to 19 times
counterclockwise,
and then remove
misfed paper.
Raise lever L5,
and then remove
misfed paper.
Remove misfed
paper, and then
close the stacker
front cover.
CEQ007
Open the stacker
front cover.
Open the stacker
upper cover.
Return lever L1
to its original
position.
Return lever L2
to its original
position.
Raise lever L3.
Return lever L5
to its original
position.
Close the stacker
upper cover.
Press the paper
jam button on the
stacker control
panel.
Return lever L3
to its original
position.
2. Clearing Misfeeds
46
2
Page 49

When Mc1 - Mc4 Is Displayed
CEQ004
Raise lever Mc1,
and then remove
misfed paper.
Raise lever Mc2,
and then remove
misfed paper.
Raise lever Mc3,
and then remove
misfed paper.
Raise lever Mc4,
and then remove
misfed paper.
Open the ring binder
front right and front
left covers.
Return lever Mc1 to
its original position.
Return lever Mc2 to
its original position.
Return lever Mc3 to
its original position.
Return lever Mc4 to
its original position.
Close the ring binder
front right and front
left covers.
When Mc5 or Mc6 Is Displayed
CEQ005
Pull down lever Mc5,
and then remove
misfed paper.
Raise lever Mc6,
and then remove
misfed paper.
Open the ring binder
front right and front
left covers.
Return lever Mc5 to
its original position.
Return lever Mc6 to
its original position.
Close the ring binder
front right and front
left covers.
Removing Jammed Paper
47
2
Page 50
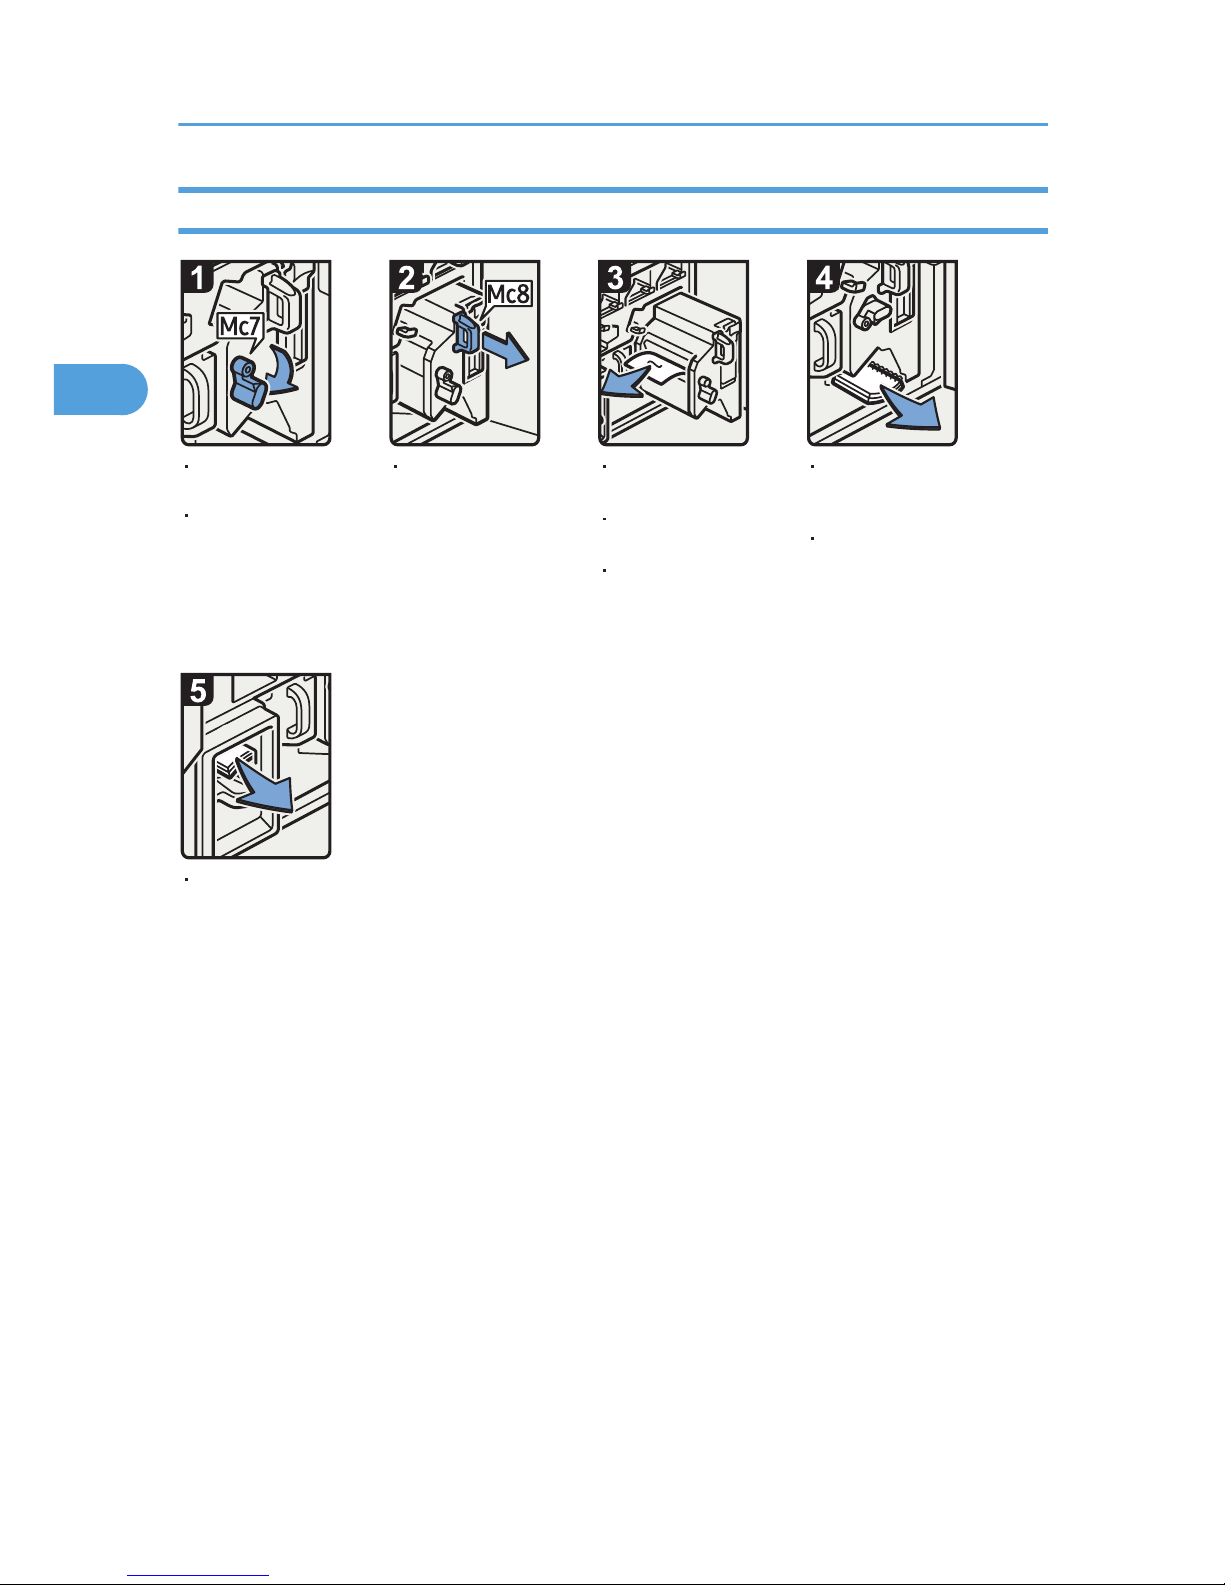
When Mc7 or Mc8 Is Displayed
CEQ006
Remove misfed
paper.
Pull handle Mc8,
and then pull out
the unit.
Open the ring binder
front right cover.
Lower lever Mc7.
Return the unit to its
original position.
Return lever Mc7 to
its original position.
Remove any bound
booklets that are
inside the machine.
Close the ring binder
front right cover.
Remove any jammed
bound booklets from
the paper exit.
2. Clearing Misfeeds
48
2
Page 51
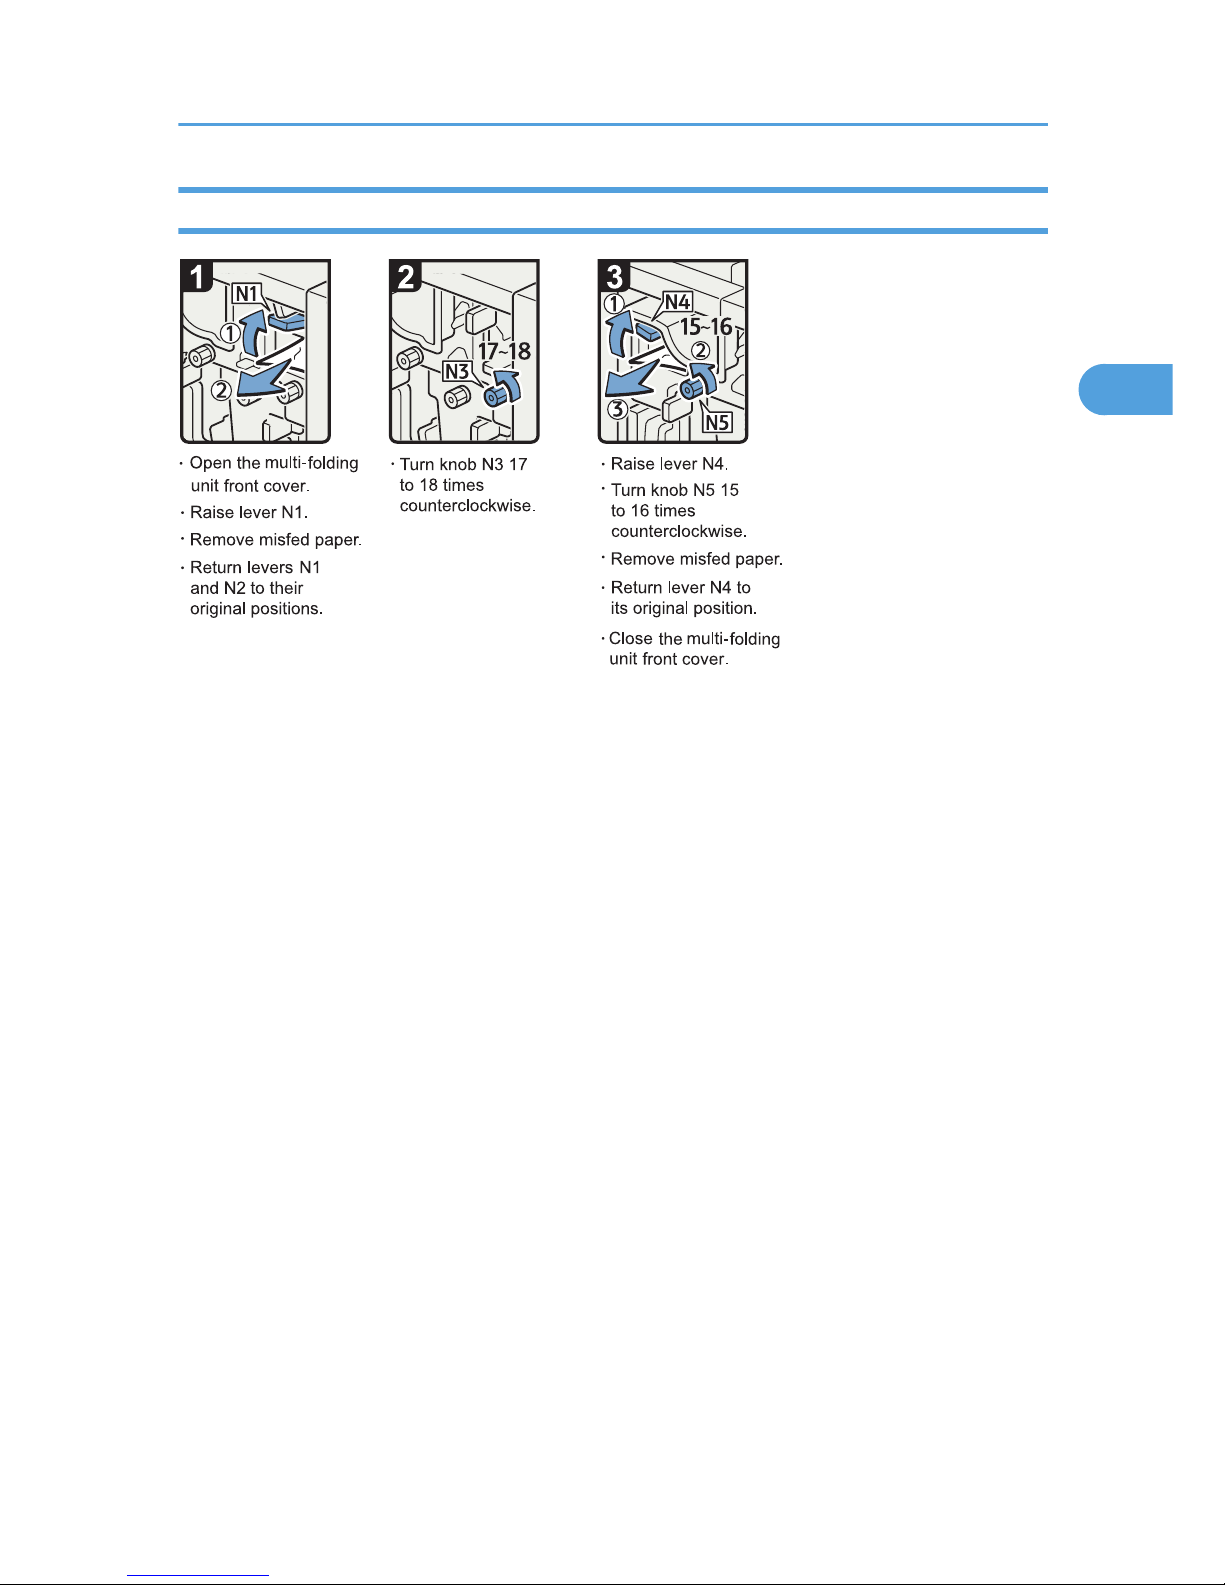
When N1 - N5 Is Displayed
CDN025
Removing Jammed Paper
49
2
Page 52

When N6 - N22 Is Displayed
CDN023
Pull the lever N10 towards you
and hold it to release the lock,
and then pull the lever to the
right to open the cover N10
illustration below.
Remove misfed
paper.
Remove misfed
paper.
Remove misfed
paper from inside.
Pull the lever N10 towards
you, and then check the
lock is released.
Pull handle N9
and pull the unit
fully out.
clockwise.
clockwise.
clockwise.
2. Clearing Misfeeds
50
2
Page 53
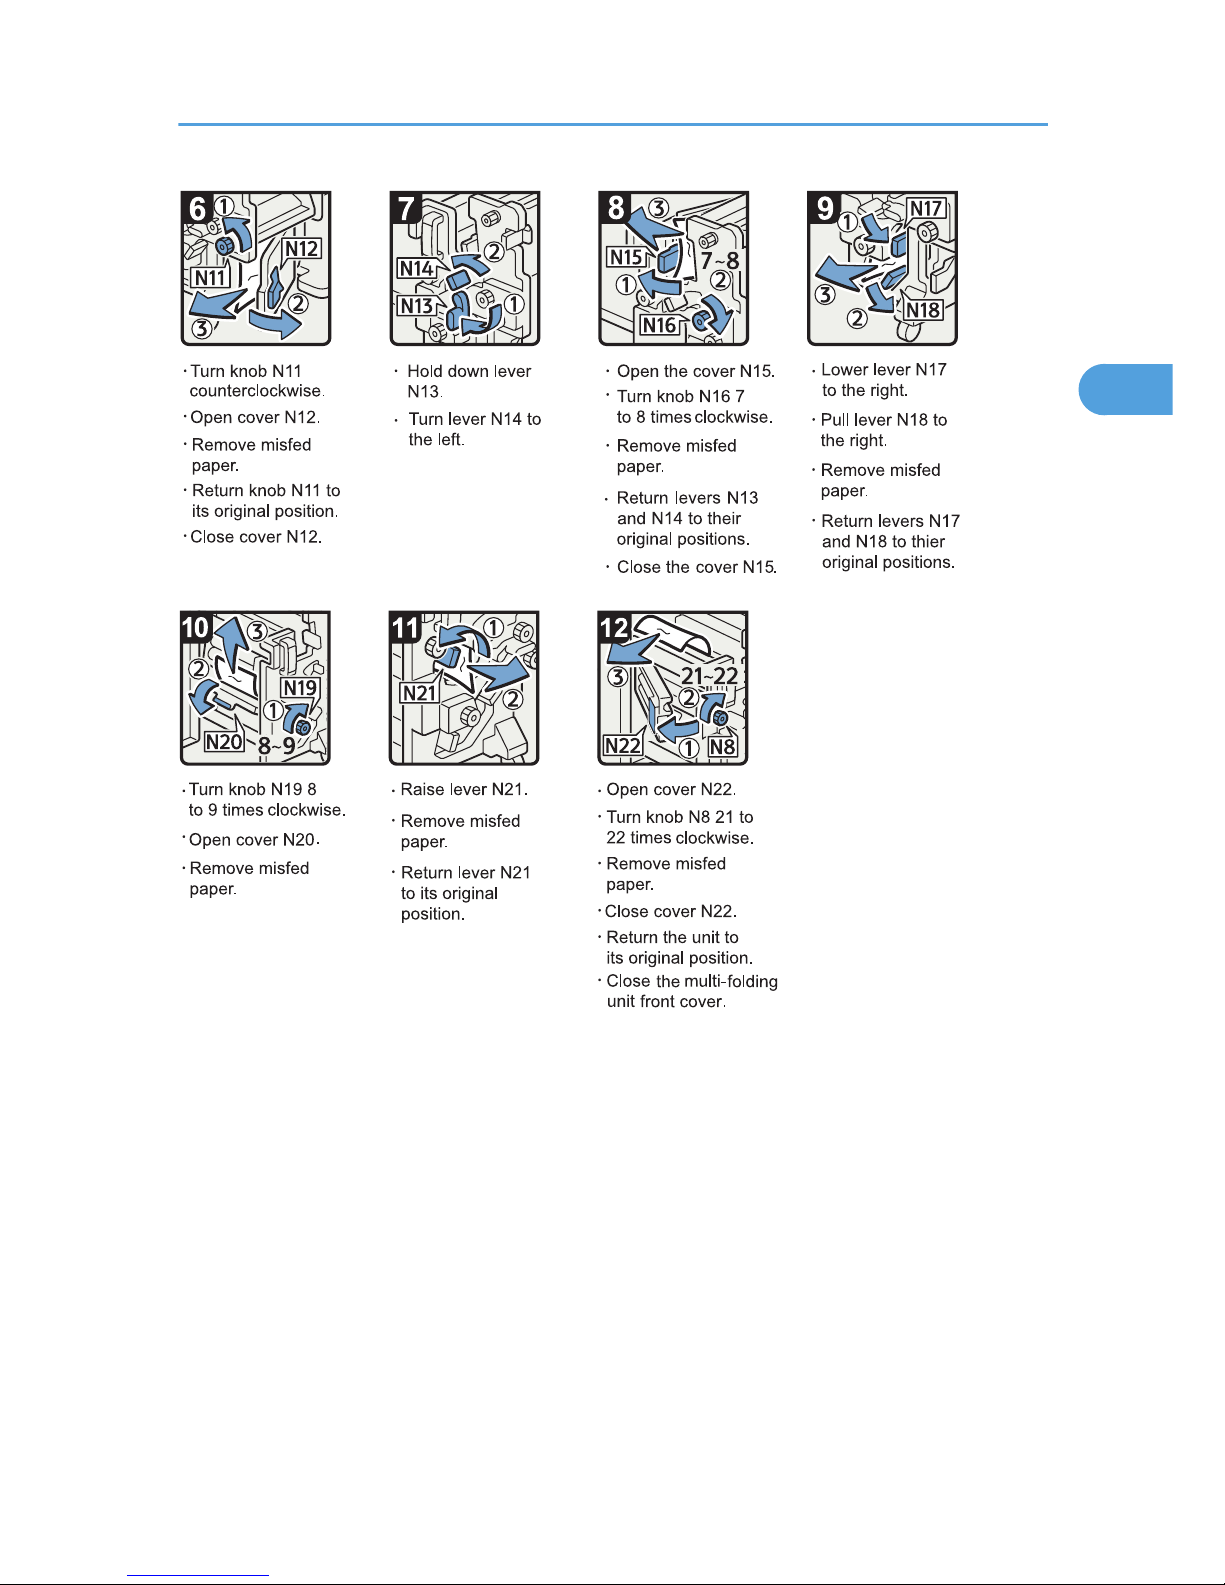
CDN024
Removing Jammed Paper
51
2
Page 54
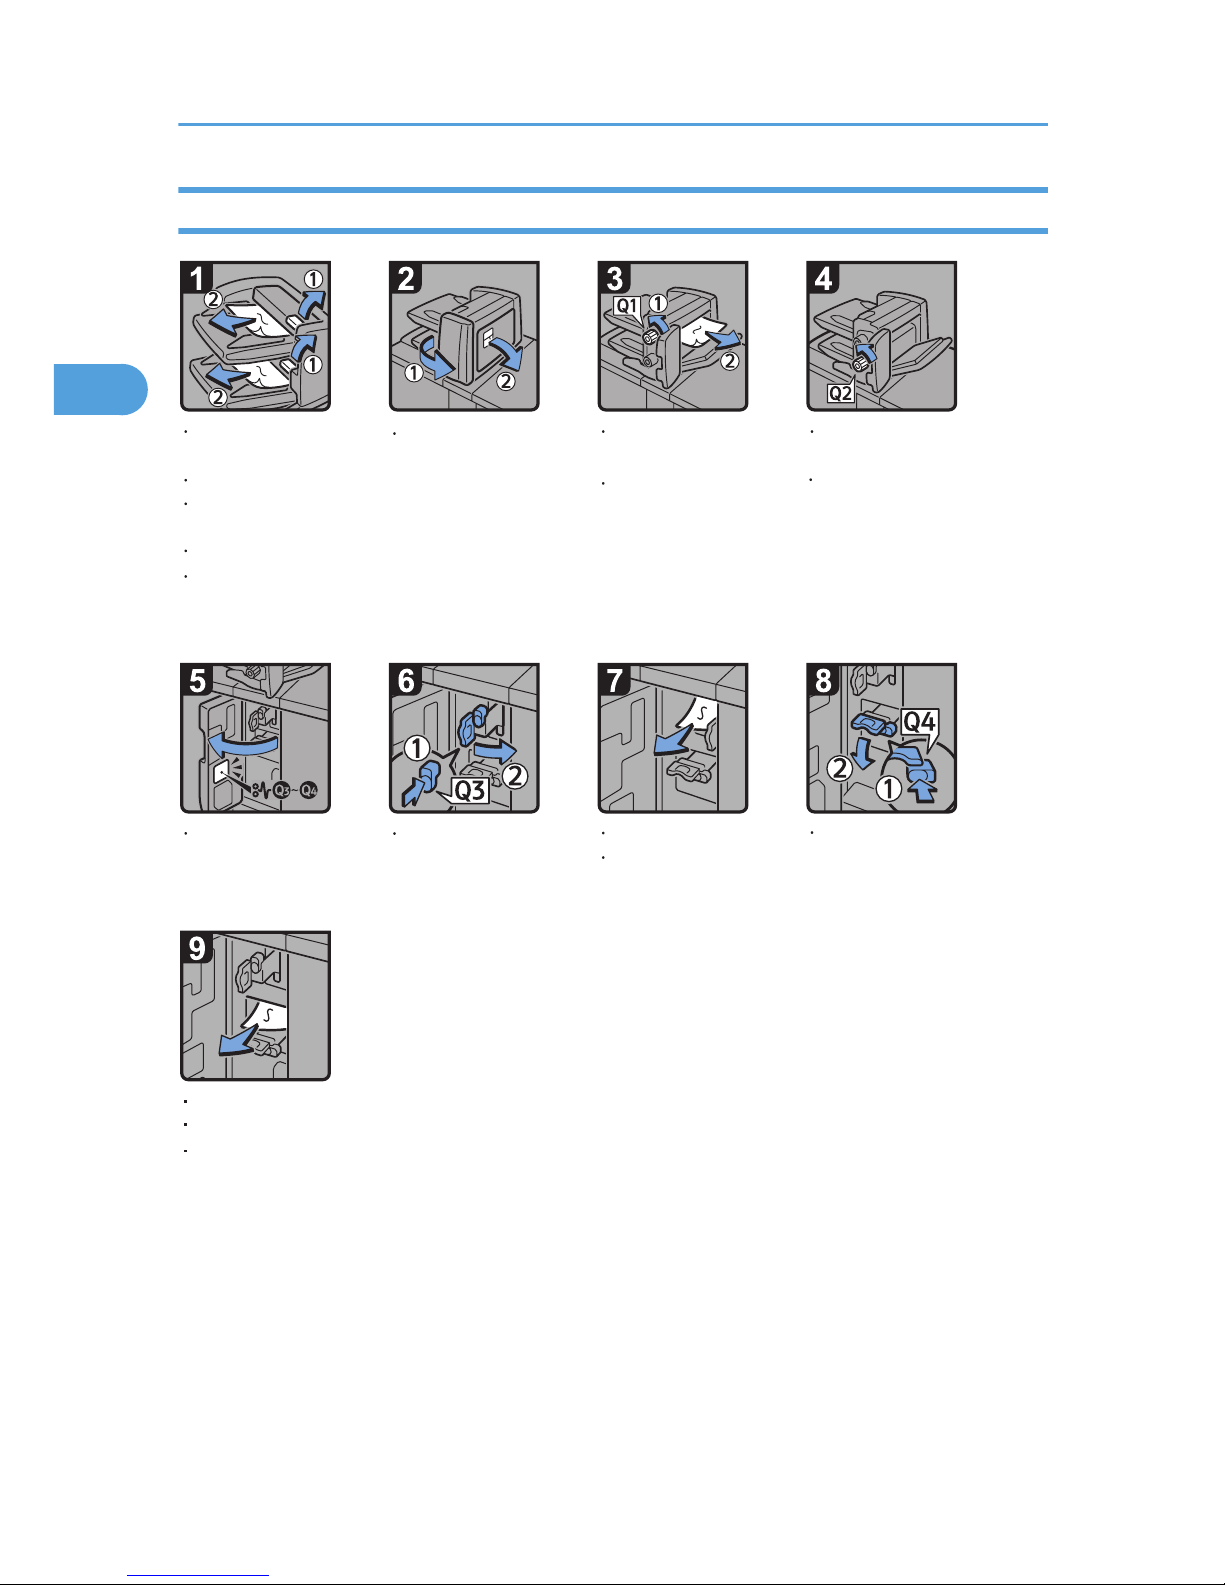
When Q1 - Q4 Is Displayed
CEQ001
Press button Q3,
and then open
the guide board.
Press button Q4,
and then open
the guide board.
Remove misfed paper.
Return the guide board to its original position.
Close the interposer base cover.
Open the interposer
upper tray cover.
Open the interposer
lower tray cover.
Close the interposer
upper tray cover and
interposer lower tray
cover.
Remove misfed paper.
Remove misfed paper.
Open the interposer
main cover and right
cover.
Turn knob Q1
counterclockwise.
Close the interposer
main cover and right
cover.
Open the interposer
base cover.
Remove misfed paper.
Return the guide
board to its original
position.
Turn knob Q2
counterclockwise.
Remove misfed paper.
2. Clearing Misfeeds
52
2
Page 55

When Rb1 - Rb5 Is Displayed in the Case of Finisher SR5030
Raise lever Rb1,
and then remove
misfed paper.
CDN013
Turn knob Rb2,
clockwise and then
remove misfed
paper.
Raise lever Rb3,
and then remove
misfed paper.
Turn lever Rb4 to the
right, and then
remove misfed paper.
Raise lever Rb5 to the
right, and then remove
misfed paper.
Open the finisher
front cover.
Return lever Rb1 to
its original position.
Return lever Rb4 to
its original position.
Return lever Rb5 to
its original position.
Close the finisher front cover.
Return lever Rb3 to
its original position.
Removing Jammed Paper
53
2
Page 56
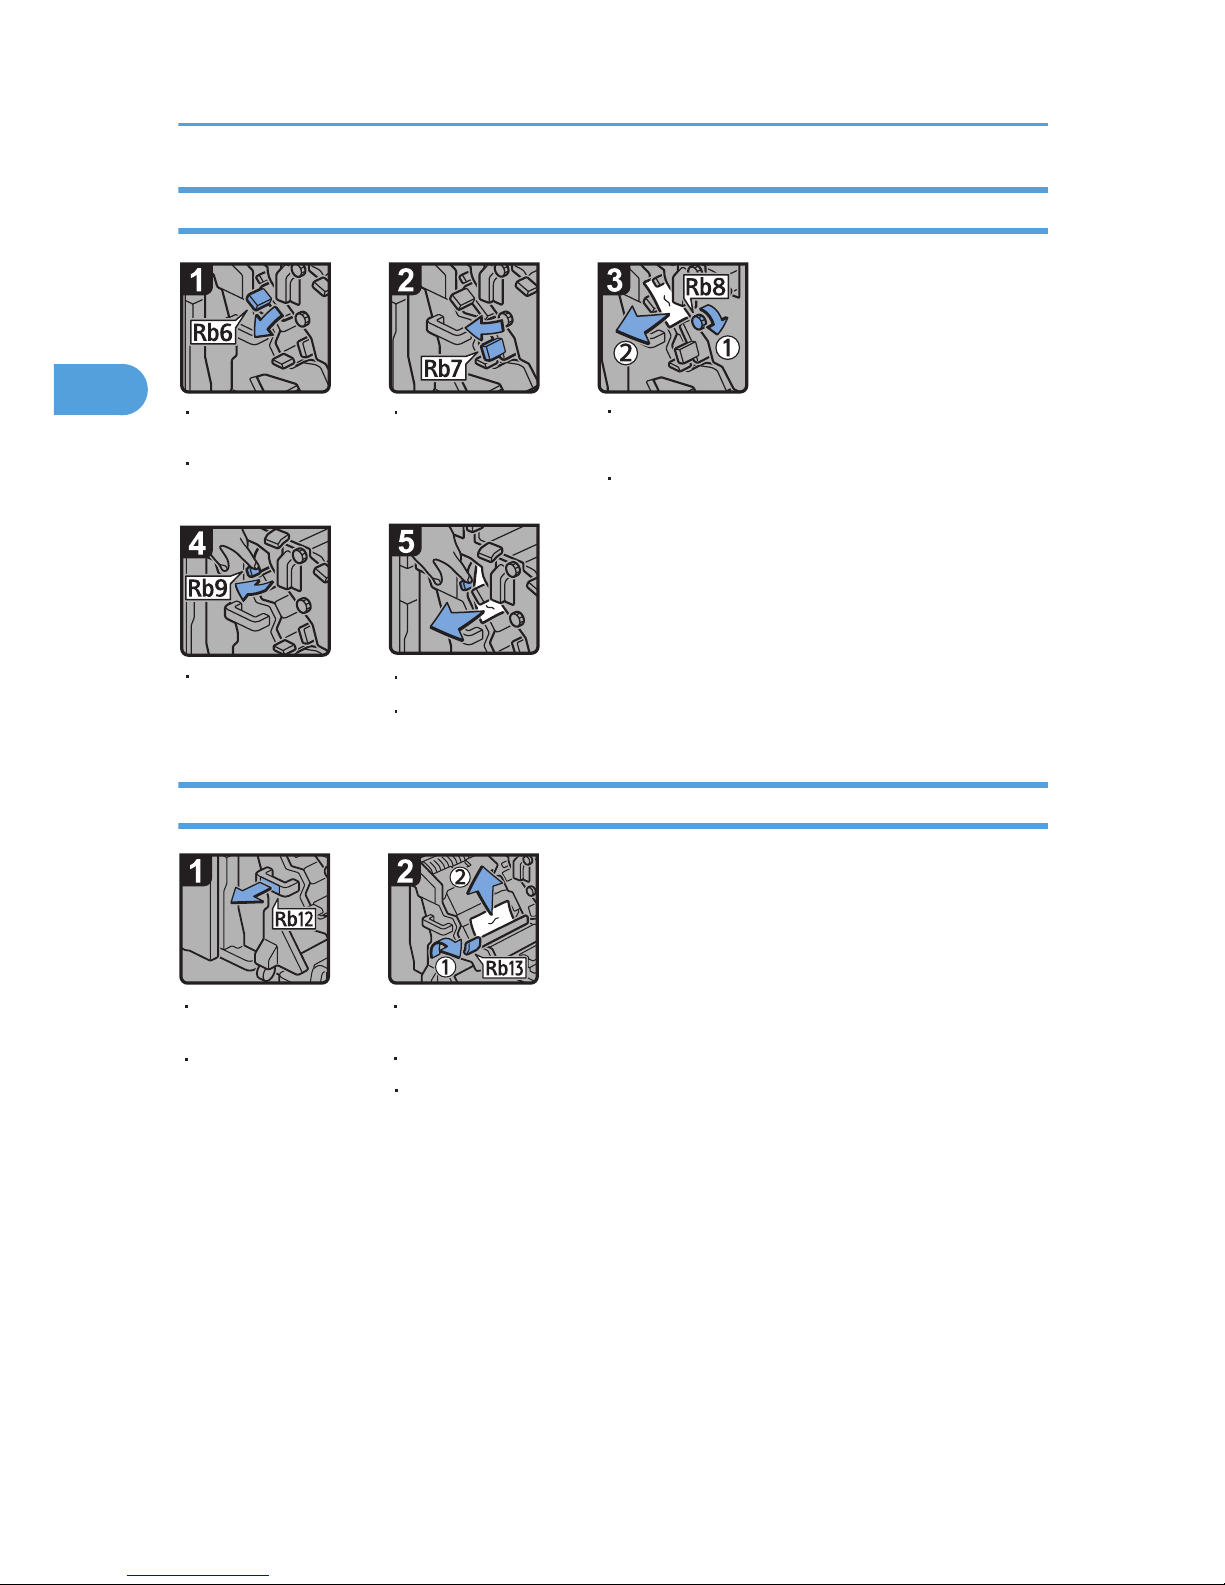
When Rb6 - Rb9 Is Displayed in the Case of Finisher SR5030
CDN014
Turn knob Rb8 clockwise,
and then remove misfed
paper.
Open the finisher
front cover.
Lower lever Rb6.
Pull lever Rb7 to the
left.
Return levers Rb6 and
Rb7 to their original positions.
Pull lever Rb9 to
the left.
Remove misfed paper.
Close the finisher front cover.
When Rb12 - Rb13 Is Displayed in the Case of Finisher SR5030
CDN015
Return the staple unit to its original position,
and then close the
finisher front cover
.
Pull handle Rb12,
and then pull out
the staple unit.
Raise lever Rb13, and then remove
misfed paper.
Open the finisher
front cover.
Return lever Rb13 to its original position.
2. Clearing Misfeeds
54
2
Page 57
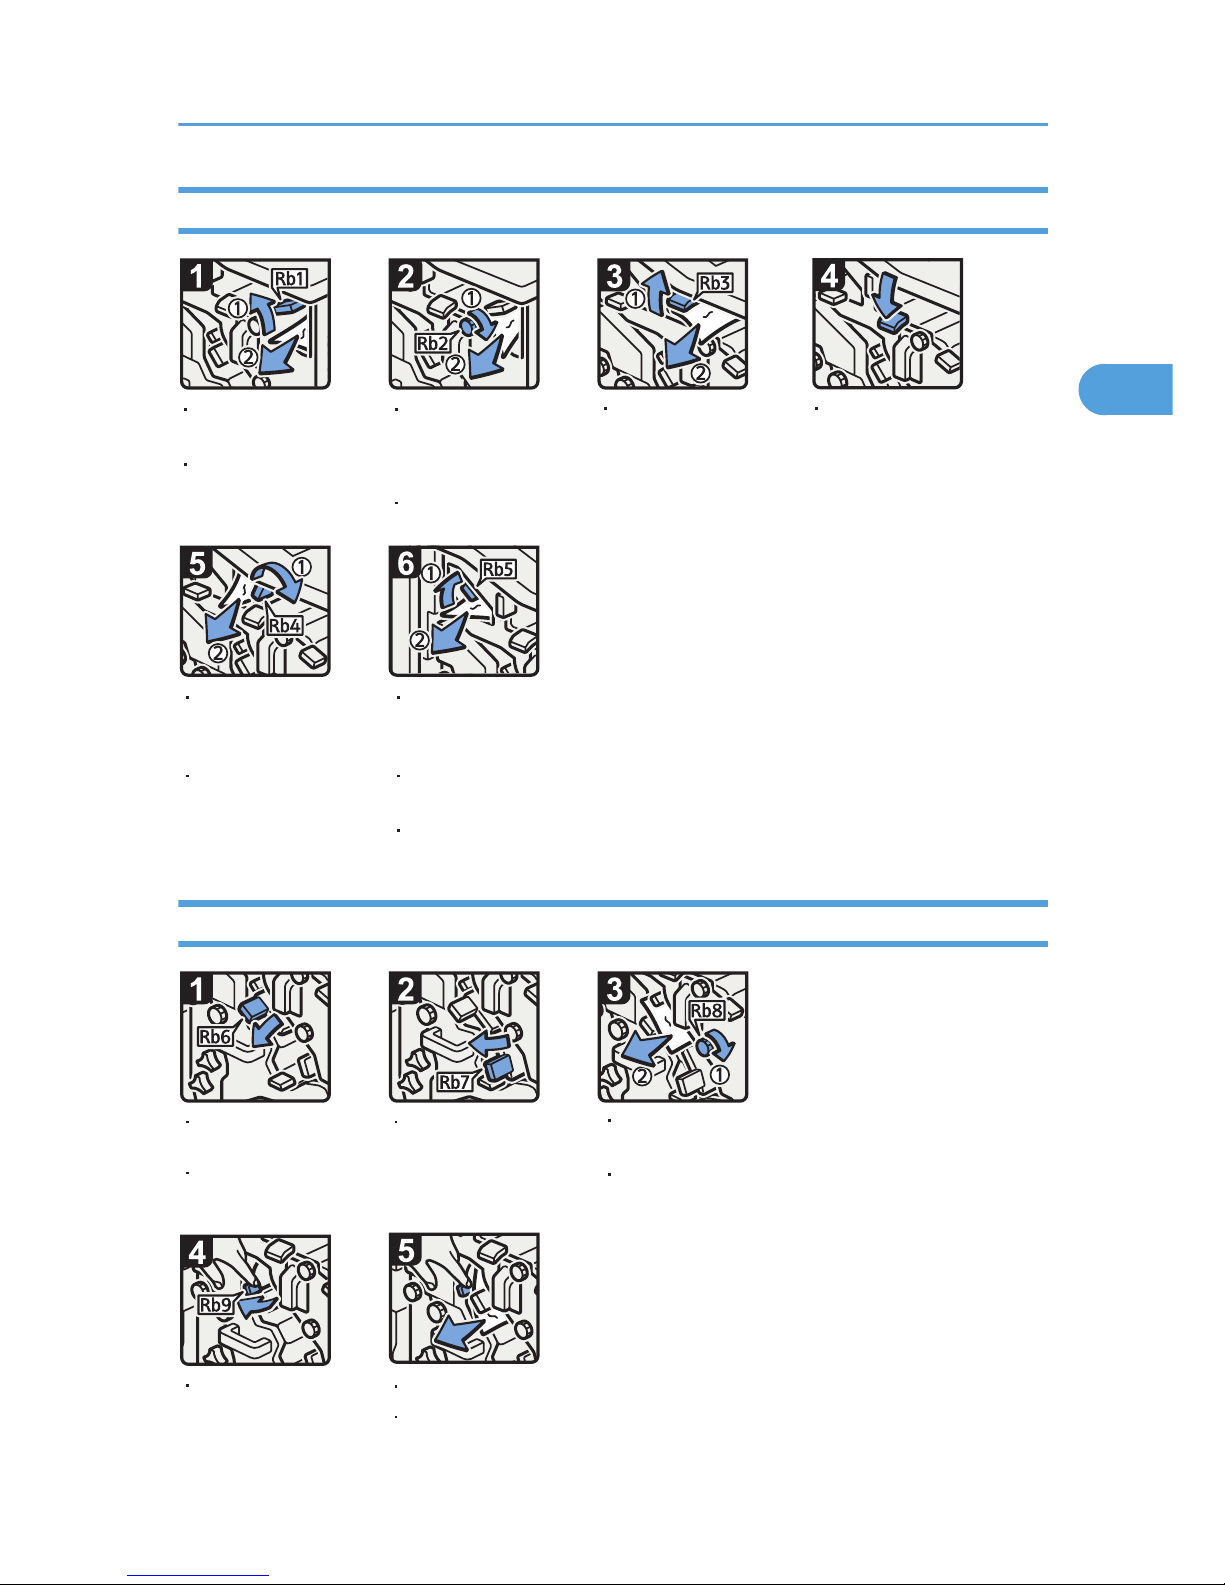
When Rb1 - Rb5 Is Displayed in the Case of Booklet Finisher SR5040
Raise lever Rb1,
and then remove
misfed paper.
CDN019
Turn knob Rb2
clockwise, and then
remove misfed
paper.
Raise lever Rb3,
and then remove
misfed paper.
Turn lever Rb4 to the
right, and then
remove misfed paper.
Raise lever Rb5 to the
right, and then remove
misfed paper.
Open the finisher
front cover.
Return lever Rb1 to
its original position.
Return lever Rb4 to
its original position.
Return lever Rb5 to
its original position.
Close the finisher front cover.
Return lever Rb3 to
its original position.
When Rb6 - Rb9 Is Displayed in the Case of Booklet Finisher SR5040
CDN020
Turn knob Rb8, and then
remove misfed paper.
Open the finisher
front cover.
Lower lever Rb6.
Pull lever Rb7 to the
left.
Return levers Rb6 and
Rb7 to their original positions.
Pull lever Rb9 to
the left.
Remove misfed paper.
Close the finisher front cover.
Removing Jammed Paper
55
2
Page 58
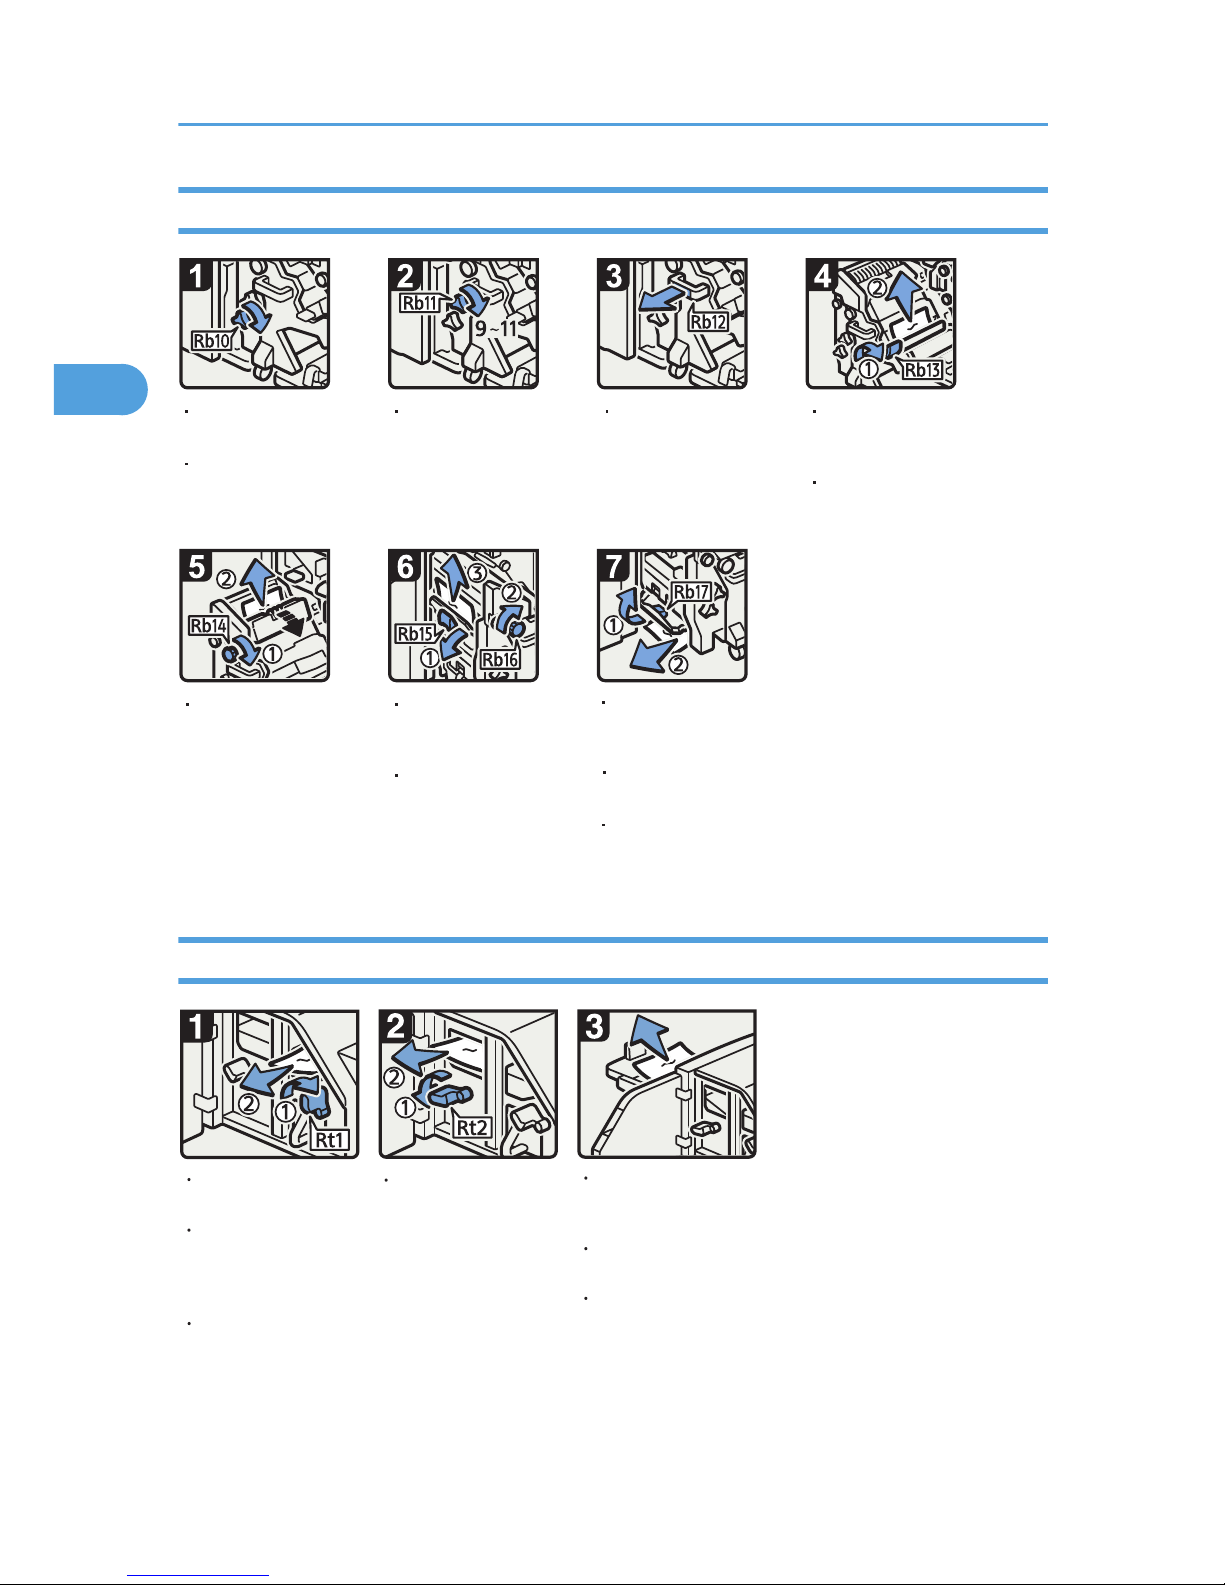
When Rb10 - Rb17 Is Displayed in the Case of Booklet Finisher SR5040
CDN021
Raise lever Rb17,
and then remove
misfed paper.
Return the staple unit to its
original position, and then
close the finisher front cover.
Lower lever Rb15,
and then turn knob
Rb16.
Pull handle Rb12,
and then pull out
the staple unit.
Raise lever Rb13,
and then remove
misfed paper.
Turn knob Rb14,
and then remove
misfed paper.
Return lever Rb13
to its original
position.
Return lever Rb17
to its original position.
Remove misfed
paper.
Open the finisher
front cover.
Turn knob Rb10.
Turn knob Rb11
9 to 11 times.
When Rt1 or Rt2 Is Displayed
Turn lever Rt1 to
the right, and then
remove misfed
paper.
Turn lever Rt2 to the
left, and then remove
misfed paper.
Return lever Rt2 to
its original position.
Close the trimmer
front cover.
CEQ003
Open the trimmer
front cover.
Remove misfed
paper from the
trimmer tray.
Return lever Rt1 to
its original position.
2. Clearing Misfeeds
56
2
Page 59
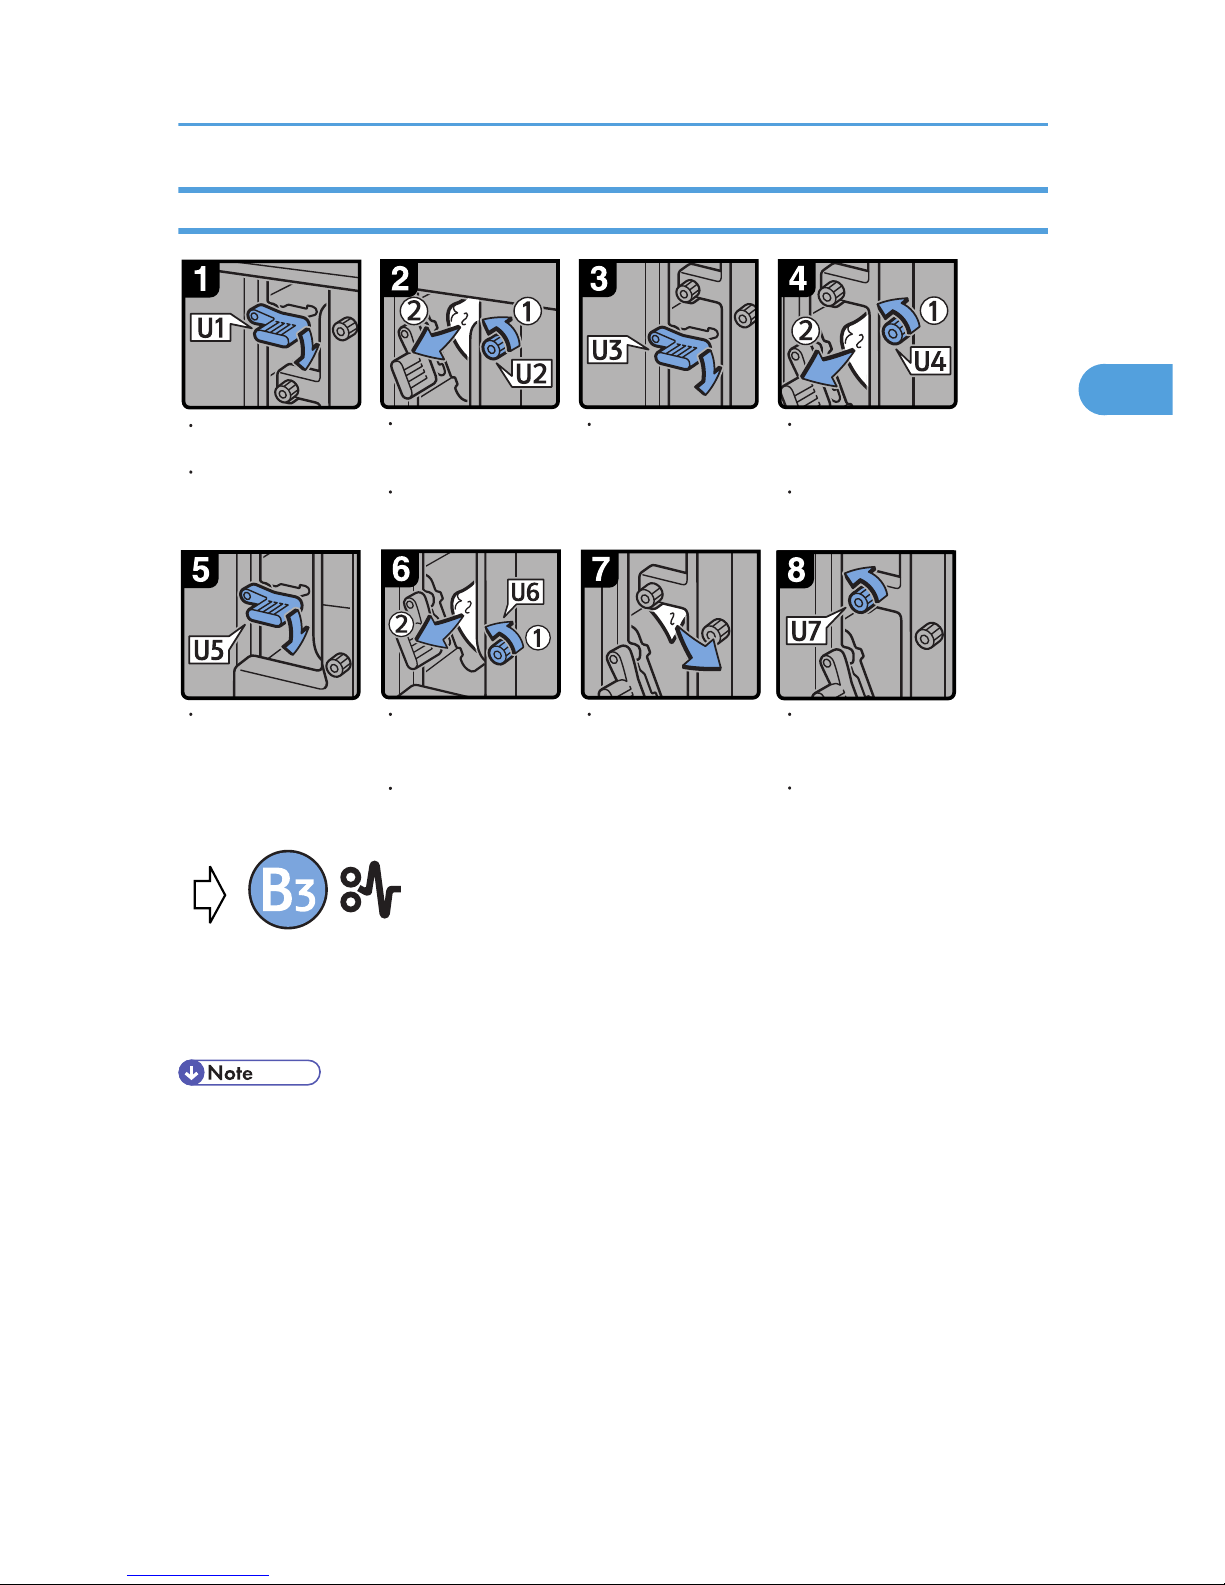
When U Is Displayed
CDN005
Open the Wide LCT
front cover.
Lower lever U1.
Turn knob U2, and
then remove misfed
paper.
Return lever U1 to
its original position.
Lower lever U3. Turn knob U4, and
then remove misfed
paper.
Lower lever U5. Turn knob U6, and
then remove misfed
paper.
Return lever U5 to
its original position.
Remove misfed paper. Turn knob U7, and
then remove misfed
paper.
Return lever U3 to
its original position.
Close the Wide LCT
front cover.
Next, follow the procedure under
the "When B Is Displayed".
• If coated paper frequently becomes jammed and causes "U" to appear, contact your service
representative.
Removing Jammed Paper
57
2
Page 60
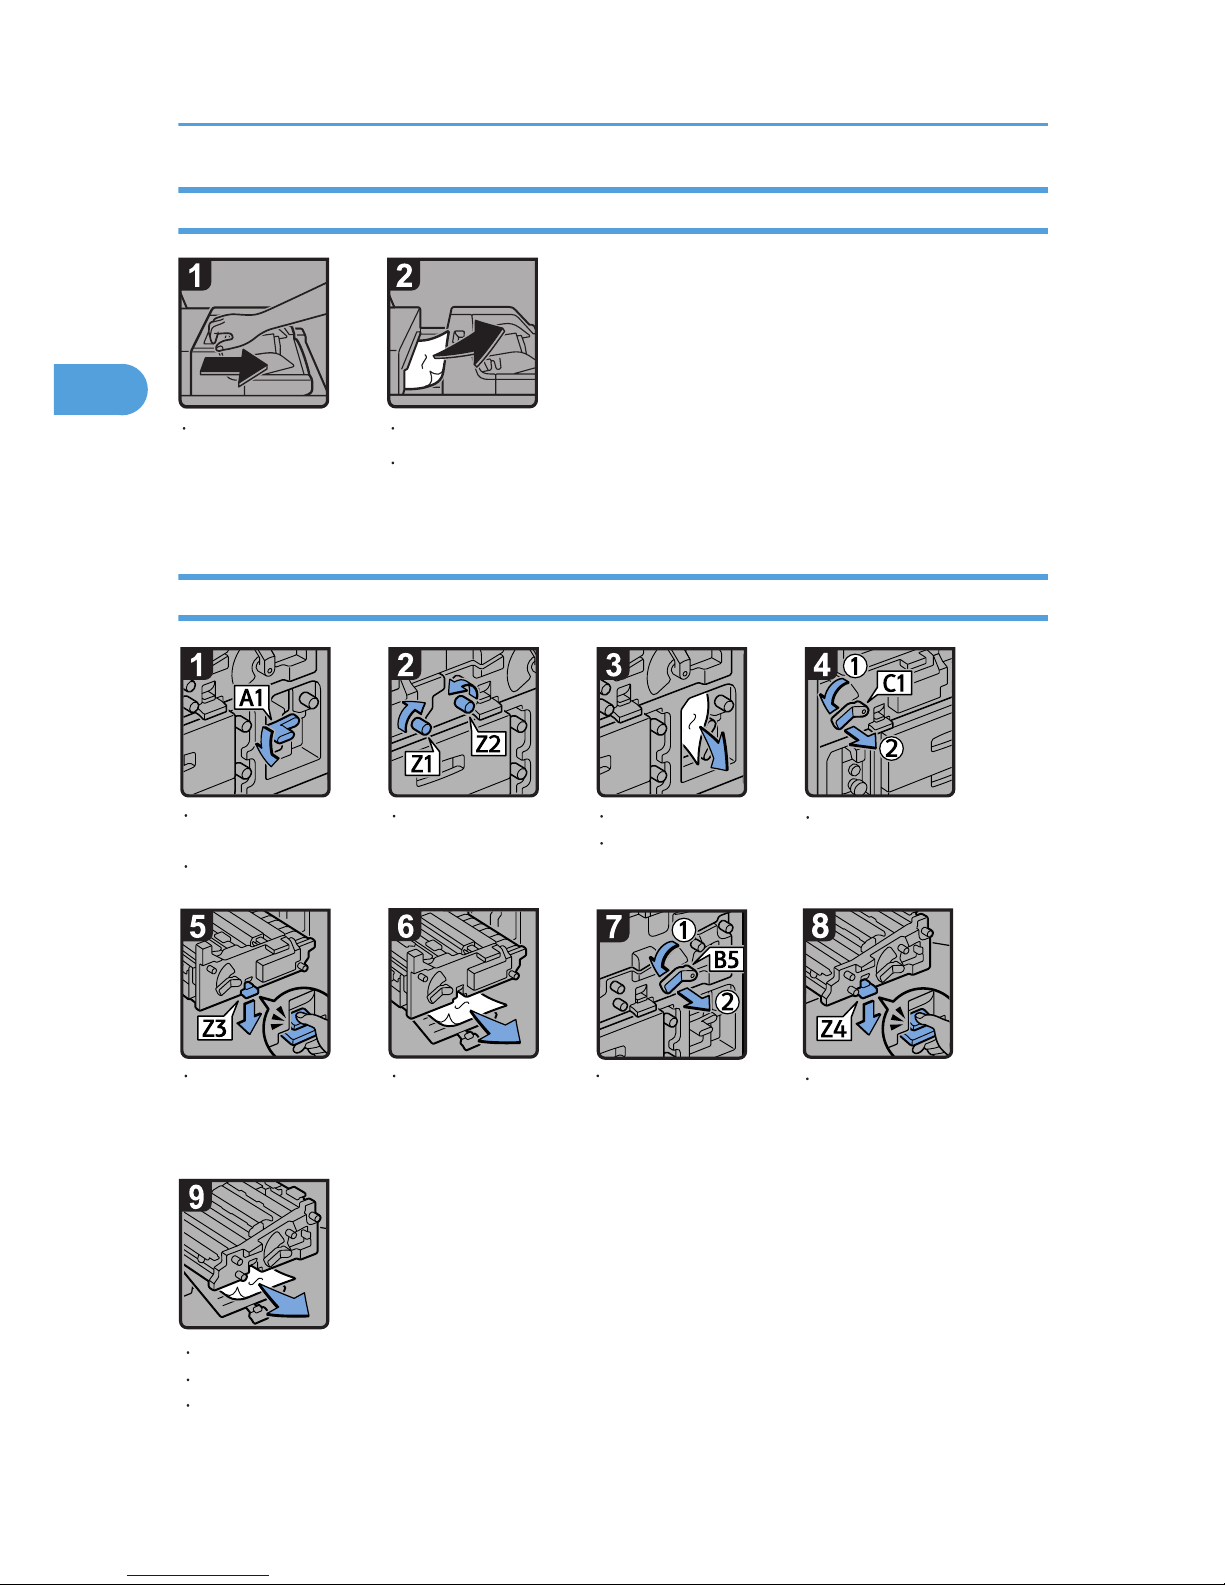
When V Is Displayed
CDN006
Disconnect the multi
bypass tray.
Remove misfed paper.
Return the multi bypass
tray to its original position.
When Z Is Displayed
CDN033
Turn lever B5 to the
left, and then pull out
the unit.
Open both front
covers.
Return the two units to their original positions.
Close both front covers.
Remove misfed paper, and then return lever Z4 to its original position.
Remove misfed paper.
Return lever A1 to
its original position.
Turn knobs Z1 and
Z2.
Lower lever Z3 by
pressing it down.
Remove misfed
paper, and then return
lever Z3 to its original
position.
Lower lever Z4 by
pressing it down.
Lower lever A1.
Turn lever C1 to the
left, and then pull
out the unit.
2. Clearing Misfeeds
58
2
Page 61
Removing Jammed Staples
This section describes how to remove jammed staples.
• Keep your hands clear of the booklet finisher tray when removing misfed paper, pulling out or
pushing in the finisher's staple unit. You can trap and injure your fingers if you do not.
• Curled paper may cause staples to jam. To avoid this, turn paper over in the tray.
• After jammed staples are removed, the stapler will automatically staple up to 10 times without
stapling paper. If a staple jam occurs on the saddle stitch, the stapler will not staple after the
jammed staples are removed.
• Remove the jammed staples according to the finisher type. Check the type if you are unsure. For
details about the type of finisher, see "Appendix", About This Machine .
Removing Jammed Staples
59
2
Page 62

Finisher SR5030
CDN016
Remove jammed
staples.
Hold the lever,
and then push in
the cartridge.
Open the finisher
front cover.
Pull handle Rb18,
and then pull out
staple unit.
Turn knob Rb19
counterclockwise to
rotate the staple unit.
Pull out the cartridge
gently.
Return the staple
unit to its original
position.
Close the finisher
front cover.
Pull down the face
plate until it clicks.
Push the cartridge
until it clicks.
Pull out the
cartridge lever.
Open the face
plate of the
cartridge.
2. Clearing Misfeeds
60
2
Page 63
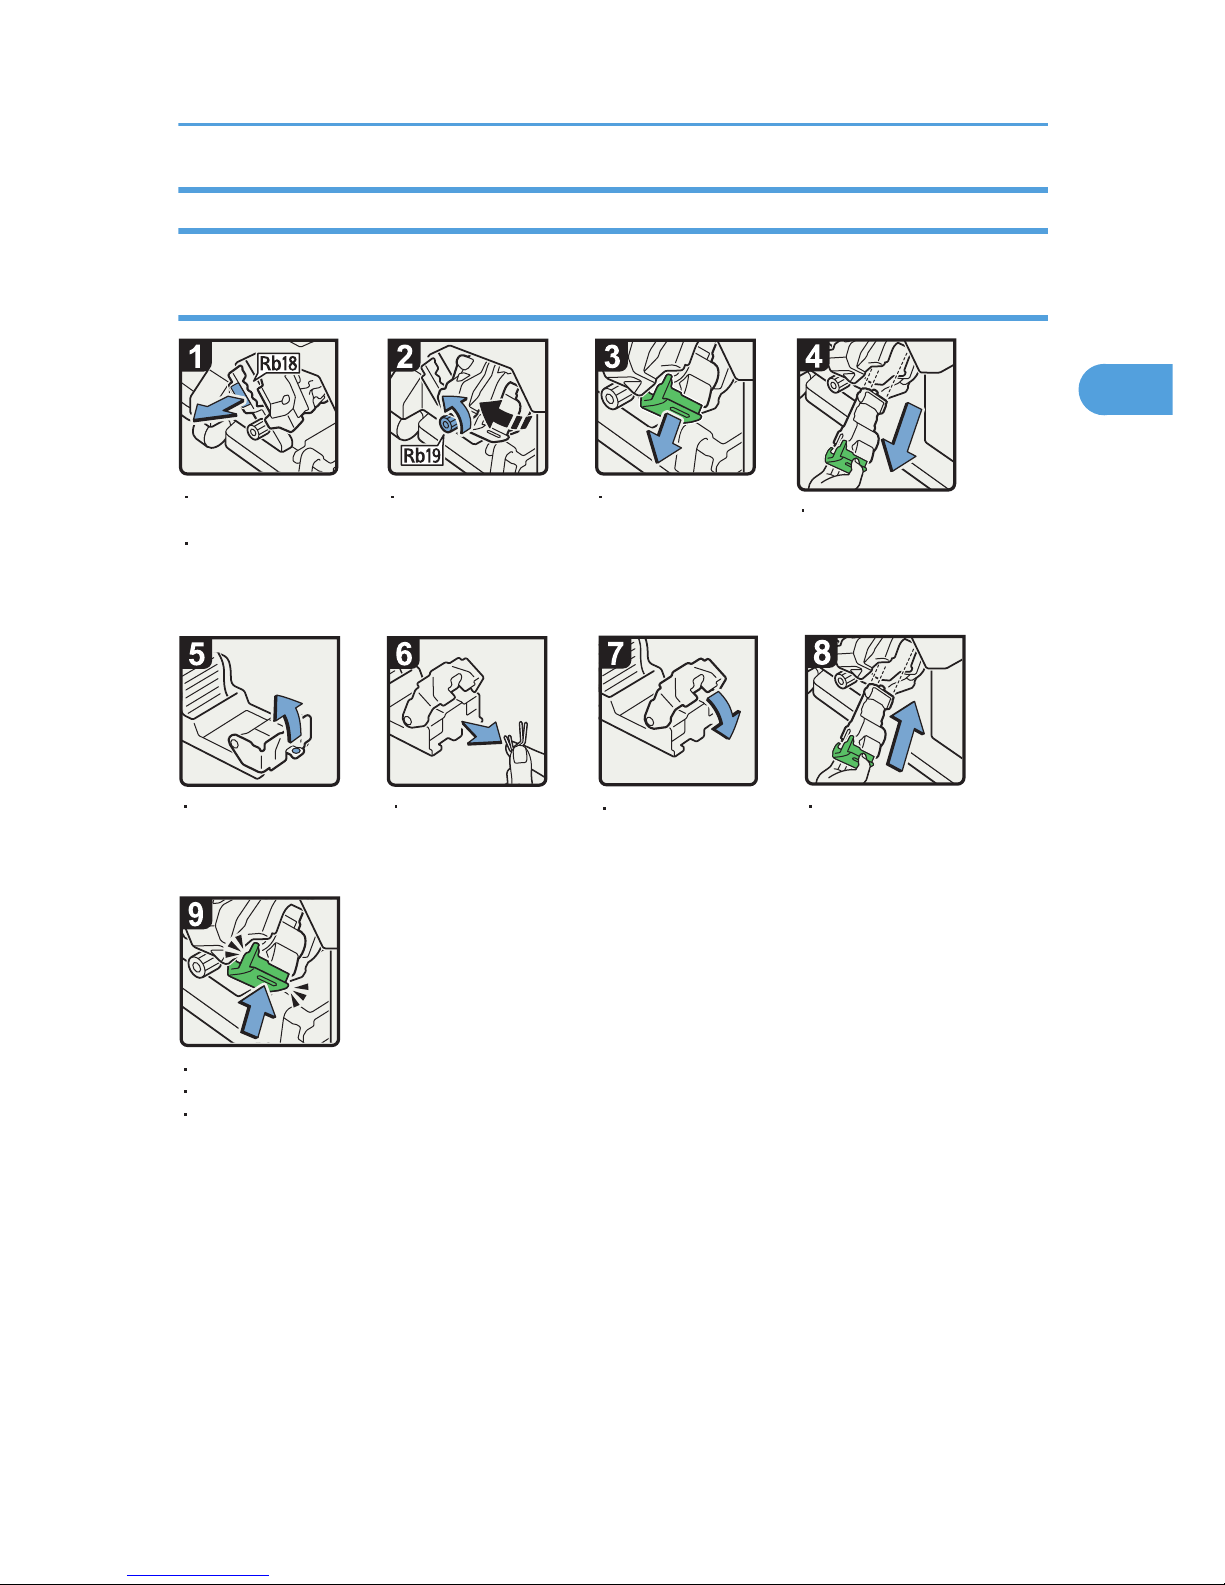
Booklet Finisher SR5040
When S1 Is Displayed
CDN034
Remove jammed
staples.
Hold the lever,
and then push in
the cartridge.
Open the finisher
front cover.
Pull handle Rb18,
and then pull out
staple unit.
Turn knob Rb19
counterclockwise to
rotate the staple unit.
Pull out the cartridge
gently.
Return the staple unit to its original position.
Close the finisher front cover.
Pull down the face
plate until it clicks.
Push the cartridge until it clicks.
Pull out the
cartridge lever.
Open the face
plate of the
cartridge.
Removing Jammed Staples
61
2
Page 64
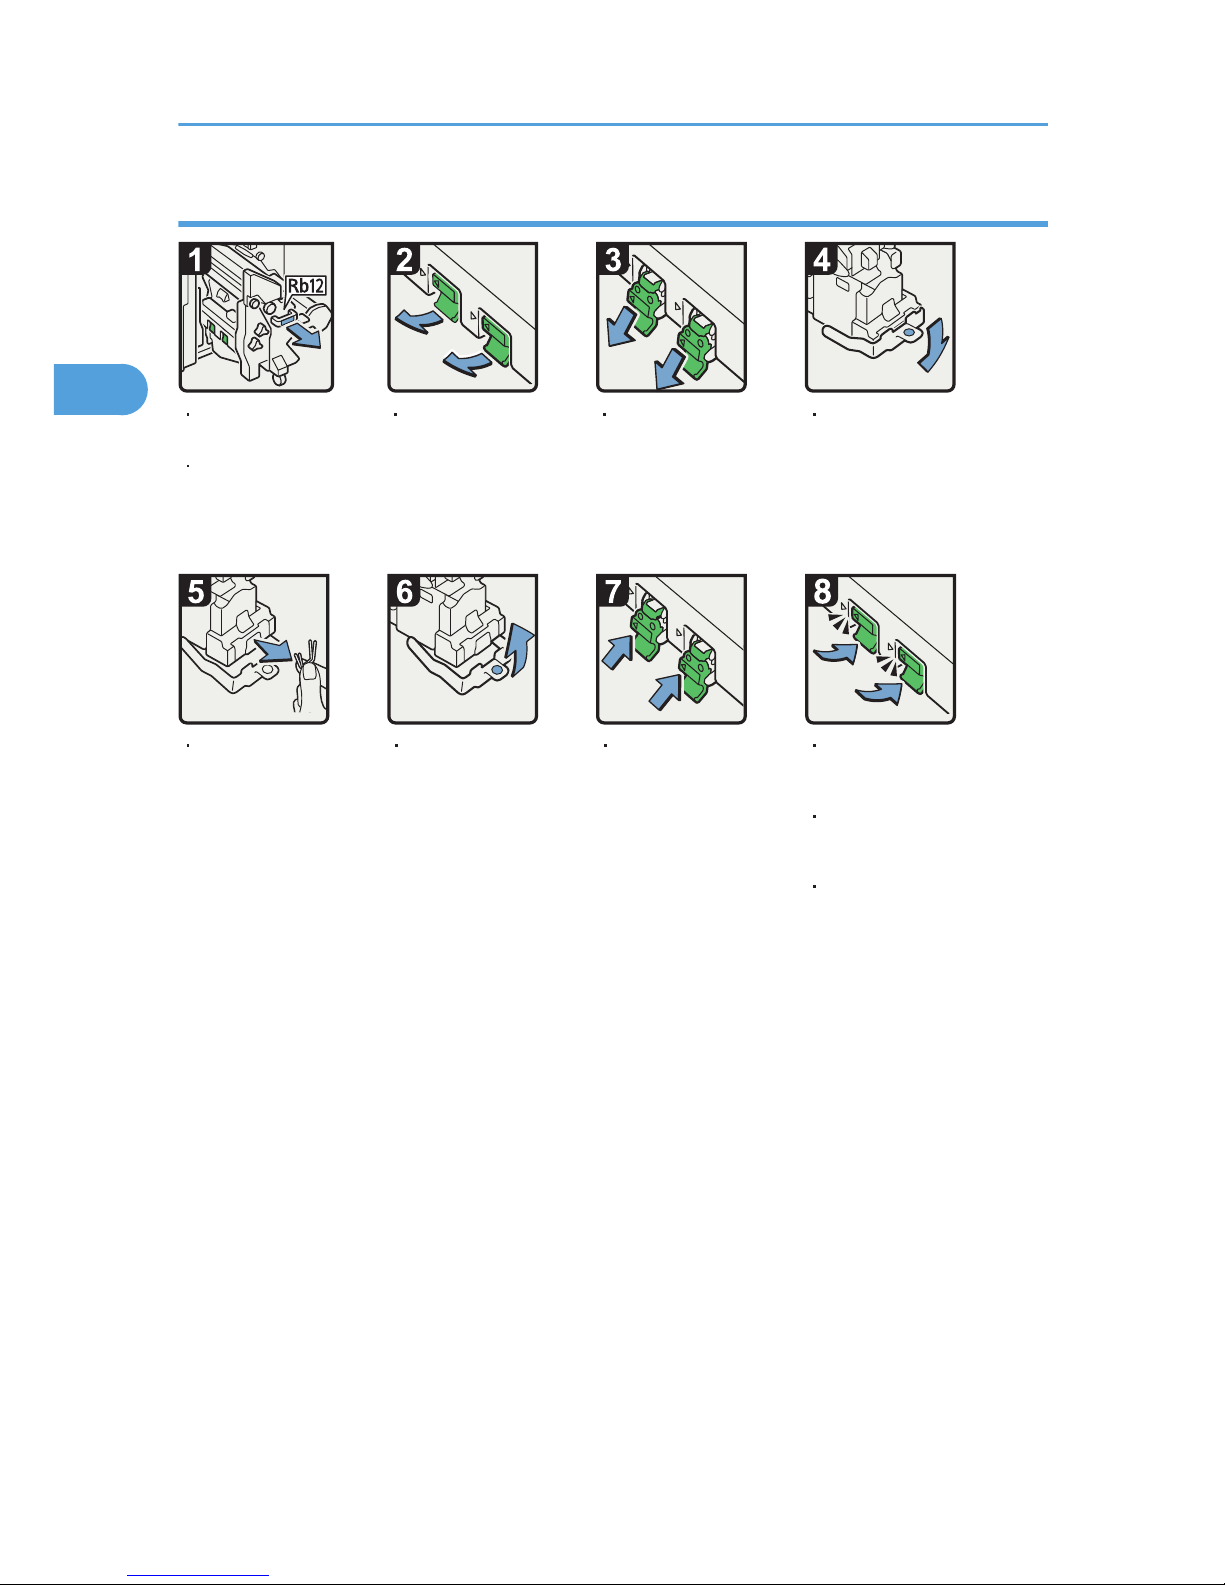
When S2 Is Displayed (Saddle Stitch)
CDN027
Open the finisher
front cover.
Pull handle Rb12,
and then pull out
the staple unit.
Hold the levers,
and then push in
the cartridge.
Remove jammed
staples.
Pull out the
cartridge gently.
Return the staple
unit to its original
position.
Close the finisher
front cover.
Pull up the face
plate of the
cartridge until it
clicks.
Push down the
cartridge until
it clicks.
Pull out the
cartridge levers.
Open the face
plate of the
cartridge.
2. Clearing Misfeeds
62
2
Page 65
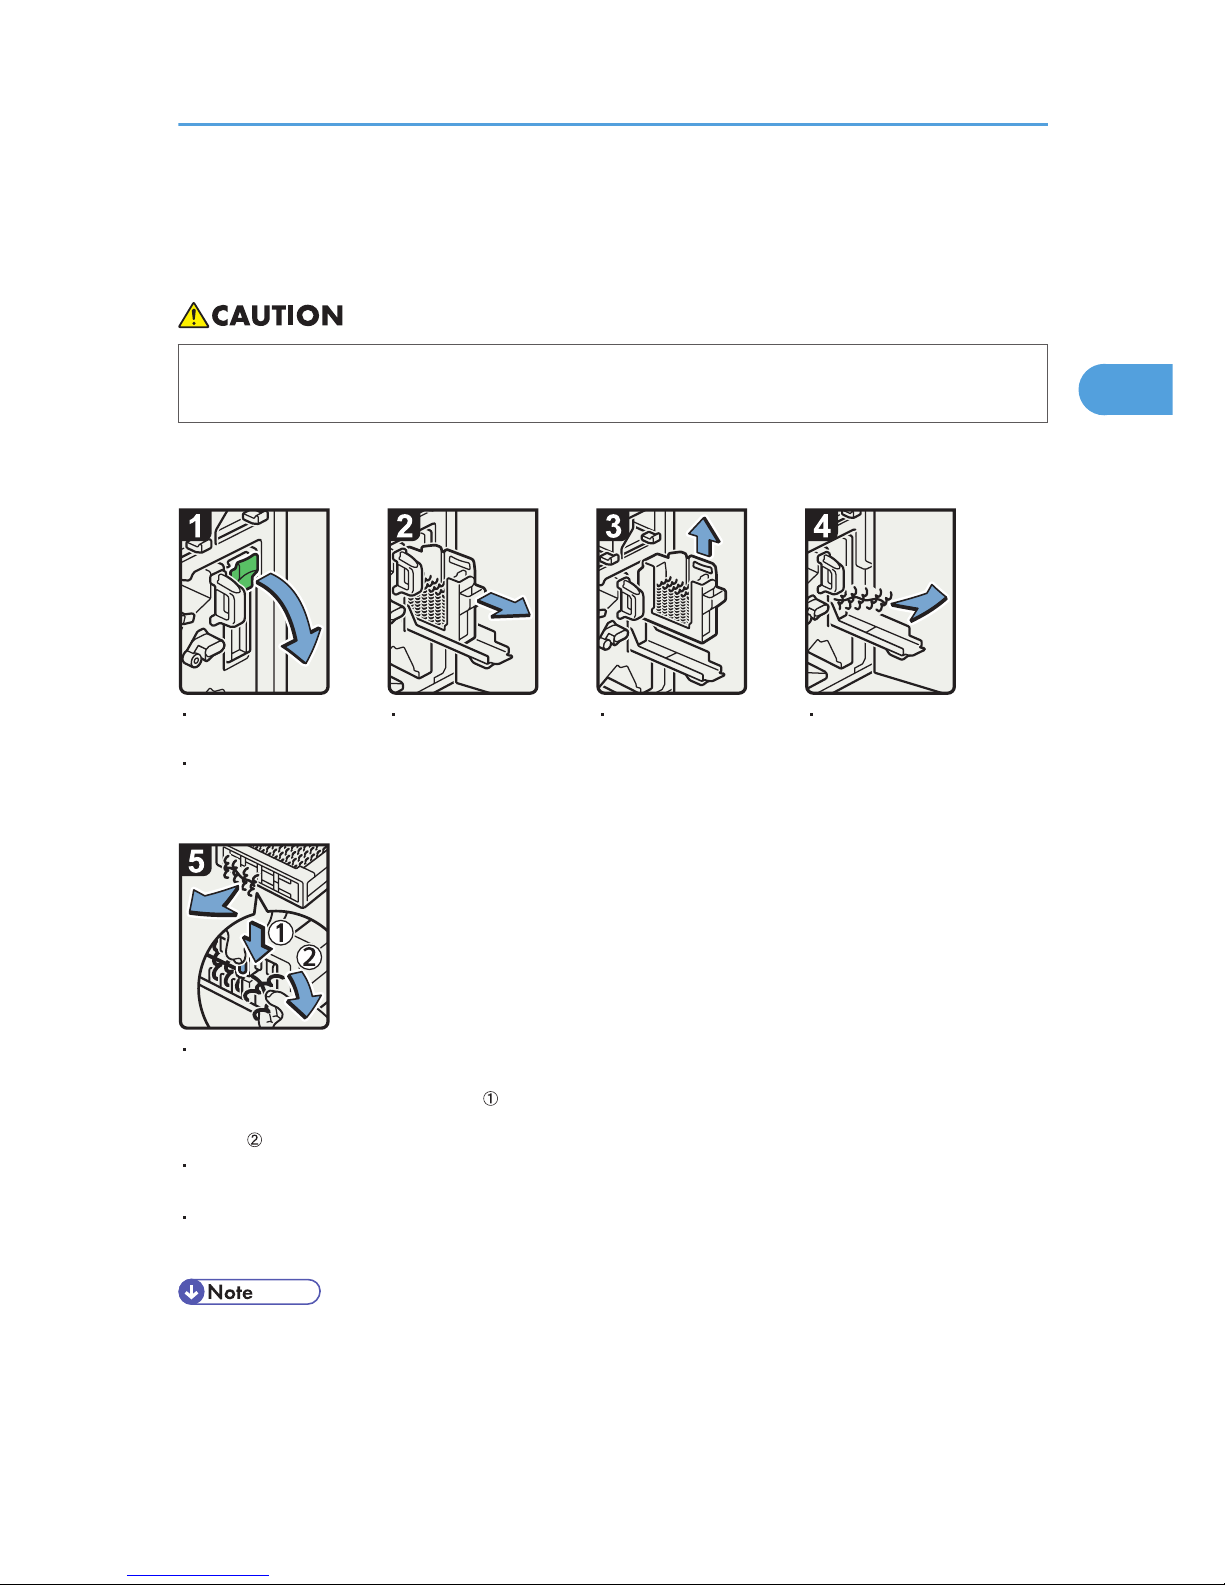
Removing Jammed Ring Combs
This section describes how to remove jammed ring combs.
• Keep your hands clear of the inside of the ring binder and the space under the ring binder tray.
You can trap your fingers if you do not.
If ring combs become jammed, a message appears on the display panel. When the message appears,
remove the jammed ring combs.
CAL130
Lift up and pull out the
ring comb cartridge.
To remove jammed ring combs from the bottom
of the cartridge:
While pressing down the blue buttons at the
bottom of the cartridge, remove the jammed ring
combs carefully.
Reinsert the cartridge, push it into place, and then close
the cartridge cover.
Open the ring binder
front right cover.
Open the cartridge
cover.
Pull out the ring
comb cartridge.
Remove the
jammed ring combs
from the ring binder.
Close the ring binder front right cover.
• The ring combs set in the ring comb cartridge might move or become slanted when you remove the
jammed ring combs from the ring comb cartridge. Before replacing the cartridge, check that all the
ring combs are straight and properly aligned.
Removing Jammed Ring Combs
63
2
Page 66
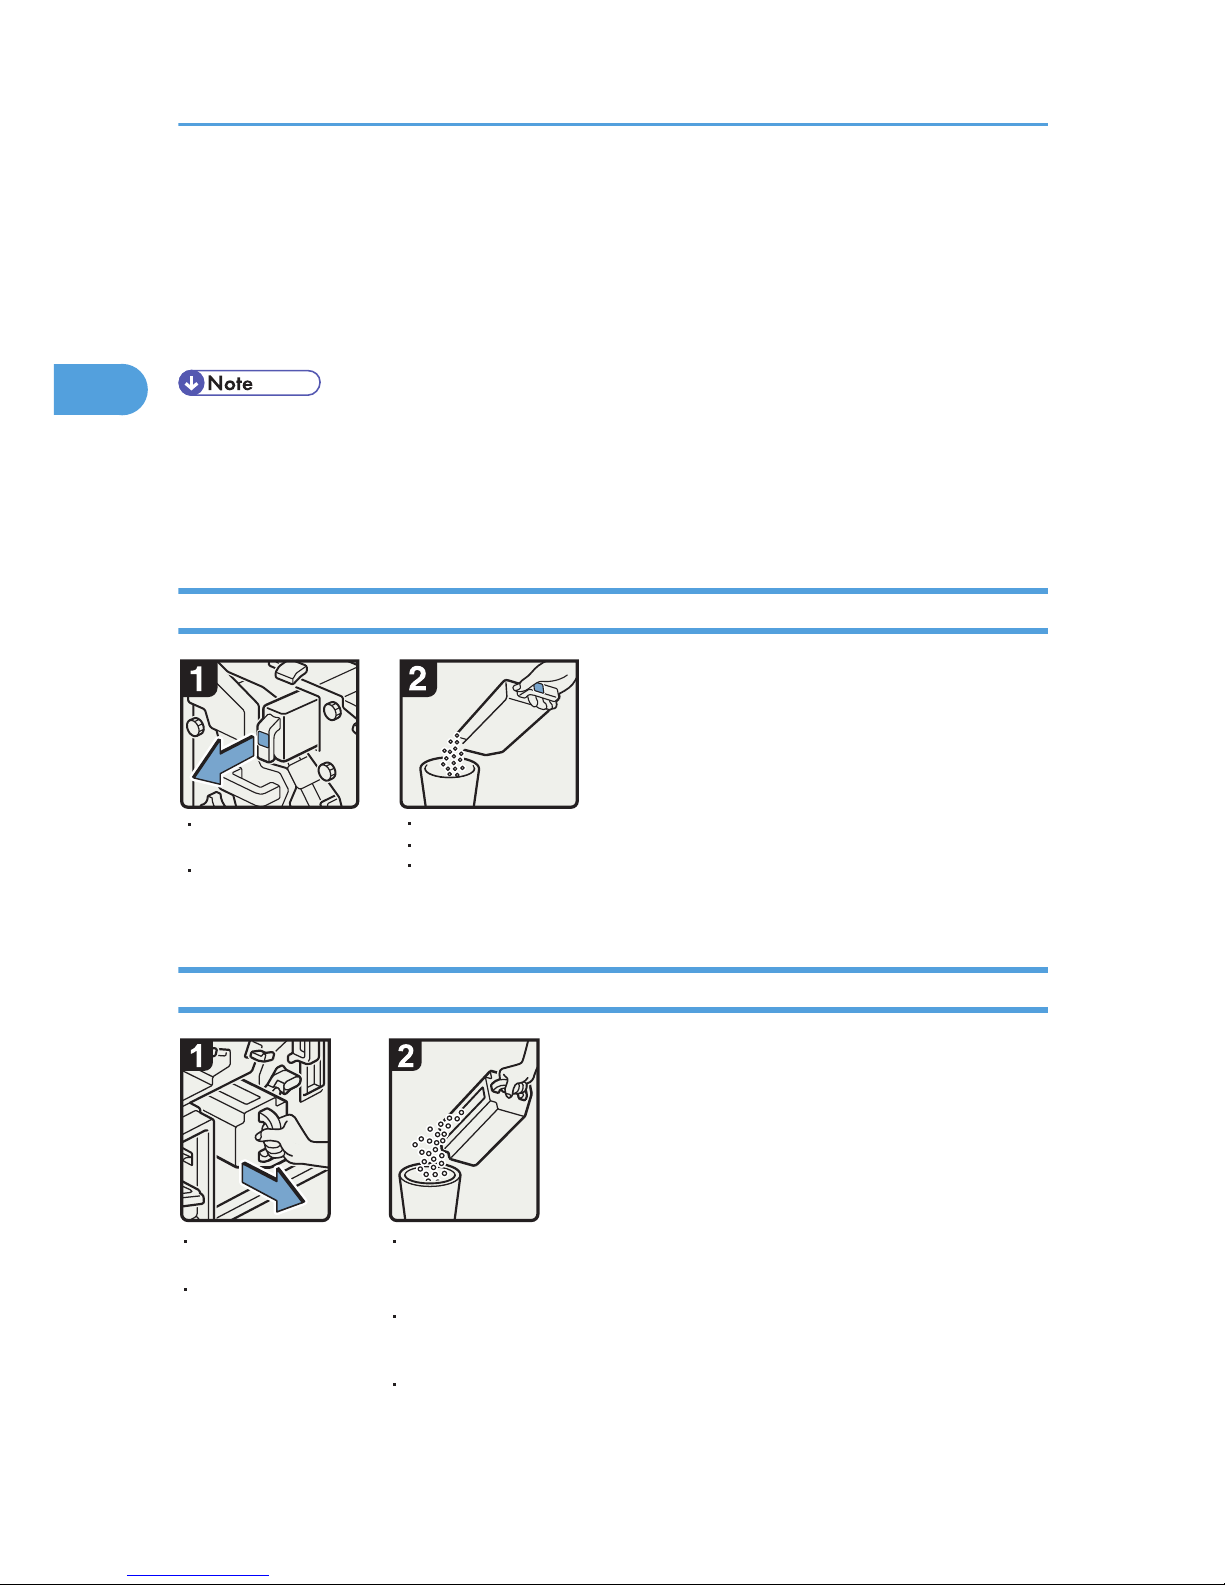
Removing Punch Waste
This section describes how to remove punch waste.
If punch waste box or comb binding punch receptacle is full, a message appears on the display panel.
When the message appears, remove punch waste.
• While the message is displayed, you cannot use the punch function.
• The message is displayed until the comb binding punch receptacle or punch waste box is
reinstalled.
• If the message is still displayed, reinstall the comb binding punch receptacle or punch waste box.
Finisher SR5030 or Booklet Finisher SR5040
CAL132
Open the finisher
front cover.
Pull out the punch
waste box.
Remove punch waste.
Reinstall the punch waste box.
Close the finisher front
cover.
Ring Binder
CAL133
Open the ring binder
front right cover.
Using both hands,
pull out the comb
binding punch
receptacle.
Empty the comb
binding punch
receptacle.
Reinstall the comb
binding punch
receptacle.
Close the ring binder
front right cover.
2. Clearing Misfeeds
64
2
Page 67
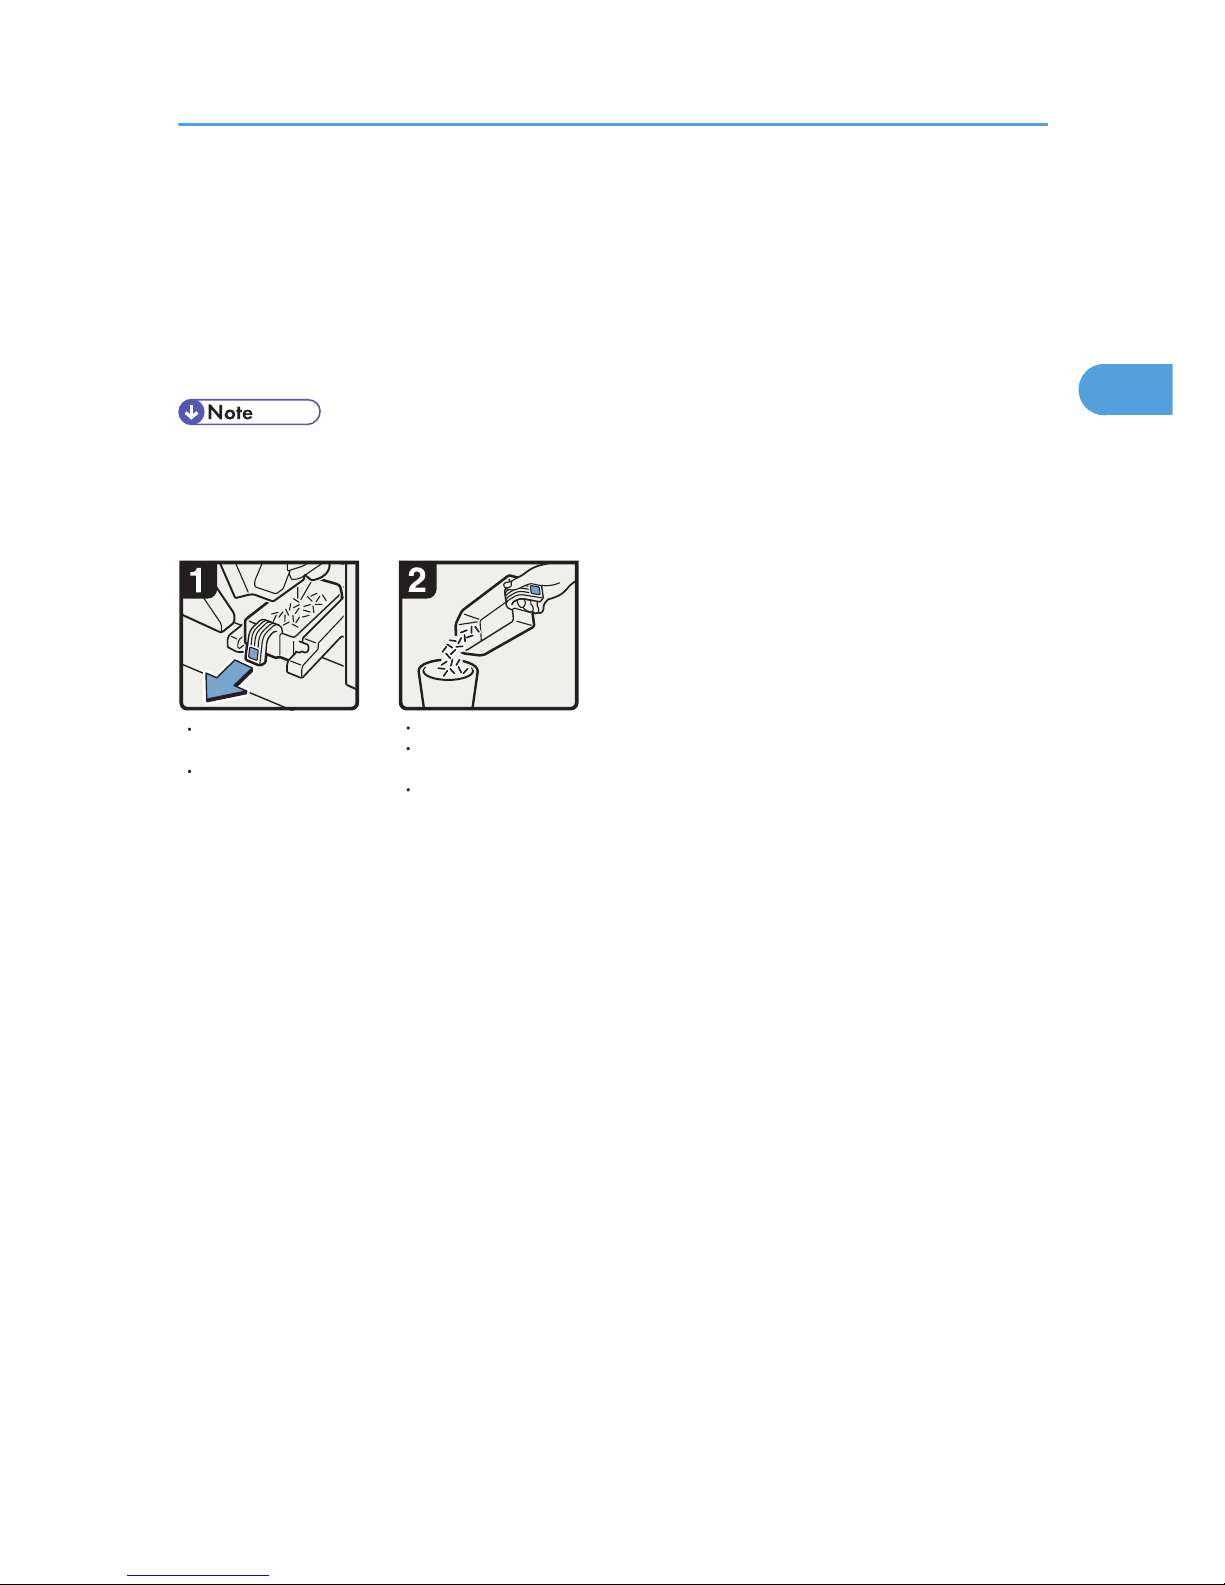
Removing Staple Waste
This section describes how to remove staple waste when using the Finisher SR5030 or Booklet Finisher
SR5040.
If staple waste box is full, a message appears on the display panel. When the message appears,
remove staple waste.
• While the message is displayed, you cannot use the staple function.
• The message is displayed until the staple waste box is reinstalled.
• If the message is still displayed, reinstall the staple waste box.
CAL135
Open the finisher front
cover.
Pull out the staple
waste box.
Remove staple waste.
Reinstall the staple
waste box.
Close the finisher front
cover.
Removing Staple Waste
65
2
Page 68
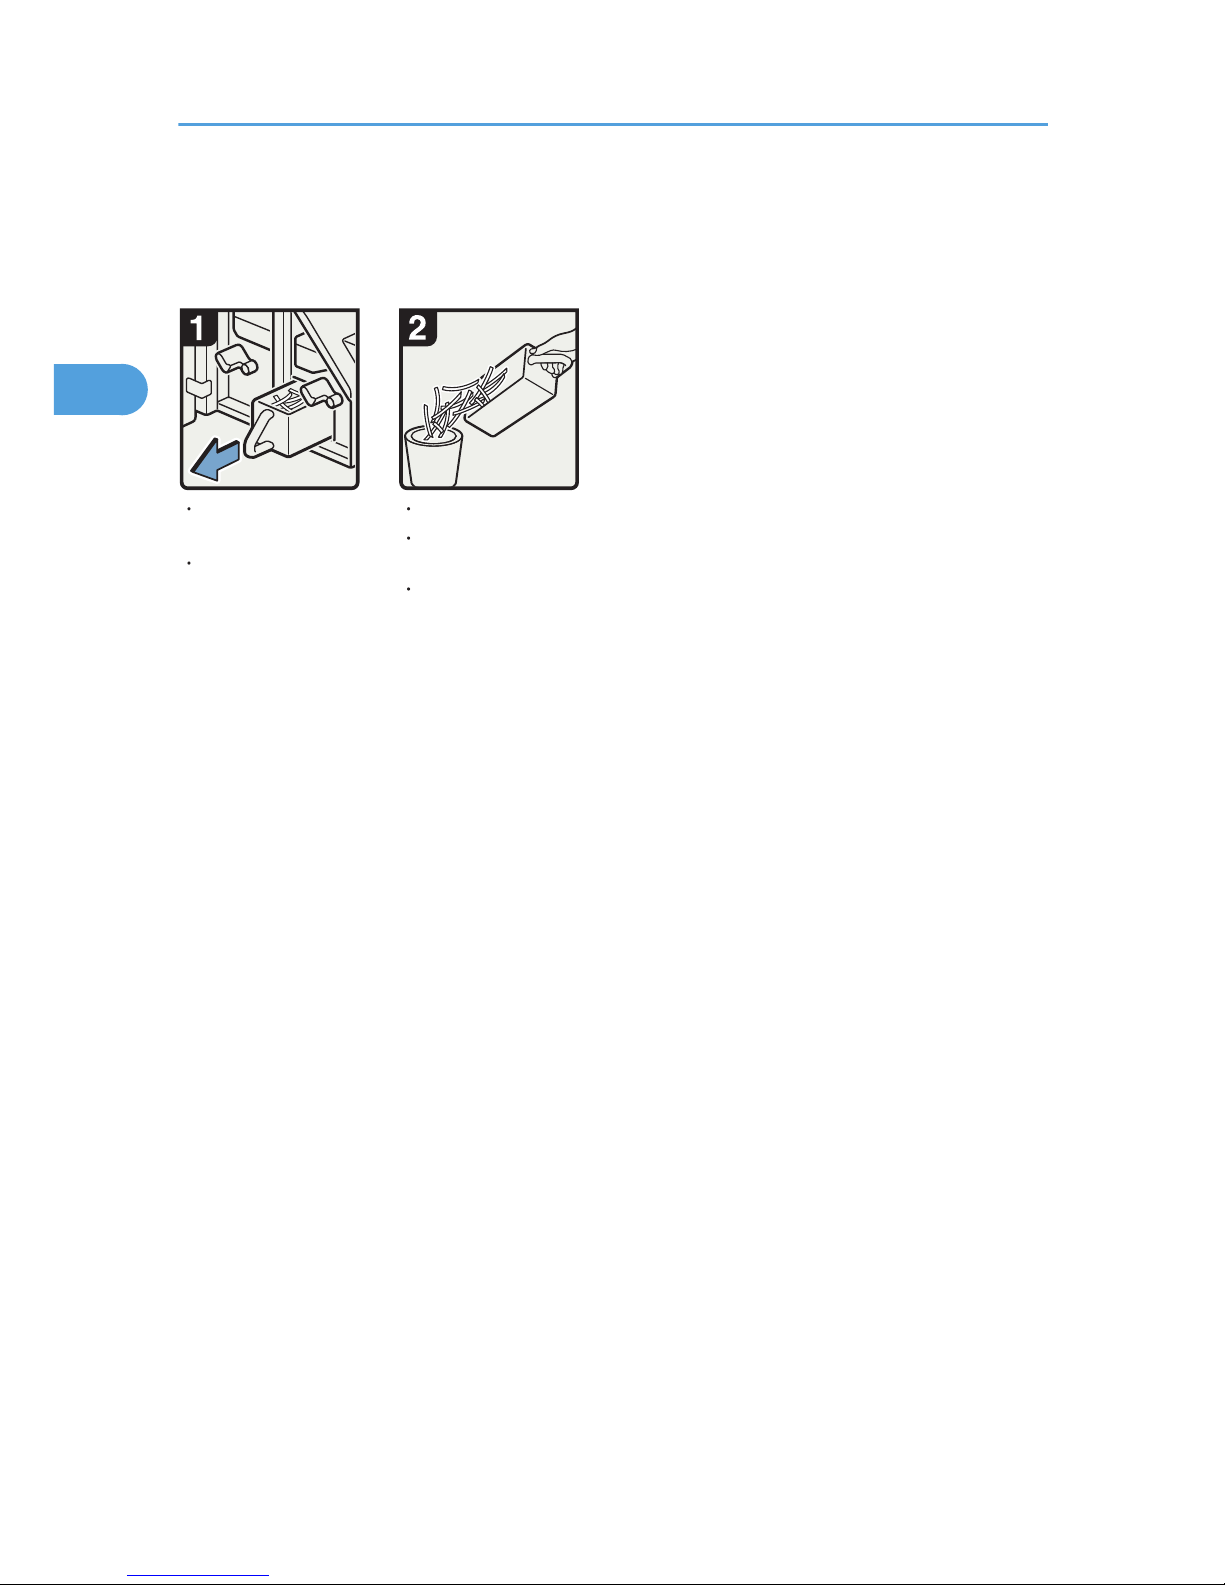
Removing Waste Paper
This section describes how to remove the paper waste produced by the trimmer unit.
CEQ008
Reinstall the waste paper
receptacle.
Open the trimmer
front cover.
Pull out the waste
paper receptacle.
Remove waste paper.
Close the trimmer
front cover.
2. Clearing Misfeeds
66
2
Page 69

3. Appendix
Trademarks
Adobe, Acrobat, and Reader are either registered trademarks or trademarks of Adobe Systems
Incorporated in the United States and/or other countries.
Windows® is either a registered trademark or a trademark of Microsoft Corporation in the United States
and/or other countries.
Other product names used herein are for identification purposes only and might be trademarks of their
respective companies. We disclaim any and all rights to those marks.
67
3
Page 70

3. Appendix
68
3
Page 71

INDEX
A
Adjusting the color registration.............................24
Adjusting the image position................................25
Attention light.........................................................11
B
Beep alert...............................................................13
Booklet Finisher SR5040.....26, 27, 31, 33, 61, 64,
65
C
Checking machine status and settings.................14
Clearing misfeeds..................................................37
Coated paper........................................................33
F
Finisher SR5030.............26, 27, 31, 33, 60, 64, 65
H
How to read this manual.........................................7
I
Indicators..................................................................9
Inquiry....................................................................14
L
Letter fold-out paper..............................................29
Locating jammed paper........................................38
M
Machine Address Info...........................................14
Maintenance Info..................................................14
Manuals for this machine........................................4
Multi-folding unit.............................................27, 29
N
Names of major items.............................................7
Notes........................................................................8
Notice.......................................................................6
P
Pausing print when using Booklet Finisher SR5040
................................................................................26
Pausing print when using Finisher SR5030.........26
Problems operating the machine..........................17
R
Removing jammed paper.....................................37
Removing jammed ring combs.............................63
Removing jammed staples....................................59
Removing punch waste.........................................64
Removing staple waste.........................................65
Removing waste paper.........................................66
Ring binder......................................................63, 64
S
Symbols....................................................................7
T
Trademarks............................................................67
Trimmer unit............................................................66
W
When A is displayed.............................................40
When B is displayed.............................................41
When B1 is displayed...........................................40
When C is displayed.............................................41
When coated paper is not properly aligned......33
When D is displayed.............................................42
When E is displayed.............................................44
When K is displayed.............................................45
When L is displayed..............................................46
When large size paper is not properly aligned..31
When Mc1 - Mc4 is displayed............................47
When Mc5 or Mc6 is displayed.........................47
When Mc7 or Mc8 is displayed.........................48
When N1 - N5 is displayed................................49
When N6 - N22 is displayed..............................50
When Q1 - Q4 is displayed................................52
When Rb1 - Rb5 is displayed in the case of
Booklet Finisher SR5040......................................55
When Rb1 - Rb5 is displayed in the case of
Finisher SR5030....................................................53
When Rb10 - Rb17 is displayed in the case of
Booklet Finisher SR5040......................................56
When Rb12 - Rb13 is displayed in the case of
Finisher SR5030....................................................54
When Rb6 - Rb9 is displayed in the case of
Booklet Finisher SR5040......................................55
When Rb6 - Rb9 is displayed in the case of
Finisher SR5030....................................................54
69
Page 72

When Rt1 or Rt2 is displayed...............................56
When the output letter fold-out paper is less than
the stack capacity..................................................29
When the output z-folded paper is less than the
stack capacity........................................................27
When U is displayed.............................................57
When V is displayed.............................................58
When Z is displayed.............................................58
Z
Z-folded paper......................................................27
70
Page 73

MEMO
71
Page 74

MEMO
72 EN
US
M044-7524
Page 75

© 2011
Page 76

Troubleshooting
Operating Instructions
M044-7524
EN
US
 Loading...