

Page 1
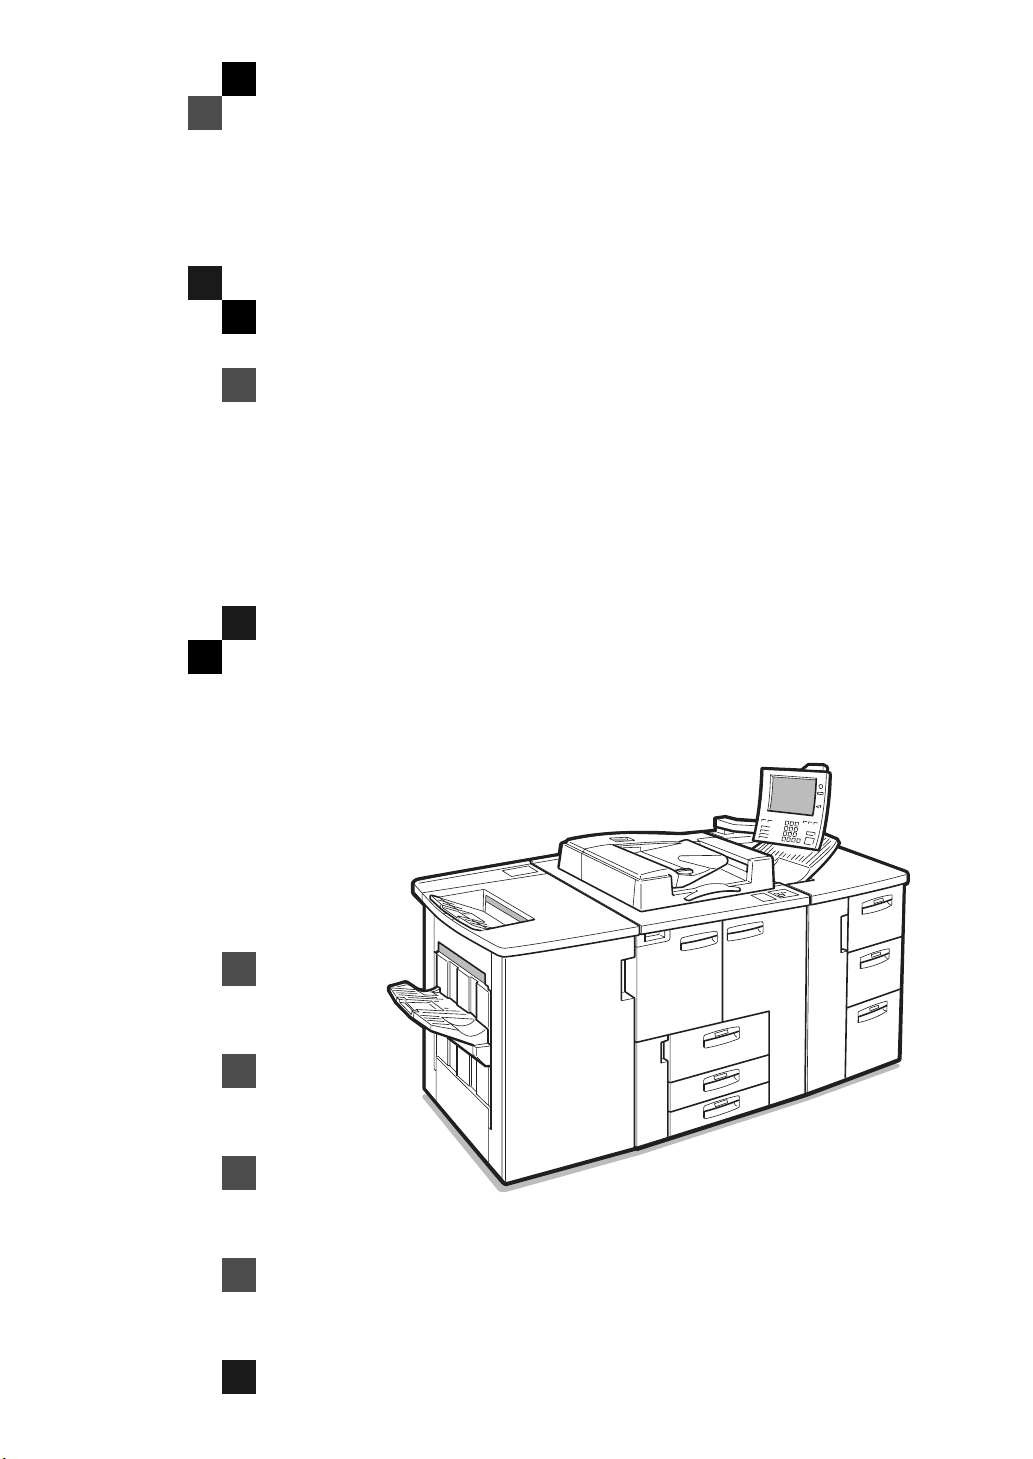
PRINTER Controller
Type 850
Operating Instructions
PRINTER REFERENCE 2 (option)
Read this manual carefully before you use this product and keep it handy for future
reference.
For safety, please follow the instructions in this manual.
Page 2

Introduction
This manual contains detailed instructions on the operation and maintenance of this machine. To get
maximum versatil ity from this ma chine all opera tors sho uld careful ly read an d follow the ins tructi ons in
this manual.
Please keep this manual in a handy place near the machine.
Please read the Safety Information in the “Copy Reference” before using this machine. It contains im-
portant information related to USER SAFETY and PREVENTING EQUIPMENT PROBLEMS.
Important
Parts of this manual are subject to change without prior notice. In no event will the company be liable
for direct, indirect, special, incidental, or consequential damages as a result of handling or operating
the machine.
Trademarks
®
Microsoft
and Windows® are registered trademark s of Micros oft Corporati on in the Uni ted States an d/
or other countries.
®
Ethernet
is a registered trademark of Xerox Corporation.
PostScript® and Acrobat® are registered trademarks of Adobe System Incorporated.
PCL® is a registered trademark of Hewlett-Packard Company.
Other product names us ed herei n are for iden tifica tion purp oses on ly and migh t be tradem arks of th eir
respective companies. We disclaim any and all rights in those marks.
©
IPS-PRINT™ Printer Language Emulation
Copyright 1999 - 2000, XIONICS DOCUMENT TECHNOL-
OGIES, INC., All Rights Reserved.
Warning:
Use of controls or adjustment or performance of procedures other than those specified in this manual
might result in hazardous radiation exposure.
Notes:
Some illustrations might be slightly different from your machine.
Certain options migh t no t be av ail abl e in some countries. F or de tails, please contac t yo ur local dealer.
Page 3

Manuals for This Machine
Manuals for This Machine
There are seven manuals that separately describe the operational procedures for
the operation and maintenance of the machine.
To enhance safe and efficient operation of the machine, all users should read and
follow the instructions contained in the following manuals.
❖
Copy Reference
Describes the procedures and functions for using this machine as a copier.
❖
System Settings
Describes the system settings of this machine.
❖
Printer Reference 1
Describes the system settings, procedures and functions for using this machine as a printer.
❖
Printer Reference 2
Describes the procedures and provides necessary information about using
this machine as a printer. The manual is included as a PDF file on the CDROM labeled “Printer Drivers and Utilities”. (This Manual)
❖
Network Interface Board Quick Configuration Guide
Describes the procedures and provides necessary information about setting
up and using the printer under the network environment. We recommend
this manual as your first choice. The manual is included as a PDF file on the
CD-ROM labeled “Printer Drivers and Utilities”.Read this manual as your
first choice before refering to the paper version of the Quick Configuration
Guide which comes with optional Network Interface Board Type 450–E.
❖
PostScript 3 Operating Instructions Supplement
Describes the menus and features you can set using the PostScript printer
driver. The manual is provided as a PDF file on the CD-ROM labeled “Printer
Drivers and Utilities”.
❖
Network Interface Board Type 450-E Owner's Manual
Describes the procedures and provides necessary information about setting
up and using the printer under the network environment. The manual is provided as a PDF file which is included on the CD-ROM labeled “Print Server
Software and Documentation” which comes with optional Network Interface
Board Type 450-E.
i
Page 4
ENERGY STAR Program
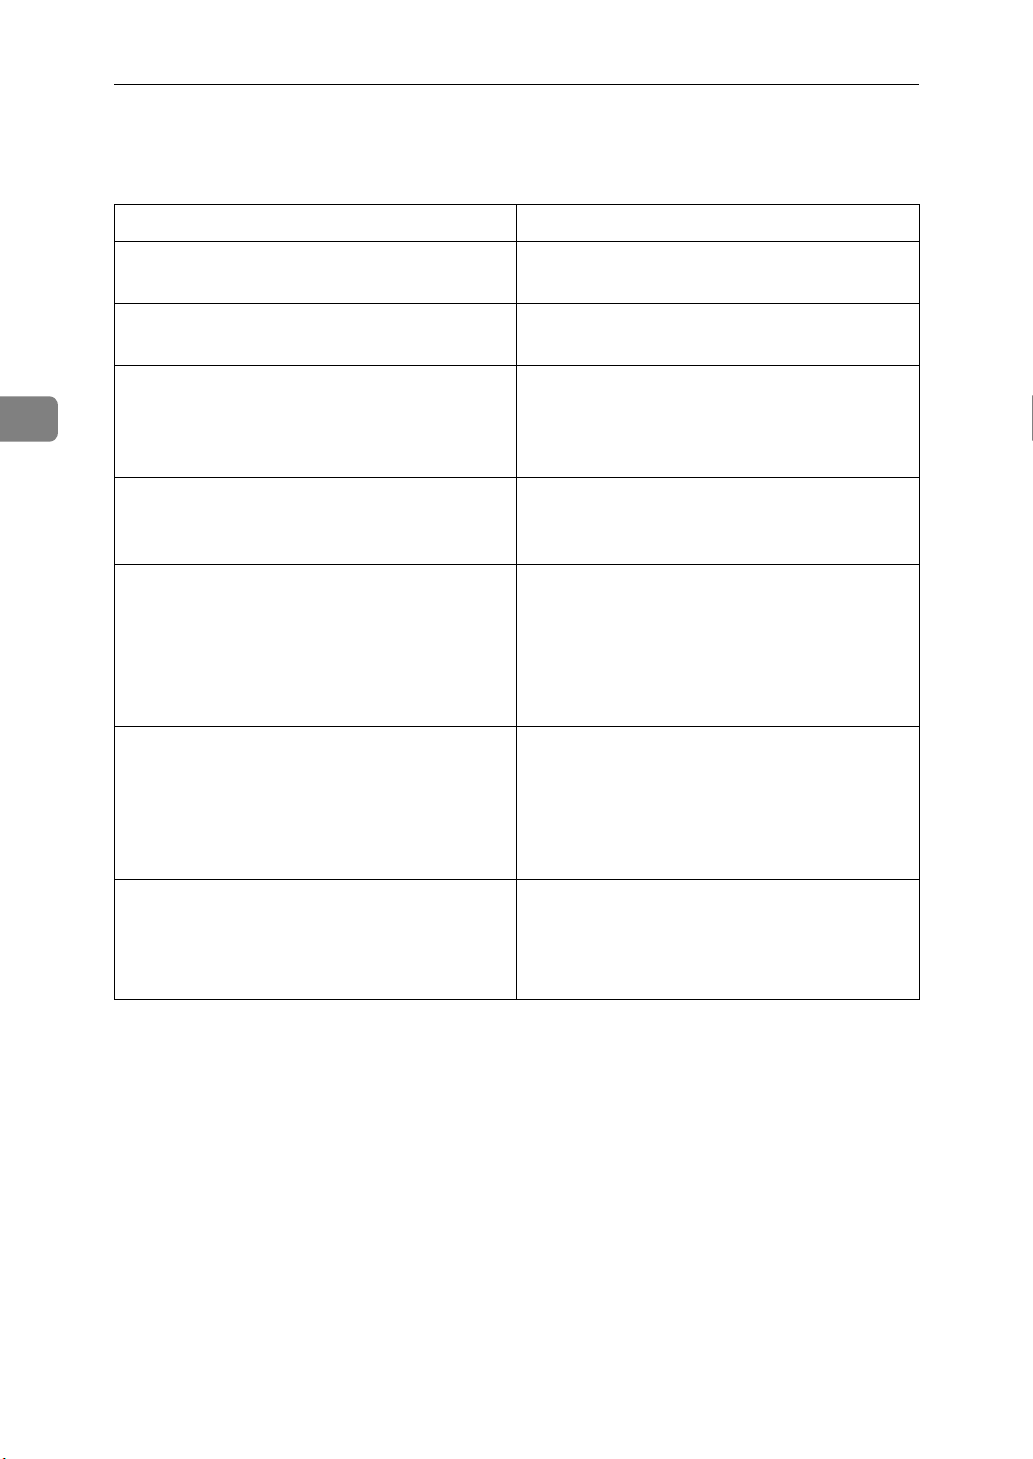
As an ENERGY STAR Partner, we have determined that this machine model meets the ENERGY STAR Guidelines for energy efficiency.
The ENERGY STAR Guidelines intend to establish an international energy-saving system for developing and introducing energy-efficient office equipment to deal with environmental issues, such as global warming.
When a product meets the ENERGY STAR Guidelines for energy efficiency, the Partner shall place the ENERGY STAR logo onto the machine model.
This product was designed to reduce the environmental impact associated with office
equipment by means of energy-saving features, such as Low-power mode.
• Low Power mode
This product automatically lowers its power consumption 15 minutes after
the last copy or print job has finished. Printing is still possible in Low-power
mode, but if you wish to make copies press the {
Energy Saver
For how to change the default interval that the machine waits before entering
Low-power mode, see “Low Power Shift Time” in the “System Settings”.
} key first.
• Sleep Mode
If the printer features are installed, this product automatically lowers its power consumption even further 120 minutues after the last copy or print job has
finished. Printing is still possible in Sleep mode, but if you wish to make copies press the operation switch first.
For how to change the default interval that the machine waits before entering
Sleep mode, see “Auto Off mode” in the “System Settings”.
• Auto Off mode
If the printer feature is not installed, this product automatically turns itself off
120 minutes after the last copy or print job has finished. If you wish to make
copies when the machine is in Auto Off mode, press the operation switch.
For how to change the default interval that the machine waits before entering
Auto Off mode, see “Auto Off Timer” in the “System Settings”.
• Duplex Priority
To conserve paper resources, the Duplex function (1-Sided → 2-Sided) is se-
lected preferentially when you turn on the operation switch or the main power switch, press the {
Energy Saver
} key, or when the machine resets itself
automatically.
For how to turn Duplex Priority mode on or off, see “Duplex Mode Priority”
in the “Copy Reference”.
ii
Page 5
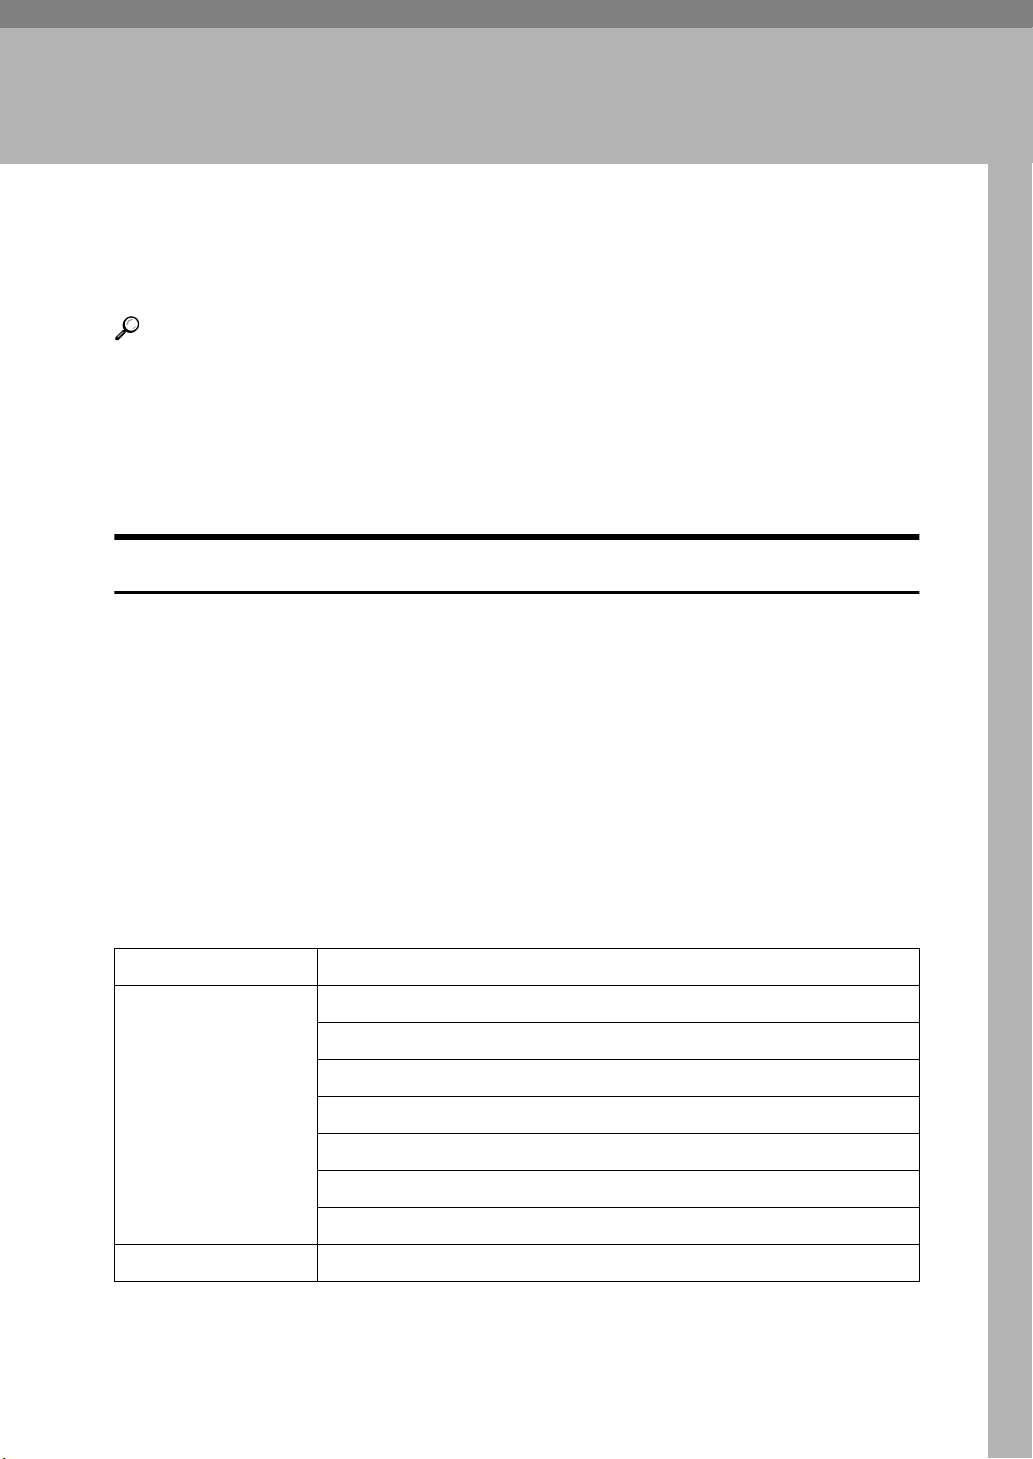
❖
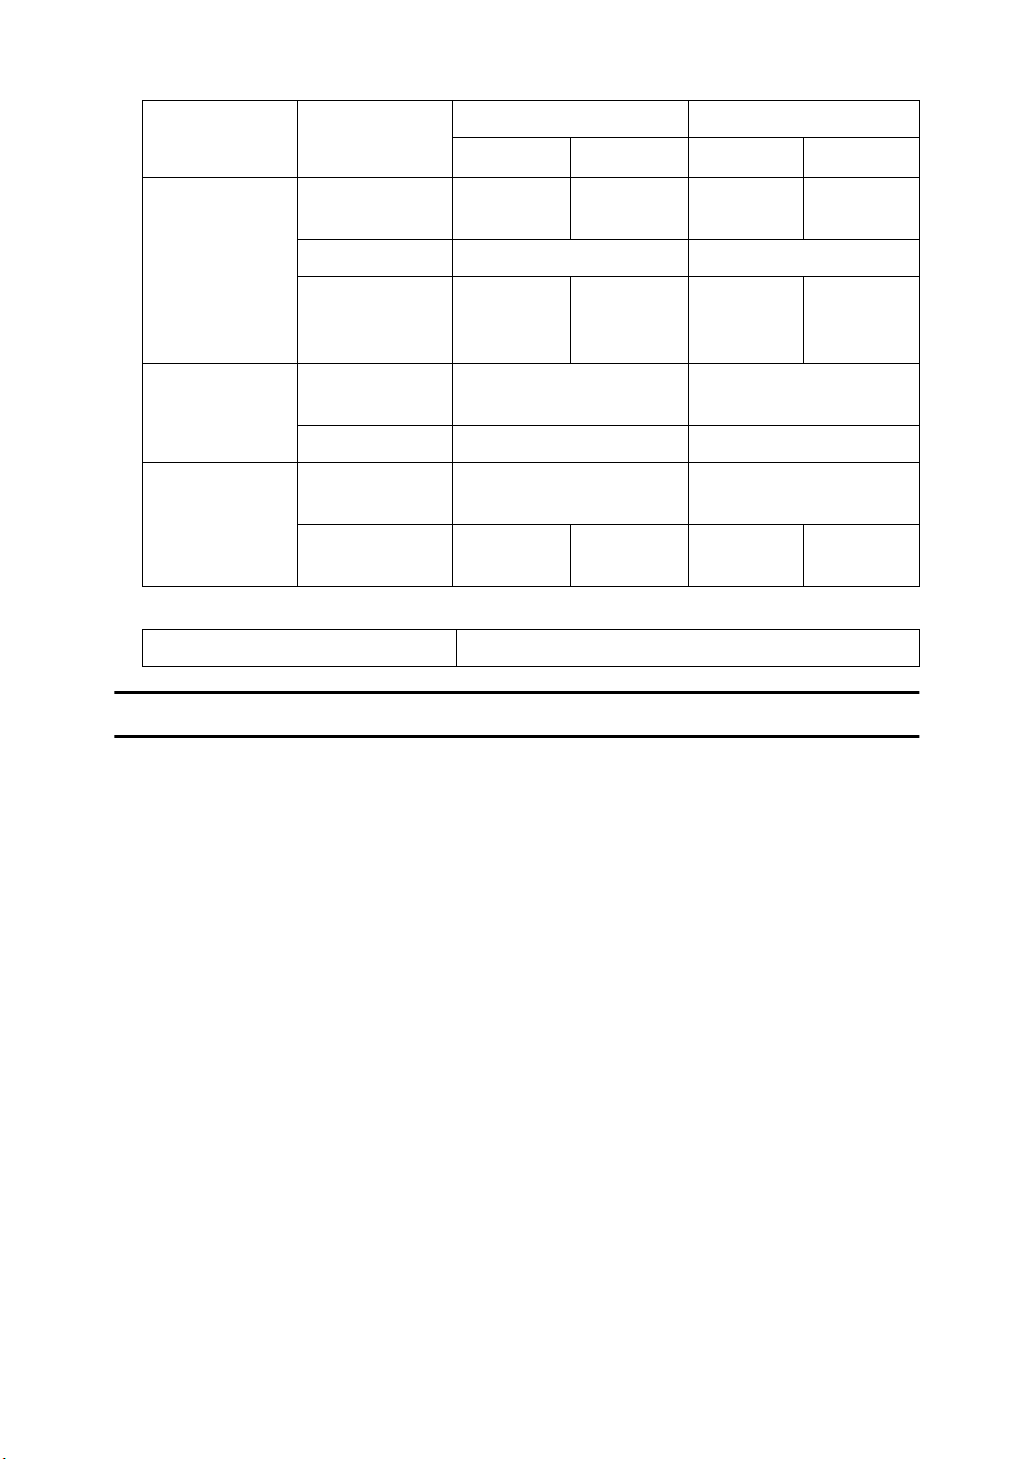
Specification
Copy feature Printer installed
Type 1
*1
Type 2
*1
Type 1
*1
Type2
*1
Low Power
mode
Power consumption
312 W 320 W 324 W 332 W
Default Time 15 minutes 15 minutes
Recovery Time 40 sec-
onds or
less
Sleep Mode Power con-
42 sec-
onds or
40 seconds
or less
less
- 24 W
42 seconds
or less
sumption
Default Time - 120 minutes
Auto Off mode Power con-
12 W 24 W
sumption
Default Time 90 minutes 120 min-
utes
*1
See the “System Settings” to confirm which machine (Type 1 or Type 2) you have.
90 min-
utes
120 min-
utes
Duplex Priority 1 Side→1Side
Recycled Paper
In accordance with the ENERGY STAR Program, we recommend use of recycled
paper which is environment friendly.Please contact your sales representative for
recommended paper.
iii
Page 6
How to Read This Manual
R
R
Symbols
In this manual, the following symbols are used:
WARNING:
This symbol indicates a potentially hazardous situation which, if instructions
are not followed, could result in death or serious injury.
CAUTION:
This symbol indicates a potentially hazardous situation which, if instructions
are not followed, may result in minor or moderate injury or damage to property.
* The statements above are notes for your safety.
Important
If this instruction is not followed, paper might be misfed, originals might be
damaged, or data might be lost. Be sure to read this.
Preparation
This symbol indicates the prior knowledge or preparations required before operating.
Note
This symbol indicates precautions for operation, or actions to take after misoperation.
Limitation
This symbol indicates numerical limits, functions that cannot be used together,
or conditions in which a particular function cannot be used.
Reference
This symbol indicates a reference.
[]
Keys that appear on the machine's panel display.
Keys and buttons that appear on the computer's display.
{}
Keys built into the machine's operation panel.
Keys on the computer's keyboard.
iv
Page 7

TABLE OF CONTENTS
1.Uninstalling the Printer Driver and Software
Uninstalling the PCL 6/5e Printer Driver................................................. 1
Windows 95/98 - Uninstalling the PCL 6/5e Printer Driver............................ 1
Windows 2000 - Uninstalling the PCL 6/5e Printer Driver............................. 1
Windows NT 4.0 - Uninstalling the PCL 6/5e Printer Driver.......................... 2
Uninstalling the PostScript Printer Driver............................................... 3
Windows 95/98 - Uninstalling the PostScript Printer Driver.......................... 3
Windows 2000 - Uninstalling the PostScript Printer Driver ........................... 3
Windows NT 4.0 - Uninstalling the PostScript Printer Driver ........................ 4
Macintosh - Uninstalling the PostScript Printer Driver .................................. 4
2.Setting Up the Printer Driver and Canceling a Print Job
PCL 6/5e - Accessing the Printer Properties.......................................... 5
Windows 95/98 - Accessing the Printer Properties....................................... 5
Windows 2000 - Accessing the Printer Properties........................................ 6
Windows NT 4.0 - Accessing the Printer Properties..................................... 7
PostScript - Setting Up for Printing....................... .... ..... ......................... 9
Windows 95/98 - Accessing the Printer Properties....................................... 9
Windows 2000 - Accessing the Printer Properties...................................... 10
Windows NT 4.0 - Accessing the Printer Properties................................... 11
Macintosh - Setting Up for Printing ............................................................. 13
Canceling a Print Job.............................................................................. 14
Windows 95/98 - Canceling a Print Job...................................................... 14
Windows 2000 - Canceling a Print Job ....................................................... 14
Windows NT 4.0 - Canceling a Print Job .................................................... 15
Macintosh - Canceling a Print Job .............................................................. 16
3.Troubleshooting
Error & Status Messages on the Operation Panel................................ 17
Machine Does not Print........................................................................... 23
Other Printing Problems......................................................................... 24
4.Using the Operation Panel
Adjusting Printer Features..................................................................... 25
Printer Features Menu ................................................................................ 25
Printer Features Parameters.................................................................. 29
PCL ................................................................................................. ........... 29
PostScript..................................... ............................................................... 30
Paper Feed ................................................................................................ 31
Parallel............................ ............................................................................ 33
v
Page 8

Network................... ................................................................................. ... 34
Configuration............................................................................................... 35
List Print.............................................................................. ........................ 36
Reset Select.................... ............................................................................ 36
Printer Condition..................................................................................... 37
Adjusting System Settings..................................................................... 39
Accessing the System Settings................................................................... 39
System Settings Parameters....................................................................... 40
Printing with the Operation Panel.......................................................... 45
Using the Sample Print ............................................................................... 45
Accessing the Document Server................................................................. 48
5.Appendix
Staple and Punch Position..................................................................... 49
Staple and Punch Position.......................................................................... 49
Specifications.......................................................................................... 51
Options................................... ..................................................................... 52
INDEX........................................................................................................ 53
vi
Page 9
1. Uninstalling the Printer
Driver and Software
Uninstalling the PCL 6/5e Printer Driver
This section describes how to uninstall the printer driver. The actual procedure
may differ depending on the operating system.
Follow the appropriate procedure.
Windows 95/98 - Uninstalling the PCL 6/5e Printer Driver
A Close all the applications that are currently running.
B Click
The
[
]
[
Start
Printers
on the taskbar, point to
window appears.
]
[
Settings
, and then click
]
[
Printers
C Click the icon of the printer you want to remove.
D On the
A confirmation dialog box appears.
E Click
[
menu, click
]
[
File
to uninstall the printer driver.
]
Yes
[
Delete
Windows 2000 - Uninstalling the PCL 6/5e Printer Driver
Limitation
❒
Uninstalling a printer driver requires Manage Printers permission. Members
of the Administrators and Power Users groups have Manage Printers permission by default. When you uninstall a printer driver, log on using an account
that has Manage Printers permission.
.
]
A Close all the applications that are currently running.
B Click
The
[
]
[
Start
Printers
on the taskbar, point to
window appears.
]
[
Settings
, and click
]
[
Printers
.
]
.
]
C Click the icon of the printer you want to remove.
D On the
A confirmation dialog box appears.
E Click
[
menu, click
]
[
File
to uninstall the printer driver.
]
Yes
[
Delete
.
]
1
Page 10

1
Uninstalling the Printer Driver and Software
Windows NT 4.0 - Uninstalling the PCL 6/5e Printer Driver
Limitation
❒
Uninstalling a printer driver requires Full Control access permission. Members of the Administrators, Server Operators, Print Operators, and Power Users groups have Full Control permission by default. When you uninstall a
printer driver, log on using an account that has Full Control permission.
A Close all the applications that are currently running.
B Click
The
[
]
[
Start
Printers
on the taskbar, point to
window appears.
]
[
Settings
, and click
]
C Click the icon of the printer you want to remove.
D On the
A confirmation dialog box appears.
E Click
[
menu, click
]
[
File
to uninstall the printer driver.
]
Yes
[
Delete
.
]
[
Printers
.
]
2
Page 11
Uninstalling the PostScript Printer Driver
Uninstalling the PostScript Printer Driver
This section describes instructions for uninstalling the PostScript printer driver.
The actual procedure may differ depending on the operating system.
Follow the appropriate one of the following procedures below.
Windows 95/98 - Uninstalling the PostScript Printer Driver
A Close all applications that are currently running.
1
B Click
The
[
]
[
Start
Printers
on the taskbar, point to
window appears.
]
[
Settings
, and then click
]
[
Printers
C Click the icon of the printer you want to remove.
D On the
A confirmation dialog box appears.
E Click
[
menu, click
]
[
File
to uninstall the printer driver.
]
Yes
[
Delete
Windows 2000 - Uninstalling the PostScript Printer Dr iver
Limitation
❒
Uninstalling a printer driver requires Manage Printers permission. Members
of the Administrators and Power Users groups have Manage Printers permission by default. When you uninstall a printer driver, log on using an account
that has Manage Printers permission.
.
]
A Close all the applications that are currently running.
B Click
The
[
]
[
Start
Printers
on the taskbar, point to
window appears.
]
[
Settings
, and click
]
[
Printers
.
]
.
]
C Click the icon of the printer you want to remove.
D On the
A confirmation dialog box appears.
E Click
[
menu, click
]
[
File
to uninstall the printer driver.
]
Yes
[
Delete
.
]
3
Page 12

1
Uninstalling the Printer Driver and Software
Windows NT 4.0 - Uninstalling the PostScript Printer Driver
Limitation
❒
Uninstalling a printer driver requires Full Control access permission. Members of the Administrators, Server Operators, Print Operators, and Power Users groups have Full Control permission by default. When you uninstall a
printer driver, log on using an account that has Full Control permission.
A Close all applications that are currently running.
B Click
The
[
]
[
Start
Printers
on the taskbar, point to
window appears.
]
[
Settings
, and then click
]
C Click the icon of the printer you want to remove.
D On the
A confirmation dialog box appears.
E Click
[
menu, click
]
[
File
to uninstall the printer driver.
]
Yes
[
Delete
Macintosh - Uninstalling the PostScript Printer Driver
A Delete the “PPD” file inside the
folder in
[
System Folder
.
]
.
]
[
Printer Description
folder in the
]
[
Printers
[
Extensions
.
]
]
4
Page 13
2. Setting Up the Printer Driver
and Canceling a Print Job
PCL 6/5e - Accessing the Printer Properties
Windows 95/98 - Accessing the Print er Properties
There are two methods you can use to open the Printer Properties.
Making printer default settings
To make the printer default settings, first open the Printer Properties from the
window.
[
Printers
]
A Click
The
[
]
[
Start
Printers
on the taskbar, point to
window appears.
]
[
Settings
, and then click
]
[
Printers
.
]
B Click the icon of the printer whose default settings you want to change.
C On the
The Printer Properties appear.
menu, click
]
[
File
[
Properties
D Set desired settings and click
Making printer settings from an application
To make the printer settings for a specific application, open the Printer Properties from that application. The following example describes how to make settings for the WordPad application that comes with Windows 95/98.
Note
❒
The actual procedures you should follow to open the Printer Properties may
differ depending on the application. For more information, see the documentation that comes with the application you are using.
❒
When you use some applications, the driver's initial default settings of the applications might be applied over the printer driver's setting.
[
OK
.
]
.
]
❒
Any settings you make in the following procedure are valid for the current
application only.
A On the
The
[
Print
B From the
.
]
erties
The Printer Properties appear.
menu, click
]
[
File
dialog box appears.
]
list, select the printer you want to use, and then click
Name:
]
[
[
Print
.
]
[
Prop-
5
Page 14
Setting Up the Printer Driver and Canceling a Print Job
2
C Set desired settings and click
D Click
to start your printing.
]
[
OK
[
OK
.
]
Windows 2000 - Accessing the Printer Properties
Making printer default settings - Printer Properties
Limitation
❒
Changing the setting of the printer requires Manage Printers permission.
Members of the Administrators and Power Users groups have Manage Printers permission by default. When you set up options, log on using an account
that has Manage Printers permission.
A Click
The
[
]
[
Start
Printers
on the taskbar, point to
window appears.
]
[
Settings
, and then click
]
[
Printers
.
]
B Click the icon of the printer whose default setting you want to change.
C On the
The Printer Properties appear.
menu, click
]
[
File
[
Properties
.
]
D Set desired settings and click
Note
❒
Settings you make here are used as the default settings for all applications.
Making printer default settings – Printing Preferences Properties
Limitation
❒
Changing the setting of the printer requires Manage Printers permission.
Members of the Administrators and Power Users groups have Manage Printers permission by default. When you set up options, log on using an account
that has Manage Printers permission.
A Click
The
[
Printers
on the taskbar, point to
]
[
Start
window appears.
]
[
OK
.
]
[
Settings
, and then click
]
[
Printers
.
]
B Click the icon of the printer whose default settings you want to change.
C On the
The Printing Preferences Properties appears.
D Set desired settings and click
menu, click
]
[
File
[
Printing Preferences...
.
]
[
OK
.
]
Note
❒
Settings you make here are used as the default settings for all applications.
6
Page 15
PCL 6/5e - Accessing the Printer Properties
Making printer settings from an application
To make the printer settings for a specific application, open the Printing Preferences Properties from that application. The following example describes how to
make settings for the WordPad application that comes with Windows 2000.
Note
❒
The actual procedures you should follow to open the Printing Preferences
Properties may differ depending on the application. For more information,
see the documentation that comes with the application you are using.
❒
Any settings you make in the following procedure are valid for the current
application only.
2
A On the
The
[
Print
menu, click
]
[
File
dialog box appears.
]
[
Print...
B Select the printer you want to use in the
C Set desired settings and click
.
]
[
Apply
box.
[
Select Prin t er
to start your printing..
]
]
Windows NT 4.0 - Accessing the Printer Properties
Making printer default settings - Printer Properties
Limitation
❒
Changing the settings of the printer requires Full Control access permission.
Members of the Administrators, Server Operators, Print Operators, and Power Users groups have Full Control permission by default. When you set up
options, log on using an account that has Full Control permission.
A Click
The
[
]
[
Start
Printers
on the taskbar, point to
window appears.
]
[
Settings
, and then click
]
[
Printers
.
]
B Click the icon of the printer whose default setting you want to change.
C On the
The Printer Properties appear.
menu, click
]
[
File
[
Properties
D Set desired settings and click
Note
❒
Settings you make here are used as the default settings for all applications.
[
OK
.
]
.
]
7
Page 16

2
Setting Up the Printer Driver and Canceling a Print Job
Making printer default settings – Default Document Properties
Limitation
❒
Changing the settings of the printer requires Full Control access permission.
Members of the Administrators, Server Operators, Print Operators, and Power Users groups have Full Control permission by default. When you set up
options, log on using an account that has Full Control permission.
A Click
The
[
]
[
Start
Printers
on the taskbar, point to
window appears.
]
[
Settings
, and then click
]
[
Printers
.
]
B Click the icon of the printer whose default settings you want to change.
C On the
The Default Document Properties appears.
D Set desired settings and click
Note
❒
Settings you make here are used as the default settings for all applications.
Making printer settings from an application
To make the printer settings for a specific application, open the Document Properties from that application. The following example describes how to make settings for the WordPad application that comes with Windows NT 4.0.
Note
❒
The actual procedures you should follow to open the Document Properties
may differ depending on the application. For more information, see the documentation that comes with the application you are using.
❒
Any settings you make in the following procedure are valid for the current
application only.
A On the
The
[
Print
menu, click
]
[
File
menu, click
]
[
File
dialog box appears.
]
[
Document Defaults
.
]
[
OK
.
[
]
Print
.
]
B From the
erties
The Document Properties appears.
[
Name:
.
]
list, select the printer you want to use, and then click
]
C Set desired settings and click
D Click
8
to start your printing.
]
[
OK
[
OK
[
Prop-
.
]
Page 17
PostScript - Setting Up for Printing
PostScript - Setting Up for Printing
Windows 95/98 - Accessing the Print er Properties
There are two methods you can use to open the Printer Properties.
Making printer default settings
To make the printer default settings, first open the Printer Properties from the
window.
The
]
[
Start
[
Printers
on the taskbar, point to
]
window appears.
]
[
Settings
, and then click
]
[
Printers
.
]
[
Printers
A Click
B Click the icon of the printer whose default settings you want to change.
C On the
The Printer Properties appear.
menu, click
]
[
File
[
Properties
D Set desired settings and click
Making printer settings from an application
To make the printer settings for a specific application, open the Printer Properties from that application. The following example describes how to make settings for the WordPad application that comes with Windows 95.
Note
❒
The actual procedures you should follow to open the Printer Properties may
differ depending on the application. For more information, see the documentation that comes with the application you are using.
[
OK
.
]
.
]
2
❒
When you use some applications, the driver's initial default settings of the applications might be applied over the printer driver's setting.
❒
Any settings you make in the following procedure are valid for the current
application only.
A On the
The
[
Print
B From the
[
Properties
The Printer Properties appear.
menu, click
]
[
File
dialog box appears.
]
box, select the printer you want to use, and then click
Name:
]
[
.
]
C Set desired settings and click
D Click
to start printing.
]
[
OK
[
Print
]
[
.
OK
.
]
9
Page 18
2
Setting Up the Printer Driver and Canceling a Print Job
Windows 2000 - Accessing the Printer Properties
Making printer default settings - Printer Properties
Limitation
❒
Changing the setting of the printer requires Manage Printers permission.
Members of the Administrators and Power Users groups have Manage Printers permission by default. When you set up options, log on using an account
that has Manage Printers permission.
A Click
The
[
]
[
Start
Printers
on the taskbar, point to
window appears.
]
[
Settings
, and then click
]
[
Printers
.
]
B Click the icon of the printer whose default setting you want to change.
C On the
The Printer Properties appear.
menu, click
]
[
File
[
Properties
D Set desired settings and click
Note
❒
Settings you make here are used as the default settings for all applications.
Making printer default settings – Printing Preferences Properties
Limitation
❒
Changing the setting of the printer requires Manage Printers permission.
Members of the Administrators and Power Users groups have Manage Printers permission by default. When you set up options, log on using an account
that has Manage Printers permission.
A Click
The
[
Printers
on the taskbar, point to
]
[
Start
window appears.
]
[
OK
.
]
.
]
[
Settings
, and then click
]
[
Printers
.
]
B Click the icon of the printer whose default settings you want to change.
C On the
The Printing Preferences Properties appears.
menu, click
]
[
File
D Set desired settings and click
Note
❒
Settings you make here are used as the default settings for all applications.
10
[
Printing Preferences...
.
]
[
OK
.
]
Page 19
PostScript - Setting Up for Printing
Making printer settings from an application
To make the printer settings for a specific application, open the Printing Preferences Properties from that application. The following example describes how to
make settings for the WordPad application that comes with Windows 2000.
Note
❒
The actual procedures you should follow to open the Printing Preferences
Properties may differ depending on the application. For more information,
see the documentation that comes with the application you are using.
❒
Any settings you make in the following procedure are valid for the current
application only.
2
A On the
The
[
Print
menu, click
]
[
File
dialog box appears.
]
[
Print...
B Select the printer you want to use in the
C Set desired settings and click
D Click
to start your printing.
]
[
OK
.
]
[
Select Prin t er
to start your printing.
]
[
Print
box.
]
Windows NT 4.0 - Accessing the Printer Properties
Making printer default settings - Printer Properties
Limitation
❒
Changing the settings of the printer requires Full Control access permission.
Members of the Administrators, Server Operators, Print Operators, and Power Users groups have Full Control permission by default. When you set up
options, log on using an account that has Full Control permission.
A Click
The
[
]
[
Start
Printers
on the taskbar, point to
window appears.
]
[
Settings
, and then click
]
[
Printers
.
]
B Click the icon of the printer whose default settings you want to change.
C On the
The Printer Properties appear.
menu, click
]
[
File
[
Properties
D Set desired settings and click
Note
❒
Settings you make here are used as the default settings for all applications.
[
OK
.
]
.
]
11
Page 20
2
Setting Up the Printer Driver and Canceling a Print Job
Making printer default settings - Default Document Properties
Limitation
❒
Changing the settings of the printer requires Full Control access permission.
Members of the Administrators, Server Operators, Print Operators, and Power Users groups have Full Control permission by default. When you set up
options, log on using an account that has Full Control permission.
A Click
The
[
]
[
Start
Printers
on the taskbar, point to
window appears.
]
[
Settings
, and then click
]
[
Printers
.
]
B Click the icon of the printer whose default settings you want to change.
C On the
The Default Document Properties appears.
D Set desired settings and click
Note
❒
Settings you make here are used as the default settings for all applications.
Making printer settings from an application
To make the printer settings for a specific application, open the Document Properties from that application. The following example describes how to make settings for the WordPad application that comes with Windows NT 4.0.
Note
❒
The actual procedures you should follow to open the Document Properties
may differ depending on the application. For more information, see the documentation that comes with the application you are using.
❒
Any settings you make in the following procedure are valid for the current
application only.
A On the
The
[
Print
menu, click
]
[
File
menu, click
]
[
File
dialog box appears.
]
[
Document Defaults
.
]
[
OK
.
[
]
Print
.
]
B From the
[
Properties
The Document Properties appears.
[
Name:
.
]
box, select the printer you want to use, and then click
]
C Set desired settings and click
D Click
12
to start printing.
]
[
OK
[
OK
.
]
Page 21

Macintosh - Setting Up for Printing
Making paper settings from an application
A Open the file you want to print.
PostScript - Setting Up for Printing
B On the
[
AdobePS Page Setup
menu, click
]
[
File
[
Page Setup
appears.
]
C Confirm that the printer you want to use is shown in the
Note
❒
If the printer is not shown in the
display a list of available printers.
Reference
The actual appearance of the Page Setup depends on the application you
are using. See the documentation that comes with the Macintosh for more
information.
D From the
[
Paper:
E Set desired settings and click
Setting up for printing from an application
box, select the paper size.
]
[
OK
.
]
.
]
[
Format for:
[
Format for:
box, use the pop-up menu to
]
A Open the file you want to print.
B On the
The Printer Settings appears.
menu, click
]
[
File
[
Print
.
]
box.
]
2
C Confirm that the printer is selected in the
D Set desired settings and click
[
Print
.
]
[
Printer:
box.
]
13
Page 22
Setting Up the Printer Driver and Canceling a Print Job
Canceling a Print Job
Windows 95/98 - Canceling a Print Job
A Double-click the printer icon on the taskbar.
2
This opens a window that shows all the print jobs that are currently queued
for printing. Check the current status of the job you want to cancel.
B Select the name of the job you want to cancel.
C On the
❒
D Press {
E Press
F Press
The message appears on the panel display indicating that the print job is being canceled.
❒
❒
❒
[
Document
Note
You can also open the print job queue window by double-clicking the
printer icon in the
Printer
[
Offline
[
JobReset
Important
When the printer is being shared by multiple computers, be careful not to
accidentally cancel someone else's print job.
Note
You cannot stop printing data that has already been processed internally
by the printer. Because of this, printing might continue for a few pages after you press
A print job that contains a large volume of data might take considerable
time to stop.
menu, click
]
[
Printers
} on the operation panel.
on the panel display.
]
on the panel display.
]
[
JobReset
.
]
[
Cancel Printing
window.
]
.
]
Windows 2000 - Canceling a Print Job
A Double-click the printer icon on the taskbar.
This opens a window that shows all the print jobs that are currently queued
for printing. Check the current status of the job you want to cancel.
B Select the name of the job you want to cancel.
menu, click
]
[
Cancel
14
C On the
[
Document
.
]
Page 23
Canceling a Print Job
Note
❒
You can also open the print job queue window by double-clicking the
printer icon in the
[
Printers
window.
]
D Press {
E Press
F Press {
The message appears on the panel display indicating that the print job is being canceled.
❒
❒
❒
Printer
[
Offline
Job Reset
Important
When the printer is being shared by multiple computers, be careful not to
accidentally cancel someone else's print job.
Note
You cannot stop printing data that has already been processed internally
by the printer. Because of this, printing might continue for a few pages after you press
A print job that contains a large volume of data might take considerable
time to stop.
} on the operation panel.
on the panel display.
]
} on the operation panel.
[
Job Reset
.
]
Windows NT 4.0 - Canceling a Print Job
A Double-click the printer icon on the taskbar.
2
This opens a window that shows all the print jobs that are currently queued
for printing. Check the current status of the job you want to cancel.
B Select the name of the job you want to cancel.
C On the
❒
D Press {
E Press
F Press
The message appears on the panel display indicating that the print job is being canceled.
[
Document
Note
You can also open the print job queue window by double-clicking the
printer icon in the
Printer
[
Offline
[
JobReset
menu, click
]
[
Printers
} on the operation panel.
on the panel display.
]
on the panel display.
]
[
Cancel
window.
]
.
]
15
Page 24

2
Setting Up the Printer Driver and Canceling a Print Job
Important
❒
When the printer is being shared by multiple computers, be careful not to
accidentally cancel someone else's print job.
Note
❒
You cannot stop printing data that has already been processed internally
by the printer. Because of this, printing might continue for a few pages after you press
❒
A print job that contains a large volume of data might take considerable
time to stop.
[
JobReset
.
]
Macintosh - Canceling a Print Job
A Double-click the printer icon on the desktop.
This opens a window that shows all the print jobs that are currently queued
for printing. Check the current status of the job you want to cancel.
B Select the name of the job you want to cancel.
C Click the pause icon, and then click the trash icon.
D Press {
E Press
F Press
The message appears on the panel display indicating that the print job is being canceled.
❒
❒
❒
Printer
[
Offline
[
JobReset
Important
When the printer is being shared by multiple computers, be careful not to
accidentally cancel someone else's print job.
Note
You cannot stop printing data that has already been processed internally
by the printer. Because of this, printing might continue for a few pages after you press
A print job that contains a large volume of data might take considerable
time to stop.
} on the operation panel.
on the panel display.
]
on the panel display.
]
[
JobReset
.
]
16
Page 25

3. Troubleshooting
Error & Status Messages on the Operation Panel
Messages Description Comments
Add Staples The staples are running out,
even though stapling will
continue.
An unformatted disk
was detected. Are you
sure want to format the
disk?
When the power was turned
on, an unformatted hard
disk was detected by the
controller.
This message remains while
the printer is in the staple
mode.
To format the hard disk,
touch the [
To cancel formatting and
switch the machine to the
online mode, touch the [
key.
Note
Usually this message ap-
❒
pears only when the optional hard disk is
installed. However, it
also appears when a hard
disk error occurs. In this
case, turn the main switch
off and then back on. If
the message appears
again, the hard disk
needs formatting. When
you format the hard disk,
the font installed in the
hard disk will be deleted.
Yes
] key.
No
]
Cleaning web is low.Call
service 0000-0000-0000
Duplex mode is in off
position for this tray.
Empty Hole Punch receptacle
The cleaning web has worn
down to a certain degree.
The selected tray does not
allow duplex printing.
The Punch Trash got full
and the print job is still in
the punch mode.
Press [
settings.
When a length of time passes
without any key pressed, the
print job will be canceled automatically.
This is not an error. Dump
the punch trash.
This message remains until
the next print job begins.
], and change the
Reset
17
Page 26

Troubleshooting
Messages Description Comments
3
Exceeded max. number
of sample print jobs. Job
download has been cancelled.
File error.Print job
download has been cancelled.
Formatting the disk... The hard disk is being for-
Functional Problems
SC2000
Functional Problems
SC2001
The total number of sample
print jobs or pages exceed
the maximum number of 30.
An error occurred while accessing files.
matted.
A controller diagnostic error
occurred while the power is
on.
A controller exception error
occurred in the printer controller.
Press [
unnecessary data from the
list of "Sample Print Jobs".
When a length of time passes
without any key pressed, the
print job will be canceled automatically.
Press [
print job.
When a length of time passes
without any key pressed the
print job will be canceled automatically.
Wait until the confirmation
message appears.
Turn the main switch off,
and then back on. If the error
appears again, contact your
sales or service representative.
Turn the main switch off,
and then back on. If the error
appears again, contact your
sales or service representative. Even if this error occurs,
the copy function is still
available.
]. Delete some
Reset
] to cancel the
Reset
18
Functional Problems
SC2002
Going Offline The machine is shifting from
The pinter controller has detected some rror at the debug trap on the software.
Online to Offline.
Turn the main switch off,
and then back on. If the error
appears again, contact your
sales or service representative. Even if this error occurs,
the copy function is still
available.
Wait until it shifts to Offline.
Page 27
Error & Status Messages on the Operation Panel
Messages Description Comments
Load <xxx> <yyy> paper in <zzz>, or select
another tray and press
[
Continue
to cancel current job.
Load <xxx> <yyy> paper in <zzz>, or select
another tray and press
[
Continue
to cancel current job.
]. Press [
]. Press [
Reset
Reset
The selected input tray is
empty.
]
The paper size selected from
the host is not set in any
trays, when the tray selec-
]
tion is set to "Auto Tray
Switching".
Put the selected paper in the
selected input tray, and the
print job will be resumed automatically, or select another
tray to print by pressing one
of the tray displyed on the
screen.
Press [
current job if you want.
When a length of time passes
without any key pressed, the
print job will be canceled automatically.
<xxx>: Paper size
<yyy>: Media Type
<zzz>: Tray
Put the correct paper in the
tray, and change the setting
of the tray using control panel.
Press [
the print job using the incorrect paper.
When a length of time passes
without any key pressed, the
print job will be canceled automatically.
] to cancel the
Reset
Continue
] to continue
3
Load <xxx> <yyy> paper in <zzz>,
or select another tray
and press [
Press [
current job.
Memory Error. Only one
set can be output.
Reset
Continue
] to cancel
].
There is no selected paper in
the selected input tray, although the paper size has
been set from the host.
The actual paper size and input tray are different from
those selected from the host.
An Engine HDD error occurred in the collate operation.
Put the correct paper in the
tray, and change the setting
of the tray using the operation panel.
Press [
the print job using the incorrect paper.
When a length of time passes
without any key pressed, the
print job will be canceled automatically.
The print job can be completed with only one set of the
document.
This message remains until
the next print job begins.
Continue
] to continue
19
Page 28
Troubleshooting
Messages Description Comments
3
Memory is full.Print job
download has been cancelled.
Memory overflow.
Press [
current job.
Network failure.
Network communica-
tion is not available.
Check the Network setting.
Reset
] to cancel
The document server memory is full and cannot receive
the data from the printer.
The job will be canceled.
Memory overflow occurred
during the print job. After a
part of the data on the page
is printed, the print job is
suspended.
This is because the emulation language sent a file too
complex for the printer to
interpret with the available
memory, or there is not
enough memory space to
download the fonts.
Network communication is
not available.
Installed Network Interface
Board fails to connect correctly communication with
the network.
Delete some unnecessary
data from the document
server.
Press [
rent job.
When a length of time passes
without any key pressed, the
print job will be canceled automatically.
To print the image correctly,
add memory to the machine.
This message remains until
the next print job.
Press [
the network settings, and the
printer will start without the
network capability.
Even if Network Interface
Board is installed, no error
will occur when it is not
plugged into a network connection.
] to cancel cur-
Reset
Continue
] and check
20
Network Interface
Board Firmware downloading...
Network Interface
Board initializing...
Offline The printer is Offline. If you want to change into
Output tray is full.
Remove the paper on
***.
Paper is left in Duplex
Unit. Open Duplex Unit
and remove paper.
Network Interface Board
firmware is being downloaded.
Network Interface Board is
being initialized.
The selected output tray is
full, and the print job is suspended.
Paper will remain in the duplex tray, when a new duplex print job is started.
The print job is suspended.
Wait until it is downloaded.
Wait until it is initialized.
Online, press [
Remove paper from the out-
put tray, and the print job
will be resumed automatically.
***: Output tray
Remove the paper from the
duplex tray, and the print job
will be resumed automatically.
Online
].
Page 29
Error & Status Messages on the Operation Panel
Messages Description Comments
Paper is left in Staple
Tray. Open Finisher and
remove paper.
Paper misfeed has interrupted Printing. Press
Reset to cancel current
job, or press Continue to
print.
Parallel Communication Error. Please set up
communication parameters in parallel menu.
Press Reset to cancel current job.
Please wait. The printer is warming up
Print overrun. Press Reset to cancel current job,
or press Continue to
print
Paper will remain in the staple tray, when the stapling
job is canceled or a new stapling job is started.
A paper misfeed occurred,
and you removed all the
misfed paper.
The print job is interrupted.
A parallel communication
error has occurred during
the print job via the parallel
port.
or processing internally.
A print overrun occurred on
a file being printed. Only a
part of the data on the page
will be printed, and the print
job is suspended.
Remove the paper from the
staple tray, and the print job
will be resumed automatically.
To cancel the print job, press
].
[
Reset
To make the jam recovery
operation, press [
Press [
current job, and check the
parallel communication settings again.
Wait for the machine to get
ready.
Press [
error, and the print job will
be resumed.
Press [
print job.
When a length of time passes
without any key pressed, the
print job will be canceled automatically.
To print the image correctly,
add memory to the machine,
or reduce the resolution of
the image and re-send the
print job.
Reset
Continue
Reset
Continue
] to cancel the
] to ignore this
] to cancel the
].
3
Printer HDD Error.
Printer HDD cannot be
used.
Printer HDD Error.
Press Reset to cancel cur-
rent job.
A Printer HDD error is detected while the power is on.
A Printer HDD error is detected while a macro or font
is being downloaded from
the host to the printer controller.
Press [
firming the error, and the
printer will start without the
Printer HDD capability.
Press [
current job.
If the error often appears,
change the Printer HDD.
Contact your sales or service
representative.
Continue
Reset
] after con-
] to cancel the
21
Page 30
Troubleshooting
Messages Description Comments
3
Printer HDD is full.
Press [
current job.
Ready The printer is Online and
The disk could not be
formatted.
The disk was formatted
successful. Turn machine off then on again
to restart.
Reset
] to cancel
A Printer HDD becomes full
while downloading a macro
or font from the host to the
printer controller.
ready to make a print.
The hard disk has not been
formatted successfully.
The hard disk has been formatted successfully.
Press [
eration.
When a length of time passes
without any key pressed, the
operation will be canceled
automatically.
To execute the operation correctly, make room on the
disk partition in advance.
If you want to change to Offline mode, press [
Turn the main switch off and
back on, and then try formatting again.
If this message appears
again, change the hard disk.
Contact your sales or service
representative.
Turn the main switch off,
and then back on.
The hard disk is ready to use.
] to cancel the op-
Reset
Offline
].
The Job has been reset The current print job has
been reset.
*** is not set correctly.
Set *** correctly.
***is not available.
Select another tray and
press [
[
job.
Continue
] to cancel current
Reset
], or press
The selected input tray is not
set correctly.
Something is wrong with
the selected input tray.
Close the selected input tray,
and the print job will be resumed automatically.
***: Input tray
Select another tray to print
by pressing one of the tray
displayed on the screen or
press [
current job.
When a length of time passes
without any key pressed, the
print job will be canceled automatically.
] to cancel the
Reset
22
Page 31
Machine Does not Print
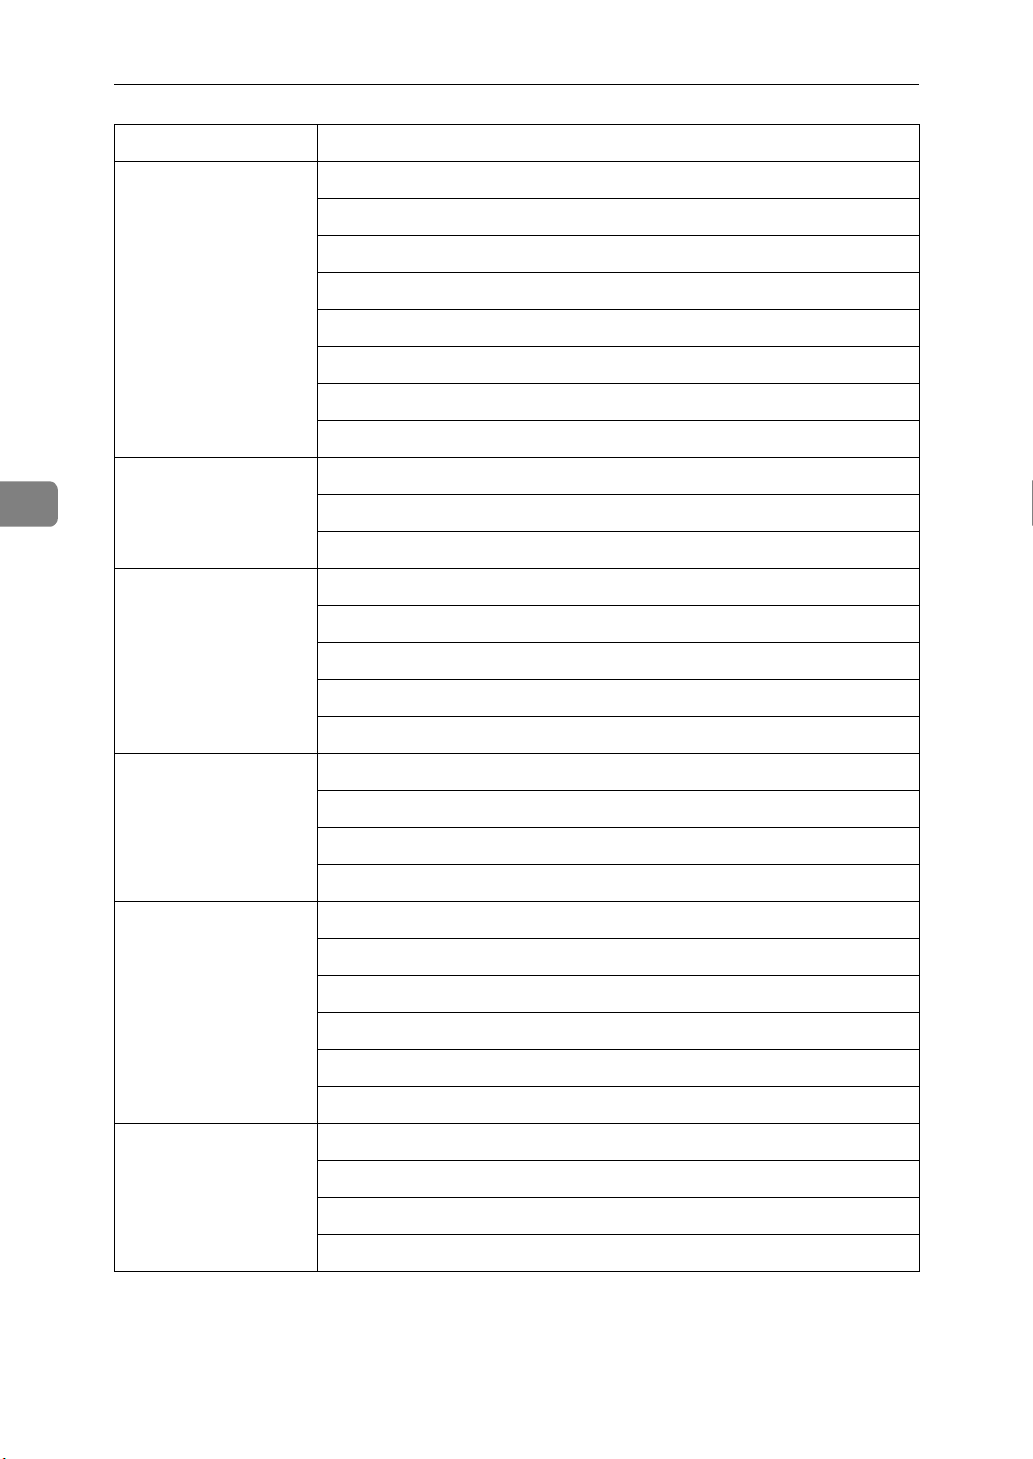
Machine Does not Print
Possible Cause Solutions
Is the power on? Turn on the machine.
Is the interface cable properly connected? Connect the interface cable properly.
If there are any connectors or screws,
make sure that they are fastened securely.
Are you using the correct interface cable? Be sure to use the correct one. If the cable
is damaged or worn, replace it with a new
one.
3
Did you connect the interface cable after
turning on the main switch?
Is the machine Online? Bring it Online by touching the [
Is the specified paper set? Set the specified paper in any of the input
Are there any error messages on the panel
display?
Does the indicator above the Printer key
stay red?
Is the Data-in Indicator blinking or lit? If it is not, the data does not reach the ma-
Can you print a configuration page? If you cannot, check the printer cable con-
Can you make a "Print Test Page" from the
printer driver?
Be sure to connect the interface cable before turning on the main switch.
]
Online
key.
trays.
Check the error message, and take the re-
quired action.
Check the error message, and take the re-
quired action.
chine. Check the printer cable connection.
Also confirm that the printer port settings
are correct.
nection.
Also confirm that the printer port settings
are correct.
If you cannot, the machine might be out of
order. Contact your sales or service representative.
23
Page 32
Troubleshooting
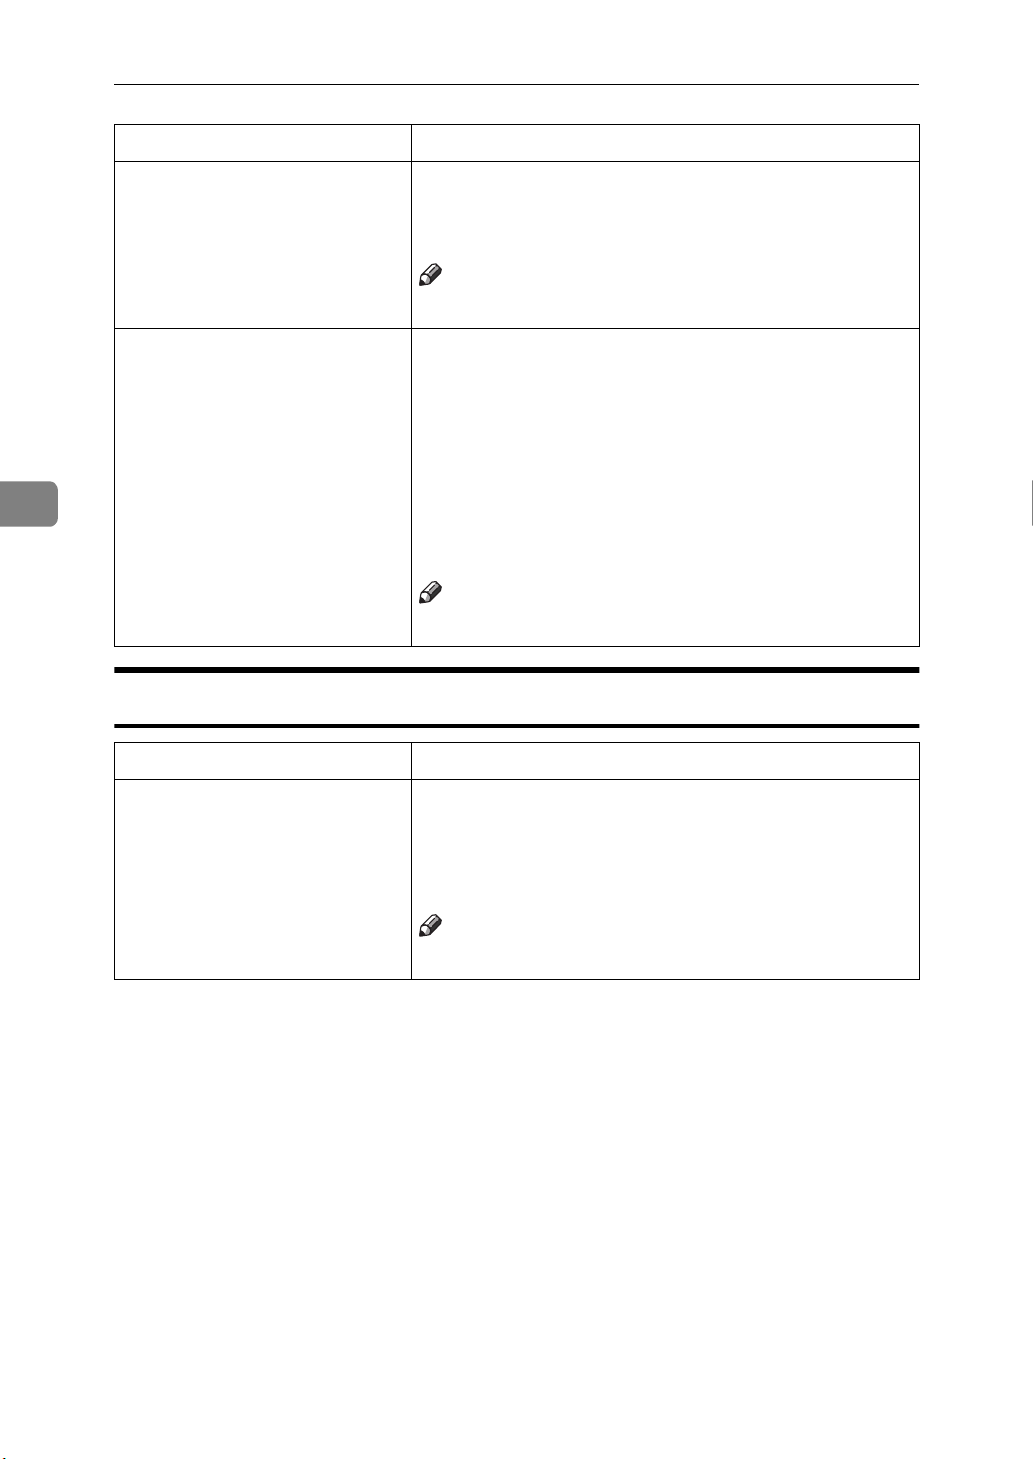
Other Printing Problems
Problem Action
3
An image is printed on the reverse side of
the paper.
Multiple pages are fed through the printer
at once.
Paper misfeeds occur frequently. Check the paper size settings. Use the rec-
An operation panel error message stays
on after removing the misfed paper.
It takes a long time for the printer to start
printing.
It takes too much time to complete the
print job.
Set the paper upside down.
Remove all the paper from the tray and
fan them gently.
ommended paper. Avoid using curled,
folded, or wrinkled paper, perforated paper, or glossy paper.
A paper misfeed message will remain until the front cover is opened and then
closed. Open the front cover and close it.
The machine might be in Energy Saver
mode or Low Power mode, which requires more time for warming up and resuming the print job. If you can't wait,
change the settings of Low Power. Shift
Time and Low Power Timer.
The data is so large or complex that it
takes time to process it.
If the Data In indicator is blinking, the
data processing is being done.
Just wait until it is finished.
24
Windows 95/98, NT 4.0 :
The computer does not recognize the in-
stalled printer options.
If the printer is not bi-directional, specify
which options you have installed using
the printer driver.
See the HELP file of the printer driver.
Page 33
4. Using the Operation Panel
Though the factory default settings of the printer are suitable for most printing
jobs, the "Printer Features" gives you access to a number of settings that control
basic printer operations. "Printer Features" settings you make are retained even
when you turn off the printer.
Reference
For more information about the copy features and their system settings, see
the "Operating Instructions" that describes the copy functions and describes
the system settings.
Adjusting Printer Features
Printer Features Menu
There are eight menu items in the "Printer Features" menu.
• PCL
• PostScript
• Paper Feed
• Parallel
• Network
• Configuration
• List Print
• Reset Select
You can select functions in the following table.
Category Function Menu
PCL⇒ P.29 Orientation
Form Length
Font Source
Font Number
Point Size
Font Pitch
Symbol Set
PostScript⇒ P.30 Print PS Errors
25
Page 34
Using the Operation Panel
Category Function Menu
Paper Feed⇒ P.31 Page Size
Tray Priority
Paper Type Priority
Auto Tray Switch
Duplex
Sort
Staple
Punch
Parallel⇒ P.33 Printer Language
4
Bi-direction
I/O Timeout
Network⇒ P.34 I/O Timeout
IP Address
Subnet Mask
Gateway Address
Network Menu Protect
Configuration⇒
P.35
List Print⇒ P.36 PS Font List
Resolution
Auto Continue
Edge Smoothing
Autocont.Timeout
PCL Font List
PS Demo Page
PCL Demo Page
Configuration Page
26
Minor Error Log
Reset Select⇒ P.36 Job Reset
Menu Reset
Printer Restart
User Code Log Clear
Page 35

Accessing the Printer Features
Adjusting Printer Features
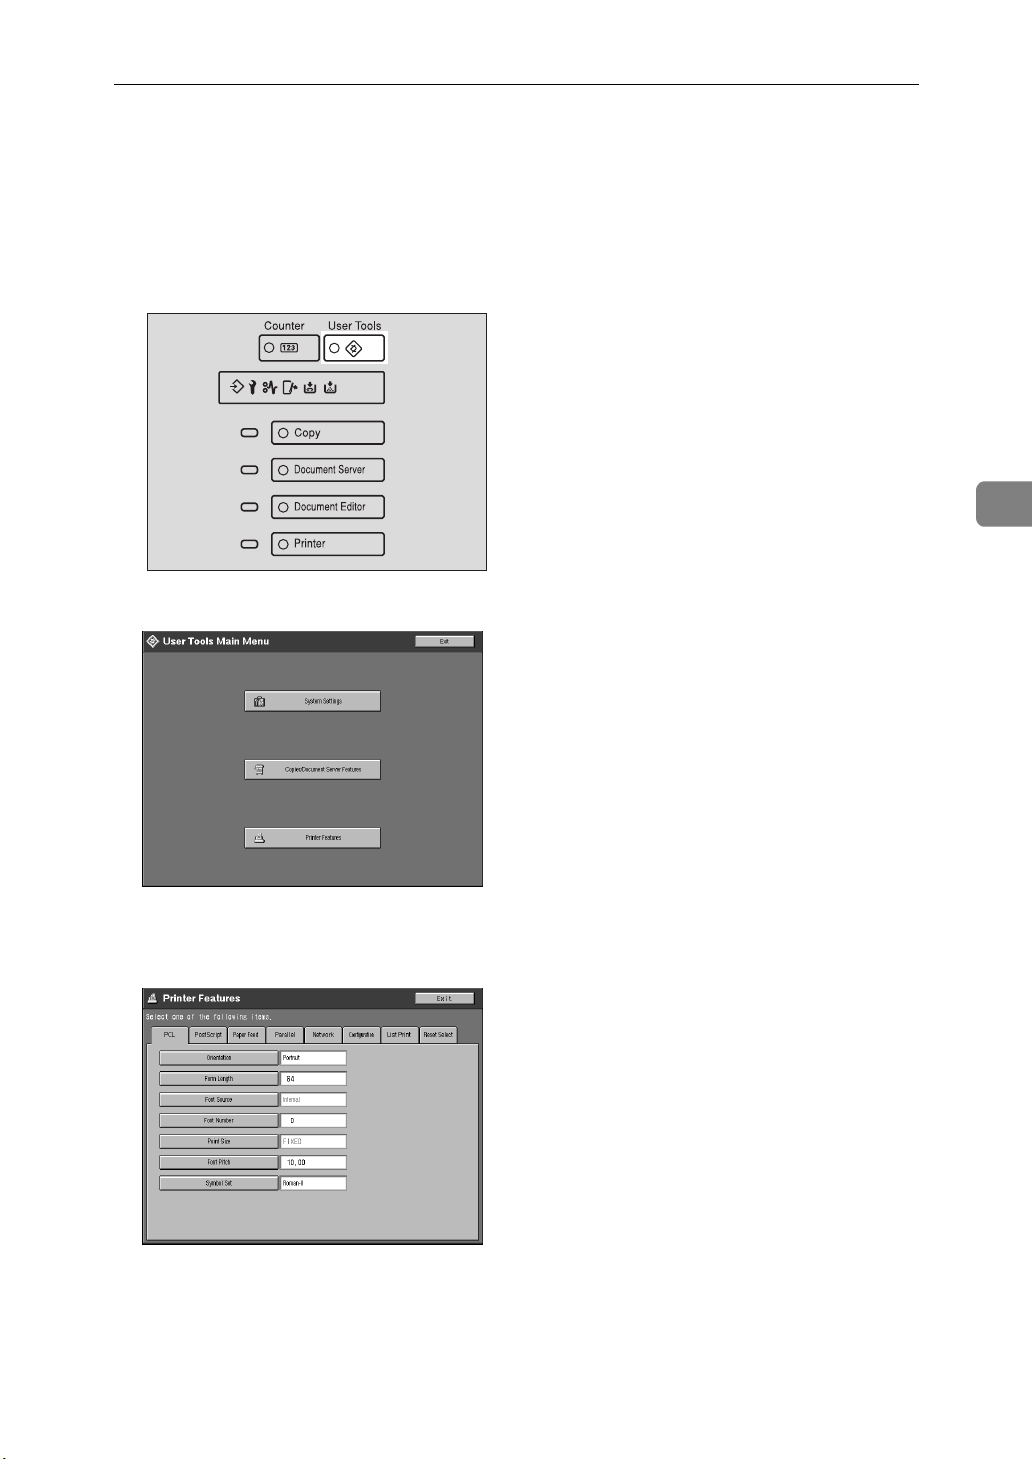
A Press {
The following screen appears on the panel display.
User Tools
}.
4
B Press
The following screen appears on the panel display.
[
Printer Features
.
]
C Select the desired item by pressing the key, and change the settings by fol-
lowing the instructions on the panel display. Then press
the "Printer Features" screen.
Note
❒
❒
: Press to set the new settings and return to the previous menu.
]
[
OK
: Press to return to the previous menu without changing any set-
[
Cancel
ting.
]
to return to
[
]
OK
27
Page 36

Using the Operation Panel
Exiting from User Tools
4
A After changing Printer Features, press
Main Menu".
B Press
Note
❒
You can also exit from User Tools by pressing {
[
Exit
.
]
to return to the "User Tools
]
[
Exit
User Tools
}.
28
Page 37

Printer Features Parameters
Printer Features Parameters
PCL
Menu Description
Orientation You can select the page orientation:
•Portrait
•Landscape
Note
Default:
❒
Portrait
Form Length You can set the number of lines per page:
5 to 128
Note
The default settings depend on the paper size.
❒
Default:
❒
Default:
❒
Font Source You can select the location of the default font:
• Internal
Specifies the resident font you want to use as the
default font.
•Sort
Specifies the font downloaded from the host machine you want to use as the default font.
64 (A4)
1
60 (8
/2 × 11)
Note
Default:
❒
Font Number You can set the value for the default font you want to
use:
0 to 52
Internal
4
Note
Default:
❒
Point Size You can set the value for the point size you want to
use for the selected font in increments of 0.25:
4.00 to 999.75
0
Note
Default:
❒
When an incorrect size is entered, it blinks for about 2
seconds. Enter the correct size at that time.
12.00
29
Page 38
4
Using the Operation Panel
Menu Description
Font Pitch You can set the number of characters per inch for the
selected font in increments of 0.01:
0.44 to 99.99
Note
Default:
❒
Symbol Set You can select the set of print characters for the select-
ed font. Search for the desired font among the options
shown in the 3 screens.
Roman-8, Win L1, Win L2, Win L5, Win Baltic, Win
3.0, Legal, ISO L1, ISO L2, ISO L5, ISO 4, ISO 6, ISO 11,
ISO 15, ISO 17, ISO 21, ISO 60, ISO 69, PC-8, PC-850,
PC-852, PC-1004, PC-8 D/N, PC-8 TK, VN Math, VN
US, VN Intel, MS Publ, Pifont, Desktop, Math-8, PS
Math, PS Text, MC Text
Note
Default:
❒
10.00
Roman-8
PostScript
Menu Description
Print PS Errors You can select whether the PostScript Error Report
should be printed:
• Off
•On
Note
Default:
❒
Off
30
Page 39
Printer Features Parameters
Paper Feed
Menu Description
Page Size You can set the page size when the page size is not
specified by the application.
A3, 11 × 17, B4 JIS, 8
13, A4, 8
8k, 16k
1
/2 × 11, 71/4 × 101/2, B5 JIS, A5, 51/2 × 81/2,
Note
Default (Metric Version):
❒
Default (Inch Version):
❒
Tray Priority You can select the input paper tray priority. Only the
installed trays appear on the panel display.
Auto, Tray 1, Tray 2, Tray 3, Tray 4, Tray 5, Tray 6
Note
Default:
❒
Auto
1
/2 × 14, 81/4 × 13, 8 × 13, 81/2 ×
A4
1
/2 × 11
8
4
Paper Type Priority You can select the paper type priority.
Plain, OHP sheet, Thick Paper, Recycled Paper, Special Paper, Tab Stock, Trancelucent Paper
Note
Default:
❒
Auto Tray Switch You can select whether Auto Tray Switching is On.
When Auto Tray Switching is On, and the current paper tray becomes empty during a print job, the machine automatically changes the paper tray to the one
that contains the same paper size and orientation:
•Off
•On
Plain
Note
Default:
❒
On
31
Page 40
4
Using the Operation Panel
Menu Description
Duplex You can select whether you want to print on both
sides of each page.
If so, you can also specify the orientation of paper.
•Off
• Long Edge Binding
• Short Edge Binding
Note
Default:
❒
Sort You can select whether you want to collate the out-
put.
If so, you can also specify the printing order.
•Off
• Shift Sort
• Rotate Sort
Off
Note
Default:
❒
Off
Staple You can select whether you want to staple the output.
If so, you can also specify the stapling position among
the options shown in the two screens.
Off, Left SlantL, Left Vert.L, Left Horiz.L, Left 2
, Right SlantL, Right Vert.L, Right Horiz.L,
L
Right 2L, Top 2L, Left SlantK, Left Vert.K, Left
Horiz.K, Left 2K, Right SlantK, Right Vert.K, Right
Horiz.K, Right 2K, Top 2
K
Note
Default:
❒
Punch You can select whether you want to punch the output
for filing.
If so, you can also select the punching position.
Off, Left Portrait, Right Portrait, Top Portrait, Left
Landscape, Right Landscape, Top Landscape
Off
Note
Default:
❒
Off
32
Page 41
Printer Features Parameters
Parallel
Menu Description
Printer Language You can set the page description language for print
jobs received through the parallel port:
•Auto
•PCL
•PostScript
Note
Default:
❒
Bi-direction You can set whether bi-directional communication
between this machine and the host computer is enabled:
• Off
•On
Note
Default:
❒
Auto
On
4
I/O Timeout You can set how many seconds to wait until an in-
complete print job should end, and the next port in
the polling sequence should be set in increments of 1:
5 to 300 sec.
Note
Default:
❒
30 sec.
33
Page 42

4
Using the Operation Panel
Network
Menu Description
I/O Timeout You can set how many seconds to wait until an in-
complete print job should end, and the next port in
the polling sequence should be set in increments of 1:
5 to 300 sec.
Note
Default:
❒
IP Address You can set the IP Address.
Note
Default:
❒
Subnet Mask You can set the Subnet Mask.
Note
Default:
❒
30 sec.
All zero
All zero
Gateway Address You can set the Gateway Address.
Note
Network menu protected.
Cannot change.
Default:
❒
You can set the Network Menu protected.
• Off
•On
Note
Default:
❒
All zero
Off
34
Page 43
Printer Features Parameters
Configuration
Menu Description
Resolution You can set the print resolution in dots per inch:
• 300 dpi
• 600 dpi
Note
Default:
❒
Auto Continue You can set whether Auto Continue is enabled. When
it is On, printing continues after a system error occurs:
•Off
•On
Note
When it is On, and certain types of error occur, the
❒
current job might be canceled, and the machine automatically resumes the next job.
Default:
❒
600 dpi
On
4
Edge Smoothing You can set whether Edge Smoothing is enabled:
•Off
•On
Note
Default:
❒
Autocont.Timeout You can set how many seconds to wait until Auto
Continue should end in increments of 1:
5 to 300 sec.
On
Note
Default:
❒
30
35
Page 44
4
Using the Operation Panel
List Print
Menu Description
PS Font List You can print a list of installed PS fonts.
PCL Font List You can print a list of installed PCL fonts.
PS Demo Page You can print a PS Demo Page.
PCL Demo Page You can print a PCL Demo Page.
Configuration Page You can print a page describing the printer configura-
tion.
Minor Error Log You can print a list of errors.
Reset Select
Menu Description
Job Reset You can cancel the print job currently being pro-
cessed.
Menu Reset You can cancel the print job and restore some of the
menu parameters to their factory defaults.
Note
The following parameters do not change back to
❒
their factory defaults:
• Bi-direction
• TCP/IP Settings
Printer Restart You can restart the printer.
User Code Log Clear You can clear the user code log.
Note
If the key operator code has been set, entering the
❒
key operator code is required.
36
Page 45
Printer Condition
Printer Condition
We recommend that you print the configuration page and check its settings, before changing settings of the machine.
A Press {
The following screen appears on the panel display.
User Tools
}.
4
B Press
The following screen appears on the panel display.
[
Printer Features
.
]
37
Page 46
Using the Operation Panel
4
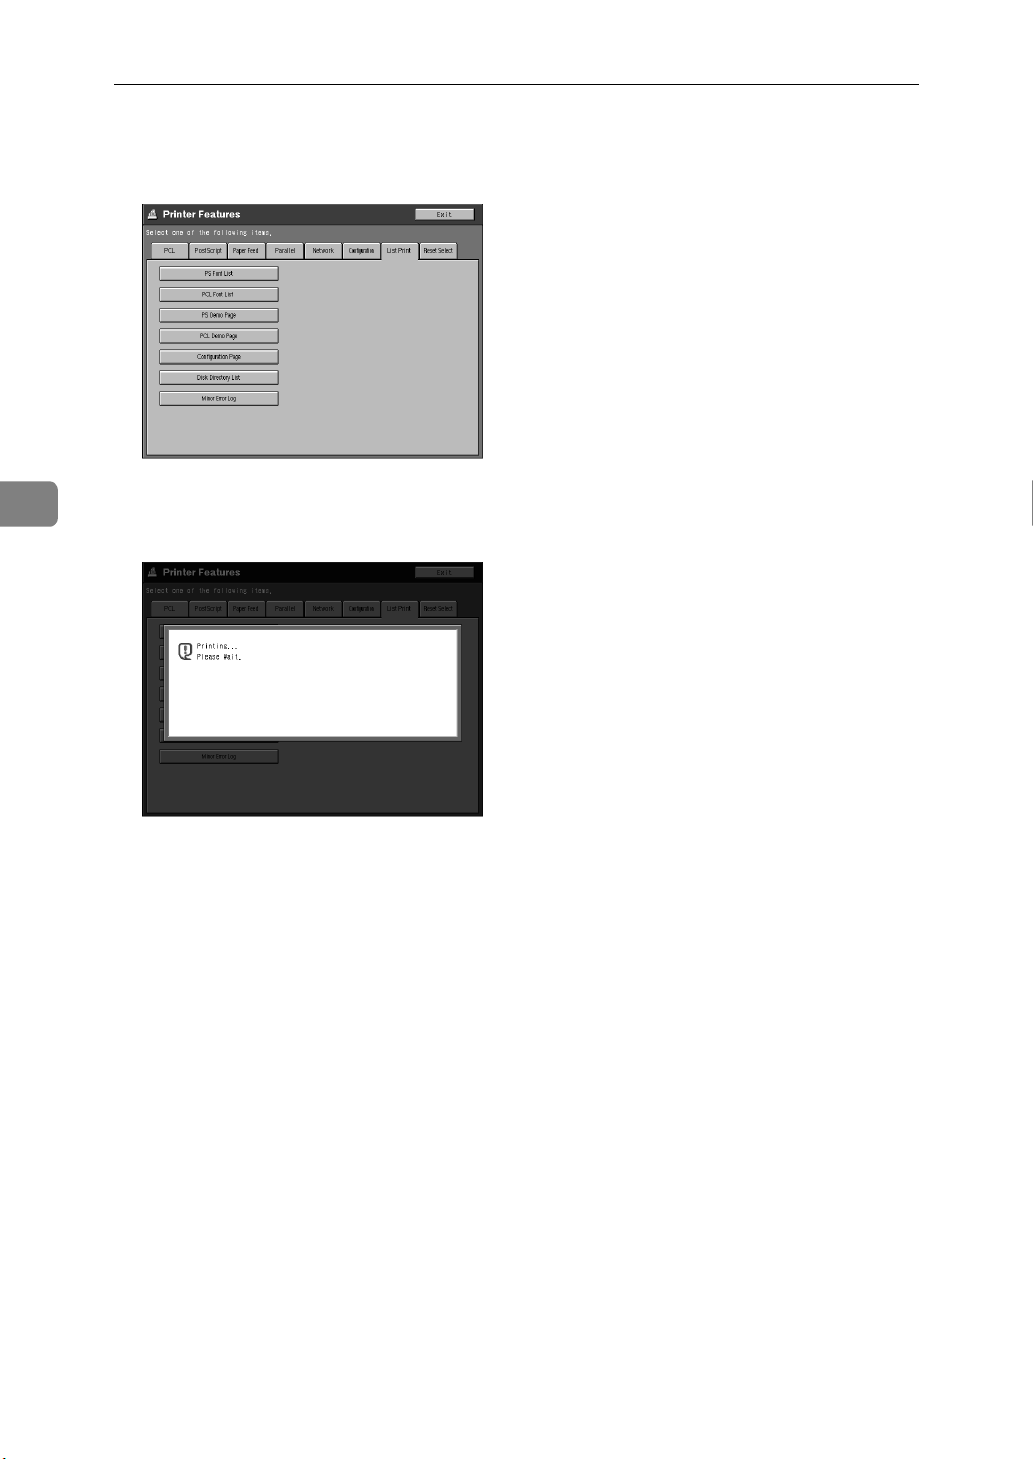
C Press
The following screen appears on the panel display.
D Press
The configuration page starts printing.
[
List Print
[
Configuration Page
.
]
.
]
38
Page 47
Adjusting System Settings
Accessing the System Settings
Adjusting System Settings
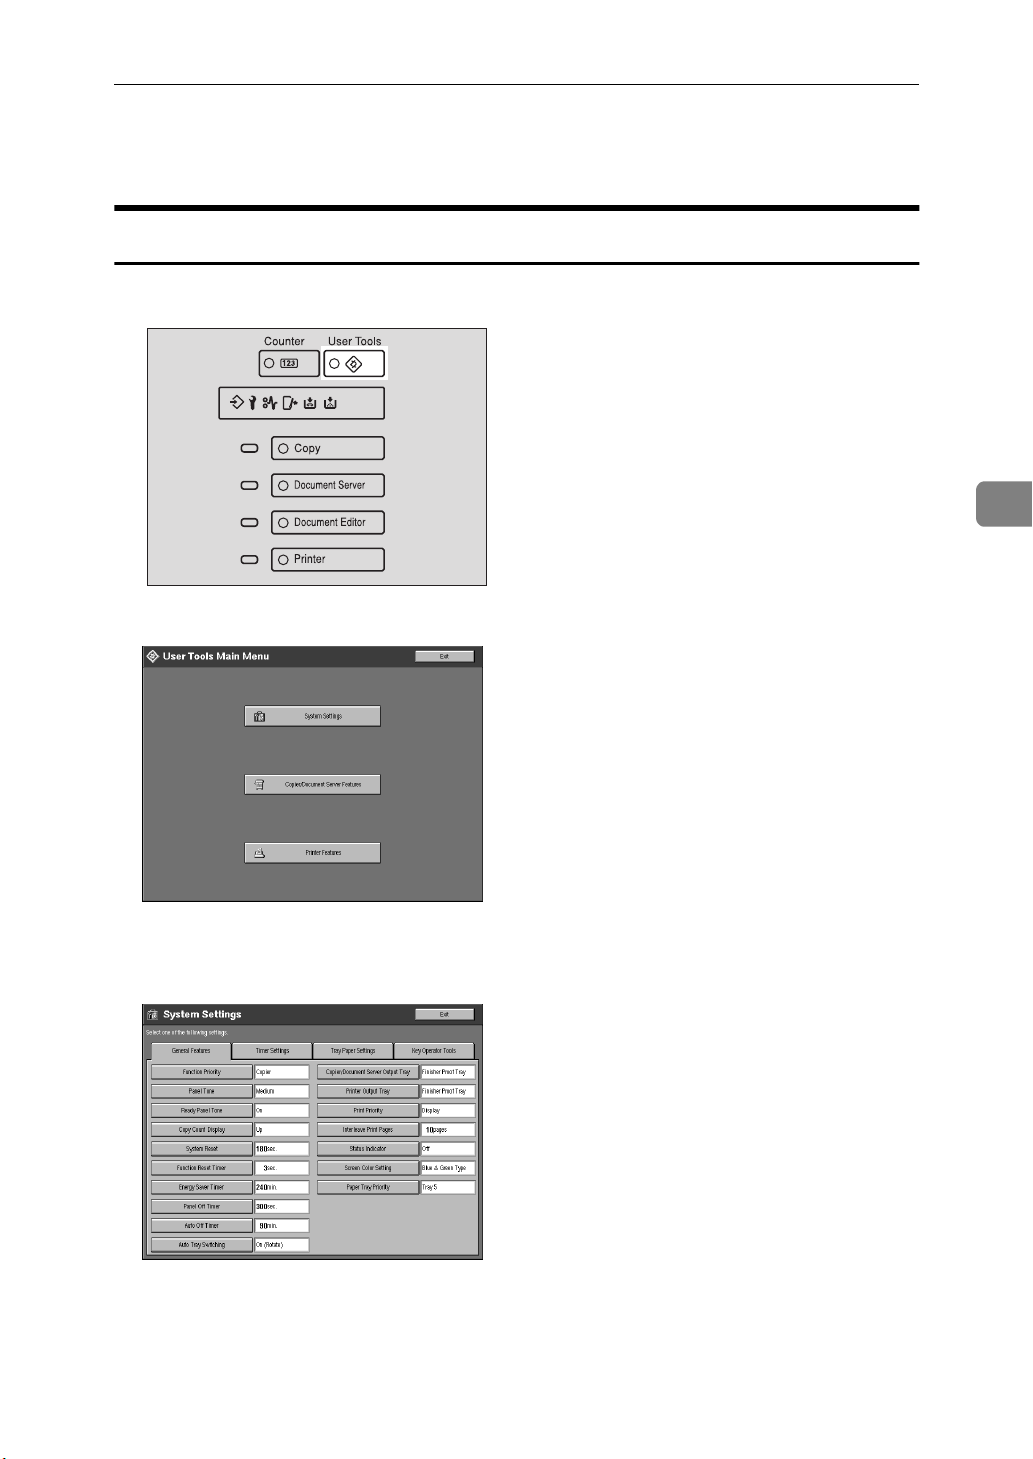
A Press {
The User Tools main menu appears.
User Tools
}.
4
B Press
The System Settings menu appears.
[
System Settings
on the panel display.
]
C Select the desired menu you want to change.
39
Page 48
Using the Operation Panel
D Change the settings by following the instructions on the panel display.
Then press
⇒ P.40
❒
❒
Exiting from the User Tools
“System Settings Parameters”
Note
: Press to set the new settings and return to the previous menu.
]
[
OK
: Press to return to the previous menu without changing any set-
[
Cancel
ting.
]
[
OK
.
]
4
A After changing system settings, press
Main Menu”.
B Press
Note
❒
You can also exit from the User Tools by pressing {
[
Exit
.
]
to return to the “User Tools
]
[
Exit
User Tools
}.
System Settings Parameters
This section contains the information about the parameters used only for the
printer.
For more information about other parameters of System Settings, see the “Operating Instructions” that describes the System Settings.
Reference
For information about the other parameters in the System Settings menu, refer to the “System Settings” manual.
40
Page 49
Adjusting System Settings
General Features
Menu Description
Function Priority You can specify the mode that is displayed when the
operation switch is turned on or System Reset is activated.
Note
Default:
❒
Reference
See “System Reset”.
System Reset If no operation is performed for a selected time, the
machine will automatically return to initially selected
display.
This function is called “System Reset”. You can set the
time between 10 and 999 seconds.
Note
Default:
❒
Copier
60 seconds
4
Energy Saver Timer The machine enters the Energy Saver mode automat-
ically a certain time after the job is finished. You can
set the time between 1 and 240 minutes.
Note
Default:
❒
Auto Off Timer The machine turns itself off automatically to conserve
energy a certain time after the job is finished. This
function is called "Auto Off". You can set the time between 1 and 240 minutes.
15 minutes
(1 minute steps)
Note
Default:
❒
Auto Off is not effective when an error message is
❒
displayed.
To return to the Ready condition from Auto Off,
❒
the machine requires the same warm-up time as
the time for becoming ready after its power is
turned on.
90 minutes
(1 minute steps)
41
Page 50
Using the Operation Panel
Menu Description
4
Copier/Document Server
Output Tray
You can specify to which tray copies are delivered.
Note
You can select from the “Finisher Shift Tray” or
❒
“Finisher Proof Tray”.
When using the staple function, this setting is ig-
❒
nored.
Printer Output Tray You can select a tray which documents are delivered.
• Finisher Shift Tray
• Finisher Proof Tray
Note
Default:
❒
The output tray may be different depending on the
❒
functional setting and the setting of the printer
driver.
Print Priority You can select the print priority for each mode.
• Display: Print priority is given to the mode shown
on the display.
• Copier/Document Server: Print priority is given
to the Copier and Document Server function.
• Printer: Print priority is given to the printer function.
• Interleave: Makes use of the Multi-access function
to print jobs in the order in which they are initiated
regardless of mode/function.
Finisher Shift Tray
42
Note
Default:
❒
Interleave Print Pages You can set the maximum output quantity using the
interleave print when “Output Priority” is set to “Interleave”.
1–20
Display
Note
Default:
❒
This setting may be different from your setting de-
❒
pending on the status of the print job.
Approx 10 pages
Page 51
Adjusting System Settings
Menu Description
Paper Tray Priority You can select the paper tray which will be selected as
a default in the following conditions:
• When the operation switch is turned on.
• When a System Reset or Auto Reset occurs.
• When the [
• When Auto Paper Select mode is selected.
] key is pressed.
Clear
4
Note
Default:
❒
• When the optional LCT is installed:
• When the optional LCT is not installed:
Tray 4
Tray 1
Timer Setting
If a key operator code (up to 8 digits) is specified, you should enter the code
when entering Set Time mode.
Reference
For more information about key operator code, see “Operationg Instructions”
that describes the system settings.
Menu Description
Key Operator Code For Off
Setting
Set a key operator code (up to 8 digits) to temporarily
cancel the power off setting of the weekly timer.
Note
When the weekly timers are set and operation
❒
switch is off, you can still use the machine by doing one of the following:
• If the key operator code is set, turn on the oper-
ation switch and enter the code.
• If the key operator code is not set, just turn on
the operation switch.
43
Page 52
Using the Operation Panel
Tray Paper Settings
You can set the types and size of the paper set in the paper tray and make them
indicated.
You can set with the following steps.
A Paper Type
B Paper Color
C Slip Sheet Copy In Duplex Mode (Only for “Normal” “Recycled Paper” or
*1
(Only for “Special Paper” or “Thick Paper”)
“Special Paper”)
D Paper Size (Only for Tray 2 and Tray 3)
*1
Paper Color can not be set from the printer driver, and you can not confirm the Paper
Color from the printer driver.
4
Reference
For more information about “Tray Paper Settings”, see the “Operation Instructions” that describes the copy functions and describes the system settings.
44
Page 53
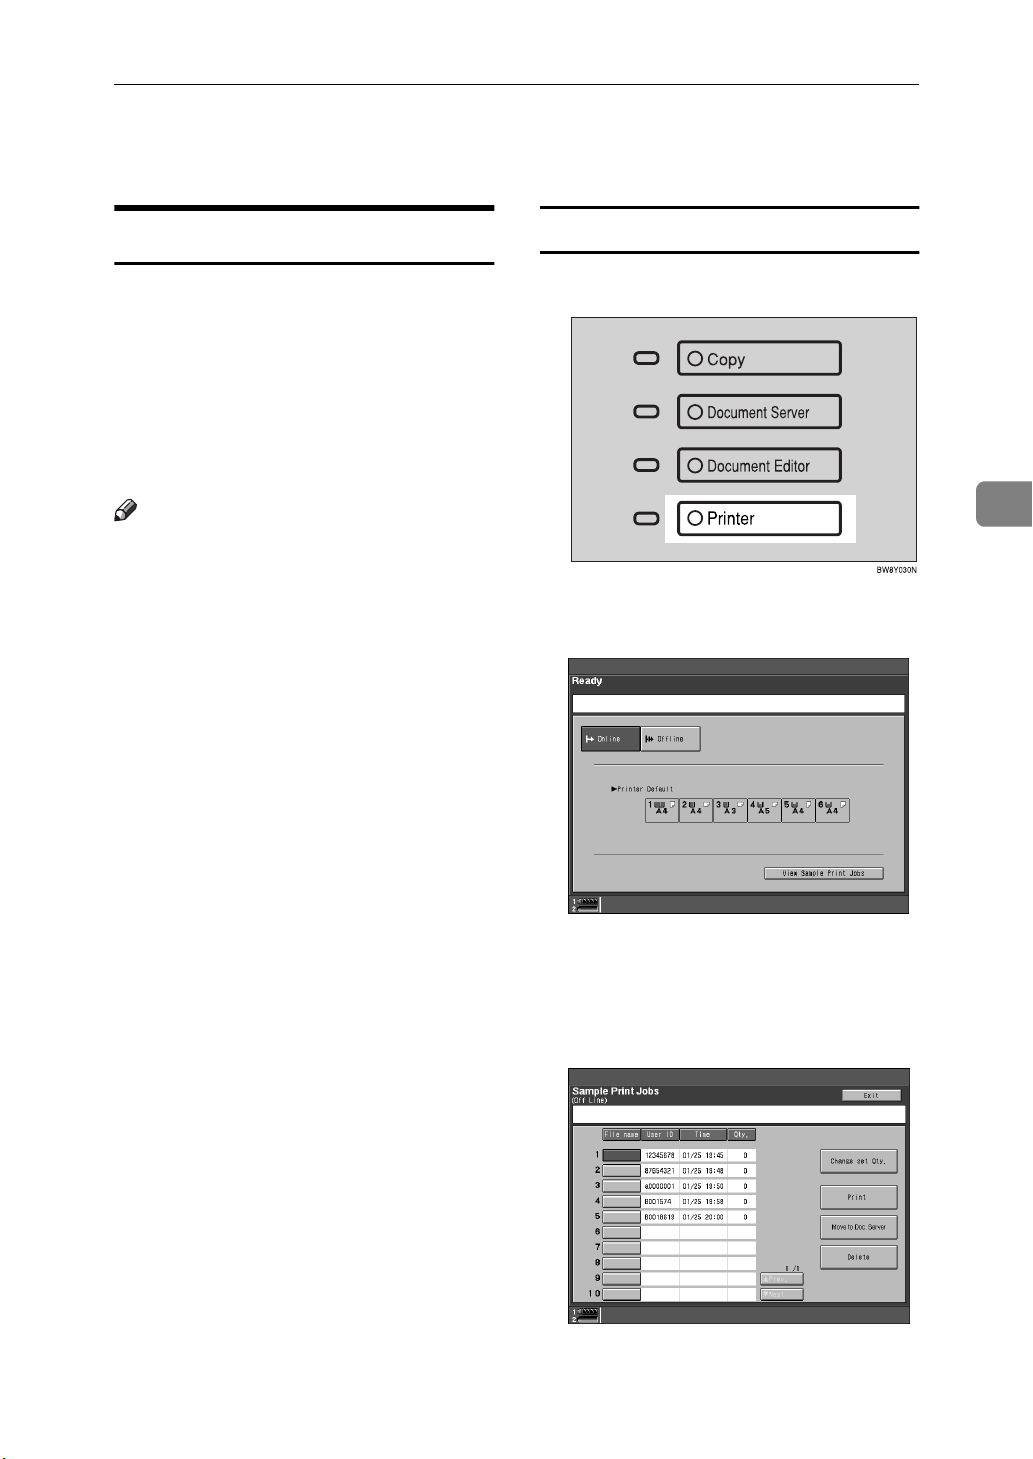
Printing with the Operation Panel
Printing with the Operation Panel
Using the Sample Print
Use this function to print only one
printing of a multiple print job. The
other printings are saved in the machine. The saved job can be printed
from the machine's operation panel.
You can also delete the saved job,
change quantity of sets and move to
"Document Server" function.
Note
❒
If the application has a collate option, confirm that it is not selected
before sending a print job. By default, sample print jobs are automatically collated by the printer
driver. If the collate option is selected from the application print
dialog box, more copy printings
than intended may be printed.
❒
You can identify the file you want
to print by the User IDs and the
time when the job was stored.
Printing a Sample Print file
A Press {
Printer
}.
The following screen appears on
the panel display.
4
❒
The actual number of pages the
machine can save depends on the
contents of the print images. As an
example, the machine can save up
to 30 jobs. 1,000 pages of one print
job and total 3,000 pages of all print
jobs can be saved. It depends on
the data volume.
❒
If you print the remaining printings of saved job file, its data in the
machine is deleted automatically.
❒
"Sample Print" is not supported by
PostScript printer driver under
Windows 2000.
B Confirm that printer is online,
then press
The following screen appears on
the panel display.
A0001
A0002
B0003
B0004
X0005
[
View Sample Print Jobs
]
.
45
Page 54
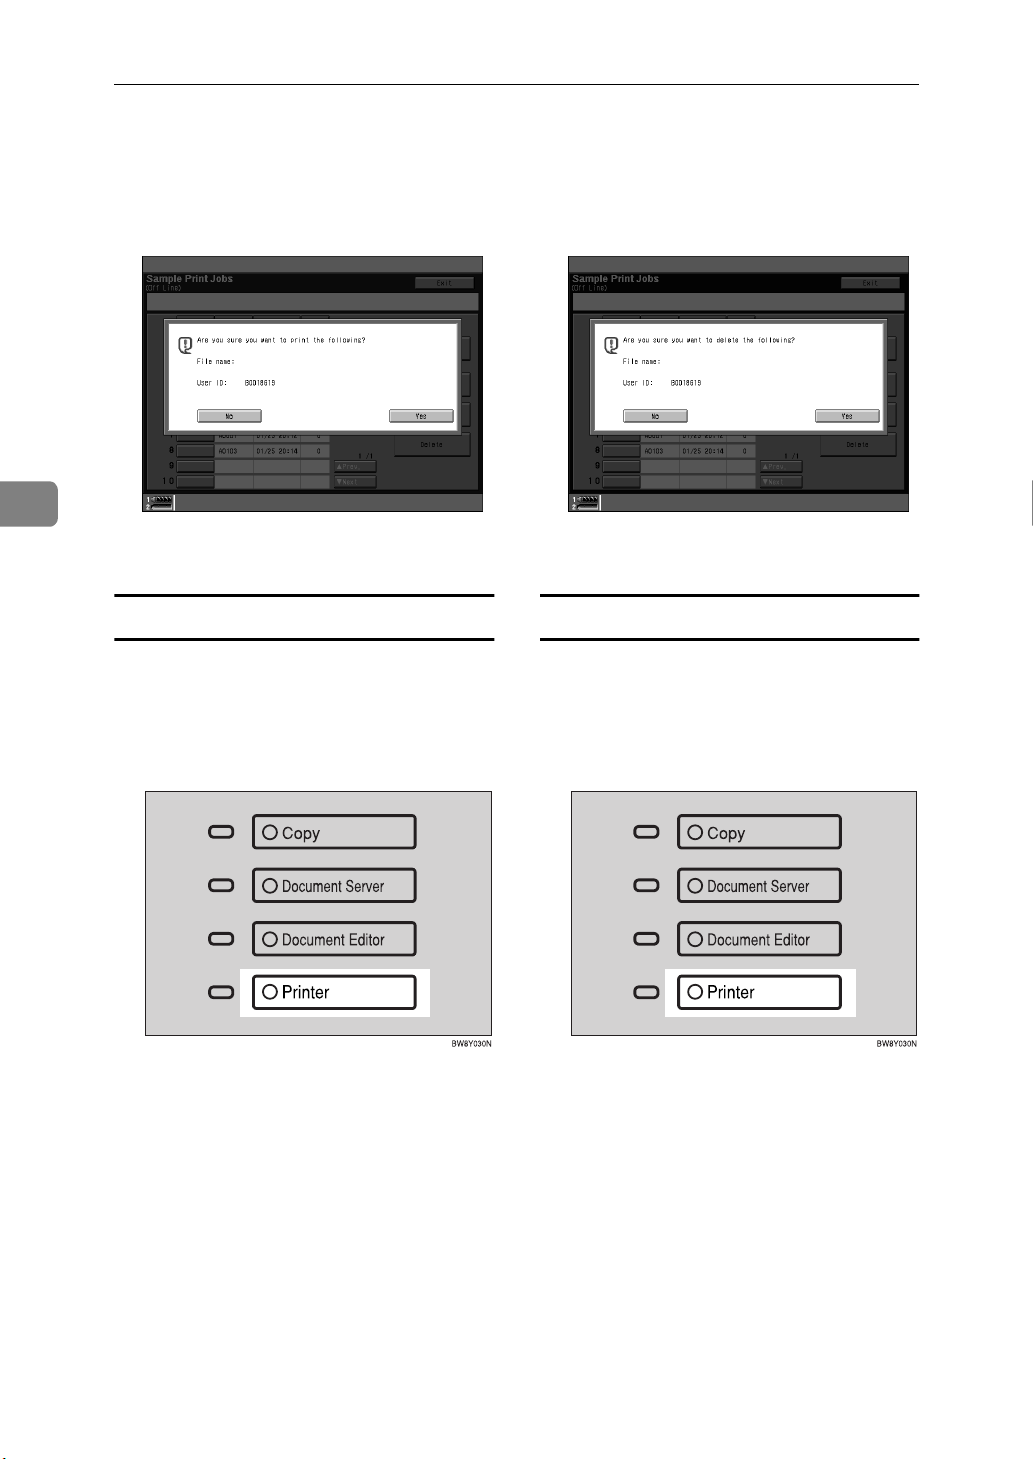
Using the Operation Panel
4
C Select a file you want to print, and
then press
The following screen appears on
the panel display.
D Press
Deleting a Sample Print file
If the printed document is not what
you expected, you can delete the sample print file.
to print the file.
]
[
Yes
[
Print
.
]
C Select the file you want to delete,
and then press
The following message appears on
the panel display.
D Press
Changing the quantity
If you want to change the quantity of
copies of sample print file, follow the
procedure below.
[
Yes
[
Delete
to delete the file.
]
.
]
A Press {
Printer
}.
B After confirming that the printer
is online, press
.
]
Jobs
[
View Sample Print
A Press {
Printer
}.
B After confirming that the printer
is online, press
.
]
Jobs
[
View Sample Print
46
Page 55
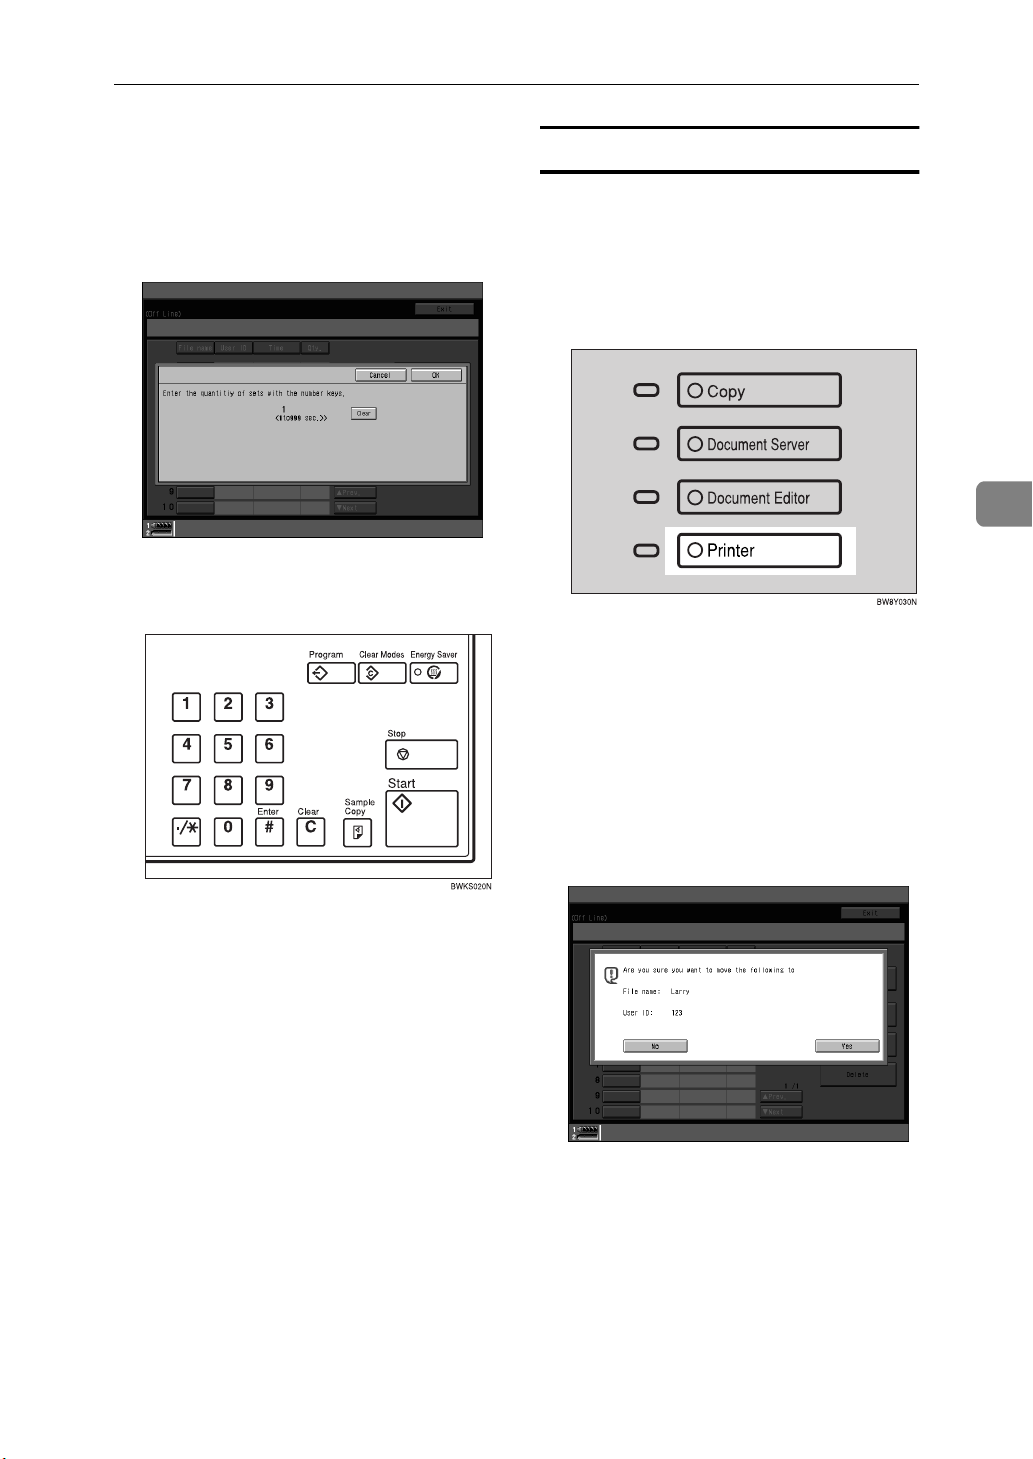
Printing with the Operation Panel
C Select the file you want to change
quantity, and then press
.
Set Qty.
The following screen appears on
the panel display.
]
[
Change
D Enter the numerical value with
the number keys.
Moving the file to the Document Server
You can move the sample print file to
the Document Saver, and can arrange
the file by using the Document Server
function.
A Press {
Printer
}.
B After confirming that the printer
is online, press
.
]
Jobs
[
View Sample Print
4
E Press
[
OK
C Select the file you want to move,
and then press
.
]
er
The following message appears on
the panel display.
.
]
D Press
Document Saver.
[
Yes
]
[
Move To Doc. Serv-
to move the file to the
47
Page 56
Using the Operation Panel
4
Accessing the Document Server
The Document Server enables you to
save documents in the machine memory and then edit and print them as
you want.
For more information about the Document Server function, see the “Operating Instructions” that describe the
copy functions.
This section describes how to access
to Document Server from the computer as a print job.
Note
❒
When you use the Document Server, the following settings must be
selected using machine's operation
panel.
•Copies:
•Collate
•Duplex
•Punch
• Staple
• Paper Source
•Output Tray
❒
Above items are grayed out, so
you can not set them from the
printer properties when the Document Server is selected.
❒
You must enter User ID up to eight
alphanumerical characters.
❒
You had better enter Password
and File Name to distinguish the
job from others.
❒
The actual number of pages the
machine can save depends on the
contents of the print images. As an
example, the machine can save up
to 250 jobs in the Document Server
function. 1,000 pages of one print
job can be saved. It depends on the
data volume.
48
Accessing the Document Server from the Printer Properties
A On the
tion you use, click
The
[
Print
menu of the applica-
]
[
File
[
Print
dialog box appears.
]
.
]
B Select the printer you want to use
in the
click
The
appears.
C In the
ment Server
box.
D Enter
numerical characters.
[
Menu
[
Properties
[
Printer Properties
[
Setup
[
User ID:
E Enter the
digits, and
alphanumerical characters in the
[
Statistics
F Press
[
OK
Reference
For more information about following settings and details of
Document Server, see the “Operating Instructions” that describe the copy functions.
•Copies
• Collate
•Duplex
•Punch
• Staple
•Paper Source
•Output Tray
list box, and then
]
.
]
dialog box
]
tab, select the
]
in the
]
[
Password
[
File Name
tab.
]
.
]
[
Job Type:
up to eight alpha-
]
up to four
]
up to eight
]
[
Docu-
list
]
Page 57
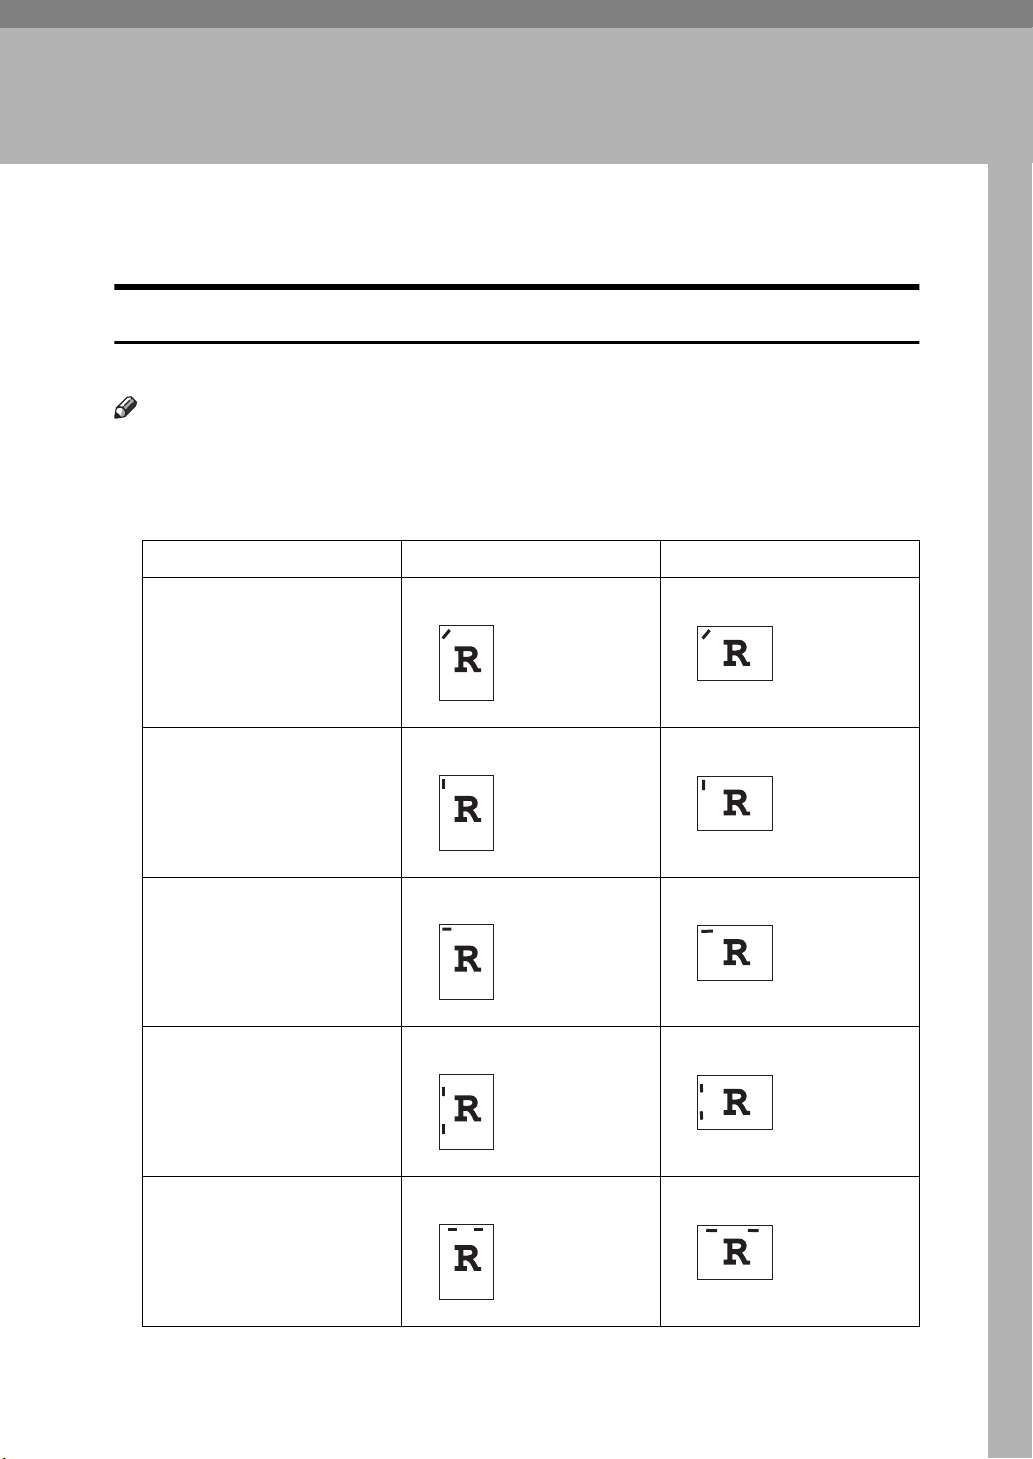
5. Appendix
Staple and Punch Position
Staple and Punch Position
The following tables show the sample of outputs of staple and punch positions.
Note
❒
Outputs of staple and punch depends on paper size, paper type, number of
pages and feed direction.
❖
Staple
Staple Setting Portrait Landscape
Upper Left Slant
Upper Left Vertical
Upper Left Horizontal
Left 2
Upper 2
49
Page 58

Appendix
❖
Punch
5
Punch
Setting
2 holes
3 holes
4 holes
Type E
*3
4 holes
Type NE
*3
Portrit Landscape
Left Top Left Top
*1
*2
50
*1
Available for metric and inch version.
*2
Available for inch version only.
*3
Available for metric version only.
Page 59
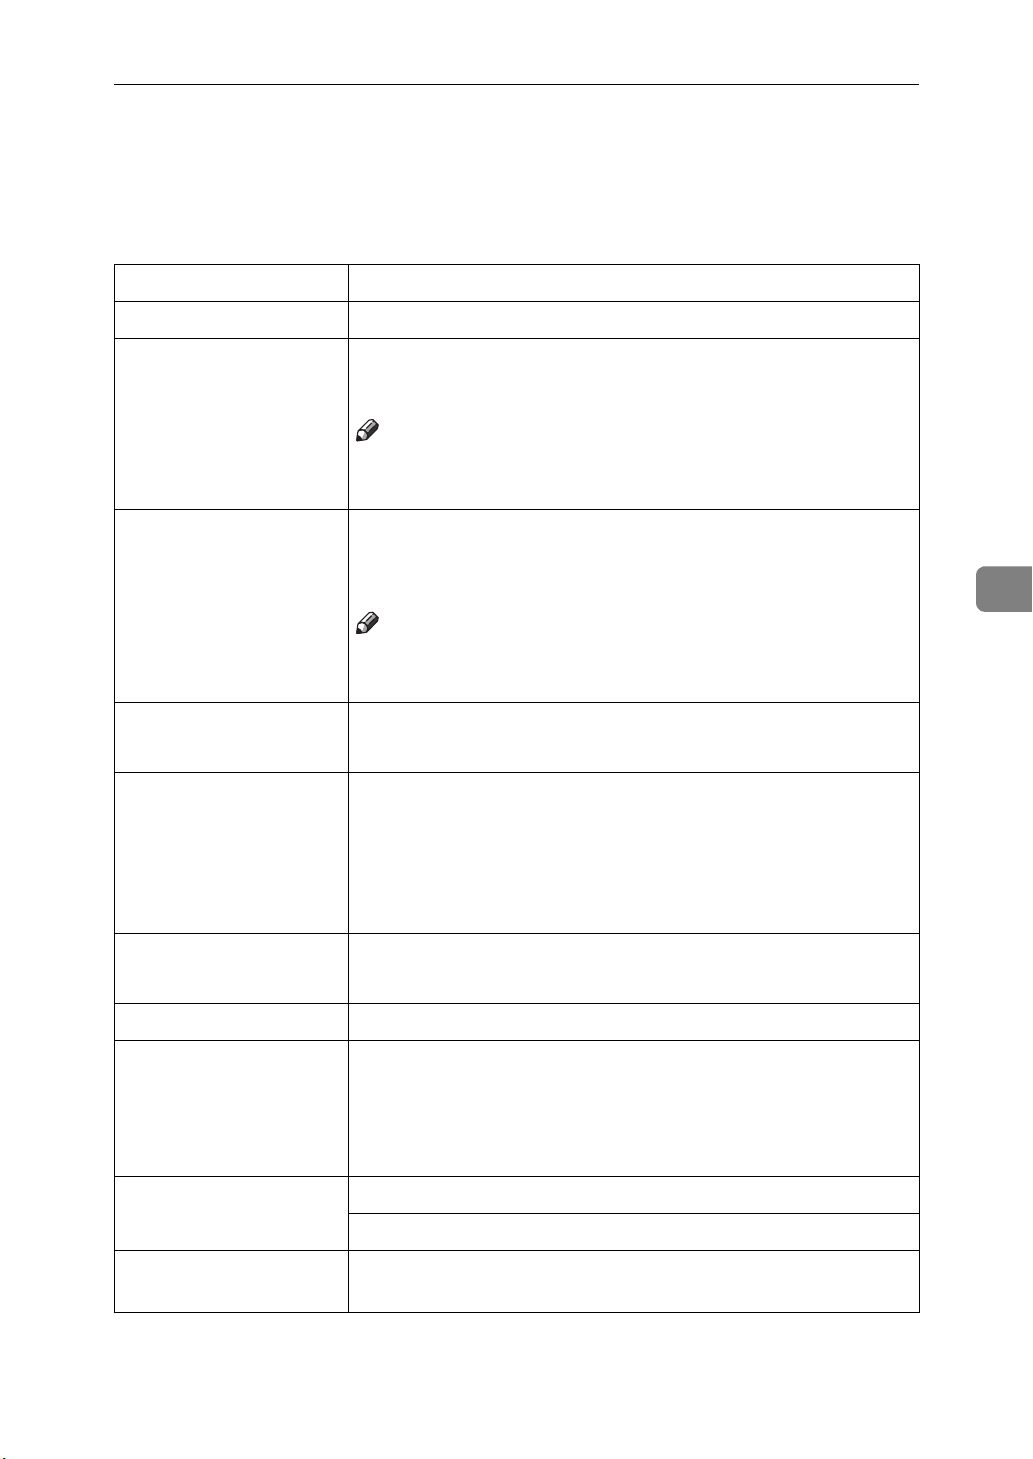
Specifications
Specifications
This section contains the electrical and hardware specifications for the printer,
including the information about the options.
Component Specification
Resolution 600dpi ; PCL 5e, PCL 6, PostScript 3
Printing Speed 85ppm, 105ppm
(A4K, 8
❒
Parallel Interface Standard 36-pin printer cable and a parallel port on the host
computer.
IEEE1284
❒
1
/2" × 11"K)
Note
Printing Speed depends on the machine. Confirm which
machine you have.
Note
Do not use a parallel cable that is longer than 3 meters (10
feet).
5
Printer Language PCL 5e , PCL 6
PostScript 3 (option)
Fonts
Memory
Hard Disk
Operation Systems
supported by this
printer
Network
Network Cable 10BASE-T/100BASE-TX shielded twisted-pair (STP, Catego-
PCL 5e, PCL 6
35 Intellifonts, 10 Trutype fonts, and 1 Bitmap font Font
Manager available.
PostScript 3
136 Adobe Type 1 fonts
Standard :
Optional SDRAM :
Storage capacity :
Windows 95/98
Windows 2000
Windows NT 4.0
Mac OS
Topology :
Protocol :
ry/Type5) cable.
32MB
32MB, 64MB, 128MB
6GB or more
Ethernet 10BASE-T/100BASE-TX
TCP/IP, IPX/SPX, AppleTalk
51
Page 60
5
Appendix
Options
Network Interface Board Type 450-E
❖
Topology:
Ethernet (10BaseT/100BaseTX)
❖
Protocols:
TCP/IP, IPX/SPX, AppleTalk
❖
Interface Connector:
RJ45
❖
Required Cable:
STP (Shielded Twisted-Pair) cable
Category/Type5 or better
*A cable is not provided with this option.
Hard Disk Drive
❖
Storage Capacity
6 GB or more
• You will be able to install the PostScript fonts with this optional Hard Disk
Drive.
Memory Unit
❖
Module Type:
SO-DIMM (Small Outline Dual-in-line Memory Module)
❖
Memory Type:
SDRAM (Synchronous Dynamic RAM)
❖
Number of Pins
168 pins
❖
Compatible:
PC100 compatible
52
Page 61
INDEX
C
Configuration
Copier/Document Server Output Tray
E
Error Messages
F
Function Priority
,
,
35
,
17
41
,
42
,
,
9
30
,
42
,
25
,
,
24
42
PostScript
Windows 2000, uninstalling
Windows 95/98, uninstalling
Windows NT 4.0, uninstalling
PostScript Printer Driver
Macintosh, uninstalling
PostScript
Printer Features
Printer Output Tray
Printing Problems
Print Priority
,
,
3
,
3
,
4
4
G
General Features
,
41
I
Interleave Print Pages
L
List Print
,
36
M
Machine Does not Print
Macintosh
, 13,
16
plugin File, uninstalling
N
Network
,
34
P
Paper Feed
Paper Tray Priority
Parallel
PCL
PCL 5e
PCL 6
,
31
,
,
33
,
29
,
5
Windows 2000, uninstalling
Windows 95/98, uninstalling
Windows NT 4.0, uninstalling
,
5
Windows 2000, uninstalling
Windows 95/98, uninstalling
Windows NT 4.0, uninstalling
,
43
,
42
23
,
R
Reset Select
,
36
S
Sample Print
Status Messages
System Reset
System Settings
,
,
45
41
,
,
17
39
T
Timer Setting
Troubleshooting
4
,
1
,
1
,
2
,
1
,
1
,
2
W
Windows 2000
PCL 5e, uninstalling
PCL 6, uninstalling
PostScript, uninstalling
Windows 95/98
PCL 5e, uninstalling
PCL 6, uninstalling
PostScript, uninstalling
Windows NT 4.0
PCL 5e, uninstalling
PCL 6, uninstalling
PostScript, uninstalling
,
43
,
, 6, 10,
, 5, 9,
, 7, 11,
17
14
14
,
,
,
,
,
,
15
1
1
,
3
1
1
,
3
2
2
,
4
53
Page 62

54 UE USA B336
Page 63

Declaration of Conformity
“The Product complies with the requirements of the EMC Directive 89/336/EEC and the Low Voltage
Directive 73/23/EEC.”
Caution (in case of 100BaseTX environment):
Properly shielded and grounded cables (STP) and connectors must be used for connections to host
computer (and/or peripheral) i n order to meet EMC Directive 89/336/EEC emission limits.
Copyright © 2000
Page 64

PRINTER Controller Type 850 Operating Instructions
UE USA B336-8687A
 Loading...