

Page 1
PRINTER Controller
Type 850
Operating Instructions
PRINTER REFERENCE 1 (option)
Read this manual carefully before you use this product and keep it handy for future
reference.
For safety, please follow the instructions in this manual.
Page 2

PRINTER Controller Type 850 Operating Instructions
Printed in Japan
UE USA B336-8607A
Page 3

Introduction
This manual contains detailed instructions on the operation and maintenance of this machine. To get
maximum versatil ity from this ma chine all opera tors sho uld careful ly read an d follow the ins tructi ons in
this manual.
Please keep this manual in a handy place near the machine.
Please read the Safety Information in the “Copy Reference” before using this machine. It contains im-
portant information related to USER SAFETY and PREVENTING EQUIPMENT PROBLEMS.
Important
Parts of this manual are subject to change without prior notice. In no event will the company be liable
for direct, indirect, special, incidental, or consequential damages as a result of handling or operating
the machine.
Trademarks
®
Microsoft
and Windows® are registered trademark s of Micros oft Corporati on in the Uni ted States an d/
or other countries.
®
Ethernet
is a registered trademark of Xerox Corporation.
PostScript® and Acrobat® are registered trademarks of Adobe System Incorporated.
PCL® is a registered trademark of Hewlett-Packard Company.
Other product names us ed herei n are for iden tifica tion purp oses on ly and migh t be tradem arks of th eir
respective companies. We disclaim any and all rights in those marks.
©
IPS-PRINT™ Printer Language Emulation
Copyright 1999 - 2000, XIONICS DOCUMENT TECHNOL-
OGIES, INC., All Rights Reserved.
Warning:
Use of controls or adjustment or performance of procedures other than those specified in this manual
might result in hazardous radiation exposure.
Notes:
Some illustrations might be slightly different from your machine.
Certain options migh t no t be av ail abl e in some countries. F or de tails, please contac t yo ur local dealer.
Page 4

Note to users in the United States of America
Notice:
This equipment has be en tes ted and found t o com ply w ith the limi ts for a Cl ass B d igital devic e, purs uant to Part 15 of the FCC Rules. These limits are designed to provide reasonable protection against
harmful interference i n a resid ential instal lation . This e quipm ent gene rates, u ses an d can rad iate rad io
frequency energy and, if not instal led and used in accorda nce with the ins tructions , may caus e harmful
interference to radio communications.
However, there is no guarantee that interference will not occur in a particular installation. If this equipment does cause harmfu l interference to radio or television reception, whic h can be determined by turning the equipment off and on, the user is encouraged to try to correct the interference by one more of
the follo wing measures :
Reorient or relocate the receiving antenna.
Increase the separation between the equipment and receiver.
Connect the equipment into an outlet on a circuit different from that to which the recei ver is
connected.
Consult the dealer or an experienced radio/TV technician for help.
Warning
Changes or modifications not expressly approved by the party responsible for compliance could void
the user's authority to operate the equipment.
Caution :
Properly shielded and grounded cables (STP) and connectors must be used for connections to host
computer (and/or peripheral) in order to meet FCC emission limits.
STP with ferrite core must be used for RF interference suppression.
Declaration of Conformity
Product Name: Printer Controller
Model Number: Type 850
Responsible party: Ricoh Corporation
Address: 5 Dedrick Place, West Caldwell, NJ 07006
Telephone number: 973-882-2000
This device complies with part 15 of FCC Rules.
Operation is subject to the following two conditi ons:
1. This device may not cause harmful interference, and
2. this device must accept any interference received,
including interference that may cause undesired operation.
Note to users in Canada
Note:
This Class B digital apparatus complies with Canadian ICES-003.
Remarque concernant les utilisateurs au Canada
Avertissement:
Cet appareil numérique de la classe B est conforme à la norme NMB-003 du Canada.
Copyright © 2000
Page 5

Manuals for This Machine
Manuals for This Machine
There are seven manuals that separately describe the operational procedures for
the operation and maintenance of the machine.
To enhance safe and efficient operation of the machine, all users should read and
follow the instructions contained in the following manuals.
❖
Copy Reference
Describes the procedures and functions for using this machine as a copier.
❖
System Settings
Describes the system settings of this machine.
❖
Printer Reference 1
Describes the system settings, procedures and functions for using this machine as a printer. (This Manual)
❖
Printer Reference 2
Describes the procedures and provides necessary information about using
this machine as a printer. The manual is included as a PDF file on the CDROM labeled “Printer Drivers and Utilities”.
❖
Network Interface Board Quick Configuration Guide
Describes the procedures and provides necessary information about setting
up and using the printer under the network environment. We recommend
this manual as your first choice. The manual is included as a PDF file on the
CD-ROM labeled “Printer Drivers and Utilities”. Read this manual as your
first choice before refering to the paper version of the Quick Configuration
Guide which comes with optional Network Interface Board Type 450-E.
❖
PostScript 3 Operating Instructions Supplement
Describes the menus and features you can set using the PostScript printer
driver. The manual is provided as a PDF file on the CD-ROM labeled “Printer
Drivers and Utilities”.
❖
Network Interface Board Type 450-E Owner's Manual
Describes the procedures and provides necessary information about setting
up and using the printer under the network environment. The manual is provided as a PDF file which is included on the CD-ROM labeled “Print Server
Software and Documentation” which comes with optional Network Interface
Board Type 450-E.
i
Page 6

ENERGY STAR Program
As an ENERGY STAR Partner, we have determined that this machine model meets the ENERGY STAR Guidelines for energy efficiency.
The ENERGY STAR Guidelines intend to establish an international energy-saving system for developing and introducing energy-efficient office equipment to deal with environmental issues, such as global warming.
When a product meets the ENERGY STAR Guidelines for energy efficiency, the Partner shall place the ENERGY STAR logo onto the machine model.
This product was designed to reduce the environmental impact associated with office
equipment by means of energy-saving features, such as Low-power mode.
• Low Power mode
This product automatically lowers its power consumption 15 minutes after
the last copy or print job has finished. Printing is still possible in Low-power
mode, but if you wish to make copies press the {
Energy Saver
For how to change the default interval that the machine waits before entering
Low-power mode, see “Low Power Shift Time” in the “System Settings”.
} key first.
• Sleep Mode
If the printer features are installed, this product automatically lowers its power consumption even further 120 minutues after the last copy or print job has
finished. Printing is still possible in Sleep mode, but if you wish to make copies press the operation switch first.
For how to change the default interval that the machine waits before entering
Sleep mode, see “Auto Off mode” in the “System Settings”.
• Auto Off mode
If the printer feature is not installed, this product automatically turns itself off
90 minutes after the last copy or print job has finished. If you wish to make
copies when the machine is in Auto Off mode, press the operation switch.
For how to change the default interval that the machine waits before entering
Auto Off mode, see “Auto Off Timer” in the “System Settings”.
• Duplex Priority
To conserve paper resources, the Duplex function (1-Sided → 2-Sided) is se-
lected preferentially when you turn on the operation switch or the main power switch, press the {
Energy Saver
} key, or when the machine resets itself
automatically.
For how to turn Duplex Priority mode on or off, see “Duplex Mode Priority”
in the “Copy Reference”.
ii
Page 7

❖
Specification
Copy feature Printer installed
Type 1
*1
Type 2
*1
Type 1
*1
Type2
*1
Low Power
mode
Power consumption
312 W 320 W 324 W 332 W
Default Time 15 minutes 15 minutes
Recovery Time 40 sec-
onds or
less
Sleep Mode Power con-
42 sec-
onds or
40 seconds
or less
less
- 24 W
42 seconds
or less
sumption
Default Time - 120 minutes
Auto Off mode Power con-
12 W 24 W
sumption
Default Time 90 minutes 120 min-
utes
*1
See the “System Settings” to confirm which machine (Type 1 or Type 2) you have.
90 min-
utes
120 min-
utes
Duplex Priority 1 Sided→1 Sided
Recycled Paper
In accordance with the ENERGY STAR Program, we recommend use of recycled
paper which is environment friendly.Please contact your sales representative for
recommended paper.
iii
Page 8

How to Read This Manual
R
R
Symbols
In this manual, the following symbols are used:
WARNING:
This symbol indicates a potentially hazardous situation which, if instructions
are not followed, could result in death or serious injury.
CAUTION:
This symbol indicates a potentially hazardous situation which, if instructions
are not followed, may result in minor or moderate injury or damage to property.
* The statements above are notes for your safety.
Important
If this instruction is not followed, paper might be misfed, originals might be
damaged, or data might be lost. Be sure to read this.
Preparation
This symbol indicates the prior knowledge or preparations required before operating.
Note
This symbol indicates precautions for operation, or actions to take after misoperation.
Limitation
This symbol indicates numerical limits, functions that cannot be used together,
or conditions in which a particular function cannot be used.
Reference
This symbol indicates a reference.
[]
Keys that appear on the machine's panel display.
Keys and buttons that appear on the computer's display.
{}
Keys built into the machine's operation panel.
Keys on the computer's keyboard.
iv
Page 9

TABLE OF CONTENTS
1.Getting Started
Connecting the Machine........................................................................... 1
Requirements................................................................................................ 1
Connecting the Machine Using Network Interface Board Type 450-E.......... 3
Connecting the Machine to the Host Using the Parallel Interface Cable ...... 4
Features of this Machine.......................................................................... 5
Printer Drivers for This Machine.................................................................... 6
Software and Utilities Included on the CD-ROM......................... .................. 7
Guide to This Machine.............................................................................. 9
Operation Panel............................................................................................ 9
Panel Display ............................................ .................................................. 10
2.Configuring the Printer for the Network
Configuring the Printer for the Network with the Operation Panel..... 13
Protecting the Network Menu...................................................................... 15
3.Installing the Printer Driver and Software
Auto Run .................................................................................................. 17
Installing by Auto Run ................................................................................ 18
Installing the PCL 6/5e Printer Driver...................................... ..... ..... .... 19
Windows 95/98 - Installing the PCL 6/5e Printer Driver.............................. 19
Windows 2000 - Installing the PCL 6/5e Printer Driver............................... 19
Windows NT 4.0 - Installing the PCL 6/5e Printer Driver............................ 22
Installing the PostScript Printer Driver................................................. 24
Windows 95/98 - Installing the PostScript Printer Driver............................. 24
Windows 2000 - Installing the PostScript Printer Driver.............................. 26
Windows NT 4.0 - Installing the PostScript Printer Driver........................... 28
Using Adobe PageMaker Version 6.0 or 6.5.......................................... 30
Macintosh................................................................................................. 31
Macintosh - Installing the PostScript Printer Driver..................................... 31
Setting Up the PPD File.............................................................................. 32
Setting Up Options................. ..................................................................... 32
INDEX........................................................................................................ 33
v
Page 10

vi
Page 11
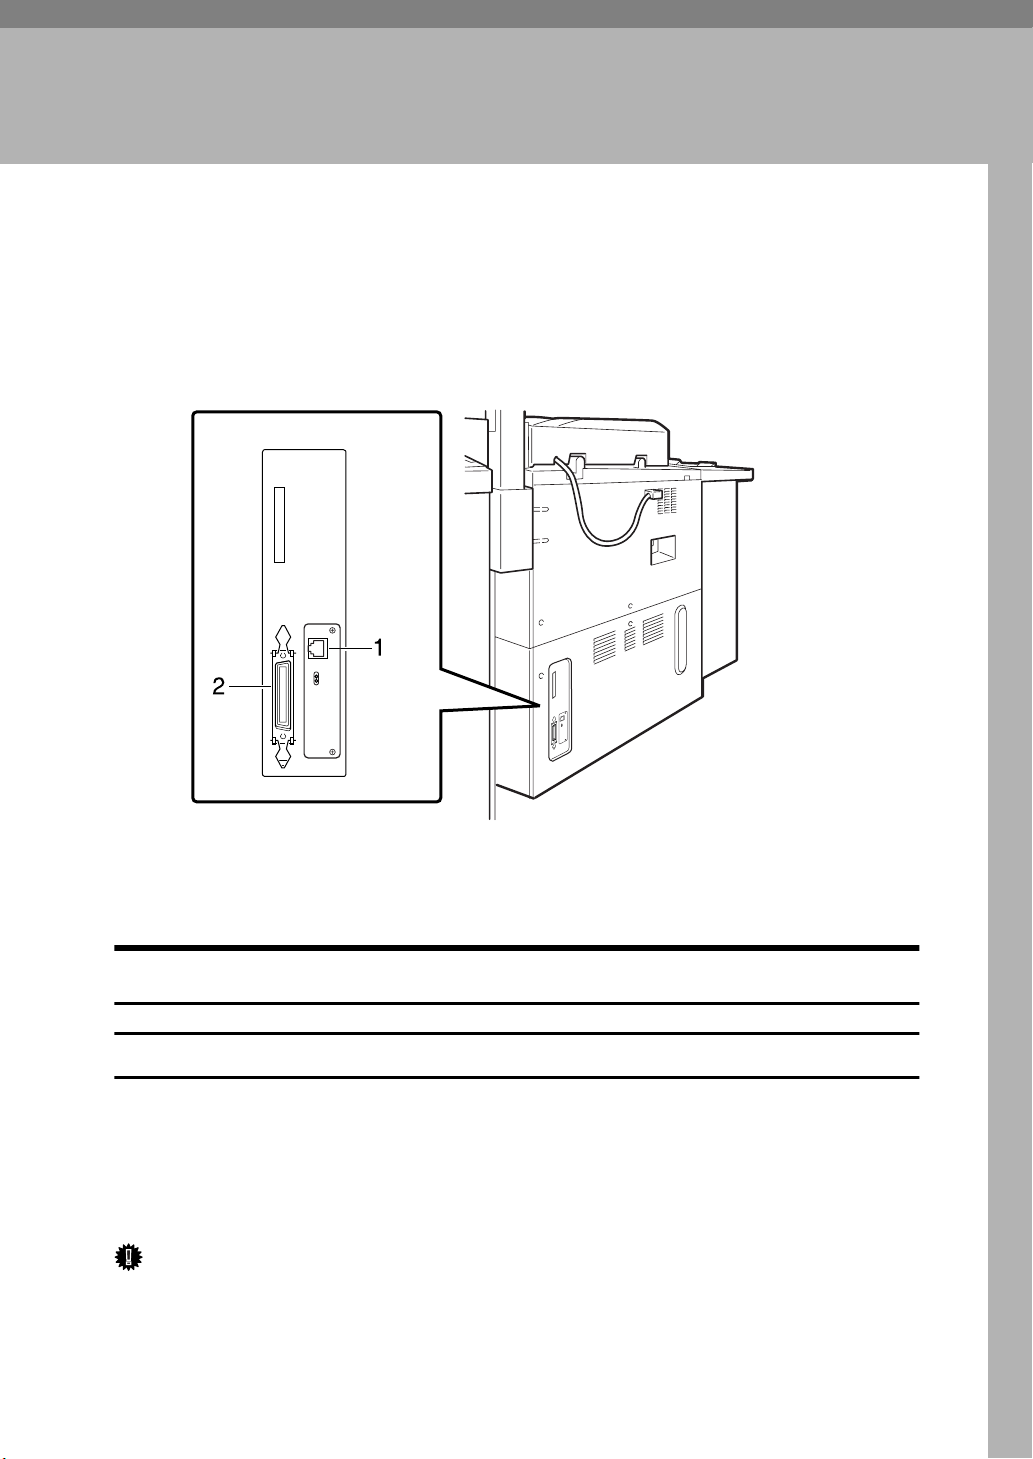
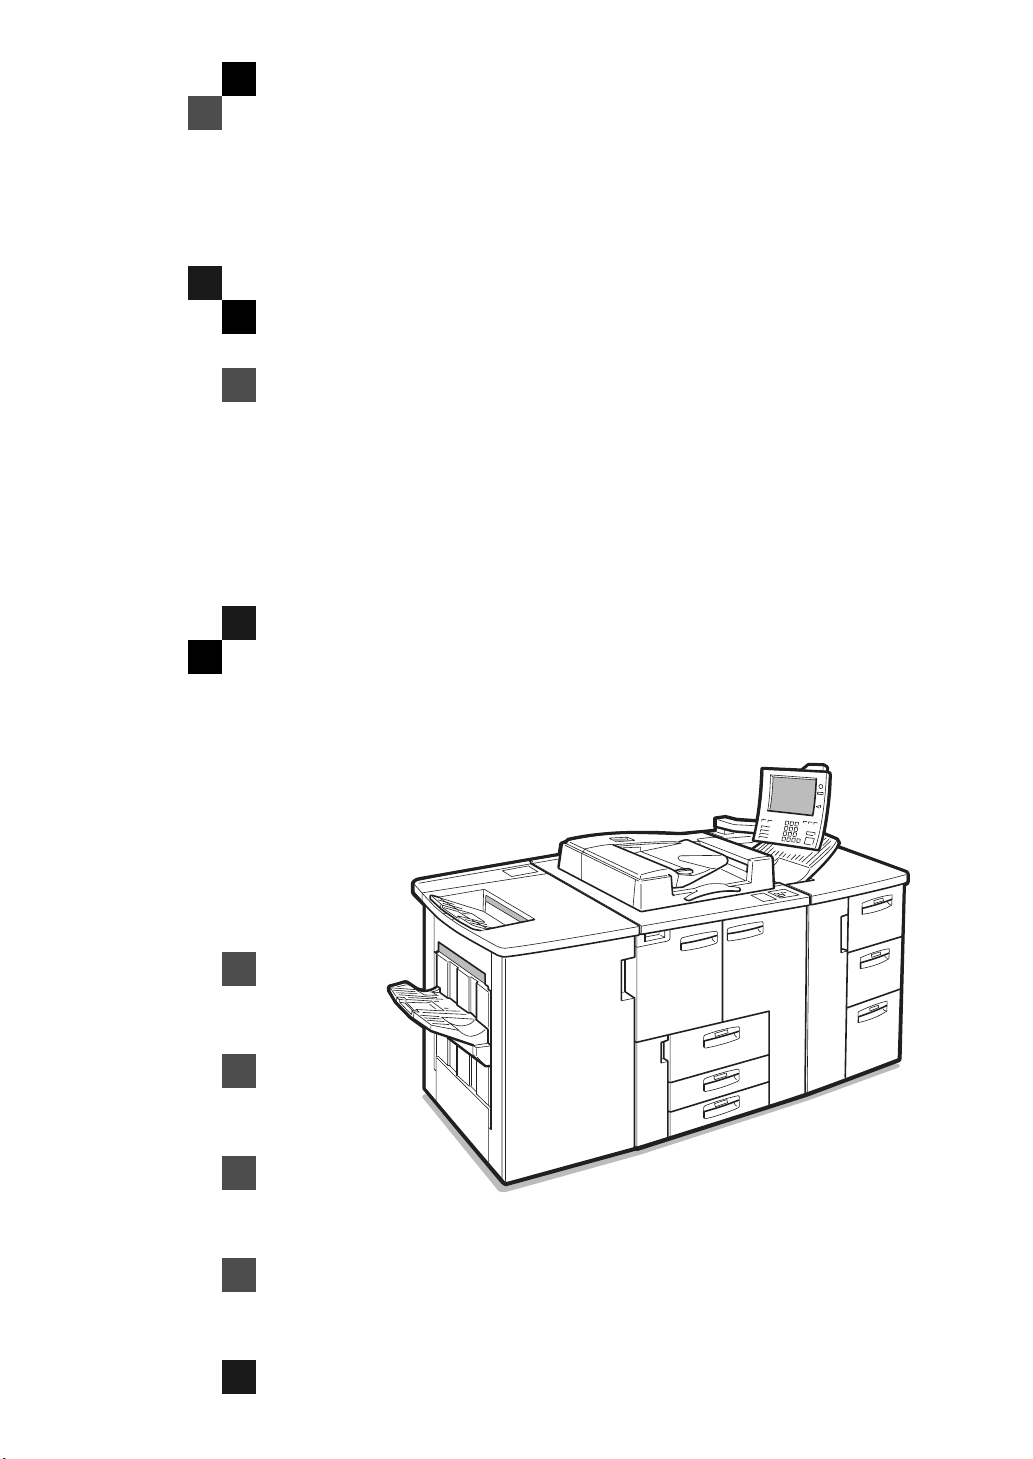
1. Getting Started
Connecting the Machine
Confirm that the shape and the position of the connector are as shown in the illustration.
1. 10BASE-T/100BASE-TX (option)
2. Parallel Port
Requirements
Requirements
Before using this machine, confirm that all the environmental and electrical requirements have been met. Connect the machine to the host computer using the
parallel port, optional Network Interface Board Type 450-E, or both.
Confirm that all the cables, connectors, and electrical outlets necessary to attach
the machine to the host computer or network are present.
Important
❒
The interface cable is not supplied in the box. It is your responsibility to provide the interface cable appropriate for the computer that you are using.
1
Page 12
1
Getting Started
Reference
For more information about using the parallel port, see P.4 “Connecting the
Machine to the Host Using the Parallel Interface Cable”.
For more information about using a network, see P.2 “Network cable requirements”.
Network cable requirements
Optional Network Interface Board Type 450-E can be installed to allow direct
connection to an Ethernet network.
Network Interface Board supports 10BASE-T or 100BASE-TX connections.
You can use the machine in the following network environments:
• Using the appropriate network management software and printer driver.
• Attaching the machine to a networked computer set up as a server.
Client
Driver
File Server
Protocol
*1
Under Windows NT 4.0, only × 86 CPU is supported.
Windows 95, 98, Windows 2000, Windows NT 4.0
(optional PostScript 3 Kit Type 850 is required )
PCL 6/5e, PostScript 3
NetWare 3.x, NetWare 4.x, NetWare 5
TCP/IP, IPX/SPX, AppleTalk
*1
, Mac OS
In a mixed network environment, the protocol switches automatically.
Reference
For more information about resolving network connection problems, see P.13
“Configuring the Printer for the Network”.
Note
❒
Consult your network administrator before connecting the machine to a network.
❒
In a 100BASE-TX environment, be sure to use properly shielded and grounded cable (STP, Category/Type5) for the connection to the host computer
(and/or HUB) in order to meet FCC and EMC Directive 89/336/EEC emission guidelines.
Paralle l cable requirement s
Connect the machine to the host computer using a parallel port. This machine
does not provide the parallel cable to connect the machine to the host computer.
The machine's parallel interface is a standard bi-directional interface. It requires
a standard 36-pin parallel cable compliant with IEEE 1284 and a parallel port
available on the host computer.
Note
❒
2
Do not use a parallel cable that is longer than 3 meters (10 feet).
Page 13
Connecting the Machine
Connecting the Machine Using Network Interface Board Type
450-E
Connect the machine to the network using Network Interface Board Type 450-E.
Follow these steps to connect the machine.
A Confirm that you have the correct cable.
B Confirm that the machine is turned off.
C Loop the network cable. The loop should be about 15cm (6”) from the end
of the cable on the end closest to the printer.
D Attach the ferrite core to the loop.
E Attach the network cable to the 10BASE-T/100BASE-TX port on the ma-
chine.
1
Reference
See P.1 “Connecting the Machine” to confirm of the position of the 10BASE-
T/100BASE-TX port.
Note
❒
Confirm that the cable is connected to the 10BASE-T/100BASE-TX port.
F Connect the other end of the cable into the network.
3
Page 14
1
Getting Started
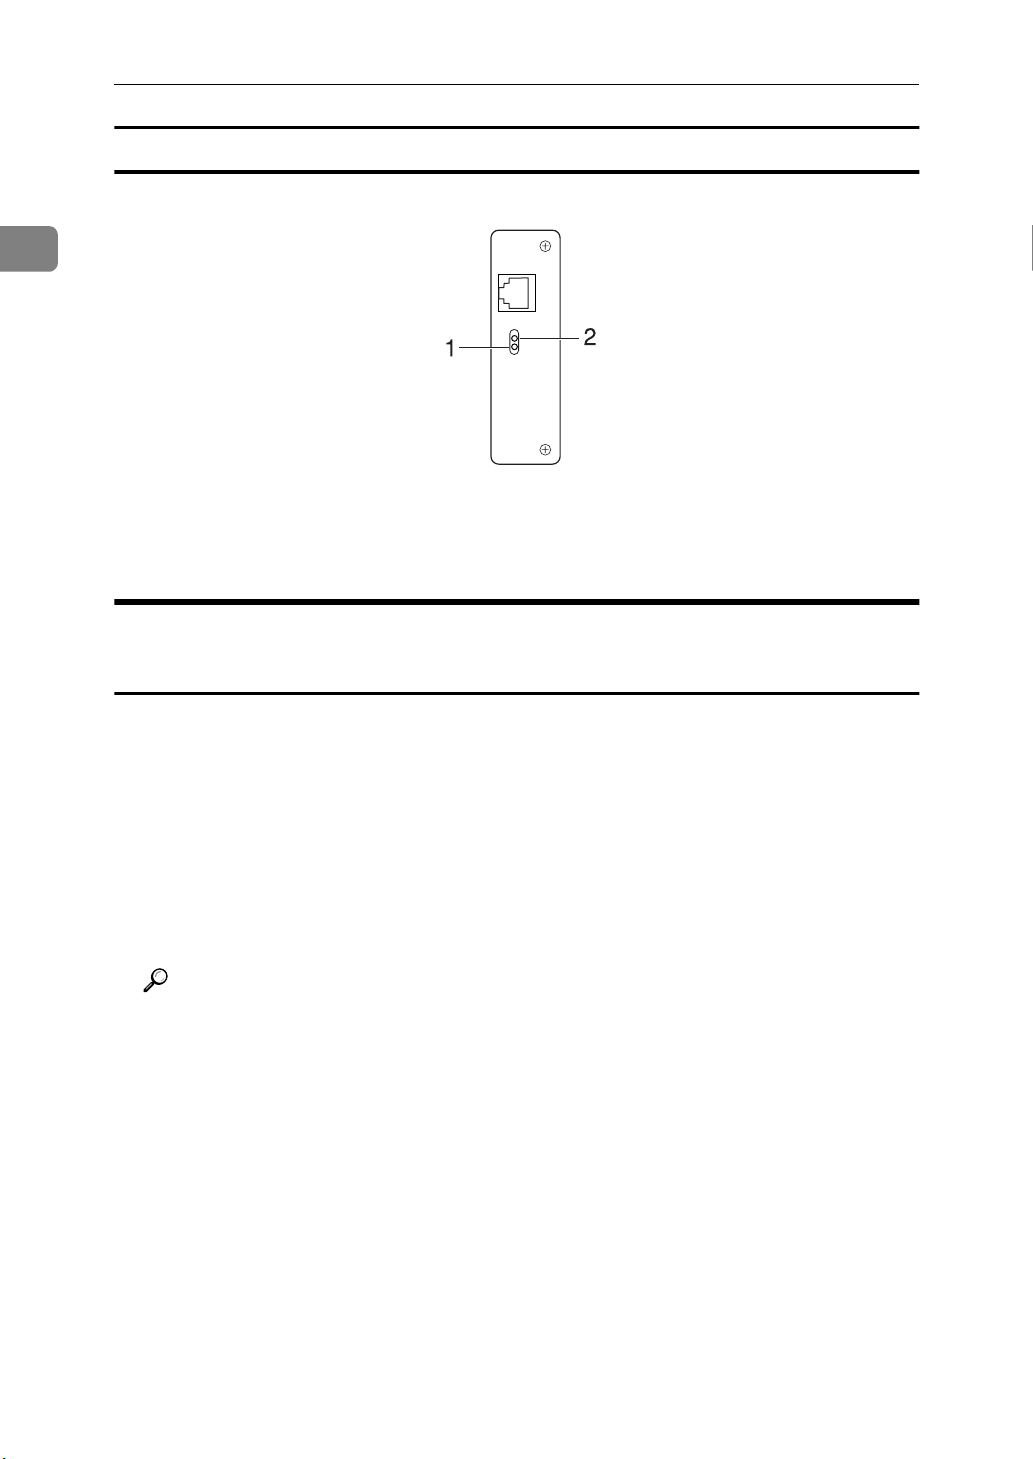
Indicators on Network Interface Board
1. Indicator (orange)
Is on while Network Interface Board is
working.
2. Indicator (green)
Is on while the machine is in a network
environment.
Connecting the Machine to the Host Using the Parallel Interface
Cable
Connect the machine to the host computer using a parallel interface cable compliant with IEEE 1284 (supplied by you).
Follow these steps to connect the machine to the host computer.
A Confirm that you have the correct cable.
B Confirm that both the machine and the host computer are turned off.
C Plug the 36-pin end of the parallel cable into the parallel port at the right
side of the back cover of the machine.
Reference
See P.1 “Connecting the Machine” to confirm the position of the parallel
port.
D Squeeze the wire clips on each side of the connector together until they
snap into place. The clips hold the cable securely in place.
E Plug the other end of the parallel cable into the computer's parallel port.
4
Page 15

Features of this Machine
Features of this Machine
This printer is designed for office workgroups and CRD, both for shared usage
within network environment, and for one-to-one usage by being connected directly to the computer.
❖
High Productivity
This printer comes with an 85-page per minute (ppm) or 105-page per minute
(ppm) engine and offers a variety of paper handling functions. A Document
Server function enables you to save documents in the machine memory and
then edit and print them as you want. Sample print allows you to confirm the
printing documents as expected before printing many.
❖
Versatile Paper Handling Options
This machine offers both versatile input and output paper handling options.
Input capacity can be raised to 7,550 sheets with the optional Large Capacity
Tray. For an output device, stapling, punching and booklet finishing are
available with the optional finisher.
1
Reference
For more information about supporting paper size and type, and optional
input and output devices, see the “ Copy Reference”.
❖
Variety of Paper Media Support with Easy Handling
Paper types can be selected from the printer driver. If you set the paper type
for each tray in advance, you can only select the paper type from the printer
driver.
❖
Network Connectivity
This machine is network ready with optional Network Interface Board.
❖
Network utility
PRINTER MANAGER
versions, is provided. With this software, multiple print devices can be utilized effectively together on a network. This software offers several convenient functions such as parallel printing and recovery printing.
*1
For the name of PRINTER MANAGER you use, see the “Quick Configuration
Guide” for optional Network Interface Board which is included as a PDF file on
the CD-ROM labeled “Printer Drivers and Utilities”.
*1
, software consisting of Administrator and Client
5
Page 16

Getting Started
❖
Major Specifications
1
Printing Speed
85/105ppm (A4K, 8
1
/2" × 11"K)
*1
Engine Resolution 600dpi resolution
Printer Language PCL 5e, PCL 6
Adobe PostScript Level 3
*2
Memory 32MB
Max. up to 160MB
Interface
10BASE-T or 100BASE-TX
*2
× 1
IEEE1284 × 1
*1
Printing Speed depends on the machine. Confirm which machine you have.
*2
Option
Printer Drivers fo r T hi s Mach i ne
Printing requires installation of a printer driver for your operating system. The
following drivers are included on the CD-ROM that comes with this machine.
Printer Language PCL 5e PCL 6 PostScript 3
Operating system
Windows 95
Windows 98
Windows 2000
*1
*2
*3
Windows NT 4.0
Mac OS
*5
*4
√√
√√
√√√
√√
√
√
√
*6 *7
√
*7
*7
*7
*1
Microsoft Windows 95 operating system
*2
Microsoft Windows 98 operating system
*3
Microsoft Windows 2000 operating system
*4
Microsoft Windows NT Server operating system version 4.0, Microsoft Windows NT
Workstation operating system version 4.0 in a computer using a x86 processor.
*5
Required system is 8.5 or later operating system.
*6
Requires Service Pack 3 or later.
*7
The Adobe PostScript printer drivers and PostScript Printer Description (PPD) files
are included on the CD-ROM.
6
Page 17

Features of this Machine
❖
PCL Printer Drivers
Printer drivers allow the computer to communicate with the printer via a
printer language. Two kinds of PCL printer drivers, PCL 6 and PCL 5e, are
included on the CD-ROM that comes with this machine. We recommend PCL
6 as your first choice. However, some of your applications might require the
installation of the PCL 5e printer driver. In this case, you can install PCL 5e in
addition to PCL 6.
⇒ P.19 “Windows 95/98 - Installing the PCL 6/5e Printer Driver”
⇒ P.19 “Windows 2000 - Installing the PCL 6/5e Printer Driver”
⇒ P.22 “Windows NT 4.0 - Installing the PCL 6/5e Printer Driver”
❖
Adobe PostScript Printer Drivers and PPD files
The Adobe PostScript printer drivers and the PPD files are included on the
CD-ROM that comes with this machine. Adobe PostScript printer driver allows the computer to communicate with the printer via a printer language.
The PPD files allow the printer driver to enable the printer specific functions.
⇒ P.24 “Windows 95/98 - Installing the PostScript Printer Driver”
⇒ P.26 “Windows 2000 - Installing the PostScript Printer Driver”
⇒ P.28 “Windows NT 4.0 - Installing the PostScript Printer Driver”
⇒ P.31 “Macintosh - Installing the PostScript Printer Driver”
1
Software and Utilities Included on the CD-ROM
❖
Agfa Font Manager
Helps you to install new screen fonts, or organize and manage fonts already
installed on your system.
❖
PRINTER MANAGER FOR ADMINISTRATOR
A utility for the system administrator to manage printers on the network.
Reference
For the name of PRINTER MANAGER FOR ADMINISTRATOR you use,
see the “Quick Configuration Guide” for optional Network Interface
Board which is included on the CD-ROM labeled “Printer Drivers and
Utilities”.
See PRINTER MANAGER FOR ADMINISTRATOR Online Help for more
information about using PRINTER MANAGER FOR ADMINISTRATOR.
❖
PRINTER MANAGER FOR CLIENT
A utility for users to manage their own print jobs on the network.
Reference
For the name of PRINTER MANAGER FOR CLIENT you use, see the
“Quick Configuration Guide” for optional Network Interface Board which
is included on the CD-ROM labeled “Printer Drivers and Utilities”.
See PRINTER MANAGER FOR CLIENT Online Help for more information about using PRINTER MANAGER FOR CLIENT.
7
Page 18

1
Getting Started
❖
PortNavi
A utility that helps you to use network printers effectively. It is useful in environments where two or more network printers are used.
Reference
For more information about PortNavi, see the “Quick Configuration
Guide” for Network Interface Board which is included on the CD-ROM
named “Printer Drivers and Utilities”.
Important
❒
If you upgrade to Windows 2000 from Windows 95/98, PortNavi must be
uninstalled pior to install Windows 2000. And then reinstall it in a Windows 2000 environment.
❖
Acrobat Reader
A utility that allows you to read PDF (Portable Document Format).
Note
❒
Documentation about using the printer is included on the CD-ROM in PDF
format.
8
Page 19

Guide to This Machine
Guide to This Machine
Operation Panel
This panel display is for the installed Copier and Printer.
1
1. {
Language Selection
Press to change the display language.
2. {
Number
Use to enter numeric values.
3. {
Feature
Press the appropriate key to choose any
of the following features:
•Copier
• Document Server
• Document Server Editor
• Printer
} keys
} keys
} key
4. Application Status indicators
These show the status of the above features:
• Green: the feature is active.
• Red: the feature has been interrupted.
5. Data In indicator
Shows if the print job is being sent from
the host computer.
If the indicator is blinking, the job is being sent.
If the indicator stays on, there is data to
be printed out.
9
Page 20

Getting Started
1
6. {
Counter
Press to check or print the total number of
prints and copies made.
7. {
User Tools
Press to change the default settings and
conditions to meet your requirements.
} key
} key
8. Panel Display
Shows the operation status, error messages, and function menus.
Panel Display
The panel display shows the status of the machine, error messages and function
menus. To select items shown on the display, lightly press the items with your
finger. When the item is selected, it is highlighted. Items that are not available
are shown grayed out.
Important
❒
Do not apply a strong shock or force of more than about 30N (about 3kgf) to
the panel display or it may be damaged.
Online and Offline
Press the {
Printer
} key on the control panel.
The following screen appears on the panel display.
10
Page 21

Guide to This Machine
1
1. Online/Offline
Shows the status of "Online" or "Offline".
2. Printer Default
Shows the default input tray which is selected on the panel display. However, if
"Auto" is selected, no tray is highlighted.
3.
[
View Sample Print Jobs
Press to show the list of "Sample Print
Jobs". You can also select each file to
print, to delete, to save and to change settings.
Online
When the printer is online, it can receive data from the computer.
]
1.
[
Online
Press this key to switch the printer online. The preceding illustration shows the
online status.
key
]
11
Page 22

1
Getting Started
Offline
When the printer is offline, it cannot receive data from the computer.
1.
[
Offline
Press this key to switch the printer offline. The preceding illustration shows
the offline status.
2.
[
Job Reset
Press this key to cancel the current print
job.
key
]
key
]
12
Page 23

2. Configuring the Printer for
the Network
Configuring the Printer for the Network
with the Operation Panel
After installing optional Network Interface Board, configure it for the network using the printer's operation
panel.
If you use TCP/IP, you should assign
the IP Address and Subnet Mask. You
can also set the Gateway Address using the printer's operation panel.
You can protect the network setting
using the printer's operation panel.
This menu helps you to prevent network setting being accidentally
changed.
Reference
For more information about using
this machine as a network printer,
see “Quick Configuration Guide”
which is included as a PDF File on
the CD-ROM labeled “Printer
Drivers and Utilities”. Read this
manual as your first choice before
refering to the paper virsion of the
Quick configuration Guide which
comes with optional Network Interface Board Type 450-E.
The following screen appears on
the panel display.
B Select
The following screen appears on
the panel display.
[
Printer Features
.
]
A Press {
User Tools
}.
C Select
[
Network
.
]
13
Page 24

Configuring the Printer for the Network
2
The following screen appears on
the panel display.
D Press
The following screen appears on
the panel display.
[
IP Address
.
]
A Type the first three digits of the
IP Address, and the pointer
moves to the next entry field automatically.
Repeat these procedures to
complete setting the IP Address.
Note
❒
If you press "Clear", the numerical value currently entered is canceled.
E Set the IP Address with the num-
ber keys.
Note
❒
To get the IP Address for the
printer, contact your network
administrator.
❒
If you press "Cancel", the entered value is canceled and
the previous setting is restored.
B Press
The setting of the IP Address is
completed. Then return to the
"Printer Features" screen.
[
OK
.
]
F Set "Subnet Mask" and "Gateway
Address" following the same procedure for setting the IP Address,
if necessary.
14
Page 25

Configuring the Printer for the Network with the Operation Panel
Protecting the Network Menu
You can protect the network setting
to prevent it being accidentally
changed.
A Press {
The following screen appears on
the panel display.
User Tools
}.
C Select
The following screen appears on
the panel display.
D Select
The following screen appears on
the panel display.
[
Network
[
Network Menu Protect
.
]
]
2
.
B Select
The following screen appears on
the panel display.
[
Printer Features
.
]
A When the operation code has
been set, enter the key operator
code, up to 8 digits with the
number keys, and then press
.
]
[
OK
Reference
For information about key
operator code, see “System
Settings”.
15
Page 26

Configuring the Printer for the Network
2
E Select
Network Menu is protected.
Note
❒
When "Network Menu Protect"
is
[
to the menu name.
. Then press
]
[
On
, the icon will appear next
]
On
[OK]
-Address
❖
Subnet Mask
A number used to mathematically
"mask" or hide an IP Address on
the network by eliminating those
parts of the address that are alike
for all the machines on the network.
.
Reference
For more information about network settings, see “Quick Configuration Guide” which is provided as
a PDF file on the CD-ROM labeled
“Printer Drivers and Utilities”.
16
❖
Gateway Address
A gateway is a connection or interchange point that connects two
networks. A gateway address is for
the router or host computer used
as a gateway.
Note
❒
To get the addresses, contact
your network administrator.
Page 27

3. Installing the Printer Driver
and Software
All of the procedures in this manual assume that you are familiar with general
Windows procedures and practices. If you are not, see the documentation that
comes with Windows for more information.
Auto Run
You can install the printer driver by using Auto Run.
Auto Run is available for the following operating systems:
• Windows 95/98
• Windows 2000
• Windows NT 4.0
If your system is a Macintosh, see information about installing the printer driver.
⇒ P.19 “Windows 95/98 - Installing the PCL 6/5e Printer Driver”.
⇒ P.31 “Macintosh”.
Important
❒
Before starting this installation, close all documents and applications. In a network environment, confirm that users who are logged on are disconnected.
Be sure to do this when it will create the least interference with other users.
❒
After installing a printer driver, you must restart the computer.
Limitation
❒
If your system is Windows 2000 or Windows NT 4.0, installing a printer driver by Auto Run requires permission of Administrators. When you install a
printer driver by Auto Run, log on using an account that has Administrators
permission.
Reference
For more information about the software and utilities included on the CDROM, see P.7 “Software and Utilities Included on the CD-ROM”.
Note
❒
Auto Run might not automatically work with certain OS settings. In this case,
manually run "INSTTOOL.EXE" on the root to install printer driver.
❒
If you want to cancel Auto Run, insert the CD-ROM while pressing the
{
} key until your computer finishes accessing the CD-ROM.
SHIFT
17
Page 28

3
Installing the Printer Driver and Software
-Using the Shared Printer on Windows 2000 or Windows NT 4.0 for
Windows 95/98 Client
If you want to share the printer on Windows 2000 or Windows NT 4.0, you must
not install the printer driver using Auto Run. In this case, cancel Auto Run and
install the printer driver using
For more information about installing the printer driver as an alternate driver,
see P.19 “Windows 2000 - Installing the PCL 6/5e Printer Driver” P.22 “Windows NT
4.0 - Installing the PCL 6/5e Printer Driver”.
[
Add Printer Wizard
in the
]
[
Printer
window.
]
Installing by Auto Run
Follow these steps to install the printer driver on Windows 95/98/Windows
2000/Windows NT 4.0.
Important
❒
Never have two versions of the same printer driver installed on your system
at the same time. When upgrading to a new version of the printer driver, uninstall the old version, and then install the new one. For more information
about uninstalling the printer driver and software, see “Uninstalling the Print-
er Driver and Software” in the “Printer Reference 2” included as a PDF file on
the CD-ROM.
Note
❒
If the "plug and play" function is started, click
dialog box or
]
Found
Hardware Found
sion of Windows 95/98, Windows 2000.
❒
The appropriate language name is used in the CD-ROM folder: ENGLISH(English), DEUTSCH (German), FRANCAIS (French), ITALIANO
(Italian), ESPANOL(Spanish), NEDRLNDS (Dutch), NORSK (Norwegian),
DANSK (Danish), SVENSKA (Swedish)
]
[
Device Driver Wizard
or
[
Device Driver Wiz ard
, and then insert the CD-ROM.
]
appears depending on the system ver-
]
[
Cancel
of the
]
[
New Hardware
A Close all applications that are currently running.
B Insert the CD-ROM into the CD-ROM drive.
C Follow the instructions on the screen.
D Restart your computer after installation is complete.
E You should set up the options with the printer driver.
[
New
18
Page 29

Installing the PCL 6/5e Printer Driver
Installing the PCL 6/5e Printer Driver
Windows 95/98 - Installing t he PCL 6/5e Printer Driver
Installing the printer driver
Install the driver in accordance with the steps explained. ⇒ P.18 “Installing by
Auto Run”
Setting up options
Note
❒
When setting up options, you should access the Printer Properties from Windows. You cannot access the Printer Properties from an application.
3
A Click
The
[
Printers
on the taskbar, point to
]
[
Start
window appears.
]
[
Settings
B Click the icon of the printer you want to use. On the
.
]
erties
C Click the
[
Accessories
tab.
]
D Select any options you have installed from the
E Click
[
OK
.
]
, and then click
]
menu, click
]
[
File
group.
[
Options
]
[
Printers
.
]
[
Prop-
Windows 2000 - Installing the PCL 6/5e Printer Driver
Installing the printer driver : Parallel connection
If the printer is connected to the computer with parallel cable, you must install
the printer driver by using
Note
❒
If the "plug and play" function starts, you can also install the printer driver
following the instructions on the screen.
[
Add Printer Wizard
. Follow the procedure below.
]
❒
During installation by using
alog box might appear. In this case, click
[
Add Printer Wizard
[
Yes
], [
Digital Signature Not Found
to continue the installation.
]
A Close all applications that are currently running.
B Click
The
[
]
[
Start
Printers
on the taskbar, point to
window appears.
]
[
Settings
, and then click
]
[
Printers
di-
]
.
]
19
Page 30

Installing the Printer Driver and Software
3
C Double-click the
[
Add Printer Wizard
D Check
A dialog box for selecting the printer port appears.
[
Local Printer
[
Add Printer
starts.
]
and click
]
E Click to select the printer port you want to use, and then click
A dialog box for selecting the printer manufacture and model name appears.
F Click
A dialog box for installing the driver from a disk appears.
[
Have Disk
.
]
G Insert the CD-ROM into the CD-ROM drive while pressing the {
until the computer finishes accessing the CD-ROM.
Note
❒
If the Auto Run program starts, click
icon.
]
[
Next
.
]
.
]
[
Next
} key
SHIFT
[
Cancel
.
]
H Change the drive name in the list box to the name of the CD-ROM drive,
and then click
[
Browse
I In the box, double-click
the folder of the appropriate language for the operating system. Finally,
click
[
Open
.
]
.
]
[
PCL5E
]
or
[
PCL6
and
]
[
NT4_2000
. Then double-click
]
J Click
A printer model selection dialog box appears.
[
OK
.
]
K Click to select the name of the printer whose driver you want to install, and
then click
A dialog box for changing the printer name appears.
L Change the name of the printer if you want, and then click
M Click
[
Next
N In the next dialog box asking if you want to print a test page, select
then click
A confirmation dialog box appears.
O Confirm the settings you have set, and then click
The installer copies the printer driver files from the CD-ROM to the computer's hard disk.
[
Next
.
]
[
Next
.
]
.
]
[
Next
and
]
[
No
.
]
.
]
[
Next
P You should set up the options with the printer driver.
20
Page 31

Installing the PCL 6/5e Printer Driver
Installing the printer driver : Network environment
You can install the PCL 6/5e printer driver by using Auto Run.
Limitation
❒
Installing a printer driver by Auto Run requires Administrators permission.
When you install a printer driver by Auto Run, log on using an account that
has Administrators permission.
Note
❒
Auto Run might not automatically work with certain OS settings. In this case,
manually run "INSTTOOL.EXE" on the root to install printer driver.
❒
If you want to cancel Auto Run, insert the CD-ROM while pressing the
{
} key until the computer finishes accessing the CD-ROM.
SHIFT
A Close all applications that are currently running.
B Insert the CD-ROM into the CD-ROM drive.
C Follow the instructions on the screen.
3
D Restart the computer after installation is complete.
E You should set up the options with the printer driver.
If you want to share the printer on Windows 2000, you must not install the printer driver using Auto Run. In this case, cancel Auto Run and install the printer
driver using
When prompted for the Windows 2000 alternate printer driver location, select
the following folder in the CD-ROM.
Note
❒
During installation by using
dialog box might appear. In this case, click
When prompted for the Windows NT 4.0 alternate driver location, select the following folder in the CD-ROM.
• PCL 5e
\DRIVERS\PCL5E\NT4\(Language)\DISK1\
• PCL 6
\DRIVERS\PCL6\NT4\(Language)\DISK1\
When prompted for the Windows 95/98 alternate printer driver location, select
the following folder in the CD-ROM.
• PCL 5e
\DRIVERS\PCL5E\WIN95_98\(Language)\DISK1\
[
Add Printer Wizard
in the
]
[
Add Printer Wizard
[
Printers
window.
]
, the
]
[
Digital Signature Not Found
to continue the installation.
[
]
Yes
]
• PCL 6
\DRIVERS\PCL6\WIN95_98\(Language)\DISK1\
21
Page 32

3
Installing the Printer Driver and Software
Setting up options
Limitation
❒
Changing the setting of the printer requires Manage Printers permission.
Members of the Administrators and Power Users groups have Manage Printers permission by default. When you set up options, log on using an account
that has Manage Printers permission.
Note
❒
When setting up options, you should access the Printer Properties from Windows. You cannot access the Printer Properties from an application.
A Click
The
[
Printers
on the taskbar, point to
]
[
Start
window appears.
]
[
Settings
B Click the icon of the printer you want to use. On the
.
]
erties
C Click the
[
Accessories
tab.
]
D Select any options you have installed from the
E Click
[
OK
.
]
, and then click
]
menu, click
]
[
File
group.
[
Options
]
[
Printers
Windows NT 4.0 - Installing the PCL 6/5e Printer Driver
Installing the printer driver
Limitation
❒
Installing a printer driver requires Full Control access permission. Members
of the Administrators, Server Operators, Print Operators, and Power Users
groups have Full Control permission by default. When you install a printer
driver, log on using an account that has Full Control permission.
.
]
[
Prop-
Install the driver in accordance with the steps explained. ⇒ P.18 “Installing by
Auto Run”
If you want to share the printer on Windows NT 4.0, you must not install the
printer driver using Auto Run. In this case, cancel Auto Run and install the
printer driver using
When prompted for the Windows 95/98 alternate driver location, select the following folder in the CD-ROM.
• PCL 5e
\DRIVERS\PCL5E\WIN95_98\(Language)\DISK1\
• PCL 6
\DRIVERS\PCL6\WIN95_98\(Language)\DISK1\
[
Add Printer Wizard
in the
]
[
Printers
window.
]
22
Page 33

Installing the PCL 6/5e Printer Driver
Setting up options
Limitation
❒
Changing the setting of the printer requires Full Control access permission.
Members of the Administrators, Server Operators, Print Operators, and Power Users groups have Full Control permission by default. When you set up
options, log on using an account that has Full Control permission.
Note
❒
When setting up options, you should access the Printer Properties from Windows. You cannot access the Printer Properties from an application.
3
A Click
The
[
]
[
Start
Printers
on the taskbar, point to
window appears.
]
[
Settings
, and then click
]
B Click the icon of the printer you want to use. On the
.
]
erties
C Click the
[
Accessories
D Select any options you have installed from the
E Click
[
OK
.
]
tab.
]
[
Options
menu, click
]
[
File
group.
]
[
Printers
.
]
[
Prop-
23
Page 34

3
Installing the Printer Driver and Software
Installing the PostScript Printer Driver
This section describes basic instructions for installing the printer driver. The actual procedure may differ depending on the operating system. Follow the appropriate procedures below.
Important
❒
When updating the printer driver by installing the latest version, you should
uninstall that of former version if any. See “Uninstalling the Printer Driver and
Software” in the “Printer Reference 2”.
Windows 95/98 - Installing t he PostScript Printer Driver
Installing the printer driver
Important
❒
Be sure to install the PPD file for Windows 95/98. Do not accidentally install
the PPD file for Windows 2000/Windows NT 4.0.
A Close all applications that are currently running.
B Click
The
[
Printers
C Double-click the
[
Add Printer Wizard
D Click
E Check
A dialog box for selecting the printer manufacture and model name appears.
F Click
A dialog box for installing the printer driver from a disk appears.
on the taskbar, point to
]
[
Start
window appears.
]
[
Add Printers
starts.
]
.
]
[
Next
and click
[
Local Printer
[
Have Disk
]
.
]
icon.
]
[
Next
[
Settings
.
]
, and then click
]
[
Printers
G Insert the CD-ROM into the CD-ROM drive, while pressing the {
key until the computer finishes accessing the CD-ROM.
If the Auto Run program starts, click
H Click
[
I Use the
Browse
[
]
Drives:
.
list box to select the CD-ROM drive.
]
[
Cancel
.
]
.
]
SHIFT
}
24
Page 35

Installing the PostScript Printer Driver
J In the
folder of the appropriate language for the operating system. Finally, click
[
K Click
OK
.
]
[
Folders:
[
OK
box, double-click
]
.
]
[PS]
and
[
WIN95_98
. Then double-click the
]
L Click to select the name of the printer whose driver you want to install, and
then click
M In the
[
Available ports:
N Change the name of the printer if you want, and then click
O Select whether or not you want to print a test page, and then click
P If you are asked whether you want to restart Windows, select
are not asked, restart Windows after completing the installation.
Important
❒
If the printer is equipped with certain options (ex. the paper feed unit or
memory unit), you should set up the options with the printer driver.
Setting up options
[
Next
.
]
box, click to select
]
[
Printer Port
, and then click
]
.
]
[
Next
[
Yes
[
Next
[
Finish
. If you
]
]
]
.
3
.
Note
❒
When setting up options, you should access the
dows. You cannot set up options when accessing the
an application.
A Click
The
[
Printers
on the taskbar, point to
]
[
Start
window appears.
]
[
Settings
[
Device Options
, and then click
]
B Click the icon of the printer you want to use. On the
.
]
erties
C Click the
The
D From the
The current setting is displayed in the
E Use the
ed option.
F Click
[
Device Options
[
Installable options
[
Installable options
[
Change setting for:
to apply the settings you made.
]
[
Apply
G After making all settings you want, click
tab.
]
group appears.
]
box, select the option you have installed.
]
[
Change settings for:
list to select the appropriate setting for the select-
]
.
]
[
OK
tab from Win-
]
[
Device Options
[
Printers
menu, click
]
[
File
list.
]
tab from
]
.
]
[
Prop-
25
Page 36

3
Installing the Printer Driver and Software
Windows 2000 - Installing the PostScript Printer Driver
Installing the printer driver
Limitation
❒
Installing a printer driver requires Manage Printers permission. Members of
the Administrators, and Power Users groups have Manage Printers permission by default. When you install a printer driver, log on using an account
that has Manage Printers permission.
Important
❒
Be sure to install the PPD file for Windows 2000. Do not accidentally install
the PPD file for Windows 95/98/Windows NT 4.0.
A Close all applications that are currently running.
B Click
The
[
Printers
C Double-click the
[
Add Printer Wizard
D After confirming that the
A dialog box for selecting the printer port appears.
on the taskbar, point to
]
[
Start
window appears.
]
[
Add Printers
starts.
]
icon.
]
[
Local Printer
[
Settings
option is selected, click
]
E Check the check box of the port you want to use, and then click
A dialog box for selecting the printer manufacture and model name appears.
F Click
A dialog box for installing the driver from a disk appears.
[
Have Disk
.
]
G Insert the CD-ROM into the CD-ROM drive while pressing the {
until the computer finishes accessing the CD-ROM.
If the Auto Run program starts, click
[
Cancel
, and then click
]
.
]
[
Printers
[
Next
[
Next
SHIFT
.
]
.
]
]
} key
.
H Change the drive name in the list box to the name of the CD-ROM drive,
and then click
I In the
folder of the appropriate language for the operating system. Finally, click
[
Open
[
Folders:
.
]
[
Browse
box, double-click
]
.
]
[PS]
and
[
WIN2000
. Then double-click the
]
26
J Click
A printer model selection dialog box appears.
[
OK
.
]
Page 37

Installing the PostScript Printer Driver
K Click to select the name of the printer whose driver you want to install, and
then click
A dialog box for changing the printer name appears.
[
Next
.
]
L Change the name of the printer if you want, and then click
M Click
[
Next
.
]
N In the next dialog box asking if you want to print a test page, select
then click
A confirmation dialog box appears.
Note
❒
Print a test page after completing installation and restarting Windows.
O Confirm the settings you have set, and then click
The installer copies the printer driver files from the CD-ROM to the computer's hard disk.
[
Next
.
]
.
Finish
]
[
[
Next
.
]
[
No
P You should set up the options with the printer driver.
Setting up options
Limitation
❒
Changing the setting of the printer requires Manage Printers permission.
Members of the Administrators and Power Users groups have Manage Printers permission by default. When you set up options, log on using an account
that has Manage Printers permission.
and
]
3
Note
❒
When setting up options, you should access the Printer Properties from Windows. You cannot set up options when accessing the Printer Properties from
an application.
A Click
The
[
Printers
on the taskbar, point to
]
[
Start
window appears.
]
[
Settings
B Click the icon of the printer you want to use. On the
.
]
erties
C Click the
D Use the
or
stalled
]
[
Device Settings
[
Installable Options
Installed from the drop-down list box.
[
]
Not
tab.
]
group to select the options, and then select
]
, and then click
]
menu, click
]
[
File
[
Printers
E Repeat steps D for all options.
F After making all settings you want, click
[
OK
.
]
.
]
[
Prop-
[
In-
27
Page 38

3
Installing the Printer Driver and Software
Windows NT 4.0 - Installing the PostScript Printer Driver
Installing the printer driver
Limitation
❒
Installing a printer driver requires Full Control access permission. Members
of the Administrators, Server Operators, Print Operators, and Power Users
groups have Full Control permission by default. When you install a printer
driver, log on using an account that has Full Control permission.
Important
❒
We recommend that you upgrade the Windows NT 4.0 operating system to
Service Pack 3 or later before installing the printer driver. Contact your Windows retailer for more information about the latest version available.
❒
Be sure to install the PPD file for Windows NT 4.0. Do not accidently install
the PPD file for Windows 95/98.
A Close all applications that are currently running.
B Click
The Printers window appears.
C Double-click the
[
Add Printer Wizard
D After confirming that the
A dialog box for selecting the printer port appears.
on the taskbar, point to
]
[
Start
[
Add Printers
starts.
]
icon.
]
[
My Computer
[
Settings
option is selected, click
]
E Check the check box of the port you want to use, and then click
A dialog box for selecting the printer manufacture and model name appears.
F Click
A dialog box for installing the driver from a disk appears.
[
Have Disk
.
]
G Insert the CD-ROM into the CD-ROM drive while pressing the {
until the computer finishes accessing the CD-ROM.
If the Auto Run program starts, click
[
Cancel
, and then click
]
.
]
[
Printers
[
Next
[
Next
SHIFT
.
]
.
]
]
} key
H Change the drive name in the list box to the name of the CD-ROM drive,
and then click
I In the
er of the appropriate language for the operating system. Finally, click
[
Open
[
Folders:
.
]
[
Browse
box, double-click
]
.
]
[PS]
and
. Then double-click the fold-
[
]
NT4
28
J Click
A printer model selection dialog box appears.
[
OK
.
]
Page 39

Installing the PostScript Printer Driver
K Click to select the name of the printer whose driver you want to install, and
then click
A dialog box for changing the printer name appears.
[
Next
.
]
L Change the name of the printer if you want, and then click
M Click
[
Next
.
]
N In the next dialog box asking if you want to print a test page, select
then click
The installer copies the printer driver files from the CD-ROM to the computer's hard disk.
Note
❒
Print a test page after completing installation and restarting Windows.
[
Finish
.
]
O If you are asked whether you want to restart Windows, select
are not asked, restart Windows after completing the installation.
Important
❒
If the printer is equipped with certain options (ex. the paper feed unit or
memory unit), you should set up the options with the printer driver.
Setting up options
Limitation
❒
Changing the setting of the printer requires Full Control access permission.
Members of the Administrators, Server Operators, Print Operators, and Power Users groups have Full Control permission by default. When you set up
options, log on using an account that has Full Control permission.
[
Next
[
Yes
.
]
[
]
No
. If you
and
]
3
Note
❒
When setting up options, you should access the Printer Properties from Windows. You cannot set up options when accessing the Printer Properties from
an application.
A Click
The
[
Printers
on the taskbar, point to
]
[
Start
window appears.
]
[
Settings
B Click the icon of the printer you want to use. On the
.
]
erties
C Click the
D Use the
E Click
[
OK
[
[
Device Settings
Installable Options
to close the Printer Properties.
]
tab.
]
group to select the options.
]
, and then click
]
menu, click
]
[
File
[
Printers
.
]
[
Prop-
29
Page 40

Installing the Printer Driver and Software
Using Adobe PageMaker Version 6.0 or
6.5
If you use the printer under Windows 95/98/NT 4.0 with Adobe PageMaker,
you need to copy the PPD file to the PageMaker folder.
The PPD file is the file with extension ".ppd". It is in the folder
“\PS\WIN95_98\(Language)\DISK1\” on the CD-ROM.
3
The
[
WIN95_98
system. Use the folder at this level that is appropriate for the operating system
you are using.
The third folder, "(Language)" may be substituted by an appropriate language
name.
Copy this file to the PageMaker folder.
For the PageMaker 6.0 default installation, the folder is "C:\PM6\RSRC\PPD4",
and for the PageMaker 6.5 default installation, the directory is
"C:\PM65\RSRC\USENGLISH\PPD4". The "USENGLISH" may be different,
depending on your language selection.
Reference
For more information about the language name, see P.18 “Installing by Auto
Run”.
folder, inside the
]
folder, is for the Windows 95/98 operating
[PS]
30
Page 41

Macintosh
Macintosh
Macintosh - Installing the PostScript Printer Driver
It is necessary to install a printer driver and a PPD file to print from a Macintosh.
Follow these steps to install a printer driver and a PPD file into a Macintosh using a system 8.5 or later operating system.
A Insert the CD-ROM into the CD-ROM drive.
B Double-click the CD-ROM icon.
3
C Double-click the
[
PS
folder.
]
D Double-click the folder of the language you use.
E Open
[
DISK1
and double-click the installer icon.
]
F Follow the instructions on the screen.
G Double-click
H Double-click
[
Extensions
[
Printer Descriptions
.
]
.
]
I Double-click the CD-ROM icon on the desktop.
J Double-click
[
DISK1
K Click and drag the PPD file into
L Click and drag the "Job Log" file into
.
[
System Folder
]
in the folder of the language you use.
]
[
Printer Descriptions
[
Printer Descriptions
M Restart the Macintosh.
.
]
in
]
[
Extensions
]
in
31
Page 42

Installing the Printer Driver and Software
Setting Up the PPD File
Preparation
Confirm that the printer is connected to an AppleTalk network before performing the following procedure.
3
A On the
[
B Click the
C In the
to use.
D Click
[
Select a PostScript Printer:
[
Create
menu, select
]
Apple
[
Adobe PS
.
]
icon.
]
[
Chooser
]
E Click the printer you want to use, and then click
The PPD file is set up, and the
name in the list. Next, follow the procedure on P.32 “Setting Up Options” to
make the option settings, or close the
[
Adobe PS
.
]
list, click the name of the printer you want
.
Select
]
[
icon appears at the left of the printer
]
[
Chooser
dialog box.
]
Setting Up Options
A On the
[
B Click the
C In the
to use, and then click
[
Select the PostS cript Printer :
menu, select
]
Apple
[
Adobe PS
icon.
]
[
Setup
[
Chooser
.
]
.
]
list, click the name of the printer you want
]
D Click
A list of options appears.
[
Configure
.
]
E Select the option you want to set up and select the appropriate setting for it.
Note
❒
If the option you want to set up is not displayed, the PPD file might not be
set up correctly. Check the name of the PPD file shown in the dialog box.
F Click
G Click
H Close the
32
The list of options closes.
The
[
.
]
[
OK
.
]
[
OK
Chooser
[
Chooser
dialog box appears.
]
dialog box.
]
Page 43

INDEX
S
10BASE-T/100BASE-TX
,
A
Auto Run
,
18
G
Gateway Address
,
16
M
Macintosh
,
setting up options
32
N
Network Connections
Network Interface Board 450
,
2
O
,
32
,
,
10
9
Online and Offline
Operational Panel
options, setting up
Macintosh
1
Subnet Mask
,
16
W
Windows 2000
,
,
,
26
24
28
,
PostScript, installing
Windows 95/98
PostScript, installing
Windows NT 4.0
PostScript, installing
3
P
PageMaker 6.0 or 6.5
,
, 2,
,
, 19,
,
10
1
6
Panel Display
Parallel Cable
Parallel Port
PCL 5e
PCL 6
PCL 6/5e
PostScript
PPD
Printer Driver
printer driver
,
7
,
7
Windows 2000
Windows 95/98 - Install
Windows NT 4.0 - Install
Windows 2000 - Install
Windows NT 4.0 - Install
Windows 2000 - Install
Windows 95/98, installing
Windows 95/98 - Install
Windows NT 4.0, installing
Macintosh - Install
,
32
4
,
22
,
19
30
,
31
,
,
,
,
,
26
,
26
19
,
24
22
28
,
24
28
33
Page 44

34 UE USA B336
 Loading...