

Page 1
User Guide
Getting Started
Selected Version
Print
Web Image Monitor
Adding Paper and Toner
Troubleshooting
Specifications for the Machine
Legal and Contact Information
For information not found in this manual,
see the online manuals available on our
web site (https://www.ricoh.com/).
For safe and correct use, be sure to read Safety Information before
using the machine.
Page 2

Page 3

How to Read the Manuals
Symbols Used in the Manuals
This manual uses the following symbols:
Indicates points to pay attention to when using functions. This symbol indicates points that may result in
the product or service becoming unusable or result in the loss of data if the instructions are not obeyed.
Be sure to read these explanations.
Indicates supplementary explanations of the machine's functions, and instructions on resolving user
errors.
[ ]
Indicates the names of keys or buttons on the product or display.
1
Page 4

TABLE OF CONTENTS
How to Read the Manuals.................................................................................................................................1
Symbols Used in the Manuals.......................................................................................................................1
1. Getting Started
Turning On and Off the Power.......................................................................................................................... 7
Turning On the Main Power.......................................................................................................................... 7
Turning Off the Main Power.......................................................................................................................... 7
Energy Saving Mode.....................................................................................................................................8
Guide to Names and Functions of Components............................................................................................10
Exterior: Front and Left View....................................................................................................................... 10
Exterior: Front and Right view..................................................................................................................... 11
Exterior: Rear and Left view.........................................................................................................................12
Interior: Front View.......................................................................................................................................13
Names and Functions of the Control Panel....................................................................................................14
How to Use the Selection Keys...................................................................................................................16
Order of Option Installation............................................................................................................................17
Attaching the Paper Feed Unit........................................................................................................................ 18
Installing the Wireless LAN Interface Board.................................................................................................. 21
Installing the IEEE 1284 Interface Board.......................................................................................................23
Installing the Device Server Option................................................................................................................ 25
Installing SD Card Options..............................................................................................................................28
Guide to the Names and Functions of the Control Panel Screen.................................................................31
Logging In from the Control Panel.................................................................................................................. 32
Logging In by Entering the User Name and Password.............................................................................32
Changing the Login Password.................................................................................................................... 33
2. Print
Installing the Printer Driver by Using Device Software Manager Installer...................................................35
Installing Device Software Manager from the CD-ROM......................................................................... 35
Installing Device Software Manager from the Downloaded File............................................................ 37
Installing the Printer Driver for Network Connection (Windows).................................................................41
Installing the PCL 6 Printer Driver from the CD-ROM............................................................................... 41
Installing the PostScript 3 Printer Driver from the CD-ROM..................................................................... 44
Installing the PCL 6/PostScript 3 Printer Driver from the Downloaded File............................................ 46
If the Machine Cannot Be Found................................................................................................................47
2
Page 5

Installing the Printer Driver for Network Connection (OS X/macOS).........................................................51
Installing the PPD file....................................................................................................................................51
Registering the Machine in [Print & Scan] or [Printers & Scanners].........................................................52
Specifying the Option Settings....................................................................................................................55
Basic Procedure for Printing Documents.........................................................................................................57
Printing a Document in Windows............................................................................................................... 57
Printing a Document in OS X/macOS....................................................................................................... 59
Printing on Both Sides of Paper.......................................................................................................................62
Specifying 2-sided Print (Windows)...........................................................................................................62
Specifying 2-sided Print (OS X/macOS).................................................................................................. 63
Combining and Printing Multiple Pages on a Single Sheet of Paper...........................................................64
Specifying the Combine 2 Originals Function (Windows).......................................................................64
Specifying the Combine 2 Originals Function (OS X/macOS)...............................................................65
Printing on Envelopes.......................................................................................................................................66
Printing Documents Stored in the Printer from the Control Panel..................................................................69
Printing a Locked Print File...........................................................................................................................69
Printing a Hold Print File.............................................................................................................................. 69
Printing a Stored Print File............................................................................................................................70
3. Web Image Monitor
Using Web Image Monitor............................................................................................................................. 71
What You Can Do on the Web Image Monitor........................................................................................72
Web Image Monitor Screen.......................................................................................................................73
Specifying Web Image Monitor Help....................................................................................................... 74
4. Adding Paper and Toner
Loading Paper into the Paper Tray................................................................................................................. 77
Loading Paper into Tray 1 to 5...................................................................................................................77
Loading Paper into the Bypass Tray...........................................................................................................81
Specifying Regular Sizes Using the Control Panel....................................................................................83
Specifying a Custom Size Paper Using the Control Panel........................................................................83
Specifying Paper Type and Thickness Settings..........................................................................................84
Recommended Paper Sizes and Types.......................................................................................................... 85
Tray 1............................................................................................................................................................85
Paper Feed Unit........................................................................................................................................... 86
3
Page 6

Bypass Tray.................................................................................................................................................. 87
Notes on Special Paper.............................................................................................................................. 88
Paper Thickness for Each Paper Weight.................................................................................................... 88
Unusable Paper............................................................................................................................................89
Paper Storage.............................................................................................................................................. 90
Saving Printouts............................................................................................................................................90
Thick Paper Orientation and Recommended Status......................................................................................91
Envelope Orientation and Recommended Status..........................................................................................92
Using the Printer Function............................................................................................................................ 93
Loading Orientation-fixed Paper or Two-sided Paper..................................................................................94
Printing onto Letterhead Paper Using the Printer Driver............................................................................ 94
Replacing the Toner......................................................................................................................................... 96
How to Replace the Toner...........................................................................................................................96
Precautions When Storing Toner................................................................................................................99
Precautions When Replacing the Toner.................................................................................................. 100
Disposing Exhausted Toners.....................................................................................................................101
Replacing the Waste Toner Bottle................................................................................................................ 102
How to Replace the Waste Toner Bottle................................................................................................. 102
Precautions When Replacing the Waste Toner Bottle............................................................................104
Disposing the Used Waste Toner Bottle.................................................................................................. 106
5. Troubleshooting
Alert Sounds...................................................................................................................................................107
Checking the Indicators, Icons, and Messages on the Control Panel.......................................................108
When an Icon Is Displayed with a Message.......................................................................................... 109
Status Messages............................................................................................................................................ 110
Alert Messages that Appear on the Control Panel..................................................................................... 112
Alert Messages that Are Printed on Error Logs and Reports...................................................................... 118
When Paper Is Jammed................................................................................................................................ 124
Paper Misfeed Message (A1)..................................................................................................................124
Paper Misfeed Message (A2)..................................................................................................................125
Paper Misfeed Message (B).....................................................................................................................126
Paper Misfeed Message (C).................................................................................................................... 127
Paper Misfeed Message (Y1) to (Y4)......................................................................................................129
4
Page 7

Paper Misfeed Message (Z).....................................................................................................................131
If Paper Jams Occur Frequently............................................................................................................... 133
6. Specifications for the Machine
Model-Specific Information.......................................................................................................................... 137
List of Specifications.......................................................................................................................................138
Specifications for the Main Unit............................................................................................................... 138
Specifications for Printer........................................................................................................................... 141
Specifications for Paper Feed Unit...........................................................................................................143
Specifications for IEEE 1284 Interface Board........................................................................................ 144
Specifications for Wireless LAN Board................................................................................................... 144
Specifications for Device Server Option................................................................................................. 145
Printable Area and Margin...........................................................................................................................146
Machine Options...........................................................................................................................................147
Guide to Functions of the Machine’s External Options..........................................................................147
Guide to Functions of the Machine’s Internal Options...........................................................................147
Functions Requiring Optional Configurations..............................................................................................149
Printer Function.......................................................................................................................................... 149
Others.........................................................................................................................................................149
7. Legal and Contact Information
Environmental Regulations............................................................................................................................151
ENERGY STAR Program........................................................................................................................... 151
Energy Saving Functions...........................................................................................................................151
User Information on Electrical and Electronic Equipment (mainly Europe)...................... 152
Note for the Battery and/or Accumulator Symbol (For EU countries only) (mainly Europe)
.................................................................................................................................................................... 153
Environmental Advice for Users (mainly Europe)............................................................... 153
Notes to users in the state of California (Notes to Users in USA) (mainly North America)....
.................................................................................................................................................................... 154
Trademarks (User Guide)..............................................................................................................................155
5
Page 8

6
Page 9
1. Getting Started
EBS034
Turning On and Off the Power
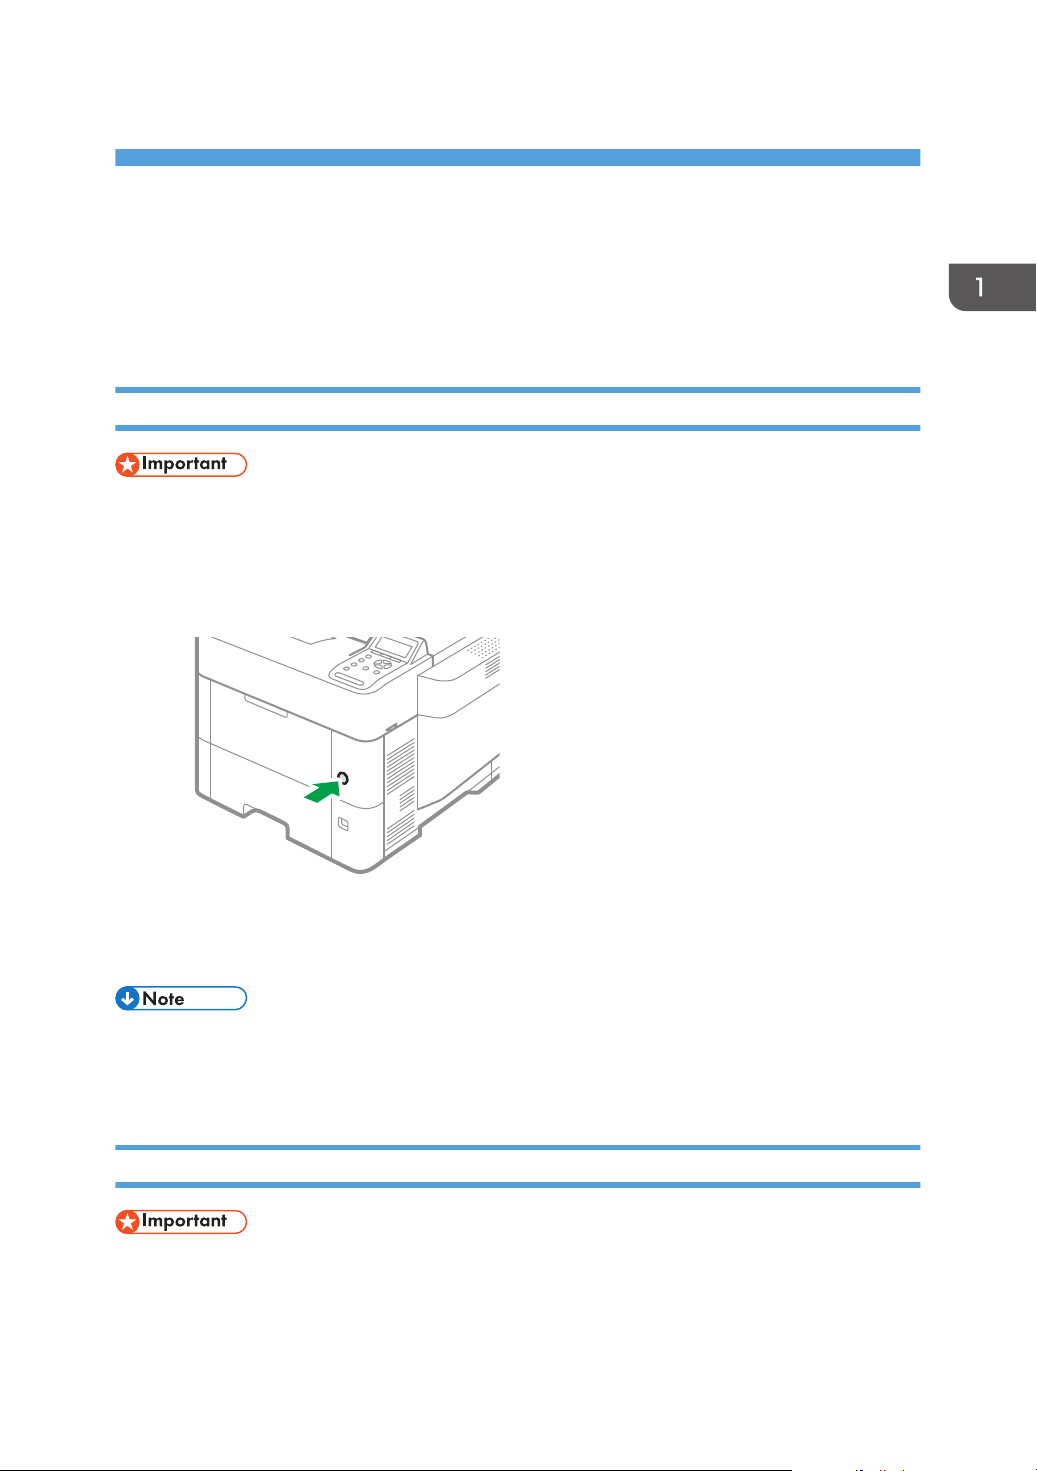
To turn the machine on and off, press the main power switch on the right of the machine.
Turning On the Main Power
• When you push the main power switch, wait at least 10 seconds after it is confirmed that the main
power indicator has lit up or gone out.
1. Make sure the power cord is firmly plugged into the wall outlet.
2. Push the main power switch.
The power indicator turns on.
After you switch the main power on, a screen may appear to indicate that the printer is initializing.
• When the power is turned on, the screen may show that the machine is performing an auto restart.
Do not turn off the main power while the machine is processing. It takes about five minutes until the
machine restarts.
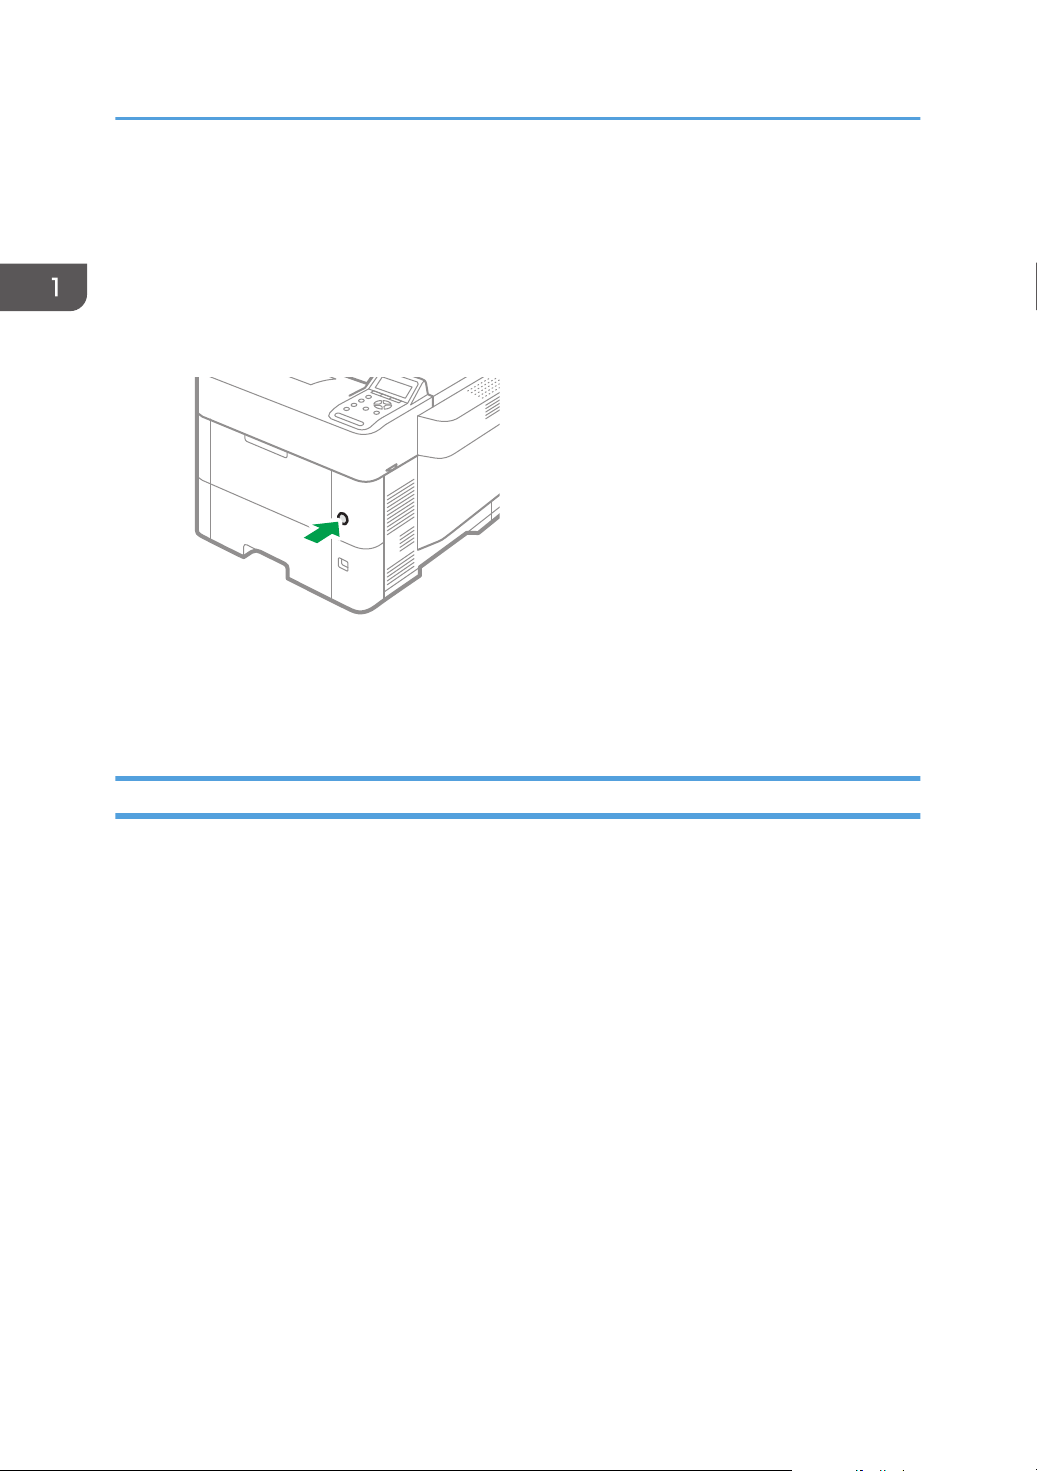
Turning Off the Main Power
• Do not turn off the power while the machine is in operation. To turn the power off, confirm that the
operation is finished.
7
Page 10
EBS034
1. Getting Started
• Do not hold down the main power switch while turning off the main power. Doing so forcibly turns
off the machine’s power and may damage the hard disk or memory and cause malfunctions.
• Do not press the main power switch soon after pressing the main power switch on the machine.
When you turn the power on or off, wait at least 10 seconds after confirming that the main power
indicator on the control panel has turned on or off.
1. Push the main power switch.
The main power is turned off automatically when the shutdown process is complete. If the shutdown
process is not complete within the period of time displayed on the screen, contact your service
representative.
Energy Saving Mode
When the machine is not operated for a specified period of time, the machine enters the "Energy Saver
Mode" automatically. "Energy Save mode" has two modes, "Low Power mode" and "Sleep mode". In
the factory default, the machine is configured to use "Sleep mode".
Low Power Mode
If the printer is not used for a certain period of time, it enters Low Power mode.
In Low Power mode, the printer consumes less electricity than in the standby mode by turning off the
display and lowering the temperature of the fusing unit heater. If the printer receives a job, it
increases the temperature of the fusing unit and perform printing, but the display remains off.
You can configure the period of time the printer waits before it enters Low Power mode in [Low
Power Mode Timer].
See "Maintenance", User Guide (Full Version).
To exit Low Power mode, do one of the following:
• Start print jobs
• Press any key on the control panel
• Load paper in the bypass tray
8
Page 11
Turning On and Off the Power
• Open any cover
• Open any paper tray
Sleep Mode
The printer enters Sleep mode when:
• The printer waits before entering Sleep mode is set in [Sleep Mode Timer]
• It is the day and time specified in [Weekly Timer]
Power consumption is minimized.
The printer can print jobs from computers.
You can change the amount of time that the printer waits before switching to Sleep mode.
Under [Weekly Timer], you can specify the times and the days of the week that the machine enters
Sleep mode.
Only the administrator can specify [Weekly Timer] when administrator authentication is enabled.
See "Maintenance", User Guide (Full Version).
To exit Sleep mode, press one of the keys on the control panel.
• The energy saving functions are disabled when an error occurs or while an operation is in
progress.
9
Page 12
EBS241
1
3
2
1. Getting Started
Guide to Names and Functions of Components
• Do not obstruct the machine's vents. Doing so can result in fire as the internal components are
overheated.
(mainly Europe and Asia), (mainly Europe), or (mainly Asia)
(mainly North America)
Differences in the functions of Region A and Region B models are indicated by two symbols.
Read the information indicated by the symbol that corresponds to the region of the model you are using.
page 137 "Model-Specific Information"
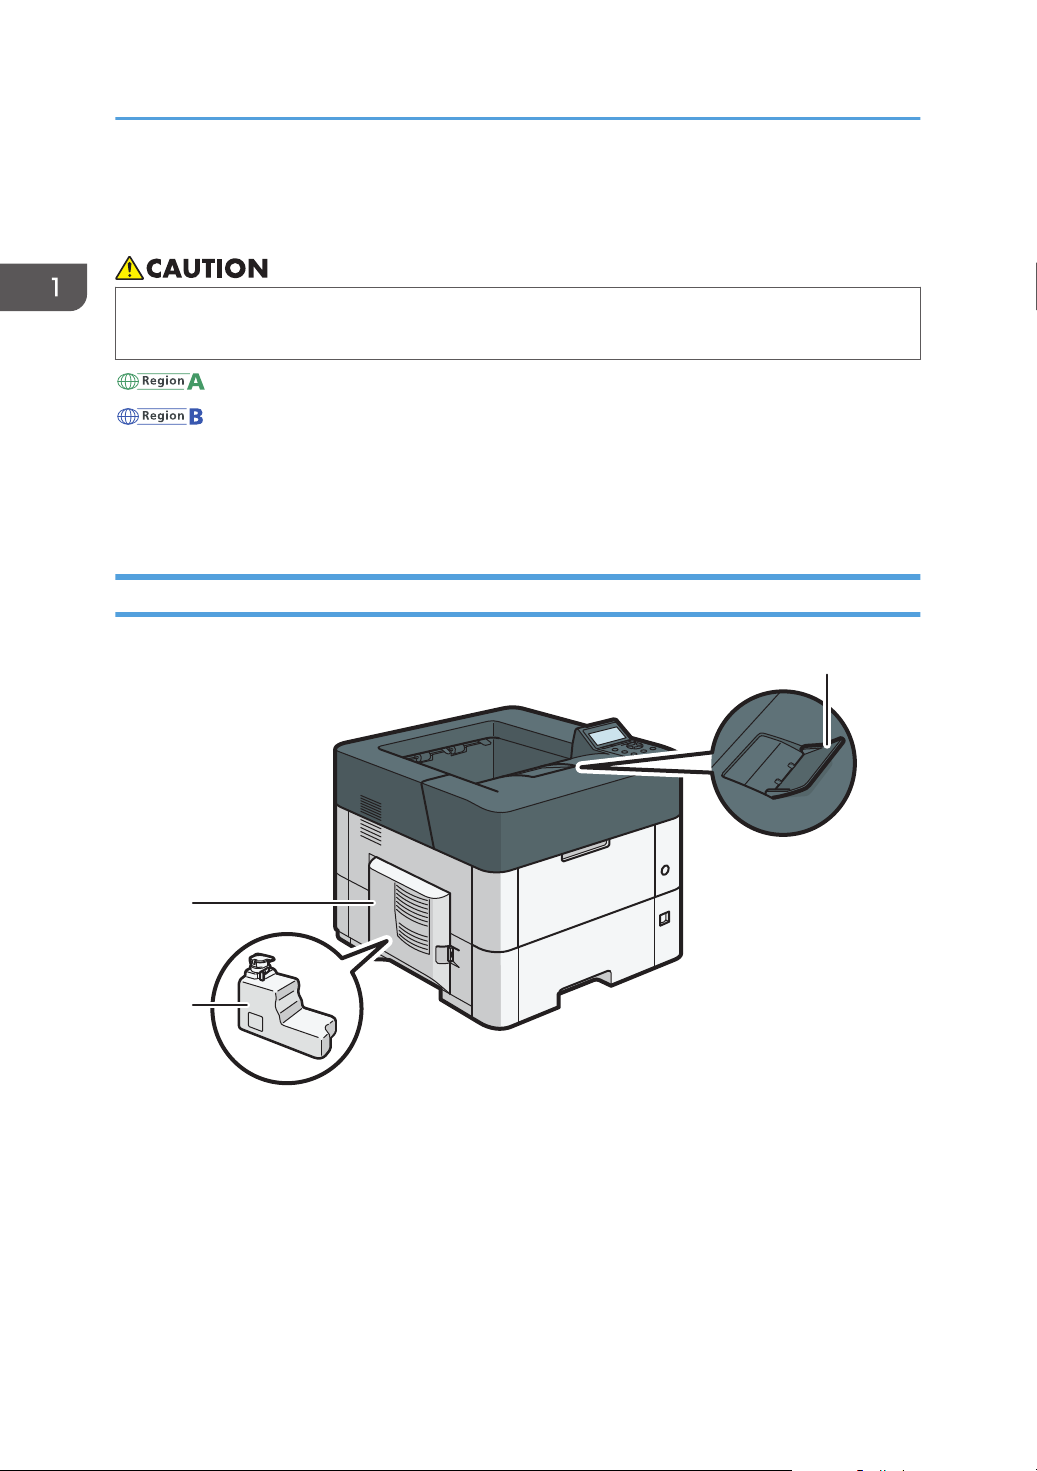
Exterior: Front and Left View
1. Tray extension
Pull this fence to prevent paper from falling off.
2. Waste toner bottle
Waste toner is collected here. Replace the bottle when it is full.
3. Left cover
Open to access the waste toner bottle.
10
Page 13
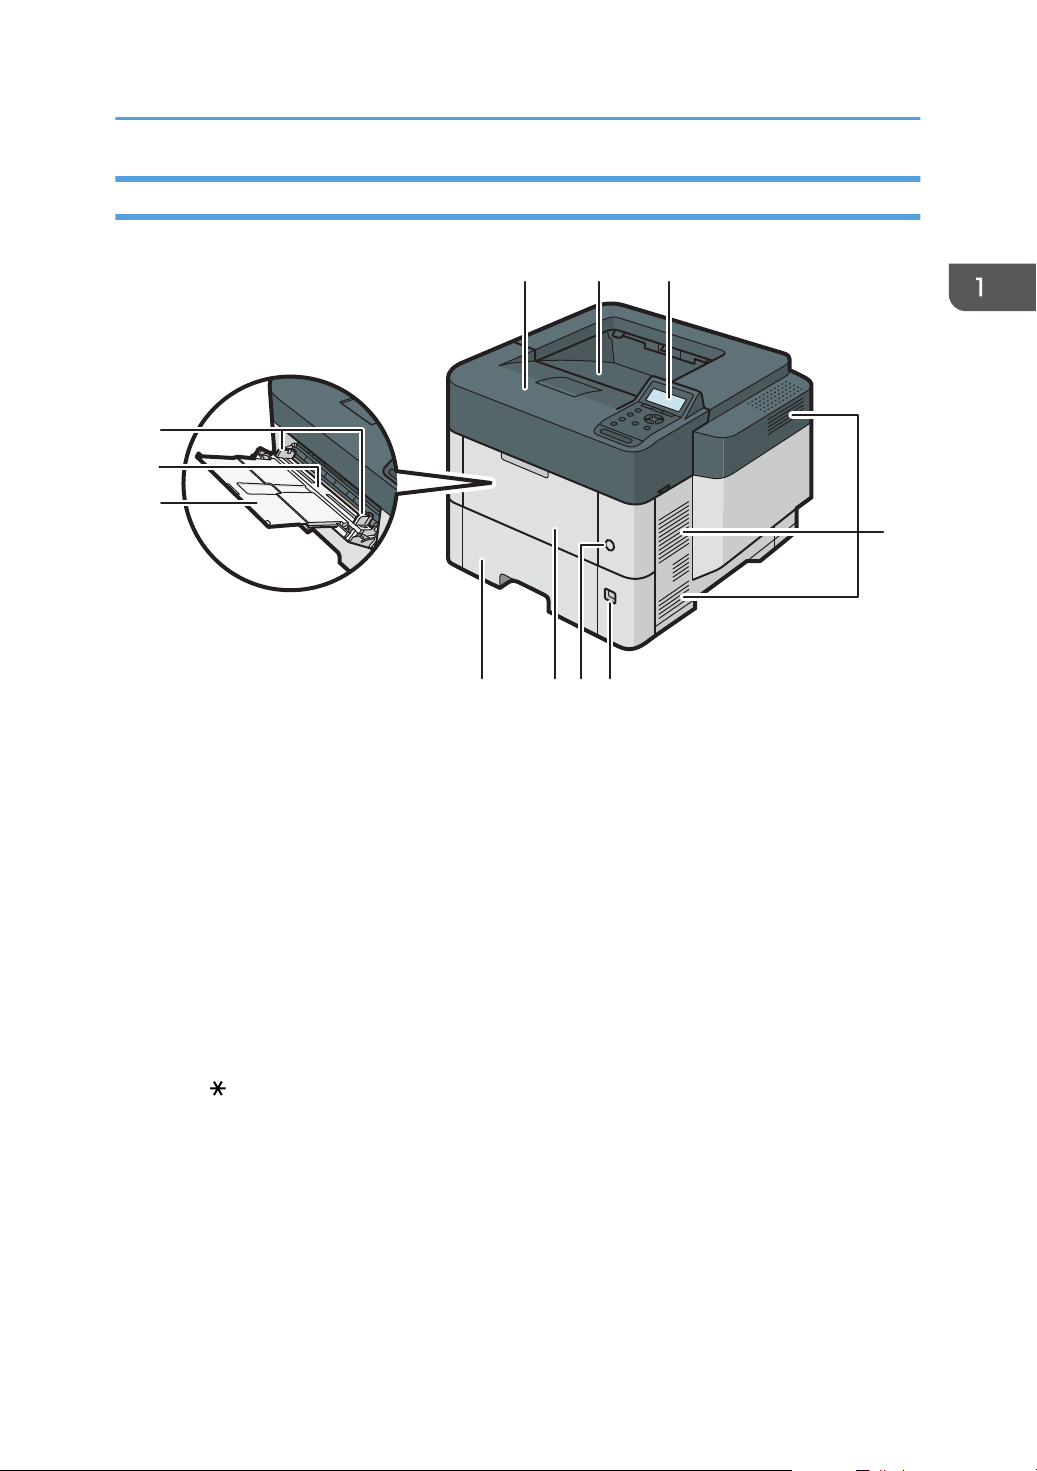
Exterior: Front and Right view
EBS242
57 68
1 2 3
4
9
10
11
Guide to Names and Functions of Components
1. Top cover
Open to access the inside of the printer and remove jammed paper.
Open here to replace the print cartridge.
2. Standard tray
Output is stacked here with the print side down.
3. Control panel
page 14 "Names and Functions of the Control Panel"
4. Vents
Prevent overheating.
5. Paper size dial
Use this dial to specify the paper size. To use a paper size that is not indicated on the paper size dial, set the
dial to " ". If this is the case, set the paper size using the control panel.
6. Main power switch
Use this switch to turn the power on and off.
page 7 "Turning On and Off the Power"
7. Front cover
Open to access the inside of the printer and remove jammed paper.
Open here to replace the print cartridge.
11
Page 14
EBS243
6
5
4
3
12
1. Getting Started
8. Tray 1
Up to 500 sheets of plain paper can be loaded.
page 85 "Recommended Paper Sizes and Types"
9. Extender for the bypass tray
Pull this extender out when loading A4 , 81/2 × 11 or larger size paper in the bypass tray.
10. Bypass tray
Up to 100 sheets of plain paper can be loaded.
page 85 "Recommended Paper Sizes and Types"
11. Paper guides
When loading paper in the bypass tray, align the paper guides flush against the paper.
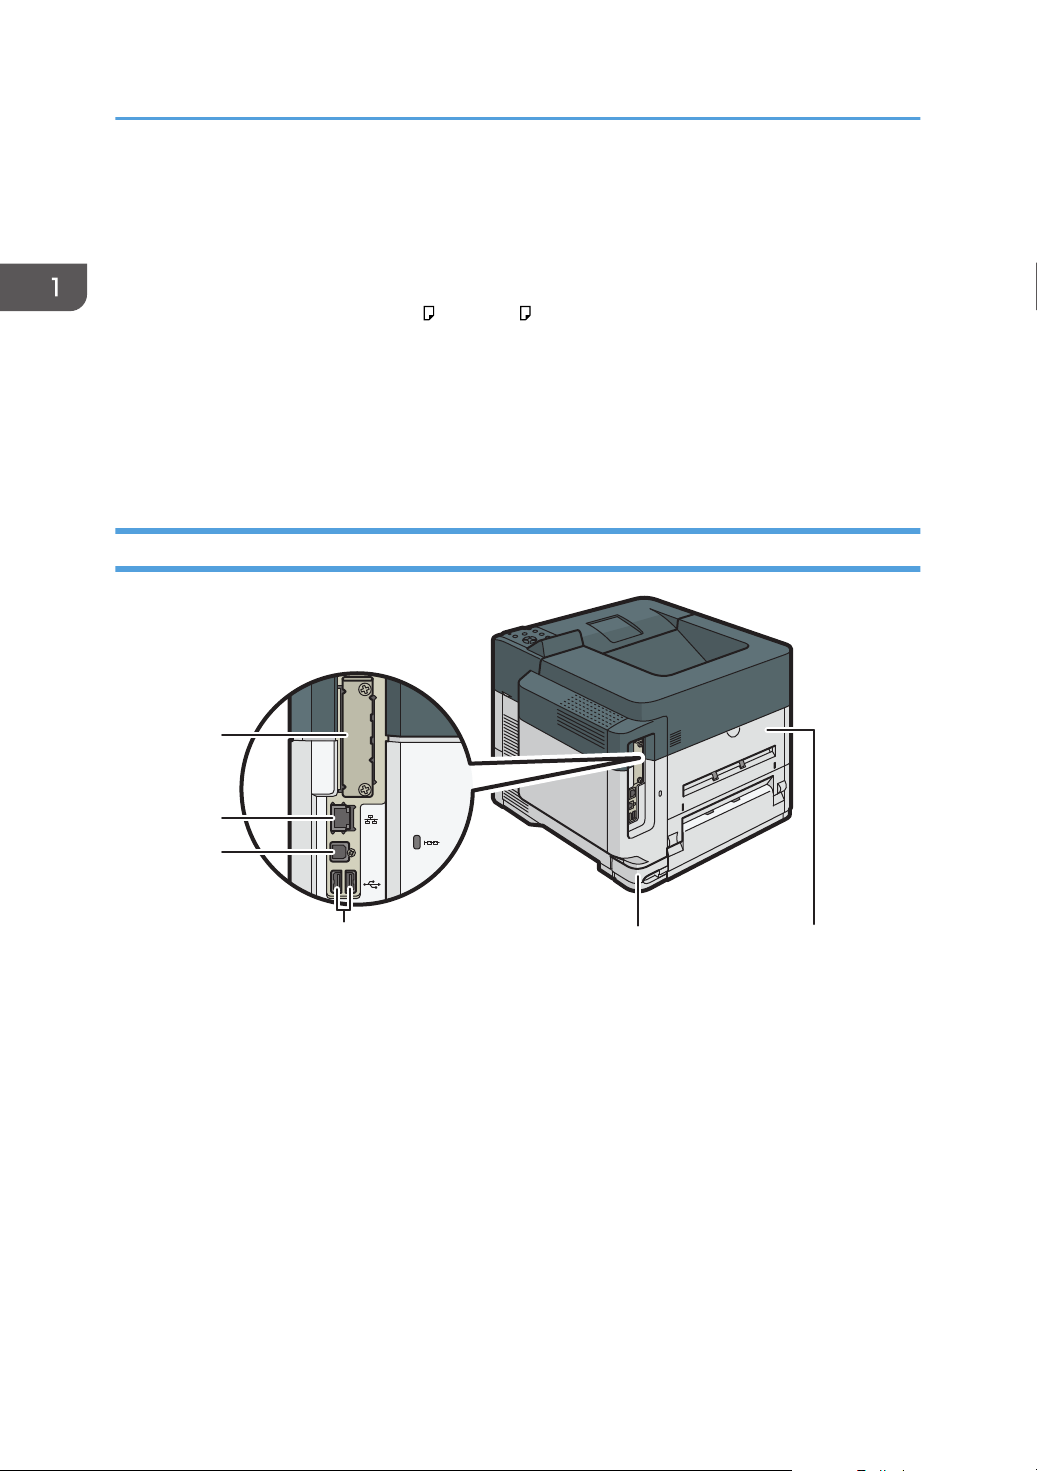
Exterior: Rear and Left view
1. Rear cover
Open to access the inside of the printer.
2. Power connector
Connect the power cord to the printer. Insert the other end into an electrical outlet.
3. USB port A
Connect external devices such as a card authentication device, etc.
4. USB port B
Use the port to connect the machine and the computer with the USB cable.
5. Ethernet port
Use a network interface cable to connect the printer to a network.
12
Page 15
EBS244
1
Guide to Names and Functions of Components
6. Optional interface board slot
Optional interface boards can be inserted.
Insert an optional wireless LAN interface board, IEEE 1284 interface board, or Device server.
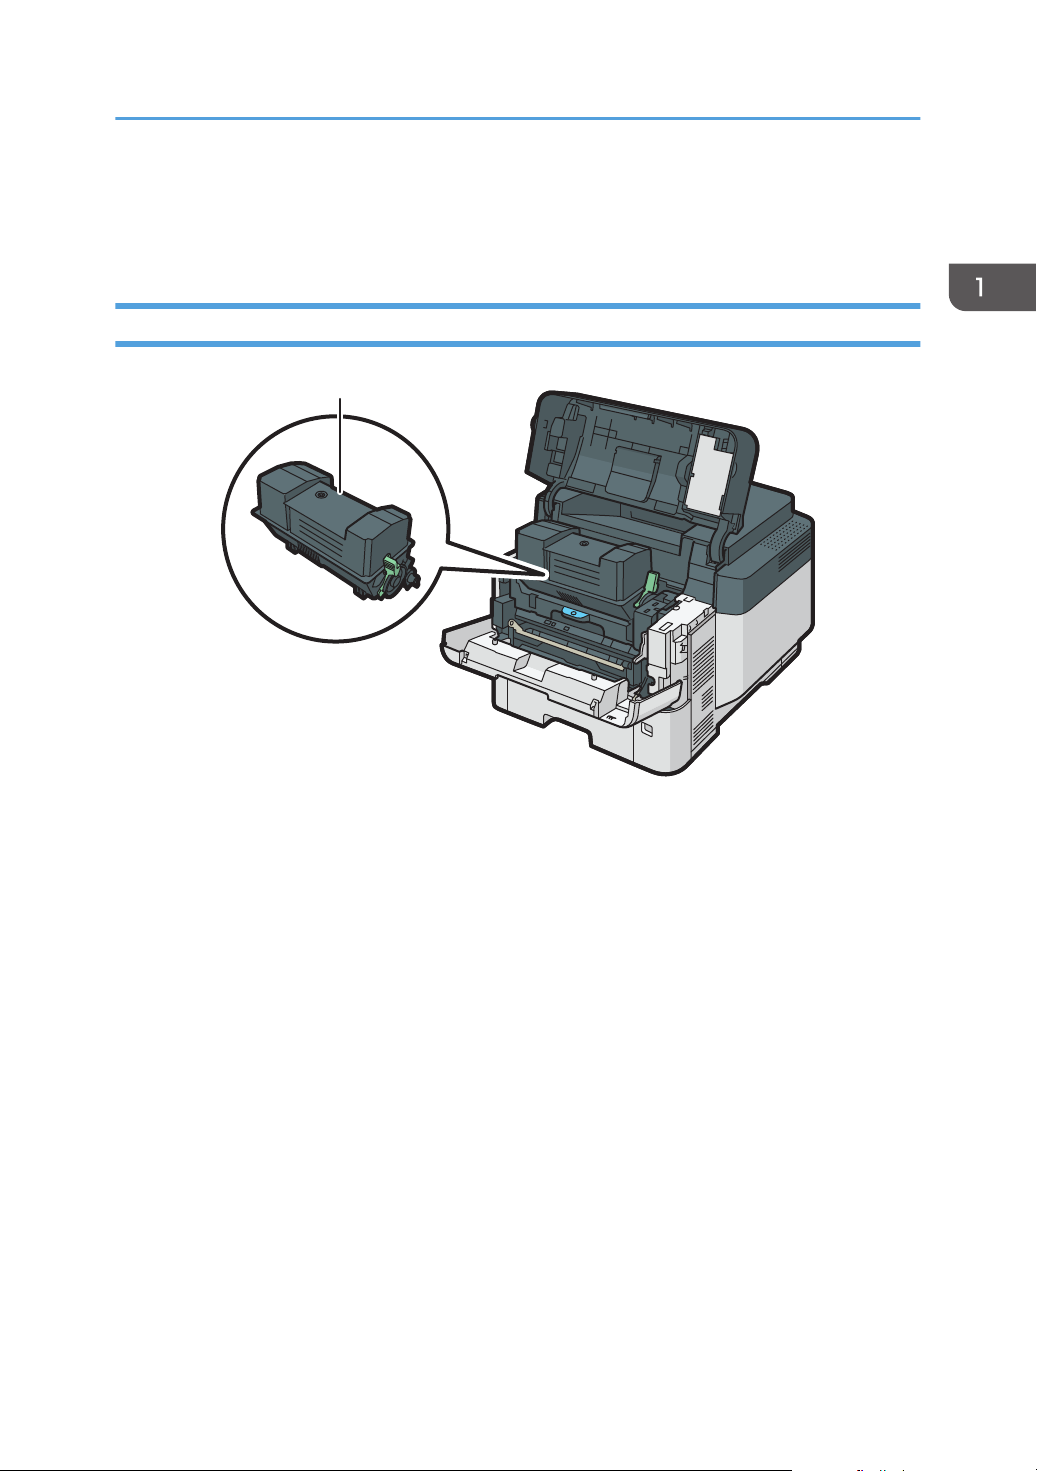
Interior: Front View
1. Print cartridge
Messages appear on the screen when the print cartridge needs to be replaced, or a new cartridge needs to
be prepared.
page 96 "Replacing the Toner"
13
Page 16
EBS141
1
2
3
4
5
6
7
8
9
10
11
12
1. Getting Started
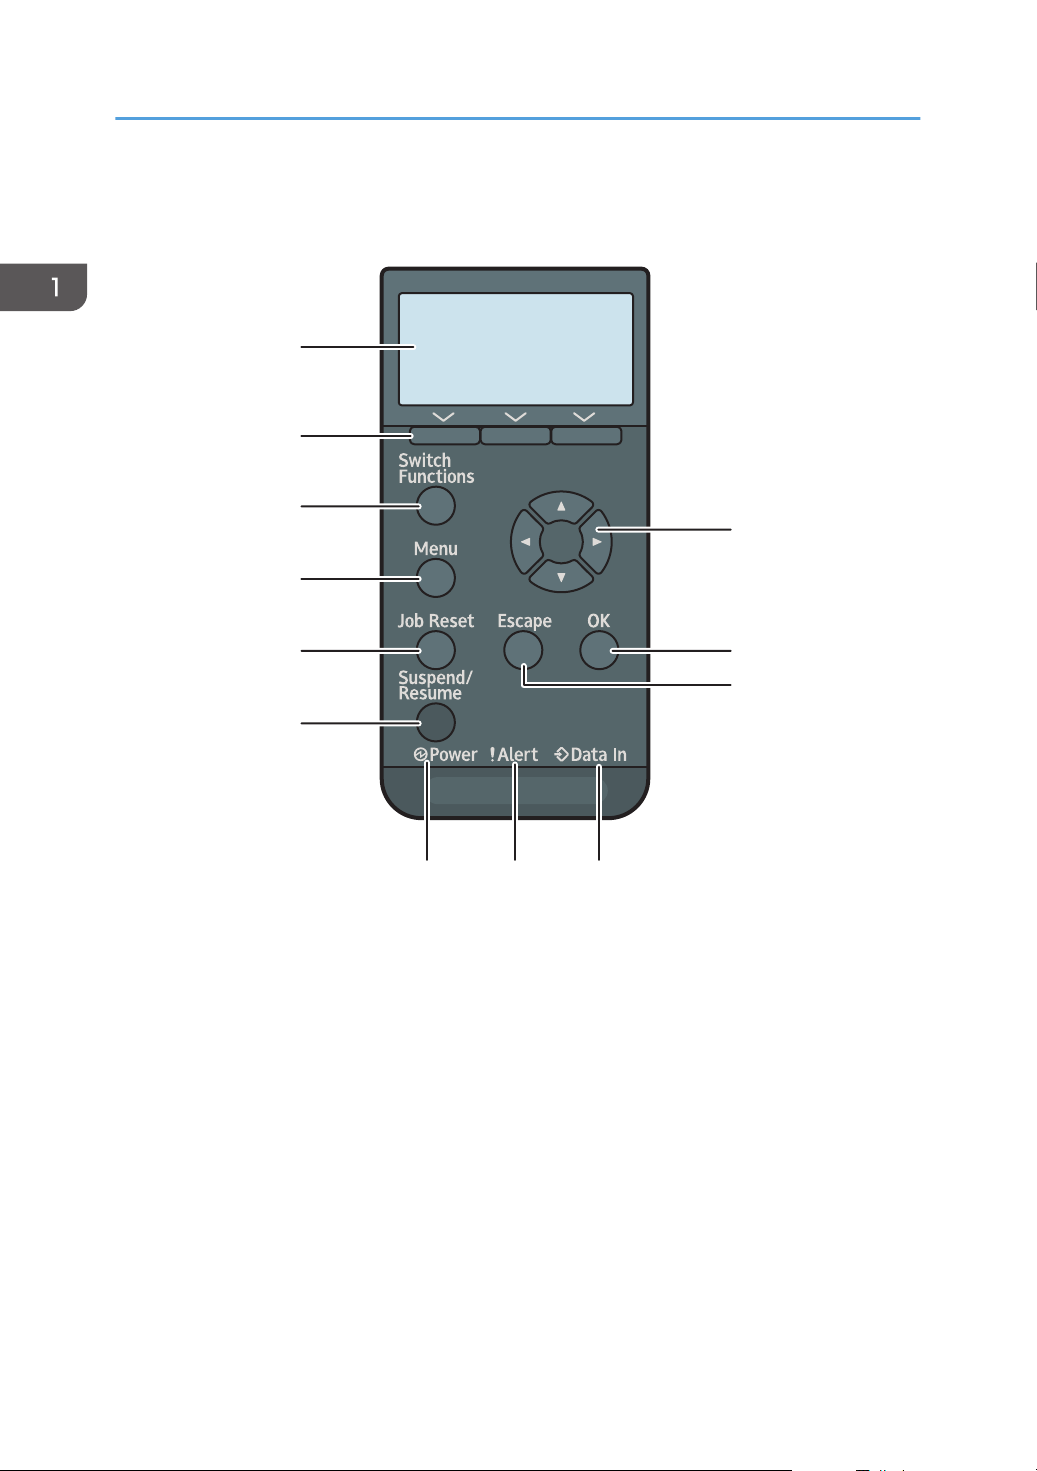
Names and Functions of the Control Panel
1. Display
Displays current printer status and error messages.
Entering energy saver mode turns off the back light.
page 8 "Energy Saving Mode"
2. Selection keys
Correspond to the function items at the bottom line on the display.
page 16 "How to Use the Selection Keys"
3. [Switch Functions] key
Press this key to switch between the operation screen of the printer function and the function screens of the
extended features currently in use.
4. [Menu] key
Press this key to configure and check the current printer settings.
Press to change the default settings to meet your requirements. See Function Details of the Printer Configuration
Items.
14
Page 17

Names and Functions of the Control Panel
5. [Job Reset] key
Press to cancel the current print job.
6. [Suspend/Resume] key
Press this to suspend the print job currently being processed. The indicator remains lit as long as the job is
suspended.
To resume the job, press this key again. The suspended job will resume automatically when the time specified
in [Auto Reset Timer] elapses (default: 60 seconds).
See "Maintenance", User Guide (Full Version).
7. Power indicator
Lights up when the printer is ready to receive data from a computer. Flashes when the printer is warming up or
receiving data. It is unlit when the power is off or when the printer is in energy saver mode.
8. Alert indicator
Lights up or flashes when a printer error occurs.
Steady red: printing is not possible, or is possible but print quality cannot be ensured.
Flashing yellow: the printer will soon require maintenance or a replacement consumable such as print
cartridge.
Follow the instructions that appear on the display.
9. Data in indicator
Flashes when the printer is receiving data from a computer. The data in indicator is lit if there is data to be
printed.
10. [Escape] key
Press this key to cancel an operation or return to the previous display.
11. [OK] key
Use this key to confirm settings or setting values, or move to the next menu level.
12. Scroll keys
Press these keys to move the cursor in each direction.
When the [ ] [ ] [ ] [ ] keys appear in this manual, press the applicable key for the direction that you want
to move the cursor.
15
Page 18
EBS263
1. Getting Started
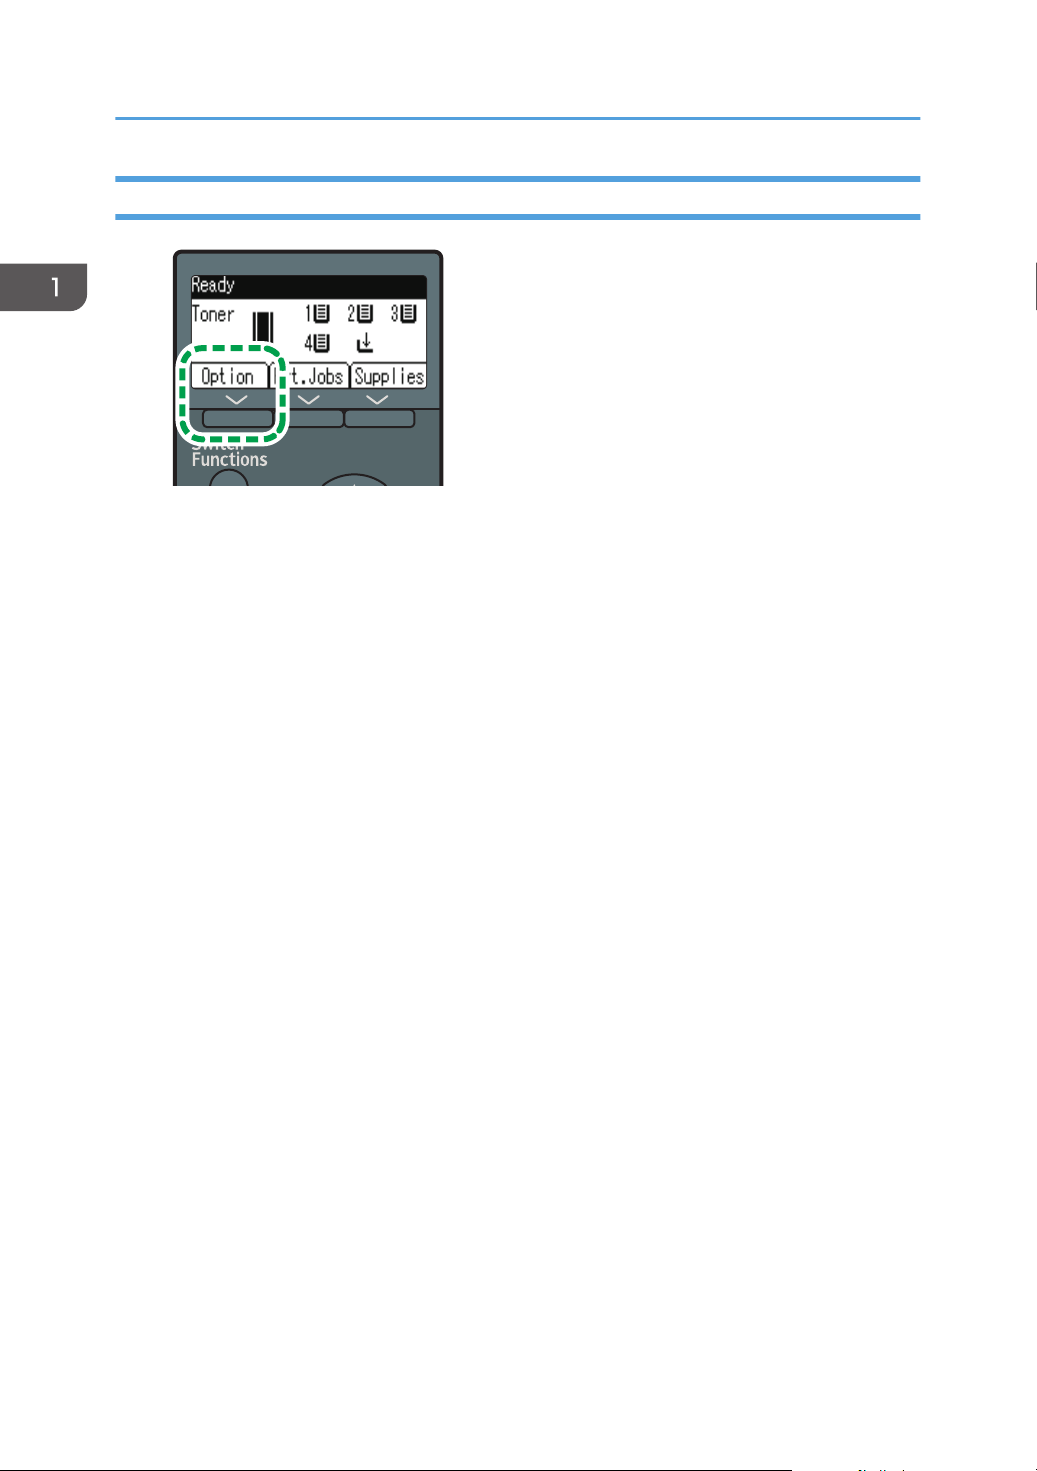
How to Use the Selection Keys
To select an item on the bottom line of the display, press the corresponding selection key directly below
the item. For example, if you want to select [Option], as shown in the illustration above, press the
selection key on the left side.
16
Page 19

Order of Option Installation
When installing multiple options, the following order is recommended:
1. Attach the paper feed unit.
Attach the paper feed unit to the bottom of the machine.
You can attach up to four paper feed units. Up to 2,000 sheets of paper can be loaded.
2. Install the caster table.
3. Install the optional interface board.
Install in the slot of the machine.
Only one interface board can be installed.
4. Insert SD card options.
Insert in the SD card slot of the machine.
There are two slots for SD cards.
Each slot supports different types of SD cards.
Order of Option Installation
If you want to use two or more SD cards that can be inserted in the same slot, contact your sales or
service representative.
17
Page 20
EAT135
1. Getting Started
Attaching the Paper Feed Unit
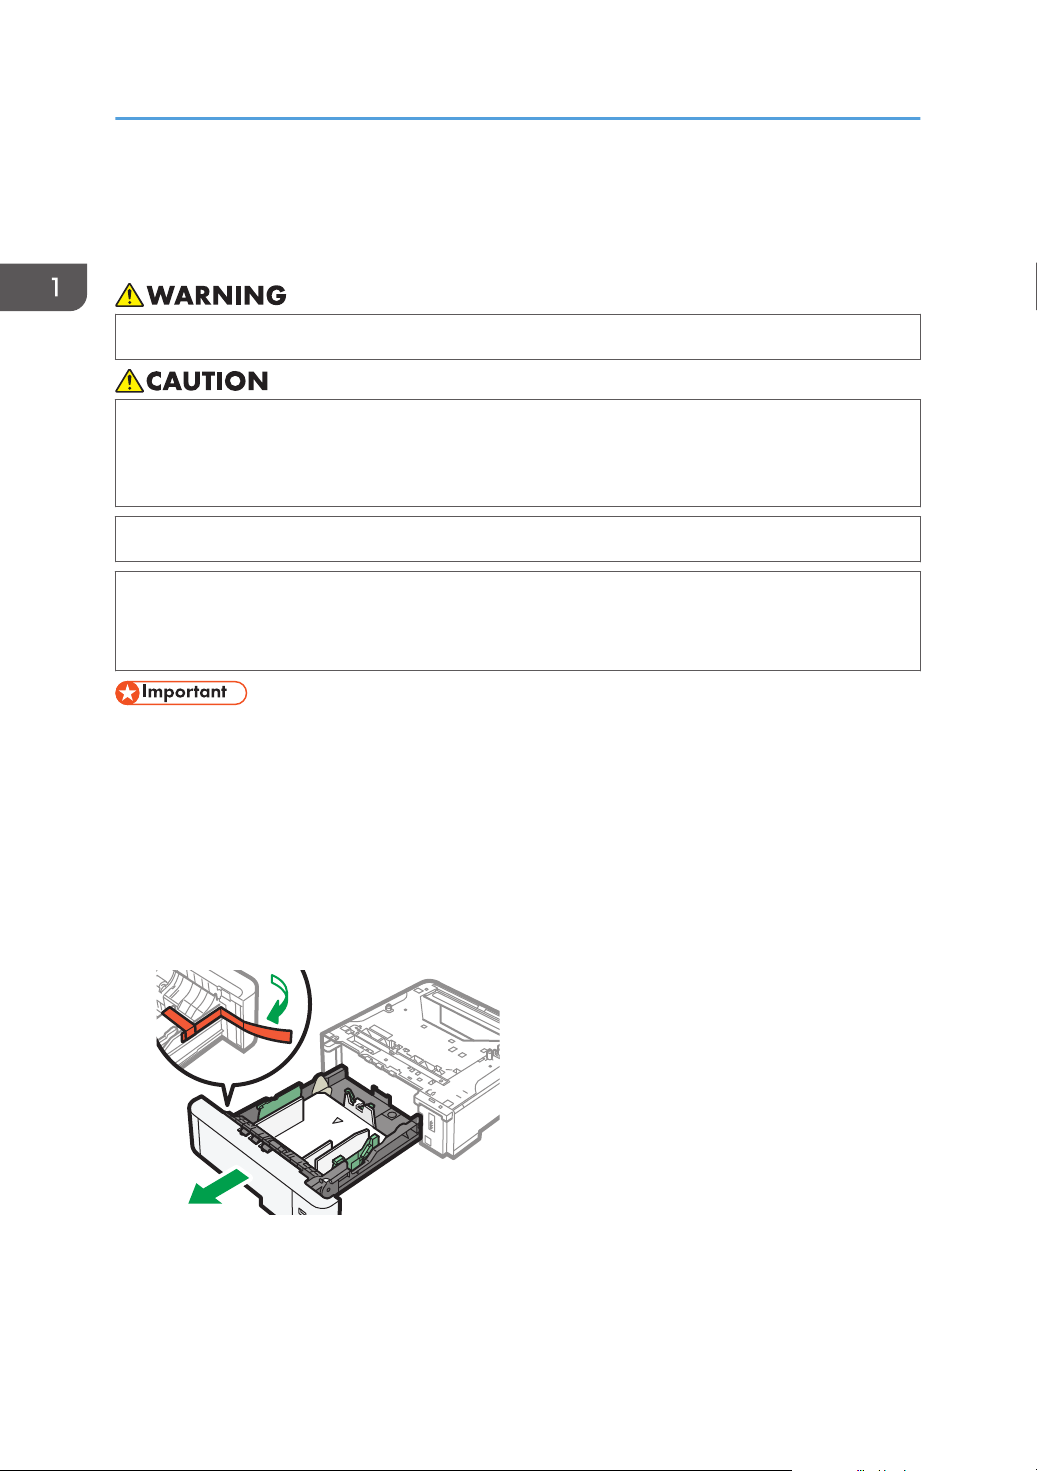
You can install a paper feed unit.
• Do not handle the power cord plug with wet hands. Doing so can result in electric shock.
• The machine weighs approximately 18 kg (40 lb.).
• When moving the machine, use the inset grips on both sides, and lift slowly in pairs. The
machine will break or cause injury if dropped.
• Lifting the paper feed unit carelessly or dropping may cause injury.
• When moving the machine, make sure to unplug the power cord from the wall outlet and
confirm that line cords and other connecting cables have been removed. Otherwise, the power
cord is damaged, possibly resulting in fire or electric shock.
• Do not place the machine directly on the floor.
• When attaching multiple options, attach the paper feed unit first.
• To attach two or more paper feed units at the same time, first stack them one upon the other, and
then attach them as a single unit.
• Before turning on the power, remove the packaging material from the paper feed unit.
1. Turn the machine off and unplug the power cord.
2. Remove the packaging, adhesive tapes, and a plastic sheet from the paper feed unit.
18
Page 21
EAT136
2
1
EAT137
Attaching the Paper Feed Unit
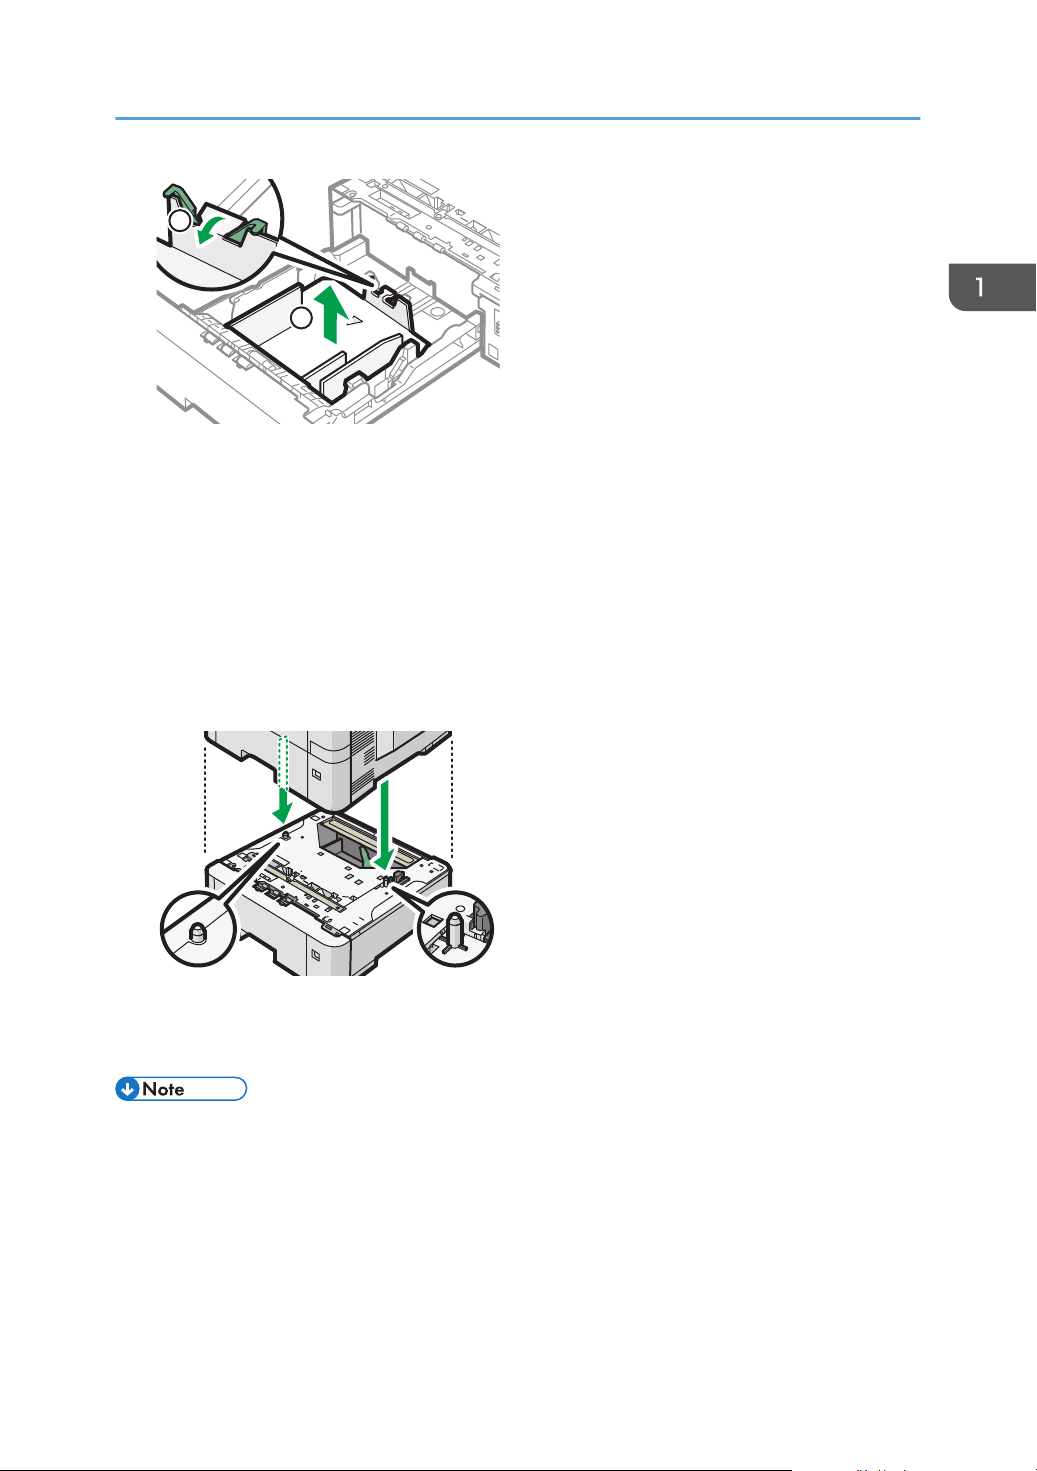
3. Lift the machine using the inset grips on both sides of the machine in pairs.
Lifting the machine requires two people.
When moving the machine, do not touch the following parts:
• Convex parts on the right side of the machine
• Places indicated on the labels attached to the machine
• The bottom of the optional paper tray
4. There are two upright pins on the optional paper feed unit. Align them with the holes on
the underside of the machine, and then carefully lower the machine.
5. Plug in the power cord, and then turn on the machine.
6. Print the configuration page to confirm that the unit was attached correctly.
• To check whether the optional paper feed unit was correctly attached, print the configuration page,
and check "Attached Equipment" on the configuration page. If the unit was attached correctly,
"Tray 2", "Tray 3", "Tray 4", and "Tray 5" will appear.
• See "Configuring the Machine Using the Control Panel", User Guide (Full Version).
• If the optional paper feed unit was not installed properly, repeat the procedure from the beginning.
If it cannot be installed correctly even after trying the installation a second time, contact your sales
or service representative.
19
Page 22

1. Getting Started
• To use the paper feed unit, configure the machine options in "Accessories" in the printer driver.
• See "Specifying the Option Configuration or Paper Settings Manually", User Guide (Full Version).
20
Page 23
EBS148
EBS149
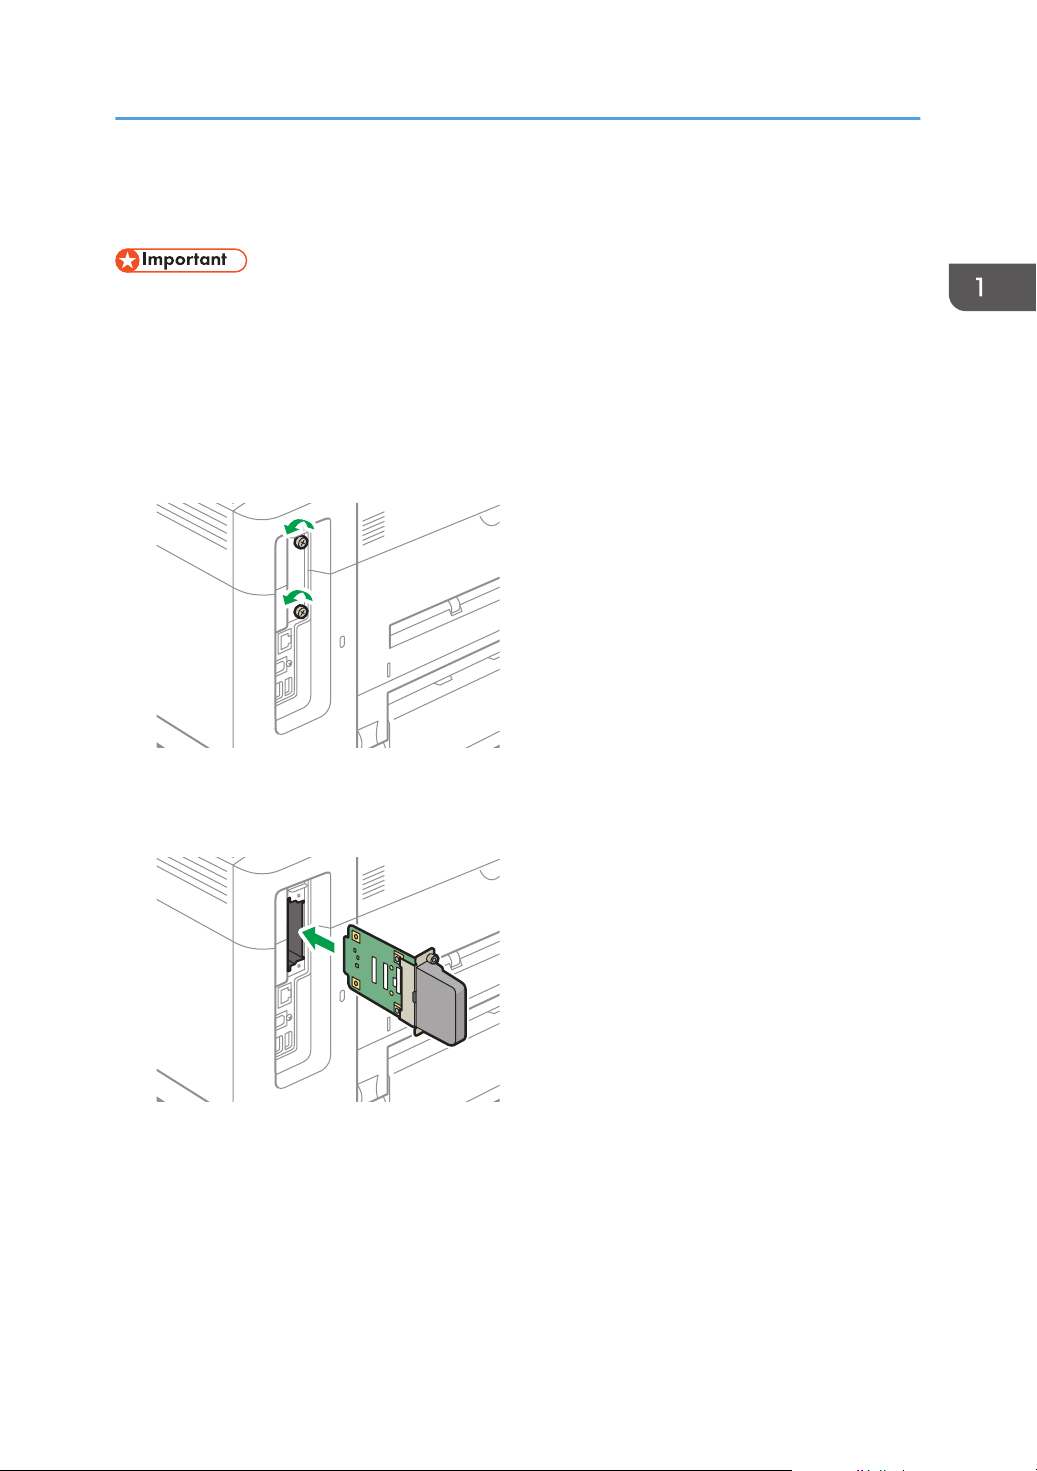
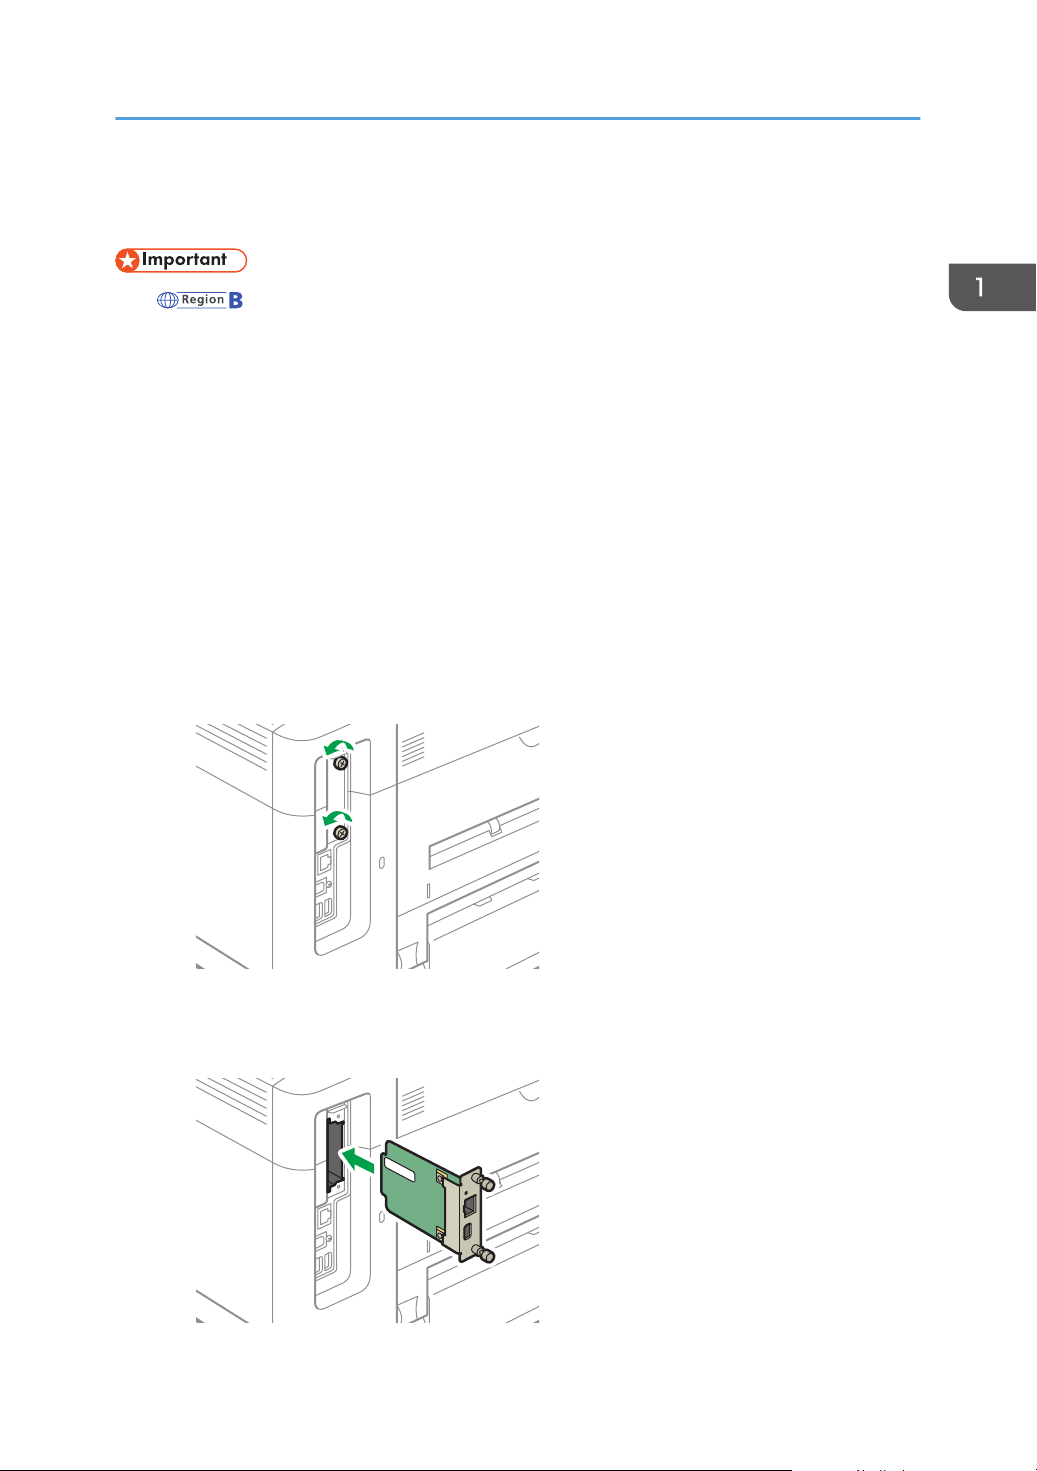
Installing the Wireless LAN Interface Board
Installing the Wireless LAN Interface Board
• Before beginning work, ground yourself by touching something metal to discharge any static
electricity. Static electricity can damage the interface units.
• Do not subject the Wireless LAN interface board to physical shocks.
1. Check the contents of the package.
2. Turn the machine off and unplug the power cord.
3. Loosen the two screws and remove the slot cover.
The removed cover will not be reused.
4. Fully insert the interface board.
Check that the interface board is firmly connected to the controller board.
21
Page 24
EBS150
1. Getting Started
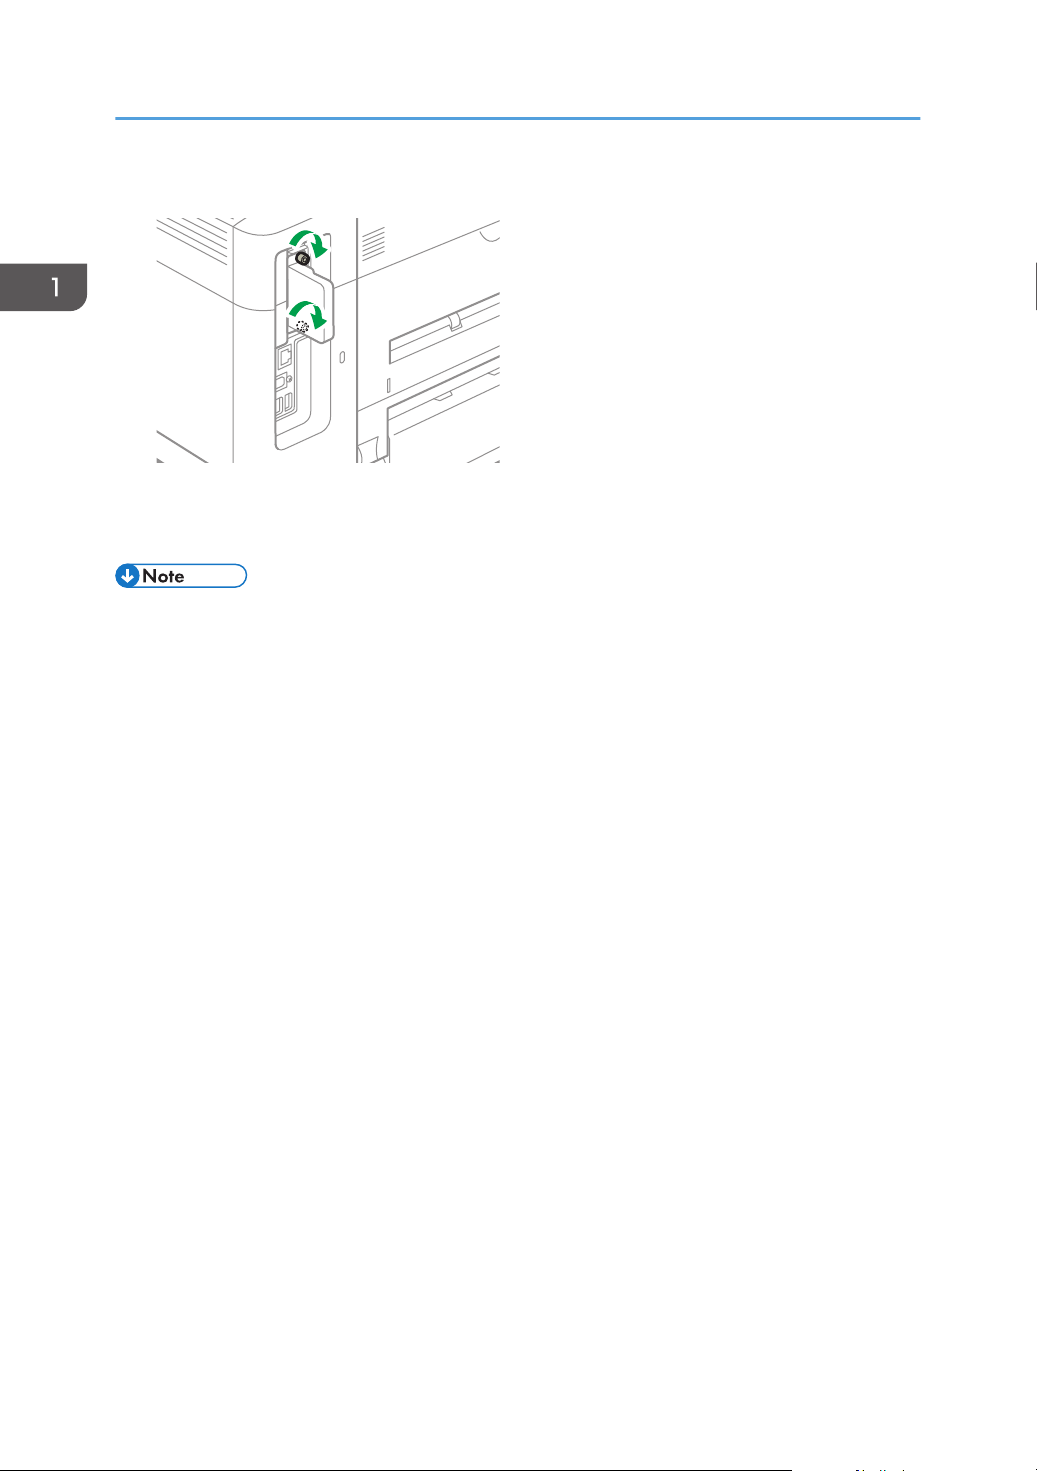
5. Tighten the two screws to secure the interface board.
6. Plug in the power cord, and then turn on the machine.
7. Print the configuration page to confirm that the board was attached correctly.
• Check that the board was correctly installed by printing the configuration page. If it is correctly
installed, "Wireless LAN" will appear for "Device Connection" on the configuration page.
• See "Configuring the Machine Using the Control Panel", User Guide (Full Version).
• If the board was not installed properly, repeat the procedure from the beginning. If it cannot be
installed correctly even after trying the installation a second time, contact your sales or service
representative.
• Before using the board, you must configure settings from the control panel.
22
Page 25
EBS148
EBS153
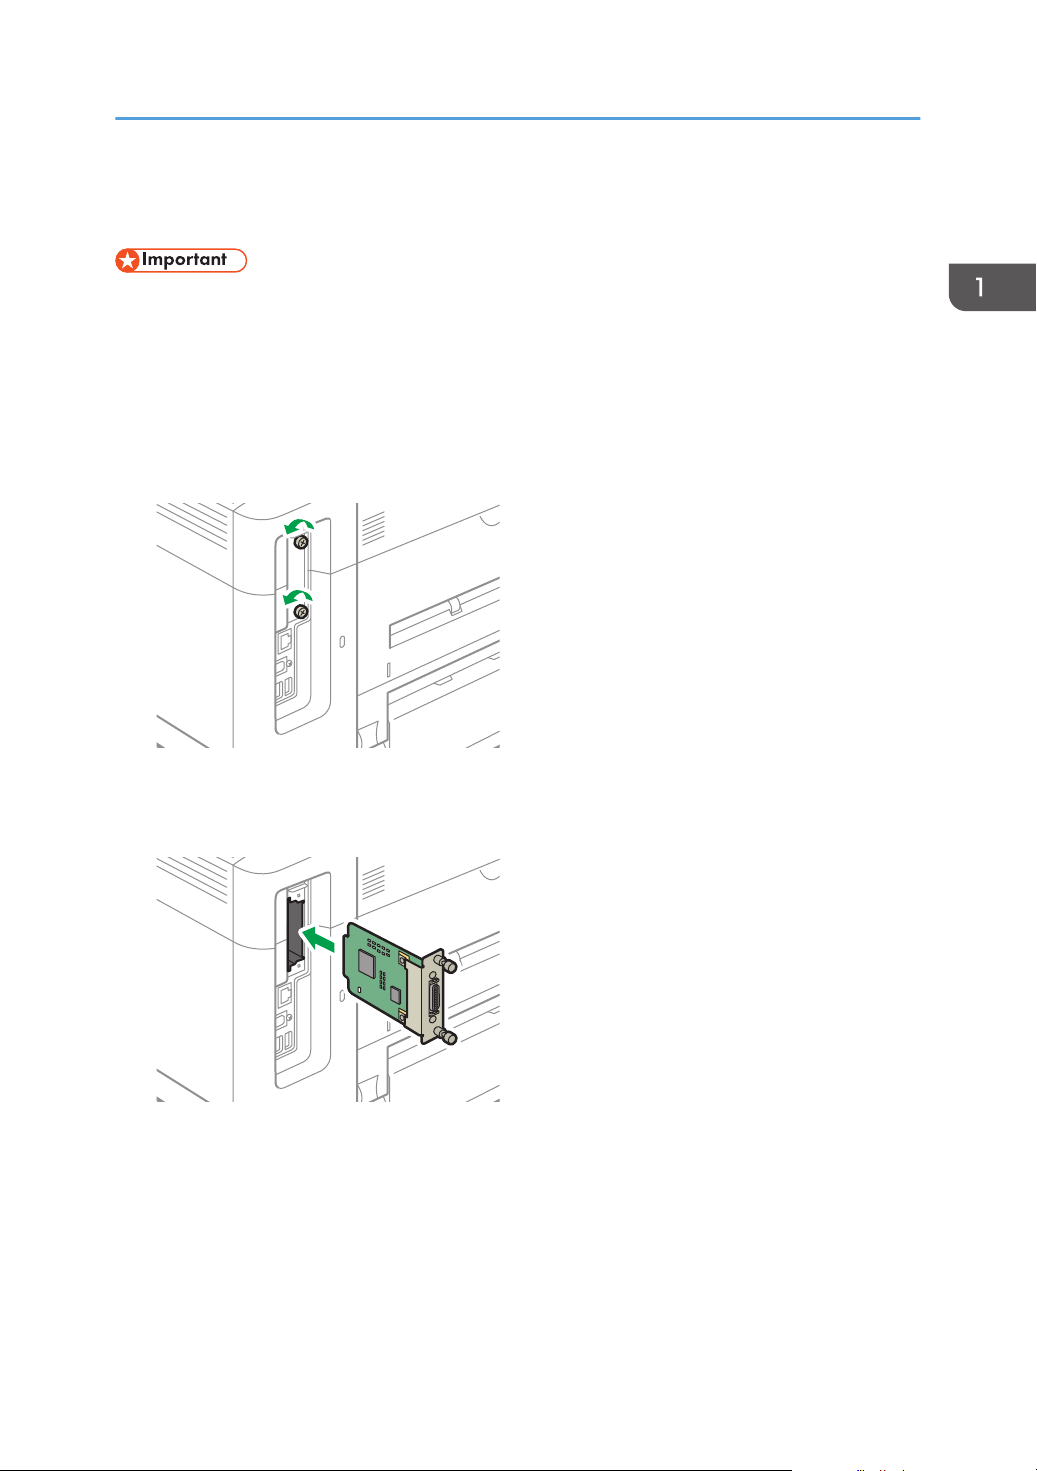
Installing the IEEE 1284 Interface Board
Installing the IEEE 1284 Interface Board
• Before beginning work, ground yourself by touching something metal to discharge any static
electricity. Static electricity can damage the interface units.
• Do not subject the IEEE 1284 interface board to physical shocks.
1. Check the contents of the package.
2. Turn the machine off and unplug the power cord.
3. Loosen the two screws and remove the slot cover.
The removed cover will not be reused.
4. Fully insert the IEEE 1284 interface board.
Check that the IEEE 1284 interface board is firmly connected to the controller board.
23
Page 26
EBS154
1. Getting Started
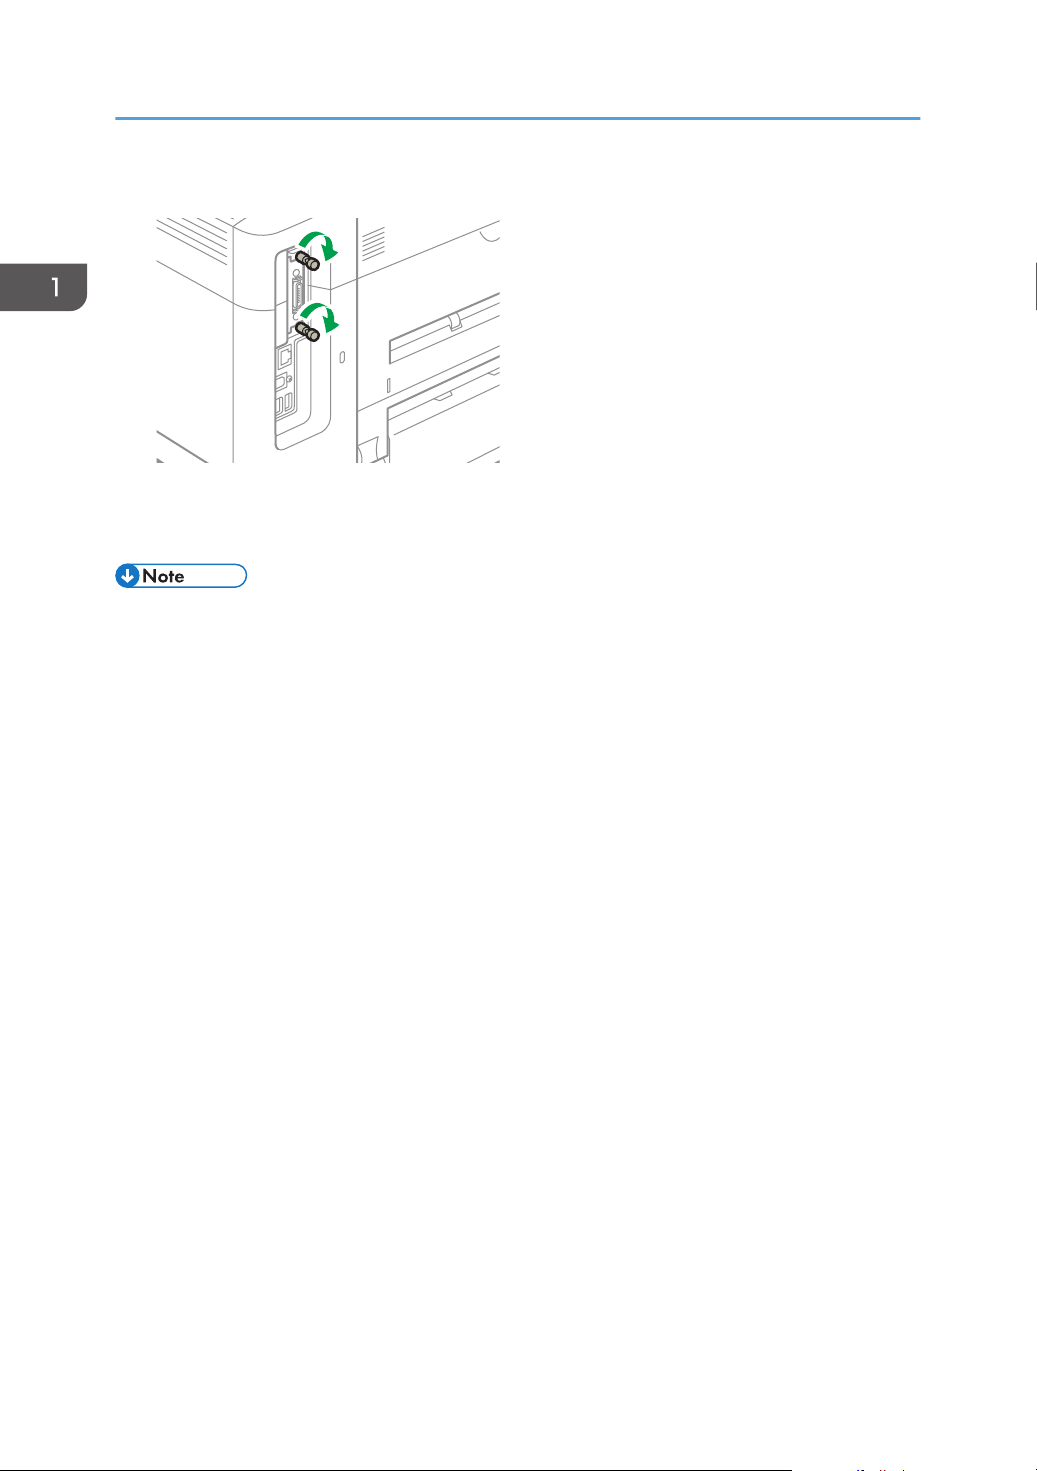
5. Tighten the two screws to secure the interface board.
6. Plug in the power cord, and then turn on the machine.
7. Print the configuration page to confirm that the board was attached correctly.
• Check that the board was correctly installed by printing the configuration page. If it is correctly
installed, "Parallel Interface" will appear for "Device Connection" on the configuration page.
• See "Configuring the Machine Using the Control Panel", User Guide (Full Version).
• If the board was not installed properly, repeat the procedure from the beginning. If it cannot be
installed correctly even after trying the installation a second time, contact your sales or service
representative.
24
Page 27
EBS148
EBS151
Installing the Device Server Option
Installing the Device Server Option
• (mainly North America)
If you want to use the device server option, contact your service representative.
• Before beginning work, ground yourself by touching something metal to discharge any static
electricity. Static electricity can damage the interface units.
• Do not subject the Device Server Option to physical shocks.
The optional device server option is an interface board that adds an Ethernet port to the machine.
With this option installed, two Ethernet cables can be connected at the same time using the standard port
on the machine and an additional port on the device server option. You can assign different IP
addresses to each port, so the machine can print jobs from different network segments.
Procedure for installing the device server option
1. Check the contents of the package.
2. Turn the machine off and unplug the power cord.
3. Loosen the two screws and remove the slot cover.
The removed cover will not be reused.
4. Fully insert the interface board.
25
Page 28
EBS152
EBS175
1. Getting Started
Check that the interface board is firmly connected to the controller board.
5. Tighten the two screws to secure the interface board.
6. Connect the device server option to the machine.
For details, see the Setup Guide provided with the device server option.
Configuring settings
After installing and connecting the device server option to the machine, configure the machine
settings.
• When using the device server option, set [Engy Sv Md to Dsbl Prt Srv] to [Disable Mode] to prevent
the machine from entering Energy Saver mode. Otherwise, the device server option loses
communication with the network while the machine is in Energy Saver mode, and the machine
cannot receive print jobs.
1. Press the [Menu] key.
2. Select [System], and then press the [OK] key.
3. Select [Engy Sv Md to Dsbl Prt Srv], and then press the [OK] key.
4. Select [Disable Mode], and then press the [OK] key.
26
Page 29

Installing the Device Server Option
• If the item you want to select is not displayed on the screen, press the [ ] or [ ] key on the control
panel to change the screen.
27
Page 30
EBS155
EBS156
1. Getting Started
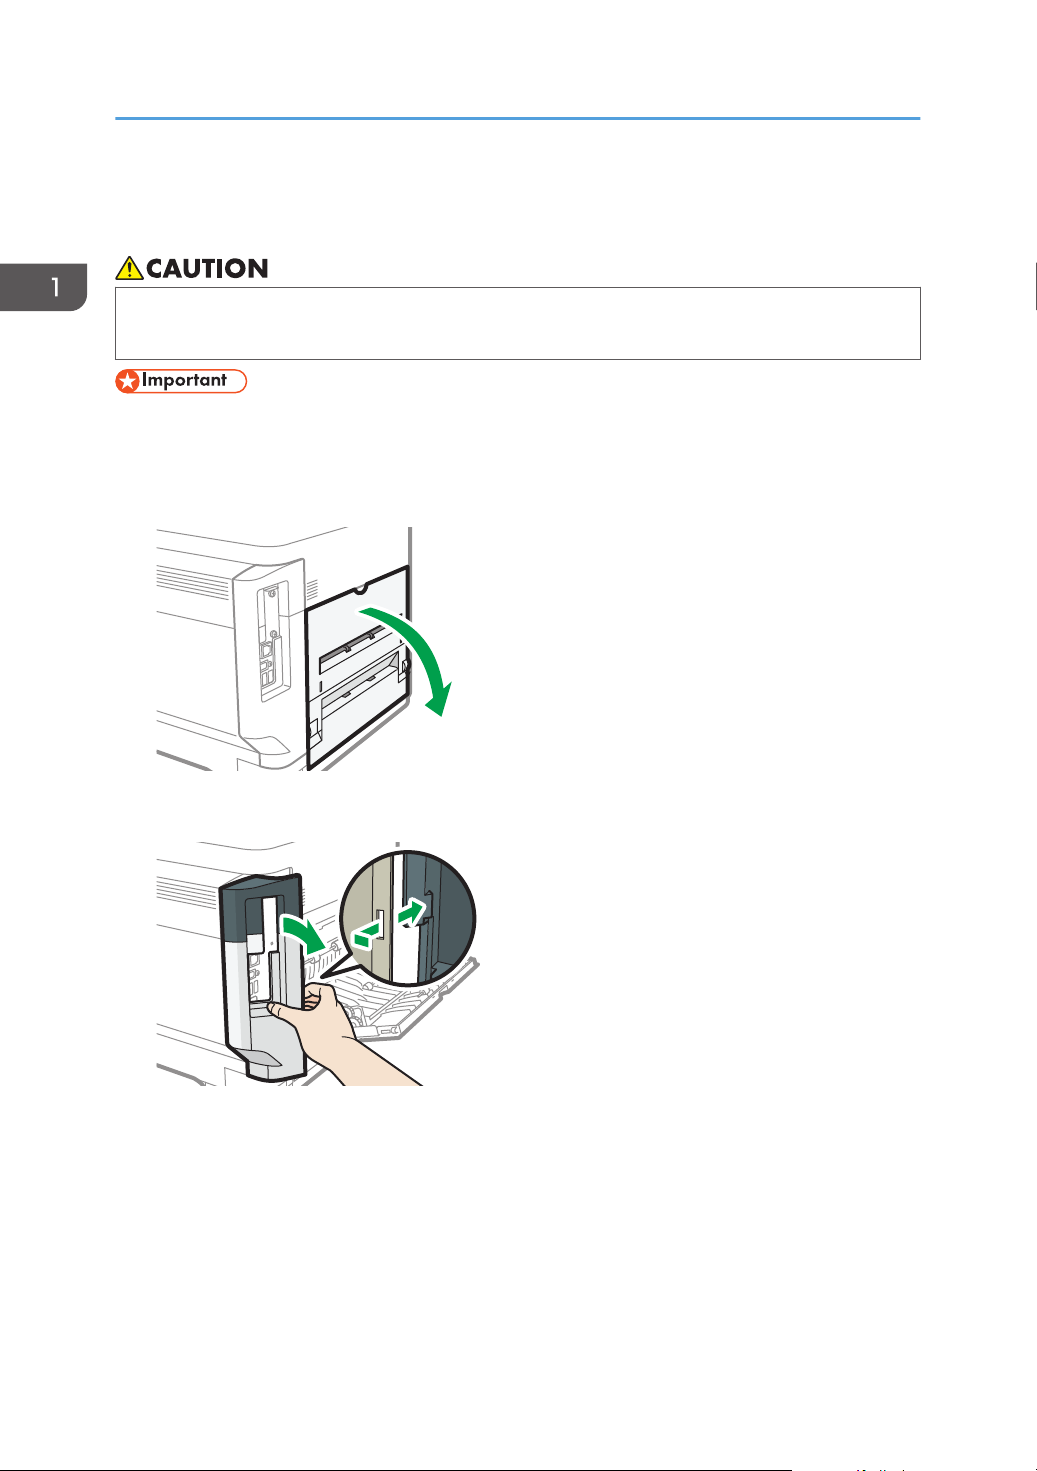
Installing SD Card Options
• Keep SD cards out of reach of children. If a child accidentally swallows an SD card, consult a
doctor immediately.
• Do not subject the card to physical shocks.
1. Turn the machine off and unplug the power cord.
2. Open the rear cover.
3. Unhook the tab on the interface cover, which is located on the side of the rear cover.
28
Page 31

4. Unhook the two tabs on the outside of the interface cover.
EBS157
EBS158
EBS159
5. Insert the SD card into the slot until it clicks.
Installing SD Card Options
If you insert only one SD card, use the upper slot. If you insert two SD cards simultaneously, use
both slots. If you insert the optional VM card, use only the lower slot.
If you want to use two or more SD cards simultaneously, contact your service representative.
If you use a commercially available SD card for back up the address book, insert the SD card to
the lower slot.
6. Hook the two tabs on the outside of the interface cover.
29
Page 32

EBS160
EBS161
1. Getting Started
7. Hook the tab on the interface cover, which is located on the side of the rear cover.
8. Close the rear cover.
9. Plug in the power cord, and then turn on the machine.
10. Check that the SD card was installed correctly.
• You can confirm that the SD card was installed correctly by checking the control panel menu or
configuration page.
• VM card: Make sure JavaTM/X appears when the [Switch Functions] key is pressed.
• XPS card/PostScript 3 unit: Printing the configuration page, if the card is installed properly,
corresponding option's name will appear for "Printer Language" in "System Reference".
• See "Configuring the Machine Using the Control Panel", User Guide (Full Version).
• If the card is not installed properly, repeat the procedure from the beginning. If it cannot be
installed correctly even after trying the installation a second time, contact your sales or service
representative.
• Do not touch the card while the machine is in use. It may come loose, even if pushed only slightly.
The slot cover must be reattached.
30
Page 33

CYN901
Guide to the Names and Functions of the Control Panel Screen
Guide to the Names and Functions of the
Control Panel Screen
1. Operational Status or Messages
Displays the printer status and messages.
2. [Option]
Press to display the following items:
• Form Feed
You can output data that is unprintable due to errors such as a missing line-feed code.
• Error Log
If a document cannot be printed due to errors or other reasons, an error log is created. You can check
the error log using the control panel.
3. [Prt.Jobs]
Press to display print jobs sent from a computer.
[Prt.Jobs] is displayed only when the optional hard disk is installed in the printer.
4. [Supplies]
Press to display the information about printer supplies.
• By default, the remaining amount of toner is displayed. To avoid displaying the remaining amount
of toner, set [Display Supply Info] to [Off] in [General Settings] under [Maintenance].
31
Page 34

1. Getting Started
Logging In from the Control Panel
When the machine is configured by the administrator to restrict use by unauthorized users, you must
authenticate your login information before starting the operation.
The authentication methods are described below.
• When Basic Authentication, Windows Authentication, or LDAP Authentication is configured on the
machine, enter the user name and password for authentication to log in to the machine before
starting operation.
• If User Code Authentication is active, specify the user code in the printer properties of the printer
driver. For details, see the printer driver Help.
To prevent use of the machine by an unauthorized person, always log out when you have finished using
the machine.
• Ask the administrator for the login user name, login password, and user code.
• See "Verifying Users to Operate the Machine (User Authentication)", User Guide (Full Version).
Logging In by Entering the User Name and Password
Enter the authentication information using the keyboard displayed on the control panel.
1. Press the selection key beneath [Prt.Jobs].
page 16 "How to Use the Selection Keys"
2. Press the selection key beneath [Enter].
3. Press the [
enter it.
4. Press the selection key beneath [Accept].
5. Press the selection key beneath [Enter].
], [ ], [ ] or [ ] key to select the user name, and then press the [OK] key to
32
Page 35

Logging In from the Control Panel
6. Press the [ ], [ ], [ ] or [ ] key to select a password, and then press the [OK] key to
enter it.
7. Press the selection key beneath [Accept].
• If the item you want to select is not displayed on the screen, press the [ ] or [ ] key on the control
panel to change the screen.
• To log out from the machine, press the [Menu] key, press the selection key beneath [Logout], and
then press the selection key beneath [Yes].
Changing the Login Password
When Basic Authentication, Windows Authentication, or LDAP Authentication is configured on the
machine, change the password periodically to prevent use of the machine by an unauthorized person.
Passwords can contain the following characters. Make the password difficult to guess.
• Uppercase letters: A to Z (26 characters)
• Lowercase letters: a to z (26 characters)
• Numbers: 0 to 9 (10 characters)
• Symbols: (space) ! “ # $ % & ‘ ( ) * + , – . / : ; < = > ? @ [ \ ] ^ _ ` { | } ~ (33 characters)
You can change the login password in Web Image Monitor.
See "Changing the Login Password Using Web Image Monitor", User Guide (Full Version).
33
Page 36

1. Getting Started
34
Page 37

2. Print
DZX615
Installing the Printer Driver by Using Device Software Manager Installer
Device Software Manager is a support utility for driver installation in Windows. Device Software
Manager helps you to detect the latest driver via the internet automatically according to the computer
you are using and install it with a simple procedure.
• Device Software Manager supports Windows OS only. To install the printer driver on Mac OS, see
the following sections:
• page 51 "Installing the Printer Driver for Network Connection (OS X/macOS)"
• See "Installing the Printer Driver for USB Connection (OS X/macOS)", User Guide (Full Version).
• Follow the instructions of the installer to connect the USB cable.
Installing Device Software Manager from the CD-ROM
1. Set the CD-ROM in the computer.
If the installer does not start automatically, double-click [Setup.exe] in the root directory of the CDROM.
2. Click [Install Online].
3. Select [I accept the agreement] on the "License Agreement" screen, and then click [Install].
35
Page 38

DZX730
DZC086
2. Print
4. On the "Quality Improvement Program" screen, select [I will participate in the Quality
Improvement Program] or [I will not participate in the Quality Improvement Program],
and then click [Next].
5. On the "Driver Update Notification Setting" screen, specify whether to display the
message about the driver update, and then click [Next].
The process of installing Device Software Manager starts.
6. Select the connection between the machine and computer, and then click [Next].
36
• Network: Search for devices connected to the network.
• USB: Following the instructions on the "Connection with device" screen, connect the machine
and the computer with the USB cable to search for the machine.
7. Select this machine from among the detected devices, and then click [Next].
Page 39

Installing the Printer Driver by Using Device Software Manager Installer
The installation of the driver starts.
• If "Could not verify publisher" is displayed at the beginning of installation, continue the
installation. There is no problem with the started installer that is downloaded from the
manufacturer's website. Continue the installation.
• When you connect the machine and the computer with a USB cable, follow the instructions on
the installer screen.
If the machine is not detected, click [Cancel Connection]. Even if the connection is canceled,
the installation is complete. After the installer screen is closed, the machine is added
automatically when it is connected to the computer with the USB cable.
8. When the installation is complete, click [Finish].
• After completing the installation, Device Software Manager icon is created on the desktop screen.
• You can update the installed printer driver with Device Software Manager.
• See "Updating the Driver (Windows)", User Guide (Full Version).
Installing Device Software Manager from the Downloaded File
1. Double-click the downloaded file.
2. Select [I accept the agreement] on the "License Agreement" screen, and then click [Install].
3. Click [Next] on the "Welcome to the Device Software Manager Setup Wizard" screen.
37
Page 40

DZX730
2. Print
4. On the "Quality Improvement Program" screen, select [I will participate in the Quality
Improvement Program] or [I will not participate in the Quality Improvement Program],
and then click [Next].
5. On the "Driver Update Notification Setting" screen, specify whether to display the
message about the driver update, and then click [Next].
The process of installing Device Software Manager starts.
6. After completing the installation, select the [Run Device Software Manager] check box,
and then click [Finish].
The installation of Install Online is complete. Next, install the printer driver.
7. On the "End User License Agreement" screen, select [Agree], and then click [Next].
8. Select the connection between the machine and computer, and then click [Next].
38
• Network: Search for devices connected to the network.
• USB: Following the instructions on the "Connection with device" screen, connect the machine
and the computer with the USB cable to search for the machine.
Page 41

DZC086
Installing the Printer Driver by Using Device Software Manager Installer
9. Select this machine from among the detected devices, and then click [Next].
The installation of the driver starts.
• If "The publisher could not be verified" is displayed at the beginning of installation, continue
the installation. There is no problem with the started installer that is downloaded from the
manufacturer's website. Continue the installation.
• When you connect the machine and the computer with a USB cable, follow the instructions on
the installer screen.
If the machine is not detected, click [Cancel Connection]. Even if the connection is canceled,
the installation is complete. After the installer screen is closed, the machine is added
automatically when it is connected to the computer with the USB cable.
10. When the installation is complete, click [Finish].
39
Page 42

2. Print
• Double-click the Device Software Manager icon created on the Finder of the computer to update
the printer driver.
• See "Updating the Driver (Windows)", User Guide (Full Version).
40
Page 43

DZC992
Installing the Printer Driver for Network Connection (Windows)
Installing the Printer Driver for Network
Connection (Windows)
When the machine and the computer are connected to the same network, the installer searches for the
machine to install the printer driver. If the installer cannot find the machine, specify the IP address or
machine name to install the printer driver.
Installing the PCL 6 Printer Driver from the CD-ROM
1. Set the CD-ROM in the computer.
If the installer does not start automatically, double-click [Setup.exe] in the root directory of the CDROM.
2. Select a language, and then click [OK].
3. Click [Install from Disk].
4. Click [Network Printer(s)].
41
Page 44

DZC081
DZC080
2. Print
5. On the "License Agreement" screen, select [I accept the agreement], and then click
[Next].
6. Confirm the "Confirm Network Connection" screen, and then click [Next].
The search detects devices connected to the network.
7. Select this machine from among the devices, and then click [Install].
42
8. If the "Set Port" screen is displayed, select the setting method of the port.
This screen is displayed when the computer cannot access the machine.
Page 45

Installing the Printer Driver for Network Connection (Windows)
Specify the port to use for the connection between the computer and machine using one of the
following methods:
To specify the IP address
1. Enter the IP address of the machine, and then click [Next].
2. Proceed to Step 9.
To select from the port list
1. Select the port to use for the connection between the computer and machine, and then
click [Next].
2. Proceed to Step 9.
To create a new port
1. Select [Specify a new port], and then click [Next].
2. On the "Add Printer and Utility Wizard" screen, select [Standard TCP/IP Port] and click
[Next].
3. On the "Add Standard TCP/IP Printer Port Wizard" screen, click [Next].
4. On the "Add port" screen, enter the printer name or IP address of the machine, and then
click [Next].
The port name is automatically entered. You can change the port name.
5. When the "Additional port information required" screen is displayed, select [RICOH
Network Printer C model], and then click [Next].
6. Click [Finish].
9. Specify the name of the printer to install, and whether to use it as the default printer.
43
Page 46

DZC990
2. Print
10. Click [Continue].
Printer driver installation starts.
11. Click [Finish].
When you are prompted to restart your computer, restart it by following the instructions that
appear.
Installing the PostScript 3 Printer Driver from the CD-ROM
1. Set the CD-ROM in the computer.
If the installer does not start automatically, double-click [Setup.exe] in the root directory of the CDROM.
2. Select a language, and then click [OK].
3. Click [PostScript 3 Printer Driver].
44
Page 47

DZC081
Installing the Printer Driver for Network Connection (Windows)
4. On the "License Agreement" screen, select [I accept the agreement], and then click
[Next].
5. Click [Next].
6. Select a method to connect a port.
Specify the port to use for the connection between the computer and machine using one of the
following methods:
To specify the IP address
1. Enter the IP address of the machine, and then click [Next].
To select from the port list
1. Select the port to use for the connection between the computer and machine, and then
click [Next].
To create a new port
1. Select [Specify a new port], and then click [Next].
2. On the "Add Printer and Utility Wizard" screen, select [Standard TCP/IP Port] and click
[Next].
3. On the "Add Standard TCP/IP Printer Port Wizard" screen, click [Next].
45
Page 48

2. Print
4. On the "Add port" screen, enter the printer name or IP address of the machine, and then
click [Next].
The port name is automatically entered. You can change the port name.
5. When the "Additional port information required" screen is displayed, select [RICOH
Network Printer C model], and then click [Next].
6. Click [Finish].
7. Select the [Printer Name] of the machine to open the menu tree, and then specify the
setting items.
8. Click [Continue].
Printer driver installation starts.
9. Click [Finish].
When you are prompted to restart your computer, restart it by following the instructions that
appear.
Installing the PCL 6/PostScript 3 Printer Driver from the Downloaded File
1. Double-click the downloaded file.
2. Confirm where to install, and then click [Extract] or [Install].
• If the "Security Warning" screen is displayed, click [OK].
• If the "User Account Control" screen is displayed, click [Yes] or [Allow].
3. On the "End User License Agreement" screen, select [Agree], and then click [Next].
46
Page 49

DZX731
DZC086
Installing the Printer Driver for Network Connection (Windows)
4. Select [Network], and then click [Next].
• The search detects devices connected to the network.
• If the error screen is displayed, see page 47 "If the Machine Cannot Be Found".
5. Select this machine from among the detected devices, and then click [Next].
Printer driver installation starts.
6. When the installation is complete, click [Finish].
If the Machine Cannot Be Found
The "Network Connection Error" screen is displayed.
47
Page 50

DZC089
2. Print
Confirm and perform to , and then click [OK]. If the machine still cannot be found, specify the IP
address or machine name to install the printer driver.
1. Click [Click if you cannot find the device].
48
2. Select [Specify device IP address] or [Specify device name], and then click [Next].
When specify the machine IP address
1. Enter the IP address of the machine and click [Search].
Page 51

DZC091
2. When the machine is detected, click [Next].
DZC094
Printer driver installation starts.
When specify the machine name
Installing the Printer Driver for Network Connection (Windows)
1. Select the machine to use, and then click [Next].
2. On the "Printer Preference" screen, select one of the port names from among "Port
Name", and then click [Next].
49
Page 52

DZC950
2. Print
Printer driver installation starts.
For details about the procedure for specifying the IP address after installing the printer
driver, see the following section:
"When You Cannot Print a Document even if the Printer Driver Is Installed", Driver
Installation Guide
3. When the installation is complete, click [Finish].
50
Page 53

DZX684
Installing the Printer Driver for Network Connection (OS X/macOS)
Installing the Printer Driver for Network
Connection (OS X/macOS)
Install the PPD file (printer driver) under OS X/macOS, and then register the machine on the computer
from the system preferences.
Installing the PPD file
1. Set the CD-ROM in the computer, and click [macOS] to display the [macOS PPD Installer]
folder.
To install the driver from the downloaded file, display the folder that is the location of the
downloaded file.
2. Double-click the package file.
• To install from the CD-ROM, double-click the package file in the [macOS] [macOS PPD
Installer] folder.
• When the install confirmation screen is displayed, click [Continue].
3. On the "Introduction" screen, click [Continue].
4. On the "License" screen, click [Continue] and then click [Accept].
• When prompted to select where to install the driver, specify the install location, and click
[Continue].
51
Page 54

DZX687
2. Print
5. Click [Install].
6. Enter the computer's user name and password, and then click [Install Software].
The installation of the PPD file starts.
7. When the installation is complete, click [Close].
Registering the Machine in [Print & Scan] or [Printers & Scanners]
Register the PPD file of the machine in the system preferences to enable printing.
1. Select [System Preferences...] from the Apple menu.
2. Click [Print & Scan] or [Printers & Scanners].
52
Page 55

DZX689
DZX690
Installing the Printer Driver for Network Connection (OS X/macOS)
3. Click [+].
4. Click [IP], and configure the information of the machine.
• Address: Enter the IP address of the machine.
• Protocol: Select [LPD (Line Printer Daemon)]. If the printer takes time to perform operations
when using the [LPD (Line Printer Daemon)] protocol, change the protocol to [HP Jetdirect Socket].
• Use: Check that the machine name is displayed. If "Generic PostScript Printer" is displayed,
the entered IP address may not be correct.
53
Page 56

DZC098
DZC099
2. Print
When "Generic PostScript Printer" is displayed even though the IP address is correct
Perform the following procedure to select the PPD file of the machine:
1. Select [Select Software...] on "Use".
2. Select the machine on the "Printer Software" screen, and then click [OK].
54
Page 57

DZX691
Installing the Printer Driver for Network Connection (OS X/macOS)
5. Click [Add].
The progress screen is displayed.
• If the progress screen does not close after a while, click [Configure...] or [Settings] and
configure the option configuration of the printer. For the procedure of the option
configuration, see page 55 "Specifying the Option Settings".
6. Check that the machine name is added to the [Print & Scan] or [Printers & Scanners]
screen.
7. Close the system preferences screen.
Specifying the Option Settings
If the option configuration of the machine is not automatically reflected, select the option installed on the
machine in [Print & Scan] or [Printers & Scanners].
1. Select [System Preferences...] from the Apple menu.
2. Click [Print & Scan] or [Printers & Scanners].
55
Page 58

DZX693
DZX694
2. Print
3. Select the machine from the list, and then click [Options & Supplies...].
4. Click [Driver] or [Options], select the option installed on the machine, and then click [OK].
56
• If the usable options are not displayed, the IP address has not been entered correctly or the
PPD file has not been registered properly. To enter the IP address or register the PPD file, see
page 52 "Registering the Machine in [Print & Scan] or [Printers & Scanners]".
5. Close the system preferences screen.
Page 59

DZC420
Basic Procedure for Printing Documents
Basic Procedure for Printing Documents
Specify the printer driver and configure the Document Size, Paper Type, and other settings to print a
document.
• Duplex printing is selected as the default setting. If you want to print on only one side, select [Off]
for the two-sided printing setting.
• If you send a print job via USB 2.0 while the machine is in Sleep mode, an error message may
appear after the print job is completed. In this case, check whether the document was printed.
Printing a Document in Windows
1. Open a document to print on the computer, and display the setting screen of the printer
driver from the print menu in the application.
The procedure to display the setting screen varies depending on the applications.
For example in Microsoft Word/Excel, click [Print] on the [File] menu, select the device to use, and
then click [Printer Properties].
2. Specify the Document Size, Paper Type, Paper Tray, and other settings.
You can specify the print settings on the [Frequently Used Settings] tab and [Detailed Settings] tab.
Basic settings can be specified on the [Frequently Used Settings] tab, even if you do not use the
[Detailed Settings] tab.
57
Page 60

EBS344
2. Print
• One Click Preset List: Some of the useful functions such as Combine or 2-sided are registered.
Click the icon of the function to select. You can register frequently used print settings in One
Click Preset.
See "Registering Frequently Used Settings", User Guide (Full Version).
• Job Type: Select [Normal Print] to execute printing immediately.
You can make a partial print as a test and proceed to print the rest of the document (Sample
Print).
See "Making a Partial Print as a Test and Proceeding to Print the Rest of the Document", User
Guide (Full Version).
You can store documents in the machine (Locked Print, Hold Print, or Stored Print).
See "Storing Documents to Print in the Machine", User Guide (Full Version).
• Document Size: Select the size of the document to print.
• Orientation: Specify the orientation of the document. Select Portrait or Landscape.
• Paper Type: Select the type of paper to use.
• Input Tray: Select the tray loaded with the paper to use. When you select [Auto Tray Select], a
suitable paper tray is selected automatically according to the specified [Print On] and [Paper
Type].
If you do not want to use particular trays when [Auto Tray Select] is specified, set the machine
so it does not automatically select those trays.
See "Paper Input", User Guide (Full Version).
To prevent the machine from selecting other trays automatically, disable auto tray switching.
58
See "Machine Modes", User Guide (Full Version).
• Copies: Enter the print quantity.
Page 61

EBS345
Basic Procedure for Printing Documents
On the [Detailed Settings] tab, you can configure the advanced settings. Change the menu and
specify the setting items.
The caution icon ( ) indicates that there are disabled items. Click the icon to check the cause.
3. After completing the configuration, click [OK].
4. On the application, click the button for printing.
The procedure to print varies depending on the applications.
For example in Microsoft Word/Excel, click [Print] on the screen shown in Step 1.
• On the [Devices and Printers] screen, right-click the printer icon of the machine, and then click [Print
Settings] to change the default values of the printer settings.
• When you use the driver distributed from the print server, [Standard settings] specified in the print
server are displayed as the default.
Printing a Document in OS X/macOS
In the following example procedure, OS X 10.13 is used. The procedure may vary for different versions.
1. Open a document to print on the computer, and click [Print] on the [File] menu.
2. Select the printer you use from "Printer:".
59
Page 62

DZC405
DZC406
2. Print
3. Specify Paper Size, Orientation, and other settings.
• Copies: Enter the print quantity.
• Paper Size: Select the size of the document to print.
• Orientation: Specify the orientation of the document. Select Portrait or Landscape.
4. Select a category from the pop-up menu, and then specify the paper tray and paper type.
Paper Feed
• All Pages From: Select the tray loaded with the paper to use. When you select [Auto
Select], a suitable paper tray is selected automatically according to the specified paper
size and paper type.
When the paper of the specified size is not loaded on the machine, printing is performed
following the settings of the machine.
60
Page 63

Job Log
EAT615
• Job Type: Select [Normal Print] to execute printing immediately.
You can make a partial print as a test and proceed to print the rest of the document
(Sample Print).
See "Making a Partial Print as a Test and Proceeding to Print the Rest of the Document",
User Guide (Full Version).
You can store documents in the machine (Locked Print, Hold Print, or Stored Print).
See "Storing Documents to Print in the Machine", User Guide (Full Version).
Printer Features
Select a category in "Feature Sets", and then specify the setting items.
Basic Procedure for Printing Documents
• Paper
• Paper Type: Select the type of paper to use.
5. After completing the configuration, click [Print] to print.
61
Page 64

EBS346
2. Print
Printing on Both Sides of Paper
Specify 2-sided Print in the printer driver.
Specifying 2-sided Print (Windows)
Specify 2-sided Print on the [Frequently Used Settings] tab.
1. Open a document to print on the computer, and display the setting screen of the printer
driver from the print menu in the application.
2. Specify Paper Size, Paper Type, Orientation and others.
page 57 "Basic Procedure for Printing Documents"
3. On the [Frequently Used Settings] tab, specify the binding side of the paper in "2 sided".
62
Orientation of the original and binding side
Orientation Long Edge Bind Short Edge Bind
Portrait
(Open to left) (Open to top)
Landscape
(Open to top)
(Open to left)
Page 65

DZC441
Long edge Short edge
DZC442
Printing on Both Sides of Paper
4. After completing the configuration, click [OK].
5. On the application, click the button for printing.
Specifying 2-sided Print (OS X/macOS)
Specify 2-sided Print on the [Layout] menu.
1. Open a document to print on the computer, and display the setting screen of the printer
driver from the print menu in the application.
2. Specify Paper Size, Orientation, Paper Type, and other settings.
page 57 "Basic Procedure for Printing Documents"
3. Select the [Two-Sided] check box, and then select [Layout] to specify the binding side of
the paper.
Orientation of the original and binding side
4. After completing the configuration, click [Print].
63
Page 66

3
2
1
3
21
3
1
2
DZB253
EBS347
2. Print
Combining and Printing Multiple Pages on a Single Sheet of Paper
You can print multiple pages on a single sheet at a reduced size (Combine 2 Originals).
For example, you can reduce an original of A4 size to A5 size and print two pages on an A4 sheet. You
can use the 2 Sided Print and Combine 2 Originals functions at the same time to economize on paper.
You can print up to 16 pages on a single sheet and specify the order to arrange the pages on the sheet.
Specifying the Combine 2 Originals Function (Windows)
Specify the Combine 2 Originals function on the [Frequently Used Settings] tab.
1. Open a document to print on the computer, and display the setting screen of the printer
driver from the print menu in the application.
2. Specify Paper Size, Paper Type, Orientation and other settings.
page 57 "Basic Procedure for Printing Documents"
3. Specify the number of pages to combine and the order of the pages.
64
Page 67

DZC446
Combining and Printing Multiple Pages on a Single Sheet of Paper
• Layout: Select the number of pages to combine.
• Page Order: Select the order of the pages.
• Draw Frame Border: Select the [Draw Frame Border] check box on the [Detailed Settings] tab
[2 Sided/Layout/Booklet] to draw a frame around each page.
4. After completing the configuration, click [OK].
5. On the application, click the button for printing.
When printing from an application that supports the same function as the machine, do not set the
function in the application. If the setting in the application is enabled, the print result may not be as
intended.
Specifying the Combine 2 Originals Function (OS X/macOS)
Specify the Combine 2 Originals function on the [Layout] menu.
1. Open a document to print on the computer, and display the setting screen of the printer
driver from the print menu in the application.
2. Specify Paper Size, Orientation, Paper Type, and other settings.
page 57 "Basic Procedure for Printing Documents"
3. Select [Layout], and then specify the number of pages to combine and the order of the
pages.
• Pages per Sheet: Select the number of pages to combine.
• Layout Direction: Select the order of the pages.
• Border: Select a type of border line to draw between the pages.
4. After completing the configuration, click [Print] to print.
65
Page 68

EAT885
EAT886
EBS175
2. Print
Printing on Envelopes
Load envelopes in the bypass tray or paper tray and change the tray paper settings on the control
panel.
1. Load an envelope in the bypass tray or the paper tray.
Orientation of Envelopes Tray 2 to 5 Bypass Tray
Side-opening envelopes
Flaps: closed
Flaps: closed
Bottom side of envelopes:
toward the right of the
machine
Side to be printed: face down
2. Press the [Menu] key.
3. Select [Paper Input], and then press the [OK] key.
4. Select [Paper Size: (tray name)], and then press the [OK] key.
Select the name of the tray in which the envelopes are loaded.
Bottom side of envelopes:
toward the right of the
machine
Side to be printed: face up
66
5. Press the [ ], [ ], [ ], or [ ] key to select the envelope size, and then press the [OK] key.
If the size of the loaded envelope is not included in the list, select [Custom Size] and specify the
size using the [
] or [ ] key.
6. Select [Paper Type: (tray name)], and then press the [OK] key.
Select the name of the tray in which the envelopes are loaded.
Page 69

EBS349
Printing on Envelopes
7. Select [Envelope], and then press the [OK] key.
8. Select [Envelope Setting], and then press the [OK] key.
9. Press the [ ] or [ ] key to select the envelope thickness, and then press the [OK] key.
10. Open a document to print in the computer, and display the setting screen of the printer
driver from the print menu application.
11. Specify the paper size and paper type.
Windows
• Document Size: Select the envelope size. If the envelope size is not included among the
options, enter the value in [Custom Paper Size...].
• Paper Type: [Envelope]
You can specify a custom paper size, which is commonly used as the option of the Document
Sizes.
See "Printing on Custom-sized Paper Loaded on the Bypass Tray", User Guide (Full Version).
See "Printing on Custom-sized Paper Loaded on the Bypass Tray", User Guide (Full Version) in
English.
67
Page 70

DZC415
2. Print
OS X/macOS
• Paper Size: Select the envelope size. If the envelope size is not included among the
options, select [Manage Custom Sizes...] and enter the value.
• Paper Type: [Envelope]
12. Execute printing.
• If the item you want to select is not displayed on the screen, press the [ ] or [ ] key on the control
panel to change the screen.
68
Page 71

Printing Documents Stored in the Printer from the Control Panel
Printing Documents Stored in the Printer from
the Control Panel
Documents that have been stored in the machine using the printer driver can be printed using the control
panel.
Printing a Locked Print File
1. Press the selection key beneath [Prt.Jobs].
See "How to Use the Selection Keys", User Guide (Full Version).
2. Select [Locked Print Jobs], and then press the selection key beneath [Job List].
3. Select the file you want to print, and then press the selection key beneath [Print].
4. Enter the password using the scroll keys, and then press the [OK] key.
5. Press the selection key beneath [Print].
• The print files that are printed or deleted using Web Image Monitor after you have selected them
using the control panel will appear in [Job List]. However, an error message will appear if you try
to print or delete those files.
• To stop printing after printing has started, press the [Job Reset] key. The files other than Stored Print
files will be deleted if the [Job Reset] key is pressed.
• If the item you want to select is not displayed on the screen, press the [ ] or [ ] key on the control
panel to change the screen.
Printing a Hold Print File
1. Press the selection key beneath [Prt.Jobs].
69
Page 72

2. Print
See "How to Use the Selection Keys", User Guide (Full Version).
2. Select [Hold Print Jobs], and then press the selection key beneath [Job List].
3. Select the file you want to print, and then press the selection key beneath [Print].
4. Press the selection key beneath [Print].
• The print files that are printed or deleted using Web Image Monitor after you have selected them
using the control panel will appear in [Job List]. However, an error message will appear if you try
to print or delete those files.
• To stop printing after printing has started, press the [Job Reset] key.
• If the item you want to select is not displayed on the screen, press the [ ] or [ ] key on the control
panel to change the screen.
Printing a Stored Print File
1. Press the selection key beneath [Prt.Jobs].
70
See "How to Use the Selection Keys", User Guide (Full Version).
2. Select [Stored Print Jobs], and then press the selection key beneath [Job List].
3. Select the file you want to print, and then press the selection key beneath [Print].
• To print a password-protected Stored Print file, enter the password using the scroll keys, and
then press the [OK] key.
• If you want to change the number of copies, specify the number in the [Quantity] box.
4. Press the selection key beneath [Print].
• The print files that are printed or deleted using Web Image Monitor after you have selected them
using the control panel will appear in [Job List]. However, an error message will appear if you try
to print or delete those files.
• To stop printing after printing has started, press the [Job Reset] key. The files other than Stored Print
files will be deleted if the [Job Reset] key is pressed.
• If the item you want to select is not displayed on the screen, press the [ ] or [ ] key on the control
panel to change the screen.
Page 73

3. Web Image Monitor
Using Web Image Monitor
Web Image Monitor is a screen to confirm the machine status and settings on the computer.
When the machine and a computer can be connected to a network, you can access to Web Image
Monitor by entering the IP address of the machine on the address bar of the Web browser.
Accessing to Web Image Monitor
1. Enter the IP address of the machine in the address bar of the Web browser.
Example: when the IP address of the machine is "192.168.1.10"
• If SSL is specified
https://192.168.1.10/
• If SSL is not specified
http://192.168.1.10/
When you do not know whether SSL is specified on the machine, enter the address starting
with https. When you fail the connection, enter the address starting with http.
When entering the IPv4 address, do not enter "0" for each segment. If "192.168.001.010" is
entered, you cannot access the machine.
2. Confirming the machine status or settings on the top page of Web Image Monitor.
The machine status and remaining amount of consumables are displayed.
To change the settings, click [Login] at the top right on the screen and enter the User Name
and Password.
71
Page 74

3. Web Image Monitor
Recommended Web Browser
Windows OS X/macOS
Internet Explorer 11 or later Safari 3.0 or later
Firefox 10, 15 or later Firefox 10, 15 or later
Google Chrome version 19 or later Google Chrome version 19 or later
Microsoft Edge 20 or later -
• You can use the screen reader software JAWS 7.0 or later on Internet Explorer.
• When you use a DNS server or WINS server, you can use Host Name instead of IP address to
connect the server.
• When the screen is distorted or the operation is unstable, confirm that "JavaScript" or "Use
Cookies" is specified to Active on the computer.
• When using Host Name under Windows Server 2008 or later in the IPv6 environment, resolve
Host Name in the external DNS server. You cannot use the host file.
• When specifying the settings from Web Image Monitor, do not log in to the machine from the
control panel. The setting value may not be reflected.
What You Can Do on the Web Image Monitor
Items displayed on the Web Image Monitor and settings depend whether the machine is logged in.
• When not logged in
The machine status, settings, and job status are displayed. You can browse the settings of the
machine but cannot change them.
• When logged in (as a user)
Log in as a user registered in the Address Book. The users can operate the jobs that they executed
and change a part of settings of the machine.
• When logged in (as an Administrator)
The administrator can change all settings of the machine.
What you can do
Function Not logged in User Administrator
72
Machine status
Page 75

EBS268
1
2
3
4
Using Web Image Monitor
Function Not logged in User Administrator
Machine settings
*1 *1
Machine setting change -
Job list
Job history
Access to Address Book -
Network settings -
Network settings change -
Cancel printing - -
Security settings - -
: Available -: Not available
Depending on the Administrator settings
*1
Web Image Monitor Screen
*1
*1
*1
1. Menu
Menu items described below are displayed.
• Status/Information: Displays the machine status, option configuration, counter, and job status.
• Device Management: Manages the machine settings and Address Book.
• Print Job/Stored File: Operates the files stored in the printer driver.
• Convenient Links: Displays the link to the Favorite URL.
73
Page 76

3. Web Image Monitor
2. Header
An icon to link to the Login screen is placed at the top right on the screen. The Help, Version Information, and
Keyword Search buttons are also displayed.
3. Refresh/Help
(Refresh): Update the information in the work area.
(Help): View or download Help file contents.
4. Main Area
The machine status and settings are displayed.
Specifying Web Image Monitor Help
Web Image Monitor has Help to describe the function of setting items. When you use Help for the first
time, you can select to read online Help or to download Help File.
View Online Help Now
You can view the latest Web Image Monitor Help on the Internet.
Download Help File
You can download Web Image Monitor Help to the computer and view it. When you store the
downloaded Help file in the Web server and assign to the Help button ( ), you can view the
Help without connecting to the Internet.
To assign the downloaded Help file to the Help button ( ), specify the path to the Help file
following the procedure below.
1. Log in to Web Image Monitor as an Administrator.
2. Click the Help button ( ) at the top right on the screen.
3. Select the operating system and displayed language, and then click [Download].
4. Unzip the downloaded zip file and store it in the Web server.
5. Click [Configuration] on the "Device Management" menu on Web Image Monitor.
74
6. Click [Webpage] under the "Webpage" category.
Page 77

Using Web Image Monitor
7. Enter the path to the Help file stored in the Web server in "URL" under "Set Help URL
Target".
For example, when URL of the Help File is "http://a.b.c.d/HELP/JA/index.html", enter "http://
a.b.c.d/HELP/".
8. Click [OK].
9. After completing the procedure, log out and finish Web Image Monitor.
75
Page 78

3. Web Image Monitor
76
Page 79

4. Adding Paper and Toner
EBS249
Tray 1
Tray 2
Tray 3
Tray 4
Tray 5
Bypass Tray
Loading Paper into the Paper Tray
The method of loading paper varies for each tray type.
• When replacing paper or removing jammed paper, make sure not to trap or injure your fingers.
• Before loading paper into a tray, check the paper size and type that can be loaded in the tray.
page 85 "Recommended Paper Sizes and Types"
• To load paper, specify the paper type or thickness in [Paper Type: xxxx] of [Paper Input] in [Menu].
See "Paper Input", User Guide (Full Version).
• To load thin paper, thick paper, or other special paper, load the paper into the bypass tray.
• When loading paper on a tray which has a few sheets of paper, multiple sheets of paper may be
fed at once from the tray. Take out all sheets, fan the sheets, and then load them again.
• You may hear the sound of rubbing paper. This is not a malfunction.
Loading Paper into Tray 1 to 5
Adjust the side and end fences according to the paper size.
• Do not stack paper over the limit mark. If you load paper over the limit mark, the printed images
may become slanted or a paper jam may occur.
• Tray 1
77
Page 80

EAT333
EAT334
EAT057
4. Adding Paper and Toner
• Tray 2-5
Load paper into every tray in the same way. In the following example procedure, Tray 1 is used.
1. Pull the tray carefully until it stops, lift the front side of the tray, and then pull it out of the
machine.
78
Page 81

EAT325
EAT326
EAT327
2
1
2
Loading Paper into the Paper Tray
Place the tray on a flat surface.
2. Squeeze the clip on the side fence and slide it to match the paper size.
3. Squeeze the end fence and slide it inward to match the standard size.
When loading paper that is larger than A4 or 81/2 × 11 , push the button, and then pull the
end fence out to match the paper size.
(mainly North America)
Mount the attachment to the end fence when loading 51/2 × 81/2 size paper.
You can use this attachment in Tray 1 only.
79
Page 82

EAT328
EAT073
EAT060
4. Adding Paper and Toner
4. Load the new paper stack print side down.
Make sure paper is not stacked higher than the upper limit (upper line) marked inside the tray.
80
5. Adjust the paper guides to close any gaps.
Do not move paper loaded in the tray more than a few millimeters.
Moving the loaded paper excessively may cause damage to paper edges on the openings of the
tray's lifting plate, resulting in sheets being folded or becoming jammed.
Page 83

EAT061
EAT062
Loading Paper into the Paper Tray
6. Adjust the paper size dial to match the size and feed direction of paper in the paper tray.
7. Lift the front side of the tray, and then slide it into the machine carefully until it stops.
To avoid paper jams, make sure the tray is securely inserted.
• Letterhead paper must be loaded in a specific orientation.
• page 94 "Loading Orientation-fixed Paper or Two-sided Paper"
• You can load envelopes into Tray 2 to 5.
• page 92 "Envelope Orientation and Recommended Status"
Loading Paper into the Bypass Tray
Use the bypass tray to use OHP transparencies, adhesive labels, and paper that cannot be loaded in
the paper trays.
The maximum number of sheets you can load into the bypass tray depends on the paper type.
page 85 "Recommended Paper Sizes and Types"
• After loading paper, specify the paper size and type using the control panel. When printing a
document, specify the same paper size and type in the printer driver as specified on the machine.
81
Page 84

EBS246
EBS247
1
2
2
EBS248
4. Adding Paper and Toner
1. Open the bypass tray.
Pull the extender out when loading A4 , 81/2 × 11 or larger paper.
82
2. Load paper face up until it stops, and then adjust both sides of the paper guide to match
the paper width.
• When using the bypass tray, it is recommended that you set the paper direction to .
• Letterhead paper must be loaded in a specific orientation.
• page 94 "Loading Orientation-fixed Paper or Two-sided Paper"
• You can load envelopes into the bypass tray. Envelopes must be loaded in a specific orientation.
Page 85

• page 92 "Envelope Orientation and Recommended Status"
EBS175
EBS175
Specifying Regular Sizes Using the Control Panel
1. Press the [Menu] key.
2.
Select [Paper Input], and then press the [OK] key.
3. Select [Paper Size: (tray name)], and then press the [OK] key.
Loading Paper into the Paper Tray
4. Select the size of the paper set in the specified tray, and then press the [OK] key.
• If the item you want to select is not displayed on the screen, press the [ ] or [ ] key on the control
panel to change the screen.
• page 85 "Recommended Paper Sizes and Types"
Specifying a Custom Size Paper Using the Control Panel
1. Press the [Menu] key.
2. Select [Paper Input], and then press the [OK] key.
3. Select [Paper Size: (tray name)], and then press the [OK] key.
83
Page 86

4. Adding Paper and Toner
4. Select [Custom Size], and then press the [OK] key.
5. Enter the horizontal value, and then press the [OK] key.
6. Enter the vertical value, and then press the [OK] key.
• If the item you want to select is not displayed on the screen, press the [ ] or [ ] key on the control
panel to change the screen.
• page 85 "Recommended Paper Sizes and Types"
Specifying Paper Type and Thickness Settings
If the print settings and the loaded paper that are used for a print job do not match, a mismatch error
occurs.
Check and specify the paper settings before you start printing.
• Before you change the settings, confirm the priority of the paper settings for printing (priority to the
printer driver or to the control panel).
On the printer driver
Check the settings of paper tray and paper type on the printer driver and make sure the settings
match the loaded paper.
On the control panel
Press the [Menu] key and check the settings in [Paper Size: (tray name)] in [Paper Input] and make
sure the settings match the loaded paper.
84
Page 87

Recommended Paper Sizes and Types
Recommended Paper Sizes and Types
The recommended paper sizes and types for each tray are as described below.
• When performing multiple sheet feeding, fan sheets thoroughly or load sheets one by one from the
bypass tray.
• The printing speed may be lower depending on the paper size or paper type.
Tray 1
Paper type and weight Paper size Paper capacity
64–120 g/m2 (17 lb. Bond–
44 lb. Cover)
Plain Paper 1–Thick Paper 1
64–120 g/m2 (17 lb. Bond–
44 lb. Cover)
Plain Paper 1–Thick Paper 1
64–120 g/m2 (17 lb. Bond–
44 lb. Cover)
Plain Paper 1–Thick Paper 1
Select the paper size using the
paper size dial on the tray:
A4 , A5 , A6 , 81/2 × 14
, 81/2 × 11 , 51/2 × 81/
Set the paper size dial on the
tray to "Asterisk", and select the
paper size with the control
panel:
A5 , B5 JIS , B6 JIS , 81/
× 13 , 81/4 × 14 , 81/4 ×
13 , 8 × 13 , 8 × 10 , 71/
× 101/2, 51/2 × 81/2,
16K , 81/2 × 132/
Custom size:
Vertical: 148.0–356.0 mm
Horizontal: 105.0–216.0 mm
5
2
500 sheets
500 sheets
2
4
500 sheets
Vertical: 5.83–14.01 inches
Horizontal: 4.14–8.50 inches
85
Page 88

4. Adding Paper and Toner
Paper Feed Unit
Paper type and weight Paper size Paper capacity
64–120 g/m2 (17 lb. Bond–
44 lb. Cover)
Plain Paper 1–Thick Paper 1
64–120 g/m2 (17 lb. Bond–
44 lb. Cover)
Plain Paper 1–Thick Paper 1
64–120 g/m2 (17 lb. Bond–
44 lb. Cover)
Plain Paper 1–Thick Paper 1
Select the paper size using the
paper size dial on the
tray:
A4 , A5 , 81/2 × 14 , 81/
× 11 , 51/2 × 81/
2
Set the paper size dial on the
tray to "Asterisk", and select the
paper size with the control
panel:
B5 JIS , B6 JIS , 81/2 × 13 ,
81/4 × 14 , 81/4 × 13 , 8 ×
13 , 8 × 10 , 71/4 × 101/
, 16K , 81/2 × 132/
2
5
Custom size:
Vertical: 162.0–356.0 mm
Horizontal: 92.0–216.0 mm
500 sheets
2
500 sheets
500 sheets
86
Vertical: 6.38–14.01 inches
Horizontal: 3.63–8.50 inches
Envelopes Set the paper size dial on the
*1
tray to "Asterisk", and select the
paper size with the control
panel:
41/8 × 91/2, 37/8 × 71/2,
C5 Env , C6 Env , DL Env
When a print job is performed on A5 or 51/2 × 81/2 paper, it is recommended to set the paper horizontally.
*1
While a print job is performed on paper that is loaded vertically, smearing may occur near the edges of the
printed paper. Also, use the bypass tray when printing on paper that is set horizontally.
Do not stack paper over the limit mark. The maximum number of sheets you can set at once depends on the
*2
paper's thickness and condition.
Page 89

Recommended Paper Sizes and Types
Bypass Tray
Paper type and weight Paper size Paper capacity
60–220 g/m2 (16 lb. Bond–
80 lb. Cover)
Thin Paper–Thick Paper 3
Select the paper size:
A4 , A5 , A6 , B5 JIS ,
B6 JIS , 81/2 × 14 , 81/2 ×
13 , 81/2 × 11 , 81/4 × 14
, 81/4 × 13 , 8 × 13 , 8 ×
10 , 71/4 × 101/2, 51/2 ×
81/2,
16K , 81/2 × 132/
60–220 g/m2 (16 lb. Bond–
Custom size *2:
80 lb. Cover)
Thin Paper–Thick Paper 3
Vertical: 148.0–356.0 mm
Horizontal: 70.0–216.0 mm
Vertical: 5.83–14.01 inches
Horizontal: 2.76–8.50 inches
OHP transparencies A4 , 81/2 × 11
Label paper (adhesive labels) A4
100 sheets
5
100 sheets
*3
*1
*1
*1
Envelopes Select the paper size:
*4
41/8 × 91/2, 37/8 × 71/2,
C5 Env , C6 Env , DL Env
Do not stack paper over the limit mark. The number of sheets you can load in the bypass tray varies
*1
depending on the weight and condition of the paper.
Specify the paper size.
*2
Using the Printer function.
page 57 "Basic Procedure for Printing Documents"
When loading OHP transparencies in the bypass tray, do not stack paper over the limit mark.
*3
Load envelopes so that the height of the stack of envelopes does not exceed the limit mark of the bypass tray
*4
without pressing on the stack of envelopes.
87
Page 90

4. Adding Paper and Toner
Notes on Special Paper
Paper Type Note
Setting thick paper page 91 "Thick Paper Orientation and Recommended
Status"
Setting envelopes page 92 "Envelope Orientation and Recommended
Status"
Setting letterhead paper page 94 "Loading Orientation-fixed Paper or Two-sided
Paper"
Setting label paper (adhesive labels) We recommend that you use specified label paper. If
paper other than the specified one is used, normal
operation and quality cannot be guaranteed.
Setting transparencies
• Use A4 or 81/2 × 11 size OHP transparencies,
and specify their size.
• Usually only one side of OHP transparencies can be
used for printing. Be sure to load them with the print
side down.
When using transparencies, check their print sides
carefully. Erroneous loading may cause problems. Remove
copied or printed sheets one by one.
Paper Thickness for Each Paper Weight
Paper Thickness Paper weight
Thin Paper 60–63 g/m2 (16 lb. Bond)
Plain Paper 1 64–74 g/m2 (17–20 lb. Bond)
Plain Paper 2 75–90 g/m2 (20-24 lb. Bond)
Middle Thick 91–105 g/m2 (24–28 lb. Bond)
Thick Paper 1 106–135 g/m2 (28–36 lb. Bond)
Thick Paper 2 136–170 g/m2 (36 lb. Bond–63 lb. Cover)
*1
88
Page 91

Recommended Paper Sizes and Types
Paper Thickness Paper weight
Thick Paper 3 171–220 g/m2 (63–80 lb. Cover)
Allowed weights for Trays 1 to 5 and duplex printing are 106 to 120 g/m2 (28 lb. Bond to 44 lb. Cover)
*1
paper.
Unusable Paper
• Do not use stapled sheets of paper, aluminum foil, carbon paper, or any kind of conductive
paper. Doing so can result in fire.
Paper causing faults
Do not use any of the following kinds of treated paper. Doing so may cause faults.
• Paper for inkjet printers
• Thermal paper
• Art paper
• Aluminum foil
• Carbon paper
• Conductive paper
• Paper with perforated lines
• Hemmed-edge paper
• Window envelopes
• Tab stock
• Certain types of OHP transparencies for color printing
Do not print onto sides that are already printed.
Paper causing paper jam
Do not use the following kinds of paper. It may cause a paper jam.
• Bent, folded, or creased paper
• Perforated paper
• Slippery paper
• Torn paper
• Rough paper
• Thin paper with little stiffness
89
Page 92

4. Adding Paper and Toner
• Paper with a dusty surface
Even supported types of paper may cause paper jams or malfunctions if the paper is not in good
condition.
If you print onto rough grain paper, the output image might be blurred.
Do not use the printed paper again. It may cause paper jam.
If you use paper curled by humidity or drying, the paper may jam.
Do not load sheets that have already been printed onto by another machine. Doing so may
interfere with loading of paper because the powder for preventing offset may attach to the paper
roller.
• A paper jam may occur depending on the condition of the paper even when using the
recommended paper.
Paper Storage
When storing paper, the following precautions should always be followed:
• Do not store paper where it will be exposed to direct sunlight or reach high temperatures.
• Store paper in a dry environment (humidity: 70% or less).
• Store on a flat surface.
• Do not store paper vertically.
• Once opened, store paper in a plastic bag.
Saving Printouts
• Prints will fade if exposed to strong light or dampness and humidity for extended periods of time.
Preserve the quality of your copies by storing them in a binder in a dark, dry place.
• When folding prints, toner in the folds will come off.
• If the prints are stored in the conditions described below, toner may melt:
• When a print and a half-dried print are put on top of each other
• When solvent-type adhesive agents are used for pasting prints
• When prints are placed on mats made of chlorinated plastic in locations of high temperature
for long periods of time
• When prints are placed in locations of extremely high temperatures, such as near a heater
90
Page 93

Thick Paper Orientation and Recommended Status
Thick Paper Orientation and Recommended
Status
When using thick paper of 106–220 g/m2 (28 lb. Bond–80 lb. Cover), keep in mind the paper
orientation or storage environment to prevent misfeeds and loss of image quality.
Paper Storage
• Temperature: 20–25°C (68–77°F)
• Humidity: 30–65%.
Do not use together paper that has been stored in different environments.
Minimum Number of Sheets
• 20 sheets or more (paper trays of the machine/optional paper feed unit used)
After loading paper, position the side fences flush against the paper stack.
• When printing on thick, smooth paper, be sure to fan the paper thoroughly before loading. If you
do not fan thick paper, jams and misfeeds can occur. If paper continues to become jammed or
feed in together even after they are fanned, load them one by one from the bypass tray.
• Select [Thick Paper 1] or [Thick Paper 2] as the paper thickness in [Paper Input].
• Proper performance and quality may not be achieved under the recommended conditions
depending on the paper.
• The printed sheet may curl. If the printed sheet curls, correct it.
91
Page 94

4. Adding Paper and Toner
Envelope Orientation and Recommended Status
The way to load envelopes varies depending on the shape and orientation of the envelopes.
• Do not print on the following envelopes:
• Window envelopes
• Envelopes with moisture
Before setting envelopes
• Before loading envelopes, press down on them to remove any air from inside and flatten out
all four edges. If they are bent or curled, flatten their leading edges (the edge going into the
machine) by running a pencil or ruler across them.
• For information about recommended envelopes, contact your local dealer.
• The Duplex function cannot be used with envelopes.
• Set the margins on the top, bottom, left and right to be 15 mm or more so as to print with adequate
quality.
• An image may not be printed clearly on a sheet whose thickness is uneven. Print a few sheets and
check the result.
• The printing result may not be adequate or the envelope may become wrinkled when the
temperature or humidity is high.
• The printing result may not be adequate or output envelopes may become wrinkled depending on
the printing environment even when using the recommended envelopes.
• When printing onto paper other than an envelope after printing onto several envelopes, you may
have to wait about one minute until printing starts to allow the machine to make adjustments.
92
Page 95

Using the Printer Function
EAT885
EAT886
Envelope Orientation and Recommended Status
Orientation of
Envelopes
Side-opening
envelopes
Tray 2-5 Bypass Tray
• Flaps: closed
• Bottom side of envelopes:
toward the right of the machine
• Side to be printed: face down
• Flaps: closed
• Bottom side of envelopes:
toward the right of the machine
• Side to be printed: face up
93
Page 96

4. Adding Paper and Toner
Loading Orientation-fixed Paper or Two-sided Paper
To print onto letterhead paper or business letter paper on which logos or patterns are printed, confirm
how to set the paper or the settings of this machine so that the document is printed onto the orientationfixed (top to bottom) or two-sided paper correctly.
Printing onto Letterhead Paper Using the Printer Driver
Specify the settings of this machine as described below.
• [Print Settings] [Machine Modes] [Letterhead Setting] [Auto Detect]
Paper Orientation
Print Side
One-sided documents
Two-sided documents
Tray 1
Bypass Tray
Paper Feed Unit
94
• When you specify [Letterhead Setting] to [On (Always)], you can print onto letterhead paper
without specifying the paper type in the printer driver’s settings to [Letterhead].
Page 97

Loading Orientation-fixed Paper or Two-sided Paper
• If a print job is changed partway through printing from one-sided to two-sided printing, one-sided
output after the first printing may be printed facing a different direction. To ensure all paper is
output facing the same direction, specify different input trays for one-sided and two-sided printing.
Note also that two-sided printing must be disabled for the tray specified for one-sided printing.
95
Page 98

EBS027
4. Adding Paper and Toner
Replacing the Toner
Toner is almost depleted when the "Toner is almost empty." message is displayed. Prepare a
replacement print cartridge.
• Replace the toner after the message prompting replacement is displayed on the control panel.
• The machine may become damaged if you use toner of a different type.
• Do not turn off the power of the machine when replacing the toner. If you turn off the power when
replenishing the toner, the specified settings are canceled, and printing will not resume afterwards.
• Store the toner in a dry environment away from direct sunlight and generally under the temperature
below 35°C (95°F).
• Keep the toner horizontal when storing it.
• After removing the print cartridge from the machine, do not shake it while its opening is facing
downward. The remaining toner may spill out.
• Do not pull out and put back the print cartridge repeatedly. The remaining toner may leak.
How to Replace the Toner
1. Open the front cover.
96
Page 99

EBS402
EBS030
EAT124
Replacing the Toner
2. Hold the print cartridge with one hand as you release the print cartridge lever with
another hand.
3. Squeeze the clip on the print cartridge and lift it.
4. Put the used print cartridge in a plastic bag and seal it so that the toner does not spill out.
97
Page 100

EAT125
10
EAT048
EBS031
4. Adding Paper and Toner
5. Remove the new print cartridge from the toner kit.
6. Shake the new print cartridge at least 10 times to the left and right so that the toner inside
it spreads uniformly.
98
7. Insert the new print cartridge into the machine.
Press the new print cartridge until it clicks into place.
 Loading...