

Page 1

Preparing to Use the Machine
1
Operating the Machine
2
Packing Up the Machine
3
Troubleshooting
4
Appendix
5
Device Reference
For safe and correct use, be sure to read the Safety Information in "Read This First" before using the machine.
Page 2

Page 3

TABLE OF CONTENTS
Manuals for This Machine.................................................................................................................................3
Introduction.........................................................................................................................................................4
Disclaimer........................................................................................................................................................4
Notes...............................................................................................................................................................4
How to Read This Manual.................................................................................................................................5
Symbols...........................................................................................................................................................5
Model-Specific Information...............................................................................................................................6
Precautions for Use.............................................................................................................................................7
Handling This Product....................................................................................................................................7
Cleaning..........................................................................................................................................................7
Wireless Networking.....................................................................................................................................8
Copyright Notice............................................................................................................................................8
1. Preparing to Use the Machine
Preparing to Start Using the Services................................................................................................................9
Checking the Package Contents.....................................................................................................................11
Guide to Components......................................................................................................................................13
Front and Top view......................................................................................................................................13
Rear and Bottom view.................................................................................................................................14
Control Panel................................................................................................................................................15
Place to Install...................................................................................................................................................17
Installation Requirements.............................................................................................................................17
Operating Environment for This Machine..................................................................................................21
Connecting the Power Cord Set......................................................................................................................24
Connecting a Video Output Device................................................................................................................27
Connecting an Ethernet Cable........................................................................................................................28
Connecting a External Microphone Speaker................................................................................................29
2. Operating the Machine
Raising the Camera Unit..................................................................................................................................31
Turning On the Power......................................................................................................................................33
Turning on the Machine for the First Time......................................................................................................34
Adjusting the Camera......................................................................................................................................36
Using the Camera To Share Information........................................................................................................38
Adjusting the Volume.......................................................................................................................................39
1
Page 4

Adjusting the Speaker Volume....................................................................................................................39
Muting the Microphone..............................................................................................................................39
Turning Off the Power......................................................................................................................................41
Putting the Camera Back Into Place................................................................................................................42
3. Packing Up the Machine
Removing the Power Cord Set and Video Output Device and Packing Up the Machine..........................43
4. Troubleshooting
When You Have Problems Operating the Machine.....................................................................................47
5. Appendix
Specifications....................................................................................................................................................53
Precautions for Use..........................................................................................................................................55
Trademarks.......................................................................................................................................................56
INDEX.............................................................................................................................................................57
2
Page 5

Manuals for This Machine
Read this manual carefully before you use this machine.
Refer to the manuals that are relevant to what you want to do with the machine.
Read This First
Explains important items to know when using this product. It also describes how to set up this
product when using it for the first time.
Quick Guide
Explains how to start a meeting.
Device Reference (This Manual)
Explains how to set up and operate the machine.
This manual also describes the specifications of the machine and provides information about how
to troubleshoot problems that occur.
Features Reference
Explains how to start a meeting and describes the features of the machine.
This manual also provides information about how to troubleshoot feature and network problems
that occur.
3
Page 6

Introduction
Disclaimer
Contents of this manual are subject to change without prior notice.
In no event will the company be liable for direct, indirect, special, incidental, or consequential damages
as a result of handling or operating the machine.
Notes
The manufacturer shall not be responsible for any damage or expense that might result from the use of
parts other than genuine parts from the manufacturer with your office products.
Two kinds of size notation are employed in this manual.
Some illustrations in this manual might be slightly different from the machine.
4
Page 7
How to Read This Manual
Symbols
This manual uses the following symbols:
Indicates points to pay attention to when using the machine, and explanations of likely causes of
damage to machine or loss of data. Be sure to read these explanations.
Indicates supplementary explanations of the machine's features, and instructions on resolving user
errors.
[ ]
Indicates the names of keys on the display or control panel.
(mainly Europe and Asia)
(mainly North America)
Differences in the functions of Region A and Region B models are indicated by two symbols. Read the
information indicated by the symbol that corresponds to the region of the model you are using. For
details about which symbol corresponds to the model you are using, see p.6 "Model-Specific
Information".
• Some of the key names that appear in the on-screen instructions or messages might differ from
those shown on the machine, depending on the region in which you live. The screen displays a key
name, followed by the corresponding key mark. If the name of the key is different, use the
corresponding mark to identify the key.
5
Page 8
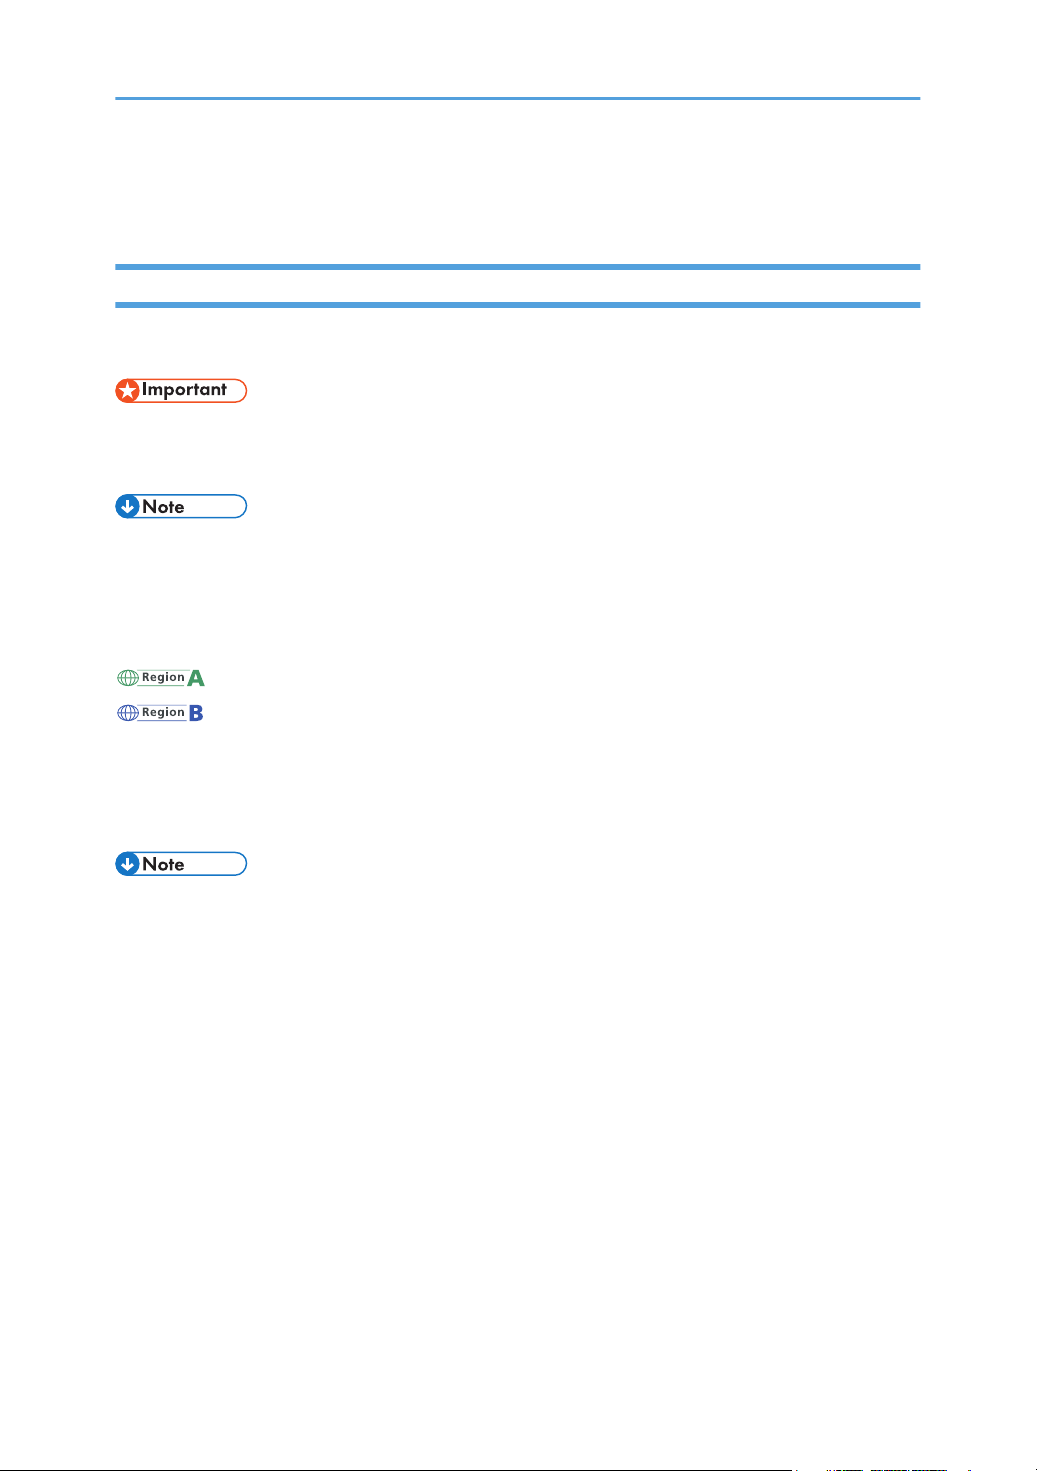
Model-Specific Information
CMJ001
This section explains how you can identify the region your machine belongs to.
There is a label on the bottom of the machine, located in the position shown below. The label contains
details that identify the region your machine belongs to. Read the label.
The following information is region-specific. Read the information under the symbol that corresponds to
the region of your machine.
(mainly Europe and Asia)
If the label contains the following, your machine is a region A model:
• 220V-240V
(mainly North America)
If the label contains the following, your machine is a region B model:
• 110V
• Dimensions in this manual are given in two units of measure: metric and inch. If your machine is a
Region A model, refer to the metric units. If your machine is a Region B model, refer to the inch
units.
6
Page 9

Precautions for Use
Handling This Product
Observe the following points when moving the machine:
• Turn off the machine and remove the power plug from the AC outlet.
• Remove all the connector cables connected to the machine.
• Return the camera to the closed position.
• Do not attempt to raise or move this machine by the camera unit.
• When carrying the machine by hand
• Use the bag that comes with the machine.
• When traveling by plane, take this machine onboard as carry-on luggage.
• When Transporting the Machine
This machine contains a large number of glass and precision parts. Observe the following points to
prevent the machine from being damaged by excessive shock:
• Wrap the machine in cushioning material to prevent it from being directly exposed to shock.
• Place the machine in the supplied bag and pack it in the original box or a sturdy cardboard
box.
• Inform the carrier that the machine is a piece of precision equipment.
• For more information about transporting the machine, consult your carrier.
Avoid contact with rubber and plastic materials for an extended period of time. Doing so may lead to
discoloration or cause the exterior coating to peel off.
Do not use this machine for an extended period of time. Doing so may lead to failure or shorten the
product life.
Cleaning
• Never use benzene or thinner to clean the machine. Doing so may lead to deformation,
discoloring, or cause the exterior coating to peel off.
• Do not use a chemically treated cloth.
• Remove the dust that accumulates in the air outlet and inlet periodically. If the air outlet or inlet
becomes clogged, the flow of air inside the machine decreases. Poor air flow can result in failure.
7
Page 10

Wireless Networking
This product features a certified construction. Disassembling or modifying this product without permission
may be punishable by law.
Copyright Notice
Using this machine to perform any of the following acts, without permission from the copyright holder,
for purposes other than personal use may constitute an infringement on the copyright and/or
neighboring rights of the commercial video software or cable broadcasting program. These acts include
broadcasting or transmitting commercial video software or cable broadcasting programs, modifying
videos, such as by freezing, or resizing videos to be displayed in an aspect ratio different from the
original. To avoid the risk of possible infringement, we advise you to obtain permission from the
copyright holder and take all other measures necessary before performing any of the above-mentioned
acts.
8
Page 11

1. Preparing to Use the Machine
Preparing to Start Using the Services
To start using the Unified Communication System services with this machine, you must set up this machine
to use the services according to the conditions in which the machine was purchased and the environment
in which the machine is used. This involves specifying the name of the machine and your password,
configuring the network settings, and registering contact.
Preparing the machine
Step Reference
1 Checking the Package contents. p.11 "Checking the Package
Contents"
2 Installing the machine. p.17 "Place to Install"
3 Connecting the power cord set. p.24 "Connecting the Power
Cord Set"
4 Connecting a video output cable. p.27 "Connecting a Video
Output Device"
5 Connecting an Ethernet cable. (If using a wired network) p.28 "Connecting an Ethernet
Cable"
6 Turning on the power. p.33 "Turning On the Power"
7 Selecting the language and time zone. p.34 "Turning on the Machine
for the First Time"
8 Specifying Wired/Wireless Network Configuration. "Changing Network
Configuration", Features
Reference
"When the Machine Cannot
Connect to the Network",
Features Reference
9 Checking the Contact ID from the Contact List screen. "About Screen", Features
Reference
9
Page 12

1. Preparing to Use the Machine
Preparing Unified Communication System Settings
Step Reference
1 Starting your Web browser. "Logging in to Unified
Communication System
Settings", Features Reference
2 Changing the default password and machine name. "Specifying the Name of the
Machine and Your Password",
Features Reference
3 Registering a contact to Address Book. "Managing Address Book",
Features Reference.
10
Page 13
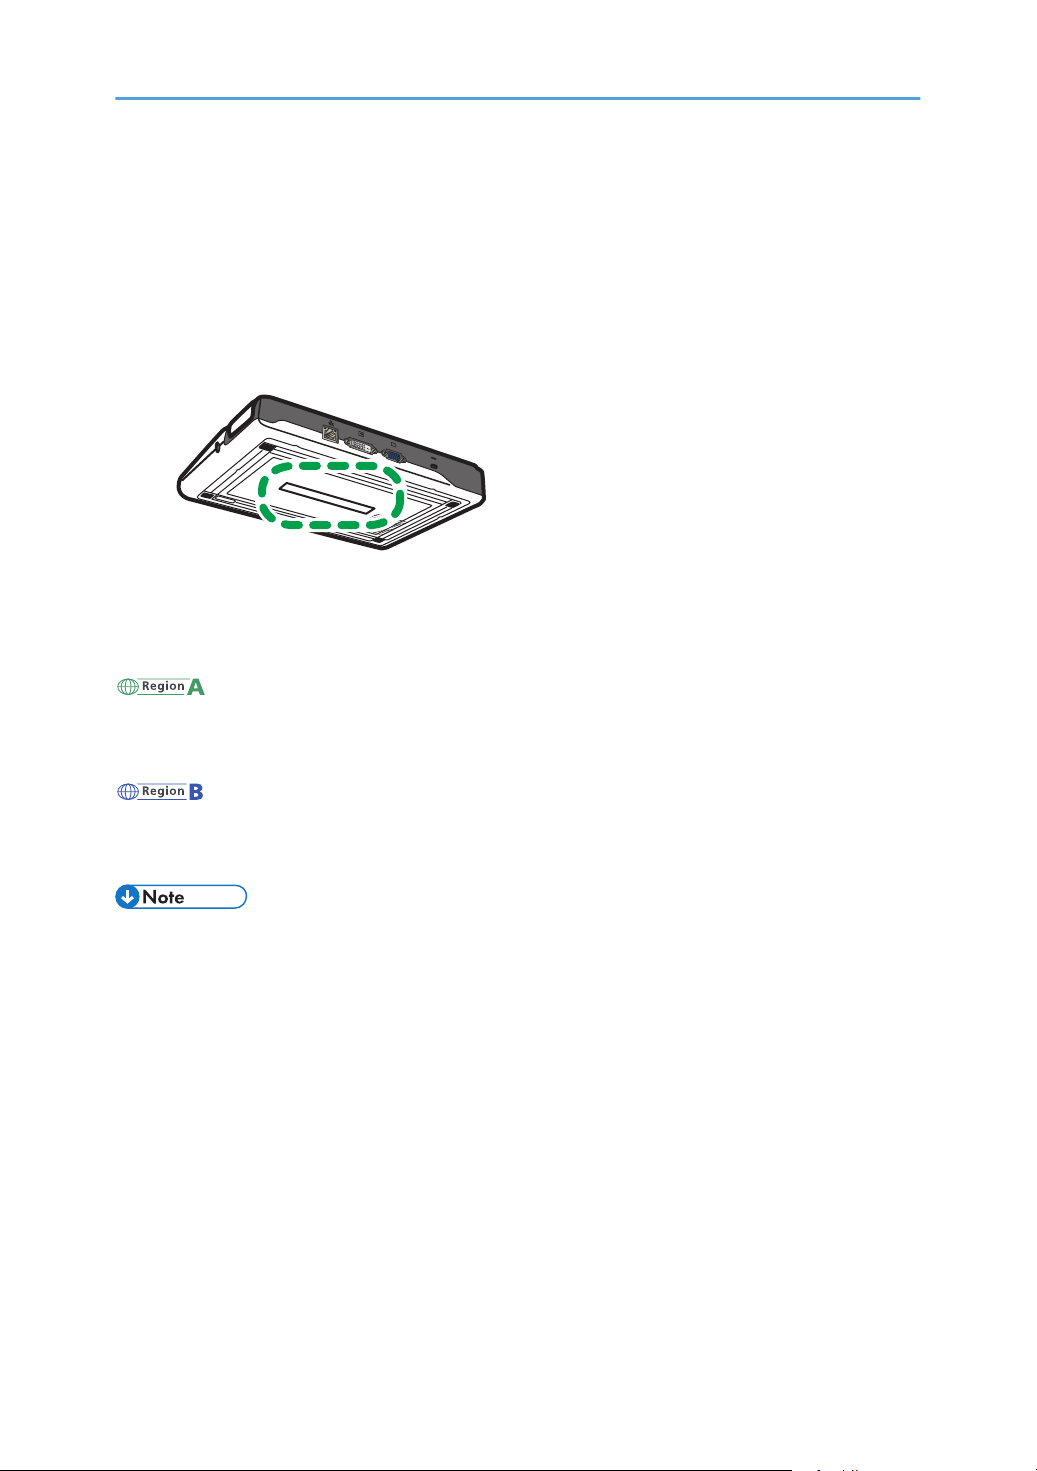
Checking the Package Contents
CMJ023
CJB037
CJB036
CJB035
The product package contains the following items:
Package Contents
Unified Communication System P3000 (this
machine)
AC adapter
Checking the Package Contents
Power cord
USB cable
11
Page 14

CJB034
1. Preparing to Use the Machine
Bag
Quick Guide
Read This First
Other documents
Package Contents
• Use the USB cable to share your computer screen. For details, see "Sharing the Computer Screen",
Features Reference.
• Be sure to use the power cord set and USB cable that come with this machine.
• This machine is factory-shipped with a protective sheet covering the camera lens. Remove the
protective sheet from the lens before using the camera.
• When this machine is not being used, store it together with the other accessories (including the
power cord set and USB cable) in the supplied bag. Do not store any other items in the supplied
bag.
• When placing this machine in the supplied bag, be sure to remove all cables and the power cord
set.
12
Page 15
Guide to Components
CMJ003
1
2
3
4
56
7
Front and Top view
Guide to Components
1. Camera unit
Captures live video that is transmitted to other parties.
The camera unit consists of a camera and an arm.
2. Control Panel
Provides a set of keys used to operate the machine.
For details about the control panel, see p.15 "Control Panel".
3. Speaker
Outputs audio from other parties.
4. Microphone
Inputs audio from the machine.
5. USB port (type B)
Used to connect the machine to your computer and share the computer screen.
6. USB ports (type A)
Used to attach an external microphone speaker to the machine.
7. Air outlet
Releases heat from inside of the machine.
13
Page 16
CMJ004
123 4
5
6
1. Preparing to Use the Machine
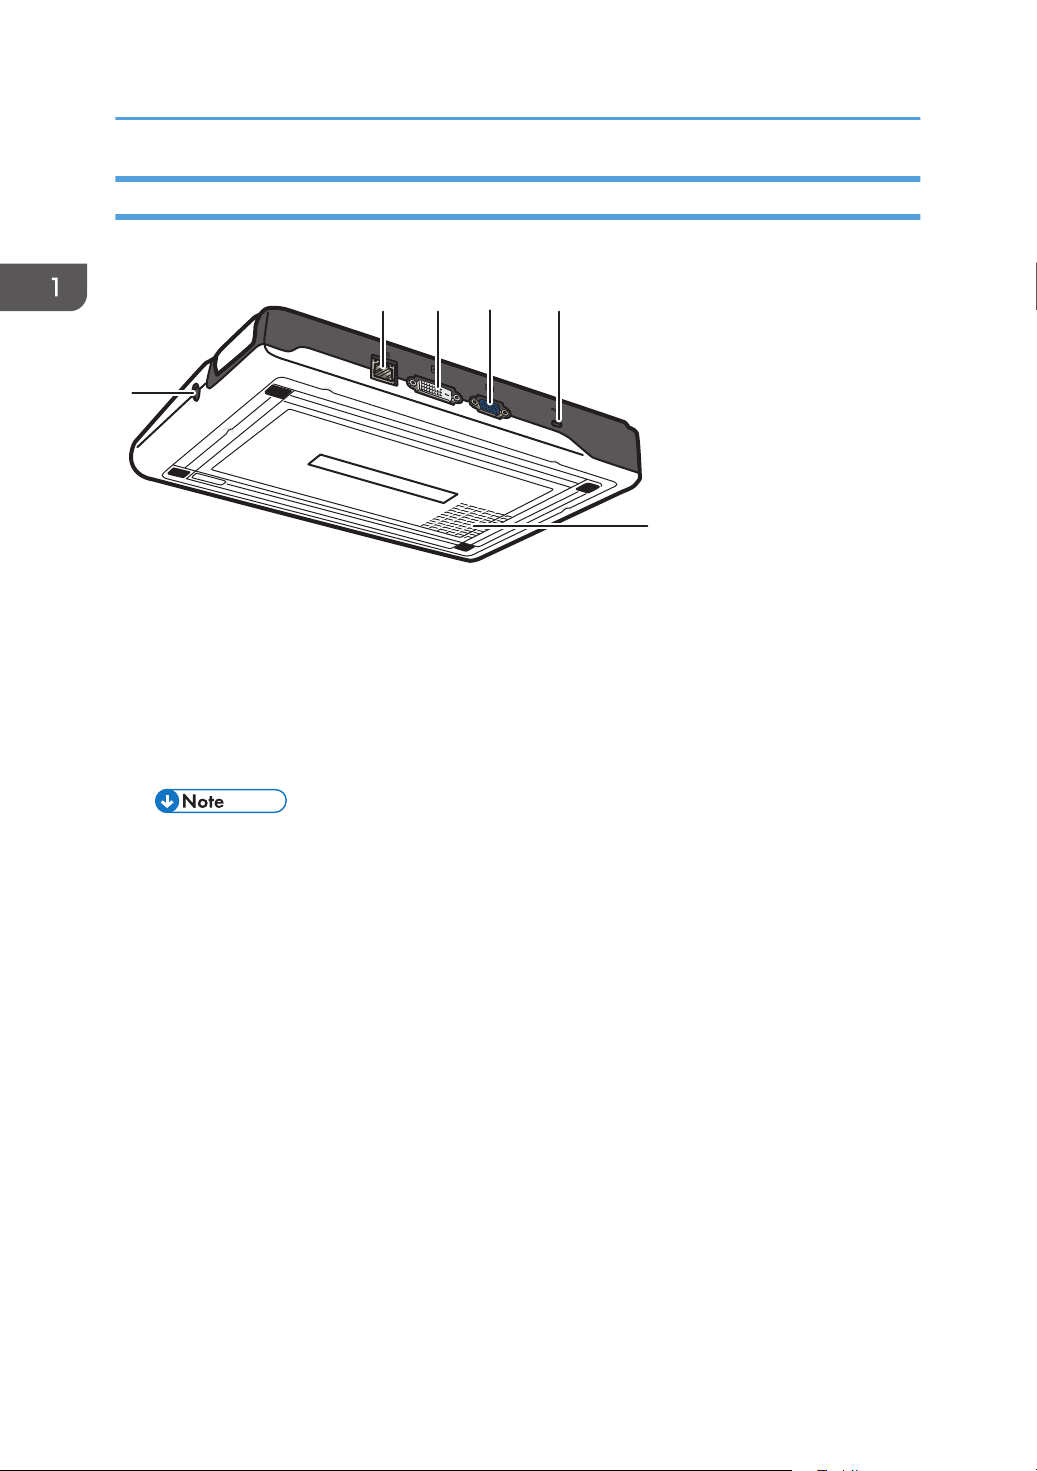
Rear and Bottom view
1. Ethernet port
Port to which the 1000BASE-T, 100BASE-TX, or 10BASE-T cable connects. This port is used when connecting
the machine to a wired network.
2. DVI-D connector
Connector used to connect this machine to a video output device, such as a projector or monitor, via a DVI-D
connector.
• DVI-I connection is not supported.
3. Analog RGB connector
Connector used to connect this machine to a video output device, such as a projector or monitor, via a RGB
(VGA) connector.
4. Anti-theft lock hole
Hole for connecting the anti-theft chain.
5. Air inlet
Brings in air from the outside to cool the machine and prevent it from overheating.
6. Power connector
Connector for connecting the power cord.
14
Page 17
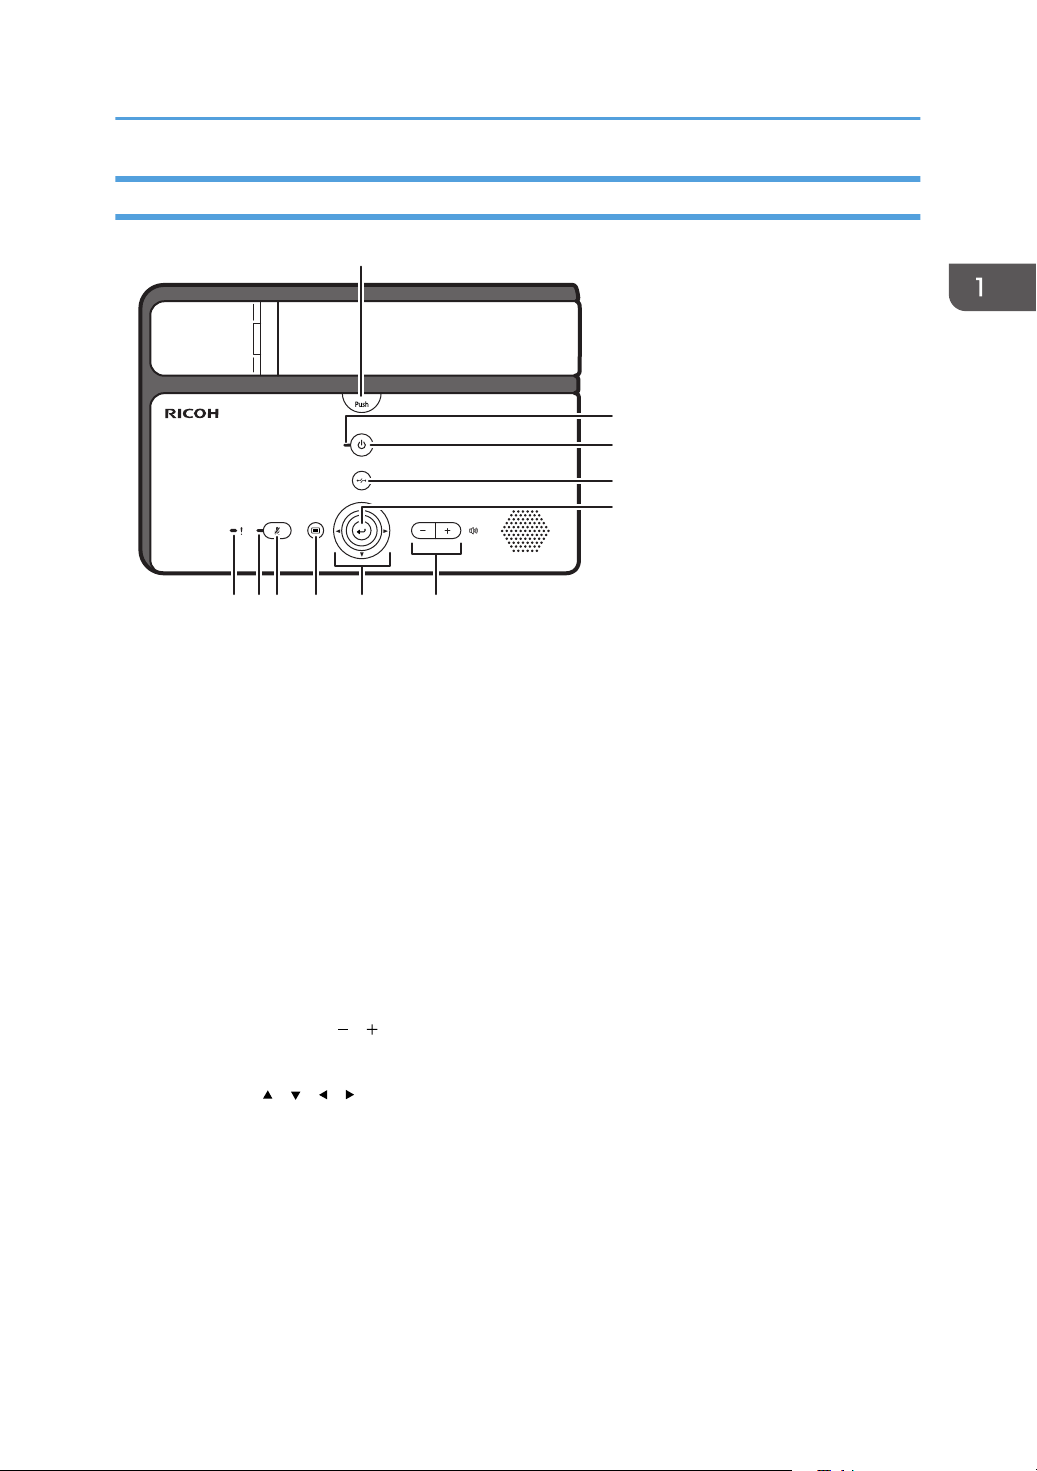
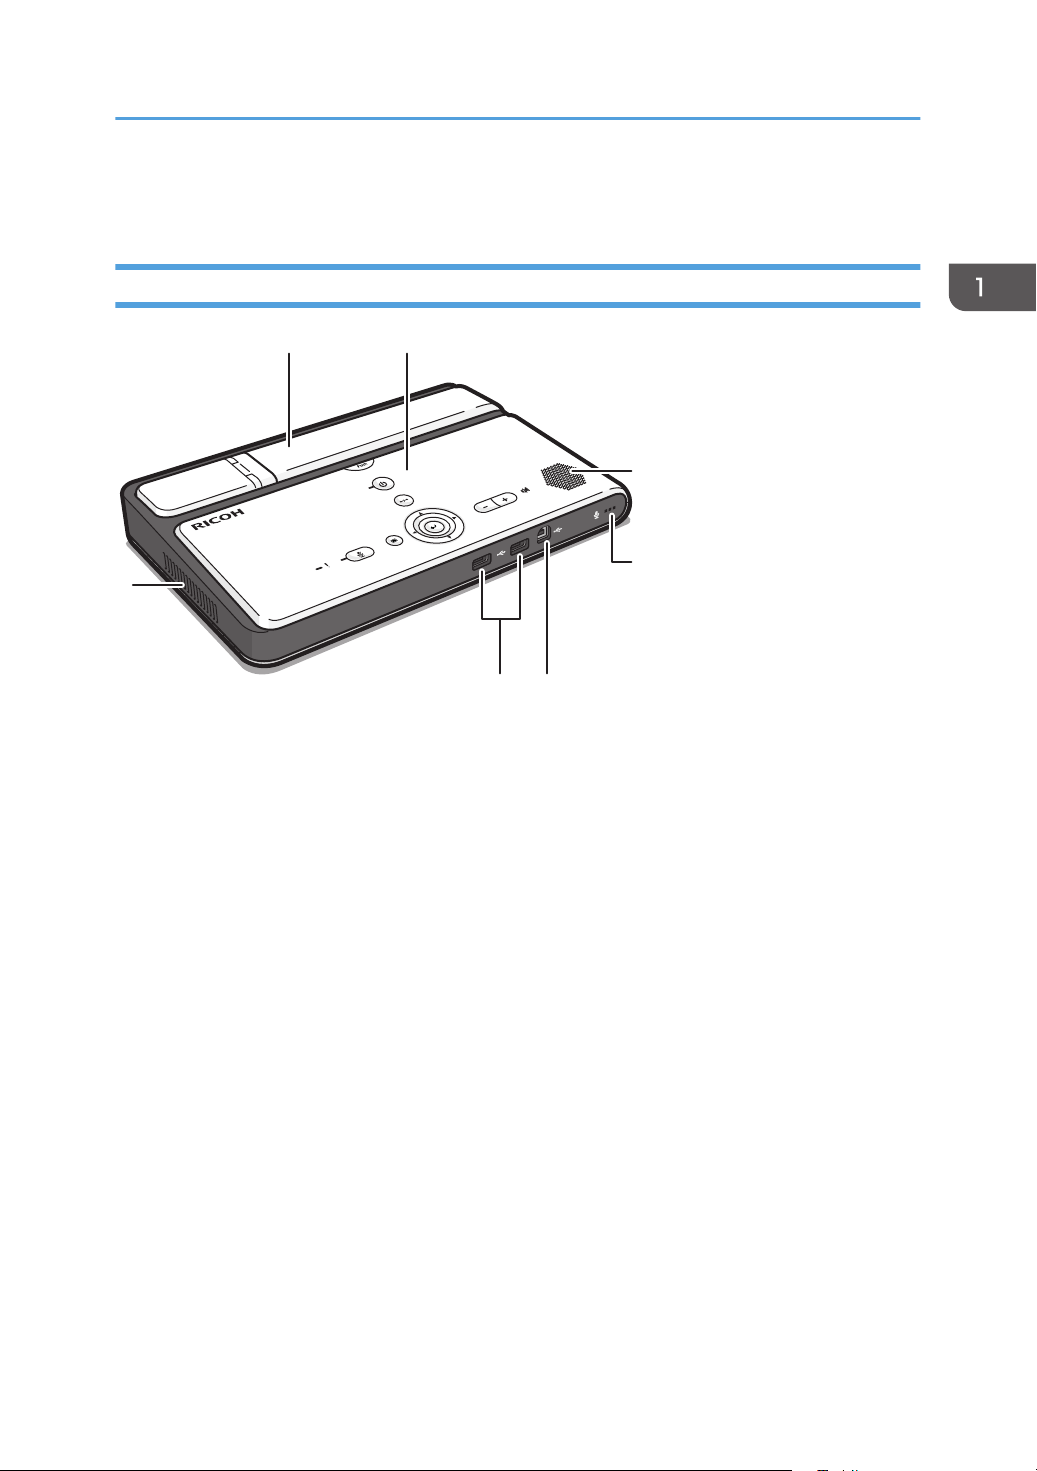
Control Panel
CJB004
1
3
2
4
5
678911 10
1. [Push] key
Used to raise the camera unit.
2. Power indicator
Lights when the machine turns on.
This indicator blinks while the machine is starting up or shutting down.
3. [Power] key
Used to turn the machine on and off.
4. [Disconnect] key
Used to leave a meeting.
5. [Enter] key
Used to activate the menu, setting, or set value selected with the cursor keys.
This key is also used to connect and leave a meeting.
6. Speaker volume keys ([ ] [ ] key)
Used to adjust the speaker volume.
7. Cursor keys ([ ] [ ] [ ] [ ] key)
Used to select a menu, dialog, or setting.
These keys are also used to switch between screen layouts during a meeting.
8. [Menu] key
Used to display the Menu screen.
9. [Mute] key
Used to temporarily disable audio input on the machine.
Guide to Components
15
Page 18

1. Preparing to Use the Machine
10. Mute indicator
Flashes if the [Mute] key is used to disable the microphone.
11. Alarm indicator
Lights when an error occurs on the machine.
Follow the instructions in the on-screen messages to resolve the error.
16
Page 19
Place to Install
Installation Requirements
• Do not place vases, plant pots, cups, toiletries, medicines, small metal objects, or containers
holding water or any other liquids, on or close to this machine. Fire or electric shock could result
from spillage or if such objects or substances fall inside this machine.
• Do not use flammable sprays or solvents in the vicinity of this machine. Doing so could result in
fire or electric shock.
• Keep the product and attachments out of the reach of children. If the product is near children, it
might fall over and cause an injury.
Place to Install
• Keep the machine away from humidity and dust. Otherwise a fire or an electric shock might
occur.
• Do not place heavy objects on the machine. Doing so can cause the machine to topple over,
possibly resulting in injury.
• Do not place the machine in an unsafe environment such as on an unstable or tilted surface. If it
falls over, an injury might occur.
• Do not place the product or use it in an environment where it might get wet such as from snow,
rain, or being near water. Doing so could result in fire or electric shock.
• Do not put your face or hand near the air outlet. Doing so could result in burns or an accident
due to hot air coming from the air outlet.
17
Page 20
1. Preparing to Use the Machine
• Do not use the product on soft material such as paper or cloth that might get sucked into the air
inlet. Doing so may cause heat buildup inside the product, resulting in malfunction, burns, or
fire.
• Do not place the power cord and connection cable in a way that might cause someone to trip
and fall. The product might fall over and cause an injury.
• Do not place the product in a location where air flow is poor. Doing so may cause fire due to
internal components becoming overheated.
• Do not place or store the product in a location where direct sunlight or heat generation might
occur. The heat may deform or wear out the exterior parts or negatively affect internal parts.
Doing so could result in fire.
• Do not place low heat resistant objects near the air outlet. Hot air may come from the air outlet,
resulting in damage to the object or an accident.
• Do not expose the product to salt air or corrosive gas. Also, do not place the product in a
laboratory or other location where a chemical reaction might occur. Doing so may cause the
product to malfunction.
• Do not obstruct the machine's air inlet or outlet. Doing so risks fire caused by overheated
internal components.
• Do not use or store this machine in a place that is exposed to soot, cigarette smoke, or any other
type of smoke. Doing so may soil the machine, resulting in shorter product life and lower video
quality.
• Abrupt changes in temperature may cause drops of water to form inside the machine, resulting in a
phenomenon called dew condensation. Continuing to use the machine in this condition may lead to
product failure or malfunction. If dew condensation forms, wait until the drops of water evaporate
before using the machine.
18
Page 21

Place to Install
• Do not use this machine when it is improperly positioned or oriented. Doing so may lead to failure
or shorten the product life.
• Route and position the power cord and other cables so that other users do not trip over them.
Tripping over the cables may cause the machine to fall, resulting in personal injury.
Preventing the deterioration of sound quality
• Keep objects that may cause the sound quality to deteriorate away from the microphone or
speaker.
• Blocking both the microphone and speaker may cause the sound quality to deteriorate.
• Do not place devices that generate noise, such as projectors or computers, near the machine.
• When using the machine in a room where sound echoes, try keeping your voice as low as
possible during meetings to avoid distracting echoes.
• Make sure there is sufficient space between this machine and the wall.
• Keep this machine away enough from the other party's device, for example, when the other
party's voice can be heard directly instead of through a speaker.
• Do not move the machine during a meeting.
• If you plan to use an external microphone and speaker, see the manual for details about how
to use the device.
• When using an external microphone speaker, keep it away from the air outlet of the machine.
Placing an external microphone speaker too close to the air outlet can cause the audio quality
to deteriorate.
About network environment
• A poor network environment can cause delays in video streaming during meetings.
• When using a wireless network, communication quality may deteriorate or communication
may be lost, depending on the environment in which the machine is used. If these problems
occur, use a wired network instead. To switch to a wired network, you must first turn the
machine off and then turn it back on.
• When using a wireless network, radio or electromagnetic interference or weak reception may
cause the following problems to occur during meetings:
• Delays in video streaming.
• Video is stopped.
• Audio of other party cuts out.
• Synchronization between video and audio is lost.
• Audio quality deteriorates.
• Meetings are automatically ended or left.
• Delays in video streaming occur when sharing computer screen.
• Your video and the other party’s video disappear and only audio is heard.
19
Page 22

1. Preparing to Use the Machine
• Screen image does not display properly when the screen layout is changed.
• The Contact List or contact status do not appear, or it takes longer than expected for
each to be displayed.
• The attempt to update the firmware fails, or it takes an excessively long time for the
update to finish.
• The machine does not start.
• You cannot connect to other party.
If you experience one of the problems above, take one of the following actions. The action to
be taken depends on the wireless network environment you are using:
• If IEEE802.11b and IEEE802.11g are in the same wireless network environment, the
IEEE802.11b connection may be used first. The recommended line speed for the
machine is 1 Mbps. To use the machine at a stable line speed, we recommend using it in
a wireless network environment in which only IEEE802.11g is available.
• Avoid environments that have multiple wireless LAN standards.
• Turn off any wireless networking or radio devices that are not being used.
• If there are multiple devices in the environment that support IEEE802.11n, use
IEEE802.11n with a single channel.
• Use the machine in an environment with stable reception, making sure to confirm the
distance from the access point and check for any obstructions.
• If the environment has multiple wireless LAN standards, change the access point channel.
There should be a difference of at least five between the channel settings for each LAN
standard. For example, set one standard to channel 1 and the other to channel 6.
• Keep the machine as far away as possible from highly conductive objects such as metal.
• This wireless product uses the 2.4 GHz band. Make sure there is no industrial, scientific,
or medical equipment that uses the same frequency band currently in operation, such as
a microwave. Interference can cause communication to become unstable. Before using
the machine, make sure that there is no equipment around that may potentially cause
interference.
• If you experience radio interference or other wireless networking problems, please call
the support desk.
Use this machine in an environment that meets the following conditions:
20
Page 23

Specification Description
Temperature • Operating
10 - 32 °C (50 - 89.6 °F)
• Non-operating
0 - 43 °C (50 - 109.4 °F)
Temperature • Operating
15 - 80 % (Non-condensing)
• Non-operating
10 - 90 % (Non-condensing)
Maximum Altitude 3,000 m (10,000 feet)
Operating Environment for This Machine
Place to Install
The following operating environments are required to use this machine:
Power Source
Specification Operating environment
Power Source • (mainly Europe and Asia)
220 V - 240 V, 50/60 Hz
• (mainly North America)
110 V, 50/60 Hz
Network
Specification Operating environment
Interface Network with one of the following interfaces that can connect to
the Internet
• Wired Network
10BASE-T, 100BASE-TX, 1000BASE-T
• Wireless Network
IEEE802.11g, IEEE802.11b, IEEE802.11n
Line speed Minimum: 500 Kbps, Recommended: 1 Mbps or higher
21
Page 24

1. Preparing to Use the Machine
Specification Operating environment
Port The following port numbers are available for communication:
• When no proxy is used
TCP: 443, 5222, 17990, 17992
UDP: 50000 - 65535
*1
• When a proxy is used
TCP: 443
Frequency Range (Wireless
Network)
• (mainly Europe and Asia)
2412 MHz - 2472 MHz (Ch1 - Ch13)
• (mainly North America)
2412 MHz - 2462 MHz (Ch1 - Ch11)
Authentication (Wireless
Network)
• Authentication method
Open system authentication, shared key authentication,
WPA-PSK, WPA2-PSK
• Encryption method
WEP (128bit/64bit), TKIP, AES
A port in the range of 50000 to 65535 is selected as the port used for communication, according to the
*1
environment and conditions.
• This machine only supports the Basic authentication method when a proxy is used.
• When using a proxy to connect to a meeting, it may take longer for the meeting.
• For details about network settings, see "Changing Network Configuration", Features Reference.
Video Output Device
22
Specification Operating environment
Supported device Monitor or projector
Resolution 1024 768 pixels (XGA), 1280 800 pixels (WXGA)
Interfaces Analog RGB, DVI-D
• If the device being used supports resolutions of both 1024 768 pixels (XGA) and 1280 800
pixels (WXGA), the screen is displayed at a resolution of 1280 800 pixels (WXGA).
Page 25

Place to Install
• Some projectors or monitors may not be able to display images from this machine correctly.
• Video output devices that do not meet these operating environment conditions may not be able to
be display images from this machine correctly.
23
Page 26

1. Preparing to Use the Machine
Connecting the Power Cord Set
• Do not use any power sources other than those that match the specifications shown. Doing so
could result in fire or electric shock.
• Do not damage, break, or modify the power cord or AC adapter. Also, do not place heavy
objects on the power cord, or pull the cord or bend it severely. Doing so could result in fire or
electric shock.
• The supplied power cord is for use with this machine only. Do not use it with other appliances.
Doing so could result in fire or electric shock.
• It is dangerous to handle the power cord plug with wet hands. Doing so could result in electric
shock.
• Do not use the AC adapter or connection cable if it is deformed, cracked, or damaged. Doing
so could result in fire or electric shock. If the AC adapter or connection cable is deformed,
cracked, or damaged, contact your service representative to request a replacement cable.
• When using an extension cord or power strip, only connect equipment whose total power
consumption is within the power rating for the extension cord or power strip. If the power rating
is exceeded, it may cause heat buildup and result in fire.
• Push the power plug all the way into the power outlet. Do not use a power outlet with a loose
connection. Doing so may result in heat buildup. Plug the power cord and AC adapter in the
correct direction into the base. If they are not plugged in correctly, it could result in smoke, fire,
or electric shock.
24
Page 27

Connecting the Power Cord Set
• If this machine is not going to be used for several days or longer at a time, disconnect its power
cord from the wall outlet.
• When disconnecting the power cord from the wall outlet, always pull the plug, not the cord.
Pulling the cord can damage the power cord. Use of damaged power cords could result in fire
or electric shock.
• Be sure to disconnect the plug from the wall outlet and clean the prongs and the area around
the prongs at least once a year. Allowing dust to build up on the plug constitutes a fire hazard.
• When performing maintenance on the machine, always disconnect the power cord from the
wall outlet.
• Do not disassemble or modify the AC adapter. Doing so may result in burns or electric shock.
Contact your service representative if the AC adapter needs repaired.
• Do not wrap the power cord or connection cable around the AC adapter. If the power cord or
connection cable is damaged or the inner wire is exposed, it may result in fire, electric shock,
or burns.
• It is recommended that you do not touch the AC adapter when using the product. Possible heat
buildup in the AC adapter may cause burns.
• Only use the supplied AC adapter indoors.
• Do not remove the power cord when the power indicator on this machine is lit or blinking.
25
Page 28

CJB012
CJB005
1. Preparing to Use the Machine
1. Connect the power cord to the AC adapter.
2. Connect the power connector to the power connector inlet on this machine.
26
3. Connect the power plug to the AC outlet.
Page 29

CJB009
CJB010
Connecting a Video Output Device
Connecting a Video Output Device
Use the appropriate interface to connect the video output device.
For details about requirements for video output device, see p.21 "Operating Environment for This
Machine".
• Make sure the machine is off before connecting to a video output device.
• This machine cannot accept two video output devices connected at the same time via the analog
RGB and DVI-D connectors. You can only use one connector at a time. Select the appropriate
connector for the video output device you want to use.
1. Connect the analog RGB or DVI-D connector to the machine.
• Analog RGB connector
• DVI-D connector
2. Connect the analog RGB or DVI-D connector to the video output device.
• For details about how to connect the cable to the video output device, see the manuals provided
with the video output device.
27
Page 30

CJB100
1. Preparing to Use the Machine
Connecting an Ethernet Cable
To use a wired network, connect the machine to a network connection device such as a hub or modem.
• Make sure the machine is off before connecting an Ethernet cable.
• Make sure the Ethernet cable is connected to a hub. Do not connect to a network switch.
• Use the following Ethernet cables.
• When using 100BASE-TX/10BASE-T:
Unshielded Twisted Pair Cable (UTP) or Shielded Twisted Pair Cable (STP) and Category type
5 or more
• When using 1000BASE-T:
Unshielded Twisted Pair Cable (UTP) or Shielded Twisted Pair Cable (STP) and Category type
5e or more
1. Connect the Ethernet cable to the Ethernet port on this machine.
28
2. Connect the other end of the Ethernet cable to the network connection device.
• An Ethernet cable connection is not required for a wireless network.
Page 31

CJB040
Connecting a External Microphone Speaker
Connecting a External Microphone Speaker
Use the USB interface to connect the external microphone speaker.
• You cannot connect and use two different external microphone speakers at the same time.
• Do not attempt to connect or disconnect the external microphone speaker while connecting or
receiving a call, or while in the middle of a meeting. Doing so will cause problems with the audio.
1. Connect the A connector end of the USB cable to the USB port (type A) on this machine.
• You can use the left and right USB ports (A type) on this machine.
• You cannot adjust the volume or mute a connected microphone speaker from the machine. You
must adjust the volume settings on the actual device. For details about how to use the external
microphone speaker, see the manuals provided with the microphone speaker.
29
Page 32

1. Preparing to Use the Machine
30
Page 33

2. Operating the Machine
CJB043
CMJ012
Raising the Camera Unit
• Do not attempt to raise or move this machine by the camera unit.
• Do not attempt to move the arm beyond its range of movement.
Range of movement
The camera arm can move within the following range:
0°-135° (when the camera unit is folded all the way down.)
1. Press the [Push] key.
31
Page 34

CMJ006
2. Operating the Machine
2. Pull up on the arm of the camera to raise the camera unit.
• This machine is factory-shipped with a protective sheet covering the camera lens. Remove the
protective sheet from the lens before using the camera.
32
Page 35

CMJ011
Turning On the Power
Turning On the Power
1. Press the [Power] key/ .
• Depending on the network environment you are using, it may take the machine one minute or more
to connect to the network.
• If the message "Connecting to the network..." remains displayed throughout the startup process,
there is a problem preventing the machine from connecting to the network. For details about how to
display the Configuration Menu screen in this state, see "About Screen", Features Reference. For
details about what to do if the machine cannot connect to the network, see "When the Machine
Cannot Connect to the Network", Features Reference.
33
Page 36

CMJ011
2. Operating the Machine
Turning on the Machine for the First Time
When you turn on the machine for the first time, a screen used to specify the language, date, and time
will appear. Select the language, date, and time for the environment in which you plan to use the
machine.
• You can also specify the language, date, and time from Configuration Menu. For details about
how to specify these items from Configuration Menu, see "Changing the Language and Time
Zone", Features Reference.
1. Press the [Power] key/
After the startup screen appears, the language selection dialog box appears.
2. Press the cursor keys ([ ] [ ] [ ] [ ] keys) to select the language, and then press the
[Enter] key/ .
3. Press the [Enter] key/ .
.
34
4. Press the [Enter] key/ to display the list.
5. Press the [ ] or [ ] key to select the language, and then press the [Enter] key/ .
Select the language to determine the data and time format.
6. Press the [ ] or [ ] key to select the format, and then press the [Enter] key/ .
Page 37

Turning on the Machine for the First Time
7. Press the [ ] key to select [Next], and then press the [Enter] key/ .
8. Press the [Enter] key/ to display the list.
9. Press the cursor keys ([ ] [ ] [ ] [ ] keys) to select the region, and then press the [Enter]
key/ .
10. Press the [ ] or [ ] key to select the time zone, and then press the [Enter] key/ .
11. Press the [Enter] key/ .
12. Confirm that the settings are correct, and then press the [Enter] key/ .
35
Page 38

CMJ025
CMJ024
2. Operating the Machine
Adjusting the Camera
• Do not attempt to raise or move this machine by the camera unit.
• Do not attempt to move the camera beyond its range of movement.
Ranges of movement
The camera can move within the following ranges:
• Horizontal direction
90°-180° (when the camera unit is facing 0 degrees after it is raised)
36
• Vertical direction
45°-45° (when the vertical position of the camera unit is 0 degrees)
1. Adjust the orientation by carefully moving and rotating the camera vertically and
horizontally while checking the screen display.
Set the camera so that the desired object is displayed on the screen.
Page 39

CMJ013
Adjusting the Camera
• Fingerprints or dust on the lens cover can cause image quality to deteriorate. If the lens cover is
dirty, lightly wipe it with a soft cloth.
37
Page 40

CMJ002
CMJ007
2. Operating the Machine
Using the Camera To Share Information
When using the camera to take a picture of a form or document directly, the camera automatically
focuses on the object and displays the image visually.
This feature is useful at meetings when sharing printed forms or other documents for which no electronic
data exists, such as hand-written memos.
1. Set the object you want to share to the right of the machine.
Orientation of the object:
2. Set the camera unit as shown in the figure below.
To display a different part of the object, move the object.
38
Page 41

Adjusting the Volume
CMJ015
CMJ016
You can adjust the audio volume and temporarily mute the microphone.
Adjusting the Speaker Volume
1. Use the [ ] and [ ] keys to adjust the volume.
Adjusting the Volume
To lower the volume, press the [ ] key.
To raise the volume, press the [ ] key.
• If an external microphone speaker are connected, you cannot adjust the volume from the machine.
For details about how to adjust the volume of your external microphone speaker, see the respective
manual for device.
Muting the Microphone
1. Press the [Mute] key.
The Mute indicator starts blinking to indicate the microphone has been muted.
39
Page 42

2. Operating the Machine
2. To cancel mute, press the [Mute] key again.
The Mute indicator turns off to indicate that mute has been cancelled.
• If an external microphone speaker are connected, you cannot mute them from the machine. For
details about how to mute your external microphone speaker, see the respective manual for device.
40
Page 43

Turning Off the Power
CMJ011
1. Press the [Power] key/ .
2. Press the [ ] or [ ] key to select [Turn Off], and then press the [Enter] key/ .
Turning Off the Power
• You can also turn off the machine by pressing the [Power] key/ twice in Step 1.
41
Page 44

CMJ013
CMJ018
2. Operating the Machine
Putting the Camera Back Into Place
• Do not attempt to raise or move this machine by the camera unit.
• Do not attempt to move the camera beyond its range of movement.
1. Carefully rotate the camera and put it back into place.
2. Push the arm down until it clicks.
42
Page 45

3. Packing Up the Machine
CJB028
CJB029
Removing the Power Cord Set and Video Output Device and Packing Up the Machine
• Before packing up the machine, make sure the machine is off by checking whether the Power
indicator is lit.
1. Remove the analog RGB or DVI-D connector from the machine.
• Analog RGB connector
• DVI-D connector
2. Remove the analog RGB or DVI-D connector from the video output device.
43
Page 46

CJB044
CJB030
CJB045
3. Packing Up the Machine
3. Remove the power connector from the power connector inlet on the machine.
4. Remove the AC adapter and power cord.
44
5. Pack the machine and power cord set in the supplied bag.
• For details about how to use your video output device, see the manual that comes with the device.
• If the USB cable for the PC Screen Share is connected, remove the USB cable. Pack the USB cable
in the supplied bag.
• If this machine is not used for an extended period of time, store it together with the other
accessories (including the power cord set, and USB cable) in the provided bag. Do not store any
other items in the bag.
Page 47

Removing the Power Cord Set and Video Output Device and Packing Up the Machine
• Be sure to disconnect all cables and the power cord set before placing this machine in the bag.
45
Page 48

3. Packing Up the Machine
46
Page 49

4. Troubleshooting
This chapter describes common problems of the machine.
For details about network problems and messages, see "Troubleshooting", Features Reference.
When You Have Problems Operating the Machine
• If the problem continues to persist even you after follow instructions given to resolve the problem,
contact the support desk.
Problems Causes Solutions
The machine does not turn
on.
The startup screen is
displayed.
No video is displayed. The video output cable is not
No video is displayed. The video output device
The power cord set is not
connected correctly.
The machine is starting. Wait for a while. If the machine does
connected correctly.
being used does not turn on.
• Check that the power cord is
connected to the AC adapter
correctly.
• Check that the power connector is
connected to the machine.
• Check that the power plug is
connected to the AC outlet
correctly.
For details about how to connect the
power cord, see p.24 "Connecting the
Power Cord Set".
not get ready in two minutes, contact
the support desk.
Check that the video output device is
connected to this machine correctly.
Check that the video output device has
been turned on.
No video is displayed. The video output device
being used is not configured
correctly.
Check that the video output device
being used is configured correctly.
47
Page 50

4. Troubleshooting
Problems Causes Solutions
Cannot be connected to the
contact whose status is
"Ready".
Cannot connect to the
contact whose status is
"Ready" or "Meeting".
Cannot connect to the
contact whose status is
"Ready" or "Meeting" after
disconnecting from the
contact.
An error occurred on the
other party's machine. If the
error message is displayed,
the machine cannot be
receive the call.
The status of the contact is
changed suddenly, if the
machine of the other party is
disconnected from the
network, or the machine is
turned off. In this case, the
status might be displayed
continuously "Ready" or
"Meeting" even the actual
status has changed.
It takes up to two minutes to
update the status of the
contact.
The status of the contact is
changed suddenly, if the
machine of the other party is
disconnected from the
network, or the machine is
turned off. In this case, the
status might be displayed
continuously "Ready" or
"Meeting" even the actual
status has changed.
Ask the party to solve the problem.
Wait for two minutes, and then check
the status of the contact and try to
connect again.
Wait for two minutes, and then check
the status of the contact and try to
connect again.
48
The screen layout cannot be
changed during a meeting.
It takes up to two minutes to
update the status of the
contact.
A dialog box indicating that
you are leaving the meeting
or turning off the machine
appears.
Check the dialog box that appears.
Use the cursor keys to select the
appropriate key, and then press the
[Enter] key/ to close the dialog box.
Page 51

When You Have Problems Operating the Machine
Problems Causes Solutions
Video or Audio of other
party cuts out.
Deterioration of sound
quality
Deterioration of sound
quality
Deterioration of sound
quality
Deterioration of sound
quality
Deterioration of sound
quality
The wireless network
problem is occurred, such as
radio/electromagnetic
interference or weak
reception.
Howling might be occurred
if placing objects near the
microphone or speaker.
Howling might be occurred
if blocking both the
microphone and speaker.
Howling might be occurred
if placing objects or hands in
front of the microphone.
Howling might be occurred
if the machine is located
near the devices that
generate noise.
Howling might be occurred
if the machine is located just
next to the wall.
Contact your network administrator.
Keep objects away from the
microphone or speaker.
Do not block both the microphone and
speaker.
Keep objects or hands away from the
microphone.
Do not place devices that generate
noise, such as projectors or computers,
near the machine.
Make sure there is sufficient space
between this machine and the wall.
Deterioration of sound
quality
Deterioration of sound
quality
Howling might be occurred
if using the machine in a
room where sound echoes.
Howling might be occurred
if using the machine close to
the other party's device for
example, when the other
party's voice can be heard
directly instead of through a
speaker.
Try keeping your voice as low as
possible during meetings to avoid
distracting echoes.
Keep this machine away enough from
the other party's device.
49
Page 52

4. Troubleshooting
Problems Causes Solutions
Deterioration of sound
quality
Deterioration of sound
quality
Deterioration of sound
quality
Deterioration of sound
quality
Howling might be occurred
if the audio volume is set too
loud.
Howling might be occurred
if your voice is too loud.
Howling might be occurred
if the machine is moved
during a meeting.
Howling might be occurred
if the external microphone
speaker is placed too close
to the air outlet of the
machine.
Adjust the audio volume on the
machine. For details about how to
adjust the volume, see p.36 "Adjusting
the Camera".
If you are using an external
microphone speaker, adjust the volume
of the external microphone speaker.
For details about how to adjust the
volume, see the respective manual for
the device.
• Keep away from the microphone.
• Lower your voice.
Before moving the machine, mute the
microphone of your machine. After you
finish moving the machine, cancel
mute.
When using an external microphone
speaker, keep it away from the air
outlet of the machine.
50
The sound is distorted. If the audio from the other
party is too loud or the
speaker volume of the
machine is raised
excessively, the audio might
become distorted.
• Lower the speaker volume of the
machine. For details about how to
lower the volume, see p.36
"Adjusting the Camera".
• If you are using an external
microphone speaker, lower the
volume of the speaker. For details
about how to lower the volume,
see the respective manual for the
device.
• Ask the other party to back away
from the microphone when they
speak.
Page 53

When You Have Problems Operating the Machine
Problems Causes Solutions
The sound cuts in and out. If you and the other party
speak at the same time, the
sound may cut in and out.
No sound can be heard
from the other party.
No sound can be heard
from the other party.
The audio volume is set to
the lowest level.
The other party's
microphone is muted.
Wait until the other party is finished
before speaking.
If the other party speaks for an
extended length of time and the audio
continually cuts out, mute the
microphone of your machine.
• Adjust the audio volume on the
machine. For details about how to
adjust the volume, see p.39
"Adjusting the Volume".
• If you are using an external
microphone speaker, adjust the
volume of the external
microphone speaker. For details
about how to adjust the volume,
see the respective manual for the
device.
Ask the party to cancel mute.
No audio is input. The microphone is muted. Cancel mute. For details about how to
cancel mute, see p.39 "Adjusting the
Volume".
The speaker volume cannot
be adjusted.
An external microphone
speaker is connected. If an
external microphone
speaker is connected, the
speaker on the machine is
disabled.
• Adjust the volume of the external
microphone speaker. For details
about how to adjust the volume,
see the respective manual for the
device.
• Remove the external microphone
speaker, and then adjust the
volume of the speaker on the
machine.
The microphone cannot be
muted.
An external microphone
speaker is connected. The
external microphone
speaker cannot be muted
Mute the external microphone speaker.
For details about how to mute the
external microphone speaker, see the
respective manual for the device.
from the machine.
51
Page 54

4. Troubleshooting
Problems Causes Solutions
Firmware Update screen is
displayed when turn on the
machine.
If a required firmware
update is detected. You
cannot start a meeting or
accept a registration request
until the update is complete.
Check the update information, and
then start the update immediately.
52
Page 55

5. Appendix
Specifications
Item Specification
Interface • Ethernet: 10BASE-T, 100BASE-TX, 1000BASE-T
• IEEE802.11g, IEEE802.11b, IEEE802.11n
• Encryption method: WEP128bit/64bit, WPA-PSK(TKIP/
AES), WPA2-PSK(AES)
• USB2.0 (type A) 2
• USB2.0 (type B)
• DVI-D
• Analog RGB (VGA)
Proxy authentication Basic authentication
Port The following port numbers are available for communication:
• When no proxy is used
TCP: 443, 5222, 17990, 17992
UDP: 50000 - 65535*
• When a proxy is used
TCP: 443
Network bandwidth Minimum 2Mbps
Video resolution • Maximum transmission resolution
640 360 pixels
• Maximum reception resolution
1280 720 pixels
Frame rate Up to 30 fps
Video mode 1024 768 pixels (XGA), 1280 800 pixels (WXGA)
Video coding H.264 Annex G (SVC)
Voice coding SPEEX wideband/ITU-T G.711/ITU-T G.722
1
Data transfer RTP (RFC1889/RFC3550) and RTCP (RFC1890/RFC3551)
53
Page 56

5. Appendix
Item Specification
Focus Pan focus
Automatic camera adjustment • Automatic gain control
• Automatic white balance control
Microphone • Automatic echo canceller
• Automatic noise reduction
• Automatic gain control
• Muting
Noise 40 dB or less
Power Source • (mainly Europe and Asia)
220 V-240 V, 50/60 Hz
• (mainly North America)
110 V, 50/60 Hz
Power consumption 50 W or less
External dimensions (W D
H)
• Main unit (Camera unit folded)
285.0 189.0 40.0 mm (11.2 7.4 1.6 inches)
• AC adapter (excludes projection)
119.2 53.3 17.6 mm (4.7 2.1 0.7 inches)
Weight • Main unit
Approx. 1.6 kg (3.5 lb.)
• AC adapter
Approx. 250 g (0.6 lb.)
A port in the range of 50000 to 65535 is selected as the port used for communication, according to the
*1
environment and conditions.
54
Page 57

Precautions for Use
Precautions for Use
This section describes precautions for using the machine. It also provides additional information about
the machine's specifications.
Where to use this machine
• The location in which the machine is used may affect the audio quality. Read the information
provided on p.17 "Installation Requirements" and select an appropriate location.
• This machine may not work properly depending on the network environment you are using.
For details, see p.17 "Installation Requirements".
Screen
• Do not remove the connected output cable to change the video output device after you turn
on the machine. Doing so can distort the screen image.
• Depending on the monitor used, the screen image may not be centered properly. If the
monitor is equipped with screen adjustment features, use these features to adjust the screen
image.
• If the machine is used in a poor network environment or the connection speed is slow, video
from a meeting or PC Screen Share may lag or even stop.
Meetings
• Because the automatic learning function of the echo canceller is active for approximately five
to ten seconds after a meeting starts, you may hear a loud noise or howling for a short time.
Although this noise greatly diminishes the audio quality and makes it difficult to hear the other
contacts, there is nothing wrong with the machine. The audio quality will gradually improve as
you continue the meeting and speak with the other parties.
• Depending on the status of the network band, video from you or the other contacts might not
be displayed. As a result, you will only be able to hear the voices of the other contacts
participating in the meeting.
PC Screen Share
• Sometimes PC Screen Share may not start automatically when you connect the machine to the
computer via a USB cable. If this is the case, the auto-play function on the computer might be
disabled. Check whether the function has been disabled. If it has been disabled, enable it. The
procedure for enabling and disabling the auto-play function differs depending on the
operating system version or edition you are using. For details, see the Windows Help.
55
Page 58

5. Appendix
Trademarks
Adobe, Acrobat, and Reader are either registered trademarks or trademarks of Adobe Systems
Incorporated in the United States and/or other countries.
Firefox is a registered trademark of the Mozilla Foundation.
Microsoft®, Windows®, Windows Vista®, and Internet Explorer® are either registered trademarks or
trademarks of Microsoft Corporation in the United States and/or other countries.
• The proper names of Internet Explorer 7, 8 and 9 are as follows:
Windows® Internet Explorer® 7
Windows® Internet Explorer® 8
Windows® Internet Explorer® 9
The proper names of the Windows operating systems are as follows:
• The product names of Windows XP are as follows:
Microsoft® Windows® XP Professional Edition
Microsoft® Windows® XP Home Edition
Microsoft® Windows® XP Media Center Edition
Microsoft® Windows® XP Tablet PC Edition
• The product names of Windows Vista are as follows:
Microsoft® Windows Vista® Ultimate
Microsoft® Windows Vista® Business
Microsoft® Windows Vista® Home Premium
Microsoft® Windows Vista® Home Basic
Microsoft® Windows Vista® Enterprise
• The product names of Windows 7 are as follows:
Microsoft® Windows® 7 Home Premium
Microsoft® Windows® 7 Professional
Microsoft® Windows® 7 Ultimate
Microsoft® Windows® 7 Enterprise
Other product names used herein are for identification purposes only and might be trademarks of their
respective companies. We disclaim any and all rights to those marks.
56
Page 59

INDEX
A
Air inlet...................................................................14
Air outlet.................................................................13
Alert indicator........................................................15
Analog RGB connector.........................................14
Anti-theft lock hole.................................................14
C
Camera unit.....................................................13, 31
Cleaning...................................................................7
Control panel..................................................13, 15
Copyright notice......................................................8
Cursor keys............................................................15
D
Disconnect key.......................................................15
DVI-D connector....................................................14
E
Enter key.................................................................15
Ethernet cable........................................................28
Ethernet port...........................................................14
External microphone speaker...............................29
Power cord set.......................................................24
Power indicator......................................................15
Power key..............................................................15
Precautions for use...................................................7
Push key..................................................................15
S
Speaker..................................................................13
Speaker volume keys............................................15
Specifications.........................................................53
Symbols....................................................................5
T
Trademarks............................................................56
U
USB port (type A)..................................................13
USB port (type B)...................................................13
V
Video output device..............................................27
W
Wireless networking................................................8
G
Guide to components............................................13
H
Handling this product..............................................7
How to read this manual.........................................5
I
Installation Requirements......................................17
Introduction..............................................................4
M
Manuals for this machine........................................3
Menu key...............................................................15
Microphone...........................................................13
Model-Specific Information....................................6
Mute indicator.......................................................15
Mute key................................................................15
P
Power connector....................................................14
57
Page 60

MEMO
58
Page 61

MEMO
59
Page 62

MEMO
GB
US
AU
60 EN
EN
EN
E0A0-8507
Page 63

© 2012 Ricoh Co., Ltd.
Page 64

Device Reference
E0A0-8507EN GB EN US EN AU
 Loading...