

Page 1

NETWORK INTERFACE BOARD
(Machine Code: B307)
May 31, 1999
Subject to change
Page 2

TABLE OF CONTENTS
1. OVERALL MACHINE INFORMATION........................................1-1
1.1 SPECIFICATIONS.....................................................................................1-1
1.2 SOFTWARE ACCESSORIES.................................................................... 1-1
1.2.1 UTILITY SOFTWARE.......................................................................1-1
1.2.2 SERVICE TOOLS............................................................................. 1-1
1.3 BLOCK DIAGRAM..................................................................................... 1-2
1.4 COMPONENT LAYOUT............................................................................ 1-3
2. INSTALLA T ION...........................................................................2-1
2.1 HARDWARE INSTALLATION.................................................................... 2-1
2.2 UTILITY SOFTWARE SETUP................................................................... 2-1
2.2.1 PRINTER MANAGER FOR ADMIN.................................................. 2-1
2.2.2 WEB STATUS MONITOR................................................................. 2-1
2.3 SETTING UP THE NIB FOR VARIOUS NETWORKS............................... 2-2
2.3.1 NETWARE NETWORKS.................................................................. 2-2
2.3.2 TCP/IP NETWORKS......................................................................... 2-3
Possible Problems with DHCP Parameter Settings............................. 2-4
2.3.3 NETBEUI NETWORKS..................................................................... 2-4
2.3.4 APPLETALK (ETHERTALK) NETWORKS....................................... 2-5
3. SERVICE TABLES AND PROCEDURES...................................3-1
3.1 PRINTING REPORTS ............................................................................... 3-1
3.1.1 NIB STATUS SHEET........................................................................ 3-1
3.1.2 NIB LOG LIST................................................................................... 3-1
3.2 NVRAM RESET......................................................................................... 3-1
4. TROUBLESHOOTING................................................................. 4-1
4.1 LED INDICATIONS.................................................................................... 4-1
i
Page 3
31 May, 1999 OVERALL MACHINE INFORMATION
1. OVERALL MACHINE INFORMATION
1.1 SPECIFICATIONS
Type Internal network interface board
Network Topology Ethernet 100BaseTX/10BaseT
Network Interface RJ45 x 1
Cable STP (Shielded Twisted-Pair) cable, category/type 5 or better
Note:
A cable is not enclosed with this option.
Protocol TCP/IP, IPX/SPX, NetBEUI, AppleTalk
Ethernet Frame Types Ethernet II, IEEE802.3, IEEE802.2, Ethernet_SNAP
SNMP support IP and IPX SNMP support of MIB-II
Supported NOS
Other
NetWare 3.x, 4.x, (5.0), Intranetware
§
Windows NT4.0
§
Windows 95/98
§
Mac OS 7.1 or later
§
Built-in web server
§
Built-in Telnet server
§
Built-in LPD daemon
§
Firmware update over IP network
§
1.2 SOFTWARE ACCESSORIES
Overall
Information
Utility software is provided in the Drivers and Utilities CD-ROM that comes with the
base printer.
1.2.1 UTILITY SOFTWARE
Software Description
Aficio Manager for Admin
(Win 95/98, NT4)
Aficio Manager for Client
(Win95/98, NT4)
Multi-Direct Print
(Win95/98, NT4)
Printer management software for network administrators.
NIB setup utilities are also available.
Printer management software for client users.
A peer-to-peer print utility for NetBEUI or TCP/ I P.
1.2.2 SERVICE TOOLS
Software Description
NBTFTP An NIB firmware update utility for use on a NetBEUI network.
This utility is not on the Driver and Utilities CD-ROM; it is
issued separately as a service tool.
1-1
Page 4
BLOCK DIAGRAM 31 May, 1999
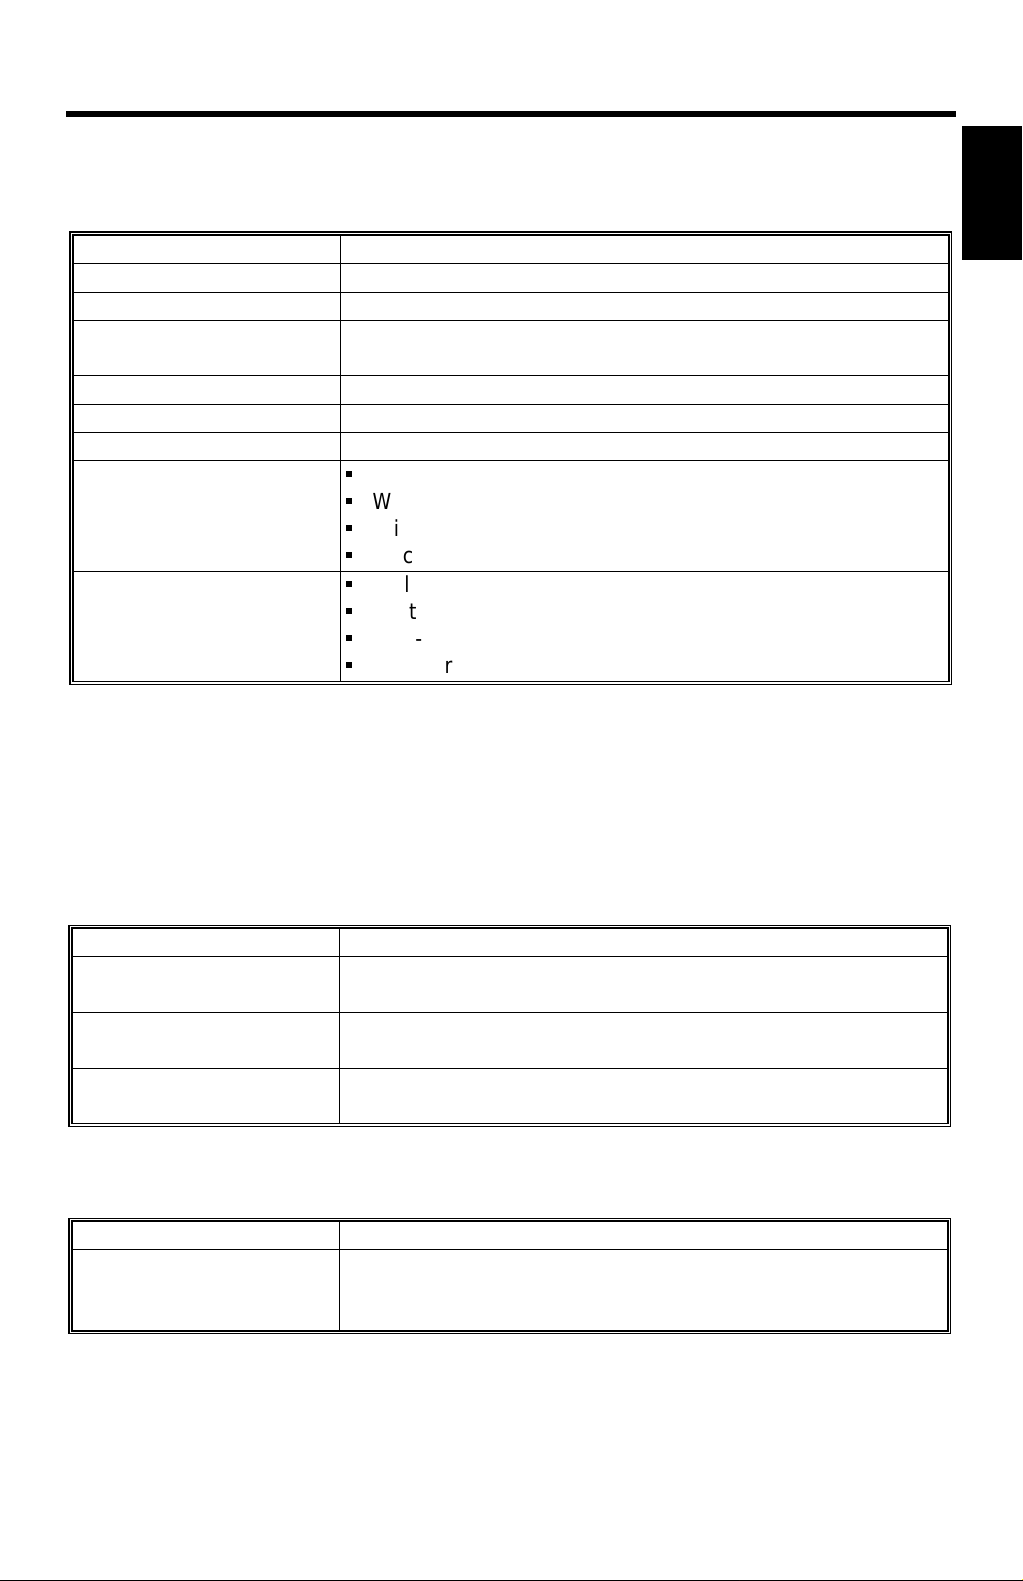
1.3 BLOCK DIAGRAM
CPU
MC68340PV
25.166MHz
DRAM
2MB
OPTION
I/F
Controller
Board
ASIC
DISCII
SRAM
EEPROM
Flash ROM
2MB
Bridge
AG1001V
MAC
Am79C971
PHY
ICS1890
Network
RJ-45
B307V501.WMF
· The Flash ROM contains NIB firmware. The firmware can be upgraded over the
network or from an IC card connected to the controller.
· The EEPROM holds all the NIB settings. Before replacing the NIB, the EEPROM
data can be backed up in the controller memory, and restored to the new NIB
after replacement.
1-2
Page 5

31 May, 1999 OVERALL MACHINE INFORMATION
1.4 COMPONENT LAYOUT
Front
DRAM
MAC
Am79C971
SRAM SRAM
EEPROM
SW1
LED1
(Y)
LED3
(G)
ROM
Flassh
PHY
ICS1890
RJ-45
LED4
(G)
ROM
Flassh
CPU
MC68340PV
Rear
Overall
Information
ASIC
DISCII
Bridge
AG1001V
B307V502.WMF
· Three LEDs show the status information.
· The push switch (SW1) is used to print reports.
1-3
Page 6

31 May, 1999 INSTALLATION
2. INSTALLATION
2.1 HARDWARE INSTALLATION
Refer to the base engine or printer controller installation instru ctions for how to
install the network interface board.
The machine does not print a NIB status sheet automatically. Print the NIB status
sheet by pressing the push switch (SW1) on the NIB after installation.
2.2 UTILITY SOFTWARE SETUP
One of the following utilities is required to monitor and set up the NIB. The utilities
are on the Drivers and Utilities CD-ROM that comes with the base machine or
controller.
2.2.1 PRINTER MANAGER FOR ADMIN
Installation
Printer Manager for Admin comes with NIB Setup Tool.
1. Install Printer Manager for Admin from the CD-ROM. (Use Custom Setup when
installing the software from the Autorun installation program.)
2. Start the NIB Setup Tool from the menu.
NOTE:
Do not use the MAP utility for this type of NIB.
2.2.2 WEB STATUS MONITOR
The built-in web server provides an interface to monitor and manage the NIB from
a remote host.
1. Assign an IP address to the NIB.
2. Access “http:// <IP address of the NIB> / from a web browser.
NOTE:
1) Use Printer User Tools at the machine’s operation panel to assign an IP
address.
2) Help for the Web Status Monitor is on the Drivers and Utilities CD-ROM.
After you can access the NIB web server, set up the “Help URL”
parameter in the [Network Config.] – [General] page as follows:
<CD-ROM drive letter>:\HELP\WSHELP\EN\index.htm
2-1
Page 7

SETTING UP THE NIB FOR VARIOUS NETWORKS 31 May, 1999
2.3 SETTING UP THE NIB FOR VARIOUS NETWORKS
This section gives a summary of how to set up the NIB in various network
environments.
NOTE:
It is not recommended for service technicians to program network and
protocol parameters. Ask the customer’s network administrator to program
and manage these parameters.
2.3.1 NETWARE NETWORKS
The following parameters are required for NetWare networks.
Parameter
Protocol
(Default = Enabled)
Operation Mode
(Default = Print Server)
Remote Printer No.
(Default = 0)
Print Server Name Yes (Note 2) Yes (Note 2)
Print Server Password Cannot be programmed Cannot be programmed
File Server Name Yes No
NDS Context Name No Yes
Preferred NDS Tree No Yes (Note 3)
Print Queue Scan Rate Cannot be programmed Cannot be programmed
Frame Type
(Default = Auto-Select)
Job Timeout
(Default = 15 s)
Disable Bindery Cannot be programmed Cannot be programmed
Novell 2.x/3.x/4.x/ (5.0)
Bindery Network
Yes Yes
Yes
(Print Server
or Remote Printer)
Yes (Note 1) Yes (Note 1)
Yes Yes
Yes Yes
Novell 4.x / (5.0)
NDS Network
Yes
(Print Server
or Remote Printer)
NOTE:
1) ‘Remote printer number’ is necessary only when the “Operation Mode”
is “Remote Printer”.
2) ‘Print server name’ is necessary only when the “Operation Mode” is
“Print Server”. The default name is “RNPxxxxxx” (xxxxxx is the lower 6
digits of the MAC address).
3) The preferred NDS context must be typed in without a starting dot ( . ).
– OU=Development.O=Corp [OK]
– .OU=Development.O=Corp [NG]
– Development.Corp [OK]
– .Development.Corp [NG]
4) The following utilities can be used to change the settings.
– Printer Manager for Admin
– Web Status Monitor
– (Telnet)
2-2
Page 8

31 May, 1999 INSTALLATION
2.3.2 TCP/IP NETWORKS
The following parameters are available for TCP/IP network printing.
Parameter Description
Protocol
(Default = Enabled)
IP Address
(Default = 11.22.33.44)
Subnet Mask
(Default = 0.0.0.0)
Default Gateway
(Default = 0.0.0.0)
Access Control Address
Access Control Mask
Network Boot Use “NONE” when an IP address is specified manually
Frame Type Ethernet II is always used.
Disable this if TCP/IP is not used.
IP address of the NIB (required)
Subnet mask for the subnet (required)
Default gateway of the subnet. This is required when the
NIB is accessed from a host in a different subnet.
These two parameters are used to allow access to the NI B
only to the hosts in the specified subnet.
For example, if the Access Control Address is set to
“128.1.2.3”, access to the NIB is restricted as follows:
When Access Control Mask is “255.0.0.0”, hosts in the
·
128.0.0.0 subnet can access the NIB.
When Access Control Mask is “255.255.0.0”, hosts in
·
the 128.1.0.0 subnet can access the NIB.
When Access Control Mask is “255.255.255.0”, hosts in
·
the 128.1.2.0 subnet can access the NIB.
When Access Control Mask is “255.255.255.255”, only
·
the host that has the IP address 128.1.2.3 can access
the NIB.
(default), or use “DHCP” if the NIB receives an IP address
from a DHCP server.
All the other settings may not be used, unless the NIB is
installed in, for example, a UNIX network.
RARP + TFTP
·
BOOTP
·
RARP + BOOTP
·
ARP + PING
·
ARP & RARP
·
ARP & BOOTP
·
ARP & RARP & BOOTP
·
Installation
2-3
Page 9

SETTING UP THE NIB FOR VARIOUS NETWORKS 31 May, 1999
Possible Problems with DHCP Parameter Settings
1. IP address conflicts with an another host
If the IP address conflicts with an another host, the NIB does not show any
errors. However, the NIB cannot receive any print jobs, because the IP protocol
is disabled automatically at startup.
In this case, the other host in conflict with the NIB must have a manually
assigned IP address. Find the host using the
PING
and
ARP
commands for
example, and assign a suitable address.
2. IP address changes after restarting the machine
The DHCP server may lease a different IP address to the NIB if available IP
addresses become in short supply. As a result, the NIB cannot receive any print
jobs, because the jobs are sent to the previously assigned IP address.
To solve this problem, reserve an IP address at the DHCP server by allocating
an address to the NIB’s Ethernet (MAC) Address.
2.3.3 NETBEUI NETWORKS
The following parameters are available for NetBEUI network printing.
In a Microsoft Windows network, the NIB appears like a computer host with a
printer connected.
Parameter Description
Protocol
(Default = Enabled)
Workgroup Name
(Default = WORKGROUP)
Computer Name
Comment Comment for the host.
Share Name
Notify Print Completion
(Default = Disabled)
Disable this if NetBEUI is not used.
The name of the workgroup to which the NIB belongs in
the Microsoft Windows network.
This appears in, for example, the Network Neighborhood”
window to which the printer is connected.
The Plug&Play name specified with SP5-907 appears
here. This cannot be changed with the utility software.
Enable this if notification is needed after printing (the
controller notifies the NIB, then the NIB notifies the client
PC).
2-4
Page 10

31 May, 1999 INSTALLATION
2.3.4 APPLETALK (ETHERTALK) NETWORKS
The following parameters are available for AppleTalk network printing.
Parameter Description
Protocol
(Default = Enabled)
Network No. The network number of the AppleTalk network to which the
Printer Name The Plug&Play name specified with SP5-907 appears
Printer Type “LaserWriter” is always displayed.
AppleTalk Zone The default AppleTalk zone name of the network is
Disable this if AppleTalk is not used.
NIB is connected is displayed.
here. This can be changed using the Apple Printer Utility.
displayed. This can be changed by sending the ZoneName
PS file to the NIB.
Installation
2-5
Page 11

31 May, 1999 SERVICE TABLES AND PROCEDURES
3. SERVICE TABLES AND PROCEDURES
3.1 PRINTING REPORTS
3.1.1 NIB STATUS SHEET
The NIB status sheet has all the current settings for the NIB parameters, as well as
the firmware version information.
1. Turn on the machine.
2. Hold down the push switch (SW1) on the NIB for 2 seconds. The NIB status
sheet is printed.
3.1.2 NIB LOG LIST
The NIB log list has all the system log information.
1. Turn on the machine.
2. Hold down the push switch (SW1) on the NIB for 5 seconds. The NIB log sheet
is printed.
3.2 NVRAM RESET
The NIB NVRAM can be reset to the factory defaults using the printer controller’s
SP modes, or using the following procedure. Refer to the controller service manual
for how to use the printer SP mode.
This resets NVRAM (EEPROM) to the factory defaults. All the NIB parameters are
initialized to the default settings.
1. Hold down the push switch (SW1) on the NIB while turning on the machine,
and keep holding down the switch for 15 seconds.
2. Release the switch for 3 seconds, press it for 3 seconds, and then release it.
3. Turn the main switch off/on to reset the NVRAM.
NOTE:
There is a margin of less than 1 second for error. Use a watch to
measure the time periods as accurately as possible.
Tables
Service
4. Print out the configuration page, and then check the settings. If the procedure
failed, the previous settings remain. Repeat the above procedure until the old
settings have been cleared.
3-1
Page 12

31 May, 1999 TROUBLESHOOTING
4. TROUBLESHOOTING
4.1 LED INDICATIONS
LED1
LED3
LED4
B307T501.WMF
LED Description On Off
LED1 Operating status Ready Not ready
LED2 Not used
LED3 Topology 100BaseTX 10BaseT
LED4 Link status Link success Link failure
Trouble-
shooting
4-1
 Loading...