

Page 1

Novell
®
NEST Autoroute
TM
Function Upgrade Card Type 140
Plus Novell
®
NEST
TM
Feature Expander Type 100 2M
Plus Novell
®
NEST
TM
SERVICE MANUAL
April 22th, 1996
Subject to change
Page 2

Lithium Batteries
CAUTION
I
The danger of explosion exists if a battery of this type is inc orr ectly
replaced. Replace only with the same or an equiv alent type
recommended by the manufacturer. Discard used batteries in
accordance with the manufactur er’s instructions.
Novell is a registered trademark and NEST is a trademark of Novell, Inc.
Page 3
April 22th, 1996 OVERALL INFORMATION
OVERVIEW
1. OVERALL INFORMATION
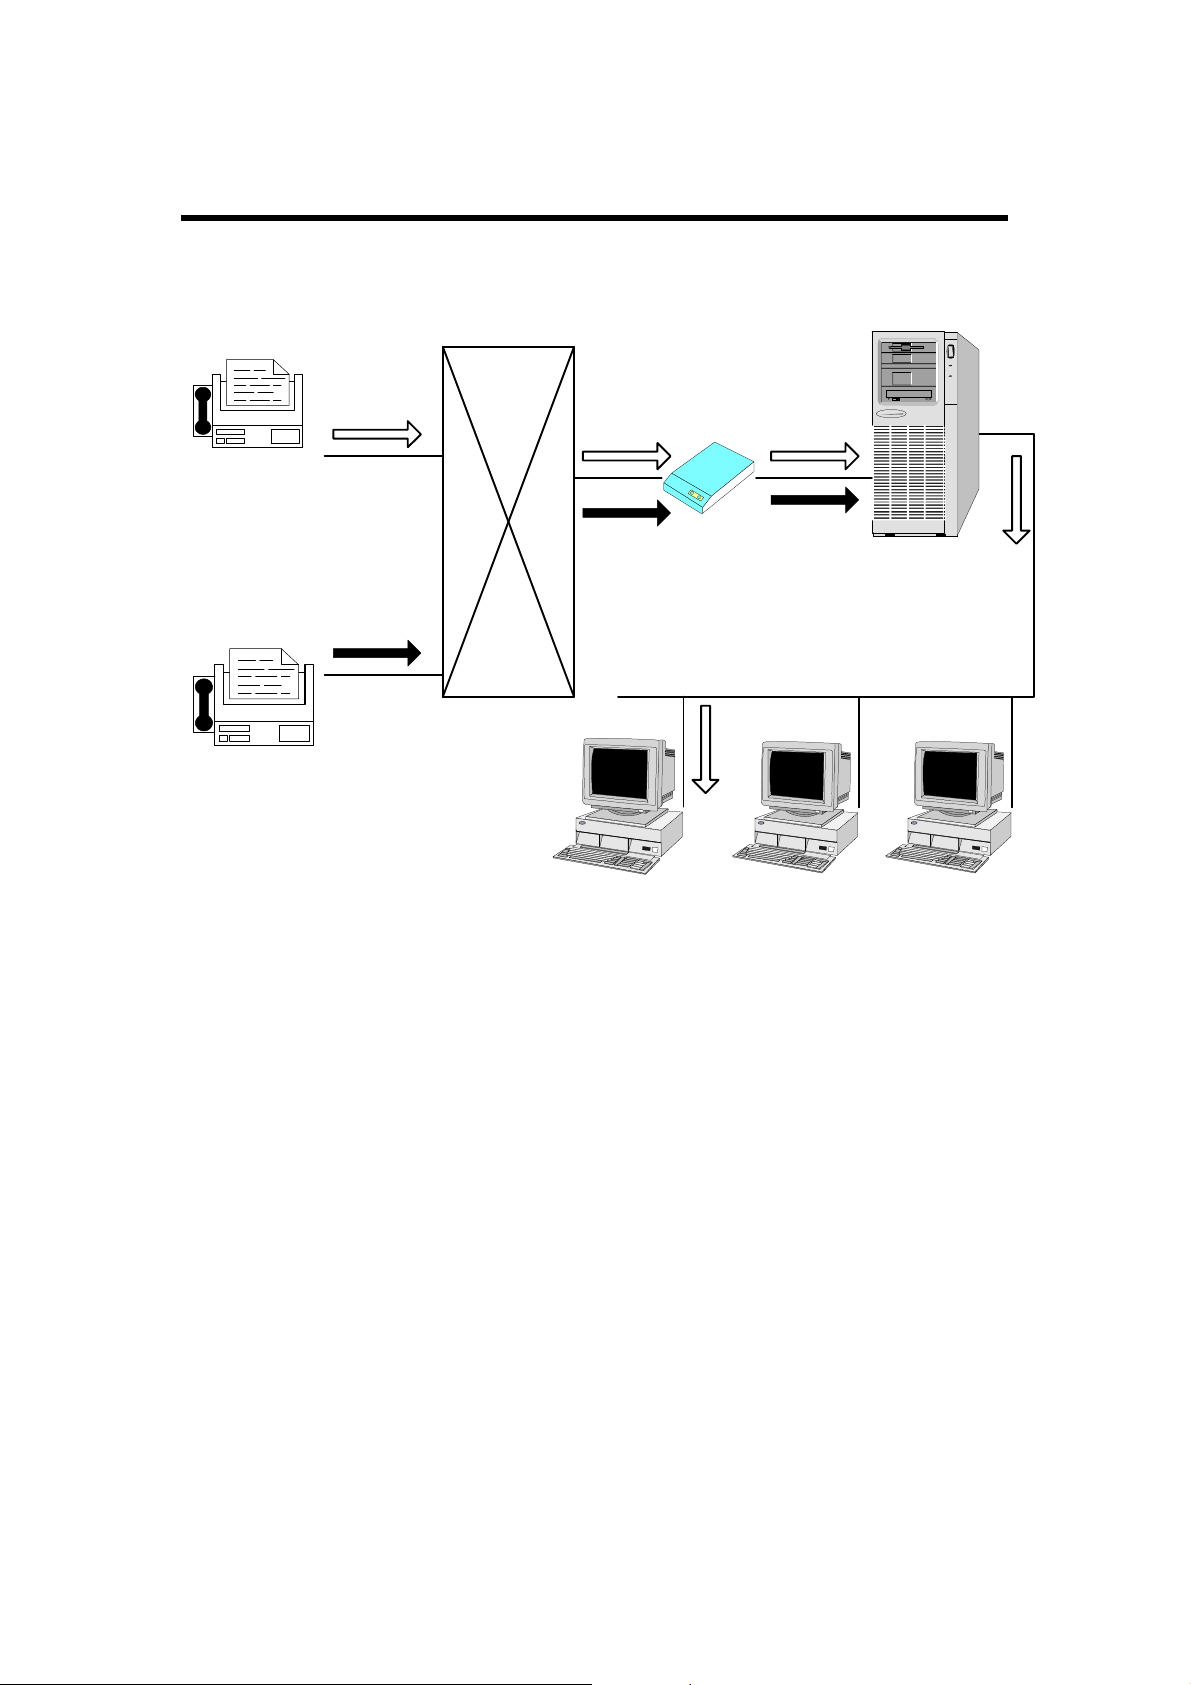
1.1. OVERVIEW
PSTN
RICOH Fax
with
NEST Autoroute
G3 Fax
TM
COMPAQ
Fax Modem
Netware Server
•{
®
Fax Server
with
TM
Software
H130V500.wmf
PC Client
Cheyenne
NEST Autoroute
PC Client PC Client
LAN
Novell® Embedded System Technology (NEST) Auto routeTM is an alternative
routing methodology, patented by Novell®. It allows a user to send a fax to a
NetWa re netwo rk and have the fax rou ted dire ctly to the recipie nt’s PC clients.
In order to take advant age of NEST AutorouteTM, the user on the receiving
end must be connected to a NetWare network (Novell® NetWere 3.12 or 4.1).
Using the standerd Group 3 T.30 protocol for rou tin g in fo rmat ion , NEST
AutorouteTM works by including an Autoroute ID code wit h each fa x t ran smission. The code, which is sent in the TSI frame , p rovides the information
required to deliver a fax to its destination.
Both the NEST cards for the fax machine, and th e ext ra software released by
Cheyenne® for the Server and PC clients, are required to perform the
Autoroute fu nction.
1-1
Page 4
OVERALL INFORMATION April 22th, 1996
NEST CARD
1.2. NEST CARD
The contents of both card options are as follows.
Function Upgrade Card Type 140 Plus Novell® NEST
IC Card
Operation Manual for the NEST Autoroute
Battery
Operation Manual for the battery
TM
TM
Feature Expander Type 100 2M Plus Novell® NEST
IC Card
Operation Manual for the NEST Autoroute
TM
TM
1.3. AUTOROUTE ID
The Autoroute ID code included in TS I is made of up to 20 alphanumeric
code, which start from "#" and end with "#". Whe n the operator enters the
telephone number and the Au to rou te ID code, and then starts to send a me ssage, the machine re pla ces the "#" and "∗" code s which are ent ere d by the
operator to "++" and "+" codes, then sends them out on the line. This is b ecause the "#" and "∗" codes are not permitted in the TSI fo r Group 3 T30.
User operation : #12345678∗1234∗1234#
TSI sent out : ++12345678+1234+12 34
[A] [B] [C]
A : Autoroute I D (4 digits to 8 d igit s)
B: Function ID / Arg ument
C: Security Code / Document ID
B and C are the optional codes for the Cheynne® FAXSERVE.
When the user TSI is a lready stored in the ma chine, the Auto route ID replaces it, then the Autoroute ID is sen t o ut. The TSI is made of up t o 20 d igits.
In the following example, the use r TSI "1 23" is re pla ced.
User TSI : 123+1234567890
Autoroute ID : #12345678#
TSI sent out : 1234567890++1234 56 78
1-2
Page 5

April 22th, 1996 OVERALL INFORMATION
AUTOROUTE ID
Note ;
Using "++" codes in the TSI must be avo ided, because the Autoroute ID may
not be recognized correctly by the NetWare Server, as shown in the following example.
User TSI : 123++456
Autoroute ID : #12345678#
TSI on the line : 123++456++123456 78
[A]
The NetWare Server may recognize "++" codes [A] as the start of an
Autoroute ID.
1-3
Page 6

April 22th, 1996 INSTALLATION
OVERVIEW
2. INSTALLA TION
2.1. OVERVIEW
Refer to the Opera tor’s Manual for the installation environment and how to install and set up the machine .
"NEST" is listed as a parameter on the system parameter list wh ile t he NES T
card is installed in the machine.
A sample system parameter list is given below.
* * * SYSTEM PARAMETER LIST (Date and Time) * * *
SERIAL NO. - Serial number programmed by function 14)
ROM VER. [Version] [Software release no.] [Software release date]
ROM NO. [Software part no.] [Check sum values (total) (boot) (main)]
R T I
T T I
C S I
ID CODE
MEMORY LOCK ID
NUMBER
OWN NUMBER
OWN NUMBER(ISDN G4)
OWN NUMBER(ISDN G3)
SERVICE NUMBER
NCU PARAMETER
COUNTER
PARAMETER
SCAN THRESHOLD
2MB, 4MB or HD - Optional memory card or Hard Disk installed
CASSETTE 2 - Optional paper feed unit installed
CASSETTE 3 - Optional paper feed unit installed
FUNCTION CARD or FOD - Optional function upgrade card or Fax on demand kit
PRINTER INTERFACE - Optional printer interface installed
G4 - Optional ISDN G4 kit installed
NEST - NEST Card installed
SWITCH (UPPER:DEFAULT LOWER:CURRENT)
(SWUSR) - User Parameter Settings
installed
CONFIDENTIAL ID
TTI
2-1
h130i500.wmf
Page 7

T
Model:
INSTALLATION May 20th,1997
INSTALLING THE NEST CARD
FX4, FX6, FX6MK2, FX6CD, FX7, LX7, LSO, AD1
echnical
ulletin
B
Date:
31-Aug-97
No:
PAGE: 2/4
005
2.2. INSTALLING THE NEST CARD
CAUTION
Before installing the NEST card,do the following:
1.Print out all messages stored in the memory.
2.Print out the lists of user-programmed items and the system parameter list.
2.2.1. Function Upgrade Card Type 140 Plus Novell
Note
The following installation procedure i nitializes (erases) all the user-programmed data
•
stored in the card, if the Function Upgrade Card already installed in the machine is
replaced with a NEST card.
NEST
TM
Installation Procedure (Without a Function Upgrade Card)
Turn off the main switch.
•
Install the battery on the NEST card.
•
Turn on the battery switch.
•
Install the NEST card in the slot.
•
Turn on the main switch.
•
Print the system parameter list and make sure that “NEST” is listed as an option on
•
the list.
Installation Procedure
(Replacing a Function Upgrade Card with the NEST card)
Read and back-up the user-programmed data stored in the Function Upgrade Card
•
with RDS.
Turn off the main switch.
•
Remove the Function Upgrade Card from the slot.
•
Install the battery on the NEST card and turn on the battery swit ch.
•
Install the NEST card in the slot.
•
Turn on the main switch.
•
Print the system parameter list and make sure that “NEST” is listed as an option on
•
the list.
Write the backed-up data to the NEST card.
•
Page 8

T
Model:
May 20th,1997 INSTALLATION
FX4, FX6, FX6MK2, FX6CD, FX7, LX7, LSO, AD1
echnical
ulletin
B
Date:
31-Aug-97
INSTALLING THE NEST CARD
No:
PAGE: 3/4
005
When the NEST card is replaced with another NEST card, do the
following so the machine can recognize the new card.
1. Turn off the main switch
2. Remove the old card.
3. Turn on the machine without the card and turn off.
4. Install the new card.
5. Turn on the main switch.
CAUTION
The IC card contains a lithium battery.
The danger of explosion exists if a battery of this type is incorrectly replaced.
Replace only with the same or an equivalent type recommended by the
manufacturer. Discard used batteries in accordance with the manufacturer’s
instructions
.
Page 9

No:
005
PAGE: 4/4
T
Model:
INSTALLATION May 20th,1997
INSTALLING THE NEST CARD
FX4, FX6, FX6MK2, FX6CD, FX7, LX7, LSO, AD1
echnical
ulletin
B
Date:
31-Aug-97
2.2.2. Feature Expander Type 100 2M Plus Novell NEST
Note
The following installation procedure initializes (erases) all the data stored in the card,
•
if the Feature Expander already installed in the machine is replaced with a NEST
card.
Installation Procedure
Turn off the main switch.
•
Install the NEST card in the slot in the machine.
•
Turn on the main switch.
•
Print the system parameter list and make sure that “NEST” is listed as an option on
•
the list.
When the NEST card is replaced with another NEST card, do the following so the
machine can recognize the new card.
1. Turn off the main switch.
2. Remove the old card.
3. Turn on the machine without the card and then turn off.
4. Install the new card.
5. Turn on the main switch.
Page 10

April 22th, 1996 TROUBLESHOOTING
"NEST" is not listed on the System Parameter List
3. TROUBLESHOOTING
Refer to the Service Manual of the machines for the common troubleshooting
procedures.
3.1."NEST" is not listed on the System Parameter List
Possible Cause:
•The NEST card is not installed completely.
•The NEST card is broken.
•The software of the facsimile machine was not updated for the
Autoroute function.
Action:
· Check if software of the facsimile machine has been updated.
. Re-install the NEST card.
Caution: Turn off the machine while replacing.
. Install a new card.
Cross reference
Installing the NEST card: Section 2.
3.2.Communication Error
Possible Cause:
•The other terminal may be faulty.
•The Autoroute ID Code was input incorrectly.
Action:
. Check if the Autoroute ID Code are in the wrong format.
. Try sending to another machine.
. Call Cheyenne® support center.
Cross reference
Autoroute ID format: Section 1-3.
3-1
Page 11

TROUBLESHOOTING April 22th, 1996
The Autoroute Feature is not working correctly
3.3.The Autoroute Fe atur e is not w or king cor rec tly
Possible Cause:
•The NEST card is not installed completely.
•The NEST card is broken.
•The software of the facsimile machine was not updated for the
Autoroute function.
•Manual sending is not available for the NEST Autoroute function.
•The Autoroute ID Code wa s not input correctly.
•The other terminal may be faulty.
Action:
. Check if software of the facsimile machine has been updated.
. Try sending from memory.
. Re-install the NEST card.
Note: Turn off the machine while replacing.
. Check if the Autoroute ID code is in the wrong format.
. Try sending to another machine.
. Install a new card.
. Call Cheyenne® support center.
Cross reference
Installing the NEST Card: Section 2.
Cross reference
Autoroute ID format: Section 1-3.
3-2
 Loading...