

Page 1

TABLE OF CONTENTS
TABLE OF CONTENTS
WHERE IS IT & WHAT IS IT
COPIER EXTERIOR ......................................................................................2
COPIER INTERIOR....................................................................................... 4
OPERATION UNIT .......................................................................................6
Touch Panel Display ....................................................................................7
WHAT YOU CAN DO WITH THIS COPIER
FUNCTIONS.................................................................................................. 10
BASIC
STARTING THE COPIER .............................................................................20
When The Main Switch Is In The Stand-by Position ...................................20
When The Touch Panel Display Is Off ........................................................21
When The Copier Is Set For User Codes....................................................21
When The Copier Has Been Turned Off By The Weekly Timer.................22
USING THE TOUCH PANEL DISPLAY ....................................................... 23
GETTING HELP ON THE DISPLAY............................................................. 25
Seeking Guidance In The Stand-by Condition ............................................25
Seeking Guidance While Entering Copy Job Settings.................................26
RECOMMENDED & NON-RECOMMENDED ORIGINALS..........................27
Recommended Originals ..............................................................................27
Non-recommended Originals For The Document Feeder ...........................27
SETTING A STACK OF ORIGINALS IN THE DOCUMENT FEEDER
(ADF, ARDF)................................................................................................. 28
SETTING ONE ORIGINAL AT A TIME IN THE DOCUMENT FEEDER
(SADF)...........................................................................................................29
SETTING ORIGINALS ON THE EXPOSURE GLASS ................................ 31
SETTING COMPUTER FORMS ON THE DOCUMENT FEEDER...............32
iii
Page 2

TABLE OF CONTENTS
SETTING ONE ORIGINAL IN THE MOVING-ORIGINAL SCAN TABLE ... 35
PROOF COPYING.........................................................................................36
COPYING
BASIC OPERATIONS...................................................................................38
One-to-one Copying .................................................................................... 38
Adjusting Copy Image Density.................................................................... 40
Selecting The Copy Paper Size (Manual Paper Select) ............................ 41
Having The Copier Choose The Paper Size (Auto Paper Select).............. 41
Having The Copier Choose The Reproduction Ratios
(Auto Reduce/Enlarge)................................................................................ 44
Temporarily Stopping One Job To Copy Something Else
(Interrupt Copying) ....................................................................................... 45
Storing Your Copy Settings In Memory (Program).....................................48
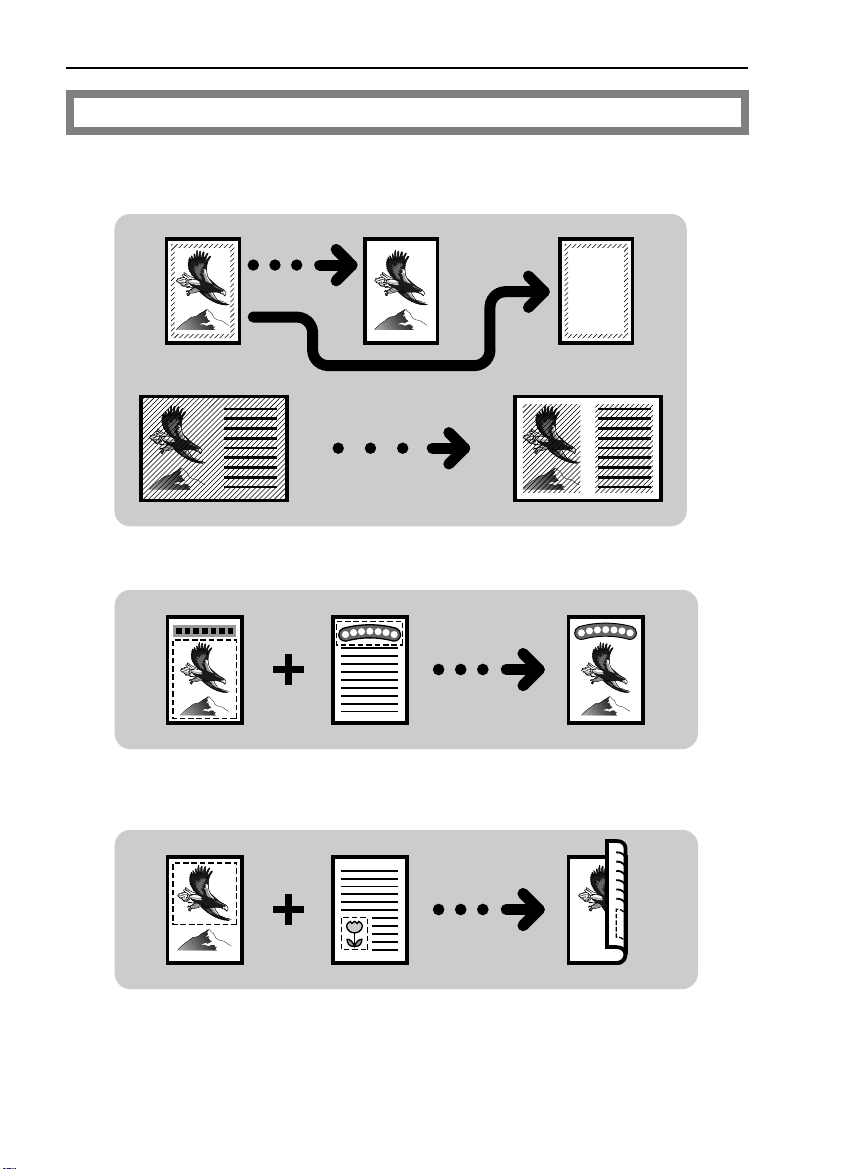
Setting Special Functions (Special Feature) .............................................. 50
Entering Copy Job Settings During The Warm-up Period (Auto Start) ...... 53
COPYING FROM THE BYPASS TRAY .......................................................54
COPYING FROM THE BYPASS TABLE IN THE MOVING-ORIGINAL
SCAN MODE.................................................................................................55
REDUCING AND ENLARGING.................................................................... 57
Reducing And Enlarging Using Preset Ratios (Preset R/E) ......................57
Reducing And Enlarging In 1% Steps (Zoom)............................................58
Fitting The Original To A Copy Of A Different Size
(Size Magnification)..................................................................................... 60
WORKING WITH BOTH SIDES OF ORIGINALS AND COPIES (Duplex) .61
Making Two-sided Copies From One-sided Originals
(1 Sided Originals → 2 Sided Copy) .......................................................... 61
Making Two-Sided Copies From Two-Sided Originals
(2 Sided Original → 2 Sided Copy)............................................................. 62
Making One-Sided Copies From Two-sided Originals
(2 Sided Original → 1 Sided Copies) .........................................................63
ADDING MARGINS FOR BINDING (Margin Adjustment).........................64
Margin For One-sided Copying .................................................................. 64
iv
Page 3

TABLE OF CONTENTS
Margin For Two-sided Copying ....................................................................65
EDITING THE COPY IMAGE (Edit Image) ..................................................66
Erasing Part Of Original Image ....................................................................66
Erasing The Center Margin And Surrounding Area Of The Original Image
(Cent./Bord.) ................................................................................................69
Merging Images (Overlay) ...........................................................................70
Editing The Copy Image When Making Two Sided Copies .......................71
ADDING OR INSERTING SHEETS (Cover/Slip Sheet )............................73
Copying The Front Cover Of The Originals ................................................73
Copying The Front And Back Covers Of The Originals..............................74
Adding A Front Cover Sheet .......................................................................76
Adding Front And Back Cover Sheets ........................................................77
Copying Designated Pages Of Originals Onto Slip Sheets
(Paper Designate) .......................................................................................78
Copying Designated Pages Of Originals Onto Tab Sheets
(Tab Sheet) ...............................................................................................80
Inserting Slip Sheets Between OHP Transparencies
(OHP Slip Sheet) .......................................................................................84
FINISHING..................................................................................................... 85
Sorting Into Sets When The Number Of Originals Is 70 Or Less
(123, 123, 123) (Sort)...................................................................................85
Sorting Into Sets When The Number Of Originals Is More Than 70
(123, 123, 123) (Large Volume Sort)...........................................................87
Stacking Together All Copies Of A Page
(111, 222, 333) (Stack)...............................................................................89
Stapling Copies (Staple) ..............................................................................90
COMBINATION CHART................................................................................ 94
WHAT TO DO IF SOMETHING GOES WRONG
IF YOUR COPIER DOES NOT OPERATE AS YOU WANT .......................98
IF YOU CANNOT MAKE COPIES AS YOU WANT ....................................100
LOADING PAPER......................................................................................... 101
Non-recommended Paper For Paper Trays.................................................101
Notes For Paper ...........................................................................................101
v
Page 4
TABLE OF CONTENTS
Loading Paper In The 500-sheet Paper Tray (Tray 1 and 2)..................... 102
Loading Paper In The 1,700-sheet Paper Tray (Tray 3) ............................ 103
Loading Paper In The Optional Large Capacity Tray (Tray T)................... 104
Loading Tab Sheets In the Tray 2 .............................................................. 105
ADDING TONER ...........................................................................................107
ADDING STAPLES .......................................................................................108
CLEARING MISFEEDS................................................................................109
Check The Misfeed Location Display .......................................................... 109
Rearranging Originals After Clearing Misfed Paper .................................... 110
Clearing Paper Misfeeds............................................................................. 111
Clearing Original Misfeeds ..........................................................................112
CHANGING THE COPIER’S SETTINGS
CHANGING PAPER SIZE .............................................................................114
500-sheet Paper Trays (Tray 1 and 2)........................................................114
USER TOOLS ................................................................................................ 116
How To Access User Tools......................................................................... 116
User Tool Menu ........................................................................................... 117
SERVICE REPRESENTATIVE SETTING .....................................................129
MAINTAINING YOUR COPIER
WHERE TO PUT YOUR COPIER
DO’S AND DON’TS
REMARKS
USE AND STORAGE OF SUPPLIES
MAINTAINING YOUR COPIER..................................................................... 132
Operation Unit.............................................................................................. 132
Document Feeder........................................................................................133
WHERE TO PUT YOUR COPIER .................................................................134
Copier Environment ..................................................................................... 134
Power Connection .......................................................................................134
Access To Copier........................................................................................ 135
vi
Page 5

TABLE OF CONTENTS
DO’S AND DON’TS.......................................................................................135
Copier...........................................................................................................135
Document Feeder.........................................................................................136
REMARKS.....................................................................................................137
Copier...........................................................................................................137
Sorter Stapler (Option).................................................................................138
USE AND STORAGE OF SUPPLIES........................................................... 138
Copy Paper ..................................................................................................138
Paper Storage ..............................................................................................139
Toner Storage ..............................................................................................139
SPECIFICATIONS
COPIER .........................................................................................................142
DOCUMENT FEEDER...................................................................................145
SORTER STAPLER (OPTION) .....................................................................147
LARGE CAPACITY TRAY (LCT) (OPTION) ................................................148
INDEX
INDEX ............................................................................................................ 150
vii
Page 6

TABLE OF CONTENTS
viii
Page 7

INTRODUCTION
INTRODUCTION
This manual contains detailed instructions on the operation and maintenance of this copier. To get maximum versatility from this copier, all
operators should carefully read and follow the instructions in this manual.
Please keep this manual in a handy place near the machine.
Please read the next section before using this copier. It contains important
information related to USER SAFETY and PREVENTING EQUIPMENT
PROBLEMS.
SAFETY INFORMATION
When using your copier, the following safety precautions should always be
followed.
Safety During Operation
In this manual, all safety messages are identified by the words "WARNING"
and "CAUTION". These words mean the following:
WARNING: Important information to alert you to a situation that might
cause serious injury and damage to your property if instructions are not followed.
CAUTION: Important information that tells how to prevent damage to equip-
ment, or how to avoid a situation that might cause minor injury.
WARNINGS:
Since some parts of the copier are supplied with high electrical volt-
age, touch only the parts specified in this manual.
Do not modify or replace any parts other than the ones specified in
this manual.
Do not incinerate toner or toner containers. Toner dust might ignite
when exposed to open flames.
Do not store toner where it will be exposed to heat.
Do not eat or swallow toner, and keep it out of reach of children.
i
Page 8

SAFETY INFORMATION
The fusing section can be very hot. Be careful when handling it.
CAUTIONS:
While copying, do not turn off the main switch.
While copying, do not open the front doors.
While copying, do not lift the document feeder.
While copying, do not unplug the power cord.
Do not lay anything weighing more than 10 kg, 22 lb on the exposure glass.
Do not place tools or other hard objects on the exposure glass.
Keep corrosive liquids, such as acid, off the machine.
Do not allow paper clips, staples, or other small metallic objects to fall inside
the machine.
General Safety Information
❐ Always turn the copier off when you have finished copying for the day, but
leave it p lugged in.
❐ When the copier will not be used for a long period, disconnect the power cord.
❐ If the copi er must be tran sported by v ehicle, plea se contact you r service rep re-
sentativ e.
❐ When the ma in switch is in the Stand-by posi tion, the antico ndensation heaters
are on. In case of emergency, unplug the machine’s power cord.
❐ To disconnect the power source, the main plug must be pulled.
ii
Page 9

WHERE IS IT
& WHAT IS IT
WHERE IS IT & WHAT IS IT
1
Page 10
14
COPIER EXTERIOR
COPIER EXTERIOR
3
2
4
1
15
5
6
10
12
13
7
8
11
9
2
Page 11

COPIER EXTERIOR
1. Operation unit Operator controls and indicators are located here.
2. Document feeder Originals inserted into the document feeder are
individually and automatically fed onto and removed from the exposure glass. ☛ See page 27.
3. Moving-original
☛ See pages 35 and 55.
scan table
4. Exposure glass Position originals here face down for copying.
5. Bypass table ☛ See pages 54 and 55.
6. 3000-sheet large
capacity tray
This tray can hold 3,000 sheets of copy paper.
☛ See page 104.
(TrayT) (Option)
7. Main switch Switches the copier between on and stand-by
conditions ("stand-by" means that the anticondensation heaters are on).
8. Front doors Open to access the inside of the copier.
9. 1,700-sheet tray
(Tray 3)
10. 500-sheet tray
(Tray 1)
11. 500-sheet tray
(Tray 2)
This tray can hold 1,700 sheets of copy paper.
☛ See page 103.
This tray can hold 500 sheets of copy paper. ☛
See page 102.
This tray can hold 500 sheets of copy paper. ☛
See page 102.
12. Bypass exit tray
13. Sorter staplers
(Option)
Copies will be sorted, stacked, or stapled here.
☛ See page 85.
14. Proof tray When the optional sorter stapler is installed, com-
pleted copies are delivered here not in the Finishing mode.
WHERE IS IT & WHAT IS IT
15. Auto response
sensor
❐ Other options: key counter, key counter holder, key counter bracket set
When operator stands in front of this sensor, the
copier automatically turns off the Screen Saver.
3
Page 12

COPIER INTERIOR
3
COPIER INTERIOR
2
1
4
Page 13

COPIER INTERIOR
1. Fusing Unit Fuses the copy image to the paper. When ac-
cessing the inside of the copier, use caution.
This unit may be very hot.
2. Unit for two-sided
This unit is used to make two-sided copies.
copying
3. Toner Cartridge Replace the toner cartridge when the copier in-
structs you to add toner.
WHERE IS IT & WHAT IS IT
5
Page 14
INTERRUPT KEY
Press to make interrupt
copies during a copy
run. ☛
See page 45.
CLEAR MODES KEY
Press to clear the
copier of previously
entered settings and
functions.
OPERATION UNIT
OPERATION UNIT
BRIGHTNESS
KNOB
You can change the
brightness of the
display.
GUIDANCE KEY
Press to see
guidance of
functions.
☛
page 25.
1234
TOUCH PANEL DISPLAY
You can see the operation status
and messages here.
☛
PROGRAM/SPECIAL
See
FEATURE KEY
☛ See pages 48 and 50.
5
See page 7.
ANGLE ADJUSTMENT
LEVER
You can change the
direction of the operation
unit up and down.
10 KEYS
Use to enter the
desired number of
copies. They are also
used to enter data for
selected functions.
6
67
890
C
CLEAR/STOP KEY
Press to cancel the copy
number entered. While copying,
press to stop copying.
START KEY
Press to start copying.
Page 15
OPERATION UNIT
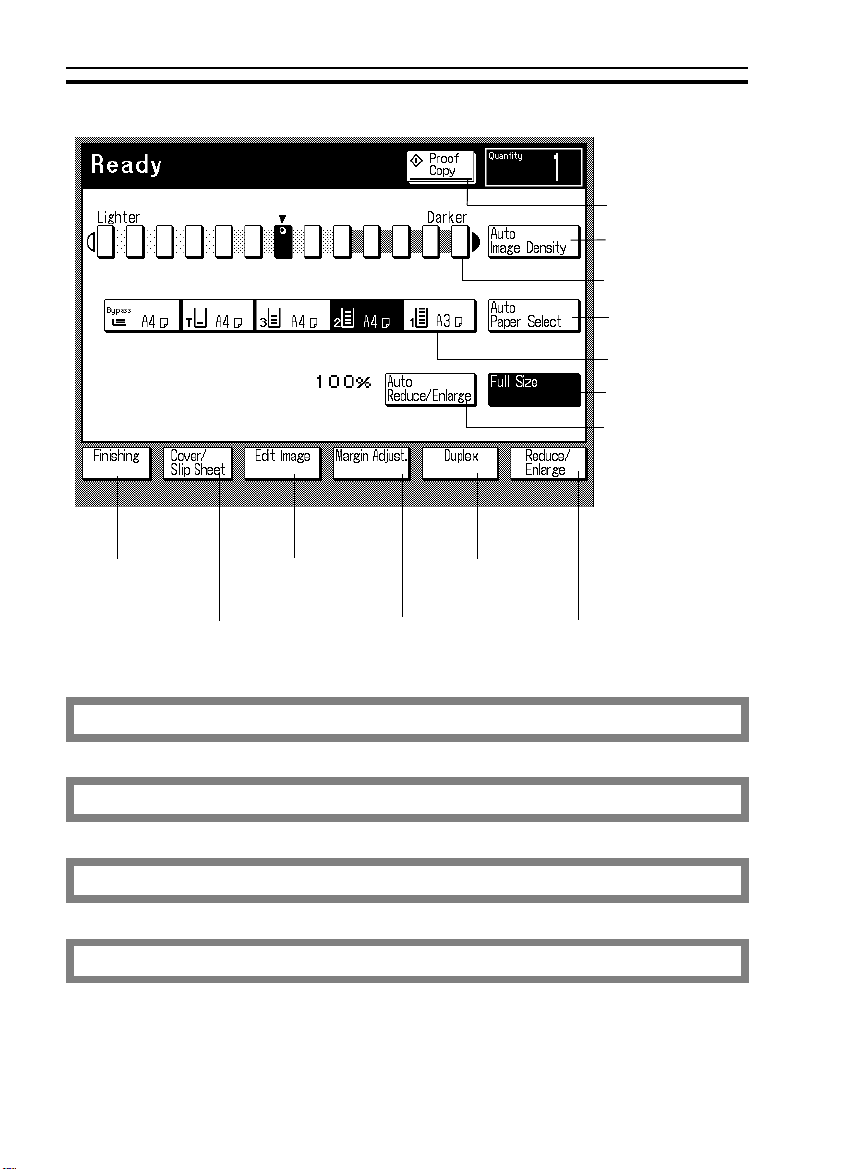
Touch Panel Display
Initial Display
COPY COUNTER
Indicates the number of copies
entered, and the number of copies
made.
To operate the machine, touch the key you want to use. Then, the display
instructs what to do next.
❐ Regarding deta iled inform atio n ab out each k ey a nd f unctio n, ☛ see page 10.
❐ For how to use the touch panel display, ☛ see page 23.
WHERE IS IT & WHAT IS IT
7
Page 16

OPERATION UNIT
8
Page 17

WHAT YOU CAN DO
WITH THIS COPIER
THIS COPIER
WHAT YOU CAN DO WITH
9
Page 18
☛ See page 40.
☛ See page 40.
☛ See page 41.
☛ See page 57.
☛ See page 50.
☛ See page 53.
☛ See page 36.
FUNCTIONS
FUNCTIONS
☛ See page 41.
☛ See page 39.
☛ See page 44.
☛ See page 85.
☛ See page 73.
☛ See page 66.
☛ See page 64.
☛ See page 61.
Temporarily stopping one job to copy something else
Storing your copy settings in memory
Special Feature
Entering copy job settings during the warm-up period
10
☛ See page 45.
☛ See page 48.
Page 19
Copying from the bypass table
☛ See page 54.
☛ See page 55.
☛ See page 57.
Copying from the bypass table in the Moving-original
scan mode
Reducing and enlarging
Reducing and enlarging using preset ratios
Reducing and enlarging with the [+- set] key
Reducing and enlarging with the [10 key set] key
FUNCTIONS
THIS COPIER
WHAT YOU CAN DO WITH
Fitting the original to a copy of a different size
11
Page 20
☛ See page 61.
FUNCTIONS
Working with both sides of originals and copies
Making two-sided copies from one-sided originals
Making two-sided copies from two-sided originals
Making one-sided copies from two-sided originals
12
Page 21
Adding margins for binding
☛ See page 64.
Margin for one-sided copying
Margin for two-sided copying
FUNCTIONS
THIS COPIER
WHAT YOU CAN DO WITH
13
Page 22
☛ See page 66.
FUNCTIONS
Editing the copy image
Erasing parts of original image
Merging images
Save Area
Save Area
Editing the copy image when making two-sided copies
Save Area Delete Area
14
Page 23
Adding or inserting sheets
☛ See page 73.
Copying the front cover of the originals
Copying the front and back covers of the originals
FUNCTIONS
THIS COPIER
WHAT YOU CAN DO WITH
Adding a front cover sheet
Adding front and back cover sheets
15
Page 24

FUNCTIONS
Copying designated pages of originals onto slip sheets
Copying designated pages of originals onto tab sheets
Inserting slip sheets between OHP transparencies
16
Page 25
Finishing
☛ See page 85.
Sorting into sets when the number of originals is 70 or less
(123,123,123)
Sorting into sets when the number of originals is more than 70
(123,123,123)
FUNCTIONS
Stacking together all copies of a page (111, 222, 333)
Stapling copies
THIS COPIER
WHAT YOU CAN DO WITH
17
Page 26

FUNCTIONS
18
Page 27

BASICS
19
BASIC
Page 28
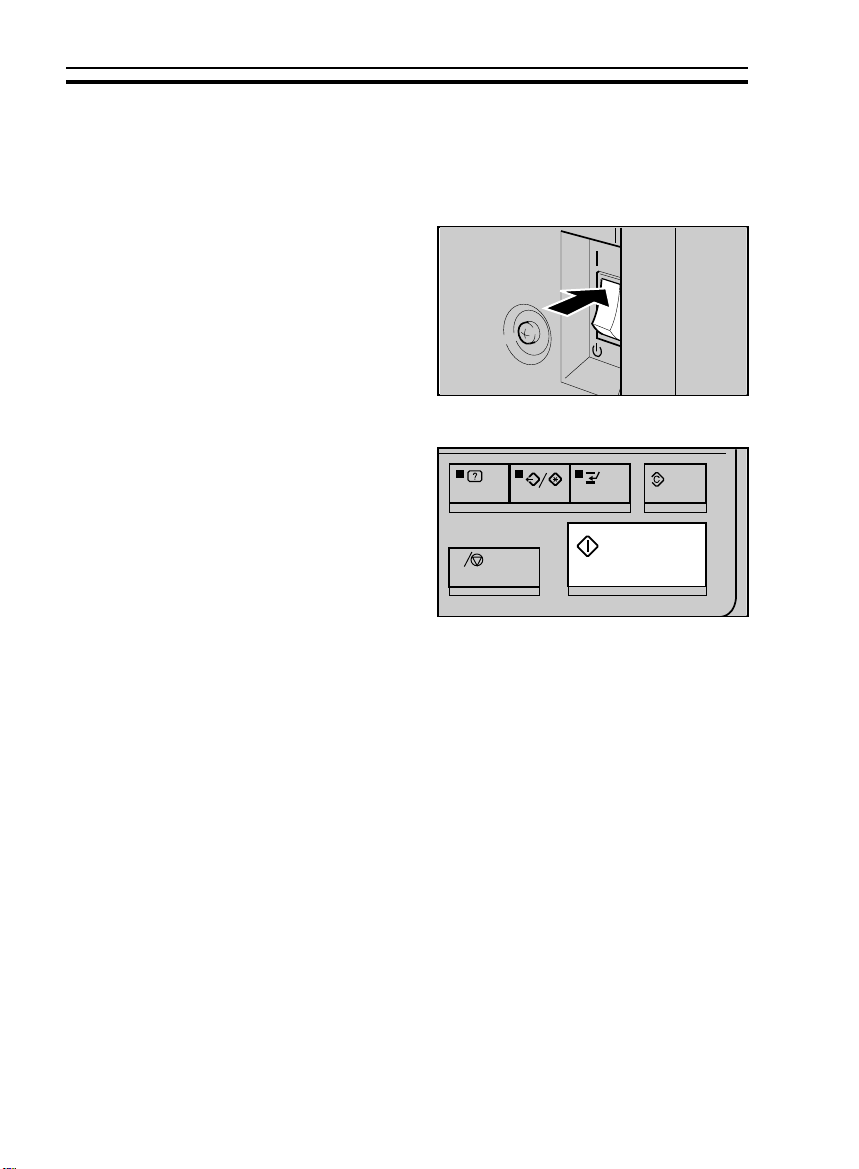
STARTING THE COPIER
STARTING THE COPIER
When The Main Switch Is In The Stand-by Position
Turn on the main switch.
1
Wait for the copier to warm-up.
2
During the warm-up period (less
than 8 minutes), the Start key is
red.
After warm-up, the copier goes
3
into Ready condition and the
Start key becomes green.
C
On
Stand
20
Page 29

STARTING THE COPIER
When The Touch Panel Display Is Off
The copier is in Screen Saver mode.
Stand in front of the auto response sensor to return to the ready condition.
❐ For details about Screen Saver, ☛ see page 1 17.
❐ The following actions will also make the copier ready:
• Opening the document feeder.
• Opening the front cover.
• Touching the to uch pa nel disp lay.
• Pressing any key on the operation panel.
• Setting originals in the document feeder.
• Pressing the Down key of the paper trays.
When The Copier Is Set For User Codes
Input your user code (6 digits)
using the 10 keys. Press the Re-
call/Enter key.
❐ To prevent others from making cop-
ies using your user code, press the
Clear/Stop and Clear Modes key simultaneously after copying.
❐ For detail s about user codes, ☛ see
page 127.
❐ If you input the wrong user code,
press the Clear/Stop key and input
the code again.
BASIC
21
Page 30
STARTING THE COPIER
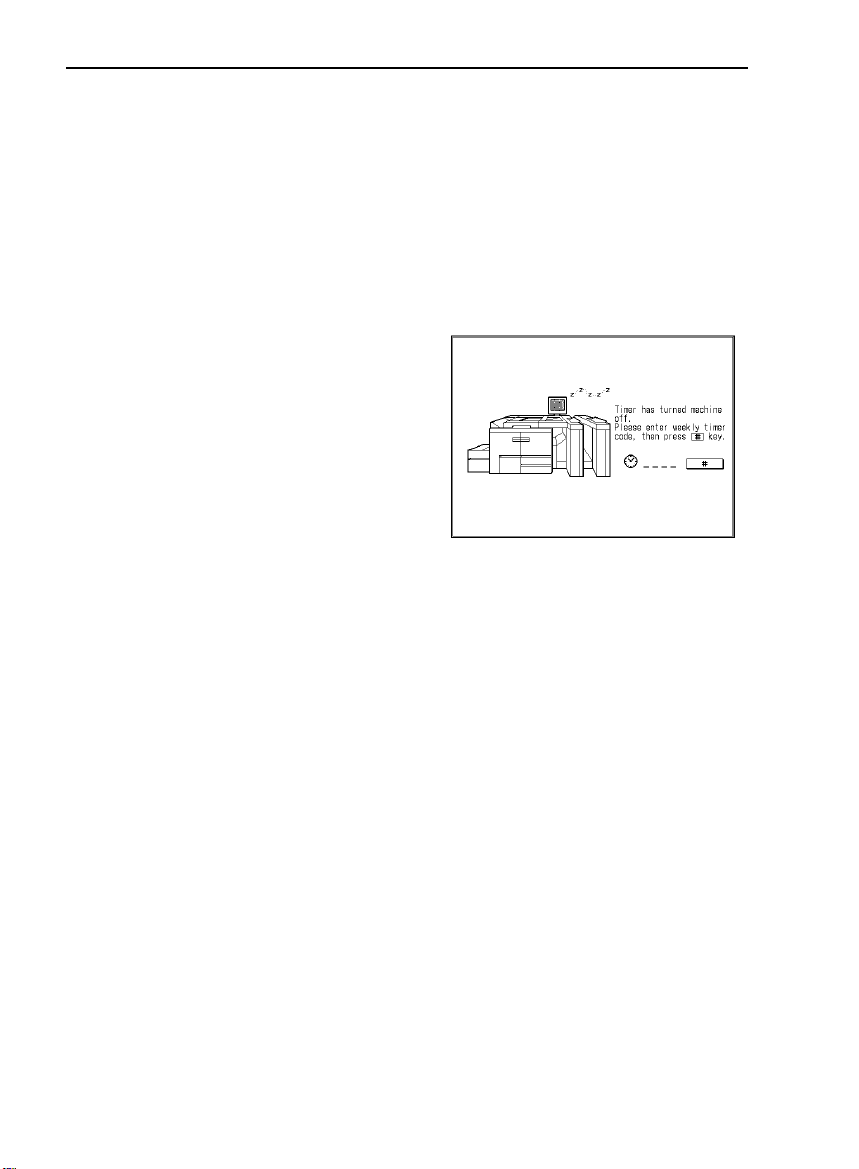
When The Copier Has Been Turned Off By The
Weekly Timer
Touch the touch panel display or
1
press any key on the operation
panel.
Enter the access code (4 digits)
2
using the 10 keys.
❐ For detail s about t he weekl y timer, ☛
see page 1 24.
❐ For details about access code, ☛
see page 1 24.
❐ If you enter the wrong number, press
the Clear/Stop key and input the
number again.
❐ The copier is turned off automatically
after a designated time set by Auto
Off. ☛ See page 118.
22
Page 31

USING THE TOUCH PANEL DISPLAY
USING THE TOUCH PANEL DISPLAY
On the touch panel display, you can find keys, instructions and messages.
By touching keys on the display, you can select or unselect functions, and
enter data for the selected modes. The keys are displayed as follows:
Keys that have been selected.
Keys that have the option of being
selected.
Keys that do not have the option of
being selected are screened.
In this manual, keys on the display are indicated as follows:
Example:
Key on the display:
in the manual: [Auto Paper Select] key
Caution:Do not press the touch panel display with any hard or sharp object
(pen, pencil, etc.) Always use your fingers or something with a soft
tip.
Initial display
Messages and instructions appear
here.
23
BASIC
Page 32

USING THE TOUCH PANEL DISPLAY
Display after selecting functions
[Check Modes] key
When you set two or more copy settings, you can see the copy setting you
set last and the [Check Modes] key. When you want to see all settings you
selected at a glance, touch the [Check Modes] key.
24
➠
Page 33

GETTING HELP ON THE DISPLAY
GETTING HELP ON THE DISPLAY
Press the Guidance key when you want to know detailed information about
functions you use. You can use this key in the Stand-by condition or when
entering settings for a copy job.
❐ If you do the foll owing whi le the gui dance dis play appe ars, the copier re turns to
Ready cond ition.
• Pressing the Program/Special Feature key.
• Pressing the Interrupt key.
• Setting computer forms originals into the document feeder.
• Entering User Tools.
Seeking Guidance In The Stand-by Condition
Press the Clear Modes key and
1
the Guidance key.
C
Touch the key you want to know
2
about on the touch panel display.
BASIC
25
Page 34

GETTING HELP ON THE DISPLAY
Seeking Guidance While Entering Copy Job
Settings
Press the Guidance key.
1
C
❐ The information about functions you
are trying to use will be displayed on
the touch pa nel disp lay.
26
Page 35

RECOMMENDED & NON-RECOMMENDED ORIGINALS
RECOMMENDED & NON-RECOMMENDED
ORIGINALS
Recommended Originals
❐ Regarding originals that the document feeder can handle, ☛ see page 146.
Non-recommended Originals For The Document
Feeder
Caution: The following types of originals are not recommended for use with
the document feeder. Place them directly on the exposure glass.
❐ Originals th icker tha n 128 g/m
2
,
34 lb in the ADF mode
❐ Originals thinner than 52 g/m
2
, 14
lb in the ADF mode
❐ Originals th icker tha n 157 g/m
2
,
42 lb in the SADF mode
❐ Originals thinner than 35 g/m
2
, 11
lb in the SADF mode
❐ Originals thicker than 93 g/m
2
, 24
lb when using two-sided originals
❐ Originals thinner than 52 g/m
2
, 14
lb when using two-sided originals
❐ Originals betwe en 35 and 51 g/m
11 and 13 lb, the document feeder
must be set to Thin paper mode.
☛ See page 120.
❐ Originals larger than A3, 11" x 17"
❐ Originals smaller than B5 :, 8" x
10" : in the ADF mode
❐ Originals smaller than B6 :, 51/2" x
1/2" : in the SADF mode
8
❐ Originals smaller than B5 :, 51/2" x
81/2" : when using two-sided origi-
nals
❐ Originals larger tha n 420 x 700
mm ; in the Movi ng-ori ginal s can
mode
❐ Originals smaller than B5 ; in the
Moving-original scan mode
❐ Originals thicker than 93 g/m
lb in the Moving-original scan mode
❐ Originals th inner t han 52g/m
lb in the Moving-original scan mode
❐ Paper with an y kind of co ating
(such as carbon) on the back
❐ Folded, cu rle d, cr ease d, or dam -
aged originals
❐ Mailing labels , or perfo rated or igi-
nals
❐ Bound, st aple d, or cli pped o rig inal s
❐ OHP transparencies
2
,
❐ Translucent paper
❐ Pasted originals
❐ Damp originals
❐ Sticky originals
❐ Wavy orig inal s
❐ Original s that are no t made fr om
paper
❐ Originals written in pencil on both
sides, or two-sided carbon originals
❐ Thermal fax paper, CRO (camera
ready originals) or aluminum foil
❐ Books, pamphlets, and booklets
2
2
, 24
, 14
BASIC
27
Page 36

SETTING A STACK OF ORIGINALS IN THE DOCUMENT FEEDER (ADF, ARDF)
SETTING A STACK OF ORIGINALS IN THE
DOCUMENT FEEDER (ADF, ARDF)
You can insert a stack of originals (one-sided or two-sided) of the same size
into the document feeder. These originals are individually fed onto and
removed from the exposure glass.
❐ If you want to set originals of different sizes at the same time, set different
sized origi nals fee ding mod e using th e User Too ls. ☛ See page 120.
❐ If you want to use originals that are not recommended for this mode, do the
following:
First make one set of copies of originals by positioning them on the exposure
glass direc tly, the n use thes e copies as origi nals.
.
Correct any curl, fold, or crease
1
in the originals before setting the
originals.
.
Confirm that the Insert Original
2
indicator is lit before setting the
originals.
.
Confirm that no previous originals
3
remain on the exposure glass.
.
Adjust the guide to the original
4
size.
28
Page 37

SETTING ONE ORIGINAL AT A TIME IN THE DOCUMENT FEEDER (SADF)
.
Set the originals
5
the document feeder until the Insert Original indicator goes off.
❐ Set the original stack so that the
leading edge is at an angle with the
bottom of stack forward, and the top
back as shown in the illustration.
❐ The last p age s hould be on the top .
❐ Do not stack originals above the limit
mark.
❐ The guide must touch the front side
of the originals.
face down
into
SETTING ONE ORIGINAL AT A TIME IN THE
DOCUMENT FEEDER (SADF)
You can insert one original at a time into the document feeder. The original
is automatically fed onto and removed from the exposure glass.
.
Correct any curl, fold, or crease
1
in the originals before setting.
.
Confirm that the Insert Original
2
indicator is lit before setting the
originals.
.
Confirm that no previous originals
3
remain on the exposure glass.
BASIC
29
Page 38

SETTING ONE ORIGINAL AT A TIME IN THE DOCUMENT FEEDER (SADF)
.
Adjust the guide to the original
4
size.
.
Set the original
5
the document feeder until the Insert Original indicator goes off.
❐ If you are copying a stack of originals
one sheet at a time and you want to
keep them in order, start with the first
page of the originals.
❐ The original guide must touch the
front side of the original.
.
Press the Start key.
face down
into
6
.
While the Auto Feed indicator is
7
lit after an original is fed, set the
next original. The original is automatically fed and copied.
❐ If you have set more than two origi-
nals, the Auto Feed indicator is not
lit after the last original is fed. In this
case, pres s the Start key again after
setting an or iginal .
30
Page 39

SETTING ORIGINALS ON THE EXPOSURE
.
Lift the document feeder.
1
.
Set the original
2
exposure glass. The original
should be aligned to the front
right corner.
face down
SETTING ORIGINALS ON THE EXPOSURE GLASS
GLASS
on the
.
Lower the document feeder.
3
BASIC
31
Page 40

SETTING COMPUTER FORMS ON THE DOCUMENT FEEDER
SETTING COMPUTER FORMS ON THE
DOCUMENT FEEDER
You can insert an unseparated stack of computer forms into the document
feeder. The computer form originals are individually fed into and removed
from the exposure glass.
❐ Regarding functions that cannot be used together with this function, ☛ see
page 94.
❐ You need not separate a stack of computer forms.
❐ You can copy computer forms of the following sizes.
Metric version:
Feed hole side length Width Number of holes per sheet
8" 141/2"16
8
1/2"12" 17
11" 147/8"22
12" 141/2"24
Inch version:
Feed hole side length Width Number of holes per sheet
8
1/2"12" 17
81/2"147/8"17
11" 147/8"22
12" 141/2"24
❐You can change the computer forms size that can be set on the document
feeder usin g the Use r Tools. ☛ See page 126.
Raise the computer form fence.
1
Caution: Be sure to set the computer
32
form fence to prevent originals from being inserted into
the docume nt feede r.
Page 41

SETTING COMPUTER FORMS ON THE DOCUMENT FEEDER
Place originals on the document
2
feeder.
❐ The first page of the originals must
be on top.
Lift the document feeder.
3
Set originals to pass under the
4
front computer form guide.
Place the first page of originals
5
on the exposure glass. The rear
edge of the first page should be
flush with the right scale.
BASIC
33
Page 42

SETTING COMPUTER FORMS ON THE DOCUMENT FEEDER
Adjust the rear computer form
6
guide to the original width.
Lower the document feeder.
7
❐ The operati on unit di splays C omputer
Form mode.
Select the computer form size on
8
the touch panel display.
❐ The copier selects the reproduction
ratio and copy paper as shown below.
❐ Example:
Metric version
Computer form size Copy paper size Reproduction ratio
8
11" x 14
Inch version
Computer form size Copy paper size Reproduction ratio
8
11" x 14
34
1/2
" x 12" A4
7/8
"A3
1/2
" x 12" 8
7/8
"8
:
:
1/2
" x 11"
:
1/2
" x 11"
:
93 %
100%
100 %
74 %
Page 43

SETTING ONE ORIGINAL IN THE MOVING-ORIGINAL SCAN TABLE
Set the original tray extender.
9
❐ After copying, the last page of com-
puter form remains on the exposure
glass. To remove it from the exposure glass, press the Clear Modes
key.
SETTING ONE ORIGINAL IN THE
MOVING-ORIGINAL SCAN TABLE
Adjust the guide to the original
1
size.
A2
Set
one
original
2
moving-original scan table.
❐ For making copies in the Moving-
original sca n m ode, ☛ see page 55.
face up
into the
BASIC
35
Page 44

PROOF COPYING
PROOF COPYING
You can check copy quality by making a proof copy before making large
volume copies. This helps you to reduce mis-copies.
❐ You cannot make pro of copy in the followin g functi ons.
• 1 Sided Originals to 2 Sided Copy mode
• 2 Sided Original to 2 Sided Copy mode
• Overlay mo de
Set the desired copy settings.
1
Set your original on the exposure glass or in the document feeder.
2
Touch the [Proof Copy] key.
3
❐ The first pa ge of origina ls will be cop ied on one copy pa per. If you canno t get a
proper copy, change the copy setting.
36
Page 45

COPYING
tb-eu-5
COPYING
37
Page 46

tb-eu-5
BASIC OPERATIONS
BASIC OPERATIONS
One-to-one Copying
You can make copies that are the same size as your originals.
Set your original on the exposure
1
glass or in the document feeder.
☛ See page 28, 29, or 31.
Enter the number of copies re-
2
quired using the 10 keys.
❐ To change the number entered,
press the Clear/Stop key, then enter
the new number.
1234
67
890
5
C
Confirm that the [Auto Paper Se-
3
lect] key is selected. If not, touch
the [Auto Paper Select] key, or
select the copy paper by touching
the key for copy paper.
❐ Regarding Auto Paper Select, ☛ see
page 41.
38
Page 47

Make sure that the magnification
tb-eu-5
4
ratio is set to 100%. If not, touch
the [Full Size] key.
Press the Start key.
5
❐ To stop the copier during the multi-
copy run, press the Clear/Stop key.
❐ Press the Start key to resume copy-
ing, or press the Clear/Stop key
again to clear the entered copy number.
BASIC OPERATIONS
C
COPYING
39
Page 48

tb-eu-5
BASIC OPERATIONS
Adjusting Copy Image Density
To match the originals, adjust the image density.
Auto image density
If you select the [Auto Image
Density] key, the copier automat-
ically controls the image density.
Manual image density
If you have dark or light originals,
adjust the image density yourself.
If the [Auto Image Density] key
is selected, touch it to cancel.
Then, touch the [Lighter] (left)
key to lower the image density.
Touch the [Darker] (right) key to
increase the image density.
40
Page 49

tb-eu-5
BASIC OPERATIONS
Selecting The Copy Paper Size (Manual Paper
Select)
If the [Auto Paper Select] key is selected, touch it to cancel. You can see
the [Paper Selection] key. Select the
paper tray you want to use.
Having The Copier Choose The Paper Size (Auto
Paper Select)
The copier selects a suitable size of copy paper based on the original size
and the reproduction ratio.
❐ You should set originals in the document feeder in this function.
❐ Regarding functions that cannot be used together with this function, ☛ see
page 94.
❐ The special paper tray for cover sheet, slip sheet, translucent paper, or tab
sheet sets set, using the User Tools are not selected by Auto Paper Select.
COPYING
41
Page 50

tb-eu-5
BASIC OPERATIONS
Example 1: When making full size copies
Make sure that the [Auto Paper
1
Select] key is selected. If not,
touch the [Auto Paper Select]
key.
Make sure that the magnification
2
ratio is set to 100%. If not, touch
the [Full Size] key.
Set your originals in the docu-
3
ment feeder. ☛ See page 28.
4
42
Press the Start key.
The copier selects paper of the
same format and orientation as
the original.
Page 51

tb-eu-5
BASIC OPERATIONS
Example 2: When making reduced copies
Example:
Metric version: original: A3, ratio: 71%
Inch version: original: 11" x 17", ratio: 65%
Make sure that the [Auto Paper
1
Select] key is selected. If not,
touch the [Auto Paper Select]
key.
Touch the [Reduce/Enlarge] key. If your machine is a metric version,
2
select 71%. If your machine is an inch version, select 65%.
Set your originals in the document feeder. ☛ See page 28.
3
Press the Start key. Suitable copy paper will be selected.
4
COPYING
43
Page 52

tb-eu-5
BASIC OPERATIONS
Having The Copier Choose The Reproduction
Ratios (Auto Reduce/Enlarge)
The copier can select the proper reproduction ratio based on the selected
paper size and the original size.
❐ You shou ld s et or iginal s in the d ocum ent fe eder in t his func tion.
❐ Regarding functions that cannot be used together with this function, ☛ see
page 94.
Example:
Metric version: original: A3
Metric version: original: 11" x 17" :, copy paper: 81/2" x 11" :
Touch the [Auto/Reduce En-
1
large] key.
:, copy paper: A4 :
2
3
4
44
Set your original on the exposure glass or in the document feeder. ☛
See page 28.
.
If your machine is a metric version, select A4 : copy paper by touching
a key. If your machine is an inch version, select 8
Press the Start key. The original image is reduced to fit the selected
copy paper.
1/2" x 11" :.
Page 53

tb-eu-5
BASIC OPERATIONS
Temporarily Stopping One Job To Copy
Something Else (Interrupt Copying)
Use the Interrupt key to interrupt a multicopy run to make urgently needed
copies.
❐ Regarding functions that cannot be used together with this function, ☛ see
page 94.
When you set the original on the exposure glass
Press the Interrupt key. The cop-
1
ier will stop the copy run and
store the present settings in the
memory. The copier will return to
the ready condition.
Remove the previous original. Set
2
your original for interrupt copying
on the exposure glass. ☛ See
page 31.
C
1
2
Make your copies.
2
3
After interrupt copying is completed, press the Interrupt key again. The
4
copier will recall the previous copy settings.
Reset the previous original and press the Start key to resume the
5
previous run.
1
COPYING
45
Page 54

tb-eu-5
BASIC OPERATIONS
When you set originals in the document feeder
Press the Interrupt key. The cop-
1
ier will stop the copy run and
store the present settings in the
memory. The original on the exposure glass will exit from the
document feeder. The copier will
return to the ready condition.
Take the originals from the exit
2
stack.
C
3
4
5
46
Separately take the remaining
originals off the original table.
Make your copies.
After interrupt copying is completed, press the Interrupt key.
The copier will recall the previous
copy settings.
Page 55

Some originals in the exit stack
tb-eu-5
6
(step 2) weren’t completely copied. Read instructions on the display and take that number of
top
pages from the
stack.
Place the sheets you just took on
7
the bottom of the stack you took
from the original table (step 3).
Place the stack you just made in
8
the original table.
of the exit
BASIC OPERATIONS
Press the Start key.
9
COPYING
47
Page 56

tb-eu-5
BASIC OPERATIONS
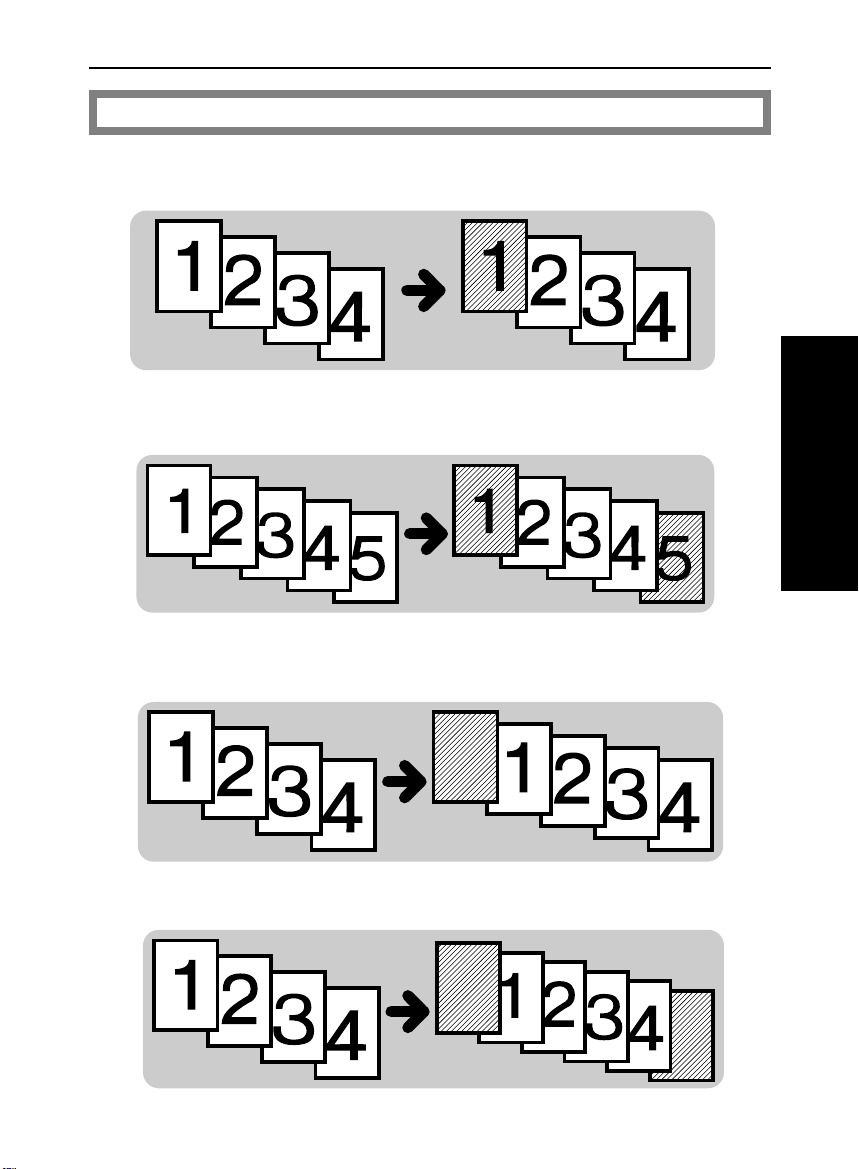
Storing Your Copy Settings In Memory (Program)
You can store up to five frequently used copy job settings in machine
memory, and recall them for future use.
❐ The followin g functi ons ca n be stored :
• Finishin g mode
• Cover/Slip Sheet mode
• Edit Image mode
• Margin Adjustment mode
• Duplex mode
• Reducing and Enlarging
• Image Density
• Paper size
Storing Your Settings
Set the copy settings you want to
1
put into memory.
Press the Program/Special Fea-
2
ture key.
❐ If you want to cancel storing, press
the Program/Special Feature key
again.
C
33
4
48
Touch the [Store program] key.
Select the program number you
want to store the settings in.
Page 57

Recalling Your Settings
tb-eu-5
Press the Program/Special Fea-
1
ture key.
Make sure that the [Recall pro-
2
gram] key is selected.
Select the program number you
3
want to recall.
❐ * (asterisk) is displayed on the key
that has a program (settings).
BASIC OPERATIONS
C
COPYING
49
Page 58

tb-eu-5
BASIC OPERATIONS
Setting Special Functions (Special Feature)
You can change or set the following
settings using the Program/Special
Feature key.
❐ You can also change or set the following settings by using the User Tools. The
default set tings of the follow ing functions dep ends on the default setting set in
the User Tools. ☛ See page 116.
❐ The followin g functions whi ch have been set in the Program/Special Features
key will be reset to t heir default setting as s et in the User To ols by auto re set,
by pressing the Clear Modes key, by turning off the main switch, or by the
weekly timer.
Thin Paper
In Thin paper mode, the originals (lighter than 52 g/m2, 14 lb) are not
damaged when being fed into the document feeder. When the [Thin paper]
key is selected, thin mode is selected.
50
Page 59

Copy Face Up
tb-eu-5
BASIC OPERATIONS
If the [Copy Face Up] key is
not
selected, completed copies are delivered
as shown below.
Original Copy on proof tray in Sort mode in Stack mode
Setting originals
in the document
feeder
Setting originals
on the expo sure
glass
2 sided 2 sided face down face down face down
1 sided 2 sided face down face down face down
2 sided 1 sided face down face down face up
1 sided 1 sided face down face down face up
2 sided 2 sided face down face down face down
1 sided 2 sided face down face down face down
2 sided 1 sided face up fa ce d own face up
1 sided 1 sided face up fa ce d own face up
You can cancel this setting and can get face down copies to be delivered
face up and vice versa.
Full Image
If the [Full image] key is
not be copied as shown in the illustration.
not
selected, narrow margins on all four sides will
b
c
a = 4 ± 3 mm (ratio: 50 ~ 150%)
a = 6
±
3 mm (ratio: 151 ~ 200%)
b = 2.5
±
2.5 mm
b + b
≤
5 mm
c = 2
±
2 mm
b
a
You can make copies without blank side (b) and trailing (c) margins.
COPYING
51
Page 60

tb-eu-5
BASIC OPERATIONS
Sort Tabs (Option)
Note: This function can be used only when your machine is equipped
with the optional sorter stapler.
❐ To use this function, you need to set the tray 2 for tab sheets using the User
Tools.
When you use the Tab Sheet and Sort modes together, you have to
rearrange the tab sheets as shown in the illustration. You can have the
copier do the arrangement using this function.
☛ See page 119.
Touch the [Sort Tabs] key.
1
Check the number of tabs in each set. Touch the key and enter the
2
number of tabs following the instructions on the display.
❐ To change the number entered:
Before touching the [#] key, press the Clear/Stop key. After touching the [#]
key, touch the key which number you want to change. Then, enter the new
number.
Touch the [#] key.
3
The copier returns to the Ready condition.
4
52
Page 61

tb-eu-5
BASIC OPERATIONS
Check that the tab sheets in the
5
2nd tray. If not, set the tab sheets
in the tray as shown in the illustration.
❐ The tabs should be aligned to the
right fe nce of the tray .
Press the Start key.
6
Entering Copy Job Settings During The Warm-up
Period (Auto Start)
If you press the Start key during the
warm-up period, the Start key will
blink, the copier will start copying after
the warm-up period. Set your copy
settings during warm-up period, then
press the Start key.
❐ To cancel Auto Start, press the
Clear/Stop key.
C
COPYING
53
Page 62

tb-eu-5
COPYING FROM THE BYPASS TRAY
COPYING FROM THE BYPASS TRAY
Use the bypass table to copy onto paper that is not set in the paper tray.
❐ The followin g size s can be set in the bypa ss tray .
Metric version: A3
❐ 40 sheets (8 0 g/m
❐ If you want to make copies on ; paper, us e the Movi ng-origina l scan mod e. ☛
See page 55.
❐ OHP transparencies and translucent paper should be fanned to get air between
the shee ts bef ore loa ding.
❐ Regarding functions that cannot be used together with this function, ☛ see
page 94.
Open the bypass table.
:, B4 :, A4 :, A5 :
2
, 20 lb) can be set at one time.
1
2
3
4
54
Adjust the guides to the paper
size and insert the
Make sure that the [Bypass] key
is selected. If not, touch it.
Set your originals, make your
copies.
: copy paper.
Page 63

tb-eu-5
COPYING FROM THE BYPASS TABLE IN THE MOVING-ORIGINAL SCAN MODE
COPYING FROM THE BYPASS TABLE IN THE
MOVING-ORIGINAL SCAN MODE
❐ The followi ng size ca n be set in th e bypass table.
Metric version: 420 x 700 mm
❐ When you use copy paper A2 or larger, use the A2 guide plate (accessory).
Otherwise, copies might not be stacked properly.
❐ To avoid problems caused by curly copies, try turning over the paper in the
bypass table. If there is no improvement, change to copy paper with less curl.
❐ The scanned original will exit from the computer form original entrance. Make
sure than there are no objects near the entrance to avoid damaging originals.
❐ Regarding functions that cannot be used together with this function, ☛ see
page 94.
Open the bypass table and pull
1
the extender out.
;, A2 ; , A3 ; , A4 ;
Adjust the guides to the paper
2
size, and insert the
Adjust the moving original scan
3
table guide to the original size.
❐ At the same time, adjust the docu-
ment feed er origin al guide to t he narrowest original position (front) to
avoid damaging originals. For location of the guide, ☛ see page 28.
; copy paper.
A2
COPYING
55
Page 64

tb-eu-5
COPYING FROM THE BYPASS TABLE IN THE MOVING-ORIGINAL SCAN MODE
Set
one
original
4
moving original scan table. Original must be set in
Select the reproduction ratio re-
5
ferring to the original and copy
paper sizes.
face up
into the
; direction.
If your machine is equipped with
6
the optional sorter stapler, set the
tray extension and A2 guide
plate.
Check that the original holder is
7
closed.
Press the Start key.
8
❐ While the Auto Feed indicator is lit,
after an original is fed, set the next
original. The original is automatically
fed and copi ed.
56
tray extension
A2 guide plate
Page 65

tb-eu-5
REDUCING AND ENLARGING
REDUCING AND ENLARGING
❐ Regarding functions that cannot be used together with this function, ☛ see
page 94.
Reducing And Enlarging Using Preset Ratios
(Preset R/E)
Touch the [Reduce/Enlarge] key.
1
Make sure that the [Preset R/E]
2
key is selected. Then, select the
preset reducing ratios.
Set your originals on the exposure glass or in the document feeder.
3
Press the Start key.
4
COPYING
57
Page 66

tb-eu-5
REDUCING AND ENLARGING
Reducing And Enlarging In 1% Steps (Zoom)
You can change the reproduction ratio from 50% to 200% in 1% steps.
Using the [+-set] key
Touch the [Reduce/Enlarge] key.
1
Touch the [Zoom] key.
2
Make sure that the [+- set] key is selected.
3
Adjust the reproduction ratio following the instructions on the display.
4
Set your originals on the exposure glass or in the document feeder.
5
Press the Start key.
6
58
Page 67

tb-eu-5
REDUCING AND ENLARGING
Using the [10 key set] key
Touch the [Reduce/Enlarge] key.
1
Touch the [Zoom] key.
2
Touch the [10 key set] key.
3
Adjust the reproduction ratio following the instructions on the display.
4
❐ To change the number entered:
Before touching the [#] key, press the Clear/Stop key. After touching the [#]
key, touch the key which number you want to change. Then, enter the new
number.
Set your originals on the exposure glass or in the document feeder.
5
Press the Start key.
6
COPYING
59
Page 68

tb-eu-5
REDUCING AND ENLARGING
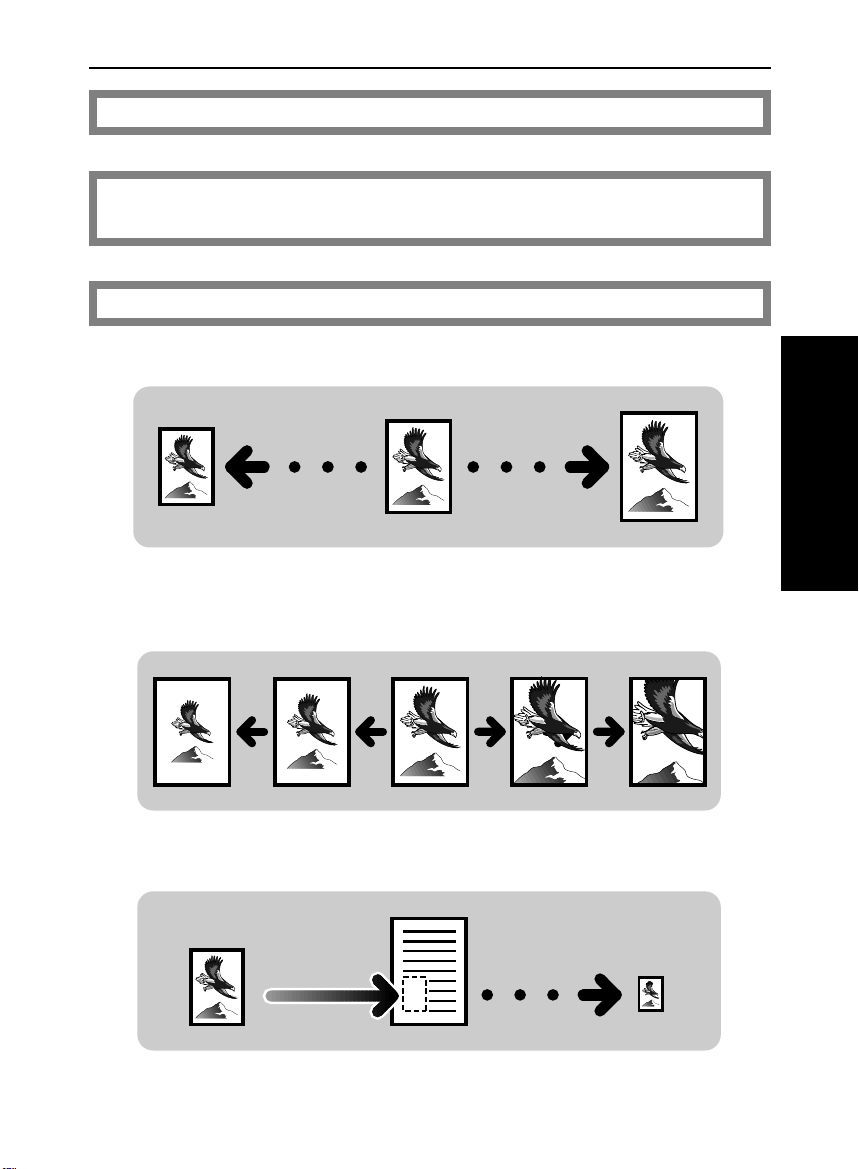
Fitting The Original To A Copy Of A Different Size
(Size Magnification)
Original
The suitable reproduction ratio will be automatically selected when you enter
the lengths of the original and copy image you want.
Touch the [Reduce/Enlarge] key.
Copy size you want
Copy
1
Touch the [Size Mag.] key.
2
Enter the original size and copy paper size using the 10 keys following
3
the instructions on the display.
❐ Up to 999 mm (metric version), 99.99" (inch version) can be entered.
❐ To change the number entered:
Before touching the [#] key, press the Clear/Stop key. After touching the [#]
key, touch the key which number you want to change. Then, enter the new
number.
4
5
60
Set your originals on the exposure glass or in the document feeder.
Press the Start key.
Page 69

tb-eu-5
WORKING WITH BOTH SIDES OF ORIGINALS AND COPIES (Duplex)
WORKING WITH BOTH SIDES OF ORIGINALS
AND COPIES (Duplex)
❐ Regarding functions that cannot be used together with this function, ☛ see
page 94.
Making Two-sided Copies From One-sided Originals
(1 Sided Originals → 2 Sided Copy)
❐ The following paper limitations apply:
Maximum size: Metric version: A3 :
Inch version: 11" x 17" :
Minimum size: Metric version: A5 :
Inch version: 51/2" x 81/2" :
Weight: Metric version: 64 ~ 105 g/m
Inch version: 17 ~ 28 lb
❐ You cannot use lengthwise paper size in Duplex mode.
❐ A right margin of 5 mm, 1/4" is set on the back side automatically. You can
change the back side margin using the User Tools. ☛ See page 123.
2
Touch the [Duplex] key.
1
u
Make sure that the [1 Sided
2
Originals → 2 Sided Copy] key
is selected.
COPYING
61
Page 70

tb-eu-5
WORKING WITH BOTH SIDES OF ORIGINALS AND COPIES (Duplex)
Set your originals on the exposure glass or in the document feeder. ☛
3
See page 28, 29, or 31.
❐ Start with the first page of the originals.
Press the Start key.
4
Making Two-Sided Copies From Two-Sided
Originals (2 Sided Original → 2 Sided Copy)
Note: It is recommended to set originals in the document feeder in this
function.
Touch the [Duplex] key.
1
Touch the [2 Sided Original →
2
2 Sided Copy] key.
Set your originals in the document feeder. ☛ See page 28 or 29.
3
❐ Start with the first page of the originals.
Press the Start key.
4
62
Page 71

tb-eu-5
WORKING WITH BOTH SIDES OF ORIGINALS AND COPIES (Duplex)
Making One-Sided Copies From Two-sided
Originals (2 Sided Original → 1 Sided Copies)
Note: It is recommended to set originals in the document feeder in this
function.
❐ A left margin of 5 mm, 1/4" is set on the back side automatically.
Touch the [Duplex] key.
1
Touch the [2 Sided Original →
2
1 Sided Copies] key.
Set your originals in the document feeder. ☛ See page 28 or 29.
3
❐ Start with the first page of the originals.
Press the Start key.
4
COPYING
63
Page 72

tb-eu-5
ADDING MARGINS FOR BINDING (Margin Adjustment)
ADDING MARGINS FOR BINDING (Margin
Adjustment)
You can make a margin by shifting the image to the left or right. This
function is convenient when you want to bind copies.
❐ The default margin width can be changed with the User Tools. ☛ see page 123.
❐ Regarding functions that cannot be used together with this function, ☛ see
page 94.
❐ Maximum margin width: Metric version: 21 mm
Inch version: 7/8"
Margin For One-sided Copying
Touch the [Margin Adjust.] key.
1
To make a left margin, touch [→]
2
key until the number displayed
reaches the required setting.
To make a right margin, touc h [←]
key until the number displayed
reaches the re quire d sett ing.
❐ To clear the margin, touch the
[Clear] key.
Set your originals on the exposure glass or in the document feeder.
3
Press the Start key.
4
64
Page 73

tb-eu-5
ADDING MARGINS FOR BINDING (Margin Adjustment)
Margin For Two-sided Copying
❐ For copies that read from left to right, set the front left and back right margins.
For copies that read from right to left, set the front right and back left margins.
Touch the [Duplex] key.
1
Select the [1 Sided Originals →
2
2 Sided Copy] or [2 Sided
Original → 2 Sided Copy] key
depending on what kind of copies
you want to make.
Touch the [Margin Adjust.] key.
3
Adjust margin for front and back
4
sides of copies following the instructions on the display.
❐ To clear the margin, touch the
[Clear] key.
Set your originals on the exposure glass or in the document feeder.
5
Press the Start key.
6
COPYING
65
Page 74

tb-eu-5
EDITING THE COPY IMAGE (Edit Image)
EDITING THE COPY IMAGE (Edit Image)
❐ Regarding functions that cannot be used together with this function, ☛ see
page 94.
Erasing Part Of Original Image
❐ Maximum erase area: Metric version: X1, X2:30 cm
Y1, Y2:44 cm
Inch version: X1, X2:11.82"
Y1, Y2:17.32"
Saving part of original image (Save Area)
❐ When making copies after designating the area, set the original on the expo-
sure glass or in the docum ent feeder as show n in the illus tration s.
❐ The desi gnated li ne will v ary by ± 5 mm or 0.2". Therefore, leave at least 5 mm
or 0.2" between the designated line and the image. If this clearance is narrower
than 5 mm or 0.2", an undesired area might be deleted or saved.
66
Page 75

tb-eu-5
EDITING THE COPY IMAGE (Edit Image)
Touch the [Edit Image] key.
1
Make sure that the [Save/Delete]
2
key is selected.
Touch the [Save Area] key.
3
Then, touch the [#] key.
Designate the area you want to save following the instructions on the
4
display.
❐ To change the number entered:
Before touching the [#] key, press the Clear/Stop key. After touching the [#]
key, touch the key which number you want to change. Then, enter the new
number.
Set your originals on the exposure glass or in the document feeder.
5
Press the Start key.
6
Erasing part of original image (Delete Area)
❐ When making copies after designating the area, set the original on the expo-
sure glass or in the document feeder as shown in the illustrations on page 66.
❐ The designated line will vary by ± 5 mm or 0.2". Therefo re, leave at le ast 5 mm
or 0.2" between the designated line and the image. If this clearance is narrower
than 5 mm or 0.2 ", an unde sired ar ea might be delete d or save d.
67
COPYING
Page 76

tb-eu-5
EDITING THE COPY IMAGE (Edit Image)
Touch the [Edit Image] key.
1
Make sure that the [Save/Delete]
2
key is selected.
Touch the [Delete Area] key.
3
Then, touch the [#] key.
Designate the area you want to delete following the instructions on the
4
display.
❐ To change the number entered:
Before touching the [#] key, press the Clear/Stop key. After touching the [#]
key, touch the key which number you want to change. Then, enter the new
number.
Set your originals on the exposure glass or in the document feeder.
5
Press the Start key.
6
68
Page 77

tb-eu-5
: copy paper
erased margins
EDITING THE COPY IMAGE (Edit Image)
Erasing The Center Margin And Surrounding Area
Of The Original Image (Cent./Bord.)
❐ The default settings of the margins to be erased can be changed by the User
Tools. ☛ See page 123.
❐ The position of the margin that is to
be erased is determined according to
the selected copy paper and the reproduction ratio. Make sure to select
copy paper suitable for your original.
; copy paper
c
1
2
3
Touch the [Edit Image] key.
Make sure that the [Save/Delete]
key is selected.
Make sure that the [Cent./Bord.]
key is selected. Then, touch the
[#] key.
COPYING
69
Page 78

tb-eu-5
EDITING THE COPY IMAGE (Edit Image)
Select each erase width of the Center and erase width of surrounding
4
area following the instructions on the display.
❐ You can select the center margin width as follows:
Metric version: 0 mm, 15 mm, 25 mm, 35 mm
Inch versio n: 0", 0.6", 1.0", 1.4"
❐ You can select the edge margins width as follows:
Metric version: 2 mm, 7 mm, 12 mm, 17 mm, 22 mm
Inch versio n: 0.1", 0.3", 0.5", 0. 7", 0.9"
If you set Full image mode (
Set your originals on the exposure glass or in the document feeder.
☛ see page 121), you can select 0 mm, or 0".
5
Press the Start key.
6
Merging Images (Overlay)
Save Area Save Area
1
2
3
4
70
Touch the [Edit Image] key.
Touch the [Overlay] key.
Set required setting for original 1
(original that will be fed first) and
original 2 (original that will be fed
the second time).
Touch the [#] key.
Page 79

tb-eu-5
EDITING THE COPY IMAGE (Edit Image)
If you select the [Save Area] or the [Delete Area] key in step 3,
5
designate the area you want to save or delete following the instructions
on the display for original 1 and 2.
❐ To change the number entered:
Before to uching the [#] key, press the Clear/Stop key. After touchin g the [#]
key, touc h the key w hich numbe r you wa nt to change . Then, en ter the new
number.
Set originals on the exposure glass or in the document feeder.
6
❐ The first original should be copied first as shown in the illustrations.
2
1
Press the Start key.
2
1
7
Editing The Copy Image When Making Two Sided
Copies
Save Area
Delete Area
COPYING
71
Page 80

tb-eu-5
EDITING THE COPY IMAGE (Edit Image)
Touch the [Duplex] key.
1
Select the [1 Sided Originals →
2
2 Sided Copy] or [2 Sided
Original → 2 Sided Copy] key
depending on what kind of originals you use.
Touch the [Edit Image] key.
3
Select the required setting for
4
each original 1 (original that will
be copied on the front side of the
copy) and original 2 (original that
will be copied on the reverse side
of the copy).
Touch the [#] key.
5
If you select the [Save Area], the [Delete Area], or the [Cent./Bord.]
6
key in step 4, designate the area you want to save or delete following
the instructions on the display for original 1 and 2.
❐ To change the number for Save or Delete Area function;
Before touching the [#] key, press the Clear/Stop key. After touching the [#]
key, touch the key which number you want to change. Then, enter the new
number.
Set originals on the exposure glass or in the document feeder.
7
❐ The first origi nal sh ould be c opied firs t as show n in t he ill ustra tions on p age 71 .
Press the Start key.
8
72
Page 81

tb-eu-5
ADDING OR INSERTING SHEETS (Cover/Slip Sheet )
ADDING OR INSERTING SHEETS (Cover/Slip
Sheet )
❐ Regarding functions that cannot be used together with this function, ☛ see
page 94.
Copying The Front Cover Of The Originals
Note: Before using the following functions, set the special paper tray
for cover sheets using the User Tools.
Note: This function can be used only when you set a stack of originals
in the document feeder.
❐ As the default setting, the original image is copied on the cover sheet. You can
cancel this setting and add blank cover sheets using the User Tools. ☛ See
page 121.
❐ A Paper tray for normal paper and a paper tray for cover sheets of identical
size and dir ection ar e required for this fun ction.
❐ When you make more than one set of copies, select optional Sort mode.
❐ When you use this function with the
Duplex mode (1 sided originals → 2
sided copy), you will get the following
copies.
☛
See page 119.
COPYING
73
Page 82

tb-eu-5
ADDING OR INSERTING SHEETS (Cover/Slip Sheet )
Make sure that the cover sheets are set in the special paper tray for
1
cover sheet.
Touch the [Cover/Slip Sheet]
2
key.
Make sure that the [Front] key is
3
selected. Then, touch the [#] key.
Set your originals in the document feeder.
4
Press the Start key.
5
Copying The Front And Back Covers Of The
Originals
Note: Before using the following functions, set the special paper tray
for cover sheets using the User Tools.
Note: This function can be used only when you set a stack of originals
in the document feeder.
74
☛
See page 119.
Page 83

tb-eu-5
ADDING OR INSERTING SHEETS (Cover/Slip Sheet )
❐ As the default setting, the original image is copied on the cover sheets. You
can cancel this setting and add blank cover sheets using the User Tools. ☛
See page 121.
❐ A Paper tray for normal paper and a paper tray for cover sheets of identical
size and dir ection ar e required for this fun ction.
❐ When you make more than one set of copies, select optional Sort mode.
Make sure that the cover sheets are set in the special paper tray for
1
cover sheet.
Touch the [Cover/Slip Sheet]
2
key.
Touch the [Both] key. Then,
3
touch the [#] key.
Set your originals in the document feeder.
4
Press the Start key.
5
COPYING
75
Page 84

tb-eu-5
ADDING OR INSERTING SHEETS (Cover/Slip Sheet )
Adding A Front Cover Sheet
Note: Before using the following functions, set the special paper tray
for cover sheets using the User Tools.
Note: Before using the following functions, you should change the set-
ting to add a blank cover sheet using the User Tools.
page 121.
Note: This function can be used only when you set a stack of originals
in the document feeder.
❐ A Paper tray for normal paper and a paper tray for cover sheets of identical
size and dir ection ar e requir ed for thi s functi on.
❐ When you make more than one set of copies, select optional Sort mode.
☛
See page 119.
☛
See
1
2
3
4
5
76
Make sure that the cover sheets are set in the special paper tray for
cover sheets.
Touch the [Cover/Slip Sheet]
key.
Make sure that the [Front] key is
selected. Then, touch the [#] key.
Set your originals in the document feeder.
Press the Start key.
Page 85

tb-eu-5
ADDING OR INSERTING SHEETS (Cover/Slip Sheet )
Adding Front And Back Cover Sheets
Note: Before using the following functions, set the special paper tray
for cover sheets using User Tools.
Note : Before using the following functions, you should change setting to
add blank cover sheets using the User Tools.
Note: This function can be used only when you set a stack of originals
in the document feeder.
❐ Paper tray for normal paper and paper tray for cover sheet of identical size and
directio n are requ ired for this func tion.
❐ When you make more than one set of copies, select optional Sort mode.
Make sure that the cover sheets are set in the special paper tray for
1
cover sheet.
☛
See page 119.
☛
See page 121.
Touch the [Cover/Slip Sheet]
2
key.
Touch the [Both] key. Then,
3
touch the [#] key.
Set your originals in the document feeder.
4
Press the Start key.
5
COPYING
77
Page 86

tb-eu-5
ADDING OR INSERTING SHEETS (Cover/Slip Sheet )
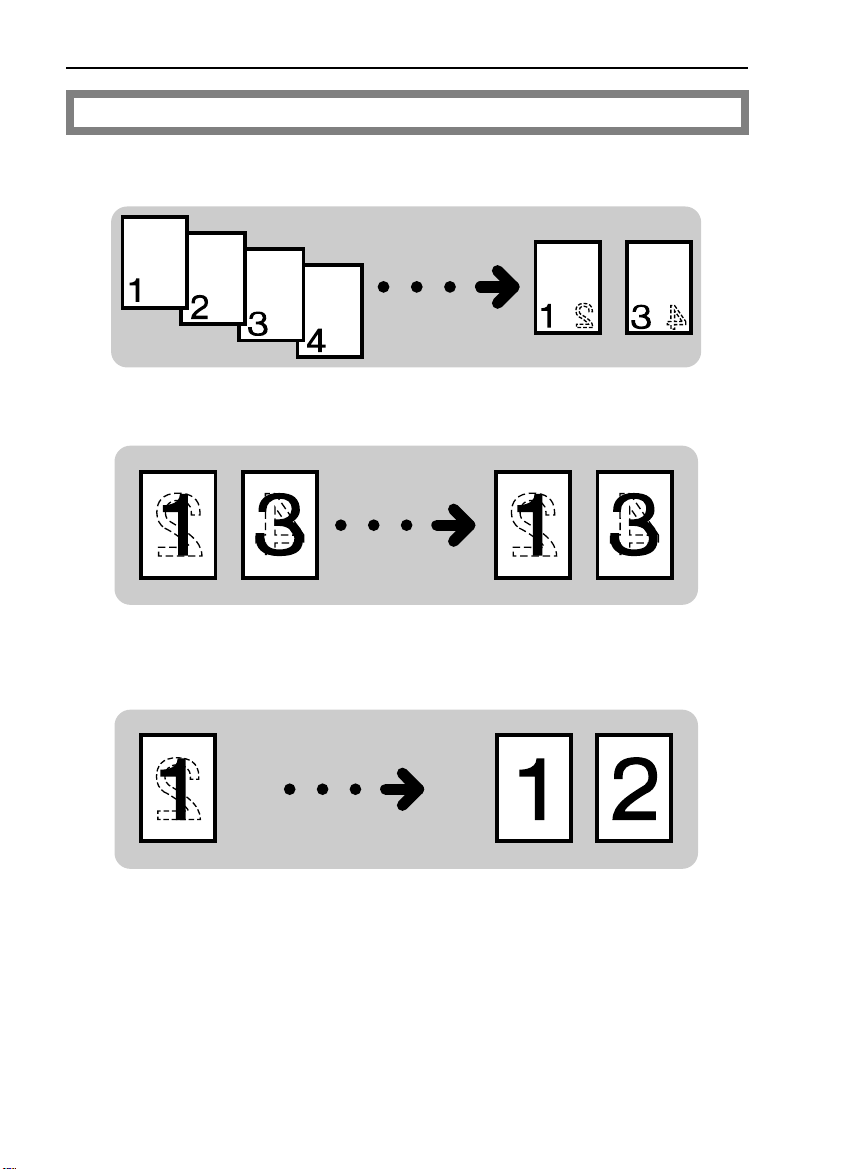
Copying Designated Pages Of Originals Onto Slip
Sheets (Paper Designate)
Note: Before using the following functions, set the special paper tray
for slip sheets using the User Tools.
Note: This function can be used only when you set a stack of originals
in the document feeder.
❐ A Paper tray for n ormal paper an d a paper tr ay for slip s heets of ident ical size
and direction are required for this function.
❐ When you make more than one set of copies, select optional Sort mode.
❐ When you use this function with 1 sided originals → 2 sided copy mode, you
will get th e follow ing cop ies. If you de signat e page 4, yo u will al so get cop ies as
shown below.
☛
See page 119.
<Originals> <Copies>
Designated page
❐ When you use this function with 2 sided original → 2 sided copy mod e, you w ill
get the follow ing cop ies.
<Originals>
<Copies>
Designated pages
78
Designated page
Designated pages
Page 87

tb-eu-5
ADDING OR INSERTING SHEETS (Cover/Slip Sheet )
Make sure that the slip sheets are set in the special paper tray for slip
1
sheet.
Touch the [Cover/Slip Sheet]
2
key.
Touch the [Paper Designate]
3
key. Then, touch the [#] key.
Set the original page number you want to copy onto slip sheets using
4
the 10 keys following the instructions on the display.
❐ To change the number entered:
Before to uching the [#] key, press the Clear/Stop key. After touchin g the [#]
key, touc h the key w hich numbe r you wa nt to change . Then, en ter the new
number.
❐ Up to 12 origina ls can be de sign ated.
❐ After de sign atin g, tou ch t he [Last Page] key.
Set your originals in the document feeder.
5
Press the Start key.
6
COPYING
79
Page 88

tb-eu-5
ADDING OR INSERTING SHEETS (Cover/Slip Sheet )
Copying Designated Pages Of Originals Onto
Tab Sheets (Tab Sheet)
Note: Before using the following functions, set the special paper tray
for tab sheets and the number of tabs using the User Tools.
See page 119.
❐ A Paper tray for norm al paper and a pa per tray for tab sheets of identi cal size
and direction are required for this function.
❐ Regarding loading tab sheets in the tray, ☛ see page 105.
❐ When you make more than one set of copies, select optional Sort mode.
❐ The Duplex mod e ca nnot b e us ed wi th thi s fu ncti on.
❐ For tab sh eets, the fo llowi ng limit ations app ly:
Maximum weight: 160 g/m
❐ In this mode, the original image is shifted by 13 mm (0.5") and copied on the
tab sheets as shown in th e illu stratio n.
2
, 90 lb index
☛
80
13mm
8mm
5mm
a a
13mm
Page 89

tb-eu-5
8 mm
2 mm
5 mm
for 5th tab
ADDING OR INSERTING SHEETS (Cover/Slip Sheet )
Making originals for tab sheets
Prepare the same size copy pa-
1
per (except for the width of the
margin) as the tab sheets.
The image area for the tab is as
2
shown in the illustration.
image area
According to the number of tabs, prepare your originals.
3
2 mm
Example: Number of tabs is 5.
for 1st tab
for 2nd tab
for 3rd tab
for 4th tab
COPYING
81
Page 90

tb-eu-5
ADDING OR INSERTING SHEETS (Cover/Slip Sheet )
Making copies with tab sheets
Make sure that the tab sheets are set in the special paper tray. For how
1
to load paper, ☛ see page 105.
Touch the [Cover/Slip Sheet]
2
key.
Touch the [Tab Sheet] key.
3
Then, touch the [#] key.
Set the original page number you want to copy onto tab sheets using
4
the 10 keys following the instructions on the display.
❐ To change the number entered:
Before touching the [#] key, press the Clear/Stop key. After touc hing the [#]
key, touch the key which number you want to change. Then, enter the new
number.
❐ The number of tabs per set as set with the User Tools are displayed on the dis-
play.
After designating the tab pages, touch the [Last Page] key.
5
If you want to make more than one set of copies, select the Sort mode.
6
❐ To use the Sort mode, an optional sorter stapler is required. Without it, you can
only make one se t of c opie s at a time.
82
Page 91

tb-eu-5
ADDING OR INSERTING SHEETS (Cover/Slip Sheet )
Set your originals on the expo-
7
sure glass
❐ Start with the first page of your origi-
nals.
❐ The side having the image for a tab
should be on the opposite side of the
right scale as shown in the illustration.
OR
face down
.
image for tab
Set your originals
the document feeder.
❐ The last p age shou ld b e on t op.
❐ The side having the image for a tab
should be at the leading edge as
shown in the illustration.
Press the Start key.
face down
in
8
image for tab
COPYING
83
Page 92

tb-eu-5
ADDING OR INSERTING SHEETS (Cover/Slip Sheet )
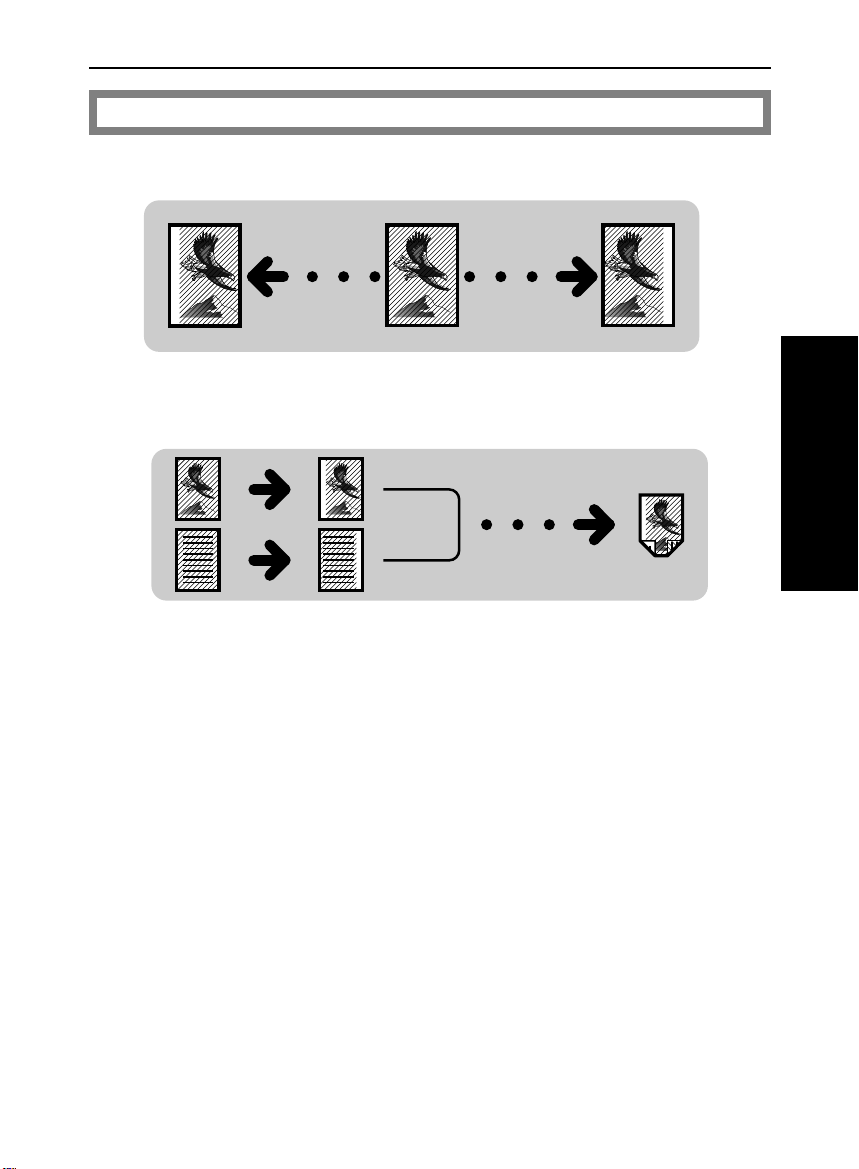
Inserting Slip Sheets Between OHP Transparencies
(OHP Slip Sheet)
Note: Before using the following functions, set the special paper tray
for slip sheets using the User Tools.
❐ A Pape r tray for normal paper and a paper tray for slip sheets of i dentical size
and direction are required for this function.
Make sure that the slip sheets are set in the special paper tray for slip
1
sheets.
Touch the [Cover/Slip Sheet]
2
key.
Touch the [OHP Slip Sheet] key.
3
Then, touch the [#] key.
☛
See page 119.
4
5
84
Set your originals on the exposure glass or in the document feeder.
Press the Start key.
Page 93

tb-eu-5
FINISHING
FINISHING
Note: This function can be used only when you have an optional sorter
stapler. Up to 2 sorter staplers can be equipped with your copier.
Note: It is recommended to set originals in the document feeder in
these functions.
❐ To avoid problems caused by curled copies, try turning over the paper stack in
the paper tray. If there is no improvement, change to copy paper with less curl.
❐ Originals se t length wise ca nnot be us ed in the Fi nishin g mode.
❐ Regarding functions that cannot be used together with this function, ☛ see
page 94.
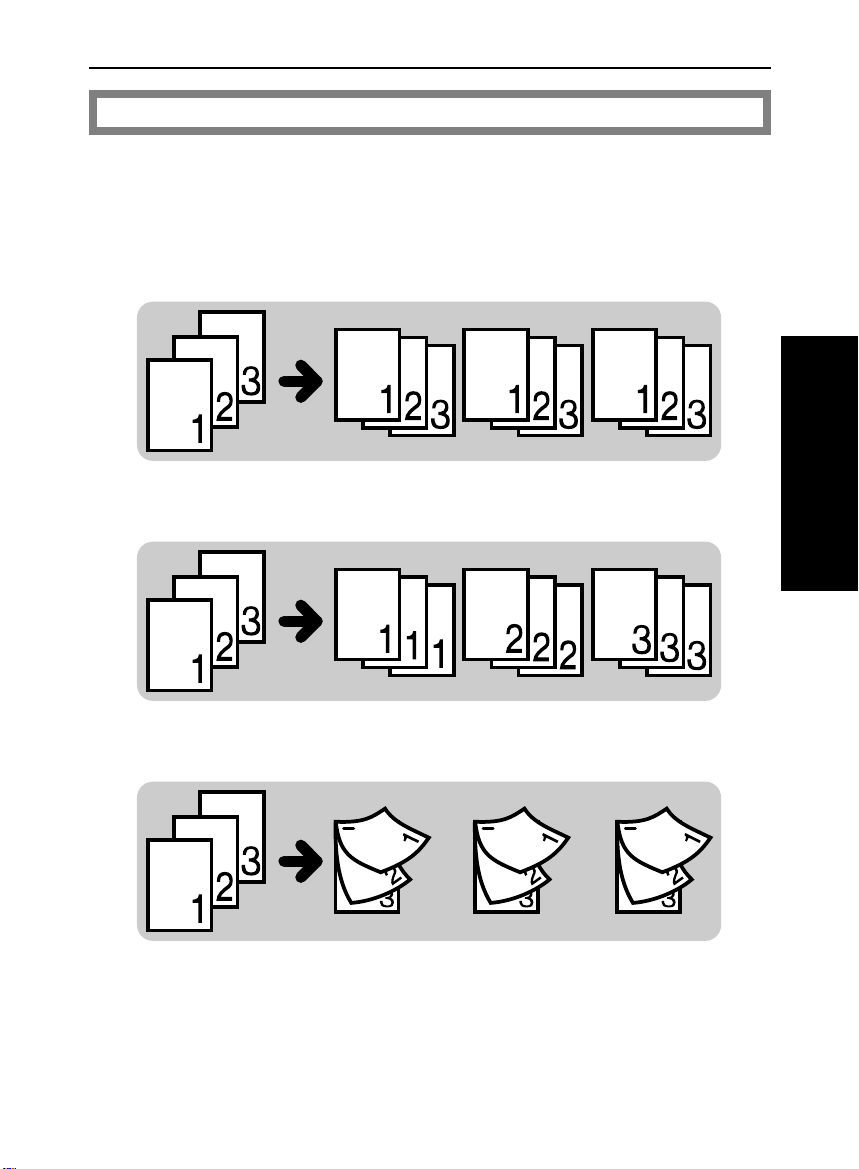
Sorting Into Sets When The Number Of Originals Is
70 Or Less (123, 123, 123) (Sort)
One copy of each original is delivered to each bin and copies are collated
into sets.
❐ For Sorting, the following limitations apply:
Metric version Inch version
Maximum paper size A3 11" x 17"
Minimum paper size A5
Maximum paper weight 160 g/m
Minimum paper weight 52 g/m
Maximum capacity of
bins
Paper that cannot be
70 sheets (80 g/m
50 sheets (80 g/m
post cards, translucent paper, OHP transparencies, and
used
❐ Maximum copy set number: 20 sets (per sorter stapler)
:
2
2
2
, one-sided)
2
, two-sided)
adhesive labels.
5
1/2
" x 8
1/2
"
:
90 lb index
14 lb
70 sheets (20 lb, one-sided)
50 sheets (20 lb, two-sided)
85
COPYING
Page 94

tb-eu-5
FINISHING
❐ If you use more than 70 copies in
Sort mode, the copies are delivered
as shown in the illustration. When
you use more than 70 originals, it is
recommended that you use Large
Volume Sort mode.
Touch the [Finishing] key.
1
Make sure that the [Sort] key is
2
selected.
Set your originals in the document feeder.
3
Press the Start key.
4
70 copies
71st copies
Example:
After the current job is finished, you can make and sort the next job without
removing the copies from the current job.
Cancel Sort mode by touching the [Sort] key.
1
Touch the [Sort] key.
2
Make your copies.
3
❐ The next copies w ill be deliver ed to the second bin bel ow the la st full bin of th e
first copy job.
86
Page 95

tb-eu-5
FINISHING
Sorting Into Sets When The Number Of Originals Is
More Than 70 (123, 123, 123) (Large Volume Sort)
Use this function when you want to
use more than 70 originals in Sort
mode. (For Sort mode, ☛ see page
85.) The copies are delivered to the
bins as shown in the illustration.
❐ For Large Volume Sorting, the following limitations apply:
Metric version Inch version
Maximum paper size A3 11" x 17"
Minimum paper size A5
Maximum paper weight 160 g/m
Minimum paper weight 52 g/m
Maximum capacity of
bins
Paper that cannot be
70 sheets (80 g/m
50 sheets (80 g/m
post cards, translucent paper, OHP transparencies, and
used
❐ Maximum copy set number: 10 sets (per sorter stapler)
❐ As a default se tting, the [Large Volume Sort] key is indicated when touching
the [Finishing] key. You can cancel this setting with the User Tools. ☛ See
page 125.
71st copies
70 copies
71st copies
70 copies
71st copies
70 copies
:
2
2
2
, one-sided)
2
, two-sided)
adhesive labels.
5
1/2
" x 8
1/2
"
:
90 lb index
14 lb
70 sheets (20 lb, one-sided)
50 sheets (20 lb, two-sided)
COPYING
87
Page 96

tb-eu-5
FINISHING
❐ If you use more than 140 originals in
Large Volume Sort mode, the copies
are delive red as show n in the illu stration.
Touch the [Finishing] key.
1
Touch the [Large Volume Sort]
2
key.
Set your originals in the document feeder.
3
Press the Start key.
4
140 copies
141st copies
Example:
After the current job is finished, you can make and sort the next job without
removing the copies from the current job.
Cancel Large Volume Sort mode by touching the [Large Volume Sort]
1
key.
Select the [Large Volume Sort] key.
2
Make your copies.
3
❐ The next co pies will be delive red to th e second or third bi n after the last full bin
of the first copy job.
88
Page 97

Stacking Together All Copies Of A Page
tb-eu-5
(111, 222, 333) (Stack)
All copies of each original are delivered to the same bin.
❐ For Stacking, the following limitations apply:
Metric version Inch version
Maximum paper size A3 11" x 17"
Minimum paper size A5
Maximum paper weight 160 g/m
Minimum paper weight 52 g/m
Maximum capacity of
bins
Paper that cannot be
used
❐ Maximum original set number:20 originals (per sorter stapler)
50 sheets (80 g/m
35 sheets (80 g/m
post cards, translucent paper, OHP transparencies, and
:
2
2
2
, one-sided)
2
, two-sided)
adhesive labels.
5
1/2
" x 8
43 lb
14 lb
50 sheets (20 lb, one-sided)
35 sheets (20 lb, two-sided)
1/2
"
FINISHING
:
Touch the [Finishing] key.
1
Touch the [Stack] key.
2
Set your originals in the document feeder.
3
Press the Start key.
4
COPYING
89
Page 98

tb-eu-5
FINISHING
Stapling Copies (Staple)
❐ If you select Stapling, Sorting is automatically selected.
❐ You cannot use Stapling with Stacking.
❐ Different siz ed c opie s ca nnot b e st aple d.
Stapling position and original setting
Original setting on the
exposure gl ass
❐ For Stapling, the following limitations apply:
Original setting in the
document fe eder
Metric version
Maximum paper size A3
Minimum paper size B5
Maximum paper weight 80 g/m
Minimum paper weight 64 g/m
:
2
2
Stapler capacity 2 ~ 50 copies (80 g/m2, 20 lb)
Paper that cannot be used
post cards, translucent paper, OHP transparencies, and
adhesive labels
Copies
Inch version
11" x 17"
81/2" x 11"
21 lb
17 lb
90
Page 99

Setting stapling before copying
tb-eu-5
Touch the [Finishing] key.
1
Touch the [1 Staple] key.
2
Set your originals in the document feeder.
3
Press the Start key.
4
FINISHING
COPYING
91
Page 100

tb-eu-5
FINISHING
Setting stapling after copying
Use this function when you place originals on the exposure glass, or in the
document feeder, one sheet at a time.
Touch the [Finishing] key.
1
Place originals on the exposure
2
glass, or set originals in the document feeder
Press the Start key.
one sheet at a time
.
3
After copying is completed, touch
4
the [Manual Staple] key.
92
 Loading...