

Page 1
INTRODUCTION
This manual contains detailed instructions on the operation and maintenance of this copier. To get maximum versatility from this copier, all
operators should carefully read and follow the instructions in this manual.
Please keep this manual in a handy place near the machine.
Please read the next section before using this copier. It contains important
information related to USER SAFETY and PREVENTING EQUIPMENT
PROBLEMS.
SAFETY INFORMATION
When using your copier, the following safety precautions should always be followed.
Safety During Operation
In this manual, the following important symbols are used:
R
nx
In addition, all safety messages are identified by the words "WARNING"
and "CAUTION". These words mean the following:
WARNING:
R
R
CAUTION:
R
WARNINGS:
Since some parts of the copier are supplied with high electrical voltage, touch only the parts specified in this manual.
This symbol is intended to alert the user to the presence of important operating and maintenance (servicing) instructions in the
literature accompanying the machine.
This symbol is attached to some components to alert the user not
to touch them, because they may be very hot.
Important information to alert you to a situation that
might cause serious injury and damage to your property
if instructions are not followed.
Important infor mation that tel ls how to prev ent dama ge to eq uipment, or how to avoid a si tuation that might cause minor injury.
i
Page 2

Do not modify or replace any parts other than the ones specified in
this manual.
Do not incinerate toner or toner containers. Toner dust might ignite
when exposed to open flames.
Do not store toner where it will be exposed to heat.
Do not eat or swallow toner, and keep it out of reach of children.
The fusing section can be very hot. Be careful when handling it.
R
CAUTIONS:
While copying, do not turn off the main switch.
While copying, do not open the front cover.
While copying, do not lift the platen cover, or the optional document feeder.
While copying, do not unplug the power cord.
Do not lay anything weighing more than 10 kg, 22 lb on the exposure glass.
Do not place tools or other hard objects on the exposure glass .
Keep corrosive liquids, such as acid, off the machine.
Do not allow paper clips, staples, or other small metallic objects to fall inside
the machine.
General Safety Information
Always turn the copier off when you have finished copying for the day, but
❐
leave it plugg ed in.
When the copier will not be used for a long period, disconnect the power cord.
❐
If the copier must b e transported by vehicl e, please contact your serv ice repre-
❐
sentative.
When the main switch is in the Stand-by position, the optional anticondensation
❐
heater is on. I n case o f emerg ency, unplug t he machi ne’s p ower cor d.
To disconnect t he power s ource, the main plug mu st be pu lled.
❐
ii
Page 3

WHERE IS IT
& WHAT IS IT
WHERE IS IT & WHAT IS IT
1
Page 4
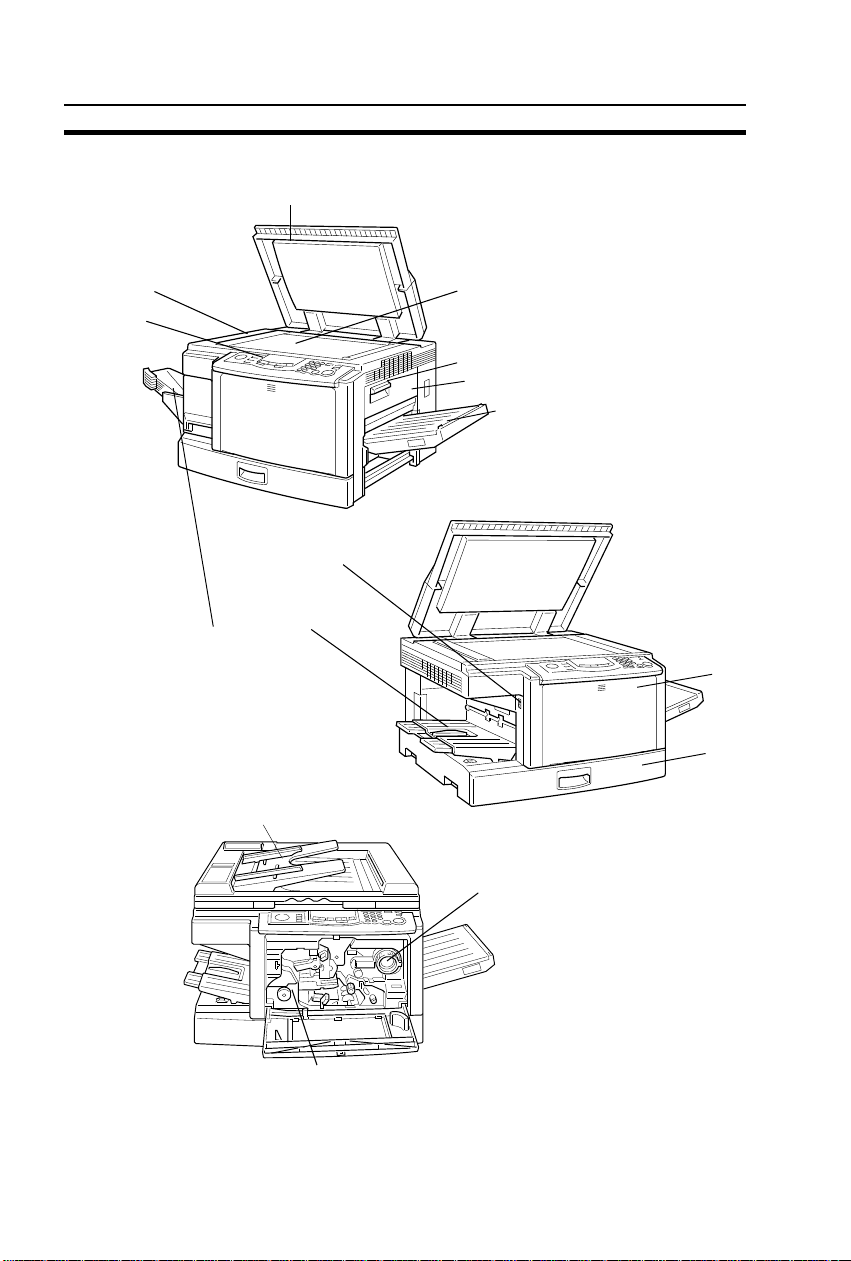
COPIER EXTERIOR AND INTERIOR
COPIER EXTERIOR AND INTERIOR
3
2
1
10
12
11
13
4
5
6
7
8
9
14
15
2
Page 5

COPIER EXTERIOR AND INTERIOR
1. Operation panel
2. Left scale
3. Platen cover
4. Exposure glass
5. Bypass feed table
6. Key counter holder
7. Cassette
8. Front cover
9. Paper Tray
10. Main switch
11. Copy tray
12. 10-bin sorter (Option)
13. Document feeder
(Option)
14. Toner Cartridge
Operator controls and indicators are located here.
Use to align originals on the exposure glass.
Lower this cover over originals for copying.
Position originals here face down for copying.
Use to copy onto paper of unusual size or
weight, or color paper.
Insert the optional key counter here.
This cassette can hold 250 sheets of copy paper.
Open to access the inside of the copier.
This tray can hold 250 sheets of copy paper.
Switches the copier between on and stand-by
conditions. ("stand-by" means that the anticondensation heater is on.)
Completed copies are delivered here.
Completed copies are sorted or stacked here.
Insert a stack of originals here. The originals are
individually fed onto and removed from the exposure glass.
Replace the toner cartridge when the f
indicator is lit or blinking.
Toner
Add
WHERE IS IT & WHAT IS IT
15. Fusing Unit
Fuses the copy image to the paper. When accessing the inside of the copier, use caution.
This unit may be very hot.
3
Page 6
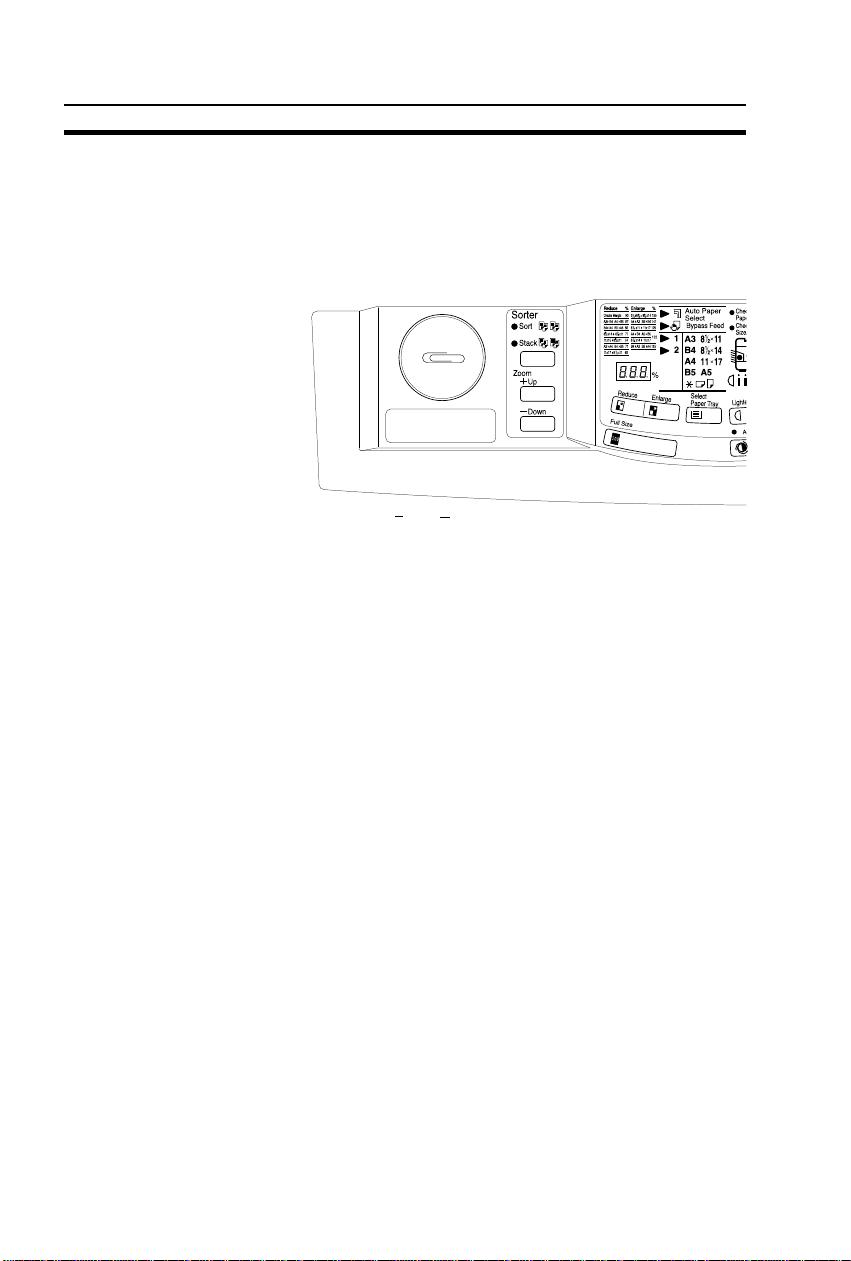
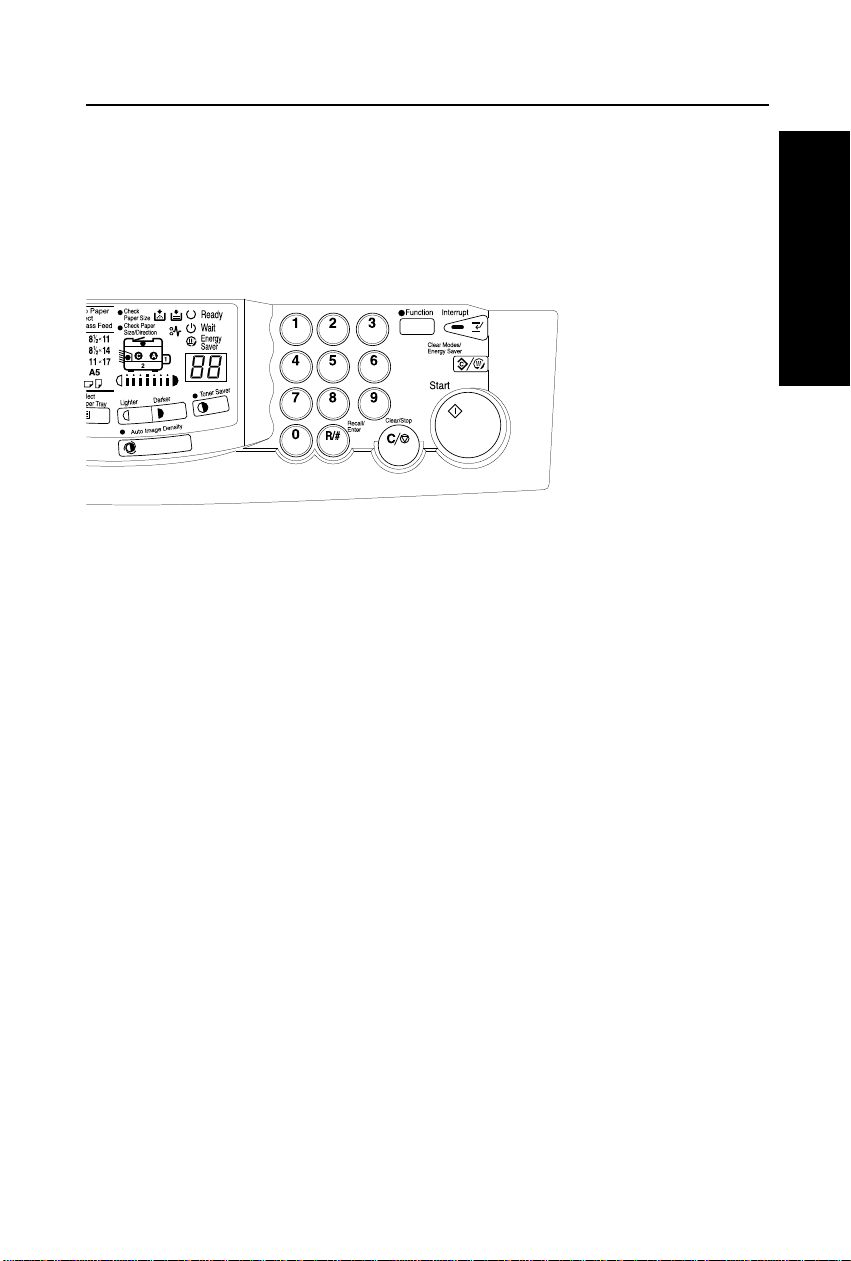
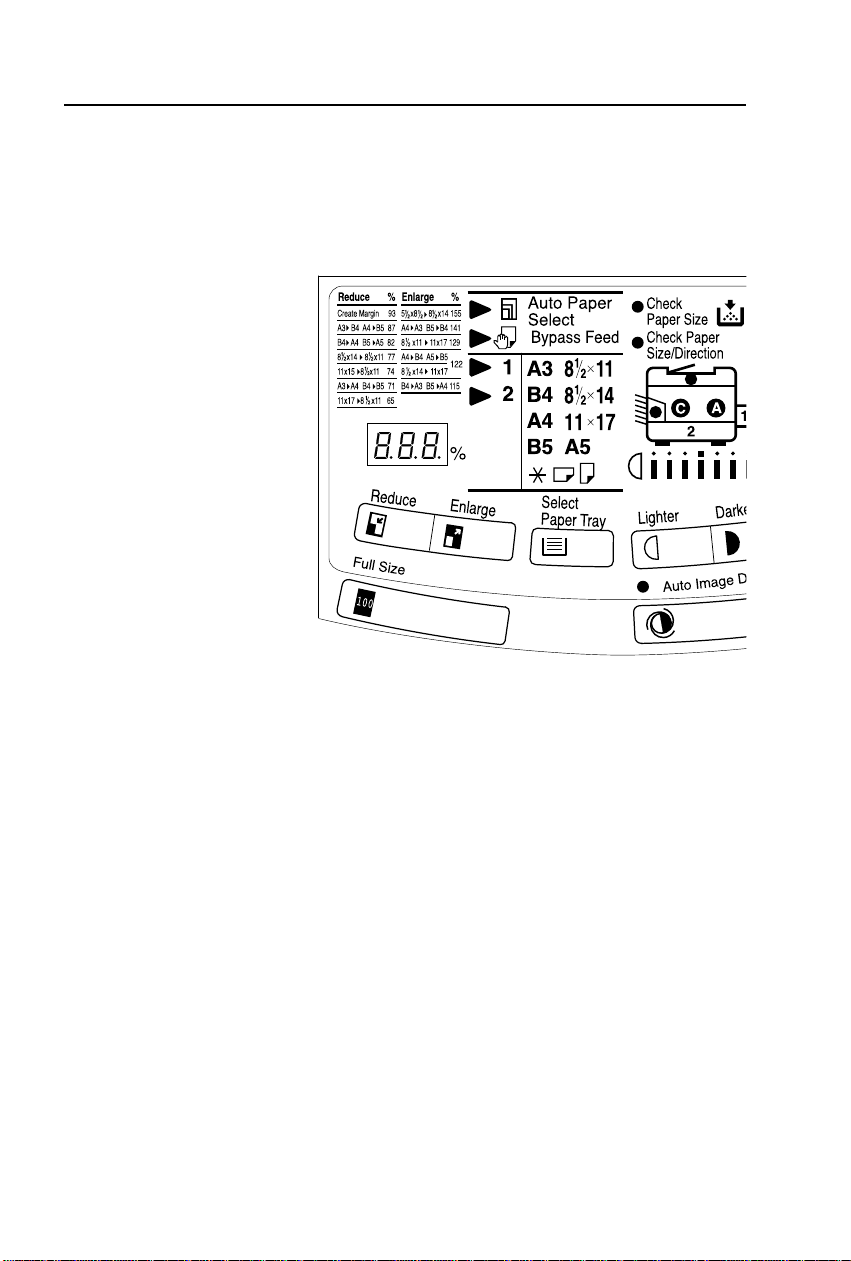
OPERATION PANEL
Keys
OPERATION PANEL
13
12
16
15
14
11
1. Function key
Press in combination with the
Number keys to make onesided copies from various
originals and to erase parts of
the copy image. ☛
38 ~ 42, 43 ~ 44.
2. Interrupt key
33 ~ 35.
See pages
☛ See pages
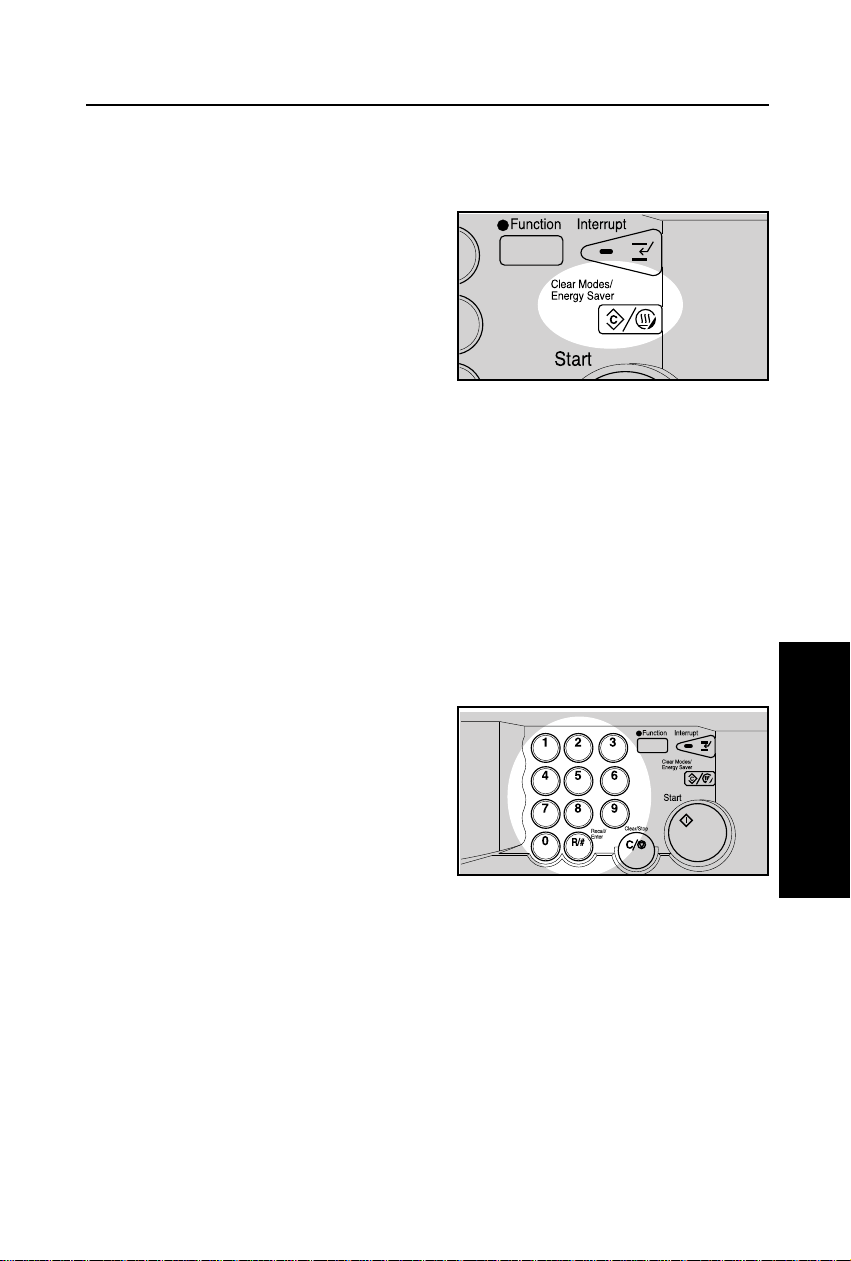
3. Clear Modes/Energy Saver
key
Press to clear the copier of previously entered settings. Press
this key for more than 1 second
to enter/exit the Energy Saver
☛
mode.
4
See pages 17 an d 24.
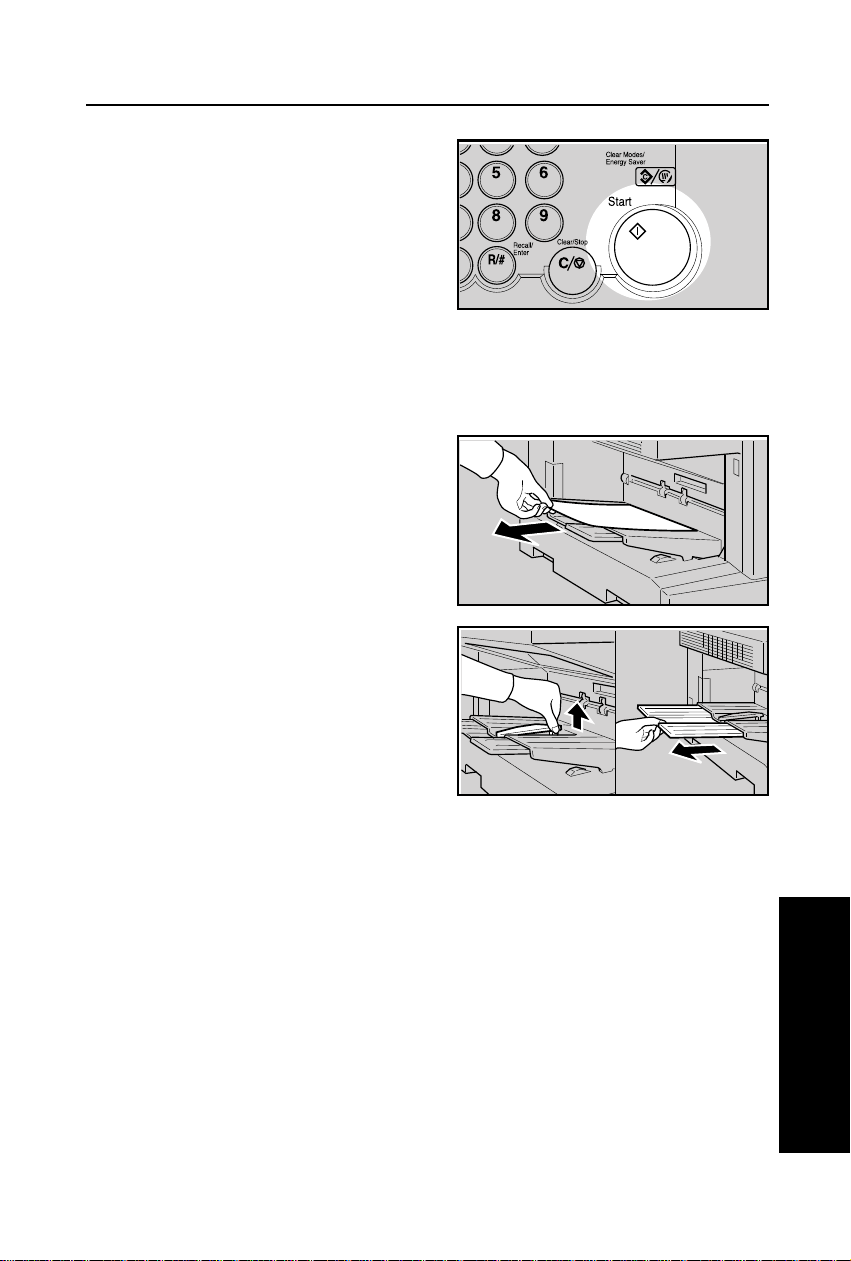
4. Start key
Press to start copying.
Use to set the Auto Start.
See page 37.
☛
5. Clear/Stop key
Press to cancel the copy number entered. While copying,
press to stop copying. This
key is also used to clear data.
6. Recall/Enter key
Use to enter data.
7. Number keys
Use to enter the desired number of copies. They are also
used to enter data.
Page 7
OPERATION PANEL
1
10
7
8
9
6
8. Toner Saver key
☛
See pages 25 and 30.
9. Lighter an d Darker k eys
☛
See page 30.
10. Auto Image Density key
☛
See page 30.
11. Select Paper Tray key
☛
See page 28.
2
3
4
5
WHERE IS IT & WHAT IS IT
14. Zoom Up key
Enlarges in 1% steps.
☛
See page 37.
15. Zoom Down key
Reduces in 1% steps.
See page 37.
☛
16. Sorter key (option)
☛
See pages 48 ~ 51.
12. Reduce and Enlarge keys
☛
See page 36.
13. Full Size key
See page 28.
☛
5
Page 8
OPERATION PANEL
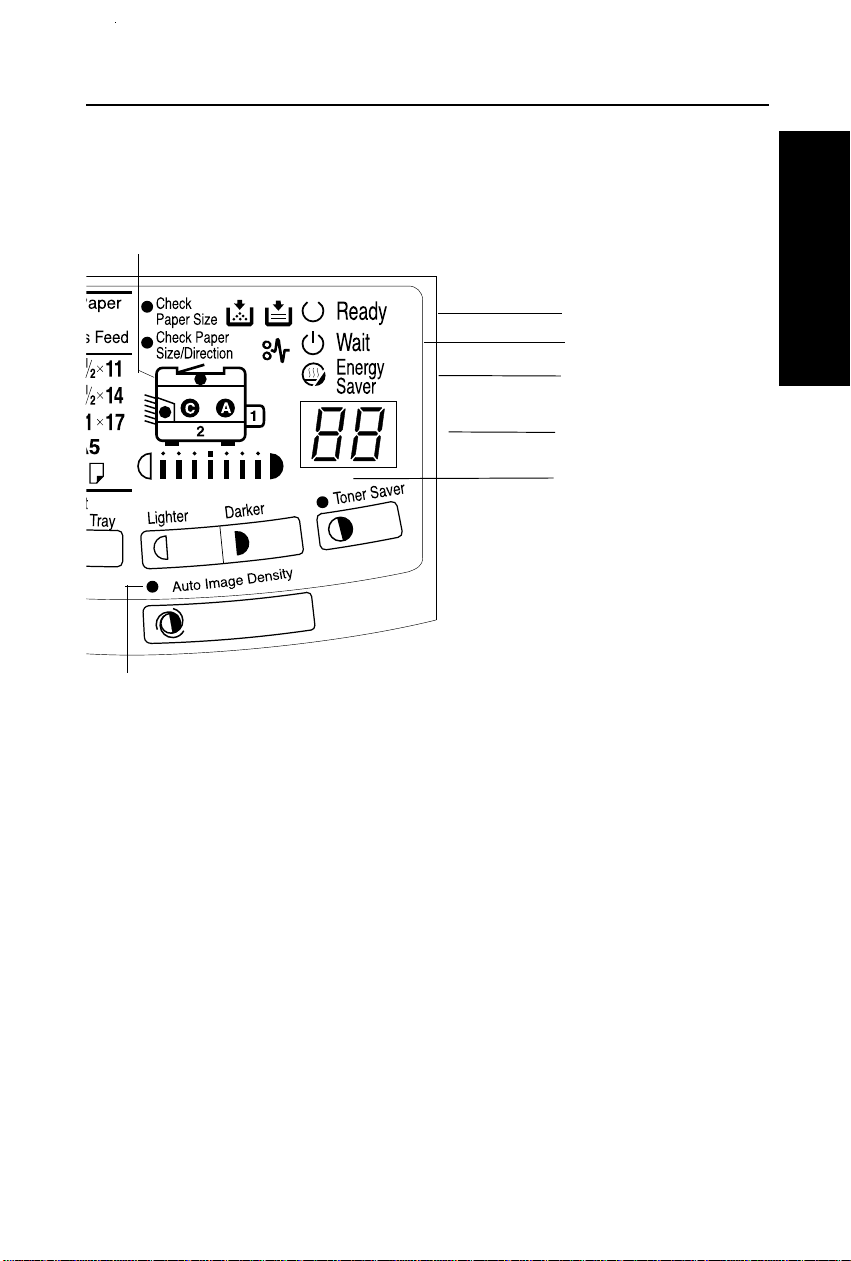
Indicators
9
8
1. Ready indicator
☛
See page 16.
2. Wait indicator
☛
See page 16.
3. Energy Saver indicator
☛
See pages 17 and 24.
4. Copy Counter
Indicates the number of copies.
Data display.
5. Toner Saver indicator
☛
See pages 25 and 30.
10
11
12
13
14
6. Manual Image Density indicator
☛
See page 30.
7. Auto Image density indicator
☛
See page 30.
8. Three Digit indicator
Data display.
9. Paper Size indicators
Show the selected feed station,
copy paper size, and direction.
6
Page 9
15
16
17 18
OPERATION PANEL
1
2
3
4
5
WHERE IS IT & WHAT IS IT
7
6
10. Reduce and Enlarge indicators
☛
See page 36.
11. Auto Paper Select indicator
(option)
☛
See pages 45 ~ 47.
12. Bypass Feed indicator
☛
See page 32.
13. Check Paper Size indicator
☛
See page 57.
14. Check Paper Size/Direction
indicator
☛
See page 57.
15. Misfeed Location display
☛
See pages 64 ~ 66.
16. Add Toner indicator
☛
See page 63.
17. Load Paper indicator
☛
See pages 59 ~ 62.
18. Check Paper Path indicator
☛
See pages 64 ~ 66.
7
Page 10

WHAT YOU CAN DO
WITH THIS COPIER
THIS COPIER
WHAT YOU CAN DO WIT H
9
Page 11
FUNCTIONS
FUNCTIONS
Auto image density
☛ See page 30.
Manual image density
☛ See page 30.
Copying from the bypass feed table
☛ See page 31.
Temporarily stopping one job to copy something else
☛ See page 33.
10
Page 12
Reducing and enlarging
Reducing and enlarging using preset ratios
FUNCTIONS
☛ See page 36.
Reducing and enlarging with the Zoom Up (+) and Zoom Down (-) keys
☛ See page 37.
Entering copy job settings during the warm-up period
☛ See page 37.
THIS COPIER
WHAT YOU CAN DO WIT H
11
Page 13
FUNCTIONS
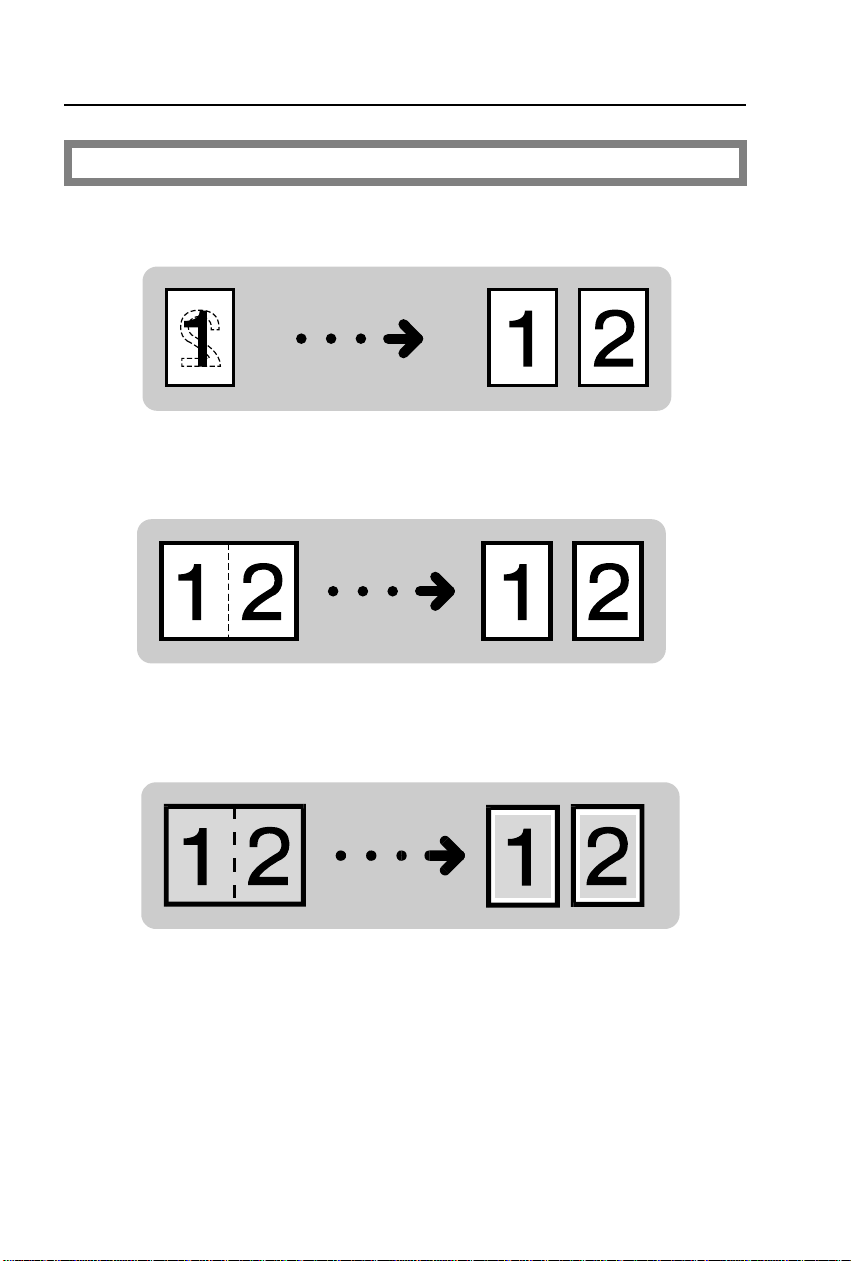
Making one-sided copies from various originals
From 1 two-sided original to 2 one-sided copies
From 2 facing pages to 2 one-sided copies
From 2 facing pages to 2 one-sided copies and erasing the surrounding
area of the original image
☛ See page 38.
☛ See page 39.
12
☛ See page 41.
Page 14
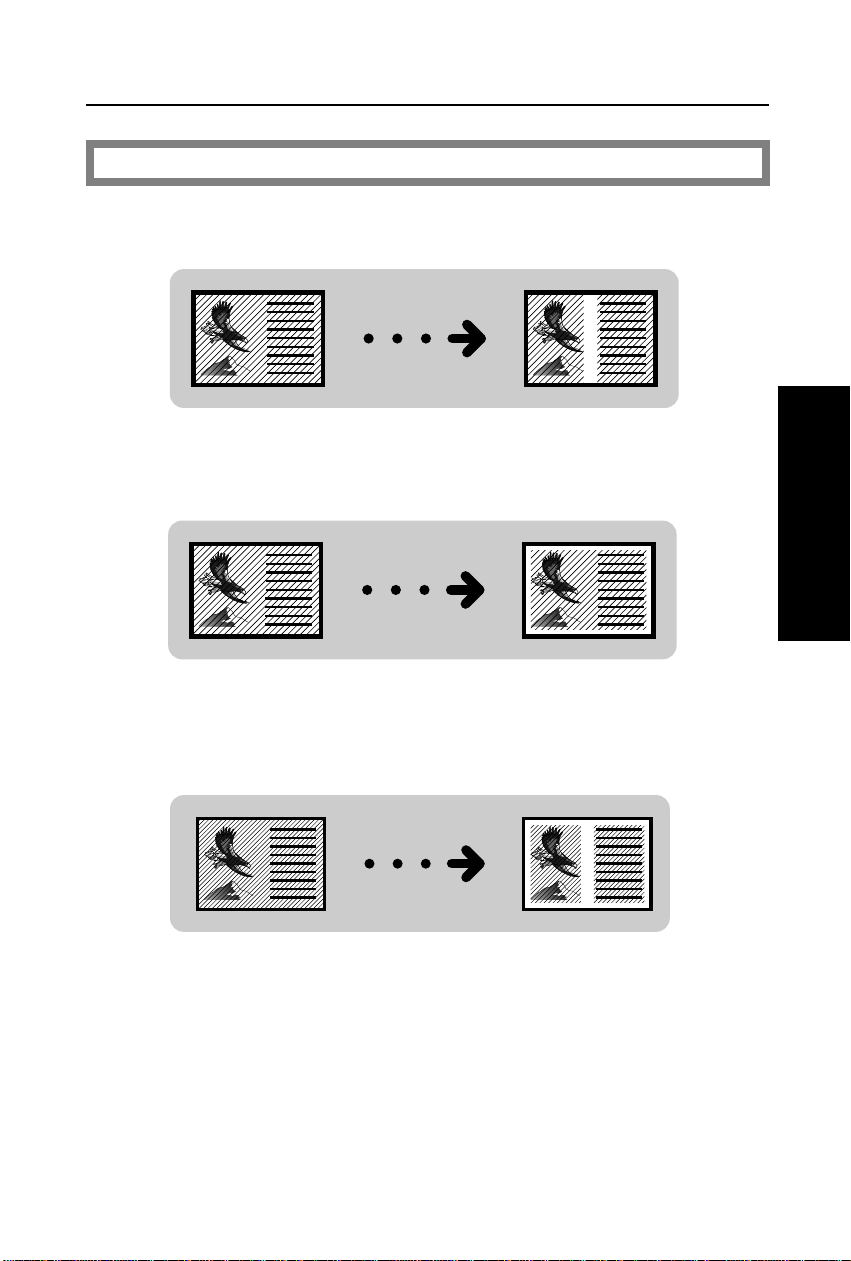
Erasing parts of copy image
Erasing the center margin of the original image
FUNCTIONS
☛ See page 43.
Erasing the surrounding area of the original image
Erasing the center margin and surrounding area of the original image
☛ See page 43.
☛ See page 43.
THIS COPIER
WHAT YOU CAN DO WIT H
13
Page 15
FUNCTIONS
Having the copier choose the paper size (Option)
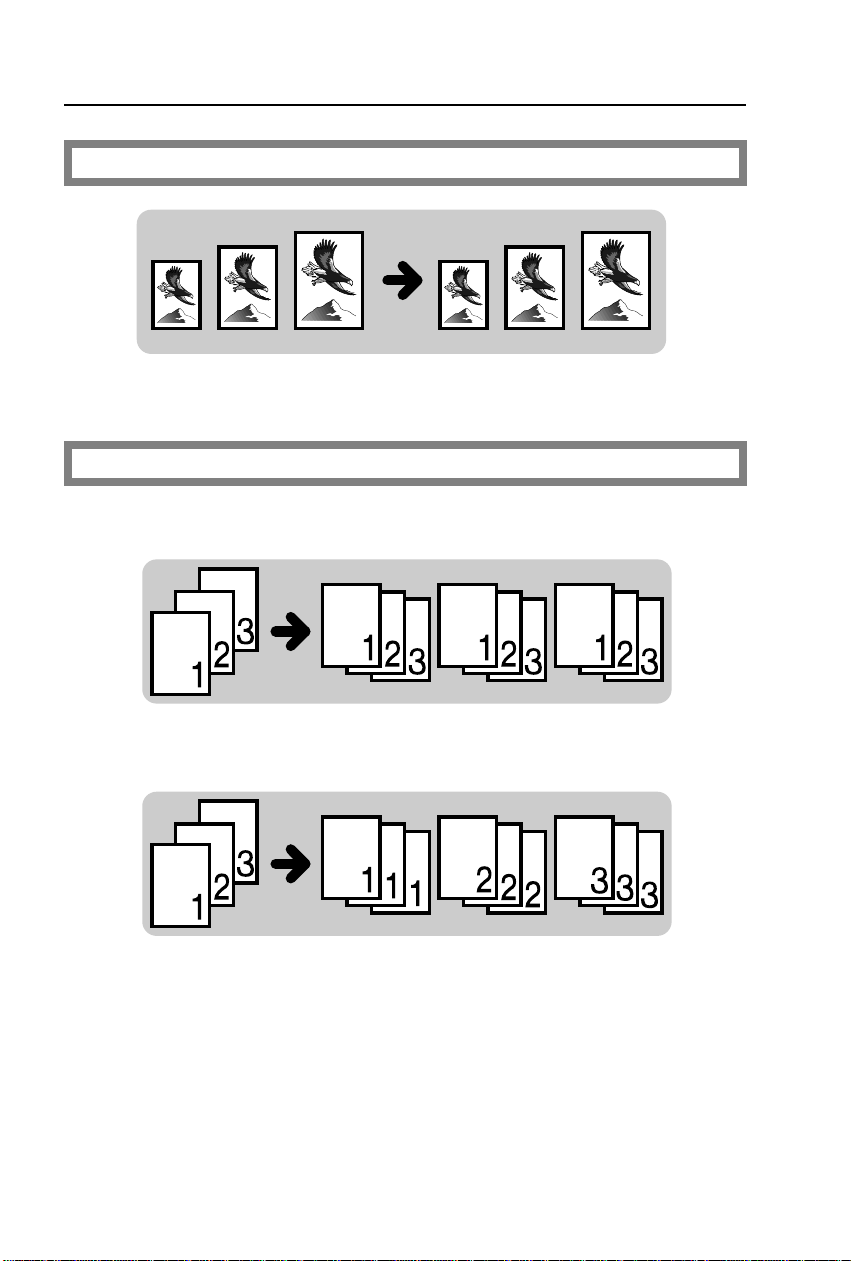
Finishing (Option)
Sorting into sets (123,123,123)
☛ See page 45.
Stacking together all copies of a page (111, 222, 333)
14
☛ See page 48.
☛ See page 50.
Page 16

BASICS
15
BASICS
Page 17
STARTING THE COPIER
STARTING THE COPIER
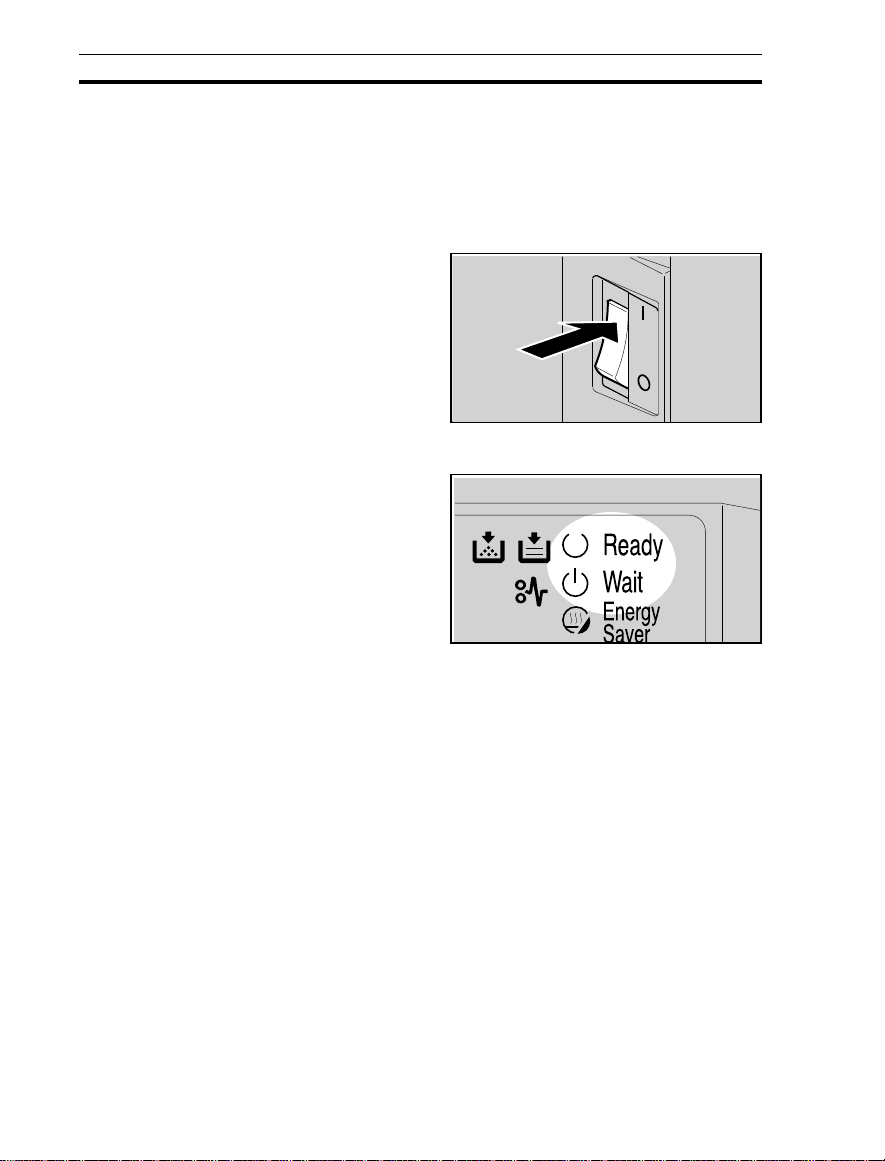
When The Main Switch Is In The Stand-by Position
Turn on the main switch.
1
On
Stand by
Wait for the copier to warm-up.
2
During the warm-up period (less
than 1 minute), the
cator is on.
After warm-up, the v Ready indi-
3
cator lights.
u Wait indi-
16
Page 18
STARTING THE COPIER
When The r Energy Saver Indicator Is On
The copier is in the Energy Saver
mode.
Press the Clear Modes/Energy
Saver key to return to the ready
condition.
For details about the Energy Saver,
❐
see page 24.
☛
The following actions will also return the copier to the ready condition:
❐
Opening or clos ing the option al document fe eder.
•
Setting origi nals in the op tional doc ument feeder .
•
Opening or clos ing the bypass feed table.
•
Setting copy paper in the bypass feed table.
•
Pressing any ke y except the
•
Start
key.
When The Copier Is Set For User Codes
When U2 is indicated in the copy
counter, the copier is set for user
codes.
Input your user code (4 digits)
using the Number keys. Then
press the Recall/Enter key.
To prevent others from making cop-
❐
ies using your user code, press the
Clear/Stop
ergy Saver
copying.
Regarding user codes,
❐
84.
To set your copier for user codes,
❐
contact your service representative.
☛
and
key simultaneously after
See page 88.
Clear Modes/En-
see page
☛
BASICS
17
Page 19

ORIGINALS
ORIGINALS
Recommended Originals
❐ Regarding ori ginals that the optiona l document feeder can ha ndle, ☛ see page
105.
Non-recommended Originals For The Optional
Document Feeder
R
Caution:
The following types of originals are not recommended for use with the
document feeder. Place them directly on the exposure glass.
❐ Originals thicker than 128 g/m
❐ Originals thicker than 105 g/m
❐ Originals thinner than 41 g/m
❐ Originals larger th an A3, 11" x 17"
❐ Originals smaller than B6 ; , 51/2" x 81/2" ;
❐ Paper with a ny kin d of coa ting (s uch as carbon ) on th e back
❐ Folded, curled , creased, or da maged origina ls
❐ Mailing labels, or perforated originals
❐ Bound, stapled, or cl ipped origi nals
❐ OHP transparencies
❐ Translucent pape r
❐ Pasted origin als
❐ Damp original s
❐ Sticky orig inals
❐ Wavy originals
❐ Originals that are not made from paper
❐ Originals written in pencil on both sides, or two-si ded carbon or iginals
❐ Thermal fax pape r
2
, 34 lb
2
, 28 lb when using two-si ded origina ls
2
, 11 lb.
18
Page 20
SETTING ORIGINALS ON THE EXPOSURE
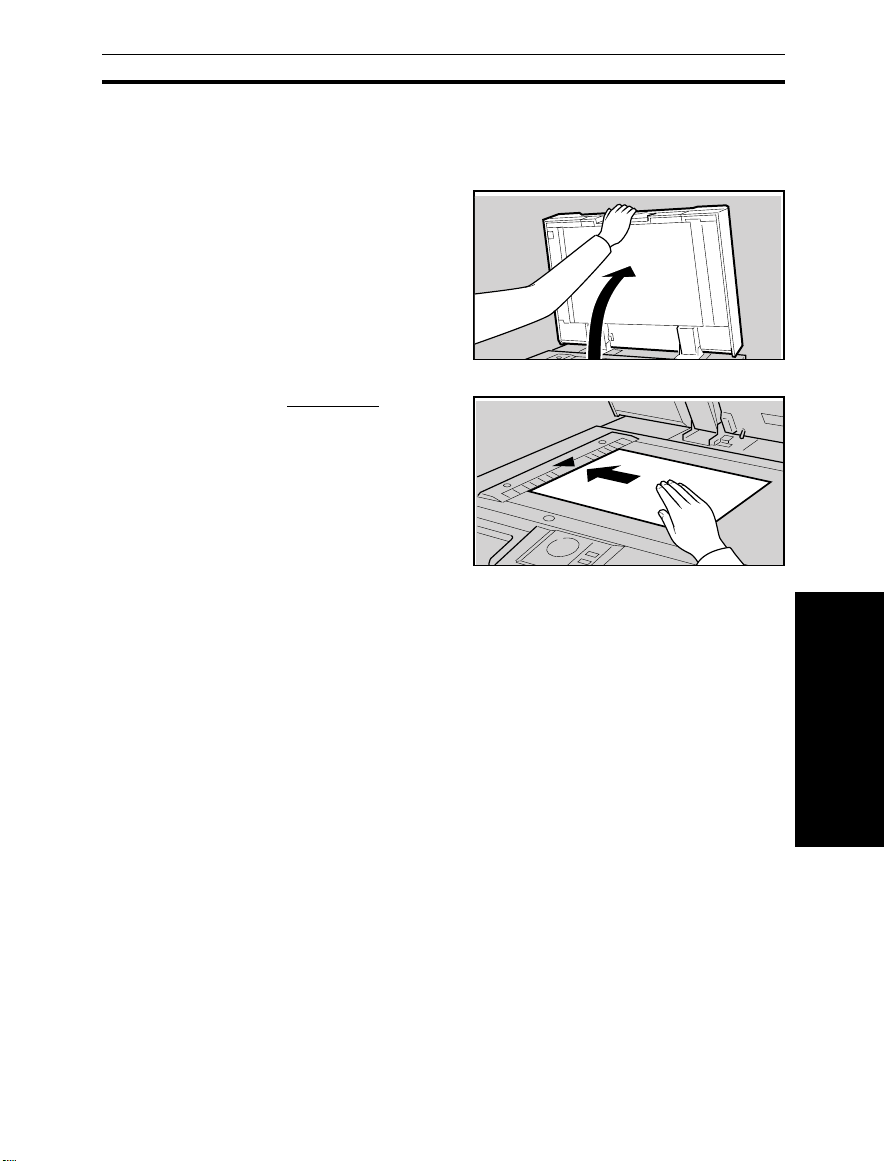
.
Lift the platen cover or the op-
1
tional document feeder.
❐ When lifting the platen cover, hold it
in the center.
.
Set the original
2
exposure glass. The original
should be centered according to
the size marks on the left scale.
face down
on the
SETTING ORIGINALS ON THE EXPOSURE GLASS
GLASS
.
Lower the platen cover or the op-
3
tional document feeder.
BASICS
19
Page 21
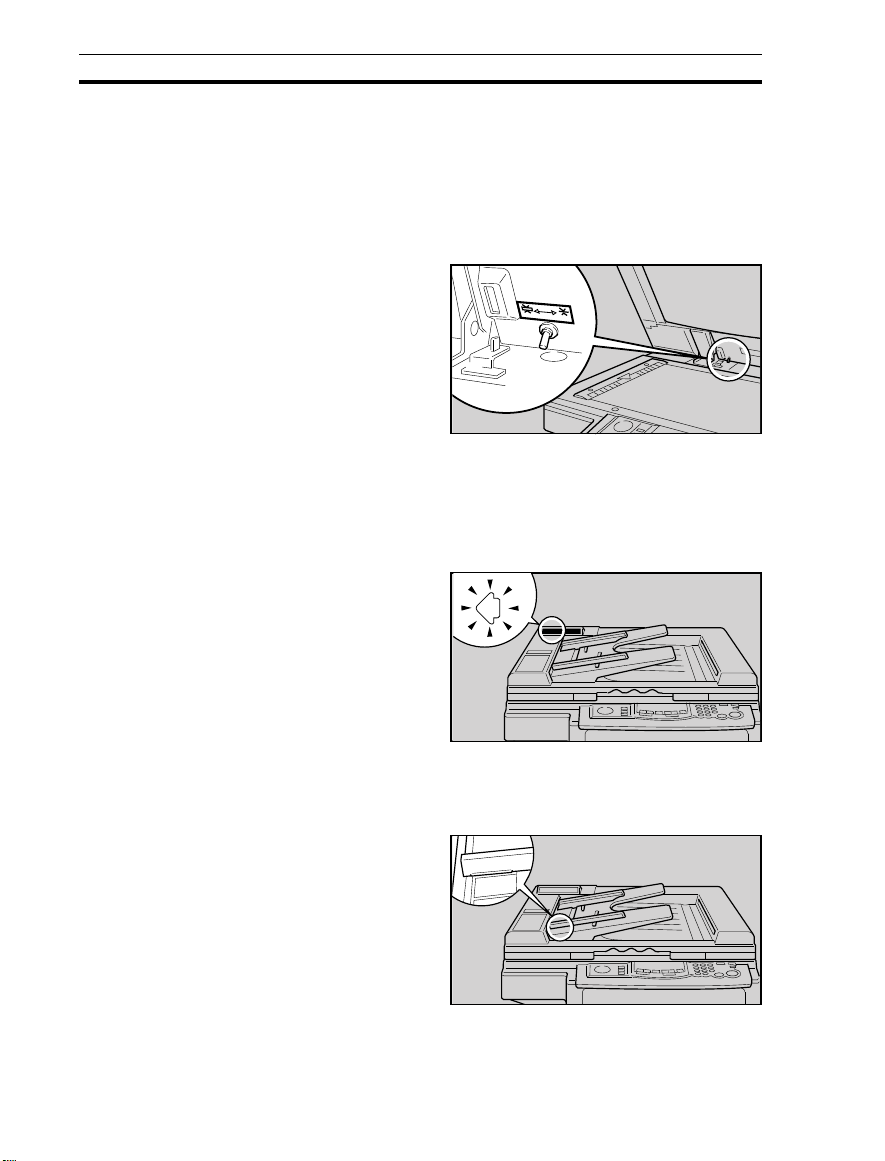
SETTING A STACK OF ORIGINALS IN THE OPTIONAL DOCU MENT FEEDER
SETTING A STACK OF ORIGINALS IN THE
OPTIONAL DOCUMENT FEEDER
You can insert a stack of originals (one-sided or two-sided) of the same size
into the document feeder. These originals are individually fed onto and
removed from the exposure glass.
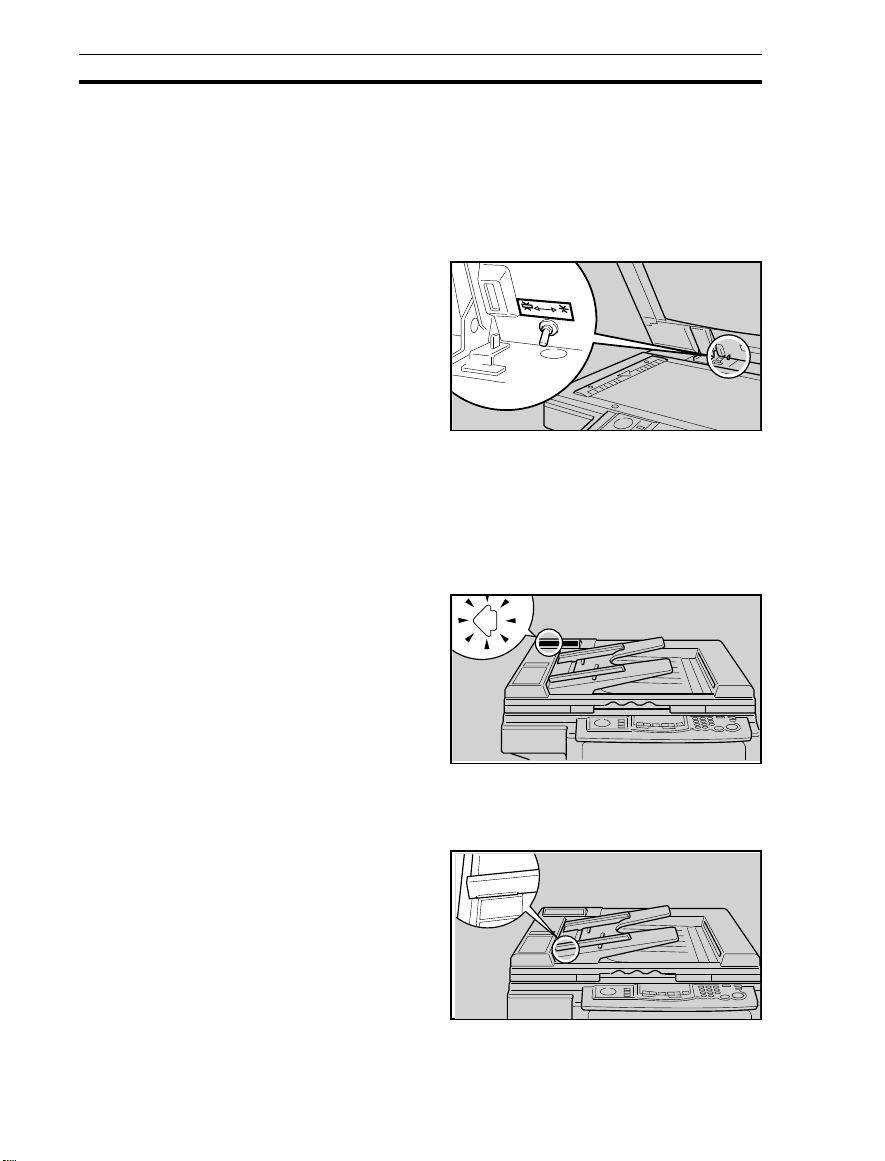
❐ If the originals are heavier than 52
g/m2, 14 lb, set the Original Select
switch of the docume nt feeder to the
Thick Original p osition.
❐ If you want to set originals of different sizes at the same time, use the user
tools. ☛ See page 81.
.
Correct any curl, fold, or crease
1
in the originals before setting.
.
Confirm that the Insert Original
2
indicator is lit before setting the
originals.
.
Confirm that no previous originals
3
remain on the exposure glass.
.
Adjust the guides to the original
4
size.
20
Page 22
SETTING A STACK OF ORIGINALS IN THE OPTIONAL DOCU MENT FEEDER
.
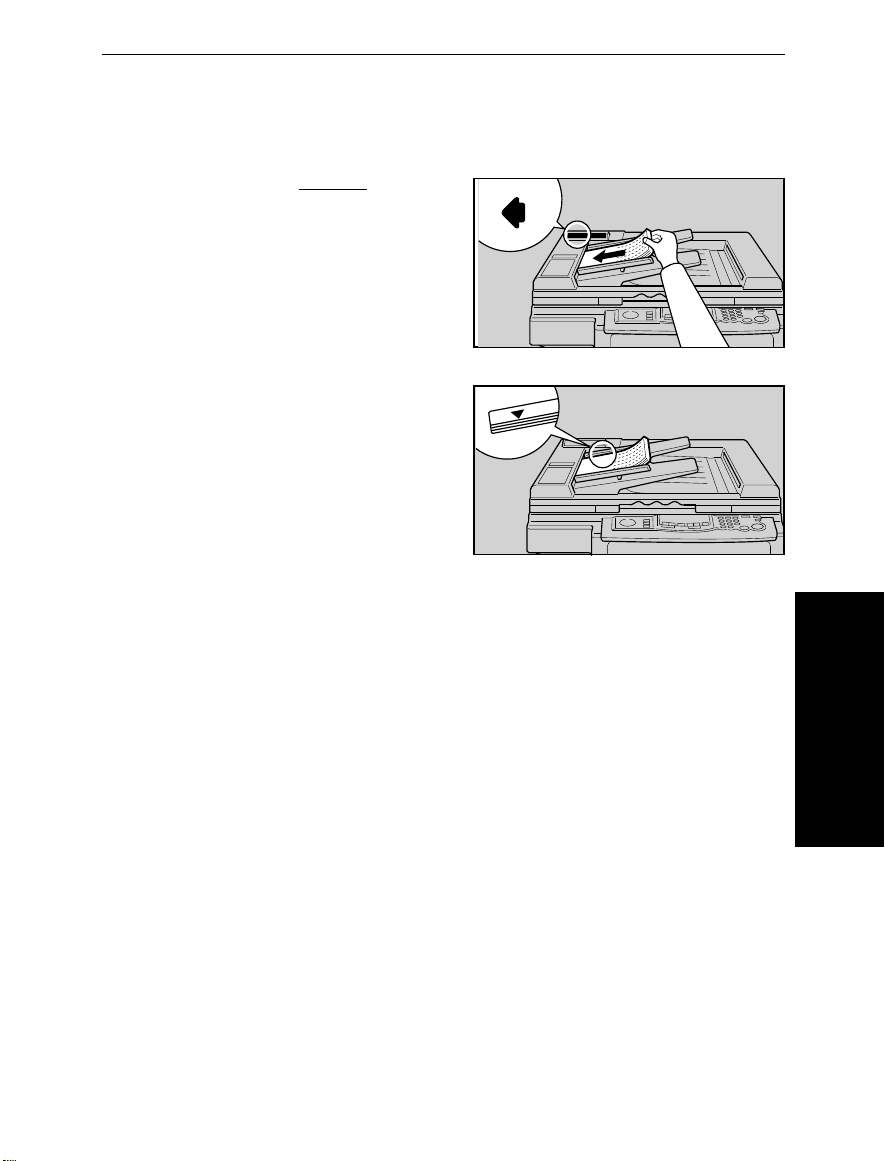
Set the originals
5
document feeder until the Insert
Original indicator goes off.
❐ The last page should be on the bot-
tom.
❐ The guides mus t touch both sides of
the originals.
❐ Do not stack originals above the limit
mark.
face up
into the
21
BASICS
Page 23
SETTING ONE ORIGINAL AT A TIME IN THE OPTIONAL DOCUMENT FEEDER
SETTING ONE ORIGINAL AT A TIME IN THE
OPTIONAL DOCUMENT FEEDER
You can insert one original at a time into the document feeder. The original
is automatically fed onto and removed from the exposure glass.
❐ If the originals are heavier than 52
g/m2, 14 lb, set the Original Select
switch of the docume nt feeder to the
Thick Original p osition.
.
Correct any curl, fold, or crease
1
in the originals before setting.
.
Confirm that the Insert Original
2
indicator is lit before setting the
originals.
.
Confirm that no previous originals
3
remain on the exposure glass.
.
Adjust the guides to the original
4
size.
22
Page 24

SETTING ONE ORIGINAL AT A TIME IN THE OPTIONAL DOCUMENT FEEDER
.
Set the original
5
document feeder until the Insert
Original indicator goes off.
❐ If you are co pying a st ack of o riginals
one sheet at a time and you want to
keep them in order, start w ith the last
page of the originals.
❐ The original guides must touch both
sides of the original.
Press the Start key.
face up
into the
6
.
While the Auto Feed indicator is
7
lit after an original is fed, set the
next original. The original is automatically fed and copied.
❐ If you have set more than two origi-
nals, the Auto Feed indicator is not
lit after th e last original is fe d. In this
case, press the Start key again after
setting an original.
23
BASICS
Page 25
SAVING ENERGY
SAVING ENERGY
With the Energy Saver, the copier is reset and uses less electricity.
❐ To have the Ene rgy Saver automatically activated when the copier is auto re-
set, set the user tools. ☛ See page 82.
❐ Your service r epresentative c an select one of four lev els for the saving rat io.(☛
See page 83.) The high er the saving ratio, the mo re time the co pier will ne ed to
return to the ready condition.
❐ The following acti ons will cancel the Energy Sav er mode:
• Opening or closing the optional document feeder.
• Setting originals in the optional document feeder.
• Opening or closing the bypass feed table.
• Setting copy pape r in the bypass feed table.
• Pressing any key except the Start key.
Press the Clear Modes/Energy
1
Saver key more than one second
to enter the Energy Saver condition.
❐ All indicators except the r Energy
Saver indicator turn o ff.
24
Page 26
SAVING TONER
SAVING TONER
With the Toner Saver, the toner cartridge lasts longer. However, the copy
image density will be lower.
❐ Depending on images on a original, toner saving ratio might be changed.
❐ If the copy im age dens ity wit h this f unction is too l ow, can cel it.
❐ The auto and manual image density modes cannot be selected with this func-
tion.
❐ To set the Toner Saver function as default, set the user tools. ☛ See page
77.
❐ Your service representative can select one of three toner saving ratio. ☛ See
page 87.
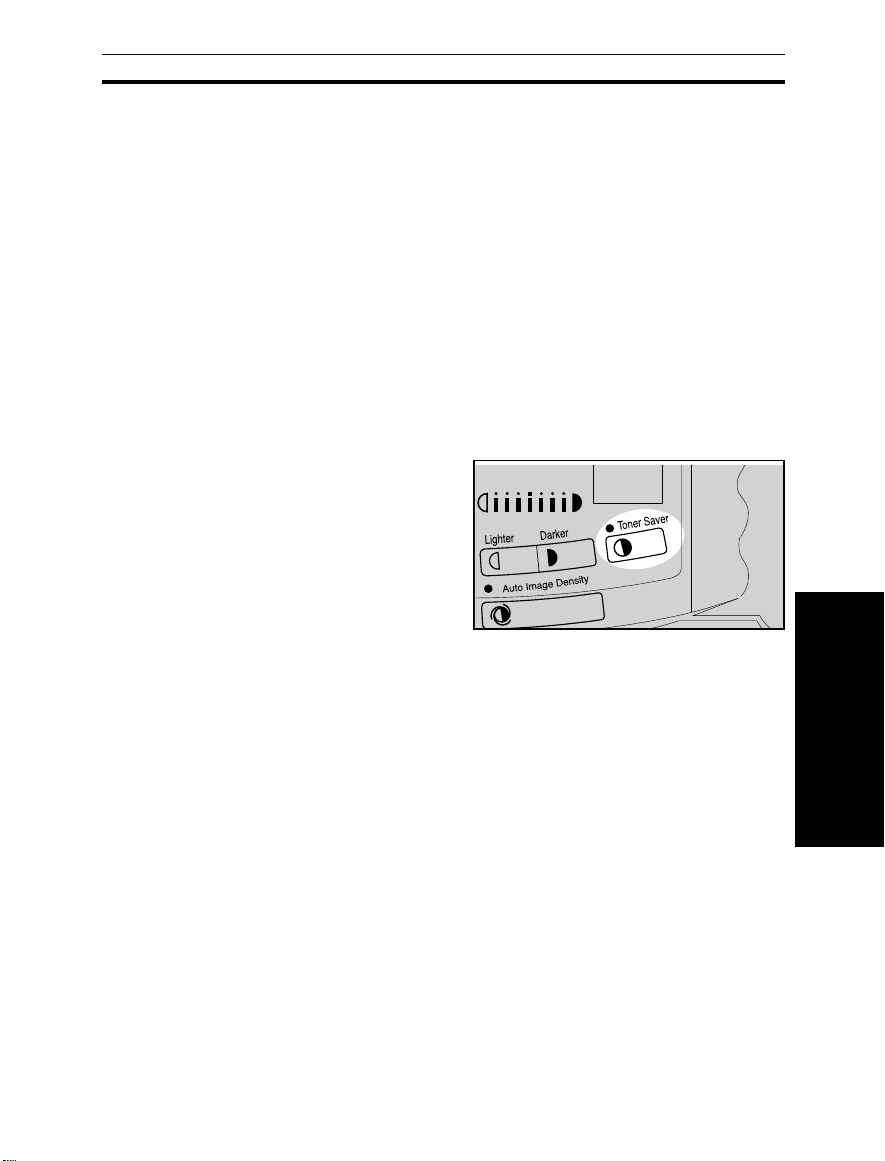
Press the Toner Saver key.
1
❐ If you want to cancel this function,
press the Toner Saver key again,
the Lighter and Darker keys, or the
Auto Image Densit y key.
Make your copies.
2
BASICS
25
Page 27

COPYING
27
COPYING
Page 28
BASIC OPERATION
BASIC OPERATION
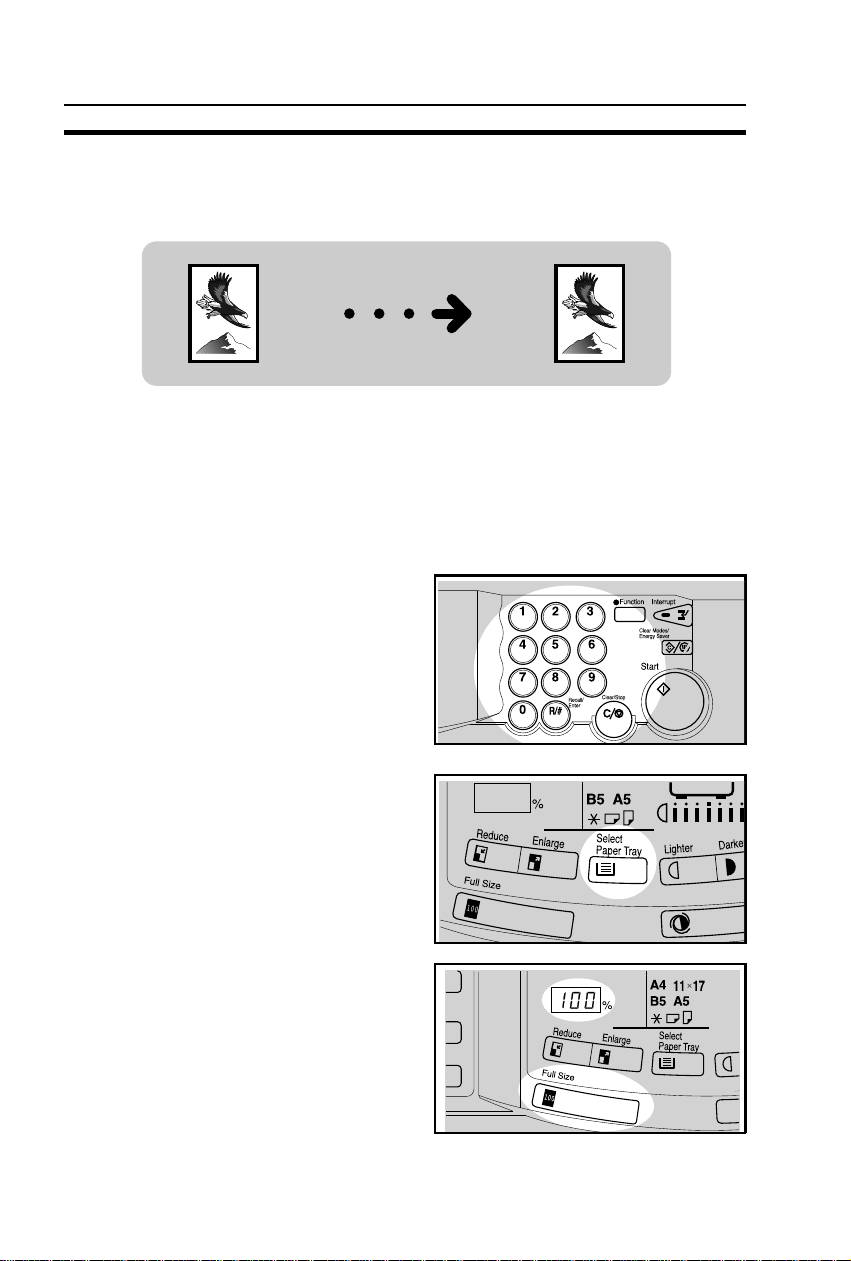
One-to-one Copying
You can make copies that are the same size as your originals.
Set your original on the exposure
1
glass or in the optional document
feeder.
22.
Enter the number of copies re-
2
quired using the Number keys.
❐
To change the number entered,
press the
the new number.
☛
See page 19, 20, or
Clear/Stop
key, then enter
Select the copy paper using the
3
Select Paper Tray key.
❐
When you set the original in the optional docum ent feeder, you can use
the Auto Paper Select function.
See page 45.
Make sure that the magnification
4
ratio is set to 100%. If not, press
the Full Size key.
28
☛
Page 29
Press the Start key.
5
❐
To confirm th e number of copie s that
you entered, press the
key.
❐
To stop the copie r during a multicop y
run, press th e
❐
Press the
ing, or press the
again to clear the entered copy number.
Clear/Stop
key to resume copy-
Start
Remove the copies from the copy
6
tray.
❐
The copy tray holds approxima tely 250
sheets (B4, 8
100 sheets (A3, 11" x 17").
❐
If you make B4, 8
size copies, raise the center rib and
extend the copy tray to stack them
properly.
" x 14" and smaller ) or
1/2
Recall/Enter
key.
Clear/Stop
" x 14" or larger
1/2
BASIC OPERATION
key
29
COPYING
Page 30
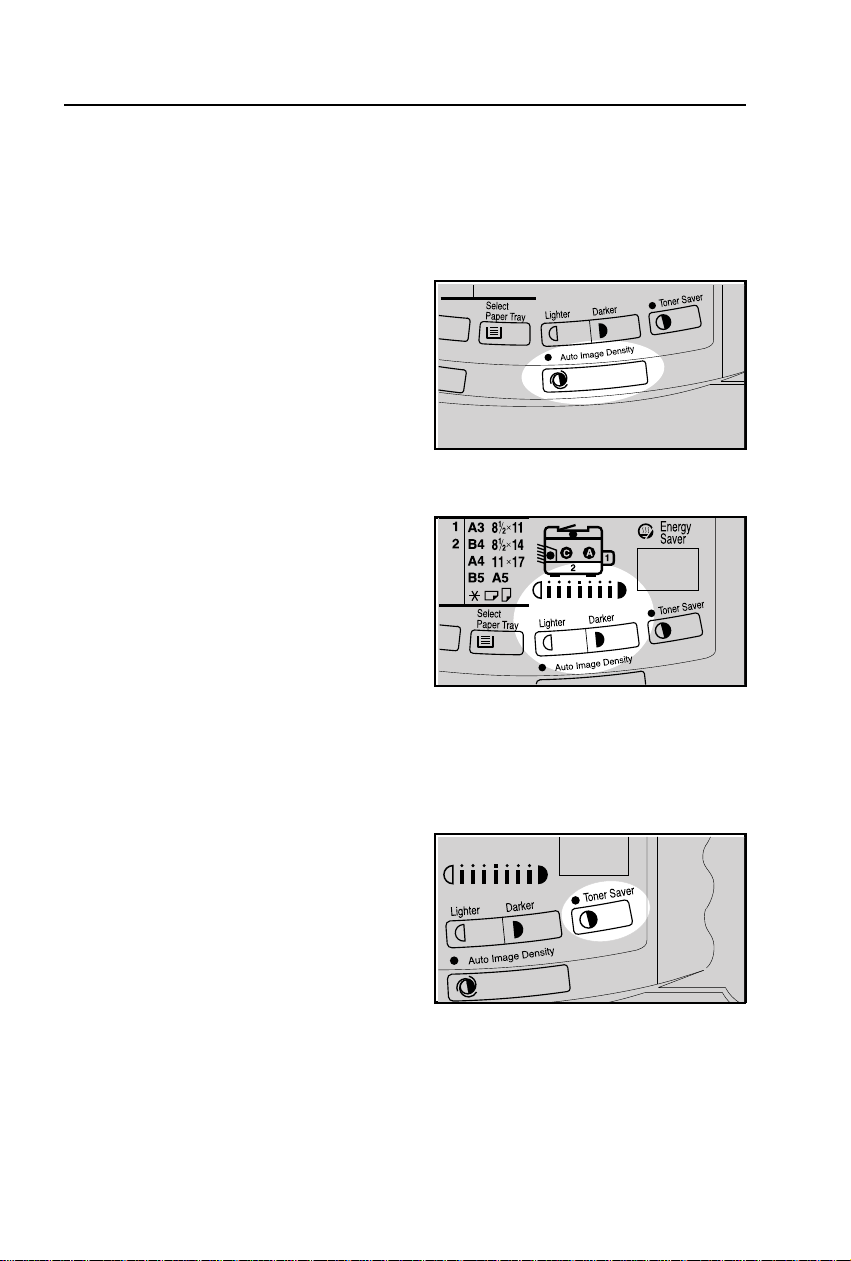
BASIC OPERATION
Adjusting Copy Image Density
To match the type of originals, adjust the image density.
Auto image density
If the Auto Image Density indicator is lit, the copier automatically controls the image density.
If the indicator is not lit, press the
Auto Image Density key.
Manual image density
If you require darker or lighter
copies, adjust the image density
yourself.
Press the Lighter (left) key to
lower the image density. Press
the Darker (right) key to increase
the image density.
Toner Saver mode
Using this mode, the copy density
will be lighter and the toner cartridge will last longer.
Press the Toner Saver key before making copies.
❐
The auto and manual image density
modes cannot be selected simultaneously with the Toner Saver mode and
vice versa.
❐
Regarding the Toner Saver function,
☛
see page 25.
30
Page 31

BASIC OPERATION
Copying From The Bypass Feed Table
Use the bypass feed table to copy onto paper of unusual size or weight, or
color paper.
When using the bypass feed table, set one sheet at a time.
❐
When using the bypass feed table, set the cassette correctly.
❐
When you use t he bypass feed table while placing the original dir ectly on the
❐
exposure glass, lower the platen cover or optional document feeder before
pressing the
Regarding functions that cannot be used together with this function, ☛ see
❐
page 53.
Set your original on the exposure
1
glass or in the optional document
feeder.
22.
Open the bypass feed table.
☛
key.
Start
See page 19, 20, or
2
31
COPYING
Page 32

BASIC OPERATION
Make sure that the o Bypass
3
Feed indicator is lit. If it is not lit,
press the Select Paper Tray key
to select the bypass feed table.
❐
If the cassette is not set correctly, the
o
Bypass Feed
you cannot selec t the bypass feed table. In this case , set the cas sette correctly.
Slide the paper guides to the pa-
4
per width and, if necessary,
swing out the extender to support
large size copy paper.
Lay the copy paper on the by-
5
pass feed table and Insert it until
the paper lightly touches the feed
roller inside.
❐
Do not shove paper into the bypass
feed table.
indicator blinks and
Press the Start key.
6
Repeat step 5 until your copying
7
is completed.
o
While the
cator is lit, the copier is ready for
the next copy paper.
32
Bypass Feed indi-
Page 33

BASIC OPERATION
Temporarily Stopping One Job To Copy
Something Else (Interrupt Copying)
Use the Interrupt key to interrupt a multicopy run to make urgently needed
copies.
Regarding functions that cannot be used together with this function,
❐
page 53.
Without the optional document feeder
Press the Interrupt key. The cop-
1
ier will stop the copy run and
store the present settings in the
memory. The copier will return to
the ready condition.
❐
The reproduct ion ratio will not be reset.
Remove the previous original. Set
2
your original for interrupt copying
on the exposure glass.
page 19.
☛
See
☛
see
Make your copies.
3
After interrupt copying is com-
4
pleted, press the Interrupt key
again. The copier will recall the
previous copy settings.
COPYING
33
Page 34

BASIC OPERATION
Reset the previous original and
5
press the Start key to resume the
previous run.
With the optional document feeder
Press the Interrupt key. The cop-
1
ier will stop the copy run and
store the present settings in the
memory. The original on the exposure glass will exit from the
document feeder. The copier will
return to the ready condition.
Take the originals from the exit
2
stack.
Separately take the remaining
3
originals off the original table.
Make your copies.
4
After interrupt copying is com-
5
pleted, press the Interrupt key.
The copier will recall the previous
copy settings.
34
Page 35

Some originals in the exit stack
6
(step 2) weren’t completely copied. Read the number in the
Three Digit indicator and take
that number of pages from the
top
of the exit stack.
Place the sheets you just took on
7
the bottom of the stack you took
from the original table (step 3).
Place the stack you just made in
8
the original table.
Press the Start key.
9
BASIC OPERATION
35
COPYING
Page 36

BASIC OPERATION
Reducing And Enlarging
☛
☛
see
You can change the number of fixe d reproduction ra tios with the user tools.
❐
see page 75.
You can set new pres et rati os with the use r tools .
❐
Regarding functions that cannot be used together with this function,
❐
page 53.
☛
See page 76.
Reducing and enlarging using preset ratios
Reducing
Press the Reduce key to select the preset reduction ratios. The reduction
ratio will change as follows:
93%➝87%➝82%➝77%➝74%➝71%➝65%
Enlarging
Press the Enlarge key to select the preset enlargement ratios. The enlarge-
ment ratio will change as follows:
115%➝122%➝129%➝141%➝155%
36
Page 37

BASIC OPERATION
Reducing and enlarging with the Zoom Up (+) and Zoom
Down (-) keys (+- Zoom)
You can change the reproduction ratio from 61% to 156% in 1% steps.
Press the Zoom Up (+) key repeatedly, or hold down the key
continuously, to increase the ratio
in 1% steps.
Press the Zoom Down (-) key
repeatedly, or hold down the key
continuously, to reduce the ratio
in 1% steps.
Entering Copy Job Settings During The Warm-up
Period (Auto Start)
If you press the Start key during
the warm-up period, the
Ready indicator will blink, then
the copier will start copying after
the warm-up period. Set your
copy settings during warm-up period, then press the Start key.
❐
To cancel Auto Start, press the
Clear/Stop
key.
v
COPYING
37
Page 38

MAKING ONE-SIDED COPIES FROM VARIOUS ORIGINALS
MAKING ONE-SIDED COPIES FROM
VARIOUS ORIGINALS
From 1 Two-sided Original To 2 One-sided Copies
Note : This function can be used only when your copier is equipped
with the optional document feeder.
Regarding functions that cannot be used together with this function,
❐
page 53.
Press the Function key. Then
1
press 6 on the Number keys.
❐
To cancel this function, press the
Function
Set your originals in the optional
2
document feeder.
20 or 22.
❐
Start with the last page of the originals to be cop ied.
Press the Start key.
key again.
☛
See page
3
☛
see
38
Page 39

MAKING ONE-SIDED COPIES FROM VARIOUS ORIGINALS
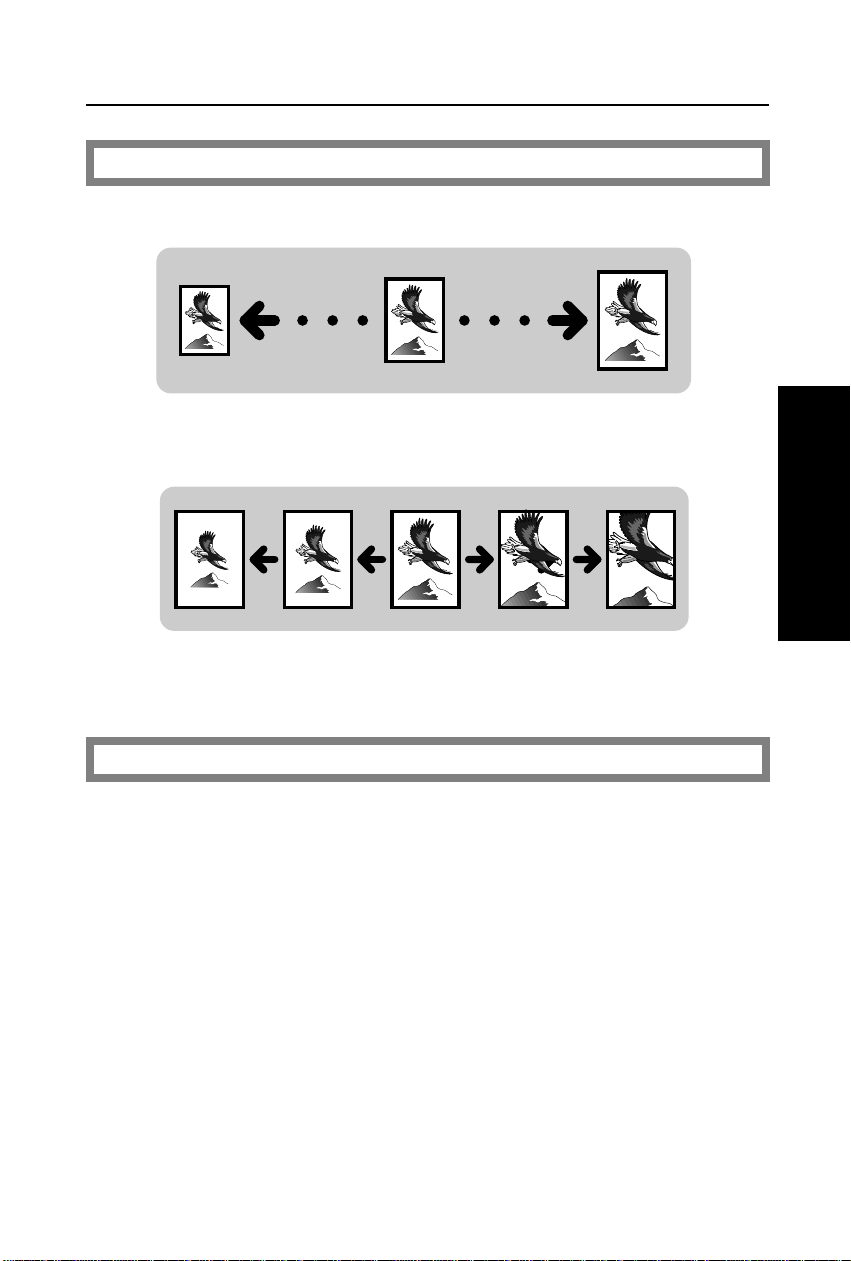
From 2 Facing Pages To 2 One-sided Copies
The maximum paper s ize that can be used in this mode is as follows:
❐
A4
, 8
" x 11"
1/2
:
The Auto Paper Selec t cannot be select ed with this func tion.
❐
The bypass fee d tabl e cannot be used with t his func tion.
❐
Regarding func tions that can not be used to gether with th is functio n,
❐
page 53.
Press the Function key. Then
1
press 1 on the Number keys.
❐
To cancel this function, press the
Function
key again.
:
☛
see
Start with the last page of your
2
book original and work your way
to the beginning.
Place the original
face down
the exposure glass.
❐
The original must be centered according to the size marks on the left
scale.
on
COPYING
39
Page 40

MAKING ONE-SIDED COPIES FROM VARIOUS ORIGINALS
Or, set the facing original in the
optional document feeder. ☛ See
page 20 or 22.
Select the copy paper size using
3
the Select Paper Tray key.
Press the Start key.
4
1
2
4
3
40
Page 41

MAKING ONE-SIDED COPIES FROM VARIOUS ORIGINALS
From 2 Facing Pages to 2 One-sided Copies And
Erasing The Surrounding Area Of The Original
Image
The maximum paper s ize that can be used in this mode is as follows:
❐
, 8
A4
:
The position of the mar gin to be erased is determined according to the se-
❐
lected copy paper an d reproduc tion ratio. Mak e sure to selec t copy paper suit able for your original.
The width of the margin to be erased can be changed with the user tools.
❐
☛
see page 77 or 79.
The Auto Paper Selec t cannot be select ed with this func tion.
❐
The bypass fee d tabl e cannot be used with t his func tion.
❐
Regarding functions that cannot be used together with this function,
❐
page 53.
" x 11"
1/2
:
☛
see
Press the Function key. Then
1
press 2 on the Number keys.
❐
To cancel this function, press the
Function
key again.
COPYING
41
Page 42

MAKING ONE-SIDED COPIES FROM VARIOUS ORIGINALS
Start with the last page of your
2
book original and work your way
to the beginning.
Place the original
the exposure glass.
❐
The original must be centered according to the size marks on the left
scale.
Or, set the facing original in the
optional document feeder.
page 20 or 22.
Select the copy paper size using
3
the Select Paper Tray key.
face down
☛
on
See
1
2
4
3
Press the Start key.
4
42
Page 43

ERASING PARTS OF THE COPY IMAGE
ERASING PARTS OF THE COPY IMAGE
Note: If the copy paper is A5 ; , B6 ; , 5
the horizontal edges of surrounding area will not be erased.
1/2
" x 8
" :, or 5
1/2
1/2
" x 8
1/2
" ;,
Erasing The Center Margin Of The Original Image
Erasing The Surrounding Area Of The Original Image
Erasing The Center Margin And Surrounding Area
Of The Original Image
COPYING
43
Page 44

ERASING PARTS OF THE COPY IMAGE
The position of the marg in to be e rased is determine d accordi ng to the s elected
❐
copy paper and re production ratio. Make sure to select copy pape r suitable for
your original.
The width of t he margin to be erased can be changed with the user tools.
❐
See page 77, 79, or 81 .
Regarding functions that cannot be used together with this function, ☛ see
❐
page 53.
Press the Function key. Then
1
press 4 on the Number keys to
select the Erase Center, 3 to select the Erase Border, or 5 to
select both of them.
Set your original on the exposure
2
glass or in the optional document
feeder. ☛ See page 19, 20, or
22.
❐
If you place a book original on the
exposure glass, the original must be
centered accordin g to the size marks
on the left scal e.
☛
Press the Start key.
3
44
Page 45

HAVING THE COPIER CHOOSE THE PAPER SIZE (Auto Paper Select, OPTION)
HAVING THE COPIER CHOOSE THE
PAPER SIZE (Auto Paper Select, OPTION)
The copier selects a suitable size of copy paper based on the original size and
the reproduction ratio.
Note:This function can be selected only when originals are inserted in
the optional document feeder.
Note:There are two measurement versions with this copier; metric and
inch. If your copier is a metric version, Auto Paper Select function cannot be used for inch size originals. If your copier is an
inch version, Auto Paper Select function cannot be used for metric size originals. To confirm which version you have, contact
your service representative.
Regarding functions that cannot be used together with this function,
❐
page 53.
Example 1: When making full size copies
Set your original in the optional
1
document feeder.
20 or 22.
Make sure that the H Auto Pa-
2
per Select indicator is lit. If not,
press the Select Paper Tray key
to select the Auto Paper Select.
❐
To cancel Auto Paper Select, Press
the
Select Paper Tray
lect the desired paper size manually.
☛
See page
key and se-
☛
see
COPYING
45
Page 46

HAVING THE COPIER CHOOSE THE PAPER SIZE (Auto Paper Select, OPTION)
Make sure that the magnification
3
ratio is set to 100%. If not, press
the Full Size key.
Press the Start key.
44
The copier selects paper of the
same format and orientation as
the original.
Example 2: When making reduced copies
Example: Original: A3 ; , 11" x 17" ;
Reproduction ratio: 71% (for A3), 65% (for 11" x 17")
Set your original in the optional
1
document feeder.
20 or 22.
☛
See page
Make sure that the H Auto Pa-
2
per Select indicator is lit. If not,
press the Select Paper Tray key
to select the Auto Paper Select.
❐
To cancel Auto Paper Select, Press
the
Select Paper Tray
lect the desired paper s ize manu ally.
46
key and se-
Page 47

HAVING THE COPIER CHOOSE THE PAPER SIZE (Auto Paper Select, OPTION)
Select 71% (for A3) or 65% (for
3
11" x 17") using the Reduce
key.
Press the Start key.
4
A4
, 8
" x 11" ; copy paper
1/2
;
will be selected.
47
COPYING
Page 48

FINISHING (OPTION)
FINISHING (OPTION)
Sorting Into Sets (123, 123, 123) (Sort)
One copy of each originals is delivered to each bin and copies are collated
into sets.
Note: This function can be used only when your copier is equipped
with the optional 10-bin sorter.
For Sorting, t he follo wing li mitation s appl y:
❐
Maximum paper size
Minimum paper size
Maximum paper weight 90 g/m2, 24 lb
Minimum paper weight 64 g/m2, 17 lb
Maximum capacity of bins A4, 8
Paper that cannot be used post cards, translucent paper, OHP transparencies,
To avoid problems caused by curled copies, try turning over the paper stack in
❐
the cassette or tray. If there is no improvement, change to copy paper with less
curl.
Regarding functions that cannot be used together with this function, ☛ see
❐
page 53.
Lengthwise
Sideways : : A4, 8
Lengthwise
Sideways : : A5, 5
1/2
B4, 8
1/2
A3, 11" x 17": 10 copies
and adhesive labels
: A3, 11" x 17"
;
" x 11"
1/2
: A4, 8
;
" x 11" or smaller: 20 copies
" x 14": 15 copies
1/2
1/2
" x 11"
" x 8
1/2
"
48
Page 49

Press the Sorter key to light the
1
Sort indicator.
Set your original on the exposure
2
glass or in the optional document
feeder.
22.
Enter the number of copies re-
3
quired using the Number keys.
❐
The maximum number of copies that
can be entered is 10.
Set other settings and press the
4
Start key.
❐
If you set your originals on the exposure glass in step
and 4 until your copying is completed.
☛
See page 19, 20, or
, repeat steps
2
FINISHING (OPTION)
2
49
COPYING
Page 50

FINISHING (OPTION)
Stacking Together All Copies Of A Page (111, 222, 333) (Stack)
All copies of each original are delivered to the same bin.
Note: This function can be used only when your copier is equipped
with the optional 10-bin sorter.
For Stacking, the fol lowing limita tions apply:
❐
Maximum paper size
Minimum paper size
Maximum paper weight 90 g/m2, 24 lb
Minimum paper weight 64 g/m2, 17 lb
Maximum capacity of bins A4, 8
Paper that cannot be used post cards, translucent paper, OHP transparencies,
To avoid problems caused by curled copies, try turning over the paper stack in
❐
the cassette or tray. If there is no improvement, change to copy paper with less
curl.
Regarding functions that cannot be used together with this function,
❐
page 53.
Lengthwise
Sideways : : A4, 8
Lengthwise
Sideways : : A5, 5
1/2
B4, 8
1/2
A3, 11" x 17": 10 copies
and adhesive labels
: A3, 11" x 17"
;
" x 11"
1/2
: A4, 8
;
" x 11" or smaller: 20 copies
" x 14": 15 copies
1/2
1/2
" x 11"
" x 8
1/2
"
☛
see
50
Page 51

Press the Sorter key to light the
1
Stack indicator.
Set your original on the exposure
2
glass or in the optional document
feeder.
22.
Enter the number of copies re-
3
quired using the Number keys.
☛
See page 19, 20, or
FINISHING (OPTION)
Set other settings and press the
4
Start key.
❐
If you set your originals on the exposure glass in step
and 4 until your copying is completed.
, repeat steps
2
2
COPYING
51
Page 52

COPYING WITH USER CODES
COPYING WITH USER CODES
Input your user code (4 digits)
1
using the Number keys. Press
the Recall/Enter key.
Make your copies.
2
To prevent others from making
3
copies using your user code,
press the Clear/Stop and Clear
Modes/Energy Saver key simultaneously after copying.
❐
Regarding user codes, ☛ see page
84.
❐
To set your copier for user codes,
contact your service representative.
☛
See page 88.
52
Page 53

COMBINATION CHART
COMBINATION CHART
This combination chart shows which modes can be used together.
✩
means that these modes can be used together.
★
means that the mode after you select will be the mode you’re working in.
✗
means that these modes cannot be used together.
Mode after you select
Mode before you select
1 From Book Original
From Book Original
2
and Erase Edge
3 Erase Edge
4 Erase Center
Erase Center and
5
Special Function
Reduce/
Finish-
Others
Edge
From Two-sided
6
Original
Preset
7
Reduce/Enlarge
Enlarge
8 +-Zoom
9 Sorting
ing
10 Stacking
11 Auto Paper Select
12 Bypass Feed Copying
13 Interrupt Copying
Special Function
12345678910111213
✗✗✗✗✗✩✩✩✩✗✗★
✗ ✗✗✗✗✩✩✩✩✗✗★
✗✗ ✗✗✗✩✩✩✩✩✗★
✗ ✗ ✗ ✗ ✗✩✩✩✩✩✗★
✗ ✗ ✗ ✗ ✗✩✩✩✩✩✗★
✗ ✗ ✗ ✗ ✗ ✩✩✩✩✩✩★
✩✩✩✩✩✩ ★✩✩✩✩✩
✩✩✩✩✩✩★ ✩✩✩✩✩
✩✩✩✩✩✩✩✩ ★✩✗★
✩✩✩✩✩✩✩✩★ ✩✗★
✗ ✗✩✩✩✩✩✩✩✩ ★✩
✗✗✗✗✗✩✩✩✗✗★ ✩
✩✩✩✩✩✩✩✩✗ ✗✩✩
Reduce/
Enlarge
Finish-
ing
Others
53
Page 54

co-6
WHAT TO DO IF
SOMETHING GOES
WRONG
GOES WRONG
WHAT TO DO IF SOMETHING
55
Page 55

IF YOUR COPIER DOES NOT OPERAT E AS YOU WANT
IF YOUR COPIER DOES NOT OPERATE AS
Check the followings:
Copier’s condition Action
Nothing happens when the
main switch is turned on.
d
is lit.
f
is blinking or lit.
Y
is lit.
r
Energy Saver is lit.
U code is displayed on the
copy counter.
E code is displayed on the
copy counter or three digit
indicator.
Check the power cord. Is it properly plugged
into the outlet?
➠
Plug it in firmly.
Load paper.
Add toner.
Remove misfed paper.
Your machine is in the Energy Saver condition.
➠
U1 Close the right cover that is under the cassette.
The copier is set for user codes. Enter your user
code (4 digits).
U2
Insert the optional key counter correctly.
U4 Reset the optional sorter correctly.
U6 Call your service representative.
Turn the main switch off, wait a few seconds,
and then turn it on. If the E code appears again,
call your service representative and tell which
code is on. Check the code as follows:
ex.)
By pressing the Recall/Enter key,
this code is displayed.
☛
Press any key except the Start key to
return to the ready condition.
E 1 2
☛
See page 59.
See page 63.
☛
co-6
YOU WANT
See page 64.
56
This code is displayed first.
Page 56

IF YOUR COPIER DOES NOT OPERATE AS YOU WANT
Copier’s condition Action
You’ve selected an improper paper size. Copying is
impossible. Select the proper paper size.
You cannot use the bypass feed table in the Sort or
Check Paper Size indicator
is lit.
Stack mode. Select the cassette or the paper tray.
When making 2 one-sided copies from 2 facing pages:
➠
You cannot select the lengthwise ; copy paper for
the book originals. Select sideways
➠
You cannot select Auto Paper Select.
:
copy paper.
Original size or direction does not match the copy
paper size or direction.
➠
Select the proper paper size or direction.
Check Paper Size/Direction
indicator is blinking.
When making copies in Auto Paper Select:
➠
There is no proper copy paper size or direction.
(copying is possible.) Select the proper paper size,
or press the Start key to continue copying.
➠
If you use translucent or transparent originals, or
originals with tags, the original size might not be
correctly detected. Do not use such originals.
The indicator of the Auto Image
Density indi cato r blink s.
The Manual Image Density
indicator blinks.
Turn the main switch off and on. If this condition reoccurs, call your service representative and explain the
problem.
The Toner Saver indicator blinks.
Is the right kind of paper in the paper tray or cassette?
➠
Paper size and weight must be within the
specifications for this copier.
Is folded, wrinkled, damp, or curled paper in the paper
tray?
➠
Misfeeds occur frequently.
Always use dry, undamaged paper.
Is the paper properly set in the cassette or the tray?
➠
Always load paper correctly.
Are there any pieces of misfed paper or other materials
in the machine?
➠
Make sure that the paper path is completely
cleared of paper and other material after a misfeed.
If you cannot correct the problem by taking the above actions, please contact
❐
your servic e repres entati ve.
co-6
GOES WRONG
WHAT TO DO IF SOMETHING
57
Page 57

IF YOU CANNOT MAKE COPIES AS YOU WANT
IF YOU CANNOT MAKE COPIES AS YOU
Problem Cause Action
The original has a gray or
colored background.
Copies appear dirty.
The reverse side of an
original image is copied.
Copies are too light.
The same copy area is
dirty whenever making
copies.
Copies are blank or
parts of the image are
not copied.
Copies have white
streaks.
If you cannot c orrect the problem by tak ing the above actions, plea se contact
❐
your service representative.
The image density is too dark.
The platen cover, exposure
glass, or document feeder belt
is dirty.
The image density is too dark.
The original has a low
contrast image.
The image density is too light.
The Toner Saver mode is
selected.
Damp or rough grain paper is
used.
The platen cover, exposure
glass, or document feeder
belt is dirty.
The original is not set correctly.
An improper paper size is
selected.
The corona wire is dirty.
Adjust the image density.
☛
See page 30.
Clean them.
☛
See pages 90 and 91.
Adjust the image density.
☛
See page 30.
Adjust the image density.
☛
See page 30.
Cancel the Toner Saver mode.
☛
See page 25.
Use dry paper without rough
grain.
Clean them.
☛
See pages 90 and 91.
Set originals correctly.
☛
See page 19, 20, or 22.
Select the proper paper size.
Clean the corona wire.
☛
See page 90.
co-6
WANT
58
Page 58

d
IS LIT: LOADING PAPER
IS LIT: LOADING PAPER
d
NOTE: The paper sizes that can be set are as follows:
Paper tray: See page 68.
Cassette and Bypass feed table:
Maximum: A3
Minimum: A6 ;, 5
NOTE: If you wan t to change th e paper size,
, 11" x 17"
;
x 8
1/2
☛
;
"
1/2
;
see page 68
.
Non-recommended Paper For Paper Tray
Folded, curled, creased, or damaged paper
❐
Torn paper
❐
Perforated paper
❐
Paper with conductive or low electrical resistance coating such as carbon or
❐
silver coating
Thermal paper, art paper
❐
Thin paper th at has low st iffness
❐
co-6
GOES WRONG
WHAT TO DO IF SOMETHING
Notes For Paper
Load paper with the copy side
❐
the cassette. If copies are curled, try turning the copy paper over in the tray. If
there is no improveme nt, change to copy pap er with less curl.
Correct curls in copy paper before loading.
❐
Fan copy paper to get air between the sheets before loading.
❐
When making two-sided copies, do not load paper in the paper tray for copying
❐
the reverse side. Use the cassette or the bypass feed table.
in the trays, and with the copy side up in
down
59
Page 59

d
IS LIT: LOADING PAPER
Loading Paper In The Cassette
If you want to change the pa per size, con tact your serv ice repres entative.
❐
When you load paper in the cassette, remove the cassette completely, then
❐
reinsert it.
Lift and take out the cassette.
1
❐
After removing cassette, remove any
paper that remains in the cassette
entrance.
Lift and remove the cover, then
2
raise the guide arms.
co-6
Load paper in the cassette, then
3
lower the guide arms.
❐
Do not stack paper above the limit
marks inside the cassette.
Replace and lower the cover.
4
❐
Make sure that the cover is replaced
to its original position befor e reinserting the cassette.
Reinsert the cassette.
5
60
Page 60

d
IS LIT: LOADING PAPER
Loading Paper In The Bypass Feed Table
Set one sheet at a time.
❐
Regarding the Byp ass Feed Tab le, ☛ see page 31.
❐
co-6
Lay the copy paper on the bypass feed table and insert it until
the paper lightly touches the feed
roller inside.
❐
Do not shove paper into the bypass
feed table.
❐
If you use the large size copy paper,
swing out the exte nder.
Loading Paper In The Paper Tray
Pull out the paper tray until it
1
stops.
GOES WRONG
WHAT TO DO IF SOMETHING
Push the bottom plate down until
2
it locks.
61
Page 61

d
IS LIT: LOADING PAPER
Load paper in the paper tray.
3
❐
Do not stack paper above the limit
mark inside the paper tray.
❐
Make sure that the le ading corners of
the paper are under the corners as
shown in the illustr ation.
While pressing the release lever
4
on the front side guide, push the
guide until the front and rear
guides securely hold the paper.
❐
Do not press the front and rear
guides strongly against the paper.
co-6
.
Reinsert the tray gently until it
5
stops.
62
Page 62

co-6
f
IS LIT OR BLINKING: ADDING TONER
IS LIT OR BLINKING: ADDING TONER
f
When the Add Toner f indicator blinks, it is time to supply toner (copying
is still possible). When the Add Toner
copies cannot be made until the toner cartridge is replaced.
WARNING:
R
Do not incinerate the used toner cartridge. Toner dust
might ignite when exposed to open flames.
f
indicator is continuously on,
GOES WRONG
R
WARNING:
NOTE: When adding toner, d o not turn off the ma in swit ch. If y ou do, y our cop y set-
tings are cleared.
NOTE: Befo re sett ing the new ton er car tridge, s hake i t well at least 5 or 6 t imes.
Open the copier’s front cover.
Dispose of the used toner cartridge according to local
regulations.
1
You can find the sticker explain-
2
ing how to add toner inside the
front cover, as shown in the illustration.
WHAT TO DO IF SOMETHING
Load the new toner cartridge fol-
3
lowing the instructions on the
sticker.
63
Page 63

Y
IS LIT: CLEARING M ISFEEDS
IS LIT: CLEARING MISFEEDS
Y
co-6
nx
WARNING:
nx
WARNING:
R
CAUTION:
NOTE: Wh en cle aring m isfeed s, do not tur n off th e main switch . If y ou do, y our
copy settings are cleared.
NOTE: After cl earing misf eeds, make sur e that all units an d levers are re turned to
their original positions and all covers are closed.
NOTE: Do no t touch origi nals in the op tional doc ument feeder when a paper m is-
feed occurs in the co pier. If you do, th e copier cannot know which ori ginals
have been copied, an d which should be copied.
NOTE: If a paper misfeed occu rs when paper is fe d from the tra y, do not pull out
the tray before clea ring misfee ds.
Since some parts of the copier are supplied with
high electrical voltage, touch only the parts specified
in the instructions on the sticker inside the machine’s cover.
When removing misfed paper from sections C, use
caution. The fusing unit may be very hot. See page 2
for the position of the fusing unit.
Do not leave any torn sc raps of paper w ithin the machin e.
Check The Misfeed Location Display
The display shows the location of
misfed paper.
64
Page 64

When A Or C Is Lit:
Open the front cover of the cop-
1
ier.
You will see a sticker (with Y at
2
the top) explaining how to remove misfed paper, inside the
front cover, as shown in the illustration.
Y
IS LIT: CLEARING M ISFEEDS
co-6
GOES WRONG
WHAT TO DO IF SOMETHING
Remove misfed paper following
3
the instructions on the sticker.
When The Sorter Misfeed Indicator Is Lit:
Open the sorter.
1
You will see a sticker (with Y at
2
the top), explaining how to remove the misfed paper, on the
cover of the sorter, as shown in
the illustration.
Remove the misfed paper follow-
3
ing the instructions on the sticker.
65
Page 65

Y
IS LIT: CLEARING M ISFEEDS
When The Original Misfeed Indicator Is Lit:
There is a sticker, explaining how
1
to remove the misfed paper, on
the optional document feeder, as
shown in the illustration.
co-6
Remove the misfed original refer-
2
ring to the sticker.
The number of originals that
3
should be reset is displayed in
the Three Digit indicator. Reset
the originals in the optional document feeder.
66
Page 66

co-7
CHANGING THE
COPIER’S SETTINGS
SETTINGS
67
CHANGING THE COPIER’S
Page 67

CHANGING PAPER SIZE
CHANGING PAPER SIZE
To check the paper size of the cas-
❐
sette or paper tray, see the
indicators. 1 is the cassette, 2 is
Size
the paper tray.
When you want to change the paper size of the cassette, contact your service
❐
representative .
Paper
co-7
How To Change The Paper Size Of The Paper Tray
When you change the paper size of the tray, change the size code.
The size codes are as fo llows:
❐
Size code Paper size Size code Paper size
20
21
22
23
24
25
26
27
" x 11"
8
1/2
8" x 13"
8
1/2
8
1/4
8" x 10
10" x 14"
11" x 15"
Ba-Kai (267 x 390 mm)
Shi-Liu-Kai (267 x 195 mm)
Shi-Liu-Kai (195 x 267 mm)
;
" x 13"
" x 13"
1/2
;
;
;
"
;
;
;
;
;
68
10
11
12
13
14
15
16
17
18
19
A3
;
B4
;
A4
:
A4
;
B5
:
B5
;
A5
:
11" x 17"
" x 14"
8
1/2
" x 11"
8
1/2
;
;
:
:
Page 68

Pull the paper tray out until it
1
stops.
Remove the copy paper.
2
co-7
CHANGING PAPER SIZE
Pick the end plate up and insert it
3
in the slot matching the paper
size you want to use.
Make sure the end plate matches the
❐
paper size.
Push the bottom plate down until
4
it locks.
Load paper in the tray.
5
Do not stack paper over the limit
❐
mark.
Make sure that the leading corners of
❐
the paper are under the corners, as
shown in the illus tration .
SETTINGS
CHANGING THE COPIER’S
69
Page 69

CHANGING PAPER SIZE
While pressing the release lever
6
on the front side guide, push the
guide until the front and rear
guides securely hold the paper.
Do not press the front and rear
❐
guides strongly against the paper.
Reinsert the tray gently until it
7
stops.
co-7
Press the
Function
key.
8
Press the
9
The preset size code blinks on the
❐
copy counter.
Recall/Enter
key.
70
Page 70

Enter the size code using the
A
Number
To change the size code entered,
❐
enter the new number.
keys.
co-7
CHANGING PAPER SIZE
Press the
Recall/Enter
key.
B
Confirm that the entered paper
C
size is displayed.
SETTINGS
CHANGING THE COPIER’S
71
Page 71

USER TOOLS
USER TOOLS
You can change or set the copier’s settings using the following user tools.
How To Access User Tools
co-7
.
Press the
1
Saver
.
Press the
2
more than three seconds until the
copy counter blinks.
.
Enter the required user tool num-
3
ber using the
For the user tool number, refer to
❐
pages 75 ~ 86.
If you input the w rong number, press
❐
the
Clear/Stop
correct number.
Clear Modes/Energy
key.
Clear/Stop
Number
key. Then, input the
keys.
key for
4
72
Press the
Recall/Enter
key.
Page 72

USER TOOLS
How To Change Adjustment Values Or Modes
co-7
The following user tools
❐
For No. 91,
•
For No. 92,
•
.
Access the user tool you want to
1
adjust. (☛ See page 72.) The
number of the user tool you select will be displayed in the copy
counter.
.
The default setting will blink in
2
❐
❐
3
❐
Three Digit
the
the required setting using the
Number
For the settings, refer to pages 75 ~
86.
If you input a wrong number, press
the
Clear/Stop
correct number.
.
Press the
store the required setting.
If you would like to adjust another
user tool, enter the user tool number.
☛
☛
keys.
key. Then, enter the
Recall/Enter
cannot
see page 84.
see page 86.
indicator. Enter
be adjusted by the pr ocedure s below .
SETTINGS
CHANGING THE COPIER’S
key to
73
Page 73

USER TOOLS
.
To exit the user tools, press the
4
Clear Modes/Energy Saver
twice.
co-7
key
74
Page 74

co-7
USER TOOLS
User Tool Menu
Change fixed R/E ratios (User tool number: 2)
As a default setting, this copier has 12 fixed ratios (7 enlargements and 5
reductions). You can change the number of fixed reproduction ratios as
shown in the table below.
If the fixed R/E ratios is changed, user reproduction ratios are canceled.
❐
Regarding the user reproduction ratios,
For how to change modes,
❐
☛
Default: Mode 0 (Setting:0)
Setting Mode
0 Mode 0
1 Mode 1
2 Mode 2
Each mode has following ratios:
see page 73.
see page 76.
☛
SETTINGS
Mode 0 Mode 1 Mode 2
65 %–65 %
71 % 71 % –
74 %–74 %
77 %–77 %
82 % 82 % –
87 % 87 % –
93 % 93 % 93 %
(100 %) (100 %) (100 %)
115 % 115 % –
122 % 122 % 122 %
129 % – 129 %
141 % 141 % –
155 % – 155 %
CHANGING THE COPIER’S
75
Page 75

USER TOOLS
User reproduction ratio (Reduction)
(User tool number: 3)
You can set a new preset reproduction ratio.
For how to change setti ng,
❐
see page 73.
☛
Default: None (Setting: 0)
Setting Definition
0None
61 61%
~~
99 99%
User reproduction ratio (Enlargement)
(User tool number: 4)
You can set a new preset reproduction ratio.
For how to change setti ng,
❐
Default: None (Setting: 0)
Setting Definition
0None
101 101%
~~
156 156%
see page 73.
☛
co-7
76
Page 76

USER TOOLS
Horizontal edge erase margin adjustment
(User tool number: 13)
You can adjust the horizontal edge margin width in E rase Edge mode.
The erased horizontal edges margin changes a little depending on paper size
❐
you use.
If the copy papers are A5 ;, B6 ;, 5
❐
horizontal edges are not erased.
For how to change settings,
❐
☛
see page 73.
1/2
" x 8
" :, or 5
1/2
1/2
" x 8
1/2
Default: Normal (Setting: 0)
Setting Definition
0Normal
1 Narrow
Toner Saver priority selection (User tool number: 14)
co-7
" ;, the
SETTINGS
As a default setting, Toner Saver mode is not selected. If you want to hav e
Toner Saver mode selected as default, you can change this setting.
For how to change modes,
❐
see page 73.
☛
Default: No (Toner Saver mode is not selected.) (Setting: 0)
Setting Mode
0 No (Toner Saver mo de is not select ed.)
1 Yes (Toner Saver mode is selected.)
77
CHANGING THE COPIER’S
Page 77

co-7
USER TOOLS
Auto reset time set (User tool number: 15)
As a default setting, the copier can reset itself 1 minute after the final copy
is made, after the last time any key is pressed, or after the copier last
detects any operation. If a 1 minute reset time is not appropriate, you can
change this time or cancel this function.
For how to change setti ngs,
❐
Default: 1 minute (Setting: 0)
Setting Definition
01 minute
13 minutes
2 Auto reset is tur ned off.
Auto reset is not eff ective w hen the copier is in t he follo wing co nditions :
❐
There are origina ls in the opti onal docum ent feeder.
•
While accessing th e user tools.
•
When the
•
u
indicator is lit.
Wait
see page 73.
☛
Counter up/down (User tool number: 16)
The copy counter can be set to show the number of copies made (count
up), or the number of copies remaining to be made (count down).
For how to change setti ngs,
❐
Default: Up (Setting: 0)
Setting Definition
0Up
1Down
78
see page 73.
☛
Page 78

co-7
USER TOOLS
Automatic paper shift set (User tool number: 17)
If you load paper of the same size and in the same direction in both the
cassette and the paper tray, the copier automatically shifts to the other
when the cassette or tray in use runs out of paper.
For how to change settings,
❐
see page 73.
☛
Default: Yes (Automatic paper shift is set.) (Setting: 0)
Setting Definition
0 Yes (Automatic paper shift is set.)
1 No (Automatic pa per shift is not se t.)
Vertical edge erase margin adjustment
(User tool number: 18)
You can adjust the vertical edge margin width in Erase Edge mode.
The erased verti cal edges margin c hanges a little de pending on paper size you
❐
use.
For how to change settings,
❐
see page 73.
☛
Default: 10 mm, 0.4" (Setting: 0)
Setting Definition
0 10 mm, 0.4"
1 5 mm, 0.2"
2 15 mm, 0.6"
3 20 mm, 0.8"
SETTINGS
CHANGING THE COPIER’S
79
Page 79

co-7
USER TOOLS
ADS priority selection (User tool number: 19)
As a default setting, Auto Image Density is selected. You can cancel this
setting.
For how to change modes ,
❐
see page 73.
☛
Default: Yes (ADS priority is selected.) (Setting: 0)
Setting Mode
0 Yes (ADS priority is selected.)
1 No (ADS priority is not selected.)
Auto APS select (DF) (User tool number: 21)
As a default setting, the Auto Paper Select is selected when you set
originals in the optional document feeder. You can cancel this setting.
For how to change modes ,
❐
Default: Yes (Auto APS is selected.) (Setting: 0)
Setting Mode
0 Yes (Auto APS is selected.)
1 No (Auto APS is not selected.)
see page 73.
☛
SADF auto reset (User tool number: 22)
When you set one original at a time in the optional document feeder, the
Auto Feed
that the document feeder is ready for another original. You can adjust this
time.
❐
80
indicator lights for a selected time after an original is fed to show
For how to change setti ngs,
see page 73.
☛
Default: 5 seconds (Setting: 0)
Setting Mode
0 5 seconds
1 60 seconds
Page 80

co-7
USER TOOLS
ADF free size (User tool number: 23)
In the default setting, you cannot use originals of different sizes when you
set originals in the optional document feeder. You can cancel this setting.
When you make one-s ided copies from one-sided origin als using this function,
❐
the copying speed will be reduced.
For how to change settings,
❐
see page 73.
☛
Default: No (Different sized orig inals cannot be u sed.) (Setting: 0)
Setting Definition
0 No (Different sized originals cannot be used.)
1 Yes (Different sized originals can be used.)
Center erase margin adjustment
(User tool number: 26)
You can adjust the center margin width in Erase Center mode.
The erased center ma rgin changes a li ttle dependi ng on paper size yo u use.
❐
For how to change settings,
❐
Default: 20 mm, 0.8" (Setting: 0)
Setting Definition
0 20 mm, 0.8"
1 10 mm, 0.4"
2 15 mm, 0.6"
3 25 mm, 1.0"
see page 73.
☛
SETTINGS
CHANGING THE COPIER’S
Toner density selection (User tool number: 33)
You can select the toner density. If the density of solid images is low, selec t
the mode "High".
For how to change settings,
❐
Default: Normal (Setting: 0)
Setting Modes
0Normal
1Low
2High
see page 73.
☛
81
Page 81

co-7
USER TOOLS
Key counter count timing selection
(User tool number: 53)
As a default setting, the optional key counter counts the number of copies
when paper is fed from the cassette, tray or bypass feed table. You can
change to have the counter count when the completed copies are delivered
to the copy tray.
For how to change setti ngs,
❐
Default: When paper is fed from the cassette, tray or bypass feed
Setting Modes
0
1
table. (Setting: 0)
When paper is fed from the cassette, tray or
bypass feed ta ble.
When the completed copies are delivered to
the copy tray .
see page 73.
☛
Auto energy saver set (User tool number: 78)
As a default setting, when the copier is reset by the auto reset, the Energy
Saver is not automatically set. You can change this s etting.
For how to change setti ngs,
❐
Default: No (Auto energy saver is not set.) (Setting: 0)
Setting Modes
0 No (Auto energy sa ver is not set.)
1 Yes (Auto e nergy saver is set .)
82
see page 73.
☛
Page 82

co-7
USER TOOLS
Energy saving ratio selection (User tool number: 86)
You can select one of four energy saving ratios. Note that the higher the
saving ratio is, the more time the copier will need to return to the ready
condition.
For how to change settings,
❐
Default: Level 3 (Setting: 2)
Setting Definition
0 Level 1 (The highest saving ratio)
1 Level 2
2 Level 3
3 Level 4
see page 73.
☛
Maximum copy quantity set (User tool number: 93)
The maximum copy quantity can be set between 1 and 99.
For how to change settings,
❐
Default: 99 sheets (Setting: 99)
Setting Definition
1 1 sheet
22 sheets
~~
99 99 sheets
see page 73.
☛
SETTINGS
CHANGING THE COPIER’S
83
Page 83

USER TOOLS
User Tools for User Codes
If the copier is set to use the user cod es, operators must input
their user codes before the copier can be operated. The
copier keeps count of the number of copies made under
each user code. To have the copier set for user codes, contact your sales or service representative.
To prevent others from making copies using your user code, press the
❐
Clear/Stop
ing.
key and
Clear Modes/Energy Saver
key simultaneously after copy-
User code counter check (User tool’s number: 91)
You can check the number of copies made us ing each user code.
How to check the copy count
co-7
Access user tool 91.
1
72.
☛
The last 2 digit of lowest user
2
code appears on the copy
counter. Press the
Zoom Up (+)
key until you reach the required
user code.
To display the previous user code,
❐
press the
The first 3 digits of the total copy
❐
quantity made under this user code
are displayed in the
cator.
Example
made under one user code, "123" is
displayed in the
tor.
Zoom Down (-)
: when 123456 copies are
Three Digit
key.
Three Digit
See page
indi-
indica-
84
Page 84

co-7
USER TOOLS
.
Hold down 0 on the
3
keys.
The last 3 digits of the total copy
❐
quantity made under this user code
are displayed in the
cator.
Example
made under one user code, "456" is
displayed in the
while you hold the 0 of the
keys.
To exit from the user tools, press
4
the
the
key twice.
: when 123456 copies are
Recall/Enter
Clear Modes/Energy Saver
Three Digit
Three Digit
key once, and
Number
indi-
indicator
Number
SETTINGS
CHANGING THE COPIER’S
85
Page 85

USER TOOLS
User code counter clear (User tool’s number: 92)
You can clear all the user code counters.
.
Access user tool 92.
1
72.
"0" will blink on the
❐
cator.
See page
☛
Three Digit
indi-
co-7
.
Press 1 on the
2
If you enter a wrong number, press
❐
the
Clear/Stop
.
Press the
Number
key.
Recall/Enter
key.
3
All user co de count ers are clear ed.
❐
To exit from the user tools, press
4
Clear Modes/Energy Saver
the
key twice.
keys .
86
Page 86

co-7
SERVICE REPRESENTATIVE SETTING
SERVICE REPRESENTATIVE SETTING
Some features can be adjusted by your service representative to suit your
needs. This section gives a brief description of these features. For more
information, contact your service representative.
Zoom range selection
As a default setting, you can select reproduction ratios from 61 to 156 % in
the zoom function. Your service representative can change the zoom range
to 50 ~ 200 %.
If the zoom range is enlarged to 50 ~ 200 %, it is possible that the
resolution may become low and uneven copy density may appear.
Auto sort selection
When you insert 2 or more originals in the optional document feeder and
make from 2 to 10 sets of copies from each original, the copier selects Sort
mode.
Auto Image Density level selection
Your service representative can adjust the Auto Image Density levels to
lighter or darker.
Toner saving ratio selection
Your service representative can adjust the density in the Toner Saver mode
to lighter or darker.
SETTINGS
CHANGING THE COPIER’S
87
Page 87

co-7
SERVICE REPRESENTATI VE SETT ING
User code mode
Your service representative can set the copier for user codes. If the c opier
is set for user codes, operators must input a user code before the copier will
operate. The copier keeps a count of the number of copies made under
each user code. Also, your service representative can check how many user
codes are stored in the copier.
For setting user co des and other fun ctions relati ng to them,
❐
see page 84.
☛
88
Page 88

co-8
MAINTAINING YOUR
COPIER
DO’S AND DON’TS
WHERE TO PUT YOUR
COPIER
REMARKS
USE AND STORAGE OF
SUPPLIES
89
OTHERS
Page 89

MAINTAINING YOUR COPIER
MAINTAINING YOUR COPIER
To maintain high copy quality, clean the following parts and units regularly.
Copier
Exposure glass
Clean the exposure glass with a
damp cloth and wipe it with a dry
cloth.
co-8
Platen cover
Clean the platen cover with a
damp cloth and wipe it with a dry
cloth.
Corona wire
Do the following when white streaks appear on the copy, or when image
density becomes uneven.
Open the front cover.
1
90
Page 90

Slide out the corona unit until it is
2
fully extended.
Push the corona unit back in.
3
Make sure it locks into place.
Repeat steps 2 and 3 several
4
times.
Close the front cover.
5
co-8
MAINTAINING YOUR COPIER
Document Feeder (Option)
Feed-in unit
Clean the original table and original guide with a damp cloth and
wipe it with a dry cloth.
Belt
Lift the document feeder. Clean
the belt with a damp cloth and
wipe it with a dry cloth.
MAINTAINING YOUR COPIER
91
Page 91

DO’S AND DON’TS
DO’S AND DON’TS
Copier
General operation
When you use the bypass feed table while placing the original directly on the
❐
exposure glass, lower the platen cover or optional document feeder before
pressing the
After removing a cassette, remove any paper that remains in the cassette en-
❐
trance.
When using the bypa ss feed table, set the cassette co rrectly.
❐
If multifeeding occurs from the paper tray, fan the sheets of copy paper or use
❐
the cassette inste ad of the tray.
When making two- sided copies, d o not load paper in the pape r tray for copying
❐
the reverse side. U se the cassett e or the bypass feed table.
While opening the front cover, do not press it down, and do not place any
❐
heavy object on it.
After you’ve opened the front cover and you close it, make sure that it clicks
❐
into place.
Start
key.
co-8
When adding toner
Do not incinerate toner or toner containers. Toner dust might ignite when ex-
❐
posed to open flames .
Dispose of the used toner c artridge accord ing to l ocal re gulati ons.
❐
When adding t oner, do not turn off the main switch. If you do, your copy set-
❐
tings are cleared.
Before setting th e new toner cartri dge, shake it w ell, at least 5 or 6 ti mes.
❐
When removing misfed paper
Since some p arts of the copier are supplied with high electric al voltage, touch
❐
only the parts specified in the instr uctions on the sticker s inside the machine’s
cover.
When removing misfed paper from sections C, use caution. The fusing unit may
❐
be very hot. See page 2 for the position of the fusing unit.
Do not leave any torn scraps of paper within the machine.
❐
92
Page 92

DO’S AND DON’TS
When clearing m isfeeds, do not t urn off the main switch. If you do, your copy
❐
settings are cleared.
After clearing misfeeds, m ake sure that al l units and lev ers are return ed to their
❐
original positions and all covers are closed.
If a paper misfeed oc curs when paper is fed from the tray, do not pull out the
❐
tray before clearing misfeeds.
Document Feeder (Option)
While original s are fed from the or iginal table to th e exposure glass, do not pull
❐
out the originals.
Do not lift the document feeder until th e last original has been complet ely fed
❐
out.
Do not press down or hold originals after inserting them.
❐
Do not press any parts of the document feeder strongly.
❐
co-8
10-bin Sorter (Option)
Do not touch moving bins.
❐
Do not place objects on the sorter when it is open.
❐
Do not press the sorter when it is open.
❐
DO’S AND DON’TS
93
Page 93

co-8
WHERE TO PUT YOUR COPIER
WHERE TO PUT YOUR COPIER
Copier Environment
Your copier’s location should be carefully chosen because environmental
conditions greatly affect its performance.
Optimum environmental conditions
Temperature: 10 - 30°C (50 - 86°F)
❐
Humidity: 15 - 90%
❐
A strong and level base .
❐
The copier m ust be level within 5 mm, 0.2" bo th fron t to r ear an d left t o right .
❐
To avoid possible build-up of ozone, make sure to locate th e copier in a large
❐
well ventilated room that has an air tur nover of more th an 30 m
3
/hr/person.
Environments to avoid
Locations exp osed to direct sunlight or str ong lig ht (more than 1, 500 lux. )
❐
Locations directly exposed to cool air from an air conditioner or heated air from
❐
a heater. (Sudden temperature changes might cause condensation within the
copier.)
Places where the cop ier mig ht be su bjecte d to fr equent s trong v ibration.
❐
Dusty areas.
❐
Areas with corrosive gases.
❐
Places higher than 6,500 ft above sea level.
❐
94
Page 94

WHERE TO PUT YOUR COPIER
Power Connection
Connect the copier to a power source meeting the specifications given on the
❐
inside front cover of this manual.
Avoid multiwiring.
❐
Make sure that the wall ou tlet is near th e copier and easi ly accessi ble.
❐
Make sure the p lug is firmly insert ed in th e outlet .
❐
Voltage must not fl uctuate mo re than 10%.
❐
Do not set anything on th e power cord.
❐
Always turn the copier off when you have finished copying for the day, but
❐
leave it plugged in .
Access To Copier
Place the copier near the power source, providing clearance as shown.
co-8
More than 30 cm, 11.9"
More than 10 cm, 4.0"
Copier
More than 70 cm, 27.6"
More than 60 cm, 23.7"
WHERE TO PUT YOUR COPIER
95
Page 95

REMARKS
REMARKS
Copier
To avoid problems caused by curled copies, try turning over the paper stack in
❐
the cassette or tray. If there is no improvement, change to copy paper with less
curl.
Load paper with the copy side
❐
the cassette. If co pies are curled, try turning the copy paper over in the tray. If
there is no i mprov ement, change to cop y pape r with less curl.
Margins on all fo ur sides of the origin al image are not copied , as shown in the
❐
illustration.
a
Paper feed
direction
in the tray, and w ith the copy side up in
down
b1
b2
co-8
Full Size magnification
Reducing and enlarging using
preset ratios
Reducing and enlarging
using the zoom key
96
c
When the origin al is se t on
the exposure glas s.
a = 3.5
b1 = b2 = 2 ± 2 mm
a = 3.5 ± 1.5 mm
a = 3.5
± 1.5 mm
c ≤ 4 mm
b1 + b2 ≤ 4 mm
c ≤ 4 mm
± 1.5 mm
b1 + b2 ≤ 8 mm
c ≤ 4 mm
When the original is set
into the option al document
feeder.
a = 3.5
b1 = b2 = 2 ± 2 mm
a = 3.5 ± 1.5 mm
a = 3.5
b1 + b2 ≤ 15 mm
± 1.5 mm
c ≤ 4 mm
b1 + b2 ≤ 8 mm
c ≤ 4 mm
± 1.5 mm
c ≤ 4 mm
Page 96

10-bin Sorter (Option)
To avoid proble ms caused by curled c opies, try turning over the paper stack in
❐
the cassette or t ray. If there i s no improvem ent, change to co py paper with l ess
curl.
If copies smaller than A4 ;, 8
❐
after taking them from the bins .
" x 11" ; are not stacked w ell, arrange them
1/2
co-8
REMARKS
97
REMARKS
Page 97

USE AND STORAGE OF SUPPLIES
USE AND STORAGE OF SUPPLIES
Copy Paper
Copy paper of th e types or in the condi tions listed below are not recommended
❐
for this copier.
• Folded, curled , creased, or da maged paper
• Torn paper
• Damp paper
• Perforated paper
• Paper wi th condu ctive or low e lectric al resi stance s uch as carbon or sli ver
coating.
• Wavy paper
• Thermal paper, art paper
• Thin paper that has lo w stiffness
Do not touch co py paper if your fingers a re wet or oi ly; finger prints may appear
❐
on the copy.
Load paper with the copy side
❐
the cassette. If co pies are curled, try turning the copy paper over in the tray. If
there is no i mprov ement, change to cop y pape r with less curl.
in the tray, and w ith the copy side up in
down
co-8
98
Page 98

co-8
USE AND STORAGE OF SUPPLI ES
Paper Storage
Paper should always be stored properly. Improperly stored paper might
result in poor image reproduction, creased copies, and paper misfeeds.
Generally, avoid curling and absorption of moisture.
Avoid storing paper in humid areas. Under high temperature and high humidity,
❐
or low temperature and low humidity conditions, store paper in a vinyl bag.
Do not store paper wher e it will be expose d to heat.
❐
Store on a flat surface.
❐
Use older stock first.
❐
Do not lay heavy object s on paper.
❐
Keep open reams of paper in the package, and store as you would unop ened
❐
paper.
Toner Storage
Store horizontally in a cool, dark place.
❐
Store toner cartridges vertically.
❐
Never store ton er whe re it wi ll be exposed to heat.
❐
Do not lay heavy objects on toner cartridg es.
❐
SUPPLIES
USE AND STORAGE OF
99
Page 99

SPECIFICATIONS
101
SPECIFICATIONS
Page 100

COPIER
COPIER
Configuration:
Process:
Originals:
Original size:
Copy paper size :
Copy paper weigh t:
Copy paper capacity:
Copying speed:
First copy time:
Toner replenishment:
Copy tray capacity:
Desktop
Dry electrostatic transfer system
Sheet, book
Maximum: A3 ;, 11" x 17"
Paper tray: See page 68.
Cassette and Bypass feed table:
Maximum:A3
Minimum: A6 ;, 5
Cassette: 58 ~ 128 g/m2, 16 ~ 34 lb
Tray: 64 ~ 81 g/m
Bypass feed table: 52 ~ 157 g/m
Cassette: 250 sheets
Tray: 250 sheets
Bypass feed table: 1 sheet
22 copies/minute (A4 :, 8
11 copies/minute (A3, 11" x 17")
less than 5.9 seconds
(A4
, 8
" x 11" :, feeding from the cassette)
1/2
:
Cartridge exchange (380 g)
250 sheets (B4, 8
100 sheets (A3, 11" x 17")
" x 14" and smaller)
1/2
;
, 11" x 17"
;
" x 8
1/2
2
" x 11" :)
1/2
;
"
1/2
;
, 17 ~ 22 lb
2
, 14 ~ 42 lb
Power source:
Warm-up time:
102
See the inside front cover of this manual.
less than 60 seconds (20°C, 68°F)
 Loading...