

Ricoh MP5000, MP5001, MP C5000, MPC6000, MPC6501 Easy reference User Manual
...
Ricoh Product Line Segment 2 thru 6
www.ricoh-usa.com
MP/5000/5001, MP C5000/C6000/C6501, MP7000/8000, MP6001/7001, MP8001/9001, MP907EX
Hard function
keys have
Red/Yellow
status LEDs
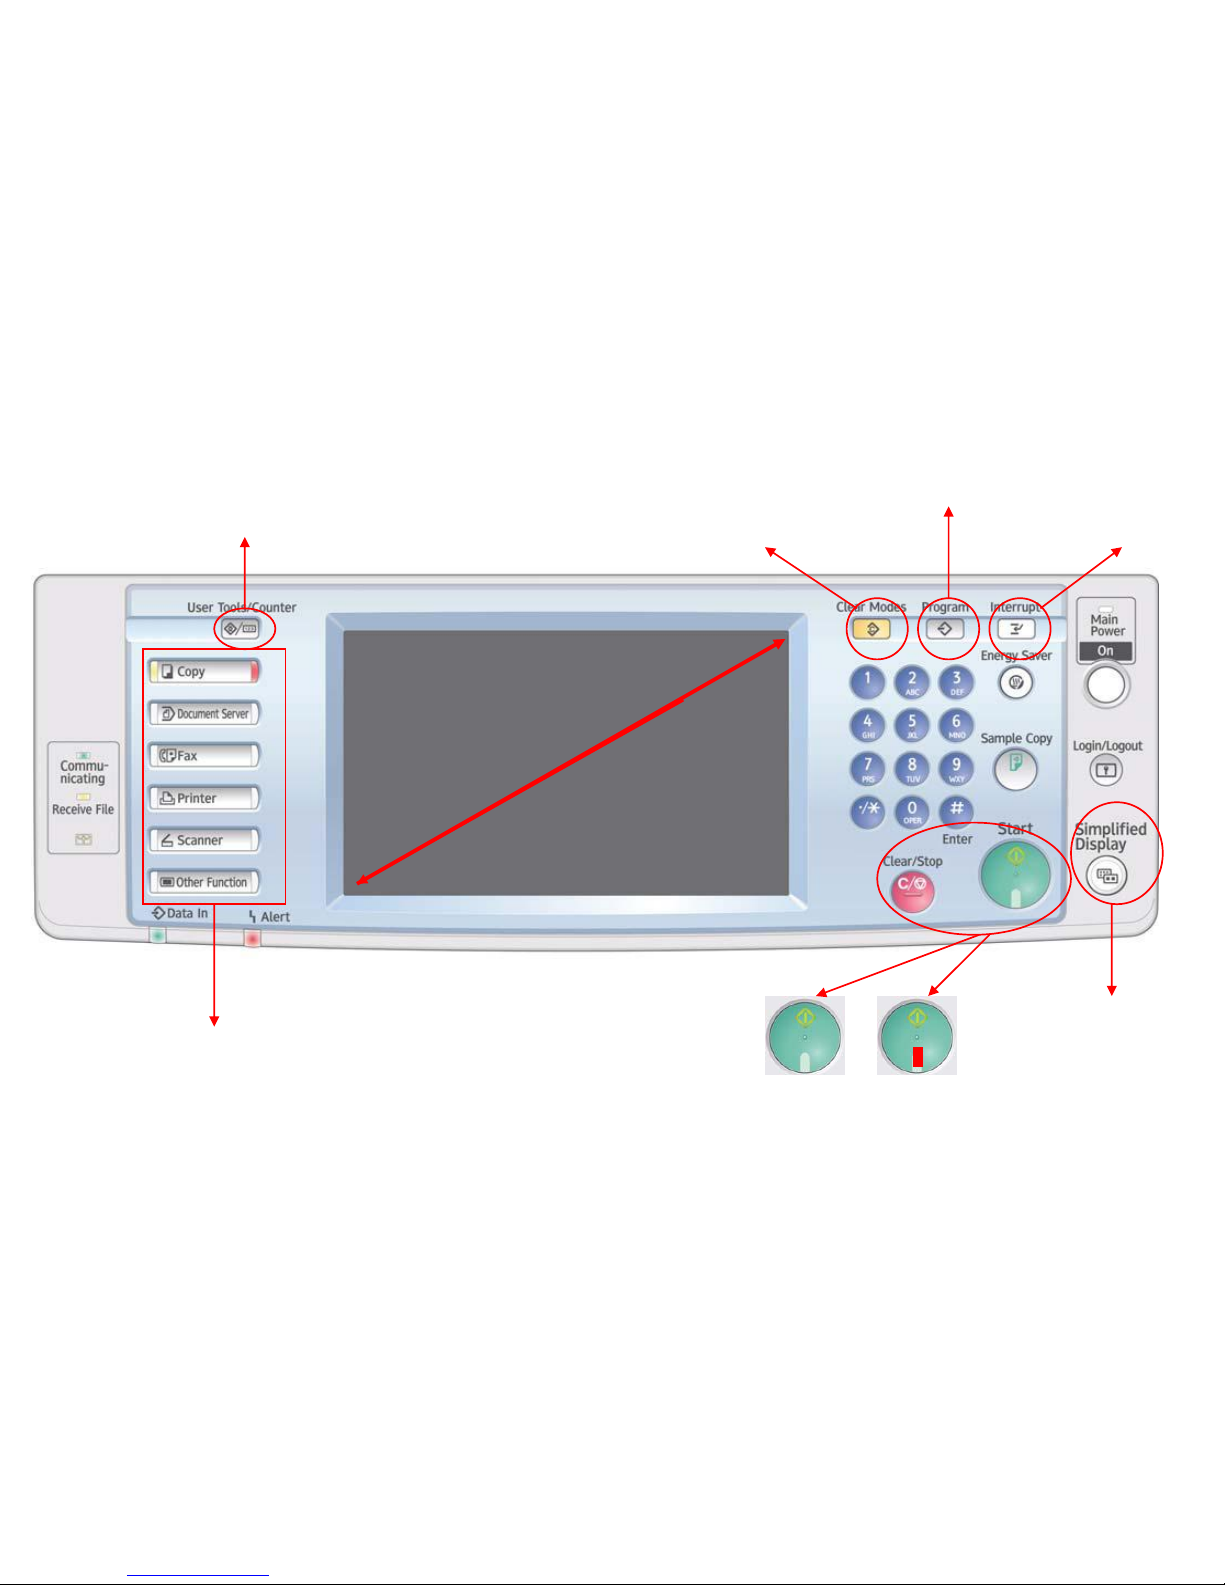
To access system administrator tools and
counter information
Ready Not Ready
Simplified display magnifies fonts
for easy viewing. See page 2 for
example
Understanding Your Ricoh Control Panel
The program button allows you to store
frequently used job settings and screen
display defaults
Clears screen to default
settings
Allows user to
interrupt job in
progress for new job
8.5” Full Color W-VGA Screen
Color Copier Display Panel
Simplified Display
Key color is only
available in simplified
display mode.
Paper tray status.
Frequently used
reduce/enlarge ratios. These
can be adjusted to suit users
needs.
Finishing options. Sort, Stack,
Staple and punch.
Short cut
keys. Register
keys in user
tools “General
Settings”
Batch & Mixed
Originals.
Extended feature options including; margins, stamps,
page numbering, covers & slip sheets.
Specify color mode
and quality.
Confirm current settings.
Black & White Display
Finishing options may be added to this screen.
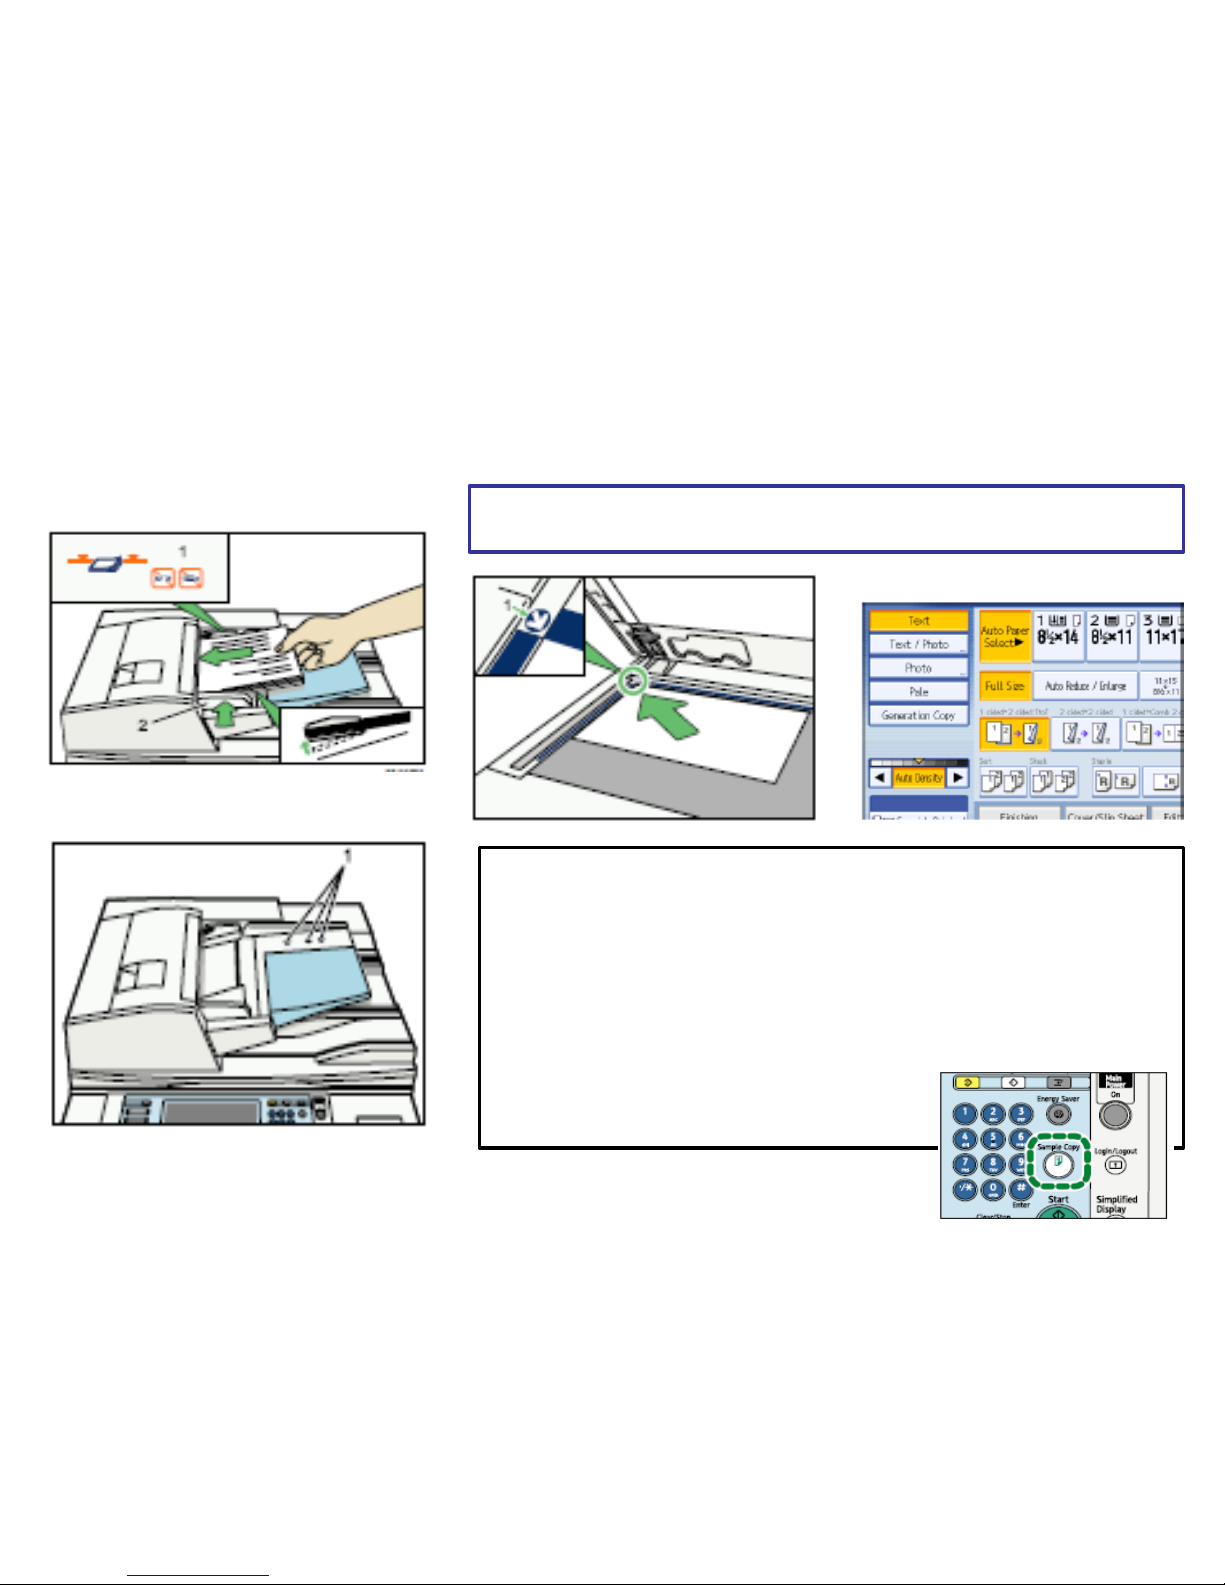
Copying Documents
Place Originals in the document
Feeder
Adjust paper guides
Remove paperclips, staples or other loose objects before placing originals in feeder. Be sure to
straighten bent or curled edges
If using the Glass Platen, Lift the lid and place documents face
down on the glass at the position of arrow regardless of size
Select any additional copy settings
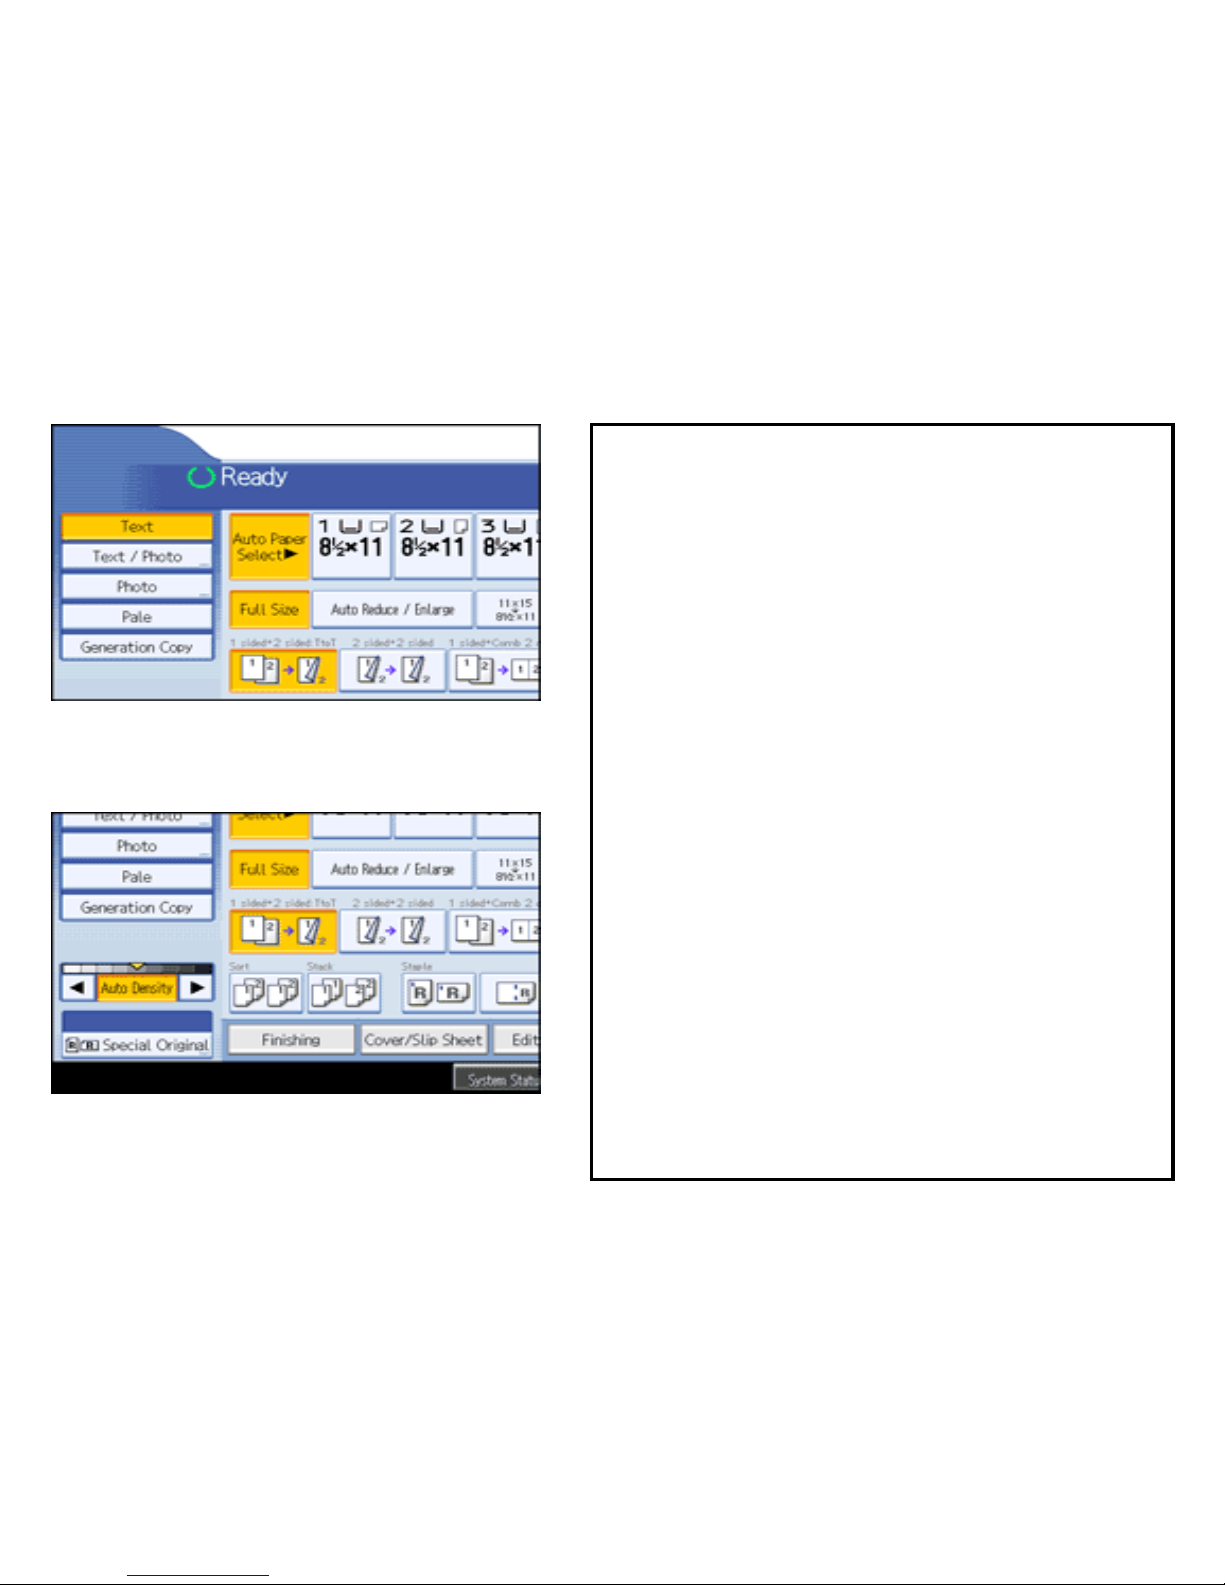
Press original document type, i.e. Text, Text/Photo, Photo, etc.
Press [sort] to collate document (if not highlighted)
Enter any finishing options
Enter desired number of copies
Press [Sample Copy] copier will print one completed set and
prompt you [Suspend] to cancel job or change settings
[Continue] if job is correct to complete remaining copy sets
Or press START to skip [Sample Copy]
Note: When copying from the glass and requesting multiple copies,
press the # key after feeding your last original to release the
additional copies
Copy Enhancements
Select an original type that is suitable for your originals to
enhance
your copies.
There are five original types available:
Text
For originals that contain mainly text or printed characters.
Text / Photo
For originals that contain both text and photographs or
pictures.
Photo
For Photographs or pictures choose from the following types.
• Glossy Photo:
• Use when copying developed photographs
• Printed Photo:
• Use when copying photographs or pictures that are
printed on
• paper e.g. magazines)
• Copied Photo:
• Use when copying copies or originals generated by color
copiers
Pale
For originals that have lighter lines written in pencil, or faintly
copied slips.
Generation Copy
For originals that are copied repeatedly. The copy image can
be reproduced sharply and clearly
Auto Image Density is highlighted
Press the Right or Left arrow to lighten or darken
document
Press [] or [] to adjust the image density
Select your Original document type
You may also select the [Auto Density] option
to further lighten or darken your document
settings.
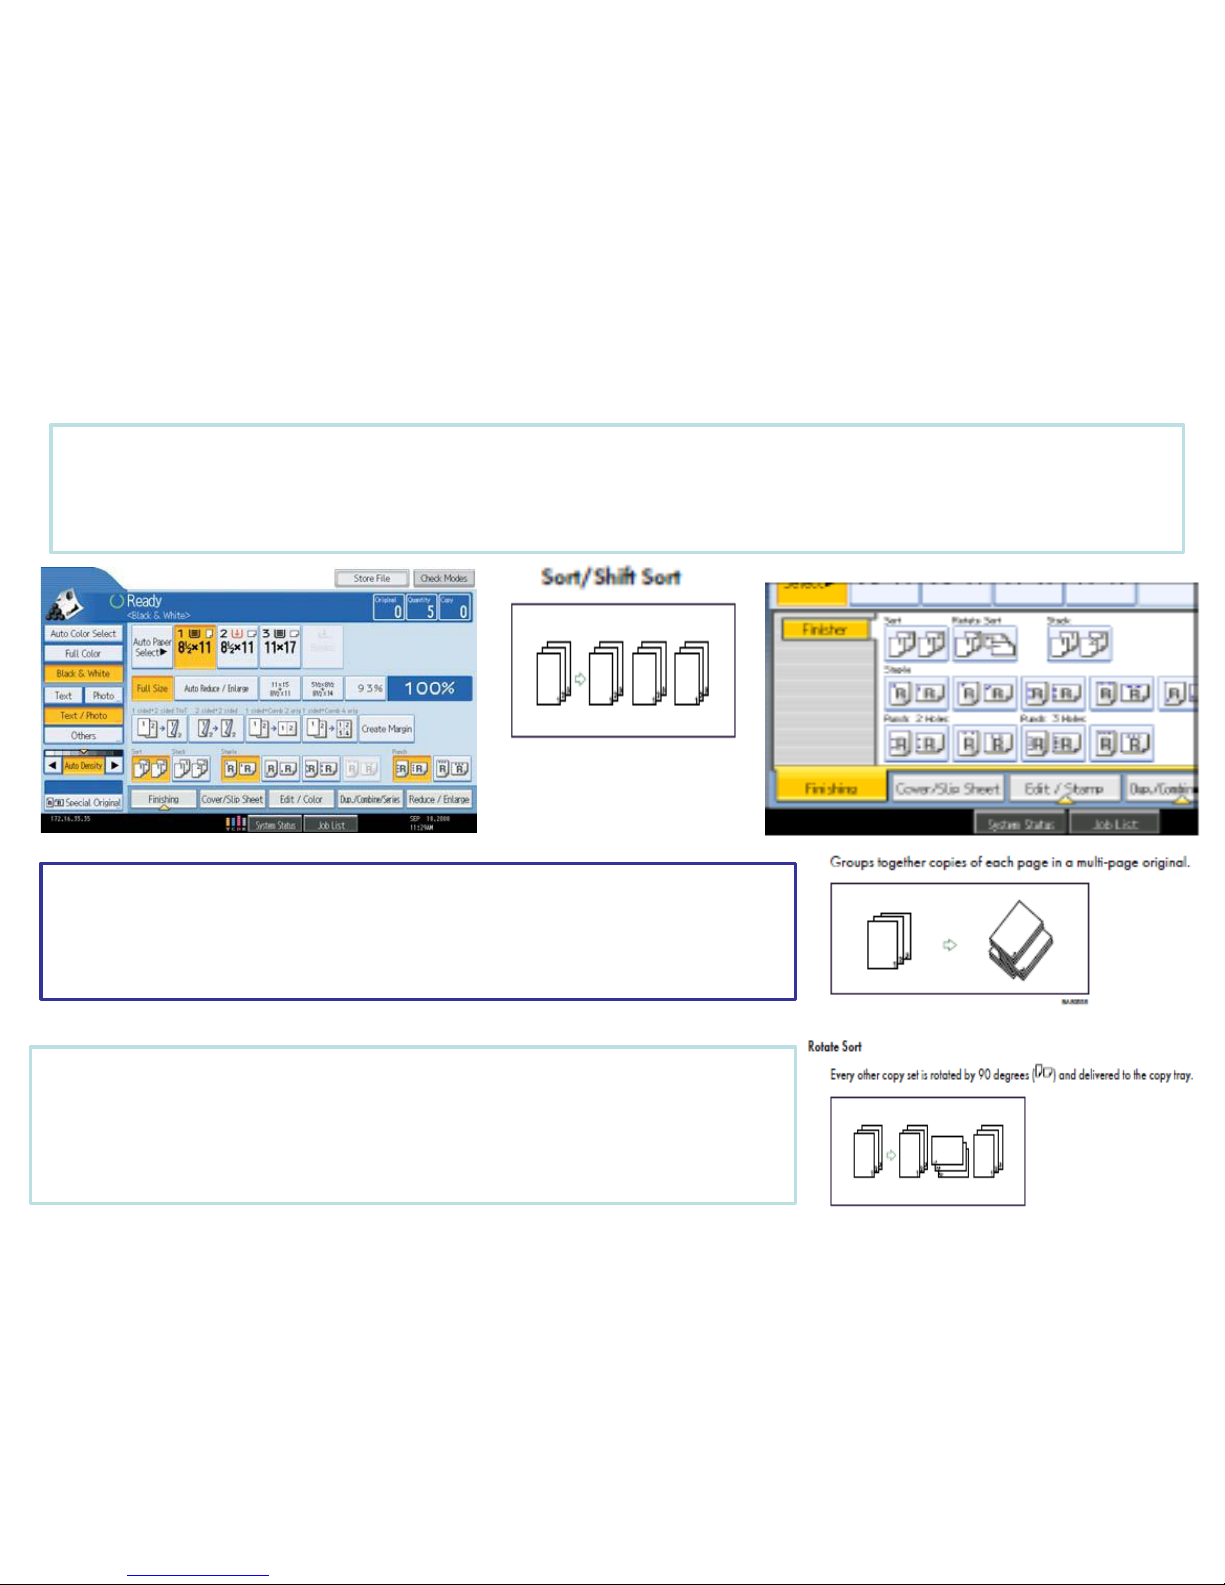
Sort/Stack & Rotate Sort Output
SORT Rotate/Sort – the machine assembles copies as sets in sequential order. Use [Sort] when
placing multiple page document to maintain page order - Same as [Collate]. When a finisher is installed
with the device the machine will output the document in the Sort/Shift Sort order, separating the first set
from the next set.
STACK – groups together copies of each page in a multi-page
original. Use Stack when setting multiple pages in the document
feeder and requiring the same copy number count per page to be
stacked.
ROTATE SORT– Use Rotate Sort when your machine does not have
a finisher to keep jobs separated . To use this option you must have
one paper tray loaded with 8.5x11 paper in landscape orientation and
the other tray loaded with 11x8.5 portrait and select this option from
the finishing mode or from the short cut menu on copier screen.
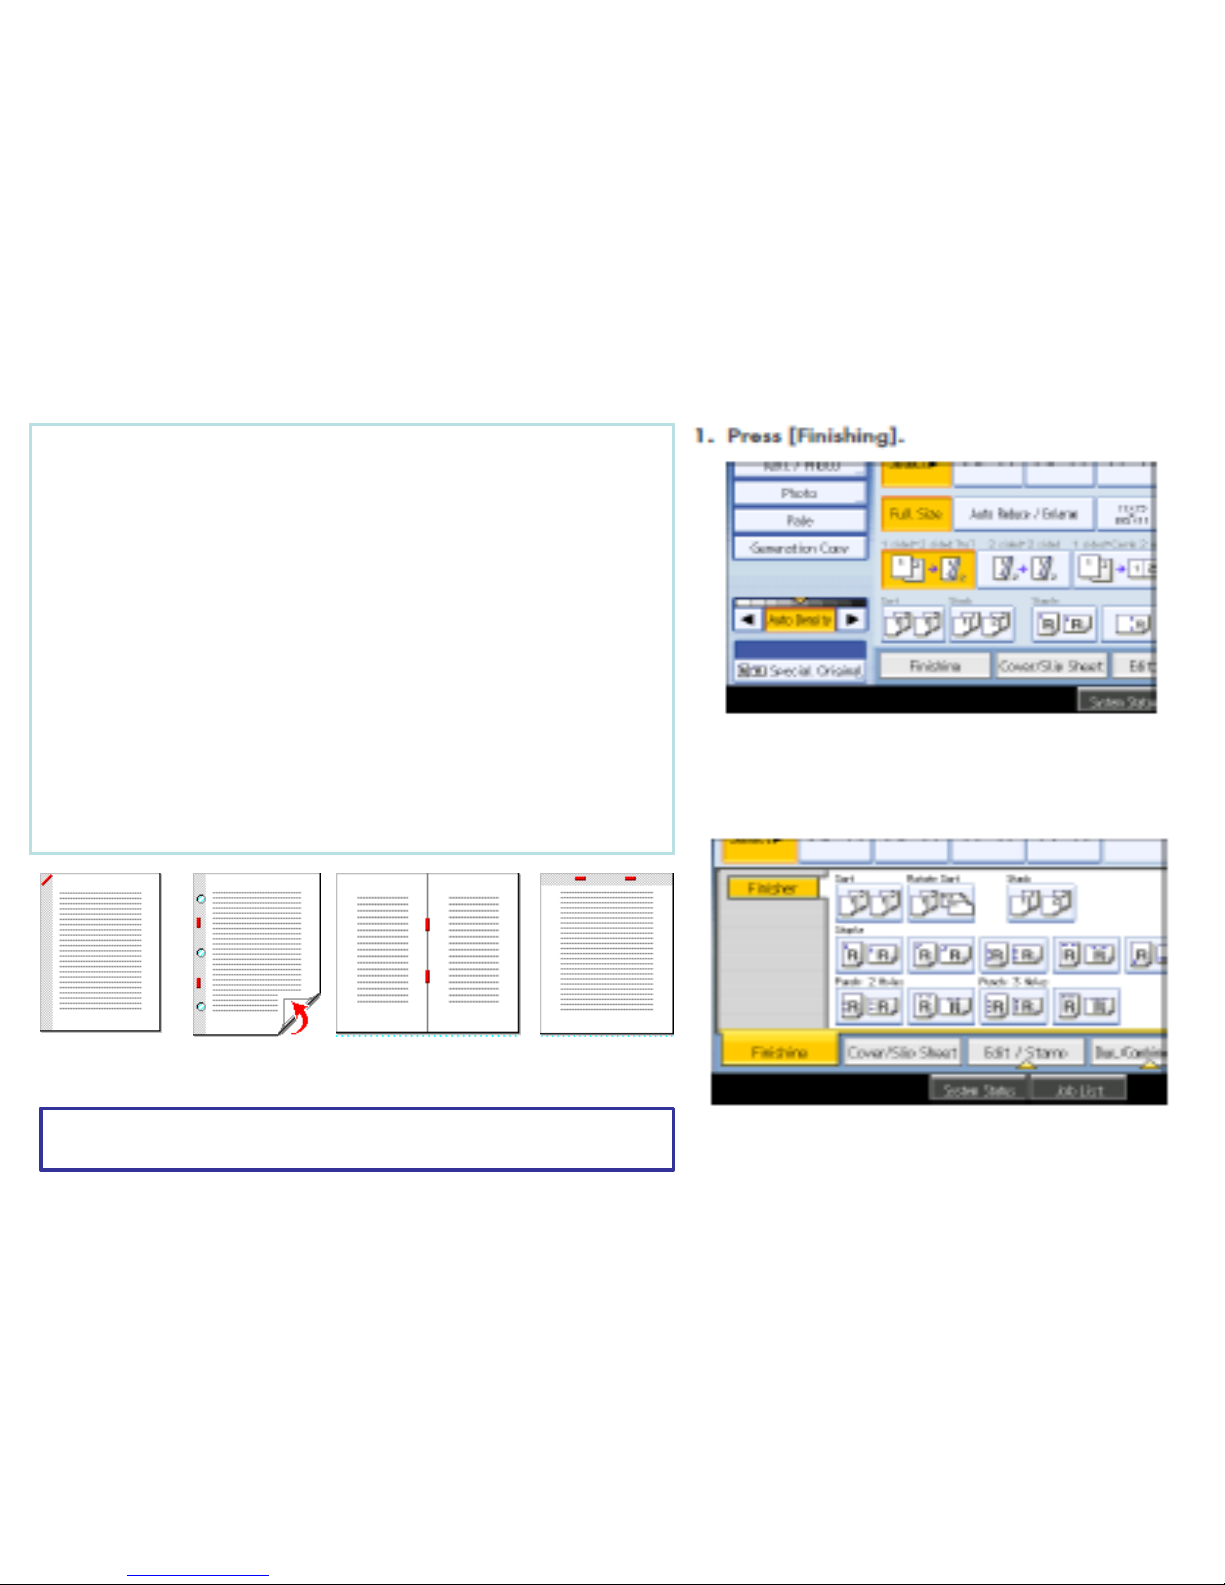
Stapling Documents
1. Place Documents in the document Feeder
2. On bottom of touch screen - select the staple
position that match your job output.
– Select Top Left (straight)
– Top Left Slant
– Bottom Left (for landscape documents fed through
feeder in portrait orientation)
– Double Staple Left (portrait Orientation)
– Double Staple Top (landscape orientation)
– Booklet stapling (for booklet folded at center
stapling)
3. Press [OK]
4. Press [Start]
2. Select desired staple position
3. Press [OK]
4. Place documents in feeder
5. Press [START]
Note: The number of pages stapled and stapling positions will vary by
machine model type and type of finisher installed.
Single Slant Top
Double LTR
BOOKLET CENTER
SADDLESTICH
Double Ledger
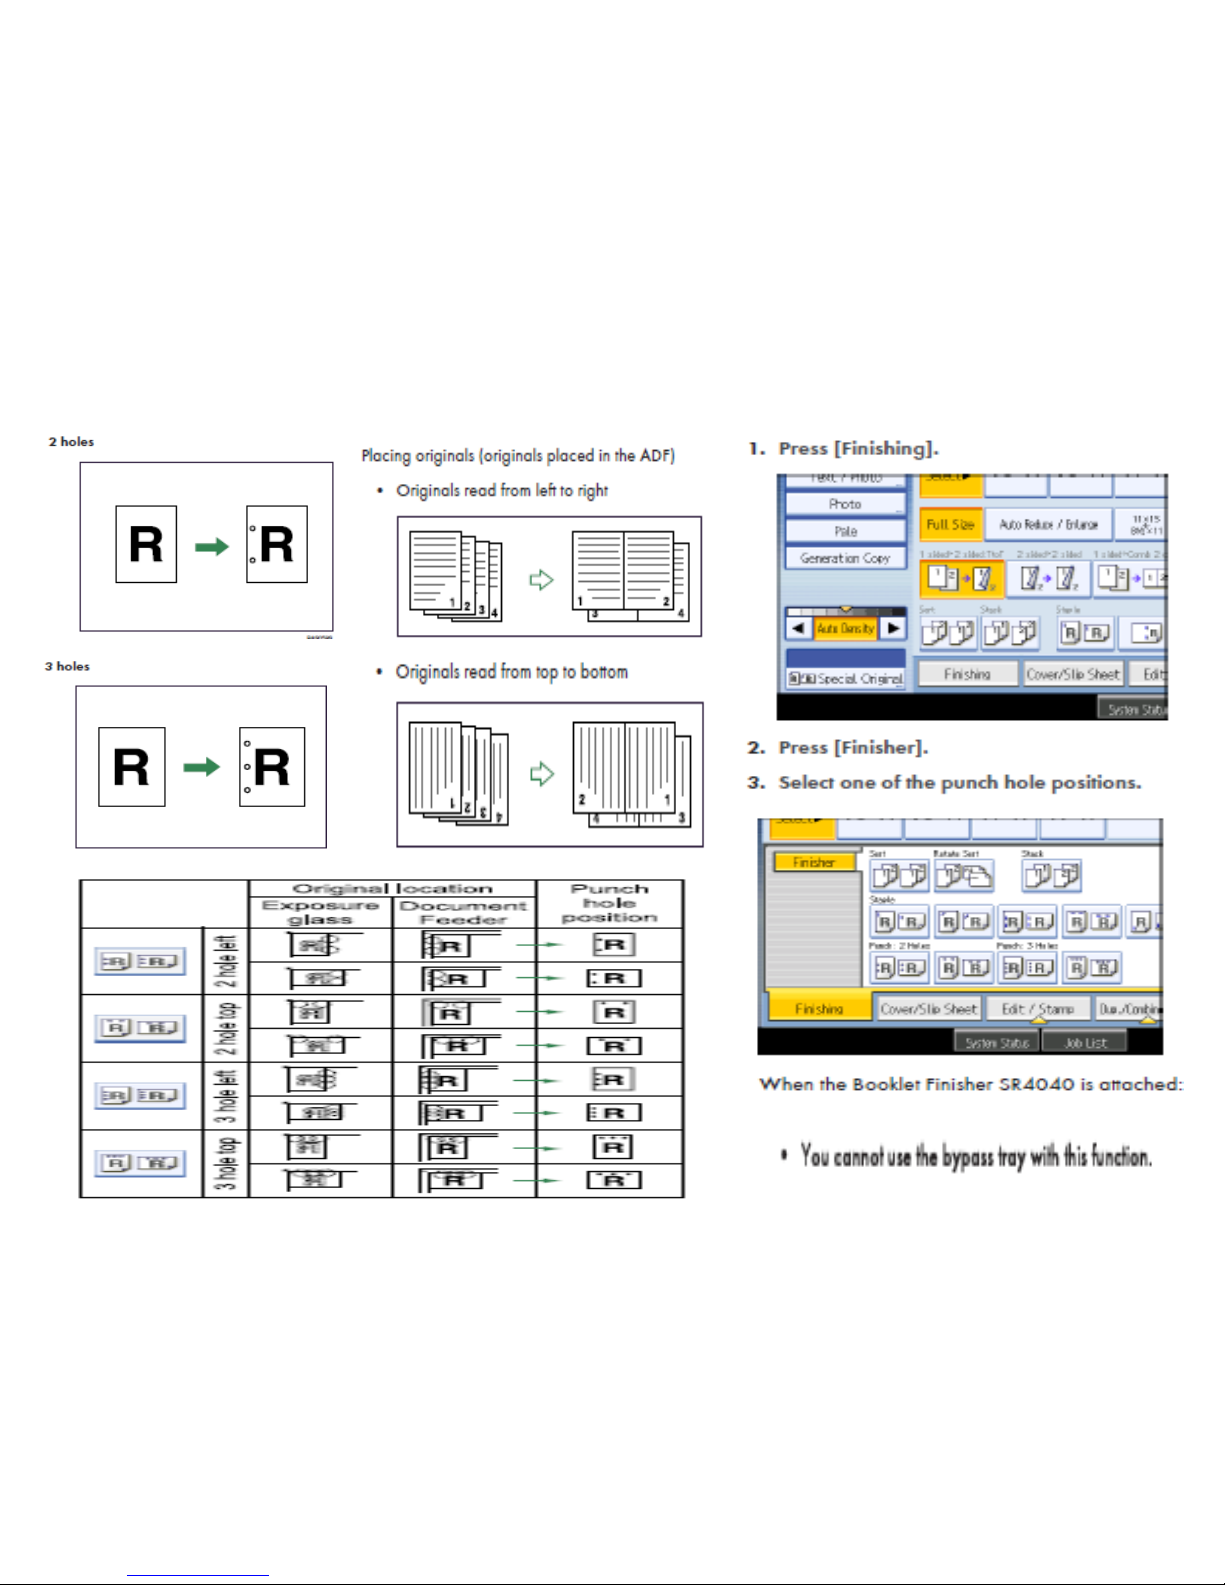
2 & 3 Hole Punch
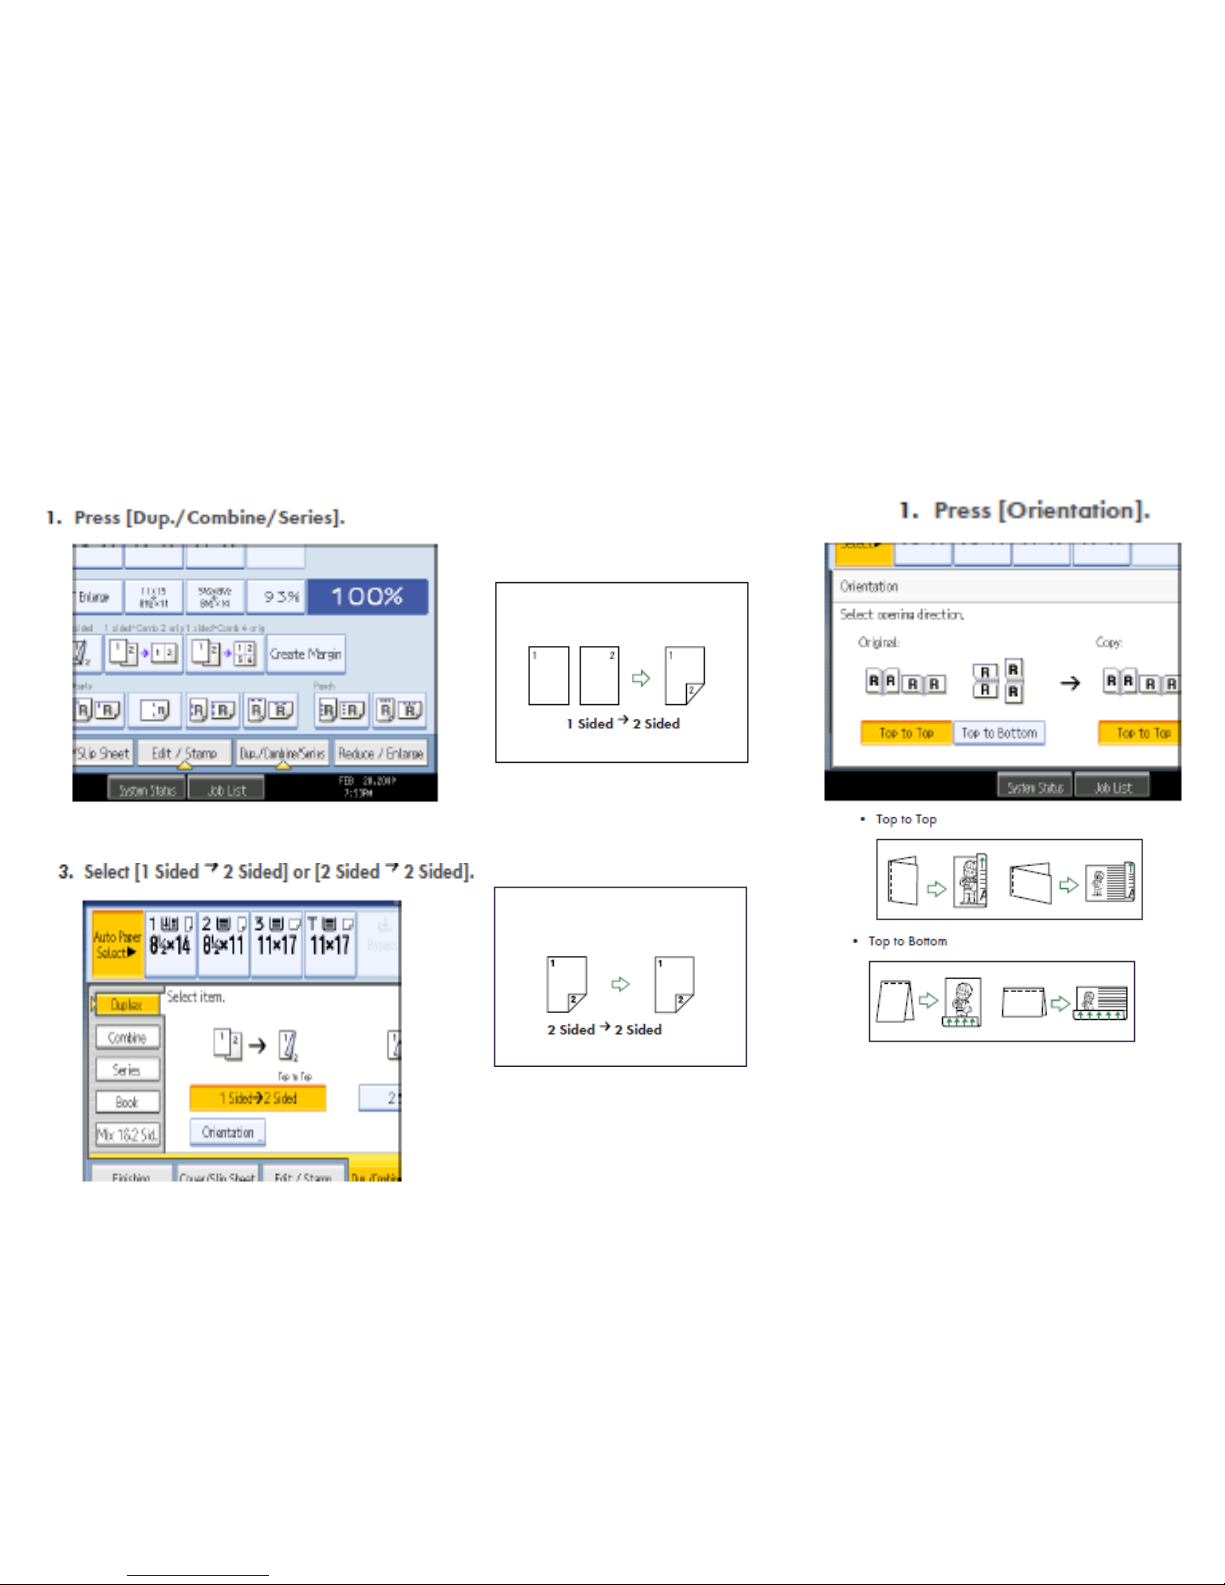
Duplex Copying (2 Sided Output)
Place Originals in Feeder
Landscape orientation or
Portrait orientation
Press OK
Enter desired options
Select copy count
Press START
Select
or
You can select these
options from the main
copier panel
Select
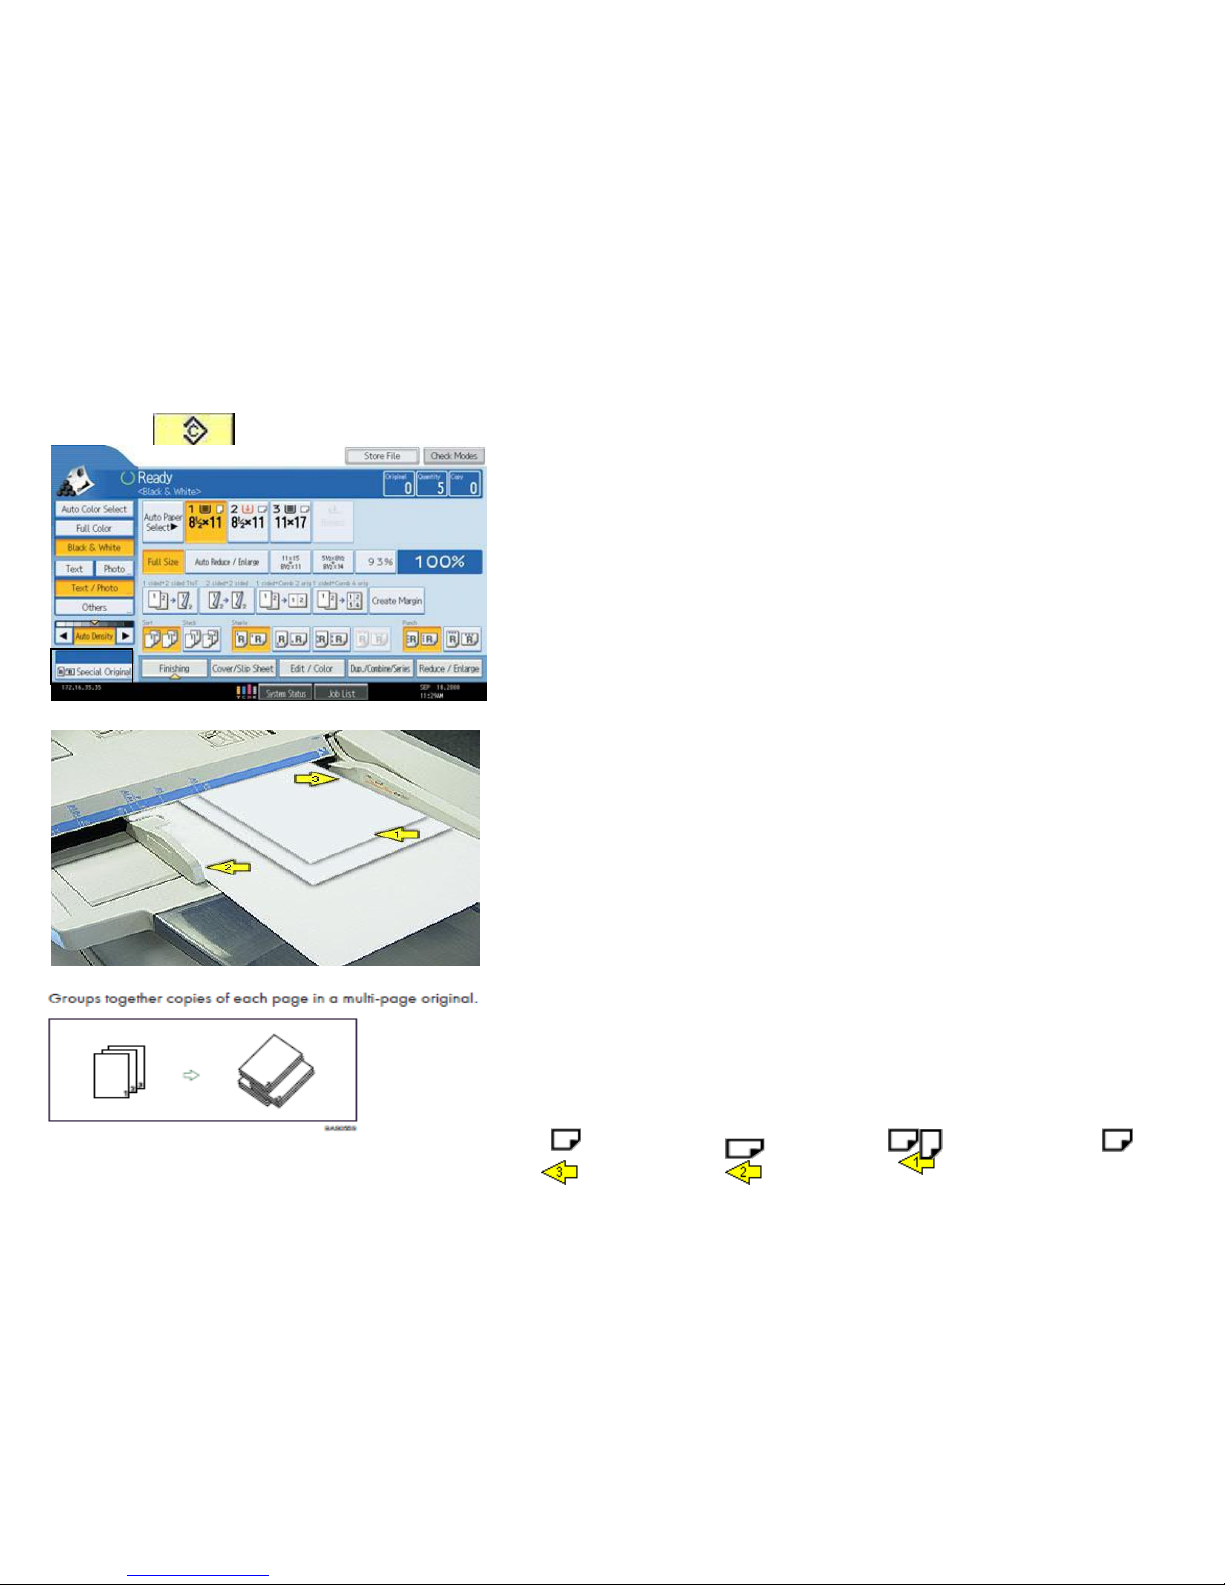
Copying Mixed Originals
1. Place Originals in the Document Feeder
Place the smaller sizes at the top of the stack as shown in the image
Adjust the Side Guide flush against the largest original.
Ensure that the right edges of all the sheets are aligned against the
right side guide .
Ensure that all originals are lying face up.
2. Check the condition of the paper stack:
All sheets should lie flat, with no curled or bent edges,
Paper should be clean and feel dry to the touch,
Attachments such as staples, tags or tapes must be removed.
3. Press [Special Original]
4. Press [Mixed Sizes] then touch [OK]
5. Select any additional options
3. If there are multiple paper sizes you must either have all the
sizes in different paper trays, or select the size paper you want
them all to be or they will output al the default auto paper select.
6. Enter desired number of copies
7. Press [Start]
8. Press [Clear Modes] key when you have
finished.
Selecting Duplexing must all be output on the same size.
This will return the document feeder to normal copy mode ready for the
next user.
Acceptable sizes in Inch:11" x 17“ ; 8½" x14" ; 8½" x 11" ;5½" x 8½"
Create Margin
• Reduces the image to 93% of its original size and places the reduced image at
the center By combining it with the Reduce / Enlarge functions, you can further
increase a margin.
• 1. Press [Create Margin].
• 2. Select the reproduction ratio, if necessary.
3. Press START

Reduction/Enlargement
Select the option that matches your output
Place originals, Press START
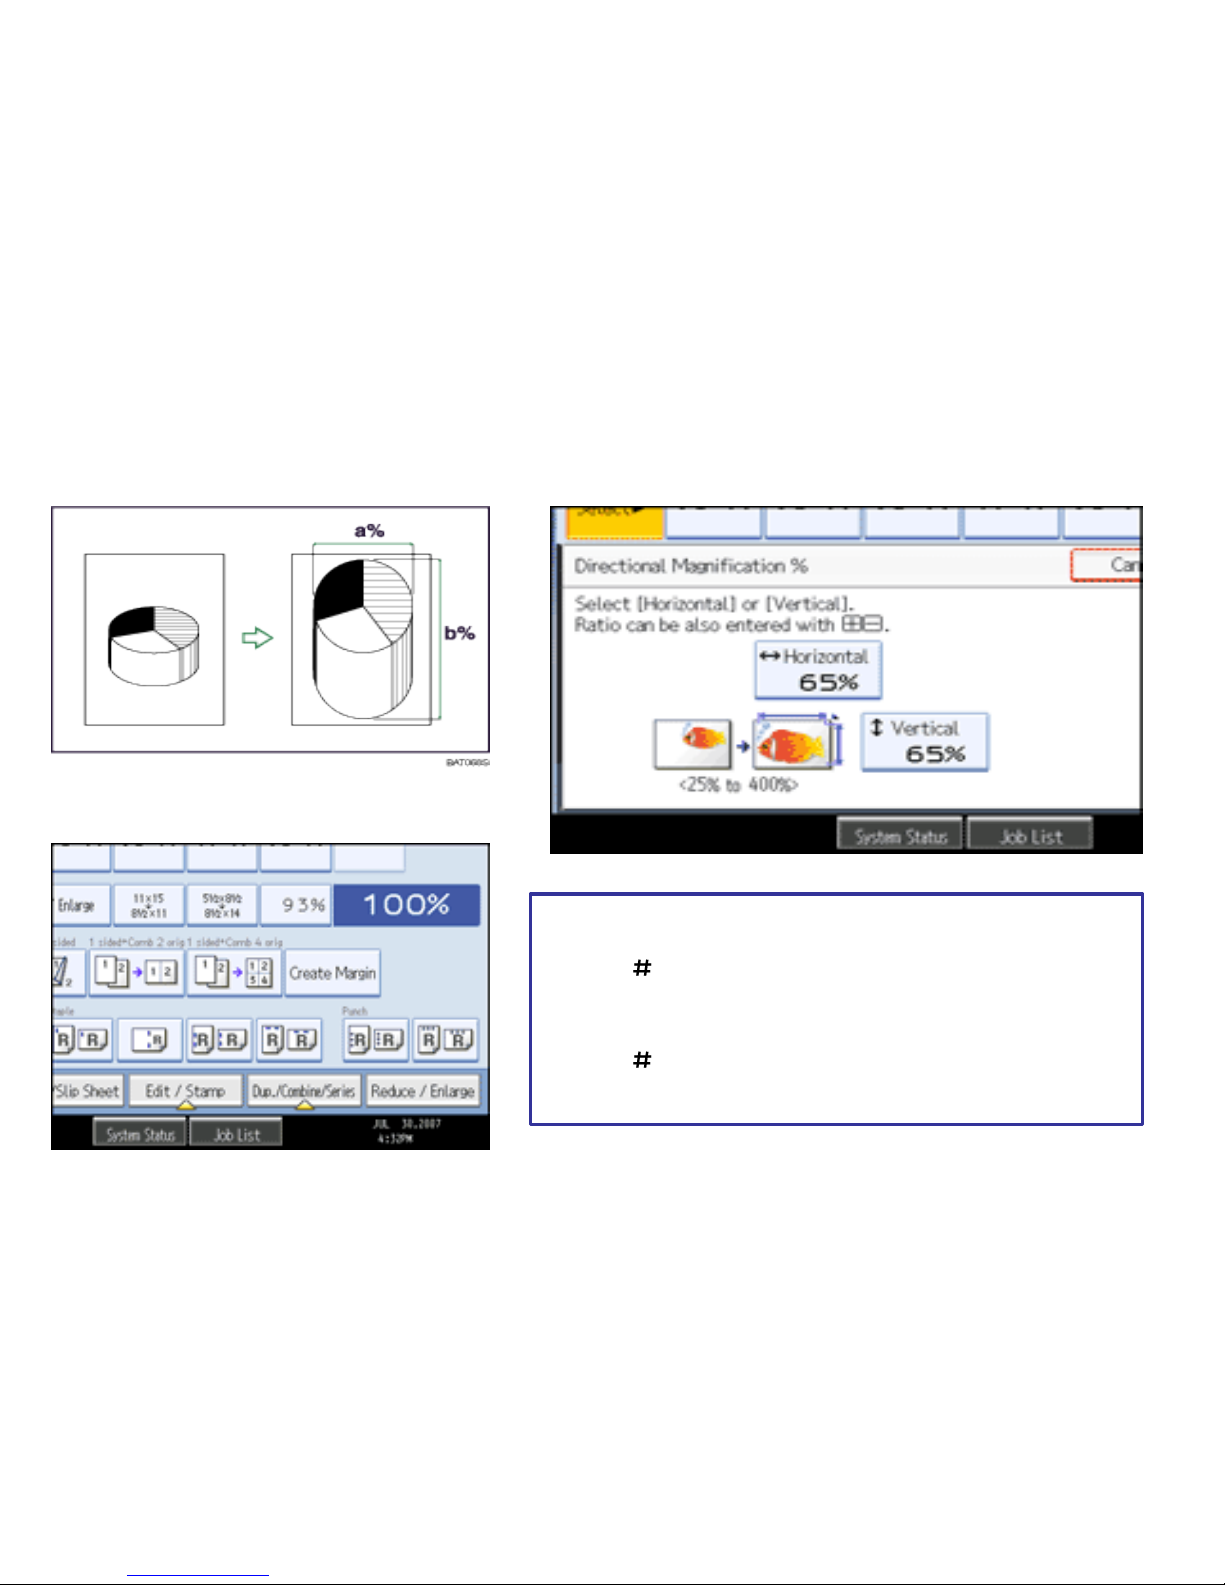
Directional Size Magnification%
Use this feature to enlarge a document by placing percentage proportions in the horizontal and
vertical fields.
Place document on platen glass
Press [Reduce/Enlarge]
Press [Direct. Mag. %].
Press [Horizontal)
Enter the desired ratio with the number keys, and then
press [ ].
Press [Vertical].
Enter the desired ratio with the number keys, and then
press [ ].
Press [OK] twice.
Place the originals, and then press the [Start] key.
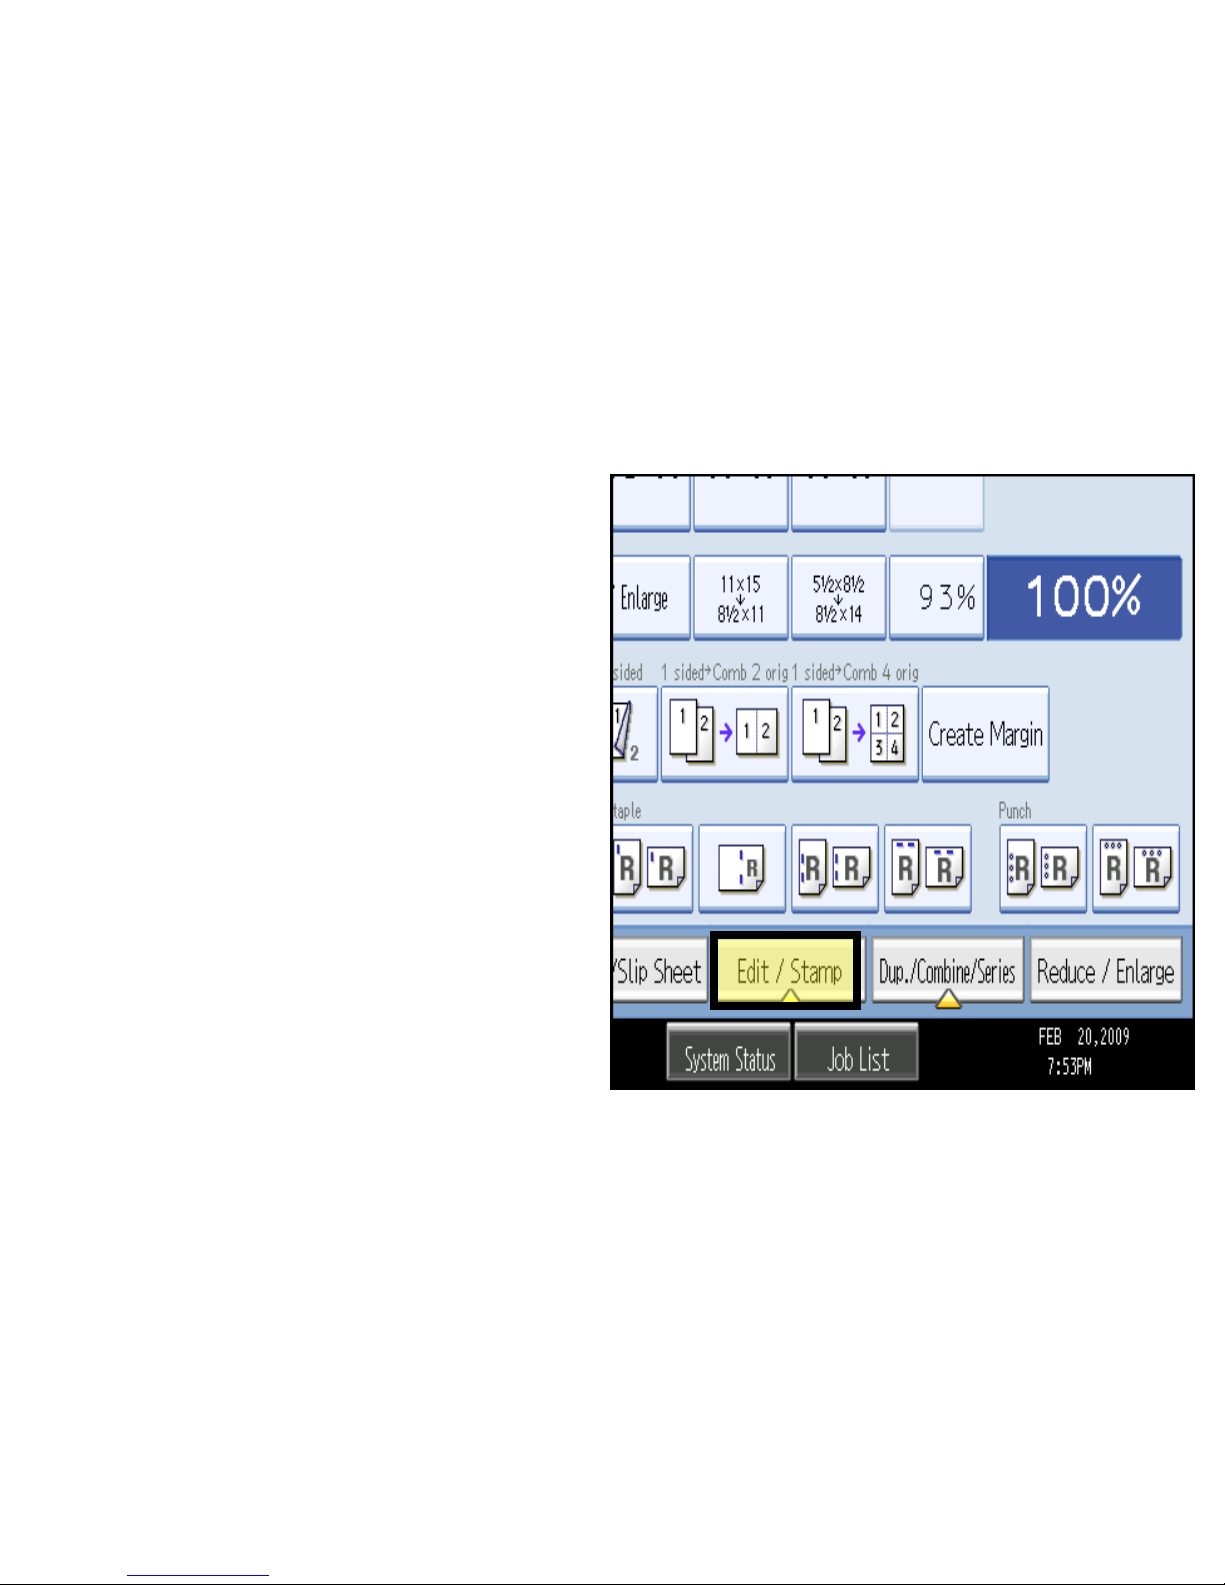
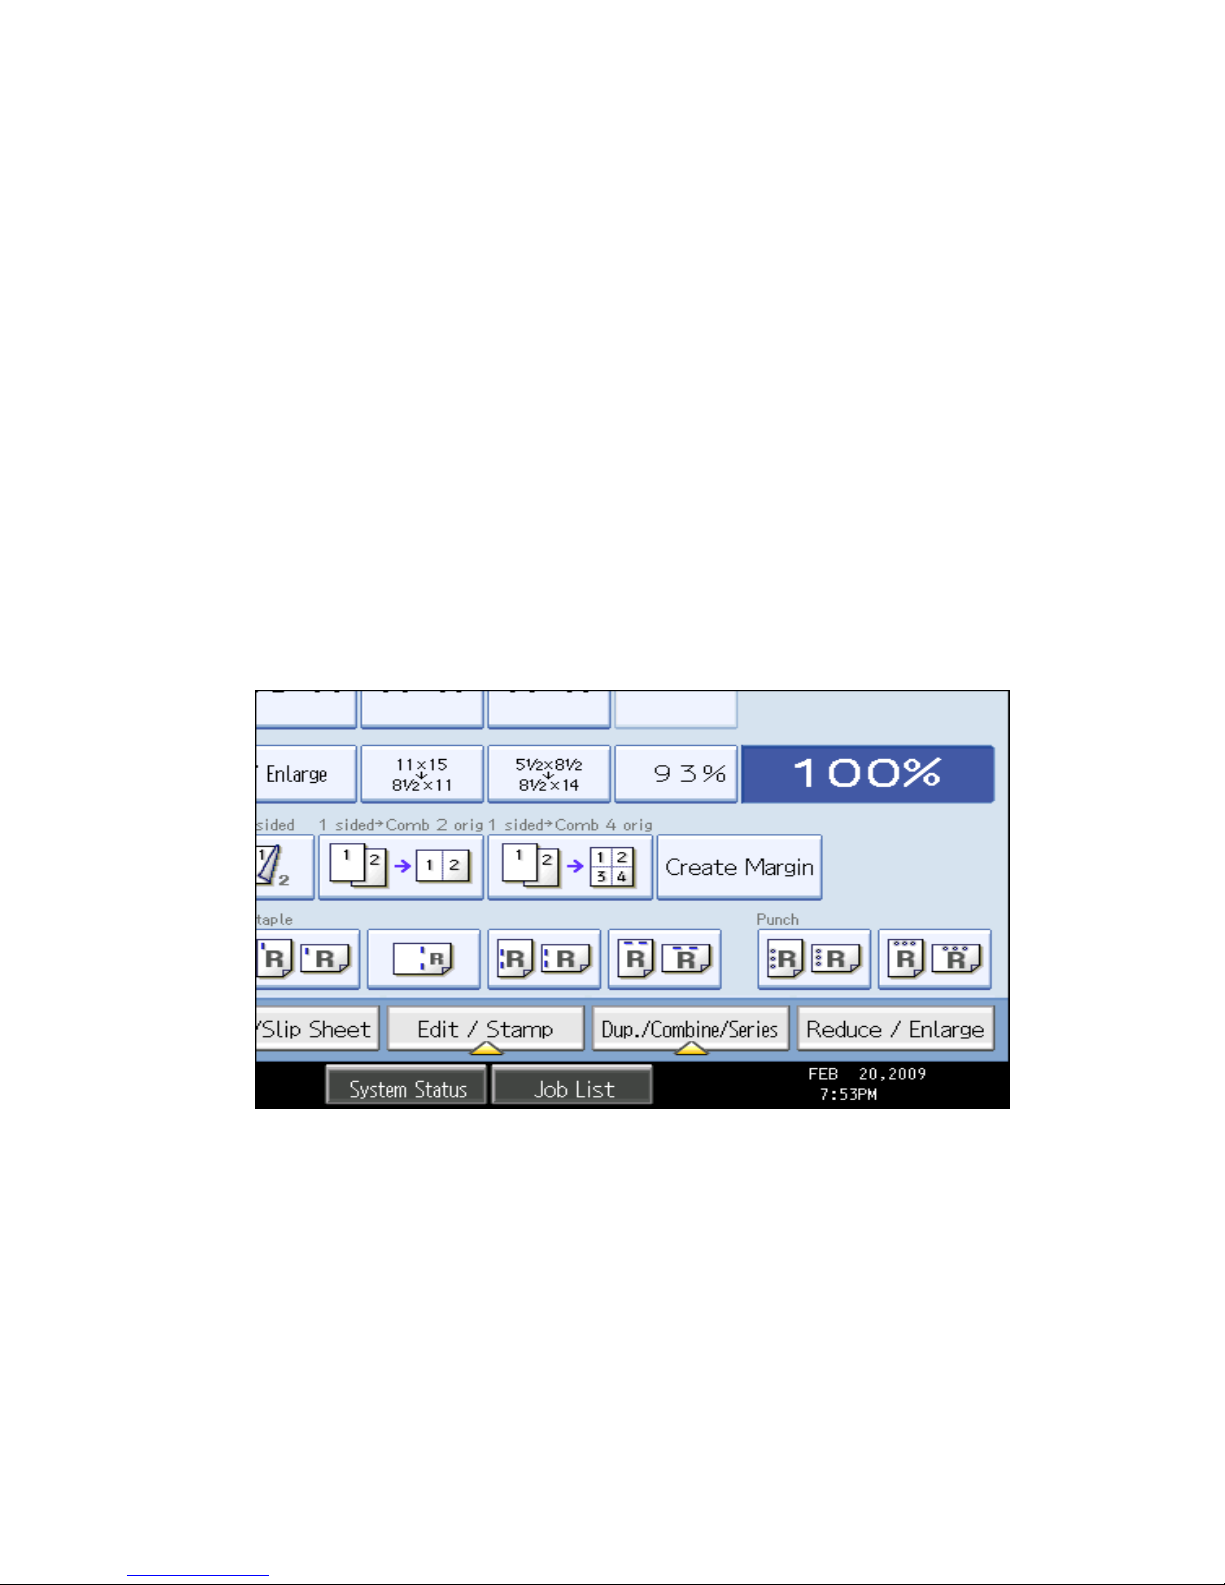
Edit/Stamp or Edit/Color Tab
Options
Vary by machine type and hard drive installed
Edit Color –
erase color, change or adjust color
Scan Position -
Used for moving copy image up or down on page
Margin Adjustments –
used to move margins for hole-punching, stapling or
binding
Stamps –
used for background numbering, page numbering,
watermarks, date stamping
Erase –
used for cleaning edges and borders, page centers
Edit Image –
used to replicate images, center images, invert images or
duplicate images
Copy Quality –
used to adjust contrast and image background
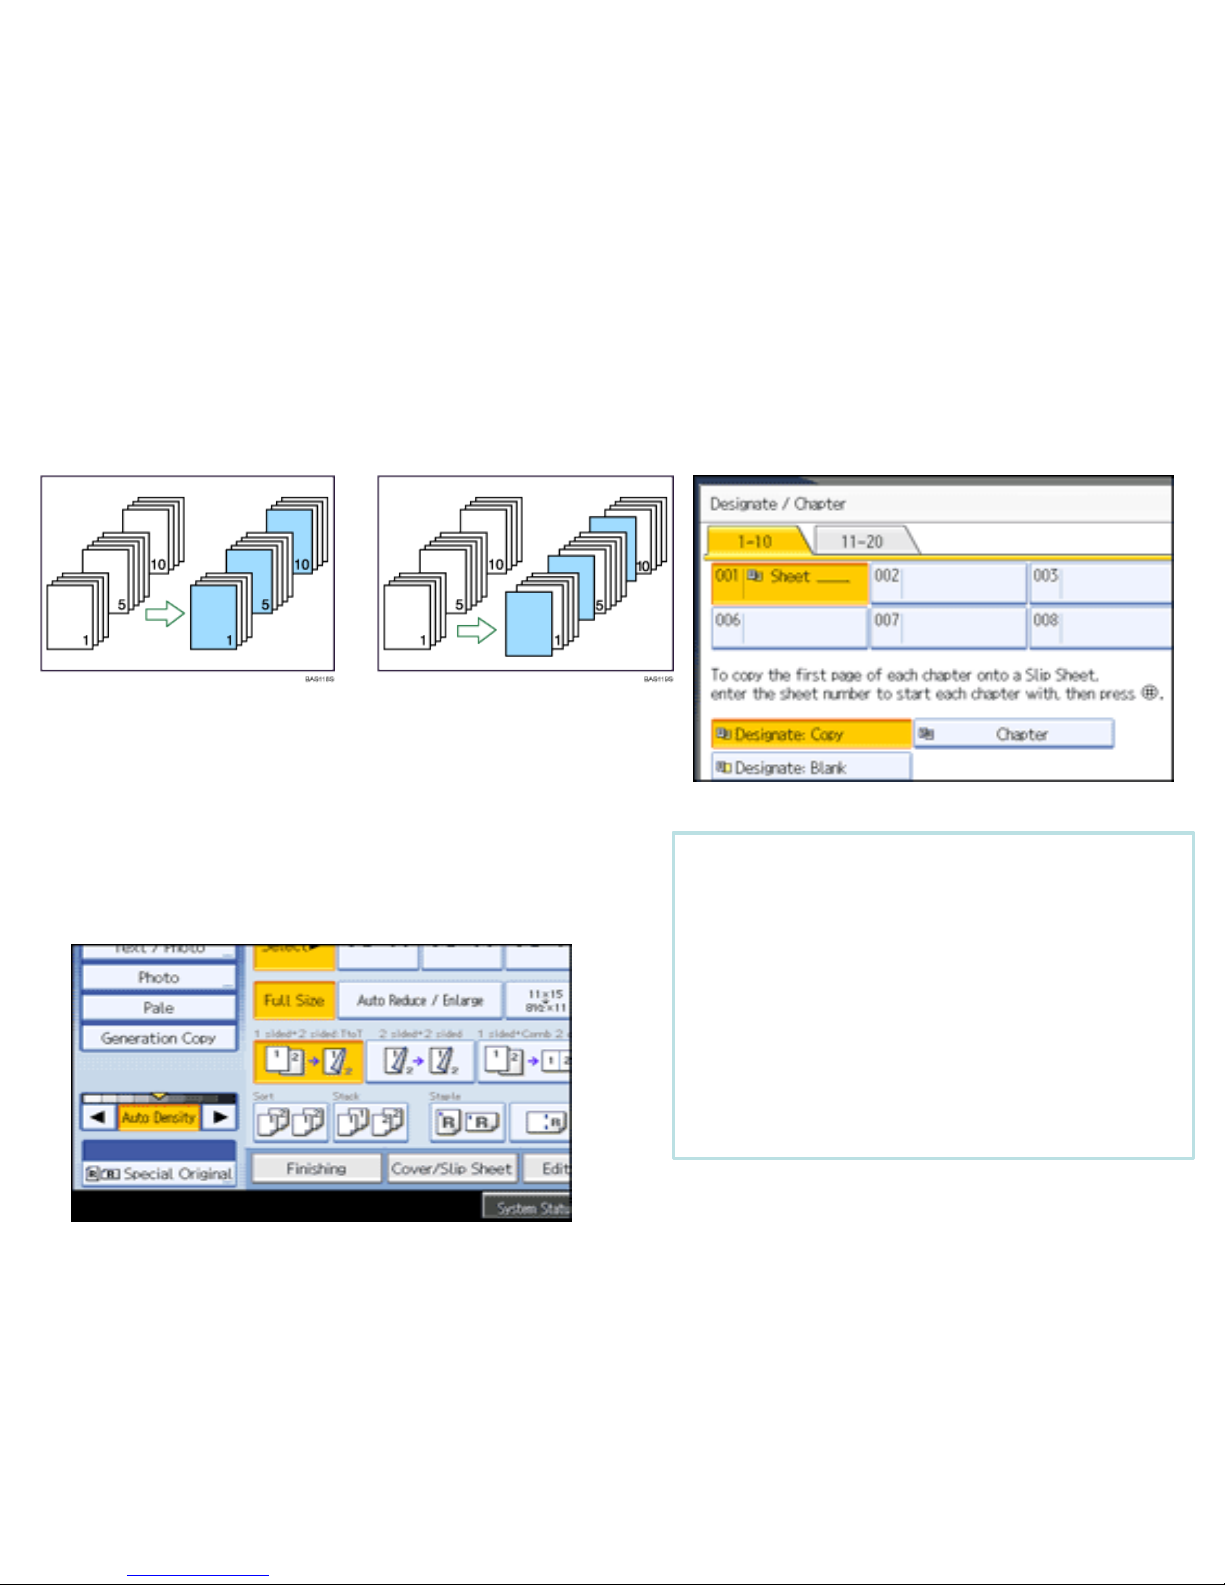
Designate
Use this function to have certain pages of your original copied onto designation sheets or to insert a
designation sheet for each page specified. Before using this option you must set up the paper trays under
paper tray settings.
Copy Blank
Press [Cover/Slip Sheet].
Press [Designate / Chapter].
Select [Designate: Copy] to copy designated
page on the designated number page or
Press [Designate: Blank]. Not to copy
anything on the specified page.
Press the key to select the chapter number.
Enter the page number of the first
chapter using the numbers key, and then
press the [#] key.
You can continue to specify additional
page location numbers, up the 20
locations may be selected.
After making all settings, press [OK]
twice.
Press [Start] or [Sample Copy].
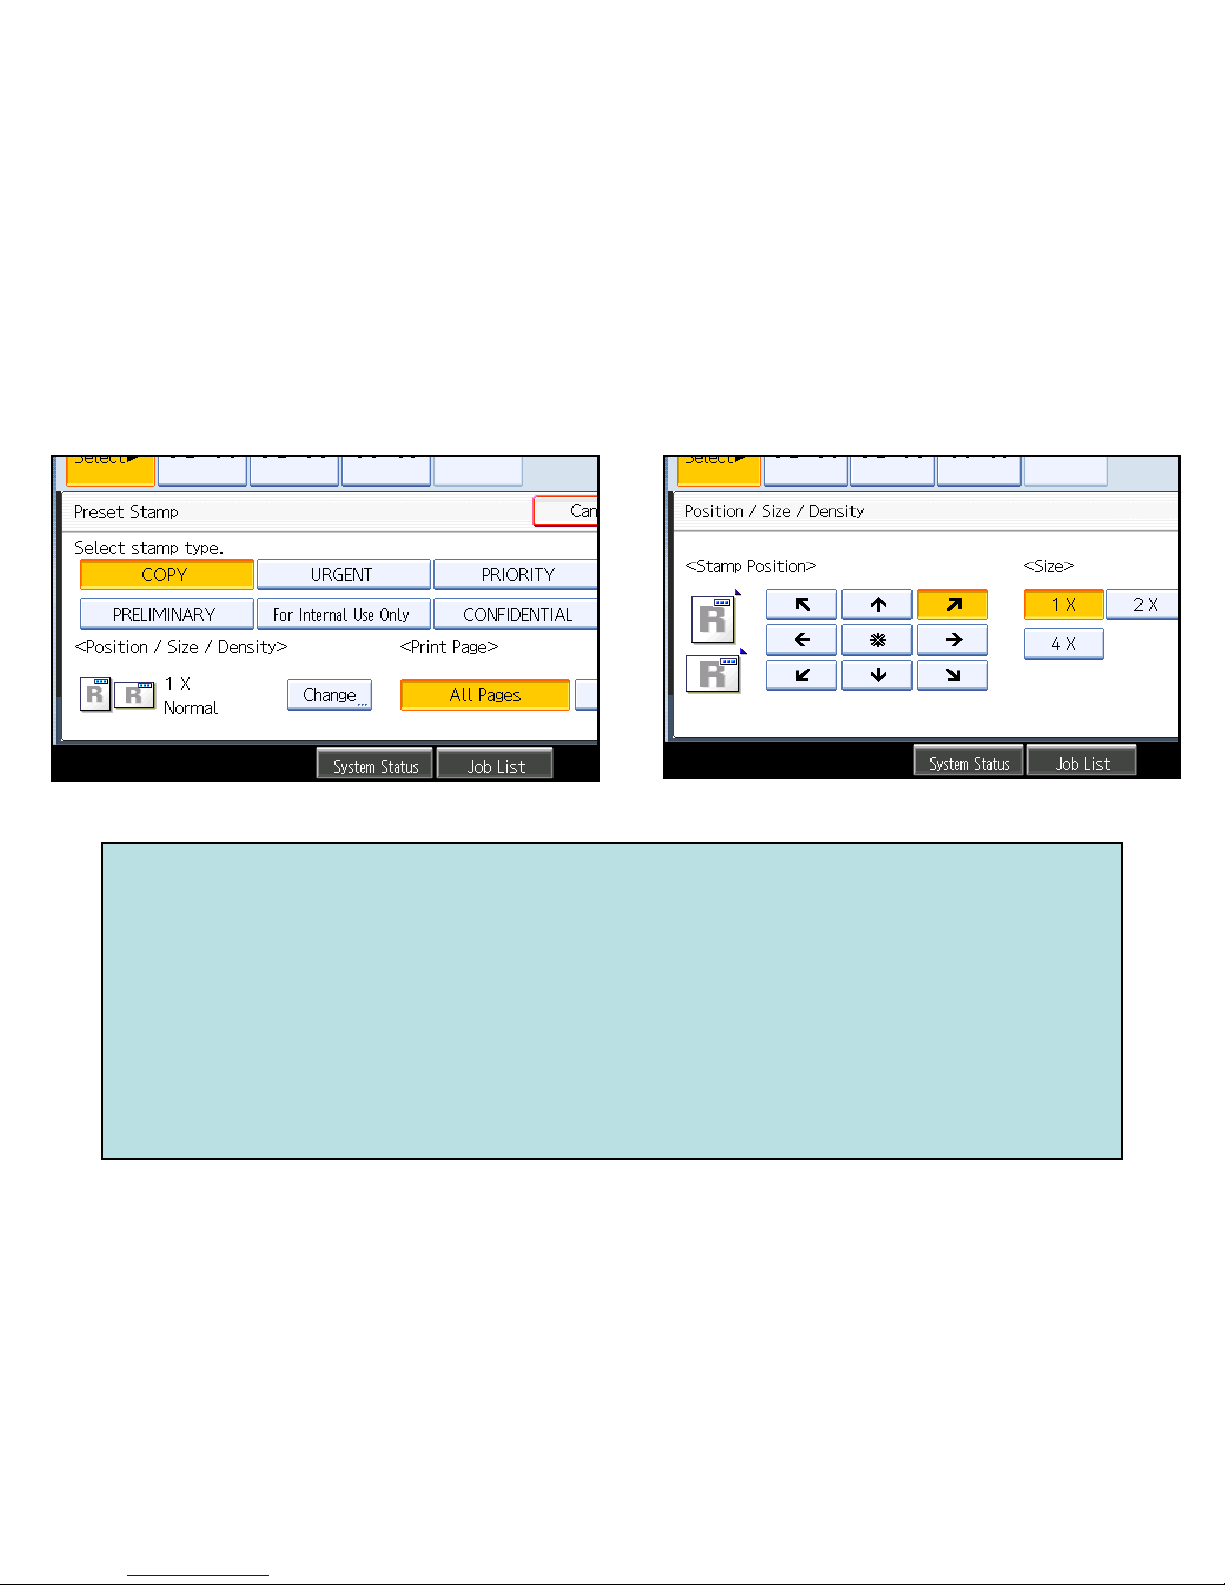
Preset Stamp
Allows users to place a watermark on documents being copied. Users
Can choose stamp option, placement, size and density. Users and also
choose to place on first page only or on all pages being copied. If using
A color unit, these options may be printed in color, on units with
60+ page speeds have the option to create a desired stamp.
(Options may vary by machine types)
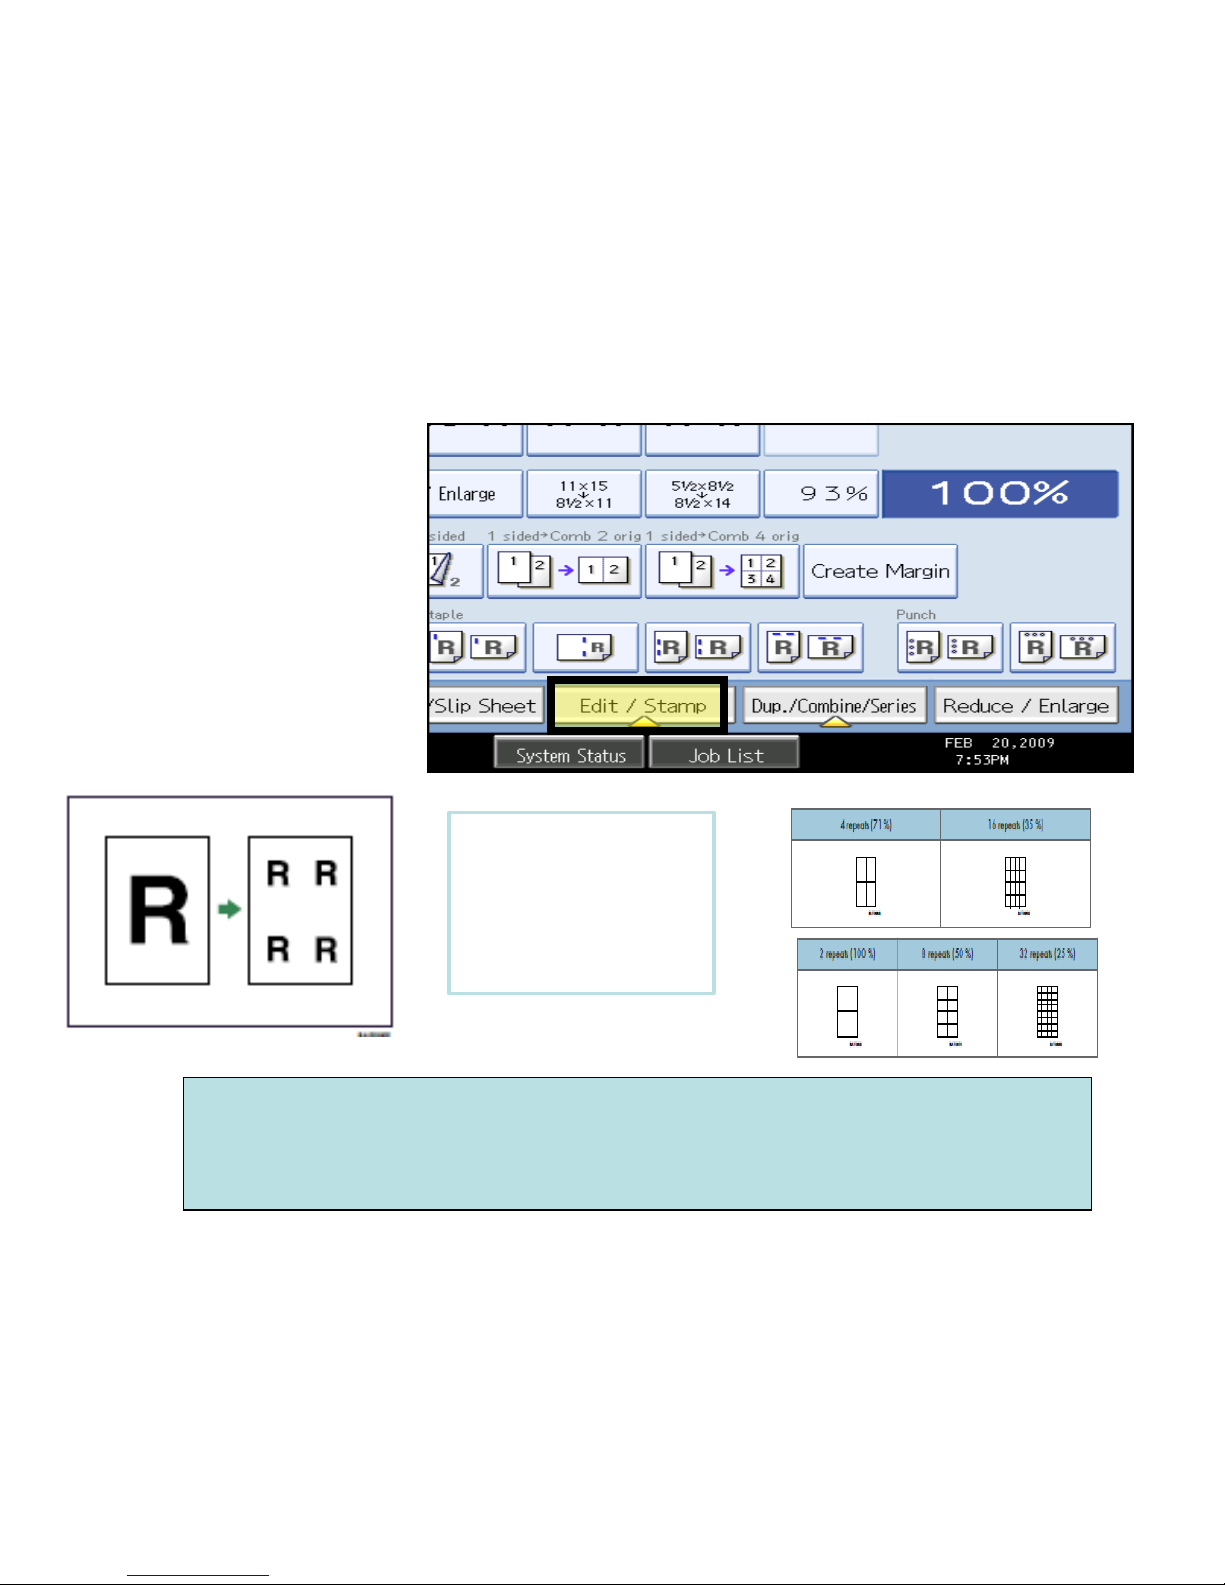
Image Repeat
Allows users place a single page on the glass and have the
image repeated multiple times on a single page
Place image on glass
Press [Edit/Stamp]
Press [Edit Image]
Press [Image Repeat]
Press [OK]
Press [Reduce/Enlarge]
Press [Numbers Key]
Enter the reproduction ratio
Press [OK]
Select the paper size
Press [Start]
4 Repeats (50%)
8 Repeats (35%)
16 Repeats (25%)
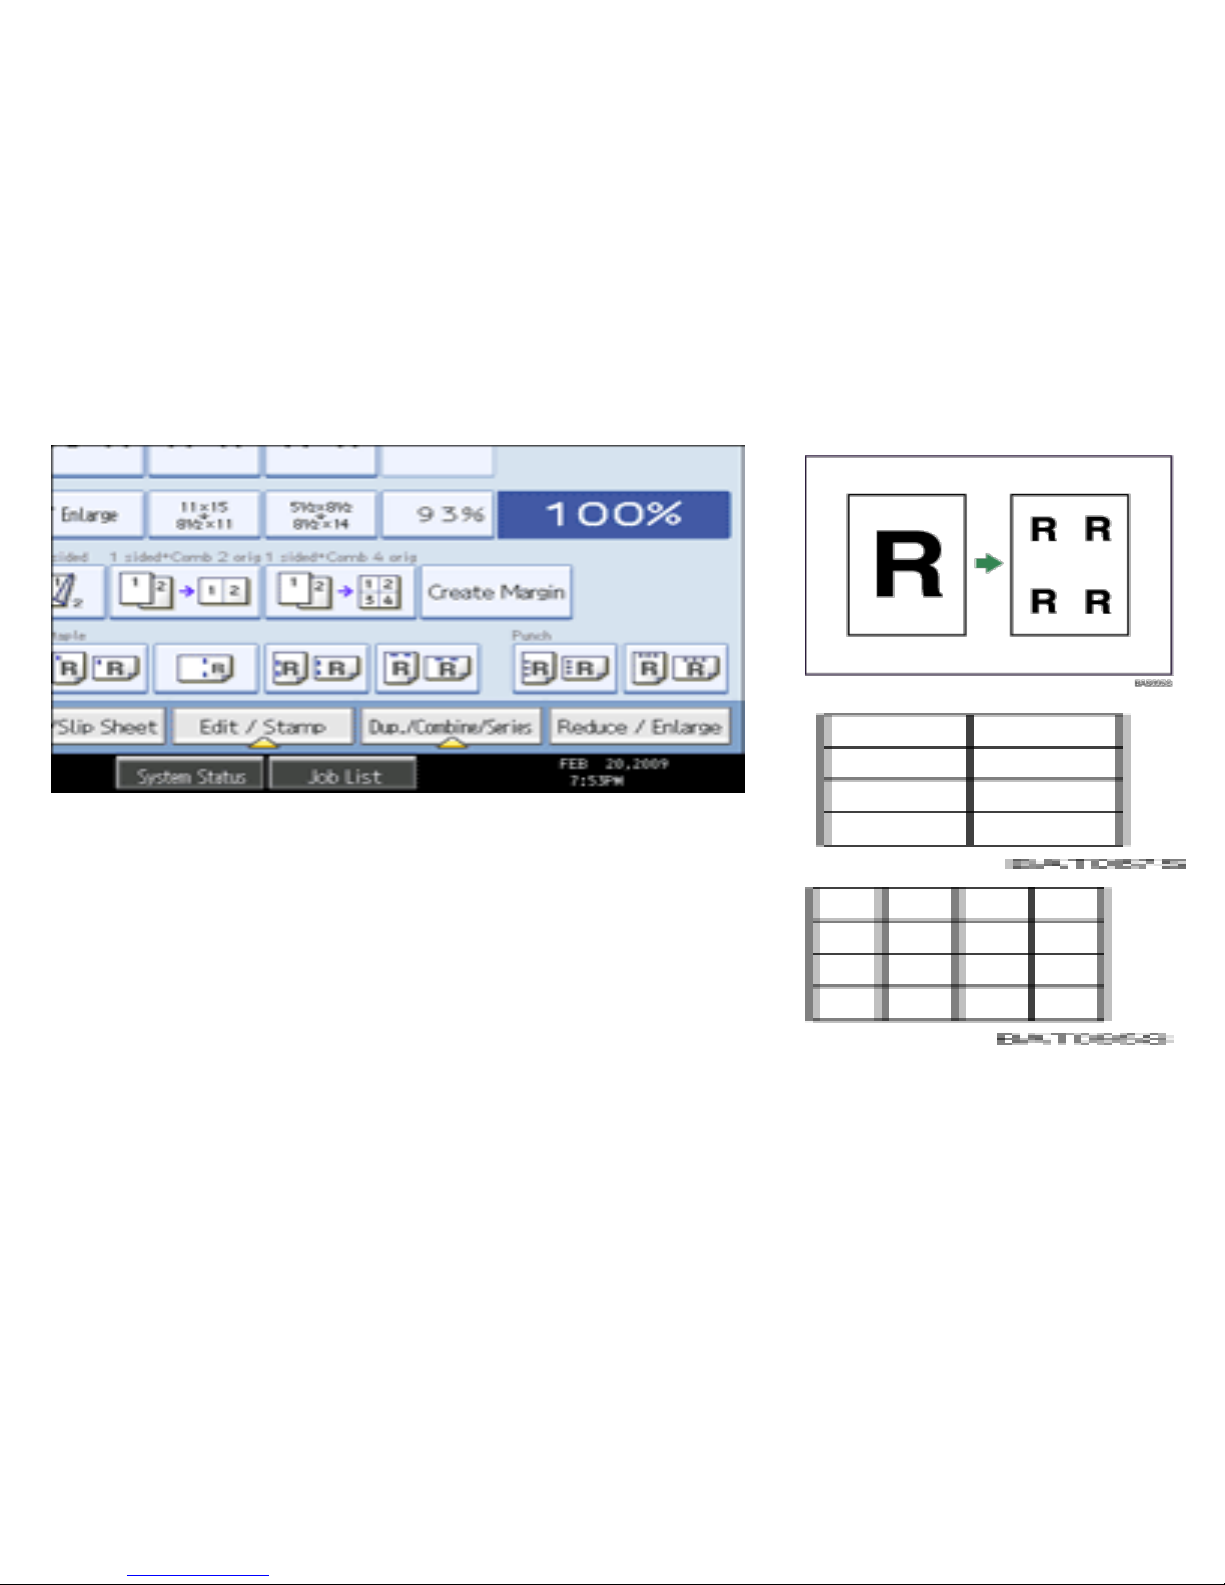
Image Repeat
Original:,51/2× 81/2/Copy paper: 81/2× 11 , or Original: 51/2× 81/2/Copy paper: 81/2× 11 Original: 51/2×
81/2/Copy paper: 81/2× 11, or Original: 51/2× 81/2/ Copy paper: 81/2× 11
This feature allow you to take an original image and copy the image repeatedly on the same page.
Select the size of copy paper and the reproduction ratio.
Press [Edit/Stamp] Key
Press [Edit Image] key
Press [Image Repeat] key
Press [OK]
Press [Reduction/Enlargement]
Enter the Percentage amounts to repeat the image on
the page.
See examples for original sizes below:-
4 repeats 50%
8 repeats 35%
25 repeats 35%
 Loading...