

Page 1

Latest Release: Nov, 2016
MP 2555/3055/3555/4055/5055/6055
D284/D285/D286/D287/D288/D289
Field Service Manual
Machine Code:
Ver 1.02
Initial Release: Nov, 2016
Copyright (c) 2016 Ricoh Co., Ltd.
Page 2

Page 3
Symbols, Abbreviations and T rademarks
Symbols, Abbreviations
This manual uses several symbols and abbreviations. Th e meaning of those symbols and abbreviation s are as
follows:
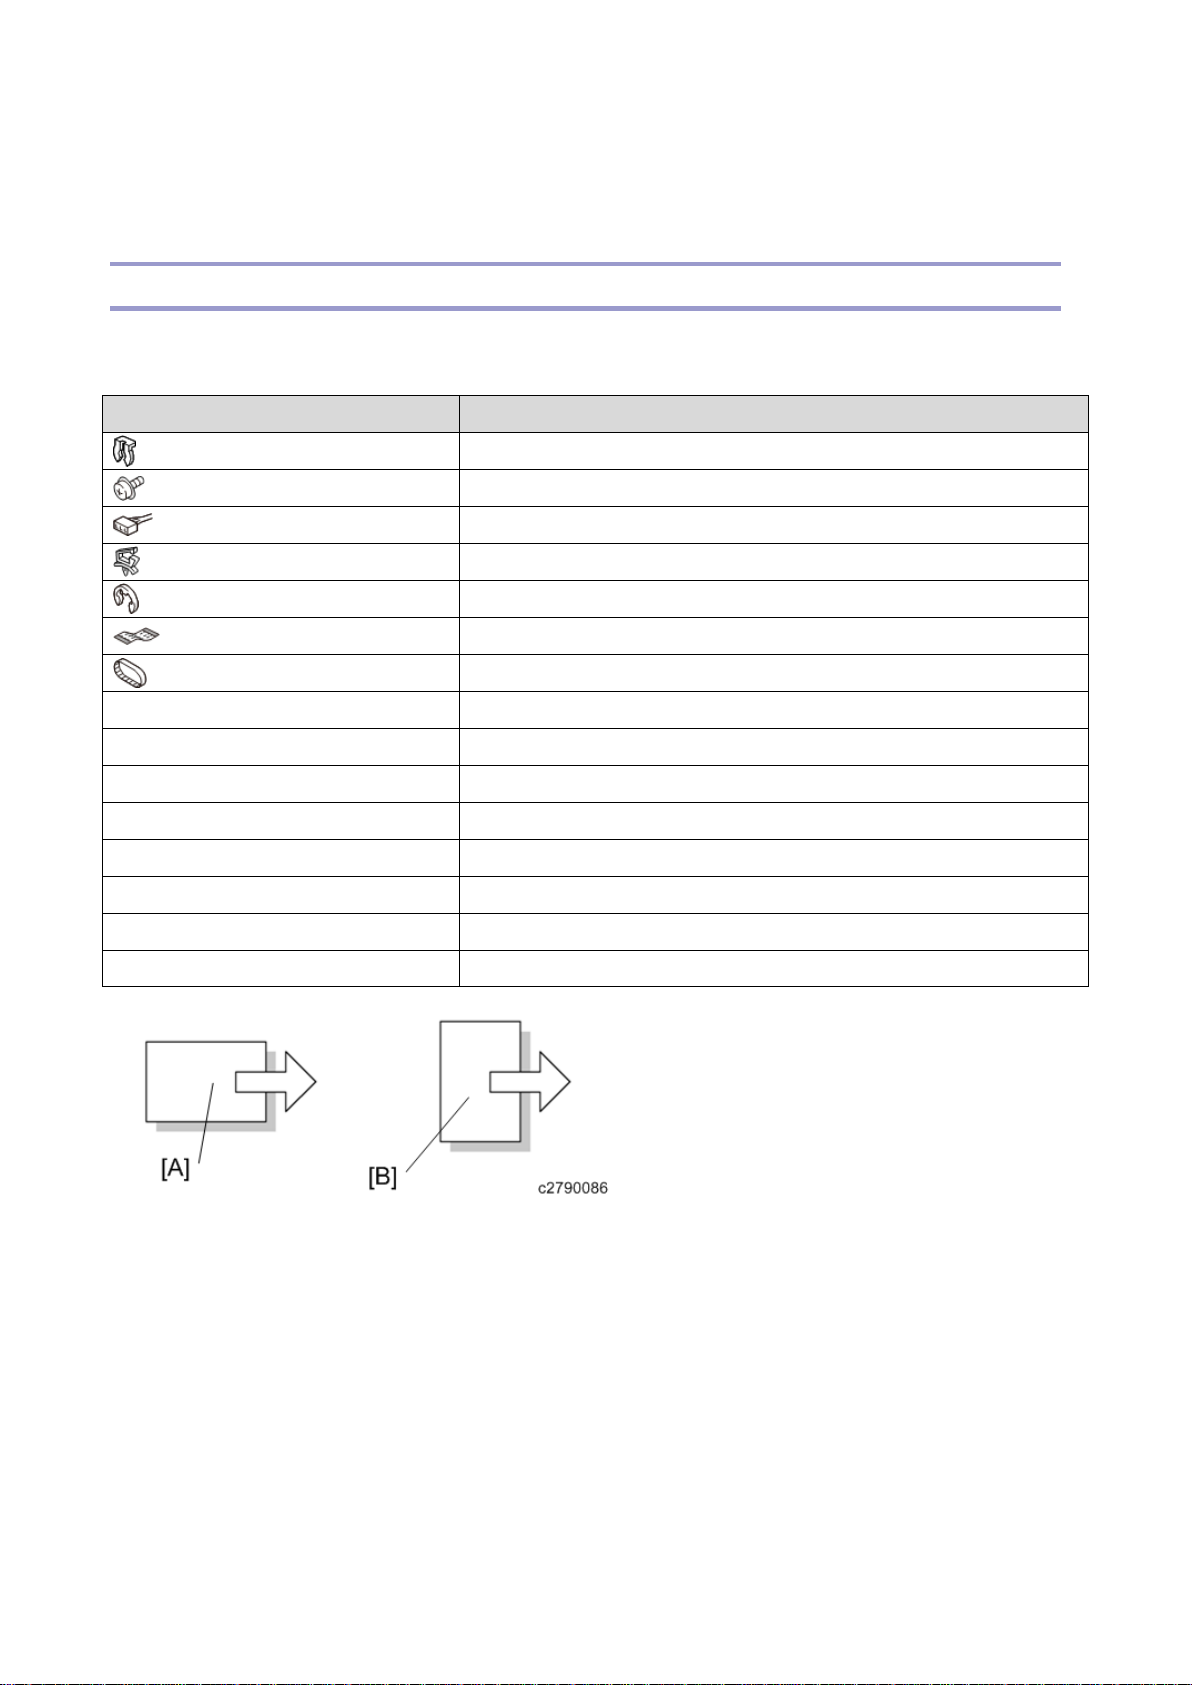
Symbol What it means
Clip ring
Screw
Connector
Clamp
E-ring
SEF Short Edge Feed
LEF Long Edge Feed
K Black
C Cyan
M Magenta
Y Yellow
B/W, BW Black and W hite
FC Full color
[A] Short Edge Feed (SEF)
Flat Flexible Cable
Timing Belt
[B] Long Edge Feed (LEF)
Page 4

Trademarks
Adobe, Acrobat, Pag eM ak er, PostS c ri pt, an d Po stS c ri p t 3 are eit h er register ed tr ademarks or tr ademarks of
Adobe Systems Incorporated in the United States and/or other count r ies.
The Bluetooth® word mark and logos are reg istered trademarks owned by Bluetooth SIG, Inc. and any use of
such marks by Ricoh Company, Ltd. i s under license.
Firef ox and Thunderbird are registere d t rademarks of the Mozilla Foundation.
Google, Android, Google Dr ive, and Chrome are trademarks of Google In c.
Java is a registered trademark of Oracle and/ or its affiliates.
JAWS® is a registered trademark of Freedom Scientific, Inc., St. Pet ersburg , Florid a and/or other countries.
Kerberos is a trademark of the Mas sachuset ts Institute of Technology (MIT).
Linux is a registered tra dem ark of Linus Torv al ds.
Macintosh, OS X, Bonjour, Safari, and TrueType are trademar ks of Apple I nc., registered in the U.S. and other
countries.
Microsoft, Windows, Windows Server, Window s Vista, Int ernet Ex plorer, Micro soft Edge, and Outlook are
either registered trademarks or trademarks of Microsoft Corp. in the United States and/or other countries.
QR Cod e is a registered tr ademark of DENSO WAVE INCORPORATED i n Japan a nd in othe r countries.
"Red Hat" is a reg istered trademark of Red Hat, Inc.
The SD and SD logo are trademarks of SD-3C, LLC.
UNIX is a registered trademark of The Open Group.
UPnP is a trademark of UPnP Implementers Corporat i on.
This product includes RSA BSAFE® Cryptogra phic software of EM C Corporation. RSA and BSAFE are
registered trademarks or trademarks of EMC Corporation in the United States a nd other countries.
The prop er n am es of Inte r ne t Ex pl ore r 7 an d 8 are as fol l ows:
• Windows® Internet Explorer® 7
• Windows® Internet Explorer® 8
The prop er n am es of the Window s op er at ing sy st ems are as follows:
• The prod uc t nam e s of Windows Vi st a are a s fol l ow s:
Microsof t® W ind ows Vista® Ultima te
Page 5

Micros of t® Windows Vista® Bus in e ss
Microsoft® Windows Vista® Home Premium
Microsoft® Windows Vista® Home Basic
Micros oft® W ind ow s V is ta® Ent erpr ise
• The produc t nam e s of Windows 7 ar e as fol l ow s :
Microsoft® Windows® 7 Home Premium
Micros oft® W ind ow s® 7 Profes sio nal
Microsoft® Windows® 7 Ultimate
Microsoft® Windows® 7 Enterprise
• The prod uc t nam e s of Windows 8 ar e as fol l ow s :
Micros oft® W ind ow s® 8
Micros oft® W ind ow s® 8 Pro
Microsoft® Windows® 8 Enterprise
• The product names of Window s 8.1 are as follow s :
Micros oft® W ind ow s® 8.1
Micros oft® W ind ow s® 8.1 Pro
Microsoft® Windows® 8.1 Enterprise
• The product names of Window s 10 are as follow s:
Microsoft® Windows® 10 Home Prem i um
Micros oft® W ind ow s® 10 Pro
Microsoft® Windows® 10 E nterprise
Microsoft® Windows® 10 E ducation
• The prod uc t nam e s of Windows S erver 2008 are as fol lows:
Microsoft® Windows Server® 2008 Standard
Microsoft® Windows Server® 2008 Enterprise
• The product names of Window s Server 2008 R2 are as follows:
Microsoft® Windows Server® 2008 R2 Standard
Microsoft® Windows Server® 2008 R 2 Enterp rise
• The prod uc t nam e s of Windows S erver 2012 are as fol lows:
Microsoft® Windows Server® 2012 Foundation
Microsoft® Windows Server® 2012 Essentials
Microsoft® Windows Server® 2012 Standard
• The product names of Window s Server 2012 R2 are as follows:
Microsoft® Windows Server® 2012 R2 Foundation
Microsoft® Windows Server® 2012 R 2 Essentials
Micros oft® W ind ow s Server® 2012 R2 Standard
Other pro d u ct nam e s us ed h er ein ar e fo r ide nt if i ca ti o n pu rpo se s onl y and might be tra demarks of their
respective companies. We disclai m any and all rights to th ose marks.
Micros of t pr o du ct s cre en sh o ts re p ri nt e d with pe rmission fr om Microsoft Corporation.
Page 6

Page 7

Table of Contents
1. Product Information ............................................................................................................................................. 14
Product Overview .................................................................................................................................................. 14
Compo nent Layout ............................................................................................................................................ 14
Paper Path .......................................................................................................................................................... 15
Drive Layout ...................................................................................................................................................... 17
Machi ne Co de s an d Pe ri pherals C onfiguration ..................................................................................................... 18
System Configuration and Options ................................................................................................................... 18
Specifications ......................................................................................................................................................... 26
2. Installation ............................................................................................................................................................ 27
Installation Requirements ...................................................................................................................................... 27
Environment ...................................................................................................................................................... 27
Minimum Space Requirements ......................................................................................................................... 27
Machine Dimen sions ......................................................................................................................................... 28
Power Requirements ......................................................................................................................................... 29
Main M achine I nstallati on ..................................................................................................................................... 30
Important Not i ce on Security Issues ................................................................................................................. 30
Installation Flow Chart ...................................................................................................................................... 33
Accessory Check ............................................................................................................................................... 34
Installation Procedur e ........................................................................................................................................ 35
Check Image Qu ality / Settings......................................................................................................................... 46
Auto Remote Firmware U pdate (ARFU) Settings ............................................................................................ 47
Moving the Ma c hi n e ......................................................................................................................................... 53
Transporting the Machine ................................................................................................................................. 55
Paper Feed Unit PB3210/ PB3220 ........................................................................................................................ 57
Accessory Check ............................................................................................................................................... 57
Installation Procedur e ........................................................................................................................................ 57
Paper Feed Unit PB3150 ....................................................................................................................................... 62
Accessory Check ............................................................................................................................................... 62
Installation Procedure ........................................................................................................................................ 62
LCIT PB3170/ PB3230 ......................................................................................................................................... 67
Accessory Check ............................................................................................................................................... 67
Installation Procedur e ........................................................................................................................................ 67
LCIT RT3030 (D696) ............................................................................................................................................ 73
Accessory Check ............................................................................................................................................... 73
Installation Procedur e ........................................................................................................................................ 73
Caster Ta bl e Type M3 (D178) .............................................................................................................................. 81
Accessory Check ............................................................................................................................................... 81
1
Page 8

Installation Procedur e ........................................................................................................................................ 81
Plate n Cover PN2000 (D700) ................................................................................................................................ 85
Accessory Check ............................................................................................................................................... 85
Installation Procedur e ........................................................................................................................................ 85
ARDF DF3090....................................................................................................................................................... 88
Accessory Check ............................................................................................................................................... 88
Installation Procedure ........................................................................................................................................ 88
SPDF DF3100 ........................................................................................................................................................ 93
Accessory Check ............................................................................................................................................... 93
Installation Procedur e ........................................................................................................................................ 93
Anti-Cond e nsa ti on H e at er s for Scan n er, PCU and Tr ays ................................................................................... 102
Overview ......................................................................................................................................................... 102
Heater B oa r d .................................................................................................................................................... 102
Anti-Cond e nsa ti on H e at er (S ca n ne r) .............................................................................................................. 108
Anti-Cond e nsa ti on H e at er ( PCU ) ................................................................................................................... 113
Tray Heater for Main Unit .............................................................................................................................. 118
Tray Heater for Paper Feed Unit PB3210 / PB3220 ....................................................................................... 120
Tray Heater for Paper Feed Unit PB3150 ....................................................................................................... 122
Tray Heater for LCIT PB3170/ PB3230 ......................................................................................................... 126
1 Bin Tray BN31 10 (D3CQ) ............................................................................................................................... 129
Accessory Check ............................................................................................................................................. 129
Installation Procedur e ...................................................................................................................................... 129
Inter nal Shift Tray SH3070 (D69 1)..................................................................................................................... 136
Accessory Check ............................................................................................................................................. 136
Installation Procedur e ...................................................................................................................................... 136
Side Tray Type M3 (D725) ................................................................................................................................. 141
Accessory Check ............................................................................................................................................. 141
Installation Procedur e ...................................................................................................................................... 141
Bridge Unit BU3070 (D685) ............................................................................................................................... 147
Accessory Check ............................................................................................................................................. 147
Installation Procedure ...................................................................................................................................... 147
Inter nal Multi-fold Unit FD3000 ( M482-17, -21) ............................................................................................... 153
Accessory Check ............................................................................................................................................. 153
Installation Procedur e ...................................................................................................................................... 154
When Attaching the Fini sher Beyond the Internal Multi-Fold Unit .............................................................. 169
Booklet Finisher SR3240 / Finisher SR3230 ...................................................................................................... 171
Accessory Check ............................................................................................................................................. 171
Installation Procedur e ...................................................................................................................................... 172
Adjustment aft er Installing the Finisher.......................................................................................................... 178
2
Page 9

Attachi ng a Su pp ort Tray ................................................................................................................................ 179
Punch Unit PU3060 (D706) ................................................................................................................................ 182
Accessory Check ............................................................................................................................................. 182
Installation Procedur e ...................................................................................................................................... 183
Booklet Finisher SR3220 (D3B9) ....................................................................................................................... 193
Accessory Check ............................................................................................................................................. 193
Installation Procedur e ...................................................................................................................................... 194
Adjustment afte r Ins t al l ing the Finisher.......................................................................................................... 202
Finisher SR3210 (D3B8) ..................................................................................................................................... 205
Accessory Check ............................................................................................................................................. 205
Installation Procedur e ...................................................................................................................................... 205
Adjustment after Installing the Fi nisher.......................................................................................................... 213
Stapleless Stapler Initial Settings .................................................................................................................... 215
Punch Unit PU3050 ............................................................................................................................................. 217
Accessory Check ............................................................................................................................................. 217
Installation Procedur e ...................................................................................................................................... 217
Internal Finisher SR3180 (D766) ........................................................................................................................ 228
Accessory Check ............................................................................................................................................. 228
Installation Procedur e ...................................................................................................................................... 228
Stapleless Stapler Initial Settings .................................................................................................................... 240
Internal Finisher SR3130 (D690) ........................................................................................................................ 242
Accessory Check ............................................................................................................................................. 242
Installation Procedur e ...................................................................................................................................... 242
Punch Unit PU3040 (D716) ................................................................................................................................ 254
Accessory Check ............................................................................................................................................. 254
Installation Procedure ...................................................................................................................................... 254
Key Cou nt er Bra ck e t Ty pe M 3 ........................................................................................................................... 260
Accessory Check ............................................................................................................................................. 260
Installation Procedur e ...................................................................................................................................... 260
Optional Counter Interface Unit Type M12 (B870-21) ...................................................................................... 264
Accessory Check ............................................................................................................................................. 264
Installation Procedur e ...................................................................................................................................... 264
NFC C ard Reader Type M29 (D3E3-21) ............................................................................................................ 267
Accessory Check ............................................................................................................................................. 267
Installation Procedur e ...................................................................................................................................... 267
Smart Card Reader Built-in Unit Type M29 ....................................................................................................... 274
Accessory Check ............................................................................................................................................. 274
Installation Procedur e ...................................................................................................................................... 274
External Keyboard Bracket Type M19 (D3BR-10) ............................................................................................ 281
3
Page 10

Compo nent Che ck ........................................................................................................................................... 281
Installation Procedur e ...................................................................................................................................... 281
Inter nal Optio ns ................................................................................................................................................... 287
List of Slots ..................................................................................................................................................... 287
IEEE 1284 Interface Board Type M19 (D3C 0) .................................................................................................. 288
Accessories ...................................................................................................................................................... 288
Installation procedur e ...................................................................................................................................... 288
IEEE 802.11a/g/n Inter face Unit Type M19 ....................................................................................................... 290
Accessory Check ............................................................................................................................................. 290
Installation procedure ...................................................................................................................................... 290
User Tool Settings for IEEE 802.11a/g/n ....................................................................................................... 292
SP Mod e Settings for IEEE 802.11 Wireless LAN ........................................................................................ 293
File Format Converter Type M19 (D3BR-04) .................................................................................................... 295
Accessory Check ............................................................................................................................................. 295
Installation procedur e ...................................................................................................................................... 295
Enhanced Security HDD Option Type M10 (D792-09) ..................................................................................... 297
Accessory Check ............................................................................................................................................. 297
Installation Procedure ...................................................................................................................................... 297
USB Device Server Option Type M19 (D3BC-28,-29) ...................................................................................... 301
Accessory Check ............................................................................................................................................. 301
Installation Procedur e ...................................................................................................................................... 302
IP Address Setting ........................................................................................................................................... 307
Extended USB B oard Type M19 (D3BS-01) ...................................................................................................... 309
Compo nent Che ck ........................................................................................................................................... 309
Installation Procedur e ...................................................................................................................................... 309
SD Card Options .................................................................................................................................................. 311
SD Card Slots .................................................................................................................................................. 311
List of Slots Used ............................................................................................................................................ 311
SD Card Appli M ove ........................................................................................................................................... 312
Overview ......................................................................................................................................................... 312
Move E xec ....................................................................................................................................................... 312
Undo E xec ....................................................................................................................................................... 313
OCR Unit Type M13 ( D3AC-23, -24, -25) ......................................................................................................... 315
Accessory Check ............................................................................................................................................. 315
Searchable PDF function outline .................................................................................................................... 315
Installation Procedur e ...................................................................................................................................... 315
Recovery Procedure ........................................................................................................................................ 317
PostSc ri pt 3 U nit Type M29 ................................................................................................................................. 318
Compo nent Che ck ........................................................................................................................................... 318
4
Page 11

Overvi ew of PostS c ri pt 3 U nit Ty pe M 2 9 (A do b e PS) ................................................................................... 318
Installation procedur e ( Adobe PS) .................................................................................................................. 318
XPS Di r ect Print Option Type M29 .................................................................................................................... 322
Compo nent Che ck ........................................................................................................................................... 322
Installation Procedur e ...................................................................................................................................... 322
Data Overwrite Security Unit Type M19 (D3BS-03) ......................................................................................... 324
Overview ......................................................................................................................................................... 324
Compo nent List ............................................................................................................................................... 324
Before You Begin the Procedure .................................................................................................................... 324
Installation Procedur e ...................................................................................................................................... 326
Configuring "Auto Erase Memory" (Performed by t he Customer) ................................................................ 327
Security Setting .................................................................................................................................................... 330
Securit y Funct i on Installation ......................................................................................................................... 330
Data Overwrite Security .................................................................................................................................. 330
HDD Encryption.............................................................................................................................................. 333
@Remote Settings ............................................................................................................................................... 341
Operation Guidance for Users ............................................................................................................................. 346
3. Preventive Maintenance ..................................................................................................................................... 347
PM Parts Settings ................................................................................................................................................. 347
Replac em e nt pr o ce d ure of the PM pa rt s ......................................................................................................... 347
After i nstalling the new PM parts ................................................................................................................... 350
Operation Check .............................................................................................................................................. 350
PM Parts List ....................................................................................................................................................... 351
Image Quality Standard s ..................................................................................................................................... 352
Resolution ........................................................................................................................................................ 352
Magnificatio n ratio error margin ..................................................................................................................... 352
Magnif i ca ti o n rat io er r or margin devia ti o n ..................................................................................................... 352
Pitch erro r marg i n ............................................................................................................................................ 352
Perpendicularity............................................................................................................................................... 353
Linearity .......................................................................................................................................................... 353
Parallelism ....................................................................................................................................................... 353
Missing Image Area ........................................................................................................................................ 353
Margin position ............................................................................................................................................... 354
Paper Transfer Quality Standards ........................................................................................................................ 355
Registration ..................................................................................................................................................... 355
Skew ................................................................................................................................................................ 355
4. Replac em e nt an d A dj us tm e nt ............................................................................................................................ 356
Notes on the Main Power Switch ........................................................................................................................ 356
Push Switch ..................................................................................................................................................... 356
5
Page 12

Beforehand ........................................................................................................................................................... 359
Special Tools and Lubricants .............................................................................................................................. 360
Special Tools ................................................................................................................................................... 360
Lubricants ........................................................................................................................................................ 360
Cover Removal Order .......................................................................................................................................... 361
Cover Layouts ................................................................................................................................................. 361
Exteri or Covers .................................................................................................................................................... 365
Front Cover ...................................................................................................................................................... 365
Controller Cov er .............................................................................................................................................. 366
Left Upper Cover............................................................................................................................................. 367
Left Rear Cover ............................................................................................................................................... 367
Left Cover ........................................................................................................................................................ 368
Rear Cover ....................................................................................................................................................... 370
Rear Lower Gap Cover ................................................................................................................................... 371
Rear Lower Cover ........................................................................................................................................... 371
Right Rear Cover ............................................................................................................................................. 371
Right Upper Cover .......................................................................................................................................... 372
Right Cover ..................................................................................................................................................... 373
Upper Front Cover .......................................................................................................................................... 375
Inverter Tray .................................................................................................................................................... 376
Paper Exi t Tr ay ................................................................................................................................................ 376
Paper Exit Cover ............................................................................................................................................. 376
Paper Exit Lower Cover .................................................................................................................................. 377
Upper Inner Cover ........................................................................................................................................... 377
Paper Exit Front Cover .................................................................................................................................... 378
Inner Cover ...................................................................................................................................................... 379
Toner Supply Housing .................................................................................................................................... 380
Smart Operation Panel ......................................................................................................................................... 382
Operat io n Pa n el Uni t ....................................................................................................................................... 382
USB Ca ble / Har ness ....................................................................................................................................... 385
ADF ..................................................................................................................................................................... 387
ADF Removal.................................................................................................................................................. 387
Scanner Unit ........................................................................................................................................................ 390
Before You Begin ............................................................................................................................................ 390
Scanner Exterior .............................................................................................................................................. 390
Exposure Glass ................................................................................................................................................ 392
Scanner Carriage ............................................................................................................................................. 394
Scanner Motor ................................................................................................................................................. 399
Original Size Sensors (APS) ........................................................................................................................... 401
6
Page 13

Scanner HP Sensor .......................................................................................................................................... 401
ARDF/Platen Cover Sensor ............................................................................................................................ 402
Scanner FFC .................................................................................................................................................... 402
Modifying the Scanner (Contact/Contact less) w hen Using the ARDF .......................................................... 406
Modifying the Scanner (Contact/Contact less) w hen Using the SPDF ........................................................... 408
Laser Unit ............................................................................................................................................................ 411
Caution Decal Location ................................................................................................................................... 411
Laser Unit ........................................................................................................................................................ 411
Quenching Lam p ............................................................................................................................................. 415
PCL (Pre Cleaning Light) ............................................................................................................................... 415
PCDU ................................................................................................................................................................... 416
PCDU .............................................................................................................................................................. 416
PCU/D evelopment Unit .................................................................................................................................. 418
OPC Drum ....................................................................................................................................................... 420
Charge Roller, Cleani ng Roller ....................................................................................................................... 421
Pick-off Pawls ................................................................................................................................................. 421
Cleaning Blade ................................................................................................................................................ 422
Developer ........................................................................................................................................................ 423
Development Filters ........................................................................................................................................ 428
TD Sensor ........................................................................................................................................................ 429
Development M ixing A uger Beari ngs ............................................................................................................ 429
Development M ixing A uger (L / R) ............................................................................................................... 431
Waste Toner ......................................................................................................................................................... 433
Waste Toner Bottle .......................................................................................................................................... 433
Toner Collection Full Sensor .......................................................................................................................... 433
Recycling Shut ter ............................................................................................................................................ 434
Transfer Unit ........................................................................................................................................................ 437
Transfer Unit ................................................................................................................................................... 437
Transfer Roller Unit ........................................................................................................................................ 438
ID Sensor ......................................................................................................................................................... 439
Transfer Unit Open/Clo sed LED .................................................................................................................... 440
Tempe r ature/H umidity Sensor ........................................................................................................................ 441
Fusing Entran ce Sensor ................................................................................................................................... 442
Transfer Unit Open/Clo sed Sens or ................................................................................................................. 443
Drive Unit ............................................................................................................................................................ 444
Drum/Waste Toner Motor ............................................................................................................................... 444
Development Motor ........................................................................................................................................ 444
Fusing/Paper Exit Motor (MP 2555 SP/3055 SP/3555 SP Only) .................................................................. 444
Fusing Motor (MP 4055 SP/5055 SP/6055 SP Only) .................................................................................... 445
7
Page 14

Paper Exit Motor (MP 4055 SP/5055 SP/6055 SP Only)............................................................................... 445
Registr at i on M o tor .......................................................................................................................................... 446
Paper Feed Motor ............................................................................................................................................ 446
Vertical Transport Motor ................................................................................................................................ 446
Transfer Roller Contact Motor ........................................................................................................................ 447
Toner Hopper .................................................................................................................................................. 447
Toner Supply Motor ........................................................................................................................................ 449
Fusing Unit .......................................................................................................................................................... 452
Fusing Unit ...................................................................................................................................................... 452
Fusing Entran ce Guide Plate ........................................................................................................................... 455
Fusing Exit Gui de Plate ................................................................................................................................... 455
Fusing Upper Cover ........................................................................................................................................ 456
Fusing Lower Cover ........................................................................................................................................ 457
Heating Sleev e Belt Unit ................................................................................................................................. 458
Pressure Roller and Press ure Roller Bearings ................................................................................................ 461
Thermostat Unit ............................................................................................................................................... 462
Fusing Roller T emperature Sens ors ................................................................................................................ 462
Pressure Roller Temper ature Se nsors ............................................................................................................. 463
Fusing T he rm op il e s ......................................................................................................................................... 463
Notes When Rea ssembli ng the Fus i ng Unit ................................................................................................... 464
Paper Exit ............................................................................................................................................................. 466
Paper Exit Unit ................................................................................................................................................ 466
Paper Exit Swit ching Solenoid........................................................................................................................ 466
Paper Exit Sensor ............................................................................................................................................ 467
Reverse Sensor ................................................................................................................................................ 468
Paper Exit Full Sensor ..................................................................................................................................... 469
Reverse Motor ................................................................................................................................................. 469
Fusing Exit Se nsor .......................................................................................................................................... 471
Paper Feed ........................................................................................................................................................... 472
Paper Feed Unit ............................................................................................................................................... 472
Paper Dust Collection Unit ............................................................................................................................. 475
Pick-up Roller, Paper Feed Roller , Separation Rol ler, Torque Limit er ......................................................... 476
1st / 2nd Pap er Fe ed T ray Lift Motor ............................................................................................................. 478
1st / 2n d Paper Feed Sensor ............................................................................................................................ 479
Vertical Transport Sensor................................................................................................................................ 480
Limit Sen sor .................................................................................................................................................... 481
1st Paper End Sensor / 2nd Paper End Sensor ................................................................................................ 482
Registration Sensor ......................................................................................................................................... 483
Duplex Unit ......................................................................................................................................................... 485
8
Page 15

Duplex/By-pass Motor .................................................................................................................................... 485
Duplex Entrance Motor ................................................................................................................................... 486
Duplex Entrance Sensor .................................................................................................................................. 487
Duplex Exit Sensor .......................................................................................................................................... 488
Bypass Tray Unit ................................................................................................................................................. 490
Bypass Tray ..................................................................................................................................................... 490
Bypass Paper End Sensor ................................................................................................................................ 492
Bypass Pick -up Roller ..................................................................................................................................... 493
Bypass Paper Feed Roll er ............................................................................................................................... 493
Bypass Separation Roller ................................................................................................................................ 494
Torque Limiter ................................................................................................................................................ 494
Bypass Width Sensor ...................................................................................................................................... 494
Bypass Length Sensor ..................................................................................................................................... 497
PCBs and Other Items ......................................................................................................................................... 498
Overview ......................................................................................................................................................... 498
Control l er B o x Cov er ...................................................................................................................................... 498
IPU ................................................................................................................................................................... 499
BCU ................................................................................................................................................................. 500
Control l er B o ar d .............................................................................................................................................. 502
HDD ................................................................................................................................................................ 507
HVPS ............................................................................................................................................................... 508
PSU .................................................................................................................................................................. 509
Heater B oa r d .................................................................................................................................................... 511
Control l er B o x ................................................................................................................................................. 511
Imaging Temperature Sensor (Thermistor) .................................................................................................... 514
DC SW board .................................................................................................................................................. 515
Fans/Filters .......................................................................................................................................................... 516
Odor Filter ....................................................................................................................................................... 516
Particulate Filter (MP 4055 SP/5055 SP/6055 SP Only)............................................................................. 517
Dust filter ......................................................................................................................................................... 518
Development Exhaust Fan .............................................................................................................................. 519
Paper Exit Cooling Fan ................................................................................................................................... 520
Fusing Fan ....................................................................................................................................................... 521
Development Bearing Cooling Fan (MP 4055 SP/5055 SP/6055 SP Only) .................................................. 522
PSU Cooling Fan (MP 4055 SP/5055 SP/6055 SP Only) .............................................................................. 523
Adjustment afte r Repl a c em en t ............................................................................................................................ 524
Printing ............................................................................................................................................................ 524
Scanning .......................................................................................................................................................... 529
ADF Image Adjustment .................................................................................................................................. 530
9
Page 16

5.
System Maintenance .......................................................................................................................................... 532
Service Program Mode ........................................................................................................................................ 532
Enteri ng SP Mode ........................................................................................................................................... 532
Exiting SP Mode ............................................................................................................................................. 533
Types of SP Modes ......................................................................................................................................... 533
Remarks ........................................................................................................................................................... 536
Firmware Update (Remo t e Firmware Update).................................................................................................... 538
RFU Performable Condition ........................................................................................................................... 538
Firmware Update (SD Ca r d) ............................................................................................................................... 539
Overview ......................................................................................................................................................... 539
Firmw ar e Ty pes ............................................................................................................................................... 539
Procedure ......................................................................................................................................................... 540
Error Screens During Updating ....................................................................................................................... 544
Firmware Update (Smart Fir mware U pdate) ...................................................................................................... 548
Overview ......................................................................................................................................................... 548
Imm edi ate Update ........................................................................................................................................... 549
Update at the Next Visit (Reserve) ................................................................................................................. 551
Update via SD card ......................................................................................................................................... 557
Firmware Update (Auto Remote Firmware Update) .......................................................................................... 560
Overview ......................................................................................................................................................... 560
Downloading and Updating Process ............................................................................................................... 561
Related SP ....................................................................................................................................................... 565
Updating JavaVM ................................................................................................................................................ 569
Creati ng an SD C ard for U pdating .................................................................................................................. 569
NVRAM Data Upload/Download ....................................................................................................................... 572
Uploading Content of NVRAM to a n SD card ............................................................................................... 572
Downloading an SD Card to NVRAM ........................................................................................................... 573
UP/SP Data Import/Export .................................................................................................................................. 574
Overview ......................................................................................................................................................... 574
UP Data Import/Export ................................................................................................................................... 574
SP Data Import/Export .................................................................................................................................... 577
Possi ble solutions for import/export pr oblems ............................................................................................... 578
Addres s B ook U pl o ad /D ow nl oa d ........................................................................................................................ 581
Information List ............................................................................................................................................... 581
Download ........................................................................................................................................................ 581
Upload ............................................................................................................................................................. 582
Specification .................................................................................................................................................... 583
Capturing the Device L ogs .................................................................................................................................. 584
Overview ......................................................................................................................................................... 584
10
Page 17

Retri eving the Device L ogs via Operation Panel ............................................................................................ 586
Retri eving the Device L ogs via Web Image M onitor ..................................................................................... 588
SMC List Card Save Function ............................................................................................................................. 592
Overview ......................................................................................................................................................... 592
Procedure ......................................................................................................................................................... 592
File Names of the Saved SMC Lists ............................................................................................................... 594
Error Messages ................................................................................................................................................ 595
Card Save Function ............................................................................................................................................. 596
Overview ......................................................................................................................................................... 596
Procedure ......................................................................................................................................................... 596
Error Messages ................................................................................................................................................ 599
6. Troubleshooting.................................................................................................................................................. 600
Self-Diagnostic Mode .......................................................................................................................................... 600
Service Call Conditions ................................................................................................................................... 600
SC Logging ...................................................................................................................................................... 601
SC A ut omatic Reboot...................................................................................................................................... 601
SC Manual Reboot .......................................................................................................................................... 603
SC Tables: SC1xx (Scanning) ............................................................................................................................. 605
SC101-01 to SC195-00 ................................................................................................................................... 605
SC Tables: SC2xx (Exposure) ............................................................................................................................. 612
SC202-00 to SC272-10 ................................................................................................................................... 612
SC Tables: SC3xx (Image Processing 1: Ch arge, Development) ....................................................................... 616
SC302-00 to SC396-01 ................................................................................................................................... 616
SC Tables: SC4xx (Image Processing 2: A round the Drum).............................................................................. 620
SC440-00 to SC498-00 ................................................................................................................................... 620
SC Tables: SC5xx (Paper Feed and Fusing) ....................................................................................................... 623
SC501-01 to SC589-02 ................................................................................................................................... 623
SC Tables: SC6xx (Communication and Others) ............................................................................................... 655
SC620-01 to SC687-00 ................................................................................................................................... 655
SC Tables: SC7xx (Peri pherals) .......................................................................................................................... 663
SC700-01 to SC792-00 ................................................................................................................................... 663
SC Tables: SC8xx ................................................................................................................................................ 690
SC816 to SC899 .............................................................................................................................................. 690
SC Tables: SC9xx (Others) ................................................................................................................................. 710
SC900-00 to SC995-04 ................................................................................................................................... 710
When SC549 Is Displayed ................................................................................................................................... 713
Troubleshooting Flowchart ............................................................................................................................. 713
Fusing Shield Check........................................................................................................................................ 713
Solution............................................................................................................................................................ 716
11
Page 18

Jam Detection ...................................................................................................................................................... 718
Paper Jam Display ........................................................................................................................................... 718
Jam Codes and D i splay Codes ........................................................................................................................ 718
Sensor Locat ions ............................................................................................................................................. 728
Paper Size Codes ............................................................................................................................................. 728
Other Problems .................................................................................................................................................... 730
When SC670 Is Displayed .............................................................................................................................. 730
When SC6 7 2 (C ont r oll er st art up err or) is di s pl ayed ..................................................................................... 730
Marks (Vertical Streaks) on Prints and Co pies due to Scanning Problems ................................................... 741
Finis her Regis t ration A djustme nt ................................................................................................................... 747
Stacking Problem at the 1000-sheet Finisher.................................................................................................. 751
Finisher Jogger Problem.................................................................................................................................. 754
Early Paper Tray Full Detection Mylar for Internal Finishe r SR3130 (D690) .............................................. 755
Paper Curl Problem for SR3180 ..................................................................................................................... 759
Maxim um number of sheets for stapling and what happens when the job has too many pages .................... 761
Fusing Offset Occurs at the Edge or Center of the Pa per ............................................................................... 763
Troubleshooting for Toner Density ................................................................................................................. 766
Troubleshooting for Blots on Middle Thi ck Glossy or Coate d Paper ............................................................ 767
Blown Fuse Condition ......................................................................................................................................... 768
7. Detail ed Descriptions ......................................................................................................................................... 770
Guidance for Those Who are Familiar with Predeces sor Prod ucts .................................................................... 770
Changes from the Previ ous Machine .............................................................................................................. 770
Overview .............................................................................................................................................................. 774
Parts Layout ..................................................................................................................................................... 774
Scanning............................................................................................................................................................... 784
Overview ......................................................................................................................................................... 784
Mechanism ...................................................................................................................................................... 785
Image Processi ng ................................................................................................................................................. 793
Struct ur al block di ag r am ................................................................................................................................. 793
Mechanism ...................................................................................................................................................... 794
Plotter Process ..................................................................................................................................................... 797
Laser Exposure ................................................................................................................................................ 797
PCU ................................................................................................................................................................. 800
Development ................................................................................................................................................... 803
Transf er a nd S ep ara ti o n .................................................................................................................................. 807
Fusing .............................................................................................................................................................. 809
Waste Toner .................................................................................................................................................... 815
Feed/ Transport part............................................................................................................................................. 819
Overview ......................................................................................................................................................... 819
12
Page 19

Feed / tran sp ort p ar t ......................................................................................................................................... 819
Bypass feed section ......................................................................................................................................... 827
Duplex s ec ti on ................................................................................................................................................. 829
Paper exi t uni t .................................................................................................................................................. 831
Paper Pat h an d Se ns or L oc at i on s .................................................................................................................... 833
Air Flows (Fan Control) ...................................................................................................................................... 836
Overview ......................................................................................................................................................... 836
Mechanism ...................................................................................................................................................... 838
Electrical parts ..................................................................................................................................................... 841
Block diagram ................................................................................................................................................. 841
Board outline ................................................................................................................................................... 842
Feed tray dehumidifier heater, Scanner/PCDU anti-conden s at ion he a te r ...................................................... 844
One-way Clutches ................................................................................................................................................ 846
Paper Feed/Bypass .......................................................................................................................................... 846
Duplex ............................................................................................................................................................. 846
Process Control .................................................................................................................................................... 848
Image Density Control (Process Control) ....................................................................................................... 848
Mechanism ...................................................................................................................................................... 851
Energy Save ......................................................................................................................................................... 853
Energy Saver Modes ....................................................................................................................................... 853
Power St at es of this M a chi n e .......................................................................................................................... 854
Verifi cation of Up Time f or each Energy Saving State .................................................................................. 857
Checking the Up time by Device State ........................................................................................................... 858
Recommendation ............................................................................................................................................. 858
Adobe PS vs. Cl on e PS ........................................................................................................................................ 859
Overview ......................................................................................................................................................... 859
How to D istinguish Adobe PS from Clone PS ............................................................................................... 859
Differ ence in Device Fonts ............................................................................................................................. 862
Differ ences in Driver Fu nctions ...................................................................................................................... 867
13
Page 20
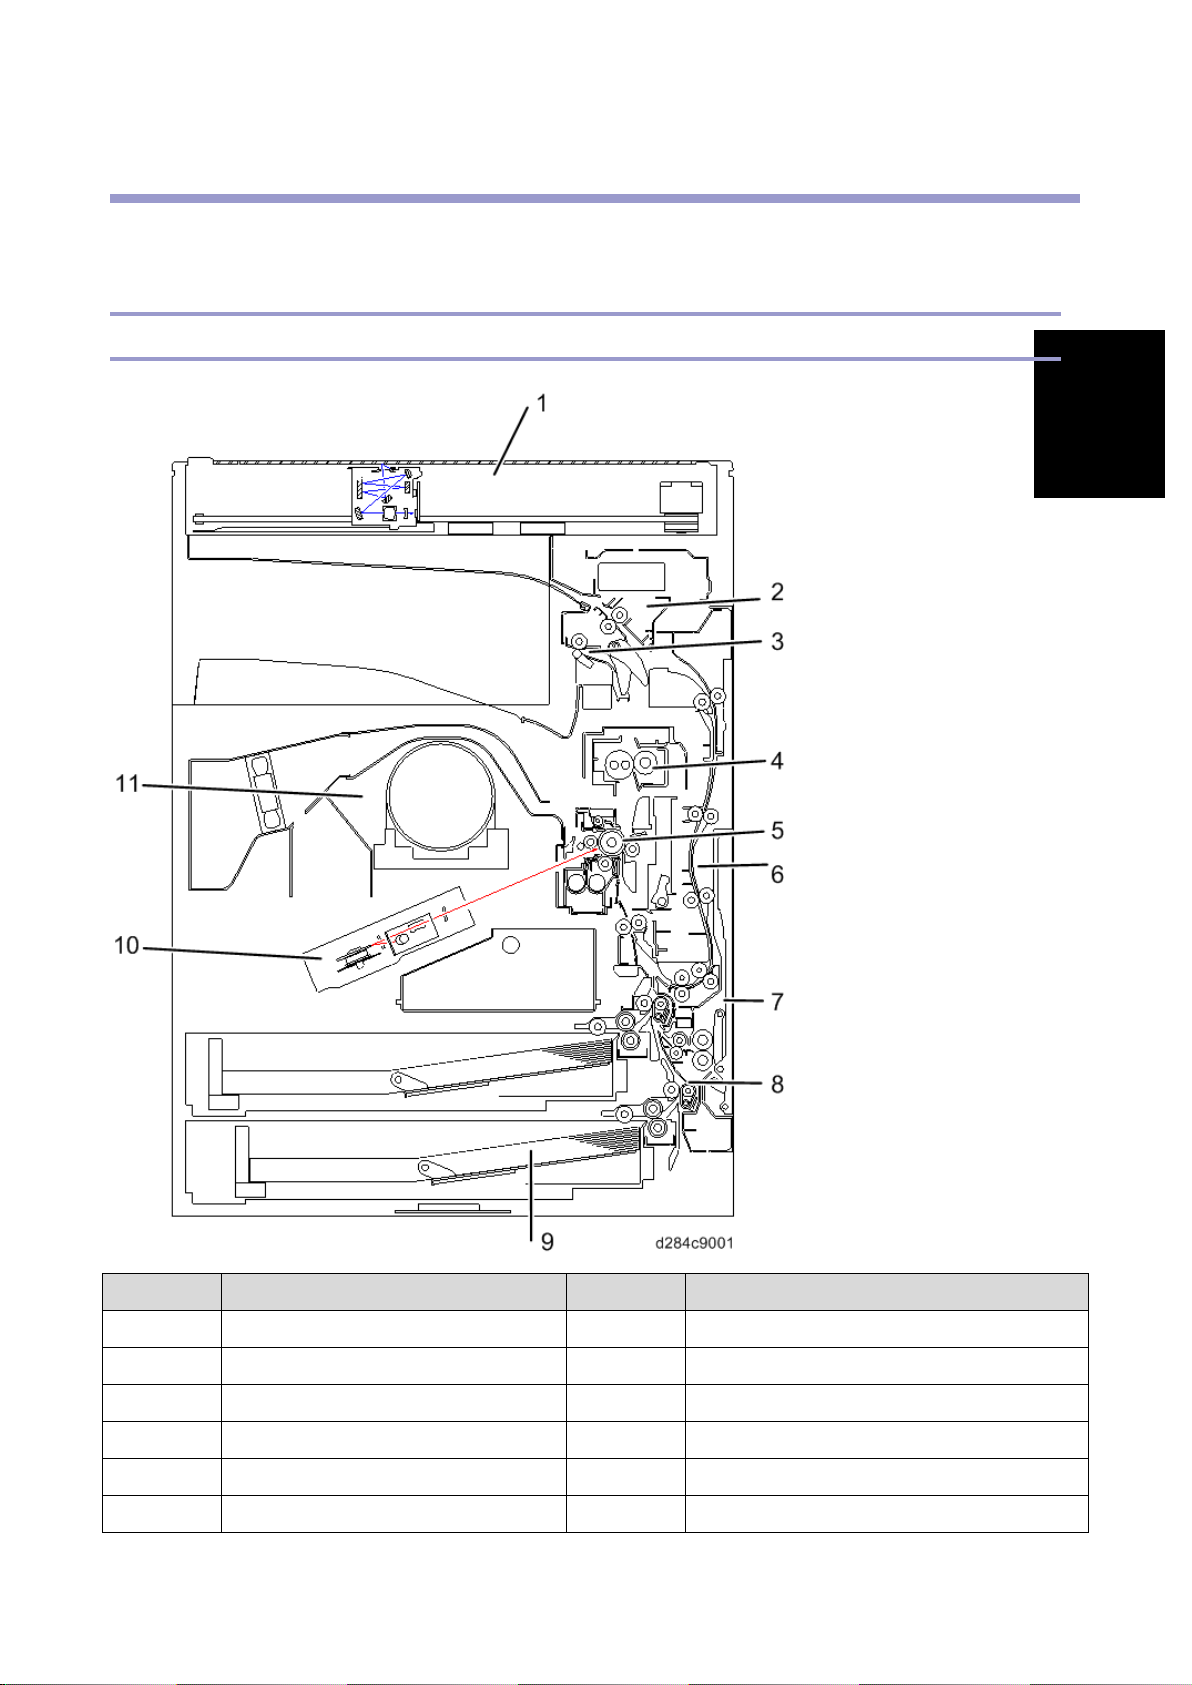
Product
1. Product Information
Product Overview
Component Layout
Product Overview
Information
No. Description No. Description
1 Scanner Unit 7 Bypass T r ay Unit
2 Reverse Unit 8 Verti cal Trans po rt
3 Paper Exit Unit 9 Paper Feed Unit
4 Fusing Unit 10 Laser Unit
5 OPC Drum 11 Toner Supply Unit
6 Duplex Unit
14
Page 21
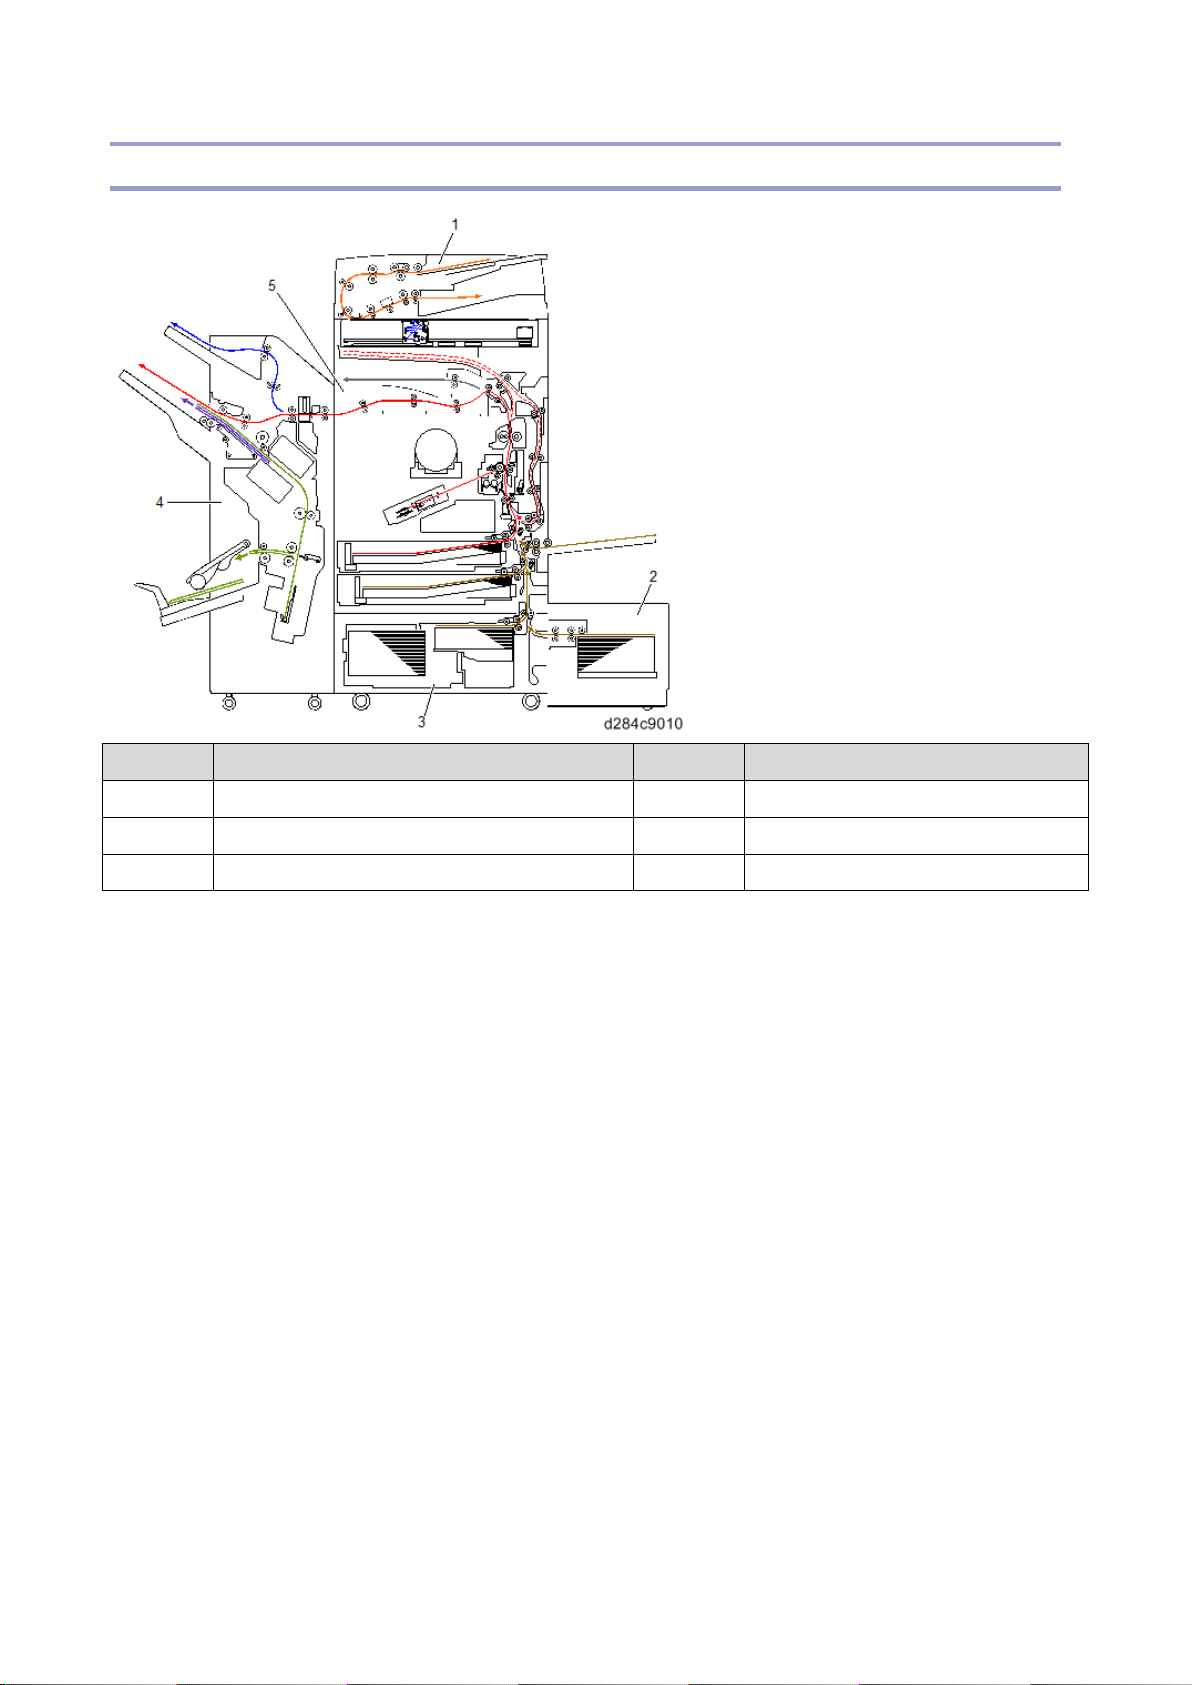
Product Overview
Paper Path
No. Description No. Description
1 ARDF 4 Booklet Finisher
2 LCIT 5 Bridge Unit
3 LCIT (Tandem Tray )
15
Page 22
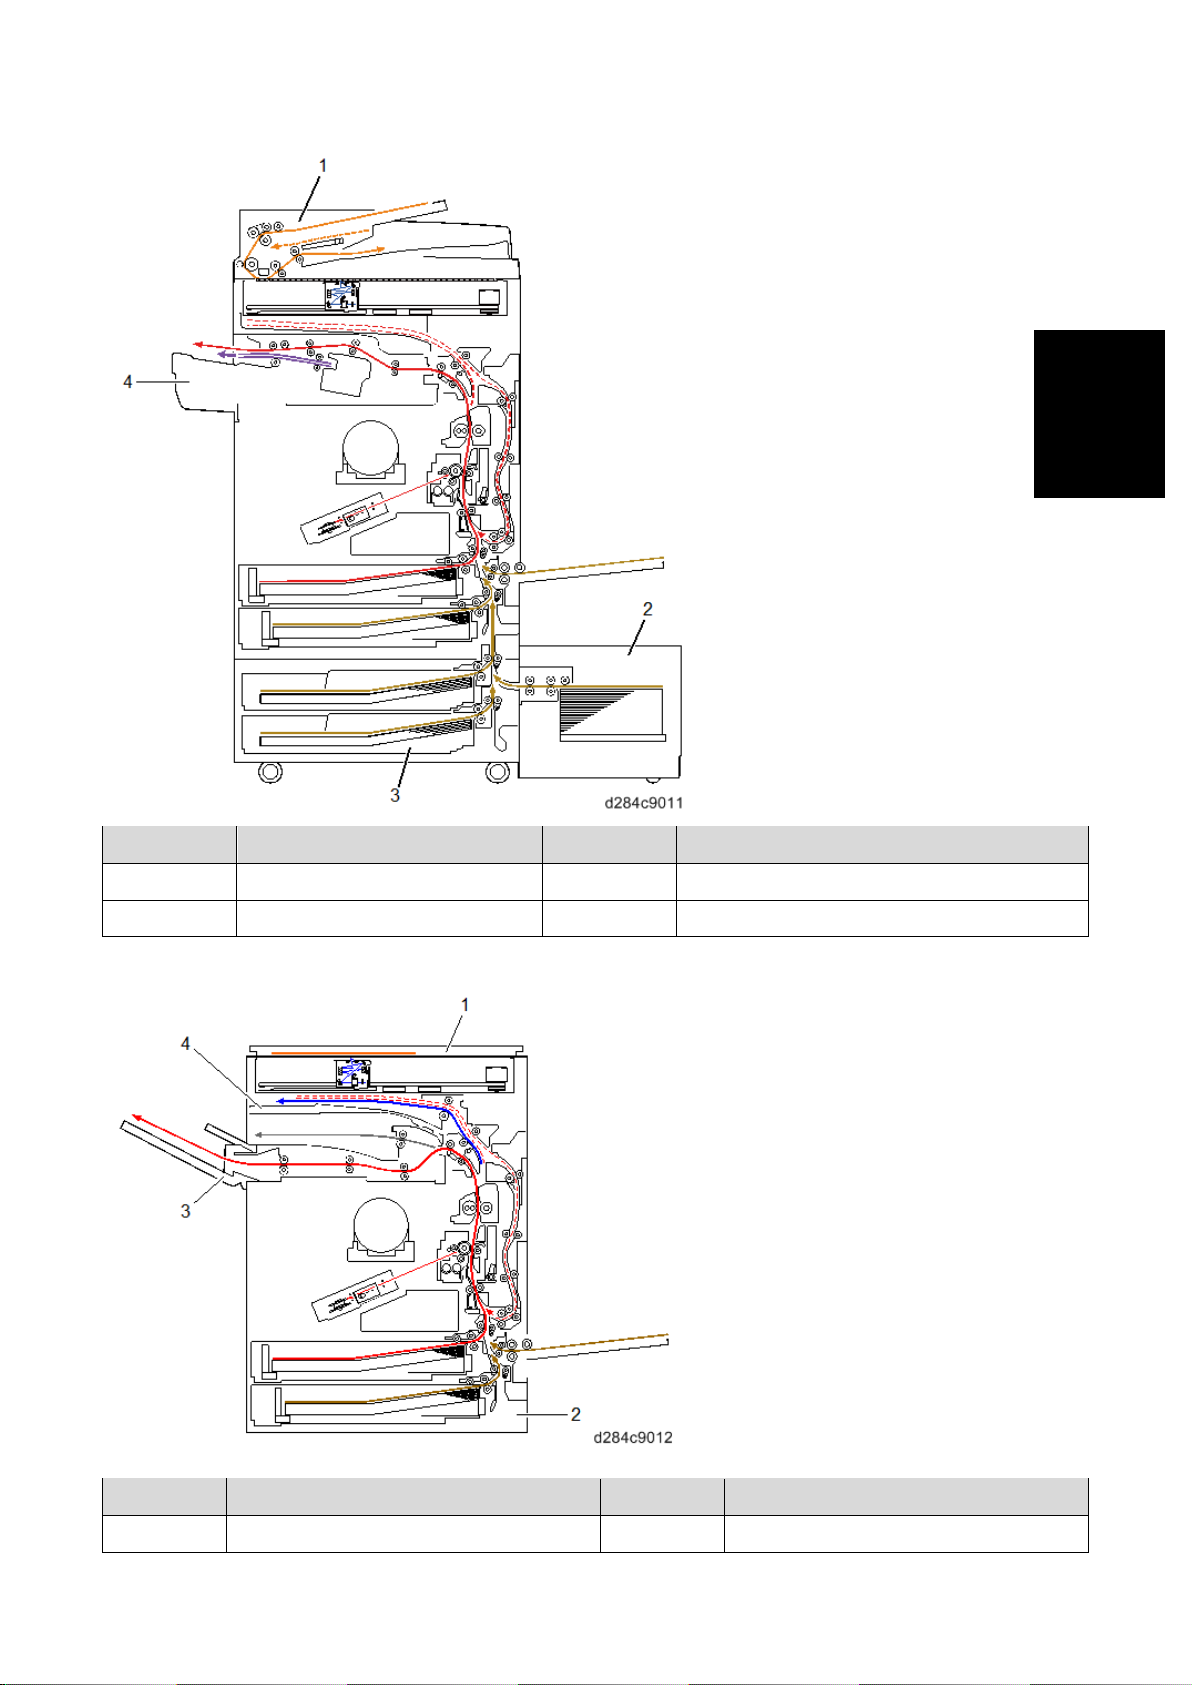
Product Overview
Product
Information
No. Description No. Description
1 ARDF 3 Pap er Feed Unit
2 LCIT 4 Inter nal Finisher
No. Description No. Description
1 Plate n Cover 3 Side Tray Uni t
16
Page 23
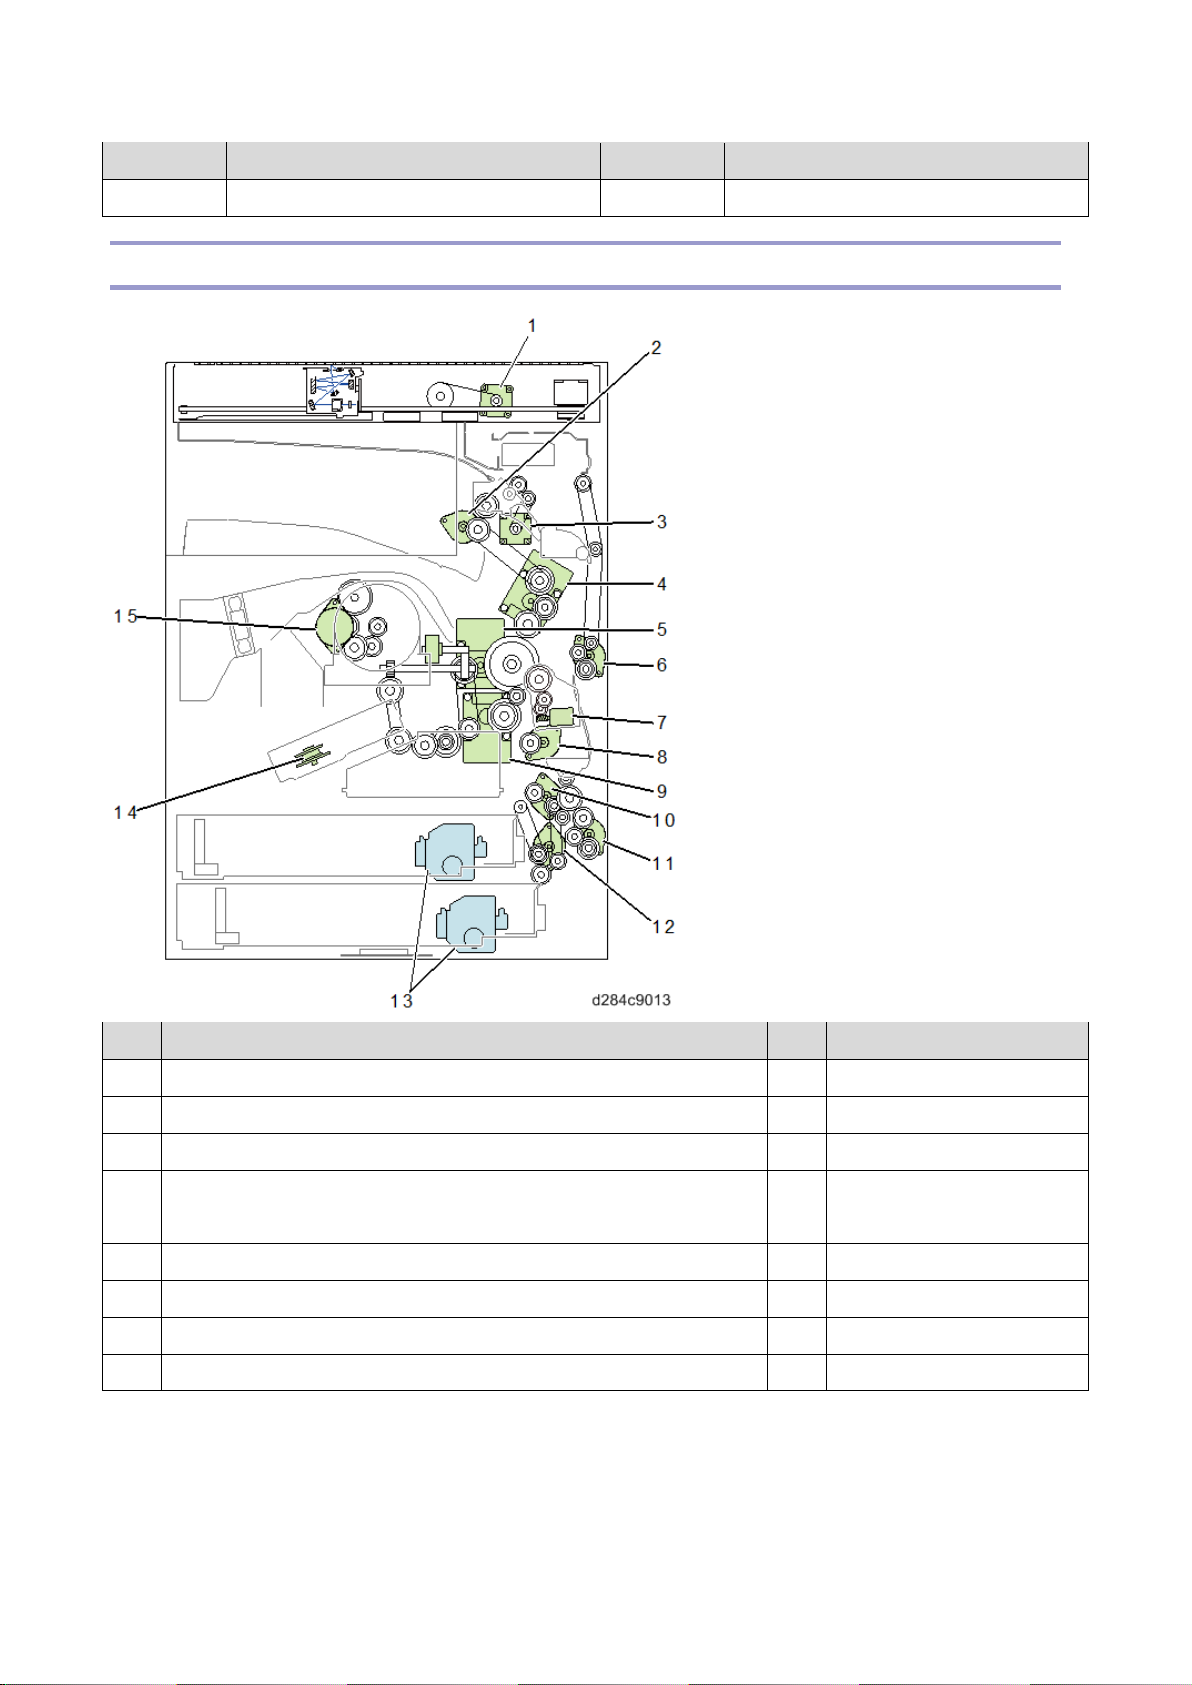
Product Overview
No. Description No. Description
2 Paper Feed Unit 4 1 Bin Tray Unit
Drive Layout
No. Description No. Description
1 Scanner motor 9 Development m otor
2 Paper exi t m ot or (MP 4055 SP/5055 SP/6055 SP only) 10 Vertical transport motor
3 Reverse motor 11 Duplex/bypass motor
4 Fusing motor (MP 4055 SP/5055 SP/6055 SP only)
Fusing/paper exit motor (MP 2555 SP/3055 SP/3555 SP only)
5 Drum/waste toner motor 13 Paper feed tray lift motor
6 Duplex e nt ra n ce m oto r 14 Polygon motor
7 Transfer roller contact moto r 15 Toner supply motor
8 Registration motor
12 Paper feed motor
17
Page 24
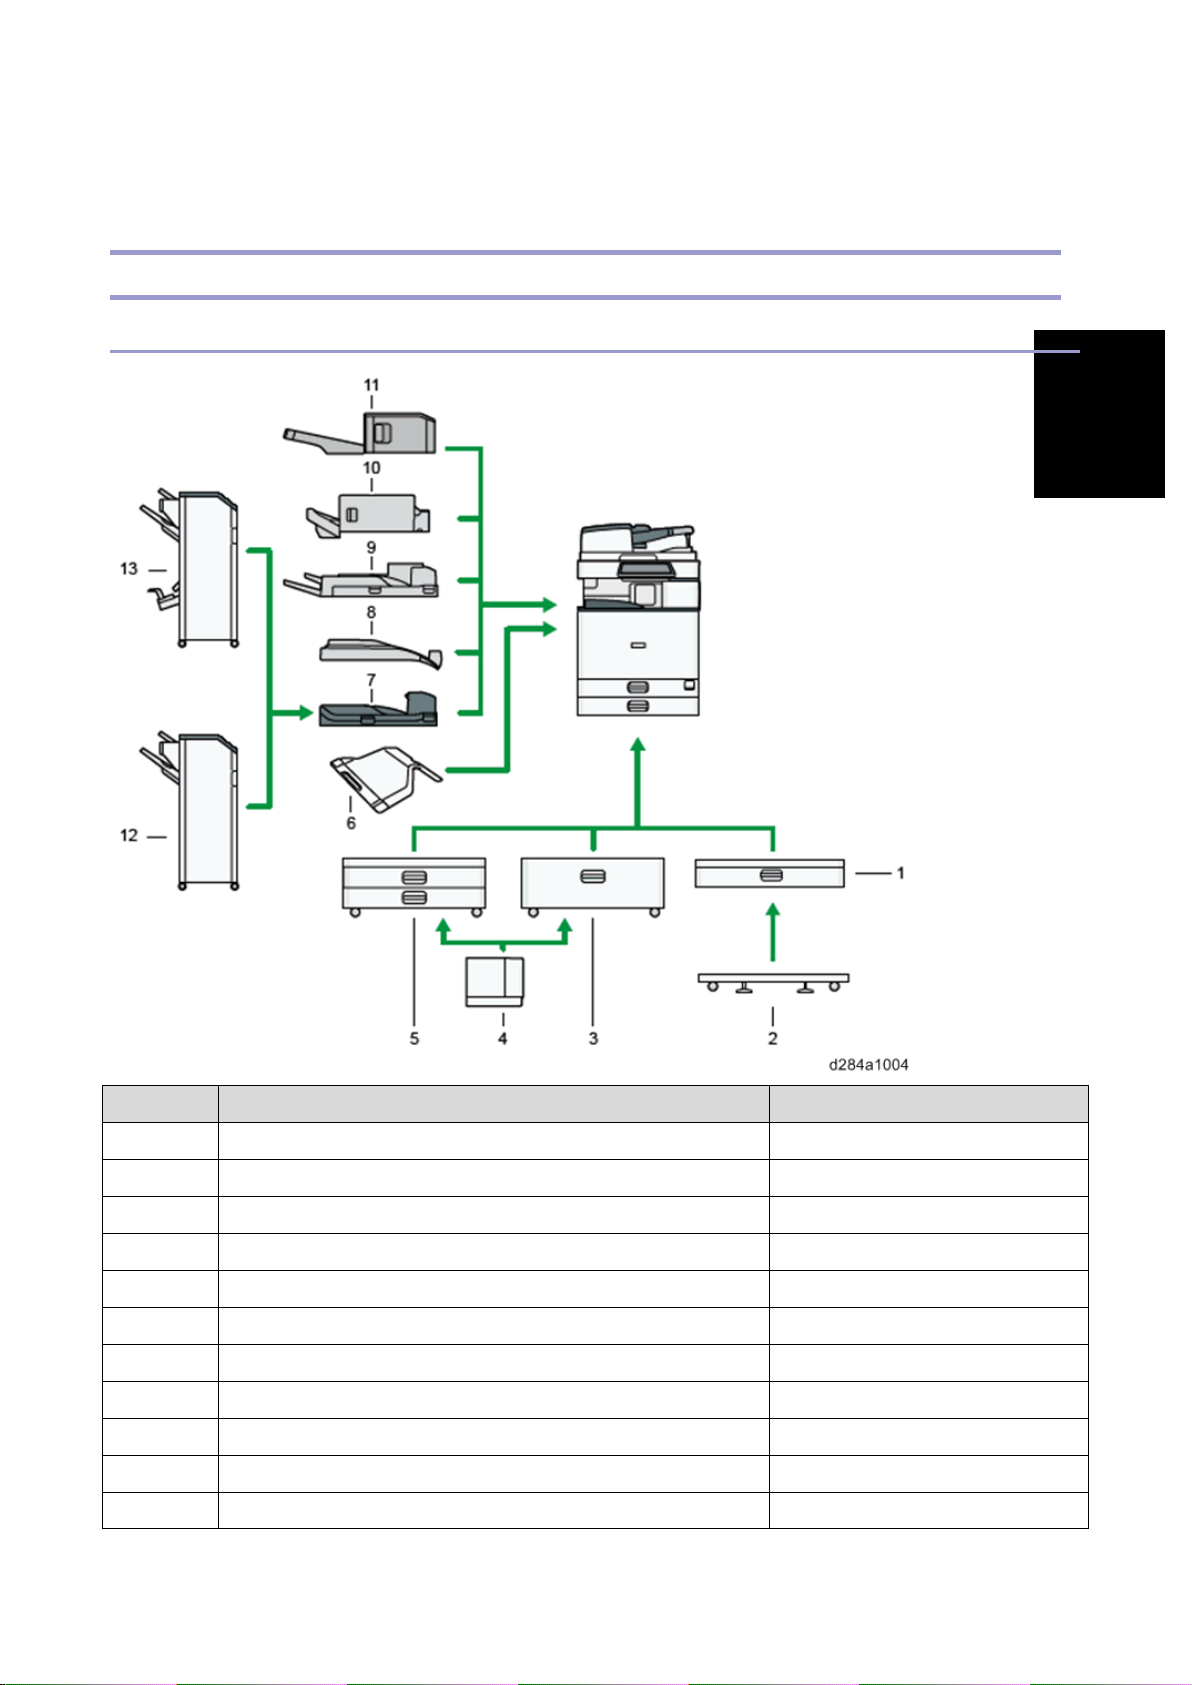
Machine Codes and Per ip h er al s Conf igurati on
Product
Machine Codes and Peripherals Configuration
System Configuration and Options
External Optio ns for MP2555/MP3055/MP3555 (mainly Europe)
Information
No. Item Machine Code
1 Paper Feed Unit PB3150 D694
2 Caster Ta bl e Ty pe M3 D178
3 LCIT PB3170 D695
4 LCIT RT3 030 D696
5 Paper Feed Unit PB3210 D787
6 1 Bin T r ay BN3 1 1 0 D3CQ
7 Bridge Unit BU3070 D685
8 Internal Shift Tray SH3070 D691
9 Side Tray Type M 3 D725
10 Internal Finisher SR3130 D690
11 Internal Finisher SR3180 D766
18
Page 25
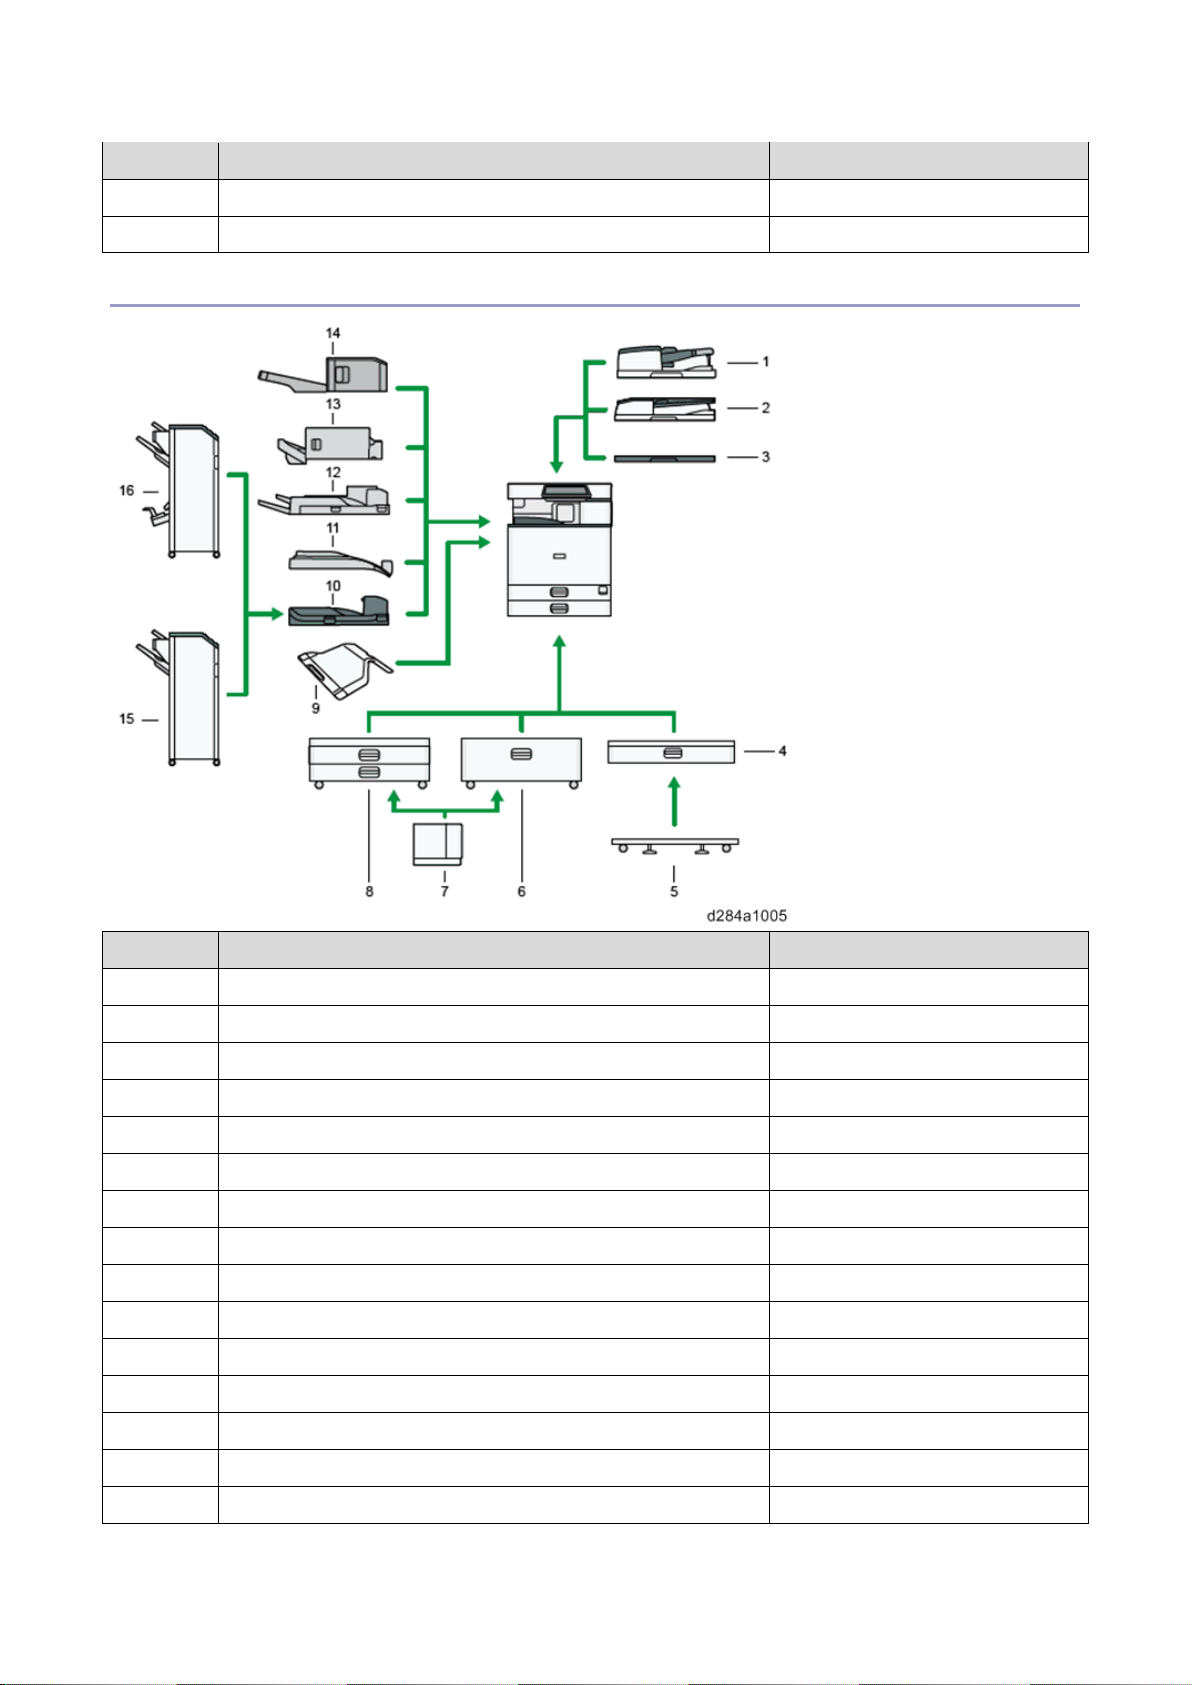
Machine Codes and Per ip h er al s Conf igurati on
No. Item Machine Code
12 Finisher SR3210 D3B8
13 Booklet Finisher SR3220 D3B9
External Options for MP2555/MP3055/MP3555 (mainly Asia)
No. Item Machine Code
1 SPDF DF3100 D3B0
2 ARDF DF3090 D779
3 Plate n Cov er PN 2 00 0 D700
4 Paper Feed Unit PB3150 D694
5 Caster Ta bl e Ty pe M3 D178
6 LCIT PB3230 D695
7 LCIT RT3 030 D696
8 Paper Feed Unit PB3220 D787
9 1 Bin T r ay BN3 1 1 0 D3CQ
10 Bridge Unit BU3070 D685
11 Internal Shift Tray SH3070 D691
12 Side Tray Type M 3 D725
13 Internal Finisher SR3130 D690
14 Internal Finisher SR3180 D766
15 Finisher SR3210 D3B8
19
Page 26
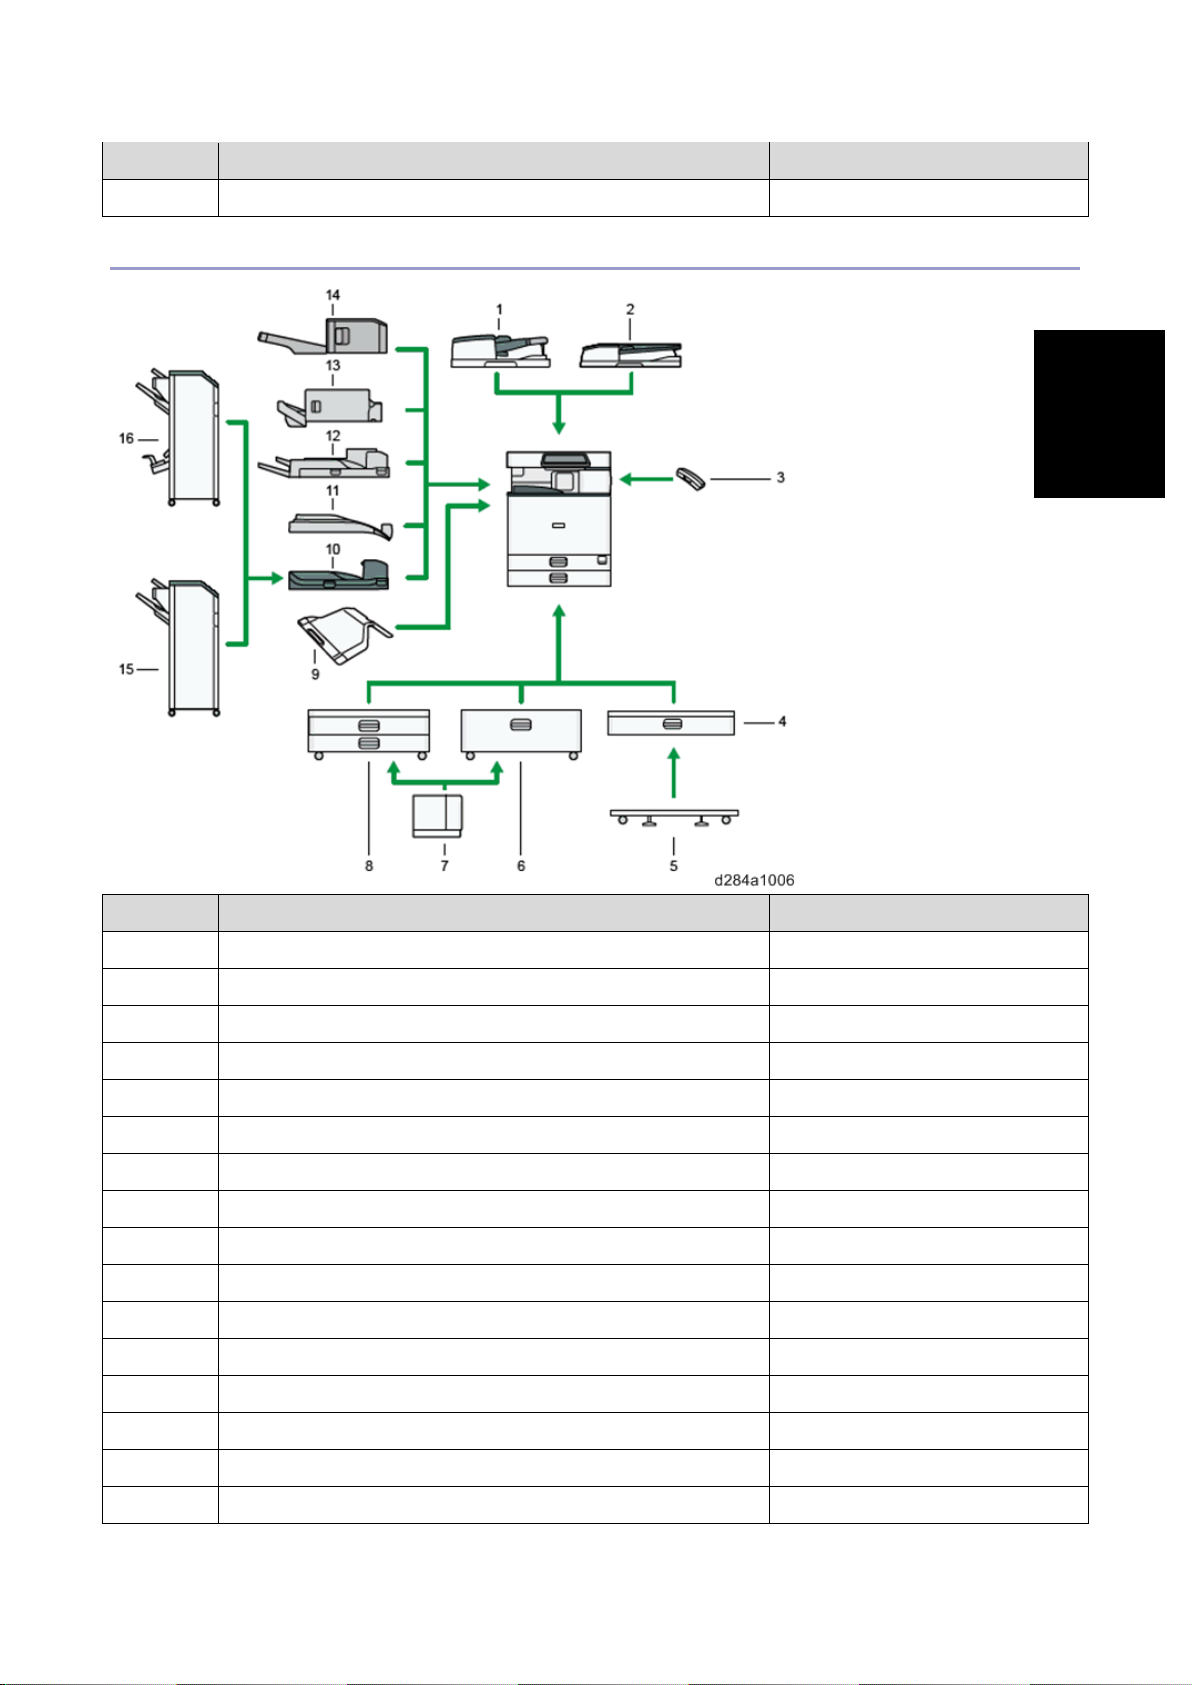
Machine Codes and Per ip h er al s Conf igurati on
Product
No. Item Machine Code
16 Booklet Finisher SR3220 D3B9
External Options for MP2555/MP3055/MP3555 (mainly North America)
Information
No. Item Machine Code
1 SPDF DF3100 D3B0
2 ARDF DF3090 D779
3 Handset HS3020 D739
4 Paper Feed Unit PB3150 D694
5 Caster Ta bl e Ty pe M3 D178
6 LCIT PB3230 D695
7 LCIT RT3 030 D696
8 Paper Feed Unit PB3220 D787
9 1 Bin T r ay BN3 1 1 0 D3CQ
10 Bridge Unit BU3070 D685
11 Internal Shift Tray SH3070 D691
12 Side Tray Type M 3 D725
13 Internal Finisher SR3130 D690
14 Internal Finisher SR3180 D766
15 Finisher SR3210 D3B8
16 Booklet Finisher SR3220 D3B9
20
Page 27
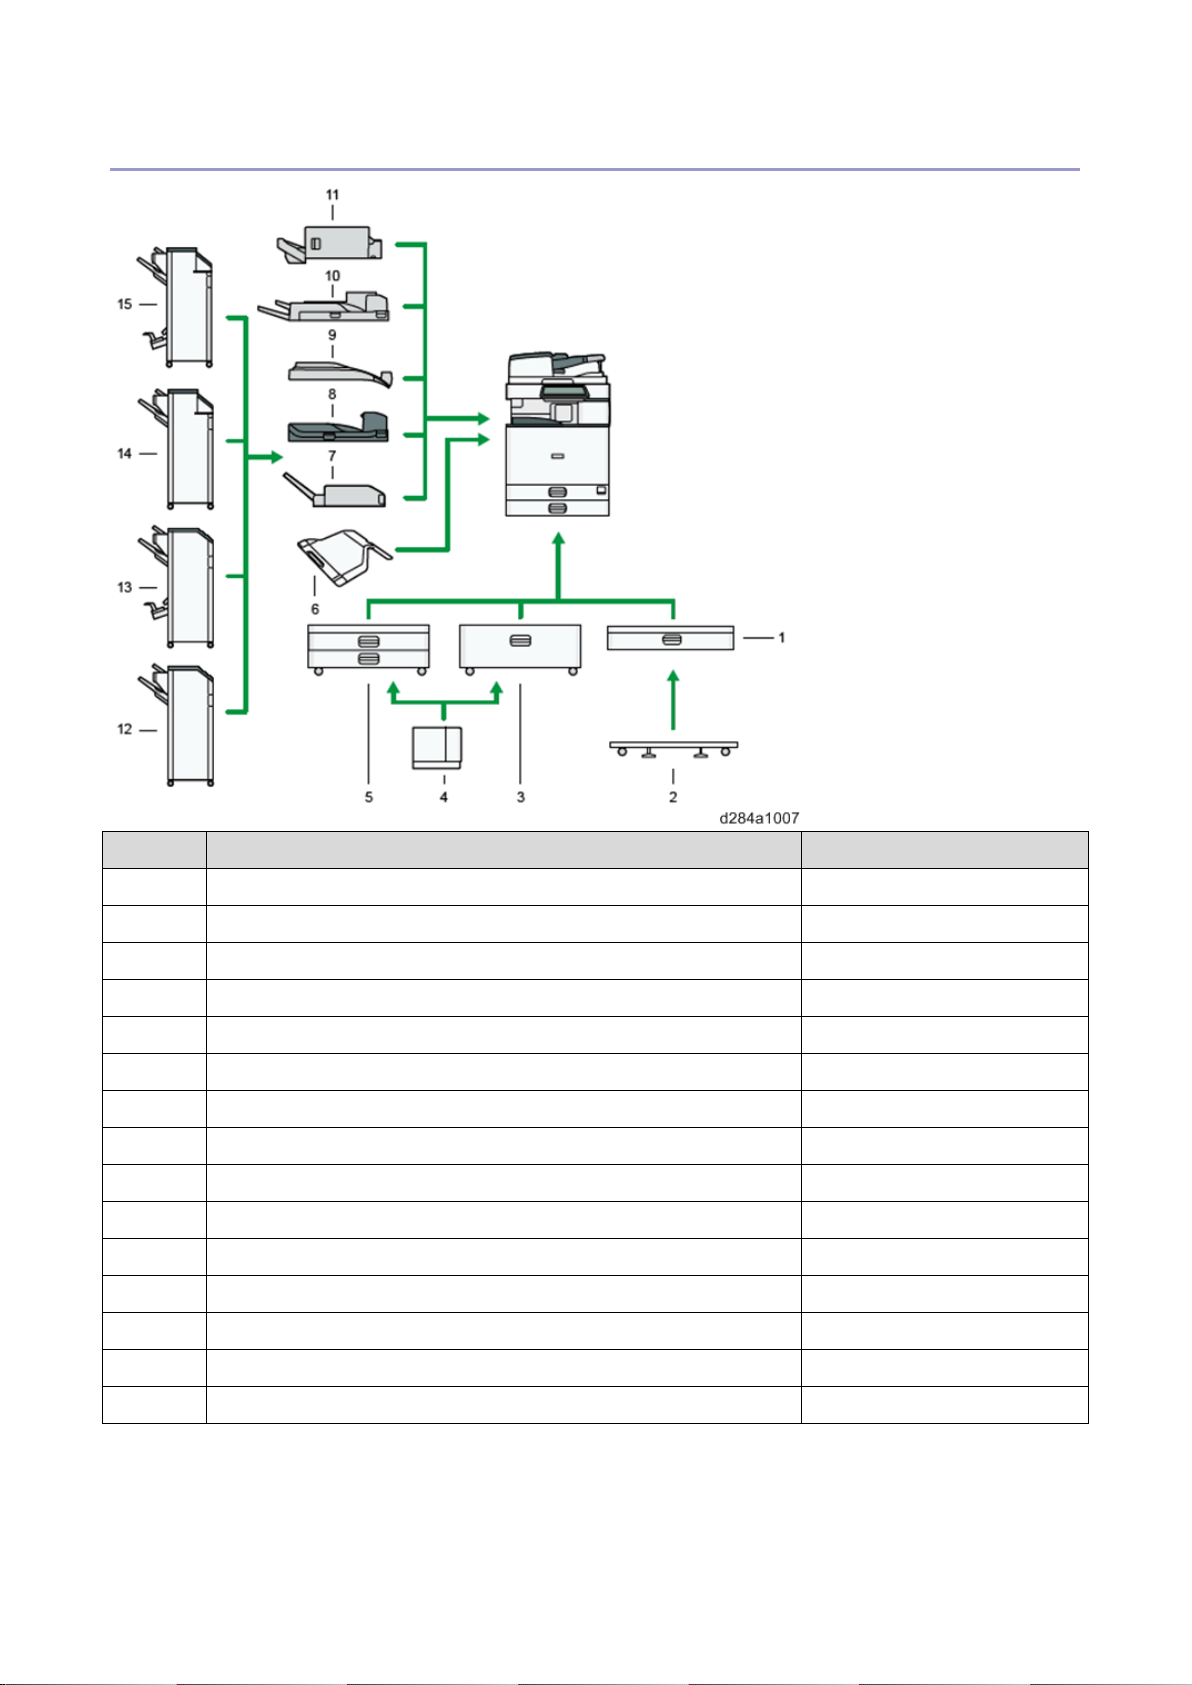
Machine Codes and Per ip h er al s Configuration
External Options for MP4055/MP5055 (mainly Europe)
No. Item Machine Code
1 Pa per Feed Unit PB3150 D694
2 C ast er Ta bl e Ty pe M3 D178
3 LCIT PB3170 D695
4 LCIT RT3030 D696
5 Pa per Feed Unit PB3210 D787
6 1 Bi n Tray BN3 1 1 0 D3CQ
7 Internal Multi-Fold Unit FD3000 M482
8 Bridge Unit BU3070 D685
9 Internal Shift Tray SH3070 D691
10 Side Tray Type M 3 D725
11 Internal Finisher SR3130 D690
12 Finisher SR3210 D3B8
13 Booklet Finisher SR3220 D3B9
14 Finisher SR3230 D3BA
15 Booklet Finisher SR3240 D3BB
21
Page 28
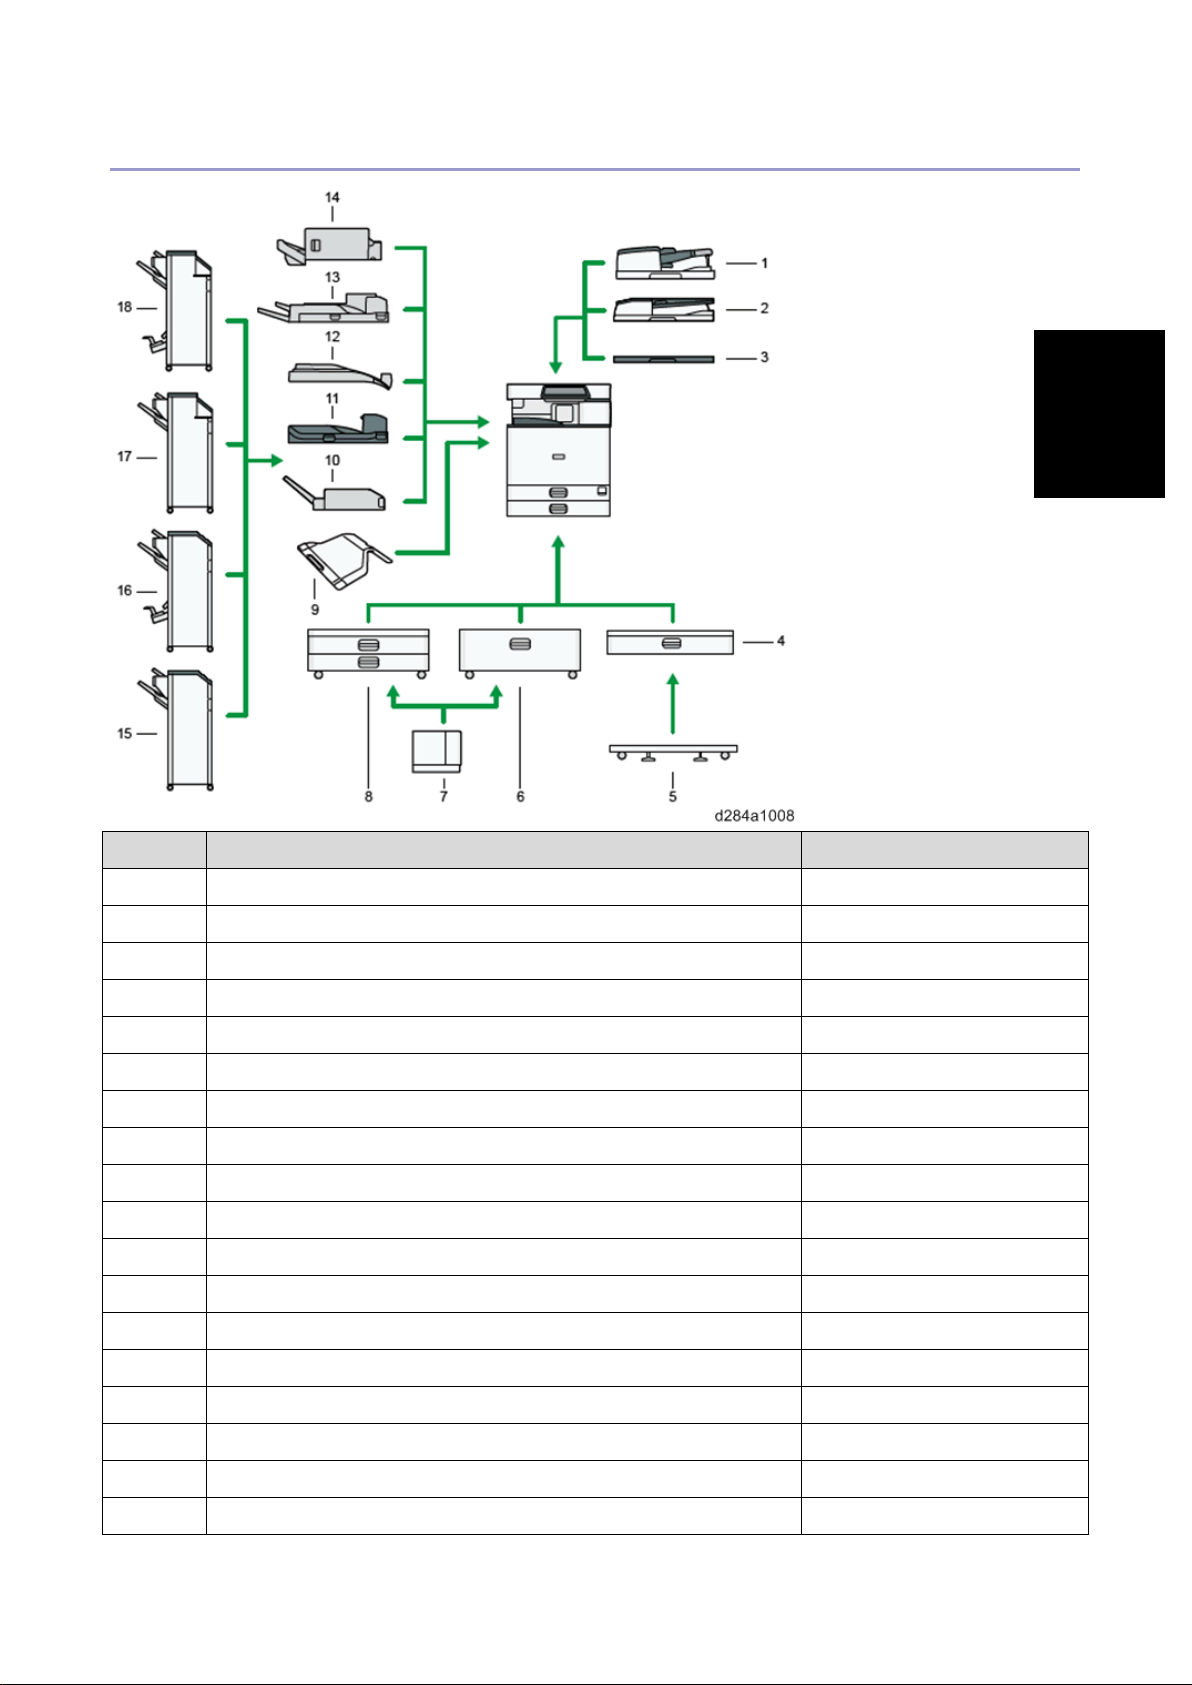
Product
External Options for MP4055/MP5055 (mainly Asia)
Machine Codes and Per ip h er al s Conf igurati on
Information
No. Item Machine Code
1 SPDF DF3100 D3B0
2 A RDF DF3090 D779
3 Pl at e n Cov er PN 2 00 0 D700
4 Pa per Feed Unit PB3150 D694
5 C ast er Ta bl e Ty pe M3 D178
6 LCIT PB3230 D695
7 LCIT RT3030 D696
8 Pa per Feed Unit PB3220 D787
9 1 Bi n Tray BN3 1 1 0 D3CQ
10 Inter nal Multi-Fold Unit FD3000 M482
11 Bridge Unit BU3070 D685
12 Inter nal Shift Tray SH3070 D691
13 Side Tray Type M 3 D725
14 Internal Finisher SR3130 D690
15 Finisher SR3210 D3B8
16 Booklet Finisher SR3220 D3B9
17 Finisher SR3230 D3BA
18 Booklet Finisher SR3240 D3BB
22
Page 29
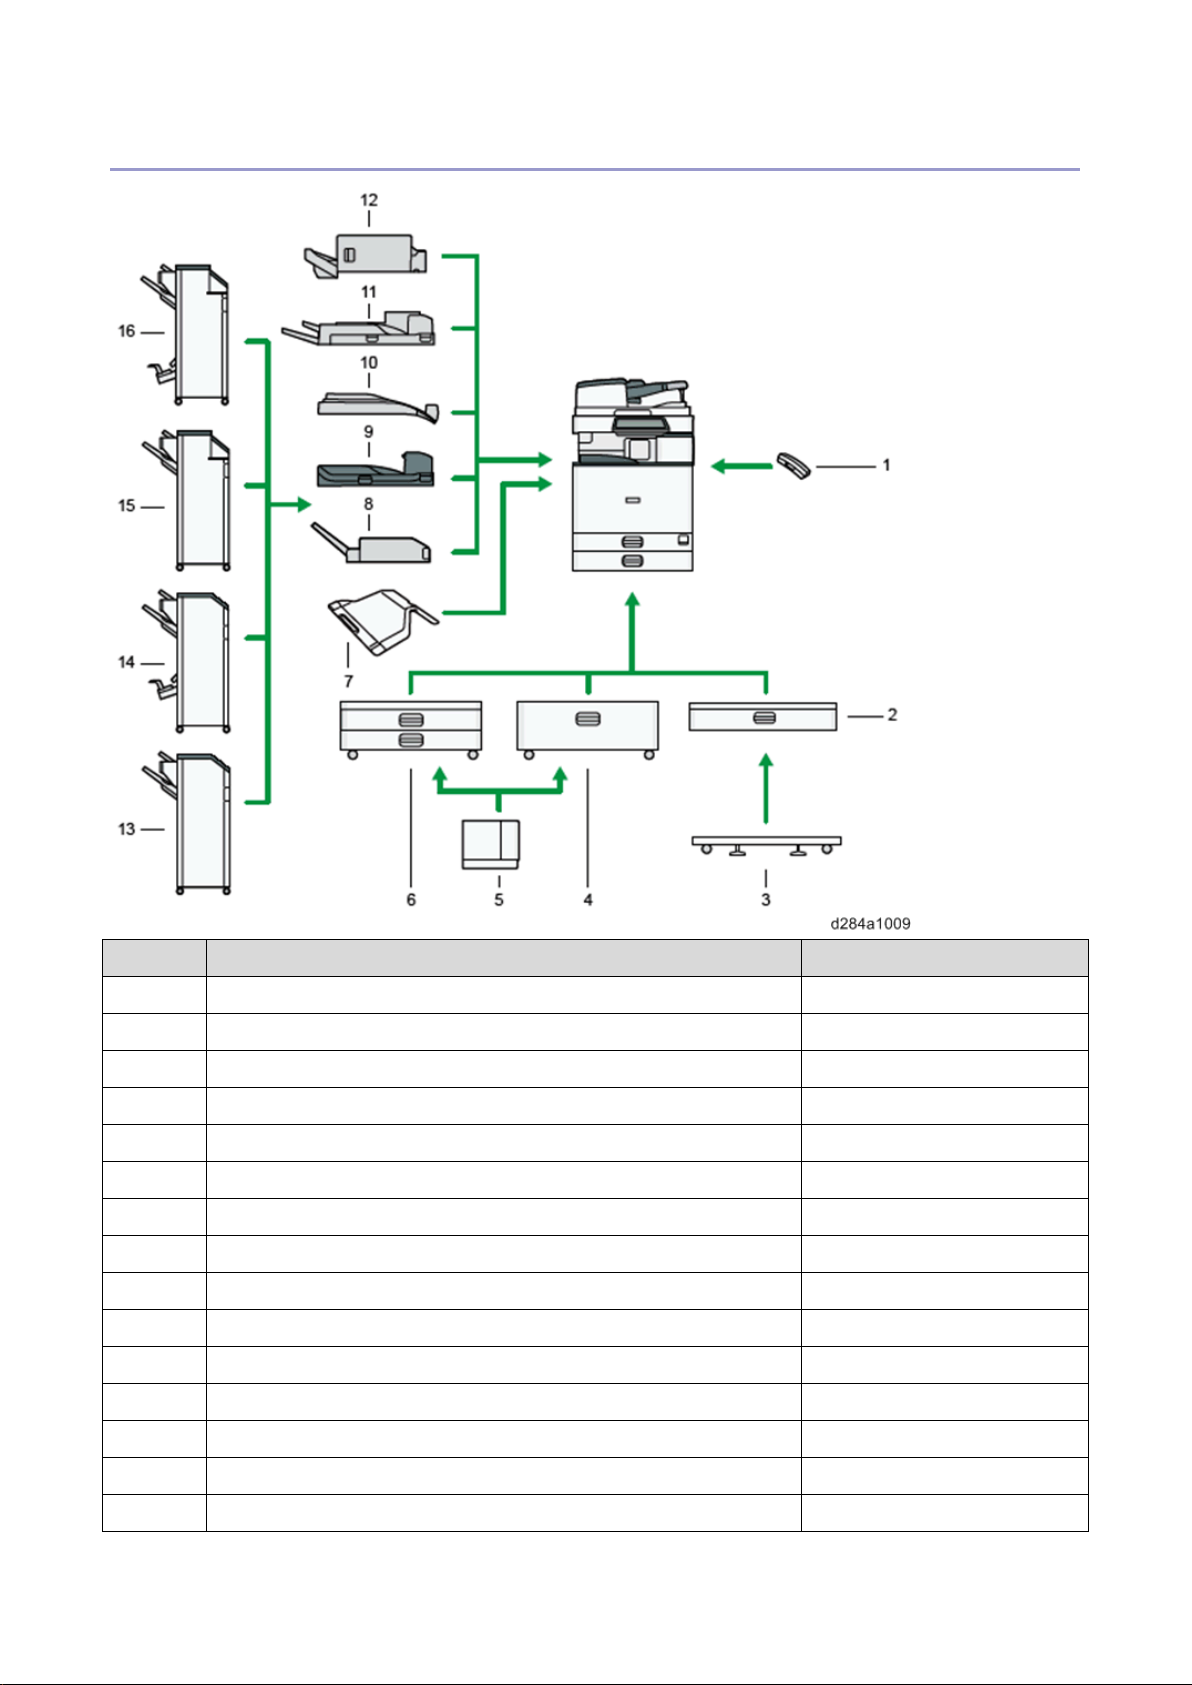
Machine Codes and Per ip h er al s Conf igurati on
External Optio ns for MP4055/MP5055 (mainly North America)
No. Item Machine Code
1 H andset HS3020 D739
2 Pa per Feed Unit PB3150 D694
3 C ast er Ta bl e Ty pe M3 D178
4 LCIT PB3230 D695
5 LCIT RT3030 D696
6 Pa per Feed Unit PB3220 D787
7 1 Bi n Tray BN3 1 1 0 D3CQ
8 Internal Multi-Fold Unit FD3000 M482
9 Bridge Unit BU3070 D685
10 Inter nal Shift Tray SH3070 D691
11 Side Tray Type M 3 D725
12 Internal Finisher SR3130 D690
13 Finisher SR3210 D3B8
14 Booklet Finisher SR3220 D3B9
15 Finisher SR3230 D3BA
23
Page 30
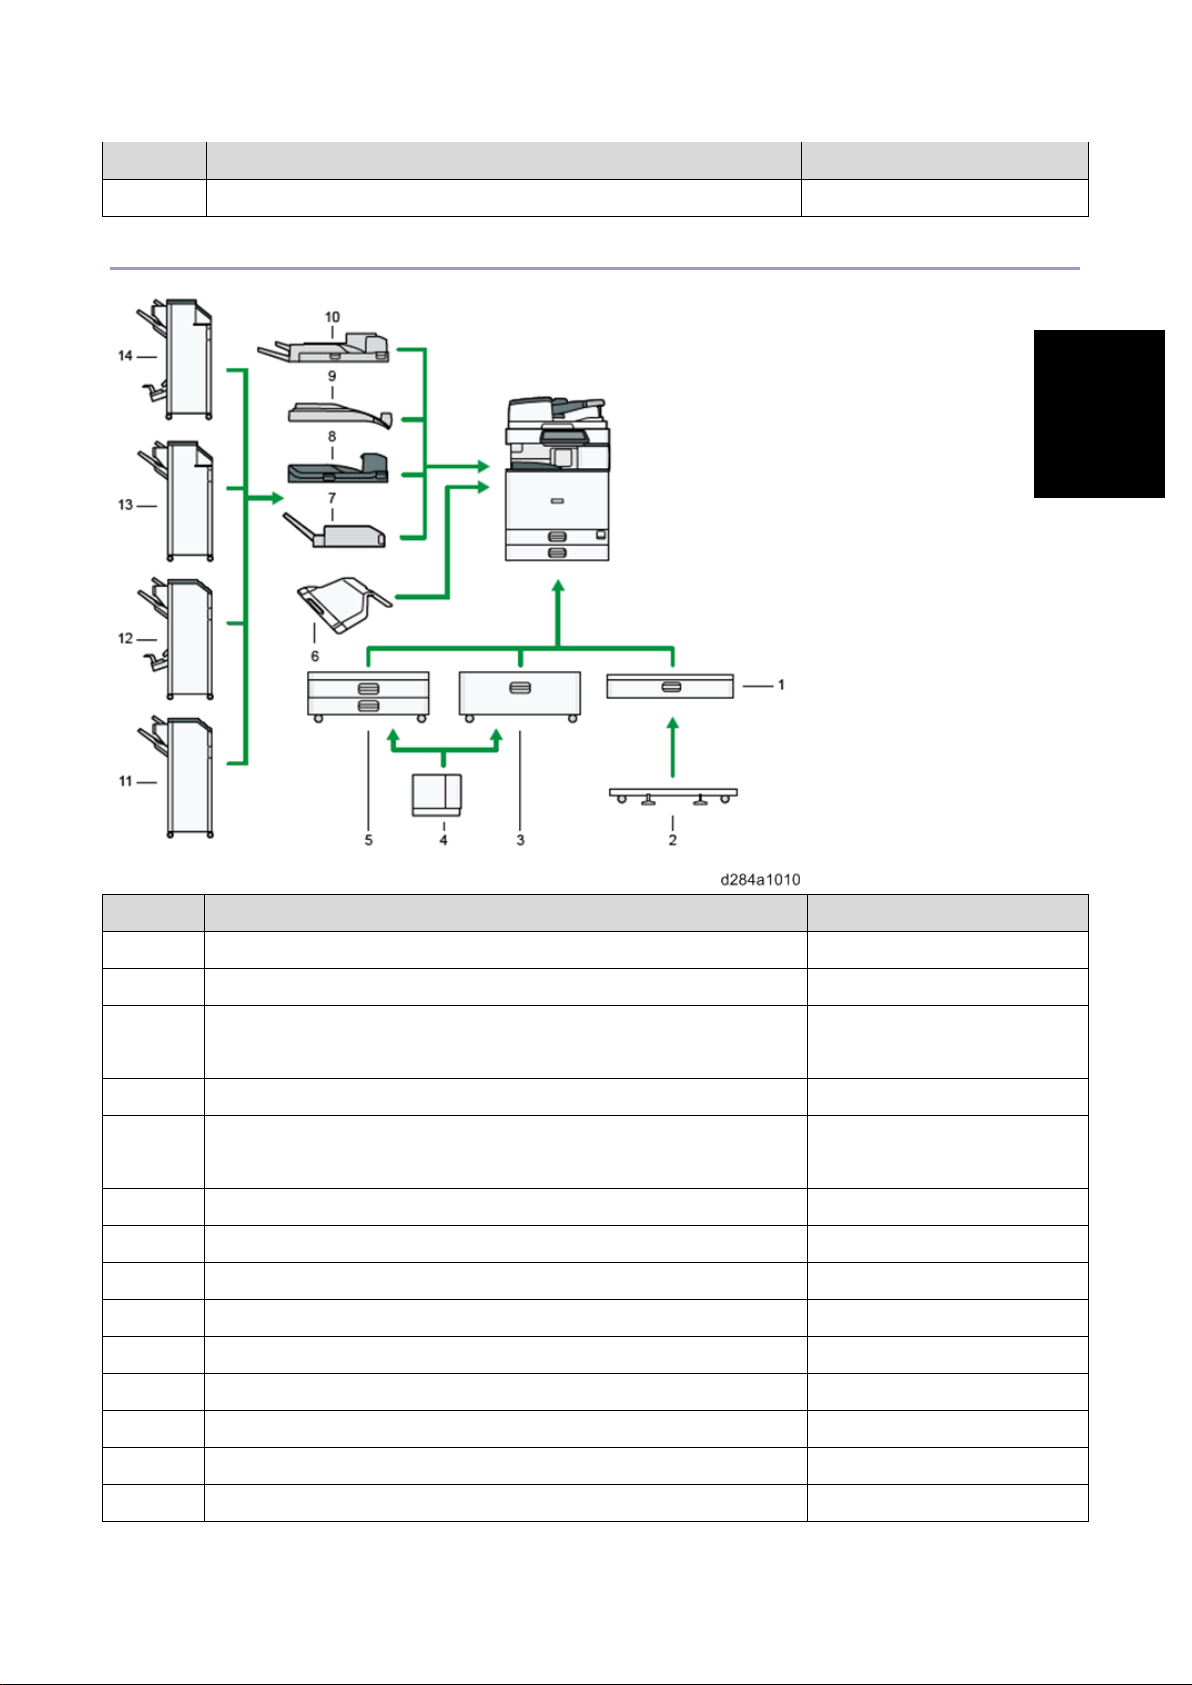
Machine Codes and Per ip h er al s Conf igurati on
Product
No. Item Machine Code
16 Booklet Finisher SR3240 D3BB
Extern al Opt io n s for MP 6 0 55 (m ai nl y Euro pe a nd Asia )
Information
No. Item Mach ine Code
1 Paper Feed Unit PB3150 D694
2 Caster Ta bl e Ty pe M3 D178
3 LCIT PB3170 (Europe)
D695
LCIT PB3230 (Asia)
4 LCIT RT3030 D696
5 Paper Fe ed U ni t PB3 2 10 (E ur o pe )
D787
Paper Fe ed U ni t PB3 2 20 (A si a)
6 1 Bin T r ay BN3 1 1 0 D3CQ
7 Inter nal Multi-Fold Unit FD3000 M482
8 Bridge Unit BU3070 D685
9 Inter nal Shift Tray SH3070 D691
10 Side Tray Type M 3 D725
11 Finisher SR3210 D3B8
12 Booklet Finisher SR3220 D3B9
13 Finisher SR3230 D3BA
14 Booklet Finisher SR3240 D3BB
24
Page 31
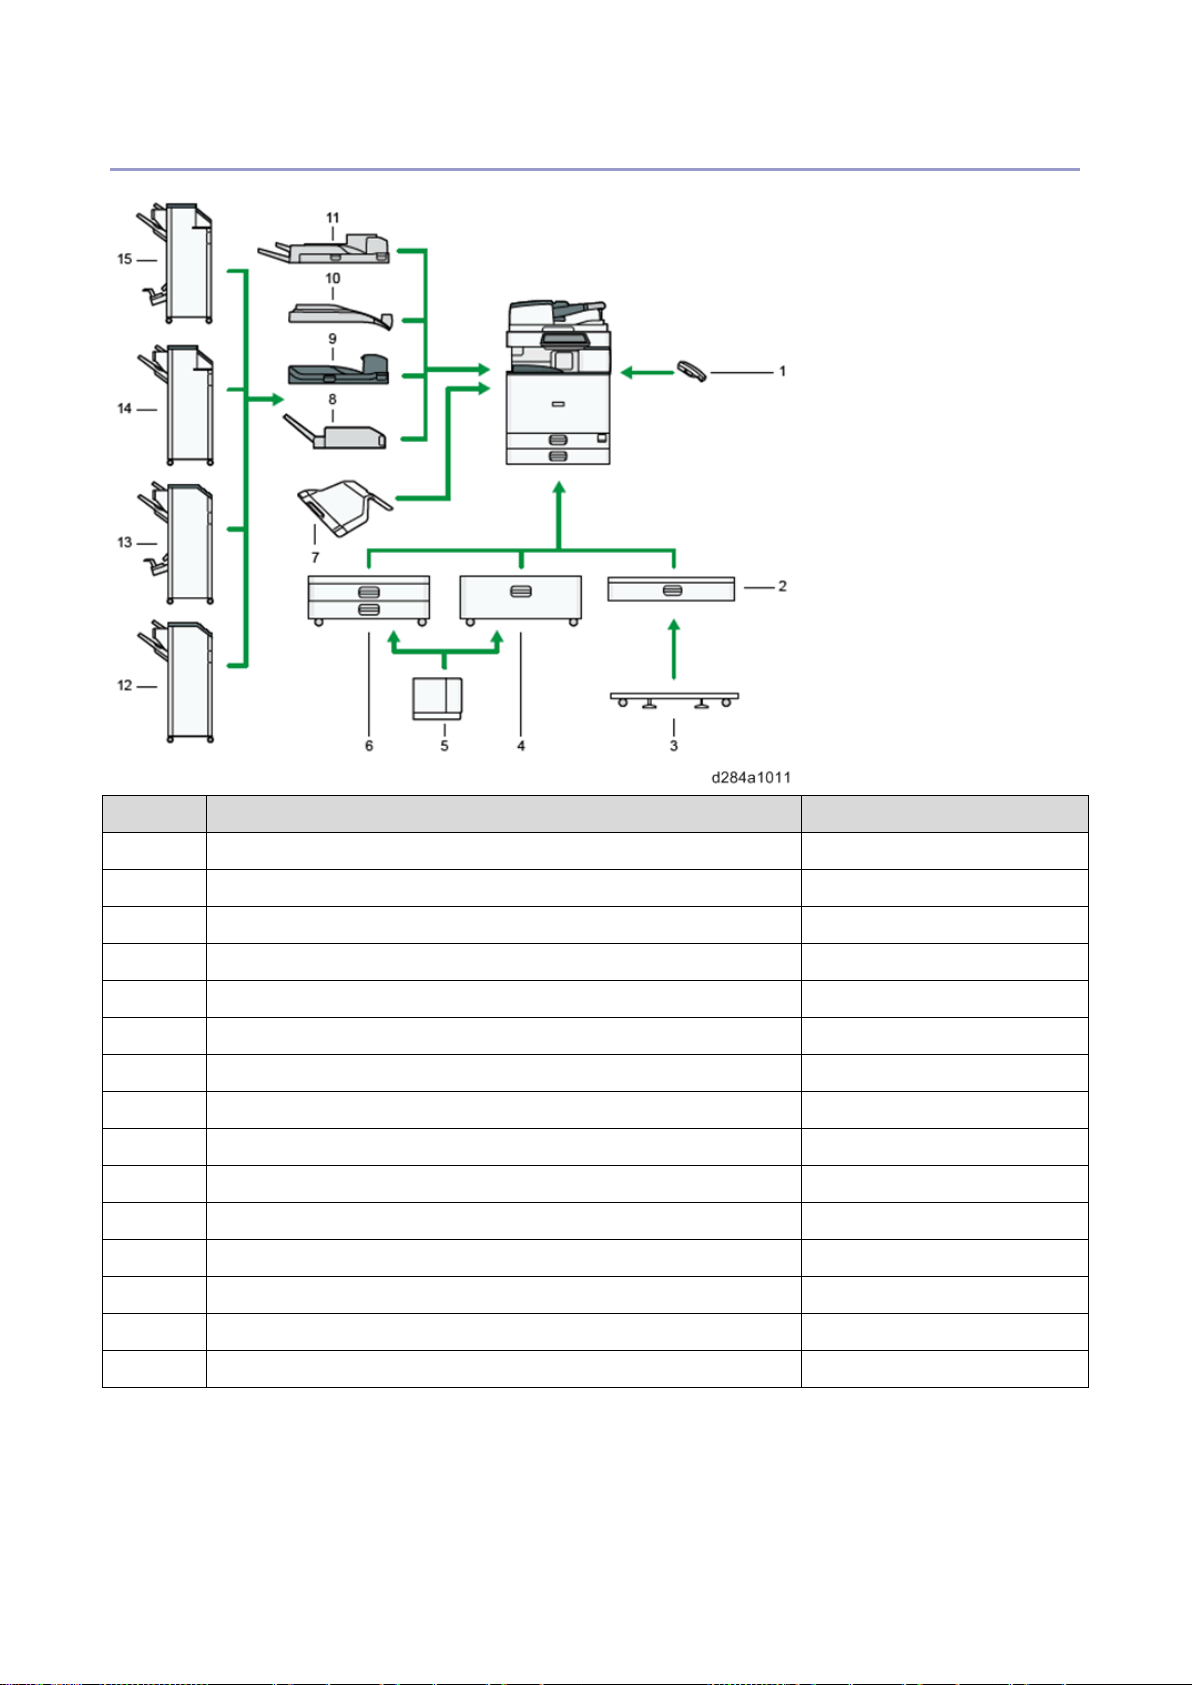
Machine Codes and Per ip h er al s Conf igurati on
External Optio ns for MP6055 (mainly Nor th America)
No. Item Machine Code
1 H andset HS3020 D739
2 Pa per Feed Unit PB3150 D694
3 C ast er Ta bl e Ty pe M3 D178
4 LCIT PB3230 D695
5 LCIT RT3030 D696
6 Pa per Feed Unit PB3220 D787
7 1 Bi n Tray BN3 1 1 0 D3CQ
8 Internal Multi-Fold Unit FD3000 M482
9 Bridge Unit BU3070 D685
10 Inter nal Shift Tray SH3070 D691
11 Side Tray Type M 3 D725
12 Finisher SR3210 D3B8
13 Booklet Finisher SR3220 D3B9
14 Finisher SR3230 D3BA
15 Booklet Finisher SR3240 D3BB
25
Page 32

Product
Specifications
See “Appendices” for th e following information :
• Machine Specifications
• Software Accessories
• Supported Paper Sizes
• Optional Specifications
Specifications
Information
26
Page 33
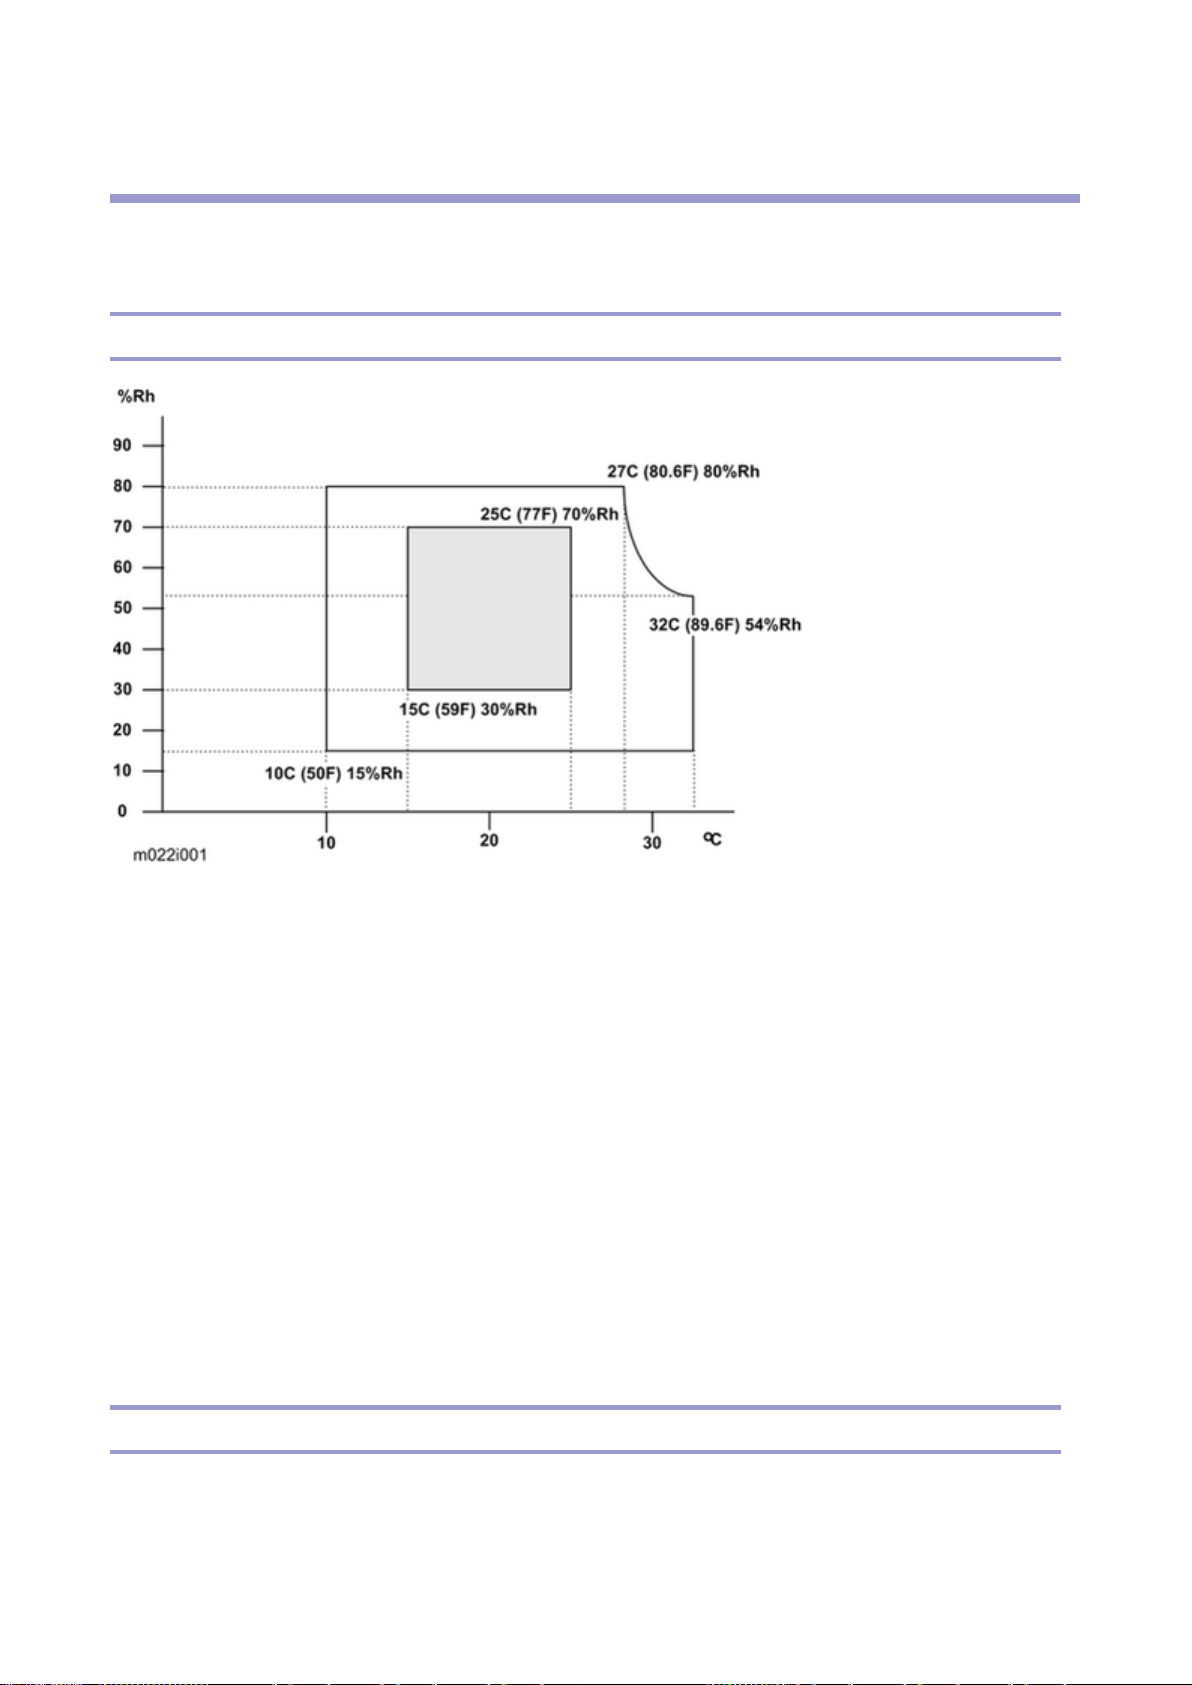
Installation Requirements
2. Installation
Installation Requirements
Environment
1. Temperature Range: 10 °C to 32 °C (5 0 °F to 89.6 °F)
2. Hum i di ty Range: 15% to 80% RH
3. Ambient Illumination: Less tha n 1,500 lux (do not expose to direct sunlight.)
4. Ventilation: Room air should t urn over a t l ea st 3 tim es/h r/p er son
5. Ambient Dust: Less tha n 0.10 mg/m
6. Avoid an area which is exp osed to su dden temperature changes. This includes :
• Areas directly exposed to cool ai r from an air conditioner.
• Areas directly exposed to heat from a heat er.
7. Do not place the machine in an area where it will be e xposed t o corrosive gases.
8. Do not install the machine at any location over 2,000 m (6,500 ft.) ab ove sea level. (In NA, it can be
installed only up to 2,500m (8,202 ft.))
9. Place t he copier on a stro ng and lev el base. (I nclination on any side sho uld be no more than 5 mm.)
10. Do not place the machin e where it may be subjected to strong v ibrations.
3
Minimum Space Requirements
Machine Level
Front t o back: With in 5 mm (0.2") of level
27
Page 34
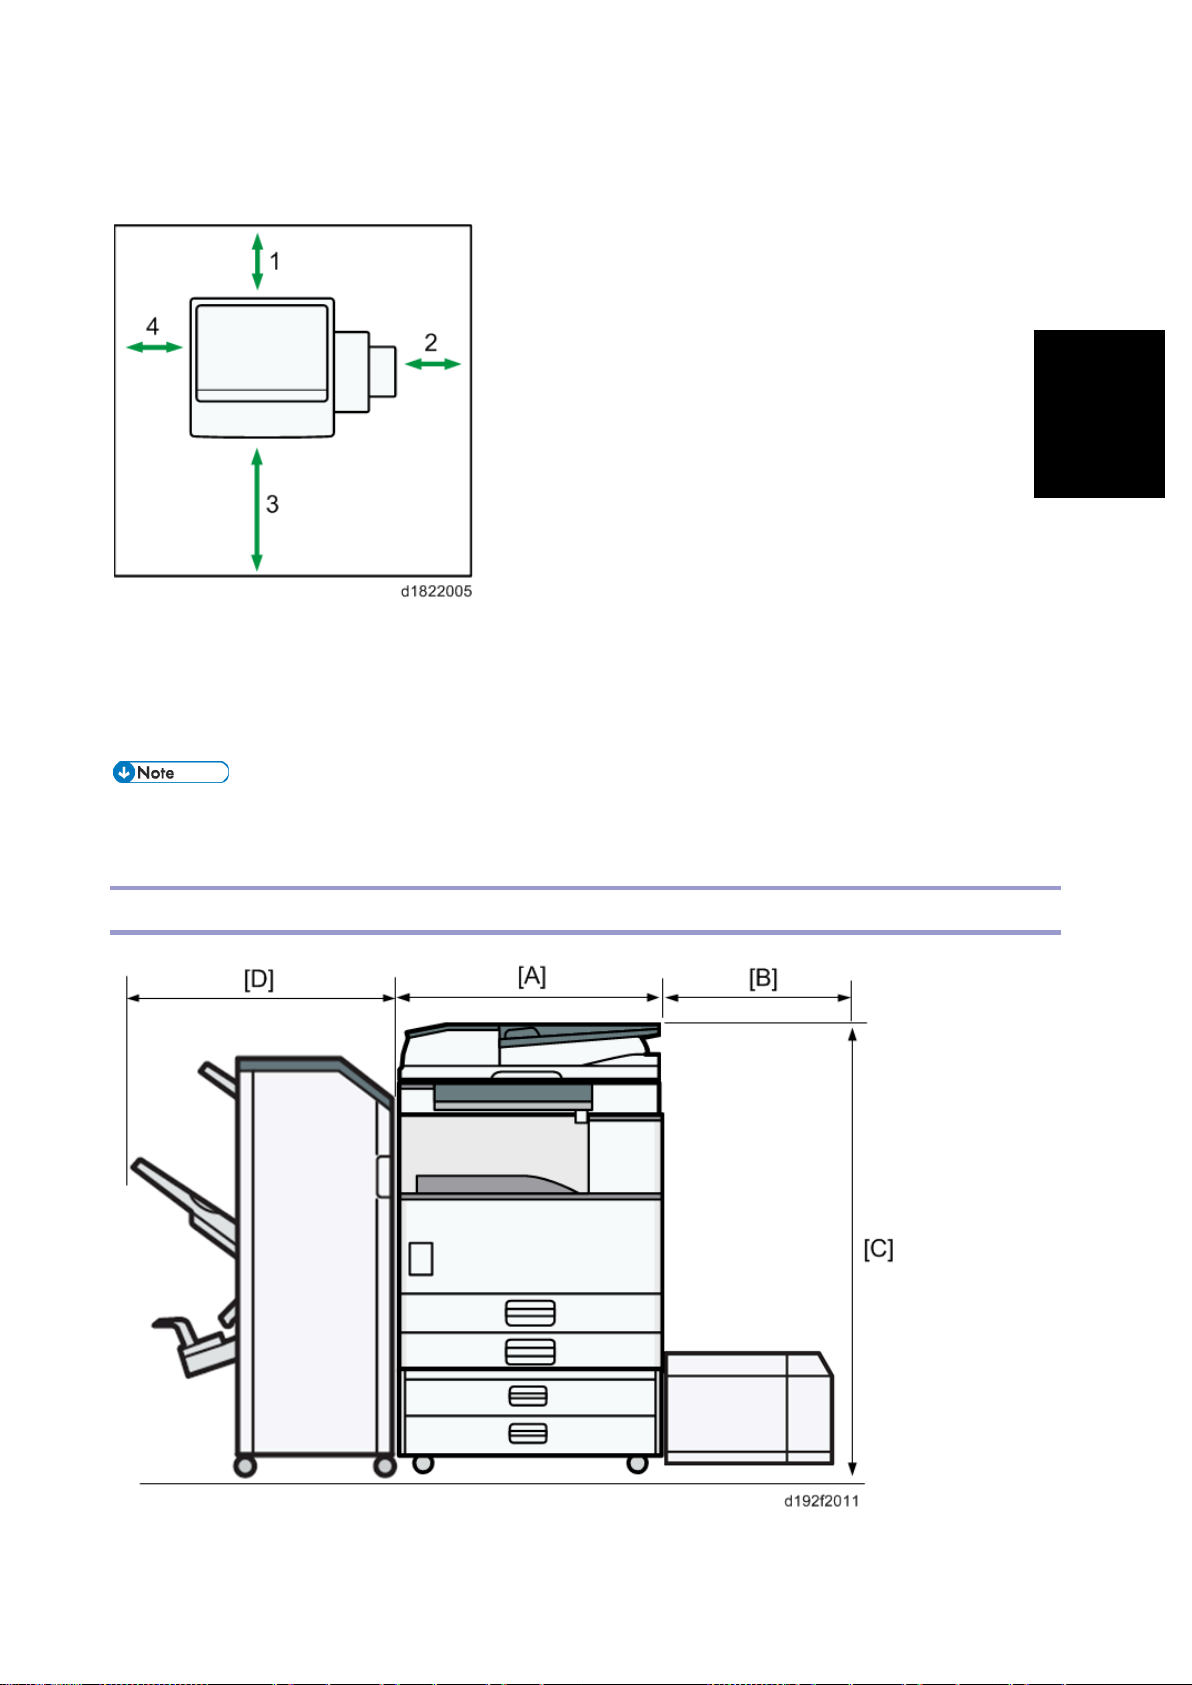
Installation
Right t o left: Within 5 mm (0. 2") of level
Place t he copier near the power source, and provide clearance as shown:
1. Rear: Over 101 mm (4")
2. Right: Over 432 mm (17")
Installation Requirements
3. Front: Over 750 mm (15.8")
4. Left: Over 100 mm (4")
• The 400 mm recommended for the s pace at the front is only for p ulling out the paper tray. If an
operator stands at the fr ont of the copier, more space is r equired.
Machine Dimensions
[A]: 587 mm (23. 1")
28
Page 35

Installation Requirements
[B]: 340mm (with D696)
[C]: 1210 mm (with D3B0), 116 0 mm (with D779)
[D]: 657 mm (w i t h D3BA or D3BB)
Power Requirements
• Make sure that th e wall outlet is near the copier and easily acces sible.
• Make sure the plug is firmly inser ted in the outlet.
• Avoid multi-wiring.
• Be sure to grou nd the machine.
Input voltage level
• 120 V to 127 V, 60 Hz: More tha n 12 A: NA
• 220 V to 240 V, 50 Hz/60 Hz: More than 8A: EU/AP
• 110V, 60 Hz: More than 13.6 A: Taiwan
• 220V,60Hz More th an 8A:KO
Voltage tolerance
• Voltage must n ot fluctuate by more than +8.66% or less than -10%.: NA
• Voltage must n ot fluctuate by more than 10%.: EU/AP
29
Page 36
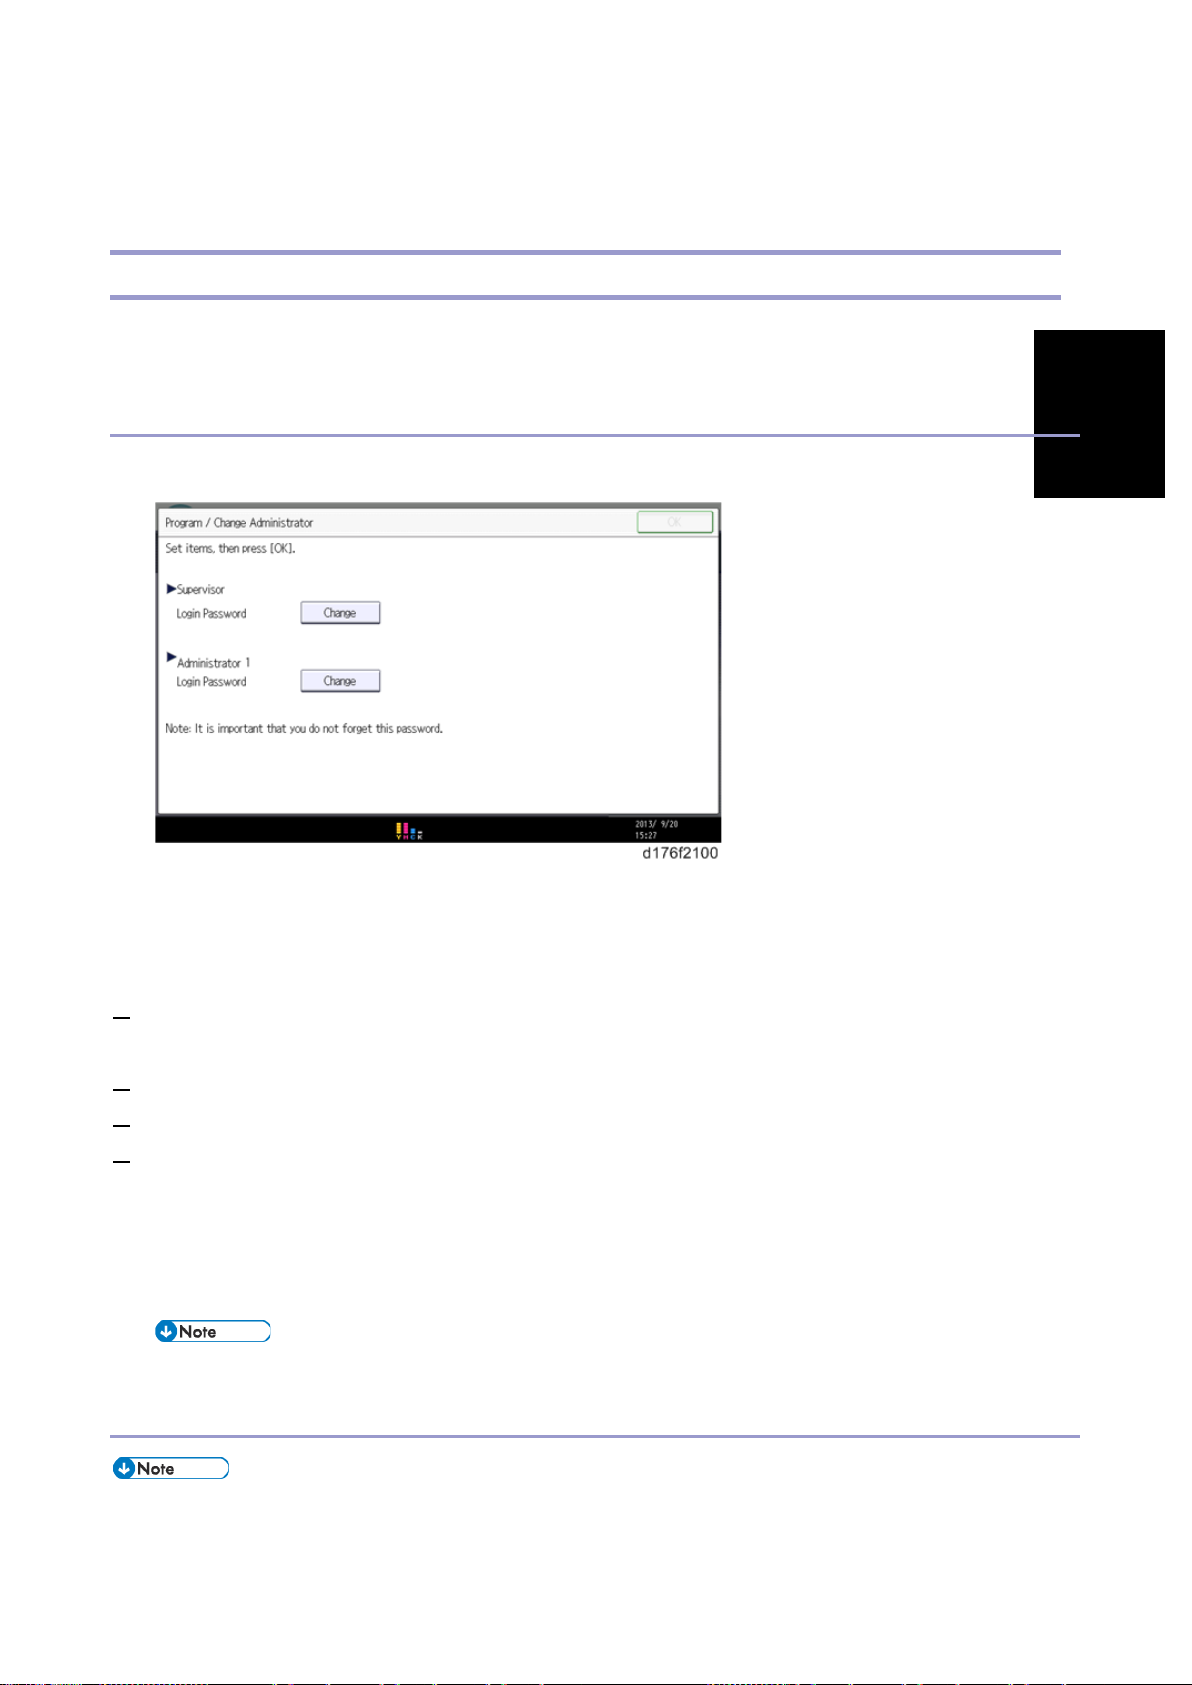
Main Machine Ins t allation
Installation
Main Machine Installation
Important Notice on Security Issues
In order to in c re ase t he se c ur ity of the MFP, an d to ens ur e th at th e cu st om er s ets the administ ra t or password, an
administrator set/cha nge prompt display is shown up at th e first power-up.
Overview
• The following Pr og r am /C h a nge Adm in is tr at or s cr een i s di spl ayed at the first pow e r-up.
• When the customers set t he admini strator/superv is or login password, the display dis appears a nd the home
displ ay will appear. The customer s, however, ca n erase this scree n with the following procedure in the case
that th ey think there is n o need to s et the pass word.
1. On the Program/Change Administrator screen, press [Change] next t o Supervisor and then touch [OK]
without inputting any password.
2. Touch [OK] again when the Confirm password display shows up.
3. For Administr ator 1, do t he same procedur e as steps 1 and 2.
4. Press the [OK] button, and then turn the power OFF/ON.
• SP5-755-002 (Dis play Setting: Hide Administr ator Password Ch ange Scrn ) allows you to skip this screen
tempor a ril y and continue the installation procedure without setting an administrator password. However ,
the Program/Change Administrator screen appears ev ery tim e you turn the power OFF/ON, if the pass word
is not set.
• For how to enter SP mode, see the note at t he end of t he Password Setting Procedure.
Password Setting Procedure
• For more detail s about th i s security issue, see "Notes on Using Multi-F un ct i on Pri nt er s Safely"
suppli ed with the MFP.
30
Page 37
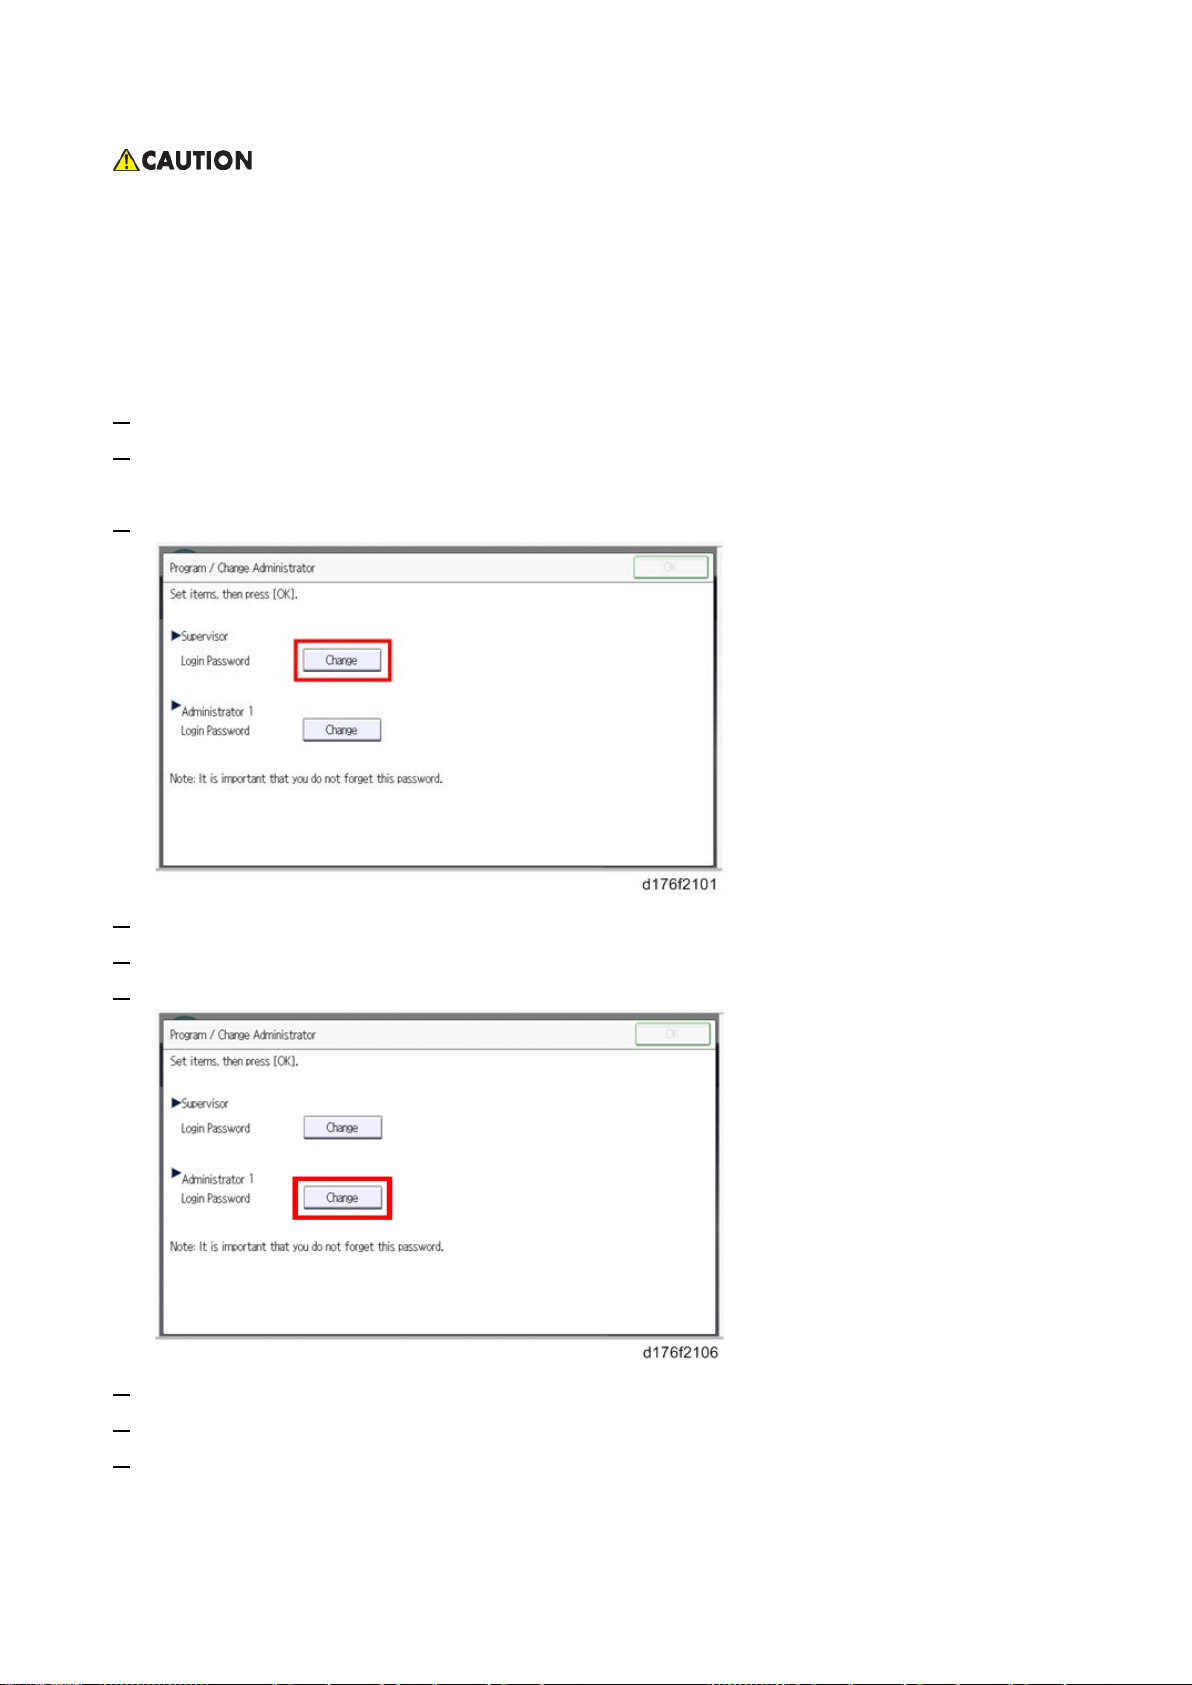
Main Machine Ins t allation
• When Supervisor / Administrator 1-4 passwords are config ured via network, the "Cha nge Supervisor
login password" window will not display.
• The passwords for Super visor or Administrator 1 to 4 can be set via "Syst em Settings". But the
Program/Change Administrator screen appears every time the power sw i tch is turned ON if the
passwords are input this way. So we recom mend the customers to set the passwords via network or
the Progr am/Chang e Administ r at or sc r ee n.
1. Install the machine.
2. Turn ON the main power.
Password change display appears.
3. Press [Change] and change the supervisor login password.
4. Inp ut th e pa ssword, and th e n pr ess [ OK ] .
5. Confirm the passwor d, and then press [ OK].
6. Cha nge the admini st r at or 1 log i n pa ssw o rd.
7. Inp ut th e pa ssword, and th e n pr ess [ OK ] .
8. Confirm the passwor d, and then press [ OK].
9. Turn the main power OFF and back ON again.
31
Page 38
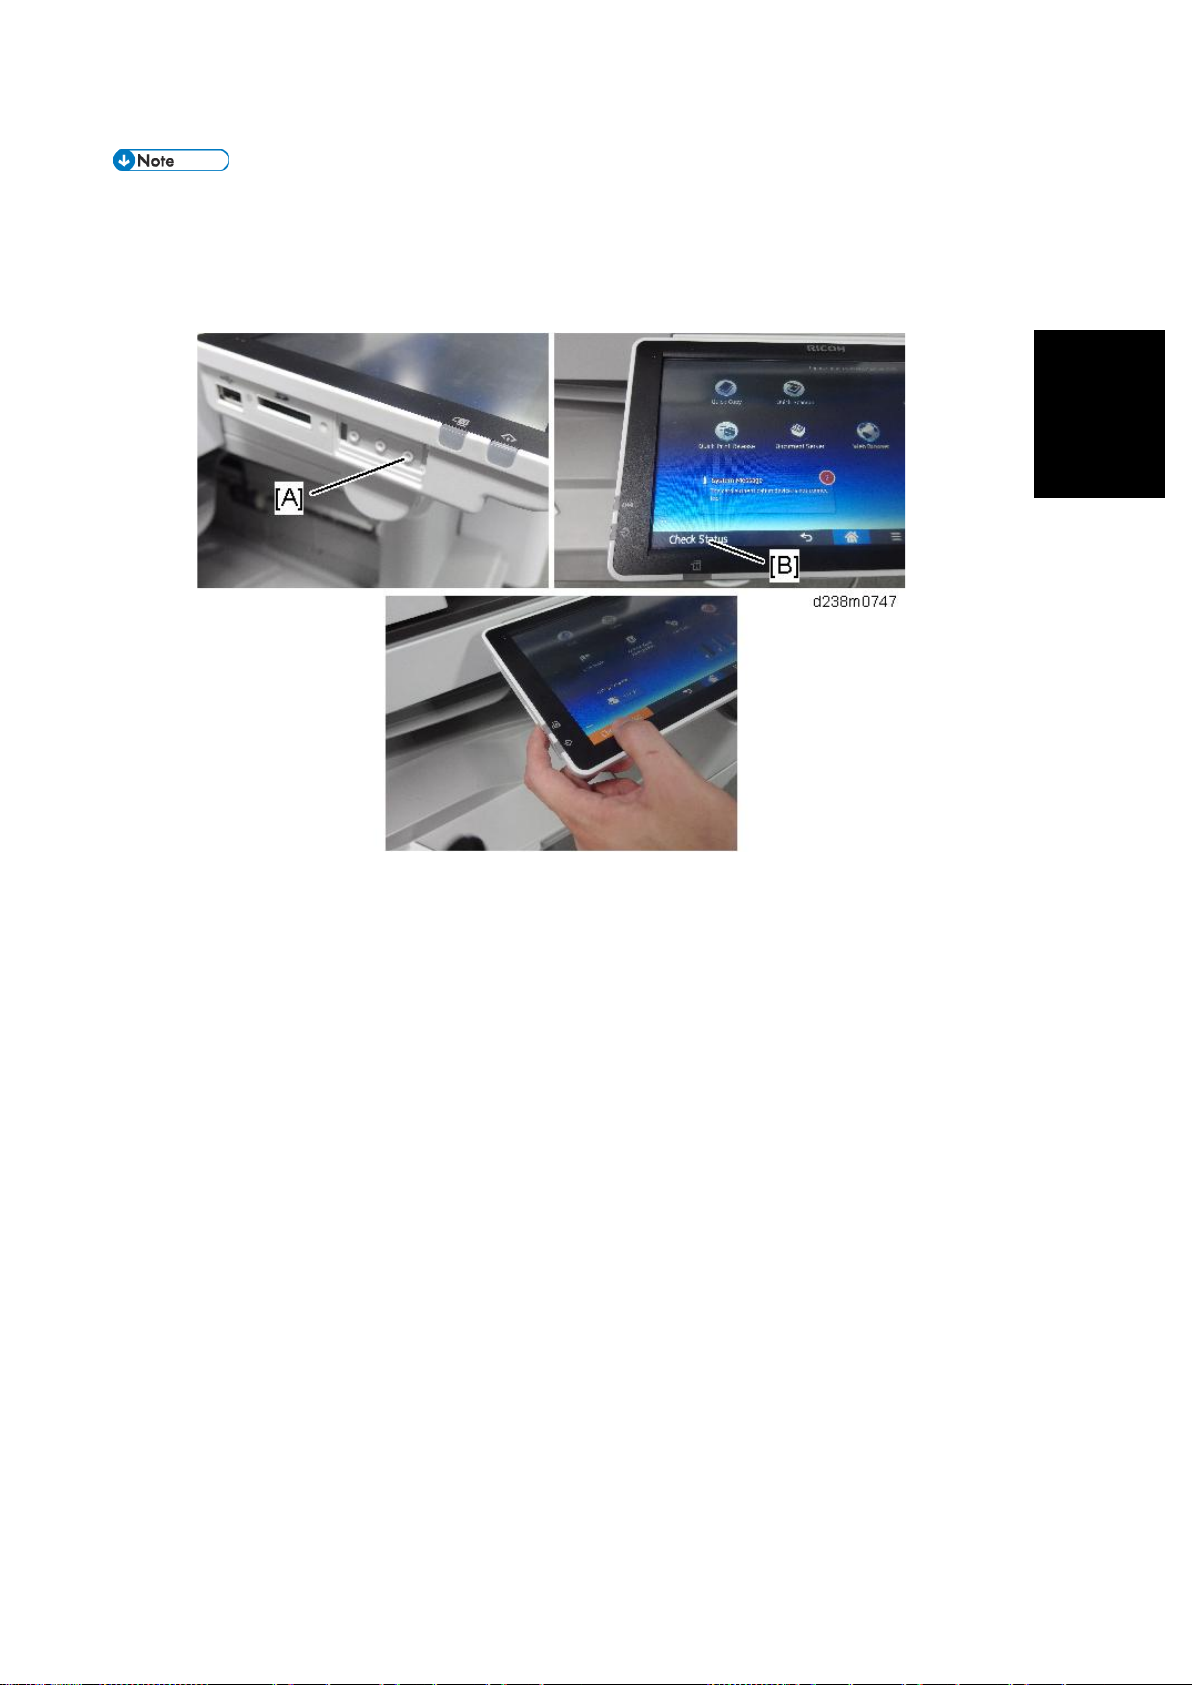
Main Machine Ins t allation
Installation
• To enter t he SP mode, there are two ways to display the numbe r keyboard on scre en;
1. Press the "Document Server" i con.
2. Press and hold the button [A] located at the left s ide of the operation panel and "Check Status [B]"
at the s ame time.
32
Page 39
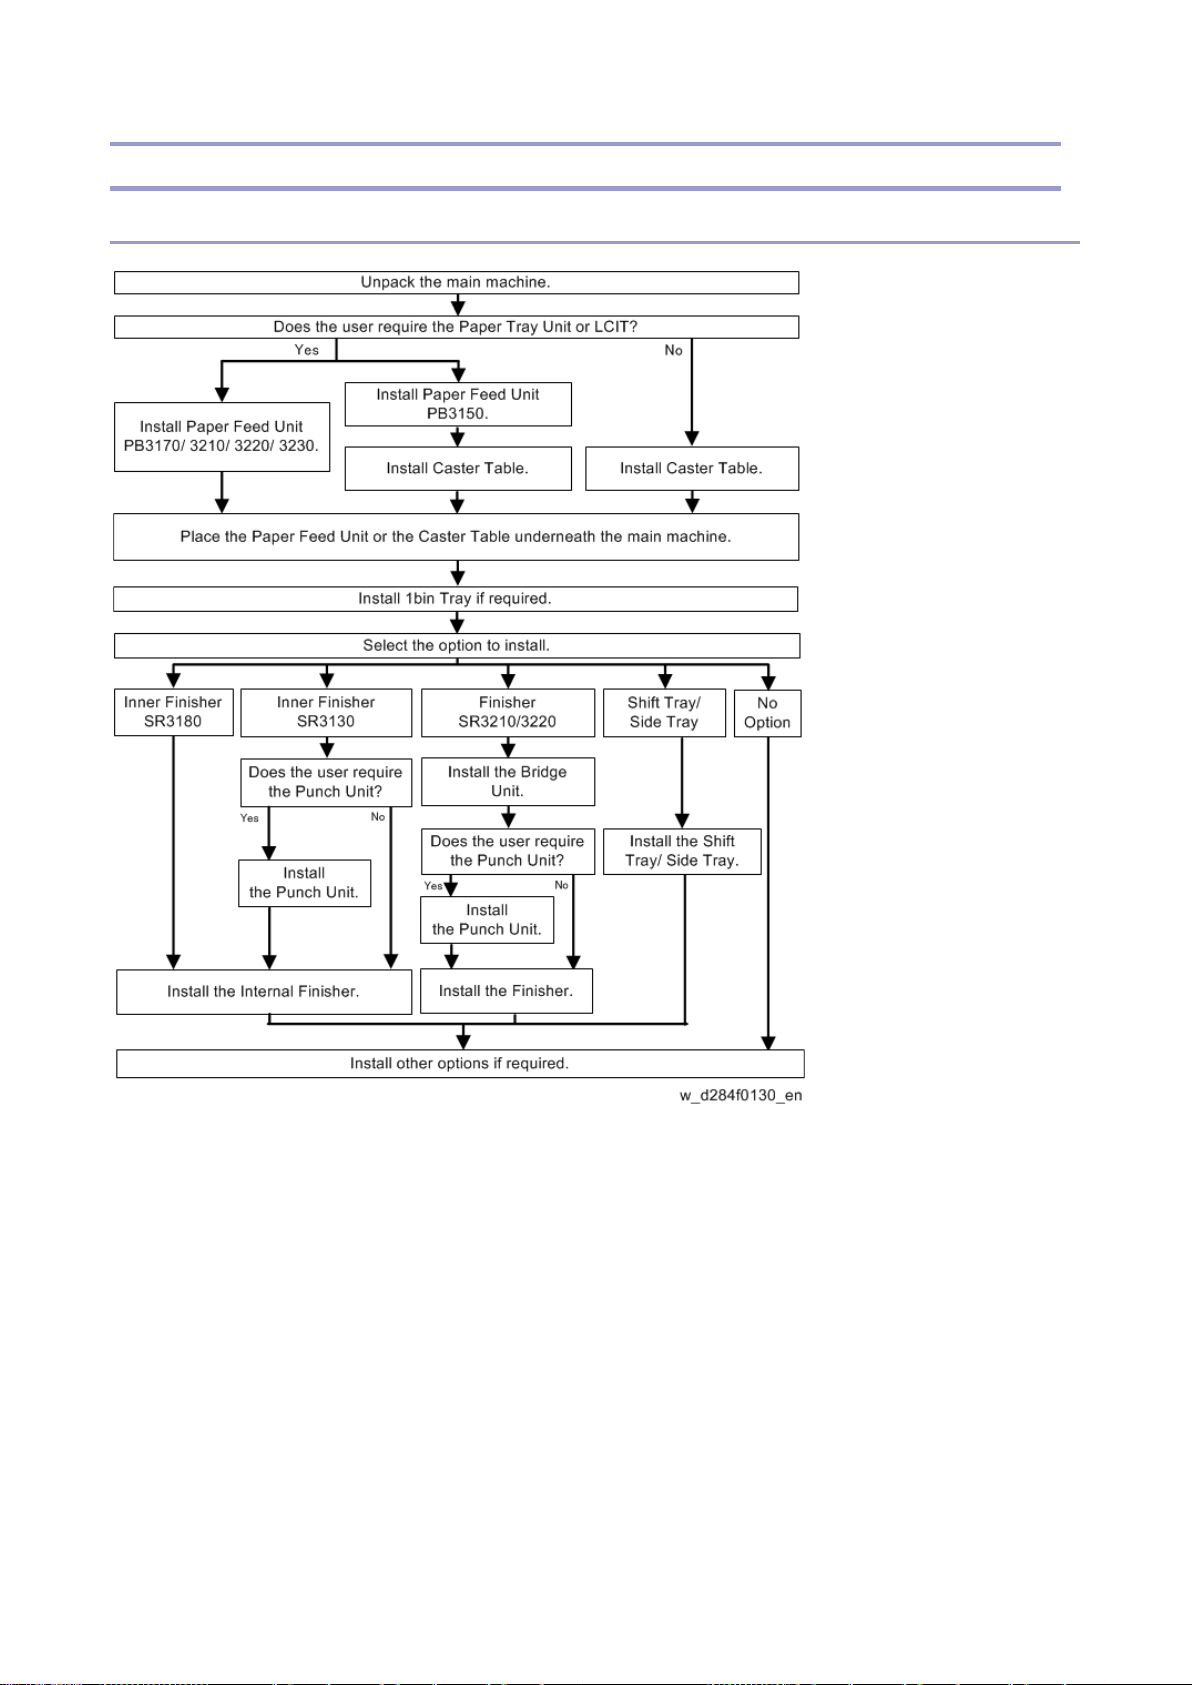
Main Machine Ins t allation
Installation Flow Chart
MP 2555SP , MP 3055SP, MP 3555SP
33
Page 40
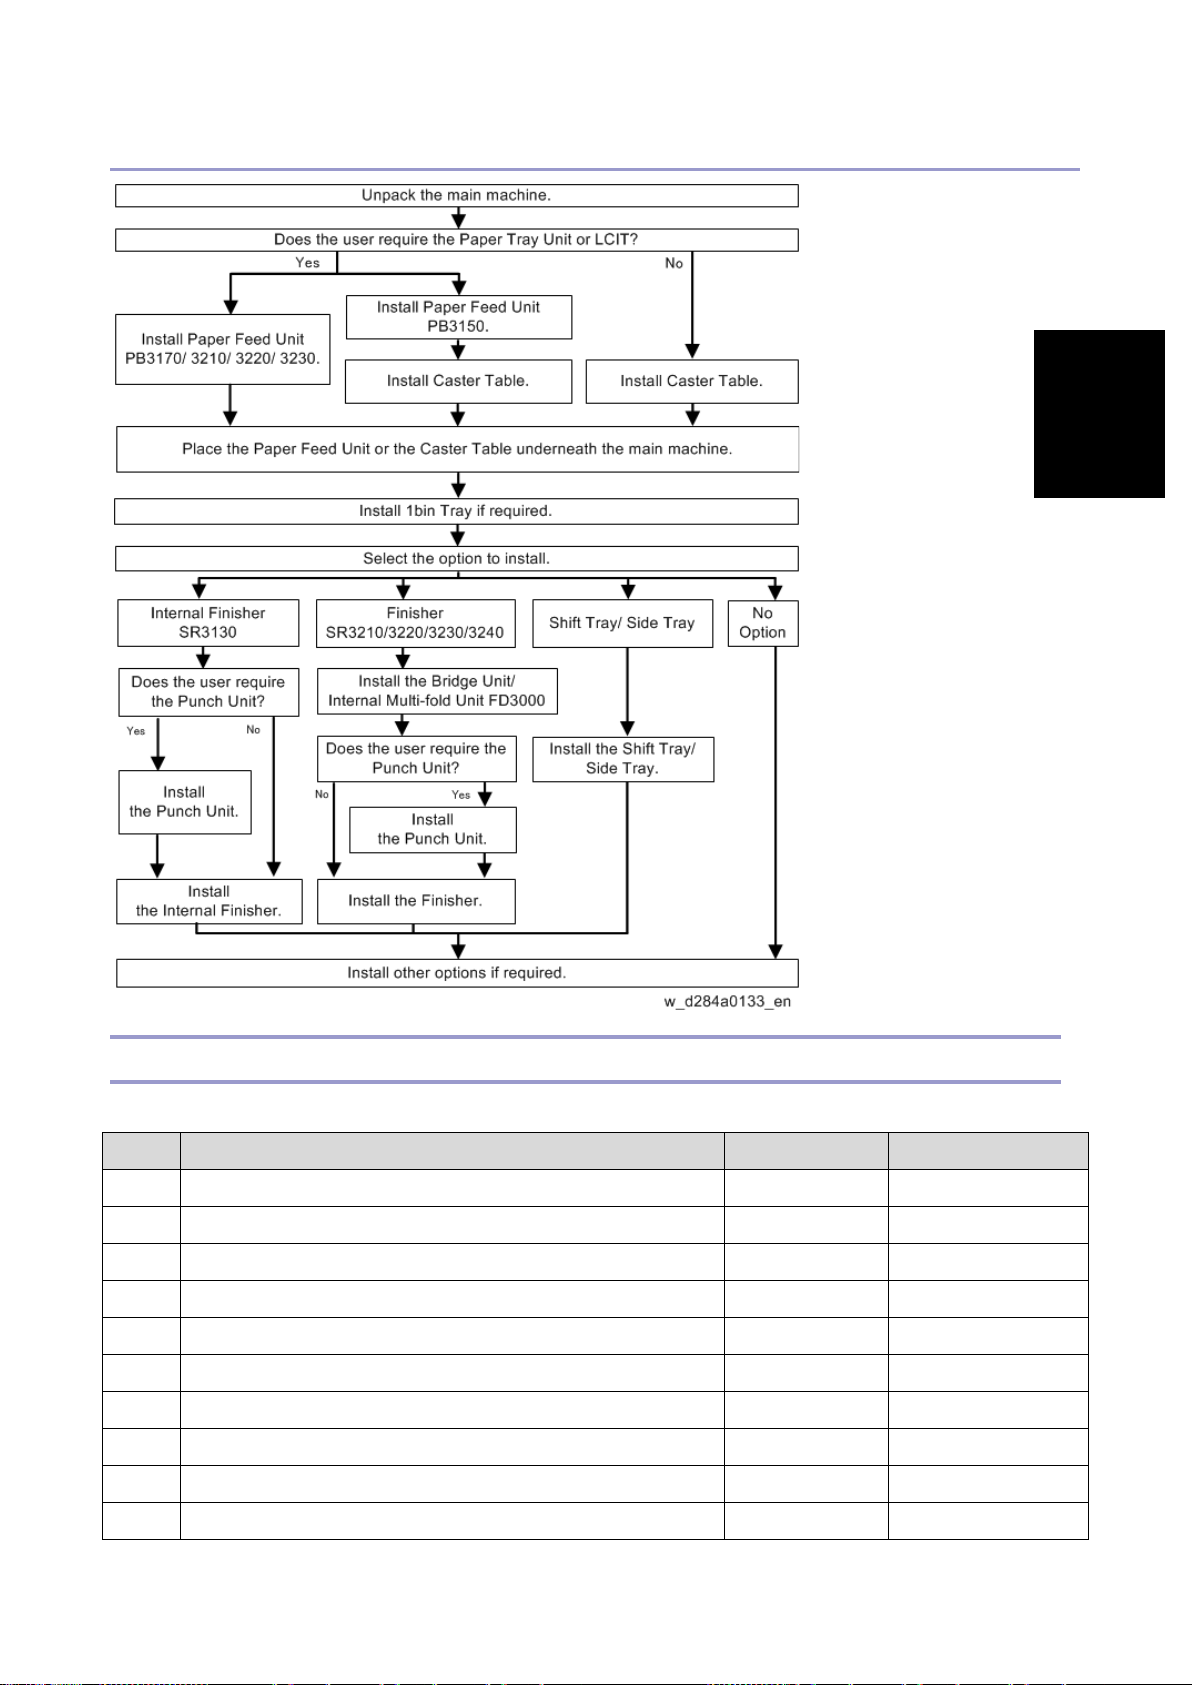
Installation
MP 4055SP , MP 5055SP, MP 6055SP
Main Machine Installation
Accessory Check
Check the quantity and condition of the ac cessories in the b ox agains t the following lis t :
No. Description Q'ty Remarks
1 Plate: Logo: RIC 1
2 Sheet: Logo 1
3 Rear Lower Gap Cover 1
4 Cap Cover 2
5 Stopper: Paper Exit Tray 1
6 NFC Tag 1
7 Decal: Paper T ray 1
8 Decal: Bluetooth 1
9 Original Caution Decal: English 1 EU Only
10 Original Caution Decal: Multi-Language 1 EU Only
34
Page 41
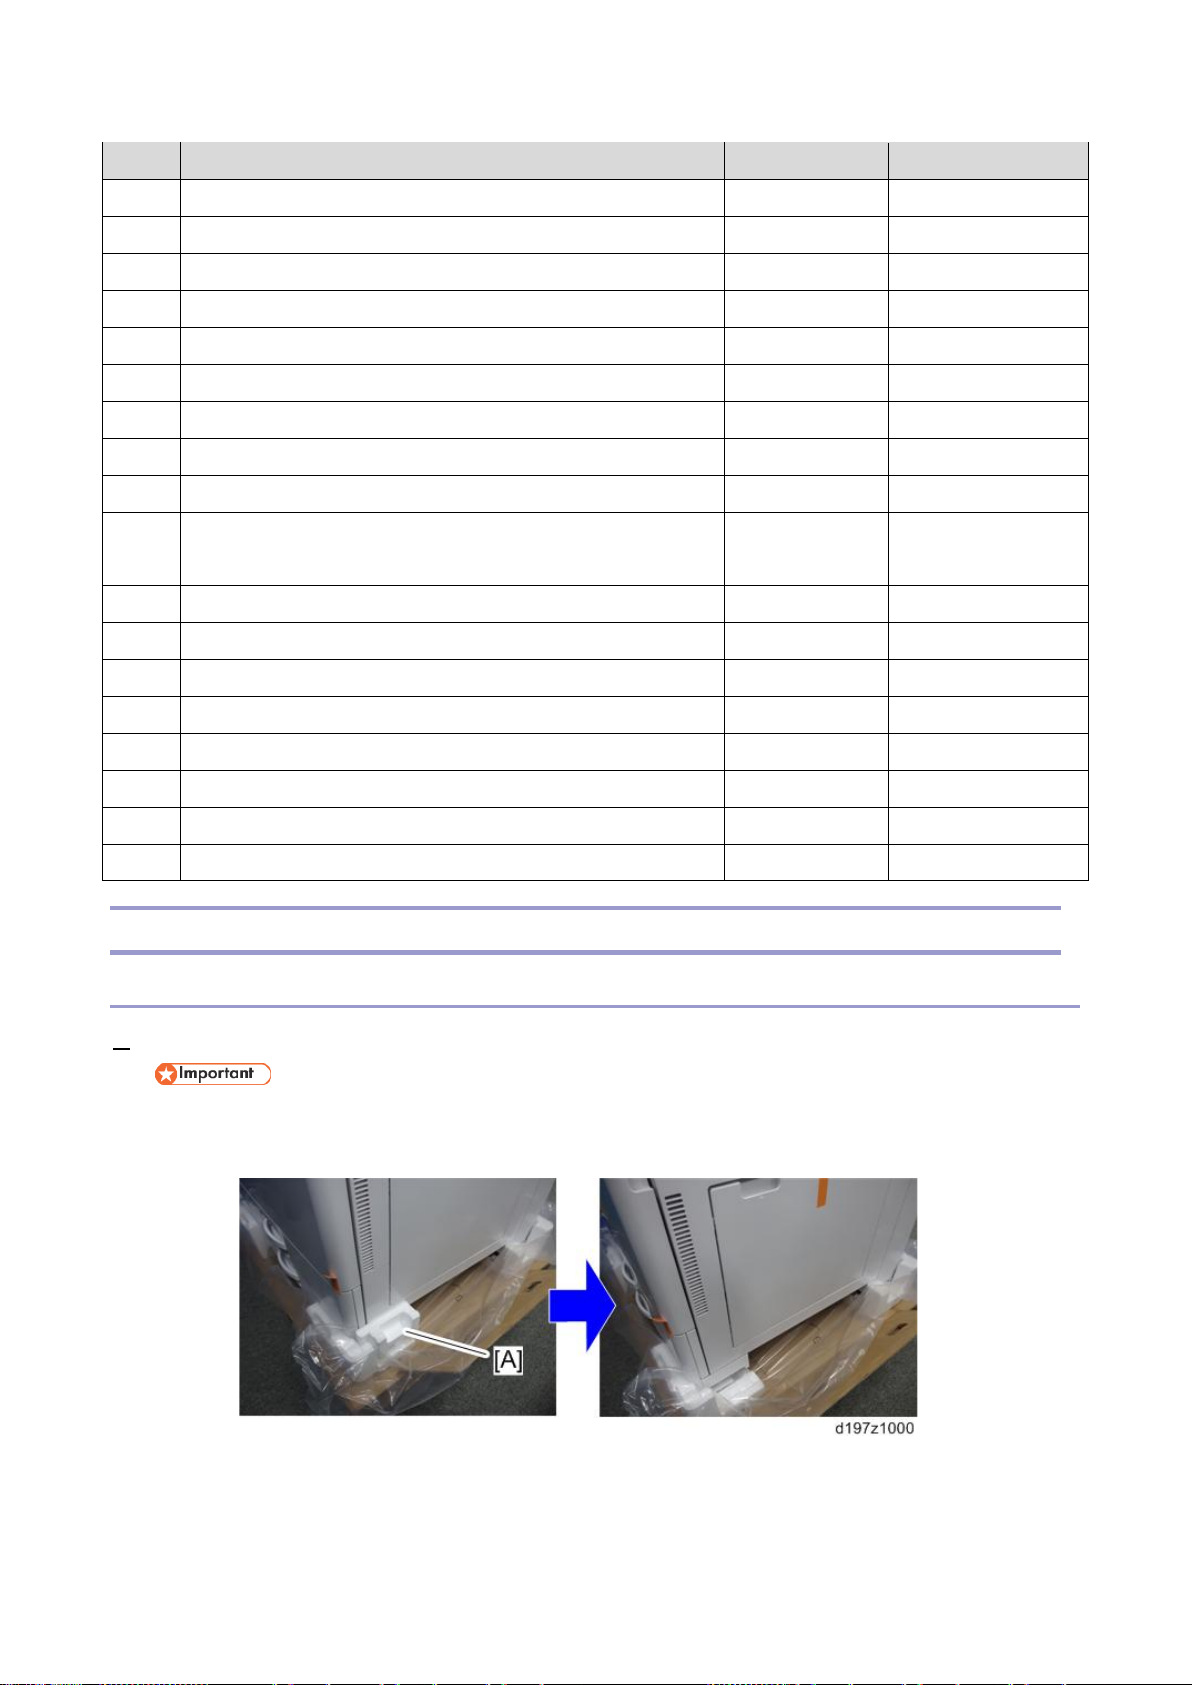
Main Machine Ins t allation
No. Description Q'ty Remarks
11 Power Supply Cord 1
12 Cleaning Cloth 1
13 Cleaning Clot h Holder 1
14 Sheet: EMC address 1 EU Only
15 Caution: CE 1 EU Only
16 Caution: Smart Operation Panel 1 NA/AA Only
17 Caution: FCC 1 NA Only
18 Caution: FCC (for Canada) 1 NA Only
19 Sheet: Safety Information 1 EU Only
20 Sheet: N otes for Us ers (AIRPRINT) NA/AA: 1
EU: 2
21 Sheet: EULA (21 La nguages) 1
22 Sheet: N otes for Us ers (Security) 1
23 Sheet: Start Guide 1 NA/AA Only
24 Caution: NFC T ag 1
25 Seal: Caution (21 Languages) 1 AA Only
26 CD-ROM (Drivers) 1
27 CD-ROM (OI) 1 AA Only
28 Manual: Read This Fir st 1 NA/AA Only
Installation Procedure
Remov al of Pack ing Mate rials and Shipping Retain ers
1. Remove the machine from the box, and check the items in the package.
• Remov e the retainer [A] at the low er front right bef ore lifting up the machine, because t he handl e
for lifting the machine i s hidden by the retainer [A].
35
Page 42
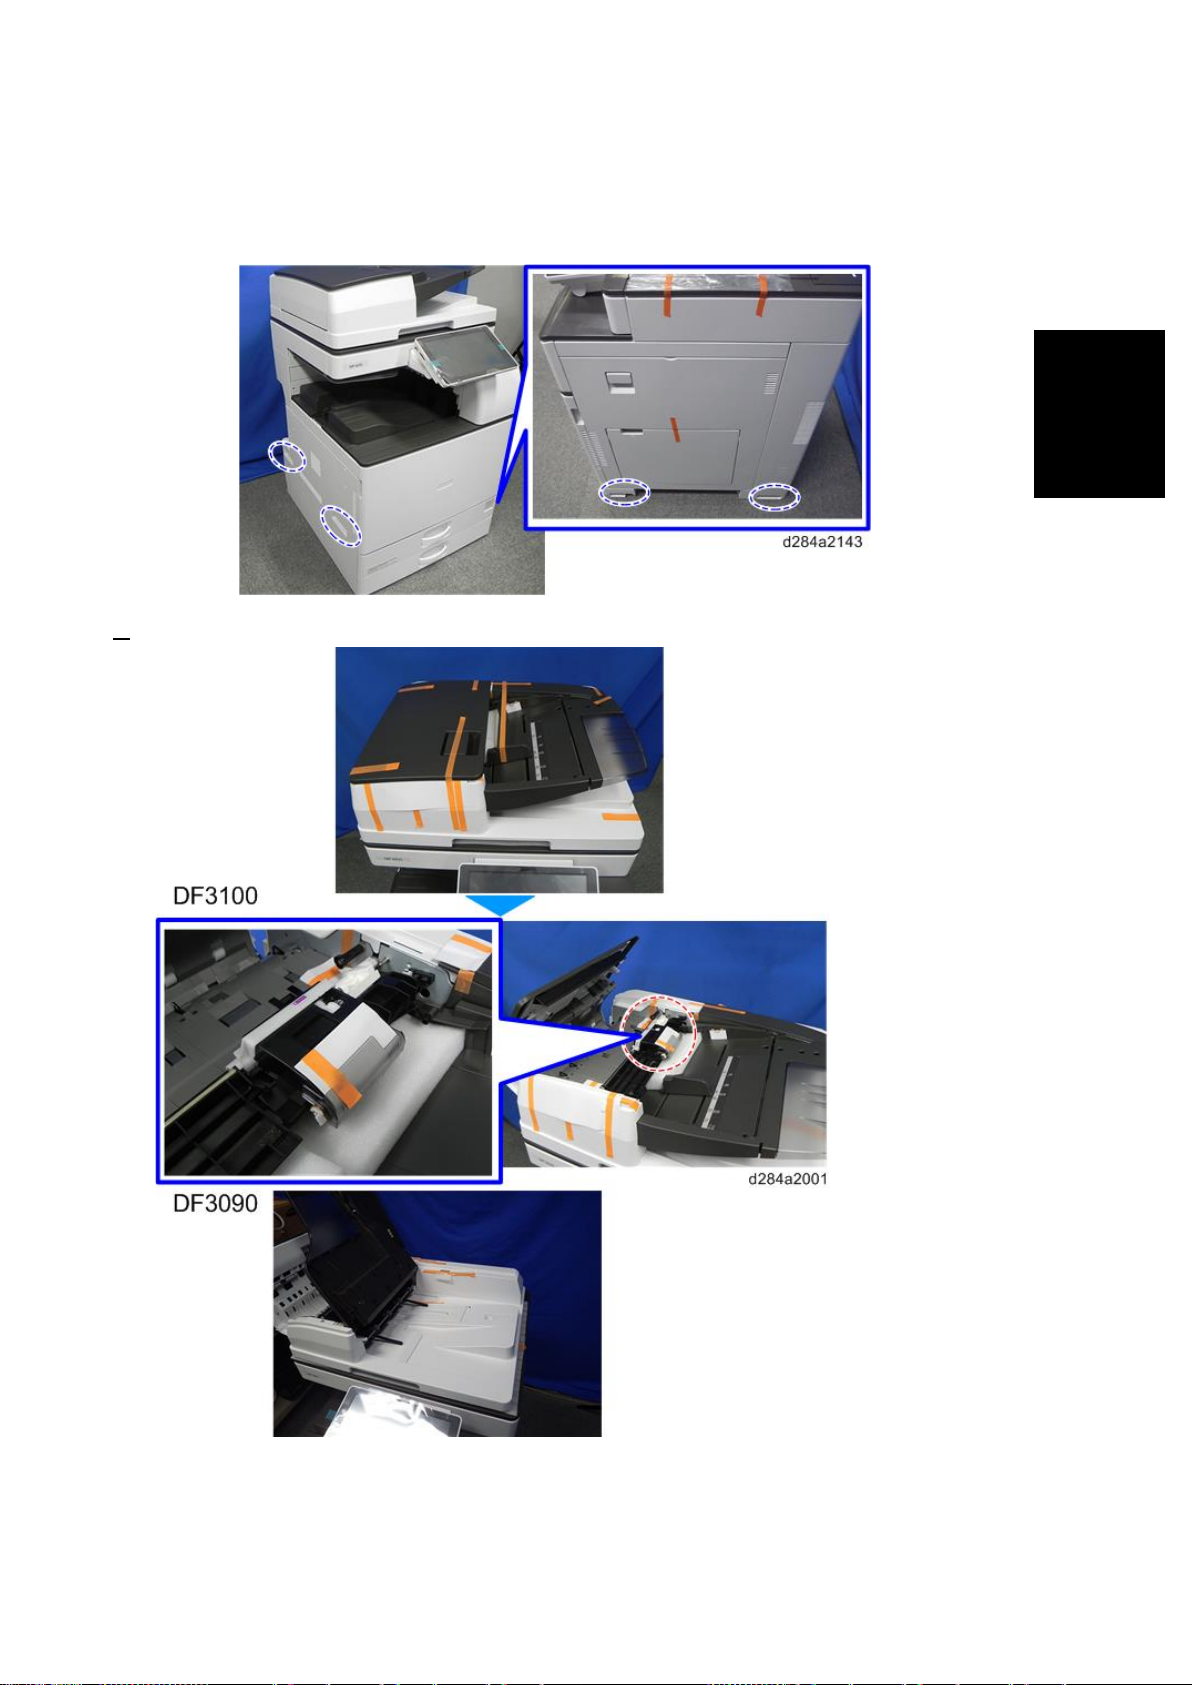
Installation
• When you lift th e machine, hold the correct parts, as shown in the pho to below. Do not lift by
holdi ng the sca nner unit, etc., because thi s might deform th e machine or break the exterior
covers.
2. Remove the tapes and retainers on the DF.
Main Machine Ins t allation
36
Page 43
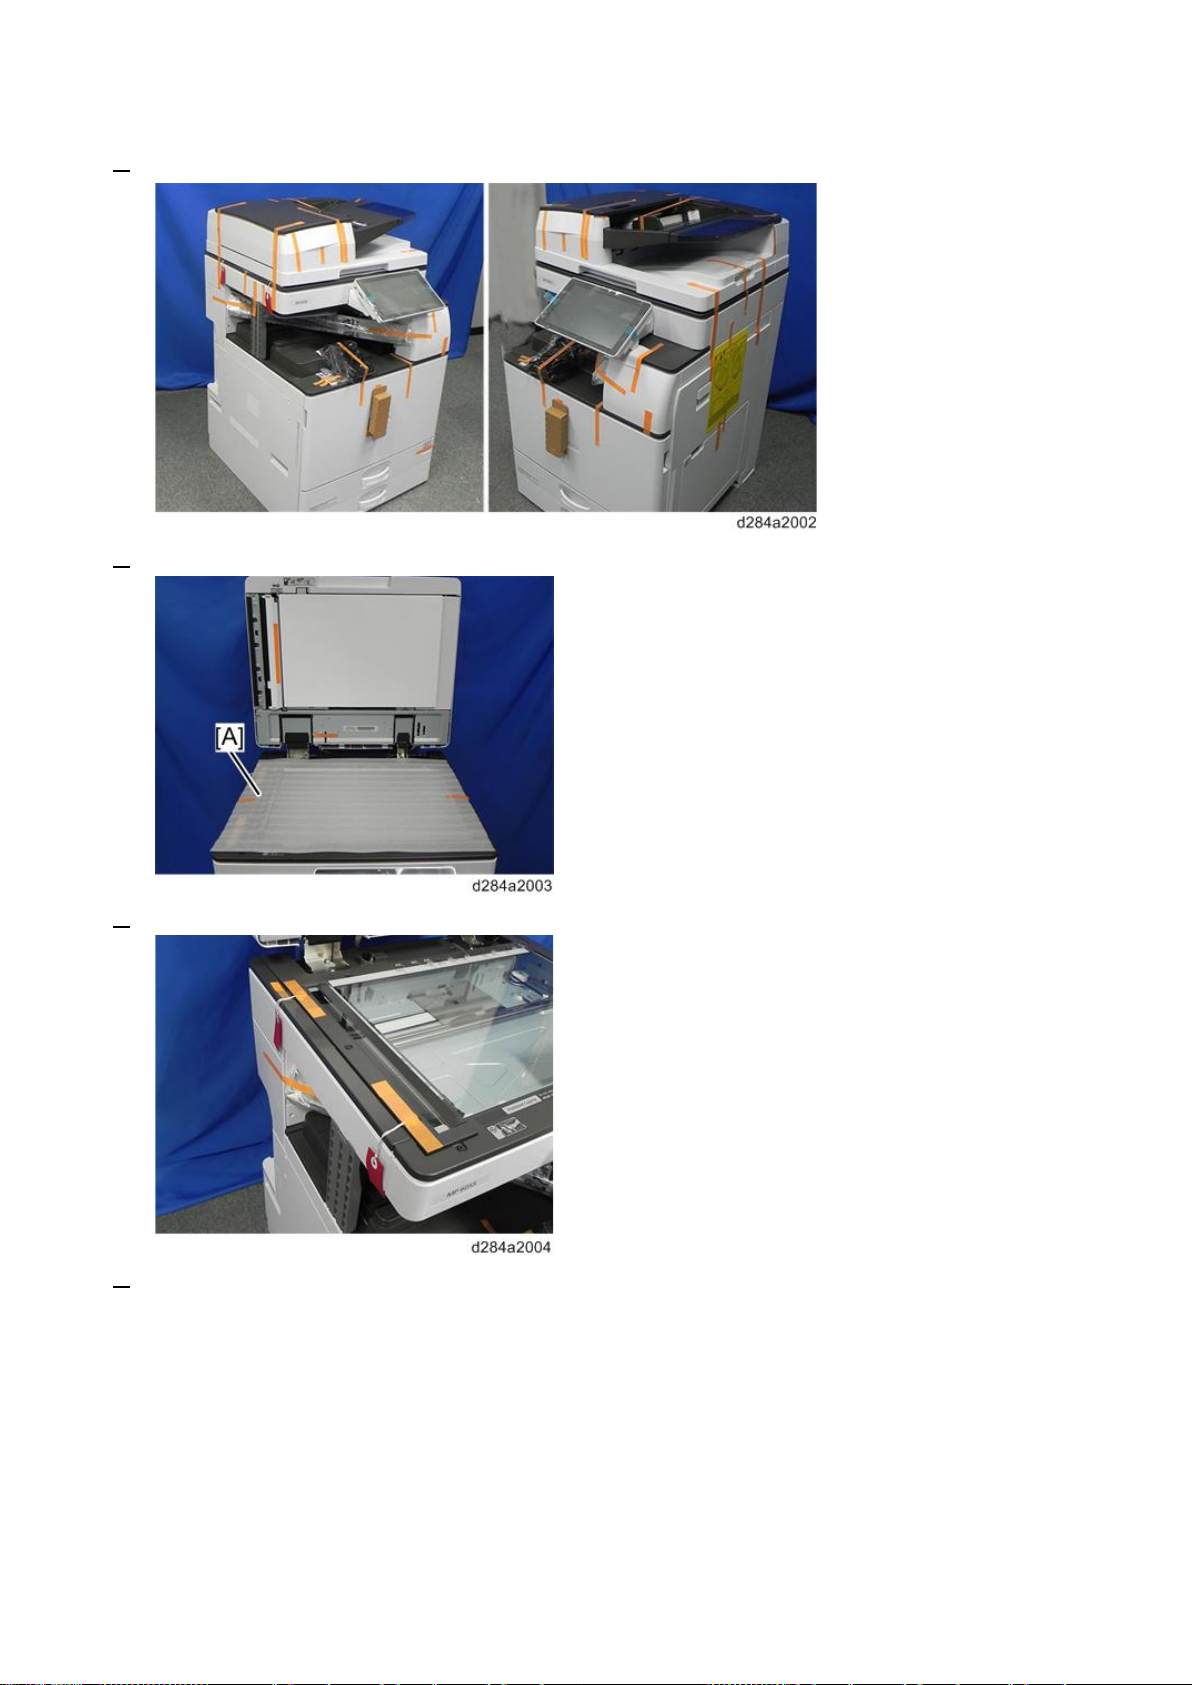
Main Machine Ins t allation
3. Remove the tapes on t he exterior of the copier.
4. Remove the cushioni ng material [A] on the exposure glas s.
5. Remove the orange tape on the scanner s hipping locks.
6. Remove the two scanner ship ping lock s [A] by rot ating them 90 degrees counterclockwise.
SC120 is displayed whe n the machine is turned ON wi th the shipping l ock attac hed.
37
Page 44
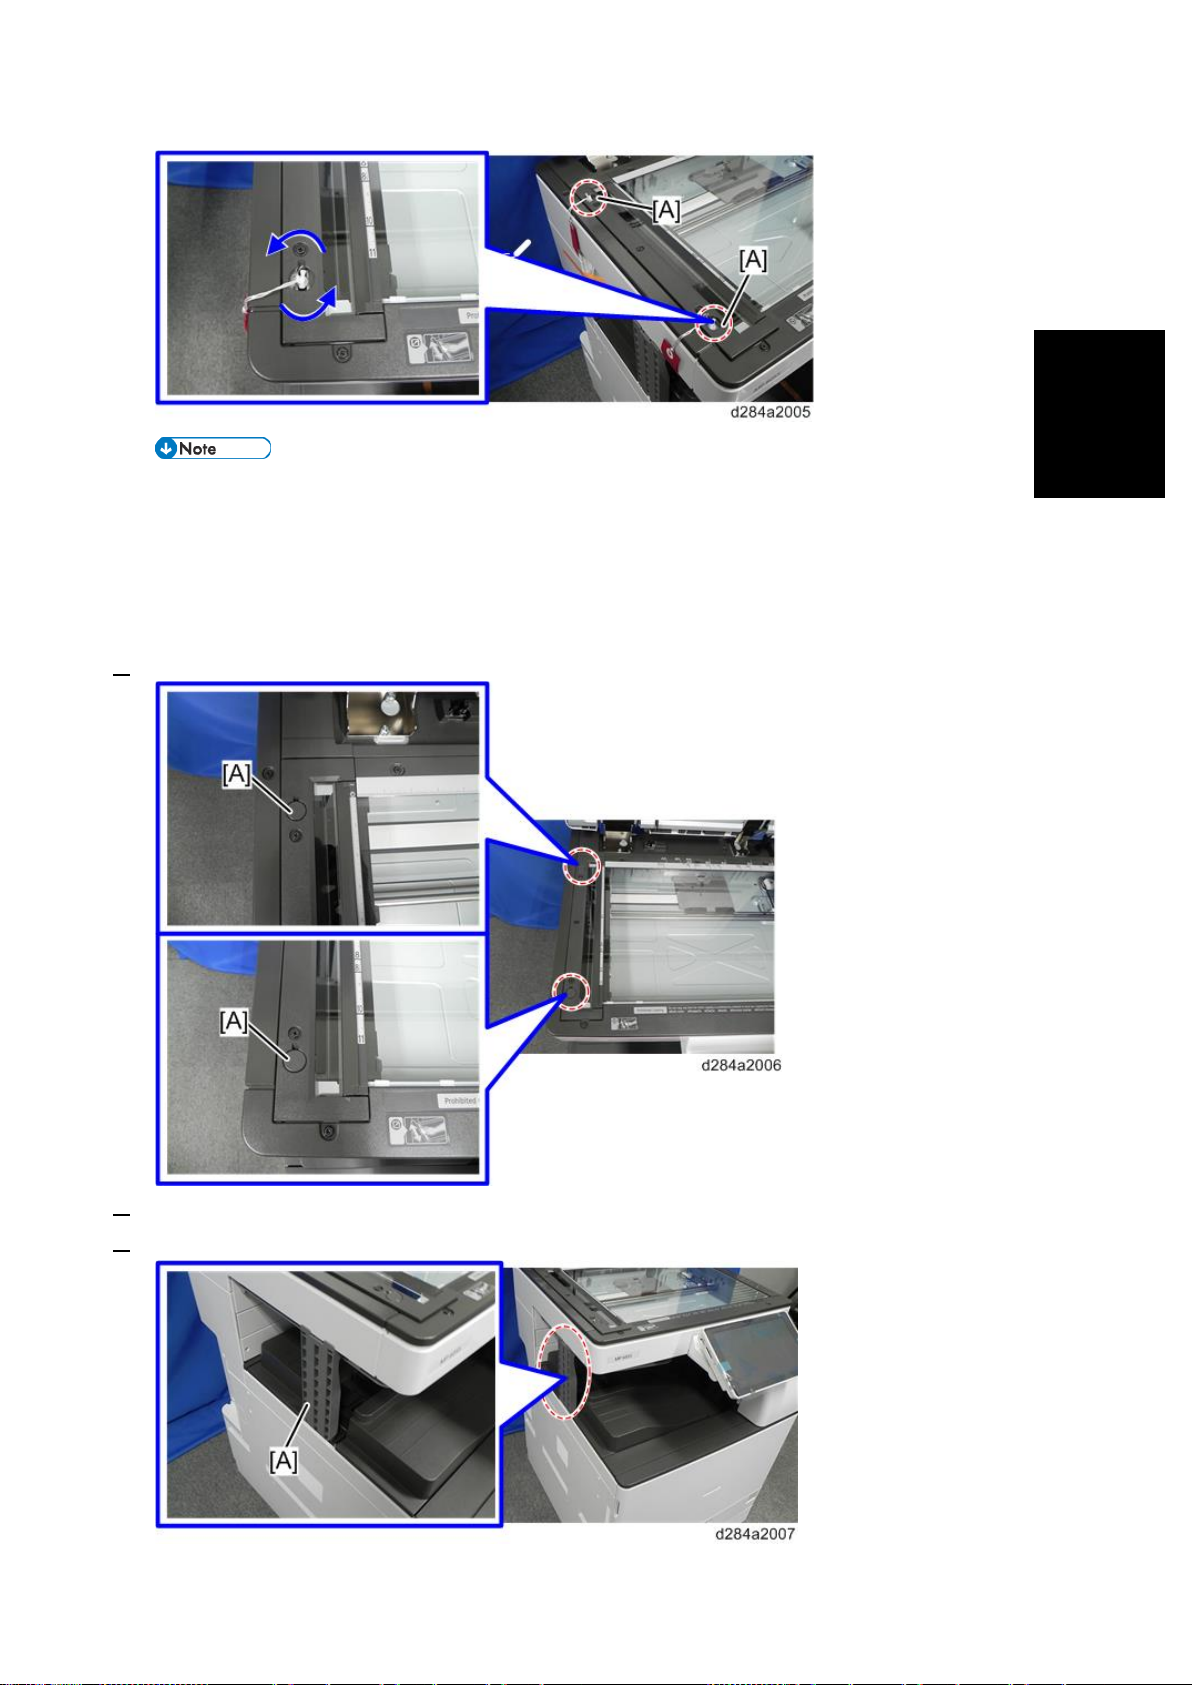
Installation
• Keep the scanner shipping locks after installing t he machine. The scanner shipping locks m ust be
installed before moving the machine to a n ew location.
• Before moving the machine, make sure to move the scanner carriage to the corr ect position with
SP4-806-001 (Super SP mode ) and reat t ach the shipping locks (page 101 "Moving the
Machine").
7.
Attach the two caps [A] provided with the machine.
Main Machine Ins t allation
8. Pull out the 1st and 2nd paper f eed tray s and remove the ta pes and accessories.
9. Remove the scanner support [A].
38
Page 45
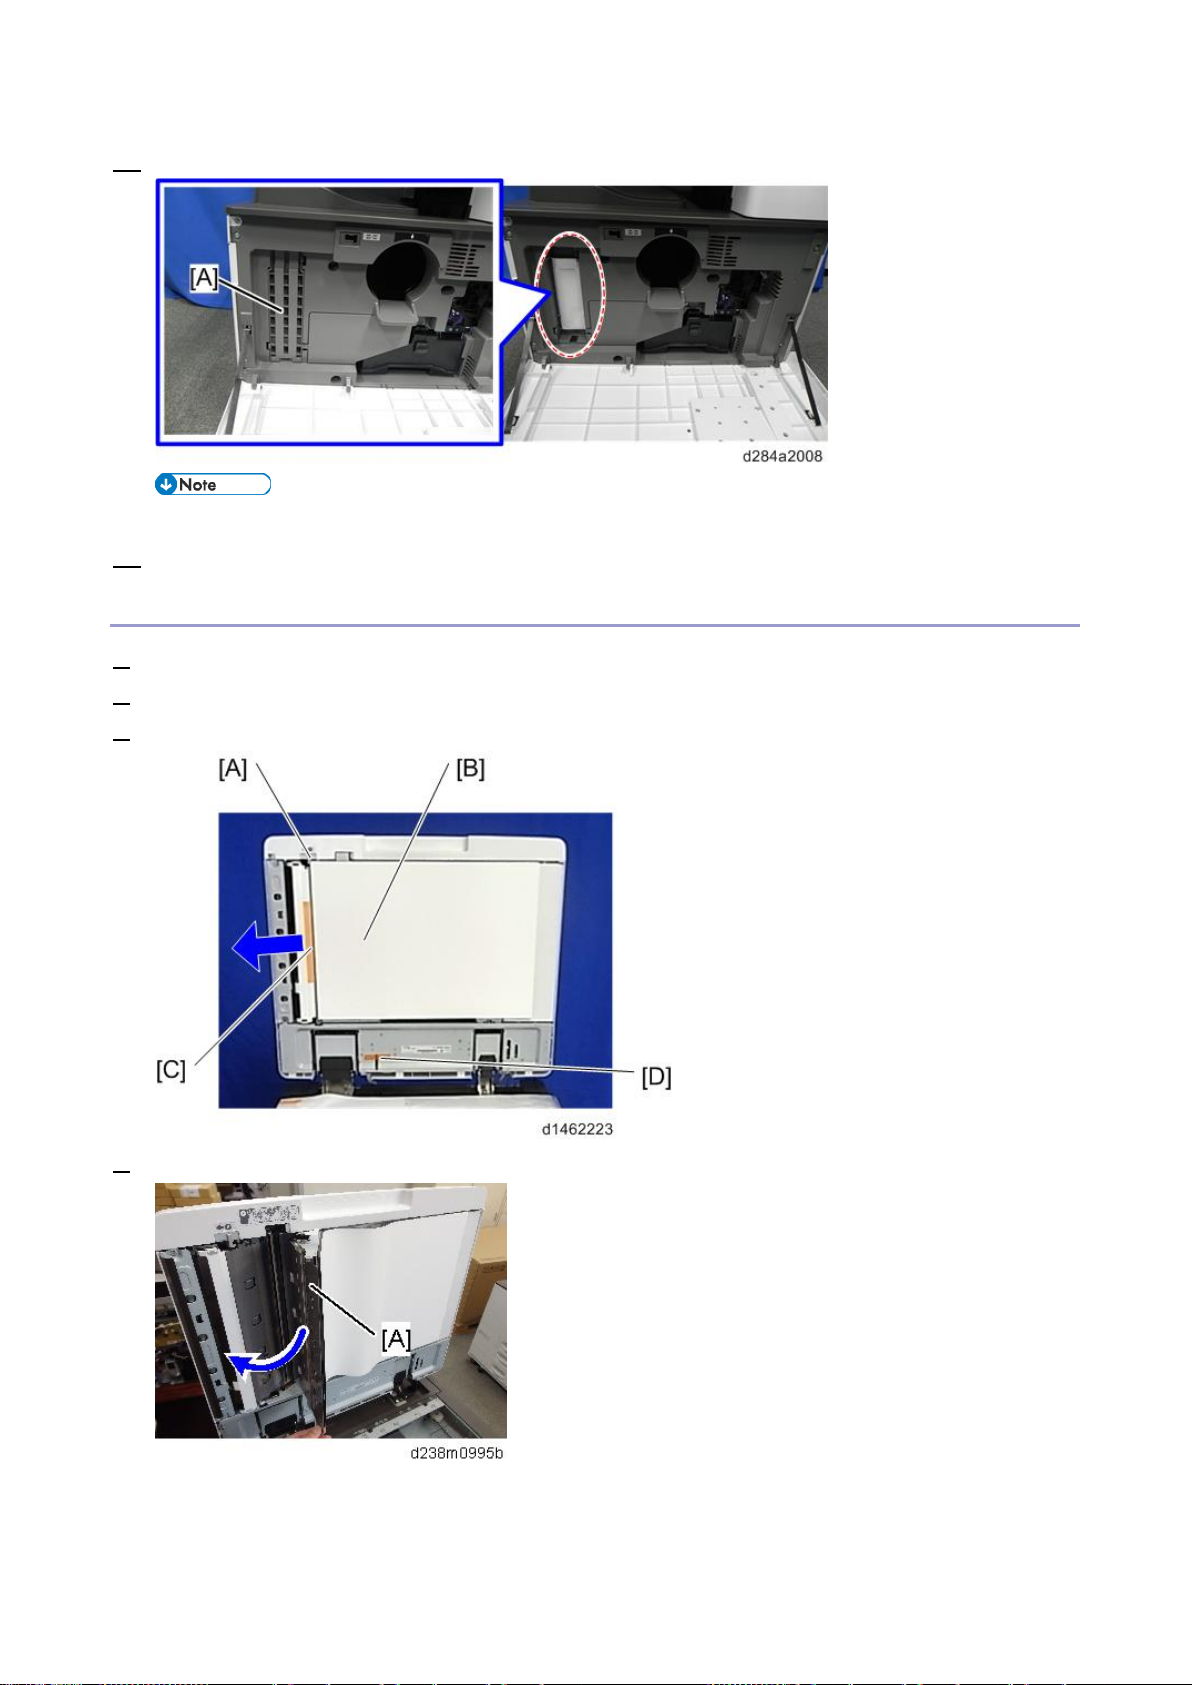
Main Machine Ins t allation
10. Open the front cov er and stor e the scanner support [A] in the storage locat ion.
• The factory setting sheet is kept in the sto rage loca t ion.
11. C l ose th e fr o nt cov er.
For Machines with Prein stalled SPDF: Removal of Protecti ve Sheet
1. Op en th e DF.
2. Release the lever [A], open the pressure plate sheet [B], and pull out the protectiv e sheet [C ] slowly.
3. Remove the filament tape [D].
4. Cl ose th e pr e ss ur e pl at e she et [A].
39
Page 46
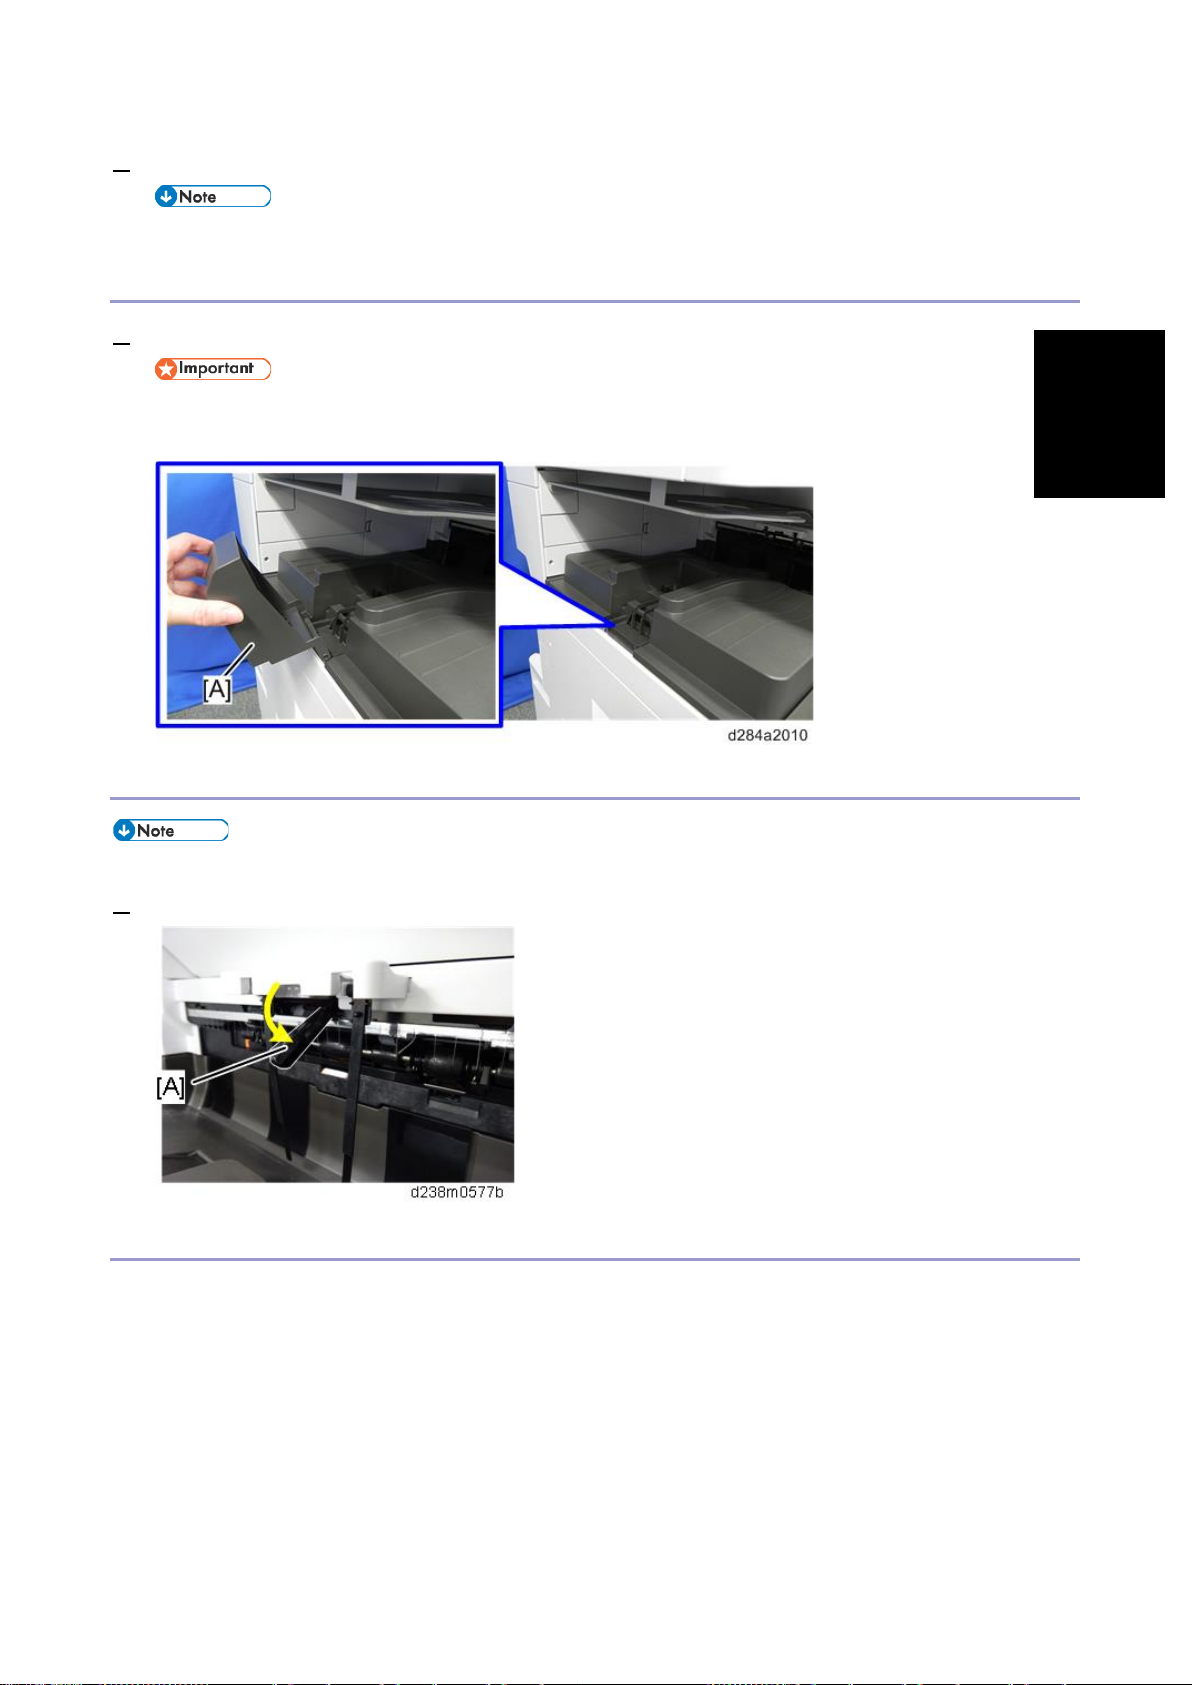
Installation
5. Cl ose th e DF.
• If the p rotective sheet r emains in the DF, a paper jam will be det ected.
Attaching the P aper Exit Tray Parts
1. Attach the stop p er [A ] to the pa per e xit tr ay.
• Before installing the stopper, move the bar inside the stopper in order to avoid damaging the bar.
Main Machine Ins t allation
Pull ing out the Feeler for the Pap er Exit Ful l Sensor
This procedur e is unnec essary when attaching the Bridge Unit or the Inner Fi ni s he r.
1. Pull the sensor feel er [A] out.
Checking the Position of the Paper Exit Feeler
Check the foll owing poi nts for the paper exit feeler [A] installed at t he paper e xit.
• It can move in line with the ejection of paper.
40
Page 47
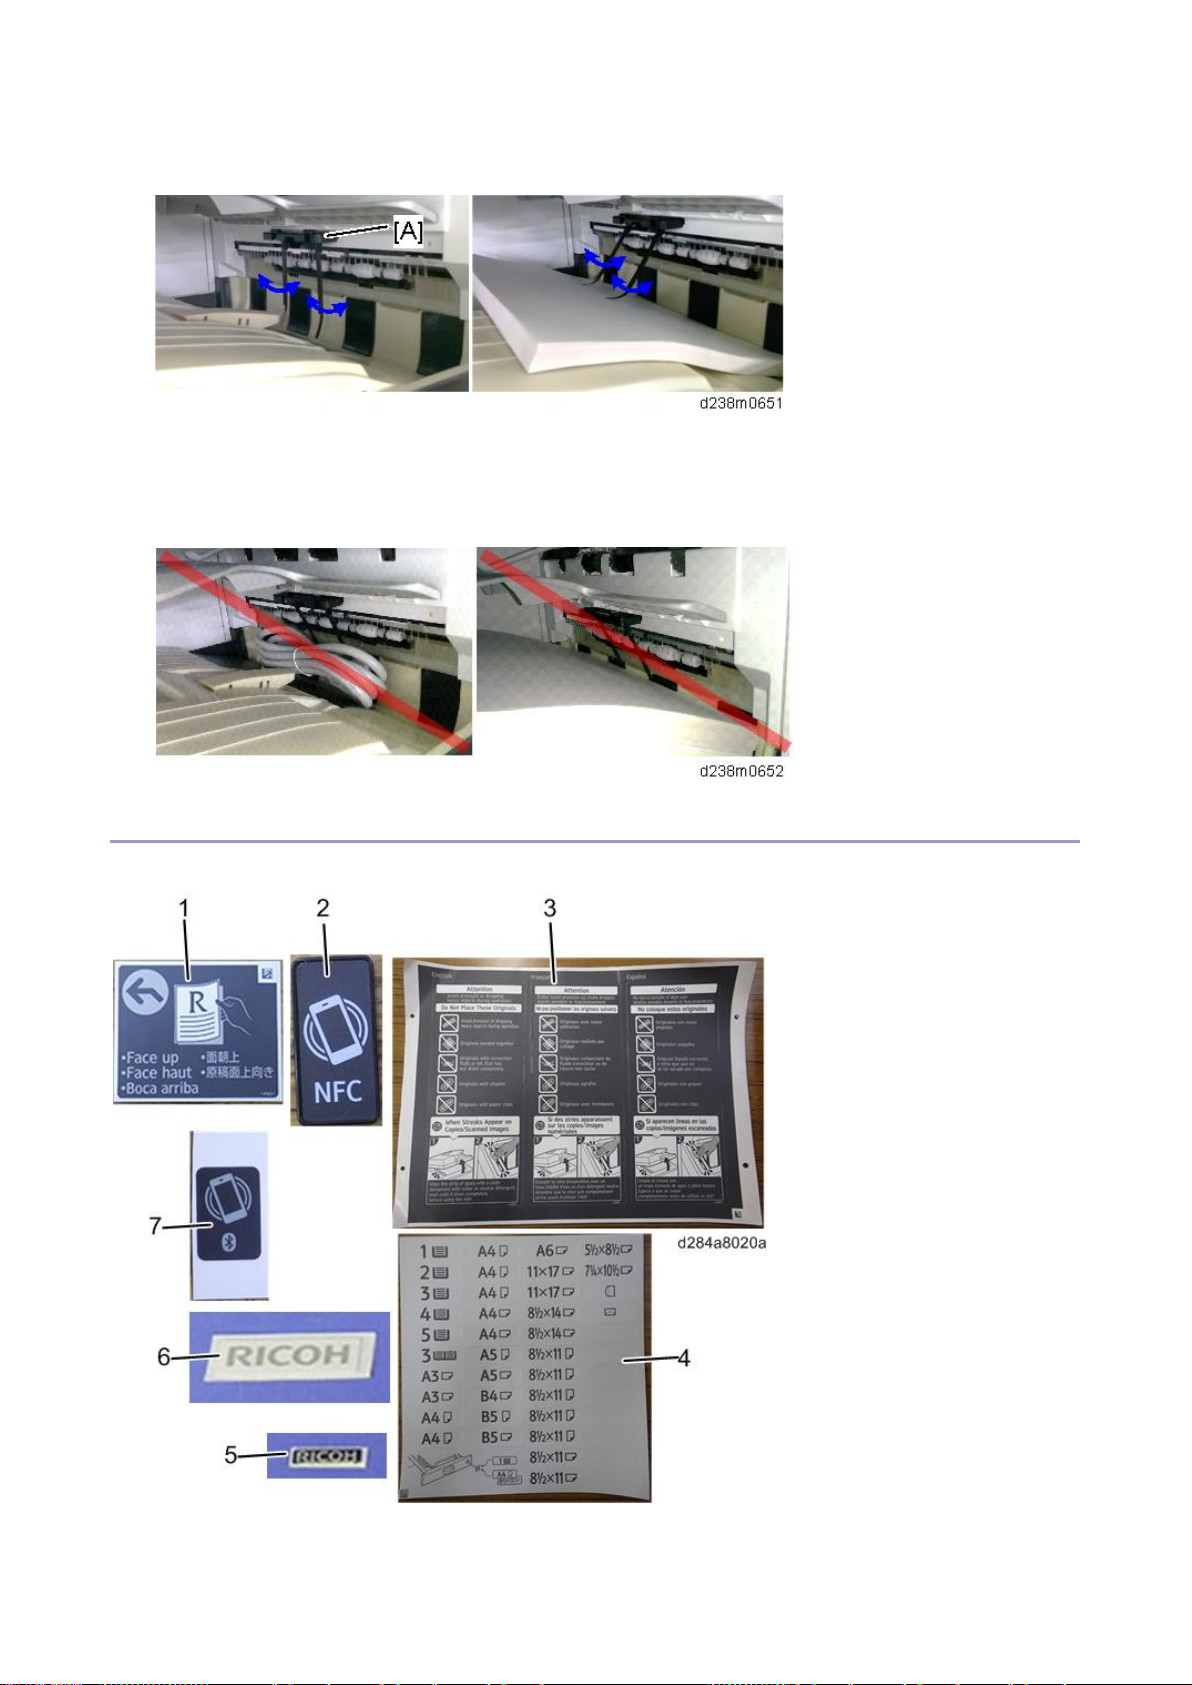
Main Machine Ins t allation
• It hold s contact with the surface of the ejected paper and is still movable.
Paper will get jammed in the foll owing cases.
• The paper exit f eeler does not function du e to obstacles (such as cables).
• The paper exit f eeler does not function when the pap er is pulled out and pushed back again.
Attaching the D ecals
Attach the following decals prov ided wit h the machine acc essories.
1: Original Set Decal
41
Page 48
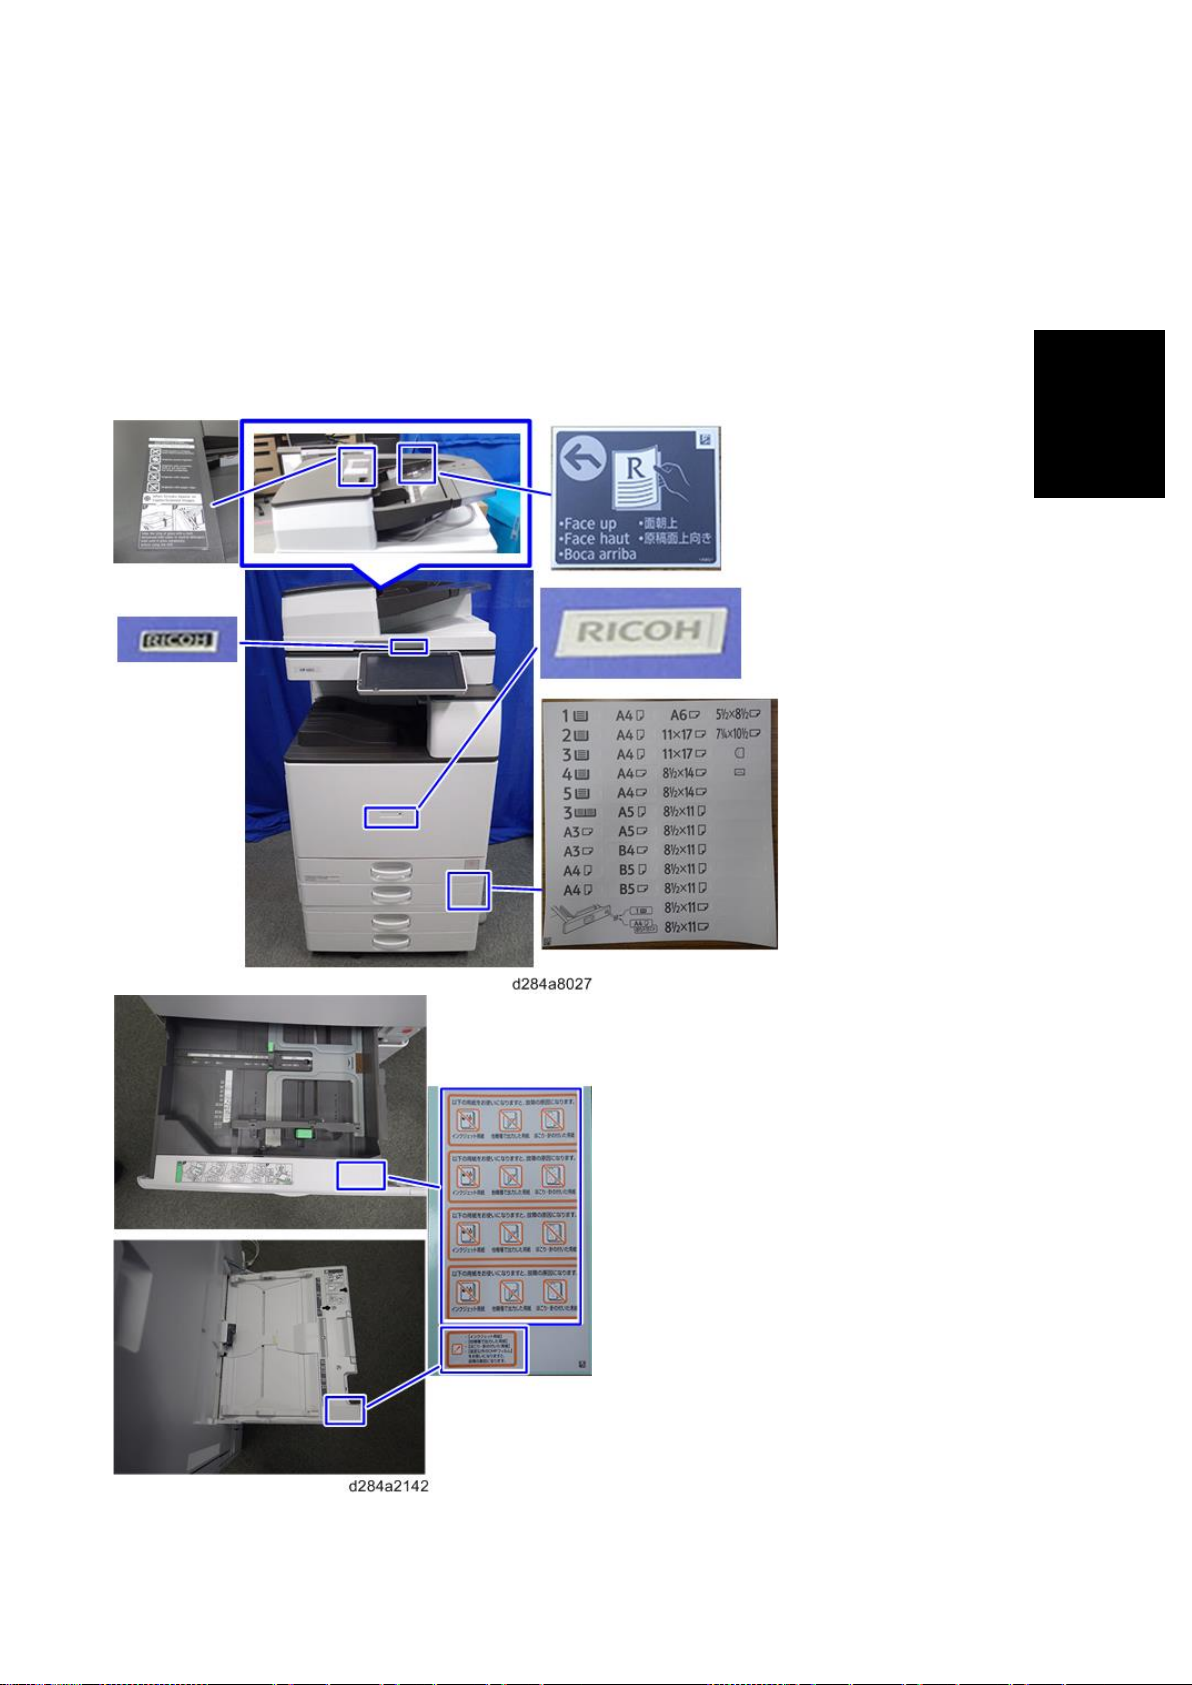
Installation
2: NFC Tag
3: ADF C aut ion Decal
4: Paper Size Tray Number Decal
5: Brand Logo for Smart Operation Panel
6: Brand Logo for Front cover
7: Bluetooth D ecal
Location for each decal
Main Machine Ins t allation
42
Page 49
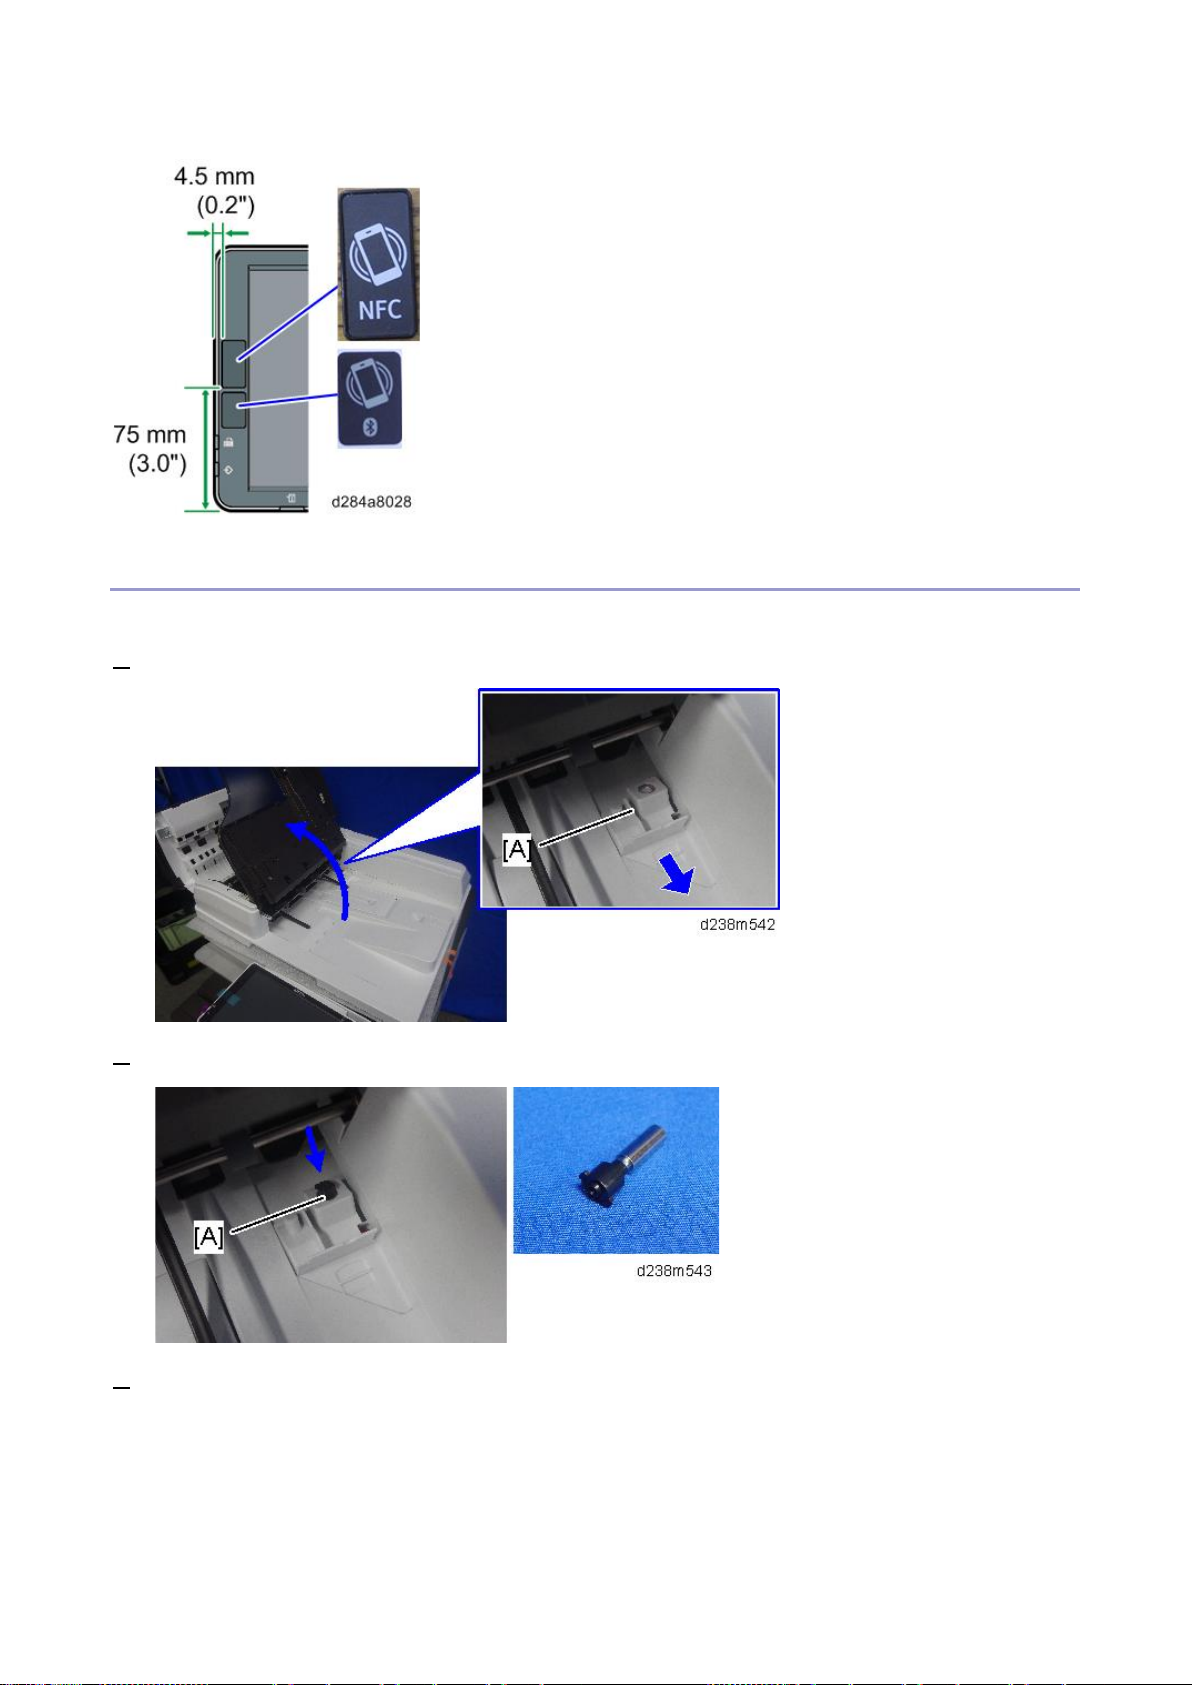
Main Machine Ins t allation
For Machines with Prein stalled ARD F: Fax Sta mp Instal lation (Option)
This procedur e is required for th e machine which has the fax function installed as sta ndard.
1. Open the ARDF original cover and stamp holder [A ].
2. Install the fax stam p [A] provided with the machine.
3. Cl ose th e h ol de r.
Make sure that i t is pushe d in to the position where the marks on the holder and th e exterior cover face
each other . If not, jam detect ion (001 ) will occur.
43
Page 50
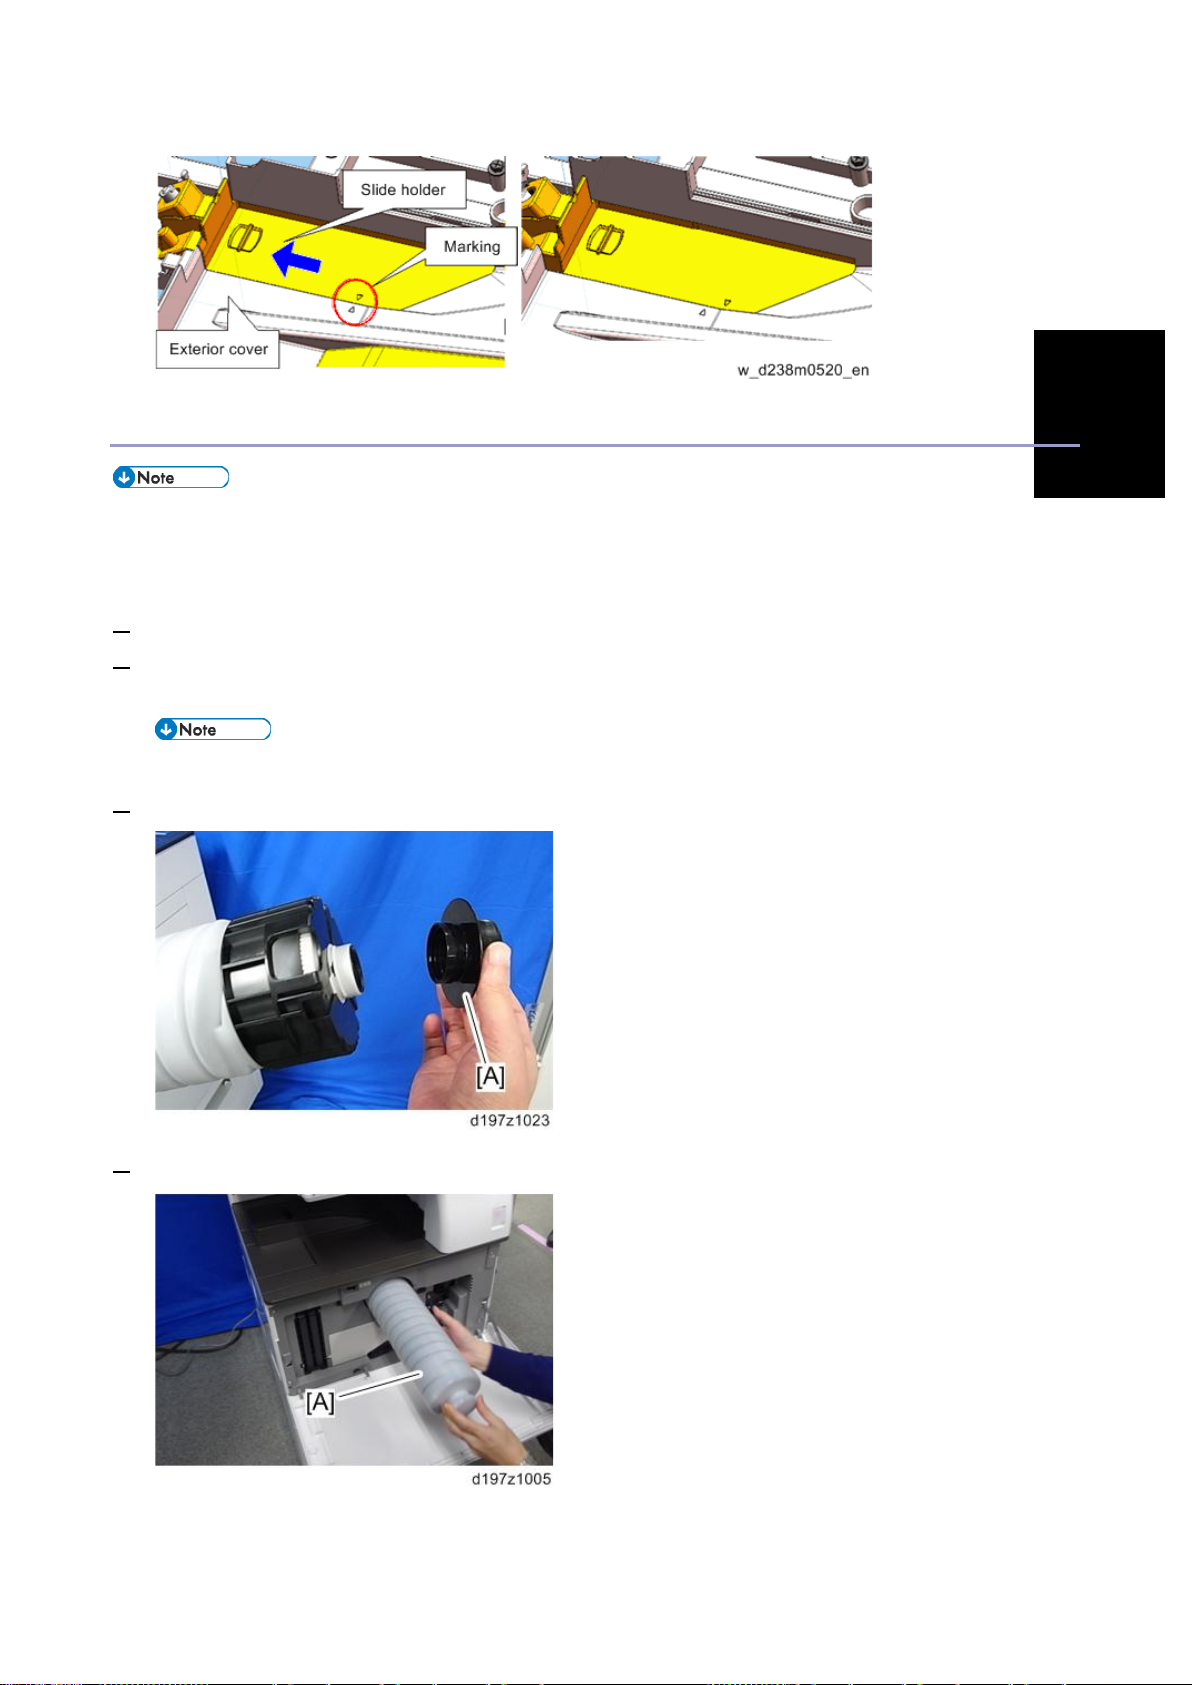
Main Machine Ins t allation
Installation
Toner Bottle Installation and Toner Initialization
• This machine has toner b ottle set detection and does not operate without the toner bottle.
• Print Car t ri dg e MP 3 5 54 is c om pa ti bl e wi th MP 4055SP, MP 5055SP, MP 6 05 5S P. However , Pr i nt
Cartri dge MP 6054 is incompatible with MP 2555SP, MP 3055SP, MP 3555SP.
1. Open the front cover.
2. Make sure that the black cap of the tone r bottle is firmly t i ghtened, then shak e the ton er bottle up and dow n
seven or eight times while the cap faces upward.
• Shaking the bottle while the cap faces downward m ay cause a toner blockage.
3. Remove the toner bot tle protection ca p [A].
4. Push the ton er bottle [A] into the machine slowly.
44
Page 51
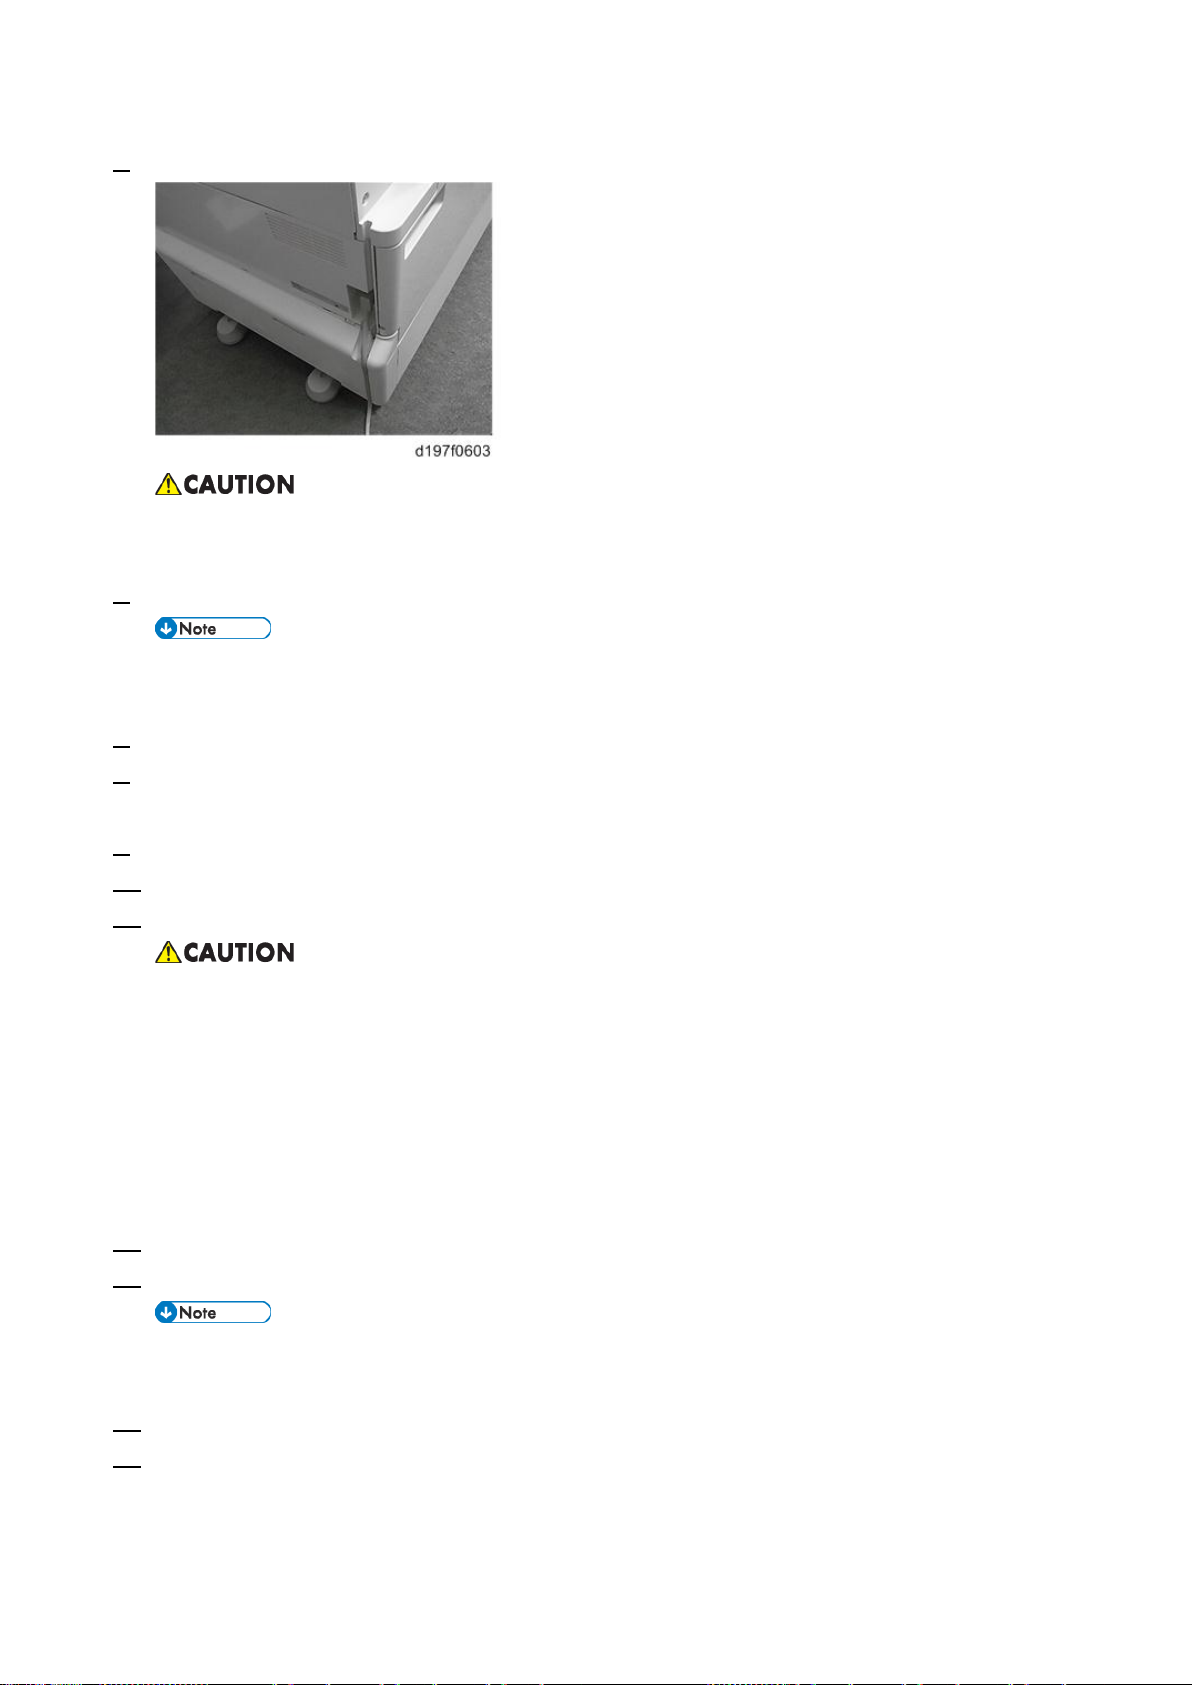
Main Machine Ins t allation
5. Connect the power cord to the machine.
Use the power cord that is provided with the machine. Do not use any other p ower cord. Also, do not use
an extens io n co r d.
6. Wh i le the front cover i s open, turn on the main power switc h.
• If the f r ont cove r is closed when tur ni ng on th e m ain power switc h, the ma ch in e st ar ts a no rm al
toner supply.
7. Enter the SP m ode, and then pre ss [System Sp].
8. Set SP3-510-031 (ImgQltyAdj :ExeFlag: Init Toner Replenish: K) to “1”, and then press “#” on the
operation panel.
9. Press [EXIT] to end the SP mode.
10. C l ose th e fr o nt cov er.
11. The machine automatically starts the initial toner supply. The initiali zation message a ppears.
• It take s about one to two minutes to finish the initial toner supply. If the toner has not bee n
shaken well, it may take up to about 10 minut es.
• If a ton er bottle has not been set, t he machine does not work be cause th ere is a toner bottle set
detect ion mechanism.
• If you t urn on th e machine without closing the front c over, the initial toner supply is not
perfor med at installati on, and the machine goes t o the toner end condition even if the m achine
has plent y of tone r in the toner bottl e.
12. Enter SP mode again, and then press [Sy s tem Sp].
13. Enter SP3-011-001 (Manu al ProCon : Exe), and then pr ess [Exe cute].
• Be sure to do this procedure in the main machine installation. Otherwise, ab normal images may
be develo p e d until the next pro cess control.
14. Press [Ex it ] when complete d.
15. Press [EXIT] to en d the SP mode.
45
Page 52

Main Machine Ins t allation
Installation
Note if th e i nitial toner supply has not been performed
If you start printing without executing the initial toner supply at installation, the machine g oes to the toner end
condit ion even i f the mac hine has plenty of toner in t he toner b ot t le. Do the follow ing proc edure to perform t he
toner end recov ery if the machine has entered the toner end condition.
1. Open the front cover for five seconds o r more.
2. Mak e s ure that the toner bottle is set properly.
3. Cl ose th e fr o nt cover.
4. The to n er e nd r ecov e ry automati cal l y starts
• MP 2555/3055/3555/4055/5055/6055 series models do not require resetting the counter, because the
repla cement year/date is updated automatically. (This is different from th e MP
2554/3054/3554/4054/5054/6054 series.)
Check Image Quality / Settings
Loading Paper
When there are other opt i ons to be install ed, install according to the procedure for each.
1. Connect the power cord to the machine.
2. Turn the main power ON .
3. Pull out the tray slowly until it stops, and then adjust the side fences and end fence to match the paper size.
To move the side fences, fi rst pull out the tray fully, t hen push down the green lock a t the rear of the tray.
4. Check that the operation pan el shows the following di splay.
"Pleas e supply the tray with paper."
5. Squ a re th e pa per and lo a d it pri nt si de up.
6. The paper si ze is basically det ected au tomatic ally.
Checking the Copy Image with the Test Cha rt
Check the copy image with the test chart.
Paper Settings
If necessary, adj ust the registration for th e paper f eed tray. (Registration - Leading Edge/Side-to-Side)
• SP1-002-002 (Side-to-Side Regis trat ion Pap er T ray 1)
• SP1-002-003 (Side-to-Side Registration Paper Tray 2)
Securit y Funct i on Settings
Perform the encr yption and overwrite settings to protect th e user information in the HDD as necessary.
Follow the instructions in Security Setting .
46
Page 53

Main Machine Ins t allation
Settings Relevant to th e Service Contract
Change the necessary se t tings for the following SP mod es if the customer has made a service contract.
SP No. Function Default
SP5-045-001
Counter method
SP5-104-001 (SSP)
A3/DLT double
count
SP5-812-001 and
-002
Service T el:
Telephone /
Facsimile
Installation is now completed.
Specifies the counting method used in met er char ge mode. "0": 1 count
Specifies whet her the counter is doubled for A3/DLT paper. "1": Double
-001: shows or sets the telephone number of the serv ice repre sentative.
-002: shows or sets the fax number of the service sta t ion. The number is printe d on the
counter list when the "Meter Cli ck Charge" is enabled. User can send a fax message wit h
the counter list.
Auto Remote Firmware Update (ARFU) Settings
Specify ARFU setti ngs as re quired.
Operating Conditions:
counting
• ARF U requires connection to the I nternet. Be sure to get permission from the cu st om er b ef o re se tti ng
ARF U up. Otherw ise, it m ay cause a n inciden t .
• ARF U is available only for machi nes that contain a HDD. If t he machine does not have a HDD, an
optio n HDD must be installed.
• The connection is one-way, so the use r’s data canno t be ac cessed from the firmware server.
Procedure:
1. ARF U enable set t ing
2. Server connection check
3. Prohibi t ed d at e an d tim e se tt ing
(1) Enable ARFU
1. Set SP5-886-111 (Auto Update Setting) to "1 (ON)".
1: ON / 0: OFF (Default)
To download the fi rmware only using SFU (Smart Firmware Update), and not by ARF U, specify the
settings as follow s:
- SP5-886-111(Auto Update Setting) to "0 (OFF)"
- SP5-886-115 (SFU Auto Download Setting) to "1 (ON)"
47
Page 54
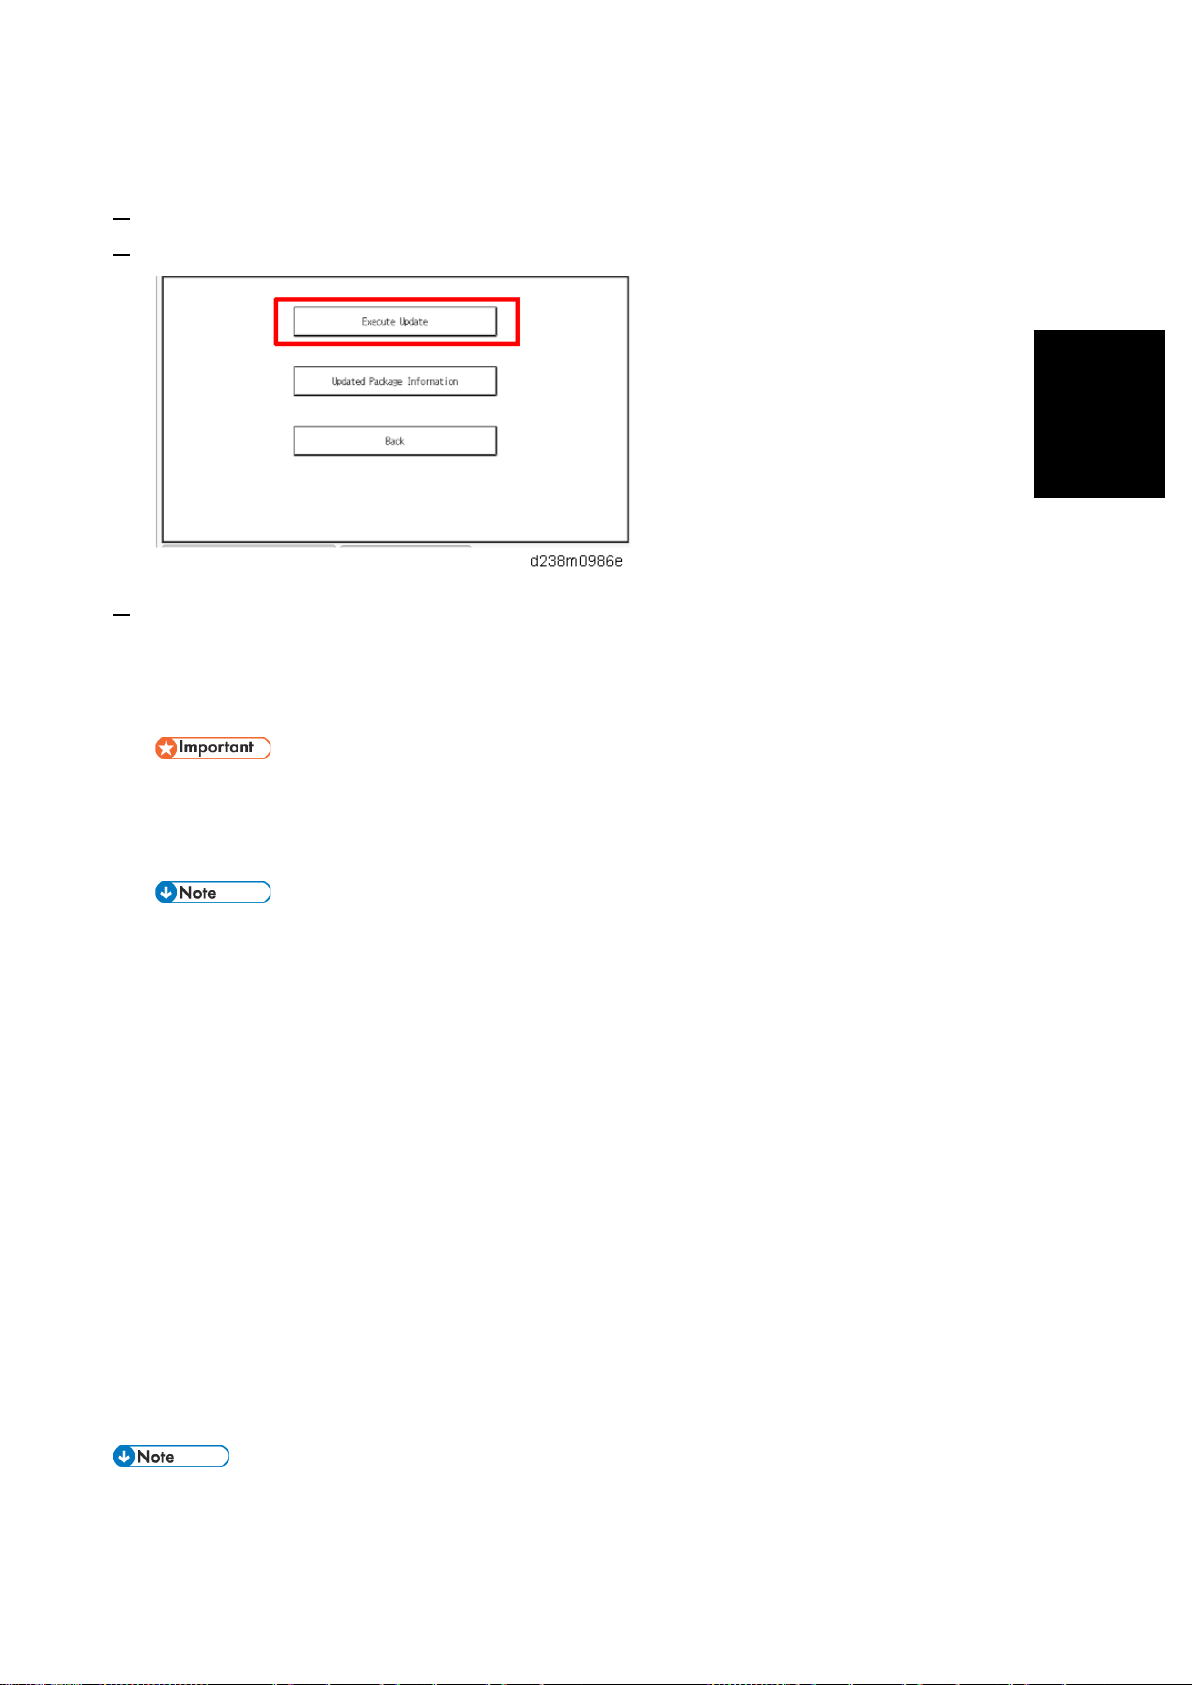
Main Machine Ins t allation
Installation
(2) Server connection check
1. Enter the SP mode.
2. Press [Firmware update] > [Update] > [Execut e update].
3. Check if one of the following messages appears : "Wil l you download th e latest package Ver *** and
update?" or " The installed package is the latest v ersion.".
If the message a ppears, it is possible to ex ecute ARFU. Press “No ” and clos e SP mode to complete th e
configuration.
The update will run immediately if you pr ess “Yes” at the m essage " Will you download the latest package
Ver *** a nd u pda te?" The update cannot be c anceled if it is run by SFU . (The update can be canceled if
ARF U is used.)
SP5-886-116 (Auto Update Proh i bit Term Setting) display s t he scheduled date and time of the next ARFU.
If erro r code 71: [Network connect ion error] appears when you click “ Execute update”, see
troubl eshooting below.
(3) Prohibited date and time setting
Ask the customer for the prohibi t ed times and days of the week for ARFU execution and set the following as
needed. The d efault prohibited time is from 9 a.m. to 5 p.m. and there is no pro hibited day.
• SP5-886-112 (Auto Update Prohibit Term Setting) Default: 1 (ON)
• SP5-886-113 (Auto Update Prohibit Start hour) Default: 9
• SP5-886-114 (Auto Update Proh i bit End h our) Default: 17
• SP5-886-120 (Auto Update Prohibit Day Of Week Setting) Default: 00000000 [00H]
Set th e bits for the days of the week to prohi bit up d at i ng.
Prohibi t ed (Monday - Sunday): bit 7, Monday: bit 6, Tuesday: bit 5
Wednesday: bit 4, Thursday: bit 3, Friday: bit 2, Saturday: bit 1, Sunday: bit 0
e.g.) Prohibited on Mon., Fri., Sat., and Sun.: 01000111 [47H]
They can be s pe cif i e d also via Web Image Mo nitor if logged i n as the ma chine administrator from the device if
SP5-886-111(Auto Update S etting) is set to "1 (ON)". For details, see Specifying t he Time and Day of the W eek
48
Page 55
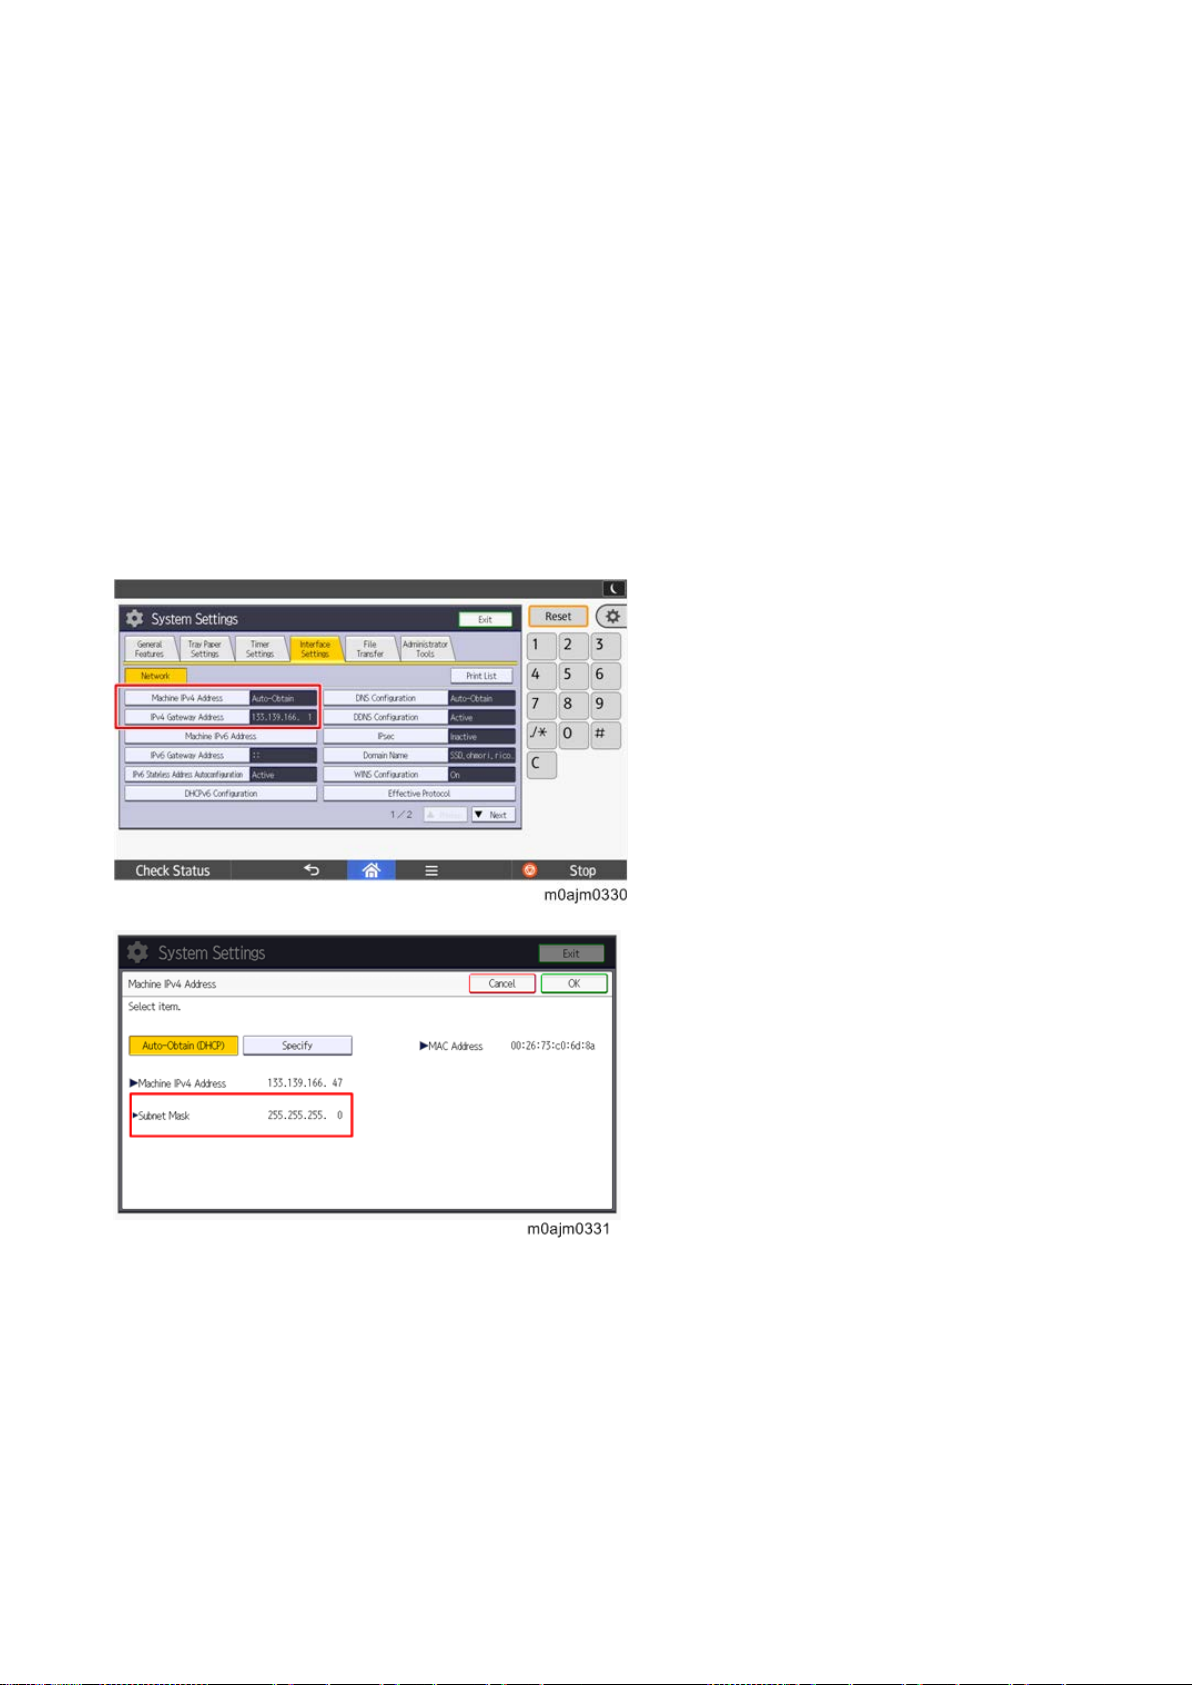
Main Machine Ins t allation
to Prohibit Updating via Web Im age Monit or.
Troubleshooting: If error code 71: [Network connection error] appears
If erro r code 71: [Network connect ion error] appears when you click [ Firmware update] > [Update] > [Execute
update] in SP mode, check the following .
• 4-1. IPv4 address, Subnet mask of the machine and Gateway IPv4 address
• 4-2. IPv4 address of the DNS server
• 4-3. Proxy server settings
• 4-4. Encryption l evel setting SP
4-1. IPv4 address, Subnet mask of the machine and Gateway IPv4 add ress
Check the machine’s IPv4 address, s ubnet mask, and gateway IPv4 address .
(In User Tools > Machine Features > System Settings > Interface Setti ngs)
4-2. IPv4 address of the DNS server
Check the DNS IPv4 address and check th e connect ion.
(In User Tools > Machine Features > System Settings > Interface Setti ngs > DNS configuration)
49
Page 56
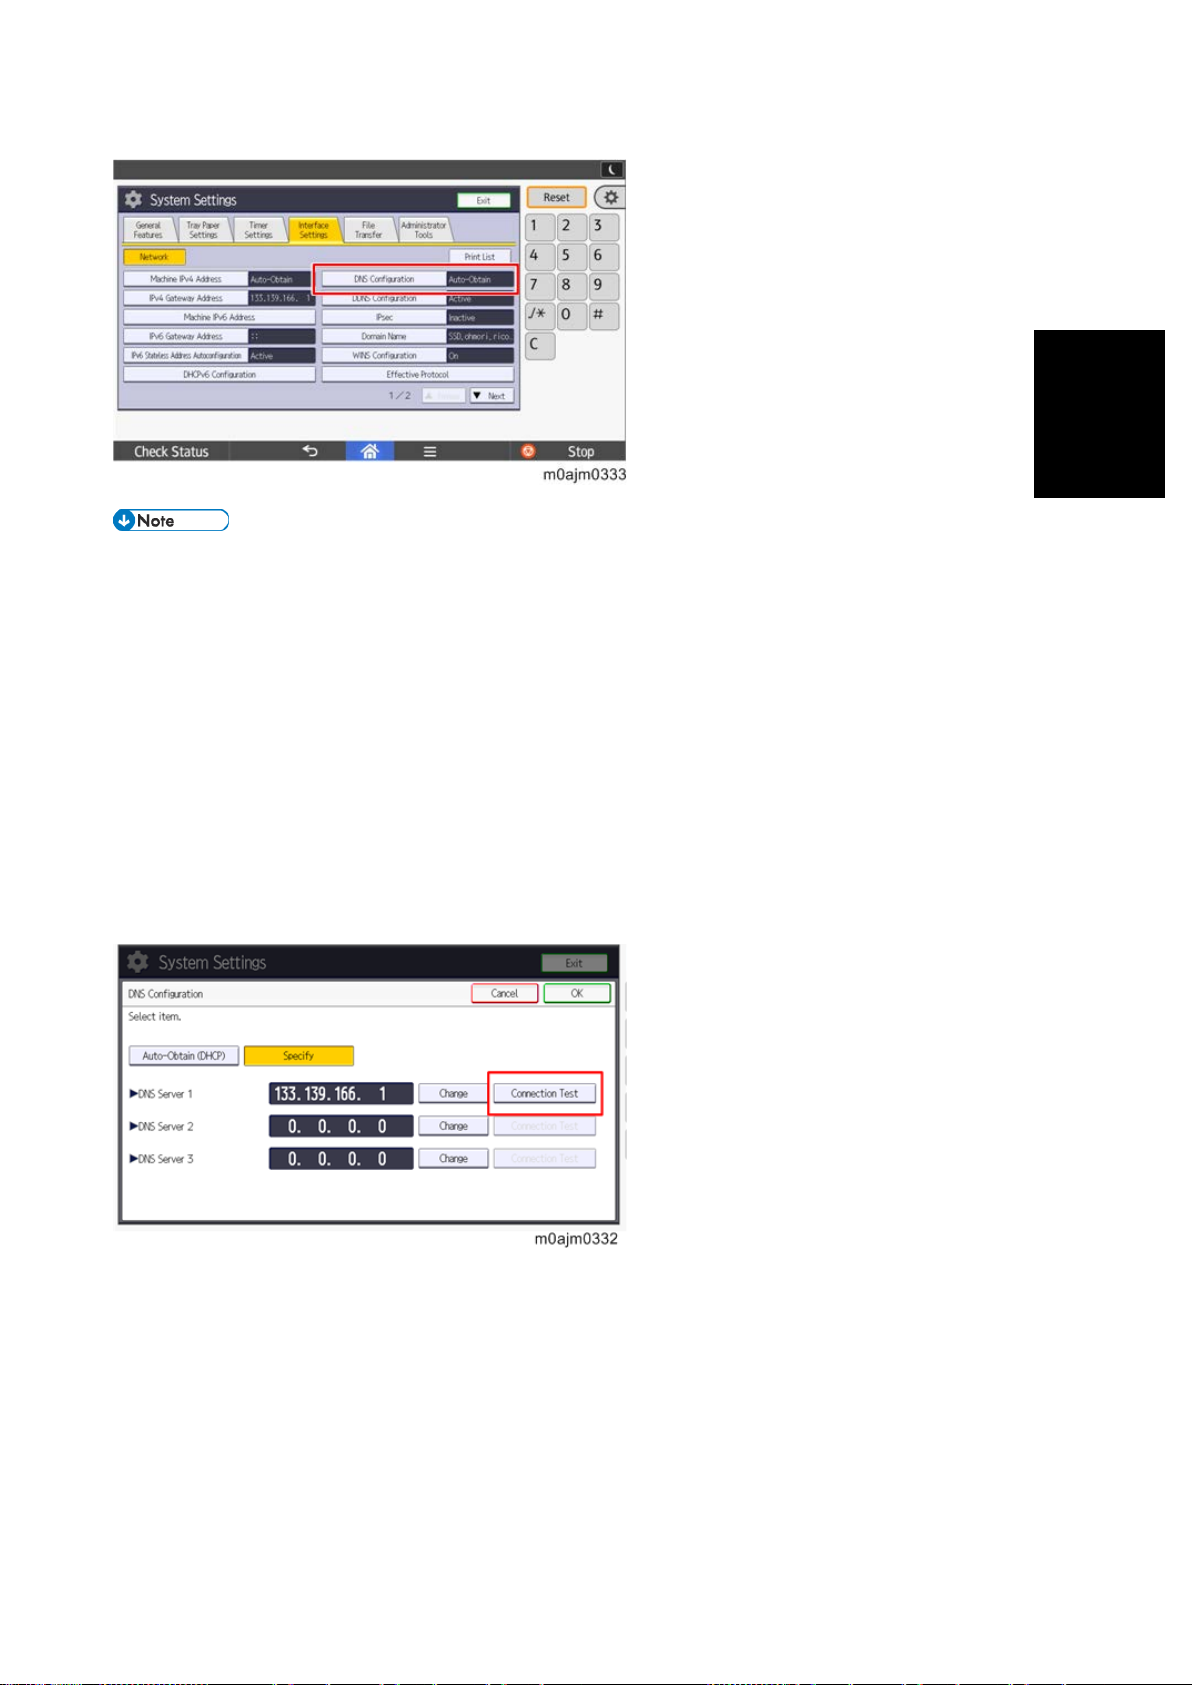
Main Machine Ins t allation
Installation
How to find the I P address:
Ask the customer to tell you the IP addr ess of the D NS server. If the customer does not know it, ask the
customer to check the IP address by one of the following ways:
1. Run "ipconfig / all" at the command prompt on the computer, then check t he IP address of the DNS server .
2. Ope n the IPv4 properties dialog box on the computer, then check whether the IP address setting of the DNS
server is manual or automatic.
• If the s etting of the DNS IP address is au t omatic , select [Auto-Obtain (DHC P) ] at the MFP machine's
DNS settings.
• If the s etting of the DNS IP address is manual, sel ect [Spec i fy] and s pecify the DNS serv er 1 to 3.
• Press [Co n ne c ti on Tes t] to che ck the c on ne cti o n w it h the in p ut a ddr es s. Mak e su re th a t it is con n ec t ed
successfully.
4-3. Proxy server setti ngs
Check the user’s netw ork environment and, as required, specify t he proxy server settings in the following SPs:
• SP5-816-062 (Use Proxy)
1: Used / 0: Not u sed
• SP5-816-063 (Proxy Host)
• SP5-816-064 (Proxy PortNumber)
• SP5-816-065 (Proxy User Name)
50
Page 57

Main Machine Ins t allation
• SP5-816-066 (Proxy Password)
If access to the external server is restricted, request the net work administrator (cus tomer) t o permi t t he
foll owing FQDN name for communication.- FQDN: p-rfu-ds2.support.ricoh.com
They can be specified also via Web Image Monitor if logged in as the m achine a dministrator fro m the device if
SP5-886-111(Auto Update S etting) is set to "1(ON)". For details, see Specifying t he Time and Day of the W eek
to Prohibit Updating via Web Image Monitor.
4-4. Encryption level setting SP
Check SP5-816-087 (Remote Servic e: CERT:Macro Ver) and make sure the encryption level i s [2]: 2048 bit.
If SP5-816-087 is [1]: 512 bit, s pecify t he settings as follows:
1. Initialize the encryption level by executing S P5-870-003 (Common Key Info Writing: Initialize)
2. Rewri te as 2 048 bi t in SP5-870-004 (Common Key Info Writing: Writing 2 048 bit).
3. T ur n th e mai n sw i tch off and on.
Make sure to check the conditions before changing the encryption level and d o the corresponding workaround.
ARF U uses the same certificate as @ Remote to communicate with the Global Server. This may cause failure i n
connecting with the Center Se rv er, if the dev ic e is to be in st al l ed in th e fol l ow i ng co n dit i on s.
Conditions
1) Customer uses RC Gate Type BN1.
RC Gate T ype BN1 does not support 2 048 bit encryption level communication w i th Ricoh devices (HTTPS
Manag ed devic e) . Therefore, the device c ann ot be r eg is te r ed u nde r RC Gate Ty pe BN 1.
2) Ricoh device ( HTTPS Managed) that supports only 512 bi t encrypti on leve l i s regis tered as an external
appliance.
Only one encryption level can be set for an external appliance for its communication with imagi ng devic es. If a
512 bit encrypt i on level Ricoh dev ice (HTTPS Manag ed) is registered, the external appliance a s well as other
device s m ust al s o us e 512 bi t enc ryption ev en if 2048 bi t e ncr y pti o n is su pp o rt ed on t hos e dev i c es .
Workaround
For Condition 1:
Advise your customer to change t o the latest appl i ance that supports 2048 bit encryption level communication.
For Condition 2:
1. Manage the device with embedded RC Gate (2048 bi t)
2. Exclude non-supported dev ices (i.e., those devices that cannot be changed from 512-bit to 2048-bit) from the
external appliances, then change the encr yption level of external applianc es and all managed devices (from 512
bit to 2048 bit).
51
Page 58
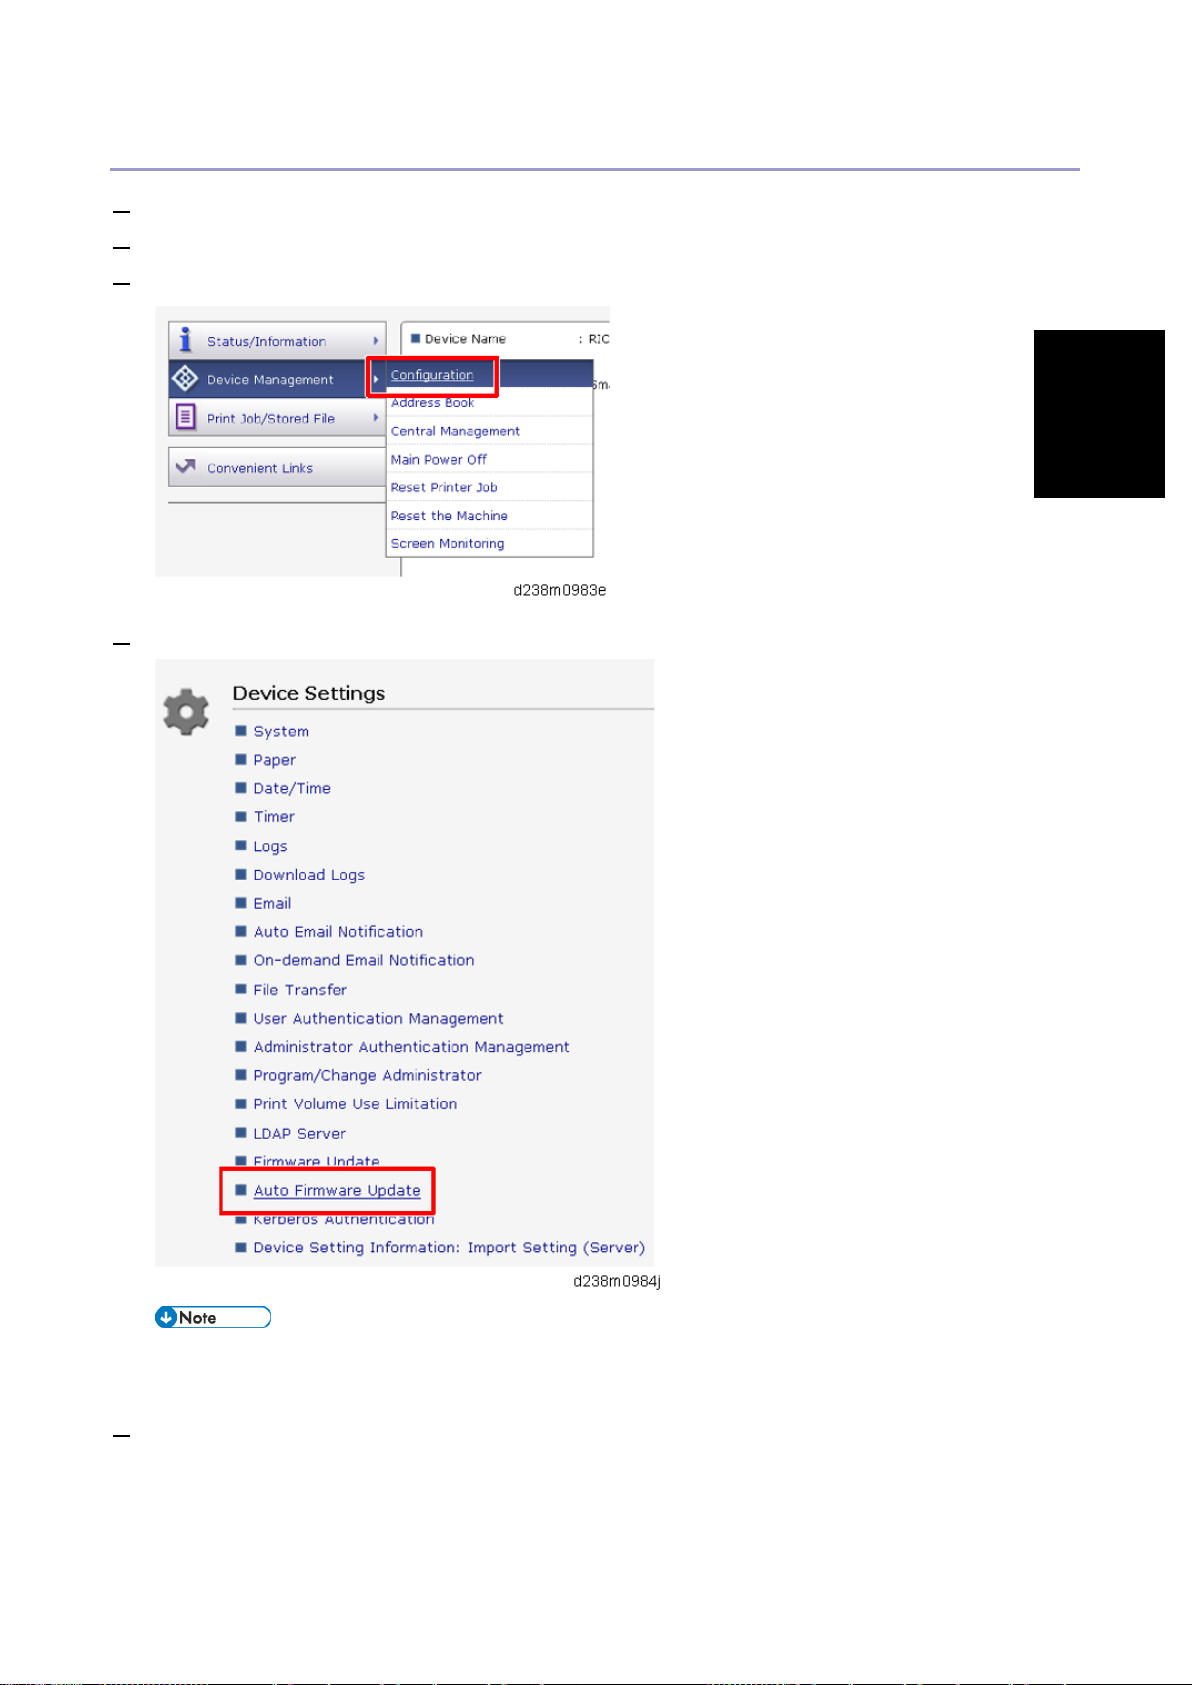
Installation
Specifying the Tim e and Day of the Week to Prohibit Updating via Web Im age Monitor
1. Start Web Image Mon i tor.
2. Log in as the machine administrator.
3. Point to [Device Ma nagement], and then click [Configuration].
4. Click "Aut o Firmware Update".
Main Machine Ins t allation
Turn the main power OFF and back ON again after setting SP5-886-111 (AutoU pd at eS e tt ing) to "1 (ON)".
"Auto Firmware Update" will app ear in the menu list of Web Image Mo nitor.
5. Specify the t i mes and days of th e week to prohibit updating .
Select the check boxes of the applicable days of the week to prohibit u pdating o n that day
52
Page 59
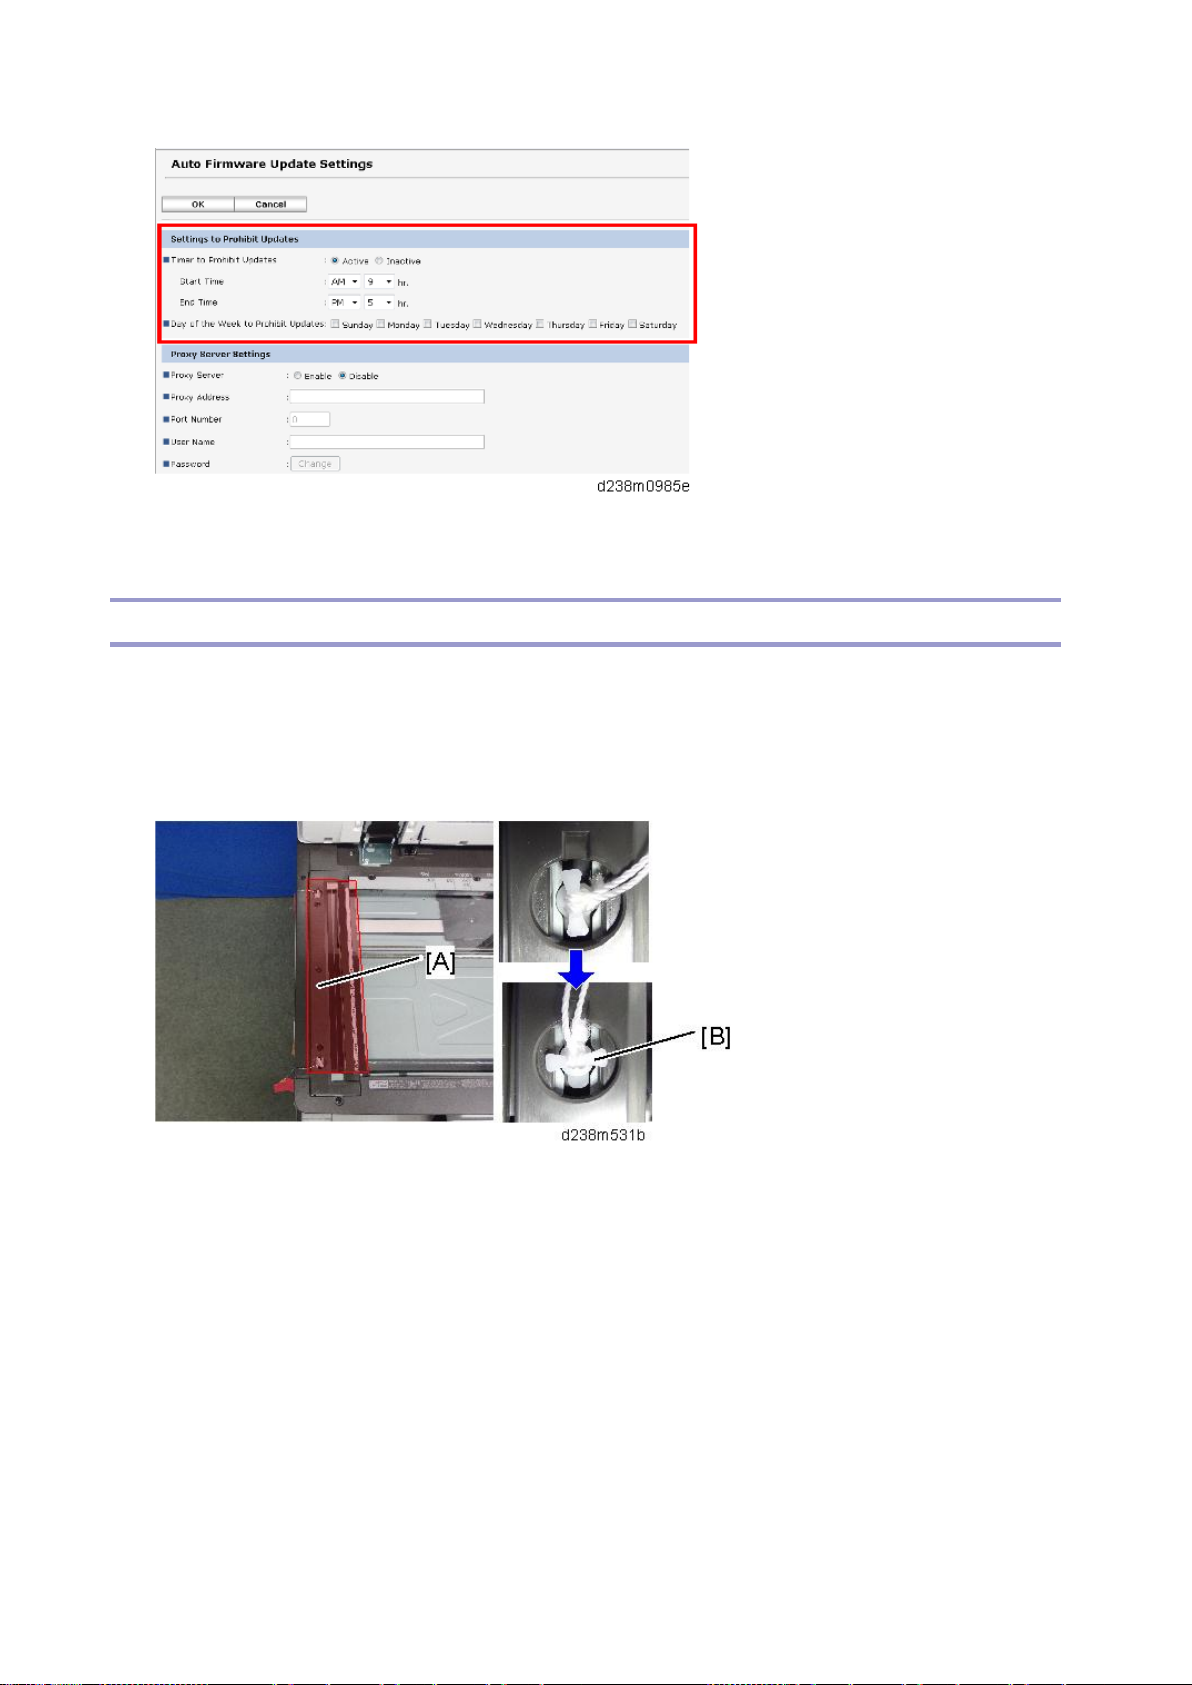
Main Machine Ins t allation
Moving the Machine
This section shows you how to ma nually move the machine from one floor to another floor. B efore turning off
the main power, mak e sure 100% is shown as available memory on the screen if the fax option i s installed.
• Move the scanner carriage to the correct position [A] with SP4-806-001 (Supe r SP mode), and reattach t he
scanner shipping locks at the lock positi on [B].
• Turn off th e main power.
• Disconnect th e power plug from t he outlet.
• Close all covers and paper trays , includi ng the front cover and bypass tray.
• Remov e the optional feed tray w hen lifting the main machine for movi ng it to another fl oor.
• Keep the machine level and carry i t carefully, taking care not to shake or ti lt it, and protect the machine
from strong sh ocks.
53
Page 60
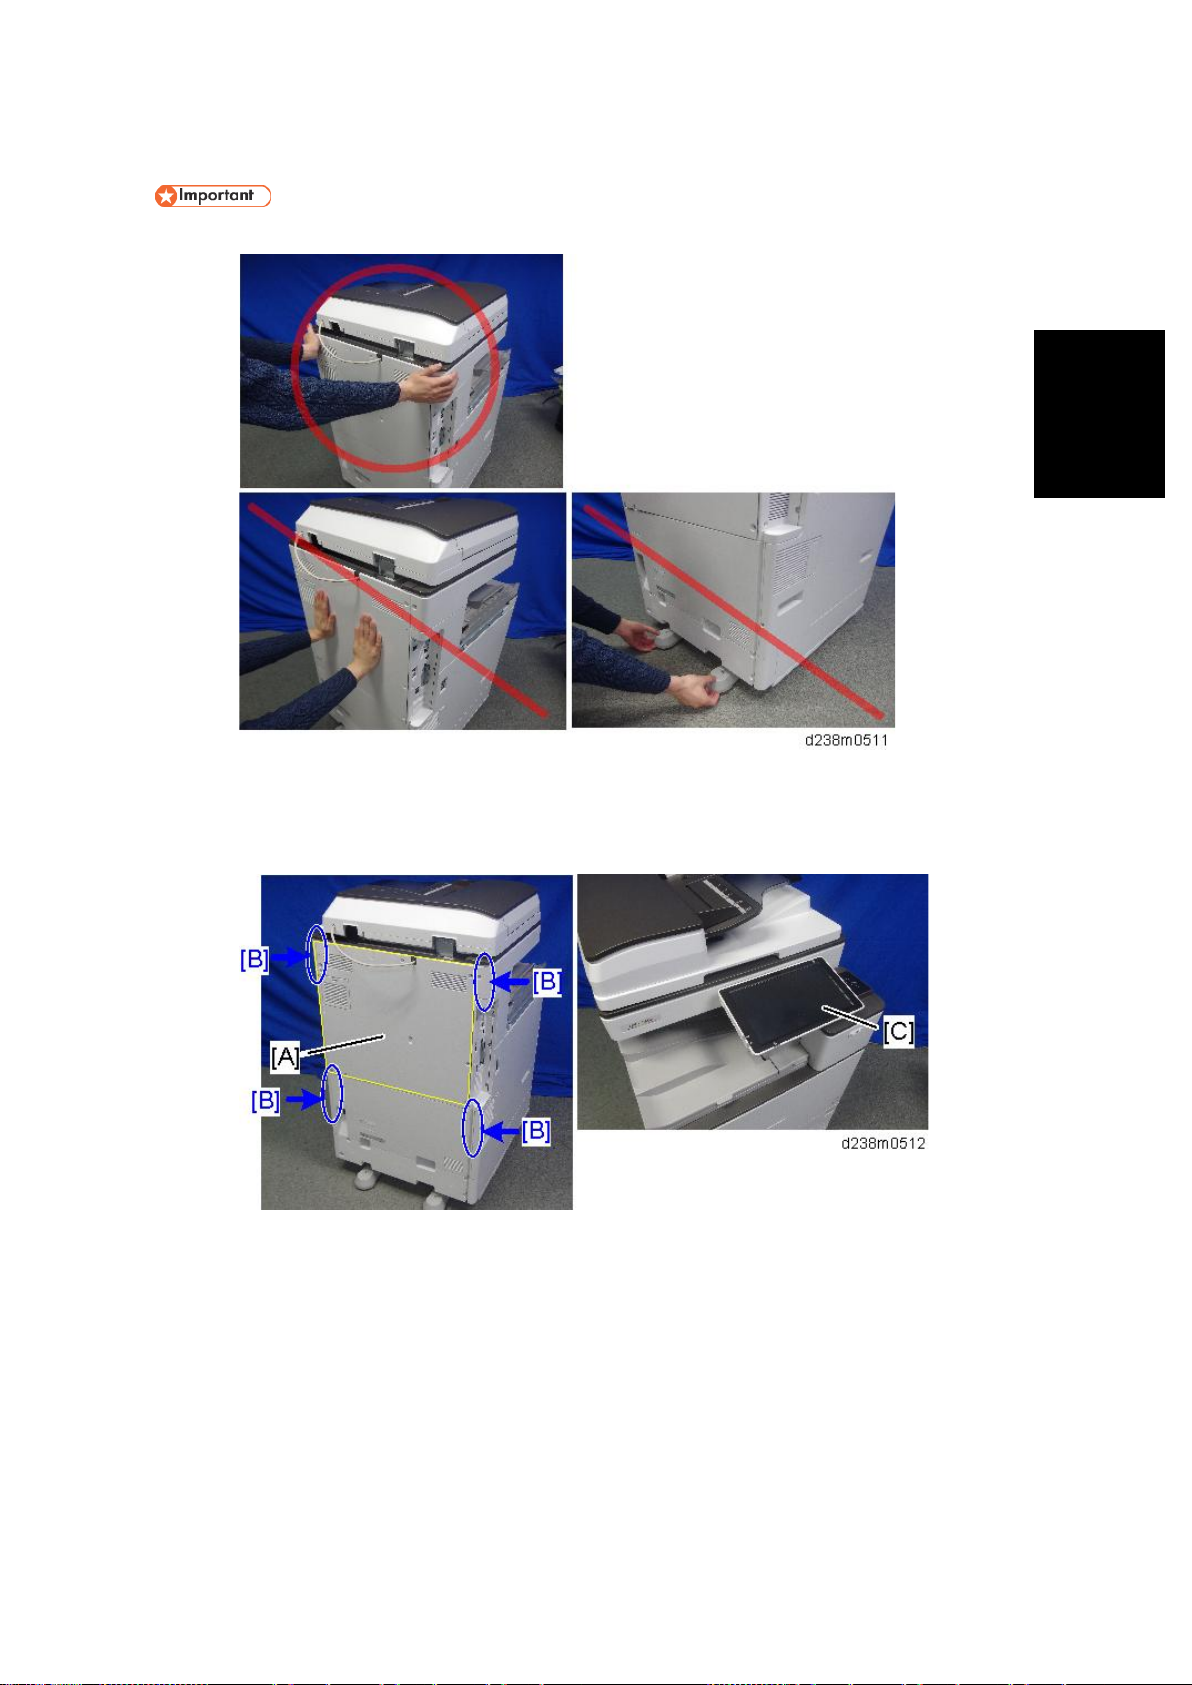
Installation
• When moving the machin e, do not pr ess again st the ADF.
• Do not push the center pa r t of the re ar cover. Do not hold th e covers of the stabilizers.
Main Machine Ins t allation
• Do not put hard pressure on the rear cover [ A] when m oving or picking up the machine as it is
fragile. This also applies to th e operation panel [C]. Hold the areas [B] when moving the
machine.
54
Page 61
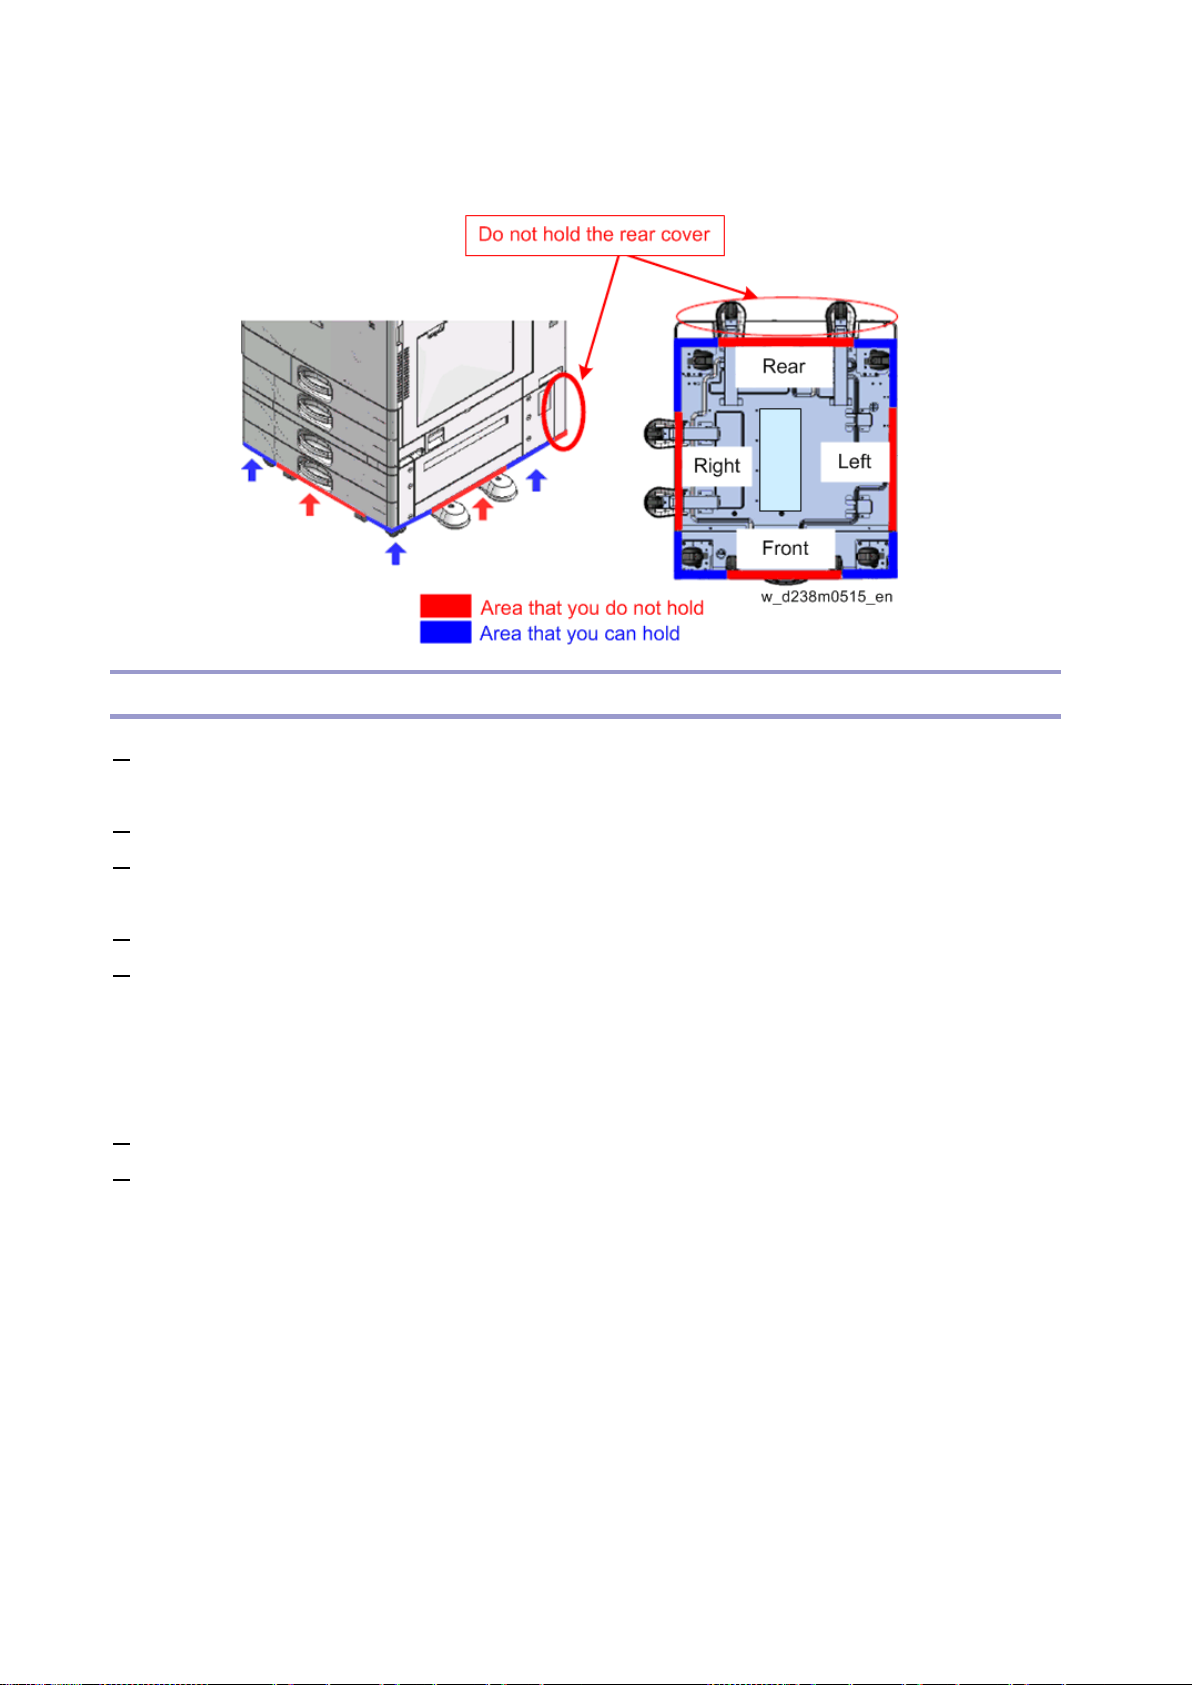
Main Machine Ins t allation
• Hold 4 corners on the bottom base when holding the machine with the o ptional paper feeding
tray j oined to the main machine. Do not hold any other parts.
Transporting the Machine
1. Do SP4-806-001 (Super SP mode) to move the scanner carriage from the home po s ition. This prev ents dust
from falling into the machine dur ing transportation.
2. Remove the toner car tridges. This pr events toner leaks, which are caused by vibration during transport.
3. Mak e s ure t her e i s no pap er lef t in t he pa p er tr ays. Then fi x dow n th e bo tt om pl at es wit h a she e t of pap e r
and tape.
4. Take out the sc anner stay from inside the f ront cov er and install the scanner stay.
5. Do one of the following steps:
• Attach sh ip p ing ta p e to the c ove rs an d doors.
• Shrink-wrap the machine tightly.
Cautions upon Las hi n g
1. Position the machine so that its left side faces the wall . Make sure to put cushioning in between.
2. Fasten the b elt at the ridge line with cushioning.
55
Page 62
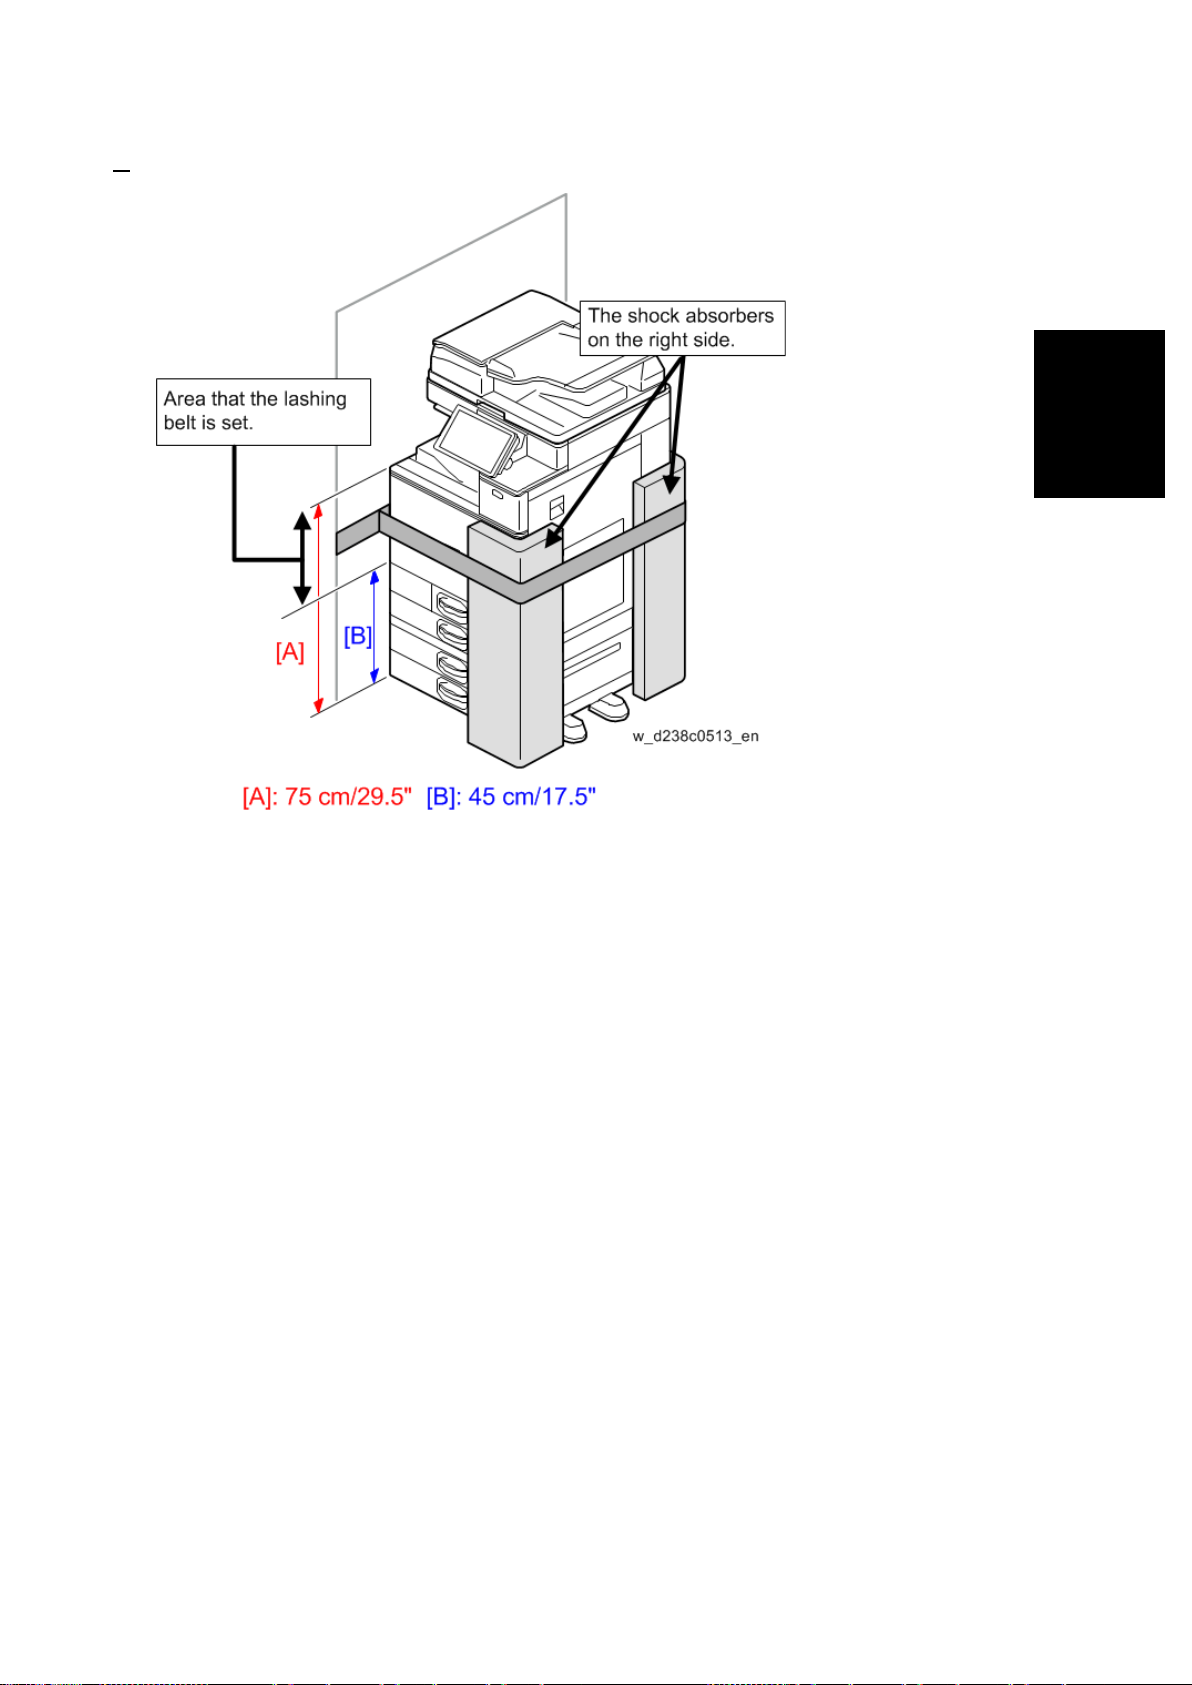
Main Machine Ins t allation
Installation
3. Make sure that the belt is over t he front c over (at 45 - 75cm height from the ground).
56
Page 63
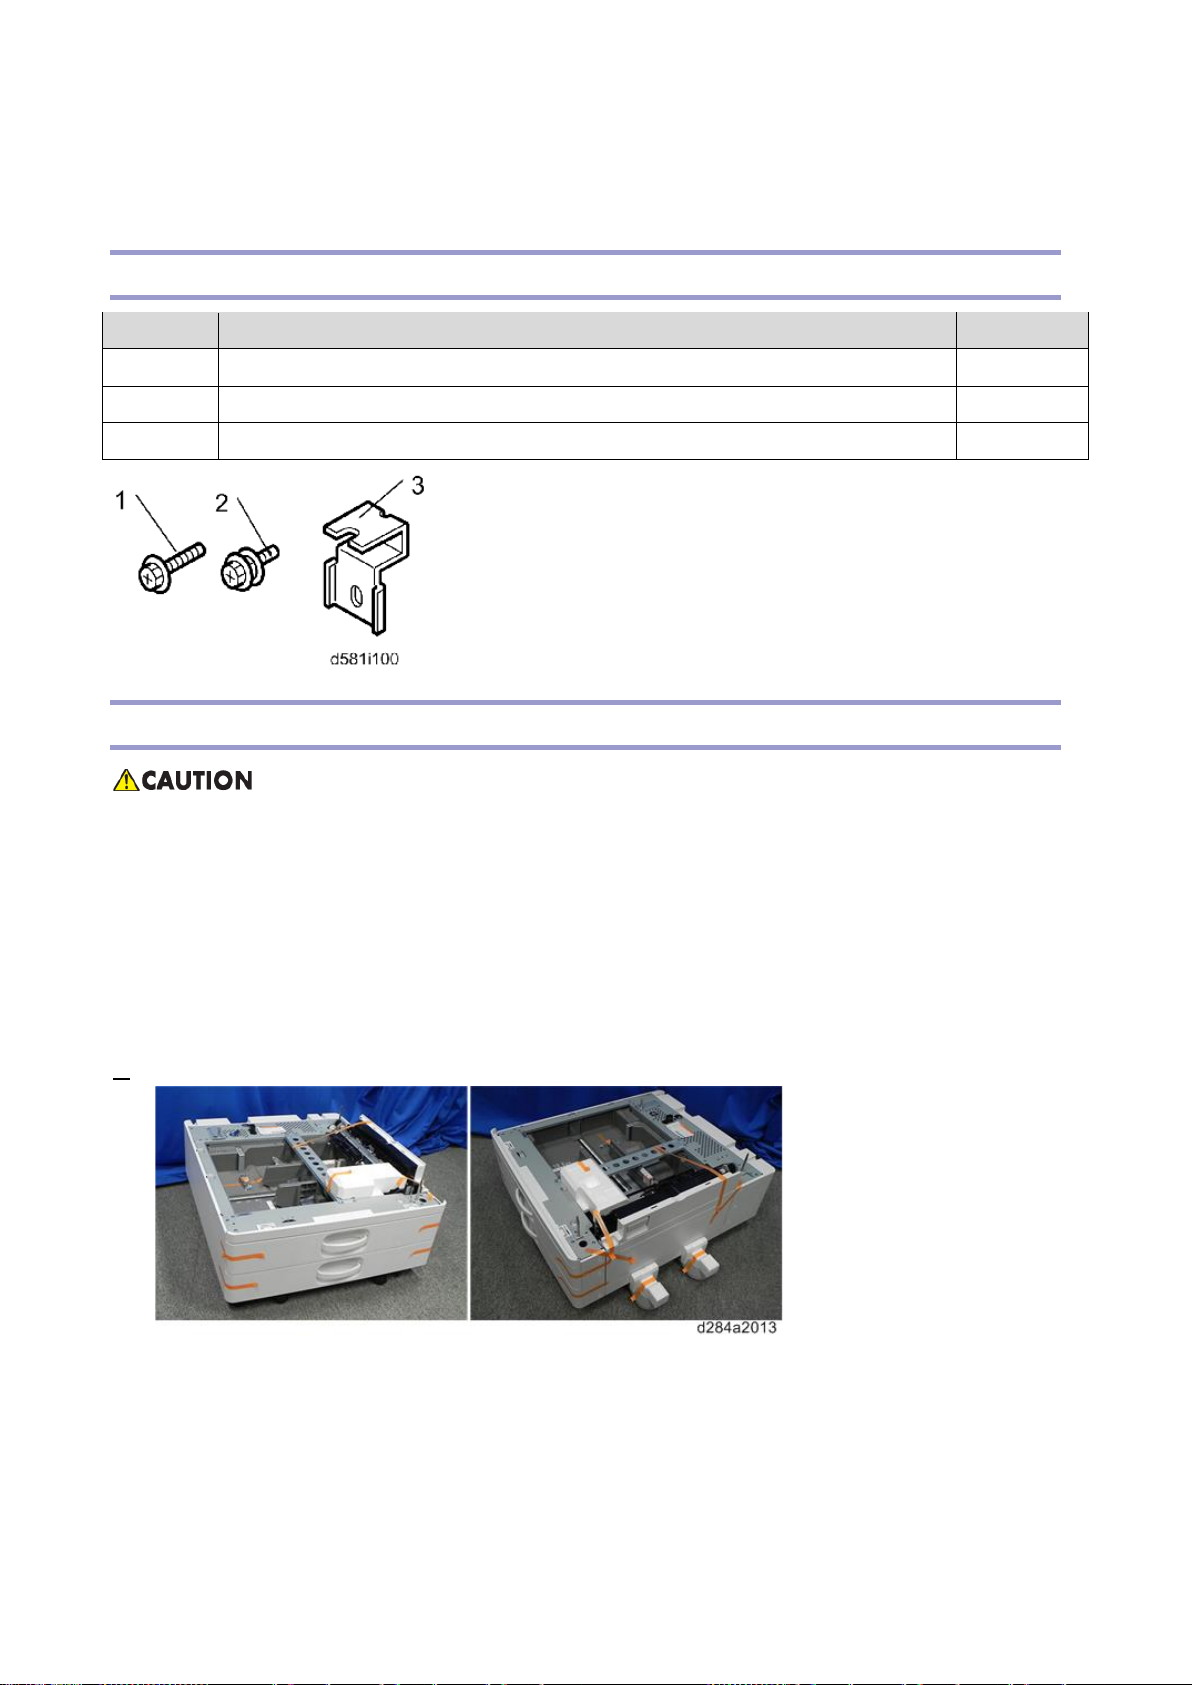
Paper Feed Unit PB3210/ PB3220
Paper Feed Unit PB3210/ PB3220
Accessory Check
No. Description Q’ty
1 Screw s (M 4 × 10 ) 2
2 Screw with Spring Washer (M4 × 10) 1
3 Securing Bracket 2
Installation Procedure
• The mac hi ne sho ul d b e hel d at the correct locations and lif t ed gently.
• If it is lifted without care, handled carelessly or dropped, it may r esult in an injury.
• When installing this opt ion, tur n the machine power OFF, and unplug the power supply cord from the
wall socket.
• If this option is installed with t he power on, it may result in an elect ric shock or a malfunction.
• Be sure to join the machine to the paper fee d unit so as to prevent equipment from falli ng over.
• If they are not connected, they may move a nd fall over, resulting in injury.
1. Remove the orange tape and re tainers.
57
Page 64
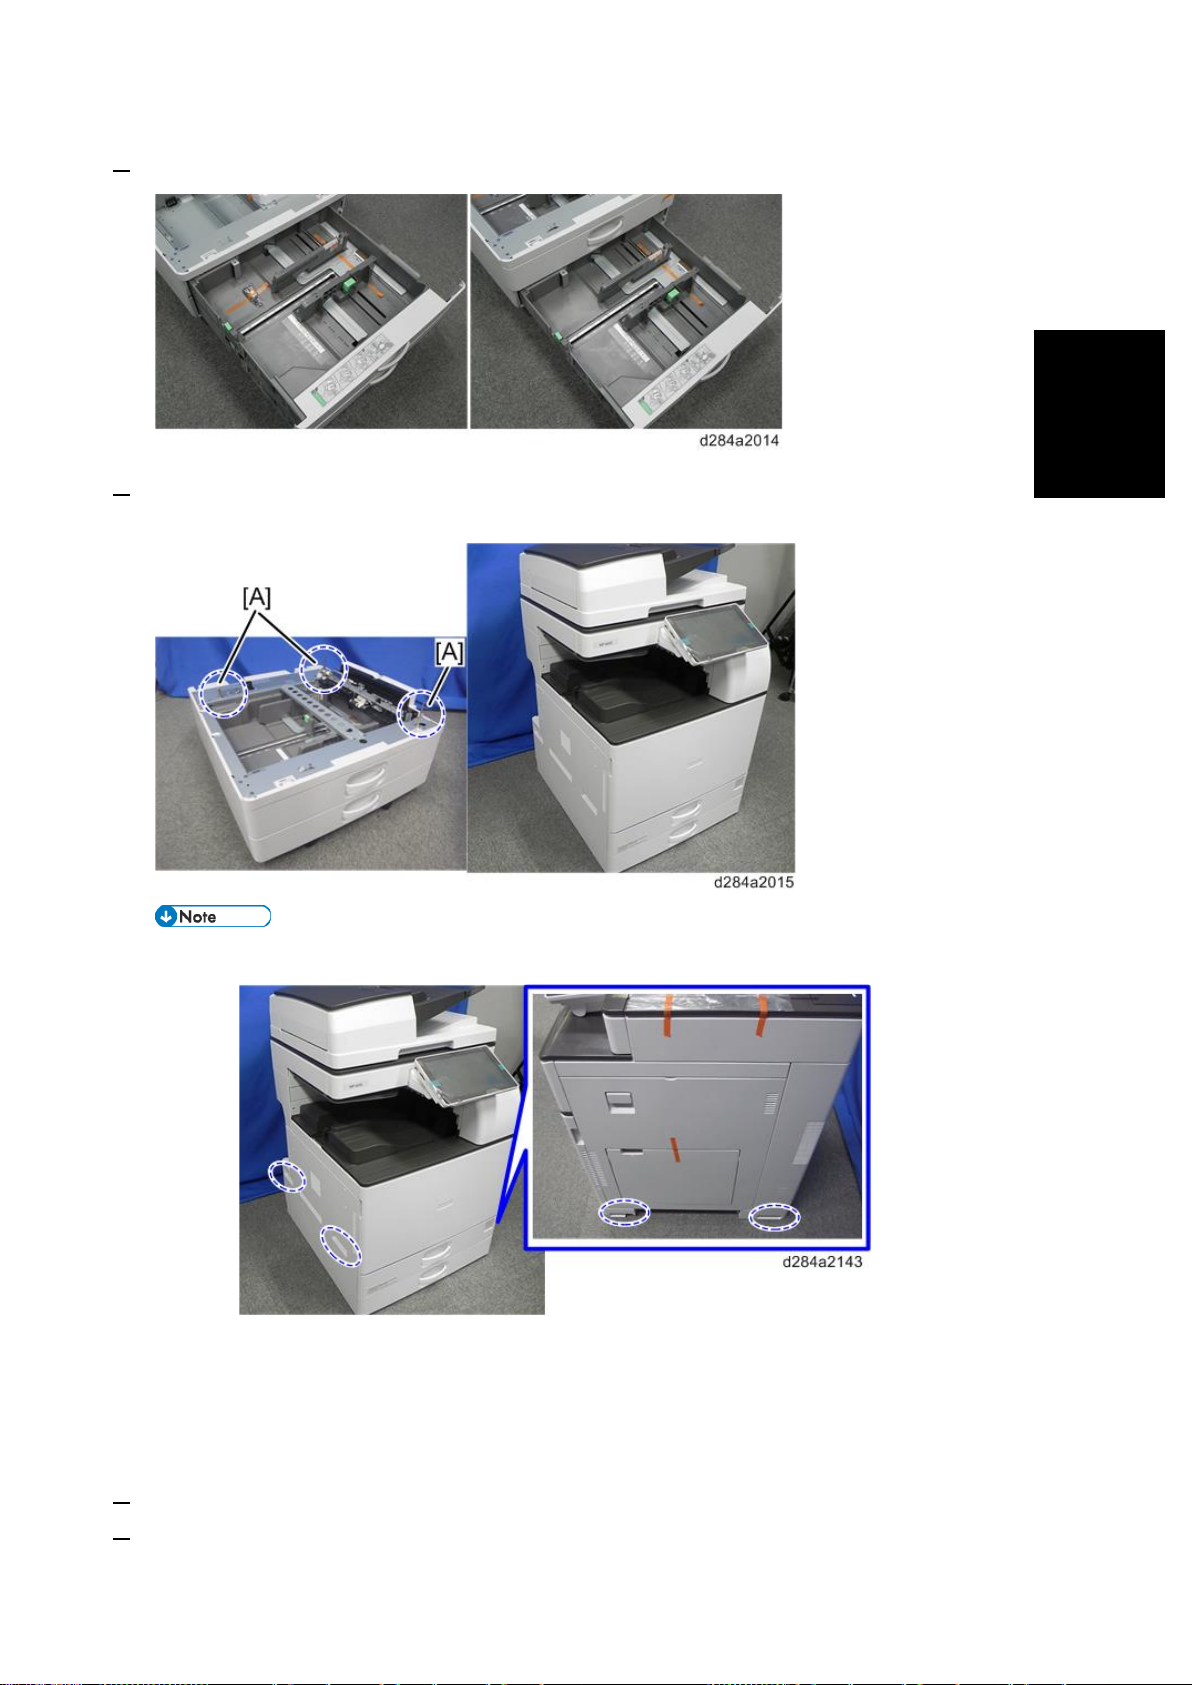
Paper Feed Unit PB3210/ PB3220
Installation
2. Remove the item s pr ov i ded ( fi xi ng sc r ew s, et c. ) f rom the pa ck ag e.
3. Holding th e grips on the machine, align it with the locati ng pins [ A], and place the machine o n the pape r
feed unit.
• When you lift th e machine, hold the correc t l oca ti on s.
• Do not hold any other parts of the machine when lifting it, because this may cau se the machine
to deform .
• Do not put the machine down on the paper fe ed unit as a temporary resting place. This may cause
the paper feed unit to deform. Always connect the machine and paper feed unit properly.
4. Pull out the 2nd paper feed tray.
5. Using a securing bracket as a screwdriver, f ix the machine to the feed unit (spring washer: screw : M4×10:
58
Page 65
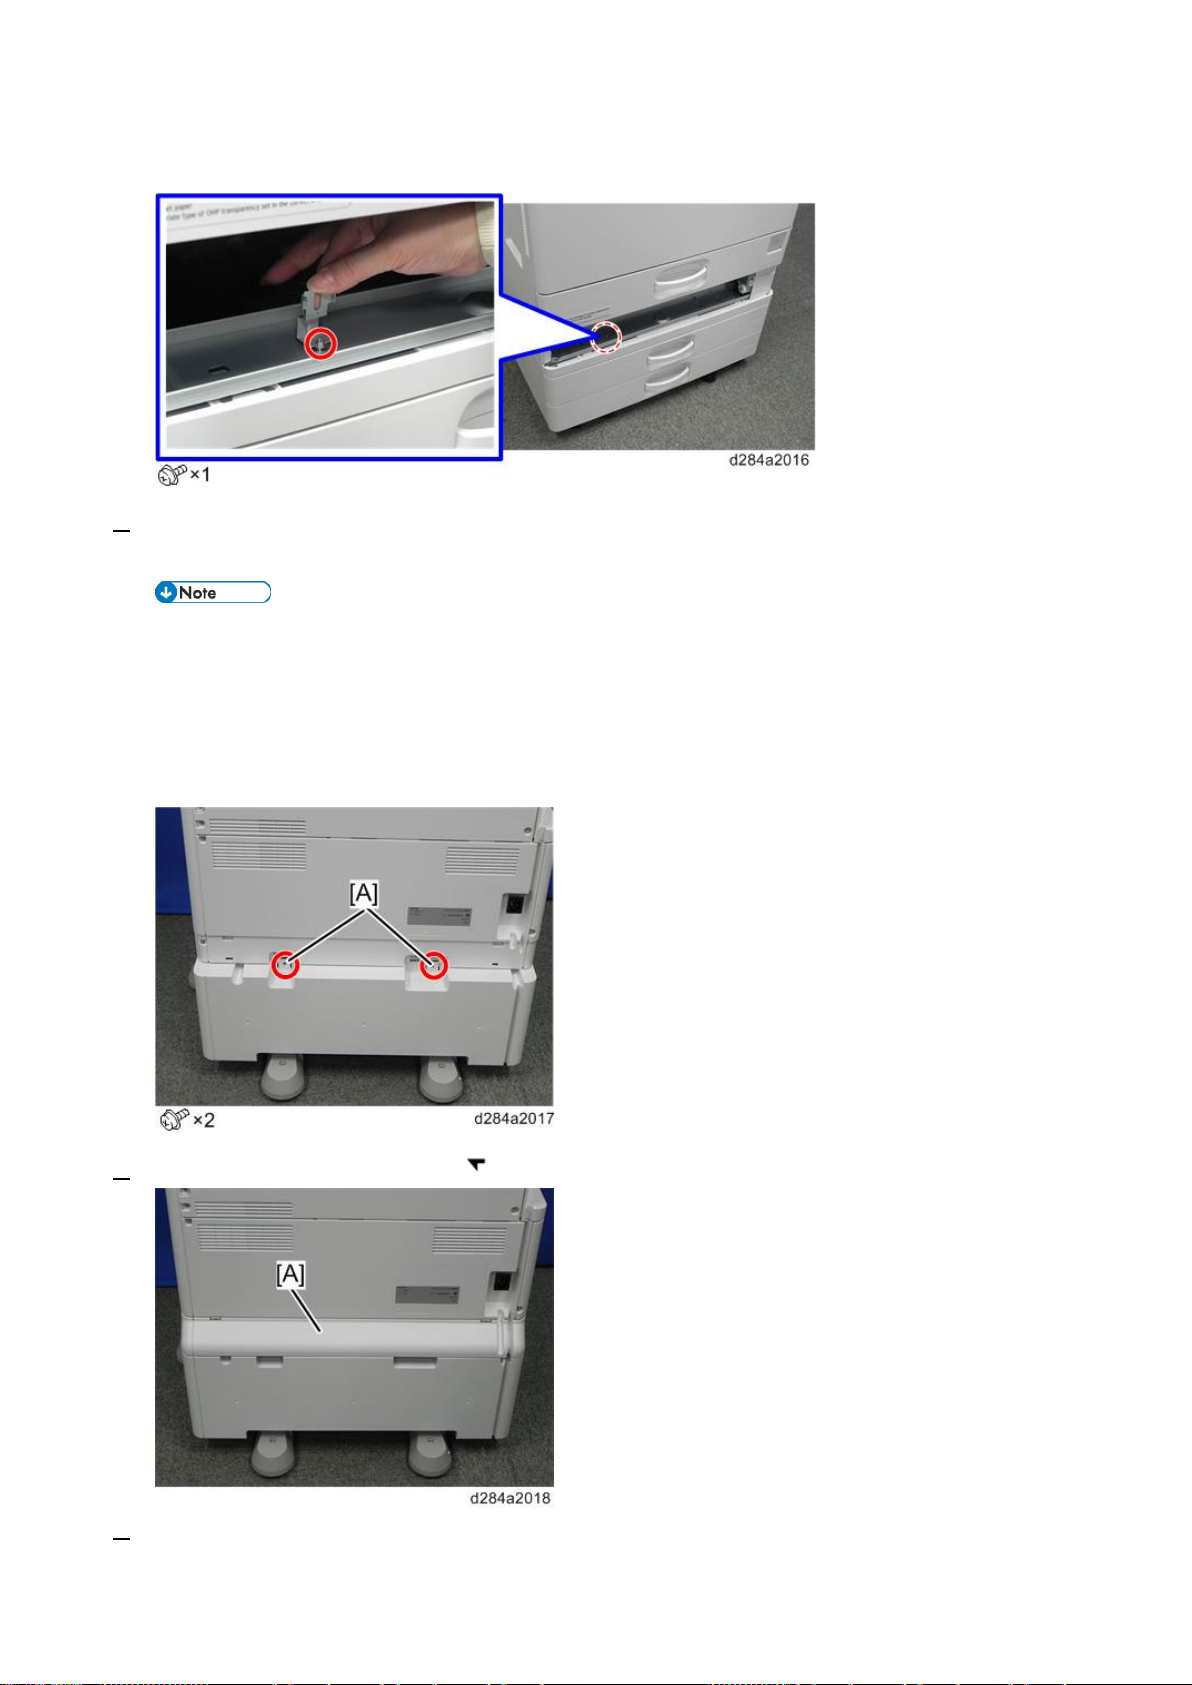
Paper Feed Unit PB3210/ PB3220
1).
6. Attach the securing brackets [A] to two positions on the left and right at the rear of the machine (screws: 1
each).
• If the anti-cond ensation heater f or this optional t r ay is to be installed, conn ect its heater harn ess
prior to thi s st ep (s te p 6) (Tray H eat er f or Pap er F ee d Uni t PB 3 21 0 / PB3 22 0 ).
• If “LCIT RT3030” is to be i nstalled, connect its harne ss prior to this step (step 6 ) (LCIT RT3030
(D696)).
7. Attach the rear lower gap cover [A] ( x 2)
8. Return the p aper fee d t ray to the machine
59
Page 66
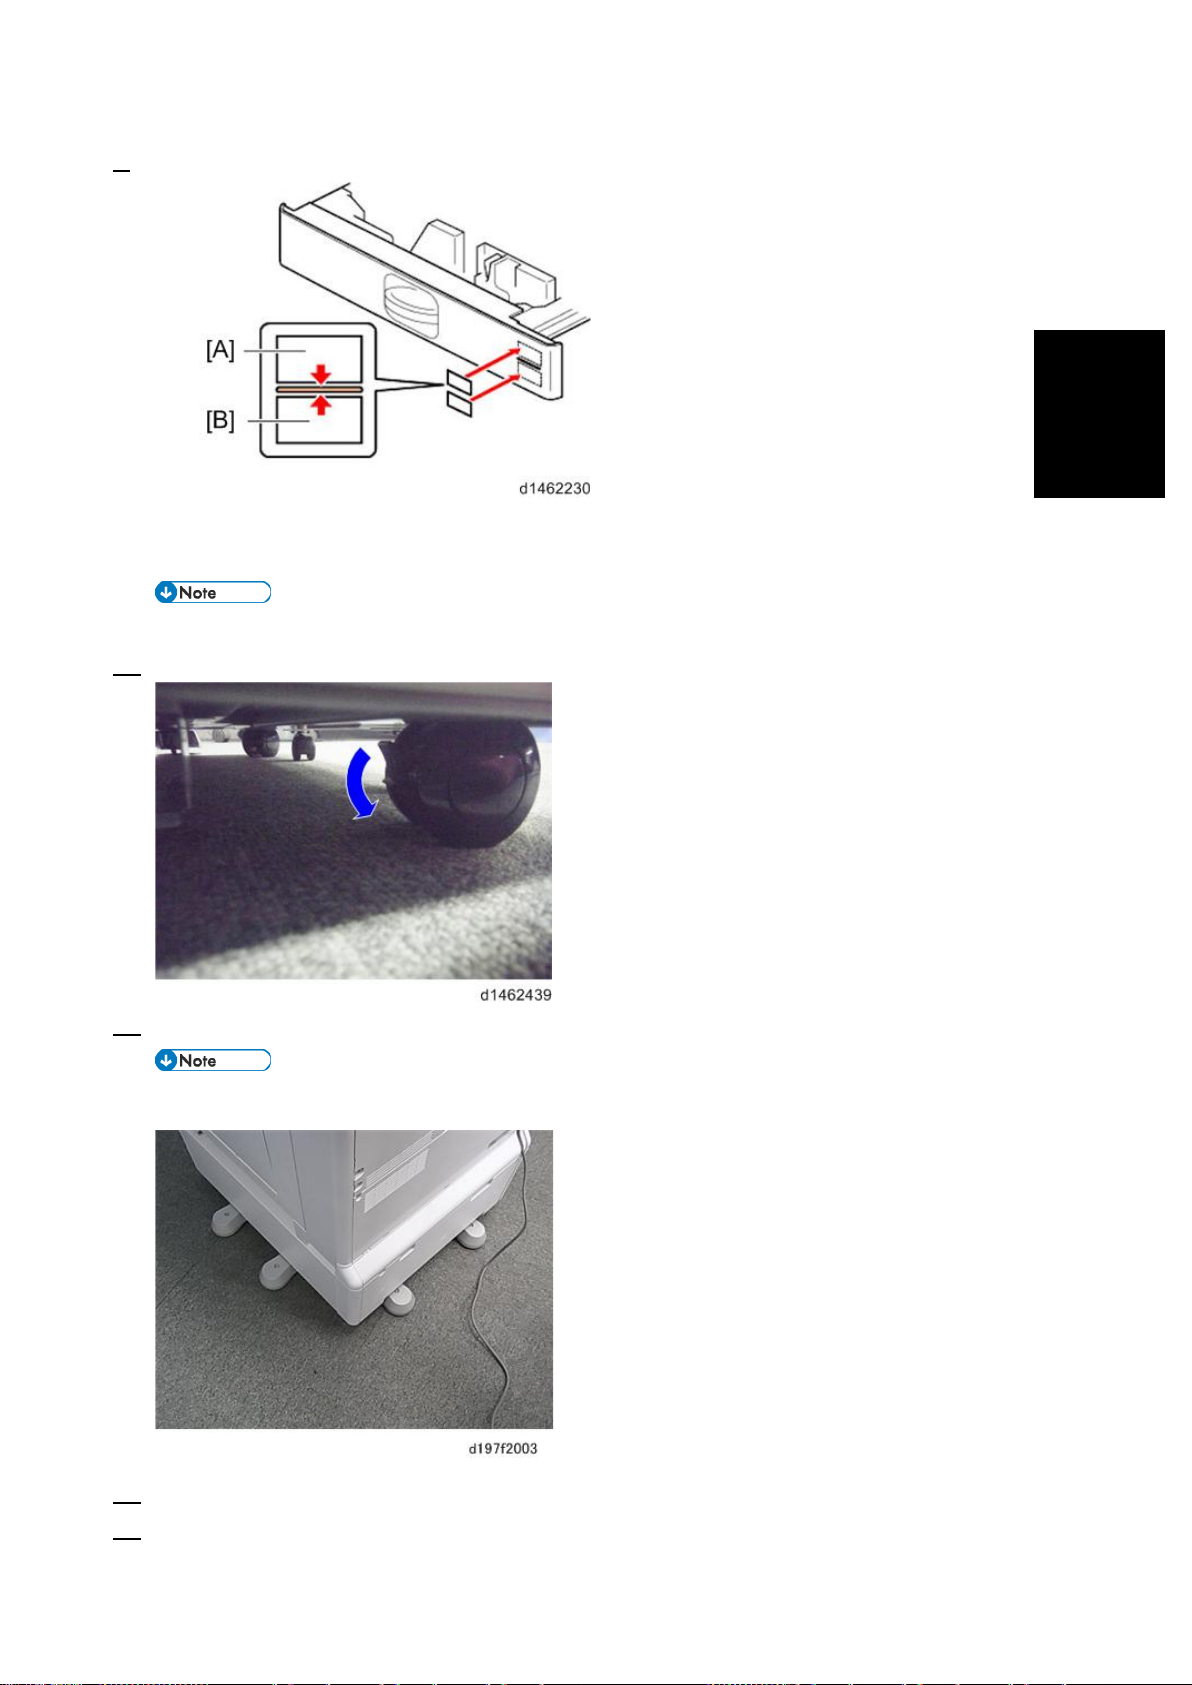
Installation
9. Attach the d ecals as shown below.
[A]: Tray number decal
[B]: Paper size decal
• The tray num ber decal and p aper size decal are packaged togeth er with the machine.
10. Lock the casters of the paper feed uni t .
Paper Feed Unit PB3210/ PB3220
11. Connect t he power cord to th e machine.
• Stabil izers are attache d to the machine when it is shipped. Do not remove them.
12. Turn t he main power ON.
13. Set the pa per, and check that the paper size set in the paper feed tray is displayed on the operation panel .
60
Page 67

Paper Feed Unit PB3210/ PB3220
• Paper si ze for t he pa p er fe e d un it ca n be ch anged with fol l ow ing SP s.
SP5-181-009 (0: A4 LEF or 1: LT LEF) for Tr ay 3
SP5-181-010 (0: A3 or 1: DLT) f or Tr ay 3
SP5-181-011 ( 0: B4 or 1: LG) for Tray 3
SP5-181-012 (0: B5 LEF or 1: Exe LEF) for Tray 3
SP5-181-014 (0: A4 LEF or 1: LT LEF) for Tr ay 4
SP5-181-015 (0: A3 or 1: DLT) for Tray 4
SP5-181-016 (0: B 4 or 1: LG) for T ray 4
SP5-181-017 (0: B5 LEF or 1: Exe LEF) for Tray 4
14. Adjust th e registration for the paper feed un it .
• For Tr ay 3
SP1-001-0xx (Leading Edge Registration Tray 3)
-055 Tray3: Thin -062 Tray3: Th i n: 120 0
-056 Tray3: Plain -063 Tray3: Plai n:1200
-057 Tray3: Mid-thick -064 Tray3: Mid-thick:1200
-058 Tray3: Thick 1 -065 Tray3: Thick 1:1 2 00
-059 Tray3: Thick 2 -066 Tray3: Thick 2:1 2 00
-060 Tray3: Thick 3 -067 Tray3: Thick 3:1 2 00
-061 Tray3: Thick 4 -068 Tray3: Thick 4:1 2 00
SP1-002-004 (Side-to-Side Registration Paper Tray 3)
• For Tray 4
SP1-001-0xx (Leading Edge Registration Tray 4)
-069 Tray4: Thin -076 Tray4: Th i n: 120 0
-070 Tray4: Plain -077 Tray4: Plai n:1200
-071 Tray4: Mid-thick -078 Tray4: Mid-thick:1200
-072 Tray4: Thick 1 -079 Tray4: Thick 1:1 2 00
-073 Tray4: Thick 2 -080 Tray4: Thick 2:1 2 00
-074 Tray4: Thick 3 -081 Tray4: Thick 3:1 2 00
-075 Tray4: Thick 4 -082 Tray4: Thick 4:1 2 00
SP1-002-005 (Side-to-Side Registration Paper Tray 4)
61
Page 68
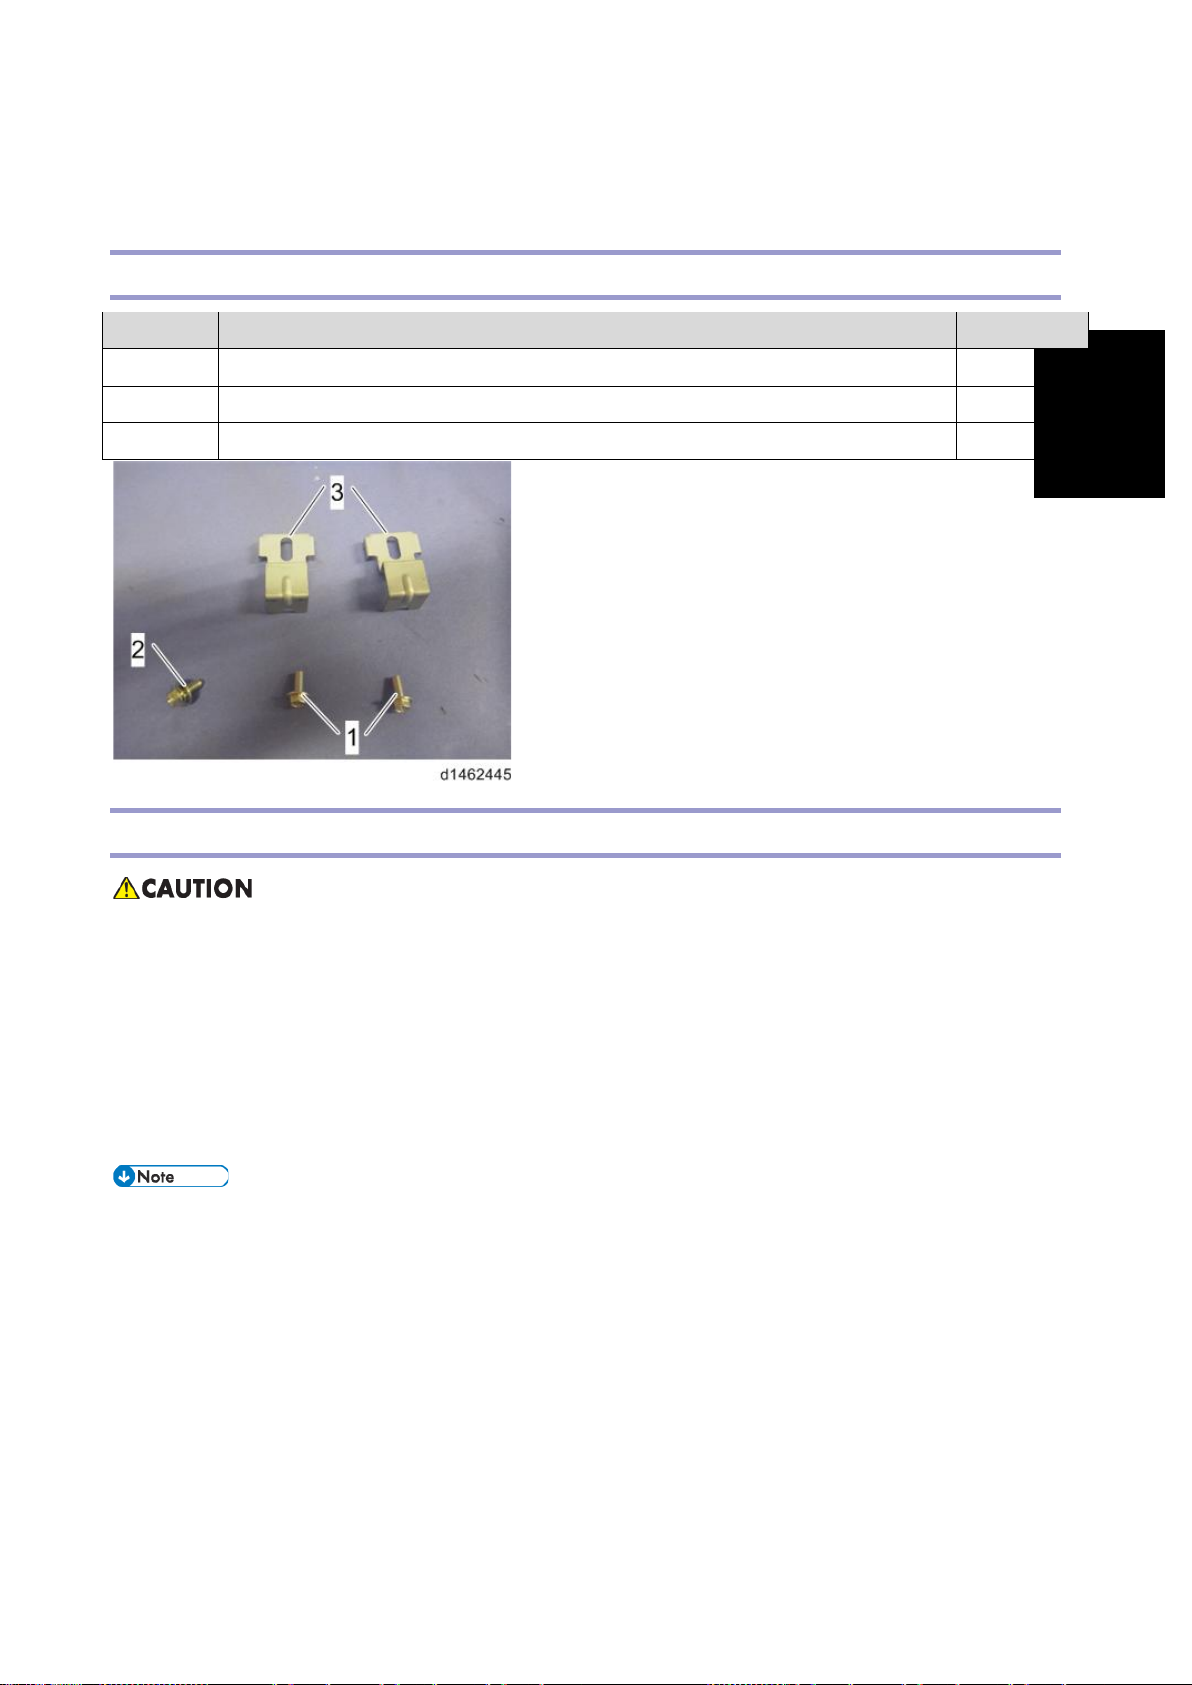
Paper Feed Unit PB3150
Installation
Paper Feed Unit PB3150
Accessory Check
No. Description Q’ty
1 Screws - M4 × 10 2
2 Screw w ith Spring Washer - M4 × 10 1
3 Securing Bracket 2
Installation Procedure
• The ma chine should be held at the c orrect locations and lifted gently by two people.
• If it is lifted without care, handled carelessly or dropped, it may r esult in injury.
• When installing this opt ion, tur n the machine power OFF, and unplug the power supply cord from the
wall socket.
• If this option i s installed with the power o n, it may result in an electric shock or a malfunction.
• Be sure to join the machine to the paper fee d unit so as to prevent equipment from falli ng over.
• If they are not connected, they may move a nd fall over, resulting in injury.
• The Pape r Fe e d Unit P B3 1 50 do es n ot have casters. Attach t he “C a st er Tabl e Ty pe M3 ” un d er th e
Paper Feed Unit PB3150, if necessary. (Caste r Table T y pe M 3 (D1 7 8) )
62
Page 69
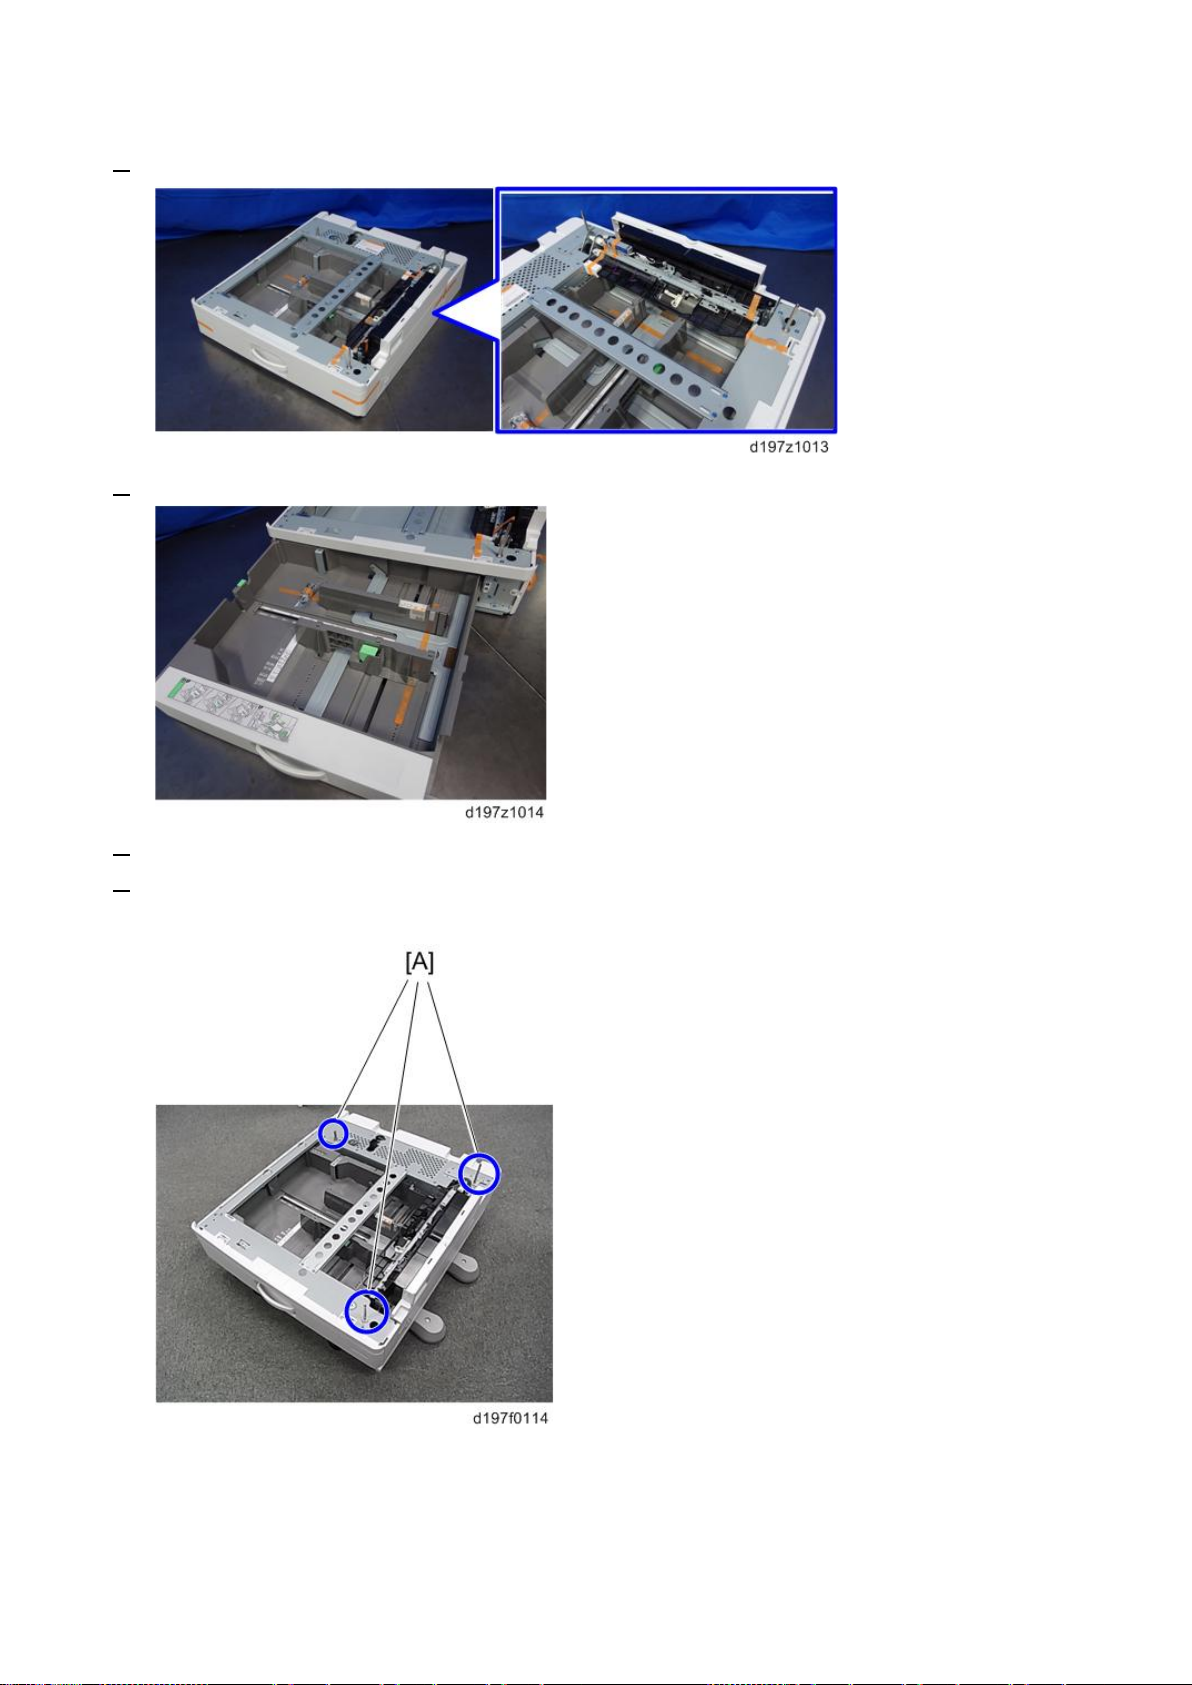
Paper Feed Unit PB3150
1. Remove the orange tape and re tainers.
2. Remove the item s pr ov i ded ( fi xi ng sc r ew s, et c. ) f rom the pa ck ag e.
3. Install thi s option on the Caster Table (C a st e r Ta ble Ty pe M 3 (D 17 8 )).
4. Holding th e grips on the machine, align it with the locati ng pins [ A], and place the mac hi ne o n the pa pe r
feed unit.
63
Page 70
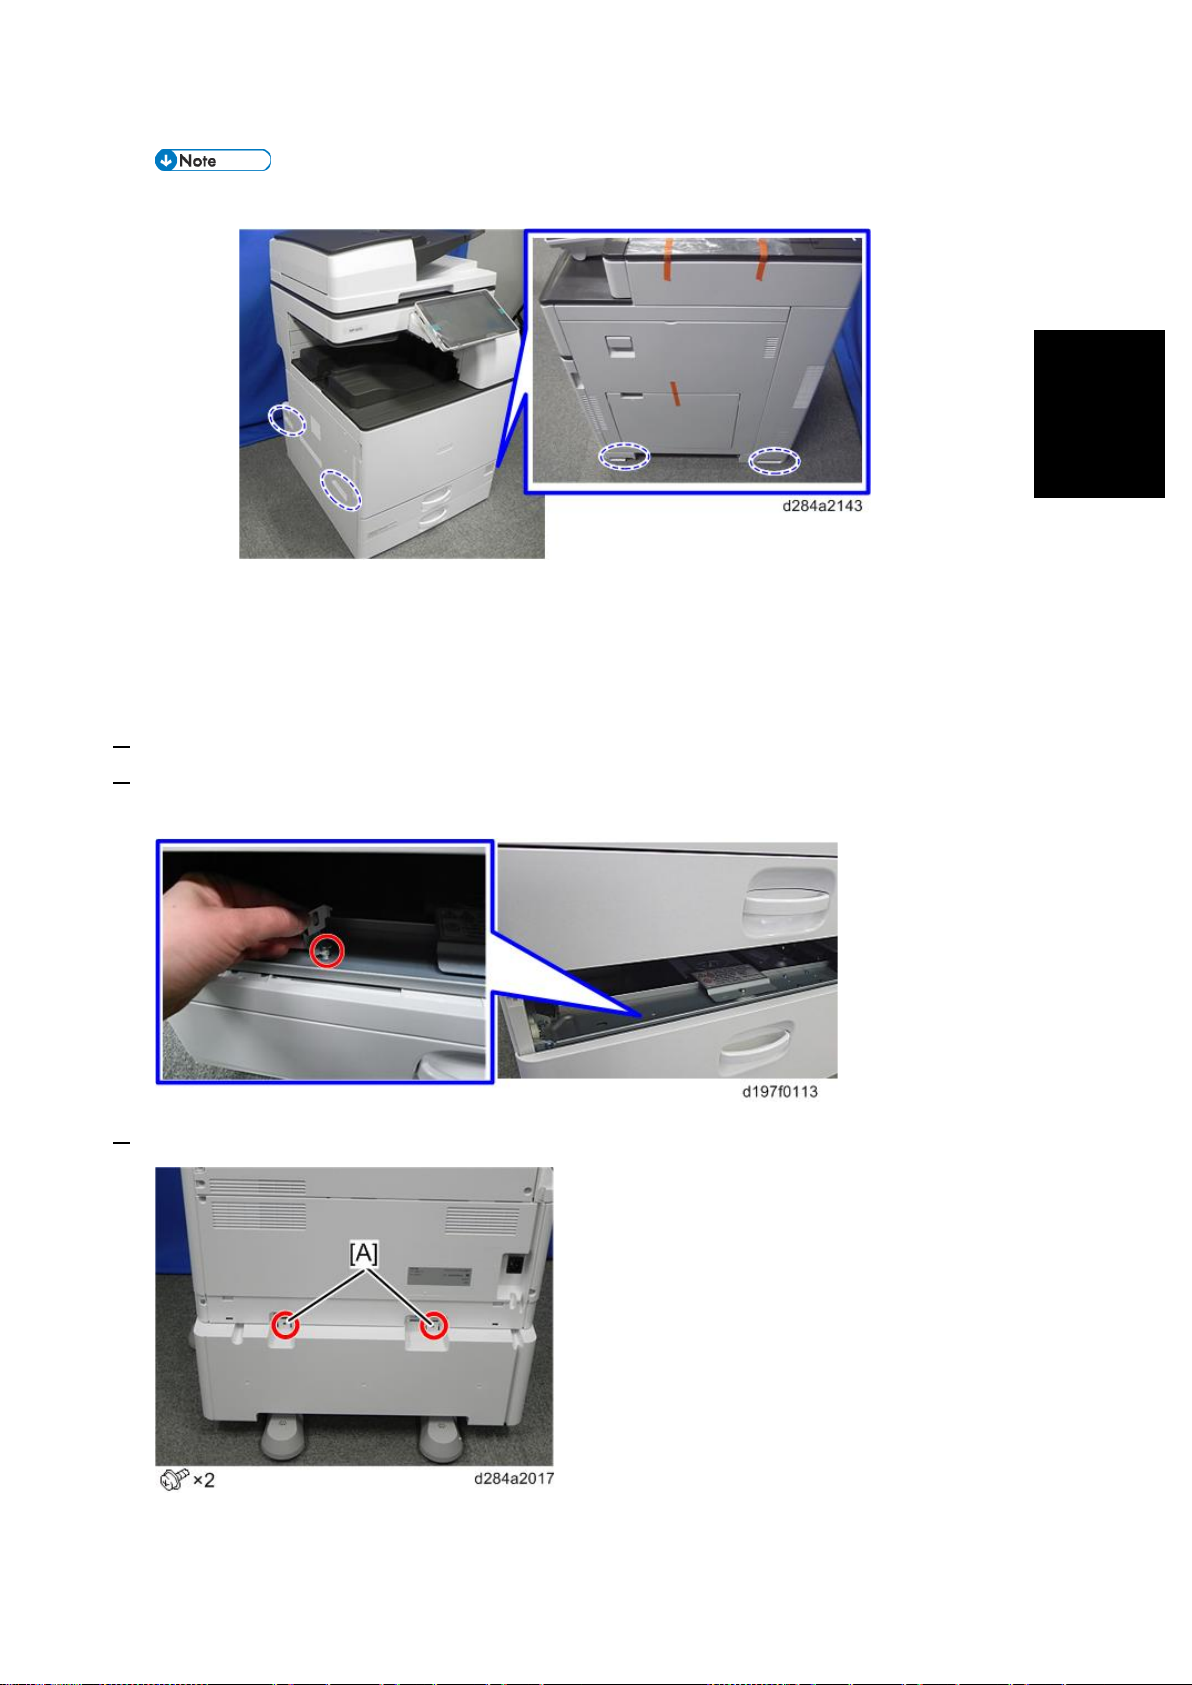
Paper Feed Unit PB3150
Installation
• When you lift th e machine, hold the correct locati ons.
• Do not hold any other parts of the machine when lifting it, because this may cau se the machine
to deform .
• Do not put the machine down on the paper fe ed unit as a temporary resting place. This may cause
the paper feed u nit to deform. Always connect the machine and paper feed unit properly.
5.
Pull out the 2nd paper feed tray of the mai n machine.
6. Using a securing bracket as a screwdriver, f ix the machine to the feed unit (spring washer: screw: M4×10:
1).
7. Attach the securing brackets [A] to tw o positions on the left and right at the rear of the machine.
64
Page 71
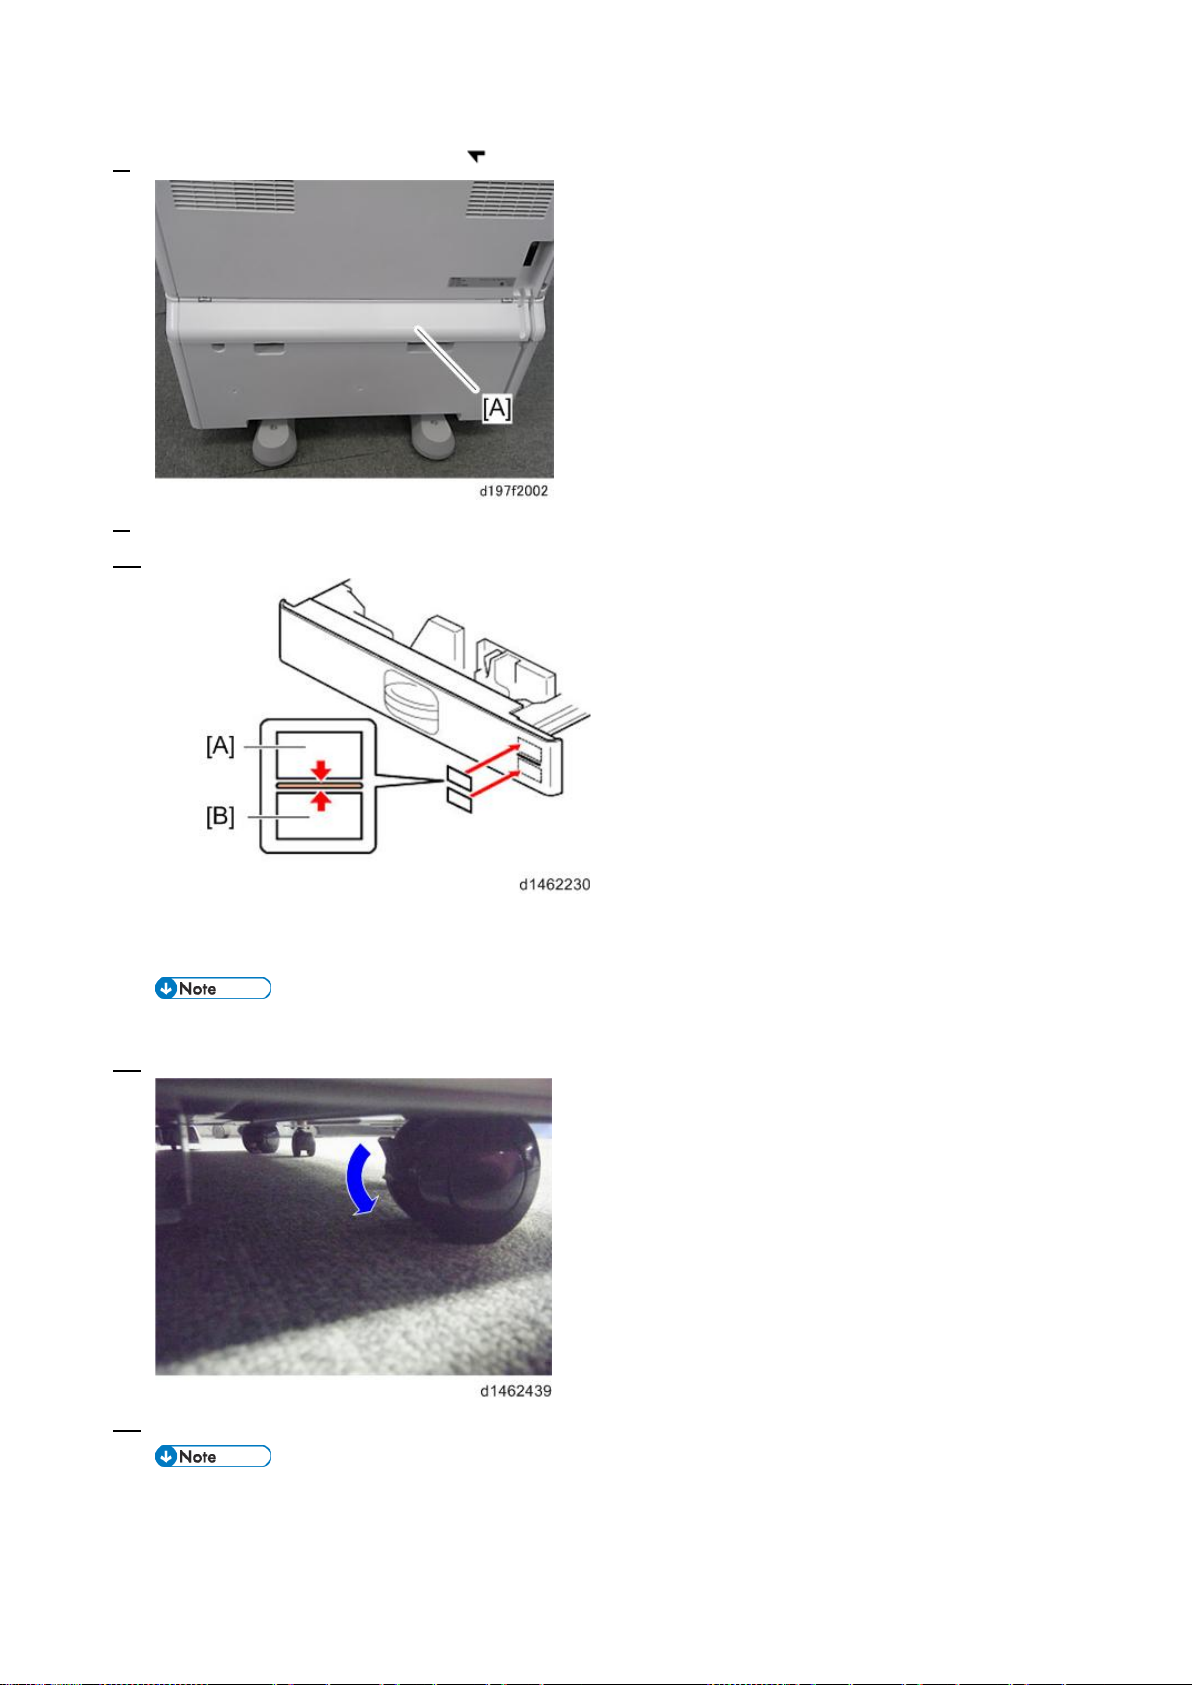
Paper Feed Unit PB3150
8. Attach the rear lower gap cover [A] ( x 2)
9. Return the p aper fee d t ray to the machine.
10. Attach th e decals as shown below.
[A]: Tray number decal
[B]: Paper size decal
• The tray number decal and paper size decal are packaged tog ether with the machine.
11. Lock the casters.
12. Connect t he power cord to th e machine.
• Stabil izers are attache d to the pa per feed unit when it is shipped. Do not remove them.
65
Page 72
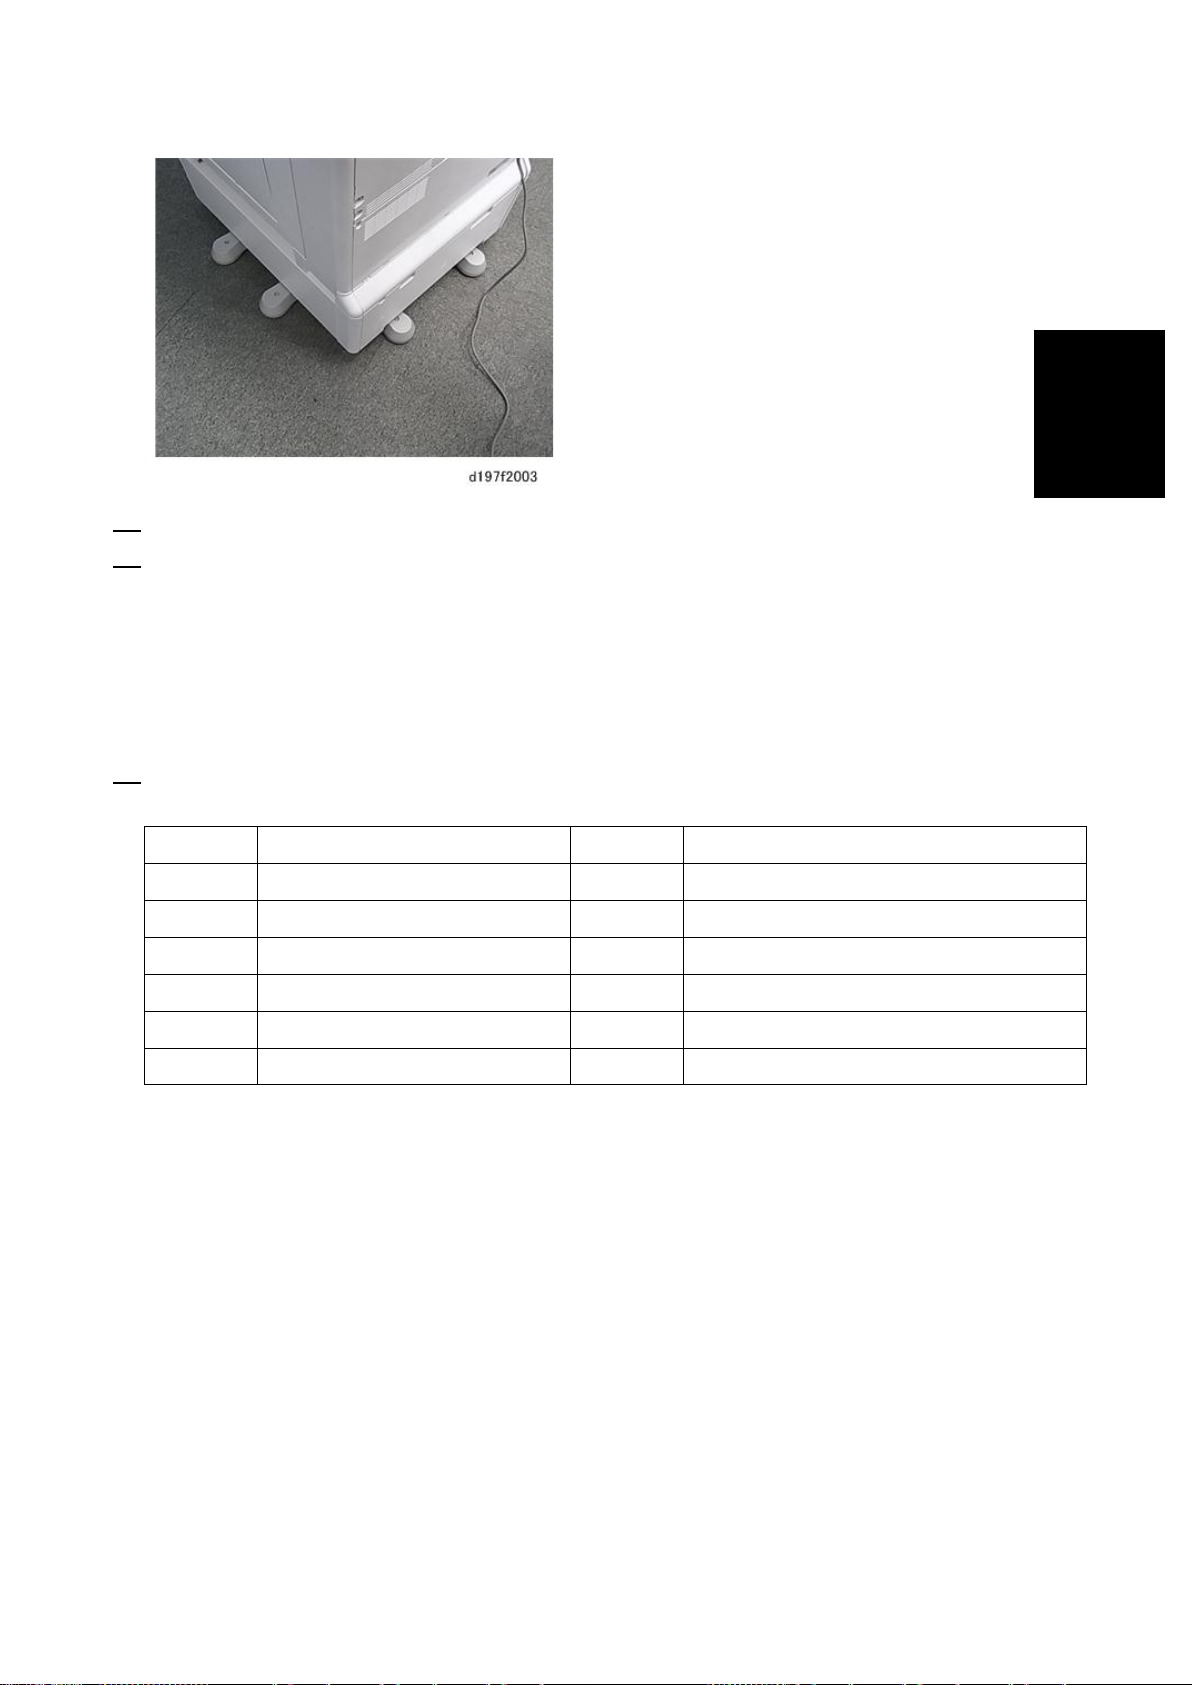
Paper Feed Unit PB3150
Installation
13. Turn t he main power switch ON.
14. Set the pa per, and check that the paper size set in the paper feed tray is displayed on the operation panel .
• Paper si ze for t he pa p er fe e d un it ca n be ch anged with fol l ow ing SP.
SP5-181-009 (0: A4 LEF or 1: L T LEF)
SP5-181-010 (0: A3 or 1: DLT)
SP5-181-011 ( 0: B4 or 1: LG)
SP5-181-012 (0: B5 LEF or 1: Exe LEF)
15. Adjust th e registration for the paper feed un it .
SP1-001-0xx (Leading Edge Registration Tray 3)
-055 Tray3: Thin -062 Tray3: Thin: 12 0 0
-056 Tray3: Plain -063 Tray3: Plain:1200
-057 Tray3: Mid-thick -064 Tray3: Mid-thick:1200
-058 Tray3: Thick 1 -065 Tray3: Thick 1:1 2 00
-059 Tray3: Thick 2 -066 Tray3: Thick 2:1 2 00
-060 Tray3: Thick 3 -067 Tray3: Thick 3:1 2 00
-061 Tray3: Thick 4 -068 Tray3: Thick 4:1 2 00
SP1-002-004 (Side-to-Side Registration Paper Tray 3)
66
Page 73
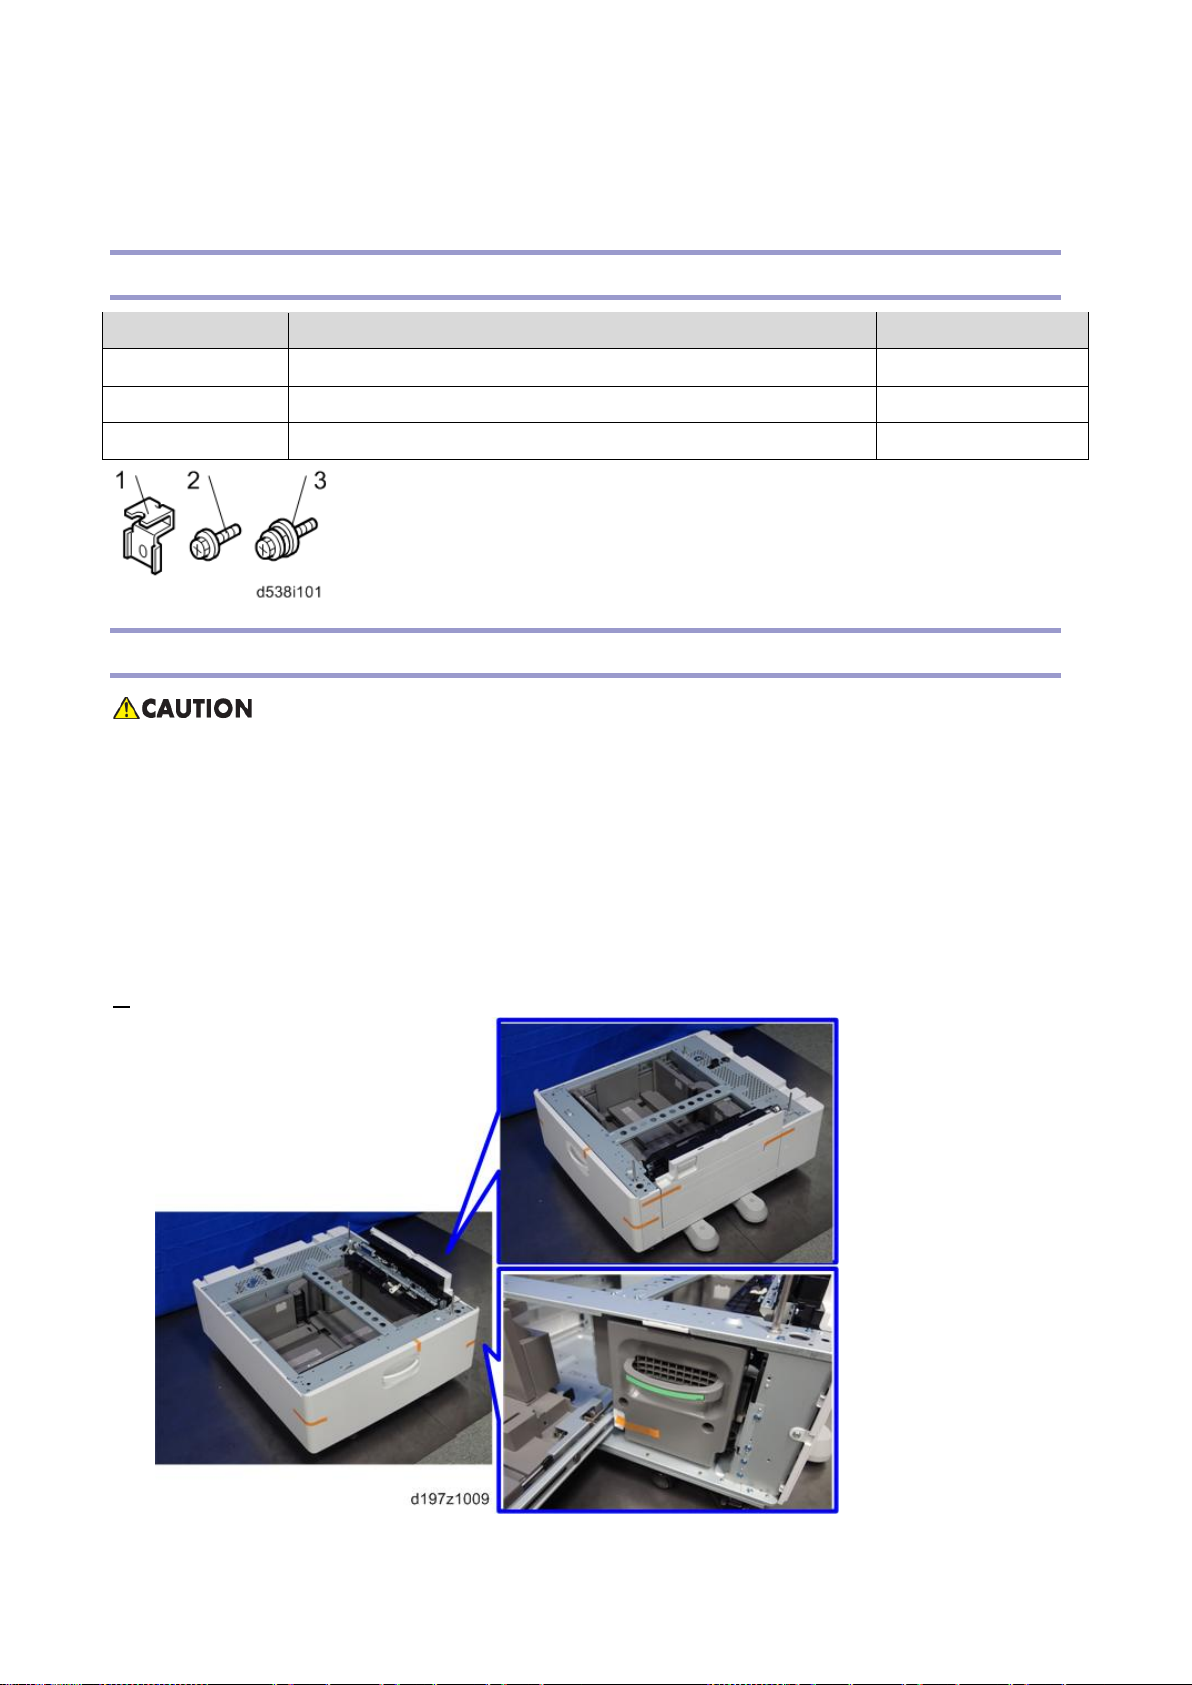
LCIT PB3170/ PB3230
LCIT PB3170/ PB3230
Accessory Check
No. Description Q’ty
1 Securing Bracket 2
2 Screw(M4×10) 2
3 Hexagonal Bolt 1
Installation Procedure
• The mac hi ne sho ul d b e hel d at th e co r rect locations and lifted gently.
• If it is lifted without care, handled carelessly or dropped, it may r esult in an injury.
• When installing this opt ion, tur n the machine power OFF, and unplug the power supply cord from the
wall socket.
• If this option is installed with the pow er on, it may result in an el ectric shock or a malfuncti on.
• Be sure to join the machine to the paper fee d unit so as to prevent equipment from falli ng over.
• If they are not connected, they may move a nd fall over, resulting in injury.
1. Remove the orange tape and re tainers.
67
Page 74
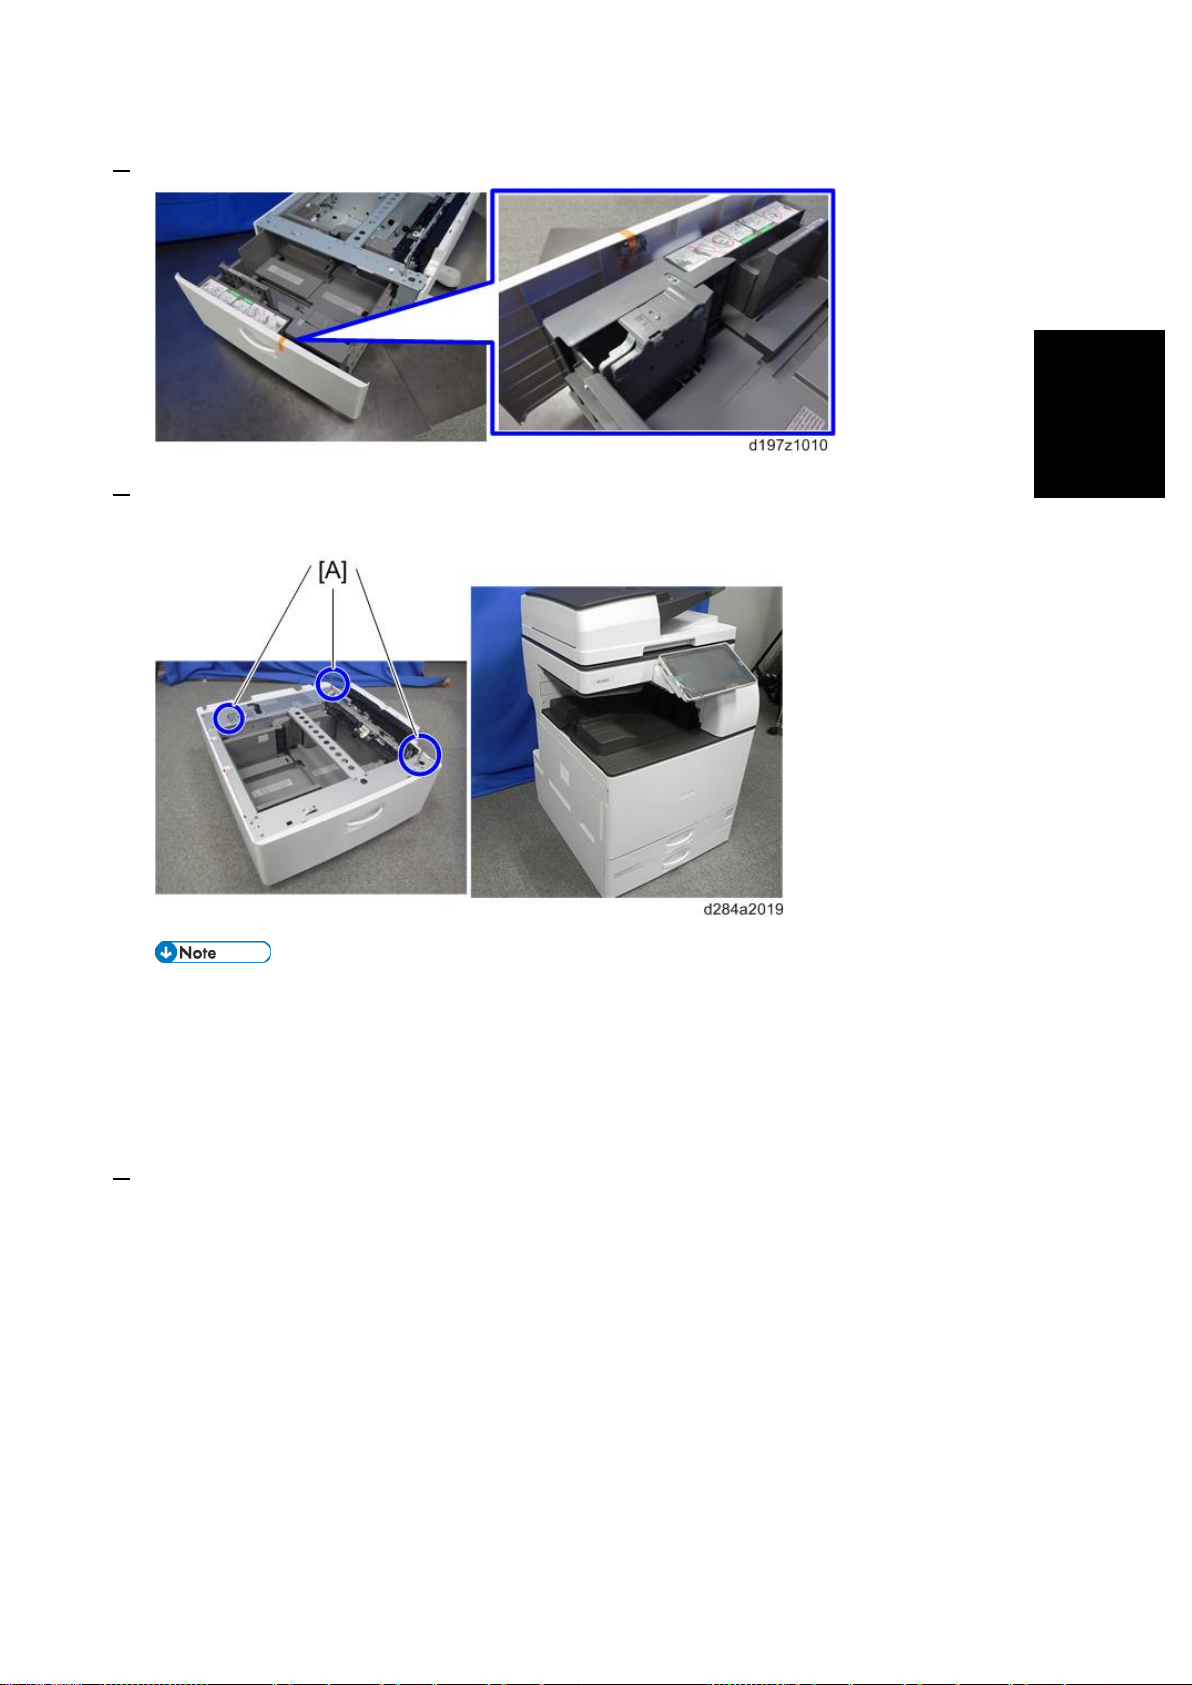
LCIT PB3170/ PB3230
Installation
2. Remove the item s pr ov i ded ( fi xi ng sc r ew s, et c. ) f rom the pa ck ag e.
3. Holding th e grips on the machine, align it with the locati ng pins [ A], and place the machine o n the pape r
feed unit.
• When you lift th e machine, be sure to hold the grips on the machine.
• In part icular, do not lift the machine by holding the scan ner unit, etc., because thi s may cause the
machin e to d ef orm .
• Do not put the machine down on the paper fe ed unit as a temporary resting place. This may cause
the paper feed u nit to deform. Always connect the machine and paper feed unit properly.
4. Pull out the 2nd paper feed tray of the m achine.
68
Page 75
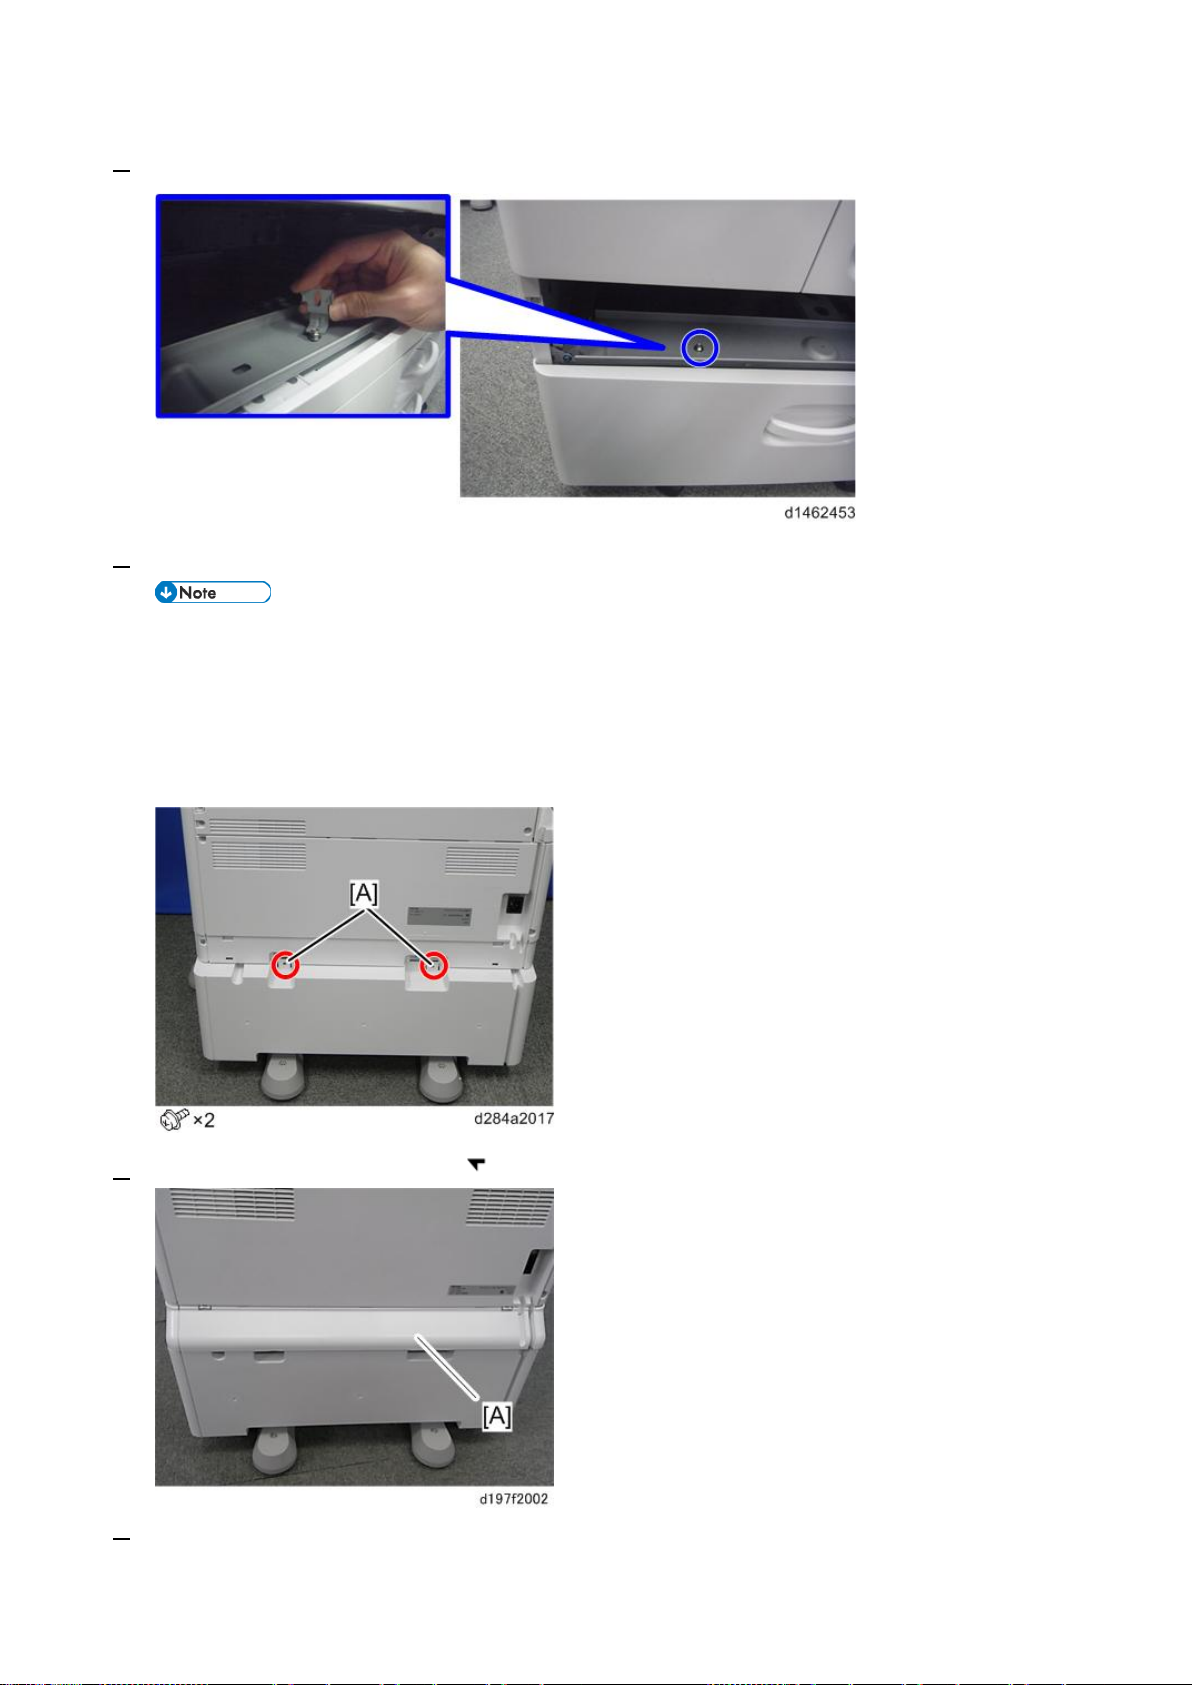
LCIT PB3170/ PB3230
5. Using a securing bracket as a screwdriver, s ecure the machine to the LC T unit (h exagonal bolt: M4×8: 1).
6. Attach the securing br ackets [A] to two position s on the left and right at the rear of the machine.
• If the anti-cond ensation heater f or this optional t r ay is to be installed, conn ect its heater harn ess
prior to thi s st ep (s te p 6) (Tray Heat er f or LCI T P B31 7 0/ P B32 3 0).
• If “LCIT RT3030” is to be i nstalled, connect its harne ss prior to this step (step 6 ) (LCIT RT3030
(D696)).
7. Attach the rear lower gap cover [A] ( x2)
8. Return the p aper fee d t ray to the machine.
69
Page 76
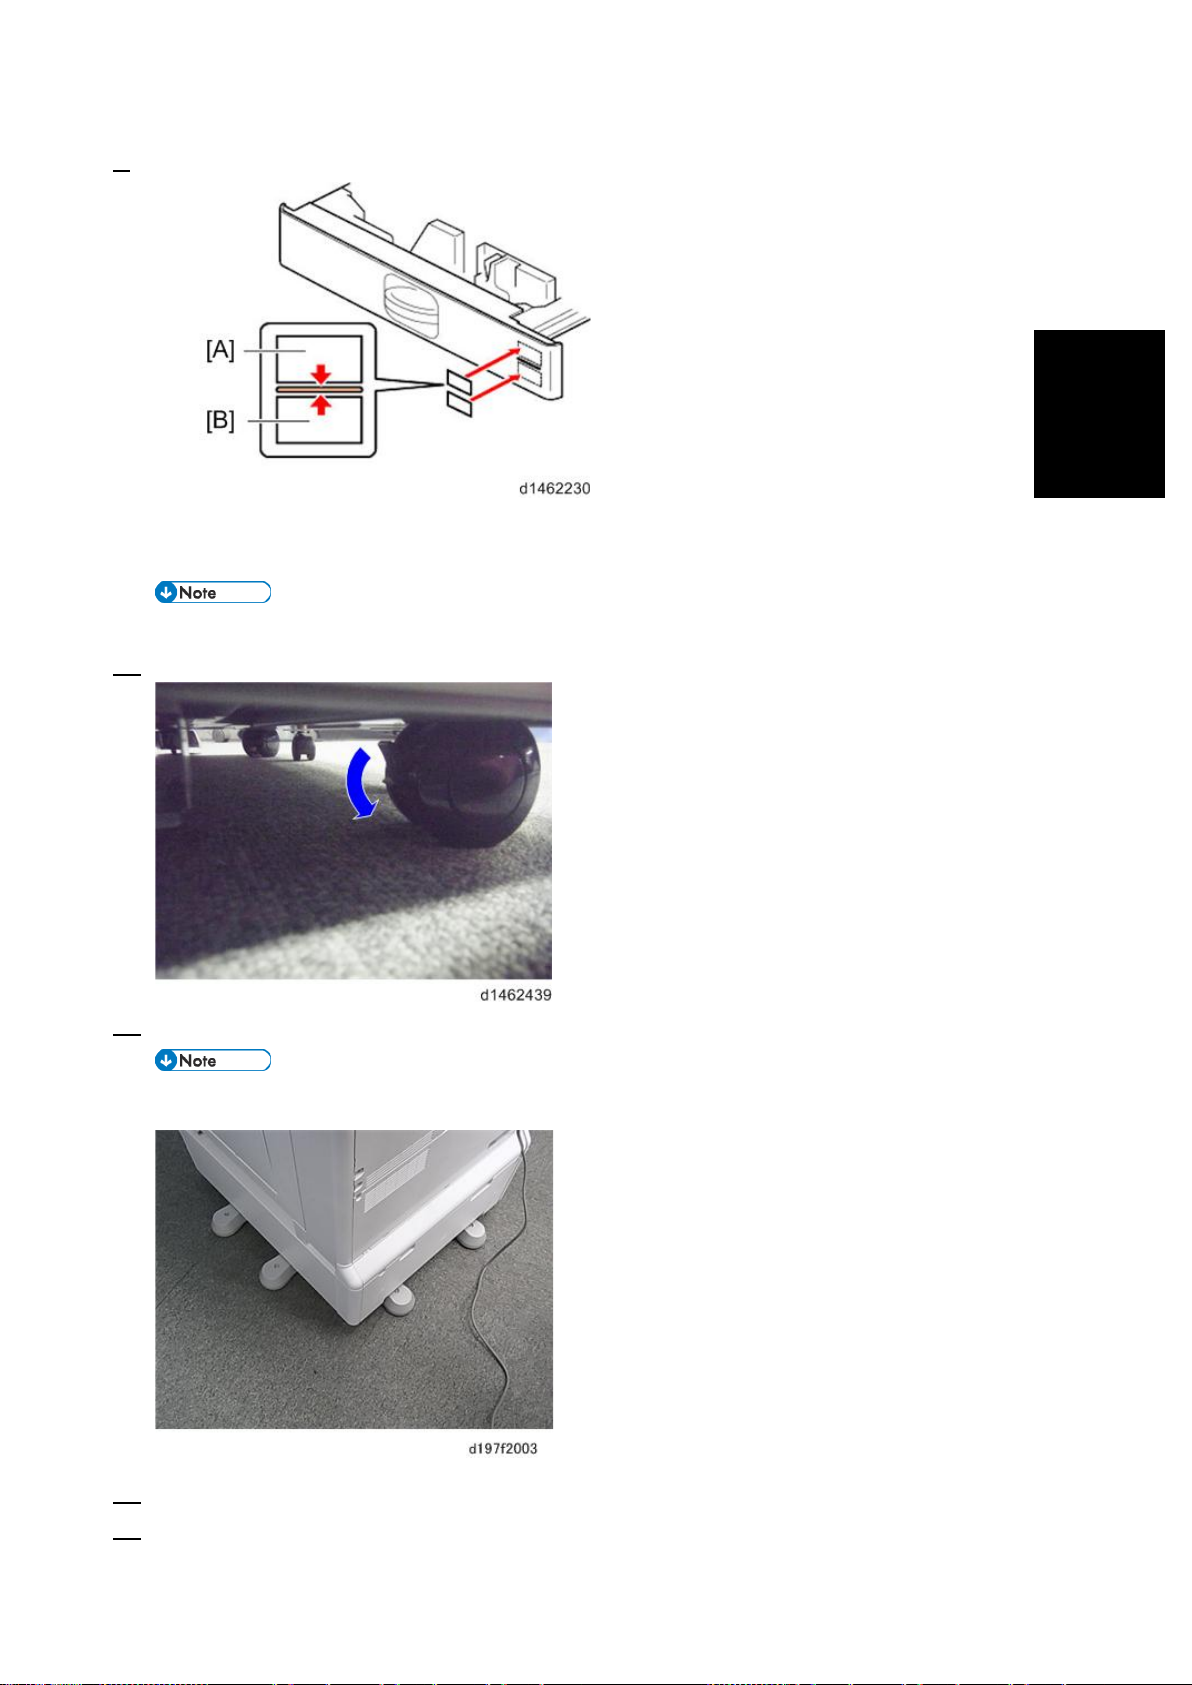
Installation
9. Attach the d ecals as shown below.
[A]: Tray number decal
[B]: Paper size decal
• The tray number decal and paper size decal are packaged tog ether with the machine.
10. Lock the casters of the paper feed uni t .
LCIT PB3170/ PB3230
11. Connect t he power cord to th e machine.
• Stabil izers are attache d to the LCIT when it is shipped. Do not remove any of them.
12. Turn t he power switch ON.
13. Set the pa per, and check that the paper size set in the paper feed tray is displayed on the operation panel .
70
Page 77
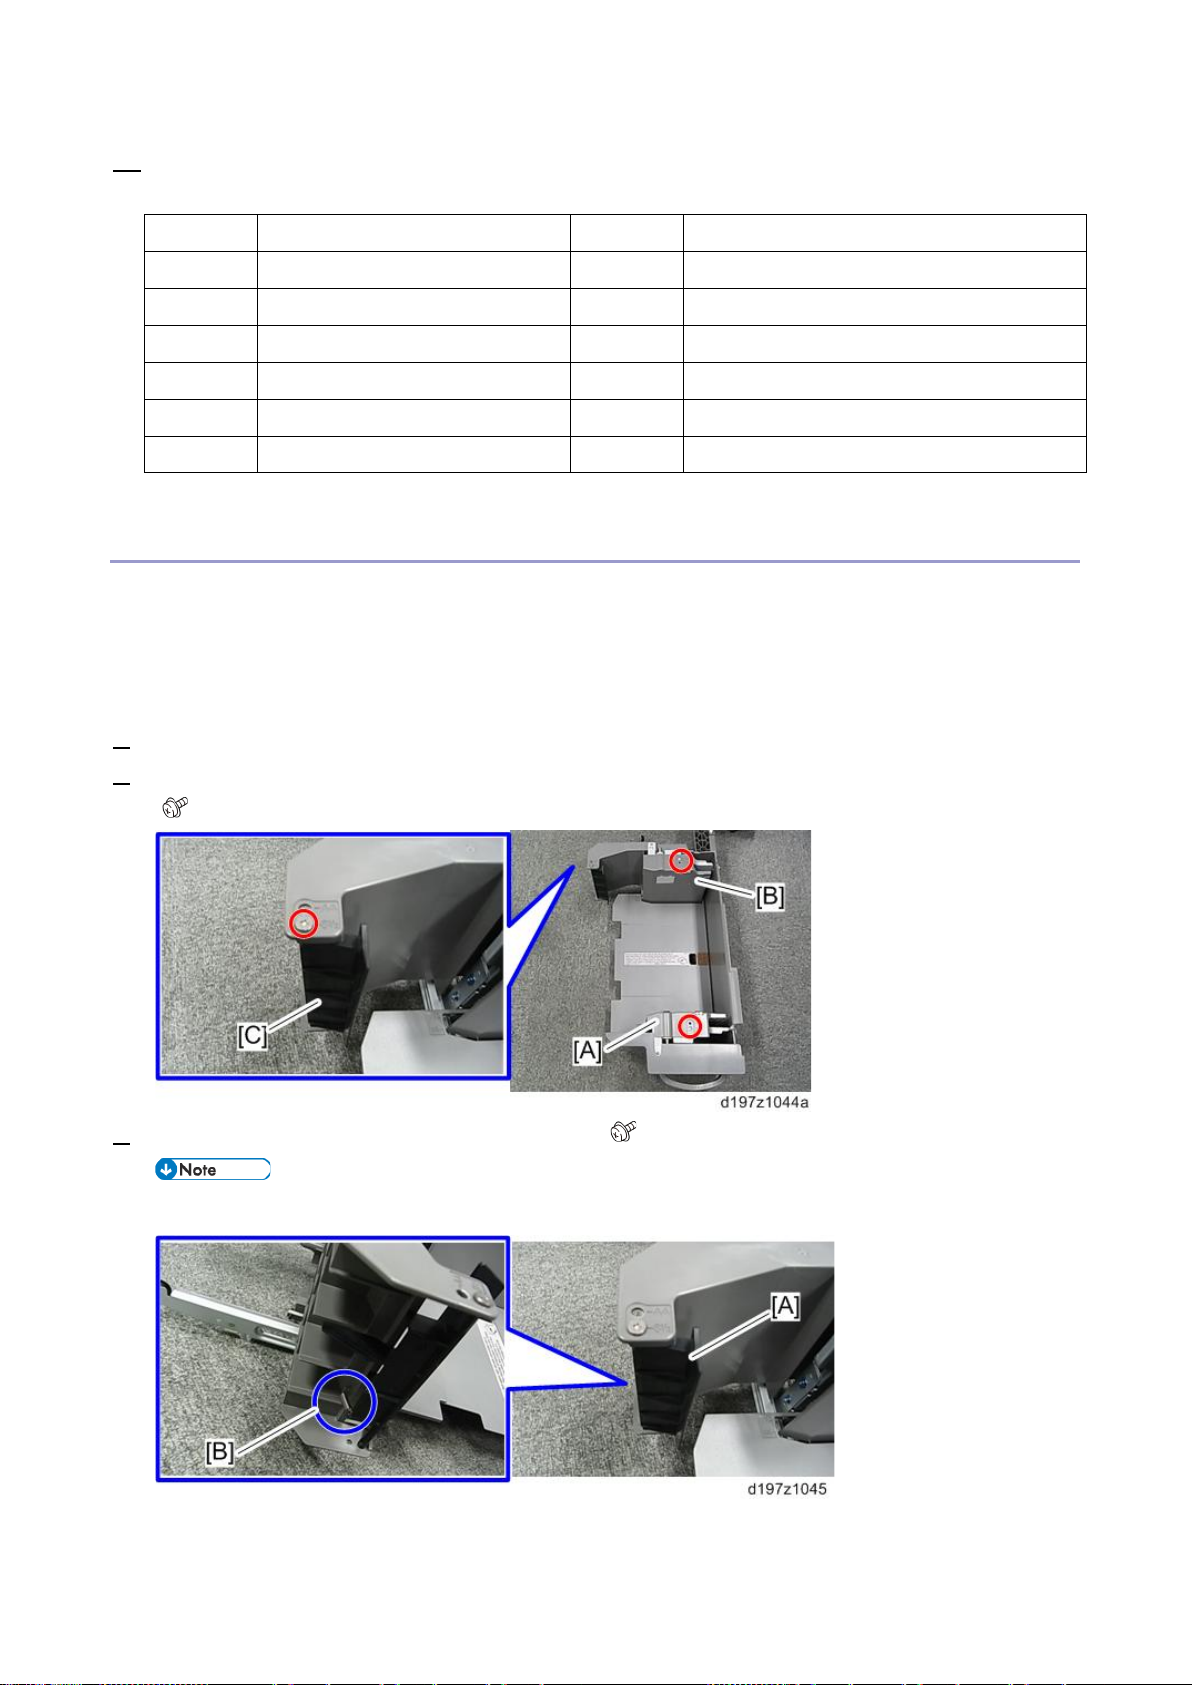
LCIT PB3170/ PB3230
14. Adjust th e registration for the paper feed un it .
SP1-001-0xx (Leading Edge Registration Tray 3)
-055 Tray3: Thin -062 Tray3: Thin: 12 0 0
-056 Tray3: Plain -063 Tray3: Plain:1200
-057 Tray3: Mid-thick -064 Tray3: Mid-thick:1200
-058 Tray3: Thick 1 -065 Tray3: Thick 1:1 2 00
-059 Tray3: Thick 2 -066 Tray3: Thick 2:1 2 00
-060 Tray3: Thick 3 -067 Tray3: Thick 3:1 2 00
-061 Tray3: Thick 4 -068 Tray3: Thick 4:1 2 00
SP1-002-004 (Side-to-Side Registration Paper Tray 3)
Changing the Paper Size
Paper size is set as shown below when the machine is shipped f rom the f actory.
NA: LT LEF
EU.AA.CHN: A4 LEF
The pape r siz e ca n be changed to A4 LEF or LT LEF.
1. Pull out the left tray and right tray.
2. Remove the right tray side fence (fron t ) [A], right tray side fence (rear) [B], and right tray end fenc e [C]
( ×3).
3. Attach the fences to the requi red position (A4 or LT) ( ×3).
• Make sure that th e spring [B] of the end fence [A] is attached
71
Page 78
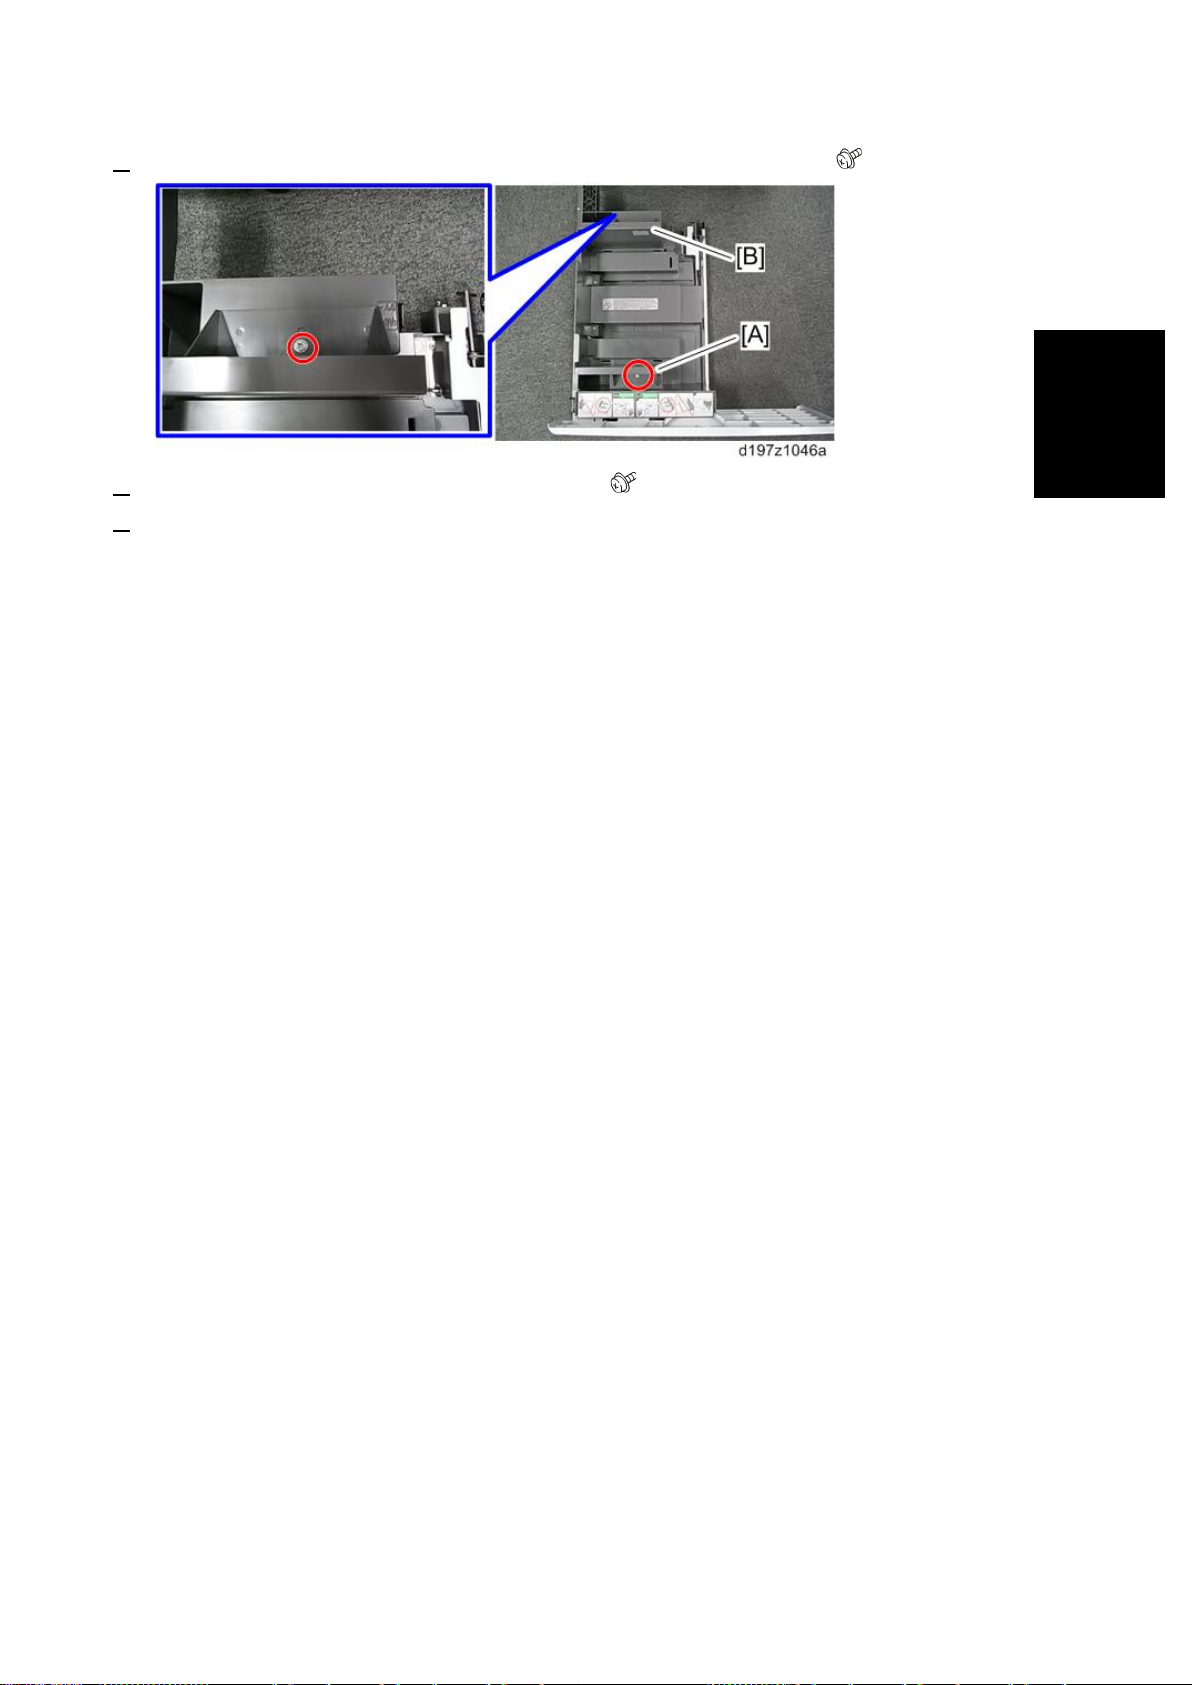
LCIT PB3170/ PB3230
Installation
4. Remove the left tray side fence (front) [A] and the left tray side f ence (rear) [B] ( ×2).
5. Attach the fences to the requi red position (A4 or LT) ( ×2).
6. Set the pape r size setting.
• SP5-181-009 (0: A4 LEF or 1: LT LEF)
72
Page 79
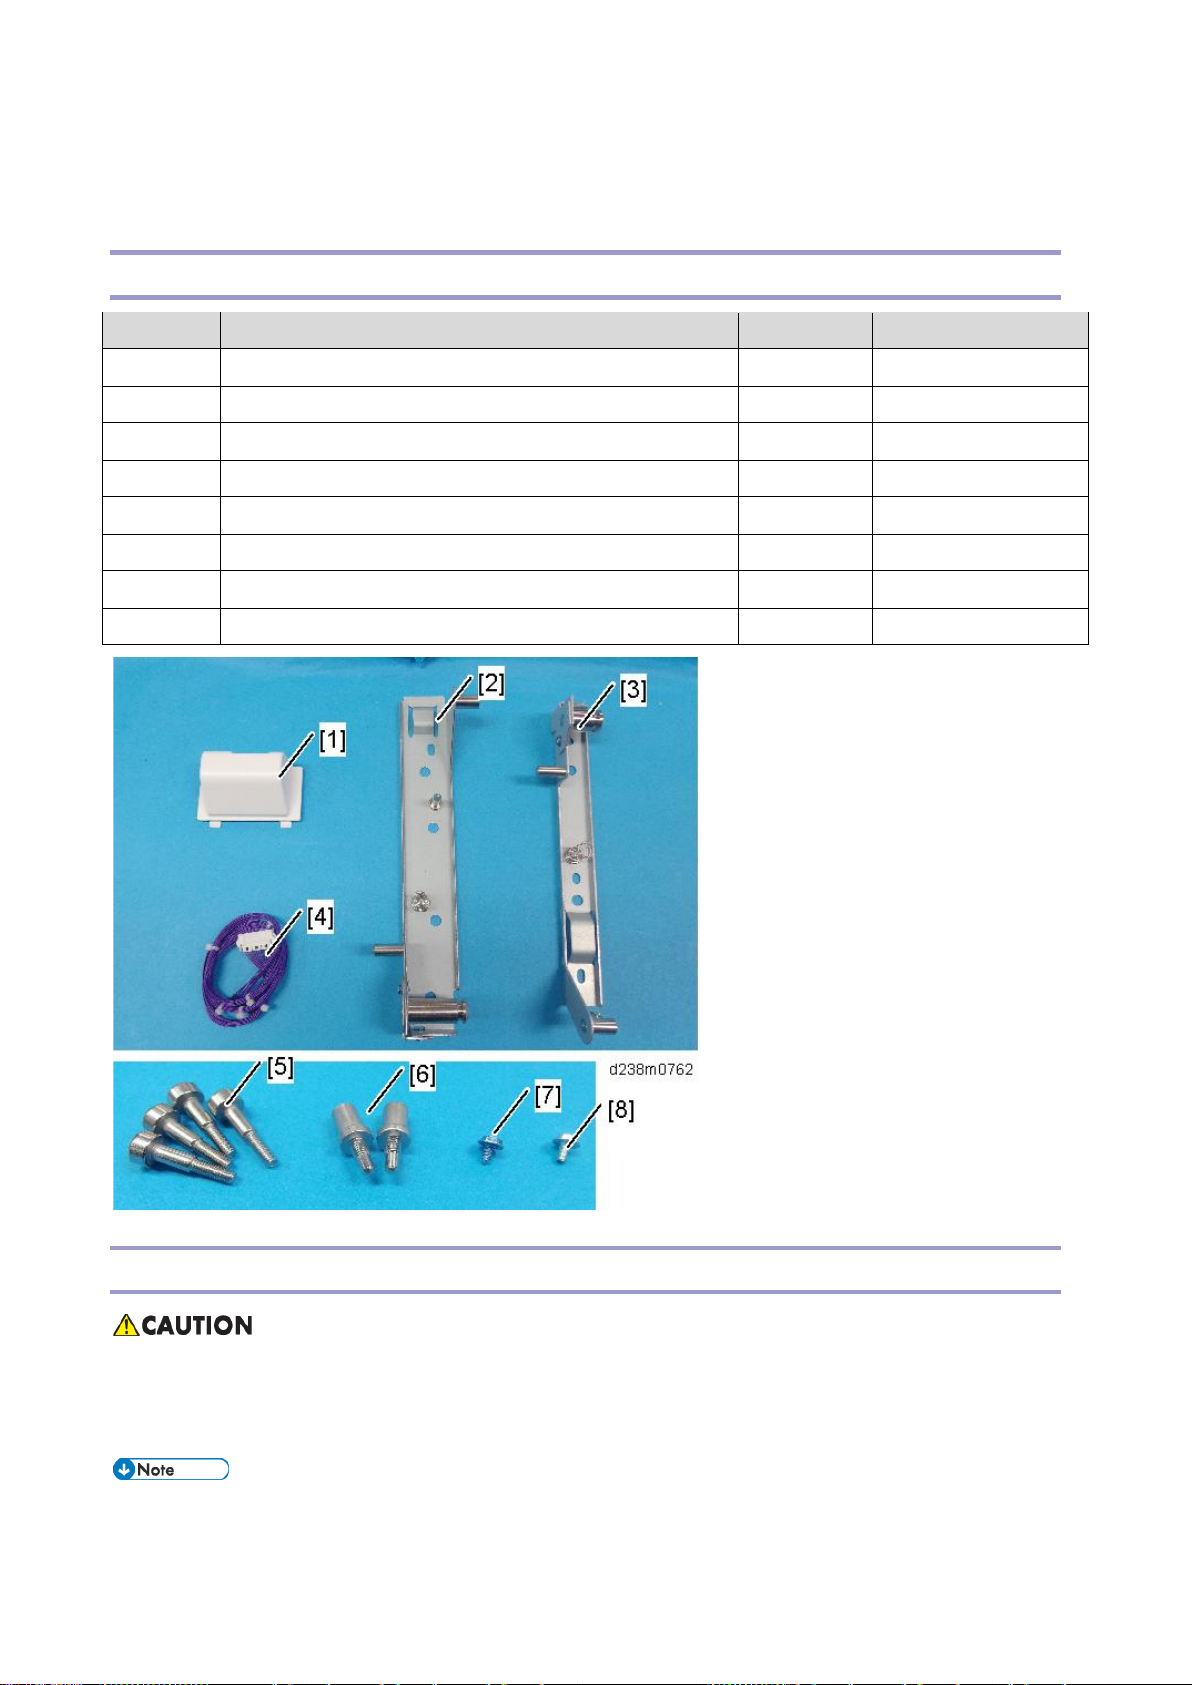
LCIT RT3030 (D696)
LCIT RT3030 (D696)
Accessory Check
No. Description Q’ty Remarks
1 Connector Cover 1
2 Front Bracket 1
3 Rear Bracket 1
4 Harness 1
5 Stud screw 4
6 Joint Pins 2
7 Tapping Screw – M3 × 6 1
8 Screw – M3 × 6 1
Installation Procedure
• When installing this opt ion, tur n the power of the machine off, and unplug the power plug from the
wall socket.
• If this option i s installed when the power is on, it will result in an ele ctric shock or a malfunctio n.
• Before installing this option, first attach the “Paper Feed Unit PB3210/ PB3220” or “LCIT PB3170/
PB3230”.
73
Page 80
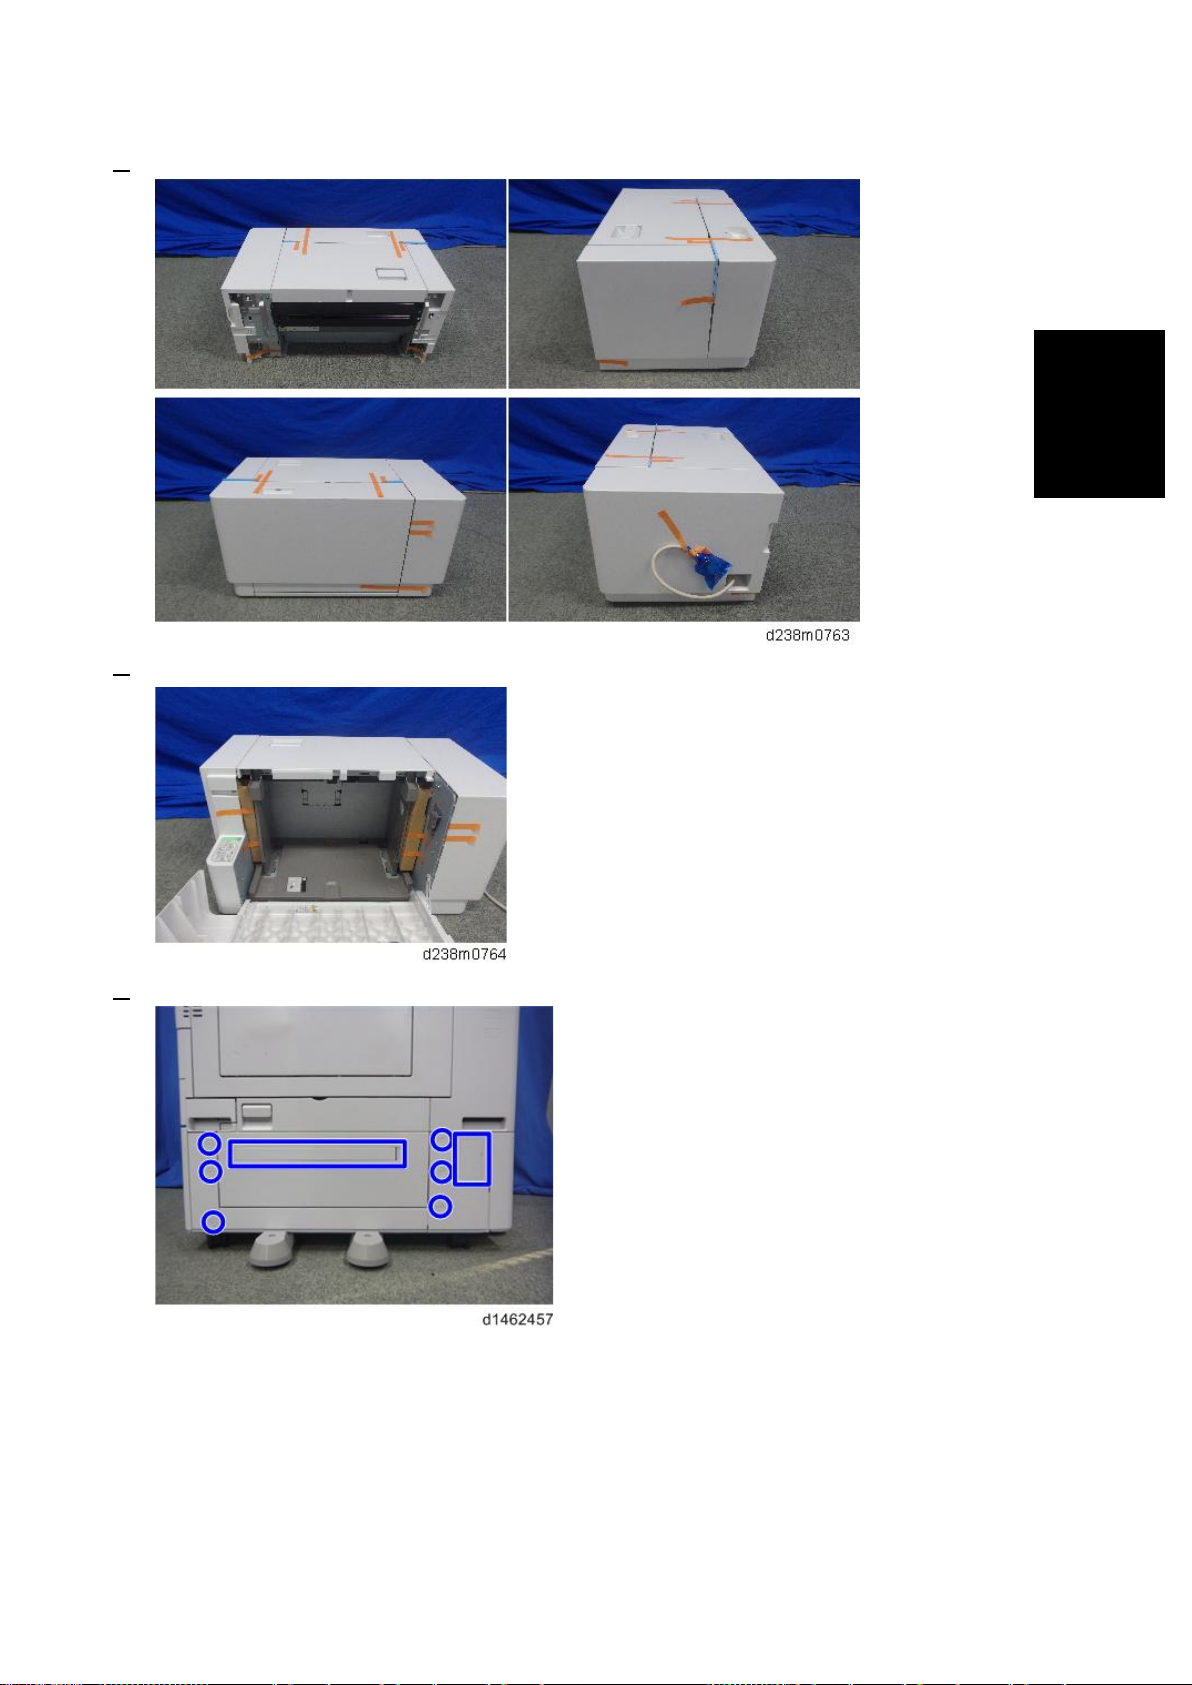
Installation
1. Remove the orange tape and re tainers.
2. Remove the enclosed items (stud screws, etc.).
LCIT RT3030 (D696)
3. Remove the eight covers on the right of the paper feed unit.
74
Page 81
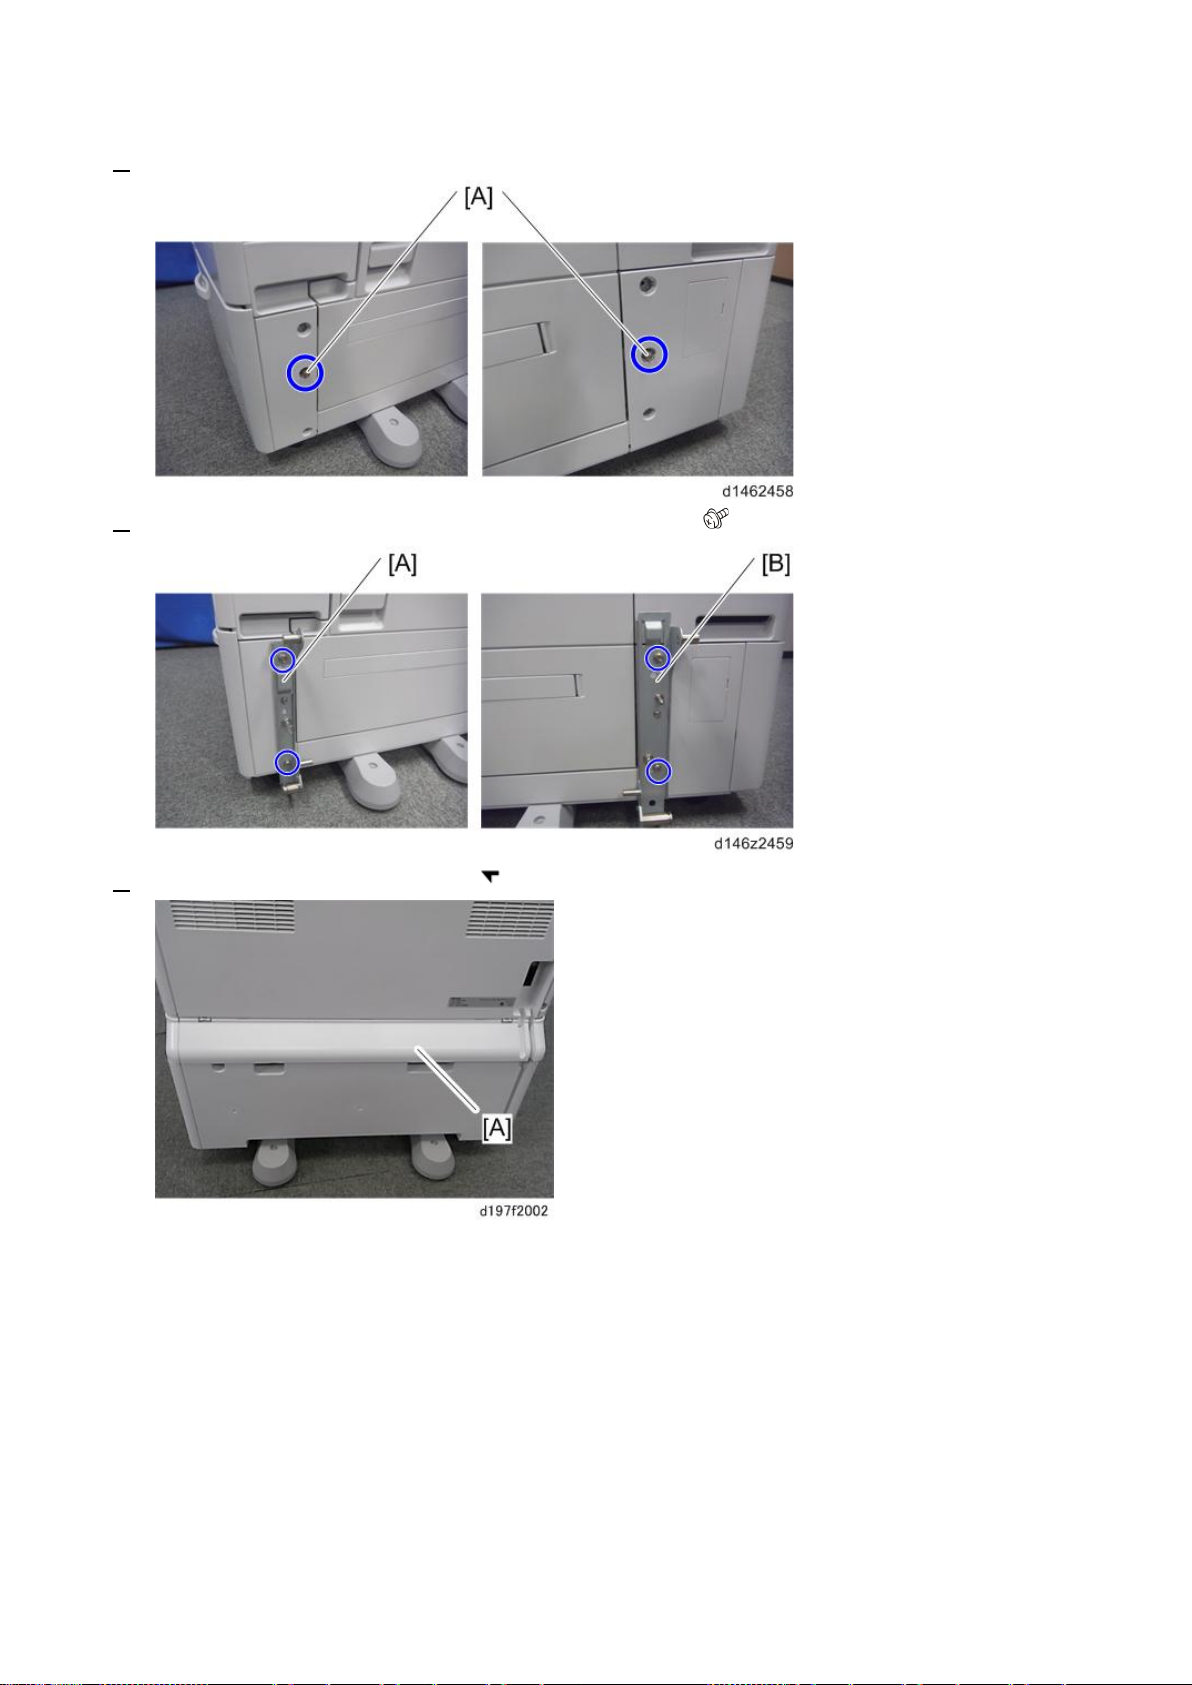
LCIT RT3030 (D696)
4. Attach the joint pins [A] to the front and r ear on the right of t he paper f eed unit.
5. Attach the b rackets [A] and [B] at the positions of the joint pins ( ×4).
6. Remove the rear lower gap cover [A] ( x2)
75
Page 82
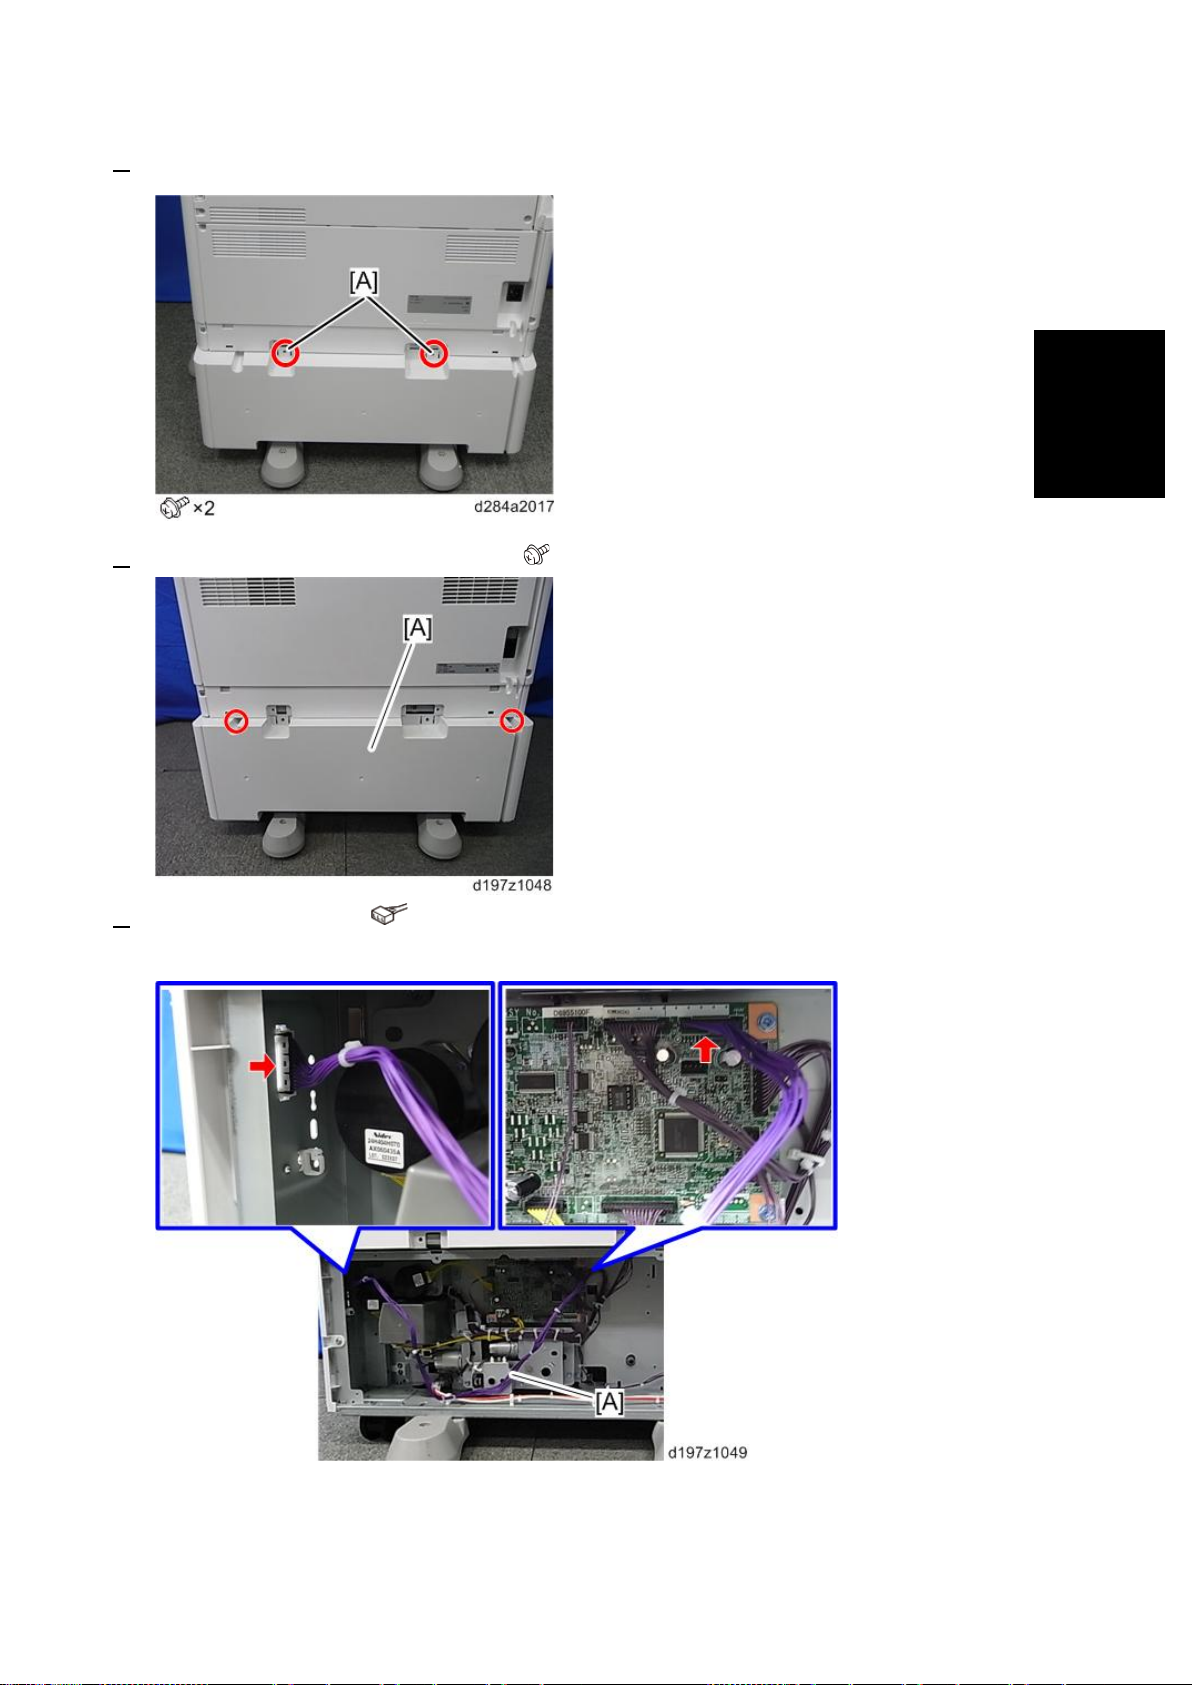
LCIT RT3030 (D696)
Installation
7. Take off the securing brackets [A] from the two positions on the left and right at the rear of the m ach in e.
8. Remove the paper feed unit rear cover [A] ( ×2).
9. Connect the harness [A] ( x2).
For the machine with Paper Feed Unit PB3170/ PB3230
For the machine with Paper Feed Unit PB3210/ PB3220
76
Page 83
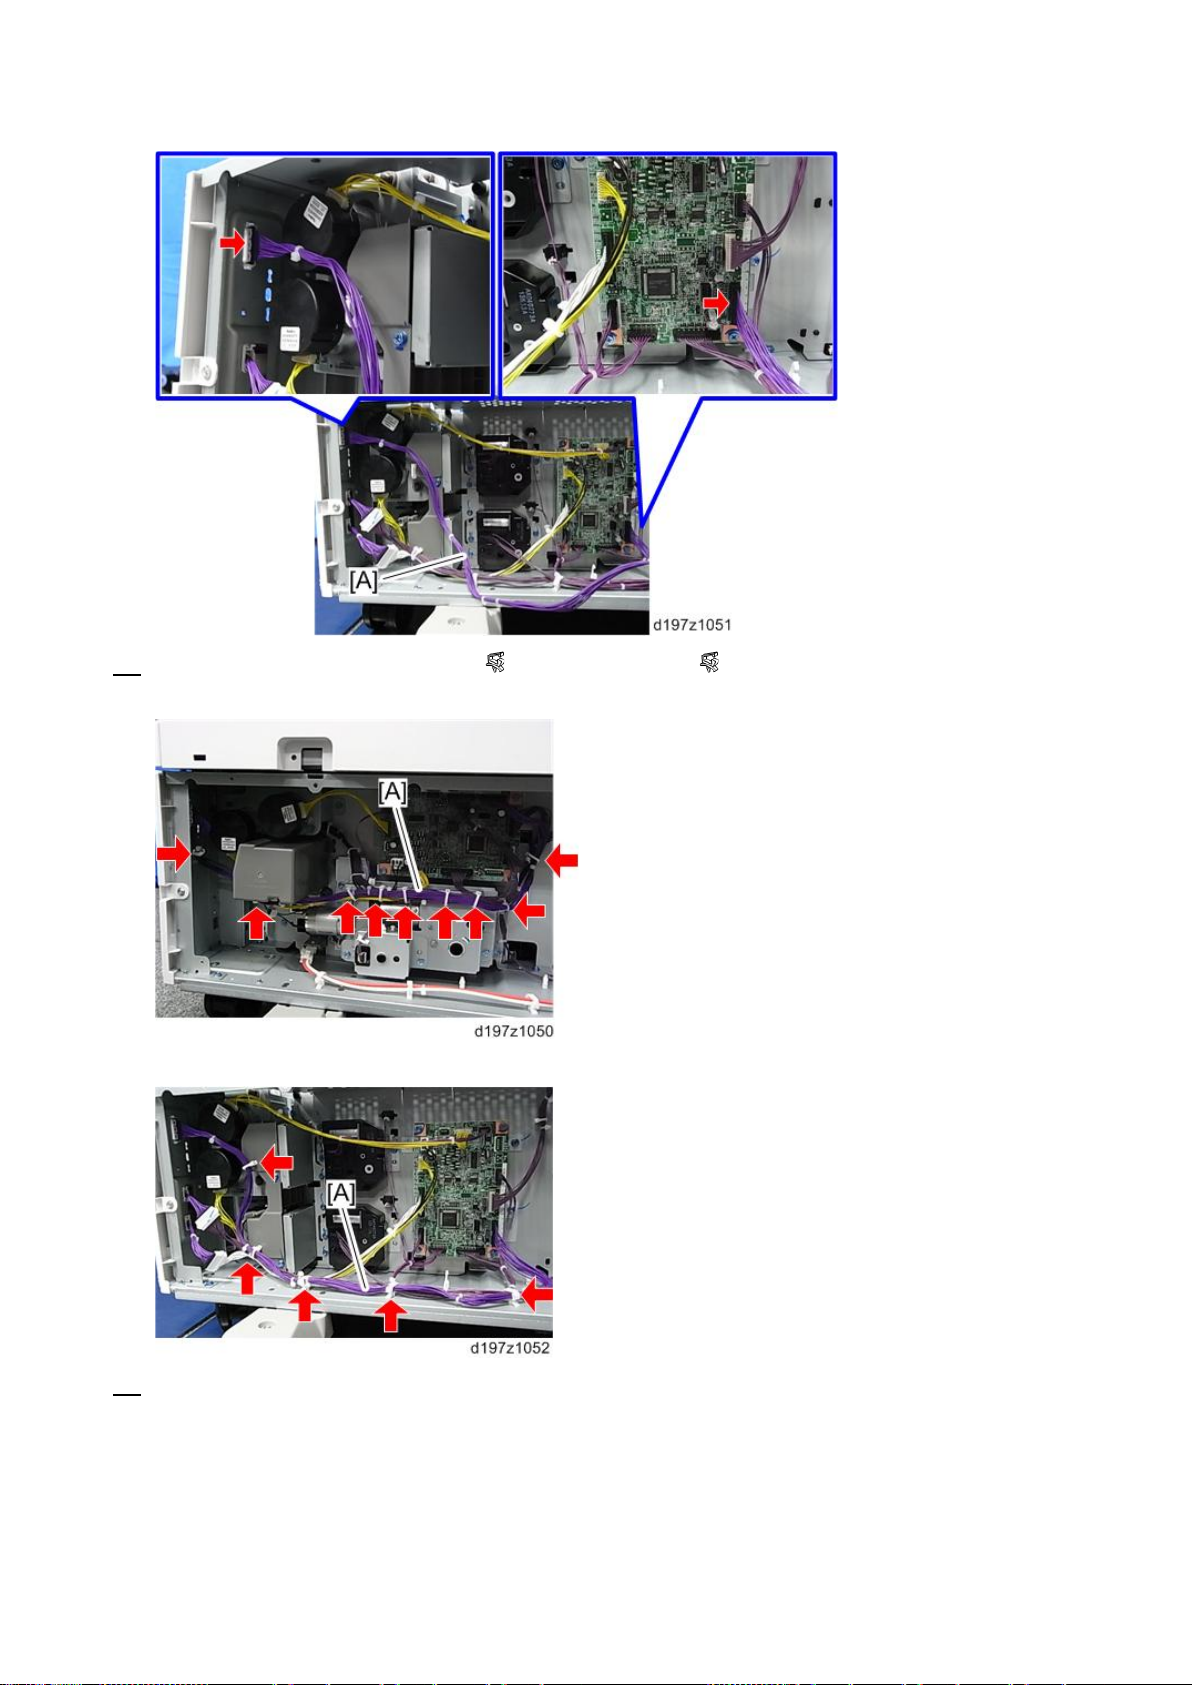
LCIT RT3030 (D696)
10.
Clamp the harness (PB3170/ PB3230: ×9, PB3210/ PB3220: ×5).
For the machine with Paper Feed Unit PB3170/ PB3230
For the machine with Paper Feed Unit PB3210/ PB3220
11. Attach th e paper fe ed unit rear cover.
77
Page 84
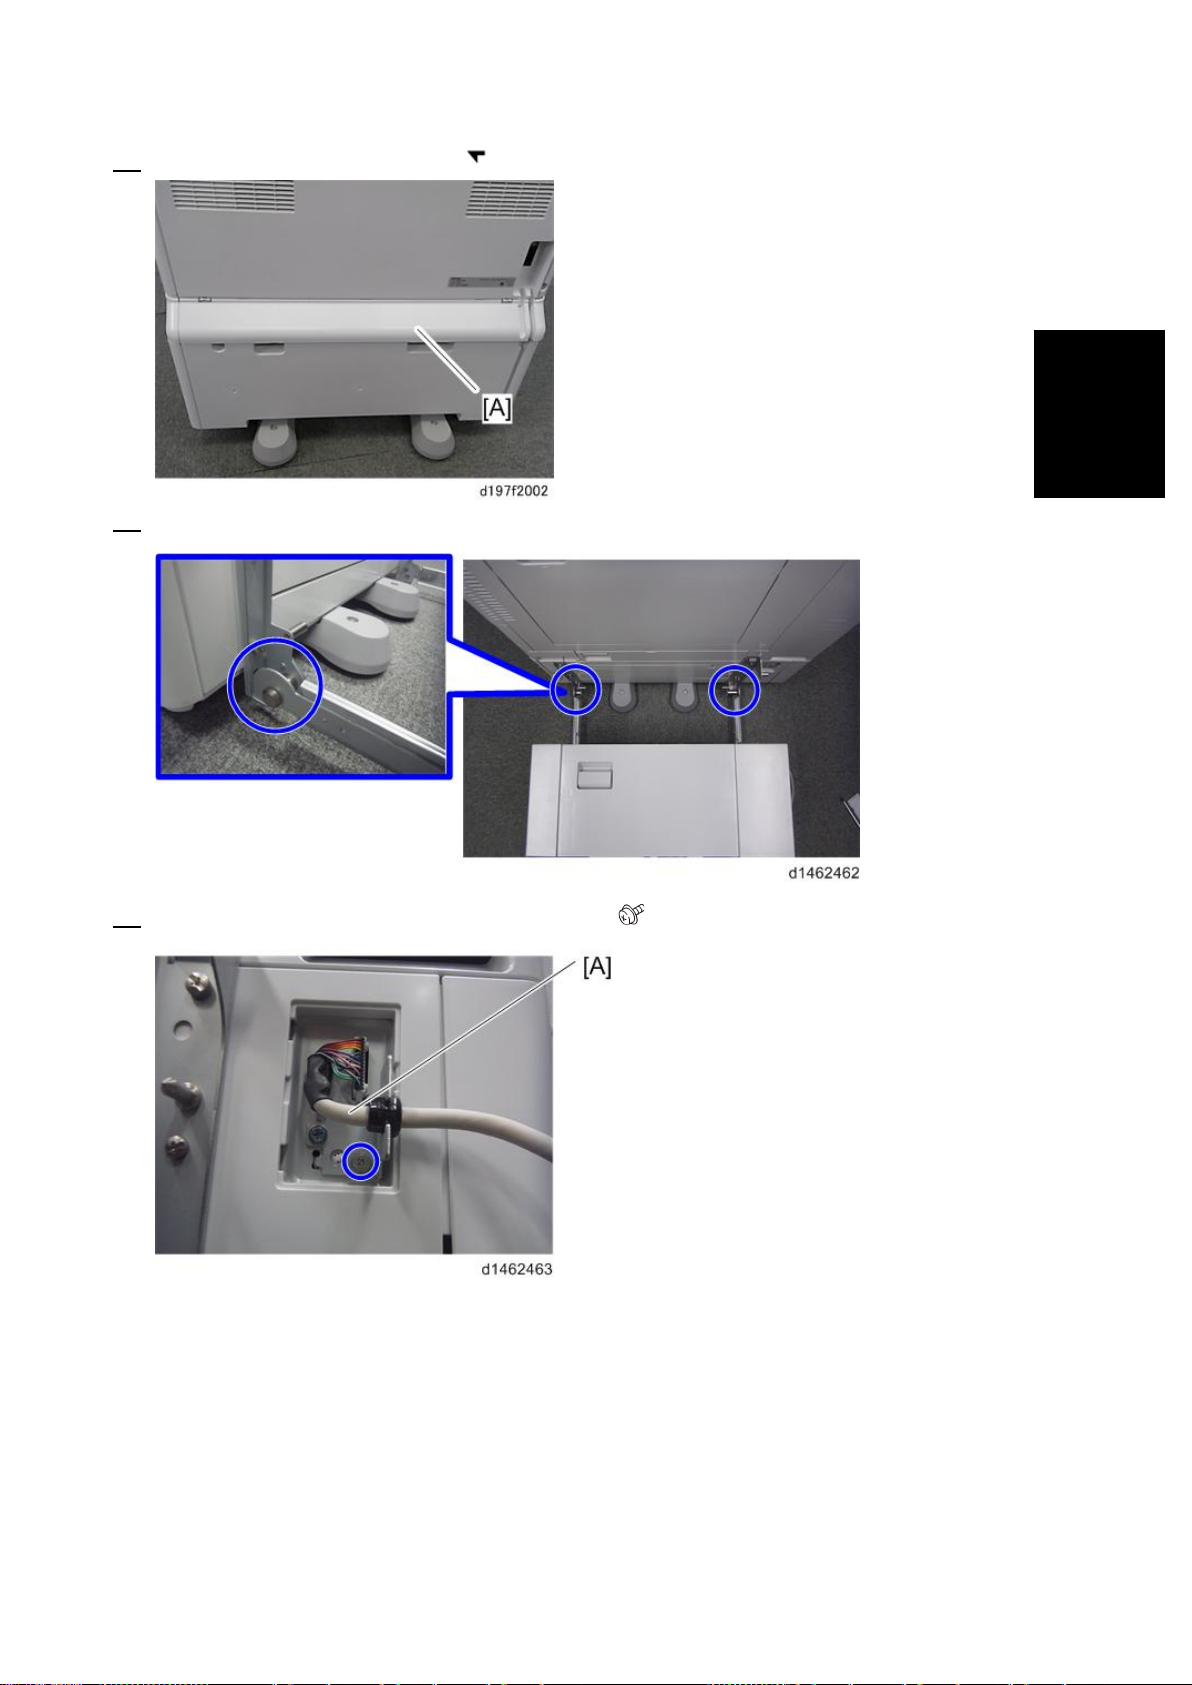
Installation
12. Attach th e rear low er gap cover [A] ( x2).
13. Attach the hook of the side LCT to the bracket.
LCIT RT3030 (D696)
14. Connect t he cable [ A] of the s i de LCT to the machine ( ×1).
78
Page 85
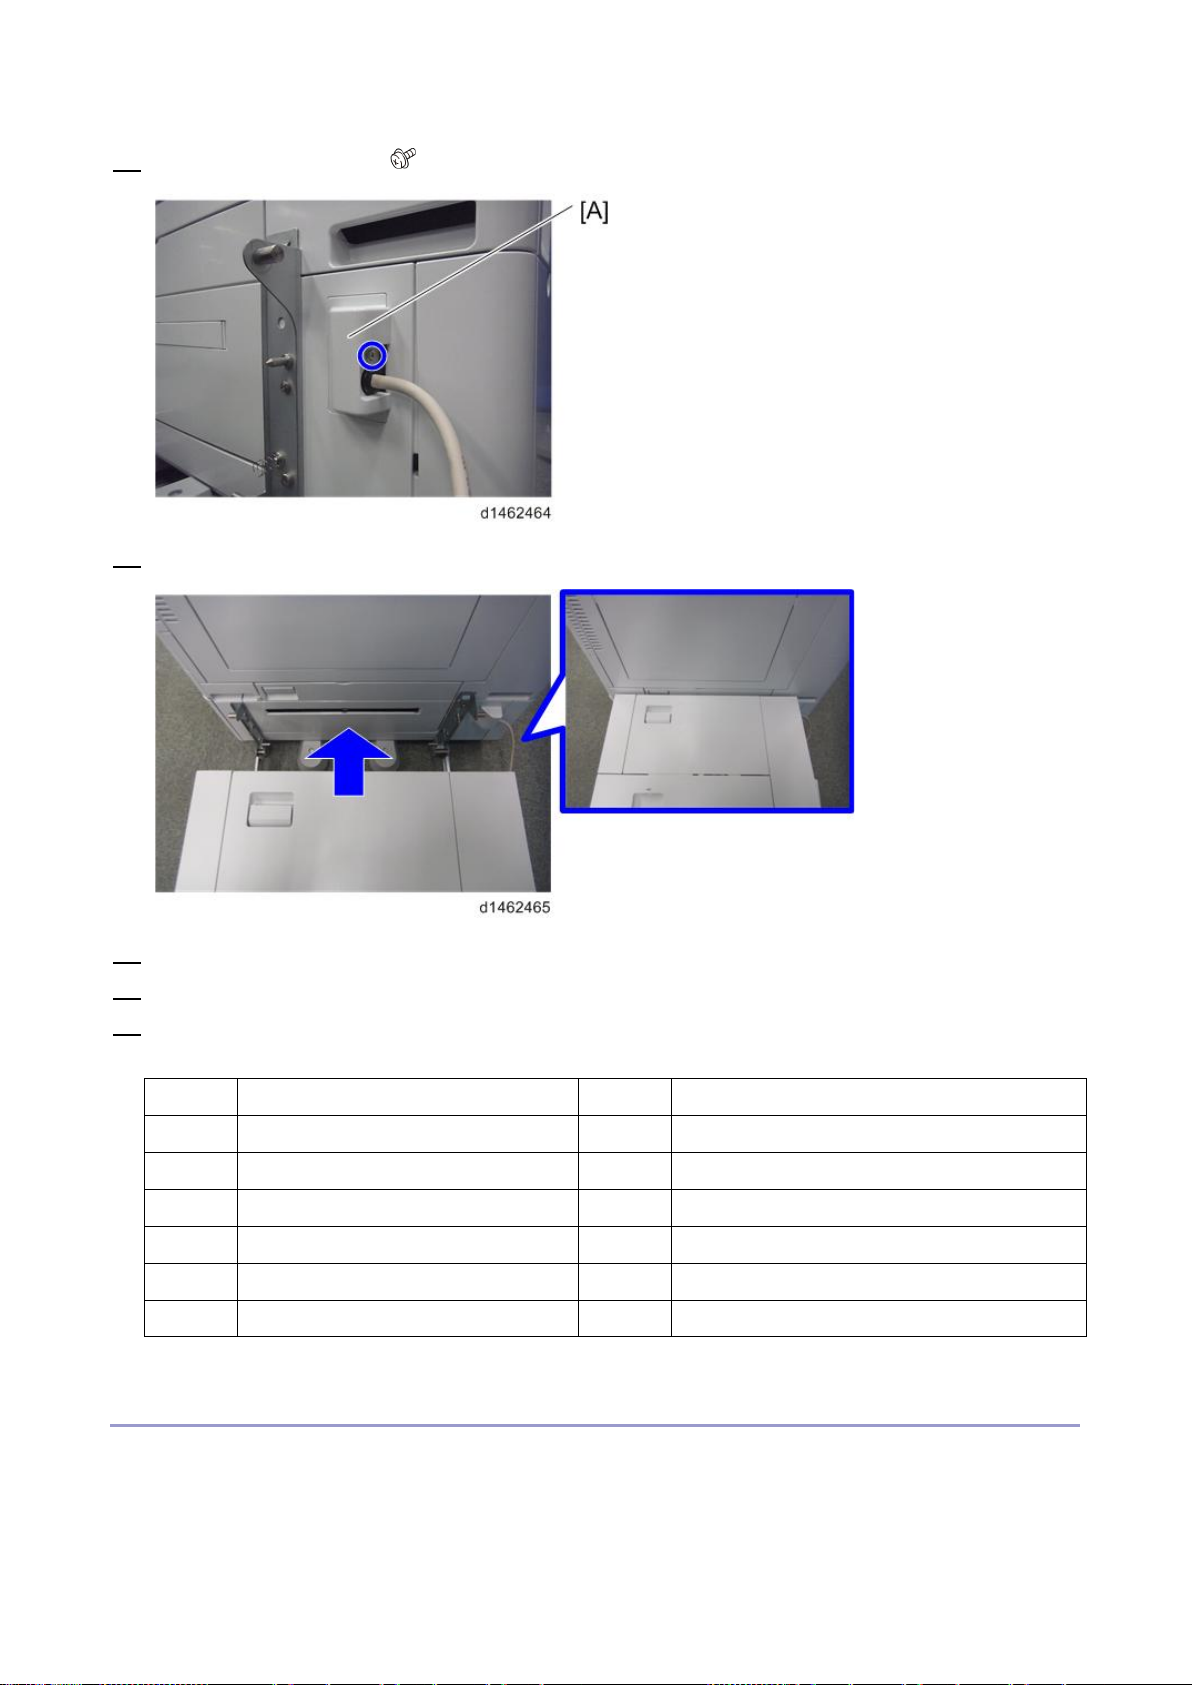
LCIT RT3030 (D696)
15. Attach th e cable cover [A] ( ×1).
16. Push the side LCT towards t he machine.
17. Turn t he power switch ON.
18. Set the pa per, and check that the paper size set in the paper feed tr ay is display ed on t he o per at io n pa n el .
19. Do the regi stration adjustment for the larg e capaci ty tray.
SP1-001-0xx (Leading Edge Registration Tray 5(LCT))
-083 Tray 5(LC T): Thin -090 T ray 5(L CT): Thin: 12 00
-084 Tray5(LCT): Plain -091 Tray5(LCT): Plain:1200
-085 Tray5(LCT): Mid-thick -092 Tray5(LCT): Mid-thick:1200
-086 Tray 5(L CT): Thi ck 1 -093 Tr ay 5(LC T): Th ick 1:1 200
-087 Tray 5(L CT): Thi ck 2 -094 Tr ay 5(LC T): Th ick 2:1 200
-088 Tray 5(L CT): Thi ck 3 -095 Tr ay 5(LC T): Th ick 3:1 200
-089 Tray5(LCT): Thick 4 -096 Tray 5(L CT): Thi ck 4:120 0
SP1-002-007 (Side-to-Side Registration Large Capacity Tray)
Changing the Paper Size
Paper size is set as shown below when the machine is shipped f rom the f actory.
NA: LT LEF
EU.AA.CHN: A4 LEF
79
Page 86
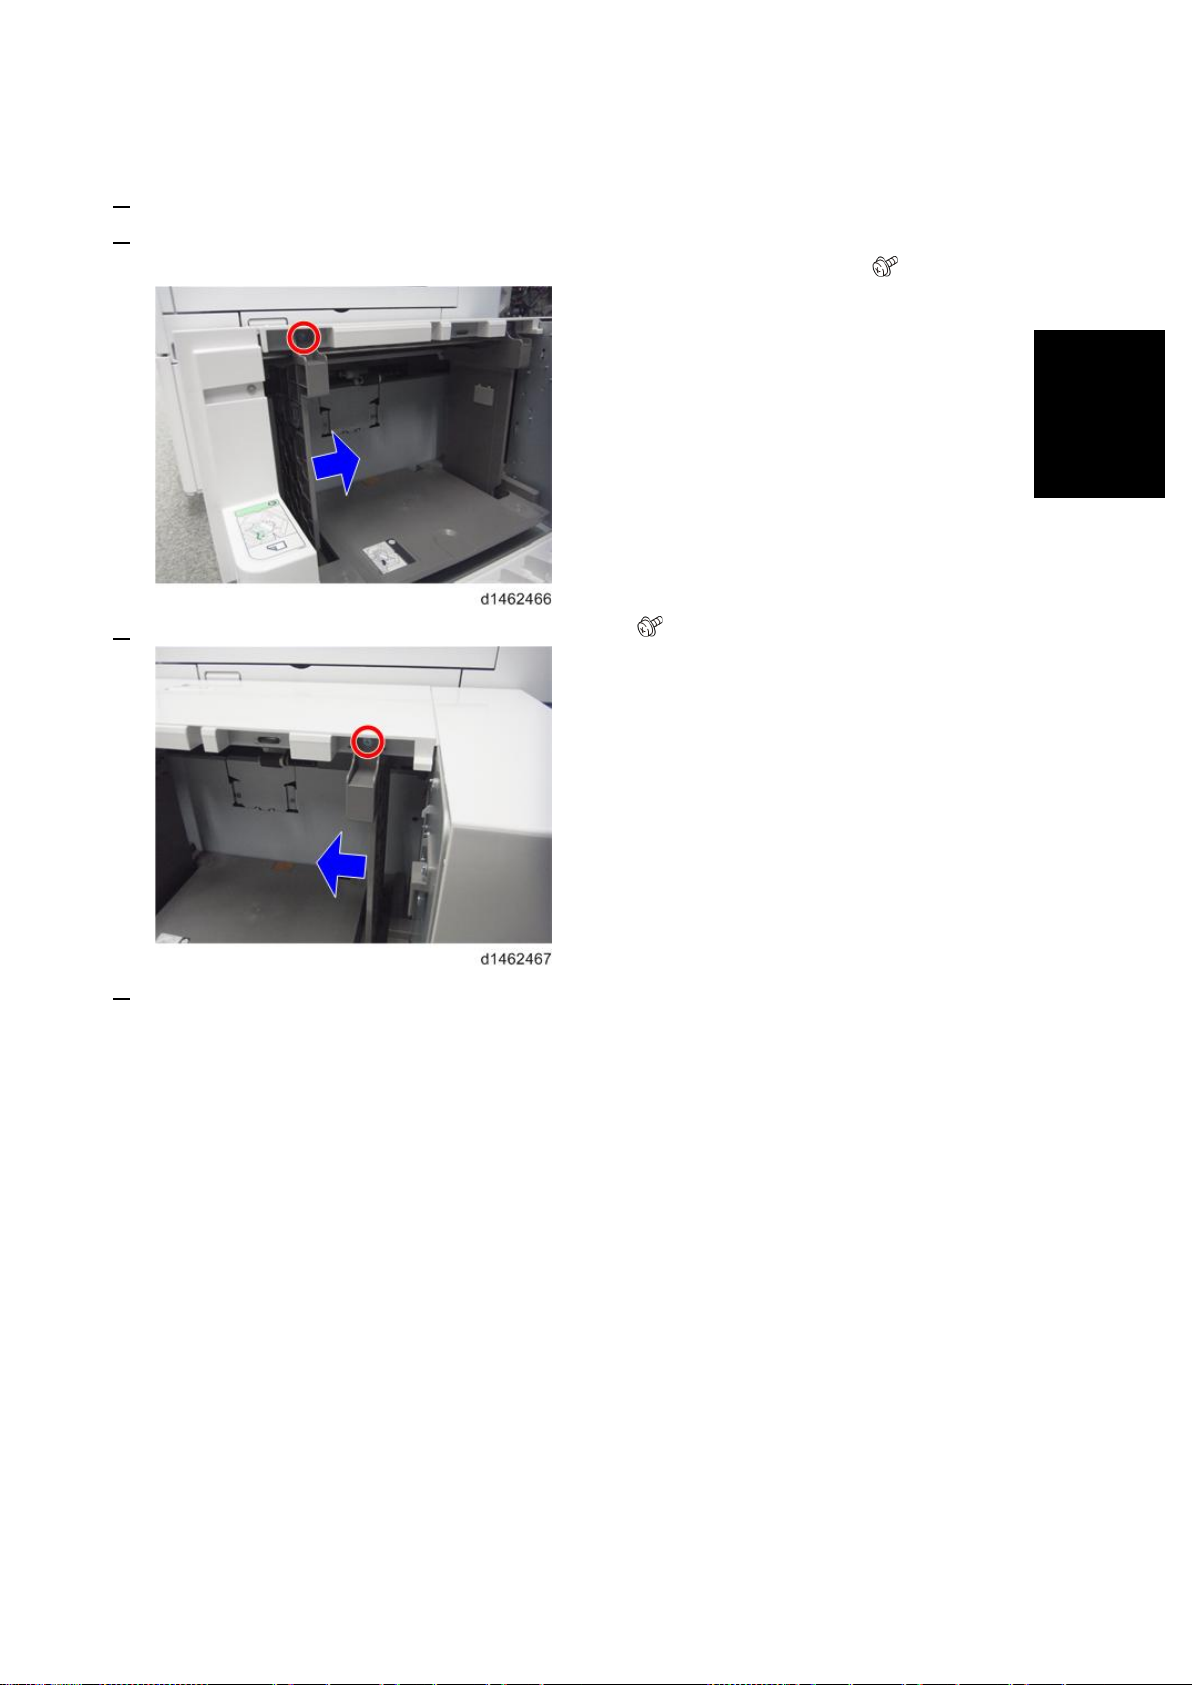
LCIT RT3030 (D696)
Installation
The pape r siz e ca n be c hanged to A4 LEF, LT L EF, or B5 LEF.
1. Open the tr ay cover.
2. Remove the upper screw at the f ront side fence, and after s etting the side fe nce to the positio n of the pa per
(outer : A4 LEF, center: LT LEF, inner: B5 LEF), t ighten the screw that was removed( ×1).
3. Also change the rear side fence to the same size positio n( ×1).
4. Change the paper siz e according to the new side fence pos i t ion.
SP5-181-024 (Size A djust LCT)
0: A 4 LEF, 1: LT LEF, 2: B5 LEF
80
Page 87
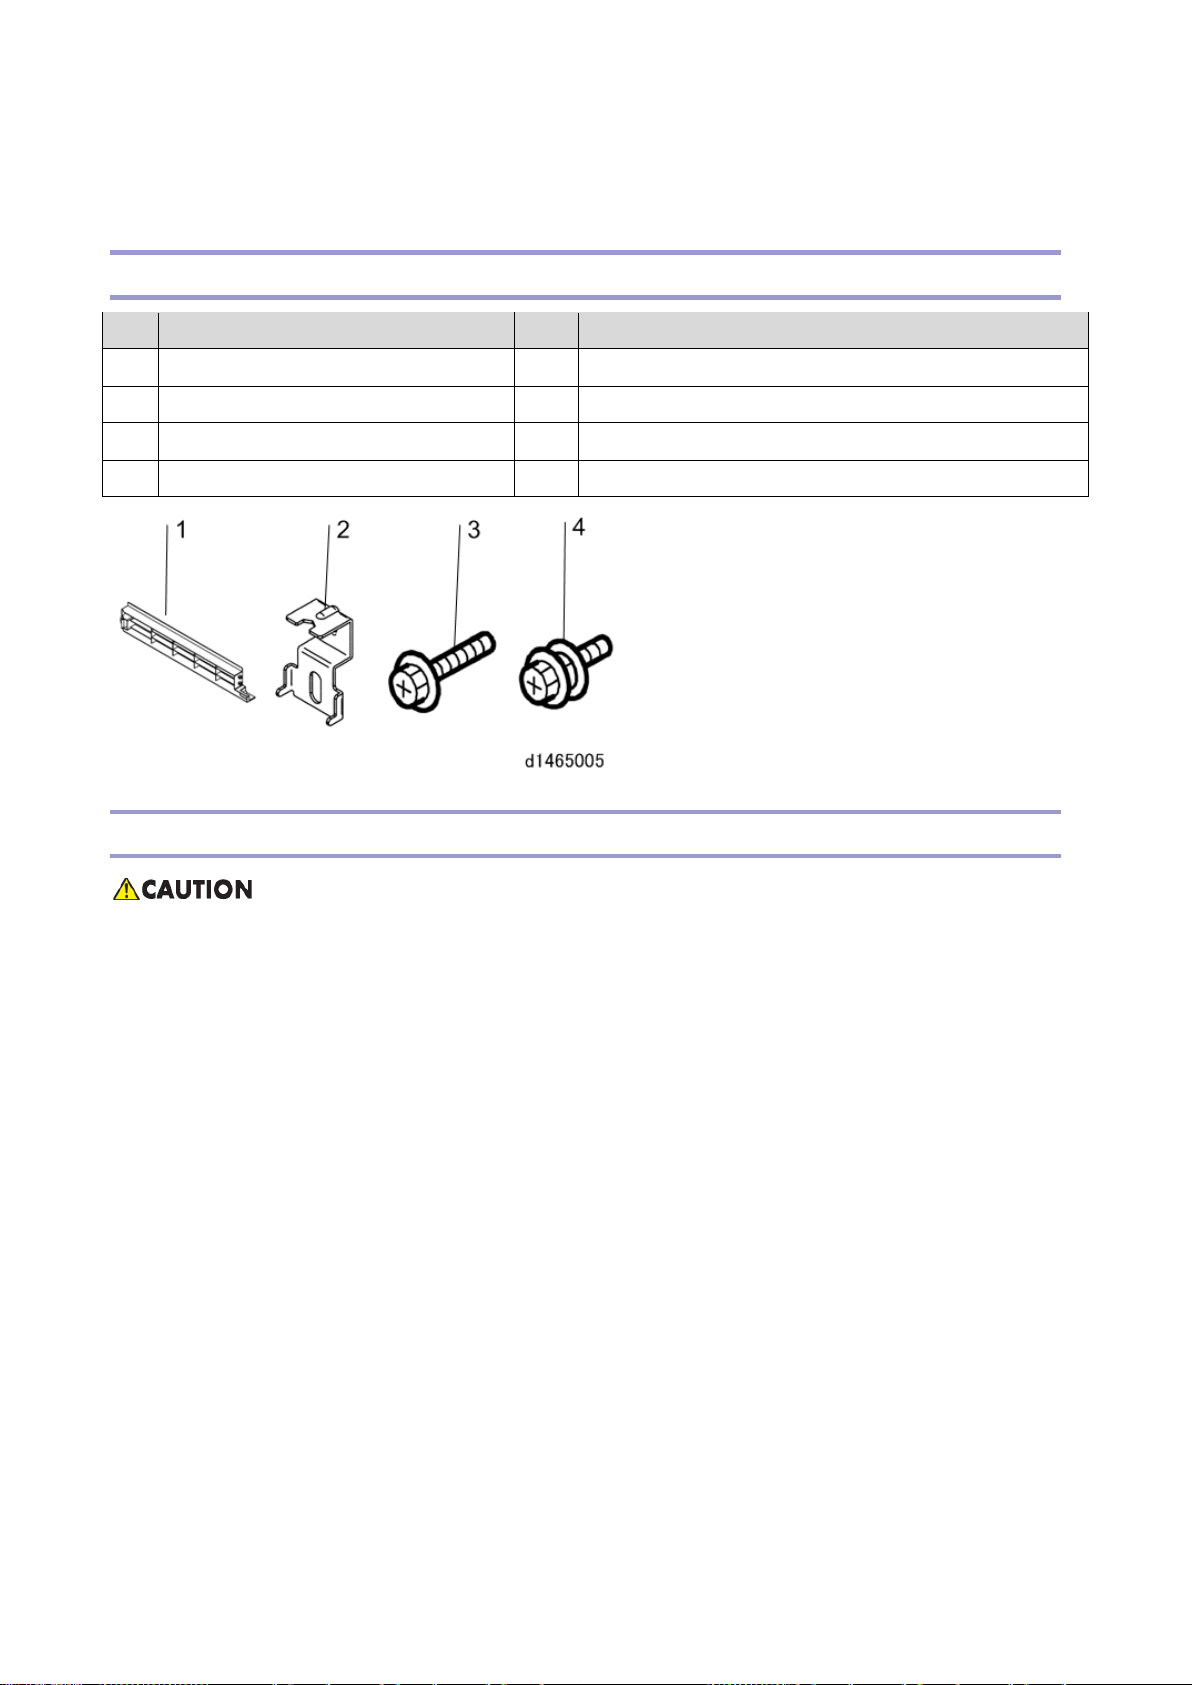
Caster Table Ty pe M3 (D178)
Caster Table Type M3 (D178)
Accessory Check
No. Description Q’ty Remarks
1 Right Lower Cover 1 Used w hen not installing the Paper Feed Unit PB3150.
2 Securing Bracket 2
3 Screws (M4 × 10) 2
4 Screw w ith Spring Washer (M4 × 10) 1
Installation Procedure
• The ma chine mus t be held at the correct locat ions, and must be lifted sl owly.
• If it is lifted with force, handled carelessly or dropped, it will result in an injury.
• If installing this optio n, turn th e power to the machine off, and unpl ug the power plug from the w all
socket.
• If this option i s installed when the power is on, it will result in an electric shock or mal function.
• Be sure to join the machine and caster table to prevent equipment from falling over .
• If it is not joined, the machine will move or fall ove r, which will result in an injury.
81
Page 88
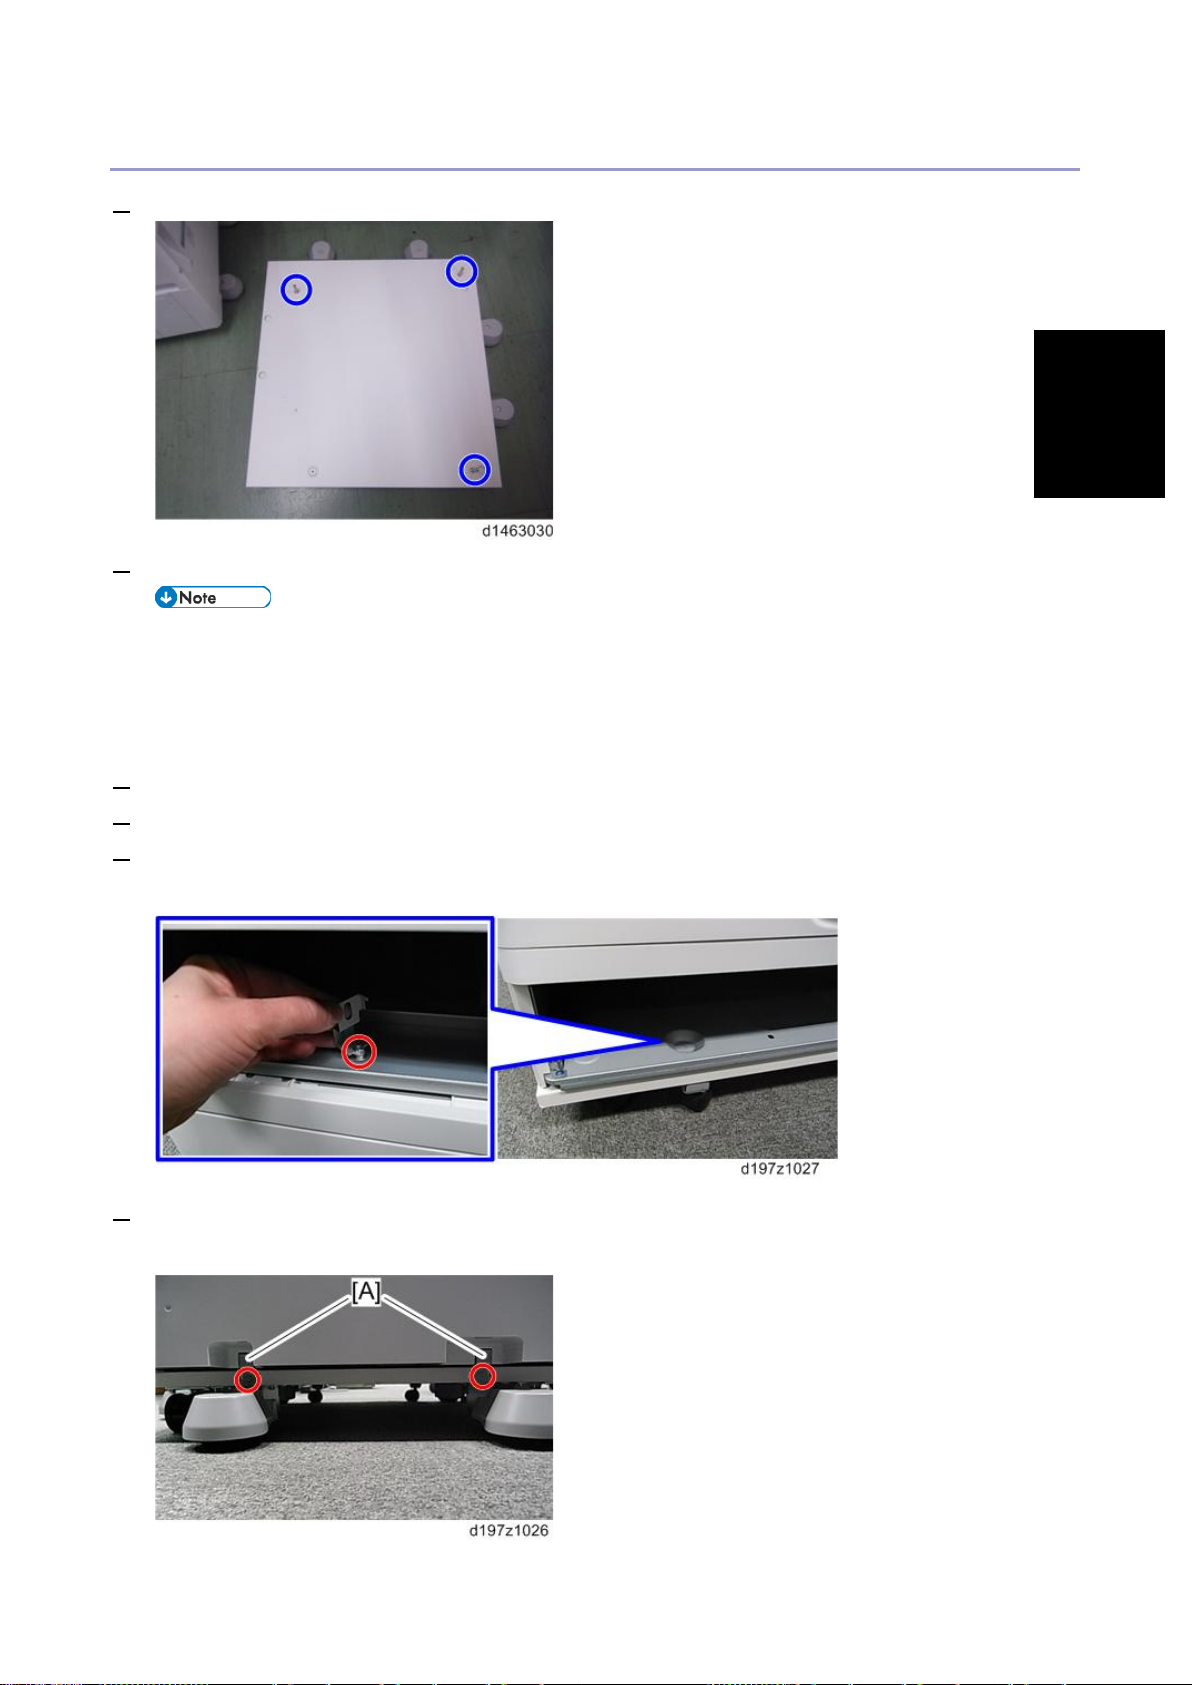
Caster Table Ty pe M3 (D178)
Installation
For Installing Directly under th e Main Machine
1. Attach the 3 locating pins.
2. Holding th e grips on the machine, align it with the locati ng pins, and plac e the machine on th e caster table.
• When you lift th e machine, hold the lifting handl es .
• In part icular, do not lift it by holding t he scanner unit, etc., (as i t may deform).
• Do not put the machine down on the caster table as a t emporary resting place. This may cause the
machine to defor m. Always connect th e machine and cast er unit properly.
3. Attach the right lower cover between t he right side of the main machine and the caster table.
4. Pull out the 2nd paper feed tray of the m achine.
5. Using a securing bracket as a screwdriver, f ix the machine or paper feed unit to the caster table (spring
washer: screw: M4×10: 1) .
6. Attach the securing br ackets [A] at 2 positions to left and r ight at the rear of t he machine or pap er feed un i t
(screws: 1 each ).
82
Page 89
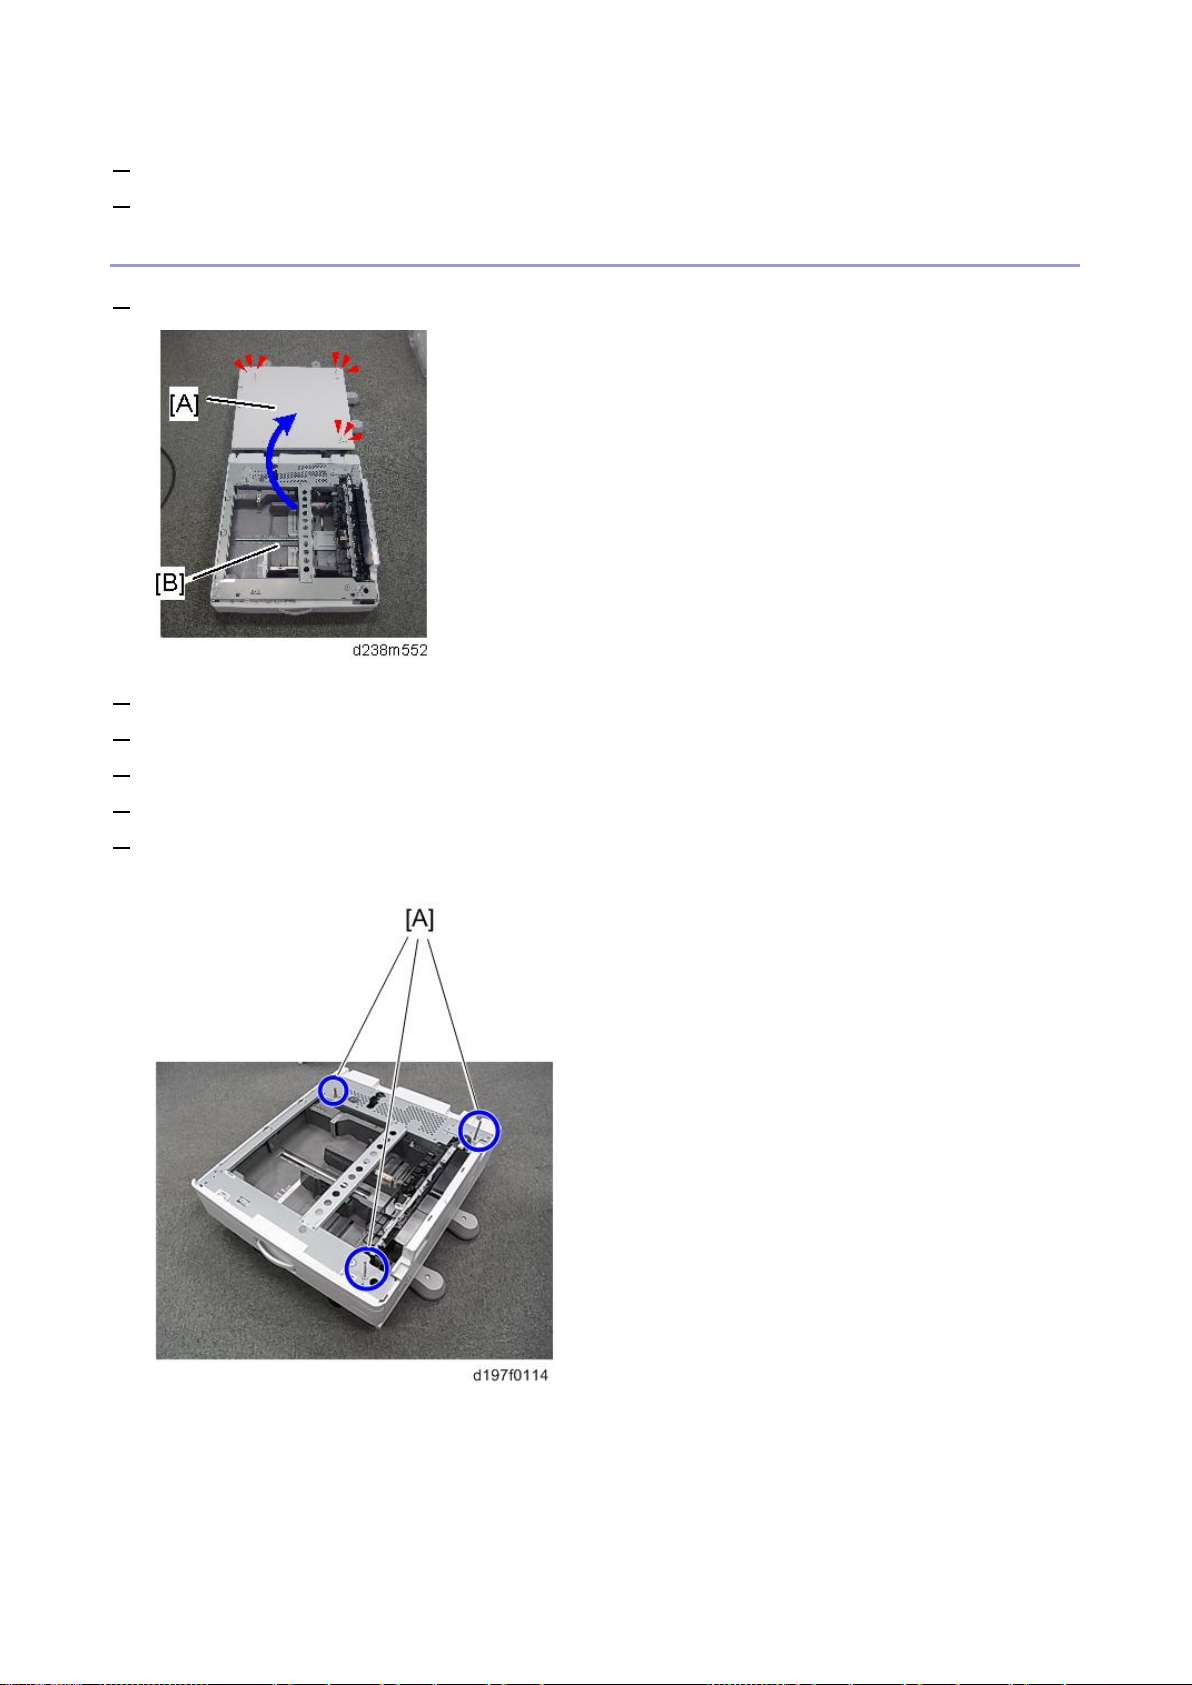
Caster Table Ty pe M3 (D178)
7. Attach the right lower cover provided with this option to the right lower s i de of the main machine.
8. Return the p aper fee d t ray to the machine or the paper fee d unit on the caster table.
For Installing under PB3150
1. Pla ce th e pa p er fe ed un it [B] on t he ca st e r tabl e [ A ].
2. Pull out the paper feed tray of the PB3150.
3. Using a securing bracket, fix the caster table t o the pape r tray unit (spring w asher: screw : M4×10: 1).
4. Attach the securing brackets at 2 positions to left and right at the rear of th e machine (screw s: 1 each).
5. Put ba ck the tr ay of the PB3150 in pl a ce.
6. By holding t he grips on the main machine, mount the main machine o n the PB3150 while fitting it to the
locati ng pins [A ] .
83
Page 90
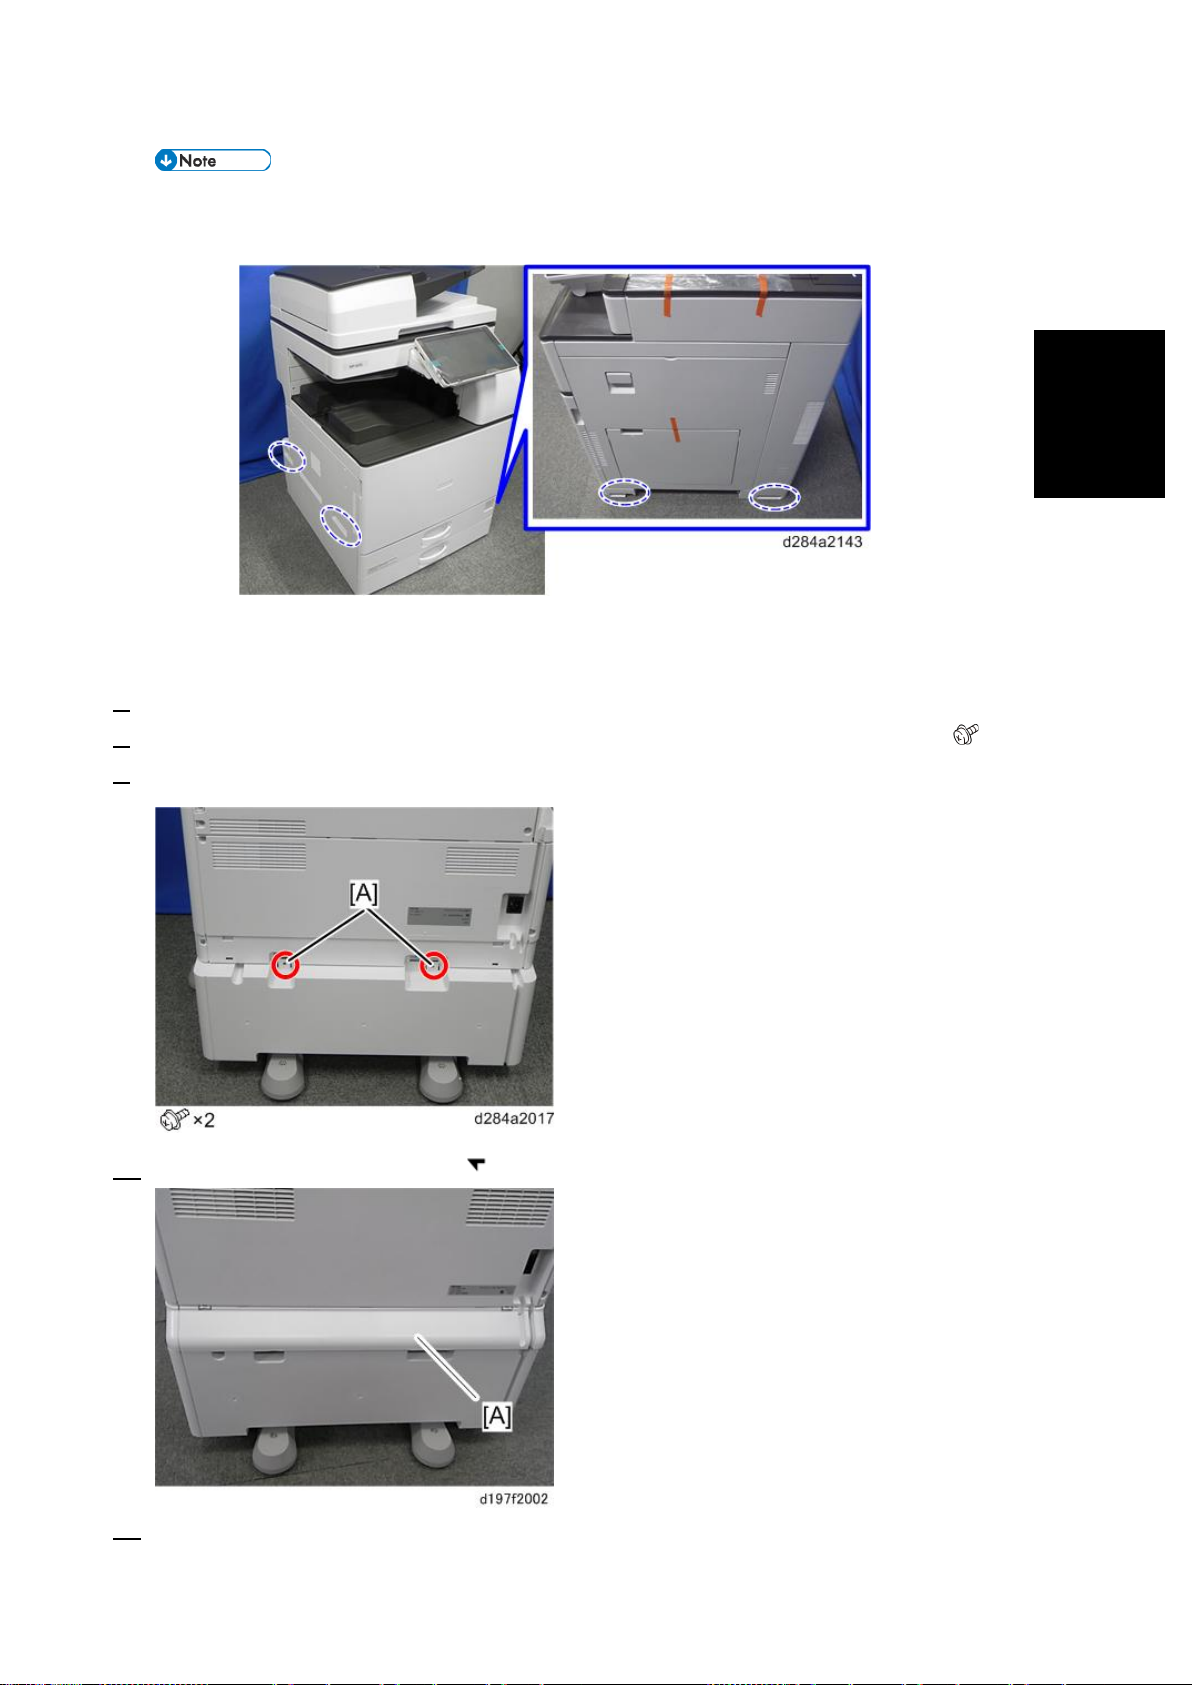
Caster Table Ty pe M3 (D178)
Installation
• Be sure to use th e specified grips on the main machine. Using any other positions may damage
the machine.
• Do not put the machine down on the PB3150 as a temporary resting place. This may cause the
PB3150 to deform.
7.
Pull out the 2nd paper feed tray of the mai n machine.
8. Usi ng a sec ur ing bra ck e t as a scr ew dri v er, secur e the m a in ma c hi ne a nd th e PB 31 50 ( M4 ×1 0: ×1).
9. Attach the securing bracket [ A] to the rear of the main machine.
10. Attach th e rear low er gap cover [A] ( ×2).
11. Return th e 2nd paper feed tray to the main machine.
84
Page 91
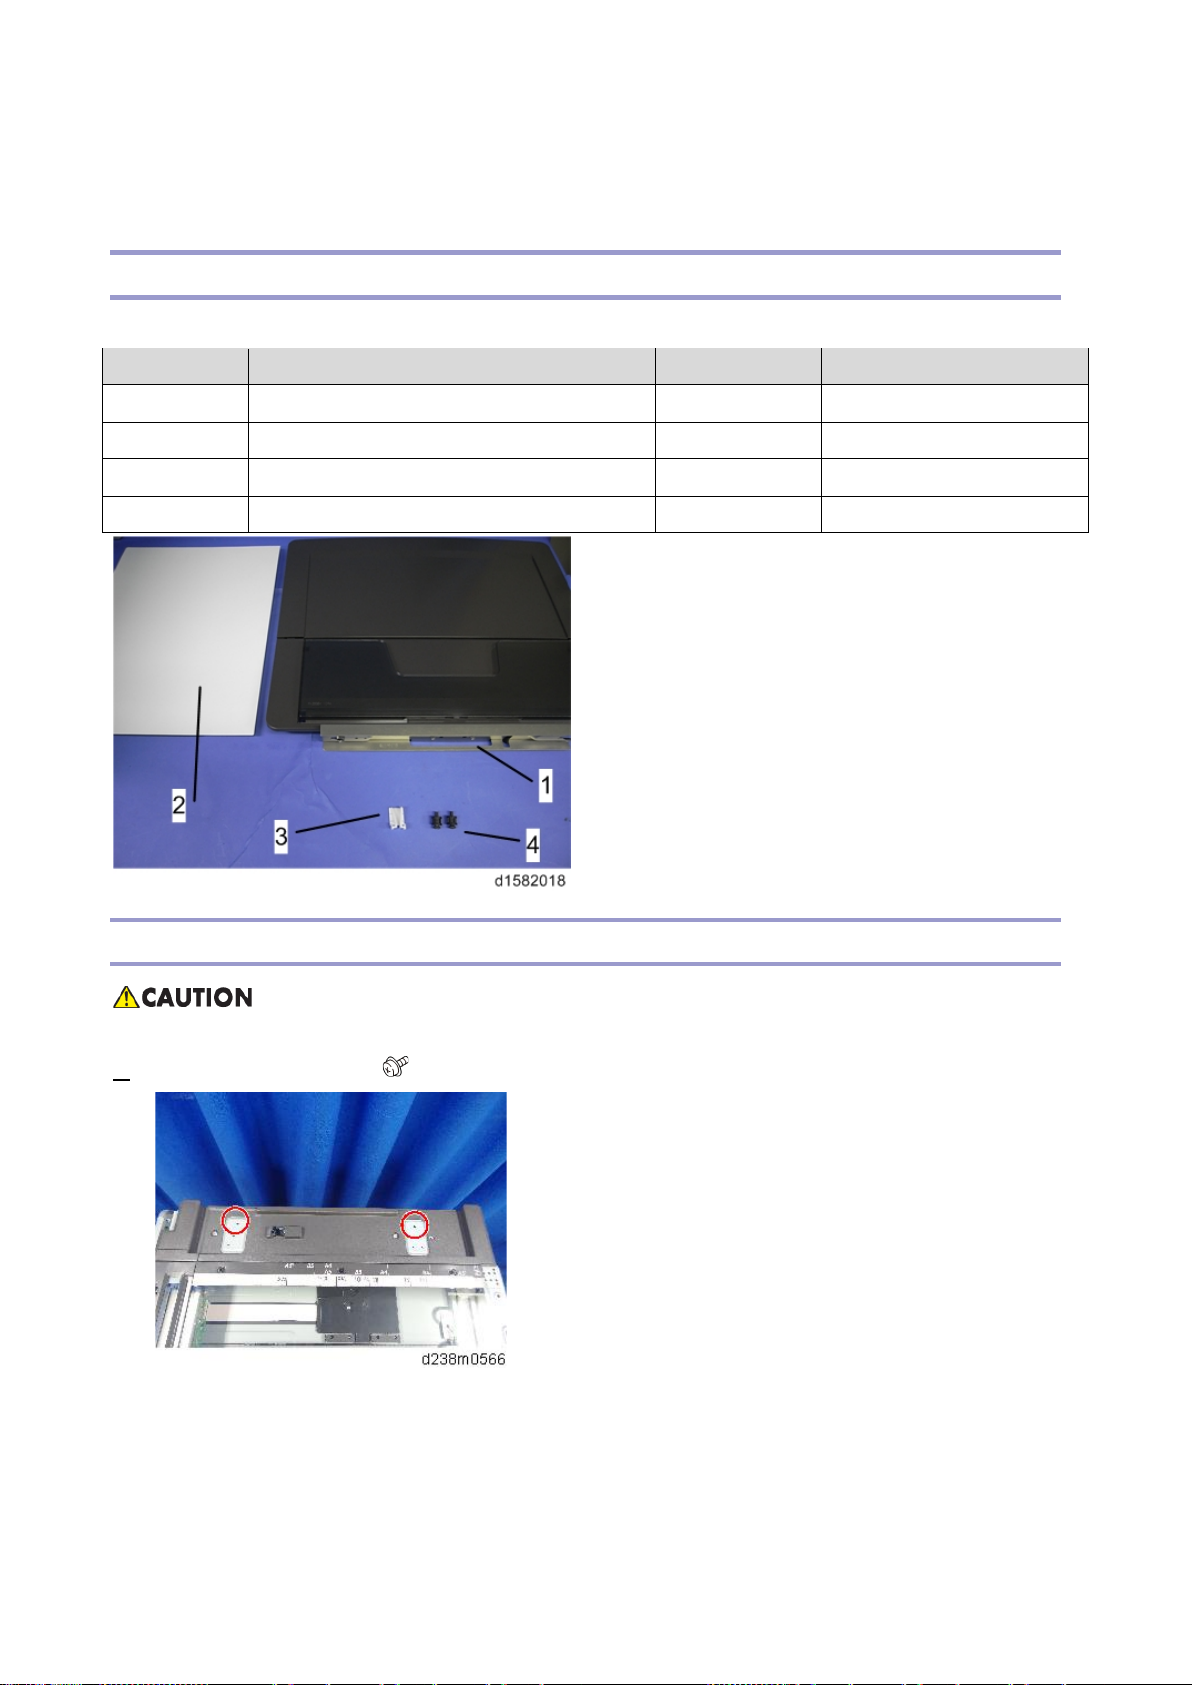
Platen Cover PN2000 (D700)
Platen Cover PN2000 (D700)
Accessory Check
Check that you have the a ccessories indicated below.
No. Descriptions Q’ty Remarks
1 Plate n Cover 1
2 Plate n Sheet 1
3 Feeler Guide 1
4 Stepped Screw 2
Installation Procedure
• Unplug the machine power cord before starting the following procedure.
1. Install the stepped screws ( × 2).
85
Page 92
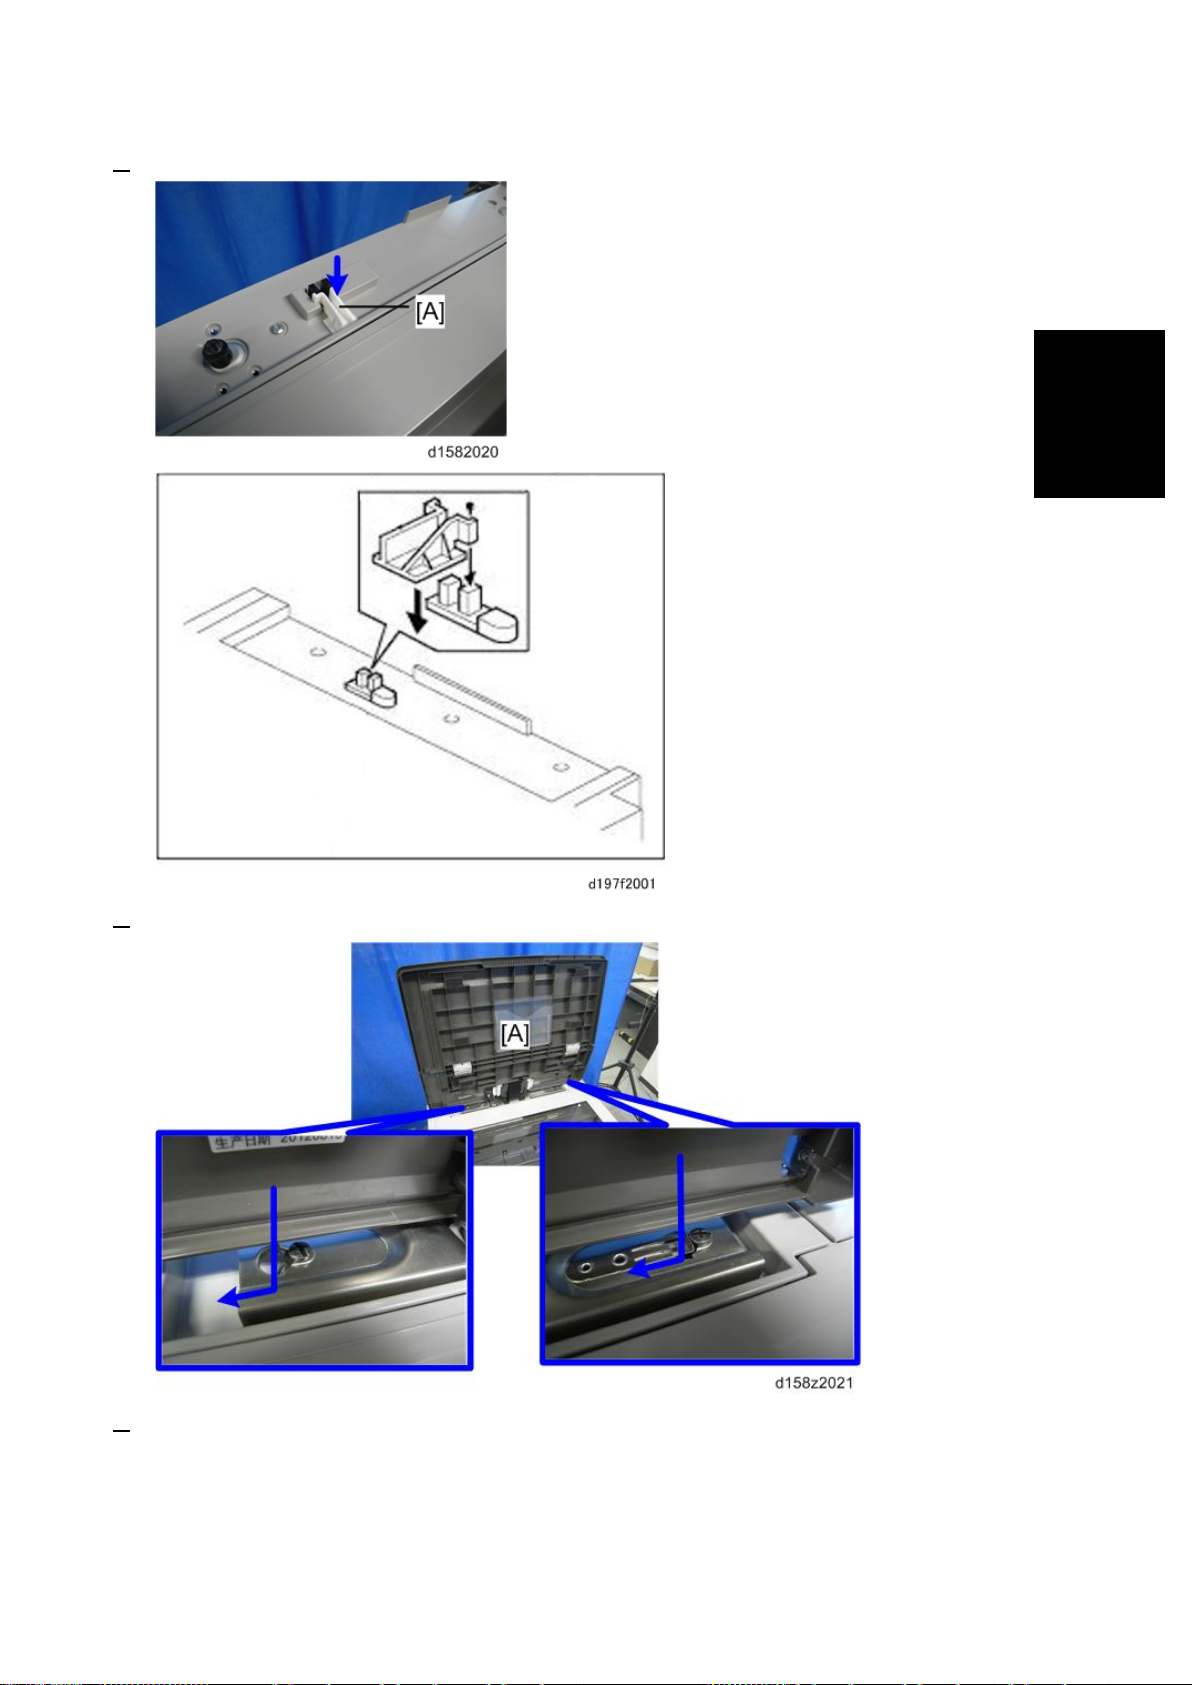
Installation
2. Install the feeler guide [A].
Platen Cover PN2000 (D700)
3. Install the platen cover [A].
4. Place the platen sheet [A] on t he exposure glass.
86
Page 93
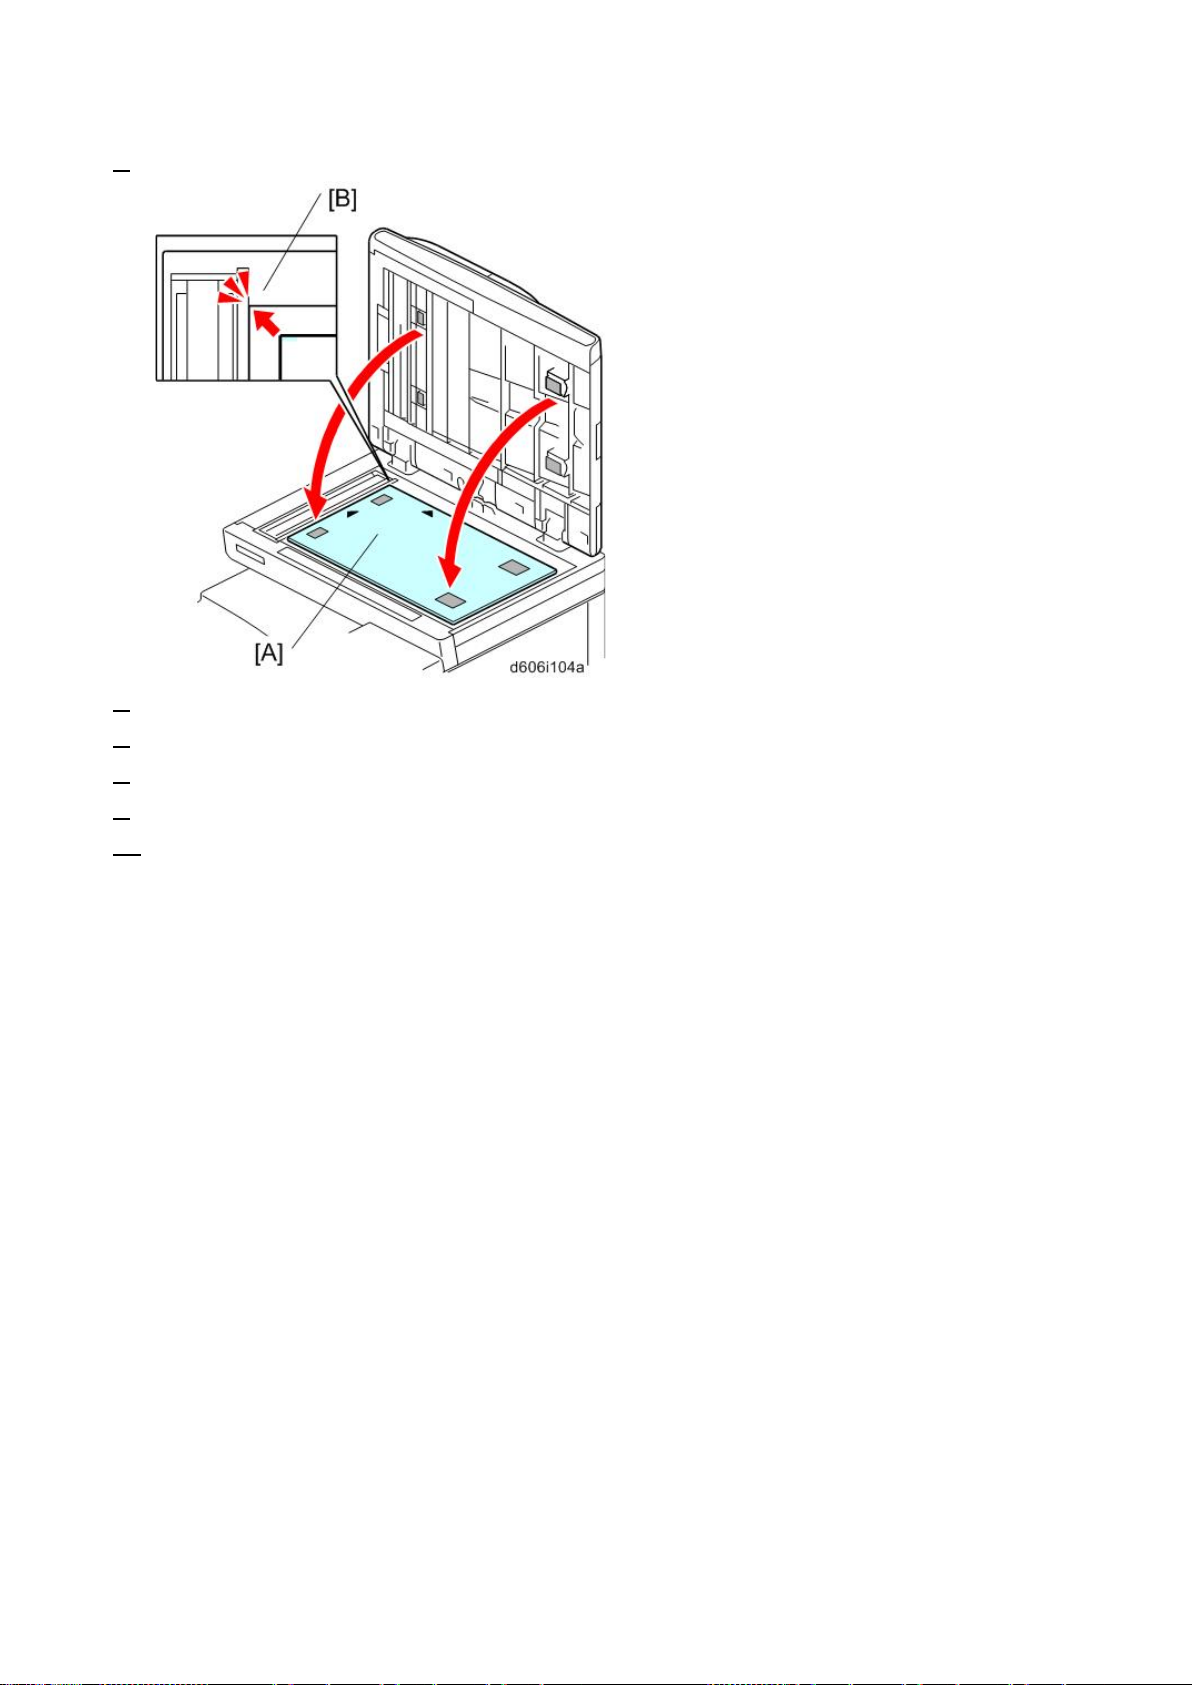
Platen Cover PN2000 (D700)
5. Line up the r ear left corner of the platen sheet fl ush again st corner [B] on the exposure glass.
6. Cl ose th e pl at e n cov er.
7. Op en th e pl at e n cove r.
8. Press the surface of the platen sheet gently to fix it on the platen cover se curely.
9. Connect the power c ord an d tu rn o n th e mai n po w er.
10. Place an or i ginal o n the platen and make a copy to check the installation.
87
Page 94
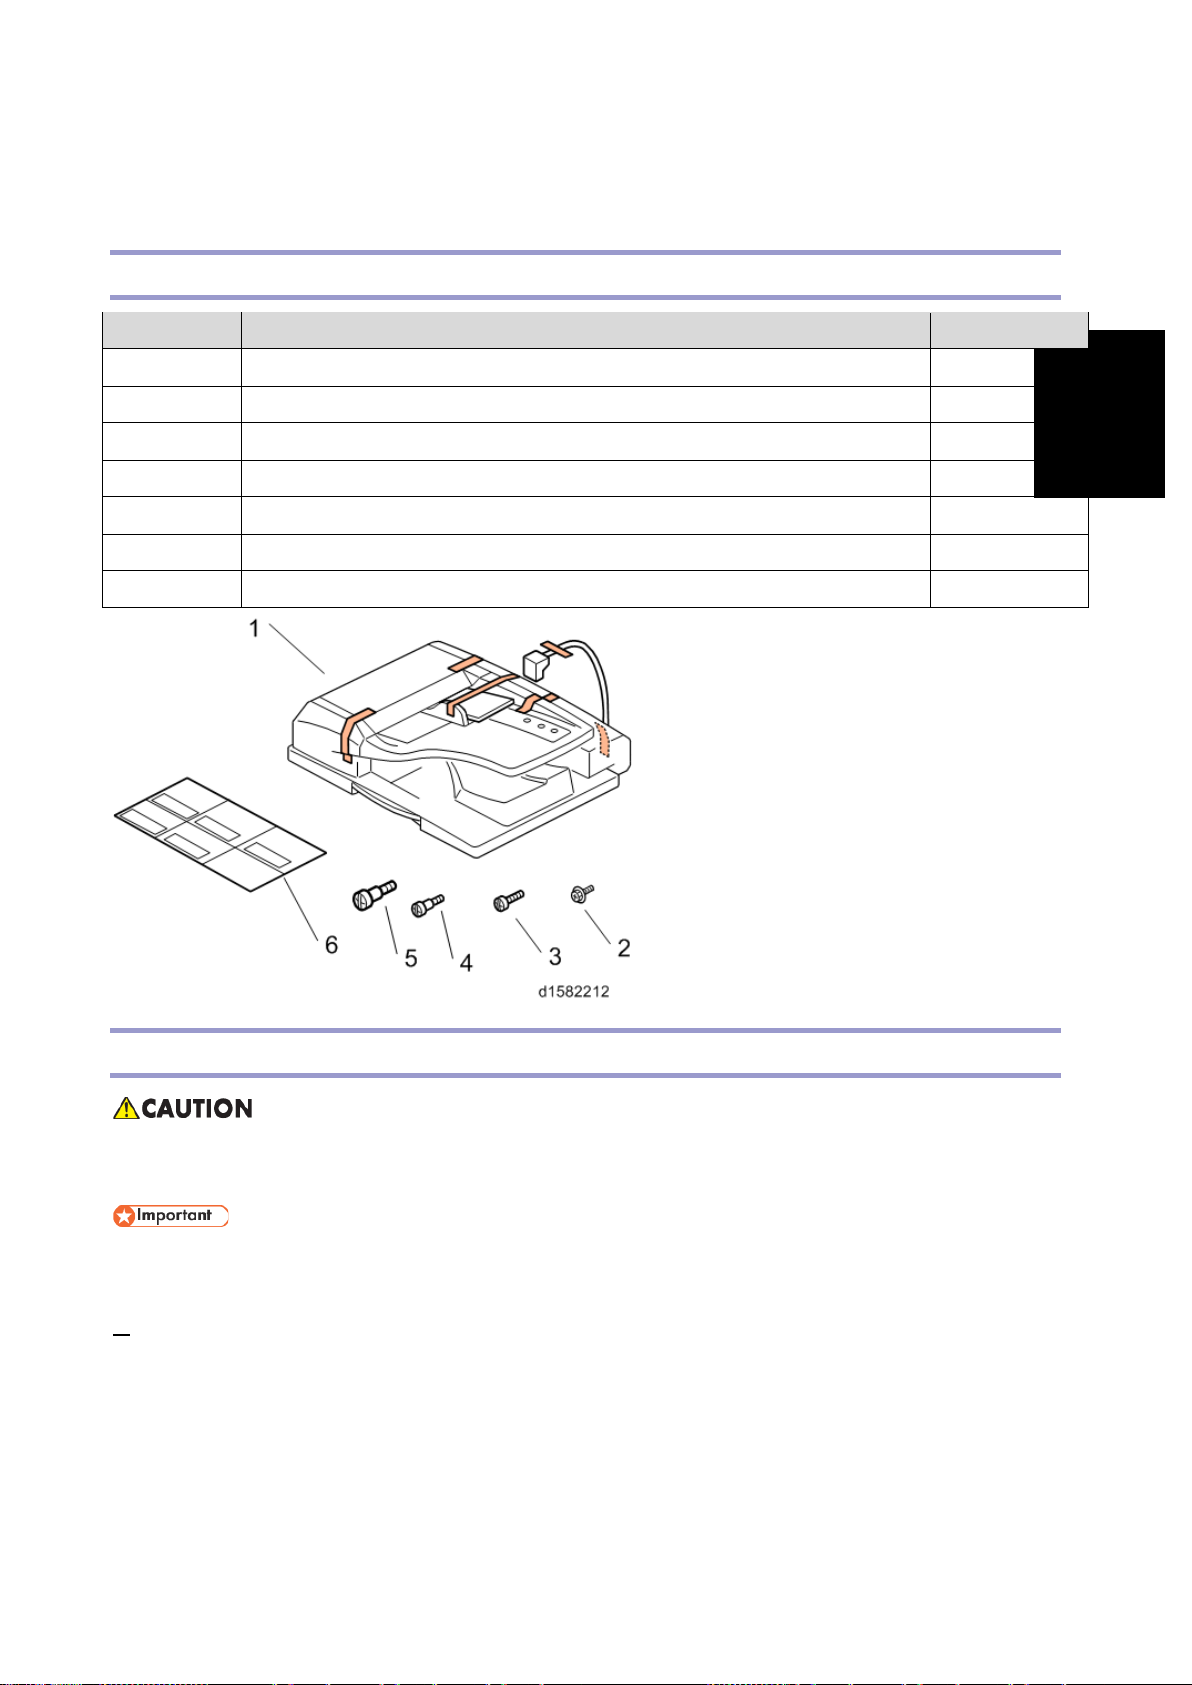
Installation
ARDF DF3090
Accessory Check
No. Description Q’ty
1 ARDF 1
2 Screw 2
3 Knob Screw 2
4 Stud Screw (Small) 1
5 Stud Screw (Large) 1
6 Attention Decal - Top Cover 1
- Decal - Exposure Glass 1
ARDF DF3090
Installation Procedure
• Turn OFF the main pow er and un plug the p ower cord from the wall socket. If installing without
turni ng OFF the main power, an electri c shock or a malfunction may occur.
• Do not turn the p ower on until you perform "adjustment after installation," or it may not start
normally.
1. Remove all tapes an d shipping retainers.
88
Page 95
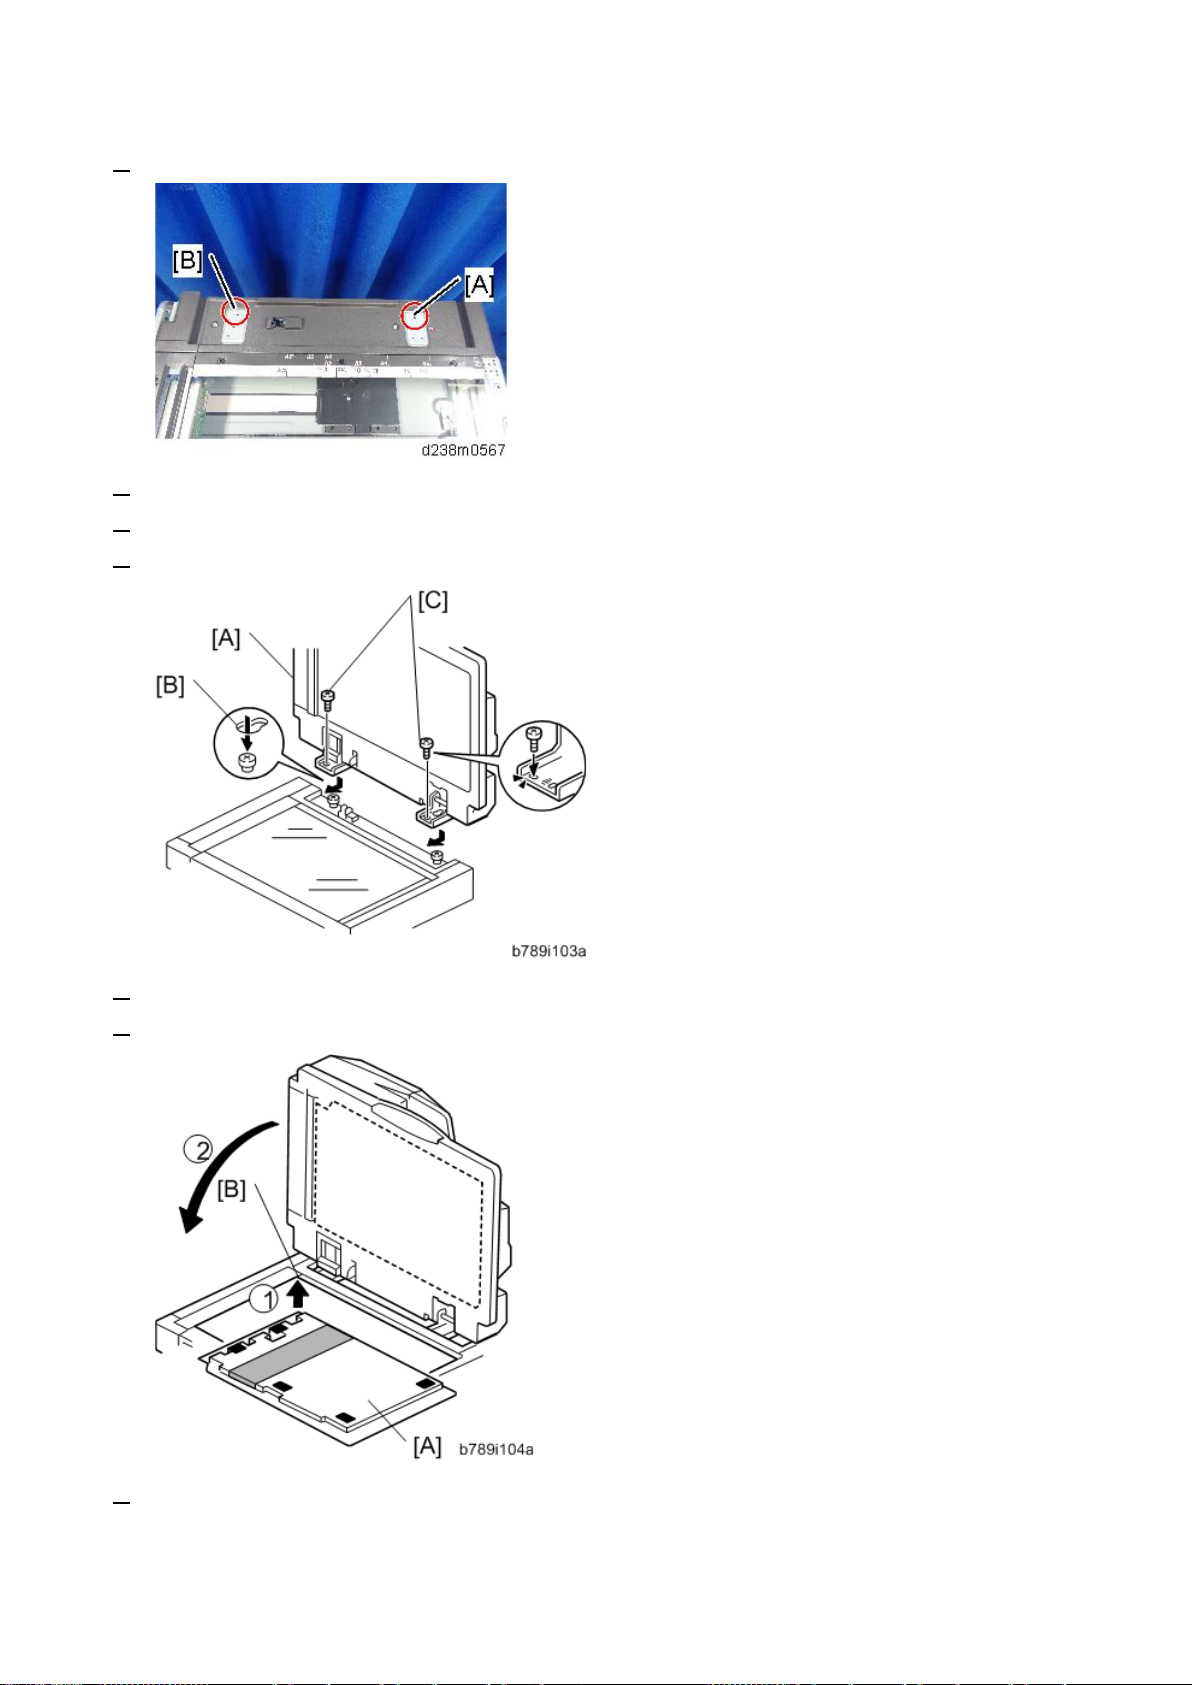
ARDF DF3090
2. Insert the two stud screws ([A] is the larger stud, [B] is the smaller stud).
3. Mount the ARDF [A] by aligning the screw keyholes [B] of t he ARDF support plat e over the stud screws.
4. Slide the ARDF toward t he front of the machine.
5. Secure the ARDF with the two knob screws [C].
6. Align the re ar left corner of th e platen sheet [A] with the corner [B] on the exposure glass.
7. Cl ose the ARD F .
8. Op en th e ARDF and ch eck that t he pl at e n sh ee t is co rr e ctl y atta ch ed.
89
Page 96
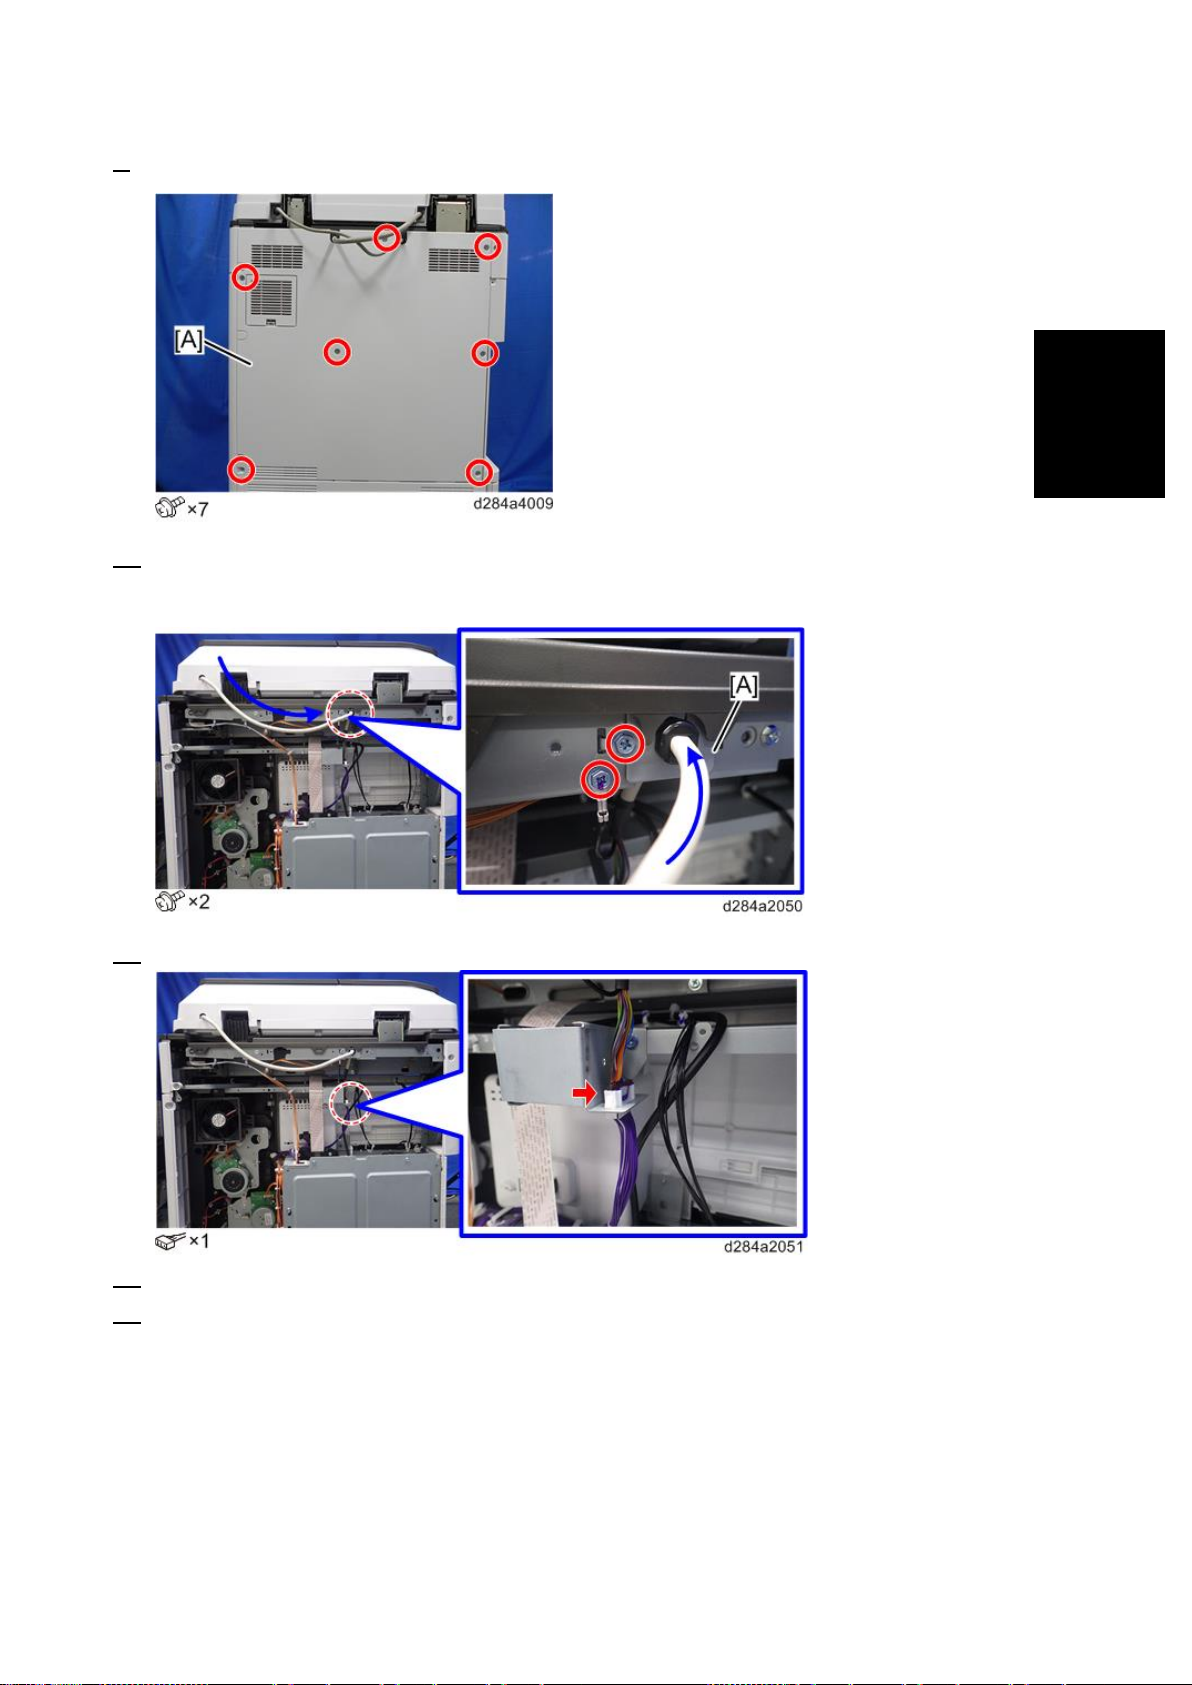
Installation
9. Remove the rear cover [A].
10. Connect t he ARDF cable as shown and mou nt the bracket [A] on the machine’s rear frame.
Make sure to connect the g roundi ng wire.
ARDF DF3090
11. Conn ect the scanner cable to the connect or at the m achine’s rear.
12. R ea tt a ch th e rear cov e r.
13. Lift the ARDF original tray.
90
Page 97
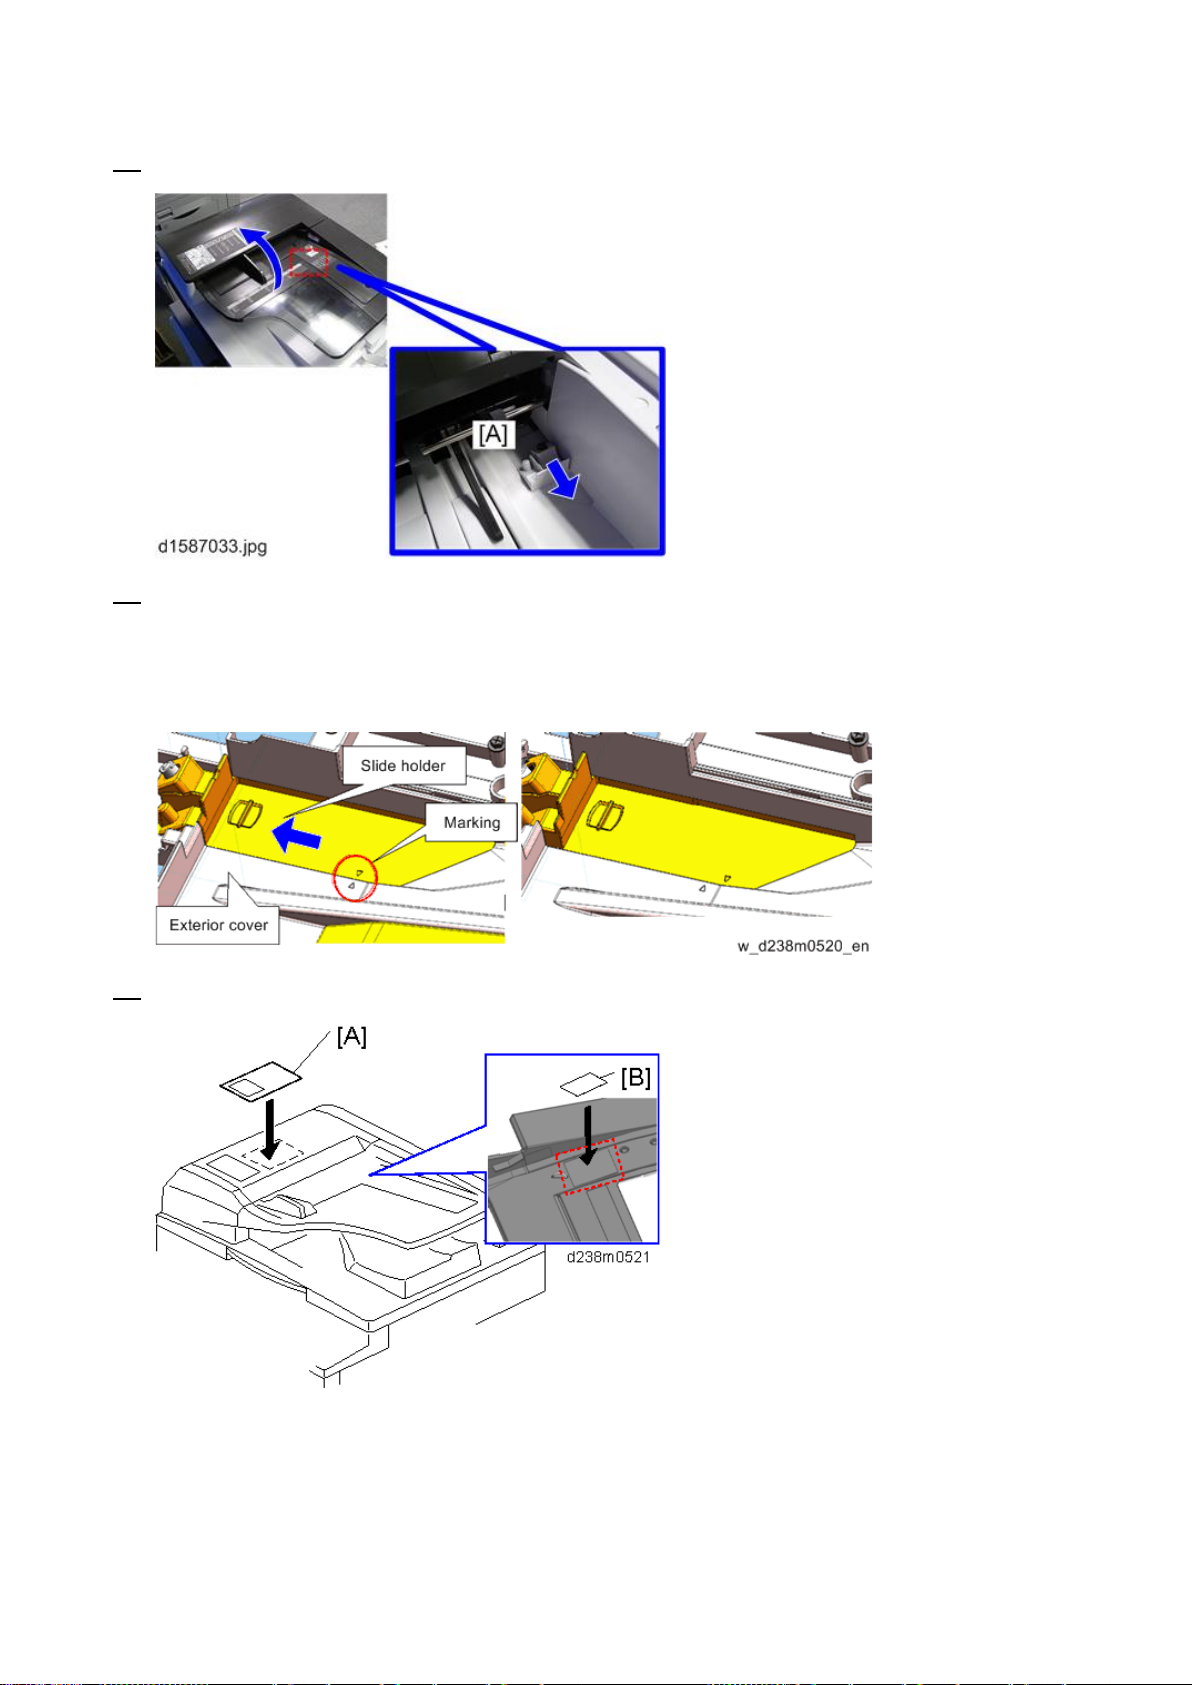
ARDF DF3090
14. Slide the stamp holder [A] out and in s tall the stamp cartridge in it, if ne cessary.
15. C l ose th e h ol der.
After t he stamp i nstallation, be sure to slide the holder in correctly. Make sure to slide it in thoroughly until
the ref erence marks on t he holder and exterior cover are aligned. If it i s not mounted corr ectly, the m achine
detect s a J001 paper jam .
16. Attach th e decals [A] and [B] to the top cover as shown. C hoose the language that you want.
91
Page 98
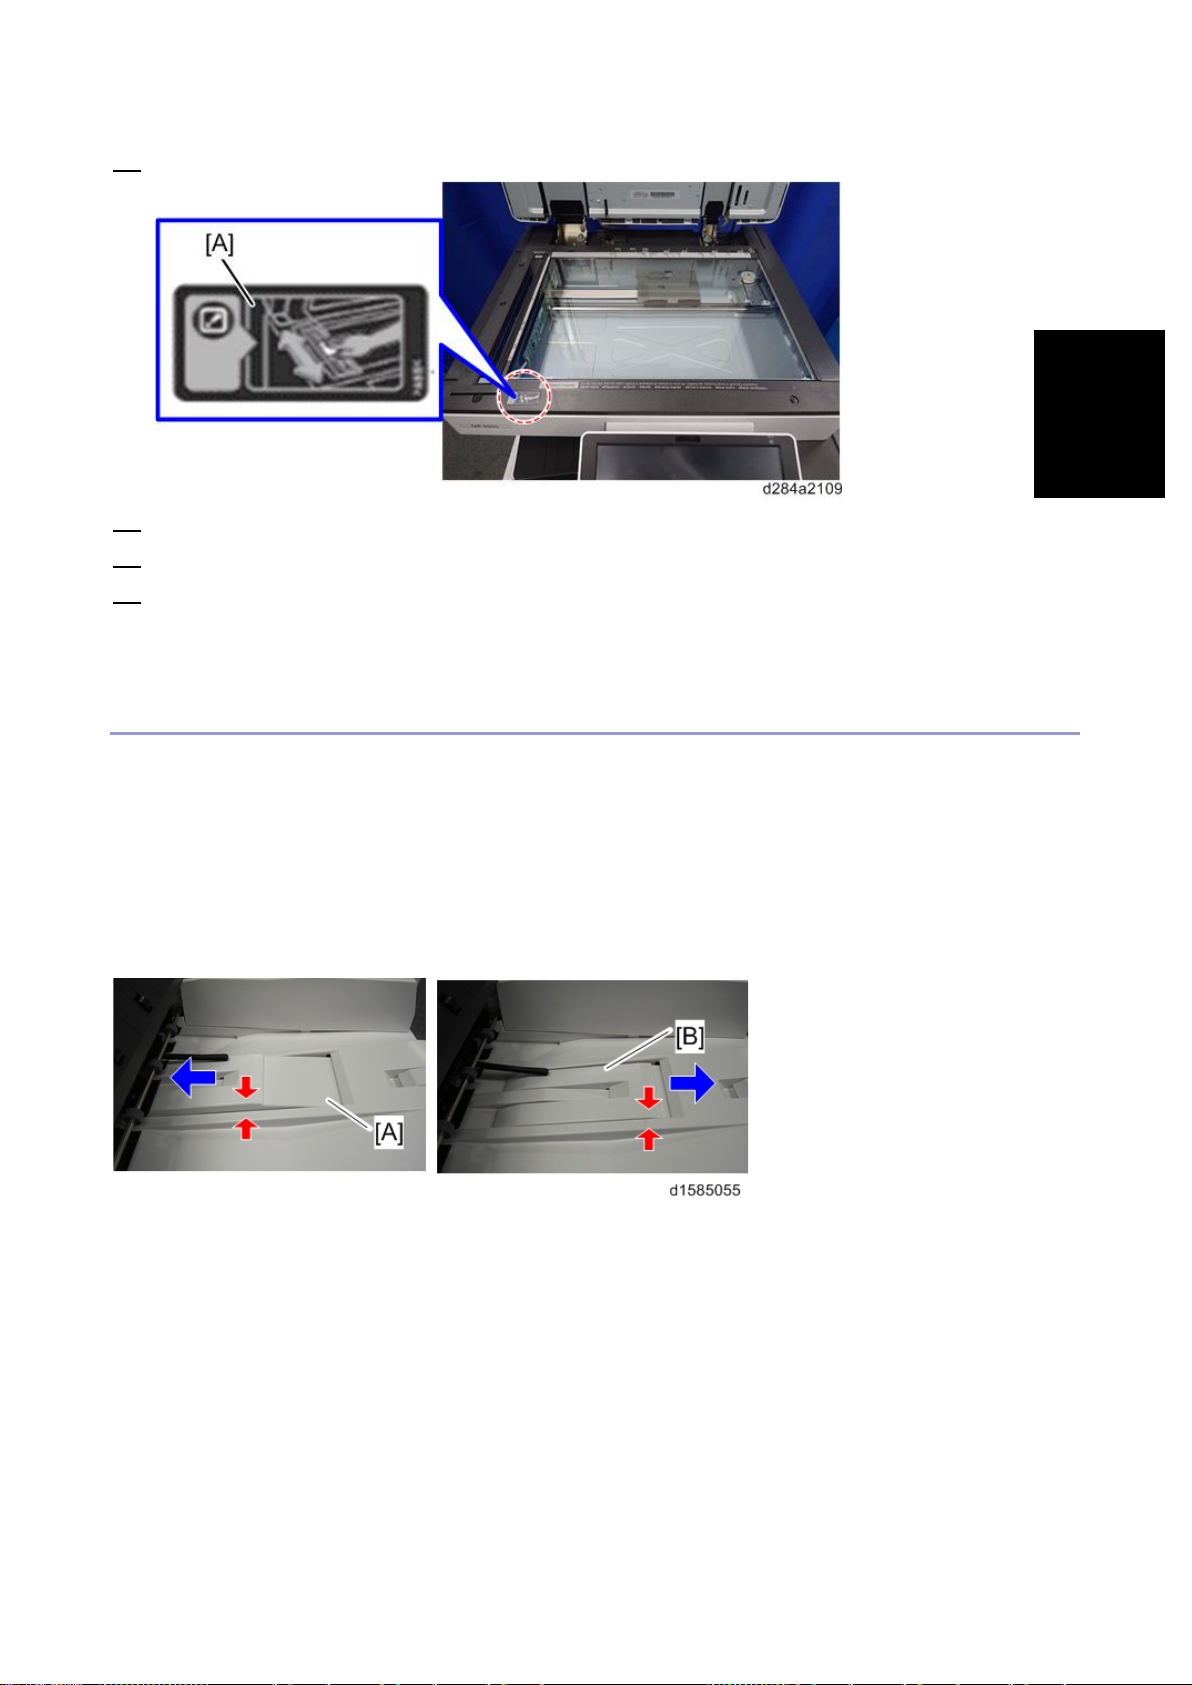
ARDF DF3090
Installation
17. Attach th e decal [A] to the scanner fr ont cover.
18. Plug in an d turn ON the main power.
19. Set SP4-688-001 (DF Density Adjustment ARDF) to "106".
20. Check the ARDF operation, and make a full size co py. Check that the registrations (side-to-side and
leadi ng edge) and image s kew are correct. I f they are not, adj ust the registrations and image skew. (
Imag e Adjus tment )
When feeding thin paper
When feeding thin paper, adj ust the sliding tray to the point shown below [ A].
When feeding normal paper, adjust th e s liding tray to the point shown below [B].
If not, i t may cause problems as fol lows:
• Original jam
• Original curl
• Originals cann ot be stacked neatly
ADF
92
Page 99
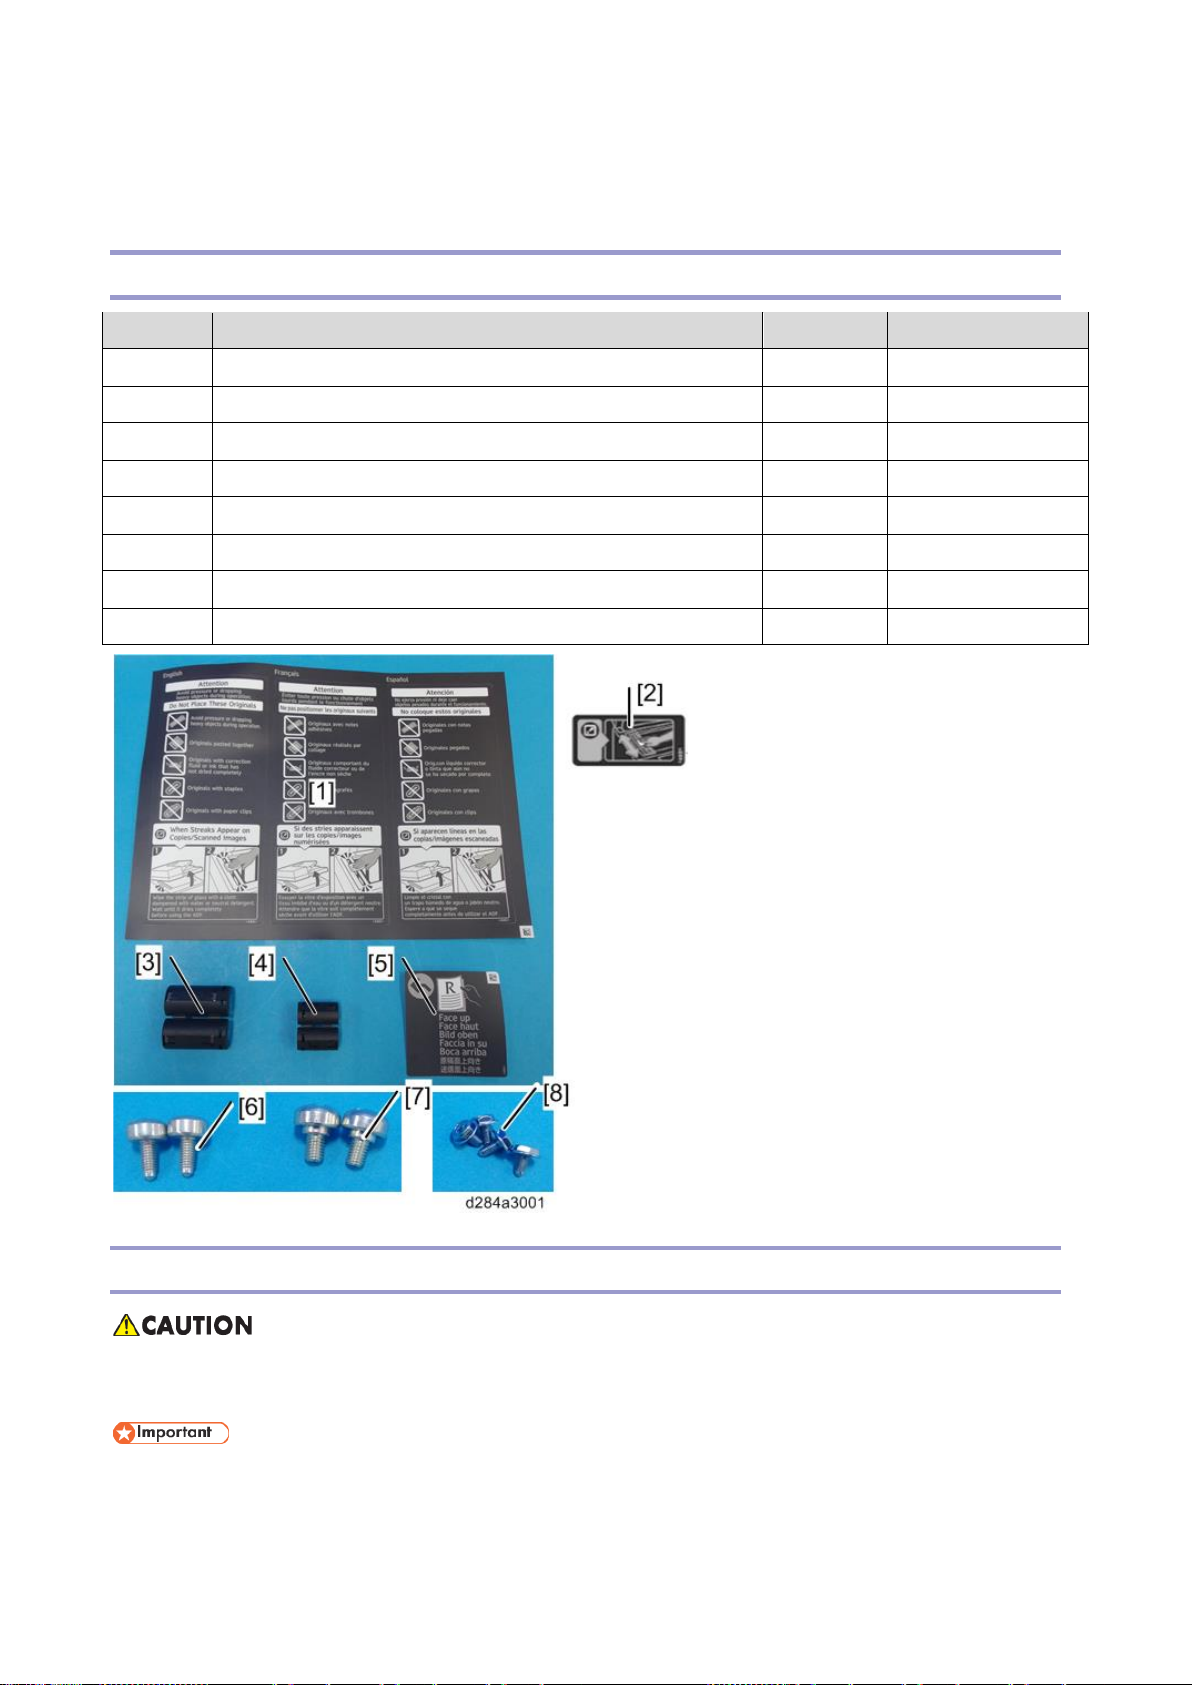
SPDF DF3100
SPDF DF3100
Accessory Check
No. Description Q’ty Remarks
1 Attenti on Decal – To p Cover 1
2 Decal – Expos ure Glass 1
3 Ferrite Core (L) 1
4 Ferrite Core (S) 1
5 Face-Up Document Decal 1
6 Knob Screw 2
7 Stud Screw 2
8 Screw (3x6) 4
Installation Procedure
• Turn OFF the main pow er and un plug the p ower cord from the wall socket. If installing without
turni ng OFF the main power, an electri c shock or a malfunction may occur.
• Do not turn the p ower on until you perform "adjustment after installation," or it may not start
normally.
93
Page 100
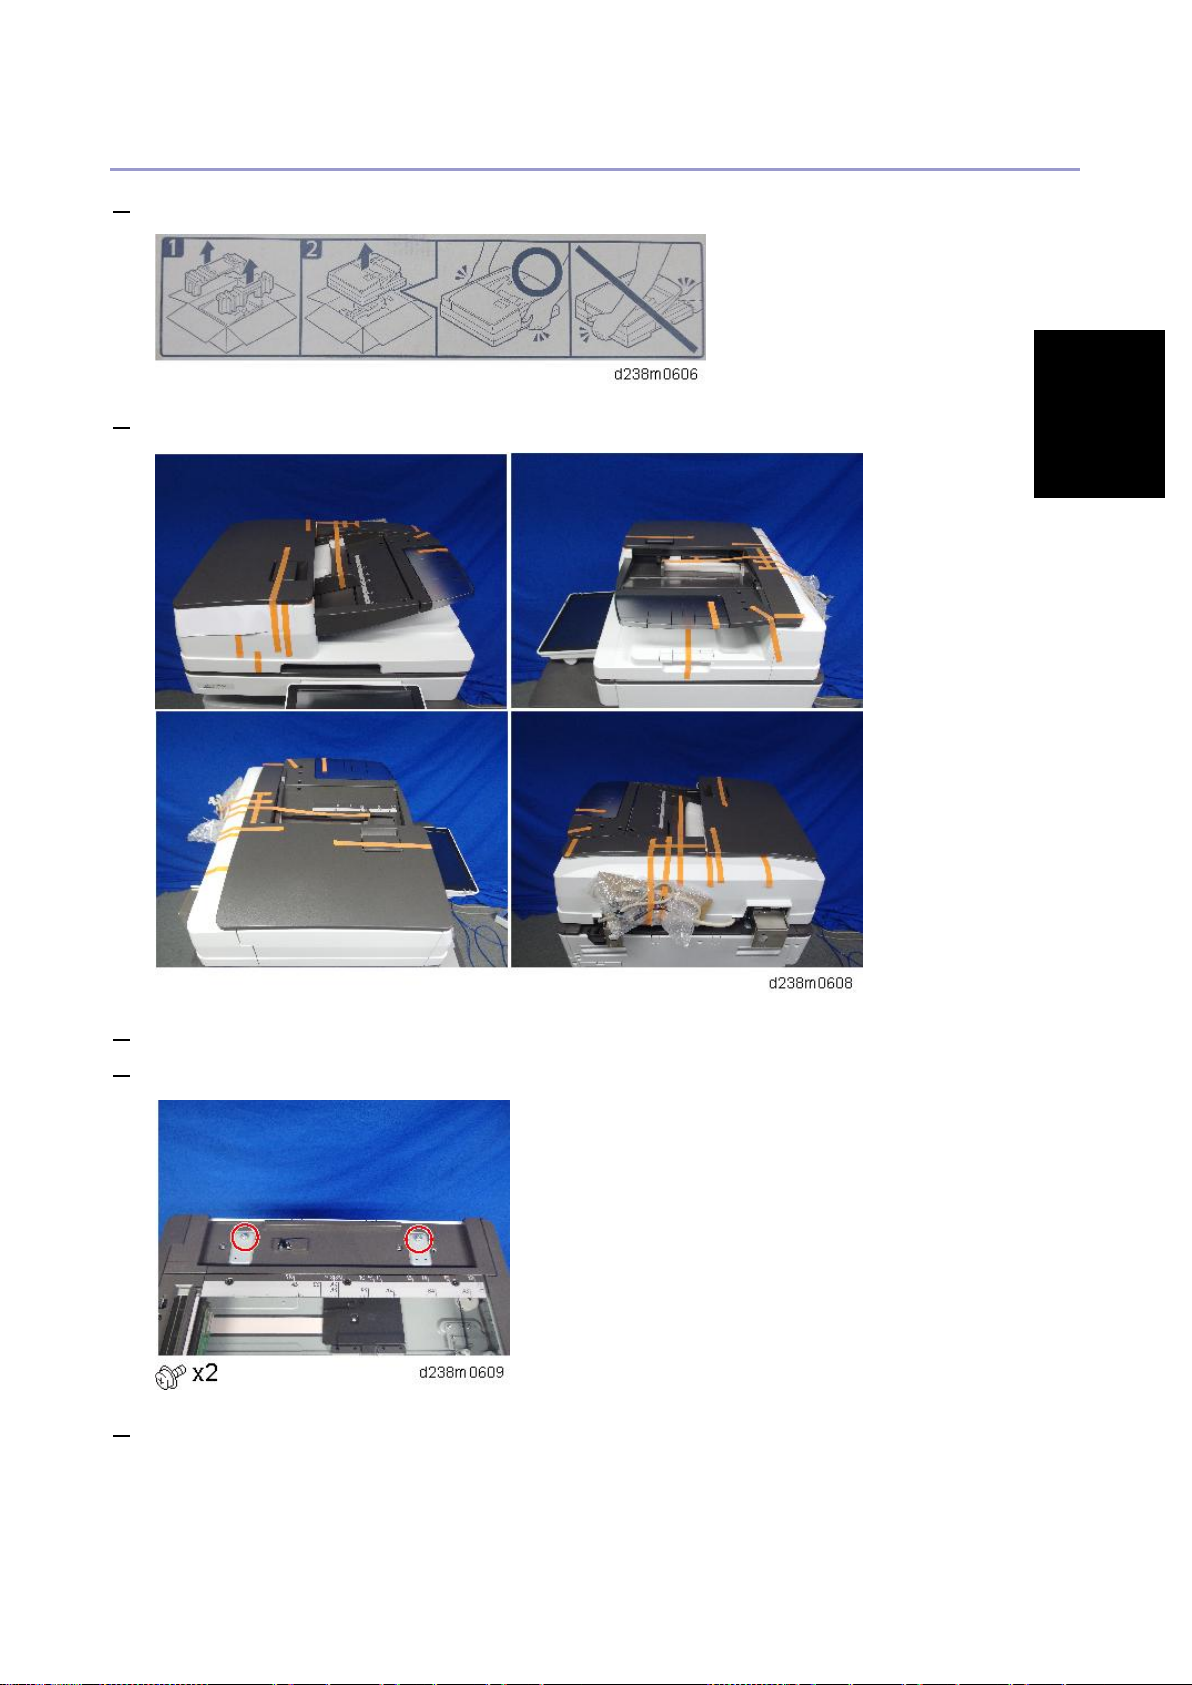
Installation
Attaching the S PDF
1. Wh en unpacking, hol d both sides of the SPDF and take it out of the box.
2. Place the un i t on the machine temporarily, and remove the orange tapes and shipping retainers.
SPDF DF3100
3. Remove the accessories in the package (boards, fixing screws, etc.).
4. Attach the 2 stepped screws to the machine.
5. Align the hinges of the SPDF w i th the stepped screws, and attach th em by sli ding them in.
94
 Loading...