

Page 1
1
2
3
4
5
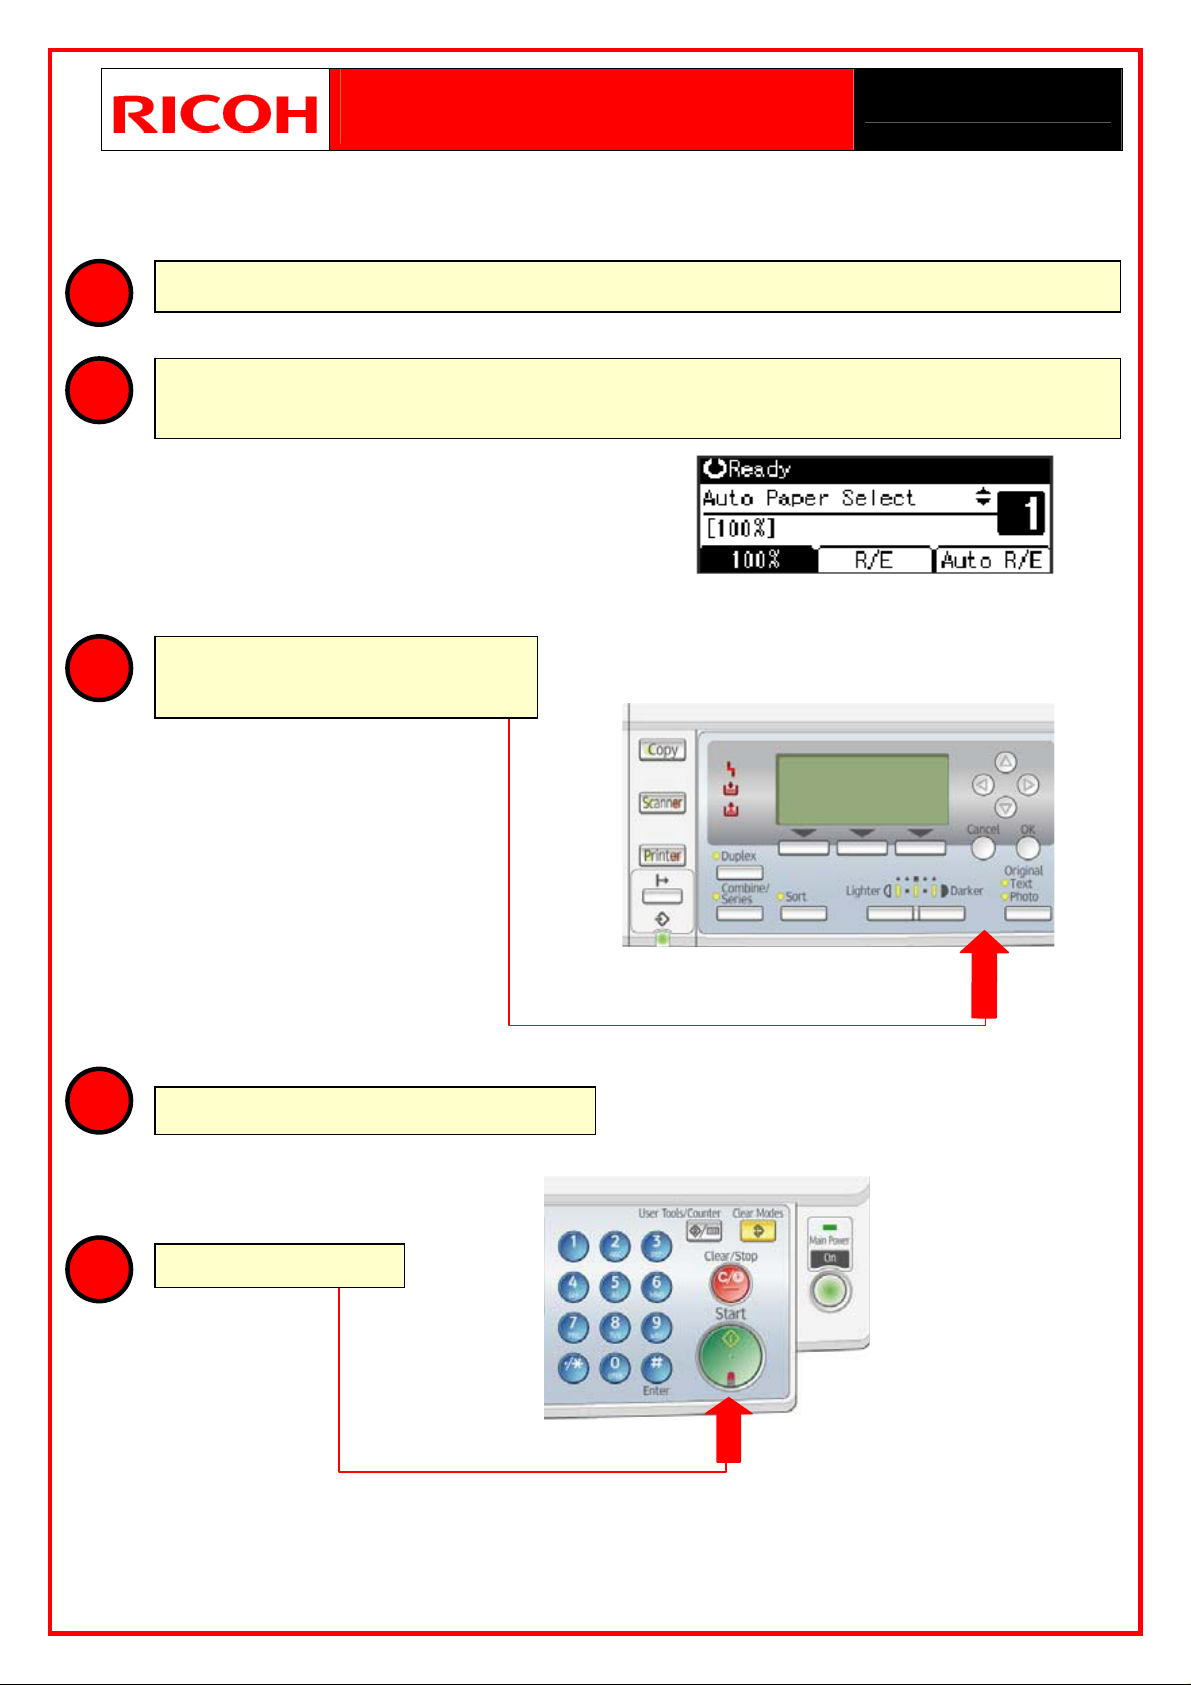
Place the documents on the glass (Face Down) or in the document feeder (Face Up)
Make sure that the screen looks like this – If not press the “Copy” button or press the “Clear
Modes” key.
Enter any required settings e.g.
Lighter / Darker, Text / photo
Enter the number of copies required.
Press the Start Key
How To
Make a Copy
MP 2000Le
Page 2
r
1
y
2
3
4
5
6
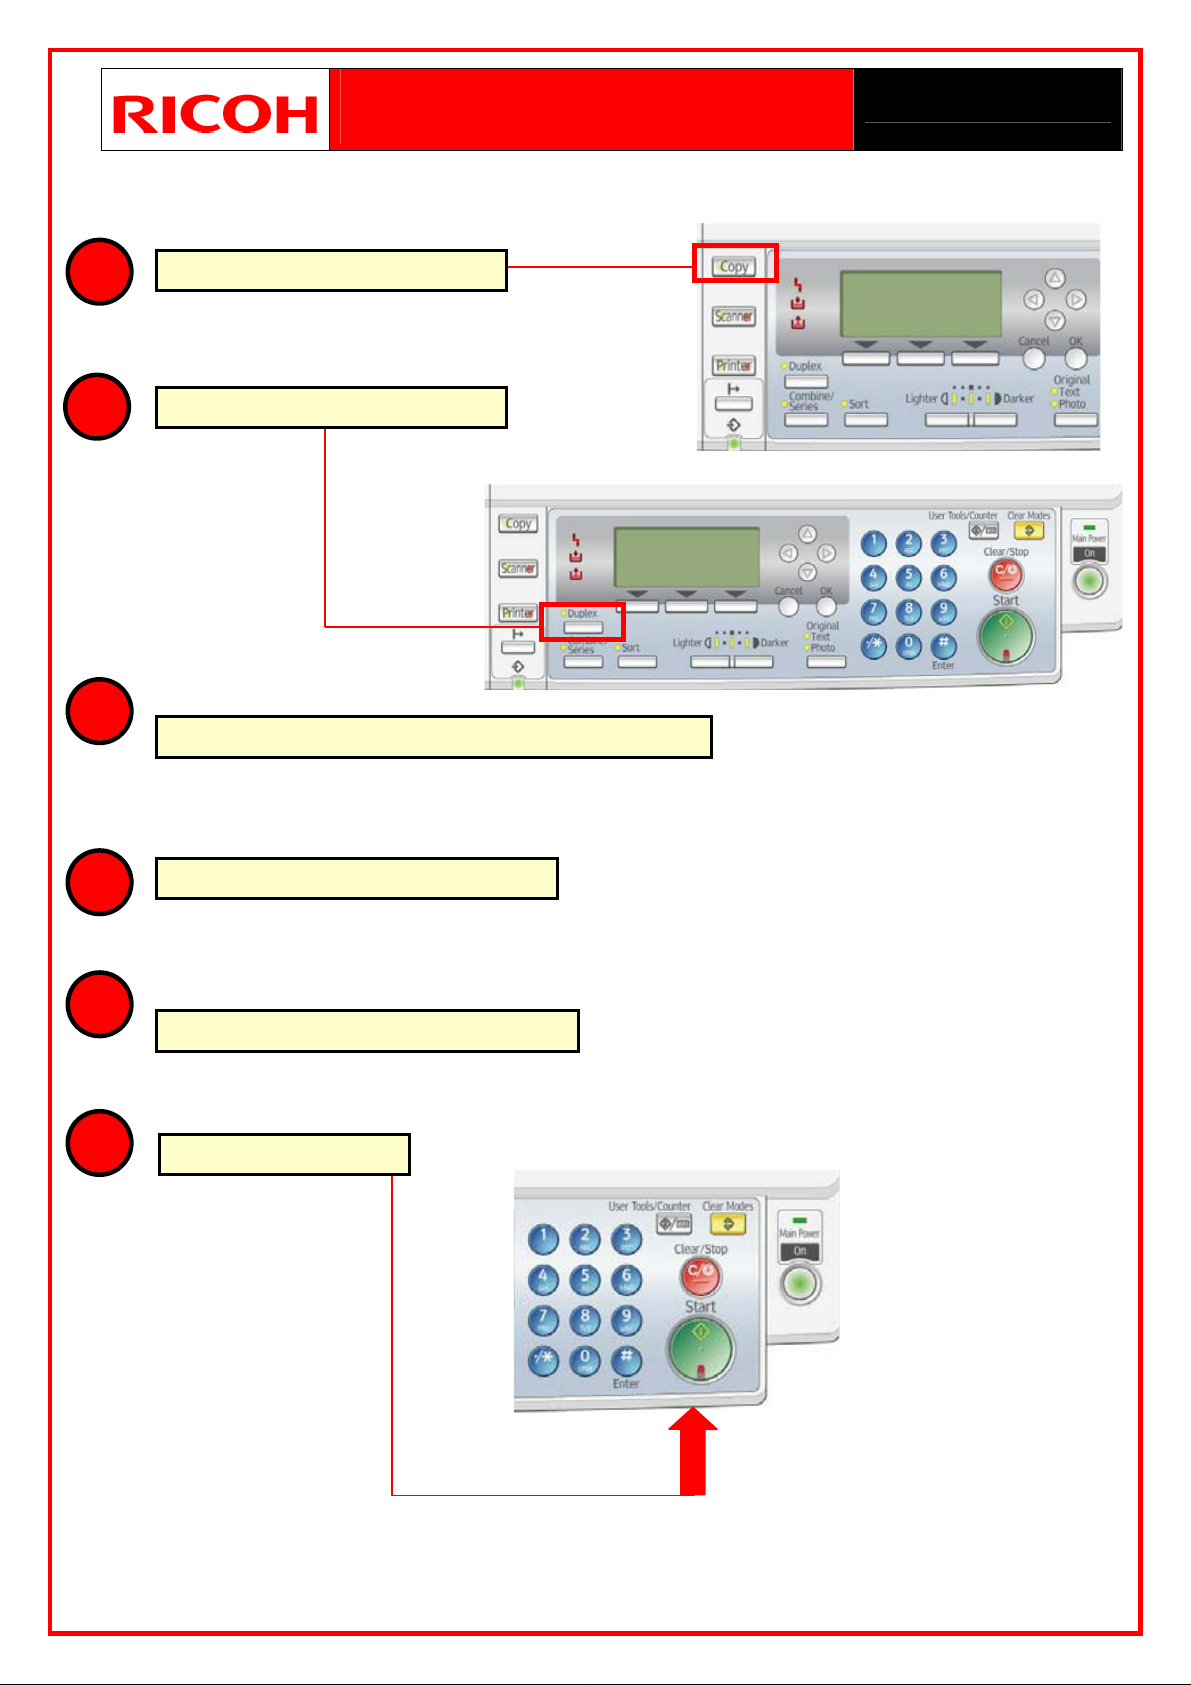
Press the Copy function key
Press the [DUPLEX] key
Set the originals face up in the document feede
Enter any other required settings
Enter the number of copies required
Press the Start ke
How To
Make Double Sided Copies
MP 2000Le
Page 3
1
2
3
4
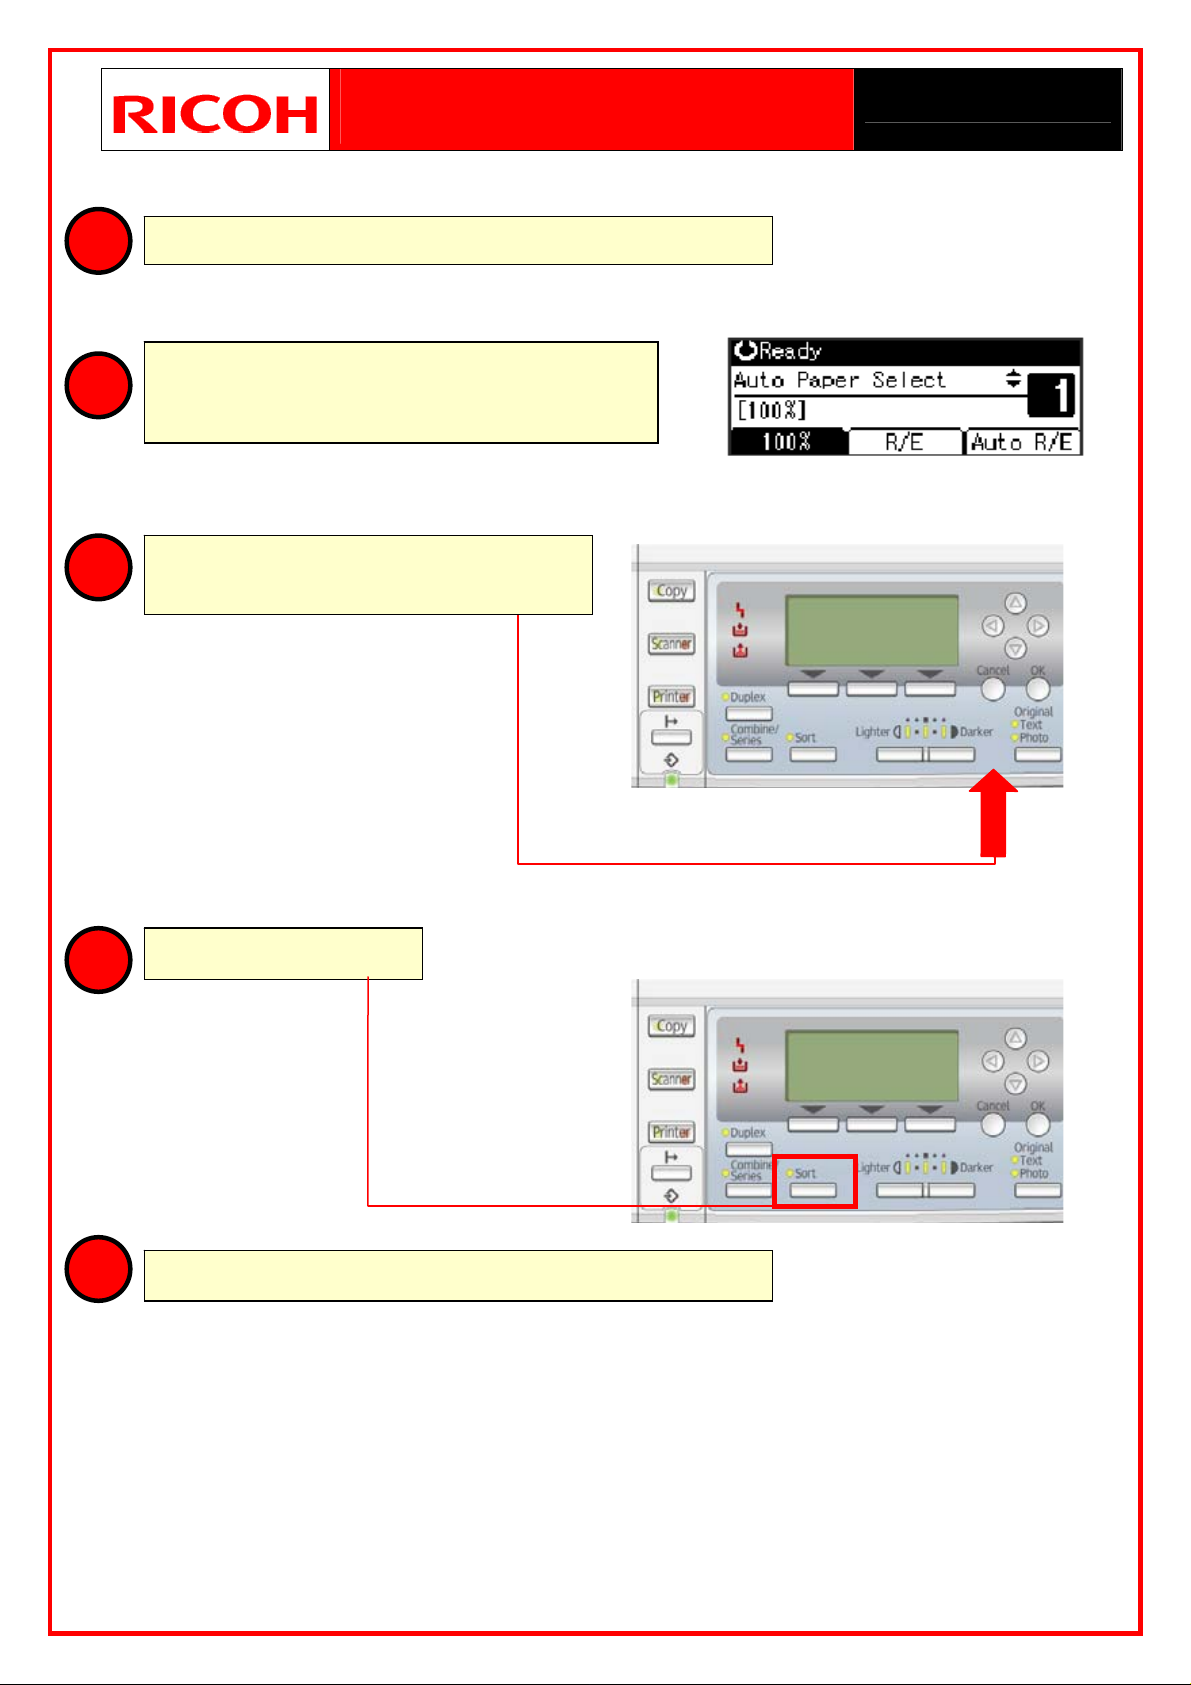
Place the documents in the document feeder (Face Up)
Ensure that the screen looks like this, if it does
not then press the “Copy” key or the Clear modes
key.
Enter any required settings e.g. Lighter /
Darker, Text / photo
Press the Sort key
How To
Sort Copies into Sets
MP 2000Le
5
Enter the number of copies using the blue number keys
Page 4

How To
Reduce or Enlarge a Copy
MP 2000Le
1
2
Place the original onto the glass (Face Down). The
original should be aligned to the rear left hand
corner as shown.
Press the R/E key then either select the Enlarge or
Reduce key.
Then
Use the arrow up or down keys to select the ratio
or
(Press the Zoom key and enter the desired ration
with the blue number keys.
3
4
5
Press the OK Key
Select the paper tray you want to copy from.
Press the Start key
Page 5

p
How To
Scan to Email
MP 2000Le
1
2
Press the scanner function key
Press the Destination key for a pre-programmed address or press the manual key and type
in the address to scan to and then press OK
3
4
Press the Options key which allows you to change the senders name, resolution, scan size,
file type, etc.
Place your document in the document feeder or on the glass and press the Start key.
If you have any problems scanning to an email address please contact your IT
re
resentative or have them contact Ricoh on 0800-807-676
Page 6

y
y
y Op
A
How To
Program Scan to Email
MP 2000Le
Addresses
1
2
3
4
5
6
Press the User Tools / Counter key
Select Systems Settings using the Up and Down arrow
keys and then press OK
Select Key Operator Tools using the Up and Down arrow
keys and then press OK
Select Address Book Management using the up and
down arrow keys and then press OK
Press the OK key to select Program / Change
Enter the registration number that you want to store the
scan to email address under (Using the blue number
keys) and then press OK
General
General
Tra
Paper
Tra
Paper
Ke
Key Operator Tools
User Code Management
Key Counter Management
ddress Book Management
erator
7
8
9
10
11
12
Type in the destination name using the Quick Dial Keys
(Similar to texting) and then press OK
Press the Dest Key and then use the down arrow key to
highlight Email Settings and then press OK
Type in the email address and then press OK
To register the email address as a sender (recommended) arrow up and then press OK
Select OFF or ON to register a senders password (OFF is recommended)
Press the Cancel key and then press the OK key to save the settings
If you have any queries then please contact our Helpdesk (through customer services) on 0800-807-676
Page 7

y
y
y Op
A
)
How To
Program Fax Destinations
MP 2000Le
1
2
3
4
5
6
Press the User Tools / Counter key
Select Systems Settings using the Up and Down arrow
keys and then press OK
Select Key Operator Tools using the Up and Down arrow
keys and then press OK
Select Address Book Management using the up and
down arrow keys and then press OK
Press the OK key to select Program / Change
Using the blue number keys, enter the registration
number to store the Quick Dial in
(e.g. 03=Ricoh NZ 9151-494) and press OK
General
General
Tra
Paper
Tra
Paper
Ke
Key Operator Tools
User Code Management
Key Counter Management
ddress Book Management
erator
Type in the destination name using the Quick Dial Keys
7
8
9
10
11
12
If you have any queries then please contact our Helpdesk (through customer services) on 0800-807-676
(Similar to texting) and then press OK
Press the Destination Key
Use arrow keys to navigate to Fax settings and press OK
Using the blue number keys, type in the fax number and press OK
Press the Cancel key (To exit the screen
Press the OK to enter settings and then Press User Tools / Counter key to exit
Page 8

How To
Transmit a Memory
MP 2000Le
Transmission Fax
1
2
Ensure that you are in Fax Mode, if you are not then press the Facsimile Key.
Make sure that the memory
transmission indicator is lit.
3
4
5
Place the original into the document feeder (Face Up) or on the glass (Face Down)
Dial the number required using the blue number keys, quick dial keys or speed dial keys.
NOTE: If you wish to send the same message to more than one destination, press the OK
key and dial another destination. Repeat this step for all destinations.
Press the Start Key
The fax is now stored in the machines memory. If the transmission was not successfully sent
with the first attempt, then the machine will redial at 5 minute intervals, another 5 times. After this
an error message will be printed and the fax will be deleted out of the machines memory
Page 9

1
How To
Fax an Immediate
MP 2000Le
Transmission
Make sure that you are in FAX mode and that the
immediate transmission is lit. (If this is not the
case then press the transmission mode key)
2
3
4
Place the original into the document feeder (Face Up) or on the glass (Face Down)
Dial the number required using the Blue Number keys, Quick Dial keys or Speed Dial
keys.
Note: You cannot send the same message to multiple destinations. Use the memory
transmission for this.
Press the Start Key
The machine will call the destination. If a successful connection is established then the pages
will be scanned through the document feeder and transmitted.
Once the transmission is complete, the machine will return to Standby mode.
Page 10

1
How To
Cancel a Fax Memory
MP 2000Le
Transmission
Make sure that the machine is in Facsimile
standby mode and that the display is in
Standby or Ready mode
2
3
4
Press the Red Clear / Stop key
Use the up / down keys to display the file that
you want to delete. (The number you dialed
will be displayed)
Press the Stop TX key
Press the Delete key
5
The file will now be erased from the machines memory and the machine will return to the
Stand by mode.
 Loading...