

Page 1

Getting Started
1
Placing Originals
2
Copying
3
User Tools
4
Troubleshooting
5
Operating Instructions
Other Functions
6
Remarks
7
Security
8
Specifications
9
Read this manual carefully before you use this machine and keep it handy for future reference. For safe and correct use, be sure to read the
Safety Information in this manual before using the machine.
Page 2
Introduction
This manual contains detailed instructions and notes on the operation and use of this machine. For your
safety and benefit, read this manual carefully before using the machine. Keep this manual in a handy
place for quick reference.
Important
Contents of this manual are subject to change without prior notice. In no event will the company be liable for direct, indirect, special, incidental, or consequential damages as a result of handling or operating the machine.
Notes:
Some illustrations in this manual might be slightly different from the machine.
Certain options might not be available in some countries. For details, please contact your local dealer.
Laser Safety:
This machine complies with the requirements of IEC60825-1:2007(EN-60825-1:2007) for class 1 laser
product. The machine contains a 5-milliwatt or 6.2-milliwatt, 760-800 nanometer wavelength, GaAlAs
laser diode. Direct (or indirect reflected ) eye contact with the laser beam might cause serious eye damage. Safety precautions and interlock mechanisms have been designed to prevent any possible laser
beam exposure to the operator.
The following label is attached on the back side of the machine.
Caution:
Use of controls or adjustments or performance of procedures other than those specified in this manual
might result in hazardous radiation exposure.
Two kinds of size notation are employed in this manual. With this machine refer to the metric version.
For good copy quality, the supplier recommends that you use genuine toner from the supplier.
The supplier shall not be responsible for any damage or expense that might result from the use of parts
other than genuine parts from the supplier with your office products.
Power Source
220 - 240V, 50/60Hz, 7A or more
Please be sure to connect the power cord to a power source as above. For details about power source,
see p.67 “Power Connection”.
Page 3

TABLE OF CONTENTS
Copyrights and Trademarks .................................................................................1
Trademarks ................................................................................................................1
Notice ......................................................................................................................2
How to Read This Manual .....................................................................................3
Safety Information .................................................................................................4
Safety During Operation.............................................................................................4
Positions of Labels and Hallmarks for RWARNING and RCAUTION Labels... 7
ENERGY STAR Program .......................................................................................8
Energy Saving Functions......................................................................................9
1. Getting Started
Guide to Components .........................................................................................11
Options .................................................................................................................13
External Options.......................................................................................................13
Control Panel........................................................................................................14
Display .....................................................................................................................15
Reading the Display and Using Keys.......................................................................16
Turning On the Power .........................................................................................17
Turning On the Main Power .....................................................................................17
Turning On the Power ..............................................................................................17
Turning Off the Power ..............................................................................................18
Turning Off the Main Power .....................................................................................18
Saving Energy..........................................................................................................18
2. Placing Originals
Originals ...............................................................................................................19
Sizes and Weights of Recommended Originals.......................................................19
Missing Image Area .................................................................................................20
Placing Originals..................................................................................................21
Original Orientation ..................................................................................................21
Placing Originals on the Exposure Glass.................................................................21
Placing Originals in the ADF ....................................................................................22
3. Copying
Basic Procedure...................................................................................................25
Copying from the Bypass Tray...........................................................................26
Copier Functions .................................................................................................30
Adjusting Image Density ..........................................................................................30
Selecting Original Type Setting................................................................................30
Selecting Copy Paper ..............................................................................................30
Preset Reduce/Enlarge ............................................................................................31
Zoom ......................................................................................................................31
Sort .........................................................................................................................32
Changing the number of sets ...................................................................................33
i
Page 4

4. User Tools
User Tools Menu ( System Settings ).................................................................35
User Tools Menu ( Copier Settings ) .................................................................. 37
Accessing User Tools .........................................................................................38
Changing Default Settings .......................................................................................38
Quitting User Tools ..................................................................................................39
Settings You Can Change with User Tools .......................................................40
System Settings ......................................................................................................40
Copier Features ......................................................................................................44
User Code ............................................................................................................46
Registering a New User Code..................................................................................46
Changing a User Code.............................................................................................47
Deleting a User Code...............................................................................................47
Displaying the Counter for Each User Code ............................................................48
Printing the Counter for Each User Code.................................................................49
Clearing the Counter ................................................................................................49
5. Troubleshooting
If Your Machine Does Not Operate As You Want..............................................51
If You Cannot Make Clear Copies.......................................................................52
If You Cannot Make Copies As You Want .........................................................53
When Memory Is Full ...............................................................................................53
B Loading Paper .................................................................................................54
Loading Paper..........................................................................................................54
Orientation-Fixed Paper or Two-Sided Paper ..........................................................55
D Adding Toner...................................................................................................56
Handling Toner.........................................................................................................56
Toner Storage ..........................................................................................................56
Used Toner ..............................................................................................................56
Removing Toner...................................................................................................57
Inserting Toner.....................................................................................................58
x Clearing Misfeeds ...........................................................................................59
Changing the Paper Size.....................................................................................61
Changing the Paper Size of the Paper Tray ............................................................61
6. Other Functions
Other Functions ...................................................................................................63
Displaying the Total Counter....................................................................................63
Changing the Language........................................................................................... 63
7. Remarks
Do's and Don'ts....................................................................................................65
Where to Put Your Machine ................................................................................66
Machine Environment ..............................................................................................66
Moving......................................................................................................................66
Power Connection....................................................................................................67
Access to the Machine.............................................................................................68
Maintaining Your Machine ..................................................................................69
ii
Page 5

Cleaning the Exposure Glass...................................................................................69
Cleaning the Exposure Glass Cover ........................................................................69
Cleaning the ADF.....................................................................................................69
8. Security
Security.................................................................................................................71
Primary Security Functions ......................................................................................71
Operating Environment and Notes.....................................................................72
Operating Environment ............................................................................................72
For Administrator......................................................................................................72
9. Specifications
Main Unit...............................................................................................................73
Options .................................................................................................................76
Exposure Glass Cover .............................................................................................76
Auto Document Feeder (ADF) .................................................................................76
Combination Chart...............................................................................................77
Supplementary Information ................................................................................78
Copy Paper ...........................................................................................................80
Recommended Paper Sizes and Types................................................................... 80
Unusable Paper .......................................................................................................81
Paper Storage ..........................................................................................................82
INDEX......................................................................................................... 83
iii
Page 6

iv
Page 7

Copyrights and Trademarks
Trademarks
Microsoft®, Windows® and Windows NT® are registered trademarks of Microsoft Corporation in the United States and/or other countries.
Acrobat
Other product names used herein are for identification purposes only and might
be trademarks of their respective companies. We disclaim any and all rights to
those marks.
The proper names of the Windows operating systems are as follows:
• The product name of Windows
• The product name of Windows
• The product name of Windows
• The product names of Windows
• The product names of Windows
• The product names of Windows Server™ 2003 are as follows:
• The product names of Windows NT
®
is a registered trademark of Adobe Systems Incorporated.
Edition (Windows Me)
Microsoft
Microsoft
Microsoft
Microsoft
Microsoft
Microsoft
Microsoft
Microsoft
Microsoft
Microsoft
®
Windows® 2000 Professional
®
Windows® 2000 Server
®
Windows® 2000 Advanced Server
®
Windows® XP Home Edition
®
Windows® XP Professional
®
Windows Server™ 2003 Standard Edition
®
Windows Server™ 2003 Enterprise Edition
®
Windows Server™ 2003 Web Edition
®
Windows NT® Workstation 4.0
®
Windows NT® Server 4.0
®
95 is Microsoft® Windows® 95
®
98 is Microsoft® Windows® 98
®
Me is Microsoft® Windows® Millennium
®
2000 are as follows:
®
XP are as follows:
®
4.0 are as follows:
1
Page 8

Notice
Important
Do not copy or print any item for which reproduction is prohibited by law.
Copying or printing the following items is generally prohibited by local law:
bank notes, revenue stamps, bonds, stock certificates, bank drafts, checks, passports, driver's licenses.
The preceding list is meant as a guide only and is not inclusive. We assume no
responsibility for its completeness or accuracy. If you have any questions concerning the legality of copying or printing certain items, consult with your legal
advisor.
2
Page 9

How to Read This Manual
R
R
Symbols
The following set of symbols is used in this manual.
WARNING:
This symbol indicates a potentially hazardous situation that might result in
death or serious injury when you misuse the machine without following the instructions under this symbol. Be sure to read the instructions, all of which are described in the Safety Information section.
CAUTION:
This symbol indicates a potentially hazardous situation that might result in minor or moderate injury or property damage that does not involve personal injury
when you misuse the machine without following the instructions under this
symbol. Be sure to read the instructions, all of which are described in the Safety
Information section.
* The statements above are notes for your safety.
Important
If this instruction is not followed, paper might be misfed, originals might be
damaged, or data might be lost. Be sure to read this.
Preparation
This symbol indicates information or preparations required prior to operating.
Note
This symbol indicates precautions for operation, or actions to take after abnormal operation.
Limitation
This symbol indicates numerical limits, functions that cannot be used together,
or conditions in which a particular function cannot be used.
Reference
This symbol indicates a reference.
[]
Keys that appear on the machine's display panel.
{}
Keys built into the machine's control panel.
3
Page 10
Safety Information
R
R
When using this machine, the following safety precautions should always be followed.
Safety During Operation
This manual uses the following symbols:
WARNING:
CAUTION:
Indicates important safety notes. Ignoring these notes could result
in serious injury or death. Be sure to read these notes.
Indicates important safety notes. Ignoring these notes could result in
moderate or minor injury, or damage to the machine or to property. Be
sure to read these notes.
R WARNING:
• Disconnect the power plug (by pulling the plug, not the cable) if the
power cable or plug becomes frayed or otherwise damaged.
• To avoid hazardous electric shock or laser radiation exposure, do not
remove any covers or screws other than those specified in this manual.
• Turn off the power and disconnect the power plug (by pulling the plug,
not the cable) if any of the following occurs:
• You spill something into the machine.
• You suspect that your machine needs service or repair.
• The external housing of your machine has been damaged.
• Do not incinerate spilled toner or used toner. Toner dust might ignite
when exposed to an open flame.
• Disposal can take place at our authorized dealer.
• Dispose of the used toner bottle in accordance with the local regula-
tions.
• Connect this machine only to a power source that matches the specifications shown on the inside front cover of this manual and do not
use an extension cord.
• Do not use power cords that are damaged, broken, or modified. Also, do
not use power cords that have been trapped under heavy objects, pulled
hard, or bent severely. Doing so could result in fire or electric shock.
• Do not use flammable sprays or solvents in the vicinity of this machine. Doing so could result in fire or electric shock.
• Confirm the wall outlet is near the machine and freely accessible, so
that in the event of emergency, it can be unplugged easily.
4
Page 11

• Keep the polythene materials(bags, gloves, etc.) supplied with this
machine away from babies and small children at all times. Suffocation
can result if polythene materials are brought into contact with the
mouth or nose.
• Do not handle the power cord or plug with wet hands. Doing so might
cause an electrical shock.
R CAUTION:
• Protect the machine from dampness or wet weather, such as rain and snow.
• Unplug the power cord from the wall outlet before you move the machine.
While moving the machine, you should take care that the power cord will not
be damaged under the machine.
• When you disconnect the power plug from the wall outlet, always pull the
plug (not the cable).
• Do not allow paper clips, staples, or other small metallic objects to fall inside
the machine.
• Keep toner (used or unused) and toner containers out of reach of children.
• For environmental reasons, do not dispose of the machine or expended
supply waste at household waste collection points. Disposal can take place
at an authorized dealer.
• The inside of the machine could be very hot. Do not touch the parts with a
label indicating the “hot surface”. Otherwise, an injury might occur.
• Keep the machine away from humidity and dust. Otherwise a fire or an electric shock might occur.
• Do not place the machine on an unstable or tilted surface. If it topples over,
an injury might occur.
• Before moving the machine, be sure to pull all four handles fully out. If not,
an injury might occur. After moving the machine, return the four handles to
their original positions.
• If you use the machine in a confined space, make sure there is a continuous
air turnover.
• Contact your service representative if you need to lift the machine (such as
when relocating it to another floor). Do not attempt to lift the machine without
the assistance of your service representative. The machine will be damaged
if it topples or is dropped, resulting in malfunction and risk of injury to users.
The machine's various handling areas are for service engineer use only. Do
not touch these areas.
• Be sure to disconnect the plug from the outlet and clean the prongs and the
area around the prongs at least once a year. Allowing dust to build up on the
plug constitutes a fire hazard.
• If toner or used toner is inhaled, gargle with plenty of water and move into a
fresh air environment. Consult a doctor if necessary.
5
Page 12

• If toner or used toner gets into your eyes, flush immediately with large
amounts of water. Consult a doctor if necessary.
• If toner or used toner is swallowed, dilute by drinking a large amount of water. Consult a doctor if necessary.
• Avoid getting toner on your clothes or skin when removing paper jam or replacing toner. If your skin comes into contact with toner, wash the affected
area thoroughly with soap and water.
• If toner gets on your clothing, wash with cold water. Hot water will set the
toner into the fabric and may make removing the stain impossible.
• Fire and breakdown can result from heavy accumulation of dust inside this
machine. Consult your service representative for details about and charges
for cleaning the machine's interior.
6
Page 13
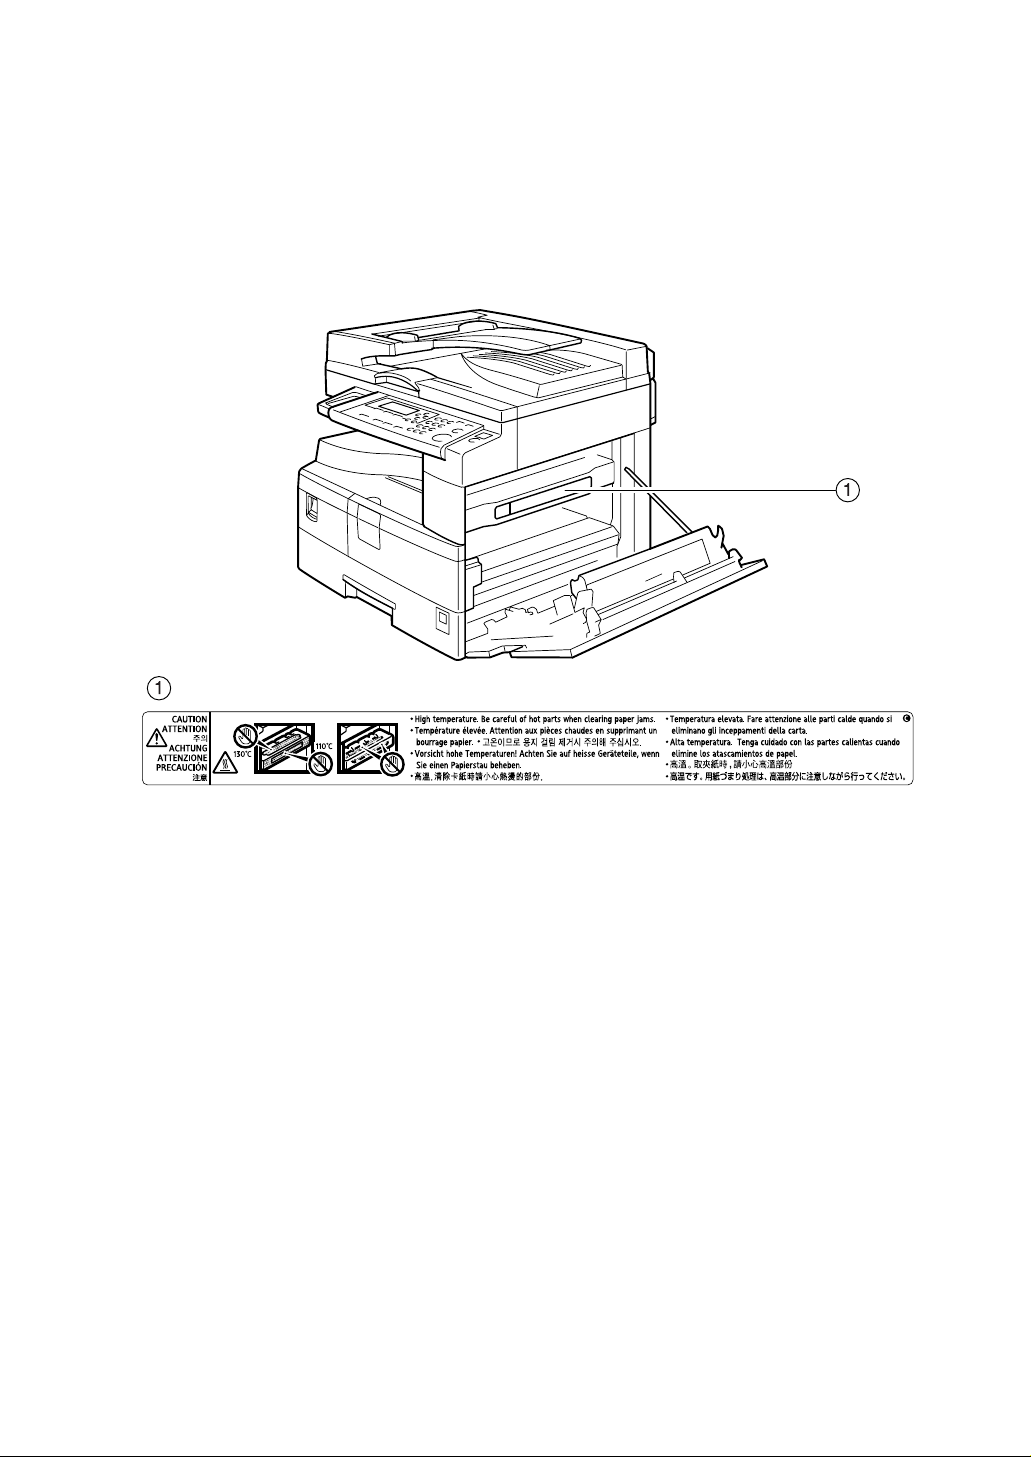
Positions of Labels and Hallmarks for
RWARNING and RCAUTION Labels
This machine has labels for RWARNING and RCAUTION at the positions
shown below. For safety, please follow the instructions and handle the machine
as indicated.
APH002S
7
Page 14
ENERGY STAR Program
❖ ENERGY STAR® Program Requirements for Imaging Equipment
This company is a participant in the ENERGY STAR®
Program.
This machine is compliant with the regulations specified by the ENERGY STAR
®
The ENERGY STAR
servation by promoting energy efficient computers and other office equipment.
The program backs the development and dissemination of products that feature energy saving
functions.
It is an open program in which manufacturers participate voluntarily.
Targeted products are computers, monitors, printers, facsimiles, copiers, scanners, and multifunction devices. Energy Star standards and logos are internationally uniform.
Program Requirements for Imaging Equipment encourage energy con-
®
Program.
Note
❒ For details about the "default delay time", see "Energy Saving Functions".
Reference
p.9 “Energy Saving Functions”
8
Page 15
Energy Saving Functions
To reduce its power consumption, this machine has the following functions:
❖ Low Power Mode
• If this machine remains idle for a specified period, it automatically reduces
its electrical consumption.
• The default period the machine waits before entering Low Power Mode is
1 minute. This default time can be changed.
❖ Off Mode (on machines with only copier function)
• If this machine remains idle for a specified period, it automatically turns
off its power.
• The default delay time the machine waits before entering Off Mode is 1
minute. This default time can be changed.
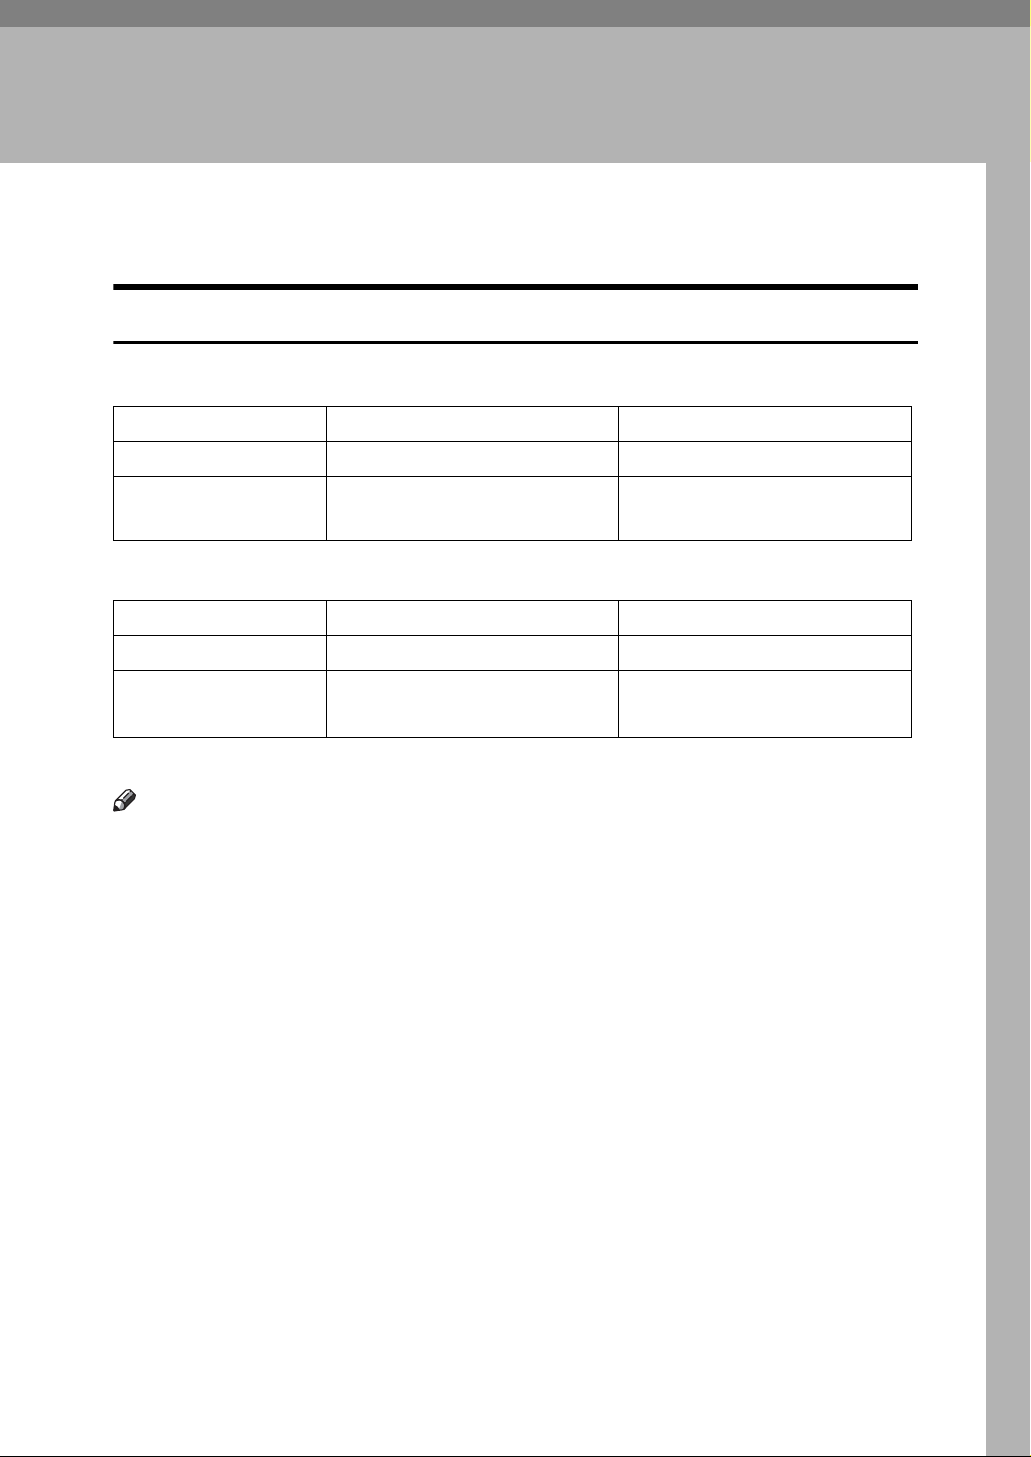
❖ Specifications
Reduced Electrical Consumption by Low Power Mode 40 W
Time of Switch into Low Power Mode 1 minute
Time of Switch out from Low Power Mode Less than 10 seconds
Reduced Electrical Consumption by Off Mode Less than 1 W
Time of Switch into Off Mode 1 minute
Time of Switch out from Off Mode Less than 10 seconds
Note
❒ For details about how to change the default interval, see "Timer Settings".
Reference
p.41 “Timer Settings”
9
Page 16

10
Page 17
1. Getting Started
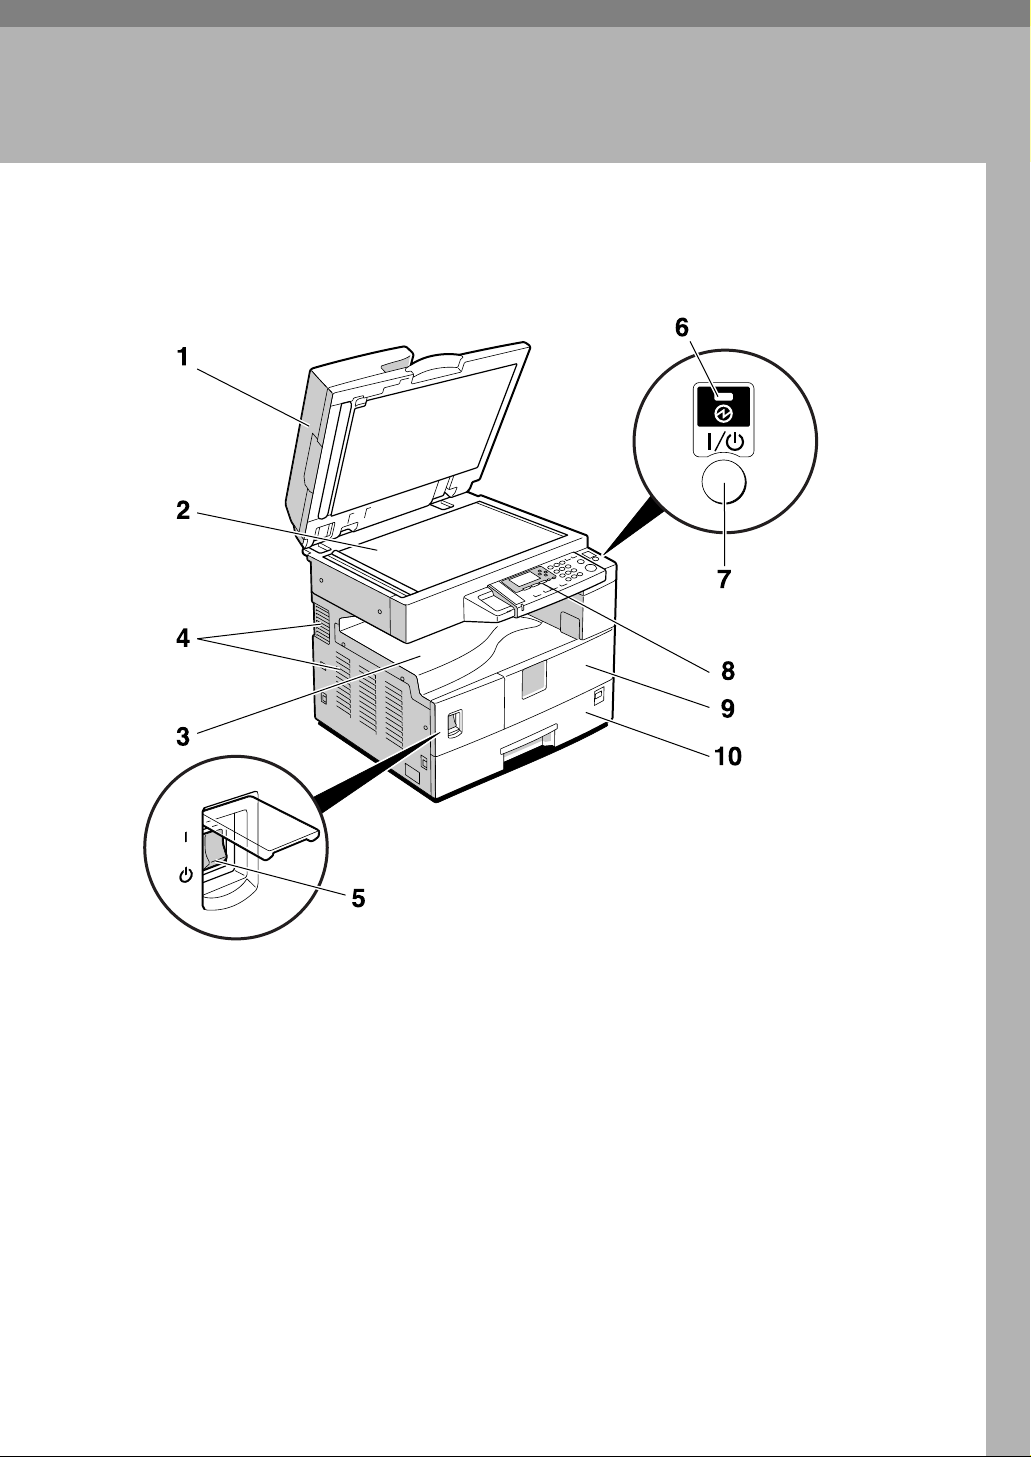
Guide to Components
1. Exposure glass cover (optional) or
ADF (optional).
See p.13 “External Options”
(The illustration shows the ADF.)
2. Exposure glass
Place originals here face down.
3. Internal tray
Copied paper is delivered here.
4. Ventilation holes
Prevents overheating. Do not obstruct
the ventilation holes by placing objects
near them or leaning things against them.
If the machine overheats, a fault might
occur.
APH003S
5. Main power switch
If the machine does not operate after
turning on the operation switch, check
the main power switch is turned on. If it
is off, turn it on.
6. Main power indicator
Lights when the main power switch is
turned on, and goes off when the switch
is turned off.
7. Operation switch (On indicator)
Press to turn the power on (the On indicator lights). To turn the power off, press
again (the On indicator goes off).
8. Control panel
See p.14 “Control Panel”.
11
Page 18
Getting Started
1
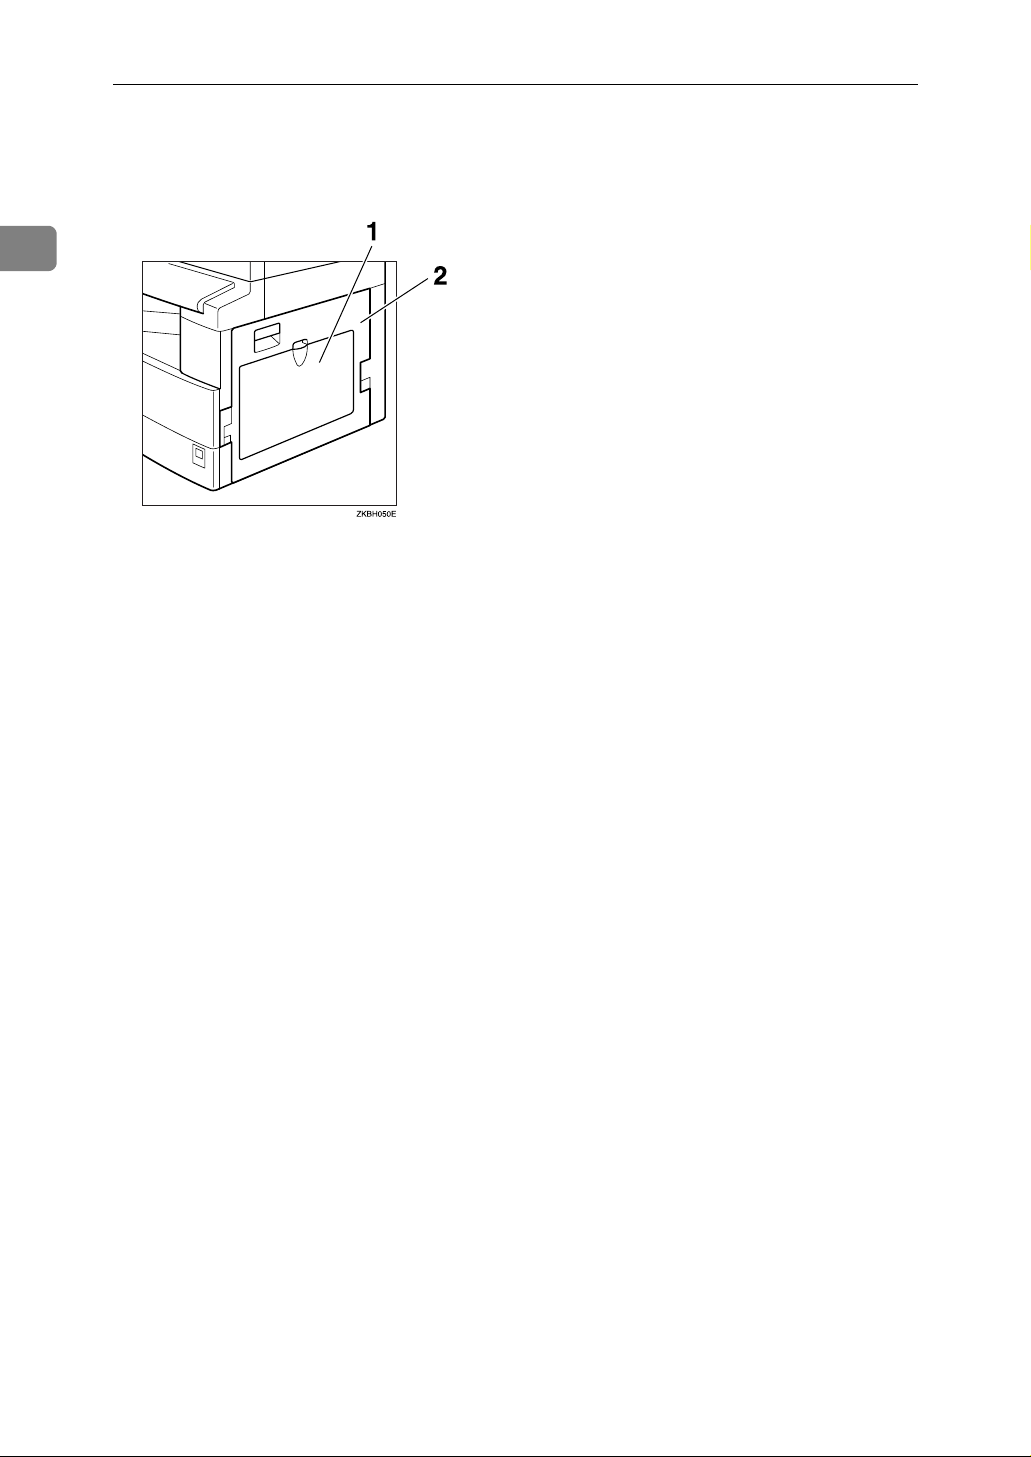
9. Front cover
Open to access the inside of the machine.
1. Bypass tray
Use to copy onto OHP transparencies,
adhesive labels, translucent paper, envelopes, and custom size paper.
10. Paper tray
Load paper here.
2. Right cover
Open this cover to remove jammed paper
fed from the paper tray.
12
Page 19
Options
Options
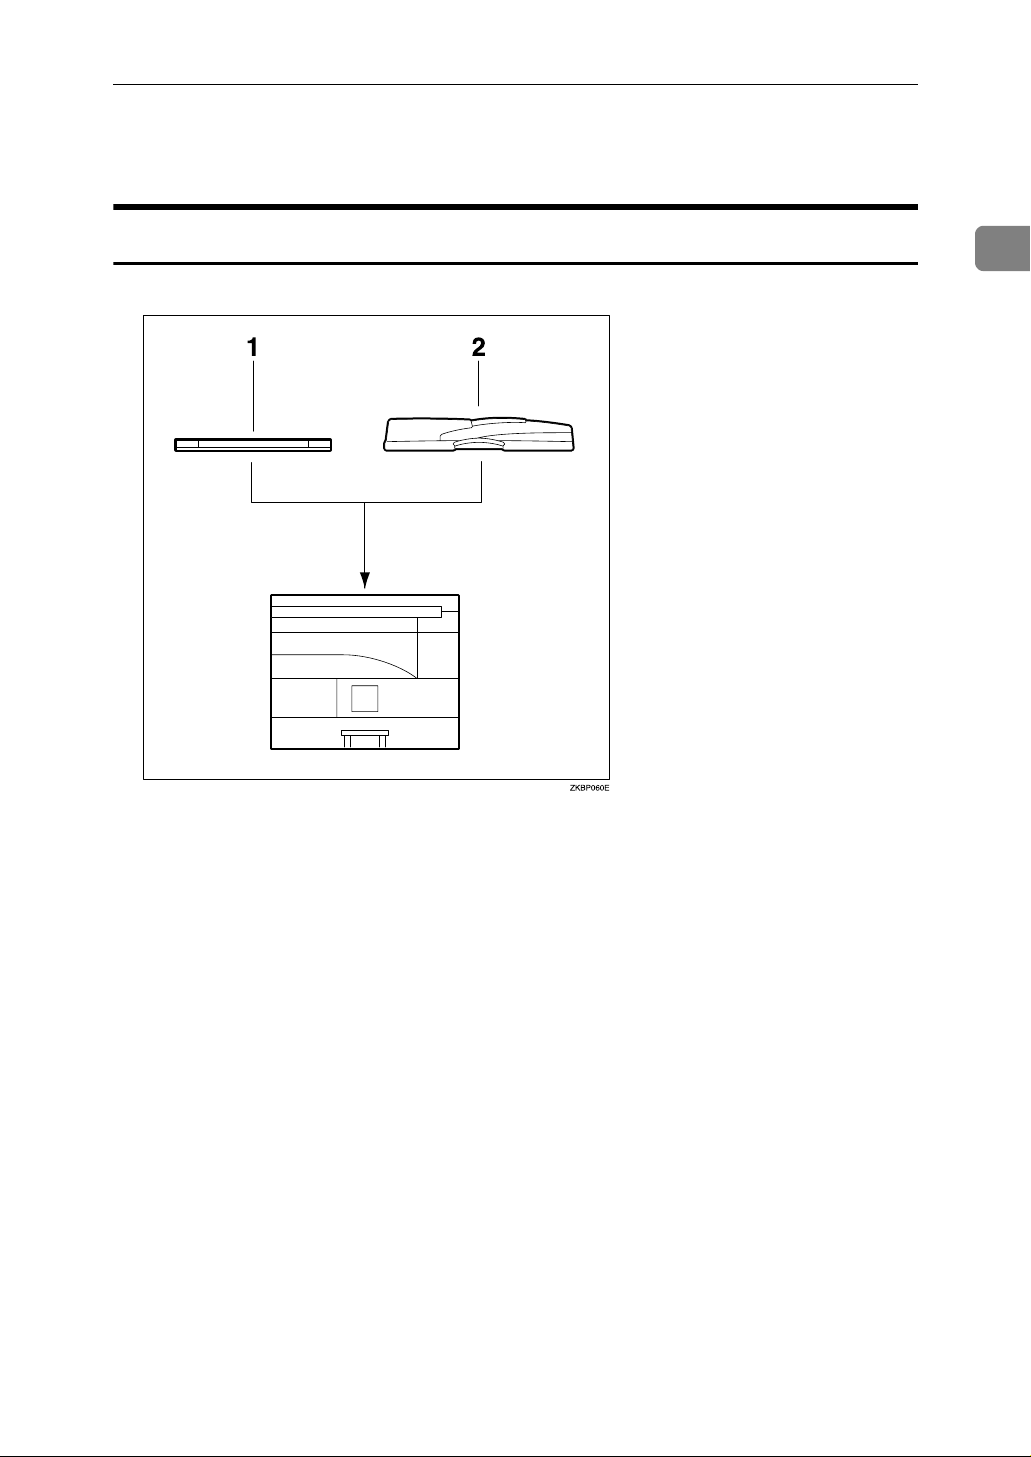
External Options
1
1. Exposure glass cover
Lower this cover over originals.
2. ADF
Place stacks of originals here.
They will feed in automatically.
13
Page 20

1
Getting Started
Control Panel
This illustration shows the control panel of the machine with options fully installed.
APH006S
1. Indicators
Display errors and machine status.
h: Error indicator. See p.59 “x Clearing
Misfeeds”.
B: Load Paper indicator. See p.54 “B
Loading Paper”.
D: Add Toner indicator. See p.56 “D
Adding Toner”.
2. Display
Displays operation status and messages.
3. Selection keys
Correspond to items on the display. Press
to select the corresponding item.
4. Scroll keys
Press to select an item.
{U} : scroll upward
{T} : scroll downward
{V} : scroll right
{W} : scroll left
Reference
See p.16 “Reading the Display and
Using Keys”.
5. {User Tools/Counter} key
•User Tools
Press to change default or operation
parameters according to requirement.
See p.38 “Accessing User Tools”.
•Counter
Press to check or print the counter value. See p.63 “Other Functions”.
6. {Clear Modes} key
Press to clear the current settings.
7. {Clear/Stop} key
•Clear:
Clears an entered numeric value.
•Stop:
Stops a job in progress, such as scanning, or printing.
8. Main power indicator
The main power indicator lights when
the main power switch is turned on.
Important
❒ Do not turn off the main power
switch while the On indicator is lit
or blinking. Doing so may damage
the memory.
14
Reference
p.17 “Turning On the Power”
Page 21

Control Panel
9. Operation switch (On indicator)
Press to turn the power on. The On indicator lights. To turn the power off, press
again.
Note
❒ This key is inactivate during scanning
or while setting defaults.
Reference
p.17 “Turning On the Power”
10. {Sort} key
Automatically sorts copies.
11. {Lighter} and {Darker} keys
Press to change the image density setting.
Select the image density in three increments, Lighter to Darker.
12. {Escape} key
Press to cancel an operation or return to
the previous display.
13. {Original Type} key
Press to select the original type registered
in [Original Type 1 (Text)] or [Original Type 2
(Photo)]. When the original type is select-
ed, the corresponding indicator lights.
1
14. {OK} key
Press to set a selected item or an entered
numeric value.
15. Number keys
Press to enter numeric values.
16. {#} key
Press to set a selected item or an entered
numeric value.
17. {Start} key
Press to start copying, printing, or scanning or sending.
Display
The display panel shows machine status, error messages, and function menus.
Important
❒ A force or impact of more than 30 N (about 3 kgf) will damage the display.
❖ Initial copy display
1 32
AAX024S
4
1. Operational status or messages
2. Messages and the selected tray ap-
pear here. Currently selected items
appear in brackets.
3. Number of copies set.
4. Reduce/Enlarge ratio function for
non-fixed ratios.
AAI024S
When you select or specify an item on the display, it is highlighted like .
15
Page 22
1
Getting Started
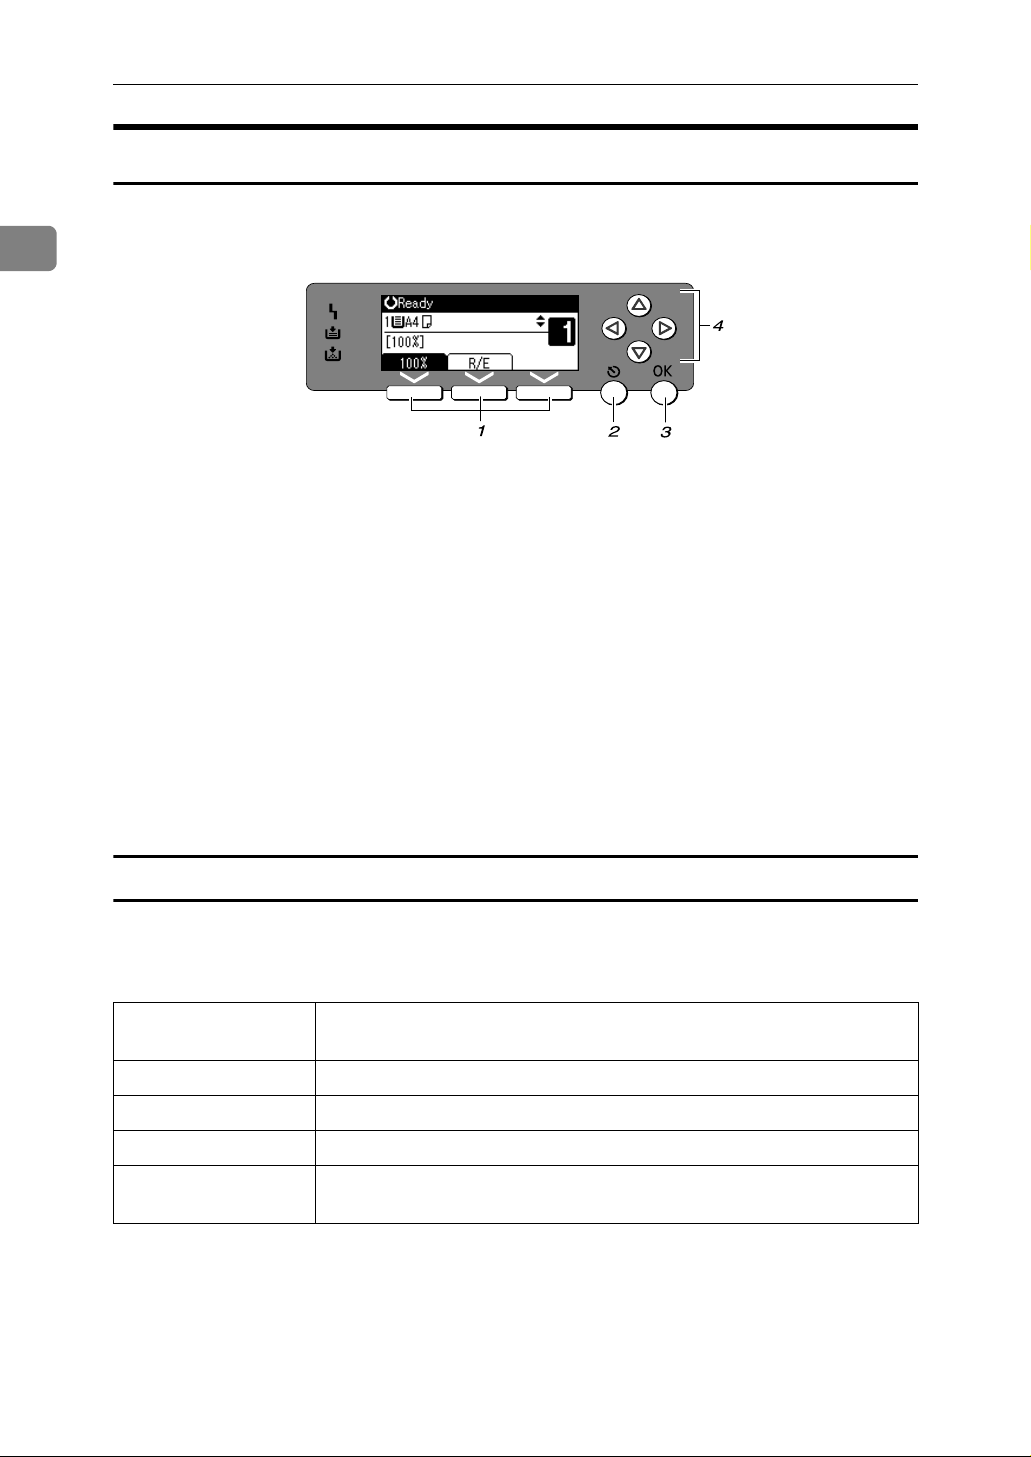
Reading the Display and Using Keys
This section explains how to read the display and use the Selection keys.
APE010S
1. Selection keys
Correspond to items at the bottom line on
the display.
Example: The Copy display
• When the instruction “press [100%] ”
appears in this manual, press the left
selection key.
• When the instruction “press [R/E] ”
appears in this manual, press the centre selection key.
2. {Escape} key
Press to cancel an operation or return to
the previous display.
3. {OK} key
Press to set a selected item or an entered
numeric value.
4. Scroll keys
Press to move the cursor in each direction, step by step.
When the {U}, {T}, {W}, or {V} key appears in this manual, press the scroll key
of the same direction.
Common key operations
The following keys are common to all screens:
❖ Key list
[Cancel] Deletes a selected function or entered values, and then the previous
display returns.
[Exit] The previous display returns.
16
[Stop] Stops a job in progress.
[Yes] Acknowledges a selected function or an entered values.
[Stop] Cancels a selected function or entered values, and then the previous
display returns.
Page 23
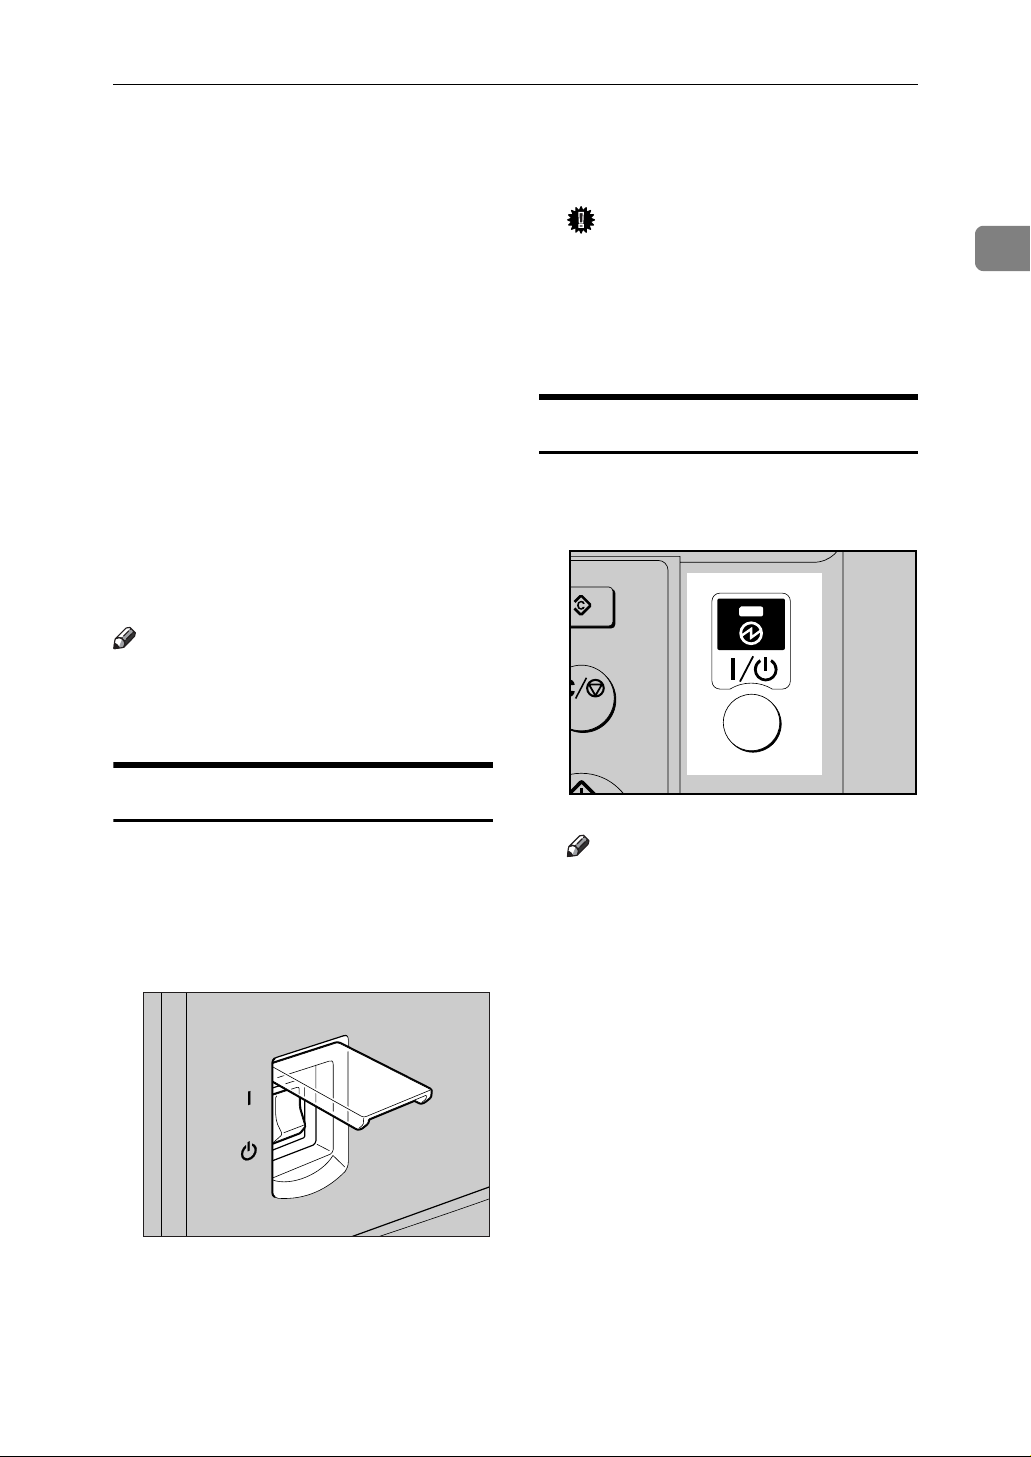
Turning On the Power
Turning On the Power
This machine has two power switches.
❖ Operation switch (right side of the con-
trol panel)
Press to activate the machine. When
the machine has finished warming
up, you can operate the machine.
❖ Main power switch (left side of the ma-
chine)
Turning off this switch makes the
main power indicator on the right
side of the control panel go off.
When this is done, machine power
is completely off.
Note
❒ This machine automatically enters
Energy Saver mode or turns itself
off if you do not use it for a while.
Important
❒ Do not turn off the main power
switch immediately after turning it on. Doing so may result in
damage to the memory, leading
to malfunctions.
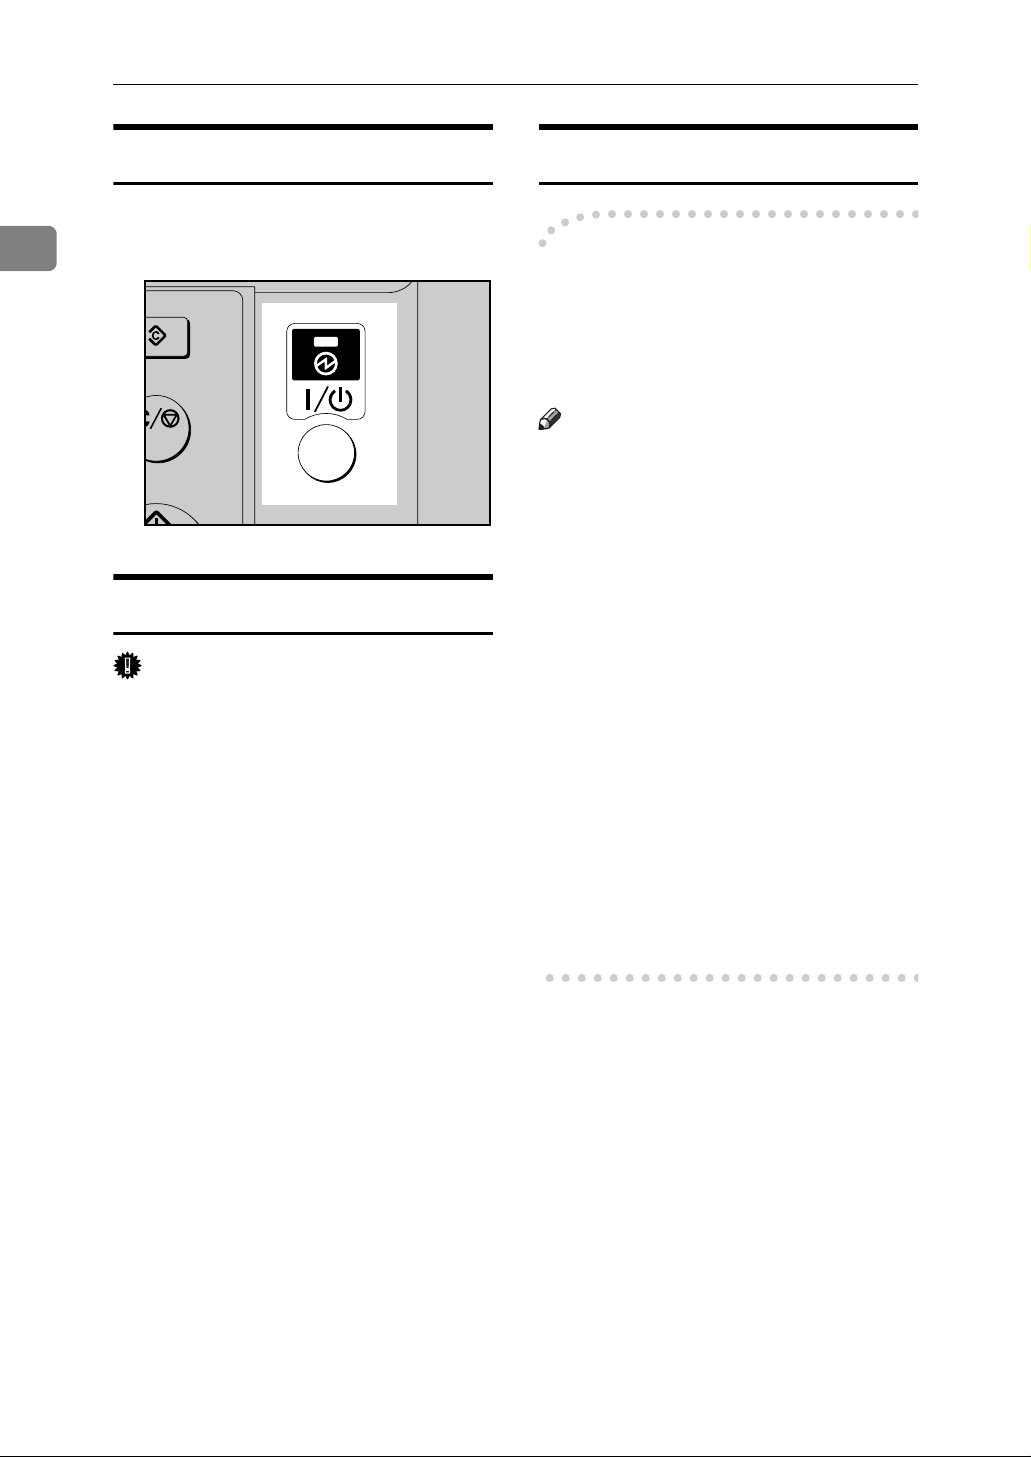
Turning On the Power
A Press the operation switch.
The On indicator goes on.
1
Turning On the Main Power
A Make sure the power cord is firm-
ly plugged into the wall outlet.
B Turn on the main power switch.
The main power indicator goes on.
AAI027S
APE013S
Note
❒ If the power does not come on
when the operation switch is
pressed, check the main power
switch is on. If it is off, turn it on.
17
Page 24
Getting Started
1
Turning Off the Power
A Press the operation switch.
The On indicator goes off.
APE013S
Turning Off the Main Power
Important
❒ Do not turn off the main power
switch when the On indicator is lit
or blinking. Doing so may result in
damage to the memory.
❒ Be sure to turn off the main power
switch before pulling out the power plug. Not doing this may result
in damage to the memory.
A Be sure the On indicator is not lit.
Saving Energy
-Auto Off / Low Power
The machine automatically turns itself off when the job is finished, after
a certain period of time has elapsed.
This function is called “Auto Off”.
Note
❒ You can change the Auto Off time.
❒ The Auto Off Timer function will
not operate in the following cases:
• When a warning message ap-
pears
• When the service call message
appears
• When paper is jammed
• When the cover is open
• When the “
sage appears
• When toner is being replen-
ished
• When the User Tools screen is
displayed
• When fixed warm-up is in
progress
Add toner ” mes-
B Turn off the main power switch.
The main power indicator goes
out.
18
Page 25
2. Placing Originals
Originals
Sizes and Weights of Recommended Originals
❖ Metric version
Original location Original size Original weight
Exposure glass Up to A3 --
ADF One-sided originals:
A3L – A5KL
40–128 g/m
❖ Inch version
Original location Original size Original weight
Exposure glass Up to 11" × 17" --
2
ADF One-sided originals:
11" × 17"L – 5
Note
1
/2" × 81/2"KL
❒ About 30 originals can be placed in the ADF.
11–34 lb.
19
Page 26

2
Placing Originals
Non-compatible originals for the ADF
Placing the following types of originals in the ADF can cause paper misfeeds or
result in damage to the originals. Place these originals on the exposure glass instead.
• Originals other than those specified on p.19 “Sizes and Weights of Recommended Originals”
• Stapled or clipped originals
• Perforated or torn originals
• Curled, folded, or creased originals
• Pasted originals
• Originals with any kind of coating, such as art paper, aluminum foil, carbon
paper, or conductive paper
• Originals with perforated lines
• Originals with indexes, tags, or other projecting parts
• Sticky originals such as translucent paper
• Thin, highly flexible originals
• Thick originals such as postcards
• Bound originals such as books
• Transparent originals such as OHP transparencies or translucent paper
Note
❒ The original might become dirty if it is written with a pencil or a similar
tool.
Missing Image Area
Even if you place originals in the ADF, or on the exposure glass correctly, 4 mm
(0.2”) margins on all four sides might not be copied.
20
Page 27
Placing Originals
Placing Originals
Note
❒ Take care to place originals only af-
ter any correction fluid and ink has
completely dried. Not taking this
precaution could cause marks on
the exposure glass that will be copied onto paper.
Reference
For original sizes you can set, see
p.19 “Originals” .
Original Orientation
You can set the original orientation in
the following ways.
This function is useful for copying
torn or large originals.
Note
❒ Originals should normally be
aligned to the rear left corner.
However, some copy functions
may produce different results depending on the orientation of the
originals. For details, see the explanations of each function.
Placing Originals on the Exposure Glass
A Lift the exposure glass cover or
ADF.
Important
❒ Do not lift the exposure glass
cover or ADF forcefully. If you
do, the ADF cover might open
or be damaged.
Note
❒ Be sure to lift the exposure glass
cover or ADF by more than 30°.
Otherwise, the size of the original might not be detected correctly.
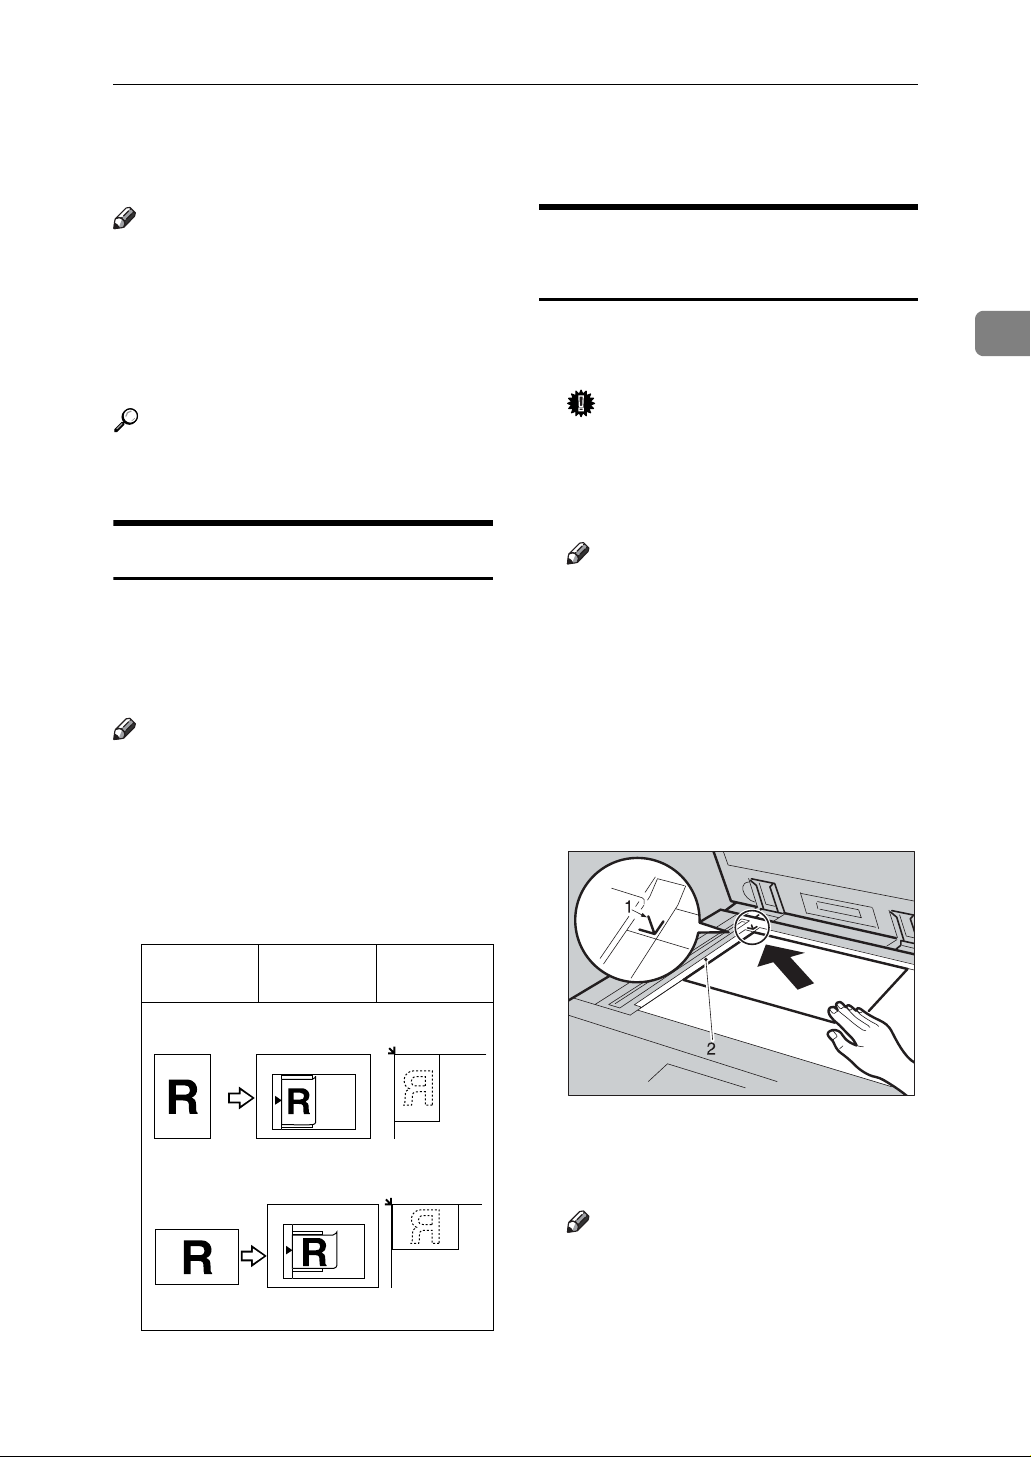
B Place the original face down on
the exposure glass. It should be
aligned with the rear left corner.
2
Originals ADF Exposure
glass
set11EE
set23EE
AAI025S
1. Positioning mark
2. Left scale
Note
❒ Start with the first page to be
copied.
C Lower the exposure glass cover or
ADF.
21
Page 28

Placing Originals
2
Placing Originals in the ADF
Settings should be made in the following situations:
❖ When placing custom size originals:
p.22 “Placing custom size originals”
Note
❒ Do not stack originals over the lim-
it mark on the side fence of the
ADF.
❒ The last page should be on the bot-
tom.
❒ Do not cover the sensors with your
hands, or place objects on them.
Doing so could cause the size to be
detected incorrectly, or the paper
misfeed error message to appear.
Also, do not place anything on the
cover, as this too could cause a
malfunction.
❖ ADF
B Align the edges of the originals
and place them in the ADF with
the side to be copied facing up.
AAI026S
1. Limit mark
2. Document guide
Note
❒ Straighten curls in the originals
before placing them in the ADF.
❒ To prevent multiple sheets feed-
ing in at once, fan the originals
before placing them in the ADF.
❒ Set the original squarely.
1. Sensor
A Set the document guide to the
original size.
22
AAI036S
Placing custom size originals
When placing custom size originals in
the ADF, specify the size of the originals.
Note
❒ Paper that has a vertical length of
105–297 mm (4.2"–11.6") and a horizontal length of 128–1260 mm
(5.1"–49.6") can be placed with this
function.
A Select the paper tray using {U} or
{T}, and then press the {#} key.
Page 29
Placing Originals
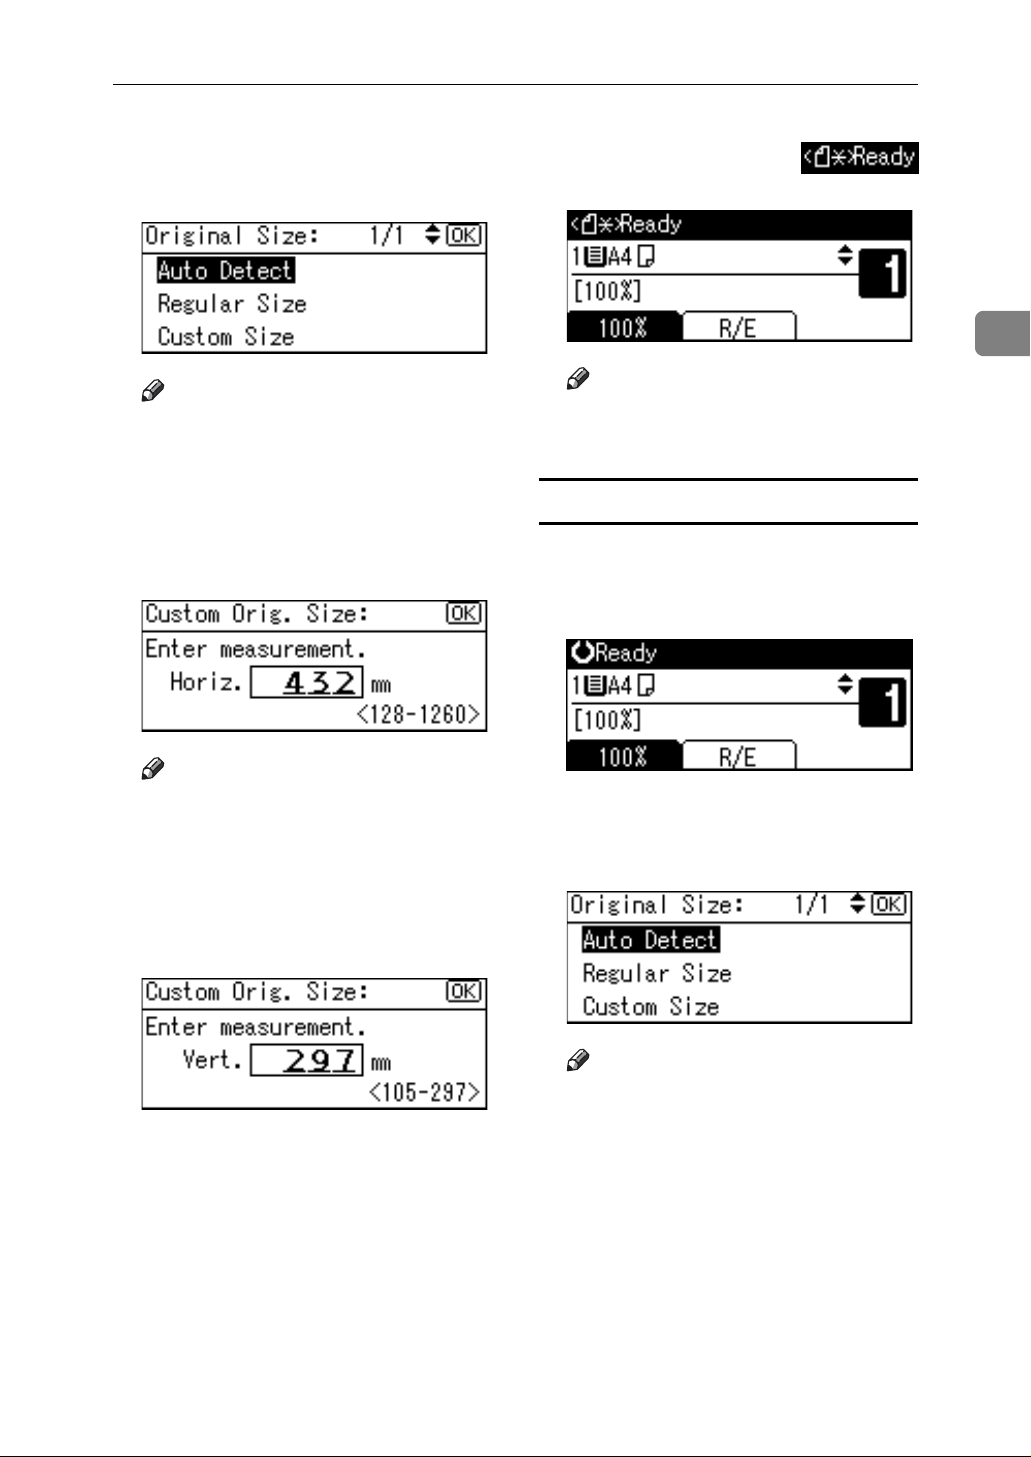
B Select [Custom Size] using {U} or
{T} key, and then press the {OK}
key.
Note
❒ When [Auto Detect] is selected,
the size of the placed original
will be detected automatically.
C Enter the horizontal size of the
original using the number keys,
and then press the {OK} key.
When the custom size originals
settings are registered,
appears on the top of copy display.
2
Note
❒ To cancel the size you have set,
press the {Clear Modes} key.
Placing regular size originals
A Select the paper tray using {U} or
{T} key, and then press the {#}
key.
Note
❒ If you make a mistake, press the
{Clear/Stop} key, and then enter
the value again.
D Enter the vertical size of the origi-
nal using the number keys, and
then press the {OK} key.
The “
pears with your set original size.
Programmed” message ap-
B Select [Regular Size] using {U} or
{T} key, and then press the {OK}
key.
Note
❒ When [Auto Detect] is selected,
the size of the placed original
will be detected automatically.
23
Page 30

2
Placing Originals
C Select the paper size using the
scroll keys, and then press {OK}
key.
The “
pears.
When the regular size originals
settings are registered,
appears on the top of copy display.
❒ To cancel the size you have set,
Programmed” message ap-
Note
press the {Clear Modes} key.
24
Page 31

Basic Procedure
3. Copying
A If the machine has user codes set,
enter a user code (up to eight digits) using the number keys, and
then press the {OK} or {#} key.
The machine is ready to copy.
Reference
For user codes, see p.42 “Key
Operator Tools”.
B Make sure "d Ready" appears on
the display.
❖ Initial copy display
C Make sure no previous settings
remain.
Note
❒ When there are previous set-
tings remaining, press the {Clear
Modes} key and enter again.
D Place your originals.
F Enter the number of copies using
the number keys.
Note
❒ The maximum copy quantity
that can be set is 99.
G Press the {Start} key.
Copying starts.
Note
❒ Copies are delivered face down.
-How to operate
❖ To switch between pages or select
functions:
Press the scroll key.
❖ To stop the machine during a multi-
copy run:
Press the {Clear/Stop} key.
Reference
p.21 “Placing Originals”
E Make the necessary settings.
Reference
See the explanations for each
function.
❖ To return the machine to the initial
condition after copying:
Press the {Clear Modes} key.
❖ To clear an entered value.
Press the {Clear/Stop} key.
25
Page 32

Copying
Copying from the Bypass Tray
3
Use the bypass tray to copy onto OHP
transparencies, thick paper, envelopes and copy paper that cannot be
loaded in the paper tray.
Important
❒ Paper longer than 433 mm may be-
come wrinkled, may not feed in,
and may jam.
Note
❒ If you do not use standard size
copy paper, or if you use special
paper, you should enter its vertical
and horizontal dimensions. See
p.22 “Placing custom size originals”. The sizes you can enter are
as follows:
Metric
version
Inch
version
• Vertical: 90–297 mm
• Horizontal: 148–600 mm
• Vertical: 3.55"–11.69"
• Horizontal: 5.83"–23.62”
A Open the bypass tray.
B Push up the paper guide release
lever.
❒ The machine can automatically de-
tect the following sizes as regular
size copy paper:
Metric
version
Inch
version
A3L, A4KL, A5KL, 8" ×
13"L
1
11" × 17"L, 8
1
5
/2" ×81/2"L, 81/2" × 14"L
/2" × 11"KL,
❒ When copying onto OHP transpar-
encies or paper heavier than 105
2
g/m
(about 28 lb.), you need to
specify the paper type. See p.28
“When copying onto special paper” .
❒ The maximum number of sheets
you can load at the same time depends on paper type. The maximum number of sheets should not
exceed the upper limit.
1
ZENY110E
1. Paper guide release lever
26
Page 33

Copying from the Bypass Tray
C Insert the paper with the side you
want to copy facing down, and
then adjust the paper guide with
the paper size.
4
1. Horizontal size
2. Vertical size
3. Extender
4. Paper guides
Note
❒ If the guides are not flush
against the copy paper, images
might be skewed or paper misfeeds might occur.
❒ Do not stack paper over the lim-
it mark, otherwise images
might be skewed or paper misfeeds might occur.
❒ Swing out the extender to sup-
port paper sizes larger than
A4L, 8
❒ Fan paper to get air between the
sheets and avoid a multi-sheet
feed.
1
/2" × 11"L.
1
2
3
ZENY120E
D Pull down the paper guide release
lever (step
The bypass tray is selected on the
display.
Note
❒ If [Byp.] is not selected on the
display, select [Byp.] using {U}
or {T}, and then press the {#}
key.
).
B
E Select the paper size and type.
When copying onto regular size
paper
A Select [Paper Size] using {U} or
{T}, and then press the {OK}
key.
B Select [Regular Size] using {U}
or {T}, and then press the {OK}
key.
3
27
Page 34

Copying
3
C Select the paper size using the
scroll keys, and then press the
{OK} key.
The “
appears.
Programmed ” message
When copying onto custom size
paper
Important
❒ You should specify the size of
copy paper to avoid paper misfeeds.
A Select [Paper Size] using {U} or
{T}, and then press the {OK}
key.
Note
❒ If you make a mistake, press
the {Clear/Stop} key, and then
enter the value again.
D Enter the vertical size of the
original using the number
keys, and then press the {OK}
key.
The “
appears.
Programmed ” message
When copying onto special paper
A Select [Paper Type] using {U} or
{T}, and then press the {OK}
key.
28
B Select [Custom Size] using {U}
or {T}, and then press the {OK}
key.
C Enter the horizontal size of the
original using the number
keys, and then press the {OK}
key.
B Select the paper type, and then
press the {OK} key.
The “
appears.
Programmed ” message
Page 35

Copying from the Bypass Tray
When copying onto envelopes
A Select [Paper Size] using {U} or
{T}, and then press the {OK}
key.
B Select [Regular Size] using {U}
or {T}, and then press the {OK}
key.
C Select the envelope size from
[C6 envL] [C5 envL] [DL envL],
and then press the {OK} key.
F Select [Thick Paper] using {U} or
{T}, and then press the {OK}
key.
The “
appears.
Programmed ” message
F Place your originals, and then
press the {Start} key.
Note
❒ When copying onto OHP trans-
parencies, remove copied sheets
one by one.
3
The “
appears.
D Press the {#} key.
E Select [Paper Type] using {U} or
{T}, and then press the {OK}
key.
Programmed ” message
29
Page 36

Copying
Copier Functions
3
Adjusting Image Density
You can adjust copy image density to
match your originals.
If you require darker or lighter copies, adjust image density accordingly.
A Press the {Lighter} or {Darker} key
to adjust the density.
APH017S
Selecting Original Type Setting
Select one of the following two types
to match your originals:
❖ Text
Select this when your originals
contain only text (no pictures).
A Press the {Original Type} key and
select the original type.
APE015S
Note
❒ Press the {Original Type} key to
go through the following types:
Upper indicator lit Text
Lower indicator lit Photo
Selecting Copy Paper
Choose the tray containing the paper
you want to copy onto: a paper tray or
the bypass tray.
A Select the paper tray or bypass
tray using {U} or {T}.
The selected tray and the paper
size appear.
30
❖ Photo
This can reproduce delicate tones
of photographs and pictures.
Reference
p.44 “Original Type Setting”
Reference
p.26 “Copying from the Bypass
Tray”
Page 37

Copier Functions
Preset Reduce/Enlarge
You can select a preset ratio for copying.
❖ Base Point
The base point of Reduce/Enlarge
differs depending on how the original is scanned. When the original
is placed on the exposure glass, the
upper left corner is the base point.
When placed in the ADF, the bottom left corner is the base point.
A Press [R/E].
B Press [Reduce] or [Enlarge].
C Select a ratio using {U} or {T},
and then press the {OK} key.
The “
pears.
Programmed ” message ap-
D Place your originals, and then
press the {Start} key.
3
GCKA031e
1. Base point when placing on the
exposure glass.
2. Base point when placing in the
ADF.
Reference
Related default settings
p.45 “Reproduction Ratio”
p.45 “Preset R/E Priority”
Zoom
You can change the reproduction ratio in increments of 1%.
Note
❒ You can also select a preset ratio
close to the desired ratio using [Re-
duce] or [Enlarge], and then adjust
the ratio using {U} or {T}.
31
Page 38

Copying
3
A Press [R/E].
B Press [Zoom].
C Enter the ratio.
To enter the ratio using the
number keys
A Enter the desired ratio using
the number keys.
B Press the {OK} key.
The “
appears.
Programmed ” message
D Place your originals, and then
press the {Start} key.
Sort
You can scan originals into memory
and automatically sort copies.
❖ Sort
Copies are assembled as sequentially ordered sets.
To select the ratio using {U} and
{T}
A Adjust the ratio using {U} or
{T}.
Note
❒ If you have incorrectly en-
tered the ratio, readjust using
{U} or {T}.
❒ To change the ratio in incre-
ments of 10%, press and hold
down {U} or {T}.
B Press the {OK} key.
The “
appears.
Programmed ” message
A Press the {Sort} key.
APH018S
Note
❒ When canceling the Sort func-
tion, press the {Sort} key, and
make sure the {Sort} key indicator is off.
32
Page 39

Copier Functions
B Enter the number of copy sets us-
ing the number keys.
C Place your originals.
Note
❒ When placing originals on the
exposure glass, start from the
first page to be copied. When
placing originals in the ADF, set
the first page on top.
D Press the {Start} key.
Note
❒ When placing originals on the
exposure glass, press the {#}
key after all originals are
scanned.
Changing the number of sets
You can change the number of copy
sets during copying.
Note
❒ This function can only be used
when the Sort function is selected.
A While “ Copying... ” is dis-
played, press the {Clear/Stop} key.
3
B Press [Sets].
C Enter the number of copy sets
with the number keys, and then
press [Resume].
Copying starts again.
Note
❒ The number of sets you can en-
ter differs depending on when
the {Clear/Stop} key is pressed.
33
Page 40

3
Copying
34
Page 41

4. User Tools
User Tools Menu ( System Settings )
❖ General Features (See p.40 “General Features”.)
Default
Copy Count Display Up
Display Contrast Centre
Key Repeat On
Measurement Unit Metric version: mm
Inch verion: inch
❖ Tray Paper Settings (See p.40 “Tray Paper Settings”.)
Default
Tray Paper Size: Tray 1 Metric version: A4L
1
Inch version: 8
/2" × 11"L
Paper Type:
Bypass tray
Thick Paper
❖ Timer Settings (See p.41 “Timer Settings”.)
Auto Off Timer 1 min.
Energy Saver Timer 1 min.
System Auto Reset Timer 60 sec.
Copier Auto Reset Timer 60 sec.
Default
35
Page 42

User Tools
❖ Key Operator Tools (See p.42 “Key Operator Tools”.)
User Code Man.: Copier Off
Key Counter Management Off
Key Operator Code Off
Display/Print Counter —
Counter per User Code Display —
Print —
Clear —
Default
4
Program/Change User
Code
AOF (Always On) On
Program —
Change —
Delete —
36
Page 43

User Tools Menu ( Copier Settings )
User Tools Menu ( Copier Settings )
❖ Copier Features (See p.44 “Copier Features”.)
Default
Original Type Setting Original Type 1 (Text): Text Mode 1
Original Type 2 (Photo): Photo Mode 1
Max. Number of Sets 99 sheets
Original Count Display
Reproduction Ratio Metric version:
Preset R/E Priority Metric version: 71%
Off
• Ratio 1: 50%
• Ratio 2: 71%
• Ratio 3: 82%
• Ratio 4: 93%
• Ratio 5: 122%
• Ratio 6: 141%
• Ratio 7: 200%
Inch version:
• Ratio 1: 50%
• Ratio 2: 65%
• Ratio 3: 78%
• Ratio 4: 93%
• Ratio 5: 121%
• Ratio 6: 129%
• Ratio 7: 155%
Inch version: 65%
4
Letterhead Setting Off
37
Page 44

User Tools
Accessing User Tools
4
This section is for key operators in
charge of this machine.
User Tools allow you to change or set
defaults.
Note
❒ Operations for system settings dif-
fer from normal operations. Always quit User Tools when you
have finished. See p.39 “Quitting
User Tools”.
❒ Selected settings are highlighted.
❒ Any changes you make with User
Tools remain in effect even if the
main power switch or operation
switch is turned off, or the {Clear
Modes} key is pressed.
Changing Default Settings
Note
❒ If a key operator code is already
set, the key operator code entry
display appears. Enter the key operator code, and then press the
{OK} key. See p.42 “Key Operator
Code”.
B Select [System Settings] or [Copier
Features] using {U} or {T}, and
then press the {OK} key.
C Select the menu using {U} or {T},
and then press the {OK} key.
Reference
p.35 “User Tools Menu ( System Settings )”p.37 “User Tools
Menu ( Copier Settings )”.
D Select the item using {U} or {T },
and then press the {OK} key.
A Press the {User Tools/Counter} key.
38
APE011S
E Change settings by following in-
structions on the display, and
then press the {OK} key.
Note
❒ To cancel changes made to set-
tings and return to the initial
display, press the {User
Tools/Counter} key.
Page 45

Quitting User Tools
A Press the {User Tools/Counter} key.
Accessing User Tools
APE011S
4
39
Page 46

User Tools
Settings You Can Change with User Tools
4
Reference
To access User Tools, see p.38 “Accessing User Tools”.
System Settings
General Features
❖ Copy Count Display
The copy counter can be set to
show the number of copies made
(count up), or the number of copies
yet to be made (count down).
Note
❒ Default: Up (count up)
❖ Display Contrast
You can adjust the brightness of
the display.
❖ Key Repeat
You can select whether or not to
use the key repeat function.
Note
❒ Default: On
❖ Measurement Unit
You can switch the measurement
between “mm” and “inch”.
Note
❒ Default:
•Metric version: mm
• Inch version: inch
Tray Paper Settings
❖ Tray Paper Size: Tray 1
Select the size of the paper loaded
in the paper tray.
• The paper sizes you can set for
Tray 1 are as follows:
A3L, B4JIS (Japanese Industrial Standard)L , A4KL,
B5JISKL, A5K, 11" × 17"L,
1
8
/2" × 14"L, 81/2" × 13"L,
1
8
/4" × 14"L, 81/4" × 13"L, 8" ×
13"L, 8
10
8KL, 16KKL
Important
❒ If the specified paper size dif-
fers from the actual size of the
paper loaded in the paper tray,
a misfeed might occur because
the correct paper size was not
detected.
Note
❒ Default:
❒ If the paper size set for the selec-
tor in the paper tray is different
from the paper size for this setting, the paper size of the selector has priority.
❒ If you load paper of a size not
indicated on the paper size selector in the paper tray, set the
selector to “p”.
1
1
• Metric version: A4L
• Inch version: 8
/2" × 11"KL, 71/4" ×
/2"KL, 51/2" × 81/2"K,
1
/2" × 11"L
40
Reference
p.61 “Changing the Paper Size”
Page 47

Settings You Can Change with User Tools
❖ Paper Type: Bypass tray
Set the display so you can see what
type of paper is loaded in the bypass tray.
• The paper types you can set for
the bypass tray are as follows:
• recycled paper, special pa-
per, colour paper, letterhead,
prepunched paper, label paper, bond paper, thick paper,
OHP, cardstock
Note
❒ Default: Thick Paper
❒ Paper types you can set in the
bypass tray for machines with
the copy function only are plain
paper, thick paper and OHP.
Timer Settings
❖ Auto Off Timer
After a specified period has
passed, following job completion,
the machine automatically turns
off, in order to conserve energy.
This function is called “Auto Off”.
The machine status after the Auto
Off operation is referred to as “Off
mode”. For the Auto Off Timer,
specify the time to elapse before
Auto Off.
Note
❒ Default: 1 min.
❒ The time can be set from 1 to 240
minutes, using the number
keys.
❒ From “Off mode”, the machine
is ready to use within 10 seconds.
❖ Energy Saver Timer
The machine automatically enters
Low Power mode automatically
after a job is finished, and the selected time elapsed.
Note
❒ Default: 1 min.
❒ The time can be set from 1 to 240
minutes, using the number key.
❒ Energy Saver may not work
when error messages appear.
❖ System Auto Reset Timer
Specify the time to elapse before
copier modes reset.
Note
❒ If [Off] is selected, the machine
does not automatically switch
to the user code entry screen.
❒ Default: On, 60 sec.
❒ The time can be set from 10 to
999 seconds, using the number
keys.
❖ Copier Auto Reset Timer
Specify the time to elapse before
copier modes reset.
Note
❒ If [Off] is selected, the machine
does not automatically switch
to the user code entry screen.
❒ Default: On, 60 sec.
❒ The time can be set from 10 to
999 seconds, using the number
keys.
4
❒ Auto Off may not work when
error messages appear.
41
Page 48

User Tools
4
Key Operator Tools
The key operator must set the following items. For settings or more information, contact the key operator.
It is recommended that the key operator program a key operator code
when performing the settings. See
p.42 “Key Operator Code”.
❖ User Code Man.: Copier
Allows you to control who uses the
machine by setting codes for users.
User codes must be registered for
user code management.
Note
❒ Default: Off
❖ Key Counter Management
Use the key counter to specify
whether users are restricted or not.
Note
❒ Default: Off
❒ [Key Counter Management] will
only be displayed when the key
counter is set.
❖ Key Operator Code
Specify whether or not to use passwords (max. eight digits) to control Key Operator Tools settings
for key operator code.
Note
❒ Default: Off
❒ If you select [On], enter the key
operator code (max. eight digits) using the number keys, and
then select [On:Partial] or [On:All]
to set the access limit.
•If you selected [On:Partial]
A key operator code is only
required for the Timer Settings and Key Operator
Tools for System Settings.
•If you selected [On:All]
A key operator code is required to access all items in
System Settings and Copier
Features.
❒ If you select [On:All], you must
enter a key operator code to access the Key Operator Code display.
❖ Display/Print Counter
Allows you to view and print the
number of prints.
• Display/Print Counter
Displays the number of prints
for each function (Total, Copier
and A3/DLT).
• Print Counter List
Prints out a list of the number of
prints made under each function.
42
• To print the counter list
A Press the {User Tools/Counter}
key.
APE011S
Page 49

Settings You Can Change with User Tools
B Select [System Settings] using
{U} or {T}, and then press
the {OK} key.
C Select [Key Operator Tools] us-
ing {U} or {T}, and then
press the {OK} key.
D Select [Display/Print Counter]
using {U} or {T}, and then
press the {OK} key.
E Press [Print].
❖ Counter per User Code
Allows you to view and print the
numbers of prints accessed with
user codes, and to set those values
to 0.
Note
❒ Press {U} and {T} to show all
the numbers of prints.
❒ The number of prints may differ
from the counter value shown
in Display/Print Counter.
• Print counter per user code
Prints the number of prints
made under each user code.
• Clear counter per user code
Sets the number of prints
made under each user code
to 0.
❒ Print list for each user code, see
p.49 “Printing the Counter for
Each User Code”.
• Print counter for all user
codes
Prints the number of prints
made under all user codes.
• Clear counter for all user
codes
Sets the number of prints
made under all user codes to
0.
4
F Press the {Start} key.
G Press the {User Tools/Counter}
key.
❖ Program/Change User Code
You can register, change, and delete user codes. For details about
these operations, see p.46 “User
Code”.
Note
❒ You can register up to 50 user
codes.
❖ AOF (Always On)
Specify whether or not to use Auto
Off.
Note
❒ Default: On
43
Page 50

User Tools
4
Copier Features
Original Type Setting
You can adjust copy finish quality
level according to original type. You
can choose these functions after selecting [Original Type 1 (Text)] or [Origi-
nal Type 2 (Photo)].
• Text Mode 1
normal text originals
• Text Mode 2
newspapers, semi-transparent
originals (reverse side print faintly
visible)
• Photo Mode 1
text/photo images containing
mostly photo areas
• Photo Mode 2
text/photo images containing
mostly text areas
• Photo Mode 3
actual photographic paper
Note
❒ Default:
• Original Type 1 (Text): Text Mode 1
• Original Type 2 (Photo): Photo
Mode 1
Max. Number of Sets
The maximum copy quantity can be
set between 1 and 99 using number
keys.
Note
❒ Default: 99 sheets
Original Count Display
You can set to display the count of
originals and copying pages on the
display when [On] is selected.
Note
❒ Default: Off
• Special Mode 1
Highly transparent originals (reverse side clearly visible), or light
text on a colored background. Also
for originals with very grainy
backgrounds (some newspapers)
and light text.
• Special Mode 2
originals with colored text and
lines
• Special Mode 3
photo images created by dithering
(visible dots), such as newspaper
photos - normal resolution
• Special Mode 4
photo images created by dithering
(visible dots), such as newspaper
photos - coarse resolution
• Special Mode 5
normal text originals (reproducing
the background)
44
Page 51

Settings You Can Change with User Tools
Reproduction Ratio
You can select which reduce, enlarge,
or input ratio is shown on the display
with priority when [Reduce] or [En-
large] is selected.
Note
❒ Default:
•Metric version:
• Ratio 1: 50%
• Ratio 2: 71%
• Ratio 3: 82%
• Ratio 4: 93%
• Ratio 5: 122%
• Ratio 6: 141%
• Ratio 7: 200%
• Inch version:
• Ratio 1: 50%
• Ratio 2: 65%
Letterhead Setting
If you select [On] for this function, the
machine rotates the image correctly.
Note
❒ Default: Off
❒ Orientation-fixed (top to bottom)
paper might not print correctly,
depending on how the originals
and paper are placed.
Reference
When using letterhead paper,
check its orientation is correct. See
p.55 “Orientation-Fixed Paper or
Two-Sided Paper”.
4
• Ratio 3: 78%
• Ratio 4: 93%
• Ratio 5: 121%
• Ratio 6: 129%
• Ratio 7: 155%
Preset R/E Priority
You can set the ratio with priority
when [R/E] is selected.
Note
❒ Default:
•Metric version: 71%
• Inch version: 65%
45
Page 52

User Tools
User Code
4
Register user codes to restrict copier
functions to certain users, and check
on their use of copier functions:
Registering a New User Code
A Press the {User Tools/Counter} key.
APE011S
B Select [System Settings] using {U}
or {T}, and then press the {OK}
key.
D Select [Program/Change User Code]
using {U} or {T}, and then press
the {OK} key.
E Select [Program] using {U} or {T},
and then press the {OK} key.
F Enter the user code using the
number keys, and then press the
{OK} or {#} key.
C Select [Key Operator Tools] using
{U} or {T}, and then press the
{OK} key.
46
The “
pears, and then the “ User Code ”
display returns.
Programmed ” message ap-
G Press the {User Tools/Counter} key.
Page 53

User Code
Changing a User Code
Note
❒ Even if you change a user code, the
counter value will not be cleared.
A Press the {User Tools/Counter} key.
B Select [System Settings] using {U}
or {T}, and then press the {OK}
key.
C Select [Key Operator Tools] using
{U} or {T}, and then press the
{OK} key.
D Select [Program/Change User Code]
using {U} or {T}, and then press
the {OK} key.
E Select [Change] using {U} or {T},
and then press the {OK} key.
F Enter the registered user code you
want to change using the number
keys, and then press the {OK} or
{#} key.
G Enter the new user code using the
number keys, and then press the
{OK} or {#} key.
The “
pears, and then the “ User Code ”
display returns.
Programmed ” message ap-
H Press the {User Tools/Counter} key.
Deleting a User Code
Important
❒ This operation also deletes user
codes registered to multiple functions. User control via the deleted
user code is no longer possible.
A Press the {User Tools/Counter} key.
B Select [System Settings] using {U}
or {T}, and then press the {OK}
key.
4
Note
❒ When you select the user code
from the User Code List, press
[List]. Select the user code you
want to change using {U} or
{T}, and then press the {OK}
key twice.
C Select [Key Operator Tools] using
{U} or {T}, and then press the
{OK} key.
D Select [Program/Change User Code]
using {U} or {T}, and then press
the {OK} key.
E Select [Delete] using {U} or {T},
and then press the {OK} key.
47
Page 54

User Tools
4
F Select [Per User Code] or [All User
Codes] using {U} or {T}, and then
press the {OK} key.
When selecting [All User Codes], a
confirmation message appears.
Press [Yes], and then proceed to
step
.
I
G Enter the registered user code you
want to delete using the number
keys, and then press the {OK} or
{#} key.
Displaying the Counter for Each User Code
You can check the counter for each
user code.
A Press the {User Tools/Counter} key.
B Select [System Settings] using {U}
or {T}, and then press the {OK}
key.
C Select [Key Operator Tools] using
{U} or {T}, and then press the
{OK} key.
D Select [Counter per User Code] using
{U} or {T}, and then press the
{OK} key.
E Select [Display] using {U} or {T},
and then press the {OK} key.
Note
❒ When you select the user code
from the User Code List, press
[List]. Select the user codes you
want to delete using {V}, and
then press the {OK} key.
A confirmation message appears.
H Press [Yes].
The “Deleted.” message appears,
and then the “User Code” display
returns.
I Press the {User Tools/Counter} key.
The counter for each user code will
be displayed.
F Press the {User Tools/Counter} key.
48
Page 55

User Code
Printing the Counter for Each User Code
You can print out the counter for each
user code.
A Press the {User Tools/Counter} key.
B Select [System Settings] using {U}
or {T}, and then press the {OK}
key.
C Select [Key Operator Tools] using
{U} or {T}, and then press the
{OK} key.
D Select [Counter per User Code] using
{U} or {T}, and then press the
{OK} key.
E Select [Print] using {U} or {T} and
then press the {OK} key.
F Press the {Start} key.
The counter list prints out.
Clearing the Counter
A Press the {User Tools/Counter} key.
B Select [System Settings] using {U}
or {T}, and then press the {OK}
key.
C Select [Key Operator Tools] using
{U} or {T}, and then press the
{OK} key.
D Select [Counter per User Code] using
{U} or {T}, and then press the
{OK} key.
E Select [Clear] using {U} or {T},
and then press the {OK} key.
A confirmation message appears.
F Press [Yes].
The “Counter has been cleared.”
message appears, and then the
“Codes:Counters” display returns.
4
G Press the {User Tools/Counter} key.
G Press the {User Tools/Counter} key.
49
Page 56

4
User Tools
50
Page 57

5. Troubleshooting
If Your Machine Does Not Operate As You Want
The following chart gives explanations of common problems and messages. If
other messages appear, follow the instructions displayed.
Problem Causes Solutions
“
Please wait. ” ap-
pears.
The display is off. The machine is in Energy
Nothing happens when the
operation switch is turned
on.
The user code entry display appears.
Problem Causes Solutions
Misfeeds occur frequently. The tray's side fences may
This message appears
when you turn on the operation switch or change the
toner bottle.
Saver mode.
The operation switch is
turned off.
The main power switch is
turned off.
Users are restricted by user
management.
not be locked.
The tray's end fence may
not be set properly.
You may have loaded paper of a size not shown on
the paper size selector.
Wait for the machine to get ready.
Turn on the operation switch.
Turn on the main power switch.
Enter the user code (up to eight digits), and then press the {OK} or {#}
key.
Check the side fences are locked.
p.61 “Changing the Paper Size”.
Check the end fence is set properly.
See p.61 “Changing the Paper Size”.
When using paper of a size that cannot be detected automatically, use
Tray Paper Settings to set the paper
size. See p.40 “Tray Paper Size: Tray
1” and p.80 “Copy Paper”.
An error message remains,
even if misfed paper is removed.
You forgot your key operator code.
Max. number of
”
sets is
* ” appears.
When a misfeed message
appears, it remains until
you open and close the cover, as required.
— Contact your service representative.
The number of copies exceeds maximum copy
quantity.
Clear misfed paper, and then open
and close the front cover. See p.59
“x Clearing Misfeeds”.
You can change the maximum copy
quantity. See p.44 “Max. Number of
Sets” .
51
Page 58

Troubleshooting
If You Cannot Make Clear Copies
Problem Causes Solutions
Copies appear dirty. Image density is too dark. Adjust the image density. See p.30
“Adjusting Image Density”.
5
Auto Image Density is not
selected.
The reverse side of an original image is copied.
A shadow appears on copies if you use pasted originals.
The same copy area is dirty
whenever making copies.
Copies are too light. Image density is too light. Adjust the image density. See p.30
Image density is too dark. Adjust the image density. See p.30
Auto Image Density is not
selected.
Image density is too dark. Adjust the image density. See p.30
The exposure glass or ADF
is dirty.
The paper size is not appropriate.
Adjust the auto image density. See
p.30 “Adjusting Image Density”.
“Adjusting Image Density”.
Adjust the auto image density. See
p.30 “Adjusting Image Density”.
“Adjusting Image Density”.
Change the orientation of the original.
Put mending tape over the pasted
areas.
Clean them. See p.69 “Maintaining
Your Machine”.
“Adjusting Image Density”.
Use the recommended paper.
Note
❒ A light copy may result when
you use damp or rough grain paper.
52
Toner bottle is almost empty.
Parts of the paper are not
copied.
Copies are blank. The original is not placed
A moiré pattern is produced on copies.
The original is not placed
correctly.
An improper paper size is
selected.
correctly.
Your original has a dot pattern image or many lines.
R
Add toner. See p.56 “D Adding
Toner”.
Place originals correctly. See p.21
“Placing Originals”.
Select the proper paper size.
When using the exposure glass,
place originals face down. When using the ADF, place them face up. See
p.21 “Placing Originals”.
Place the original on the exposure
glass at a slight angle.
Page 59

If You Cannot Make Copies As You Want
If You Cannot Make Copies As You Want
This section explains causes and remedies when copy results are not as expected.
❖ Basic
Problem Causes Solutions
You cannot combine several functions.
Selected functions cannot
be used together.
Check the combination of functions
and make the settings again.
Reference
p.77 “Combination Chart”
When Memory Is Full
Messages Causes Solutions
Reset * orig., then press
[Resume] to scan and copy the remaining originals.
[Stop] [Resume]
The machine checks
if the remaining originals should be copied, after the scanned
original has been
printed.
To continue copying,
remove all copies,
and then press
[Resume]. To stop
copying, press [Stop].
5
53
Page 60

5
Troubleshooting
B Loading Paper
C Push the paper tray in, until it
stops.
Loading Paper
Note
❒ You can change the paper size.
❒ This illustration shows the paper
tray.
A Pull the paper tray out slowly un-
til it stops.
B Square the paper and load it in
the tray.
54
APH009S
Important
❒ Check the top of the stack is not
higher than the limit mark inside the tray.
Note
❒ Fan the paper before loading.
❒ Straighten curled or warped pa-
per before loading.
❒ When using paper tray 1, before
loading paper, push down the
metal plate.
Page 61

B Loading Paper
Orientation-Fixed Paper or Two-Sided Paper
Orientation-fixed (top to bottom) or two-sided paper (for example, letterhead
paper, prepunched paper, or copied paper) might not print correctly, depending
on how the originals and paper are placed.
Reference
p.45 “Letterhead Setting”
Note
❒ Select [On] in [Letterhead Setting] under [Copier Features] (User Tools), and then
place the original and paper as shown below.
❖ Original Orientation
Exposure glass ADF
5
❖ Loaded paper orientation
APH004S
55
Page 62

5
R
R
Troubleshooting
D Adding Toner
When D appears, it is time to add toner.
Handling Toner
WARNING:
• Do not incinerate used toner or toner containers. Toner dust might ignite when exposed to an open flame. Dispose of used toner containers
in accordance with local regulations.
CAUTION:
• Keep toner (used or unused) and toner containers out of reach of children.
Important
❒ Faults may occur if you use toner other than the recommended type.
❒ When adding toner, do not turn off the operation switch. If you do, settings
will be lost.
❒ Always add toner when the machine instructs you.
❒ Do not repeatedly install and remove toner bottles. This will result in toner
leakage.
❒ Do not shake the removed toner bottle. Remaining toner might scatter.
Note
❒ You can make about 50 copies even after the D symbol begins flashing, but
replace toner early to prevent poor copy quality.
Toner Storage
When storing toner, the following precautions should always be followed:
• Store toner containers in a cool, dry place free from direct sunlight.
• Store on a flat surface.
Used Toner
Note
❒ Toner cannot be re-used.
56
Page 63

Removing Toner
Removing Toner
• 1: Open the front cover of the machine.
• 2: Lift the green lever.
• 3: Push the green lever, and then gently
pull out the holder.
5
• 4: Press the toner bottle back to raise its top,
and then gently pull it out.
57
Page 64

5
Troubleshooting
Inserting Toner
• 1: Hold the new bottle horizontally and
shake it from side to side five or six times.
2: Remove the black cap.
Note
❒ Do not remove the black cap before
shaking.
❒ Do not remove the inner cap.
• 3: Put the toner bottle on the holder, and
then pull its top forward.
• 4: Push in the green lever until it clicks.
• 5: Press down the green lever.
• 6: Close the machine's front cover.
58
Page 65

x Clearing Misfeeds
R
x Clearing Misfeeds
CAUTION:
• The fusing section of this machine might be very hot. Caution should be taken when removing misfed paper.
Important
❒ When clearing misfeeds, do not turn off the power switch. If you do, your
copy settings are cleared.
❒ To prevent misfeeds, do not leave any torn scraps of paper inside the ma-
chine.
❒ If paper misfeeds occur repeatedly, contact your service representative.
5
Note
❒ More than one misfeed area may be indicated. If this is the case, check every
applicable area. Refer to the following charts: A, B, P, R, Y, Z.
❒ You can find a sticker explaining how to remove misfed paper inside the right
cover.
❒ When the machine instructs you to reset originals, reset them in the feeding
position. The display will show you the number of originals to return.
59
Page 66

5
Troubleshooting
60
Page 67

Changing the Paper Size
Changing the Paper Size
Preparation
Be sure to select the paper size
with User Tools and the paper size
selector. If you do not, misfeeds
might occur. See p.40 “Tray Paper
Size: Tray 1”.
Reference
For details about paper sizes and
types, see p.80 “Copy Paper”.
Changing the Paper Size of the Paper Tray
A Make sure the paper tray is not in
use.
B Pull the paper tray out slowly un-
til it stops.
Note
❒ Remove any remaining copy
paper.
When using 11”× 17”size paper
A Pull the back fence off from
the tray.
5
B Place it in the corner pocket on
the left.
C While pressing the release lever,
adjust the back fence.
APH010S
D Press down the release button.
APH011S
61
Page 68

Troubleshooting
5
E While pressing the release lever,
adjust the side fences.
APH012S
F Push the metal plate down.
H While pressing the release lever,
adjust the side and back fences to
the new paper size.
APH014S
Important
❒ When setting small quantities of
copy paper, be careful not to
squeeze in the side fence too
much or paper will not feed in
properly.
I Press down the lock button.
APH013S
G Square the paper and set it in the
tray.
APH009S
Important
❒ Be sure to set the paper under
the roller.
❒ Do not stack paper over the lim-
it mark.
J Adjust the tray size to the new pa-
per size using the paper size selector.
APH015S
Note
❒ Be sure to set the correct size,
otherwise a paper jam might occur.
K Push the paper tray in until it
stops.
62
Page 69

Other Functions
6. Other Functions
Displaying the Total Counter
You can display the total counter value used for all functions.
A Press the {User Tools/Counter} key.
APE011S
B Select [Counter] using {U} or {T},
and then press the {OK} key.
E Press the {User Tools/Counter} key.
Changing the Language
You can change the language used on
the display. English is set as default.
A Press the {User Tools/Counter} key.
APE011S
B Select [Language] using {U} or
{T}, and then press the {OK} key.
C To print the counter list, press
[Print].
Note
❒ To print the counter list, set the
paper size to larger than A4 or
1
8
/2" × 11".
D Press the {Start} key.
A counter list prints out.
C Select the language using {U} or
{T}, and then press the {OK} key.
The “
pears, and then the “ User Tools ”
display returns.
Programmed ” message ap-
D Press the {User Tools/Counter} key.
63
Page 70

Other Functions
6
64
Page 71

Do's and Don'ts
R
7. Remarks
CAUTION:
• Unplug the power cord from the
wall outlet before you move the
machine. While moving the machine, you should take care that
the power cord will not be damaged under the machine.
Important
❒ Do not turn the power off while
the On indicator is lit or blinking.
Doing so may damage the memory.
❒ Before unplugging the power cord
or turning off the main power
switch, make sure remaining
memory space is at 100%, as
shown on the display. See p.18
“Turning Off the Power” and p.18
“Turning Off the Main Power”.
• When you use this machine for a
long time in a confined space without good ventilation, you may detect an odd smell. To keep the
workplace comfortable, we recommend that you keep it well ventilated.
• Do not touch areas on or around
the fusing unit. These areas get hot.
• After making copies continuously,
the exposure glass may become
warm—this is not a malfunction.
• The area around the ventilation
hole might feel warm. This is
caused by exhaust air and is not a
malfunction.
• When the machine is not in use
and in stand-by mode, you may
hear a small noise inside. This is
caused by the image stabilization
process and is not a malfunction.
• Do not turn off the operation
switch while copying. Make sure
all copying has finished first.
• The machine might not produce
good copy images if condensation
forms inside as a result of rapid
temperature change.
• Do not open the covers of the machine while copying. If you do,
misfeeds might occur.
• Do not move the machine during
copying.
• If you operate the machine improperly or a machine failure occurs, settings might be lost. Be sure
to make a note of your machine
settings.
• The manufacturer shall not be liable for any loss or damage resulting from mechanical failure, loss of
settings, or use of the machine.
65
Page 72

Remarks
R
R
R
R
Where to Put Your Machine
7
Machine Environment
Choose your machine's location carefully. Environmental conditions
greatly affect its performance.
Optimum environmental conditions
CAUTION:
• Keep the machine away from humidity and dust. Otherwise a fire
or an electric shock might occur.
• Do not place the machine on an
unstable or tilted surface. If it topples over, an injury might occur.
CAUTION:
• If you use the machine in a confined space, make sure there is a
continuous air turnover.
• Temperature: 10-32 °C (50-89.6 °F)
(humidity to be 54% at 32 °C, 89.6 °F)
• Humidity: 15-80% (temperature to
be 27 °C, 80.6 °F at 80%)
• A strong and level base.
• The machine must be level within
5 mm, 0.2 inches: both front to rear,
and left to right.
• To avoid possible buildup of
ozone, be sure to locate this machine in a large well ventilated
room that has an air turnover of
more than 30 m
3
/hr/person.
Environments to avoid
• Locations exposed to direct sunlight or other sources of strong
light (more than 1,500 lux).
• Locations directly exposed to cool
air from an air conditioner or heated air from a heater. (Sudden temperature changes can cause
condensation to form inside the
machine.)
• Locations close to machines generating ammonia, such as a diazo
copy machine.
• Places where the machine will be
subject to frequent strong vibration.
•Dusty areas.
• Areas with corrosive gases.
Moving
CAUTION:
• Unplug the power cord from the
wall outlet before you move the
machine. While moving the machine, you should take care that
the power cord will not be damaged under the machine.
CAUTION:
• Before moving the machine, be
sure to pull all four handles fully
out. If not, an injury might occur.
After moving the machine, return
the four handles to their original
positions.
66
Page 73

Where to Put Your Machine
R
R
R
Important
❒ Be careful when moving the ma-
chine. Take the following precautions:
• Turn off the main power. See
p.18 “Turning Off the Main
Power”.
• Unplug the power cord from
the wall outlet. When you pull
out the plug from the socket,
grip the plug to avoid damaging the cord, thereby reducing
the risk of fire or electric shock.
• Close all covers and trays, including the front cover and bypass tray.
❒ Do not take off the holding stand.
❒ Protect the machine from strong
shocks. Impact can damage the
memory.
Power Connection
WARNING:
• Connect the machine only to
the power source described
on the inside front cover of
this manual. Connect the power cord directly into a wall outlet and do not use an
extension cord.
CAUTION:
• Unplug the power cord from the
wall outlet before you move the
machine. While moving the machine, you should take care that
the power cord will not be damaged under the machine.
CAUTION:
• When you disconnect the power
plug from the wall outlet, always
pull the plug (not the cable).
• When the main power switch is in
the stand-by position, the optional
anti-condensation heaters are on.
In an emergency, unplug the machine's power cord.
• When you unplug the power cord,
the anti-condensation heaters turn
off.
• Make sure the plug is inserted
firmly in the wall outlet.
• Voltage must not fluctuate by
more than 10%.
• The wall outlet shall be installed
near the machine and shall be easily accessible.
7
• Do not damage, break or make
any modifications to the power cord. Do not place heavy
objects on it. Do not pull it
hard nor bend it more than
necessary. These actions
could cause an electric shock
or fire.
67
Page 74

Remarks
Access to the Machine
Place the machine near the power
source, providing the clearance areas
shown.
1. Rear: 5 cm (2") or more
2. Right: 25 cm (10") or more
7
3. Front: 75 cm (29.6") or more
4. Left: 15 cm (6") or more
Note
❒ For the required space when op-
tions are installed, contact your
service representative.
68
Page 75

Maintaining Your Machine
If the exposure glass, exposure glass
cover or ADF belt is dirty, copy clarity may be reduced. Clean these parts
if they are dirty.
❖ Cleaning the machine
Wipe the machine with a soft,
damp cloth. Then wipe it with a
dry cloth to remove the water.
Important
❒ Do not use chemical cleaner or or-
ganic solvents such as thinner or
benzene. If such substances get inside the machine or melt plastic
parts, a failure might occur.
❒ Do not clean parts other than those
explicitly specified in this manual.
Other parts should only be cleaned
by your service representative.
Cleaning the Exposure Glass Cover
Cleaning the ADF
Maintaining Your Machine
TRSR140E
Cleaning the Exposure Glass
ND1C0200
7
69
Page 76

Remarks
7
70
Page 77

8. Security
Security
Confidential information is always at risk of being copied without permission or
subject to unauthorized access through the network. To protect documents from
such intrusion, not only can passwords be set, but also the Extended Security
function can be used to strengthen security.
For those who require increased document protection, we recommend the Extended Security function.
Primary Security Functions
❖ Protecting Image Data Remaining in Memory
Protects image data remaining in memory. When a copy job is completed, or
a job is canceled, the data is secure.
❖ Authenticating Administrator
Protects essential functions for administrating document security using an access code. See p.42 “Key Operator Code”.
71
Page 78

Security
Operating Environment and Notes
Security for this machine is assured on the premises that the machine is used under the following conditions:
Operating Environment
• The condition of the machine is normal. (For example, it is not damaged,
modified, or lacking components.)
• The machine is managed by an administrator with thorough knowledge of
the machine and capable of providing the proper conditions under which users can use the machine safely.
For Administrator
• Security of this machine cannot be assured if any hardware component is detached or replaced with an inappropriate component. If these things have the
possibility of occurring, other security measures are necessary.
• Avoid using a single number or consecutive numbers for a key operator code
such as “00000000” or “12345678”. Since the numbers like this are easy to
guess, using them will not provide the appropriate level of security.
• User code is a function to help manage the use of the machine. It is not to protect confidential documents from others.
8
72
Page 79

9. Specifications
Main Unit
❖ Configuration:
Desktop
❖ Photosensitivity type:
OPC drum
❖ Original scanning:
One-dimensional solid scanning system through CCD
❖ Copy process:
Dry electrostatic transfer system
❖ Development:
Dry two-component magnetic brush development system
❖ Fusing:
Heating roll pressure system
❖ Resolution:
600 dpi
❖ Exposure glass:
Stationary original exposure type
❖ Original reference position:
Rear left corner
❖ Warm-up time:
From the main power switch
10 seconds or less (20 °C)
From the operation switch
10 seconds or less (20 °C)
❖ Originals:
Sheet/book/objects
❖ Maximum original size:
A3L, 11" × 17"L
73
Page 80

Specifications
❖ Copy paper size:
•Tray: A3L – A5K, 11" × 17"L – 51/2" × 81/2"K
1
•Bypass: A3L – A6L, 11" × 17"L – 5
/2" × 81/2"L
• Bypass (custom size):
Vertical: 90 – 305 mm, 3.5" – 12.0"
Horizontal: 148 – 1,260 mm, 5.8" – 49.6"
❖ Copy paper weight:
• Paper tray (Standard size): 60 – 90 g/m2, 16 – 24 lb
2
• Bypass tray: 52 – 162 g/m
, 14 – 43 lb
❖ Non-reproduction area:
• Leading edge: 2 ± 1.5 mm (0.08 ± 0.06 inch)
• Trailing edge: more than 0.5 mm (0.02 inch)
• Left edge: 2 ± 1.5 mm (0.08 ± 0.06 inch)
• Right edge: more than 0.5 mm (0.02 inch)
❖ First copy time:
6.5 seconds or less
(A4K, 8
1
/2" × 11"K 100%, feeding from Tray 1)
9
❖ Copying speed:
• 19 copies/minute (A4K, 81/2" × 11"K)
❖ Reproduction ratio:
Preset reproduction ratios:
— Metric version Inch version
Enlargement 200% 155%
141% 129%
122% 121%
Full Size 100% 100%
Reduction 93% 93%
82% 78%
71% 65%
50% 50%
Zoom: From 50% to 200% in 1% steps.
❖ Continuous copying count:
1 – 99 copies
❖ Copy paper capacity:
• Tray 1: 250 sheets (80 g/m2, 20 lb)
• Bypass: 100 sheets (80 g/m
74
2
, 20 lb)
Page 81

❖ Power consumption:
Warm up Less than 1,280 W
Stand-by About 110 W
During printing About 440 W
Maximum Less than 1,280 W
❖ Dimensions (W × D × H up to exposure glass):
550 × 568 × 420mm, 21.65" × 22.36" × 16.54"
Main Unit
❖ Noise Emission
*1
:
• Sound power level
Stand-by 32.1 dB (A)
During printing 60.2 dB (A)
• Sound pressure level
Stand-by 20.7 dB (A)
During printing 51.9 dB (A)
*1
The above measurements made in accordance with ISO 7779 are actual values.
*2
Measured at the position of the operator.
*2
❖ Weight:
35 kg (78 lb) or less
Note
❒ Specifications are subject to change without notice.
9
75
Page 82

Specifications
Options
Exposure Glass Cover
Lower this over originals.
Auto Document Feeder (ADF)
❖ Mode:
•ADF mode
❖ Original size:
•A3L – A5KL
• 11" × 17"L – 5
❖ Original weight:
• One-sided originals: 52 – 105 g/m2 (14 – 28 lb)
1
/2" × 81/2"KL
9
❖ Number of originals to be set:
• 30 sheets (80 g/m2, 20 lb)
❖ Maximum power consumption:
• less than 25 W (power is supplied from the main unit.)
❖ Dimensions (W × D × H):
• 550 × 470 × 90 mm, 21.7" × 18.6" × 3.6"
❖ Weight:
• 7 kg (15 lb) or less
Note
❒ Specifications are subject to change without notice.
76
Page 83

Combination Chart
Combination Chart
The combination chart below shows which functions can be used together.
When you read the chart, see the following table:
❍ These functions can be used together.
$
The following shows the combinations of functions.
These functions cannot be used together. The second function selected will be the
function you are working in.
APH005S
9
77
Page 84

Specifications
Supplementary Information
❖ Bypass Tray Copy
• The following paper sizes can be selected as standard sizes:
A3L, A4KL, A5KL, B4 JISL, B5 JISKL, B6 JISL, 11"×17"L,
1
8
/2"×14"L, 81/2"×11"KL, 51/2"×81/2"L, 71/4"×101/2"KL, 8"×13"L,
1
8
/2"×13"L, 81/4"×13"K, 8KL, 16KKL, 41/8"×91/2"L, 37/8"×71/2L", C5
EnvL, C6 EnvL, DL EnvL
• When the beeper is turned off, it will not sound if you insert paper into the
bypass tray.
❖ Preset Enlarge/Reduce
• You can select one of 7 preset ratios (3 enlargement ratios, 4 reduction ra-
tios).
• You can select a ratio regardless of the size of an original or copy paper.
With some ratios, parts of the image might not be copied or margins will
appear on copies.
• Copies can be reduced or enlarged as follows:
9
❖ Metric version
Ratio (%) Original → Copy paper size
200 (enlarge area by 4) A5→A3
141 (enlarge area by 2) A4→A3, A5→A4
122 F→A3, A4→B4 JIS
115 B4 JIS→A3
93 --
82 F→A4, B4 JIS→A4
1
1
/2)
/4)
71 (reduce area by
65 A3→F
50 (reduce area by
A3→A4, A4→A5
A3→A5, F→A5
78
Page 85

Supplementary Information
❖ Inch version
Ratio (%) Original → Copy paper size
200 (enlarge area by 4)
155 (enlarge area by 2)
129
121
93 --
85
78
73
65
1
50 (reduce area by
/4) 11" × 17"→51/2" × 81/2"
51/2" × 81/2"→11" × 17"
1
/2" × 81/2"→81/2" × 14"
5
1
/2" × 11"→11" × 17"
8
1
8
/2" × 14"→11" × 17"
1
/2" × 11"
F→8
1
/2" × 14"→81/2" × 11"
8
11" × 15"→8
11" × 17"→8
1
/2" × 11"
1
/2" × 11"
❖ Zoom
• The reproduction ratios you can specify are 50–200%.
• You can select a ratio regardless of the size of an original or copy paper.
With some ratios, parts of the image might not be copied or margins will
appear on copies.
79
9
Page 86

9
Specifications
Copy Paper
Recommended Paper Sizes and Types
The following limitations apply to each tray:
Metric version Inch version Paper weight Paper capaci-
Paper tray 1 A3L, B4JISL, A4KL, B5JISKL,
A5K, 11" × 17"L, 8
1
8
/2" × 13"L, 81/4" × 14"L, 81/4" ×
13"L, 8" × 13"L, 8
1
7
/4" × 101/2"KL, 51/2" × 81/2"K,
*3
8KL
, 16KKL
Note
❒ You can specify the paper size
with the user tools or the paper
size selector. See p.61 “Changing
the Paper Size”.
Bypass
tray
Standard
Sizes
A3L , B4JISL
A4KL, B5JISKL, A5KL,
B6JISL
11" × 17"L
13"(F4)L,8
*2
1
/4" × 14"L, 81/4" ×
13"L, 8" × 13"(F)L, 8
1
7
/4" × 101/2"KL, 51/2" × 81/2"L,
*3
8KL
, 16KKL
A3L, B4JISL
A4KL, B5JISKL, A5KL,
B6JISL
1
/2" × 14"L,
1
/2" × 11"KL,
*4
, 81/2" × 14"L, 81/2" ×
1
/2" × 11"KL,
*4
60 – 90 g/m
– 24 lb
52 – 162 g/m
14 – 43 lb
60 – 157 g/m
16 – 42 lb
2
, 16
2
2
ty
250 sheets
,
10 sheets
100 sheets
,
10 sheets
40 sheets
*1
*1
*1
*1
*1
80
Custom
*5
sizes
11" × 17"L, 81/2" × 14"L, 81/2" ×
13"L, 8
× 11"KL, 7
× 8
1
/4" × 13"L, 8" × 13"L, 81/2"
1
1
/2"L, 8KL
/4" × 101/2"KL, 51/2"
*3
, 16KKL
*4
Note
❒ You can specify the paper size.
Translucent paper (A3L , B4JISL),
OHP transparencies
Translucent paper (A4KL,
B5JISKL)
Adhesive labels (B4JISL, A4L) 1 sheet
Envelope (C5, C6, DL, Monarch,
Commercial #10)
10 sheets
40 sheets
10 sheets
Page 87

Copy Paper
R
*1
Paper weight: 80 g/m2, 20 lb
*2
When you set custom size paper in the bypass tray, You can specify the size.
*3
8K(Ba-Kai) = 267 × 390 mm, 10.6" × 15.4"
*4
16K(Shi-Lui-Kai) = 195 × 267 mm, 7.7" × 10.6"
*5
Set one sheet at a time for your needs.
Important
❒ If you use damp or curled paper, a misfeed might occur. In such a case, try
turning over the paper stack in the paper tray. If there is no improvement,
change to copy paper with less curl.
Note
❒ When using the bypass tray, we recommend you set the copy paper direction
to L.
Reference
To change the paper size, see p.61 “Changing the Paper Size”.
Unusable Paper
CAUTION:
• Do not use aluminum foil, carbon paper, or similar conductive paper to avoid
a fire or machine failure.
Important
❒ Do not use any of the following kinds of paper or a fault might occur:
• Art paper
• Aluminum foil
• Carbon paper
•Conductive paper
❒ Do not use copy paper that has been already copied on. Otherwise, a paper
misfeed might occur.
Note
❒ Do not use any of the following kinds of paper or a misfeed might occur.
• Bent, folded, or creased paper
• Torn paper
• Slippery paper
• Perforated paper
• Rough paper
• Thin paper that has low stiffness
• Paper with a dusty surface
❒ If you make copies on rough grain paper, the copy image might come out
blurred.
❒ Do not use paper already copied or printed on.
9
81
Page 88

Specifications
Paper Storage
Note
❒ When storing paper, the following precautions should always be followed:
• Do not store paper where it will be exposed to direct sunlight.
• Avoid storing paper in humid areas (humidity: 70% or less).
• Store on a flat surface.
❒ Keep open reams of papers in the package, and store as you would unopened
paper.
❒ Under conditions of high temperature and high humidity, or low tempera-
ture and low humidity conditions, store papers in a plastic bag.
9
82
Page 89

INDEX
A
Accessing user tools ( System Settings ),
38
Adding toner
ADF
, 13
Adjusting
image density
AOF (Always On)
Auto Document feeder (ADF)
Auto Off / Low Power
Auto off timer
Auto reset timer
copier
B
Basic procedure, 25
Bypass tray
C
Changing a user code, 47
Changing default settings
Changing the language
Changing the paper size
Changing the Paper Size of the Paper
, 61
Tray
Cleaning
ADF or ARDF
exposure glass
exposure glass cover
Clearing misfeeds
Clearing the counter
Combination chart
Common key operations
Control Panel
Control panel
Copier Features
letterhead setting
max. number of sets
original count display
original type setting
preset r/e priority
reproduction ratio
Copy Count Display
Copy functions
adjusting image density
preset reduce/enlarge
selecting copy paper
selecting original type setting
sort
, 56
, 30
, 43
, 76
, 18
, 41
, 41
, 12
, 38
, 63
, 61
, 69
, 69
, 69
, 59
, 49
, 77
, 16
, 11
, 14
, 45
, 44
, 44
, 44
, 45
, 45
, 40
, 30
, 30
, 31
, 30
, 30
, 32
, 31
zoom
Copying
Copying from bypass tray
Copy paper
Counter per User Code
, 25
onto custom size paper
onto envelops
onto regular size paper
onto special paper
, 29
, 28
, 80
, 43
, 26
, 28
, 27
D
Deleting a user code, 47
Display
Display Contrast
Displaying the counter for each user code
Displaying the total counter
Display/Print Counter
Do's and Don'ts
, 15
, 40
48
, 63
, 42
, 65
E
Energy Saver Timer, 41
Environment
Exposure glass
Exposure glass cover
External options
, 66
, 11
, 13, 76
, 13
F
For administrator, 72
Front cover
, 12
G
General Features, 40
Guide to components
, 11
H
Handling toner, 56
I
If your machine does not operate as you
, 51
want
Inserting toner
Internal tray
, 58
, 11
K
Key Counter Management, 42
Key Operator Code
, 42
,
83
Page 90

Key Operator Tools, 42
Key Repeat
, 40
49
Program/Change User Code
, 43
L
Loading paper, 54
M
Machine environment, 66
Main power indicator
Main power switch
Maintaining
Main unit
Measurement Unit
Missing image area
Moving
, 69
, 73
, 66
, 11
, 11, 17
, 40
, 20
N
Non-compatible originals for the ADF or
, 20
ARDF
O
Operating environment, 72
Operating environment and notes
Operation switch
Operation switch (On indicator)
Options
Orientation-Fixed Paper or Two-Sided
Original
Originals
Other functions
Paper
orientation
, 13, 76
, 55
, 19
, 17
, 21
, 63
, 72
, 11
Q
Quitting user tools, 39
R
Reading the display and using keys, 16
Recommended paper sizes and types
Registering a new user code
Remarks
Removing toner
Right cover
, 65
, 57
, 12
, 46
S
Safety information, 4
Saving energy
Security
Selecting
copy paper
original type setting
Settings you can change with user tools
40
Sizes
of recommended originals
Sort
, 32
Sort key
Specifications
Supplementary information
Supplementary informations
bypass tray copy
preset enlarge/reduce
zoom
, 18
, 71
, 30
, 30
, 19
, 15
, 73
, 78
, 78
, 78
, 79
, 80
,
84
P
Paper
loading
Paper Storage
Paper tray
Paper type
Bypass tray
Photo
Placing
custom size originals
originals
originals in ADF/ARDF
originals on exposure glass
regular size originals
Placing Originals
Power connection
Primary security functions
Printing the counter for each user code
, 54
, 82
, 12
, 41
, 30
, 22
, 21, 22, 23
, 22
, 21
, 23
, 19
, 67
, 71
,
T
Text, 30
Timer settings
Toner
adding
handling
inserting
removing
storage
used
Toner storage
Tray paper settings
Tray paper size
Troubleshooting
memory is full
you cannot make clear copies
you cannot make copies as you want
Turning Off
, 41
, 56
, 56
, 58
, 57
, 56
, 56
, 56
, 40
, 40
, 51
, 53
, 52
, 53
Page 91

main power, 18
power
, 18
Turning On
, 17
main power
power
, 17
, 17
U
Unusable paper, 81
Used toner
User code
User Code Man.: Copier
User Tools Menu ( Copier Settings )
User Tools Menu ( System Settings )
, 56
, 46
, 42
V
Ventilation holes, 11
W
Weights
of recommended originals
, 19
, 37
, 35
85
Page 92

86 EN GB D096-7502
Page 93

The meanings of the symbols for the switches on this machine are as follows:
a : POWER ON.
c : STANDBY.
Copyright © 2009
Page 94

Operating Instructions
EN GB D096-7502
 Loading...