

Page 1
MP01
Printer Reference
Operating Instructions
Read this manual carefully before you use this product and keep it handy for
future reference. For safety, please follow the instructions in this manual.
Page 2
INTRODUCTION
This manual contains detailed instructions on the operation and maintenance of this machine. To get maximum versatility
from this machine, all operators should carefully read and follow the instructions in this manual. Please keep this manual
in a handy place near the machine.
Please read the Safety Information in the Printer Reference before using this machine. It contains Important Information
related to USER SAFETY and PREVENTING EQUIPMENT PROBLEMS.
As an Energy Star Partner, we have determined that this printer model meets Energy Star Guidelines
for energy efficiency.
For good print quality, Ricoh recommends that you use genuine Ricoh toner.
Ricoh shall not be responsible for any damage or expense that may result from the use of parts other than genuine Ricoh
parts in your Ricoh office product.
Note: Some illustrations may be slightly different from your machine.
Note: Certain options may not be available in some countries. For details, please contact your local dealer.
Important
Parts of this manual are subject to change without prior notice.
In no event will the company be liable for direct, indirect, special, incidental, or consequential damages as a result of
handling or operating the machine.
Trademarks
Microsoft, Windows, and MS-DOS are registered trademarks of Microsoft Corporation in the United States and/or other
countries.PostScript
Other product names used herein are for identification purposes only and might be trademarks of their respective
companies. We disclaim any and all rights in those marks.
is registered trademark of Adobe System Incorporated.
Operator Safety:
This machine is considered a CDRH Class 1 laser device, safe for office/EDP use. The machine contains a 5-milliwat, 760
to 800 nanometer wavelength, GaAlAs laser diode. Direct (or indirect reflected) eye contact with the laser beam may
cause serious eye damage. Safety precautions and interlock mechanisms have been designed to prevent any possible
laser beam exposure to the operator.
The following label is attached on the machine.
This label can be found when opening the By-pass Tray.
Class 1 LASER PRODUCT
IN ACCORDANCE WITH IEC 825
LASER KLASSE 1 nach IEC 825
Laser Safety:
The Center for Devices and Radiological Health (CDRH) prohibits the repair of laser-based optional units in the field. The
optical housing unit can only be repaired in a factory or at a location with the requisite equipment. The laser subsystem
is replaceable in the field by a qualified Customer Engineer. The laser chassis is not repairable in the field. Customer
engineers are therefore directed to return all chassis and laser subsystems to the factory or service depot when
replacement of the optical subsystem is required.
Warning:
Use of controls or adjustment or performance of procedures other than those specified in this manual may result in
hazardous radiation exposure.
Page 3

SAFETY INFORMATION
SAFETY INFORMA TION
When using your machine, the following safety precautions should always be
followed.
R
WARNING : Ignoring this warning could cause serious injury or even
death.
R
CAUTION : Ignoring this caution could cause injury or damage to
property.
R
Symbols R means a situation that requires you take care.
q
Do NOT carry out the operation represented by the symbol q.
This example means “Do not take apart.”
r
Symbols r means you MUST perform this operation . This example
means “You must remove the wall plug.”
i
Page 4

SAFETY INFORMATION
R
WARNINGS:
••
•
Only connect the machine to the power source described in the
••
Important Information Section.
m
o
q
r
m
••
•
Avoid multi-wiring.
••
••
•
Do not damage , break or make any modifications to the power
••
cord. Do not place heavy objects on it, pull it hard or bend it
more than necessary. These actions could cause an electric
shock or fire.
••
•
Do not plug or unplug the power cord with your hands wet.
••
Otherwise, an electric shock might occur.
••
•
Make sure the wall outlet is near the machine and freely
••
accessible so that in event of an emergency it can be unplugged
easily .
••
•
Do not remove any covers or screws other than those specified
••
in this manual. Some parts of the machine are at a high voltage
and could give you an electric shock. When the machine needs
to be checked, adjusted, or repaired, contact your service
representative.
••
•
Do not take apart or attempt any modifications to this machine.
••
There is a risk of fire, electric shock, explosion or loss of sight.
••
•
If the machine looks damaged or breaks down, smoke is coming
••
out, there is a strange smell or anything looks unusual,
immediately turn off the power switch then unplug the power
cord from the wall. Do not continue using the machine in this
condition. Contact your service representative.
••
•
If metal, liquid or foreign matter falls into the machine, turn off
••
the power switch, and unplug the power cord.
Contact your service representative. Do not keep using the
machine with a fault or defect.
••
•
Do not put any metal objects or containers holding water
••
(e.g.vases, flowerpots, glasses) on the machine. If the contents
fall inside the machine, a fire or electric shock could occur.
ii
Page 5

s
s
SAFETY INFORMATION
••
•
Do not incinerate used toner or toner containers. Toner dust
••
might ignite when exposed to an open flame. Dispose of the
used toner containers according to local regulations for plastics.
••
•
Do not incinerate the photoconductor unit. Toner dust might
••
ignite when exposed to open flame. Dispose of the used
photoconductor unit according to local regulations for plastics.
iii
Page 6

SAFETY INFORMATION
R
CAUTIONS:
••
•
Keep the machine away from humidity and dust. A fire or an
••
electric shock might occur.
m
r
••
•
Do not place the machine on an unstable or tilted surface. If it
••
topples over, it could cause injury.
••
•
When you move the machine, unplug the power cord from the
••
wall outlet to avoid fire or electric shock.
••
•
When the machine dose not be used for a long time, unplug the
••
power cord.
••
•
When you pull out the plug from the sock et, grip the plug to
••
avoid damaging the cord and causing fire or electric shock.
t
••
•
If you use the machine in a confined space, make sure there is a
••
continuous air turnover .
o
••
•
Do not reuse stapled paper. Do not use aluminum f oil,
••
carboncontaining paper or other conductive paper . Otherwise, a
m
fire might occur.
n
R
iv
••
•
When removing misfed paper, do not touch the fusing section
••
because it could be very hot.
••
•
This machine has been tested for safety using this supplier’s
••
parts and consumables. We recommend you only use these
specified supplies.
Page 7

SAFETY INFORMATION
SAFETY INFORMA TION
When using your machine, the following safety precautions should always be
followed.
R
WARNING : Ignoring this warning could cause serious injury or even
death.
R
CAUTION : Ignoring this caution could cause injury or damage to
property.
R
Symbols R means a situation that requires you take care.
q
Do NOT carry out the operation represented by the symbol q.
This example means “Do not take apart.”
r
Symbols r means you MUST perform this operation . This example
means “You must remove the wall plug.”
i
Page 8

SAFETY INFORMATION
R
WARNINGS:
••
•
Only connect the machine to the power source described in the
••
Important Information Section.
m
o
q
r
m
••
•
Avoid multi-wiring.
••
••
•
Do not damage , break or make any modifications to the power
••
cord. Do not place heavy objects on it, pull it hard or bend it
more than necessary. These actions could cause an electric
shock or fire.
••
•
Do not plug or unplug the power cord with your hands wet.
••
Otherwise, an electric shock might occur.
••
•
Make sure the wall outlet is near the machine and freely
••
accessible so that in event of an emergency it can be unplugged
easily .
••
•
Do not remove any covers or screws other than those specified
••
in this manual. Some parts of the machine are at a high voltage
and could give you an electric shock. When the machine needs
to be checked, adjusted, or repaired, contact your service
representative.
••
•
Do not take apart or attempt any modifications to this machine.
••
There is a risk of fire, electric shock, explosion or loss of sight.
••
•
If the machine looks damaged or breaks down, smoke is coming
••
out, there is a strange smell or anything looks unusual,
immediately turn off the power switch then unplug the power
cord from the wall. Do not continue using the machine in this
condition. Contact your service representative.
••
•
If metal, liquid or foreign matter falls into the machine, turn off
••
the power switch, and unplug the power cord.
Contact your service representative. Do not keep using the
machine with a fault or defect.
••
•
Do not put any metal objects or containers holding water
••
(e.g.vases, flowerpots, glasses) on the machine. If the contents
fall inside the machine, a fire or electric shock could occur.
ii
Page 9

s
s
SAFETY INFORMATION
••
•
Do not incinerate used toner or toner containers. Toner dust
••
might ignite when exposed to an open flame. Dispose of the
used toner containers according to local regulations for plastics.
••
•
Do not incinerate the photoconductor unit. Toner dust might
••
ignite when exposed to open flame. Dispose of the used
photoconductor unit according to local regulations for plastics.
iii
Page 10

SAFETY INFORMATION
R
CAUTIONS:
••
•
Keep the machine away from humidity and dust. A fire or an
••
electric shock might occur.
m
r
••
•
Do not place the machine on an unstable or tilted surface. If it
••
topples over, it could cause injury.
••
•
When you move the machine, unplug the power cord from the
••
wall outlet to avoid fire or electric shock.
••
•
When the machine dose not be used for a long time, unplug the
••
power cord.
••
•
When you pull out the plug from the sock et, grip the plug to
••
avoid damaging the cord and causing fire or electric shock.
t
••
•
If you use the machine in a confined space, make sure there is a
••
continuous air turnover .
o
••
•
Do not reuse stapled paper. Do not use aluminum f oil,
••
carboncontaining paper or other conductive paper . Otherwise, a
m
fire might occur.
n
R
iv
••
•
When removing misfed paper, do not touch the fusing section
••
because it could be very hot.
••
•
This machine has been tested for safety using this supplier’s
••
parts and consumables. We recommend you only use these
specified supplies.
Page 11

TABLE OF CONTENTS
TABLE OF CONTENTS
INTRODUCTION
SAFTY INFORMATION...................................................................i
IMPORTANT INFORMATION........................................................v
OVERVIEW...................................................................................x
Manuals for this Machine.....................................................................................x
System Overview..................................................................................................x
Features............................................................................................................xiii
Options..............................................................................................................xiv
Using this Manual...............................................................................................xv
1. SETTING UP
REQUIREMENTS................................................................................................1-2
Environmental Requirements...........................................................................1-2
Electrical Requirements...................................................................................1-3
Parallel Cable Requirements...........................................................................1-4
CONNECTING TO THE HOST COMPUTER.....................................................1-5
Connecting the Parallel Cable.........................................................................1-5
INSTALLING DRIVERS.......................................................................................1-7
LOADING PAPER................................................................................................1-7
Using the By-pass Tray......................................................................................1-9
TESTING...........................................................................................................1-11
2. USING THE CONTROL PANEL
CONTROL PANEL FUNCTIONS........................................................................2-2
Using the Function Keys..................................................................................2-3
Using the Display Panel...................................................................................2-5
Using the LED Indicators..................................................................................2-5
MAIN MENUS......................................................................................................2-6
USING THE JOB CONTROL MENU...................................................................2-8
Paper Input Submenu......................................................................................2-8
vii
Page 12

TABLE OF CONTENTS
Paper Output Submenu ................................................................................. 2-12
System Submenu ........................................................................................... 2-13
PCL5 Submenu .............................................................................................. 2-18
Menu Reset .................................................................................................... 2-21
USING THE HOST INTERFACE MENU ........................................................... 2-21
Parallel Setup Submenu ................................................................................ 2-21
NIC Personality Submenu .............................................................................. 2-23
Menu Reset .................................................................................................... 2-24
USING THE LANGUAGE MENU....................................................................... 2-24
USING THE TEST/PRINT MENU ...................................................................... 2-25
3. MAINTAINING THE PRINTER
OVERVIEW .......................................................................................................... 3-2
TONER CARTRIDGE ......................................................................................... 3-2
Storing Toner Cartridges .................................................................................. 3-2
Replacing the Toner Cartridge ......................................................................... 3-3
Low Toner Condition ........................................................................................ 3-5
PHOTOCONDUCTOR UNIT (PCU) ................................................................... 3-6
Replacing the PCU........................................................................................... 3-6
TRANSFER ROLLER UNIT, FUSING UNIT, AND PAPER FEED ROLLERS .... 3-8
Replacing the Transfer Roller Unit ................................................................... 3-8
Replacing the Fusing Unit.............................................................................. 3-11
Replacing the Paper Feed Rollers ................................................................ 3-13
Replacing the LCT Paper Feed Rollers ........................................................ 3-16
CLEANING ........................................................................................................ 3-17
4. USING THE OPTIONS
OVERVIEW .......................................................................................................... 4-2
POSTSCRIPTOPTION ..................................................................................... 4-2
NETWORK CONNECTIONS .............................................................................. 4-2
MEMORY EXPANSION ....................................................................................... 4-4
Selecting DRAM SIMM Modules ...................................................................... 4-5
Installing DRAM SIMM Modules ....................................................................... 4-6
HARD DISK OPTIONS ........................................................................................ 4-8
Disk Based Collation ........................................................................................ 4-8
Soft Font Storage.............................................................................................. 4-9
viii
Page 13

TABLE OF CONTENTS
INPUT OPTIONS ............................................................................................... 4-10
Envelope Feeder............................................................................................ 4-10
Large Capacity Tray ....................................................................................... 4-14
Paper Bank ..................................................................................................... 4-16
OUTPUT OPTIONS .......................................................................................... 4-19
Finisher .......................................................................................................... 4-19
Replacing the Staple Cartridge ...................................................................... 4-22
Duplex Tray .................................................................................................... 4-23
Mailbox ........................................................................................................... 4-24
5. TROUBLESHOOTING
OVERVIEW .......................................................................................................... 5-2
PRINT OPERATIONAL PROBLEMS .................................................................. 5-2
Paper Misfeeds................................................................................................. 5-2
Clearing Misfeeds ............................................................................................ 5-3
Solving Problems ........................................................................................... 5-16
PRINT QUALITY PROBLEMS .......................................................................... 5-19
NETWORK TROUBLESHOOTING .................................................................. 5-22
CONTROL PANEL MESSAGES ....................................................................... 5-23
6. SPECIFICATIONS
PRINTER ............................................................................................................. 6-2
Electrical and Hardware Specifications ........................................................... 6-2
Printer Capabilities ........................................................................................... 6-5
Parallel Interface .............................................................................................. 6-9
Network Interface............................................................................................ 6-10
MEDIA ................................................................................................................ 6-10
Media Guidelines ........................................................................................... 6-10
Media Tips ...................................................................................................... 6-12
INDEX
ix
Page 14

OVERVIEW
OVERVIEW
Manuals for this Machine
We have three manuals that describe the operational procedures separately for
the operation and maintenance of the machine, the operation of Printer Driver/
Utility <PCL and TIFF> and the operation of Printer Driver/Utility <PostScript
option>.
This manual contains detailed instructions on the operation and maintenance of
the machine. To ensure safe and efficient operation of the machine, all users should
read and follow the instructions contained in this manual.
Printer Reference (this manual)
Describes the operational procedures and functions to use the
machine.
Printer Driver/Utility Reference <PCL and TIFF>
Describes the operational procedures and functions to use PCL
and TIFF driver.
Printer Driver/Utility Reference <PostScript
-option>
-
Describes the operational procedures and functions to use
PostScript
(option) driver.
System Overview
This machine provides letter or A4 paper size output at 25 pages per minute (ppm).
Standard output resolution is 600 dots per inch (dpi), with 300dpi emulation available.
An Adobe
The printer can handle various paper sizes from A6 up to A3 or 11" x 17" format. It
can also print on custom paper sizes and envelopes.
Available output features include a four-bin Mailbox; a Finisher that provides faceup and face-down printing, job separation, and stapling; duplex printing; and diskbased collation. The input options include a Large Capacity Tray, Envelope Feeder
and a two tray Paper Bank.
x
PostScript option is available that also supports 400dpi resolution.
Page 15
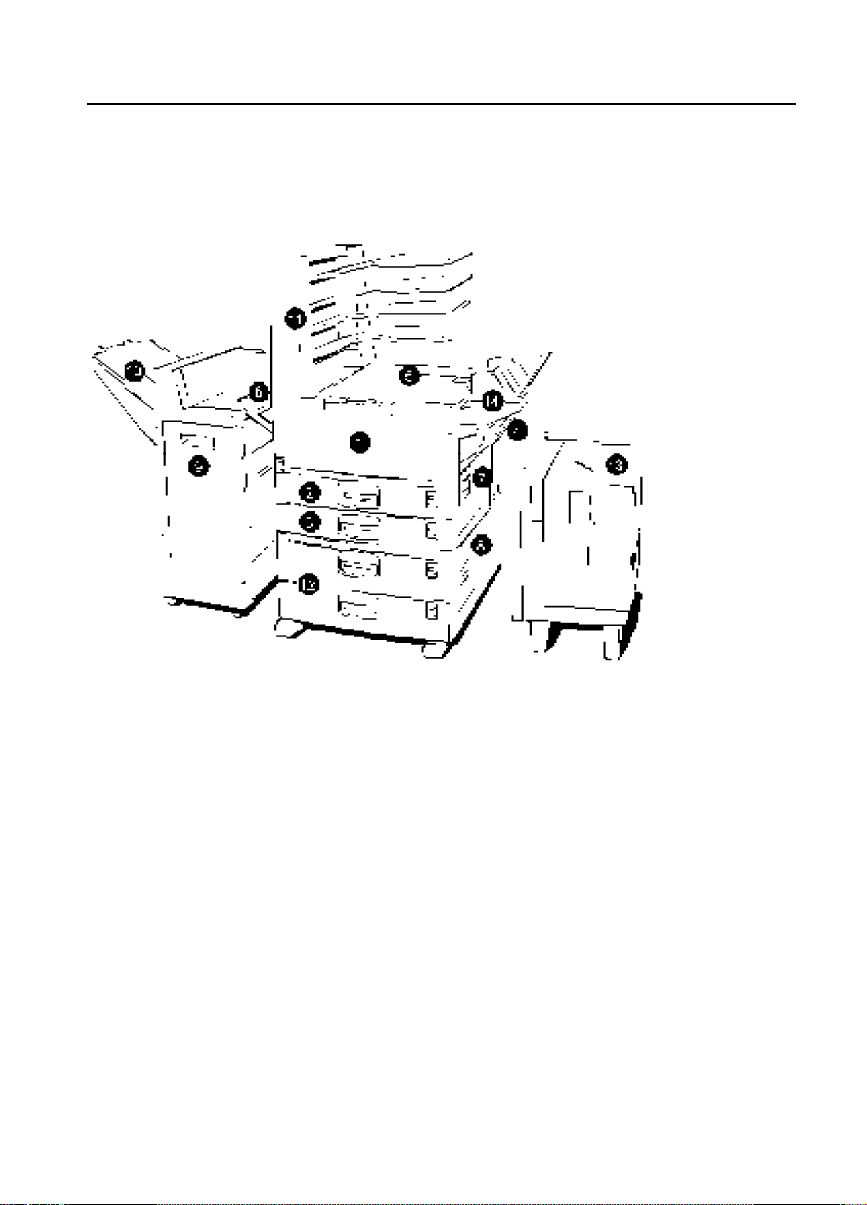
Figure 1-1 shows the printer with available optional accessories.
Figure 1-1.Machine with accessories
OVERVIEW
1.Printer (Front Cover)
2.Tray 1
3.Tray 2
4.By-pass Tray
5.Standard Output Tray
6. External Tray
7. Right Cover
8. Right Lower
Cover
9. Finisher
10. Shift Tray
11. Mailbox
12. Paper Bank
13. Large Capacity
Tray
14. Envelope
Feeder
xi
Page 16

OVERVIEW
The following optional equipment are available with the printer:
❐
Large Capacity Tray (LCT)
❐
Duplex Tray (replaces Tray 1)
❐
Finisher (replaces the External Tray)
❐
Envelope Feeder (replaces the By-pass Tray)
❐
Mailbox (the Standard Tray becomes Tray 1)
The printer is provided with PCL5e printer drivers for Windows 3.1 and Windows 95.
TIFF printer drivers for Windows 3.1 and Windows 95 are also included. PostScript
printer drivers for Windows 3.1, Windows 95, and Macintosh are available with the
PostScript
option.
The base dynamic random access memory (DRAM) of 8 megabytes (MB) provided
with the printer allows simplex printing up to A3 or Ledger paper size. The printer
supports the standard 46 PCL5e fonts, (35 scaleable fonts equivalent to the PCL5e
font set), 10 TrueType fonts, and 1 bitmapped font. The printer also supports 35
Postscript
A hard disk option is available, which provides support for PostScript
Type 1 fonts when the printer is equipped with the PostScript option.
soft font and
forms image storage and temporary storage of print data as required for printing
collated sets of multiple page documents, referred to as disk-based collation.
The printer is connected to a host computer or network through either a standard bidirectional parallel interface or an optional Ethernet or Token Ring Network Interface
Card (NIC).
The optional NIC provides connectivity to any network-connected work-station through
an Ethernet or Token Ring network.
xii
Page 17

Features
The following are some of the standard features of this machine:
❐
11" x 17" or A3 maximum paper size, using the paper trays.
❐
297 x 432 mm (11.69" x 17.00") maximum image size, using the By-pass Tray.
❐
High quality laser print output at 600 dpi. 400 dpi resolution is available when
the PostScript
by doubling the pixel size at 600 dpi.
❐
Support for PCL5e and TIFF printer languages.
❐
A bi-directional parallel port for connection to systems running Windows 3.1, or
Windows 95.
❐
46 PCL5e fonts that include 35 scaleable fonts equivalent to the PCL5e Intellifont
font set, 10 TrueType fonts and 1 bitmapped font.
❐
Output speed of up to 25 pages/minute (ppm), for Letter or A4 paper fed on the
long edge.
option is installed. The printer can emulate 300 dpi resolution
OVERVIEW
❐
Two 250-sheet input trays and a 100-sheet By-pass Tray.
❐
A 400-sheet Standard Output Tray and a 100-sheet External Tray.
❐
Halftoning, which uses a dithering process to improve the appearance of gray
tones.
❐
Edge Smoothing, which produces output emulating 1200 dpi.
❐
Toner Saving mode.
❐
Energy Saver mode.
xiii
Page 18

OVERVIEW
Options
The following are options that you can add to enhance the basic capabilities of the
printer:
❐
PostScript® option - The PostScript® option provides Adobe PostScript® Level
II, including 35 PostScript
includes a rasterizer for TrueType fonts that allows you to download TrueType
fonts as soft fonts. The PostScript
Dual Inline Memory Module (DIMM) that you install in the PostScript
DIMM socket on the printer controller.
❐
Hard Disk option - To provide for additional permanent PostScript® soft font
storage and disk-based collation, you can add the hard disk to the printer. The
disk is partitioned with the half of the capacity for PostScript
storage and the remaining capacity for temporary internal storage for diskbased collation when the PostScript
option, all of storage capacity is used for disk-based collation.
❐
Input Tray options - The optional input trays include a 100-capacity Envelope
Feeder, a 1,500-sheet Large Capacity Tray, and a Paper Bank consisting of
two 500-sheet input trays.
®
Type 1 scaleable fonts. The PostScript® option
®
option is provided on a PostScript® ROM
®
fonts and forms
®
option is installed. Without the PostScript
®
ROM
®
❐
Output options - The output options include a Finisher, which performs job
separation and stapling, a Duplex Tray, and a four-bin Mailbox.
❐
Network Interface Card (NIC) - NIC unit is available for Ethernet or Token Ring
network. Protocols that can run concurrently include IPX/SPX (Novell NetWare),
TCP/IP and AppleTalk for Macintosh.
☛ Refer to the “NIC Personality Submenu” in this manual for more information.
❐
Memory expansion (supplied by you) - The printer is configured with eight
megabytes (MB) DRAM. You can add DRAM Single Inline Memory Modules
(SIMM) in the two available DRAM SIMM sockets. The DRAM SIMM sockets
accept modules of 4 MB, 8MB, 16 MB, or 32 MB. You can add up to 64 MB of
additional DRAM for a maximum system total of 68 MB of DRAM. Additional
memory allows the printer to process print data at a faster rate and to store
additional rasterized fonts or downloaded font data.
xiv
Page 19

OVERVIEW
Using this Manual
This manual explains how to set up and use this machine. This section contains a
list of the contents of this manual, conventions used, and various publications that
can be of further use to you.
Contents
This manual contains the following chapters:
❐
Chapter 1: SETTING UP - basic information on setup and connection to a
host computer or network
❐
Chapter 2: USING THE CONTROL PANEL - how to use the buttons and menus
on the Control Panel
❐
Chapter 3: MAINTAINING THE PRINTER - basic maintenance procedures
❐
Chapter 4: USING THE OPTIONS - overview of how to use the optional
hardware and software accessories
❐
Chapter 5: TROUBLESHOOTING - information on how to handle output quality
problems, paper misfeeds, network problems, and software problems
❐
Chapter 6: SPECIFICATIONS - hardware specifications, interface
specifications
An index is provided at the end of this manual.
xv
Page 20

OVERVIEW
Conventions
The following conventions are used throughout this manual:
Square brackets - The names of the function keys on the printer Control Panel are
shown in square brackets. For example, the [Esc.] key.
Angle brackets - The variable information that displays in a message or protocol
statement is shown in angle brackets. For example, “Add Paper <tray number>”.
Italics - The names of documents are shown in italics. For example, Network Printer
Server User Guide.
☛ This symbol indicates that the following text refers to other sections and
chapters containing further information about a topic.
Note: In general, “Note” provides additional information important to help you
complete a task or further understand the text.
R CAUTION: In general, “Caution” provides information in preventing damage
to your equipment, or in avoiding a situation that can cause
minor injury to you.
R WARNING: In general, “Warning” provides information important in alerting
you to a situation that can cause serious injury to you and major
damage to your equipment and property when instructions are
not followed correctly.
n This symbol displays to notify you that the component can be very hot and
should not be touched.
xvi
Page 21

OVERVIEW
Related Documents
Printer Driver/Utility Reference <PCL and TIFF > Operating Instructions
®
Printer Driver/Utility Reference <PostScript
Network Printer Server User Guide (supplied with the optional NIC unit)
®
PostScript
Language Reference Manual, Second Edition, Adobe Systems Inc.
Published by Addison Wesley Publishing Co. (ISBN 0-201-18127-4)
®
PostScript
Language Reference Manual Supplement for Version 2015, Adobe
System, Inc.
PCL5 Comparison Guide, Edition 1 (10/96), HP Part No. 5021-0329, Hewlett Packard
Company
PCL5 Printer Language Technical Reference Manual, HP Part No. 33459-90903,
Hewlett Packard Company
Printer Job Language Technical Reference Manual Edition 9 (10/96), HP Part No.
5021-0328, Hewlett Packard Company
- option> Operating Instructions
HP LaserJet 4si User’s Reference Manual, First Edition, 1993, HP Part No C2010-
90901. Hewlett Packard Company
xvii
Page 22

1. SETTING UP
SETTING UP
1-1
Page 23

SETTING UP
REQUIREMENTS
Before using this machine you must make sure that you have met all of the
environmental and electrical requirements. You must also connect the machine
to your host computer using the parallel port, optional network interface card
(NIC), or both. Make sure that you have all of the cables, connectors, and
electrical outlets necessary to attach the machine to your host computer or
network.
☛ Refer to the “Connecting to the Host Computer” in this chapter for further
information on using the parallel port.
☛ Refer to the “Using the Options” chapter in this man ual f or information on
using the NIC to connect to a network.
Environmental Requirements
The location of the machine is important, because environmental conditions
can greatly affect its performance. Keep the following in mind when setting up
the machine:
❐
Make sure you set up the machine in an easily accessible area where the
temperature ranges between 10 - 32°C (50 - 90°F), and where relative
humidity is 20 - 80 %. The location should be no higher than 2000 m (6600
feet) above sea level.
❐
Make sure to locate the machine in a well-ventilated room with good air
circulation.
❐
Make sure that the machine is on a sturdy, level surface with a minimum
free area of 750 mm (29.6") above the machine , 20 mm (1") on each side
when the trays and covers are open. There should also be 130 mm (5")
clearance in rear and a comfortable working area in front of the machine.
The area where you install the machine should be subject to little or no
vibration.
1-2
Page 24

SETTING UP
❐
Locate the machine in an area subjected to little dust, and keep the machine
out of direct sunlight.
❐
Keep users from placing an y items on top of the machine.
R
CAUTION: Do not locate the machine directly below an air conditioning
or heating vent. Sudden temperature changes can cause
condensation in the machine.
Electrical Requirements
Keep the f ollowing in mind when connecting your machine to an electrical outlet:
❐
The machine requires a power source of 120V, 60 Hz, more than 9A.
In Europe, power requirements are 220V to 240V, 50 Hz, more than 4.5A.
❐
Make sure that your wall outlet is close to the machine and is easily
accessible. Also make sure outlet accepts a three-prong plug. When a threeprong plug is not available, replace the outlet with the one that has a threeprong plug.
❐
Make sure that the voltage does not fluctuate more than 10 per cent at any
time and avoid multiwiring.
SETTING UP
❐
Make sure the power cord plug of the machine is firmly inserted in the
outlet.
❐
Do not place anything on top of the power cord.
1-3
Page 25
SETTING UP
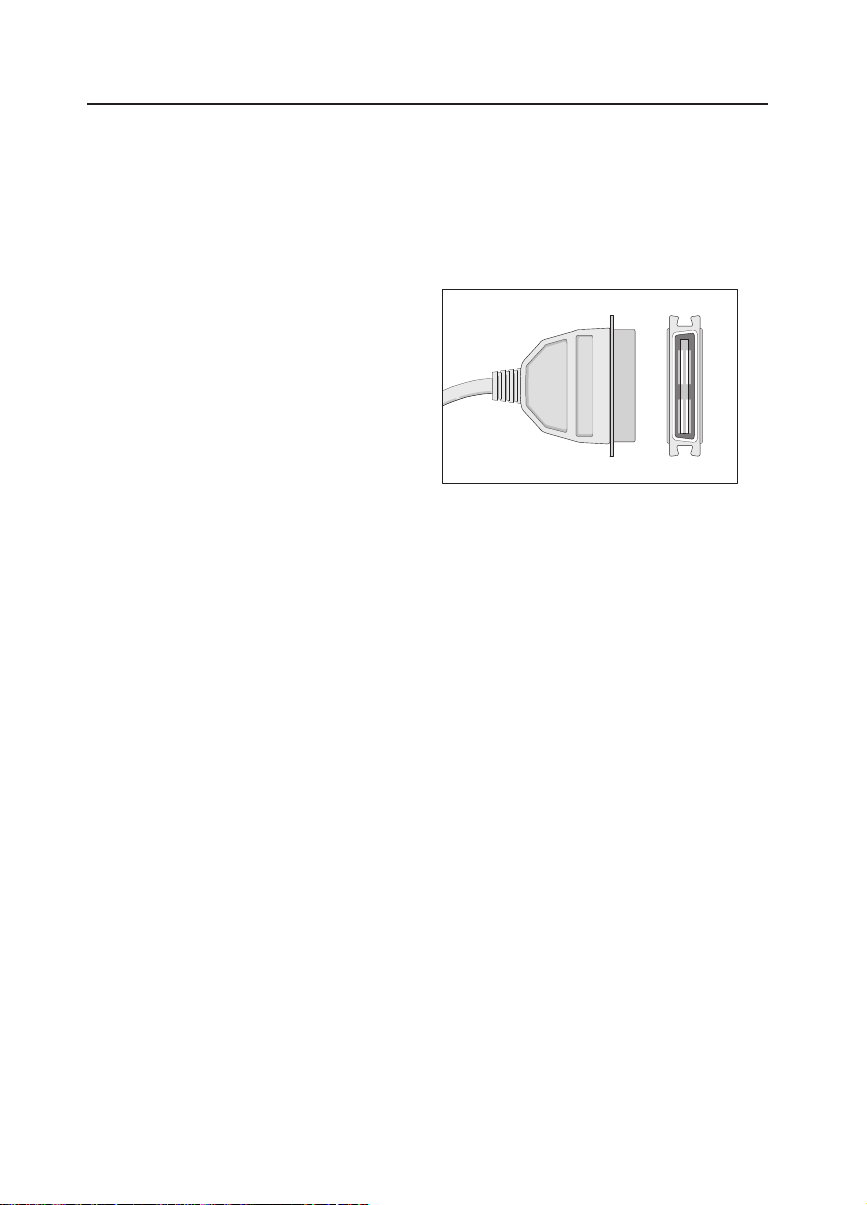
Parallel Cable Requirements
You connect the machine to your host computer using a parallel port. It is your
responsibility to provide the cable necessary for the interface you want to use to
connect to your host computer. This cable is not provided with the machine.
The machine’s parallel connection is a
standard bi-directional parallel interface.
It requires a standard 36-pin parallel
cable compliant with IEEE 1284 and a
parallel port available on the host
computer.
Note: Do not use a parallel cable
longer than 3 meters (10 feet).
1-4
Page 26
SETTING UP
CONNECTING TO THE HOST COMPUTER
Connect the machine to your host computer using a parallel cable compliant
with IEEE 1284 (supplied by you ).
Connecting the Parallel Cable
Follow these steps to connect the machine to y our host computer:
Make sure you have the correct
1
cable.
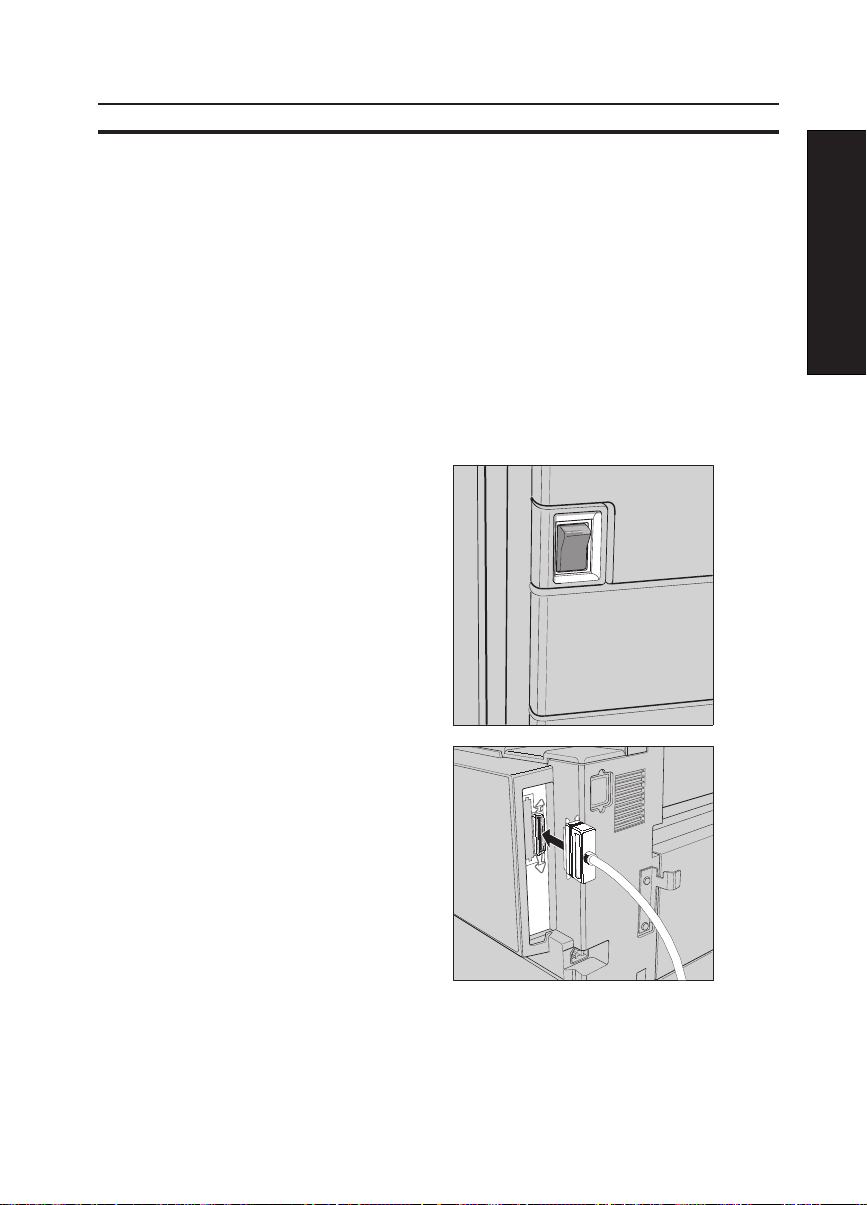
Make sure both the machine and
2
your host computer are turned off.
Plug the 36-pin end of the parallel
3
cable into the parallel port on the
left side of the controller cover on
the back of the machine.
SETTING UP
1-5
Page 27

SETTING UP
Squeeze the wire clips on each
4
side of the connector together until
they snap into place. The clips hold
the cable securely in place.
Plug the end of the parallel cable into the computer’ s parallel port.
5
1-6
Page 28

SETTING UP
INSTALLING DRIVERS
When you hav e connected the machine to your host computer , you must install
the appropriate printer drivers to enable y our applications to communicate with
the machine.
The machine is provided with diskettes that contain PCL and TIFF printer driver
software for Windows 3.1, Windows 95.
☛ Refer to the “Printer Driver/Utility Reference <PCL and TIFF>” for detailed
information on setting up and using the standard PCL and TIFF printer drivers.
Optional PostScript® printer drivers are also availab le for Windo ws 3.1, Windows
95, and Macintosh.
☛ Refer to the “Printer Driver/Utility Reference <PostScript®-opion>” for more
information on setting up and using the optional P ostScript® printer drivers.
LOADING PAPER
Follow these steps to load paper into standard input trays 1 and 2.
☛ Refer to the “Using the Options” chapter in this manual for instructions on
how to load paper in the optional large capacity tray (LCT), Paper Bank, and
Envelope F eeder.
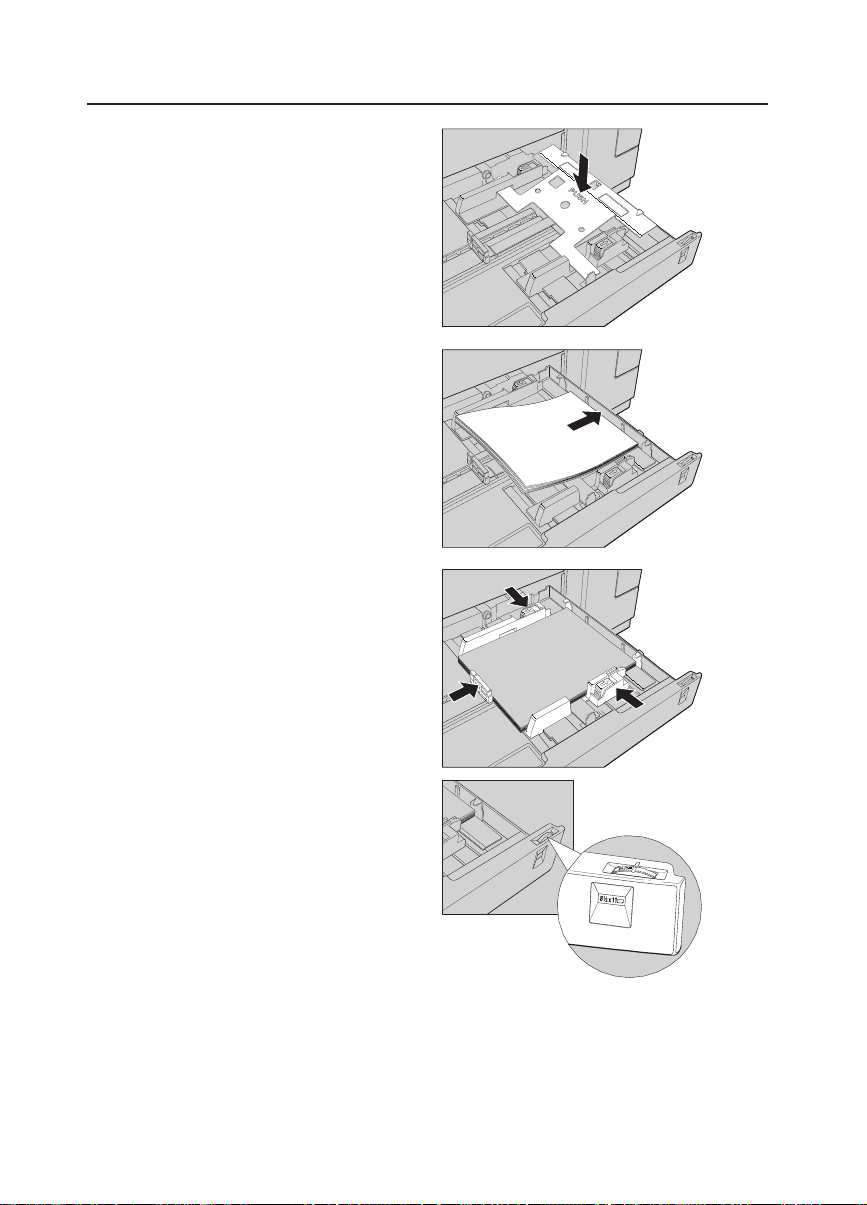
Pull out the paper tray using the recessed handle.
1
Move the green paper guides to the
2
edges of the paper tray.
SETTING UP
1-7
Page 29
SETTING UP
Press down on the gray metal
3
pressure plate until it locks into
position at the bottom of the tray.
Fan a stack of paper no larger than
4
250 sheets, and place it in the tray .
Make sure to place the paper in
the tray with the printing side face
down. The paper package indicates
the printing side.
Position the paper guides against
5
the stack of paper .
Set the paper size selection dial
6
on the right edge of the tray to
match the size and orientation of
the paper you placed in the tray.
The following sizes are shown on
the dial.
❐
A3 L
❐
F L
❐
Letter 11" x 81/2" K
❐
Letter 81/2" x 11" L
1-8
❐
A4 L
❐
A4 K
❐
A5 K
Page 30
SETTING UP
If you want to load a paper size not shown in the list of step 6, set the dial to
7
“p”. When the paper size dial is set to “p”, you must enter the special paper
size information using the printer Control Panel.
☛ Refer to the “Using Control Panel” chapter in this manual for instructions
on how to enter paper sizes using the Paper Input submenu of the Job
Control menu.
Close the paper tray. The pressure plate rises into position, moving the stack
8
of paper to the top of the tray.
Note: If the paper size you selected using the paper size selection dial or
the Control Panel does not match the size of paper in the tra y , and the
printer attempts to print from this tray, the “Paper Size Error Tray
<tray number>” message displays on the Control P anel. To correct the
error, y ou must place the correct paper siz e in the tray and press the
[ ] key to continue printing.
Using the By-pass Tray
Follow these steps to print a job using the By-pass Tray:
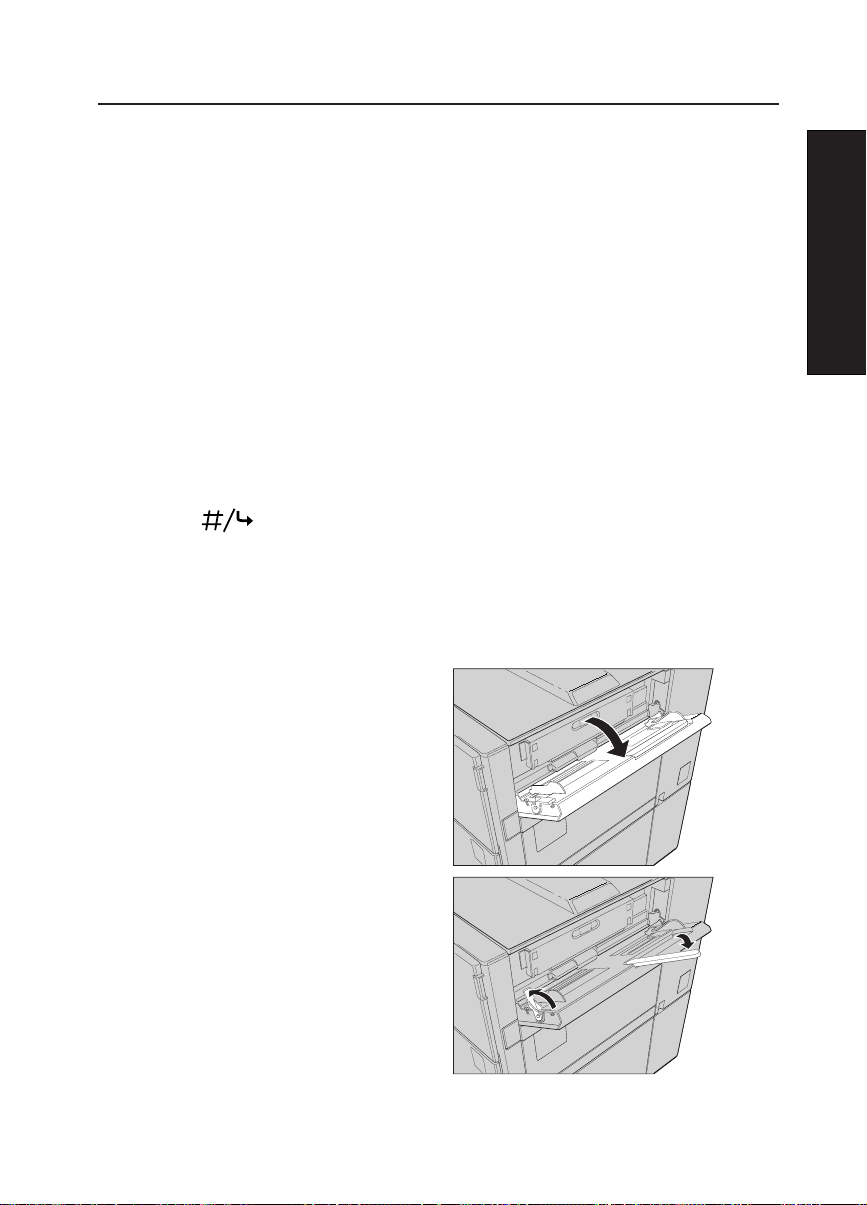
Open the By-pass Tray door on the
1
right side of the machine.
SETTING UP
Raise the green lever on the left
2
side of the By-pass Tray, and extend
the paper support.
1-9
Page 31

SETTING UP
Fan a stack of paper no thicker than 10 mm (0.4"), and place it in the tray.
3
Make sure to place the paper in the tray with the printing side face up. The
paper package indicates the printing side. You can also place a stack of up
to ten envelopes in the By-pass Tray.
When you use heavy paper, trans-
4
parencies, labels, or envelopes,
you must open the External Tray
or specify the output destination as
“Shift Tray Face-up“ using your
application, your printer driver, or
the printer Control Panel.
Note: The Sift Tray is av ailable only
when the optional Finisher
is installed.
Position the paper guides against
5
the stack of paper.
☛When printing envelopes, refer
to the “Using the Envelope
Feeder ” in this manual.
Lower the green lever on the left side of the By-pass Tray to position the
6
paper stack.
Using the Control Panel, enter the size of the paper you placed in the By-pass
7
Tray. ☛ Refer to the “Using the Control Panel” chapter in this manual for
information on how to enter paper sizes.
Print your job. Output is delivered to the output tray you selected using your
8
application or the printer driver.
Note: When you close the By-pass Tray, position the paper guides outside.
1-10
Page 32

SETTING UP
TESTING
After you load paper, you can test the machine using the Test menu available
from the Control Panel.
Follow these steps to access the Test menu:
Make sure the [ ] and [ ] indicator lights are lit.
1
Press the [ ] key so the [ ] indicator turns off. This indicates you are in
2
the Menu mode.
Press the
3
Press the [5] key until “System Config” appears on the displa y, then press
4
the [ ] key to print the Configuration Page, listing information about
the machine system and configuration.
After printing the page, the printer will return to the On Line mode and display
5
“Ready”.
Check the Configuration P age for your settings .
[5]
key until “Test/Print” appears on the display , then press the
]
key
6
☛ Refer to the “Using the Control P anel” chapter in this man ual for further
information on configuring the machine and testing the printing capabilities.
SETTING UP
[
1-11
Page 33

2. USING THE CONTROL P ANEL
USING THE
CONTROL P ANEL
2-1
Page 34

USING THE CONTROL PANEL
CONTROL PANEL FUNCTIONS
This chapter describes how you use the main keys and the Control P anel menus
to configure and use this machine.
Note: In general, you can provide most of the printer control settings using the
application (the word processor, spreadsheet software , and so forth) from
which you are printing. Almost all software application settings override
the Control Panel settings you specify.
Figure 2-1. Control Panel
1. The Control P anel indicates the current status of the printer, and provides a
means of entering control information into the printer. It consists of a twoline, 16-column alphanumeric display , fiv e function keys, and four light emitting
diode (LED) indicators.
2. You can use the Control Panel to specify information such as the default
input paper source you want to use, and how you want the printed output to
look. You can also use it to print test sheets and error logs.
2-2
Page 35

USING THE CONTROL PANEL
Using the Function Keys
You use the function keys to enter Menu mode and to navigate among the
different menus and submenus.
When you press the [ ] key while the printer is in On Line mode,
the printer enters Menu mode and the On Line LED indicator turns
off.
When you press the [ ] key while the printer is in Menu mode,
the printer returns to On Line mode and the On Line LED turns on.
When you press the [ ] key while the printer is processing or
printing a job, a message displays “Press Escape to cancel this
job”. Pressing the [ ] key again causes the printer to enter Menu
mode and printing stops. You can restart the job by pressing the
[ ] key. Pressing the [Esc.] key causes the printer to abort the
job.
When you press the [5] key while the printer is in Menu mode, the
display moves to the next selection at the same menu level.
USING THE
CONTROL P ANEL
When you hold down the [5] key, you can cycle through the
selections more quickly.
When you press the [6] key while the printer is in Menu mode, the
display moves to the previous selection at the same menu level.
When you hold down the [6] key, you can cycle through the
selections more quickly.
2-3
Page 36

USING THE CONTROL PANEL
When you press the [ ] key while the printer is in Menu
mode, the display accesses the next (lower) menu level.
When you are in the selection level or bottom level in a menu, you
press the [ ] key to activate the selection displayed on the
Display. When the selection is made, a small arro w appears to the
left of the selected item in the display.
You also use the [ ] key when a Paper Size Error occurs.
After loading the correct paper size, press the [ ] key to
continue printing.
Esc.
When you press the [Esc.] key while the printer is in Menu mode,
the display accesses the previous (higher) menu level.
When the printer does not have a requested paper size, it displays
“Load <paper-size>”. You can press the [Esc.] key to ignore the
paper size request. The printer continues printing from the default
tray, ignoring the specified paper tray.
To abort the current pr int job, press the [ ] key, and then the
[Esc.] key . The printer stops printing and cancels the remainder of
the current job.
2-4
Page 37

USING THE CONTROL PANEL
Using the Display
The Display shows messages about the current status of print jobs as well as
general configuration and condition messages. It also displays menus that you
use to make printer configuration and print job selections.
Figure 2-2. Display
When you first turn on the printer, it is in On Line mode. The Displa y first shows
the “Selt Test” message, the “Initializing” message , and then the “Warming Up”
message. When the printer is ready to operate, the “Ready” message displa ys.
☛ Refer to the “Troubleshooting” chapter in this manual f or more information on
Control Panel messages.
Using the LED Indicators
The four LED indicators on the Control P anel provide information on printer status,
as follows:
❐
Lit - indicates the printer power is on.
❐
Off - indicates the printer power is off.
USING THE
CONTROL P ANEL
2-5
Page 38

USING THE CONTROL PANEL
❐
Lit - indicates the printer is unable to print because of an
operator or printer error.
❐
Off - indicates the printer has no error conditions.
❐
Lit - indicates the printer has data remaining in the buffer,
waiting to print.
❐
Blinking - indicates the printer is busy processing a job or
printing.
❐
Off - indicates the printer is not processing data, and is idle.
Note: When printing a PCL5e job and no “End of File” character
is received, the printer will stop with this light on.
❐
Lit - indicates the printer is in On Line mode.
❐
Off - indicates the printer is in Menu mode.
MAIN MENUS
The four main menus that you can access using the Control P anel are as follo ws:
❐
Job Control menu
❐
Host Interface menu
❐
Language menu
❐
Test/Print men u
2-6
Page 39

USING THE CONTROL PANEL
Figure 2-3 shows the structure of the Control Panel men us and submenus.
Figure 2-3. Control Panel menu structure
USING THE
CONTROL P ANEL
2-7
Page 40

USING THE CONTROL PANEL
USING THE JOB CONTROL MENU
To access the Job Control menu, press the [ ] key to enter Menu mode. Press
the [5] key or the [6] key until “Job Control Menu” displays. The Job Control
menu contains the following submenus:
❐
Paper Input
❐
Paper Output
❐
System
❐
PCL5 Menu
❐
Menu Reset
Paper Input Submenu
From the Job Control menu, press the [ ] key and press the [5] key or the
[6] key until “Paper Input” displays on the Control Panel. You use this submenu
to specify the input paper source.
The Paper Input submenu contains the following selections:
❐
Tray Priority
❐
By-pass Size
❐
Envelope Size
❐
Tray Size(*)
Tray Priority Selection
You use this selection to specify the default input tray you want the printer to
use. The options are as follows:
❐
Tray 1
❐
Tray 2
❐
Tray 3
❐
Tray 4
The Tray 3 and Tray 4 options display when the optional Paper Bank is installed.
The LCT option displays when the optional Large Capacity Tray (LCT) is installed.
The Envelope Feeder option displays when the optional Envelope Feeder is
installed. The By-pass Tray option does not display when the Envelope Feeder is
installed. The Tray 1 option does not display when the optional Duplex Tray is
installed.
2-8
❐
LCT
❐
Envelope Feeder
❐
By-pass Tray
Page 41

USING THE CONTROL PANEL
The default value is Tray 1. However, when the Duplex Tray is installed, the
default value is Tray 2.
By-pass Size Selection
You use this selection to specify the fixed size of the paper or envelopes you
want to print in the By-pass Tray. This selection no longer displays when the
optional Envelope Feeder is installed and the Envelope selections display (see
below). The options are as follows:
❐
Letter 11" x 81/2" K
❐
Letter 81/2" x 11" L
❐
Legal 81/2" x 14" L
❐
11" x 17" L
❐
51/2" x 81/2" L (Halfletter)
❐
Exec. 71/4" x 101/2" L
❐
Exec. 101/2" x 71/4" K
❐
A3 L
❐
A4 L
❐
A4 K
❐
A5 L
❐
A5 K
The default value is A4 K.
❐
B4 JIS L
❐
B5 JIS L
❐
B5 JIS K
❐
A6 L
❐
8" x 13" L
❐
81/4" x 13" L
❐
81/2" x 13" L
❐
41/8" x 91/2" L
(COM 10 Env)
❐
37/8" x 71/2" L
(Monarch Env)
❐
C5 Env L
❐
C6 Env L
❐
DL Env L
❐
Width/Length
USING THE
CONTROL P ANEL
2-9
Page 42

USING THE CONTROL PANEL
Width/Length
You use this option to specify the dimensions of a custom paper size you want
to use in the By-pass Tray. The paper size settings are as follows:
❐
Width - specifies the length of the edge of the paper perpendicular to the
feeding direction, in millimeters.
❐
Length - specifies the length of the edge of the paper parallel to the feeding
direction, in millimeters.
Use the [5] key or the [6] key to select the dimension value. Holding either
key down increases or decreases the value in increments of ten. After you
select the value you want, press the [ ] key to save your selection.
Note: For detailed inf ormation on printing custom size paper, refer to the Printer
Driver/Utility Reference <PCL and TIFF> and the Pr inter Driver/Utility
Reference <P ostScript-option>.
Envelope Size Selection
You use this option to specify the size of the envelopes loaded in the Envelope
Feeder. This menu option displays only when the optional Envelope Feeder is
installed. The options are as follows:
❐
41/8" x 91/2" L
❐
(COM 10 Env) ❐ C6 Env L
❐
37/8" x 71/2" L
❐
(Monarch Env)
The default value is 41/8" x 91/2" L (COM 10 Env).
2-10
C5 Env L
DL Env L
Page 43

USING THE CONTROL PANEL
Tray Size (*) Selection
Y ou use this selection to specify special standard paper siz es for standard input
trays, T ra y 1 and T ray 2, and for the optional trays, Tray 3 and T ra y 4, located in
the Paper Bank.
Each of the paper trays has a paper size selection dial to specify the paper size
in the tray. You can specify the sizes not indicated on the selection dial by
setting the dial to the “*” position and entering the paper size using this selection.
This allows the printer to conveniently accommodate a wide range of paper
sizes.
To access the selection for each tray, press the [ ] key and press the [5]
key or the [6] key until the tray for which you want to specify a special paper
size displays. Then press the [ ] key to display the options. The options
are as follows:
❐
Letter 11" x 81/2" K
❐
Letter 81/2" x 11" L
❐
Legal 81/2" x 14" L
❐
11" x 17" L
❐
Exec. 71/4" x 101/2" L
❐
Exec. 101/2" x 71/4" K
❐
8" x 13" L
❐
A3 L
❐
A4 L
❐
A4 K
❐
A5 K
❐
B4 JIS L
❐
B5 JIS L
❐
B5 JIS K
❐
81/4" x 13" L
❐
A3 L
USING THE
CONTROL P ANEL
The default value is A4 K .
Note: If the paper size selection dial is set to “*”, and the paper size you selected
using the paper size selection dial or the Control P anel does not match
the size of paper in the tray, when the printer attempts to print from this
tray, the “Paper Size Error Tray <tray number>” message displays. To
correct the error, you must place the correct paper size in the tray, and
press the [ ] key to continue printing.
2-11
Page 44

USING THE CONTROL PANEL
Paper Output Submenu
From the Job Control menu, press the [ ] key and press the [6] ke y until
“Paper Output” displays on the Control Panel. You use this submenu to specify
the destination and attributes of your printed output.
The Paper Output submenu contains the Output Tray selection.
Output Tray Selection
You use this selection to specify an output tray. The options are as follows:
❐
External Tray
❐
Standard T ray
❐
Output T ray 1
❐
Output T ray 2
❐
Output T ray 3
❐
Output T ray 4
❐
Output T ray 5
❐
Shift Tray Face-down (FD)
❐
Shift T ray Face-up (FU)
The External Tray option does not display when the optional Finisher is installed.
The Output Tray 1, Output Tray 2, Output T ray 3, Output Tray 4, and Output
Tray 5 options displa y only when the optional Mailbox is installed. The Shift Tray
options display only when the optional Finisher is installed.
The default value is Standard T ray.
Note: When the Mailbox is installed, the standard tray at the top of the printer
becomes Output Tray 1.
2-12
Page 45

USING THE CONTROL PANEL
System Submenu
From the Job Control menu, press the [ ] ke y and then press the [5] key
or the [6] ke y until “System” displays on the Control Panel. You use this submenu
to make changes to the operating status of the printer .
The System submenu contains the following selections:
❐
Jam Recovery
❐
Print PS Errors
❐
Edge Smoothing
❐
T oner Saving
❐
Time Out
❐
Energy Saver
❐
Low T oner
❐
Resolution
❐
Image Density
❐
PM (Preventive Maintenance)
Alarm
❐
Reset Fusing Ut (This menu
item displays only when the
Fusing Unit must be replaced.)
Jam Recovery Selection
You use this selection to enable the printer to recover automatically from paper
misfeed. The options are as follows:
❐
On - enab les Jam Recovery. When a paper jam occurs, the printer reprints
all lost pages after you clear the paper jam.
❐
Off - disab les Jam Reco very.
The default value is Off.
Note: When Jam Recovery is enabled, the printer can almost always recover all
lost pages. If a misfeed occurs in the Stapler the printer cannot reprint
lost pages.
USING THE
CONTROL P ANEL
2-13
Page 46

USING THE CONTROL PANEL
Print PS Errors Selection
You use this selection to specify that you want the printer to print a PostScript
error page when an error occurs. This selection displays only when the P ostScript
option is installed. The options are as follows:
❐
Yes - prints a PostScript error page when a PostScript error occurs, and
skips the print job. The P ostScript error page contains information that may
help you to diagnose the cause of the error in the P ostScript print file.
❐
No - does not print a PostScript error page and skips the PostScript job
that caused the error.
The default value is No.
Edge Smoothing Selection
You use this selection to enhance print quality for text and line art. The options
are as follows:
❐
On - enables Edge Smoothing. The printer rasterizes output to enhance
print quality. The appearance of the output emulates a resolution of 1200
dpi, reducing ragged edges and providing printed output with smooth curved
and diagonal lines.
❐
Off - disables Edge Smoothing.
The default value is On.
Note: When you enable this function, images and halftones may be adversely
affected, and may not print correctly. It is recommended that y ou disable
Edge Smoothing when printing images.
2-14
Page 47

USING THE CONTROL PANEL
Toner Saving Selection
You can use this selection when you print draft copies of documents. When y ou
enable Toner Saving, the printer uses less than the normal amount of toner,
which makes black areas print as gra y but does not aff ect readability . The options
are as follows:
❐
On - enables T oner Saving. The printer uses approximately one half of the
normal amount of toner.
❐
Off - disables Toner Saving.
The default value is Off.
Time Out Selection
You use this selection to specify how long the printer waits for more print data
before terminating a job when it receives no end of job code.
The options are as follows:
❐
15 seconds
❐
30 seconds
❐
60 seconds
❐
180 seconds
❐
300 seconds
The default setting is 30 seconds.
Energy Saver Selection
You use this selection to specify the length of inactive time after which the
printer switches to Energy Saver mode. When the pr inter is in Energy Saver
mode and a job is received, the printer takes about one minute to warm up and
print the job. Energy Sav er mode meets EPA Energy Star standards.
USING THE
CONTROL P ANEL
2-15
Page 48

USING THE CONTROL PANEL
The options are as follows:
❐
Off
❐
15 minutes
❐
30 minutes
❐
❐
❐
1 hour
2 hours
3 hours
The default value is 15 minutes.
Low T oner Selection
Y ou use this selection to specify whether y ou want the printer to continue to print
after a low toner condition is detected. The options are as follows:
❐
Continue - allows the printer to continue printing. Output becomes lighter
and may be unusable unless the toner cartridge is changed.
❐
Stop - causes the printer to stop printing.
The default value is Continue.
Resolution Selection
You use this selection to set the printer resolution for PCL output. The options
are as follows:
❐
300 dpi
❐
600 dpi
When the PostScript option is installed, you can set the printer resolution for
PostScript output. The options are as follows:
❐
300 dpi
❐
400 dpi
❐
600 dpi
The default value for both PCL and PostScript is 600 dpi.
2-16
Page 49

USING THE CONTROL PANEL
Image Density Selection
You use this selection to set the Image density, or darkness, of the printed
output. The options are as f ollo ws:
❐
Very Light
❐
Light
❐
Normal
❐
Dark
❐
Very Dark
The default value is Normal.
Note: You must print several pages before the changed Image Density value
becomes effective.
PM (Preventive Maintenance) Alarm Selection
You use this selection to specify whether you want the Control Panel to display
a message when the printer PCU, the Fusing unit and Rollers must be replaced.
The options are as follows:
❐
On - displays a preventive maintenance message.
❐
Off - dose not display a preventive maintenance message.
The default value is Off.
Reset Fusing Ut (Unit) Selection
This menu item displays only when the Fusing Unit must be replaced. After the
Fusing Unit is replaced, access this menu item and press the [Enter] key to
reset the counter . This counter , located in the printer engine, determines when
the Fusing Unit must be replaced again.
USING THE
CONTROL P ANEL
2-17
Page 50

USING THE CONTROL PANEL
PCL5 Submenu
From the Job Control menu, press the [ ] key and press the [6] key until
“PCL5 Menu” displays on the Control Panel. You use this submenu to specify
some PCL5 output features.
The PCL5 submenu contains the following selections:
❐
Form Feed
❐
Orientation
❐
Line Wrap
❐
Form Length
❐
Default Font
❐
Symbol Set
Form Feed Selection
You use this selection to clear pages from the print buffer. When y ou press the
[ ] key while this selection displays, the printer prints and ejects the page
stored in the print buffer .
Orientation Selection
Y ou use this selection to specify the image orientation. The options are as f ollows:
❐
Portrait - prints with the left margin along the long side of the paper.
❐
Landscape - prints with the left margin along the short side of the paper.
The default value is P ortrait.
2-18
Page 51

USING THE CONTROL PANEL
Line Wrap Selection
You use this selection to enable the printer to automatically wrap any line
containing an excessive number of characters . The options are as follows:
❐
On - enables line wrap.
❐
Off - disables line wrap.
The default value is Off.
Form Length Selection
Y ou use this selection to specify the f orm length, in lines, for each page. You can
specify from 5 to 128 lines. The default v alue is 60.
Default Font Selection
Y ou use this selection to define a def ault printer font. The options are as f ollows:
❐
Font Source
❐
Font Number
Font Source Option
You use this option to specify the source of the default printer font. The options
are as follows:
❐
Internal - specifies that the default printer font is an internal font.
❐
Download - specifies that the default printer font is downloaded from the
host computer.
The default value is Internal.
❐
Point Size
❐
Font Pitch
USING THE
CONTROL P ANEL
2-19
Page 52

USING THE CONTROL PANEL
Font Number Option
You use this option to select the font number of the default printer font. The valid
range is 0 to 50.
Internal fonts numbered 0, and 39 to 44, are fixed-pitch fonts. Fonts numbered 1
to 38 are proportional-space fonts. Internal f onts numbered 45 to 50 are bitmapped
fonts.
The default font is Courier, which is font number 0 when the Font Source is
Internal, and 1 when the font source is Download. The def ault v alue is 0.
Point Size Option
You use this option to select the height, in points, of the default printer font. The
valid range is 4 to 999.75 points. The default value is 12.
Note: The Point Size option is available only when you select a proportional-
space font. It is not available when you select a fixed-pitch font.
Font Pitch Option
You use this option to select the pitch, in characters per inch (cpi), of the default
printer font. The v alid r ange is 0.44 to 99.99 cpi. The default value is 10.00.
Symbol Set selection
You use this option to select the symbol set for the default printer font. The
options are as follows:
❐
❐
❐
❐
❐
❐
❐
2-20
Roman8
ISOLatin1
ISOLatin2
ISOLatin5
PC-8
PC-8 dn
PC-850
❐
❐
❐
❐
❐
❐
❐
PC-852
PC-8 tk
WinL1
WinL2
WinL5
Desktop
PS Te xt
❐
❐
❐
❐
❐
❐
❐
VN Intl
VN US
MS Publ
Math-8
PS Math
VN Math
Pifont
Page 53

USING THE CONTROL PANEL
❐
❐
❐
❐
Legal
ISO4
ISO6
ISO11
❐
❐
❐
❐
ISO15
ISO17
ISO21
ISO60
❐
❐
ISO69
Win3.0
The default value is Roman8.
Menu Reset
From the Job Control men u, press the [ ] key and press the [5] k ey or the
[6] key until “Menu Reset” displa ys on the Control P anel.
When you press the [ ] key while “Menu Reset” displays, all printer settings
that are controlled in the Job Control menu are reset to the original default values.
The printer returns to Ready mode after resetting.
USING THE HOST INTERFACE MENU
To access the Host Interface menu, press the [ ] key to enter Menu mode.
Press the [5] key or the [6] key until “Host Interface Menu” displays.
USING THE
CONTROL P ANEL
The Host Interface menu contains the following:
❐
Parallel Setup
❐
NIC Personality
❐
Menu Reset
Note: The NIC Personality menu displays only when the NIC Unit is installed.
Parallel Setup Submenu
From the Host Interface men u, press the [ ] key and press the [5] key or
the [6] key until “Par allel Setup” displays on the Control Panel.
2-21
Page 54

USING THE CONTROL PANEL
The Parallel Setup submenu contains the f ollowing selections:
❐
Personality
❐
Bi-Direction
Personality Selection
You use this selection to specify the language interpreter mode for the parallel
port. The options are as f ollows :
❐
PCL
❐
TIFF Raw Mode
❐
Hex Dump
The Auto Sense, PS (PostScript
❐
Auto Sense
❐
PS (PostScript
❐
PS TBCP
) and PS TBCP options display only when
)
the PostScript option is installed. PS TBCP (Tagged Binary Communications
Protocol) is a binary format used by PostScript.
Note: When P arallel or NIC Personality is set to PS (PostScript), the printer
will not be able to interpret PJL commands. If you use the PostScript
driver, P arallel or NIC personality should be set to A uto Sense.
TIFF Raw Mode supports printing of TIFF files with no PJL commands
included in the print file.
Hex Dump prints the print file as hexadecimal data instead of interpreting
and formatting the print data. This is used for error analysis of the print
file.
The default value is PCL. How ever , when the P ostScript option is installed, the
default value is Auto Sense.
2-22
Page 55

USING THE CONTROL PANEL
Bi-Direction Selection
You use this selection to specify whether you want the printer to send status
readback messages to the host computer. The options are as follows:
❐
On - enables Bi-Direction mode
❐
Off - disables Bi-Direction mode
The default setting is On.
NIC Personality Submenu
From the Host Interf ace menu, press the [ ] key and press the [5] key or
the [6] key until “NIC Personality” displays on the Control Panel. You use this
submenu to specify the language interpreter for the network connection.
The NIC Personality submen u contains the following selections:
❐
PCL
❐
TIFF Raw Mode
❐
Auto Sense
❐
PS (PostScript
❐
PS TBCP
)
USING THE
CONTROL P ANEL
The Auto Sense, PS (PostScript
) and PS TBCP (Tagged Binary
Communications Protocol) options display only when the P ostScript option is
installed. The default value is PCL. However, when the PostScript option is
installed, the default value is Auto Sense.
Note: When the NIC Personality is set to PS (PostScript
interpret PJL commands. If y ou use the PostScript
), the printer cannot
driver , Par allel or NIC
personality should be set to Auto Sense.
2-23
Page 56

USING THE CONTROL PANEL
Menu Reset
From the Host Interface menu, press the [ ] key and press the [5] key or
[6] key until “Men u Reset” displays on the Control Panel.
When you press the [ ] key while “Menu Reset” displays, all settings
controlled in the Host Interface menu are reset to the original default values. The
printer returns to Ready mode after resetting.
USING THE LANGUAGE MENU
T o access the Language menu, press the [ ] key to enter Menu mode . Press
the [5] key or the [6] key until “Language” displays.
The Language menu allows you to select the language that you want to use on
the display panel. The a v ailable choices are as f ollo ws :
❐
English
❐
German
The default value is English.
2-24
❐
❐
French
Italian
Page 57

USING THE CONTROL PANEL
USING THE TEST/PRINT MENU
To access the Test/Print menu, press the [ ] key to enter Menu mode. Press
the [5] key or the [6] key until “Test/Print” diaplays.
The Test/Print menu contains the following selections:
❐
System Reset
❐
PCL Font List
❐
System Config
❐
Error Log
❐
PS Font List
Note: This PS font list menu displays only when the PostScript option is
installed.
System Reset
From the Test/Print menu, press the [ ] key and press the [5] key or the
[6] key until “System Reset” displays on the Control Panel.
When you press the [ ] key while “System Reset” displays on the Control
Panel, the printer resets to the settings you saved most recently. The system
resets and goes through initialization sequence, including resetting DRAM memory .
Therefore, all downloaded fonts are lost.
PCL Font List
USING THE
CONTROL P ANEL
From the Host Interface menu, press the [ ] key and press the [5] key or
the [6] key until “PCL Font List” displa ys on the Control Panel.
When you press the [ ] key while “PCL Font List” displays on the Control
Panel, a page prints listing the resident PCL fonts , and permanently downloaded
fonts.
2-25
Page 58

USING THE CONTROL PANEL
System Config
From the Host Interface menu, press the [ ] ke y and press the [5] ke y or
the [6] key until “System Config” displa ys on the Control P anel.
When you press the [ ] key while “System Config” displays on the Control
Panel, a page prints describing the current system configuration.
Error Log
From the Host Interface menu, press the [ ] key and press the [5] ke y or
the [6] key until “Error Log” displa ys on the Control P anel.
When you press the [ ] key while “Error Log” displays on the Control
Panel, a page prints listing the last 15 errors and 15 paper misfeeds locations .
☛ Ref er to the “Troubleshooting” chapter in this manual for more inf ormation on
printer errors.
PS Font List
From the Host Interface menu, press the [ ] key and press the [5] key or
the [6] key until “PS F ont List” displays on the Control Panel. This option displays
only when the PostScript option is installed.
When you press the [ ] key while “PS Font List” displays on the Control
Panel, a page prints listing all resident PostScript fonts, downloaded fonts in
RAM, and all PostScript fonts loaded on the Hard Disk.
2-26
Page 59

3. MAINT AINING THE PRINTER
3-1
MAINT AINING
THE PRINTER
Page 60

MAINTAINING THE PRINTER
OVERVIEW
This chapter provides information on the procedures for maintaining the machine,
including periodic replacements and cleaning procedures.
TONER CARTRIDGE
The Toner Cartridge should be replaced when print quality starts to deteriorate,
or when the “Add Toner” message appears on the Control Panel.
Storing T oner Cartridges
Make sure to store T oner Cartridges at room temperature, in their original packages.
R
Warnings: Do not incinerate toner or toner containers.
Toner dust might ignite when exposed to open flames.
Do not eat or swallow toner.
Keep toner or toner containers out of reach of children.
3-2
Page 61

MAINT AINING THE PRINTER
Replacing the Toner Cartridge
Use the following procedure to replace the Toner Cartridge.
Important: Be sure to leave po wer turned on when replacing the Toner
Cartridge. Do not turn power off!
Open the Front Cov er .
1
Raise the square shaped green
2
Toner Cartridge handle on the far
right.
Press the lever under the Toner
3
Cartridge down as far as it goes.
3-3
MAINT AINING
THE PRINTER
Page 62

MAINTAINING THE PRINTER
Pull out the Toner Cartridge by the
4
green handle, supporting the
center of the cartridge with your
other hand as shown.
Note: You will feel the Toner Car tridge stop just before its end exits from the
machine. This is to keep the end of the car t ridge from falling down and
possibly spilling toner. Lift up on the Toner Cartridge with both hands to
free it from the machine.
Follow the recycling instructions on the package of the ne w Toner Cartridge
5
to dispose of the old one.
Remove the new Toner Cartridge
6
from its package. Gently rock it
back and forth a few times to mak e
sure that the toner inside is
distributed evenly.
Remove the tape securing the green handle at the end of the new Toner
7
Car tr idge.
Insert the new Toner Cartridge in
8
the machine by tilting upward the
end with the green handle and
inserting the opposite end into the
T oner Cartridge position.
Then bring the T oner Cartridge leve l
and insert fully until the small green
lever clicks up into position.
3-4
Page 63

MAINT AINING THE PRINTER
Lower the square shaped green T oner Cartridge handle into place. The lev er
9
below the Toner Cartridge should snap back into its raised position at this
time.
Close the Front Cov er.
j
Low T oner Condition
When “Add T oner” message displa ys on the Control Panel, this indicates that the
toner inside the cartridge is getting low. If you want to clear this message and
continue printing, the “Low T oner” selection of the System submenu must be set
to “Continue . ” Try redistributing the toner as described below or change the Toner
Cartridge when printing becomes too light.
Sometimes unevenly distributed toner inside the cartridge can cause the “Add
Toner” message to appear. Whenever the message first appears, try using the
following procedure to redistribute the toner inside the cartridge.
Use steps 1 through 4 under “Replacing the Toner Cartridge” to remove the
1
T oner Cartridge from the machine.
Gently rock the Toner Car tridge
2
back and forth a few times to
ev enly distribute the toner inside.
Use steps 8 through j under “Replacing the Toner Cartridge” to replace the
3
T oner Cartridge in the machine.
3-5
MAINT AINING
THE PRINTER
Page 64

MAINTAINING THE PRINTER
PHOTOCONDUCTOR UNIT (PCU)
The PCU should be replaced when print quality starts to deteriorate, or when the
“Change PCU” message appears on the Control P anel.
Replacing the PCU
Use the following procedure to replace the PCU .
Open the Front Cov er .
1
Move the curved blue lever
2
“B1”down to the left.
Pressing down on the top of the
3
PCU as shown in the illustration,
pull it out of the machine.
3-6
Page 65

MAINT AINING THE PRINTER
Note: Be sure to suppor t the
center of the PCU with
your other hand as you
pull it out.
Note: You will feel the PCU stop when it is about half way out. This is to keep
the PCU from falling accidentally. Lift up on the PCU with both hands to
free it from the machine.
Follow the recycling instructions on the package of the new CPU to dispose
4
of the old one.
Remove the new PCU from its package.
5
Using both hands, slide the new
6
PCU into the machine as far as it
goes. Make sure that the shaft
inside the machine (which rotates
the drum) seats correctly into the
slot on the inside end of the PCU.
Note: Be sure to gently but firmly press on the end of the PCU until you hear it
snap into place.
Turn the lever “B1” up to the right.
7
Close the Front Co v er of the machine.
8
3-7
MAINT AINING
THE PRINTER
Page 66

MAINTAINING THE PRINTER
TRANSFER ROLLER UNIT , FUSING UNIT,
AND PAPER FEED ROLLERS
The transfer roller unit, Fusing Unit and paper feed rollers should be replaced
when print quality starts to deteriorate, or when the “Change Fusing Unit” message
appears on the Control Panel.
Replacing the T ransfer Roller Unit
Use the following procedure to replace the transfer roller unit.
T urn off machine power and unplug
1
its power cord.
Open the Front Cov er .
2
Move the curved blue lever
3
“B1”down to the left.
3-8
Page 67

MAINT AINING THE PRINTER
Swing the transfer roller unit up to
4
the left so its rectangular shaft is
positioned for removal as shown
in the illustration.
Lifting up on the transfer roller unit,
5
slide it carefully out of the machine.
Follow the recycling instructions on the package of the transfer roller unit to
6
dispose of the old one.
Remove the new transfer roller unit from its package.
7
Using both hands, slide the new
8
transfer roller unit into the machine.
Make sure that the rectangular
shafts on either end of the transfer
roller unit seat correctly into the
two bearings that support them.
3-9
MAINT AINING
THE PRINTER
Page 68

MAINTAINING THE PRINTER
Once the shafts are seated
9
correctly, swing the transfer roller
unit down into place.
T urn the lev er “B1”up to the right.
j
Close the Front Cover of the
k
machine.
Plug in the power cord and turn on
l
the machine power.
3-10
Page 69

MAINT AINING THE PRINTER
Replacing the Fusing Unit
Use the following procedure to replace the Fusing Unit.
R
Warning: Wait until the Fusing Unit is completely cooled off bef ore
attempting to handle it.
T urn off machine power and unplug
1
its power cord.
Open the Front Cov er .
2
Rotate the blue triangular knob next
3
to the Fusing Unit so the flat side
of the knob is facing the unit. Use
a coin to remove the metal screw
at the top of the Fusing Unit.
3-11
MAINT AINING
THE PRINTER
Page 70

MAINTAINING THE PRINTER
Carefully pull the Fusing Unit out
4
of the machine.
Note: Be sure to support the
center of the Fusing Unit
with your other hand as you
pull it out.
Follow the recycling instructions on the package of the new Fusing Unit to
5
dispose of the old one.
Remove the new Fusing Unit from its package.
6
Using both hands, slide the new
7
Fusing Unit into the machine.
Replace the screw and use a coin
8
to tighten it securely.
Rotate the triangular knob so that one of its corners is pointed towards the
9
Fusing Unit, securing it in place.
Close the Front Cover .
j
Plug in the power cord and turn on the machine power.
k
3-12
Page 71

MAINT AINING THE PRINTER
Press the [ ] key to enter the Menu mode (On Line indicator off) and then
l
press the [ ] key.
Press the [5] key until “Job Control” appears on the Control Panel.
m
Press the [ ] key and then press the [6] key until “System ” appears.
n
Press the [ ] key and then press the [6] key until “Reset Fusing Ut”
o
appears.
Press the [ ] key to reset “Reset Fusing Ut” message.
p
Replacing the Paper Feed Rollers
Use the following procedure to replace the upper and lower paper feed rollers.
T urn off machine power and unplug
1
its power cord.
Pull out the top and second paper
2
feed tray drawers and remove
them from the machine.
3-13
MAINT AINING
THE PRINTER
Page 72

MAINTAINING THE PRINTER
Open the Front Cov er .
3
Detach the Front Cover from the
4
machine. Lift up the L-shaped
hinge bars and pull out the bars.
Use a coin to remove the screws
5
that secure the black plastic
stoppers in place on the far right,
and then remove the stoppers.
Carefully pull out the upper and
6
lower rollers.
Follow the recycling instructions on the package of the new paper feed rollers
7
to dispose of the old ones.
3-14
Page 73

MAINT AINING THE PRINTER
Carefully slide the new paper feed
8
rollers into the machine, making
sure the plastic fins on the ends of
their shafts seat securely into the
slots inside the machine as shown
in the illustration.
Note: Make sure that the round sides of the paper feed rollers are facing up
when you slide them into the machine.
Replace the two black plastic retaining clips and secure them in place with
9
their screws.
Replace the two paper feed drawers.
j
Reattach the Front Cover with the two L-shaped hinge bars, and close the
k
Front Cov er.
Plug in the power cord and turn on
l
the machine power .
3-15
MAINT AINING
THE PRINTER
Page 74

MAINTAINING THE PRINTER
Replacing the LCT Paper Feed Rollers
When the optional large capacity tray is installed, use the following procedure to
replace its two paper feed rollers.
Open the LCT cover .
1
Unlock the hook [A] of the paper feed roller [B].
2
Lift up the paper feed roller shaft [C], then remove the paper feed rollers [B].
3
Insert new rollers into [C], and return the paper feed roller unit to its original
4
position.
3-16
Page 75

MAINT AINING THE PRINTER
CLEANING
Keep the machine clean to ensure best print quality. You may need to clean the
machine when you notice print quality problems, such as smudging or streaking.
To clean the outside of the machine, use a slightly moistened cloth. Follow
these steps to clean the inside of the machine:
R
CAUTION: Do not use ammonia-based cleaning products near the
machine.
T urn off machine power and unplug
1
its power cord.
Open the Front Cov er .
2
Remove the T oner Cartridge.
3
☛ Refer to the “Toner Cartridges” in this chapter for more instructions.
With a dry , lint-free cloth, carefully
4
wipe any dust, toner residue, or
paper residue from the paper path
areas and the T oner Cartridge area.
3-17
MAINT AINING
THE PRINTER
Page 76

MAINTAINING THE PRINTER
When the optional Duplex T ra y is installed, pull out the tra y and wipe the top
5
surfaces and rollers.
Replace the Toner Cartridge.
6
Close the Front Cover .
7
Plug in the power cord and turn
8
on the machine power.
3-18
Page 77

USING THE OPTIONS
4. USING THE OPTIONS
4-1
Page 78

USING THE OPTIONS
OVERVIEW
This chapter provides information on how to install and use options that are
available for the machine.
POSTSCRIPT® OPTION
The PostScript® option provides Adobe® PostScript® Level II. It consists of the
following components:
❐
PostScript® ROM DIMM module
❐
PostScript® printer driver software.
®
☛ Refer to “Printer Driver/Utility Reference <PostScript
information on setting up and using the optional PostScript
- option>” for more
®
printer driver.
NETWORK CONNECTIONS
Optional Network Interface Cards (NIC) can be installed to allow direct connection
to an Ethernet or Token Ring network.
The Ethernet card supports 10 BaseT Unshielded Twisted Pair (UTP) or 10
Base2 (BNC) connections. The Token Ring card supports UTP or Shielded
Twisted Pair (STP) connections, with a line speed of 4 megabits per second
(Mbps) or 16 Mbps.
You can use the machine in a network environment as follows.
❐
Using the appropriate network management software and printer driver
❐
Attaching the machine to a networked computer set up as a server
4-2
Page 79

USING THE OPTIONS
USING THE OPTIONS
Table 4-1 lists supported platforms and file server software required for each.
Table 4-1. Supported network configurations
Client Driver File Server Protocol
Windows 3.1
Windows for Workgroups
PCL
TIFF
PostScript
Netware 3.x
®
Netware 4.x
IPX/SPX
TCP/IP
Windows 95 IPX/SPX
Macintosh PostScript
PCL
TIFF
PostScript
®
®
Netware 3.x
Netware 4.x
TCP/IP
AppleTalk
In a mixed network environment, the NIC automatically switches among network
protocols.
☛ Refer to the Network Printer Server User Guide for more information on installing
the NIC.
Note: Make sure to consult your Network Administrator before connecting your
machine to a network.☛ Refer to the “Troubleshooting” chapter in this
manual for information on resolving network connection problems.
4-3
Page 80

USING THE OPTIONS
MEMORY EXPANSION
The machine has a base Dynamic Random Access Memory (DRAM) of 8
megabytes (MB). You can upgrade memory by inserting additional memory
modules in the two available Single Line Memory Module (SIMM) sockets.
Note: The machine has an additional socket that accepts only a PostScript
ROM Dual Line Memory Module (DIMM). Install the PostScript® ROM
®
DIMM module when you want to use the PostScript
option.
☛ Refer to the “Installing DRAM SIMM Modules”.
☛ Refer to this chapter for instructions on how to install the PostScript
ROM DIMM module.
The DRAM SIMM sockets accept modules of 4 MB, 8 MB, 16 MB, or 32 MB. You
can add a total of 64 MB of DRAM, for a total of 68 MB.
You should install additional DRAM when you print high-resolution graphics or
large documents on a regular basis, or use memory-intensive features such as
special fonts or duplex printing. Adding memory increases printing speed.
Extra memory is required for some features such as duplex print jobs on large
paper sizes. Table 4-2, 4-3 list the amount of memory required for duplex printing
on large paper sizes.
Table 4-2. TIFF memory requirement for paper size / dpi (uncompressed)
Unicomp. Simplex Duplex
200dpi 300dpi 400dpi 600dpi 200dpi 300dpi 400dpi 600dpi
Letter/A4 8MB 8MB 8MB 8MB 8MB 8MB 8MB 12MB
Legal 8MB 8MB 8MB 12MB 8MB 8MB 8MB 12MB
B4/B5 8MB 8MB 8MB 16MB 8MB 8MB 8MB 16MB
Ledger/A3 8MB 8MB 8MB 20MB 8MB 8MB 12MB 20MB
®
Table 4-3. TIFF memory requirement for paper size / dpi (uncompressed, G3/G4/JBIG)
Unicomp. Simplex Duplex
200dpi 300dpi 400dpi 600dpi 200dpi 300dpi 400dpi 600dpi
Letter/A4 8MB 8MB 8MB 12MB 8MB 8MB 8MB 12/20MB*
Legal 8MB 8MB 8MB 16MB 8MB 8MB 12MB 24MB
B4/B5 8MB 8MB 8MB 16MB 8MB 12MB 12MB 24MB
Ledger/A3 8MB 8MB 8MB 20MB 8MB 12MB 16MB 24MB
*12MB= K , 20MB = L( rotation required )
4-4
Page 81

USING THE OPTIONS
USING THE OPTIONS
Selecting DRAM SIMM Modules
Table 4-4 lists by product number and manufacturer the DRAM SIMM modules
that are approved for use with this machine.
Table 4-4. SIMM modules compatible with this machine
TOSHIBA MITSUBISHI SAMUSUNG
4 MB Module THM3210B0 MH1M32 KMM5321200
THM3210B5 MH1M325 KMM5321204
8 MB Module THM3220C0 MH2M32 KMM5322200
THM3220C5 MH2M325 KMM5322204
16 MB Module THM324000 MH4M32 KMM5324100
THM324005 MH4M325 KMM5324104
32 MB Module THM328020 MH8M32 KMM5328100
THM328025 KMM5328104
All DRAM SIMM modules must be used at 70 ns access time or less. Exact
equivalent memory modules from other manufactures may also be used.
4-5
Page 82

USING THE OPTIONS
Installing DRAM SIMM Modules
Follow these steps to install DRAM SIMM modules.
Turn off the machine power the
1
machine and unplug the power
cord.
Disconnect the parallel cable and the network cable as needed.
2
Remove the four coin screws that
3
secure the cover of the controller
board on the back of the machine.
Remove the controller board cover.
4
Identify the sockets where you can
5
install DRAM SIMM modules.
Sockets “B” and “C” can accept
DRAM SIMM modules. Socket “A”
can accept a PostScript
DIMM module only.
Note: Socket “B” already has a DRAM SIMM module installed in it. To increase
memory size, insert a DRAM SIMM module into Socket “C”. If you need
to increase memory even further, replace the DRAM SIMM modules in
Socket “B” and Socket “C” with larger capacity DRAM SIMM modules.
4-6
®
ROM
Page 83

USING THE OPTIONS
USING THE OPTIONS
Make sure to touch the frame of the machine or use an anti-static grounding
6
product to discharge static electricity before you touch the DRAM SIMM
module.
Make sure to handle the DRAM SIMM module by its edges only. Do not
7
touch the surface of the DRAM SIMM module.
Hold the DRAM SIMM module at
8
a 30 degree angle, making sure
the corner notch is on the left side
and the metallic connectors are
pointed toward the DRAM SIMM
socket.
Gently push the DRAM SIMM
9
module into the socket, rotating the
module up until the module snaps
into the tabs on the socket and the
metal retaining clips lock the
module in place.
Replace the controller board cover and reinstall the screws.
j
Reconnect cables and plug in the power cord.
k
Turn on the machine power. The
l
machine detects the additional
memory. To verify whether the
additional memory was installed
correctly, you can print a System
Configuration page. ☛ Refer to the
“Using the Control Panel” chapter
in this manual for instructions on
how to print a configuration page.
4-7
Page 84

USING THE OPTIONS
HARD DISK OPTION
You can add a Hard Disk option to allow for permanent soft font and to enable
some printing features. The Hard Disk is required for the following features.
❐
Disk Based Collation
❐
Permanent PostScript® soft font storage
Installation
Use the instructions that come with the Hard Disk to install it.
Partitioning
The Hard Disk is partitioned as follows:
❐
Permanent storage - one half of the disk capacity is allocated for font data,
when the PostScript
area for Disk Based Collation.
❐
Temporary storage - one half of the disk capacity is allocated to Disk
Based Collation, when the PostScript
option is not installed, temporary storage capacity occupies the full disk.
®
option is installed. This reduces the available storage
®
option is installed. If the PostScript
®
Disk Based Collation
This feature makes it easy to separate your printed output into complete sets,
and reduces printing time. You use the Disk Based Collation feature to print
multiple copy job in collated sets.
Normally, all copies of a single page are printed at the same time. For example,
when you specify five copies of a four-page job, five copies of page 1 are printed,
then five copies of page 2 are printed, and so forth. If you select Collation using
your application, the application sends the entire document to the printer five
times.
When you use the Disk Based Collation feature, your application sends the
entire document to the printer once. The printer images each page of the
document and stores the page images on the Hard Disk. The printer then
retrieves and prints pages 1 through the last page of the first set, pages 1
4-8
Page 85

USING THE OPTIONS
USING THE OPTIONS
through the last page of the second set, and so forth. It also reduces network
traffic, if the printer is connected to a network.
☛ Refer to Printer Driver/Utility Reference <PCL and TIFF> and Printer Driver/
®
Utility Reference <PostScript
-option>.
Soft Font Storage
You can use the Hard Disk to store PostScript® soft fonts that you commonly
use with your Windows or Macintosh applications. Storing soft fonts on the Hard
Disk reduces printing time because the printer driver does not have to retrieve
and download fonts for each print job.
®
You download PostScript
printer driver.
☛ Refer to Printer Driver/Utility Reference <PostScript
information on downloading soft fonts using the optional PostScript
you are using a Macintosh, you can use the LaserWriter Utility to download
fonts to the printer’s Hard Disk.
soft fonts for disk storage using your Windows 3.1
®
-option> for more
®
driver. If
4-9
Page 86

USING THE OPTIONS
INPUT OPTIONS
The following optional input trays are available.
❐
Envelope Feeder
❐
Large Capacity Tray (LCT)
❐
Paper Bank
Envelope Feeder
The optional Envelope Feeder holds up to 100 envelopes and replaces the By-pass
Tray located on the right side of the machine.
Note:You can also print up to ten envelopes at a time using the By-pass Tray.
☛ Refer to the “Setting Up” chapter in this manual for information on
using the By-pass Tray.
Media Selection
You can use the Envelope Feeder to print on the following types of envelopes.
❐
4 1/8" x 91/2" L (COM 10 Env)
❐
3 7/8" x 71/2" L (Monarch Env)
❐
C5 Env L
❐
C6 Env L
❐
DL Env L
☛ Refer to the “Specifications” chapter in this manual for more information on
selecting envelopes.
4-10
Page 87

USING THE OPTIONS
USING THE OPTIONS
Installing the Envelope Feeder
Follow the instruction sheet provided with the Envelope Feeder to install it. You
must turn off the machine power before installing or removing the Envelope
Feeder.
Figure 4-1. Machine with Envelope Feeder
Using the Envelope Feeder
Follow these steps to print envelopes using the Envelope Feeder.
Using the printer Control Panel, enter the size of the envelopes you want to
1
print in the Envelope Feeder.
☛ Refer to the “Using the Control Panel” chapter in this manual for
instructions on how to enter the envelope size.
Using the Print menu of your application, select the envelope size you want
2
to use.
Make sure the envelopes you want to print are undamaged and not curled.
3
4-11
Page 88

USING THE OPTIONS
Raise the spring-loaded pressure
4
bar and lock it into position at the
top of the Envelope Feeder.
Move the envelope guides toward the edges of the Envelope Feeder.
5
Prepare a stack of up to 100 envelopes by fanning them and evening up the
6
edges to make sure that none of the envelope flaps will open. Place the
stack into the Envelope Feeder, face up with the top of the envelopes facing
the rear of the printer.
Note: Make sure the end of the stack going into the feeder is angled, so
that the bottom of the stack extends forward (into the feeder) further
than the top of the stack. The end of the stack should not be perfectly
flat.
Position the guides against the
7
stack of envelopes.
4-12
Page 89

USING THE OPTIONS
Lower the pressure bar so that it
8
rests on top of the stack of
envelopes.
Open the Front Cover.
9
Pull the lever down to the left so
j
you can see the
as shown. Then,close the Front
Cover.
* mark under it
USING THE OPTIONS
Important: Be sure to return the
lever to its original position after
finishing the envelope printing job.
Open the External Tray, or specify
k
the output destination as Shift Tray
Face-up.
Note:The Shift Tray is available
only when the optional Finisher is
installed.
To output to the Shift Tray, you must select Shift Tray Face-up as the output
l
destination,using your application, your printer driver, or Control Panel.
4-13
Page 90

USING THE OPTIONS
Print the job. The envelopes are output face-up to the External Tray or the
m
Shift Tray.
When the print job is complete, make sure to change the Control Panel
n
settings if necessary.
Large Capacity Tray
The Large Capacity Tray (LCT) holds up to 1,500 sheets of 8½” x 11" or A4
paper. You can use the LCT as a supplemental input tray.
Note: If you want to change the paper size for the LCT, contact your service
provider.
Installing the LCT
Follow the instruction sheet provided with the LCT to install it.
Figure 4-2. Machine with LCT
4-14
Page 91

USING THE OPTIONS
USING THE OPTIONS
Using the LCT
Follow these steps to print using the LCT.
Using the Print menu of your application, select the LCT as the input tray.
1
Open the LCT door. When the LCT
2
runs out of paper, the paper tray
descends and allows you to load
paper. Do not attempt to open the
door while the tray is descending.
The red indicator on the tray
loading button blinks while the tray
is descending or rising. The light
stays on when the tray is down and
the door can be safely opened.
If the LCT is not empty, you can
3
lower the paper tray by pressing
the tray loading button located on
the left side of the unit.
Place up to 1,500 sheets in the
4
LCT face-up.
Close the LCT door. The paper tray rises and positions the top of the stack
5
against the input rollers. When the tray is ready for printing, the indicator
light on the tray loading button goes off.
4-15
Page 92

USING THE OPTIONS
Note: When you print using the LCT, make sure to clear the Standard Tray
often. A sensor stops operation when the Standard Tray reaches its
capacity of 400 sheets.
Paper Bank
The optional Paper Bank consists of two 500-sheet input trays. You can use as
supplemental input trays.
Installing the Paper Bank
Follow the instruction sheet provided with the Paper Bank to install it.
Figure 4-3. Machine with Paper Bank
4-16
Page 93

USING THE OPTIONS
USING THE OPTIONS
Using the Paper Bank
The two trays included in the Paper Bank are Tray 3 and Tray 4. Tray 3 is the
upper tray and Tray 4 is the lower tray.
Follow these steps to place paper in either tray of the Paper Bank.
Pull out the paper tray using the recessed handle.
1
Move the green paper guides to the
2
positions that match the size of the
paper you want to load.
Fan a stack of no more than 500
3
sheets of paper, and place it in the
tray. Make sure to place the paper
in the tray with the printing side
face-down. The package the paper
comes in should indicate which is
the printing side.
4-17
Page 94

USING THE OPTIONS
Set the paper size selection dial
4
on the right edge of the tray to
match the size and orientation of
the paper you placed in the tray.
The following size are shown on
the dial.
❐
A3 L
❐
F L
❐
Letter 11" x 81/2" K
❐
Letter 81/2" x 11" L
If you want to load a paper size not shown in the above list, set the dial to “*”.
5
When the paper size selector is set to “*”, you must enter the special paper
size information using the printer Control Panel.
☛ Refer to the “Using the Control Panel” chapter in this manual for instructions
on how to enter paper sizes using the Paper Input submenu of the Job
Control menu.
Close the paper tray.
❐
A4 L
❐
A4 K
❐
A5 K
6
4-18
Page 95

USING THE OPTIONS
USING THE OPTIONS
OUTPUT OPTIONS
The following output options are available.
❐
Finisher
❐
Duplex Tray
❐
Mailbox
Finisher
The optional Finisher provides the following functions.
❐
Job separation
❐
Face-up or Face-down printing
❐
Stapling
The Finisher Shift Tray can hold up to 1,000 sheets of output and replaces the
External Tray.
☛ Refer to the “Specifications” chapter in this manual for specifications on the
Finisher.
4-19
Page 96

USING THE OPTIONS
Installing the Finisher
Follow the instruction sheet provided with the Finisher to install it.
Figure 4-4. Machine with Finisher
Job Separation
When the Finisher is installed, all print jobs directed to the Finisher are separated
using the offset feature. The Finisher activates a jogger mechanism that moves
the Shift Tray slightly to the right or left for each job. This makes it easy to
determine where the end of a set or job occurs. Job separation is especially
useful when separating collated jobs.
4-20
Page 97

USING THE OPTIONS
USING THE OPTIONS
Face-up and Face-down Output
When you print a job using the Finisher, you can select whether you want the
printed pages output face-up or face-down to the Shift Tray. You can select faceup (FU) and face-down (FD) output from your application or by using the printer
Control Panel.
Select Face-up (FU) output when you print on envelopes, transparencies, labels,
or heavy paper. This provides a straighter paper path and helps to prevent
paper misfeeds.
Note: Selecting face-up printing outputs pages in reverse order.
Stapling
The stapling feature is available when the Finisher is installed. You can select
stapling from your application or by using the printer driver. The default setting
for stapling is Off.
The maximum job size for stapling is 20 pages per set, with a maximum of 30
sets. The stapler locates one diagonal staple at the upper left corner of each
set. You can use stapling with duplex jobs and collated jobs using the Disk
Based Collation.
Note: The stapling feature can be used only with A4
when the optional Hard Disk is installed. For stapled output, the Finisher
must be set to Face-down output.
Note: When you select collation using your application, collated sets are not
stapled properly. Either the entire job (all sets) is stapled together, or, if
the total job size exceeds 20 pages, the job is not stapled at all.
Note: When you select one of the following output combination, the stapler
places staples in an awkward position relative to the printed data:
1. Duplex, Short Edge binding, Landscape Orientation
2. Reverse Portrait Orientation, Simplex or Duplex
3. Reverse Landscape Orientation, Simplex or Duplex.
K or 8½” x 11" K, and
4-21
Page 98

USING THE OPTIONS
Replacing the Staple Cartridge
Replace the staple cartridge when “Add Staple Finisher” message appears on
the printer Control Panel. Each staple cartridge holds 2,000 staples.
Follow these steps to replace the staple cartridge.
Use the recessed handle on the
1
Finisher door to pull the Finisher
unit out of the Finisher housing.
Remove the empty staple cartridge
2
using the green clips on either side
of the cartridge.
Remove all tape and other packaging material from the new staple cartridge.
3
Insert the new cartridge in the
4
bracket and push it in until it snaps
into place.
Push the Finisher unit back into the Finisher housing.
5
4-22
Page 99

USING THE OPTIONS
USING THE OPTIONS
Duplex Tray
The optional Duplex Tray replaces the top input tray (Tray 1). Use the Duplex Tray
to produce two-sided output.
Installing the Duplex Tray
Follow the instruction sheet provided with the Duplex Tray to install it.
☛ Refer to the “Specifications” chapter in this manual for specifications on the
Duplex Tray.
Using the Duplex Tray
You select duplex printing from your application or by using the printer driver.
You can also use the printer Control Panel to select duplex printing.
Before printing a duplex document, you must select one of the following modes.
❐
Short Edge Binding - When printing in Portrait orientation, use this setting
for binding along the top edge of the paper, like a calendar. In Landscape
orientation, this setting produces output that can be bound along the left
edge of the paper, like a book.
❐
Long Edge Binding - When printing in Portrait orientation, use this setting
for binding along the left edge of the paper, like a book. In Landscape
orientation, this setting produces output that can be bound along the top
edge of the paper, like a calendar.
4-23
Page 100

USING THE OPTIONS
Figure 4-5 illustrates the two binding methods.
Figure 4-5. Binding methods
A. Long Edge binding
B. Short Edge binding
Note: The Duplex feature does not support certain paper sizes, including
K, A6, 5½” x 8½”, and envelopes.
A5
Mailbox
The Mailbox consists of four trays located above the Standard Tray. Each tray
has a capacity of 125 sheets. The Mailbox supplements the Standard Tray, and
when it is installed, the Standard Tray becomes Output Tray 1, while the trays in
the Mailbox become Output Tray 2, Output Tray 3, Output Tray 4, and Output
Tray 5.
Use the Mailbox to direct output to a specific bin. This feature is useful for
separating output by workgroup or project so that picking up printed output is
easier.
You can select Mailbox trays from your application or by using the printer driver.
You can also select trays using the Control Panel.
4-24
 Loading...