

Ricoh MLP150DN, Aficio SP8200DN, LP150DN Operaing Instructions

Read this manual carefully before you use this machine and keep it handy for future reference. For safe and correct use, be sure to read the Safety Information
before using the machine.
10
8
9
11
Guide to the Printer
Installing Options
Connecting the Printer Cables
Configuration
Paper and Other Media
Replacing Consumables
Cleaning the Printer
Adjusting the Printer
Troubleshooting
Removing Misfed Paper
Appendix
1
2
3
4
5
6
7
Hardware Guide
Operating Instructions

Introduction
This manual contains detailed instructions and notes on the operation and use of this printer. For your safety and
benefit, read this manual carefully before using the printer. Keep this manual in a handy place for quick
reference.For safe and correct use, be sure to read the "Safety Information" before using the machine.

TABLE OF CONTENTS
Positions of WARNING and CAUTION Labels...............................................................................................5
Manuals for This Printer......................................................................................................................................7
How to Read This Manual.................................................................................................................................8
Symbols...........................................................................................................................................................8
Model-Specific Information...............................................................................................................................9
List of Options...................................................................................................................................................10
Installing the Operating Instructions...............................................................................................................11
1. Guide to the Printer
Exterior: Front View..........................................................................................................................................13
Exterior: Rear View...........................................................................................................................................15
Interior...............................................................................................................................................................16
Control Panel....................................................................................................................................................17
Display Panel....................................................................................................................................................19
Reading the Display and Using Keys.........................................................................................................19
2. Installing Options
Available Options............................................................................................................................................21
Order of Option Installation........................................................................................................................21
Where to Install Options.............................................................................................................................22
Cautions When Re-installing the Controller Board...................................................................................24
Attaching the Paper Feed Unit........................................................................................................................26
Installing the Memory Expansion Units..........................................................................................................30
Installing the SDRAM Module....................................................................................................................30
Installing the Hard Disk................................................................................................................................33
Installing the Interface Units.............................................................................................................................37
Installing the Gigabit Ethernet Board.........................................................................................................37
Installing the Wireless LAN Interface Board..............................................................................................39
Installing the IEEE 1284 Interface Board...................................................................................................43
Installing SD Card Options..............................................................................................................................46
3. Connecting the Printer Cables
Ethernet Cable Connection.............................................................................................................................49
Reading the LED Lamps...............................................................................................................................51
USB Cable Connection....................................................................................................................................52
Parallel Cable Connection..............................................................................................................................54
1

4. Configuration
Ethernet Configuration.....................................................................................................................................55
Specifying an IP Address (No DHCP)........................................................................................................56
Receiving an IP Address Automatically (DHCP)........................................................................................58
Configuring Network Settings When Using NetWare.............................................................................60
Setting the Ethernet Speed..........................................................................................................................61
Wireless LAN Configuration...........................................................................................................................64
Setting the SSID............................................................................................................................................66
Setting Security Method of Wireless LAN......................................................................................................68
Setting a WEP Key.......................................................................................................................................68
Setting WPA.................................................................................................................................................69
Configuring WPA/WPA2...............................................................................................................................73
Installing a Site Certificate...........................................................................................................................73
Installing Device Certificate.........................................................................................................................74
Setting Items of WPA/WPA2.....................................................................................................................75
5. Paper and Other Media
Supported Paper for Each Tray.......................................................................................................................77
500-sheet Paper Trays................................................................................................................................77
2000-sheet Paper Feed Unit......................................................................................................................78
1200-sheet Paper Feed Unit......................................................................................................................78
Bypass Tray..................................................................................................................................................78
Paper Weight and Capacity.......................................................................................................................79
Paper Recommendations.................................................................................................................................80
Storing Paper................................................................................................................................................80
Types of Paper and Other Media..............................................................................................................80
Paper Not Supported by This Printer..........................................................................................................87
Print Area......................................................................................................................................................87
Loading Paper..................................................................................................................................................89
500-sheet Paper Feed Trays.......................................................................................................................89
2000-sheet Paper Feed Unit......................................................................................................................97
1200-sheet Paper Feed Unit......................................................................................................................99
Bypass Tray................................................................................................................................................102
6. Replacing Consumables
2

Adding Toner.................................................................................................................................................109
Replacing Maintenance Kit A.......................................................................................................................114
Replacing the Development Unit..............................................................................................................114
Replacing Maintenance Kit B.......................................................................................................................121
Replacing the Transfer Unit.......................................................................................................................122
Replacing the Fusing Unit.........................................................................................................................125
Adding Staples...............................................................................................................................................129
When the 1000-sheet Finisher is Installed..............................................................................................129
When the 2 Tray Finisher is Installed.......................................................................................................133
7. Cleaning the Printer
Cautions When Cleaning..............................................................................................................................137
Cleaning the Friction Pads............................................................................................................................138
500-sheet Paper Trays..............................................................................................................................138
2000-sheet Paper Feed Unit....................................................................................................................139
1200-sheet Paper Feed Unit....................................................................................................................140
Cleaning the Registration Roller...................................................................................................................142
8. Adjusting the Printer
Adjusting Image Density................................................................................................................................145
Adjusting Printing Position.............................................................................................................................147
9. Troubleshooting
Error and Status Messages Appears on the Control Panel........................................................................151
Panel Tones....................................................................................................................................................155
Printer Does Not Print....................................................................................................................................156
Checking the Port Connection..................................................................................................................157
Printing Problems............................................................................................................................................159
Additional Troubleshooting...........................................................................................................................166
Removing Jammed Staples...........................................................................................................................168
When the 1000-sheet Finisher is Installed..............................................................................................168
When the 2 Tray Finisher is Installed.......................................................................................................170
Removing Punch Waste.................................................................................................................................173
When the 2 Tray Finisher is Installed.......................................................................................................173
10. Removing Misfed Paper
Removing Misfed Paper................................................................................................................................175
3

Paper Misfeed Message (A).........................................................................................................................176
Paper Misfeed Message (B).........................................................................................................................178
Paper Misfeed Message (C).........................................................................................................................180
Paper Misfeed Message (D).........................................................................................................................182
Paper Misfeed Message (R).........................................................................................................................184
When the 1000-sheet Finisher is Installed..............................................................................................184
When the 2 Tray Finisher is Installed.......................................................................................................186
Paper Misfeed Message (Y).........................................................................................................................191
Paper Misfeed Message (Z).........................................................................................................................192
Paper Misfeed Message (U).........................................................................................................................194
Duplex Print Always Misfeeds......................................................................................................................198
11. Appendix
Moving and Transporting the Printer............................................................................................................201
Moving the Printer.....................................................................................................................................201
Consumables..................................................................................................................................................204
Toner...........................................................................................................................................................204
Maintenance Kit........................................................................................................................................204
Staple Cartridge........................................................................................................................................205
Specifications.................................................................................................................................................206
Mainframe.................................................................................................................................................206
Options.......................................................................................................................................................208
INDEX...........................................................................................................................................................219
4
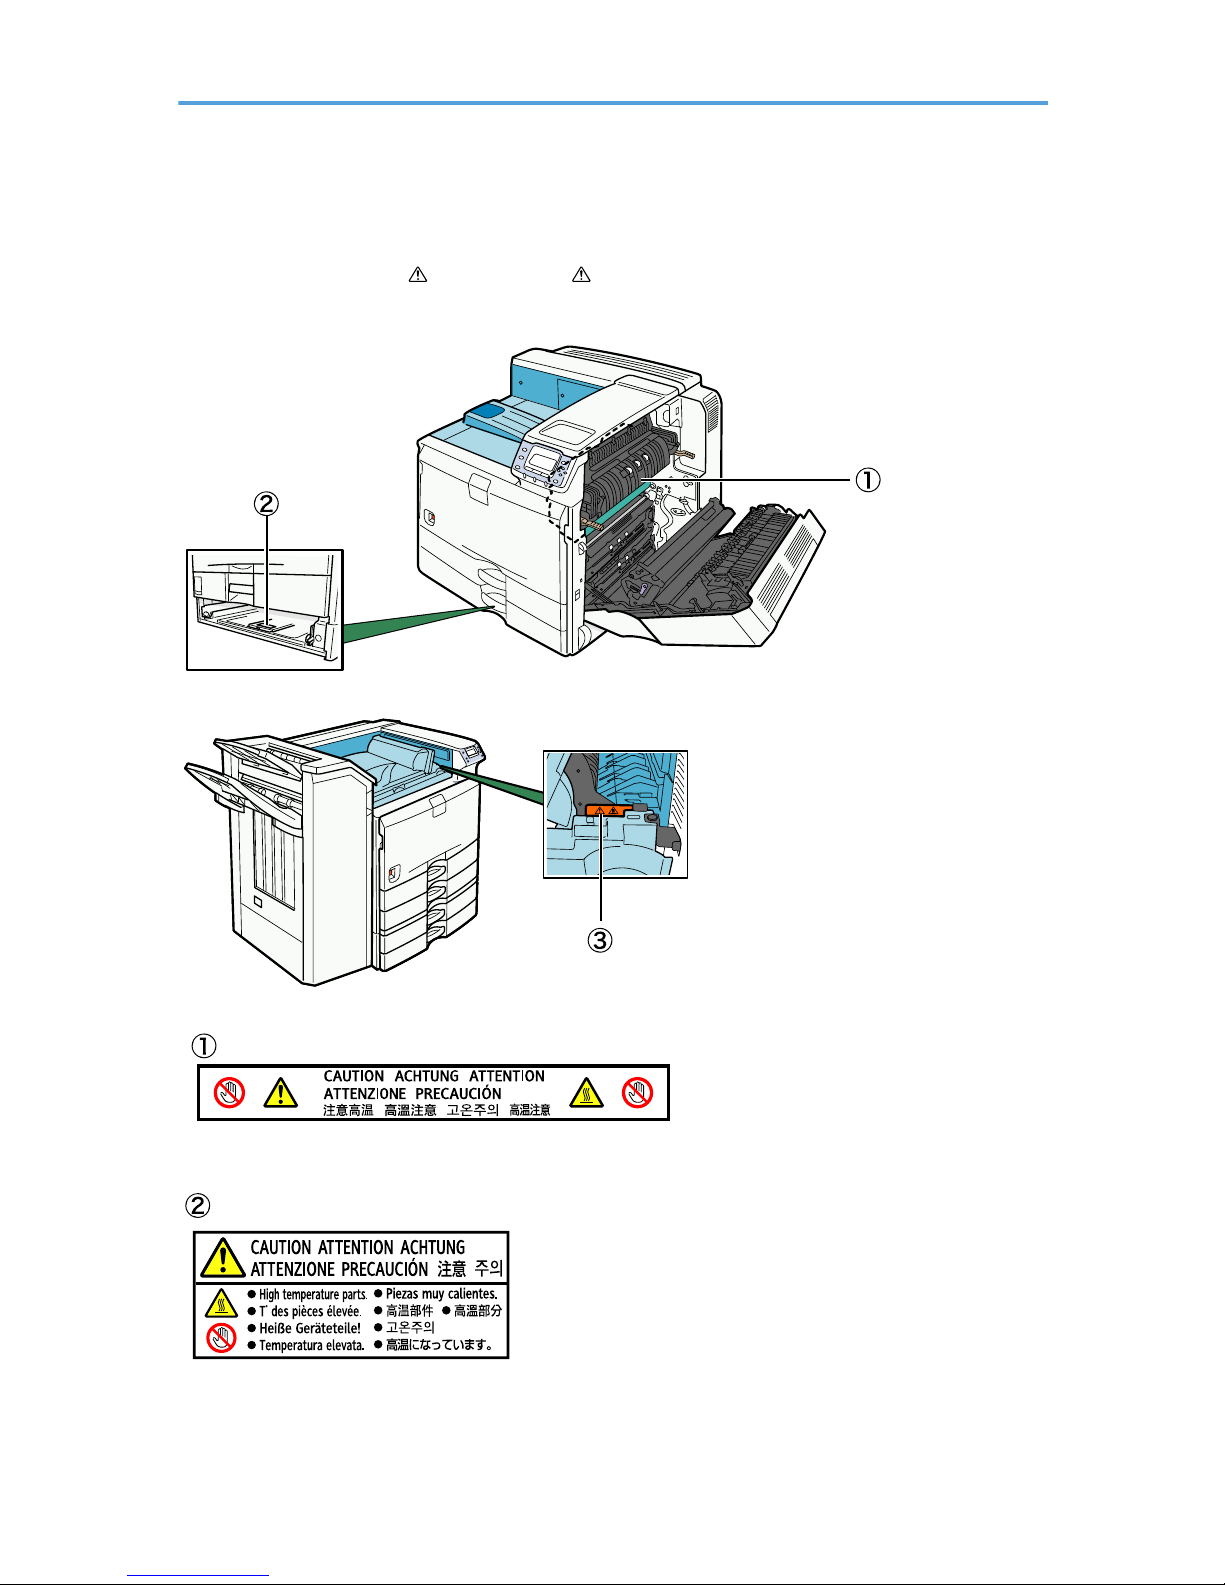
Positions of WARNING and CAUTION Labels
This machine has labels for WARNING and CAUTION at the positions shown below. For safety,
please follow the instructions and handle the machine as indicated.
BEK205S
BEK206S
High temperature. Be careful of hot parts when clearing paper jams.
The inside of this printer could be very hot. Do not touch parts which a label is put on. Otherwise, an injury
might occur.
5

High temperature. Be careful of hot parts when clearing paper jams.
6

Manuals for This Printer
Refer to the manuals that are relevant to what you want to do with the printer.
• Media differ according to manual.
• The printed and electronic versions of a manual have the same contents.
• Adobe Acrobat Reader/Adobe Reader must be installed in order to view the manuals as PDF files.
• A Web browser must be installed in order to view the html manuals.
Safety Information
Contains information about safe usage of this printer.
To avoid injury and prevent damage to the printer, be sure to read this.
Quick Installation Guide
Contains procedures for removing the printer from its box, connecting it to a computer, and installing
its driver.
Hardware Guide (This manual)
Contains information about paper and procedures such as installing options, replacing consumables,
responding to error messages, and resolving jams.
Software Guide
Contains information about using this printer, its software, and its security functions.
Security Guide
Contains information for administrators of the printer. It explains security functions that the
administrators can use to prevent data tampering or unauthorized use of the printer. Also refer to this
manual for the procedure for registering an administrator, as well as setting user and administrator
authentication.
UNIX Supplement
For "UNIX Supplement", please visit our Web site or consult an authorized dealer.
This manual includes descriptions of functions and settings that might not be available on this printer.
• Manuals provided are specific to machine types.
7

How to Read This Manual
Symbols
This manual uses the following symbols:
Indicates important safety notes.
Ignoring these notes could result in serious injury or death. Be sure to read these notes. They can be found
in the “Safety Information” section of this manual.
Indicates important safety notes.
Ignoring these notes could result in moderate or minor injury, or damage to the machine or to property. Be
sure to read these notes. They can be found in the “Safety Information” section of this manual.
Indicates points to pay attention to when using the machine, and explanations of likely causes of paper
misfeeds, damage to originals, or loss of data. Be sure to read these explanations.
Indicates supplementary explanations of the machine's functions, and instructions on resolving user errors.
This symbol is located at the end of sections. It indicates where you can find further relevant information.
[ ]
Indicates the names of keys that appear on the machine's display panel.
[ ]
Indicates the names of keys on the machine's control panel.
8
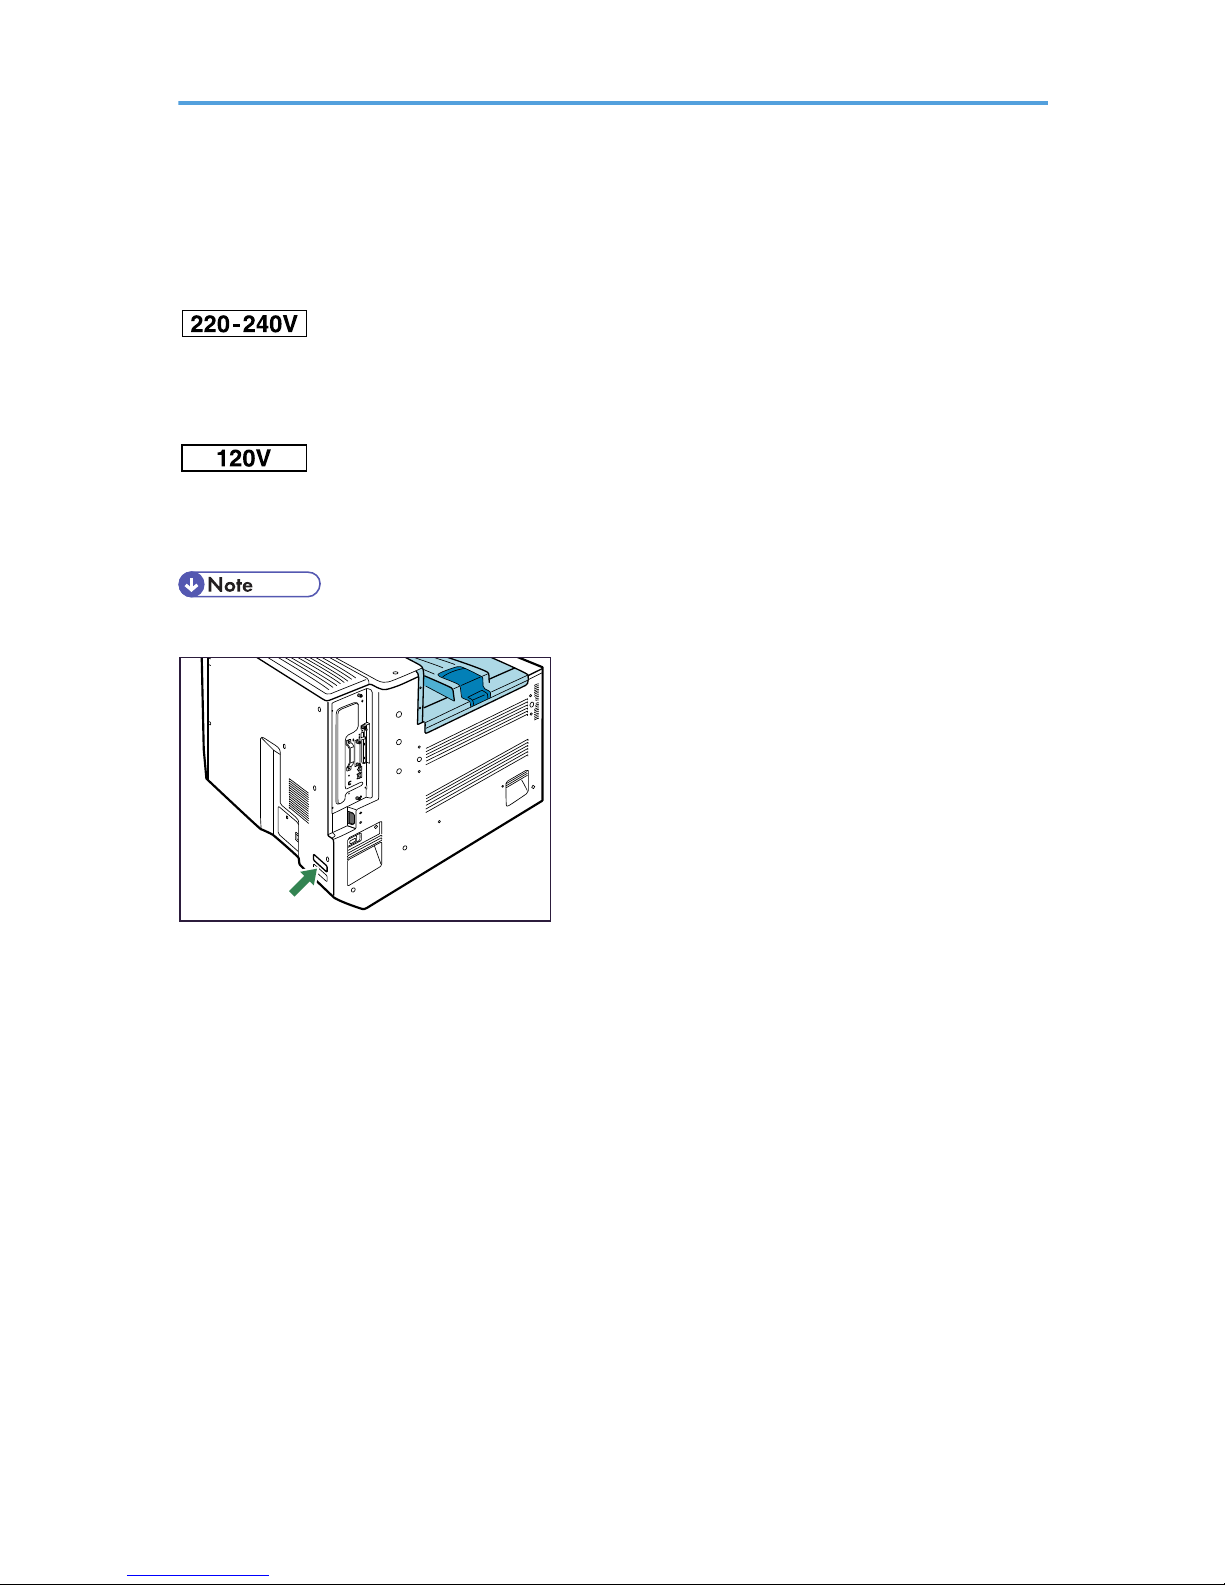
Model-Specific Information
In this manual, the following symbols indicate information that relates to a specific printer model.
This indicates information about the 220 to 240 V model printer.
Read if you have purchased this model.
This indicates information about the 120 V model printer.
Read if you have purchased this model.
• Check the label on the rear of the printer to identify the printer's model.
BEK189S
9

List of Options
This section provides a list of options for this printer, and how they are referred to as in this manual.
Option name Referred to as
HDD ENCRYPTION UNIT Type B HDD encryption unit
VM Card Type G VM card
Data Overwrite Security Unit Type J Data overwrite security unit
IEEE802.11a/g Interface Unit Type J,
IEEE802.11g Interface Unit Type K
Wireless LAN interface board
Data Storage Card Type A Data storage card
Memory Unit Type G 128 MB,
Memory Unit Type G 256 MB
SDRAM module
Hard Disk Drive Option Type 5000 Hard disk
Gigabit Ethernet Board Type A Gigabit Ethernet board
IEEE 1284 Interface Board Type A IEEE 1284 interface board
IPDS Unit Type 5100 IPDS unit
Finisher SR3030 2 tray finisher
Finisher SR790 1000-sheet finisher
Punch Unit Type 3260 NA 3/2,
Punch Unit Type 3260 EU 2/4,
Punch Unit Type 3260 SC
Punch unit
Output Jogger Unit Type 3260 Output jogger unit
Paper Feed Unit PB3040 1000-sheet paper feed unit
LCIT PB3050 2000-sheet paper feed unit
LCIT RT3000 1200-sheet paper feed unit
Bridge Unit BU3030 Bridge unit
10

Installing the Operating Instructions
The CD-ROM "Manuals" provided with this printer contains HTML version Operating Instructions. Follow
the instructions below to install it.
• System Requirements:
• Windows 95/98/Me, Windows 2000/XP/Vista, Windows Server 2003/2003 R2, or
Windows NT 4.0
• 800 × 600 or higher monitor resolution
• Web Browsers:
• Microsoft Internet Explorer 4.01 SP2 or later
• Netscape 6.2 or later
• Non-recommended browsers can display the simplified manual only.
• HTML manuals can also be viewed on a Macintosh.
1. Quit all applications currently running.
2. Insert the CD-ROM “Manuals” into the CD-ROM drive.
The installer starts.
Auto Run may not work under certain operating system settings. In this case, launch "Setup.exe" in
the CD-ROM root directory.
3. Select an interface language, and click [OK].
4. Click [Install manuals].
If you want to read manuals from the CD-ROM, click [Read HTML manuals] or [Read PDF manuals].
5. Follow the instructions on the screen to complete the installation.
6. Click [Finish] when the installation is complete.
7. Click [Exit].
• If you cannot install a manual, copy the "MANUAL_HTML" folder to your computer's hard drive, and
then run "Setup.exe".
• To delete an installed manual, on the [Start] menu, click All Programs, then [Product Name], and then
uninstall the data.
• If you are installing the manuals on a Macintosh, open the "Manuals.htm" file on the CD-ROM.
11

12
1. Guide to the Printer
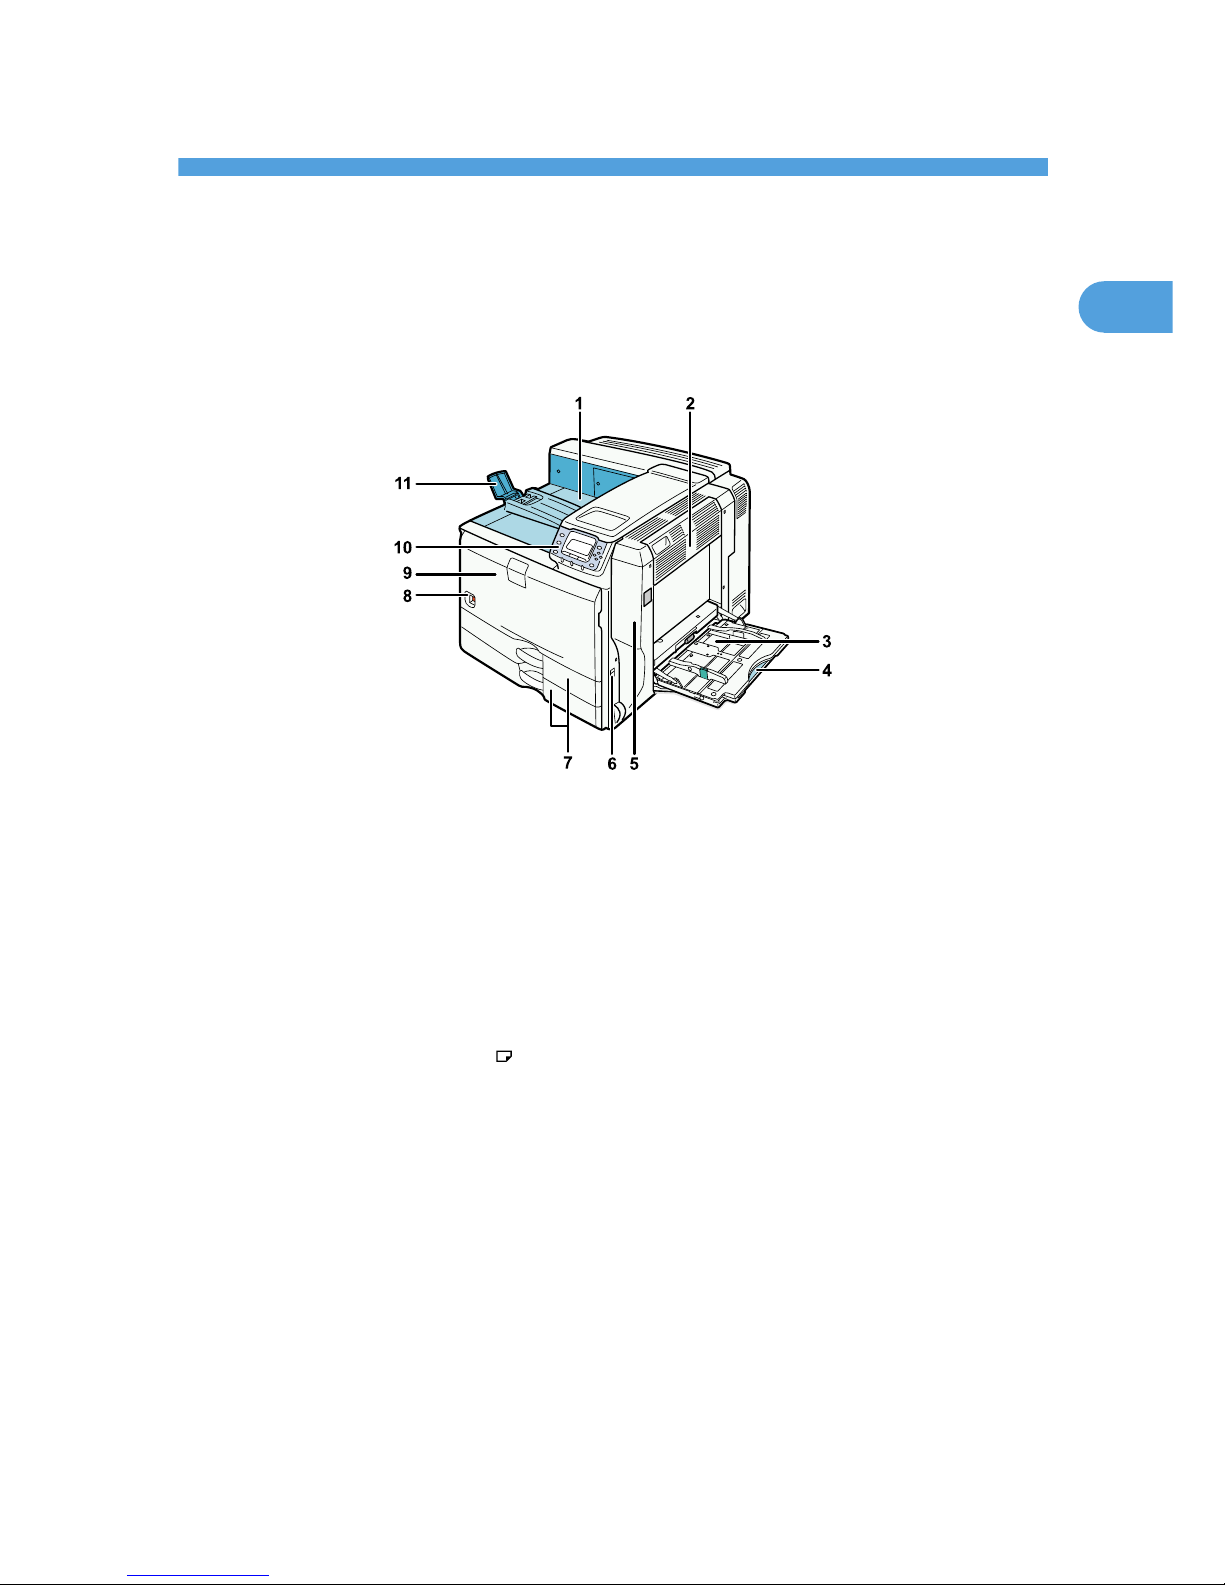
Exterior: Front View
This section explains names and functions of the parts on the front and right side of the printer.
BEK193S
1. Standard Output Tray
Printed pages are output here.
2. Upper Right Cover
Open this cover to remove jammed paper.
3. Bypass Tray
Up to 100 sheets of plain paper can be loaded.
4. Bypass Tray Extension
When loading paper larger than A4 , pull out the bypass tray extension.
5. Right Cover
Open this cover to remove jammed paper, or to replace Maintenance Kit B (the fusing unit and transfer unit).
6. Handle
Pull out this handle when lifting the printer.
7. Tray 1, Tray 2
Up to 550 sheets of plain paper can be loaded in each tray.
8. Power Switch
Use this switch to turn the power on and off.
9. Front Cover
Open this cover to replace the toner or Maintenance Kit A (the development unit).
13
1

10. Control Panel
Contains keys for printer control and a display that shows the printer's status.
11. Paper Support
Extend the paper support when printing to paper larger than A3 .
1. Guide to the Printer
14
1
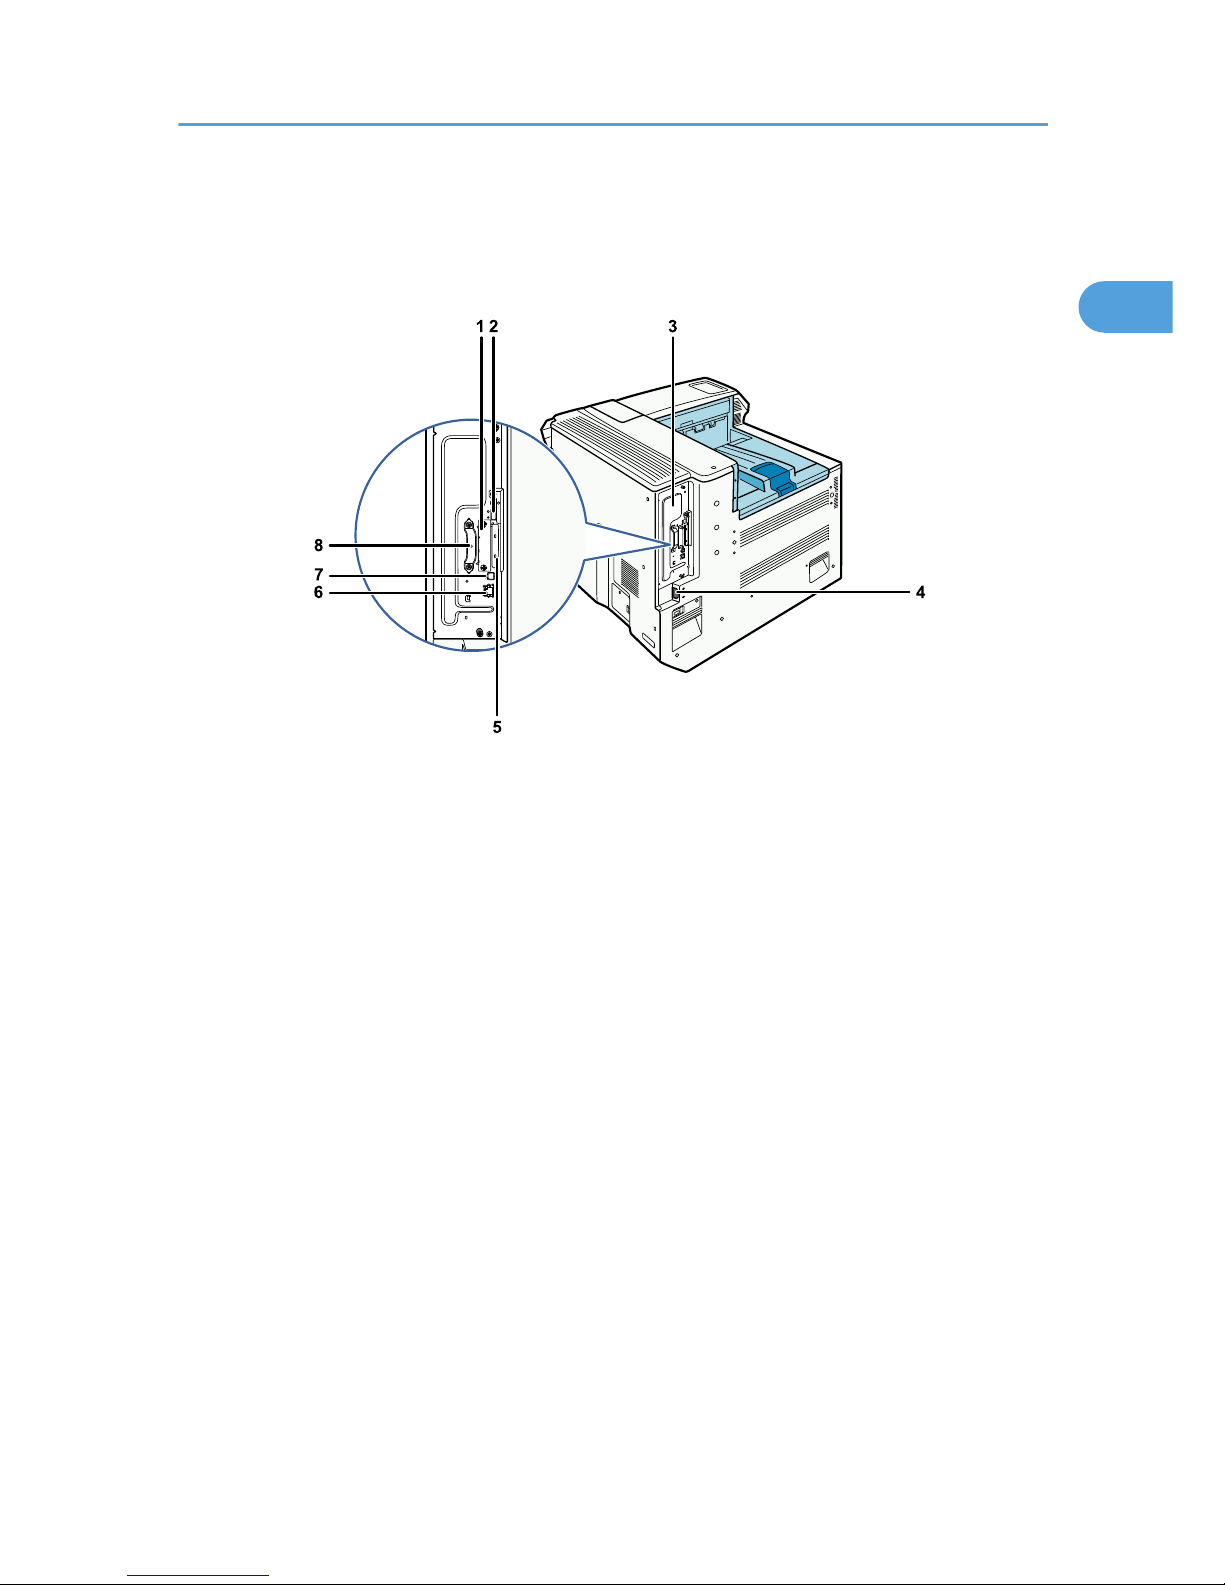
Exterior: Rear View
This section explains names and functions of the parts on the rear side of the printer.
BEK133S
1. Optional Interface Board Slot
Install an optional interface board. The Gigabit Ethernet board, Wireless LAN board, or IEEE1284 interface
board can be installed.
2. USB Port A
This port is usually not used.
3. Controller Board
Slide this out to install the hard disk or SDRAM module.
4. Power Connector
Connect the power cord to the printer. Insert the other end of the cable into an electrical outlet.
5. SD Card Slots
Remove the cover and install the SD cards. Install the data overwrite security unit, data storage card, or IPDS
unit in the upper slot. Install the HDD encryption unit or VM card in the lower slot.
6. Ethernet Port
Use a network interface cable to connect the printer to the network.
7. USB Port B
Use a USB cable to connect the printer to a computer.
8. Handle
Hold this handle when you pull out the controller board.
Exterior: Rear View
15
1
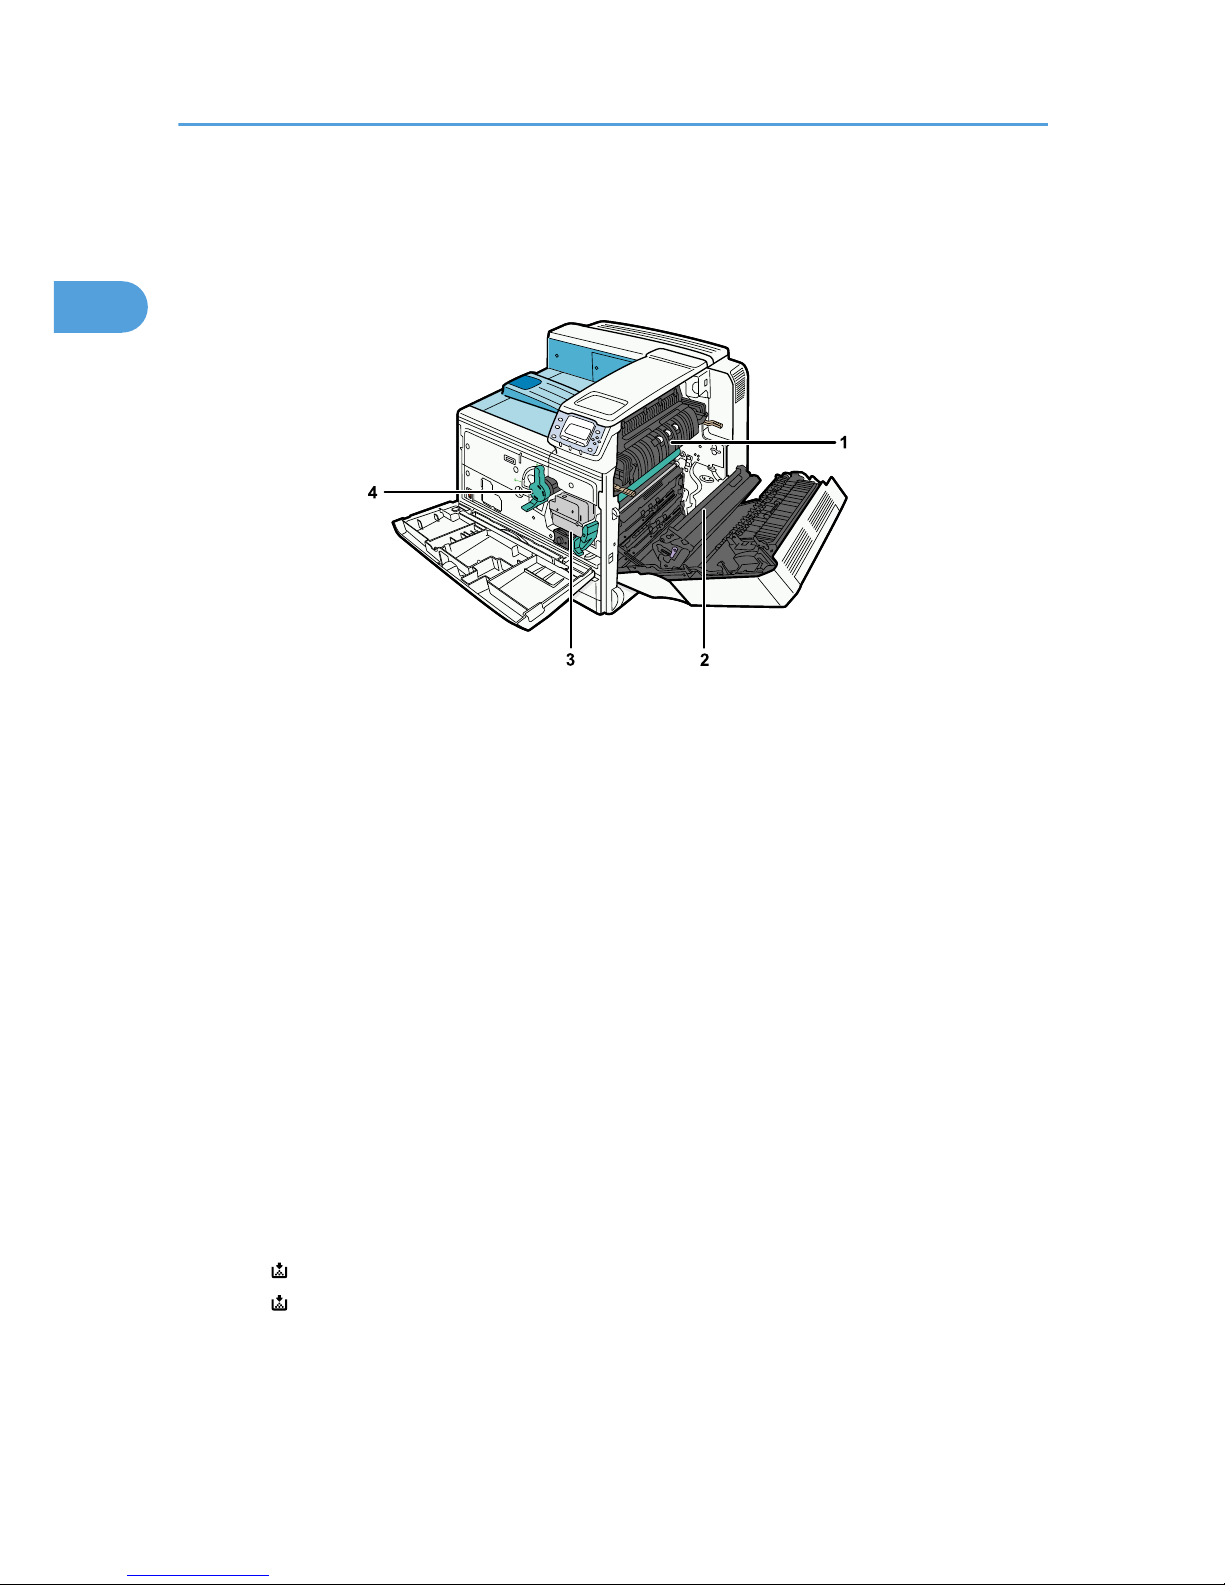
Interior
This section explains names and functions of the parts inside of the printer.
BEK002S
1. Fusing Unit
Replace the fusing unit when the following messages appear:
• "Replace Maint. Kit B soon."/ "A new kit is required."/ "Contact your local vendor."
• "Replace Maintenance Kit B."
The fusing unit is included in Maintenance Kit B.
2. Transfer Unit
Replace the transfer unit when the following messages appear:
• "Replace Maint. Kit B soon."/"A new kit is required."/ "Contact your local vendor."
• "Replace Maintenance Kit B."
The transfer unit is included in Maintenance Kit B.
3. Development Unit
Replace the development unit when the following messages appear:
• "Replace Maint. Kit A soon."/ "A new kit is required."/ "Contact your local vendor."
• "Replace Maintenance Kit A."
The development unit is included in Maintenance Kit A.
4. Toner
Replace the toner when the following messages appear:
• " Toner is almost empty."/ "Contact your local vendor."
• " Add toner"
1. Guide to the Printer
16
1
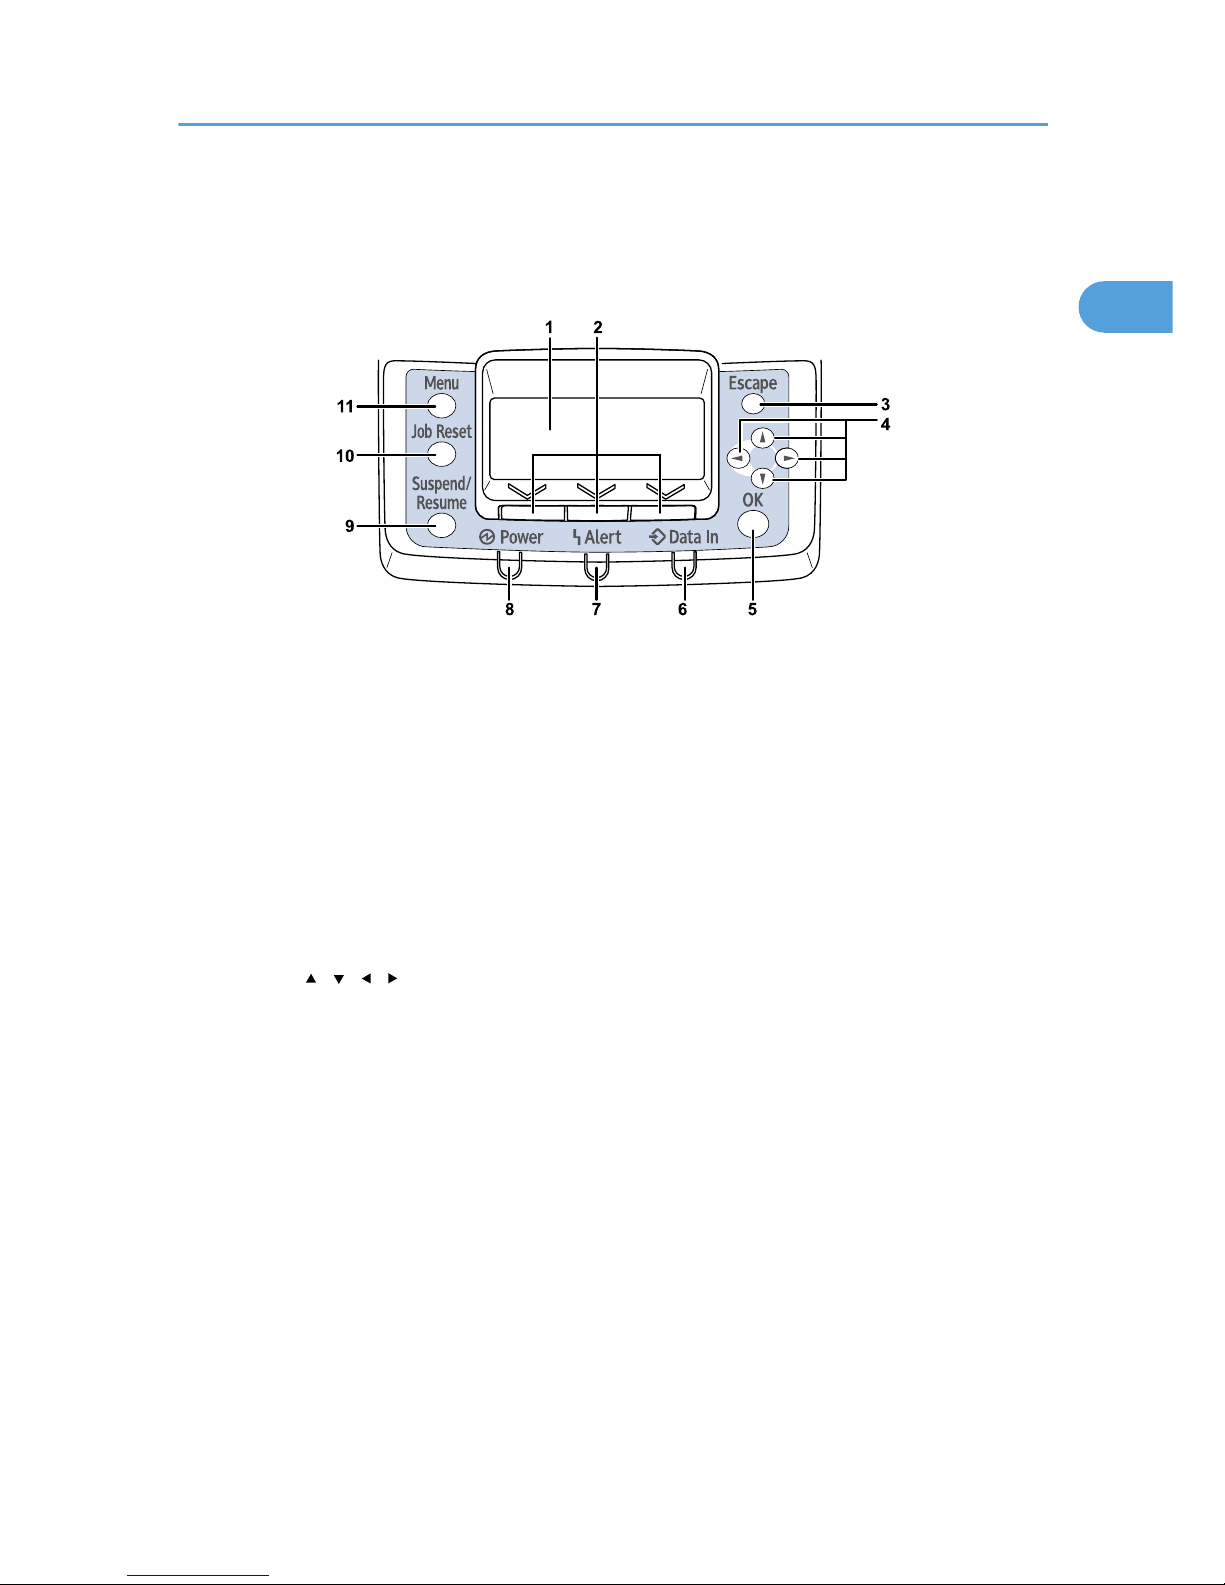
Control Panel
This section explains names and usage of the parts of the control panel.
BEK202S
1. Display
Displays current printer status and error messages.
Entering energy saver mode turns off the back light. For details about energy saver mode, see Software Guide.
2. Selection Keys
Correspond to the function items shown on the bottom line of the display.
3. [Escape] Key
Press this key to return to the previous display.
4. Scroll Keys
Press to move the cursor in each direction.
When the [ ] [ ] [ ] [ ] keys appear in this manual, press the scroll key of the same direction.
5. [OK] Key
Press this key to confirm settings or setting values, or move to the next menu level.
6. Data In indicator
Blinks when the printer is receiving data from a computer. Lights up if there is data to be printed.
7. Alert Indicator
Lights up in red or yellow when a printer error occurs.
Red: printing is not possible/possible but print quality cannot be ensured.
Yellow: printer requires maintenance, such as replacing consumables, shortly.
Follow the instructions that appear on the display.
8. Power Indicator
Remains lit while the power is on. It is unlit when the power is off or while the printer is in energy saver mode.
Control Panel
17
1

9. [Suspend/Resume] Key
Press this key to suspend a print job. The key lights up while the job is suspended. To resume the job, press this
key again.
10. [Job Reset] Key
Press this key to cancel an ongoing print job.
11. [Menu] Key
Press this key to configure and check the current printer settings.
While configuring settings, press this key to return to the initial screen.
1. Guide to the Printer
18
1
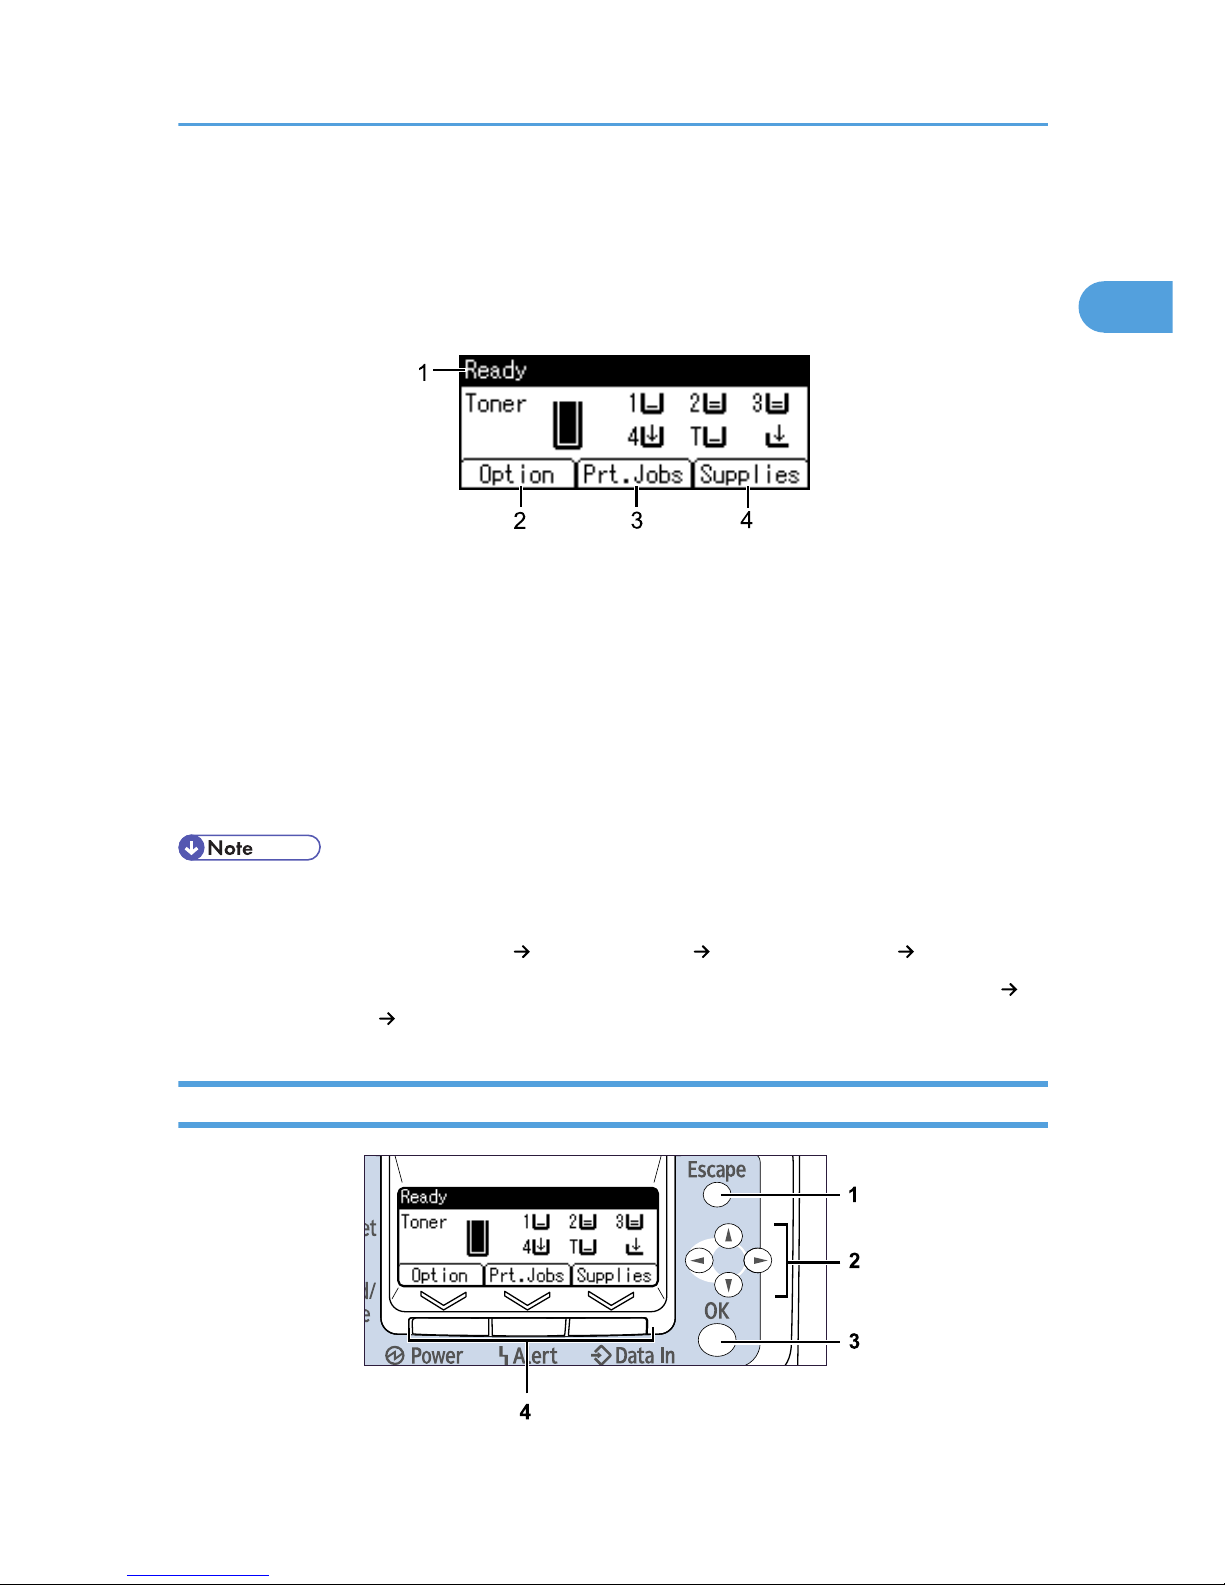
Display Panel
The display panel shows machine status, error messages, and function menus.
The items are highlighted when selected.
BEK302S
1. Operational Status or Messages
Displays the current printer status or messages.
2. [Option]
Press to display the status of options installed in the printer.
3. [Prt.Jobs]
Press to display print jobs sent from a computer. For details, see Software Guide.
4. [Supplies]
Press to display the menu of supplies for the printer.
• [Prt.Jobs] is displayed only when the hard disk is installed in the printer.
• By default, the remaining amount of toner and paper in each tray are displayed. You can change this
setting by selecting [Maintenance] [General Settings] [Display Supply Info] [Off].
• Adjust the brightness if the screen is dark. To adjust the display contrast, select [Maintenance]
[General Settings] [Display Contrast].
Reading the Display and Using Keys
BEK203S
Display Panel
19
1

1. [Escape] key
Cancels an operation or returns to the previous display.
2. Scroll keys
Move the cursor in each direction.
When the [ ] [ ] [ ] [ ] keys appear in this manual, press the scroll key of the same direction.
3. [OK] key
Confirms settings or setting values, or moves to the next menu level.
4. Selection keys
Correspond to the function items shown on the bottom line of the display.
When this manual instructs you to "press [Option]", press the left selection key.
1. Guide to the Printer
20
1

2. Installing Options
Available Options
By installing options, you can improve printer performance and expand the available features.
• Before installing options, the machine should be turned off and unplugged for at least an hour.
Components inside the machine become very hot, and can cause a burn if touched.
Order of Option Installation
When installing multiple options, the following order is recommended:
1. Attach the 1000-sheet paper feed unit or 2000-sheet paper feed unit
Either the 1000-sheet paper feed unit or 2000-sheet paper feed unit can be attached, but not both.
2. Attach the 1200-sheet paper feed unit
The 1000-sheet paper feed unit or 2000-sheet paper feed unit must have been attached.
To attach this option, contact your sales or service representative.
3. Install the SDRAM module
Install in the slot inside the controller board.
4. Install the hard disk
Install inside the controller board.
5. Install the interface board
Install in the slot of the controller board.
Only one interface board can be installed.
6. Insert SD card options
Insert in the SD card slot of the controller board.
There are two slots for SD cards.
Each slot supports different types of SD cards.
If you want to use two or more SD cards that can be inserted in the same slot, contact your sales or
service representative.
7. Attach the bridge unit
To attach this option, contact your sales or service representative.
8. Attach the 1000-sheet finisher or 2 tray finisher
Either the 1000-sheet finisher or 2 tray finisher can be attached, but not both.
21
2
The bridge unit and the 1000-sheet paper feed unit or 2000-sheet paper feed unit must have been
attached.
To attach this option, contact your sales or service representative.
9. Install the punch unit in the 2 tray finisher
To attach this option, contact your sales or service representative.
10. Attach the output jogger unit to the 2 tray finisher
To attach this option, contact your sales or service representative.
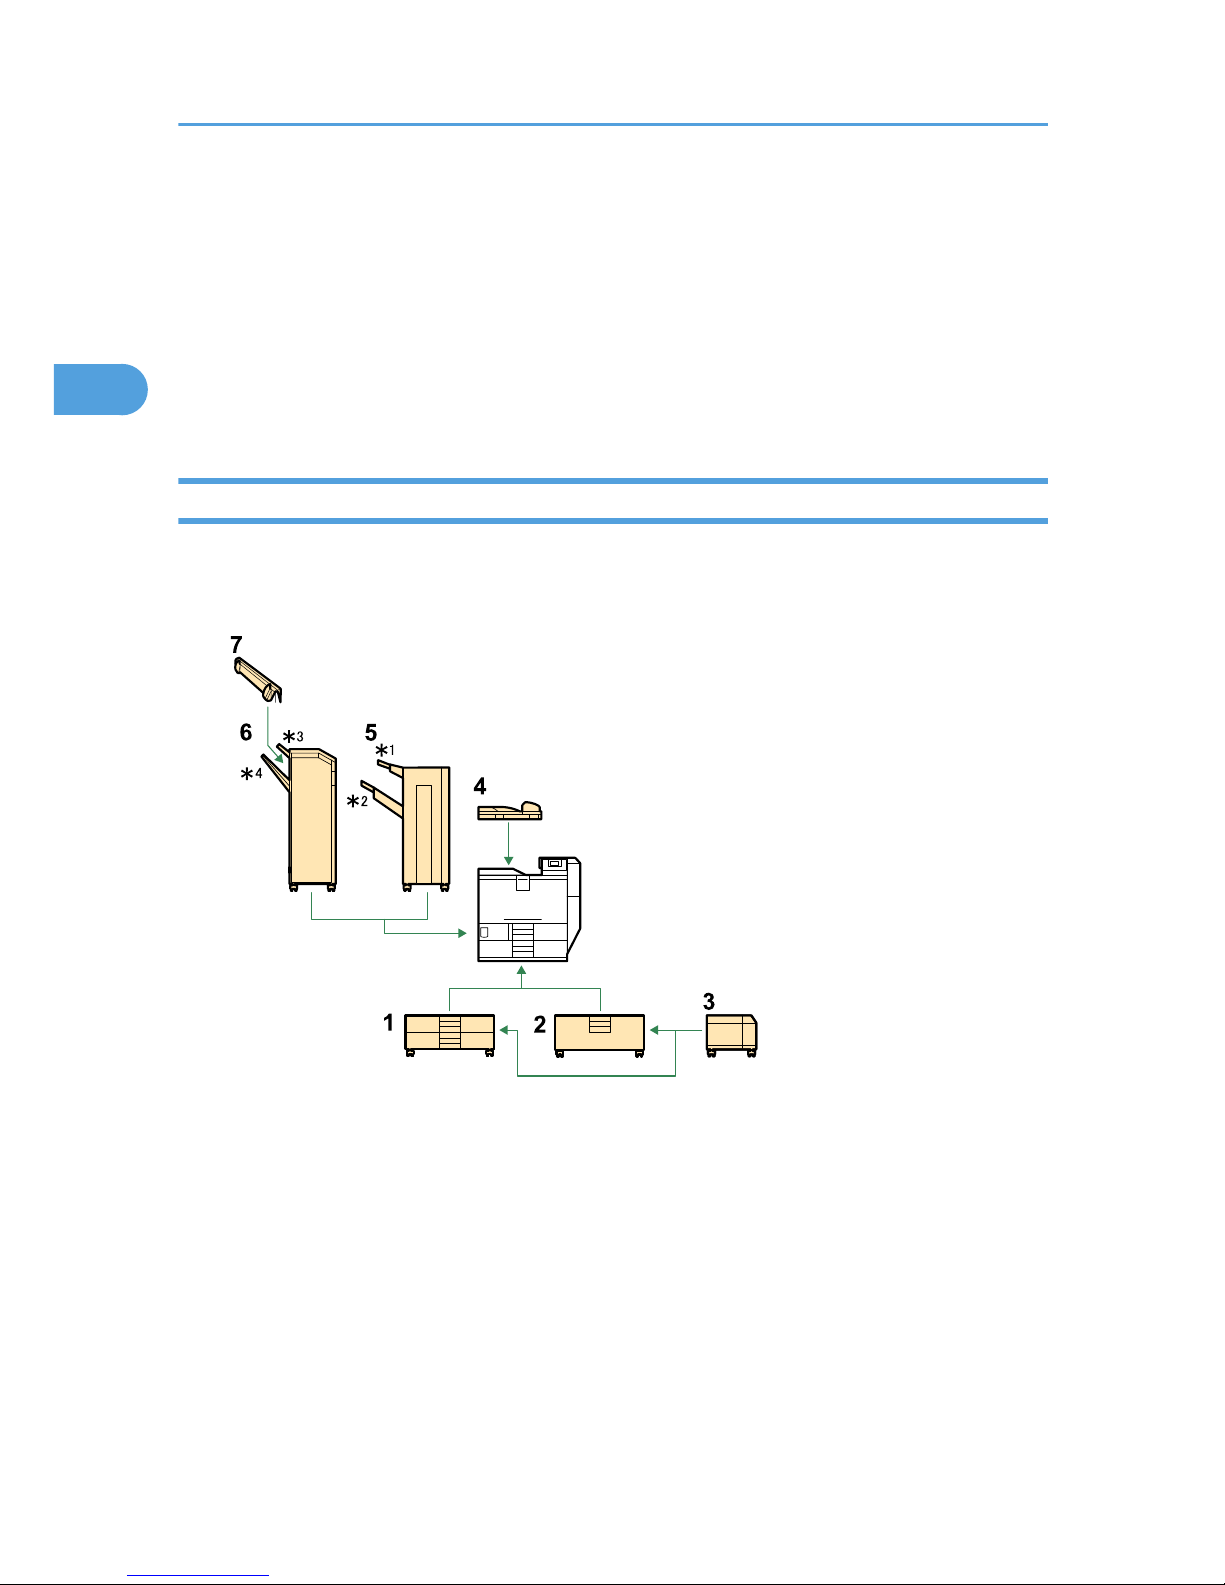
Where to Install Options
Install options in the locations shown in the following illustrations.
External options
BEK188S
1. 1000-sheet paper feed unit
Attach to the underside of the printer. See “Attaching the Paper Fed Unit”.
2. 2000-sheet paper feed unit
Attach to the underside of the printer. See “Attaching the Paper Fed Unit”.
3. 1200-sheet paper feed unit
Attach to the right side of the 1000-sheet paper feed unit or 2000-sheet paper feed unit.
To attach this option, contact your sales or service representative.
4. Bridge unit
Remove the output tray and attach the bridge unit.
2. Installing Options
22
2
To attach this option, contact your sales or service representative.
5. 1000-sheet finisher
Attach to the left side of the printer.
• *1: Finisher upper tray
• *2: Finisher shift tray
To attach this option, contact your sales or service representative.
6. 2 Tray finisher
Attach to the left side of the printer.
• *3: Finisher upper tray
• *4: Finisher shift tray
To attach this option, contact your sales or service representative.
7. Output jogger unit
Attach to the 2 tray finisher.
To attach this option, contact your sales or service representative.
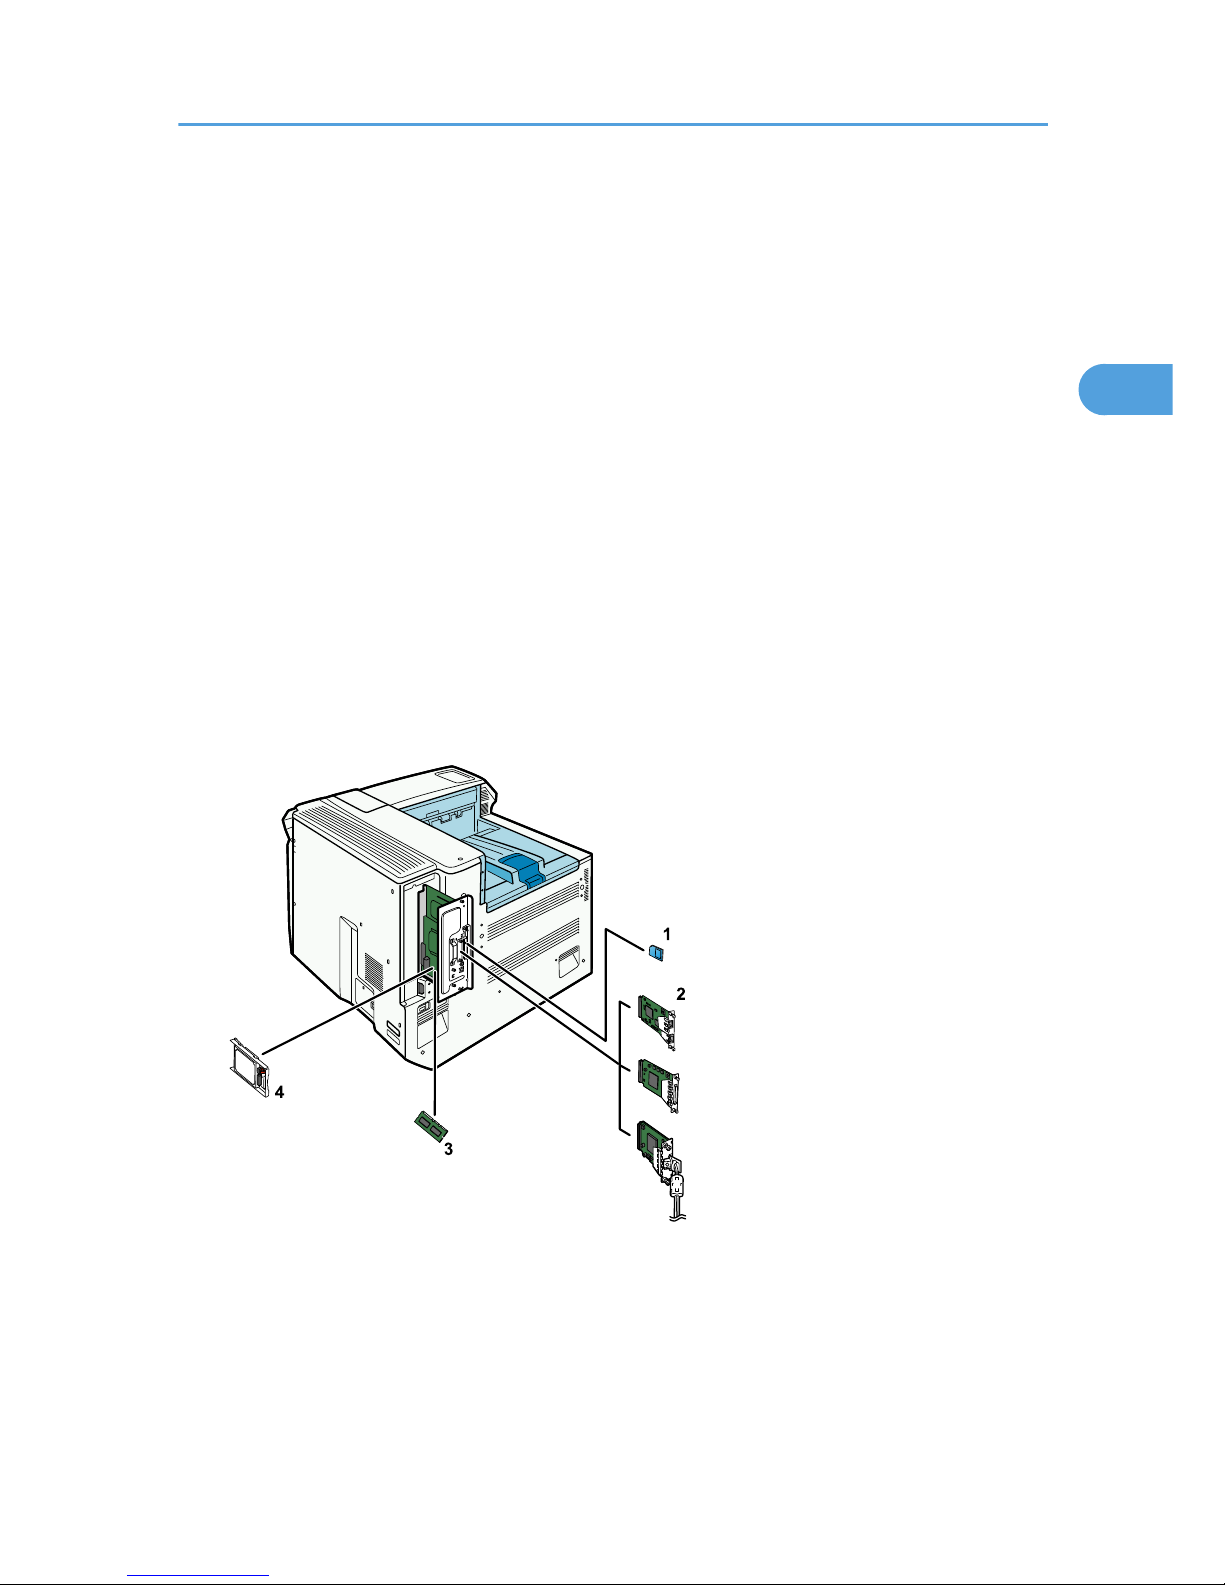
Internal options
BEK186S
1. Data overwrite security unit/data storage card/IPDS unit/HDD encryption unit
If you want to use two or more SD cards that can be inserted in the same slot, contact your sales
or service representative.
• Upper slot: data overwrite security unit, data storage card, or IPDS unit
Available Options
23
2

• Lower slot: HDD encryption unit or VM card
See “Installing SD Card Options”.
2. Optional interface board
Only one interface board can be installed.
• Gigabit Ethernet board
• IEEE 1284 interface board
• IEEE 802.11 g interface board
• IEEE 802.11 a/g interface board
See “Installing the Interface Units”.
3. SDRAM module
See "Installing the Memory Expansion Units".
4. Hard disk
See "Installing the Memory Expansion Units".
• For the specifications of each option, see "Specifications".
• p.26 "Attaching the Paper Feed Unit"
• p.46 "Installing SD Card Options"
• p.37 "Installing the Interface Units"
• p.30 "Installing the Memory Expansion Units"
• p.206 "Specifications"
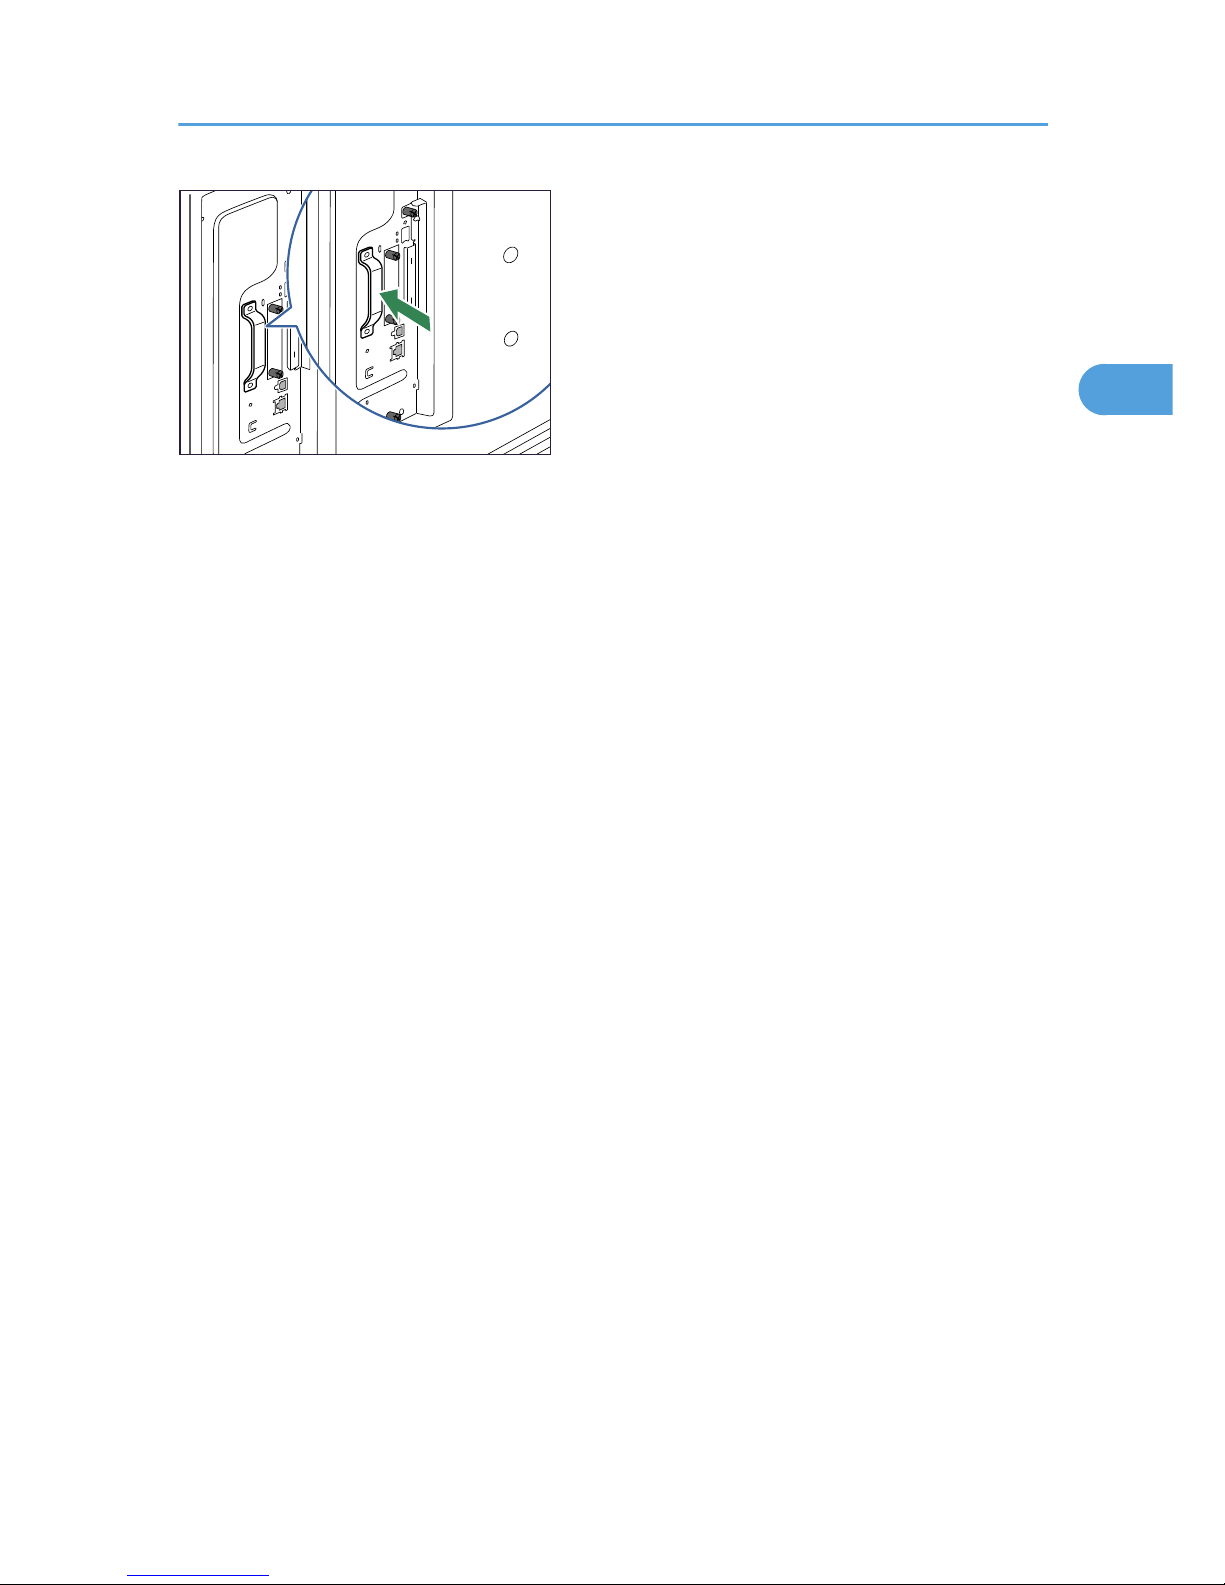
Cautions When Re-installing the Controller Board
When installing options inside the controller board, handle the board carefully while it is outside the printer.
To re-install the controller board, holding the handle in the center of the board, push the board firmly into
the printer.
• The following may occur if the controller board is not correctly installed:
1. All control panel indicators are lit.
2. No control panel indicators are lit.
3. The "SC670" error message appears on the display.
2. Installing Options
24
2
BEK156S
Available Options
25
2
Attaching the Paper Feed Unit
This section describes how to attach the 1000-sheet paper feed unit or 2000-sheet paper feed unit to the
printer. The procedure is the same for both units. The 1000-sheet paper feed unit is used as an example.
• The printer weights approximately 73 kg (161 lb.).
• Four or more people are required to move the printer. Hold the handles located on both sides, and
then lift it slowly. Lifting it carelessly or dropping it may cause an injury.
• It is dangerous to handle the plug with wet hands. Doing this may result in receiving an electric shock.
• Before moving the machine, unplug the power cord from the outlet. If the cord is unplugged abruptly,
it could become damaged. Damaged plugs or cords can cause an electrical or fire hazard.
• When attaching multiple options, attach the paper feed unit first.
• Either the 1000-sheet paper feed unit or 2000-sheet paper feed unit can be attached, but not both.
• When the 1000-sheet paper feed unit or the 2000-sheet paper feed unit is attached, you can also
attach the 1200-sheet paper feed unit. To attach the 1200-sheet paper feed unit, contact your sales
or service representative.
• Before using the new paper feed unit, you must configure settings in the printer driver.
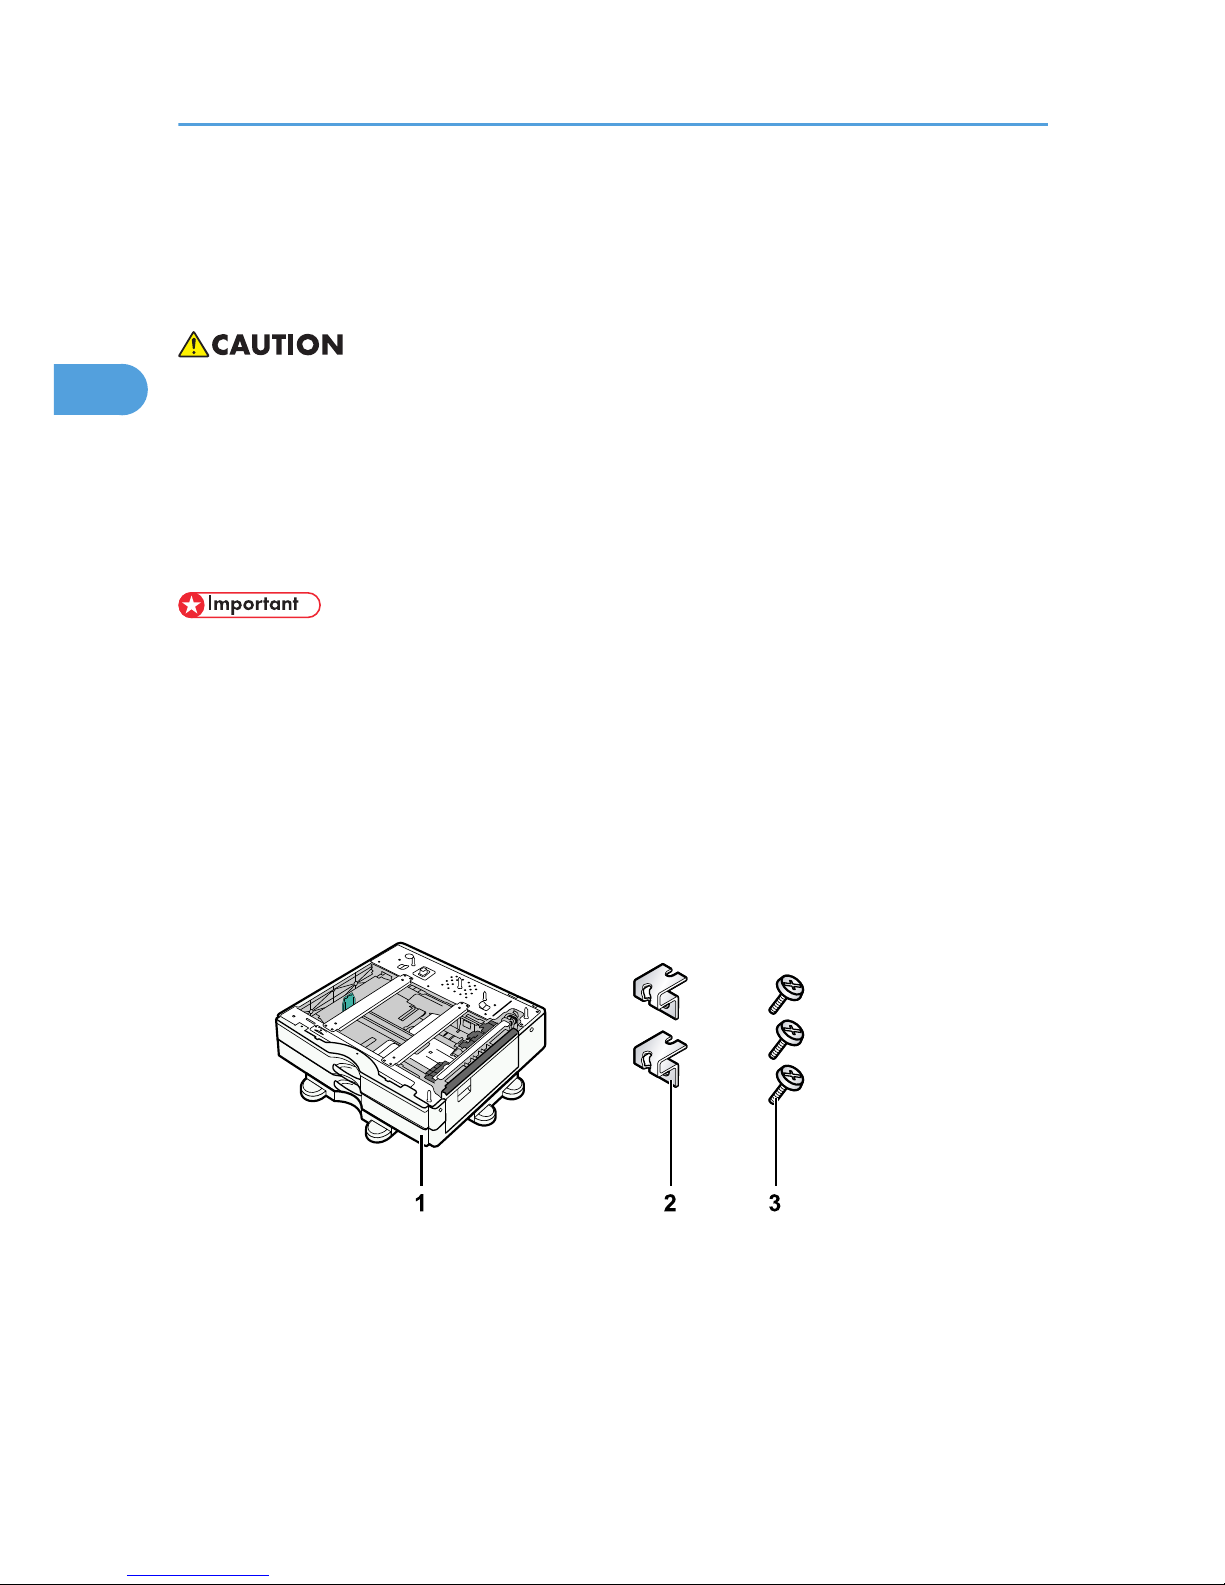
1. Check the contents of the package.
• For 1000-sheet paper feed unit:
BEK242S
1. 1000-sheet paper feed unit
2. Two Brackets
3. Three Screws
• For 2000-sheet paper feed unit:
2. Installing Options
26
2
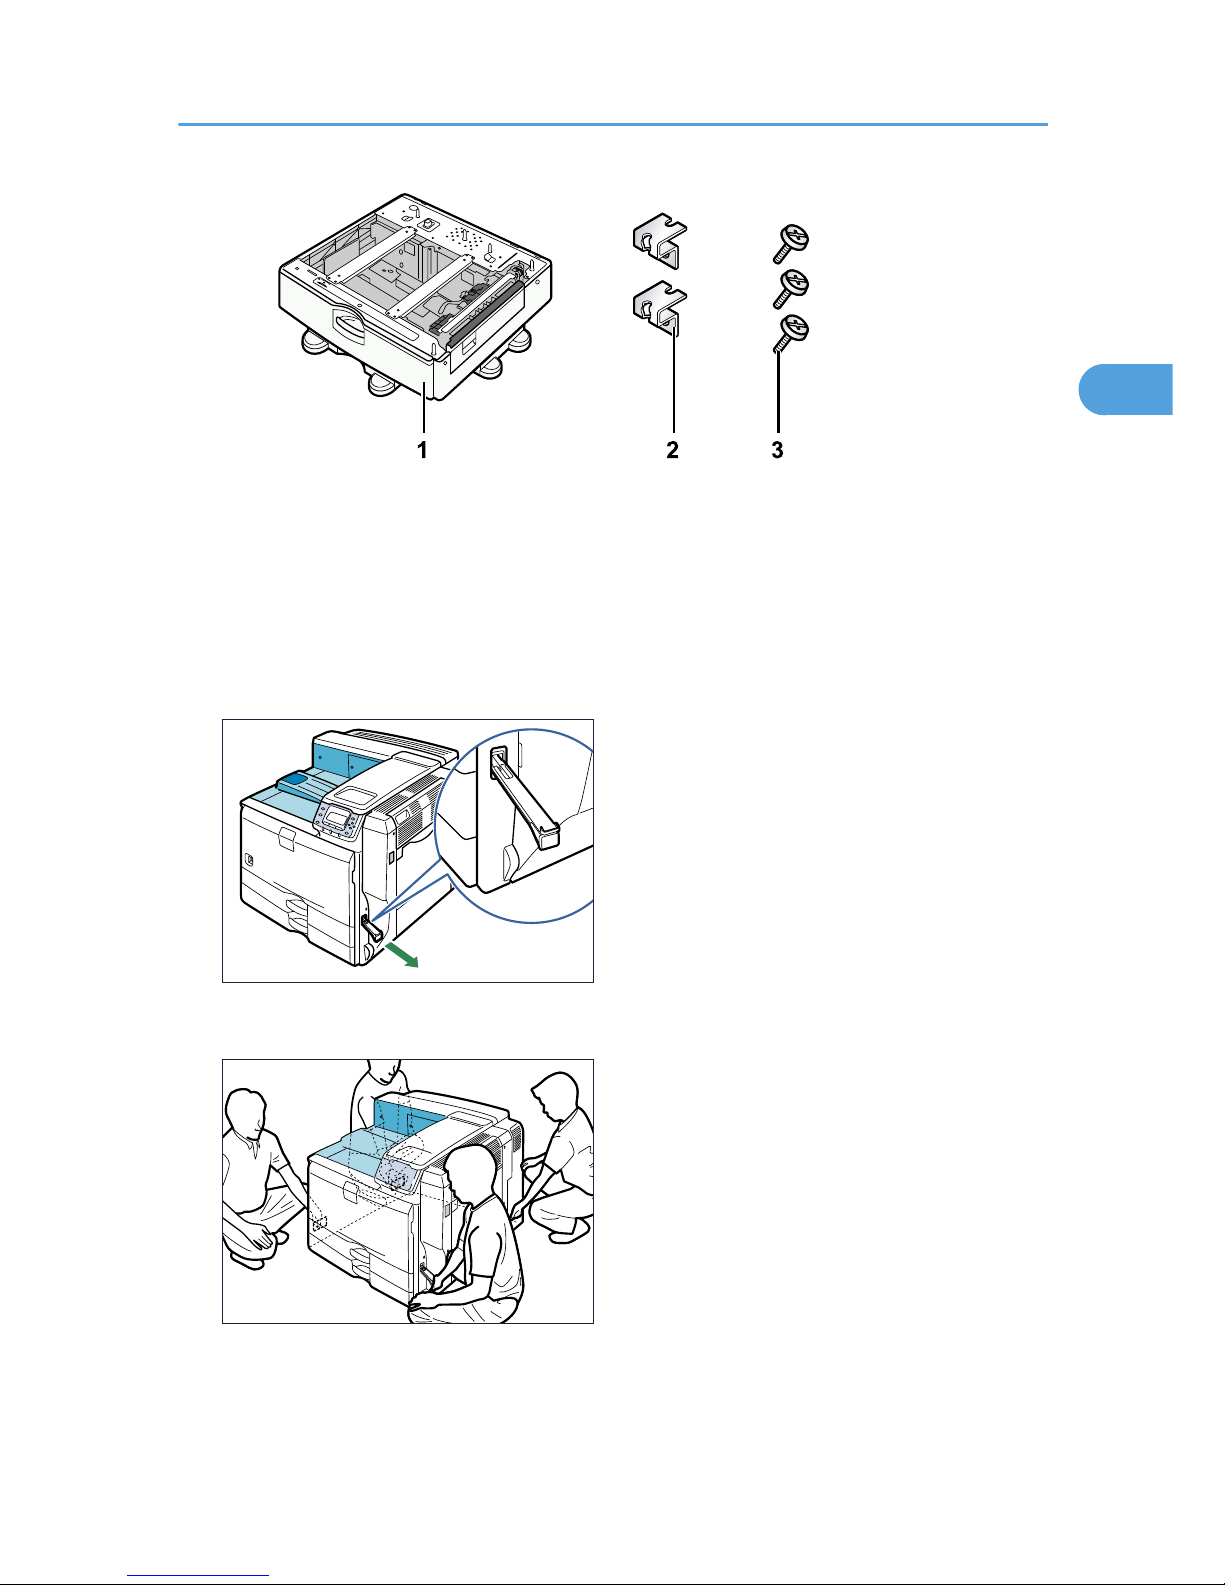
BEK241S
1. 2000-sheet paper feed unit
2. Two Brackets
3. Three Screws
2. Turn the printer off and unplug the power cord.
3. Remove the packaging from the paper feed unit.
4. Pull out the handle from the right side of the printer.
BEK011S
5. Lift the printer using the handles on both sides.
BEK012S
The printer should always be lifted by at least four people.
Attaching the Paper Feed Unit
27
2
6. Align the front of the printer with the front of the paper feed unit, and slowly lower it.
Place it so that it is held firmly in place by the vertical pins.
BEK102S
Return the handle you pulled out from the printer to its original position.
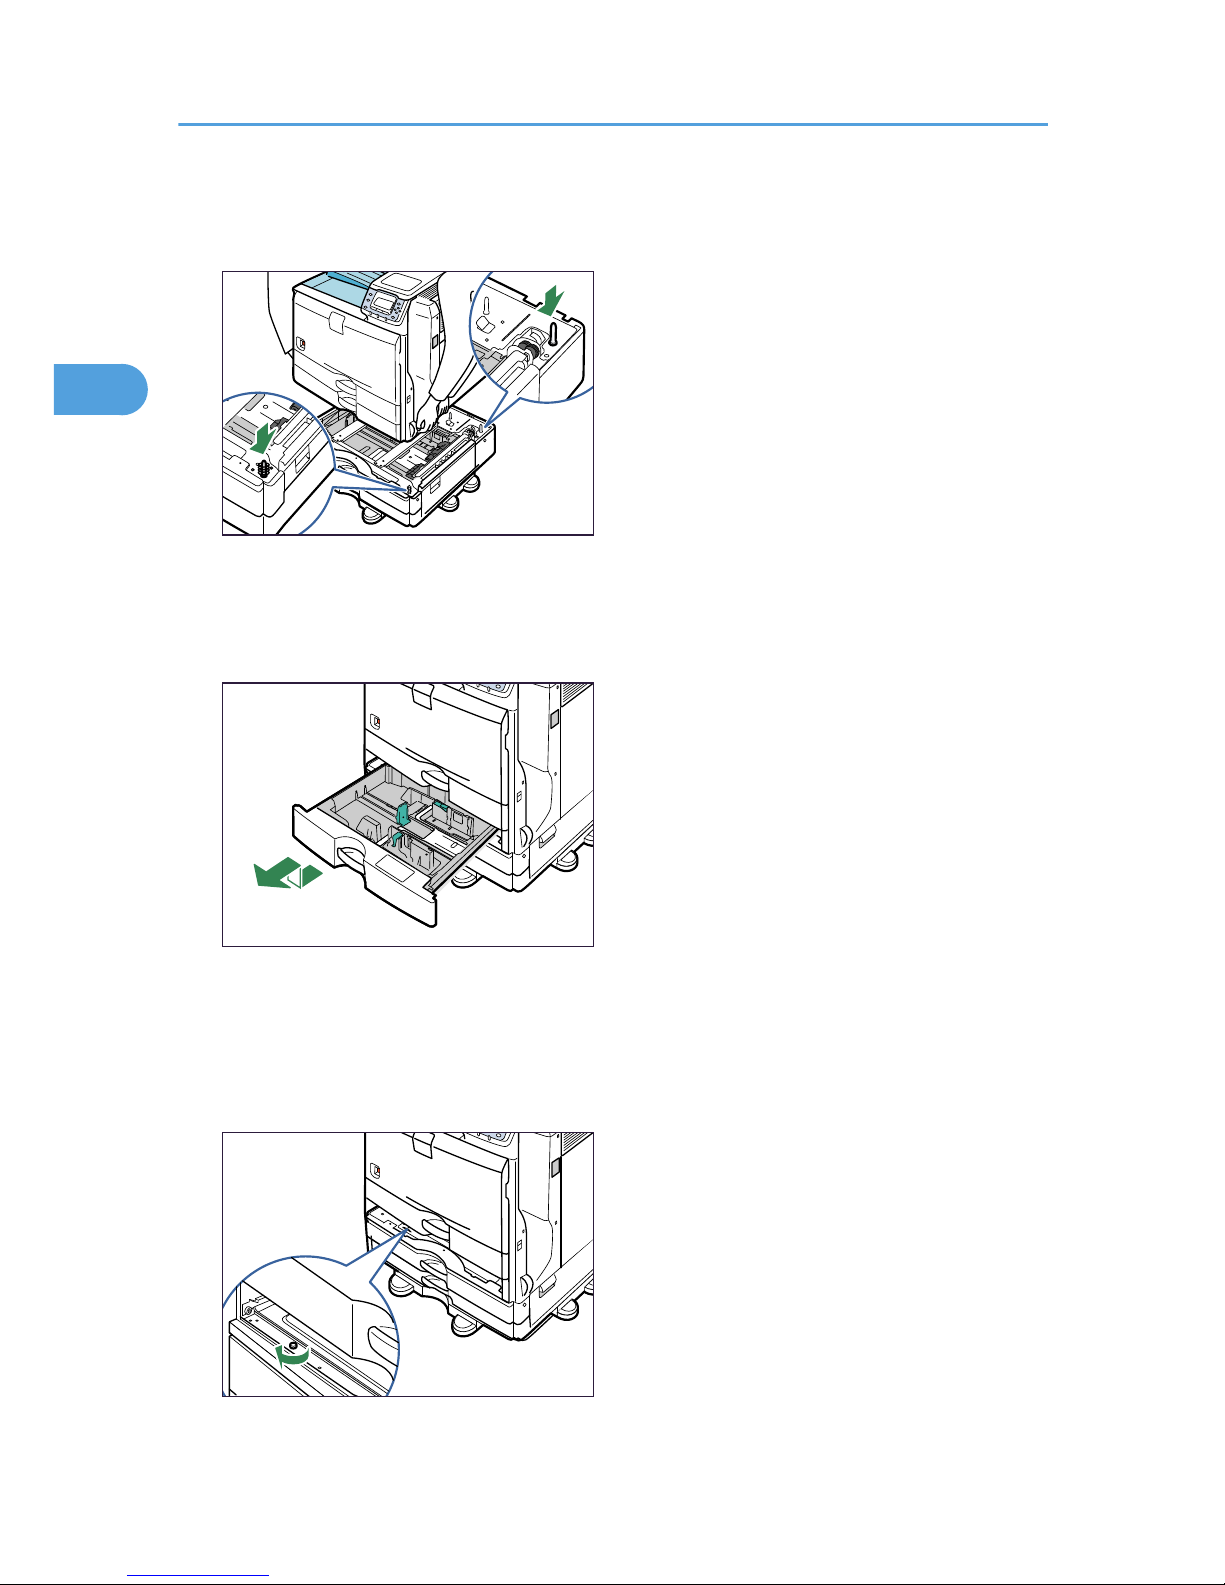
7. Pull out tray 2 of the printer slowly until it stops, lift the front of the tray slightly, and then
pull out the tray completely.
BEK103S
Place the tray on a flat surface.
8. Attach a screw in the hole on the left side of the tray opening to secure the printer to the
paper feed unit.
Tighten the screw firmly using a coin.
BEK104S
2. Installing Options
28
2
 Loading...