


TABLE OF CONTENTS
Draft 2013/03/26
How to Read This Manual.................................................................................................................................6
Introduction.....................................................................................................................................................6
Legal Prohibition.............................................................................................................................................6
Disclaimer........................................................................................................................................................6
Type-Specific Functions.................................................................................................................................7
Model Names................................................................................................................................................7
Model Names................................................................................................................................................7
Model-Specific Information...............................................................................................................................8
Important Safety Instructions .........................................................................................................9
User Information on Electrical & Electronic Equipment...............................................................................9
Environmental Advice for Users..................................................................................................................10
Note for the Battery and/or Accumulator Symbol (For EU countries only)............................................11
Notes to Users of Facsimile Unit.................................................................................................................11
NOTICE TO USERS (NEW ZEALAND).....................................................................................................11
Important Safety Instructions .......................................................................................................13
Notes to Users in the State of California....................................................................................................13
ENERGY STAR Program..................................................................................................................................14
1. Guide to the Machine
Guide to Components......................................................................................................................................17
Exterior..........................................................................................................................................................17
Exterior..........................................................................................................................................................19
Exterior..........................................................................................................................................................20
Interior...........................................................................................................................................................21
Control Panel................................................................................................................................................22
Control Panel................................................................................................................................................23
Installing the Driver and Software...................................................................................................................25
Quick Install..................................................................................................................................................25
Installing the Printer Driver...........................................................................................................................25
Upgrading or Deleting the Printer Driver...................................................................................................26
Installing the Smart Organizing Monitor...................................................................................................27
Initial Setup.......................................................................................................................................................28
What is Smart Organizing Monitor?..............................................................................................................29
1

2. Loading Paper
Draft 2013/03/26
Supported Paper..............................................................................................................................................31
Non-Recommended Paper Types...................................................................................................................32
Print Area..........................................................................................................................................................33
Loading Paper..................................................................................................................................................36
Specifying Paper Type and Paper Size Using Control Panel...................................................................38
Specifying Paper Type and Paper Size Using Smart Organizing Monitor.............................................40
Placing Originals..............................................................................................................................................42
About Originals............................................................................................................................................42
Placing Originals on the Exposure Glass...................................................................................................44
Placing Originals in the Auto Document Feeder.......................................................................................45
3. Printing Documents
Basic Operation...............................................................................................................................................47
Printing on Both Sides of Sheets..................................................................................................................48
Canceling a Print Job...................................................................................................................................49
If a Paper Mismatch Occurs............................................................................................................................51
Continuing Printing Using Mismatched Paper...........................................................................................51
Continuing Printing Using Mismatched Paper...........................................................................................51
Continuing Printing Using Mismatched Paper...........................................................................................52
Resetting the Print Job..................................................................................................................................52
Resetting the Print Job..................................................................................................................................53
Resetting the Print Job..................................................................................................................................53
Preventing Paper Mismatch Errors..............................................................................................................53
4. Copying Originals
Copier Mode Screen.......................................................................................................................................55
Basic Operation...............................................................................................................................................56
Canceling a Copy.......................................................................................................................................57
Basic Operation...............................................................................................................................................58
Canceling a Copy.......................................................................................................................................58
Making Enlarged or Reduced Copies............................................................................................................60
Specifying Reduce/Enlarge.......................................................................................................................60
Specifying Reduce/Enlarge.......................................................................................................................61
Combining Multiple Pages..............................................................................................................................62
2

Specifying Combine for Copying...............................................................................................................63
Draft 2013/03/26
Copying Both Sides of an ID Card onto One Side of Paper........................................................................65
Copying an ID Card....................................................................................................................................65
Copying an ID Card....................................................................................................................................68
Making 2-sided Copies...................................................................................................................................70
Specifying 2 Sided Copying.......................................................................................................................70
Specifying the Scan Settings...........................................................................................................................73
Adjusting Image Density..............................................................................................................................73
Adjusting Image Density..............................................................................................................................73
Selecting the Document Type According to Original...............................................................................74
5. Scanning from a Computer
Basic Operation...............................................................................................................................................77
Using TWAIN scanner................................................................................................................................77
TWAIN Scanning.........................................................................................................................................77
Basic Operation for WIA Scanning...........................................................................................................79
6. Sending and Receiving a Fax
Fax Mode Screen.............................................................................................................................................81
Setting the Date and Time................................................................................................................................82
Entering Characters..........................................................................................................................................83
Registering Fax Destinations............................................................................................................................84
Registering Fax Destinations.......................................................................................................................84
Modifying or Deleting Fax Destinations.....................................................................................................85
Configuring Fax Destinations Using Smart Organizing Monitor.............................................................85
Sending a Fax..................................................................................................................................................87
Selecting Transmission Mode.....................................................................................................................87
Basic Operation for Sending a Fax............................................................................................................88
Specifying the Fax Destination....................................................................................................................90
Useful Sending Functions............................................................................................................................93
Specifying the Scan Settings.......................................................................................................................96
Using the Fax Function from a Computer (PC FAX).......................................................................................98
Basic Operation for Sending Faxes from a Computer..............................................................................98
Configuring Transmission Settings..............................................................................................................99
Configuring the PC FAX Address Book....................................................................................................100
3

Editing a Fax Cover Sheet........................................................................................................................101
Draft 2013/03/26
Receiving a Fax..............................................................................................................................................102
Selecting Reception Mode.......................................................................................................................102
Lists/Reports Related to Fax.........................................................................................................................105
7. Configuring the Machine Using the Control Panel
Basic Operation.............................................................................................................................................107
Copier Features Settings...............................................................................................................................108
Fax Features Settings.....................................................................................................................................111
Address Book Settings...................................................................................................................................117
System Settings...............................................................................................................................................118
Printing Lists/Reports.....................................................................................................................................124
Printing the Configuration Page................................................................................................................124
Types of Report..........................................................................................................................................124
Printer Features Settings.................................................................................................................................125
8. Configuring the Machine Using Smart Organizing Monitor
Checking the System Information.................................................................................................................127
Checking the Status Information...............................................................................................................127
Checking the Status Information...............................................................................................................128
Checking the Status Information...............................................................................................................129
Checking the Status Information...............................................................................................................130
Checking the Status Information...............................................................................................................131
Printing the Configuration Page................................................................................................................132
Configuring the Machine Settings................................................................................................................133
Tab Settings................................................................................................................................................133
Updating the Firmware..................................................................................................................................135
9. Maintaining the Machine
Replacing the Print Cartridge........................................................................................................................137
Cautions When Cleaning..............................................................................................................................139
Cleaning the Inside of the Machine.............................................................................................................140
Cleaning the Exposure Glass........................................................................................................................141
Cleaning the Auto Document Feeder...........................................................................................................142
10. Troubleshooting
Common Problems.........................................................................................................................................143
4

Paper Feed Problems.....................................................................................................................................144
Draft 2013/03/26
Removing Printing Jams.............................................................................................................................145
Removing Scanning Jams.........................................................................................................................149
Print Quality Problems...................................................................................................................................151
Checking the Condition of the Machine..................................................................................................151
Printer Problems.............................................................................................................................................152
Print Positions Do Not Match Display Positions......................................................................................153
Copier Problems............................................................................................................................................154
Scanner Problems..........................................................................................................................................155
Fax Problems..................................................................................................................................................156
Error and Status Indicate on the Control Panel...........................................................................................158
Messages on the Screen...........................................................................................................................158
Codes on the Screen.................................................................................................................................162
Error and Status Messages Appear on the Smart Organizing Monitor...................................................164
Error and Status Messages Appear in the PC FAX Window......................................................................166
11. Appendix
Notes About the Toner..................................................................................................................................167
Moving and Transporting the Machine.......................................................................................................168
Disposal......................................................................................................................................................168
Where to Inquire.......................................................................................................................................168
Consumables..................................................................................................................................................169
Print Cartridge............................................................................................................................................169
Specifications of the Machine......................................................................................................................170
General Function Specifications..............................................................................................................170
Printer Function Specifications..................................................................................................................172
Copier Function Specifications.................................................................................................................172
Scanner Function Specifications...............................................................................................................173
Fax Function Specifications......................................................................................................................174
Trademarks.....................................................................................................................................................175
INDEX...........................................................................................................................................................177
5

How to Read This Manual
Draft 2013/03/26
Introduction
This manual contains detailed instructions and notes on the operation and use of this machine. For your
safety and benefit, read this manual carefully before using the machine. Keep this manual in a handy
place for quick reference.
Legal Prohibition
Do not copy or print any item for which reproduction is prohibited by law.
Copying or printing the following items is generally prohibited by local law:
bank notes, revenue stamps, bonds, stock certificates, bank drafts, checks, passports, driver's licenses.
The preceding list is meant as a guide only and is not inclusive. We assume no responsibility for its
completeness or accuracy. If you have any questions concerning the legality of copying or printing
certain items, consult with your legal advisor.
Disclaimer
Contents of this manual are subject to change without prior notice.
To the maximum extent permitted by applicable laws, in no event will the manufacturer be liable for any
damages whatsoever arising out of failures of this machine, losses of the registered data, or the use or
non-use of this product and operation manuals provided with it.
Make sure that you always copy or have backups of the data registered in this machine. Documents or
data might be erased due to your operational errors or malfunctions of the machine.
In no event will the manufacturer be responsible for any documents created by you using this machine or
any results from the data executed by you.
For good output quality, the manufacturer recommends that you use genuine toner from the
manufacturer.
Two kinds of size notation are employed in this manual.
Some illustrations or explanations in this guide may differ from your product due to improvement or
change in the product.
6 meihua-p2_mf2_com_user_guide_00106384_eng.xml

FiO
Type-Specific Functions
TiO
P
Draft 2013/03/26
Type 1 Type 2
Model SP 110SF SP 111SF
PC FAX Not Available Available
Model Names
SP110SU: Type 1
SP111SU: Type 2
Model Names
SP110: Type 1
SP111: Type 2
meihua-p2_mf2_com_user_guide_00106384_eng.xml 7

Model-Specific Information
CXP042
Draft 2013/03/26
This section explains how you can identify the region your machine belongs to.
There is a label on the rear of the machine, located in the position shown below. The label contains
details that identify the region your machine belongs to. Read the label.
The following information is region-specific. Read the information under the symbol that corresponds to
the region of your machine.
(mainly Europe and Asia)
If the label contains the following, your machine is a region A model:
• CODE XXXX -27, -29
• 220-240V
(mainly North America)
If the label contains the following, your machine is a region B model:
• CODE XXXX -17
• 120V
• Dimensions in this manual are given in two units of measure: metric and inch. If your machine is a
Region A model, refer to the metric units. If your machine is a Region B model, refer to the inch
units.
8 meihua-p2_mf2_com_user_guide_00106385_eng.xml

Important Safety Instructions
Draft 2013/03/26
User Information on Electrical & Electronic Equipment
Users in the countries where this symbol shown in this section has been specified in national law on collection and treatment of E-waste
Our Products contain high quality components and are designed to facilitate recycling.
Our products or product packaging are marked with the symbol below.
The symbol indicates that the product must not be treated as municipal waste. It must be disposed of
separately via the appropriate return and collection systems available. By following these instructions
you ensure that this product is treated correctly and help to reduce potential impacts on the environment
and human health, which could otherwise result from inappropriate handling. Recycling of products
helps to conserve natural resources and protect the environment.
For more detailed information on collection and recycling systems for this product, please contact the
shop where you purchased it, your local dealer or sales/service representatives.
All Other Users
If you wish to discard this product, please contact your local authorities, the shop where you bought this
product, your local dealer or sales/service representatives.
For Users in India
This product complies with the "India E-waste Rule 2011" and prohibits use of lead, mercury,
hexavalent chromium, polybrominated biphenyls or polybrominated diphenyl ethers in concentrations
exceeding 0.1 weight % and 0.01 weight % for cadmium, except for the exemptions set in Schedule 2
of the Rule.
meihua-p2_mf2_com_user_guide_00106386_eng.xml 9

Environmental Advice for Users
Draft 2013/03/26
Users in the EU, Switzerland and Norway
Consumables yield
Please refer to either the User’s Manual for this information or the packaging of the consumable.
Recycled paper
The machine can use recycled paper which is produced in accordance with European standard
EN 12281:2002 or DIN 19309. For products using EP printing technology, the machine can print
on 64g/m2 paper, which contains less raw materials and represents a significant resource
reduction.
Duplex printing (if applicable)
Duplex printing enables both sides of a sheet of paper to be used. This saves paper and reduces
the size of printed documents so that fewer sheets are used. We recommend that this feature is
enabled whenever you print.
Toner and ink cartridge return program
Toner and ink cartridge for recycling will be accepted free of charge from users in accordance with
local regulations.
For details about the return program, please refer to the Web page below or consult your service
person.
https://www.ricoh-return.com/
Energy efficiency
The amount of electricity a machine consumes depends as much on its specifications as it does on
the way you use it. The machine is designed to allow you to reduce electricity costs by switching to
Ready mode after it prints the last page. If required, it can immediately print again from this mode.
If no additional prints are required and a specified period of time passes, the device switches to an
energy saving mode.
In these modes, the machine consumes less power (watts). If the machine is to print again, it needs
a little longer to return from an energy saving mode than from Ready mode.
For maximum energy savings, we recommend that the default setting for power management is
used.
Products that comply with the Energy Star requirement are always energy efficient.
10 meihua-p2_mf2_com_user_guide_00106386_eng.xml

Note for the Battery and/or Accumulator Symbol (For EU countries only)
FiO
FiO
Draft 2013/03/26
In accordance with the Battery Directive 2006/66/EC Article 20 Information for end-users Annex II,
the above symbol is printed on batteries and accumulators.
This symbol means that in the European Union, used batteries and accumulators should be disposed of
separately from your household waste.
In the EU, there are separate collection systems for not only used electrical and electronic products but
also batteries and accumulators.
Please dispose of them correctly at your local community waste collection/recycling centre.
Notes to Users of Facsimile Unit
Declaration of Conformity
Notice to Users in EEA Countries
This product complies with the essential requirements and provisions of Directive 1999/5/EC of
the European Parliament and of the Council of 9 March 1999 on radio equipment and
telecommunications terminal equipment and the mutual recognition of their conformity.
Notice to Users Accessing Analog PSTN in EEA Countries
This product is designed to be able to access analog PSTN in all EEA countries. Local PSTN
compatibility is dependent on software switch settings. Please contact your service representative if
relocating this product to another country. In the event of problems, please contact your service
representative in the first instance.
The CE Declaration of Conformity is available by accessing the URL:
http://www.ricoh.co.jp/fax/ce_doc/ and selecting the product applicable.
NOTICE TO USERS (NEW ZEALAND)
• The grant of a Telepermit for any item of terminal equipment indicates only that Telecom has
accepted that the item complies with minimum conditions for connection to its network. It indicates
no endorsement of the product by Telecom, nor does it provide any sort of warranty. Above all, it
provides no assurance that any item will work correctly in all respects with another item of
meihua-p2_mf2_com_user_guide_00106386_eng.xml
11

Telepermitted equipment of a different make or model, nor does it imply that any product is
Draft 2013/03/26
compatible with all of Telecom's network services.
• This equipment is not capable, under all operating conditions, of correct operation at the higher
speeds for which it is designed. Telecom will accept no responsibility should difficulties arise in such
circumstances.
• Devices connected to the telephone port may lose their memory if this fax machine is on line for
extended periods. To prevent this, such devices should have the facility for battery or similar
backup of memory.
• This device may be subject to ringing or bell tinkle when certain other devices are connected to the
same line. If this occurs, the problem should not be referred to the Telecom Faults Service.
• This equipment should not be used under any circumstances that may constitute a nuisance to other
Telecom customers.
• Telepermitted equipment only may be connected to the auxiliary telephone port. The auxiliary
telephone port is not specifically designed for 3-wire connected equipment that may not respond to
incoming ringing when attached to this port.
12 meihua-p2_mf2_com_user_guide_00106386_eng.xml

Important Safety Instructions
Draft 2013/03/26
Notes to Users in the State of California
Perchlorate Material - special handling may apply. See: www.dtsc.ca.gov/hazardouswaste/
perchlorate
meihua-p2_mf2_com_user_guide_00106387_eng.xml 13

ENERGY STAR Program
Draft 2013/03/26
ENERGY STAR® Program Requirements for Imaging Equipment
The ENERGY STAR® Program Requirements for Imaging Equipment encourage energy conservation
by promoting energy efficient computers and other office equipment.
The program backs the development and dissemination of products that feature energy saving
functions.
It is an open program in which manufacturers participate voluntarily.
Targeted products are computers, monitors, printers, facsimiles, copiers, scanners, and multifunction
devices. Energy Star standards and logos are internationally uniform.
This machine is equipped with the following Energy Saver modes: Energy Saver mode 1 and Energy
Saver mode 2. The machine recovers from Energy Saver mode when it receives a print job, prints a
received fax, or when any key is pressed.
Energy Saver mode 1
This machine automatically enters Energy Saver mode 1 about 30 seconds after the last operation
is completed.
Energy Saver mode 2
This machine automatically enters Energy Saver mode 2 1 minute after the last operation is
completed.
Specifications
*1
*1
*1
60 W or less
10 seconds or less
5 W or less
Energy Saver mode 1 Power Consumption
Default Interval 30 seconds
Recovery Time
Energy Saver mode 2 Power Consumption
14 meihua-p2_mf2_com_user_guide_00106388_eng.xml

Default Interval 1 minute
Draft 2013/03/26
Recovery Time
Recovery time and power consumption may differ depending on the conditions and environment of the
*1
machine.
*1
25 seconds or less
meihua-p2_mf2_com_user_guide_00106388_eng.xml 15

16 meihua-p2_mf2_com_user_guide_00106388_eng.xml
Draft 2013/03/26

1. Guide to the Machine
FiO
CXP001
11 13109
15 1716148
12
1 24
3
6 75
Draft 2013/03/26
Guide to Components
This section introduces the names of the various parts on the front and rear side of the machine and
outlines their functions.
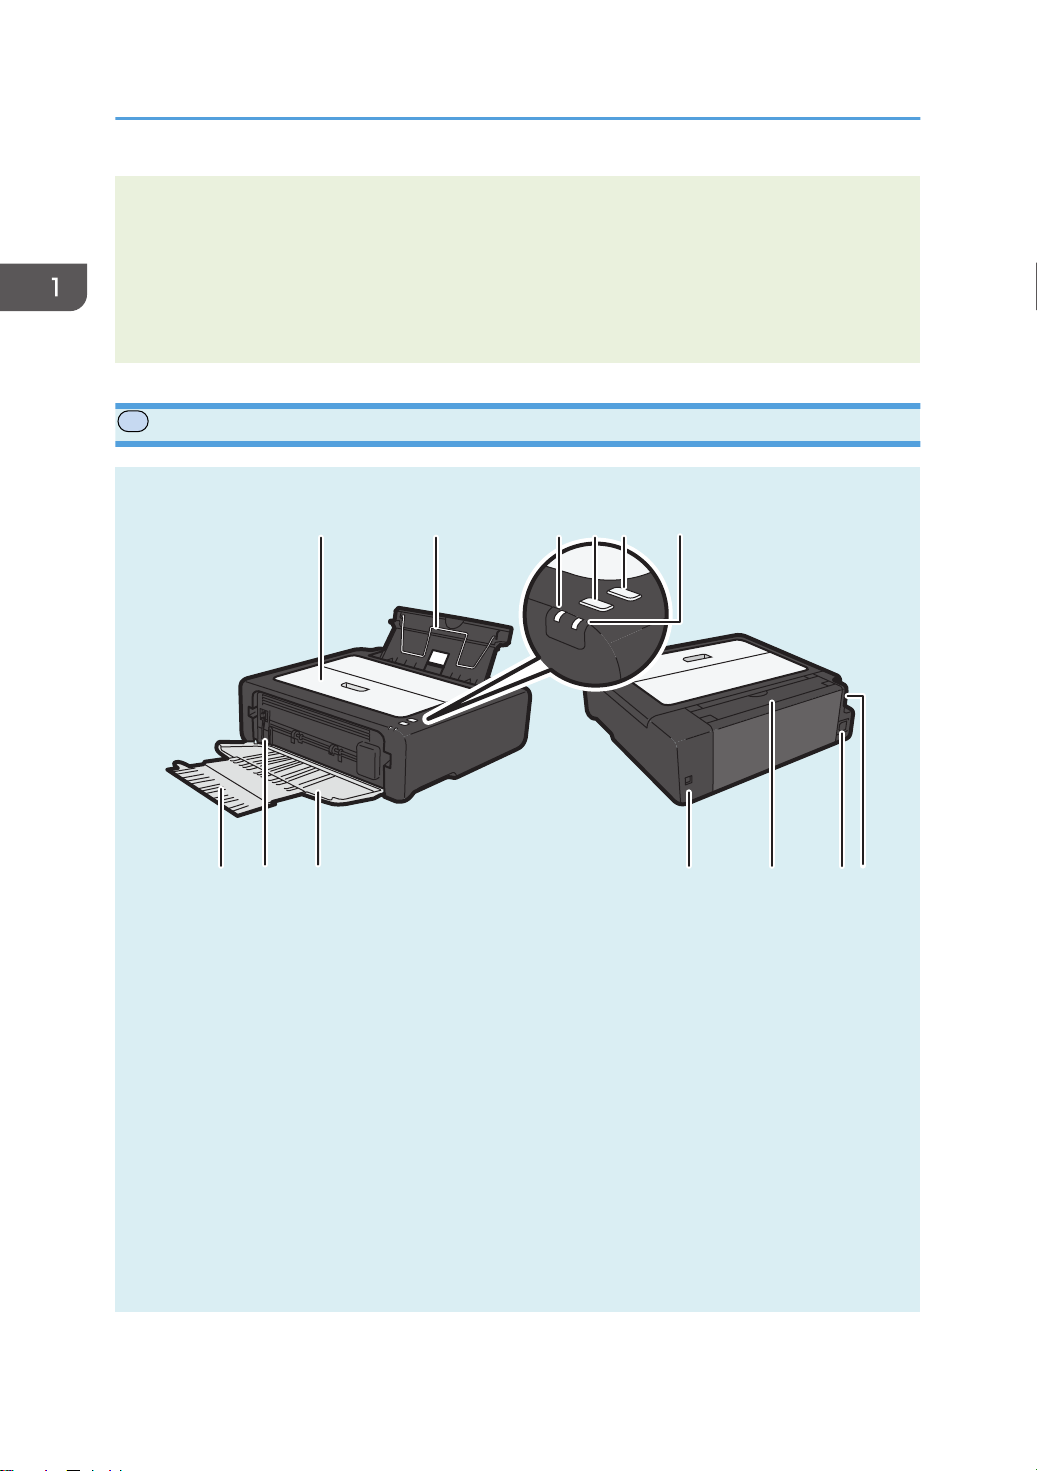
Exterior
1. Control Panel
Contains a screen and keys for machine control.
2. ADF Cover
Open this cover to remove originals jammed in the ADF.
3. Input Tray for the ADF
Place stacks of originals here. They will feed in automatically. This tray can hold up to 15 sheets of plain
paper.
4. Tray Extension for the ADF
Pull out this tray extension to hold the originals.
5. Input Tray
This tray can hold up to 50 sheets of plain paper.
meihua-p2_mf2_com_user_guide_00106316_eng.xml
17

1. Guide to the Machine
Draft 2013/03/26
6. Exposure Glass
Place originals here sheet by sheet.
7. Input Tray Cover
Set this cover up and pull out the paper source tray to load paper.
8. Tray Extension
Pull out and extend this tray extension to hold the output paper.
9. Fusing Pressure Release Lever
If paper is jammed, lower the lever on the left end, and then remove the paper.
10. Front Cover
Open this cover to pull out the output tray before printing.
11. Maintenance Cover
Lift up this cover to replace consumables or clear a paper jam.
12. Auto Document Feeder (Exposure Glass Cover)
The auto document feeder (ADF) is integrated with the exposure glass cover. Open this cover to place
documents on the exposure glass.
13. Tray Extension
Pull out this tray extension to hold the originals.
14. USB Port
Use this port to connect the machine to a computer using a USB cable.
15. Line and TEL Port
• Upper port: Port for external telephone connection.
• Lower port: G3 (analog) line Interface port for telephone line connection.
16. Power Connector
Connect the power cord to the machine here. Insert the other end of the cable into a nearby wall outlet.
17. Power Switch
Use this switch to turn the power on or off.
18 meihua-p2_mf2_com_user_guide_00106316_eng.xml

TiO
Exterior
CXP002
1 2 3 4 5
6
11
87 9 10
12
Draft 2013/03/26
Guide to Components
1. Control Panel
Contains a screen and keys for machine control.
2. Exposure Glass Cover
Open this cover to place originals on the exposure glass.
3. Input Tray
This tray can hold up to 50 sheets of plain paper.
4. Exposure Glass
Place originals here sheet by sheet.
5. Input Tray Cover
Set this cover up and pull out the paper source tray to load paper.
6. Tray Extension
Pull out and extend this tray extension to hold the output paper.
7. Fusing Pressure Release Lever
If paper is jammed, lower the lever on the left end, and then remove the paper.
8. Front Cover
Open this cover to pull out the output tray before printing.
9. Maintenance Cover
Lift up this cover to replace consumables or clear a paper jam.
meihua-p2_mf2_com_user_guide_00106316_eng.xml 19
P
CXP003
3 4 5
6
1 2
11
10
12
7
98
13
1. Guide to the Machine
Draft 2013/03/26
10. USB Port
Use this port to connect the machine to a computer using a USB cable.
11. Power Connector
Connect the power cord to the machine here. Insert the other end of the cable into a nearby wall outlet.
12. Power Switch
Use this switch to turn the power on or off.
Exterior
1. Maintenance Cover
Lift up this cover to replace consumables or clear a paper jam.
2. Input Tray
This tray can hold up to 50 sheets of plain paper.
3. Power Indicator
This indicator lights up blue when the machine is turned on. It flashes when a print job is received and while
printing is in progress.
4. [Form Feed] key
Press this key to resume printing if printing stops due to paper running out or a paper settings error.
You can also press this key to print a test page.
5. [Job Reset] key
Press this key to cancel an ongoing print job.
20 meihua-p2_mf2_com_user_guide_00106316_eng.xml

1
CXP043
Guide to Components
Draft 2013/03/26
6. Alert Indicator
This indicator lights up red when the machine runs out of paper or consumables, when the paper settings do
not match the settings specified by the driver, or when other errors occur.
7. Tray Extension
Pull out and extend this tray extension to hold the output paper.
8. Fusing Pressure Release Lever
If paper is jammed, lower the lever on the left end, and then remove the paper.
9. Front Cover
Open this cover to pull out the output tray before printing.
10. USB Port
Use this port to connect the machine to a computer using a USB cable.
11. Input Tray Cover
Set this cover up and pull out the paper source tray to load paper.
12. Power Connector
Connect the power cord to the machine here. Insert the other end of the cable into a nearby wall outlet.
13. Power Switch
Use this switch to turn the power on or off.
Interior
1. Print Cartridge
A replacement consumable that is required to make prints on paper. It needs to be replaced after
approximately every 1,200 or 2,000 pages printed. For details about replacing the cartridge, see page 137
"Replacing the Print Cartridge".
meihua-p2_mf2_com_user_guide_00106316_eng.xml 21

FiO
CXP100
12 3 4 56
7891011 12
1. Guide to the Machine
Draft 2013/03/26
Control Panel
• The actual control panel may look different from the illustration below, depending on the country of
use.
1. [Copy/Facsimile] key
Use this key to switch the machine to copier or fax mode.
2. [Speed Dial] Key
Use this key to send a fax using a registered speed dial number.
3. [User Tools] Key
Press to display the menu for configuring the machine's system settings.
4. [OK] Key
Use this key to confirm settings and specified values, or move to the next menu level.
5. [Clear/Stop] Key
Use this key to cancel or stop a print job, document copying, fax transmission/reception, and other actions in
progress.
6. [Start] Key
Use this button to start fax transmit/receive or copy.
7. [ID Card Copy/On Hook Dial] Key
When the machine is in copier mode, use this key to perform an ID copy or modify ID copy settings.
When the machine is in fax mode, use this key to perform on-hook dialing.
8. Power Indicator
This indicator lights up blue when the machine is turned on. It flashes when a print job is received and while
printing, scanning, or fax transmission/reception is in progress.
9. Screen
Displays current status and messages.
22 meihua-p2_mf2_com_user_guide_00106316_eng.xml

TiO
CTT134
5
6
2
1
3
4
7
8
9
10
11
Guide to Components
Draft 2013/03/26
10. Alert Indicator
This indicator lights up red when the machine runs out of paper or consumables, when the paper settings do
not match the settings specified by the driver, or when other errors occur. It flashes slowly when the machine is
running out of toner.
11. Scroll Keys
Press these keys to move the cursor in each direction.
12. Number Keys
Use to enter numerical values when specifying settings such as fax numbers and copy quantities, or enter
letters when specifying names.
Control Panel
• The actual control panel may look different from the illustration below, depending on the country of
use.
meihua-p2_mf2_com_user_guide_00106316_eng.xml 23

1. Guide to the Machine
Draft 2013/03/26
1. Original Type Indicator
Displays the original type in three levels.
The original type is indicated by which segment is lit on this indicator.
• Upper: Text/Photo
• Middle: Text
• Lower: Photo
2. Original Type key
Use this key to select the type of original.
3. Density Indicator
Displays the copy density in three levels.
The print density is indicated by which segment is lit on this indicator.
• Left: Lighter than normal
• Middle: Normal density
• Right: Darker than normal
4. [Density] Key
Use this key to adjust the copy density.
5. [ID Card Copy] Key
Use this key to perform an ID copy.
6. Screen
Shows the number of copies and the error code.
7. [Number of copies] Key
Use this key to change the number of copies.
8. [Stop/Clear] Key
When the machine is online, press this key to cancel an ongoing print job.
9. [Start] Key
Use this key to start copying.
10. Power Indicator
This indicator lights up blue when the machine is turned on. It flashes when a print job is received and while
printing or scanning is in progress.
11. Alert Indicator
This indicator lights up red when the machine runs out of paper or consumables, when the paper settings do
not match the settings specified by the driver, or when other errors occur. It flashes slowly when the machine is
almost out of toner.
24 meihua-p2_mf2_com_user_guide_00106316_eng.xml

TiO
FiO
P
P
Installing the Driver and Software
Draft 2013/03/26
Installing the Driver and Software
You can install the necessary driver for this machine using the included CD-ROM.
The operating systems compatible with the drivers and software for this machine are: Windows XP/
Vista/7/8 and Windows Server 2003/2003 R2/2008/2008 R2/2012.
The procedure in this section is an example based on Windows 7. The actual procedure may vary
depending on the operating system you are using.
• Be sure to disconnect the USB cable from the machine and turn the machine off before beginning
the installation.
Quick Install
Use Quick Install to install the printer driver, TWAIN driver, WIA driver, and Smart Organizing
Monitor from the CD-ROM.
Use Quick Install to install the printer driver, TWAIN driver, WIA driver, and PC FAX driver from
the CD-ROM.
Use Quick Install to install the printer driver, and Smart Organizing Monitor from the CD-ROM.
1. Close all applications except this manual.
2. Insert the CD-ROM into the CD-ROM drive.
3. From the CD-ROM menu, click [USB Quick Install].
4. Follow the instructions in the installation wizard.
Installing the Printer Driver
1. Close all applications except this manual.
2. Insert the CD-ROM into the CD-ROM drive.
3. From the CD-ROM menu, click [DDST Printer Driver].
4. Follow the instructions in the installation wizard.
meihua-p2_mf2_com_user_guide_00106317_eng.xml 25

1. Guide to the Machine
Draft 2013/03/26
Upgrading or Deleting the Printer Driver
Upgrading the printer driver
1. On the [Start] menu, click [Devices and Printers].
• Windows XP, Windows Server 2003/2003 R2:
On the [Start] menu, select [Printers and Faxes].
• Windows Vista, Windows Server 2008:
On the [Start] menu, select [Control Panel], and then click [Printers] in [Hardware and Sound]
category.
• Windows 8, Windows Server 2012:
Click [Search] on the Charm Bar, and then click [Control Panel]. When the [Control Panel]
window appears, click [View devices and printers].
2. Right-click the icon of the printer model you want to modify, and then click [Printer
properties].
3. Click the [Advanced] tab.
4. Click [New Driver...], and then click [Next].
5. Click [Have Disk...].
6. Click [Browse...], and then select the printer driver location.
7. Click [OK], and then specify the printer model.
8. Click [Next].
9. Click [Finish].
10. Click [OK] to close the printer properties window.
11. Restart the computer.
Deleting the printer driver
1. On the [Start] menu, click [Devices and Printers].
• Windows XP, Windows Server 2003/2003 R2:
On the [Start] menu, select [Printers and Faxes].
• Windows Vista, Windows Server 2008:
On the [Start] menu, select [Control Panel], and then click [Printers] in [Hardware and Sound]
category.
• Windows 8, Windows Server 2012:
26 meihua-p2_mf2_com_user_guide_00106317_eng.xml

FiO
Installing the Driver and Software
Draft 2013/03/26
Click [Search] on the Charm Bar, and then click [Control Panel]. When the [Control Panel]
window appears, click [View devices and printers].
2. Right-click the icon of the printer you want to delete, and then click [Remove device].
3. Click [Yes].
4. Click any printer icon, and then click [Print server properties].
5. Click the [Drivers] tab.
6. Click the [Change Driver Settings] button if it is displayed.
7. Click [Remove...].
8. Select [Remove driver and driver package.], and then click [OK].
9. Click [Yes].
10. Click [Delete].
11. Click [OK].
12. Click [Close] to close the print server properties window.
Installing the Smart Organizing Monitor
Smart Organizing Monitor is a utility that allows you to modify the machine’s settings or view the
machine’s status from your computer. For details, see page 29 "What is Smart Organizing Monitor?".
1. Close all applications except this manual.
2. Insert the CD-ROM into the CD-ROM drive.
3. From the CD-ROM menu, click [Smart Organizing Monitor].
4. Select a language for Smart Organizing Monitor.
5. Follow the instructions in the installation wizard.
meihua-p2_mf2_com_user_guide_00106317_eng.xml 27

FiO
1. Guide to the Machine
Draft 2013/03/26
Initial Setup
When you turn this machine on for the first time, you must set the following items. Select each setting
using the [ ], [ ], or number keys, and then press the [OK] key.
• [Language]
• [Country Code]
• [Year]
• [Month]
• [Day]
• Date format
• Time format
• [Hour]
• [Minute]
28 meihua-p2_mf2_com_user_guide_00106389_eng.xml

TiO
TiO
P
P
TiO
TiO
FiO
FiO
What is Smart Organizing Monitor?
Draft 2013/03/26
What is Smart Organizing Monitor?
Install this utility on your computer from the included CD-ROM before using it.
Smart Organizing Monitor provides the following functions:
• Displays the status of the machine
Displays paper jam messages and other error messages.
• Paper size and type settings
Displays the settings for paper sizes or types available on this machine.
• Print test and configuration pages
Prints List/Report to check the list of settings for this machine and other information.
• Modify the system settings
Use to change custom paper size settings and other settings on this machine.
•
Modify the printer settings
Use to change print settings such as [Auto Continue:] and [I/O Time Out:] on this machine.
•
Modify the printer settings
Use to change this machine's print settings such as [Auto Continue:] and [I/O Time Out:].
•
Modify the copy settings
Use to change the machine’s copy settings such as [Reduce / Enlarge:].
•
Modify the Speed Dial
Register, change, or delete Speed Dial settings.
For details about basic instructions on how to use Smart Organizing Monitor, see page 127
"Configuring the Machine Using Smart Organizing Monitor".
meihua-p2_mf2_com_user_guide_00106318_eng.xml 29

1. Guide to the Machine
Draft 2013/03/26
30 meihua-p2_mf2_com_user_guide_00106318_eng.xml
 Loading...