

Page 1
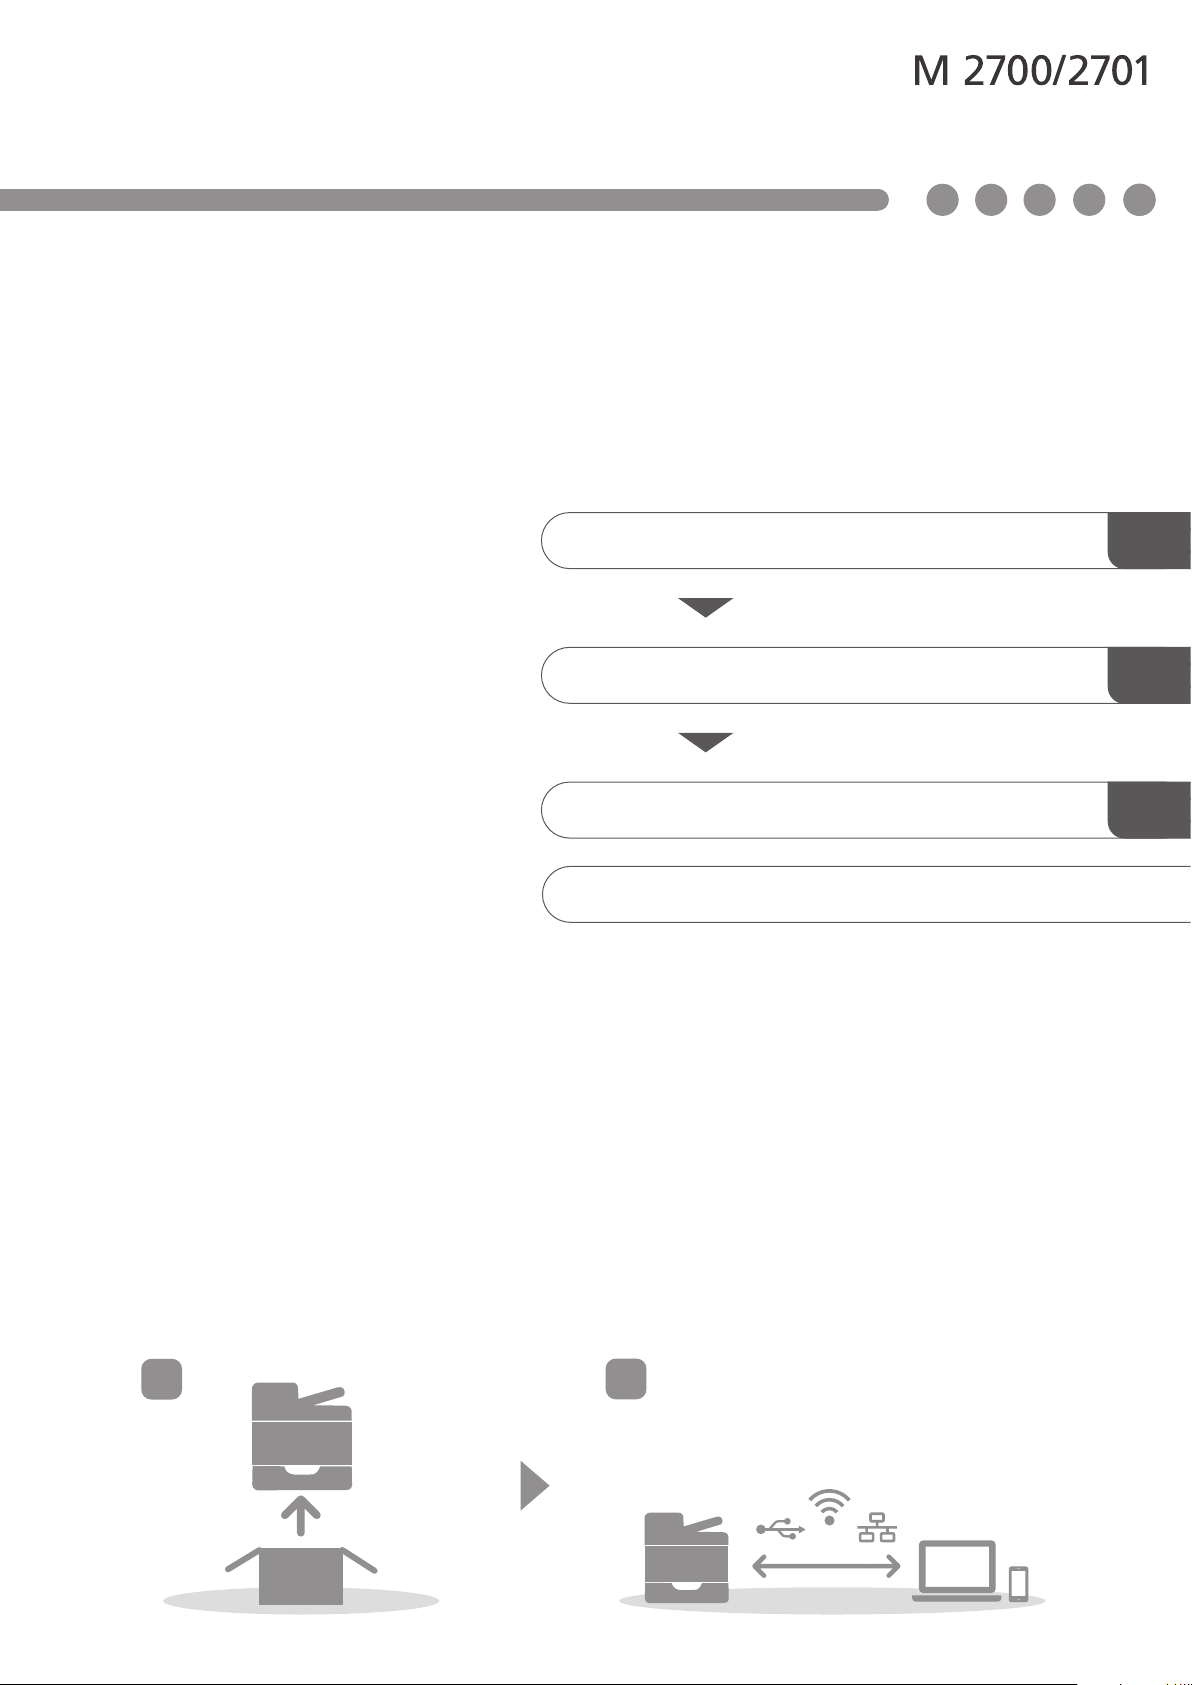
Setup Guide
Setting Up the Machine
Installing the Software
Scan settings
Control Panel Sheet
1
2
3
1
2
Page 2

Page 3
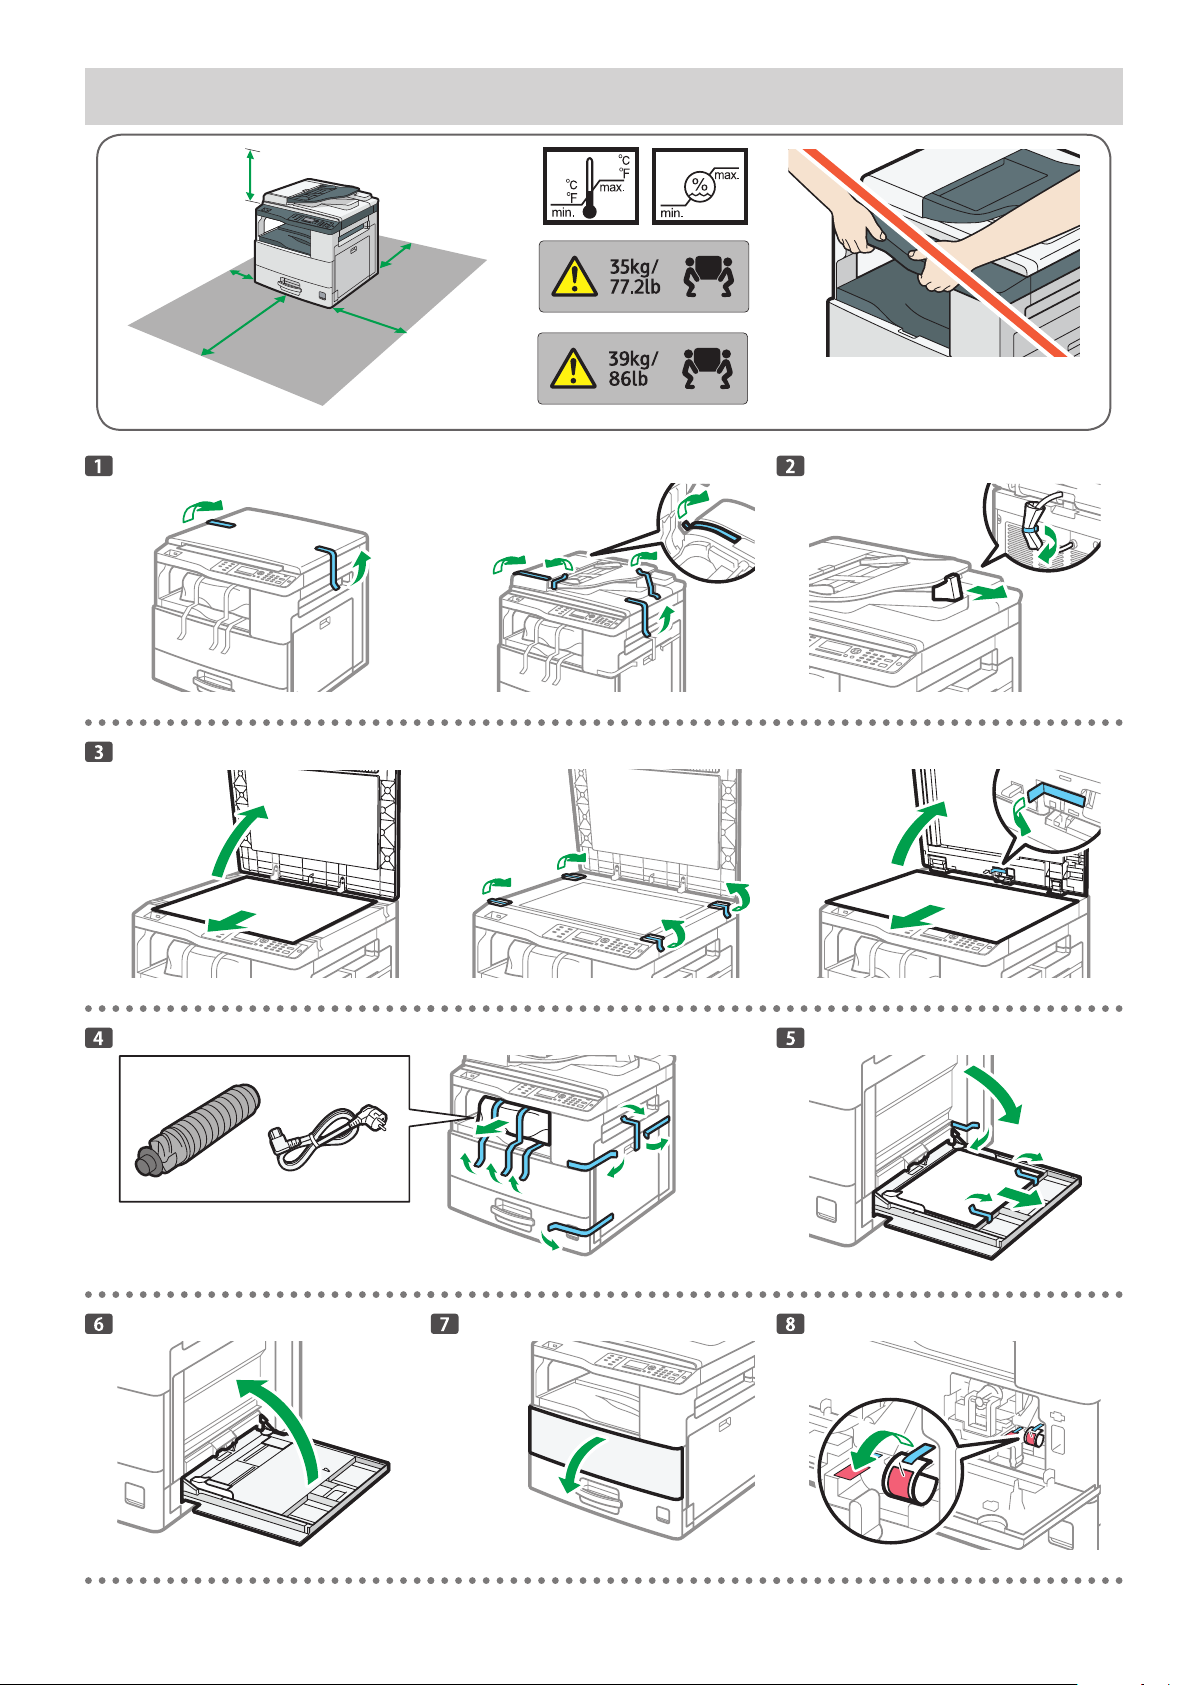
1. Setting Up the Machine
48 cm
(18.9 inches)
15 cm
(5.9 inches)
75 cm
(29.5 inches)
M 2700
30 cm
(11.8 inches)
45 cm
(17.7 inches)
DZV127
ECP004
M 2701
32
89.6
10
50
15
80
DZV179
DZV180
Power Source
220 - 240 V, 50/ 60 Hz, 6.6 A
DZV178
M 2701
DZV103
DZV104
M 2700
DZV128
DZV129
DZV106
M 2701
DZV105
DZV107
DZV108
DZV109
DZV110
1
Page 4

2
2
1
DZV111
DZV114 DZV115 DZV116
DZV112 DZV113
1
DZV117 DZV118
DZV119
ECP001
DZV120
ECP002
DZV175
DZV121
DZV122
2
Page 5
DZV123
DZV124
1
2
DZV125
DZV126
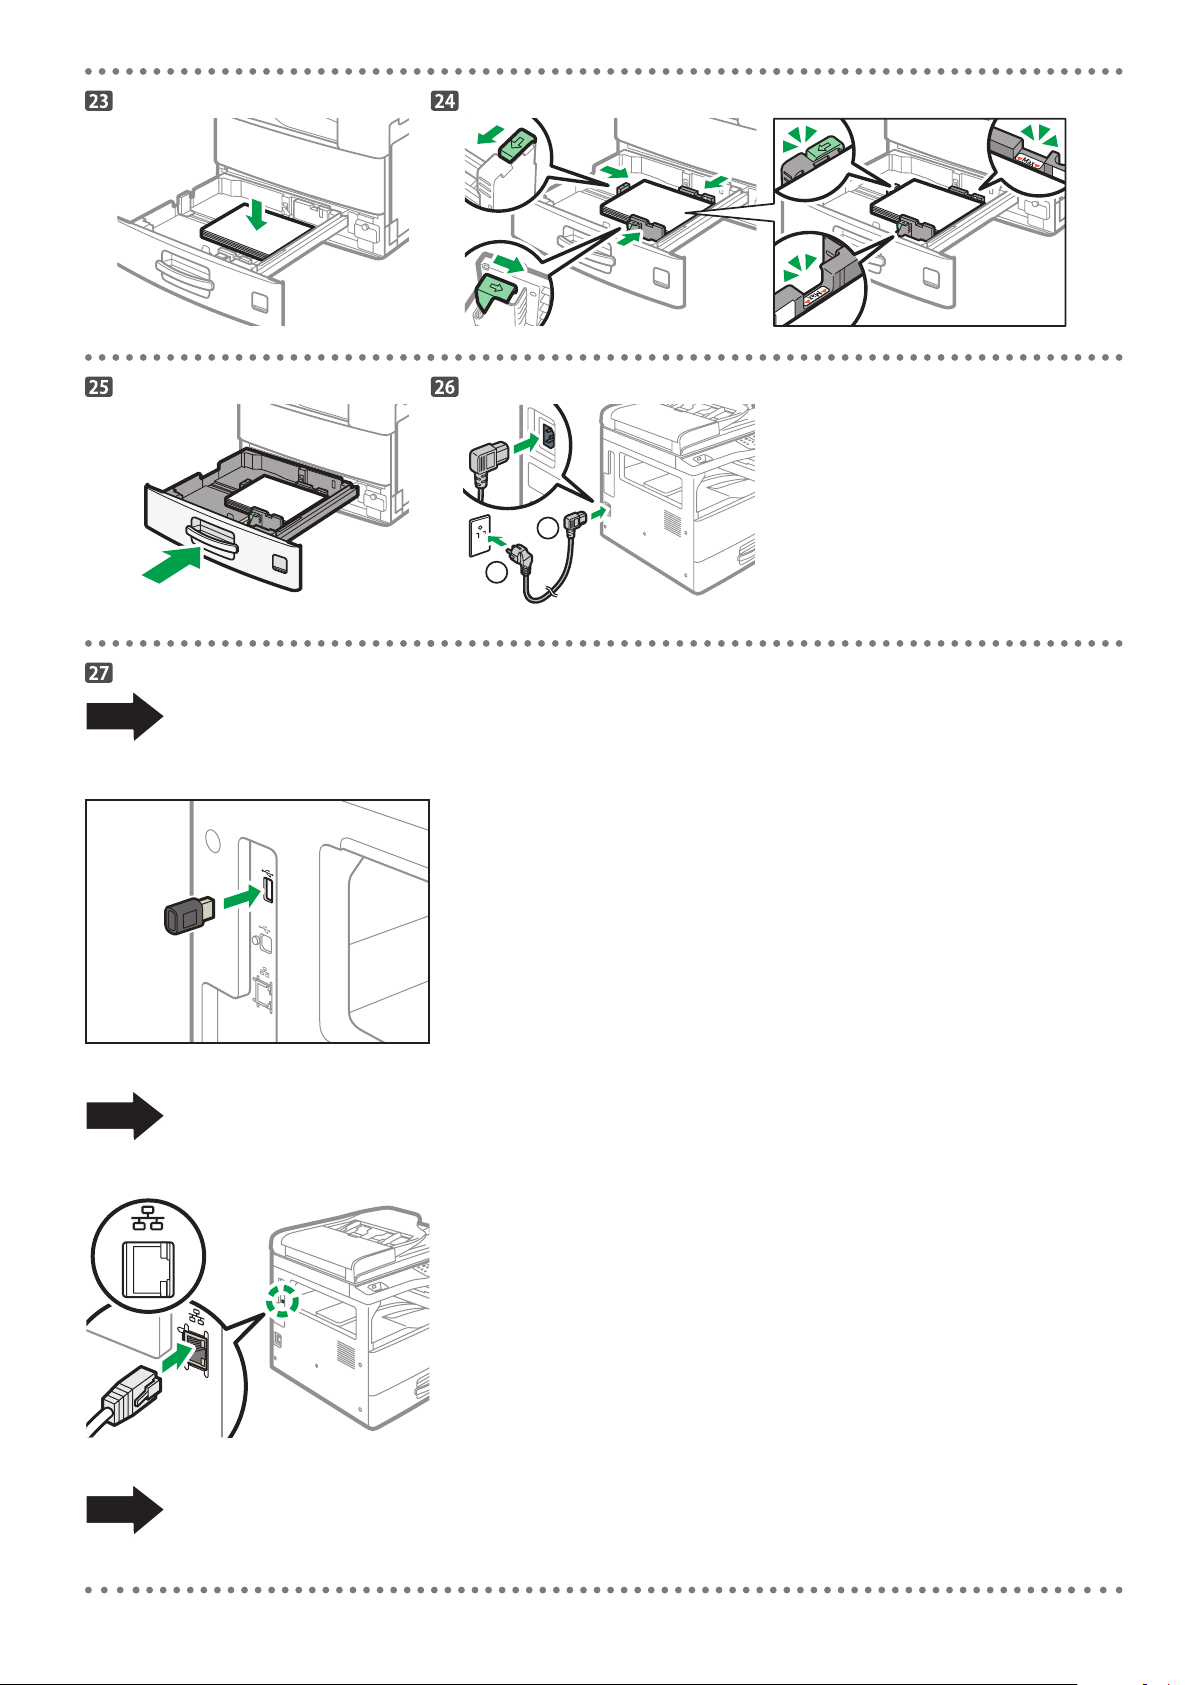
When using a wireless (Wi-Fi) connection, connect the wireless LAN option and proceed to Step 28.
DZV407
When using a wired (Ethernet) connection, connect the Ethernet cable and proceed to Step 28.
DZV132
When using a USB connection, do not connect the cable and proceed to Step 28.
3
Page 6
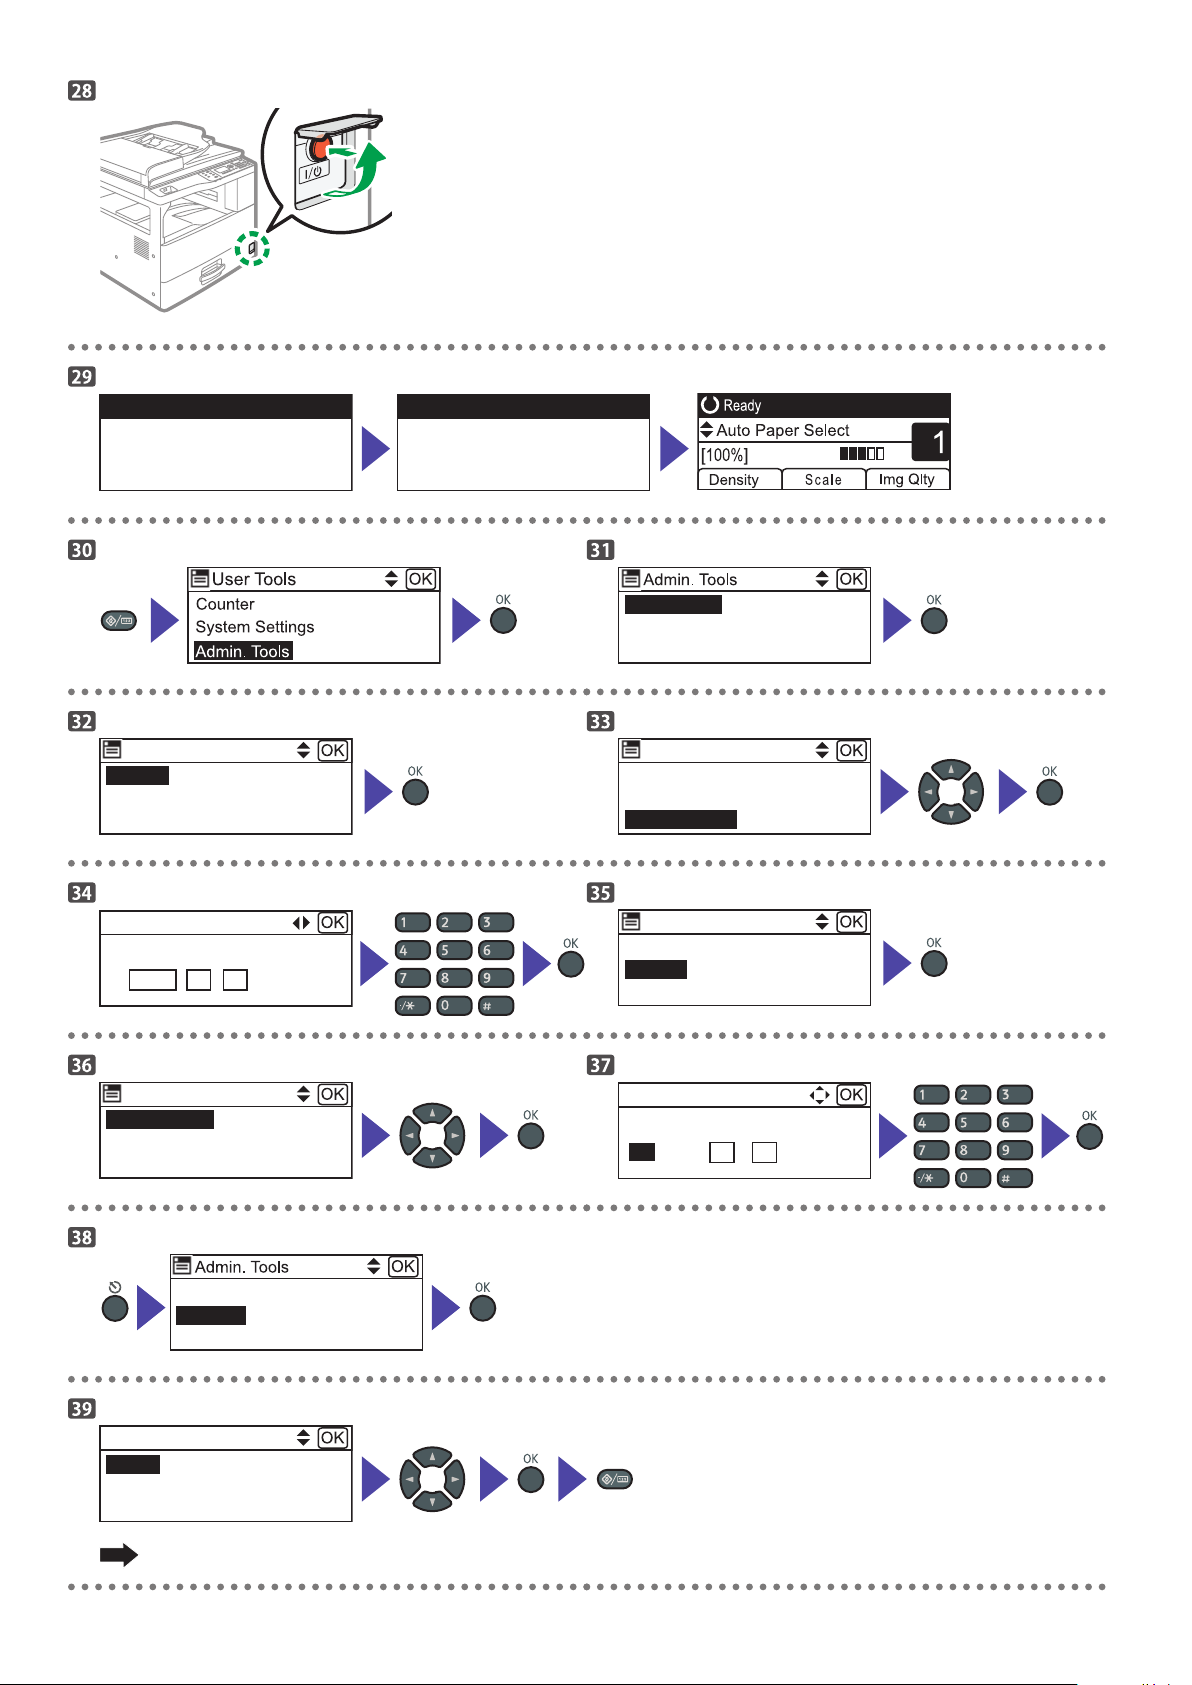
Calibrating...
Warming up...
Set Date/Time
Set Date
Set Date
Set Time
2/3
ECP003
Set Date
Set Time
Year/Month/Day
2018
Set Time
12-hour Format
24-hour Format
06
DZV172
DZV173
DZV174
1/3
1/3
Set Date/Time
Function Priority
System Auto Reset Timer
DZV136
DZV138
Month/Day/Year
Day/Month/Year
Year/Month/Day
DZV139
DZV140
Set Date/Time
Set Date
/
07
DZV142
DZV145
Set Time
AM
PM
Hour : Min
:
02
43
DZV144
DZV146
4
Language
English
French
Spanish
Energy Saver Mode
Language
Reset Settings
DZV148
1/5
DZV149
P. 5
Page 7

Install the software to use the machine.
Go to page 6 “2. Installing the Software”.
5
Page 8
2. Installing the Software
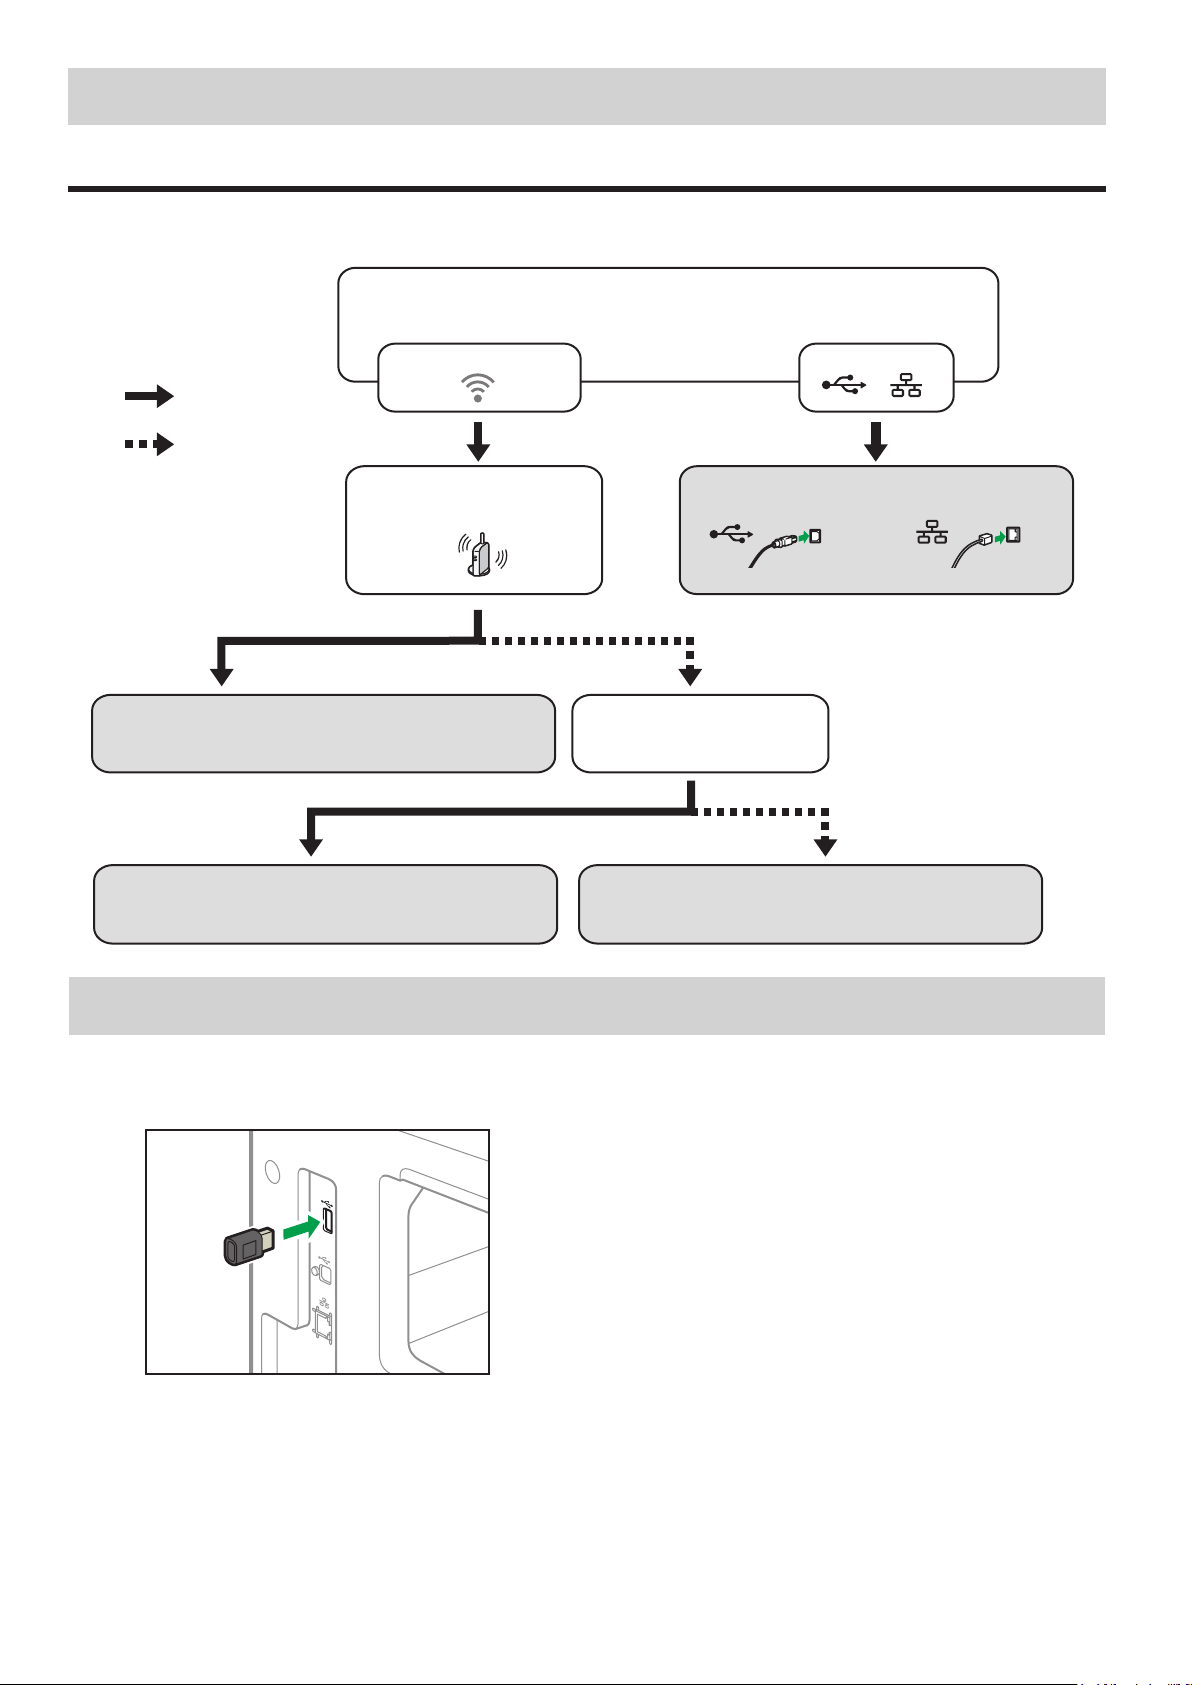
Check how the computer is connected
Specify how to connect to your computer according to the communication environment of your system.
The wireless LAN (Wi-Fi) connection is available when you attach a wireless LAN option to the USB port on the left side of the machine.
Which method do you want to use (wireless or wired)?
Wireless
Yes
No
Does the router (access point)
have a WPS button?
Connect by WPS PBC
See page 6 "Attaching the wireless L AN option" and go
to page 8 "Easy Setup Using the WPS Button".
Connect by Wi-Fi Setup Wizard Connect using a CD-ROM
See page 6 "Attaching the wireless L AN option" and go
to page 7 "Easy Setup Using the Wi-Fi Setup Wizard".
Can you identify the name
of the access point (SSID)
to which you want to connect?
See page 6 "Attaching the wireless L AN option" and go
to page 11 "Easy Setup Using the CD-ROM".
Connect using a
USB interface cable
Go to page 13 "Connecting the Machine (USB/Network)".
Wired
Connect using an
Ethernet interface cable
DZV168
•You can use both the CD-ROM and Wi-Fi Setup Wizard to configure the Wireless (Wi-Fi) settings for the machine.
•To connect using a PIN code, see page 6 "Attaching the wireless LAN option" and go to page 10 “Easy Setup Using a PIN Code”.
■Attaching the wireless LAN option
Turn off the machine, and then insert the wireless LAN option into the USB port on the left side of the machine.
DZV407
6
Page 9
Connecting the Machine via Wireless (Wi-Fi)
Network Set. are Locked
WiFi
WiFi Enable
Windows
To use the machine with a Wireless (Wi- Fi) connection, we recommend setting up the Wireless (Wi-Fi) settings of the machine first, and then
installing the printer driver.
DZV169
Easy Setup Using the Wi-Fi Setup Wizard
From the control panel of this machine, you can also configure the
Wireless (Wi-Fi) settings for the machine.
The following item is necessar y to set up a Wireless
(Wi-Fi) connection.
● Router (access point)
Checking the SSID and Encryption key
The SSID and Encryption key for the router (access point) may be
printed on a label affixed to the router (access point). For details
about the SSID and Encryption key, refer to the router (access point)
manual.
SSID
:XXXXXXXXXXXXX
Encryption key
:XXXXXXXXXXXXX
DSG099
Confirm the SSID and Encryption key, and write them down on the
blank space as shown below.
SSID:
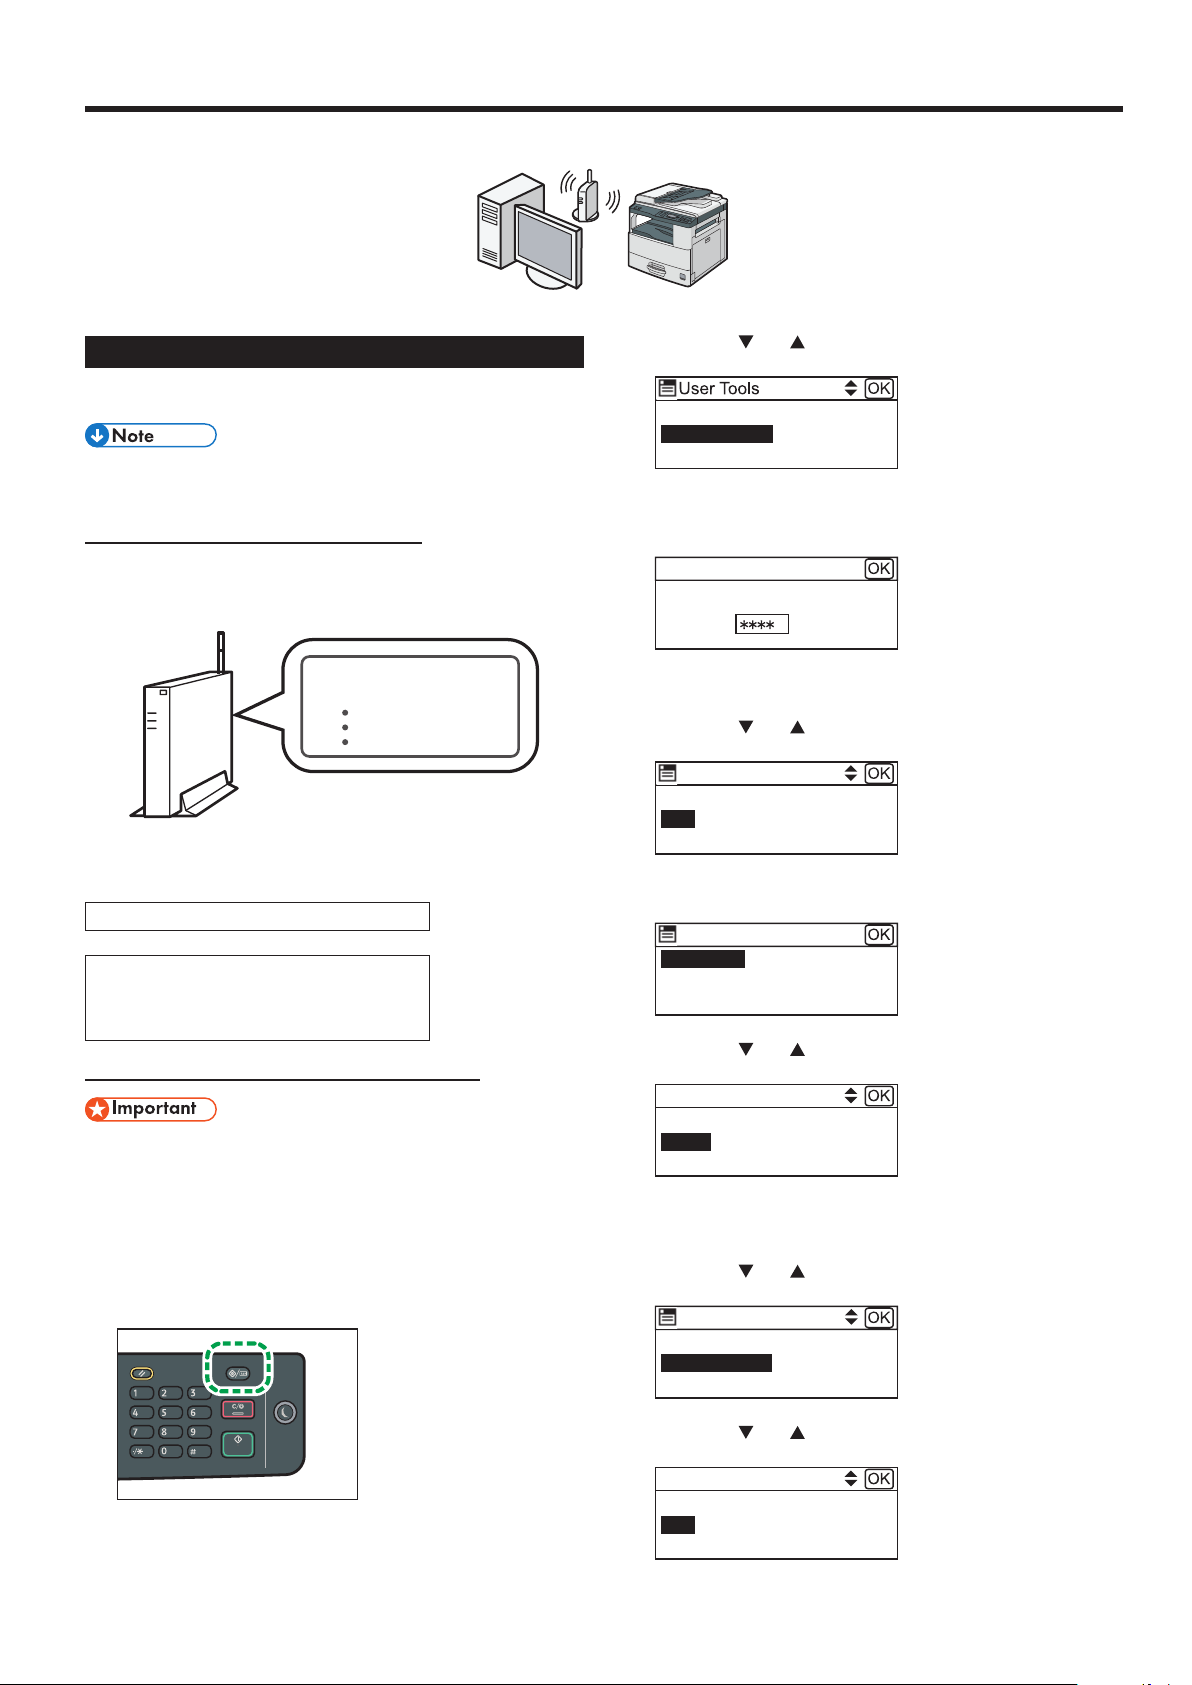
4. Press the [ ] or [ ] key to select [Net work Settings], and
then press the [OK] key.
2/3
Print List/Report
Network Settings
Copier Features
DZV150
5. If you are requested to enter a password, enter the
password using the number keys, and then press the [OK]
key.
Enter Password
DZV151
A password for accessing the [Network Settings] menu can be
specified in [Admin. Tools Lock] under [Admin. Tools] menu.
6. Press the [
] or [ ] key to select [WiFi], and then press the
[OK ] key.
Network Settings
1/2
Ethernet
WiFi
IPv4 Configuration
DZV152
7. Check [WiFi Enable] is selected, and then press the [OK]
key.
Encryption key:
Configuring Settings Using the Control Panel
● Make sure the Ethernet cable is not connected to the
machine.
1. Check that the router (access point) is working correctly.
2. Make sure the wireless LAN option is attached to the
machine.
For details, see page 6 "Attaching the wireless LAN option".
3. Press the [User Tools/Counter] key.
DZV451
WiFi Enable
DZV153
8. Press the [ ] or [ ] key to select [Enable], and then press
the [OK] key.
Disable
Enable
DZV154
9. Turn off the machine and then turn on.
10. Repeat Steps 3 to 5.
11. Press the [
] or [ ] key to select [Connect Method], and
then press the [OK] key.
Network Settings
2/2
IPv6 Configuration
Connect Method
DZV155
12. Press the [ ] or [ ] key to select [WiFi], and then press the
[OK ] key.
Connect Method
Ethernet
WiFi
DZV156
7
Page 10
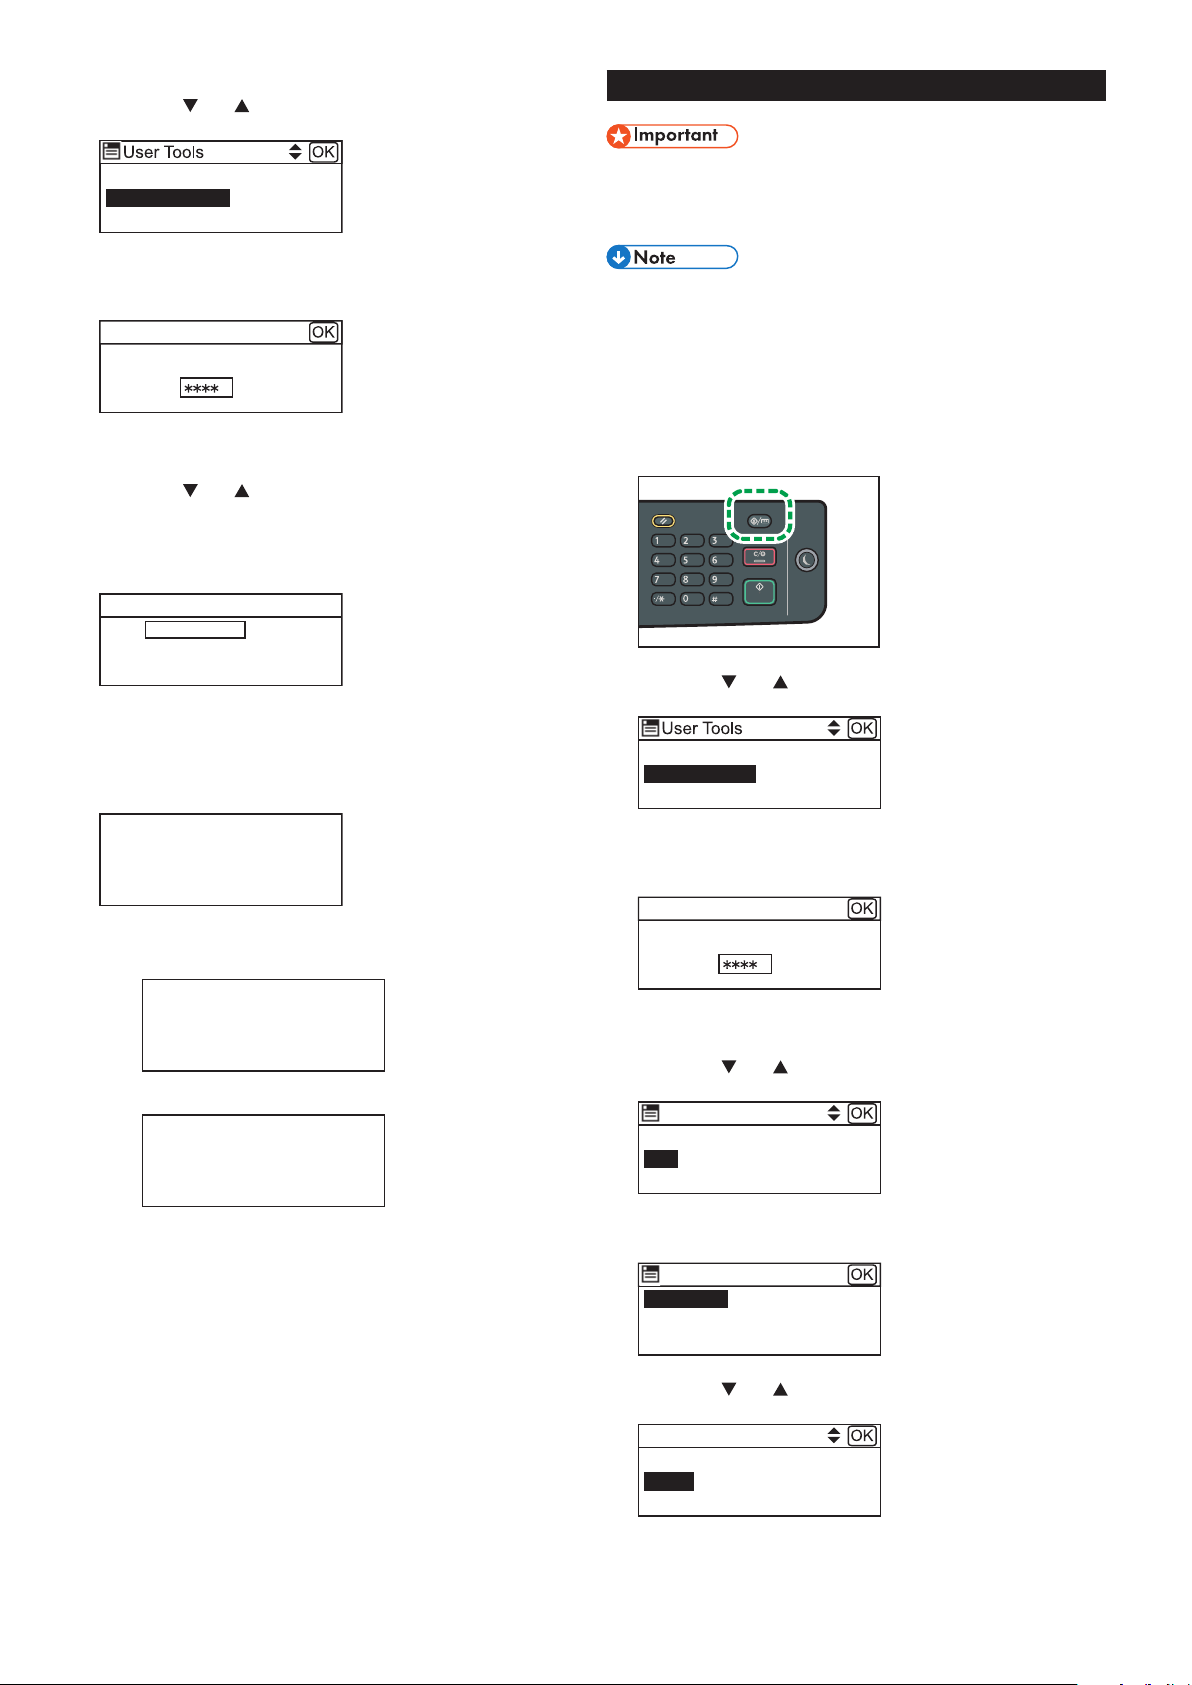
13. Press the [Escape] key.
2/3
Setup Wizard are Locked
Network Set. are Locked
WiFi
14. Press the [
] or [ ] key to select [WiFi Setup Wizard], and
then press the [OK] key.
Easy Setup Using the WPS Button
Print List/Report
WiFi Setup Wizard
Network Settings
DZV157
15. If you are requested to enter a password, enter the
password using the number keys, and then press the [OK]
key.
Enter Password
DZV176
A password for accessing the [WiFi Setup Wizard] menu can be
specified in [Admin. Tools Lock] under [Admin. Tools] menu.
16. Press the [
] or [ ] key to select SSID of the router (access
point) from the searched SSID list, and then press the [OK]
key.
17. Enter the encryption key using the number keys, and then
press the [OK] key.
Password
Key :
(8-63chars/64hex)
WPA2-PSK
• As the pas sphrase, you can enter eith er 8 to 63 ASCII characters
(0x20 -0x7e) or 64 hexadecimal digits (0 -9, A-F, a-f).
• For details about ch ecking the encr yptio n key, see “Ch ecking the
SSID and Encryption key”.
DZV158
18. Press the [OK] key.
Are you sure to connect?
(OK/Back)
DZV159
19. Check the result.
Connection has succeeded:
Connect succeed!
DSG355
Connection has failed:
Connect failed!
• Checktheconguration for the router (accesspoint),andthen
try the connection again.
DSG356
Configuring the Wireless (Wi-Fi) settings is complete.
To use the printer driver, install the printer driver according
to the procedure on page 11 "Easy Setup Using the
CD-ROM" and select "Automatically configure the printer
network" on Step 6.
● Make sure the Ethernet cable is not connected to the
machine.
● In Steps 16 to 18, congure each setting within two
minutes.
The following item is necessar y to set up a Wireless
(Wi-Fi) connection.
● Router (access point)
1. Check that the router (access point) is working correctly.
2. Make sure the wireless LAN option is attached to the
machine.
For details, see page 6 "Attaching the wireless LAN option".
3. Press the [User Tools/Counter] key.
DZV451
4. Press the [ ] or [ ] key to select [Net work Settings], and
then press the [OK] key.
2/3
Print List/Report
Network Settings
Copier Features
DZV150
5. If you are requested to enter a password, enter the
password using the number keys, and then press the [OK]
key.
Enter Password
DZV151
A password for accessing the [Network Settings] menu can be
specified in [Admin. Tools Lock] under [Admin. Tools] menu.
6. Press the [
] or [ ] key to select [WiFi], and then press the
[OK ] key.
Network Settings
1/2
Ethernet
WiFi
IPv4 Configuration
DZV152
7. Check [WiFi Enable] is selected, and then press the [OK]
key.
WiFi Enable
DZV153
8. Press the [ ] or [ ] key to select [Enable], and then press
the [OK] key.
WiFi Enable
Disable
Enable
8
DZV154
9. Turn off the machine and then turn on.
10. Repeat Steps 3 to 5.
Page 11
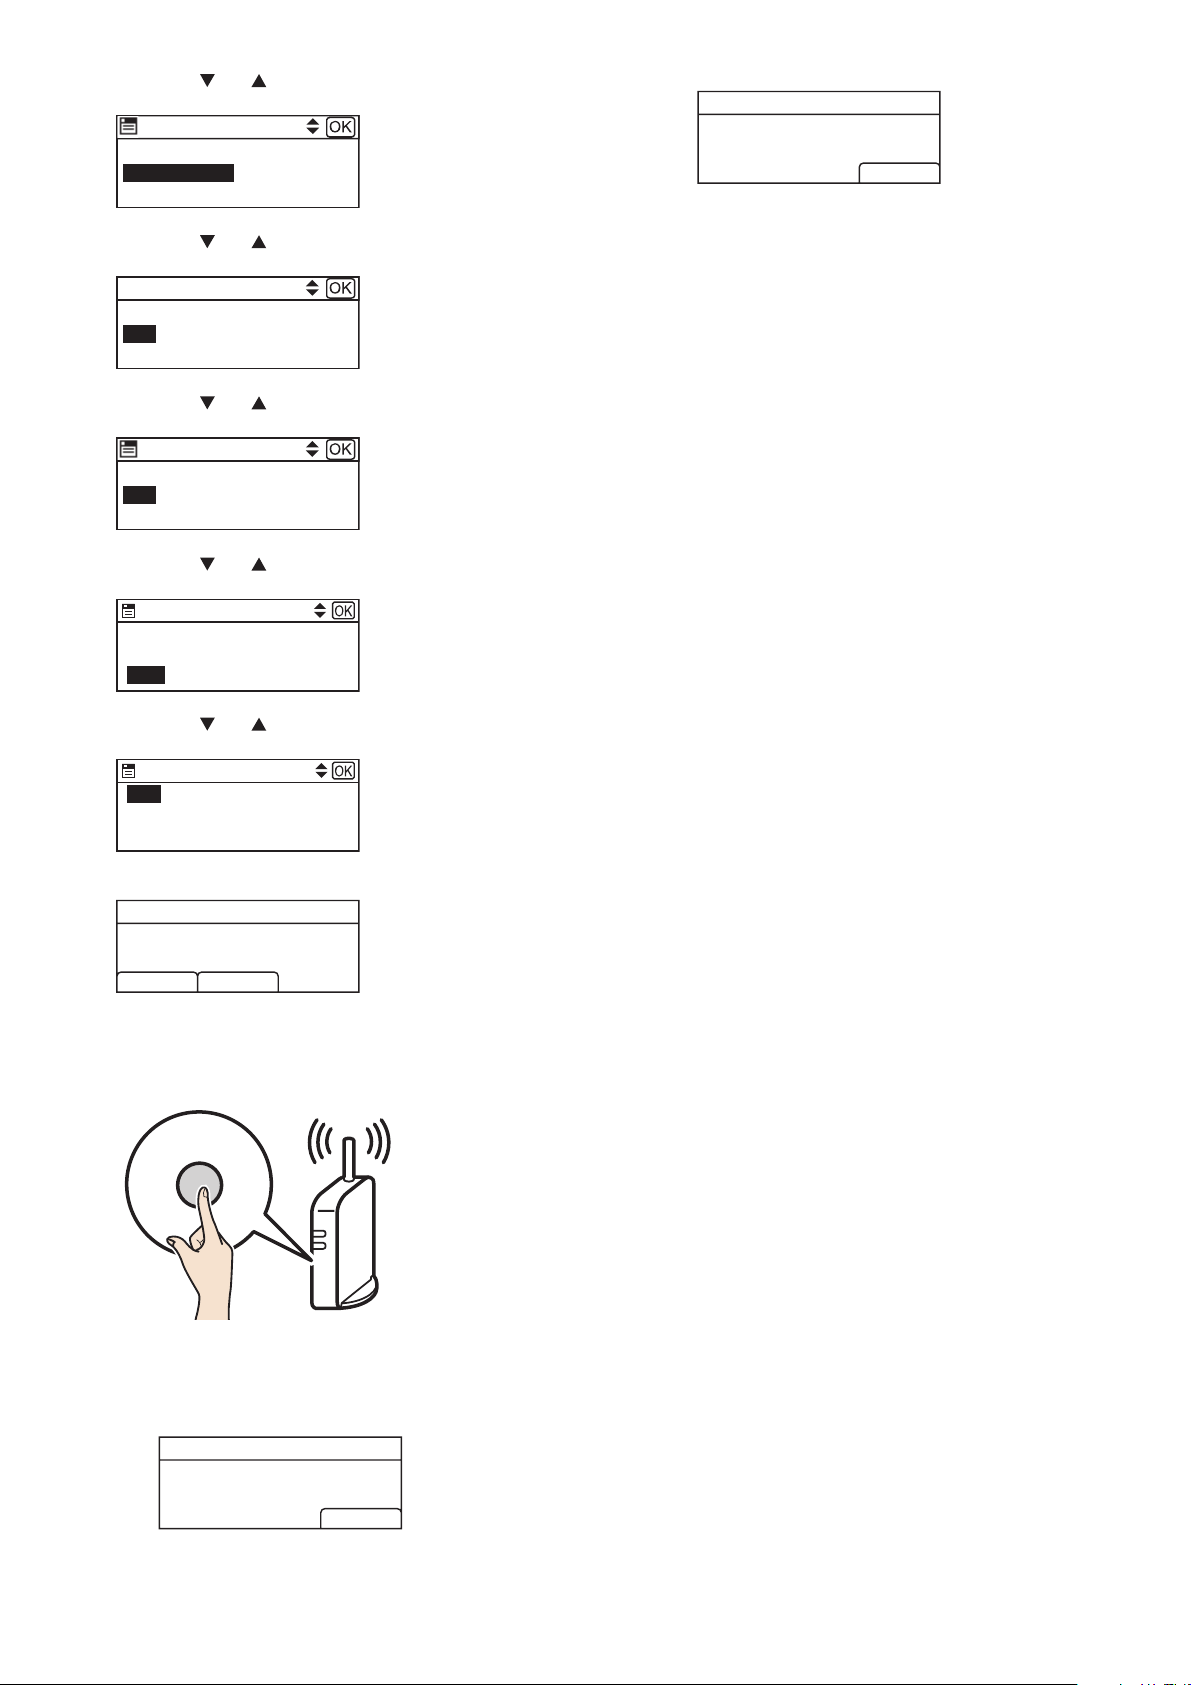
11. Press the [ ] or [ ] key to select [Connect Method], and
Connect Method
then press the [OK] key.
Network Settings
2/2
IPv6 Configuration
Connect Method
DZV155
12. Press the [ ] or [ ] key to select [WiFi], and then press the
[OK ] key.
Ethernet
WiFi
DZV156
13. Press the [ ] or [ ] key to select [WiFi], and then press the
[OK ] key.
Network Settings
1/2
Ethernet
WiFi
IPv4 Configuration
DZV152
14. Press the [ ] or [ ] key to select [WPS], and then press the
[OK ] key.
WiFi
2/2
Current Connection
Input SSID
WPS
DZV160
15. Press the [ ] or [ ] key to select [PBC], and then press the
[OK ] key.
WPS Type
PBC
PIN
Connection has failed:
PBC
Connection to AP
has Failed
EXIT
• Press the selection key und er [E XIT ] to ret urn to the screen
displayed in Step 15. Check the con figuration for the router
(access point), then tr y the connection again.
DSG095
Configuring the Wireless (Wi-Fi) settings is complete.
To use the printer driver, install the printer driver according
to the procedure on page 11 "Easy Setup Using the
CD-ROM" and select "Automatically configure the printer
network" on Step 6.
16. Press the selection key under [Yes].
17. Press the WPS button on the router (access point) within
18. Check the result.
DZV161
PBC
WPS PBC Connect ?
YesNo
DSG093
“Please push the [AP] within 2 minutes” appears, and the
machine starts to connect in PBC method.
two minutes.
WPS
• For details about how to use the WPS button, refer to the manuals for
the router (access point).
Connection has succeeded:
CHV607
PBC
Connection to AP
has Succeeded
EXIT
• Press the selection key und er [E XIT ] to ret urn to the screen
displayed in Step 15, and then press the [User Tools/Counter]
key to return to the initial screen.
DSG094
9
Page 12
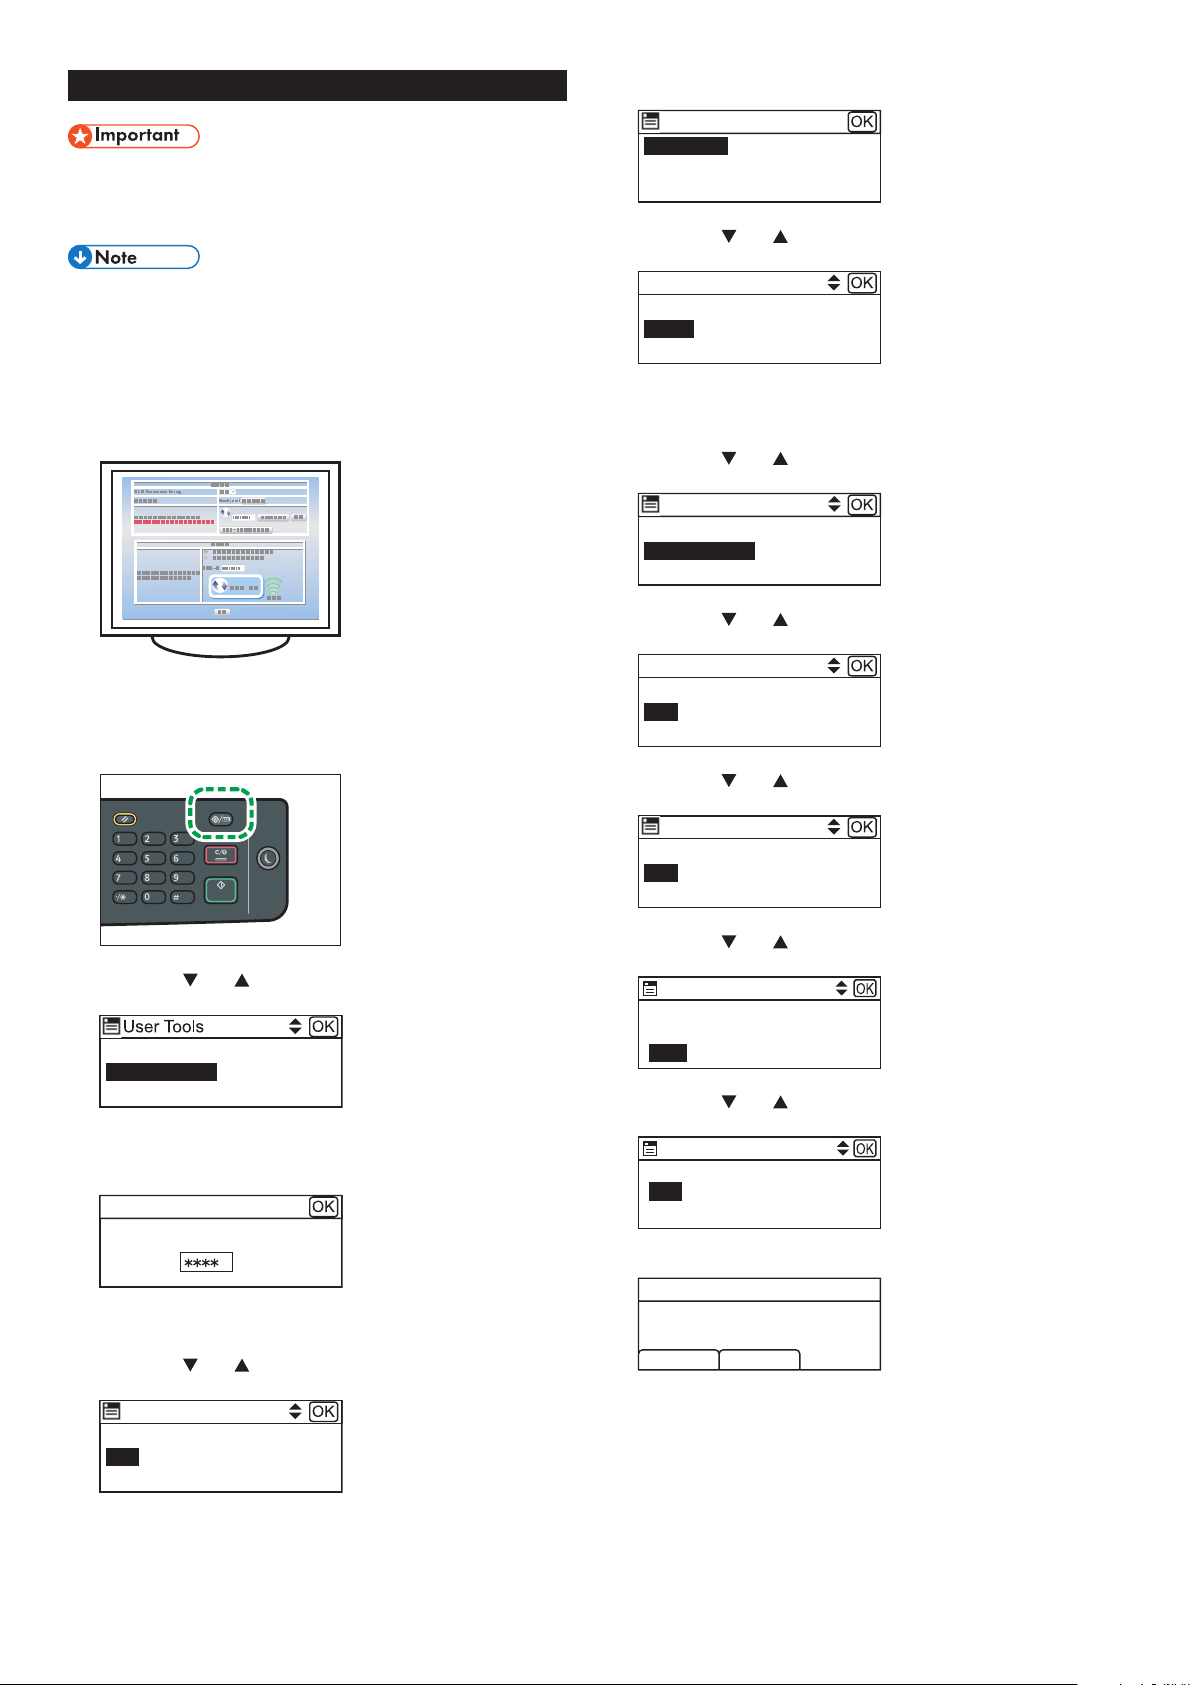
Easy Setup Using a PIN Code
Network Set. are Locked
Network Settings
Connect Method
2/2
● Make sure the Ethernet cable is not connected to the
machine.
● In Steps 19 to 21, congure each setting within two
minutes.
● To establish a connection using the PIN code, use a
computer that is connected to the router (access point).
● The following item is necessar y to set up a Wireless
(Wi-Fi) connection.
● Router (access point)
1. Check that the router (access point) is working correctly.
2. Open the PIN code configuration window (web page) for the
router (access point) on your computer.
8. Check [WiFi Enable] is selected, and then press the [OK]
key.
WiFi
WiFi Enable
DZV153
9. Press the [ ] or [ ] key to select [Enable], and then press
the [OK] key.
WiFi Enable
Disable
Enable
DZV154
10. Turn off the machine and then turn on.
11. Repeat Steps 4 to 6.
12. Press the [
] or [ ] key to select [Connect Method], and
then press the [OK] key.
2/2
IPv6 Configuration
Connect Method
DZV155
13. Press the [ ] or [ ] key to select [WiFi], and then press the
[OK ] key.
3. Make sure the wireless LAN option is attached to the
machine.
For details, see page 6 "Attaching the wireless LAN option".
4. Press the [User Tools/Counter] key.
DZV451
5. Press the [ ] or [ ] key to select [Net work Settings], and
then press the [OK] key.
2/3
Print List/Report
Network Settings
Copier Features
DZV150
6. If you are requested to enter a password, enter the
password using the number keys, and then press the [OK]
key.
Enter Password
DZV151
A password for accessing the [Network Settings] menu can be
specified in [Admin. Tools Lock] under [Admin. Tools] menu.
7. Press the [
] or [ ] key to select [WiFi], and then press the
[OK ] key.
Network Settings
1/2
Ethernet
WiFi
IPv4 Configuration
DZV152
Ethernet
WiFi
DZV156
14. Press the [ ] or [ ] key to select [WiFi], and then press the
[OK ] key.
Network Settings
1/2
Ethernet
WiFi
IPv4 Configuration
DZV152
15. Press the [ ] or [ ] key to select [WPS], and then press the
[OK ] key.
WiFi
Current Connection
Input SSID
WPS
DZV160
16. Press the [ ] or [ ] key to select [PIN], and then press the
[OK ] key.
WPS Type
PBC
PIN
DZV162
17. Check the PIN code.
PIN
PIN Code:
XXXXXXXX
Connect Abort
DSG098
Write down the PIN code in case you might forget it.
10
Page 13
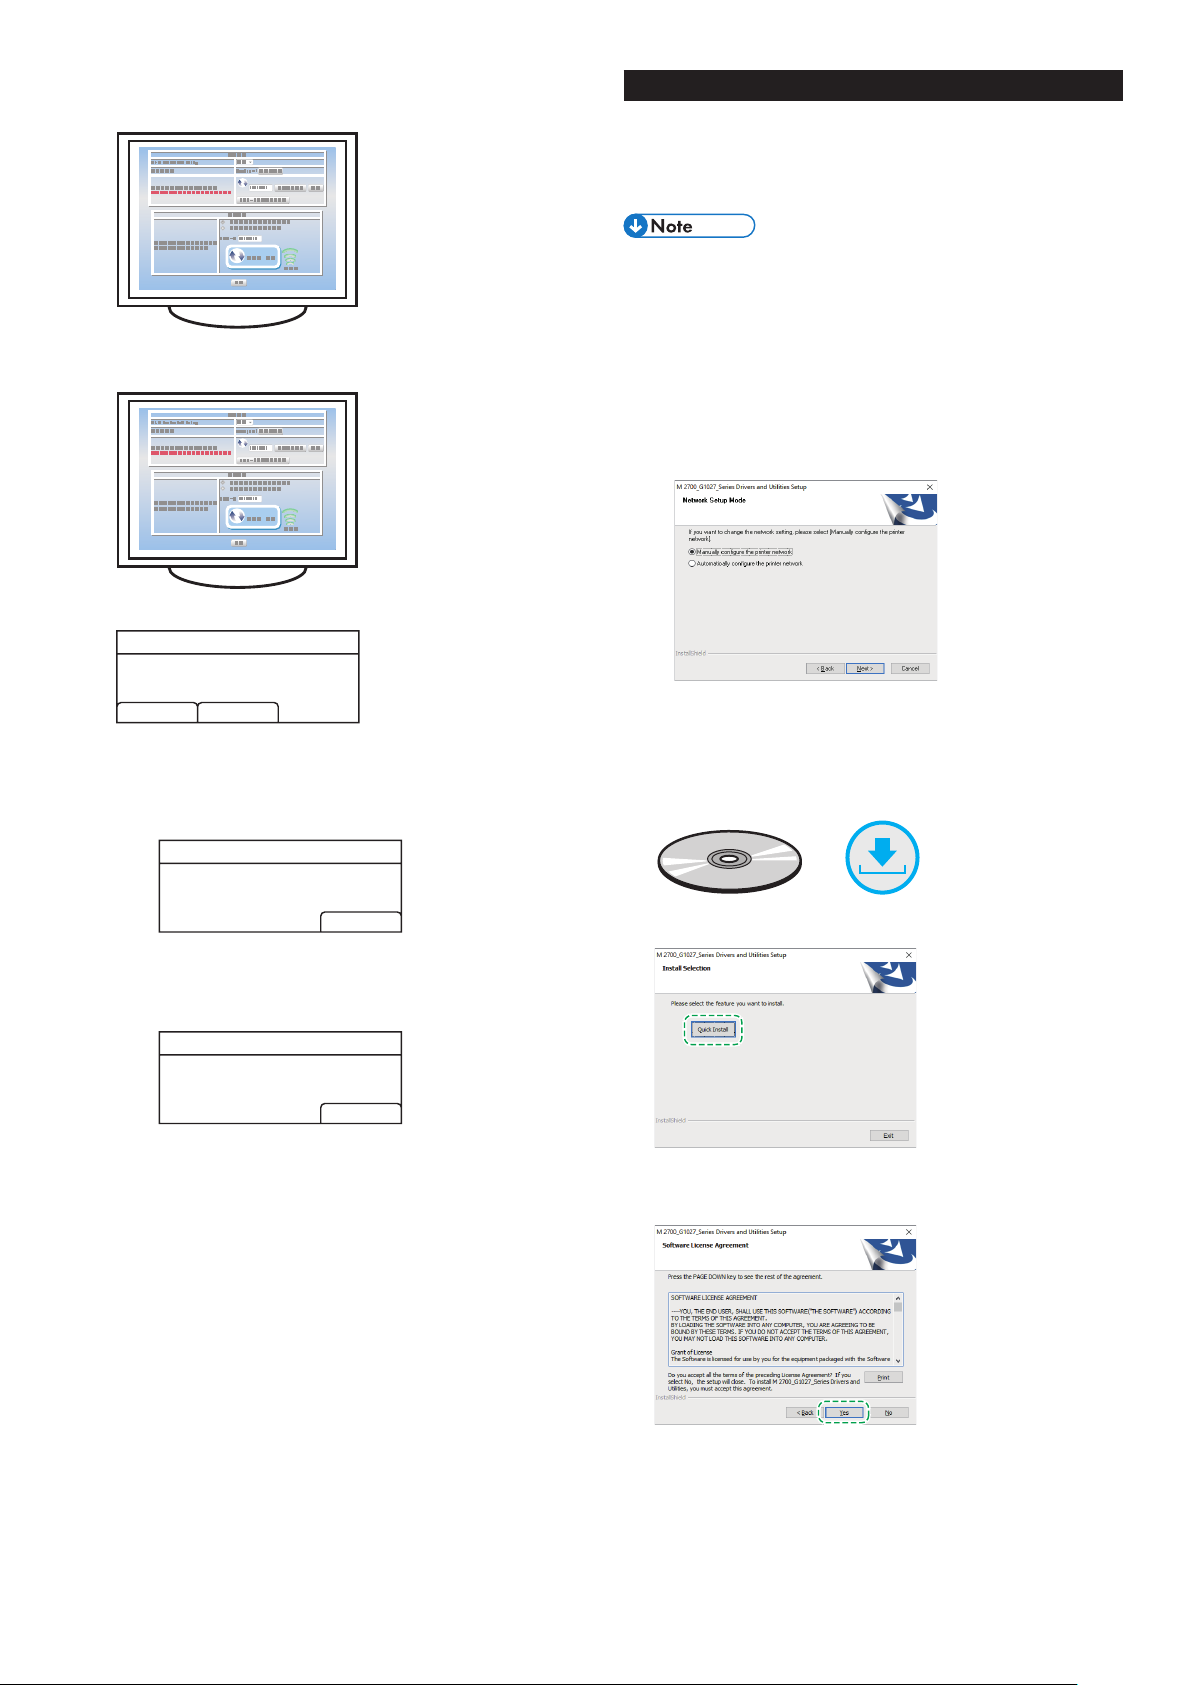
18. Enter the machine’s PIN code (8 digits) on the router
(access point)’s web page.(The web page accessed in Step
2)
19. Execute WPS (PIN system) from the router (access point)’s
web page.
20. Press the selection key under [Connect].
PIN
PIN Code:
XXXXXXXX
Connect Abort
DSG098
“Please wait for 2 minutes” appears and connecting with PIN
method starts.
21. Check the result.
Connection has succeeded:
PIN
Connection to AP
has Succeeded
EXIT
• Press the selection key und er [E XIT ] to ret urn to the screen
displayed in Step 16, and then press the [User Tools/Counter]
key to return to the initial screen.
DSG368
Connection has failed:
PIN
Connection to AP
has Failed
EXIT
• Press the selection key und er [E XIT ] to ret urn to the screen
displayed in Step 16. Check the con figuration for the router
(access point), then tr y the connection again.
DSG369
Configuring the Wireless (Wi-Fi) settings is complete.
To use the printer driver, install the printer driver according
to the procedure on page 11 "Easy Setup Using the
CD-ROM" and select "Automatically configure the printer
network" on Step 6.
Easy Setup Using the CD-ROM
Using the CD -ROM supplied with this machine, you can install
the driver from your computer and configure the Wireless (Wi-Fi)
settings for this machine.
If you intend to use this machine mainly from computers, we
recommend using the CD-ROM to configure the settings.
● The following items are necessary to set up a Wireless
(Wi-Fi) connection.
● USB interface cable
Using the USB cable is needed to update the settings of
this machine when it is installed or the Wireless (Wi-Fi)
settings change in your environment. See Step 6 to
connect your computer to this machine.
● Router (access point)
● CD-ROM supplied with the machine
● To install the software, quick installation and manual
installation can be used. Using the manual installation,
you can specify data to be installed as you prefer.
1. Turn on your computer.
2. Inser t the provided CD-ROM into the CD-ROM drive of the
computer.
If your computer does not have a CD-ROM drive, download a
setup file from our website.
or
3. Click [Quick Install].
4. The software license agreement appears in the [Software
License Agreement] dialog box. Af ter reading the
agreement, click [Yes].
11
Page 14
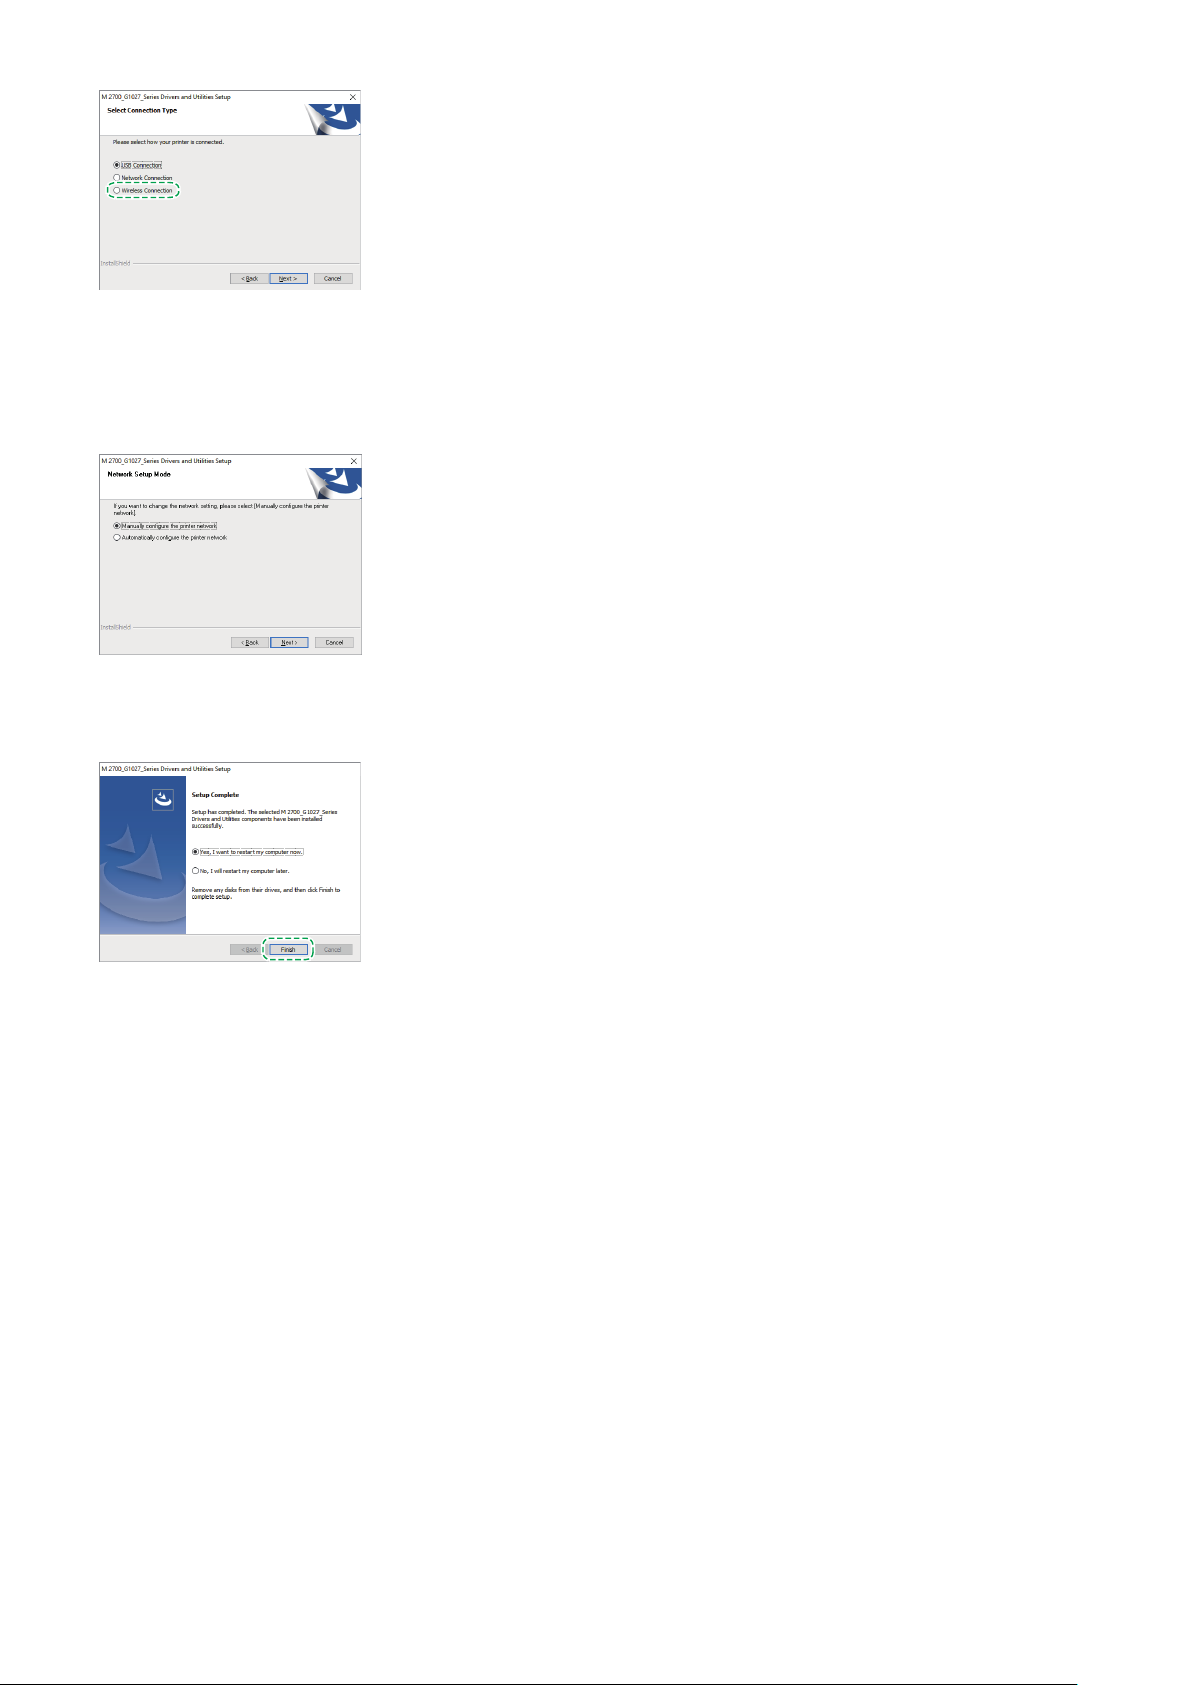
5. Select [Wireless Connection] and click [Next].
6. Select [Manually configure the printer network] when
installing this machine.
Connect your computer and this machine by using the USB
cable.
Select [Automatically configure the printer network] when
configuring the Wireless (Wi- Fi) settings for this machine is
completed.
7. Follow the instructions in the setup wizard.
8. Click [Finish] in the [Setup Complete] dialog box. If the
installer prompt you to restart Windows, reboot your
computer.
Setup is completed.
12
Page 15
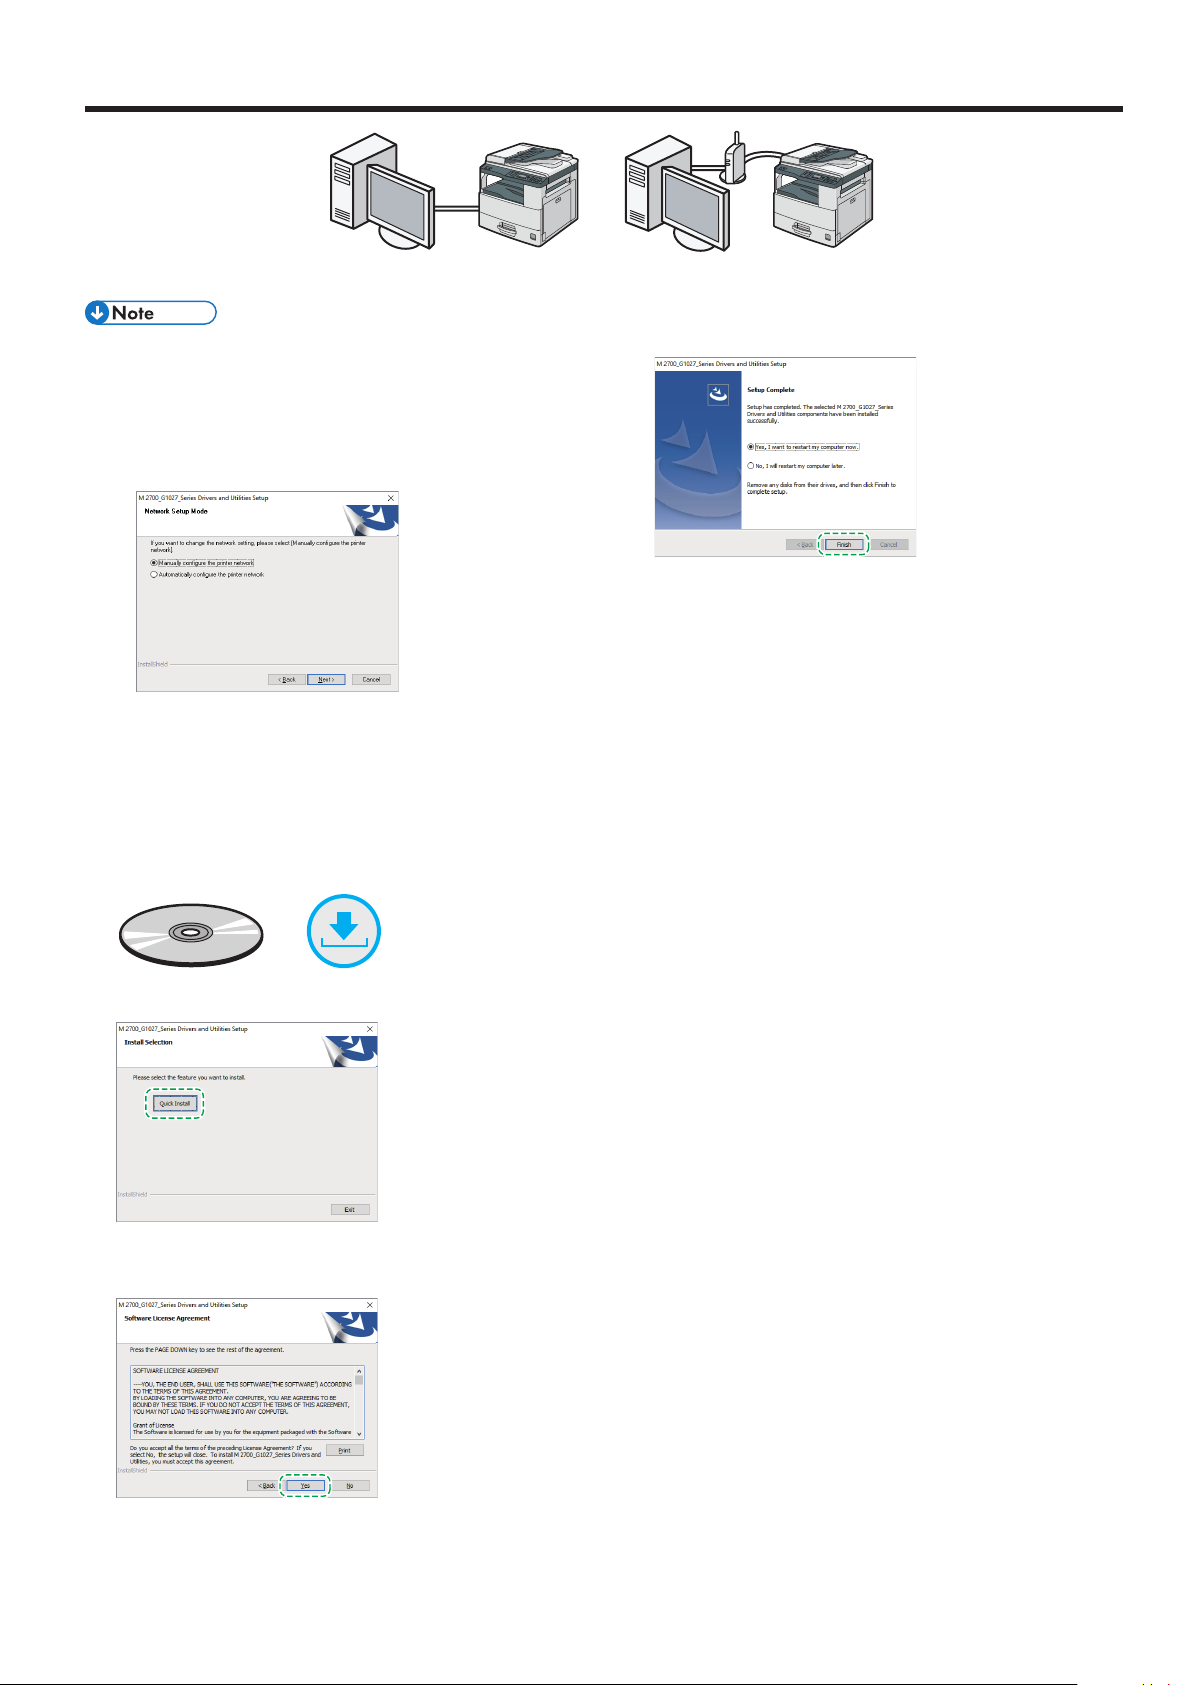
Connecting the Machine (USB/Network)
Windows
DZV170
● The following items are necessary to set up a wired
connection.
● USB interface cable or Ethernet interface cable
● CD-ROM supplied with the machine
● To install the software for network connection, quick
installation and manual installation can be used. Using
the manual installation, you can specify data to be
installed as you prefer.
● If you connect the computer by a USB cable, do not
connect the cable until you are instructed to do so on
the screen.
1. Turn on your computer.
2. Inser t the provided CD-ROM into the CD-ROM drive of the
computer.
If your computer does not have a CD-ROM drive, download a
setup file from our website.
DZV171
7. Click [Finish] in the [Setup Complete] dialog box. If the
installer prompt you to restart Windows, reboot your
computer.
Setup is completed.
or
3. Click [Quick Install].
4. The sof tware license agreement appears in the [Software
License Agreement] dialog box. Af ter reading the agreement,
click [Yes].
5. Select [USB Connection] or [Network Connection]
according to communication environment or your device,
and then click [Next].
6. Follow the instructions in the setup wizard.
13
Page 16
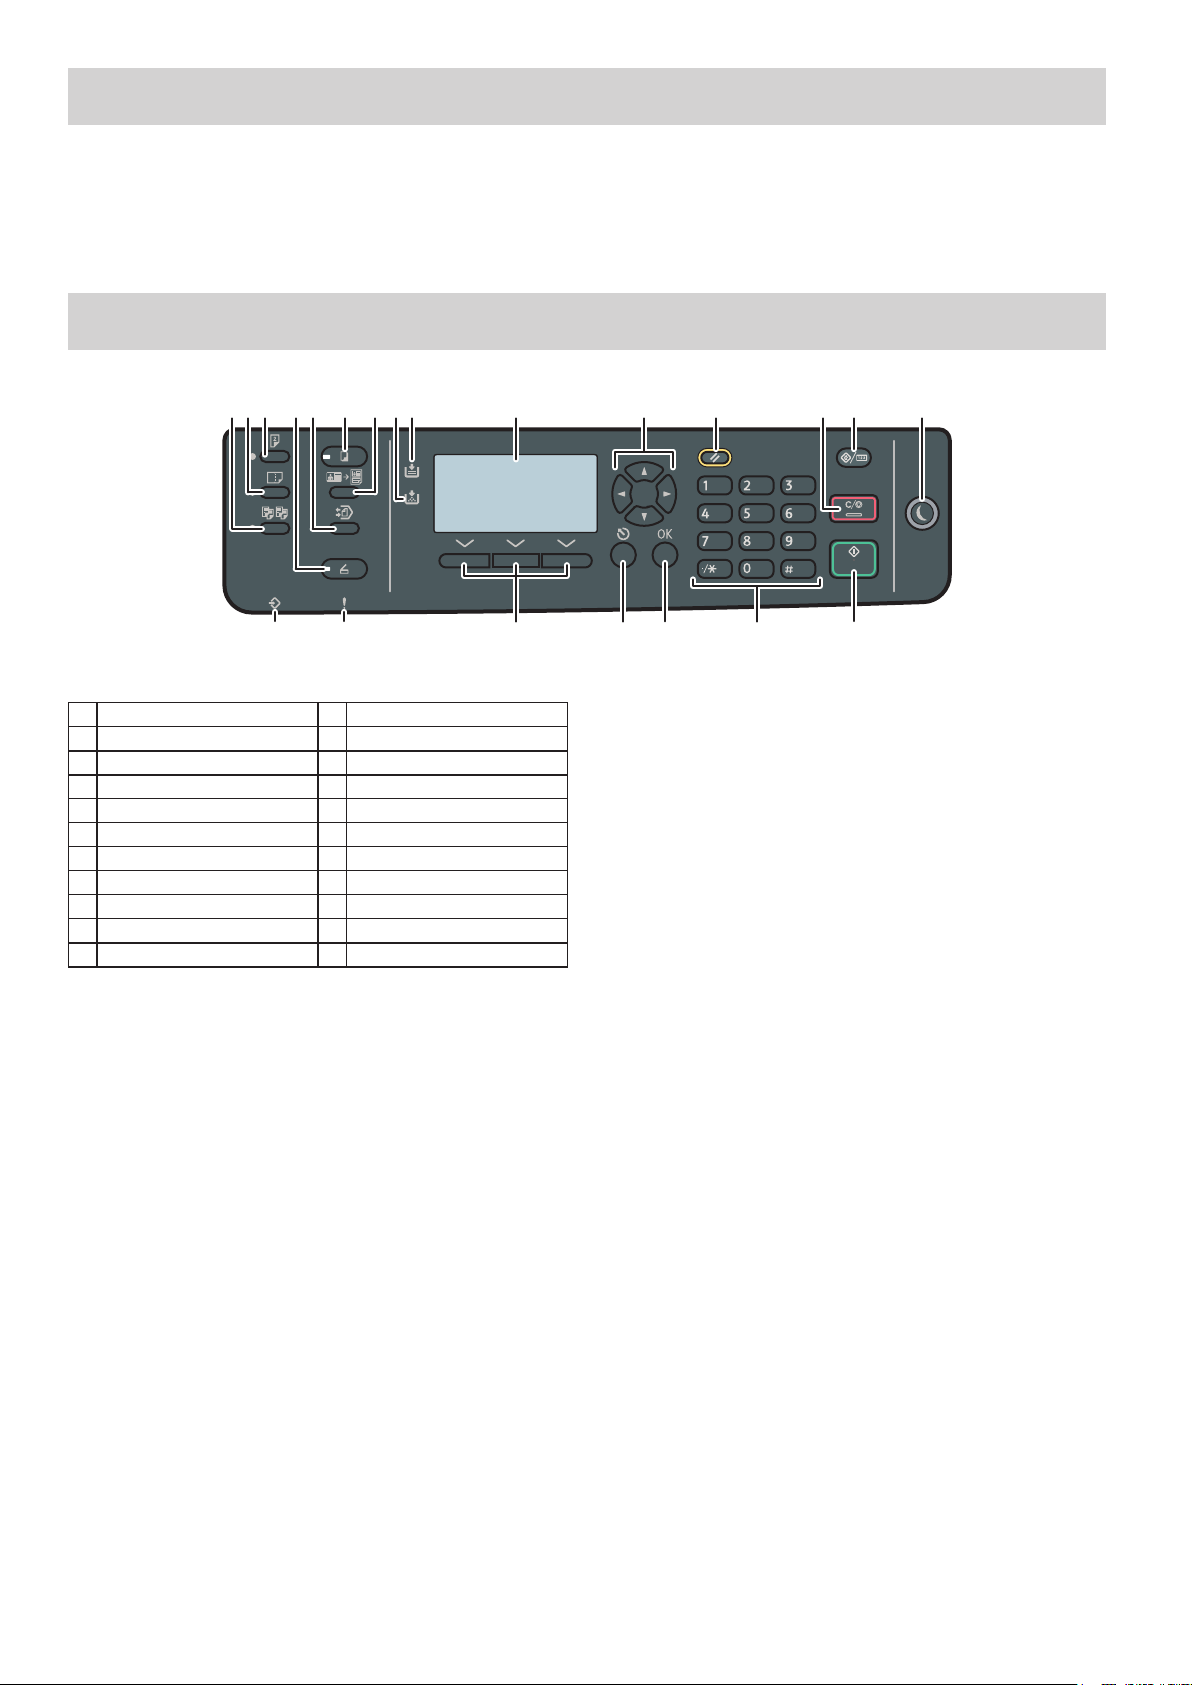
3. Scan settings
151413121110987654321
■For those using the scanner features for the first time
For information about specifying the initial scan settings, see “What You Can Do with the Scanner Function”, User Guide in the provided CDROM or our website.
Control Panel Sheet
1 [Sort] key 12 [Reset] key
2 [Combine] key 13 [Clear/Stop] key
3 [Duplex] key 14 [User Tools/Counter] key
4 [Scanner] key 15 [Energy Saver] key
5 [Folder Print] key 16 Data In Indicator
6 [Copy] key 17 Alert Indicator
7 [ID Card Copy] key 18 Selection keys
8 Add Toner Indicator 19 [Escape] key
9 Load Paper Indicator 20 [OK] key
10 Screen 21 Number keys
11 Scroll keys 22 [Start] key
22212019181716
DZV102
For safe and correct use, please be sure to read the Safety Information before using the machine.
14
Page 17

Trademark
Wi-Fi, Wi-Fi Protected Setup, WPA, Wi-Fi Protected Access, WPA2, and
Wi-Fi Protected Access 2 are registered trademarks of Wi-Fi Alliance.
Windows® is a registered trademark of Microsoft Corporation in the United
States and/or other countries/regions.
Other product names used herein are for identification purposes only and
might be trademarks of their respective companies. We disclaim any and all
rights to those marks.
All Microsoft product screenshots are reprinted with permission from the
Microsoft Corporation.
© 2018
Page 18

EN
GB
EN
D0B3-7105AAU
 Loading...