

Page 1
INTRODUCTION
SAFETY INFORMATION
INTRODUCTION
This manual contains detailed instructions on the operation and maintenance of this copier. To get maximum
versatility from this copier, all operators should carefully read and follow the instructions in this manual. Please
keep this manual in a handy place near the machine.
Please read the next section before using this copier. It contains important information related to USER SAFETY
and PREVENTING EQUIPMENT PROBLEMS.
SAFETY INFORMATION
When using your copier, the following safety precautions should always be followed.
Safety During Operation
In this manual, the following important symbols are used:
R
W ARNING: Ignoring this warning could cause serious injury or even death.
R
Caution: Ignoring this caution could cause injury or damage to property.
Examples Of Indications
R
Symbol R means a situation that requires you take care.
q
Do NOT carry out the operation represented by the symbol m. This example
means “Do not take apart”.
r
Symbols ● means you MUST perform this operation. This example means “You
must remove the wall plug”.
R
WARNINGS:
m
Only connect the copier to the power source described on the inside front cover
of this manual. Avoid multi-wiring as it could cause an electric shock or a fire.
Avoid using an extension cord. Make sure the wall outlet is near the copier and
freely accessible so that in event of an emergency it can be unplugged easily.
m
Do not damage, break or make any modifications to the power cord. Do not
place heavy objects on it, pull it hard or bend it more than necessary. These
actions could cause an electric shock or fire.
q
Do not remove any covers or screws other than those specified in this manual.
Some parts of the copier are at a high voltage and could give you an electric
shock. When the copier needs to be checked, adjusted or repaired, contact your
service representative.
Do not take apart or attempt any modifications to this copier. There is a risk of
fire, electric shock, explosion or loss of sight.
i
Page 2
SAFETY INFORMATION
r
If the copier looks damaged or breaks down, smoke is coming out, there is a
strange smell or anything looks unusual, immediately turn off the main power
switch then unplug the power code from the wall. Do not continue using the
copier in this condition. Contact your service representative.
m
Do not put any metal objects or containers holding water (e.g. vases, flowerpots, glasses) on the copier. If the contents fall inside the copier a fire or electric shock could occur.
s
Do not incinerate used toner or toner containers. Toner dust might ignite when
exposed to an open flame. Dispose of the used toner containers according to
local regulations for plastics.
r
If any metal, liquid or foreign matter falls into the copier , turn off the main switch
and unplug the main power cord. Contact your service representative. Do not
keep using the copier with a fault or defect.
m
Do not plug or unplug the power cord with wet hands or an electric shock might
occur .
R
Cautions:
r
When you move the copier , unplug the power cord from the wall outlet to avoid
fire or electric shock.
t
When you pull out the plug from the socket, grip the plug to avoid damaging the
cord and causing fire or electric shock.
m
Keep the copier away from humidity and dust. A fire or an electric shock might
occur .
Do not place the copier on an unstable or tilted surface. If it topples over it
could cause injury.
r
When the copier will not be used for long time, unplug the power cord.
o
If you use this copier in a confined space, make sure there is a continuous air
turnover.
n
When removing misfed paper, do not touch the fusing section because it could
be very hot.
R
This copier has been tested for safety using this supplier’s parts and consumable. We recommend you only use these specified supplies.
ii
Page 3

TABLE OF CONTENTS
TABLE OF CONTENTS
WHERE IT IS & WHAT IT IS
COPIER EXTERIOR..............................................................................................................2
COPIER INTERIOR ..............................................................................................................3
OPTIONS ............................................................................................................................4
OPERATION UNIT ...............................................................................................................4
Touch Panel Display................................................................................................................................... 5
WHAT YOU CAN DO WITH THIS COPIER
DIFFERENCES BETWEEN EDIT TYPE AND BASIC TYPE ........................................................ 8
FUNCTION SUMMARY .......................................................................................................9
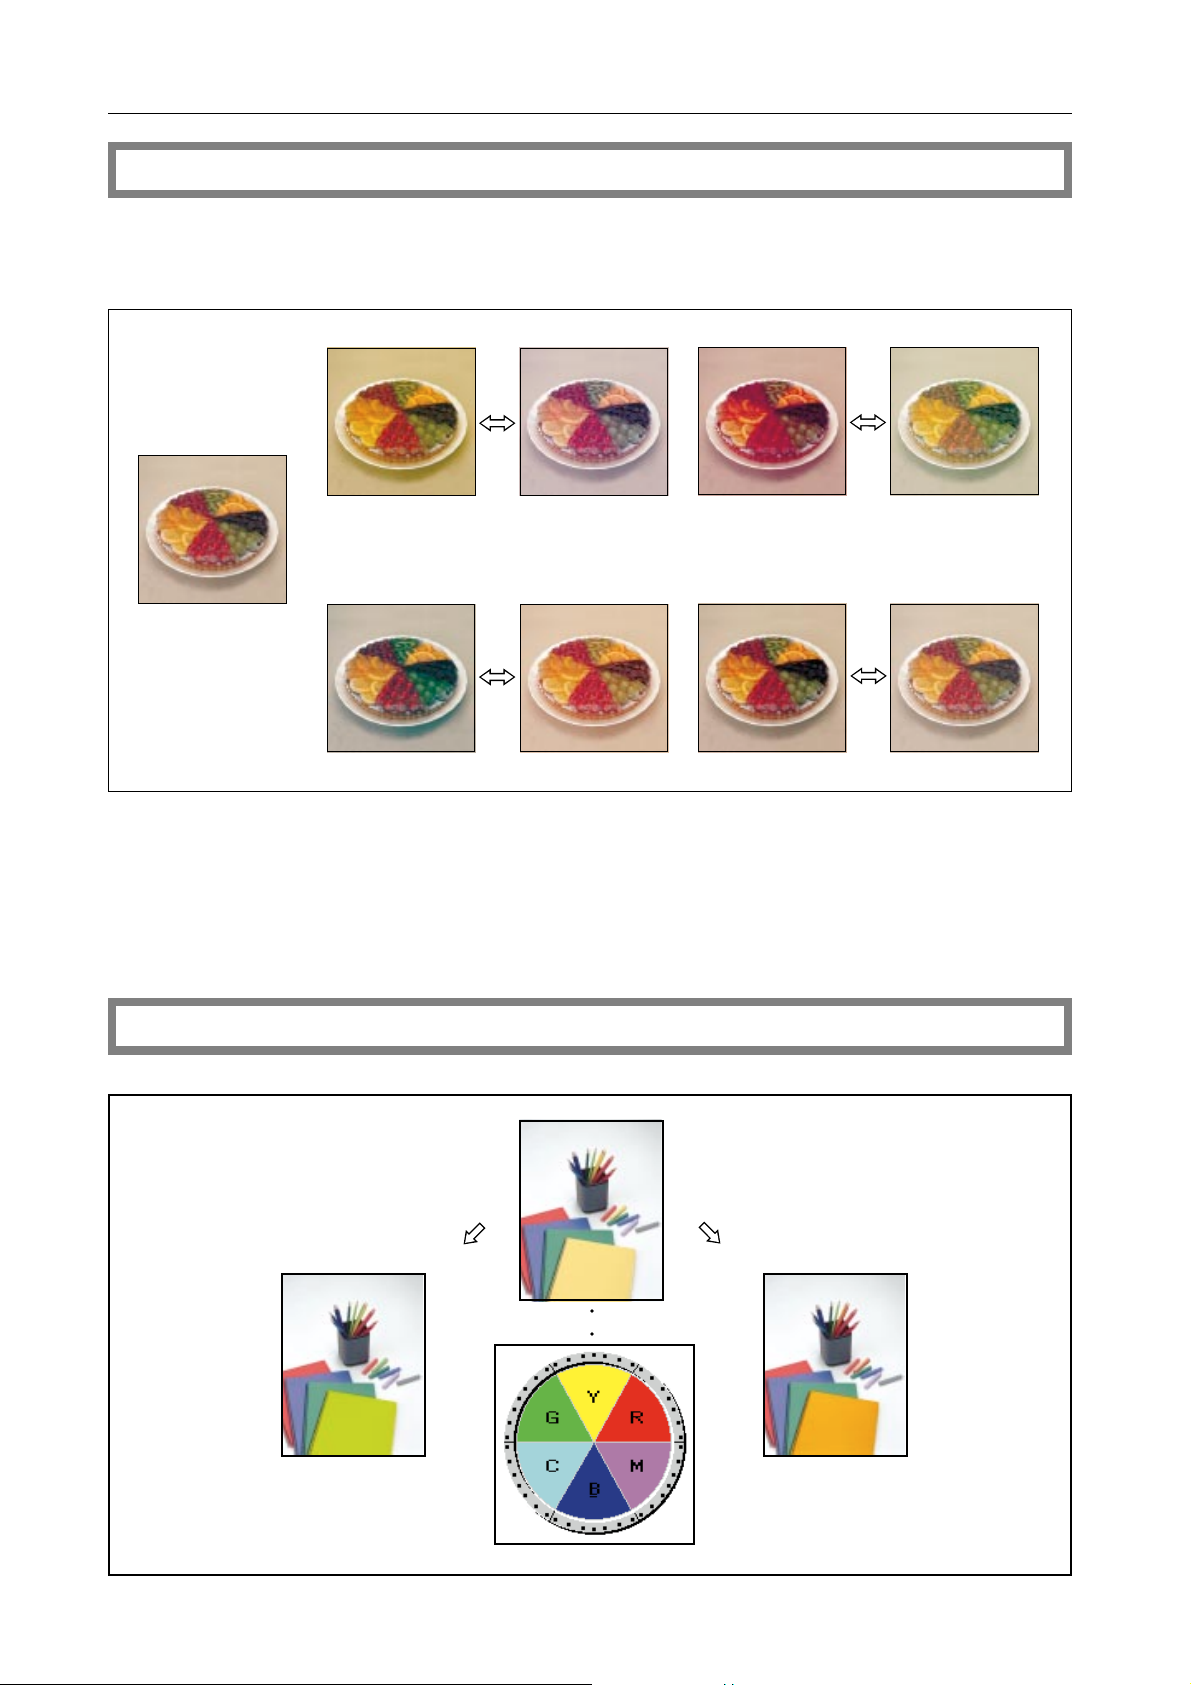
Selecting The Color.................................................................................................................................... 9
Reducing And Enlarging .......................................................................................................................... 10
Shifting The Image (Shift/Book) ............................................................................................................... 11
Erasing Parts Of The Copy Image (Shift/Book) ....................................................................................... 11
Making Single Copies (Shift/Book) .......................................................................................................... 12
Color Creation.......................................................................................................................................... 12
Image Creation ........................................................................................................................................ 13
Adjusting And Storing The Color Balance (Color Balance)......................................................................14
Adjusting A Single Color (Single Color Adjustment) ................................................................................ 14
Image Adjustment .................................................................................................................................... 15
Storing User Colors (User Color Memory)............................................................................................... 15
Area Editing (Only for Edit type) .............................................................................................................. 16
Finishing (Option)..................................................................................................................................... 16
Using The Projector (Option) ................................................................................................................... 16
COLOR SAMPLE CHART .................................................................................................. 17
BASICS
STARTING THE COPIER.....................................................................................................20
When The Main Switch Is In The Stand-by Position ................................................................................20
When The Touch Panel Display Is Blank And The Main Switch Is On.....................................................20
When The Copier Is Set For User Codes ................................................................................................ 20
iii
Page 4

USING THE TOUCH PANEL DISPLAY ................................................................................. 21
Selecting Functions.................................................................................................................................. 21
Entering Numbers .................................................................................................................................... 21
Checking The Functions You Have Selected............................................................................................ 22
ORIGINALS ...................................................................................................................... 23
Standard Size Paper ................................................................................................................................ 23
Recommended Originals ......................................................................................................................... 23
Non-recommended Originals For The Dual Job Feeder ..........................................................................23
SETTING ORIGINAL ON THE EXPOSURE GLASS .............................................................. 23
SETTING A STACK OF ORIGINALS IN THE DUAL JOB FEEDER (ADF, ARDF) ................... 24
SETTING ONE ORIGINAL AT A TIME IN THE DUAL JOB FEEDER (SADF).......................... 25
SETTING NON-STANDARD SIZED ORIGINALS ................................................................. 26
REMOVING THE PLATEN COVER TO COPY A LARGE ORIGINAL .................................. 27
COPYING
BASIC OPERATIONS ........................................................................................................30
One-to-one Copying................................................................................................................................. 30
Adjusting Copy Image Density................................................................................................................. 31
Selecting The Color.................................................................................................................................. 32
Selecting The Original Image Type (Photo/Letter) ...................................................................................35
Selecting The Copy Paper Size ............................................................................................................... 36
Copying From The Bypass T ray ............................................................................................................... 37
Having The Copier Choose The Reproduction Ratios (Auto Reduce/Enlarge)........................................41
Turning The Touch Panel Display OFF/ON (Stand by).............................................................................41
Temporarily Stopping One Job To Copy Something Else (Interrupt Copying) .........................................42
Entering Copy Job Settings During The Warm-up Period (Auto Start) ....................................................42
Presetting Copy Job During A Copy Run (Preset) ................................................................................... 43
Recalling The Previous Job Settings (Recall).......................................................................................... 43
Storing And Recalling Your Copy Settings In Memory (Program)............................................................44
Checking And Changing The Selected Copy Jobs .................................................................................. 45
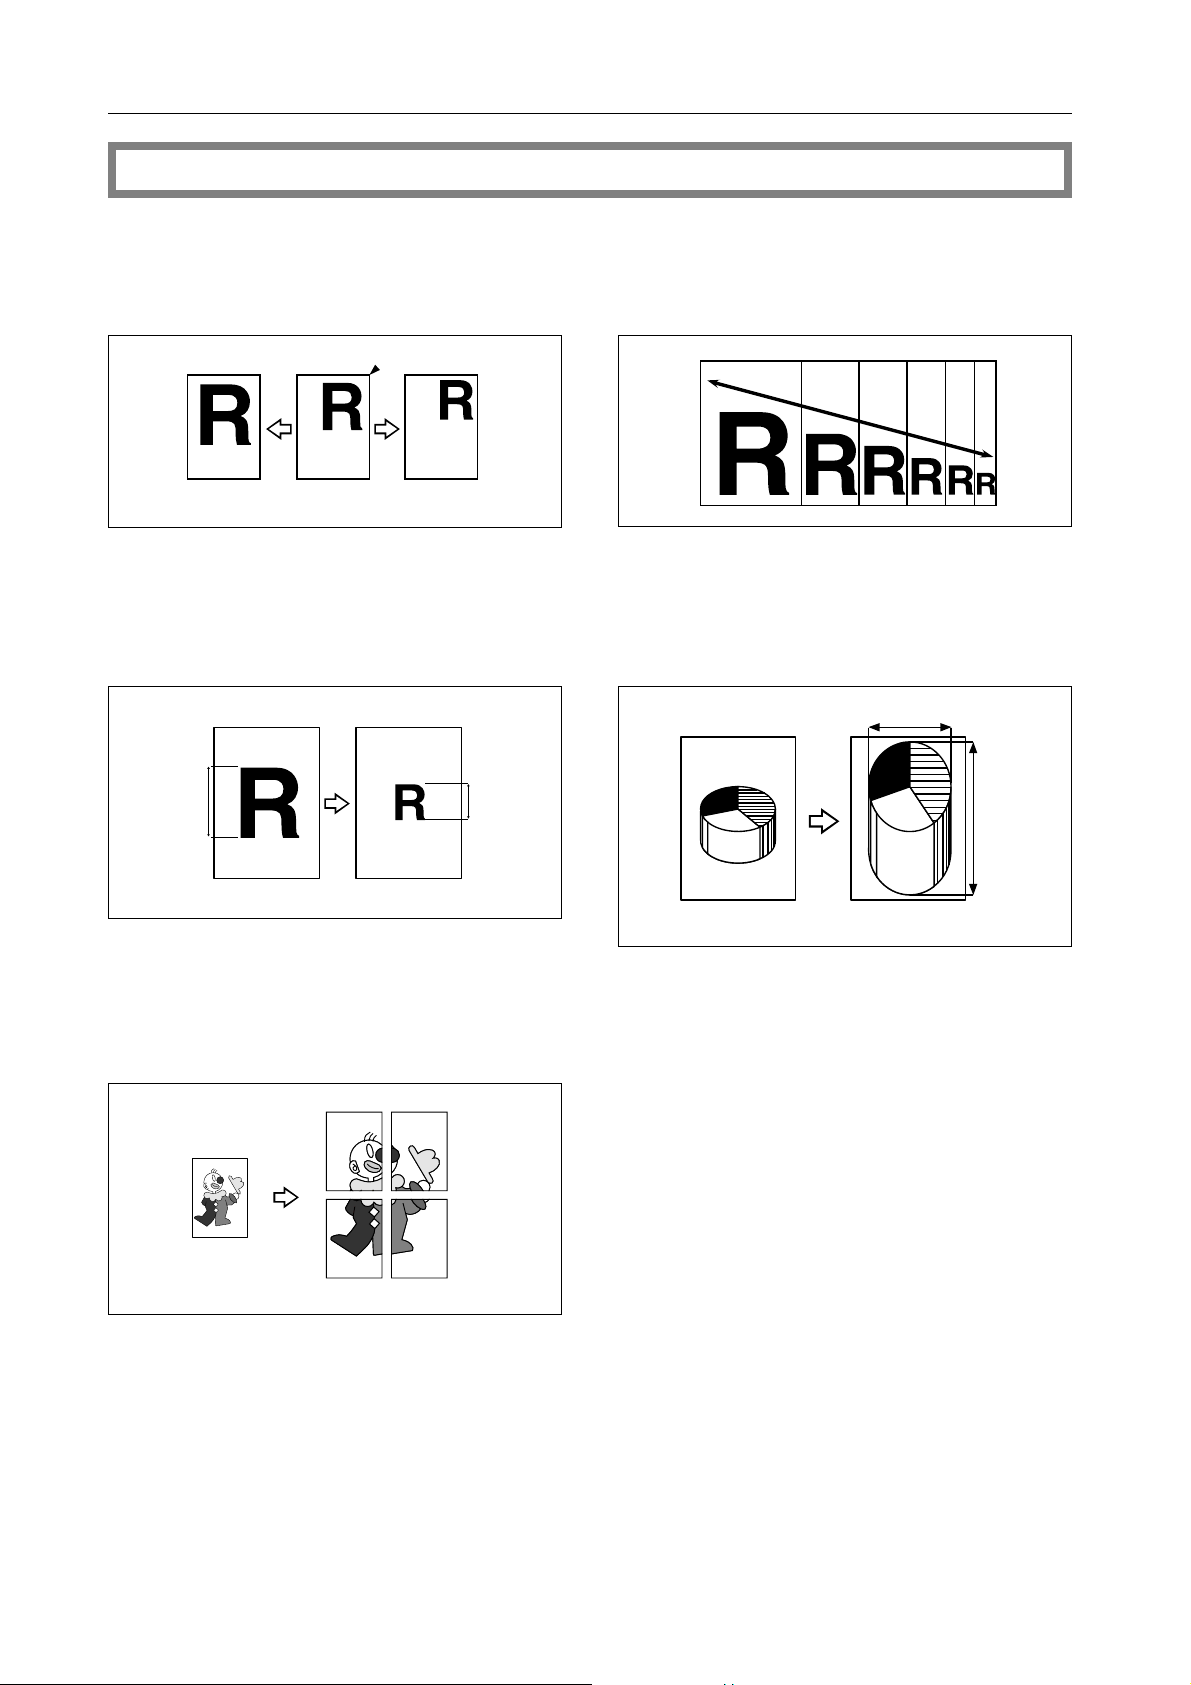
REDUCING AND ENLARGING (Reduce/Enlarge)......................................................... 45
Reducing And Enlarging Using Preset Ratios (Preset R/E) ....................................................................45
Reducing And Enlarging In 1% Steps (Zoom) ......................................................................................... 46
Fitting The Original To A Copy Of A Different Size (Size Magnification)..................................................47
Reducing And Enlarging With Independent Ratios For Vertical And Horizontal Directions
(Directional Size Magnification) ............................................................................................................... 47
Enlarging The Complete Image Onto Several Sheets (Poster Mode)......................................................48
iv
Page 5

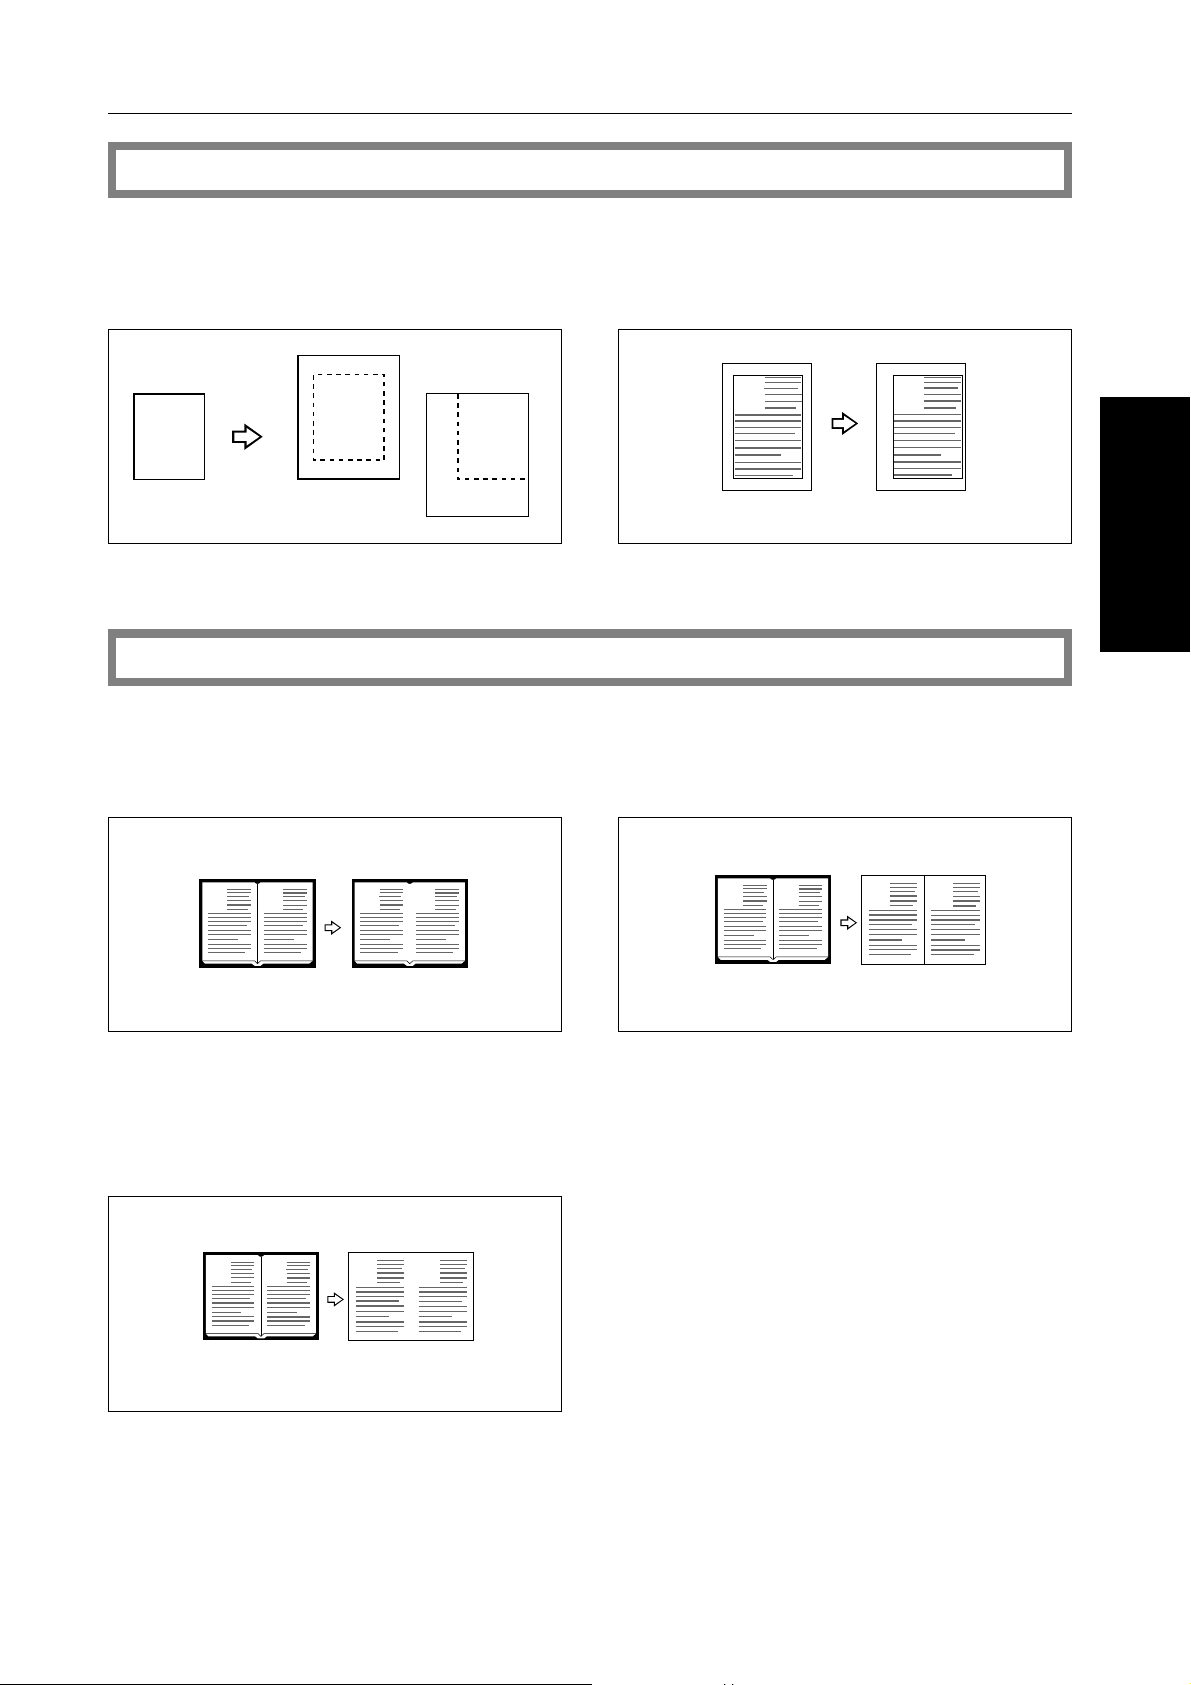
SHIFTING THE IMAGE (Shift/Book) ................................................................................. 50
Centering/Cornering ................................................................................................................................ 50
Adding Margins For Binding (Margin Adjustment) ................................................................................... 50
ERASING PARTS OF THE COPY IMAGE (Shift/Book) ...................................................... 51
Erasing The Center Margin Of The Original Image (Erase Center).........................................................51
Erasing The Surrounding Area Of The Original Image (Erase Border)....................................................51
Erasing The Center Margin And Surrounding Area Of The Original Image
(Erase Center And Border) ...................................................................................................................... 51
MAKING SINGLE COPIES (Shift/Book)........................................................................... 52
From Book Originals To 2 One-sided Copies (Book → 1 Sided)..............................................................52
From Two-sided Originals To 2 One-sided Copies (2 Sided → 1 Sided)..................................................53
Combining T wo Originals (Combine)........................................................................................................ 53
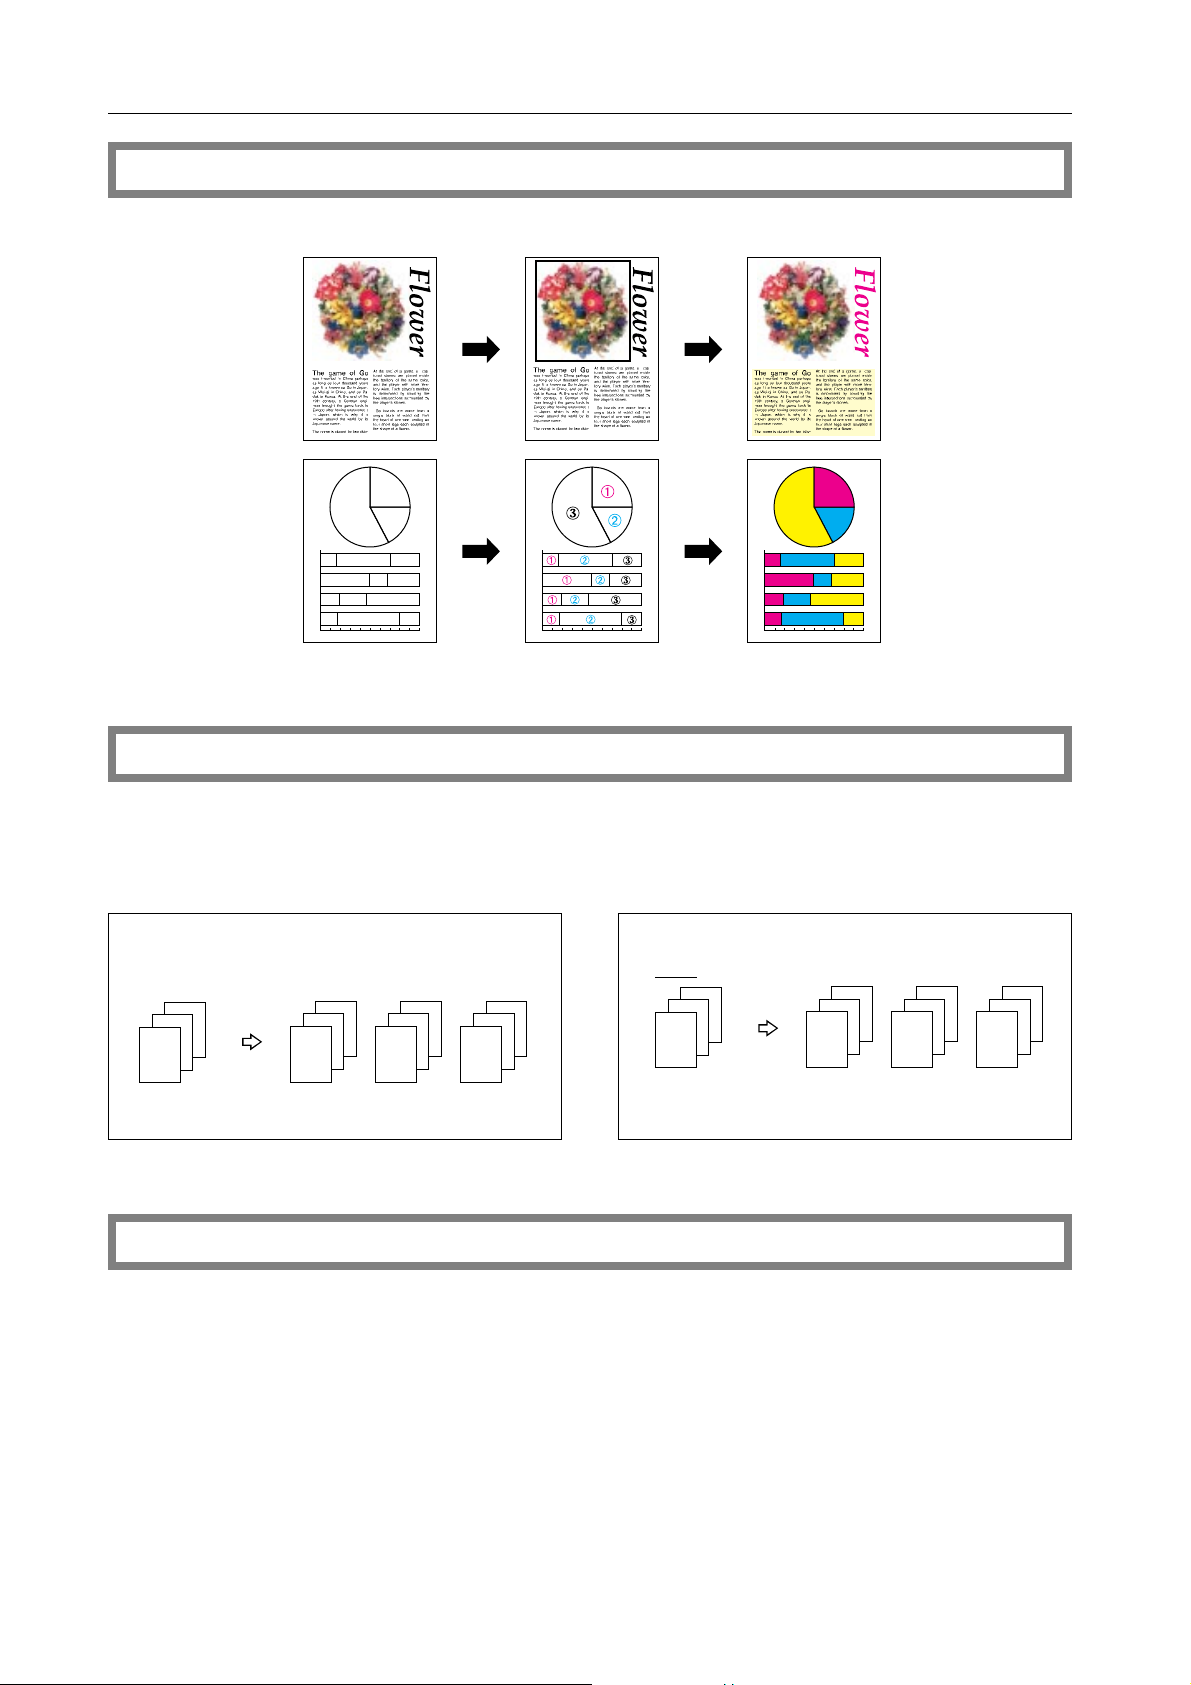
COLOR CREATION ..........................................................................................................55
Converting A Selected Color Into A Different Color (Color Conversion)..................................................55
Erasing The Selected Color (Color Erase)............................................................................................... 56
Making Copy With Color Background (Color Background) ......................................................................57
IMAGE CREATION ........................................................................................................... 58
Copying Only The Outline Of The Image (Outline) .................................................................................. 58
Adding A Shadow Around The Copy Image Elements (Shadow) ............................................................59
Slanting The Copy Image (Slanted) ......................................................................................................... 61
Making A Mirror Image (Mirror)................................................................................................................ 62
Copying In Complementary Colors (Positive/Negative) ........................................................................... 63
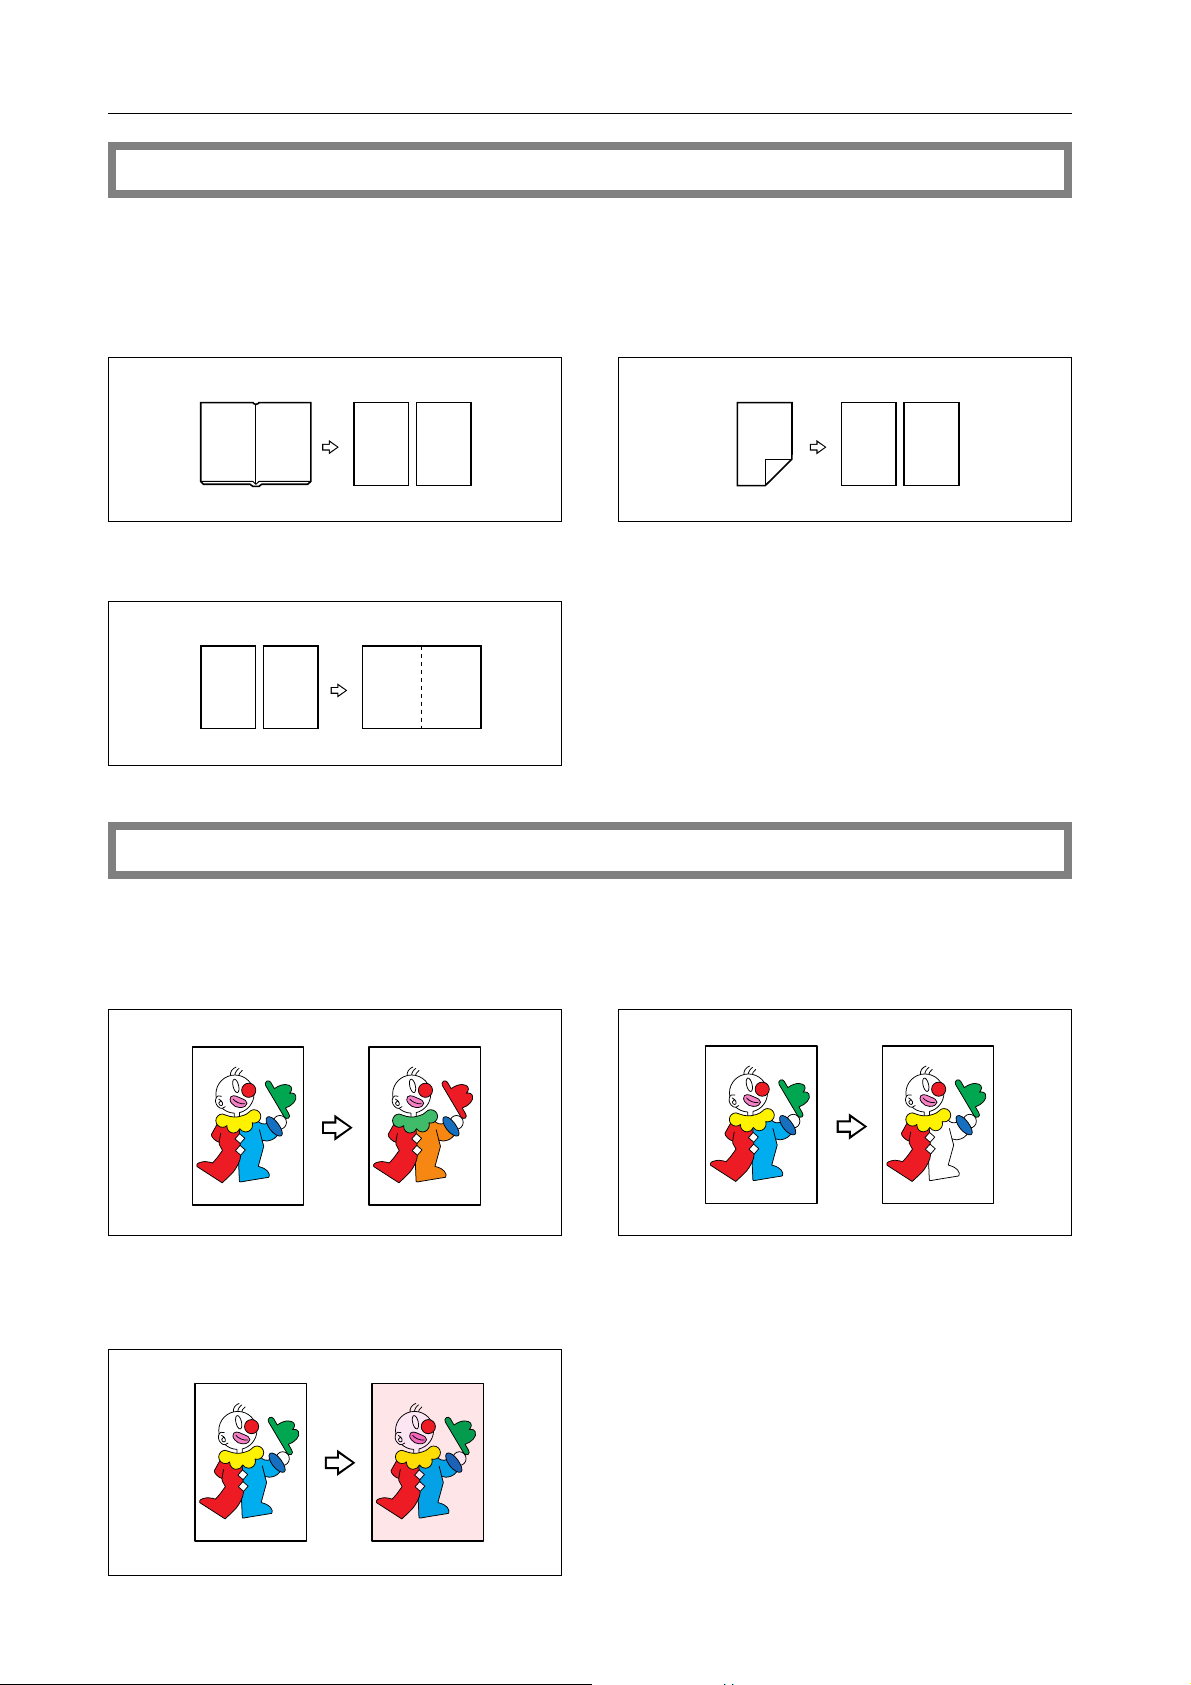
Copying A Part Of An Original Image Repeatedly (Image Repeat).........................................................63
Merging Images (Image Overlay) (Only for Edit type)..............................................................................66
FINISHING........................................................................................................................71
Sorting Into Sets (123, 123, 123) (Sort)................................................................................................... 71
Stacking Together All Copies Of A Page (111, 222, 333) (Stack)............................................................72
COMBINATION CHART ................................................................................................... 73
ADJUSTMENT AND COLOR MEMORY
ADJUSTING AND STORING THE COLOR BALANCE (Color Balance) ........................... 76
Color Balance Adjustment ....................................................................................................................... 76
Storing And Recalling The Color Balance (Color Balance Memory) .......................................................77
Sampling The Color Balance (Color Balance Sample) ............................................................................ 78
SINGLE COLOR ADJUSTMENT ......................................................................................... 82
IMAGE ADJUSTMENT....................................................................................................... 83
v
Page 6

STORING USER COLORS (User Color Memory)............................................................. 85
Adjusting Colors Based On The Selected Color ...................................................................................... 85
Mixing Colors Manually With The Number Keys ...................................................................................... 87
Sampling The User Color (Only for Edit type).......................................................................................... 88
AREA EDITING (Only for Edit type)
WHAT IS AREA EDITING? ................................................................................................. 90
HOW TO EDIT AREAS .......................................................................................................91
DESIGNATING AREAS......................................................................................................92
Designate Area Display............................................................................................................................ 92
Designate Area Tools............................................................................................................................... 93
If You Make A Mistake.............................................................................................................................. 96
Notes For Designating Areas................................................................................................................... 97
SELECTING MODES FOR DESIGNATED AREAS................................................................ 98
Basic Modes ............................................................................................................................................ 98
Coloring Frames And Lines (Frame Line/Color Line)...............................................................................99
Painting An Area (Paint)......................................................................................................................... 100
Blanking Out Part Of The Image (Save Area)........................................................................................ 101
Erasing A Part Of The Image (Delete Area) ........................................................................................... 102
SELECTING MODES FOR OUTSIDE DESIGNATED AREAS............................................... 103
CHANGING JOB SETTINGS FOR THE ENTIRE IMAGE.................................................... 104
CHECKING AND CHANGING AREAS .......................................................................... 105
Change Modes....................................................................................................................................... 105
Adding Areas ......................................................................................................................................... 106
Erasing A Group .................................................................................................................................... 107
EXITING AREA EDITING ................................................................................................. 108
COMBINATION CHART FOR AREA EDITING................................................................. 110
WHAT TO DO IF SOMETHING GOES WRONG
IF YOUR COPIER DOES NOT OPERATE AS YOU WANT ................................................. 114
IF YOU CANNOT MAKE COPIES AS YOU WANT ..........................................................115
LOADING PAPER............................................................................................................117
Non-recommended Paper For Paper Trays............................................................................................ 117
Notes...................................................................................................................................................... 117
Loading Paper In The Paper Tray........................................................................................................... 117
vi
Page 7

Loading Paper On The Bypass Tray....................................................................................................... 118
ADDING TONER............................................................................................................. 119
CLEARING MISFEEDS..................................................................................................... 121
Check The Misfeed Location Display ..................................................................................................... 121
Clearing Paper Misfeeds........................................................................................................................ 121
Clearing Original Misfeeds..................................................................................................................... 122
CHANGING THE COPIER’S SETTINGS
CHANGING PAPER SIZE IN TRAYS 1 AND 2 .................................................................. 124
USER TOOLS ................................................................................................................... 125
How To Access User Tools ..................................................................................................................... 125
User Tools Menu .................................................................................................................................... 126
ADMINISTRATOR TOOLS ................................................................................................ 131
How To Access Administrator Tools ....................................................................................................... 131
Administrator Tool Menu ........................................................................................................................ 132
MAINTAINING YOUR COPIER
WHERE TO PUT YOUR COPIER
DO’S AND DON’TS
REMARKS
USE AND STORAGE OF SUPPLIES
MAINTAINING YOUR COPIER ....................................................................................... 134
Copier .................................................................................................................................................... 134
Dual Job Feeder (Option)....................................................................................................................... 134
WHERE TO PUT YOUR COPIER ....................................................................................... 135
Copier Environment ............................................................................................................................... 135
Power Connection.................................................................................................................................. 135
Access To Copier ................................................................................................................................... 136
DO’S AND DON’TS ........................................................................................................136
Copier .................................................................................................................................................... 136
Dual Job Feeder (Option)....................................................................................................................... 136
REMARKS ....................................................................................................................... 137
Copier .................................................................................................................................................... 137
USE AND STORAGE OF SUPPLIES .................................................................................. 137
Copy Paper ............................................................................................................................................ 137
Paper Storage ........................................................................................................................................ 138
Toner Storage......................................................................................................................................... 138
vii
Page 8

PROJECTOR UNIT OPERATION
GUIDE TO COMPONENTS ............................................................................................. 140
BEFORE OPERATING THE PROJECTOR .......................................................................... 142
About Film.............................................................................................................................................. 142
About Copying........................................................................................................................................ 142
Notes For Operation............................................................................................................................... 143
HOW TO COPY FROM FILM .......................................................................................... 144
POSITIONING THE PROJECTOR..................................................................................... 145
PREPARING THE FILM ..................................................................................................... 146
Selecting The Base Film (If Needed) ..................................................................................................... 146
Setting Films In The Holder (If Needed) ................................................................................................147
Cutting The Film Position Sheet (If Needed).......................................................................................... 148
SELECTING THE FILM TYPE AND PERFORM SHADING .................................................. 149
35 mm Slides Positive (Slide Holder/Mount Film Holder/Film Strip Holder) ..........................................150
35 mm Strip Negative (Film Strip Holder) .............................................................................................. 151
Positive Film On Glass........................................................................................................................... 152
Negative Film On Glass ......................................................................................................................... 154
ADJUSTING COLOR, DENSITY, AND FOCUS ................................................................ 156
Color Tones In Film Scanning ................................................................................................................ 156
Density Adjustment ................................................................................................................................ 156
Adjusting The Color Tone/Brightness Using Negative Film....................................................................157
Focus ..................................................................................................................................................... 158
SELECTING MODES........................................................................................................159
CHOOSING NEXT JOB .................................................................................................. 160
EXITING PROJECTOR MODE ......................................................................................... 161
WHAT TO DO IF SOMETHING GOES WRONG............................................................... 162
DAILY MAINTENANCE ................................................................................................... 164
Exterior................................................................................................................................................... 164
Lens ....................................................................................................................................................... 164
Film Holder............................................................................................................................................. 164
Holder Slot ............................................................................................................................................. 164
Mirror Unit .............................................................................................................................................. 164
viii
Page 9

SPECIFICATION
COPIER..........................................................................................................................166
DUAL JOB FEEDER (Option)..........................................................................................169
SORTER (Option)...........................................................................................................169
PROJECTOR UNIT (Option)...........................................................................................170
ix
Page 10

WHERE IT IS
& WHAT IT IS
WHERE IT IS & WHAT IT IS
1
Page 11
COPIER EXTERIOR
5.
6.
COPIER EXTERIOR
4.
3.
2.
1.
10.
9.
8.
7.
1. Operation panel Operator controls and indicators are located here.
2. Editor pen holder Place the editor pen here when you don’t use it.
3. Exposure glass Position originals here face down for copying.
4. Platen cover Lower this cover over originals for copying.
11.
5. Main switch Switches the copier between on and stand-by conditions. (“Stand-by” means
that the anticondensation heaters are on.)
6. Copy tray Completed copies are delivered here.
7. Stopper When you copy onto thin paper, raise this to prevent curling.
8. 500-sheet tray (T rays 1~3) Each tray can hold 500 sheets. ☛ See page 117.
9. Front door Open to access the inside of the copier.
10. Bypass tray Use to copy onto OHP transparencies, thick paper and other non-standard
copy paper.
11. Key counter holder A key counter may be installed here as an option.
2
Page 12
COPIER INTERIOR
COPIER INTERIOR
WHERE IT IS & WHAT IT IS
2
1
1. Fusing unit Fuses the copy image to the paper . When accessing the inside of the copier ,
use caution. This unit may be very hot.
2. Toner unit Toner bottles are in this unit. Replace the toner bottle when the copier
instructs you to add toner.
3
Page 13
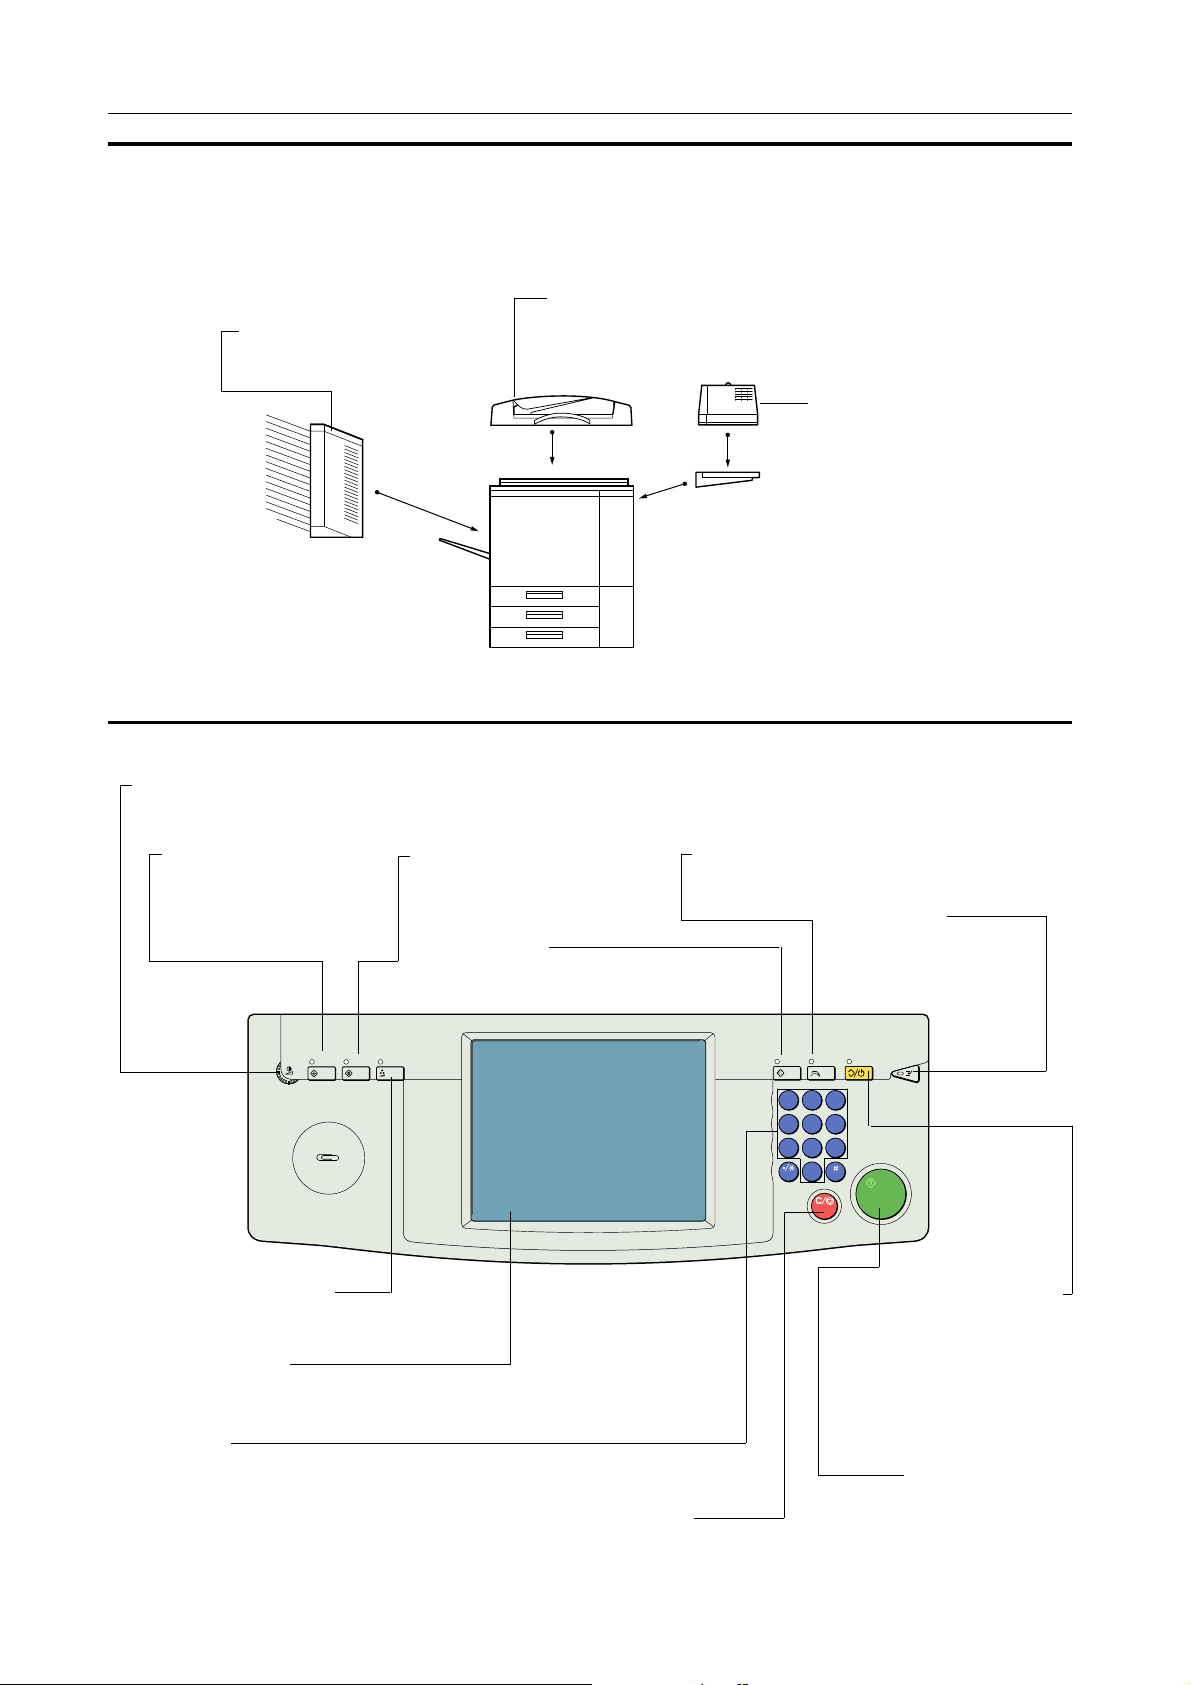
OPTIONS
OPERATION UNIT
This copier can be provided with the following options:
Dual job feeder
Sorter
Copies will be sorted or stacked
here. ☛ See page 71.
Originals inserted into the dual job feeder are individually and automatically fed onto and removed
from the exposure glass. ☛ See page 24.
OPTIONS
Projector unit
Use to copy films. ☛ See page 139.
Other options: key counter
Brightness knob
You can change the brightness of the display.
Special Accessory key
Press to use optional equipment such as the projector
unit. ☛ See page 139.
User Tools key
Press to change the default
setting. ☛ See page 125.
Program key
Press when storing copy job settings. ☛ See page 44.
Adjustment/Memory key
Press to adjust the image or color balance,
or to make user colors. ☛ See page 75.
Touch panel display
You can see the operation status and messages here.
☛ See page 21.
Number keys
Use to enter the desired number of copies. They
are also used to enter data for selected functions.
OPERATION UNIT
Recall key
Press to recall the previously selected copy jobs.
☛ See page 43.
Interrupt key
Press to make interrupt copies during a copy run. ☛ See
page 42.
C
1 2 3
4 5 6
7 8 9
0
Clear Modes/Stand by key
Press to clear the copier of previously entered settings and modes.
Hold down for more than 3 seconds to enter the stand by mode.
In stand by mode, the touch panel
display turns off. Press this key
again to use the touch panel display.
☛ See page 41.
Start key
Press to start copying.
Clear/Stop key
Press to cancel the copy number entered. While copying, press to stop
copying. This key is also used to clear data for selected functions.
4
Page 14
Touch Panel Display
OPERATION UNIT
Initial display
Total number of copies to make
COPY COUNTER
Counts number of copies made so far.
❒ You can select whether the copy counter counts up (counter
up) or counts down (counter down). If you want to change
the setting, contact your service representative.
This machine’s features are accessed by simply touching the name of the feature and following the instructions that come up on the display.
❒ Regarding detailed information about each key and function, ☛ see page 9.
❒ For how to use the touch panel display, ☛ see page 21.
WHERE IT IS & WHAT IT IS
5
Page 15

6
Page 16

WHAT YOU CAN DO
WITH THIS COPIER
THIS COPIER
WHAT YOU CAN DO WITH
7
Page 17
DIFFERENCES BETWEEN EDIT TYPE AND BASIC TYPE
DIFFERENCES BETWEEN EDIT TYPE AND BASIC TYPE
This machine comes in two versions. Refer to the table below for features available on your machine.
Functions
Copy Image Density Adjustment (Auto/Manual)
Auto Color Selection
Full Color
Black
Single Color
Twin Color
Original Image Type Selection
Paper Selection (Auto/Manual)
Preset R/E
Zoom
Size Magnification
Directional Size Magnification
Enlarging
Reducing/
Poster Mode
Centering/Cornering
Margin Adjustment
Erase
Shift/Book
Single Copies
Color Conversion
Color
Color Adjust-
Area Editing
Interrupt Copying
Recall
Auto Start
Program
Auto Reduce/Enlarge
Bypass Feed Copying
Duplex Copying
Default Setting
User Tools
Display Color
Color Erase
Color Background
Creation
Outline
Positive/Negative
Shadow
Mirror
Slanted
Image Repeat
Image Creation
Image Overlay
User Color Memory
Single Color Adjustment
Color Balance Adjustment
Color Balance Sample
ment/Memory
Image Adjustment
Edit type
✓
✓
✓
✓
✓
✓
✓
✓
✓
✓
✓
✓
✓
✓
✓
✓
✓
✓
✓
✓
✓
✓
✓
✓
✓
✓
✓
✓
✓
✓
✓
✓
✓
✓
✓
✓
✓
✓
✓
✓
✓
✓
Full color
Basic type
✓
✓
✓
✓
✓
✓
✓
✓
✓
✓
✓
✓
✓
✓
✓
✓
✓
✓
✓
✓
✓
✓
✓
✓
✓
✓
–
✓
✓
✓
✓
✓
–
✓
✓
✓
✓
✓
✓
✓
✓
✓
Black & White
8
Page 18
See Page 31.
See Page 32.
See Page 35.
FUNCTION SUMMARY
FUNCTION SUMMARY
See Page 89.
Full color
See Page 36.
See Page 26.
Selecting The Color
See Page 41.
See Page 72.
See Page 71.
See Page 45.See Page 50.See Page 55.See Page 58.
THIS COPIER
WHAT YOU CAN DO WITH
☛ See page 32.
i
Black
c
Single color
ABCDE
ABCDEFGHIJKL
MNOPQRSTUV
WXYZ
ABCDEFGHIJKL
MNOPQRSTUV
WXYZ
i
ABCDE
ABCDEFGHIJKL
MNOPQRSTUV
WXYZ
ABCDEFGHIJKL
MNOPQRSTUV
WXYZ
F
F
Scan colorUser color Twin color
9
Page 19
FUNCTION SUMMARY
Reducing And Enlarging
☛ See page 45.
Reducing and enlarging using preset
ratios (Preset R/E)
Fitting the original to a copy of a
different size (Size Magnification)
A mm, A"
a mm, a"
Reducing and enlarging in 1% steps
(Zoom)
Reducing and enlarging with independent ratios for vertical and horizontal directions (Directional Size Magnification)
Horizontal
Vertical
Enlarging the complete image onto several sheets (Poster Mode)
10
Page 20
FUNCTION SUMMARY
Shifting The Image (Shift/Book)
Centering/Cornering Adding margins for binding
(Margin Adjustment)
☛ See page 50.
R
R
Erasing Parts Of The Copy Image (Shift/Book)
Erasing the center margin of the original
image (Erase Center)
B
A
A
R
B
A
A
☛ See page 51.
B
A
Erasing the surrounding area of the original image (Erase Border)
B
A
THIS COPIER
WHAT YOU CAN DO WITH
Erasing the center margin and surrounding area of the original image
(Erase Center And Border)
B
A
A
B
11
Page 21
FUNCTION SUMMARY
2
2
11
Making Single Copies (Shift/Book)
☛ See page 52.
From book original to 2 one-sided copies (Book → 1Sided)
1
2
1
2
Combining two originals (Combine)
1
2
2
1
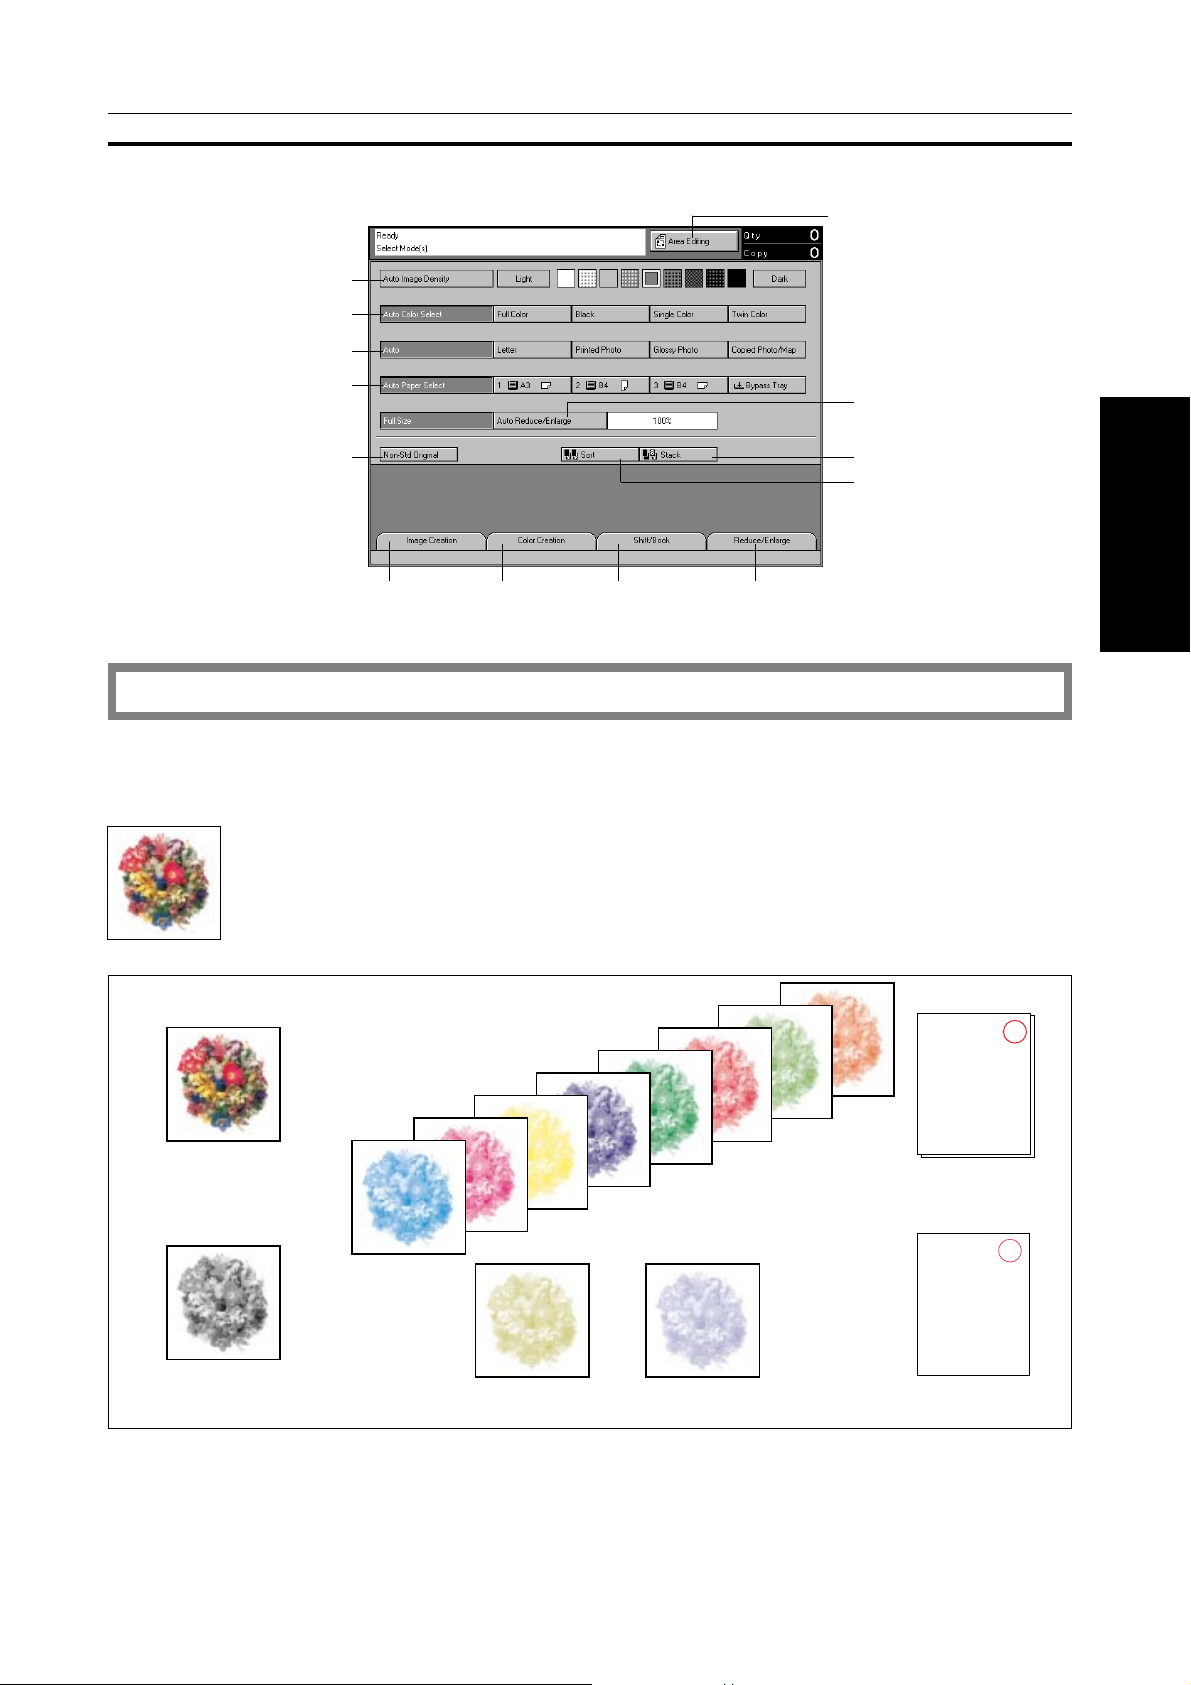
Color Creation
From two-sided original to 2 one-sided
copies (2 Sided → 1 Sided)
Converting a selected color into a
different color (Color Conversion)
Making copies with a color background (Color Background)
☛ See page 55.
Erasing the selected color (Color Erase)
12
Page 22
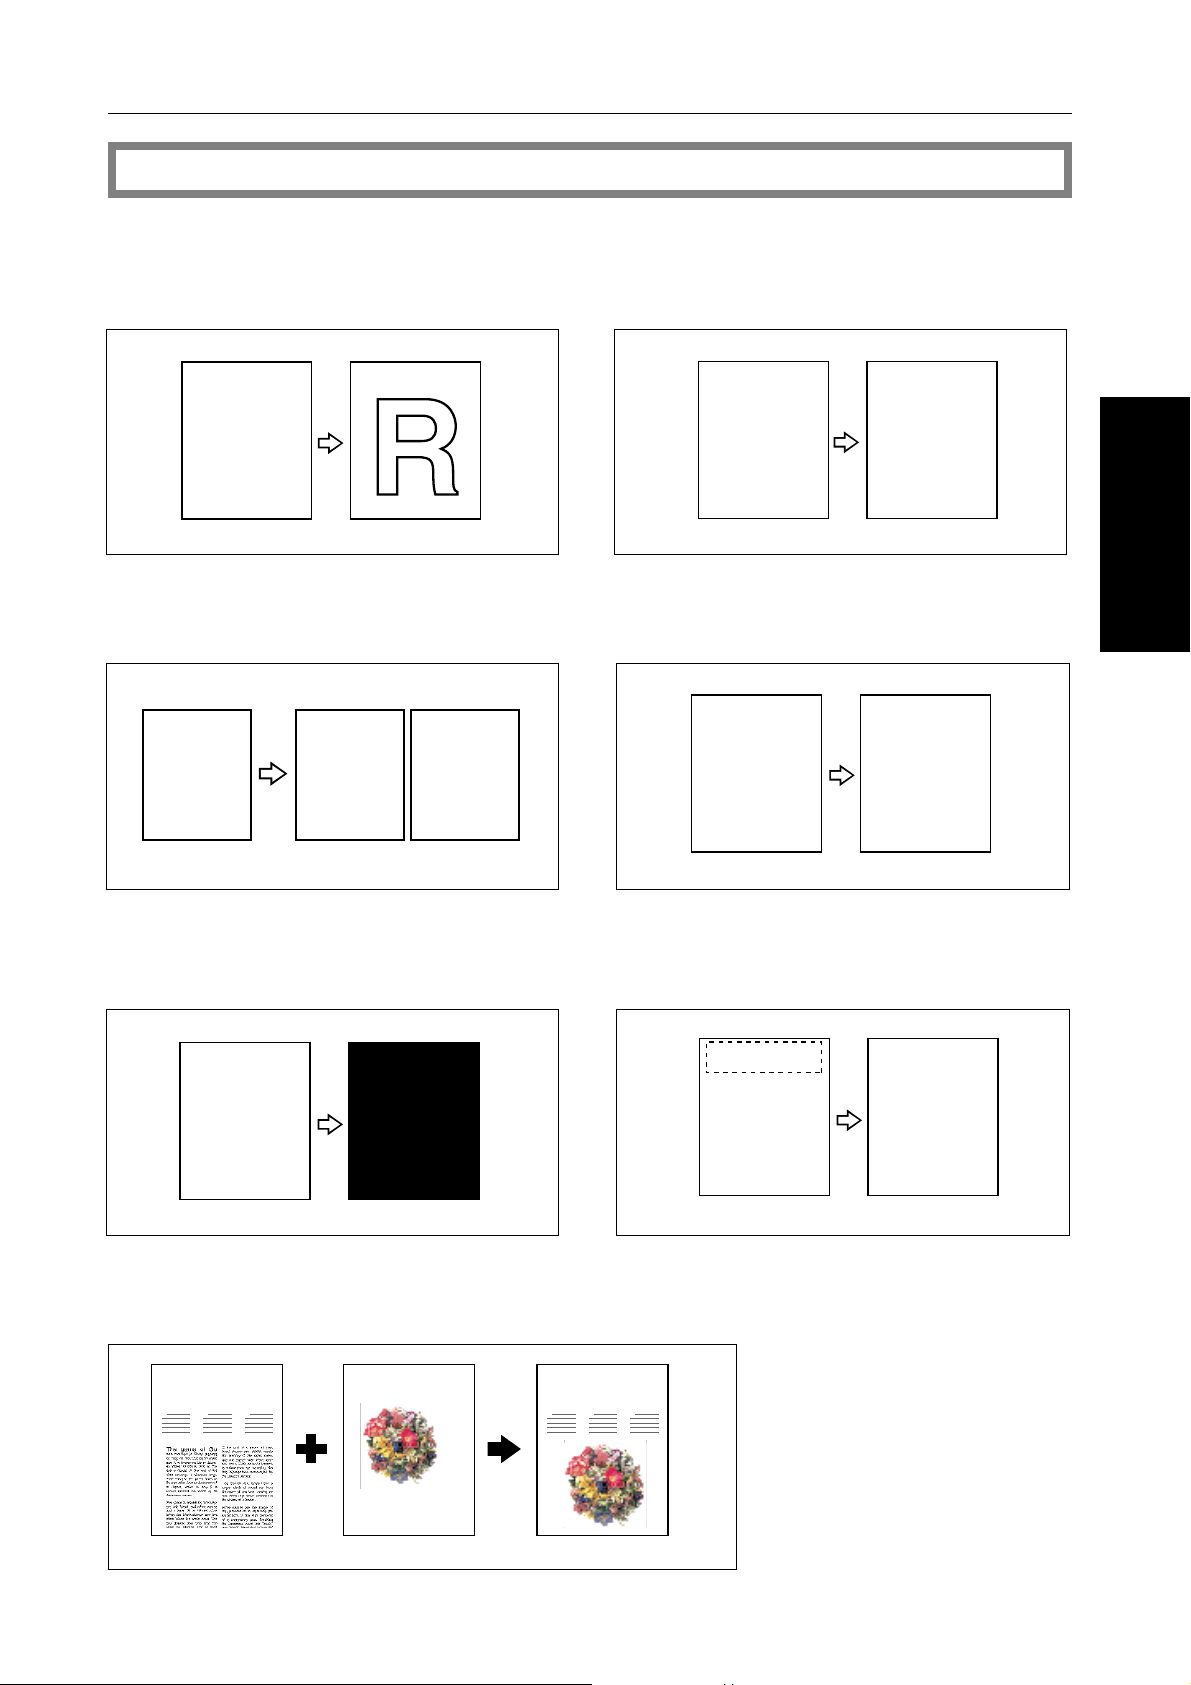
Image Creation
FUNCTION SUMMARY
☛ See page 58.
Copying only the outline of the image
(Outline)
R
Slanting the copy image (Slanted) Making a mirror image copy of the
R
R
R
Adding a shadow around the copy
image elements (Shadow)
R
original (Mirror)
R
R
R
R
THIS COPIER
WHAT YOU CAN DO WITH
Copying the original image in complementary colors (Positive/Negative)
R R
Merging Images (Image Overlay)
1996
11213
- - - - - - - - - -
- - - - - - - - - - - - -
- - - - - - - - - - - - -
<1st original>
1
- - - - - - - - - -
- - - - - - - - - - -
- - - - - - - - - -
- - - - - - - - - -
<2nd original>
- - - - - - - - - - -
Flower
Copying a part of the original image
repeatedly (Repeat)
1996
11213
ABCDE
R
1
ABCDE
ABCDE
ABCDE
ABCDE
ABCDE
13
Page 23
FUNCTION SUMMARY
Adjusting And Storing The Color Balance (Color Balance)
Adjusting the color balance (Color Balance Adjustment)
☛ See page 76.
<Magenta>
<Black>
Dark
<Yellow>
<Cyan>
Light
Dark
Storing and recalling the color balance (Color Balance Memory)
Sampling the color balance (Color Balance Sample)
Adjusting A Single Color (Single Color Adjustment)
Light
☛ See page 82.
14
Adjusting Yellow to RedAdjusting Yellow to Green
○○
Page 24
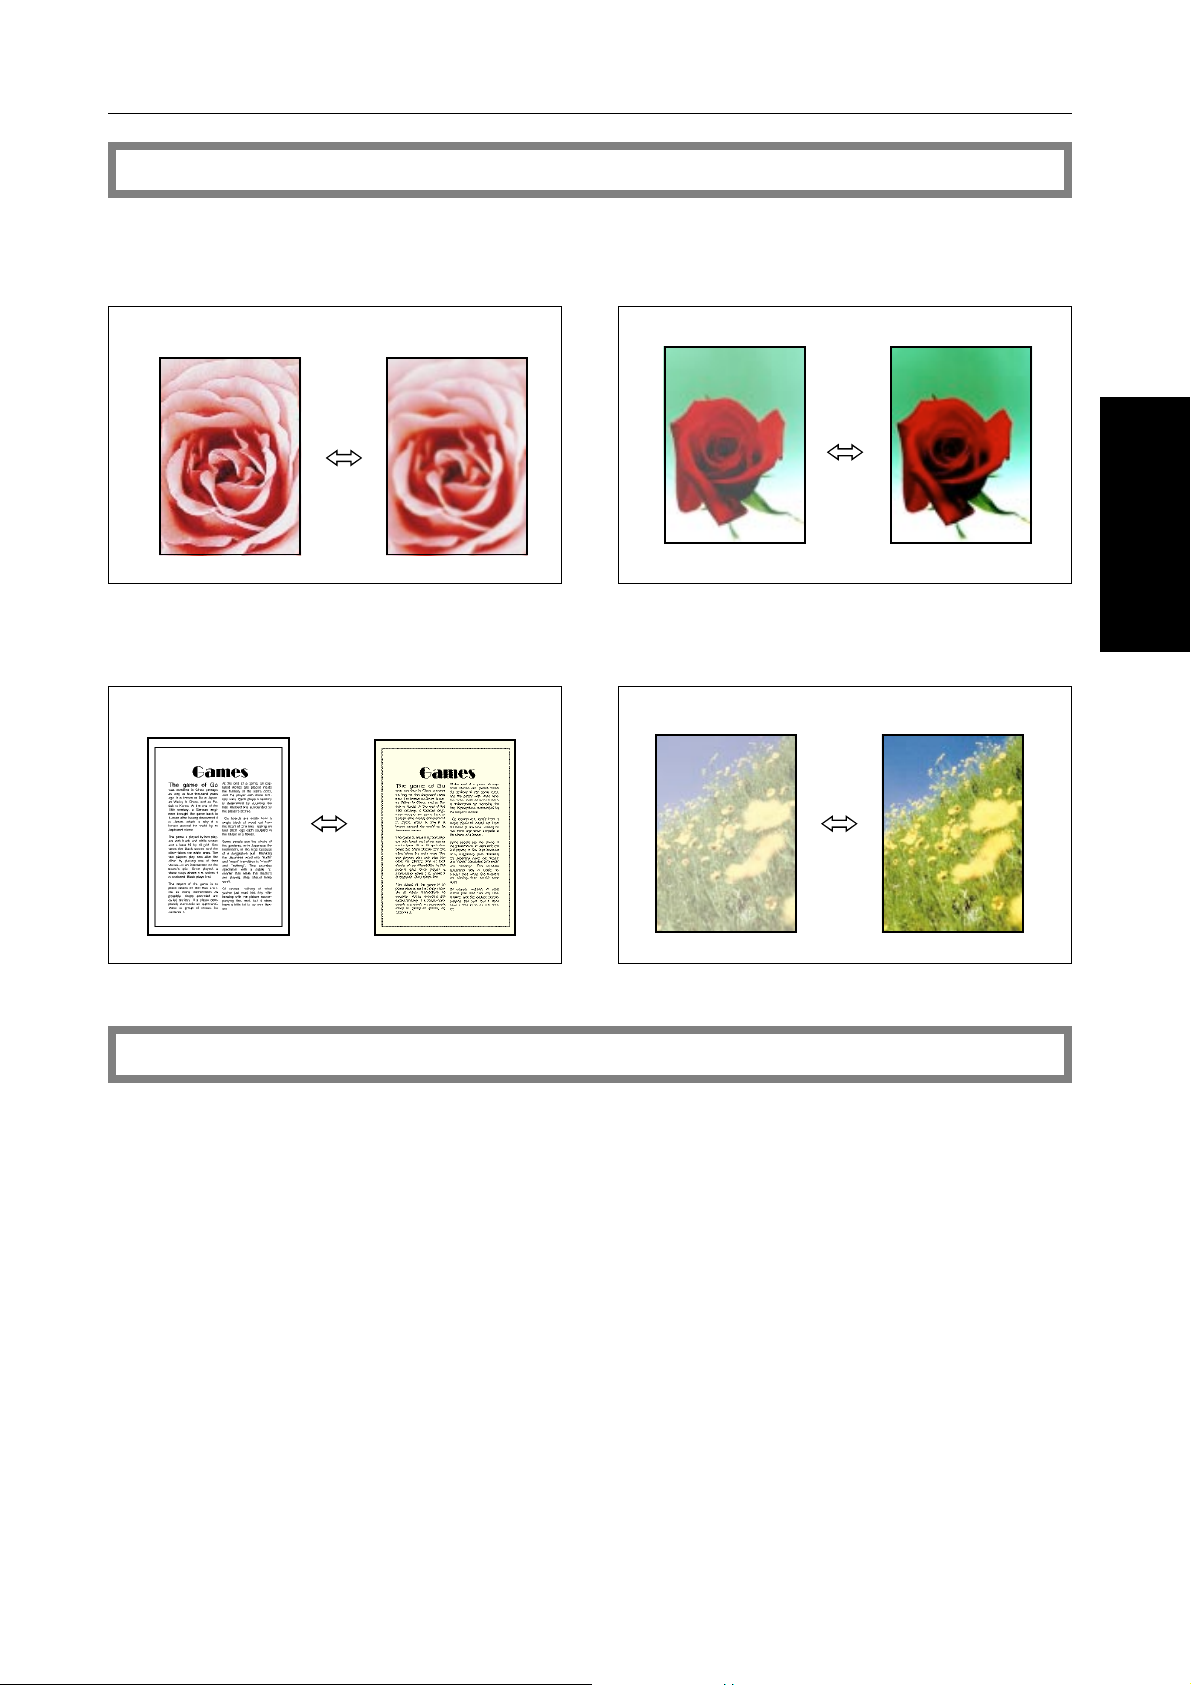
Image Adjustment
FUNCTION SUMMARY
☛ See page 83.
Sharp/Soft
SoftSharp
Contrast
Weak Strong
Background density control Pastel color
Light Dark
Light Normal
THIS COPIER
WHAT YOU CAN DO WITH
Storing User Colors (User Color Memory)
☛ See page 85.
15
Page 25
FUNCTION SUMMARY
Area Editing (Only for Edit type)
☛ See page 89.
Finishing (Option)
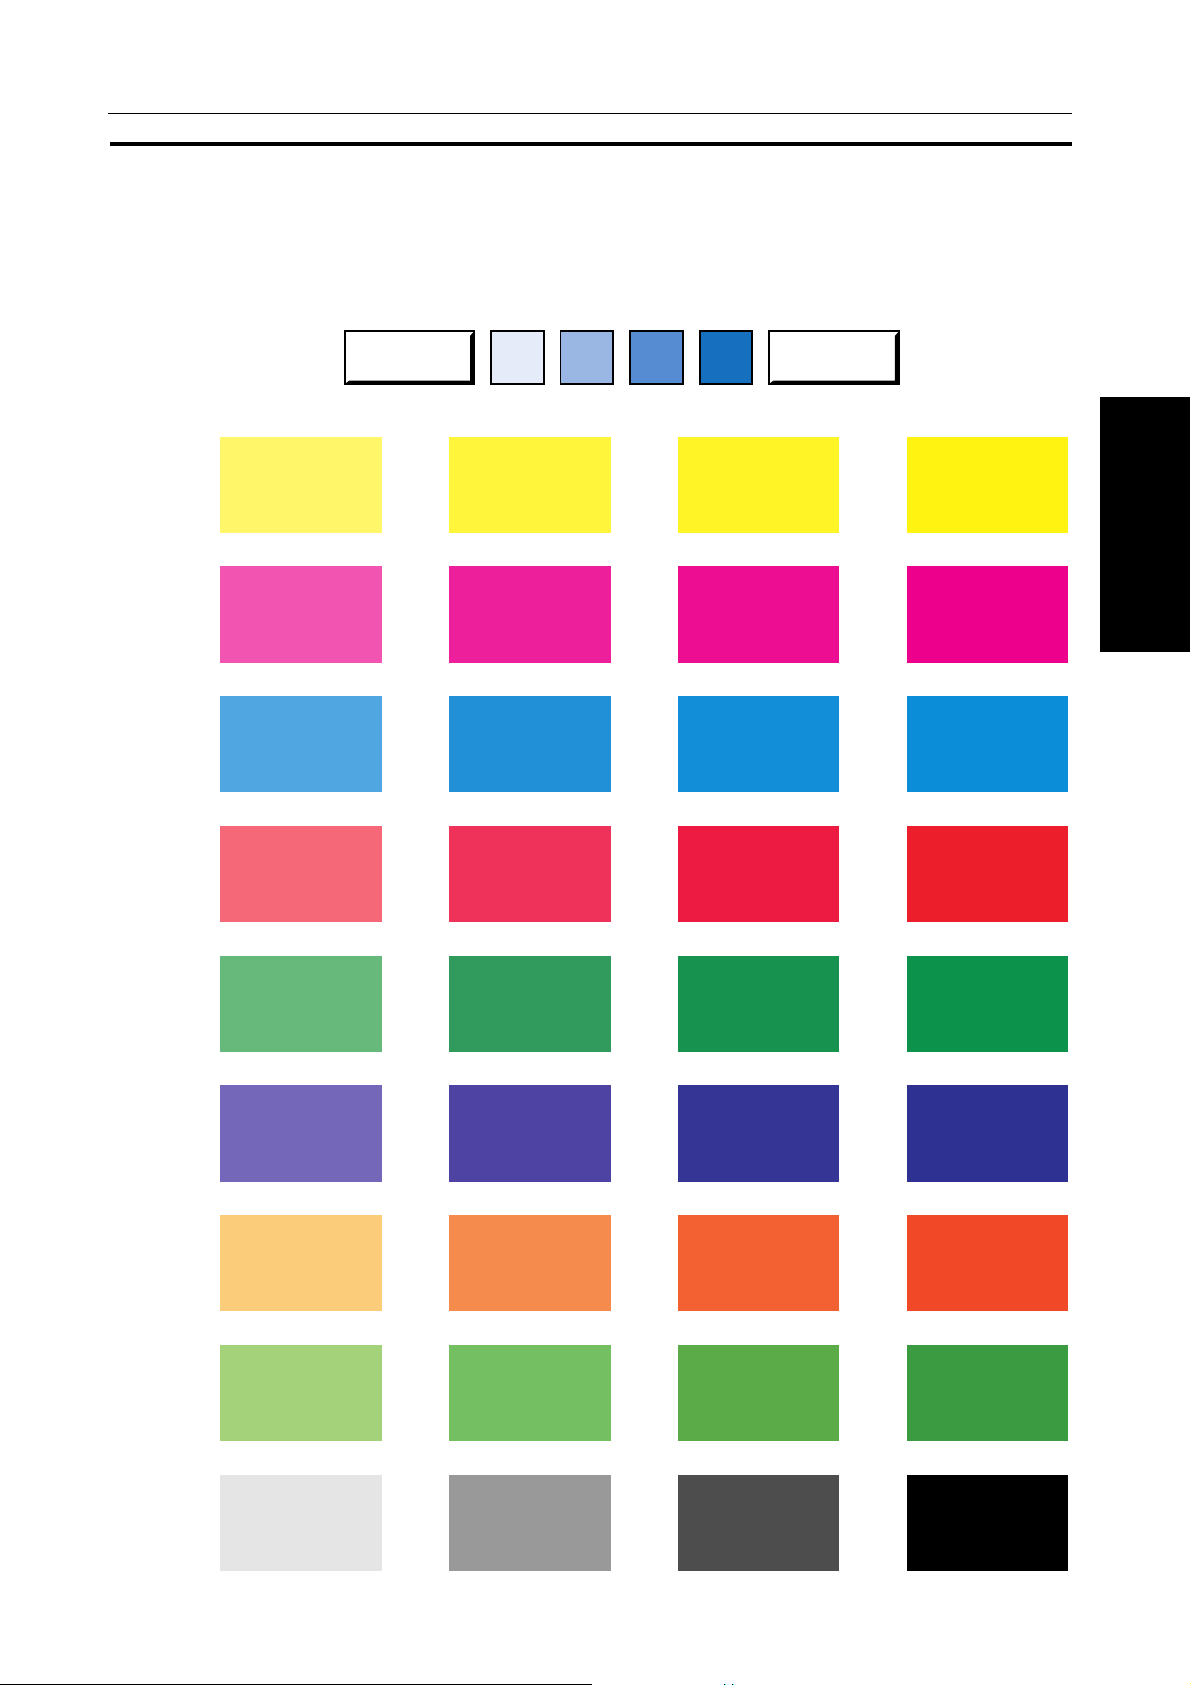
Sorting into sets (123, 123, 123) (Sort)
---------
- - - - - - - - - - - - - -
- - - - - - - - - - - - - -
Stacking together all copies of a page
(111, 222, 333)
---------
☛ See page 71.
3
3
2
1
3
2
1
3
2
1
3
2
1
2
1
1
1
1
2
2
2
3
3
3
Using The Projector (Option)
☛ See page 139.
16
Page 26
COLOR SAMPLE CHART
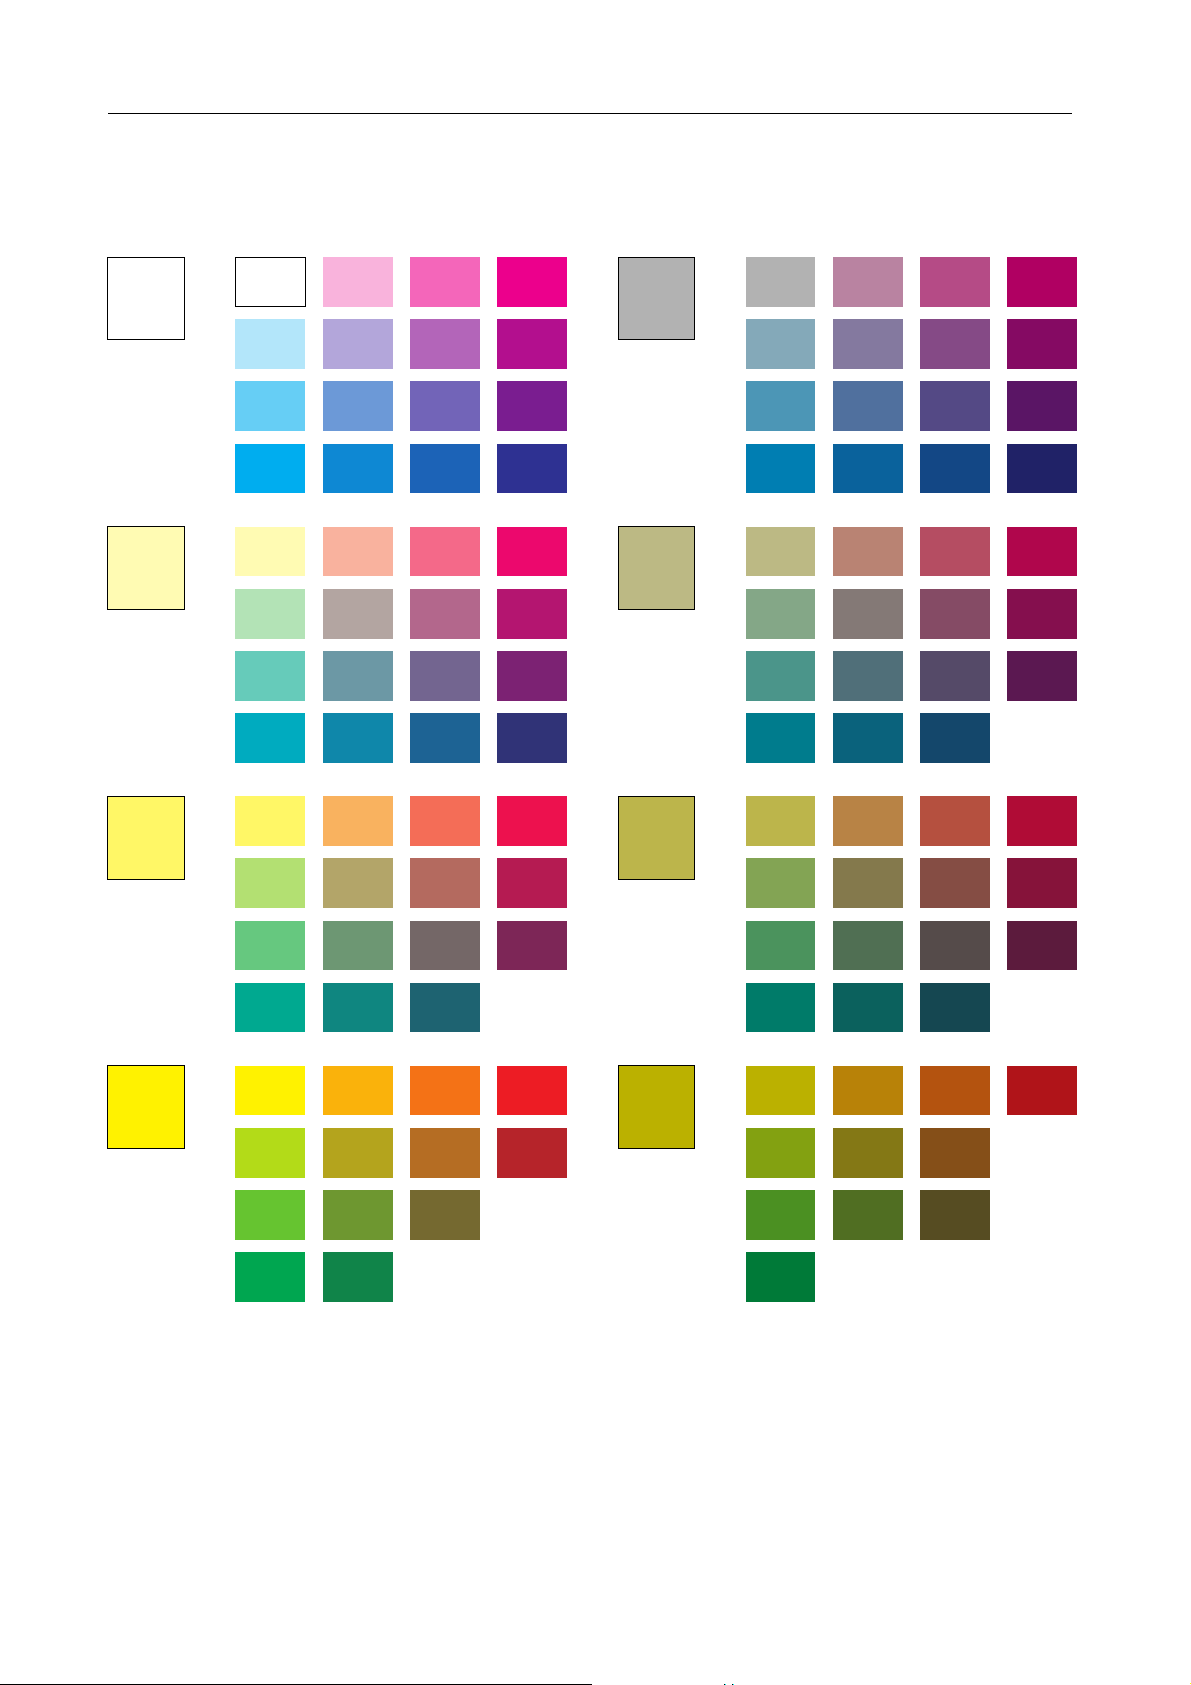
This is the single color sample (Letter mode).
Note: The color sample might differ somewhat from actual copies due to printing effects.
DarkLight
Y
ellow
M
agenta
COLOR SAMPLE CHART
THIS COPIER
WHAT YOU CAN DO WITH
C
R
G
B
O
yan
ed
reen
lue
range
L
ight Green
B
lack
17
Page 27
COLOR SAMPLE CHART
This is the User Color sample. You can mix the basic colors to make your own colors (User Color).
Note: The color sample might differ somewhat from actual copies due to printing effects.
Y
BK
Y
BK
Y
BK
0%
0%
30%
0%
60%
0%
C
C
30%
C
60%
C
100%
C
C
30%
C
60%
C
100%
C
C
30%
M0% M30% M60% M100%
0%
M0% M30% M60% M100%
0%
M0% M30% M60% M100%
0%
Y
BK
Y
BK
Y
BK
0%
30%
30%
30%
60%
30%
C
C
C
C
100%
C
C
C
C
100%
C
C
M0% M30% M60% M100%
0%
30%
60%
M0% M30% M60% M100%
0%
30%
60%
M0% M30% M60% M100%
0%
30%
Y
100%
BK
0%
C
60%
C
100%
C
C
30%
C
60%
C
100%
M0% M30% M60% M100%
0%
Y
BK
100%
30%
C
C
100%
C
C
C
C
100%
60%
M0% M30% M60% M100%
0%
30%
60%
18
Page 28

BASICS
BASICS
19
Page 29
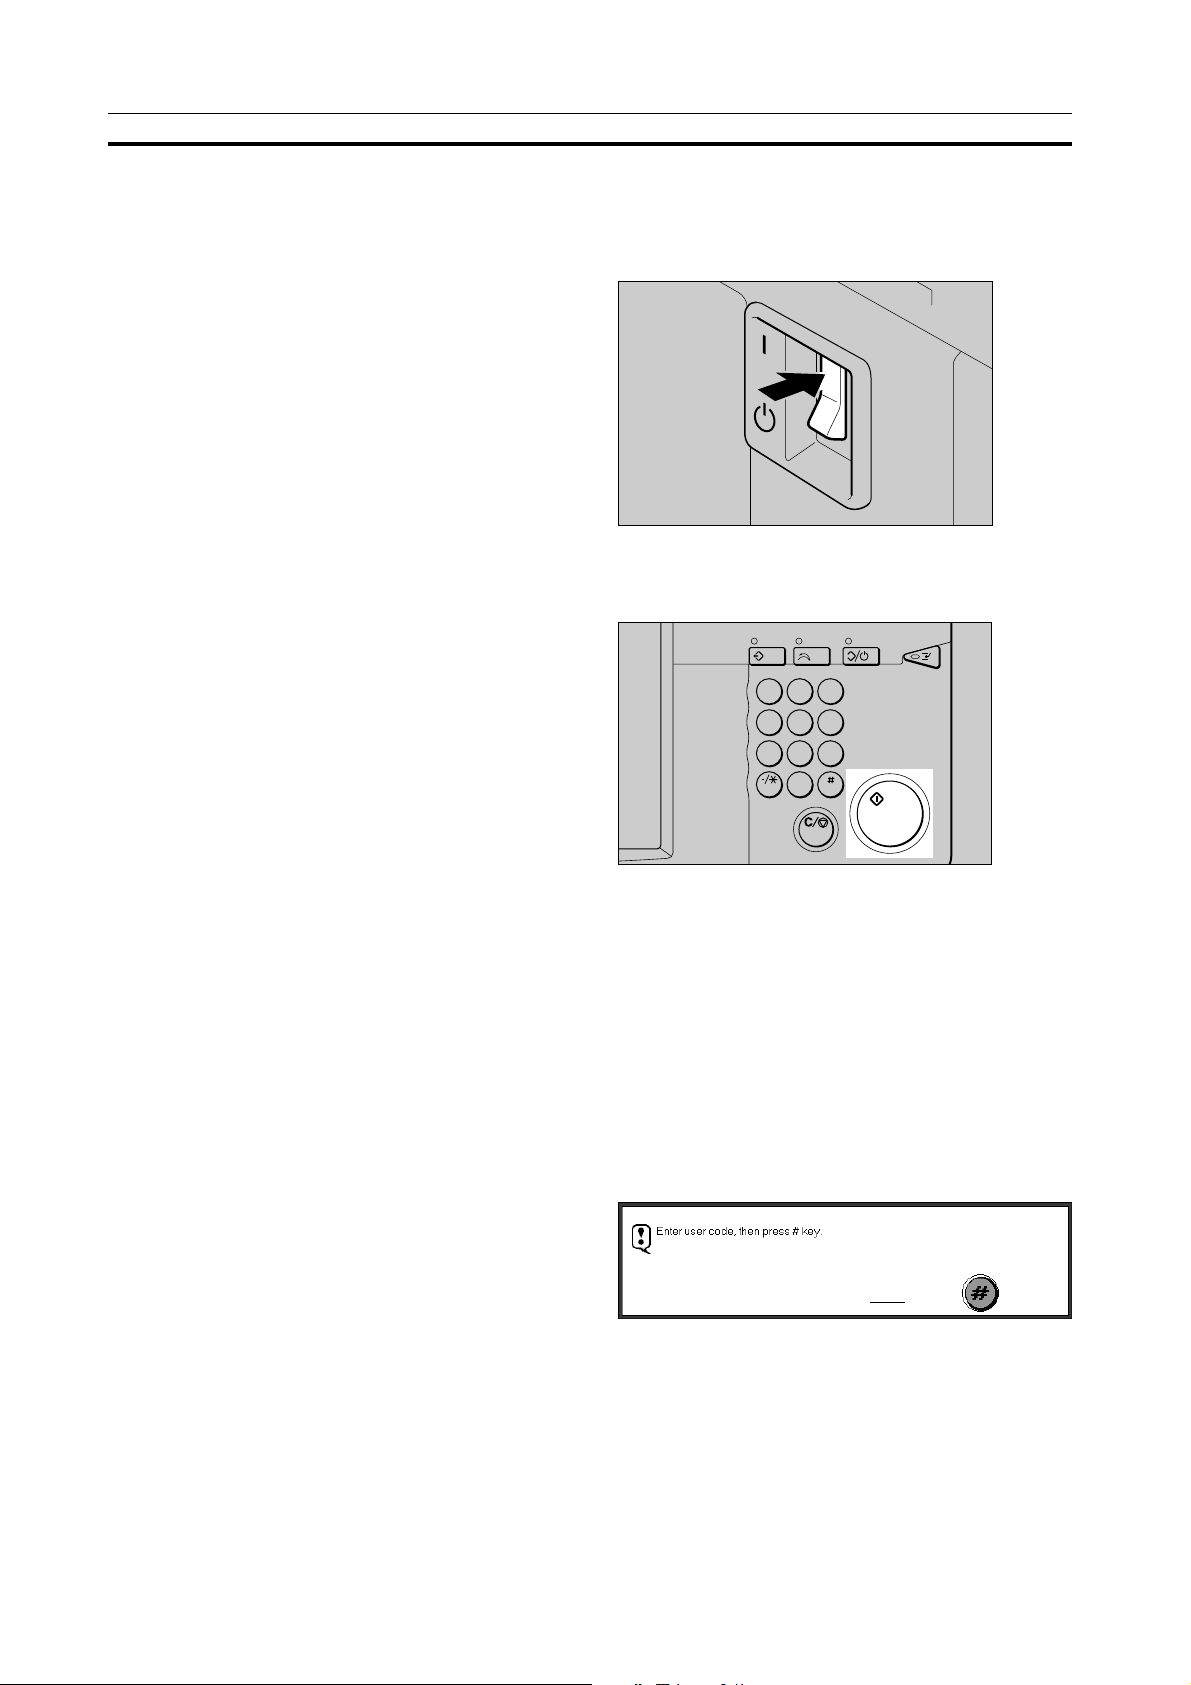
STARTING THE COPIER
When The Main Switch Is In The Stand-by Position
Turn on the main switch.
1
Wait for the copier to warm-up. During the warm-
2
up period (about 8 minutes), the Start lights red.
After warm-up, the copier goes into ready con-
3
dition and the Start key lights green.
STARTING THE COPIER
On
Stndby
C
1 2 3
4 5 6
7 8 9
0
When The Touch Panel Display Is Blank And The Main Switch Is On
The copier is under the stand by condition. Press the Clear Modes/Stand by key to return to the ready
condition.
❐ Regarding the stand by condition, ☛ see page 41.
When The Copier Is Set For User Codes
Input your user code (6 digits) using the Number
keys. Then touch the [#] key.
❐ To prevent others from making copies using your user
code, press the Clear/Stop and Clear Modes/Stand
by key simultaneously after copying.
❐ For details about user codes, ☛ see page 132.
❐ If you input the wrong user code, press the Clear/Stop
key and input the code again.
20
Page 30
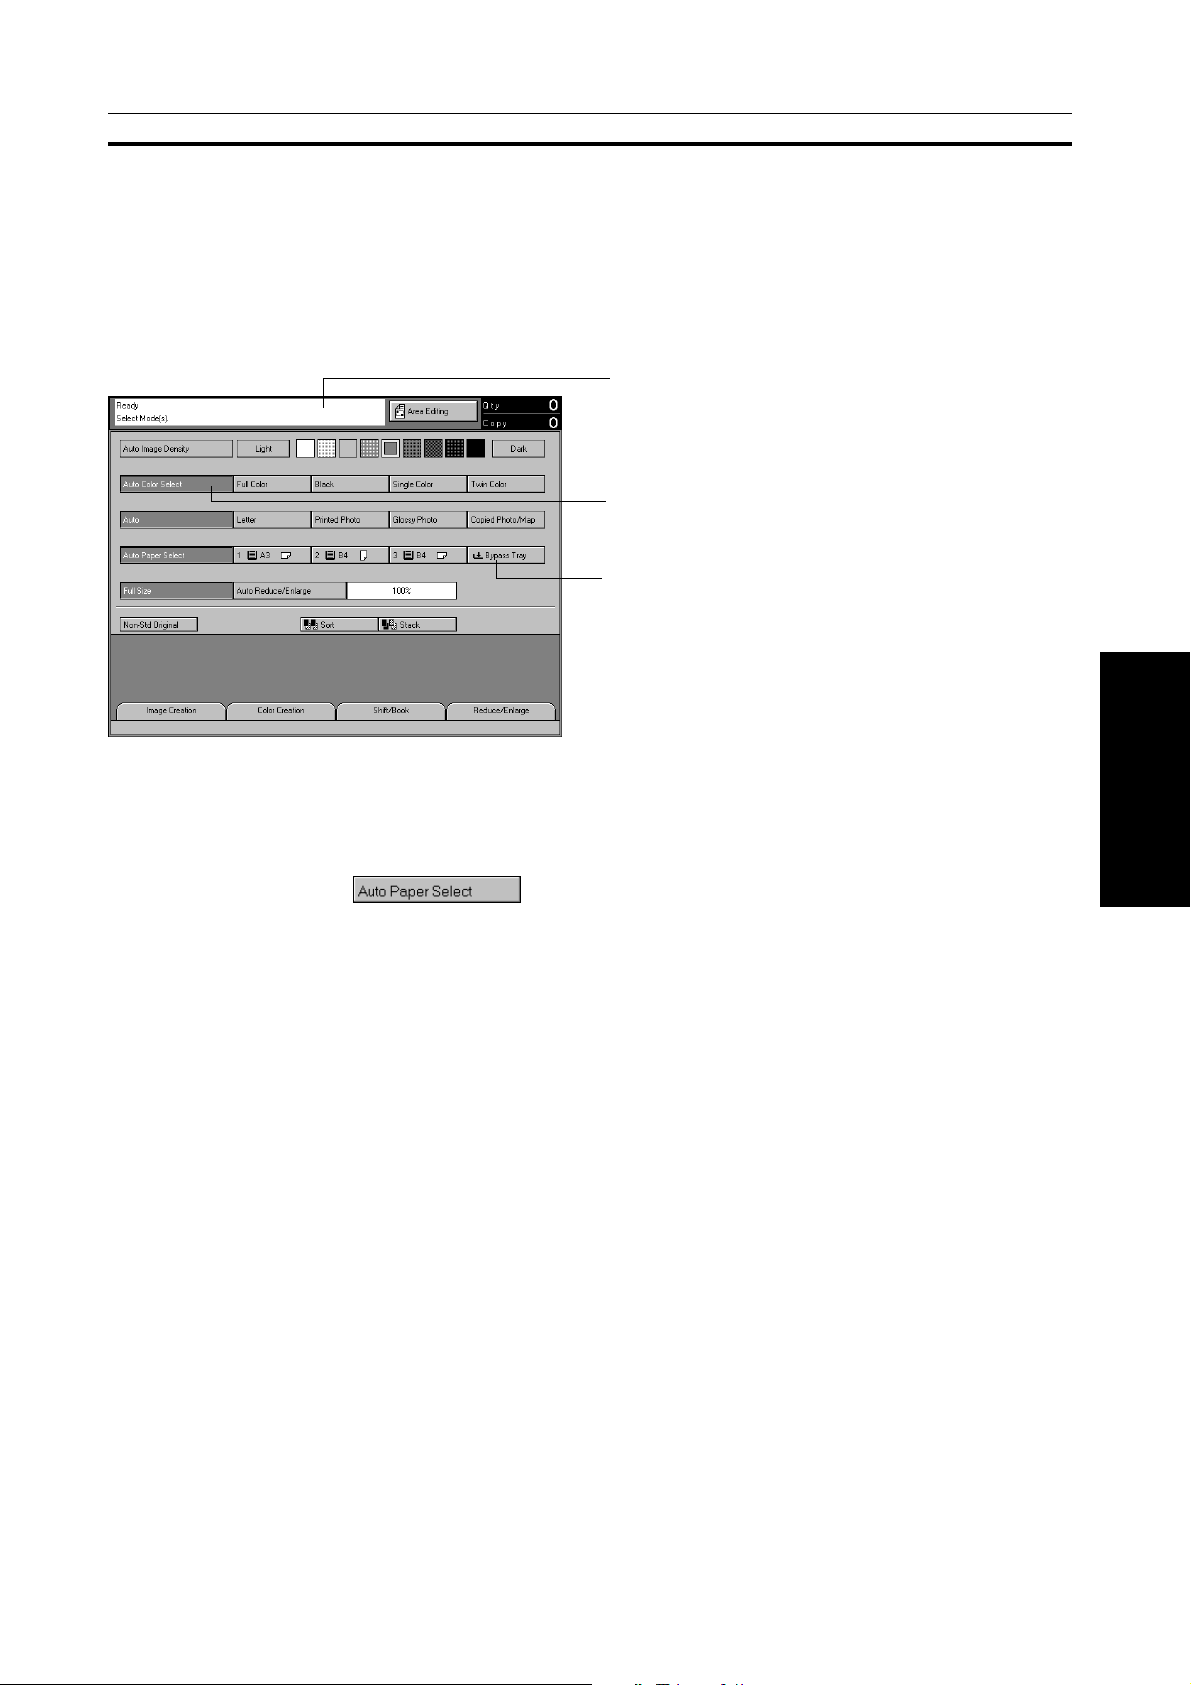
USING THE TOUCH PANEL DISPLAY
USING THE TOUCH PANEL DISPLAY
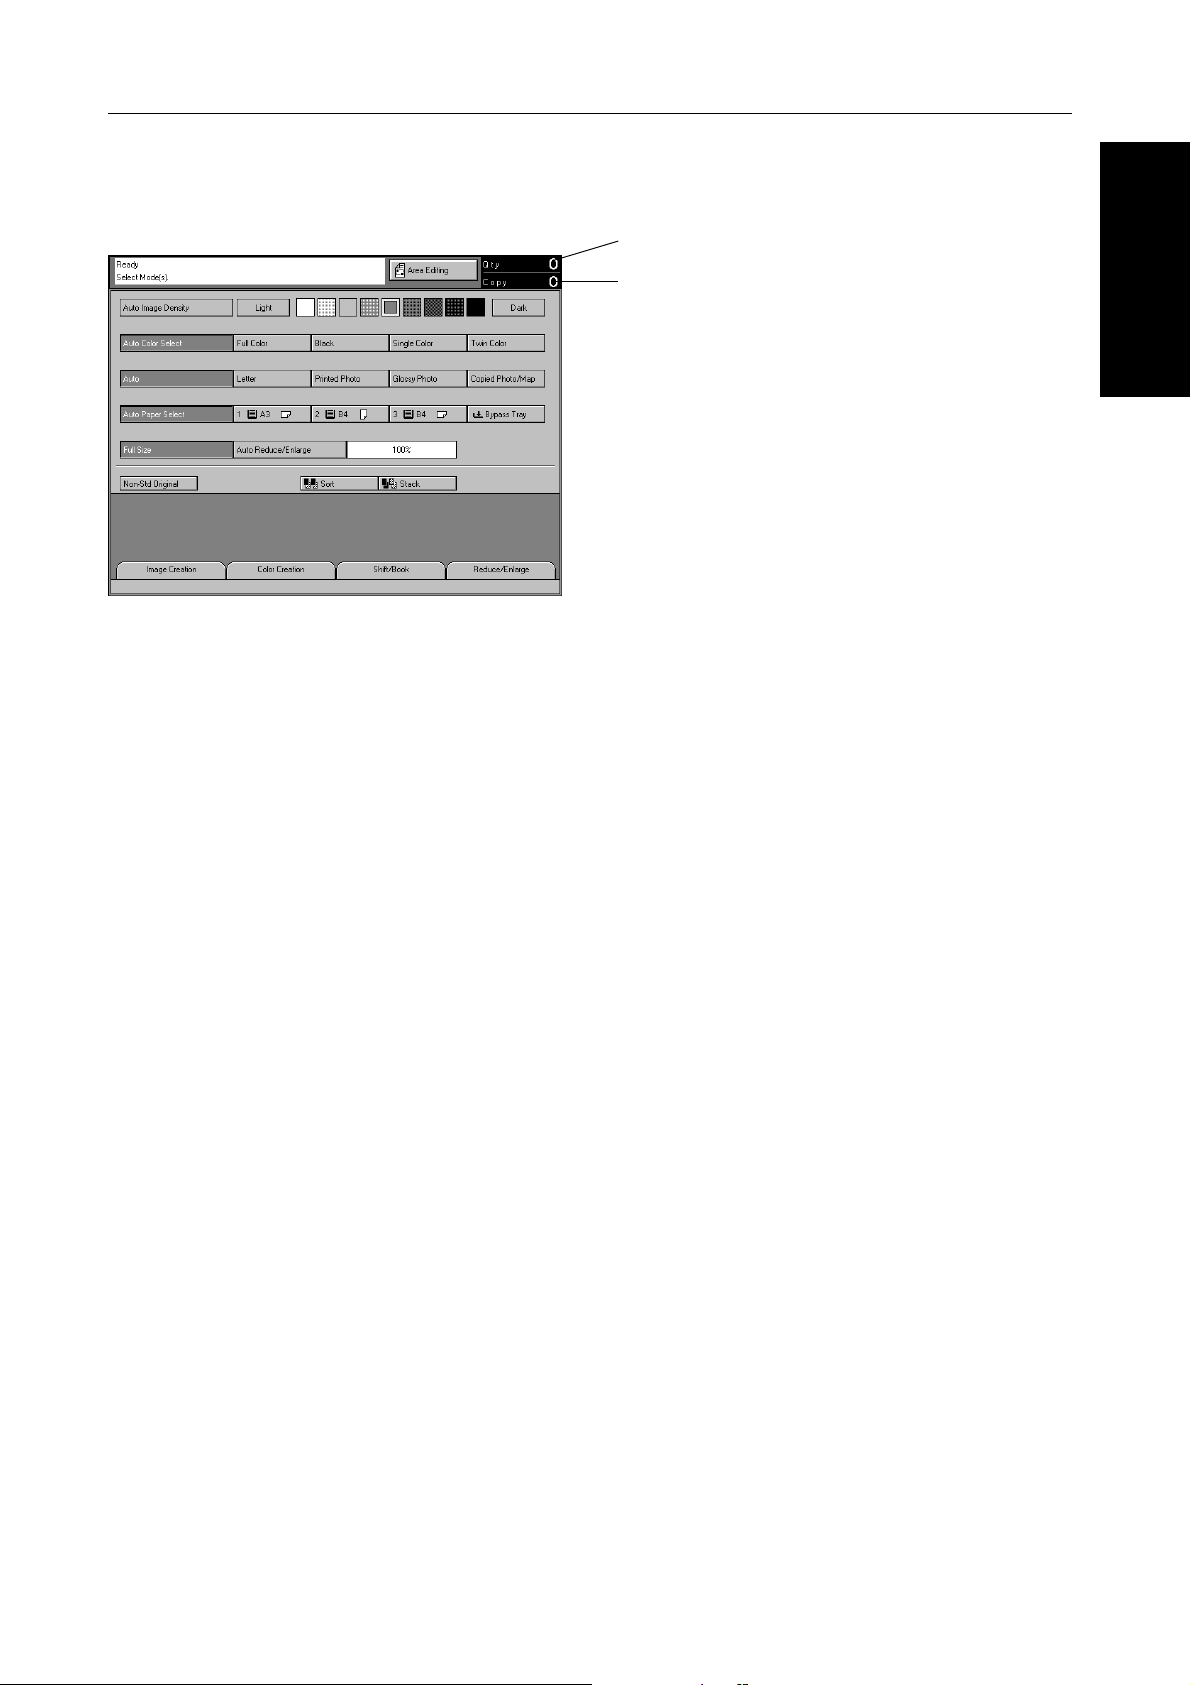
Selecting Functions
On the touch panel display, you can find keys, instructions and messages. By touching keys on the display, you
can select or deselect functions, and enter data for the selected modes. If you make a mistake and wish to
clear the current settings, press the Clear Modes/Stand by key.
Messages and instructions appear here.
Keys that have been selected.
Keys that have the option of being selected.
Keys that do not have the option of being selected are fainter.
In this manual, keys on the display are indicated as follows:
Example:
Key on the display:
In the manual: [Auto Paper Select] key
Note: Do not press the touch panel display with any hard or sharp object. Always use the editor pen.
Entering Numbers
When the display prompts you to enter a number, type in the number with the Number keys and touch the [#]
key on the display to accept it.
Should you make a mistake:
• If you have not touched the [#] key yet, touch the [Clear] key and then re-enter it. If there is not the [Clear] key on
the display, press the Clear/Stop key .
• If you have already touched the [#] key, touch the item you wish to change on the display and re-enter the number
with the Number keys. Touch the [#] key on the display to accept it.
BASICS
21
Page 31

USING THE TOUCH PANEL DISPLAY
Checking The Functions You Have Selected
When you set one or more copy settings, the last item you selected will remain on the screen.
[Check Modes] key
To check all the settings you have set so far, touch the [Check Modes] key.
➡
22
Page 32

SETTING ORIGINALS ON THE EXPOSURE GLASS
Standard Size Paper
The machine will detect paper of the following size and direction as standard size paper:
ORIGINALS
ORIGINALS
Metric version
A3l, B4l, A4lp, B5lp, A5lp, B6p,
81/2"×13" (F4)l, 81/2"×11" l
11"×17" l, 10"×14" l, 8
8"×13" l, 8
1/2"×11" lp, 51/2"×81/2"lp
Inch version
1/2"×14" l, 81/2"×13" (F4)l,
Recommended Originals
❐ Regarding originals that the dual job feeder can handle, ☛ see page 169.
Non-recommended Originals For The Dual Job Feeder
Note: The following types of originals are not recommended for use with the dual job feeder. Place them
directly on the exposure glass.
❐ Originals thicker than 128 g/m2, 34 lb
2
❐ Originals thinner than 40 g/m
❐ For originals between 40 and 52 g/m2, 11 and 14 lb,
the dual job feeder must be set to Thin paper mode. ☛
See page 130.
❐ Originals larger than A3, 11" x 17"
❐ Originals smaller than B6p, 5
❐ Folded, curled, creased, or damaged originals
❐ Mailing labels, or perforated originals
❐ Bound, stapled, or clipped originals
❐ OHP transparencies
, 11 lb
1/2" x 81/2"lp
❐ Translucent paper
❐ Pasted originals
❐ Damp originals
❐ Sticky originals
❐ Wavy originals
❐ Originals that are not made from paper
❐ Originals written in pencil on both sides, or two-sided
carbon originals
❐ Thermal fax paper, CRO (camera ready originals) or
aluminum foil
❐ Books, pamphlets, and booklets
BASICS
SETTING ORIGINALS ON THE EXPOSURE GLASS
Lift the platen cover or the optional dual job
1
feeder.
Set the original face down on the exposure glass.
2
The original must be aligned with the rear left
corner.
Lower the platen cover or the optional dual job
3
feeder.
23
Page 33
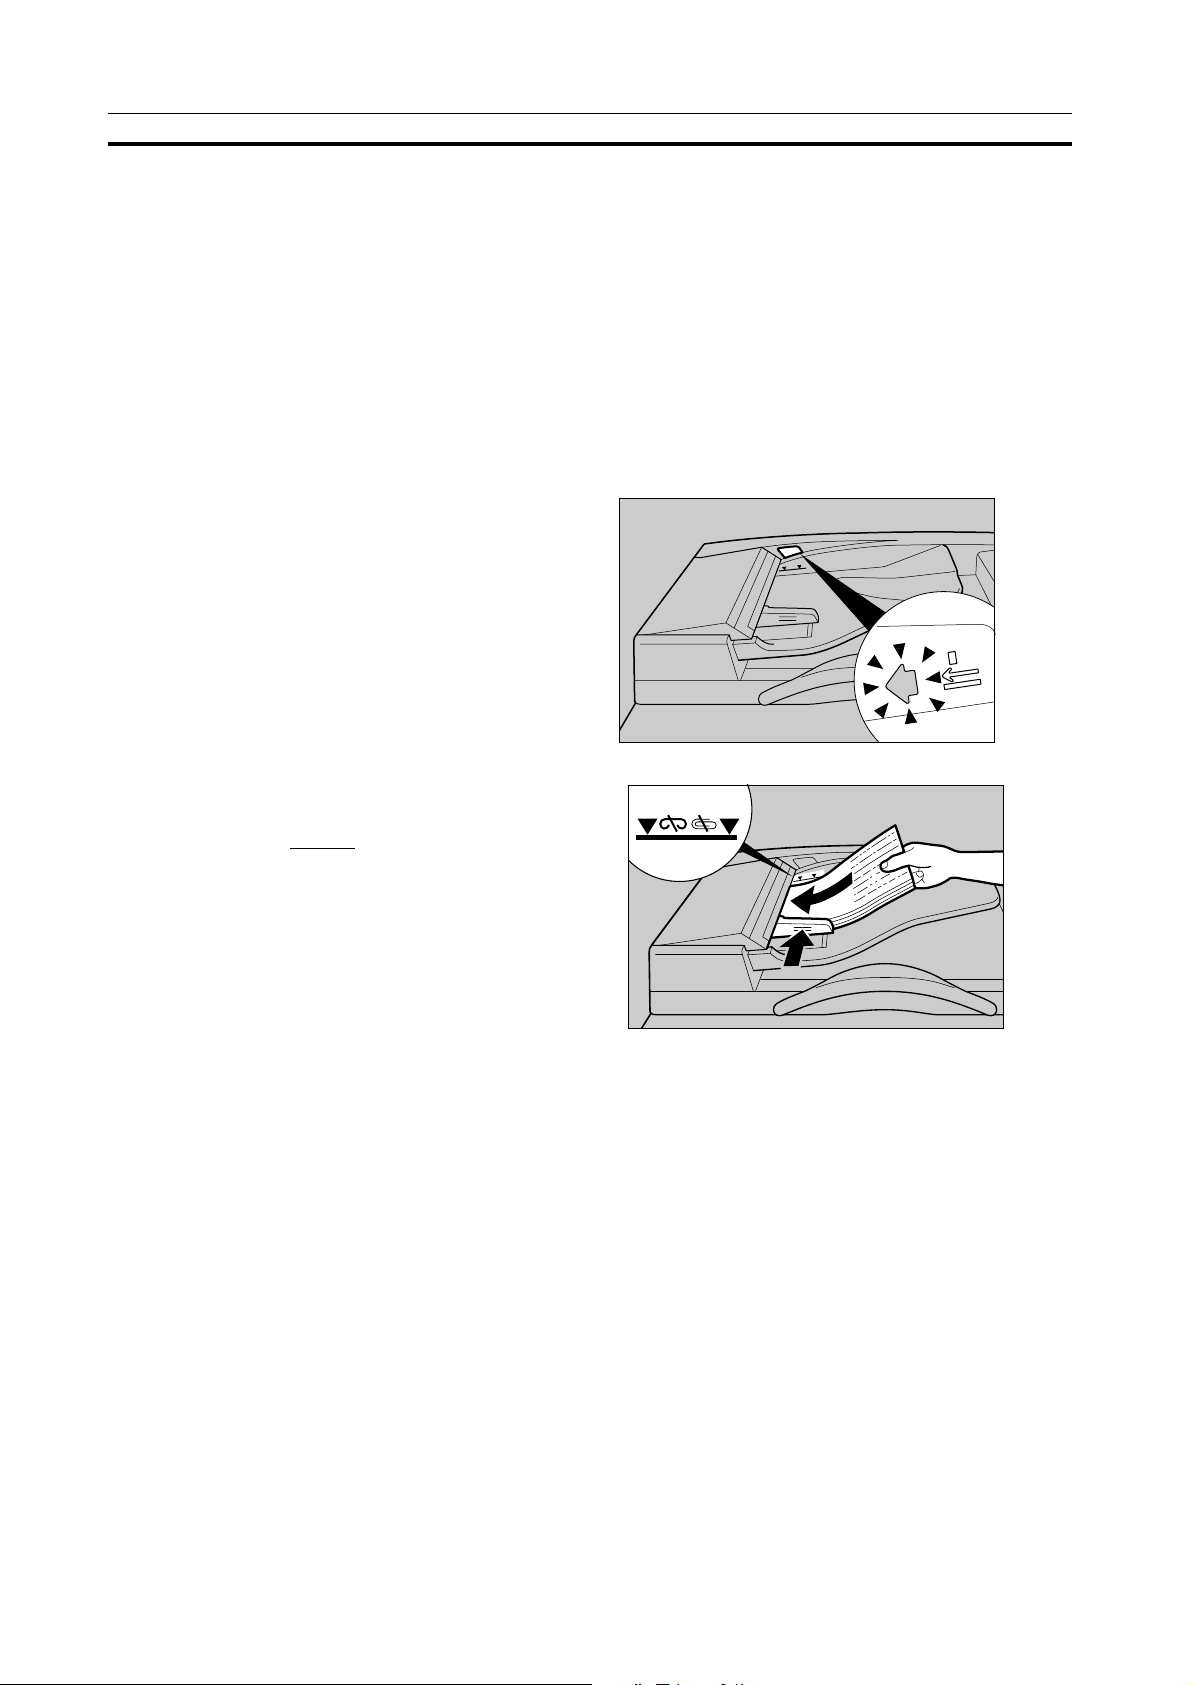
SETTING A STACK OF ORIGINALS IN THE DUAL JOB FEEDER (ADF, ARDF)
SETTING A STACK OF ORIGINALS IN THE DUAL JOB FEEDER
(ADF, ARDF)
You can insert a stack of originals of the same size into the dual job feeder. These originals are individually fed
onto and removed from the exposure glass.
❐ Some originals are unsuitable for the dual job feeder. ☛ See page 23.
❐ You can still use originals that are not recommended for this mode. First make a set of copies of the originals by
positioning them directly on the exposure glass, then use these copies as originals.
❐ If you want to set originals of different sizes at the same time, use the User Tools. ☛ See page 130.
Correct any curl, fold, or crease in the originals
1
before setting the originals.
Make sure the Insert Original indicator is lit and
2
the exposure glass is clear of originals.
Adjust the guide to the original size.
3
Set the originals
4
until the Insert Original indicator goes off.
❐ The last page should be on the bottom.
❐ The original guide must touch the front side of the
originals.
❐ Do not stack originals above the limit mark.
face up
into the dual job feeder
24
Page 34

SETTING ONE ORIGINAL AT A TIME IN THE DUAL JOB FEEDER (SADF)
SETTING ONE ORIGINAL AT A TIME IN THE DUAL JOB FEEDER
(SADF)
You can insert one original at a time into the document feeder. The original is automatically fed onto and
removed from the exposure glass.
❐ Do not press down or hold originals after inserting them.
❐ While originals are fed from the original table to the exposure glass, do not pull them out.
❐ Do not lift the dual job feeder until the original has been completely fed out.
Correct any curl, fold, or crease in the originals
1
before setting.
Make sure the Insert Original indicator is lit and
2
the exposure glass is clear of originals.
Adjust the guide to the original size.
3
Set the original
4
until the Insert Original indicator goes off.
❐ If you are copying a stack of originals one sheet at a
time and you want to keep them in order, start with
the last page of the originals.
❐ The original guide must touch the front side of the
original.
Press the Start key.
face up
into the dual job feeder
5
While the Auto Feed indicator is lit after an origi-
6
nal is fed, set the next original. The original is
automatically fed and copied.
❐ When the Auto Feed indicator is lit, the dual job feeder
is ready for another original. You can change the time
until the mode is cleared with User Tools. ☛ See page
126.
BASICS
25
Page 35
SETTING NON-STANDARD SIZED ORIGINALS
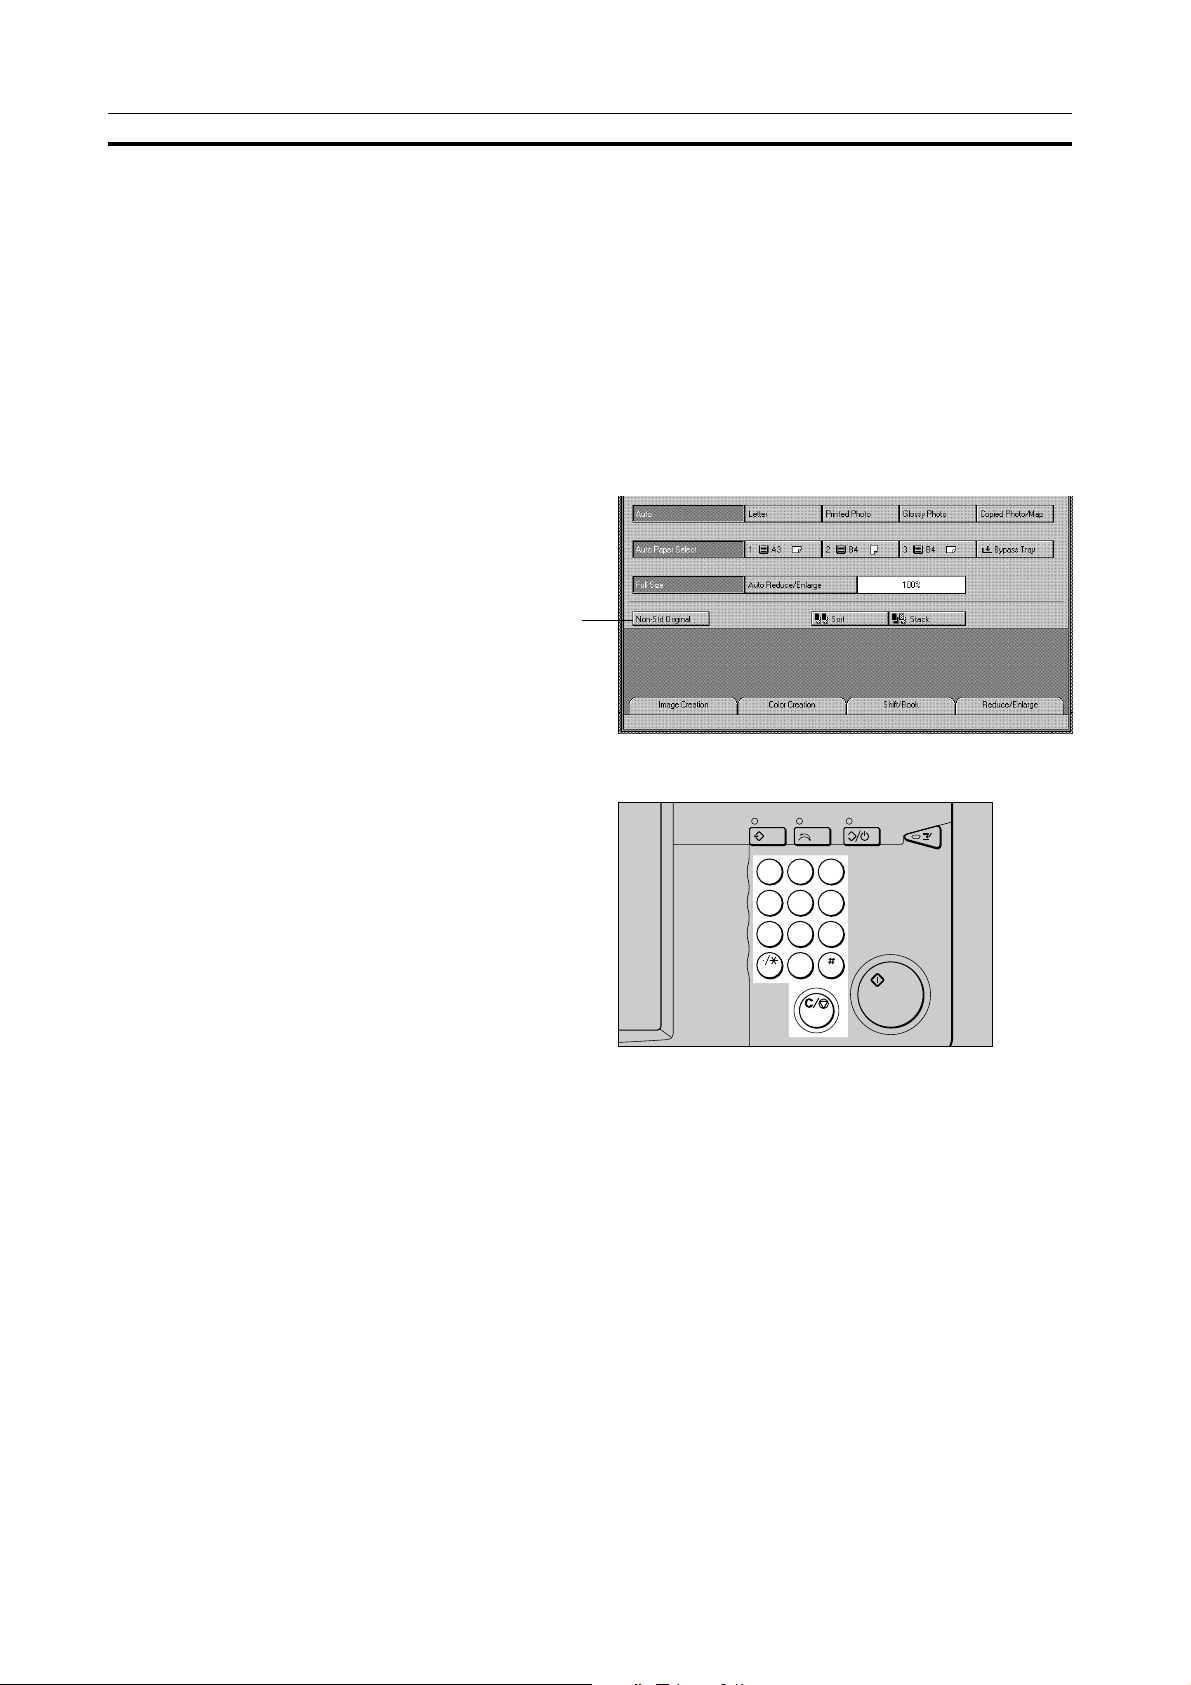
SETTING NON-STANDARD SIZED ORIGINALS
When copying from non-standard sized originals, enter the original size so that copy is well aligned.
❐ You should set an original on the exposure glass in this function.
❐ About the standard sizes the copier can detect, ☛ See page 23.
❐ The size that can be entered:
length: 50 ~ 297 mm, 2.0" ~ 11.7"
width: 50 ~ 432 mm, 2.0" ~ 17"
Select the copy paper size.
1
Touch the [Non-Std Original] key.
2
[Non-Std Original] key
Enter the horizontal size, then touch the [#] key .
3
Touch the [V. (Orig).] key and enter the vertical
4
size. Touch the [#] key to accept.
Touch the [Exit] key.
5
Set your original on the exposure glass, then
6
press the Start key.
C
1 2 3
4 5 6
7 8 9
0
26
Page 36
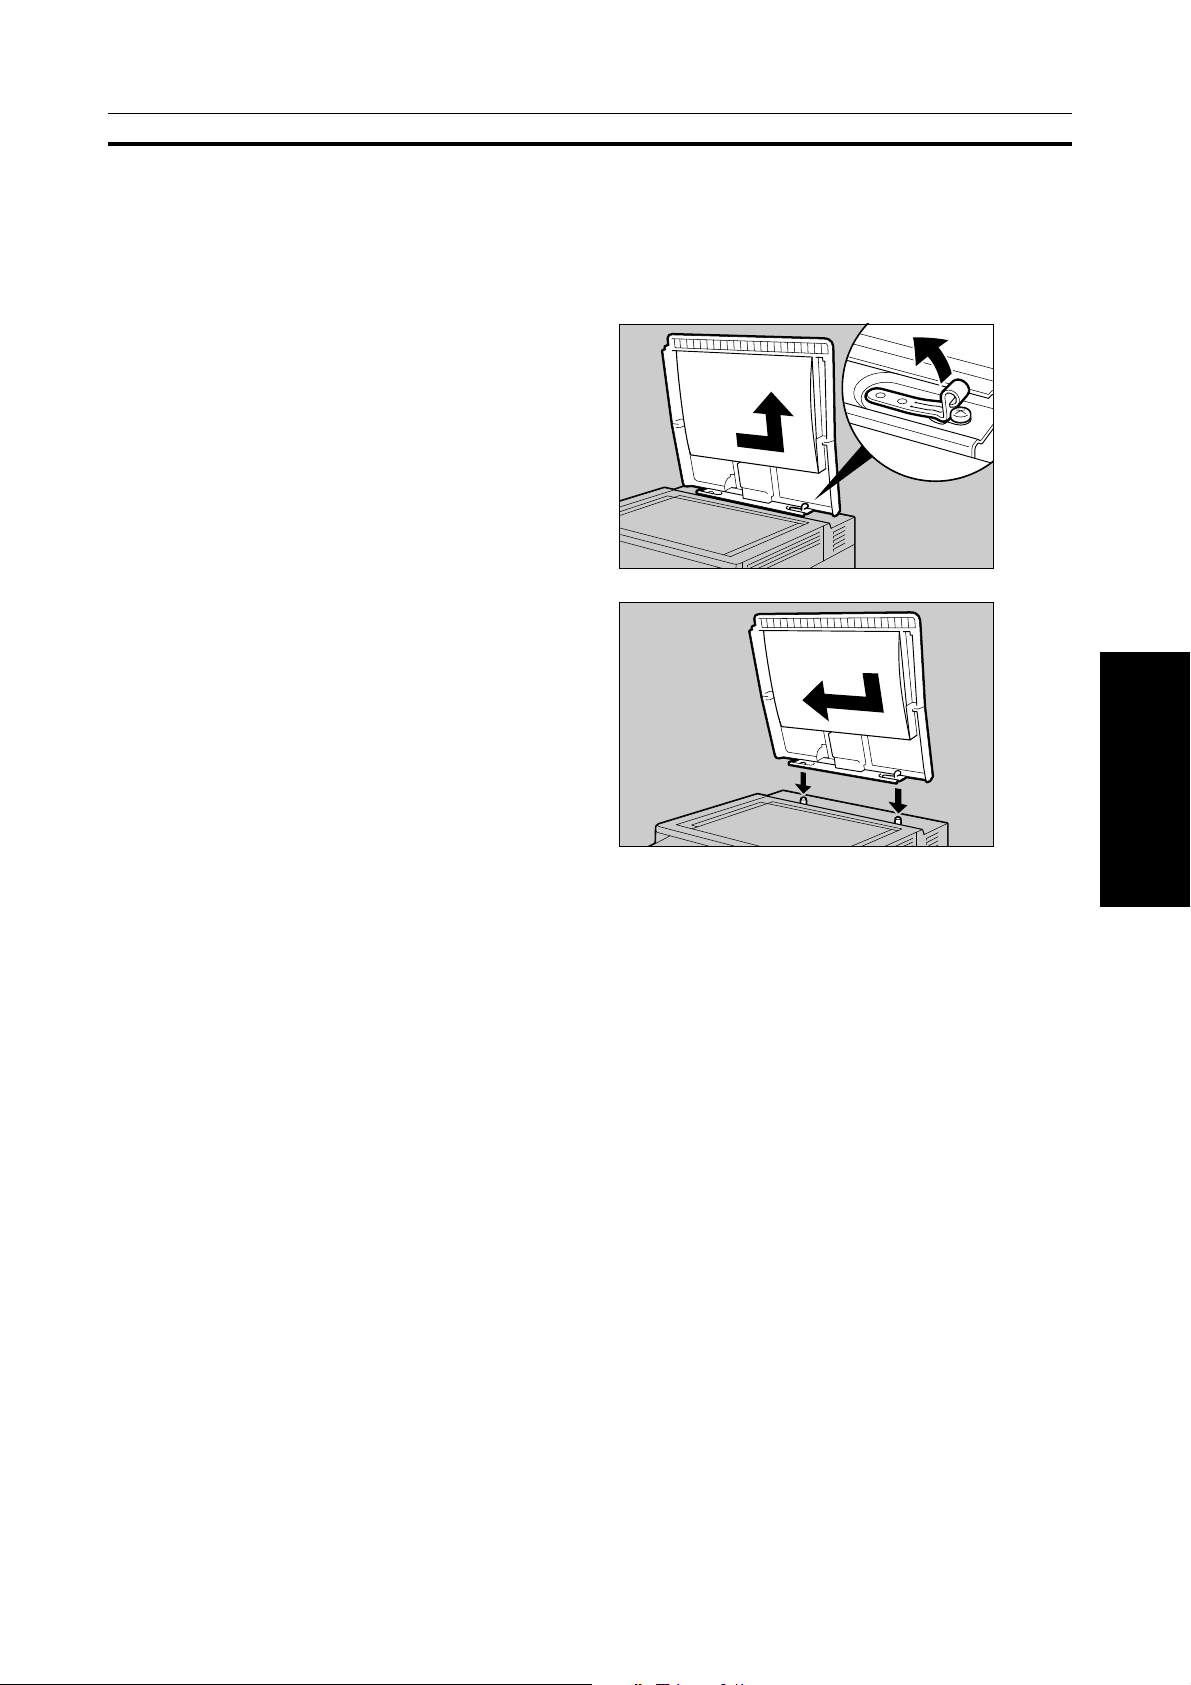
REMOVING THE PLATEN COVER TO COPY A LARGE ORIGINAL
REMOVING THE PLATEN COVER TO COPY A LARGE ORIGINAL
You can remove the platen cover to copy a large (more than A3, 11" × 17") original.
❐ Y ou cannnot remove the dual job feeder.
To unlock the platen cover, slide it to the right while
pulling the hook. Lift it out to remove it.
❐ Lift the platen cover with both hands. Place the removed
cover on a flat surface such as a desk and where it will
not be damaged.
To reset the platen cover, align the pins of the copier
and the holes of the platen cover. Then slide the
platen cover to the left until it locks.
BASICS
27
Page 37

28
Page 38

COPYING
29
COPYING
Page 39

BASIC OPERATIONS
BASIC OPERATIONS
One-to-one Copying
You can make copies that are the same size and the same color as your originals.
Set your original on the exposure glass or in the
1
dual job feeder. ☛ See page 23, 24, or 25.
Enter the number of copies required using the
2
Number keys.
❐ T o change the number entered, press the Clear/Stop
key, then enter the new number.
1 2 3
4 5 6
7 8 9
0
C
Confirm that the [Auto Color Select], [Auto],
3
[Auto Paper Select], [Full Size] keys are selected. If not, touch the key.
❐ Image Density Adjustment ☛ see page 31.
❐ Auto Color Select ☛ see page 32.
❐ Auto (Letter/Photo) ☛ see page 35.
❐ Auto Paper Select ☛ see page 36.
Press the Start key.
4
❐ To stop the copier during a multi-copy run, press the
Clear/Stop key.
❐ Press the Start key to resume copying, or press the
Clear/Stop key again to clear the entered copy
number.
C
1 2 3
4 5 6
7 8 9
0
30
Page 40

BASIC OPERATIONS
Adjusting Copy Image Density
Image density affects the contrast of copies. With these functions you can control the image density so that
copies match originals. Make the selection you require then set your originals and press the Start key.
Auto image density
If you select the [Auto Image Density] key, the
copier automatically controls the image density.
❐ Auto image density and Auto color select cannot be
set together.
Manual image density
If you require darker or lighter copies, adjust the
image density yourself.
If the [Auto Image Density] key is selected, touch
it to cancel. Then, touch the [Light] (left) key to lower
the image density. Touch the [Dark] (right) key to
increase the image density.
Combined auto & manual image density
Use when copying originals with a dirty background
(such as newspapers). You can adjust the foreground density while leaving the background unchanged.
Just touch the [Light] or [Dark] key, when [Auto
Image Density] is selected.
COPYING
31
Page 41

BASIC OPERATIONS
Selecting The Color
To match the originals and your purpose, you can
select the color mode.
Simply make your selection, set your originals and
press the Start key.
❐ To see the color samples, ☛ see page 9.
❐ Normally the copier uses 4 toners (Yellow, Magenta,
Cyan, and Black). You can change this setting so that
only 3 colors (Yellow, Magenta, and Cyan) are used.
☛ See page 126.
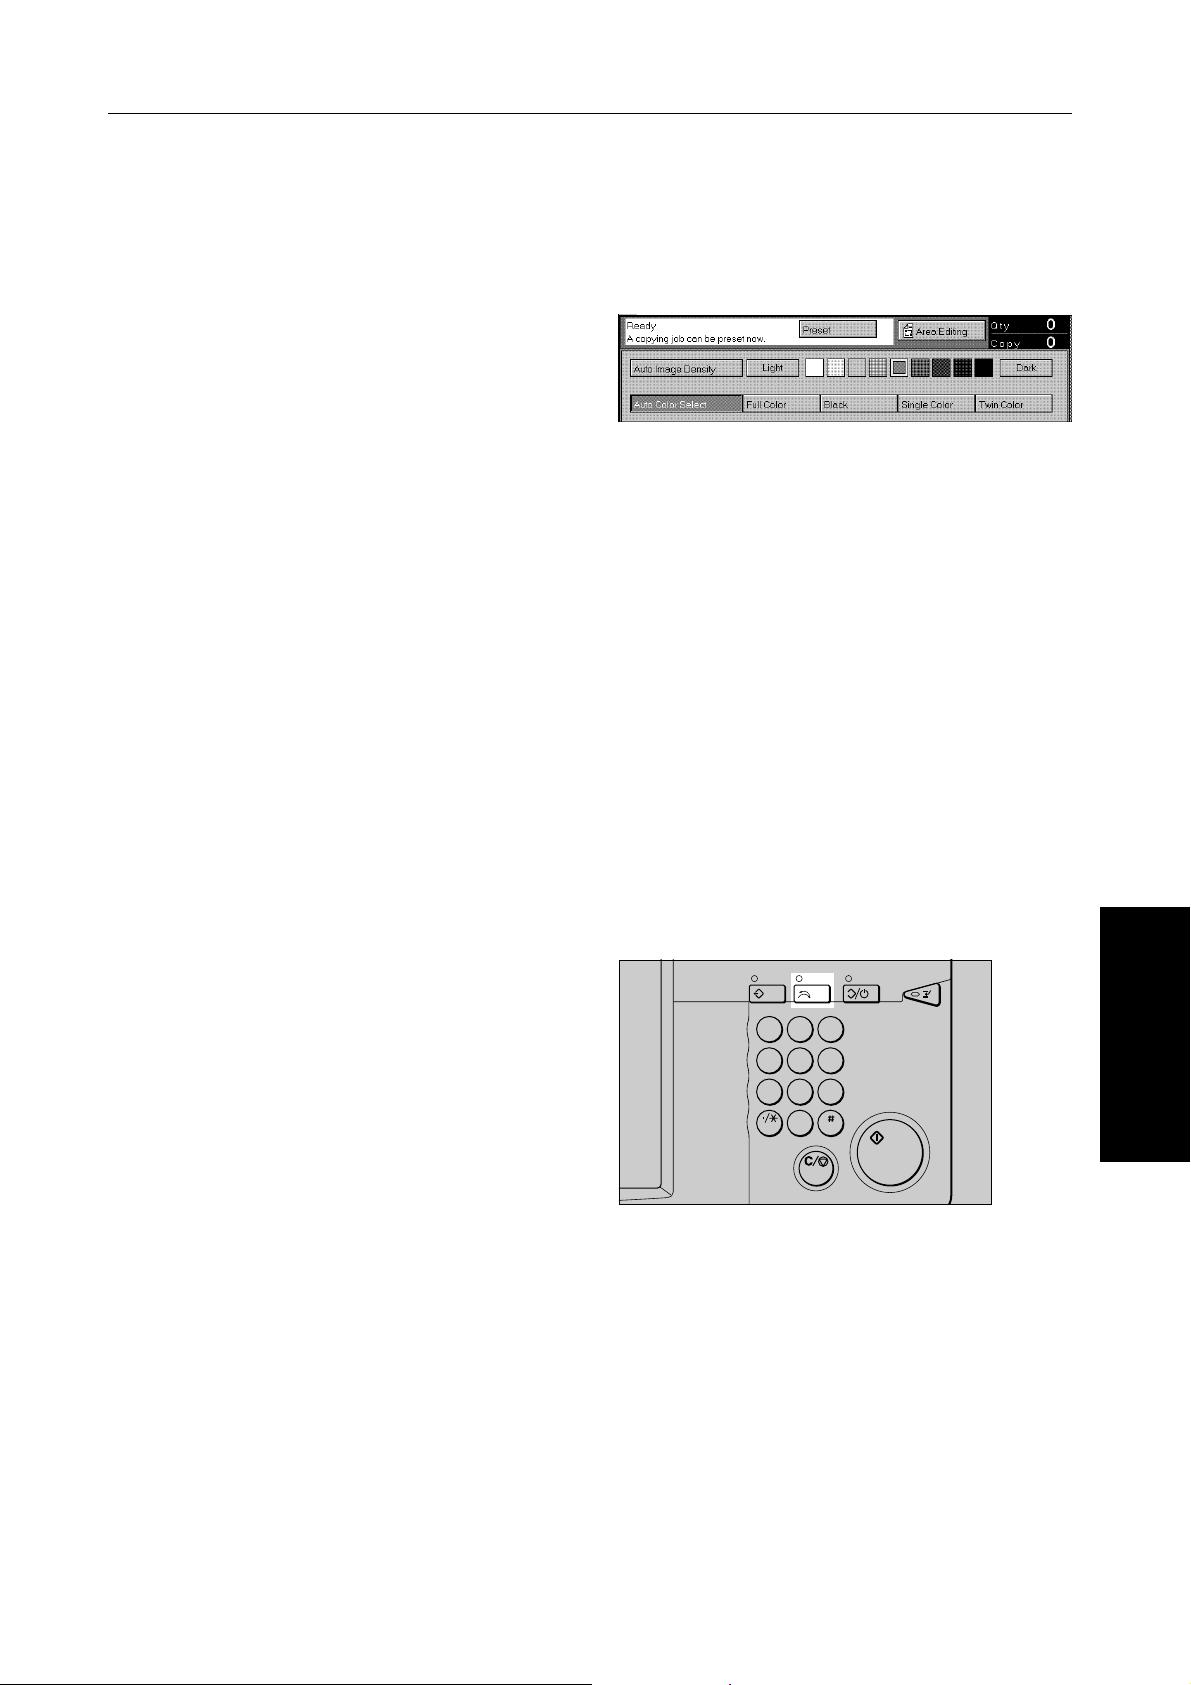
Auto color select
The copier automatically detects whether the original has color parts or not. Originals with only black images
will be copied in Black mode. Originals with some color areas will be copied in Full Color mode.
❐ The copier may detect some black and white screen images (such as from newspapers) as full color originals. If you
copy from a newspaper original, select Black mode.
❐ If you make one copy set of a black original using the dual job feeder, it is recommended to select Black mode. If you
choose Auto Color Select mode, the copier will reset the color selection for every original page, taking a long time to
complete the job.
Full color copy
This function makes copies in full color.
❐ You can adjust the overall color tone of copies. ☛ See page 76.
❐ You can adjust the specified color. ☛ See page 82.
Black copy
This function makes copies in black.
Single color
This function makes copies in single colors. The colors you can choose for single color copying are as follows.
• 8 standard single colors:
Yellow, Orange, Red, Magenta, Green, Cyan, Blue, Light-green
• 12 user colors:
Up to 12 colors can be manually mixed and stored in memory. ☛ See page 85.
• 1 scan color (Only for Edit type):
You can scan in a color from an original. ☛ See page 34.
-Standard single color
Touch the [Single Color] key.
1
Select the color.
2
❐ You can adjust the copy image density at this point.
32
Page 42

BASIC OPERATIONS
Touch the [Exit] key.
3
-User colors
❐ When Single Color copying, user colors might come out lighter.
❐ The appearance of user colors might vary slightly according to the Image Type you have selected (ex. Photo, Letter,
etc.).
Touch the [Single Color] key.
1
Touch the [User Color] key.
2
Select the color.
3
❐ You can adjust the copy image density at this point.
Touch the [Exit] key.
4
COPYING
33
Page 43

BASIC OPERATIONS
-Scan color (Only for Edit type)
❐ The diagram opposite shows the relationships between
the position of the original and the orientation of the
scanned image on the display.
❐ When Single Color copying, Scan colors might come
out lighter.
Touch the [Single Color] key.
1
Touch the [Scan Color] key.
2
Set your original, then touch the [Scan] key.
3
❐ The image of the original is displayed.
R
Exposure glass Display
R
Touch the color on the image you wish to scan
4
in with the editor pen.
❐ Point to an area of color with a radius of at least 5
mm.
❐ To cancel the pointing, touch the [Erase] key.
❐ For details of this display, ☛ see page 92.
Touch the [Exit] key.
5
❐ The color you have chosen is scanned in.
Touch the [Exit] key.
6
34
Page 44

Twin color
This function makes copies with black parts in black and other parts in the selected color.
Example:
BASIC OPERATIONS
<Original>
Touch the [Twin Color] key.
1
Select the color.
2
Black text
Blue picture
Selecting
“Red”
➡
<Output>
Black text
Red picture
Selecting The Original Image Type (Photo/Letter)
To optimize the likeness between copies and originals, select an image type that matches your originals.
❐ You can improve the readability of black lettering in
colored areas. ☛ See page 83.
Auto (Letter/Photo) mode
This mode automatically detects letter and photo parts of an original. The letter parts are copied in Letter
mode, and the photo parts are copied in Photo mode.
❐ “Photo” means not only photo pictures but also screened letter and solid areas.
❐ Moire patterns may appear on the screened bold letters or screened areas of the copy. To lessen this effect, select
“Soft” as image sharpness in the Image Adjustment function. ☛ See page 83.
❐ With some types of originals, Auto (Letter/Photo) mode might not be able to recognize the letter parts and photo parts
correctly. As a result, the copy might not be reproduced well. In this case, select Letter mode or Photo mode.
❐ Border parts between letters and photos or high contrast photo may be copied with an emphasized outline.
COPYING
35
Page 45

BASIC OPERATIONS
Letter mode
This mode is suitable for copying originals consisting of characters, line diagrams, and letters, but without
photographs.
❐ If a photograph type original is copied in this mode, the photograph parts will not be reproduced as well as they should.
❐ When you select this mode, the background density of the copy may become lighter than the original image, especially
under the following conditions:
• The original has low density letters or lines.
• The original has letters or lines with colored or screened background.
• The original has screened letters.
• When enlarged copies are made.
In this case, you can darken the background density. ☛ See page 83.
Printed Photo mode
Use this function when copying photographs or pictures that are printed on glossy paper. (for example: magazines).
Glossy Photo mode
Use this function when copying developed photographs.
Copied Photo/Map mode
Copied Photo mode
Use this function when copying originals that have
been color copied.
Map mode
Use this function for maps.
❐ When you want to use Copied Photo mode or Map
mode, touch the [Copied Photo/Map] key then select
the mode.
Selecting The Copy Paper Size
Select a suitable size of copy paper based on the
original size and the reproduction ratio.
Auto paper select
The copier automatically selects a suitable size of copy paper based on the original size and the reproduction
ratio.
❐ Regarding functions that cannot be used together with this function, ☛ see page 73.
❐ Originals which are of a non-standard size, or smaller than A5, 51/2" × 81/2" cannot be detected. In this case, select the
paper size manually.
36
Page 46

BASIC OPERATIONS
Manual Paper Select
You can select the copy paper manually by touching one of the paper tray keys.
Copying From The Bypass Tray
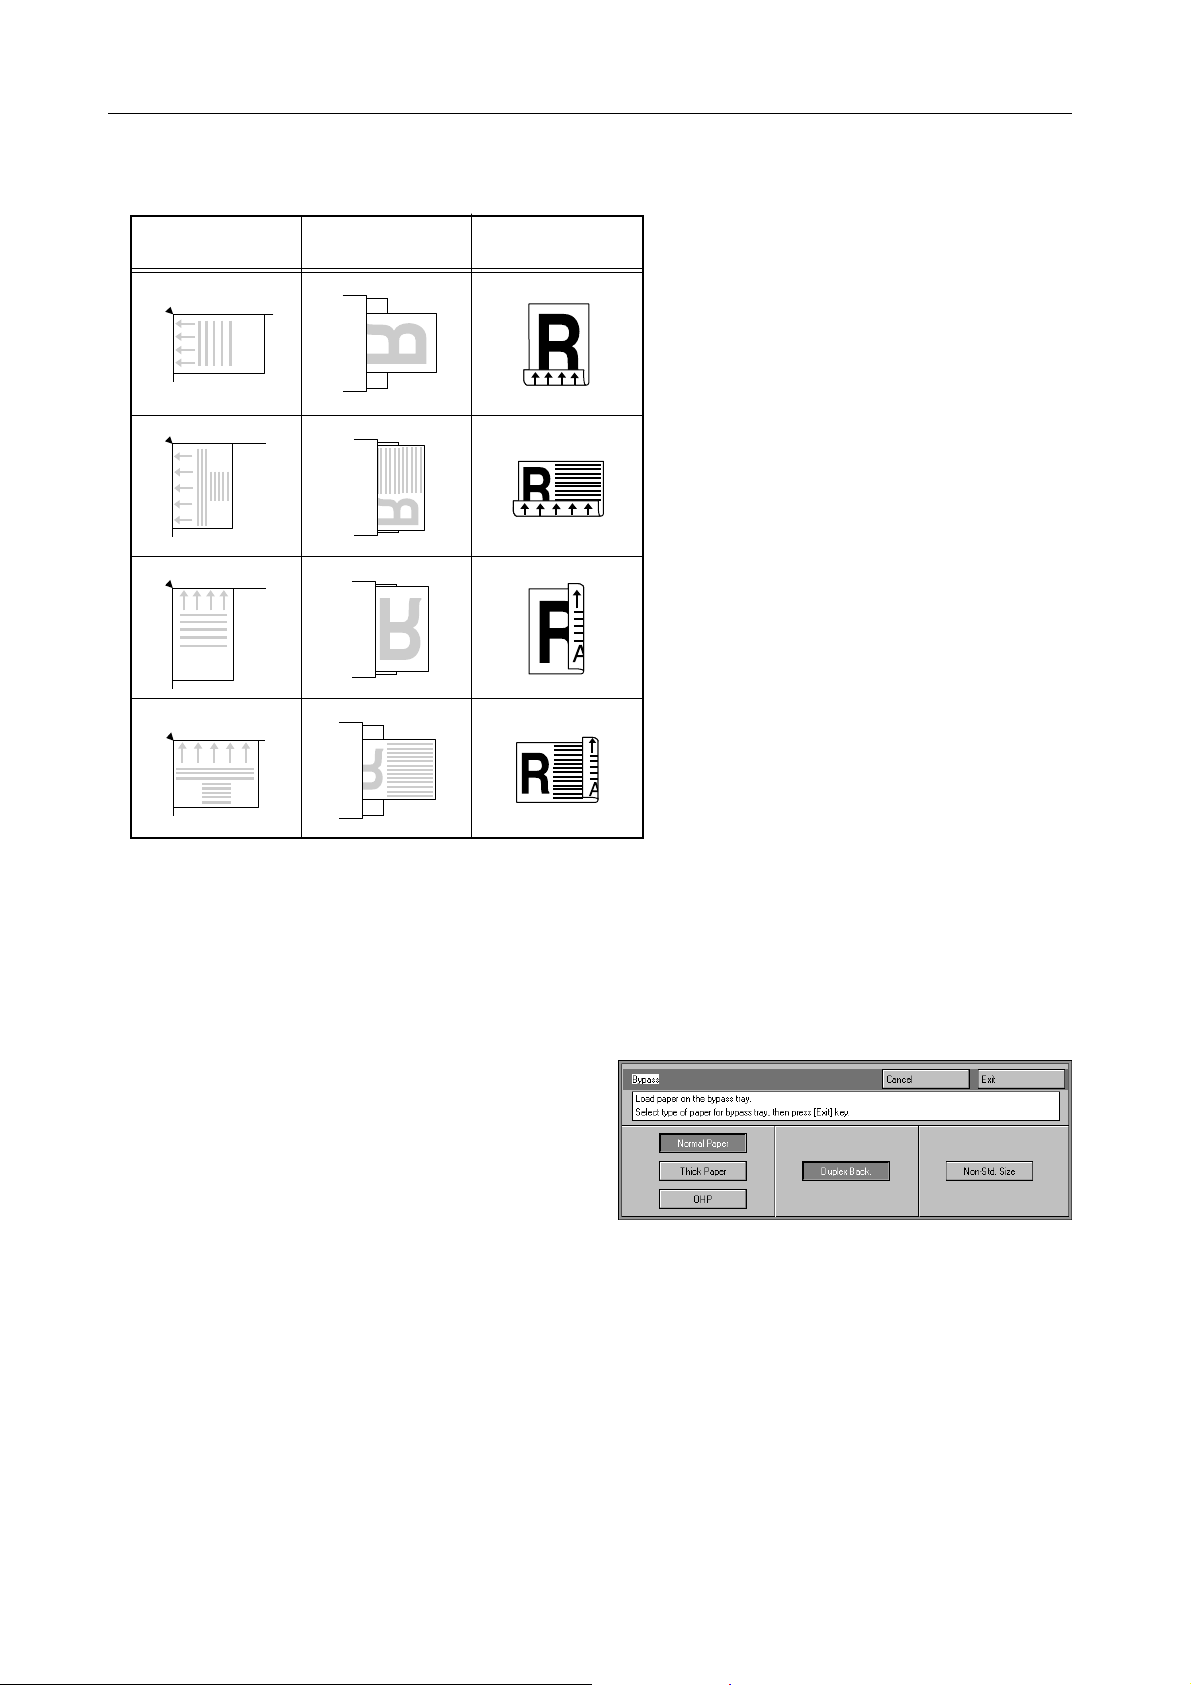
Use the bypass tray to copy onto thick paper, adhesive labels, OHP transparencies, or non-standard size
paper. Also use the bypass tray to copy onto the reverse side of paper that has already been copier onto.
❐ The following limitations apply:
2
Acceptable paper types
normal paper (64 ~ 104.7 g/m
thick paper (104.7 ~ 157 g/m2, 28 ~ 42 lb),
post cards,
OHP transparencies,
adhesive labels
Standard size Metric version:
, 17 ~ 28 lb),
l:A3, B4, A4, B5, A5, B6, A6
p: A4, B5, A5
Inch version:
l:11" × 17", 10" × 14", 8
p:8
1/2" × 11", 51/2" × 81/2"
1/2" × 11", 51/2" × 81/2"
Non-standard size Metric version:
Horizontal
g
Feed direction
Number of sheets that can
be set at one time
❐ Touch a key that matches the paper:
[Normal Paper] : normal paper
[Thick Paper] : thick paper, post cards, adhesive labels
[OHP] : OHP transparencies
[Duplex Back] : Copying onto the reverse side of copies already made. ☛ See page 40.
[Non-Std. Size] : Select this after the paper type for non-standard sized paper. ☛ See page 39.
❐ When you set several sheets at a time, fan them to get air between them before loading.
❐ If the copy paper is curled, gently roll it to remove the curl.
❐ When you copy onto OHP transparencies, remove copied sheets one by one.
❐ When you copy onto OHP transparencies, insert them with the copy side up.
❐ Do not stack copy paper above the limit mark.
standard paper: 50 sheets
thick paper, post cards, OHP transparencies: 20 sheets
adhesive labels: 1 sheets
Vertical
Vertical: 100 ~ 297 mm
Horizontal:148 ~ 432 mm
Inch version:
Vertical: 3.9" ~ 11.7"
Horizontal:5.8" ~ 17"
COPYING
37
Page 47

BASIC OPERATIONS
Copying onto standard size paper with the bypass tray
Push the button on the bypass tray to open it.
1
Touch the [Normal Paper] key, [Thick Paper]
2
key, or [OHP] key.
Touch the [Exit] key.
3
Adjust the guides to the paper size.
4
❐ Make sure that the guides matches to the paper size.
❐ With large copy paper (more than A4l, 11" × 81/2"l),
swing out the extender.
With the side you wish to copy onto face up, in-
5
sert the paper into the feeder until the machine
beeps.
Set your originals, then press the Start key.
6
38
Page 48

Copying onto non-standard size paper with the bypass tray
❐ The size that can be entered:
Vertical: 100 ~ 297 mm, 3.9" ~ 11.7"
Horizontal:148 ~ 432 mm, 5.8" ~ 17"
❐ For an explanation of entering numbers, ☛ see page 21.
Push the button of the bypass feed table to open it.
1
Touch the [Normal Paper] key, [Thick Paper] key, or [OHP] key.
2
Touch the [Non-Std. Size] key.
3
Enter the horizontal size, then touch the [#] key.
4
Touch the [Vertical] key and enter the vertical
5
size. Touch the [#] key to accept.
BASIC OPERATIONS
Touch the [Exit] key.
6
Adjust the guides to the paper size.
7
❐ With large copy paper (more than A4l, 11" × 81/2"l) , swing out the extender.
With the side you wish to copy onto face up, insert the paper into the feeder until the machine beeps.
8
Set your originals, then press the Start key.
9
COPYING
39
Page 49
BASIC OPERATIONS
Copying onto the reverse side of paper that has been already copied onto
❐ Notice the direction of originals and copy paper.
Original setting on
the exposure glass
ABC
BA
ABC
BA
Copy paper setting on
the bypass tray
Copies
➞
➞
➞
➞
❐ You cannot use this function for OHP transparencies.
Push the button on the bypass tray to open it.
1
Touch the [Normal Paper] key or [Thick Paper] key.
2
❐ When you copy onto non-standard size paper, touch the [Non-Std. Size] key and enter the size. For details, ☛ see
page .
Touch the [Duplex Back] key.
3
Touch the [Exit] key.
4
Adjust the guides to the paper size.
5
❐ With large copy paper (more than A4l, 11" × 81/2"l) , swing out the extender.
Insert the copy paper until the machine beeps.
6
❐ Make sure the front side (the side that has been copied onto) faces down.
Set your originals, then press the Start key.
7
40
Page 50

BASIC OPERATIONS
Having The Copier Choose The Reproduction Ratios (Auto Reduce/Enlarge)
The copier can select the proper reproduction ratio based on the selected paper size and the original size.
❐ Regarding functions that cannot be used together with this function, ☛ see page 73.
Example:
Metric version: original: A3l, copy paper: A4l
Inch version: original: 11" × 17" l, copy paper: 81/2" × 11"l
Touch the [Auto Reduce/Enlarge] key.
1
Set your original on the exposure glass or in the dual job feeder. ☛ See page 23, 24 or 25.
2
Choose your copy paper size (ex. A4l, 81/2" × 11"l ).
3
Press the Start key. The original image is enlarged or reduced to fit the selected copy paper.
4
Turning The Touch Panel Display OFF/ON (Stand by)
You can manually turn off the touch panel display to save energy.
❐ When the copier does not detect anyone operating it for a certain selected time, the touch panel display automatically
turns off. You can change this time with User Tools, ☛ see page 126.
Hold down the Clear Modes/Stand by key more
1
than 3 seconds to enter the Stand by mode.
❐ The touch panel display goes blank and the indicator
for this key is on.
❐ To cancel this mode, press the Clear Modes/Stand
by key again.
1 2 3
4 5 6
7 8 9
C
0
COPYING
41
Page 51
BASIC OPERATIONS
Temporarily Stopping One Job To Copy Something Else (Interrupt Copying)
Use the Interrupt key to interrupt a multicopy run and make urgently needed copies.
❐ Regarding functions that cannot be used together with this function, ☛ see page 73.
Press the Interrupt key . The copier will stop the
1
copy run and store the present settings in the
memory . The copier will return to the ready condition.
Remove the previous original. Set your original for interrupt copying on the exposure glass or in the dual
2
job feeder.
Make your copies.
1 2 3
4 5 6
7 8 9
C
0
3
After interrupt copying is completed, press the Interrupt key again. The copier will recall the previous copy
4
settings.
Reset the previous original and press the Start key to resume the previous run.
5
Entering Copy Job Settings During The Warm-up Period (Auto Start)
If you press the Start key during the warm-up period, the Start key will blink and the copier will start copying
after the warm-up period.
Set your copy settings during the warm-up pe-
1
riod.
Press the Start key.
2
❐ To cancel Auto Start, press the Clear/Stop key.
1 2 3
4 5 6
7 8 9
C
0
42
Page 52
BASIC OPERATIONS
Presetting Copy Job During A Copy Run (Preset)
You can set the copy settings for your next job. The copier will start the next copy job after the current job is
completed.
NOTE: This function can be used only when your machine is equipped with the optional dual job feeder.
Touch the [Preset] key.
1
Set the copy job settings.
2
Touch the [Exit] key.
3
Set the originals for your next job on top of the originals being copied.
4
❐ Push in the originals completely, but do not insert too strongly.
Touch the [Exit] key.
5
❐ After the first job is finished, the next job will start automatically.
❐ To change or cancel the preset copy jobs, touch the [Preset] key and follow the instructions on the display.
Recalling The Previous Job Settings (Recall)
This copier automatically stores the previous job settings. If you want to copy with the same settings as the
previous job, press the Recall key. You can also change the recalled job settings.
❐ When the recalled job setting is for area editing, you
cannot change it.
❐ Colors grabbed with the Scan Color function cannot
be recalled and it will be copied in Black.
1 2 3
4 5 6
7 8 9
C
0
COPYING
43
Page 53

BASIC OPERATIONS
Storing And Recalling Your Copy Settings In Memory (Program)
You can store up to five frequently used copy job settings in machine memory, and recall them for future use.
❐ The following functions can be stored:
• Image density
• Color selection
• Paper size
• Reducing and enlarging
• Size of non-standard size original
• Finishing mode
• Shift/Book mode
• Color creation
• Image creation
• Default settings
• Color balance adjustment
• Single color adjustment
• Image adjustment
• User color memory
• Projector mode
• Area editing
❐ Colors grabbed with the Scan Color function cannot be stored in memory and it will be copied in Black.
1 2 3
4 5 6
7 8 9
C
0
Storing Your Settings
Set the copy settings you want to put into memory.
1
Press the Program key.
2
Touch the [Store] key.
3
Select the program number you want to store the settings in.
4
Recalling Your Settings
❐ When the recalled job setting is for area editing, you cannot change it.
Press the Program key .
1
Make sure the [Recall] key is selected.
2
Select the program number you want to recall.
3
44
Page 54
REDUCING AND ENLARGING (Reduce/Enlarge)
Checking And Changing The Selected Copy Jobs
When you have selected modes, the [Check Modes]
key appears on the touch panel display.
By touching the [Check Modes] key, you can see at
a glance all the modes you have selected.
To return to the display when the [Check Modes]
key was touched, touch the [Prev. Screen] key.
REDUCING AND ENLARGING (Reduce/Enlarge)
Reducing And Enlarging Using Preset Ratios (Preset R/E)
❐ You can add up to two preset ratios by User Tools. ☛ See page 128.
❐ Regarding functions that cannot be used together with this function, ☛ see page 73.
Touch the [Reduce/Enlarge] key.
1
Make sure that the [Preset R/E] key is selected.
2
Then, select the ratio.
Set your originals, then press the Start key.
3
COPYING
45
Page 55

REDUCING AND ENLARGING (Reduce/Enlarge)
Reducing And Enlarging In 1% Steps (Zoom)
You can change the reproduction ratio from 25 % to 400 % in 1% steps.
Using the [+– set] key
Touch the [Reduce/Enlarge] key.
1
Touch the [Zoom] key.
2
Make sure that the [+– Set] key is selected.
3
Adjust the reproduction ratio following the in-
4
structions on the display.
Set your originals, then press the Start key.
5
Using the [Number keys] key
❐ For an explanation of entering numbers, ☛ see page 21.
Touch the [Reduce/Enlarge] key.
1
Touch the [Zoom] key.
2
Touch the [Number Keys] key.
3
Adjust the reproduction ratio following the in-
4
structions on the display.
Set your originals, then press the Start key.
5
46
Page 56

REDUCING AND ENLARGING (Reduce/Enlarge)
Fitting The Original To A Copy Of A Different Size (Size Magnification)
A mm, A"
The suitable reproduction ratio will be automatically selected when you enter the length of the original and the
length of the copy image you want.
❐ For an explanation of entering numbers, ☛ see page 21.
Touch the [Reduce/Enlarge] key.
a mm, a"
1
Touch the [Size Mag.] key.
2
Enter the original size and copy paper size us-
3
ing the Number keys following the instructions
on the display.
❐ Up to 999 mm (metric version), 99.99" (inch version)
can be entered.
Set your originals, then press the Start key.
4
Reducing And Enlarging With Independent Ratios For Vertical And Horizontal Directions (Directional Size Magnification)
Horizontal
Vertical
❐ There are two ways to set the ratios.
❐ For an explanation of entering numbers, ☛ see page 21.
Using the [%] key
Touch the [Reduce/Enlarge] key.
1
Touch the [Direct. Mag.] key.
2
Make sure that the [%] key is selected.
3
COPYING
47
Page 57
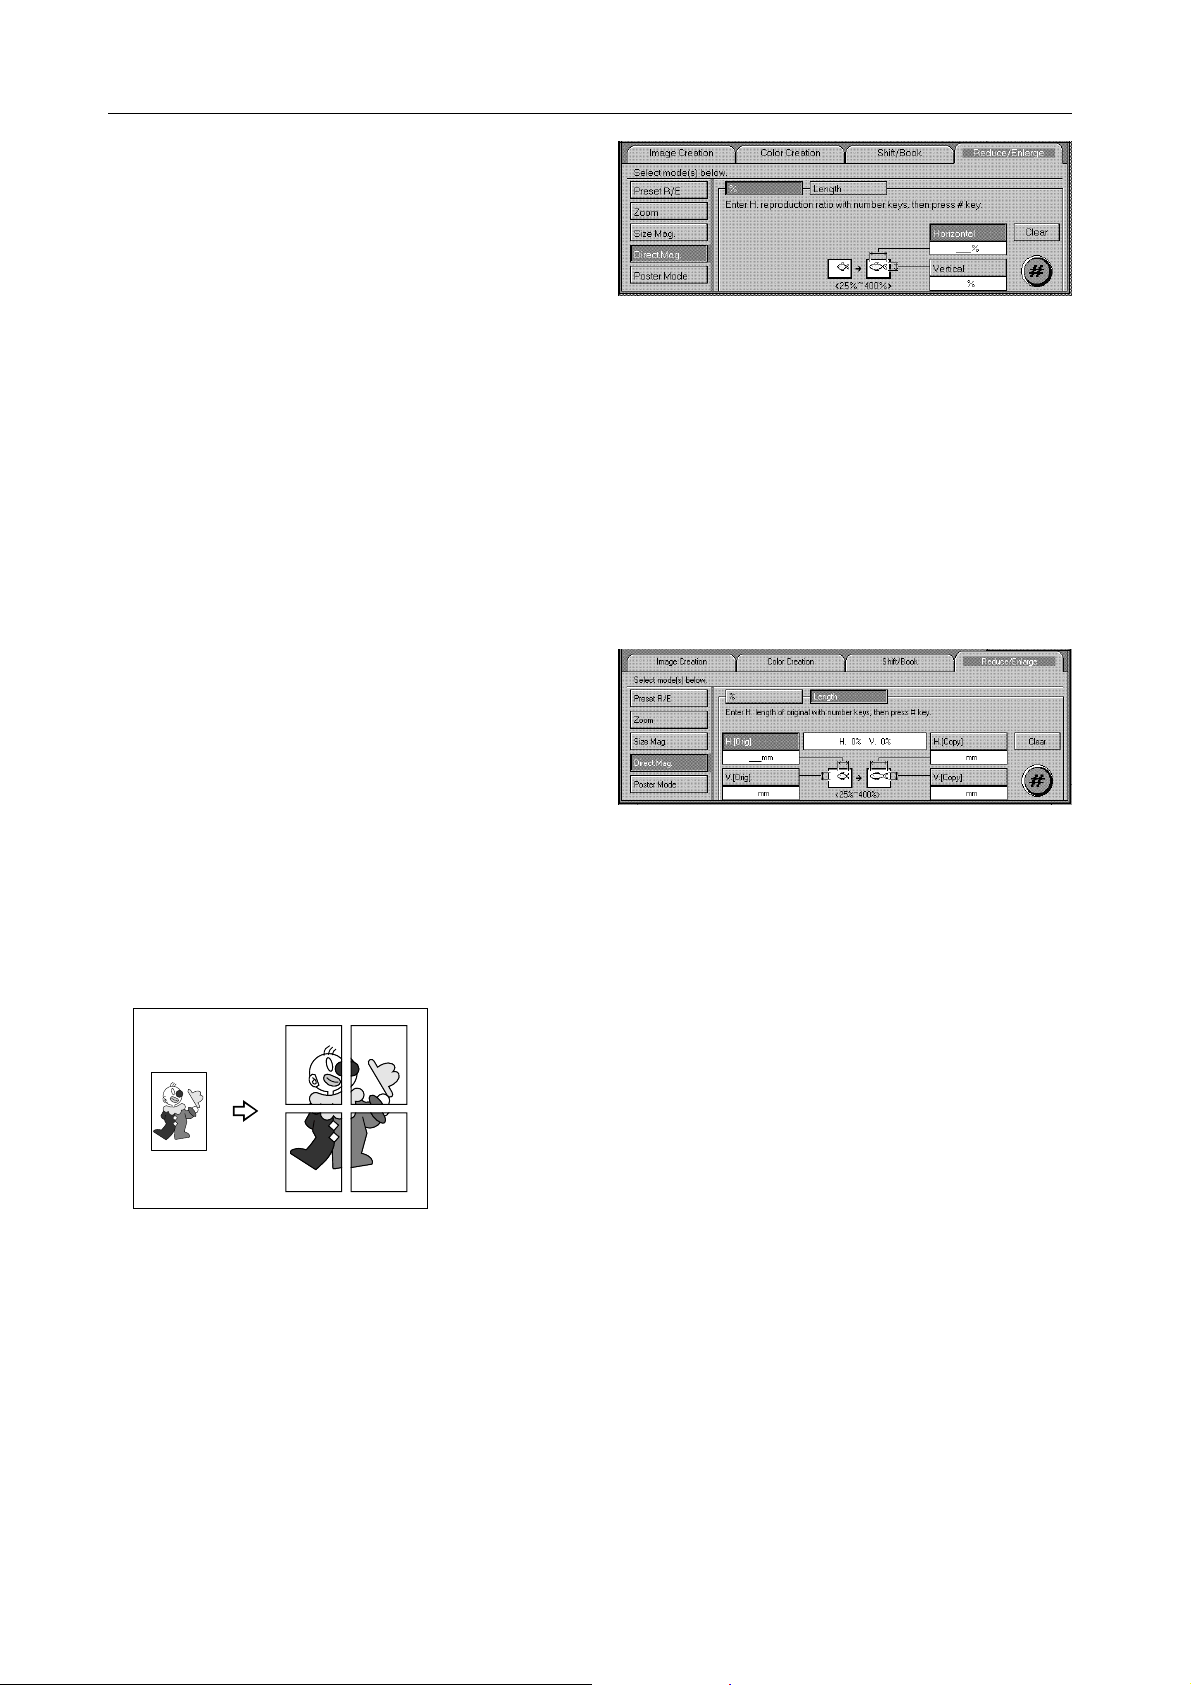
REDUCING AND ENLARGING (Reduce/Enlarge)
Adjust the reproduction ratio following the instruc-
4
tions on the display.
❐ You can enter the ratio in the range of 25 ~ 400 %.
Set your originals, then press the Start key.
5
Using the [Length] key
By inputting the size of the original and the copy, the machine automatically calculates the reproduction ratio.
Touch the [Reduce/Enlarge] key.
1
Touch the [Direct. Mag.] key.
2
Touch the [Length] key.
3
Adjust the reproduction ratio following the instruc-
4
tions on the display.
❐ Up to 999 mm (metric version), 99.99" (inch version)
can be entered.
Set your originals, then press the Start key.
5
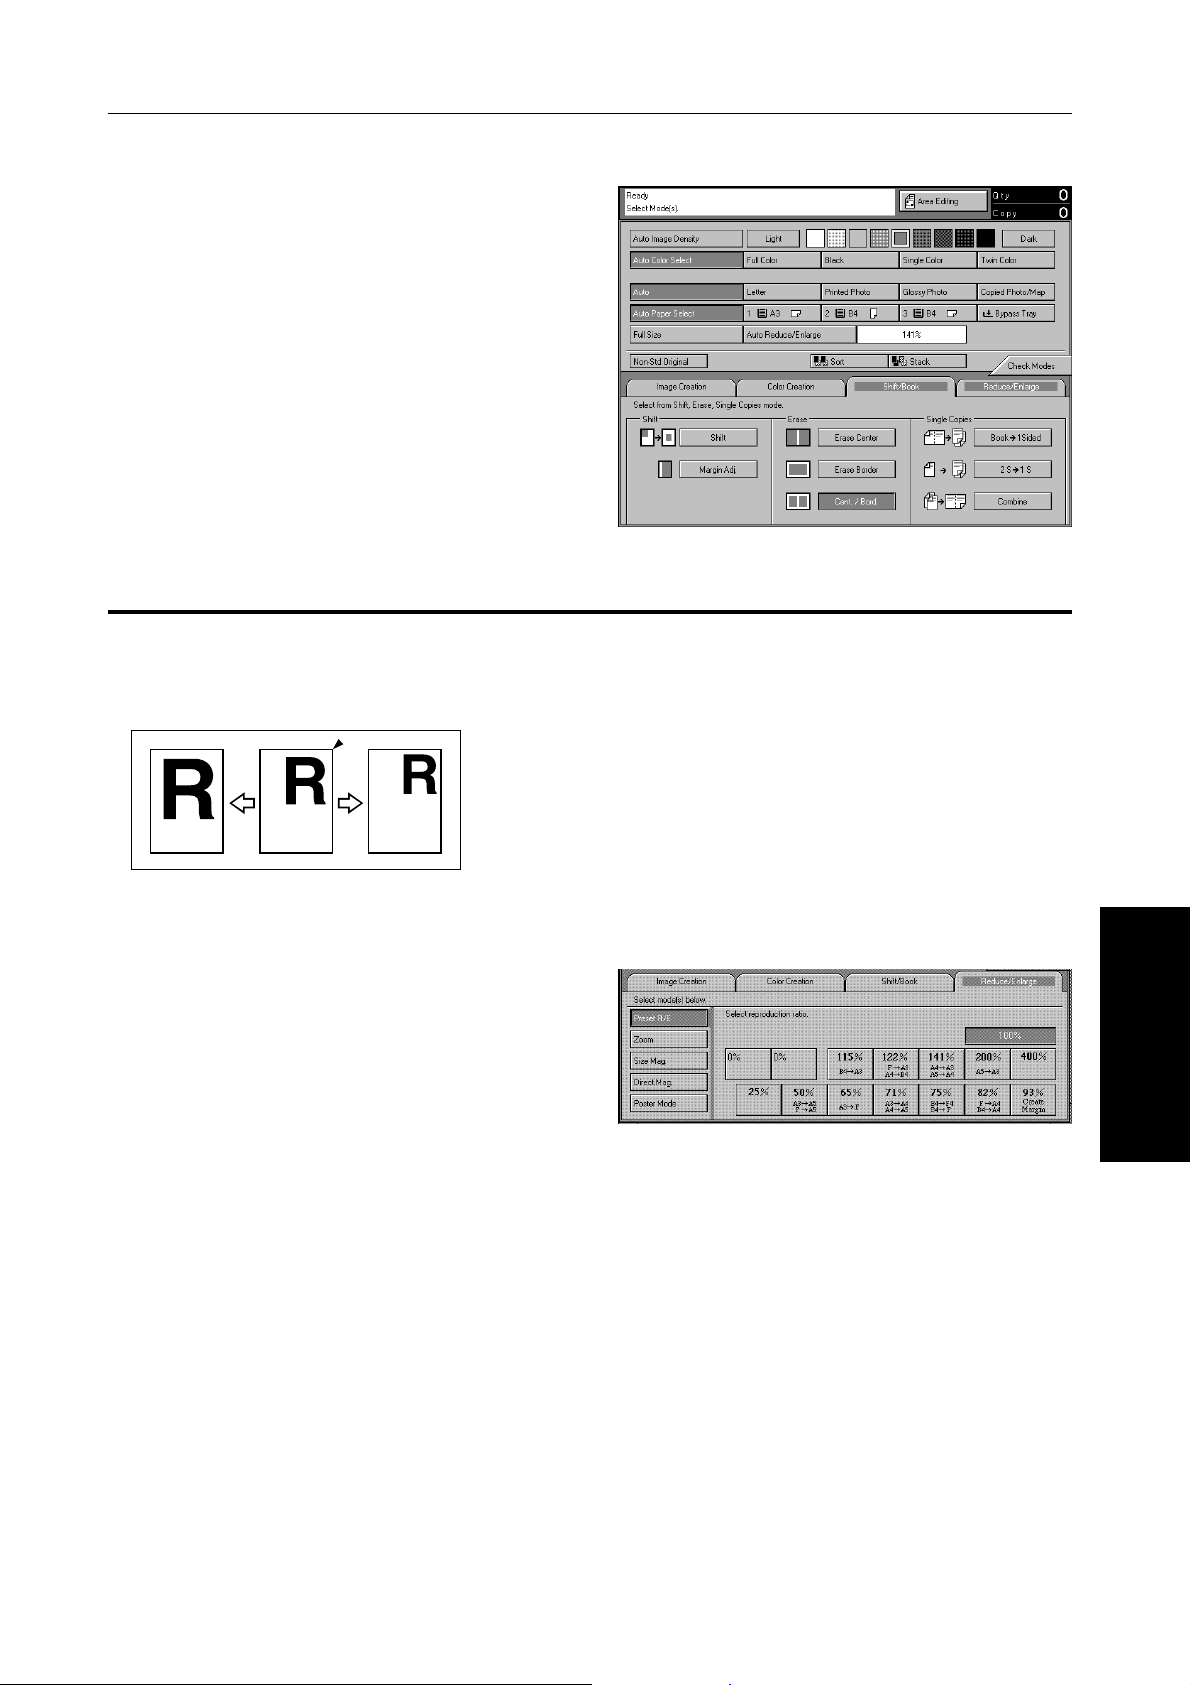
Enlarging The Complete Image Onto Several Sheets (Poster Mode)
You can enlarge the complete image of originals onto several sheets. This function is convenient for making
posters.
❐ In this function, the copies are delivered with margins around the copy image (about 15 mm, 0.6"). If you want to paste
the sheets to make a poster (one large sheet), cut the margins out.
48
Page 58

REDUCING AND ENLARGING (Reduce/Enlarge)
R
A
B
R
R R
15mm, 0.6"
C
15mm, 0.6"
A
❐ For an explanation of entering numbers, ☛ see page 21.
Using the [Page Nos] key
By entering the desired number of pages, the machine automatically calculates the suitable enlargement ratio
for copying.
Touch the [Reduce/Enlarge] key.
B
C
1
D
D
Touch the [Poster Mode] key.
2
Make sure that the [Page Nos] key is selected.
3
Enter the number of pages following the instruc-
4
tions on the display.
❐ Up to 20 pages can be entered.
❐ If the number of pages coincides with an enlarge-
ment of more than 400%, blank pages will be fed out.
Set your originals, press the Start key.
5
Using the [%] key
By entering the desired enlargement ratio, the machine automatically calculates the necessary number of
copy pages.
Touch the [Reduce/Enlarge] key.
1
Touch the [Poster Mode] key.
2
Make sure that the [%] key is selected.
3
COPYING
Enter the ratios following the instructions on the
4
display.
❐ You can enter the ratios in the range of 25 ~ 400 %.
Set your originals, then press the Start key.
5
49
Page 59

SHIFTING THE IMAGE (Shift/Book)
Centering/Cornering
SHIFTING THE IMAGE (Shift/Book)
R
R
You can move the image to a corner or edge as well as center it. This function is convenient when the copy
paper is larger than the original.
Touch the [Shift/Book] key.
1
Touch the [Shift] key.
2
Select the direction in which you want to shift
3
the image.
❐ When you want to center the image, touch the
[Center] key .
R
Touch the [Exit] key.
4
Select the copy paper size.
5
Set your originals, then press the Start key.
6
Adding Margins For Binding (Margin Adjustment)
A
You can make a margin by shifting the image to the left or right. This function is convenient when you want to
bind copies.
❐ Maximum margin width: Metric version: 20 mm (in 1 mm steps)
❐ Regarding functions that cannot be used together with this function, ☛ see page 73.
50
A
Inch version: 0.8" (in 0.1" steps)
Page 60

Touch the [Shift/Book] key.
1
Touch the [Margin Adj.] key.
2
To make a left margin, touch the [→] key until
3
the number displayed reaches the required setting.
To make a right margin, touch the [←] key until
the number displayed reaches the required setting.
❐ To clear the margin, touch the [Clear] key.
Touch the [Exit] key.
4
Set your originals, then press the Start key.
5
ERASING PARTS OF THE COPY IMAGE (Shift/Book)
ERASING PARTS OF THE COPY IMAGE (Shift/Book)
Erasing The Center Margin Of The Original Image (Erase Center)
A
B
A
Erasing The Surrounding Area Of The Original Image (Erase Border)
A
B
A
Erasing The Center Margin And Surrounding Area Of The Original Image (Erase Center And Border)
B
B
COPYING
A
❐ Regarding functions that cannot be used together with these functions, ☛ see page 73.
B
A
B
51
Page 61

MAKING SINGLE COPIES (Shift/Book)
Touch the [Shift/Book] key.
1
Touch the [Erase Center] key, the [Erase Bor-
2
der] key, or the [Cent./Bord.] key.
Adjust the width of the margin to be erased by
3
touching the [+] key or the [–] key.
❐ You can adjust the width in the range of 3 ~ 50 mm,
0.1" ~ 2.0".
Touch the [Exit] key.
4
Set your originals, then press the Start key.
5
MAKING SINGLE COPIES (Shift/Book)
From Book Originals To 2 One-sided Copies (Book → 1 Sided)
1
This function makes one-sided copies from two facing pages of bound (book) originals.
❐ Regarding functions that cannot be used together with this function, ☛ see page 73.
Select the copy paper size.
2
1
2
1
Touch the [Shift/Book] key.
2
Touch the [Book → 1 Sided] key.
3
Start with the last page of your book original and work your way to the beginning.
4
Place the original
Or, set the facing original in the optional dual job feeder.
Press the Start key.
face down
on the exposure glass.
5
52
Page 62

MAKING SINGLE COPIES (Shift/Book)
From Two-sided Originals To 2 One-sided Copies (2 Sided → 1 Sided)
11
2
NOTE: This function can be used only when your copier is equipped with the optional dual job feeder.
❐ Regarding functions that cannot be used together with this function, ☛ see page 73.
Touch the [Shift/Book] key.
2
1
Touch the [2 S → 1 S] key.
2
Set your originals in the dual job feeder.
3
Select the copy paper size.
4
Press the Start key.
5
Combining Two Originals (Combine)
1
This function automatically combines 2 one-sided originals onto one copy.
NOTE: This function can be used only when your copier is equipped with the optional dual job feeder.
❐ Regarding functions that cannot be used together with this function, ☛ see page 73.
Touch the [Shift/Book] key.
2
1
2
1
Touch the [Combine] key.
2
COPYING
53
Page 63

MAKING SINGLE COPIES (Shift/Book)
Touch the [Even] key or the [Odd] key accord-
3
ing to the number of your originals.
Set your originals in the dual job feeder.
4
Select the copy paper size.
5
Press the Start key.
6
54
Page 64

COLOR CREATION
COLOR CREATION
Converting A Selected Color Into A Different Color (Color Conversion)
This function converts a selected color of an original into a different color on the copy.
❐ Color samples, ☛ see page 12.
❐ Up to 4 colors can be converted at one time.
❐ Colors that can be converted:
Y ellow, Red, Magenta, Green, Cyan, Blue, Black, White, and Scan Color (only one Scan Color can be selected
at a time)
❐ Colors that can be used after conversion:
Yellow, Orange, Red, Magenta, Green, Cyan, Blue, Light-green, Black, White, User colors, and Scan Color
(only one Scan Color can be selected at a time)
❐ This function can be made more or less sensitive to the color to be converted. It can be adjusted within five levels from
“Narrow” to “Wide”. ☛ See page 127.
For example, if red is selected as the color to be converted, “Narrow” will result in only red being converted, and “Wide”
will result in other colors close to red being converted.
❐ If you pick the wrong color, touch the [Clear] key and choose another.
❐ For details on Scan Color, ☛ See page 34.
Touch the [Color Creation] key.
1
Touch the [Color Conv.] key.
2
Select the color to be converted.
3
Select the color to be used after conversion.
4
If you want to convert more than one color, re-
5
peat steps 3 and 4.
Touch the [Exit] key.
6
Set your originals, then press the Start key.
7
COPYING
55
Page 65
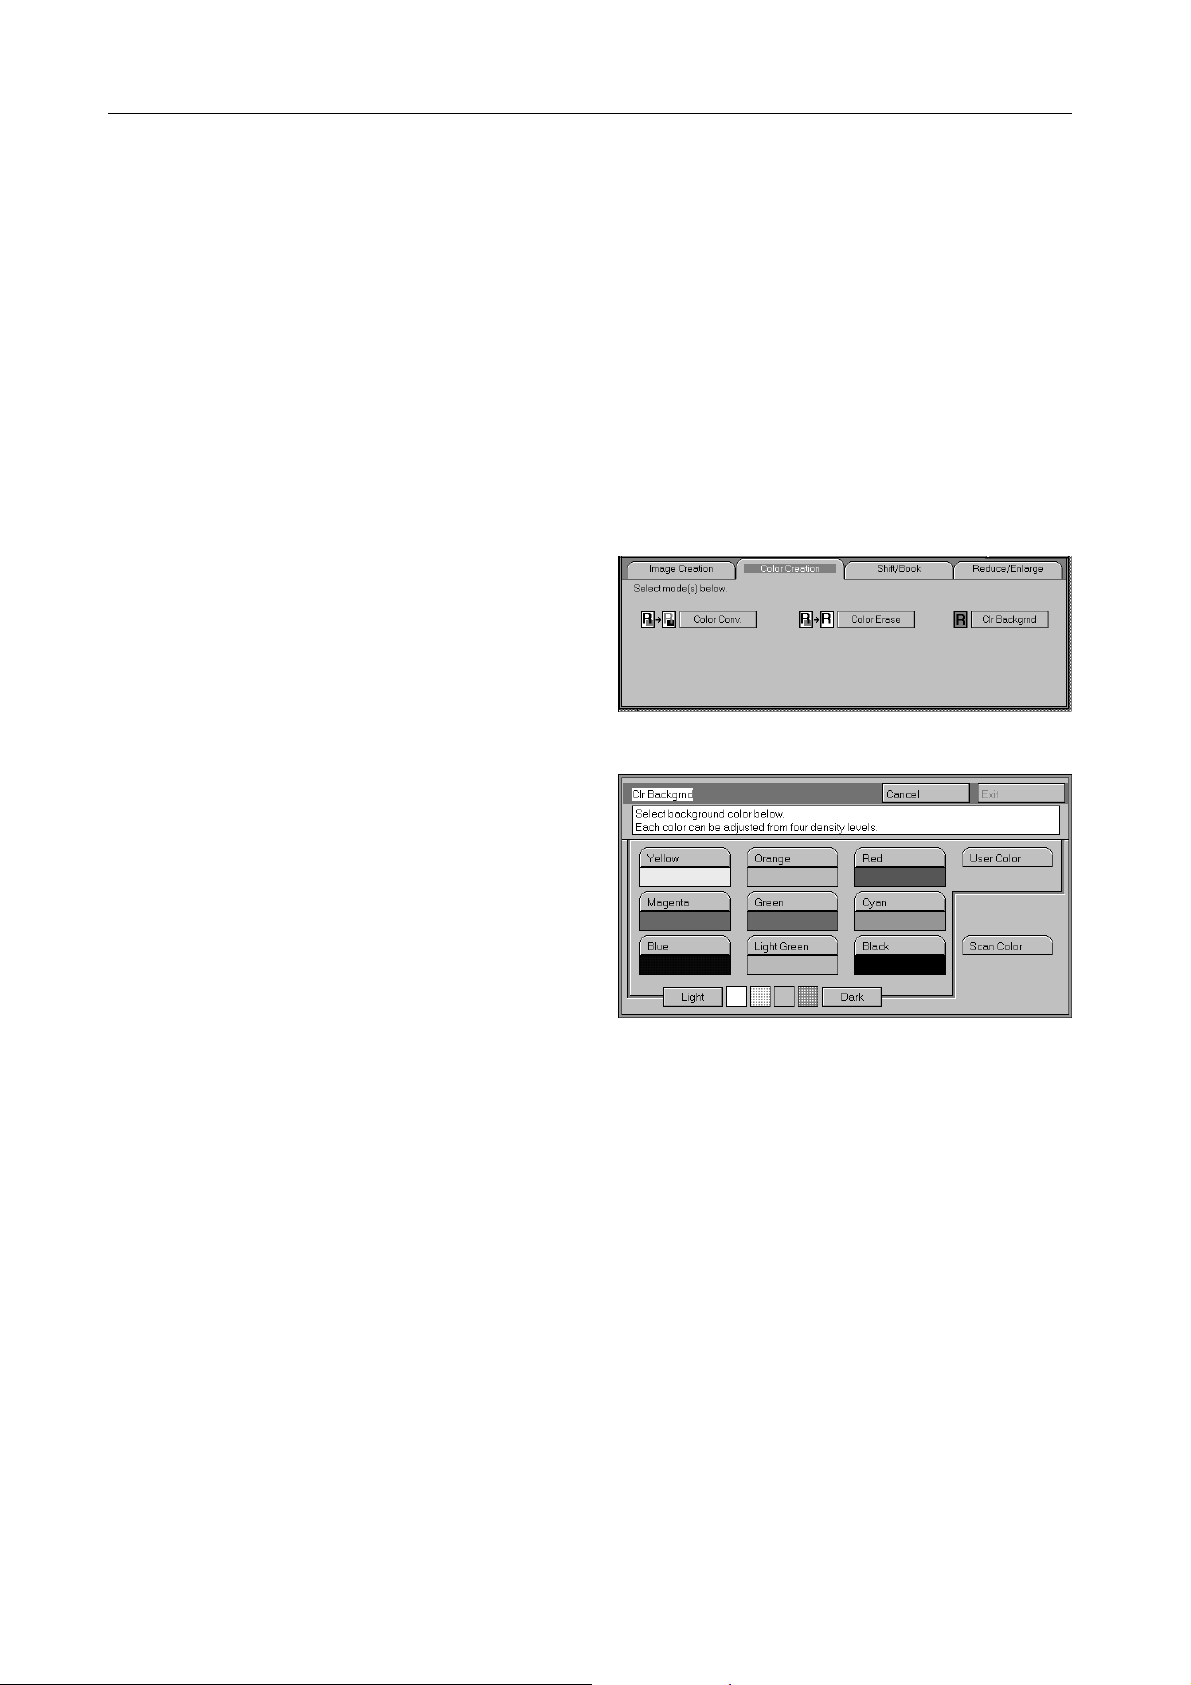
COLOR CREATION
Erasing The Selected Color (Color Erase)
This function erases a selected color from the original image.
❐ To see the color samples, ☛ see page 12.
❐ Up to 4 colors can be erased at one time.
❐ Colors that can be erased:
Yellow, Red, Magenta, Green, Cyan, Blue, Black, and Scan Color (only one Scan Color can be selected at a
time)
❐ This function can be made more or less sensitive to the color to be erased. It can be adjusted within five levels from
“Narrow” to “Wide”. ☛ See page 127.
For example, if red is selected as the color to be converted, “Narrow” will result in only red being erased, and “Wide” will
result in other colors close to red being erased.
Touch the [Color Creation] key.
1
Touch the [Color Erase] key.
2
Select the color to be erased.
3
❐ T o cancel the selected color , touch the color key again.
❐ For details on Scan Color, ☛ See page 34.
Touch the [Exit] key.
4
Set your originals on the exposure glass or in
5
the dual job feeder.
Press the Start key.
6
56
Page 66

COLOR CREATION
Making Copy With Color Background (Color Background)
This function makes copies with a selected color background.
❐ Color samples, ☛ see page 12.
❐ Colors that can be selected as a background color:
Yellow, Orange, Red, Magenta, Green, Cyan, Blue, Light-green, Black, Scan Color, and User Colors
❐ In this mode, color tones of photo or picture in originals might be changed due to the color on the background.
Touch the [Color Creation] key.
1
Touch the [Clr Backgrnd] key.
2
Select the color for background.
3
❐ For details on Scan Color, ☛ See page 34.
❐ Colors (except for Scan Color) can be made lighter or
darker.
Touch the [Exit] key.
4
Set your originals, then press the Start key.
5
COPYING
57
Page 67

IMAGE CREATION
IMAGE CREATION
Copying Only The Outline Of The Image (Outline)
R
This function copies only the outline of the image.
❐ In the Photo mode, this function might not work well. In this case, select Letter mode or Auto (Letter/Photo) mode.
Touch the [Image Creation] key.
1
Touch the [Outline] key.
2
Select the width of the outline.
3
Touch the [Exit] key.
4
Set your originals, then press the Start key.
5
58
Page 68

IMAGE CREATION
Adding A Shadow Around The Copy Image Elements (Shadow)
R
This function adds a shadow around the edges of copy image elements.
❐ You can select block shadow or offset shadow.
R
❐ The orientation of the original decides the position of the shadow as follows:
R
<Exposure glass>
R
R
OffsetBlock
R
<ADF>
❐ You can select the color of shadow as follows:
Same Color: A shadow of the same color as the original is added. When you select this key, Full Color mode will be
automatically selected. You cannot change the color mode.
Select Color: You can select the color of the shadow. When you select this key, Full Color mode will be automatically
selected. You can change the color mode as follows:
Color of the shadow
Black
Yellow, Orange, Red, Magenta, Blue,
Cyan, Green, Light-green, User Color,
Scan Color
❐ Shadow widths:
Metric version: 1 mm, 2 mm, 3 mm, 4 mm
Inch version: 0.04", 0.08", 0.12", 0.16"
Black
Single color: Same color as the color selected for the shadow.
Twin color: Same color as the color selected for the shadow.
Acceptable Color Mode
COPYING
59
Page 69

IMAGE CREATION
Same color shadow
Touch the [Image Creation] key.
1
Touch the [Shadow] key.
2
Touch the [Block] key or the [Offset] key.
3
Adjust the width by touching the [+] key or the
4
[–] key.
Make sure the [Same Color] key is selected.
5
Touch the [Exit] key.
6
Set your originals, then press the Start key.
7
Select color shadow
Touch the [Image Creation] key.
1
Touch the [Shadow] key.
2
Touch the [Block] key or the [Offset] key.
3
Adjust the width by touching the [+] key or the
4
[–] key.
Touch the [Select Color] key.
5
60
Page 70

Select the color, then touch the [Exit] key.
6
❐ For details on Scan Color, ☛ See page 34.
❐ Colors (except for Scan Color) can be made lighter
or darker.
Touch the [Exit] key.
7
Set your originals, then press the Start key.
8
Slanting The Copy Image (Slanted)
IMAGE CREATION
R
This function slants the copy image at a selected angle.
❐ The slant direction is decided as shown in the illustration.
❐ You can select the angle from –45° to +45°.
Touch the [Image Creation] key.
R
–
+
R
1
COPYING
Touch the [Slanted] key.
2
61
Page 71
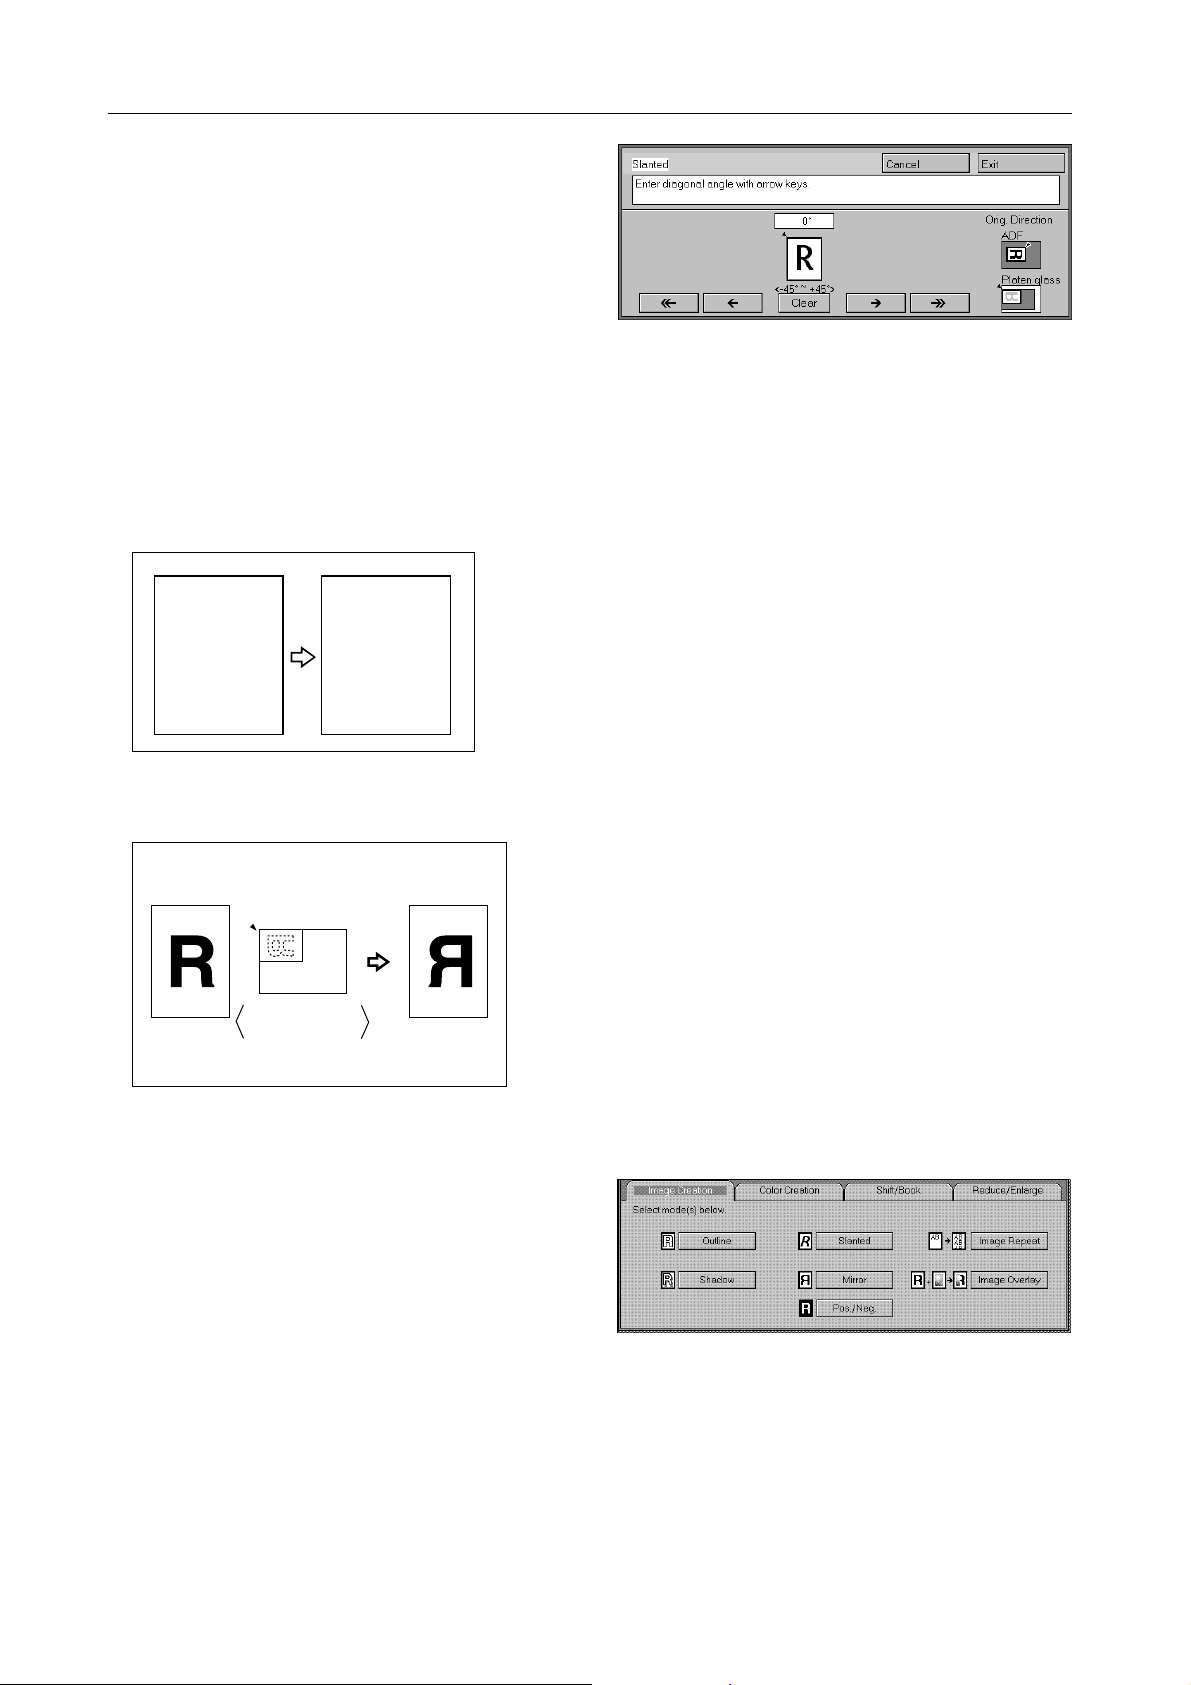
IMAGE CREATION
Adjust the angle by touching the arrow keys.
3
❐ By touching the [→>] key or the [<←] key, the number
of the angle can be adjusted by in steps of 5°.
❐ To cancel the angle, touch the [Clear] key.
Touch the [Exit] key.
5
Set your originals, then press the Start key.
6
Making A Mirror Image (Mirror)
R
This function makes a mirror image copy of the original.
❐ Original and copy orientations are as below:
Original Copy
Setting on the
exposure glass
Touch the [Image Creation] key.
R
1
Touch the [Mirror] key.
2
Set your originals, then press the Start key.
3
62
Page 72
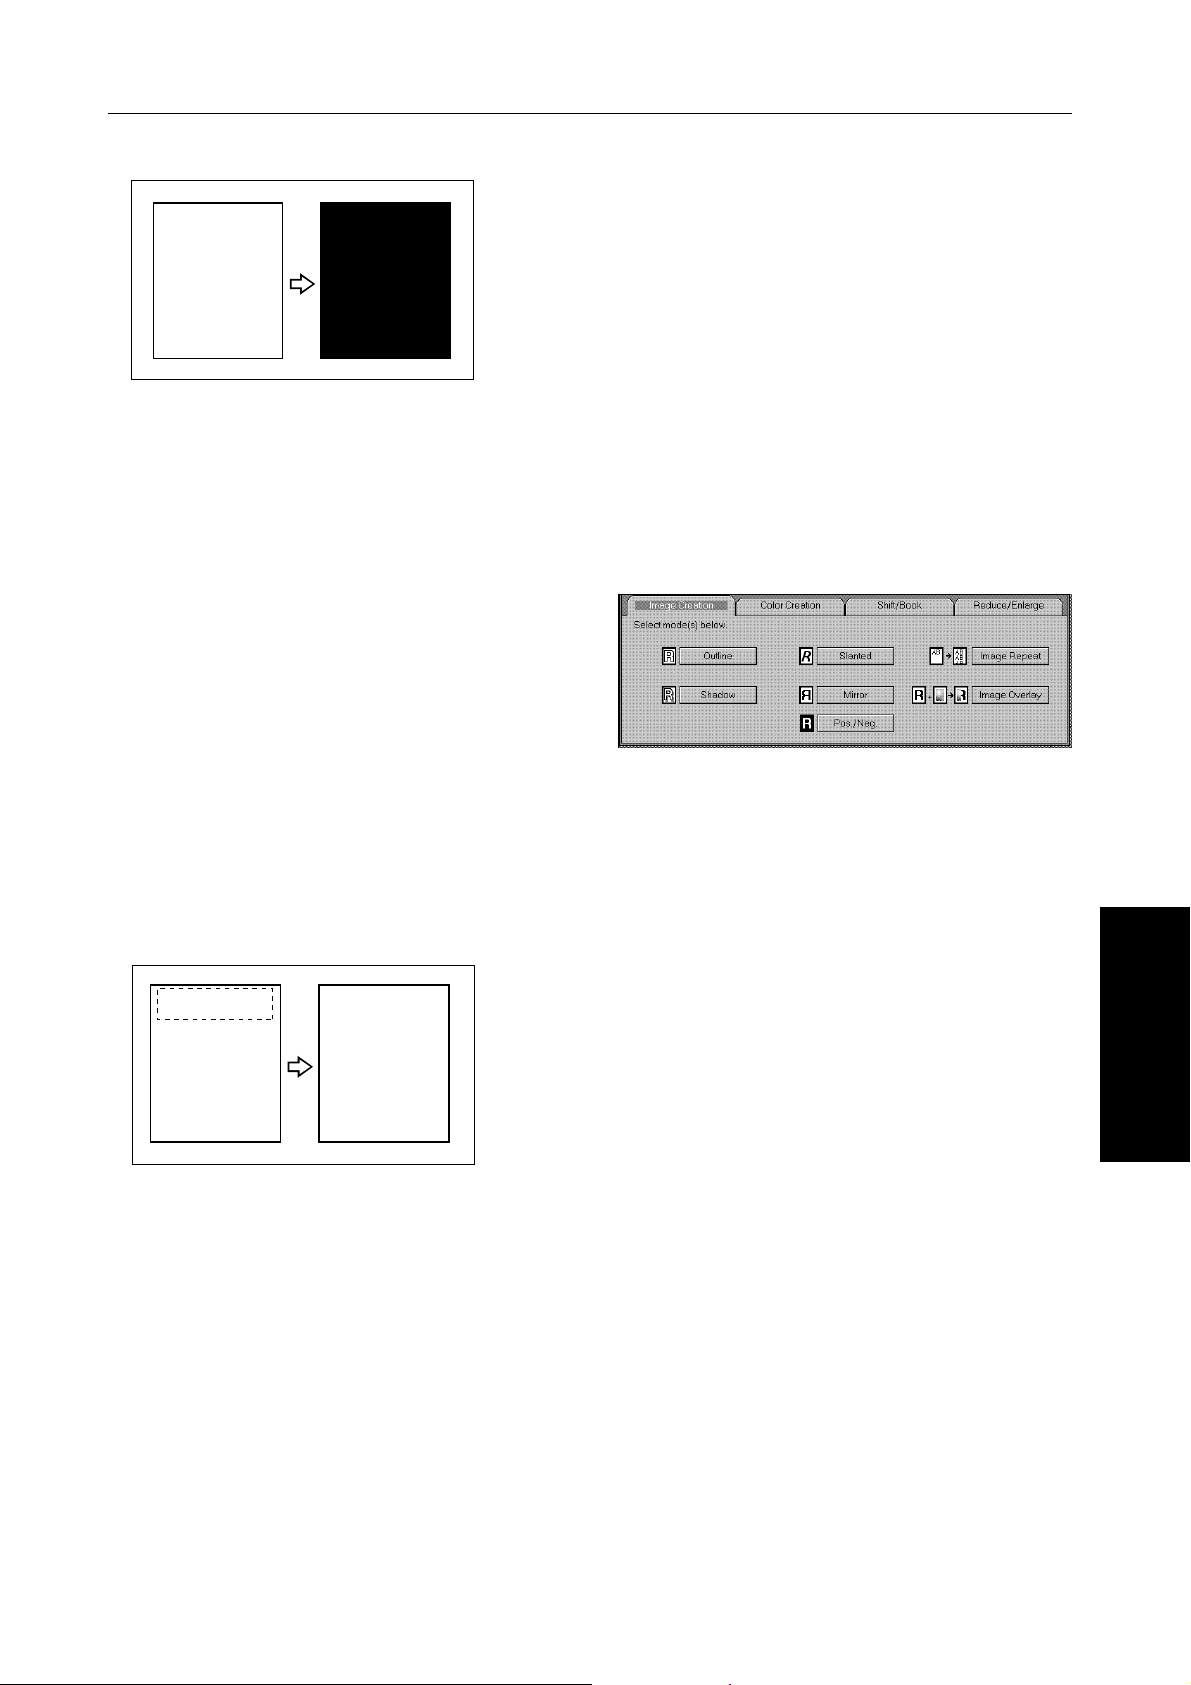
IMAGE CREATION
Copying In Complementary Colors (Positive/Negative)
R R
This function copies the original image in complementary colors. If you use a black and white original, black
and white areas of the original are reversed.
❐ If you copy using twin color mode, white areas are changed to black, black areas are changed to white, and color areas
are changed to the selected color.
Touch the [Image Creation] key.
1
Touch the [Pos./Neg.] key.
2
Set your originals, then press the Start key.
3
Copying A Part Of An Original Image Repeatedly (Image Repeat)
ABCDE
R
This function copies a part of the original image repeatedly.
❐ When this function is used, the leading edge margin of 10 mm, 0.4" is set on the copy paper.
❐ There are three ways to specify the image of the original to be repeated as follows:
Length: This function allows you to reproduce the top band of an original repeatedly down the entire copy. Y ou
specify the width of the band (the vertical length of image ) and it is repeated as many times as will fit
on the copy.
No. of Images: This function also allows you to reproduce the top band of an original repeatedly down the entire copy,
but here you specify the number of image repetitions you want and the copier will determine the width
of the top band.
Editing: This function allows you to select an area of the original and reproduce it repeatedly down the copy.
The repetitions are made one below the other, and are all aligned to the right. (Only for Edit type)
❐ For an explanation of entering numbers, ☛ See page 21.
ABCDE
ABCDE
ABCDE
ABCDE
ABCDE
COPYING
63
Page 73
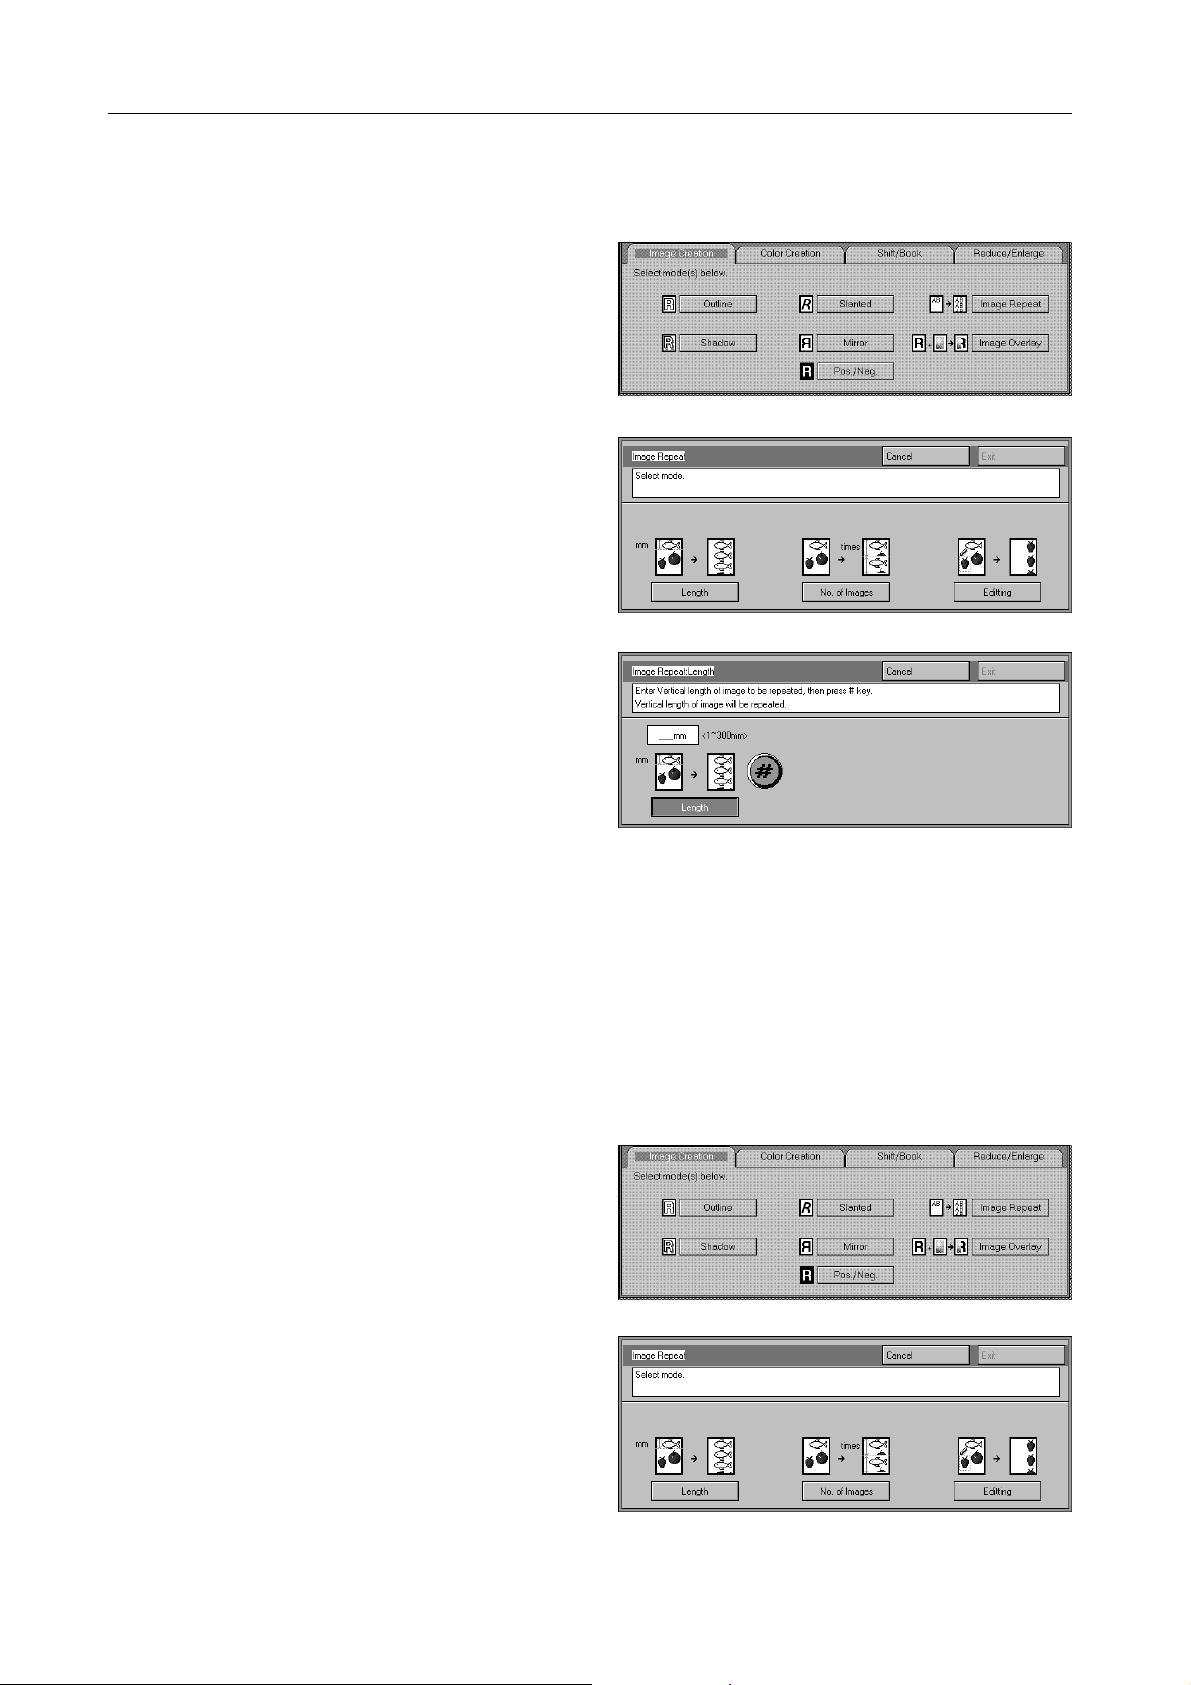
IMAGE CREATION
When using the [Length] key
Touch the [Image Creation] key.
1
Touch the [Image Repeat] key.
2
Touch the [Length] key.
3
Enter the length using the Number keys then
4
touch the [#] key.
❐ The length that you can enter is 1 ~ 300 mm, 0.1" ~
11.7". When you enter less than 5 mm, 0.2", however,
the image might not repeated well.
Touch the [Exit] key.
5
Set your originals, then press the Start key.
6
When using the [No. of Images] key
Touch the [Image Creation] key.
1
Touch the [Image Repeat] key.
2
Touch the [No. of Images] key.
3
64
Page 74

Enter a number between 2 and 9 and touch the
4
[#] key .
Touch the [Exit] key.
5
Set your originals, then press the Start key.
6
When using the [Editing] key (Only for Edit type)
Touch the [Image Creation] key.
1
Touch the [Image Repeat] key.
2
IMAGE CREATION
Touch the [Editing] key.
3
Set your original on the exposure glass, then
4
touch the [Scan] key.
❐ The image of the original is displayed.
Mark diagonally opposite corners of area to be
5
repeated.
❐ The area you have designated is scanned in.
❐ For details about designating the area, ☛ see page
92.
COPYING
65
Page 75

IMAGE CREATION
Touch the [Exit] key.
6
Set your originals, then press the Start key.
7
Merging Images (Image Overlay) (Only for Edit type)
1996
11213
- - - - - - - - - -
- - - - - - - - - - - - -
- - - - - - - - - - - - -
<1st original>
1
- - - - - - - - - -
- - - - - - - - - - -
- - - - - - - - - -
- - - - - - - - - -
<2nd original>
- - - - - - - - - - -
Flower
1996
11213
This function makes a copy merging images of two originals.
❐ For overlaying, the following limitations apply:
Original
Size
Resolutions/
Gradations
Scanning/Displaying
Color selection
Image type
A4p, 11" × 8
400 dpi/
Two values (black and white)
Scanning and displaying in
black
Black, Single Color, User Color
Letter
1st original
1/2"p or less
A3l, 11" × 17"l or less
400 dpi/256 gradations
Scanning and displaying in full color
Full Color, Black, Single Color, User Color, Scan Color
Printed photo, Glossy photo, Letter, Non-standard
original (Copied photo, Map)
1
2nd original
Reducing/Enlarging
Other functions that can
be set
❐ If the 1st original has half tone images (such as photos), it might not come out well.
Full Size
—
Full Size, Preset R/E, Zoom, Auto R/E
Copy Image Density Adjustment, Color Creation,
Image Adjustment, Color Balance Adjustment, Single
Color Adjustment
Touch the [Image Creation] key.
1
Touch the [Image Overlay] key.
2
66
Page 76

Set the first original (original that will be the base
3
image) on the exposure glass. Then touch the
[Scan] key .
❐ The image of the first original is displayed.
Mark diagonally opposite corners of area to be
4
overlaid.
❐ If you want to change the color mode for the first origi-
nal, touch the [Select Color] key and select the color.
❐ If you want to re-scan the first original, set the origi-
nal and touch the [Scan] key.
Touch the [2nd original] key.
5
IMAGE CREATION
Set the second original (original that has the im-
6
age to be composed) on the exposure glass.
Then touch the [Scan] key.
❐ The image of the second original is displayed.
Mark diagonally opposite corners of area to be
7
put into the first original.
❐ If you want to change the copy paper, touch the [T ray
Select] key.
❐ If you want to edit the image that has been selected,
touch the [Edit Image] key. Regarding image editing, ☛ see page 68.
Press the Start key.
8
COPYING
❐ The overlaid image is copied.
67
Page 77

IMAGE CREATION
Editing the image to be composed
You can edit the selected image.
❐ The modes that can be set are as follows:
• Reduce/Enlarge : Preset R/E, Zoom, Auto R/E
• Color/Image : Copy Image Density Adjustment, Color Selection, Original Image Type (Photo/Letter) Selection,
Image Adjustment, Single Color Adjustment, Color Balance Adjustment
• Color Creation : Color Conversion, Color Erase, Color Background
❐ You can reproduce the image to fit the area of the first original (Auto R/E function). There are two modes in Auto R/E
function as follows:
[Same Ratio] : This mode reproduces the image with the same ratios for horizontal and vertical direction, and puts
it into the area of the first original.
[Independent Ratios] :This mode reproduces the image with the independent ratios for horizontal and vertical direc-
tion to fit the area of the first original.
-Reducing/Enlarging
Touch the [Edit image] key.
1
D
C
B
A
0 1 2 3 4 5 6 7 8 9 10
<Same Ratio>
<Independent Ratio>
Make sure the [Reducing/Enlarging] key is
2
selelcted.
Select the [Preset R/E] key, [Zoom] key, or
3
[Auto R/E] key.
❐ For details about Preset R/E, ☛ see page 45.
❐ For details about Zoom, ☛ see page 46.
68
Page 78

If you have selected the [Auto R/E] key, select
4
the [Same Ratio] key or the [Independent Ra-
tios] key .
Touch the [Exit] key.
5
-Color/Image
Touch the [Edit image] key.
1
IMAGE CREATION
Touch the [Color/Image] key.
2
Make any adjustments you require.
3
❐ Image Density, ☛ see page 31.
❐ Color Selection, ☛ see page 32.
❐ Original Image Type, ☛ see page 35.
Make any adjustments you require.
4
❐ Image Adjustment, ☛ see page 83.
❐ Single Color Adjustment, ☛ see page 82.
❐ Color Balance Adjustment, ☛ see page 76.
Touch the [Exit] key.
5
COPYING
69
Page 79

IMAGE CREATION
-Color Creation
Touch the [Edit image] key.
1
Touch the [Color Creation] key.
2
Select the [Color Conv .] key , [Color Erase] key,
3
or [Clr Backgrnd] key.
❐ Color Conversion, ☛ see page 55.
❐ Color Crase, ☛ see page 56.
❐ Color Background, ☛ see page 57.
Touch the [Exit] key.
4
70
Page 80

FINISHING
FINISHING
NOTE: This function can be used only when you have an optional sorter.
NOTE: It is recommended to set originals in the dual job feeder with this function.
❐ To avoid problems caused by curled copies, try turning over the paper stack in the paper tray. If there is no improve-
ment, change to copy paper with less curl.
❐ Regarding functions that cannot be used together with this function, ☛ see page 73.
Sorting Into Sets (123, 123, 123) (Sort)
3
2
1
One copy of each original is delivered to each bin and copies are collated into sets.
❐ For sorting, the following limitations apply:
Metric version Inch version
Maximum paper size A3 11" × 17"
Minimum paper size B6l 5
Maximum paper weight 90 g/m
Minimum paper weight 50 g/m
Maximum paper capacity of bins 50 sheets (80 g/m
Paper that cannot be used post cards, OHP transparencies, and adhesive labels
❐ Maximum copy set number: 15 sets
❐ You can make the copier select Sort mode automatically when you insert two or more originals in the dual job feeder
and make two or more copies from each original. ☛ See page 130.
2
2
3
2
1
2
) 50 sheets (20 lb)
3
2
1
1/2" × 81/2"l
24 lb
14 lb
3
2
1
COPYING
Touch the [Sort] key.
1
Set your originals in the dual job feeder.
2
Press the Start key.
3
71
Page 81

Stacking Together All Copies Of A Page (111, 222, 333) (Stack)
FINISHING
3
2
1
All copies of each original are delivered to the same bin.
❐ For stacking, the following limitations apply:
Metric version Inch version
Maximum paper size A3 11" × 17"
Minimum paper size B6l 5
Maximum paper weight 90 g/m
Minimum paper weight 50 g/m
Maximum paper capacity of bins 40 sheets (80 g/m
Paper that cannot be used post cards, OHP transparencies, and adhesive labels
❐ Maximum original set number: 15 originals
Touch the [Stack] key.
2
2
1
1
1
2
) 40 sheets (20 lb)
2
2
2
1/2" × 81/2"l
24 lb
14 lb
1
3
3
3
Set your originals in the dual job feeder.
2
Press the Start key.
3
72
Page 82
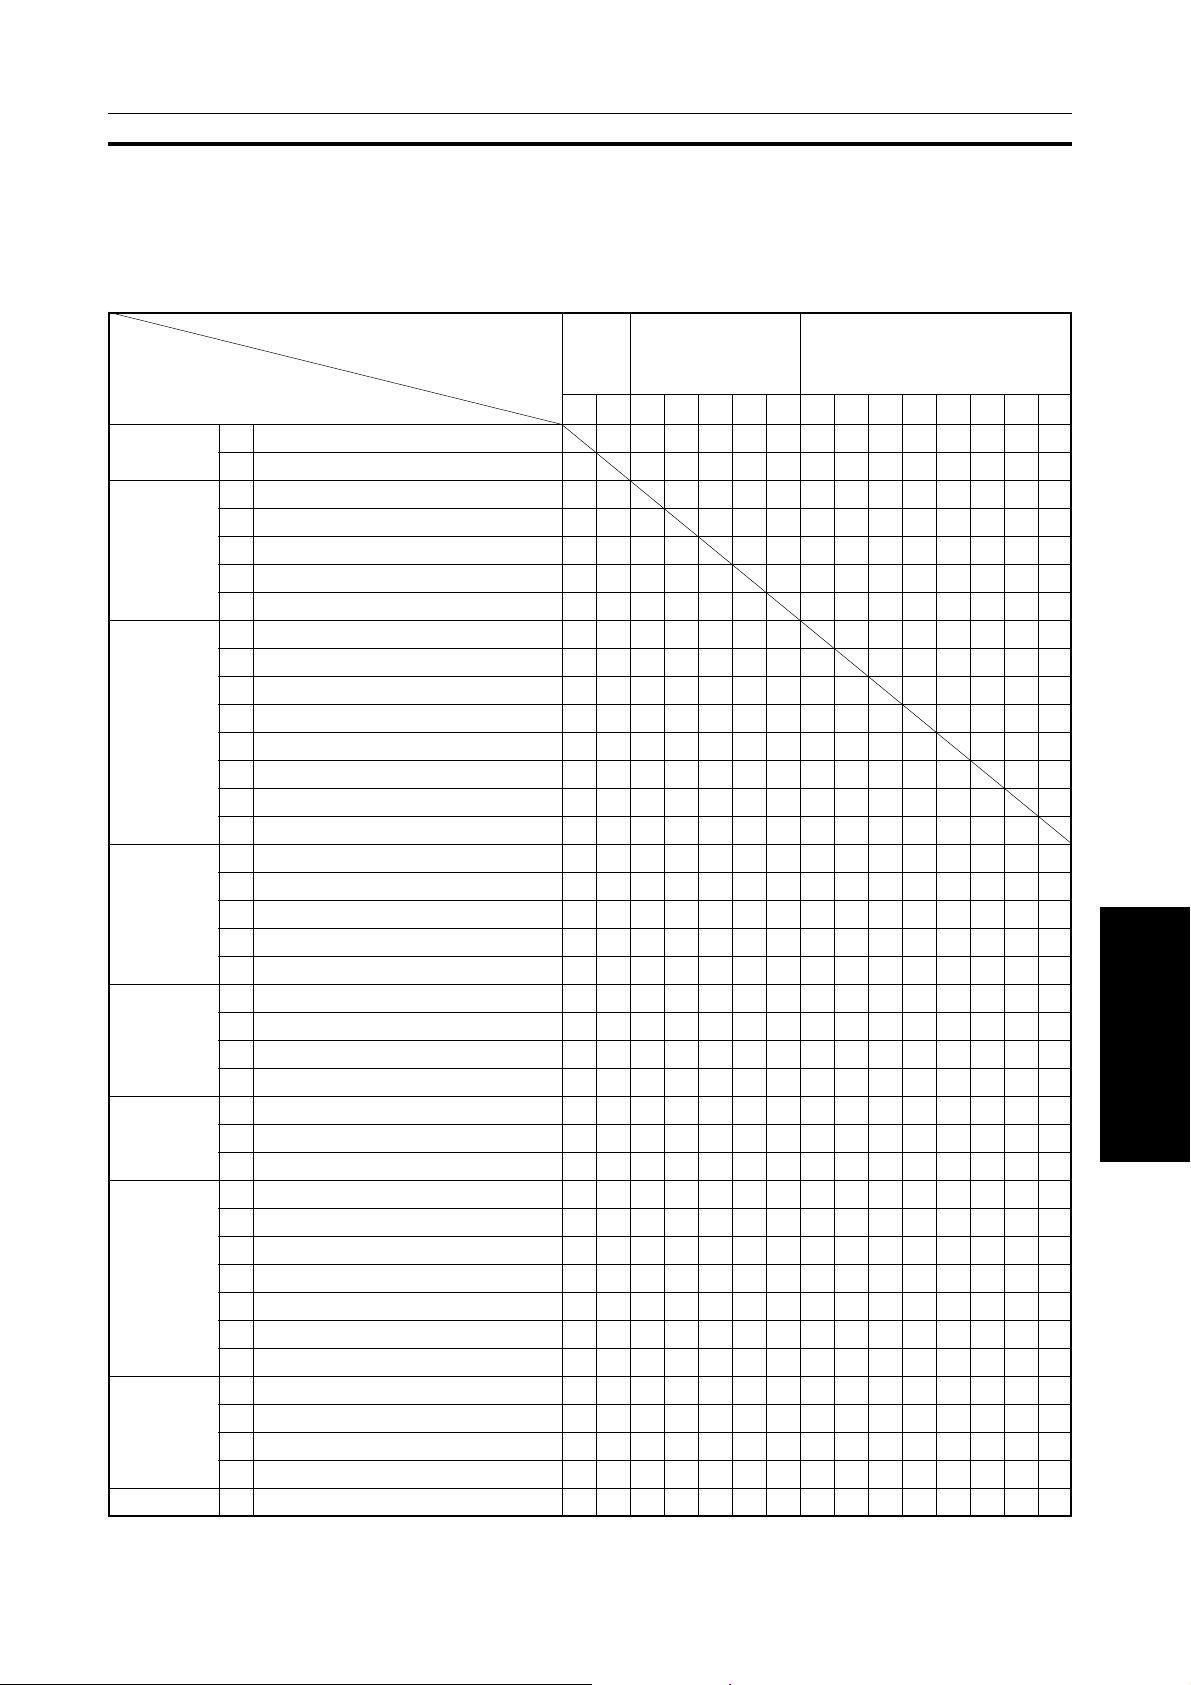
COMBINATION CHART
✩ : These modes can be used together.
★ : These modes can be used together with some limitations.
➞ : The original mode is overridden and only the newly selected mode is active.
✗ : These modes cannot be used together.
COMBINATION CHART
Original mode
Density
Color
Selection
Reducing/
Enlarging
Shift/Book
Image
Creation
Color
Creation
Color
Adjustment/
Memory
Newly selected mode
1
Auto Image Density ✩➞✩✩✩✩✩✩✩✩✩✩✩✩
2
Manual Image Density ✩ ✩✩✩✩✩✩✩✩✩✩✩✩✩
3
Auto Color Selection ✗✩ ➞➞➞➞✩✩✩✩✩✩✩✩
4
Full Color ✩✩➞ ➞➞➞✩✩✩✩✩✩✩✩
5
Black ✩✩➞➞ ➞➞✩✩✩✩✩✩✩✩
6
Single Color ✩✩➞➞➞ ➞✩✩✩✩✩✩✩✩
7
Twin Color ✩✩➞➞➞➞ ✩✩✩✩✩✩✩✩
8
Original Image Type Selection ✩✩✩✩✩✩✩ ✩✩✩✩✩✩✩
9
Auto Paper Selection ✩✩✩✩✩✩✩✩ ➞✩✩✩✩✗
10
Auto Reduce/Enlarge ✩✩✩✩✩✩✩✩➞ ✩✩★✩✗
11
Interrupt Copying ✩✩✩✩✩✩✩✩✩✩ ✗✩✗✩
12
Program ✩✩✩✩✩✩✩✩✩✩✩ ✩✩✩
13
Bypass Feed Copying/Duplex Copying
14
Sort/Stack (Option) ✩✩✩✩✩✩✩✩✩✩✩★✩✩
15
Non-standard Size Original ✩✩✩✩✩✩✩✩✗ ✗✩✩✩✩
16
Preset R/E ✩✩✩✩✩✩✩✩➞➞✩✩✩✩✩
17
Zoom ✩✩✩✩✩✩✩✩➞➞✩✩✩✩✩
18
Size Magnification ✩✩✩✩✩✩✩✩➞➞✩✩✩✩✩
19
Directional Size Magnification ✩✩✩✩✩✩✩✩➞➞✩✩✩✩✩
20
Poster Mode ✩✩✗✩✩✩✩✩➞➞✗✩✩✗ ✗
21
Centering/Cornering ✩✩✩✩✩✩✩✩✗✩✩✩✩✩✩
22
Margin Adjustment ✩✩✩✩✩✩✩✩✩✩✩✩✩✩✗
23
Erase ✩✩✩✩✩✩✩✩✩✩✩✩✩✩✗
24
Series Copies ✩✩✩✩✩✩✩✩✗★✩✩✩✩✗
25
Color Conversion ✗✩✗✩✗ ✗ ✗✩✩✩✩✩✩✩✩
26
Color Erase ✗✩✗ ✩✩✩✗✩✩✩✩✩✩✩✩
27
Color Background ✗✩✗✩✩✩✩✩✩✩✩✩✩✩✩
28
Outline ✩✩✩✩✩✩✗✩✩✩✩✩✩✩✩
29
Positive/Negative ✩✩✩✩✩✩✩✩✩✩✩✩✩✩✩
30
Shadow ✩✩✗ ✩
31
Mirror ✩✩✩✩✩✩✩✩✩✩✩✩✩✩✩
32
Slanted ✩✩✩✩✩✩✩✩✩✩✩✩✩✩✩
33
Image Repeat ✩✩✩✩✩✩✩✩✩✗✩✩✩✩✩
34
Image Overlay ✗✩✗➞➞➞✗➞✗✗✗✗✩✗✗
35
User Color Memory –––––––––––––––
36
Single Color Adjustment ✩✩✩✩
37
Color Balance Adjustment ✩✩✩✩
38
Image Adjustment ✩✩✩✩✩✩✩✩✩✩✩✩✩✩✩
39
Film Projector (Option) ✗✩✩✩✩✩✩✩✗✩✗ ✩✩✩✗
Den-
sity
123456789101112131415
✩✩✩✩✩✩✩✩➞★✩✩
Color
Selection
★★★
★★★
★★★
★
✩✩✩✩✩✩✩✩
✩✩✩✩✩✩✩✩
✩✩✩✩✩✩✩✩
✩
COPYING
73
Page 83
COMBINATION CHART
Density
Color
Selection
Reducing/
Enlarging
Shift/Book
Image
Creation
Color
Creation
Color
Adjustment/
Memory
Reducing/Enlarging Shift/Book
16 17 18 19 20 21 22 23 24 25 26 27 28 29 30 31 32 33 34 35 36 37 38 3 9
1
✩✩✩✩✩✩✩✩✩➞➞➞✩✩➞✩✩✩➞✩✩✩✩➞
2
✩✩✩✩✩✩✩✩✩✩✩✩✩✩✩✩✩✩✩✩✩✩✩✩
3
✩✩✩✩➞✩✩✩✩➞➞➞✩✩➞✩✩✩➞✩✩✩✩➞
4
✩✩✩✩✩✩✩✩✩✩✩✩✩✩✩✩✩✩✩✩✩✩✩✩
5
✩✩✩✩✩✩✩✩✩➞✩✩✩✩➞✩✩✩➞✩
6
✩✩✩✩✩✩✩✩✩➞✩✩✩✩➞✩✩✩➞✩
7
✩✩✩✩✩✩✩✩✩➞✗✩✗✩➞✩✩✩➞✩
8
✩✩✩✩✩✩✩✩✩✩✩✩✩✩✩✩✩✩➞✩✩✩✩✩
9
✩✩✩➞➞➞✩✩★✩✩✩✩✩✩✩✩✩➞✩✩✩✩➞
10
➞➞➞➞➞✩✩✩★✩✩✩✩✩✩✩✩➞➞✩✩✩✩➞
11
✩✩✩✩✗✩✩✩✩✗ ✗✗✗✗✗✗✗✗✗✗✗✗✗✗
12
✩✩✩✩✩✩✩✩✩✩✩✩✩✩✩✩✩✩✩✩✩✩✩✩
13
✩✩✩✩✩✩✩✩★✩✩✩✩✩✩✩✩✩✩✩✩✩✩➞
14
✩✩✩✩➞✩✩✩✩✩✩✩✩✩✩✩✩✩➞✩✩✩✩✩
15
✩✩✩✩✗✩✗ ✗ ✗✩✩✩✩✩✩✩✩✩✗✩✩✩✩✩
16
17
18
19
20
21
22
23
24
25
26
27
28
29
30
31
32
33
34
35
36
37
38
39
➞➞➞➞✩✩✩✩✩✩✩✩✩✩✩✩✩➞✩✩✩✩➞
➞ ➞➞➞✩✩✩✩✩✩✩✩✩✩✩✩✩➞✩✩✩✩➞
➞➞ ➞➞✩✩✩✩✩✩✩✩✩✩✩✩✩➞✩✩✩✩➞
➞➞➞ ➞✩✩✩✩✩✩✩✩✩✩✩✩✩➞✩✩✩✩➞
➞➞➞➞ ✗✗✗✗✗✗✗✗✩✗✩✗✗➞✩✩✩✩➞
✩✩✩✩✗ ✩➞★✩✩✩✩✩✩✩✩✗ ✗✩✩✩✩✩
✩✩✩✩✗✩ ✩✩✩✩✩✩✩✩✩✩✗ ✗ ✩✩✩✩✩
✩✩✩✩✗➞✩ ✩✩✩✩✩✩✩✩✩✗ ✗✩✩✩✩
✩✩✩✩✗★✩✩ ✩✩✩✗ ✗ ✗ ✗ ✗ ✗ ✗✩✩✩✩➞
✩✩✩✩✗✩✩✩✩ ✩✩✗✩✩✩✩✩✗ ✩✗✩✩✩
✩✩✩✩✗✩✩✩✩✩ ✩✗✩✩✩✩✩✗ ✩✗✩✩✩
✩✩✩✩✗✩✩✩✩✩✩ ✗✩✩✩✩✩✗✩✗✩✩✩
✩✩✩✩✗✩✩✩✗ ✗ ✗ ✗ ✩✩✩✩✩✗✗✗✗✗✩
✩✩✩✩✩✩✩✩✗✩✩✩✩ ✩✩✩✩✗✩✩✩✩✩
✩✩✩✩✗✩✩✩✗✩✩✩✩✩ ✩✩✩✗✩✩✩✩✩
✩✩✩✩✩✩✩✩✗✩✩✩✩✩✩ ✩✩✗✩✩✩✩✩
✩✩✩✩✗✩✩✩✗✩✩✩✩✩✩✩ ✩✗ ✩✩✩✩✩
✩✩✩✩✗✗✗✗✗✩✩✩✩✩✩✩✩ ✗✩✩✩✩➞
✩✩✗✗✗✗✗✗✗✩✩✩✗✗✗✗✗✗ ✩✩✩✩✗
––––––––––––––––––✩ ––––
✩✩✩✩✩✩✩✩✩➞➞➞➞✩✩✩✩✩➞✩ ✩✩✩
✩✩✩✩✩✩✩✩✩✩✩✩➞✩✩✩✩✩➞✩✩ ✩✩
✩✩✩✩✩✩✩✩✩✩✩✩➞✩✩✩✩✩➞✩✩✩ ✩
✩✩✩✩✩✩✩★✗✩✩✩✩✩✩✩✩✩✗✩✩✩✩
Image
Creation
Color Creation
Color Adjust-
ment/Memory
★★
★★
★★
✩➞
✩➞
✩➞
★
74
Page 84

ADJUSTMENT AND
COLOR MEMORY
75
COLOR MEMORY
ADJUSTMENT AND
Page 85
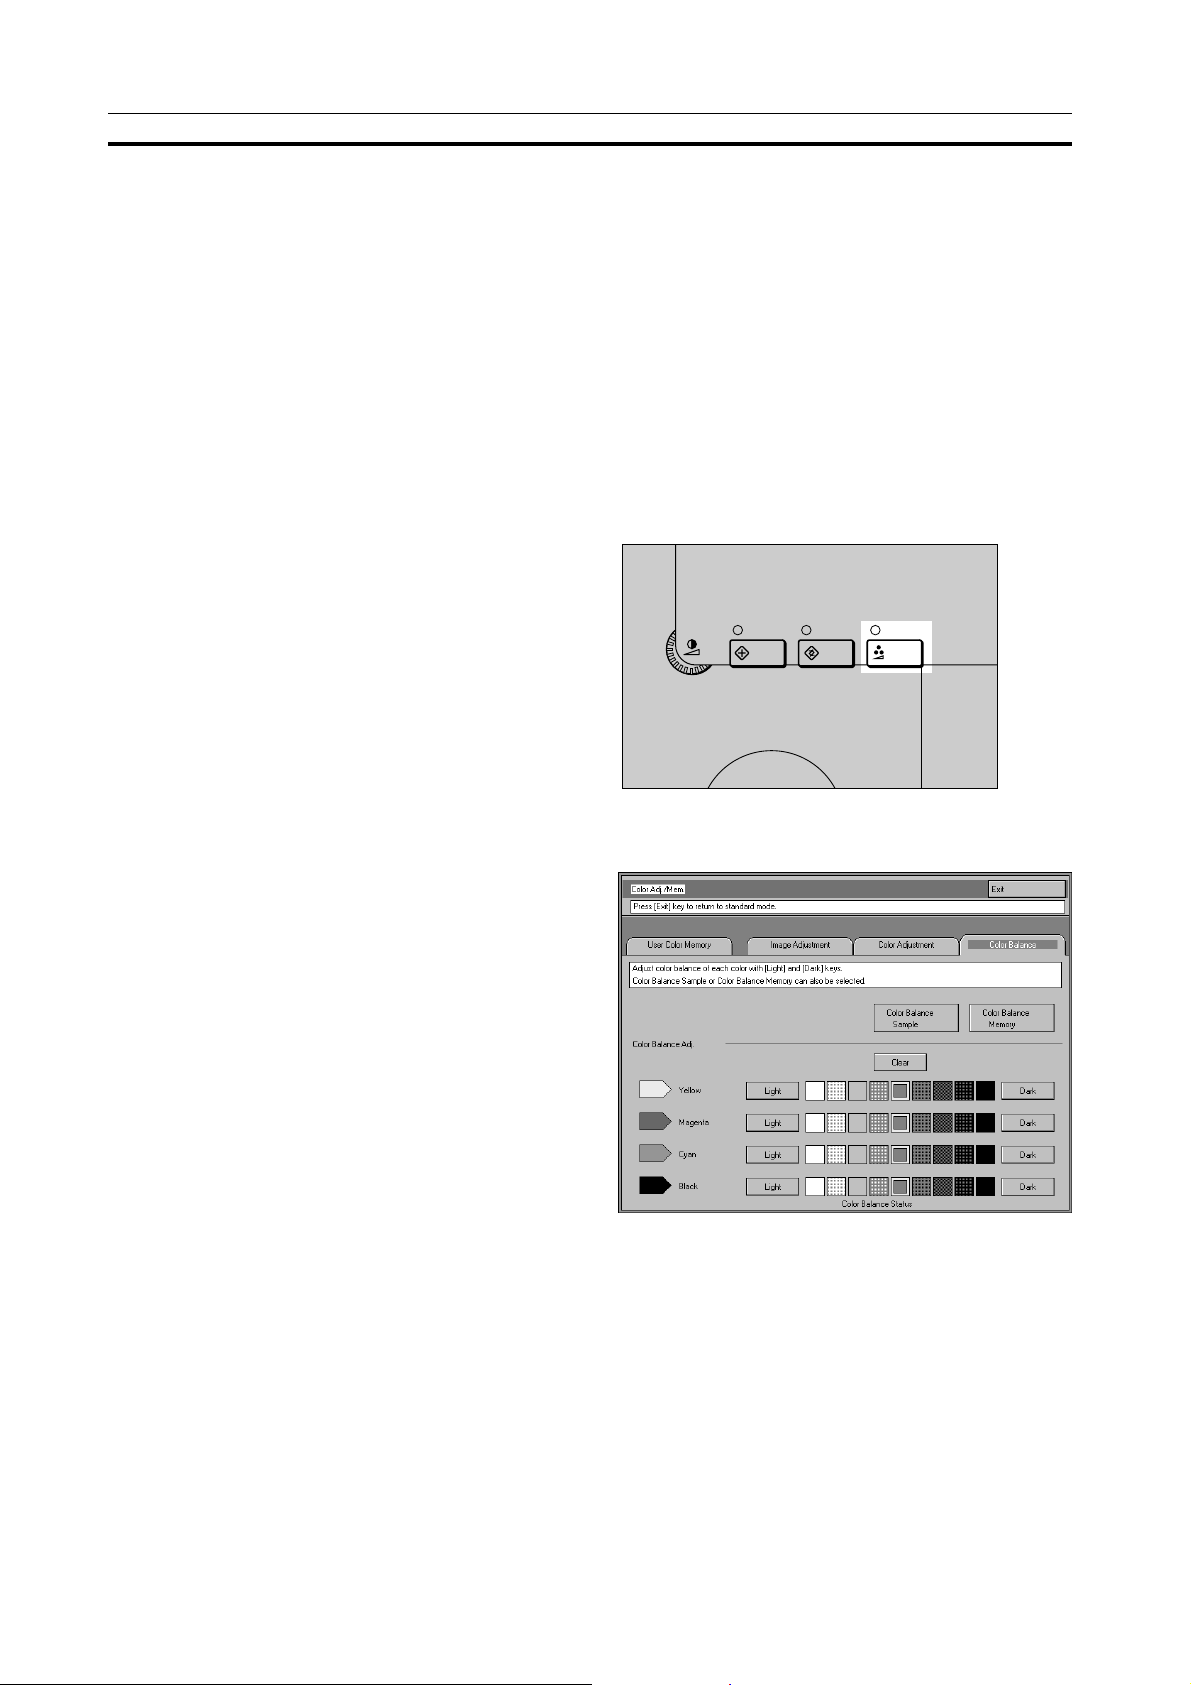
ADJUSTING AND STORING THE COLOR BALANCE (Color Balance)
ADJUSTING AND STORING THE COLOR BALANCE (Color Balance)
This feature allows you to control the overall color tone of copies by adjusting the levels of the basic colors
(Yellow, Magenta, and Cyan) as well as Black. Nine levels of tone are available.
❐ Color sample, ☛ See page 14.
❐ Your adjustment is cancelled after:
• Auto reset.
• The Clear Modes/Stand by key is pressed.
• The main switch is turned off.
❐ You can store and recall the adjusted color balance. ☛ See page 77.
❐ You can sample color balance. ☛ See page 78.
Color Balance Adjustment
Press the Adjustment/Memory key.
1
Make sure the [Color Balance] key is selected.
2
Adjust the color balance.
3
❐ If you want to cancel the setting, touch the [Clear]
key.
Touch the [Exit] key.
4
76
Page 86
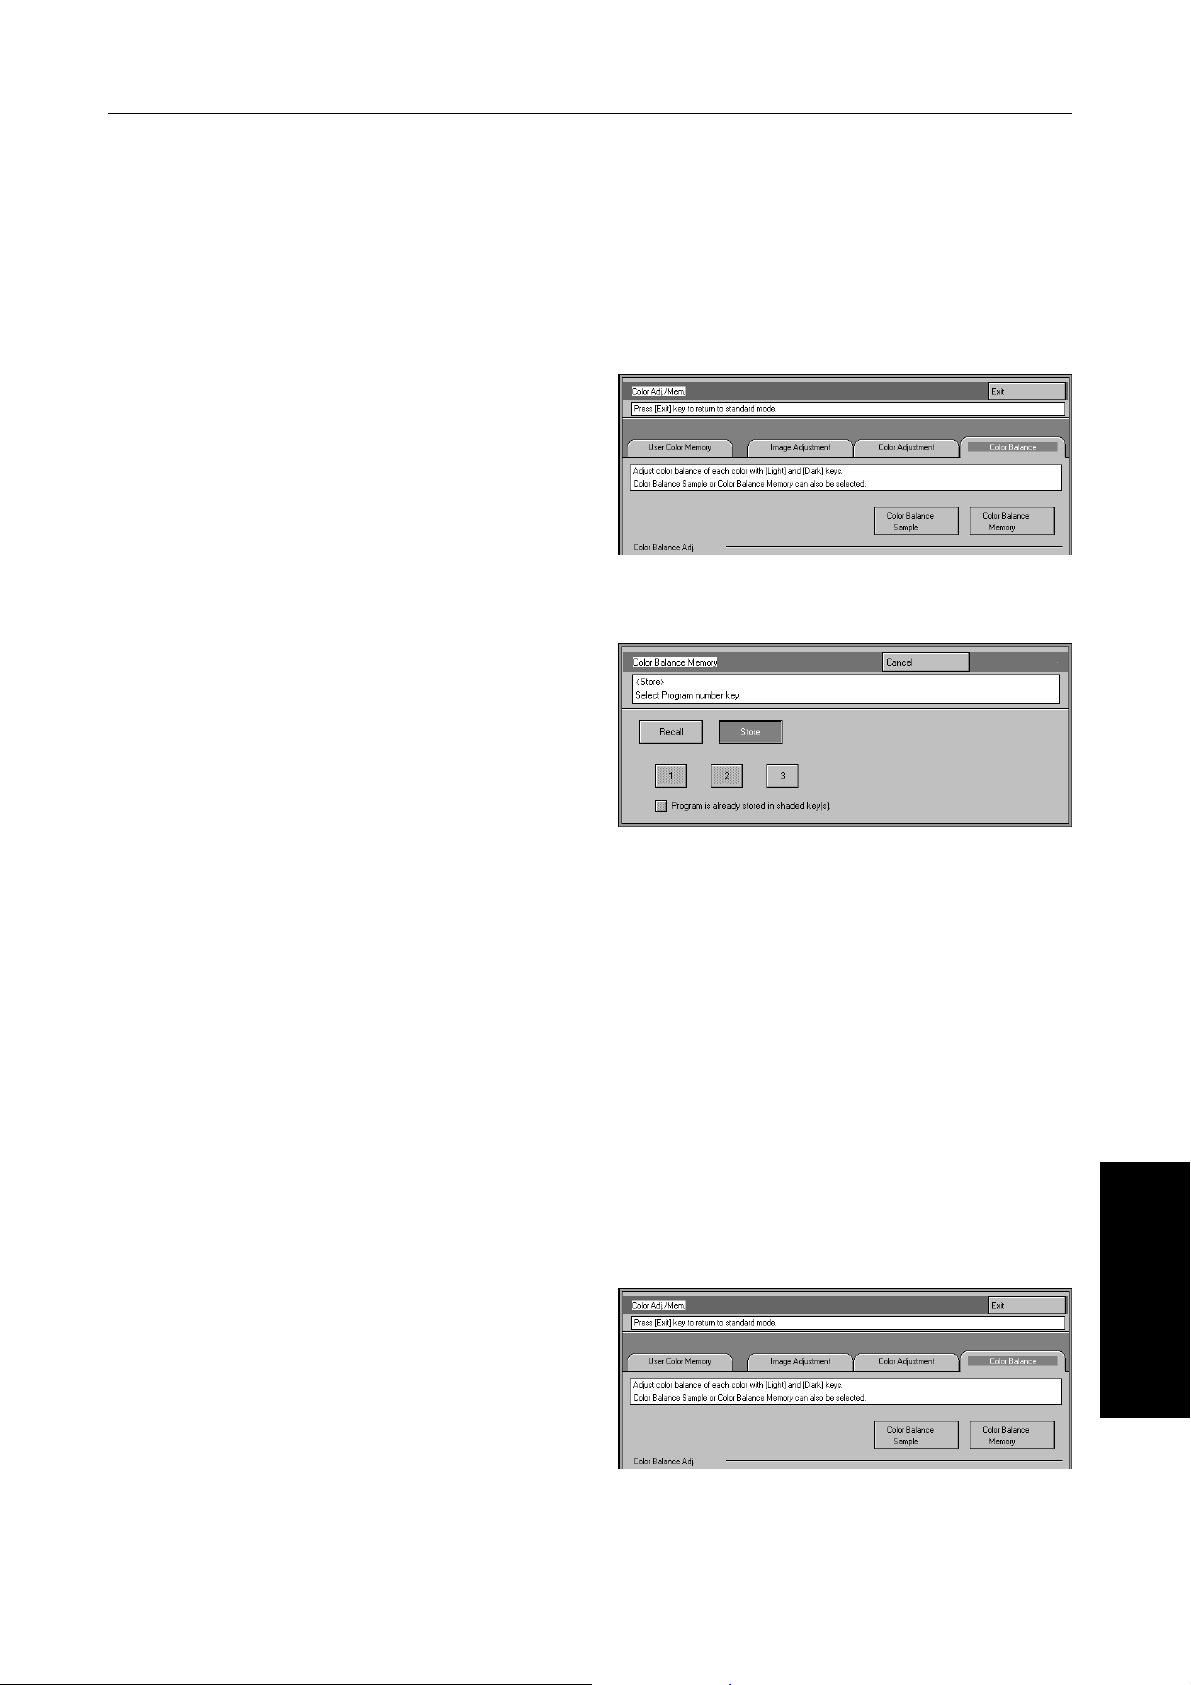
ADJUSTING AND STORING THE COLOR BALANCE (Color Balance)
Storing And Recalling The Color Balance (Color Balance Memory)
You can store the color balance setting in memory and recall it when you want to use it.
Storing the adjusted color balance
Change the color balance (☛ see page 76), but
1
don’t touch the [Exit] key .
Touch the [Color Balance Memory] key.
2
Touch the [Store] key.
3
Three settings may be stored – choose a number
4
for this setting.
Touch the [Exit] key.
5
Recalling the color balance
❐ The recalled color balance is canceled after:
• Copying is finished.
• Auto reset.
• The Clear Modes/Stand by key is pressed.
Press the Adjustment/Memory key.
1
Make sure the [Color Balance] key is selected.
2
Touch the [Color Balance Memory] key.
3
COLOR MEMORY
ADJUSTMENT AND
Make sure the [Recall] key is selected.
4
77
Page 87
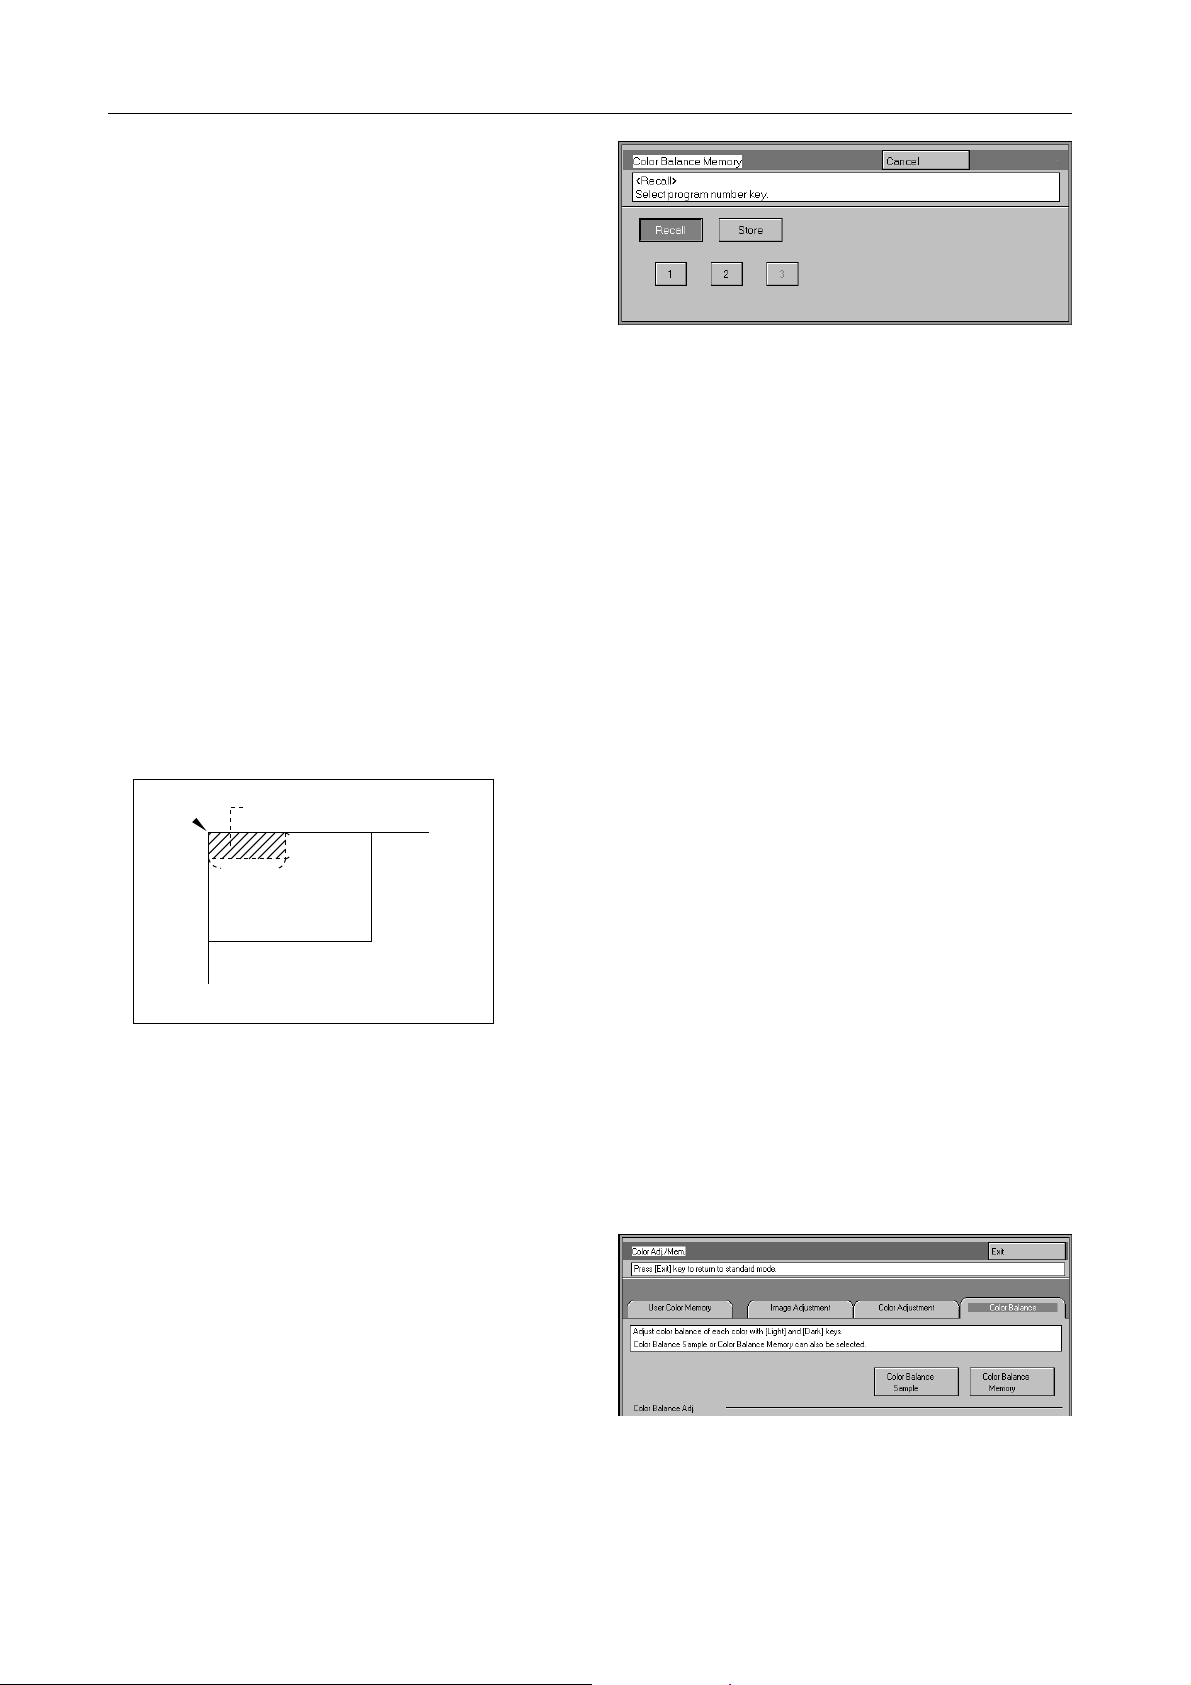
ADJUSTING AND STORING THE COLOR BALANCE (Color Balance)
Select the setting you want to recall.
5
Touch the [Exit] key.
6
Sampling The Color Balance (Color Balance Sample)
Adjusting the color balance by trial and error could require many copies. The color balance sampling function
allows you to produce nine samples on two copies. The first sample of each sheet uses the current color
balance (standard). Each sample after that changes one toner color by a fixed number of steps.
❐ The sample will be copied on two A4p, 81/2" × 11" p sheets or two A3l, 11" × 17"l sheets.
❐ Selecting Color Balance Sample does not reset the adjustments, allowing you to make many samples while
progressively changing the balance. The sample might yield a color balance outside the copier’s range which will be
reproduced on the sample but not on the copy.
For example, if yellow is already adjusted to +3 and you select Sample ±4, the yellow samples will be copied at yellow
+7 and –1, but the adjustment for the final copy cannot be set to +7.
❐ The sampled area is as shown in the illustration.
Sampled Area
58mm, 2.3"
180mm, 7.1"
❐ If your machine is Edit type, you can select the sampled area. ☛ See page 79.
Press the Adjustment/Memory key.
1
Make sure the [Color Balance] key is selected.
2
Touch the [Color Balance Sample] key.
3
78
Page 88
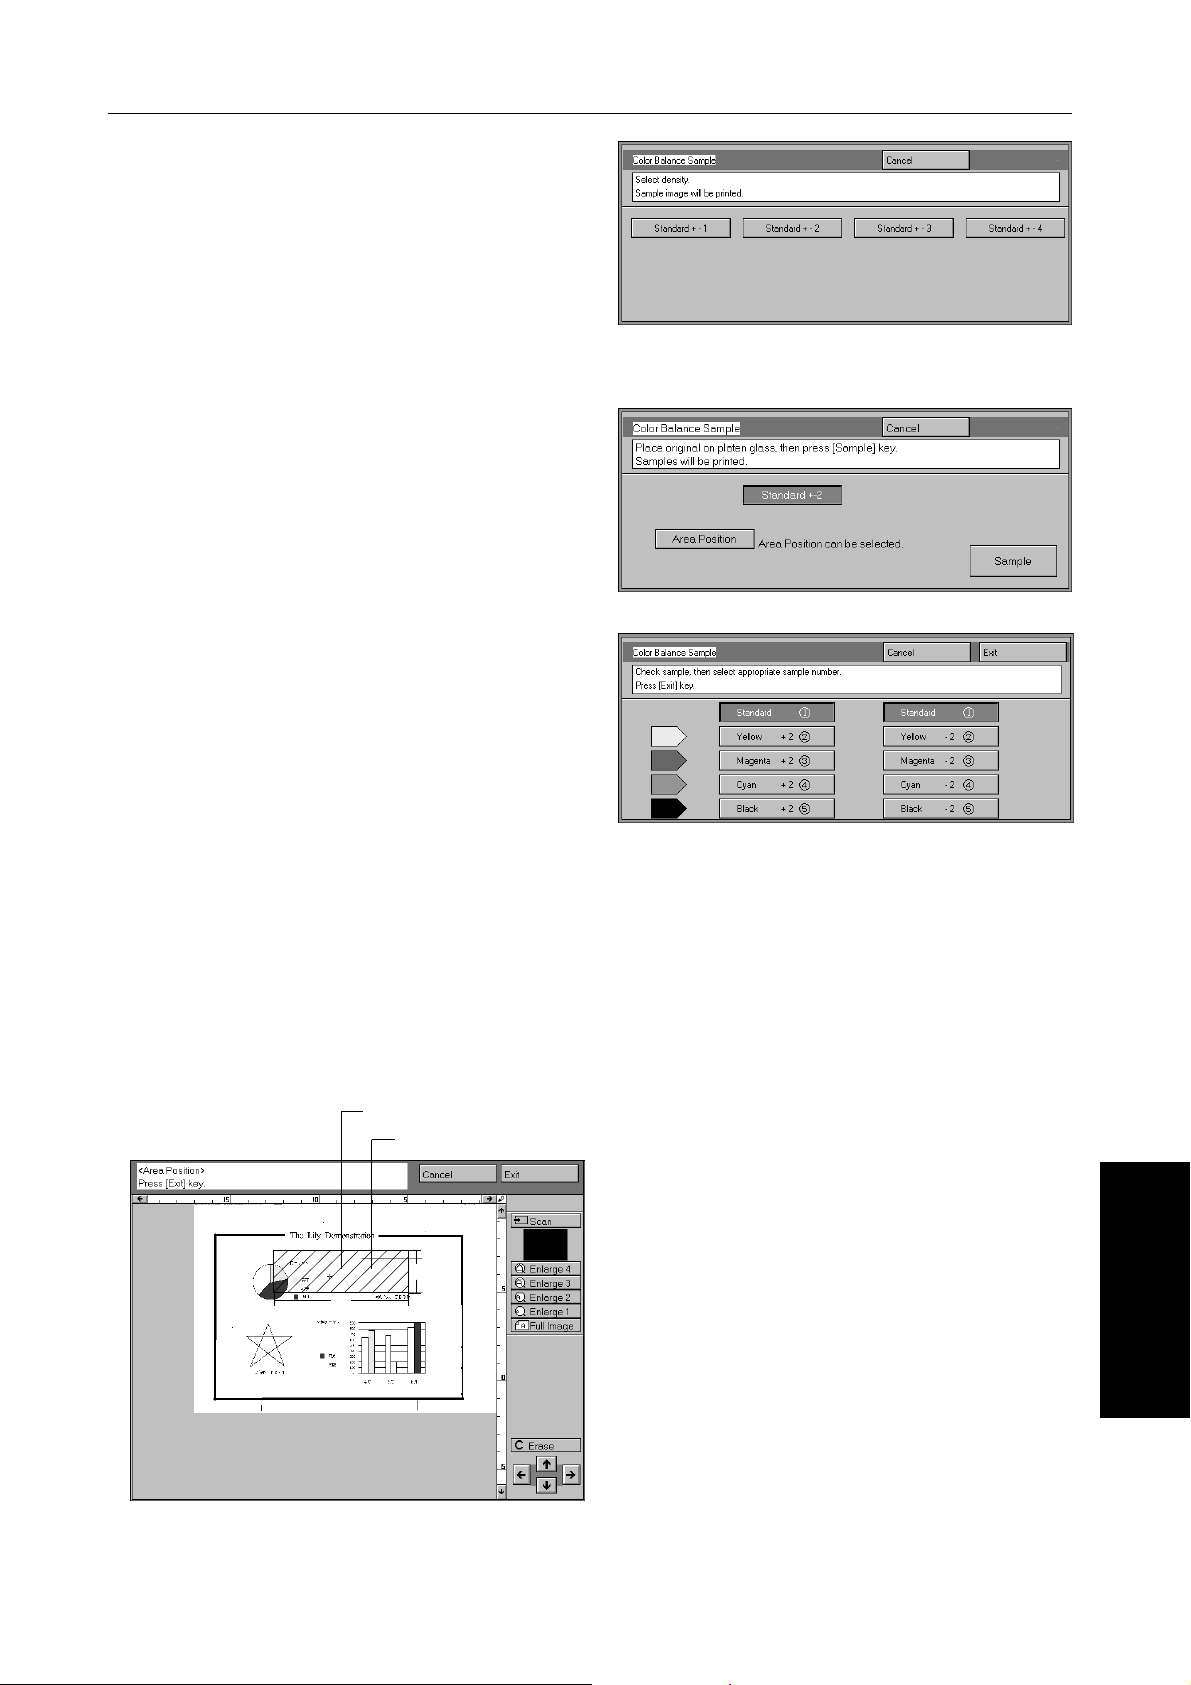
Select the range of densities (standard is the
4
current setting).
Set your originals on the exposure glass.
5
Touch the [Sample] key.
6
❐ The sample is copied.
Select the color balance that you want to set,
7
then touch the [Exit] key.
ADJUSTING AND STORING THE COLOR BALANCE (Color Balance)
Touch the [Exit] key.
8
Selecting the sampled area (Only for Edit type)
❐ The sampled area is as shown below.
a: 58mm, 2.3"
b: 180mm, 7.1"
Selected position
Sampled area
<
+
<
b
a
<
>
COLOR MEMORY
ADJUSTMENT AND
79
Page 89

ADJUSTING AND STORING THE COLOR BALANCE (Color Balance)
❐ Orientation of the original and scanned image are related as shown:
R
<Exposure Glass>
<Display>
R
Press the Adjustment/Memory key.
1
Make sure the [Color Balance] key is selected.
2
Touch the [Color Balance Sample] key.
3
Select the range of densities (standard is the
4
current setting).
Set your original on the exposure glass.
5
Touch the [Area Position] key.
6
Set your original, then touch the [Scan] key.
7
❐ The image of the original is displayed.
80
Page 90

Point at the center of the area with the editor
8
pen, then touch the [Exit] key.
❐ For details about this display, ☛ see page 92.
Touch the [Sample] key.
9
❐ The sample is copied.
ADJUSTING AND STORING THE COLOR BALANCE (Color Balance)
Select the color balance that you want to set,
0
then touch the [Exit] key.
Touch the [Exit] key.
!
81
COLOR MEMORY
ADJUSTMENT AND
Page 91

SINGLE COLOR ADJUSTMENT
SINGLE COLOR ADJUSTMENT
This function lets you alter up to three single colors by mixing them with adjacent colors in the color circle. For
example, yellow can be shifted towards red to make orange, or towards green to make a lime-green. Note that
only areas of the image containing this color will be modified.
❐ Color sample, ☛ see page 14.
❐ This feature requires Full Color mode or Auto Color mode.
❐ The adjustment you make will be canceled after:
• Auto reset.
• The Clear Modes/Stand by key is pressed.
• The main switch is turned off.
Press the Adjustment/Memory key.
1
Touch the [Color Adjustment] key.
2
Select the color key that you want to adjust from
3
the color circle.
Adjust the color.
4
Touch the [Exit] key.
5
82
Page 92

You can change the default settings for image adjustment as follows:
IMAGE ADJUSTMENT
IMAGE ADJUSTMENT
Soft/Sharp
Contrast
Background Density
Pastel
UCR Adjustment
Color Sensitivity Adjustment
Letter/Photo Adjustment
You can adjust the edges of the image to make the image sharper or softer.
❐ To see the color sample, ☛ see page 15.
❐ default : level 4
You can adjust the contrast between light parts and dark parts of the image.
❐ To see the color sample, ☛ see page 15.
❐ default : level 5
You can adjust the background density control.
❐ To see the color sample, ☛ see page 15.
❐ If copying a newspaper or an original with a dark background, touch the Light key
and adjust the background density to a lighter setting.
❐ If part of the original is marked with a highlighting pen, touch the Dark key and adjust
the background density to a darker setting.
❐ default : level 5
You can make copies in pastel tones.
❐ To see the color sample, ☛ see page 15.
❐ default : level 9 which yields a normal color copy
You can adjust the black toner density to make the black parts clearer.
❐ default : level 5
You can adjust the sensitivity level that detects whether the original has color parts or
not when Auto Color Select mode is selected. If color parts or non-color parts of an
original are not copied correctly in Auto Color Select mode, adjust this setting.
❐ default : level 3
You can adjust the evaluation level that detects letter parts and photo parts of an
original when Auto (Letter/Photo) mode is selected. If letter parts and photo parts of an
original are not separated correctly, adjust this setting.
❐ default : level 5
❐ The settings in Sharp/Soft, Contrast, Background Density Control and Pastel Color are canceled under the following
conditions:
• The copier is auto reset.
• The Clear Modes/Stand by key is pressed.
• The main switch is turned off.
Press the Adjustment/Memory key.
1
COLOR MEMORY
ADJUSTMENT AND
83
Page 93

IMAGE ADJUSTMENT
Touch the [Image Adjustment] key.
2
Adjust the settings.
3
Touch the [Exit] key.
4
84
Page 94

STORING USER COLORS (User Color Memory)
STORING USER COLORS (User Color Memory)
In addition to the base colors, you can store up to 12 customized colors into memory (User Color).
❐ There are two ways to make user colors as follows:
• Adjusting a selected base color
• Mixing colors manually with Number keys
❐ Up to 12 colors can be stored.
❐ The total percentages of the mixed colors must be 255% or less.
❐ If the total percentage of the mixed color is over 255%, the copier cannot create the color properly and the results will
appear different.
❐ If the total percentage of the mixed colors is too low, it may not be bonded to the paper properly resulting in a change
in image density.
❐ Color chart, ☛ see page 18.
❐ If your machine is Edit type, you can sample the user color. ☛ See page 88.
❐ The appearance of user colors might vary slightly according to the Image Type you have selected (ex. Photo, Letter,
etc.).
Adjusting Colors Based On The Selected Color
Press the Adjustment/Memory key.
1
Touch the [User Color Memory] key.
2
Select the key you wish to store the color in.
3
85
COLOR MEMORY
ADJUSTMENT AND
Page 95

STORING USER COLORS (User Color Memory)
Select the base color.
4
❐ If your machine is Edit type, you can scan in a color.
☛ See page 34.
❐ If you want to mix colors manually with Number keys,
touch the [Number keys] key. ☛ see page 87.
You can change the color density in two ways.
5
❐ Increase or decrease in steps — touch the [+ – Set]
key.
❐ Enter the percentage with the Number keys — touch
the [Number Keys] key.
Touch the [Exit] key.
6
86
Page 96
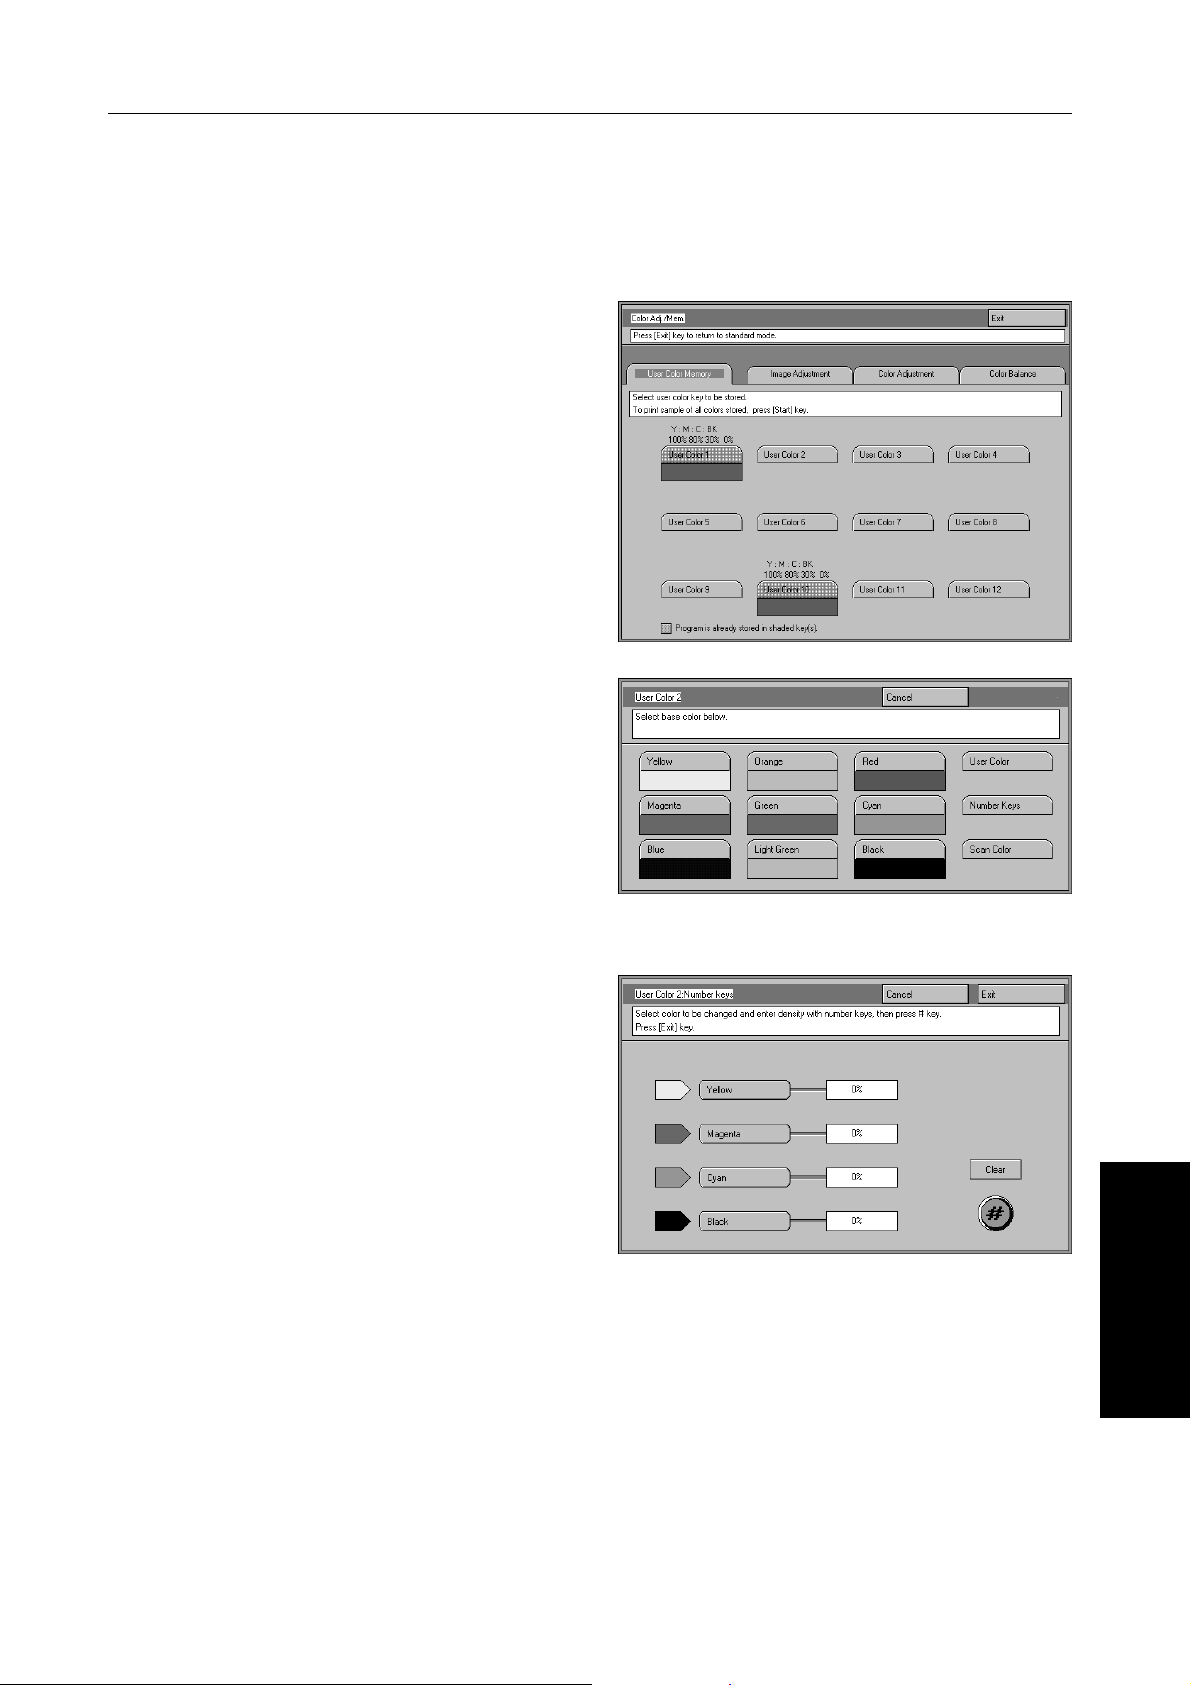
STORING USER COLORS (User Color Memory)
Mixing Colors Manually With The Number Keys
Press the Adjustment/Memory key.
1
Touch the [User Color Memory] key.
2
Select the number that you want to store the user
3
color in.
Touch the [Number keys] key.
4
Select the color that you want to adjust.
5
Enter the density, then touch the [#] key.
6
❐ To change the number, touch the [Clear] key.
Repeat steps 5 and 6 for each color then touch
7
the [Exit] key.
Touch the [Exit] key.
8
87
COLOR MEMORY
ADJUSTMENT AND
Page 97
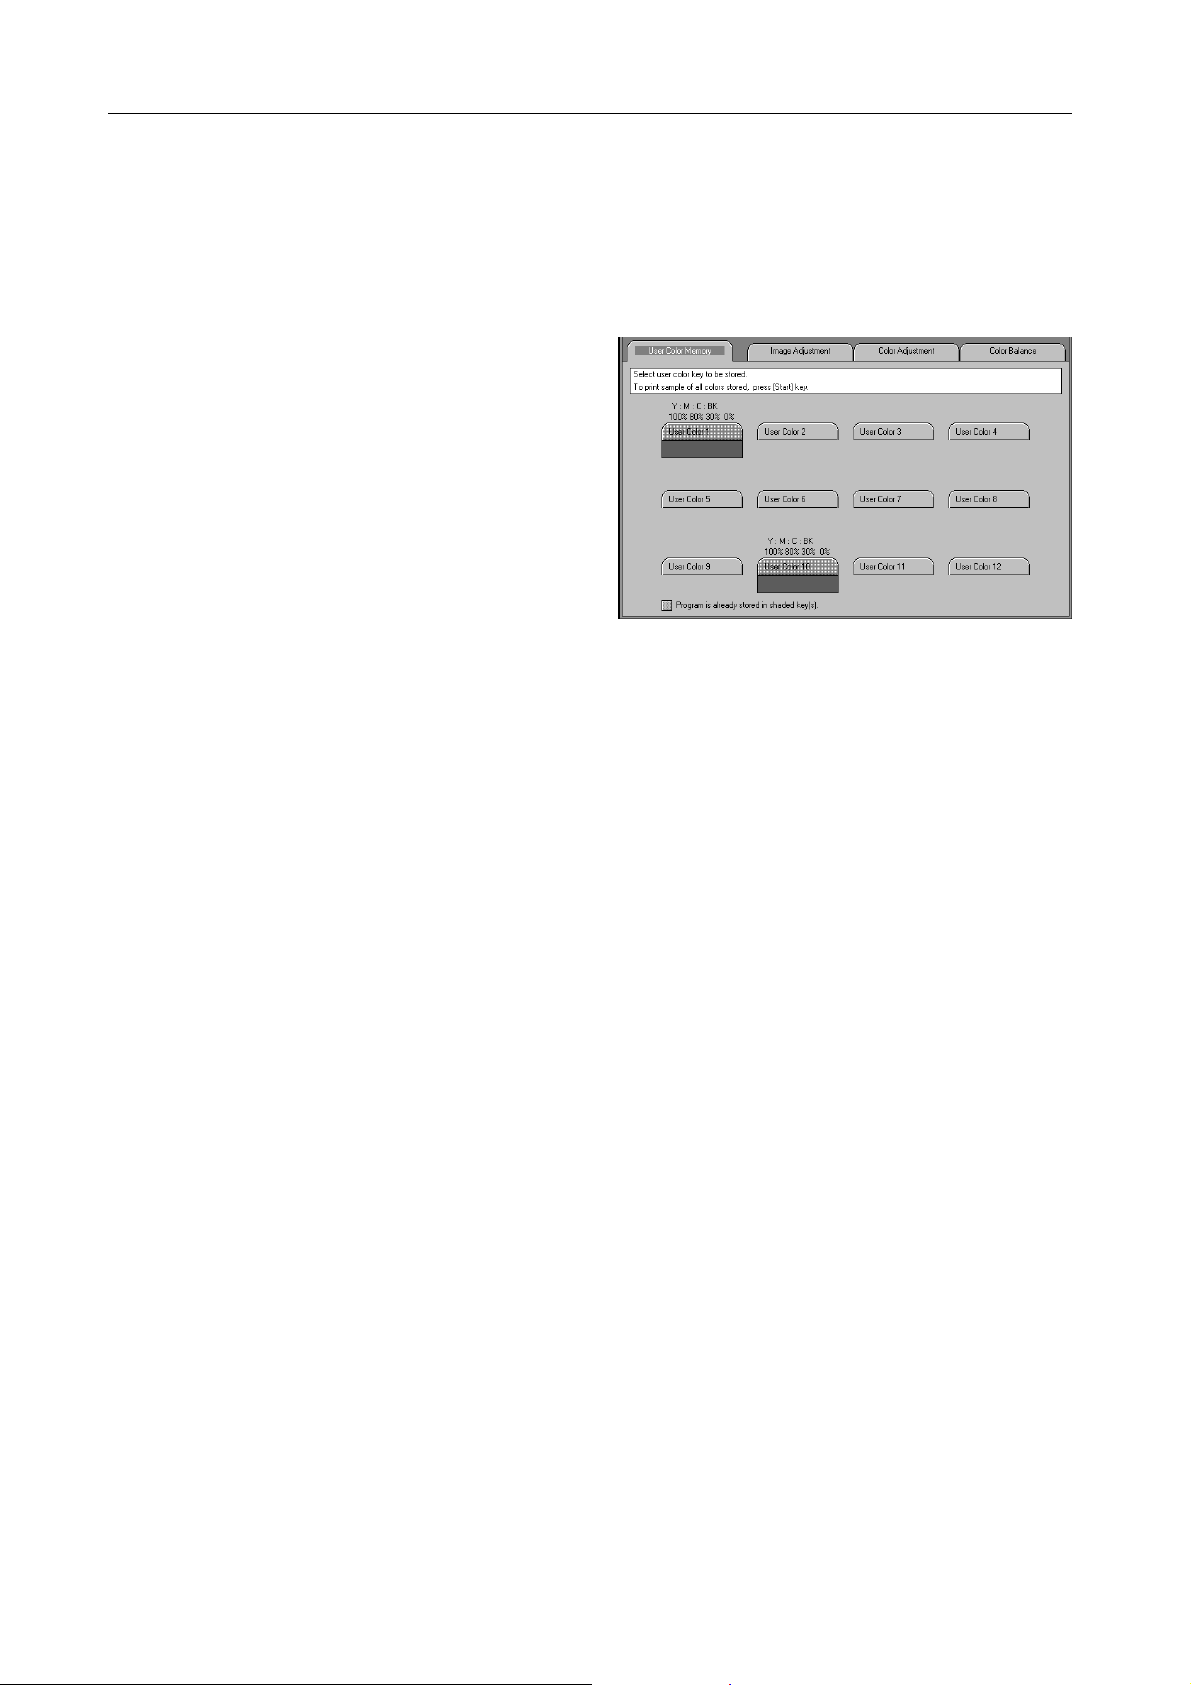
STORING USER COLORS (User Color Memory)
Sampling The User Color (Only for Edit type)
You can print out a sample of User Colors to check the colors you have made.
❐ The sample will be copied on a A4p, 81/2" × 11" p sheet or a A3l, 11" × 17"l sheet.
Press the Adjustment/Memory key.
1
Touch the [User Color Memory] key.
2
Press the Start key.
3
88
Page 98

AREA EDITING
(Only for Edit type)
AREA EDITING
(ONLY FOR EDIT TYPE)
89
Page 99
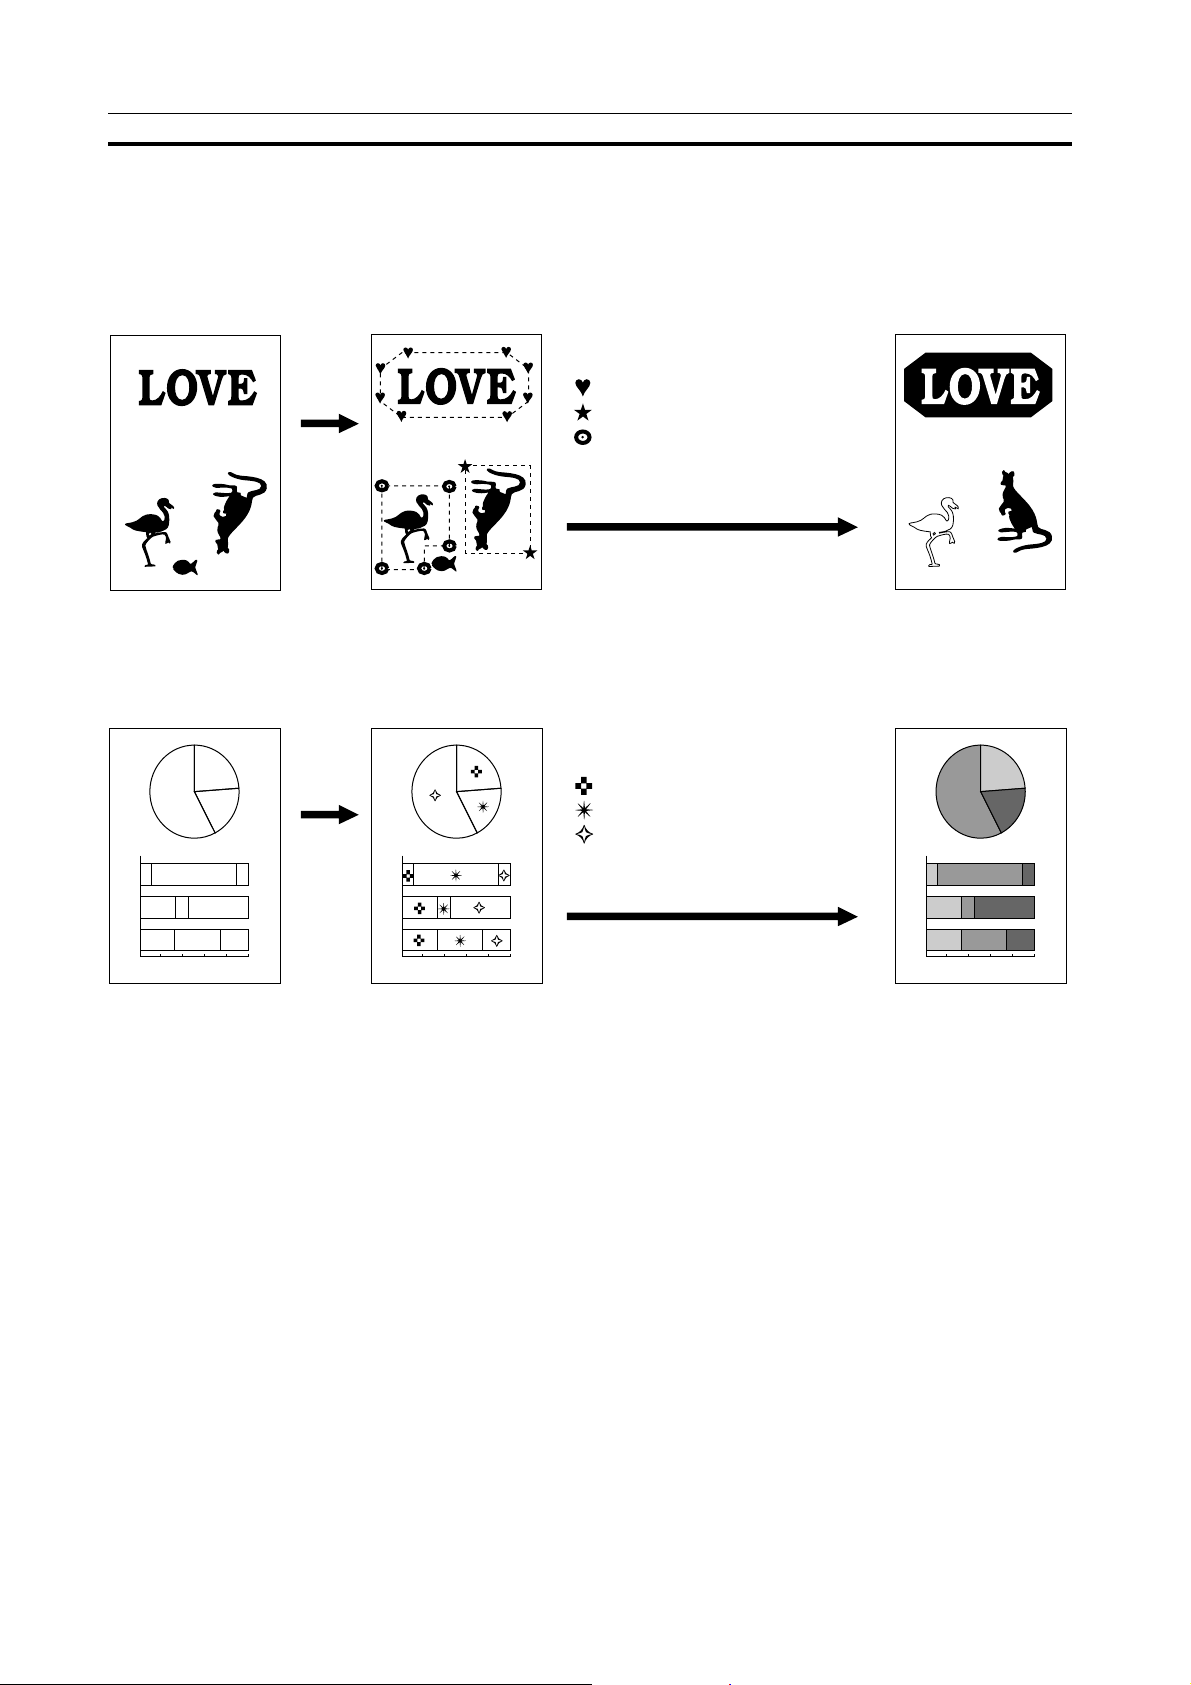
WHAT IS AREA EDITING?
WHAT IS AREA EDITING?
If your machine is Edit type, you can select areas of an image to be treated differently or have effects applied
to them. Some examples are shown below.
Example:
Group 1:Positive/Negative
Group 2:Mirror Image
Group 3:Outline Image
Scan
and select Save Area
Original Designate areas
(There is an area in each group.)
Specify modes for
each group.
Group 1:Color Background
Group 2:Color Background
Group 3:Color Background
3
2
1
❐ “Group” means a set of areas that you want to do the same edit.
Scan
3
2
1
0% 20% 40% 60% 80% 100%0% 20% 40% 60% 80% 100%
Designate areas
(There are 4 areas in each group.)
Specify modes for
each group.
Copy
3
2
1
0% 20% 40% 60% 80% 100%
CopyOriginal
90
Page 100

HOW TO EDIT AREAS
HOW TO EDIT AREAS
Editing an image involves scanning it in to memory, choosing areas to edit and how those areas will be reproduced.
The basic steps are summarized below. Details are given in the rest of this section.
1 Enter Area Editing mode.
❐ Touch the [Area Editing] key.
↓
2 Scan in the image.
❐ Touch the [Scan] key.
↓
3 Designate areas.
❐☛ See page 92.
↓
4 Select modes.
❐☛ See page 98.
↓
AREA EDITING
(ONLY FOR EDIT TYPE)
5 Specify more areas to be treated differently (optional).
❐ Repeat 3 and 4.
↓
6 Copy image.
❐ Press the [Start] key.
91
 Loading...