

Ricoh CP6123L+, LDD735, JP735 Operating Instructions Manual
Operation
1
Optional Functions
2
Replenishing Supplies
3
Troubleshooting
4
Remarks
5
Specifications
6
Operating Instructions
Read this manual carefully before you use this machine and keep it handy for future reference. For safe and correct use, be sure to read the
Safety Information before using the machine.

Introduction
This manual contains detailed instructions and notes on the operation and use of this machine. For your
safety and benefit, read this manual carefully before using the machine. Keep this manual in a handy
place for quick reference.
Important
Contents of this manual are subject to change without prior notice. In no event will the company be liable for direct, indirect, special, incidental, or consequential damages as a result of handling or operating the machine.
Notes:
Some illustrations in this manual might be slightly different from the machine.
Certain options might not be available in some countries. For details, please contact your local dealer.
Notes:
The model names of the machines do not appear in the following pages. Check the type of your machine before reading this manual.
• LG drum: CP6123L+, LDD735, JP735
• B4 drum: Not Available
Certain types might not be available in some countries. For details, please contact your local dealer.
Two kinds of size notation are employed in this manual. With this machine refer to the inch version.
For good copy quality, the supplier recommends that you use genuine toner from the supplier.
The supplier shall not be responsible for any damage or expense that might result from the use of parts
other than genuine parts from the supplier with your office products.
Power Source
110 – 120V, 50/60Hz, 2.9A or more
Please be sure to connect the power cord to a power source as above. For details about power source,
see p.71 “Power Connection”.

TABLE OF CONTENTS
Safety Information ................................................................................................. 1
Safety During Operation............................................................................................. 1
How to Read this Manual ...................................................................................... 3
What You Can Do with this Machine.................................................................... 4
Machine Exterior ....................................................................................................6
Machine Interior ..................................................................................................... 7
Control Panel.......................................................................................................... 8
Keys ........................................................................................................................... 8
Indicators.................................................................................................................... 9
1. Operation
Printing Paper ...................................................................................................... 11
Originals ...............................................................................................................12
Printing Preparations .......................................................................................... 13
Loading Paper..........................................................................................................13
Preparing the Paper Delivery Tray...........................................................................14
Standard Printing.................................................................................................15
After Printing ........................................................................................................17
Adjusting the Print Image Position .................................................................... 18
Shifting the Print Image Position Forwards or Backwards .......................................18
Shifting the Print Image Position to the Right or Left ...............................................19
Adjusting the Print Image Density ..................................................................... 20
Before Making a Master ...........................................................................................20
After Making a Master .............................................................................................. 20
Changing the Printing Speed.............................................................................. 21
Stopping the Machine during the Multi-print Run ............................................22
When You Want to Stop the Machine during the Multi-print Run and Print the Next Original
When You Want to Change the Number of Prints Entered or Check the Completed Prints
Preset Reduce/Enlarge—Reducing and Enlarging Using Preset Ratios ........ 23
Printing on Different Types of Paper Thickness............................................... 25
Feed Roller Pressure Lever ..................................................................................... 25
Separation Pressure Lever ...................................................................................... 26
Selecting Original Type ....................................................................................... 27
Auto Cycle—Processing a Master and Making Prints in One Step................. 28
Combine—Combining Two Originals onto One Print ...................................... 29
...22
...22
2. Optional Functions
Color Printing Using the Optional Color Drum ................................................. 33
Making Color Prints .................................................................................................. 33
Changing the Color Drum Unit.................................................................................33
Printing in Two Colors ..............................................................................................35
i

3. Replenishing Supplies
Loading Paper into the Paper Feed Tray ........................................................... 37
Replenishing Paper..................................................................................................37
Changing the Paper Size .........................................................................................38
When the Add Ink Indicator (j) Lights ............................................................. 39
Master Roll Replacement ....................................................................................42
4. Troubleshooting
If Your Machine does not Operate as You Want ............................................... 45
x Clearing Misfeeds ........................................................................................... 47
When “x” and “P” light up ....................................................................................... 48
When “x”, “B” and “A” light up............................................................................... 50
When “x” and “B” light up ....................................................................................... 50
When “x” and “C” light up ....................................................................................... 52
When “x” and “D” light up ....................................................................................... 55
When “x” and “E” light up ....................................................................................... 56
When the Open Cover/Unit Indicator (M) Lights ..............................................58
When the Master Eject Indicator (k) Lights ..................................................... 60
Poor Printing ........................................................................................................ 61
Dirt on the Back Side of Paper.................................................................................61
Dirt on the Front Side of Paper (Black Line/Stain) ................................................... 63
White Prints or Incomplete Prints.............................................................................64
5. Remarks
Operation Notes ................................................................................................... 67
General Cautions .....................................................................................................67
Print Paper ............................................................................................................... 69
Originals ................................................................................................................... 69
Where to Put Your Machine ................................................................................ 70
Environmental Conditions ........................................................................................70
Power Connection .................................................................................................... 71
Access to Machine ................................................................................................... 71
Maintaining Your Machine .................................................................................. 72
Document Feeder ....................................................................................................72
Paper Feed Roller (paper feed tray) ........................................................................72
Combination Chart...............................................................................................73
6. Specifications
Main Frame ........................................................................................................... 75
Consumables ....................................................................................................... 78
INDEX......................................................................................................... 79
ii

Safety Information
R
R
When using this machine, the following safety precautions should always be followed.
Safety During Operation
In this manual, the following important symbols are used:
WARNING:
CAUTION:
Indicates a potentially hazardous situation which, if instructions
are not followed, could result in death or serious injury.
Indicates a potentially hazardous situation which, if instructions are not
followed, may result in minor or moderate injury or damage to property.
R WARNING:
• Do not damage, break or make any modifications to the power cord.
Do not place heavy objects on it. Do not pull it hard nor bend it more
than necessary. These actions could cause an electric shock or fire.
• Disconnect the power plug (by pulling the plug, not the cable) if the
power cable or plug becomes frayed or otherwise damaged.
• To avoid hazardous electric shock, do not remove any covers or
screws other than those specified in this manual.
• Turn off the power and disconnect the power plug (by pulling the plug,
not the cable) if any of the following occurs:
• You spill something into the machine.
• You suspect that your machine needs service or repair.
• The external housing of your machine has been damaged.
• Keep the machine away from flammable liquids, gases, and aerosols.
A fire or an electric shock might occur.
• Connect the power cord directly into a wall outlet and never use an extension cord.
• Only connect the machine to the power source described in this manual.
• Disposal can take place at our authorized dealer or at appropriate collection sites.
1

R CAUTION:
• After you move the machine, use the caster fixture to fix it in place. Otherwise the machine might move or come down to cause an injury.
• If you use the machine in a confined space, make sure there is a continuous
air turnover.
• Keep the machine away from humidity and dust. Otherwise a fire or an electric shock might occur.
• Protect the machine from dampness or wet weather, such as rain and snow.
• Do not place the machine on an unstable or tilted surface. If it topples over,
an injury might occur.
• Unplug the power cord from the wall outlet before you move the machine.
While moving the machine, you should take care that the power cord will not
be damaged under the machine.
• When you disconnect the power plug from the wall outlet, always pull the
plug (not the cable).
• Do not allow paper clips, staples, or other small metallic objects to fall inside
the machine.
• For environmental reasons, do not dispose of the machine or expended
supply waste at household waste collection points. Disposal can take place
at an authorized dealer.
• When disposing of a used ink container, reattach the cap to prevent ink from
splattering.
• Be careful not to get ink on your clothes when replacing an ink container. Ink
stains on clothes are hard to remove.
• Be careful not to cut yourself on any sharp edges when you reach inside the
machine to remove misfed sheets of paper or masters.
• If ink comes into contact with your eyes, rinse immediately in running water.
For other symptoms, consult a doctor.
• Keep the ink or ink container out of reach of children.
• If ink is ingested, induce vomiting by drinking a strong saline solution. Con-
sult a doctor immediately.
• If your skin comes into contact with ink, wash the affected area thoroughly
with soap and water.
• While printing, do not touch the belt at the end of the paper delivery tray or
the job separator. Otherwise, an injury might occur.
• Our products are engineered to meet the high standards of quality and functionality, and we recommend that you only use the expendable supplies
available at an authorized dealer.
2

How to Read this Manual
R
R
Symbols
In this manual, the following symbols are used:
WARNING:
This symbol indicates a potentially hazardous situation that might result in
death or serious injury when you misuse the machine without following the instructions under this symbol. Be sure to read the instructions, all of which are described in the Safety Information section.
CAUTION:
This symbol indicates a potentially hazardous situation that might result in minor or moderate injury or property damage that does not involve personal injury
when you misuse the machine without following the instructions under this
symbol. Be sure to read the instructions, all of which are described in the Safety
Information section.
* The statements above are notes for your safety.
Important
If this instruction is not followed, paper might be misfed, originals might be
damaged, or data might be lost. Be sure to read this.
Preparation
This symbol indicates the prior knowledge or preparations required before operating the machine.
Note
This symbol indicates precautions for operation, or actions to take after misoperation.
Limitation
This symbol indicates numerical limits, functions that cannot be used together,
or conditions in which a particular function cannot be used.
Reference
This symbol indicates a reference.
[]
Keys that appear on the machine's display panel.
{}
Keys built into the machine's control panel.
3
What You Can Do with this Machine
Below is a quick summary of this machine's features and where to look in this
manual for more information.
❖ Standard Printing
See p.15 “Standard Printing”.
❖ Adjusting the Print Image Position
See p.18 “Adjusting the Print Image Position”.
❖ Adjusting the Print Image Density
See p.20 “Adjusting the Print Image Density”.
❖ Changing the Print Speed
See p.21 “Changing the Printing Speed”.
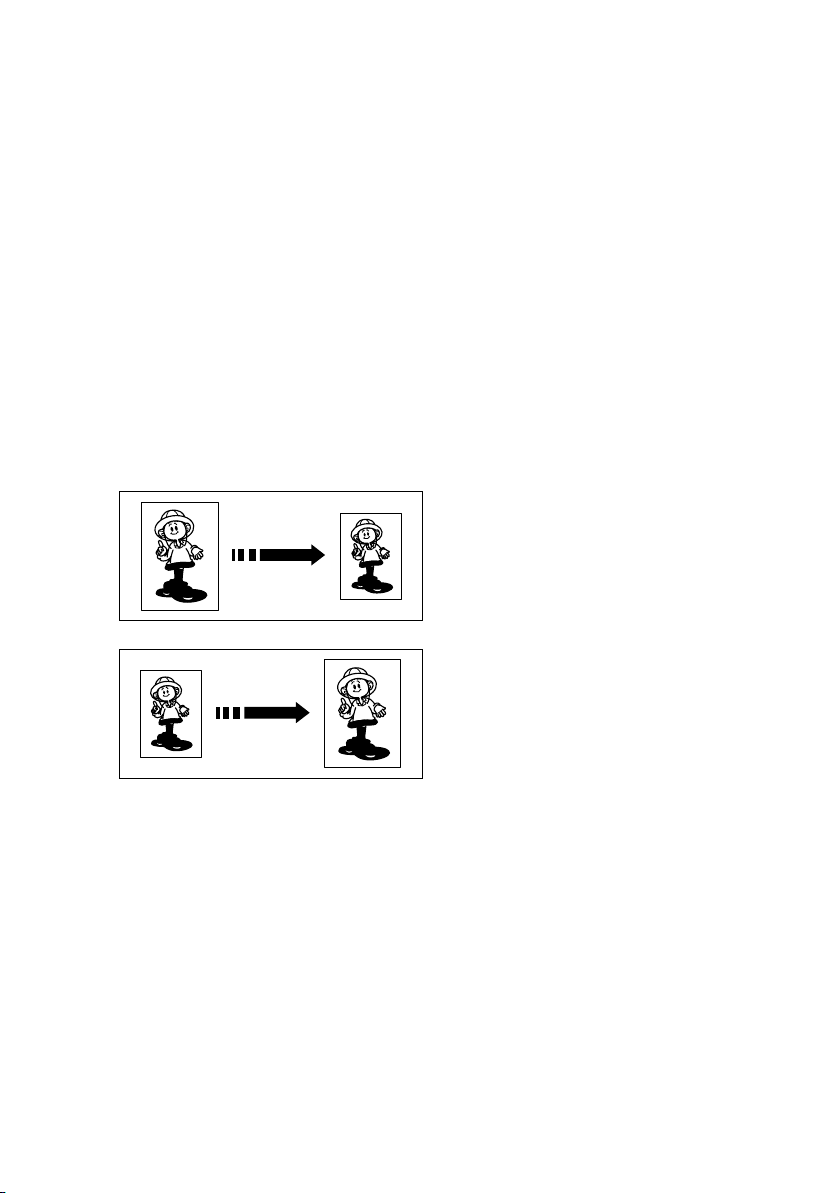
❖ Reducing and Enlarging Using Preset Ratios
See p.23 “Preset Reduce/Enlarge—Reducing and Enlarging Using Preset Ratios”.
GRREDU0E
❖ Printing on Thick or Thin Paper
See p.25 “Printing on Different Types of Paper Thickness”.
❖ Selecting Original Type
See p.27 “Selecting Original Type”.
❖ Printing from Several Originals at Once
See p.28 “Auto Cycle—Processing a Master and Making Prints in One Step”.
4
GRENLA0E

❖ Combining Originals onto One Print
See p.29 “Combine—Combining Two Originals onto One Print”.
BA AB
ZCTX040E
❖ Making Color Prints
See p.33 “Making Color Prints”.
❖ Printing in Two Colors
See p.35 “Printing in Two Colors”.
5

Machine Exterior
1. Front door
Open for access to the inside of the machine.
2. Original delivery tray
The scanned original is delivered here.
3. Control panel
Operator controls and indicators are located here. See p.8 “Control Panel”.
4. Document feeder cover
Open this cover to clean the document
feeder.
5. Right side cover
Open to replace the master roll or to clear
a master misfeed.
6
6. Feed roller pressure lever
Use to adjust the contact pressure of the
paper feed roller according to the paper
thickness.
7. Paper feed tray
Set paper on this tray for printing.
8. Paper feed side plates
Use to prevent paper skew.
9. Paper feed side plate lock levers
Use to lock or unlock the paper feed side
plates.
10. Separation pressure lever
Use to prevent double-feed.
11. Paper feed tray adjustment lever
Use to move the paper feed tray up or
down.
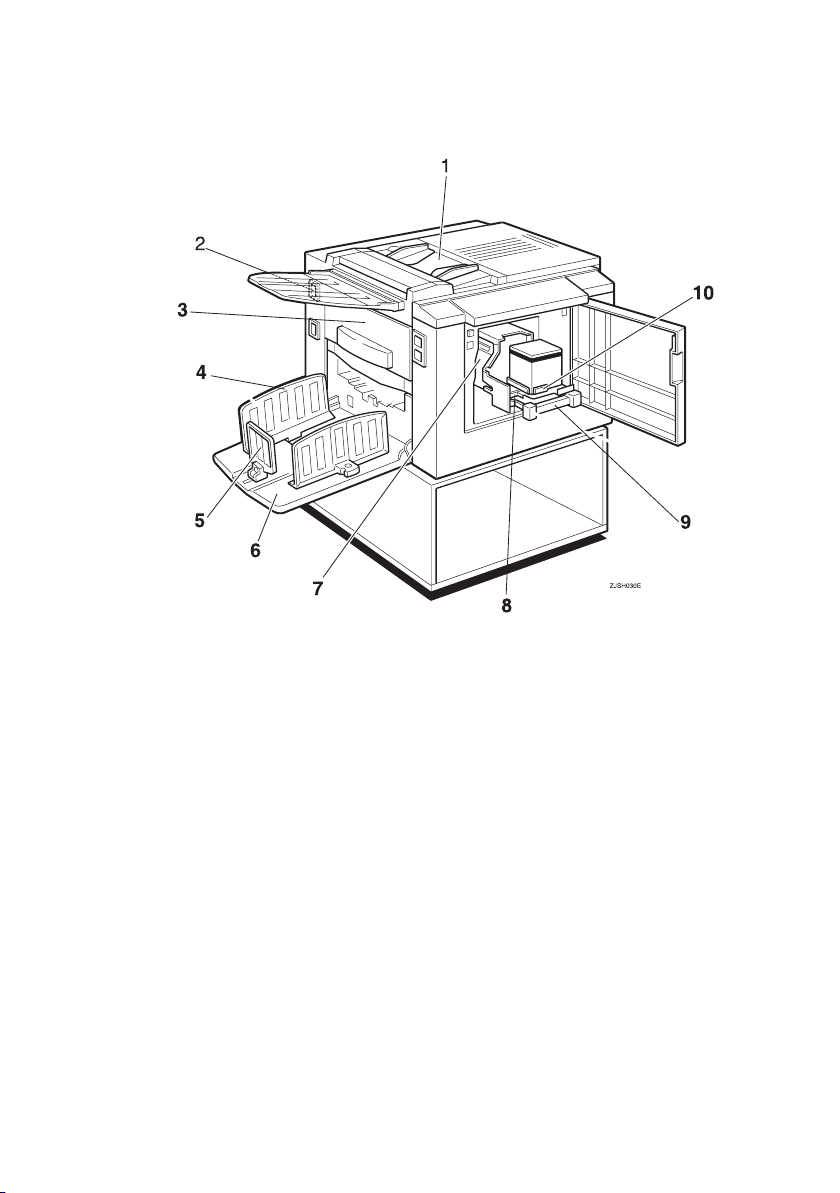
Machine Interior
1. Document feeder
Place the original in the document feeder
one sheet at a time.
2. Main switch
Use to turn the power on or off.
3. Master eject box
Used masters are stored here.
4. Paper delivery side plates
Use to align the prints on the paper delivery tray.
5. Paper delivery end plate
Use to align the leading edge of prints.
6. Paper delivery tray
Completed prints are delivered here.
7. Drum unit
The master is wrapped around this unit.
8. Ink holder lock lever
Release this lever in order to pull out the
ink holder.
9. Drum unit lock lever
Lift to unlock and pull out the drum unit.
10. Ink holder
Set the ink cartridge in this holder.
7
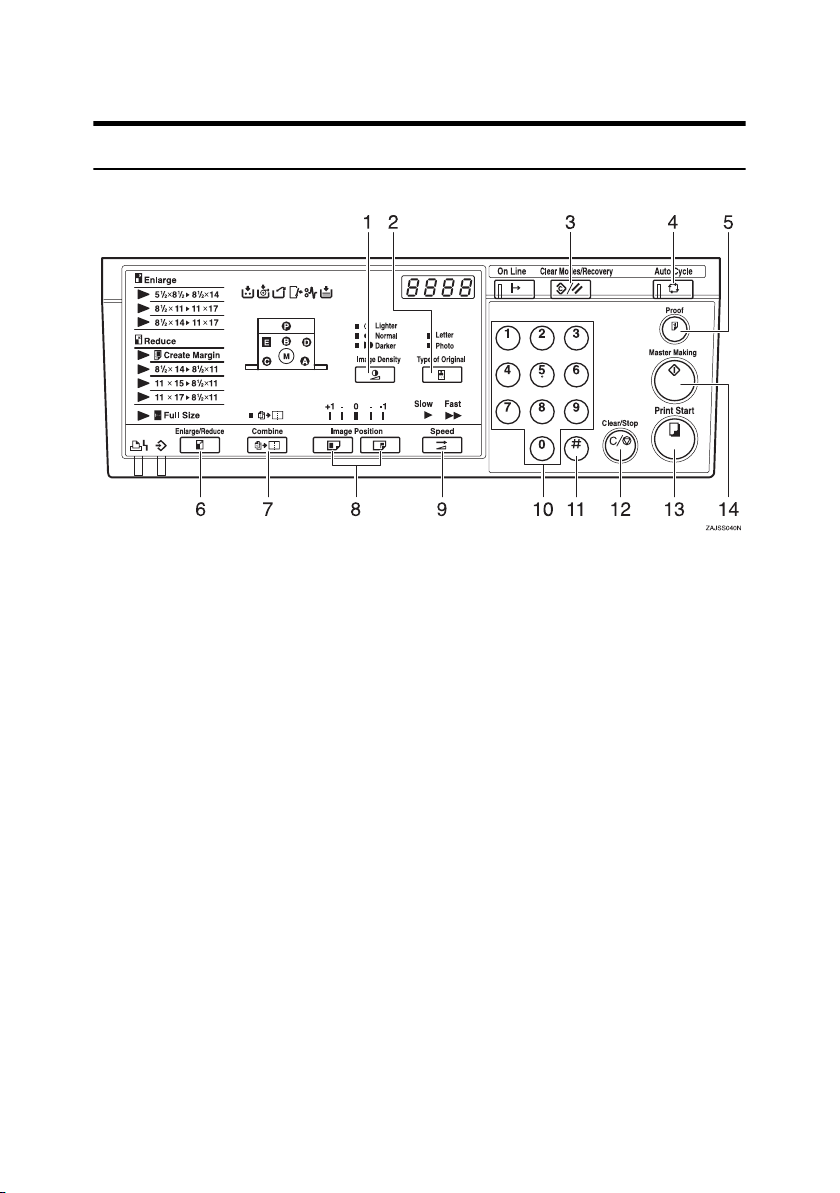
Control Panel
Keys
1. {Image Density} key
Press to make prints darker or lighter. See
“Adjusting the Print Image Density”.
2. {Type of Original} key
Press to select Letter, Photo or Letter/Photo mode. See p.27 “Selecting
Original Type”.
3. {Clear Modes/Recovery} key
•Clear Modes
Press to clear the previously entered
job settings.
•Recovery
Press to reset the error indicators after
clearing a misfeed. See p.47 “x Clearing Misfeeds”.
4. {Auto Cycle} key
Press to process the master and make
prints automatically. See p.28 “Auto Cycle—Processing a Master and Making
Prints in One Step”.
5. {Proof} key
Press to make proof prints.
6. {Enlarge/Reduce} key
Press to enlarge or reduce the image. See
p.23 “Preset Reduce/Enlarge—Reducing
and Enlarging Using Preset Ratios”.
8
p.20
7. {Combine} key
Press to combine originals onto one print.
See p.29 “Combine—Combining Two
Originals onto One Print”.
8. {Image Position} keys
Press to shift the image forwards or backwards. See p.18 “Adjusting the Print Image Position”.
9. {Speed} key
Press to select Fast or Slow for your printing speed. See p.21 “Changing the Printing Speed”.
10. Number keys
Press to enter the desired number of
prints and data for selected modes.
11. {q} key
Press to enter data in selected modes.
12. {Clear/Stop} key
Press to cancel a number you have entered or to stop printing.
13. {Print Start} key
Press to start printing.
14. {Master Making} key
Press to make a master.
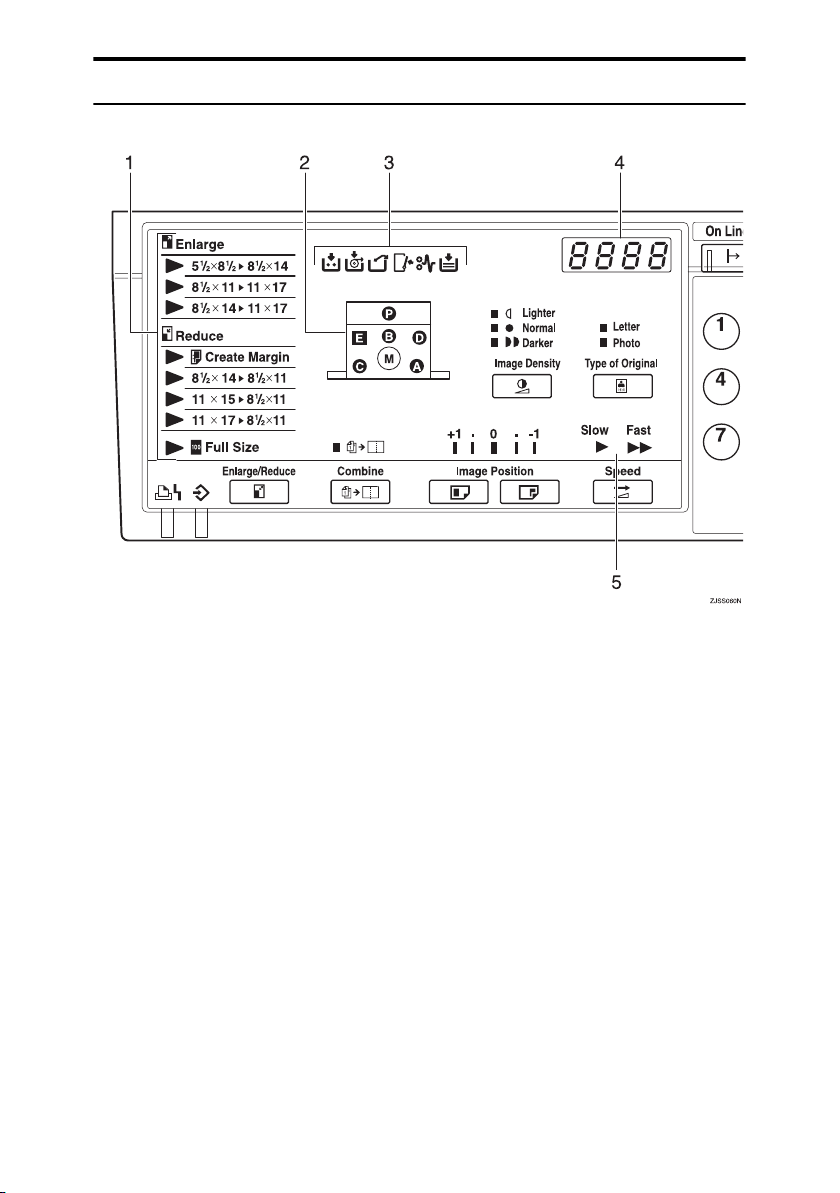
Indicators
1. Magnification indicators
Show the preset magnification ratio selected. See p.23 “Preset Reduce/Enlarge—Reducing and Enlarging Using
Preset Ratios”.
2. Machine indicators
Show the jammed area with the x indicator. See p.47 “x Clearing Misfeeds”.
Show the cover/unit that is opened with
the M indicator. See p.58 “When the
Open Cover/Unit Indicator (M) Lights”.
3. Error indicators
Show errors and machine status.
j: Add Ink indicator
See p.39 “When the Add Ink Indicator
(j) Lights”.
C: Master End indicator
See p.42 “Master Roll Replacement”.
k: Master Eject indicator
See p.60 “When the Master Eject Indica-
tor (k) Lights”.
M: Open Cover/Unit indicator
See p.58 “When the Open Cover/Unit In-
dicator (M) Lights”.
x: Misfeed indicator
See p.47 “x Clearing Misfeeds”.
B: Load Paper indicator
See p.37 “Loading Paper into the Paper
Feed Tray”.
4. Counter
Displays the number of prints entered.
While printing, it shows the number of
prints remaining.
5. Speed indicators
Shows the printing speed selected.
9

10
1. Operation
Printing Paper
The following types of print paper are not recommended for this machine.
• Paper smaller than 90 mm × 140 mm, 3.6" × 5.6"
• Paper larger than 275 mm × 395 mm, 10.8" ×15.6"
• Paper heavier than 127.9 g/m
• Paper lighter than 35 g/m
• Roughly-cut paper
• Paper of different thickness in the same stack
• Buckled or curled paper
• Low stiffness paper
Correct curls in the paper before setting it in the machine. When you cannot correct the paper curl, stack the paper with the curl face down. Otherwise the paper
might wrap around the drum or stains might appear.
Store paper where it will not curl or absorb moisture. Use paper soon after it is
unpacked.
Only use paper where the leading edge has two right angle corners, as shown
below.
2
2
, 9.3 lb
, 34.0 lb
GRPRIN0E
11
Operation
Originals
Note
1
❒ Originals that can be set in the document feeder are as follows:
• Maximum size: 275 × 395 mm, 10.8" × 15.6"
• Minimum size: 90 × 140 mm, 3.6" × 5.6"
• Maximum weight: 127.9 g/m
• Minimum weight: 40.7 g/m
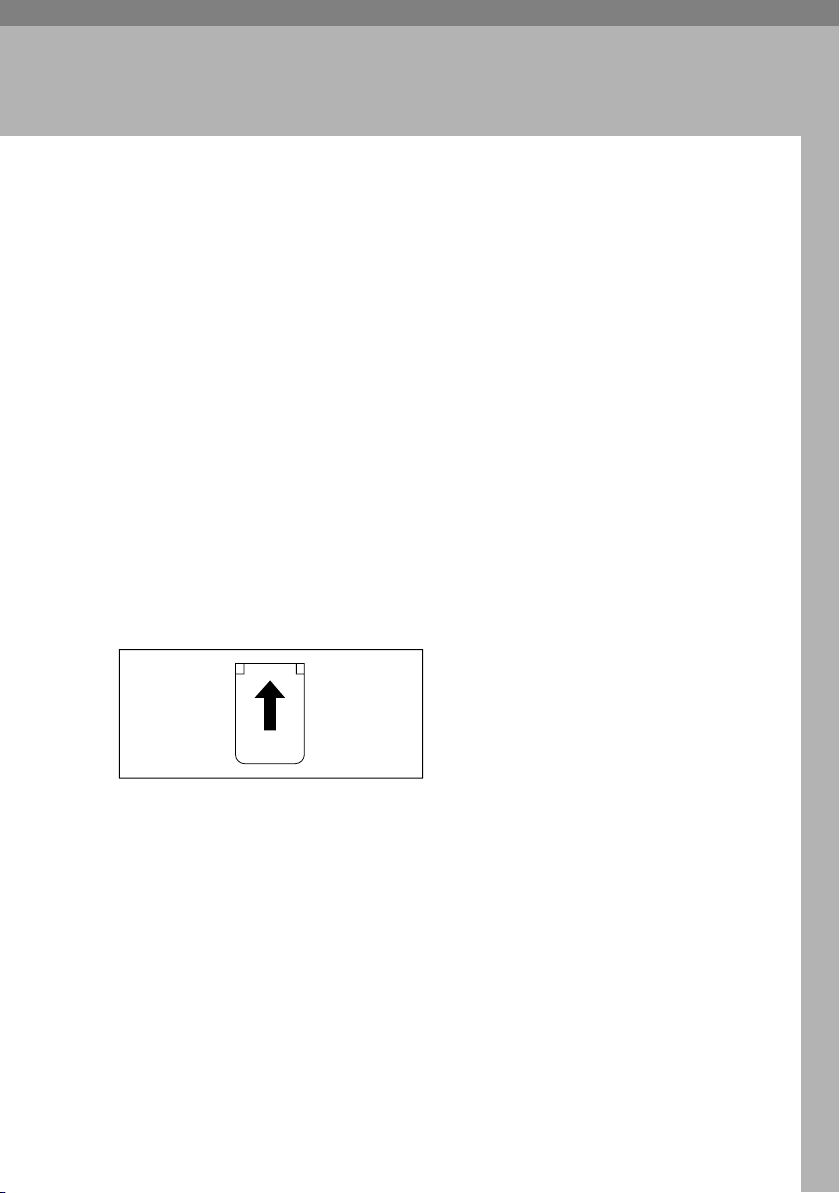
❒ If you are printing from originals that have bold letters or solid images at the
leading edges, you may get prints with dirty edges. In this case, insert the
widest margin first, or raise the printing speed.
❒ The first 5 mm, 0.2" of the leading edge cannot be printed. Make sure the lead-
ing edge margin is at least 5 mm, 0.2".
Original Print
2
, 34.0 lb
2
, 10.8 lb
a
❒ a: 5 mm, 0.2"
12
Printing Preparations
Printing Preparations
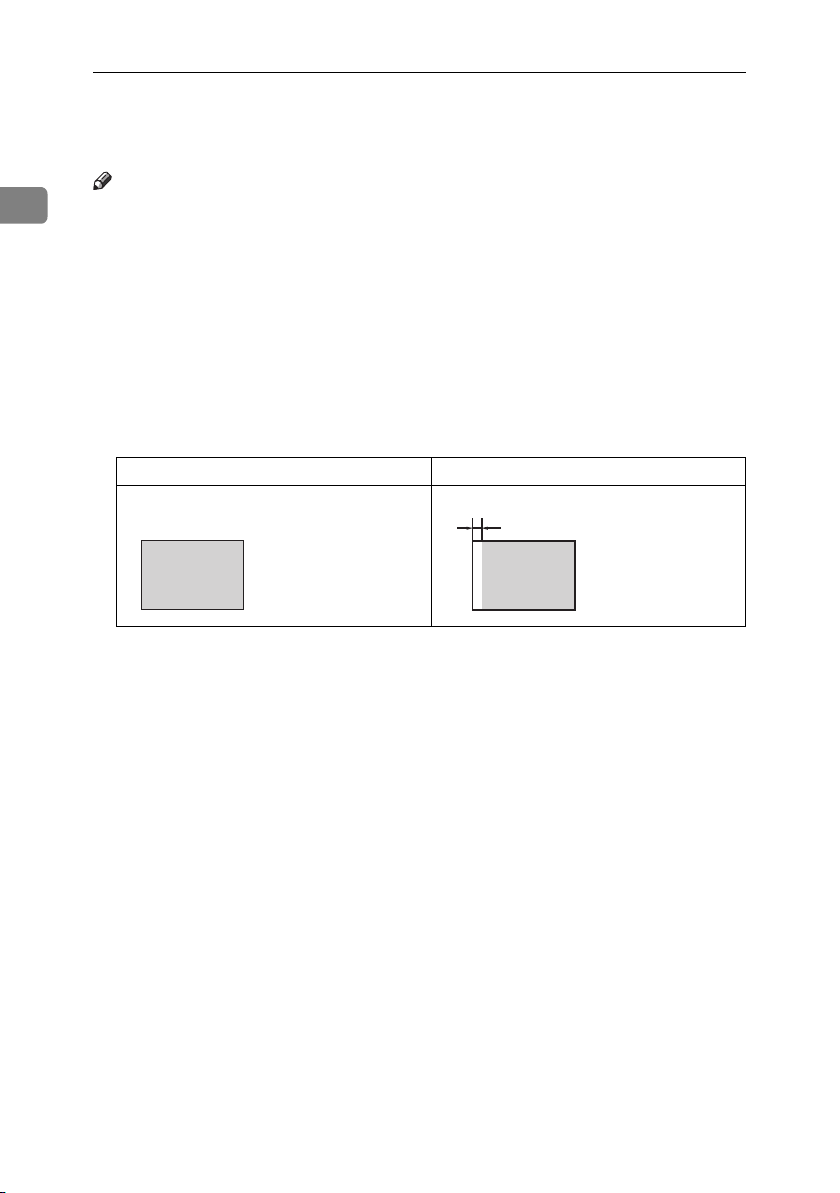
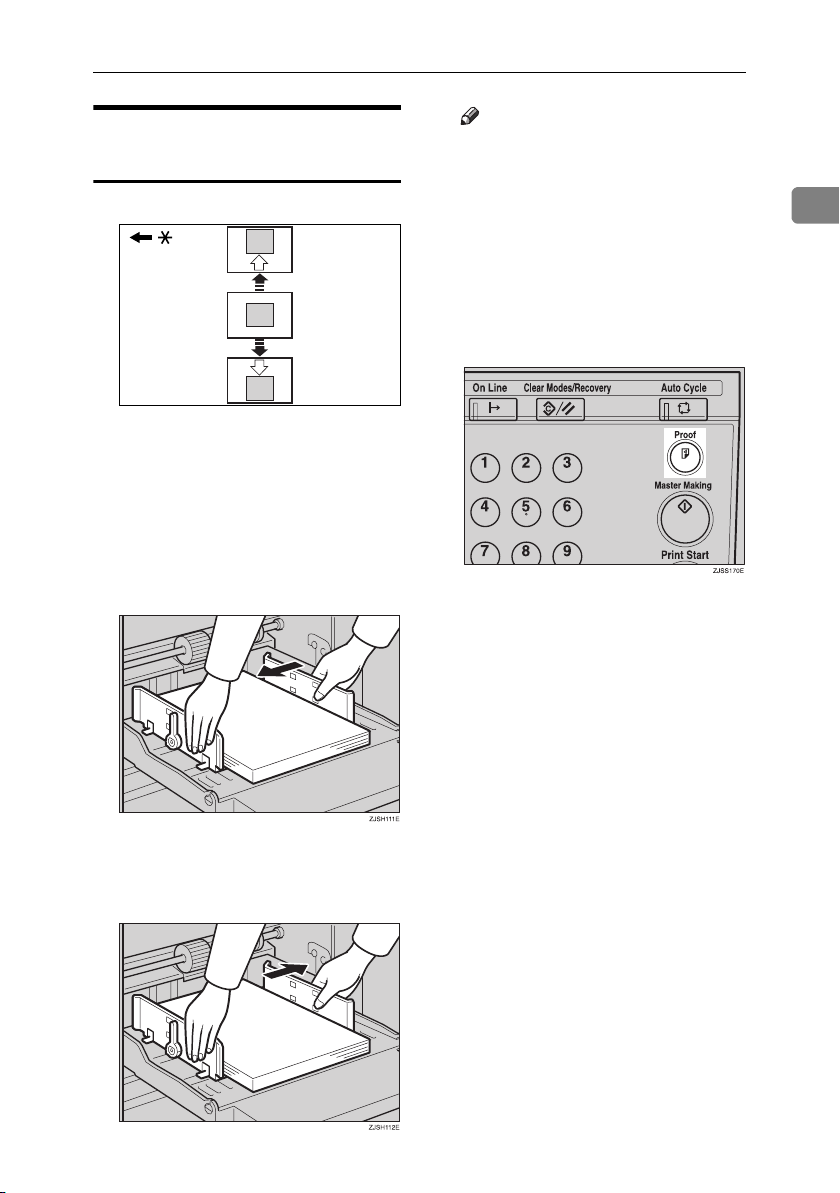
Loading Paper
A Lower the paper feed tray adjust-
ment lever.
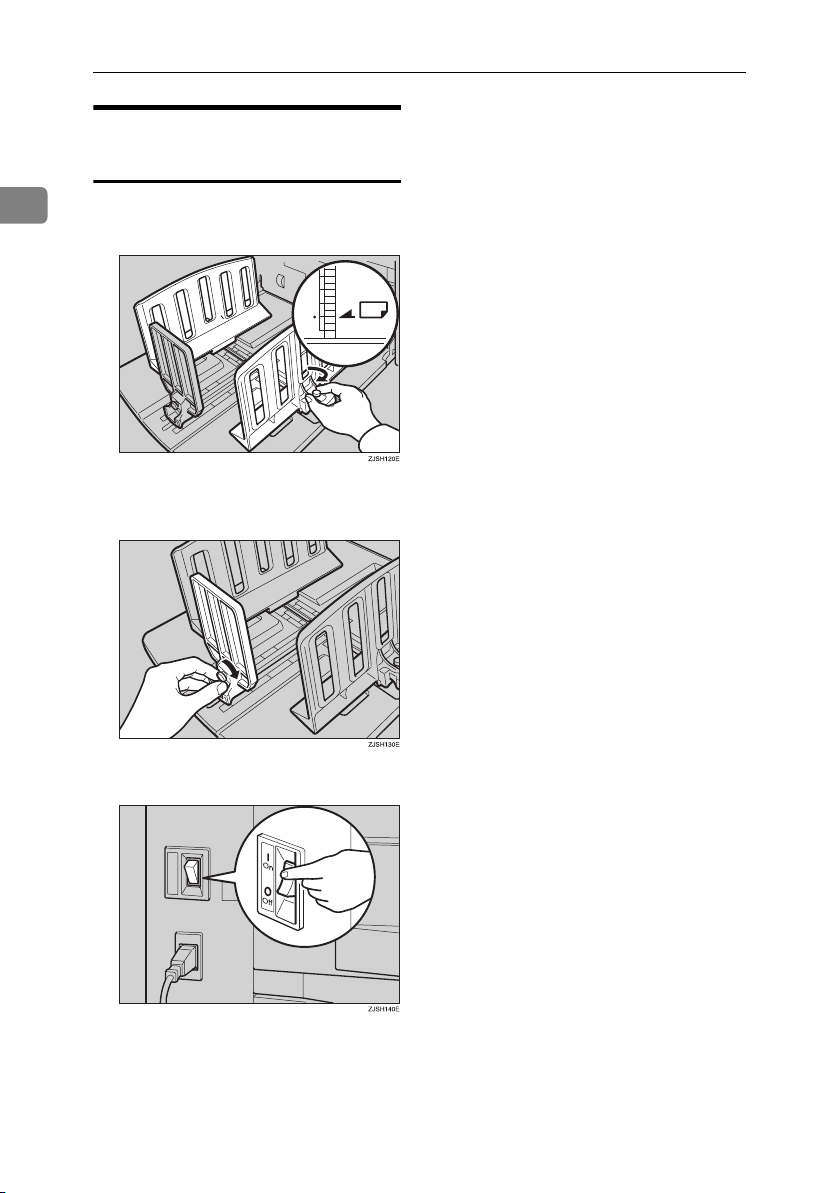
B Release the paper feed side plate
lock levers and adjust the side
plates to match the paper size.
Note
❒ Correct the paper curl before
setting the paper. If you cannot
do so, stack the paper with the
curl face down as shown.
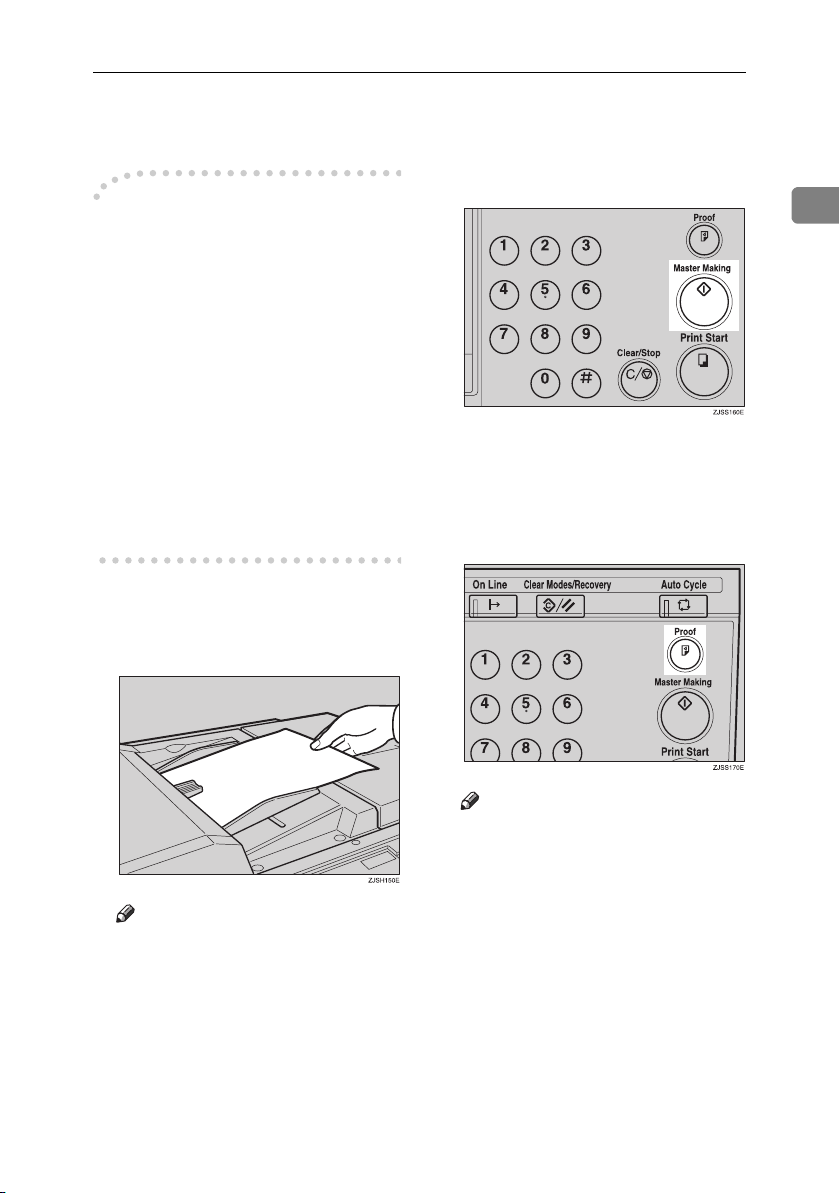
D Make sure that the paper feed
side plates touch the paper lightly. Shift the lock levers back to
their original positions.
1
1: Paper Feed Side Plate Lock Levers
C Load paper into the paper feed
tray.
E Shift the tray adjustment lever to
the paper feeding position.
Note
❒ Before you start printing, the
paper feed tray must be aligned
with the feeding position. If not,
a paper misfeed might occur.
13
Operation
Preparing the Paper Delivery
Tray
1
A Adjust the paper delivery side
plates to match the paper size.
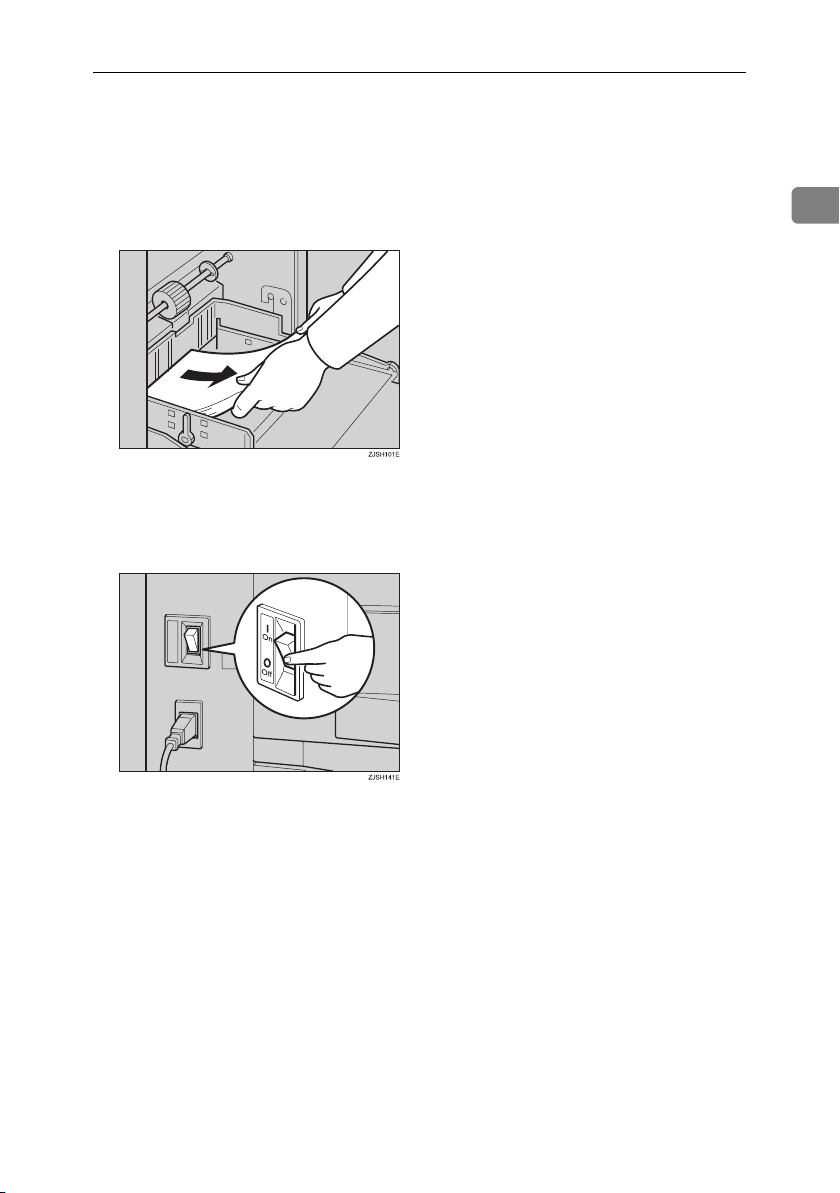
B Adjust the paper delivery end
plate to match the paper size.
C Turn on the main switch.
14
Standard Printing
-Printing
In this manual, the word, “printing”
is used as opposed to “copying” in order to distinguish between the process that your machine uses to make
prints, and the process used by a standard copier machine.
A standard copier scans in the original for each copy set made. This machine, however, scans in your original
once and makes multiple prints from
this master.
This chapter describes the basic printing operations that your machine is
capable of.
A Place the original face down in
the document feeder. Adjust the
original side guides to match the
size of the original.
Standard Printing
B Press the {Master Making} key.
1
A trial print is delivered to the paper delivery tray.
C Press the {Proof} key and check
the image density and image position on the proof print.
Note
❒ You can only place one original
at a time.
Note
❒ If the image position is not cor-
rect, adjust it using the {Image
Position} keys. See p.18 “Adjust-
ing the Print Image Position”.
❒ If the image density is too dark
or too light, adjust the image
density using the {Image Densi-
ty} key. See p.20 “Adjusting the
Print Image Density”.
15

Operation
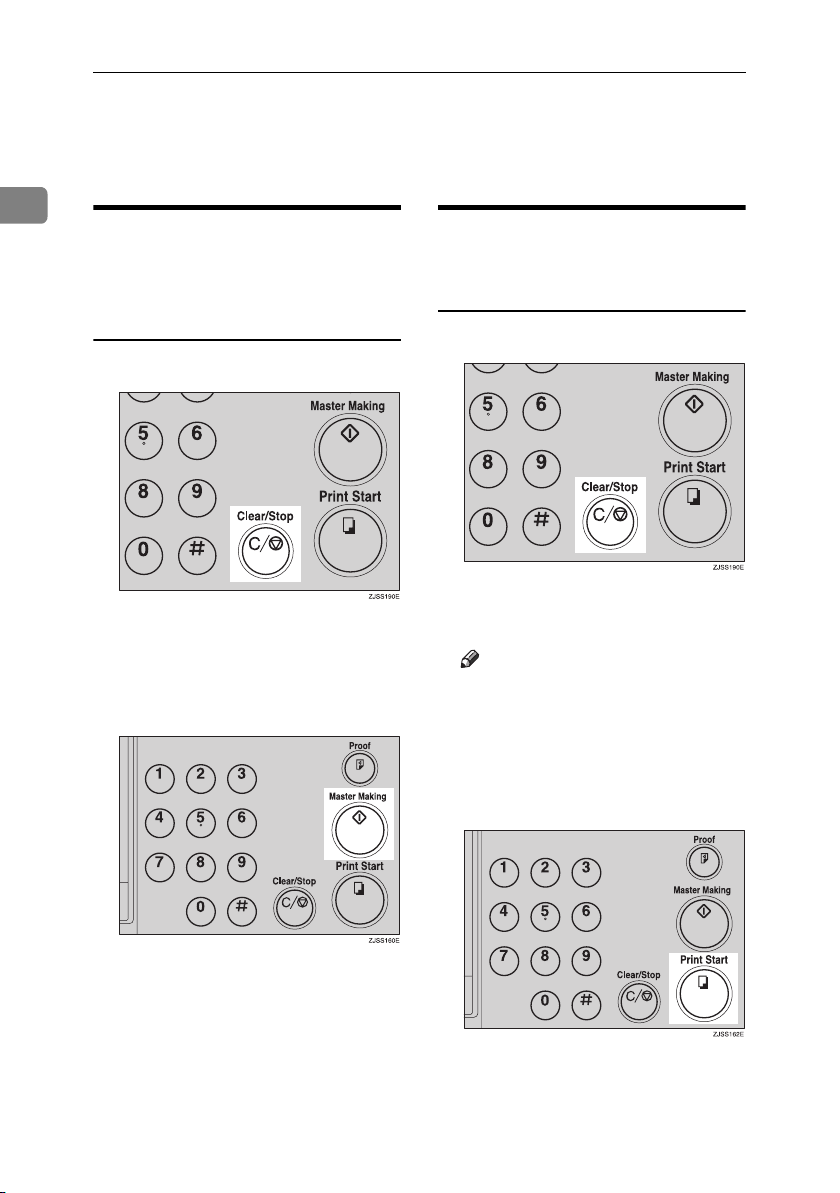
D Enter the number of prints re-
quired with the number keys.
1
Note
❒ Up to 9999 prints can be entered
at a time.
❒ To change the number entered,
press the {Clear/Stop} key and
enter the new number.
E Press the {Print Start} key.
16
Note
❒ After printing is completed, the
same number of prints is automatically set for the next job.
❒ To stop the machine during the
multi-print run, press the
{Clear/Stop} key.
❒ To return the machine to the ini-
tial condition after printing,
press the {Clear Modes/Recovery}
key.
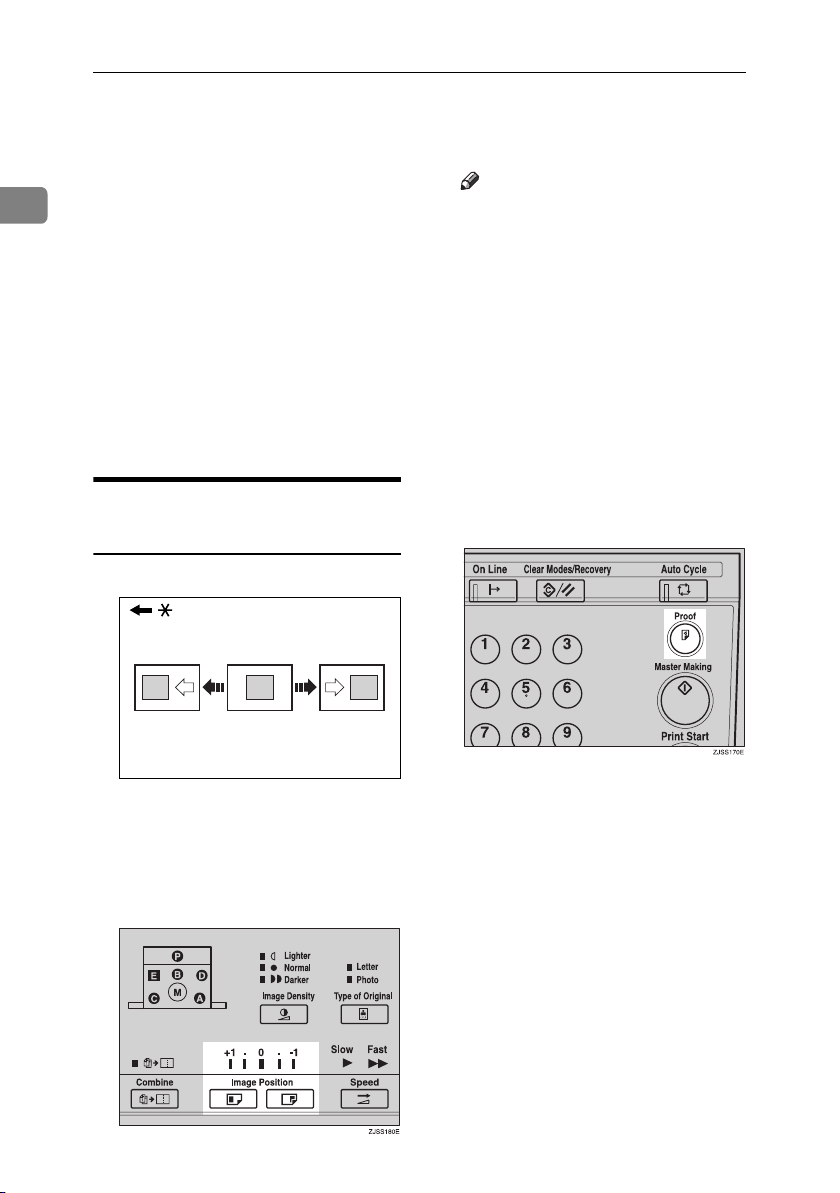
After Printing
A Lower the paper feed tray adjust-
ment lever and remove the paper
from the paper feed tray.
B Remove the prints from the paper
delivery tray.
C Turn off the main switch.
After Printing
1
17
Operation
Adjusting the Print Image Position
After master making, you can adjust
1
the print image position to suit your
needs. There are two ways to do this:
❖ Shifting the Image Position Forwards
or Backwards
Adjust the image position using
the {Image Position} keys.
❖ Shifting the Image Position to the
Right or Left
Adjust the image position by shifting the paper in the paper feed
tray.
Shifting the Print Image Position
Forwards or Backwards
Note
❒ When you shift the image for-
wards, leave a margin (more
than 5 mm, 0.2") at the leading
edge. If there is no margin, paper might wrap around the
drum and cause a misfeed.
❒ The right or left {Image Position}
keys shift the image about 1
mm, 0.04" each time they are
pressed. However, the indicator
will only register a change
when the image position is
shifted about 5 mm, 0.2".
B Press the {Proof} key to check the
image position.
* Paper feed direction
A Press the left {Image Position} key
to move the image forwards, and
the right key to move it backwards.
18
GRFORW0E
Adjusting the Print Image Position
Shifting the Print Image
Position to the Right or Left
GRLEFT0E
* Paper feed direction
A Lower the paper feed tray adjust-
ment lever and unlock the paper
feed side plates.
❖ Shifting the image to the right
Shift the paper towards the
front of the machine.
Note
❒ The image position can be shift-
ed up to about 10 mm, 0.4" each
way.
B
Lock the paper delivery side plates
and shift the tray adjustment lever back to the paper feeding position.
C Press the {Proof} key to check the
image position.
1
❖ Shifting the image to the left
Shift the paper towards the back
of the machine.
19
Operation
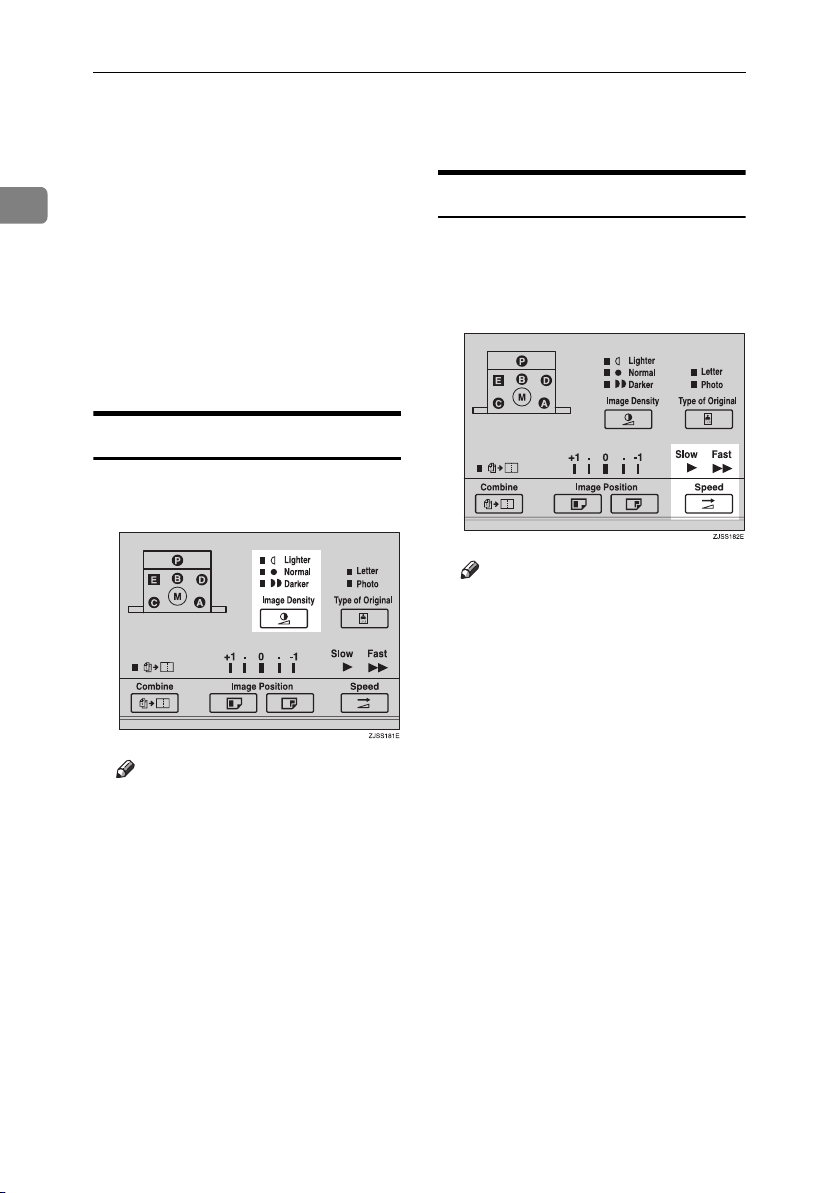
Adjusting the Print Image Density
You can adjust the print image densi-
1
ty to suit your needs. There are two
ways to do this:
❖ Before Making a Master
Adjust the image density using the
{Image Density} key.
❖ After Making a Master
Adjust the image density using the
{Speed} key.
Before Making a Master
A Use the {Image Density} key before
pressing the {Master Making} key.
After Making a Master
A Press the {Speed} key to decrease
the printing speed. Press it again
to bring the printing speed back
to Fast.
Note
❒ The faster the printing speed be-
comes, the lighter the printing
density is. If you want darker
prints, decrease the printing
speed.
20
Note
❒ In addition to Normal, Darker
and Lighter modes, you can also
select Tint mode to make halftone prints. When the Lighter
mode indicator is blinking, Tint
mode is selected.
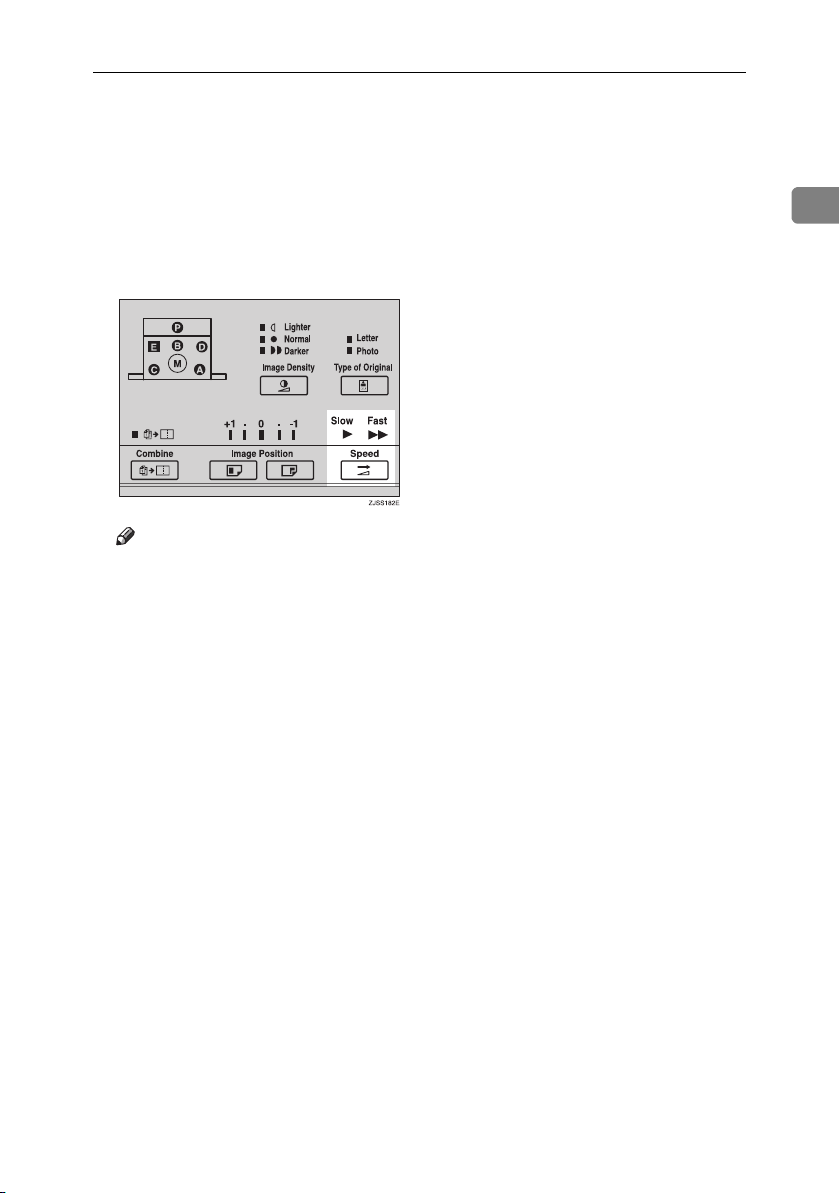
Changing the Printing Speed
Use the {Speed} key to adjust the
speed of the machine to suit the image density and paper type.
A Press the {Speed} key to select the
printing speed.
Note
❒ The following speeds are avail-
able:
•Fast:
90 sheets/minute
•Slow:
60 sheets/minute
❒ The default is 90 sheets/minute.
❒ The faster the printing speed be-
comes, the lighter the printing
density is, and vice versa.
❒ Select the slower speed when
you are printing on very thick
or very thin paper.
Changing the Printing Speed
1
21
Operation
Stopping the Machine during the Multiprint Run
1
When You Want to Stop the
Machine during the Multi-print
Run and Print the Next
Original
A Press the {Clear/Stop} key.
B Place the new original in the doc-
ument feeder.
C Enter the number of prints and
press the {Master Making} key.
When You Want to Change the
Number of Prints Entered or
Check the Completed Prints
A Press the {Clear/Stop} key.
B Change the number of prints or
check the completed prints.
Note
❒ When you change the number
of prints, you can re-enter the
number with the number keys
after pressing the {Clear/Stop}
key.
22
C Press the {Print Start} key.
Preset Reduce/Enlarge—Reducing and Enlarging Using Preset Ratios
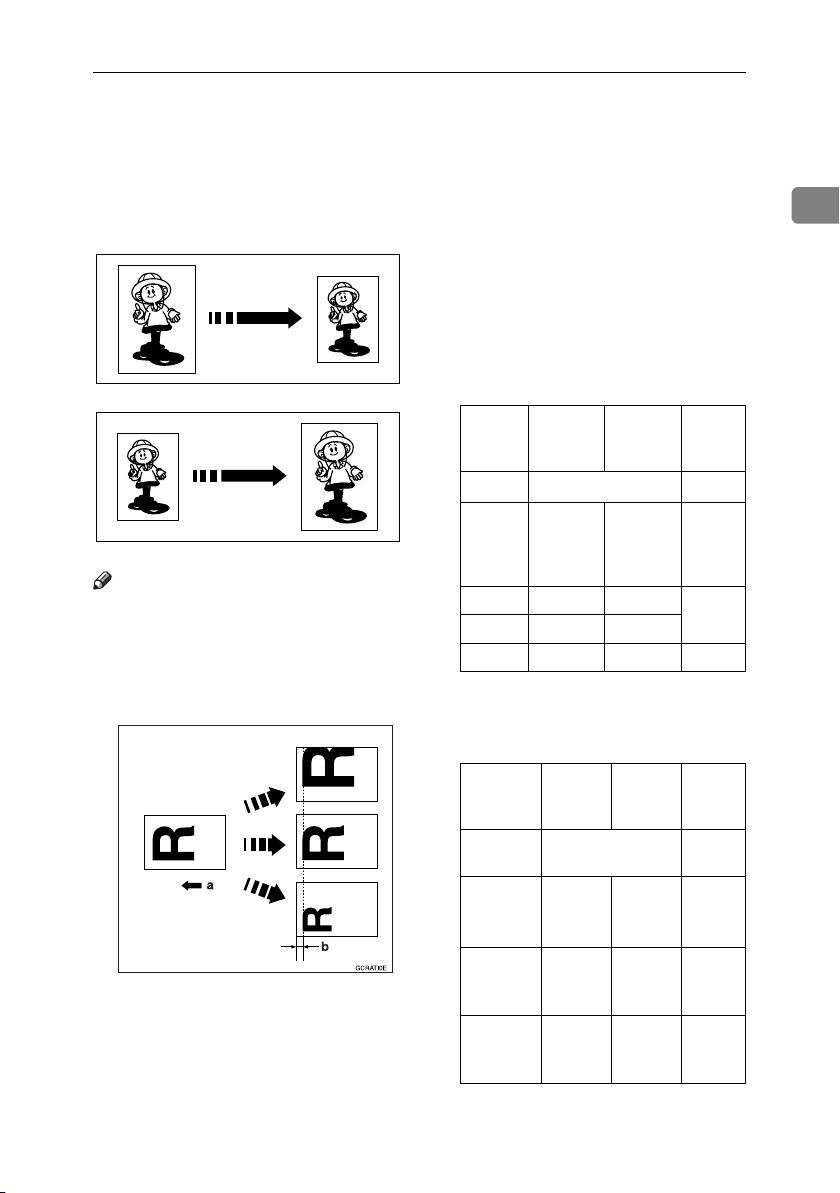
Preset Reduce/Enlarge—Reducing and
Enlarging Using Preset Ratios
You can select a preset ratio for printing.
GRREDU0E
GRENLA0E
Note
❒ The center and the leading edge of
the print image do not shift when a
print image is made with this function.
a: Paper Feed Direction
b: Constant
❒ You can select one of 7 preset ratios
(3 enlargement ratios, 4 reduction
ratios).
❒ You can select a ratio regardless of
the size of an original or printing
paper. With some ratios, parts of
the image might not be printed or
margins will appear on prints.
❒ Prints can be reduced or enlarged
as follows:
❖ Reduction (Metric version)
Indicator
93%
A4VB5 A4
B4VA4 B4 JIS A4 82%
B5VA5 B5 JIS A5
B4VB5 B4 JIS B5 JIS 71%
*1
Original
Size
*1
Print
Size
B5 JIS
(Japanese
Industrial
Standard)
Reduction
Ratio
93%
87%
Select this ratio when you make
prints with a lot of edge margins.
❖ Reduction (Inch version)
Indicator Origi-
Create
Margin
1
8
/2" ×
14"V8
× 11"
11" ×
15"V8
× 11"
11" ×
17"V8
× 11"
*1
Select this ratio when you make
1
1
1
/2"
/2"
/2"
nal Size
*1
1
8
14"
11" × 15"
11" × 17"
prints with a lot of edge margins.
/2" ×
Print
Size
81/2" ×
11"
1
/2" ×
8
11"
1
8
/2" ×
11"
Reduction
Ratio
93%
77%
74%
65%
1
23
 Loading...