

Page 1
Operating Instructions
Printer Reference
Preparing the Machine
1
Setting Up the Printer Driver
2
Other Print Operations
3
Saving and Printing Using the Document Server
4
Appendix
5
Read this manual carefully before you use this machine and keep it handy for future reference. For safe and correct use, be sure to read the Safety Information
in "About This Machine" before using the machine.
Page 2

Introduction
This manual contains detailed instructions and notes on the operation and use of this machine. For your safety and
benefit, read this manual carefully before using the machine. Keep this manual in a handy place for quick reference.
Important
Contents of this manual are subject to change without prior notice. In no event will the company be liable for direct,
indirect, special, incidental, or consequential damages as a result of handling or operating the machine.
Do not copy or print any item for which reproduction is prohibited by law.
Copying or printing the following items is generally prohibited by local law:
bank notes, revenue stamps, bonds, stock certificates, bank drafts, checks, passports, driver's licenses.
The preceding list is meant as a guide only and is not inclusive. We assume no responsibility for its completeness or
accuracy.
legal advisor.
Notes:
Some illustrations in this manual might be slightly different from the machine.
Certain options might not be available in some countries. For details, please contact your local dealer.
Depending on which country you are in, your machine may include certain options as standard. For details, please
contact your local dealer.
Caution:
Use of controls or adjustments or performance of procedures other than those specified in this manual might result
in hazardous radiation exposure.
Two kinds of size notation are employed in this manual. With this machine refer to the inch version.
If you have any questions concerning the legality of copying or printing certain items, consult with your
Page 3

Manuals for This Machine
Read this manual carefully before you use this machine.
Refer to the manuals that are relevant to what you want to do with the machine.
• Media differ according to manual.
• The printed and electronic versions of a manual have the same contents.
• Adobe Acrobat Reader/Adobe Reader must be installed in order to view the manuals as PDF files.
• A Web browser must be installed in order to view the html manuals.
About This Machine
Before using the machine, be sure to read the section of this manual entitled Safety Information.
This manual provides an introduction to the functions of the machine. It also explains the control panel,
preparation procedures for using the machine, how to enter text, and how to install the CD-ROMs
provided.
Troubleshooting
Provides a guide to solving common problems, and explains how to replace paper, toner, staples,
and other consumables.
Copy/ Document Server Reference
Explains Copier and Document Server functions and operations. Also refer to this manual for
explanations on how to place originals.
Facsimile Reference
Explains Facsimile functions and operations.
Printer Reference
Explains Printer functions and operations.
Scanner Reference
Explains Scanner functions and operations.
Network Guide
Explains how to configure and operate the machine in a network environment, and use the software
provided.
General Settings Guide
Explains User Tools settings, and Address Book procedures such as registering fax numbers, e-mail
addresses, and user codes. Also refer to this manual for explanations on how to connect the machine.
1
Page 4
Security Reference
This manual is for administrators of the machine. It explains security functions that you can use to
prevent unauthorized use of the machine, data tampering, or information leakage. For enhanced
security, we recommend that you first make the following settings:
• Install the Device Certificate.
• Enable SSL (Secure Sockets Layer) Encryption.
• Change the user name and password of the administrator using Web Image Monitor.
For details, see “Setting Up the Machine”, Security Reference.
Be sure to read this manual when setting the enhanced security functions, or user and administrator
authentication.
PostScript 3 Supplement
Explains how to set up and use PostScript 3.
Information
Contains general notes on the machine, and information about the trademarks of product names used
in the manuals.
Other Manuals
• UNIX Supplement
• Extended Feature Settings Reference <Device Version>
• Extended Feature Settings Reference <Web Version>
• App2Me Start Guide
• Manuals provided are specific to machine types.
• For "UNIX Supplement", please visit our Web site or consult an authorized dealer. This manual
includes descriptions of functions and settings that might not be available on this machine.
Product name General name
DeskTopBinder Lite and DeskTopBinder Professional
Optional
*1
*1
DeskTopBinder
2
Page 5

TABLE OF CONTENTS
Manuals for This Machine.................................................................................................................................1
How to Read This Manual.................................................................................................................................6
Symbols...........................................................................................................................................................6
Model-Specific Information...............................................................................................................................7
Display Panel......................................................................................................................................................8
Initial Display..................................................................................................................................................8
Simplified Display...........................................................................................................................................9
Job List...............................................................................................................................................................11
Job List Screen..............................................................................................................................................11
Checking Jobs in the Job List.......................................................................................................................12
Changing the Order of Jobs.......................................................................................................................13
Holding Jobs................................................................................................................................................13
Deleting Jobs................................................................................................................................................14
Checking the Job History.............................................................................................................................14
Setting Paper on the Bypass Tray...................................................................................................................15
Setting the Paper Size Using the Control Panel.........................................................................................17
Setting Custom Size Paper Using the Control Panel.................................................................................19
Setting Thick Paper, Thin Paper, or OHP Transparencies Using the Control Panel................................21
Setting Envelopes Using the Control Panel................................................................................................23
1. Preparing the Machine
Confirming the Connection Method...............................................................................................................27
Network Connection...................................................................................................................................27
Local Connection.........................................................................................................................................29
Installing the Printer Driver...............................................................................................................................31
Quick Install..................................................................................................................................................31
Installing the Printer Driver for the Selected Port........................................................................................32
Using as a Windows Network Printer............................................................................................................43
Using as a NetWare Print Server / Remote Printer.......................................................................................45
Form Feed.....................................................................................................................................................46
Banner Page.................................................................................................................................................47
Printing after Resetting the Printer................................................................................................................47
Installing the Printer Driver Using USB............................................................................................................48
Windows 2000 - USB.................................................................................................................................48
3
Page 6

Windows XP, Windows Server 2003/2003 R2 - USB...........................................................................49
Windows Vista, Windows Server 2008 - USB.........................................................................................50
Printing with Parallel Connection....................................................................................................................52
Making Option Settings for the Printer...........................................................................................................54
Conditions for Bidirectional Communication.............................................................................................54
If Bidirectional Communication Is Disabled...............................................................................................55
Installing Font Manager...................................................................................................................................56
Using Adobe PageMaker Version 6.0, 6.5, or 7.0......................................................................................57
2. Setting Up the Printer Driver
PCL - Accessing the Printer Properties.............................................................................................................59
Windows 2000 - Accessing the Printer Properties...................................................................................59
Windows XP, Windows Server 2003/2003 R2 - Accessing the Printer Properties.............................61
Windows Vista, Windows Server 2008 - Accessing the Printer Properties............................................64
3. Other Print Operations
Printing a PDF File Directly...............................................................................................................................67
Printing Method............................................................................................................................................67
Using DeskTopBinder Lite............................................................................................................................67
PDF Direct Print Properties...........................................................................................................................69
Using Commands.........................................................................................................................................70
Using the Print Job Function.............................................................................................................................71
Selecting the Initial Print Job List..................................................................................................................74
Printing from the Print Job Screen....................................................................................................................76
Sample Print..................................................................................................................................................76
Locked Print..................................................................................................................................................79
Hold Print......................................................................................................................................................82
Stored Print...................................................................................................................................................85
Printing from the Jobs Per User ID Screen......................................................................................................90
Printing the Selected Print Job.....................................................................................................................90
Printing All Print Jobs....................................................................................................................................91
Form Feed.........................................................................................................................................................94
Printing from a Selected Tray......................................................................................................................94
Canceling a Print Job...................................................................................................................................95
Canceling a Print Job.......................................................................................................................................96
4
Page 7

Canceling a Print Job Using the Control Panel..........................................................................................96
Windows - Canceling a Print Job from the computer...............................................................................96
Checking the Error Log....................................................................................................................................98
Spool Printing.................................................................................................................................................100
User Defined Pages.......................................................................................................................................101
Printing with the Finisher................................................................................................................................102
Staple.........................................................................................................................................................102
Punch..........................................................................................................................................................104
Collate........................................................................................................................................................106
Covers.............................................................................................................................................................109
Chaptering.....................................................................................................................................................112
No Slip Sheets...........................................................................................................................................112
Inserting Chapter Slip Sheets....................................................................................................................112
Slip Sheet........................................................................................................................................................114
Specifying the Paper Type with the Printer Driver.......................................................................................116
Using the Virtual Printer.................................................................................................................................117
Adding a Virtual Printer.............................................................................................................................117
Changing a Virtual Printer Configuration................................................................................................118
Confirming a Virtual Printer Configuration..............................................................................................118
Deleting a Virtual Printer...........................................................................................................................119
Printing Using a Virtual Printer..................................................................................................................119
4. Saving and Printing Using the Document Server
Accessing the Document Server...................................................................................................................121
5. Appendix
Specifications.................................................................................................................................................123
Printer Features Menu....................................................................................................................................125
INDEX...........................................................................................................................................................133
5
Page 8
How to Read This Manual
Symbols
This manual uses the following symbols:
Indicates points to pay attention to when using the machine, and explanations of likely causes of paper
misfeeds, damage to originals, or loss of data. Be sure to read these explanations.
Indicates supplementary explanations of the machine’s functions, and instructions on resolving user errors.
This symbol is located at the end of sections. It indicates where you can find further relevant information.
[ ]
Indicates the names of keys on the machine's display or control panels.
6
Page 9
Model-Specific Information
BDJ008S
In this manual, model-specific information is indicated by the following marks:
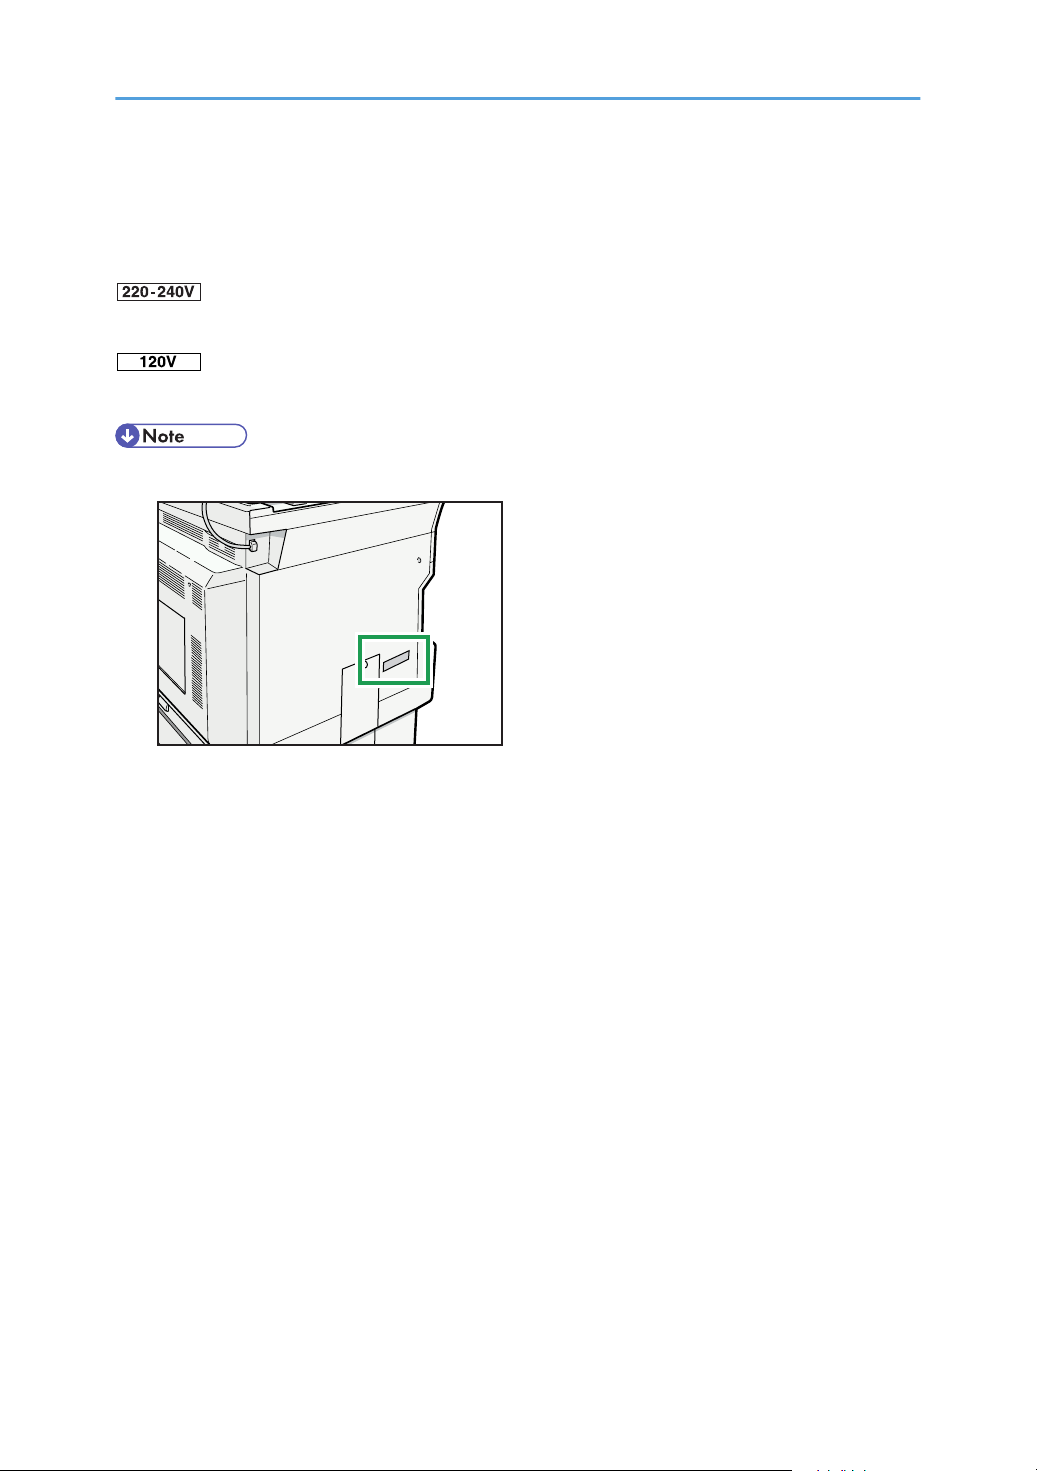
Indicates information that is specific to the 220 to 240 V model.
Indicates information that is specific to the 120 V model.
• Check the label on the rear of the machine to identify the model.
• Dimensions in this manual are given in two units of measure: metric and inch. If your machine is the
220 to 240 V model, refer to the metric units. If your printer is the 120 V model, refer to the inch units.
7
Page 10
Display Panel
BDJ003S
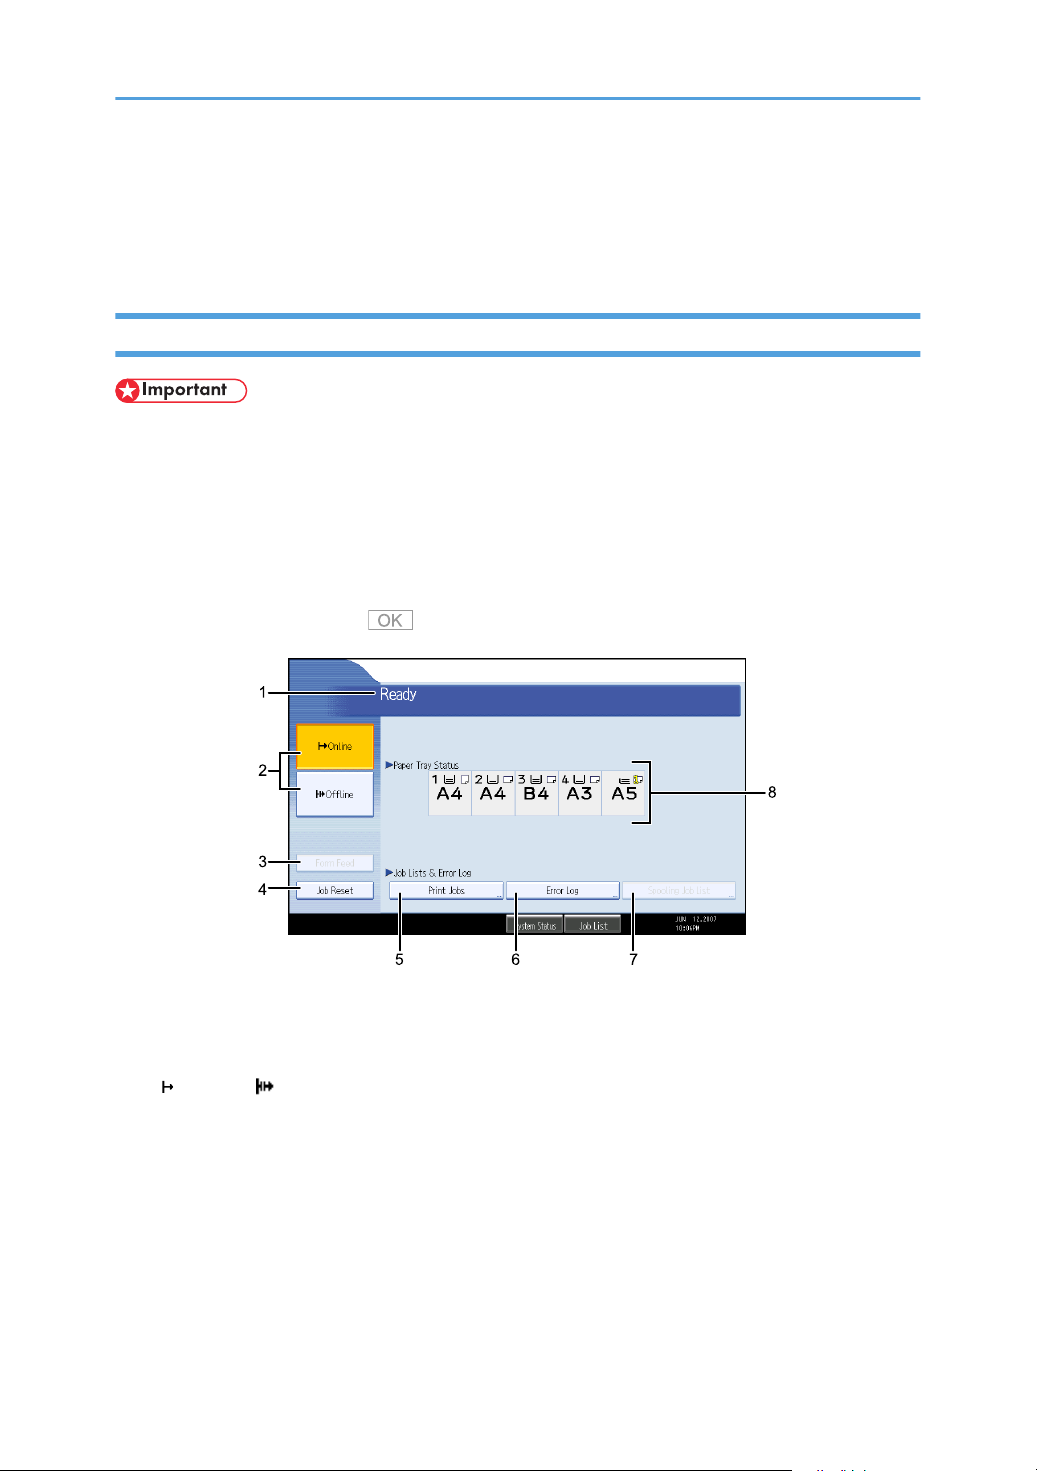
This section describes configuration using the display panel when the printer function is selected.
Initial Display
• The machine switches to offline when you make settings in online mode. After you complete the setting,
the machine switches to online automatically.
• If you make a setting when the machine is offline, it will stay offline afterwards.
• The function items displayed serve as selector keys. You can select or specify an item by pressing it
lightly.
• When you select or specify an item on the control panel, it becomes highlighted.
• Keys dimmed (for example, ) cannot be used.
1. Operational status or messages
Displays current machine status, such as "Ready", "Offline", and "Printing...". Information about the print job (user
ID and document name) appears in this section.
2. [ Online] / [ Offline]
Press to switch the machine between online and offline.
When the machine is online, it can receive data from the computer.
When the machine is offline, it cannot receive data from the computer.
3. [Form Feed]
Press to print all the data left in the machine's input buffer.
• When the machine is online, the status appears dimly.
• This function is not available with the RPCS printer language.
8
Page 11
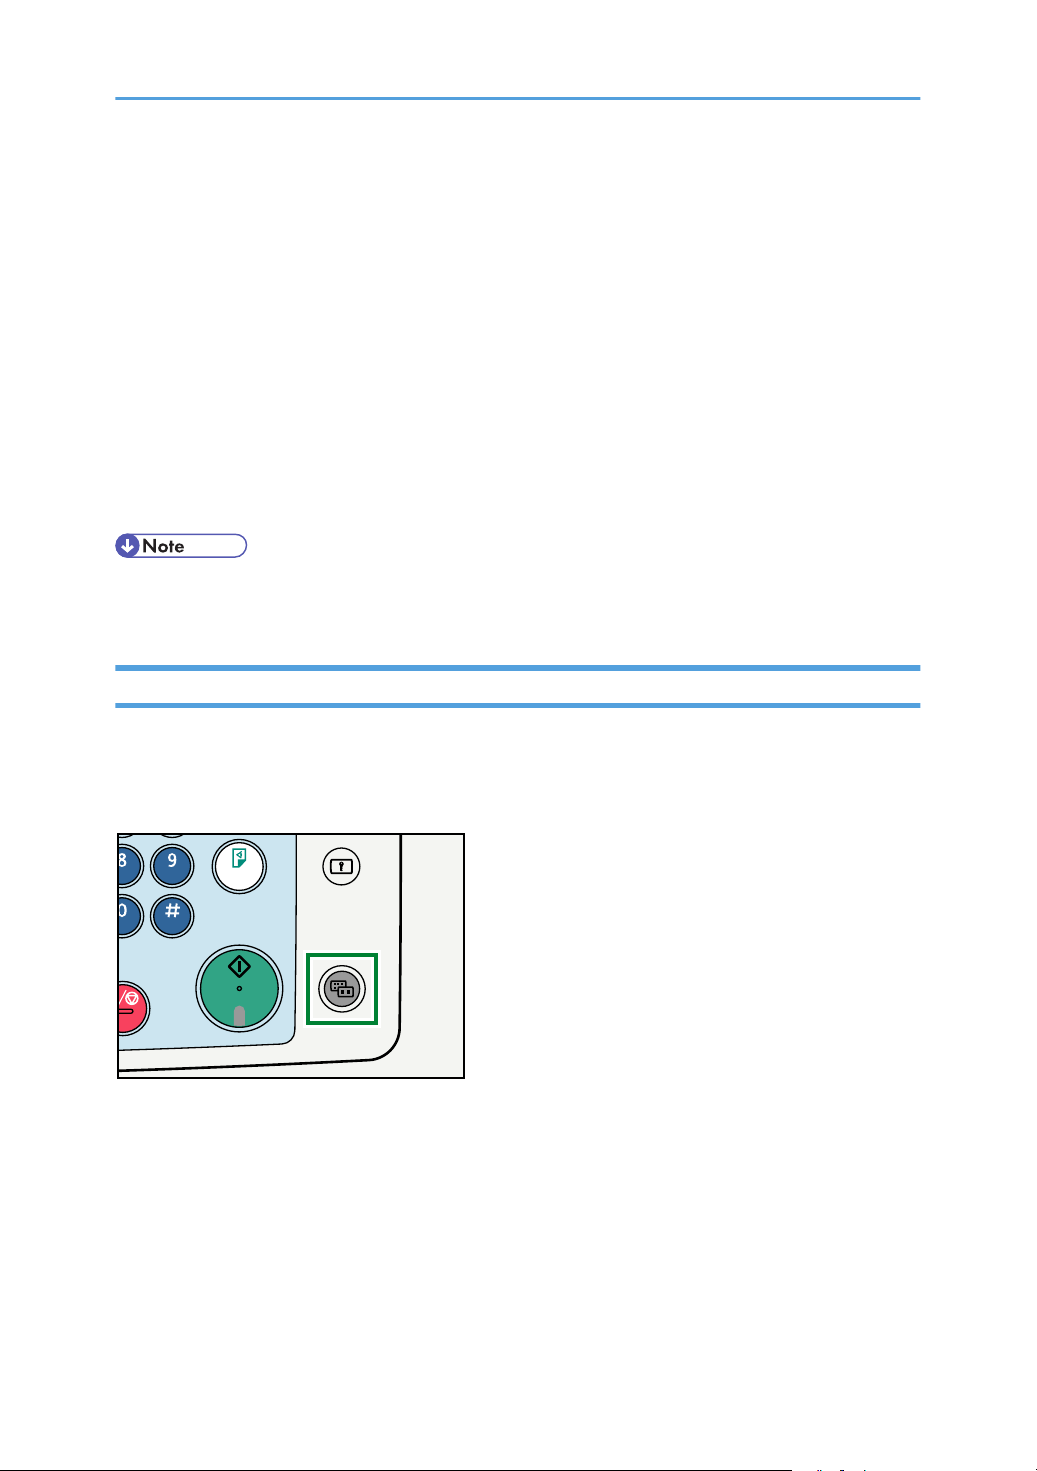
4. [Job Reset]
BAC002S
Press to cancel the current print job.
If you press it when the machine is offline and Hex Dump is selected, Hex Dump is canceled.
5. [Print Jobs]
Press to display print jobs sent from a computer.
6. [Error Log]
Press to display the error logs of print jobs sent from a computer.
7. [Spooling Job List]
Press to display spooled jobs.
8. Paper Tray Status indicators
The paper tray settings appear.
• When the power is turned on, the copier display is shown. This is a factory default. This initial setting
can be changed. See "System Settings", General Settings Guide.
Simplified Display
This section explains how to switch to the simplified display.
When you press the [Simplified Display] key, the screen changes from the initial display to the simplified
display. Letters and keys are displayed at a larger size, making operations easier.
9
Page 12
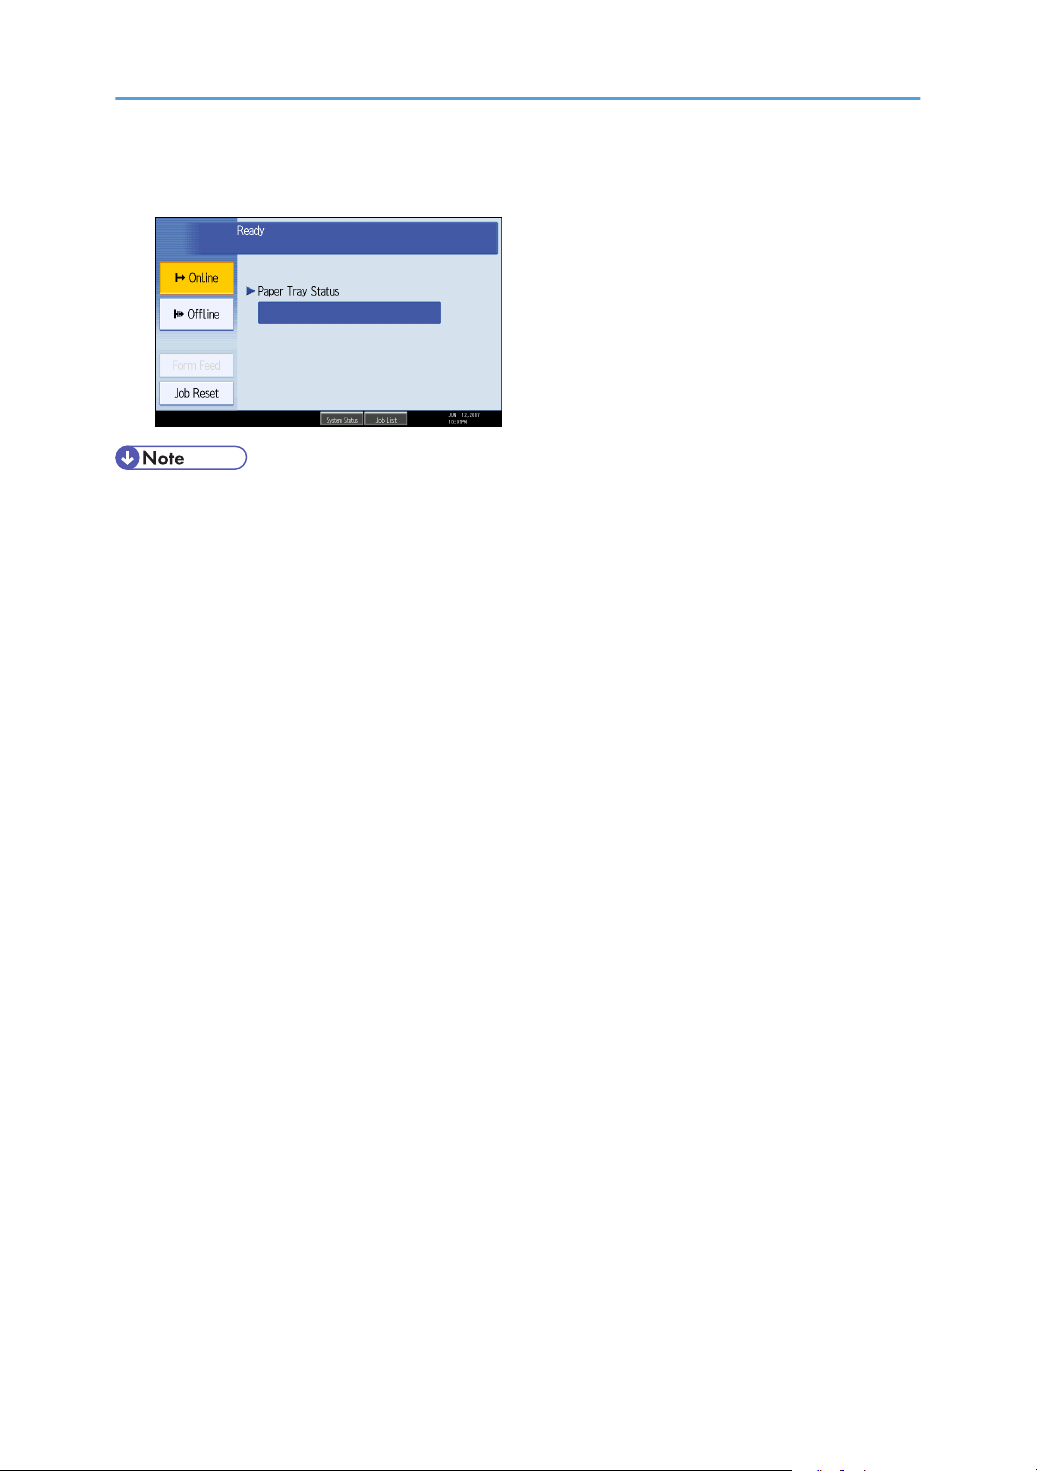
Example of a simplified display
• To return to the initial display, press the [Simplified Display] key again.
• Certain keys do not appear on the simplified display.
10
Page 13
Job List
BAC014S
Jobs printed using Copy, Document Server, or Printer mode are temporarily stored in the machine, and
then executed in order. The Job List function allows you to manage these jobs.
For example, you can cancel incorrect job settings or print an urgent document.
• You cannot use the Job List function when Interrupt Copy is active.
• Documents printed using the facsimile function and scanner function are not displayed in the job list.
Job List Screen
This section explains displays and icons that appear in the Job List screen.
The Job List screen varies depending on whether Job Order is selected with Print Priority for the System
Settings. For details about setting procedure, see "System Settings", General Settings Guide.
When [Job Order] is not selected:
The job list is displayed for each of the functions.
When [Job Order] is selected:
The job list is displayed for all functions in the order of print jobs.
11
Page 14
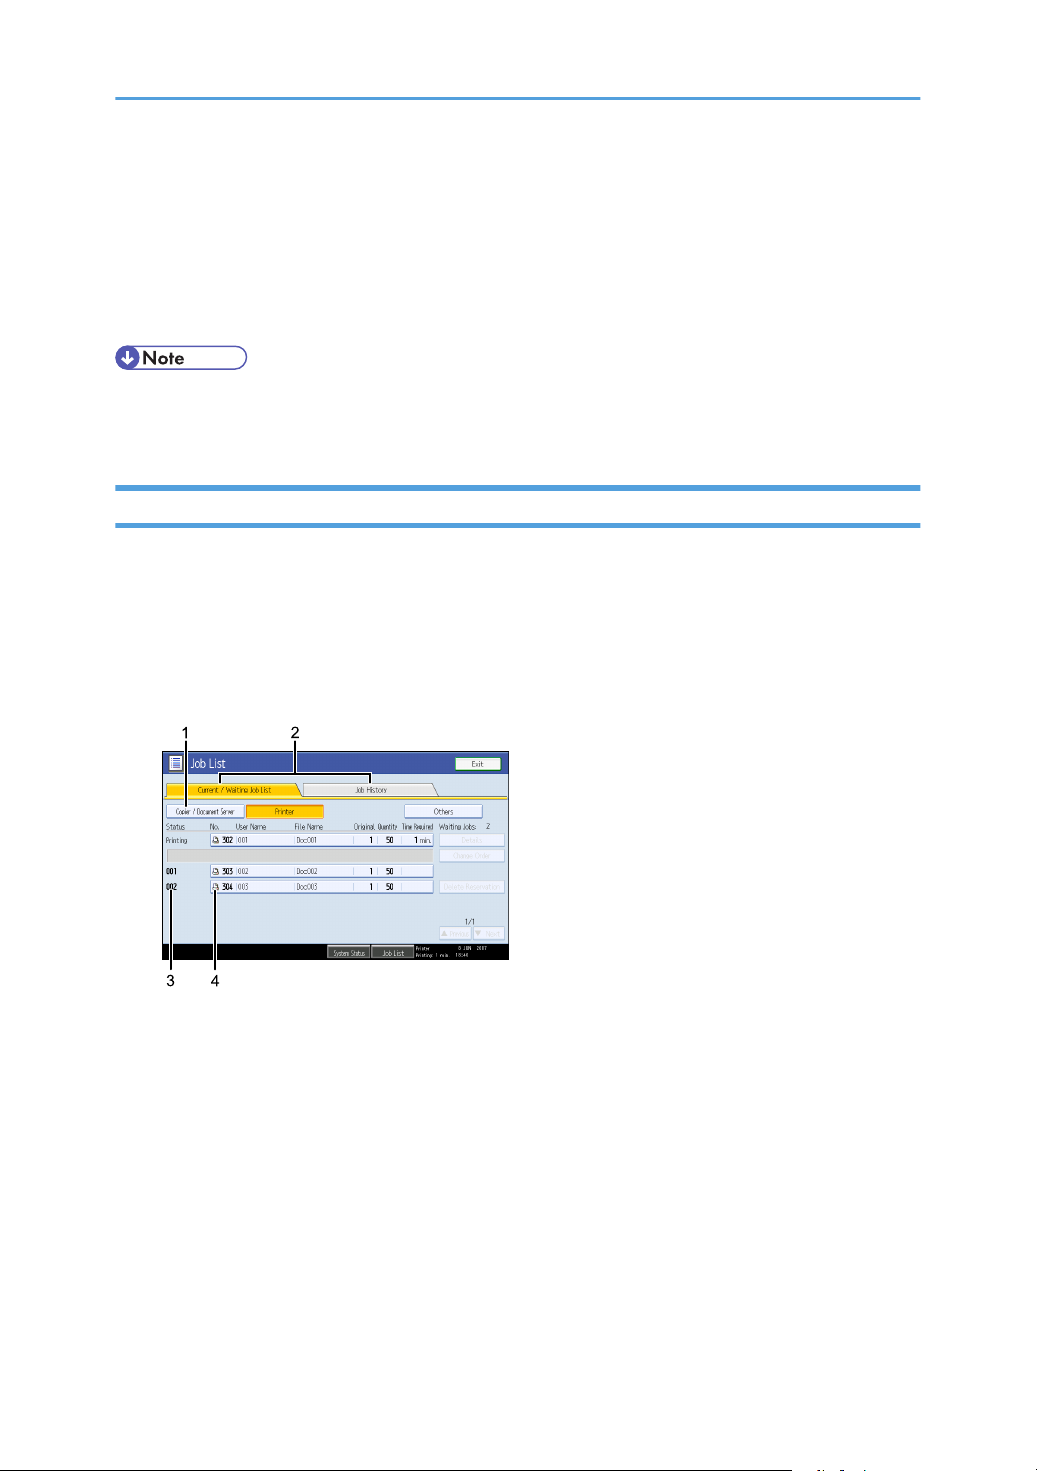
BAC015S
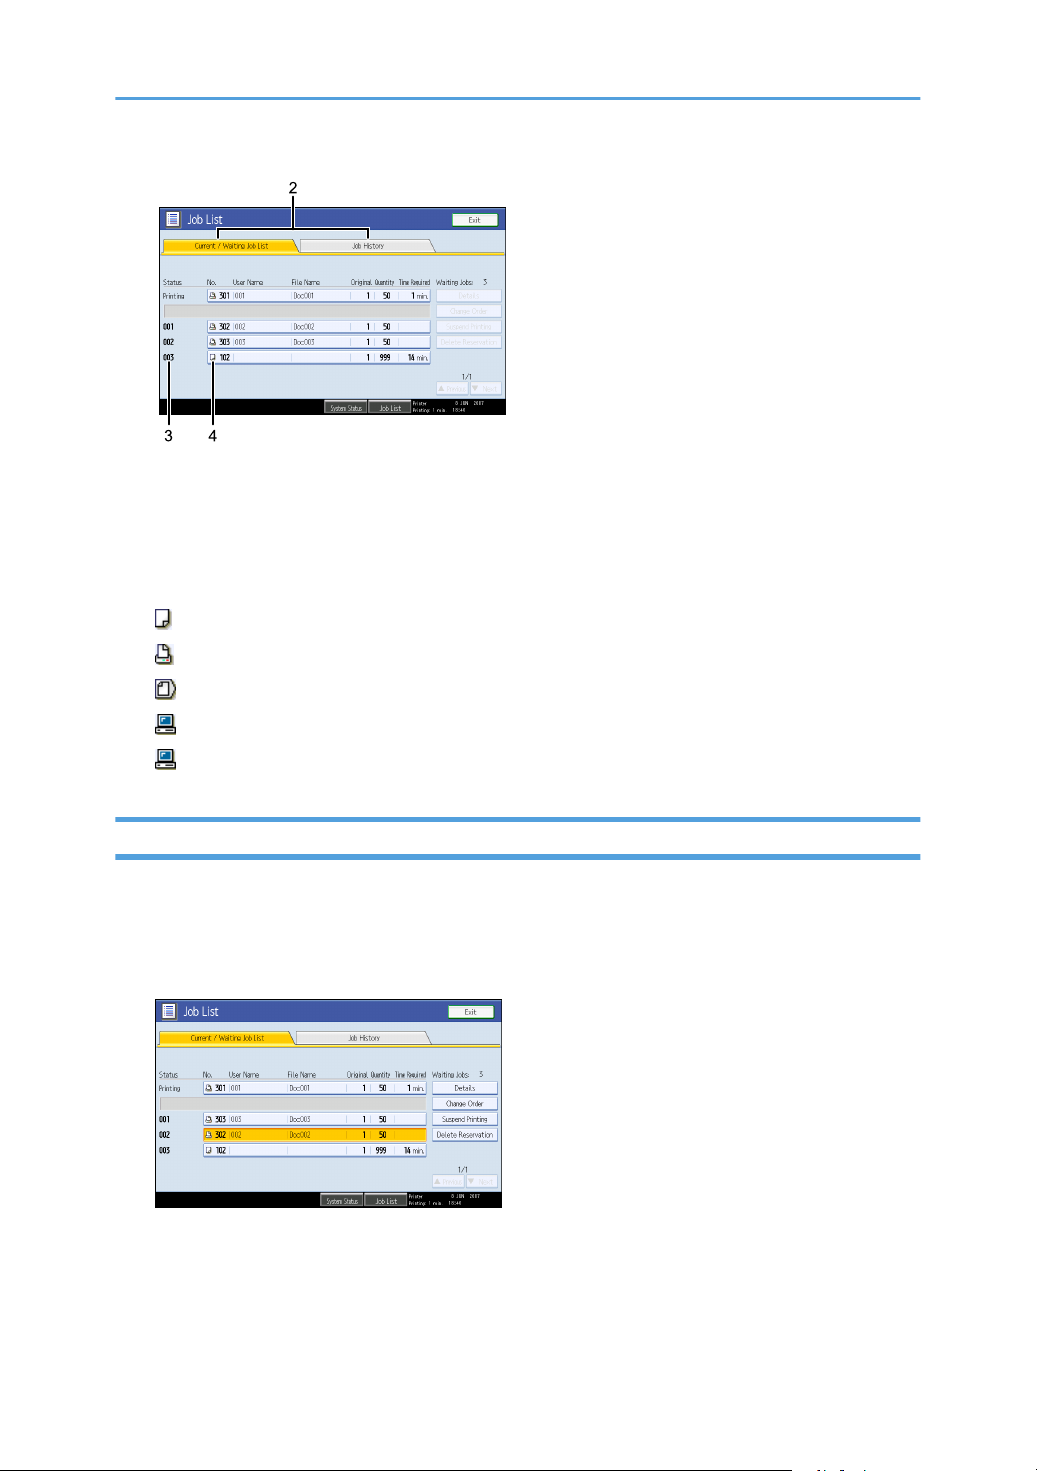
1. Switches between job lists for each function.
2. Switches between [Current / Waiting Job List] and [Job History].
3. Displays reserved job numbers.
4. Displays the function used to print jobs.
: Job printed using copy function
: Job printed using printer function
: Job printed using Document Server function
: Job printed using DeskTopBinder
: Job printed using Web Image Monitor
Checking Jobs in the Job List
You can check the contents of jobs in the job list.
1. Press [Job List].
2. Select a job whose contents you want to check.
12
3. Press [Details], and then check the contents.
4. Press [Exit].
Page 15
Changing the Order of Jobs
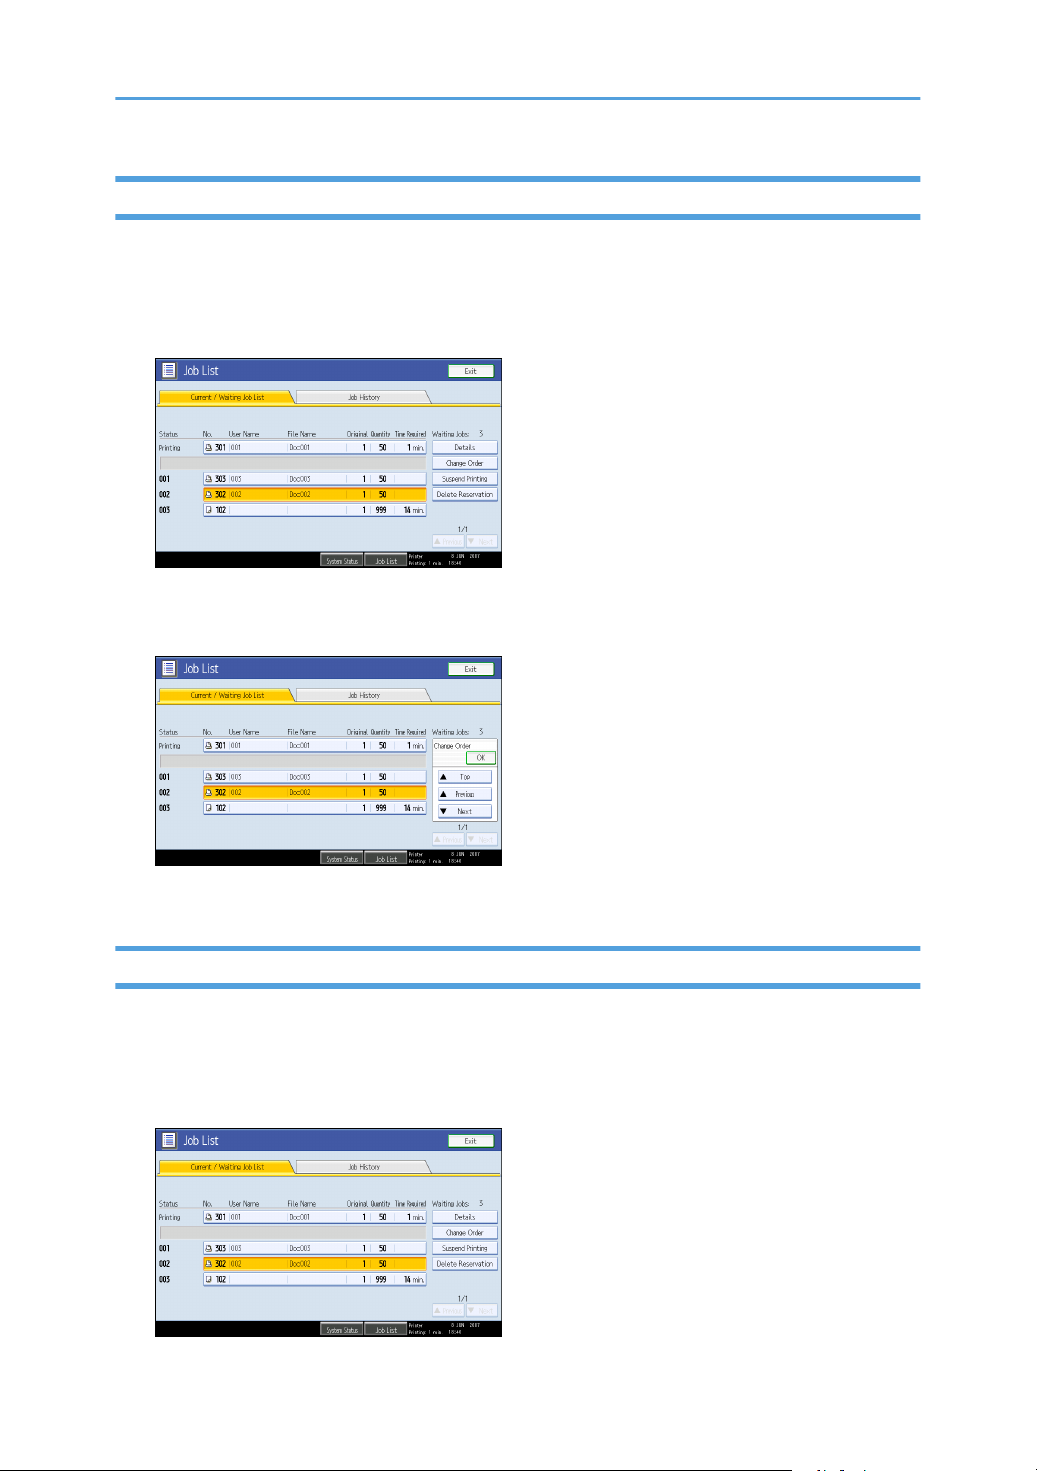
You can change the order of jobs in the job list.
1. Press [Job List].
2. Select a job whose order you want to change.
3. Press [Change Order].
4. Change the order using [Top], [Previous], or [Next].
5. Press [OK].
Holding Jobs
You can hold jobs that are queued or currently printing.
1. Press [Job List].
2. Select a job you want to hold.
13
Page 16
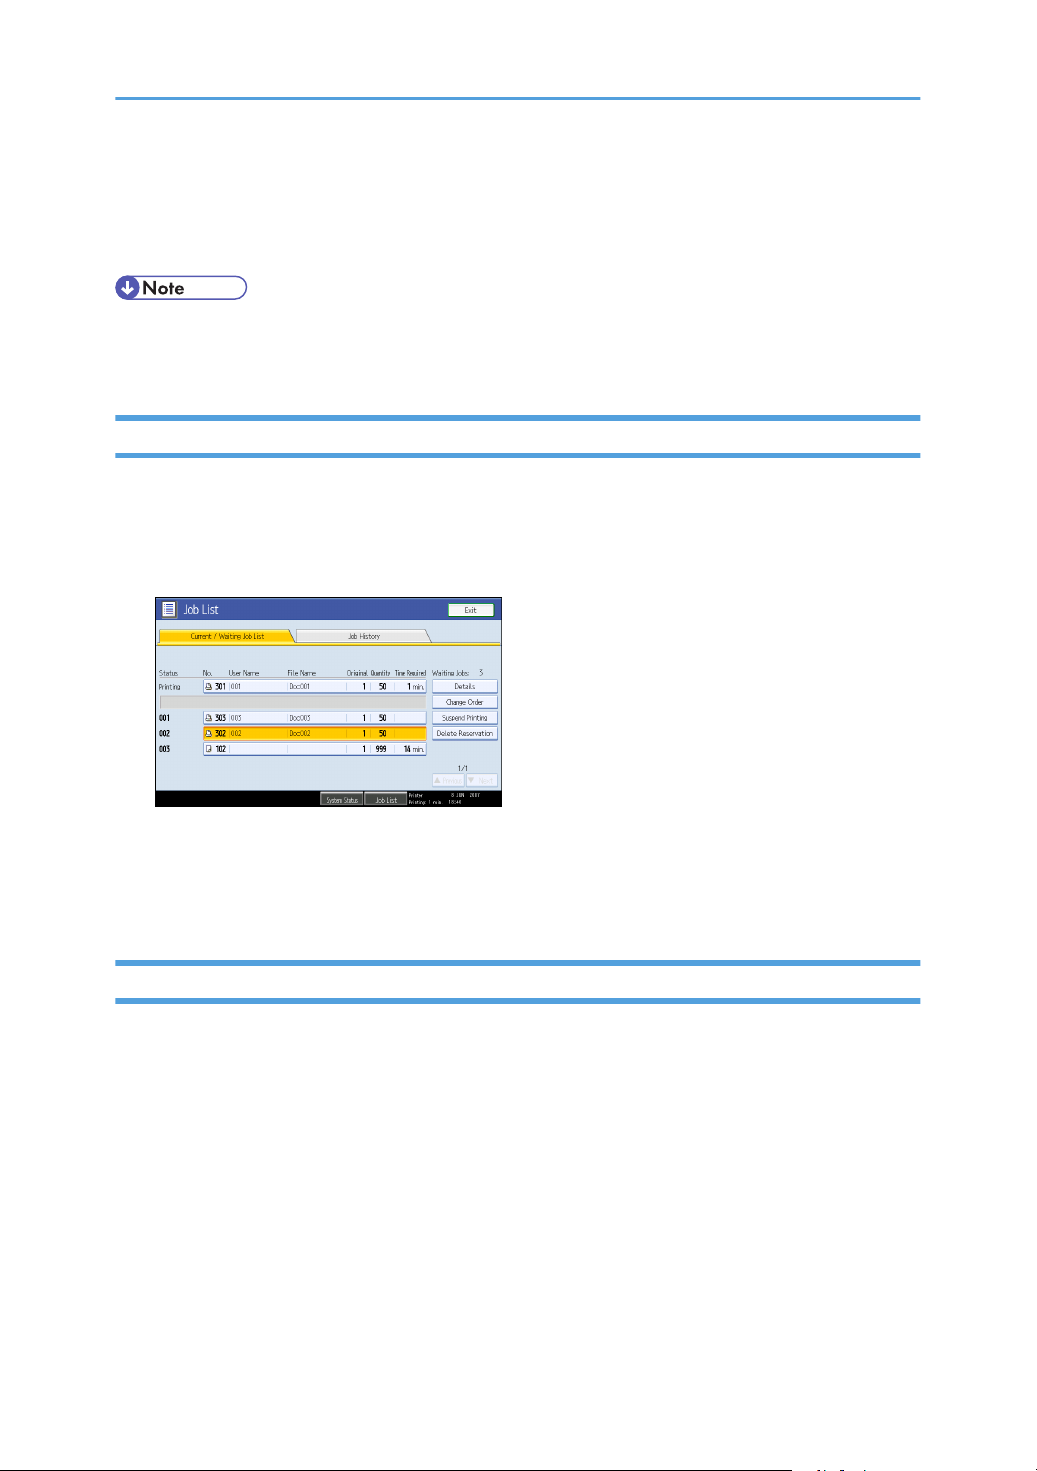
3. Press [Suspend Printing].
The selected job and the jobs that follow it are suspended. "Suspended" is displayed at the left of the
jobs in the job list that are suspended.
• To resume the suspended jobs, press [Resume Printing].
• This function is available only if [Job Order] is specified.
Deleting Jobs
You can delete a job that is queued or currently printing.
1. Press [Job List].
2. Select a job you want to delete.
To delete multiple print jobs, select all print jobs you want to delete.
3. Press [Delete Reservation].
4. Press [OK].
Checking the Job History
You can view the history and contents of completed print jobs.
1. Press [Job List].
2. Press [Job History].
A list of completed print jobs appears.
3. Select a job whose contents you want to check.
4. Press [Details], and then check the contents.
5. Press [Exit].
14
Page 17
Setting Paper on the Bypass Tray
This section gives instructions for setting paper on the bypass tray.
For details about paper size and paper type, see "Paper Size and Paper Type", About This Machine.
• Paper sizes that can be loaded onto the bypass tray are 90 - 305 mm (3.55 - 12 in.) vertical, and
148 - 600 mm (5.83 - 23.62 in.) horizontal.
• When paper larger than 600 mm (23.62 in.) in length is used, the paper may become wrinkled, may
not be fed into the machine, or may cause paper jams.
• The machine can automatically detect the following sizes as regular size copy paper:
• A3 , B4 , A4 , B5 , A5 , B6 , A6
• 11" 17" , 10" 15" , 8" 13" , 81/2" 11" , A5 , B6 , A6
• If you want to use the size of paper other than the above, be sure to specify the size.
• The following functions are disabled when printing from the bypass tray:
• Duplex/Booklet printing (when the optional Finisher SR790, Finisher SR3000, or SR3050 is
installed)
• Auto Tray Select
• Auto Tray Switching
• Rotating Collate
• Staple (when the optional Finisher SR790, Finisher SR3000, or SR3050 is installed)
• Punch (when the optional Finisher SR3000 and Punch Unit are installed)
Printing onto paper with specific orientation
When printing onto paper that has specific orientation requirements, such as envelopes or letterhead
paper, be sure to set as the followings:
• If the paper feed orientation is , insert paper print side down in the bypass tray, and set the
bottom edge of the paper toward the machine.
• If the paper feed orientation is , insert paper print side down in the bypass tray, and set the
bottom edge of the paper toward you.
To print on paper that is set in the opposite position to either of the correct positions described above,
rotate the print image 180 degrees using the printer driver. For details, see the printer driver Help.
15
Page 18
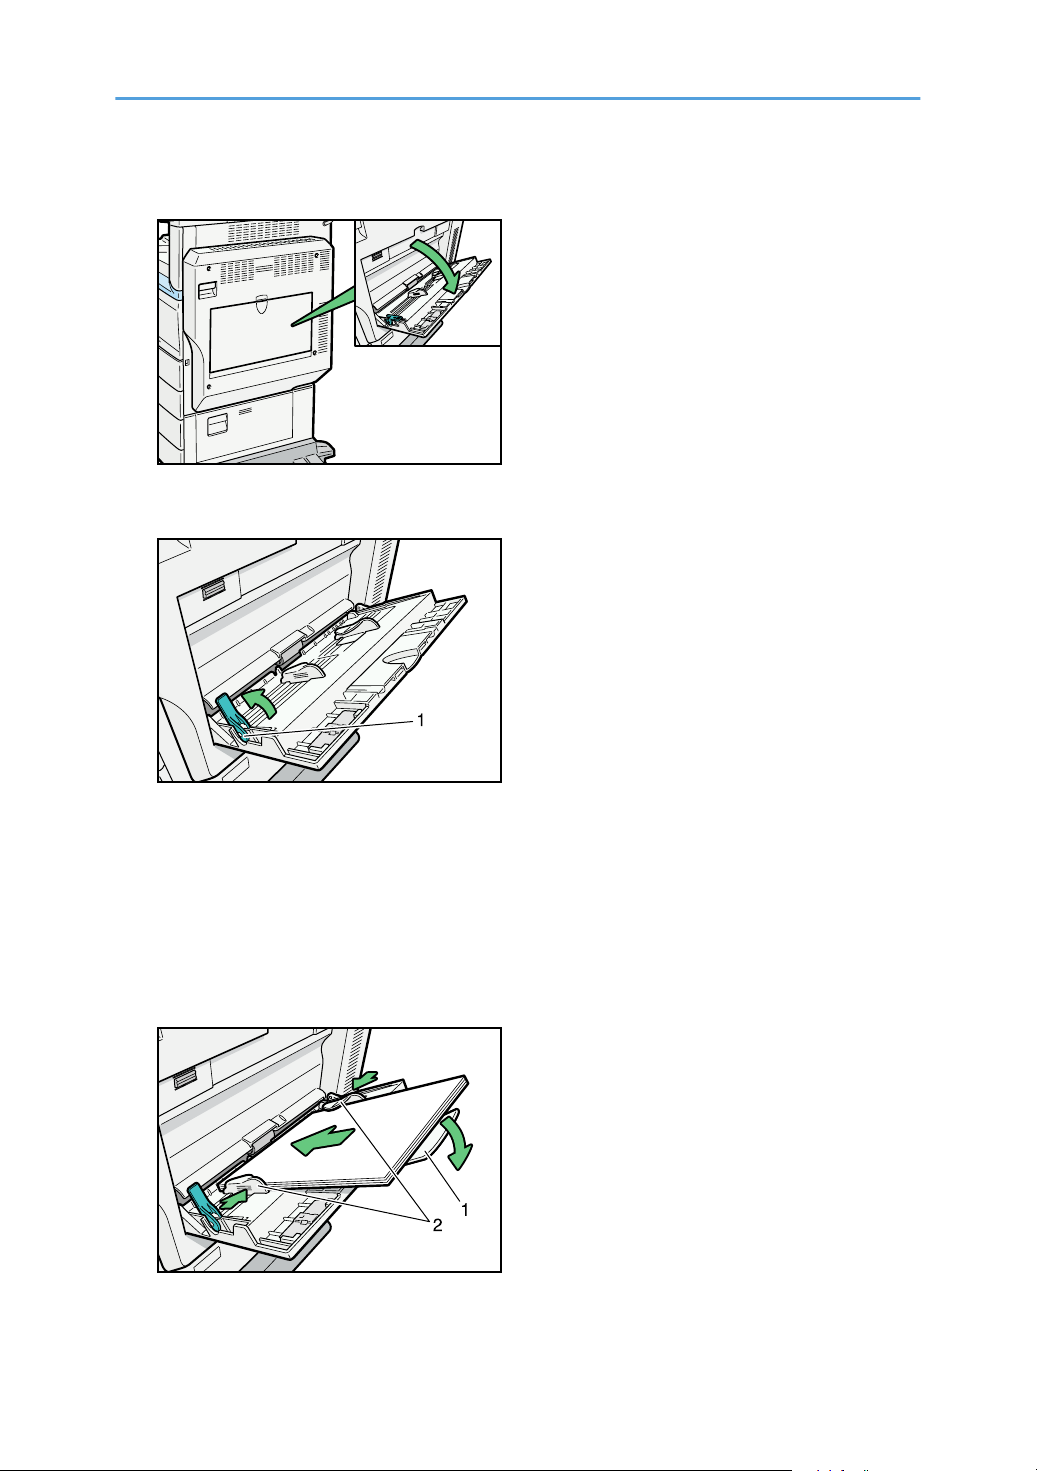
1. Open the bypass tray.
BCU007S
BCU008S
BCU009S
2. Unlock the paper guide by pushing up the paper guide release lever.
16
1. Paper guide release lever
3. Open out the extender and gently insert paper facing down into the bypass tray until the
beeper sounds, and then adjust the paper guide to the paper size.
If the paper size of the paper guide and the paper do not match, skewing and misfeeds might occur.
Do not stack paper over the limit mark, otherwise a skewed image or misfeeds might occur.
Fan the paper to get air between the sheets to avoid a multi-sheet feed.
1. Extender
Page 19
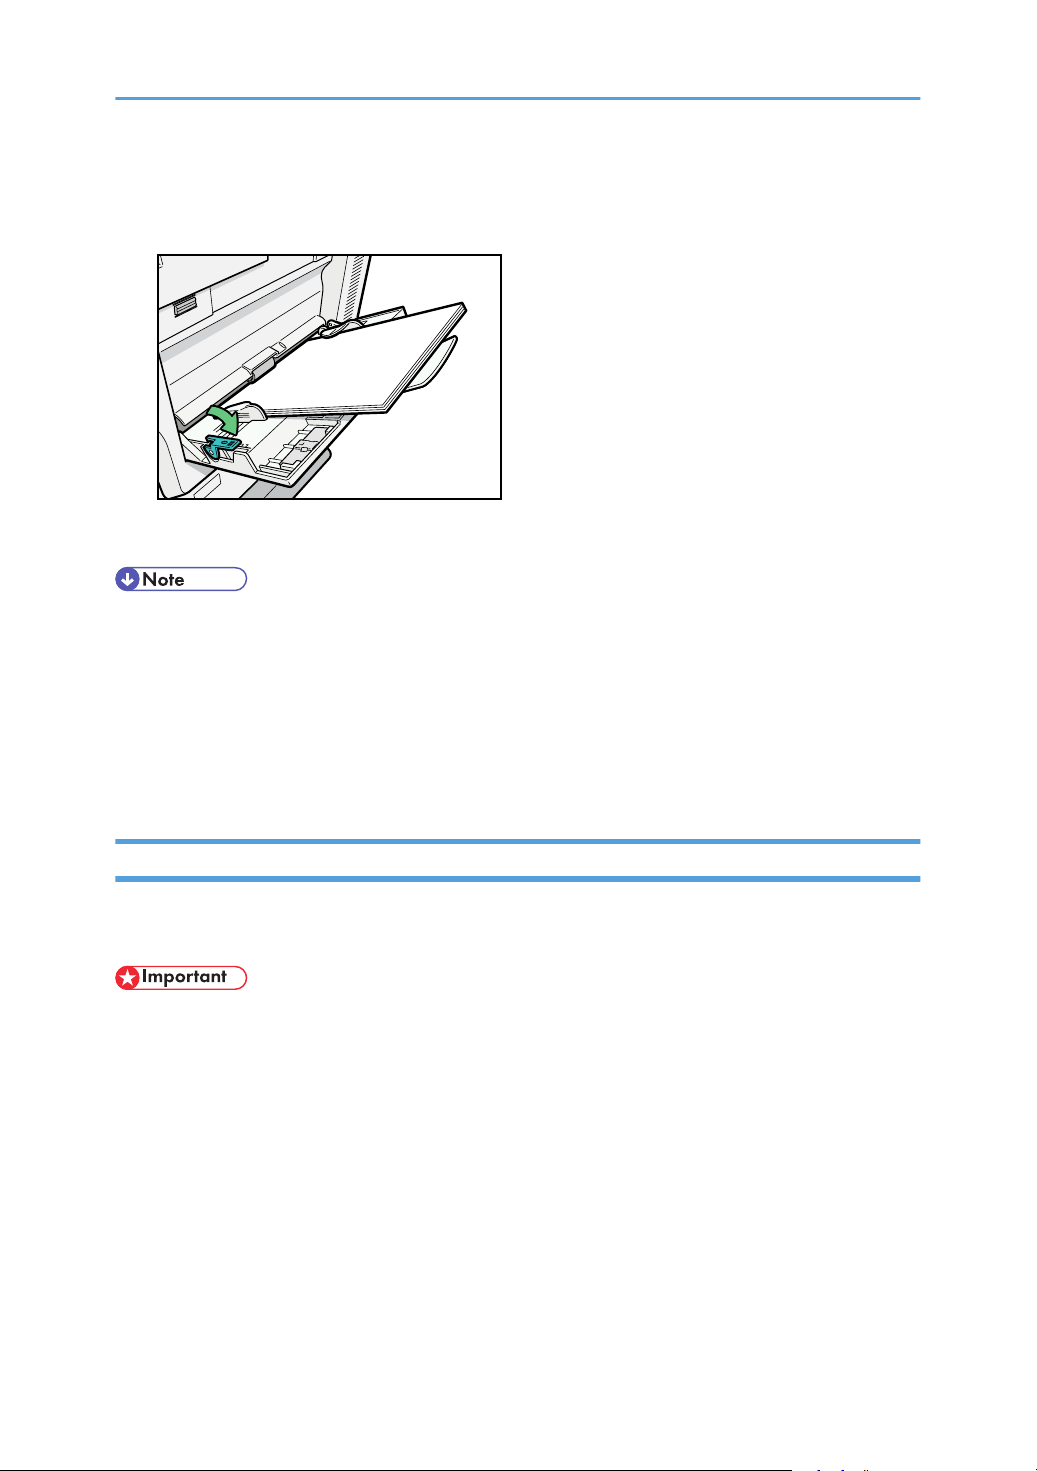
2. Paper Guide
BCU010S
4. Lock the paper guide by pushing down the paper guide release lever.
5. Set the paper size using the printer driver or the control panel.
• When loading thick paper, thin paper, or OHP transparencies, set paper size and paper type.
• The number of sheets that can be loaded in the bypass tray depends on the paper type.
• When loading letterhead paper, see "Loading Paper", General Settings Guide.
• When the Panel Key Sound is turned off, it will not sound if you insert paper into the bypass tray. For
details about Panel Key Sound, see "System Settings", General Settings Guide.
• For details about setting printer drivers, see the printer driver Help.
Setting the Paper Size Using the Control Panel
Follow the procedure below to set the machine using the control panel when loading standard size paper
onto the bypass tray.
• The following procedures are not required if you select [Driver / Command] from [Bypass Tray Setting
Priority] in [System] of [Printer Features] (see "Printer Features", General Settings Guide). In that case,
set the paper size using the printer driver.
• Under [Printer Features], [System], if you set [Bypass Tray Setting Priority] to [Driver / Command] ,
paper size settings made on the printer driver must match those made on the control panel. If they do
not match, an error message appears and printing stops if [Printer Features], [System], [Auto Continue]
is not set. For details about [Printer Features] settings, see General Settings Guide.
17
Page 20
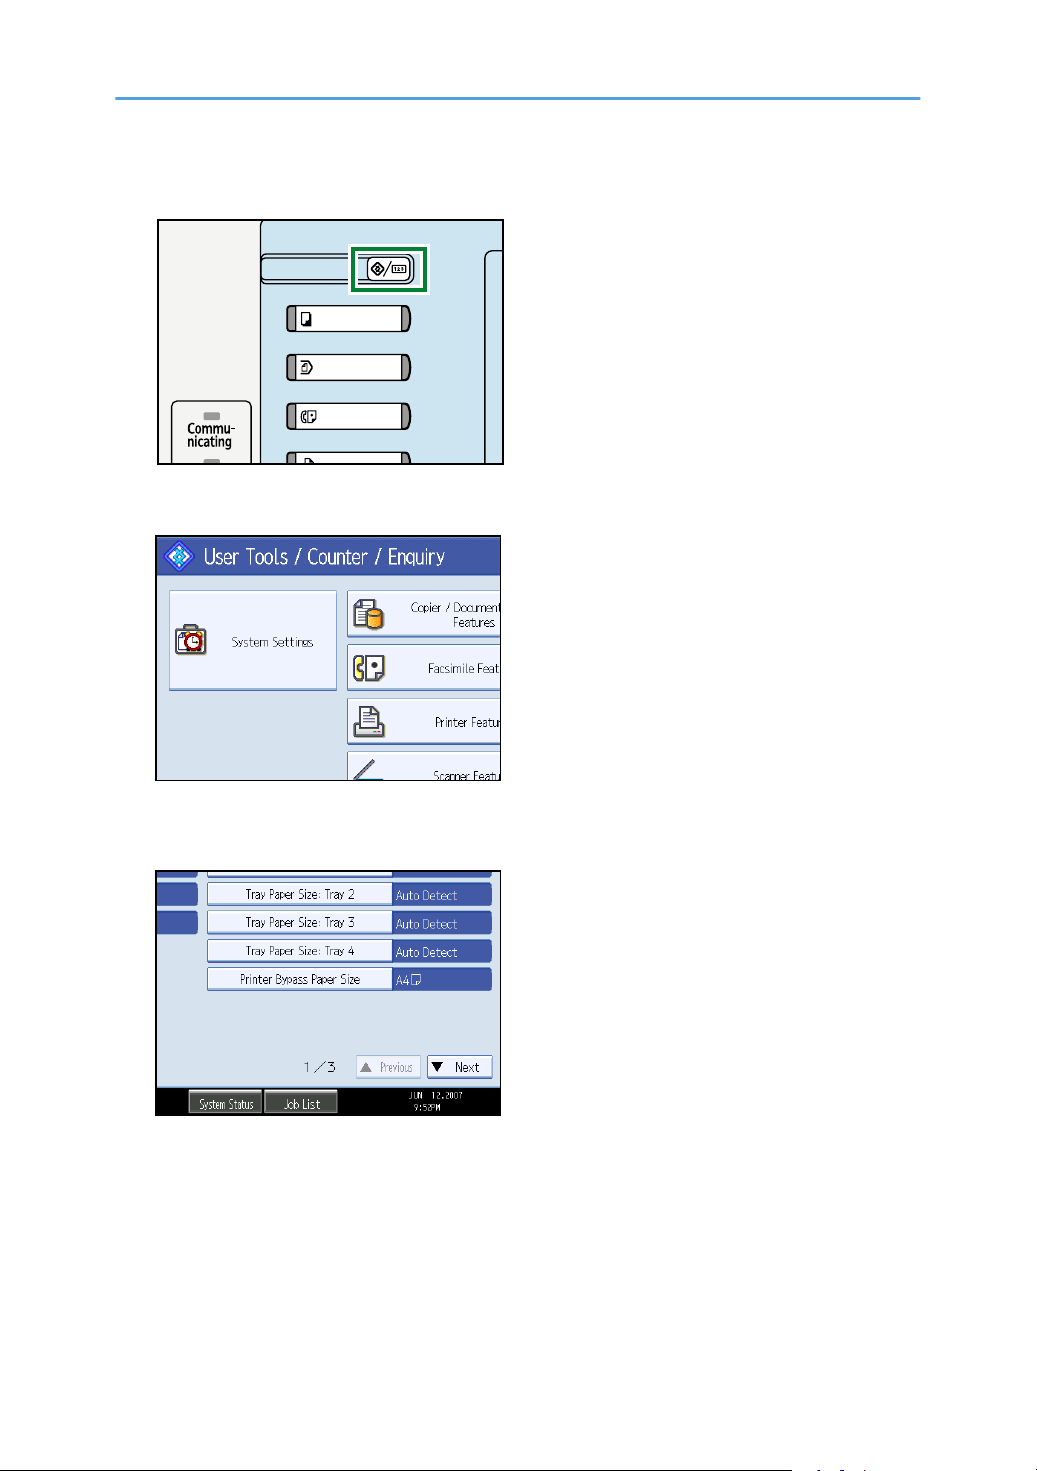
1. Press the [User Tools/Counter] key on the control panel.
BAC001S
2. Press [System Settings].
3. Press the [Tray Paper Settings] tab.
4. Press [Printer Bypass Paper Size].
18
Page 21
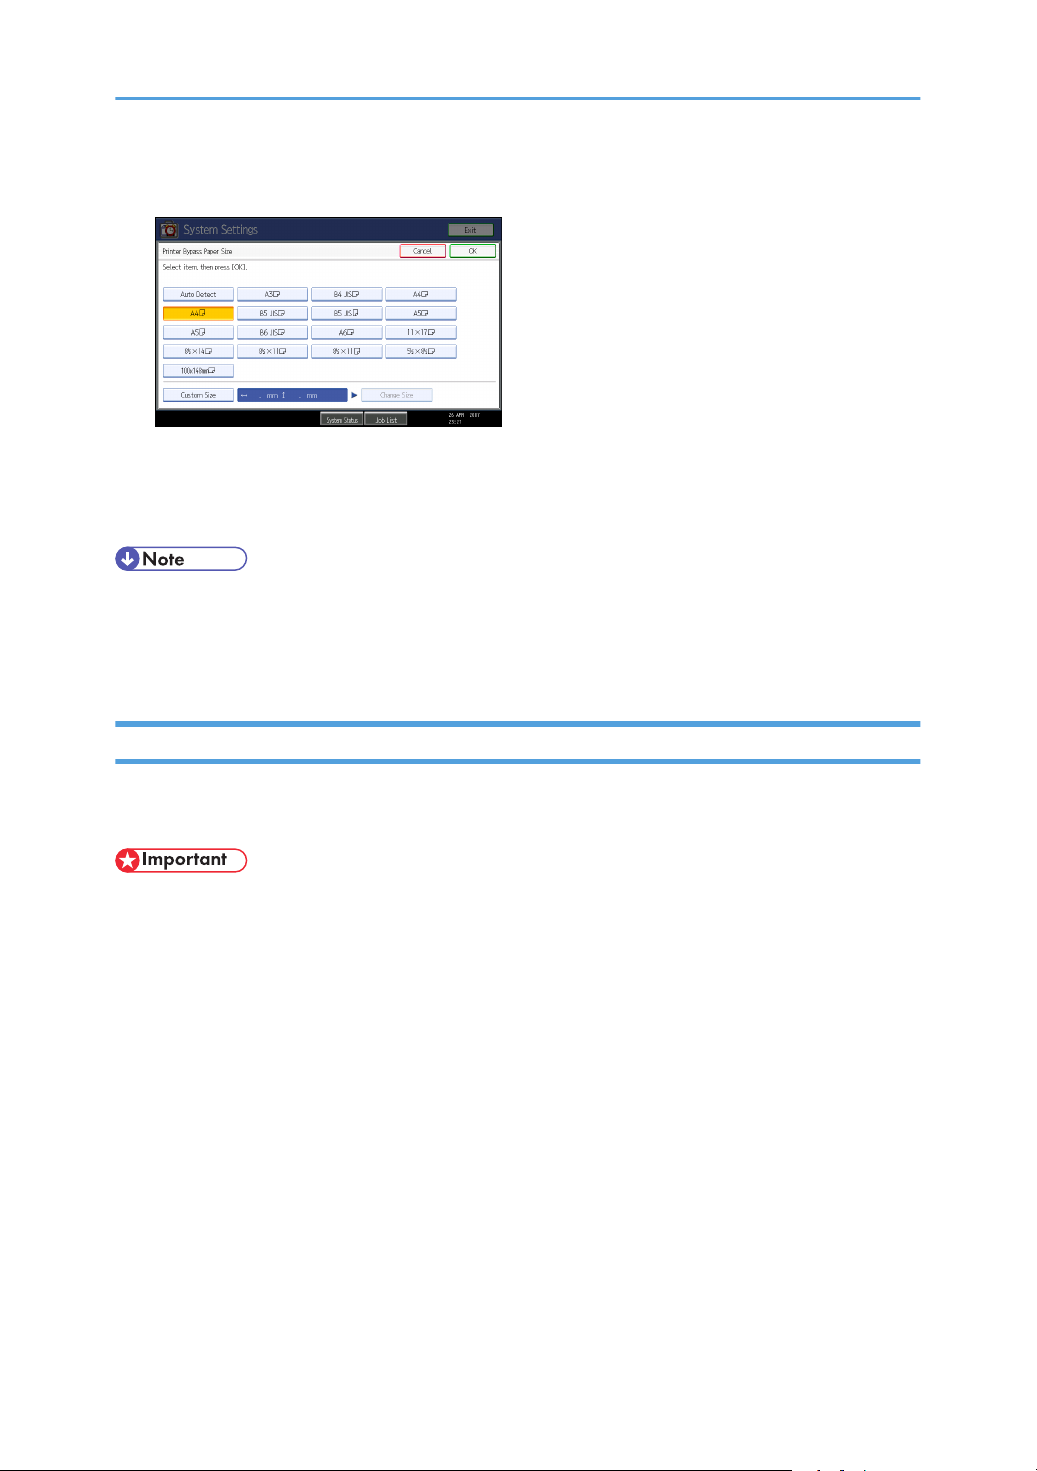
5. Select the paper size.
6. Press [OK].
7. Press the [User Tools/Counter] key.
The initial screen appears.
• When loading thick paper, thin paper, or OHP transparencies, set paper size and paper type.
• [Auto Detect] is the default setting for [Printer Bypass Paper Size].
• For details about setting printer drivers, see the printer driver Help.
Setting Custom Size Paper Using the Control Panel
Follow the procedure below to set the machine using the control panel when loading custom size paper
onto the bypass tray.
• The following procedures are not required if you select [Driver / Command] from [Bypass Tray Setting
Priority] in [System] of [Printer Features] (see "Printer Features", General Settings Guide). In that case,
set the paper size using the printer driver.
• If you select [Machine Settings] from [Bypass Tray Setting Priority] in [System] of [Printer Features]
(see "Printer Features", General Settings Guide), the settings made using the control panel have priority
over the printer driver settings.
• If the printer driver is not used, select [Machine Settings] from [Bypass Tray Setting Priority] in [System]
of [Printer Features] (see "Printer Features", General Settings Guide). Set paper size using the control
panel.
19
Page 22
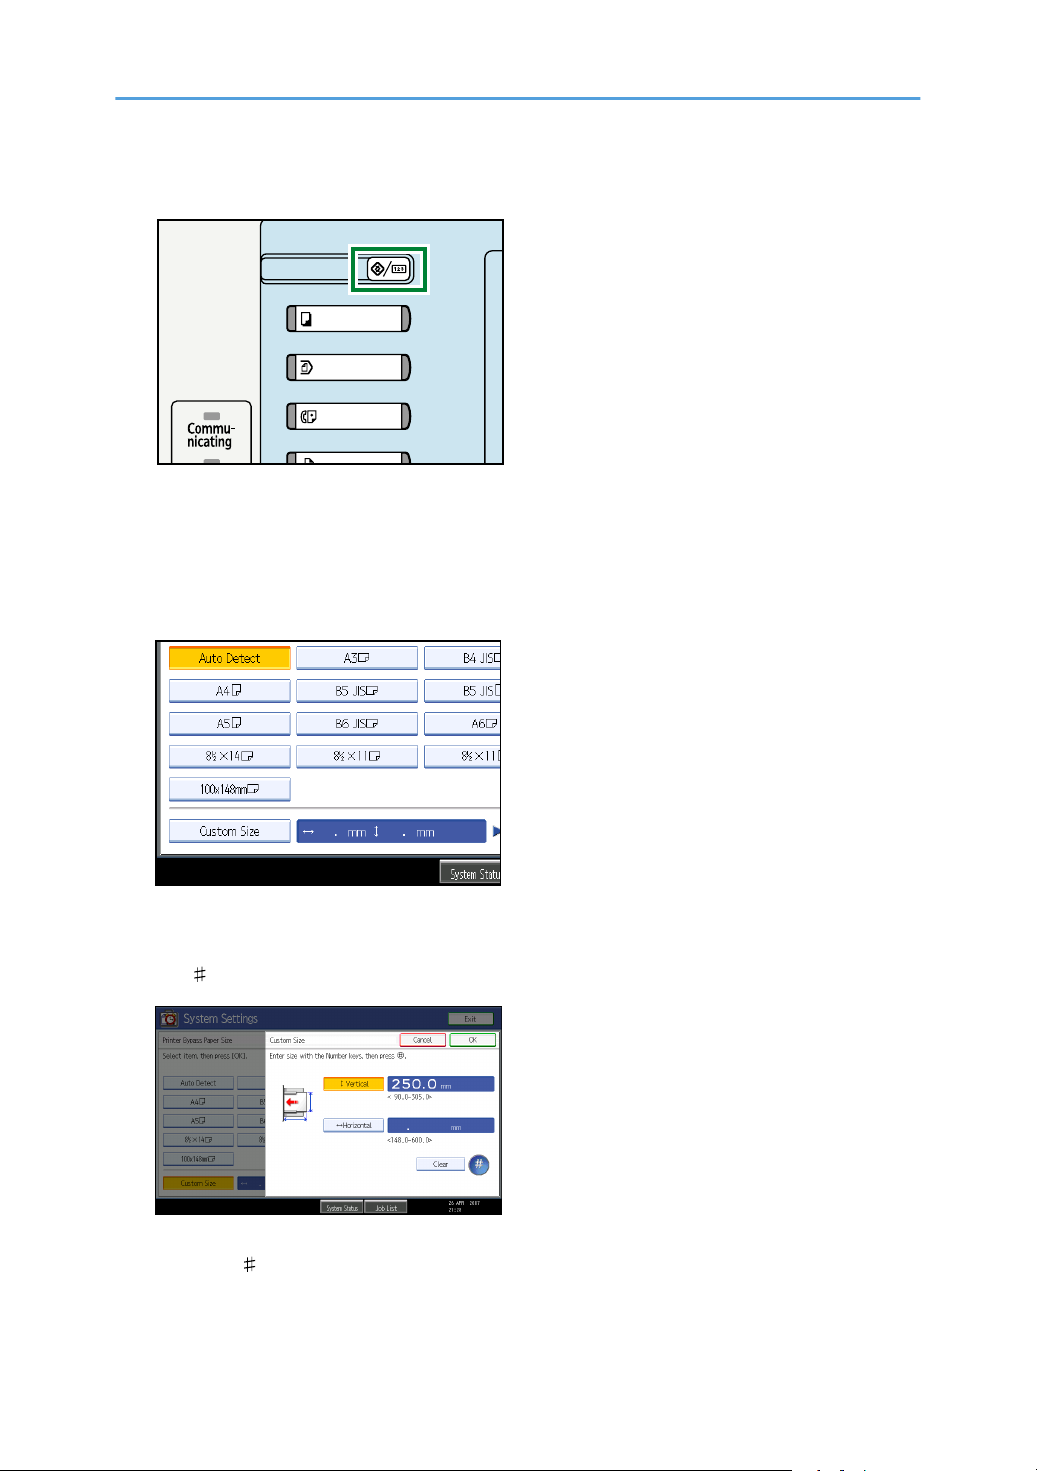
1. Press the [User Tools/Counter] key on the control panel.
BAC001S
2. Press [System Settings].
3. Press the [Tray Paper Settings] tab.
4. Press [Printer Bypass Paper Size].
5. Press [Custom Size].
20
If a custom size is already set, press [Change Size].
6. Press [Vertical], enter the vertical size of the paper using the number keys, and then press
the [ ] key.
7. Press [Horizontal], enter the horizontal size of the paper using the number keys, and then
press the [ ] key.
Page 23
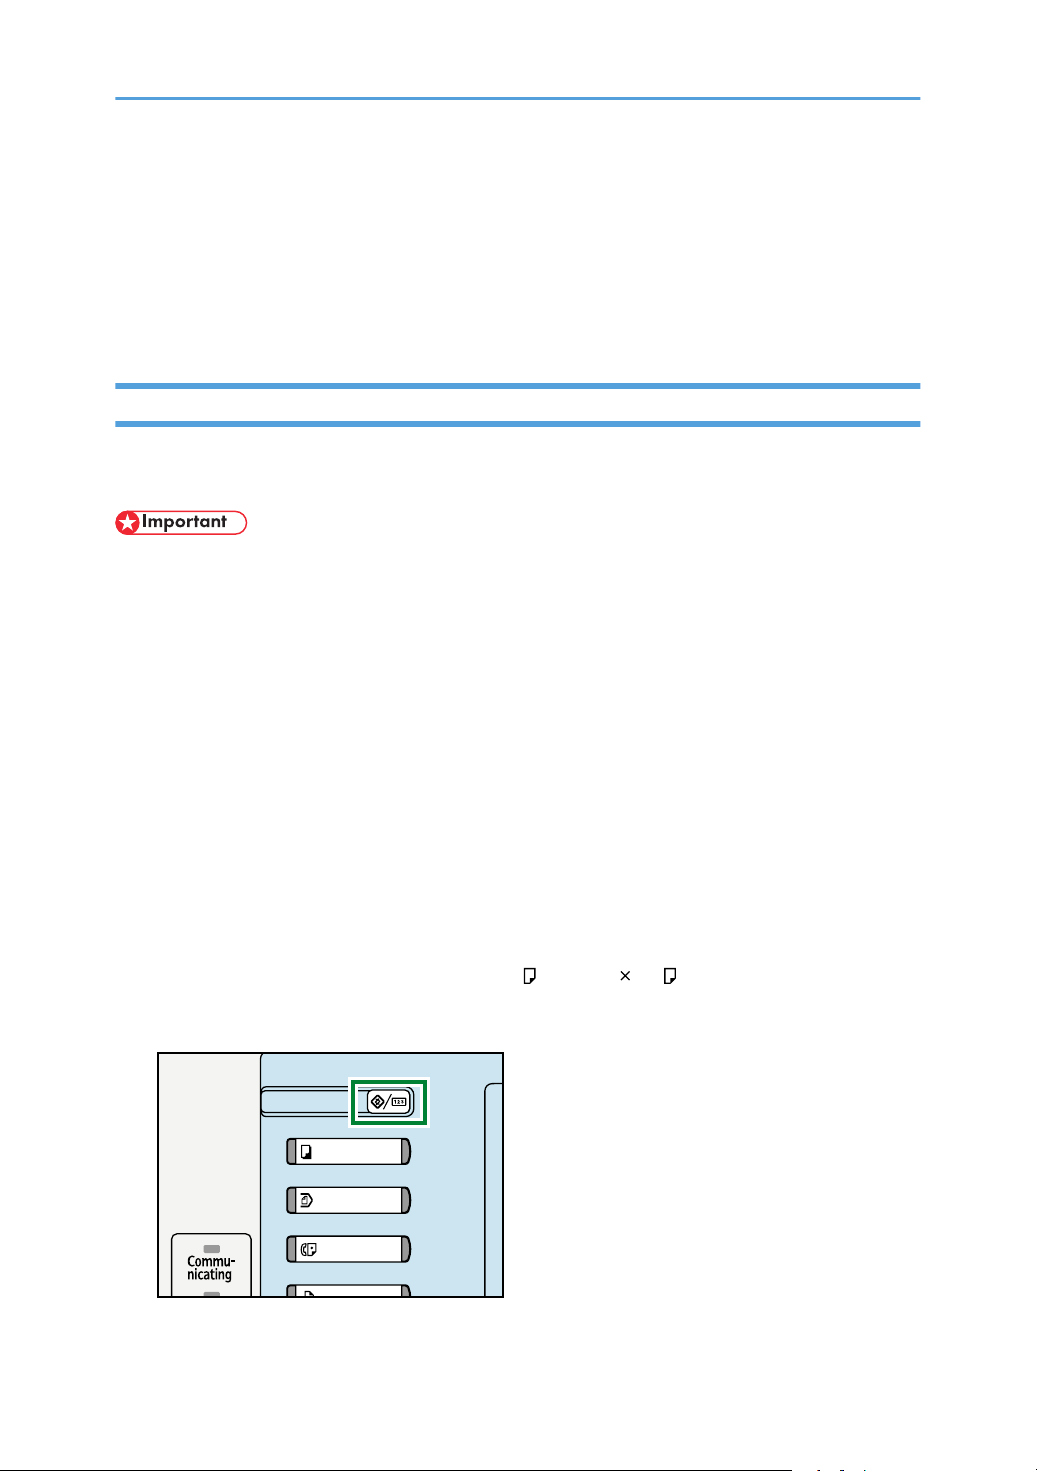
8. Press [OK].
BAC001S
The paper sizes entered are displayed.
9. Press [OK].
10. Press the [User Tools/Counter] key.
The initial screen appears.
Setting Thick Paper, Thin Paper, or OHP Transparencies Using the Control Panel
Follow the procedure below to set the machine using the control panel when loading thick paper, thin
paper, or OHP transparencies onto the bypass tray.
• The following procedures are not required if you select [Driver / Command] from [Bypass Tray Setting
Priority] in [System] of [Printer Features] (see "Printer Features", General Settings Guide). In that case,
set the paper size using the printer driver.
• If you select [Machine Settings] from [Bypass Tray Setting Priority] in [System] of [Printer Features]
(see "Printer Features", General Settings Guide), the settings made using the control panel have priority
over the printer driver settings.
• If the printer driver is not used, select [Machine Settings] from [Bypass Tray Setting Priority] in [System]
of [Printer Features] (see "Printer Features", General Settings Guide). Set the paper size using the
control panel.
• When printing onto OHP transparencies, paper thinner than 52 g/m2 (about 11 lb.), or paper of
105 g/m2 (about 23 lb.) or above, you need to specify the type and size of paper with Tray Paper
Settings in User Tools Menu. For details about Tray Paper Settings, see "System Settings", General
Settings Guide.
• Do not use colour OHP transparencies that have easily melted coatings.
• When printing onto OHP transparencies, use A4 , or 81/2 " 11" , size sheets, and specify its size.
1. Press the [User Tools/Counter] key on the control panel.
21
Page 24
2. Press [System Settings].
3. Press the [Tray Paper Settings] tab.
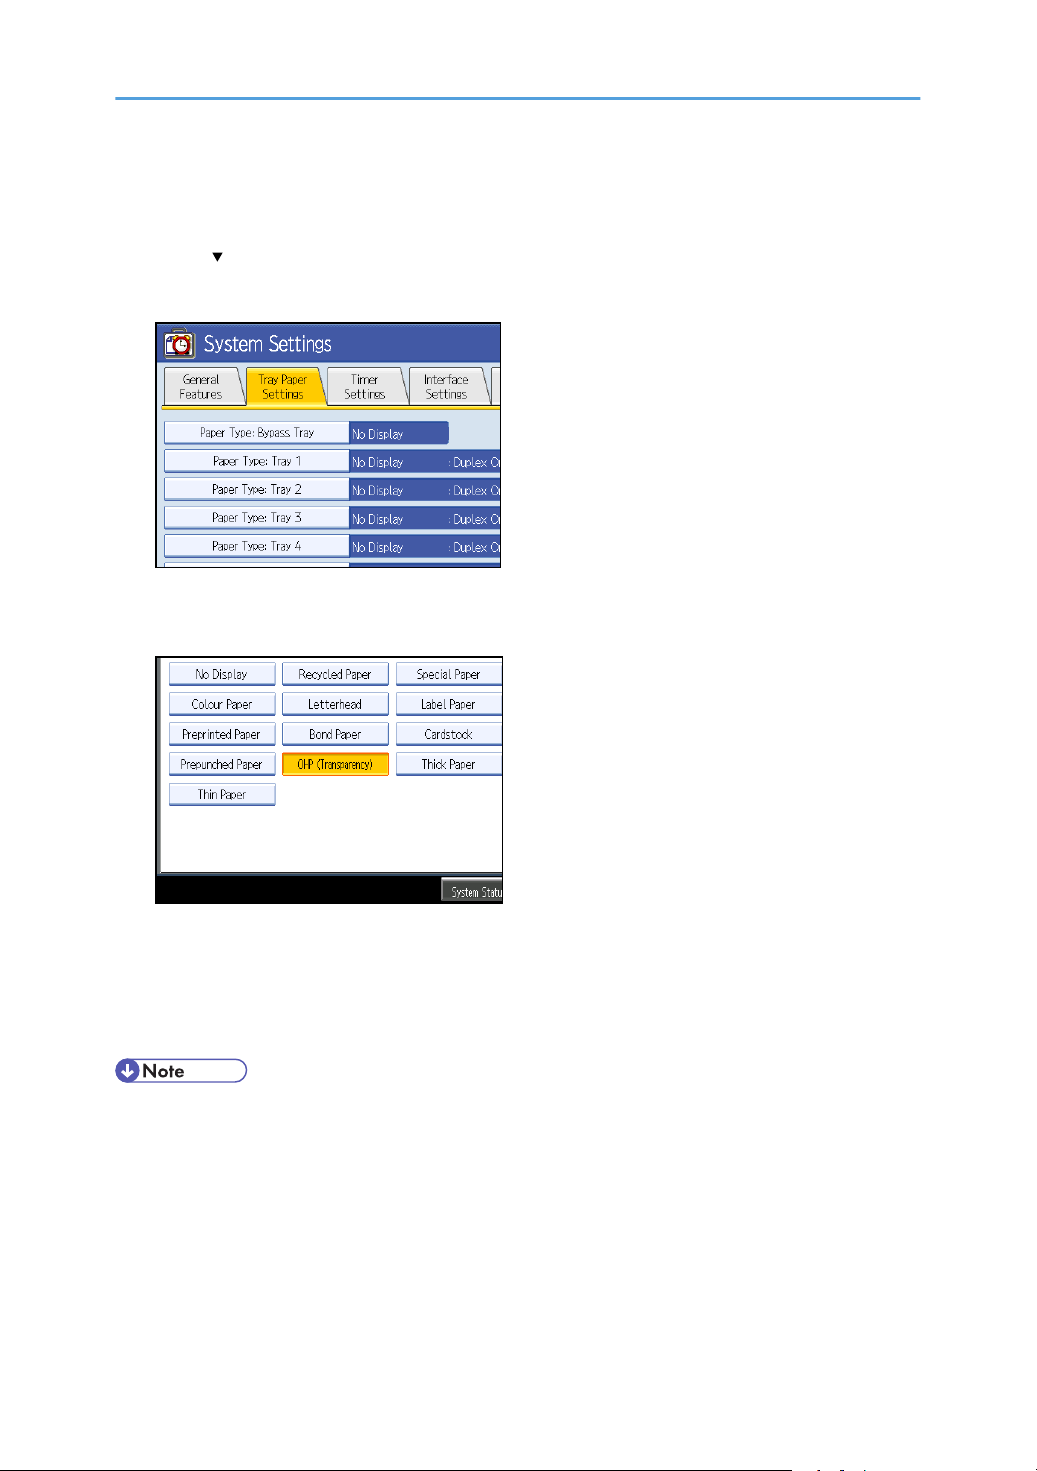
4. Press [ Next] to scroll through the list.
5. Press [Paper Type: Bypass Tray].
6. Select the proper items, according to the paper type you want to set.
Press [OHP (Transparency)] on the [Paper Type] area when loading OHP transparencies.
22
7. Press [OK].
The paper type selected is displayed.
8. Press the [User Tools/Counter] key.
The initial screen appears.
• Printing on special paper such as thick paper, thin paper, or OHP transparencies may be slower than
printing on plain paper.
• The settings made will remain valid until they are reset again. After printing on OHP transparencies
or thick paper, thin paper, make sure to clear settings for the next user.
• For details about setting printer drivers, see the printer driver Help.
Page 25
Setting Envelopes Using the Control Panel
BXV402S
Follow the procedure below to set the machine using the control panel when loading envelopes onto the
bypass tray.
• If you select [Machine Settings] from [Bypass Tray Setting Priority] in [System] of [Printer Features],
the settings made using the control panel have priority over the printer driver settings.
• If the printer driver is not used, select [Machine Settings] from [Bypass Tray Setting Priority] in [System]
of [Printer Features]. Set paper size using the control panel.
• If printed envelopes come out badly creased, load the envelopes in the opposite direction, and then
rotate the print object by 180 degrees using the printer driver before printing. For details, see the
printer driver Help.
• Check there is no air in the envelopes before loading.
• You cannot print envelopes with duplex function.
• Load only one size and type of envelope at a time.
• Before loading envelopes, flatten leading edges (the side going into the machine) by pressing a pencil
or ruler across them.
• Before loading envelopes, check they are rectangular in shape.
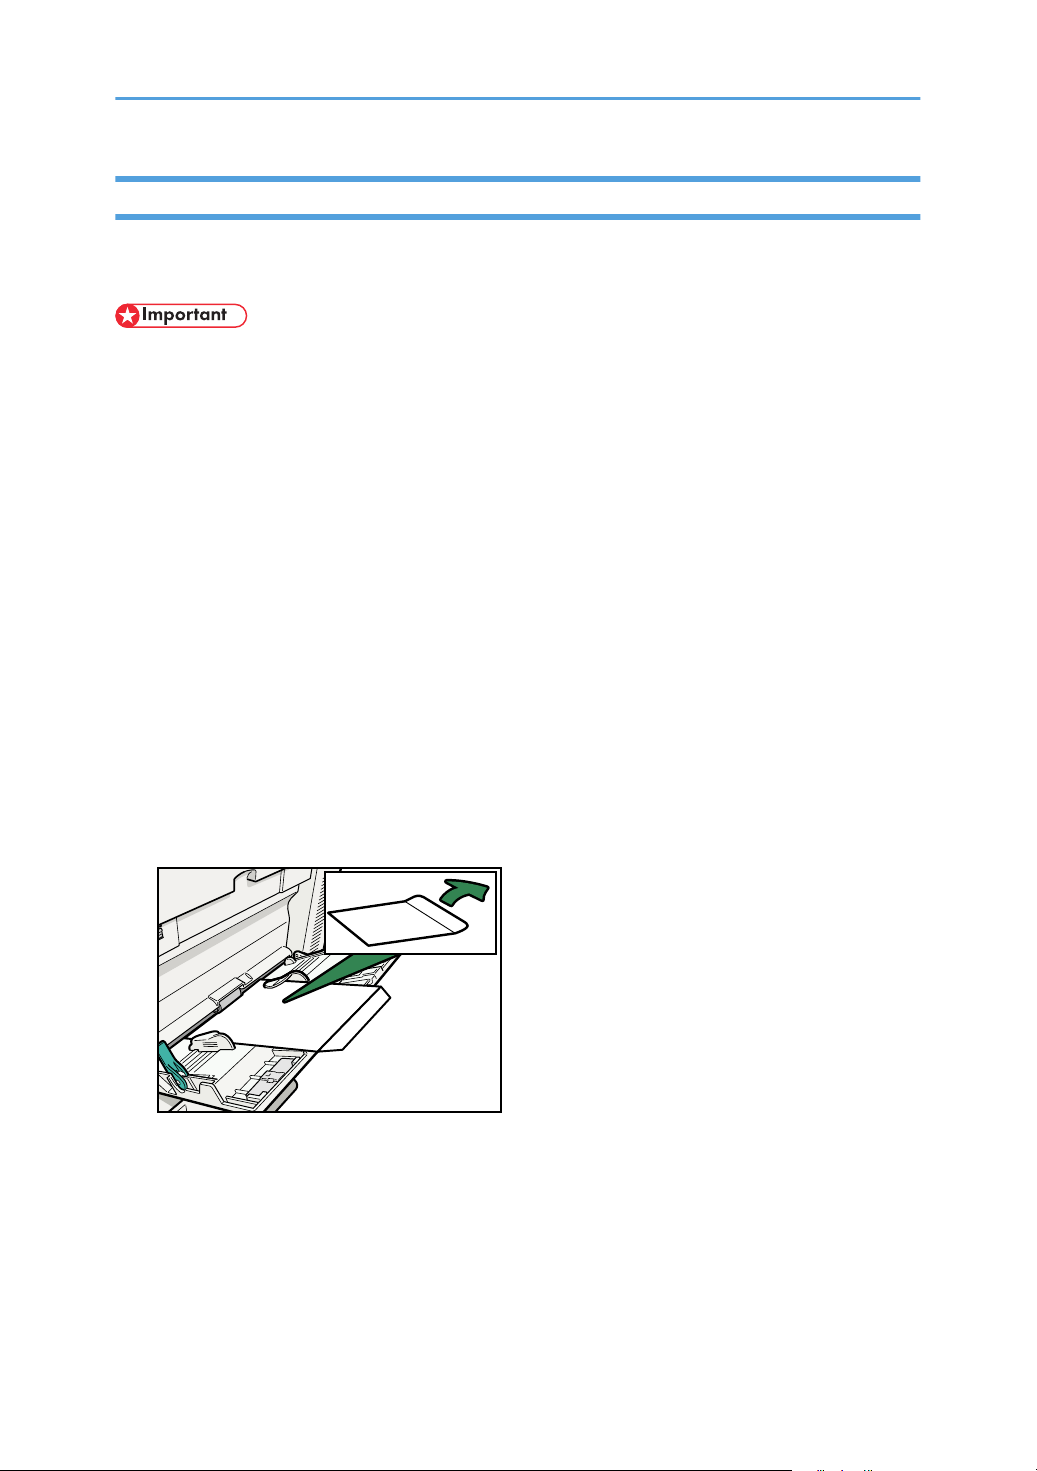
1. Open the bypass tray, and then push up the release lever.
2. Insert the envelopes face-down until you hear the beep, and then align the paper guides to
the paper size.
3. Push down the release lever.
23
Page 26
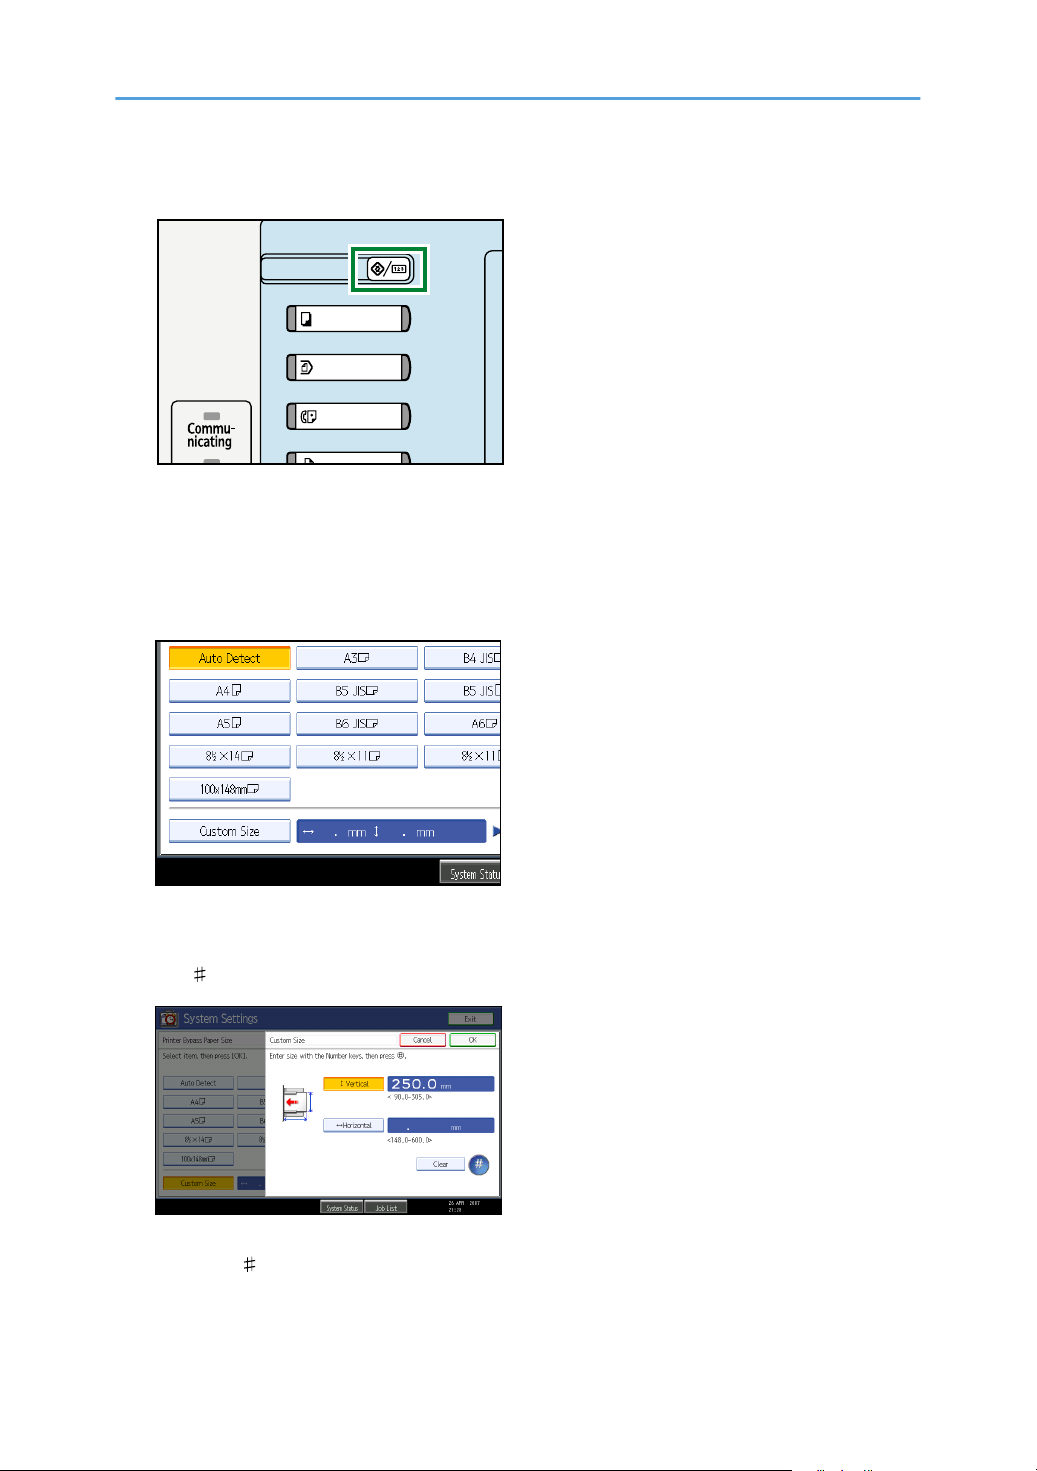
4. Press the [User Tools/Counter] key on the control panel.
BAC001S
5. Press [System Settings].
6. Press the [Tray Paper Settings] tab.
7. Press [Printer Bypass Paper Size].
8. Press [Custom Size].
If a custom size is already set, press [Change Size].
9. Press [Vertical], enter the vertical size of the paper using the number keys, and then press
the [ ] key.
10. Press [Horizontal], enter the horizontal size of the paper using the number keys, and then
press the [ ] key.
24
Page 27
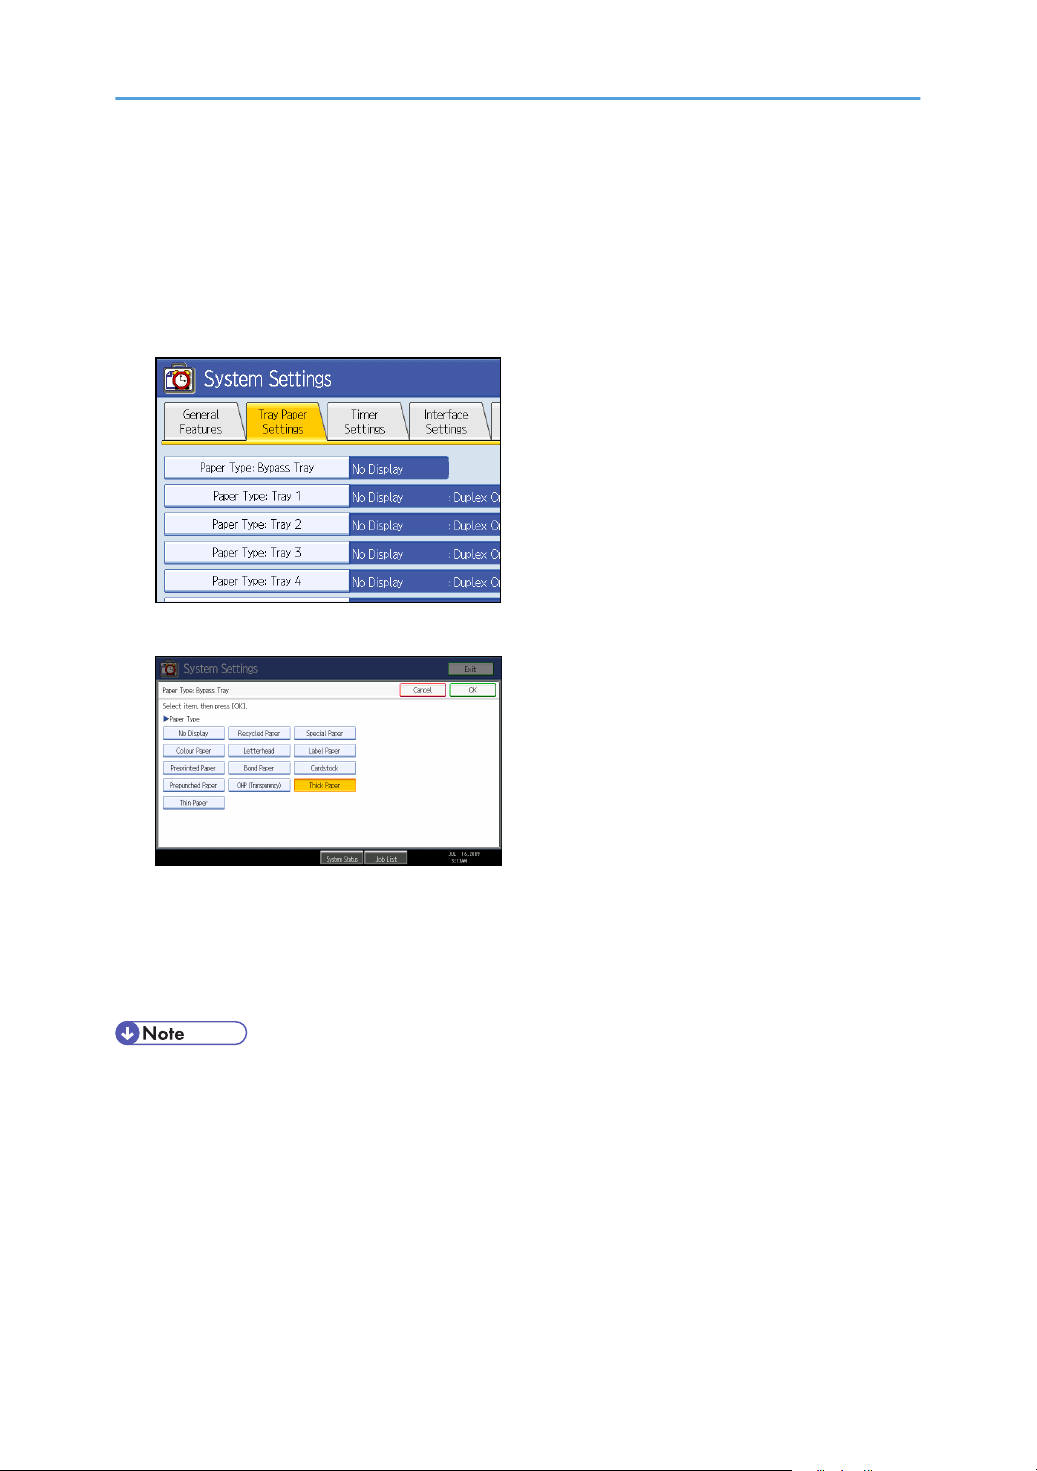
11. Press [OK].
The paper sizes entered are displayed.
12. Press [OK].
13. Press [Next] to scroll through the list.
14. Press [Paper Type: Bypass Tray].
15. Press [Thick Paper] on the [Paper Type] area.
16. Press [OK].
The paper type selected is displayed.
17. Press the [User Tools/Counter] key.
The initial screen appears.
• When entering the horizontal size for Recommended Paper Sizes and Types, including the openedout flap in the measurement.
25
Page 28

BAT029S
1. Vertical size
2. Horizontal size
• For details about envelopes, see "Envelope", About This Machine.
26
Page 29
1. Preparing the Machine
BXU401S
1
This chapter describes how to connect this machine to your computer, and install the printer driver.
Confirming the Connection Method
This machine supports network and local connection.
Before installing the printer driver, check how the machine is connected. Follow the driver installation
procedure that is appropriate to the connection method.
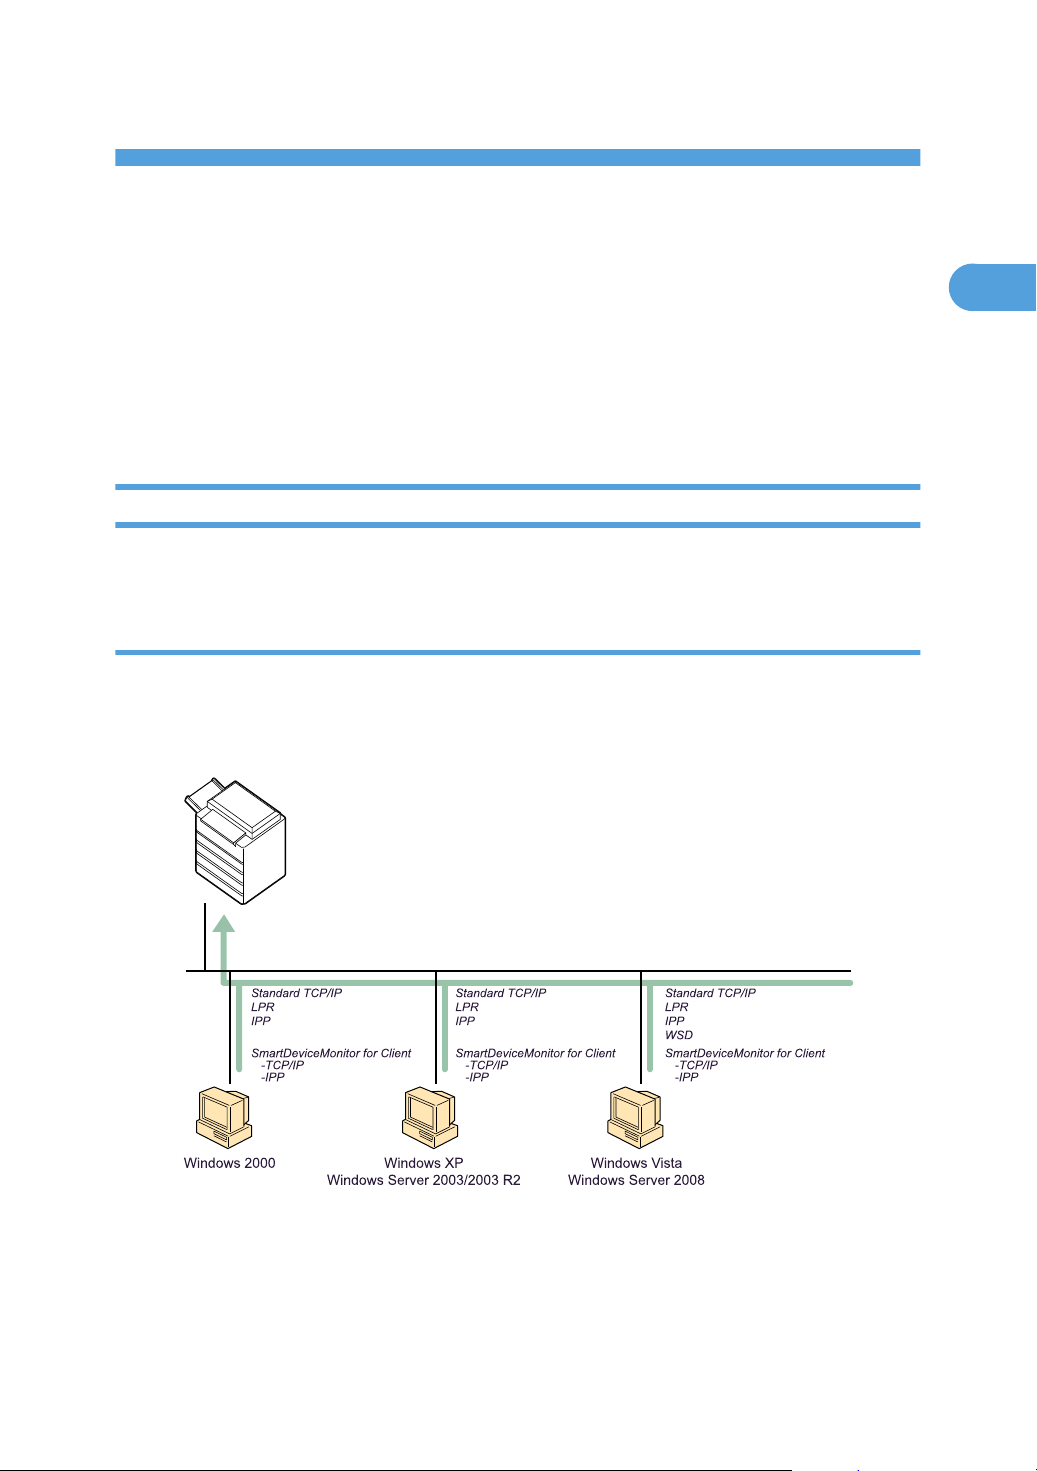
Network Connection
This machine can be used as a Windows printing port or network printer.
Using this machine as the Windows printing port
Network connections can be established through Ethernet, and Wireless LAN.
Available ports are determined based on the combination of Windows operating system version and
connection method used.
27
Page 30
1. Preparing the Machine
1
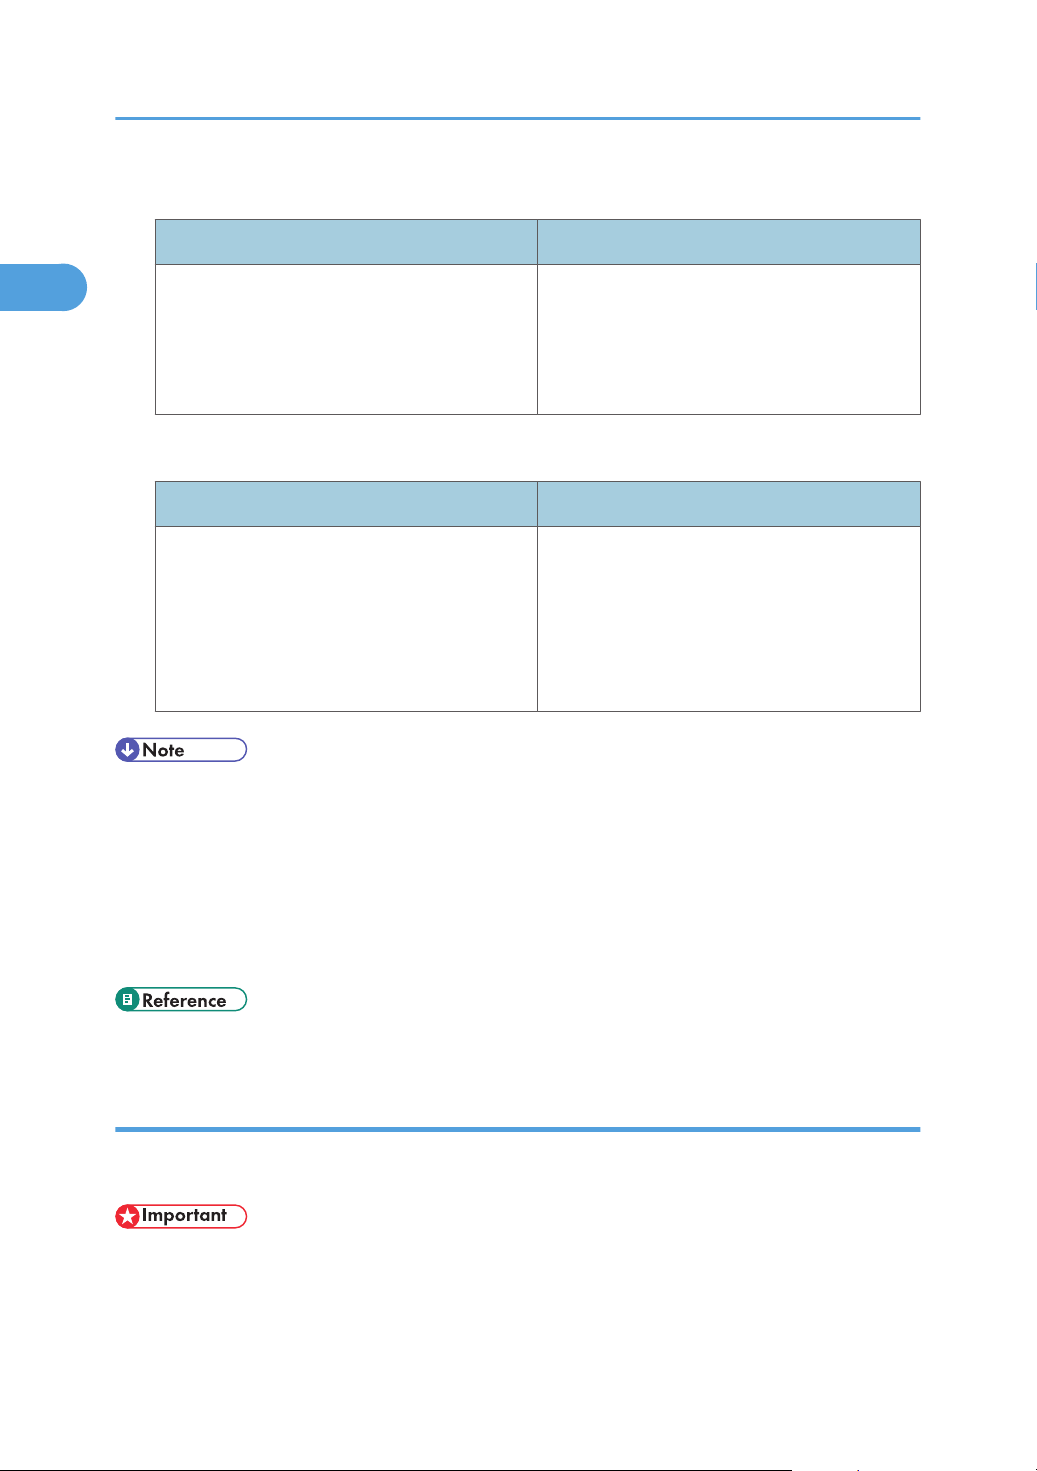
Windows 2000/XP, Windows Server 2003/2003 R2
Connection Method Available Ports
• Ethernet
• Wireless LAN
Windows Vista, Windows Server 2008
Connection Method Available Ports
• Ethernet
• Wireless LAN
• See the explanation about how to install the printer driver for each type of port.
• For details about Standard TCP/IP port, see "Installing the Printer Driver".
• For details about IPP port, see "Installing the Printer Driver".
• Standard TCP/IP port
• IPP port
• LPR port
• SmartDeviceMonitor for Client port
• Standard TCP/IP port
• IPP port
• LPR port
• WSD port
• SmartDeviceMonitor for Client port
• For details about LPR port, see "Installing the Printer Driver".
• For details about WSD port, see "Installing the Printer Driver".
• For details about SmartDeviceMonitor for Client port, see "Installing the Printer Driver".
• p.31 "Installing the Printer Driver"
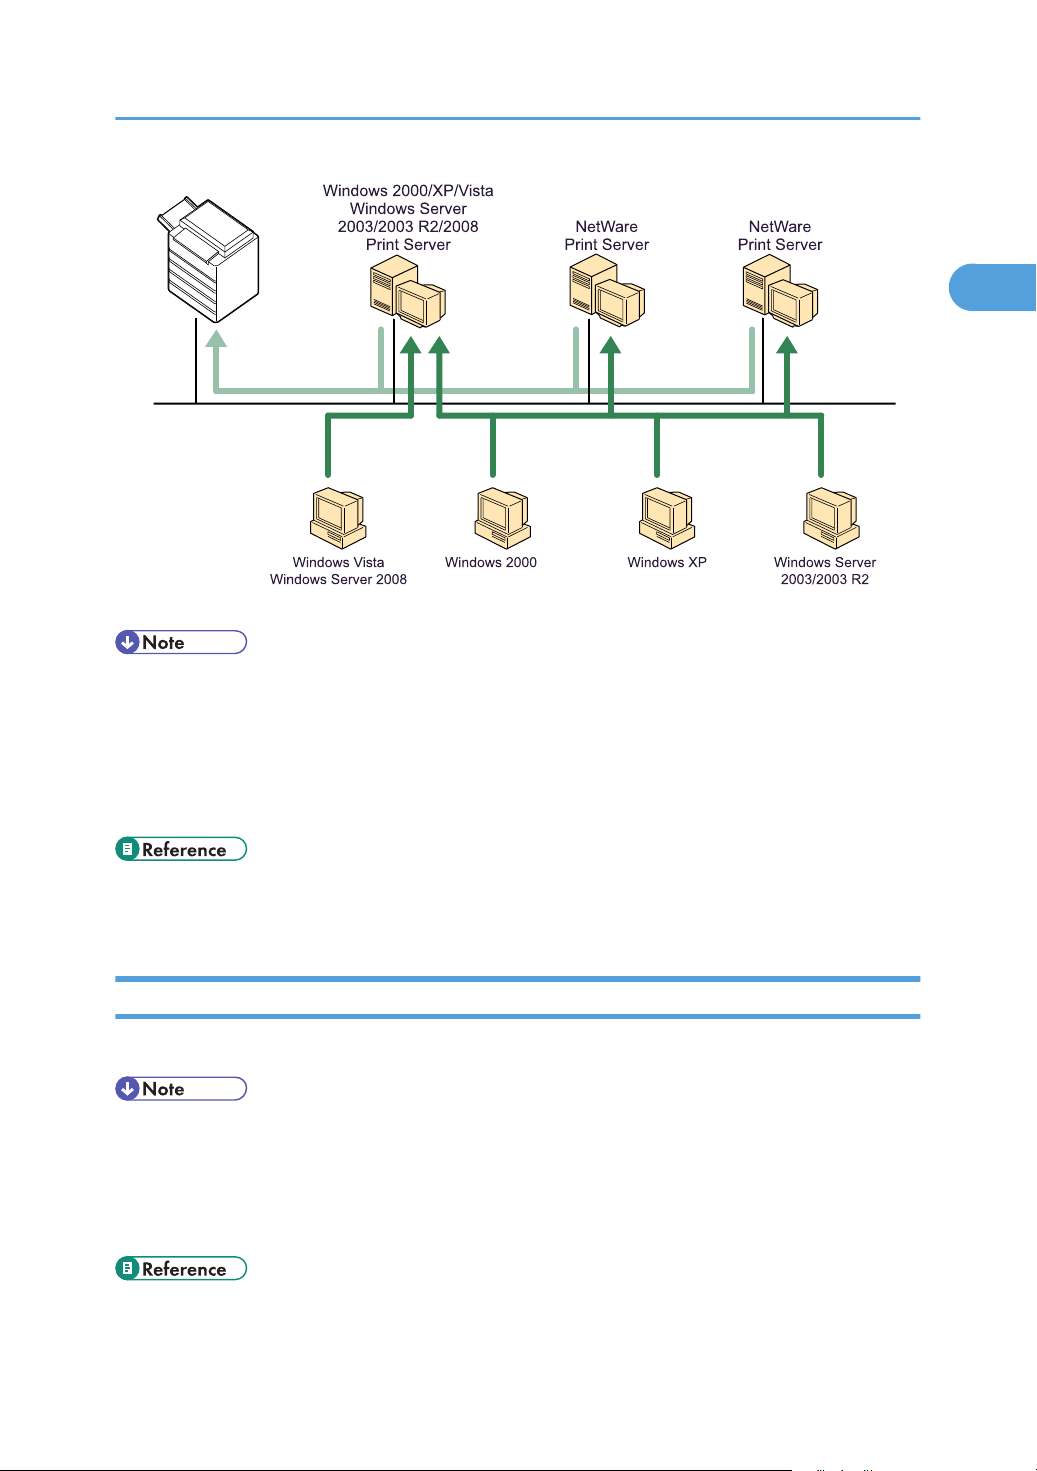
Using as a network printer
This machine can be used as the Windows network printer, the NetWare print server, or the NetWare
remote printer.
• IPX/SPX (NetWare) cannot be used under Windows Vista and Windows Server 2008.
28
Page 31
BXU402S
Confirming the Connection Method
1
• In an IPv6 environment, NetWare servers cannot be used.
• See the explanation about how to install the printer driver for each type of network printer.
• For details about Windows network printer, see "Using as a Windows Network Printer".
• For details about NetWare print server and remote printer, see "Using as a NetWare Print Server /
Remote Printer".
• p.43 "Using as a Windows Network Printer"
• p.45 "Using as a NetWare Print Server / Remote Printer"
Local Connection
Local connections can be established via parallel, USB, and Bluetooth connections.
• See the explanation about how to install the printer driver for each method of connections.
• For details about Bluetooth connections, see "Printing with Bluetooth Connection", Network Guide.
• For details about USB connections, see "Installing the Printer Driver Using USB".
• For details about parallel connections, see "Printing with Parallel Connection".
• p.48 "Installing the Printer Driver Using USB"
29
Page 32

1. Preparing the Machine
1
• p.52 "Printing with Parallel Connection"
30
Page 33

Installing the Printer Driver
1
Installing the Printer Driver
This section explains how to install the printer driver. There are two ways to install the printer driver: using
Quick Install, which installs the settings at once, or installing the appropriate driver according to the port
you want to use.
Downloading the Printer Driver
You can install the printer driver from the CD-ROM provided with this machine or download it from
the supplier's Website.
If your operating system is Windows XP Professional x64, Windows Vista x64, or Windows Server
2003/2003 R2/2008 x64, you must download the printer driver from the supplier's Website. Select
this machine and the operating system you are using, and then download it.
• The PostScript 3 printer driver is also available for this machine. For details about installing and
configuring the PostScript 3 printer driver, see PostScript 3 Supplement.
Quick Install
You can install the printer drivers easily from the CD-ROM provided with this machine.
Using Quick Install, the PCL printer driver is installed under network environment, and the TCP/IP port will
be set.
• Manage Printers permission is required to install the drivers. Log on as an Administrators group
member.
• If you connect using USB, see "Installing the Printer Driver Using USB" and install the printer driver.
1. Quit all applications currently running.
2. Insert the CD-ROM into the CD-ROM drive.
The installer starts.
3. Select an interface language, and then click [OK].
The default interface language is English.
4. Click [Quick Install].
The software license agreement appears in the [License Agreement] dialog box.
5. After reading the agreement, click [I accept the agreement.], and then click [Next >].
6. Select the machine model you want to use in the [Select Printer] dialog box.
For network connection via TCP/IP, select the machine whose IP address is displayed in [Connect
To].
31
Page 34
1. Preparing the Machine
1
For parallel connection, select the machine whose printer port is displayed in [Connect To].
7. Click [Install].
The printer driver installation starts.
8. Click [Finish].
A message about restarting the computer appears. Restart the computer to complete installation.
9. Click [Exit] in the first dialog box of the installer, and then take out the CD-ROM.
• To stop installation of the selected software, click [Cancel] before installation is complete.
• Auto Run may not work with certain operating system settings. If this happens, launch "Setup.exe" on
the CD-ROM root directory.
• Quick Install is not available unless bidirectional communication between the machine and computer
is enabled via parallel connection. For details about bidirectional communication between the
machine and computer, see "Making Option Settings for the Printer".
• p.48 "Installing the Printer Driver Using USB"
• p.54 "Making Option Settings for the Printer"
Installing the Printer Driver for the Selected Port
Using the Standard TCP/IP port
This describes how to install the PCL printer driver using the Standard TCP/IP port.
• Manage Printers permission is required to install the driver. Log on as an Administrators or Power
Users group member.
• In an IPv6 environment, you cannot use the Standard TCP/IP Port. Use the SmartDeviceMonitor for
Client port.
Installing the PCL Printer Driver
1. Quit all applications currently running.
2. Insert the CD-ROM into the CD-ROM drive.
The installer starts.
3. Select an interface language, and then click [OK].
The default interface language is English.
4. Click [PCL Printer Driver].
32
Page 35

Installing the Printer Driver
1
5. The software license agreement appears in the [License Agreement] dialog box.
After reading the agreement, click [I accept the agreement.], and then click [Next >].
6. Select a printer driver you want to use in the [Select Program] dialog box.
You can select several printer drivers.
The PCL 6 printer driver is installed in the language specified by your operating system.
7. Click [Next >].
8. Select the machine model you want to use.
The printer name can be changed in the [Change settings for 'Printer Name'] box.
9. Double-click the printer name to display the printer settings.
The details shown in [Comment], [Driver], and [Port] vary depending on the operating system, printer
model, and port.
10. Click [Port], and then click [Add].
11. Click [Standard TCP/IP Port], and then click [OK].
Configure the Standard TCP/IP port settings, and then see Windows Help if [Standard TCP/IP Port]
does not appear.
12. Click [Next >] in the [Add Standard TCP/IP Printer Port Wizard] dialog box.
13. Enter the printer name or IP address in the [Printer Name or IP Address] box.
The [Port Name] text box automatically obtains a port name. Change this name if necessary.
When the device selection appears, select "RICOH NetworkPrinter Driver C Model".
14. Click [Next >].
15. Click [Finish] in the [Add Standard TCP/IP Printer Port Wizard] dialog box.
The installation start dialog box reappears.
16. Check that the port of the selected printer is displayed in [Port].
17. Configure the default printer as necessary.
18. Click [Continue].
The printer driver installation starts.
19. After the installation is completed, select one of the options to restart the computer either
now or later, and then click [Finish].
Restart the computer to complete installation.
• To stop installation of the selected software, click [Cancel] before installation is complete.
• Auto Run may not work with certain operating system settings. In that case, launch "Setup.exe" on the
CD-ROM root directory.
33
Page 36

1. Preparing the Machine
1
• A message appears if there is a newer version of the printer driver already installed. If there is, you
cannot install the printer driver using Auto Run. If you still want to install the printer driver, use [Add
Printer]. See "When a Message Appears during Installation of the Printer Driver", Troubleshooting.
Using the IPP Port
This describes how to install the PCL printer driver using the IPP port.
• Manage Printers permission is required to install the driver. Log on as an Administrators group member.
• In an IPv6 environment, you cannot use the IPP Port. Use the SmartDeviceMonitor for Client port.
• The IPP port cannot be used under Windows 2000. If you are using Windows 2000, install the PCL
printer driver using the SmartDeviceMonitor for Client port. To use the SmartDeviceMonitor for
Client port, you must first download SmartDeviceMonitor for Client from the supplier's Website. For
details about the SmartDeviceMonitor for Client port, see "Using the SmartDeviceMonitor for Client
Port".
• To print via IPP-SSL under Windows Vista or Windows Server 2008, you must install the certificate
on your computer before you install the printer driver using the IPP port. For details, consult your
administrator.
Installing the PCL printer driver
1. Quit all applications currently running.
2. On the [Start] menu, click [Printers and Faxes].
3. Click [Add a printer].
The [Add printer Wizard] dialog box appears.
4. Click [Next>].
5. Click [A network printer, or a printer attached to another computer].
6. Click [Next>].
7. Click [Connect to a printer on the Internet or on a home or official network:].
8. In the [URL:] box, enter "http:// printer's IP address/ printer (or ipp)" as the printer's
address, and then click [Next>].
9. Click [Have Disk...].
10. Insert the provided CD-ROM into the computer's CD-ROM drive.
If the [AutoPlay] dialog box appears, click the [close] button.
11. Click [Browse...], and then specify a location for the inf file.
If the CD-ROM drive letter is D, the printer driver's source files are stored in "D:\DRIVERS\PCL5E
\XP_VISTA\(Language)\DISK1" or "D:\DRIVERS\PCL6\XP_VISTA\MUI\DISK1".
The PCL 6 printer driver is installed in the language specified by your operating system.
34
Page 37
Installing the Printer Driver
1
12. Click [OK] to close the Install From Disk window.
13. Select the machine you want to use, and then click [OK].
Only machines that respond to a broadcast from the computer appear. To use a machine not listed
here, click [Specify Address], and then enter the IP address or host name of the machine.
14. Configure the default printer as necessary, and then click [Next >].
If the [Windows can't verify the publisher of this driver software] message appears, click [Install this
driver software anyway].
15. Click [Finish].
If installation is successful, the icon of the printer connected to the IPP port is added to the [Printers
and Faxes] window.
• To stop installation of the selected driver, click [Cancel] before installation is complete.
• p.38 "Using the SmartDeviceMonitor for Client port"
Using the LPR port
This describes how to install the PCL printer driver using the LPR port.
• Manage Printers permission is required to install the driver. Log on as an Administrators or Power
Users group member.
• In an IPv6 environment, you cannot use the Standard TCP/IP Port. Use the SmartDeviceMonitor for
Client port.
Installing the PCL Printer Driver
1. Quit all applications currently running.
2. Insert the CD-ROM into the CD-ROM drive.
The installer starts.
3. Select an interface language, and then click [OK].
The default interface language is English.
4. Click [PCL Printer Driver].
5. The software license agreement appears in the [License Agreement] dialog box.
After reading the agreement, click [I accept the agreement.], and then click [Next >].
6. Select a printer driver you want to use in the [Select Program] dialog box.
You can select several printer drivers.
35
Page 38

1. Preparing the Machine
1
The PCL 6 printer driver is installed in the language specified by your operating system.
7. Select the machine model you want to use.
The printer name can be changed in the [Change settings for 'Printer Name'] box.
8. Click [Next >].
9. Double-click the printer name to display the printer settings.
The details shown in [Comment], [Driver], and [Port] vary depending on the operating system, printer
model, and port.
10. Click [Port], and then click [Add].
11. Click [LPR Port], and then click [OK].
If [LPR Port] does not appear, see Windows Help and install it.
12. Enter the printer's IP address in the [Name or address of server providing lpd] box.
13. Enter "lp" in the [Name of printer or print queue on that server] box, and then click [OK].
The port is added.
14. Check that the port of the selected printer is displayed in [Port].
15. Configure the default printer as necessary.
16. Click [Continue].
The printer driver installation starts.
17. After the installation is completed, select one of the options to restart the computer either
now or later, and then click [Finish].
Restart the computer to complete installation.
• To stop installation of the selected software, click [Cancel] before installation is complete.
• Auto Run may not work with certain operating system settings. In that case, launch "Setup.exe" on the
CD-ROM root directory.
• A message appears if there is a newer version of the printer driver already installed. If there is, you
cannot install the printer driver using Auto Run. If you still want to install the printer driver, use [Add
Printer]. See "When a Message Appears during Installation of the Printer Driver", Troubleshooting.
Using the WSD port
This section explains installation when using the WSD port.
• The WSD port can be used only under Windows Vista or Windows Server 2008.
• Manage Printers permission is required to install the driver. Log on as an Administrators group member.
36
Page 39

Installing the Printer Driver
1
• If the machine is connected using the WSD port, bi-directional communication is not possible. For
details about bi-directional communication, see "Making Option Settings for the Printer".
• You can connect to the machine only if both the machine and computer are on the same network
segment, or "Network discovery" is enabled. For details, see Windows Help.
Installing the PCL Printer Driver
1. Quit all applications currently running.
2. On the [Start] menu, click [Network].
The [Network] window appears, and the device search begins automatically.
3. Right-click the machine's icon, and then click [Install].
If the [User Account Control] dialog box appears, click [Continue].
The [Found New Hardware] dialog box appears.
4. Click [Locate and install driver software (recommended)].
If the [User Account Control] dialog box appears, click [Continue].
5. Click [Don't search online].
6. Click [Browse my computer for driver software (advanced)].
7. Insert the provided CD-ROM into the computer's CD-ROM drive.
If the [AutoPlay] dialog box appears, click the [close] button and then proceed to step 8.
8. Click [Browse...], and then specify a location for the printer driver.
If the CD-ROM drive letter is D, the printer driver's source files are stored in "D:\DRIVERS\PCL5E
\XP_VISTA\(Language)\DISK1" or "D:\DRIVERS\PCL6\XP_VISTA\MUI\DISK1".
The PCL 6 printer driver is installed in the language specified by your operating system.
9. Click [Next].
If the [Windows can't verify the publisher of this driver software] message appears, click [Install this
driver software anyway].
10. Click [Close].
If installation is successful, the icon of the printer connected to the "WSD" port is added to the [Printers]
window.
• The port name that follows "WSD" uses random character strings. It cannot be changed freely.
• To stop the installation, click [Cancel] before the installation is complete. When re-installing the WSD
Port, right-click the machine's icon in the [Network] window, and then click [Uninstall].
• p.54 "Making Option Settings for the Printer"
37
Page 40

1. Preparing the Machine
1
Using the SmartDeviceMonitor for Client port
This describes how to install the printer driver using the SmartDeviceMonitor for Client port.
To use this function, you must first download SmartDeviceMonitor for Client from the supplier's Website
and install it on your computer. Contact your local dealer for information on downloading
SmartDeviceMonitor for Client.
• Manage Printers permission is required to install SmartDeviceMonitor for Client. Log on as an
Administrators group member.
• Install SmartDeviceMonitor for Client before installing the printer driver when using the
SmartDeviceMonitor for Client port.
Installing the PCL printer driver (TCP/IP)
• Manage Printers permission is required to install the driver. Log on as an Administrators or Power
Users group member.
1. Quit all applications currently running.
2. Insert the CD-ROM into the CD-ROM drive.
The installer starts.
3. Select an interface language, and then click [OK].
The default interface language is English.
4. Click [PCL Printer Driver].
5. The software license agreement appears in the [License Agreement] dialog box.
After reading the agreement, click [I accept the agreement.], and then click [Next >].
6. Select the printer driver you want to use in the [Select Program] dialog box.
You can select several printer drivers.
The PCL 6 printer driver is installed in the language specified by your operating system.
7. Click [Next >].
8. Select the machine model you want to use.
The printer name can be changed in the [Change settings for 'Printer Name'] box.
9. Double-click the printer name to display the printer settings.
The details shown in [Comment], [Driver], and [Port] vary depending on the operating system, printer
model, and port.
10. Click [Port], and then click [Add].
11. Click [SmartDeviceMonitor], and then click [OK].
38
Page 41
Installing the Printer Driver
1
12. Click [TCP/IP], and then click [Search].
A list of printers using TCP/IP appears.
13. Select the printer you want to use, and then click [OK].
Only printers that respond to a broadcast from the computer appear. To use a machine not listed
here, click [Specify Address], and then enter the IP address or host name of the machine.
14. Check that the port of the selected printer is displayed in [Port].
15. Set a user code, if necessary.
Up to 8 numeric characters can be entered. No alphabetic characters or symbols can be entered.
16. Select the [Default Printer] check box to configure the printer as default.
17. Click [Continue].
Installation starts.
18. After the installation is completed, select one of the options to restart the computer either
now or later, and then click [Finish].
• Auto Run may not work with certain operating system settings. If this happens, launch "Setup.exe" on
the CD-ROM root directory.
• A message appears if there is a newer version of the printer driver already installed. If there is, you
cannot install the printer driver using Auto Run. If you still want to install the printer driver, use [Add
Printer]. See "When a Message Appears during Installation of the Printer Driver", Troubleshooting.
Installing the PCL printer driver (IPP)
• Manage Printers permission is required to install the driver. Log on as an Administrators or Power
Users group member.
1. Quit all applications currently running.
2. Insert the CD-ROM into the CD-ROM drive.
The installer starts.
3. Select an interface language, and then click [OK].
The default interface language is English.
4. Click [PCL Printer Driver].
5. The software license agreement appears in the [License Agreement] dialog box.
After reading the agreement, click [I accept the agreement.], and then click [Next >].
6. Select a printer driver you want to use in the [Select Program] dialog box.
You can select several printer drivers.
39
Page 42

1. Preparing the Machine
1
The PCL 6 printer driver is installed in the language specified by your operating system.
7. Click [Next >].
8. Select the machine model you want to use.
The printer name can be changed in the [Change settings for 'Printer Name'] box.
9. Double-click the printer name to display the printer settings.
The details shown in [Comment], [Driver], and [Port] vary depending on the operating system, printer
model, and port.
10. Click [Port], and then click [Add].
11. Click [SmartDeviceMonitor], and then click [OK].
12. Click [IPP].
13. In the [Printer URL] box, enter "http://printer's IP address/printer" as the printer's address.
If the server authentication is issued, to enable SSL (a protocol for encrypted communication), enter
"https://printer's IP address/printer" (Internet Explorer 5.01, or a higher version must be installed).
(example IP address: 192.168.15.16)
http://192.168.15.16/printer
https://192.168.15.16/printer
You can enter "http://printer's IP address/ipp" as the printer's address.
14. Enter a name for identifying the printer in [IPP Port Name]. Use a name different from the
one of any existing ports.
If a name is not specified here, the address entered in the [Printer URL] box becomes the IPP port
name.
15. Click [Detailed Settings] to make necessary settings.
For details about the settings, see SmartDeviceMonitor for Client Help.
16. Click [OK].
17. Check that the port of the selected printer is displayed in [Port].
18. Set a user code, if necessary.
Up to 8 numeric characters can be entered. No alphabetic characters or symbols can be entered.
19. Select the [Default Printer] check box to configure the printer as default.
20. Click [Continue].
Installation starts.
21. After the installation is completed, select one of the options to restart the computer either
now or later, and then click [Finish].
Restart the computer to complete installation.
40
Page 43

Installing the Printer Driver
1
• To stop installation of the selected software, click [Cancel] before installation is complete.
• Auto Run may not work with certain operating system settings. In that case, launch "Setup.exe" on the
CD-ROM root directory.
• Setting a user code allows a SmartDeviceMonitor for Admin user to display and check the number
of sheets each user prints. For details, see SmartDeviceMonitor for Admin Help.
• A message appears if there is a newer version of the printer driver already installed. If there is, you
cannot install the printer driver using Auto Run. If you still want to install the printer driver, use [Add
Printer]. See "When a Message Appears during Installation of the Printer Driver", Troubleshooting.
Changing the port settings for SmartDeviceMonitor for Client
Follow the procedure below to change the SmartDeviceMonitor for Client settings, such as TCP/IP timeout,
recovery/parallel printing, and printer groups.
Windows 2000:
1. On the [Start] menu, point to [Settings], and then click [Printers].
The [Printers] window appears.
2. Click the icon of the machine you want to use. On the [File] menu, click [Properties].
3. On the [Ports] tab, click [Configure Port...].
The [Configuration] dialog box appears.
Windows XP, Windows Server 2003 / 2003 R2:
1. On the [Start] menu, click [Printers and Faxes].
The [Printers and Faxes] window appears.
2. Click the icon of the machine you want to use. On the [File] menu, click [Properties].
3. Click the [Ports] tab, and then click [Configure Port...].
The [Port Configuration] dialog box appears.
Windows Vista, Windows Server 2008:
1. On the [Start] menu, click [Control Panel].
The [Control Panel] window appears.
2. Click [Printer].
The [Printers] window appears.
3. Right-click the icon of the printer you want to use, and then click [Properties].
41
Page 44

1. Preparing the Machine
1
4. Click the [Ports] tab, and then click [Configure Port].
The [Port Configuration:] dialog box appears.
• For TCP/IP, timeout setting can be configured.
• User, proxy, and timeout settings can be configured for IPP.
• If no settings on the [Recovery/Parallel Printing] tab are available, follow the procedure below.
1. Click [Cancel] to close the [Port Configuration:] dialog box.
2. Start SmartDeviceMonitor for Client, and then right-click the SmartDeviceMonitor for Client icon
on the tasktray.
3. Point to [Properties], and then click [Extended Features Settings].
4. Select the [Set Recovery/Parallel Printing for each port] check box.
5. Click [OK] to close the [Extended Features Settings] dialog box.
• For details about these settings, see "Using SmartDeviceMonitor for Client", Network Guide, or
SmartDeviceMonitor for Client Help.
42
Page 45

Using as a Windows Network Printer
1
Using as a Windows Network Printer
This describes how to install the PCL printer driver when using the printer as a Windows network printer.
To use the print server, install the printer driver by selecting "Network printer server", and then select the
Windows 2000/XP/Vista, or Windows Server 2003/2003 R2/2008 shared printer.
This section assumes that the client has already been configured to communicate with a Windows 2000/
XP/Vista, or Windows Server 2003/2003 R2/2008 print server. Do not begin the following procedure
before the client is set up and configured correctly.
• Manage Printers permission is required to install the driver. Log on as an Administrators or Power
Users group member.
• If you print with a print server connected to the printer using the SmartDeviceMonitor for Client port,
Recovery Printing and Parallel Printing cannot be used from the client.
• If you print under Windows XP/Vista or Windows Server 2003/2003 R2/2008 print server,
notification functions of SmartDeviceMonitor for Client may not be used with the client.
• You can install the printer driver from the CD-ROM provided with this machine or download it from
the supplier's Website.
• If your operating system is Windows XP Professional/Vista x64, Windows Server 2003/2003
R2/2008 x64, you must download the printer driver from the manufacturer's Website. Select this
printer and the operating system you are using, and then download it.
Installing the PCL Printer Driver
1. Quit all applications currently running.
2. Insert the CD-ROM into the CD-ROM drive.
The installer starts.
3. Select an interface language, and then click [OK].
The default interface language is English.
4. Click [PCL Printer Driver].
5. The software license agreement appears in the [License Agreement] dialog box.
After reading the agreement, click [I accept the agreement.], and then click [Next >].
6. Select the printer driver you want to use in the [Select Program] dialog box.
You can select several printer drivers.
The PCL 6 printer driver is installed in the language specified by your operating system.
7. Click [Next >].
8. Select the [Printer Name] check box to select the printer models you want to use.
The printer name can be changed in the [Change settings for 'Printer Name'] box.
43
Page 46

1. Preparing the Machine
1
9. Double-click the printer name to display the printer settings.
The details shown in [Comment], [Driver], and [Port] vary depending on the operating system, printer
model, and port.
10. Click [Port], and then click [Add].
11. Click [Network Printer], and then click [OK].
12. Double-click the computer name you want to use as a print server in the [Browse for Printer]
window.
13. Select the printer you want to use, and then click [OK].
14. Check that the port of the selected printer is displayed in [Port].
15. Configure the user code as necessary.
For details about user code, see the printer driver Help.
16. Select the [Default Printer] check box to configure the printer as default.
17. Click [Continue].
The printer driver installation starts.
18. After the installation is completed, select one of the options to restart the computer either
now or later, and then click [Finish].
Restart the computer to complete installation.
• To stop installation of the selected software, click [Cancel] before installation is complete.
• Auto Run may not work with certain operating system settings. In that case, launch "Setup.exe" on the
CD-ROM root directory.
• A message appears if there is a newer version of the printer driver already installed. If there is, you
cannot install the printer driver using Auto Run.
• If you still want to install the printer driver, use [Add Printer]. See "When a Message Appears during
Installation of the Printer Driver", TroubleShooting.
44
Page 47

Using as a NetWare Print Server / Remote Printer
1
Using as a NetWare Print Server / Remote
Printer
This describes how to set up the Windows computer used as the NetWare client.
• To install this printer driver under Windows 2000/XP, and Windows Server 2003/2003 R2, you
must have an account that has Manage Printers permission. Log on as an Administrators or Power
Users group member.
• IPX/SPX (NetWare) cannot be used under Windows Vista and Windows Server 2008.
• In an IPv6 environment, NetWare servers cannot be used.
The following explanation assumes NetWare Client is installed on the client computer and the NetWare
server environment is correctly set up. Install all necessary client applications before following this
procedure.
Set up the printer driver while logging on to the NetWare file server.
The following values are used in the example:
• NetWare version: 4.1
• File server name: CAREE
• Queue name: R-QUEUE
1. Insert the CD-ROM into the CD-ROM drive.
The installer starts.
Auto Run may not work with certain operating system settings. In that case, launch "Setup.exe" on the
CD-ROM root directory.
2. Select an interface language, and then click [OK].
The default interface language is English.
3. Click [PCL Printer Driver].
4. The software license agreement appears in the [License Agreement] dialog box.
After reading the agreement, click [I accept the agreement.], and then click [Next >].
5. Select the printer driver you want to use in the [Select Program] dialog box.
You can select several printer drivers.
The PCL 6 printer driver is installed in the language specified by your operating system.
6. Click [Next >].
7. Select the [Printer Name] check box to select the printer model you want to use.
The printer name can be changed in the [Change settings for 'Printer Name'] box.
45
Page 48

1. Preparing the Machine
1
8. Double-click the printer name to display the printer settings.
The details shown in [Comment], [Driver], and [Port] vary depending on the operating system, printer
model, and port.
9. Click [Port], and then click [Add].
10. Click [Network Printer], and then click [OK].
11. Double-click the name of the NetWare file server on the network tree.
The created queue is displayed.
12. Select the print queue, and then click [OK].
13. Check that the port of the selected printer is displayed in [Port].
14. Click [Continue].
The printer driver installation starts.
15. Click [Finish] in the [Select Program] dialog box.
16. After the installation is completed, select one of the options to restart the computer either
now or later, and then click [Finish].
Restart the computer to complete installation.
17. After restarting the computer, launch the [Printers and Faxes] window, and then open the
printer properties.
Under Windows 2000 or Windows Server 2003/2003 R2, open the printer properties from the
[Printers] window.
18. Click the [NetWare setting] tab.
Under Windows Server 2003/2003 R2, on the [Printer Settings] tab, clear the [Form Feed] and
[Enable Banner] check boxes.
Do not select these check boxes since they are automatically selected by the printer driver. If you
select the check boxes, the printer may not print correctly.
19. Click [OK] to close the printer properties dialog box.
• To stop installation of the selected software, click [Cancel] before installation is complete.
• The protocol is set to inactive as default. Enable the protocol on the control panel, using Web Image
Monitor or using telnet.
Form Feed
Do not use NetWare to configure form feed. Form feed is controlled by the printer driver on Windows. If
NetWare form feed is configured, the printer may not print properly.
46
Page 49

Using as a NetWare Print Server / Remote Printer
1
Under Windows 2000/XP or Windows Server 2003/2003 R2, follow the procedure below to disable
form feed according to the operating system used:
• Clear the [Form feed] check box on the [NetWare Settings] tab in the printer properties dialog box.
Banner Page
Do not use NetWare to configure a banner page.
Under Windows 2000/XP or Windows Server 2003/2003 R2, follow the procedure below to disable
banner pages according to the operating system used:
• Clear the [Enable banner] check box on the [NetWare Settings] tab in the printer properties dialog
box.
Printing after Resetting the Printer
Printer to print server connection requires 30 - 40 seconds to resume after the printer is reset. During this
period, jobs may be accepted (depending on NetWare specifications) but not printed.
To print after resetting the printer as the remote printer, check on the print server that the remote printer is
disconnected, or wait for two minutes before trying to print.
47
Page 50

1. Preparing the Machine
1
Installing the Printer Driver Using USB
This section explains how to install printer drivers using USB.
Before installing, check that only the operating system is running on the computer and no print jobs are in
progress.
You can use the printer driver included on the CD-ROM provided with this machine, or can download it
from the supplier's web site.
Windows 2000 - USB
• To install a printer driver, you must have Administrator privilege. Log on using an account that has
Administrator privilege.
When USB is first used, Found New Hardware Wizard starts, and USB Printing Support is installed
automatically.
If the printer driver is already installed and plug-and-play is enabled, the icon of the printer connected to
the "USB" port appears in the [Printers] window.
The printer drivers can be installed from the CD-ROM provided with this machine.
If the printer driver is not already installed, follow the printer's plug-and-play instructions to install it from
the provided CD-ROM.
1. Check that the power of the machine is off.
2. Connect the machine to the computer using a USB cable.
Connect the USB cable firmly.
3. Turn on the power of the machine.
Found New Hardware Wizard starts, and USB Printing Support is installed automatically.
4. In the Found New Hardware Wizard window, click [Search for a suitable driver for my
device [recommended]], and then click [Next >].
5. Select the [Specify location] check box, and then click [Next >].
6. Insert the CD-ROM into the CD-ROM drive.
If Auto Run starts, click [Cancel] and then [Exit].
7. Specify the location where the source files of the printer driver are stored.
If the CD-ROM drive is D, the source files of the printer driver are stored in the following location:
• PCL 5e
D: DRIVERS PCL5E XP_VISTA (Language) DISK1
• PCL 6
48
Page 51
Installing the Printer Driver Using USB
1
D: DRIVERS PCL6 XP_VISTA MUI DISK1
The PCL 6 printer driver is installed in the language specified by your operating system.
8. Check the printer driver location, and then click [OK].
9. Click [Next >].
10. Click [Finish].
If the installation is successful, the icon of the machine connected to the "USB001" port is added to
the [Printers] window.
• To disable Auto Run, press the left Shift key when inserting the CD-ROM into the drive and keep it
pressed until the computer finishes reading from the CD-ROM.
• The number after "USB" varies depending on the number of printers that the computer is connected
to.
Windows XP, Windows Server 2003/2003 R2 - USB
• To install a printer driver, you must have Administrators privilege. Log on using an account that has
Administrators privilege.
When USB is first used, Found New Hardware Wizard starts, and USB Printing Support is installed
automatically.
If the printer driver is already installed and plug-and-play is enabled, the icon of the printer connected to
the "USB" port appears in the [Printers and Faxes] window.
The printer drivers can be installed from the CD-ROM provided with this machine.
If the printer driver is not already installed, follow the printer's plug-and-play instructions to install it from
the provided CD-ROM.
1. Check that the power of the machine is off.
2. Connect the machine to the computer using a USB cable.
Connect the USB cable firmly.
3. Turn on the power of the machine.
Found New Hardware Wizard starts, and USB Printing Support is installed automatically.
4. In the Found New Hardware Wizard window, click [Install the software automatically
(Recommended)], and then click [Next >].
5. Insert the CD-ROM into the CD-ROM drive.
If Auto Run starts, click [Cancel], and then [Exit].
49
Page 52
1. Preparing the Machine
1
6. Select the [Include this location in the search] check box under [Search for the best driver in
these location], and then click [Browse] to select the printer driver location.
If the CD-ROM drive is D, the source files of the printer driver are stored in the following location:
• PCL 5e
D: DRIVERS PCL5E XP_VISTA (Language) DISK1
• PCL 6
D: DRIVERS PCL6 XP_VISTA MUI DISK1
The PCL 6 printer driver is installed in the language specified by your operating system.
7. Check the printer driver location, and then click [Next >].
8. Click [Continue].
9. Click [Finish].
If the installation is successful, the icon of the printer connected to the "USB001" port appears in the
[Printers and Faxes] window.
• To disable Auto Run, press the left Shift key when inserting the CD-ROM into the drive and keep it
pressed until the computer finishes reading from the CD-ROM.
• The number after "USB" varies depending on the number of printers that the computer is connected
to.
Windows Vista, Windows Server 2008 - USB
• To install a printer driver, you must have Administrators privilege. Log on using an account that has
Administrators privilege.
If the printer driver is already installed and plug-and-play is enabled, the icon of the printer connected to
the "USB" port appears in the [Printers] window.
The printer drivers can be installed from the CD-ROM provided with this machine.
If the printer driver is not already installed, follow the printer's plug-and-play instructions to install it from
the provided CD-ROM.
1. Check that the power of the machine is off.
2. Connect the machine to the computer using a USB cable.
Connect the USB cable firmly.
3. Turn on the power of the machine.
Found New Hardware Wizard starts, and USB Printing Support is installed automatically.
50
Page 53

Installing the Printer Driver Using USB
1
4. In the Found New Hardware Wizard window, click [Locate and install driver software
(recommended)].
Click [Continue] if the [User Account Control] window appears.
5. When a message prompting insertion of the CD-ROM, insert the CD-ROM into the CD-ROM
drive.
Installation of the printer driver is automatically started.
If "Windows can't verify the publisher of this software" display appears in the installation, select the
[Install this driver software anyway].
6. Click [Exit].
If the installation is successful, the icon of the printer connected to the "USB001" port appears in the
[Printers] window.
• To disable Auto Run, press the left Shift key when inserting the CD-ROM into the drive and keep it
pressed until the computer finishes reading from the CD-ROM.
• The number after "USB" varies depending on the number of printers that the computer is connected
to.
51
Page 54

1. Preparing the Machine
1
Printing with Parallel Connection
This describes how to install the PCL printer driver when using the parallel port.
To use a machine connected using a parallel interface, click [LPT1] when installing the printer driver.
• Manage Printers permission is required to install the driver. Log on as an Administrators or Power
Users group member.
• If your operating system is Windows XP Professional/Vista x64, Windows Server 2003/2003
R2/2008 x64, you must download the printer driver from the manufacturer's Web site. Select this
printer and the operating system you are using, and then download it.
Installing the PCL Printer Driver
1. Quit all applications currently running.
2. Insert the CD-ROM into the CD-ROM drive.
The installer starts.
3. Select an interface language, and then click [OK].
The default interface language is English.
4. Click [PCL Printer Driver].
5. The software license agreement appears in the [License Agreement] dialog box.
After reading the agreement, click [I accept the agreement.], and then click [Next >].
6. Select the printer driver you want to use in the [Select Program] dialog box.
You can select several printer drivers.
The PCL 6 printer driver is installed in the language specified by your operating system.
7. Click [Next >].
8. Select the [Printer Name] check box to select the printer model you want to use.
The printer name can be changed in the [Change settings for 'Printer Name'] box.
9. Double-click the printer name to display the printer settings.
The details shown in [Comment], [Driver], and [Port] vary depending on the operating system, printer
model, and port.
10. Check that [LPT1:] is shown in [Port].
11. Select the [Default Printer] check box to configure the printer as default.
12. Click [Finish].
The printer driver installation starts.
52
Page 55

Printing with Parallel Connection
1
13. After the installation is completed, select one of the options to restart the computer either
now or later, and then click [Finish].
Restart the computer to complete installation.
• To stop installation of the selected software, click [Cancel] before installation is complete.
• Auto Run may not work with certain operating system settings. In that case, launch "Setup.exe" on the
CD-ROM root directory.
• A message appears if there is a newer version of the printer driver already installed. If there is, you
cannot install the printer driver using Auto Run. If you still want to install the printer driver, use [Add
Printer]. See "When a Message Appears during Installation of the Printer Driver", Troubleshooting.
53
Page 56

1. Preparing the Machine
1
Making Option Settings for the Printer
Make option settings for the machine using the printer driver when bidirectional communication is disabled.
Conditions for Bidirectional Communication
Bidirectional communication allows information about paper size and feed direction settings to be
automatically sent to the printer. You can check machine status from your computer.
To support bidirectional communication, the following conditions must be met:
When connected with parallel cables
• The computer must support bidirectional communication.
• The machine must support bidirectional communication.
• The interface cable must support bidirectional communication.
• The machine must be connected to the computer using the standard parallel cables and parallel
connectors.
• Under Windows 2000, [Enable bidirectional support] must be selected, and [Enable printer
pooling] must not be selected on the [Ports] tab with the printer driver.
When connected with the network
• The machine must support bidirectional communication.
• The standard TCP/IP must be used.
• [Enable bidirectional support] must be selected, and [Enable printer pooling] must not be
selected on the [Ports] tab with the printer driver.
• In addition to the above, one of the following conditions must also be met:
• The TCP/IP protocol must be used.
• IPP port name must include the IP address when using the IPP protocol.
When connected with USB
• The machine must be connected to the computer's USB port using the USB interface cable.
• The computer must support bidirectional communication.
• The PCL 6 printer driver supports bidirectional communication and updates the machine status
automatically.
• The PCL 5e printer driver supports bidirectional communication. You can update the machine status
manually.
54
Page 57

Making Option Settings for the Printer
1
If Bidirectional Communication Is Disabled
Set up option settings when bidirectional communication is disabled.
• Manage Printers permission is required to change the printer properties in the [Printers] folder. Log
on as an Administrators or Power Users group member.
1. On the [Start] menu, click [Printers and Faxes].
The [Printers and Faxes] window appears.
When using Windows 2000, point to [Settings] on the [Start] menu, and then click [Printers]. The
[Printers] window appears.
When using Windows Vista or Windows Server 2008, click [Control Panel] on the [start] menu, and
then click [Printer]. The [Printers] window appears.
2. Click the icon of the printer you want to use.
3. On the [File] menu, click [Properties].
When using Windows Vista or Windows Server 2008, right-click the icon of the printer you want to
use, and then click the [Properties].
4. Click the [Accessories] tab.
If options in the [Accessories] tab are disabled, bidirectional connection is enabled. In this case, no
change is necessary for option settings.
5. Select options installed from the [Options] area, and then make the necessary settings.
6. In [Input Tray:] select which trays to use, and then, in [Paper Size:] select the size of the
paper that you want to load in each tray.
Click [Update] in the [Input Tray Settings] area to apply the setting for each tray.
7. Click [OK] to close the printer properties dialog box.
55
Page 58

1. Preparing the Machine
1
Installing Font Manager
• Manage Printers permission is required to install Font Manager. Log on as an Administrators group
member.
1. Quit all applications currently running.
2. Insert the CD-ROM into the CD-ROM drive.
The installer starts.
3. Click [Font Manager].
4. Follow the instructions on the display.
56
Page 59

Using Adobe PageMaker Version 6.0, 6.5, or 7.0
1
Using Adobe PageMaker Version 6.0, 6.5, or
7.0
Under Windows 2000/XP with Adobe PageMaker, you need to copy PPD files to the PageMaker folder.
PPD files have the .ppd extension in the folder "DRIVERS PS XP_VISTA (Language) DISK1" on the CDROM.
The "XP_VISTA" folder inside the "PS" folder is for Windows 2000/XP, Windows Server 2003/2003
R2/2008. Use the folder that is appropriate for the operating system you are currently using.
The third folder "(Language)" may be substituted by an appropriate language name.
Copy the .ppd file to the PageMaker folder.
• For PageMaker 6.0 default installation
The directory is "C: PM6 RSRC PPD4".
• For PageMaker 6.5 default installation
The directory is "C: PM65 RSRC USENGLISH PPD4".
The "USENGLISH" may vary depending on your language selection.
• For PageMaker 7.0 default installation
The directory is "C: PM7 RSRC USENGLISH PPD4".
The "USENGLISH" may vary depending on your language selection.
• If the driver is not set correctly after copying the ".ppd" file, printing may not be performed properly.
• When using PageMaker, the optional features that can be selected by the printer driver will not be
active. The following procedure describes how to activate the optional printer features.
1. On the [File] menu, click [Print].
The [Print Document] dialog box appears.
2. Make the necessary settings in the [Features] box.
57
Page 60

1. Preparing the Machine
1
58
Page 61
2. Setting Up the Printer Driver
2
This chapter explains the printer properties and how to make changes to the printer settings.
PCL - Accessing the Printer Properties
Windows 2000 - Accessing the Printer Properties
Making printer default settings - the printer properties
• To change the printer's default settings (including settings for options), log on using an account that
has Manage Printers permission. Members of the Administrator and Power Users groups have
Manage Printers permission by default.
• You cannot change the printer default settings for individual users. Settings made in the [Printer
Properties] dialog box are applied to all users.
1. On the [Start] menu, point to [Settings], and then click [Printers].
The [Printers] window appears.
2. Click the icon of the printer you want to use.
3. On the [File] menu, click [Properties].
The [Printer Properties] dialog box appears.
4. Make the settings you require, and then click [OK].
• The settings you make here are used as the default settings for all applications.
• For details, see the printer driver Help.
Making printer default settings - printing preferences
• When the printer driver is distributed from the print server, the setting values specified by the server
are displayed as the default for [Printing Defaults...].
1. On the [Start] menu, point to [Settings], and then click [Printers].
The [Printers] window appears.
2. Click the icon of the printer you want to use.
59
Page 62
2. Setting Up the Printer Driver
2
3. On the [File] menu, click [Printing Preferences...].
The [Printing Preferences] dialog box appears.
4. Make the settings you require, and then click [OK].
The setting is temporarily registered as [Unregistered] in the [One Click Presets list:] area.
• The settings you make here are used as the default settings for all applications.
• The [Unregistered] setting is invalid if the other One Click Presets icon is selected. If you wish to confirm
the [Unregistered] setting, click [Register Current Settings...]. For details about confirming the setting,
see "Making Printer Settings - One Click Presets".
• For details, see the printer driver Help.
• p.61 "Making Printer Settings - One Click Presets"
Making printer settings from an application
You can make printer settings for a specific application.
To make printer settings for a specific application, open the [Printing Preferences] dialog box from that
application. The following procedure explains making printer settings for Windows 2000 WordPad as an
example of how to make printer settings for a specific application.
1. Open the application.
2. On the [File] menu, click [Print...].
The [Print] dialog box appears.
3. Select the printer you want to use in the [Select Printer] list, and then click the tab for the
settings you want to change.
4. Make the necessary settings, and then click [Apply].
5. Click [Print].
• Procedures for opening the [Printing Preferences] dialog box vary depending on the application. For
details, see the manuals provided with the application.
• Any settings you make using this procedure apply to the current application only.
• General users can change the properties displayed in the [Print] dialog box of an application. Settings
made here are used as defaults when printing from the application.
• For details, see the printer driver Help.
60
Page 63

PCL - Accessing the Printer Properties
2
Making Printer Settings - One Click Presets
This section explains how to register and use one click presets.
Each function explained in this chapter is preconfigured and registered under [One Click Presets List:] on
the [One Click Presets] tab.
You can apply the relevant setting simply by clicking on the one click preset name. This helps to avoid
incorrect settings and misprints.
One click presets can be added, modified, and deleted as required. They can also be shared for use by
different users. By using registered one click presets, users without in-depth knowledge of the printer driver
can utilize advanced printing functions easily.
Follow the procedure to register one click presets.
1. In the application, on the [File] menu, click [Print].
The [Print] dialog box appears.
2. Select the machine, and then open the [Printing Preferences] dialog box in the document's
native application.
The [Printing Preferences] dialog box appears.
3. Make the settings you require.
4. Click [Register Current Settings...]. Enter a name and comment that describe the setting, and
then click [OK].
The newly registered icon appears with its registered name in the One Click Preset List: area.
5. Click [OK].
• Under Windows operating systems, this function is available through the PCL 6 and PostScript 3 printer
driver. When using this function using the PostScript 3 printer driver, see PostScript 3 Supplement.
• For details about modifying and deleting one click presets, see the printer driver Help.
Windows XP, Windows Server 2003/2003 R2 - Accessing the Printer Properties
Making printer default settings - the printer properties
• To change the printer's default settings (including settings for options), log on using an account that
has Manage Printers permission. Members of the Administrators and Power Users groups have
Manage Printers permission by default.
• You cannot change the printer default settings for individual users. Settings made in the [Printer
Properties] dialog box are applied to all users.
61
Page 64
2. Setting Up the Printer Driver
2
1. On the [Start] menu, click [Printers and Faxes].
The [Printers and Faxes] window appears.
2. Click the icon of the printer you want to use.
3. On the [File] menu, click [Properties].
The [Printer Properties] dialog box appears.
4. Make the settings you require, and then click [OK].
• The settings you make here are used as the default settings for all applications.
• For details, see the printer driver Help.
Making printer default settings - printing preferences
• When the printer driver is distributed from the print server, the setting values specified by the server
are displayed as the default for [Printing Defaults...].
1. On the [Start] menu, click [Printers and Faxes].
The [Printers and Faxes] window appears.
2. Click the icon of the printer you want to use.
3. On the [File] menu, click [Printing Preferences...].
The [Printing Preferences] dialog box appears.
4. Make the settings you require, and then click [OK].
The setting is temporarily registered as [Unregistered] in the [One Click Presets list:] area.
• The settings you make here are used as the default settings for all applications.
• The [Unregistered] setting is invalid if the other One Click Presets icon is selected. If you wish to confirm
the [Unregistered] setting, click [Register Current Settings...]. For details about confirming the setting,
see "Making Printer Settings - One Click Presets".
• For details, see the printer driver Help.
• p.63 "Making Printer Settings - One Click Presets"
Making printer settings from an application
You can make printer settings for a specific application.
62
Page 65

PCL - Accessing the Printer Properties
2
To make printer settings for a specific application, open the [Printing Preferences] dialog box from that
application. The following procedure explains making printer settings for Windows XP WordPad as an
example of how to make printer settings for a specific application.
1. On the [File] menu, click [Print...].
The [Print] dialog box appears.
2. Select the printer you want to use in the [Select Printer] list, and then click [Preferences].
3. Make the necessary settings, and then click [OK].
• Procedures for opening the [Printing Preferences] dialog box vary depending on the application. For
details, see the manuals provided with the application.
• Any settings you make using this procedure apply to the current application only.
• General users can change the properties displayed in the [Print] dialog box of an application. Settings
made here are used the defaults when printing from the application.
• For details, see the printer driver Help.
Making Printer Settings - One Click Presets
This section explains how to register and use one click presets.
Each function explained in this chapter is preconfigured and registered under [One Click Presets List:] on
the [One Click Presets] tab.
You can apply the relevant setting simply by clicking on the one click preset name. This helps to avoid
incorrect settings and misprints.
One click presets can be added, modified, and deleted as required. They can also be shared for use by
different users. By using registered one click presets, users without in-depth knowledge of the printer driver
can utilize advanced printing functions easily.
Follow the procedure to register one click presets.
1. In the application, on the [File] menu, click [Print].
The [Print] dialog box appears.
2. Select the machine, and then open the [Printing Preferences] dialog box in the document's
native application.
The [Printing Preferences] dialog box appears.
3. Make the settings you require.
4. Click [Register Current Settings...]. Enter a name and comment that describe the setting, and
then click [OK].
The newly registered icon appears with its registered name in the One Click Preset List: area.
5. Click [OK].
63
Page 66
2. Setting Up the Printer Driver
2
• Under Windows operating systems, this function is available through the PCL 6 and PostScript 3 printer
driver. When using this function using the PostScript 3 printer driver, see PostScript 3 Supplement.
• For details about modifying and deleting one click presets, see the printer driver Help.
Windows Vista, Windows Server 2008 - Accessing the Printer Properties
Making printer default settings - the printer properties
• To change the printer's default settings (including settings for options), log on using an account that
has Manage Printers permission. Members of the Administrators group have Manage Printers
permission by default.
• You cannot change the printer default settings for individual users. Settings made in the [Printer
Properties] dialog box are applied to all users.
1. On the [Start] menu, click [Control Panel].
The [Control Panel] window appears.
2. Click [Printer] in "Hardware and Sound".
3. Right-click the icon of the printer you want to use, and then click [Properties].
4. Make the settings you require, and then click [OK].
• The settings you make here are used as the default settings for all applications.
• For details, see the printer driver Help.
Making printer default settings - printing preferences
• When the printer driver is distributed from the print server, the setting values specified by the server
are displayed as the default for [Printing Defaults...].
1. On the [Start] menu, click [Control Panel].
The [Control Panel] window appears.
2. Click [Printer] in "Hardware and Sound".
3. Right-click the icon of the printer you want to use, and then click [Printing Preferences...].
The [Printing Preferences] dialog box appears.
64
Page 67
PCL - Accessing the Printer Properties
2
4. Make the settings you require, and then click [OK].
The setting is temporarily registered as [Unregistered] in the [One Click Presets list:] area.
• The settings you make here are used as the default settings for all applications.
• The [Unregistered] setting is invalid if the other One Click Presets icon is selected. If you wish to confirm
the [Unregistered] setting, click [Register Current Settings...]. For details about confirming the setting,
see "Making Printer Settings - One Click Presets".
• For details, see the printer driver Help.
• p.65 "Making Printer Settings - One Click Presets"
Making printer settings from an application
You can make printer settings for a specific application.
To make printer settings for a specific application, open the [Printing Preferences] dialog box from that
application. The following procedure explains making printer settings for Windows Vista WordPad as an
example of how to make printer settings for a specific application.
1. On the [File] menu, click [Print...].
The [Print] dialog box appears.
2. Select the printer you want to use in the [Select Printer] list, and then click [Preferences].
3. Make the settings you require, and then click [OK].
• Procedures for opening the [Printing Preferences] dialog box vary depending on the application. For
details, see the manuals provided with the application.
• Any settings you make using this procedure apply to the current application only.
• General users can change the properties displayed in the [Print] dialog box of an application. Settings
made here are used the defaults when printing from the application.
• For details, see the printer driver Help.
Making Printer Settings - One Click Presets
This section explains how to register and use one click presets.
Each function explained in this chapter is preconfigured and registered under [One Click Presets List:] on
the [One Click Presets] tab.
You can apply the relevant setting simply by clicking on the one click preset name. This helps to avoid
incorrect settings and misprints.
65
Page 68

2. Setting Up the Printer Driver
2
One click presets can be added, modified, and deleted as required. They can also be shared for use by
different users. By using registered one click presets, users without in-depth knowledge of the printer driver
can utilize advanced printing functions easily.
Follow the procedure to register one click presets.
1. In the application, on the [File] menu, click [Print].
The [Print] dialog box appears.
2. Select the machine, and then open the [Printing Preferences] dialog box in the document's
native application.
The [Printing Preferences] dialog box appears.
3. Make the settings you require.
4. Click [Register Current Settings...]. Enter a name and comment that describe the setting, and
then click [OK].
The newly registered icon appears with its registered name in the One Click Preset List: area.
5. Click [OK].
• Under Windows operating systems, this function is available through the PCL 6 and PostScript 3 printer
driver. When using this function using the PostScript 3 printer driver, see PostScript 3 Supplement.
• For details about modifying and deleting one click presets, see the printer driver Help.
66
Page 69
3. Other Print Operations
3
This chapter explains the various printing functions, including Sample Print, Locked Print, Hold Print, Stored
Print, and PDF Direct Print.
Printing a PDF File Directly
You can send PDF files directly to the machine for printing, without having to open a PDF application.
• This function is possible only when the optional PostScript 3 unit is installed.
• This function is possible for genuine Adobe PDF files only.
• Version 1.3, 1.4, 1.5, and 1.6 PDF files are compatible.
• PDF files created using PDF version 1.5 Crypt Filter functions or more than eight DeviceN Color Space
components cannot be printed.
• PDF files created using PDF version 1.6 watermark note functions, extended optional contents, or
page size exceeds 5.08 m cannot be printed.
• PDF version 1.7 (Acrobat 8.0) files created without any functions that are exclusive to PDF version
1.7 can be printed.
• If memory is insufficient or there are other problems, direct printing of High Compression PDF files
created using this device's scanner function might not be possible.
• Paper size errors may occur when printing on custom size paper.
Printing Method
There are the two methods of printing the PDF files directly, either using the DeskTopBinder Lite, or entering
commands.
To use this function, you must first download DeskTopBinder Lite from the supplier's Website and install it
on your computer. Contact your local dealer for information on downloading DeskTopBinder Lite.
Using DeskTopBinder Lite
DeskTopBinder Lite enhancements
Follow the DeskTopBinder Lite enhancement procedure to print PDF files directly.
67
Page 70

3. Other Print Operations
3
1. On the [Start] menu, point to [All Programs], [DeskTopBinder], and then click [Extended
Features Wizard].
The [Extended Features Wizard] dialog box appears.
2. Select [Easy settings], and then click [Start]. Click [Next>] repeatedly until the [Printing
Function2] dialog box appears.
If you select [All function settings], and then click [Start]. Click the [Output] icon on the [Type:] list.
Select [PDF Direct Print] in [Selectable function(s):], and then click [Add].
3. In the [Printing Function2] dialog box, click [Add…].
The [PDF Direct Print Properties] dialog box appears.
4. Click [Specify...], and then enter the IP address or host name of the printer.
5. Click [OK].
The [PDF Direct Print Properties] dialog box closes.
6. Click [Next>] repeatedly until [Finish] appears.
7. Click [Finish].
Function Palette
The Function palette contains buttons for functions that are already configured through DeskTopBinder
Lite enhancement. Using these buttons, you can print Windows files, preview printouts, convert images,
and register scanners for documents without having to open DeskTopBinder Lite. You can also use these
functions simply by dragging a target file to the button corresponding to the required function and dropping
it there.
1. On the [Start] menu, point to [All Programs], [DeskTopBinder], and then click [Function
Palette].
An icon for the Function palette is added to the task tray displayed at the bottom right of the screen.
2. Right-click the new icon that has been added to the task tray, and then click [Properties...].
The [Properties] dialog box appears.
3. Click the [Contents] tab, select the [PDF Direct Print] check box at the center, and then click
[OK].
The [Properties] screen closes and the [PDF Direct Print] icon is added to the palette.
PDF Direct Printing
Follow the procedure below to print PDF files directly.
68
Page 71
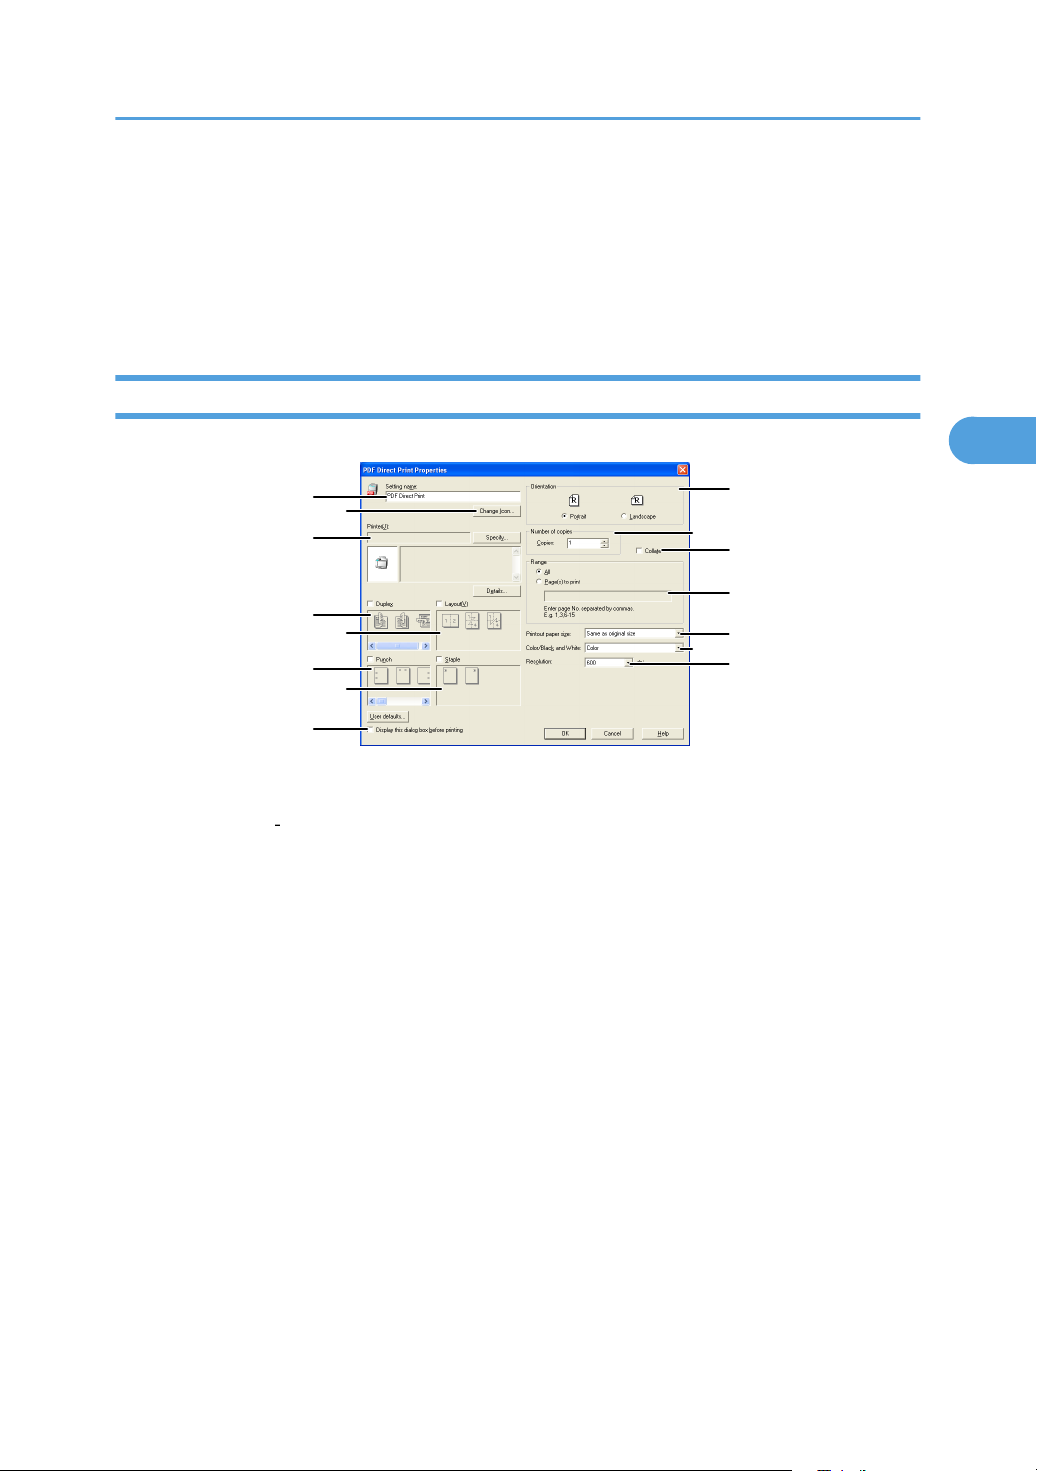
BRP007S
1
2
3
4
5
6
7
8
9
10
15
11
12
13
14
Printing a PDF File Directly
3
1. Drag the PDF file you want to print to the PDF Direct Printing icon in the palette and drop it
there.
The [Output File List - PDF Direct Print] dialog box appears.
2. Highlight the PDF you want to print, and then click [OK].
The PDF file is printed.
PDF Direct Print Properties
1. Setting name:
Displays the plug in configuration name (up to 63 single byte characters)
2. Change Icon...
Changes the icon displayed on the tool bar.
3. Printer
Displays printer's IP address or hostname.
4. Duplex
Prints on both sides of sheets.
5. Layout
Prints multiple pages on a single sheet.
6. Punch
Punches holes in printed sheets.
7. Staple
Staples together printed sheets.
8. Display this dialog box before printing
Appears in PDF direct printing mode if this check box is selected.
69
Page 72

3. Other Print Operations
3
9. Orientation:
Specify the original's orientation.
10. Number of copies
Specify the number of copies to print.
11. Collate
Sorts printed sheets.
12. Range
Specify which paper to print.
13. Printout paper size:
Specify the paper size you want copies to be printed onto.
14. Color/ Black and White: (not available for this machine)
Specify color or black-and-white printing.
15. Resolution:
Specify a print resolution.
Using Commands
You can print PDF files directly, using commands such as "ftp", "sftp", and "lpr".
For details about UNIX commands, see Network Guide.
70
Page 73
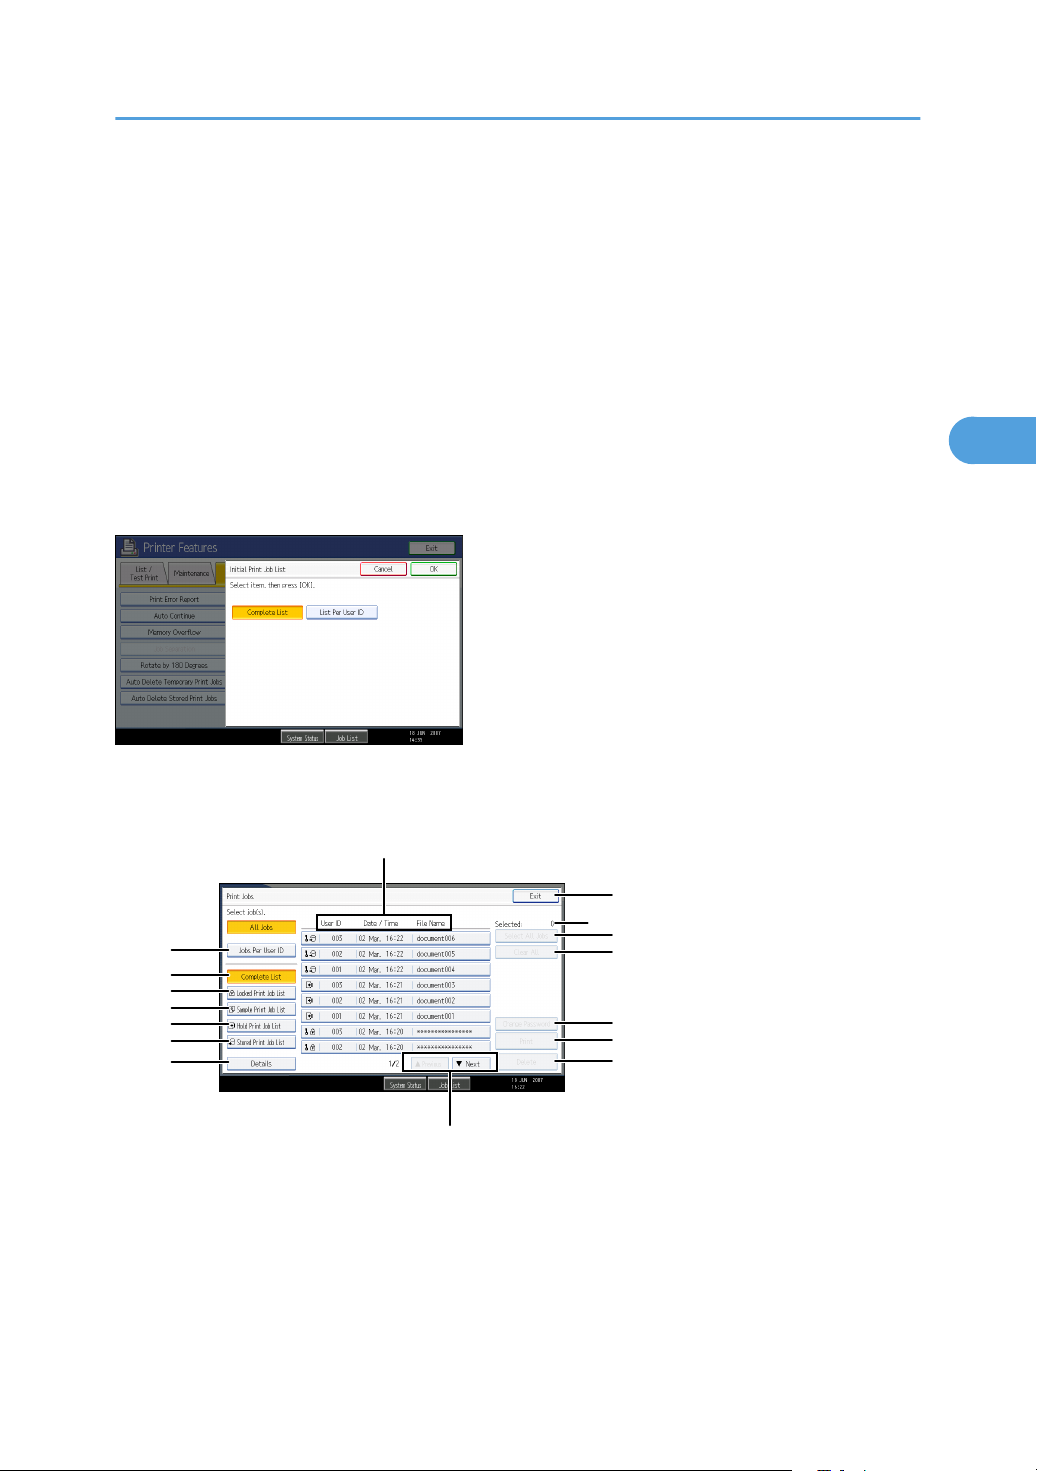
1
2
3
4
5
6
7
8
9
10
11
12
13
15
14
16
BAC007S
Using the Print Job Function
3
Using the Print Job Function
This describes how to print files stored in the machine.
The following types of printing can be selected using the printer driver: Sample Print, Locked Print, Hold
Print, and Stored Print.
You can print or delete the print jobs stored in the machine which is sent from computers.
If you select Sample Print, Locked Print, and Hold Print, the print files stored in the machine are deleted
after printing is completed. If you select Stored Print, the files remain in the machine even after printing is
finished.
If you press [Print Jobs] on the Printer screen, the Complete List or the List Per User ID screen appears
depending on which list type you select from [Initial Print Job List].
Complete List
If you select [Complete List] from [Initial Print Job List], the following screen appears:
1. [Jobs Per User ID]
Displays List Per User ID.
2. [Complete List]
Displays all files stored in the machine.
3. [Locked Print Job List]
71
Page 74

3. Other Print Operations
3
Displays only Locked Print files stored in the machine.
4. [Sample Print Job List]
Displays only Sample Print files stored in the machine.
5. [Hold Print Job List]
Displays only Hold Print files stored in the machine.
6. [Stored Print Job List]
Displays only Stored Print files stored in the machine.
7. [Details]
Displays details about a selected file.
8. [ Previous] / [ Next]
If the list of files does not fit on the screen, scroll up or down to view the list.
9. [Delete]
Deletes a selected file.
10. [Print]
Prints a selected file.
11. [Change Password]
Changes or deletes the password of a file if a password is set. To change the password, press [Change
Password], enter the current password, and then enter the new password on the confirmation screen.
To delete the password, press [Change Password], leave the entering/confirming a new password
box blank, and then press [OK].
You can also set passwords to the Stored Print files that do not currently have passwords.
12. [Clear All]
Clears all selections.
13. [Select All Jobs]
Selects all files stored in the machine.
14. [Selected:]
Displays number of the files selected.
15. [Exit]
Returns to the Printer screen.
16. User ID, Date / Time: , and File Name: display
Displays the time when the instruction to print the stored files was entered, the User IDs, and the file
names.
List Per User ID
If you select [List Per User ID] from [Initial Print Job List], the following screen appears:
72
Page 75
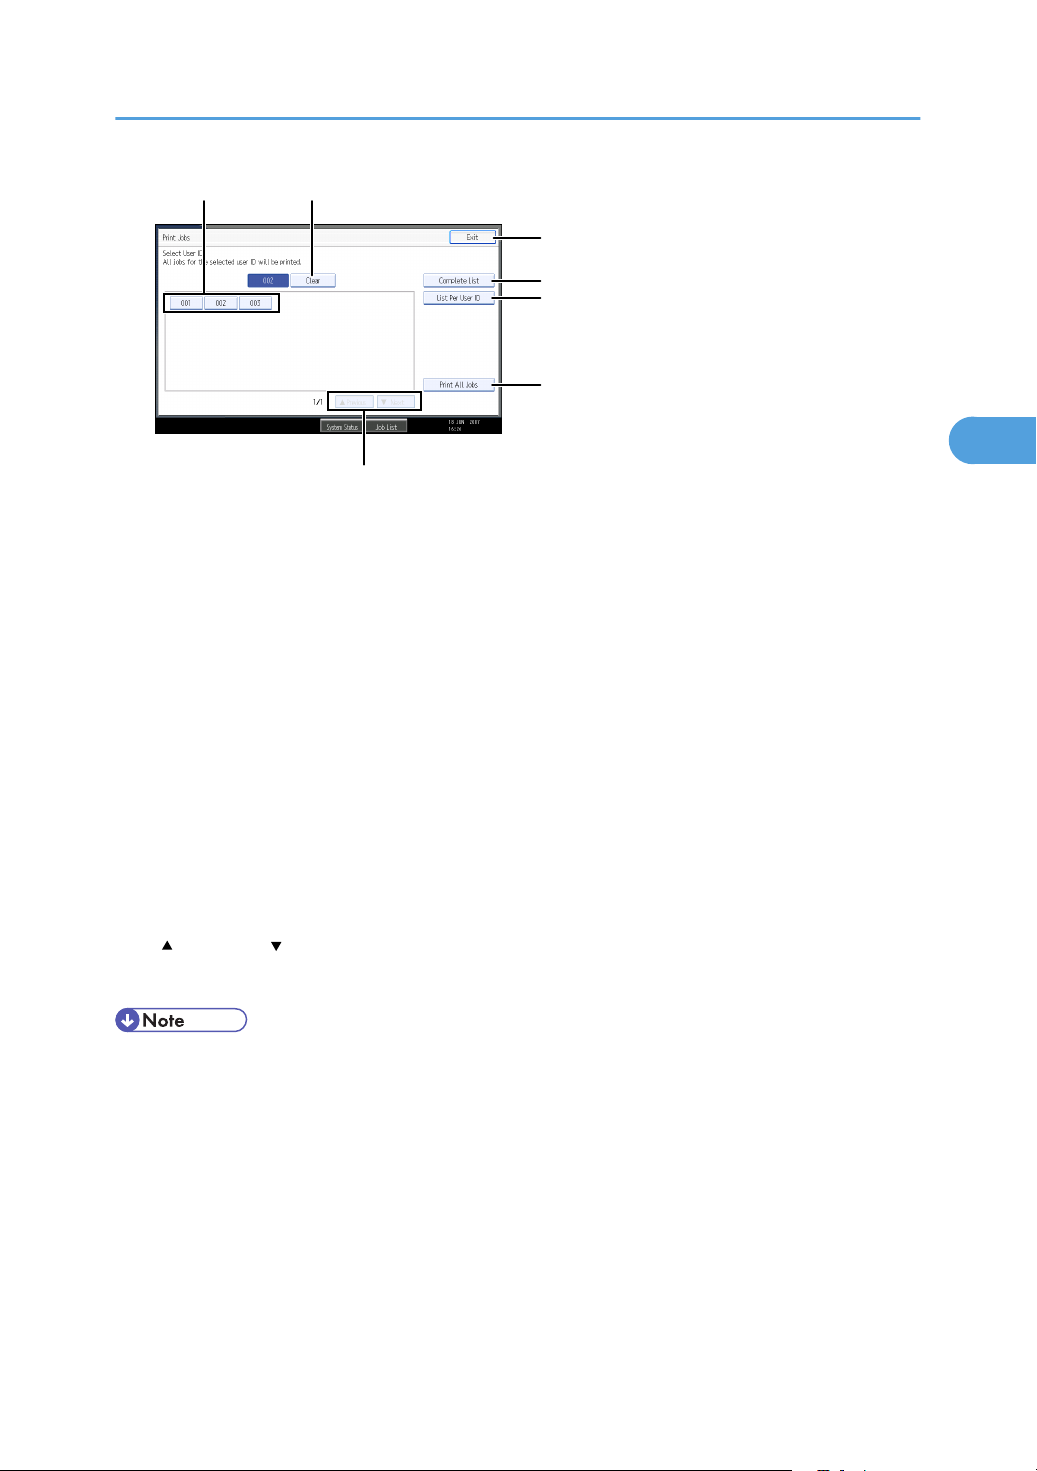
1 2
7
3
4
5
6
BAC008S
1. User ID
3
Displays the User IDs who sent files to the machine.
2. [Clear]
Clears a selection.
3. [Exit]
Using the Print Job Function
4. [Complete List]
5. [List Per User ID]
6. [Print All Jobs]
7. [ Previous] / [ Next]
• Multiple files can be selected on the Print Jobs screen. To clear selection, press the selected print jobs
• The display is not updated if a new file is stored while the list of stored files is displayed. To update
• If a large number of print jobs is stored in the machine, processing may slow temporarily, depending
• If you press [List Per User ID] in the Complete List screen, the screen switches to the List Per User ID
Returns to the Printer screen.
Displays all print jobs.
Displays the print job list of each ID.
Prints all selected type of files sent by the user ID.
If the list of files does not fit on the screen, scroll up or down to view the list.
again.
the display, press [Exit] to return to the Printer screen, and then press [Print Jobs] again.
on which functions are used.
screen where [Back] appears at the bottom right. Press [Back] to switch to the Complete List screen.
• For details about Sample Print, Locked Print, Hold Print, and Stored Print, see "Printing from the Print
Job Screen".
73
Page 76
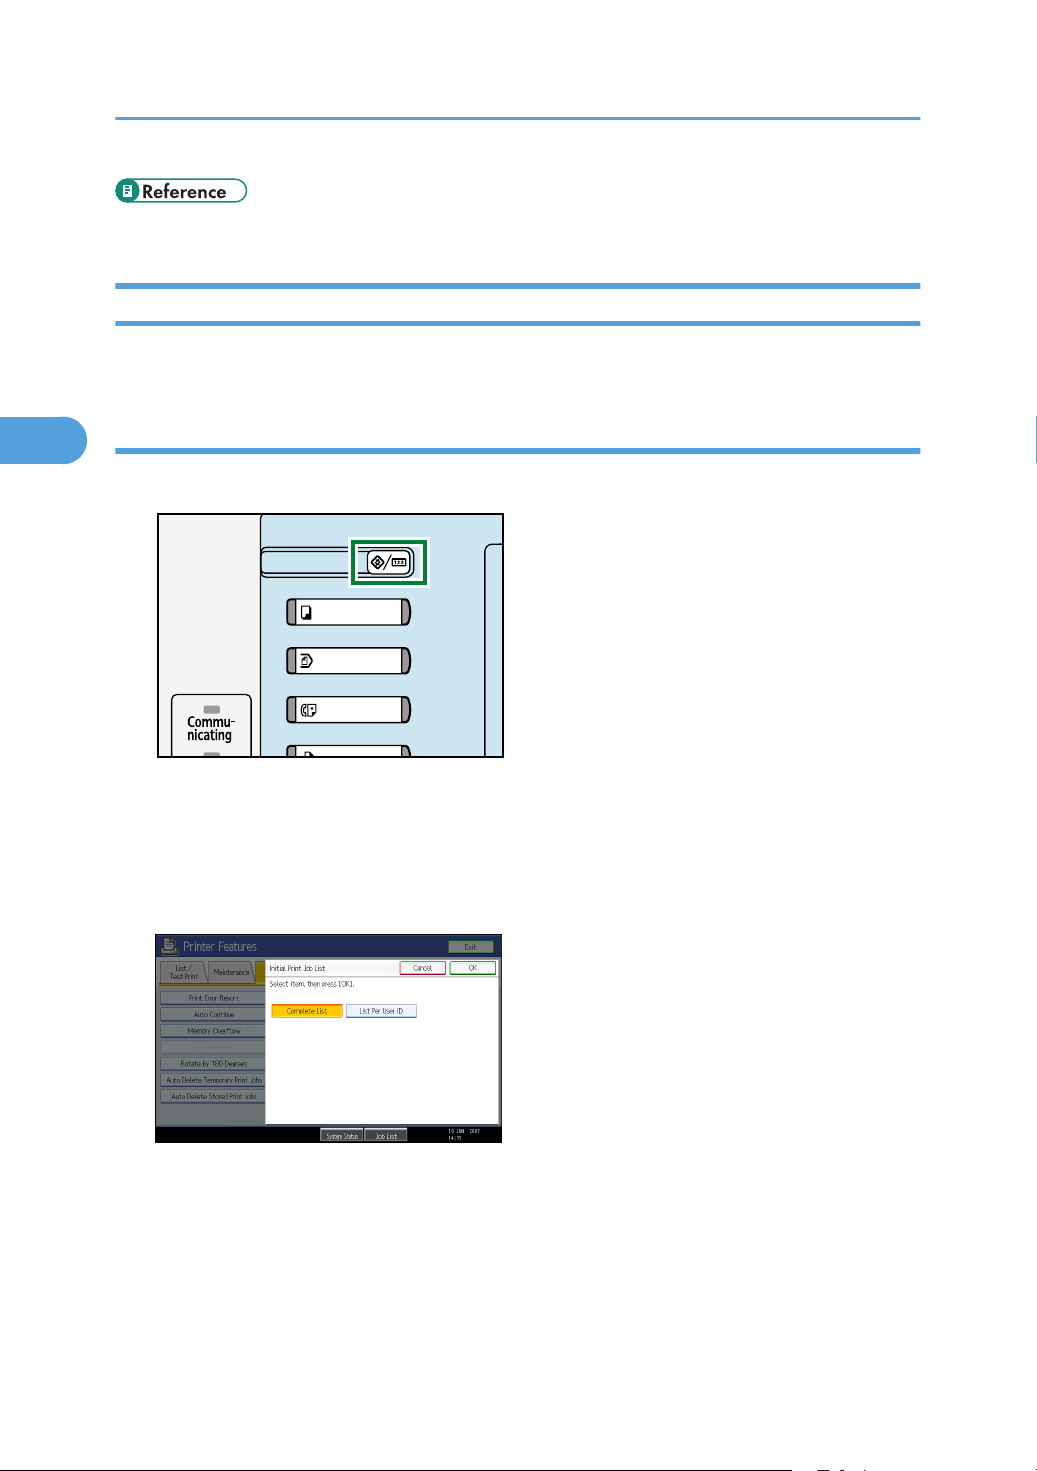
BAC001S
3. Other Print Operations
3
• p.76 "Printing from the Print Job Screen"
Selecting the Initial Print Job List
Follow the procedure below to set the initial Print Jobs screen, and to show it.
Selecting the Initial Print Job List
1. Press the [User Tools/Counter] key.
2. Press [Printer Features].
The Printer Features menu appears
3. On the [System] tab, press [Initial Print Job List].
4. Select either [Complete List] or [List Per User ID].
After configuring the settings, the selected type of print job list is displayed.
74
Page 77
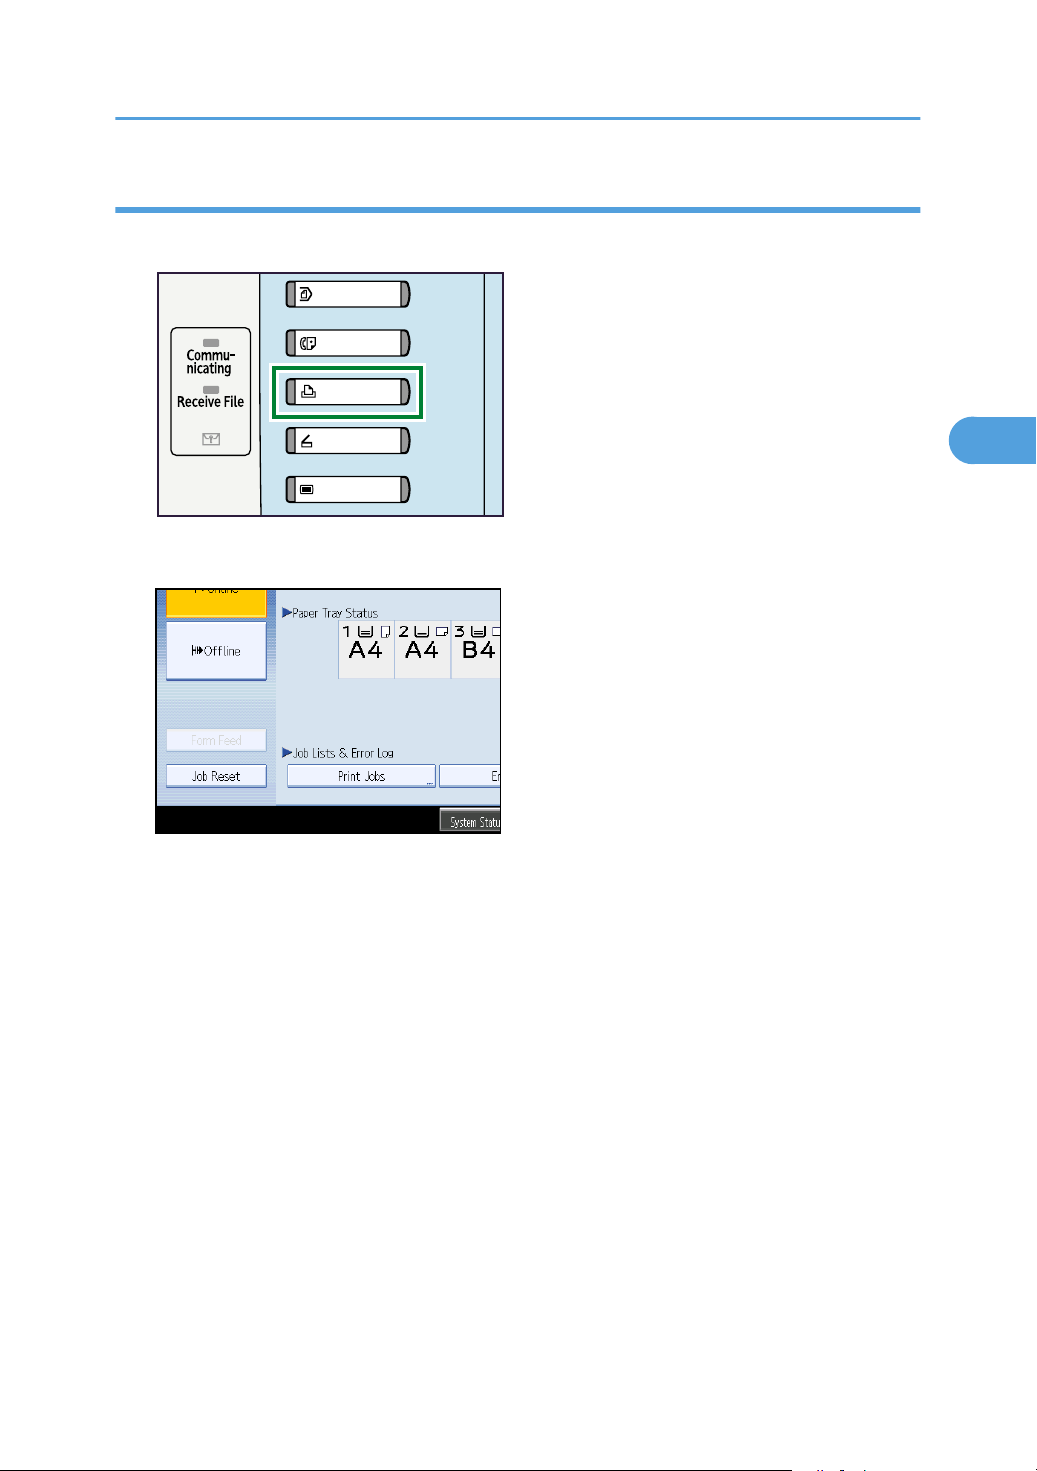
Displaying a Print Job List
BAC003S
3
1. Press the [Printer] key.
2. Press [Print Jobs].
Using the Print Job Function
Either the Complete List or List Per User ID screen appears.
75
Page 78
3. Other Print Operations
3
Printing from the Print Job Screen
This describes about Sample Print, Locked Print, Hold Print, and Stored Print.
Sample Print
Use this function to print only the first set of a multiple-set print job. After you have checked the result,
remaining sets can be printed or canceled using the machine's control panel. This can reduce misprints due
to mistakes in contents or settings.
• A Sample Print file cannot be stored if:
• the total number of Sample Print, Locked Print, Hold Print, and Stored Print files in the machine
is over 100. (The maximum number varies depending on the volume of data in files.)
• the file contains over 1,000 pages.
• the machine's sent or stored files total over 9,000 black-and-white pages. (The total varies
depending on the size of the files.)
• The PostScript 3 printer driver is also available for this machine. For details about installing and
configuring the PostScript 3 printer driver, see PostScript 3 Supplement.
• If a Sample Print file has not been stored properly, check the error log on the control panel.
• Even after you turn off the machine, stored documents in the machine remain. However, the [Auto
Delete Temporary Print Jobs] or [Auto Delete Stored Print Jobs] settings are applied first.
• If the application has a collate option, make sure it is not selected before sending a print job. By
default, Sample Print jobs are automatically collated by the printer driver. If a collate option is selected
from the application's [Print] dialog box, more prints than intended may be produced.
• If the first set of the Sample Print files is not as you expected and you do not want to print remaining
sets, delete the Sample Print file using the control panel. If you print the remaining sets of the Sample
Print file, the job in the machine is deleted automatically.
• For details about the error log on the control panel, see "Checking the Error Log".
• For details about the [Auto Delete Temporary Print Jobs] and [Auto Delete Stored Print Jobs], see
"Printer Features", General Settings Guide.
• p.98 "Checking the Error Log"
76
Page 79
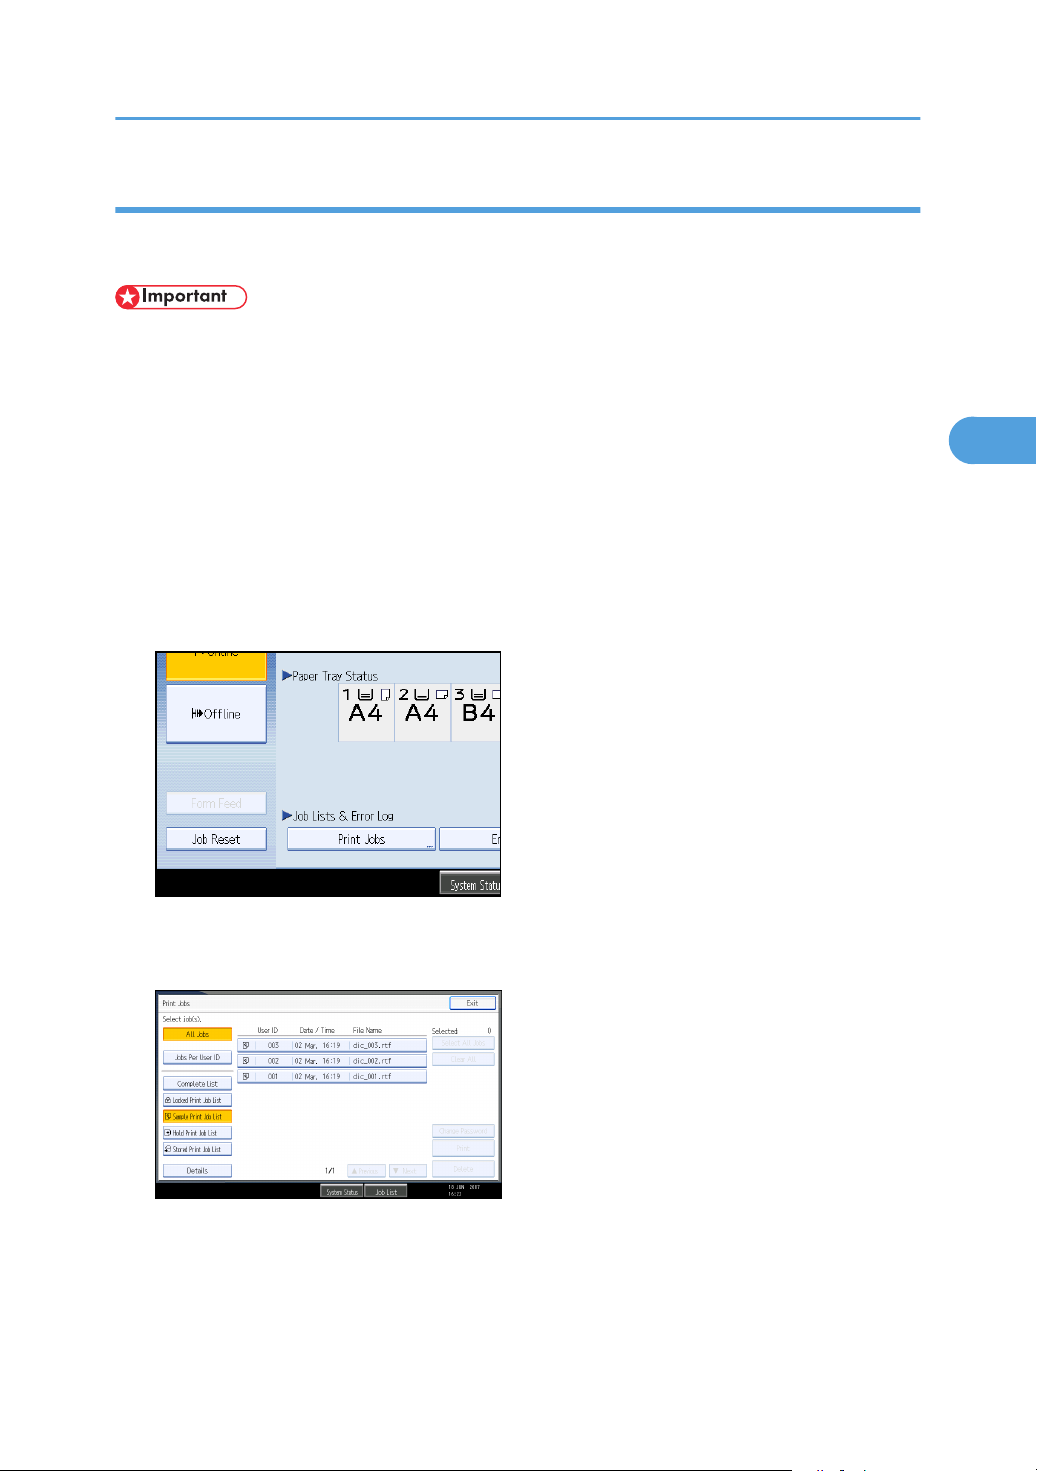
Printing from the Print Job Screen
3
Printing a Sample Print File
The following procedure describes how to print a Sample Print file with the PCL 6/5e printer driver. For
details about how to print a Sample Print file with the PostScript 3 printer driver, see PostScript 3 Supplement.
• Applications with their own drivers, such as PageMaker, do not support this function.
• If you are using Mac OS X, you need Mac OS X v10.2 or higher version to use this function.
1. Configure Sample Print in the printer driver's properties.
For details about configuring the printer drivers, see the relevant Help files.
2. Start printing from the application's [Print] dialog box.
Make sure to set more than two copies.
The Sample Print job is sent to the machine, and the first set is printed.
3. On the machine's control panel, press the [Printer] key to display the Printer screen.
4. Press [Print Jobs].
A list of print files stored in the machine appears.
5. Press [Sample Print Job List].
A list of Sample Print files stored in the machine appears.
Depending on the security settings, certain print jobs may not be displayed.
77
Page 80
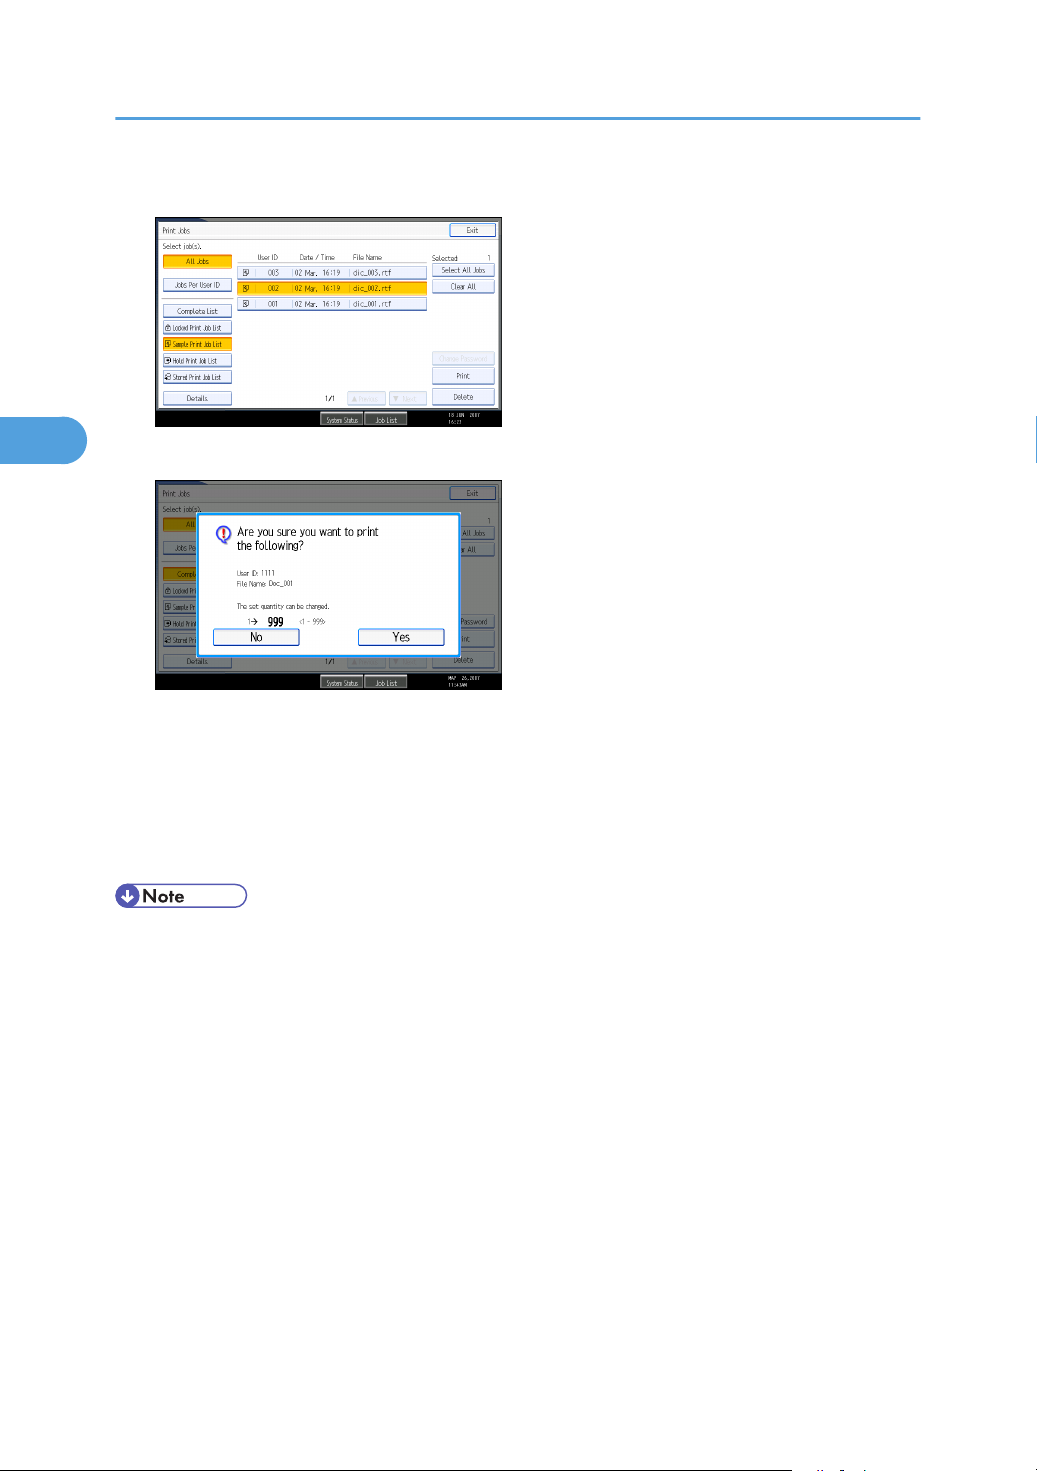
3. Other Print Operations
3
6. Select the file you want to print, and press [Print].
7. Enter the new number of sets using the number keys.
You can enter up to 999 sets.
Press the [Clear/Stop] to correct any entry mistakes.
8. Press [Yes].
The remaining sets are printed.
Press [No] to cancel printing.
• If you select multiple files, the confirmation screen displays the total number of files to be printed.
• If you select a Sample Print file that contains multiple documents, you can use the confirmation screen
to specify the number of copy sets. The number you specify will be the number of copy sets printed
for each document. If you do not specify a number of copy sets on the confirmation screen, the number
of copy sets printed for each document will be the number specified in the printer driver minus one.
(If the number of copy sets specified in the printer driver is "1", one copy set will be printed for each
document.)
• When printing accumulated sample print documents, you cannot change the numbers of sets.
• When printing is completed, the stored file will be deleted.
• To stop printing after printing has started, press [Exit] until the Printer screen appears, and then press
[Job Reset]. The file will be deleted.
78
Page 81

Printing from the Print Job Screen
3
Deleting Sample Print Files
If you are not satisfied with the sample printout, you can delete the Sample Print file, revise it and print it
again until the settings are suitable.
1. Press the [Printer] key to display the Printer screen.
2. Press [Print Jobs].
A list of the print files stored in the machine appears.
3. Press [Sample Print Job List].
A list of Sample Print files stored in the machine appears.
Depending on the security settings, certain print jobs may not be displayed.
4. Select the file you want to delete, and then press [Delete].
The delete confirmation screen appears.
5. Press [Yes] to delete the file.
The selected file is deleted.
• If you do not want to delete the file, press [No].
• If you select multiple files, the confirmation screen displays the total number of files to be deleted.
Locked Print
Use this function to maintain privacy when printing confidential documents on the machine over a shared
network. Usually, it is possible to print data using the control panel once it is stored in this machine. When
using Locked Print, it is not possible to print unless a password is entered on the machine's control panel.
Your confidential documents will be safe from being viewed by other people.
• A Locked Print file cannot be stored if:
• the total number of Sample Print, Locked Print, Hold Print, and Stored Print files in the machine
is over 100. (The maximum number varies depending on the volume of data in files.)
• the file contains over 1,000 pages.
• the machine's sent or stored files total over 9,000 black-and-white pages. (The total varies
depending on the size of the files.)
• The PostScript 3 printer driver is also available for this machine. For details about installing and
configuring the PostScript 3 printer driver, see PostScript 3 Supplement.
• If a Locked Print file has not been stored properly, check the error log on the control panel.
79
Page 82
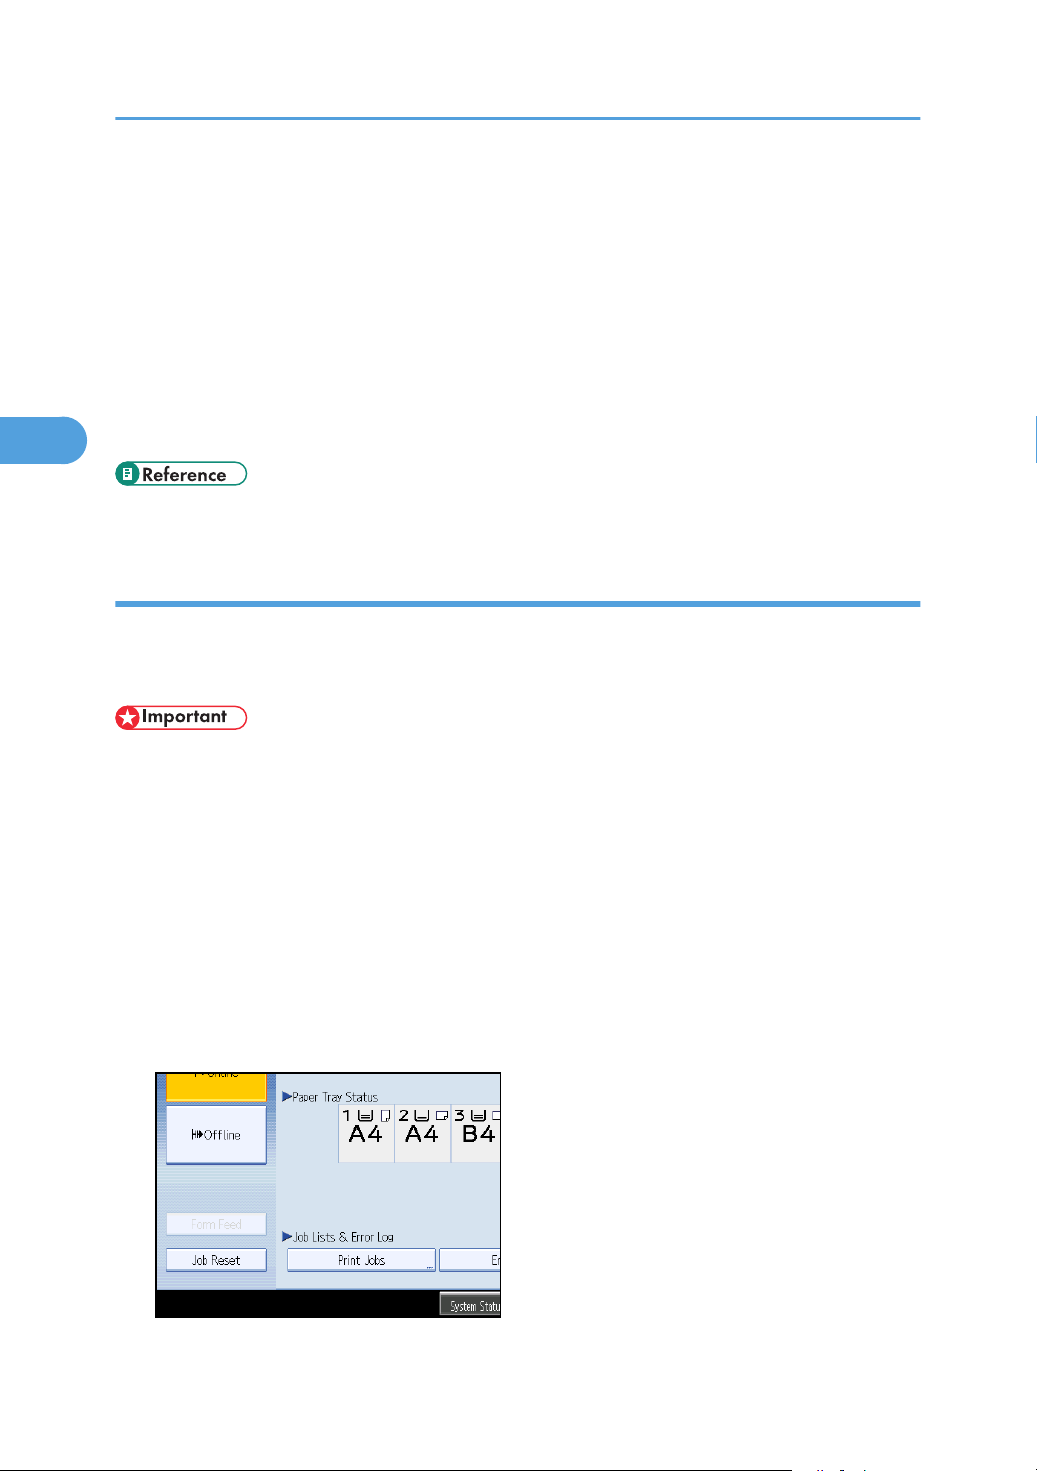
3. Other Print Operations
3
• Even after you turn off the machine, stored documents remain. However, the [Auto Delete Temporary
Print Jobs] or [Auto Delete Stored Print Jobs] settings are applied first.
• If the application has a collate option, make sure it is not selected before sending a print job. Locked
Print jobs are automatically collated by the printer driver as default. If a collate option is selected in
the application print dialog box, more sets than intended may be printed.
• After the Locked Print file is printed, the job is automatically deleted.
• For details about the error log on the control panel, see "Checking the Error Log".
• For details about the [Auto Delete Temporary Print Jobs] and [Auto Delete Stored Print Jobs], see
"Printer Features", General Settings Guide.
• p.98 "Checking the Error Log"
Printing a Locked Print File
The following procedure describes how to print a Locked Print file with the PCL 6/5e printer driver. For
details about how to print a Locked Print file with the PostScript 3 printer driver, see PostScript 3 Supplement
included as a PDF file on the CD-ROM.
• Applications with their own drivers, such as PageMaker, do not support this function.
• If you are using Mac OS X, you need Mac OS X v10.2 or higher to use this function.
1. Configure the Locked Print in the printer driver's properties.
For details about configuring the printer drivers, see the corresponding Help files.
2. Click [OK] to close the printer driver's properties.
3. Start printing from the application's [Print] dialog box.
The Locked Print job is sent to the machine.
4. On the machine's control panel, press the [Printer] key to display the Printer screen.
5. Press [Print Jobs].
80
Page 83
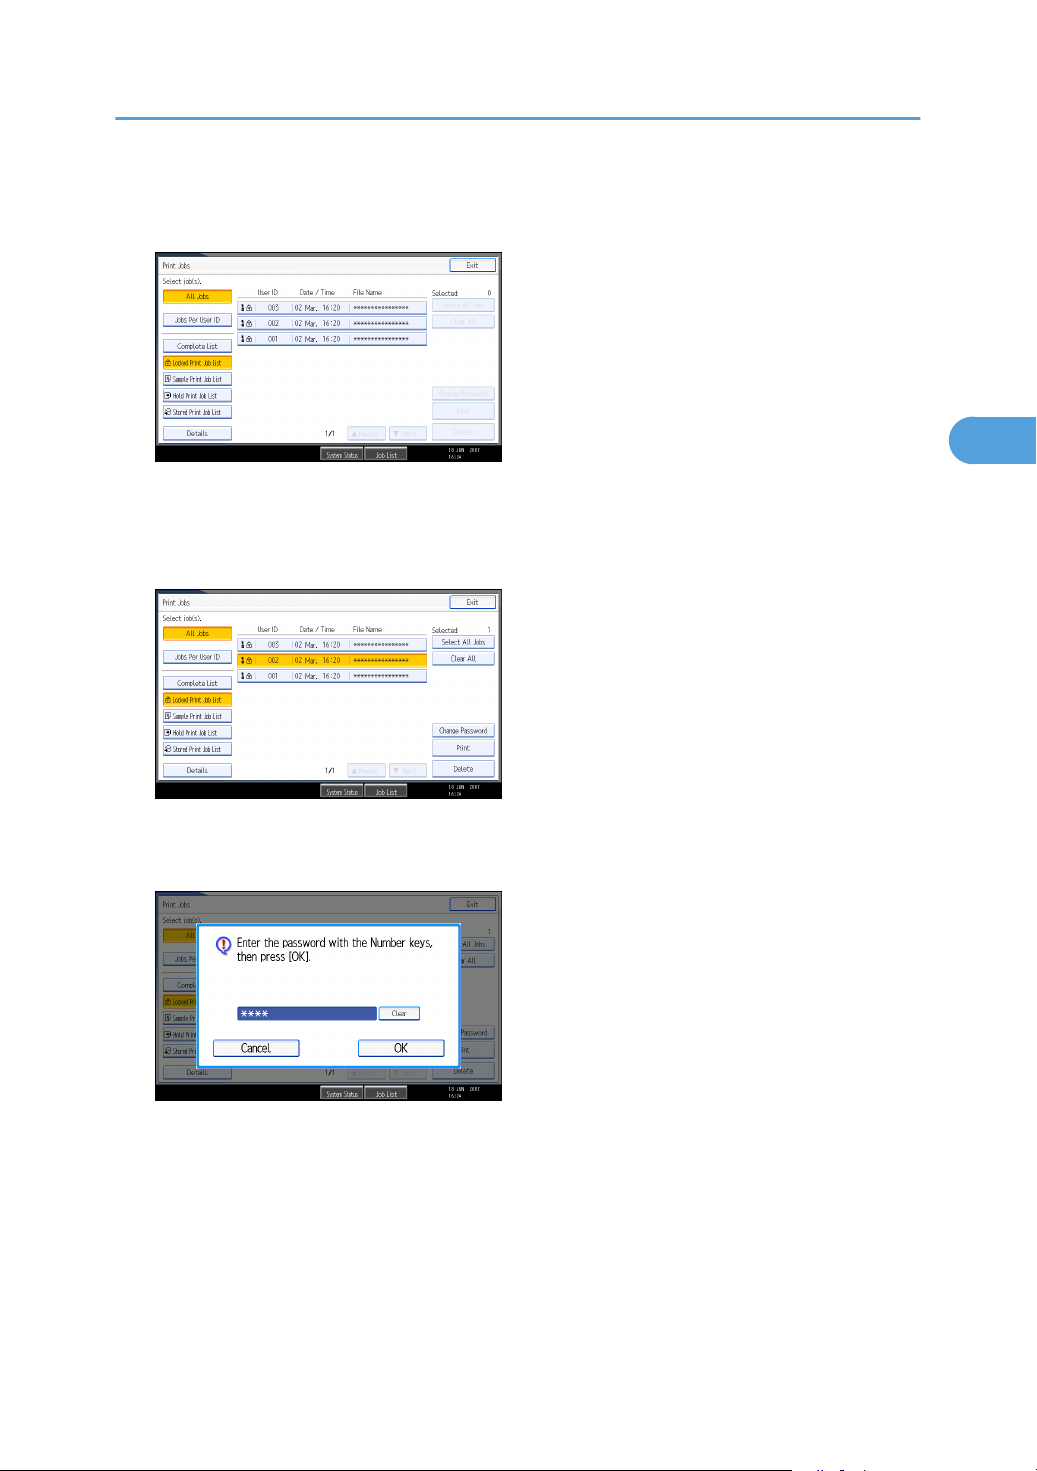
A list of print files stored in the machine appears.
3
6. Press [Locked Print Job List].
A list of Locked Print files stored in the machine appears.
Depending on the security settings, certain print jobs may not be displayed.
7. Select the file you want to print, and then press [Print].
Printing from the Print Job Screen
The password screen appears.
8. Enter the password using the number keys, and then press [OK].
The print confirmation screen appears.
A confirmation screen will appear if the password is not entered correctly. Press [Exit] to enter the
password again.
If multiple print files are selected, the machine prints files that correspond to the entered password.
The number of files to be printed is displayed on the confirmation screen.
If you forgot your password, ask your file administrator for help.
81
Page 84

3. Other Print Operations
3
9. Press [Yes].
The locked file is printed.
Press [No] to cancel printing.
• The PostScript 3 printer driver is also available for this machine. For details about installing and
configuring the PostScript 3 printer driver, see PostScript 3 Supplement.
• When printing is completed, the stored file will be deleted.
• To stop printing after printing has started, press [Exit] until the Printer screen appears, and then press
[Job Reset]. The file will be deleted.
Deleting Locked Print Files
1. Press the [Printer] key to display the Printer screen.
2. Press [Print Jobs].
3. Press [Locked Print Job List].
A list of Locked Print files stored appears.
Depending on the security settings, certain print jobs may not be displayed.
4. Select the file you want to delete, and then press [Delete].
The password screen is displayed.
5. Enter the password using the number keys, and then press [OK].
The delete confirmation screen appears.
A confirmation screen will appear if the password is not entered correctly. Press [Exit] to enter the
password again.
If you forget your password, ask your file administrator for help.
6. Press [Yes].
The selected file is deleted.
If you do not want to delete the file, press [No].
• If multiple print files are selected, the machine deletes files that correspond to the entered password.
The number of files to be deleted is displayed on the confirmation screen.
Hold Print
Use this function to temporarily hold a file in the machine, and print it from the computer or the machine's
control panel later.
82
Page 85

Printing from the Print Job Screen
3
• A Hold Print file cannot be stored if:
• the total number of Sample Print, Locked Print, Hold Print, and Stored Print files in the machine
is over 100. (The maximum number varies depending on the volume of data in files.)
• the file contains over 1,000 pages.
• the machine's sent or stored files total over 9,000 black-and-white pages. (The total varies
depending on the size of the files.)
• The PostScript 3 printer driver is also available for this machine. For details about installing and
configuring the PostScript 3 printer driver, see PostScript 3 Supplement.
• If a Hold Print file has not been stored properly, check the error log on the control panel.
• Even after you turn off the machine, stored documents in the machine remain. However, the [Auto
Delete Temporary Print Jobs] or [Auto Delete Stored Print Jobs] settings are applied first.
• If the application has a collate option, make sure it is not selected before sending a print job. By
default, Hold Print jobs are automatically collated by the printer driver. If a collate option is selected
from the application's Print dialog box, more prints than intended may be produced.
• For details about the error log on the control panel, see "Checking the Error Log"
• For details about the [Auto Delete Temporary Print Jobs] and [Auto Delete Stored Print Jobs], see
"Printer Features", General Settings Guide.
• p.98 "Checking the Error Log"
Printing a Hold Print File
The following procedure describes how to print a Hold Print file with the PCL 6/5e printer driver. For details
about how to print a Hold Print file with the PostScript 3 printer driver, see Postscript 3 Supplement included
as a PDF file in the supplied CD-ROM.
• Applications with their own drivers, such as PageMaker, do not support this function.
• If you are using Mac OS X, you need Mac OS X v10.2 or higher to use this function.
1. Configure Hold Print in the printer driver's properties.
For details about configuring the printer drivers, see the relevant Help files.
2. Click [Details...], and then enter a User ID in the [User ID:] box.
3. Click [OK] to close [Details...], and then click [OK] to close the printer driver's properties.
83
Page 86
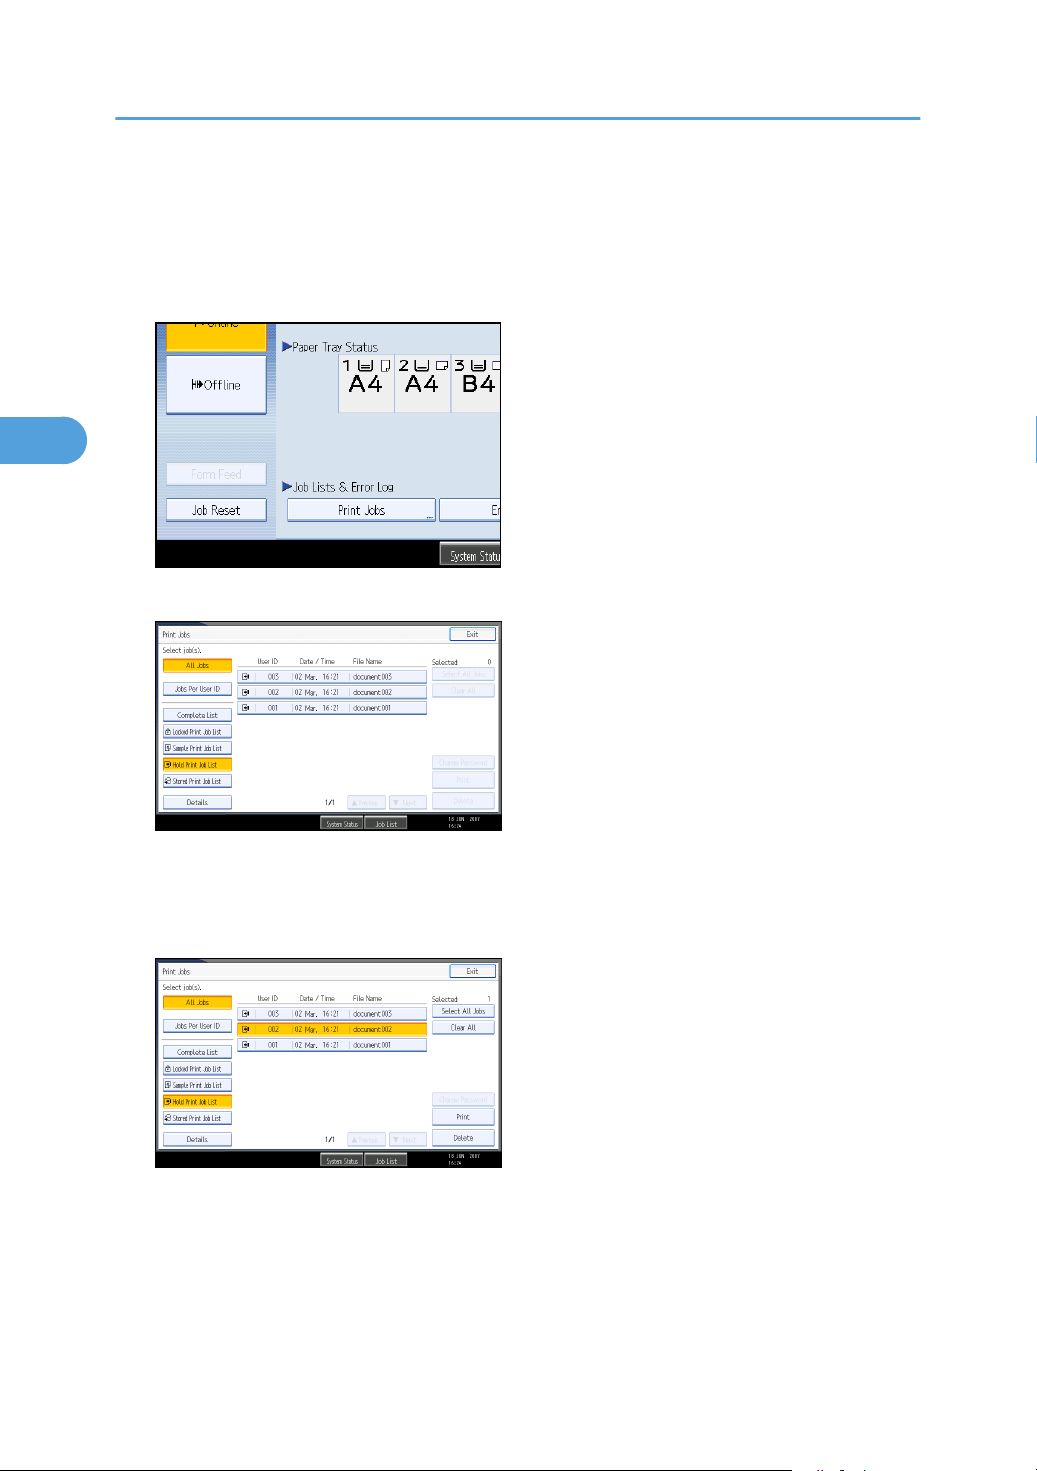
3. Other Print Operations
3
4. Start printing from the application's [Print] dialog box.
The Hold Print job is sent to the machine and stored.
5. On the machine's control panel, press the [Printer] key to display the printer screen.
6. Press [Print Jobs].
7. Press [Hold Print Job List].
84
A list of Hold print files stored in the machine appears.
Depending on the security settings, certain print jobs may not be displayed.
8. Select the file you want to print, and press [Print].
The confirmation screen appears.
9. Press [Yes].
The Hold Print file is printed.
Press [No] to cancel printing.
Page 87

Printing from the Print Job Screen
3
• When printing is completed, the stored file is deleted.
• To stop printing after printing has started, press [Exit] until the Printer screen appears, and then press
[Job Reset]. The file will be deleted.
• If you select multiple files, the confirmation screen displays the total number of files to be printed.
• For details about setting printer drivers, see the printer driver Help.
• You can also print or delete a Hold Print file from Web Image Monitor. For details, see Web Image
Monitor Help.
Deleting Hold Print Files
1. Press the [Printer] key to display the Printer screen.
2. Press [Print Jobs].
A list of print files stored in the machine appears.
3. Press [Hold Print Job List].
A list of Hold Print files stored in the machine appears.
Depending on the security settings, certain print jobs may not be displayed.
4. Select the file you want to delete, and then press [Delete].
The delete confirmation screen appears.
5. Press [Yes] to delete the file.
The selected file is deleted.
If you do not want to delete the file, press [No].
• If you select multiple files, the confirmation screen displays the total number of files to be deleted.
Stored Print
Use this function to store a file in the machine, and then print it from the computer or the machine's control
panel later.
Jobs are not deleted after they are printed, so the same job need not be re-sent in order to print multiple
copies.
• A Stored Print file cannot be stored if:
• the total number of Sample Print, Locked Print, Hold Print, and Stored Print files in the machine
is over 100. (The maximum number varies depending on the volume of data in files.)
85
Page 88

3. Other Print Operations
3
• the file contains over 1,000 pages.
• the machine's sent or stored files total over 9,000 black-and-white pages. (The total varies
depending on the size of the files.)
• The PostScript 3 printer driver is also available for this machine. For details about installing and
configuring the PostScript 3 printer driver, see PostScript 3 Supplement.
• If a Stored Print file has not been stored properly, check the error log on the control panel. Even after
you turn off the machine, stored documents remain. However, the [Auto Delete Temporary Print Jobs]
or [Auto Delete Stored Print Jobs] settings are applied first (see "Printer Features", General Settings
Guide).
• If the application has a collate option, make sure it is not selected before sending a print job. By
default, Stored Print jobs are automatically collated by the printer driver. If a collate option is selected
from the application's Print dialog box, more prints than intended may be produced. You can
optionally set a document title and a password of a Stored Print file. For details about a password
setting, see the printer driver Help.
• For details about the error log on the control panel, see "Checking the Error Log".
• For details about the [Auto Delete Temporary Print Jobs] and [Auto Delete Stored Print Jobs], see
"Printer Features", General Settings Guide.
• p.98 "Checking the Error Log"
Printing a Stored Print File
The following procedure describes how to print a Stored Print file with the PCL 6/5e printer driver. For
details about how to print a Stored Print file with the PostScript 3 printer driver, see Postscript 3 Supplement
included as a PDF file on the supplied CD-ROM.
• Applications with their own drivers, such as PageMaker, do not support this function.
• If you are using Mac OS X, you need Mac OS X v10.2 or higher to use this function.
1. Configure Stored Print in the printer driver's properties.
You can select two methods of Stored Print:
• [Stored Print]
Stores the file in the printer and prints it later using the control panel.
• [Store and Print]
Prints the file at once and also stores the file in the machine.
For details about configuring the printer drivers, see the relevant Help files.
86
Page 89
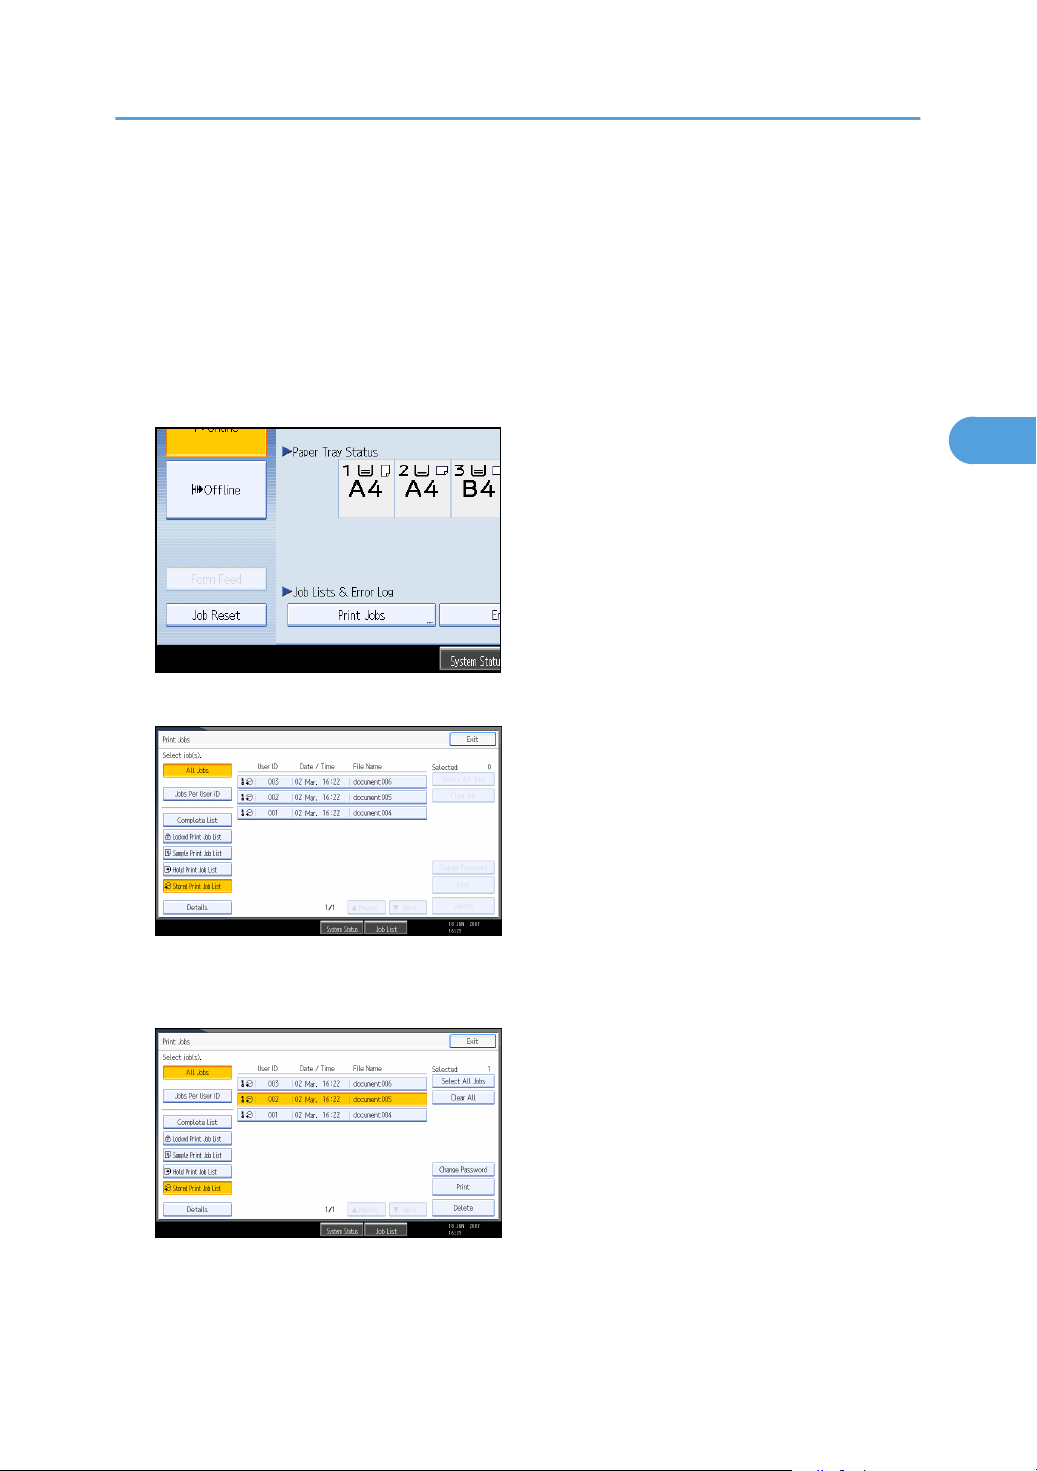
Printing from the Print Job Screen
3
2. Click [Details...], and then enter a User ID in the [User ID:] box.
You can also set a password. The same password must be entered when printing or deleting.
3. Click [OK] to close [Details...], and then click [OK] to close the printer driver's properties.
4. Start printing from the application's [Print] dialog box.
The Stored Print job is sent to the machine and stored.
5. On the machine's control panel, press the [Printer] key to display the Printer screen.
6. Press [Print Jobs].
7. Press [Stored Print Job List].
A list of Stored Print files stored in the machine appears.
8. Select the file you want to print, and press [Print].
The confirmation screen appears.
If you set a password in the printer driver, a password confirmation screen appears. Enter the
password.
87
Page 90
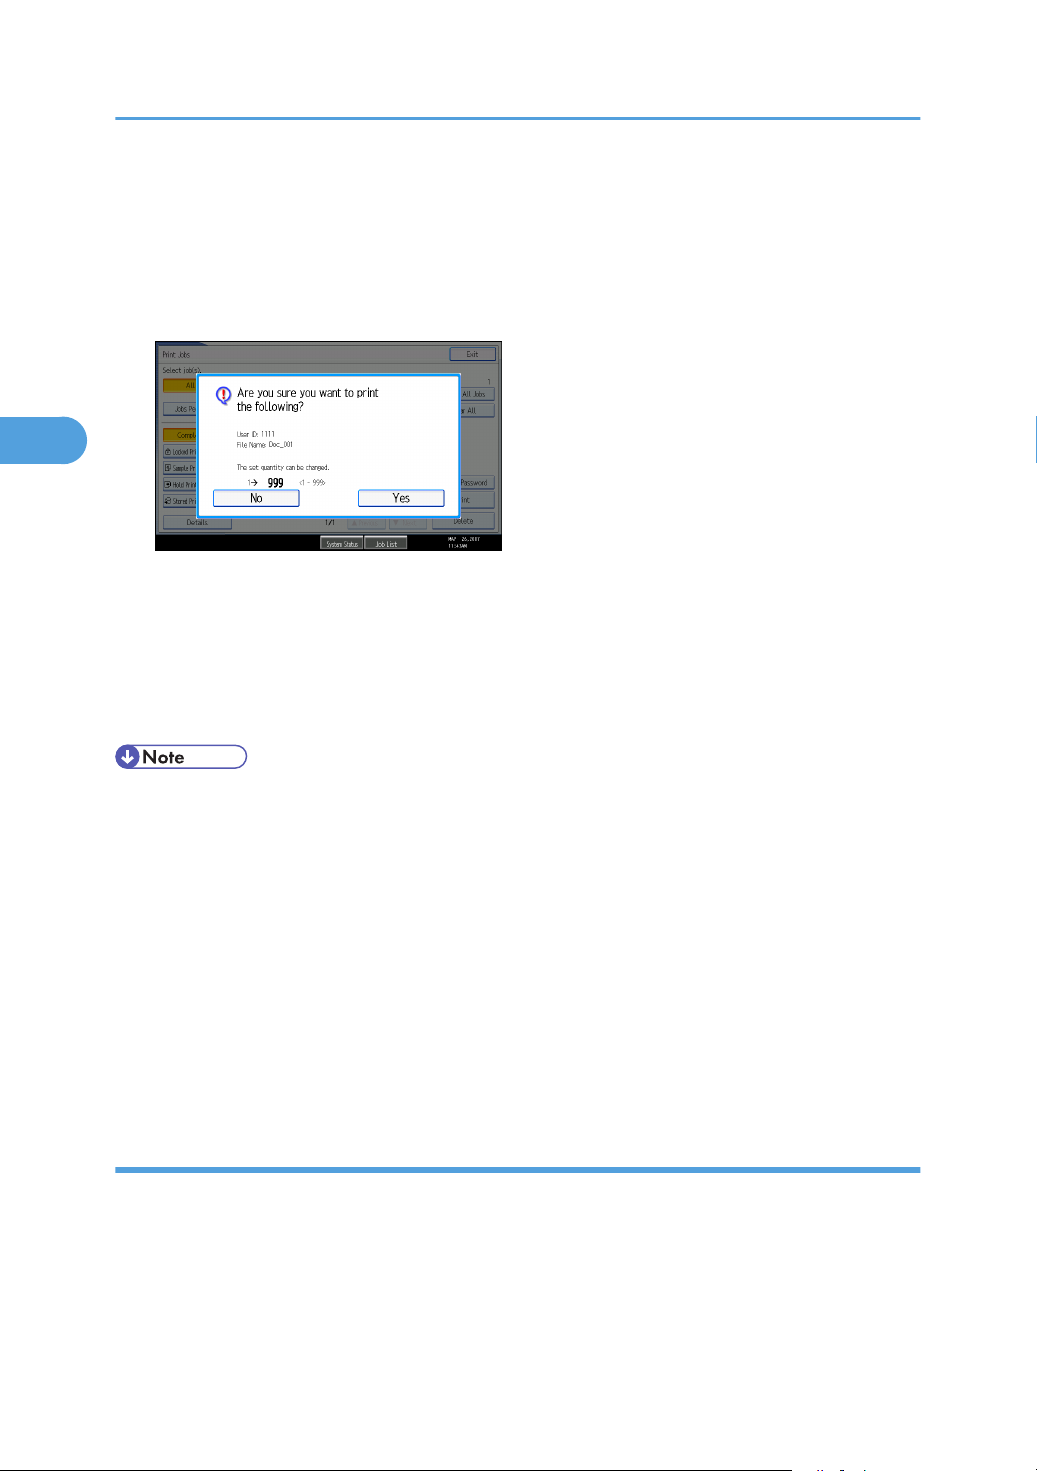
3. Other Print Operations
3
If multiple print files are selected, and some of these require a password, the machine prints files that
correspond to the entered password and files that do not require a password. The number of files to
be printed is displayed on the confirmation screen.
If you forgot your password, ask your file administrator for help.
9. Enter the number of sets using the number keys.
You can enter up to 999 sets.
Press the [Clear/Stop] to correct any entry mistakes.
10. Press [Yes].
The Stored Print file is printed.
Press [No] to cancel printing.
• If you do not specify a number of copy sets, the number of copy sets printed for each document will
be the number specified in the printer driver minus one.
• When printing accumulated stored print documents, you cannot change the numbers of sets.
• To stop printing after printing has started, press [Exit] until the Printer screen appears, and then press
[Job Reset]. A Stored Print file is not deleted even if [Job Reset] is pressed.
• The Stored Print file that sent to the machine is not deleted unless you delete a file or select [Auto Delete
Stored Print Jobs] (see "Printer Features", General Settings Guide).
• For details about setting printer drivers, see the printer driver Help.
• You can also print or delete a Stored Print file from Web Image Monitor. For details, see Web Image
Monitor Help.
Deleting Stored Print Files
1. Press the [Printer] key to display the Printer screen.
2. Press [Print Jobs].
A list of print files stored in the machine appears.
88
Page 91

Printing from the Print Job Screen
3
3. Press [Stored Print Job List].
A list of Stored Print files stored in the machine appears.
Depending on the security settings, certain print jobs may not be displayed.
4. Select the file you want to delete, and press [Delete].
The delete confirmation screen appears.
If you set the password in the printer driver, enter the password to delete.
If multiple print files are selected, and some of these require a password, the machine deletes files
correspond to the entered password and files that do not require a password. The number of files to
be deleted is displayed on the confirmation screen.
If you forgot your password, ask your file administrator for help.
5. Press [Yes] to delete the file.
The selected file is deleted.
If you do not want to delete the file, press [No].
• If you select multiple files, the confirmation screen displays the total number of files to be deleted.
89
Page 92
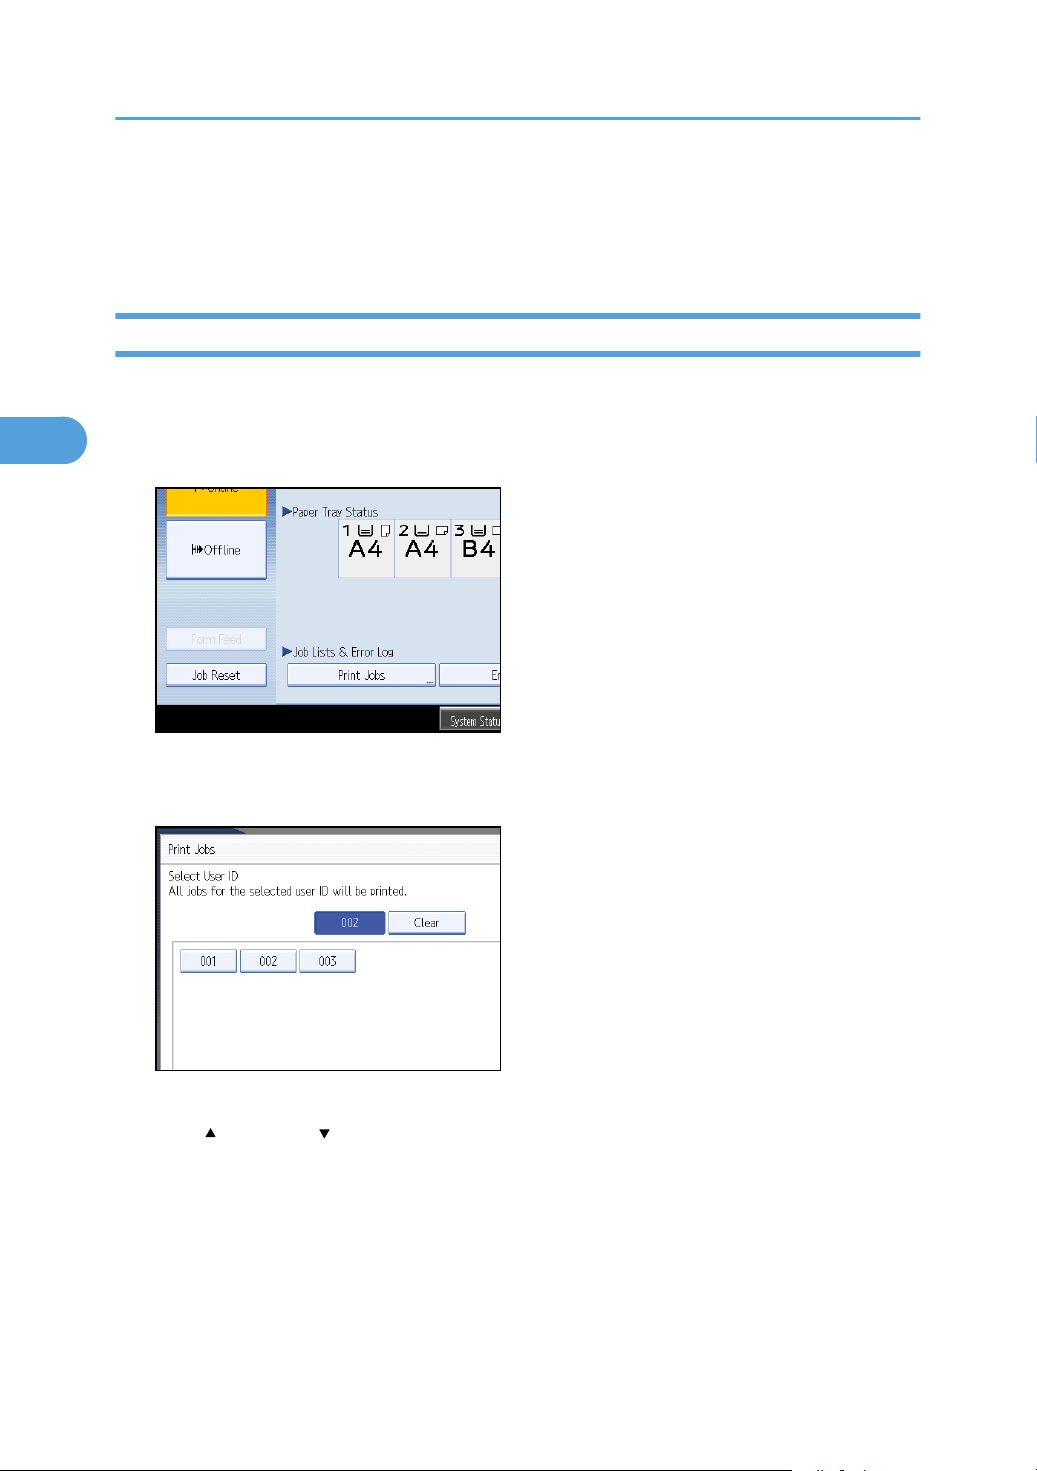
3. Other Print Operations
3
Printing from the Jobs Per User ID Screen
This describes how to print the files saved in the machine from the User ID screen.
Printing the Selected Print Job
1. Press the [Printer] key.
The Printer screen appears.
2. On the Printer screen, press [Print Jobs].
A list of user IDs whose files are stored in the machine appears.
3. Press the user ID whose file you want to print.
You cannot select multiple user IDs at the same time.
Press [ Previous] or [ Next] to scroll through the list.
Press [Clear] to cancel a selection.
90
Page 93
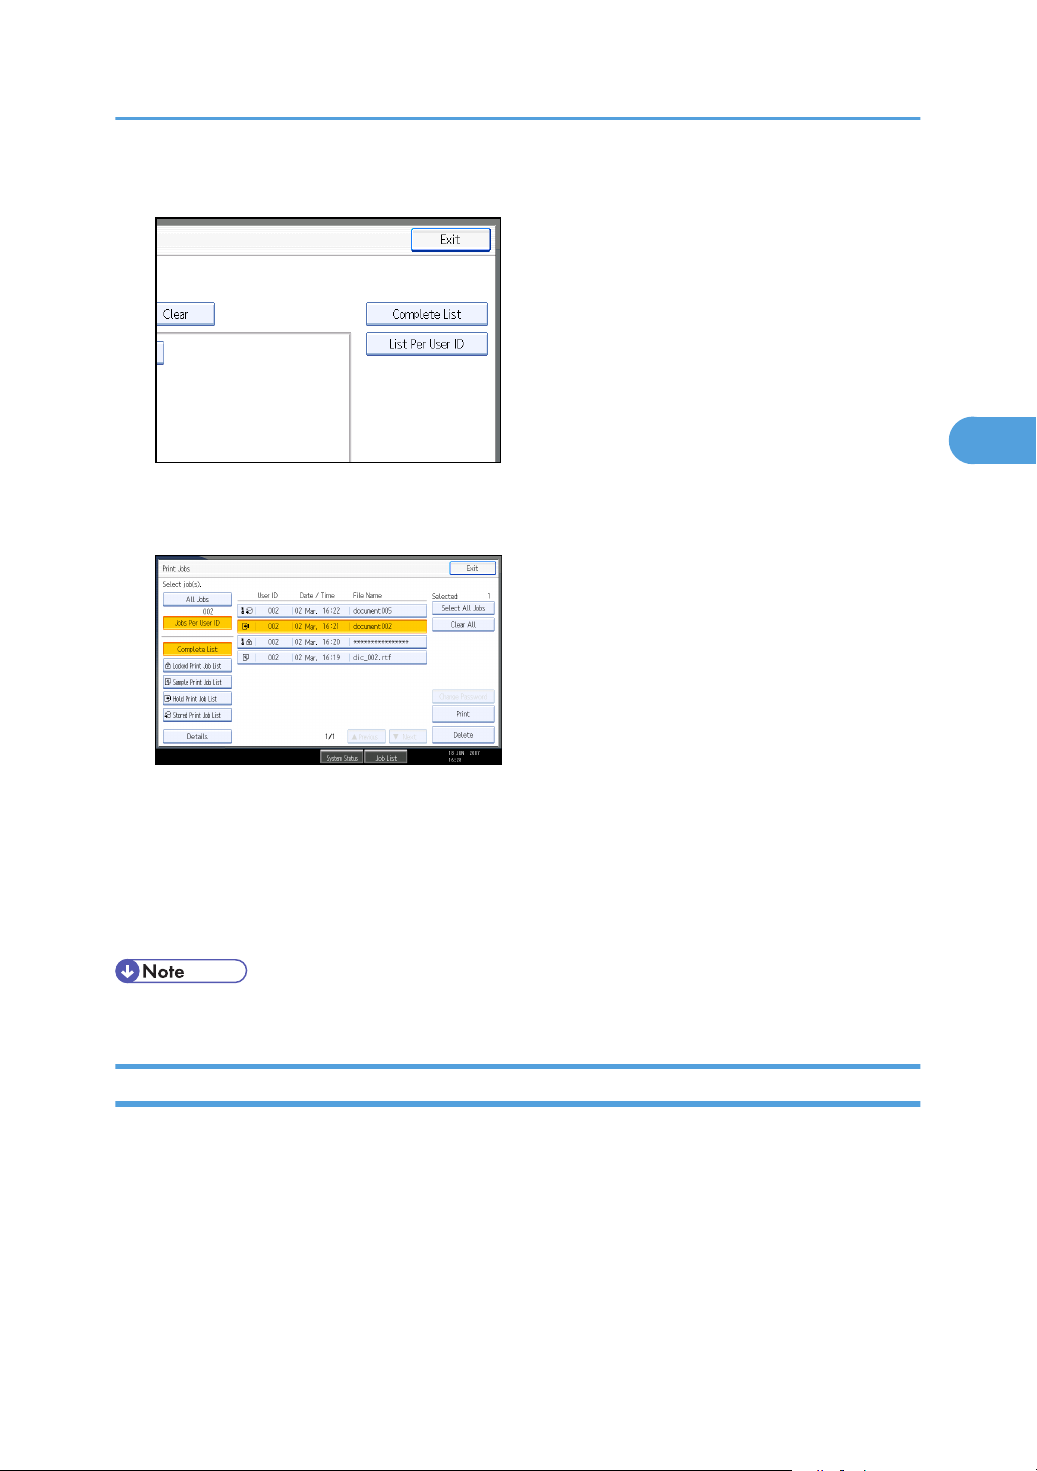
4. Press [List Per User ID].
3
The print job list of the selected user ID appears.
5. Select the desired print jobs.
Printing from the Jobs Per User ID Screen
To cancel a selection, press the highlighted print job again. To clear all selections, press [Clear All].
6. Press [Print].
The confirmation screen appears.
7. Press [Yes].
The selected files are printed.
• If you select multiple files, the confirmation screen displays the total number of files to be printed.
Printing All Print Jobs
1. Press the [Printer] key.
The Printer screen appears.
91
Page 94
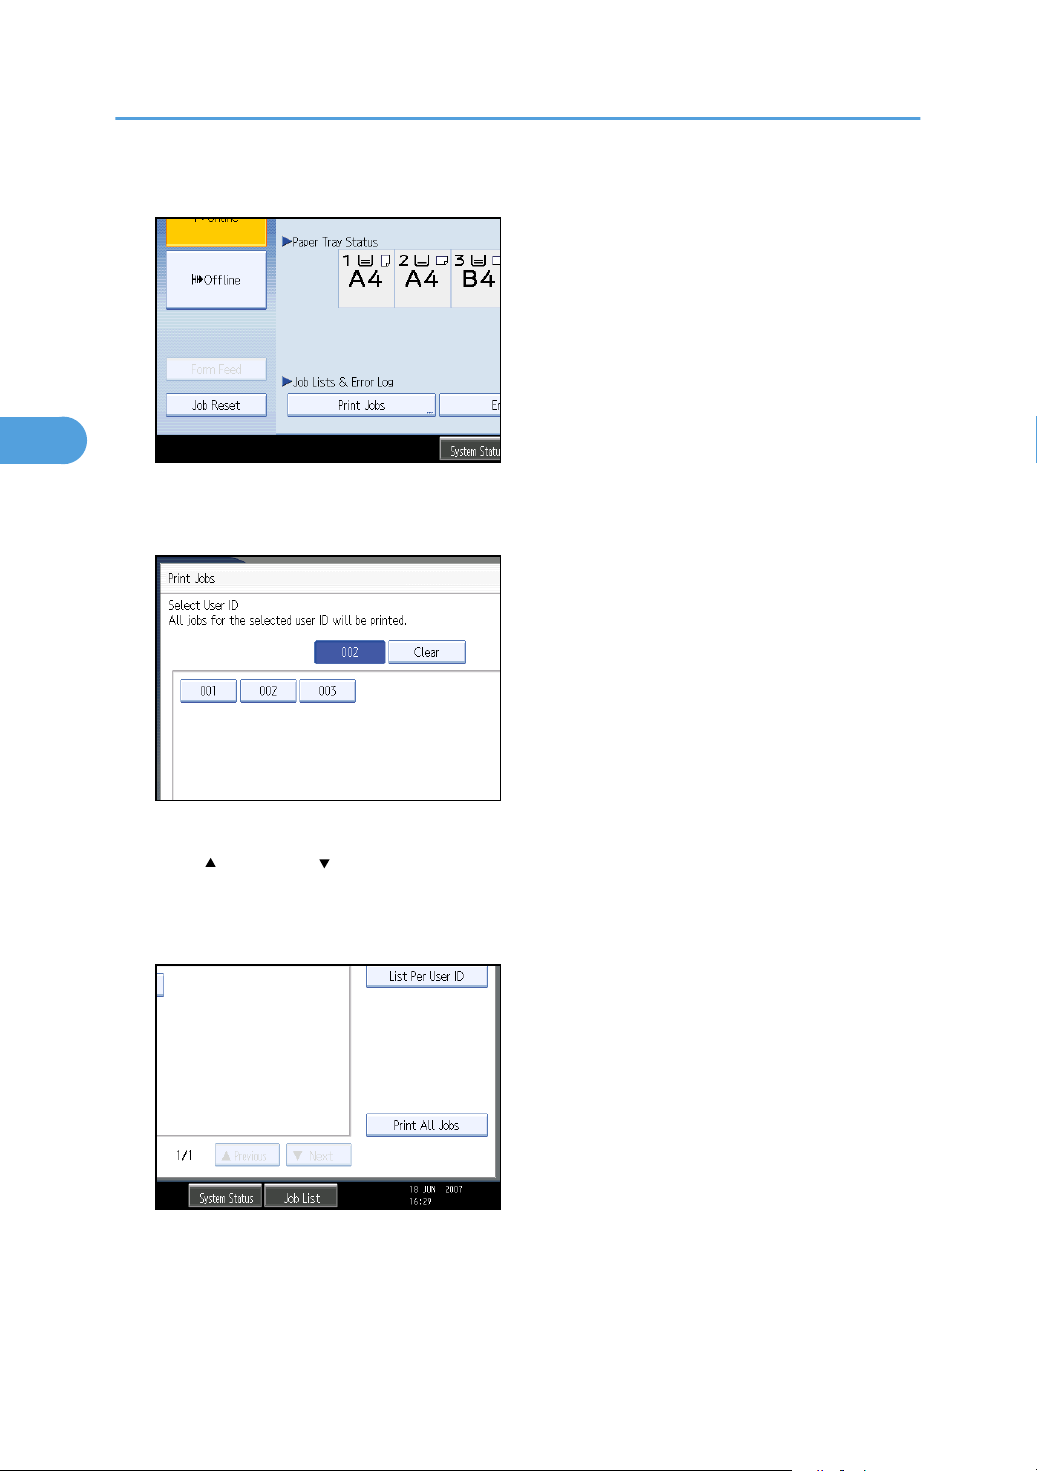
3. Other Print Operations
3
2. On the Printer screen, press [Print Jobs].
A list of user IDs whose files are stored in the machine appears.
3. Press the user ID whose file you want to print.
92
You cannot select multiple user IDs at the same time.
Press [ Previous] or [ Next] to scroll through the list.
Press [Clear] to cancel a selection.
4. Press [Print All Jobs].
If the selected user ID has multiple types of print jobs, the selection screen of the print job type appears.
Page 95
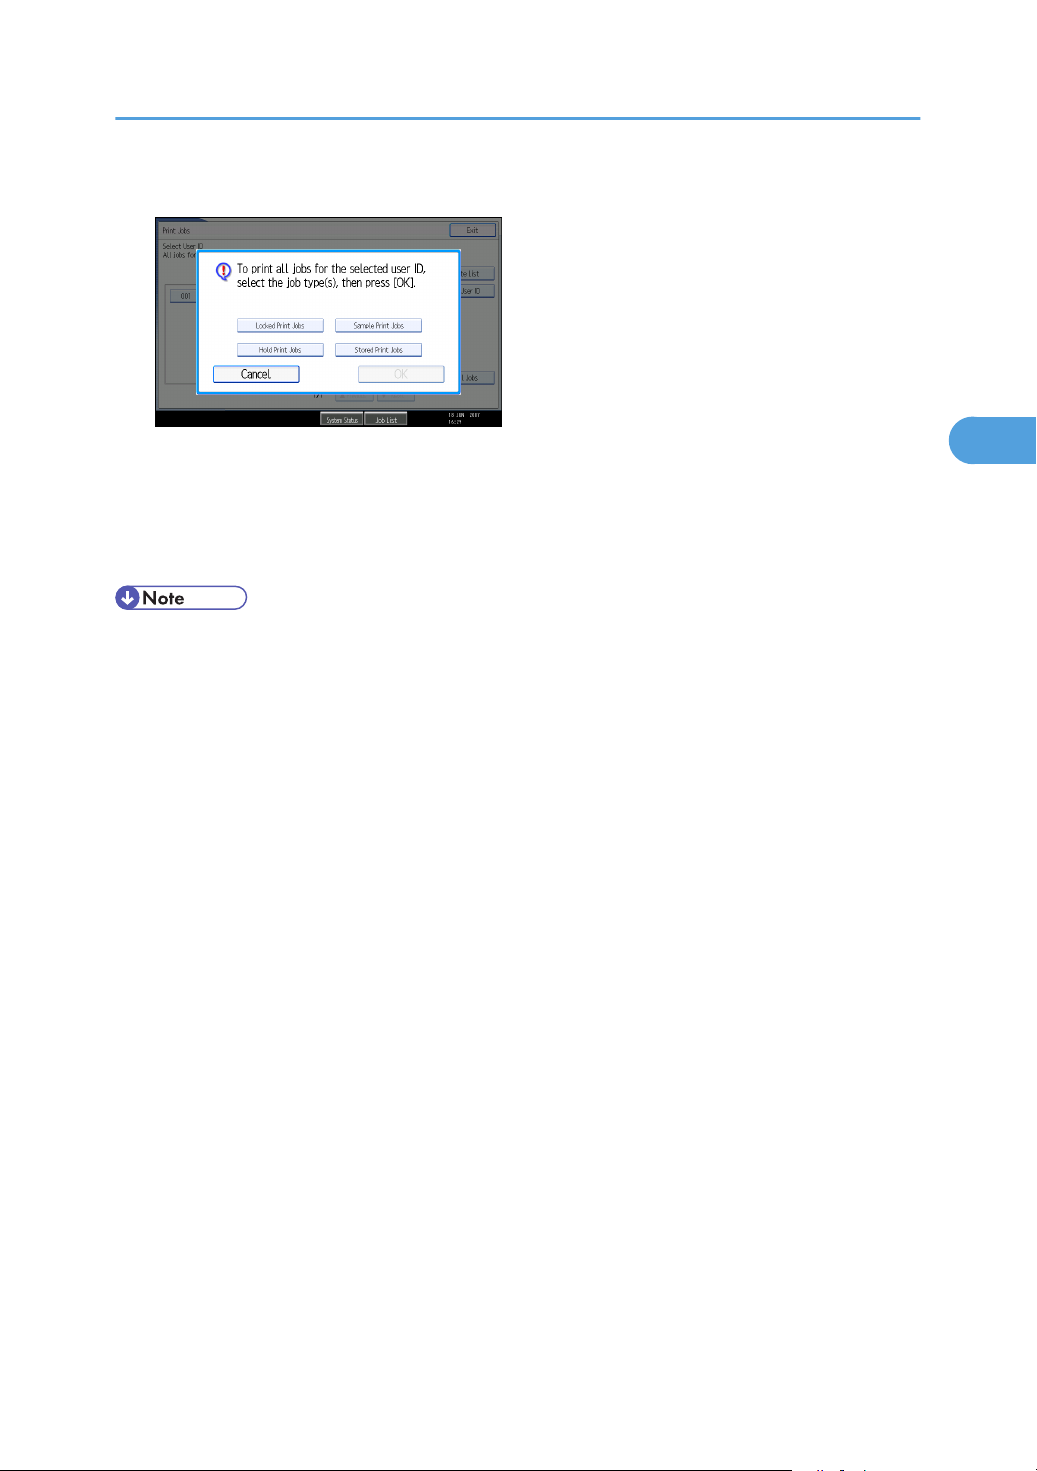
Printing from the Jobs Per User ID Screen
3
5. Select the desired print job type, and then press [OK].
The confirmation screen appears.
The confirmation screen does not appear if the selected ID has only one type of print job.
6. Press [Yes].
The selected files are printed.
• After printing is completed, Sample Print, Locked Print, and Hold Print files are deleted.
• You cannot select a print job that is not stored under the selected user ID.
• If you select a Sample Print file that contains multiple documents, you can use the confirmation screen
to specify the number of copy sets. The number you specify will be the number of copy sets printed
for each document. If you do not specify a number of copy sets on the confirmation screen, the number
of copy sets printed for each document will be the number specified in the printer driver minus one.
(If the number of copy sets specified in the printer driver is "1", one copy set will be printed for each
document.)
• If you select Stored Print, the number you set on the confirmation screen is applied to all files of the
selected print job type. If you do not set a quantity, the minimum number is applied to all files.
• If you select Locked Print, enter the correct password. If there are multiple passwords, the machine
prints only files that correspond to the entered password.
• If you select Stored Print files, and some of these require a password, the machine prints files that
correspond to the entered password and files that do not require a password.
• The confirmation screen displays the total number of files that have the selected user ID to be printed.
93
Page 96

3. Other Print Operations
3
Form Feed
This section gives instructions for operating the machine when there is no tray for the selected paper size
or type, or when paper loaded in the machine has run out.
• The tray cannot be changed if the following functions are set:
• Staple
• Punch
• Duplex Print to a tray that does not support duplex printing
• Cover Sheet
• Front and Back covers
• Slip Sheet
• Chaptering
• Chapter Slip Sheets
• If form feed is selected for a tray with the following settings, you can change the tray by canceling
the settings:
• Staple
• Punch
• Duplex
• If Auto Continue is selected, form fed paper is printed after a set interval. See "Printer Features",
General Settings Guide.
Printing from a Selected Tray
If the machine does not have a tray for the selected paper size or paper type, or if the selected paper
loaded in the machine has run out, a caution message appears. If this message appears, do the following
procedure.
1. Press the [Printer] key.
2. Select the tray for form feed from those that appear on the control panel.
If you want to print after adding paper to the tray, select the tray after loading the correct paper.
3. Press [Continue].
The machine prints using the selected tray.
94
Page 97
Form Feed
3
• If a tray with a smaller paper size is selected, the print job may be cut short, or other problems may
occur.
Canceling a Print Job
Follow the procedure below to cancel a print job if the message prompting form feed appears.
1. Press the [Printer] key.
The Printer screen appears.
2. Press [Job Reset] or the [Clear/Stop] key.
Delete the stored print jobs, and then cancel form feed.
3. Press [Reset the Job] to cancel the current print job, or [Reset All Jobs] to cancel all jobs.
A confirmation message appears.
4. Press [Yes] to cancel the print job.
Press [No] to return to the previous display.
• To resume printing print jobs, press [Resume Printing].
• If the machine is shared by multiple computers, be careful not to accidentally cancel someone else's
print jobs.
• Under Windows, if the machine is connected to the computer using a parallel cable, sent print jobs
may be canceled if [Reset All Jobs] is pressed while "Waiting for print data..." is on the control panel.
After the interval set in [I/O Timeout] in Printer Features has passed, the next print job can be sent. A
print job sent from a different client computer will not be canceled in this case.
• You cannot stop printing data that has already been processed. For this reason, printing may continue
for a few pages after you press [Job Reset] or the [Clear/Stop] key.
• A print job containing a large volume of data may take considerable time to stop.
• For details, see "Canceling a Print Job".
• p.96 "Canceling a Print Job"
95
Page 98
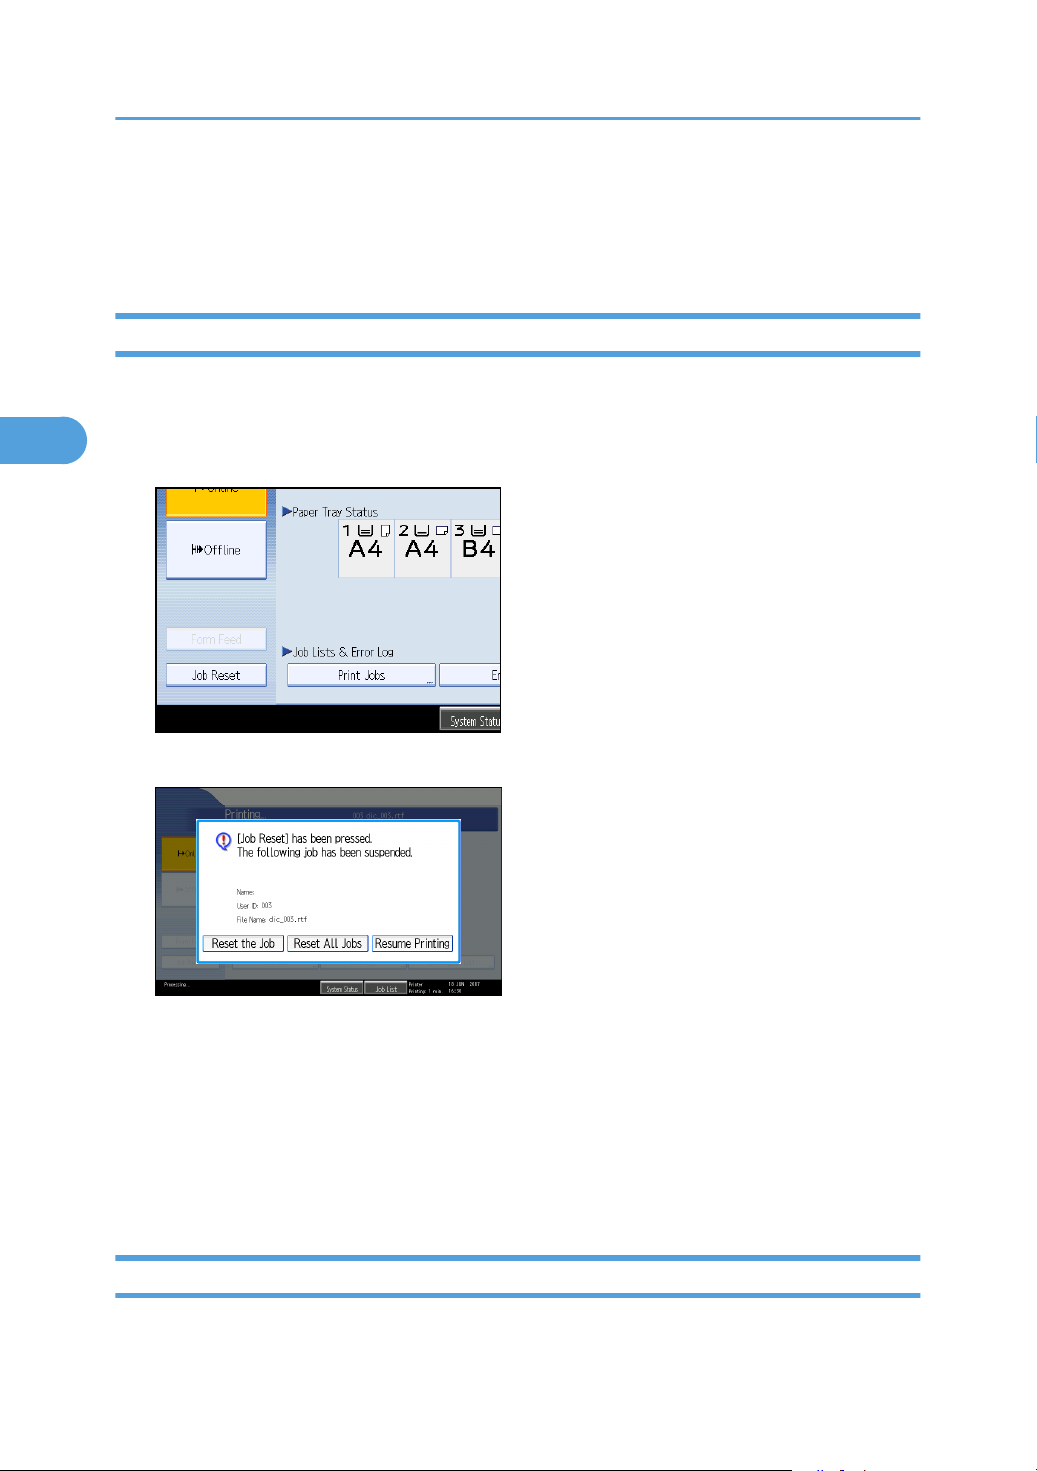
3. Other Print Operations
3
Canceling a Print Job
This section gives instruction to stop printing from the computer or the control panel.
Canceling a Print Job Using the Control Panel
1. Press the [Printer] key.
The Printer screen appears.
2. Press [Job Reset].
3. Press [Reset the Job] or [Reset All Jobs].
• [Reset the Job]: cancels the print job currently being processed.
• [Reset All Jobs]: cancels all jobs in the print queue.
• [Resume Printing]: resumes printing print jobs.
A confirmation message appears.
4. Press [Yes] to cancel the print job.
5. Press [No] to return to the previous display.
Windows - Canceling a Print Job from the computer
You can cancel a print job from the computer if transferring print jobs is not completed.
96
Page 99

Canceling a Print Job
3
1. Double-click the printer icon on the Windows task tray.
A window appears, showing all print jobs currently queued for printing. Check the current status of
the job you want to cancel.
2. Select the name of the job you want to cancel.
3. On the [Document] menu, click [Cancel].
4. Press the [Printer] key on the machine's control panel.
• If the machine is shared by multiple computers, be careful not to accidentally cancel someone else's
print jobs.
• If the machine is connected to the computer using a parallel cable, sent print jobs may be canceled
if [Reset All Jobs] is pressed while "Waiting for print data..." is on the control panel. After the interval
set in [I/O Timeout] in Printer Features has passed, the next print job can be sent. A print job sent from
a different client computer will not be canceled in this case.
• Under Windows XP/Vista, Windows Server 2003/2003 R2/2008, click [Cancel] on the
[Document] menu.
• Under Windows 2000, you can also open the print job queue window by double-clicking the machine
icon in the [Printers] machine window.
• You cannot stop printing data that has already been processed. For this reason, printing may continue
for a few pages after you press [Job Reset].
• A print job containing a large volume of data may take considerable time to stop.
97
Page 100
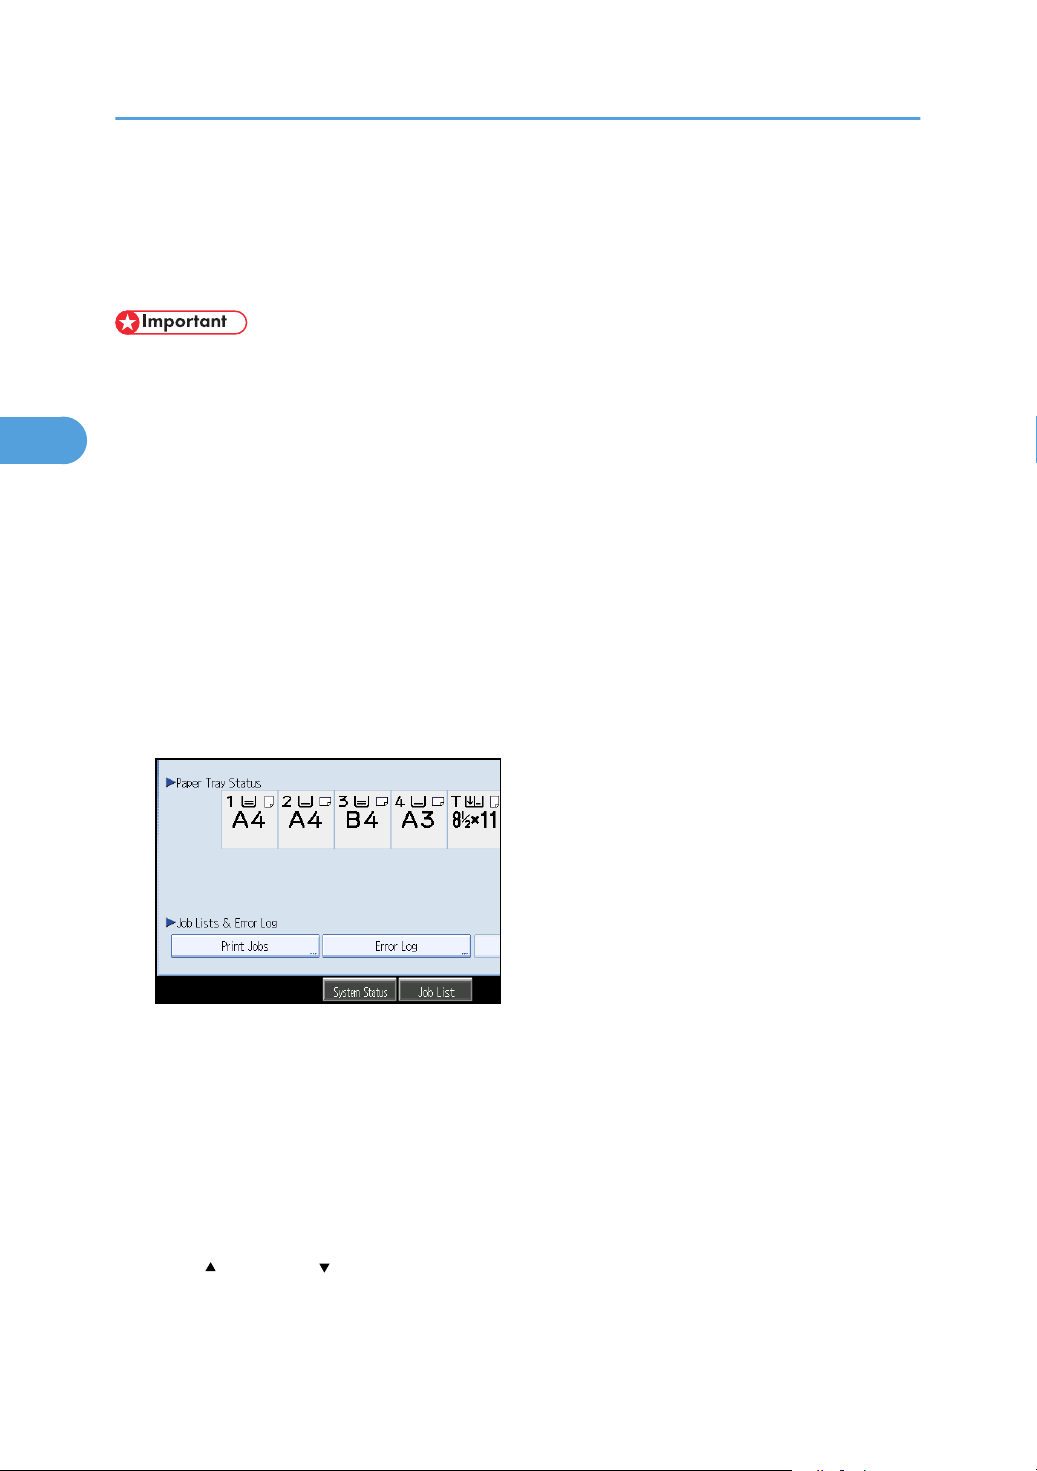
3. Other Print Operations
3
Checking the Error Log
If files could not be stored due to printing errors, identify the cause of the errors by checking the error log
on the control panel.
• The most recent 30 errors are stored in the error log. If a new error is added when there are 30 errors
already stored, the oldest error is deleted. However, if the oldest error belongs to one of the following
print jobs, it is not deleted. The error is stored separately until the number of those errors reaches 30.
You can check any of these print jobs for error log information.
• Sample Print
• Locked Print
• Hold Print
• Stored Print
• If the main power switch is turned off, the error log is deleted.
1. Press the [Printer] key.
The Printer screen appears.
2. Press [Error Log].
An error log list appears.
Depending on the security settings, certain errors may not be displayed.
3. Press the desired job list.
You can select job list from [Complete List], [Locked Print Job List], [Sample Print Job List], [Hold Print
Job List], or [Stored Print Job List].
4. Select the print file you want to check, and then press [Details].
A detailed error log appears.
Press [ Previous] or [ Next] to scroll the error files.
98
 Loading...